


MS409D / MS408D
Network Twin HD Recorder
English
MEDIA STATION
To ensure proper use of this product, please read this
owner’s manual carefully and retain for future reference.
2
This lightning flash with arrowhead symbol
within an equilateral triangle is intended to
alert the user to the presence of uninsulated
dangerous voltage within the product’s enclosure that may be of sufficient magnitude to
constitute a risk of electric shock to persons.
The exclamation point within an equilateral triangle is intended to alert the user to the presence of important operating and maintenance
(servicing) instructions in the literature accompanying the product.
WARNING: TO PREVENT FIRE OR ELECTRIC
SHOCK HAZARD, DO NOT EXPOSE THIS PRODUCT
TO RAIN OR MOISTURE.
WARNING: Do not install this equipment in a confined
space such as a book case or similar unit.
CAUTION: The apparatus should not be exposed to
water (dripping or splashing) and no objects filled with
liquids, such as vases, should be placed on the apparatus.
CAUTION concerning the Power Cord
Most appliances recommend they be placed upon a
dedicated circuit;
That is, a single outlet circuit which powers only that
appliance and has no additional outlets or branch circuits. Check the specification page of this owner's manual to be certain.
Do not overload wall outlets. Overloaded wall outlets,
loose or damaged wall outlets, extension cords, frayed
power cords, or damaged or cracked wire insulation are
dangerous. Any of these conditions could result in electric shock or fire. Periodically examine the cord of your
appliance, and if its appearance indicates damage or
deterioration, unplug it, discontinue use of the appliance, and have the cord replaced with an exact
replacement part by an authorized servicer.
Protect the power cord from physical or mechanical
abuse, such as being twisted, kinked, pinched, closed in
a door, or walked upon. Pay particular attention to
plugs, wall outlets, and the point where the cord exits
the appliance.
To disconnect power from the unit, unplug the unit from
the outlet. When installing the product, ensure that the
plug is easily accessible.
The appliance is not intended for use by young chil-
dren or infirm persons without supervision.
Young Children should be supervised to ensure that
they do not play with appliance.
If the appliance is supplied from a cord extension set
or an electrical portable outlet device, the cord extension set on electrical portable outlet device must be
positioned so that it is not subject to splashing or
ingress of moisture.
CAUTION
RISK OF ELECTRIC SHOCK
DO NOT OPEN
CAUTION: TO REDUCE THE RISK
OF ELECTRIC SHOCK
DO NOT REMOVE COVER (OR BACK)
NO USER-SERVICEABLE PARTS INSIDE
REFER SERVICING TO QUALIFIED SERVICE
PERSONNEL
.
As an ENERGY STA R®Partner, LG
has determined that this product
or product models meet the
ENERGY STA R®guidelines for
energy efficiency.
ENERGY STA R®is a U.S. registered mark.
3
Copyrights
Recording equipment should be used only for lawful
copying and you are advised to check carefully what is
lawful copying in the area in which you are making a
copy. Copying of copyright material such as films or
music is unlawful unless permitted by a legal exception
or consented to by the rights owner.
This product incorporates copyright protection technolo-
gy that is protected by method claims of certain U.S.
patents and other intellectual property rights owned by
Macrovision Corporation and other rights owners. Use
of this copyright protection technology must be authorized by Macrovision Corporation, and is intended for
home and other limited viewing uses only, unless otherwise authorized by Macrovision corporation. Reverse
engineering or disassembly is prohibited.
CONSUMERS SHOULD NOTE THAT NOT ALL HIGH
DEFINITION TELEVISION SETS ARE FULLY COMPATIBLE WITH THIS PRODUCT AND MAY CAUSE
ARTIFACTS TO BE DISPLAYED IN THE PICTURE. IN
CASE OF 625 PROGRESSIVE SCAN PICTURE
PROBLEMS, IT IS RECOMMENDED THAT THE USER
SWITCH THE CONNECTION TO THE ‘STANDARD
DEFINITION’ OUTPUT. IF THERE ARE QUESTIONS
REGARDING OUR TV SET COMPATIBILITY WITH
THIS MODEL 625p UNIT PLEASE CONTACT OUR
CUSTOMER SERVICE CENTRE.
Licenses
Manufactured under license from Dolby Laboratories.
Dolby and the double-D symbol are trademarks of Dolby
Laboratories.
Manufactured under license under U.S. Patent #’s:
5,451,942; 5,956,674; 5,974,380; 5,978,762; 6,487,535 &
other U.S. and worldwide patents issued & pending. DTS
and DTS 2.0+ Digital Out are registered trademarks and
the DTS logos and Symbol are trademarks of DTS, Inc. ©
1996-2008 DTS, Inc. All Rights Reserved.
HDMI, the HDMI logo and High-Definition Multimedia
Interface are trademarks or registered trademarks of
HDMI licensing LLC.
YouTube is a trademark of Google Inc.
Picasa web albums is a trademark of Google Inc.
DLNA and DLNA CERTIFIED are trademarks and/or service marks of Digital Living Network Alliance.
WIFI CERTIFIED 802.11n based on Draft 2.0.
Draft 2.0 refers to the version of the not-yet-ratified IEEE
802.11n standard used in Wi-Fi Alliance as of June 2007.
The “HD TV” Logo is trademark of DIGITALEUROPE.
Trademark of DVB Digital video Broadcasting Project
(1991 to 1996)
WARNING:
Media contents including but not limited to broadcast
materials, movie, music, and photo files are protected
by copyright and that recording copy and playback of
those contents would only be permissible by permission
of the copyright owner. LG has no right to grant such
permission. Permission should always be sought from
the copyright owner.
Andio and Video recordings and copies you make using
this products are for your personal and non-commercial
use only. You may sell, lend or rent them to other people. LG is not responsible for your panelties, disadvantages by illegal use of this product.
About the Symbol Display
“ ” may appear on your TV display during operation
and indicates that the function is not permitted by this
recorder or specific media.
Symbol Used in this Manual
Indicates special notes and operating features.
Indicates tips and hints for making the task easier.
Indicates hazards likely to cause harm to
the recorder itself or other material damage.
Caution
Caution

4
Table of contents
File requirement . . . . . . . . . . . . . . . . . . . . . . . . . . . . . . . . . .5
File compatibility . . . . . . . . . . . . . . . . . . . . . . . . . . . . . . . .5
Home Menu Overview . . . . . . . . . . . . . . . . . . . . . . . . . . . .6-7
Remote control . . . . . . . . . . . . . . . . . . . . . . . . . . . . . . . . . . .8
Main unit . . . . . . . . . . . . . . . . . . . . . . . . . . . . . . . . . . . . . . . .9
Connection overview . . . . . . . . . . . . . . . . . . . . . . . . . . . . .10
Connections to Your TV . . . . . . . . . . . . . . . . . . . . . . . . . .10
(Option A) Best quality - HDMI connection
(includes audio and video) . . . . . . . . . . . . . . . . . . . . . . . .11
(Option B) Excellent quality - Component video
and stereo audio connection . . . . . . . . . . . . . . . . . . . . . .12
(Option C) Connections to your TV (Composite) . . . . . . . .12
Connecting to an Amplifier . . . . . . . . . . . . . . . . . . . . . . . .13
Connecting to an Amplifier via 2 Channel Audio Output . .13
Connecting to an Amplifier via Digital Audio Output
(Optical or Coaxial) . . . . . . . . . . . . . . . . . . . . . . . . . . . . .13
Connecting to an Amplifier via HDMI Output . . . . . . . . . .13
Network connection . . . . . . . . . . . . . . . . . . . . . . . . . . .14-19
Wired network connection . . . . . . . . . . . . . . . . . . . . . .14-15
Wireless network connection . . . . . . . . . . . . . . . . . . . .16-19
Setup Wizard (Initial install) . . . . . . . . . . . . . . . . . . . . . . . .20
DTV . . . . . . . . . . . . . . . . . . . . . . . .21-30
DTV Installation . . . . . . . . . . . . . . . . . . . . . . . . . . . . . . . . .21
Settings for Digital TV . . . . . . . . . . . . . . . . . . . . . . . . . .22-24
Selecting a Region . . . . . . . . . . . . . . . . . . . . . . . . . . . . . .22
Scanning programmes automatically . . . . . . . . . . . . . . . .22
Scanning programmes manually . . . . . . . . . . . . . . . . . . .22
Editing Programme List . . . . . . . . . . . . . . . . . . . . . . . . . .23
Setting the Lock System . . . . . . . . . . . . . . . . . . . . . . . . .23
Setting a new password . . . . . . . . . . . . . . . . . . . . . . . . . .23
Adjusting TV Rating level . . . . . . . . . . . . . . . . . . . . . . . . .24
Setting the antenna power . . . . . . . . . . . . . . . . . . . . . . . .24
Setting the permanent Timeshift . . . . . . . . . . . . . . . . . . . .24
Setting recording storage . . . . . . . . . . . . . . . . . . . . . . . . .24
Using the Digital TV functions . . . . . . . . . . . . . . . . . . .25-27
Viewing the Digital TV . . . . . . . . . . . . . . . . . . . . . . . . . . .25
Adjusting volume of audio out . . . . . . . . . . . . . . . . . . . . .25
Changing Digital TV programmes . . . . . . . . . . . . . . . . . . .25
Setting favorite programmes . . . . . . . . . . . . . . . . . . . . . .25
Viewing the programme information . . . . . . . . . . . . . . . . .25
Selecting DTV audio language . . . . . . . . . . . . . . . . . . . . .25
Selecting DTV subtitle language . . . . . . . . . . . . . . . . . . .26
Viewing the EPG
(Electronic Programme Guide) Display . . . . . . . . . . . . . . .26
Using the timeshift function manually . . . . . . . . . . . . . . . .26
Using the permanent timeshift . . . . . . . . . . . . . . . . . . . . .27
Using the teletext (Viewing Teletext) . . . . . . . . . . . . . . . . .27
Recording TV programmes . . . . . . . . . . . . . . . . . . . . . .28-30
Normal Recording . . . . . . . . . . . . . . . . . . . . . . . . . . . . . .28
Dual Programme Recording . . . . . . . . . . . . . . . . . . . . . . .28
Timer Recording (Manual) . . . . . . . . . . . . . . . . . . . . . . . .28
Timer Recording (EPG) . . . . . . . . . . . . . . . . . . . . . . . . . .29
Canceling a timer recording . . . . . . . . . . . . . . . . . . . . . . .29
Checking the history . . . . . . . . . . . . . . . . . . . . . . . . . . . .29
Editing a timer recording . . . . . . . . . . . . . . . . . . . . . . . . .30
Instant Timer Recording . . . . . . . . . . . . . . . . . . . . . . . . . .30
Media . . . . . . . . . . . . . . . . . . . . . .31-37
Playback functions . . . . . . . . . . . . . . . . . . . . . . . . . . . .32-45
General playback . . . . . . . . . . . . . . . . . . . . . . . . . . . . . . .32
Sorting the recorded titles . . . . . . . . . . . . . . . . . . . . . . . .32
Frame-by-Frame playback . . . . . . . . . . . . . . . . . . . . . . . .33
Fast forward and fast reverse . . . . . . . . . . . . . . . . . . . . . .33
Slow down the playing speed . . . . . . . . . . . . . . . . . . . . . .33
Skip to the next/previous . . . . . . . . . . . . . . . . . . . . . . . . .33
Resume playback . . . . . . . . . . . . . . . . . . . . . . . . . . . . . .33
Enlarges the playback image . . . . . . . . . . . . . . . . . . . . . .33
Selecting a subtitle language . . . . . . . . . . . . . . . . . . . . . .33
Selecting a subtitle code . . . . . . . . . . . . . . . . . . . . . . . . .33
Selecting a audio language . . . . . . . . . . . . . . . . . . . . . . .34
Repeat playback . . . . . . . . . . . . . . . . . . . . . . . . . . . . . . .34
Playback from selected time . . . . . . . . . . . . . . . . . . . . . .34
Add files to the Playlist . . . . . . . . . . . . . . . . . . . . . . . . . . .34
Delete a file/folder from the list . . . . . . . . . . . . . . . . . . . . .35
Naming a file . . . . . . . . . . . . . . . . . . . . . . . . . . . . . . . . . .35
Playing selected files . . . . . . . . . . . . . . . . . . . . . . . . . . . .35
Selecting a slideshow speed . . . . . . . . . . . . . . . . . . . . . .35
Selecting a slideshow effect . . . . . . . . . . . . . . . . . . . . . . .35
Listening to music while viewing a slideshow . . . . . . . . . .35
Playing files on your PC . . . . . . . . . . . . . . . . . . . . . . . . . .36
Accessing your PC . . . . . . . . . . . . . . . . . . . . . . . . . . . . .36
Editing the [My_Shortcuts] . . . . . . . . . . . . . . . . . . . . . . . .36
Using [File Copy] features . . . . . . . . . . . . . . . . . . . . . . . . .37
Copying or moving files/folders . . . . . . . . . . . . . . . . . . . .37
Deleting files/folders . . . . . . . . . . . . . . . . . . . . . . . . . . . . .37
DLNA . . . . . . . . . . . . . . . . . . . . . . .38-40
About DLNA . . . . . . . . . . . . . . . . . . . . . . . . . . . . . . . . . . . .38
Notes on DLNA features . . . . . . . . . . . . . . . . . . . . . . . . .38
Installing Nero MediaHome 4 Essentials . . . . . . . . . . . . .39
Sharing files and folders . . . . . . . . . . . . . . . . . . . . . . . . .39
Operating DLNA feature . . . . . . . . . . . . . . . . . . . . . . . . . . .40
General operation . . . . . . . . . . . . . . . . . . . . . . . . . . . . . .40
YouTube . . . . . . . . . . . . . . . . . . . .41-42
Operating YouTube feature . . . . . . . . . . . . . . . . . . . . . . . .41
General operation . . . . . . . . . . . . . . . . . . . . . . . . . . . . . .41
Searching YouTube videos . . . . . . . . . . . . . . . . . . . . . . . .42
Selecting your local site . . . . . . . . . . . . . . . . . . . . . . . . . .42
Picasa . . . . . . . . . . . . . . . . . . . . . .43-44
Operating Picasa web albums feature . . . . . . . . . . . . . . .43
General operation . . . . . . . . . . . . . . . . . . . . . . . . . . . . . .43
Searching Picasa web albums . . . . . . . . . . . . . . . . . . . . .44
Viewing your Picasa web albums . . . . . . . . . . . . . . . . . . .44
Removing an ID from the ID List . . . . . . . . . . . . . . . . . . .44
Setup . . . . . . . . . . . . . . . . . . . . . . .45-48
General Setup Operation . . . . . . . . . . . . . . . . . . . . . . . . .45
DTV settings . . . . . . . . . . . . . . . . . . . . . . . . . . . . . . . . . .45
Audio settings . . . . . . . . . . . . . . . . . . . . . . . . . . . . . . . . .46
Display settings . . . . . . . . . . . . . . . . . . . . . . . . . . . . .46-47
Record settings . . . . . . . . . . . . . . . . . . . . . . . . . . . . . . . .47
Network settings . . . . . . . . . . . . . . . . . . . . . . . . . . . . . . .47
System settings . . . . . . . . . . . . . . . . . . . . . . . . . . . . . . . .48
Others settings . . . . . . . . . . . . . . . . . . . . . . . . . . . . . . . .48
Reference . . . . . . . . . . . . . . . . . . . . . . . . . . . . . . . . . . .49-57
Software update via the Internet . . . . . . . . . . . . . . . . . . . .49
Software update via built-in tuner . . . . . . . . . . . . . . . . . . .49
Formatting HDD . . . . . . . . . . . . . . . . . . . . . . . . . . . . . . . .49
External HDD Installation . . . . . . . . . . . . . . . . . . . . . . . . .50
About the internal/External HDD . . . . . . . . . . . . . . . . . . .51
Connecting an USB device . . . . . . . . . . . . . . . . . . . . . . .51
Controlling a TV with the Supplied Universal
Remote Control . . . . . . . . . . . . . . . . . . . . . . . . . . . . . . . .52
Code numbers of controllable TVs . . . . . . . . . . . . . . .53-54
Troubleshooting . . . . . . . . . . . . . . . . . . . . . . . . . . . . .55-56
Specifications . . . . . . . . . . . . . . . . . . . . . . . . . . . . . . . . .57
IMPORTANT INFORMATION RELATING
TO NETWORK SERVICES . . . . . . . . . . . . . . . . . . . . . . . . .58
Open source software notice . . . . . . . . . . . . . . . . . . . . . . .59

5
File requirement
File compatibility
• Because the compatibility and available playback
functions on the [DLNA] menu are tested on the
bundle DLNA server (Nero MediaHome 4 Essentials)
environment, file requirements and playback functions
on the [DLNA] menu may differ depending on the
media servers.
• The file requirements on this page are not always
compatible for DLNA features. There may have some
restrictions by file features and media server's ability.
• This unit can recognize file/folder name less than 512
characters include path name.
• This unit can recognize files less than 4000 file/folders
is one folder.
• Depending on the size and number of the files, it may
takes several minutes to read the contents of the
media.
Movie file
•Available resolution size: 1920 x1080 (W x H) pixels.
• The file names of movie and subtitle are limited to 50
characters.
• Supported extensions: “.avi”, “.divx”, “.mpg”, “.mpeg”,
“.m2ts”, “.mp4”, “.mkv”, “.wmv”, “.ts”, “.xvid”, “.asf”,
“.mov”, “.trp”, “.dat”, “.flv”, “.mts”, “.tp”
• Supported encodings: DIVX3.xx, DIVX4.xx, DIVX5.xx,
XVID”, “DIVX6.xx (Standard playback only), MPEG1/2,
H.264/MPEG-4 AVC, WMV9, VC-1
• This device might not playback the file which is not
encoded on the list, even though its extension belongs
to “Supported extensions” above.
• Playable movie subtitle: SubRip (.srt / .txt), SAMI
(.smi), SubStation Alpha (.ssa/.txt), MicroDVD
(.sub/.txt), SubViewer 2.0 (.sub/.txt), VobSub (“.idx”
and “.sub” files should be together in the media)
• Playable Audio format: “Dolby Digital”, “DTS”, “MP3”,
“WMA”, “AAC”
• Not all WMA Audio formats are compatible with this
recorder.
•Sampling frequency: within 8 - 48 kHz (MP3),
within 32 - 48 kHz (WMA)
• Bit rate: within 8 - 320 kbps (MP3),
within 32 - 192 kbps (WMA)
• This recorder supports H.264/MPEG-4 AVC profile
Main, High at Level 4.1. and Baseline at Level 3.1
• For a file with higher level, the recorder well ask
whether you want to play or not.
• Displaying subtitle on DLNA is only available for bundle DLNA server (Nero MediaHome 4 Essentials) environment.
• This recorder does not support the file that are recorded with GMC. (GMC: Global Motion Compensation)
Music files
• File extensions: “.mp3”, “.wma”,“.aac”,“.ogg”, “.asf”,
“.flac”, “.mp4”
• Sampling frequency: within 8 - 48 kHz (MP3),
within 32 - 48kHz (WMA)
• Bit rate: within 8 - 320kbps (MP3), within 32 - 192kbps
(WMA)
• This recorder does not support the ID3 Tag embedded
in the MP3 file.
• The total playback time indicated on the screen may
not correct for VBR files.
• The total playback time will not be displayed for “.aac”,
and “.flac” files.
Photo file
• File extensions: “.jpg”, “.jpeg”, “.bmp”, “.png”, “.gif”,
“.tif/tiff”
• Photo files with “.png”, “.gif” or “.tif” extensions are not
be completely supported on this recorder. Only limited
basic format of them are supported.
• Recommended size:
Less than 4,000 x 3,000 x 24 bit/pixel
Less than 3,000 x 3,000 x 32 bit/pixel
• Progressive and lossless compression photo image
files are not supported.
Setup W
Setup W
izard
izard
(page 20)
DTV Installation
DTV Installation
(page 21)
Settings for Digital TV
Settings for Digital TV
(page 22-24)
Using the Digital TV
Using the Digital TV
functions
functions (page 25-27)
Recording TV
Recording TV
programmes
programmes (page 28-30)
File requirement
File requirement
(page 5)
Playback functions
Playback functions
(page 32-35)
Playing files on your PC
Playing files on your PC
(page 36)
Using [File Copy]
Using [File Copy]
features
features (page 37)
Network connection
Network connection
(page 14-19)
About DLNA
About DLNA
(page 38)
Installing Nero
Installing Nero
MediaHome 4 Essentials
MediaHome 4 Essentials
(page 39)
Operating DLNA
Operating DLNA
feature
feature
(page 40)
6
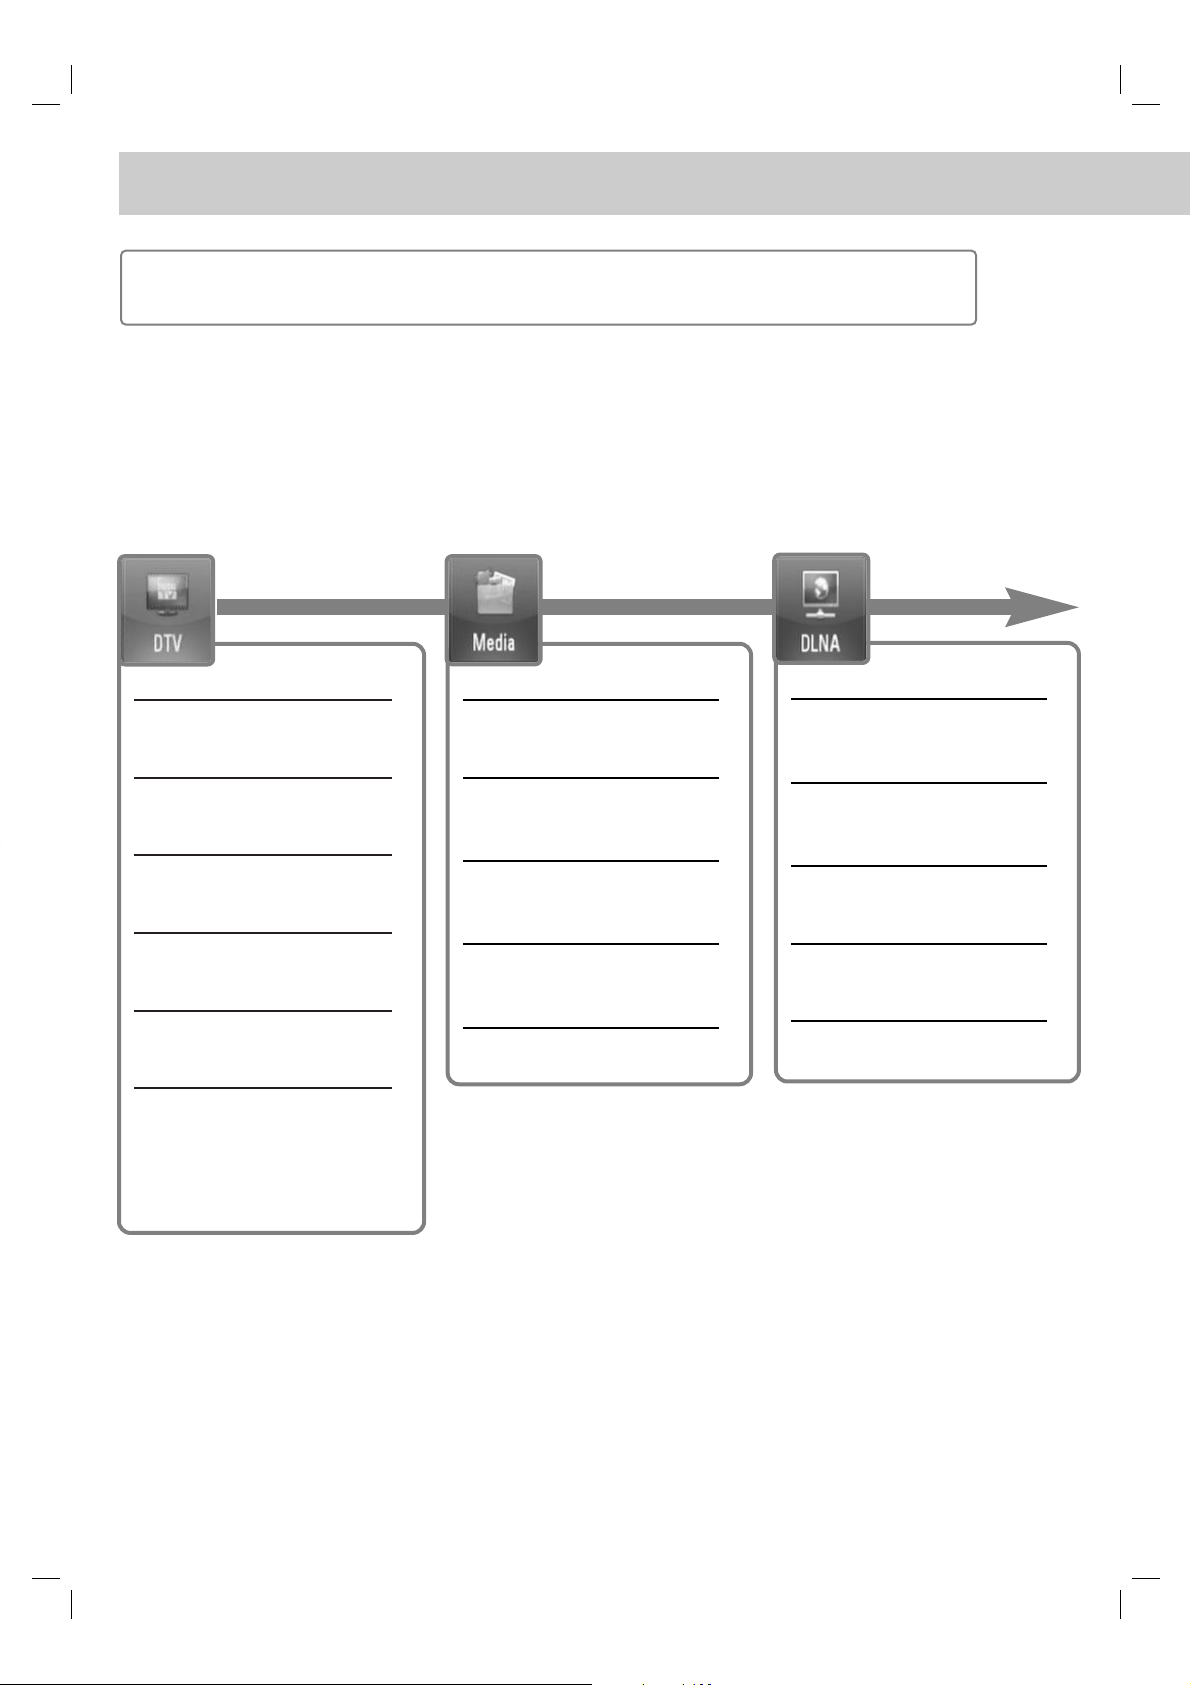
Home Menu Overview
Starting from HOME
To access numerous functions of the server, press the “HOME” button on the remote.

7
Basic button operations
- HOME : Accesses or removes the HOME menu.
- bb/
BB
: Used to navigate on-screen displays.
- OK ( ): Acknowledges menu selection.
- BACK (O): Exits the menu.
Operating
Operating YY
ouT
ouT
ube
ube
feature
feature (page 41)
General operation
General operation
(page 41)
Searching
Searching YY
ouT
ouT
ube
ube
videos
videos (page 42)
Selecting your local
Selecting your local
site
site (page 42)
Operating Picasa web
Operating Picasa web
albums feature
albums feature (page 43)
General operation
General operation
(page 43)
Searching Picasa web
Searching Picasa web
albums
albums (page 44)
VViewing your Picasa web
iewing your Picasa web
albums
albums(page 44)
Removing an ID from
Removing an ID from
the ID List
the ID List (page 44)
General Setup
General Setup
Operation
Operation
(page 45)
DTV settings
DTV settings
(page 45)
Audio settings
Audio settings
(page 46)
Display settings
Display settings
(page 46-47)
Record settings
Record settings
(page 47)
Network settings
Network settings
(page 47)
System settings
System settings
(page 48)
Others settings
Others settings
(page 48)
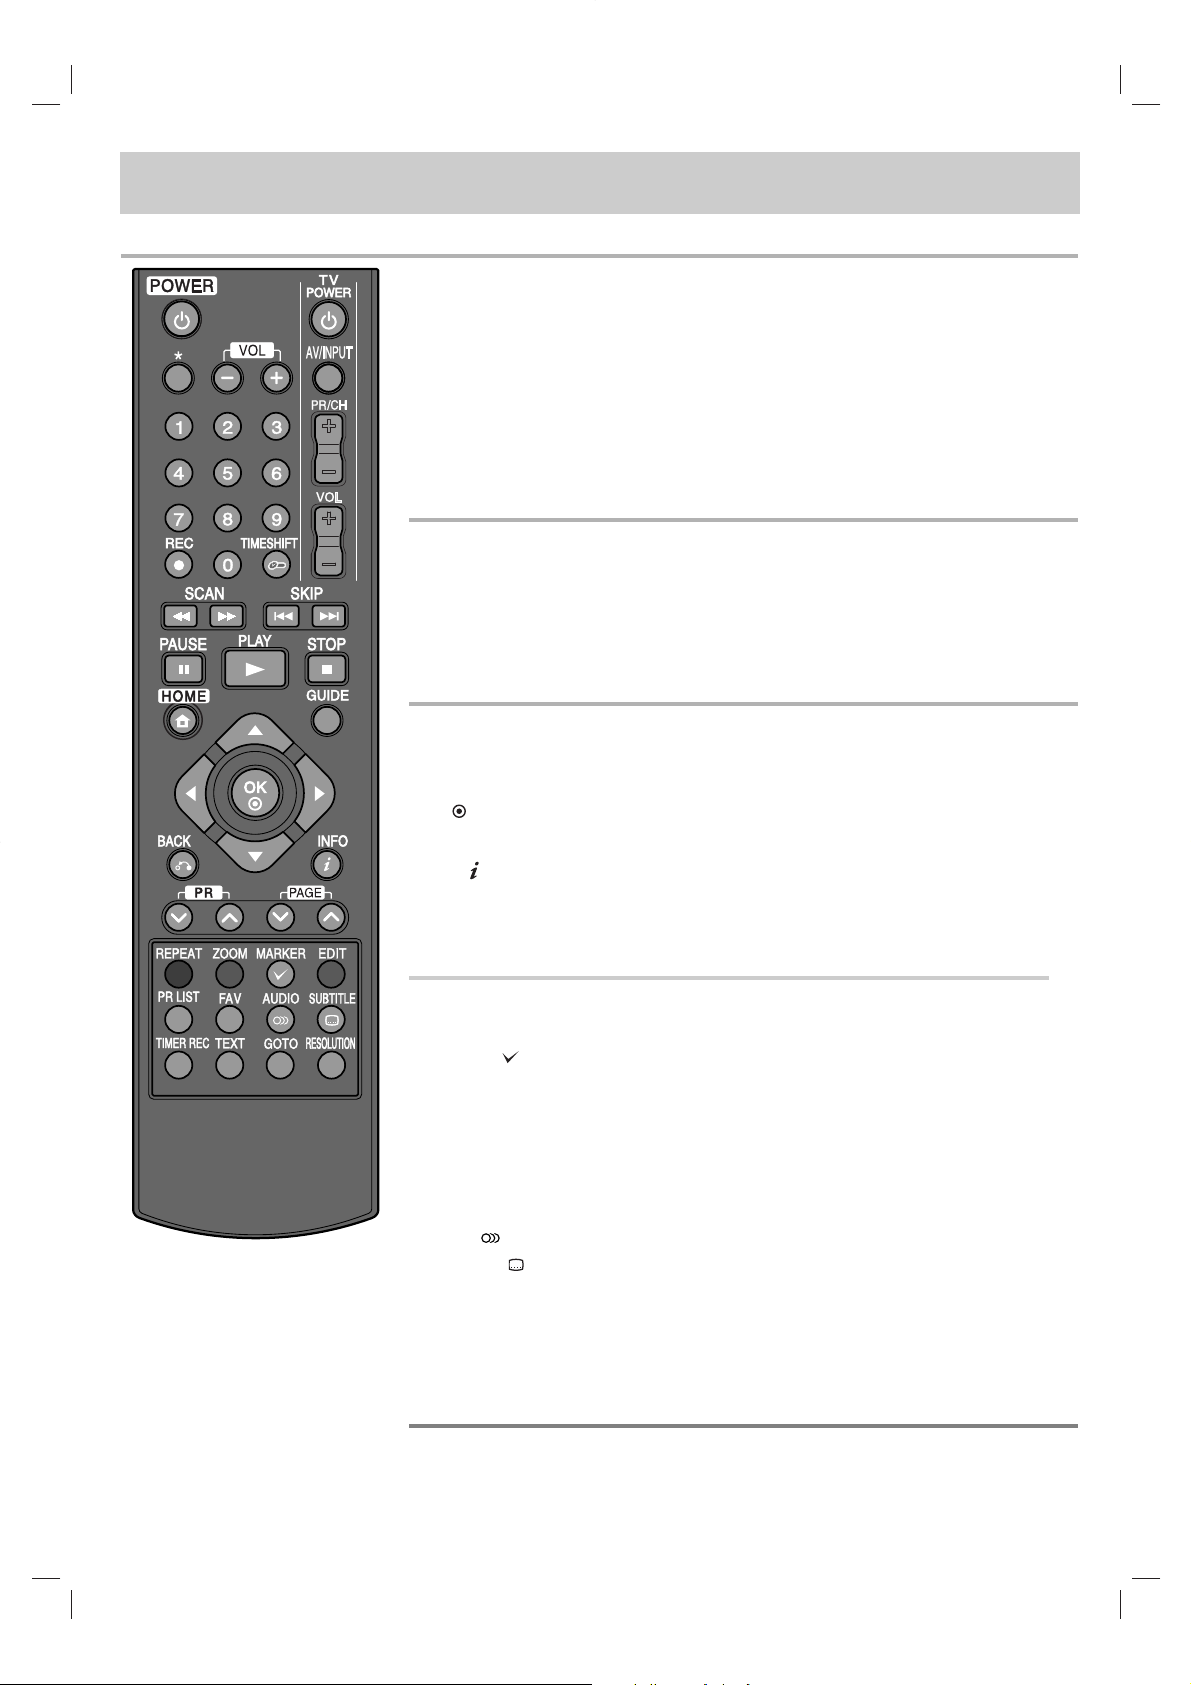
POWER (11): Switches the recorder ON or OFF.
*
: Feature is not available.
VOL (- / +): Adjusts the sound level of the recorder.
TV Control Buttons: You can control the programme selection, sound level, input
source, and power switch of your TV (see page 52).
0-9 numerical buttons: Selects numbered options in a menu.
REC (z): Starts recording and copying.
TIMESHIFT: Pauses live TV/playback (timeshift) for a live TV programme.
m / M (SCAN): Searches backward or forward.
. / > (SKIP): Goes to next or previous track/file.
X (PAUSE): Pauses playback.
B (PLAY): Starts playback.
x (STOP): Stops playback.
HOME: Accesses or removes the HOME menu.
GUIDE: Displays the EPG menu.
b / B / v / V (left/right/up/down): Navigates on-screen displays.
OK ( ): Acknowledges menu selection or displays the programme list.
BACK (O): Exits the menu or back to previous step.
INFO ( ): Displays or exits On-Screen Display.
PR (
UU / uu
): Scans up or down through memorized programmes.
PAGE (
UU / uu
): Moves to next or previous page of contents/TV list.
REPEAT: Repeats a desired section or sequence.
ZOOM: Displays or exits the [ZOOM] menu.
MARKER ( ): Used for selecting multiple files or folders in certain operation.
EDIT: Displays an editing menu
Coloured buttons: Used for [MOVIE], [PHOTO] and [MUSIC] menu or when an
EPG screen is displayed. The function of each button will be described on-screen,
and changes depending on the screen being displayed.
PR LIST: Displays the programme list.
FAV: Displays the favorite programme list.
AUDIO ( ): Selects an audio language or audio channel.
SUBTITLE ( ): Selects a subtitle language.
TIMER REC: Display [Timer Recording] menu.
TEXT: Switches between teletext mode and normal TV viewing.
GOTO: Displays the time search option during movie playback.
RESOLUTION: Sets the output resolution for HDMI and COMPONENT VIDEO
OUT jacks. (This key only work is TV watching mode or Home Menu mode.)
8
Remote control
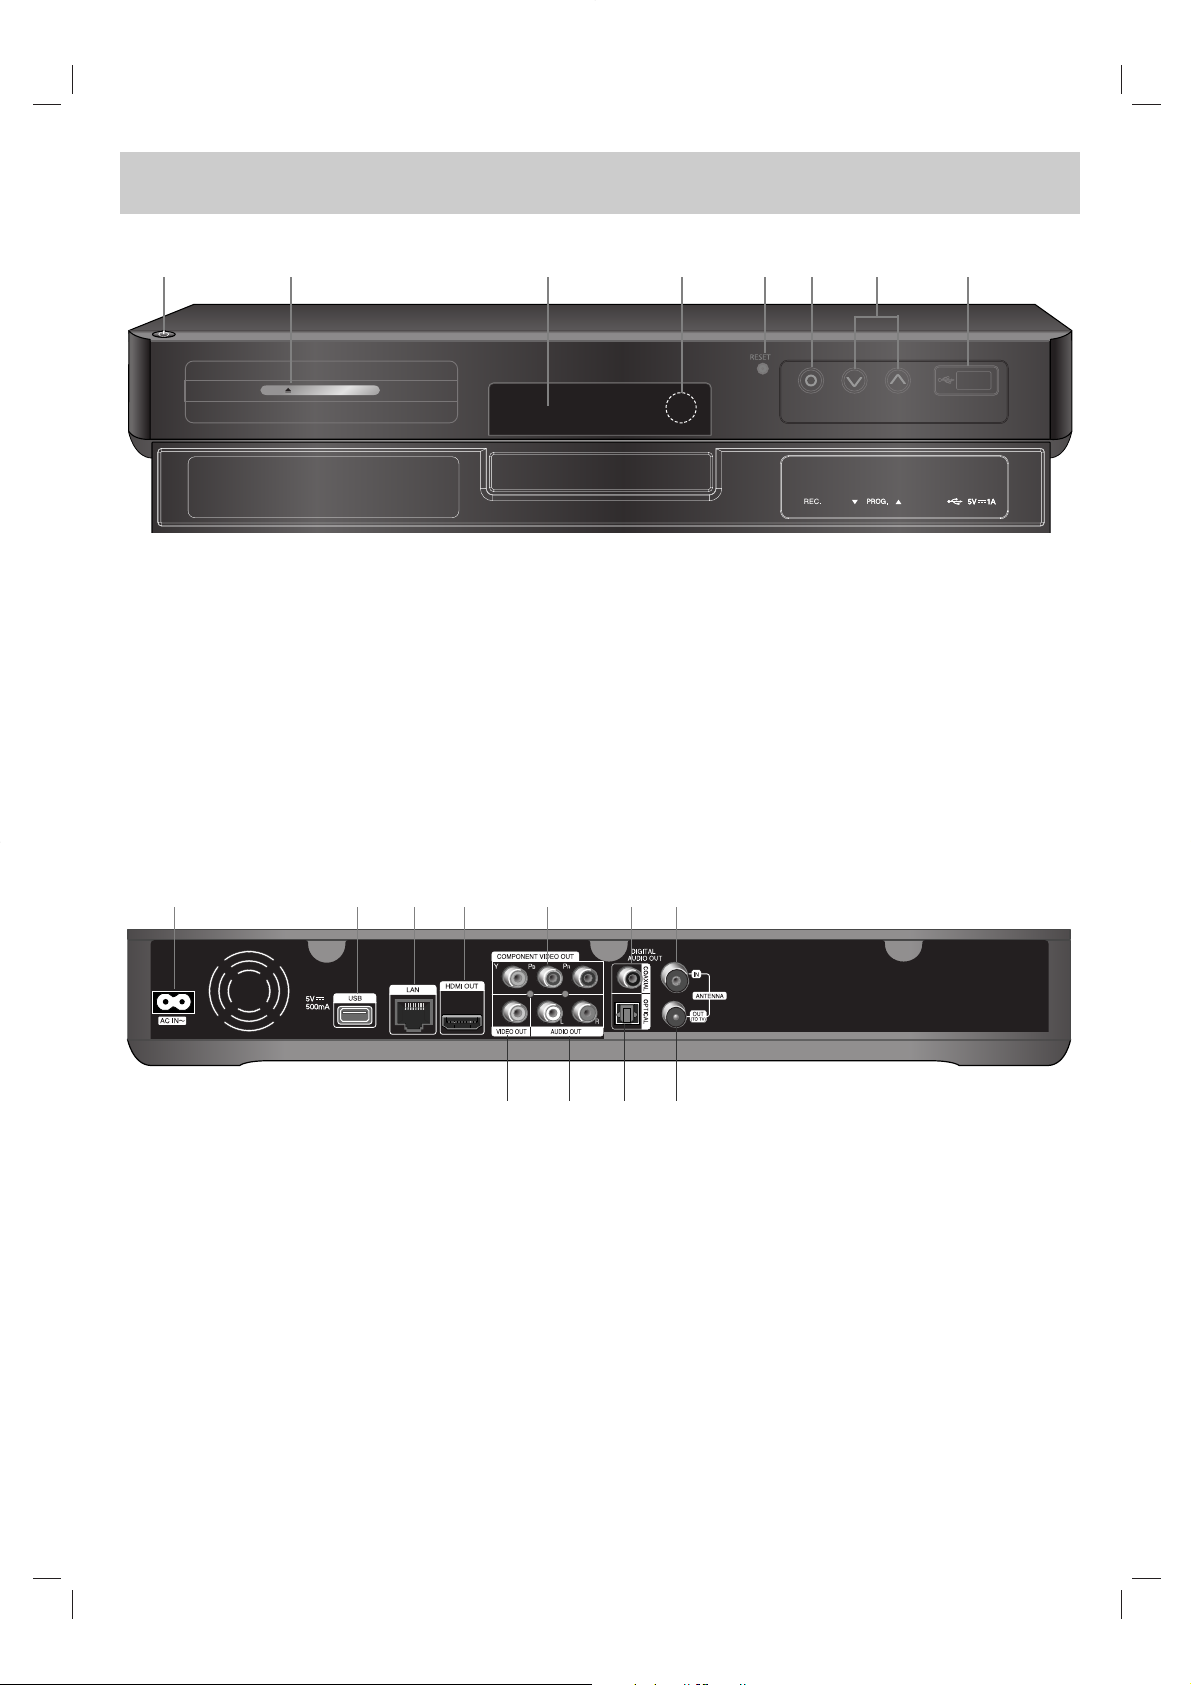
a11(POWER) Button
Switches the recorder ON or OFF.
b External HDD Slot
Mounting an additional HDD here.
c Display window
Shows the current status of the recorder.
d Remote Sensor
Point the remote control here.
e RESET
Press this button to reboot.
f z (REC.)
Starts recording.
g PROG. v/V
Scans up or down through memorized programmes.
h USB Port
Connect a USB Device.
9
Main unit
PUSH / OPEN
a AC IN connector
Connect the supplied power cord.
b USB Port
Connect the supplied Wireless LAN Adapter.
c LAN port
Connect a network with an always-on broadband connection.
d HDMI OUT
Connect to TV with HDMI inputs. (Interface for digital
audio and video)
e COMPONENT VIDEO OUT (Y P
B PR)
Connect to a TV with Y PB PR inputs.
f DIGITAL AUDIO OUT (COAXIAL)
Connect to digital (coaxial) audio equipment.
g ANTENNA IN
Connect the antenna to this terminal.
h VIDEO OUT
Connect to a TV with video inputs.
i AUDIO OUT (Left/Right)
Connect to a TV with audio inputs.
j DIGITAL AUDIO OUT (OPTICAL)
Connect to digital (optical) audio equipment.
k ANTENNA OUT (TO TV)
Passes the signal from the ANTENNA IN jack to your
TV/monitor
hijk
abcdefg
ab c defgh
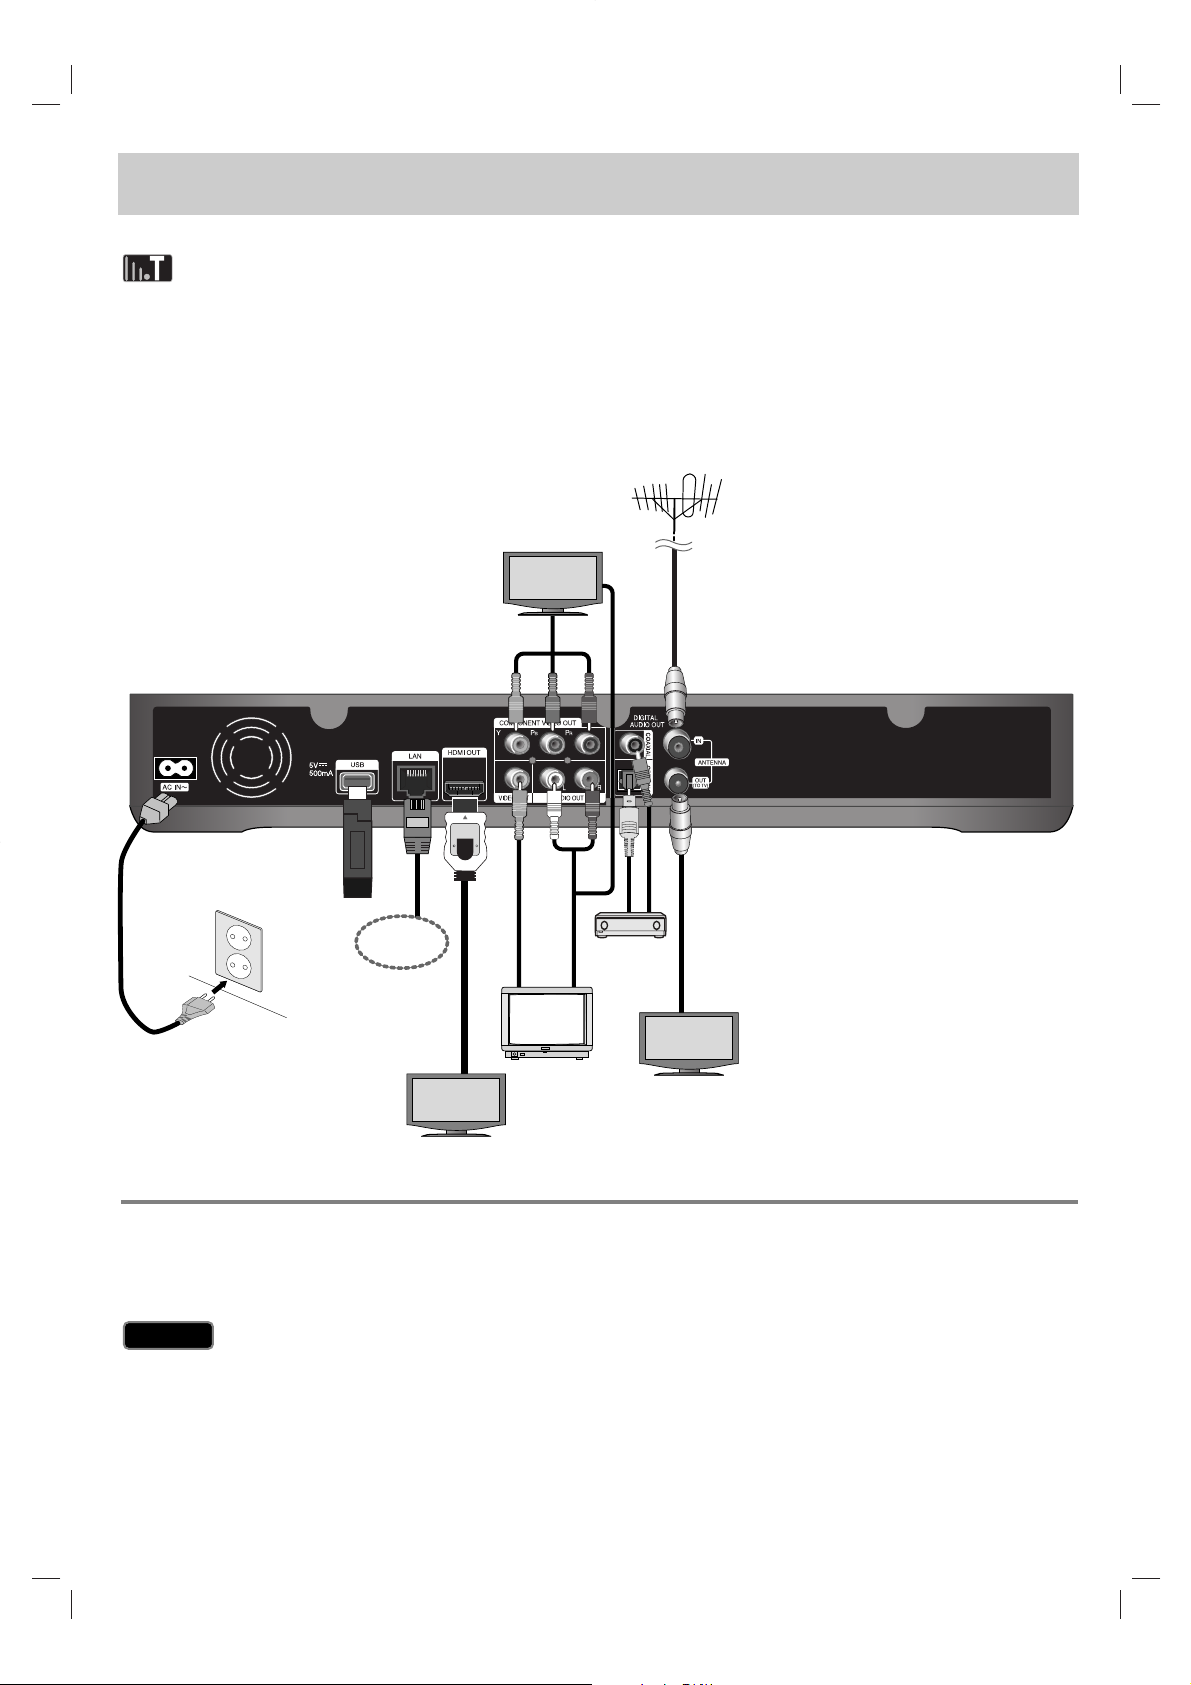
Depending on your TV and other equipment you wish to connect, there are various ways you could connect the
recorder. Use only one of the connections described on pages 11-13.
Please refer to the manuals of your TV, Stereo System or other devices as necessary to make the best connections.
Be sure to switch off the recorder before installation and connection.
Connections to Your TV
Make one of the following connections, depending on the capabilities of your existing equipment.
Connect to your TV with option A, B or C.
Make sure the recorder is connected directly to the TV. Tune the TV to the correct video input source.
Do not connect the recorder’s AUDIO OUT jack to the phono in jack (record player) of your audio system.
Do not connect your recorder via your VCR. The image could be distorted by the copy protection system.
Caution
Caution
10
Connection overview
Wireless LAN
Adapter
Broadband
Service
11
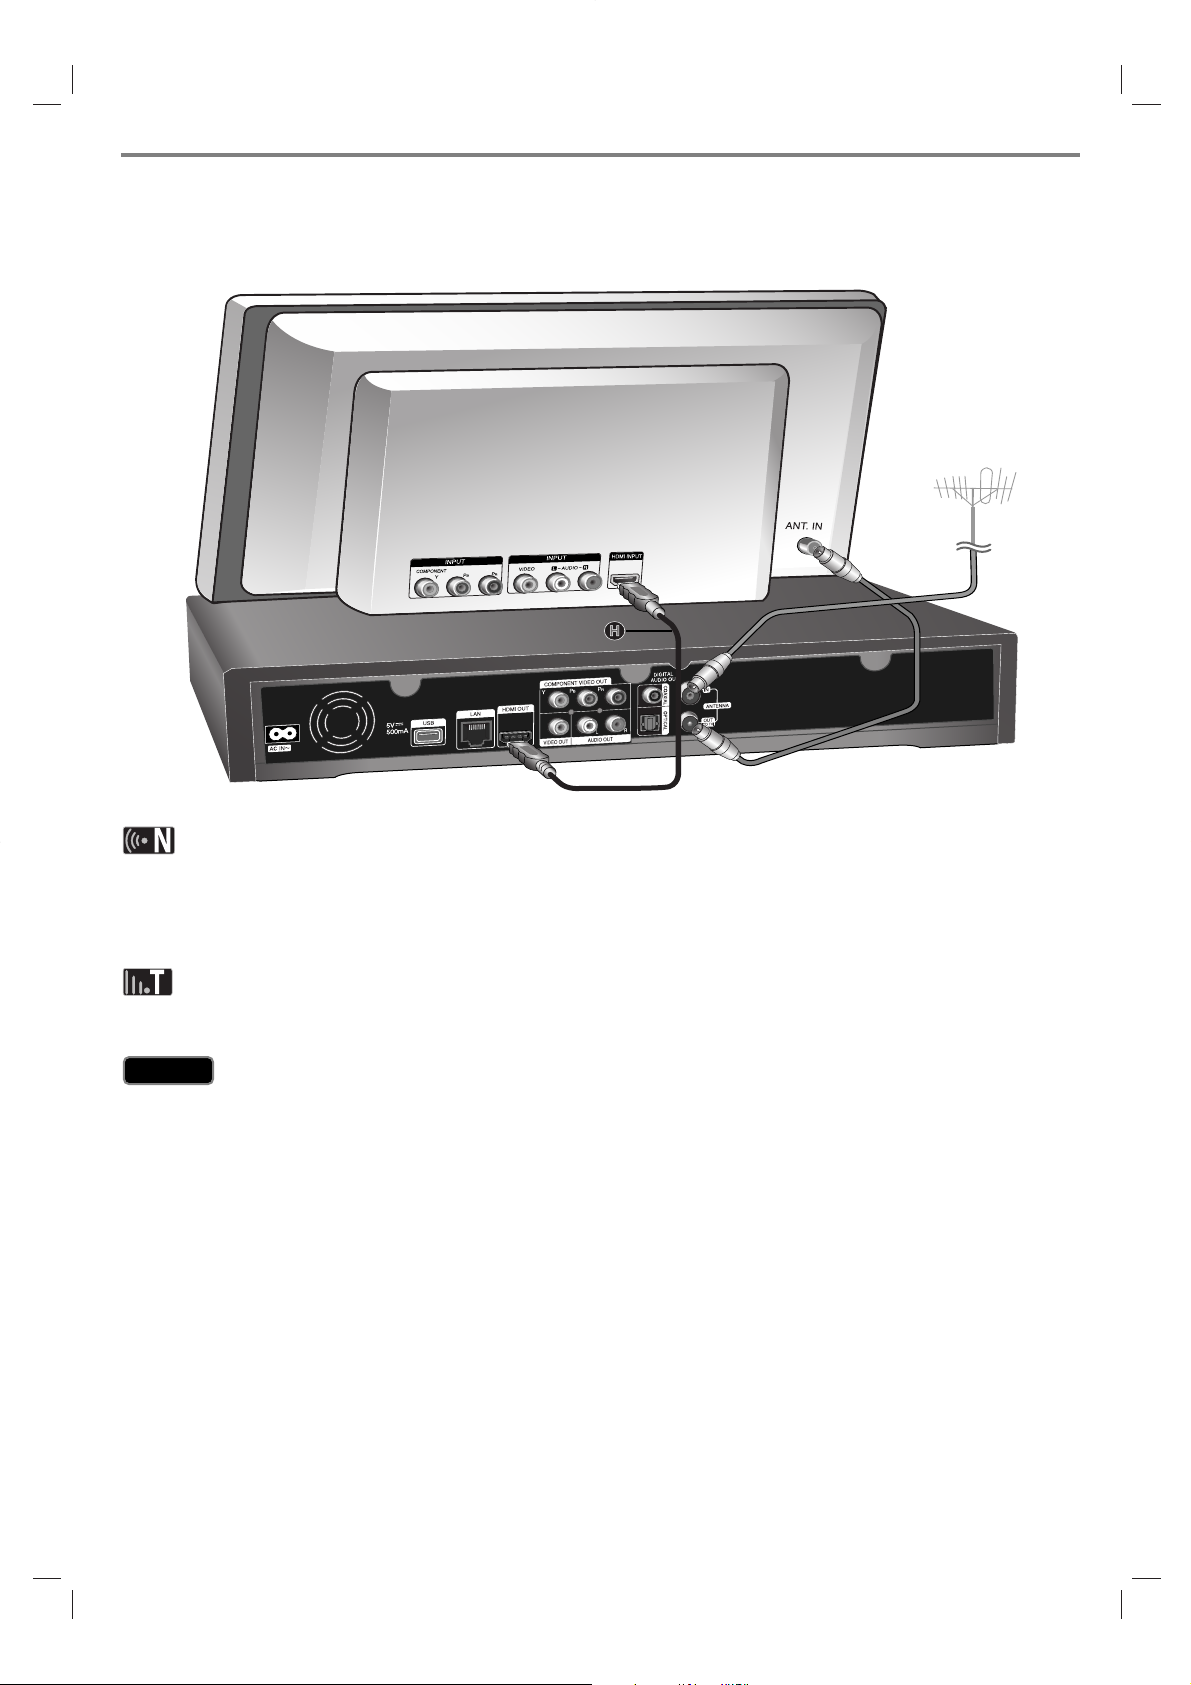
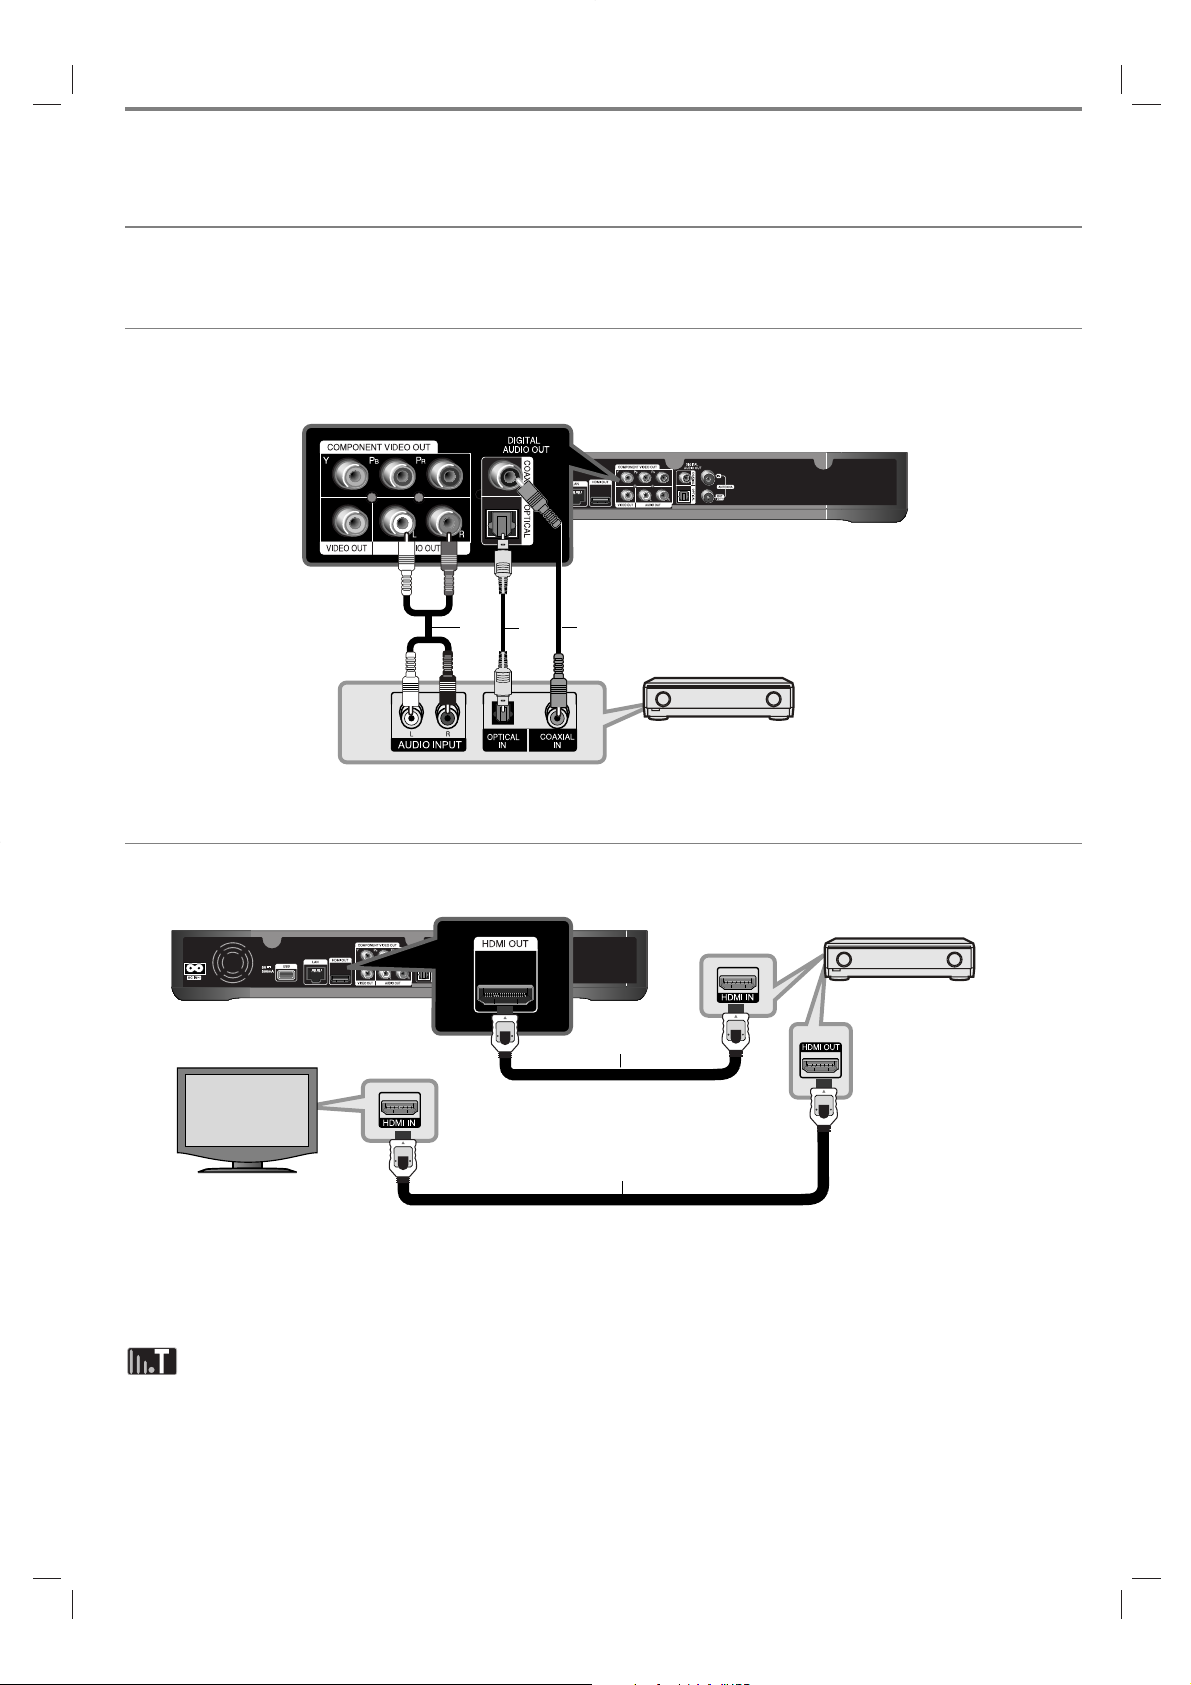
(Option A) Best quality - HDMI connection (includes audio and video)
If you have a HDMI TV or monitor, you can connect it to this recorder using a HDMI cable H. Connect the HDMI jack
on the recorder to the HDMI jack on a HDMI compatible TV or monitor. Set the TV’s source to HDMI (refer to TV’s
Owner’s manual).
You must select a HDMI audio output and a maximum sampling frequency that your TV accepts using [Digital Output]
option on the [Setup] menu (see page 47).
If a connected HDMI device does not accept the audio output of the recorder, the HDMI device’s audio sound may be
distorted or may not output.
When you use HDMI connection, you can change the resolution for the HDMI output by pressing RESOLUTION
button in TV watching mode or in Home Menu mode.
Changing the resolution when the connection has already been established may result in malfunctions. To solve the
problem, turn off the recorder and then turn it on again.
When the HDMI connection with HDCP is not verified, TV screen is changed to black screen. In this case, check the
HDMI connection, or disconnect the HDMI cable.
If there is noise or lines on the screen, please check the HDMI cable (length is generally limited to 4.5m).
Additional Information for HDMI
When you connect a HDMI or DVI compatible device make sure of the following:
- Try switching off the HDMI/DVI device and this recorder. Next, switch on the HDMI/DVI device and leave it for
around 30 seconds, then switch on this recorder.
- The connected device’s video input is set correctly for this unit.
- The connected device is compatible with 720x576p, 1280x720p, 1920x1080i or 1920x1080p video input.
Not all HDCP-compatible HDMI or DVI devices will work with this recorder.
- The picture will not be displayed properly with non-HDCP device.
- This recorder does not playback and TV screen is changed to black screen.
Caution
Caution
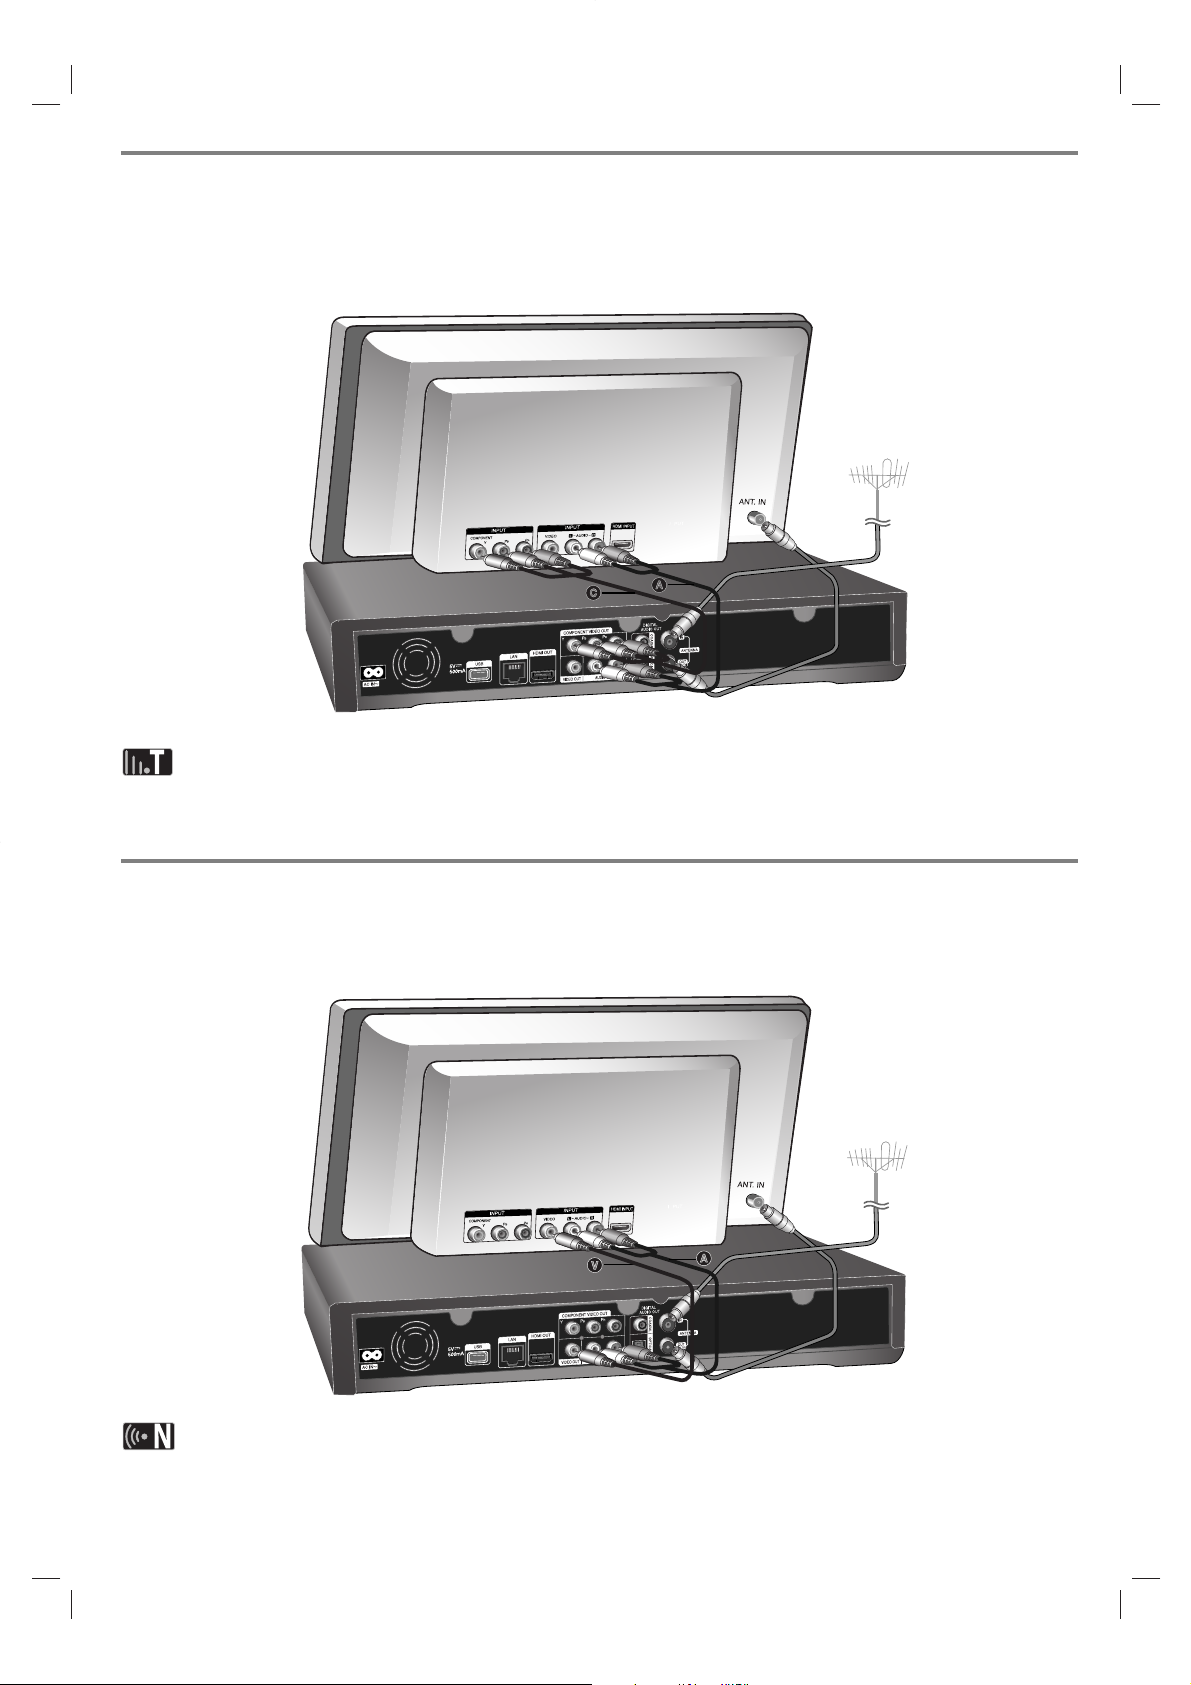
(Option B) Excellent quality - Component video and stereo audio
connection
Connect the COMPONENT VIDEO OUT jacks on the Recorder to the corresponding input jacks on the TV using Y PB
PR cables C. Connect the left and right AUDIO OUT jacks of the Recorder to the audio left and right IN jacks on the
TV using the audio cables A.
When you cannot use the screen, you can change resolution for the component VIDEO OUT by pressing RESOLUTION button in TV watching mode or in Home menu mode (Refer to “Resolution setting” on page 46.)
(Option C) Connections to your TV (Composite)
Connect the VIDEO OUT jack on the Recorder to the video in jack on the TV using the video cable
supplied V. Connect the Left and Right AUDIO OUT jacks on the Recorder to the audio left/right in jacks on the TV
using the supplied audio cables A.
If you use this connection, set the TV’s source selector to VIDEO.
12
13
Connecting to an Amplifier
Make one of the following connections, depending on the capabilities of your existing equipment.
Connecting to an Amplifier via 2 Channel Audio Output
Connect the Left and Right 2CH AUDIO OUT jacks (A) on the player to the audio left and right in jacks on your
amplifier, receiver, or stereo system, using audio cables.
Connecting to an Amplifier via Digital Audio Output (Optical or Coaxial)
Connect the player’s DIGITAL AUDIO OUT (OPTICAL or COAXIAL) jack to the corresponding in jack (OPTICAL O or
COAXIAL X) on your amplifier. Use an optional digital (optical O or coaxial X) audio cable. You will need to activate the
unit’s digital output. (See “[Audio] Menu” on page 46.)
Connecting to an Amplifier via HDMI Output
Connect the unit HDMI OUT jack to the corresponding in jack on your amplifier. Use a HDMI cable (H1). You will need
to activate the player’s digital output. (See “[Audio] Menu” on page 46.)
Digital Multi-channel sound
A digital multi-channel connection provides the best sound quality. For this you need a multi-channel Audio/Video
Receiver that supports one or more of the audio formats supported by your player. Check the receiver manual and the
logos on the front of the receiver. (LPCM, Dolby Digital and DTS)
Connect the amplifier’s HDMI output jack to HDMI input jack on your TV using a HDMI cable (H2) if your amplifier has
HDMI output jack.
Amplifier/Receiver
Amplifier/Receiver
A
O
X
H1
H2
This recorder can be connected to the local area network (LAN) via the LAN port or the wireless LAN adapter.
Be sure to set the network configuration before using this recorder.
You can use the wired and/or wireless network depending on your network environment.
14
Network connection
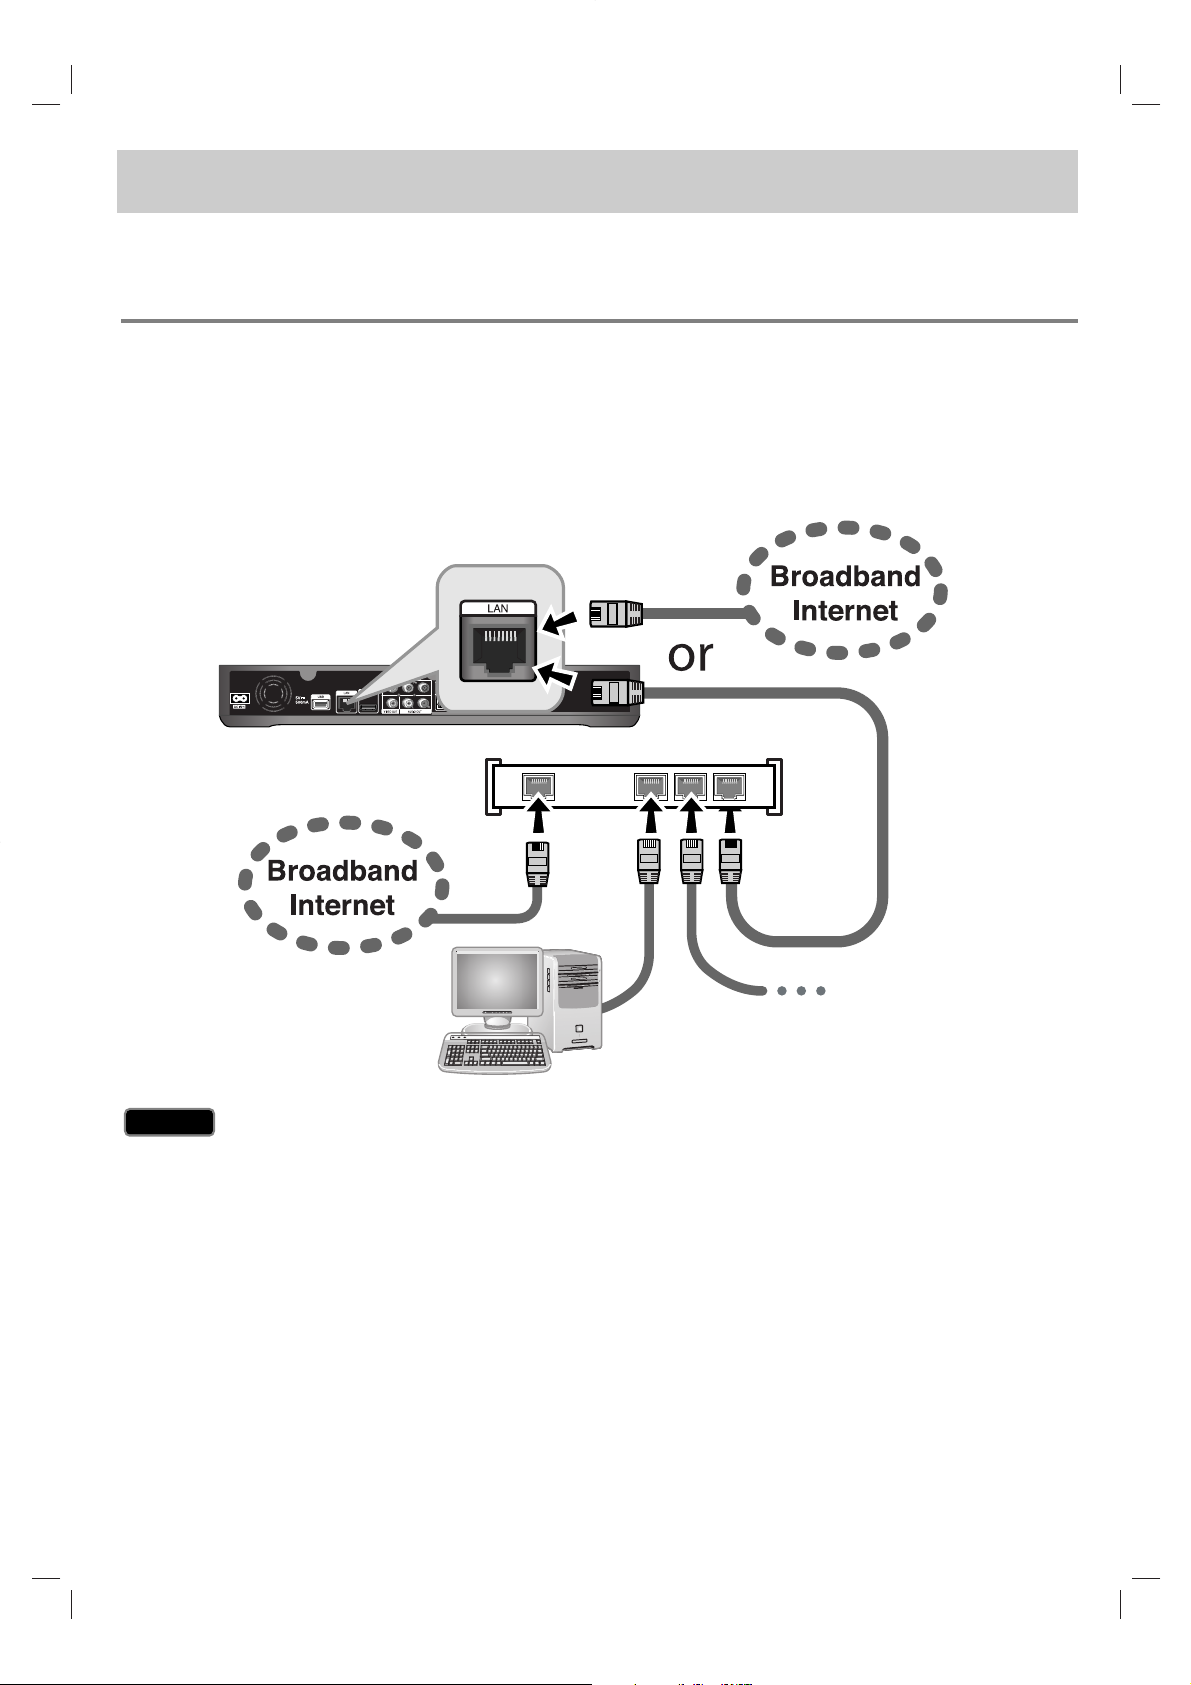
Wired network connection
Using a wired network provides the best performance, because the attached devices connect directly to the network
and are not subject to radio frequency interference.
Please refer to the documentation for your network device for further instructions.
The following connection example explain how to connect to the internet using LAN cable.
If you want to access content from PCs or DLNA servers, this recorder must be connected to the same local area network with them via a router.
When plugging or unplugging the LAN cable, hold the plug portion of the cable. When unplugging, do not pull on the
LAN cable but unplug while pressing down on the lock.
Do not connect a modular phone cable to the LAN port.
Since there are various connection configurations, please follow the specifications of your telecommunication carrier
or internet service provider.
Caution
Caution
Router
Other devices
such as DLNA server
PC
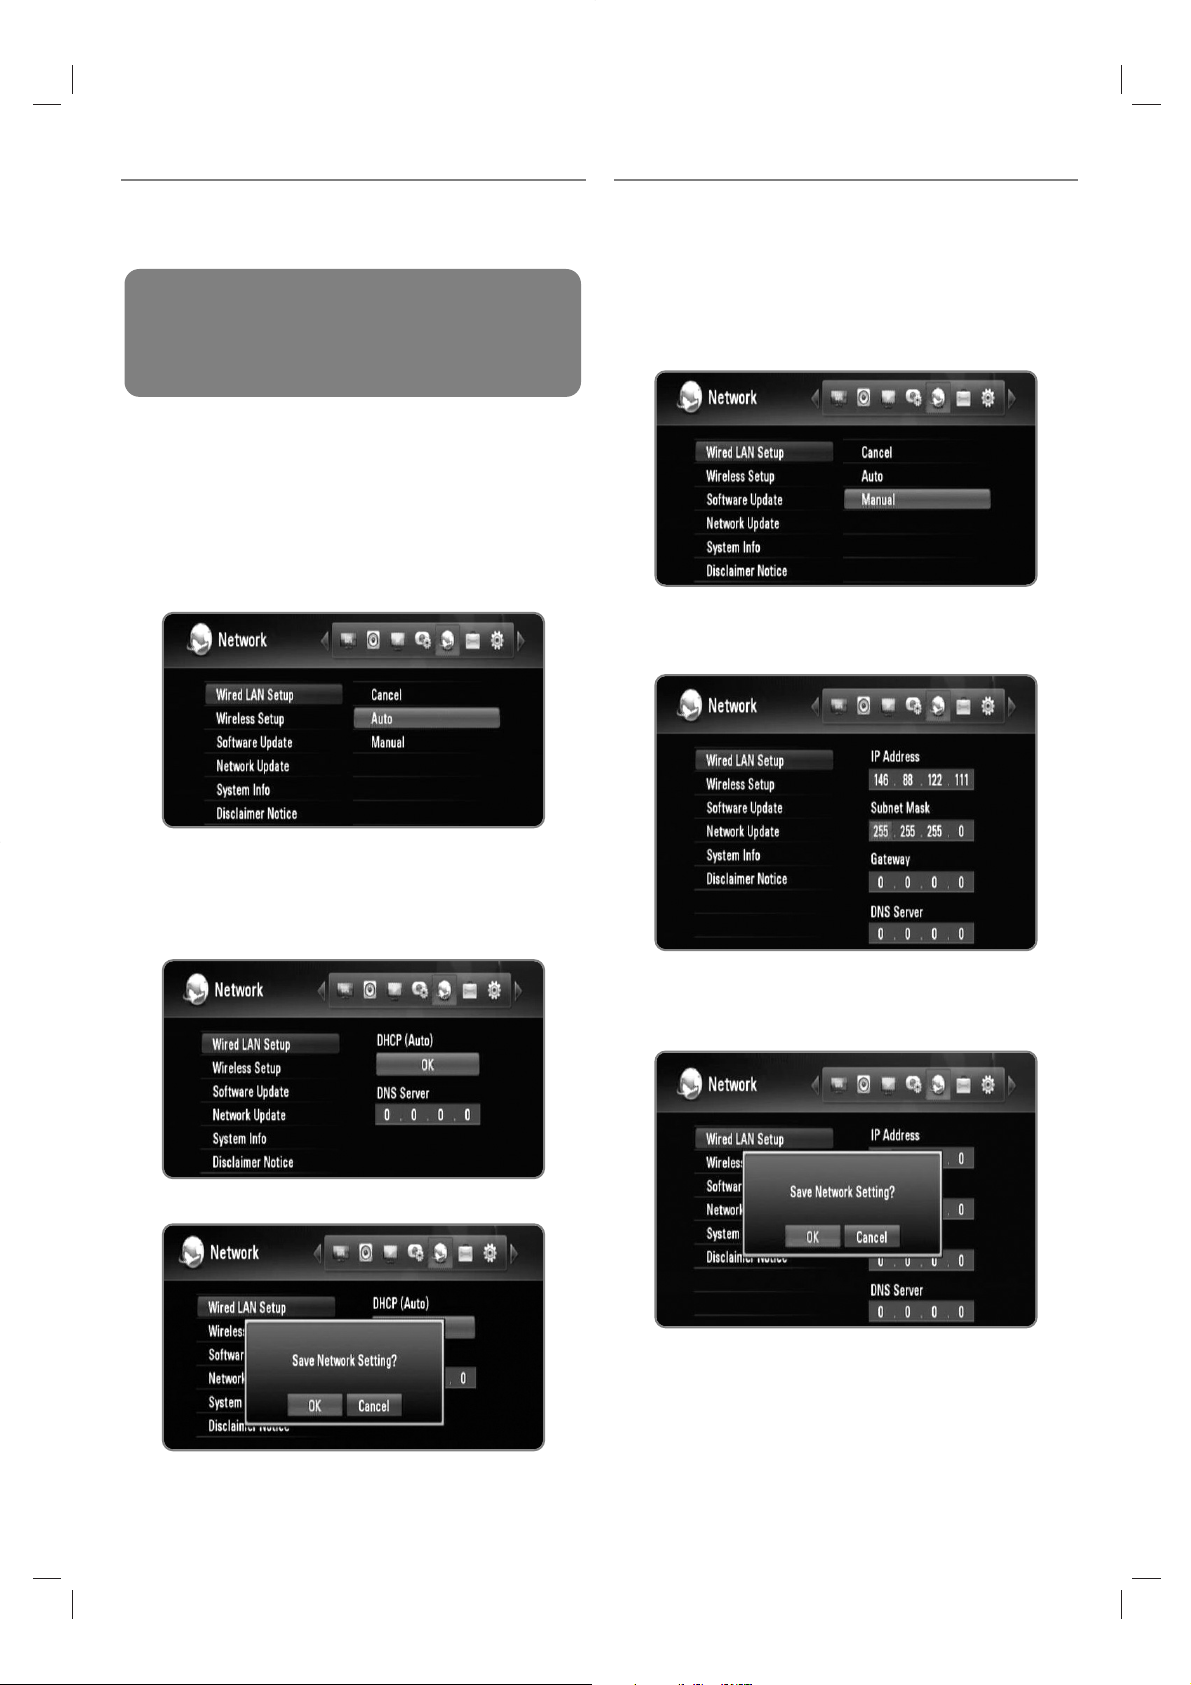
Wired network setting (Auto)
If there is a DHCP server on the local area network (LAN)
via wired connection, this recorder will automatically be
allocated an IP address.
1 Press HOME.
2 Use b/B to select the [Setup], and press OK.
3 Use b/B to select the [Network] option.
4 Use v/V to select the [Wired LAN Setup], and press
OK.
5 Use v/V to select the [Auto], and press OK.
If you want to set the IP address of the DNS server,
use v V/b/B to select the [DNS server IP
address] field and input the IP address using
numerical buttons.
6 Use v/V to select the [OK], and press OK.
7 Use b/B to select the [OK], and press OK.
Wired network setting (Manual)
If there is no DHCP server on the network and you want
to set the network manually, follow the instructions as
below.
1 Follow the steps 1-3 from “Wired network setting
(Auto)” on page 15.
2 Use v/V to select the [Wired LAN Setup], and press
OK.
3 Use v/V/b/B to move to the [IP Address], [Subnet
Mask], [Gateway] and [DNS Server] fields, and fill
them using numerical buttons.
4 Press OK when you finish inputting all the network
information.
5 Use b/B to select the [OK], and press OK.
15
Preparation:
Before setting the wired network, you need to:
– connect the broadband internet to your home
network.
16
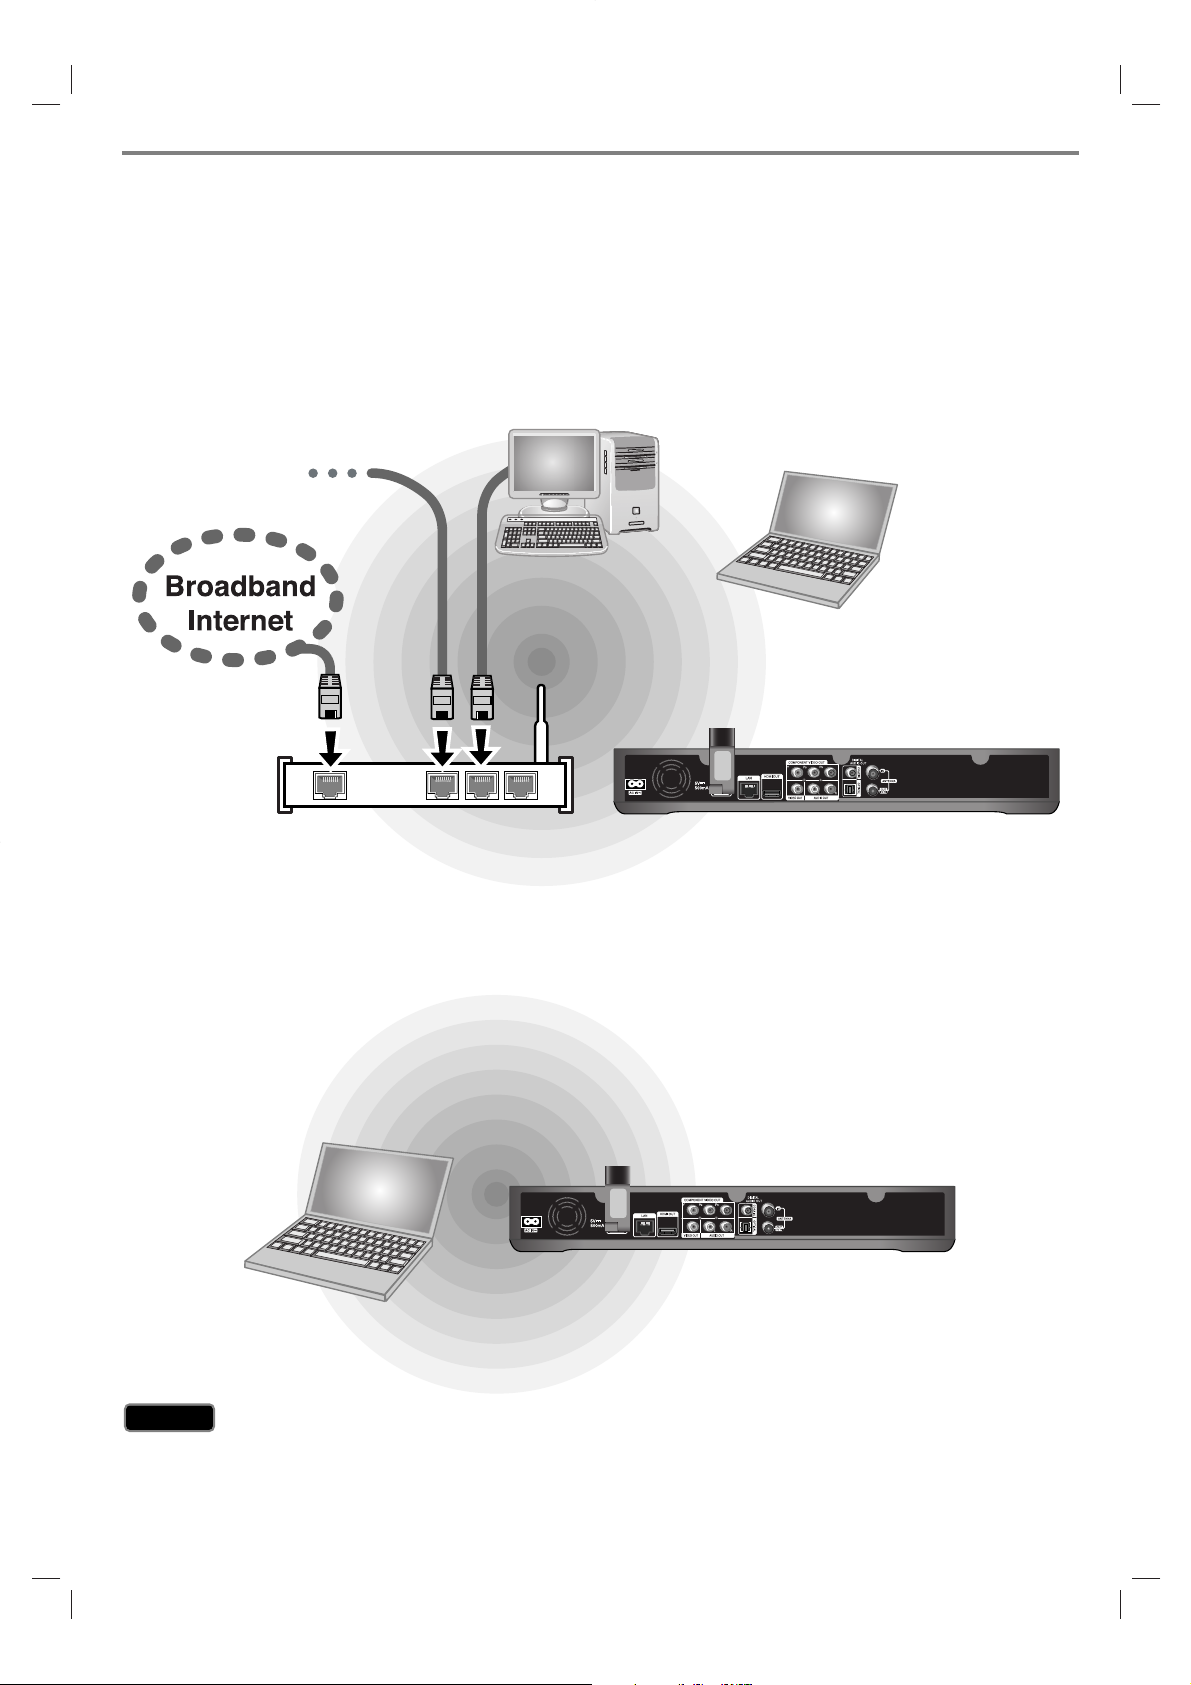
Wireless network connection
Another network connection is using the supplied wireless adapter.
This recorder supports an IEEE 802.11n wireless module using supplied wireless LAN adapter, which also supports the
802.11b/g standards. For the best wireless performance, we recommend the use of a IEEE 802.11n certified Wi-Fi
network (access point or wireless router).
Refer to the setup instructions supplied with your access point or wireless router for detailed connection steps and
network settings.
The following connection example explain how to connect to the internet using an access point or wireless router.
If you want to access content from PCs or DLNA servers, this recorder must be connected to the same local area network with them via a wireless network device.
If you do not have a wireless network at your home, you can connect directly to the wireless network equipped
computer using peer to peer (Ad-Hoc) setting.
Refer to page 18 for more information of peer to peer connection.
Using wireless network can be affected by the household devices using radio frequencies.Therefore, operating quality
may not good with wireless network connection. Wired network connection is strongly recommended.
Caution
Caution
Other devices
such as DLNA server
PC
PC
Wireless
communication
Access point
or wireless router
Wireless
communication
17
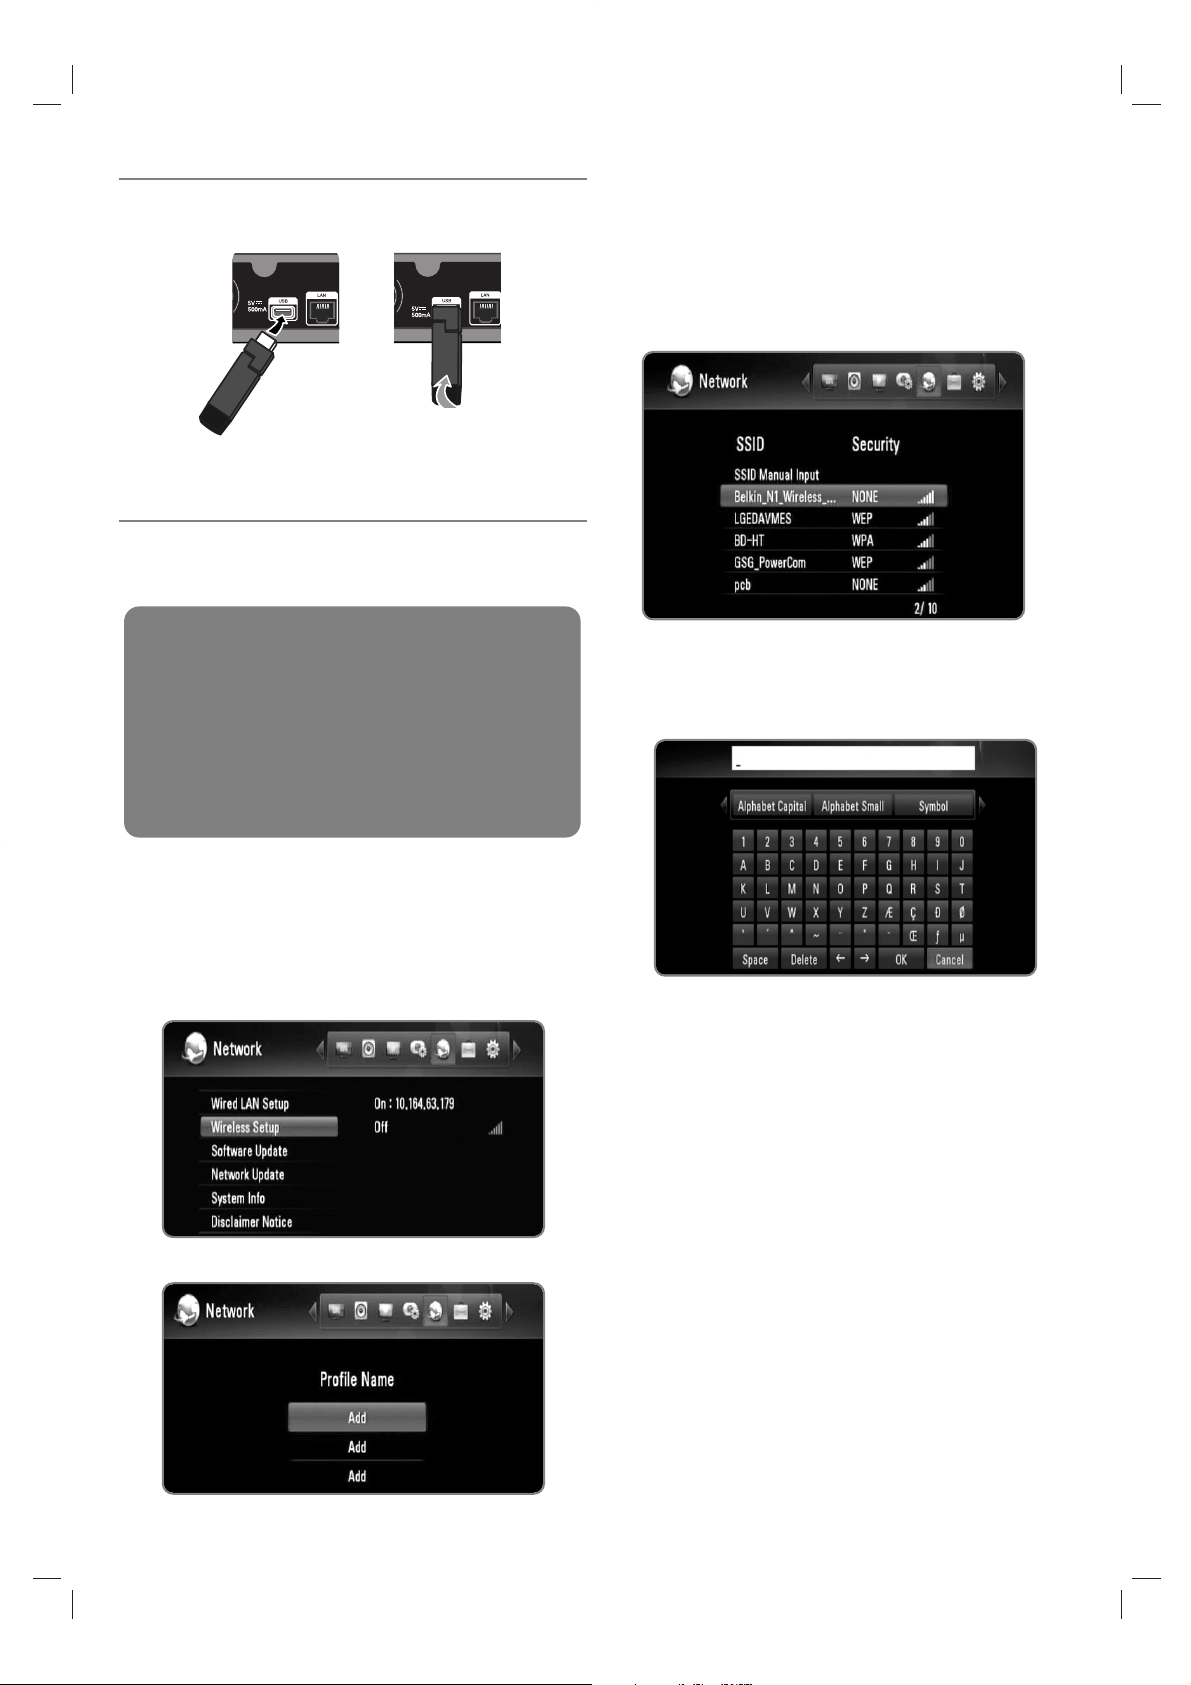
Wireless LAN adapter connection
1 Connect the supplied wireless LAN adapter to the
USB port on the rear panel.
2 Fold the wireless LAN adapter to the upper direction.
Wireless network setting (Infrastructure)
If there is a DHCP server on the local area network (LAN)
via wired connection, this recorder will automatically be
allocated an IP address.
1 Press HOME.
2 Use b/B to select the [Setup], and press OK.
3 Use b/B to select the [Network] option.
4 Use v/V to select the [Wireless Setup], and press
OK.
5 Use v/V to select a [Profile Name], and press OK.
A maximum of 3 profile names can be set for the
wireless network setup.
6 Use v/V to select the [Infrastructure (AP)], and press
OK.
The recorder scans for all of the available access
points or wireless routers within range and displays
them as a list.
7 Use v/V to select a SSID, and press OK.
If you have security on your access point or wireless
router, verify that the WEP or WPA key that was
entered into the recorder matches the router’s
information exactly.
You need to input the security code as necessary.
Select [Alphabet Capital], [Alphabet Small] or
[Symbol], and press OK to change the character set
of the virtual keyboard.
[Space]: Inserts a space at the cursor position.
[Delete]: Delete a previous character at the cursor
position.
[T t]: Moves cursor to the left or right.
[OK]: Complete inputting security code.
[Cancel]: Cancels the naming, and return to the
previous.
8 Check the network information, and press OK to finish
the network setup.
Preparation:
Before setting the wireless network, you need to:
– connect the broadband internet to the wireless
home network.
– connect the wireless LAN adapter on the USB
port.
– set the access point or wireless router.
– note the SSID and security code of the network.
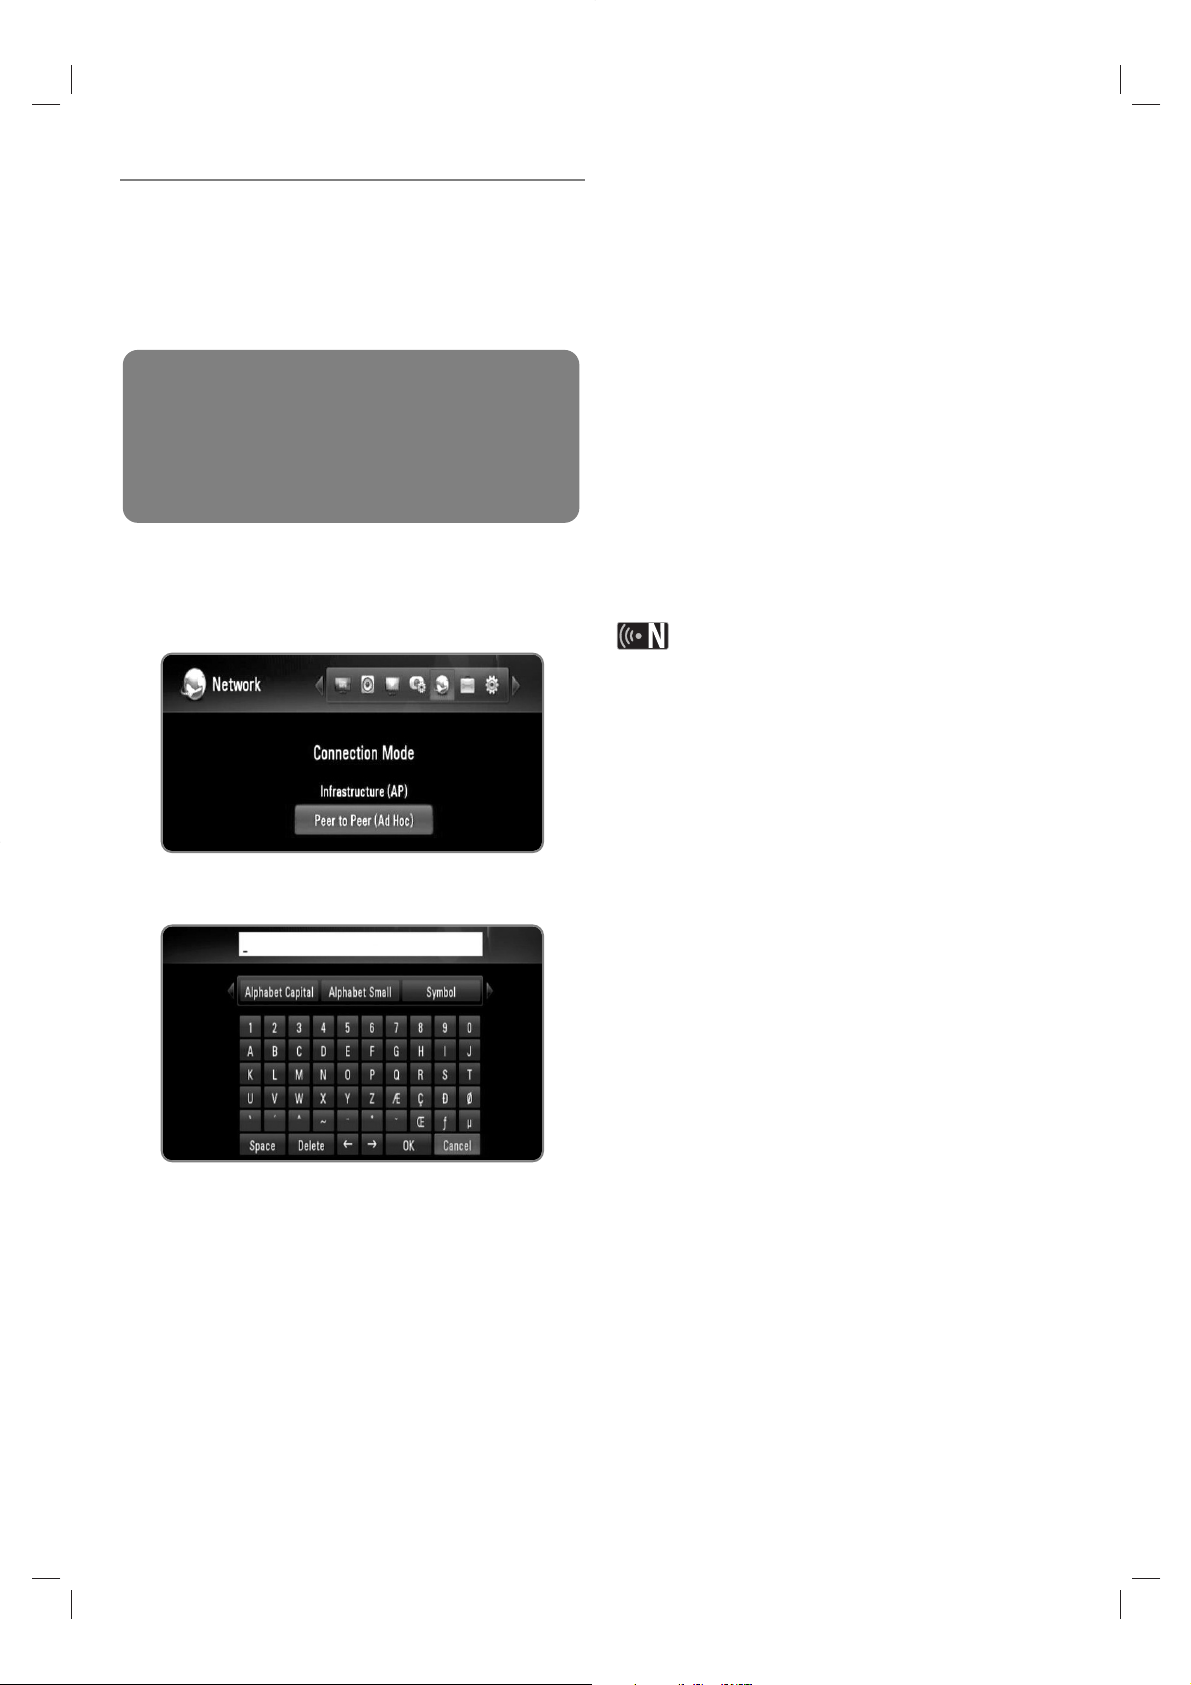
Wireless network setting (peer to peer)
If you do not have a wireless network device at your
home, you can connect directly to the wireless network
equipped computer using [Peer to Peer (Ad Hoc)]
setting.
For this connection, features which require internet
connection such as YouTube, Picasa web albums cannot
be operated.
1 Follow the steps 1-5 from “Wireless network setting
(Infrastructure)” on page 17.
2 Use v/V to select the [Peer to Peer (Ad Hoc)], and
press OK.
3 Use v/V to select the [Wireless SSID], and press OK
to display the virtual keyboard.
Select [Alphabet Capital], [Alphabet Small] or
[Symbol], and press OK to change the character set
of the virtual keyboard.
[Space]: Inserts a space at the cursor position.
[Delete]: Delete a previous character at the cursor
position.
[T t]: Moves cursor to the left or right.
[OK]: Complete inputting SSID.
[Cancel]: Cancels the naming, and return to the
previous.
4 If you want to set the security, use v/V to select the
[Shared key (WEP)], and press OK to display the
virtual keyboard.
Refer to step 3 above for using virtual keyboard.
If you do not want to set the security for the wire-
less connection, select the [Open System], and
press OK.
5 Use v/V to select the [Host IP] field, and input the IP
address using numerical buttons.
Using default IP address is recommended.
6 Press yellow coloured button to complete the [Ad-Hoc
Setup] settings.
7 Check the network information, and press OK to finish
the network setup.
8 On your computer, the SSID you have set can be
found on the wireless network list.
Please refer to the documentation for your comput-
er or operating system for further instructions.
There may be various ways to get Ad-Hoc connection
to your computer depending on the operating system,
wireless network application,
18
Preparation:
Before setting the peer to peer connection, you need
to:
– connect the wireless LAN adapter on the USB
port.
– prepare the wireless network equipped computer.

Notes on Network Connection
Many network connection problems during set up can
often be fixed by re-setting the router or modem.
After connecting the recorder to the home network,
quickly power off and/or disconnect the power cable of
the home network router or cable modem. Then power
on and/or connect the power cable again.
Depending on the internet service provider (ISP), the
number of devices that can receive internet service
may be limited by the applicable terms of service. For
details, contact your ISP.
Our company is not responsible for any malfunction of
the recorder and/or the internet connection feature due
to communication errors/ malfunctions associated with
your broadband internet connection, or other connected
equipment.
Some internet contents may require a higher bandwidth
connection.
Even if the recorder is properly connected and config-
ured, some internet contents may not operate properly
because of internet congestion, the quality or bandwidth of your internet service, or problems at the
provider of the content.
Some internet connection operations may not be possi-
ble due to certain restrictions set by the Internet service
provider (ISP) supplying your broadband Internet connection.
Any fees charged by an ISP including, without limita-
tion, connection charges are your responsibility.
A10 Base-T or 100 Base-TX LAN port is required for
wired connection to this recorder. If your internet service does not allow for such a connection, you will not
be able to connect the recorder.
You must use a Router to use xDSL service.
ADSL modem is required to use DSL service and a
cable modem is required to use cable modem service.
Depending on the access method of and subscriber
agreement with your ISP, you may not be able to use
the internet connection feature contained in this
recorder or you may be limited to the number of
devices you can connect at the same time. (If your ISP
limits subscription to one device, this recorder may not
be allowed to be connected when a PC is already connected.)
The use of a “Router” may not be allowed or its usage
may be limited depending on the policies and restrictions of your ISP. For details, contact your ISP directly.
The wireless network operate at 2.4GHz radio frequen-
cies that are also used by other household devices
such as cordless telephone, Bluetooth® devices,
microwave oven, and can be affected by interference
from them.
Turn off all unused network equipment in your local
home network. Some devices may generate network
traffic.
For the purpose of better transmission, place the
recorder as close as possible to the access point.
In some instances, placing the access point or wireless
router at least 1.5 ft (0.45m) above the floor may
improve the reception.
Move closer to the access point if possible or re-orient
the recorder so there is nothing between it and the
access point.
The reception quality over wireless depends on many
factors such as type of the access point, distance
between the recorder and access point, and the location of the recorder.
ADSL modem is required to use DSL service and a
cable modem is required to use cable modem service.
Depending on the access method of and subscriber
agreement with your ISP, you may not be able to use
the internet connection feature contained in this
recorder or you may be limited to the number of
devices you can connect at the same time. (If your ISP
limits subscription to one device, this recorder may not
be allowed to connect when a PC is already connected.)
The use of a “Router” may not be allowed or its usage
may be limited depending on the policies and restrictions of your ISP. For details, contact your ISP directly.
Your ISP may protect this recorder from being connect-
ed to network when confirming MAC ADDRESS. In that
case, contact your ISP to request to initialize MAC
ADDRESS.
19

20
After turning on the recorder for the first time or
after resetting the recorder, the Setup Wizard
menu is displayed.
You can set the display language, region,
programme scan, time and network setup on the
[Setup Wizard] menu.
1 Use v/V to select a language for the on-screen
display, and press OK.
2 Use v/V to select a region, and press OK.
3 Use v/V to select the [OK], and press OK to begin
programme scanning. The recorder automatically
searches for and saves the programmes.
If you select [Cancel], the [Auto Programming] function
will be skipped.
4 Use v/V to select an option among [Cancel], [Manual]
or [Auto], and press OK.
Auto: Set the programme that broadcasts a clock signal and the clock will be set automatically.
If the time that has automatically set is not correct
comparing your local time, you can set additional time
option. Select your region in the [Time Zone] option to
set a time relative to area. If the summer time has
started in your region, select the [Time Offset] option
and increase or decrease time using b/B.
Manual: If there is no channel that broadcasts a clock
signal in your area, you can set the time and date
manually. Use b/B to select each field, and input
correct time and date using v/V.
5 Press OK to complete the [Time] setting.
6 Refer to “Wired network connection” on page 14-15 to
complete the [Wired LAN Setup] option, and press OK.
Select [Cancel] and press OK to cancel.
7 Refer to “Wireless network connection” on page 16-18
to complete the [Wireless Setup] option, and press
OK.
Select [Cancel] and press OK to cancel.
This recorder can apply only one network setup
between [Wired LAN setup] and [Wireless Setup]. If
you already set the [Wired LAN setup] at step 6, you
do not need to set [Wireless Setup] setting.
You can reset the Setup Wizard from the [Initialization]
in the setup menu. (see page 48).
The [Initialization] option is not available while recording
or [Lock System] in the [Setup] menu is set to [On].
Setup Wizard (Initial install)

21
DTV Installation
Connect the DTV antenna to the ANTENNA IN jack on the rear panel as described below.
And connect the ANTENNA OUT jack on the rear panel to the ANTENNA IN jack on your TV using RF cable.
If you are using an indoor antenna, use one with a signal amplifier rated at DC 5V, 100mA and set “Antenna Feed 5V”
option to [ON] on the setup menu. (see page 24)
The [Antenna Feed 5V] option must be set to [Off] when your indoor antenna is supplied the power from the
mains. If you set [Antenna Feed 5V] option to [On] for the indoor antenna which is supplied power from the
mains, it may cause serious defect to this recorder.
Caution
Caution
DTV
TV
or or

22
Selecting a Region
Select a region where you operate this recorder.
1 Press HOME.
2 Use b/B to select the [Setup], and press OK.
3 Use b/B to select the [DTV] option.
4 Use v/V to select the [Region] and press OK.
5 Use v/V to select a region where you operate this
recorder, and press OK.
If the [Lock] option is set to [On], this function is not available (page 23).
Scanning programmes automatically
All available digital TV or radio programmes are searched
and stored automatically based on the selected region.
1 Follow the steps 1-3 from “Selecting a Region” on
page 22.
2 Use v/V to select the [Auto Programming] and press
OK.
3 Use v/V to select the [Auto Scan] and press OK to
start the programme scanning.
Select [Cancel] and press OK to cancel.
This option is not available while recording or the
[Permanent Timeshift] option is the [Setup] menu is set
to [On].
If the [Lock] option is set to [On], this function is not
available (page 23).
Scanning programmes manually
Scans digital TV or radio programmes and adds the
found programmes to the programme list.
1 Follow the steps 1-3 from “Selecting a Region” on
page 22.
2 Use v/V to select the [Auto Programming] and press
OK.
3 Use v/V to select the [Manual Scan] and press OK
to display the [Manual Scan] menu.
Select [Cancel] and press OK to cancel.
4 Use b/B to select the desired multiplexer (MUX), and
press OK to start scanning.
OR
If you know the programme bandwidth and frequency,
use b/B to select the desired [Bandwidth], and Fill
the [Frequency] field using numerical buttons.
5 Press OK to start programme scanning.
This option is not available while recording or the
[Permanent Timeshift] option is the [Setup] menu is set
to [On].
If the [Lock] option is set to [On], this function is not
available (page 23).
Settings for Digital TV
To use DTV functions, this recorder needs some settings in advance. You can make settings and adjustments using
the [Setup wizard] menu. (refer to page 20 for details).
You can also set them manually as below.

23
Editing Programme List
You can remove any digital TV or radio programs stored
on this recorder using [Program edit] menu.
1 Follow the steps 1-3 from “Selecting a Region” on
page 22.
2 Use v/V to select the [Program Edit] and press OK.
3 Use v/V to select the [DTV] and press OK to display
the [Edit - TV] menu.
Select [CANCEL] and press OK to cancel.
4 Press yellow coloured button to toggle list between TV
and RADIO programme list.
[Edit - TV] or [Edit - Radio] menu shows the
signal strength ( ) and quality ( )of the current
programme at the bottom.
5 Use v/V to select a programme you want to delete
from the list, and press blue coloured button.
If you do not want to remove the programme, select
[No] and press OK on the popup menu.
6 Press BACK to return to the [Setup] menu.
This option is not available while recording or the
[Permanent Timeshift] option is the [Setup] menu is set to
[On].
Setting the Lock System
Allows you to activate or deactivate all of the lock
schemes previously set. When the [Lock System] is set to
[Off], the [TV Rating] option is not effective.
1 Follow the steps 1-3 from “Selecting a Region” on
page 22.
2 Use v/V to select the [Parental Guidance] and press
OK.
3 Input the password using numerical buttons.
If you have not set your password yet, input “0000”.
4 Use v/V to select the [Lock System] and press OK.
5 Use v/V to select the [On] and press OK to activate
the parental lock.
Setting a new password
You ca n set or change your password.
1 Follow the steps 1-3 from “Selecting a Region” on
page 22.
2 Use v/V to select the [Parental Guidance] and press
OK.
3 Input the password using numerical buttons.
If you have not set your password yet, input “0000”.
4 Use v/V to select the [Set Password] and press OK.
5 Enter the current password.
6 Enter a new password.
7 Enter the new password to verify it.
This option is not available while recording.
If you forget your password, you can clear it using the
following steps:
1.Highlight the [Parental Guidance] option in the
[Setup] menu.
2.Use Number buttons to enter “210499”. The password will be set to default password (0000).

24
Adjusting TV Rating level
Viewing of some digital TV programmes can be limited
according to the age limit you set.
If the [Lock System] is set to [Off] in the [Setup] menu,
the [DTV Rating] option is not available.
1 Follow the steps 1-3 from “Selecting a Region” on
page 22.
2 Use v/V to select the [Parental Guidance] and press
OK.
3 Input the password using numerical buttons.
If you have not set your password yet, input “0000”.
4 Use v/V to select the [DTV Rating] and press OK.
5 Use v/V to select the [Parental Guidance].
6 use b/B to set the limitation level and press OK.
Select the [No Control] to release the limitation.
To watch programmes that exceed the rating level
you set, your password is required.
Refer to page 45 for more information about rating
levels.
Setting the antenna power
If you are using indoor antenna with a signal amplifier
rated at DC 5V, 100mA, the recorder can supply power
through ANTENNA IN jack.
1 Follow the steps 1-3 from “Selecting a Region” on
page 22.
2 Use v/V to select the [Antenna Feed 5V] and press
OK.
3 Use v/V to select the [On], and press OK to supply
antenna power.
The [Antenna Feed 5V] option must be set to [Off]
when your indoor antenna is supplied the power from
the mains. If you set the [Antenna Feed 5V] option to
[On] for the indoor antenna which is supplied power
from the mains, it may cause serious defect to this
recorder.
Setting the permanent Timeshift
You can set the Time Shift function automatically without
pressing TIMESHIFT button. The timeshift will start after
Digital TV tuner mode is started.
1 Press HOME.
2 Use b/B to select the [Setup], and press OK.
3 Use b/B to select the [Record] option.
4 Use v/V to select the [Permanent Timeshift] and
press OK.
5 Use v/V to select the [On] to apply permanent
timeshift.
This option is not available while recording.
Setting a recording storage location
You can set the storage location where you want to store
the DTV recordings.
1 Press HOME.
2 Use b/B to select the [Setup], and press OK.
3 Use b/B to select the [Record] option.
4 Use v/V to select the [REC Device] and press OK.
5 Use v/V to select a storage, and press OK.
This option is not available while recording.
Caution
Caution

25
Viewing the Digital TV
Viewing the Digital TV broadcasting on the TV screen.
1 Press POWER to turn on the recorder.
2 Use b/B to select [DTV] on the HOME menu and
press OK.
Adjusting volume of audio out
Press VOL (-/+) to adjust the sound level of audio
output from this recorder.
Changing Digital TV programmes
Generally, press PR (U / u) or v/V to select the pro-
gramme position, or entering a programme number using
numerical buttons.
If you want to change the programme on the programme
list, follow the instruction as below.
1 While watching DTV, press OK or PR LIST.
2 Press yellow coloured button to toggle menu between
[TV List] and [Radio List].
3 Use v/V to select a desired programme, and press
OK.
4 Press BACK to exit the programme list.
Setting favorite programmes
1 While watching DTV, press OK or PR LIST
2 Press yellow coloured button to toggle menu between
[TV List] and [Radio List].
3 Use v/V to select a programme you want to add on
the Favorite List.
4 Press red coloured button to set the programme as a
favorite programme.
The ♥ mark appears for the favorite programmes.
To cancel the favorite programmes, select a pro-
gramme with ♥ mark, and press red coloured button.
5 Press FAV to display the favorite programme list.
On the Favorite List menu, press yellow coloured
button to toggle menu between TV favorite List and
Radio favorite List.
Viewing the programme information
You can view description of the programme being broadcast.
1 While watching DTV, press INFO to display the
programme information.
2 Press INFO again to close the programme
information.
Selecting DTV audio language
Some digital programmes may broadcast several audio
languages or encoding methods. You can select an audio
language or an encoding method when it is available.
1 While watching DTV, press AUDIO.
2 Use b/B to select an audio language or an encoding
method, and press OK.
Preparation:
DTV antenna connection is required. (page 21)
DTV settings such as [Auto Programming],
[Parental Guidance] in the [Setup] menu may be
required. (page 23)
Using the Digital TV functions
You can watch and record the digital TV programmes or play back the recorded TV programmes you want to watch
using this recorder.

26
Selecting DTV subtitle language
Some digital programmes may broadcast several subtitle
language. You can select a subtitle language when it is
available.
1 While watching DTV, press SUBTITLE.
2 Use b/B to select a subtitle language, and press OK.
You can find a programme that supports subtitle language
on the programme information. For the programmes with
subtitle, icon appears on the programme information.
Viewing the EPG (Electronic Programme
Guide) Display
The Electronic Programme Guide is a guide showing the
programme schedule for a day or more at a time.
Digital Services availability and contents may differ
depends on the broadcaster.
1 Press GUIDE while watching Digital TV.
The EPG screen appears and it updates
automatically if the EPG data is acquired
successfully.
2 Select an item using b/B and adjust the selected
item using v/V.
The adjustable items are c, d and e.
a Shows the Live Digital TV programme that
you have chosen on the programme field.
b Indicates the detailed information of the
currently selected programme.
c Indicates the currently selected date.
Use v/V to select a different date.
d Indicates the current programme name.
Use v/V to change the programme.
e Indicates the programme guide of the
selected programme. Shows the start time,
end time and title of the programme.
Using the timeshift function manually
You can pause a Live TV broadcast, then continue watching the programme at a later time. This is useful when
you receive an unexpected call or visitor while watching
TV.
Followings are operating steps when the [Permanent
Timeshift] option is set to [Off].
1 Press TIMESHIFT while watching a TV broadcast.
The picture pauses, and the recorder starts recording
the current TV programme to the internal HDD.
Make sure that there is sufficient space on the
internal HDD for the timeshift function.
2 Press PLAY to resume watching the prgramme.
Press INFO to display the progress of timeshift.
Press SKIP (. / >) to move the starting point
or the ending point of timeshift.
Press SCAN (m / M) to playback of timeshift
fast forward or fast reverse.
Press SCAN (M) while in pause mode to slow
down the timeshift playback spped. Press SCAN
(M) repeatedly to change the playback speed.
3 Press STOP to cancel the timeshift.
Timeshift cannot be saved as a title.
SUB
a
b
d
e
c

27
Using the permanent timeshift
If you set the [Permanent Timeshift] option to [On], live
TV broadcast will automatically be recorded to the internal HDD without pressing TIMESHIFT button. The
timeshift will start automatically when the Digital TV tuner
mode is started.
Refer to “Setting the permanent timeshift” on page 24 to
set the [Permanent Timeshift] option.
1 Press POWER to turn on the recorder.
2 Use b/B to select [DTV] and press OK.
The timeshift function will automatically start.
Press SKIP (./>) to move the starting point
or the ending point of timeshift.
Press SCAN (m/M) to playback of timeshift fast
forward or fast reverse.
Press SCAN (M) while in pause mode to slow
down the timeshift playback spped. Press SCAN
(M) repeatedly to change the playback speed.
3 Press HOME to exit from the DTV viewing.
Using the teletext (Viewing Teletext)
Many Digital TV programmes broadcast information via
their text service, and this recorder has access to dedicated text programmes transmitted by the broadcasters.
1 Press TEXT while watching TV.
2 Use red or green coloured button to select a page.
You can also select a page by entering a three digit
number with the numerical buttons.
3 Press TEXT to exit the teletext screen.
Additionally, you now have four coloured buttons to
navigate through the content of the page. The use of
these coloured buttons will be displayed on the screen.

28
Normal Recording
1 Use PR (U/u) or v/V to select a programme you
want to record.
2 Press REC to start recording.
Press PAUSE to pause recording, press PAUSE
again to resume recording.
You can watch another programme while recording.
3 Press STOP to stop recording.
To stop recording, you must move to the pro-
gramme being recorded before pressing STOP.
TV recordings will be stored in the [REC] folder of the
storage you’ve set in the [REC Device].
Only HDD type USB storages are Available for USB
recording. Flash type USB storages are not available
for recording.
Dual Programme Recording
You can record two Digital TV programme at the same
time.
1 Use PR (U/u) or v/V to select a programme you
want to record.
2 Press REC to start recording.
3 Use PR (U/u) or v/V to select another programme
you want to record.
4 Press REC to start recording.
While recording two programmes simultaneously,
you can only watch the programmes being recorded.
5 Press STOP to stop recording.
To stop recording, you must move to the pro-
gramme being recorded before pressing STOP.
Timer Recording (Manual)
You can set the timer for a total of 32 programmes, up to
30 days in advance.
1 While watching TV, press TIMER REC.
2 Use v/V to select [NEW], and press OK.
3 Select an item using b/B and adjust it using v/V.
The adjustable items are listed below.
PR Sets the programme position.
Date Sets the date.
Start Sets the start time.
End Sets the end time.
Repeat Choose a desired repeat mode.
(Once, Everyday, Mon-Fri, Mon-Sat or
Weekly)
Media Sets the device to be recorded.
HDD: internal HDD
HDD+: external HDD
The timer recording can be set from 3 minutes after
the current time.
Timer recording is not available on a USB device.
4 Press OK and confirm message appears.
5 Select [Confirm] then press OK.
If you input the wrong information, an error mes-
sage will be appeared and the timer recording cannot made. Refer to “Editing a timer recording” on
page 30 to edit timer recording.
Select [Cancel] and press OK to cancel.
Preparations:
Select the recording location using [REC Device]
option on the SETUP menu. (page 24)
Connect a USB device, if [REC Device] option is
set to [USB].
You need minimum of 20MB free space on the
storage for recording.
Recording TV programmes
You can record Digital TV programmes, store it on the internal HDD, external HDD or USB device.

29
Timer Recording (EPG)
You can also set the timer based on the information
provided by the EPG.
1 While watching TV, press GUIDE.
2 Use b/B to select date field, and select the date of
recording schedule using v/V.
3 Use b/B to select programme field, and set the
programme using v/V.
4 Use b/B to select the programme list, and select a
programme you want to record using v/V.
5 Press REC.
For the successfully scheduled programme, a red
bullet mark appears.
A red bullet mark may not appear for inavailable
programme to record.
6 Press BACK to return to the TV viewing.
7 Press TIMER REC, and check whether the schedule
is registered properly or not.
Canceling a timer recording
You can cancel a timer recording before the timer recording actually starts.
1 While watching TV, press TIMER REC.
2 Use v/V to select a schedule you want to cancel.
3 Press the blue coloured button.
4 Use b/B to select [Delete one], and press OK.
Select [Cancel] and press OK to cancel .
Select [Delete all] and press OK to delete whole
schedules.
Checking the history
You can check if the timer recording is completed or not
on the [Timer Record History ] menu. The [Result] column
shows “OK” or ”FAIL”.
1 While watching TV, press TIMER REC.
2 Press yellow coloured button to display the [Timer
Record History] menu.
To delete a history, select a history and press
ENTER. And select [OK] and press OK to delete the
history.

30
Editing a timer recording
You can edit a pre-scheduled timer before the timer
recording actually starts.
1 While watching TV, press TIMER REC.
2 Use v/V to select a schedule you want to edit.
3 Press OK to display the [Timer Record Edit] menu.
4 Follow the steps 3-5 from “Timer Recording (Manual)”
on page 28 to complete the editing.
Instant Timer Recording
You can set the recording time instantly to stop the
recording automatically.
1 Use PR (+/-) or v/V to select a programme you want
to record.
2 Press REC to start recording.
3 While recording, press REC repeatedly to set the
recording duration.
Continue (Normal recording) , 10M , 20M ,
30M , 60M , 90M , 120M , Continue
4 Press STOP to stop recording.

31
You can play media files stored on
various media. Select [Media] on
[Home menu] and press [OK].
b
BB
Select a menu option.
HDD
You can play media (MOVIE, MUSIC, PHOTO) files
stored in the internal HDD or external HDD.
(page 32-35)
USB
You can play media (MOVIE, MUSIC, PHOTO) files
stored in USB device. Before using this function, you
should connect USB device to the front panel
recorder. (page 32-35)
PC
You can play media (MOVIE, MUSIC, PHOTO) files
stored on PC connected via your local area network.
(page 36)
Rec. List
You can play the recorded TV program.
(page 32-35)
Playlist
Displays the Playlist you organized in this recorder.
You need to organize your playlist before using it
(page 34).
File Copy
You can copy media files by connecting to various
storage devices and the network. (page 37)
Media

32
General playback
1 Press HOME.
2 Use b/B to select [Media] in the [Home] menu, and
press OK.
3 Select a storage type using b/B and press OK.
a Displays media (MOVIE, MUSIC, PHOTO)
files stored in internal/external HDD .
b Displays media (MOVIE, MUSIC, PHOTO)
files stored in a connected USB device.
c Displays media (MOVIE, MUSIC, PHOTO)
files stored in your PC .
You need to input network ID and password.
(page 36)
d Displays Digital TV titles that recorded via
DTV tuner.
To record DTV titles, see page 28-30.
e Displays the Playlist you organized in this
recorder. You need to organize your playlist
before using it (page 34).
4 Use b/B to select a media type (MOVIE, MUSIC or
PHOTO).
5 Use v/V to select a file you want to play.
Use v/V to select a folder, and press OK. A list of
files and sub-folders in the folder appears.
If you want to move to the upper directory, press
BACK or use v/V to select and press OK.
Press INFO while selecting a movie file to display
the detailed file information.
6 Press PLAY or OK to play the selected file.
Starts slideshow when selecting a photo file.
When playing a slideshow, press INFO to show the
control icons as below.
Prev: Press . to move to the previous file.
Next: Press > to move to the next file.
90° : Press v/V to rotate the picture
clockwise or counterclockwise.
Stop: Press STOP (x) to stop the slideshow.
Hide: Press BACK to hide the control icons.
To show the icons again, press INFO.
If you apply an effect, slideshow timing may be longer
than you have set in [Slide Show timing] option. (page
35)
7 To pause playback, press PAUSE playing movie file.
Press PLAY to resume playback.
8 Press STOP to stop playback.
Sorting the recorded titles
1 Press HOME.
2 Use b/B to select [Media] in the [Home] menu, and
press OK.
3 Use b/B to select [Rec. List], and press OK.
4 Press green coloured button to bring up the options
menu.
5 Use v/V to select a sorting method among [Latest],
[Time] or [Title Name].
Latest sorted by latest recording
Time sorted by recorded time in numerical
order.
Title Name by title name in alphabetical order
Press VOL +/- to adjust the sound level for audio out-
put.
REC
Playback functions
The recorder can play movie, music and photo files on the HDD, USB, PC, REC.List, Playlist or using DLNA feature.
Before playing movie, music or photo files, read “File requirement” on page 5.
Symbols used in playback functions
Each playback function has symbols which
indicates available features as below
Movie files in the HDD, USB or PC.
Music files in the HDD, USB or PC.
Photo files in the HDD, USB or PC.
Titles recorded via DTV tuner.
Movie files in the DLNA server.
Music files in the DLNA server.
Photo files in the DLNA server.
Photos from the Picasa web albums.
Picasa
DLNA-P
DLNA-M
DLNA-V
REC
PHOTO
MUSIC
MOVIE
ab c d e

33
Frame-by-Frame playback
1 While a movie file is in playback, press PAUSE.
2 Press PAUSE repeatedly to play frame by frame.
Fast forward and fast reverse
1 While a movie file is in playback,
press SCAN (m/M) to play fast forward or fast
reverse.
2 Press SCAN (m/M) repeatedly to change the
playback speed.
3 Press PLAY to return to normal playback speed.
Slow down the playing speed
1 While a movie file is in playback, press PAUSE.
2 press SCAN (M) to play in slow motion.
3 Press SCAN (M) repeatedly to change the
playback speed.
4 Press PLAY to return to normal playback speed.
Skip to the next/previous file
While a file is in playback, press SKIP (./>).
Movie file/Recoded title – Moves to the next file or
beginning of the currently playing file. To move to the
previous file, press SKIP (.) twice.
Music/Photo file – Moves to the previous or next file.
Resume playback
If you play a movie that was stopped previously, you can
resume playback from the point where you pressed
STOP.
1 Use v/V to select a file you want to resume.
2 Press PLAY or OK.
3 Use b/B to select [Yes], and press OK to resume
playback.
If you select [No], the playback starts from the
beginning.
Enlarges the playback image
1 While a movie or a photo file is in playback, press
ZOOM.
If you press ZOOM while viewing a slideshow in
photo list, the slideshow will be stopped.
If you try to do other function in movie playback,
picture size return to normal size.
2 Press ZOOM repeatedly to change the magnification.
You can move through the zoomed picture using
v/V/b/B buttons.
3 Press BACK to return to normal playback size.
Selecting a subtitle language
Some movie files or titles recorded may contains several
subtitle languages. You can select a subtitle language
when it is available.
1 While a movie file is in playback, press SUBTITLE.
2 Use b/B to select a subtitle language, and press OK.
Selecting a subtitle language code
If the movie subtitle is not displayed properly, change the
subtitle language code that supports your language.
1 Press HOME.
2 Use b/B to select the [Setup], and press OK.
3 Use b/B to select the [Others] option.
4 Use v/V to select the [Code Page] and press OK.
5 Use v/V to select a language code that supports
your language.
You can change the subtitle language code while a movie
is in playback. Press and hold SUBTITLE for 3 seconds
during playback. The language code will appear. Use
b/B to select another language code until the subtitle is
displayed properly and then press ENTER.
DLNA-VMOVIE
DLNA-VRECMOVIE
Picasa
DLNA-P
DLNA-VRECPHOTOMOVIE
DLNA-VRECMOVIE
Picasa
DLNA-PDLNA-MDLNA-V
RECPHOTOMUSICMOVIE
DLNA-VRECMOVIE
DLNA-VRECMOVIE
RECDLNA-VMOVIE

34
Selecting an audio language
Some movie files have several audio languages or
encoding methods. You can select an audio language or
an encoding method.
1 While a movie file is in playback, press AUDIO.
2 Use b/B to select an audio language or an encoding
method, and press OK.
Repeat playback
For movie and music playback, you can apply the various
repeat modes.
1 While a movie or a music file is in playback, press
REPEAT to select a repeat mode.
Press REPEAT repeatedly to select various repeat
options as described below.
The current file will be played back
repeatedly.
All files in the current directory will be
played back repeatedly.
All files in the current directory will be
played back repeatedly in random order.
(music files only)
All files in the current directory will be
played back in random order. (music files
only)
2 To cancel the repeat playback, press REPEAT repeat-
edly until repeat mode icon disappears.
Playback from selected time
1 While a movie file is in playback, press GOTO.
2 Use b/B to select a field from either hours, minutes
and
seconds.
3 Input the required start time using numerical buttons.
If you input wrong number, select the field and
re-enter the correct number.
4 Press OK to start playback from the selected time.
This function may not be available on some movie files.
Add files to the Playlist
You can add your favorite movie, music and photo files to
the playlist.
1 Follow the steps 1-5 from “General playback” on page
32 to select a file.
2 Press MARKER on the file.
You can mark multiple files using MARKER button.
3 Press EDIT to display option menu.
4 Use v/V to select [Add to playlist], and press OK to
add to the playlist.
If you want to add multiple files to the playlist, press
MARKER on each file, and select the [Add to the
Playlist] on the option menu.
To unmark all marked files, select the [Unmark ALL]
on the option menu.
Only the files on the internal HDD can be added to the
playlist.
Delete a file/folder from the list
You can delete files/folders from HDD, USB, PC or
Playlist.
1 Follow the steps 1-5 from “General playback” on page
32 to select a file.
2 Press EDIT to display option menu.
3 Use v/V to select [Delete], and press OK to delete
file.
If you want to delete multiple files and/or folders
from HDD, USB, PC or Playlist, press MARKER on
each file or folder, and select the [Select Delete] on
the option menu.
To unmark all marked files, select the [Unmark ALL]
on the option menu.
If you delete a file from the PC feature, the file on your
computer will also be deleted.
Although file from the playlist is deleted, the file on the
original position will not be deleted.
RECPHOTOMUSICMOVIE
RECPHOTOMUSICMOVIE
DLNA-VRECMOVIE
DLNA-MDLNA-VRECMUSICMOVIE
RECDLNA-VMOVIE

35
Naming a file
You can rename the selected file on HDD, USB or PC.
1 Follow the steps 1-5 from “General playback” on page
32 to select a file.
2 Press EDIT to display option menu.
3 Use v/V to select [Rename], and press OK to display
the virtual keyboard.
4 Use v/V/b/B to select a character, and press OK to
confirm your selection.
Select [Alphabet Capital], [Alphabet Small] or
[Symbol], and press OK to change the character set
of the virtual keyboard.
[Space]: Inserts a space at the cursor position.
[Delete]: Delete a previous character at the cursor
position.
[T t]: Moves cursor to the left or right.
[OK]: Complete naming.
[Cancel]: Cancels the naming, and return to the
previous.
5 Use v/V/b/B to select [OK] and press OK to com-
plete a naming.
If you rename a file from the PC feature, the file name on
your computer will also be changed.
Playing selected files
You can play only the selected files, using MARKER on
the file list.
1 Follow the steps 1-5 from “General playback” on page
32 to select a file.
2 Press MARKER on the file.
You can mark multiple files using MARKER button.
3 Press EDIT to display option menu.
To unmark all marked files, select the [Unmark ALL]
on the option menu.
4 Use v/V to select [Select play], and press OK to play
selected files.
Selecting a slideshow speed
You can set the photo delaying timing while viewing a
Slide Show.
1 Follow the steps 1-3 from “Selecting a subtitle
language code” on page 33.
2 Use v/V to select the [Slide Show Timing] and press
OK.
3 Use v/V to select a speed you want to set, and press
OK.
If you select [Off], slideshow is not playable.
Selecting a slideshow effect
You can apply various transition style between pictures in
a slideshow.
1 Follow the steps 1-3 from “Selecting a subtitle code”
on page 33.
2 Use v/V to select the [Transition Effect] and press
OK.
3 Use v/V to select an effect you want to apply on the
slideshow, and press OK.
Listening to music while viewing a
slideshow
You can listen to background music during slideshow.
1 Follow the steps 1-3 from “Selecting a subtitle
language code” on page 33.
2 Use v/V to select the [Background Music] and press
OK.
3 Use v/V to select [On], and press OK to take effect.
If you set this option to [Off], music file is not played
when you start slideshow.
Music files and photo files must be located in the same
directory for using this function.
DLNA-PPHOTO
Picasa
DLNA-PPHOTO
Picasa
DLNA-PPHOTO
RECPHOTOMUSICMOVIE
RECPHOTOMUSICMOVIE

36
Accessing to your PC
1 Press HOME.
2 Use b/B to select [Media], and press OK.
3 Use b/B to select [PC], and press OK.
4 Use v/V to select the workgroup that your PC is
located, and press OK.
Press blue coloured button to search workgroup
within your network environment.
If the connection of your PC is saved before, select
[My_Shortcuts] and select connection previously
saved.
5 Use v/V to select the name of your PC, and press
OK.
Press blue coloured button to search for PCs again
from the workgroup.
6 Use v/V to select the Network User ID and password
of your PC, and press OK.
a Input the Network User ID of your PC
b Input the password that corresponds with
your network ID.
c Save a Network User ID and password in the
[My_shortcuts] folder, so that the recorder
can access your PC without entering network
ID and password next time.
d Complete the connection setting.
e Cancels connecting to your PC.
Refer to “Naming a file” on page 35 for using virtual
keyboard.
7 Use b/B to select a media type (MOVIE, MUSIC or
PHOTO).
8 Use v/V to select a file you want to play.
Press v/V to select a folder, and press OK. A list of
files and folders in the folder appears.
If you want to move to the upper directory, press
BACK or use v/V to select and press OK.
Press INFO while selecting a movie file to display
the detailed file information.
9 Press PLAY or OK to play the selected file.
Refer to “Playback functions” on page 32-35 to use
various playback functions.
Depending on your PC's environment, folders that you
are not shared on your PC may be displayed on this
recorder.
Editing the [My_Shortcuts]
Once a connection of your PC is saved in the
[My_Shortcuts], you can browse the shares on your PC
without entering network user ID and password.
Additionally, you can edit your shortcut list as described
below.
1 Follow the steps 1-3 from “Accessing to your PC” on
page 36.
2 Use v/V to select the [My_Shortcuts], and press OK.
3 Press blue coloured button to display the editing
options.
4 Use v/V to select an option, and press OK.
a Adds a shortcut by manually inputting your
PC’s information.
b Modifies the selected shortcut.
c Deletes the selected shortcut.
d Exits the editing options
Preparations:
This recorder and your PC must be connected to
the same local area network. (page 14-19)
Note the Network User ID, password and
workgroup of your PC
Your PC must be turned on.
The NetBios Protocol must be installed on your
PC.
Share folders or drivers on your PC.
Playing files on your PC
This recorder can access and play movie, music or photo files on a PC which is connected to your local area network.
a
b
c
d
e
a
b
c
d

37
Using [File Copy] features
You can move or copy files to the other storage or folder. You can delete files also.
Copying or moving files/folders
1 Press HOME.
2 Use b/B to select [Media], and press OK.
3 Use b/B to select [Copy], and press OK.
4 Use v/V to select a storage you want to copy or
move file from, and press B.
5 Use v/V to select a storage you want to copy or
move to, and press OK.
6 Use v/V to select file/folder you want to copy or
move, and press MARKER.
Repeat this step to mark additional files and folders.
You need to input network ID and password for
selecting files on PC.
7 Press B to select the destination field.
8 Use v/V to select directory you want to copy or move
to, and press REC.
You need to input network ID and password for
selecting files on PC.
9 Use b/B to select [Copy] or [Move], and press OK.
Select [Cancel] to cancel copying or moving.
If you try to copy or move a broken file, copy or move
procedure will be stopped.
If you copy or move a files/folders to a FAT16/FAT32
formatted storage, copy or move capacity is limited to
4GB.
Do not turn off this recorder or other connected storage
such as PC while files are copying or moving.
If you have no writing permission, you can’t copy
file/folders to PC
Deleting files/folders
1 Press HOME.
2 Use b/B to select [Media], and press OK.
3 Use b/B to select [Copy], and press OK.
4 Use v/V to select a storage that contains files to
delete, and press B.
5 Use v/V to select [Trash Can], and press OK.
6 Use v/V to select file/folder you want to delete, and
press MARKER.
Repeat this step to mark additional files and folders.
You need to input network ID and password for
selecting files on PC.
7 Press B.
8 Use b/B to select [OK], and press OK.
Select [Cancel] to cancel deleting.
To delete files on your PC, you must set the sharing privilege to be deleted on your PC.

38
The Digital Living Network Alliance (DLNA) is a crossindustry organization of consumer electronics, computing
industry and mobile device companies. Digital Living provides consumers with easy sharing of digital media
through a wired or wireless network in the home.
The DLNA certification logo makes it easy to find products that comply with the DLNA Interoperability
Guidelines. This unit complies with DLNA Interoperability
Guidelines v1.5.
When a PC running DLNA server software or other DLNA
compatible device is connected to this recorder, some
setting changes of software or other devices may be
required. Please refer to the operating instructions for the
software or device for more information.
Notes on DLNA features
• Because the compatibility and available playback
functions on the [DLNA] menu are tested on the
bundle DLNA server (Nero MediaHome 4 Essentials)
environment, file requirements and playback functions
on the [DLNA] menu may differ depending on media
servers.
• The file requirements on page 5 are not always
compatible. There may have some restrictions by file
features and media server’s ability.
• If you press INFO while a movie file is selected, the
file information is displayed on the screen. But, the
information may not correct comparing the actual file
features.
• The thumbnail of the unplayable files can be displayed
in the menu, but those cannot be played on this
recorder.
• If there is an unplayable music file in the [DLNA]
menu, the recorder skip the file and play next file.
• The file information indicated on the screen may not
correct for music and movie files in [DLNA] menu.
• Playing a movie subtitle files are only available on
media server created by supplied Nero MediaHome 4
Essentials software on this recorder’s package.
• The subtitle file name and movie file name have to be
the same and located at the same folder.
• If subtitle files have been added after a directory has
been indexed already, the user has to remove and readd the folder to the list of shares.
• The playback and operating quality of the [DLNA]
function may affected by your home network condition.
• The files from removable media such as USB drive,
DVD-drive etc. on your media server may not be
shared properly.
DLNA
About DLNA
The DLNA features allow you to browse and play movies, music and photos stored on DLNA media servers connected
on an identical Local Area Network (LAN) as the recorder.
This recorder allows playing files stored on a computer with Nero MediaHome 4 Essentials and a DLNA-compatible digital media server (PC and Consumer Electronics).

Installing Nero MediaHome 4 Essentials
Nero MediaHome 4 Essentials is a software for sharing
movie, music and photo files stored on your computer to
this recorder.
• The supplied Nero MediaHome 4 Essentials CD-ROM
is a customized software edition only for sharing files
and folders to this recorder.
• The supplied Nero MediaHome 4 Essentials software
does not support following functions: Transcoding,
Remote UI, TV control, Internet services and Apple
iTunes
• This manual explains operations with the English
version of Nero MediaHome 4 Essentials as examples.
Follow the explanation referring to the actual operations of your language version.
Before you install Nero MediaHome 4 Essentials, check
the system requirement shown below.
Windows® XP (Service Pack 2 or higher), Windows
Vista® (no Service Pack required), Windows® XP
Media Center Edition 2005 (Service Pack 2 or higher),
Windows Server® 2003
Windows Vista® 64-bit edition (application runs in 32-
bit mode)
Hard drive space: 200 MB hard drive space for a typi-
cal installation of Nero MediaHome stand-alone
1.2 GHz Intel® Pentium® III or AMD Sempron™ 2200+
processors
Memory: 256 MB RAM
Graphics card with at least 32 MB video memory, mini-
mum resolution of 800 x 600 pixels, and 16-bit color
settings
Windows® Internet Explorer® 6.0 or higher
DirectX® 9.0c revision 30 (August 2006) or higher
Network environment: 100 Mb Ethernet, WLAN (IEEE
802.11b/g/n)
Start up your computer, and insert the Nero MediaHome
4 Essentials CD-ROM into your computer’s CD-ROM
drive. An installation wizard will walk you through the
quick and uncomplicated installation process.
To install Nero MediaHome 4 Essentials, proceed as
follows:
1 Close all Microsoft Windows programs and exit any
anti-virus software that may be running.
2 Insert the Nero MediaHome 4 Essentials CD-ROM
into your computer’s CD-ROM drive.
3 Click [Nero MediaHome 4 Essentials]. The installation
is prepared and the installation wizard appears.
4 Click the [Next] button to display the serial number
input screen.
Click [Next] to go to the next step.
5 If you accept all conditions, click [I accept the License
Conditions] check box and click [Next]. Installation is
not possible without this agreement.
6 Click [Typical] and click [Next].
The installation process is started.
7 If you want to take part in the anonymous collection of
data, select the check box and click the [Next] button.
8 Click the [Exit] button to complete the installation.
Sharing files and folders
On your computer, you must share the folder containing
movie, music and/or photo content to play them using
[DLNA] features.
This parts explains the procedure for selecting the shared
folders on your computer.
1 Double-click the “Nero MediaHome 4 Essentials” icon
on the desktop.
2 Click [Network] icon on the left and define your net-
work name in the [Network name] field. The Network
name you enter will be recognized by your recorder.
3 Click [Shares] icon on the left.
4 Click [Local Folders] tab on the [Shared] screen.
5 Click [Add] icon to open the [Browse Folder] window.
6 Select the folder containing the files you want to
share. The selected folder is added to the list of
shared folders.
7 Click [Start Server] icon to start the server.
If the shared folders or files are not displayed on the
recorder, click the folder on the [Local Folders] tab and
click [Rescan Folder] at the [More] button.
Visit www.nero.com for more information and software
tools.
39

40
General operation
1 Press HOME.
2 Use b/B to select [DLNA], and press OK.
3 Use v/V to select a server, and press OK.
Press blue coloured button to search servers within
your network environment.
4 Use b/B to select a media type (MOVIE, MUSIC or
PHOTO).
5 Use v/V to select a file you want to play.
Press v/V to select a folder, and press OK. A list of
files and folders in the folder appears.
If you want to move to the upper directory, press
BACK or use v/V to select and press OK.
Press INFO while selecting a movie file to display
the detailed file information.
6 Press PLAY or OK to play the selected file.
Refer to “Playback functions” on page 32-35 to use
various playback functions.
Starts slideshow when selecting a photo file.
When playing a slideshow, press INFO to show the
control icons as below.
Prev: Press . to move to the previous file.
Next: Press > to move to the next file.
90° : Press v/V to rotate the picture clockwise or counterclockwise.
Stop: Press STOP (x) to stops the slideshow.
Hide: Press BACK to hide the control icons.
To show the icons again, press INFO.
Operating DLNA feature
The recorder can play movie, music and photo files on the DLNA server.
Before playing movie, music or photo files from DLNA server, read “File requirement” on page 5.
Preparations:
This recorder and DLNA server must be
connected to the same local area network. (page
14-19)
DLNA server device must be turned on.
Depending on DLNA server, you may need
permission to get access .

41
YouTube
Operating YouTube feature
You can search and play YouTube videos on this recorder.
General operation
1 Press HOME.
2 Use b/B to select [YouTube], and press OK.
3 Use v/V to select an option from the main menu, and
press ENTER.
Recent Videos : The most recently updated
videos list will be displayed.
Featured : The featured videos list will be
displayed.
Top Rated : The best rated videos list from
YouTube server will be displayed. The period
option appears on the left of the screen.
Most Viewed : The most viewed videos list will be
displayed. The period option appears on the left of
the screen.
Search : The keyboard menu will be displayed.
See “Searching videos” on page 42 for more detail.
Local Site : Choose which country's videos you
would like to view. The countries listed on the
[Local Site] menu may differ from those listed on
the YouTube web site.
4 Use v/V to select a video from list, and press OK to
play the video.
If you select [Most Viewed] or [Top Rated] option,
the period option appears on the screen.
Use v/V/b/B to select a period option and press
OK to display the videos within the selected period.
Press BACK to return to the main YouTube menu
screen.
Use v/V/b/B to select [Next] or [Prev] to move to
the next or previous video list.
5 Use v/V to select a video from list, and press OK to
play the video.
Press PAUSE to pause playback, and press PLAY
to resume playback.
Press OK to view the video in full screen.
Full Screen : Enlarges the video screen in full
screen.
Related Video : Displays the related videos.
Previous : Moves to the previous menu screen.
Preparations:
A broadband Internet service is required to use
this feature.
Network settings must be set before using this
features.

6 Press STOP to stop playback.
• The settings of this recorder do not affect the
YouTube’s playback quality.
• The playback of YouTube videos may be paused,
stopped or buffering occurring often depending on
your broadband speed.
We recommend a minimum connection speed of 1.5
Mbps. For the best playback condition, a connection
speed of 4.0 Mbps is required. Sometimes your
broadband speed varies based on your ISP’s network
conditions. Contact your ISP if you have problems
maintaining a fast connection that is reliable, or if you
want to increase your connection speed. Many ISPs
offer a variety of broadband speed options.
Searching YouTube videos
You can search videos by entering search words up to 41
characters.
1 Use v/V to select [Search] option on the YouTube
main screen, and press OK.
2 Enter a search word. Use v/V/b/B to select a char-
acter, and press OK to confirm your selection.
Select [Alphabet Capital], [Alphabet Small] or
[Symbol], and press OK to change the character set
of the virtual keyboard.
[Space]: Inserts a space at the cursor position.
[Delete]: Delete a previous character at the cursor
position.
[T t]: Moves cursor to the left or right.
[OK]: Complete naming.
[Cancel]: Cancels the naming, and return to the
previous.
3 Use v/V/b/B to select [OK] and press OK to display
videos according to the search word.
Use v/V/b/B to select [Next] or [Prev] to move to
the next or previous video list.
Selecting your local site
You can select a country in which you want to view
YouTube videos. The countries listed on the [Local Site]
menu may different with those listed on the YouTube web
site.
1 Use v/V to select [Local Site] option on the YouTube
main screen,, and press OK.
2 Use v/V/b/B to select a country, and press OK.
42

43
Picasa
Operating Picasa web albums feature
You can view and download photos from the Picasa web albums. Only public photos can be viewed and downloaded.
If you have your own album on the Picasa web albums., you can browse your photos using this recorder.
General operation
1 Press HOME.
2 Use b/B to select [Picasa], and press OK.
3 Use v/V to select an option from the main menu, and
press ENTER.
Search for Photo : The keyboard menu will be
displayed. See “Searching Picasa web albums” on
page 44 for more detail.
New ID : The keyboard menu will be displayed.
See “Viewing your Picasa web albums” on page
44 for more detail.
Remove ID : Delete the selected ID from the ID
list.
4 Use v/V/b/B to select a photo, and press OK to
start slideshow.
If you want to download a photo, use v/V/b/B to
select a photo and press blue coloured button.
Downloaded photo will be stored in the [image] folder on the internal HDD.
5 Press INFO (i) to show the control icons as below.
Prev: Press . to move to the previous file.
Next: Press > to move to the next file.
90° : Press v/V to rotate the picture clockwise or counterclockwise.
Stop: Press STOP (x) to stop the slideshow.
Hide: Press BACK to hide the control icons.
To show the icons again, press INFO.
6 Refer to “Playback functions” on page 32-35 to use
various playback functions.
The playback of Picasa photos may not be fluent depending on your broadband speed.
We recommend a minimum connection speed of 1.5
Mbps. For the best playback condition, a connection
speed of 4.0 Mbps is required. Sometimes your broadband speed varies based on your ISP’s network conditions. Contact your ISP if you have problems maintaining
a fast connection that is reliable, or if you want to
increase your connection speed. Many ISPs offer a variety of broadband speed options.

44
Searching Picasa web albums
You can search photos by entering search words up to 43
characters.
1 Use v/V to select [Search for photos] option on the
Picasa web albums main screen, and press OK.
2 Enter a search word. Use v/V/b/B to select a
character, and press OK to confirm your selection.
Select [Alphabet Capital], [Alphabet Small] or
[Symbol], and press OK to change the character set
of the virtual keyboard.
[Space]: Inserts a space at the cursor position.
[Delete]: Delete a previous character at the cursor
position.
[T t]: Moves cursor to the left or right.
[OK]: Complete naming.
[Cancel]: Cancels the naming, and return to the
previous.
3 Use v/V/b/B to select [OK] and press OK to display
photos according to the search word.
Use v/V/b/B to select [Next] or [Prev] to move to
the next or previous photo list.
Viewing your Picasa web albums
If you have your own web album on the Picasa web
albums, you can view your own album by entering your
ID.
Only public albums can be shown on this recorder.
1 Use v/V to select [New ID] option on the YouTube
main screen, and press OK.
2 Refer to the steps 3 from “Searching Picasa web
albums” on page 44 to enter your Google ID.
3 Use v/V/b/B to select [OK] and press OK to add
your ID on the ID List.
4 Use v/V/b/B to select your ID, and press OK to
display your photo album.
Only the public photos can be displayed using this
recorder.
5 Use v/V/b/B to select a photo, and press OK to
start slideshow.
If you want to edit your album, you must visit your Picasa
web albums. Refer to the help page of the Picasa web
albums.
Removing an ID from the ID List
You can remove an ID from the ID List
1 Use v/V/b/B to select an ID on the YouTube main
screen, you want to delete from the ID List.
2 Use v/V to select [Remove ID] option, and press OK.

45
Setup
General Setup Operation
1 Press HOME.
2 Use b/B to select [Setup] in the [Home] menu, and
press OK.
3 Use b/B to select an option from the [Setup] menu,
and press OK.
4 Use v/V to select a desired option, and press OK to
display the sub-options .
5 Use v/V to select a desired option, and press OK to
set an option.
DTV settings
Select a region where you operate this recorder.
Refer to page 22 for more information.
This option scans a programme and sets the available
programmes. Refer to page 22 for more information.
This option allows you to edit the TV or Radio
programmes. Refer to page 23 for more information.
You can set the limitation of TV viewing according to the
age limit you set. Your password is required to watch a
locked program.
Refer to page 23-24 for more information.
Refer to the table below for the rating levels .
Rating Level Age
P 5-6
C 7-8
G 9-10
PG 11-12
M 13-14
MA 15-16
AV 17
R18
If you are using an indoor antenna, use one with a signal
amplifier rated at DC 5V, 100mA and set this option to [On].
Refer to page 24 for more information.

46
Audio settings
This option allows you to listen to a movie at a lower volume without losing clarity of sound.
Set [DRC] to [On] for the Dolby Digital encoded files only
and [Comfort] for files with any encoding method.
Selects the type of digital audio signal when using the
HDMI OUT or DIGITAL AUDIO OUT (OPTICAL or COAXIAL) jack.
[HDMI PCM]: Select if you connect this recorder’s
HDMI OUT jack to a device with two-channel digital
stereo decoder.
[HDMI Bitstream]: Select if you connect this recorder’s
HDMI OUT jack to a device with LPCM, Dolby Digital
and DTS decoder.
[SPDIF PCM]: Select if you connect this recorder’s
DIGITAL AUDIO OUT jack to a device with two-channel
digital stereo decoder.
[SPDIF Bitstream]: Select if you connect this
recorder’s DIGITAL AUDIO OUT jack to a device with
LPCM, Dolby Digital and DTS decoder.
[48KHz]: Select this if your A/V Receiver or Amplifier
is NOT capable of handling 192 KHz and 96 KHz
signal. When this choice is made, this unit
automatically converts any 192 KHz and 96 KHz signals to 48 KHz so your system can decode them.
[96KHz]: Select this if your A/V Receiver or Amplifier
is NOT capable of handling 192 KHz signals. When
this choice is made, this unit automatically converts
any 192 KHz signals to 96 KHz so your system can
decode them.
[192KHz]: Select this if your A/V Receiver or Amplifier
is capable of handling 192 KHz signals.
If audio signal is outputted through HDMI OUT jack
and the resolution is set to lower than 720p, the
sampling frequency can be limited to 48 KHz.
Check the documentation for your A/V Receiver or
Amplifier to verify its capabilities.
Display settings
Selects the aspect ratio of the connected TV.
[Letter Box 4:3]: Select this when connecting to a standard 4:3 screen TV and prefer the wide picture with
bands on the upper and lower portions of the screen.
[Pan Scan 4:3]: Select this when connecting to a standard 4:3 screen TV and prefer the wide picture on the
entire screen and cuts off the portions that do not fit.
[16:9 Original]: Select when a 16:9 wide TV is
connected. The 4:3 picture is displayed with an original
4:3 aspect ratio, with black bars appearing at the left
and right sides.
[16:9 Wide]: Select when a 16:9 wide TV is connected.
The 4:3 picture is adjusted horizontally (in a linear
proportion) to fill the entire screen.
(Digital Noise Reduction)
Set this option to [Auto] to reduce the digital noise, which
may appear especially on fast-moving pictures, produced
in the MPEG compression process.
Sets the output resolution of the Component and HDMI
video signal. Refer to “Resolution Setting” for details
about the resolution.
[Auto] – If the HDMI OUT jack is connected for TVs
providing display information (EDID), automatically
selects the resolution best suited to the connected TV.
If the COMPONENT VIDEO OUT is only connected,
this changes the resolution to 1080i as default resolution.
[1080p]: Outputs 1080 lines of progressive video.
[1080i]: Outputs 1080 lines of interlaced video.
[720p]: Outputs 720 lines of progressive video.
[576p]: Outputs 576 lines progressive video.
[576i]: Outputs 576 lines of interlaced video

When the resolution is set to 1080i or 1080p, change this
option to [On] for smooth presentation of film material
(24Hz) with a HDMI-equipped display compatible with
1080/24p input.
• When you select [ON], you may experience some pic-
ture disturbance when the video switches video and
film material.
• When the 1080p 24Hz video source is outputted via
HDMI connection, the COMPONENT VIDEO OUT may
not visible any video signal.
Record settings
Set this option to [On] to use the Time Shift function
automatically without pressing TIMESHIFT button. The
timeshift will start after TV viewing is started. Refer to
page 24 for more information.
This option sets the storage where your TV recording will
be stored. Select an option between [HDD (Internal)],
[HDD (External)] or [USB], and press OK to set.
Refer to page 24 for more information.
When you select [USB], make sure that there is sufficient
space for the recording on the USB device.
Network settings
If you have connected this recorder to a local area
network (LAN)using LAN cable, the recorder needs to be
set up for network communication. (See “Wired network
connection” on pages 14-15.)
If you have connected the Wireless LAN adapter on this
recorder, the recorder needs to be set up for wireless
network communication. (See “Wireless network
connection” on pages 16-19.)
Your recorder is able to keep the built-in digital tuner up
to date with the latest software. You can either check for
updates manually, or set the recorder to do it
automatically at regular interval.
While the recorder is updating, there may be a disruption
in reception for a few hours. The reception should return
to normal after the update is complete.
This recorder must be plugged into AC power to receive
updates.
Do not unplug your recorder while an update is in
progress.
The update is not available during recording, Timeshift,
viewing teletext or EPG menu.
[Standby mode]: Updates the software when this
recorder is turned off. The check mark appears when
this option is selected.
[Operation Mode]: Start the software update
immediately.
Refer to page 49 for more information.
You can update the software by connecting the recorder
directly to the software update server via wired or
wireless network connection to the Internet.
Refer to page 49 for more information.
Shows system information. (MODEL, CHIP ID or MAIN
VER)
Press ENTER or B to view the notice of Network Service
Disclaimer on page 58.
47

System settings
Select a language for the Setup menu and information
display.
The clock must be set in order to use timer recording.
[Auto]: Set the programme that broadcasts a clock signal and the clock will be set automatically.
If the time that has been automatically set is not correct
when compared your local time, you can set additional
time option. Select your region in the [Time Zone]
option to set a time relative to area. If the summer time
has started in your region, select the [Time Offset]
option and increase or decrease time using b/B, and
press OK.
[Manual]: If there is no channel that broadcasts a clock
signal in your area, you can set the time and date manually. Use b/B to select each field, and input
correct time and date using v/V, and press OK.
Selects whether this recorder is in power save mode
when the power is turned off. This option is not available
when a timer recording is set.
[ON]: The front panel display is off and only signals
arriving at the antenna input are passed through when
the recorder is turned off.
[OFF]: Turns off the [Power Save Mode] function.
You can reset the recorder to its original factory settings.
[Cancel]: Return to the previous.
[Factory Set]: You can reset the recorder to all its fac-
tory settings. Some options cannot be reset (Rating
and Password). The [Setup Wizard] menu appears on
the screen after the factory settings.
Everything recorded on the HDD will be erased.
Select an storage option between [HDD (Internal)] and
[HDD (External)], and press OK to perform the
formatting.
Others settings
You can set the photo delaying timing while viewing a
Slide Show. (See “Selecting slideshow speed” on pages
35.)
Specify the transition style between pictures in a slideshow.
(See “Selecting a slideshow effect” on pages 35.)
This option is available after the background music is
selected using [On]. This option is not available on [Off]
(See “Listening to music while viewing a slideshow” on
pages 35.)
/
Select a default language for the DTV Audio/Subtitle.
If a movie subtitle does not display properly, change the
recorder’s subtitle language code. (See “Selecting a subtitle language code” on pages 33.).
ABOUT DIVX VIDEO: DivX® is a digital video format
created by DivX, Inc. This is an official DivX Certified
device that plays DivX video. Visit www.divx.com for more
information and software tools to convert your files into
DivX videos.
ABOUT DIVX VIDEO-ON-DEMAND: This DivX® Certified
device must be registered in order to play DivX Video-onDemand (VOD) content. To generate the registration
code, locate the [DivX Reg. Code] section in the [Setup]
menu. Go to vod.divx.com with this code to complete the
registration process and learn more about DivX VOD.
All the downloaded videos from DivX
®
VOD can only be
played back on this recorder.
Deactivate your recorder and display the deactivation
code. Go to vod.divx.com for more information.
48

49
Reference
Software update via the Internet
You can update the latest software to enhance the
products operation and/or add new features using
broadband Internet connection.
1 Press HOME.
2 Use b/B to select [Setup] in the [Home] menu, and
press OK.
3 Use b/B to select the [Network] option from the
[Setup] menu, and press OK.
4 Use v/V to select the [Network Update], and press
OK to display the sub-options.
5 Press OK to start network update.
The recorder will check for the newest update.
If there is no update available, the Message,
“No update is found.” appears.
6 Use b/B to select the [Yes], and press OK to start
software download.
When downloading is completed, the message,
“Download is complete. Do you want to update?”
appears.
7 Use b/B to select the [Yes], and press OK to start
software update.
8 When update is completed, the message, “Update is
complete.” will appear, and the power will turn off
automatically after 5 seconds.
9 Turn the power back on. The system now operates
with the new version.
Software update via built-in tuner
You can also update the latest software through the
built-in digital tuner.
1 Press HOME.
2 Use b/B to select [Setup] in the [Home] menu, and
press OK.
3 Use b/B to select the [Network] option from the
[Setup] menu, and press OK.
4 Use v/V to select the [Software Update], and press
OK to display the sub-options.
5 Use v/V to select the [Operation mode], and press
OK.
6 Use b/B to select the [Yes], and press OK to search
for a new update.
The recorder will check for the newest update.
If there is no update available, the Message,
“No software.” appears.
7 Use b/B to select the [Yes], and press OK to start
software update.
8 When update is completed, the message, “Update is
complete.” will appear, and the power will turn off
automatically after 5 seconds.
9 Turn the power back on. The system now operates
with the new version.
Formatting HDD
1
Press HOME.
2 Use b/B to select [Setup] in the [Home] menu, and
press OK.
3 Use b/B to select the [System] option from the
[Setup] menu, and press OK.
4 Use v/V to select the [HDD Format], and press OK
to display the sub-options.
5 Use v/V to select a storage between [HDD (Internal)]
and [HDD (External)] and press OK.
Select [Cancel] and press OK to cancel.
Warrning message appears on the screen.
6 Use b/B to select the [OK], and press OK.
7 Use v/V to adjust the buffer for timeshift function,
and press OK while [Next] option is highlighted.
This option is available only when you are
formatting the internal HDD.
Select [Back] and press OK to return to the
previous.
8 Use b/B to select the [Format], and press OK to start
the HDD format.
Select [Back] and press OK to return to the
previous.
9 After HDD format is finished, press OK to reboot the
recorder.
Preparations:
A broadband Internet service is required to use
this feature.
Network settings must be set before using this
features.
Stop recording before using update function.
Preparations:
DTV antenna must be connected to the
ANTENNA IN jack on the rear panel.
Stop recording before using update function.

50
External HDD Installation
You can install an additional HDD to the external HDD
slot.
1 Press PUSH/OPEN on the front of the recorder.
2 Grab the holder and extract it completely to the arrow
direction.
3 Stretch out the Right/Left hooks as shown below.
Match the hooks with External case. Push and fit the
HDD into the place completely.
4 Fasten the hooks as shown below.
5 Insert the external HDD to the recorder as shown
below and push it to fit into the recorder completely.
If you want to completely fix the external HDD, fix the
screws as below.
PUSH / OPEN
HDD
External HDD case
Preparations:
Prepare a 3.5” SATA HDD.
It is strongly recommended to use SATA standard
HDD of makers for the external HDD.
(Seagate, Western Digital, Hitachi, Samsung)
The recorder must be turned off before
installation.
1
2

51
About the internal/External HDD
The internal hard disk drive (HDD) is a fragile piece of
equipment. Please use the recorder following the
guidelines below to protect against possible HDD failure.
Do not move the recorder while it is on.
Do not use a damaged HDD. Product can be
damaged.
Install and use the recorder on a stable, level surface.
Do not use the recorder in excessively hot or humid
places, or in places that may be subject to sudden
changes in temperature. Sudden changes in
temperature can cause condensation to form inside the
recorder. This can be a cause of HDD failure.
While the recorder is switched on, do not unplug from
the wall socket or switch the electricity off from the
breaker switch.
Do not move the recorder immediately after switching it
off. If you need to move the recorder, please follow the
steps below:
1. After the message “OFF” is shown in the display,
wait at least two minutes.
2. Unplug from the wall socket.
3. Move the recorder.
If there’s a power failure while the recorder is on, there
is a chance that some data on the HDD will be lost.
The HDD is very delicate. If used improperly or in an
unsuitable environment, it is possible that the HDD will
fail after a few years of use. Signs of problems include
playback unexpectedly freezing and noticeable block
noise (mosaic) in the picture.
However, sometimes there will be no warning signs of
HDD failure.
If the HDD fails, playback of recorded material will not
be possible. In this case it will be necessary to replace
the HDD.
The manufacturer disclaims responsibility for loss of
data contained in internal/external HDD.
When detaching a HDD from the external HDD case,
the HDD can be extremely hot and you may get injury
from it. Proper cooling is required before detaching a
HDD from external HDD case.
It is strongly recommended to use SATA standard HDD
of makers as below for the external HDD.
(Seagate, Western Digital, Hitachi, Samsung)
While operating this recorder, do not detach external
HDD. It may cause a serious defect to this recorder.
Maximum capacity of external HDD is limited to 1TB.
The HDD capacity displayed on your TV screen may
not exactly same with the capacity printed on your
HDD.
Connecting an USB Device
This recorder can play the MOVIE / MUSIC / PHOTO
files contained in the USB Device connected on the front
panel.
Inserting the USB Device
Insert straight-in until it fits into place.
Removing the USB Device
Withdraw the USB Device carefully when the connected
USB Device is not operating.
• This recorder supports only USB Flash Drive and USB
External HDD with FAT16, FAT32 or NTFS format.
• It is recommended to use the USB device with one
partition.
• Do not extract the USB device during operation (play,
etc.).
• An USB device which requires additional program
installation when you have connected it to a
computer is not supported.
• This recorder supports USB devices with USB1.1 and
USB2.0.
• Movie Files, Music files and photo files can be played.
For details of operations on each file, refer to relevant
pages.
• Regular back up is recommended to prevent data loss.
• If you use a USB extension cable or USB HUB, the
USB devices may not be recognized.
• Some USB device may not work on this recorder.
• Digital cameras and mobile phones are not supported.
• USB Port of the recorder cannot be connected directly
to your PC. The recorder cannot be used as a storage
device.
• Unformatted storage must be used after formatting.
• If you use a USB extension cable or USB HUB, the
USB devices may not be recognized.
• If USB HDD can’t be recognized, try another different
USB cable.
•Some of USB cable may not support enough current
for normal USB operation.
USB Device
USB External HDD

52
Controlling a TV with the Supplied Universal Remote Control
You can control the volume, input source, and power state of your TV with the supplied Universal Remote Control.
If your TV is listed in the table on pages 53-54, set the appropriate manufacturer code. Follow steps 1-2 as shown
right. You can control your TV using the buttons below.
By pressing You can
TV POWER Turn the TV on or off.
AV/INPUT Switch the TV’s input source between the TV and other input sources.
PR/CH +/– Scan up or down through memorized programmes.
VOL +/– Adjust the volume of the TV.
Depending on the TV being connected, you may not be able to control your TV using some of the buttons.
To programme the remote to control the TV using the manufacturer code
If your TV is listed in the table on the next page, set the appropriate manufacturer code.
1 While holding down TV POWER button, press the number buttons to select the manufacturer code for your TV
(Refer to table on the next page).
• If more than one code number is listed, try entering them one at a time until you find the one that works with your
TV.
2 Release TV POWER button.
• Depending on your TV, some or all buttons may not function on the TV, even after entering the correct manufacturer
code.
• If you enter a new code number, the code number previously entered will be erased.
• When you replace the batteries in the remote, the code number you have set may be reset to the default setting.
Set the appropriate code number again.
TV Control
Buttons
TV POWER

53
Code numbers of controllable TVs
If more than one code number is listed, try entering them one at a time until you find the one that works with your TV.
BRANDS CODES
ADMIRAL 137 204
ADYSON 159 219
AKAI 009 010 108 132 133
135 139 140 156 174
175
AKURA 064 086 108 110 155
171
ALBA 009 060 064
ALLSTAR 108
AMSTRAD 006 025 157
AMWAY 108
ANITECH 010 049 108 185 219
ANTECNO 064
ARC EN CIEL 173 179 239
ASA 087 102 108 235 236
ASBERG 185
ASORA 171
ATLANTIC 089 197
AUDIOSONIC 085
AUTOVOX 159 163 197
BANK 232
BEKO 045 085 086 108 250
BESTAR 086
BLAUPUNKT 031 091 092 096 097
098 099 210 253
BONDSTEC 163
BOSCH 210
BRANDT 173 179 225 239
ELECTRONIQUE
BRIONVEGA 204
BSR 144
BUSH 009 136 139 144 232
CENTURY 165 204
CGE 139 165 210
CIE 025 108 170
CLATRONIC 009 010 064 108 144
149 159 164 165 171
185
CLARIVOX 033
CONDOR 108 149 191
CONIC 219
CONTEC 171 222
CONTINENTAL 173 179 225 239
EDISON
COSMOS 108
CROSLEY 165 204
CROWN 084 085 086 108 144
171 185
CS-ELECTRONICS 064
DAEWOO 051 108 120 127 170
DANSAI 010 219
DE GRAAF 108 134
DECCA 070 108 159 161 162
184 189 190 206
DECCAVIDEO 108
DUAL 233
DUMONT 204
ELBE 058 144 157 160 192
246
ELBIT 108 248
ELECTROVENDA 108
ELEKTRONIKA 108
ELIN 108
BRANDS CODES
ELITE 064 149
ELMAN 144
ELTA 010 171
EMERSON 108 204
ESC 108
ETRON 133
EUROPHON 144 159
EXPERT 089
FENNER 171
FERGUSON 078 079 080 160 182
195 198 199 200 201
202
FINLANDIA 194 195
FINLUX 008 087 102 104 105
107 108 140 144 159
161 174 189 235 236
FIRST-LINE 144
FISHER 086 208 222 233
FORMENTI 108 149
FRABA 108
FRONTECH 136 171 220
FUBA 073 109
FUJITSU GENERAL
088 159 197
FUNAI 010
GALAXIS 108 185
GALERIA 171
GBC 137 144 171
GEC 011 108 129 147 159
189
GELOSO 064 137 144 164 171
GENERAL 171
GENERAL TECHNIC
171
GOLDHAND 159 171
GOLDSTAR 038 050 108 110 136
144 159 163 166 171
191 219 237
GOODMANS 009 064 108 109 110
120 159 170 171
GORENJE 086
GPM 010 064
GRANADA 027 105 108 111 121
134 140 159 162 167
187 194 195 238
GRUNDIG 091 092 093 094 095
097 098 100 101 172
232 238
HCM 010 108 159 171
HIFIVOX 173 179 239
HINARI 010 064 108 133 171
HIT 204
HITACHI 011 013 015 017 021
022 023 024 028 029
030 035 039 040 041
048 053 054 055 056
057 120 127 128 129
134 135 140 143 145
147 151 156 159 173
193 219
HYPER 009 159 163 171
ICE 009 010 064 108 171
BRANDS CODES
IMPERIAL 043 049 108 139 144
154 165 255
INGERSOLL 171
INNO HIT 159 189 237
INTERBUY 010
INTERCORD 233
INTERFUNK 108 109 113 130 133
134 135 137 141 146
147 148 165 179 210
INTERVISION 010 086 108 132 144
166
IRRADIO 163 235 237
ITC 144 159
ITS 009 010 064 171
ITT 141 151 186
JVC 009 169
KAIDO 136
KAPSCH 089 147 148 197
KARCHER 084 108
KATHREIN 109
KAWA 009
KENDO 060 108 137 157
KENNEDY 197
KNEISSEL 108
KONKA 009
KORTING 086 204 209
KUBA 233
KUBA ELECTRONIC
233
KURA 134
LENCO 108 170
LG 001(Default) 038 050
108 110 136 144 159
163 166 171 191 219
237
LIESENKOTTER 108 210
LIFETEC 010 064 108 170
LOEWE 109 113 204 205
LOGIK 070 227
LUMA 137 197
LUXOR 102 104 132 133 134
135 138 140 143 145
153 156 174 186 237
M ELECTRONIC 103 104
MAGNADYNE 163 164 204
MAGNAFON 199
MAGNASONIC 108
MARANTZ 108
MARSHAL 064
MATSUI 009 016 025 060 061
062 063 070 108 131
136 152 154 159 171
172
MERRIT 132
METZ 047 092 097 098 100
101 108 204 207 254
MITSUBISHI 075 076 077 097 113
204 222 224 240
MIVAR 044 042 159 235
MNARTT 007
MTC 086 109 134

54
BRANDS CODES
MULTITECH 136 159 171 185
MURPHY 232
NAONIS 137
NECKERMANN 037 059 060 092
098 100 101 108
109 113 115 118 119
134 135 137 143
157 159
NEI 064 108
NIKKAI 219
NIKKO 108
NOBLIKO 232 235
NOGAMATIC 173 179 239
NOKIA 014 019 032 102
103 104 108 132
133 134 135 138
140 141 145 146
147 148 156 174
NORDMENDE 129 173 179 180
181 193 195 225
226 228 239
NORMN 108
NOVA 087
OCEANIC 032 103 104 135
140 156
OKANO 108
ONWA 009 010 064
ORAVA 10 8
ORBITER 086
ORION 025 059 060 061
062 064 070 108 110
118 219
OSAKE 106
OTTO-VERSAND 002 005 009 014
059 060 081 082
083 085 092 097
098 100 101 108
109 111 113
PAEL 235
PANASONIC 002 003 005 167
168 229
PATHE CINEMA 144
PATHE MARCONI 173 179 225 239
PHILCO 090 108 139 144
148 165 204
PHILIPS 065 066 067 068
069 092 108 109 111
112 114 115 116 119
122 123 124 125
193 212 251 252
PIONEER 193
PRANDONI-PRINCE
137 235
PRIMA 219
PRO VISION 108
PROFEX 108 136 171
PROFITRONIC 108
QUELLE 002 010 014 019
025 059 060 072
084 086 087 088
092 097 098 100
101 102 175
RADIOLA 108
RADIOTONE 010 085 108 171
REDIFUSSION 187
BRANDS CODES
REVOX 109
REX 088 089 137 157
158 164 197 246
247
RFT 064 085 135 204
RITAR 138
ROADSTAR 108
ROSITA 171
SABA 079 146 147 173
179 181 193 195
225 226 239
SAISHO 025 060 070 136
159
SAKIO 171
SALORA 019 032 103 104
132 133 134 135
137 138 140 142
143 145 150 156
174 237 241
SAMBERS 235
SAMSUNG 004 010 050 086
108 117 126 171 220
237
SANY 193
SANYO 014 018 019 020
032 034 071 086
087 189 218 221
222 223
SCHNEIDER 009 064 088 108
133 141 159 163
233
SEG 010 064 108 144
159 165 171 185
219
SEI-SINUDYNE 025 108 204 212
SELECO 088 089 137 157
197 222
SENTRA 064 133
SHARP 081 082 083 222
SHINTOM 108
SHINTOSHI 108
SHIVAKI 108
SIAREM 204
SIEMENS 092 096 097 098
100 101 108 210
218 219 221
SIESTA 085
SILVER 010 064
SINGER 108 164 204
SINUDYNE 118 131
SMARAGO 172
SOLAVOX 133
SONOLOR 140 156
SONTEC 108
SONY 072 074 211 212 213
214 215 216 217
222
SPECTRA 170
STARLITE 108 171
STARLUX 171
STERN 088 089 137 157
197
SUNSTAR 108 171
BRANDS CODES
SUPERTECH 108 139 152 171
TADISTAR 108
TASHIKO 108 159 218
TEC 108 139 144 159
170 171
TECHLINE 185
TECHNISAT 108 165
TECNISON 108 171
TEKON 171
TELEAVIA 173 178 179 225
239
TELEFUNKEN 079 177 179 181
193 195 200 210
TELEOPTA 171
TELERNT 109
TELETECH 165 171
TELETEXT 115
TELETON 088
TELETON 089 134 159 197
TENSAI 064 108 144 149
171 191
TENSON 171
TESLA 204
THOMSON 052 078 079 134
173 178 179 181
193 195 225 239
THORN 011 014 016 018 026
028 066 072 075
087 097 102 108 116
135 141 145 146
160
THORN-FERGUSON
160 188 200 227
TOSHIBA 012 016 026 036
037 222 232
TOWADA 144 185
TRISTAR 010 064
TRIUMPH 025 219 236
UHER 089 108 109 149 185
197 233
ULTRAVOX 108 164 185 204
UNIVERSUM 174
UNIVOX 204
VESTEL 108
VIDEOSAT 165
VIDEOTON 178 193
VIDEOWAY 230
VISION 108 149
VOXSON 137 204
WALTHAM 178
WATSON 064 108 149 171
WEGA 208 222
WHITE 108 110 149
WESTINGHOUSE
YOKO 010 064 108 136
144 159 164 170
171
ZANUSSI 137 197
ZENITH 231

55
Playback
Cannot play MUSIC/ b The files are not recorded in a format that the recorder can play.
PHOTO/MOVIE files. b The recorder does not support the codec of the movie file.
Recording
Cannot record or does b Check the remaining space on the HDD.
not record successfully. b If your source is copy-protected, you cannot record it using this recorder.
b If you set a DTV rating for the recorder and higher rated digital programs are received, the programme
cannot be recorded. Change the DTV rating level in order to record it.
Timer record does not b Clock is not set to correct time.
record successfully. b The start time of the timer recording is past.
b Two timer recordings may have overlapped, in which case only the earlier one will record
completely.
b When setting the recording programme, make sure you set the recorder’s built-in tuner, not the TV’s
built-in tuner.
b If the HDD is damaged, the recording may not complete successfully.
You cannot enter a b A recording is already underway.
timer programme when b The time you’re trying to set has already passed.
b There are already 32 timer programs set.
If two or more timer b The earlier programme takes priority.
programs overlap b The recorder can record 2 channels simultaneously but do not make overlap timer recording, may
some programme cannot be recorded according to it’s priority.
b If the HDD is damaged, the recording may not complete successfully. In this case even though
the [Check] field shows [Ready], it may not be.
Troubleshooting
General
The power does b Plug the power cord into the wall outlet securely.
not turned on.
There is no picture. b Select the appropriate video input mode on the TV so the picture from the recorder appears on the
TV screen.
b Connect the video connection securely.
Picture noise b The video signal from the external component is copy-protected.
appears. b Set the resolution that your TV can accept.
b
The programme is not b Check your antenna connection.
found or stored.
There is no sound. b Connect the audio connection securely.
b The input source setting on the amplifier or the connection to the amplifier is incorrect.
b The recorder is in scan, slow motion, or pause mode.
b Try to select another audio channel or source using AUDIO button.
b Set the [Digital Output] option to the correct position (see page 46).
The remote control b The remote control is not pointed at the remote sensor of the recorder.
does not work b The remote control is too far from the recorder.
properly. b There is an obstacle in the path of the remote control and the recorder.
b The batteries in the remote control are exhausted.
The connected USB b Try another different USB cable, some of USB cable may not support enough current for normal
not recognized. USB operation.
storage device is b If you use a USB extension cable or USB HUB, the USB devices may not be recognized.
b Try another USB storage device.
b This recorder supports only USB Flash Drive and USB External HDD with FAT16, FAT32 or
NTFS format.
b An USB device which requires additional program installation when you have connected it to a
computer is not supported.

56
HDMI
The connected HDMI b Try disconnecting then reconnecting the HDMI cable.
device does not display b Try switching the power of the HDMI device off then back on.
any picture. b The video input of the connected device is set correctly for this recorder.
b The HDMI cable you are using is fully HDMI-compliant.
Using a non-standard cable may result in no picture being output.
b Not all HDCP-compatible DVI devices will work with this recorder.
The connected HDMI b Some HDMI-compatible devices do not output sounds
device does not Check the manual that came with the connected device.
output sounds. b If your TV is not capable of handling 96 kHz sampling frequency, set the [Sampling Freq.] option
to [48 kHz] on the setup menu. When this choice is made, this recorder will automatically convert any
96 kHz signals to 48 kHz so your system can decode them.
b If your TV is not equipped with Dolby Digital, DTS and MPEG decoder, set the [Digital Output]
option to [HDMI LPCM]on the setup menu.
Resetting the recorder
If you observe any b The recorder is plugged in, but the power will not turn on or off.
of the following b The front panel display is not working.
symptoms. b The recorder is not operating normally.
You can reset the b Press RESET button on the front pannel.
recorder as follows. This will force the recorder to power off then turn the recorder back on.
b Unplug the power cord, wait at least five seconds, and then plug it in again.
Customer Support
You can update this recorder using the latest software to enhance the products operation and/or add new features.
To obtain the latest software for this recorder (if updates have been made), please visit http://lgservice.com
or contact
LG Electronics customer care center.

57
General
Power requirements: AC 200-240 V, 50/60 Hz
Power consumption: 30W
Dimensions (W x H x D): Approx. 430 x 65.3 x 255 mm without foot
Net Weight (Approx.): 3.7 kg
Operating temperature: 5 °C to 35 °C
Operating humidity: 5 % to 90 %
Television system DVB-T Standard Compliant
TV Recording
Recording format: TS (Transport Stream format)
Recordable media: Hard Disk Drive (MS408D: 250GB / MS409D: 500GB),
External Disk Drive, USB 2.0 HDD
Connectors
ANTENNA IN: Antenna input, 75 ohms
VIDEO OUT: 1.0 V (p-p), 75 Ω, sync negative, RCA jack x 1
COMPONENT VIDEO OUT: (Y) 1.0 V (p-p), 75 Ω, sync negative, RCA jack x 1(Pb)/(Pr) 0.7 V (p-p),
75 Ω, RCA jack x 2
HDMI OUT (video/audio): 19 pin (HDMI standard, Type A)
ANALOG AUDIO OUT: 2.0 Vrms (1 kHz, 0 dB), 600 Ω, RCA jack (L, R) x 1
DIGITAL OUT (COAXIAL): 0.5 V (p-p), 75 Ω, RCA jack x 1
DIGITAL OUT (OPTICAL): 3 V (p-p), Optical jack x 1
USB Port: 4 pin (USB 2.0 standard) x 2
System
LAN port: Ethernet jack x 1, 10BASE-T/100BASE-TX
Wireless LAN: Integrated IEEE 802.11n (Draft 2.0)
(internal antenna) wireless networking access, compatible with 802.11b/g/n Wi-Fi networks.
Bus power supply (USB): DC 5 V --- 1 A (Front), DC 5 V --- 500 mA (Rear)
Accessories
Video/Audio cable (1), Remote control (1), Batteries (2), Nero MediaHome 4 Essentials software CD-ROM (1),
Wireless LAN Adapter (USB type) (1), Screws (4)
Design and specifications are subject to change without notice.
Specifications

PLEASE READ CAREFULLY. USE OF THE NETWORK
SERVICES IS SUBJECT TO THE FOLLOWING TERMS
AND CONDITIONS.
Use of the Network Services requires an Internet connection which is sold separately and for which you are solely
responsible. The Network Services may be limited or
restricted depending upon the quality, capabilities and
technical limitations of your Internet service.
The Network Services belong to third parties and may be
protected by copyright, patent, trademark and/or other
intellectual property laws. The Network Services are provided solely for your personal and noncommercial use.
Unless expressly authorized by the respective content
owner or service provider, you shall not modify, copy,
republish, upload, post, transmit, translate, sell, create
derivative works, exploit, or distribute in any manner or
medium any content or services accessible through this
product.
LG IS NOT RESPONSIBLE FOR YOUR USE OF THE
NETWORK SERVICES. THE NETWORK SERVICES
ARE PROVIDED "AS IS." TO THE FULLEST EXTENT
PERMISSIBLE BY LAW, LG MAKES NO
REPRESENTATIONS OR WARRANTIES OF ANY KIND
WHATSOEVER (i) FOR THE ACCURACY, VALIDITY,
TIMELINESS, LEGALITY, OR COMPLETENESS OF
ANY NETWORK SERVICE MADE AVAILABLE
THROUGH THIS PRODUCT; OR (ii) THAT THE
NETWORK SERVICES ARE FREE OF VIRUSES OR
OTHER COMPONENTS THAT MAY INFECT, HARM, OR
CAUSE DAMAGE TO THIS PRODUCT, YOUR
COMPUTER, TELEVISION, OTHER EQUIPMENT, OR
ANY OTHER PROPERTY. LG EXPRESSLY DISCLAIMS
ANY IMPLIED WARRANTIES, INCLUDING BUT NOT
LIMITED TO, WARRANTIES OF MERCHANTABILITY
OR FITNESS FOR A PARTICULAR PURPOSE.
UNDER NO CIRCUMSTANCES AND UNDER NO
LEGAL THEORY, WHETHER IN CONTRACT, TORT,
STRICT LIABILITY OR OTHERWISE, SHALL LG BE
LIABLE TO YOU OR ANY THIRD PARTY FOR ANY
DIRECT, INDIRECT, INCIDENTAL, SPECIAL,
STATUTORY, CONSEQUENTIAL OR OTHER DAMAGES
OR ATTORNEY FEES OR EXPENSES RELATING TO
OR ARISING OUT OF THE NETWORK
SERVICES EVEN IF ADVISED OF THE POSSIBILITY
OF SUCH DAMAGES OR IF SUCH DAMAGES COULD
HAVE BEEN REASONABLY FORESEEN.
The Network Services may be terminated or interrupted
at any time, and LG makes no representation or warranty
that any Network Service will remain available for any
period of time. Use of the Network Services may be
subject to additional terms and conditions of the respective third party service provider. The Network Services
are transmitted by third parties by means of networks and
transmission facilities over which LG has no
control. LG EXPRESSLY DISCLAIMS ANY RESPONSIBILITY OR LIABILITY FOR ANY INTERRUPTION OR
SUSPENSION OF ANY NETWORK SERVICE.
LG shall be neither responsible nor liable for customer
service related to the Network Services. Any question or
request should be made directly to the respective
Network Service providers.
"Network Service(s)" means the third party services
accessible through this product including but not limited
to all data, software, links, messages, video and other
content found thereon or used in connection therewith.
"LG" means LG Electronics, Inc. its parent company and
all of their respective subsidiaries, affiliates and related
companies worldwide.
IMPORTANT INFORMATION RELATING
TO NETWORK SERVICES
58

The following GPL executables and LGPL libraries used
in this product are subject to the GPL2.0/LGPL2.1
License Agreements:
GPL EXECUTABLES:
Linux kernel, busybox, dosfstools, gdbserver, ntfsprogs,
udftools, wireless-tools
LGPL LIBRARIES:
ebase, mplib, neon, qDecoder, uClibc
LG Electronics offers to provide source code to you on
CD-ROM for a charge covering the cost of performing
such distribution, such as the cost of media, shipping and
handling upon e-mail request to LG Electronics at:
opensource@lge.com
This offer is valid for a period of three (3) years from the
date of the distribution of this product by LG Electronics.
You can obtain a copy of the GPL, LGPL licenses from
http://www.gnu.org/licenses/old-licenses/gpl-2.0.html and
http://www.gnu.org/licenses/old-licenses/lgpl-2.1.html .
You can also obtain a copy of translations from
http://www.gnu.org/licenses/old-licenses/gpl-2.0-translations.html and http://www.gnu.org/licenses/oldlicenses/lgpl-2.1-translations.html
This software is based in part on the work of the
Independent JPEG Group copyright © 1991 – 1998,
Thomas G. Lane.
This product includes
Freetype : copyright © 2003 The FreeType Project
(www.freetype.org).
Libpng : copyright © 2004 Glenn Randers-Pehrson
Zlib : Copyright © 1995-2002 Jean-loup Gailly and
Mark Adler.
OpenSSL:
- cryptographic software written by Eric Young
(eay@cryptsoft.com).
- software written by Tim Hudson (tjh@cryptsoft.com).
- software developed by the OpenSSL Project for use
in the OpenSSL Toolkit. (http://www.openssl.org)
Tinyxml : copyright © 2000-2006 Lee Thomason
WPA Supplicant : Copyright © 2003-2007, Jouni
Malinen <j@w1.fi> and contributors
miniUPnP client: Copyright © 2005-2006, Thomas
BERNARD
giflib: Copyright © 1997 Eric S. Raymond
regex : Copyright © 1992, 1993, 1994, 1997 Henry
Spencer
All rights reserved.
Permission is hereby granted, free of charge, to any
person obtaining a copy of this software and associated
documentation files (the "Software"), to deal in the
Software without restriction, including without limitation
the rights to use, copy, modify, merge, publish, distribute,
sublicense, and/or sell copies of the Software, and to
permit persons to whom the Software is furnished to do
so, subject to the following conditions:
THE SOFTWARE IS PROVIDED "AS IS", WITHOUT
WARRANTY OF ANY KIND, EXPRESS OR IMPLIED,
INCLUDING BUT NOT LIMITED TO THE WARRANTIES
OF MERCHANTABILITY, FITNESS FOR A PARTICULAR
PURPOSE AND NONINFRINGEMENT. IN NO EVENT
SHALL THE AUTHORS OR COPYRIGHT HOLDERS BE
LIABLE FOR ANY CLAIM, DAMAGES OR OTHER
LIABILITY, WHETHER IN AN ACTION OF CONTRACT,
TORT OR OTHERWISE, ARISING FROM, OUT OF OR
IN CONNECTION WITH THE SOFTWARE OR THE USE
OR OTHER DEALINGS IN THE SOFTWARE.
59
Open source software notice

P/NO : MFL62320916
 Loading...