

LG MS409D, MS408D Manual book

MS409D / MS408D
Network Twin HD Recorder
English
MEDIA STATION
To ensure proper use of this product, please read this
owner’s manual carefully and retain for future reference.
2
This lightning flash with arrowhead symbol
within an equilateral triangle is intended to
alert the user to the presence of uninsulated
dangerous voltage within the product’s enclosure that may be of sufficient magnitude to
constitute a risk of electric shock to persons.
The exclamation point within an equilateral triangle is intended to alert the user to the presence of important operating and maintenance
(servicing) instructions in the literature accompanying the product.
WARNING: TO PREVENT FIRE OR ELECTRIC
SHOCK HAZARD, DO NOT EXPOSE THIS PRODUCT
TO RAIN OR MOISTURE.
WARNING: Do not install this equipment in a confined
space such as a book case or similar unit.
CAUTION: The apparatus should not be exposed to
water (dripping or splashing) and no objects filled with
liquids, such as vases, should be placed on the apparatus.
CAUTION concerning the Power Cord
Most appliances recommend they be placed upon a
dedicated circuit;
That is, a single outlet circuit which powers only that
appliance and has no additional outlets or branch circuits. Check the specification page of this owner's manual to be certain.
Do not overload wall outlets. Overloaded wall outlets,
loose or damaged wall outlets, extension cords, frayed
power cords, or damaged or cracked wire insulation are
dangerous. Any of these conditions could result in electric shock or fire. Periodically examine the cord of your
appliance, and if its appearance indicates damage or
deterioration, unplug it, discontinue use of the appliance, and have the cord replaced with an exact
replacement part by an authorized servicer.
Protect the power cord from physical or mechanical
abuse, such as being twisted, kinked, pinched, closed in
a door, or walked upon. Pay particular attention to
plugs, wall outlets, and the point where the cord exits
the appliance.
To disconnect power from the unit, unplug the unit from
the outlet. When installing the product, ensure that the
plug is easily accessible.
The appliance is not intended for use by young chil-
dren or infirm persons without supervision.
Young Children should be supervised to ensure that
they do not play with appliance.
If the appliance is supplied from a cord extension set
or an electrical portable outlet device, the cord extension set on electrical portable outlet device must be
positioned so that it is not subject to splashing or
ingress of moisture.
CAUTION
RISK OF ELECTRIC SHOCK
DO NOT OPEN
CAUTION: TO REDUCE THE RISK
OF ELECTRIC SHOCK
DO NOT REMOVE COVER (OR BACK)
NO USER-SERVICEABLE PARTS INSIDE
REFER SERVICING TO QUALIFIED SERVICE
PERSONNEL
.
As an ENERGY STA R®Partner, LG
has determined that this product
or product models meet the
ENERGY STA R®guidelines for
energy efficiency.
ENERGY STA R®is a U.S. registered mark.

3
Copyrights
Recording equipment should be used only for lawful
copying and you are advised to check carefully what is
lawful copying in the area in which you are making a
copy. Copying of copyright material such as films or
music is unlawful unless permitted by a legal exception
or consented to by the rights owner.
This product incorporates copyright protection technolo-
gy that is protected by method claims of certain U.S.
patents and other intellectual property rights owned by
Macrovision Corporation and other rights owners. Use
of this copyright protection technology must be authorized by Macrovision Corporation, and is intended for
home and other limited viewing uses only, unless otherwise authorized by Macrovision corporation. Reverse
engineering or disassembly is prohibited.
CONSUMERS SHOULD NOTE THAT NOT ALL HIGH
DEFINITION TELEVISION SETS ARE FULLY COMPATIBLE WITH THIS PRODUCT AND MAY CAUSE
ARTIFACTS TO BE DISPLAYED IN THE PICTURE. IN
CASE OF 625 PROGRESSIVE SCAN PICTURE
PROBLEMS, IT IS RECOMMENDED THAT THE USER
SWITCH THE CONNECTION TO THE ‘STANDARD
DEFINITION’ OUTPUT. IF THERE ARE QUESTIONS
REGARDING OUR TV SET COMPATIBILITY WITH
THIS MODEL 625p UNIT PLEASE CONTACT OUR
CUSTOMER SERVICE CENTRE.
Licenses
Manufactured under license from Dolby Laboratories.
Dolby and the double-D symbol are trademarks of Dolby
Laboratories.
Manufactured under license under U.S. Patent #’s:
5,451,942; 5,956,674; 5,974,380; 5,978,762; 6,487,535 &
other U.S. and worldwide patents issued & pending. DTS
and DTS 2.0+ Digital Out are registered trademarks and
the DTS logos and Symbol are trademarks of DTS, Inc. ©
1996-2008 DTS, Inc. All Rights Reserved.
HDMI, the HDMI logo and High-Definition Multimedia
Interface are trademarks or registered trademarks of
HDMI licensing LLC.
YouTube is a trademark of Google Inc.
Picasa web albums is a trademark of Google Inc.
DLNA and DLNA CERTIFIED are trademarks and/or service marks of Digital Living Network Alliance.
WIFI CERTIFIED 802.11n based on Draft 2.0.
Draft 2.0 refers to the version of the not-yet-ratified IEEE
802.11n standard used in Wi-Fi Alliance as of June 2007.
The “HD TV” Logo is trademark of DIGITALEUROPE.
Trademark of DVB Digital video Broadcasting Project
(1991 to 1996)
WARNING:
Media contents including but not limited to broadcast
materials, movie, music, and photo files are protected
by copyright and that recording copy and playback of
those contents would only be permissible by permission
of the copyright owner. LG has no right to grant such
permission. Permission should always be sought from
the copyright owner.
Andio and Video recordings and copies you make using
this products are for your personal and non-commercial
use only. You may sell, lend or rent them to other people. LG is not responsible for your panelties, disadvantages by illegal use of this product.
About the Symbol Display
“ ” may appear on your TV display during operation
and indicates that the function is not permitted by this
recorder or specific media.
Symbol Used in this Manual
Indicates special notes and operating features.
Indicates tips and hints for making the task easier.
Indicates hazards likely to cause harm to
the recorder itself or other material damage.
Caution
Caution

4
Table of contents
File requirement . . . . . . . . . . . . . . . . . . . . . . . . . . . . . . . . . .5
File compatibility . . . . . . . . . . . . . . . . . . . . . . . . . . . . . . . .5
Home Menu Overview . . . . . . . . . . . . . . . . . . . . . . . . . . . .6-7
Remote control . . . . . . . . . . . . . . . . . . . . . . . . . . . . . . . . . . .8
Main unit . . . . . . . . . . . . . . . . . . . . . . . . . . . . . . . . . . . . . . . .9
Connection overview . . . . . . . . . . . . . . . . . . . . . . . . . . . . .10
Connections to Your TV . . . . . . . . . . . . . . . . . . . . . . . . . .10
(Option A) Best quality - HDMI connection
(includes audio and video) . . . . . . . . . . . . . . . . . . . . . . . .11
(Option B) Excellent quality - Component video
and stereo audio connection . . . . . . . . . . . . . . . . . . . . . .12
(Option C) Connections to your TV (Composite) . . . . . . . .12
Connecting to an Amplifier . . . . . . . . . . . . . . . . . . . . . . . .13
Connecting to an Amplifier via 2 Channel Audio Output . .13
Connecting to an Amplifier via Digital Audio Output
(Optical or Coaxial) . . . . . . . . . . . . . . . . . . . . . . . . . . . . .13
Connecting to an Amplifier via HDMI Output . . . . . . . . . .13
Network connection . . . . . . . . . . . . . . . . . . . . . . . . . . .14-19
Wired network connection . . . . . . . . . . . . . . . . . . . . . .14-15
Wireless network connection . . . . . . . . . . . . . . . . . . . .16-19
Setup Wizard (Initial install) . . . . . . . . . . . . . . . . . . . . . . . .20
DTV . . . . . . . . . . . . . . . . . . . . . . . .21-30
DTV Installation . . . . . . . . . . . . . . . . . . . . . . . . . . . . . . . . .21
Settings for Digital TV . . . . . . . . . . . . . . . . . . . . . . . . . .22-24
Selecting a Region . . . . . . . . . . . . . . . . . . . . . . . . . . . . . .22
Scanning programmes automatically . . . . . . . . . . . . . . . .22
Scanning programmes manually . . . . . . . . . . . . . . . . . . .22
Editing Programme List . . . . . . . . . . . . . . . . . . . . . . . . . .23
Setting the Lock System . . . . . . . . . . . . . . . . . . . . . . . . .23
Setting a new password . . . . . . . . . . . . . . . . . . . . . . . . . .23
Adjusting TV Rating level . . . . . . . . . . . . . . . . . . . . . . . . .24
Setting the antenna power . . . . . . . . . . . . . . . . . . . . . . . .24
Setting the permanent Timeshift . . . . . . . . . . . . . . . . . . . .24
Setting recording storage . . . . . . . . . . . . . . . . . . . . . . . . .24
Using the Digital TV functions . . . . . . . . . . . . . . . . . . .25-27
Viewing the Digital TV . . . . . . . . . . . . . . . . . . . . . . . . . . .25
Adjusting volume of audio out . . . . . . . . . . . . . . . . . . . . .25
Changing Digital TV programmes . . . . . . . . . . . . . . . . . . .25
Setting favorite programmes . . . . . . . . . . . . . . . . . . . . . .25
Viewing the programme information . . . . . . . . . . . . . . . . .25
Selecting DTV audio language . . . . . . . . . . . . . . . . . . . . .25
Selecting DTV subtitle language . . . . . . . . . . . . . . . . . . .26
Viewing the EPG
(Electronic Programme Guide) Display . . . . . . . . . . . . . . .26
Using the timeshift function manually . . . . . . . . . . . . . . . .26
Using the permanent timeshift . . . . . . . . . . . . . . . . . . . . .27
Using the teletext (Viewing Teletext) . . . . . . . . . . . . . . . . .27
Recording TV programmes . . . . . . . . . . . . . . . . . . . . . .28-30
Normal Recording . . . . . . . . . . . . . . . . . . . . . . . . . . . . . .28
Dual Programme Recording . . . . . . . . . . . . . . . . . . . . . . .28
Timer Recording (Manual) . . . . . . . . . . . . . . . . . . . . . . . .28
Timer Recording (EPG) . . . . . . . . . . . . . . . . . . . . . . . . . .29
Canceling a timer recording . . . . . . . . . . . . . . . . . . . . . . .29
Checking the history . . . . . . . . . . . . . . . . . . . . . . . . . . . .29
Editing a timer recording . . . . . . . . . . . . . . . . . . . . . . . . .30
Instant Timer Recording . . . . . . . . . . . . . . . . . . . . . . . . . .30
Media . . . . . . . . . . . . . . . . . . . . . .31-37
Playback functions . . . . . . . . . . . . . . . . . . . . . . . . . . . .32-45
General playback . . . . . . . . . . . . . . . . . . . . . . . . . . . . . . .32
Sorting the recorded titles . . . . . . . . . . . . . . . . . . . . . . . .32
Frame-by-Frame playback . . . . . . . . . . . . . . . . . . . . . . . .33
Fast forward and fast reverse . . . . . . . . . . . . . . . . . . . . . .33
Slow down the playing speed . . . . . . . . . . . . . . . . . . . . . .33
Skip to the next/previous . . . . . . . . . . . . . . . . . . . . . . . . .33
Resume playback . . . . . . . . . . . . . . . . . . . . . . . . . . . . . .33
Enlarges the playback image . . . . . . . . . . . . . . . . . . . . . .33
Selecting a subtitle language . . . . . . . . . . . . . . . . . . . . . .33
Selecting a subtitle code . . . . . . . . . . . . . . . . . . . . . . . . .33
Selecting a audio language . . . . . . . . . . . . . . . . . . . . . . .34
Repeat playback . . . . . . . . . . . . . . . . . . . . . . . . . . . . . . .34
Playback from selected time . . . . . . . . . . . . . . . . . . . . . .34
Add files to the Playlist . . . . . . . . . . . . . . . . . . . . . . . . . . .34
Delete a file/folder from the list . . . . . . . . . . . . . . . . . . . . .35
Naming a file . . . . . . . . . . . . . . . . . . . . . . . . . . . . . . . . . .35
Playing selected files . . . . . . . . . . . . . . . . . . . . . . . . . . . .35
Selecting a slideshow speed . . . . . . . . . . . . . . . . . . . . . .35
Selecting a slideshow effect . . . . . . . . . . . . . . . . . . . . . . .35
Listening to music while viewing a slideshow . . . . . . . . . .35
Playing files on your PC . . . . . . . . . . . . . . . . . . . . . . . . . .36
Accessing your PC . . . . . . . . . . . . . . . . . . . . . . . . . . . . .36
Editing the [My_Shortcuts] . . . . . . . . . . . . . . . . . . . . . . . .36
Using [File Copy] features . . . . . . . . . . . . . . . . . . . . . . . . .37
Copying or moving files/folders . . . . . . . . . . . . . . . . . . . .37
Deleting files/folders . . . . . . . . . . . . . . . . . . . . . . . . . . . . .37
DLNA . . . . . . . . . . . . . . . . . . . . . . .38-40
About DLNA . . . . . . . . . . . . . . . . . . . . . . . . . . . . . . . . . . . .38
Notes on DLNA features . . . . . . . . . . . . . . . . . . . . . . . . .38
Installing Nero MediaHome 4 Essentials . . . . . . . . . . . . .39
Sharing files and folders . . . . . . . . . . . . . . . . . . . . . . . . .39
Operating DLNA feature . . . . . . . . . . . . . . . . . . . . . . . . . . .40
General operation . . . . . . . . . . . . . . . . . . . . . . . . . . . . . .40
YouTube . . . . . . . . . . . . . . . . . . . .41-42
Operating YouTube feature . . . . . . . . . . . . . . . . . . . . . . . .41
General operation . . . . . . . . . . . . . . . . . . . . . . . . . . . . . .41
Searching YouTube videos . . . . . . . . . . . . . . . . . . . . . . . .42
Selecting your local site . . . . . . . . . . . . . . . . . . . . . . . . . .42
Picasa . . . . . . . . . . . . . . . . . . . . . .43-44
Operating Picasa web albums feature . . . . . . . . . . . . . . .43
General operation . . . . . . . . . . . . . . . . . . . . . . . . . . . . . .43
Searching Picasa web albums . . . . . . . . . . . . . . . . . . . . .44
Viewing your Picasa web albums . . . . . . . . . . . . . . . . . . .44
Removing an ID from the ID List . . . . . . . . . . . . . . . . . . .44
Setup . . . . . . . . . . . . . . . . . . . . . . .45-48
General Setup Operation . . . . . . . . . . . . . . . . . . . . . . . . .45
DTV settings . . . . . . . . . . . . . . . . . . . . . . . . . . . . . . . . . .45
Audio settings . . . . . . . . . . . . . . . . . . . . . . . . . . . . . . . . .46
Display settings . . . . . . . . . . . . . . . . . . . . . . . . . . . . .46-47
Record settings . . . . . . . . . . . . . . . . . . . . . . . . . . . . . . . .47
Network settings . . . . . . . . . . . . . . . . . . . . . . . . . . . . . . .47
System settings . . . . . . . . . . . . . . . . . . . . . . . . . . . . . . . .48
Others settings . . . . . . . . . . . . . . . . . . . . . . . . . . . . . . . .48
Reference . . . . . . . . . . . . . . . . . . . . . . . . . . . . . . . . . . .49-57
Software update via the Internet . . . . . . . . . . . . . . . . . . . .49
Software update via built-in tuner . . . . . . . . . . . . . . . . . . .49
Formatting HDD . . . . . . . . . . . . . . . . . . . . . . . . . . . . . . . .49
External HDD Installation . . . . . . . . . . . . . . . . . . . . . . . . .50
About the internal/External HDD . . . . . . . . . . . . . . . . . . .51
Connecting an USB device . . . . . . . . . . . . . . . . . . . . . . .51
Controlling a TV with the Supplied Universal
Remote Control . . . . . . . . . . . . . . . . . . . . . . . . . . . . . . . .52
Code numbers of controllable TVs . . . . . . . . . . . . . . .53-54
Troubleshooting . . . . . . . . . . . . . . . . . . . . . . . . . . . . .55-56
Specifications . . . . . . . . . . . . . . . . . . . . . . . . . . . . . . . . .57
IMPORTANT INFORMATION RELATING
TO NETWORK SERVICES . . . . . . . . . . . . . . . . . . . . . . . . .58
Open source software notice . . . . . . . . . . . . . . . . . . . . . . .59

5
File requirement
File compatibility
• Because the compatibility and available playback
functions on the [DLNA] menu are tested on the
bundle DLNA server (Nero MediaHome 4 Essentials)
environment, file requirements and playback functions
on the [DLNA] menu may differ depending on the
media servers.
• The file requirements on this page are not always
compatible for DLNA features. There may have some
restrictions by file features and media server's ability.
• This unit can recognize file/folder name less than 512
characters include path name.
• This unit can recognize files less than 4000 file/folders
is one folder.
• Depending on the size and number of the files, it may
takes several minutes to read the contents of the
media.
Movie file
•Available resolution size: 1920 x1080 (W x H) pixels.
• The file names of movie and subtitle are limited to 50
characters.
• Supported extensions: “.avi”, “.divx”, “.mpg”, “.mpeg”,
“.m2ts”, “.mp4”, “.mkv”, “.wmv”, “.ts”, “.xvid”, “.asf”,
“.mov”, “.trp”, “.dat”, “.flv”, “.mts”, “.tp”
• Supported encodings: DIVX3.xx, DIVX4.xx, DIVX5.xx,
XVID”, “DIVX6.xx (Standard playback only), MPEG1/2,
H.264/MPEG-4 AVC, WMV9, VC-1
• This device might not playback the file which is not
encoded on the list, even though its extension belongs
to “Supported extensions” above.
• Playable movie subtitle: SubRip (.srt / .txt), SAMI
(.smi), SubStation Alpha (.ssa/.txt), MicroDVD
(.sub/.txt), SubViewer 2.0 (.sub/.txt), VobSub (“.idx”
and “.sub” files should be together in the media)
• Playable Audio format: “Dolby Digital”, “DTS”, “MP3”,
“WMA”, “AAC”
• Not all WMA Audio formats are compatible with this
recorder.
•Sampling frequency: within 8 - 48 kHz (MP3),
within 32 - 48 kHz (WMA)
• Bit rate: within 8 - 320 kbps (MP3),
within 32 - 192 kbps (WMA)
• This recorder supports H.264/MPEG-4 AVC profile
Main, High at Level 4.1. and Baseline at Level 3.1
• For a file with higher level, the recorder well ask
whether you want to play or not.
• Displaying subtitle on DLNA is only available for bundle DLNA server (Nero MediaHome 4 Essentials) environment.
• This recorder does not support the file that are recorded with GMC. (GMC: Global Motion Compensation)
Music files
• File extensions: “.mp3”, “.wma”,“.aac”,“.ogg”, “.asf”,
“.flac”, “.mp4”
• Sampling frequency: within 8 - 48 kHz (MP3),
within 32 - 48kHz (WMA)
• Bit rate: within 8 - 320kbps (MP3), within 32 - 192kbps
(WMA)
• This recorder does not support the ID3 Tag embedded
in the MP3 file.
• The total playback time indicated on the screen may
not correct for VBR files.
• The total playback time will not be displayed for “.aac”,
and “.flac” files.
Photo file
• File extensions: “.jpg”, “.jpeg”, “.bmp”, “.png”, “.gif”,
“.tif/tiff”
• Photo files with “.png”, “.gif” or “.tif” extensions are not
be completely supported on this recorder. Only limited
basic format of them are supported.
• Recommended size:
Less than 4,000 x 3,000 x 24 bit/pixel
Less than 3,000 x 3,000 x 32 bit/pixel
• Progressive and lossless compression photo image
files are not supported.
Setup W
Setup W
izard
izard
(page 20)
DTV Installation
DTV Installation
(page 21)
Settings for Digital TV
Settings for Digital TV
(page 22-24)
Using the Digital TV
Using the Digital TV
functions
functions (page 25-27)
Recording TV
Recording TV
programmes
programmes (page 28-30)
File requirement
File requirement
(page 5)
Playback functions
Playback functions
(page 32-35)
Playing files on your PC
Playing files on your PC
(page 36)
Using [File Copy]
Using [File Copy]
features
features (page 37)
Network connection
Network connection
(page 14-19)
About DLNA
About DLNA
(page 38)
Installing Nero
Installing Nero
MediaHome 4 Essentials
MediaHome 4 Essentials
(page 39)
Operating DLNA
Operating DLNA
feature
feature
(page 40)
6
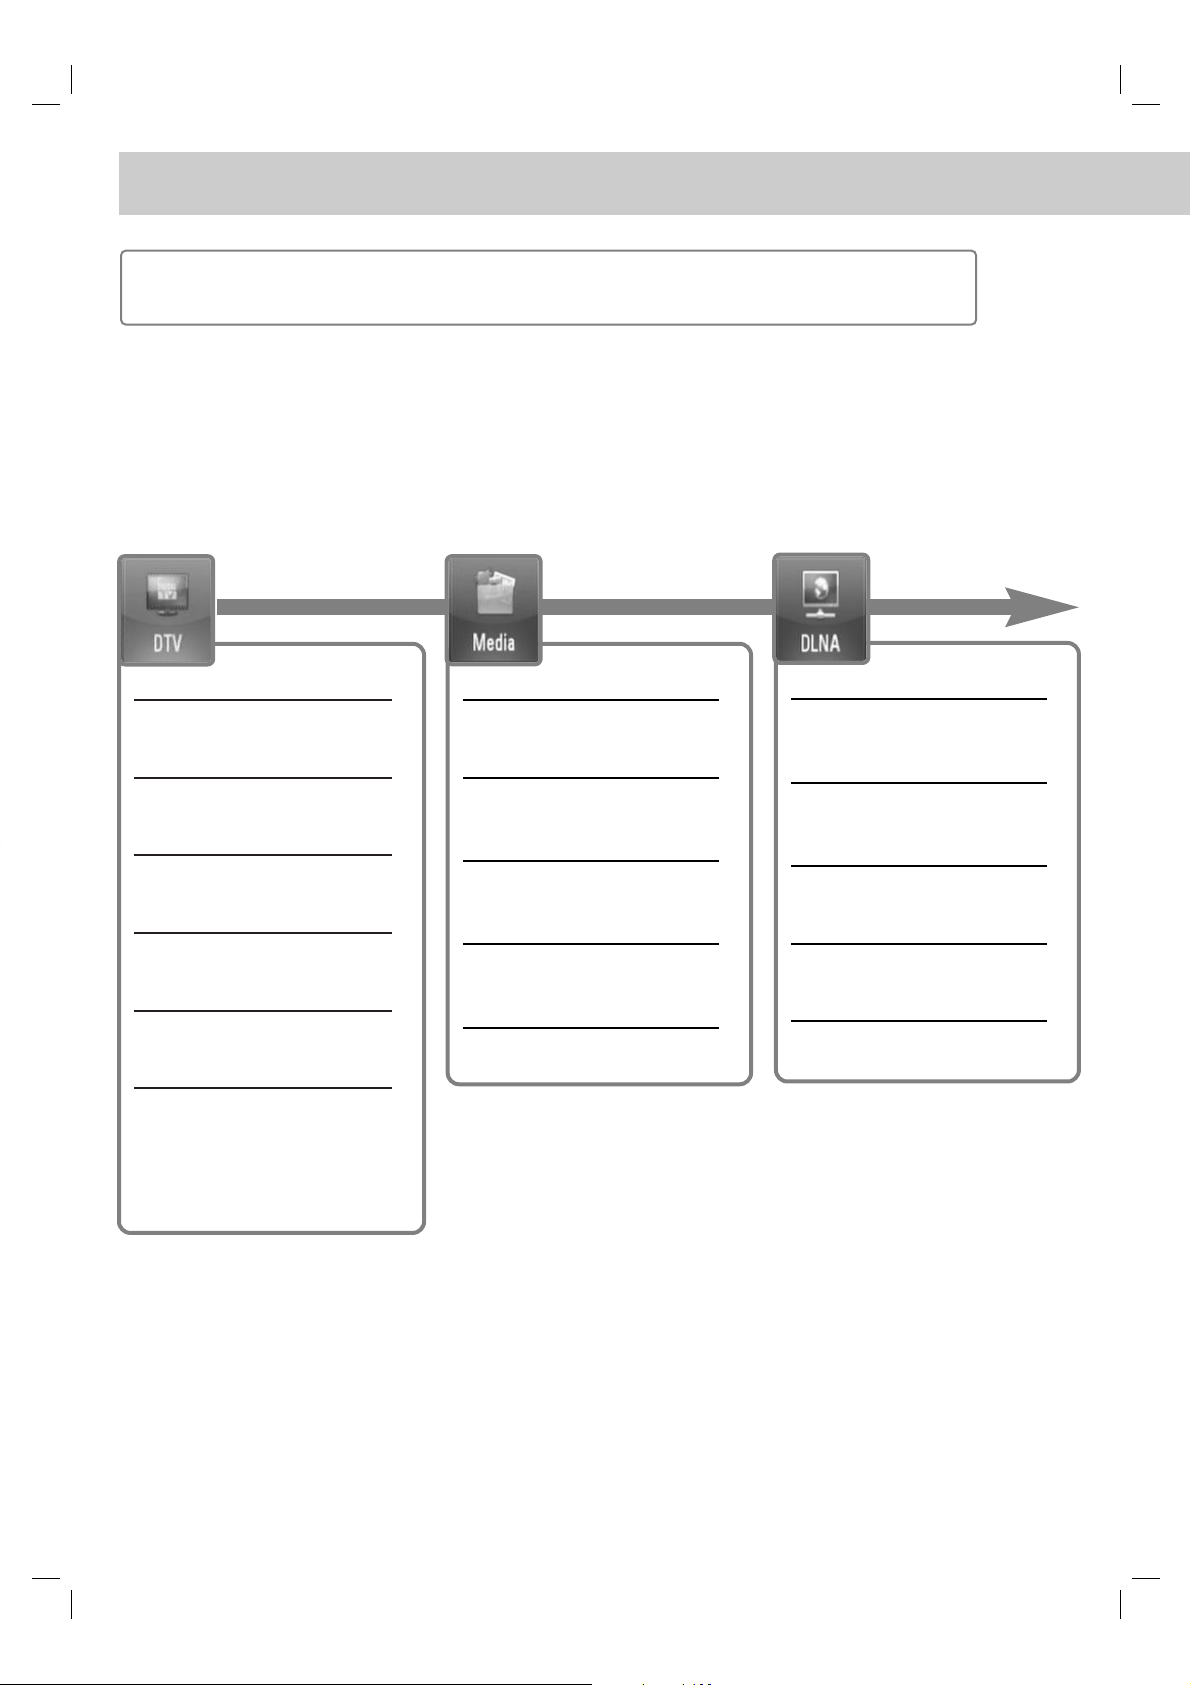
Home Menu Overview
Starting from HOME
To access numerous functions of the server, press the “HOME” button on the remote.

7
Basic button operations
- HOME : Accesses or removes the HOME menu.
- bb/
BB
: Used to navigate on-screen displays.
- OK ( ): Acknowledges menu selection.
- BACK (O): Exits the menu.
Operating
Operating YY
ouT
ouT
ube
ube
feature
feature (page 41)
General operation
General operation
(page 41)
Searching
Searching YY
ouT
ouT
ube
ube
videos
videos (page 42)
Selecting your local
Selecting your local
site
site (page 42)
Operating Picasa web
Operating Picasa web
albums feature
albums feature (page 43)
General operation
General operation
(page 43)
Searching Picasa web
Searching Picasa web
albums
albums (page 44)
VViewing your Picasa web
iewing your Picasa web
albums
albums(page 44)
Removing an ID from
Removing an ID from
the ID List
the ID List (page 44)
General Setup
General Setup
Operation
Operation
(page 45)
DTV settings
DTV settings
(page 45)
Audio settings
Audio settings
(page 46)
Display settings
Display settings
(page 46-47)
Record settings
Record settings
(page 47)
Network settings
Network settings
(page 47)
System settings
System settings
(page 48)
Others settings
Others settings
(page 48)
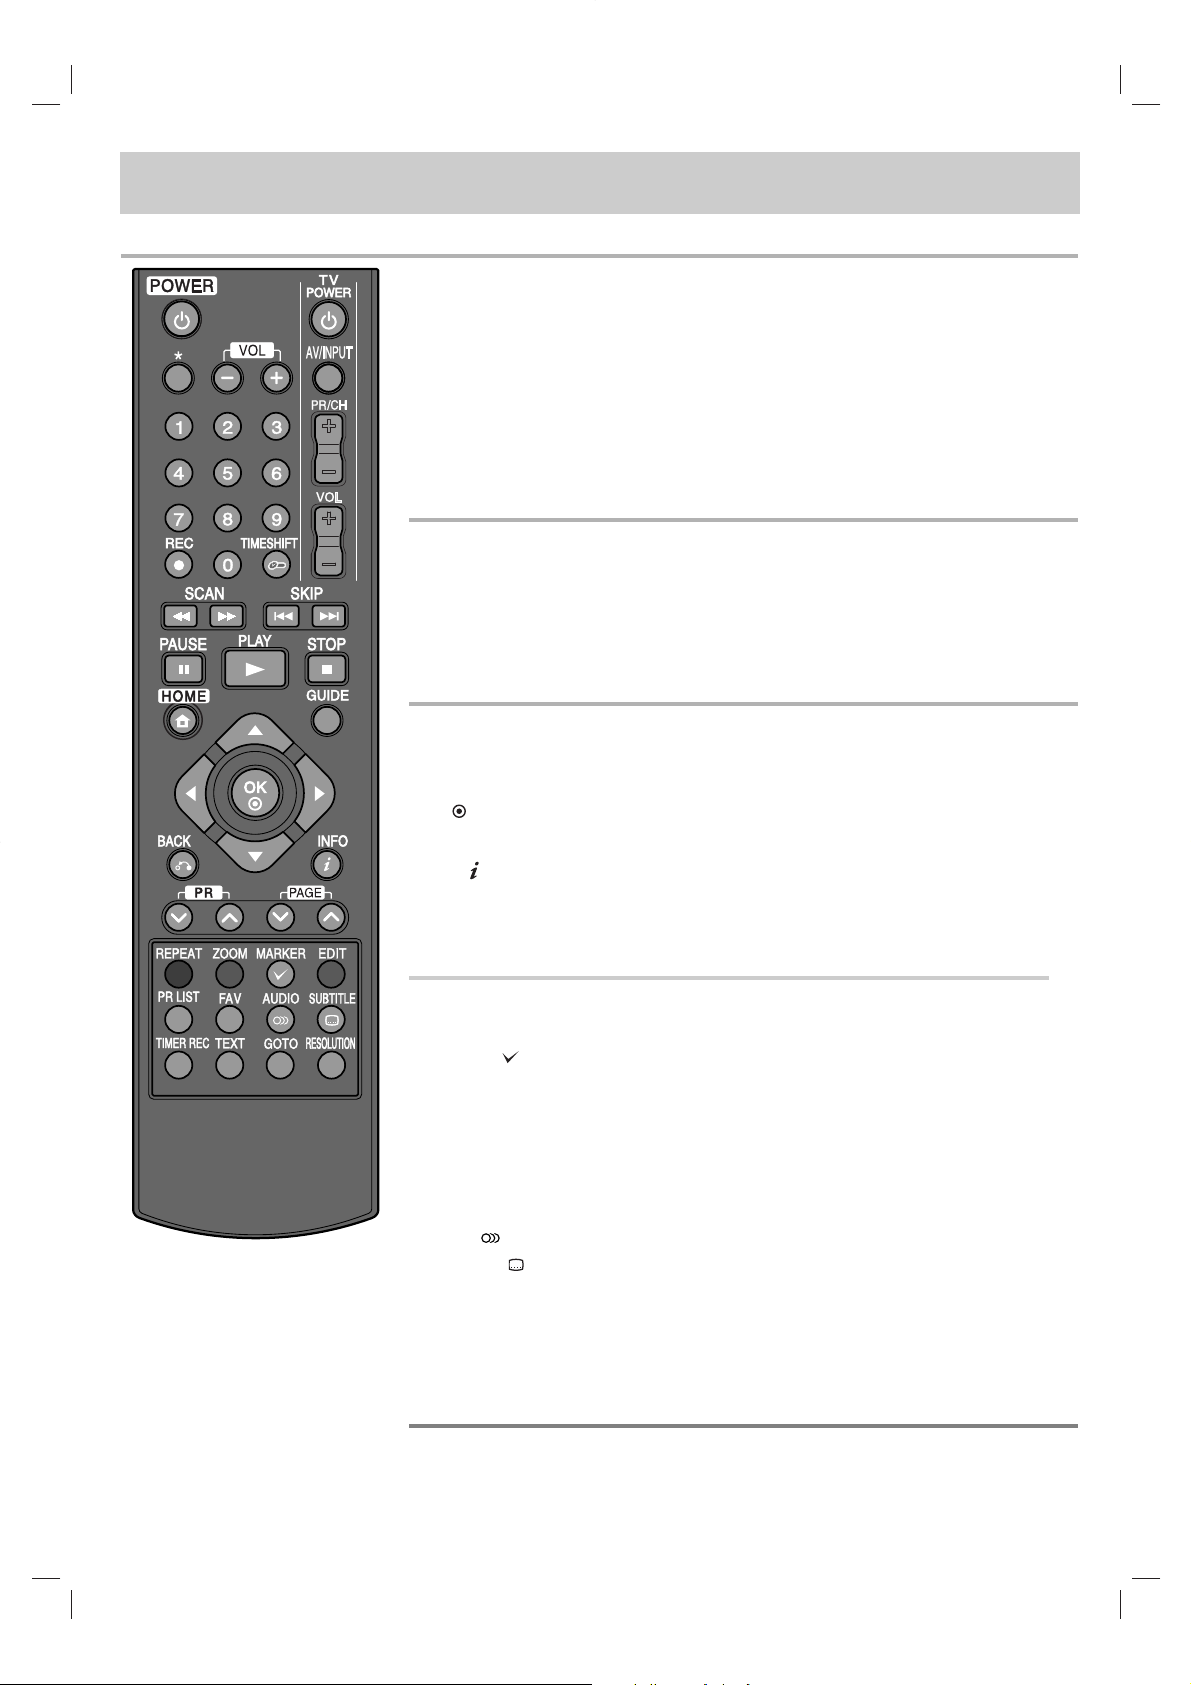
POWER (11): Switches the recorder ON or OFF.
*
: Feature is not available.
VOL (- / +): Adjusts the sound level of the recorder.
TV Control Buttons: You can control the programme selection, sound level, input
source, and power switch of your TV (see page 52).
0-9 numerical buttons: Selects numbered options in a menu.
REC (z): Starts recording and copying.
TIMESHIFT: Pauses live TV/playback (timeshift) for a live TV programme.
m / M (SCAN): Searches backward or forward.
. / > (SKIP): Goes to next or previous track/file.
X (PAUSE): Pauses playback.
B (PLAY): Starts playback.
x (STOP): Stops playback.
HOME: Accesses or removes the HOME menu.
GUIDE: Displays the EPG menu.
b / B / v / V (left/right/up/down): Navigates on-screen displays.
OK ( ): Acknowledges menu selection or displays the programme list.
BACK (O): Exits the menu or back to previous step.
INFO ( ): Displays or exits On-Screen Display.
PR (
UU / uu
): Scans up or down through memorized programmes.
PAGE (
UU / uu
): Moves to next or previous page of contents/TV list.
REPEAT: Repeats a desired section or sequence.
ZOOM: Displays or exits the [ZOOM] menu.
MARKER ( ): Used for selecting multiple files or folders in certain operation.
EDIT: Displays an editing menu
Coloured buttons: Used for [MOVIE], [PHOTO] and [MUSIC] menu or when an
EPG screen is displayed. The function of each button will be described on-screen,
and changes depending on the screen being displayed.
PR LIST: Displays the programme list.
FAV: Displays the favorite programme list.
AUDIO ( ): Selects an audio language or audio channel.
SUBTITLE ( ): Selects a subtitle language.
TIMER REC: Display [Timer Recording] menu.
TEXT: Switches between teletext mode and normal TV viewing.
GOTO: Displays the time search option during movie playback.
RESOLUTION: Sets the output resolution for HDMI and COMPONENT VIDEO
OUT jacks. (This key only work is TV watching mode or Home Menu mode.)
8
Remote control
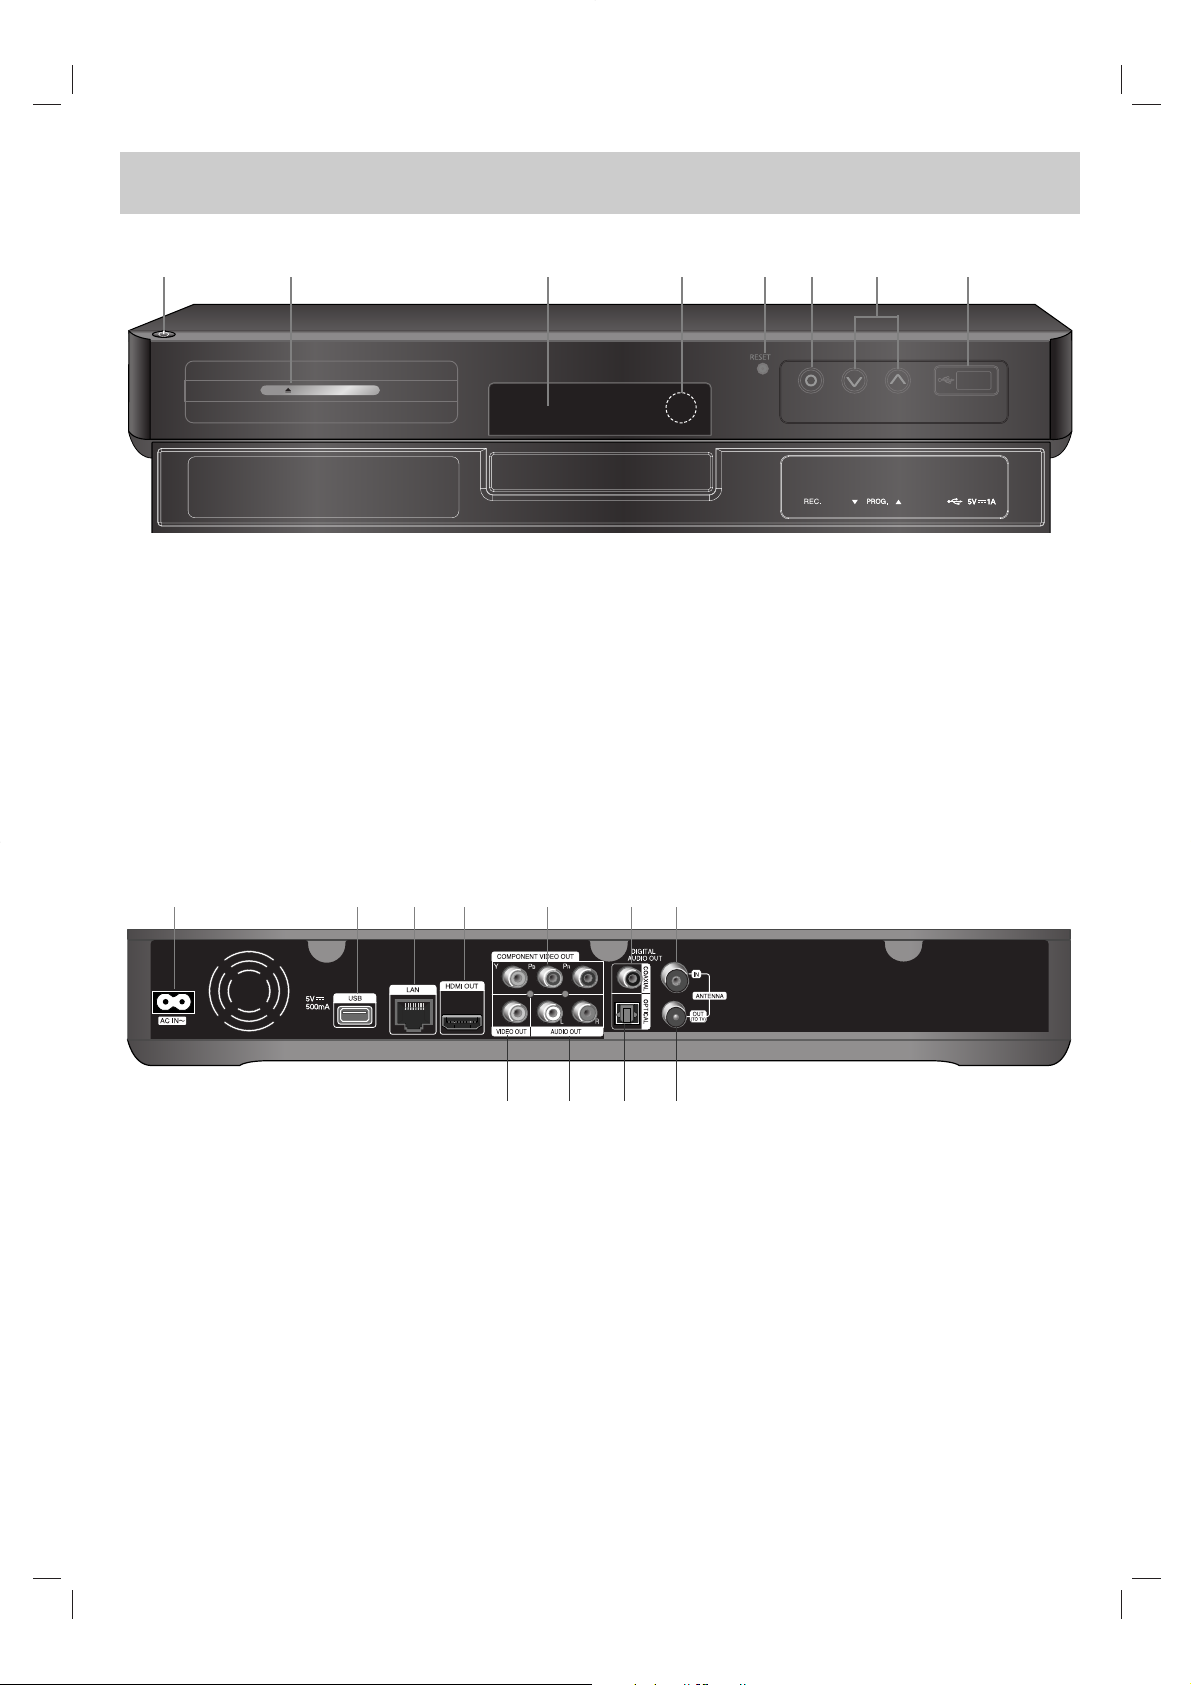
a11(POWER) Button
Switches the recorder ON or OFF.
b External HDD Slot
Mounting an additional HDD here.
c Display window
Shows the current status of the recorder.
d Remote Sensor
Point the remote control here.
e RESET
Press this button to reboot.
f z (REC.)
Starts recording.
g PROG. v/V
Scans up or down through memorized programmes.
h USB Port
Connect a USB Device.
9
Main unit
PUSH / OPEN
a AC IN connector
Connect the supplied power cord.
b USB Port
Connect the supplied Wireless LAN Adapter.
c LAN port
Connect a network with an always-on broadband connection.
d HDMI OUT
Connect to TV with HDMI inputs. (Interface for digital
audio and video)
e COMPONENT VIDEO OUT (Y P
B PR)
Connect to a TV with Y PB PR inputs.
f DIGITAL AUDIO OUT (COAXIAL)
Connect to digital (coaxial) audio equipment.
g ANTENNA IN
Connect the antenna to this terminal.
h VIDEO OUT
Connect to a TV with video inputs.
i AUDIO OUT (Left/Right)
Connect to a TV with audio inputs.
j DIGITAL AUDIO OUT (OPTICAL)
Connect to digital (optical) audio equipment.
k ANTENNA OUT (TO TV)
Passes the signal from the ANTENNA IN jack to your
TV/monitor
hijk
abcdefg
ab c defgh
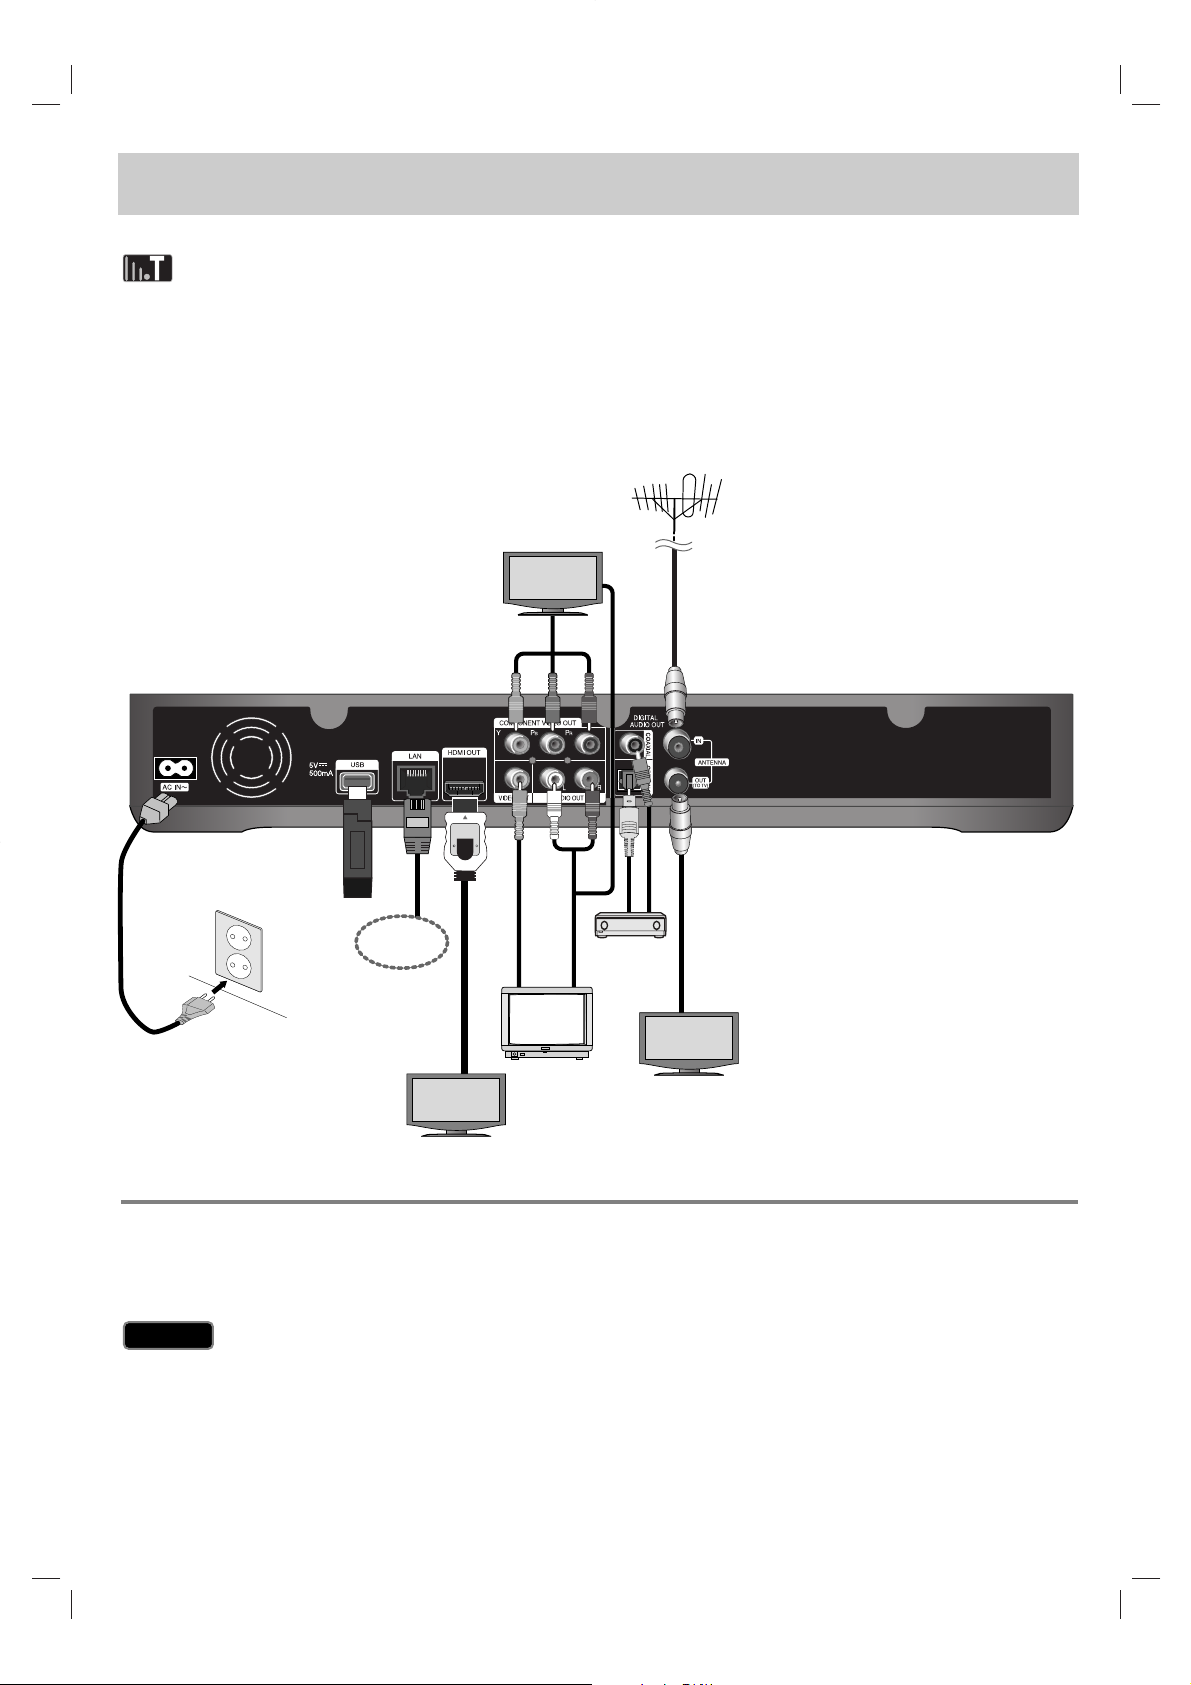
Depending on your TV and other equipment you wish to connect, there are various ways you could connect the
recorder. Use only one of the connections described on pages 11-13.
Please refer to the manuals of your TV, Stereo System or other devices as necessary to make the best connections.
Be sure to switch off the recorder before installation and connection.
Connections to Your TV
Make one of the following connections, depending on the capabilities of your existing equipment.
Connect to your TV with option A, B or C.
Make sure the recorder is connected directly to the TV. Tune the TV to the correct video input source.
Do not connect the recorder’s AUDIO OUT jack to the phono in jack (record player) of your audio system.
Do not connect your recorder via your VCR. The image could be distorted by the copy protection system.
Caution
Caution
10
Connection overview
Wireless LAN
Adapter
Broadband
Service
11
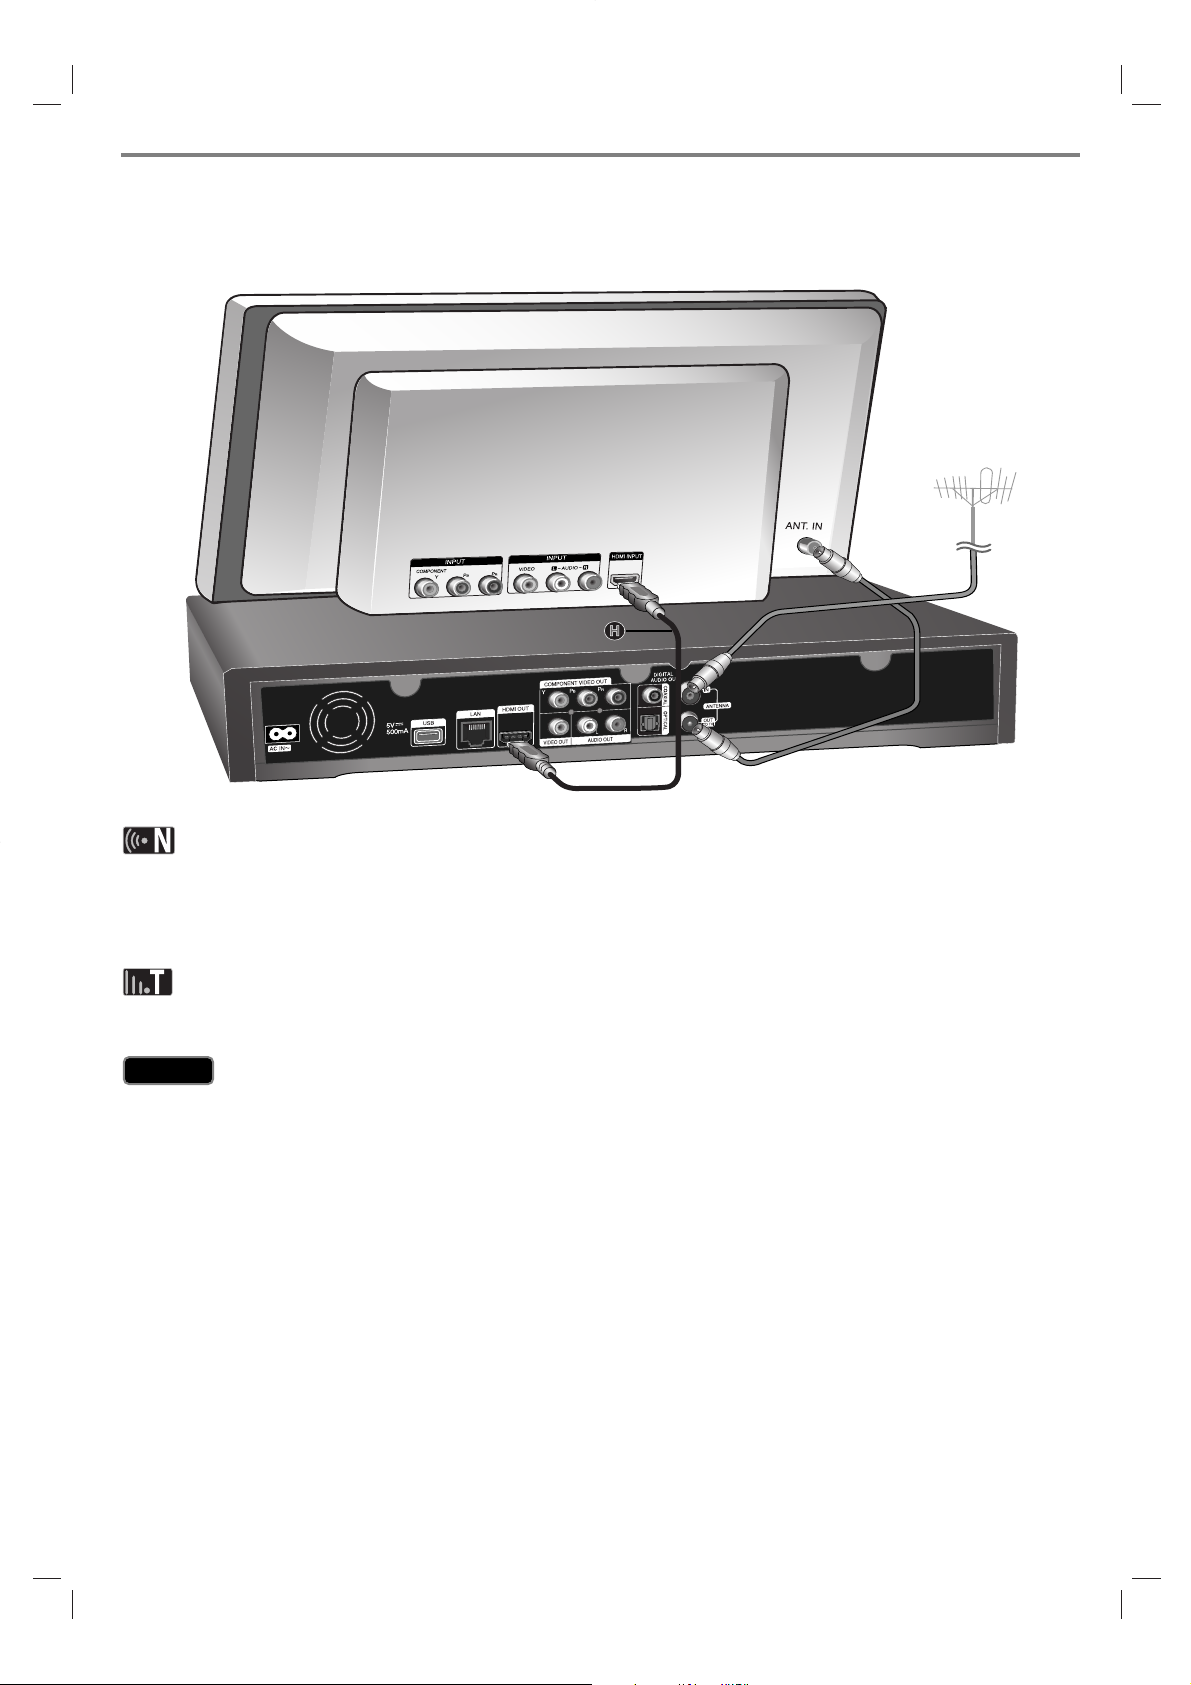
(Option A) Best quality - HDMI connection (includes audio and video)
If you have a HDMI TV or monitor, you can connect it to this recorder using a HDMI cable H. Connect the HDMI jack
on the recorder to the HDMI jack on a HDMI compatible TV or monitor. Set the TV’s source to HDMI (refer to TV’s
Owner’s manual).
You must select a HDMI audio output and a maximum sampling frequency that your TV accepts using [Digital Output]
option on the [Setup] menu (see page 47).
If a connected HDMI device does not accept the audio output of the recorder, the HDMI device’s audio sound may be
distorted or may not output.
When you use HDMI connection, you can change the resolution for the HDMI output by pressing RESOLUTION
button in TV watching mode or in Home Menu mode.
Changing the resolution when the connection has already been established may result in malfunctions. To solve the
problem, turn off the recorder and then turn it on again.
When the HDMI connection with HDCP is not verified, TV screen is changed to black screen. In this case, check the
HDMI connection, or disconnect the HDMI cable.
If there is noise or lines on the screen, please check the HDMI cable (length is generally limited to 4.5m).
Additional Information for HDMI
When you connect a HDMI or DVI compatible device make sure of the following:
- Try switching off the HDMI/DVI device and this recorder. Next, switch on the HDMI/DVI device and leave it for
around 30 seconds, then switch on this recorder.
- The connected device’s video input is set correctly for this unit.
- The connected device is compatible with 720x576p, 1280x720p, 1920x1080i or 1920x1080p video input.
Not all HDCP-compatible HDMI or DVI devices will work with this recorder.
- The picture will not be displayed properly with non-HDCP device.
- This recorder does not playback and TV screen is changed to black screen.
Caution
Caution
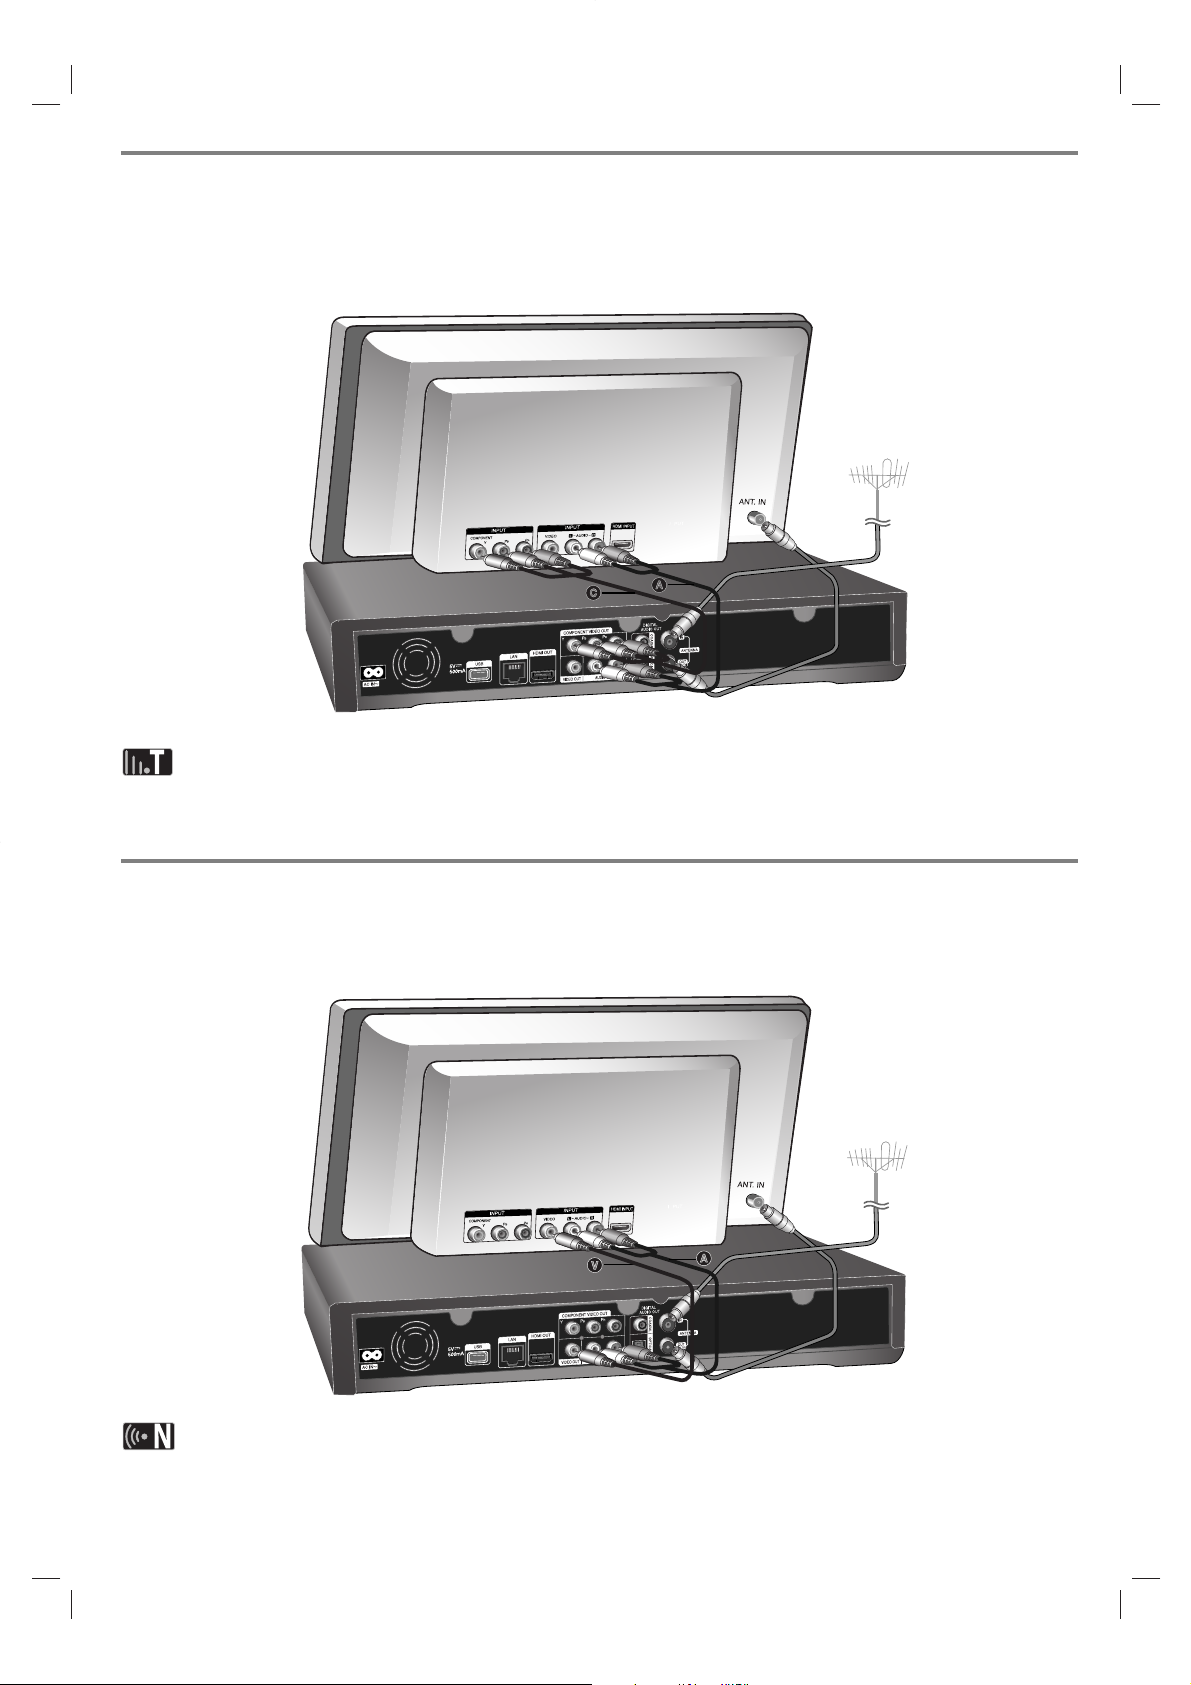
(Option B) Excellent quality - Component video and stereo audio
connection
Connect the COMPONENT VIDEO OUT jacks on the Recorder to the corresponding input jacks on the TV using Y PB
PR cables C. Connect the left and right AUDIO OUT jacks of the Recorder to the audio left and right IN jacks on the
TV using the audio cables A.
When you cannot use the screen, you can change resolution for the component VIDEO OUT by pressing RESOLUTION button in TV watching mode or in Home menu mode (Refer to “Resolution setting” on page 46.)
(Option C) Connections to your TV (Composite)
Connect the VIDEO OUT jack on the Recorder to the video in jack on the TV using the video cable
supplied V. Connect the Left and Right AUDIO OUT jacks on the Recorder to the audio left/right in jacks on the TV
using the supplied audio cables A.
If you use this connection, set the TV’s source selector to VIDEO.
12
13
Connecting to an Amplifier
Make one of the following connections, depending on the capabilities of your existing equipment.
Connecting to an Amplifier via 2 Channel Audio Output
Connect the Left and Right 2CH AUDIO OUT jacks (A) on the player to the audio left and right in jacks on your
amplifier, receiver, or stereo system, using audio cables.
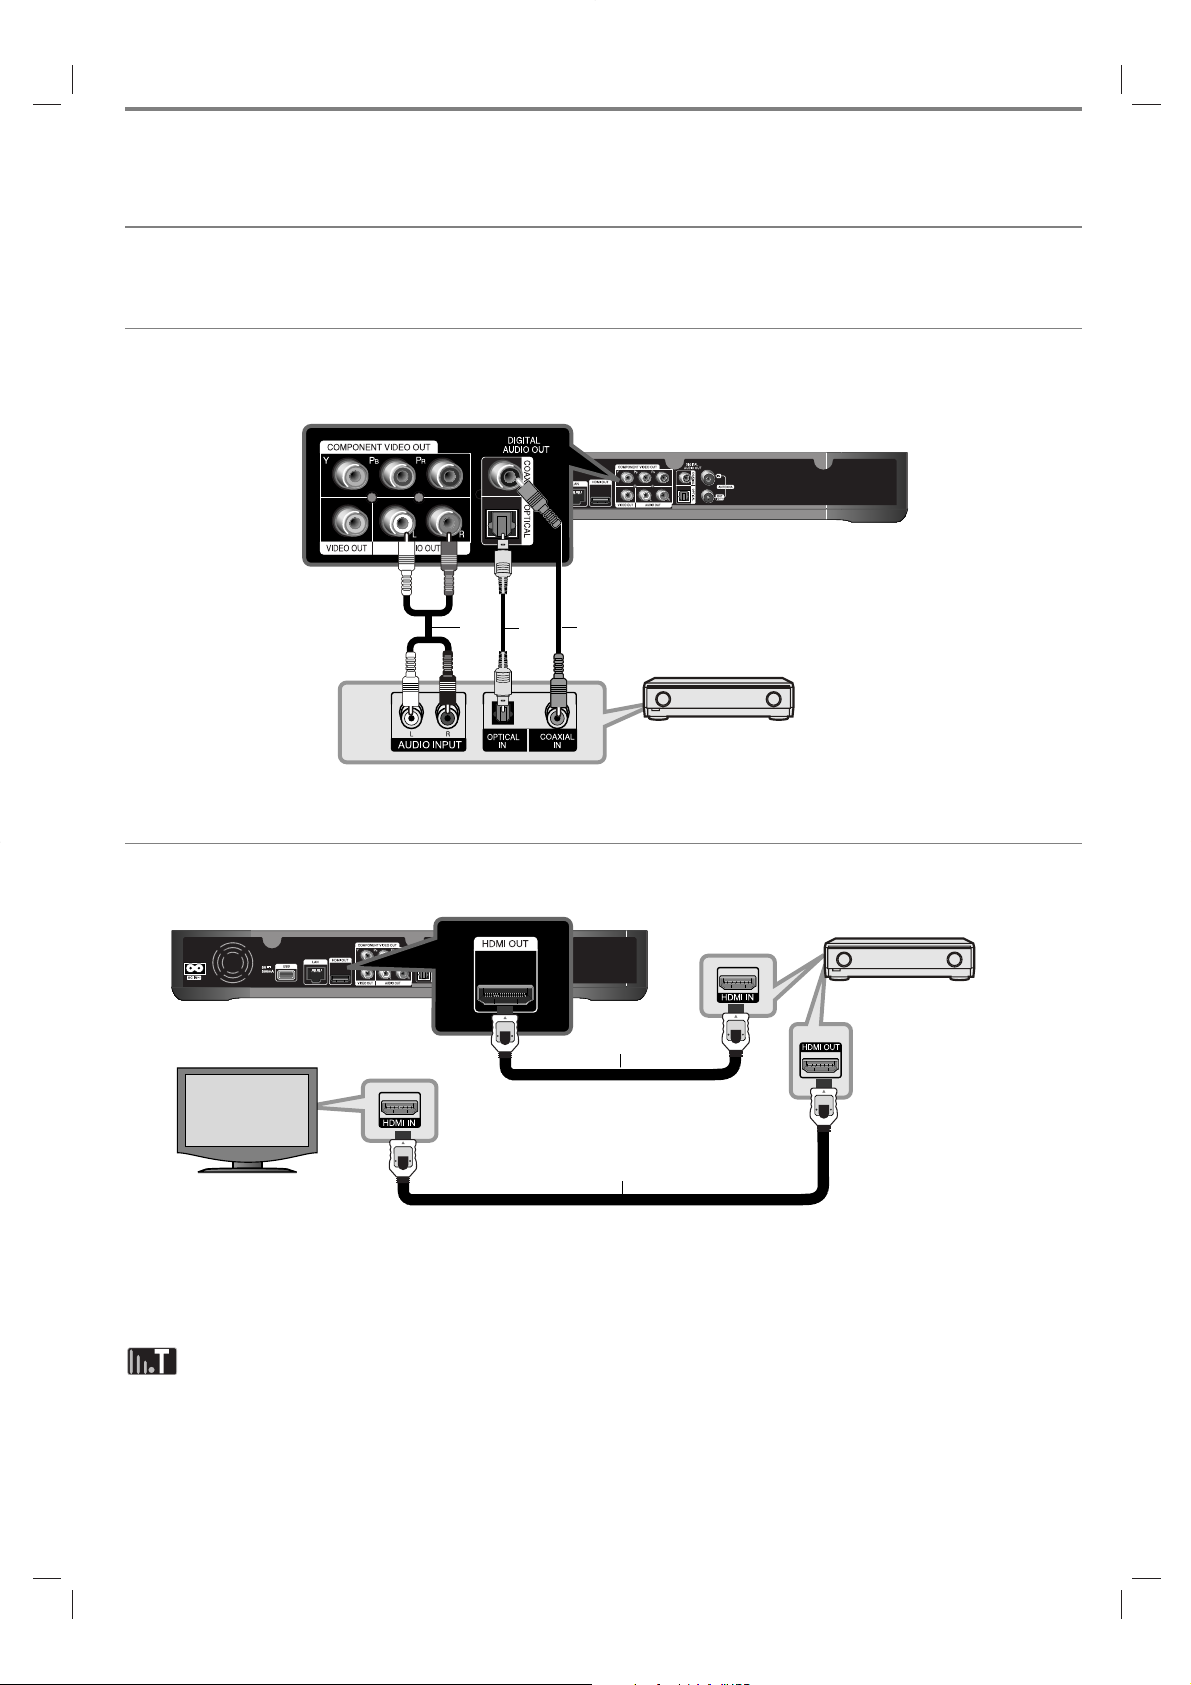
Connecting to an Amplifier via Digital Audio Output (Optical or Coaxial)
Connect the player’s DIGITAL AUDIO OUT (OPTICAL or COAXIAL) jack to the corresponding in jack (OPTICAL O or
COAXIAL X) on your amplifier. Use an optional digital (optical O or coaxial X) audio cable. You will need to activate the
unit’s digital output. (See “[Audio] Menu” on page 46.)
Connecting to an Amplifier via HDMI Output
Connect the unit HDMI OUT jack to the corresponding in jack on your amplifier. Use a HDMI cable (H1). You will need
to activate the player’s digital output. (See “[Audio] Menu” on page 46.)
Digital Multi-channel sound
A digital multi-channel connection provides the best sound quality. For this you need a multi-channel Audio/Video
Receiver that supports one or more of the audio formats supported by your player. Check the receiver manual and the
logos on the front of the receiver. (LPCM, Dolby Digital and DTS)
Connect the amplifier’s HDMI output jack to HDMI input jack on your TV using a HDMI cable (H2) if your amplifier has
HDMI output jack.
Amplifier/Receiver
Amplifier/Receiver
A
O
X
H1
H2
This recorder can be connected to the local area network (LAN) via the LAN port or the wireless LAN adapter.
Be sure to set the network configuration before using this recorder.
You can use the wired and/or wireless network depending on your network environment.
14
Network connection
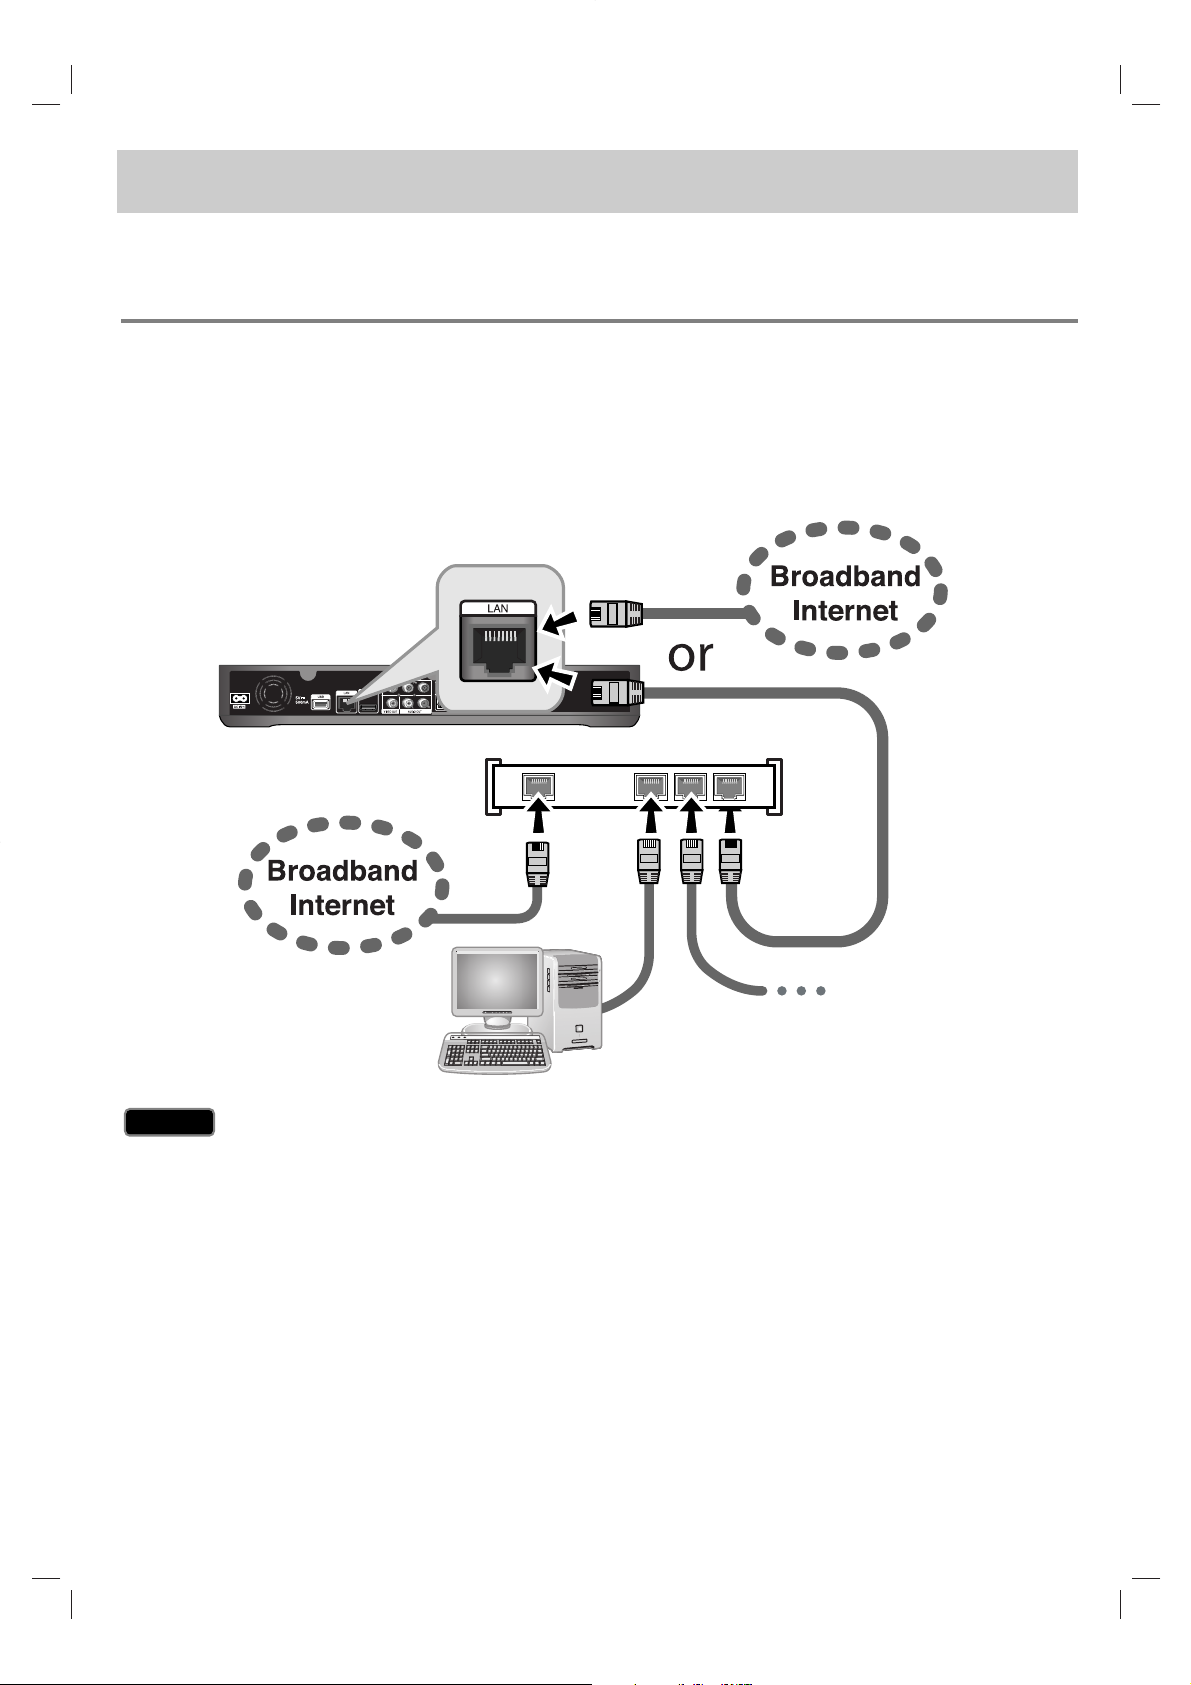
Wired network connection
Using a wired network provides the best performance, because the attached devices connect directly to the network
and are not subject to radio frequency interference.
Please refer to the documentation for your network device for further instructions.
The following connection example explain how to connect to the internet using LAN cable.
If you want to access content from PCs or DLNA servers, this recorder must be connected to the same local area network with them via a router.
When plugging or unplugging the LAN cable, hold the plug portion of the cable. When unplugging, do not pull on the
LAN cable but unplug while pressing down on the lock.
Do not connect a modular phone cable to the LAN port.
Since there are various connection configurations, please follow the specifications of your telecommunication carrier
or internet service provider.
Caution
Caution
Router
Other devices
such as DLNA server
PC
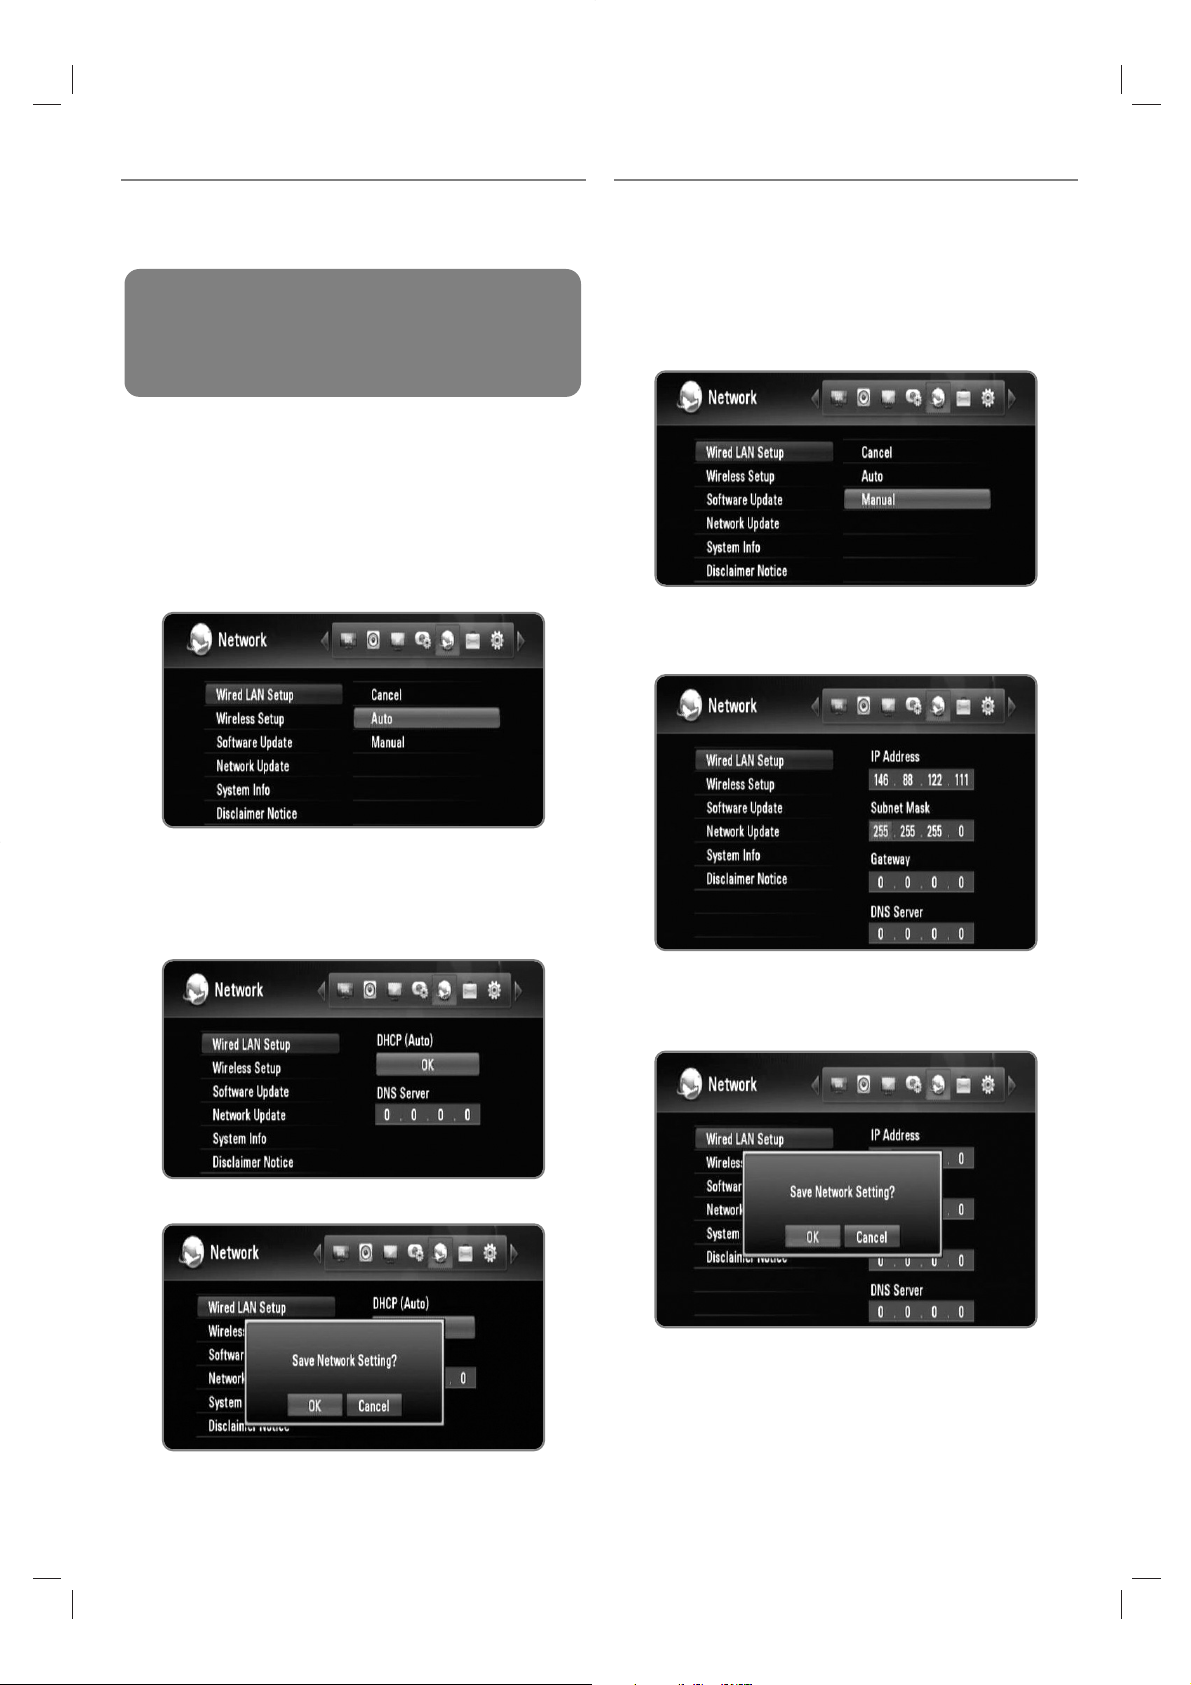
Wired network setting (Auto)
If there is a DHCP server on the local area network (LAN)
via wired connection, this recorder will automatically be
allocated an IP address.
1 Press HOME.
2 Use b/B to select the [Setup], and press OK.
3 Use b/B to select the [Network] option.
4 Use v/V to select the [Wired LAN Setup], and press
OK.
5 Use v/V to select the [Auto], and press OK.
If you want to set the IP address of the DNS server,
use v V/b/B to select the [DNS server IP
address] field and input the IP address using
numerical buttons.
6 Use v/V to select the [OK], and press OK.
7 Use b/B to select the [OK], and press OK.
Wired network setting (Manual)
If there is no DHCP server on the network and you want
to set the network manually, follow the instructions as
below.
1 Follow the steps 1-3 from “Wired network setting
(Auto)” on page 15.
2 Use v/V to select the [Wired LAN Setup], and press
OK.
3 Use v/V/b/B to move to the [IP Address], [Subnet
Mask], [Gateway] and [DNS Server] fields, and fill
them using numerical buttons.
4 Press OK when you finish inputting all the network
information.
5 Use b/B to select the [OK], and press OK.
15
Preparation:
Before setting the wired network, you need to:
– connect the broadband internet to your home
network.
16
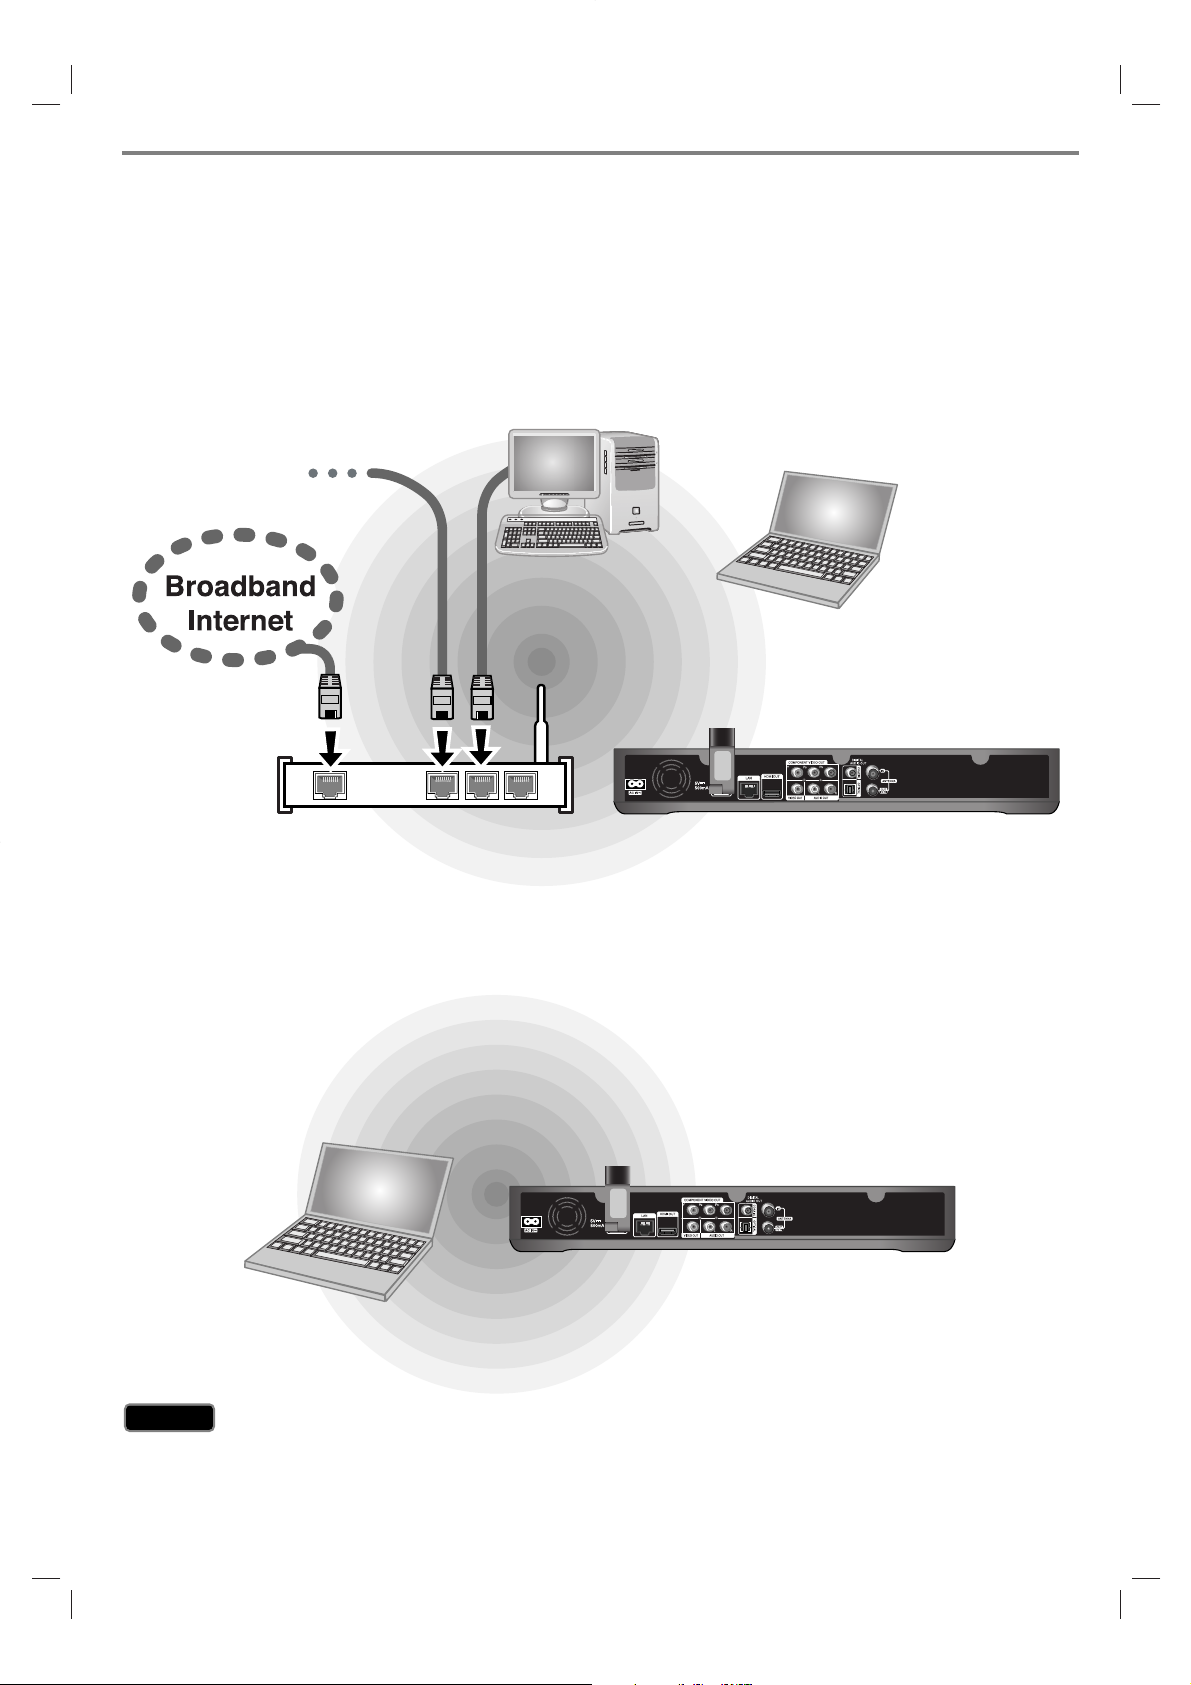
Wireless network connection
Another network connection is using the supplied wireless adapter.
This recorder supports an IEEE 802.11n wireless module using supplied wireless LAN adapter, which also supports the
802.11b/g standards. For the best wireless performance, we recommend the use of a IEEE 802.11n certified Wi-Fi
network (access point or wireless router).
Refer to the setup instructions supplied with your access point or wireless router for detailed connection steps and
network settings.
The following connection example explain how to connect to the internet using an access point or wireless router.
If you want to access content from PCs or DLNA servers, this recorder must be connected to the same local area network with them via a wireless network device.
If you do not have a wireless network at your home, you can connect directly to the wireless network equipped
computer using peer to peer (Ad-Hoc) setting.
Refer to page 18 for more information of peer to peer connection.
Using wireless network can be affected by the household devices using radio frequencies.Therefore, operating quality
may not good with wireless network connection. Wired network connection is strongly recommended.
Caution
Caution
Other devices
such as DLNA server
PC
PC
Wireless
communication
Access point
or wireless router
Wireless
communication
17
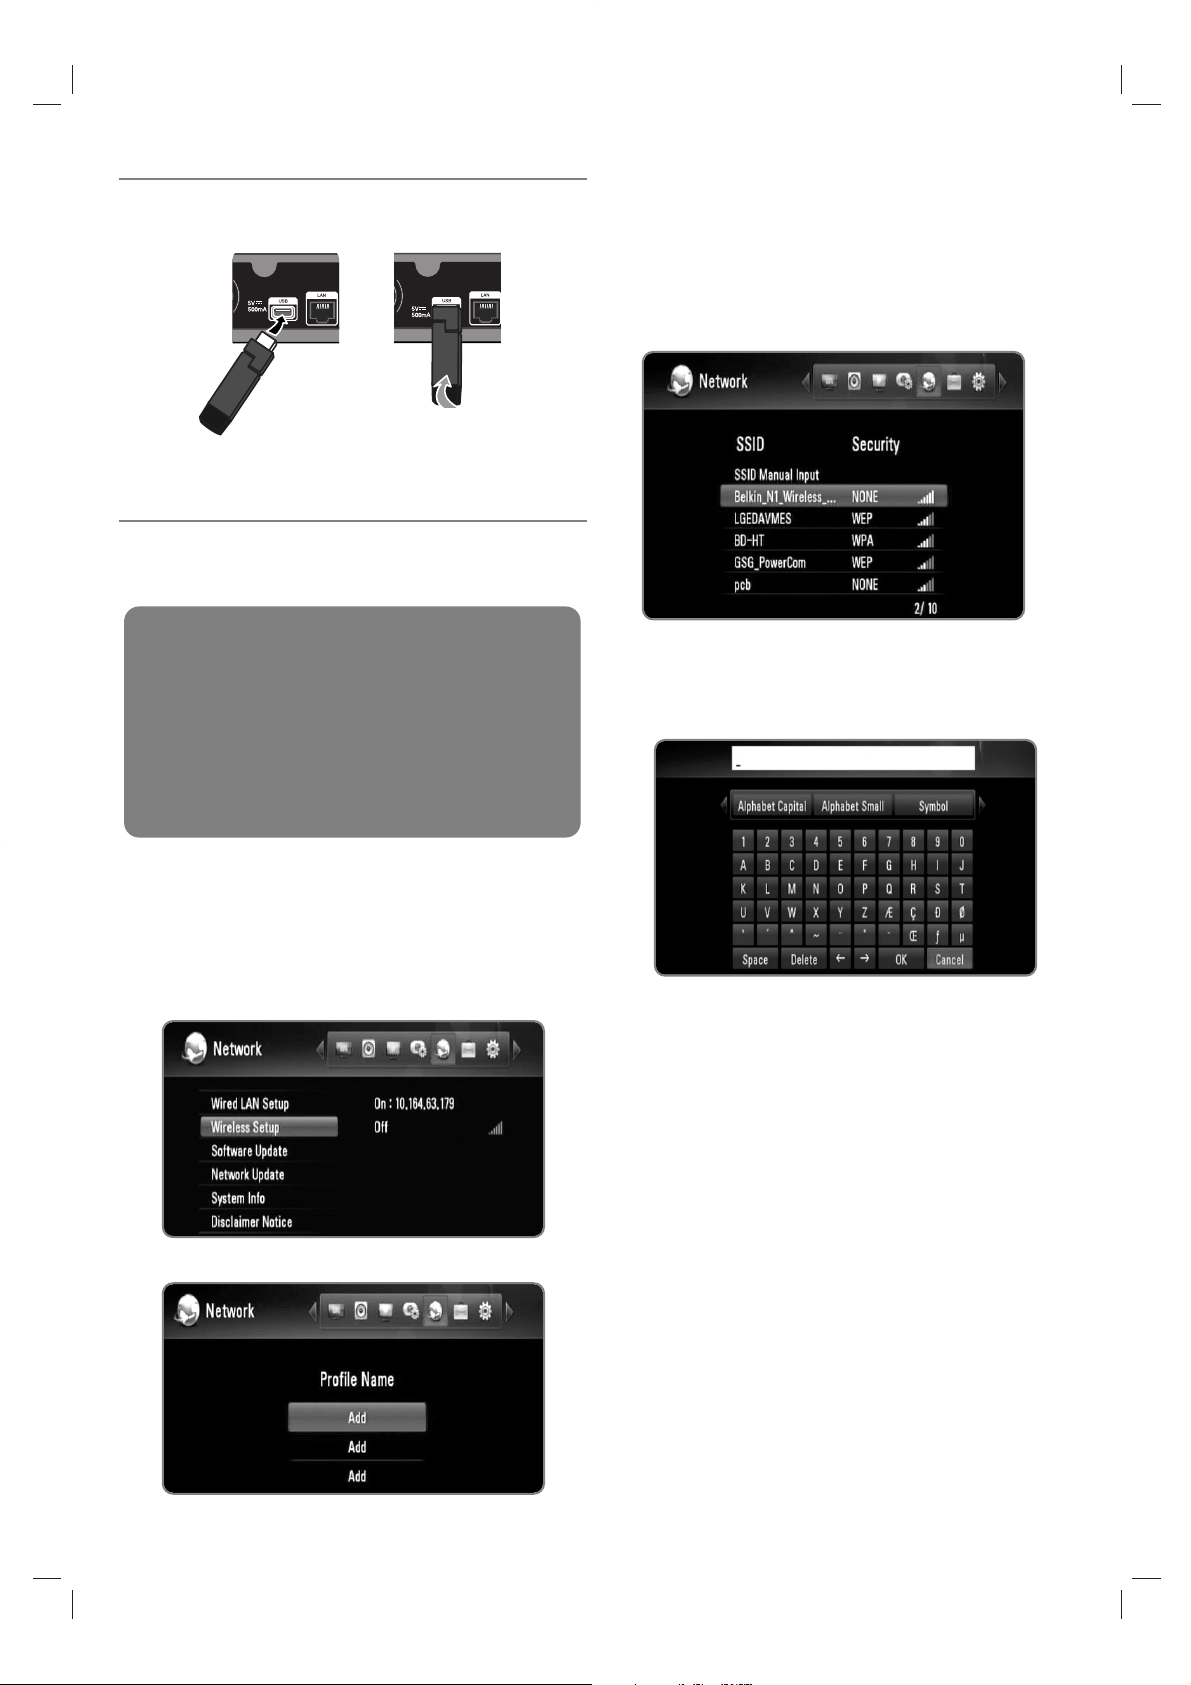
Wireless LAN adapter connection
1 Connect the supplied wireless LAN adapter to the
USB port on the rear panel.
2 Fold the wireless LAN adapter to the upper direction.
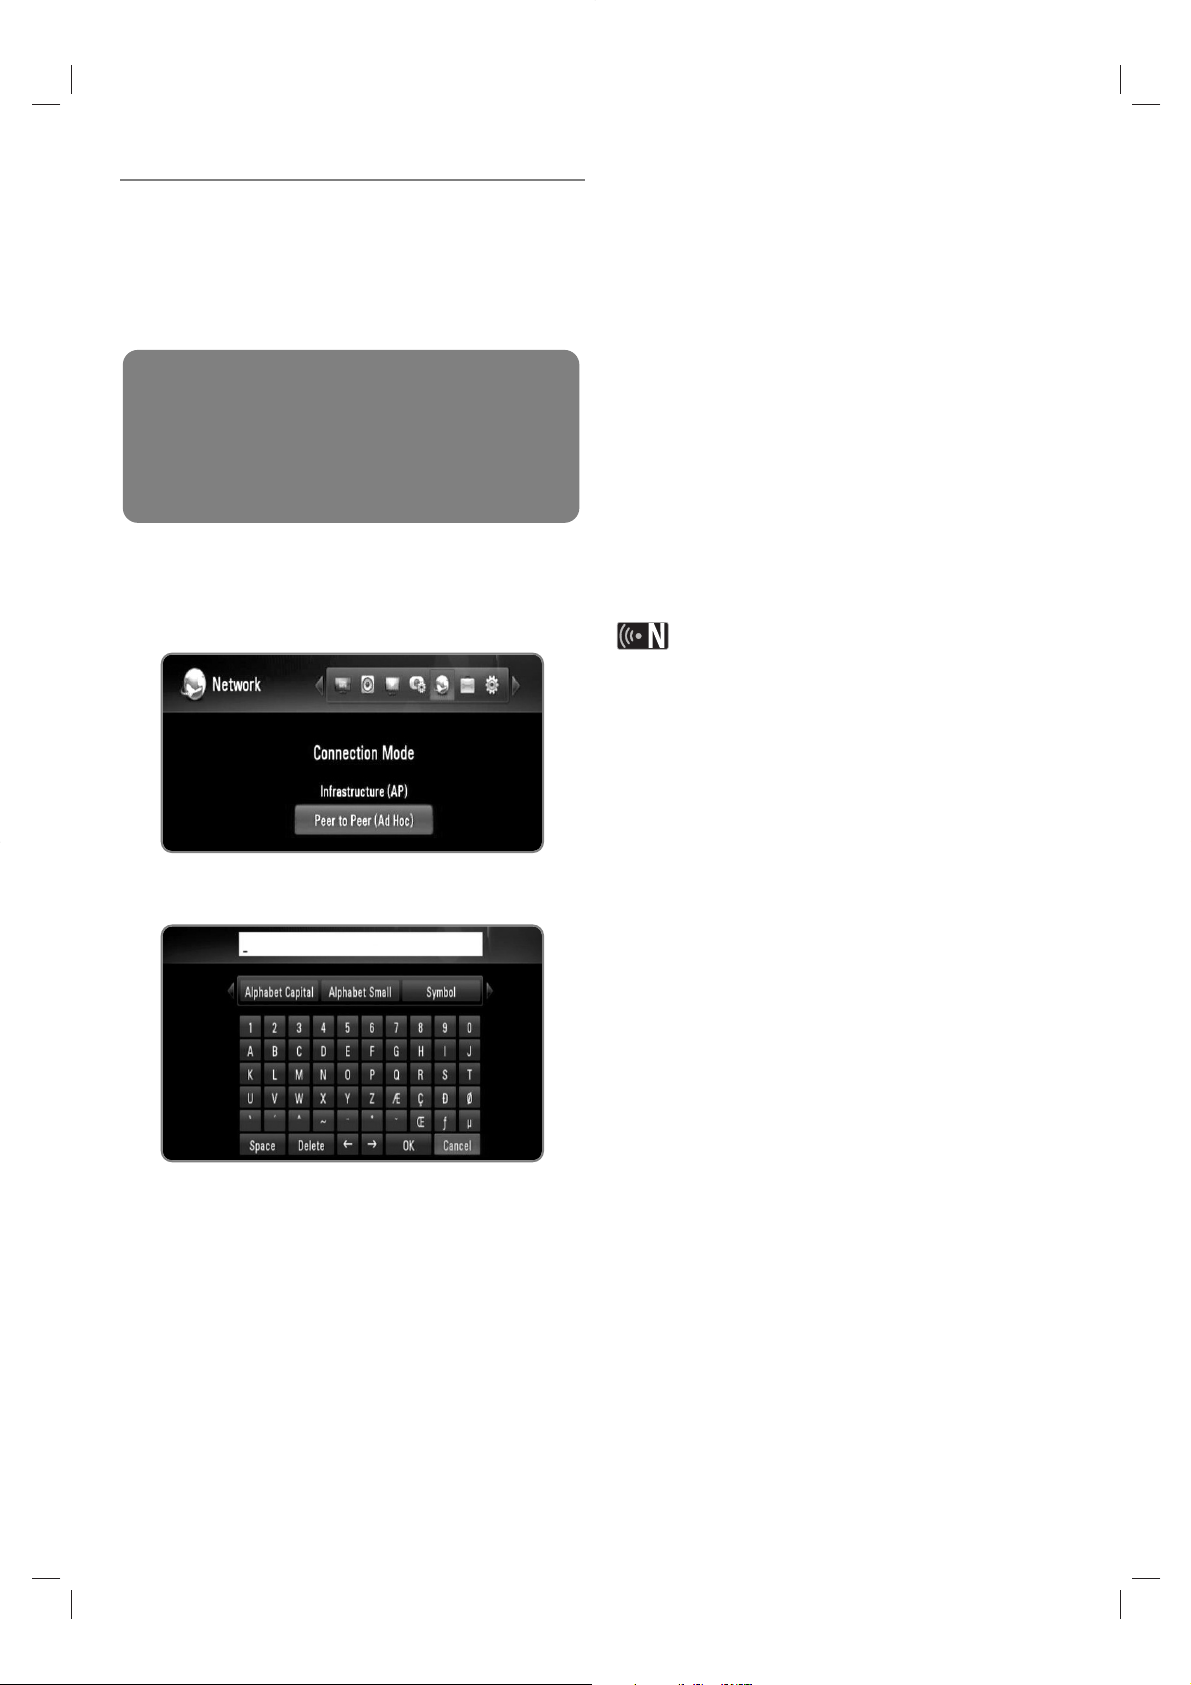
Wireless network setting (Infrastructure)
If there is a DHCP server on the local area network (LAN)
via wired connection, this recorder will automatically be
allocated an IP address.
1 Press HOME.
2 Use b/B to select the [Setup], and press OK.
3 Use b/B to select the [Network] option.
4 Use v/V to select the [Wireless Setup], and press
OK.
5 Use v/V to select a [Profile Name], and press OK.
A maximum of 3 profile names can be set for the
wireless network setup.
6 Use v/V to select the [Infrastructure (AP)], and press
OK.
The recorder scans for all of the available access
points or wireless routers within range and displays
them as a list.
7 Use v/V to select a SSID, and press OK.
If you have security on your access point or wireless
router, verify that the WEP or WPA key that was
entered into the recorder matches the router’s
information exactly.
You need to input the security code as necessary.
Select [Alphabet Capital], [Alphabet Small] or
[Symbol], and press OK to change the character set
of the virtual keyboard.
[Space]: Inserts a space at the cursor position.
[Delete]: Delete a previous character at the cursor
position.
[T t]: Moves cursor to the left or right.
[OK]: Complete inputting security code.
[Cancel]: Cancels the naming, and return to the
previous.
8 Check the network information, and press OK to finish
the network setup.
Preparation:
Before setting the wireless network, you need to:
– connect the broadband internet to the wireless
home network.
– connect the wireless LAN adapter on the USB
port.
– set the access point or wireless router.
– note the SSID and security code of the network.
Wireless network setting (peer to peer)
If you do not have a wireless network device at your
home, you can connect directly to the wireless network
equipped computer using [Peer to Peer (Ad Hoc)]
setting.
For this connection, features which require internet
connection such as YouTube, Picasa web albums cannot
be operated.
1 Follow the steps 1-5 from “Wireless network setting
(Infrastructure)” on page 17.
2 Use v/V to select the [Peer to Peer (Ad Hoc)], and
press OK.
3 Use v/V to select the [Wireless SSID], and press OK
to display the virtual keyboard.
Select [Alphabet Capital], [Alphabet Small] or
[Symbol], and press OK to change the character set
of the virtual keyboard.
[Space]: Inserts a space at the cursor position.
[Delete]: Delete a previous character at the cursor
position.
[T t]: Moves cursor to the left or right.
[OK]: Complete inputting SSID.
[Cancel]: Cancels the naming, and return to the
previous.
4 If you want to set the security, use v/V to select the
[Shared key (WEP)], and press OK to display the
virtual keyboard.
Refer to step 3 above for using virtual keyboard.
If you do not want to set the security for the wire-
less connection, select the [Open System], and
press OK.
5 Use v/V to select the [Host IP] field, and input the IP
address using numerical buttons.
Using default IP address is recommended.
6 Press yellow coloured button to complete the [Ad-Hoc
Setup] settings.
7 Check the network information, and press OK to finish
the network setup.
8 On your computer, the SSID you have set can be
found on the wireless network list.
Please refer to the documentation for your comput-
er or operating system for further instructions.
There may be various ways to get Ad-Hoc connection
to your computer depending on the operating system,
wireless network application,
18
Preparation:
Before setting the peer to peer connection, you need
to:
– connect the wireless LAN adapter on the USB
port.
– prepare the wireless network equipped computer.
 Loading...