

LG MH-1261ME Owner’s Manual

MICROWAVE/GRILL/
CONVECTION
OWNER'S
MODEL
PLEASE
THOROUGHLY
:
MH-1261ME
READ
THIS
BEFORE
OWNER'S
MANUAL
OPERATING.
OVEN
MANUAL

GENERAL
INSTALLATION
Install
1.
Remove
2.
Place
on
is
An
3.
Plug
and
NOTE:
your
the
air
exhaust
that
the
top
flow
your
then
This
oven
all
oven
andatthe
for
oven
your
If
your
by
following
packing
in
the
ventilation.
outletislocated
intoastandard
microwave
oven
it
plug
appliance
materials
level
rear
does
back
should
INSTRUCTIONS
three
oven
not
in.
location
for
proper
on
operate
not
simple
and
top
240
is
accessories.
of
your
ventilation.
of
the
volt
the
only
properly,
be used
steps.
choice,
oven.
household
appliance
for
commercial
but
The
Blocking
outlet.
unplug
top
on
it
make
of
the
from
sure
the
oven
the
outlet
Be
sure
circuit.
the
catering
there
should
can
the
240
purposes.
isatleast
damage
electrical
volt
household
be
2.5cm
clearsothere
kept
the
oven.
isatleast
outlet
of
space
13
amps
and
The
wiresinthis
As
the
coloured
The
wire
letter
Norcoloured
The
wire
letter
Lorcoloured
The
wire
with
the
WARNING:
mains
coloursofthe
markings
whichiscoloured
whichiscoloured
whichiscoloured
letter
Eormarked
THIS
WIRING
lead
Green
wiresinthe
identifying
blue
black.
brown
red.
green
with
APPLIANCE
are
the
the
coloured
and
mains
terminals
must
must
and
earth
INSTRUCTIONS
IMPORTANT
in
accordance
Blue
Brown
Yellow
leadofthis
in
be
connected
be
connected
yellow
symbol
:
:
:
your
must
MUST
Neutral
Live
Earth
appliance
plug.
to
the
to
be
connected
or
coloured
BE
with
proceed
terminal
the
the
following
may
as
terminal
to
green.
EARTHED
codes.
not
correspond
follows:
whichismarked
whichismarked
the
terminal
with
the
with
the
with
the
whichismarked
If
the
supply
a
similarly
cord
is
qualified
damaged,
person
it
must
be
in
ordertoavoidahazard.
replaced
-2-
by
the
manufacturer
or
its
service
agent
or
INTRODUCTION
FOR
MICROWAVE
COOKING
HOW
YOUR
WORKS
Microwaves
and
television
Everything
a
Our
microwave
microwave
microwaves
through
heat
eventually
the
food.
moisture
very
of
the safestofall
door
producing
given
cooking
For
example,
and
than
temperature.
the
coffee
the
as
dishes
the
As
each
in
safe
is
affecting
eggs
power
time.
sink,
microwaves
through
effect.
constructed
of
into
and
area
Microwaves
wallsofthe
materials
the materials
cooking
not
will
by
the
molecules
second.
against
friction,
A
one
the
stops
Factors
times
approximate
affect
ingredients
difference
milk,
bake
room
Also,
cooking
are
a
waves
emits
pot,
spread
atmosphere
microwave
in
such
energy.
energy
are
openings
cannot
oven,
glass,
out
are
cookware,
get
Rather,
in
foods
to
vibrate,
the
water
other,
causes
turn,
appliance:
opened,
microwaves.
in
the
rather
times.
used
in
cooking
a
cake
will
one
made
setting
MICROWAVE
form
of
and
microwaves
even
people
outward
and
oven,
a
way
Electricity
by
then
at
pass
but
of
recipes
in
through
they
porcelain,
which
constructed.
though
hot
from
microwaves
and
2,450
molecules
producing
the
Your
home
the
oven
cooking
than
exact.
The
a
recipe
time.
made
take
considerably
with
will
energy
to
similartoradio
ordinary
---
the
---
but
as
they
disappear
however,
as
to
take
is
converted
the
magnetron
sent
into
the
the
sideofthe
the
can
penetrate
paper,
microwave-safe
Microwaves
cooking
the
heat
are
cause
the
million
times
vibrate
friction.
foodtoheat.
Microwave
appliances.
automatically
The
times:
in
this
guide
Many
temperature
makes
with
ice-cold
ingredients
determine
OVEN
daylight.
kitchen
ordinarily
travel
without
is
advantage
tube,
cooking
oven.
metal
such
and
wicker,
vessels
generated
attracted
water
per
they
This
oven
When
cooking
are
factors
of
a
big
butter,
longer
that
are
the
UTENSILS
Never
use
do
rub
to
is
microwave
your
penetrate
in
object
metal
the
wallsofthe
phenomenon
Most
heat-resistant,
utensils
oven.
that
cookware.
particular
out
Testing
the
filled
Microwave
the
to
However,
render
if it
utensil
with
water
touch,
are
utensil,
can
utensils
water
heats
the
However,
temperature,
microwaves
anditis
HOW
not
CHARACTERISTICS
FOODS
metalormetal-trimmed
oven.
Microwaves
metal.
oven
that
safe
them
If
you
be used
in
question
at
maximum
utensilismicrowave-safe.
if
the
but the
are
safe
AFFECT
They
---
oven
resembles
for
some
unsuitable
have
there's
for
in
the
but the
up,
water
being
for
will
bounce
Just
as
---
and
non-metallic
use
in
your
contain
may
doubts
any
a
simple
in
your
microwave
next
microwave
power
does
not
utensil
absorbed
use
in
the
MICROWAVE
to
utensil
utensils
off
bounce
they
cause
lightning.
cooking
microwave
as
microwave
about
way
microwave
use:
a
glass
oven.
for1minute.
remains
change
becomes
by
microwave
cannot
any
"arcing"
materials
to
oven.
Place
measure
warm,
the
utensil
OF
a
find
in
metal
off
cold
oven.
the
a
If
COOKING
of
Height
foods,
than
turn
several
Density
cakes
heavy,
at
casseroles.
microwaving
do
not
foilormicrowave
to
foods:
particularly
the
lower
tall
foods
times.
of
and
dense
become
foods:
breads
foods
You
porous
The
roasts,
portion.
during
Light,
cook
such
must
and
dry
at
a
upper
will
Therefore,
cooking,
porous
more
as
take
foods
brittle.
low
power
portion
cook
sometimes
quickly
roasts
care
that
Shield
food
when
the
level.
of
tall
more
itiswise
such
than
and
outer
edges
quickly
to
as
edges
with
-3-
Starting
of
must
frozen
foods
cook
food
Temperatures:
directly
or
refrigerated
temperature
Moisture
are
such
either
covered
Sizeoffoods:
the
also
a
roomy
the
attracted
as
roasts
be
sprinkled
so
pieces
a
good
pan
pieces
content
of
from
cooking.
much
food
by
of
oven
food
you
time.
at
Quantity
in
your
how
more
cooking
times
recipe.
Bone
and
fat
conduct
microwave
taken
that
become
Foods
the
heat,
when
meats
overdone.
with
(Christmas
instance)
hot
fire
Shape
about
thick
the
the
by
convection.
possible
microwaved
burn
Round
microwave
need
and
burn
in
your
of
foods:
2.5cm
foodsiscooked
outside
outer
2.5cm
microwave
shape
before
long
thin
The
initial
affects
the
heat.Asinaconventional
takes
longer
while
food,
cooks
most
of
moisture,
by
and
some
with
as
to
retain
The
smaller
foodinthe
ideatomicrowave
so
that
all
sides,
foods:
remains
is
The
being
place
Remember
least
one-third
content
and
large
energy.
Therefore,
cooking
do
not
a
fat
high
puddings
careful
---
easily
oven.
Microwaves
into
foods: the
travels
foods
the
of
energy
It
follows,
forafood
isathick
the
and
most
inward.Inother
any
length
to
cook
food
at
quickly.
foods:
Since
relatively
vegetables
water
priortocooking
steam.
and
oven,
the
microwaves
thus
number
constant
cooked.
in
the
oven,
to
decrease
when
of
foods:
amounts
bonyorfatty
cook
unevenly
and
sugar
and
mince
timing,
possibly
interior
as
the
heat
food
is
the
rest
that
then,
that
square;
centre
is
ring-shaped
successfully.
temperature
of
time
than
does
room
microwaves
dry
should
more
uniform
the
better.Itis
cut-cup
can
ensuring
of
microwaves
regardless
Therefore,
the
longer
cooking
having
Bones
of
fat
care
must
cutsofmeat
and
content
for
pies,
can
they
even
causing
penetrate
portion
generated
words,
actually
is
cooked
the
worst
istobe
the
corners
even
warm.
foods
they
oven,
foods
foods
get
even
a
attract
be
do
get
only
cooked
by
of
the
the
very
of
only
will
on
not
SPECIAL
MICROWAVE
Arranging
as
baked
d'oeuvres
oven
an
circular
another.
or
Stirring:
all
microwaving
cooking,
blending.
stirredinorder
in
a
Always
as
the
outsideoffoods
Turning
and
whole
the
top
idea
good
Shielding:
microwaves,
corners
shaped
overcooking.
make
sure
else
you
Elevating:
elevated
the
underside
by
Browning:
for
fifteen
their
own
shorter
browning
The
most
Worcestershire
sauce
and
amounts
the
foods,
altered.
to
TECHNIQUES
and
potatoes,
will
heat
distance
equal
pattern.
Stirring
foods
Microwaved
stir
from
over:
chickens
and
bottom
to
turn
Strips
are
or
edges
foods
to
Never
the
foil
cause
may
Thickordense
so
that
Meats
minutes
fat.
Foods
of
period
sauce
commonly
bouquet
of
browning
original
COOKING
spacing:
cupcakes,
more
is
one
stirred
foods,
spread
outside
tall
should
will
cut-up
of
aluminum
sometimes
of
square-
use
is
tightly
"arcing".
and
centre
and
or
longer
that
time
may
achieve
used
sauce.
sauces
flavours
apart,
stack
of
heats
cook
too
poultry
soy
Never
techniques.
are
to
the
Large,
prevent
microwaves
to
sauce,
Individual
evenlyifplaced
foods
the
In
for
the
however,
and
toward
foods
be
evenly.
chicken
placed
and
those
much
secured
foods
can
of
will
are
cooked
be
all
browning
sauce,
Since
or
IN
foods
and
hors
preferably
on
most
important
conventional
purpose
redistribute
the
first.
such
as
turned,
Itisalso
and
chops.
which
foil,
over
rectangular-
portions
foil,
to
are
often
be absorbed
the foods.
that
are
brown
for
brushed
appetising
sauces
barbecue
relatively
are
added
recipes
are
such
in
in
of
top
of
are
heat.
centre,
roasts
so
that
block
the
from
and
dish
cooked
lightly
a
with
colour.
small
to
not
the
a
one
of
a
or
in
a
are
-4-

PRECAUTIONS
TO
AVOID
POSSIBLE
EXPOSURE
MICROWAVE
Do
not
attempttooperate
harmful
Do
residuetoaccumulate
Do
properly
loosened),
The
not
not
oven
exposure
place
operate
and
(3)
should
any
the
that
door
personnel.
WARNING
Please
subsequent
*
ensure
DO NOT
OPERATING.
cooking
damage
TOUCH
TO
the
to
microwave
between
object
on
sealing
oven
if it
is
there
is
no
damage
and
adjustedorrepaired
times
the
oven.
FRONT
not
seals
be
to
THE
ENERGY
oven
with
energy.
the
oven
surfaces.
damaged.
sealing
are
correctly
GLASS;
EXCESSIVE
the
door
It
It
to
the
surfaces.
open
is
important
front
face
is
particularly
door
(1)
by
anyone
set
as
over
THIS
GLASS
not
and
bent,
cooking
since
to
the
important
(2)
except
IS
VERY
door
open
tamper
with
doororallow
that
hinges
and
properly
resultinfire
may
HOT
operation
the
safety
soilorcleaner
the
oven
latches
qualified
DURING
can
interlocks.
door
(broken
service
and
HEATER
result
closes
in
or
-5-
TABLE
OF
CONTENTS
FEATURES
CONTROL
HOW
COOKING
OPERATING
COOKING
OPERATING
TO
REGULAR
"JET
"MICRO
"CONVECTION"
"GRILL"
"COMBINATION"
PANEL
THE
MICROWAVE/GRILL/CONVECTION
FLOW
CHART
PROCEDURE
GUIDE
INSTRUCTIONS
SET
THE
TIME
TIMER
START"
POWER"
COOKING
COOKING
OF
COOKING
COOKING
DAY
OVEN
WORKS
7
8
9
10
11
13
15
15
16
16
17
18
20
22
"AUTO
"AUTO
TWO-STAGE
ROTISSERIE
SAFETY
CLEANING
PRECAUTIONS
QUESTIONS
COOKING
SPECIFICATIONS
WEIGHT
WEIGHT
AND
AND
UTENSILS
DEFROST"
COMBINATION"
COOKING
CARE
ANSWERS
COOKING
23
24
25
27
29
30
31
32
32
-6-

FEATURES
SEE-THROUGH
DOOR
AIR
VENTS
CONTROL
PANEL
Remove
Your
CONVECTION
GRILL
your
oven
will
Turntable
Rotating
Convection
Grill
Rack
Cookbook
Owner's
Roti-Bar
Roti-Handle
SARETY
INTERLOCK
SYSTEM
RACK
RACK
Microwave/Grill/Convection
be
packed
Ring
Manual
Rack
Asm
with
the
TURN
ROTATING
following
Oven
material:
TABLE
RING
and
ASM
all
material
from
ROTI-HANDLE
the
1
Each
1
Each
1
Each
1
Each
1
Each
1
Each
1
Each
1
Each
ROTI-BAR
shipping
carton.
Do
not
use
this
This
Microwave/Grill/Convection
Do
not
convection
operate
and
Microwave/Grill/Convection
Oven
the
oven
at
microwave
grill
rack
placed
in
the
is
made
and
cavity
Oven
for
for
combination
when
-7-
commercial
household
mode
oven
is
use
with
empty.
purposes.
only.
Roti-Bar,
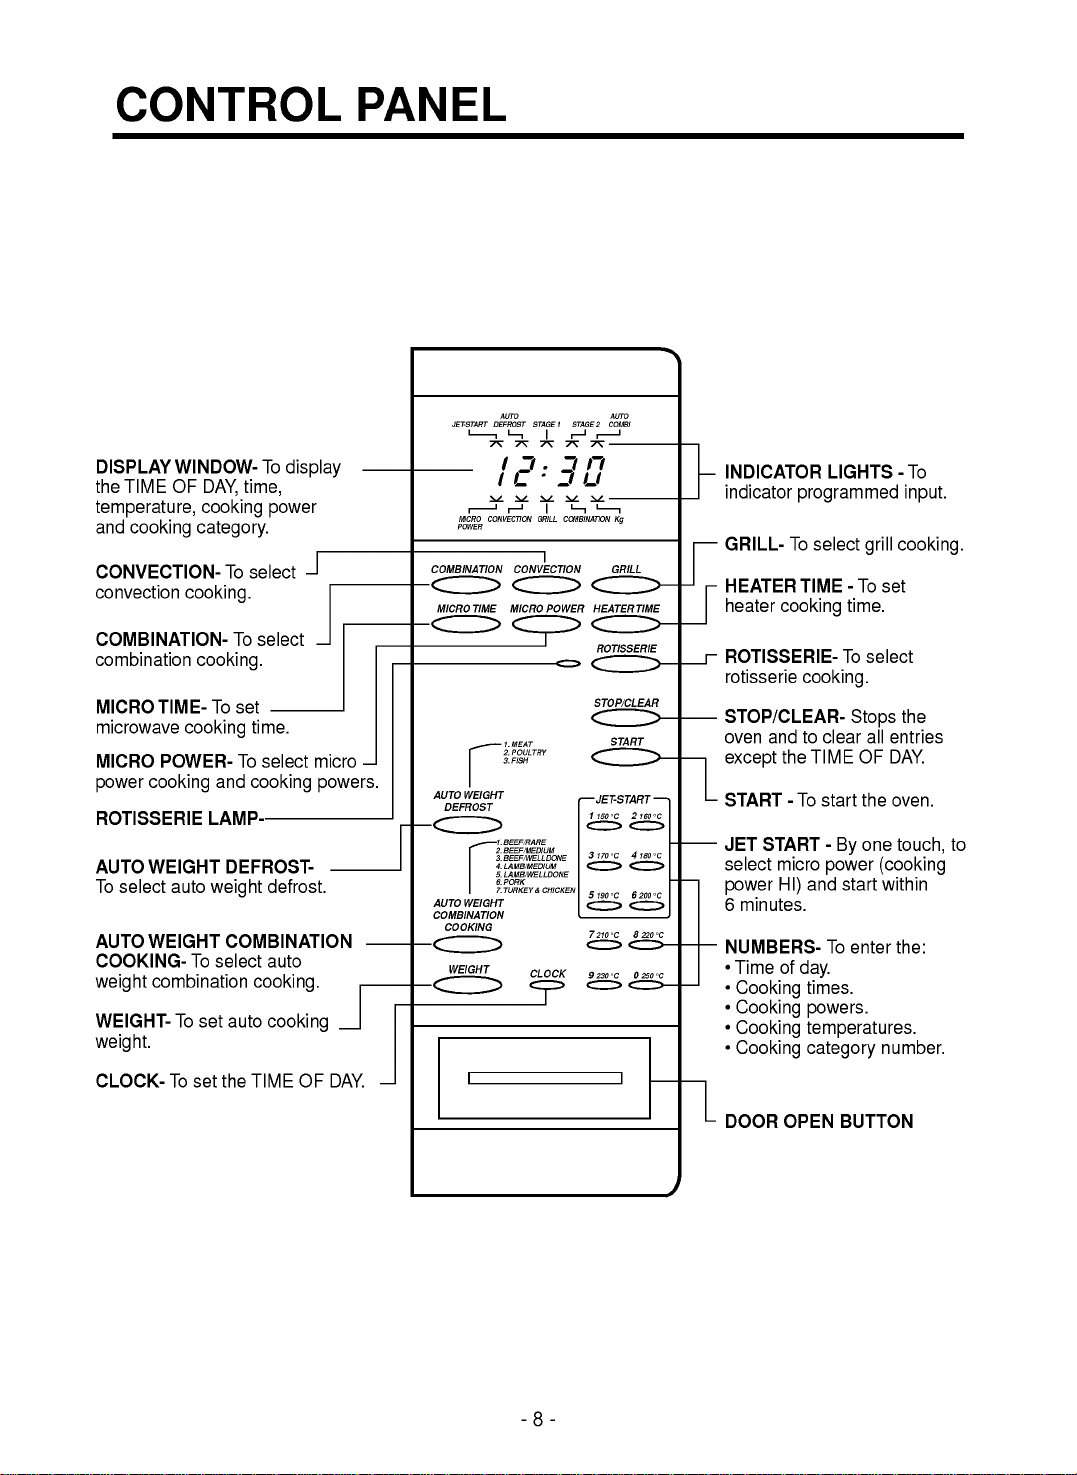
CONTROL
PANEL
DISPLAY
the
temperature,
and
TIME
cooking
WINDOW-
OF
CONVECTION-
convection
COMBINATION-
combination
MICRO
TIME-
microwave
MICRO
power
POWER-
cooking
ROTISSERIE
AUTO
WEIGHT
To
select
auto
AUTO
WEIGHT
COOKING-
combination
weight
WEIGHT-
To
weight.
CLOCK-
To
DAY,
cooking
category.
To
cooking.
To
cooking.
To
set
cooking
To
and
LAMP-
DEFROST-
weight
COMBINATION
To
select
set
auto
set
the
To
display
time,
power
select
select
time.
select
cooking
defrost.
auto
cooking.
cooking
TIME
OF
micro
powers.
DAY.
JET-START
MICRO
POWER
COMBINATION
MICRO
AUTO
DEFROST
AUTO
COMBINATION
COOKING
WEIGHT
CONVECTION
TIME
WEIGHT
WEIGHT
AUTO
DEFROST
STAGE1STAGE
12:30
GRILL
CONVECTION
MICRO
POWER
1.
MEAT
2.
POULTRY
3.
FISH
1.
BEEF/RARE
2.
BEEF/MEDIUM
3.
BEEF/WELLDONE
4.
LAMB/MEDIUM
5.
LAMB/WELLDONE
6.
PORK
7.
TURKEY&CHICKEN
CLOCK
COMBINATION
1150°C
3170°C 4180°C
5190°C
7210°C
9230°C
AUTO
COMBI
2
Kg
GRILL
HEATER
ROTISSERIE
STOP/CLEAR
START
JET-START
TIME
2160°C
6200°C
8220°C
0250°C
INDICATOR
indicator
GRILL-
To
HEATER
heater
cooking
ROTISSERIE-
rotisserie
STOP/CLEAR-
oven
andtoclear
the
except
START-To
JET
START
select
micro
HI)
power
6
minutes.
NUMBERS-
?
Time
of
?
Cooking
?
Cooking
?
Cooking
?
Cooking
LIGHTS-To
programmed
select
grill
TIME-To
time.
To
select
cooking.
Stops
all
TIME
OF
start
the
-
one
By
power
To
start
enter
(cooking
and
day.
times.
powers.
temperatures.
category
input.
cooking.
set
the
entries
DAY.
oven.
touch,
within
the:
number.
to
-8-
DOOR
OPEN
BUTTON

HOW
THE
MICROWAVE/GRILL/
CONVECTION
MICROWAVE
the
Using
cooked
shape.
enter
rotating
adjusted
of
goods
best
quickly
Microwaves
the
oven
turntable.
in
to
results.
energy
CONVECTION
This
isamethod
convection
oven.
This
fan.
without
by
This
of
can
weight
the
be
evenly
heated
a
cooking
oven
and
of
without
and
Power
11
steps
cook
at
of
heater
situatedatthe
method
losing
heateriscirculatedinthe
enables
food.
The
controlled
of
food
COOKING
microwaves
altering
generated
cook
the
control
which
a
suitable
COOKING
cooking
allows
of
any
the
efficient
temperature
according
cooked.
being
only,
its
by
food
can
can
enable
power
with
hot
rear
foodtobe
the
juices.
heating
OVEN
food
colour
a
magnetron
evenly
be
a
for
air
of
browned
Air
inside
to
the
is
and
on
a
variety
the
from
the
oven
and
the
type
WORKS
the
by
GRILL
This
from
isatraditional
seals
inside
grilling
COOKING
isamethod
the
grill
and
browns
the
oven
temperature
COMBINATION
a
Using
radiant
alternately,
programmed.
fully
functions,
appearance
combination
heat,
utilizes
according
the
giving
of
heater
way
is
this
solid
This
advantages
quick
to
your
cooking
on
of
cooking
food
fixed
for
of
state
to
efficient
cooking.
with
the
evenly.
at
this
of
top
which
The
180°C,
oven.
COOKING
microwaves,
control
the
cycles
method
of
all
results
withatraditional
radiant
the
oven.
quickly
temperature
which
hot
can
of
cooking
three
heat
is
air
cook
This
ideal
and
-9-

COOKING
AUTO
AUTO
COMBINATION
CLOCK
DEFROST
WEIGHT
WEIGHT
FLOW
CHART
STAGE
START
1
STAGE
2
Cooking
AUTO
Cooking
Example:
JET
procedure
WEIGHT
program
AUTO
AUTO
AUTO
STAGE
STAGE
AUTO
JET
START
have
can
DEFROST
be
WEIGHT
WEIGHT
WEIGHT
1
1
WEIGHT
START
three
sequential
partially
DEFROST
DEFROST
DEFROST
COMBINATION
and
independently
programs.
STAGE
1
selected.
STAGE
STAGE
STAGE
STAGE
1
1
2
STAGE
2
2
-10-
 Loading...