

LG MC9280MRZ Owner’s Manual [ar,en]

OWNER’S MANUAL
MICROWAVE/GRILL/CONVECTION
Please read this owner’s manual thoroughly before operating. This is dual cycle machine
operable with 50 or 60 hz a/c power source, and is presently set up to operate at 60 hz.
If you wish to operater at 50 hz, you must contact united naghi service center:
How to read the manufactured month and year from the label stuck on the back of the product.
Ex) 2 0 5 K M ? ? 0 0 0 0 1
MC9280MRZ
MC9280XRZ
MFL30540810_06
Algorithm
Product code
Month
Year (The last digit of year)
Serial No.
www.lg.com

Precautions
Precautions to avoid possible exposure to excessive microwave energy.
You cannot operate your oven with the door open due to the safety interlocks
built into the door mechanism. These safety interlocks automatically switch off
any cooking activity when the door is opened; which in the operation of
microwave function could result in harmful exposure to microwave energy.
It is important not to tamper with the safety interlocks.
Do not place any object between the oven front face and the door or allow
food or cleaner residue to accumulate on sealing surfaces.
Do not operate your oven if it is damaged. It is particularly important that the
oven door closes properly and that there is no damage to the: (1) door(bent),
(2) hinges and latches (broken or loosened), (3) door seals and sealing
surfaces.
Your oven should not be adjusted or repaired by anyone except qualified
service personnel.
WARNING
Please ensure cooking times are correctly set as
over cooking may result in the FOOD catching fire
and subsequent damage to your oven.
When heating liquids, e.g. soups, sauces and beverages in your microwave
oven, delayed eruptive boiling can occur without evidence of bubbling. This
could result in a sudden boil over of the hot liquid. To prevent this possibility
the following steps should be taken:
1 Avoid using straight sided containers with narrow necks.
2 Do not overheat.
3 Stir the liquid before placing the container in the oven and again halfway
through the heating time.
4 After heating, allow to stand in the oven for a short time, stir or shake
them(especially the contents of feeding bottles and baby food jars) again
carefully and check the temperature of them before consumption to avoid
burns (especially, contents of feeding bottles and baby food jars).
Be careful when handling the container.
WARNING
Always allow food to stand after being cooked by
microwaves and check the temperature of them
before consumption. Especially contents of feeding
bottles and baby food jars.
2

Contents
How the Microwave Function Works
Microwaves are a form of energy similar to radio and television waves and
ordinary daylight. Normally, microwaves spread outwards as they travel
through the atmosphere and disappear without effect. Microwave ovens,
however, have a magnetron which is designed to make use of the energy in
microwaves. Electricity, supplied to the magnetron tube, is used to created
microwave energy.
These microwaves enter the cooking area through openings inside the oven.
A turntable or tray is located at the bottom of the oven. Microwaves cannot
pass through metal walls of the oven, but they can penetrate such materials
as glass, porcelain and paper, the materials out of which microwave-safe
cooking dishes are constructed.
Microwaves do not heat cookware, though cooking vessels will eventually
get hot from the heat generated by the food.
A very safe appliance
Your microwave oven is one of the safest of all home
appliances. When the door is opened, the oven
automatically stops producing microwaves. Microwave
energy is converted completely to heat when it enters
food, leaving no “left over” energy to harm you when
you eat your food.
Precautions ................................................................................ 2
Contents .................................................................................... 3
Unpacking & Installing ................................................................ 4 ~ 5
Setting the Clock ........................................................................ 6
Child Lock .................................................................................. 7
Micro Power Cooking ................................................................. 8
Micro Power Level ...................................................................... 9
Quick Start ................................................................................ 10
Grill Cooking ............................................................................ 11
Convection Preheat .................................................................... 12
Convection Cooking ................................................................... 13
Convection Combination Cooking ................................................ 14
Grill Combination Cooking ......................................................... 15
Arabic Cook .............................................................................. 16 ~ 24
Rotisserie Assembly ..................................................................... 25
Rotisserie Cook ........................................................................... 26 ~ 30
Sweet Cook ............................................................................... 31 ~ 37
My Recipe .................................................................................. 38 ~ 39
Crispy Reheat ............................................................................. 40 ~ 41
Sensor Cook .............................................................................. 42 ~ 44
Auto Defrost ............................................................................... 45
Auto weight defrost guide ........................................................... 46
Timer/Clock ............................................................................... 47
Heating or Reheating Guide ........................................................ 48
Fresh Vegetable Guide ............................................................... 49
Grill Cooking Guide ................................................................... 50
Important safety instructions ........................................................ 51 ~ 52
Microwave-safe Utensils .............................................................. 53
Food characteristics & Microwave cooking ................................... 54 ~ 55
Questions & Answers .................................................................. 56
Plug wiring information/Technical Specifications .......................... 57
3

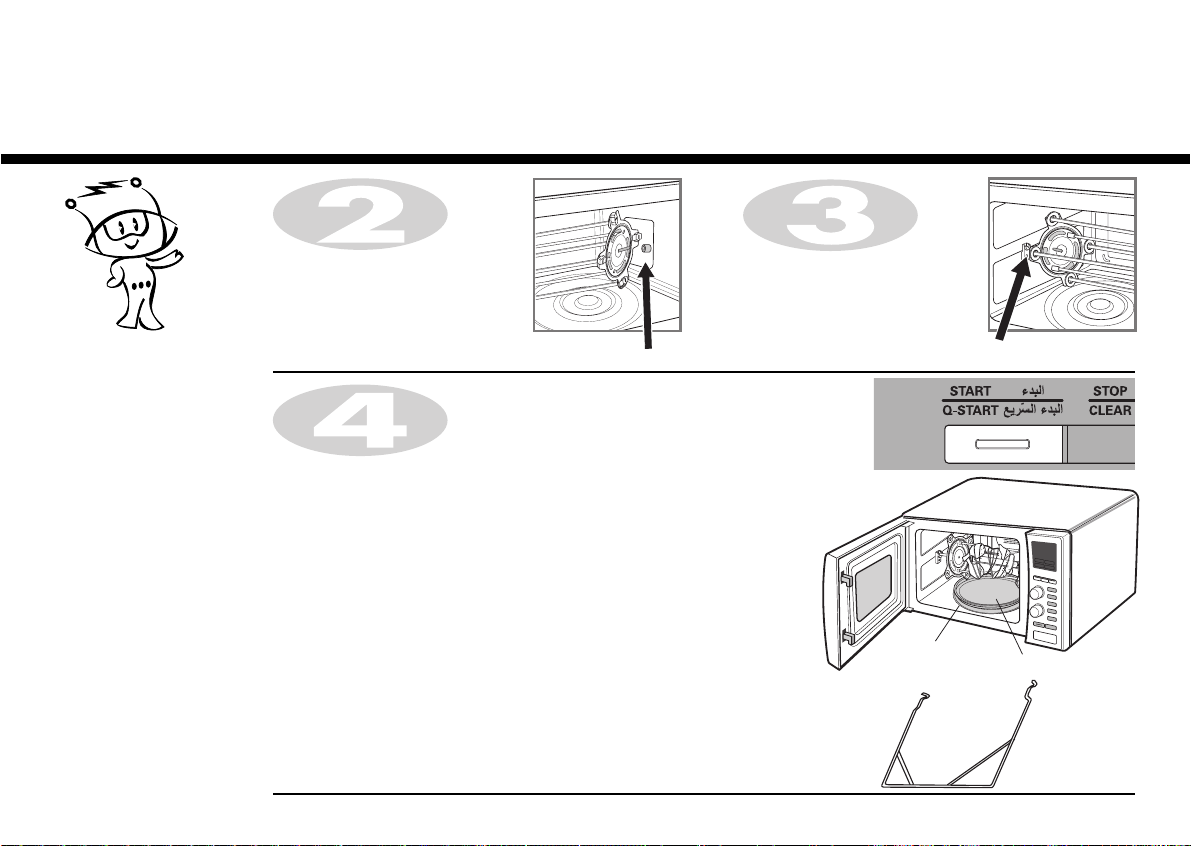
Unpacking &
Installing
Unpack your oven and place it on a flat level surface. Place the oven in the level location of your choice with
By following the basic steps on these two pages you will be able to quickly check that your oven is operating
correctly. Please pay particular attention to the guidance on where to install your oven. When unpacking your
oven make sure you remove all accessories and packing. Check to make sure that your oven has not been
damaged during delivery.
more than 85cm height but make sure there is at least
20cm of space on the top and 10cm at the rear for proper
ventilation. The front of the oven should be at least 8cm from the
edge of the surface to prevent tipping.
An exhaust outlet is located on top or side of the oven. Blocking the
outlet can damage the oven.
GRILL RACK
(HIGH RACK)
GLASS TRAY
ROTATING RING
CONVECTION RACK
(LOW RACK)
ROTISSERIE
BAR
METAL TRAY
HANDLE
* THIS OVEN SHOULD NOT BE USED FOR COMMERCIAL
CATERING PURPOSES
4
Plug your oven into a
standard household
socket. Make sure your oven is
the only appliance connected to
the socket. If your oven does not
operate properly, unplug it from
the electrical socket and then
plug it back in.
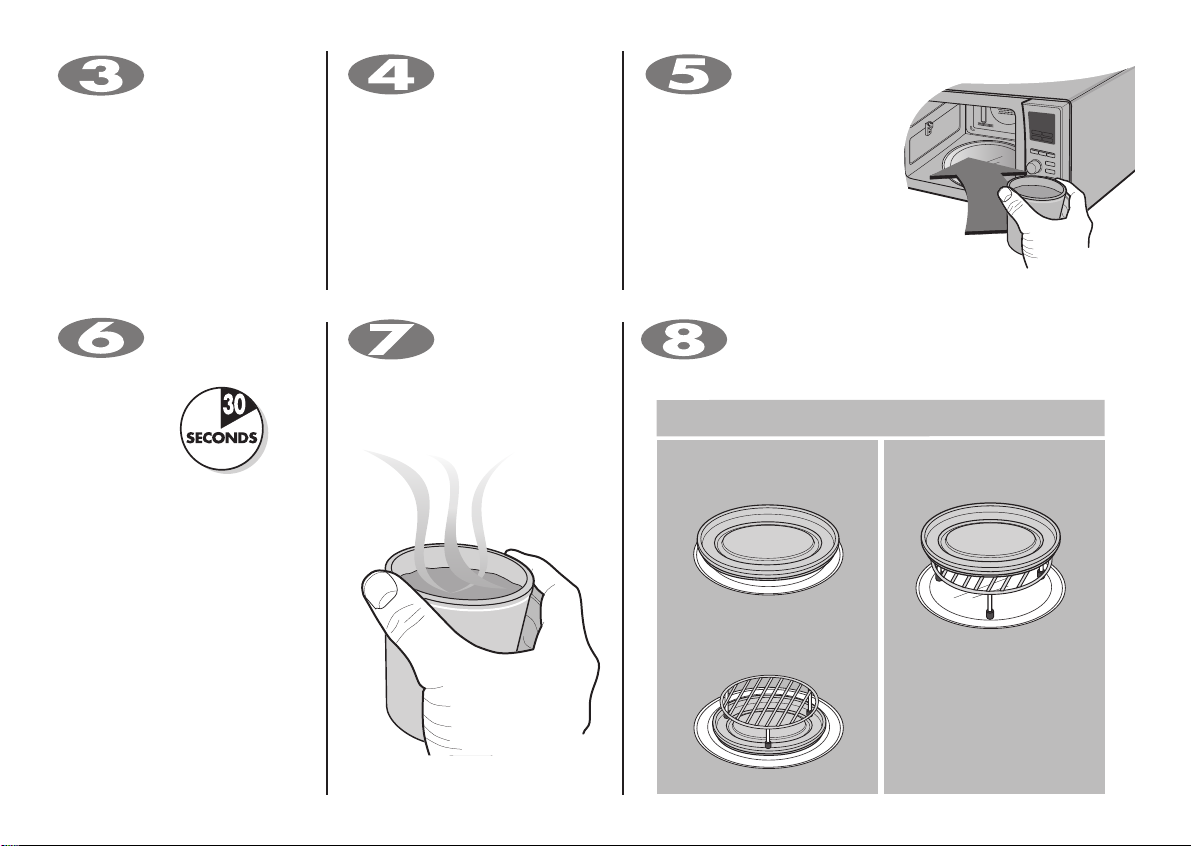
Open your oven door
by pressing the
DOOR OPEN BUTTON. Place the
ROTATING RING inside the oven
and place the GLASS TRAY on
top.
Fill a microwave
safe container with
300 ml (
1
/2
pint) of water.
Place on the GLASS TRAY and
close the oven door. If you have
any doubts about what type of
container to use please refer to
page 53.
Press the STOP
button, and press the
START button
one time to set
30 seconds of
cooking time.
You will hear a
BEEP each time you press the
button. Your oven will start before
you have finished the sixth press;
don’t worry this is normal.
The DISPLAY will
count down from 30
seconds. When it reaches 0 it
will sound BEEPS. Open the oven
door and test the temperature of
the water. If your oven is
operating the water should be
warm. Be careful when removing
the container it may be hot.
YOUR OVEN IS NOW INSTALLED
The contents of feeding bottles and baby food jars
shall be stirred or shaken and the temperature
checked before consumption, in order to avoid burns.
HOW TO USE THE ACCESSORY
Normal Abnormal
Do not operate the
appliance as shown figure.
As misuse will lead to
sparking and damage the
appliance.
5

Setting the
Clock
You can set either12 hour clock or 24 hour clock.
In the following example I will show you how to set the time for 14:35 when using the 24 clock.
Make sure that you have removed all packaging from your oven.
Press STOP/CLEAR.
When your oven is plugged in for the
first time or when power resumes after a
power cut, a ‘:’ will be shown in the
display; you will have to reset the clock.
If the clock (or display) shows any
strange looking symbols, unplug your
oven from the electrical socket and plug
it back in and reset the clock.
Press and hold Timer/Clock until “12 H” appears on the display.
Press Timer/Clock again for 24 hour clock setting.
(If you want to change different option after setting clock, you have to
unplug and plug it back in.)
Turn TIME/WEIGHT dial until display shows “14:00”.
(PRESS CLOCK KEY)
Press Timer/Clock.
Turn TIME/WEIGHT dial until display shows “14:35”.
Press START/Q-START.
The clock starts counting.
6
Press STOP/CLEAR.
Child
Lock
Your oven has a safety feature that
prevents accidental running of the oven.
Once the child lock is set, you will be
unable to use any functions and no
cooking can take place.
However your child can still open the
oven door.
Press and hold STOP/CLEAR until “CHILD LOCKED” appears on the
display and BEEP sounds.
The CHILD LOCK is now set.
To cancel CHILD LOCK press and hold STOP/CLEAR until “CHILD
LOCKED” disappears.
You will hear BEEP when it’s released.
7

Micro Power
Cooking
In the following example I will show you how to cook some food on 80 % power for 5 minutes and 30 seconds.
Make sure that you have correctly installed your oven as described
earlier in this book.
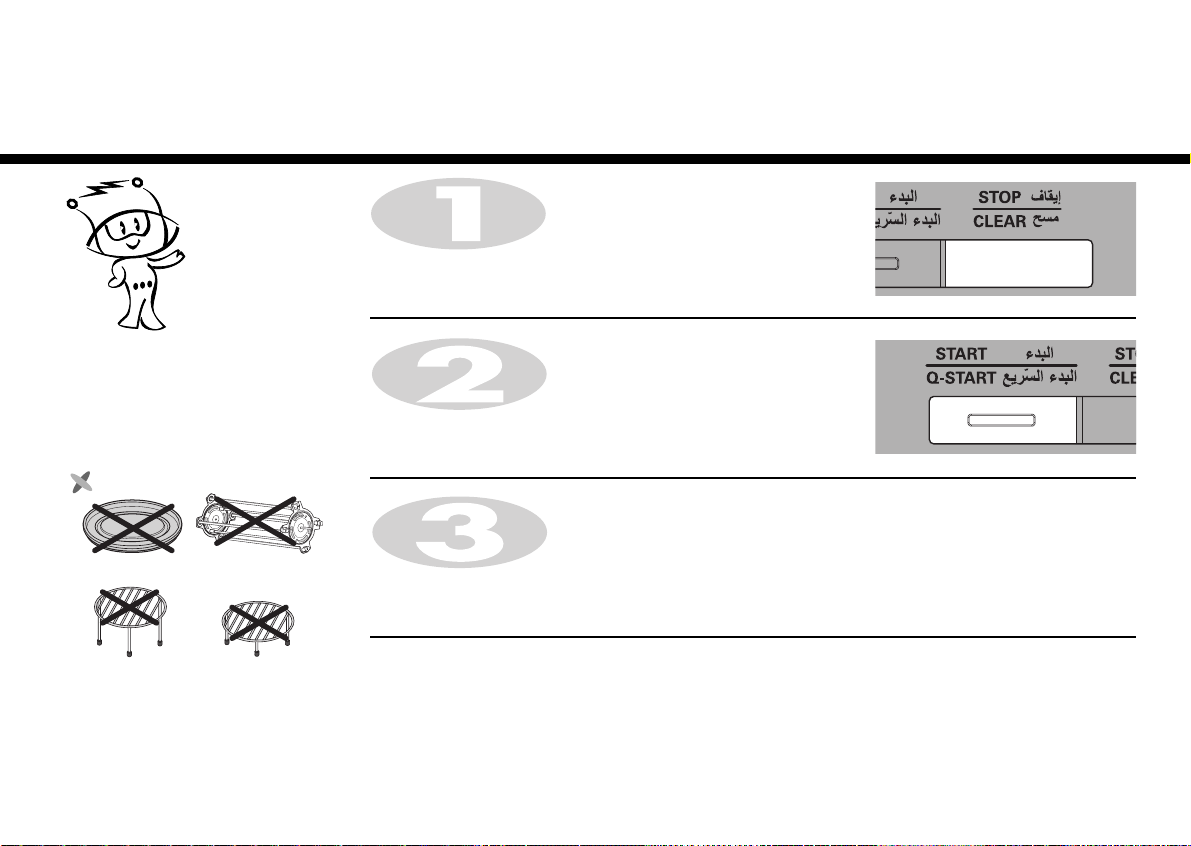
Press STOP/CLEAR.
Your oven has five microwave Power settings.
Power Output
POWER
HIGH M
AX
MEDIUM HIGH
MEDIUM
DEFROST
MEDIUM LOW
LOW
%
100 %
80 %
60 %
40 %
20 %
850 W
680 W
510 W
340 W( )
170 W
Don't Use
METAL TRAY ROTISSERIE
GRILL RACK
(HIGH RACK)
CONVECTION RACK
(LOW RACK)
Press Micro twice.
It will show 680 W.
TIME/WEIGHT dial
Turn
Press START/Q-START.
When cooking you can increase or decrease cooking time by turning
TIME/WEIGHT dial.
until display shows “5:30”.
8

Your microwave oven is equipped with 5 power levels to give you maximum flexibility and control over cooking.
The table below shows the examples of food and their recommended cooking power levels for use with this
microwave oven.
Micro Power
Level
POWER LEVEL USE POWER OUTPUT
HIGH
MEDIUM HIGH
MEDIUM
DEFROST/
MEDIUM LOW
LOW
* Boil Water
* Brown minced beef
* Cook poultry pieces, fish, vegetables
* Cook tender cuts of meat
* Reheating(Liquid)
* Roast meat and poultry
* Cook mushrooms and shellfish
* Cook foods containing cheese and eggs
* Reheating(Mashed potato, Plated meal, Ready meal)
* Prepare eggs
* Cook custard
* Prepare rice, soup
* All thawing
* Melt butter and chocolate
* Cook less tender cuts of meat
* Soften butter & cheese
* Soften ice cream
* Raise yeast dough
POWER LEVEL (%)
100 %
80 %
60 %
40 %
20 %
850 W
680 W
510 W
340 W( )
170 W
9
Quick
Start
In the following example I will show you how to set 2 minutes of cooking on 850 W power.
Press STOP/CLEAR.
The QUICK START feature allows you to
set 30 seconds intervals of HIGH power
cooking with a touch of the
START/Q-START button.
Don't Use
METAL TRAY ROTISSERIE
GRILL RACK
(HIGH RACK)
CONVECTION RACK
(LOW RACK)
Press START/Q-START four times to select 2 minutes on 850W power.
Your oven will start before you have finished the fourth press.
During QUICK START cooking, you can extend the cooking time up to
99 minutes 59 seconds by turning the
TIME/WEIGHT dial.
10

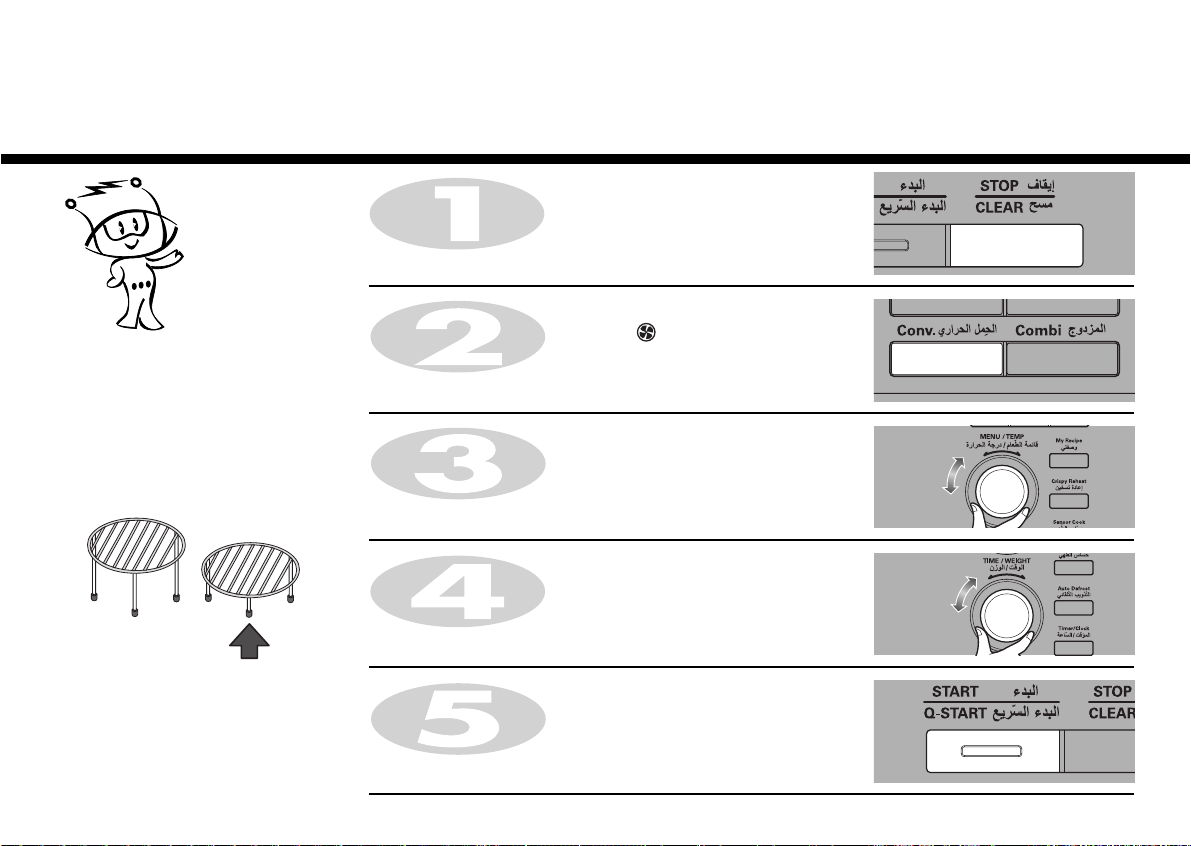
In the following example I will show you how to use the grill to cook some food for 12 minutes and 30 seconds.
Press STOP/CLEAR.
Grill
Cooking
This model is fitted with a QUARTZ
GRILL, so preheating is not needed.
This feature will allow you to brown and
crisp food quickly.
The metal tray is placed between a glass
tray and a grill rack at the grill mode.
The grill rack(high rack) must be used
during grill cooking.
Press Grill.
The following indication is displayed: “ “
Turn
TIME/WEIGHT dial
Press START/Q-START.
When cooking you can increase or decrease cooking time by turning
TIME/WEIGHT dial.
Be careful when removing your food because the container will be hot!
until display shows “12:30”.
11
Convection
Preheat
In the following example I will show you how to preheat the oven at a temperature of 230°C.
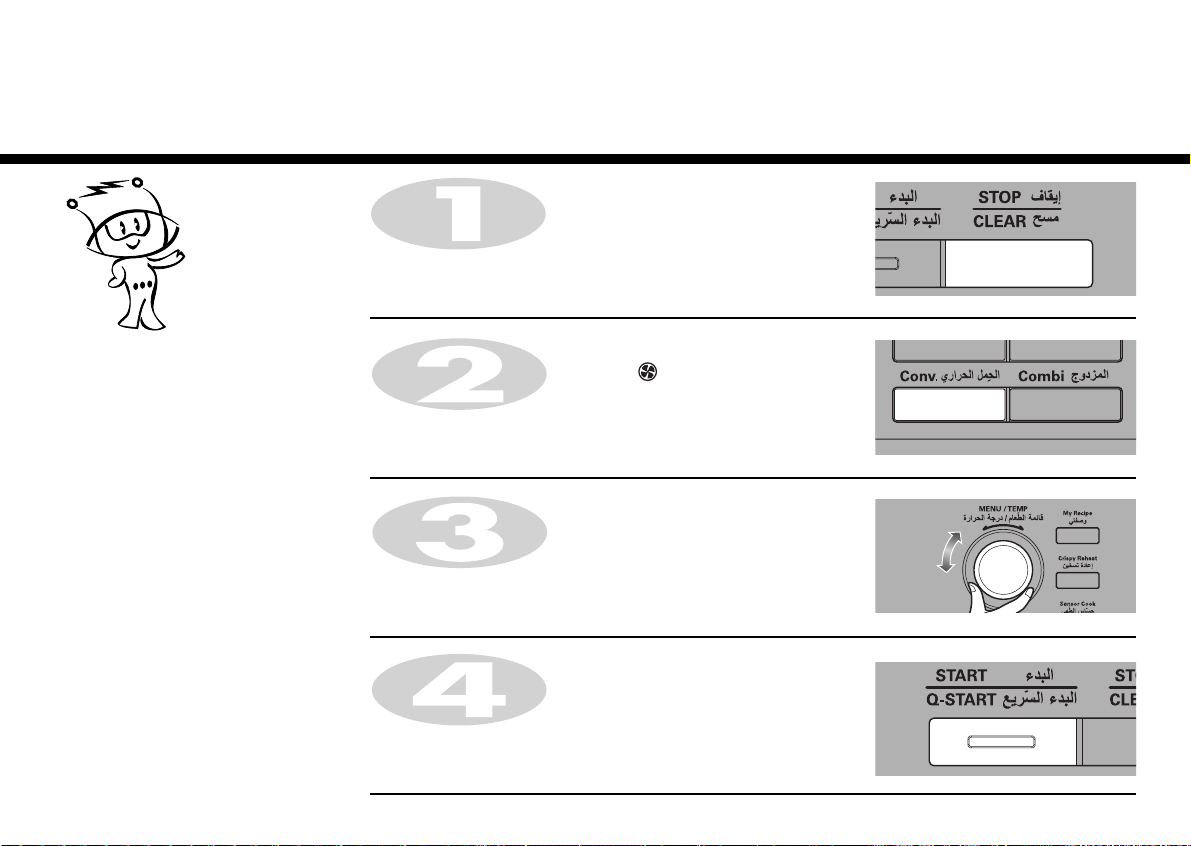
Press STOP/CLEAR.
The convection oven has a temperature
range of 40°C and 100°C~250°C
(180°C is automatically available when
convection mode is selected).
The oven has a ferment function at the
oven temperature of 40°C. You may wait
until the oven is cool because you cannot
use a ferment function if the oven
temperature is over 40°C.
When you use this function if the oven
temperature is over 70°C Error code
“E-05” displays.
Your oven will take a few minutes to reach
the selected temperature.
Once it has reached correct temperature,
your oven will BEEP to let you know that it
has reached the correct temperature.
Then place your food in your oven: then
tell your oven to start cooking.
Press Conv.
The following indication is displayed: “ “
Turn MENU/TEMP
Press START/Q-START.
Preheating will be started with displaying “PREHEAT”.
dial
until display shows “230°C”.
12
In the following example I will show you how to preheat the oven first, then cook some food at a temperature of
230°C for 50 minutes.
Press STOP/CLEAR.
Press Conv.
The following indication is displayed: “ “
If you do not set a temperature your
oven will automatically select 180°C, the
cooking temperature can be changed by
turning DIAL.
The convection rack(low rack) must be
used during convection cooking.
Turn MENU/TEMP
Turn
TIME/WEIGHT dial
dial
until display shows “230°C”.
until display shows “50:00”.
Convection
Cooking
Press START/Q-START.
When cooking you can increase or decrease cooking time by turning
TIME/WEIGHT dial.
Be careful when removing your food because the container will be hot!
13
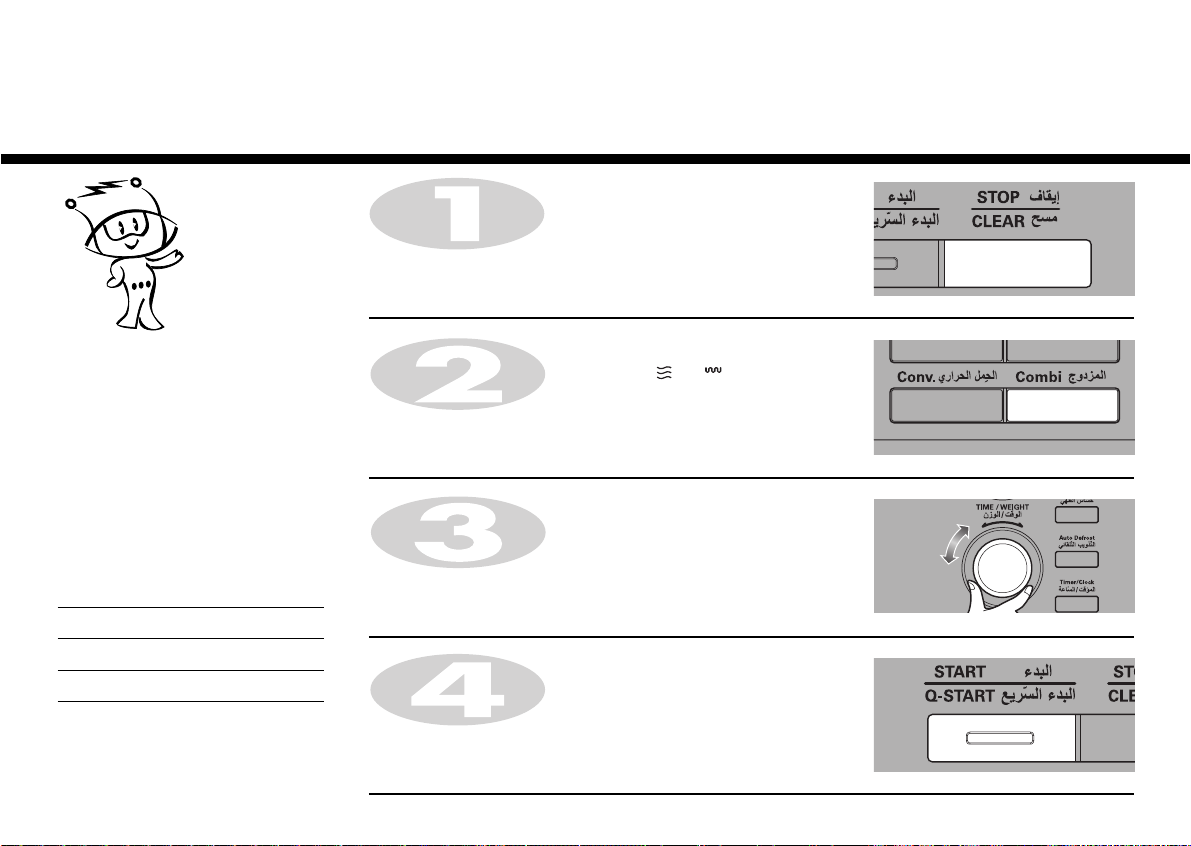
Convection Combination
Cooking
Press STOP/CLEAR.
Press Combi button once until display shows “510W”.
The following indications are displayed: “ “, “ “.
You can set three kinds of micro power
level(20%, 40% and 60%) in combi
mode.
In the following example I will show you how to programme your oven with micro power
60% and at a convection temperature 200°C for a cooking time of 25 minutes.
Microwave Power
(%)
60
40
20
(Watts)
510
340
170
Turn MENU/TEMP
Turn
TIME/WEIGHT dial
Press START/Q-START.
When cooking you can increase or decrease cooking time by turning
TIME/WEIGHT dial.
Be careful when removing your food because the container will be hot!
dial
until display shows “200°C”.
until display shows “25:00”.
14
In the following example I will show you how to programme your oven with micro power 20 % and grill
for a cooking time of 25 minutes.
Press STOP/CLEAR.
Grill Combination
Cooking
Your oven has a combination cooking
feature which allows you to cook food
with heater and microwave at the same
time or alternately. This generally means
it takes less time to cook your food.
You can set three kinds of micro power
level(20%, 40% and 60%) in combi
mode.
Microwave Power
(%)
60
40
20
(Watts)
510
340
170
Press Combi button six times until display shows “170W”.
The following indications are displayed: “ “, “ “.
Turn
TIME/WEIGHT dial
Press START/Q-START.
When cooking you can increase or decrease cooking time by turning
TIME/WEIGHT dial.
Be careful when removing your food because the container will be hot!
until display shows “25:00”.
15

Arabic
Cook
Arabic Cook allows you to cook most of
your favorite sweet food easily by
selecting the food type and entering the
weight of the food.
In the following example I will show you how to cook 0.3 kg rice with saffron.
Press STOP/CLEAR.
Press Arabic Cook.
Turn MENU/TEMP
Turn
TIME/WEIGHT dial
dial
until display shows “2” (RICE WITH SAFFRON).
until display shows “0.3kg”.
Press START/Q-START.
When cooking you can increase or decrease cooking time by turning
TIME/WEIGHT dial.
16
CategoryFunction Weight Limit Utensil InstructionsFood Temp.
Arabic
Cook
1
Kabsa
Chicken
Rice With
Saffron
1 Microwave-safe
bowl
(deep glass pot)
0.1 – 0.4kg Microwave-safe
bowl
(deep glass pot)
Room
Room2
Ingredients
1 chicken, cut into 6 to 8 pieces
1
1
/2
cups rice
1 chopped onion
2 chopped tomatoes
1 tablespoon tomato paste
1 tablespoon butter
1 teaspoon ground spices from each of :
(black pepper, cumin, cardamom)
2 tablespoons salt
350ml boiling water
1. Wash chicken and then cut into 6 to 8 pieces.
2. Put chicken pieces, washed rice, butter, onion, tomatoes, tomato
paste, salt, spices and boiling water into a deep and large bowl.
3. Cover with lid. Place food in the bowl.
4. Choose the menu, press start to cook.
After cooking, stand covered for 3-5 minutes. Serve in prepared plate.
5.
Rice
Water
Oil(liquid)
Saffron water
Salt
0.1kg
250ml
15ml
15ml
0.2kg
500ml
30ml
30ml
To taste
0.3kg
750ml
0.4kg
1000ml
45ml
45ml
1. Wash the rice and threw away additional water. First, add the rice,
water, salt, liquid oil and saffron into a deep glass pot and mix them.
2. Do not cover to vaporize whole water. Place the pot in the oven.
3. Choose the menu and weight, press start to cook.
4. After cooking, stir and stand covered for 5-10 minutes if needed.
17

CategoryFunction Weight Limit Utensil InstructionsFood Temp.
Arabic
Cook
Pizza 1 26cm Pizza pan
3
on the Low rack
Room
Ingredients
For Dough
120g all-purpose flour
1 teaspoon dry yeast
1 teaspoon salt
1 teaspoon sugar
70ml warm water
5ml olive oil, plus a little for coating
For Topping
200g grated mozzarella cheese
100g pizza sauce
50g sliced olives
50g green pepper and red pepper chopped to small pieces
1. Combine all ingredients in a large mixing bowl.
2. Knead with an electric mixer to make a smooth and elastic dough.
3. Roll dough out on the pizza pan.
4. Spread pizza sauce. Top with toppings and cheese.
5. Place the pizza pan on the low rack. Choose the menu, press start to
cook.
18

CategoryFunction Weight Limit Utensil InstructionsFood Temp.
Arabic
Cook
Stuffed
4
Eggplant
0.2 – 0.8kg Heat proof dish
on the Low rack
Room
Ingredients
400g eggplants
200ml tomato juice
1 magi cube
50ml lemon juice
15ml vegetable oil
Salt and pepper to taste
For filling
200g cooked rice
1 chopped tomato
1 teaspoon chopped dill
1 teaspoon chopped parsley
Chopped onion
1 tablespoon tomato paste
Salt and pepper to taste
1. Combine all ingredients of filling.
2. Remove the inside of the eggplants.
3. Fill eggplants with the filling mixture.
4. Place all filled eggplants on the heat proof dish on the low rack.
5. Choose the menu and weight, press start to cook.
19
CategoryFunction Weight Limit Utensil InstructionsFood Temp.
Arabic
Cook
Grape Leaf 0.3 – 0.6kg Heat proof dish
5
on the Low rack
Room
Ingredients
Grape leaves
200ml tomato juice
1
/2
magi cube
50ml lemon juice
15ml vegetable oil
1 potato cut to thick slices
Salt and pepper to taste
For filling
200g cooked rice
1 tomato cut to small pieces
5 teaspoons chopped dill
5 teaspoons chopped parsley
1 chopped onion
1 tablespoons tomato paste
Salt and pepper to taste
1. Combine all ingredients of filling.
2. Wash grape leaves well then fill each grape leaves with some of the
filling mixture and wrap it.
3. Place the potato slices in the bottom of the heat proof dish and place
all the wrapped grape leaves on it.
4. Mix the tomato juice with magi, lemon juice, oil, salt and pepper.
5. Pour tomato juice mixture on the grape leaves.
6. Place the heat proof dish on the low rack.
7. Choose the menu and weight, press start to cook.
20
CategoryFunction Weight Limit Utensil InstructionsFood Temp.
Arabic
Cook
6
Grilled
Vegetables
0.2 – 0.5kg High rack
on the Metal tray
Room
Ingredients
1 marrow cut to long slices
1 eggplant cut to long slices
1 green pepper cut to long slices
1 red pepper cut to long slices
For marinade
2 grated garlic
30ml balsamic vinegar
45ml vegetable oil
Salt and pepper to taste
For dressing
170ml yogurt
1 tablespoon mayonnaise
15ml lemon juice
Salt and pepper to taste
1. Marinate the vegetable pieces in the marinade ingredients for half
an hour.
2. Put the vegetable pieces on the high rack on the metal tray.
3. Choose the menu and weight, press start. When BEEP, turn food over
and press start to continue cooking. After cooking, remove from the
oven.
21

CategoryFunction Weight Limit Utensil InstructionsFood Temp.
Arabic
Cook
7
Potato
Wedges
Oat and
Cinnamon
Cake
0.2 – 0.5kg Metal tray Room
1 20 X 20cm
baking dish on the
Low rack
Room8
Ingredients
4 potatoes
2 eggs
1 tablespoon bread crumb
1 tablespoon corn flour
1 tablespoon oats
25ml vegetable oil
Salt and white pepper to taste
1. Wash potatoes and cut into 8 pieces.
2. Sprinkle with salt and white pepper then dip in eggs.
3. In another bowl, mix corn flour with bread crumb and oats together.
4. Cover the potatoes with this mixture.
5. Spread oil on the metal tray and place all the potato pieces.
6. Choose the menu and weight, press start to cook.
Ingredients
4 eggs
2 teaspoons vanilla
100g sugar
50ml oil
100g grind oats
2 teaspoons powdered cinnamon
2 teaspoons baking powder.
1. Beat eggs, vanilla and sugar together until thick and creamy.
2. Add the rest of the ingredients.
3. Pour the batter in greased 20 X 20cm baking dish on the low rack.
4. Choose the menu, press start to cook.
22

CategoryFunction Weight Limit Utensil InstructionsFood Temp.
Arabic
Cook
Grilled Steak 0.3 – 0.6kg High rack
9
on the Metal tray
Refrigerated
Ingredients
Steaks (200g weight / 2.5cm thickness each)
For marinade
20ml vegetable oil
4 teaspoons meat sauce
50ml lemon juice
1 grated garlic
Salt and pepper to taste
1. Marinate the steaks in the marinade ingredients for an hour in
refrigerated.
2. Place food on the high rack on the metal tray.
3. Choose the menu and weight, press start. When BEEP, turn food over
and press start to continue cooking. After cooking, remove from the
oven.
23

CategoryFunction Weight Limit Utensil InstructionsFood Temp.
Arabic
Cook
Grilled Shrimp 0.2 – 0.5kg Roti Bar
10
on the High rack
on the Metal tray
Refrigerated
Ingredients
900g cleaned shrimp (keep the tail)
4 lemons cut into 4 pieces
3 green pepper chopped small pieces
3 red pepper chopped small pieces
Salt
For marinade
2 grated garlic
30ml white vinegar
30ml soy sauce
200ml lemon juice
Salt, pepper, cumin, curry powder
50ml oil
1. Marinate shrimp in the marinade ingredients for 3 hours in
refrigerated.
2. Skewer shrimp, lemon and green / red pepper using the rotisserie
bar and sprinkle with salt. Note that the bar pass the center of
pieces.
3. Place food on the high rack. Choose the menu and weight, press
start. When BEEP, turn food over and press start to continue cooking.
After cooking, remove from the oven.
24
CAUTION
Rotisserie is not a toy.
Keep the Rotisserie away
from the child.
Rotisserie
Assembly
Barbecue bars into the left plate
Screw the barbecue bar
clockwise into the left plate
Assemble the right plate
Push barbecue bars into right plate.
Assemble skewers
Install the handle on the
rotisserie.
25
Insert the pointed edge of
the skewer into hole on
the left plate.
Insert the other edge
of the skewer into a
hole on the right plate.
Turn it clockwize until it’s
fixed. Repeat 4 times until
rotisserie is assembled.
Rotisserie
Cook
In the following example I will show you how to cook whole chicken using rotisserie.
CAUTION
Rotisserie is not a toy. Keep
the Rotisserie away from the
child.
Tie chicken’s feet, wings and
body with a cotton thread
before cooking whole
chicken as show in the
picture.
Whole Chicken
Press STOP/CLEAR and Rotisserie Cook.
Turn MENU/TEMP
(WHOLE CHICKEN).
TIME/WEIGHT dial
Turn
Prepare foods with the rotisserie.
dial
until display shows “1”
in order to set weight.
Chicken
26
Rotisserie
Cook
To Clean ROTISSERIE &
METAL TRAY
When cooking is completed,
separate the ROTISSERIE from
the food. Take care when
handling both ROTISSERIE &
metal tray and food stuff as it is
very hot. During cooking it is
normal for the ROTISSERIE &
metal tray to be stained from the
food. Simply clean the
ROTISSERIE & metal tray with a
warm soapy water and a soft
cloth. If the ROTISSERIE & metal
tray remain stained after
washing, Utensils in hot soapy
water for a few minutes.
Do not use metal scouring pads.
They will scratch the surface .
Insert the shaft of right
plate into the shaft of
motor.
The shaft of motor
Press START/Q-START.
After cooking hold the rotisserie bar of both side with the handle and lift up
the right end slightly and pull out from the left end.
NOTE:
1. The rotisserie cooking is convenient for grilling of meat and poultry.
All the surface of the food will become even brown without overturning.
2. The rotisserie cooking can be used in grill mode, convection mode and
Arabic Cook.
3. The rotisserie bar is used for rotisserie cooking only. After rotisserie cooking
is finished remove the rotisserie bar and store with other accessories.
CAUTION
1. DO NOT USE THE METAL TRAY AND ROTISSERIE WITH NO LOAD, IT WILL BE
DAMAGED THE OVEN.
2. AFTER COOKING, THE METAL TRAY WILL BECOME EXTREMELY HOT.
3. It is recommended to remove the grease from the turntable every time before
cooking. Hot grease on the turntable may cause smoke.
Put the shaft of left plate on the
holder of rotisserie.
Glass Tray
The holder of Rotisserie
Metal tray
27

CategoryFunction Weight Limit Utensil InstructionsFood Temp.
Rotisserie
Cook
Whole
1
Chicken
0.8 – 2.4 kg Rotisserie bar and
Holder
over the Metal tray
Refrigerated
1. Brush the chicken with oil. Sprinkle with salt and black pepper on the
chicken.
2. Skewer the chicken with the roti bar. Note that the bar pass through
the chicken completely.
3. Tie its feet, wings and body with a cotton thread and insert the bar
into the holder over the metal tray on the glass tray.
4. Choose the menu and weight, press start.
5. After cooking, remove from the oven. Stand covered with aluminum
foil for 10 minutes before serving.
28

CategoryFunction Weight Limit Utensil InstructionsFood Temp.
Rotisserie
Cook
Kebab 0.2 – 0.5 kg Rotisserie Bar
2
on the High rack
on the Metal tray
Refrigerated
Ingredients for marinade
1 kg boned lamb or mutton, cut into 2cm cubes
(leg, thick rib or shoulder can be used)
* Curry marinade
15ml cooking oil
2 onions, sliced
1 clove garlic, crushed
1 tablespoon curry powder
1 teaspoon tumeric
2 tablespoons brown sugar
1
/4
teaspoon cayenne pepper
1
/4
teaspoon chilli powder
125g dried apricots, or 30g smooth apricot jam
500ml vinegar
1. Heat the cooking oil in a pan and fry the onion and garlic until the
onion is translucent.
2. Add the curry powder and turmeric and fry gently.
3. Stir in the sugar, cayenne pepper, chilli powder, apricots and
vinegar and simmer for 10 minutes.
4. Let the marinade cool for a few minutes before pouring it over the
meat and then leave it in the refrigerator for 1 day.
5. Stir the meat in the marinade from time to time to make sure all the
cubes are well coated.
6. Skewer the pieces of meat with the roti bar. Note that the bar pass
the center of pieces.
7. Place food on the high rack on the metal tray. Choose the menu and
weight, press start.
8. When BEEP, turn food over and press start to continue cooking.
29
CategoryFunction Weight Limit Utensil InstructionsFood Temp.
Rotisserie
Cook
3
Vegetable
Skewers
0.2 – 0.5 kg Rotisserie Bar
on the High rack
on the Metal tray
Refrigerated
Ingredients
Cucumber, sliced thickly or cut into pieces
Brinjal, cut into cubes
Mushrooms, whole or cut into pieces
Red or green pepper, seeded and cut into pieces
Tomatoes, whole or quartered
Baby marrows, sliced thickly
Pickling onions
* Wine marinade
125ml cooking oil or olive oil
375ml dry red or white wine
1 clove garlic, crushed
1 small onion, sliced
Freshly ground pepper to taste
1. Choose a combination of the above vegetables, aiming for
complementary color and flavor
2. Marinate the vegetable pieces in the wine marinade for several
hours.
3. Skewer the pieces of vegetable with the roti bar. Note that the bar
pass the center of pieces.
4. Place food on the high rack on the metal tray. Choose the menu and
weight, press start.
5. When BEEP, turn food over and press start to continue cooking.
30
 Loading...