

LG MC8188HRC Owner’s Manual

www.lg.com
OWNER’S MANUAL
MICROWAVE OVEN
PLEASE READ THIS OWNER’S MANUAL THOROUGHLY BEFORE OPERATING.
MC8188HRC
P/No. : MFL55318530

Contents
How the Microwave Function Works
Microwaves are a form of energy similar to radio, television waves, and
ordinary daylight. Normally, microwaves spread outwards as they travel
through the atmosphere and disappear without effect. This oven, however,
has a magnetron that is designed to make use of the energy in microwaves.
Electricity, supplied to the magnetron tube, is used to create microwave
energy.
These microwaves enter the cooking area through openings inside the oven.
A tray is located inside the oven. Microwaves cannot pass through metal
walls of the oven, but they can penetrate such materials as glass, porcelain
and paper, the materials out of which microwave-safe cooking dishes are
constructed.
Microwaves do not heat cookware, though cooking vessels will eventually
get hot from the heat generated by the food.
A very safe appliance
Your Microwave oven, is one of the safest of all home
appliances. When the door is opened, the oven
automatically stops producing microwaves. Microwave
energy is converted completely to heat when it enters
food, leaving no “left over” energy to harm you when
you eat your food.
Contents ________________________________________________
Important Safety Instructions ________________________________ 4 ~ 8
Precautions ______________________________________________ 9
Unpacking & Installing _____________________________________ 10 ~ 11
Control Panel ____________________________________________ 12
Method To se Accessories As Per Mode _____________________ 13
Child Lock _______________________________________________ 14
Micro Power Cooking _____________________________________ 15
Micro Power Level ________________________________________ 16
Grill Cooking ____________________________________________ 17
Grill Combi Cooking ______________________________________ 1
Convection Preheat _______________________________________ 19
Convection Cooking _______________________________________ 20
Convection Combi Cooking _________________________________ 21
Quick Start ______________________________________________ 22
More or Less Cooking _____________________________________ 23
Keep Warming ___________________________________________ 24
Steam Chef ____________________________________________ 2 ~ 3
Nutri Care _______________________________________________ 3 ~ 3
Indian Rasoi _____________________________________________ ~
24 Hours ______________________________________________ ~6
Just 4 U _____________________________________________ 7 ~
Bakers Basket ____________________________________________
Utility Corner ____________________________________________
Usage of accessories/utensils ______________________________
Ez Clean ________________________________________________
Microwave Safe Utensils __________________________________
Food Characteristics & Microwave Cooking___________________
Questions & Answers
Technical Specifications ____________________________________
2
U
____________________________________
______
__
_
_
_
_
__
44
8
9
9
99
101
0
1
0
1
2
18
4
4
5
4
7
8
0
2
5
~
~
4
8
9
9
3 5
3
6
4
7
3
1
69 ~2
0
1

Congratulations on becoming the proud owner of an LG Microwave oven. You can now cook
almost anything in it. And that's what makes it India's first choice. In choosing it, you too
have chosen health for your family and friends. Besides, as it cooks food fast,
it also gives you more time to spend with them.
Our chefs conduct Microwave Cookery Classes to help you get started.
Register for free and learn to cook some great dishes. You'll also get some tips on maintaining
and cleaning your oven. And should you ever feel the need to talk to someone about anything
that concerns your LG microwave oven, please feel free to call our Healthwave Experts.
You'll find their numbers on the back.
Now go ahead, and cook up some magic in your LG Healthwave Microwave Ovens.
Complimentary
Cookery Class
Coupon
Class 1
Complimentary
Cookery Class
Coupon
Class 2
Complimentary
Cookery Class
Coupon
Class 3
Important Safety
Instructions
This is the safety alert symbol. This symbol alerts you to potential hazards that can kill or hurt you and others.
All safety messages will follow the safety alert symbol and either the word "WARNING" or "CAUTION". These word means :
Please keep for future reference. Read and follow all instructions before using your oven to
prevent the risk of fire, electric shock, personal injury, or damage when using the oven.
This guide does not cover all possible conditions that may occur. Always contact your
service agent or manufacturer about problems that you do not understand.
WARNING
CAUTION
This symbol will alert you to hazards or unsafe practices which could cause serious bodily harm or death.
This symbol will alert you to hazards or unsafe practices which could cause bodily injury or property damage.
WARNING
1. Do not attempt to tamper with, or make any adjustments or repairs to the door,
door seals, control panel, safety interlock switches or any other part of the oven
which would involve the removal of any cover protecting against exposure to
microwave energy. Do not operate the oven if the door seals and adjacent parts
of the microwave oven are faulty. Repairs should only be undertaken by a
qualified service technician.
Unlike other appliances, the microwave oven is a high-voltage and a highelectrical-current piece of equipment. Improper use or repair could result in harmful
exposure to excessive microwave energy or in electric shock.
2. Do not use the oven for the purpose of dehumidification. (ex. Operating the
microwave oven with wet newspapers, clothes, toys, electric devices, pet or child
etc.)
It can be the cause of serious damage to safety such as a fire, a burn or a sudden
death due to an electric shock.
3. The appliance is not intended for use by young children or elderly persons. Only
allow children to use the oven without supervision when adequate instructions
have been given so that the child is able to use the oven in a safe way and
understands the hazards of improper use.
4
Improper use may cause damage such as a fire, electric shock or burn.
4. Accessible parts may become hot during use. Young children should be kept
away.
They may get a burn.
5. Liquids or other foods must not be heated in sealed containers since they are
liable to explode. Remove the plastic wrapping from food before cooking or
defrosting. Note though that in some cases food should be covered with plastic
film, for heating or cooking.
They could burst.
6. Be certain to use proper accessories on each operation mode, refer to the guide
page 12.
Improper use could result in damage to your oven and accessories, or could make
spark and a fire.
7. The children should not allow to play with accessories or hang down from the
door handle.
They may get hurt.
Please keep for future reference. Read and follow all instructions before using your oven to
prevent the risk of fire, electric shock, personal injury, or damage when using the oven.
This guide does not cover all possible conditions that may occur. Always contact your
service agent or manufacturer about problems that you do not understand.
Important Safety
Instructions
CAUTION
1. You cannot operate your oven with the door open due to the safety
interlocks built into the door mechanism. It is important not to tamper
with the safety interlocks.
It could result in harmful exposure to excessive microwave energy. (Safety
interlocks automatically switch off any cooking activity when the door is
opened.)
2. Do not place any object (such as kitchen towels, napkins, etc.) between
the oven front face and the door or allow food or cleaner residue to
accumulate on sealing surfaces.
It could result in harmful exposure to excessive microwave energy.
3. Do not operate your oven if it is damaged. It is particularly important
that the oven door closes properly and that there is no damage to the:
(1) door(bent), (2) hinges and latches (broken or loosened), (3) door seals
and sealing surfaces.
It could result in harmful exposure to excessive microwave energy.
4. Please ensure cooking times are correctly set, Small amounts of food
require shorter cooking or heating time.
Over cooking may result in the food catching on fire and subsequent
damage to your oven.
5. When heating liquids, e.g. soups, sauces and beverages in your
microwave oven,
* Avoid using straight sided containers with narrow necks.
* Do not overheat.
* Stir the liquid before placing the container in the oven and again
halfway through the heating time.
* After heating, let it stand in the oven for a short time; stir or shake it
again carefully and check the temperature of it before consuming to
avoid burns (especially, contents of feeding bottles and baby food jars).
Be careful when handling the container. Microwave heating of beverages
can result in delayed eruptive boiling without evidence of bubbling.
This could result in hot liquids suddenly boiling over.
6. An exhaust outlet is located on the top, bottom or side of the oven. Don't
block the outlet.
It could result in damage to your oven and poor cooking results.
7. Do not operate the oven when empty. It is best to leave a glass of water
in the oven when not in use. The water will safely absorb all microwave
energy, if the oven is accidentally started.
Improper use could result in damage to your oven.
8. Do not cook food wrapped in paper towels, unless your cook book
contains instructions for the food you are cooking. And do not use
newspaper in place of paper towels for cooking.
Improper use can cause an explosion or a fire.
5
Important Safety
Instructions
Please keep for future reference. Read and follow all instructions before using your oven to
prevent the risk of fire, electric shock, personal injury, or damage when using the oven.
This guide do not cover all possible conditions that may occur. Always contact your
service agent or manufacturer about problems that you do not understand.
CAUTION
9. Do not use wooden containers and ceramic containers that have metallic
(e.g. gold or silver) inlays. Always remove metal twist ties. Check that
the utensils are suitable for use in microwave ovens before use.
They may heat-up and char. Metal objects in particular may arc in the
oven, which can cause serious damage.
10. Do not use recycled paper products.
They may contain impurities which may cause sparks and/or fires when
used in cooking.
11. Do not rinse the tray and rack by placing it in water just after cooking.
This may cause breakage or damage.
Improper use could result in damage to your oven.
12. Be certain to place the oven so the front of the door is 8 cm or more
behind the edge of the surface on which it is placed, to avoid
accidental tipping of the appliance.
Improper use could result in bodily injury and oven damage.
13. Before cooking, pierce the skin of potatoes, apples or any such fruit or
vegetable.
They could burst.
14. Do not cook eggs in their shell. Eggs in their shell and whole hardboiled eggs should not be heated in microwave ovens since they may
explode, even after microwave heating has ended.
Pressure will build up inside the egg which will burst.
15. Do not attempt deep fat frying in your oven.
This could result in a sudden boil over of the hot liquid.
16. If smoke is observed, switch off or disconnect the oven from the power
supply and keep the oven door closed in order to stifle any flames.
It can cause serious damage such as a fire or electric shock.
17. When food is heated or cooked in disposable containers made of
plastic, paper or other combustible materials, keep an eye on the oven
and check it frequently.
Your food may be poured due to the possibility of container
deterioration, which also can cause a fire.
18. The temperature of accessible surfaces may be high when the
appliance is operating. Do not touch the oven door, outer cabinet, rear
cabinet, oven cavity, accessories and dishes during grill mode,
convection mode and auto cook operations, before clearing make sure
they are not hot.
As they will become hot, there is the danger of a burn unless wearing
thick culinary gloves.
6
Please keep for future reference. Read and follow all instructions before using your oven to
prevent the risk of fire, electric shock, personal injury, or damage when using the oven.
This guide does not cover all possible conditions that may occur. Always contact your
service agent or manufacturer about problems that you do not understand.
Important Safety
Instructions
CAUTION
19. The oven should be cleaned regularly and any food deposits should be
removed.
Failure to maintain the oven in a clean condition could lead to
deterioration of the surface. This could adversely affect the life of the
appliance and possibly result in a hazardous situation.
20. Only use the temperature probe recommended for this oven.
You can not ascertain that the temperature is accurate with an unsuitable
temperature probe.
21. If there are heating elements, the appliance becomes hot during use.
Care should be taken to avoid touching the heating elements inside the
oven.
There is danger of a burn.
22. Follow exact directions given by each manufacturer for their popcorn
product. Do not leave the oven unattended while the corn is being
popped. If corn fails to pop after the suggested times, discontinue
cooking. Never use a brown paper bag for popping corn. Never
attempt to pop leftover kernels.
Overcooking could result in the corn catching a fire.
23. This appliance must be earthed.
The wires in the mains lead are colored in accordance with the
following codes
BLUE ~ Neutral
BROWN ~ Live
GREEN & YELLOW ~ Earth
As the colours of the wires in the mains lead of this appliance may not
correspond with the coloured markings identifying the terminals in
your plug proceed as follows:
The wire which is colored BLUE must be connected to the terminal
which is marked with the letter N or Colored BLACK.
The wire which is colored BROWN must be connected to the terminal
which is marked with the letter L or colored RED.
The wire which is colored GREEN & YELLOW or GREEN must be
connected to the terminal which is marked with the letter E or .
If the supply cord is damaged, it must be replaced by the
manufacturer, a service agent or a similarly qualified person in order
to avoid potential hazards.
Improper use may cause serious electric damage.
7

Important Safety
Instructions
Please keep for future reference. Read and follow all instructions before using your oven to
prevent the risk of fire, electric shock, personal injury, or damage when using the oven.
This guide does not cover all possible conditions that may occur. Always contact your
service agent or manufacturer about problems that you do not understand.
CAUTION
24. Do not use harsh abrasive cleaners or sharp metal scrapers to clean the
oven door glass.
They can scratch the surface, which may result in the glass shattering.
25. This oven should not be used for commercial catering purposes.
Improper use could result in damage to your oven.
26. The microwave oven must be operated with the decorative door open.
If the door is closed while operating, the airflow will get worse possibly
resulting in a fire or damage to your oven and the cabinet.
27. The connection may be achieved by having the plug accessible or by
incorporating a switch in the fixed wiring in accordance with the wiring
rules.
Using improper plug or switch can cause an electric shock or a fire.
8
Precautions for avoiding possible exposure to excessive microwave energy.
Precautions
You cannot operate your oven with the door open due to the safety interlocks
built into the door mechanism. These safety interlocks automatically switch off
any cooking activity when the door is opened; which in the operation of
microwave function could result in harmful exposure to microwave energy.
It is important not to tamper with the safety interlocks.
Do not place any object between the oven front face and the door or allow
food or cleaner residue to accumulate on sealing surfaces.
Do not operate your oven if it is damaged. It is particularly important that the
oven door closes properly and that there is no damage to the: (1) door(bent),
(2) hinges and latches (broken or loosened), (3) door seals and sealing
surfaces.
Your oven should not be adjusted or repaired by anyone except qualified
service personnel.
WARNING
Please ensure cooking times are correctly set as
over cooking may result in the FOOD catching fire
and subsequent damage to your oven.
When heating liquids, e.g. soups, sauces and beverages in your oven with
microwave function, delayed eruptive boiling can occur without evidence of
bubbling. This could result in hot liquids suddenly boiling over. To prevent
this possibility the following steps should be taken:
1 Avoid using straight - sided containers with narrow necks.
2 Do not overheat.
3 Stir the liquid before placing the container in the oven and again halfway
through the heating time.
4 After heating, let it stand in the oven for a short time; stir or shake it
(especially the contents of feeding bottles and baby food jars) again
carefully and check the temperature of it before consuming to avoid burns
(especially, contents of feeding bottles and baby food jars).
Be careful when handling the container.
WARNING
Always allow food to stand after being cooked by
microwaves. Check the temperature of the food
before consumption. Especially contents of feeding
bottles and baby food jars.
9
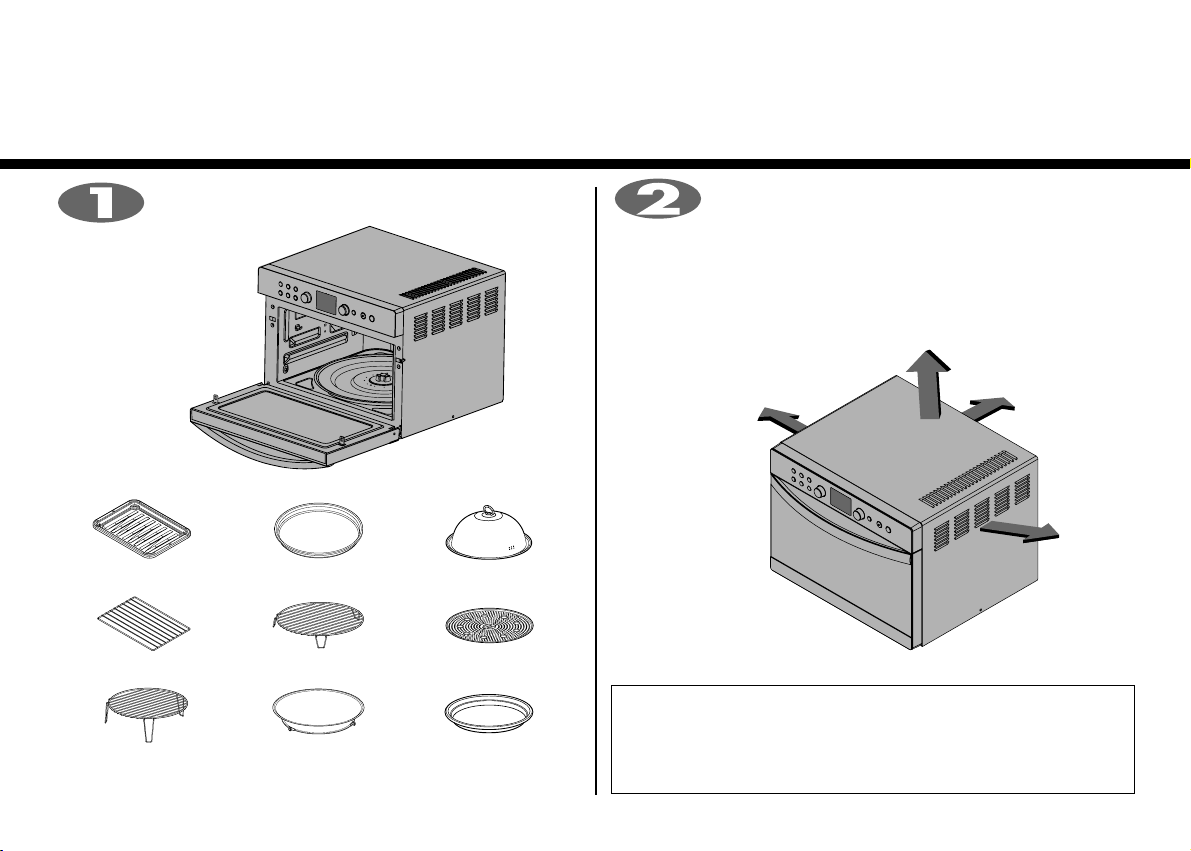
Unpacking &
Installing
By following the basic steps on these two pages you will be able to quickly check that your oven is operating
correctly. Please pay particular attention to the guidelines on where to install your oven. When unpacking your
oven make sure you remove all accessories and packing materials. Check to make sure that your oven has not
been damaged during shipping.
Unpack your oven and place it on a flat level surface.
Square tray
Square rack Low rack Steam plate
High rack
Multi Cook Tawa
Glass tray
Rotating ring
Steam cover
Steam water bowl
Place the oven on the level location of your choice with
more than 85cm height but make sure there is at least
20cm of space on the top and 10cm at the rear for proper
ventilation. The front of the oven should be at least 8cm from the
edge of the surface to prevent tipping.
An exhaust outlet is located on bottom or side of the oven. Blocking
the outlet can damage the oven.
*
THIS OVEN SHOULD NOT BE USED FOR COMMERCIAL CATERING
PURPOSES.
*
THIS OVEN CAN BE USED AS BUILT-IN TYPE.
*
MUST USE THE BUILT-IN KIT THATIS MADE BY LG ELECTRONICS.
10
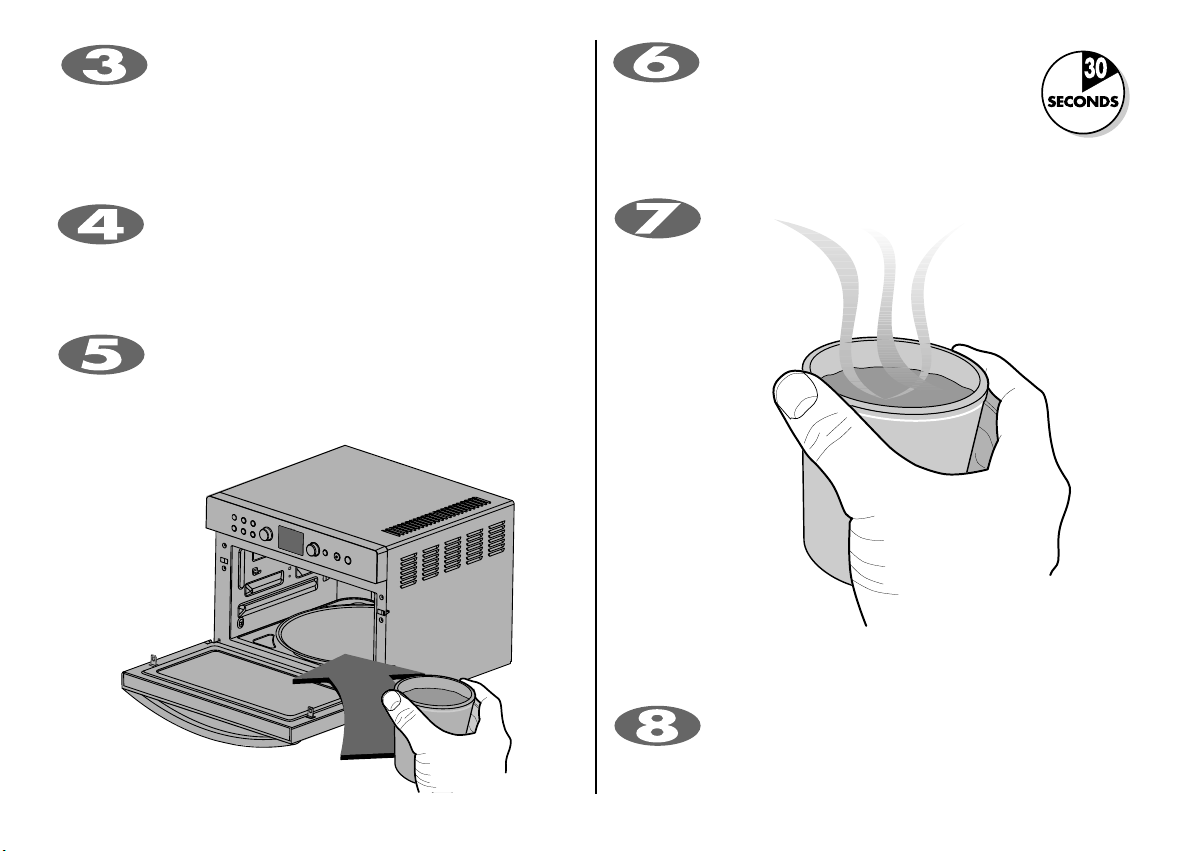
Plug your oven into a standard household socket. Make
sure your oven is the only appliance connected to the
socket.
If your oven does not operate properly, unplug it
from the electrical socket and then plug it back in.
Open your oven door by pulling the DOOR HANDLE.
Place the ROTATING RING inside the oven and place
the GLASSTRAY on top.
Fill a
microwave safe container
with 300 ml (1/2 pint)
of water. Place on the GLASSTRAY and close the oven
door. If you have any doubts about what type of container to
use please refer to Page 99.
Press the Stop/Clear button, and press the
Start/Quick Start button one time to set 30
seconds of cooking time.
The
DISPLAY
will count down from 30 seconds. When it
reaches 0 it will sound BEEPS. Open the oven door and
test the temperature of the water. If your oven is operating the water
should be warm.
Be careful when removing the container it may
be hot.
YOUR OVEN IS NOW INSTALLED
The contents of feeding bottles and baby food jars shall
be stirred or shaken and the temperature checked
before consumption in order to avoid burns.
11
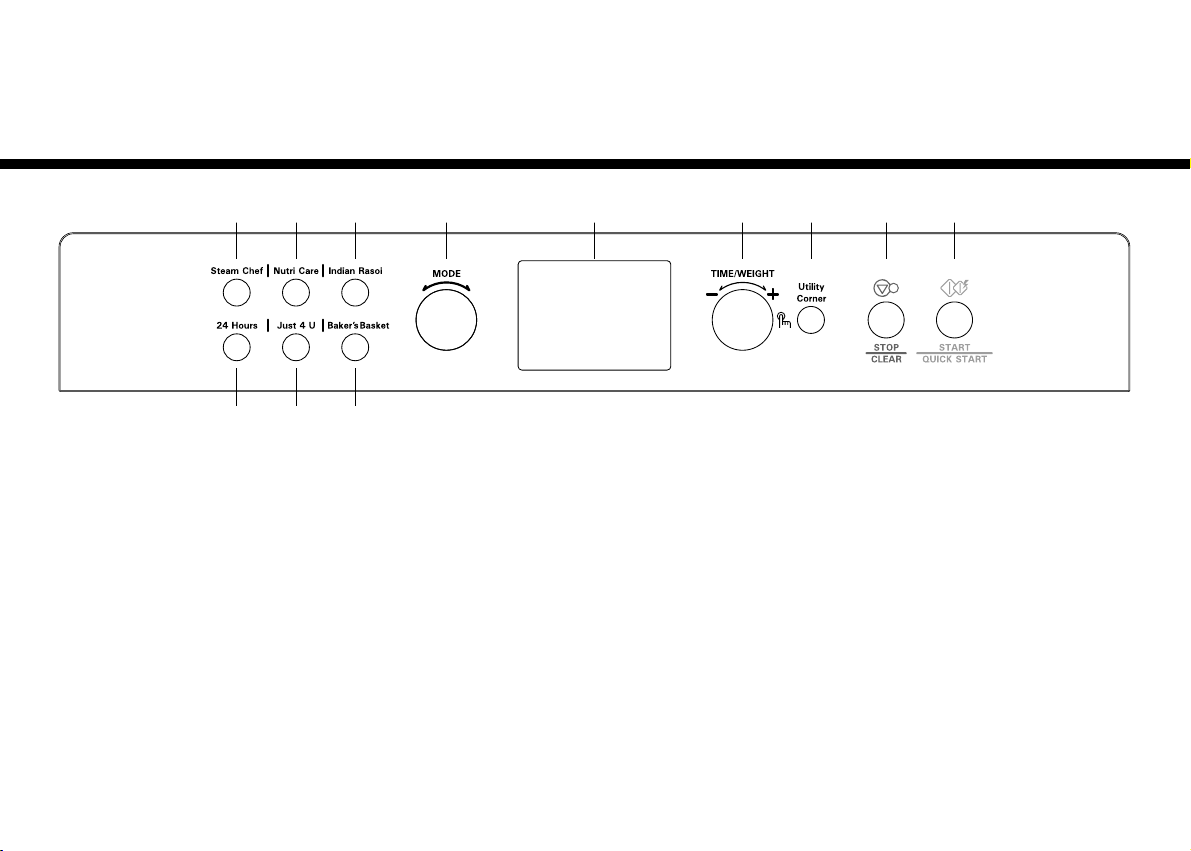
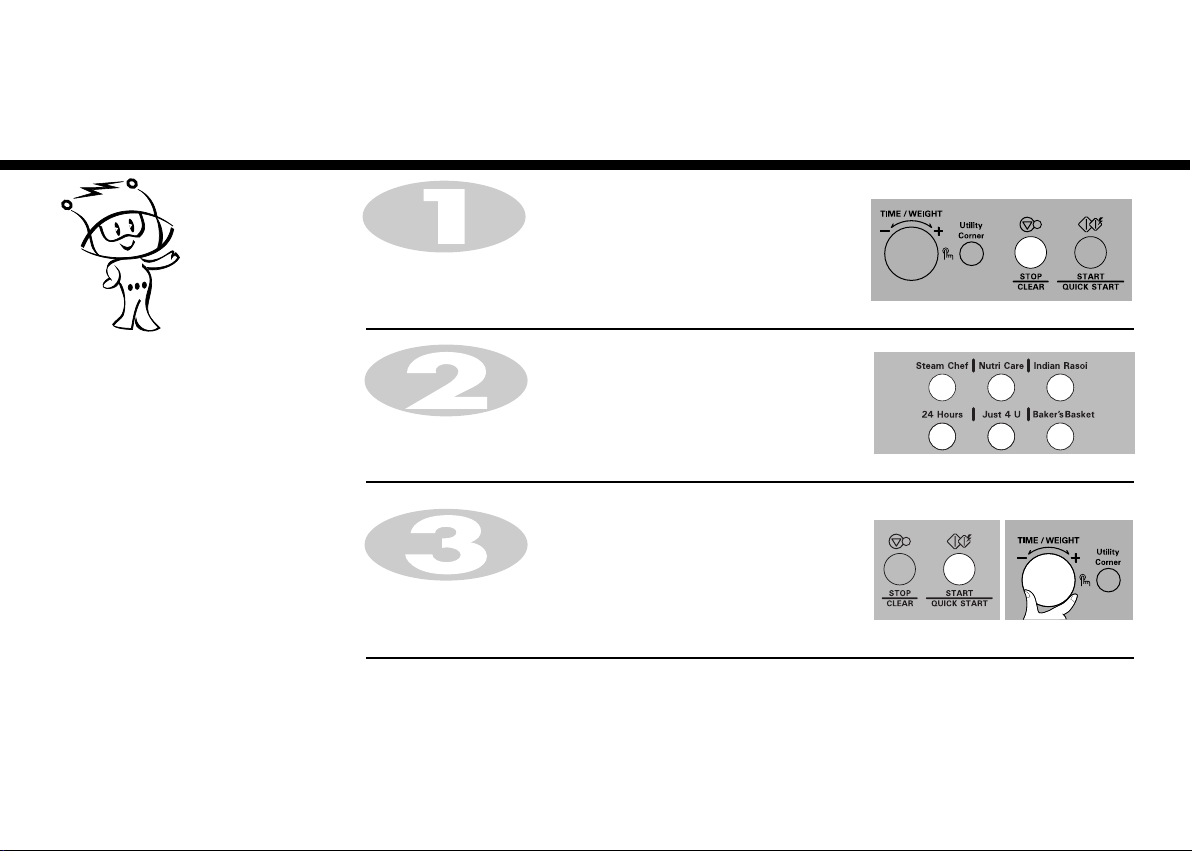
Control Panel
1 2 3
7
8 9 10 11 12
4 5 6
1. STEAM CHEF : To steam cook food. (St1~St24)
2. NUTRI CARE : To cook Health Plus, Soup, Continental food categories.
(HP1~HP9; So1~So8; Co1~Co6)
3. INDIAN RASOI : To cook Indian Cuisine, Tawa corner food categories.
(IC1~IC18; tC1~tC7)
4. 24 HOURS : To cook Breakfast, Snacks, Child's Favourite food categories.
(bF1~bF7; Sn1~Sn8;CF1~CF7)
5. JUST 4 U : To cook Sea Food, Go! China food categories.
(SF1~SF7;OC1~OC4)
6. BAKERS BASKET : To bake the selected food. (Bt1~bt15)
7. MODE : To select the cooking & function categories.
8. DISPLAY WINDOW : To show cooking time, temperature, power level &
cooking categories.
12
9. TIME/WEIGHT : Increase/decrease weight/time/temp during the
cooking process.
10. UTILITY CORNER :
To perform the desired function. (UC1,UC2,UC5,UC6)
To perform the desired function by selecting the weight of the food.
(UC3,UC4)
11. STOP/CLEAR : To stand by/stop cook functionality.
12. START/QUICK START :
To begin the cook operations.
The quick start feature allows you to 30 seconds interval of high
power cooking with a touch of the quick start button.
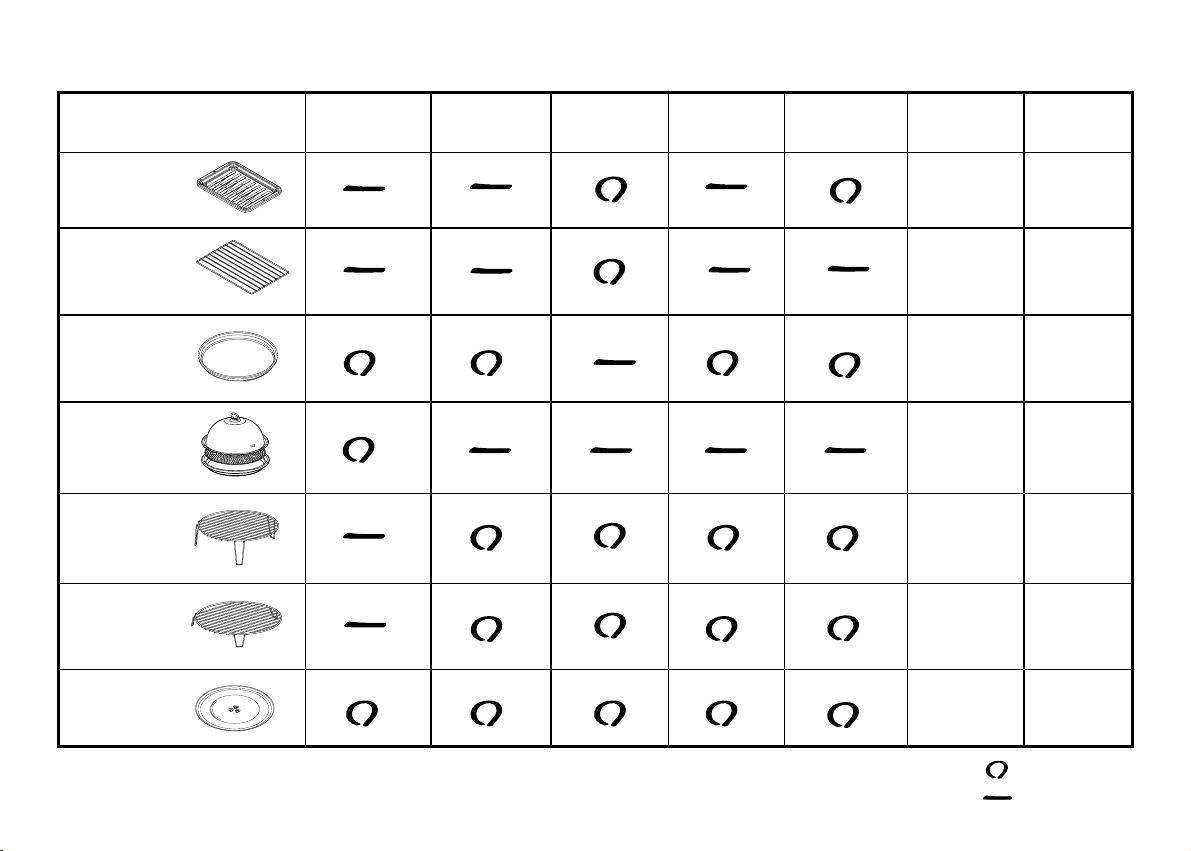
Method To Use Accessories As Per Mode
Square tray
Square rack
Multi Cook Tawa
Steam Chef
High rack
Low rack
Glass tray
Microwave
Grill
Convection
Grill combi
Conv combi
Caution : Use accessories in accordance with cooking guides!
13
: Acceptable
: Not Acceptable
Child
Lock
Your oven has a safety feature that
prevents accidental running of the oven.
Once the child lock is set, you will be
unable to use any functions and no
cooking can take place.
However your child can still open the
oven door.
In the following example I will show you how to set the child lock.
Press STOP/CLEAR.
Press and hold STOP/CLEAR until “L” appears on the display and
BEEP sounds.
The CHILD LOCK is now set.
The time will disappear on the display
If any button is pressed, “ ” will appear on the display. L
To cancel CHILD LOCK press and hold STOP/CLEAR until “L” and
disappears.
You will hear BEEP when it’s unlocked.
14
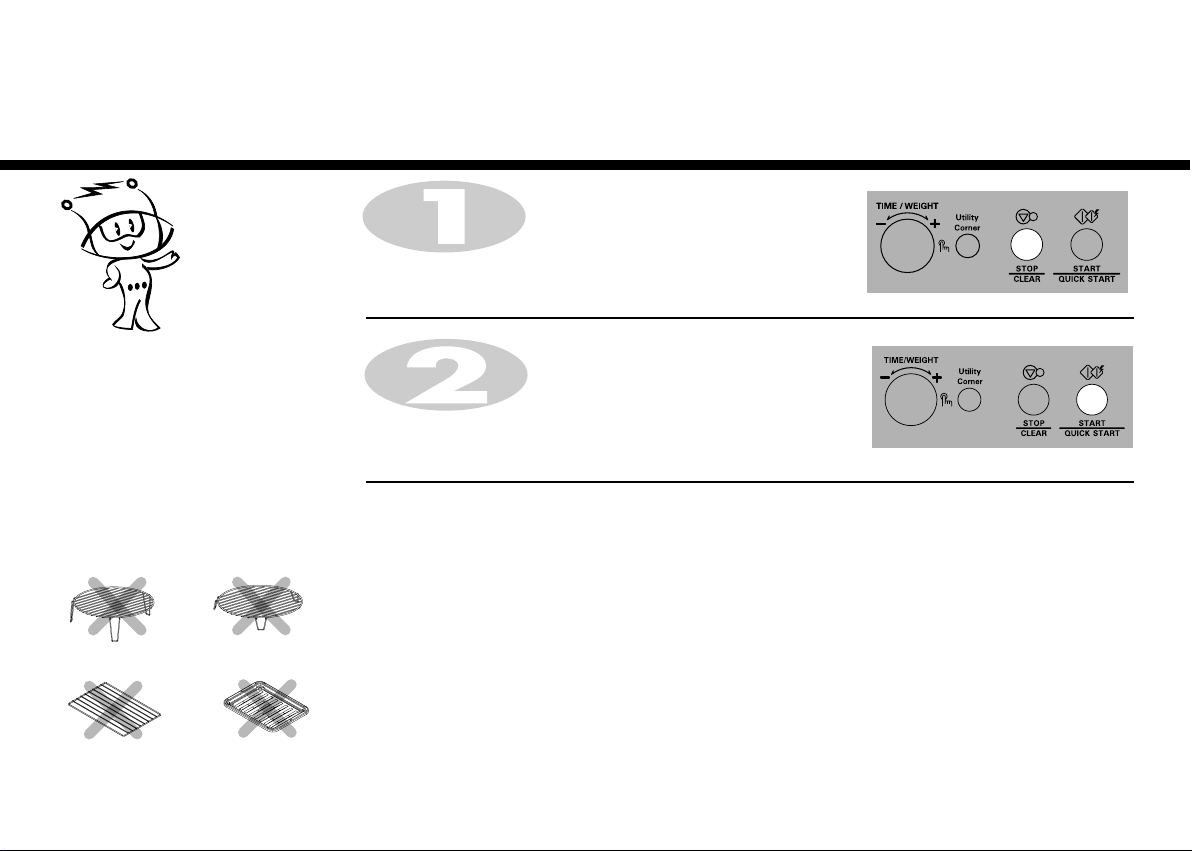
Micro Power
In the following example I will show you how to cook some food on 400W power for 5 minutes.
Make sure that you have correctly installed your oven as described
earlier in this book.
Press STOP/CLEAR.
Your oven has five microwave Power
settings. High power is automatically
selected and turning of TIME/WEIGHT
will select a different power level.
Food to be cooked should be placed in a
Microwave-safe utensils.
Please do not use the following
accessories.
High rack Low rack
Turn MODE to select Microwave.
The following indication is displayed: “ “.
Turn TIME/WEIGHT until display shows “400W”.
Press TIME/WEIGHT for power confirmation.
Turn TIME/WEIGHT until display shows “5:00”.
Press START/QUICK START.
Cooking
Square rack Square tray
15

Micro Power
Level
POWER LEVEL OUTPUT USE ACCESSORY
HIGH
This oven is equipped with 5 power levels to give you maximum flexibility and control over cooking.
The table below shows some examples of food and their recommended cooking power levels for use with this oven.
1000 W
* Boil Water
* Brown minced beef
* Cook poultry pieces, fish, vegetables
* Cook tender cuts meat
MEDIUM HIGH
MEDIUM
DEFROST/
MEDIUM LOW
LOW
800 W
600 W
400 W
200 W
* All reheating
* Roast meat and poultry
* Cook mushrooms and shellfish
* Cook foods containing cheese and eggs
* Bake cakes and scones
* Prepare eggs
* Cook custard
* Prepare rice, soup
* All thawing
* Melt butter and chocolate
* Cook less tender cuts of meat
* Soften butter & cheese
* Soften ice cream
* Raise yeast-based dough
16
Microwave-safe
plate
Grill
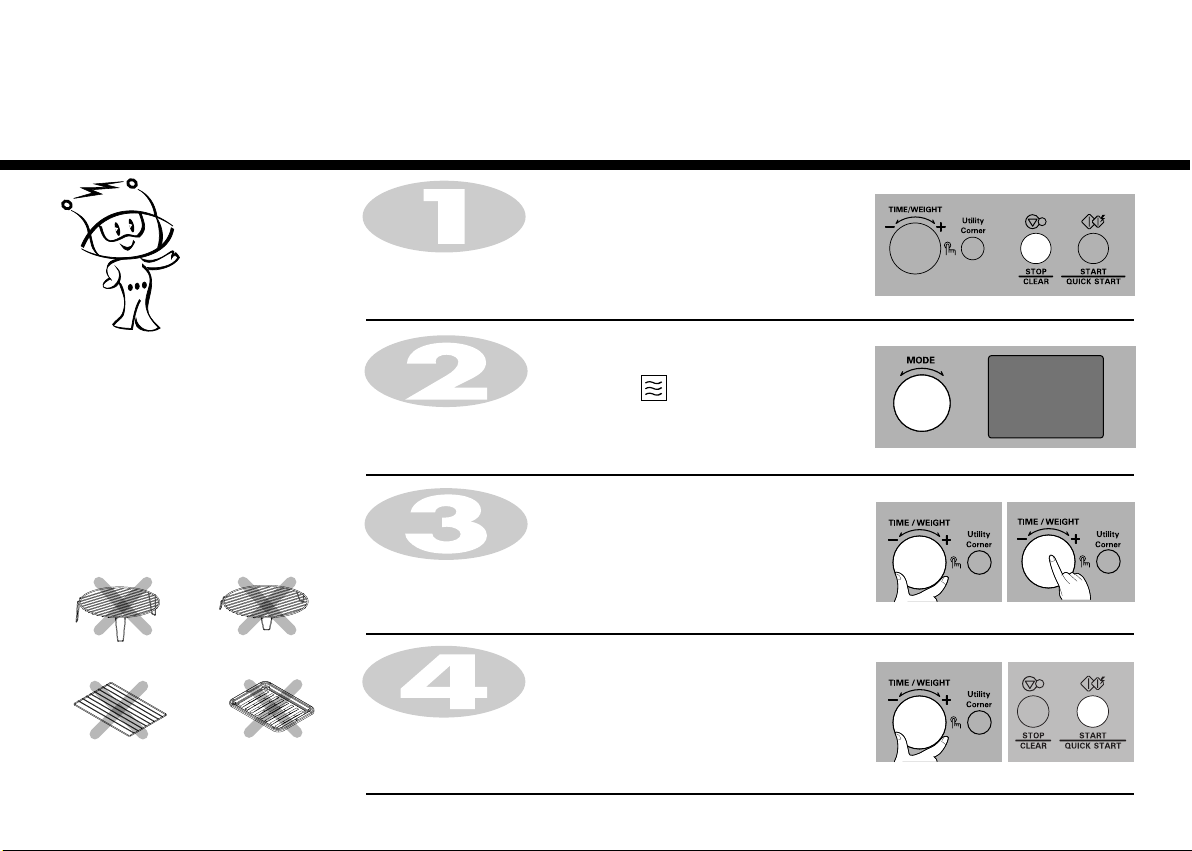
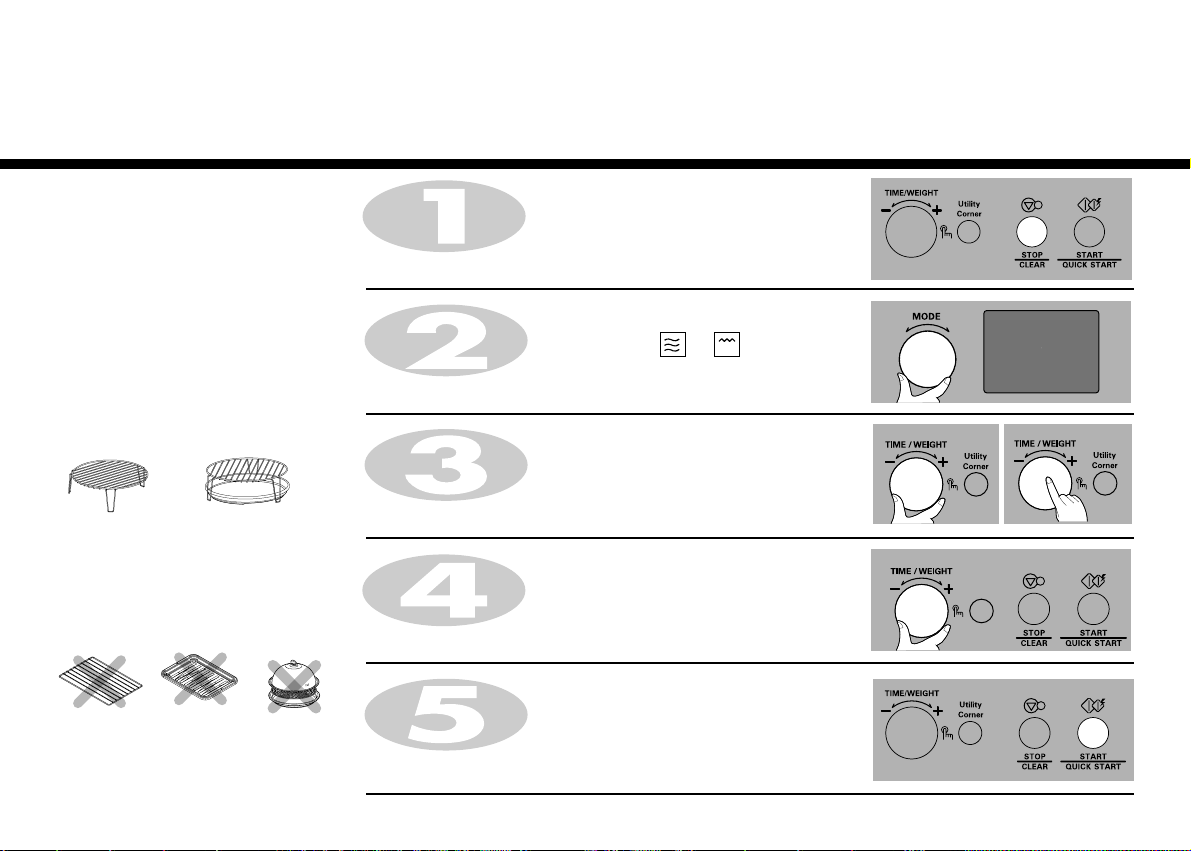
In the following example I will show you how to use the Grill to cook some food for 12 minutes.
Press STOP/CLEAR.
This feature will allow you to brown
and crisp food quickly.
For the best result use the following
accessories.
High rack
Please do not use the following
accessories.
High rack
+
Multi Cook Tawa
Turn MODE to select Grill.
The following indication is displayed: “ “.
Turn TIME/WEIGHT until display shows “12:00”.
Press START/QUICK START.
Cooking
Square rack Square tray
Steam cover
Always use oven gloves when removing the food and accessories
after cooking as the oven & accessoories will be very hot.
17
Grill Combi
Cooking
In the following example I will show you how to programme your oven with micro power 400W
and grill for a cooking time of 25 minutes.
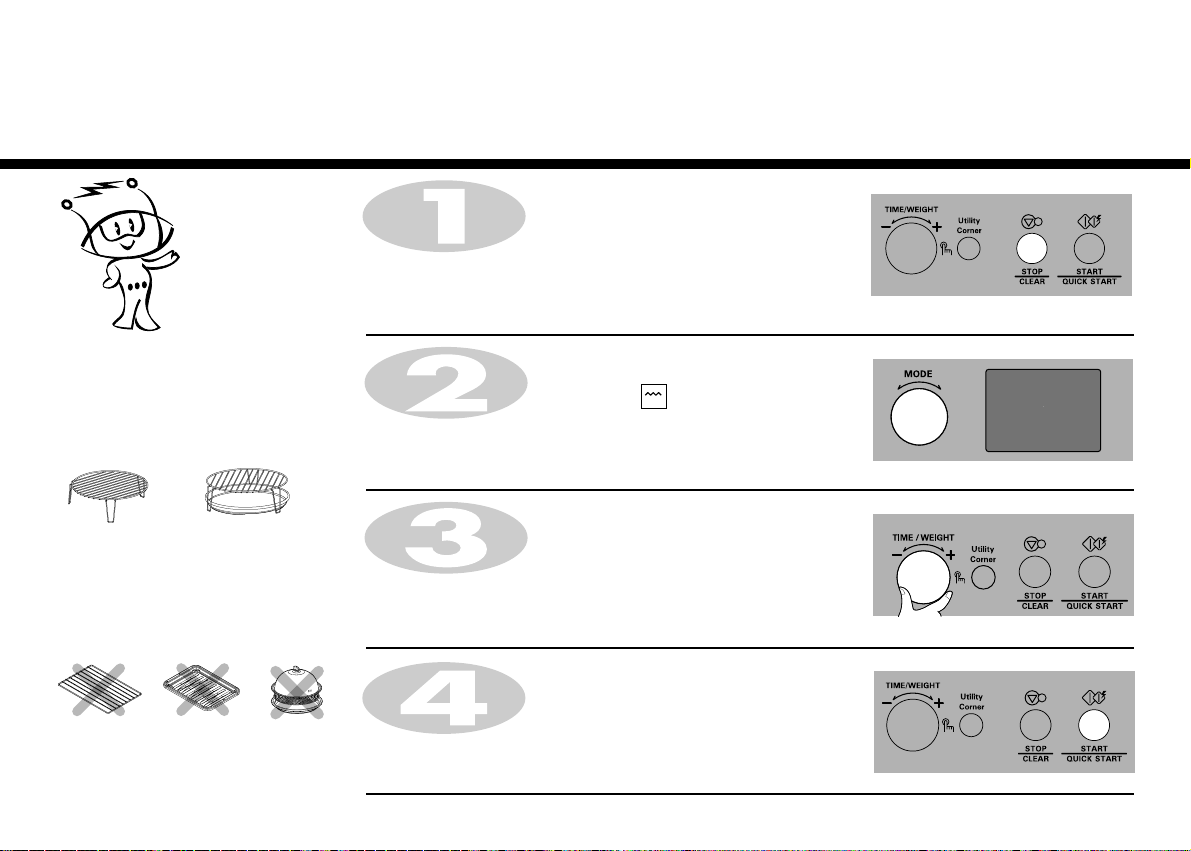
Your oven has a combination cooking
feature which allows you to cook food
with Heater and Microwave .
This generally means it takes less time
to cook your food.
You can set three kinds of micro power
level (200W, 400W, and 600W) in
grill combi mode.
For the best result use the following
accessories.
High/Low rack
Please do not use the following
accessories.
Square rack Square tray
High/Low rack
+
Multi Cook Tawa
Steam cover
Press STOP/CLEAR.
Turn MODE to select Grill Combi .
The following indications are displayed: “ “, “ “.
Turn TIME/WEIGHT until display shows “400W”.
Press TIME/WEIGHT for power confirmation.
Turn TIME/WEIGHT until display shows “25:00”.
Press START/QUICK START.
Always use oven gloves when removing the food and accessories
after cooking as the oven & accessoories will be very hot.
18
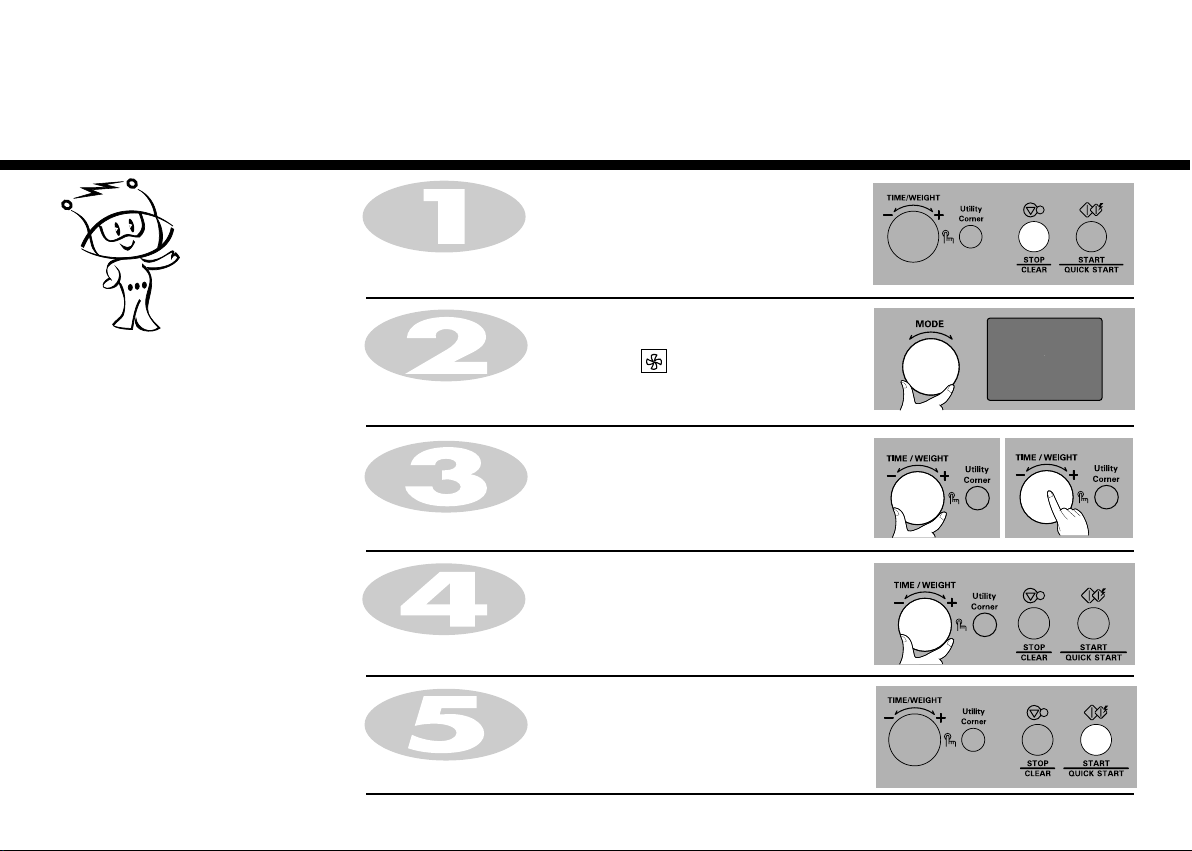
Convection
In the following example I will show you how to preheat the oven to a temperature of 200°C.
Press STOP/CLEAR.
The convection oven has a temperature
range of 40°C and 100°C ~ 230°C
(180°C is automatically available when
convection mode is selected).
The oven has a ferment function at the
oven temperature of 40°C. You may wait
until the oven is cool because you cannot
use a ferment function if the oven
temperature is over 40°C.
Your oven will take a few minutes to reach
the selected temperature.
Once it has reached correct temperature,
your oven will BEEP to let you know that it
has reached the correct temperature.
Then place your food in your oven and tell
your oven to start cooking.
Turn MODE to select Conv.
The following indication is displayed: “ “.
Turn TIME/WEIGHT until display shows “200°C”.
Press START/QUICK START.
Preheating will be started with displaying “ Pr-H”.
Preheat
19
Convection
Cooking
In the following example, I will show you how to cook some food at a temperature of 230°C for 50 minutes.
If you do not set a temperature your
oven will automatically select 180 °C, the
cooking temperature can be changed by
turning TIME/WEIGHT.
FOR TWO LEVEL COOKING
1. When cooking on two levels use both
the shelves supplied, with the square
tray on the lower level and the
square rack on the upper level.
2. When cooking on two levels, remove
other accessories(glass tray, rotating
ring).
FOR ONE LEVEL COOKING
For the best result, please use the
following accessories.
Press STOP/CLEAR.
The metal tray or metal rack must be used during convection cooking.
Turn MODE to select Conv.
The following indication is displayed: “ “.
Turn TIME/WEIGHT until display shows “230°C”.
Press TIME/WEIGHT for temperature confirmation.
Turn TIME/WEIGHT until display shows “50:00”.
Press START/QUICK START.
Always use oven gloves when removing the food and accessories
after cooking as the oven & accessories will be very hot.
Low rack
Square tray
20
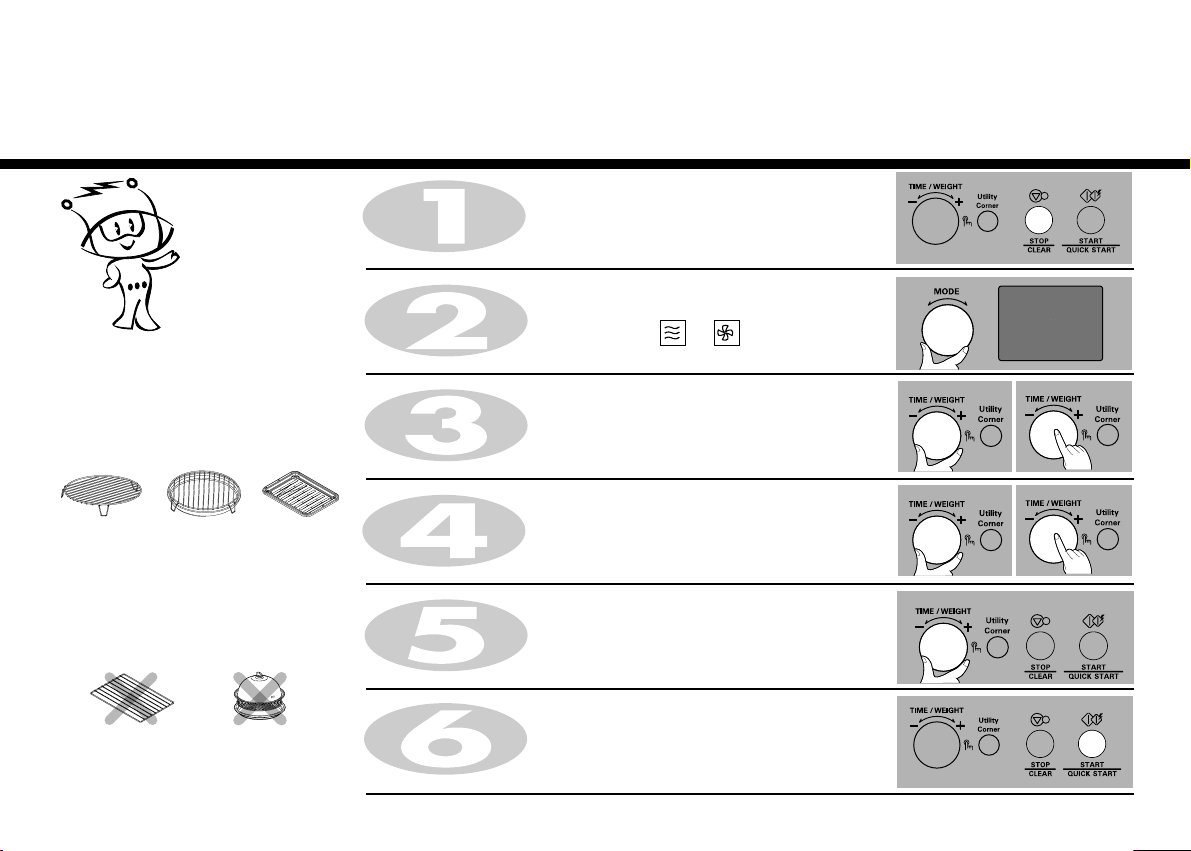
In the following example I will show you how to programme your oven with micro power 300W and at a
convection temperature 200 C for a cooking time of 25 minutes.
You can set three kinds of micro power
level (200W, 300W and 400W).
For the best result, use the following
accessories.
High/Low
Rack
High/Low rack
Multi Cook Tawa
°
Press STOP/CLEAR.
Turn MODE to select Conv. Combi.
The following indications are displayed: “ “, “ “.
Turn TIME/WEIGHT until display shows “300W”.
Press TIME/WEIGHT for power confirmation.
Turn TIME/WEIGHT until display shows “200°C”.
+
Square
tray
Press TIME/WEIGHT for temperature confirmation.
Convection Combi
Cooking
Please do not use the following
accessories.
Square rack
Steam cover
Turn TIME/WEIGHT until display shows “25:00”.
Press START/QUICK START.
Always use oven gloves when removing the food and accessories
after cooking as the oven & accessoories will be very hot.
21
Quick
Start
The QUICK START feature allows you
to set 30 second intervals of HIGH
power (1000W) cooking by pressing
the START/QUICK START button.
Food to be cooked should be placed
in a Microwave-safe utensils.
Please do not use the following
accessories.
High rack Low rack
In the following example I will show you how to set 2 minutes of cooking on high power (1000W).
Press STOP/CLEAR.
Press START/QUICK START four times to select 2 minutes
on HIGH power (1000W).
Your oven will start before you have finished the fourth press.
Square rack Square tray
22
In the following example I will show you how to change the preset COOK programmes for a longer or
shorter cooking time.
Press STOP/CLEAR.
More or Less
Cooking
If you find that your food is over or
undercooked when using the preset
COOK programme, you can increase
or decrease cooking time by turning
the TIME/WEIGHT..
You can lengthen or shorten the
cooking time(except defrost mode) at
any point by turning the
TIME/WEIGHT.
Set the required preset COOK programme.
Select weight of food.
Press START/QUICK START.
Turn TIME/WEIGHT.
The cooking time will increase or decrease.
23
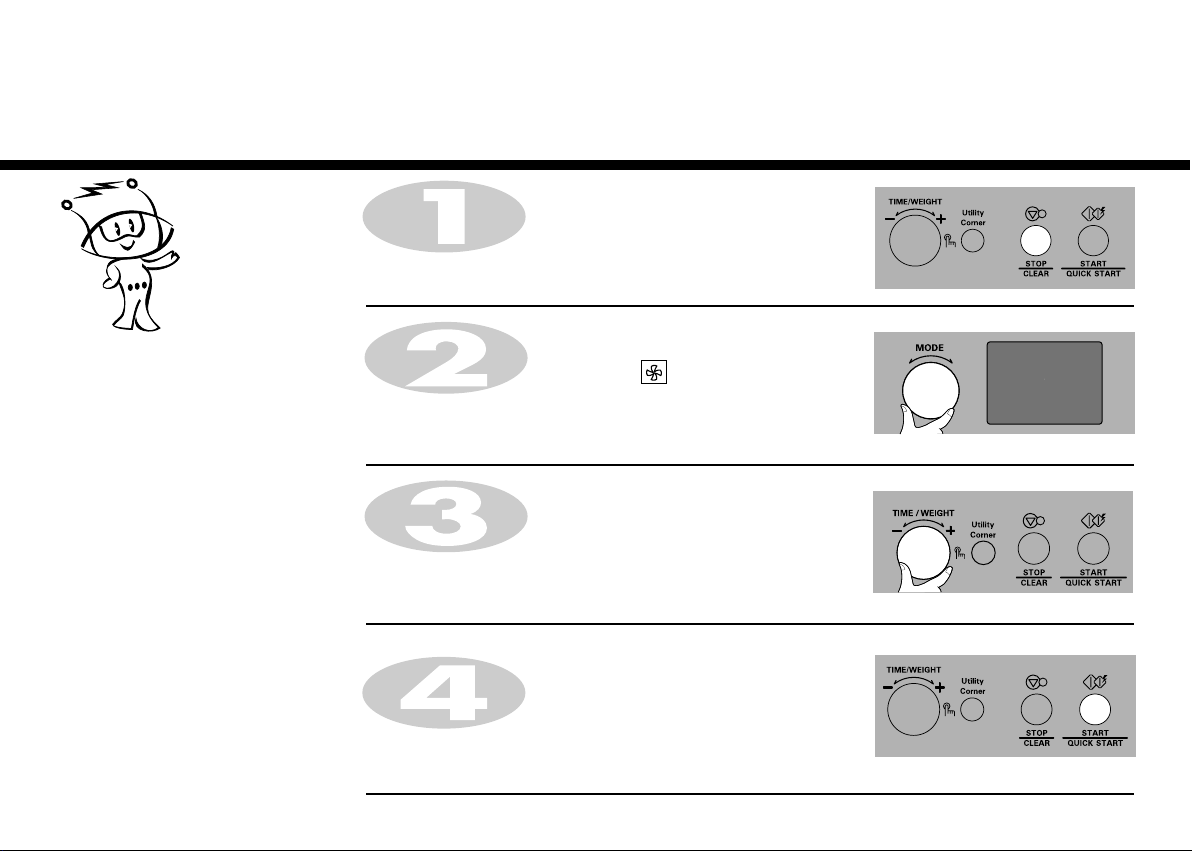
Keep
Warming
The oven has a temperature range of
30°C ~ 90°C, when keep warming
is selected.
When you press keep warming,
60°C is set initially.
Your oven will take a few minutes to
reach the selected tempeature.
Once it has reached the correct
temperature, your oven will BEEP.
In the following example I will show you how to keep warming at the temperature of 90°C for 30 minutes.
Press STOP/CLEAR.
Turn MODE until display shows “60°C”.
The following indication is displayed: “ “.
Turn TIME/WEIGHT until display shows “90°C”.
Press TIME/WEIGHT for temperature confirmation.
Turn TIME/WEIGHT until display shows “30:00”.
Press START/QUICK START.
24

STEAM CHEF (St)
25
Steam Chef (St)
Menu Weight Limit Utensil Instructions
St1
Momos
0.1 ~ 0.3 kg
Steam chef*
For
Maida
Salt
Water
Baking powder
For filling
Boiled mix veg (carrot, peas, capsicum, potato)
Soya sauce, Chilli sauce
Salt, pepper, garam masala
Method : 1.
In a bowl take maida, add salt, baking powder and water, prepare a soft dough. Keep it for 15 minutes.
Roll out the dough into thin chapattis and add the filling in the centre and wrap it like a bag. Prepare all the momos in the same way.
2.
In the steam chef, add water to the steam water bowl, place the momos on the steam plate and cover.
3.
Select menu and weight, press start. Serve with schzewan sauce.
4.
0.1 kg
100 g 200 g 300 g
¼ tsp
1 cup
0.2 kg 0.3 kg
As per your taste
For making dough
½ tsp
1½ cup
As per your taste
As per your taste
½ tsp
2 cup
Sprouts
St2
Steamed
St3
fish
Steamed
St4
chicken
* MWS - Microwave Safe
0.1 ~ 0.3 kg
0.1 ~ 0.3 kg
0.1 ~ 0.3 kg
Steam chef*
Steam chef*
Steam chef*
For
Moong sprouts
Chopped onion, Chopped tomato
Salt, Chaat masala, Lemon juice
Method :
1. In the steam chef, add water to the steam water bowl, place the moong sprouts on the steam plate and cover.
2. Select menu and weight and press start. Stand for 3 minutes. Add chopped onion, tomato, salt, chaat masala
and lemon juice and serve.
For
Fish fillet
Salt, Pepper, Lemon juice, Spring onion (chopped
Method :
1. In the steam chef, add water to the steam water bowl, place the fish on the steam plate and cover.
Select menu and weight and press start. Stand for 3 minutes.
2. Add salt, pepper, lemon juice and garnish with chopped spring onions and serve.
For
Boneless chicken
Soya sauce, salt, pepper
1. Marinate the chicken with soya sauce, salt, pepper and keep it in refrigerator for 1 an hour.
Method :
2. In the steam chef, add the water to the steam water bowl, place the marinated chicken on the steam plate and cover.
3. Select menu and weight and press start. Stand for 3 minutes.
0.1 kg
100 g
0.1 kg
100 g
0.1 kg
100 g
0.2 kg
200 g
0.2 kg
200 g
0.2 kg
200 g
As per taste
As per taste
As per taste
26
0.3 kg
300 g
221
0.3 kg
300 g
0.3 kg
300 g
Menu Weight Limit Utensil Instructions
St5
Steamed
Veg
0.1 ~ 0.3 kg
Steam chef*
For
Chopped vegetables ( Capsicum, carrots, peas, beans)
1. In the steam chef, add water to the steam water bowl, place the chopped vegetables on the steam plate and cover.
Method :
2. Select menu and weight and press start. Sprinkle salt and pepper as per taste and serve.
0.1 kg
100 g
Steam Chef (St)
0.2 kg
200 g
0.3 kg
300 g
Sweet corn
St6
Boiled Egg
St7
St8
Gajar ka
Halwa
* Refer Page 97, Fig 1
0.1 ~ 0.3 kg
2-9No
0.3 kg Steam chef*
Steam chef*
Steam chef*
Microwave safe
flat glass dish
For
Sweat corn
Salt, Red chilli powder, Chaat masala, Lemon juice
Method : 1. In the steam chef, add water to the steam water bowl, place the chopped sweet corns on the steam plate and cover.
2. Select menu and weight and press start.
Sprinkle salt, red chilli powder, chaat masala and lemon juice and serve.
Eggs
Method : 1. In the steam chef, add water to the steam water bowl, place the eggs on the steam plate and cover.
2. Select menu and weight & press start.
Remove the shell of the eggs and sprinkle salt and pepper and serve.
&
For
Grated Gajar
Ghee
Milk Powder
Khoya
Sugar
Elaichi Powder and Dry Fruits
Method : 1.
In steam chef, add water in steam water bowl. Place the grated gajar on steam plate and cover.
2.
Select menu and weight and weight & press start.
3..
When beeps, transfer the steamed gajar to the MWS* glass dish. Add rest of the ingredients to the grated gajar and mix well.
Press start.
0.1 kg
100 g
2 4 5 6 7 8 9
0.2 kg
200 g
As per taste
0.3 kg
300 g
2 tbsp
4 tbsp
5 tbsp
4 tbsp
As per your taste
0.3 kg
300 g
27
Steam Chef (St)
Menu Weight Limit Utensil Instructions
St9
Keema
Balls
0.1 ~ 0.3 kg
Steam chef*
For
Chicken Keema
Boiled & Mashed Potato
Ginger, Garlic Paste, Salt, Garam Masala, Hara Dhania
Lemon Juice
Besan
Method : 1.
Mix all the ingredients together. Make Keema balls from it.
2.
In the steam chef, add water in steam water bowl.
3.
Place the keema balls over the steam plate and cover.
4.
Select menu and weight, press start.
0.1 kg
75 g
1 tsp
0.2 kg
125 g
As per your taste
2 tsp
0.3 kg
175 g
3 No.2 No.1 No.
3 tsp
Avial
St10 Steam chef*
Steamed
St11
bhutta
* Refer Page 97, Fig 1
0.1 ~ 0.3 kg
1~2 No.
Microwave
safe bowl
Steam chef*
&
For
Cut vegetables (long pieces), Carrot, potato, drumstick,
French beans, bottlegourd
Oil
Mustard seeds, Curry leaves, Salt, Haldi
Coconut milk
Curd (beaten)
1. In the steam chef, add the water to the steam water bowl, place the vegetables on the steam plate and cover. Press start.
Method :
Allow to stand for 3 minutes.
2. Select menu and weight and press start.
3. When beeps, remove the Steam Chef.
4. In a MWS bowl add 1tbsp oil, mustard seeds, curry leaves, haldi, salt. Add coconut milk and curd.
5. When beeps, add the steamed vegetables to the coconut milk and press start. Garnish with grated coconut and serve.
Bhutta
Salt, Chaat masala, Lemon juice
Method :
1. In the steam chef, add water to the steam water bowl, break one bhutta into two pieces and place on the steam plate and cover.
2. Select menu and weight and press start. Sprinkle salt, chaat masala and lemon juice and serve.
0.1 kg
100 g
1 tbsp
1/2 cup
1/2 cup
0.2 kg
200 g
1 tbsp
As per taste
1 cup
1 cup
2 No.1 No.
As per taste
0.3 kg
300 g
1½ tbsp
1½ cup
1½ cup
28
Menu Weight Limit Utensil Instructions
St12
Methi
Muthiya
0.1 ~ 0.3 kg
Steam chef*
For
Methi Leaves
Atta
Besan
Suji
Soda bi carb
Ginger garlic chilli paste
Dhaniya powder, Hali, Salt, Sugar
Method :
1. Mix all the ingredients. Add some water and make a soft dough. Make small balls from this dough.
2. In the steam chef, add water to the steam water bowl, place the muthiyas on the steam plate and cover.
3. Select menu and weight press start
0.1 kg
1/2 cup
1/4 cup
2 tbsp
1 tbsp
1/4 tsp
Steam Chef (St)
0.2 kg
3/4 cup
1/2 cup
3 tbsp
1½ tbsp
1/2 tsp
As per your taste
As per your taste
0.2 kg
1 cup
3/4 cup
4 tbsp
3/4 tbsp
3/4 tsp
Sarson ka
St13 Steam chef*
saag
* Refer Page 97, Fig 1
0.1 ~ 0.3 kg
Microwave
safe bowl
&
For
Sarson (washed & separated leaves)
Palak (washed & separated leaves)
Oil
Onion garlic paste
Tomato (chopped)
Salt, Red chilli powder
Water
Method : 1. In the steam chef, add water in the steam water bowl, place sarson and palak on the steam plate and cover.
Select menu and weight and press start. Allow it to stand for 3 mins.
2. When beeps, remove the steam chef, grind it with water.
3. In a MWS bowl add oil, onion garlic paste, tomato, salt and red chilli powder and press start. Mix well.
4. When beeps, add grind sarson and palak, water (as required) to the MWS bowl. Mix well and press start.
Serve it with makki ki roti.
0.1 kg
75 g
20 g
1 tbsp
1 tsp
1/2 cup
0.2 kg
150 g
50 g
1½ tbsp
1½ tsp
1 cup
As per your taste
As required
0.3 kg
200 g
100 g
2 tbsp
2 tsp
1½ cup
29
Steam Chef (St)
Menu Weight Limit Utensil Instructions
St14
Shorshe
Ilish
0.3 kg
Steam chef*
&
Microwave
safe bowl
For
Hilsa pieces
Mustard oil
Onion
Mustard seeds and chilli paste
Salt, Red chilli powder
1) In the steam chef, add the water to the steam water bowl, place the hilsa pieces on the steam plate and cover. Select menu
Method :
and press start. Stand for 3 minutes.
2) When beeps, remove the steam chef. In a MWS bowl add mustard oil, onion, mustard and chilli paste, salt, red chilli powder
and press start.
3) When beeps, add the steamed hilsa in MWS bowl, mix well and cover. Press start.
serve with rice.
0.3 kg
300 g
1 tbsp
2 nos.
1½ tbsp
As per taste
Matar
St15
Mushroom
* Refer Page 97, Fig 1
0.1 ~ 0.3 kg
Steam chef*
&
Microwave
safe bowl
For
Matar
Mushroom (chopped)
Oil
Onion (chopped)
Tomato puree
Salt, Red chilli powder, Garam masala
1. In the steam chef, add water to the steam water bowl, place the matar and chopped mushroom on the steam place and cover.
Method :
Select menu and weight and press start.
2. When beeps, remove the steam chef.
3. In a MWS bowl add oil, onion, tomato puree, salt, red chilli powder, garam masala and press start. Mix well.
4. When beeps, add steamed matar and mushroom to the mws bowl and add little water, press start. Mix well and add chopped
coriander leaves and serve with roti.
0.1 kg
50 g
50 g
1 tbsp
1/2 cup
2 tbsp
0.2 kg
100 g
100 g
1½ tbsp
1 cup
2½ tbsp
As per taste
30
0.3 kg
150 g
150 g
2 tbsp
1 cup
3 tbsp
 Loading...