

LG M3703C, M3703CCBA, M3203C-BA User Manual

M
ake sure to read the
Safety Precautions
before using the product.
Keep the User's Guide(CD) in an accessible place for future reference.
S
ee the label attached on the product and give the information to your dealer when you ask
for service.
M3703C
User's Guide
Temporary noise is normal when powering ON or OFF this device.

1
Safety Precautions
Maintenance and Servicing
Never remove the back cover of the apparatus : this can
expose you to high voltage and other hazards. If the
apparatus does not operate properly, unplug it and call
authorized service center or PDI.
Cleaning and Disinfection
Clean the exterior of this apparatus by removing dust with a
lint-free cloth.
Caution : To avoid damage to the surface of the apparatus, do
not use abrasive or chemical cleaning agents.
Clean only with dry cloth.
Note to cable/Apparatus Installer
This reminder is provided to call the CATV system
installer's attention to Article 820-40 of the National
Electric Code.(U.S.A).
The code provides guidelines for proper grounding and,
in particular, specifies that the cable ground shall be
connected to the grounding system of the building, as
close to the point of the cable entry as practical.
WARNING / CAUTION
To prevent fire or shock hazards, do not expose
this product to rain or moisture.
Class B digital device
This equipment has been tested and found to
comply with the limits for a Class B digital device,
pursuant to Part 15 of the FCC Rules. These limits
are designed to provide reasonable protection
ag ainst harmful interfe rence in a re sidential
installation. This equipment generates, uses and
can radiate radio frequency energy and, if not
installed and used in a ccordance with the
instructions, may cause harmful interference to
radio communications. However, th ere is no
guarantee that interference will not occur in a
particular installation. If this equipment does cause
harmf ul in terfere nce to rad io or t elevi si on
reception, which can be determined by turning the
equipment off and on, the user is encouraged to try
to correct the interference by one or more of the
following measures:
- Reorient or relocate the receiving antenna.
- Increase the separation between the equipment
and receiver.
- Connect the equipment to an outlet on a circuit
differe nt from that to which the receiver is
connected.
- Consult the dealer or an experienced radio/
apparatus technician for help.
Any changes or modifications not expressly
app rov ed b y the par ty res pon sib le f or
compliance could void the user's authority to
operate the equipment.
Do not attempt to modify this product in any way
without written authorization from LG Electronics.
Unauthorized modification could void the user's
authority to operate this product.
FCC NOTICE
CAUTION
2
Safety Precautions
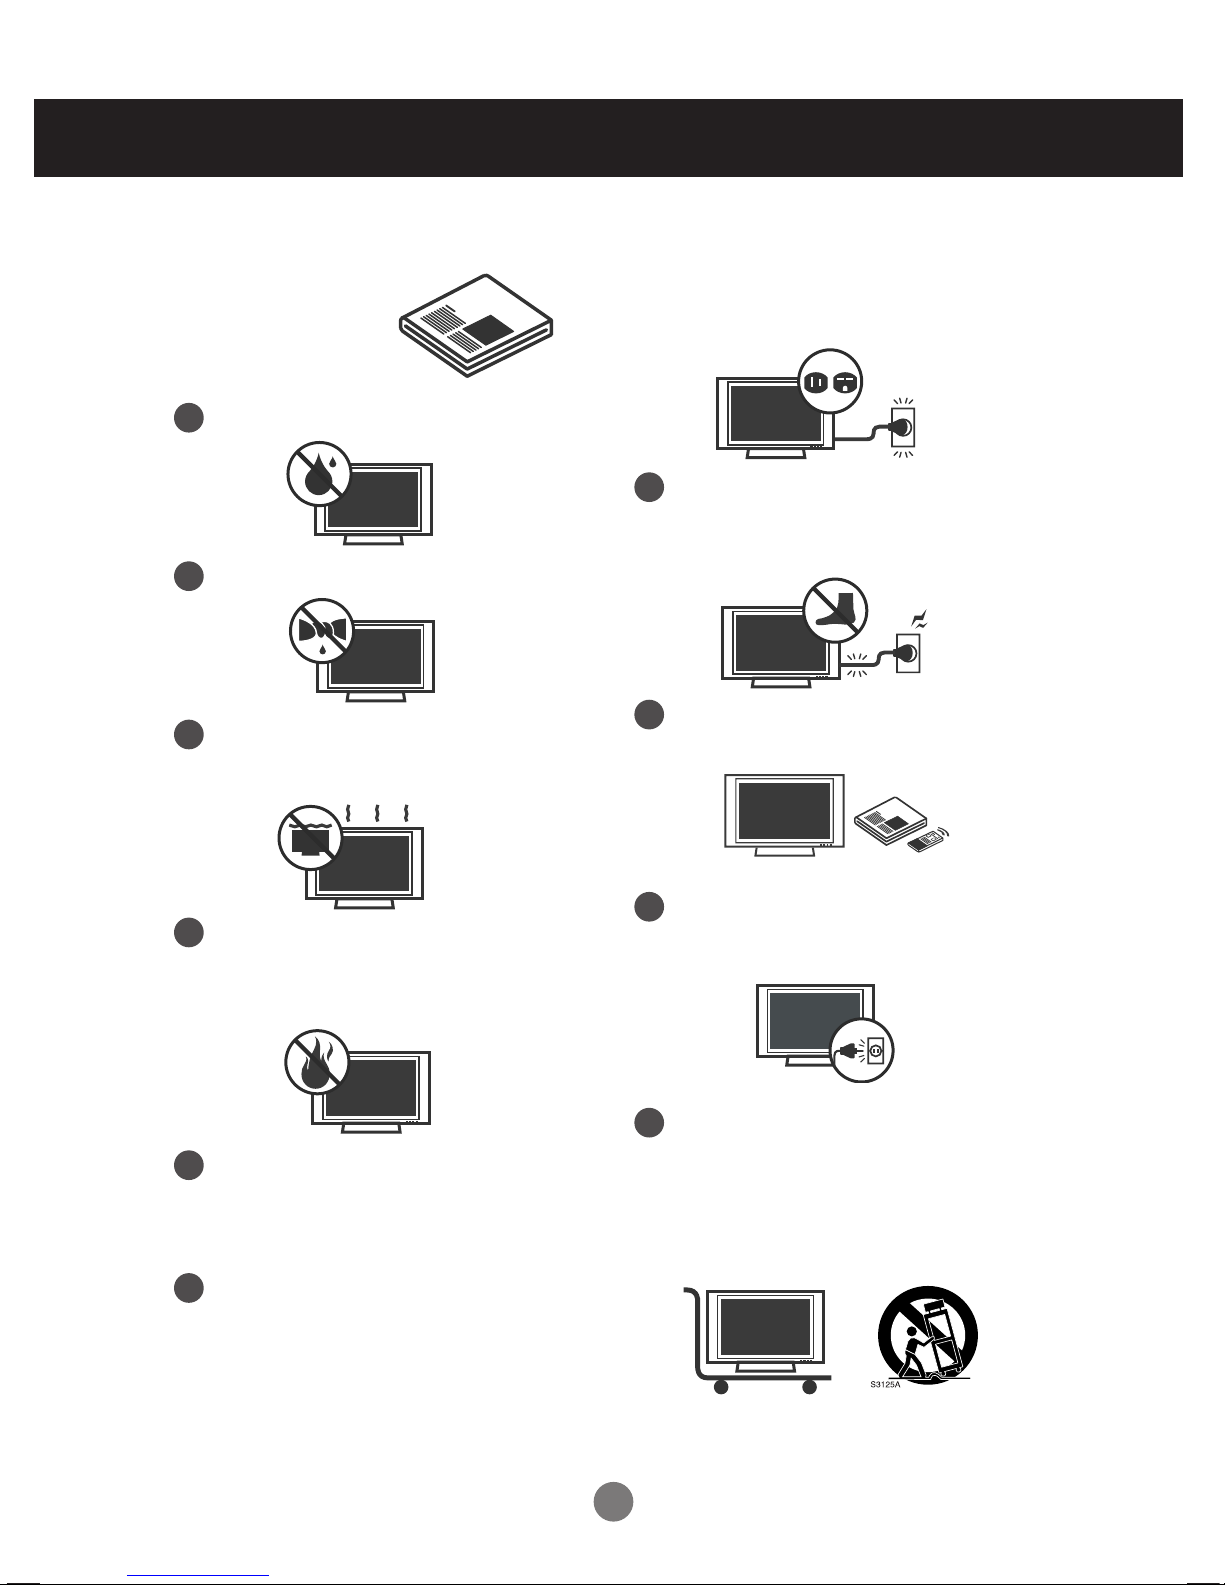
1
Do not use this apparatus near water.
Read these instructions.
Keep these instructions.
Heed all warnings.
Follow all instructions.
IMPORTANT SAFETY INSTRUCTIONS
2
Clean only with dry cloth.
3
Do not block any ventilation openings. Install in
accordance with the manufacturer's instructions.
4
Do not install near any heat sources such as
radiators, heat registers, stoves, or other
apparatus (including amplifiers) that produce
heat.
5
When mounting a apparatus on the wall, make
sure not to install apparatus by the hanging
power and signal cables on the back of the
apparatus.
6
Do not defeat the safety purpose of the
polarized or grounding-type plug. A polarized
plug has two blades with one wider than the
other. A grounding type plug has two blades
and a third grounding prong, The wide blade or
the third prong are provided for your safety.
7
Protect the power cord from being walked on
or pinched particularly at plugs, convenience
receptacles, and the point where they exit
from the apparatus.
If the provided plug does not fit into your outlet,
consult an electrician for replacement of the
obsolete outlet.
8
Only use attachments/accessories specified
by the manufacturer.
9
Unplug this apparatus during lightning storms
or when unused for long periods of time.
10
Use only with the cart, stand, tripod, bracket,
or table specified by the manufacturer, or sold
with the apparatus. When a cart is used, use
caution when moving the cart/apparatus
combination to avoid injury from tip-over.

3
Safety Precautions
11
Never touch this apparatus or antenna during a
thunder or lighting storm.
12
Do not allow an impact shock or any objects to
fall into the product, and do not drop onto the
screen with something.
13
Refer al l servicing to qualified service
personnel. Servicing is required when the
apparatus has been damaged in any way,
such as power-supply cord or plug is
damaged, liquid has been spilled or objects
have fallen into the apparatus, the apparatus
has been exposed to rain or moisture, does not
operate normally, or has been dropped.
15
WARNING - To reduce the risk of fire or
electrical shock, do not expose this product to
rain, moisture or other liquids. Do not touch the
apparatus with wet hands. Do not install this
product near flammable objects such as
gasoline or candles or expose the apparatus to
direct air conditioning.
Do not move the apparatus with the power
cord plugged in. Do not use a damaged or
loose power cord. Be sure do grasp the plug
when unplugging the power cord. Do not pull
on the power cord to up unplug the apparatus.
16
Do no expose to dripping or splashing and do
not place objects filled with liquids, such as
vases, cups, etc. on or over the apparatus
(e.g. on shelves above the unit).
17
GROUNDING
Ensure that you connect the earth ground wire
to prevent possible electric shock (i.e. a
apparatus with a three-prong grounded AC
plug must be connected to a three-prong
grounded AC power outlet). If grounding
methods are not possible, have a qualified
electrician install a separate circuit breaker.
Do not try to ground the unit by connecting it to
telephone wires, lightening rods, or gas pipes.
Power
Supply
Short-circuit
Breaker
14
CAUTION concerning the Power Cord:
It is recommend that appliances be placed upon
a dedicated circuit; that is, a single outlet circuit
which powers only that appliance and has no
additional outlets or branch circuits. Check the
specification page of this owner's manual to be
certain.
Do not connect too many appliances to the same
AC power outlet as this could result in fire or
electric shock.
Do not overload wall outlets. Overloaded wall
outlets, loose or damaged wall outlets, extension
cords, frayed power cords, or damaged or
cracked wire insulation are dangerous. Any of
these conditions could result in electric shock or
fire. Periodically examine the cord of your
appliance, and if its appearance indicates
damage or deterioration, unplug it, discontinue
use of the appliance, and have the cord replaced
with an exact replacement part by an authorized
servicer. Protect the power cord from physical or
mechanical abuse, such as being twisted,
kinked, pinched, closed in a door, or walked
upon. Pay particular attention to plugs, wall
outlets, and the point where the cord exits the
appliance.

4
Safety Precautions
19
Cleaning
When cleaning, unplug the power cord and scrub
gently with a soft cloth to prevent scratching. Do
not spray water or other liquids directly on the
apparatus as electric shock may occur. Do not
clean with chemicals such as alcohol, thinners or
benzene.
21
Ventilation
Install your apparatus where there is proper
ventilation. Do not install in a confined space
such as a bookcase. Do not cover the product
with cloth or other materials (e.g.) plastic while
plugged in. Do not install in excessively dusty
places.
22
If you smell smoke or other odors coming from
the apparatus or hear strange sounds, unplug the
power cord contact an authorized service center.
23
As long as this unit is connected to the AC wall outlet, it
is not disconnected from the AC power source even if
the unit is turned off.
24
On Disposal
The fluorescent lamp used in this product contains a
small amount of mercury.
Do not dispose of this product with general household
waste.
Disposal of this product must be carried out in
accordance to the regulations of your local authority.
18
DISCONNECTING DEVICE FROM MAINS
Mains plug is the disconnecting device. The plug
must remain readily operable.
20
Moving
Make sure the product is turned off, unplugged
and all cables have been removed. It may take 2
or more people to carry larger apparatus. Do not
press against or put stress on the front panel of
the apparatus.

5
Safety Precautions
Please read these safety precautions carefully before using the product.
If you ignore the caution message, you may be slightly injured or the product may be damaged
If you ignore the warning message, you may be seriously injured or there is a possibility of
accident or death.
Warning
Caution
Precautions in installing the Product
Keep away from heat sources like electrical heaters.
- Electrical shock, fire, malfunction or deformation may occur.
Keep the packing anti-moisture material or vinyl packing out of the reach of children.
- Anti-moisture material is harmful if swallowed. If swallowed by mistake, force the patient to vomit and visit the
nearest hospital. Additionally, vinyl packing can cause suffocation. Keep it out of the reach of children.
Do not put heavy objects on the product or sit upon it.
- If the product collapses or is dropped, you may be injured. Children must pay particular attention.
Do not leave the power or signal cable unattended on the pathway.
- The passerby can falter, which can cause electrical shock, fire, product breakdown or injury.
Install the product in a neat and dry place.
- Dust or moisture can cause electrical shock, fire or product damage.
If you can smell smoke or other odors or hear a strange sound unplug the power cord and contact the
service center.
- If you continue to use without taking proper measures, electrical shock or fire can occur.
If you dropped the product or the case is broken, turn off the product and unplug the power cord.
- If you continue to use without taking proper measures, electrical shock or fire can occur. Contact the service center.
Do not drop an object on or apply impact to the product. Do not throw any toys or objects on the product screen.
- It can cause injury to human, problem to product and damage the display.
Do not let the product fall or drop when connecting it with an external device.
- This may cause injury and/or damage to the product.
When connecting it with a game device, keep a distance of four times as long as the diagonal measurement of the
screen from the device.
- If the product falls because of the short cable, this may cause injury and/or damage to the product.
Leaving a fixed image on the screen for a long time may cause damage to the screen and cause
image burn-in. Make sure to use a screen saver on the product.
Burn-in and related problems are not covered by the warranty on this product.
Make sure the product ventilation hole is not blocked. Install the product in a suitably wide place (more
than 10cm from the wall)
- If you install the product too close to the wall, it may be deformed or fire can break out due to internal heat.
Do not block the ventilation hole of the product by a tablecloth or curtain.
- The product can be deformed or fire can break out due to overheating inside the product.
Install the product on a flat and stable place that has no risk of dropping the product.
- If the product is dropped, you may be injured or the product may be broken.
Install the product where no EMI occurs.
Keep the product away from direct sunlight.
- The product can be damaged.
Warning
Caution

6
Safety Precautions
Electrical Power Related Precautions
Make sure to connect the power cable to the grounded current.
- You may be electrocuted or injured.
Use the rated voltage only.
- The product can be damaged, or you may be electrocuted.
In the presence of thunder and lightning, never touch the power cord and signal cable because it can be
very dangerous.
- It can cause electric shock.
Do not connect several extension cords, electrical appliances or electrical heaters to a single outlet. Use
a power bar with a grounding terminal designed for exclusive use with the computer.
- A fire can break out due to overheating.
Do not touch the power plug with wet hands. Additionally, if the cord pin is wet or covered with dust, dry
the power plug completely or wipe dust off.
- You may be electrocuted due to excess moisture.
If you don't intend to use the product for a long time, unplug the power cable from the product.
- Covering dust can cause a fire, or insulation deterioration can cause electric leakage, electric shock or fire.
Fix the power cable completely.
- If the power cable is not fixed completely, a fire can break out.
Hold the plug when pulling out the power cable. Do not bend the power cord with excessive force or put
heavy objects on the power cord.
- The power line can be damaged, which may cause electric shock or fire.
Do not insert a conductor (like a metal chopstick) into one end of the power cable while the other end is
connected to the input terminal on the wall. Additionally, do not touch the power cable right after
plugging into the wall input terminal.
- You may be electrocuted.
The power supply cord is used as the main disconnection device. Ensure that the socket-outlet is easily
accessible after installation.
Main power breaker is the power cord and this breaking device must be located at a location where it is
easy to operate.
As long as this unit is connected to the AC wall outlet, it is not disconnected from the AC power source
even if the unit is turned off.
Do not unplug the power cord while the product is in use.
- Electrical shock can damage the product.
Warning
Caution

7
Safety Precautions
Precautions in Using the Product
Warning
Caution
Do not shock the product when moving it.
- You may be electrocuted or the product can be damaged.
Do not dispose the product-packing box. Use it when you move.
Do not disassemble, repair or modify the product at your own discretion.
- Fire or electric shock accident can occur.
- Contact the service center for check, calibration or repair.
When the display is to be left unattended for an extended period of time, unplug it from the wall outlet.
Keep the product away from water.
- Fire or electric shock accident can occur.
Do not shock or scratch the front and sides of the screen with metallic objects.
- Otherwise, it may cause damage to the screen.
Avoid high temperatures and humidity.
Precautions in Moving the Product
Warning
Make sure to turn off the product.
- You may be electrocuted or the product can be damaged.
Make sure to remove all cables before moving the product.
- You may be electrocuted or the product can be damaged.
Make sure the panel faces forward and hold it with both hands to move. If you drop the product, the
damaged product can cause electric shock or fire. Contact an authorized the service center for repair.

8
Safety Precautions
Caution
Do not put or store inflammable substances near the product.
- There is a danger of explosion or fire due to careless handling of the inflammable substances.
When cleaning the product, unplug the power cord and scrub gently with a soft cloth to prevent
scratching. Do not clean with a wet cloth or spray water or other liquids directly onto the product. An
electric shock may occur. (Do not use chemicals such as benzene, paint thinners or alcohol)
Take a rest from time to time to protect your vision.
Keep the product clean at all times.
Take a comfortable and natural position when working with a product to relax the muscles.
Take a regular break when working with a product for a long time.
Do not press strongly upon the panel with a hand or sharp object such as nail, pencil or pen, or make a
scratch on it.
Keep the proper distance from the product.
- Your vision may be impaired if you look at the product too closely.
Set the appropriate resolution and clock by referring to the Userユs Guide.
- Your vision can be impaired.
Use authorized detergent only when cleaning the product. (Do not use benzene, thinner or alcohol.)
- Product can be deformed.
Spray water onto a soft cloth 2 to 4 times, and use it to clean the front frame; wipe in one direction only.
Too much moisture may cause staining.
The fluorescent lamp used in this product contains a small amount of mercury.
Do not dispose of this product with general household waste.
Disposal of this product must be carried out in accordance to the regulations of your local authority.
On Disposal (Only, Hg lamp used LCD Monitor)

9
9
Connecting the Speakers
Mount the product onto the speaker by using a screw as shown in the following
connect the speaker cable.
- Only on some models.
When the speaker is installed.
*Connect the input terminal with a proper color match.
Remove the paper.
Cable holder
After installing your speakers, use holders and cable ties to organize the speaker cables.
* This feature is not available in all model.
Cable tie
* This feature is not available in all model.
1010
Using the Remote Control
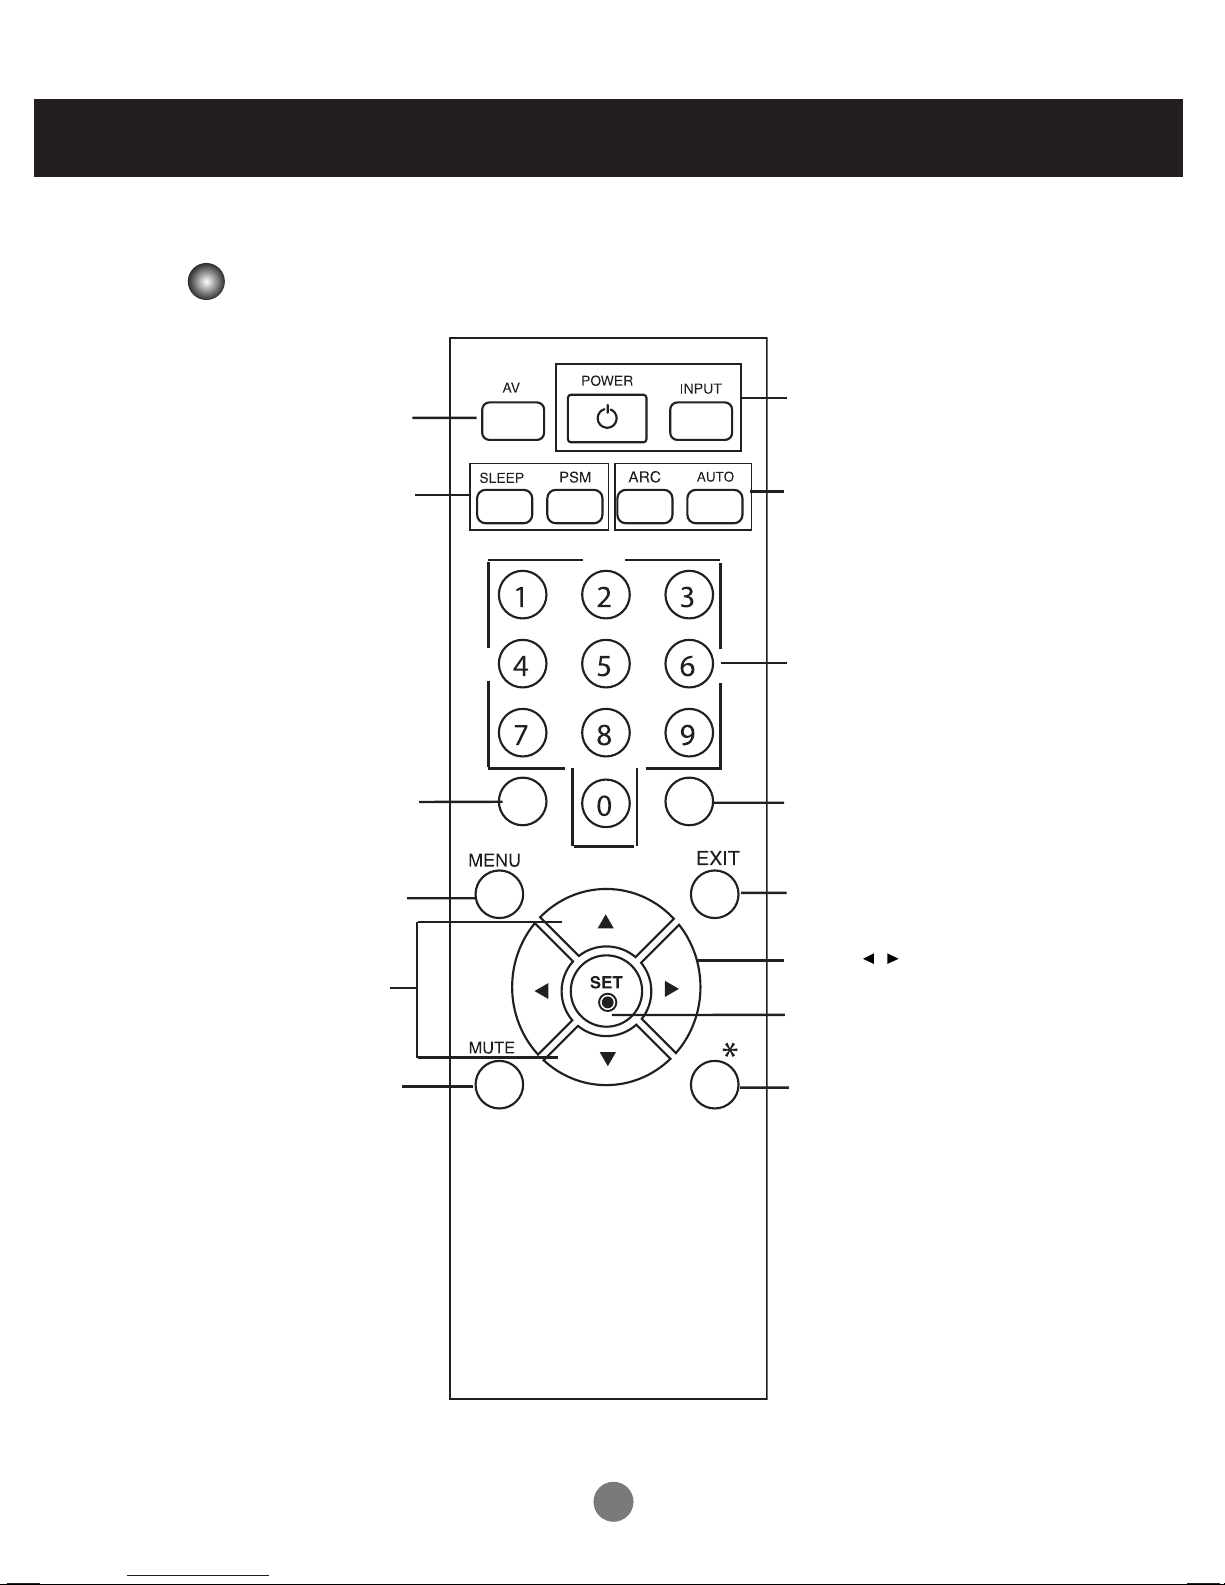
Name of the Remote Control Buttons
• AV Button
• Sleep Button
When watching AV, RGB PC,HDMI/DVI,
Component
The product will be automatically turned
off after a certain period of time.
Press this button repetitively to
select an appropriate time duration
• PSM Button
- Toggles through preset video
settings.
•
Menu Button
• Check Button
• Volume Button
Volume up and down
• Mute button
There is not a function
which is supported
• UP and Down buttons
Bring up and down direction
adjustment.
• ARC button
Aspect Ratio Correction. Toggles
through aspect ratio options.
• Auto Button
Automatic adjustment function
(Operational for the analog signal only)
•
Exit Button
There is not a function
which is supported
There is not a function
which is supported
There is not a function
which is supported
• Power On/Off Button
• Input Select Button
(See next page)
1111
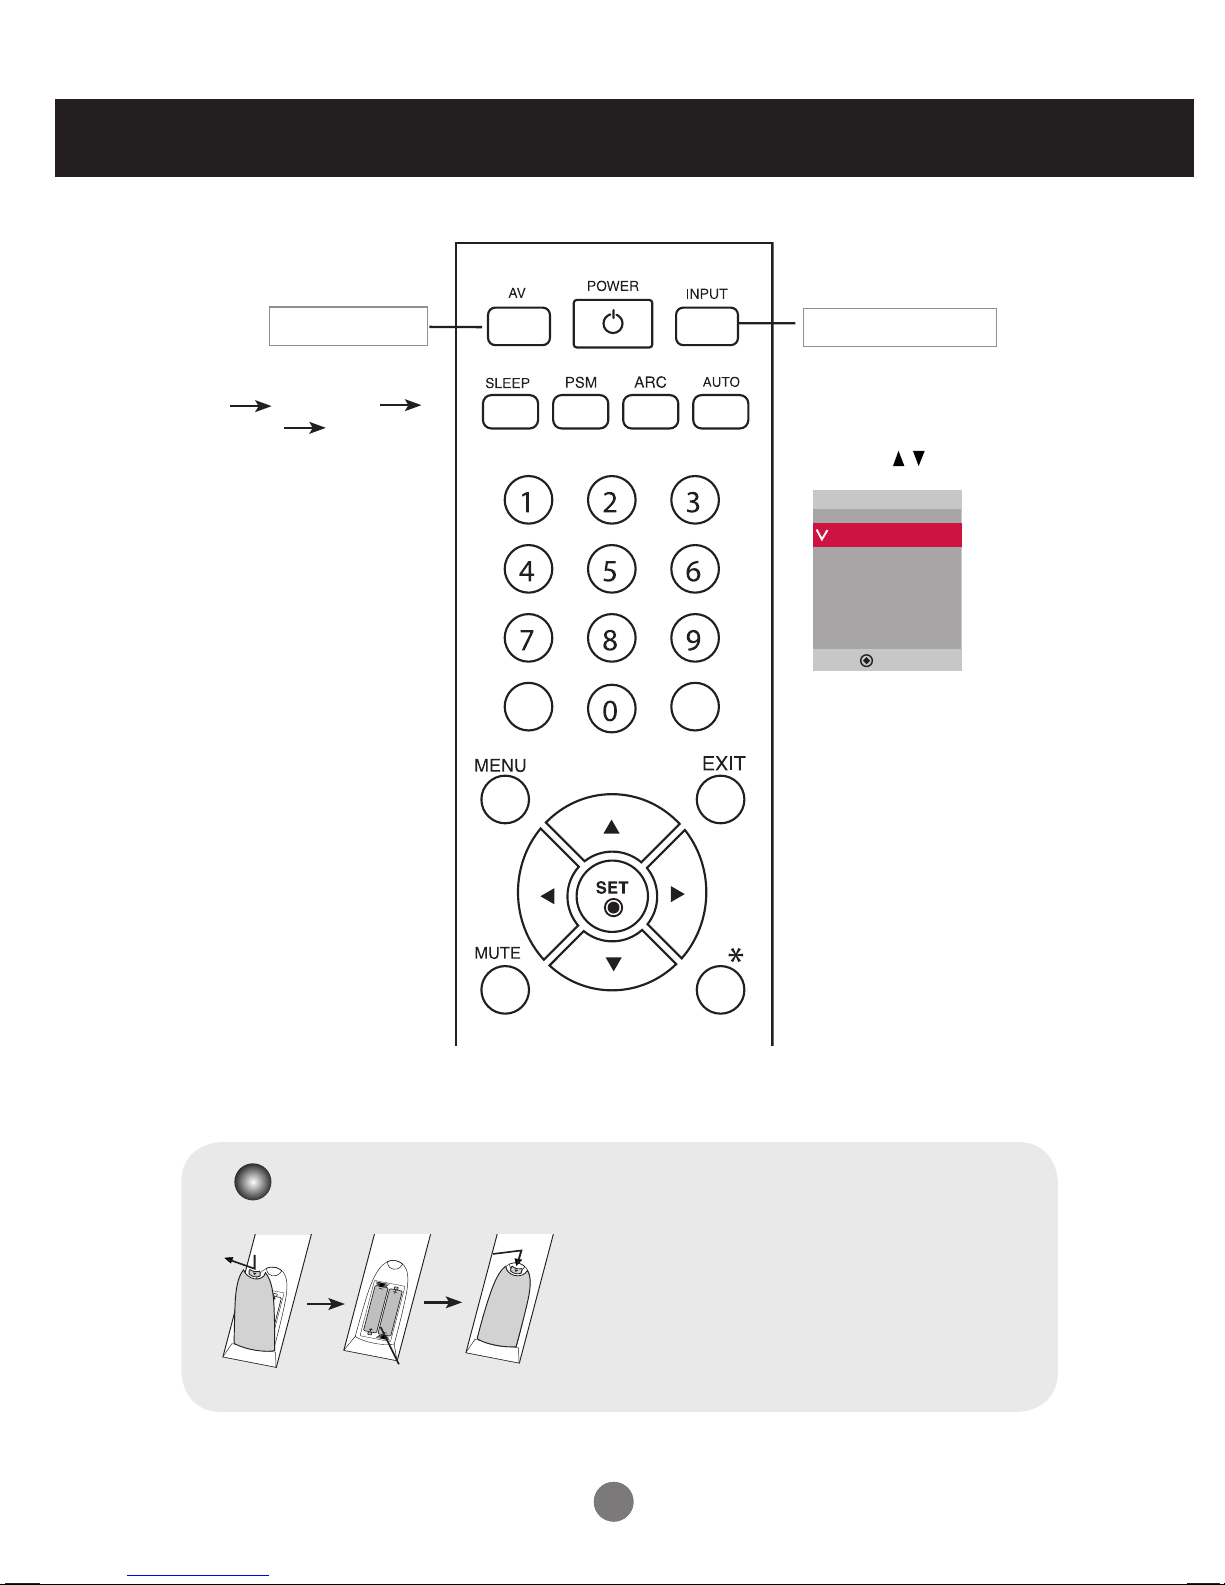
Using the Remote Control
• AV Button
If you press the button once,
the following Input Signal
Window will appear. Select
the signal type you want
using the button.
• Input Select Button
1. Slide off the battery cover.
2. Insert the batteries with correct polarity (+/-).
3. Close the battery cover.
• Dispose of used batteries in the recycle bin to prevent
environmental pollution.
Inserting batteries into remote control.
AAA Type
AV Component
RGB PC HDMI/DVI
Toggles through video
Input
AV
Component
RGB PC
HDMI/DVI
▲▼
1212
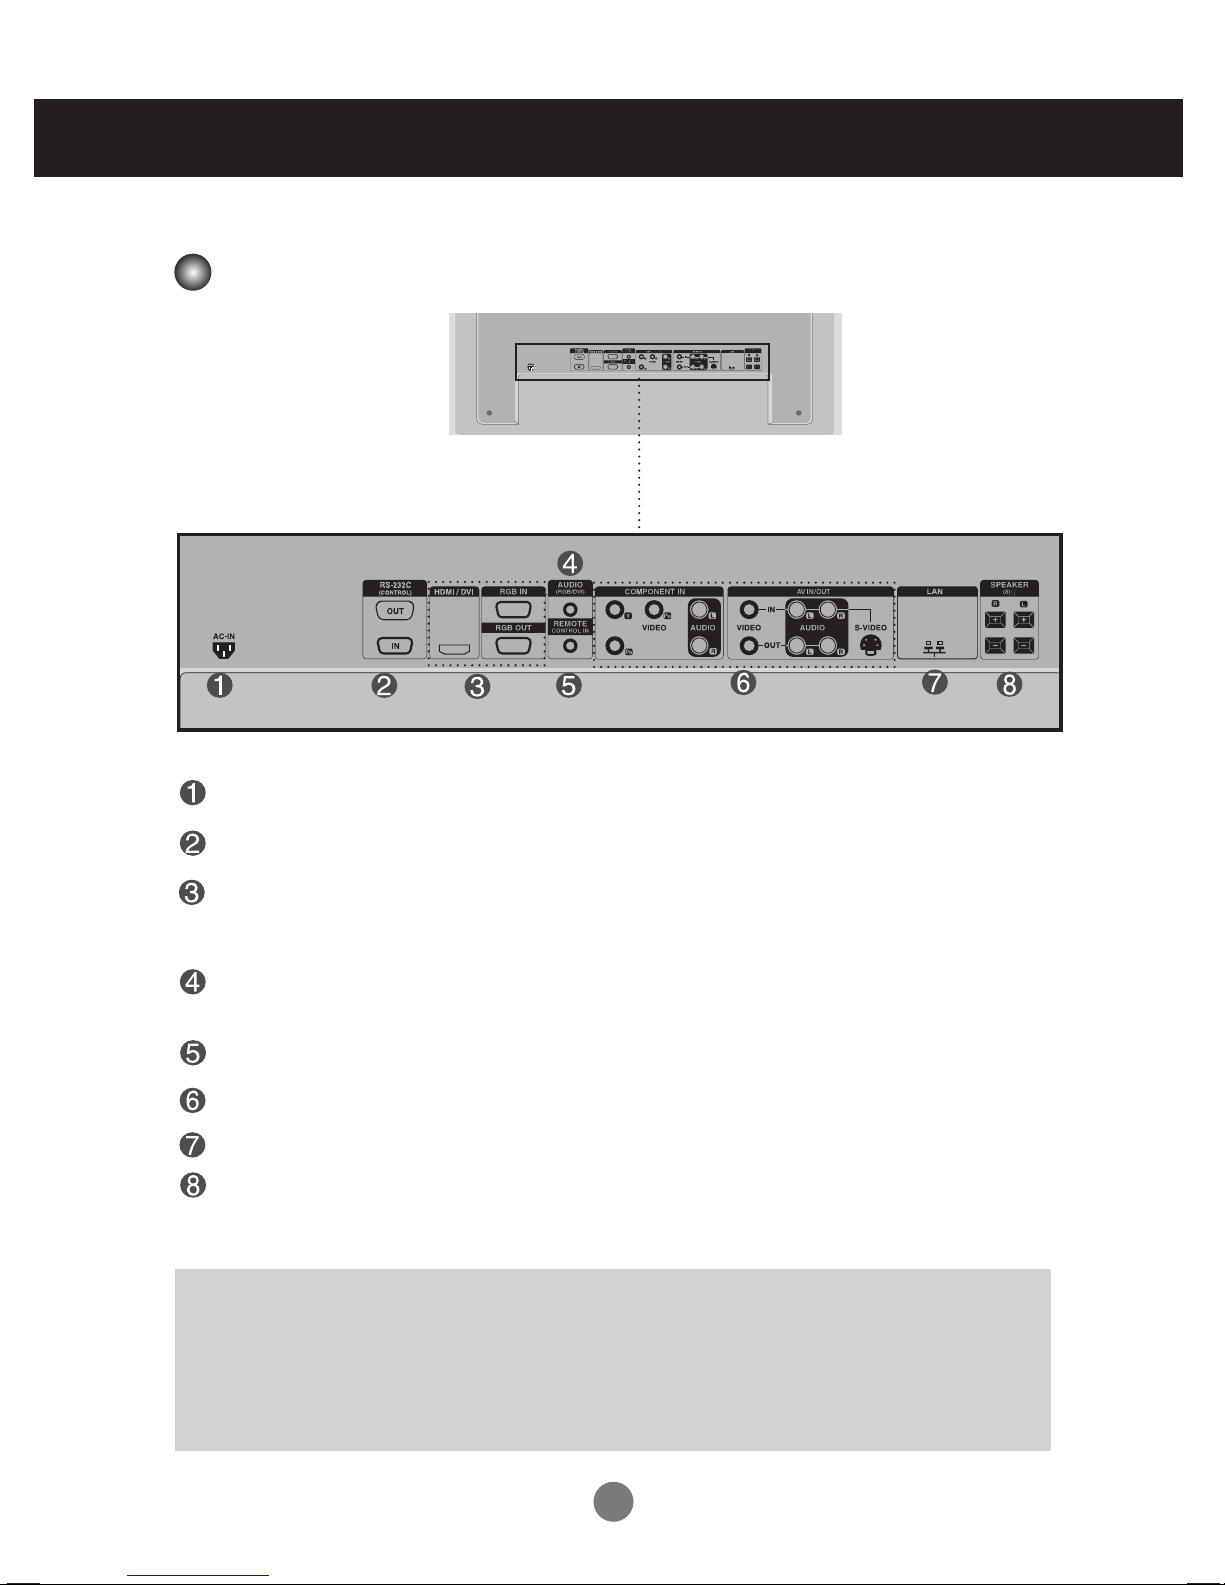
Name and Function of the Parts
Rear View
*LINE OUT
A terminal used to connect to the speaker including a built-in amplifier (Amp). Make sure that
the connecting terminal of the PC sound card is checked before connecting. If the Audio Out of
PC sound card has only Speaker Out, reduce the PC volume.
If the Audio Out of the PC sound card supports both Speaker Out and Line Out, convert to Line Out
using the card jumper of the program (Refer to the Sound Card Manual).
* The product image in the user's guide could be different from the actual image.
Power Connector : Connect the power cord
RS-232C Serial Ports
RGB PC, HDMI/DVI Ports
-HDMI Supports High Denition input and HDCP (High-bandwidth Digital Content
Protection). Some devices require HDCP in order to display HD signals.
PC Sound Jack
: Connect the audio cable to the *LINE OUT jack of the PC sound card.
Wired Remote Control Port
AV Ports
LAN Port
Speaker Ports
1313
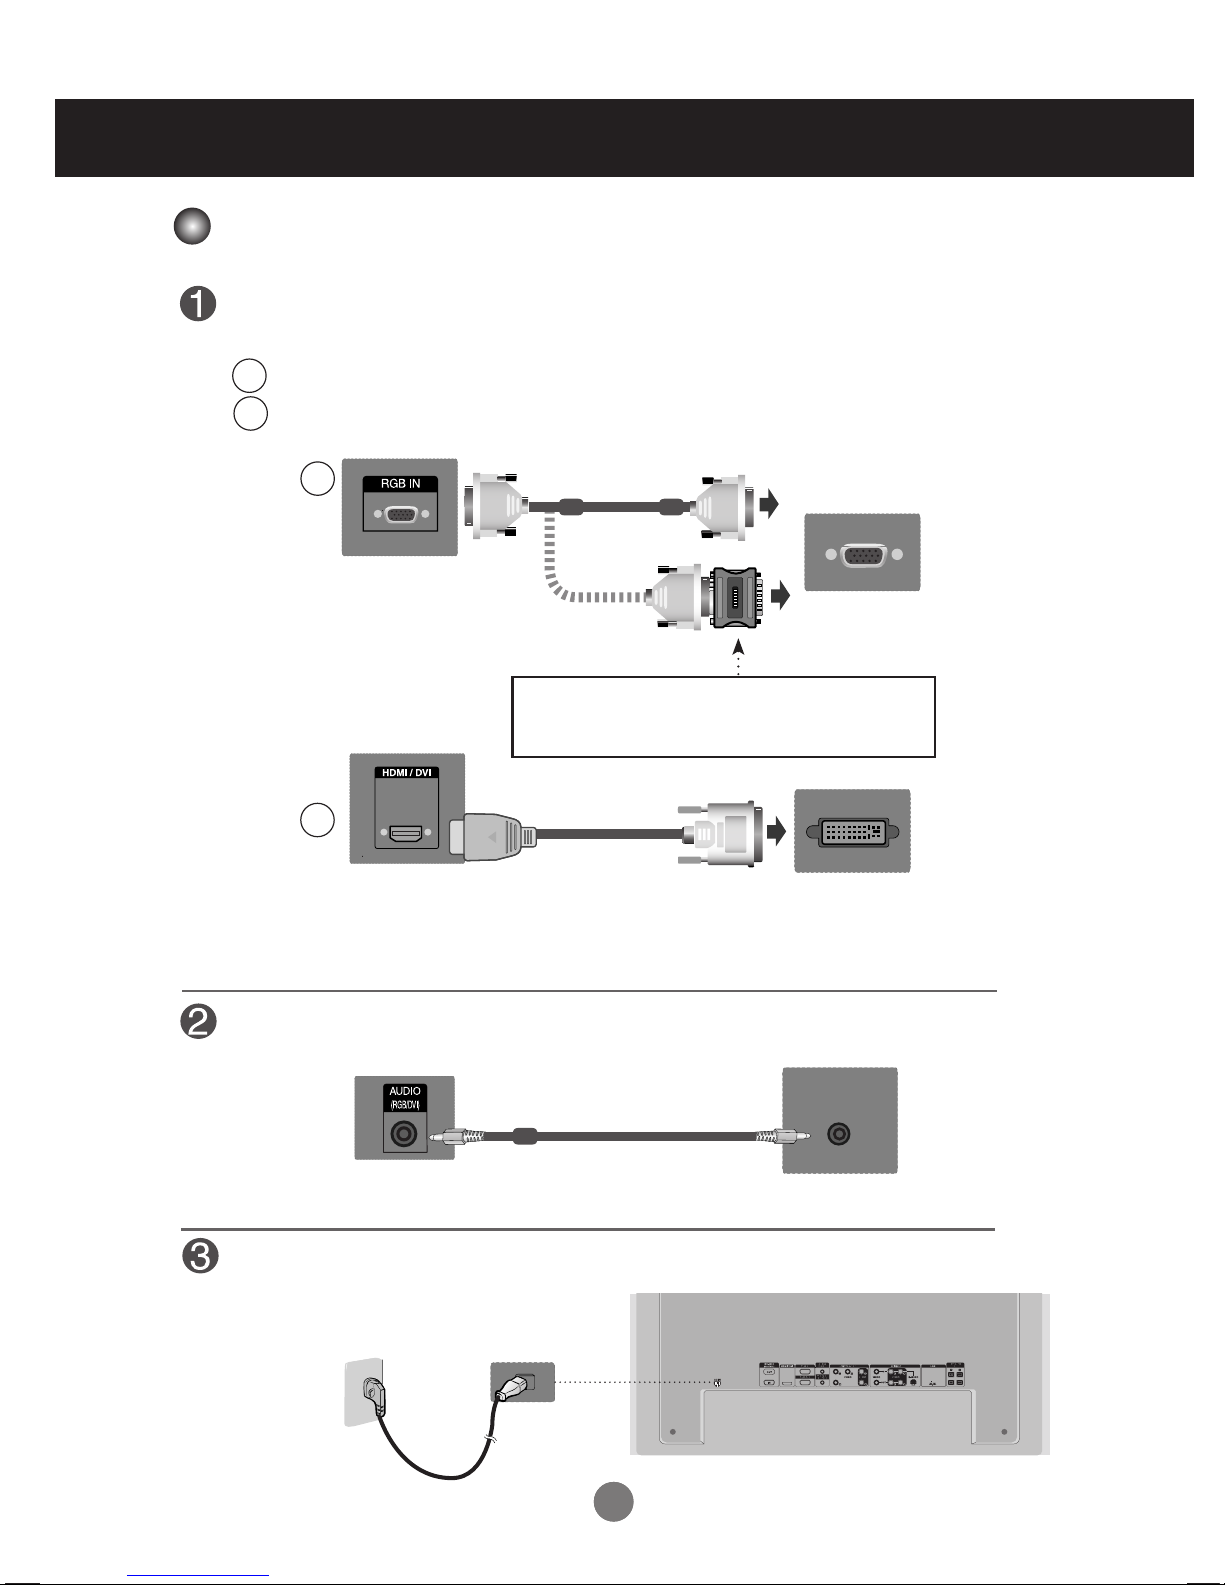
First of all, see if the computer, product and the peripherals are turned off.
Then, connect the signal input cable.
When connecting with the D-Sub signal input cable.
When connecting with the HDMI to DVI signal input cable (not included).
* When HDMI PC is used, a compatiblity problem might occur.
MAC
Macintosh Adapter (not included)
Use the standard Macintosh adapter since an incompatible
adapter is available in the market. (Different signaling system)
Rear side of the product.
Connecting to External Devices
Connect the power cord.
B
A
B
A
PC
PC/
MAC
PC
Rear side of the product.
Rear side of the product.
PC
Rear side of the product.
Connect the Audio cable.
(not included)
* User must use shielded signal interface cables (D-sub 15 pin cable, DVI cable) with ferrite cores to maintain
standard compliance for the product.
When Connecting to your PC

1414
Select an input signal.
Press the INPUT button on the remote control to select the input signal.
Or, press the INPUT button on the back of the product.
•
How to connect to two computers.
Connect the signal cables (HDMI to DVI and D-Sub) to each computer.
Press the INPUT button on the remote control to select the computer to use.
•
Directly connect to a grounded power outlet on the wall or a power bar with a ground wire.
Note
Turn on power by pressing the power button on the product.
Turn on the PC.
When connecting with a D-Sub signal input cable.
• Select RGB PC : 15-pin
D-Sub
analog signal.
When connecting with a HDMI to DVI signal input cable.
• Select HDMI/DVI :
HDMI to DVI
Digital signal.
B
A
Connecting to External Devices
2
1
Power button
Input
AV
Component
RGB PC
HDMI/DVI
Input
AV
Component
RGB PC
HDMI/DVI
▲▼
▲▼
INPUT
AUTO/SET
▼▲
INPUT SET
▼▲

1515
• Using LAN establishes communication between your PC and the monitor and enables to
use the OSD menus on the PC as well as on the monitor.
Note
Connecting to External Devices
Connect the LAN cable as shown in the below gure .
Connect the LAN cable and install the eZ-Net Manager program on the CD-ROM.
For more information about the program, please refer to eZ-Net Guide in the
enclosed CD-ROM.
Connect PC to Monitor directly.
A
Using a router(Switch)
B
PC
Product
Product
LAN
PC
LAN
Switch
Using the Internet.
C
PC
Product
Network
LAN
When using the LAN
1616
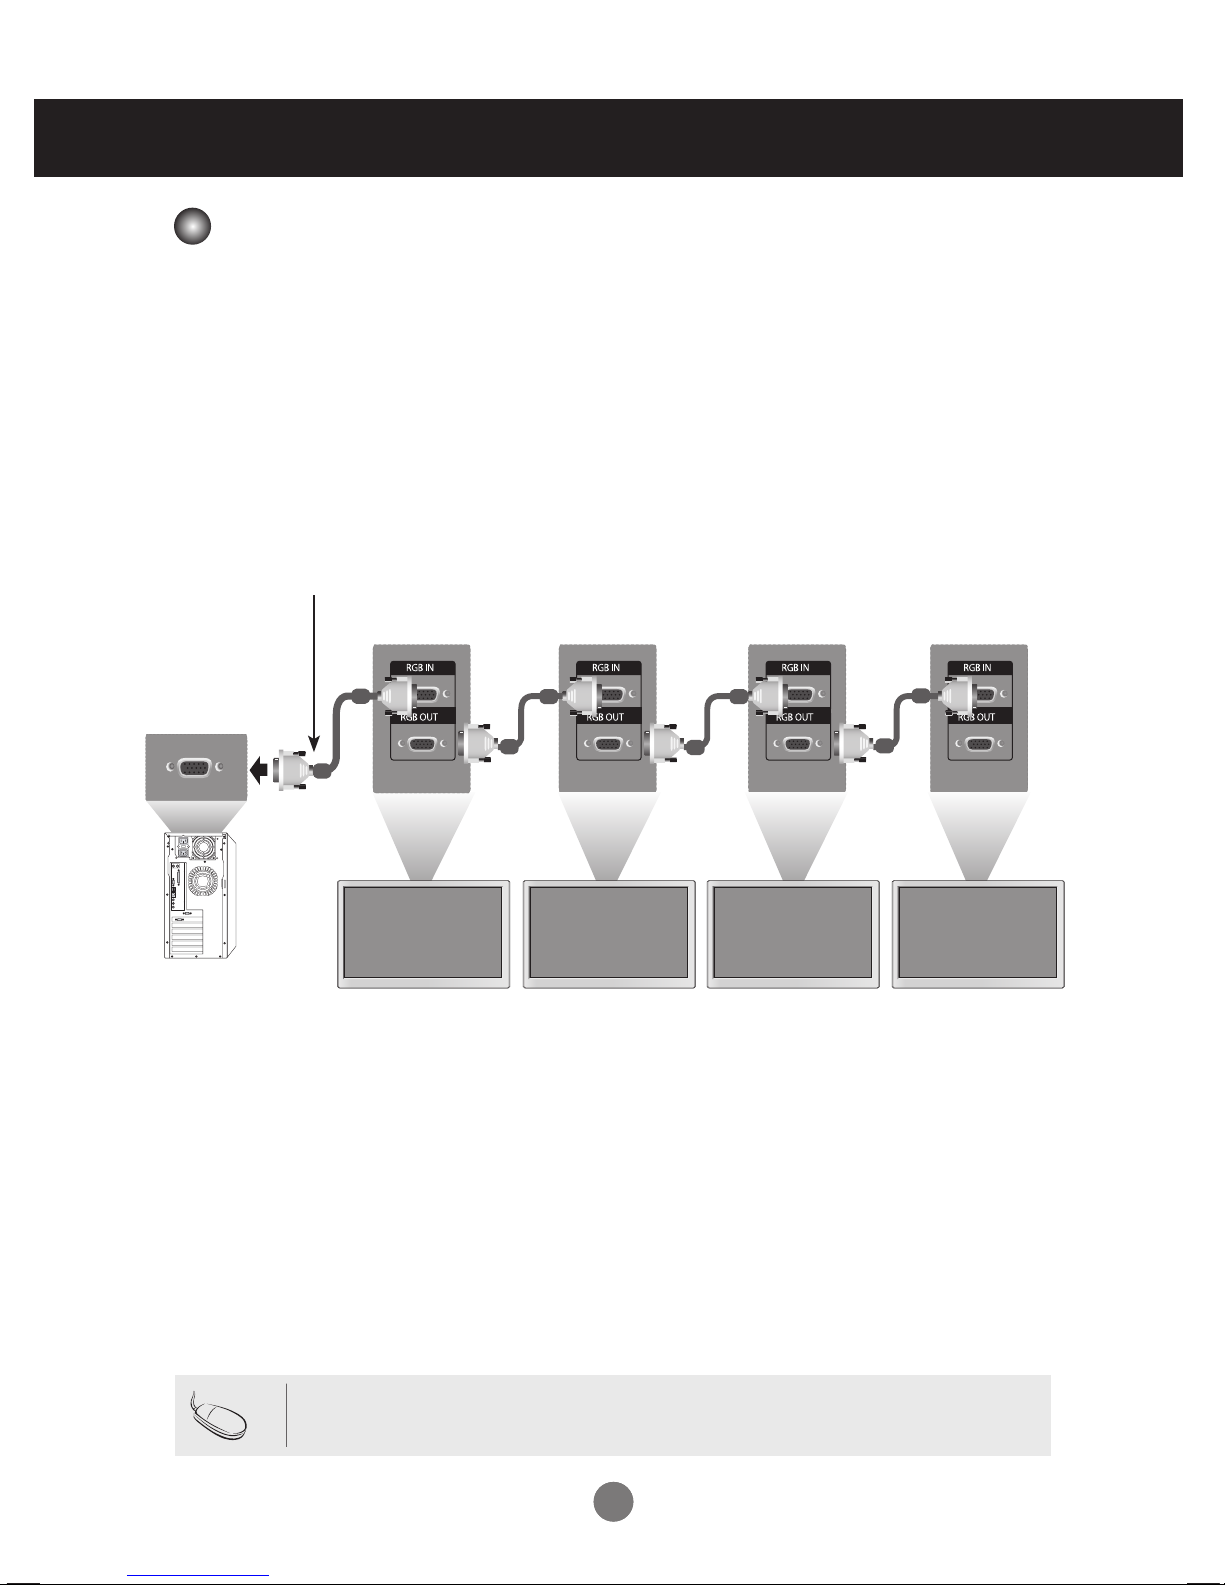
Use this function when displaying ANALOG RGB inputs of a PC to the other product.
Product 1
•
To use different products connected to each other Connect one end of the signal input cable(15-pin
D-Sub Signal Cable) to the RGB OUT connector of product 1 and connect the other end to the RGB IN
connector of other products.
Product 2
Product 3
Product 4
15-pin D-Sub Signal Cable
Connecting to External Devices
• When multi-connecting in/out cascade format, no loss cables are recommended.
We recommend that you should use cable distributor.
Note
PC
Daisy Chain Monitors

1717
Kensington Security Slot
The Set is equipped with a kensington Security System
connector on the back panel. The cable and lock are
available separate and are not sold by LG. For more info,
visit http://www.kensington.com, the internet home page
of the Kensington company.
This product supports a VESA FDMI compliant mounting interface. These mounts are purchased
separately and not available from LG. Refer to the instructions included with wall mount for more
info.
Connecting to External Devices
VESA FDMI wall Mounting
WARNING
•
To prevent injury, this apparatus must be securely attached to the wall in accordance
with the installation instructions.
Optional Installer Remote Control for model No. Series M3703C
There is an optional Installer remote control available for the M3703C Models. The installer
remote control is NOT included with the apparatus.
Wall Mounting Bracket
(AP-WX60)
Option Extras

1818
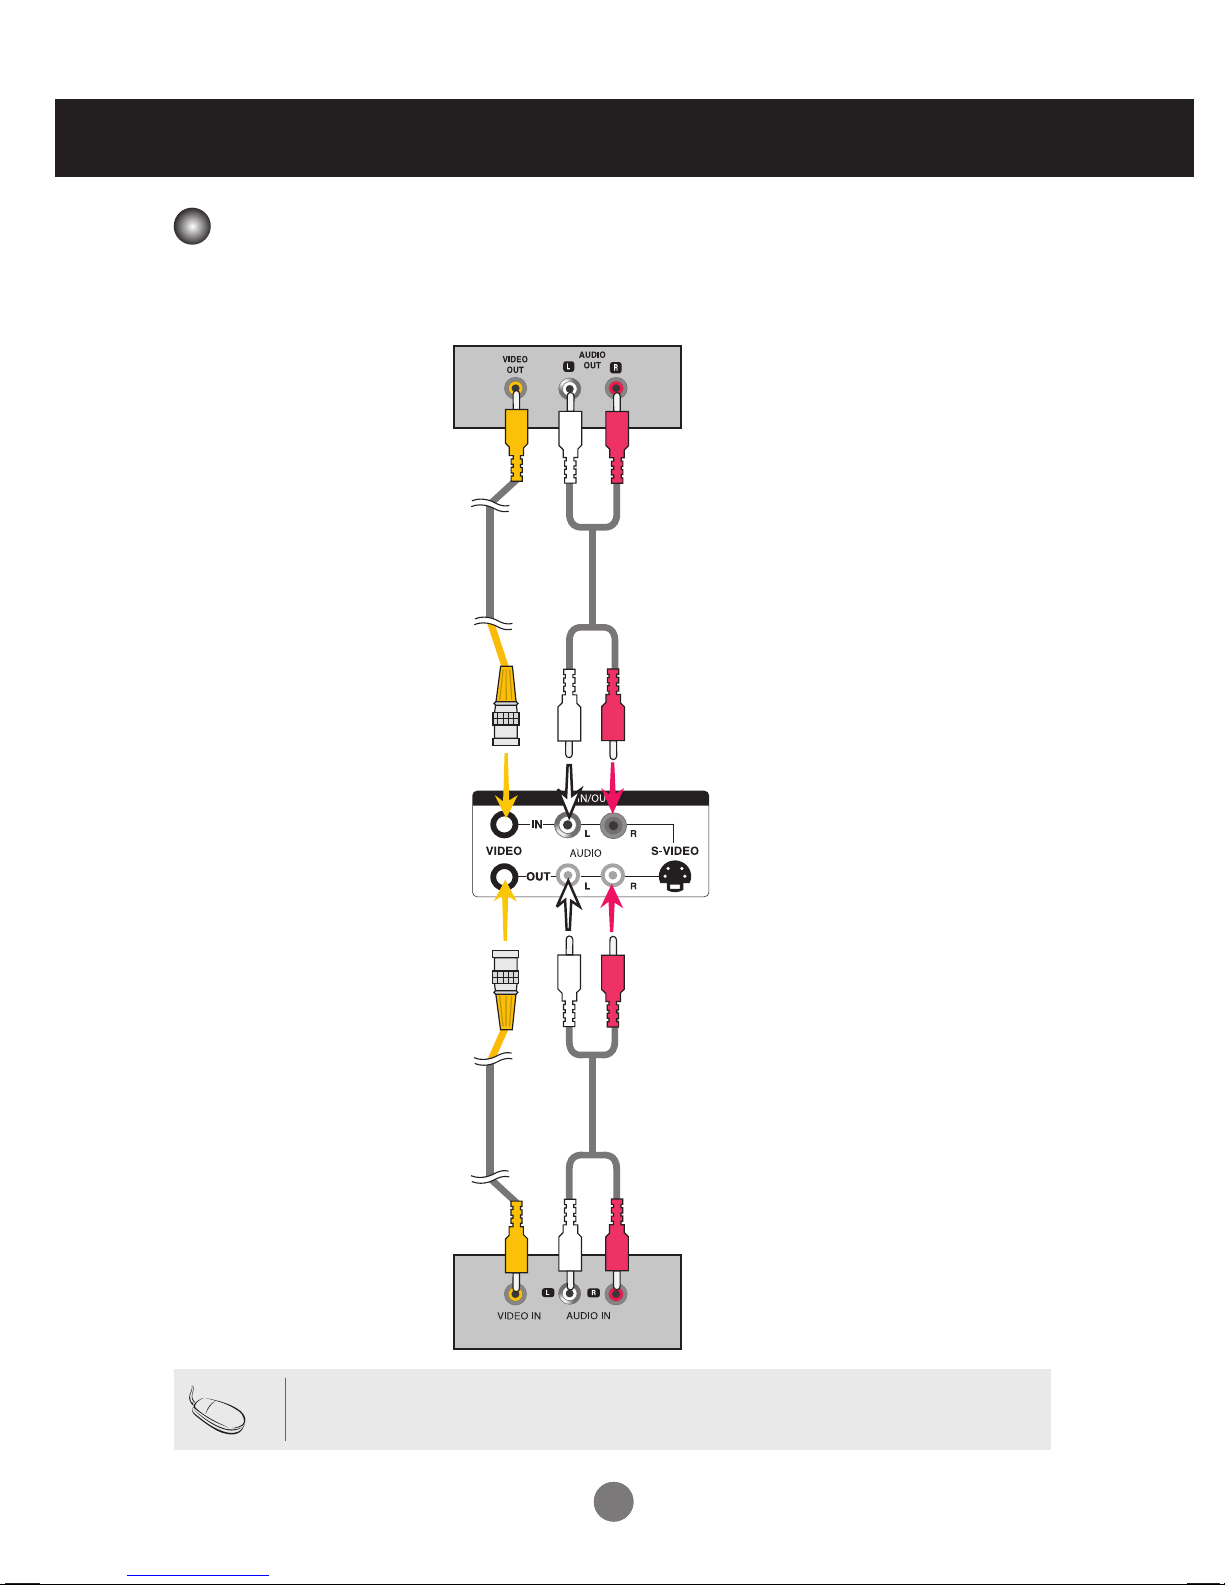
Connecting to External Devices
When connecting with an BNC cable.
•
Select AV.
When connecting with an S-Video cable.
•
Select AV.
B
A
When connecting with a S-Video cable.
•
Connect to the S-Video input terminal to
watch high image quality movies.
Connect the video cable as shown in the below gure and then connect the power cord
(See page 13).
B
When connecting with a BNC cable.
•
Connect the input terminal with a
proper color match.
A
BNC Cable
(not included)
Product
VCR/DVD Receiver
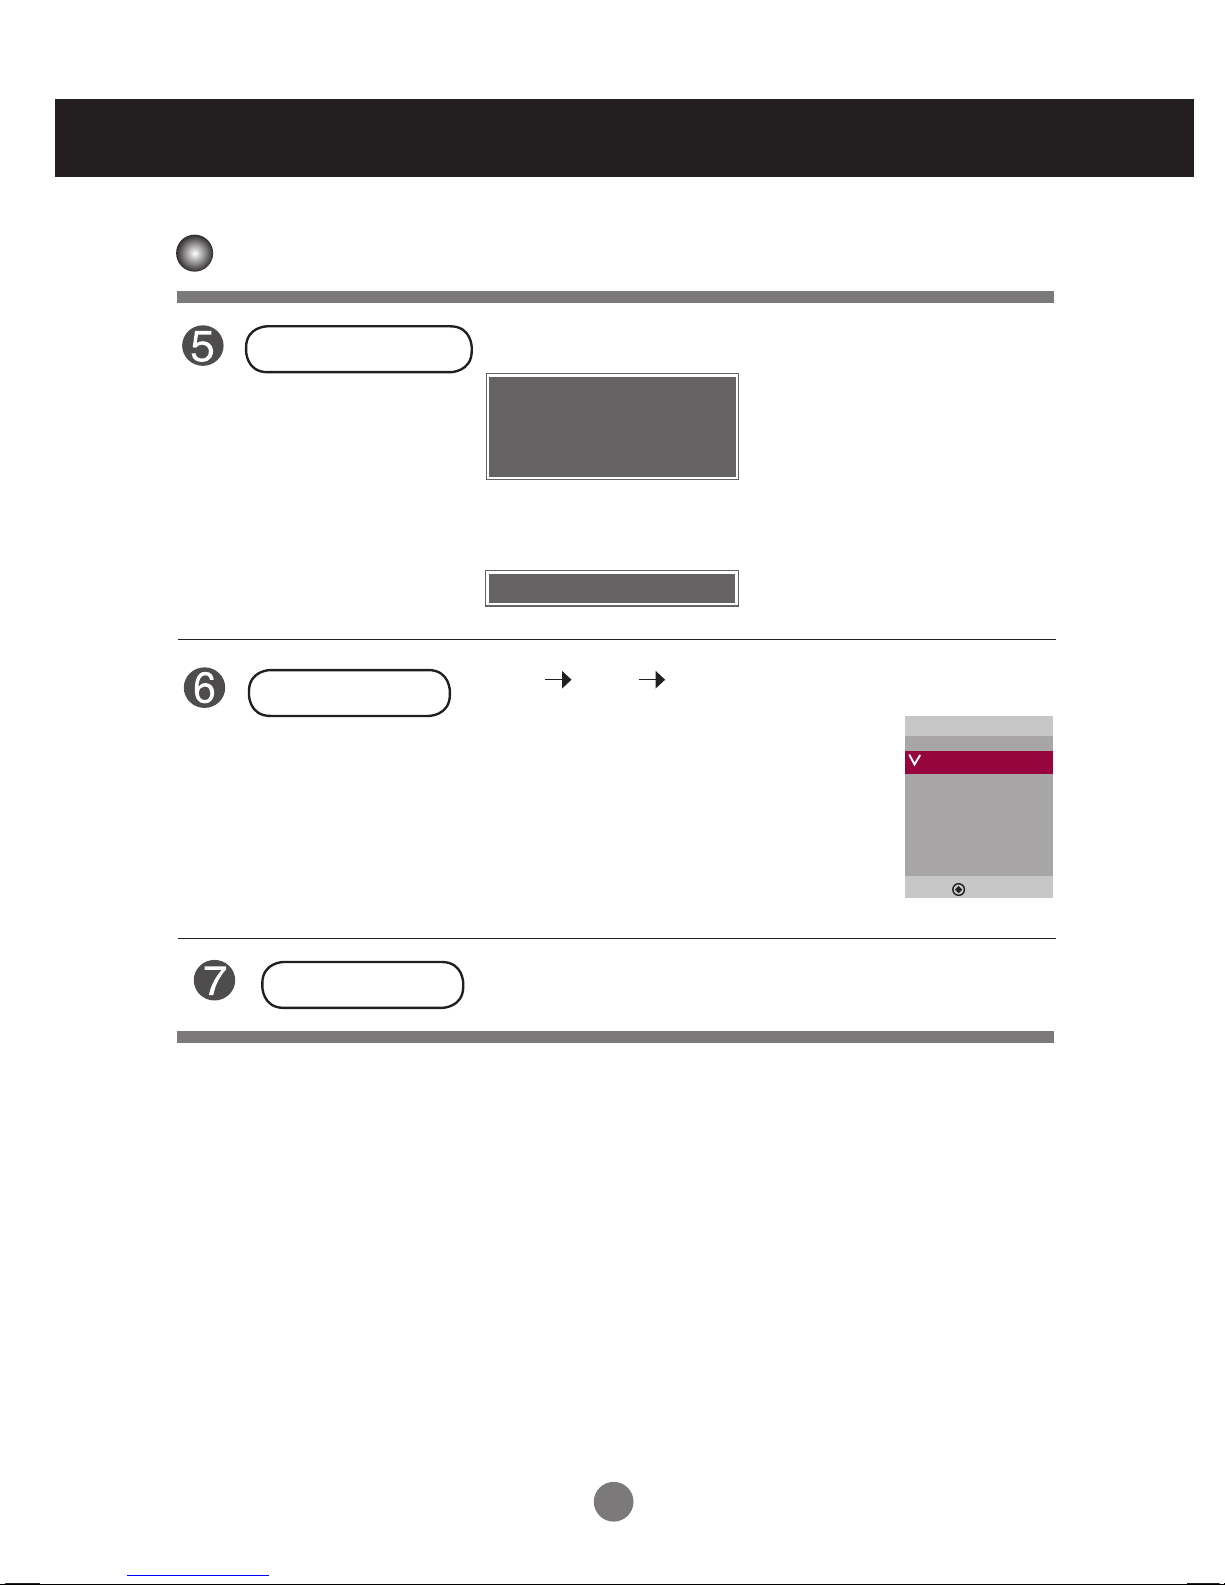
Select an input signal.
Press the INPUT button on the remote control to select the input signal.
Or, press the INPUT button on the back of the product.
• When the BNC cable is connected simultaneously with S-Video cable, S-Video input has a priority.
Note
Audio Cable
(not included)
S-Video Cable
(not included)
Audio Cable
(not included)
Product
VCR/DVD Receiver
Input
AV
Component
RGB PC
HDMI/DVI
▲▼
INPUT SET
▼▲
INPUT
AUTO/SET
▼▲
Video Input
1919
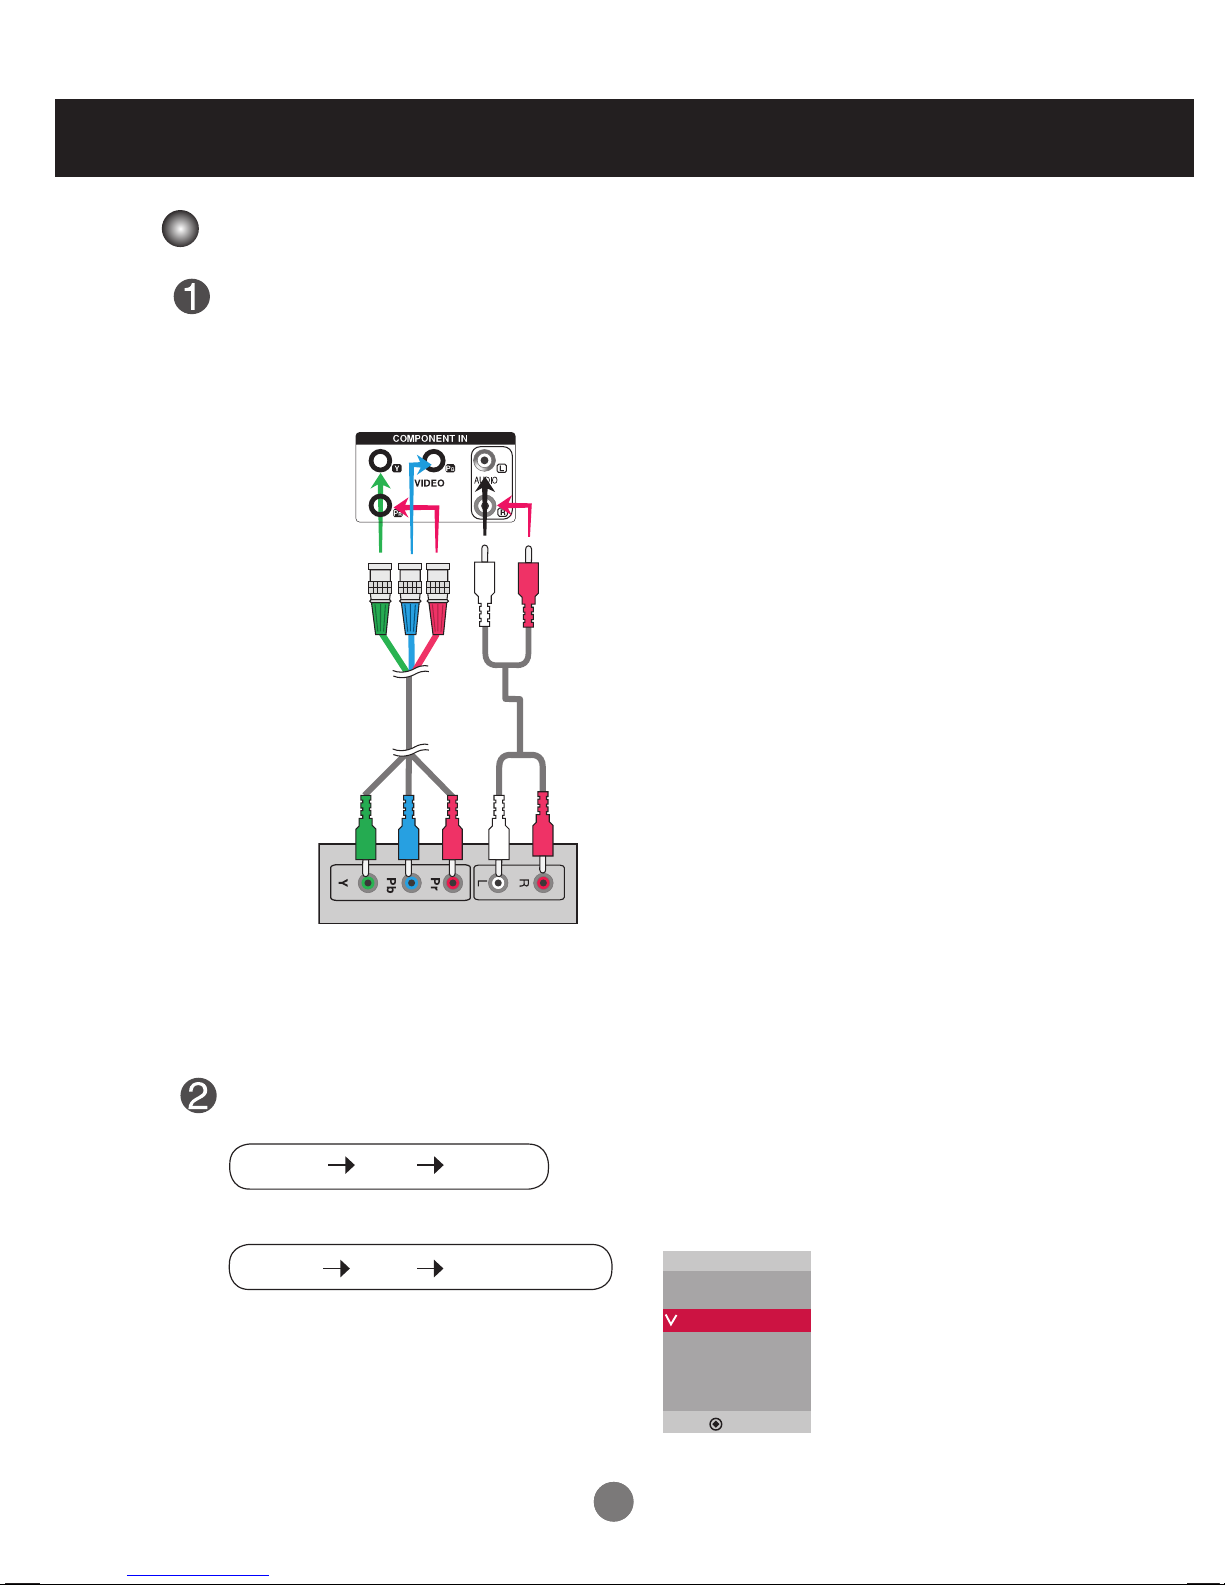
•
Select Component
Connect the video/audio cable as shown in the below gure and then, connect the power
cord (See page 13).
•
Connect the input terminal with a proper color match.
BNC Cable
(not included)
Product
HDTV Receiver
Select an input signal.
Press the INPUT button on the remote control to select the input signal.
Or, press the INPUT button on the back of the product.
Audio Cable
(not included)
Connecting to External Devices
Note
- Some devices may require HDCP in order to display HD signals.
- Component doesn't support HDCP.
Input
AV
Component
RGB PC
HDMI/DVI
▲▼
INPUT SET
▼▲
INPUT
AUTO/SET
▼▲
Component Input (480p/576p/720p/1080p/1080i/480i/576i)
2020
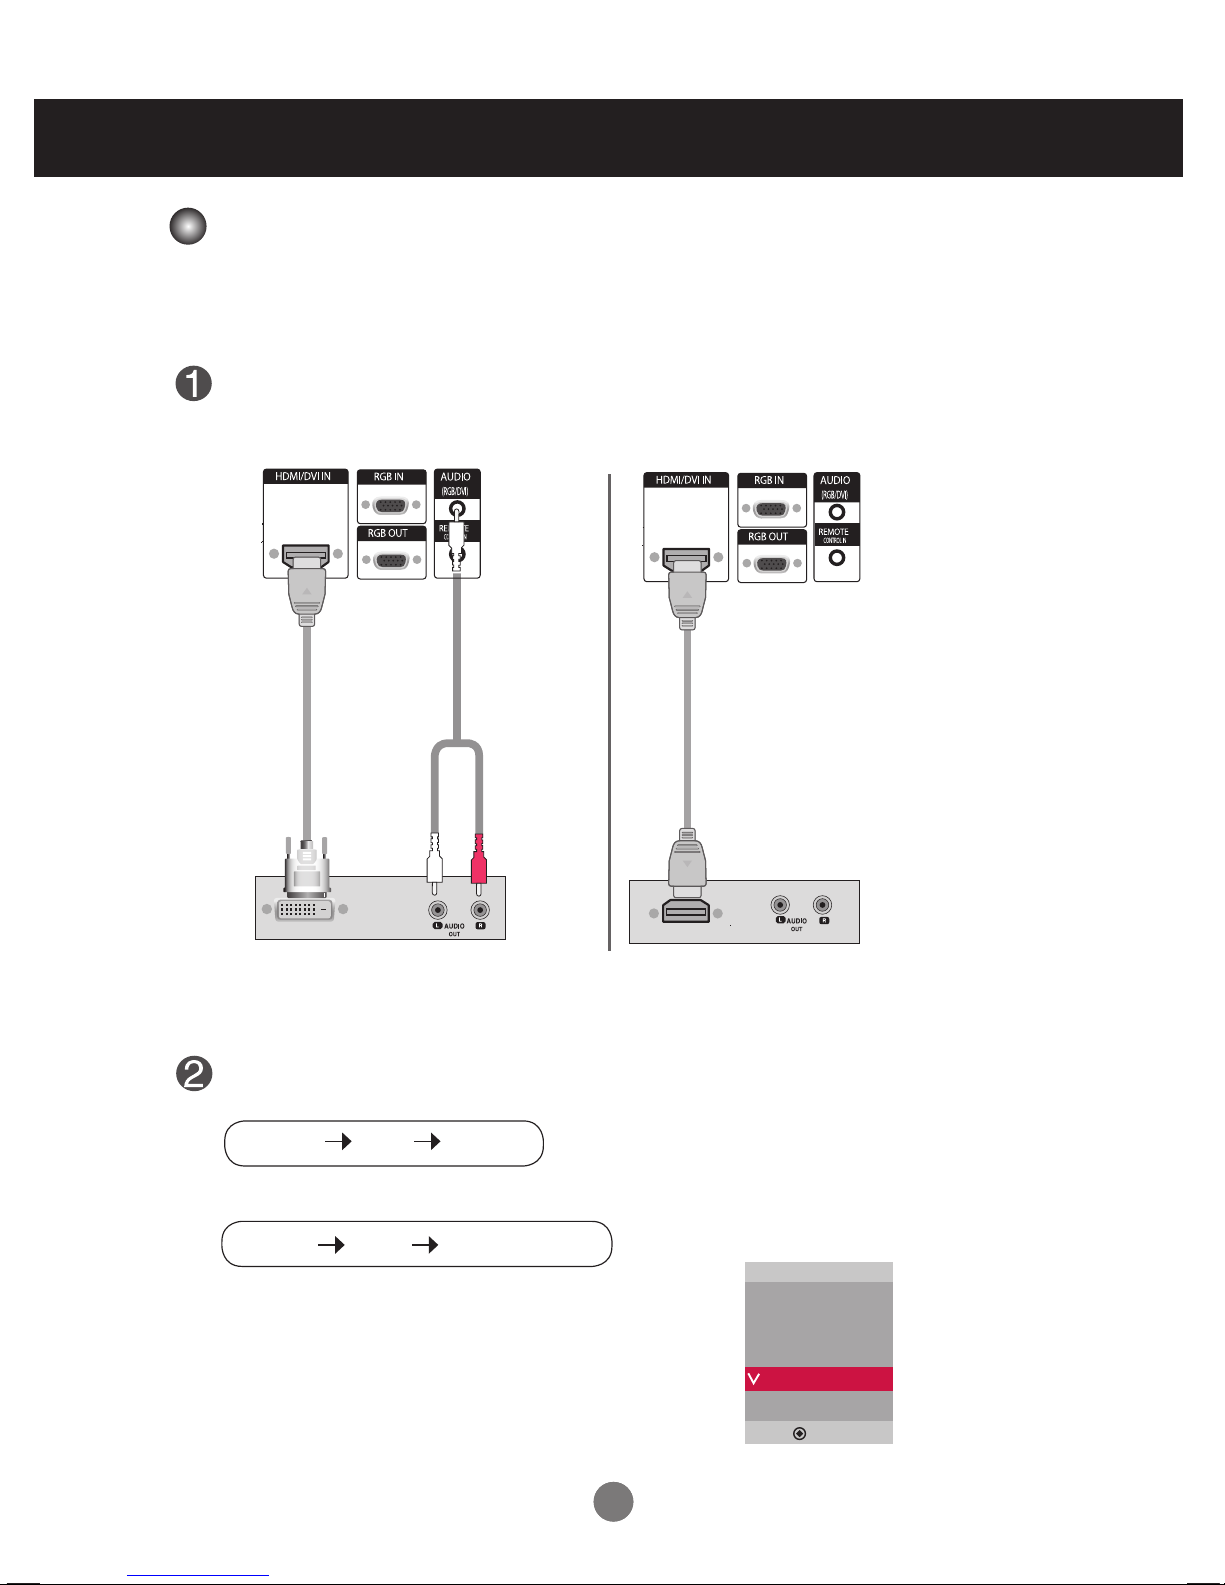
Connect the video/audio cable as shown in the below gure and then connect the power
cord (See page 13).
RCA-PC
Audio Cable
(not included)
Product
VCR/DVD/Set-top Box
HDMI to DVI
Signal Cable
(not included)
VCR/DVD/Set-top Box
Product
Select an input signal.
Press the INPUT button on the remote control to select the input signal.
Or, press the INPUT button on the back of the product.
HDMI Signal Cable
(not included)
Connecting to External Devices
When connecting with a HDMI to DVI signal input cable.
When connecting with a HDMI signal input cable.
• Select HDMI/DVI
- HDMI Supports High Denition input and HDCP (High-bandwidth Digital Content Protection). Some devices require HDCP in order to display HD signals.
Note : Dolby Digital is not supported.
Input
AV
Component
RGB PC
HDMI/DVI
▲▼
INPUT SET
▼▲
INPUT
AUTO/SET
▼▲
HDMI Input (480p/576p/720p/1080i/1080p)
2121
- When using AV input, you can connect the AV Out to other monitors.
Video/apparatus
BNC Cable
(not included)
Audio Cable
(not included)
BNC Cable
(not included)
Audio Cable
(not included)
Video/apparatus
Product
Connecting to External Devices
• When multi-connecting in/out cascade format, no loss cables are recommended.
We recommend that you should use cable distributor.
Note
Watching AV Outputs

22
User Menus
Screen Adjustment options
• Press this button to turn on the power. Press this button again to
turn it off.
• This Indicator lights up green when the display operates normally(on
mode). If the display is in sleep (Energy Saving) mode, this indicator
color changes to amber.
Power Button
• Adjust the volume.
• Adjust the up and down.
• Use this button to show/hide the OSD (On Screen Display) menu
screen.
MENU Button
• Use
this
button to select an icon or adjust the setting in the OSD screen.
OSD Select /
Adjust Button
Power Indicator
Volume
35
23
User Menus
• This is where the unit receives signals from the remote control.
Screen Adjustment options
[For PC Analog signal]
AUTO/SET Button
AV Composite Video, Separate Video
Component HDTV, DVD
RGBPC 15-pin D-Sub analog signal
HDMI/DVI Digital signal
- Toggles between inputs
INPUT Button
IR Receiver
[When XGA Mode is active and
1360 X768 is selected]
Input
AV
Component
RGB PC
HDMI/DVI
▲▼
INPUT
AUTO/SET
▼▲
Auto in progress
For optimal display change
resolution to 1360x768
Auto in progress
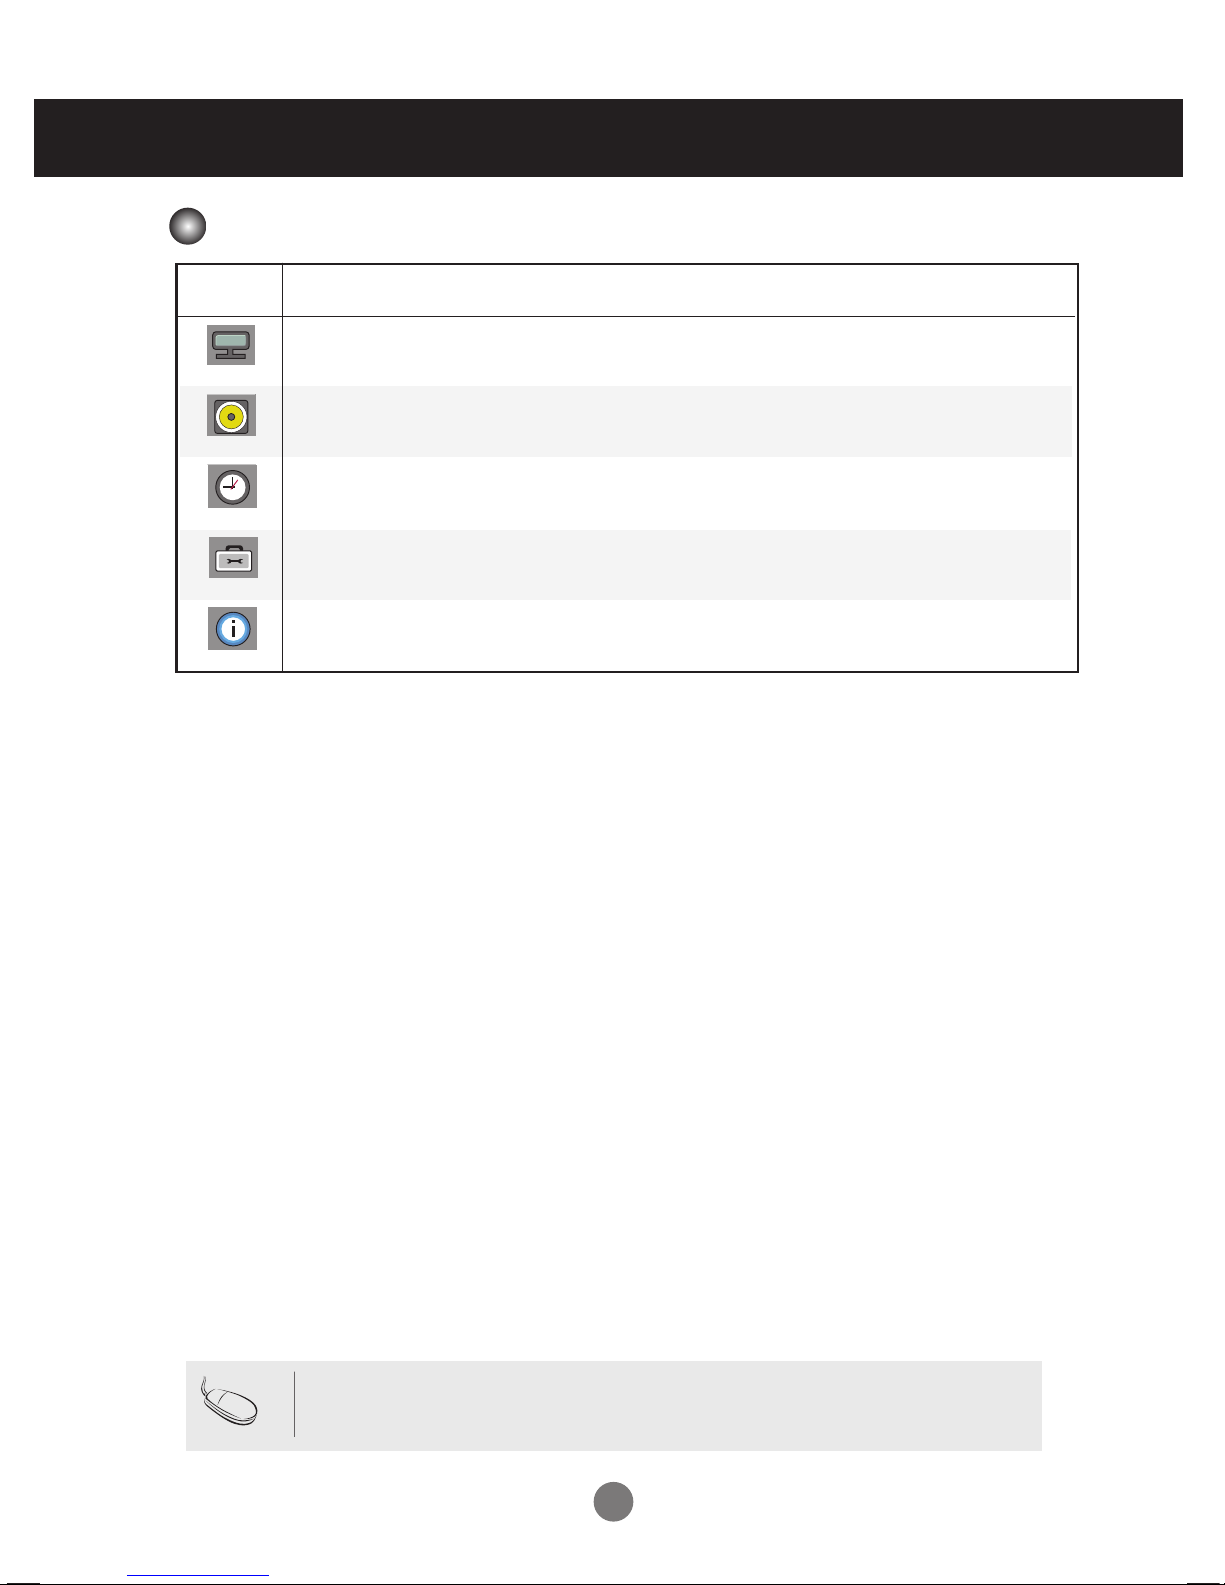
24
OSD Menu
Icon Function Description
Picture
Audio
Adjusts the audio options.
Adjusts screen brightness, contrast and color that you prefer.
Note
OSD(On Screen Disp lay)
The OSD function enables you to adjust the screen status conveniently since it provides
graphical presentation.
Option
Adjusts the screen status according to the circumstances.
Time
Adjusts the timer options.
Information
Adjust Set ID and check Serial No. and SW version and IP
address
User Menus
 Loading...