

Page 1

LG
Window-Type Air Conditioner
OWNER'S MANUAL
LG
www.lgappliances.com.
IMPORTANT
• Please read this owner's manual carefully and
thoroughly before installing and operating your room
air conditioner.
• Please retain this owner's manual for future reference
after reading it thoroughly.
PRECAUTIONS
• Antes de instalar y poner en marcha su ventilador de
casa, haga el favor de leer cuidadosamente esta
instrucción de Usuario.
• Luego de su lectura, guarde este manual para el
futuro usuario para las referencias.
MODELS, MODELOS: LWHD1200FR
ENGLISH ESPAÑOL
Page 2
2 Room Air Conditioner
Window-Type Air Conditioner Owner’s Manual
TABLE OF CONTENTS
FOR Y OUR RECORDS
Write the model and serial numbers here:
Model #
Serial #
You can find them on a label on the side of each unit.
Dealer's Name
Date Purchased
■ Staple your receipt to this page in the event you need it
to prove date of purchase or for warranty issues.
READ THIS MANU AL
Inside you will find many helpful hints on how to use and
maintain your air conditioner properly. Just a little preventive
care on your part can save you a great deal of time and
money over the life of your air conditioner.
You'll find many answers to common problems in the chart
of troubleshooting tips.If you review our chart of
Troubleshooting Tips first, you may not need to call for
service at all.
PRECAUTION
• Contact an Authorized Service Center for repair or
maintenance of this unit. Call 1-800-243-0000 to
locate the nearest ASC.
• This air conditioner is not intended for use by young
children or invalids without supervision.
• Young children should be supervised to ensure that
they do not play with the air conditioner.
• If the power cord requires replacement, have an
Authorized Servicer install an exact replacement part.
• Installation work must be performed in accordance
with the National Electric Code by qualified and
authorized personnel only.
Safety Precautions ..........................3
Before Operation .............................7
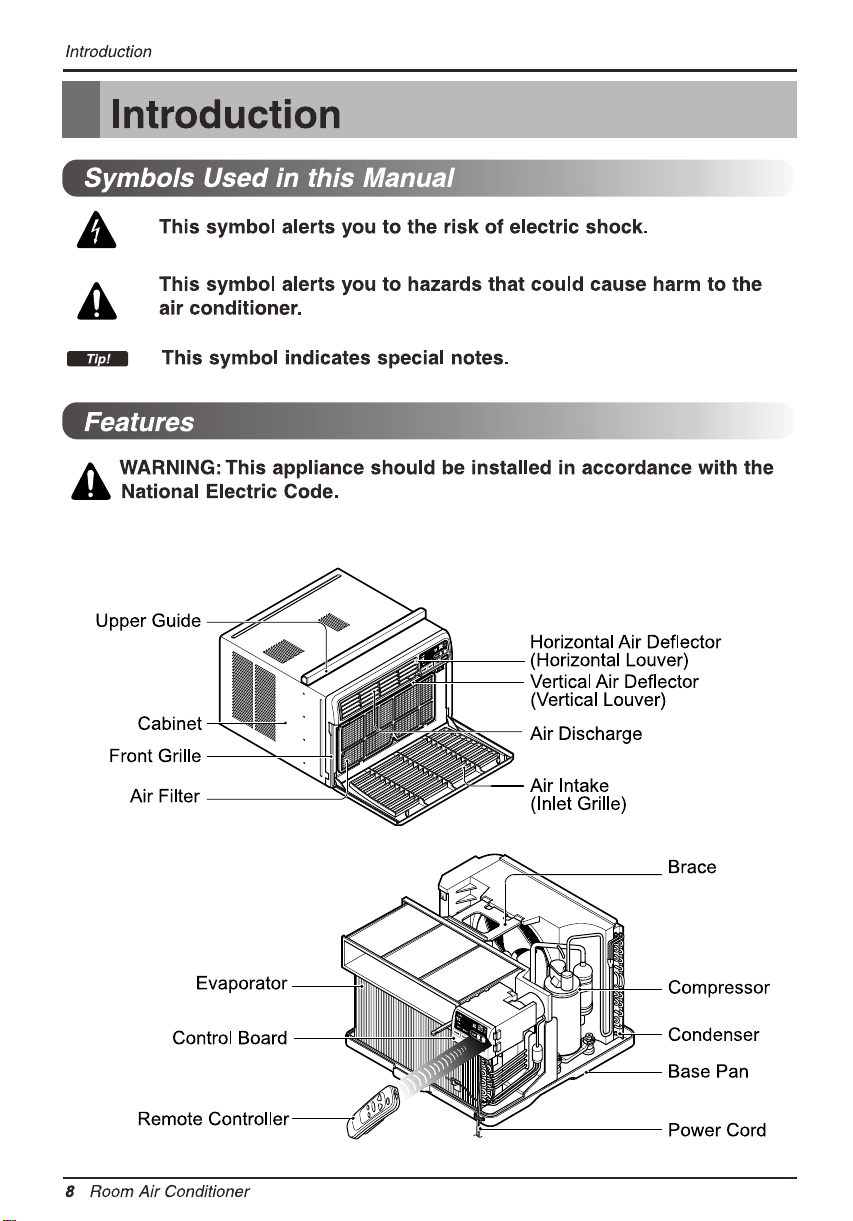
Introduction .....................................8
Symbols Used in this Manual .........8
Features..........................................8
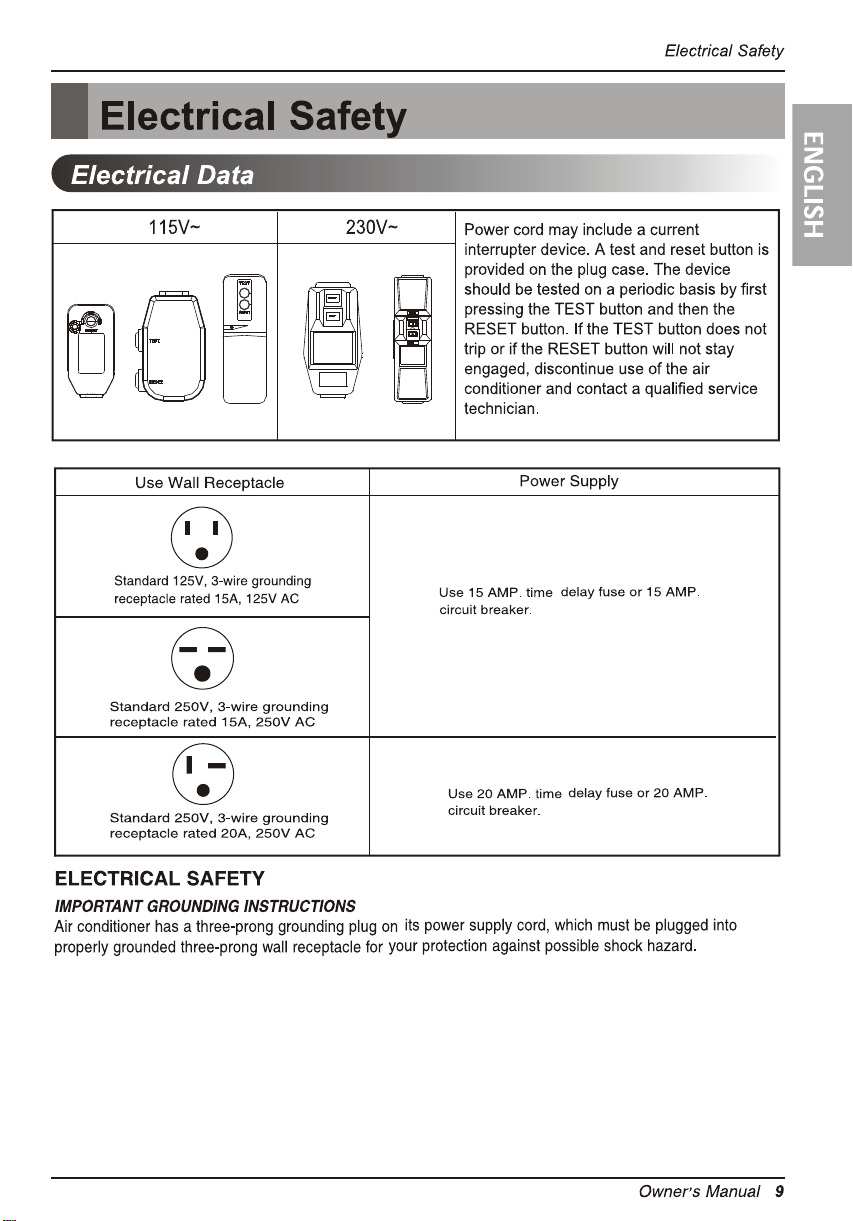
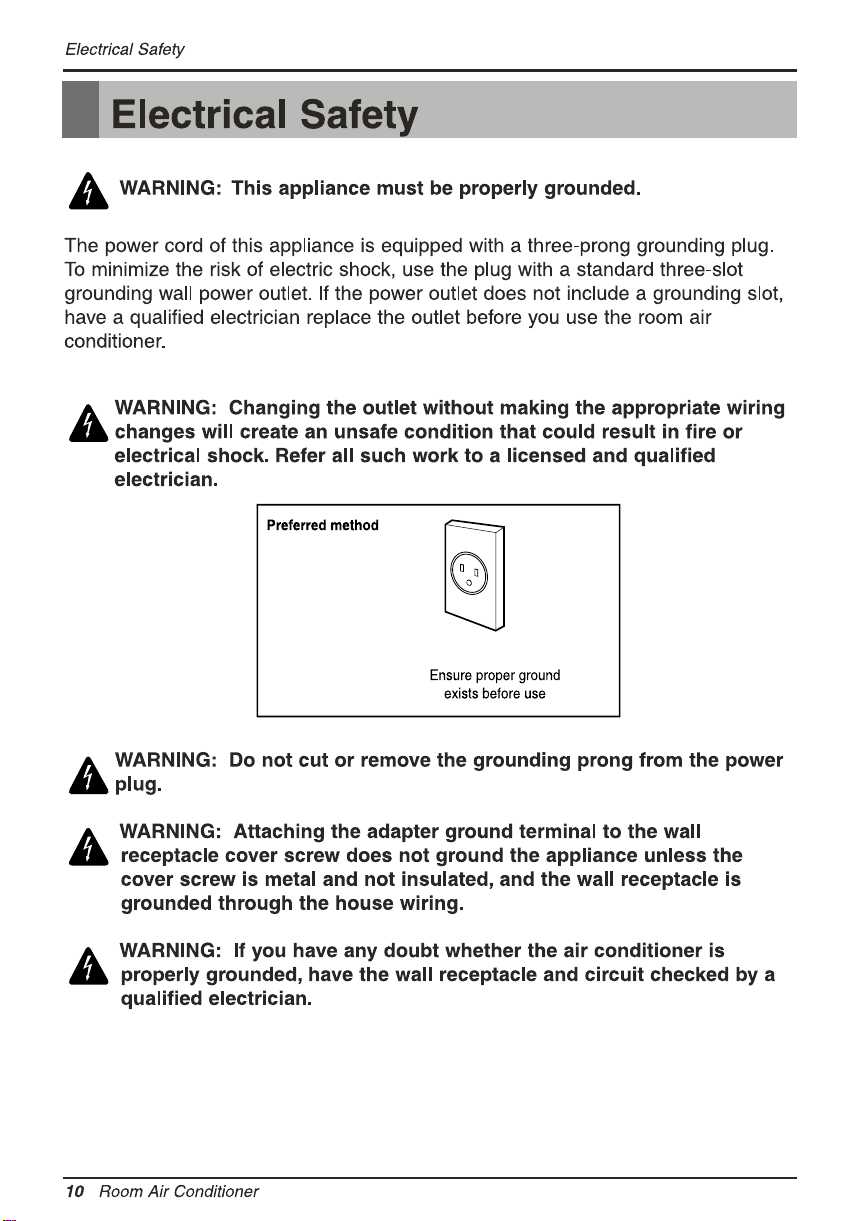
Electrical Safety ..............................9
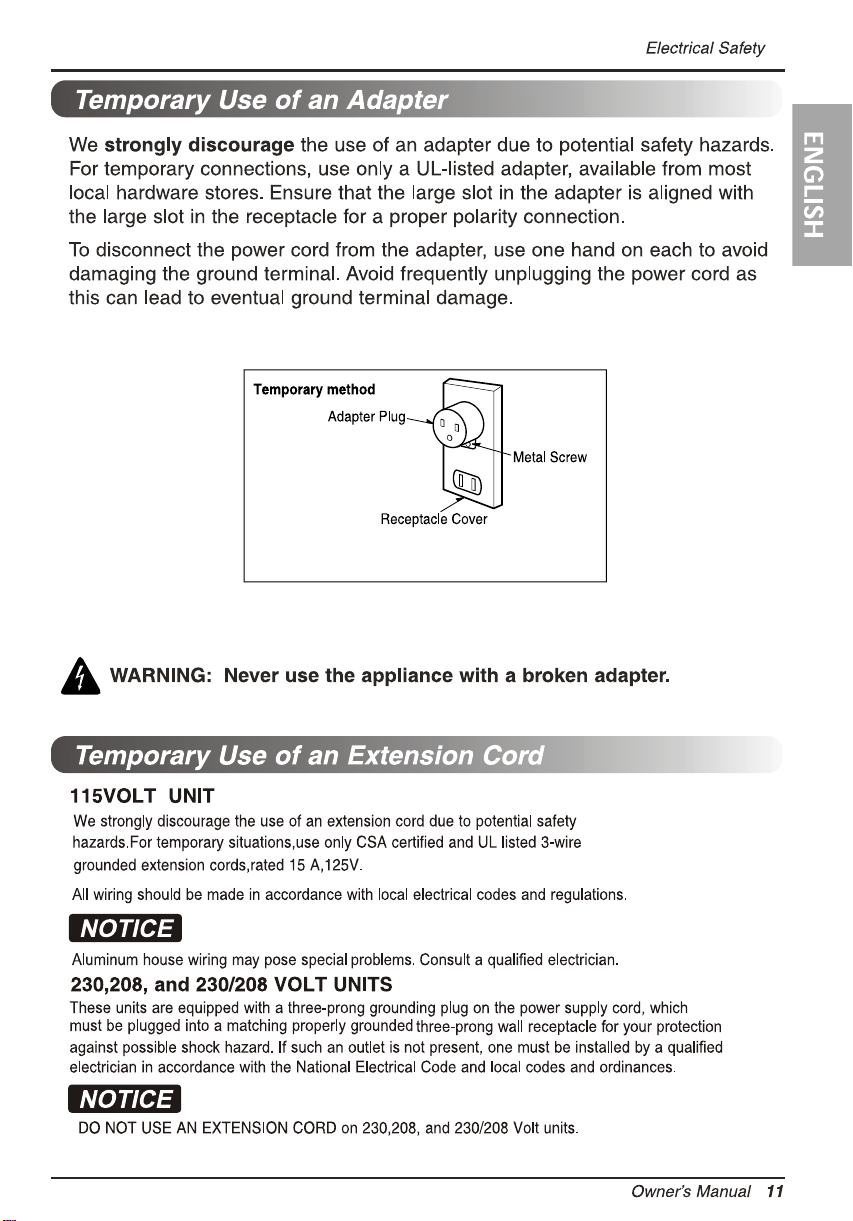
Temporar y Use of an
Adapter .........................................11
Temporar y Use of an
Extension Cord .............................11
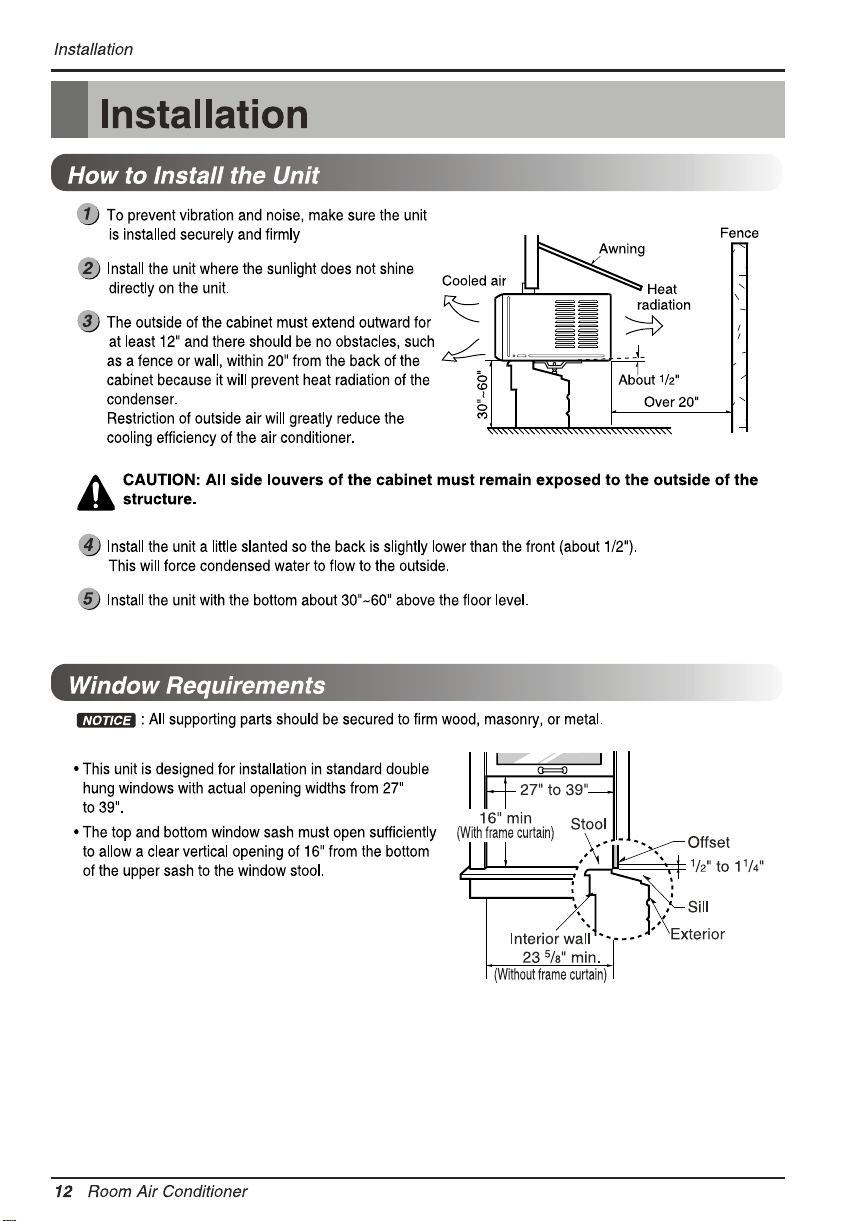
Introduction ...................................12
How to Install the unif ...................12
Window Requirements..................12
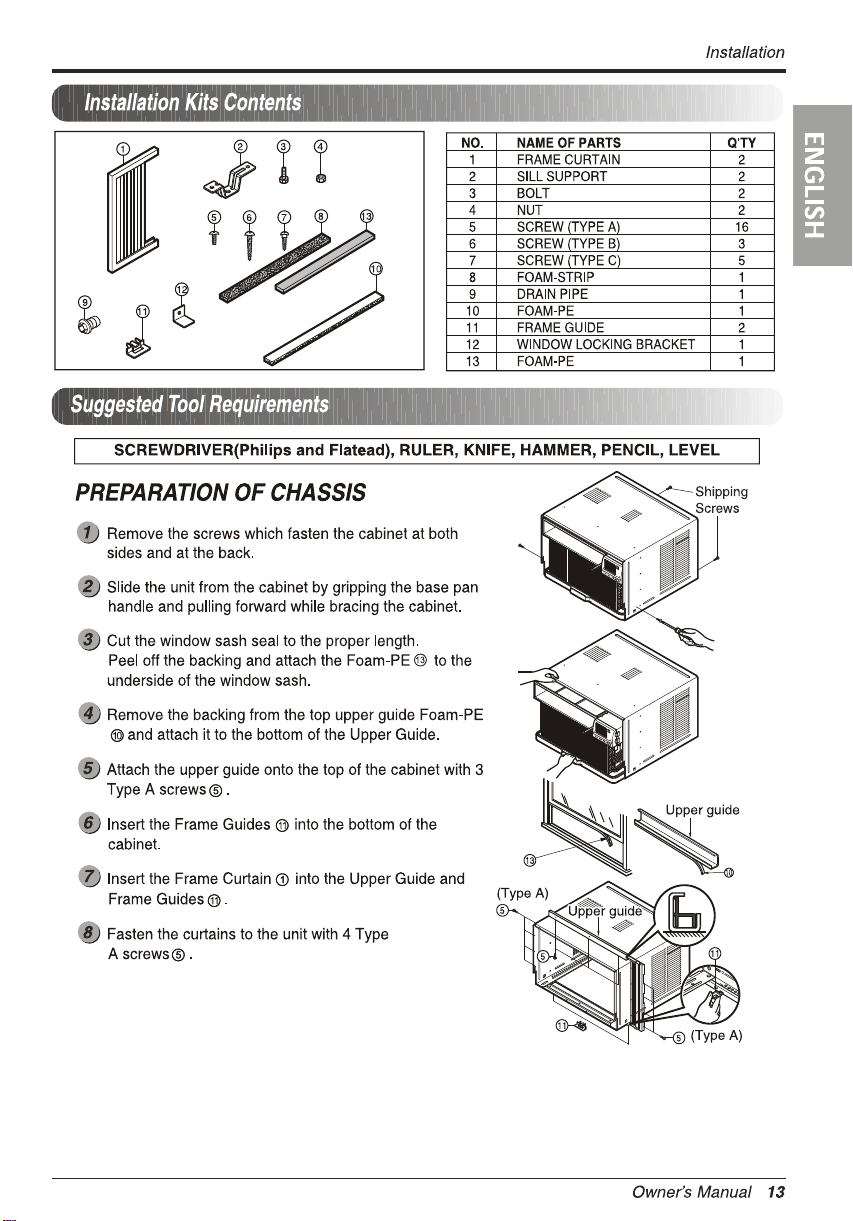
Installation Kits Contents ..............13
Requirements Saggested Tool......13
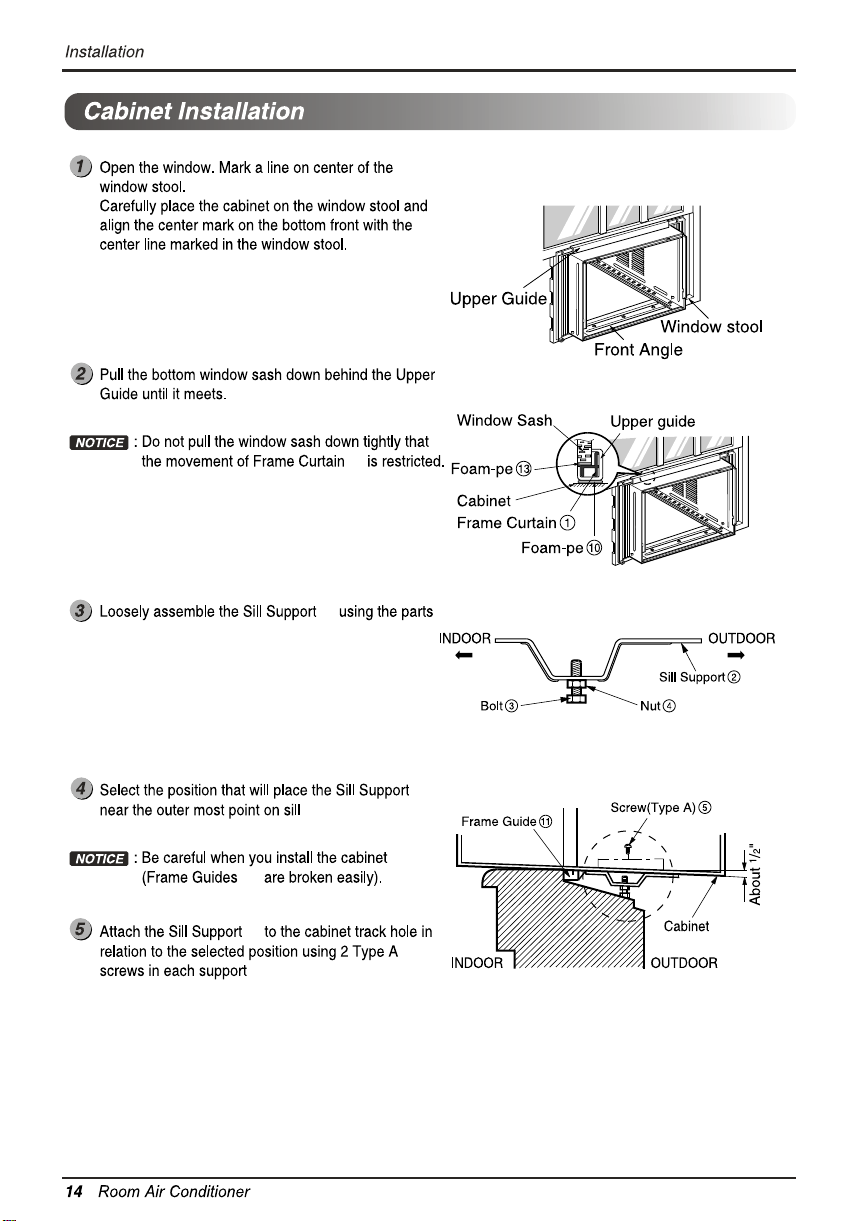
Cabinet Installation .......................14
Operating Instructions .................17
Remote Control Operations..........17
Remote Controller.........................18
Additional Features.......................19
Air Direction ..................................19
Vent Control..................................19
Drain Pipe.....................................20
Removal from Window..................20
Maintenance and Service ............21
Air Filter.........................................21
Cleaning the Air Conditioner.........21
How to Remove the Front Grille ...22
Common Problems and
Solutions .......................................23
Troubleshooting.............................24
Page 3
Owner’s Manual 3
ENGLISH
Safety Precautions
Safety Precautions
To prevent injury to the user or other people and proper ty damage, the following instructions
must be followed.
■ Incorrect operation due to ignoring instr uctions will cause har m or damage. The seriousness
is classified by the following indications.
■ Because of the weight of the product, it is recommended that you have a helper to assist in
the installation.
■ Meanings of symbols used in this manual are as shown below.
WARNING
CAUTION
This symbol indicates the possibility of death or serious injury.
This symbol indicates the possibility of injury or damage to property only.
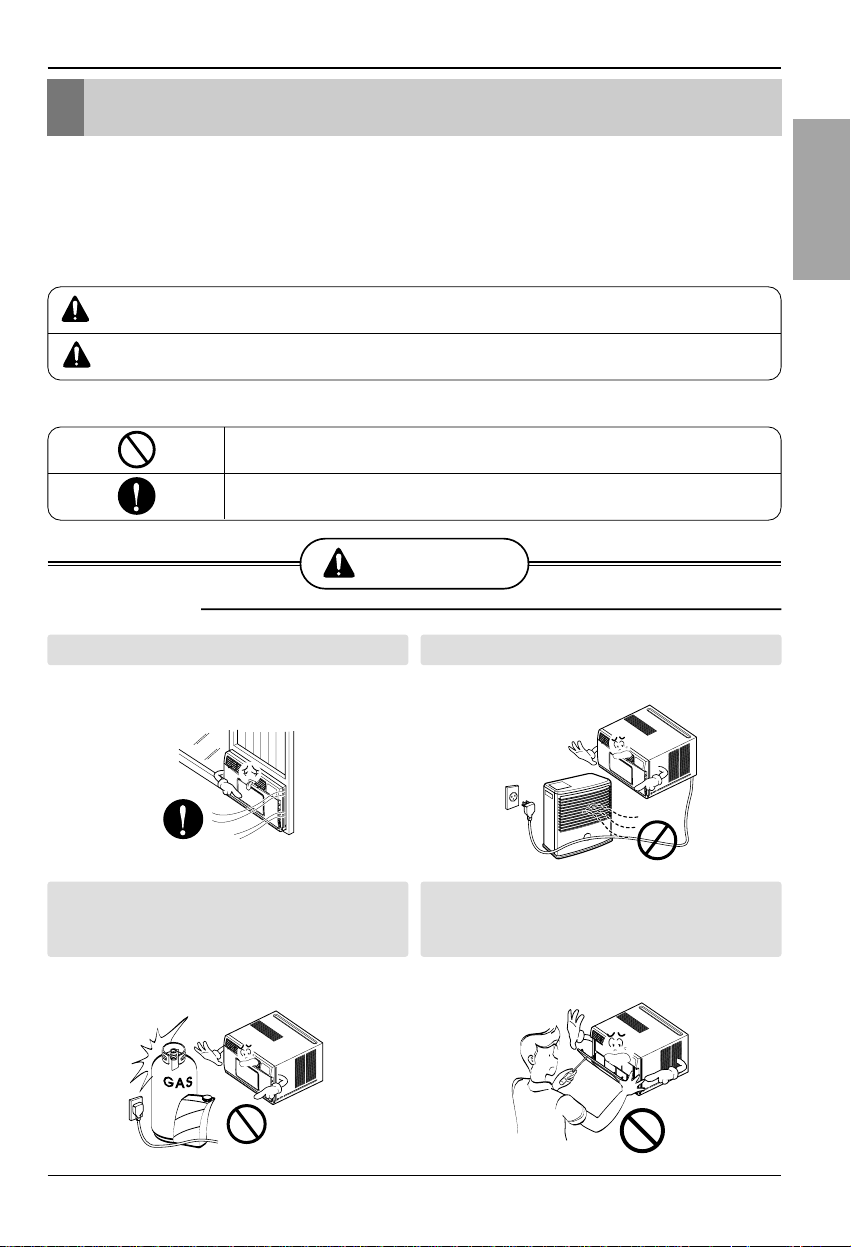
WARNING
■ Installation
Be sure not to do.
Be sure to follow the instruction.
Always install the expansion panel(s).
• Improper assembly or installation may cause
incorrect operation, including injury, fire, and
Do not place the power cord near a heater.
• It may cause fire and electric shock.
Do not use the power cord near flammable
gas or combustibles such as gasoline,
benzene, thinner, etc.
• It may cause explosion or fire.
Do not disassemble or modify products.
• It may cause electric shock and failure.
Gasolin
Page 4

4 Room Air Conditioner
Safety Precautions
■ Operation
Do not modify power cord
length.
• It will cause electric shock or fire.
Use the air conditioner on a
single outlet circuit. (See
page 7.) Do not share the
outlet with other appliances.
• It will cause electric shock or fire.
Always plug into a
grounded outlet.
• No grounding may cause electric
shock.
ON
Unplug the unit if strange
sounds, odors, or smoke
come from it.
• Otherwise it will cause fire and
electric shock accident.
Do not use the socket if it is
loose or damaged.
• It may cause fire and electricm
shock.
Do not operate with wet
hands or in damp
environment.
• It may cause electric shock.
Plug in the power plug
properly.
• Otherwise, it will cause electric
shock or fire.
Do not operate or stop the
unit by inserting or pulling
out the power plug.
• It will cause electric shock or fire.
Do not damage or use an
unspecified power cord.
• It will cause electric shock or
fire.
Page 5
Owner’s Manual 5
ENGLISH
Safety Precautions
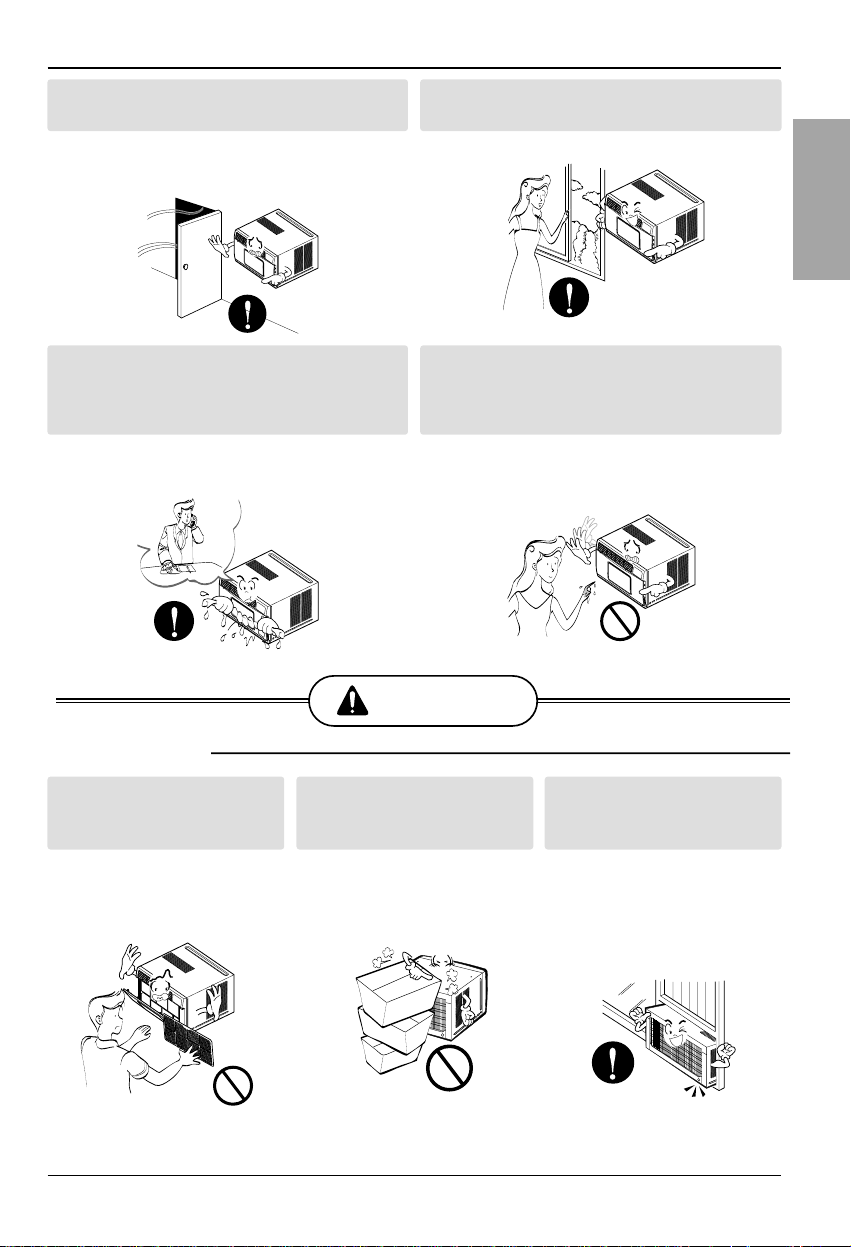
CAUTION
■ Installation
Never touch the metal parts
of the unit when removing
the filter.
• They are sharp and may cause
injury.
Do not block the inlet or
outlet.
• It may cause failure of
appliance or performance
deteriorate.
Ensure that the outer case is
not damaged by age or
wear.
• If the outer case is damaged, it
must be repaired or replaced
immediately. Leaving it damaged
could result in the air conditioner
falling out of the window, creating
a safety hazard.
Close all doors, windows and other outside
openings to the room.
• The air conditioner must be operated in a
enclosed area to be most effective.
Ventilate before operating air conditioner
when gas goes out.
• It may cause explosion, fire, and burn.
If water enters the product, turn off the the
power switch of the main body of appliance.
Contact service center after taking the
power-plug out from the socket.
• It will cause electric shock or failure of
machine.
Do not clean the air conditioner with water.
• Water may enter the unit and degrade the
insulation. It may cause an electric shock.
Page 6
6 Room Air Conditioner
Safety Precautions
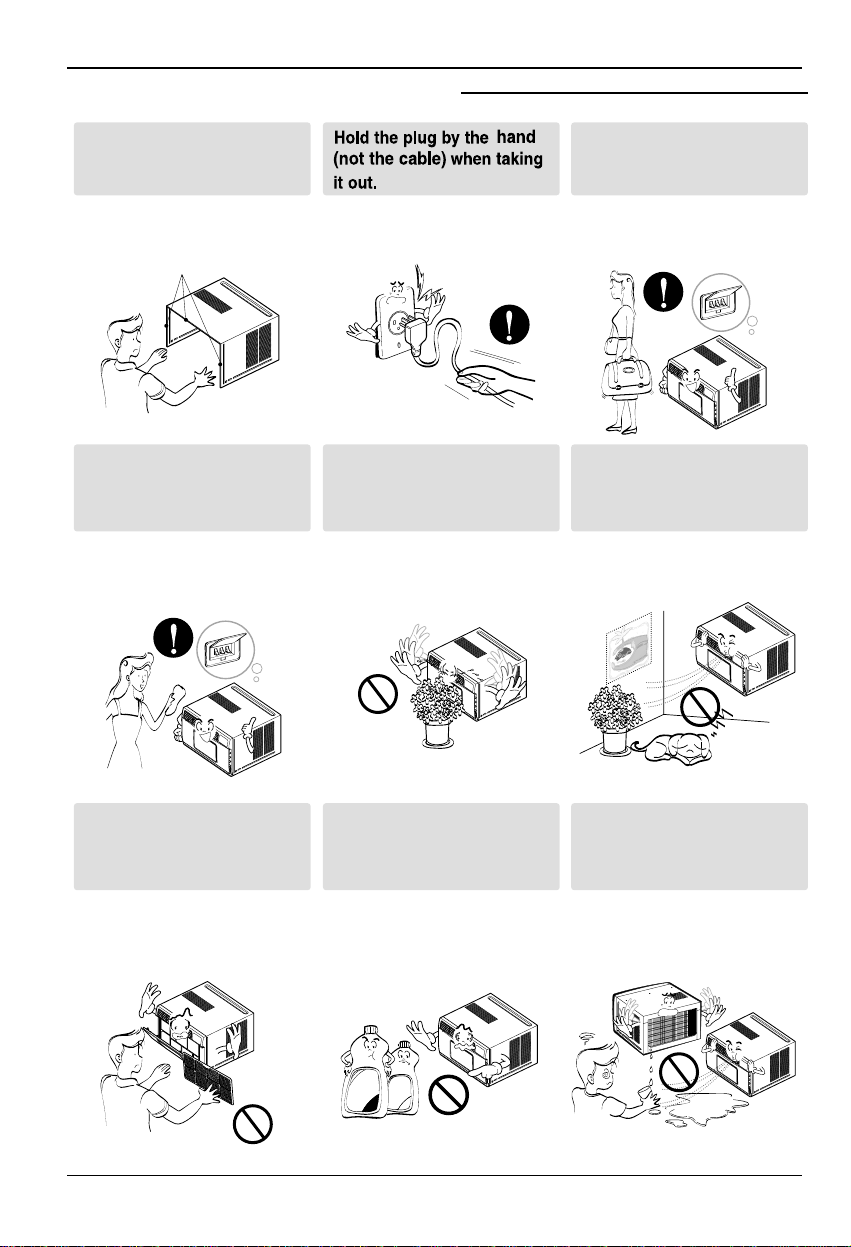
■ Operation
Always insert the filter
securely. Clean it every two
weeks.
• Operation without filters will
cause failure.
Use a soft cloth to clean. Do
not use wax, thinner, or a
strong detergent.
• The appearance of the air
conditioner may deteriorate,
change color, or develop
surface flaws.
Do not drink water drained
from air conditioner. Do not
direct airflow at room
occupants only.
• It is not sanitary and could
cause illness or personal injury
hazard.
Be cautious not to touch the
sharp edges when
installing.
• It may cause injury.
Hold the plug by the hand
when taking it out.
• It may cause electric shock and
damage.
Unplug the air conditioner if
it will not be used for a long
period.
• It will waste power consumption
in vain and it may cause
accident.
Unplug the air conditioner
before cleaning it.
• Since the fan rotates at high
speed during operation, it may
cause injury.
Do not put a pet or house
plant where it will be
exposed to direct air flow.
• This could injury the pet or plant.
Do not use this appliance
for special purposes such
as pets, foods, precision
machinery, or objects of art.
• It is an air conditioner, not a
precision refrigeration system.
Wax
Thinner
Sharp edges
Page 7
Page 8
Page 9
Page 10
Page 11
Page 12
Page 13
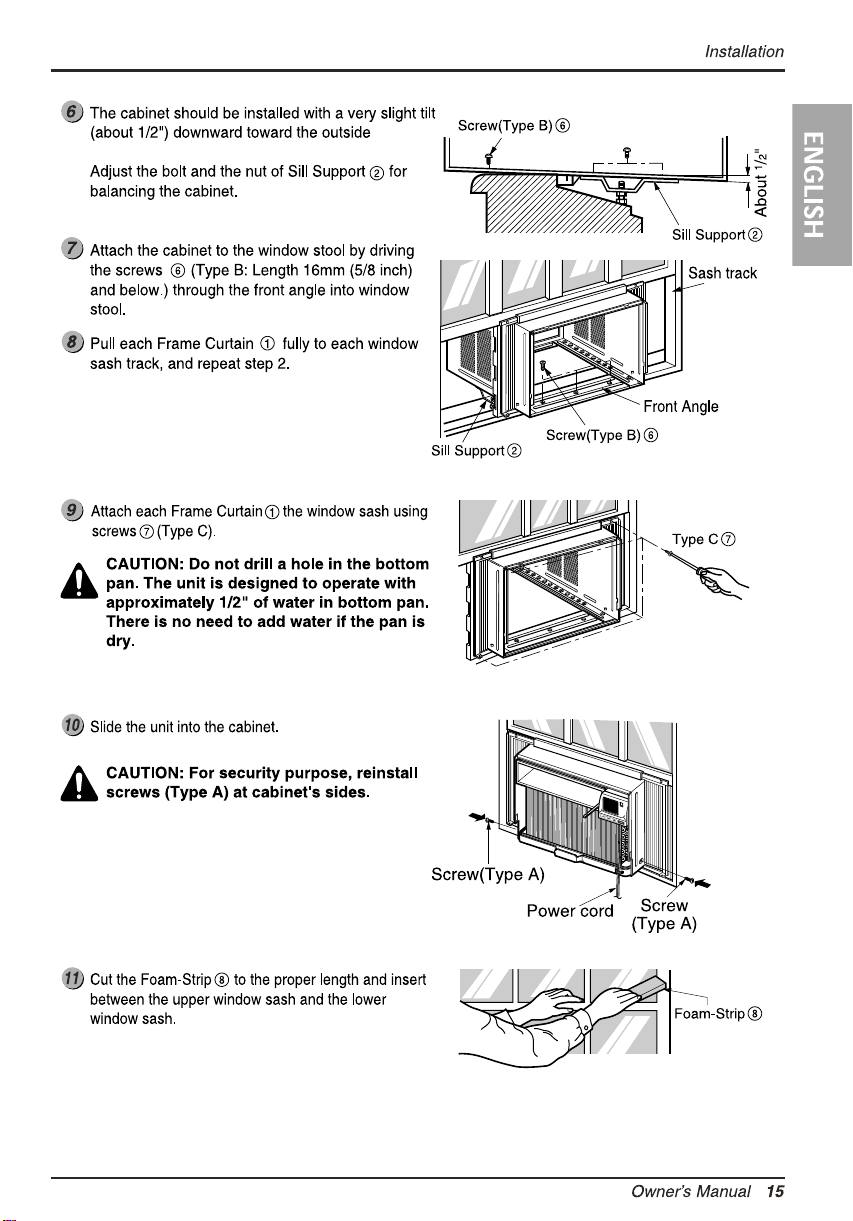
Page 14
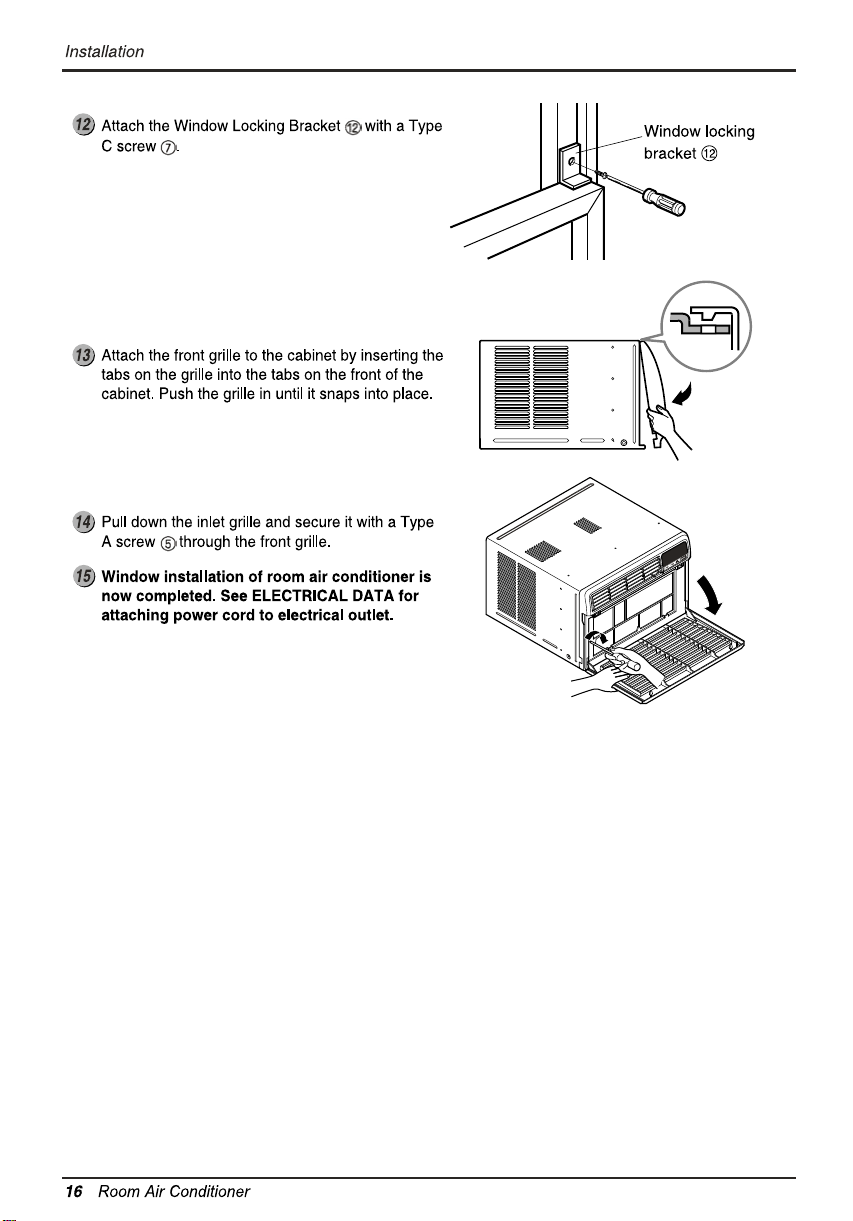
Page 15
Page 16
Page 17

Page 18

Page 19

Operating Instructions
Owner’s Manual 19
ENGLISH
Additional Features
Air Direction
Airflow can be adjusted by changing the direction of the air
conditioner's louvers.This can also increase the cooling
efficiency of the air conditioner.
Adjusting Horizontal Air Flow Direction
Adjusting the vertical louvers left and right will change
horizontal airflow.
Adjusting Vertical Air Flow Direction
Adjusting the horizontal vane up and down will change
vertical airflow.The vane can be adjusted by nudging
the back or up and down of the vane.
Recommended orientation of louvers
Adjust louvers to face upwards when cooling to
maximize cooling efficiency.
Adjusting horizontal air flow
Adjusting vertical air flow
VENTCLOSE OPEN
Vent Control
For maximum cooling efficiency, CLOSE the vent. This will allow internal air circulation.
OPEN the vent to discharge stale air.
Page 20

Page 21

Maintenance and Service
Owner’s Manual 21
ENGLISH
Maintenance and Service
Air Filter
Check the air filter at least twice a month to see if cleaning is necessary. Trapped particles in the filter can
build up and block the airflow, reducing cooling capacity and causing an accumulation of frost on the
evaporator.To clean the air filter:
1. Pull the inlet grille forward.
2. Remove the air filter from the front grille by pulling the air filter up slightly.
3.Wash the filter using lukewarm water below 40˚C (104˚F).
4. Gently shake the excess water from the filter and replace.
Cleaning The Air Conditioner
The front grille and Inlet grille may be wiped with a cloth
dampened in a mild detergent solution.
The cabinet may be washed with mild soap or detergent
and lukewarm water, then polished with Liquid Wax for
Appliances.
To ensure continued peak efficiency, the condenser coils
(outside of unit) should be checked periodically and
cleaned if clogged with soot or dirt from the atmosphere.
'
F
T
I
M
E
R
P
O
W
E
R
M
O
DE
T
E
M
P
F
A
N
S
P
E
E
D
F
1
L
O
W
F
2
M
E
D
F
3
H
I
G
H
D
r
y
T
i
m
e
r
Fa
n
E
n
e
r
g
y
S
a
v
er
C
o
o
l
Do not force
open or open to far.
'
F
TIMER POWERMODE
TEMP
FAN
SPEED
F1 LOW
F2 MED
F3 HIGH
Dry Timer
Fan
Energy
Saver
Cool
Page 22

22 Room Air Conditioner
Maintenance and Service
How to Remove the Front Grille
1. Pull the inlet grille forward
2. Remove the screw securing the Front Grille.
3. Push the grille up from the bottom and pull the top
of the grille away from the case as the top tabs lift
out of their slots.
'
F
T
I
M
E
R
P
O
W
E
R
M
O
D
E
T
E
M
P
F
A
N
S
P
E
E
D
F
1
L
O
W
F
2
M
E
D
F
3
H
I
G
H
D
r
y
T
i
m
e
r
F
a
n
E
n
e
r
g
y
S
av
e
r
C
o
o
l
'
F
TIMER POWERMODE
TEMP
FAN
SPEED
F1 LOW
F2 MED
F3 HIGH
Dry Timer
Fan
Energy
Saver
Cool
Page 23

Page 24

Page 25

Page 26

Page 27

Page 28

ESPAÑOL
Manual del Propietario 28
Precauciones de Seguridad
Precauciones de Seguridad
Para prevenir tanto lesiones al usuario u otras personas como daños materiales, es preciso
seguir estas instrucciones.
■ La incorrecta operación del aparato como consecuencia de ignorar las instrucciones
provocará daños o lesiones.
■ A cause del peso pesado del producto, se recomienda que usted tenga a un ayudante a
participa en la instalación.
■ El significado de los símbolos utilizados en este manual se indica a continuación.
ADVERTENCIA
PRECAUCION
Este símbolo indica la posibilidad de lesiones mortales o graves.
Este símbolo indica la posibilidad de lesiones o daños materi-ales.
ADVERTENCIA
■ Instalación
Asegúrese de no hacerlo.
Asegúrese de seguir las instrucciones.
Instale siempre el (los) panel(es) de
expansion.
• Un montaje o instalación defectuoso puede
provocar un funcionamiento incorrecto, incluyendo
riesgos de lesiones, incendios o
No coloque el cable eléctrico cerca de un
calefactor.
• Puede causar incendio y descarga eléctrica.
No use el cable de corriente cerca de gas
inflamable o combustibles tales como
gasolina, benzina, solvente, etc.
• Puede causar explosión o incendio.
No desarme o modifique los productos.
• Puede causar descarga eléctrica y fallos.
Gasolin
Page 29

29 Aire Acondicionador
Precauciones de Seguridad
■ Funcionamiento
No modifique la longitud del
cable de corriente eléctrica.
• Causará descarga eléctrica o
incendio.
Use el aparato de aire
acondicionado en un solo
circuito. (Consulte la página
30). No comparta el circuito
con otros electrodomésticos.
• Causará descarga eléctrica o
incendio.
Siempre enchufe las piezas
eléctricas en una salida
conectada a masa.
• Si no hay conexión a masa, se
puede producir una descarga
eléctrica.
ON
Desenchufe la unidad si se
producen sonidos u olores
extraños en la unidad.
• En caso que no, puede causar
incendio y accidente de corto
circuito.
No use el tomacorriente si
está suelto o dañado.
• Puede causar incendio y
accidente eléctrico.
No haga funcionar la unidad
con las manos húmedas o
en un ambiente húmedo.
• Puede causar descarga
eléctrica.
Enchufe la corriente
adecuadamente.
• De otro modo, causará descarga
eléctrica o incendio.
No haga funcionar o
detenga la unidad
insertando o tirando del
enchufe.
• Causará descarga eléctrica o
incendio.
No dañe ni use un cable no
especificado.
• Causará descarga eléctrica o
incendio.
Page 30

ESPAÑOL
Manual del Propietario 30
Precauciones de Seguridad
PRECAUCION
■ Instalación
Nunca toque las piezas de
metal de la unidad cuando
quite el filtro.
• Son filosas y pueden causar
lesiones.
No bloquee la entrada o la
salida de aire.
• Puede provocar el fallo de un
electrodoméstico o
deterioración de su
rendimiento.
Asegúrese de que la caja
externa no está dañada por
los anõs o desgaste.
• Si la carcasa exterior está
dañada, debe repararse o
recambiarse inmediatamente.
Dejarla podría provocar que el
aparato de acondicionado se
caiga de la ventana, con el
consiguiente peligro de lesiones.
Cierre todas las puertas, ventanas y otras
aberturas de la sala.
• El aparato de aire acondicionado debe
operarse en un área cerrada para ser más
efectivo.
Ventile antes de hacer funcionar el
acondicionador de aire cuando sale el gas.
• Puede causar explosión, incendio, quemaduras.
Si entra agua a la unidad, gire el interruptor
principal del artefacto.Tome contacto con el
centro de servicio después de desconectar
el enchufe del tomacorriente.
• Causará descarga eléctrica o incendio.
No limpie la unidad de aire acondicionado
con agua.
• Puede entrar agua en la unidad y disminuir la
aislación. Puede causar una descarga eléctr ica.
Page 31

31 Aire Acondicionador
Precauciones de Seguridad
■ Funcionamiento
Siempre asegure los filtros
al insertarlos. Límpielos
cada dos semanas.
• El funcionamiento sin filtros
puede dañar la unidad.
Use una paño suave para
limpiar. No use ceras,
solventes o un detergente
fuerte
• La unidad del aire
acondicionado puede
deteriorarse, cambiar de color,
o desarrollar manchas en la
superficie.
No beba el agua drenada del
acondicionador de aire. / No
dirija el flujo de aire sólo a
los ocupantes de la
habitación.
• No es sano y podría provocar
enfermedades o peligros de
lesiones personales.
Al momento de su
instalación, evite que se
contacte con los bordes
afilados.
• Hay riesgo de lesiones
personales.
Sostenga el enchufe por el
cuerpo (no del cable)
cuando lo saque.
• Puede causar descarga eléctrica
y daño.
Desenchufe el aparato de
aire acondicionado si no va
a utilizarlo durante un largo
período de tiempo.
• Gastará energía en vano y
podría provocar un accidente.
Desenchufe el aparato de
aire acondicionado antes de
limpiarlo.
• Como el ventilador gira a alta
velocidad cuando está
funcionando, puede causar
lesiones.
No coloque una mascota o
una planta donde quede
expuesto al flujo directo de
aire. No se siente donde
haya corrientes de aire.
• Este puede causar lesiones o
daños en la mascota o la
planta.
No use la unidad para
propósitos especiales tales
como animals o vegetales,
máquinas de precision u
objetos de arte.
• Puede causar daño a los
animales o vegetales y pérdida
de objetos.
Wax
Thinner
Sharp edges
Page 32

Page 33

Page 34

Page 35

Page 36

Page 37

Page 38

Page 39

Page 40

Page 41

Page 42

Page 43

Page 44

Instrucciones de funcionamiento
Manual del Propietario 44
ESPAÑOL
Ajustar la dirección del flujo de aire
El flujo de aire puede ser ajustado cambiando la dirección de
las rejillas de ventilación del acondicionador deaire.Esto
puede también incrementar la eficacia del acondicionador de
aire.
Ajustar la dirección del flujo de aire
horizontal.
Ajustar las rejillas verticales hacia la izquierda yderecha
cambiará el flujo horizontal.
Ajustar la dirección del flujo de aire vertical
Ajustar el álabe horizontal hacia arriba y abajocambiará
el flujo de aire vertical. El álabe puedeser ajustado
moviendo la parte posterior del álabehacia arriba o
abajo.
Orientación recomendada de las rejillas
Ajuste las rejillas hacia arriba para llevar al máximo a
eficacia del fresco.
Ajustar el flujo de aire horizontal
Ajustar el flujo de aire vertical
VENTILACIÓNCERRADA ABIERTA
Control de ventilación
Para máxima eficiencia de frescura, CIERRE la ventilación. Esto permitirá la circulación interna de aire.
ABRA la ventilación para descargar el aire viciado.
Page 45

Page 46

Mantenimiento y servicio
Manual del Propietario 46
ESPAÑOL
Mantenimiento y servicio
Filtro de Aire
Revise por lo menos dos veces al mes si no es necesario limpiar el filtro de aire.Las partículas detenidad se
pueden acumular en el filtro impidiendo el flujo del aire, limitando el rendimiento de enfriamiento y causando
la acumulación de hielo en el evaporador. Proceder de la limpieza del filtro de aire:
1. Levante la rejilla de entrada
2. Saque el filtro de aire de la rejilla delantera sacándolo ligeramente hacia arriba.
3. Lave el filtro con agua tibia de temperatura menor de 40°C (104°F).
4. Escurra ligeramente el agua sobrante del filtro y vuelva a instalarlo.
Limpieza del Aire Acondicionado
La parrilla frontal puede ser limpiada con un trapo húmedo
mojado en un detergente suave.El gabinete puede ser
lavado con jabón suave o detergente y agua tibia,
entonces pulido Cera Liquida para aparatos.Para
asegurarse una eficiencia continua, las bobinas del
condensador (del lado expuesto al exterior) debe ser
revisado y lavado periódicamente sea por que se tranque
con basura o polvo de la atmosférico.
'
F
T
I
M
E
R
P
O
W
E
R
MO
DE
T
E
M
P
F
A
N
S
P
E
E
D
F
1
L
O
W
F
2
M
E
D
F
3
H
I
G
H
D
r
y
T
i
m
e
r
Fa
n
E
n
e
rg
y
S
a
v
er
C
o
o
l
No debe forzar a abrir
o abrir a lo lejos.
'
F
TIMER POWERMODE
TEMP
FAN
SPEED
F1 LOW
F2 MED
F3 HIGH
Dry Timer
Fan
Energy
Saver
Cool
Page 47

47 Aire Acondicionador
Mantenimiento y servicio
Como Remover la Parilla Frontal
1.Tire de la rejilla de entrada hacia delante
agarrando ambas lengüetas y tire del filtro del aire
hasta sacarlo.
2. Saque el tor nillo que asegura la Parrilla Frontal.
3. Suelte el lado izquierdo primero. Después
cuidadosamente hale desde la parte de arriba y
empuje hacia la derecha. Las lengüetas están
aseguradas.
'
F
T
I
M
E
R
P
O
W
E
R
M
O
D
E
T
E
M
P
F
A
N
SP
E
E
D
F
1
L
O
W
F
2
M
E
D
F
3
H
I
G
H
D
r
y
T
i
m
e
r
Fa
n
E
n
e
r
g
y
S
av
e
r
C
o
o
l
'
F
TIMER POWERMODE
TEMP
FAN
SPEED
F1 LOW
F2 MED
F3 HIGH
Dry Timer
Fan
Energy
Saver
Cool
Page 48

Page 49

Page 50

Page 51

Page 52

3828A21004L
 Loading...