

Page 1

ENGLISH
ESPAÑOL
FRANÇAIS
OWNER’S MANUAL
VACUUM CLEANER
Please read this owner's manual thoroughly before
operating and keep it handy for reference at all times.
LuV350P*
P/NO : MFL67230701 www.lg.com
Page 2

2
ENGLISH
ENGLISH
TABLE OF CONTENTS
TABLE OF CONTENTS
3 VACUUM CLEANER WARRANTY
4 IMPORTANT SAFETY INFORMATION
6 PARTS AND FEATURES
7 ASSEMB LY
7 Unpacking the Vacuum Cleaner
7 Assembly Parts
7 Attaching the Wand
8 Attaching the Hose
8 Accessory Storage
8 Cord Storage
9 OPERATION
9 Wand Release Operation
9 Body Release Operation
1 0 Accessories
1 0 Accessory Use Chart
1 1 Using the Wand
1 1 Installing Attachments
1 1 Tips and Tricks
1 2 Using the Pet Hair Turbine Tool
1 2 Stairways and Landings
1 2 Using the Wand
1 2 Agitator Motor Overload Protection
1 2 Thermal Overload Protection
13 CARE & CLEANING
1 3 Storing the Vacuum Cleaner
1 3 Dust Tank Components
1 4 Emptying the Dust Tank
1 4 Cleaning the Dust Tank
1 5 Cleaning the Foam Filter
1 5 Cleaning the HEPA Filter
1 6 Pet Hair Turbine Tool
1 6 Agitator Maintenance
1 6 Replacing the Agitator Belt
1 7 Removing Clogs
1 8 Cleaning the Exterior of the Vacuum Cleaner
19 TROUBLESHOOTING
Page 3

WARRANTY
3
WARRANTY (USA)
LG Electronics Inc. will repair or replace your product, at LG’s option, if it proves to be defective in material or workmanship under personal household use,
during the warranty period set forth below, eective from the date of original consumer purchase of the product. This limited warranty is good only to the
original purchaser of the product and eective only when used in U.S.A. and Canada.
WARRANTY PERIOD HOW SERVICE IS HANDLED
Five Year
From the date of the original purchase
THIS WARRANTY IS IN LIEU OF ANY OTHER WARRANTIES, EXPRESS OR IMPLIED, INCLUDING WITHOUT LIMITATION, ANY WARRANTY OF MERCHANTABILITY OR FITNESS FOR A PARTICULAR PURPOSE. TO THE EXTENT ANY IMPLIED WARRANTY IS REQUIRED BY LAW, IT IS LIMITED IN DURATION TO THE EXPRESS WARRANTY PERIOD ABOVE. LG WILL NOT BE LIABLE FOR ANY CONSEQUENTIAL, INDIRECT, OR INCIDENTAL DAMAGES OF
ANY KIND, INCLUDING LOST REVENUES OR PROFITS, IN CONNECTION WITH THE PRODUCT. SOME STATES DO NOT ALLOW LIMITATION ON HOW
LONG AN IMPLIED WARRANTY LASTS OR THE EXCLUSION OF INCIDENTAL OR CONSEQUENTIAL DAMAGES, SO THE ABOVE LIMITATIONS OR EXCLUSIONS MAY NOT APPLY TO YOU.
THIS WARRANTY COVERS ONLY DEFECTS IN MATERIAL AND WORKMANSHIP. LGE WILL NOT PAY FOR:
1. Expendable items that can wear out, including but not limited to lters, and belts.
2. A service technician to instruct the user in correct product assembly, operation or maintenance.
3. A service technician to clean or maintain this product.
4. Damage to or failure of this product if it is not assembled, operated or maintained according to all instructions supplied with this product.
5. Damage to or failure of this product resulting from accident, abuse, misuse or use for other than its intended purpose.
6. Damage to or failure of this product caused by the use of detergents, cleaners, chemicals or utensils other than those recommended in all instructions
supplied with this product.
7. Damage to or failure of parts or systems resulting from unauthorized modications made to this product.
This warranty is extended to the original purchaser for products purchased for home use within the U.S.A. In Alaska, the warranty excludes the cost of shipping or service calls to your home.
Some states do not allow the exclusion or limitation of incidental or consequential damages, so this exclusion or limitation may not apply to you. This warranty gives you specic legal rights, and you may also have other rights which vary from state to state. To know what your legal rights are, consult your local
or state consumer aairs or your state’s Attorney General.
CUSTOMER ASSISTANCE INFORMATION:
Any part of the vacuum cleaner which fails due to a defect in materials or workmanship. During this
full ve-year warranty, LG will also provide, free of charge, all labor and shop service to replace
the defective part.
ENGLISH
To Prove Warranty Coverage Retain your Sales Receipt to prove date of purchase.
A copy of your Sales Receipt must be submitted at the time warranty service is
provided.
To Obtain Nearest Authorized Service Center or Sales Dealer, or
to Obtain Product, Customer, or Service Assistance
Call 1-800-243-0000 (24 hours - 365 days a year) and choose the appropriate
prompt from the menu; or visit our website at http://www.lg.com
(In Canada Call 1-888-542-2623, website http://www.lg.com)
Page 4
4
IMPORTANT SAFETY INFORMATION
ENGLISH
IMPORTANT SAFETY INSTRUCTIONS
READ ALL INSTRUCTIONS BEFORE USE - SAVE THESE INSTRUCTIONS
Read and follow all instructions before using your vacuum cleaner to prevent the risk of re, electric shock, personal injury, or damage when using the
vacuum cleaner. This guide does not cover all possible conditions that may occur. Always contact your service agent or manufacturer regarding problems
that you do not understand.
y Disconnect electrical supply before servicing or cleaning the vacuum
y Do not u se the vacuum cleane r to pick up anythin g that is burning
y Do not vacuum flammable or explosive substances such as
y Do not handle the plug or vacuum cleaner with wet hands. Doing
y Do not unplug the vacuum cleaner by pulling on the cord. Doing
y Keep hair, loose clothing, fingers, and all parts of the body away
y Do not pull or carry the vacuum cleaner by its cord, use the cord
y Do not run the vacuum cleaner over the cord. Keep the cord away
y The vacuum cleaner is not a toy and should not be operated by
y Do not use the vacuum cleaner if the power cord or plug is
y Do not use vacuum cleaner if it has been under water. Personal
This is the safety alert symbol. This symbol alerts you to potential hazards that can result in property damage and / or serious bodily harm or death.
All safety messages will follow the safety alert symbol and either the word WARNING or CAUTION.
Indicates a hazardous situation which, if not avoided, could result in death or serious injury.
WARNING
CAUTION
Indicates a hazardous situation which, if not avoided, may result in minor or moderate injury.
WARNING
y Do not continue to vacuum if any parts appear missing or
cleaner o r when the vacuum cle aner is not in use. Failure to do so could
result in electrical shock or personal injury.
or smoki ng such as cigaret tes, or hot ashes. Do ing so could result in
death, fire or electrical shock.
gasoline, benzene, thinners, propane (liquids or gases). The
fumes from these substances can create a fire hazard or explosion.
Doing so could result in death or personal injury.
so could result in death or electrical shock.
so could result in product damage or electrical shock. To unplug,
grasp the plug, not the cord.
from openings and moving parts. Failure to do so could result in
electrical shock or personal injury.
as a handle, c lose a door on the cord or p ull the cord around sharp
edges or corners.
from heate d surfaces. Failure to do so could result in electrical shock ,
personal injury, re, or product damage.
children. Pay close attention when operating the vacuum cleaner
near children. Personal injury or product damage could result.
damaged or faulty. Personal injury or product damage could result.
In these cases, contact LG Electronics Service Agent to avoid hazard.
injury or product damage could result. In these cases, contact LG
Electronics Service Agent to avoid hazard.
damaged. Personal injury or product damage could result. In these
cases, contact LG Electronics Service Agent to avoid
hazard.
y Do not u se an extension co rd with this vacuum c leaner. Fire hazard
or product damage could result.
y Use proper voltage. Using improper voltage may result in damage to
the motor and possible injury to the user. Proper voltage is listed on
the bottom of the vacuum cleaner.
y Turn o all controls before unplugging. Failure to do so could result
in electrical shock or personal injury.
y Do not change the plug in any way. Failure to follow this warning
could result in electrical shock, personal injury, product damage or
death. If plug does not t, contact a qualied electrician to install the
proper outlet.
y Repairs to electrical appliances may only be performed by
qualied service engineers. Improper repairs may lead to serious
hazards for the user.
y Do not put ngers near the gear. Failure to follow this warning could
result in personal injury.
y Do not use out doors or on wet surfaces. Failure to follow this
warning could result in electrical shock or personal injury.
y Do not put anything between the vacuum cleaner body and
agitator head space. Personal injury or product damage could result.
y This product contains chemicals known to the State of California to
cause cancer and birth defects or other reproductive harm. Wash
hands after handling.
y Use extra care when cleaning on stairs.
y Do not leave the appliance when it is plugged in. Unplug from the
outlet when not in use and before servicing.
Page 5

IMPORTANT SAFETY INFORMATION
24
INSTRUCCIONES DE SEGURIDAD IMPORTANTES
GUARDE ESTAS INSTRUCCIONES
LEA TODAS LAS INDICACIONES ANTES DE USAR EL PRODUCTO
Lea y siga todas las instrucciones antes de usar la aspiradora para prevenir riesgos de incendio, descarga eléctrica, lesión personal o daños cuando use
la aspiradora. Esta guía no cubre todos los posibles inconvenientes que puedan surgir. Siempre debe ponerse en contacto con su agente de servicio o
fabricante en caso de que surjan problemas que no comprenda.
Este es el símbolo de alerta de seguridad. Este símbolo lo alertará en caso de que existan riesgos que puedan acarrear daños a la propiedad y/o
lesiones corporales graves o muerte.
Todos los mensajes de seguridad seguirán al símbolo de alerta de seguridad y a los términos ADVERTENCIA o PRECAUCIÓN.
ADVERTENCIA
Indica una situación peligrosa que, si no se evita, podría ocasionar la muerte o lesiones graves.
PRECAUCIÓN
Indica una situación peligrosa que, si no se evita, podría ocasionar lesiones menores o moderadas.
INFORMACIÓN IMPORTANTE DE SEGURIDAD
5
CAUTION
y Do not insert objects into vacuum openings. Failure to follow this
instruction could result in product damage.
y Do not use the vacuum cleaner i f any of the openings are b locked.
Keep vacuum openings free of dust, lint, hair and anything that
may reduce air ow. Failure to follow instruction could result in
product damage.
y Do not use the vacuum cleaner without the tank and / or lters
properly installed. Failure to follow instruction could result in
product damage.
y Always clean the dust tank and lters after vacuuming carpet
cleaners or fresheners, powders and ne dust. These products can
clog the lters, reduce airow and / or cause damage to the vacuum.
Failure to clean the dust tank and lters could cause permanent
damage to the vacuum.
y Do not use the vacuum cleaner to pick up sharp or hard objects
such as small toys, pins, paper clips, etc. They may damage the
vacuum or dust tank.
y Store the vacuum cleaner indoors. Put the vacuum cleaner away
after use to prevent tripping over it.
y The vacuum cleaner should not be operated by young children.
Failure to follow this instruction could result in personal injury or
product damage.
ENGLISH
y Follow all instructions in the owner’s manual. Only use LG
recommended or approved attachments and accessories. Failure
to do so could result in product damage.
y Never place the vacuum cleaner at the top of stairs. Failure to
follow instruction could result in personal injury or product damage.
y Make sure the lters (exhaust lter and motor safety lter) are
complet ely dry before p lacing in the vacuum . Failure to do so could
result in product damage.
y Do not dry the lters in an oven or microwave. Failure follow
instruction could result in a re hazard.
y Do not dry the lters in a clothes dryer. Failure to follow instruction
could result in a re hazard.
y Do not dry the lters near an open ame. Failure to follow
instruction could result in a re hazard.
y Always turn the vacuum cleaner o before connecting or
disconnecting the hose. Personal injury or product damage could
result.
y The vacuum cleaner is only intended for household use.
y You are responsible for proper assembly and use of your vacuum
cleaner.
y Only use parts produced or recommended by Qualied Service
Technicians. Failure to do so could result in product damage.
Thermal Protector:
This vacuum cleaner has a special thermostat that protects the vacuum cleaner in case of motor overheating. If the vacuum cleaner suddenly shuts
o, turn o the switch and unplug the vacuum cleaner.
Check the vacuum cleaner for possible source of overheating such as a full dust tank, a blocked hose or clogged lter. If theses conditions are found,
x them and wait at least 30 minutes before attempting to use the vacuum cleaner. After 30 minutes, plug the vacuum cleaner back in and turn on
the switch. If the vacuum cleaner still does not run, contact a qualied electrician.
Page 6
6
PARTS AND FEATURES
ENGLISH
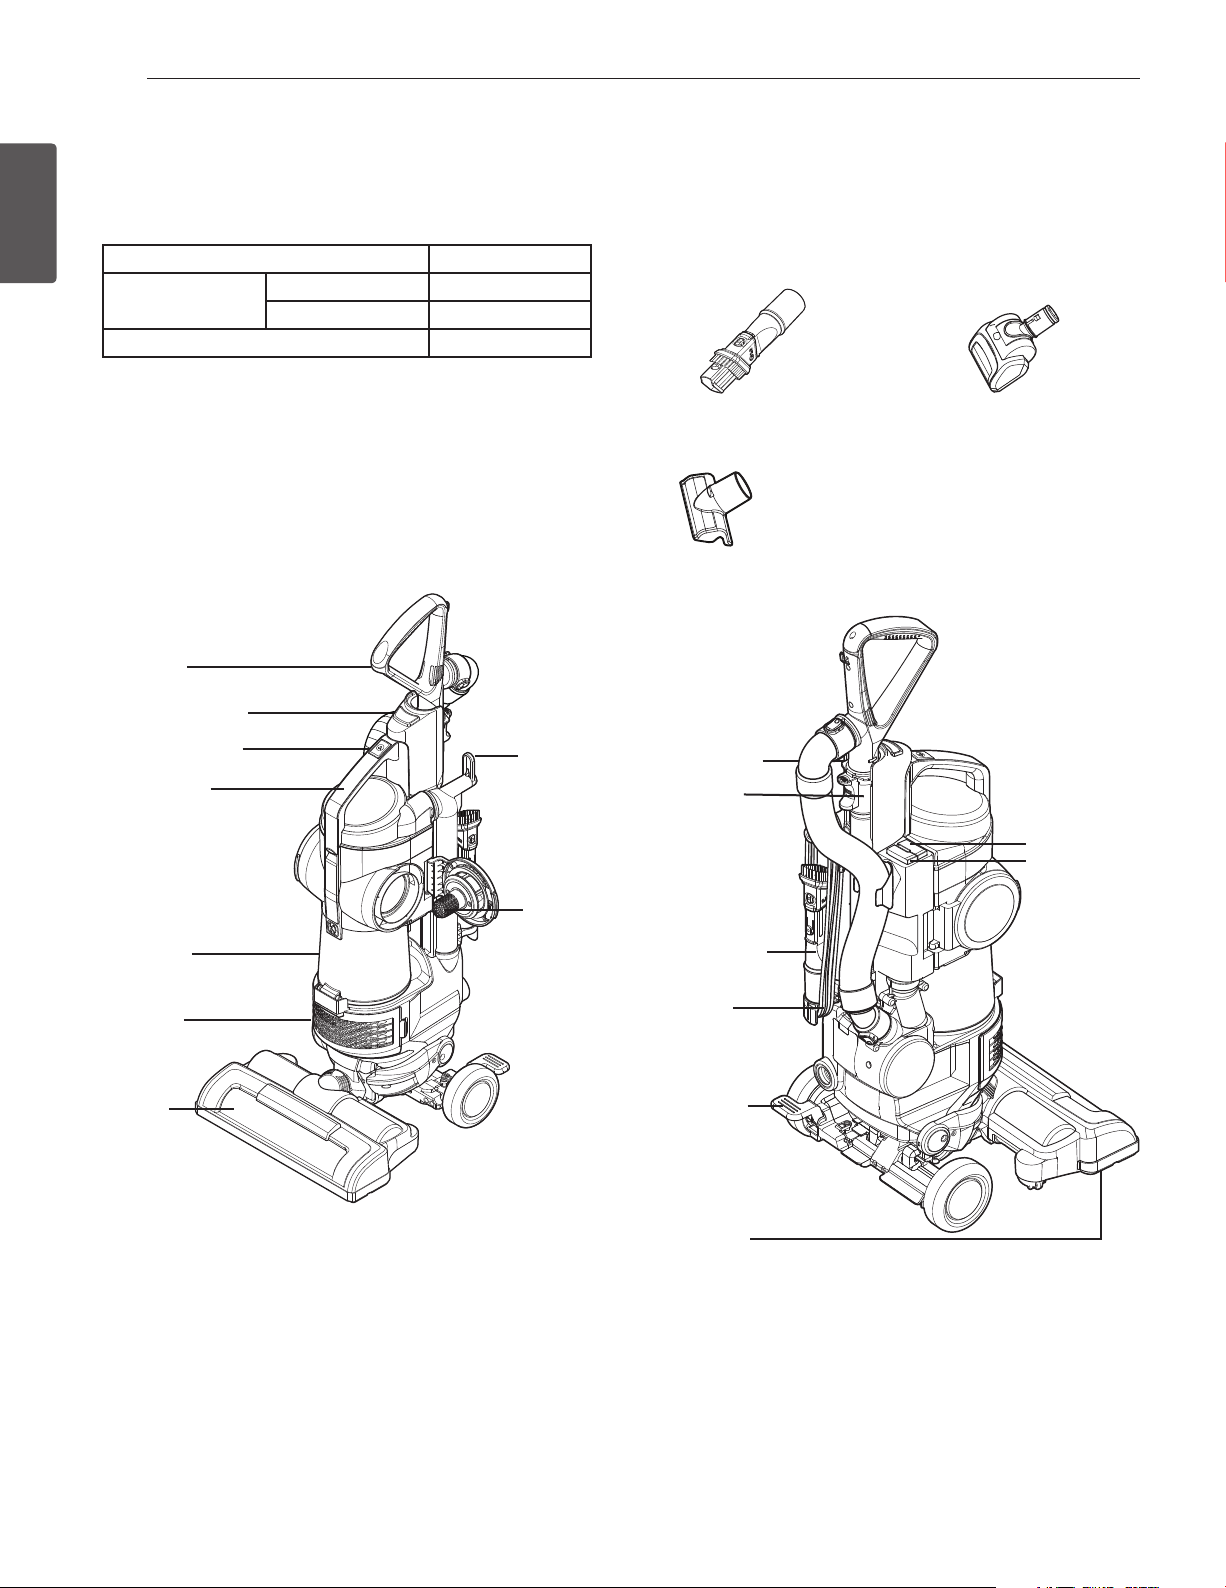
It is impor tant to know your vacuum cleaner parts and features to assure its pr oper and safe use. Review these be fore using your vacuum cleaner.
Common Replacement Parts
HEPA Filter ADQ73353501
Foam Filter
ADV74067001
Agitator Belt MAS62064002
To order these parts call:
1-800-243-0000 (U.S.A.)
1-888-542-2623 (Canada)
Handle
Wand release
button
Dust tank
release
Carry handle
Filter Frame ADV74067001
Foam Filter MDJ61980604
Quick release
cord hanger
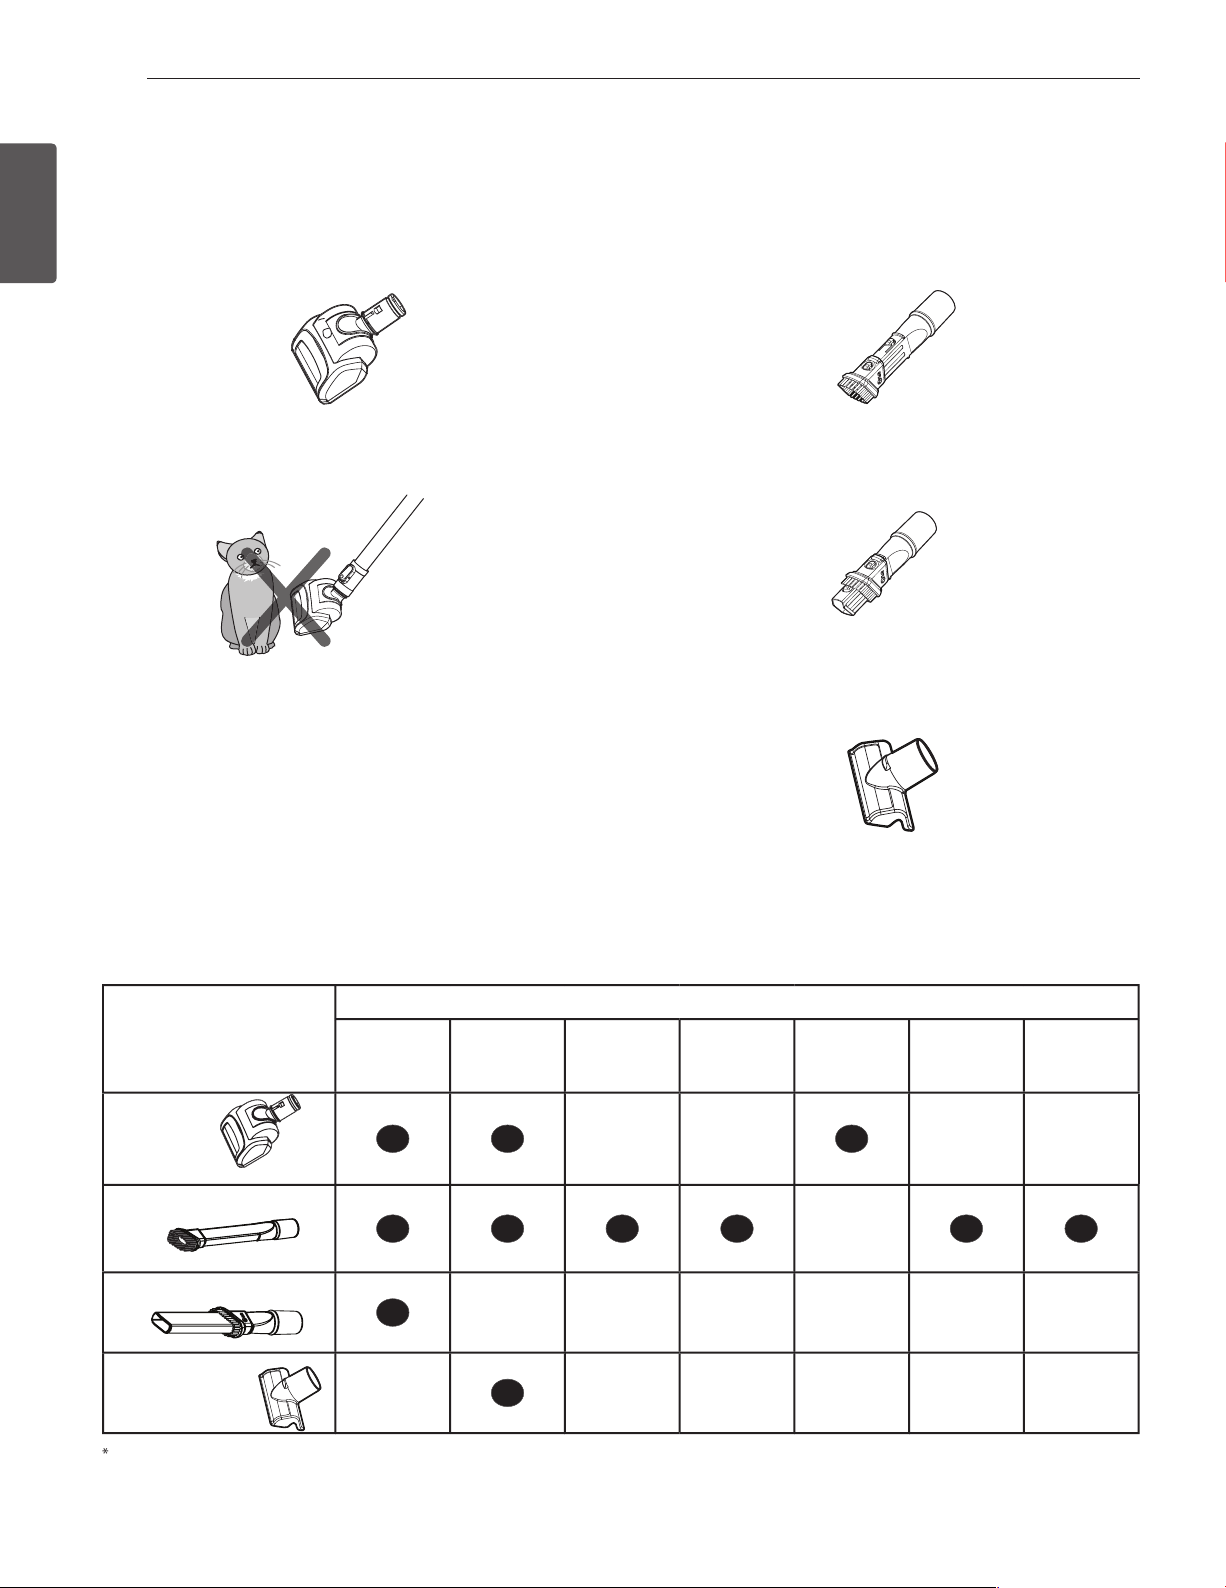
Accessory Tools
Dusting brush & Crevice tool
Upholstery tool
Hose
Wand
Pet hair turbine tool
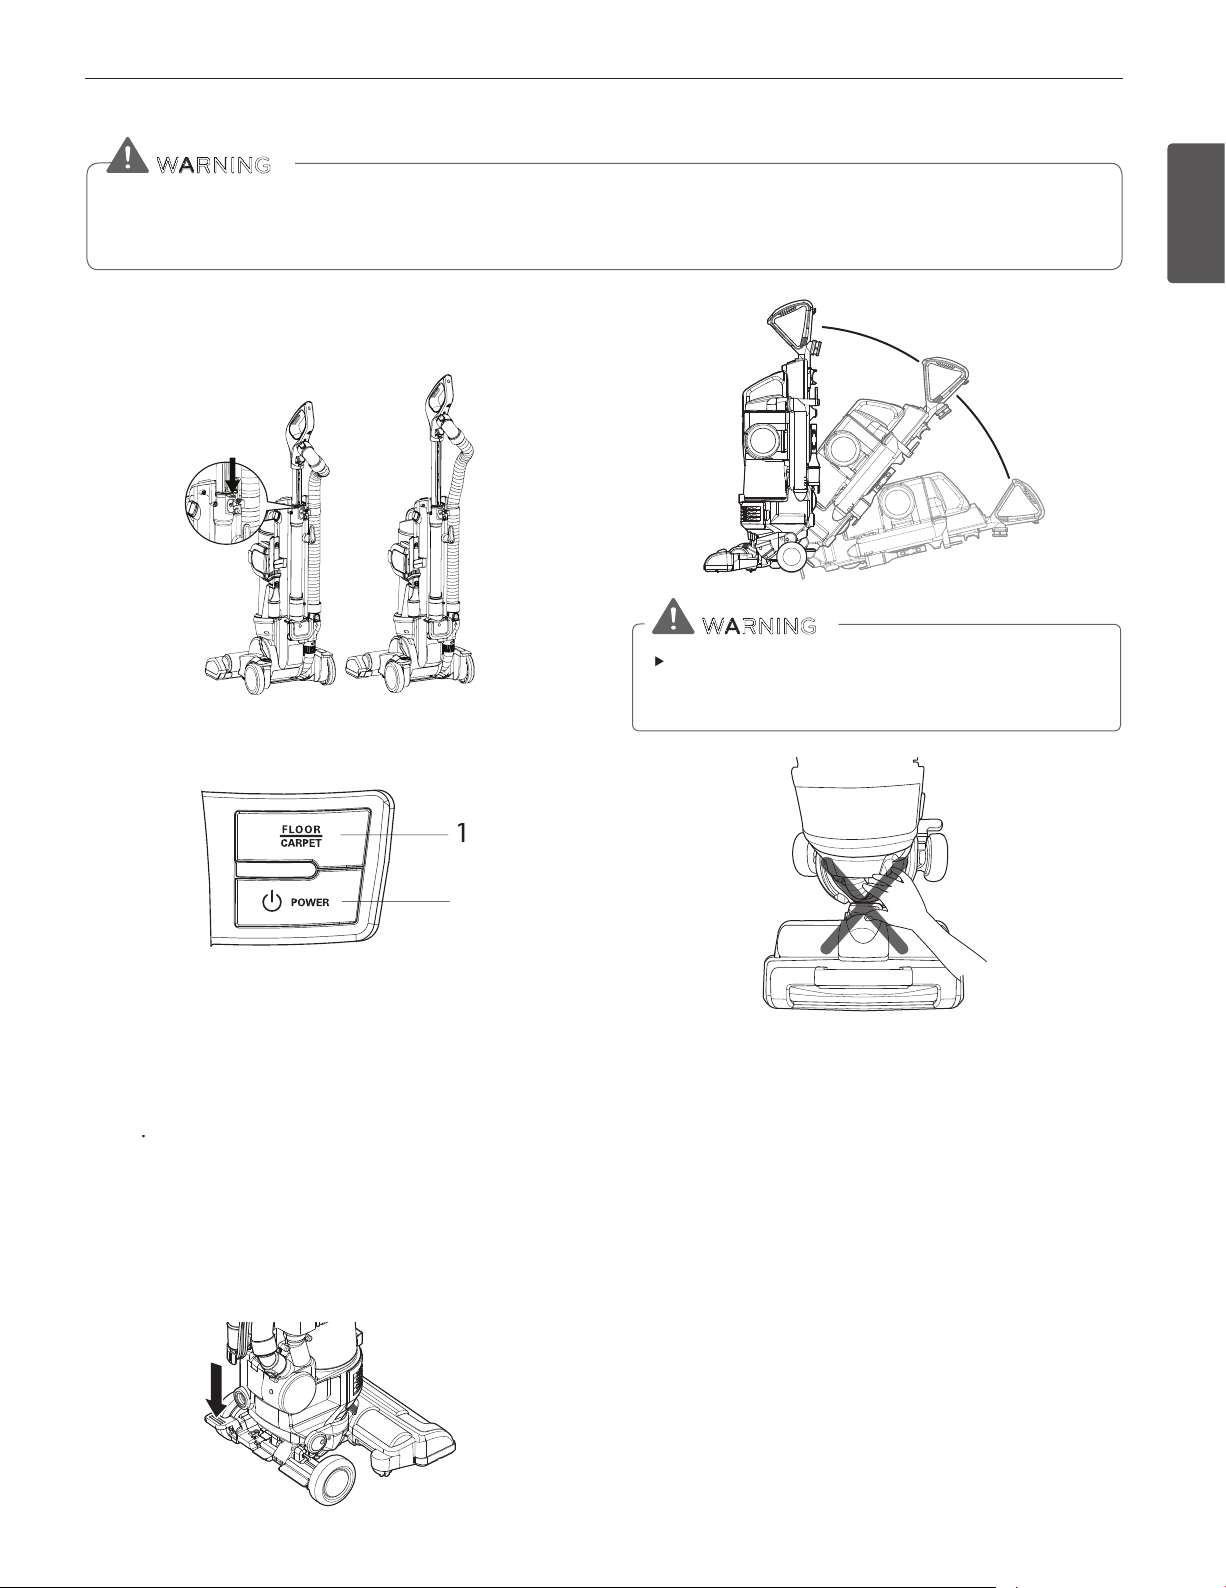
Floor/Carpet
button
Power button
Dust tank
Exhaust
lter
Viewing
window
Dust
separator
Dusting brush
& Crevice tool
Cord
Body release
Agitator
Page 7
ASS EM B LY
7
ASSEMBLY
To reduce the risk shipping damage, your vacuum cleaner is shipped partially assembled.
Unpacking the Vacuum Cleaner
Carefully unpack the vacuum cleaner and make sure that you have all
parts before discarding of any packaging.
Remove any tape, cardboard inserts and protective lm before assembly.
Items that are packed in the box:
1. Vacuum Cleaner Body
2. Dusting Brush & Crevice Tool
3. Handle and Wand
4. Hose
5. Pet Hair Turbin e Tool
6. Additional Foam Filter
7. Upholstery Tool
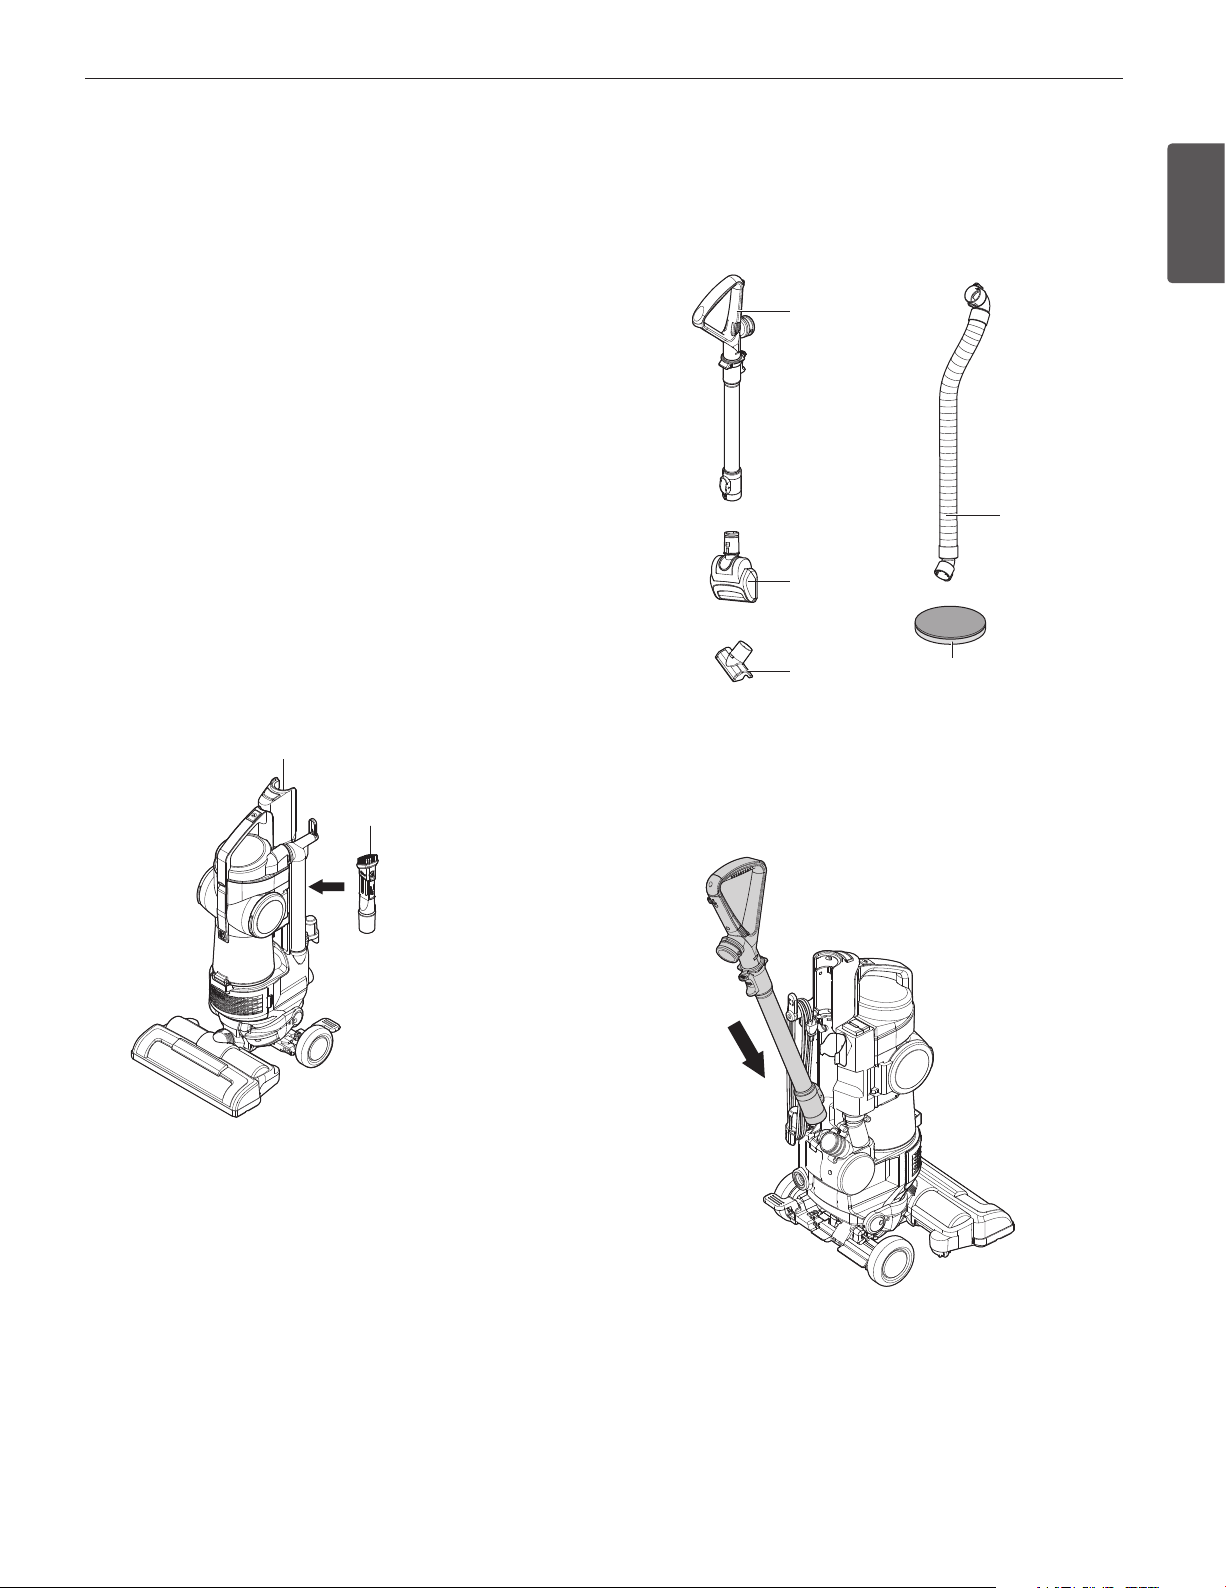
Assembly Parts
3. Handle and
Wand
5. Pet Hair
Turbin e Tool
7. Upholstery
Too l
ENGLISH
4. Hose
6. Additional Foam
Filter
1. Vacuum Cleaner Body
2. Dusting Brush and
Crevice Tool
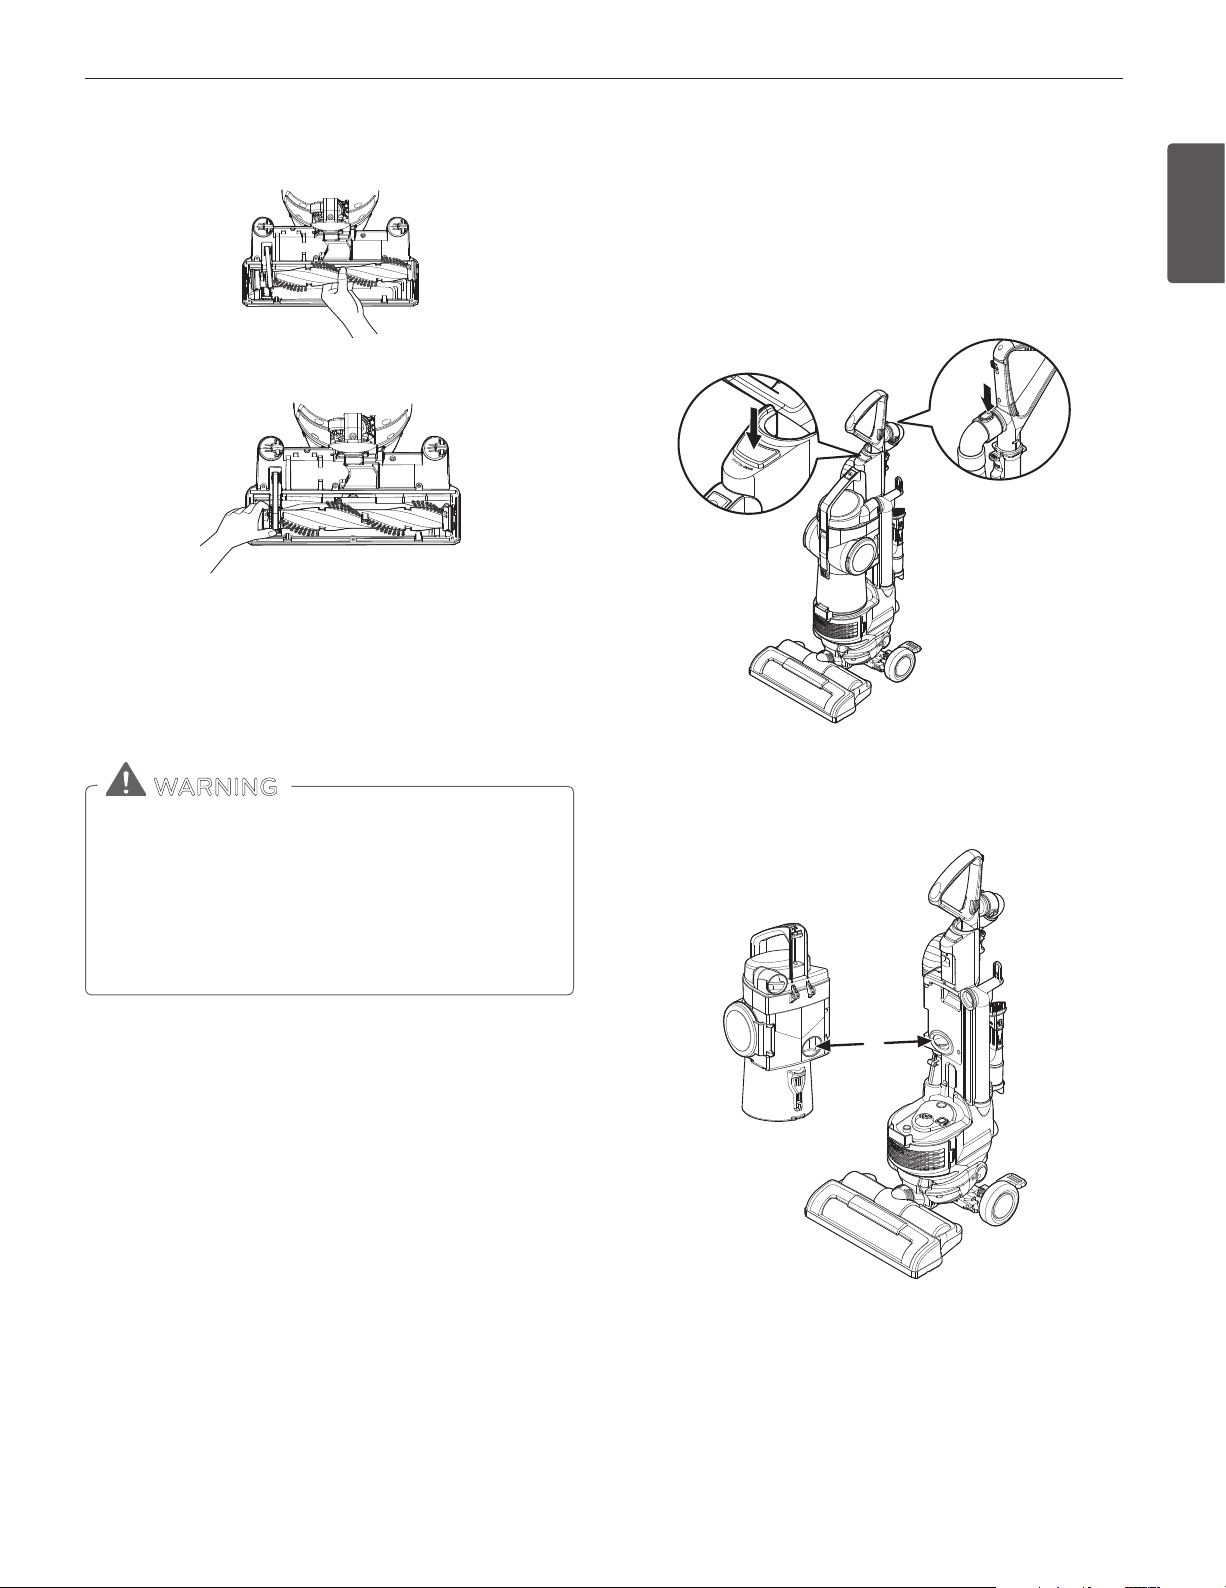
Attaching the Wand
1. Insert the wand onto the wand-locator knob.
2. Snap the wand into the body.
Page 8
8
ASS EM B LY
ENGLISH
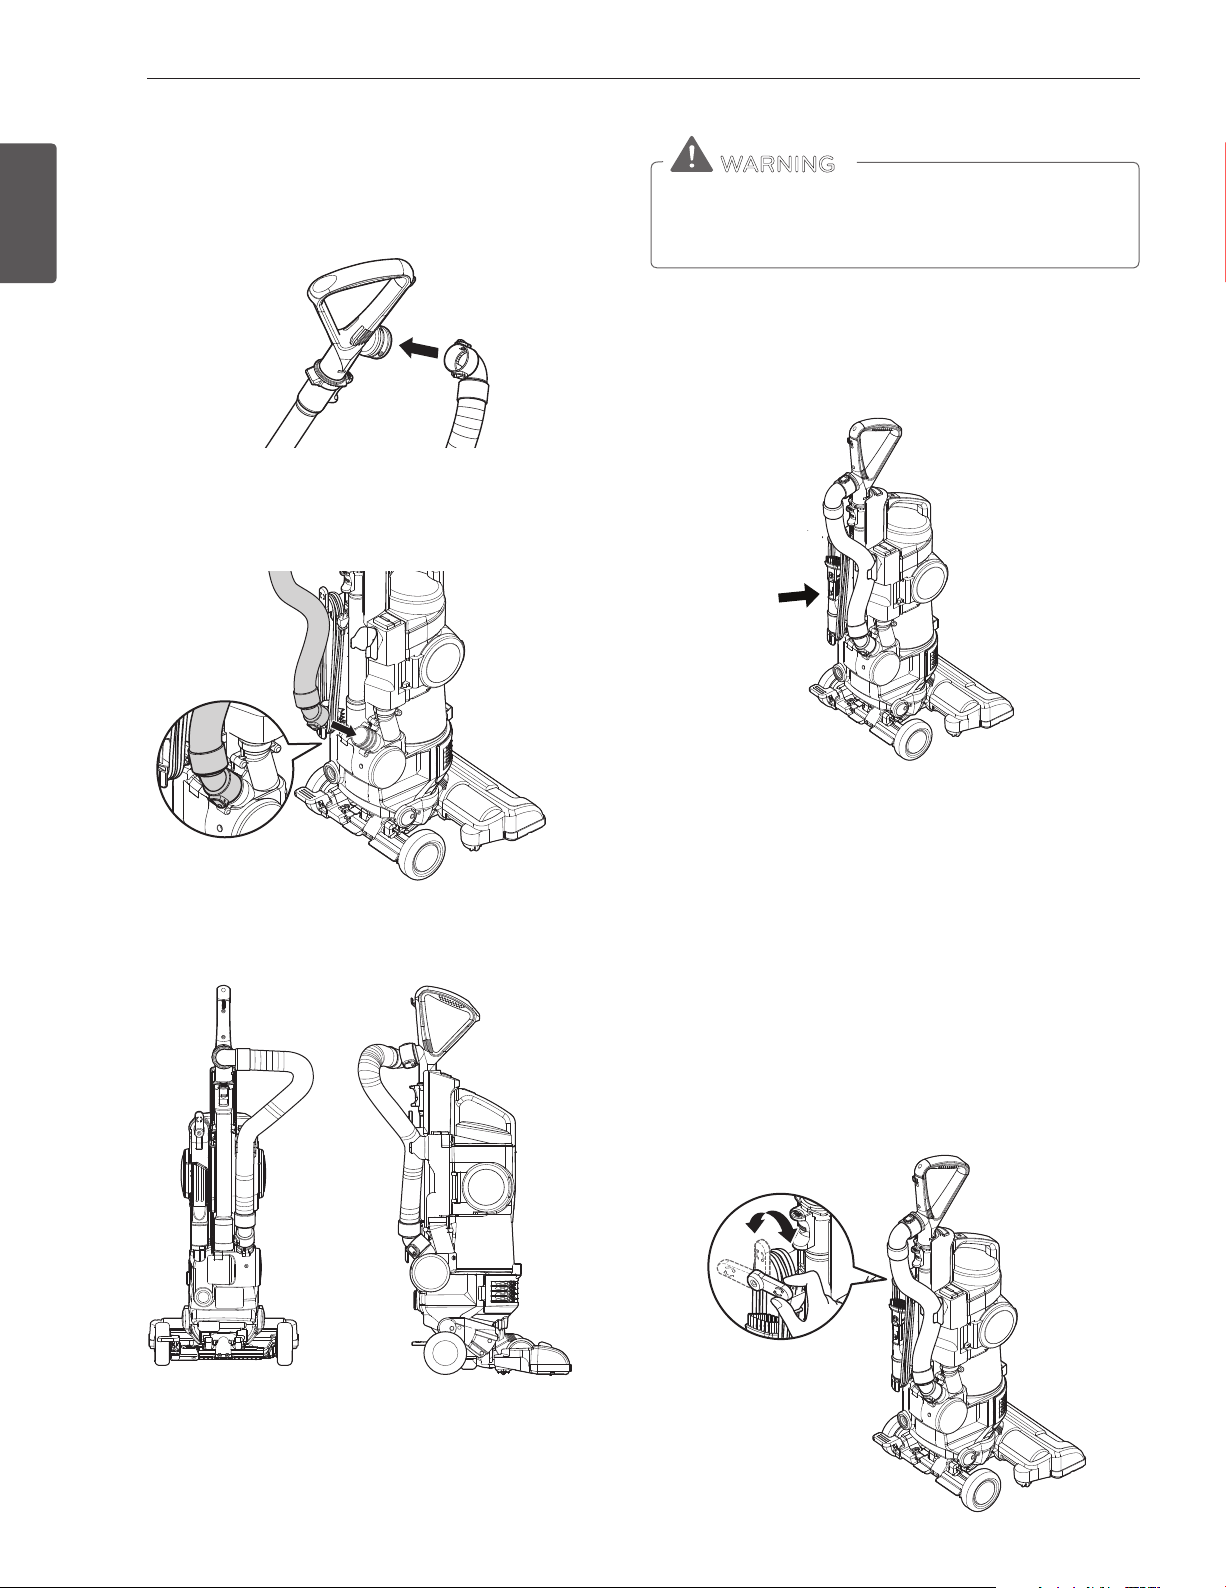
Attaching the Hose
1. Attached the top side of the hose to the handle. The top side of the
2. Insert the bottom side of the hose to the main body. The bottom side
hose can be recognized by the two holes.
of the hose can be recognized by the two release clips.
WARNING
Personal injury and Product Damage Hazard! DO NOT use
outlets above counters. Not following this warning could
result in damage to the surrounding items.
Accessory Storage
Your vacuum cleaner features convenient on-board storage for the
dusting brush & crevice tool.
y Insert the dusting brush & crevice tool onto the main body
3. Clip the hose into its holder on the back side of the vacuum.
Cord Storage
To store the cord:
1. Make sure the cord hanger is in the UP position.
2. Wrap the cord around the cord hanger and hook into place. Clip the
plug onto the cord.
NOTE: To reduce the risk of electric shock, this vacuum cleaner has a
polarized plug; one blade is wider than the other. This plug will t in a
polarized outlet only one way. If the plug does not t fully in the outlet,
reverse the plug. If it still does not t, contact a qualied electrician to
install the proper outlet. Do not change the plug in any way.
To release the cord:
1. Rotate the upper cord holder to the DOWN position.
2. Unclip the plug and extend the cord.
Page 9
9
OPERATION
Wand Extension
Press
the
extension
button
on
the
wand
and
extend
the
wand
handle.
WARNING
Do not place anything in the space between the body and
agitator head.
Personal
injury
or
product
damage
could
result.
WARNING
set
the
vacuum
cleaner
on
stairs;
always
on
the
oor.
thistoturn
the
agitator
ONorOFF
The
also
the
agitator
2.
Turns
the
vacuum
on
and
o.
The
agitator
will
spin
when
the
vacuum
the
To
vacuuming,
theonthe
sideofthe
vacuum
and
the
down.
When
the
vacuum
the
the
agitator
ENGLISH
Page 10
ENGLISH
10
This
air-turbine
designed
for
etc.
from
fabrics
and
carpets.
the
dusting
to
clean
furniture,
walls,
etc.
Crevice Tool
The
crevice
tool
can
for
tight
corners,
cushions
and
other
to
the
tooltoclean
fabriconfurniture.
Accessory
Cushions
Surfaces*
and Hard
Surfaces*
Stairs/
Cushions
Carpeted
Walls
Turbine
Too l
Crevice
Too l
Too l
Always
sure
attachments
are
cleanonfabrics.
OPERATION
Page 11
OPERATION
11
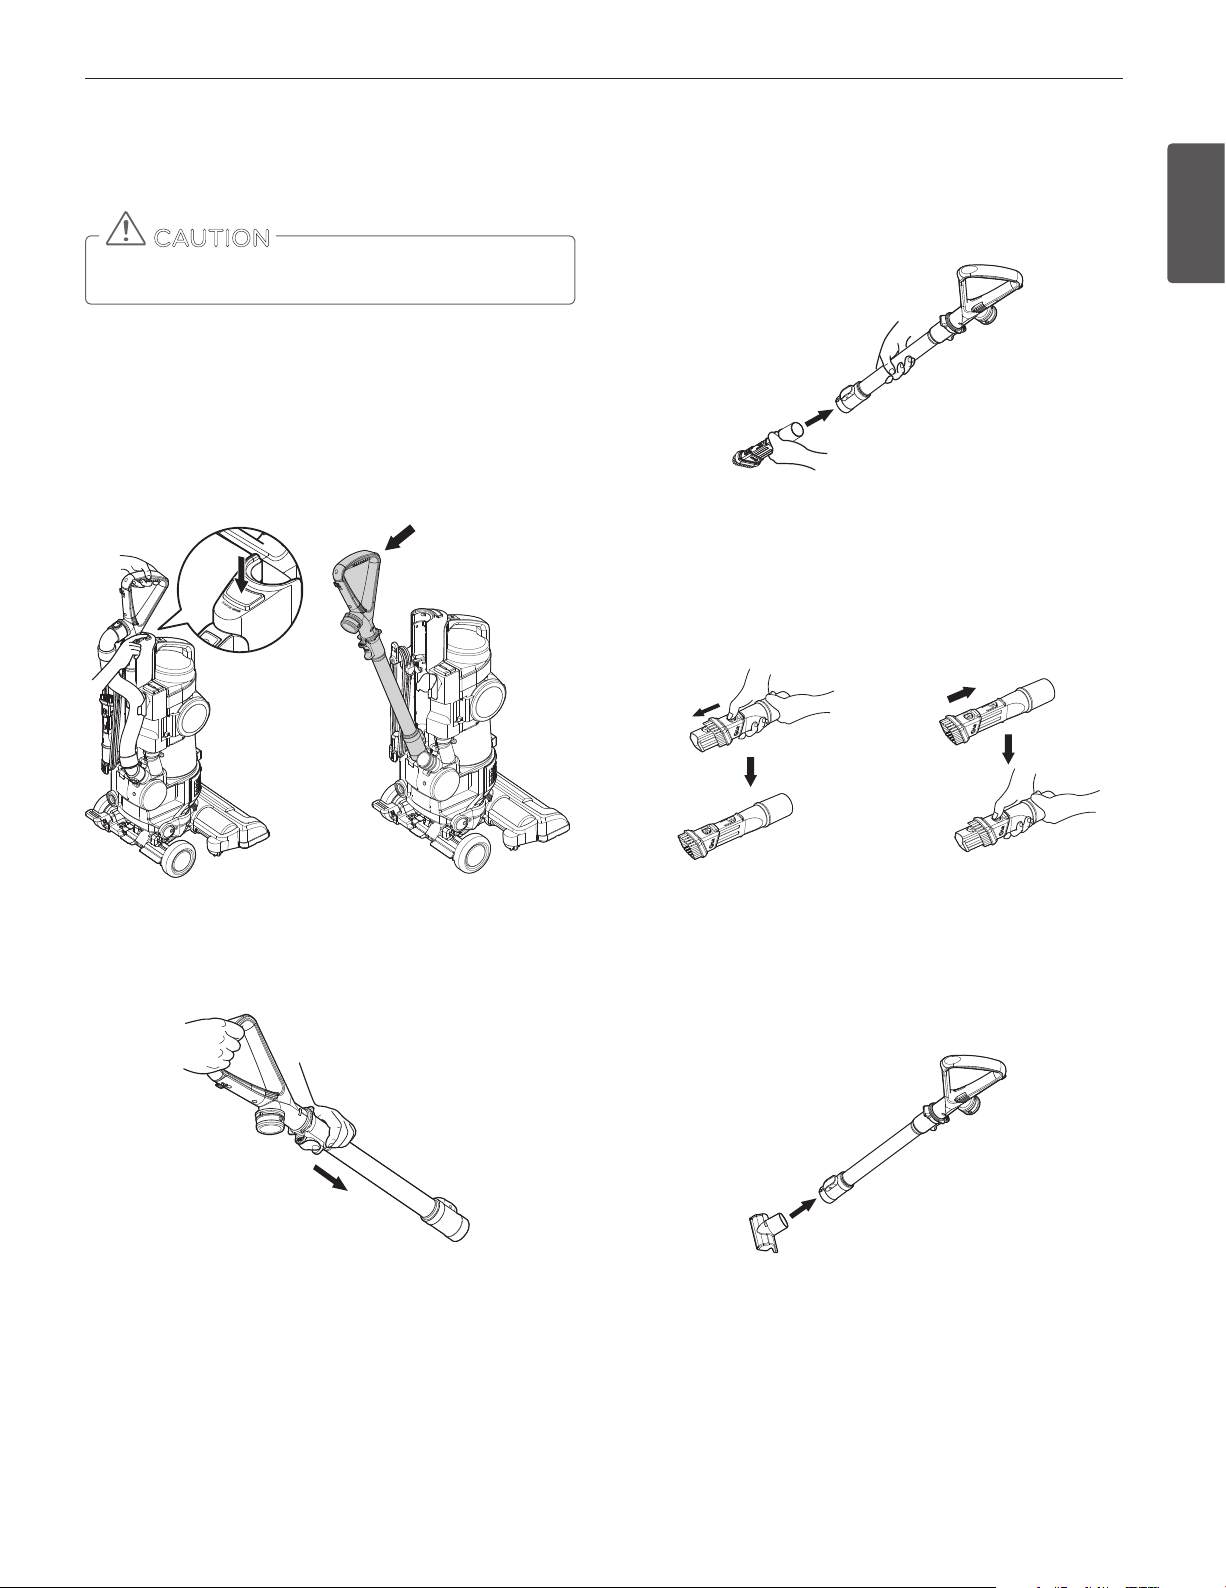
Using the Wand
CAUTION
Never pull the vacuum cleaner by the hose.
Release the wand and handle:
1. Make sure that the vacuum cleaner is locked in the upright position
on a at, stable surface.
2. Press the wand release button on the body and tilt the wand handle.
3. Lift the wand up and out.
Installing Attachments
Crevice Tool:
Slide the crevice tool into the end of the wand.
Dusting Brush:
Press the brush release button on the crevice tool and slide the brush
forward.
ENGLISH
4. Press the wand extension button on the wand and pull the wand
down.
Dusting brush
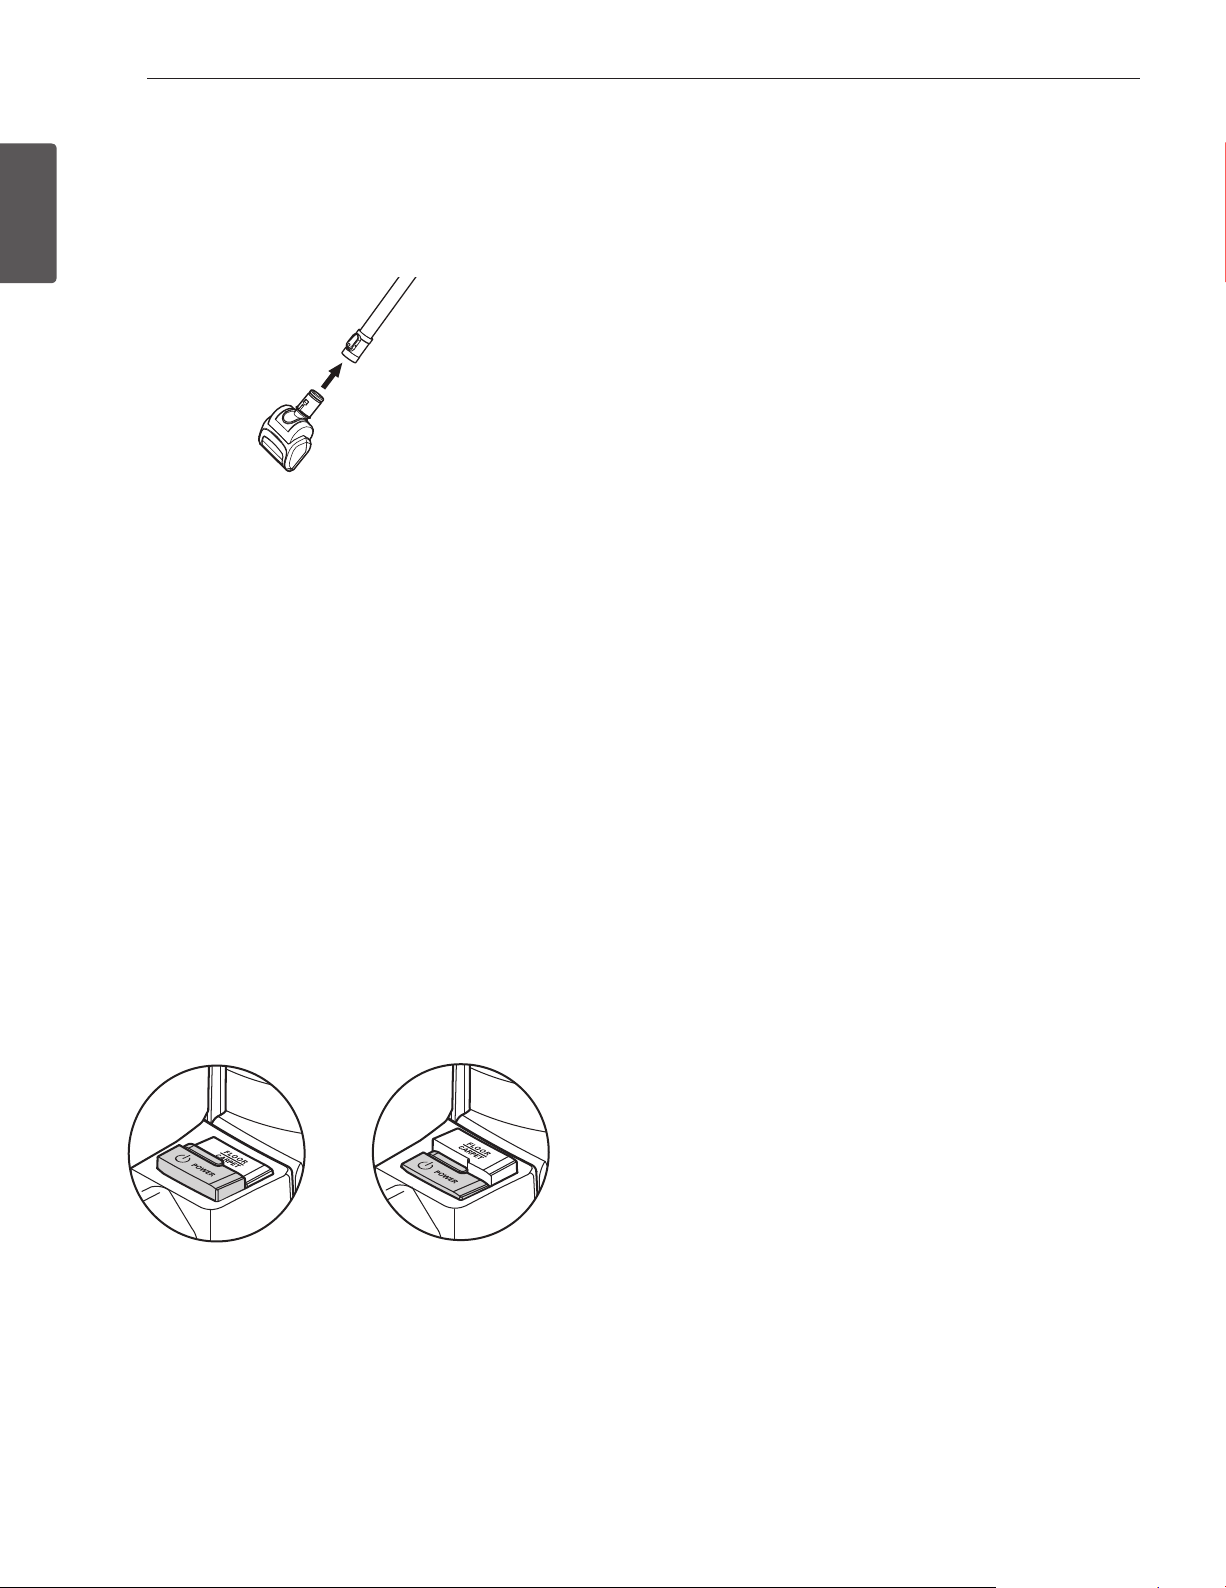
Upholstery Tool:
Slide the upholstery tool into the end of the wand.
Crevice tool
Tips and Tricks
Carpet Edges and Corners:
For tight corners, carpet edges and along base boards, use the dusting
brush. For especially hard to reach areas, use the crevice tool.
Page 12
12
ENGLISH
13
CARE & CLEANING
Always follow all safety precautions when cleaning and servicing the vacuum cleaner.
Storing the Vacuum Cleaner
When not in use, wrap the cord around the cord hanger as shown. The
hose can be wrapped around the handle/wand if the wand is being
stored un-extended. Store the dusting brush/crevice tool in its proper
place on the left of the vacuum cleaner.
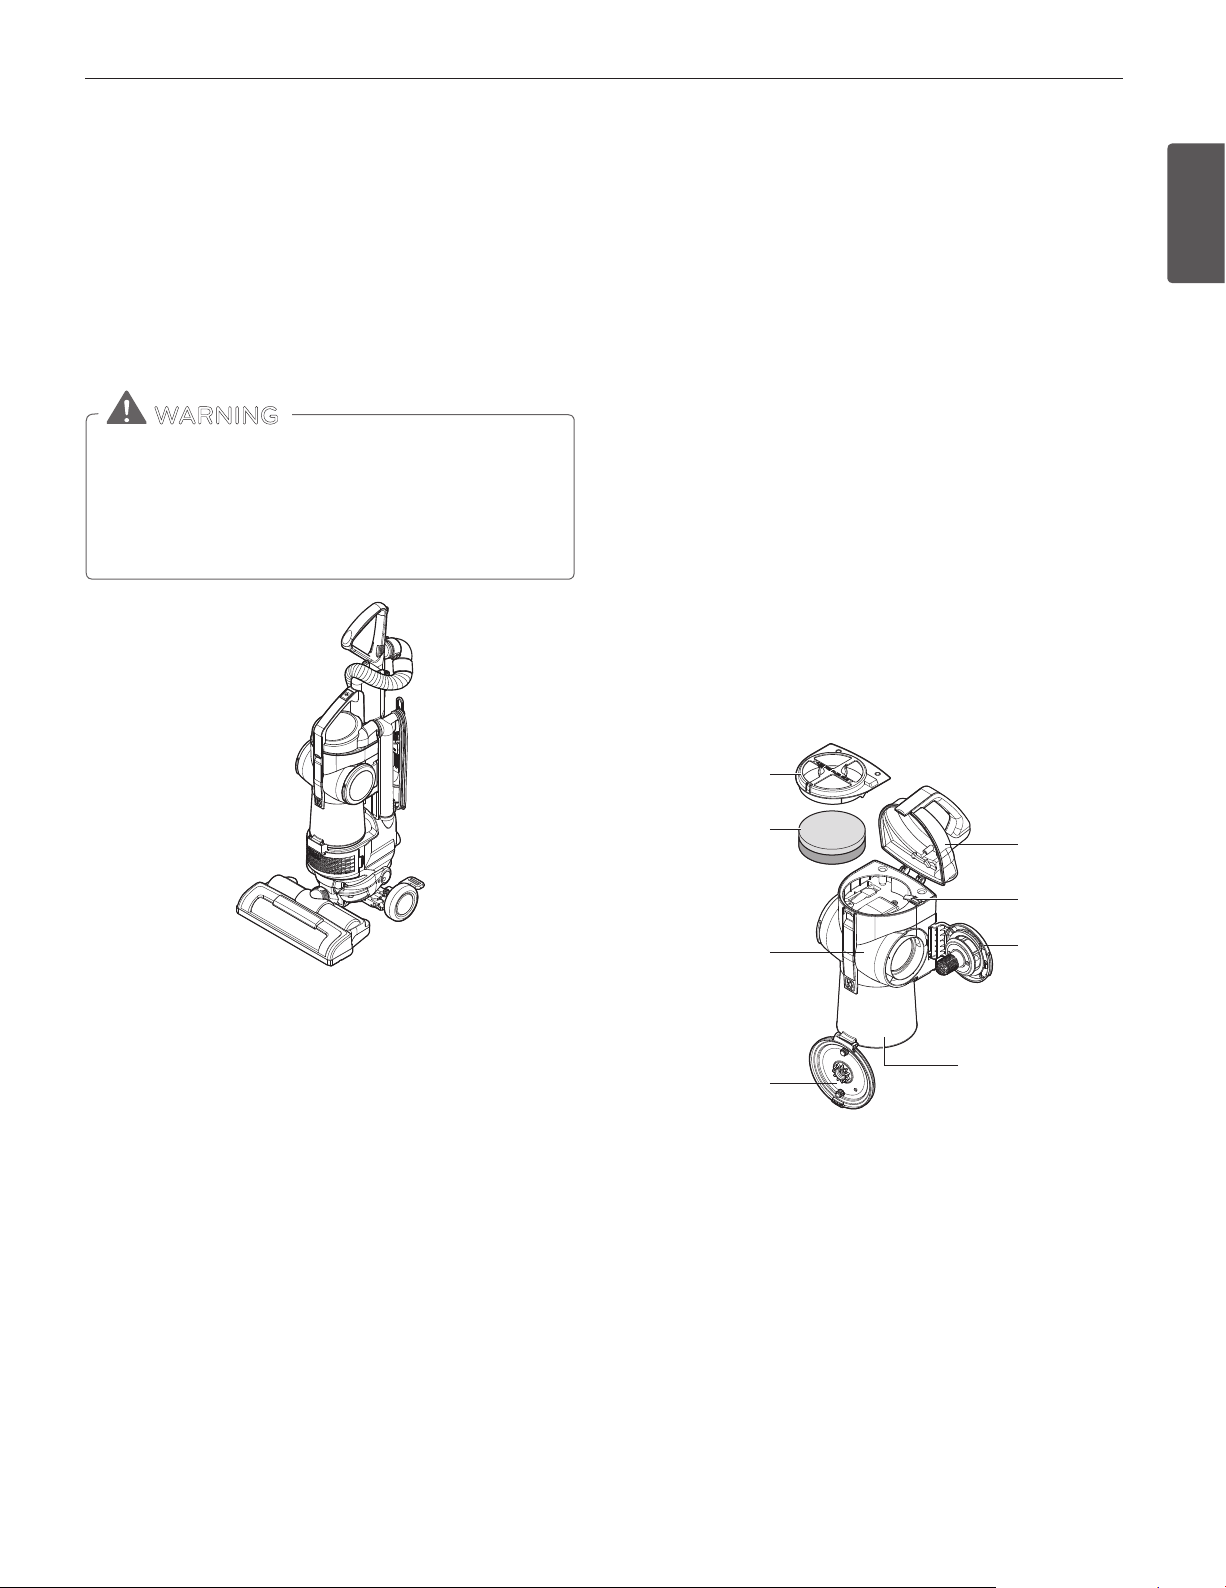
Dust Tank Components
The dust tank consists of several key components. Always make sure that
all parts are properly reinstalled after emptying the dust tank.
NEVER operate the vacuum cleaner without all lters in place.
NEVER operate the vacuum cleaner with wet lters or components.
Key components:
1. Filter frame and foam lter:
Captures medium to ne particles. It consists of Filter frame &
Foam lter. These are washable.
2. Foam lter
3. Dust tank lid: Open to access the foam lter.
4. Dust separator: Separates dust from air coming in.
5. Side door: Open to remove dirt from the dust separator.
6. Prevention tab: Prevents the lid from closing without a foam lter
installed.
7. Dust tank: Where dirt is collected.
8. Bottom plate: Open to empty the dust tank.
y Electrical shock and personal injury hazard.
y Take care when wrapping the cord. Wrapping the cord too tightly
puts stress on the cord and can cause cord damage. Do not
crisscross when wrapping the cord. A damaged cord could cause
an electrical shock hazard, personal injury or damage.
WARNING
1. Filter frame
2. Foam lter
3. Dust tank
lid
4. Dust separator
5. Side door
6. Prevention
Tab
7. Dust tank
8. Bottom plate
OPERATION
ENGLISH
Using the Pet Hair Turbine Tool
The Pet Hair Turbi ne Tool features a turbine-powered agitator to provide
extra cleaning power on carpets and fabrics. It is great for cleaning stairs,
cushions and vehicle upholstery.
When using the pet hair turbine tool, check the brush area frequently for
buildup of hair, bers, lint and other debris.
Excessive buildup can reduce performance and could damage the pet hair
turbine tool. See the Care and Cleaning section for cleaning instructions.
Stairways and Landings
Use the dusting brush or pet hair turbine tool on stairs and landings. Make
sure that the vacuum cleaner is placed so that it cannot tip or fall.
Thermal Overload Protection
This vacuum cleaner has a thermal overload protector that automatically
activates to protect the vacuum cleaner from overheating. If a clog
disturbs the normal ow of air to the motor, the thermal protector turns
the motor o automatically to allow the motor to cool in order to prevent
possible damage to the vacuum cleaner.
To correct the problem: Turn the vacuum cleaner o and unplug the
power cord. Check for and remove clogs, if necessary. Also check and
clean any dirty lters.
Wait approximately 30 minutes and then plug the vacuum cleaner in
and turn it back on to see if the motor protector has reset. The thermal
protector system will not reset until the vacuum cleaner has completely
cooled down.
Agitator Motor Overload Protection
The agitator has a built-in protection against motor damage
should the agitator jam. If the agitator slows down or stops, the
agitator overload protector shuts o the agitator and suction
motor.
To correct problem: Turn o and unplug the vacuum cleaner. Remove
the obstruction and turn on the vacuum cleaner by pressing the Power
button, and then press the Floor/Carpet button.
Page 13
CARE & CLEANING
13
Always follow all safety precautions when cleaning and servicing the vacuum cleaner.
Storing the Vacuum Cleaner
When not in use, wrap the cord around the cord hanger as shown. The
hose can be wrapped around the handle/wand if the wand is being
stored un-extended. Store the dusting brush/crevice tool in its proper
place on the left of the vacuum cleaner.
Dust Tank Components
The dust tank consists of several key components. Always make sure that
all parts are properly reinstalled after emptying the dust tank.
NEVER operate the vacuum cleaner without all lters in place.
NEVER operate the vacuum cleaner with wet lters or components.
Key components:
WARNING
y Electrical shock and personal injury hazard.
y Take care when wrapping the cord. Wrapping the cord too tightly
puts stress on the cord and can cause cord damage. Do not
crisscross when wrapping the cord. A damaged cord could cause
an electrical shock hazard, personal injury or damage.
1. Filter frame and foam lter:
Captures medium to ne particles. It consists of Filter frame &
Foam lter. These are washable.
2. Foam lter
3. Dust tank lid: Open to access the foam lter.
4. Dust separator: Separates dust from air coming in.
5. Side door: Open to remove dirt from the dust separator.
6. Prevention tab: Prevents the lid from closing without a foam lter
installed.
7. Dust tank: Where dirt is collected.
8. Bottom plate: Open to empty the dust tank.
ENGLISH
1. Filter frame
2. Foam lter
4. Dust separator
8. Bottom plate
3. Dust tank
lid
6. Prevention
Tab
5. Side door
7. Dust tank
Page 14
14
CARE & CLEANING
Always unplug the power cord from the electrical outlet
cleaner. Failure to do so could result in electrical shock or
WARNING
WARNING
always
empty
the
dust
tank
when
the
dirt
the
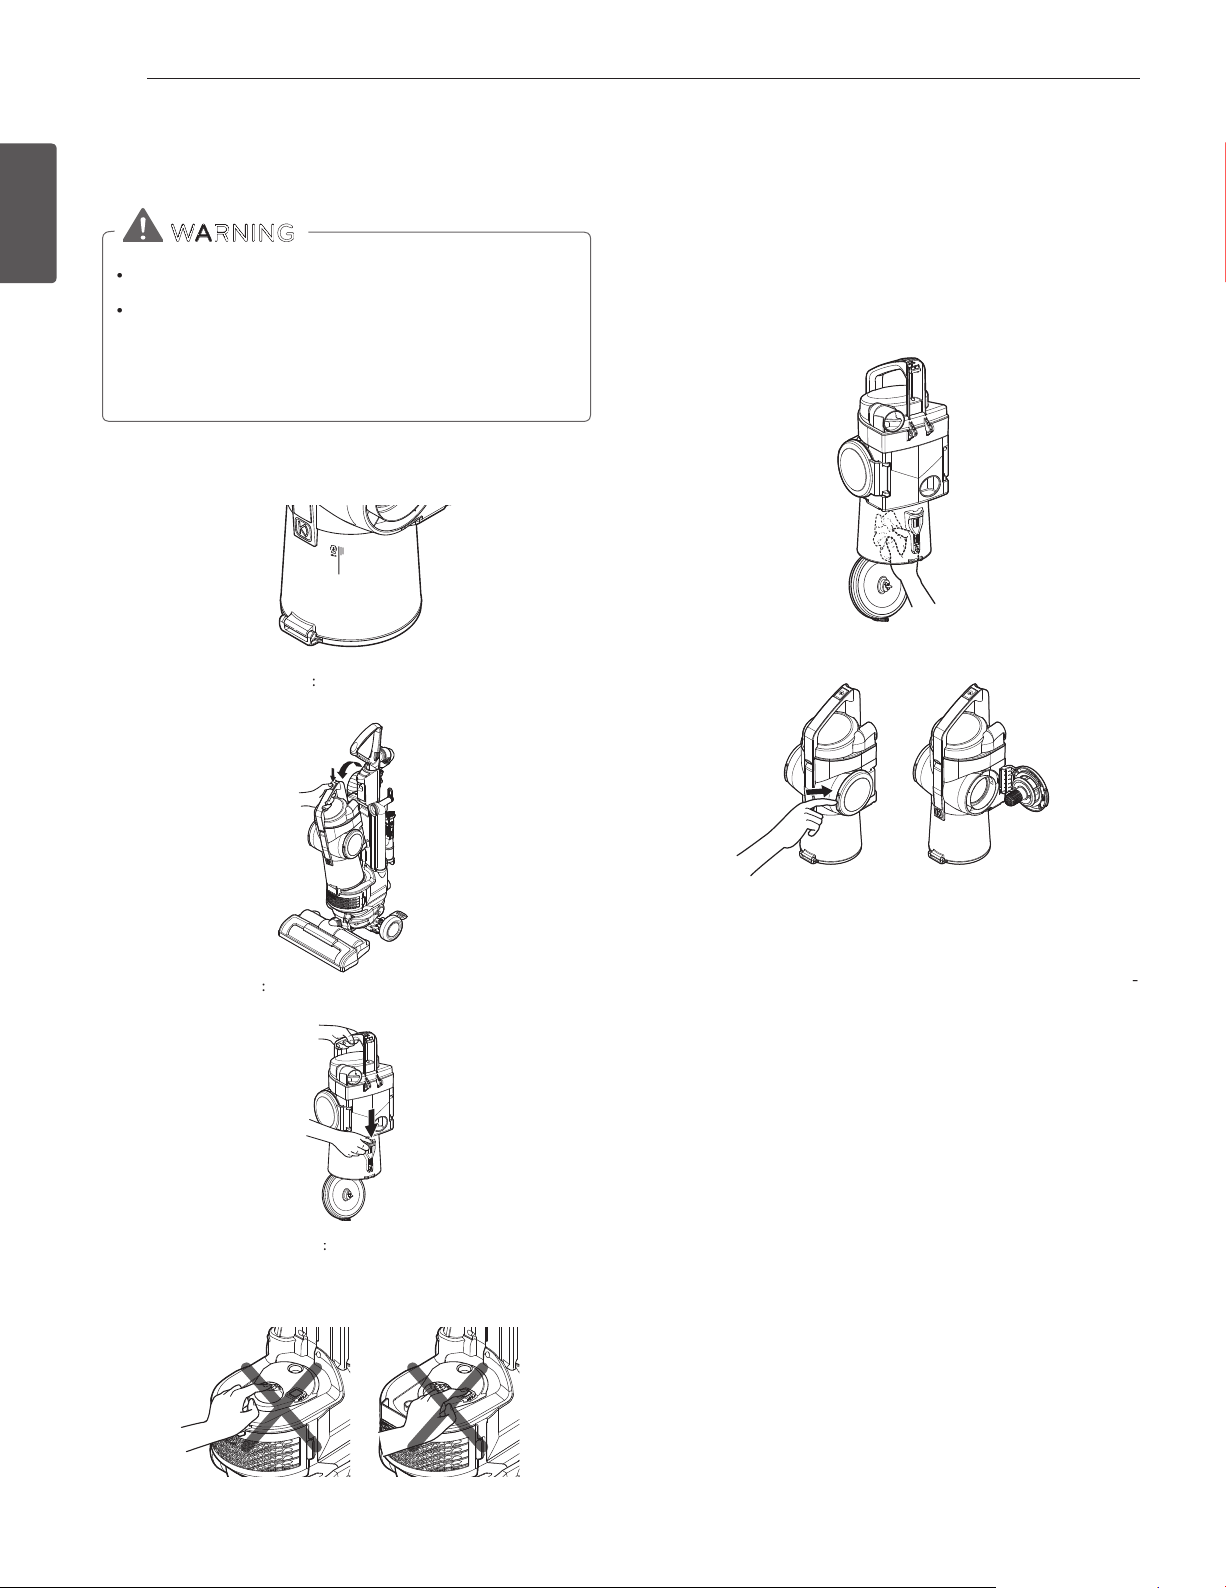
TO REMOVE THE DUST TANK
the
dust
tank
tilt
the
dust
tank
then
outofthe
vacuum
cleaner.
TO EMPT Y DUST TANK
the
dirt
and
open
the
as
shown.
TO REINSTALL THE D UST TANK
the
dust
tank
the
and
tilt
forward
clicks
sure
that
the
dust
tank
seated.
optimal
clean
the
dust
tank
To Clean the Dust Tank:
the
dust
tank
from
the
vacuum
cleaner.
2.
the
emptying
dirt
and
open
the
3.
Wipe
out
the
dust
tank
withasoft
clothortowel.
4.
theonthe
side
dooronthe
and
sides.
5.
any
bersorother
debris
from
the
dust
separator.
the
cones
attached
to
the
side
door
for
cleaning.
touch
the
gear
and
ENGLISH
15
CARE & CLEANING
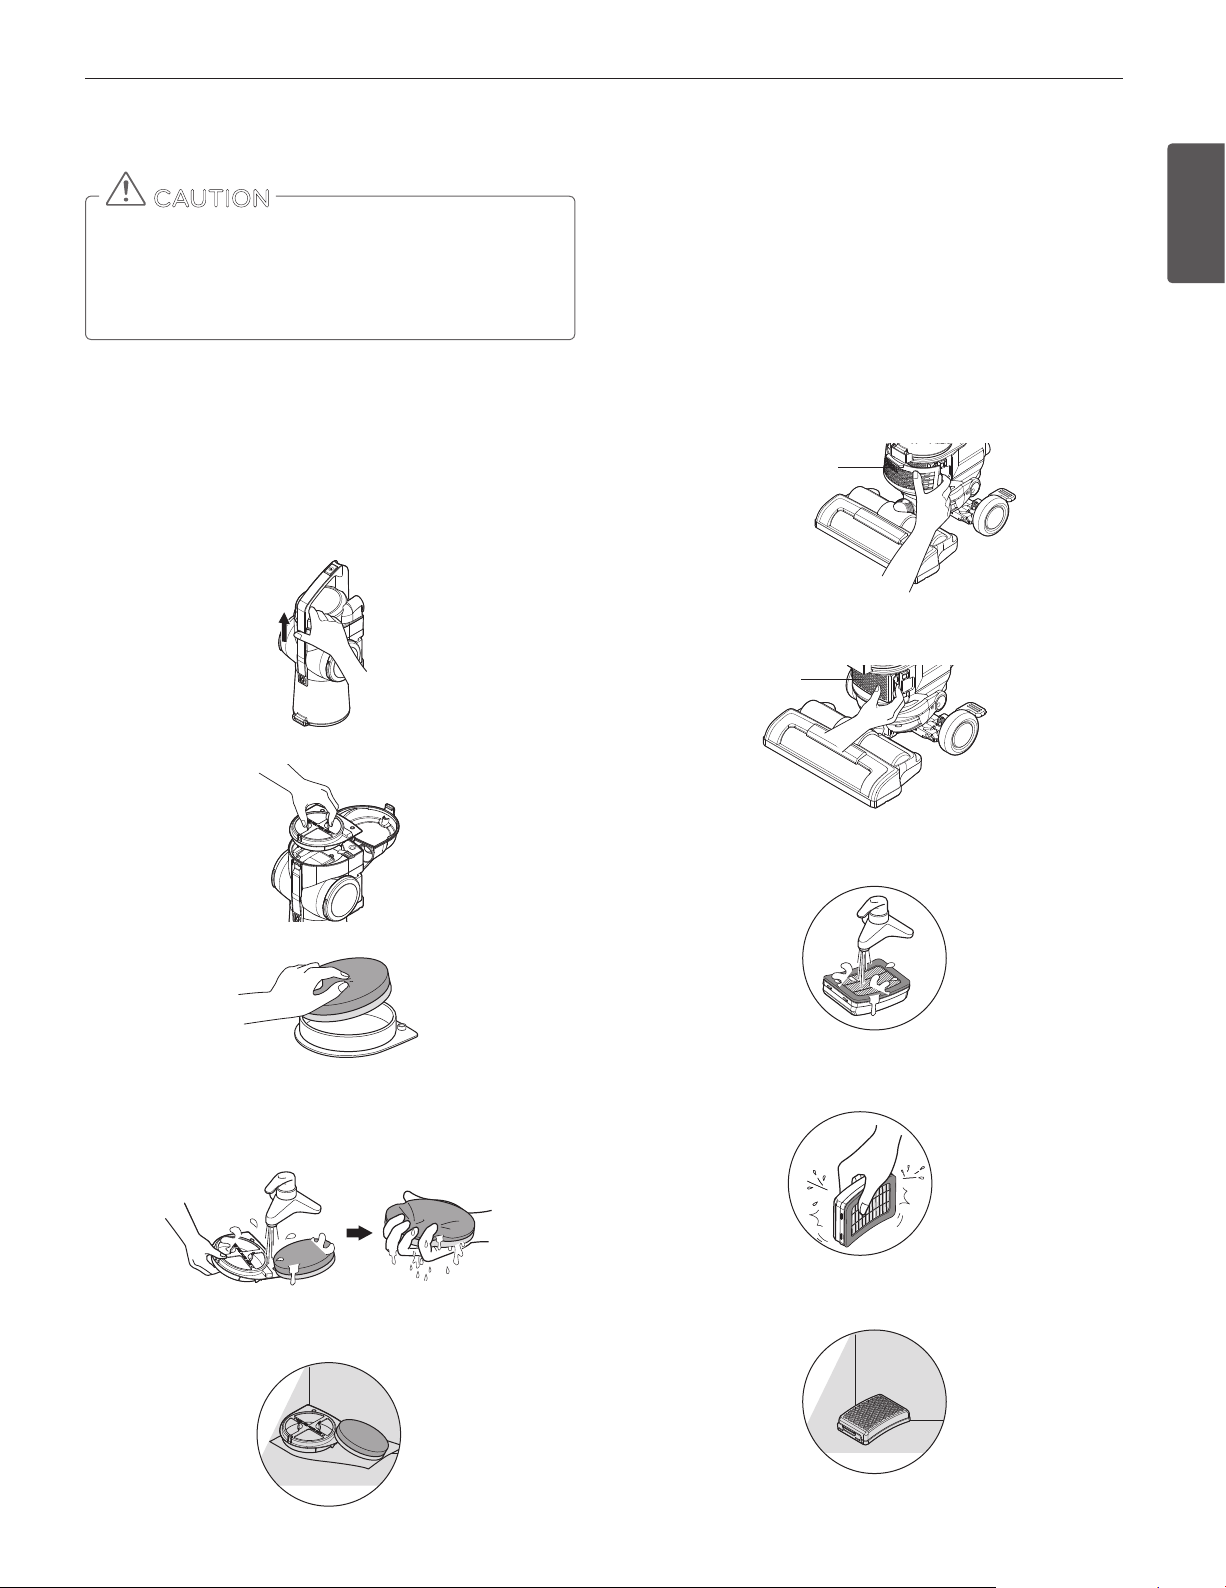
Cleaning the Foam Filter
For optimal performance, check the lters every month and clean
when necessary. Don’t close the dusk tank lid without the foam
lter.
To clean the foam filter:
1. Remove the dusk tank from the vacuum cleaner.
2. Lift up on the dust tank lid release and open the lid.
y A wet lter can cause permanent damage to the
vacuum cleaner.
y Be sure lters are completely dry before reinstalling.
CAUTION
3. Lift out the foam lter.
4. Separate the foam lter from the lter frame.
5. Shake out any excess dirt or debris and rinse the foam lter and lter
frame with clean water. Squeeze out water from the foam lter.
6. Dry completely away from sunlight.
NEVER operate the vacuum cleaner with wet lters or
components.
If you notice a loss of suction and cleaning the foam lter does not
help, you may need to replace the foam lter. You can purchase
additional foam lters from LG by calling 1-800-243-0000 (U.S.A.),
1-888-542-2623 (Canada) and asking for parts on page 6.
Cleaning the HEPA Filter
To Clean the HEPA Filter:
1. Remove the exhaust lter cover.
Exhaust Filter
Cover
2. Remove the lter from the body.
3. Wash the lter thoroughly in owing water.
4. Remove moisture.
5. Dry completely away from sunlight.
Filter
ENGLISH
Page 15
CARE & CLEANING
15
Cleaning the Foam Filter
CAUTION
y A wet lter can cause permanent damage to the
vacuum cleaner.
y Be sure lters are completely dry before reinstalling.
For optimal performance, check the lters every month and clean
when necessary. Don’t close the dusk tank lid without the foam
lter.
To clean the foam filter:
1. Remove the dusk tank from the vacuum cleaner.
2. Lift up on the dust tank lid release and open the lid.
NEVER operate the vacuum cleaner with wet lters or
components.
If you notice a loss of suction and cleaning the foam lter does not
help, you may need to replace the foam lter. You can purchase
additional foam lters from LG by calling 1-800-243-0000 (U.S.A.),
1-888-542-2623 (Canada) and asking for parts on page 6.
Cleaning the HEPA Filter
To Clean the HEPA Filter:
1. Remove the exhaust lter cover.
Exhaust Filter
Cover
2. Remove the lter from the body.
Filter
ENGLISH
3. Lift out the foam lter.
4. Separate the foam lter from the lter frame.
5. Shake out any excess dirt or debris and rinse the foam lter and lter
frame with clean water. Squeeze out water from the foam lter.
3. Wash the lter thoroughly in owing water.
4. Remove moisture.
5. Dry completely away from sunlight.
6. Dry completely away from sunlight.
Page 16
CARE & CLEANING
16
ENGLISH
Pet Hair Turbine Tool
To clean the pet hair turbine tool:
1. Remove the four screws on the bottom of the pet hair turbine tool.
2. Lift o the cover.
3. Remove any debris.
To reassemble:
4. Carefully press the cover onto the tabs until they snap into place.
5. Insert and tighten the screws that were removed in step 1. Do NOT
Do Not use the pet hair turbine tool on animals.
overtighten the screws.
3. Set the head on a cloth or a smooth surface. Remove the six screws on
the bottom of the head and remove the cover.
4. Carefully remove any accumulated string, hair, etc. from the agitator
and the agitator area.
To reinstall the cover, reverse the steps above.
WARNING
y Electrical shock and personal injury hazard.
y Always unplug the power cord from the electrical outlet
before servicing. Failure to do so could result in electrical
shock or personal injury.
WARNING
y Electrical shock and personal injury hazard.
y Always unplug the power cord from the electrical outlet
before servicing.
y Failure to do so could result in electrical shock or personal
injury.
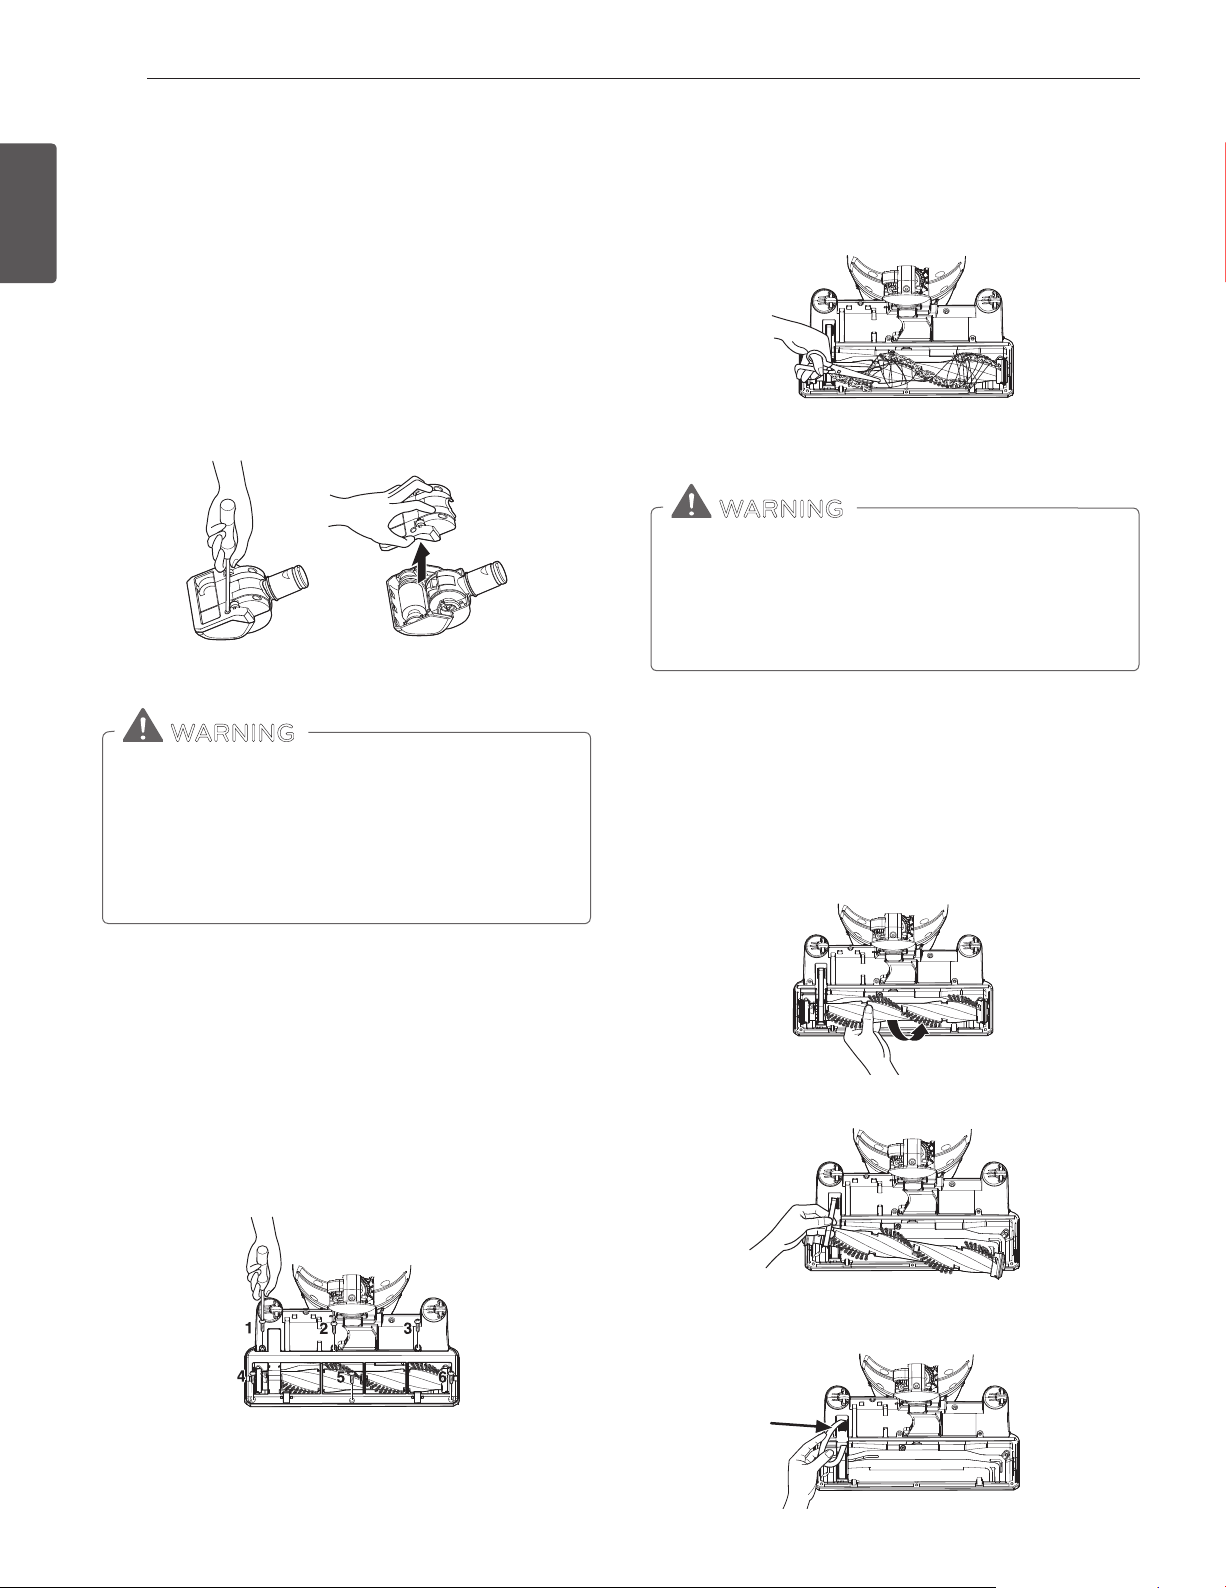
Agitator Maintenance
Frequently check the agitator brush area for hair, string and line buildup.
Remove the Agitator Brush Cover:
1. Unplug the vacuum cleaner. Press the left foot pedal to release the
head. Lower the handle until the vacuum cleaner is lying at on the
oor.
2. Turn the vacuum cleaner so that the agitator is facing up.
Replacing the Agitator Belt
If the belt breaks, follow the steps below to replace the agitator belt.
To Replace the Belt:
1. Remove the agitator brush cover.
2. Lift the agitator straight out.
3. Unhook the old belt from the drive pulley. Make sure no pieces of the
broken belt are trapped in the agitator or drive pulley area.
4. Hook the new belt over the drive pulley of the agitator motor.
Page 17
CARE & CLEANING
17
5. Fit the agitator through the belt, making sure the belt is aligned with
the pulley section of the agitator.
6. Lower the agitator into place, making sure that the oval shaped tabs t
into the indents on the head.
7. Reinstall the agitator brush cover as described above.
For a replacement belt, order LG service center belt part
#MAS62064002.
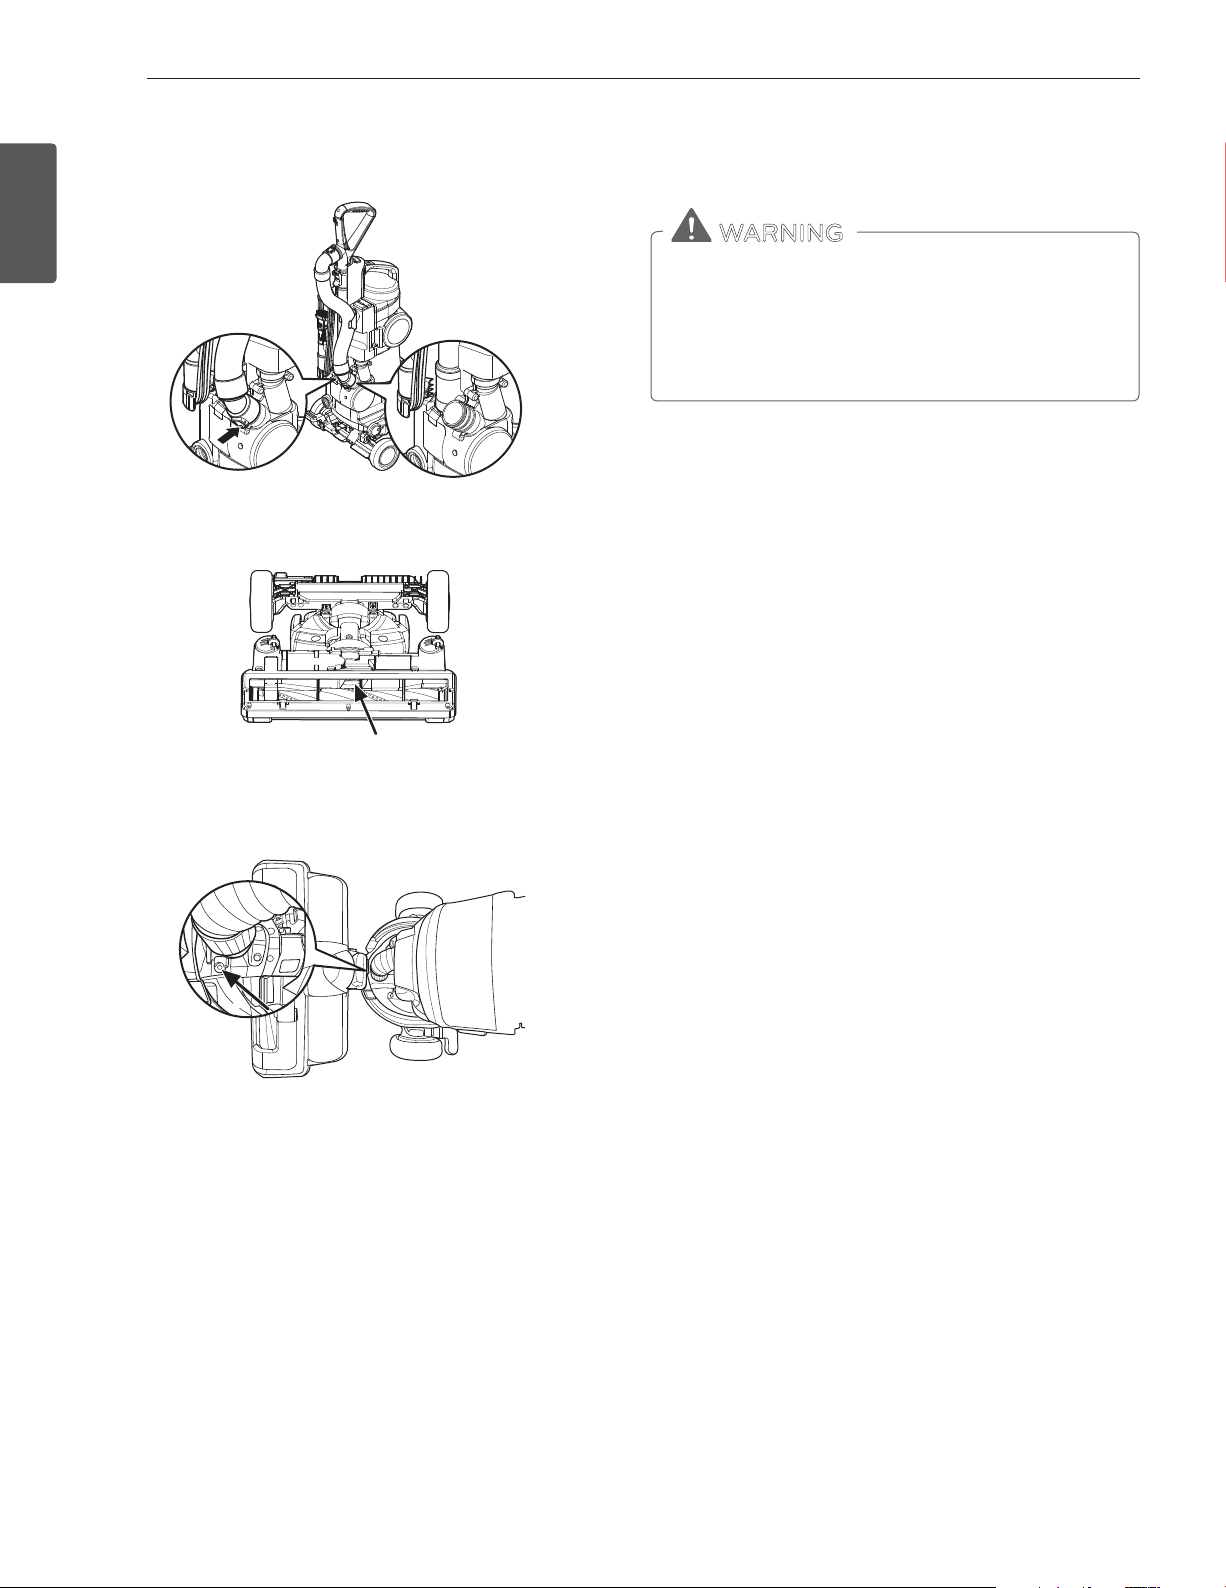
If you notice a loss in suction, rst check the lters as described on page
13. If the lters are clean, there may be a clog. The arrows show areas
where clogs are most likely to occur.
To Check for Clogs:
1. Check the hose where it connects to the handle by pressing the two
release buttons on the top end of the hose.
ENGLISH
Removing Clogs
WARNING
y Electrical shock and personal injury hazard.
y Always unplug the power cord from the electrical outlet
before servicing.
y Failure to do so could result in electrical shock or personal
injury.
2. Remove the dust tank and check the dust tank inlet and body inlet
where it connects to the vacuum cleaner body.
Page 18
CARE & CLEANING
18
ENGLISH
3. Check the hose where it connects to the back of the body by pressing
4. Turn the vacuum cleaner over and check the agitator inlet.
the release buttons on the bottom end of the hose.
WARNING
y Electrical shock and personal injury hazard.
y Always unplug the power cord from the electrical outlet
before servicing. Failure to do so could result in electrical
shock or personal injury.
Cleaning the Exterior of the Vacuum
Cleaner
Wipe the exterior of the vacuum cleaner with a clean, soft cloth that has
been dipped in water and wrung dry.
DO NOT allow water to enter any openings in the vacuum cleaner.
DO NOT clean tools in dishwasher or clothes washer. Wash tools in warm
soapy water, rinse and allow to air dry completely.
DO NOT use tools if they are wet.
5. To check more thoroughly, remove the screw on the port.
Page 19

TROUBLESHOOTING
19
Review this section to nd do-it-yourself solutions for minor performance problems. Any service or repair needed, other than as described in this owner’s
manual, should be performed through your local LGE service center.
WARNING
y Electrical shock and personal injury hazard.
y Always unplug the power cord from the electrical outlet before servicing. Failure to do so could result in electrical shock or personal
injury.
Problem Possible Causes Solutions
Vacuum cleaner will not run. Vacuum unplugged at wall outlet. Make sure cord is plugged into a functioning outlet.
Agitator motor overload protection. Unplug the vacuum cleaner and check the agitator for
obstructions and reset the unit.
Thermal protector activated. Allow the vacuum cleaner to cool down.
Poor dirt pickup. Full or clogged dust tank. Empty dust tank and clean lters.
Dust tank improperly installed. Make sure all dust tank components and lters are installed
correctly.
Clogged hose, wand or head. Check for clogs.
Belt broken/not installed properly. Check belt and replace if needed.
Agitator motor overload protection activated. Unplug the vacuum cleaner and check the agitator for
obstructions. Press the reset button.
Hole in hose. Inspect hose carefully. Replace if needed.
Worn agitator. Contact service.
Agitator does not turn Switch is o (unit is in oor mode). Turn on agitator power switch.
Cleaner is in upright position. Press the body release and tilt until back.
Agitator motor overload protection is tripped (brush
is jammed).
Belt is broken. Replace belt.
Dust escapes the dust tank. Dust tank improperly installed. Make sure all dust tank components and lters are installed
The dust tank lid is not closed. Check the
The bottom plate is not latched. Make sure the bottom plate is closed and latched.
Agitator on pet hair turbine
tool will not run when
attached.
Accessory has no suction
when using with the handle.
Dust tank feels loose when
lifting by the carry handle.
Dirty agitator or agitator supports. Clean the inside of the pet hair turbine tool.
Obstruction in turbine air path. Clean the inside of the pet hair turbine tool.
Low suction from vacuum cleaner. Check for clogs.
Main wand still connected to body base. Remove wand.
This is normal. The vacuum is designed like this to prevent the tank from
Unplug the vacuum cleaner and check the agitator for
obstructions and reset the unit.
correctly.
dust tank lid.
separating
ENGLISH
Page 20

P/NO : MFL67230701 www.lg.com
MANUAL DEL PROPIETARIO
ASPIRADORA
Por favor, lea atentamente este manual antes de operar su
aparato y guárdelo para futuras referencias.
ESPAÑOL
LuV350P*
ENGLISH
ESPAÑOL
Page 21

ESPAÑOL
22
ÍNDICE
ÍNDICE
23 GARANTÍA DE LA ASPIRADORA
24 INFORMACIÓN IMPORTANTEDE SE-
GURIDAD
26 PIEZAS Y CARACTERÍSTICAS
27
ARMADO
27 Cómo desembalar la aspiradora
27 Piezas de montaje
27 Colocación de la vara
28 Conexión de la manguera
28 Guardado de accesorios
28 Guardado del cable
29 OPERACIÓN
29 Desbloqueo de la vara
29 Desbloqueo del cuerpo de la aspiradora
30 Accesorios
30 Cuadro de uso de accesorios
31 Uso de la vara
31 Instalación de los accesorios
31 Consejos y trucos
32 Uso del accesorio de turbina para remover pelos
de mascotas
32 Escaleras y rellanos
32 Uso de la vara
33 CUIDADO Y LIMPIEZA
33 Cómo guardar la aspiradora
33 Componentes del tanque de polvo
34 Vaciado del tanque de polvo
34 Limpieza del tanque de polvo
35 Limpieza del filtro de espuma
35 Limpieza del filtro HEPA
36 Accesorio de turbina para remover pelos de
mascotas
36 Mantenimiento del agitador
36 Reemplazo de la correa del agitador
37 Eliminación de obstrucciones
38 Limpieza del exterior de la aspiradora
39 RESOLUCIÓN DE PROBLEMAS
ESPAÑOL
23
GARANTÍA (EE. UU.)
LG Electronics Inc. reparará o reemplazará su producto, a discreción de LG, si llegara a encontrar defectos en los materiales o defectos de fabricación en
condiciones de uso personal y doméstico de la aspiradora, durante el período de la garantía que se indica a continuación, en vigencia a partir de la fecha de
compra original del producto por parte del consumidor. Esta garantía limitada es válida únicamente para el comprador original del producto, y solo si éste
se usa en EE. UU. o Canadá.
PERÍODO DE VIGENCIA DE LA GARANTÍA CÓMO SE MANEJA EL SERVICIO
Cinco años
A partir de la fecha original de compra
Cualquier pieza de la aspiradora que falle por algún defecto en los materiales o de fabricación. Du-
rante este período de vigencia de la garantía de cinco años, LG cubrirá también, y sin cargo,todo
servicio y trabajo realizado para reemplazar la pieza defectuosa.
ESTA GARANTÍA SE BRINDA EN LUGAR D E OTRAS GARANTÍAS , EXPRESAS O IMPLÍCITAS, QU E INCLUYEN, ENTRE OTRAS, CUALQU IER GARANTÍA DE
COMERCIABILIDAD O IDONEIDAD PARA UN FIN PARTICULAR. EN LA MEDIDA EN QUE LA LEY EXIJA UNA DETERMINADA GARANTÍA IMPLÍCITA, SU
DURACIÓN SE LIMITA AL PERÍODO DE GARANTÍA EXPRESO MENCIONADO ANTERIORMENTE. LG NO SERÁ RESPONSABLE DE DAÑOS CONSECUEN -
TES, IND IRECTOS O INCIDE NTALES DE NIN GUNA ÍNDOLE, IN CLUSO LA PÉRDIDA DE IN GRESOS O GANANCIAS, R ELACIONADAS CON EL PRO DUCTO.
ALGUNOS ESTADOS NO AUTORIZAN LIMITACIONES DEL PERÍODO DE VIGENCIA DE UNA GARANTÍA IMPLÍCITA NI LA EXCLUSIÓN DE DAÑOS INCI-
DENTALES O CONSECUENTES, POR LO QUE ES POSIBLE QUE LAS LIMITACIONES O EXCLUSIONES ANTERIORES NO SE APLIQUEN A SU CASO.
ESTA GARANTÍA CUBRE SÓLO DEFECTOS DE MATERIALES Y FABRICACIÓN. LGE NO PAGARÁ LO SIGUIENTE:
1. Los bienes desechables que pueden gastarse, como los ltros y las correas, entre otros.
2. Un técnico de servicio para instruir al usuario sobre el armado, el funcionamiento o el mantenimiento correctos del producto.
3. Un técnico de servicio para limpiar o mantener este producto.
4. Por daños al producto o fallas de este producto si no se lo ha armado, operado o mantenido de acuerdo con todas las instrucciones suministradas con
el
producto.
5. Por daños al producto o fallas de este producto que resultasen de accidentes, abuso, mal uso o usos que no sean aquellos para los que fue diseñado el
producto.
6. Por daños al producto o fallas de este producto causadas por el uso de detergentes, limpiadores, sustancias químicas o utensilios que no sean los reco-
mendados en todas las instrucciones suministradas con este producto.
7. Por daños a piezas o sistemas, o fallas en ellos, que resultasen de modicaciones no autorizadas realizadas en este producto.
Esta garantía se extiende al comprador original para productos comprados para uso doméstico dentro de EE. UU. En Alaska, la garantía excluye el costo de
envío o de visitas de servicio a domicilio.
Algunos estados no permiten la exclusión o limitación de daños incidentales o consecuentes, por lo que es posible que esta limitación no se aplique a su
caso. Esta garantía le otorga derechos legales especícos y es posible que usted cuente con otros derechos que pueden variar de un estado a otro. Para
conocer sus derechos legales, consulte a su ocina de asuntos de consumidores local o estatal o al procurador general de su estado.
INFORMACIÓN DE ASISTENCIA A CLIENTES:
Para probar la cobertura de la garantía: Conserve su recibo de compra para comprobar la fecha de compra.
Deberá presentar una copia del recibo de compra cuando
se le brinde el servicio
técnico cubierto por la garantía.
Para averiguar cuál es el centro de servicios o el distribuidor
autorizado más cercano, o para recibir asistencia del producto,
cliente o servicio,
llame al 1-800-243-0000 (las 24 horas del día, los 365 días del año) y elija la opción
correspondiente del menú. También puede visitar nuestro sitio web http://www.lg.com
(En Canadá, llame al 1-888-542-2623 o visite http://www.lg.com)
GARANTÍA
22
ÍNDICE
ÍNDICE
23 GARANTÍA DE LA ASPIRADORA
24 INFORMACIÓN IMPORTANTEDE SE-
GURIDAD
26 PIEZAS Y CARACTERÍSTICAS
27
ARMADO
27 Cómo desembalar la aspiradora
27 Piezas de montaje
27 Colocación de la vara
28 Conexión de la manguera
28 Guardado de accesorios
28 Guardado del cable
29 OPERACIÓN
29 Desbloqueo de la vara
33 CUIDADO Y LIMPIEZA
33 Cómo guardar la aspiradora
33 Componentes del tanque de polvo
34 Vaciado del tanque de polvo
34 Limpieza del tanque de polvo
35 Limpieza del filtro de espuma
35 Limpieza del filtro HEPA
36 Accesorio de turbina para remover pelos de
mascotas
36 Mantenimiento del agitador
36 Reemplazo de la correa del agitador
37 Eliminación de obstrucciones
38 Limpieza del exterior de la aspiradora
39 RESOLUCIÓN DE PROBLEMAS
22
ÍNDICE
ÍNDICE
23 GARANTÍA DE LA ASPIRADORA
ESPAÑOL
24 INFORMACIÓN IMPORTANTEDE SE-
ESPAÑOL
GURIDAD
26 PIEZAS Y CARACTERÍSTICAS
27
ARMADO
27 Cómo desembalar la aspiradora
27
27 Piezas de montaje
27
27 Colocación de la vara
27
28 Conexión de la manguera
28
28 Guardado de accesorios
28
28 Guardado del cable
28
29 OPERACIÓN
29 Desbloqueo de la vara
29
29 Desbloqueo del cuerpo de la aspiradora
29
30 Accesorios
30
30 Cuadro de uso de accesorios
30
31 Uso de la vara
31
31 Instalación de los accesorios
31
31 Consejos y trucos
31
32 Uso del accesorio de turbina para remover pelos
32
de mascotas
32 Escaleras y rellanos
32
32 Protección contra sobrecarga del motor del
32
agitador
32 Protección de sobrecarga térmica
32
33 CUIDADO Y LIMPIEZA
33 Cómo guardar la aspiradora
33
33 Componentes del tanque de polvo
33
34 Vaciado del tanque de polvo
34
34 Limpieza del tanque de polvo
34
35 Limpieza del filtro de espuma
35
35 Limpieza del filtro HEPA
35
36 Accesorio de turbina para remover pelos de
36
mascotas
36 Mantenimiento del agitador
36
36 Reemplazo de la correa del agitador
36
37 Eliminación de obstrucciones
37
38 Limpieza del exterior de la aspiradora
38
39 RESOLUCIÓN DE PROBLEMAS
Page 22

GARANTÍA
23
GARANTÍA (EE. UU.)
LG Electronics Inc. reparará o reemplazará su producto, a discreción de LG, si llegara a encontrar defectos en los materiales o defectos de fabricación en
condiciones de uso personal y doméstico de la aspiradora, durante el período de la garantía que se indica a continuación, en vigencia a partir de la fecha de
compra original del producto por parte del consumidor. Esta garantía limitada es válida únicamente para el comprador original del producto, y solo si éste
se usa en EE. UU. o Canadá.
PERÍODO DE VIGENCIA DE LA GARANTÍA CÓMO SE MANEJA EL SERVICIO
Cinco años
A partir de la fecha original de compra
ESTA GARANTÍA SE BRINDA EN LUGAR D E OTRAS GARANTÍAS , EXPRESAS O IMPLÍCITAS, QU E INCLUYEN, ENTRE OTRAS, CUALQU IER GARANTÍA DE
COMERCIABILIDAD O IDONEIDAD PARA UN FIN PARTICULAR. EN LA MEDIDA EN QUE LA LEY EXIJA UNA DETERMINADA GARANTÍA IMPLÍCITA, SU
DURACIÓN SE LIMITA AL PERÍODO DE GARANTÍA EXPRESO MENCIONADO ANTERIORMENTE. LG NO SERÁ RESPONSABLE DE DAÑOS CONSECUEN TES, IND IRECTOS O INCIDE NTALES DE NIN GUNA ÍNDOLE, IN CLUSO LA PÉRDIDA DE IN GRESOS O GANANCIAS, R ELACIONADAS CON EL PRO DUCTO.
ALGUNOS ESTADOS NO AUTORIZAN LIMITACIONES DEL PERÍODO DE VIGENCIA DE UNA GARANTÍA IMPLÍCITA NI LA EXCLUSIÓN DE DAÑOS INCIDENTALES O CONSECUENTES, POR LO QUE ES POSIBLE QUE LAS LIMITACIONES O EXCLUSIONES ANTERIORES NO SE APLIQUEN A SU CASO.
ESTA GARANTÍA CUBRE SÓLO DEFECTOS DE MATERIALES Y FABRICACIÓN. LGE NO PAGARÁ LO SIGUIENTE:
1. Los bienes desechables que pueden gastarse, como los ltros y las correas, entre otros.
2. Un técnico de servicio para instruir al usuario sobre el armado, el funcionamiento o el mantenimiento correctos del producto.
3. Un técnico de servicio para limpiar o mantener este producto.
4. Por daños al producto o fallas de este producto si no se lo ha armado, operado o mantenido de acuerdo con todas las instrucciones suministradas con
el producto.
5. Por daños al producto o fallas de este producto que resultasen de accidentes, abuso, mal uso o usos que no sean aquellos para los que fue diseñado el
producto.
6. Por daños al producto o fallas de este producto causadas por el uso de detergentes, limpiadores, sustancias químicas o utensilios que no sean los recomendados en todas las instrucciones suministradas con este producto.
7. Por daños a piezas o sistemas, o fallas en ellos, que resultasen de modicaciones no autorizadas realizadas en este producto.
garantía se extiende al comprador original para productos comprados para uso doméstico dentro de EE. UU. En Alaska, la garantía excluye el costo de
Esta
envío o de visitas de servicio a domicilio.
Algunos estados no permiten la exclusión o limitación de daños incidentales o consecuentes, por lo que es posible que esta limitación no se aplique a su
caso. Esta garantía le otorga derechos legales especícos y es posible que usted cuente con otros derechos que pueden variar de un estado a otro. Para
conocer sus derechos legales, consulte a su ocina de asuntos de consumidores local o estatal o al procurador general de su estado.
INFORMACIÓN DE ASISTENCIA A CLIENTES:
Cualquier pieza de la aspiradora que falle por algún defecto en los materiales o de fabricación. Du-
rante este período de vigencia de la garantía de cinco años, LG cubrirá también, y sin cargo,todo
servicio y trabajo realizado para reemplazar la pieza defectuosa.
ESPAÑOL
ESPAÑOL
Para probar la cobertura de la garantía: Conserve su recibo de compra para comprobar la fecha de compra.
Deberá presentar una copia del recibo de compra cuando se le brinde el servicio
técnico cubierto por la garantía.
Para averiguar cuál es el centro de servicios o el distribuidor
autorizado más cercano, o para recibir asistencia del producto,
cliente o servicio,
llame al 1-800-243-0000 (las 24 horas del día, los 365 días del año) y elija la opción
correspondiente del menú. También puede visitar nuestro sitio web http://www.lg.com
(En Canadá, llame al 1-888-542-2623 o visite http://www.lg.com)
Page 23

ESPAÑOL
22
ÍNDICE
ÍNDICE
23 GARANTÍA DE LA ASPIRADORA
24 INFORMACIÓN IMPORTANTEDE SE-
GURIDAD
26 PIEZAS Y CARACTERÍSTICAS
27
ARMADO
27 Cómo desembalar la aspiradora
27 Piezas de montaje
27 Colocación de la vara
28 Conexión de la manguera
28 Guardado de accesorios
28 Guardado del cable
29 OPERACIÓN
29 Desbloqueo de la vara
33 CUIDADO Y LIMPIEZA
33 Cómo guardar la aspiradora
33 Componentes del tanque de polvo
34 Vaciado del tanque de polvo
34 Limpieza del tanque de polvo
35 Limpieza del filtro de espuma
35 Limpieza del filtro HEPA
36 Accesorio de turbina para remover pelos de
mascotas
36 Mantenimiento del agitador
36 Reemplazo de la correa del agitador
37 Eliminación de obstrucciones
38 Limpieza del exterior de la aspiradora
39 RESOLUCIÓN DE PROBLEMAS
24
INFORMACIÓN IMPORTANTE DE SEGURIDAD
INSTRUCCIONES DE SEGURIDAD IMPORTANTES
GUARDE ESTAS INSTRUCCIONES
LEA TODAS LAS INDICACIONES ANTES DE USAR EL PRODUCTO
Lea y siga todas las instrucciones antes de usar la aspiradora para prevenir riesgos de incendio, descarga eléctrica, lesión personal o daños cuando use
la aspiradora. Esta guía no cubre todos los posibles inconvenientes que puedan surgir. Siempre debe ponerse en contacto con su agente de servicio o
fabricante en caso de que surjan problemas que no comprenda.
Este es el símbolo de alerta de seguridad. Este símbolo lo alertará en caso de que existan riesgos que puedan acarrear daños a la propiedad y/o
lesiones corporales graves o muerte.
ESPAÑOL
Todos los mensajes de seguridad seguirán al símbolo de alerta de seguridad y a los términos ADVERTENCIA o PRECAUCIÓN.
ADVERTENCIA
PRECAUCIÓN
Indica una situación peligrosa que, si no se evita, podría ocasionar la muerte o lesiones graves.
Indica una situación peligrosa que, si no se evita, podría ocasionar lesiones menores o moderadas.
ADVERTENCIA
y Desconecte el suministro eléctrico antes de realizar el mantenimiento
o la limpieza de la aspiradora o cuando no se la esté usando. Si no lo
hace, correrá riesgo de sufrir una descarga eléctrica o lesiones personales.
y No use la aspiradora para recoger objetos que estén quemándose
o lanzando humo, como cigarrillos o cenizas calientes. Esto podría
ocasionar la muerte, un incendio o una descarga eléctrica.
y No aspire sustancias inflamables ni explosivas, como nafta,
benceno, diluyentes, propano (en estado líquido o gaseoso).
Los gases de estas sustancias pueden generar riesgo de incendio
o explosión. Hacer esto puede conducir a la muerte o a lesiones
personales.
y No manipule el enchufe ni la aspiradora con las manos mojadas.
Esto podría ocasionar la muerte o una descarga eléctrica.
y No desenchufe la aspiradora tirando del cable. Podría dañar
el producto o sufrir una descarga eléctrica. Para desenchufar la
aspiradora, tome el enchufe, no el cable.
y Mantenga el cabello, la ropa holgada, los dedos y todas las
partes del cuerpo alejadas de las aberturas y las piezas móviles.
Si no lo hace, correrá riesgo de sufrir una descarga eléctrica o lesiones
personales.
y No tire ni transporte la aspiradora por el cable; no use el cable
como manija; no cierre puertas dejando el cable atrapado; no tire
del cable cuando esté alrededor de bordes o esquinas filosas.
y No pase la aspiradora por encima del cable. Mantenga el cable
alejado de supercies calientes. Si no lo hace, pueden ocasionarse
descargas eléctricas, lesiones personales, incendios o daños al
producto.
y La aspiradora no es un juguete y no debe ser operada por niños.
Preste muc ha atención cuando e sté usando la aspir adora cerca de
niños. De lo contrario, podría ocasionar lesiones personales o daños
al producto.
y No use la aspi radora si el cable de al imentación o el enc hufe están
dañados. De lo contrario, podría ocasionar lesiones personales o
daños al producto. En estos casos, póngase en contacto con el agente
de servicios de LG Electronics para evitar los riesgos.
y No use la aspiradora si ha estado bajo agua. De lo contrario, podría
ocasionar lesiones personales o daños al producto. En estos casos,
póngase en contacto con el agente de servicios de LG Electronics para
evitar los riesgos.
y No siga aspirando si sospecha que faltan piezas o que están
dañadas. De lo contrario, podría ocasionar lesiones personales o daños
al producto. En estos casos, póngase en contacto con el agente de
servicios de LG Electronics para evitar los riesgos.
y No use un cable de extensión con esta aspiradora. Esto podría
acarrear riesgos de incendio o daños al producto.
y Use la tensión adecuada. El uso de tensión incorrecta podría acarrear
daños en el motor y posibles lesiones al usuario. La tensión adecuada
se especica en la parte inferior de la aspiradora.
y Apague todos los controles antes de desenchufarla. Si no lo hace,
correrá riesgo de sufrir una descarga eléctrica o lesiones personales.
y No modique el enchufe de ninguna manera. Si lo hace, se
pueden ocasionar descargas eléctricas, lesiones personales, daños
al producto o muerte. Si el enchufe no entra en el tomacorriente,
póngase en contacto con un electricista calicado para que instale un
tomacorriente adecuado.
y Las reparaciones de electrodomésticos deben realizarlas
únicamente ingenieros de mantenimiento calicados. Una
reparación inadecuada puede generar graves peligros para el usuario.
y No coloque los dedos cerca del engranaje. Si lo hace, puede sufrir
lesiones personales.
y No use la aspiradora en exteriores ni en supercies húmedas. Si
lo hace, puede provocar descargas eléctricas o lesiones personales.
y No coloque ningún objeto entre el cuerpo de la aspiradora y el
espacio del cabezal del agitador. De lo contrario, podría ocasionar
lesiones personales o daños al producto.
y Este producto contiene sustancias químicas que el estado de
California reconoce que pueden causar cáncer y toxicidad
reproductiva. Lávese las manos después de manipularlo.
y Tome precauciones adicionales cuando limpie escaleras.
y No deje electrodomésticos enchufados mientras no estén en uso.
Desenchúfelos mientras no los esté usando y antes de realizar tareas
de mantenimiento.
Page 24

PRECAUCIÓN
24
INSTRUCCIONES DE SEGURIDAD IMPORTANTES
GUARDE ESTAS INSTRUCCIONES
LEA TODAS LAS INDICACIONES ANTES DE USAR EL PRODUCTO
Lea y siga todas las instrucciones antes de usar la aspiradora para prevenir riesgos de incendio, descarga eléctrica, lesión personal o daños cuando use
la aspiradora. Esta guía no cubre todos los posibles inconvenientes que puedan surgir. Siempre debe ponerse en contacto con su agente de servicio o
fabricante en caso de que surjan problemas que no comprenda.
Este es el símbolo de alerta de seguridad. Este símbolo lo alertará en caso de que existan riesgos que puedan acarrear daños a la propiedad y/o
lesiones corporales graves o muerte.
Todos los mensajes de seguridad seguirán al símbolo de alerta de seguridad y a los términos ADVERTENCIA o PRECAUCIÓN.
ADVERTENCIA
Indica una situación peligrosa que, si no se evita, podría ocasionar la muerte o lesiones graves.
PRECAUCIÓN
Indica una situación peligrosa que, si no se evita, podría ocasionar lesiones menores o moderadas.
INFORMACIÓN IMPORTANTE DE SEGURIDAD
INFORMACIÓN IMPORTANTE DE SEGURIDAD
25
y No introduzca objetos en las aberturas de la aspiradora. De lo
contrario, el producto podría sufrir daños.
y No use la aspiradora si alguna de las aberturas se encuentra
obstruida. Mantenga las aberturas de la aspiradora libres de
polvo, pelusa, pelo y cualquier otra cosa que pueda reducir el
ujo de aire. Si no lo hace, puede ocasionar daños al producto.
y No use la aspiradora si el tanque y/o los ltros no están bien
instalados. De lo contrario, el producto podría sufrir daños.
y Siempre debe limpiar el tanque de polvo y los ltros después
de aspirar limpiadores o aromatizantes de alfombras, polvos y
partículas de polvo nas. Estos productos pueden obstruir los ltros,
reducir el ujo de aire y/o causar daños en la aspiradora. Si no limpia
el tanque de polvo y los ltros, la aspiradora puede dañarse de forma
permanente.
y No use la aspiradora para recoger objetos losos o duros como
juguetes pequeños, alleres, sujetadores para papeles, etc.
Pueden dañar la aspiradora o el tanque de polvo.
y Guarde la aspiradora en interiores. Después de usarla, aparte la
aspiradora del paso para evitar tropezarse con ella.
y La aspiradora no debe ser operada por niños. Si no se respeta
esta instrucción, se pueden producir lesiones personales u ocasionar
daños al producto.
y Use únicamente piezas fabricadas o recomendadas por técnicos
calicados. De lo contrario, el producto podría sufrir daños.
y Siga todas las instrucciones del manual del usuario. Use
únicamente accesorios aprobados o recomendados por LG. De lo
contrario, el producto podría sufrir daños.
y No coloque nunca la aspiradora en la parte superior de las
escaleras. Si lo hace, podría ocasionar lesiones personales o daños
al producto.
y Asegúrese de que los ltros (el ltro de escape de aire y el ltro
de seguridad del motor) estén completamente secos antes de
colocarlos en la aspiradora. De lo contrario, el producto podría
sufrirdaños.
y No seque los ltros en un horno convencional ni en un horno de
microondas. Esto podría generar peligros de incendio.
y No seque los ltros en una secadora de ropa. Esto podría generar
peligros de incendio.
y No seque los ltros cerca de una llama abierta. Esto podría generar
peligros de incendio.
y Siempre apague la aspiradora antes de conectar o desconectar
la manguera. Esto podría ocasionar lesiones personales o daños al
producto.
y La aspiradora ha sido diseñada para uso doméstico únicamente.
y Usted es res ponsable del a rmado y uso corre ctos de su aspirad ora.
ESPAÑOL
ESPAÑOL
Protector térmico:
La aspiradora cuenta con un termostato especial que la protege en caso de sobrecalentamiento del motor. Si la aspiradora se apaga de repente,
apague el interruptor y desenchufe la aspiradora.
Revise la aspiradora para detectar la posible fuente del sobrecalentamiento: tanque de polvo lleno, manguera bloqueada o ltro obstruido.
Si encuentra alguna de estas condiciones, repárelas y espere al menos 30 minutos antes de intentar usar nuevamente la aspiradora. Pasados los
30minutos, vuelva a enchufar la aspiradora y a encender el interruptor. Si sigue sin funcionar, póngase en contacto con un electricista calicado.
Page 25

26
22
ÍNDICE
ÍNDICE
23 GARANTÍA DE LA ASPIRADORA
24 INFORMACIÓN IMPORTANTEDE SE-
GURIDAD
26 PIEZAS Y CARACTERÍSTICAS
27
ARMADO
27 Cómo desembalar la aspiradora
27 Piezas de montaje
27 Colocación de la vara
28 Conexión de la manguera
28 Guardado de accesorios
28 Guardado del cable
29 OPERACIÓN
29 Desbloqueo de la vara
33 CUIDADO Y LIMPIEZA
33 Cómo guardar la aspiradora
33 Componentes del tanque de polvo
34 Vaciado del tanque de polvo
34 Limpieza del tanque de polvo
35 Limpieza del filtro de espuma
35 Limpieza del filtro HEPA
36 Accesorio de turbina para remover pelos de
mascotas
36 Mantenimiento del agitador
36 Reemplazo de la correa del agitador
37 Eliminación de obstrucciones
38 Limpieza del exterior de la aspiradora
39 RESOLUCIÓN DE PROBLEMAS
PIEZAS Y CARACTERÍSTICAS
Es importante conocer las piezas y las características de la aspiradora para garantizar un uso adecuado y seguro. Revise esto antes de usar la
aspiradora.
ESPAÑOL
ESPAÑOL
Repuestos comunes
Filtro HEPA ADQ73353501
Filtro de espuma
ADV74067001
Correa del agitador MAS62064002
Para pedir estas piezas, llame a los siguientes números:
1-800-243-0000 (EE. UU.)
1-888-542-2623 (Canadá)
Manija
Botón de des
bloqueo de la vara
Desbloqueo del
tanque de polvo
Manija de
transporte
Tanque
de polvo
Filtro de escape
de aire
Marco del ltro ADV74067001
Filtro de espuma MDJ61980604
Botón de
desbloqueo
rápido del
gancho
paracable
Separador
de polvo
Visor
Accesorios adicionales
Cepillo de polvo y accesorio
rinconero
Accesorio para
tapicería
Manguera
Vara
Cepillo de polvo
y accesorio
rinconero
Cable
Accesorio de turbina para
remover pelos de mascotas
Botón PISO/
ALFOMBRA
(FLOOR/
CARPET)
Botón de
ENCENDIDO
(POWER)
Desbloqueo del
cuerpo de la
aspiradora
Agitador
Page 26

ARMADO
Para minimizar el riesgo de daños durante el envío, su aspiradora se envía armada parcialmente.
ARMADO
27
Cómo desembalar la aspiradora
Desembale cuidadosamente la aspiradora y asegúrese de que tiene todas
las piezas antes de desechar los paquetes.
Retire cintas, cartones y películas protectoras antes de armarla.
Artículos que vienen en la caja:
1. Cuerpo de la aspiradora
2. Cepillo de polvo y& accesorio rinconero
3. Manija y vara
4. Manguera
5. Accesorio de turbina para remover pelos de mascotas
6. Filtro de espuma adicional
7. Accesorio para tapicería
Piezas de montaje
1. Cuerpo de la aspiradora
2. Cepillo para polvo y
accesorio rinconero
3. Manija y vara
4. Manguera
5. Accesorio de
turbina para
remover pelos
de mascotas
7. Accesorio para
tapicería
6. Filtro de espuma
adicional
Colocación de la vara
1. Inserte la vara en la boca para colocar la vara.
2. Presione la vara hasta que quede colocada en el cuerpo.
ESPAÑOL
ESPAÑOL
Page 27

28
22
ÍNDICE
ÍNDICE
23 GARANTÍA DE LA ASPIRADORA
24 INFORMACIÓN IMPORTANTEDE SE-
GURIDAD
26 PIEZAS Y CARACTERÍSTICAS
27
ARMADO
27 Cómo desembalar la aspiradora
27 Piezas de montaje
27 Colocación de la vara
28 Conexión de la manguera
28 Guardado de accesorios
28 Guardado del cable
29 OPERACIÓN
29 Desbloqueo de la vara
33 CUIDADO Y LIMPIEZA
33 Cómo guardar la aspiradora
33 Componentes del tanque de polvo
34 Vaciado del tanque de polvo
34 Limpieza del tanque de polvo
35 Limpieza del filtro de espuma
35 Limpieza del filtro HEPA
36 Accesorio de turbina para remover pelos de
mascotas
36 Mantenimiento del agitador
36 Reemplazo de la correa del agitador
37 Eliminación de obstrucciones
38 Limpieza del exterior de la aspiradora
39 RESOLUCIÓN DE PROBLEMAS
ARMADO
ESPAÑOL
ESPAÑOL
Conexión de la manguera
1. Conecte el lado superior de la manguera a la manija. El lado superior
de la manguera puede identicarse por los dos agujeros que contiene.
2. Introduzca el lado inferior de la manguera en el cuerpo principal. El
lado inferior de la manguera puede reconocerse por los dos clips de
seguridad.
ADVERTENCIA
¡Peligro de lesiones personales y daños al producto! NO use
tomacorrientes que estén arriba de encimeras. Si no respeta
esta indicación, podría ocasionar daños a los artículos que se
encuentren en las encimeras.
Guardado de accesorios
Su aspiradora viene con espacios integrados para guardar
convenientemente el cepillo de polvo y el accesorio rinconero.
y Inserte el cepillo para polvo y el accesorio rinconero en el cuerpo
principal de la aspiradora.
3. Enganche la manguera en su soporte en la parte trasera de la
aspiradora.
Guardado del cable
Para guardar el cable:
1. Asegúrese de que el gancho del cable esté en posición vertical.
2. Enrolle el cable alrededor del gancho de cable y fíjelo en su sitio.
Enganche el enchufe al cable.
NOTA: Para reducir el riesgo de descarga eléctrica, esta aspiradora cuenta
con un enchufe polarizado en el que una paleta es más ancha que la otra.
El enchufe entra en un tomacorriente polarizado en una sola posición. Si
el enchufe no encaja en el tomacorriente, de vuelta el enchufe. Si sigue
sin encajar, comuníquese con un electricista profesional para instalar un
tomacorriente adecuado. No cambie el enchufe de ninguna manera
Para liberar el cable:
1. Gire el gancho superior del cable hasta que apunte hacia abajo.
2. Desenganche el enchufe y extienda el cable.
Page 28

OPERACIÓN
eldeextensión
de
varayextienda
de
vara.
ADVERTENCIA
aspiradora y el cabezal del agitador.
ocasionar
o
daños
al
ADVERTENCIA
coloque
aspiradora
en
escalera;
siempre
enelsuelo.
este
el
agitador
alfombras)
o
APAGARLO
Tambié n
el
del
agitador.
2.
y
apaga
aspiradora.
agitador
gira
cuando
aspiradora
se
encuentra
en
vertical
empezar
a
aspirar,
elade
aspiradora
y
tire
abajo.
agitador
funciona
cuando
aspiradora
se
encuentra
en
vertical.
ESPAÑOL
ESPAÑOL
Page 29

Accesorio de turbina para remover pelos de mascotas
cepillo
accionado
turbina
de
aire
sido
diseñado
de
etc.detelasyalfombras.
Cepillo para polvo
el
cepillo
etc.
Accesorio rinconero
accesorio
estrechos,
espacios
entre
almohadones
y
otros
difíciles
de
alcanzar.
Accesorio para tapicería
este
accesorio
tela
sobre
Accesorio
ÁREA DE LIMPIEZA
almohadones
Supercies
tapizadas*
supercies
duras*
Cortinas*
almohadones
alfombras/
Tapetes
Accesorio
de
turbina
de
Cepillo
Accesorio
Accesorio
tapicería
Asegúrese
siempre
de
que
accesorios
estén
antesdesobre
telas.
ESPAÑOL
22
ÍNDICE
ÍNDICE
23 GARANTÍA DE LA ASPIRADORA
24 INFORMACIÓN IMPORTANTEDE SE-
GURIDAD
26 PIEZAS Y CARACTERÍSTICAS
27
ARMADO
27 Cómo desembalar la aspiradora
27 Piezas de montaje
27 Colocación de la vara
28 Conexión de la manguera
28 Guardado de accesorios
28 Guardado del cable
29 OPERACIÓN
29 Desbloqueo de la vara
33 CUIDADO Y LIMPIEZA
33 Cómo guardar la aspiradora
33 Componentes del tanque de polvo
34 Vaciado del tanque de polvo
34 Limpieza del tanque de polvo
35 Limpieza del filtro de espuma
35 Limpieza del filtro HEPA
36 Accesorio de turbina para remover pelos de
mascotas
36 Mantenimiento del agitador
36 Reemplazo de la correa del agitador
37 Eliminación de obstrucciones
38 Limpieza del exterior de la aspiradora
39 RESOLUCIÓN DE PROBLEMAS
ESPAÑOL
OPERACIÓN
Page 30

OPERACIÓN
31
Uso de la vara
PRECAUCIÓN
Nunca tire de la aspiradora mediante la manguera.
Suelte la vara y la manija:
1. Asegúrese de que la aspiradora esté ja en posición vertical sobre
una supercie plana y estable.
2. Presione el botón para desbloquear la vara que está en el cuerpo de
la aspiradora e incline la manija de la vara.
3. Mueva la vara hacia arriba y hacia afuera.
Instalación de los accesorios
Accesorio rinconero:
Deslice el accesorio rinconero en el extremo de la vara.
ESPAÑOL
ESPAÑOL
Cepillo para polvo:
Presione el botón para desbloquear el cepillo que está en el accesorio
rinconero y deslice el cepillo hacia adelante.
4. Presione el botón de extensión de la vara y tire de ésta hacia abajo.
Cepillo para polvo
Accesorio para tapicería:
Deslice el accesorio para tapicería en el extremo de la vara.
Accesorio rinconero
Consejos y trucos
Bordes y esquinas de alfombras:
Use el cepillo para polvo para limpiar esquinas estrechas, bordes de
alfombras y zócalos. Para áreas especialmente difíciles de alcanzar, use el
accesorio rinconero.
Page 31

32
22
ÍNDICE
ÍNDICE
23 GARANTÍA DE LA ASPIRADORA
24 INFORMACIÓN IMPORTANTEDE SE-
GURIDAD
26 PIEZAS Y CARACTERÍSTICAS
27
ARMADO
27 Cómo desembalar la aspiradora
27 Piezas de montaje
27 Colocación de la vara
28 Conexión de la manguera
28 Guardado de accesorios
28 Guardado del cable
29 OPERACIÓN
29 Desbloqueo de la vara
33 CUIDADO Y LIMPIEZA
33 Cómo guardar la aspiradora
33 Componentes del tanque de polvo
34 Vaciado del tanque de polvo
34 Limpieza del tanque de polvo
35 Limpieza del filtro de espuma
35 Limpieza del filtro HEPA
36 Accesorio de turbina para remover pelos de
mascotas
36 Mantenimiento del agitador
36 Reemplazo de la correa del agitador
37 Eliminación de obstrucciones
38 Limpieza del exterior de la aspiradora
39 RESOLUCIÓN DE PROBLEMAS
OPERACIÓN
ESPAÑOL
ESPAÑOL
Uso del accesorio de turbina para
remover pelos de mascotas
Este accesorio cuenta con un agitador accionado por una turbina que
brinda potencia de limpieza adicional sobre alfombras y telas. Es ideal
para la limpieza de escaleras, almohadones y tapizados de vehículos.
Cuando use el accesorio de turbina para remover pelos de mascotas,
revise con frecuencia el área del cepillo para detectar acumulación de
pelos, bras, pelusas y otros residuos.
La acumulación excesiva puede afectar el rendimiento y podría incluso
dañar el accesorio de turbina para remover pelos
instrucciones de limpieza, consulte la sección de Cuidado y limpieza.
de mascotas. Para
Escaleras y rellanos
Use el cepillo para polvo o el accesorio de turbina para remover pelos
de mascotas en escaleras y rellanos. Asegúrese de que la aspiradora esté
colocada de manera tal que no pueda volcarse ni caerse.
Protección de sobrecarga térmica
Esta aspiradora cuenta con un protector de sobrecarga térmica que
se activa de manera automática para proteger la aspiradora contra
sobrecalentamiento. Si una obstrucción interrumpe el ujo de aire normal
hacia el motor, el protector térmico apaga el motor automáticamente
para permitir que el motor se enfríe y evitar posibles daños a la aspiradora.
Para corregir el problema: Apague la aspiradora y desenchufe el cable
de alimentación. Compruebe si hay obstrucciones y quítelas de ser
necesario. Revise también los ltros y límpielos si están sucios.
Espere aproximadamente 30 minutos y luego enchufe la aspiradora y
vuelva a encenderla para ver si el protector del motor se ha reiniciado. El
sistema de protección térmica no se reiniciará hasta que la aspiradora se
haya enfriado por completo.
Protección contra sobrecarga del
motor del agitador
El agitador tiene una protección incorporada contra daños del motor por
si el agitador se atasca. Si el agitador reduce la velocidad o se detiene,
el protector de sobrecarga del agitador apaga el agitador y el motor de
succión.
Para corregir el problema: Apague y desenchufe la aspiradora, quite la
obstrucción y encienda de vuelta la aspiradora con el botón de encendido
presione el botón PISO/ALFOMBRA (FLOOR/CARPET) nuevamente.
Page 32

Respete siempre las instrucciones de seguridad cuando limpie y realice el mantenimiento de la aspiradora.
CUIDADO Y& LIMPIEZA
33
Cómo guardar la aspiradora
Cuando no la use, enrolle el cable alrededor del gancho para cable como
se muestra. La manguera puede enrollarse alrededor de la manija o de
la vara si ésta se guarda sin extender. Guarde el cepillo para polvo y el
accesorio rinconero en el lugar correspondiente, a la izquierda de la
aspiradora.
ADVERTENCIA
y Peligro de descarga eléctrica y lesión personal.
y Tenga cuidado al enrollar el cable. Si lo aprieta mucho al enrollarlo
puede ocasionarle daños. No entrecruce el cable al enrollarlo. Un
cable
dañado puede presentar peligros de descarga eléctrica,
lesión personal o daño.
Componentes del tanque de polvo
El tanque de polvo está compuesto por varios componentes clave.
Asegúrese siempre de que todas las piezas estén correctamente
colocadas luego de vaciar el tanque de polvo.
NUNCA utilice la aspiradora si no tiene todos los ltros en su sitio.
No use NUNCA la aspiradora con ltros o componentes húmedos.
Componentes clave:
1. Marco del ltro y ltro de espuma:
Captura las partículas de tamaños medianos a nos. Está
compuesto por el marco del ltro y& el ltro para espuma. Estos
componentes son lavables.
2. Filtro de espuma
3. Tapa del tanque de polvo: Ábrala para acceder al ltro de espuma.
4. Separador de polvo: Separa el polvo del aire que ingresa.
5. Puerta lateral: Ábrala para sacar la suciedad del separador de polvo.
6. Lengüeta de prevención: Evita que se cierre la tapa sin tener un
ltro instalado.
7. Tanque de polvo: Tanque donde se acumula la suciedad.
8. Base: Ábrala para vaciar el tanque de polvo.
ESPAÑOL
ESPAÑOL
1. Marco del
ltro
2. Filtro de
espuma
4. Separador de
polvo
8. Base
3. Tapa del
tanque de
polvo
6. Lengüeta de
prevención
5. Puerta lateral
7. Tan que de polvo
Page 33

Siempre desenchufe el cable de alimentación del
tomacorriente antes de realizar el mantenimiento de
descarga eléctrica o lesiones personales.
ADVERTENCIA
obtener
el
vacíe
siempre
el
tanque
de
cuando
eldesuciedad
a
CÓMO QUITAR EL TANQUE DE POLVO
el
desbloquear
el
tanque
de
el
tanque
atrás
y
sáquelo
de
aspiradora
arriba.
eldevaciado
de
suciedad
y
abra
como
se
Coloque
el
tanque
en
el
soporte
e
adelante
que
encaje
y
clic.
Asegúrese
de
queeltanque
de
esté
colocado.
conseguir
óptimo,
el
tanque
Quite
el
tanque
de
de
aspiradora.
2. elel
vaciado
de
suciedad
y
abra
3.
el
tanque
con
suaveocon
toalla
de
4.
Suelte
el
seguro
de
derecha
e
5.
Quite
brasyotros
que
en
el
separador
de
saque
conos
sujetos
a
toque
el
engranaje
el
ESPAÑOL
22
ÍNDICE
ÍNDICE
23 GARANTÍA DE LA ASPIRADORA
24 INFORMACIÓN IMPORTANTEDE SE-
GURIDAD
26 PIEZAS Y CARACTERÍSTICAS
27
ARMADO
27 Cómo desembalar la aspiradora
27 Piezas de montaje
27 Colocación de la vara
28 Conexión de la manguera
28 Guardado de accesorios
28 Guardado del cable
29 OPERACIÓN
29 Desbloqueo de la vara
33 CUIDADO Y LIMPIEZA
33 Cómo guardar la aspiradora
33 Componentes del tanque de polvo
34 Vaciado del tanque de polvo
34 Limpieza del tanque de polvo
35 Limpieza del filtro de espuma
35 Limpieza del filtro HEPA
36 Accesorio de turbina para remover pelos de
mascotas
36 Mantenimiento del agitador
36 Reemplazo de la correa del agitador
37 Eliminación de obstrucciones
38 Limpieza del exterior de la aspiradora
39 RESOLUCIÓN DE PROBLEMAS
ESPAÑOL
CUIDADO Y& LIMPIEZA
Page 34

CUIDADO Y& LIMPIEZA
35
Limpieza del filtro de espuma
PRECAUCIÓN
y Un ltro húmedo puede causar daños permanentes a la
aspiradora.
y Asegúrese de que los ltros estén completamente secos
antes de volver a colocarlos.
Para un desempeño óptimo, revise los ltros todos los meses y
límpielos cuando sea necesario. No cierre la tapa del tanque de
polvo sin colocar el ltro de espuma.
Para limpiar el filtro de espuma:
1. Quite el tanque de polvo de la aspiradora.
2. Levante el seguro de la tapa del tanque de polvo y abra la tapa.
edos.
Si percibe una disminución de la succión que no se soluciona con la
limpieza del ltro de espuma, es posible que tenga que reemplazar
el ltro de espuma. Para comprar ltros de espuma adicionales a LG,
llame al 1-800-243-0000 (EE. UU.) o al 1-888-542-2623 (Canadá) y pida
las piezas de la página 6.
Limpieza del filtro HEPA
Para limpiar el filtro de partículas de aire de alta eficiencia
(HEPA), haga lo siguiente:
1. Quite la cubierta del ltro de escape de aire.
Filtro de escape de aire
2. Saque el ltro del cuerpo de la aspiradora.
Filtro
ESPAÑOL
ESPAÑOL
3. Saque el ltro de espuma.
4. Separe el ltro de espuma del marco del ltro.
5. Sacuda la suciedad o los residuos y enjuague el ltro de espuma y el
marco de ltro con agua limpia. Escurra el agua del ltro de espuma.
6. Seque por completo pero sin exponerlo al sol.
No use NUNCA la aspiradora con ltros o componentes húm-
3. Lave bien el ltro con agua corriente.
4. Elimine la humedad.
5. Seque por completo pero sin exponerlo al sol.
Page 35

CUIDADO Y& LIMPIEZA
22
ÍNDICE
ÍNDICE
23 GARANTÍA DE LA ASPIRADORA
24 INFORMACIÓN IMPORTANTEDE SE-
GURIDAD
26 PIEZAS Y CARACTERÍSTICAS
27
ARMADO
27 Cómo desembalar la aspiradora
27 Piezas de montaje
27 Colocación de la vara
28 Conexión de la manguera
28 Guardado de accesorios
28 Guardado del cable
29 OPERACIÓN
29 Desbloqueo de la vara
33 CUIDADO Y LIMPIEZA
33 Cómo guardar la aspiradora
33 Componentes del tanque de polvo
34 Vaciado del tanque de polvo
34 Limpieza del tanque de polvo
35 Limpieza del filtro de espuma
35 Limpieza del filtro HEPA
36 Accesorio de turbina para remover pelos de
mascotas
36 Mantenimiento del agitador
36 Reemplazo de la correa del agitador
37 Eliminación de obstrucciones
38 Limpieza del exterior de la aspiradora
39 RESOLUCIÓN DE PROBLEMAS
36
ESPAÑOL
ESPAÑOL
Accesorio de turbina para remover
pelos de mascotas
Para limpiar el accesorio de turbina para remover pelos de
mascotas, haga lo siguiente:
1. Quite los cuatro tornillos de la parte inferior del accesorio de turbina
para remover pelos de mascotas.
2. Levante la cubierta.
3. Quite la suciedad.
Para volver a armarlo:
4. Presione cuidadosamente la cubierta contra las lengüetas hasta que
encajen en su lugar.
5. Inserte y ajuste los tornillos que quitó en el paso 1. NO los ajuste
excesivamente.
3. Coloque el cabezal sobre un trapo o una supercie plana. Quite los
seis tornillos de la parte inferior del cabezal y retire la cubierta.
4. Quite cuidadosamente los hilos, pelos, etc. que se hayan acumulado
en el agitador y en el área del agitador.
Para volver a instalar la cubierta, siga los pasos anteriores en orden
inverso.
ADVERTENCIA
y Peligro de descarga eléctrica y lesión personal.
y Siempre debe desenchufar el cable de alimentación del
tomacorriente antes de realizar el mantenimiento. Si no
lo hace, correrá riesgo de sufrir una descarga eléctrica o
lesiones personales.
NO utilice el accesorio de turbina para remover pelos de mascotas en animales.
ADVERTENCIA
y Peligro de descarga eléctrica y lesión personal.
y Siempre debe desenchufar el cable de alimentación del
tomacorriente antes de realizar el mantenimiento.
y Si no lo hace, correrá riesgo de sufrir una descarga eléctrica
o lesiones personales.
Mantenimiento del agitador
Revise a menudo el área del cepillo del agitador para comprobar si
contiene acumulaciones de pelo, hilo o cordel.
Quite la cubierta del cepillo del agitador:
1. Desenchufe la aspiradora. Presione el pedal del pie izquierdo para
desbloquear el cabezal. Baje la manija hasta que la aspiradora quede
tendida en el piso.
2. Gire la aspiradora hasta que el agitador quede mirando hacia arriba.
Reemplazo de la correa del agitador
Si la correa se rompe, haga lo siguiente para reemplazarla.
Para remplazar la correa:
1. Quite la cubierta del cepillo del agitador.
2. Levante el agitador hacia afuera.
3. Desenganche la correa vieja de la polea de impulsión. Asegúrese de
que no queden piezas de la correa rota atrapadas en el agitador o en
el área de la polea de impulsión.
4. Enganche la nueva correa sobre la polea de impulsión del motor del
agitador.
Page 36

CUIDADO Y& LIMPIEZA
37
5. Enganche el agitador a través de la correa, asegurándose de que la
correa esté alineada con la sección de polea del agitador.
6. Baje el agitador hasta colocarlo en su sitio y asegúrese de que las
lengüetas ovaladas encajen en los huecos del cabezal.
7. Vuelva a colocar la cubierta del cepillo del agitador como se describió
anteriormente.
Si necesita una correa de repuesto, pida al centro de servicios de
LG la correa con nro. de pieza MAS62064002.
Si percibe una disminución de la succión, primero revise los ltros como
se describe en la página 13. Si los ltros están limpios, es posible que
haya una obstrucción. Las echas muestran las áreas en donde es más
probable que se produzcan obstrucciones.
Para comprobar si hay obstrucciones:
1. Revise la parte de la manguera que se conecta con la manija
presionando los dos botones para desbloquearla que se encuentran
en el extremo superior de la manguera.
ESPAÑOL
ESPAÑOL
Eliminación de obstrucciones
ADVERTENCIA
y Peligro de descarga eléctrica y lesión personal.
y Siempre debe desenchufar el cable de alimentación del
tomacorriente antes de realizar el mantenimiento.
y Si no lo hace, correrá riesgo de sufrir una descarga eléctrica
o lesiones personales.
2. Extraiga el tanque de polvo y revise las conexiones de entrada de éste
y las del cuerpo donde se conectan con el cuerpo de la aspiradora.
Page 37

ESPAÑOL
22
ÍNDICE
ÍNDICE
23 GARANTÍA DE LA ASPIRADORA
24 INFORMACIÓN IMPORTANTEDE SE-
GURIDAD
26 PIEZAS Y CARACTERÍSTICAS
27
ARMADO
27 Cómo desembalar la aspiradora
27 Piezas de montaje
27 Colocación de la vara
28 Conexión de la manguera
28 Guardado de accesorios
28 Guardado del cable
29 OPERACIÓN
29 Desbloqueo de la vara
33 CUIDADO Y LIMPIEZA
33 Cómo guardar la aspiradora
33 Componentes del tanque de polvo
34 Vaciado del tanque de polvo
34 Limpieza del tanque de polvo
35 Limpieza del filtro de espuma
35 Limpieza del filtro HEPA
36 Accesorio de turbina para remover pelos de
mascotas
36 Mantenimiento del agitador
36 Reemplazo de la correa del agitador
37 Eliminación de obstrucciones
38 Limpieza del exterior de la aspiradora
39 RESOLUCIÓN DE PROBLEMAS
ESPAÑOL
CUIDADO Y& LIMPIEZA
38
3. Revise la parte de la manguera que se conecta con la parte posterior
del cuerpo presionando los botones para desbloquearla que se
encuentran en el extremo inferior de la manguera.
4. Voltee la aspiradora y revise la conexión de entrada del agitador.
ADVERTENCIA
y Peligro de descarga eléctrica y lesión personal.
y Siempre debe desenchufar el cable de alimentación del
tomacorriente antes de realizar el mantenimiento. Si no
lo hace, correrá riesgo de sufrir una descarga eléctrica o
lesiones personales.
Limpieza del exterior de la
aspiradora
Limpie el exterior de la aspiradora con un paño limpio y suave humedecido
y escurrido.
NO permita que ingrese agua por ninguna abertura en la aspiradora.
NO limpie los accesorios en la lavadora de vajilla ni en el lavarropas.
Limpie los accesorios en agua jabonosa tibia, enjuáguelos y permita que
el aire los seque por completo.
NO use los accesorios si están mojados.
5. Revise cuidadosamente. Quite el tornillo del oricio.
Page 38

RESOLUCIÓN DE PROBLEMAS
39
Lea esta sección para encontrar soluciones sencillas
del equipo distintos a los descritos en este manual, deberá hacerlo a través de su centro de servicios de LGE local.
ADVERTENCIA
ADVERTENCIA
y Peligro de descarga eléctrica y lesión personal.
y Siempre debe desenchufar el cable de alimentación del tomacorriente antes de realizar el mantenimiento. Si no lo hace, correrá riesgo
de sufrir una descarga eléctrica o lesiones personales.
Problema Posibles causas Soluciones
La aspiradora no funciona. Aspiradora desenchufada del tomacorriente de la
pared.
Protección contra sobrecarga del motor del agitador. Desenchufe la aspiradora, verique si hay obstrucciones en el
Protector térmico activado. Deje que la aspiradora se enfríe.
Poca aspiración de suciedad. Tanque de polvo lleno u obstruido. Vacíe el tanque de polvo y limpie los ltros.
Tanque de polvo mal instalado. Asegúrese de que todos los componentes y ltros del tanque
Manguera, varilla o cabezal obstruidos. Compruebe si hay obstrucciones.
Correa rota o instalada incorrectamente. Revise la correa y reemplácela de ser necesario.
Protección contra sobrecarga del motor del agitador
activada.
Agujero en la manguera. Inspeccione la manguera cuidadosamente. Reemplácela de ser
Agitador gastado. Póngase en contacto con el servicio técnico.
El agitador no gira. El interruptor está apagado (la unidad está en modo
desbordado).
La aspiradora está en posición vertical. Presione el pedal para desbloquear el cuerpo de la aspiradora
La protección contra sobrecarga del motor del
agitador se
La correa está rota. Reemplace la correa.
Escapa polvo del tanque de
polvo.
El agitador del accesorio de
turbina para remover pelos de
mascotas no funciona cuando
se lo conecta.
El accesorio no presenta
succión cuando se lo usa con
la manija.
El tanque de polvo parece
ojo cuando se lo levanta de la
manija para transportarlo.
Tanque de polvo mal instalado. Asegúrese de que todos los componentes y ltros del tanque
La tapa del tanque de polvo no está cerrada. Revise la tapa del tanque de polvo.
La base no está trabada. Asegúrese de que la base esté cerrada y trabada.
Agitador o soportes del agitador sucios. Limpie el interior del accesorio de turbina para remover pelos
Obstrucción en el conducto de aire de la turbina. Limpie el interior del accesorio de turbina para remover pelos
Escasa succión de la aspiradora. Compruebe si hay obstrucciones.
La varilla principal sigue conectada a la base. Quite la varilla.
Esto es normal. La aspiradora está diseñada así para evitar que el tanque se
para problemas de funcionamiento menores. Si necesita realizar un mantenimiento o una reparación
Asegúrese de que el cable esté enchufado a un tomacorriente
que funcione.
agitador y vuelva a encender la unidad.
de polvo estén instalados correctamente.
Desenchufe la aspiradora y verique si hay obstrucciones en el
agitador. Presione el botón de reinicio.
necesario.
Encienda el interruptor del agitador.
e inclínelo hasta atrás.
Desenchufe la aspiradora, verique si hay obstrucciones en el
ha activado (el cepillo está atorado).
agitador y vuelva a encender la unidad.
de polvo estén instalados correctamente.
de mascotas.
de mascotas.
separe.
ESPAÑOL
ESPAÑOL
Page 39

P/NO : MFL67230701 www.lg.com
MANUEL D’UTILISATION
ASPIRATEUR
Avant de mettre votre appareil en fonctionnement, lisez ce
manuel attentivement et rangez-le soigneusement à titre de
référence ulteriéure.
LuV350P*
FRANÇAIS
ENGLISH
ESPAÑOL
FRANÇAIS
Page 40

42
42
FRANÇAIS
TABLE DES MATIÈRES
TABLE DES MATIÈRES
43 GARANTIE DE L'A SPIR AT EU R
44
INFORMATION DE SÉCURITÉ IMPOR-
TANTE
46 PIÈCES ET FONCTIONS
47 ASSEMBLAGE
47 Déballage de l'aspirateur
47 Pièces d'assemblage
47 Fixation du tube
48 Fixation du boyau
48 Rangement d'accessoires
48 Rangement de cordon
49 Opération
49 Opération de dégagement du tube
49 Opération de dégagement du corps
50 Accessoires
50 Tableau d'utilisation d'accessoires
51 Utilisation du tube
51 Installation des accessoires
51 Conseils et trucs
52 Utilisation de l'outil à turbine pour les poils
d'animaux domestiques
52 Escaliers et paliers
52 Utilisation du tube
53 ENTRETIEN & NETTOYAGE
53 Rangement de l'aspirateur
53 Composants du réservoir de poussières
54 Vider le réservoir de poussières
54 Nettoyage du réservoir de poussières
55 Nettoyage du filtre en mousse
55 Nettoyage du filtre HEPA
56 Outil à turbine pour les poils d'animaux domes-
tiques
56 Entretien de l'agitateur
56 Remplacement de la courroie d'agitateur
57 Élimination des blocages
58 Nettoyage de l'extérieur de l'aspirateur
59 DÉPANNAGE
42
TABLE DES MATIÈRES
TABLE DES MATIÈRES
43 GARANTIE DE L'A SPIR AT EU R
44
INFORMATION DE SÉCURITÉ IMPOR-
TANTE
46 PIÈCES ET FONCTIONS
47 ASSEMBLAGE
47 Déballage de l'aspirateur
47 Pièces d'assemblage
47 Fixation du tube
48 Fixation du boyau
48 Rangement d'accessoires
48 Rangement de cordon
49 Opération
49 Opération de dégagement du tube
49 Opération de dégagement du corps
50 Accessoires
50 Tableau d'utilisation d'accessoires
51 Utilisation du tube
51 Installation des accessoires
51 Conseils et trucs
52 Utilisation de l'outil à turbine pour les poils
d'animaux domestiques
52 Escaliers et paliers
52 Utilisation du tube
52 Protection de surcharge du moteur d'agitateur
52 Protection de surcharge thermique
53 ENTRETIEN & NETTOYAGE
53 Rangement de l'aspirateur
53 Composants du réservoir de poussières
54 Vider le réservoir de poussières
54 Nettoyage du réservoir de poussières
55 Nettoyage du filtre en mousse
55 Nettoyage du filtre HEPA
56 Outil à turbine pour les poils d'animaux domes-
tiques
56 Entretien de l'agitateur
56 Remplacement de la courroie d'agitateur
57 Élimination des blocages
58 Nettoyage de l'extérieur de l'aspirateur
59 DÉPANNAGE
TABLE DES MATIÈRES
TABLE DES MATIÈRES
43 GARANTIE DE L'A SPIR AT EU R
FRANÇAIS
44
46 PIÈCES ET FONCTIONS
FRANÇAIS
47 ASSEMBLAGE
47
47 Déballage de l'aspirateur
47
47 Pièces d'assemblage
47
47 Fixation du tube
48
48 Fixation du boyau
48
48 Rangement d'accessoires
48
48 Rangement de cordon
49 Opération
49 Opération de dégagement du tube
49
49 Opération de dégagement du corps
49
50 Accessoires
50
50 Tableau d'utilisation d'accessoires
50
51 Utilisation du tube
51
51 Installation des accessoires
51
51 Conseils et trucs
51
52 Utilisation de l'outil à turbine pour les poils
52
52 Escaliers et paliers
52
52 Protection de surcharge du moteur d'agitateur
52
52 Protection de surcharge thermique
52
INFORMATION DE SÉCURITÉ IMPOR-
TANTE
d'animaux domestiques
53 ENTRETIEN & NETTOYAGE
53 Rangement de l'aspirateur
53
53 Composants du réservoir de poussières
53
54 Vider le réservoir de poussières
54
54 Nettoyage du réservoir de poussières
54
55 Nettoyage du filtre en mousse
55
55 Nettoyage du filtre HEPA
55
56 Outil à turbine pour les poils d'animaux domes-
56
tiques
56 Entretien de l'agitateur
56
56 Remplacement de la courroie d'agitateur
56
57 Élimination des blocages
57
58 Nettoyage de l'extérieur de l'aspirateur
58
59 DÉPANNAGE
Page 41

GARANTIE
43
GARANTIE (É.-U.)
LG Electronics Inc. réparera ou remplacera votre appareil, à la discrétion de LG, s'il s'avère défectueux au niveau des matériaux ou du travail suite à une utilisation résidentielle, durant la période de garantie indiquée plus bas, en vigueur à partir de la date d'achat par le consommateur original de l'appareil. Cette
garantie limitée est valide seulement pour l'acheteur original de l'appareil et n'est oerte que lorsque l'appareil est utilisé au Canada et aux É.-U.
PÉRIODE DE GARANTIE COMMENT LE SERVICE EST TRAITÉ
Cinq ans
De la date d'achat original
CETTE GARANTIE REMPLACE TOUTES AUTRES GARANTIES, EXPRESSES OU IMPLICITES, INCLUANT, MAIS SANS S'Y LIMITER, TOUTE GARANTIE DE
COMMERCIALITÉ OU D'APTITUDE D'EMPLOI. DANS LA MESURE OÙ TOUTE GARANTIE IMPLICITE EST REQUISE PAR LA LOI, SA DURÉE SE LIMITE À
LA PÉRIODE DE GARANTIE EXPRESSE INDIQUÉE CI-DESSUS. LG NE SERA PAS TENUE RESPONSABLE DE TOUS DOMMAGES CONSÉCUTIFS OU INDIRECTS DE QUELQUE SORTE, INCLUANT LES PERTES DE REVENUS OU PROFITS, SE RAPPORTANT À L'APPAREIL. CERTAINES JURIDICTIONS NE PERMETTENT PAS DE LIMITATIONS DE LA DURÉE DE LA GARANTIE IMPLICITE NI D'EXCLUSIONS DE DOMMAGES INDIRECTS OU CONSÉCUTIFS, ALORS
IL SE PEUT QUE LES LIMITATIONS OU LES EXCLUSIONS PRÉCÉDENTES NE S’APPLIQUENT PAS DANS VOTRE CAS.
CETTE GARANTIE COUVRE SEULEMENT LES DÉFAUTS DE MATÉRIAU ET DE FABRICATION. LGE NE PAIERA PAS :
1. les articles remplaçables qui s'usent, incluant, mais sans s'y limiter, les ltres et les courroies.
2. un technicien de service pour montrer à l'utilisateur l'installation, l'utilisation ou l'entretien approprié(e) de l'appareil.
3. un technicien de service pour nettoyer ou entretenir cet appareil.
4. des dommages ou défaillances de cet appareil s'il n'est pas installé, utilisé ou entretenu selon toutes les instructions fournies avec l'appareil.
5. des dommages ou défaillance de cet appareil suite à un accident, abus, mauvaise utilisation ou utilisation autre que celle prévue.
6. des dommages ou défaillance de cet appareil à cause de l'utilisation de détergents, nettoyants, produits chimiques ou ustensiles autres que ce qui est
recommandé dans toutes les instructions fournies avec l'appareil.
7. des dommages ou défaillances de pièces ou des systèmes découlant de modications non autorisées de cet appareil.
Cette garantie est oerte à l'acheteur original pour les appareils achetés pour une utilisation résidentielle aux É.-U. En Alaska, cette garantie exclut le coût
d'expédition ou
Certaines juridictions ne permettent pas d’exclusions ou de limitations de garanties consécutives, alors il se peut que les limitations ou les exclusions précédentes ne s’appliquent pas dans votre cas. Cette garantie vous donne des droits légaux spéciques; vous pouvez aussi avoir d'autres droits qui varieront d'un
État à un autre. Pour connaître vos droits juridiques, consultez vos aaires des consommateurs locales ou d'état ou l'avocat général de votre État.
INFORMATION D'AIDE À LA CLIENTÈLE :
les appels de service à votre résidence.
Toute pièce de l'aspirateur qui connaît une défaillance à cause d'un défaut de matériaux ou de fabrication. Durant cette garantie complète de cinq ans, LG orira aussi, sans frais,le service d'atelier et
la main d'œuvre pour remplacer toute pièce défectueuse.
FRANÇAIS
FRANÇAIS
Pour prouver la couverture de garantie Conservez votre reçu de vente pour prouver la date d'achat.
Une copie de votre reçu de ventes doit être présentée au moment où le service sous
garantie est fourni.
Pour connaître le centre de service autorisé le plus proche ou le
concessionnaire des ventes ou pour obtenir de l'aide pour les
produits, les clients ou le service
appelez le 1-800-243-0000 (24 heures - 365 jours par année) et choisissez l'option
appropriée du menu; ou visitez notre site Web à http://www.lg.com
(Au Canada, appelez le 1-888-542-2623, site Web http://www.lg.com)
Page 42

44
42
TABLE DES MATIÈRES
TABLE DES MATIÈRES
43 GARANTIE DE L'A SPIR AT EU R
44
INFORMATION DE SÉCURITÉ IMPOR-
TANTE
46 PIÈCES ET FONCTIONS
47 ASSEMBLAGE
47 Déballage de l'aspirateur
47 Pièces d'assemblage
47 Fixation du tube
48 Fixation du boyau
48 Rangement d'accessoires
48 Rangement de cordon
49 Opération
49 Opération de dégagement du tube
49 Opération de dégagement du corps
50 Accessoires
50 Tableau d'utilisation d'accessoires
51 Utilisation du tube
51 Installation des accessoires
51 Conseils et trucs
52 Utilisation de l'outil à turbine pour les poils
d'animaux domestiques
52 Escaliers et paliers
52 Utilisation du tube
52 Protection de surcharge du moteur d'agitateur
52 Protection de surcharge thermique
53 ENTRETIEN & NETTOYAGE
53 Rangement de l'aspirateur
53 Composants du réservoir de poussières
54 Vider le réservoir de poussières
54 Nettoyage du réservoir de poussières
55 Nettoyage du filtre en mousse
55 Nettoyage du filtre HEPA
56 Outil à turbine pour les poils d'animaux domes-
tiques
56 Entretien de l'agitateur
56 Remplacement de la courroie d'agitateur
57 Élimination des blocages
58 Nettoyage de l'extérieur de l'aspirateur
59 DÉPANNAGE
LISEZ TOUTES LES CONSIGNES AVANT L'UTILISATION
Lisez et suivez toutes les instructions avant d'utiliser votre aspirateur pour prévenir les risques d'incendies, de choc électrique, de blessures ou de dommages
FRANÇAIS
en utilisant l'aspirateur. Ce guide ne couvre pas toutes les situations possibles qui pourraient sur venir. Contactez toujours votre agent de service ou le
fabricant pour les problèmes que vous ne comprenez pas.
FRANÇAIS
INFORMATION DE SÉCURITÉ IMPORTANTE
CONSIGNES DE SÉCURITÉ IMPORTANTES
CONSERVEZ CES INSTRUCTIONS
Ceci est le symbole d'alerte de sécurité. Ce symbole vous indique des dangers possibles qui pourraient mener à des dommages à la propriété
et/ou à de graves blessures ou à la mort.
Tous les messages de sécurité suivront le symbole d'alerte de sécurité et l'un des deux mots AVERTISSSEMENT ou MISE EN GARDE.
AVERTISSEMENT
MISE EN GARDE
AVERTISSEMENT
y Coupez le courant avant tout entretien ou nettoyage de l'aspirateur
ou lorsque l'aspirateur n'est pas utilisé. Sinon ceci pourrait mener à des
chocs électriques ou des blessures.
y N'utilisez pas l'aspirateur pour ramasser quelque chose qui brûle
ou fume comme des cigarettes ou des cendres chaudes. Ceci
pourrait mener à la mort, à des incendies ou à des chocs électriques.
y N'aspirez pas de substances inflammables ou explosives comme
l'essence, le benzène, les diluants, le propane (liquides ou gaz).
Les fumées de ces substances peuvent créer des dangers d'incendie
ou d'explosion. Sinon ceci pourrait mener à la mort ou à des blessures.
y Ne manipul ez pas la fiche ou l'a spirateur avec les mai ns mouillées.
Ceci pourrait mener à la mort ou à des chocs électriques.
Indique une situation dangereuse qui, si elle n'est pas évitée, pourrait mener à la mort ou à de graves blessures.
Indique une situation dangereuse qui, si elle n'est pas évitée, pourrait mener à des blessures mineures ou modérées.
y Ne débranchez pas l'aspirateur en tirant sur le cordon. Sinon ceci
pourrait endommager l'article ou produire des chocs électriques. Pour
débrancher, agrippez la fiche et non pas le cordon.
y Gardez les cheveux, les vêtements amples , les doigts et toutes les
parties du corps loin des ouvertures et des pièces mobiles. Sinon
ceci pourrait mener à des chocs électriques ou des blessures.
y Ne tirez pas ou ne transportez pas l'aspirateur par son cordon,
n'utilisez pas le cordon comme poignée, ne refermez pas une
porte dessus et ne le frottez pas contre les bords ou les coins
tranchants.
y Ne passez pas l'aspirateur en marche sur le cordon. Gardez le
cordon loin de surfaces chauées. Sinon ceci pourrait mener à des
chocs électriques, à des blessures, des incendies ou endommager
l'appareil.
y L'aspirateur n'est pas un jouet et les enfants ne devraient pas
l'utiliser. Attention tout particulièrement en utilisant l'aspirateur
près d'enfants. Des blessures ou des dommages à l'appareil
pourraient en découler.
y N'utilisez pas l'aspirateur si le cordon ou la che est endommagé(e)
ou défectueux(se). Des blessures ou des dommages à l'appareil
peuvent en résulter. Dans ces cas, contactez l'agent de service LG
Electronics pour éviter les dangers.
y N'utilisez pas l'aspirateur s'il a été sous l'eau. Des blessures ou des
dommages à l'appareil peuvent en résulter. Dans ces cas, contactez
l'agent de service LG Electronics pour éviter les dangers.
y Ne continuez pas à passer l'aspirateur s'il manque des pièces ou si
elles sont endommagées. Des blessures ou des dommages à l'appareil
peuvent en résulter. Dans ces cas, contactez l'agent de service LG
Electronics pour éviter les dangers.
y N'utilisez pas de rallonge avec cet aspirateur. Sinon il pourrait y
avoir des risques d'incendie ou de dommages à l'appareil.
y Utilisez la bonne tension. Utiliser la mauvaise tension pourrait
endommager le moteur et peut-être causer des blessures à l'utilisateur.
La bonne tension est indiquée au bas de l'aspirateur.
y Éteignez toutes les commandes avant de débrancher. Sinon ceci
pourrait mener à des chocs électriques ou des blessures.
y Ne changez pas la che de quelque façon que ce soit. Sinon ceci
pourrait mener à des chocs électriques, à des blessures, des incendies,
endommager l'appareil ou provoquer la mort. Si la che n'entre pas,
contactez un électricien qualié pour installer une prise appropriée.
y Les réparations des appareils électriques devraient être
exécutées seulement par des ingénieurs de service qualiés. De
mauvaises réparations pourraient mener à de graves dangers pour
l'utilisateur.
y Ne mettez pas les doigts près de l'engrenage. Ne pas suivre cet
avertissement pourrait mener à des blessures.
y N'utilisez pas à l'extérieur ou sur des surfaces mouillées. Ne pas
suivre cet avertissement pourrait mener à des chocs électriques ou à
des blessures.
y Ne mettez rien entre le corps de l'aspirateur et l'espace de la tête
de l'agitateur. Des blessures ou des dommages à l'appareil peuvent
en résulter.
y Cet appareil contient des produits chimiques qui de l'avis de
l'État de Californie pourraient causer des cancers et une toxicité
reproductive. Lavez-vous les mains après sa manipulation.
y Soyez tout particulièrement prudent en nettoyant les escaliers.
y Ne laissez pas l'appareil branché lorsqu'il n'est pas utilisé. Débranchez
de la prise lorsqu'il n'est pas utilisé et avant tout entretien ou
réparation.
Page 43

MISE EN GARDE
24
INSTRUCCIONES DE SEGURIDAD IMPORTANTES
GUARDE ESTAS INSTRUCCIONES
LEA TODAS LAS INDICACIONES ANTES DE USAR EL PRODUCTO
Lea y siga todas las instrucciones antes de usar la aspiradora para prevenir riesgos de incendio, descarga eléctrica, lesión personal o daños cuando use
la aspiradora. Esta guía no cubre todos los posibles inconvenientes que puedan surgir. Siempre debe ponerse en contacto con su agente de servicio o
fabricante en caso de que surjan problemas que no comprenda.
Este es el símbolo de alerta de seguridad. Este símbolo lo alertará en caso de que existan riesgos que puedan acarrear daños a la propiedad y/o
lesiones corporales graves o muerte.
Todos los mensajes de seguridad seguirán al símbolo de alerta de seguridad y a los términos ADVERTENCIA o PRECAUCIÓN.
ADVERTENCIA
Indica una situación peligrosa que, si no se evita, podría ocasionar la muerte o lesiones graves.
PRECAUCIÓN
Indica una situación peligrosa que, si no se evita, podría ocasionar lesiones menores o moderadas.
INFORMACIÓN IMPORTANTE DE SEGURIDAD
INFORMATION DE SÉCURITÉ IMPORTANTE
45
y N'insérez pas d'objets dans les ouvertures de l'aspirateur. Ne
pas suivre ces instructions pourrait mener à des blessures ou à des
dommages à l'appareil.
y N'utilisez pas l'aspirateur si des ouvertures sont bloquées. Gardez
les ouvertures de l'aspirateur libres de poussière, peluches,
cheveux, poils et toutes autres choses qui pourraient réduire la
circulation d'air. Ne pas suivre ces instructions pourrait mener à des
dommages à l'appareil.
y N'utilisez pas l'aspirateur si le réservoir et / ou les ltres ne sont
pas installés correctement. Ne pas suivre ces instructions pourrait
endommager l'appareil.
y Nettoyez toujours le réservoir de poussières et les ltres après
avoir passé l'aspirateur sur les nettoyants de moquettes ou
rafraîchisseurs, poudres et poussière ne. Ces produits peuvent
bloquer les ltres, réduire la circulation d'air et /ou endommager
l'aspirateur. Ne pas nettoyer le réservoir de poussières et les ltres
pourrait endommager l'aspirateur de manière permanente.
y N'utilisez pas l'aspirateur pour ramasser des objets tranchants
ou durs comme les petits jouets, les épingles, les trombones, etc.
Ceci pourrait endommager l'aspirateur ou le réservoir de poussières.
y Rangez l'aspirateur à l'intérieur. Rangez l'aspirateur après l'avoir
utilisé pour éviter de trébucher dessus.
y Les jeunes enfants ne devraient pas utiliser l'aspirateur. Ne
pas suivre ces instructions pourrait mener à des blessures ou à des
dommages à l'appareil.
y Suivez toutes les instructions du manuel du propriétaire.
Utilisez seulement les accessoires et les pièces approuvés ou
recommandés par LG. Ne pas suivre ces instructions pourrait
endommager l'appareil.
y Ne placez jamais l'aspirateur en haut d'un escalier. Ne pas suivre
ces instructions pourrait mener à des blessures ou endommager
l'appareil.
y Assurez-vous que les ltres (ltre d'échappement et ltre de
sécurité du moteur) sont bien secs avant de les placer dans
l'aspirateur. Ne pas suivre ces instructions pourrait endommager
l'appareil.
y Ne faites pas sécher les ltres dans un four ou un micro-ondes.
Ne pas suivre les instructions pourrait mener à des risques d'incendie.
y N'asséchez pas les ltres dans une sécheuse. Ne pas suivre les
instructions pourrait mener à des risques d'incendie.
y N'asséchez pas les ltres près d'une amme nue. Ne pas suivre les
instructions pourrait mener à des risques d'incendie.
y Éteignez toujours l'aspirateur avant de brancher ou débrancher
le boyau. Des blessures ou des dommages à l'appareil peuvent en
résulter.
y L'aspirateur est réservé à une utilisation résidentielle.
y Vous êtes responsable d'assembler et d'utiliser correctement
votre aspirateur.
FRANÇAIS
FRANÇAIS
y Utilisez s eulement des piè ces produites ou r ecommandées pa r les
techniciens en réparation qualiés. Ne pas suivre ces instructions
pourrait endommager l'appareil.
Protecteur thermique :
Cet aspirateur est doté d'un thermostat spécial qui protège l'aspirateur contre toute surchaue du moteur. Si l'aspirateur s'éteint soudainement,
éteignez l'interrupteur et débranchez l'aspirateur.
Vériez l'aspirateur pour toute source possible de surchaue comme un réservoir de poussières plein, un tuyau bloqué ou un ltre bloqué. Si ces
conditions existent, corrigez-les et attendez au moins 30 minutes avant d'essayer d'utiliser l'aspirateur. Après 30 minutes, rebranchez l'aspirateur et
mettez l'interrupteur en marche. Si l'aspirateur ne fonctionne toujours pas, contactez un électricien qualié.
Page 44

46
42
TABLE DES MATIÈRES
TABLE DES MATIÈRES
43 GARANTIE DE L'A SPIR AT EU R
44
INFORMATION DE SÉCURITÉ IMPOR-
TANTE
46 PIÈCES ET FONCTIONS
47 ASSEMBLAGE
47 Déballage de l'aspirateur
47 Pièces d'assemblage
47 Fixation du tube
48 Fixation du boyau
48 Rangement d'accessoires
48 Rangement de cordon
49 Opération
49 Opération de dégagement du tube
49 Opération de dégagement du corps
50 Accessoires
50 Tableau d'utilisation d'accessoires
51 Utilisation du tube
51 Installation des accessoires
51 Conseils et trucs
52 Utilisation de l'outil à turbine pour les poils
d'animaux domestiques
52 Escaliers et paliers
52 Utilisation du tube
52 Protection de surcharge du moteur d'agitateur
52 Protection de surcharge thermique
53 ENTRETIEN & NETTOYAGE
53 Rangement de l'aspirateur
53 Composants du réservoir de poussières
54 Vider le réservoir de poussières
54 Nettoyage du réservoir de poussières
55 Nettoyage du filtre en mousse
55 Nettoyage du filtre HEPA
56 Outil à turbine pour les poils d'animaux domes-
tiques
56 Entretien de l'agitateur
56 Remplacement de la courroie d'agitateur
57 Élimination des blocages
58 Nettoyage de l'extérieur de l'aspirateur
59 DÉPANNAGE
PIÈCES ET FONCTIONS
Il est important de connaître les pièces et fonctions de votre aspirateur pour assurer son utilisation appropriée et sans danger. Lisez ce qui suit
avant d'utiliser votre aspirateur.
Pièces de rechange courantes
Filtre HEPA ADQ73353501
FRANÇAIS
ltre en mousse
ADV74067001
Courroie d'agitateur MAS62064002
Pour commander ces pièces, appelez :
1-800-243-0000 (É.-U.)
1-888-542-2623 (Canada)
FRANÇAIS
Poignée
Bouton de
dégagement de tube
Dégagement du réservoir
de poussières
Poignée de transport
Réservoir de poussières
Cadre du ltre ADV74067001
Filtre en mousse MDJ61980604
Dégagement
rapide
Support de
cordon
Séparateur de
poussières
Outils d'accessoires
Brosse d'époussetage &
Long suceur
Outil à turbine pour les poils
d'animaux domestiques
Outil pour meubles
capitonnés
Boyau
Tub e
Brosse
d'époussetage
& Long suceur
Bouton de
PLANCHER/
MOQUETTE
(Floor /Carpet)
Bouton
d’ALIMENTATION
(Power)
Filtre d'échappement
Fenêtre
d'achage
Cordon
Dégagement
du corps
Agitateur
Page 45

ASSEMBLAGE
ASSEMBLAGE
Pour réduire les risques de dommage pendant le transport, votre aspirateur est expédié partiellement démonté.
47
Déballage de l'aspirateur
Déballez l'aspirateur avec soin et assurez-vous d'avoir toutes les pièces
avant de jeter l'emballage.
Retirez tout papier collant, garnitures de carton et pellicule protectrice
avant l'assemblage.
Voici les articles emballés dans la boîte :
1. Corps de l'aspirateur
2. Brosse d'époussetage & Long suceur
3. Poignée et tube
4. Boyau
5. Outil à turbine pour les poils d'animaux domestiques
6. Filtre en mousse supplémentaire
7. Outil pour meubles capitonnés
Pièces d'assemblage
1. Corps de l'aspirateur
2. Brosse d'époussetage
et long suceur
3. Poignée et
tube
5. Outil à turbine
pour les poils
d'animaux
domestiques
7. Outil pour
meubles
capitonnés
6. Filtre en mousse
supplémentaire
Fixation du tube
1. Insérez le tube dans le bouton de localisateur de tube.
2. Enclenchez le tube dans le corps.
FRANÇAIS
FRANÇAIS
4. Boyau
Page 46

48
42
TABLE DES MATIÈRES
TABLE DES MATIÈRES
43 GARANTIE DE L'A SPIR AT EU R
44
INFORMATION DE SÉCURITÉ IMPOR-
TANTE
46 PIÈCES ET FONCTIONS
47 ASSEMBLAGE
47 Déballage de l'aspirateur
47 Pièces d'assemblage
47 Fixation du tube
48 Fixation du boyau
48 Rangement d'accessoires
48 Rangement de cordon
49 Opération
49 Opération de dégagement du tube
49 Opération de dégagement du corps
50 Accessoires
50 Tableau d'utilisation d'accessoires
51 Utilisation du tube
51 Installation des accessoires
51 Conseils et trucs
52 Utilisation de l'outil à turbine pour les poils
d'animaux domestiques
52 Escaliers et paliers
52 Utilisation du tube
52 Protection de surcharge du moteur d'agitateur
52 Protection de surcharge thermique
53 ENTRETIEN & NETTOYAGE
53 Rangement de l'aspirateur
53 Composants du réservoir de poussières
54 Vider le réservoir de poussières
54 Nettoyage du réservoir de poussières
55 Nettoyage du filtre en mousse
55 Nettoyage du filtre HEPA
56 Outil à turbine pour les poils d'animaux domes-
tiques
56 Entretien de l'agitateur
56 Remplacement de la courroie d'agitateur
57 Élimination des blocages
58 Nettoyage de l'extérieur de l'aspirateur
59 DÉPANNAGE
ASSEMBLAGE
Fixation du boyau
1. Fixez le côté supérieur du boyau à la poignée. Le côté supérieur du
boyau se distingue par les deux trous.
FRANÇAIS
FRANÇAIS
2. Insérez le côté inférieur du boyau au corps principal. Le côté inférieur
du boyau se distingue par les deux pinces de dégagement.
3. Pincez le boyau dans son support à l'arrière de l'aspirateur.
AVERTISSEMENT
Danger de blessures et de dommages à l'appareil! N'utilisez
PAS les prises au-dessus des comptoirs. Ne pas suivre cet
avertissement pourrait mener à des dommages aux articles
autour.
Rangement d'accessoires
Votre aspirateur comprend un espace de rangement pratique intégré
pour la brosse d'époussetage& long suceur.
y Insérez la brosse d'époussetage &le long suceur sur le corps principal
Rangement de cordon
Pour ranger le cordon :
1. Assurez-vous que le support de cordon est en position RELEVÉE.
2. Enroulez le cordon autour du support de cordon et accrochez en
place. Pincez la che sur le cordon.
REMARQUE: Pour réduire le risque de choc électrique, cet aspirateur est
doté d'une che polarisée; une lame est plus large que l'autre. Cette che
entrera dans une prise polarisée d'une seule manière. Si la che ne peut
pas entrer entièrement dans la prise, inversez-la. Si elle n’entre toujours
pas, contactez un électricien qualié pour installer une prise appropriée.
Ne changez pas la che de quelque façon que ce soit.
Pour dégager le cordon :
1. Tournez le support de cordon supérieur en position ABAISSÉE.
2. Prenez la che et tirez sur le cordon.
Page 47

49
OPÉRATION
dedutubeetsortez
du
tube.
AVERTISSEMENT
ou
des
dommages
à
en
AVERTISSEMENT
sur
gardez-le
toujours
sur
ceenou
éteindre
aussi
d’agitateur.
2.
Courant :
en
et
tournera
est
en
verticale.
commencer
à
enfoncez
du
côté
gauche
deetabaissez
est
en
verticale,
tournera
FRANÇAIS
FRANÇAIS
Page 48

OPÉRATION
Cette
alimentée
turbine
à
air
est
conçue
d'animaux
domestiques,
etc.,
sur
tissus
et
d'époussetage
etc.
suceur
être
coins
entre
coussins
et
autres
endroits
diciles
à
atteindre.
capitonnés
tissu
des
Tableau d'utilisation d'accessoires
Accessoire
coussins
Surfaces de
capitonnés*
et surfaces
dures*
Tentures*
coussins
tapis
Outilàturbine
d'animaux
domestiques
d'époussetage
suceur
Outil
capitonnés
Assurez-vous
toujours
que
accessoires
sont
avantdesur
tissus.
42
TABLE DES MATIÈRES
TABLE DES MATIÈRES
43 GARANTIE DE L'A SPIR AT EU R
44
INFORMATION DE SÉCURITÉ IMPOR-
TANTE
46 PIÈCES ET FONCTIONS
47 ASSEMBLAGE
47 Déballage de l'aspirateur
47 Pièces d'assemblage
47 Fixation du tube
48 Fixation du boyau
48 Rangement d'accessoires
48 Rangement de cordon
49 Opération
49 Opération de dégagement du tube
49 Opération de dégagement du corps
50 Accessoires
50 Tableau d'utilisation d'accessoires
51 Utilisation du tube
51 Installation des accessoires
51 Conseils et trucs
52 Utilisation de l'outil à turbine pour les poils
d'animaux domestiques
52 Escaliers et paliers
52 Utilisation du tube
52 Protection de surcharge du moteur d'agitateur
52 Protection de surcharge thermique
53 ENTRETIEN & NETTOYAGE
53 Rangement de l'aspirateur
53 Composants du réservoir de poussières
54 Vider le réservoir de poussières
54 Nettoyage du réservoir de poussières
55 Nettoyage du filtre en mousse
55 Nettoyage du filtre HEPA
56 Outil à turbine pour les poils d'animaux domes-
tiques
56 Entretien de l'agitateur
56 Remplacement de la courroie d'agitateur
57 Élimination des blocages
58 Nettoyage de l'extérieur de l'aspirateur
59 DÉPANNAGE
FRANÇAIS
FRANÇAIS
Page 49

OPÉRATION
51
Utiliser le tube
MISE EN GARDE
Ne tirez jamais l'aspirateur par le boyau.
Dégagez le tube et la poignée :
1. Assurez-vous que l'aspirateur soit verrouillé en position verticale sur
une surface plane et stable.
2. Enfoncez le bouton de dégagement du tube sur le corps et penchez
la poignée du tube.
3. Relevez le tube et sortez-le.
Installation des accessoires
Long suceur :
Glissez le suceur à l'extrémité du tube.
FRANÇAIS
FRANÇAIS
Brosse d'époussetage :
Enfoncez le bouton de dégagement de la brosse sur le long suceur et
glissez la brosse vers l'avant.
4. Enfoncez le bouton de rallonge du tube sur le tube et abaissez le
tube.
Brosse d'époussetage
Outil pour meubles capitonnés
Glissez l'outil pour meubles capitonnés à l'extrémité du tube.
Long suceur
Conseils et trucs
Bords de moquette et coins :
Pour les coins restreints, les bords de moquettes et le long de plinthes,
utilisez la brosse d'époussetage. Pour les endroits particulièrement
diciles à atteindre, utilisez le long suceur.
Page 50

52
42
TABLE DES MATIÈRES
TABLE DES MATIÈRES
43 GARANTIE DE L'A SPIR AT EU R
44
INFORMATION DE SÉCURITÉ IMPOR-
TANTE
46 PIÈCES ET FONCTIONS
47 ASSEMBLAGE
47 Déballage de l'aspirateur
47 Pièces d'assemblage
47 Fixation du tube
48 Fixation du boyau
48 Rangement d'accessoires
48 Rangement de cordon
49 Opération
49 Opération de dégagement du tube
49 Opération de dégagement du corps
50 Accessoires
50 Tableau d'utilisation d'accessoires
51 Utilisation du tube
51 Installation des accessoires
51 Conseils et trucs
52 Utilisation de l'outil à turbine pour les poils
d'animaux domestiques
52 Escaliers et paliers
52 Utilisation du tube
52 Protection de surcharge du moteur d'agitateur
52 Protection de surcharge thermique
53 ENTRETIEN & NETTOYAGE
53 Rangement de l'aspirateur
53 Composants du réservoir de poussières
54 Vider le réservoir de poussières
54 Nettoyage du réservoir de poussières
55 Nettoyage du filtre en mousse
55 Nettoyage du filtre HEPA
56 Outil à turbine pour les poils d'animaux domes-
tiques
56 Entretien de l'agitateur
56 Remplacement de la courroie d'agitateur
57 Élimination des blocages
58 Nettoyage de l'extérieur de l'aspirateur
59 DÉPANNAGE
OPÉRATION
Utilisation de l'outil à turbine pour
les poils d'animaux domestiques
L'outil à turbine pour les poils d'animaux domestiques comprend un
agitateur alimenté par une turbine pour fournir une puissance de
nettoyage supplémentaire pour les tapis et les tissus. Il est fantastique
FRANÇAIS
pour nettoyer les escaliers, les coussins et le capitonnage des véhicules.
FRANÇAIS
Lorsque vous utilisez l'outil, vériez fréquemment s'il y a une accumulation
de poils, bres, peluche et autres débris sur la brosse.
Une trop grande accumulation peut réduire la performance et pourrait
endommager l'outil à turbine pour les poils d'animaux domestiques.
Consultez la section d'Entretien et Nettoyage pour les instructions de
nettoyage.
Escaliers et paliers
Utilisez la brosse d'époussetage ou l'outil à turbine pour les poils
d'animaux domestiques pour les escaliers et les paliers. Assurez-vous que
l'aspirateur est placé de manière à ne pas tomber ni basculer.
Protection de surcharge du moteur
d'agitateur
L'agitateur est doté d'une protection intégrée contre les dommages du
moteur suite à un blocage d'agitateur. Si l'agitateur ralentit ou s'arrête,
le protecteur de surcharge d'agitateur arrête le moteur d'aspirateur et
l'agitateur.
Pour corriger le problème : Éteignez et débranchez l'aspirateur, retirez
l'obstruction et mettez l'aspirateur en marche en appuyant sur le bouton
Power (courant) enfoncez ensuite à nouveau le bouton de PLANCHER/
MOQUETTE.
Protection en cas de surcharge
thermique
Cet aspirateur est pourvu d'un protecteur de surcharge thermique
qui s'active automatiquement pour protéger l'aspirateur contre toute
surchaue. Si un blocage interrompt la circulation normale de l'air au
moteur, le protecteur thermique coupe automatiquement le moteur
pour permettre au moteur de se refroidir pour éviter tout dommage
possible à l'aspirateur.
Pour corriger le problème : Éteignez l'aspirateur et débranchez le
cordon. Vériez et retirez les blocages si nécessaire. Vériez et nettoyez
aussi les ltres sales.
Attendez environ 30 minutes, puis branchez l'aspirateur et remettez-le en
marche pour voir si le protecteur du moteur s'est réinitialisé. Le système
de protecteur thermique ne se réinitialisera pas avant que l'aspirateur ne
soit entièrement refroidi.
Page 51

ENTRETIEN & NETTOYAGE
Suivez toujours toutes les précautions de sécurité lorsque vous nettoyez et que vous faites l'entretien de l'aspirateur.
53
Rangement de l'aspirateur
Lorsqu'il n'est pas utilisé, enroulez le cordon autour du support de cordon
comme indiqué. Le boyau peut être enroulé autour de la poignée/tube si
le tube est rangé enroulé. Rangez la brosse d'époussetage/le suceur plat
à sa place à gauche de l'aspirateur.
AVERTISSEMENT
y Danger de choc électrique et de blessures.
y Attention en enroulant le cordon. Enroulez le cordon trop serré
stressera le cordon et peut l'endommager. N'entrecroisez pas le
cordon en l'enroulant. Un cordon endommagé pourrait mener
à un danger de choc électrique, de blessures ou
de dommages.
Composants de réservoir de
poussières
Le réservoir de poussières se compose de plusieurs importants
composants. Assurez-vous toujours que toutes les pièces sont bien
réinstallées après avoir vidé le réservoir de poussières.
NE faites JAMAIS fonctionner l'aspirateur si tous les ltres ne sont
pas en place.
NE faites JAMAIS fonctionner l'aspirateur avec des ltres ou des
composants humides.
Principaux composants:
1. Cadre du ltre et ltre en mousse :
Attrape les particules moyennes à nes. Cela comprend un cadre
de ltre& un ltre en mousse. Ils sont lavables.
2. ltre en mousse
3. Couvercle de réservoir de poussières : Ouvrez pour accéder au
ltre en mousse.
4. Séparateur de poussières : Sépare la poussière de l'air qui entre.
5. Porte de côté : Ouvrez pour retirer la saleté du séparateur de
poussières.
6. Languette de prévention : Empêche le couvercle de se fermer si le
ltre en mousse n'est pas installé.
7. Réservoir de poussières : où est recueillie la saleté.
8. Plaque inférieure : Ouvrez pour vider le réservoir de poussières.
FRANÇAIS
FRANÇAIS
1. Cadre du ltre
2. ltre en
mousse
4. Séparateur de
poussières
8. Plaque inférieure
3. Couvercle de
réservoir de
poussières
6. Languette de
prévention
5. Porte de côté
7. Réservoir de
poussières
Page 52

ENTRETIEN & NETTOYAGE
AVERTISSEMENT
videz
toujours
dedeatteint
dégagement
dudevers
soulevez
et
sortez
de
de
dégagement
de
et ouvrez
comme
de
dans
support
et
vers
jusqu'à
ce
qu'il
s'encliquette
en
Assurez-vous
que
de
est
optimale,
de
de
de
2.
dégagement
de
videretouvrez
3. deavec
chion
douxouessuie-
tout.
4.
verrou
de
des
côtés
droit
et
gauche.
5.
tous
cheveux,
bresouautres
débris
du
séparateur
de
cônes
attachés
à
des composants humides.
touchez
42
TABLE DES MATIÈRES
TABLE DES MATIÈRES
43 GARANTIE DE L'A SPIR AT EU R
44
INFORMATION DE SÉCURITÉ IMPOR-
TANTE
46 PIÈCES ET FONCTIONS
47 ASSEMBLAGE
47 Déballage de l'aspirateur
47 Pièces d'assemblage
47 Fixation du tube
48 Fixation du boyau
48 Rangement d'accessoires
48 Rangement de cordon
49 Opération
49 Opération de dégagement du tube
49 Opération de dégagement du corps
50 Accessoires
50 Tableau d'utilisation d'accessoires
51 Utilisation du tube
51 Installation des accessoires
51 Conseils et trucs
52 Utilisation de l'outil à turbine pour les poils
d'animaux domestiques
52 Escaliers et paliers
52 Utilisation du tube
52 Protection de surcharge du moteur d'agitateur
52 Protection de surcharge thermique
53 ENTRETIEN & NETTOYAGE
53 Rangement de l'aspirateur
53 Composants du réservoir de poussières
54 Vider le réservoir de poussières
54 Nettoyage du réservoir de poussières
55 Nettoyage du filtre en mousse
55 Nettoyage du filtre HEPA
56 Outil à turbine pour les poils d'animaux domes-
tiques
56 Entretien de l'agitateur
56 Remplacement de la courroie d'agitateur
57 Élimination des blocages
58 Nettoyage de l'extérieur de l'aspirateur
59 DÉPANNAGE
FRANÇAIS
FRANÇAIS
Page 53

ENTRETIEN & NETTOYAGE
55
Nettoyage du filtre en mousse
MISE EN GARDE
y Un ltre humide peut causer des dommages permanents à
l'aspirateur.
y Assurez-vous que les ltres sont bien secs avant de les
réinstaller.
Pour une performance optimale, vériez les ltres chaque mois et
nettoyez-les au besoin. Ne fermez pas le couvercle du réservoir de
poussières sans ltre en mousse.
Pour nettoyer le filtre en mousse :
1. Retirez le réservoir de poussières de l'aspirateur.
2. Relevez le dégagement du couvercle de réservoir de poussières et
ouvrez le couvercle.
NE faites JAMAIS fonctionner l'aspirateur avec des ltres
ou composants humides.
Si vous remarquez une perte d'aspiration et si le nettoyage du ltre
en mousse n'aide pas, vous devrez peut-être remplacer le ltre en
mousse. Vous pouvez acheter d'autres ltres en mousse de LG en
appelant le 1-800-243-0000 (É.-U.), le 1-888-542-2623 (Canada) et en
demandant les pièces sur la page 6.
Nettoyage du filtre HEPA
Pour nettoyer le filtre HEPA :
1. Retirez le couvercle du ltre d'échappement.
Filtre d'échappement
2. Retirez le ltre du corps.
Filtre
FRANÇAIS
FRANÇAIS
3. Soulevez et sortez le ltre en mousse.
4. Séparez le ltre en mousse du cadre du ltre.
5. Secouez le surplus de saletés ou débris et rincez le ltre en mousse et
le cadre du ltre à l'eau propre. Exprimez l'eau du ltre en mousse en
le pressant.
6. Faites sécher complètement à l'ombre.
3. Lavez bien le ltre dans l'eau courante.
4. Supprimez l'humidité.
5. Faites sécher complètement à l'ombre.
Page 54

ENTRETIEN & NETTOYAGE
42
TABLE DES MATIÈRES
TABLE DES MATIÈRES
43 GARANTIE DE L'A SPIR AT EU R
44
INFORMATION DE SÉCURITÉ IMPOR-
TANTE
46 PIÈCES ET FONCTIONS
47 ASSEMBLAGE
47 Déballage de l'aspirateur
47 Pièces d'assemblage
47 Fixation du tube
48 Fixation du boyau
48 Rangement d'accessoires
48 Rangement de cordon
49 Opération
49 Opération de dégagement du tube
49 Opération de dégagement du corps
50 Accessoires
50 Tableau d'utilisation d'accessoires
51 Utilisation du tube
51 Installation des accessoires
51 Conseils et trucs
52 Utilisation de l'outil à turbine pour les poils
d'animaux domestiques
52 Escaliers et paliers
52 Utilisation du tube
52 Protection de surcharge du moteur d'agitateur
52 Protection de surcharge thermique
53 ENTRETIEN & NETTOYAGE
53 Rangement de l'aspirateur
53 Composants du réservoir de poussières
54 Vider le réservoir de poussières
54 Nettoyage du réservoir de poussières
55 Nettoyage du filtre en mousse
55 Nettoyage du filtre HEPA
56 Outil à turbine pour les poils d'animaux domes-
tiques
56 Entretien de l'agitateur
56 Remplacement de la courroie d'agitateur
57 Élimination des blocages
58 Nettoyage de l'extérieur de l'aspirateur
59 DÉPANNAGE
56
Outil à turbine pour les poils
d'animaux domestiques
Pour nettoyer l'outil à turbine pour les poils d'animaux
domestiques :
FRANÇAIS
FRANÇAIS
1. Retirez les quatre vis au bas de l'outil à turbine pour les poils d'animaux
domestiques.
2. Relevez le couvercle.
3. Retirez les débris.
Pour remonter :
4. Enfoncez avec soin le couvercle sur les languettes jusqu'à ce qu'elles
s'enclenchent.
5. Insérez et resserrez les vis retirées à l'étape 1. NE resserrez PAS trop
les vis.
N'utilisez PAS l'outil à turbine pour les poils des animaux
domestiques sur les animaux.
y Danger de choc électrique et de blessures.
y Débranchez toujours le cordon d'alimentation de la prise
y Sinon ceci pourrait mener à des chocs électriques ou des
AVERTISSEMENT
avant tout entretien.
blessures.
3. Déposez la tête sur une toile ou une surface lisse. Retirez les six vis au
bas de la tête et retirez le couvercle.
4. Retirez avec soin toutes celles, tous cheveux accumulés, etc. de
l'agitateur et de la section de l'agitateur.
Pour réinstaller le couvercle, inversez les étapes précédentes.
AVERTISSEMENT
y Danger de choc électrique et de blessures.
y Débranchez toujours le cordon d'alimentation de la prise
avant tout entretien. Sinon ceci pourrait mener à des chocs
électriques ou des blessures.
Remplacez la courroie d'agitateur
Si la courroie se brise, suivez les étapes plus bas pour remplacer la courroie
de l'agitateur.
Pour remplacer la courroie :
1. Retirez le couvercle de la brosse de l'agitateur.
Entretien de l'agitateur
Vériez fréquemment la section de la brosse de l'agitateur pour tout
signe d'accumulation de cheveux, de celles et autres.
Retirez le couvercle de la brosse d'agitateur :
1. Débranchez l'aspirateur. Enfoncez la pédale gauche pour dégager la
tête. Abaissez la poignée jusqu'à ce que l'aspirateur repose à plat sur
le plancher.
2. Retournez l'aspirateur pour que l'agitateur soit face vers le haut.
2. Soulevez et sortez l'agitateur.
3. Décrochez la vieille courroie de la poulie d'entraînement. Assurez-vous
qu'aucune pièce de courroie brisée ne soit coincée dans l'agitateur ou
dans la section de la poulie d'entraînement.
4. Accrochez la nouvelle courroie sur la poulie d'entraînement du moteur
d'agitateur.
Page 55

ENTRETIEN & NETTOYAGE
57
5. Installez l'agitateur par la courroie en vous assurant que la courroie est
alignée avec la section de poulie de l'agitateur.
6. Abaissez l'agitateur en place en vous assurant que les languettes de
forme ovale s'ajustent dans les indentations de la tête.
7. Réinstallez le couvercle de la brosse de l'agitateur selon la description
plus haut.
Pour une courroie de rechange, commandez la pièce LG
MAS62064002 du centre de service.
Si vous remarquez une perte d'aspiration, vériez d'abord les ltres selon
la description de la page 13. Si les ltres sont propres, il pourrait y avoir
un blocage. Les èches montrent des endroits où les blocages sont les
plus probables.
Pour vérifier les blocages :
1. Vériez le boyau où il se branche à la poignée en enfonçant les deux
boutons de dégagement à l'extrémité supérieure du boyau.
FRANÇAIS
FRANÇAIS
Élimination des blocages
AVERTISSEMENT
y Danger de choc électrique et de blessures.
y Débranchez toujours le cordon d'alimentation de la prise
avant tout entretien.
y Sinon ceci pourrait mener à des chocs électriques ou des
blessures.
2. Retirez le réservoir de poussières et vériez l'entrée du réservoir et
l'entrée du corps qui se branche au corps de l'aspirateur.
Page 56

ENTRETIEN & NETTOYAGE
42
TABLE DES MATIÈRES
TABLE DES MATIÈRES
43 GARANTIE DE L'A SPIR AT EU R
44
INFORMATION DE SÉCURITÉ IMPOR-
TANTE
46 PIÈCES ET FONCTIONS
47 ASSEMBLAGE
47 Déballage de l'aspirateur
47 Pièces d'assemblage
47 Fixation du tube
48 Fixation du boyau
48 Rangement d'accessoires
48 Rangement de cordon
49 Opération
49 Opération de dégagement du tube
49 Opération de dégagement du corps
50 Accessoires
50 Tableau d'utilisation d'accessoires
51 Utilisation du tube
51 Installation des accessoires
51 Conseils et trucs
52 Utilisation de l'outil à turbine pour les poils
d'animaux domestiques
52 Escaliers et paliers
52 Utilisation du tube
52 Protection de surcharge du moteur d'agitateur
52 Protection de surcharge thermique
53 ENTRETIEN & NETTOYAGE
53 Rangement de l'aspirateur
53 Composants du réservoir de poussières
54 Vider le réservoir de poussières
54 Nettoyage du réservoir de poussières
55 Nettoyage du filtre en mousse
55 Nettoyage du filtre HEPA
56 Outil à turbine pour les poils d'animaux domes-
tiques
56 Entretien de l'agitateur
56 Remplacement de la courroie d'agitateur
57 Élimination des blocages
58 Nettoyage de l'extérieur de l'aspirateur
59 DÉPANNAGE
58
3. Vériez le boyau où il se branche à l'arrière du corps en pressant les
boutons de dégagement à l'extrémité inférieure du boyau.
FRANÇAIS
FRANÇAIS
4. Inversez l'aspirateur et vériez l'entrée de l'agitateur.
5. Vériez avec soin. Retirez la vis du port.
Nettoyage de l'extérieur de
AVERTISSEMENT
y Danger de choc électrique et de blessures.
y Débranchez toujours le cordon d'alimentation de la prise
avant tout entretien. Sinon ceci pourrait mener à des chocs
électriques ou des blessures.
l'aspirateur
Essuyez l'extérieur de l'aspirateur avec un chion propre et doux trempé
dans l'eau et tordu pour l'assécher.
NE laissez PAS l'eau entrer par une ouverture de l'aspirateur.
NE nettoyez PAS les outils dans le lave-vaisselle ni dans la laveuse. Lavez
les outils dans de l'eau chaude et savonneuse, rincez et laissez sécher
entièrement à l'air.
N'utilisez PAS d'outils qui sont humides.
Page 57

DÉPANNAGE
Révisez cette section pour trouver des solutions à faire vous-même pour les problèmes de performance mineurs. Toute réparation ou tout entretien
nécessaire, autre que ce qui est décrit dans ce manuel du propriétaire devrait être eectué par votre centre de service LGE local.
59
AVERTISSEMENT
y Danger de choc électrique et de blessures.
y Débranchez toujours le cordon d'alimentation de la prise avant tout entretien. Sinon ceci pourrait mener à des chocs électriques ou des
blessures.
Problème Causes possibles Solutions
L'a sp ir ateur ne fonctionne
pas.
Aspirateur débranché de la prise murale. Assurez-vous que le cordon est branché dans une prise qui
fonctionne.
Protection de surcharge du moteur d'agitateur. Débranchez l'aspirateur et vériez l'aspirateur pour tout signe
d'obstructions et réinitialisez l'appareil.
Protecteur thermique activé. Laissez l'aspirateur refroidir.
FRANÇAIS
FRANÇAIS
Mauvais ramassage de
poussières.
L'agitateur ne tourne pas L'interrupteur est éteint (l'appareil est en mode
De la
poussière s'échappe du
réservoir de poussières.
L'agitateur de l'outil à turbine
pour les poils d'animaux
domestiques ne fonctionnera
pas si attaché.
L'accessoire n'a pas
d'aspiration en utilisant
l'appareil avec la poignée.
Le réservoir de poussières
semble desserré en soulevant
par la poignée.
Réservoir de poussières plein ou bloqué. Videz le réservoir et nettoyez les ltres.
Le réservoir de poussières est mal installé. Assurez-vous que tous les composants du réservoir de
Tête, tube ou tuyau bloqué. Vériez s'il y a des blocages.
Courroie brisée/non installée correctement. Vériez la courroie et remplacez-la au besoin.
Protection de surcharge du moteur d'agitateur
activée.
Trou dans le boyau. Inspectez le boyau attentivement. Remplacez-le au besoin.
Agitateur usé. Contacter le service.
d'inondation).
L'a sp ir ateur n'est pas en position verticale. Enfoncez le dégagement du corps et inclinez jusqu'en arrière.
La protection de surcharge du moteur d'agitateur est
déclenchée (la brosse est bloquée).
La courroie est brisée. Remplacez la courroie.
Le réservoir de poussières est mal installé. Assurez-vous que tous les composants du réservoir de
Le couvercle du réservoir de poussières n'est pas
fermé.
La plaque inférieure n'est pas attachée. Assurez-vous que la plaque inférieure est fermée et verrouillée.
Supports d'agitateur ou agitateur sales. Nettoyez l'intérieur de l'outil à turbine pour les poils d'animaux
Obstruction dans le passage d'air de la turbine. Nettoyez l'intérieur de l'outil à turbine pour les poils d'animaux
Faible aspiration de l'aspirateur. Vériez s'il y a des blocages.
Tub e principal encore raccordé à la base. Retirez le tube.
Ceci est normal. L'a sp ir ateur est conçu comme ceci pour empêcher le réservoir
poussières et les ltres sont installés correctement.
Débranchez l'aspirateur et vériez l'agitateur pour tout signe
d'obstruction. Enfoncez le bouton de réinitialisation.
Mettez l'interrupteur de courant d'agitateur en marche.
Débranchez l'aspirateur et vériez l'aspirateur pour tout signe
d'obstructions et réinitialisez l'appareil.
poussières et les ltres sont installés correctement.
Vériez le couvercle du réservoir de poussières.
domestiques.
domestiques.
de se séparer
Page 58

LG Customer Information Center
For inquires or comments, visit www.lg.com or call;
1-800-243-0000
1-888-865-3026
1-888-542-2623
Register your product Online!
www.lg.com
USA, Consumer User
USA, Commercial User
CANADA
 Loading...