

Page 1

Model
Language
Page
재질
작성일자
VF7911CW
영어+스페인어+불어
68
모조지 100g
2010.2.4
MFL62862401
1/1
182X257
김태경
Part No.
인쇄도수(외/내)
크 기(D*W)
담당자
Page 2

ENGLISH
ESPAÑOL FRANÇAIS
OWNER’S MANUAL
VACUUM CLEANER
Please read this manual carefully before operating
your set and retain it for future reference.
LuV300
P/NO : MFL62862401
www.lg.com
Page 3

2
CONTENTS
1
LG VACUUM CLEANER WARRANTY
3
LG VACUUM CLEANER WARRANTY
2
IMPORTANT SAFETY INFORMATIONS
4
IMPORTANT SAFETY INFORMATIONS
3
PARTS AND FEATURES
6
PARTS AND FEATURES
4
ASSEMBLY
Unpacking the Vacuum Cleaner
7
Assembly Parts
7
Wand & Hose assembly
8
Attaching the Hose
8
Accessory Storage
9
Cord storage
9
6
CARE & CLEANING
15
Storing the Vacuum Cleaner
15
Dust Tank Components
16
Emptying the Dust Tank
16
Cleaning the Dust Tank
17
Cleaning the Foam Pre Filter
17
Cleaning the HEPA Filter
18
Pet Hair Turbine tool
18
Agitator Maintenance
18
Replacing the Agitator Belt
19
Removing Clogs
20
Cleaning the Exterior of the Vacuum Cleaner
7
TROUBLESHOOTING
Troubleshooting 21
5
OPERATION
10
Control Operation
10
Body Release Operation
11
Adjusting the Pile Height
12
Accessory
12
Accessory Use Chart
13
Using the Wand or Wand Handle
14
Installing Attachments
14
Tips and Tricks
14
Using the Pet hair turbine tool
14
Stairways and Landings
14
Agitator Motor Overload Protection
14
Thermal Overload Protection
Page 4

LG VACUUM CLEANER WARRANTY
LG Electronics Inc. will repair or replace your product, at LG’s option, if it proves to be defective in material or workmanship
under Personal household use, during the warranty period set forth below, effective from the date of original consumer
purchase of the product. This limited warranty is good only to the original purchaser of the product and effective only when
used in U.S.A and Canada.
WARRANTY PERIOD:
Five Year
From the date of the
original purchase
THIS WARRANTY IS IN LIEU OF ANY OTHER WARRANTIES, EXPRESS OR IMPLIED, INCLUDING
WITHOUT LIMITATION, ANY WARRANTY OF MERCHANTABILITY OR FITNESS FOR A PARTICULAR
PURPOSE. TO THE EXTENT ANY IMPLIED WARRANTY IS REQUIRED BY LAW, IT IS LIMITED IN
DURATION TO THE EXPRESS WARRANTY PERIOD ABOVE. LG WILL NOT BE LIABLE FOR ANY
CONSEQUENTIAL, INDIRECT, OR INCIDENTAL DAMAGES OF ANY KIND, INCLUDING LOST REVENUES
OR PROFITS, IN CONNECTION WITH THE PRODUCT. SOME STATES DO NOT ALLOW LIMITATION ON
HOW LONG AN IMPLIED WARRANTY LASTS OR THE EXCLUSION OF INCIDENTAL OR CONSEQUENTIAL
DAMAGES, SO THE ABOVE LIMITATIONS OR EXCLUSIONS MAY NOT APPLY TO YOU.
This warranty covers only defects in material and workmanship.
LGE will NOT pay for:
1. Expendable items that can wear out, including but not limited to filters, belts, batteries.
2. A service technician to instruct the user in correct product assembly, operation or maintenance.
3. A service technician to clean or maintain this product.
4. Damage to or failure of this product if it is not assembled, operated or maintained according to all instructions
supplied with this product.
5. Damage to or failure of this product resulting from accident, abuse, misuse or use for other than its intended
purpose.
6. Damage to or failure of this product caused by the use of detergents, cleaners, chemicals or utensils other than
those recommended in all instructions supplied with this product.
7. Damage to or failure of parts or systems resulting from unauthorized modifications made to this product.
HOW SERVICE IS HANDLED:
Any part of the vacuum cleaner which fails due to a defect in materials or workmanship.
During this full five-year warranty, LG will also provide, free of charge, all labor and shop
service to replace the defective part.
ENGLISH
This warranty is extended to the original purchaser for products purchased for home use within the USA. In Alaska, the
warranty excludes the cost of shipping or service calls to your home.
Some states do not allow the exclusion or limitation of incidental or consequential damages, so this exclusion or limitation
may not apply to you. This warranty gives you specific legal rights, and you may also have other rights which vary from states
to states. To know what your legal rights are, consult your local or state consumer affairs or your state’s Attorney General.
CUSTOMER ASSISTANCE INFORMATION:
To Prove Warranty Coverage
To Obtain Nearest Authorized
Service Center or Sales Dealer, or
to Obtain Product, Customer, or
Service Assistance
Retain your Sales Receipt to prove date of purchase.
A copy of your Sales Receipt must be submitted at the time warranty service is
provided.
Call 1-800-243-0000 (Phone answered 24 hours - 365 days a year) and choose the
appropriate prompt from the menu; or visit our website at: http://us.lgservice.
com. (In Canada- Call 1-888-542-2623, website http://ca.lgservice.com)
3
Page 5
4
IMPORTANT SAFETY INFORMATIONS
READ ALL INSTRUCTIONS BEFORE USE
IMPORTANT SAFETY IINSTRUCTIIONS
Read and follow all instructions before using your Vacuum cleaner to prevent the risk of fire, electric shock, personal injury, or
damage when using the Vacuum cleaner. This guide do not cover all possible conditions
service agent or manufacturer about problems that you do not understand.
This is the safety alert symbol. This symbol alerts you to potential hazards that can kill or
hurt you and others. All safety messages will follow the safety alert symbol and either the
word “WARNING” or “CAUTION”.
that may occur. Always contact your
WARNING
serious bodily harm or death.
This symbol will alert you to hazards or unsafe practices which could cause
This symbol will alert you to hazards or unsafe practices which could cause
CAUTION
bodily injury or property damage.
WARNING
• Disconnect electrical supply before servicing or
cleaning the unit or when cleaner is not in use.
Failure to do so could result in electrical shock or personal
injury.
• Do not use vacuum cleaner to pick up anything that is
burning or smoking such as cigarettes, or hot ashes.
Doing so could result in death, fire or electrical shock.
• Do not vacuum flammable or explosive substances such
as gasoline, benzene, thinners, propane (liquids or
gases).
The fumes from these substances can create a fire hazard or
explosion. Doing so could result in death or personal injury.
• Do not handle plug or vacuum cleaner with wet hands.
Doing so could result in death or electrical shock.
• Do not unplug by pulling on cord.
Doing so could result in product damage or electrical shock.
To unplug, grasp the plug, not the cord.
• Keep hair, loose clothing, fingers, and all parts of the
body away from openings and moving parts.
Failure to do so could result in electrical shock or personal
injury.
• Do not pull or carry by cord, use cord as a handle, close
a door on cord, or pull cord around sharp edges or
corners. Do not run vacuum cleaner over cord. Keep
cord away from heated surfaces.
Failure to do so could result in electrical shock or personal
injury or fire or product damage.
• Do not allow to be used as toy. Close attention is
necessary when used by or near children.
Personal injury or product damage could result.
• Do not use the vacuum cleaner if the power cord or plug
is damaged or faulty.
Personal injury or product damage could result. In these
cases, contact LG Electronics Service Agent to avoid hazard.
• Do not use vacuum cleaner if it has been under water.
Personal injury or product damage could result. In these
cases, contact LG Electronics Service Agent to avoid hazard.
• Do not continue to vacuum if any parts appear missing
or damaged.
Personal injury or product damage could result. In these
cases, contact LG Electronics Service Agent to avoid hazard.
• Do not use an extension cord with this vacuum cleaner
Fire hazard or product damage could result.
• Using proper voltage.
Using improper voltage may result in damage to the motor
and possible injury to the user. Proper voltage is listed on the
bottom of vacuum cleaner.
• Turn off all controls before unplugging.
Failure to do so could result in electrical shock or personal
injury.
• Do not change the plug in any way.
Failure to do so could result in electrical shock or personal
injury or product damage. Doing so result in death. If plug
does not fit, contact a qualified electrician to install the proper
outlet.
• Repairs to electrical appliances may only be performed
by qualified service engineers.
Improper repairs may lead to serious hazards for the user.
• Do not put fingers near the gear.
Failure to do so could result in personal injury.
• Do not use out doors or on wet surfaces.
Failure to do so could result in electrical shock or personal
injury.
• Do not put anything, between Vacuum cleaner body and
agitator head space.
Personal injury or product damage could result.
• This product contains chemicals known to the State of
California to cause cancer and reproductive toxicity.
Wash hands after handling.
• Use extra care when cleaning on stairs.
SAVE THESE INSTRUCTIONS
Page 6
IMPORTANT SAFETY INFORMATIONS
CAUTION
• Do not put any objects into openings.
Failure to do so could result in product damage.
• Do not use with any opening blocked: keep free of dust, lint,
hair, and anything that may reduce air flow.
Failure to do so could result in product damage.
• Do not use vacuum cleaner without dust tank and/or filters
in place.
Failure to do so could result in product damage.
• Always clean the dust tank after vacuuming carpet cleaners
or fresheners, powders and fine dust.
These products clog the filters,reduce airflow and can cause
damage to the cleaner. Failure to clean the dust tank could cause
permanent damage to the cleaner.
• Do not use vacuum cleaner to pick up sharp hard objects,
small toys, pins, paper clips, etc.
They may damage the cleaner or dust tank.
• Store the vacuum cleaner indoors.
Put the vacuum cleaner away after use to prevent tripping over it.
• The vacuum cleaner is not intended to use by young
children or infirm people without supervision.
Failure to do so could result in personal injury or product damage.
• Only use parts produced or recommended Electronics
Service Agents.
Failure to do so could result in product damage.
• Use only as described in this manual. Use only with LG
recommended or approved attachments and accessories.
Failure to do so could result in personal injury or product damage.
Thermal protector :
This vacuum cleaner has a special thermostat that protects the vacuum cleaner in case of motor overheating. If the vacuum
cleaner suddenly shuts off, turn off the switch and unplug the vacuum cleaner.
Check the vacuum cleaner for possible source of overheating such as a full dust tank, a blocked hose or clogged filter. If these
conditions are found, fix them and wait at least 30 minutes before attempting to use the vacuum cleaner. After the 30 minutes period,
plug the vacuum cleaner back in and turn on the switch. If the vacuum cleaner still does not run, contact a qualified electrician.
The Federal Communications Commission Radio Frequency Interference Statement includes the following warning:
NOTE: This equipment has been tested and found to comply with the limits for a Class B digital device, pursuant to Part 15 of the FCC
Rules. These limits are designed to provide reasonable protection against harmful interference in a residential installation.
This equipment generates, uses, can radiate radio frequency energy and if not installed and used in accordance with the instructions, may
cause harmful interference to radio communications.
However, there is no guarantee that interference will not occur in a particular installation.
If this equipment does cause harmful interference to radio or television reception, which can be determined by turning the equipment off and
on, the user is encouraged to try to correct the interference by one or more of the following measures:
• Reorient or relocate the receiving antenna.
• Increase the separation between the equipment and receiver.
• Connect the equipment into an outlet on a circuit different from that to which the receiver is connected.
• Consult the dealer or an experienced radio/TV technician for help.
This device complies with part 15 of the FCC (RSS-210) Rules.
Operation is subject to the following two conditions:(1)This device may not cause harmful interference and (2) this device must accept any
interference received, including interference that may cause undesired operation.
• To avoid personal injury and to prevent the machine from
falling when cleaning stairs, always place it at the bottom of
stairs.
Failure to do so could result in personal injury or product
damage.
• Make sure the filters (exhaust filter and motor safety filter)
are completely dry before replacing in the machine.
Failure to do so could result in product damage.
• Do not dry the filter in an oven or microwave.
Failure to do so could result in fire hazard.
• Do not dry the filter in a clothes dryer.
Failure to do so could result in fire hazard.
• Do not dry near an open flame.
Failure to do so could result in fire hazard.
• Always turn vacuum cleaner off before connecting or
disconnecting the hose.
Personal injury or product damage could result.
• Your vacuum cleaner is intended only for household use.
• Proper assembly and safe use of your vacuum cleaner are
your responsibilities.
• Do not put the finger between crevice tool and cord hanger,
when take out the crevice tool.
• Hose storage consist of two strong magnetic. Keep away
electronic equipment or dangerous steel things from hose
storage.
ENGLISH
CAUTION
Any changes or modifications in construction of this device which are not expressly approved by the party
responsible for compliance could void the user’s authority to operate the equipment.
IMPORTANT NOTE:
FCC Radiation Exposure Statement
This equipment complies with FCC radiation exposure limits set forth an uncontrolled environment.
This equipment should be installed and operated with minimum distance 20cm between the radiator and your body. This transmitter must
not be co-located or operating in conjunction with any other antenna or transmitter.
Transmitter specification
* Carrier frequency: 2456, 2463, 2470 MHz * RF output power : 0 dBm
5
Page 7
6
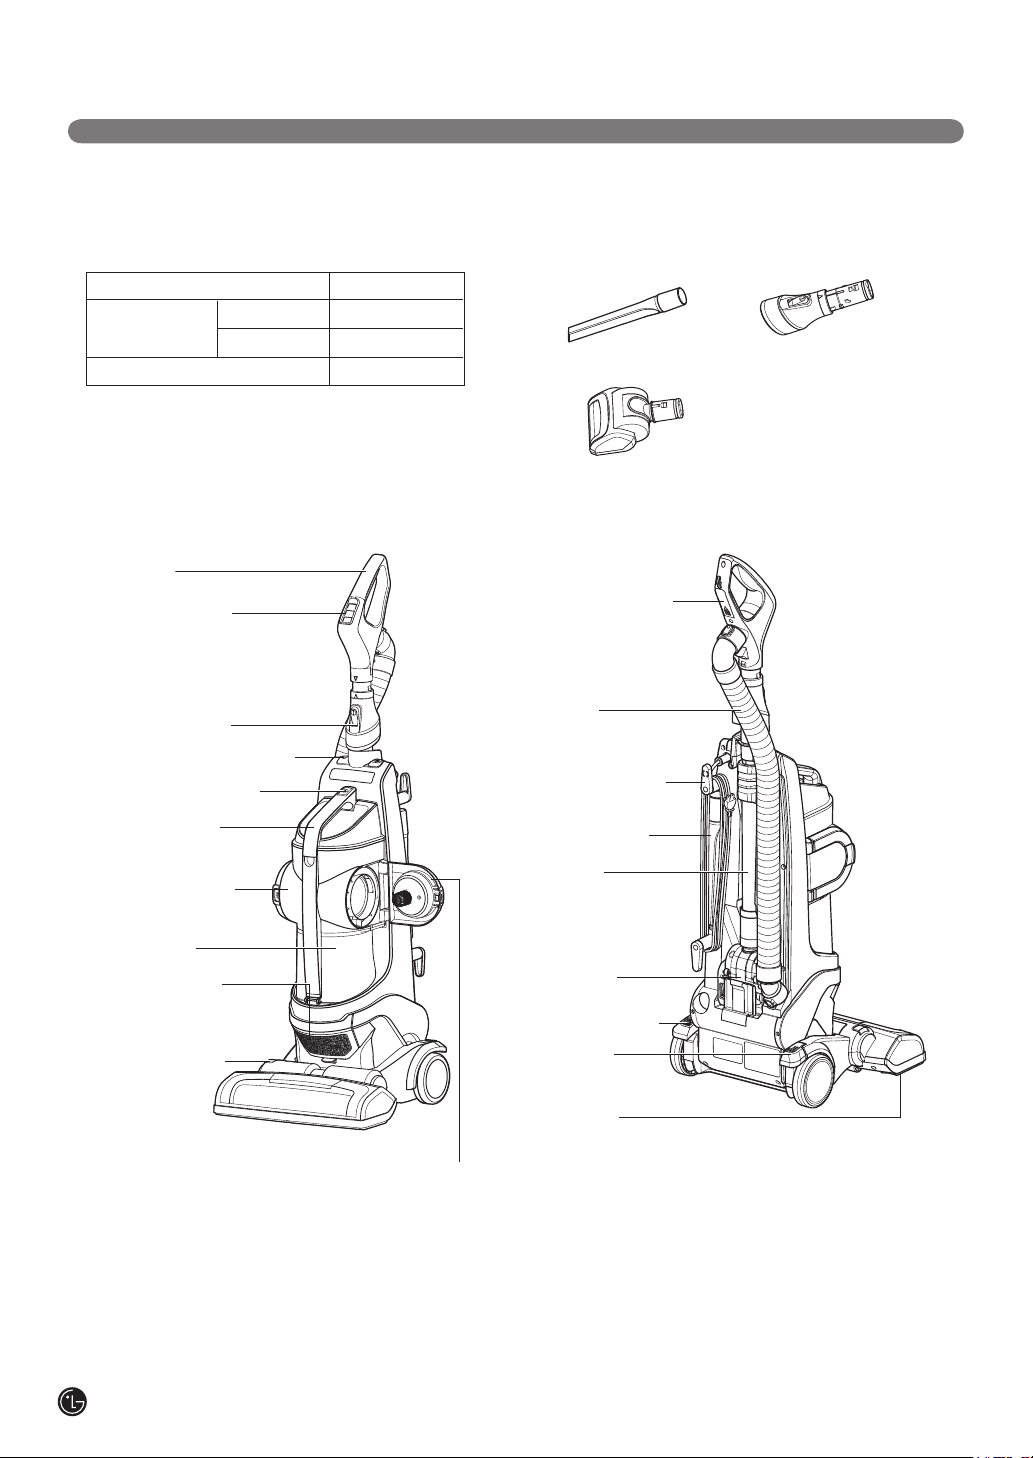
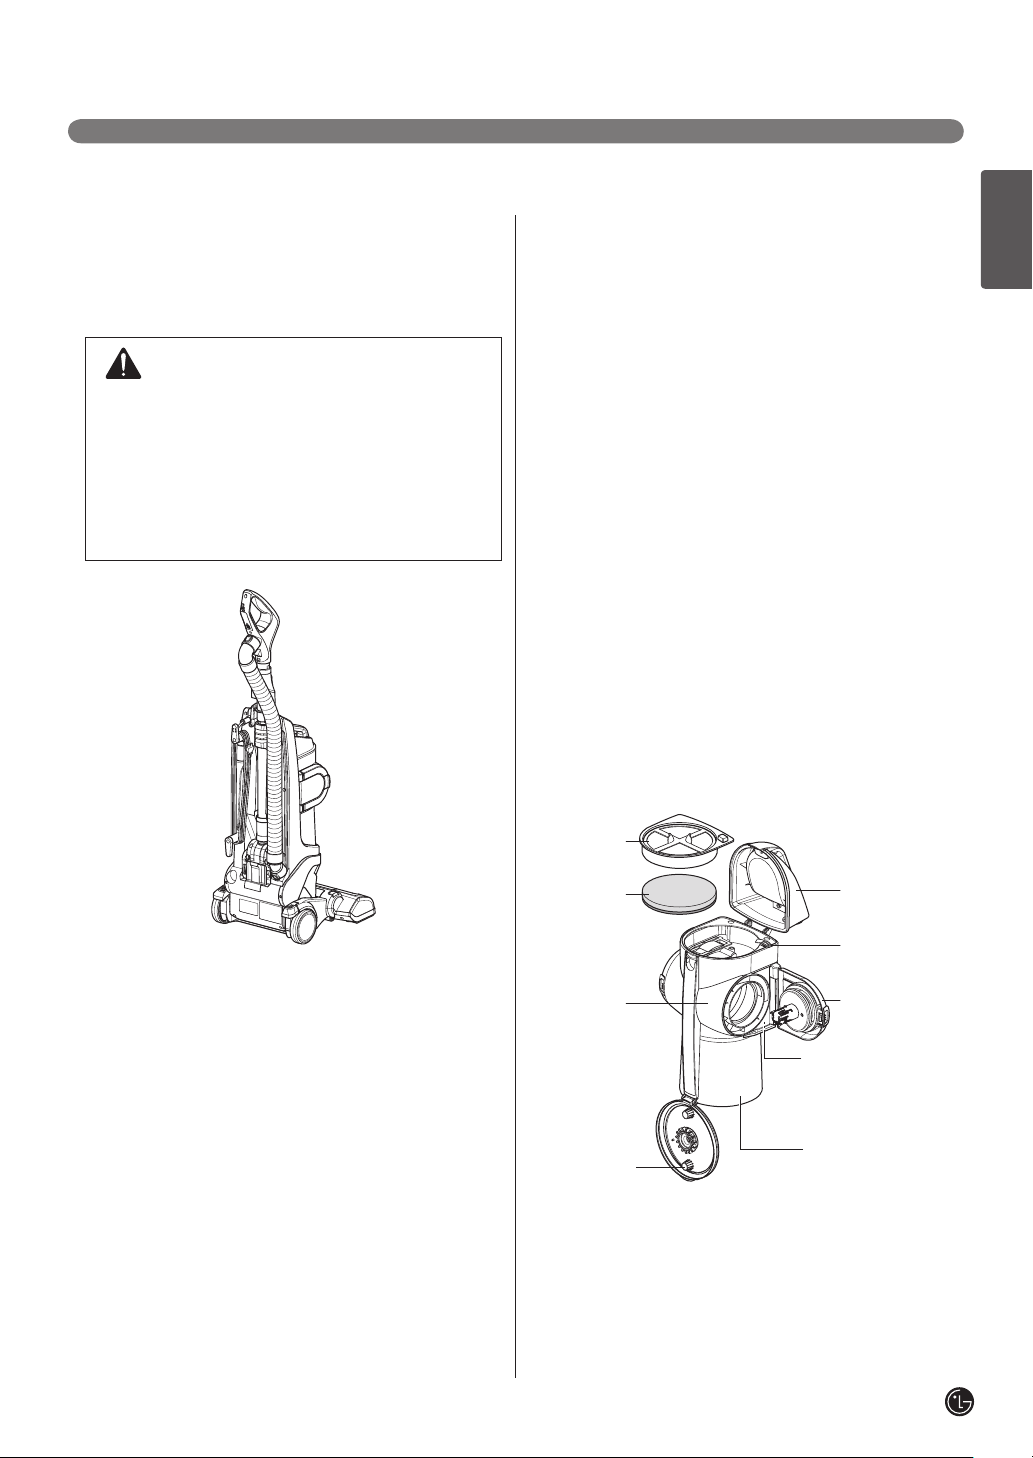
PARTS AND FEATURES
It is important to know your vacuum cleaner’s parts and features to assure its proper and safe use.
Review these before using your vacuum cleaner.
Common Replacement Parts
HEPA Filter ADQ72913001
Foam Pre Filter Filter Frame MDQ61918301
(ADV72987201) Foam Filter MDJ61980601
Agitator Belt MAS61842501
To order these parts call
1-800-243-0000 (U.S.A)
1-888-542-2623 (Canada)
Handle
Power control
Dusting brush
Auxiliary Power button
Dust tank release
Carry handle
Accessory Tools
Crevice Tool Dusting brush
Pet hair turbine tool
Battery location
Hose
Quick release
Cord hanger
Crevice tool
Dust separator
Dust tank
Exhaust filter
Carpet height
indicators
Wand
Pet hair
turbine tool
Body release
Height
adjustment
Agitator
Side door
Page 8

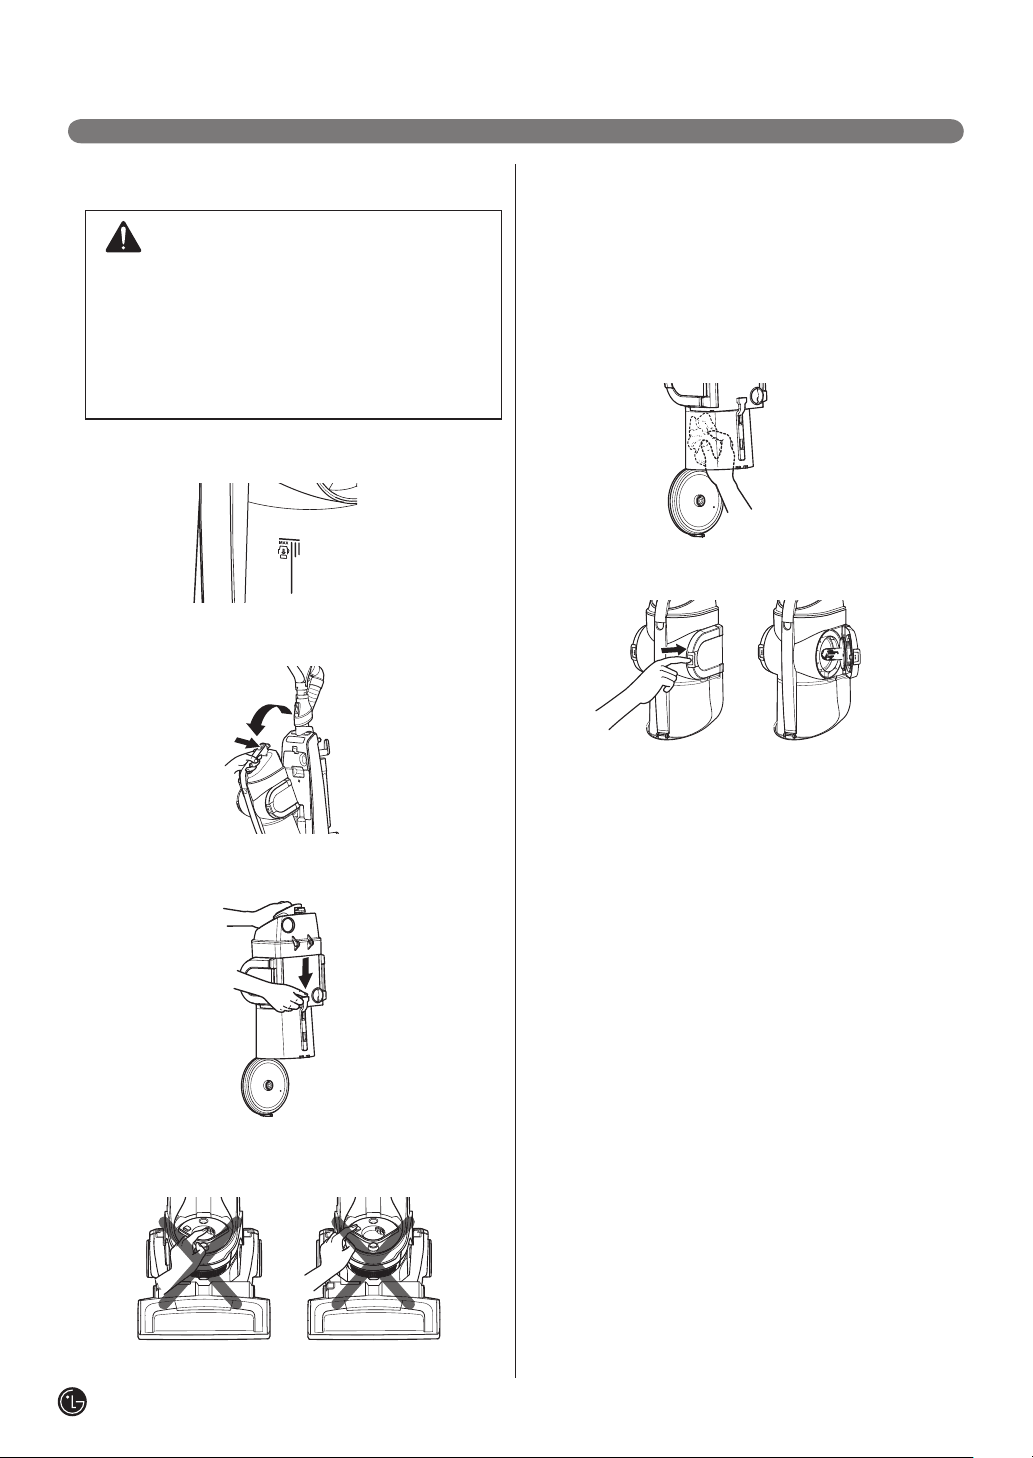
ASSEMBLY
To reduce the risk of shipping damage, your vacuum cleaner is shipped partially unassembled.
Unpacking the Vacuum Cleaner
Carefully unpack the vacuum cleaner and make
sure that you have all parts before discarding of any
packaging.
Remove any tape, cardboard inserts and protective
film before assembly.
Items that are packed in the box:
1. Vacuum Cleaner Body
2. Crevice Tool (already installed)
3. Handle
4. Two “AAA” Batteries - See page 8 for installation
instructions
5. Dusting Brush
6. Adjustable Wand
7. Hose
Assembly Parts
1. Vacuum Cleaner Body
3. Handle
2. Crevice Tool
4. Two "AAA"
Batteries
ENGLISH
8. Pet Hair Turbine Tool
9. Additional Foam Filter
5. Dusting Brush
6. Adjustable
Wand
8.
Pet Hair
Turbine Tool
9. Additional Foam Filter
7. Hose
7
Page 9
8
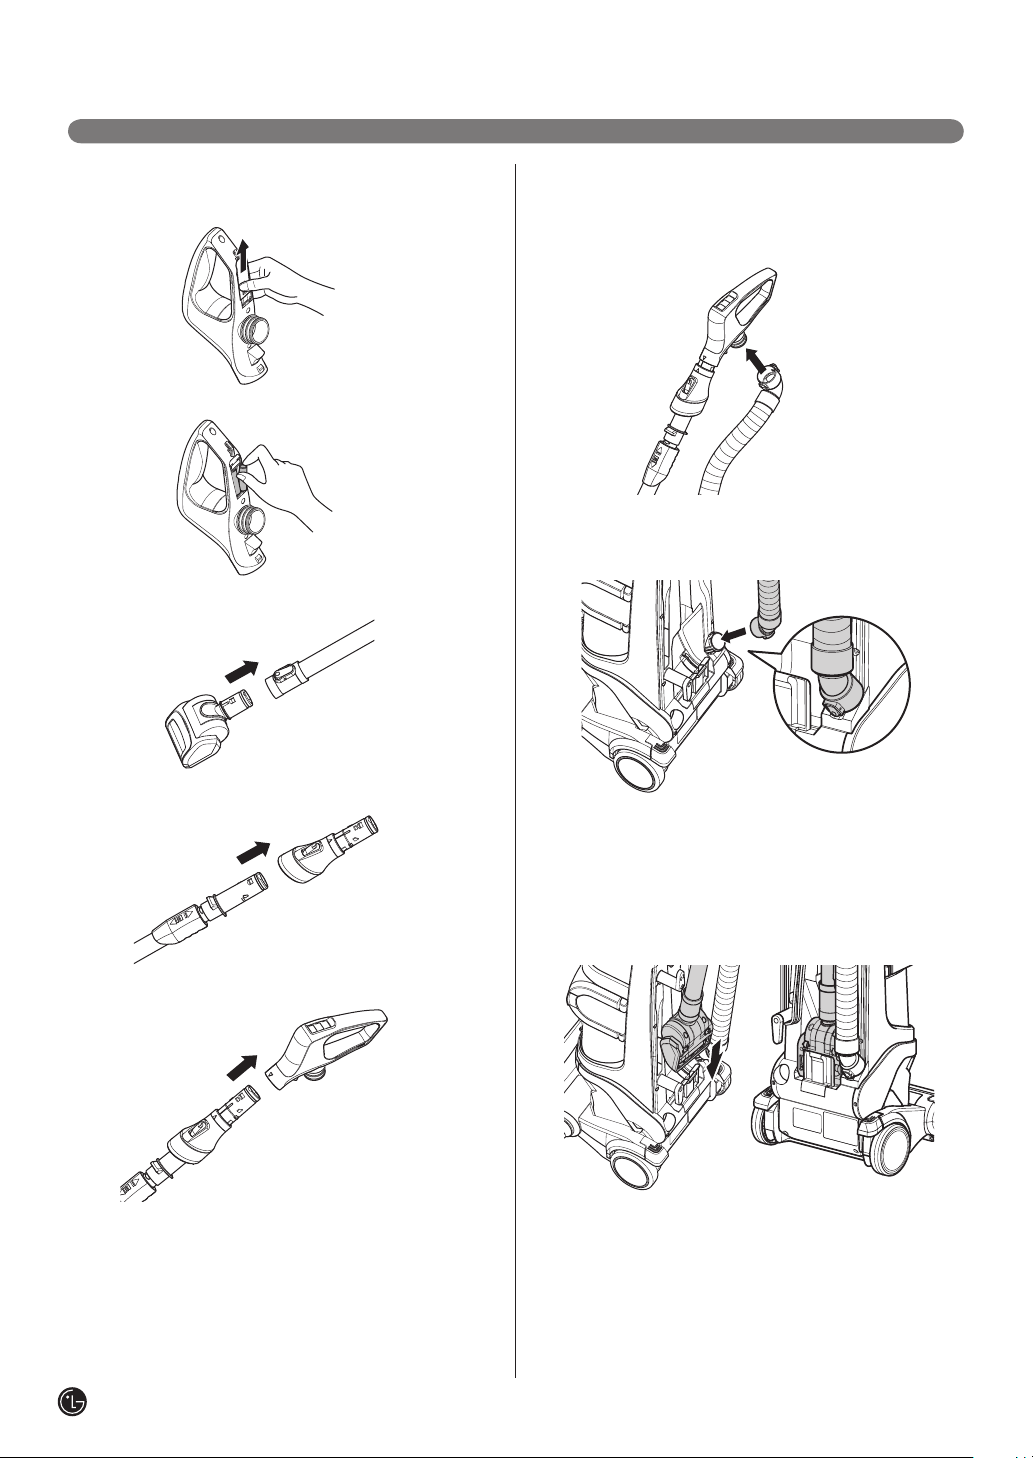
ASSEMBLY
Wand & Hose assembly
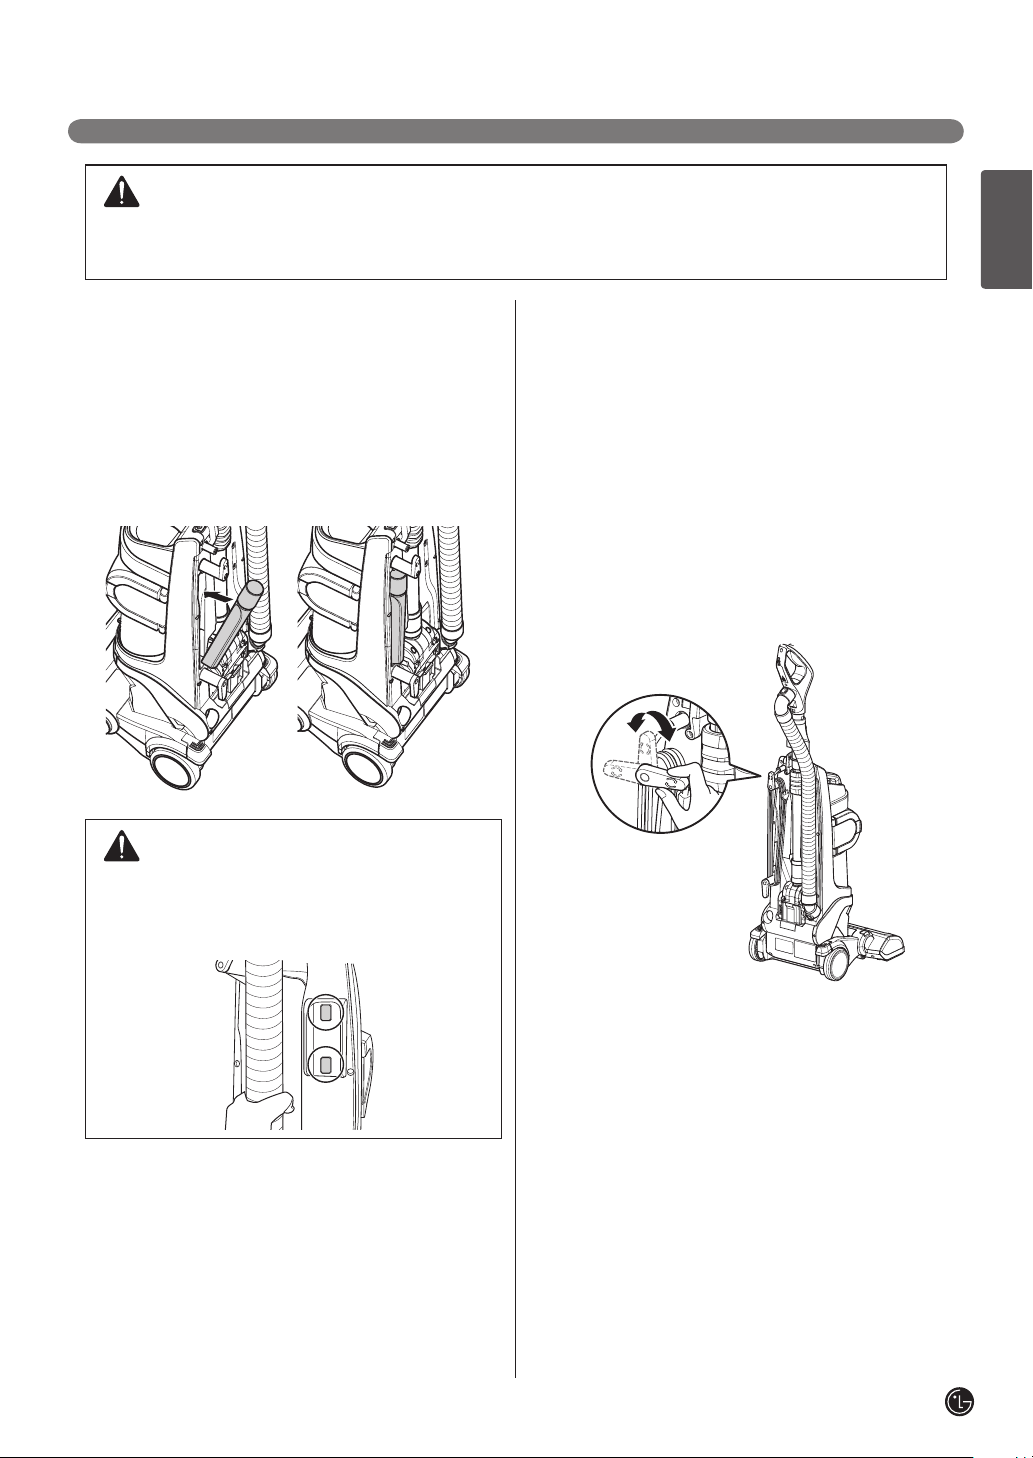
1. Remove Cover by sliding up.
2. Insert the 2 “AAA” batteries.
3. Insert the Pet hair turbine tool into the bottom of
the wand.
Attaching the Hose
1. Attach the top side of the hose to the handle. The
top side of the hose can be recognized because
is has 2 clips for releasing.
2. Insert the bottom side of the hose to the main
body. The bottom side of the hose can be
recognized because it only has 1 clip to release.
4. Insert the other side of the wand into the Dusting
brush.
5. Insert the Dusting brush into the handle.
NOTE: When inserting the bottom of the hose to
the main body the clip should be on the side closest
to the floor and centered.
Insert the wand with all accessories assembled into
3.
the main body of the vacuum cleaner.
Page 10
ASSEMBLY
WARNING
Personal Injury and Product Damage Hazard!
DO NOT use outlets above counters. Damage to items in the surrounding area could occur.
Accessory Storage
Your vacuum cleaner features convenient on-board
storage for the accessories.
• Put the wand & hose assembly on the back of
body and then push the wand & hose assembly to
the body.
• Put the sharp end of the crevice tool into the boss
and then push the crevice tool to fix into the back
of body.
Cord Storage
To store the cord:
1. Make sure the cord hanger is in the UP position.
2. Wrap the cord around the cord hanger and hook,
then clip the plug onto the cord.
NOTE: To reduce the risk of electric shock, this
vacuum cleaner has a polarized plug; one blade is
wider than the other. This plug will fit in a polarized
outlet only one way.
To release the cord:
1. Rotate the upper cord holder to the DOWN
position.
2. Unclip the plug and extend the cord.
ENGLISH
CAUTION
• Hose storage consist of two strong
magnetic. Keep away electronic equipment
or dangerous steel things from hose
storage.
9
Page 11
10
OPERATION
POWER
POWER
POWER
POWER
POWER
POWER
WARNING
Personal Injury Hazard
Do not set the vacuum on the stairs, always keep the unit on the floor.
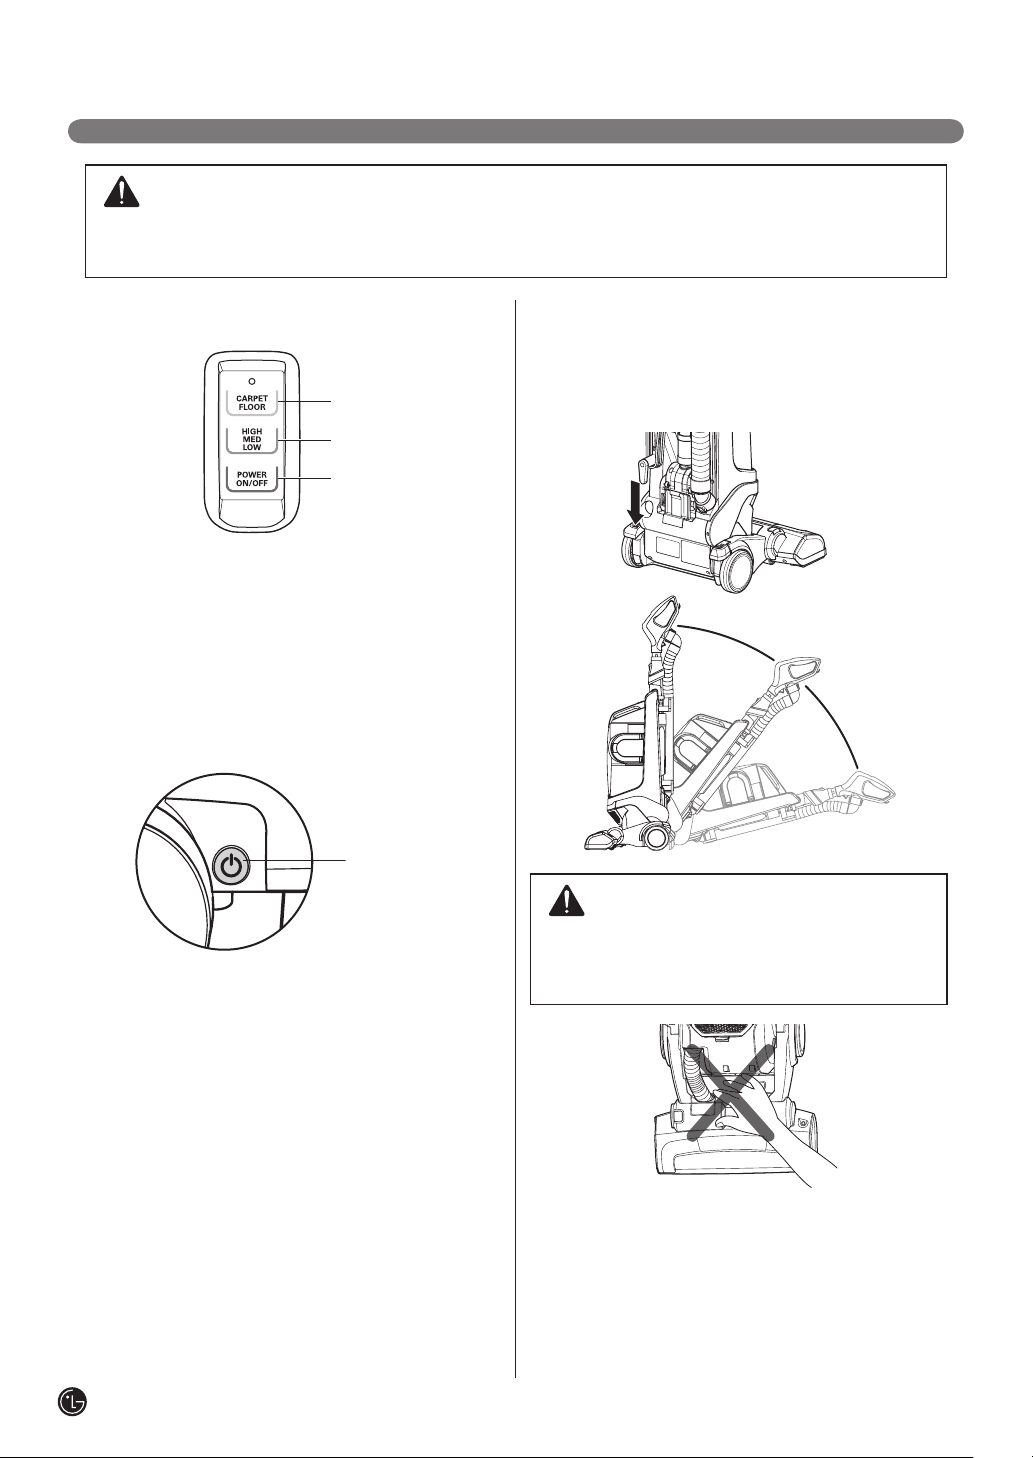
Control Operation
1
2
3
1. Carpet / Floor: To toggle between the agitator
being on or off.
NOTE: If the vacuum is in the upright position the
agitator will not run even if the vacuum power is
on.
2. HIGH MED LOW: To select the proper suction of
the vacuum such as High, Medium or Low.
3. Power On/Off :
To turn the vacuum on and off.
4
Body Release Operation
• To begin vacuuming, press the pedal on the left
side of the vacuum and pull down.
NOTE: When the vacuum is in the upright position
the agitator will not run.
4. Power button
This power button is only needed when the
batteries in the handle need to be changed. When
pressing the handle controls a blue light at the top
of control indicates the batteries are OK, if there is
not blue light when pressing the batteries should be
replaced.
If you need to still vacuum and replacement
batteries are not readily available the power button
on the main body can be used to run the vacuum
until the batteries are changed.
WARNING
• Do not put anything, between body and
agitator head space.
Personal injury or product damage could result.
Page 12
OPERATION
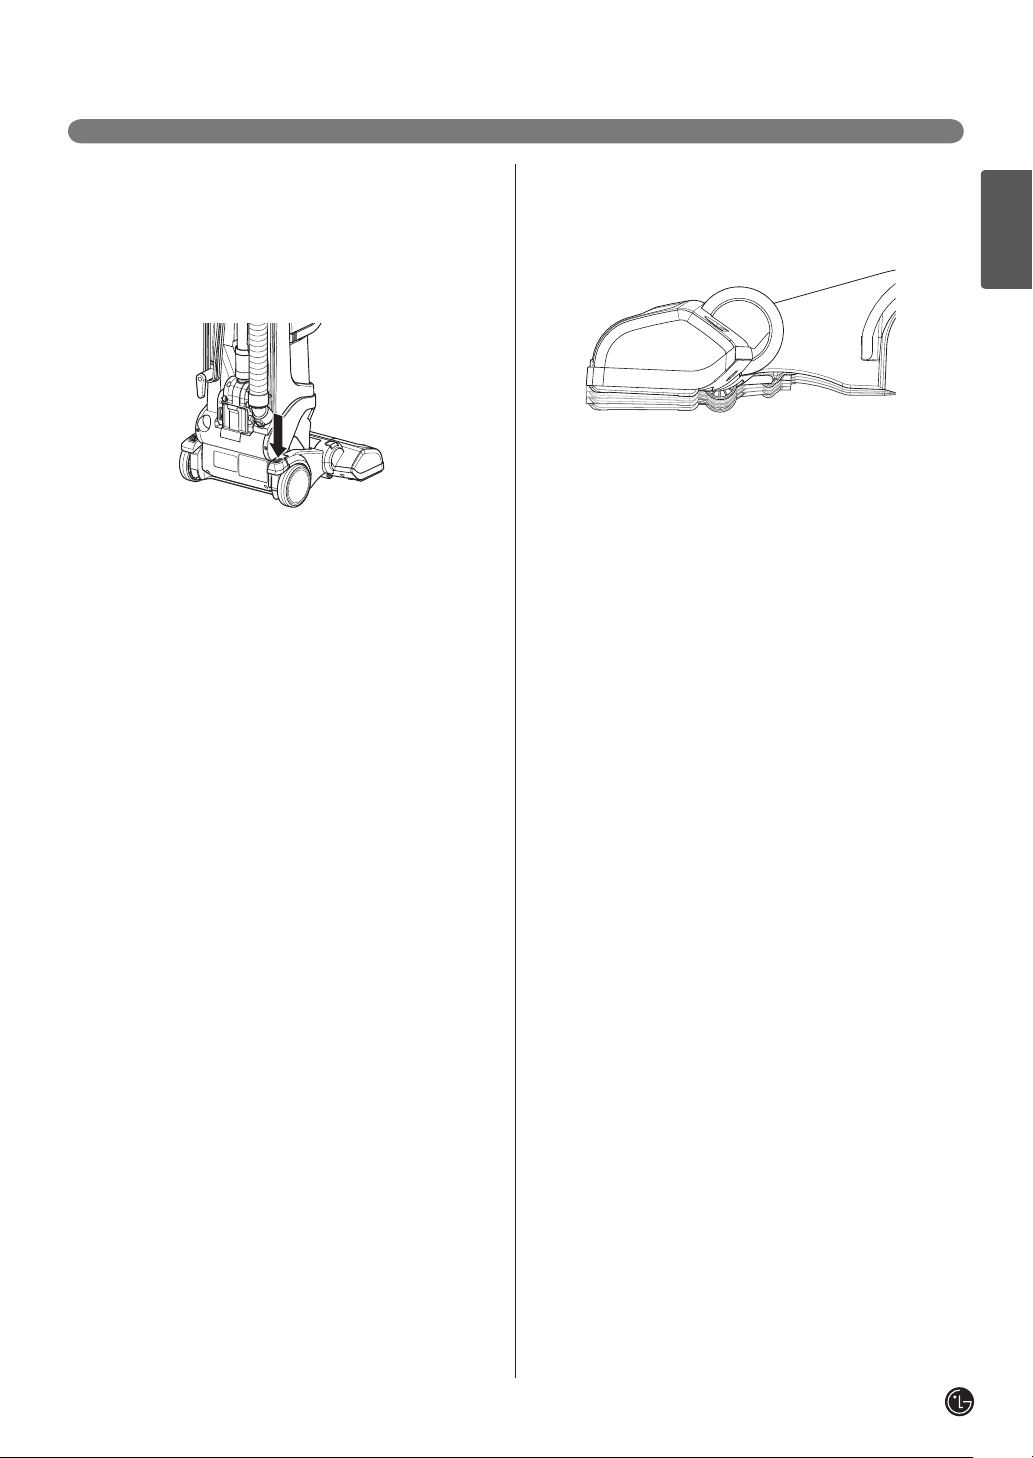
Adjusting the Pile Height
To adjust the pile height:
When it is necessary to raise and lower the front of
the vacuum for various carpet pile heights, press
the right foot pedal to adjust the pile height. Each
press will raise the agitator one notch.
Suggested pile height settings:
You may need to raise the height to make some
jobs easier, such as vacuuming area rugs and
longer pile rugs.
For maximum cleaning performance, the following
carpet height settings are recommended:
• L– for all types of carpet
• Higher settings– for very deep pile carpet where
easier pushing effort is desired, while maintaining
good cleaning performance.
There are 4 settings:
H = High
M = Medium
ML = Medium Low
L = Low
NOTE: If the vacuum is difficult to push, press the
Height adjustment to the next higher setting.
ENGLISH
Attention:
certain types of carpet or flooring. Always check the
carpet or floor covering manufacturer’s recommended
cleaning instructions before vacuuming.
Special care is required when vacuuming
11
Page 13
12
OPERATION
Accessory
Pet Hair Turbine Tool
This air-turbine powered brush is great for stairs
and interiors, as well as removing pet hair, lint, etc.
from fabrics and carpets.
Do NOT use on pets.
Dusting brush
Use the Dusting brush in place for cleaning
furniture, walls, etc.
Crevice Tool
The crevice tool can be used for tight corners,
between cushion and various other hard to reach
places.
CAUTION
• Do not put the finger between crevice tool
and cord hanger, when take out the crevice
tool.
Accessory Use Chart
Accessory
Pet Hair
Turbine Tool
Dusting brush
Crevice Tool
* Always make sure attachments are clean before using on fabrics.
Between
Cushions
Upholstered
Surfaces*
Furniture
and Hard
Surfaces*
CLEANING AREA
Drapes*
(lower
power level)
Stairs
Cushions
Carpeted
Floors/
Rugs
Walls
Page 14

OPERATION
Using the Wand or Wand Handle
CAUTION
Never pull the vacuum cleaner by the hose.
If using any accessory on the end of the handle the
entire wand must be removed from the body base.
Release the wand and handle:
1. Make sure the vacuum cleaner is locked in the
upright position and on a flat, stable surface.
2. Press the wand release button on the body and
tilt the wand handle.
3. Lift the wand out and up.
4. To use the handle only, press the release button
on the bottom of the handle and pull the wand
straight out of the handle.
5. To use the dusting brush, press the release
button on the front of the dusting brush and pull
the wand straight out of the dusting brush.
Second, pull the dusting brush toward handle.
After use, press the release button and pull out
the dusting brush.
ENGLISH
NOTE: The dusting brush is surrounded with a soft
rubber coating to prevent damage to your furniture.
13
Page 15

14
OPERATION
Installing Attachments
Using the crevice tool:
Slide the crevice tool over the end of the wand or fit
it into the handle.
Tips and Tricks
Carpet Edges and Corners:
For tight corners, carpet edges and along base
boards, use the dusting brush.
Use the crevice tool for especially hard to reach
areas.
Stairways and Landings
Use the Dusting brush or Pet hair turbine tool on
stairs and landings. Make sure that the vacuum
cleaner is placed so that it cannot tip or fall.
See below and page 12 for instructions on selecting
and using attachments.
Agitator Motor Overload
Protection
The agitator has a built-in protection against motor
damage should the agitator jam. If the agitator
slows down or stops, the agitator overload protector
shuts off the agitator motor. The suction motor will
remain on at this time.
To correct problem: Turn off and unplug vacuum
cleaner, remove obstruction and press the reset
button.
Use the crevice tool for hard to reach places such
as tight corners and base boards.
Using the Pet hair turbine tool
The Pet hair turbine tool attaches to the wand like
the other attachments. It features a turbine-powered
agitator to provide extra cleaning power on carpets
and fabrics. It is great for cleaning stairs, cushions
and vehicle upholstery.
When using the Pet hair turbine tool, check
frequently for the buildup of hair, fibers, lint and
other debris in the brush area.
Excessive buildup can reduce performance and
could damage the Pet hair turbine tool. See the
Care and Cleaning section for cleaning instructions.
Thermal Overload Protection
This vacuum cleaner has a thermal overload
protector which automatically activates to protect
the vacuum cleaner from overheating. If a clog
disturbs the normal flow of air to the motor, the
thermal protector turns the motor off automatically
to allow the motor to cool in order to prevent
possible damage to the vacuum cleaner.
To correct the problem: Turn the vacuum cleaner
off and unplug the power cord. Check for and
remove clogs, if necessary. Also check and clean
any dirty filters.
Wait approximately 30 minutes and plug the
vacuum cleaner in and turn back on to see if the
motor protector has reset. The thermal protector
system will not reset until the vacuum cleaner has
completely cooled down.
Page 16
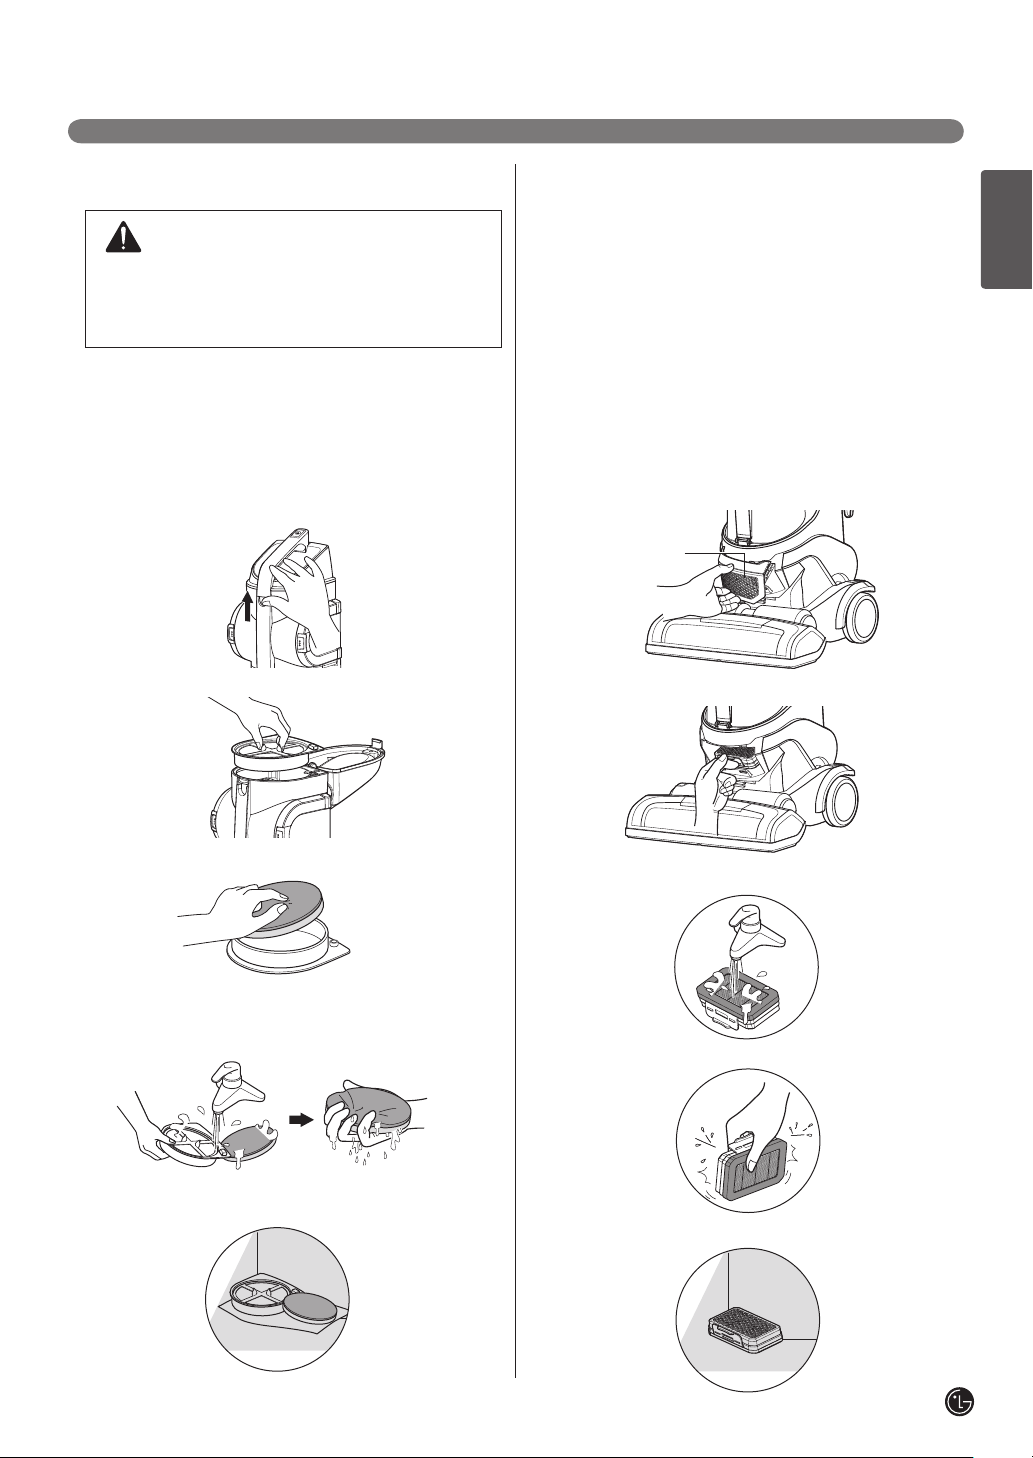
CARE & CLEANING
Always follow all safety precautions when cleaning and servicing the vacuum cleaner.
Storing the Vacuum Cleaner
When not in use, wrap the cord around the cord
hanger as shown. Store the crevice tool in their
proper places on the back of the vacuum cleaner.
WARNING
Electrical shock and personal injury hazard.
Take care when wrapping the cord. Wrapping
the cord too tightly puts stress on the cord
and can cause cord damage. Do not crisscross when wrapping the cord. A damaged
cord makes an electrical shock hazard and
could cause personal injury or damage.
Dust Tank Components
The dust tank consists of several key components.
Always make sure that all parts are properly
reinstalled after emptying the dust tank.
NEVER operate the vacuum cleaner without all
filters in place!
NEVER operate the vacuum cleaner with wet
filters or components!
Key components:
1~2. Foam pre filter: Captures medium to fine
particles. It consists of Filter frame & Foam
filter. These are washable.
3. Dust tank lid: Open to access Foam pre filter.
4. Dust separator: Separate dust from air coming
in.
5. Side door: Open to remove dirt from dust
separator.
6. Emptying dirt release: Press down to open the
bottom plate.
7. Dust tank: where dirt is collected.
8.
Bottom plate: Open to empty the dust tank.
9. Prevention Lever: Prevent using without Foam
pre filter.
ENGLISH
1. Filter
frame
2. Foam
filter
4. Dust
separator
8. Bottom
plate
3. Dust
tank lid
9. prevention
Lever
5. Side
door
6. Emptying
dirt release
7. Dust tank
15
Page 17
16
CARE & CLEANING
Emptying the Dust Tank
WARNING
Electrical shock and personal injury hazard.
Always unplug power cord from electrical
outlet before performing any service on
vacuum cleaner. Failure to do so could result
in electrical shock or personal injury from
vacuum cleaner suddenly starting.
For maximum performance, always empty the dust
tank when the dirt level reaches the MAX line.
TO REMOVE DUST TANK, press the dust tank
release, tilt the dust tank back, then lift it out of the
vacuum cleaner.
Cleaning the Dust Tank
For optimal performance, check filters regularly and
clean when necessary.
To Clean the Dust Tank:
Remove the dust tank from the vacuum cleaner.
1.
2. Press the Emptying dirt release and open the
bottom plate.
3. Wipe out the dust tank with a soft cloth or paper
towel.
4. Release the latch on the Side door on both the
right and left sides.
TO EMPTY DUST TANK, press the Emptying dirt
release and open the bottom plate, as shown.
TO REINSTALL THE DUST TANK, place it in the
holder, then tilt forward until it clicks into place.
Make sure the dust tank is properly seated!
5. Remove any hair, fibers or other debris from the
dust separator.
Do not remove the cones attached to the side
door for cleaning.
NEVER operate the vacuum cleaner with wet
filters or components!
Don’t touch the inner gear and button.
Page 18
CARE & CLEANING
Cleaning the Foam Pre Filter
CAUTION
A wet filter can cause permanent damage to
the vacuum cleaner. Be sure filters are
completely dry before reinstalling.
For optimal performance, check the filters every
3 months and clean when necessary. Don’t close
the dust tank lid without the Foam pre filter.
To Clean the Foam pre filter:
1. Remove the dust tank from the vacuum cleaner.
Lift up on the dust tank lid release and open the lid.
2.
3. Lift out the foam pre filter.
NEVER operate the vacuum cleaner with wet
filters or components!
If you notice a loss of suction and cleaning the
Foam pre filter does not help, you need to replace
the Foam pre filter. You can purchase additional
foam filters from LG by calling
1-800-243-0000(U.S.A), 1-888-542-2623
(Canada) and asking for parts on page 6.
Cleaning the HEPA Filter
For optimal performance, check the filter every
6 months and clean when necessary.
To Clean the HEPA Filter:
1. Remove the exhaust filter cover.
Exhaust filter
cover
2. Lift out the filter by pressing the hook.
ENGLISH
Separate the foam filter from the filter frame.
4.
5.
Shake out any excess dirt or debris and rinse the
foam filter & filter frame with clean water.
And then squeeze out water from foam filter.
6. Dry completely away from sunlight.
3. Wash the filter cleanly in flowing water.
4. Remove moisture.
5. Dry completely away from sunlight.
17
Page 19
18
CARE & CLEANING
Pet hair turbine tool
To clean the pet hair turbine tool
1. Remove the four screws on the bottom of the pet
hair turbine tool.
2. Lift off the cover.
3. Remove any debris.
To reassemble:
4. Carefully press cover onto tabs until they snap
into place.
5. Insert and tighten screws removed in
Step 1. Do NOT overtighten the screws.
Do Not use the pet hair turbine tool on any animal.
➀
➁
4.
Carefully remove any accumulated string, hair, etc.
from the agitator and the agitator area.
To reinstall the cover.
Reverse the steps above.
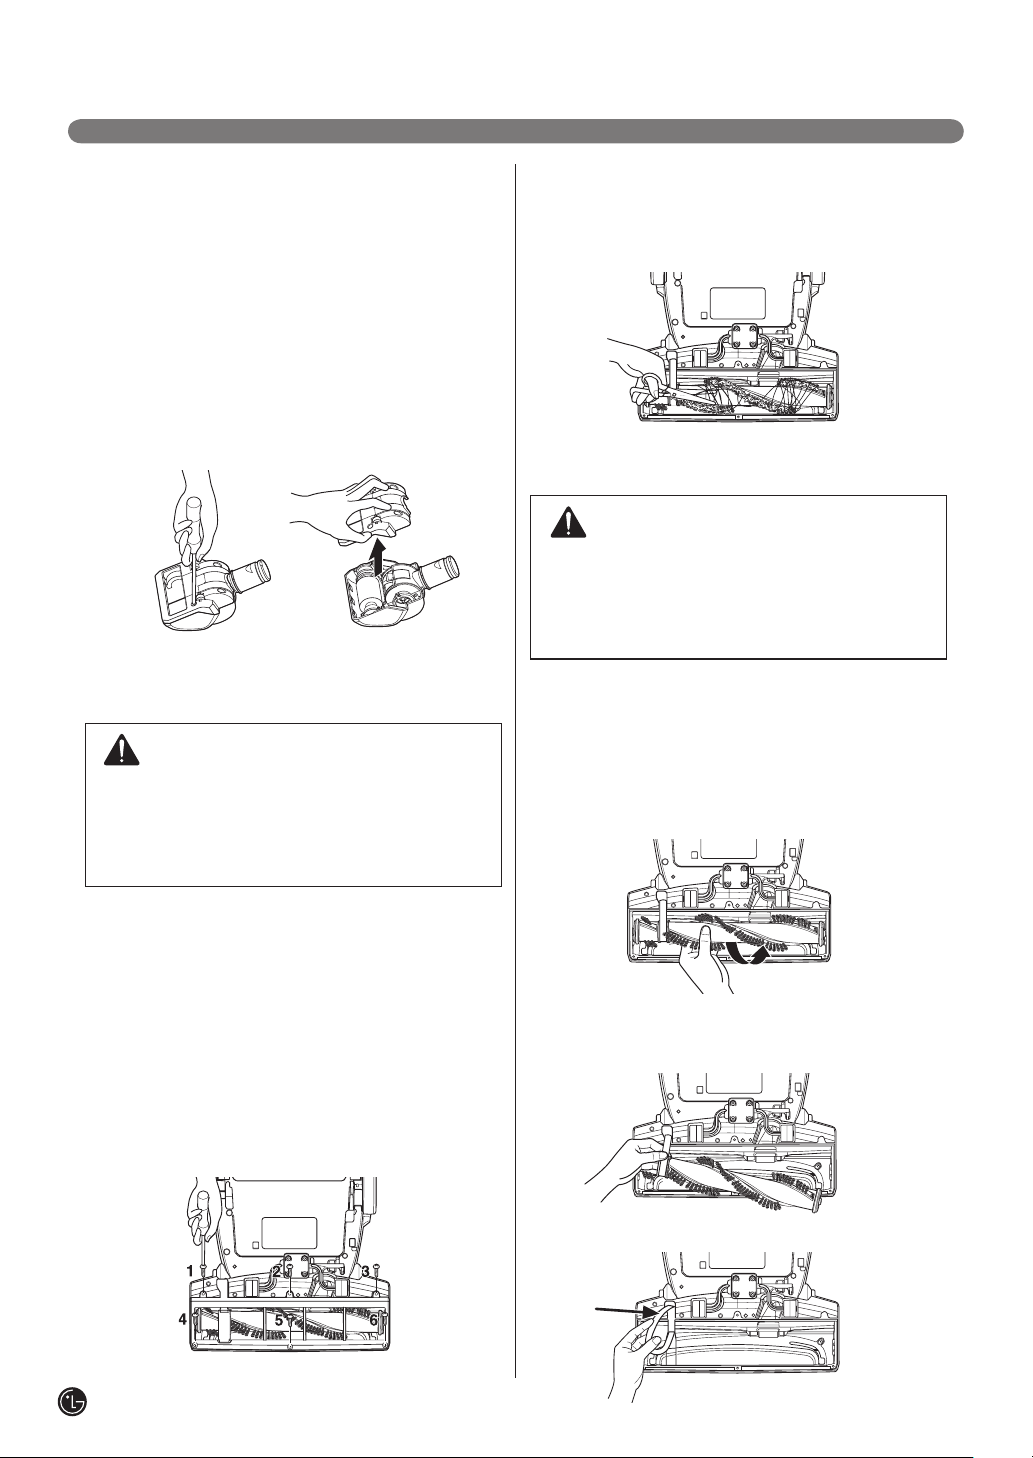
Replacing the Agitator Belt
WARNING
Electrical shock and personal injury hazard.
Always unplug the vacuum cleaner before
servicing. Failure to do so could result in
electrical shock or personal injury.
Agitator Maintenance
WARNING
Electrical shock and personal injury hazard.
Always unplug the vacuum cleaner before
servicing. Failure to do so could result in
electrical shock or personal injury.
Frequently check the agitator brush area for hair,
string and lint buildup.
Remove the Agitator Brush Cover:
1. Unplug the vacuum cleaner. Press the left foot
pedal to release the head. Lower the handle until
the vacuum cleaner is lying flat on the floor.
2. Turn the vacuum cleaner over, so that the
agitator is facing up.
3. Set the agitator on a cloth or a smooth surface.
Remove the six screws on the bottom of the
head and remove the cover.
If the belt breaks, follow the steps below to replace
the agitator belt.
To Replace the Belt:
1. Remove the agitator brush cover as described
above.
2. Lift the agitator straight out.
3. Unhook the old belt from the drive pulley. Make
sure no pieces of the broken belt are trapped in
the agitator or drive pulley area.
4.
Hook the new belt over drive pulley of agitator motor.
Page 20
CARE & CLEANING
5. Fit the agitator through the belt, making sure the
belt is aligned with the pulley section of the
agitator.
6. Lower the agitator into place, making sure the
oval shaped tabs fit into the indents on the head.
7. Reinstall the agitator brush cover as described
above.
For a replacement belt, order LG service center belt
part # MAS61842501.
Replacing the batteries
1. Slide the battery cover up and away from the
hose.
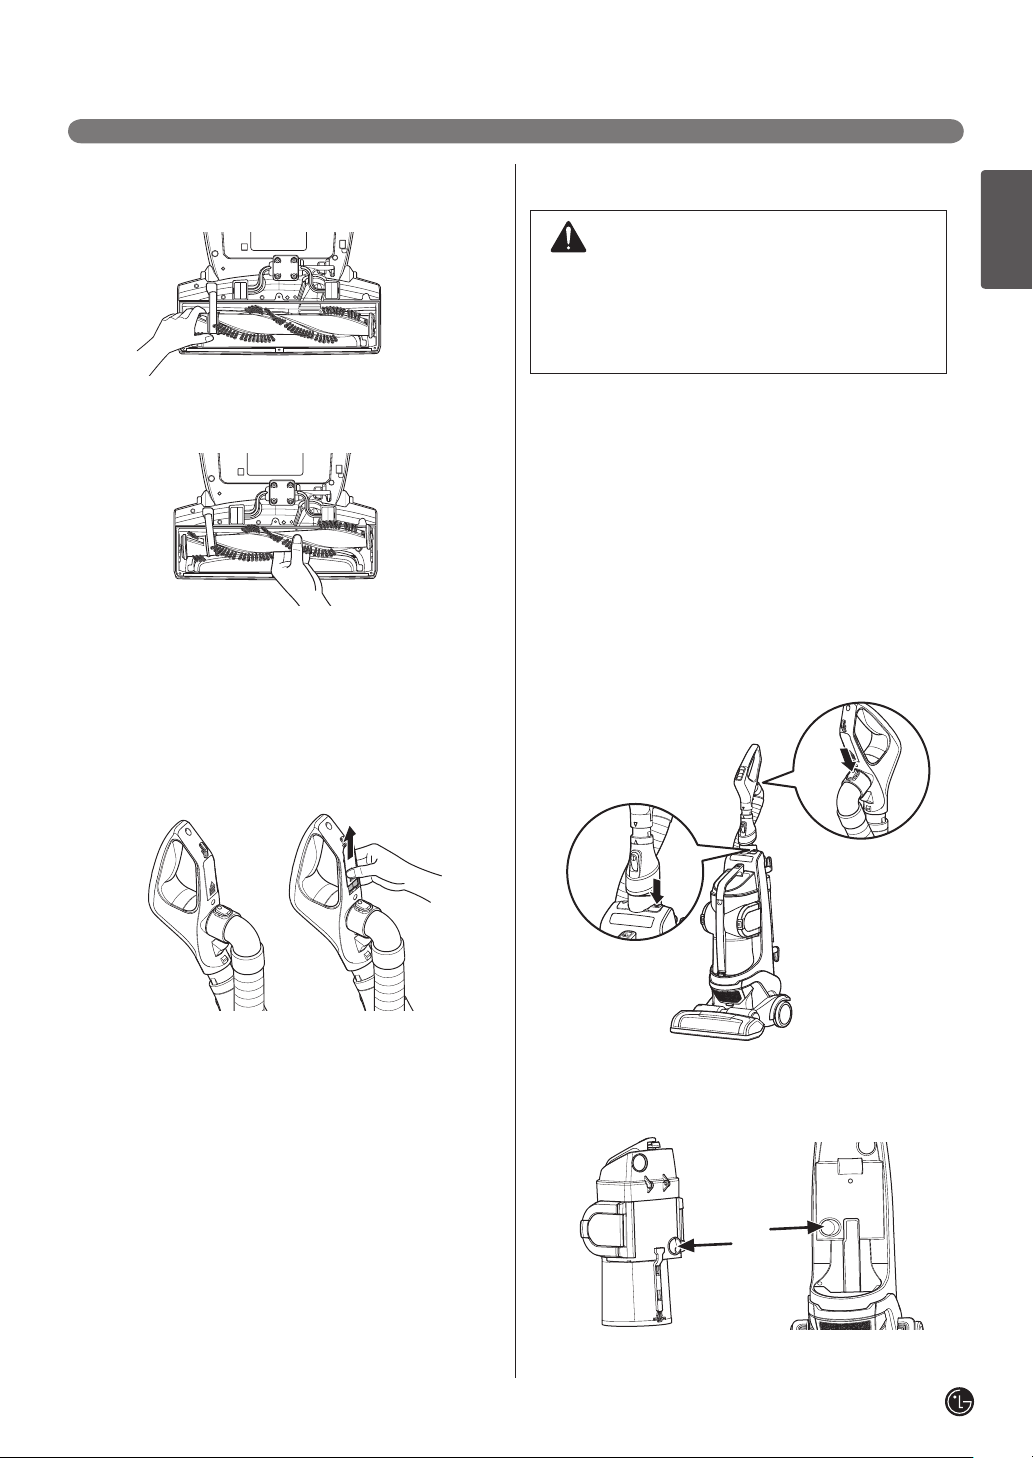
Removing Clogs
WARNING
Electrical shock and personal injury hazard.
Always unplug the vacuum cleaner before
servicing. Failure to do so could result in
electrical shock or personal injury.
If you notice a loss in suction, first check the filters
as described on pages 15. If the filters are clean,
there may be a clog. The arrows show areas where
clogs are most likely to occur.
To check for clogs:
1. Check the hose where it connects to the handle
by pressing the two release buttons on the top
end of the hose.
2. Release the wand from the vacuum cleaner by
pressing the wand release button.
Separate each accessories, see page 8. and
check accessories.
➀
ENGLISH
2. Replace the two batteries and reinstall the
battery cover.
NOTE : Replacing isn’t done yet, use the power
button on the body.
➁
3. Remove the dust tank and check the dust tank
inlet and body inlet where it connects to the
vacuum cleaner body.
19
Page 21
20
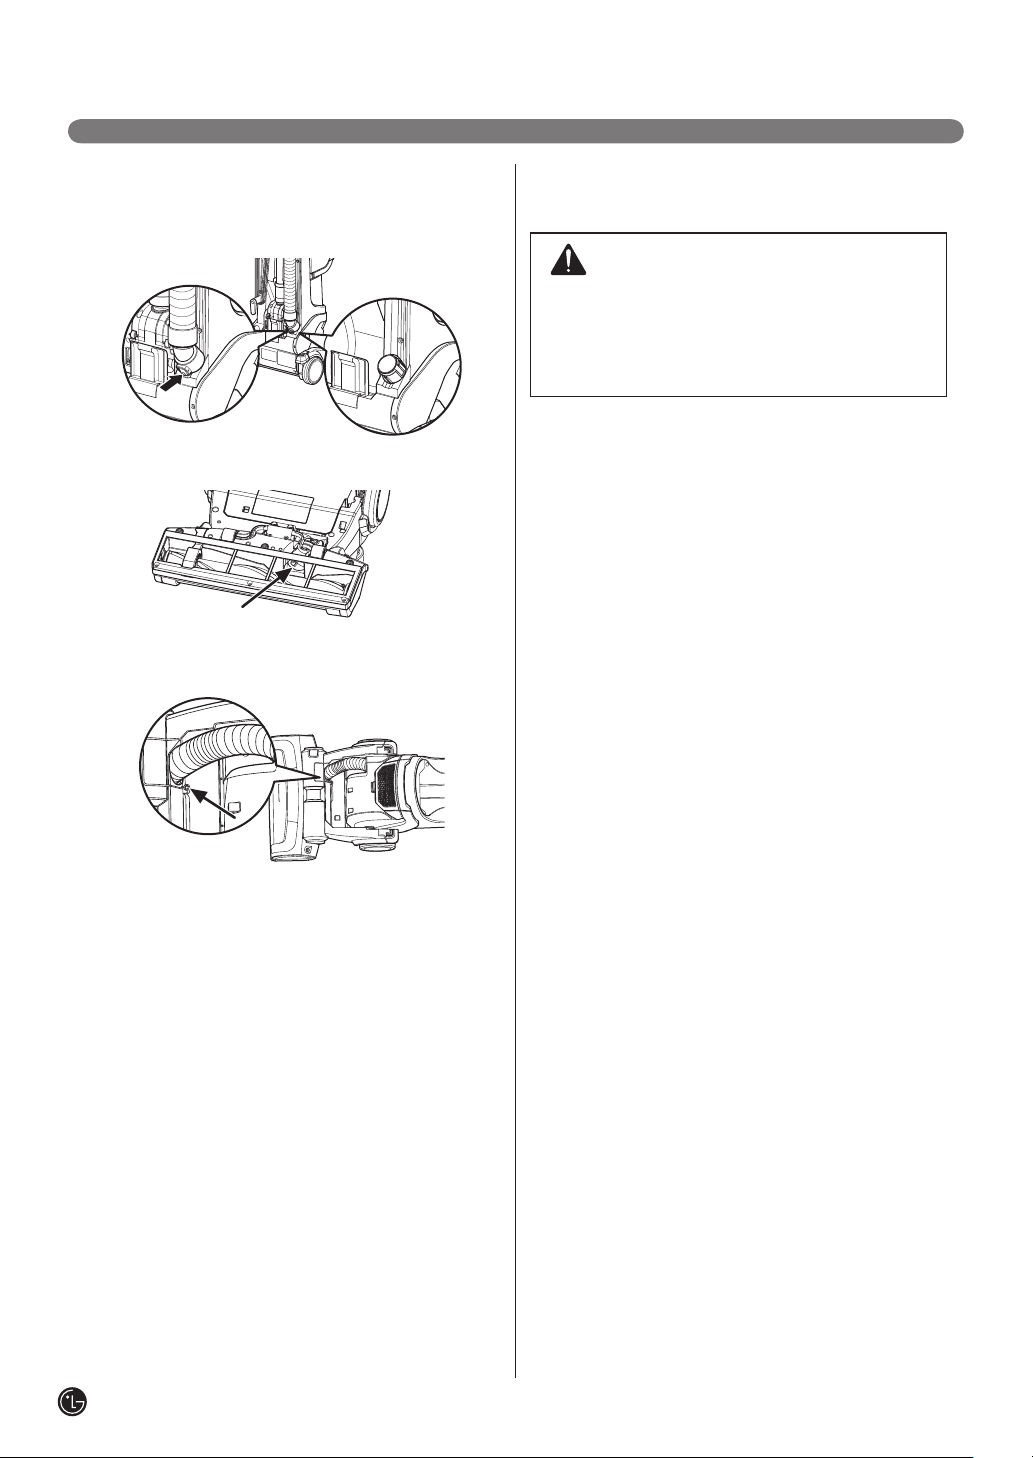
CARE & CLEANING
4. Check the hose where it connects to back of the
body by pressing the release button on the top
end of the hose. And then check two cases, the
wand installed and uninstalled.
5. Turn the vacuum cleaner over, Check the agitator
inlet.
6. To check more thoroughly, remove the screw on
the port.
Cleaning the Exterior of the
Vacuum Cleaner
WARNING
Electrical shock and personal injury hazard.
Always unplug the vacuum cleaner before
servicing. Failure to do so could result in
electrical shock or personal injury.
Wipe the exterior of the vacuum cleaner with a
clean, soft cloth that has been dipped in water and
wrung dry.
DO NOT allow water to enter any openings in the
vacuum cleaner.
DO NOT clean tools in dishwasher or clothes
washer. Wash tools in warm soapy water, rinse and
allow to air dry completely.
DO NOT use tools if they are wet.
Page 22

TROUBLESHOOTING
Review this chart to find do-it-yourself solutions for minor performance problems.
Any service or repair needed, other than as described in this User’s Guide, should be performed through
your local LGE service center.
WARNING
Electrical shock and personal injury hazard.
Always unplug the vacuum cleaner before servicing. Failure to do so could result in electrical
shock or personal injury.
PROBLEM
Vacuum cleaner will
not run
Poor dirt pickup
Agitator does not
turn
Dust escapes the
dust tank
Cleaner picks up
moveable rugs or is
hard to push
Agitator on pet hair
turbine tool will not
run when attached
Accessory has no
suction when using
with the handle
Handle controls not
working
Dust tank feels
loose when lifting by
the carry handle.
POSSIBLE CAUSE POSSIBLE SOLUTION
• Unplugged at wall outlet
• Batteries are dead
• Thermal protector activated
• Full or clogged dust tank
• Dust tank improperly installed
• Clogged hose or wand
• Belt broken/not installed properly
• Agitator motor overload protection
activated
• Hole in hose
• Worn agitator
• Use lower power level
• Switch is off (unit is in bare floor
mode)
• Cleaner is in upright position
• Agitator motor overload protection
is tripped (brush is jammed)
• Belt broken
• Dust tank improperly installed
• The dust tank lid not closed
• The bottom plate is not latched
• Wrong pile height setting
• Dirty agitator or agitator supports
• Obstruction in turbine air path
• Low suction from vacuum cleaner
• Main wand still connected to body
base
• Batteries need replacement
• This is normal
• Make sure cord is plugged into a functioning outlet.
• Replace batteries. [See page 19]
• Allow the vacuum cleaner to cool down.
[See page 14]
• Empty dust tank and clean filters. [See page 16-17]
• Make sure all dust tank components and filters are
installed correctly.
• Check for clogs. [See page 19-20]
• Check belt and replace if needed. [See page 18-19]
• Unplug the vacuum cleaner and check the agitator for
obstructions. Press the reset button. [See page 14]
• Inspect hose carefully. Replace if needed.
• Contact service.
• Increase the power level. [See page 10]
• Turn on agitator power switch. [See page 10]
• Press the Body release and tilt unit back.
[See page 10]
• Unplug the vacuum cleaner and check the agitator for
obstructions and reset the unit. [See Page 14]
• Replace belt. [See page 18-19]
• Make sure all dust tank components and filters are
installed correctly.
• Check the dust tank lid.
• Make sure the bottom plate is closed and latched.
• Adjust pile height. [See page 11]
• Clean the inside of the pet hair turbine tool.
[See page 18]
• Clean the inside of the pet hair turbine tool.
[See page 18]
• Check for clogs. [See page 19-20]
• Remove wand. [See page 13]
• Replace batteries in handle. [See page 19]
• The vacuum is designed like this prevent the tank from
separating from the main body while carrying.
ENGLISH
21
Page 23

MEMO
Page 24

ESPAÑOL
MANUAL DEL PROPIETARIO
ASPIRADORA
Por favor, lea atentamente este manual antes de operar
su aparato y guárdelo para futuras referencias.
LuV300
P/NO : MFL62862401
www.lg.com
Page 25

2
ÍNDICE
1
GARANTÍA DE LA ASPIRADORA LG
3
Garantía de la Aspiradora LG
2
INFORMACIÓN IMPORTANTE DE SEGURIDAD
4
Información importante de seguridad
3
PIEZAS Y CARACTERÍSTICAS
6
Piezas y características
4
MONTAJE
Desempaque de la aspiradora
7
Piezas para el montaje
7
Montaje del tubo y la manguera
8
Sujeción de la manguera
8
Almacenamiento de los accesorios
9
Almacenamiento del cordón eléctrico
9
6
CUIDADO Y LIMPIEZA
15
Almacenamiento de la aspiradora
15
Componentes del tanque para polvo
16
Vaciado del tanque para polvo
16
Limpieza del tanque para polvo
17
Limpieza del prefiltro de espuma
17
Limpieza del filtro HEPA
18
Boquilla turbo para pelo de mascota
18
Mantenimiento del cepillo rotativo
18
Reemplazo de la correa del cepillo rotativo
19
Eliminación de obstrucciones
20
Limpieza del exterior de la aspiradora
7
SOLUCIÓN DE PROBLEMAS
Solución de problemas 21
5
OPERACIÓN
10
Operación de los controles
10
Operación para desacoplar el cuerpo
11
Ajuste de altura de la alfombra
12
Accesorios
12
Cuadro sobre el uso de los accesorios
13
Uso del tubo o el mango del tubo
14
Instalación de los accesorios
14
Consejos y trucos
14
Uso de la boquilla turbo para pelo de mascota
14
Escaleras y descansillos
14
Protección de sobrecarga del motor de cepillo rotativo
14
Protección de sobrecarga térmica
Page 26

GARANTÍA PARA LA ASPIRADORA LG
LG Electronics Inc. reparará o reemplazará su producto, a opción de LG, si se demuestra que los materiales o la mano de obra
están defectuosos sometidos a uso doméstico sin fines comerciales durante el período de garantía indicado más adelante, a
partir de la fecha de compra por el consumidor original del producto. Esta garantía limitada es válida solamente para el
comprador original del producto y está en vigor solamente cuando se usa en los EE.UU. y Canadá.
PERÍODO DE GARANTÍA:
Cinco años
A partir de la fecha
de compra original
ESTA GARANTÍA REEMPLAZA CUALQUIER OTRA GARANTÍA, EXPRESA O IMPLÍCITA, INCLUYENDO SIN
LIMITACIÓN, CUALQUIER GARANTÍA DE COMERCIALIZACIÓN O APTITUD DEL PRODUCTO PARA UN FIN
DETERMINADO. EN EL CASO DE QUE UNA GARANTÍA IMPLÍCITA SEA EXIGIDA POR LA LEY, LA
DURACIÓN DE DICHA GARANTÍA SE LIMITARÁ AL PERÍODO EXPRESO DE GARANTÍA ARRIBA
INDICADO. LG NO SE HARÁ RESPONSABLE POR NINGÚN DAÑO CONSECUENTE, INDIRECTO O
INCIDENTAL DE CUALQUIER ÍNDOLE, INCLUIDA LA PÉRDIDA DE INGRESOS O GANANCIAS, EN
RELACIÓN CON EL PRODUCTO. ALGUNOS ESTADOS NO PERMITEN LIMITACIONES SOBRE LA
DURACIÓN DE UNA GARANTÍA IMPLÍCITA O LA EXCLUSIÓN DE LOS DAÑOS INCIDENTALES O
CONSECUENTES, DE MODO QUE TAL VEZ LAS LIMITACIONES ARRIBA MENCIONADAS NO SEAN
APLICABLES EN SU CASO.
Esta garantía cubre solamente defectos de materiales y de mano de obra.
LGE NO pagará por:
1. Artículos de duración limitada que se pueden gastar, que incluyen pero no se limitan a filtros, correas, pilas.
2. Un técnico de servicio para instruir al usuario en el montaje, la operación o el mantenimiento correcto.
3. Un técnico de servicio para limpiar y mantener este producto.
4. Daño o falla de este producto ocasionada por no haber seguido todas las instrucciones de montaje, operación y
mantenimiento provistas con este producto.
5. Daño o falla de este producto a causa de accidente, maltrato, uso indebido o uso distinto a la función para la cual
está destinado.
6. Daño o falla de este producto causada por el uso de detergentes, productos de limpieza, sustancias químicas o
utensilios distintos a aquéllos recomendados en todas las instrucciones provistas con este producto.
7. Daño o falla de piezas o sistemas causada por modificaciones no autorizadas hechas a este producto.
Esta garantía se extiende al comprador original para los productos comprados para uso doméstico dentro del territorio de los
EE.UU. En Alaska, la garantía excluye el costo de envío o llamadas de servicio a domicilio.
Algunos estados no permiten la exclusión o limitación de los daños incidentales o consecuentes, de modo que esta exclusión o
limitación tal vez no sea aplicable en su caso. Esta garantía le concede derechos legales específicos y usted puede también
tener otros derechos que varían de un estado a otro. A fin de saber cuáles son sus derechos legales, consulte a su oficina local o
estatal de protección al consumidor o al Procurador General de su estado.
CÓMO SE MANEJA EL SERVICIO:
Cualquier pieza de la aspiradora que falle debido a un defecto de los materiales o de la mano de obra. Durante esta
garantía completa de cinco años, LG también proporcionará, en forma gratuita, todos los servicios de mano de obra
y del taller a fin de reemplazar la pieza defectuosa. (Excepción - el motor del cepillo rotativo tiene 3 años de garantía)
ESPAÑOL
INFORMACIÓN SOBRE SERVICIO AL CLIENTE:
Para comprobar la cobertura de
la garantía
Para informarse sobre el Centro de Servicio
Autorizado o Distribuidor más cercano o
para obtener servicio al consumidor o ayuda
sobre piezas o reparación del producto
Guarde su recibo para comprobar la fecha de compra.
Se debe entregar una copia del recibo en el momento de obtener servicio bajo la
garantía.
Llame al número 1-800-243-0000
y seleccione el mensaje guía apropiado del menú; o visite nuestro sitio Web en:
http://us.lgservice.com. (En Canadá- Llame al número 1-888-542-2623, sitio
Web: http://ca.lgservice.com)
(Se contesta las 24 horas del día, 365 días al año)
3
Page 27

4
INFORMACIÓN IMPORTANTE DE SEGURIDAD
LEA TODAS LAS INSTRUCCIONES ANTES DE PONER EN SERVICIO
INSTRUCCIONES IMPORTANTES DE SEGURIDAD
Lea y siga todas las instrucciones antes de utilizar su aspiradora para evitar el riesgo de incendio, descarga eléctrica, lesiones
personales o daños a la propiedad durante el uso de la aspiradora. En esta guía no se cubren todas las posibles condiciones que
podrían ocurrir. Siempre póngase en contacto con su agente de servicio o fabricante sobre los problemas que usted no entienda.
Este es el símbolo de alerta de seguridad. Este símbolo le alerta sobre peligros potenciales que podrían
causarle la muerte o lesiones a usted o a los demás. En todos los mensajes de seguridad, este símbolo
de alerta de seguridad estará seguido ya sea por la palabra ‘ADVERTENCIA” o “PRECAUCIÓN”.
ADVERTENCIA
causar lesiones personales graves o la muerte.
Este símbolo le alertará sobre peligros o prácticas inseguras que podrían
Este símbolo le alertará sobre peligros o prácticas inseguras que podrían
PRECAUCIÓN
causar lesiones personales o daños a la propiedad.
ADVERTENCIA
• Desconecte el suministro eléctrico antes de dar mantenimiento
o limpiar el aparato o cuando la aspiradora no esté en uso.
El incumplimiento de esta indicación podría provocar descarga
eléctrica o lesiones personales.
• No utilice la aspiradora para recoger algo que esté
quemándose o humeante por ejemplo cigarrillos o cenizas
calientes.
Si lo hace podría ocasionar la muerte, incendio o descarga eléctrica.
• No recoja sustancias inflamables o explosivas como gasolina,
benceno, diluyentes, propano (líquidos o gases) con la
aspiradora.
Los vapores de estas sustancias pueden representar un peligro de
incendio o explosión. Si lo hace podría provocar la muerte o
lesiones personales.
o manipule el enchufe o la aspiradora con las manos mojadas.
• N
Si lo hace podría ocasionar la muerte o descarga eléctrica.
• No desconecte la aspiradora tirando del cordón eléctrico.
Si lo hace podría ocasionar en daños al producto o descarga
eléctrica. Para desenchufar, agarre el enchufe, no el cordón
eléctrico.
• Mantenga el cabello, la ropa holgada, los dedos y todas las
partes del cuerpo lejos de las aberturas y las piezas en
movibles.
El incumplimiento de esta indicación podría provocar descarga
eléctrica o lesiones personales.
• No tire ni arrastre la aspiradora usando el cordón eléctrico, ni
use el cordón como agarradera ni cierre la puerta sobre él, no
jale el cordón alrededor de esquinas o bordes afilados. No pase
la aspiradora sobre el cordón eléctrico. Mantenga el cordón
lejos de las superficies calientes.
El incumplimiento de esta indicación podría provocar descarga
eléctrica o lesiones personales o incendio o daños al producto.
• No permita que la aspiradora sea usada como juguete. Ponga
atención esmerada si es usada por los niños o si se usa cerca
de ellos.
Podría provocar lesiones personales o daños al producto.
• No utilice la aspiradora si el cordón eléctrico o el enchufe está
dañado o defectuoso.
Podría ocasionar lesiones personales o daños al producto. En estos
casos, comuníquese con el agente de servicio de LG Electronics
para evitar el peligro.
• No utilice la aspiradora si ha estado sumergida en agua.
Podría provocar lesiones personales o daños al producto. En estos
casos, comuníquese con el agente de servicio de LG Electronics
para evitar el peligro.
• No continúe pasando la aspiradora si aparentemente tiene
alguna pieza faltante o dañada.
Podría provocar lesiones personales o daños al producto. En estos
casos, comuníquese con el agente de servicio de LG Electronics
para evitar el peligro.
• No utilice un cordón de extensión con esta aspiradora
Podría representar un peligro de incendio o causar daños al producto.
• Uso del voltaje correcto.
El uso del voltaje incorrecto puede ocasionar daños al motor y
posibles lesiones al usuario. El voltaje correcto se indica en la base
de la aspiradora.
• Apague todos los controles antes de desconectar.
El incumplimiento de esta indicación podría provocar descarga
eléctrica o lesiones personales.
• No cambie el enchufe de ninguna forma.
El incumplimiento de esta indicación podría provocar descarga
eléctrica o lesiones personales o daños al producto. Cualquier
modificación podría causar la muerte. Si el enchufe no se adapta al
tomacorriente, comuníquese con un electricista calificado para
instalar el tomacorriente correcto.
• Las reparaciones a los aparatos eléctricos deben ser
efectuadas solamente por ingenieros de servicio calificados.
Las reparaciones incorrectas pueden conducir a graves peligros
para el usuario.
• No ponga los dedos cerca del engranaje.
El incumplimiento de esta indicación podría provocar lesiones
personales.
• No la use en espacios exteriores ni en superficies mojadas.
El incumplimiento de esta indicación podría provocar descarga
eléctrica o lesiones personales.
• No coloque ningún objeto en el espacio entre el cuerpo de la
aspiradora y el cabezal del cepillo rotativo.
Podría provocar lesiones personales o daños al producto o
animales domésticos.
• Este producto contiene productos químicos que en el estado
de California se consideran cancerígenos tóxicos para la
reproducción. Lávese las manos tras manipularlos.
• Tenga extremo cuidado cuando limpie sobre escaleras.
GUARDE ESTAS INSTRUCCIONES
Page 28

PRECAUCIÓN
IMPORTANT SAFETY INFORMATIONS
• No coloque ningún objeto entre las aberturas.
El incumplimiento de esta indicación podría causar daños al producto.
• No utilice la aspiradora con cualquier abertura obstruida:
manténgala libre de polvo, pelusa, cabellos y cualquier cosa que
pueda reducir el flujo de aire.
El incumplimiento de esta indicación podría causar daños al producto.
•
No use la aspiradora sin el tanque para polvo y/o los filtros en su lugar.
El incumplimiento de esta indicación podría causar daños al producto.
• Siempre limpie el tanque para polvo después de haber pasado la
aspiradoras sobre productos de limpieza o refrescantes para
alfombras, polvos, talcos o partículas finas.
Estos productos obstruyen los filtros, reducen el flujo de aire y pueden
causar daños a la aspiradora. Si no limpia el tanque para polvo podría
ocasionar daños permanentes a la aspiradora.
• No utilice la aspiradora para recoger objetos filosos duros, juguetes
pequeños, alfileres, sujetapapeles, etc.
Podrían dañar la aspiradora o el tanque para polvo.
• Almacene la aspiradora dentro de la casa.
Guarde la aspiradora después de cada uso para evitar tropezarse sobre
ella.
• La aspiradora no está destinada para el uso de niños pequeños o
personas enfermas, sin la debida supervisión.
El incumplimiento de esta indicación podría causar lesiones personales o
daños al producto.
• Solamente utilice piezas producidas o recomendadas por los
Agentes de Servicio de LG Electronics.
El incumplimiento de esta indicación podría causar daños al producto.
•
Utilice la aspiradora solamente como se describe en este manual. Use
solamente las piezas o accesorios recomendadas o aprobadas por LG.
Protector térmico:
Esta aspiradora tiene un termostato especial que protege la aspiradora en caso de recalentamiento del motor. Si la aspiradora se apaga de repente,
apague el interruptor y desenchufe la aspiradora.
Inspeccione la aspiradora en busca de la fuente posible de recalentamiento como por ejemplo un tanque para polvo que esté lleno, una manguera obstruida
o un filtro atascado. Si encuentra cualquiera de estas condiciones, repárela y espere por lo menos 30 minutos antes de intentar usar la aspiradora. Al
transcurrir los 30 minutos, enchufe de nuevo la aspiradora y encienda el interruptor. Si la aspiradora todavía no funciona, llame a un electricista calificado.
La declaración de interferencia de radiofrecuencia de la Comisión Federal de Comunicaciones incluye la siguiente advertencia:
NOTA: Este equipo ha sido sometido a prueba y se verificó que cumple con los límites para los dispositivos digitales de Clase B, de
conformidad con la Parte 15 de las normas FCC. Estos límites se han concebido para proveer una protección razonable contra
interferencias perjudiciales en una instalación residencial.
Este equipo genera, usa y puede irradiar energía de radiofrecuencia y, si no se instala y se emplea de acuerdo con las instrucciones,
puede causar interferencia perjudicial a las comunicaciones de radio.
Sin embargo, no existe ninguna garantía de que la interferencia no ocurrirá en una instalación particular.
Si este equipo llegara a causar alguna interferencia perjudicial a la recepción de radio o televisión, lo que podrá determinarse encendiendo
y apagando el equipo, se recomienda al usuario tratar de corregir la interferencia mediante una o más de las medidas siguientes:
• Reoriente o reubique la antena receptora.
• Aumente el espacio de separación entre el equipo y el receptor.
• Conecte el equipo a un tomacorriente de un circuito distinto del que esté conectado el receptor.
• Consulte al distribuidor o pida ayuda a un técnico de radio y televisión con experiencia.
Este dispositivo cumple con la parte 15 de las normas FCC (RSS-210).
La operación está sujeta a las dos condiciones siguientes: (1) Este dispositivo no puede causar interferencia perjudicial y (2) este
dispositivo debe aceptar cualquier interferencia recibida, incluidas aquellas que provoquen un funcionamiento no deseado.
El incumplimiento de esta indicación podría causar lesiones personales o
daños al producto.
• Para evitar lesiones personales y evitar que se caiga la máquina al
limpiar las escaleras, siempre colóquela al pie de las escaleras.
El incumplimiento de esta indicación podría causar lesiones personales o
daños al producto.
•
Asegúrese de que los filtros (filtro de aire expulsado y filtro protector del
motor) estén totalmente secos antes de volverlos a colocar en la máquina.
El incumplimiento de esta indicación podría provocar daños al producto.
• No seque el filtro en un horno convencional o de microondas.
El incumplimiento de esta indicación podría representar un peligro de
incendio.
• No seque el filtro en una secadora de ropa.
El incumplimiento de esta indicación podría representar un peligro de
incendio.
• No seque el filtro cerca de una llama descubierta.
El incumplimiento de esta indicación podría representar un peligro de
incendio.
• Siempre apague la aspiradora antes de conectar o desconectar la
manguera.
Podría ocasionar lesiones personales o daños al producto.
• Su aspiradora ha sido fabricada solamente para uso en el hogar.
• Usted es el responsable del montaje correcto y el uso seguro de su
aspiradora.
• Cuando retire el accesorio para espacios reducidos, no ponga el
dedo entre este accesorio y el soporte del cable.
• El almacenamiento de la manguera consisten en dos fuertes
magnéticos. Mantener alejado de equipos electrónicos o de material
de acero peligrosos de el almacenamiento de la manguera.
ESPAÑOL
PRECAUCIÓN
Los cambios o modificaciones de cualquier índole en la construcción de este dispositivo que no sean aprobados
expresamente por la parte responsable del cumplimiento podrían anular la autorización del usuario para operar el equipo.
NOTA IMPORTANTE:
Declaración de exposición a radiación de FCC
Este equipo cumple con los límites de exposición a la radiación estipulados por FCC para un ambiente no controlado. Este equipo debe
instalarse y operarse a una distancia mínima de 20 cm entre el radiador y su cuerpo. Este transmisor no debe colocarse a la par u operarse
conjuntamente con cualquier otra antena o transmisor.
Especificaciones de transmisor
* Frecuencia de transportadora: 2456, 2463, 2470 MHz * Potencia de salida de RF: 0 dBm
5
Page 29

6
PIEZAS Y CARACTERÍSTICAS
Es importante que usted conozca las piezas y las características de su aspiradora a fin de
garantizar el uso correcto y seguro. Sugerimos que se familiarice con ellas antes de usar su
aspiradora.
Piezas de repuesto comunes
Filtro HEPA ADQ72913001
Preltro de espuma
(ADV72987201)
Agitator Belt MAS61842501
Portaltro MDQ61918301
Filtro de espuma
MDJ61980601
Para pedir estas piezas puede llamar al número
1-800-243-0000.(U.S.A)
1 888 542 2623 (Canada)
Manija
Control de potencia
Cepillo para el polvo
Botón auxiliar de encendido
Desenganche del
tanque para polvo
Asa de transporte
Herramientas auxiliares
Boquilla plana Cepillo para el polvo
Boquilla turbo para
pelo de mascota
Sección para
las pilas
Manguera
Ganchos de
enrollado rápido
del cordón
Boquilla plana
Separador de polvo
Tanque para polvo
Filtro de aire
expulsado
Indicadores
de altura de
alfombra
Tubo
Boquilla turbo
para pelo de
mascota
Desenganche
del cuerpo
Ajuste de
la altura
Cepillo rotativo
Puerta lateral
Page 30

MONTAJE
A fin de reducir el riesgo de daños en tránsito, su aspiradora se envía parcialmente desensamblada.
Desempaque de la aspiradora
Desempaque con mucho cuidado la aspiradora y
asegúrese de que tiene todas las piezas antes de
descartar cualquier empaque. Retire cualquier cinta
adhesiva, las inserciones de cartón y la película
protectora antes de ensamblar.
Artículos que vienen empacados en la caja:
1. Cuerpo de la aspiradora
2. Boquilla plana (ya instalada)
3. Manija
4. Dos pilas “AAA” – Vea la página 8 para las
instrucciones de instalación
5. Cepillo para el polvo
6. Tubo ajustable
7. Manguera
8. Boquilla turbo para pelo de mascota
Piezas para el montaje
1. Cuerpo de la aspiradora
2. Boquilla plana
3. Manija
5. Cepillo para el
polvo
ESPAÑOL
4. Dos pilas
“AAA”
9. Filtro de espuma adicional
6. Tubo
ajustable
8.
Boquilla turbo
para pelo de
mascota
7. Manguera
9. Filtro de espuma adicional
7
Page 31

8
MONTAJE
Montaje del tubo y la manguera
1. Retire la tapa deslizándola hacia arriba.
2. Inserte las 2 pilas “AAA”.
3. Inserte la boquilla turbo para pelo de mascota
dentro de la parte inferior del tubo.
Sujeción de la manguera
1. Sujete el lado superior de la manguera a la
manija. El lado superior de la manguera puede
reconocerse por sus 2 presillas para desacoplar.
2. Inserte el extremo inferior de la manguera en el
cuerpo principal. La parte inferior de la manguera
puede reconocerse porque solamente tiene una
presilla para desacoplar.
4. Inserte el otro extremo del tubo dentro del cepillo
para el polvo.
5. Inserte el cepillo para el polvo dentro de la
manija.
NOTA: Cuando inserte la parte inferior de la
manguera en el cuerpo principal, la presilla debe
estar en el lado más cercano al piso y centrada.
3. Inserte el tubo con todos los accesorios
ensamblados en el cuerpo principal de la
aspiradora.
Page 32

MONTAJE
ADVERTENCIA
¡Peligro de lesiones personales y daños al producto!
NO use tomacorrientes sobre mostradores. Podrían dañarse los artículos en el área circundante.
Almacenamiento de los accesorios
Su aspiradora cuenta con almacenamiento
incorporado para la boquilla plana.
• Coloque el conjunto de tubo y manguera en la
parte de atrás del cuerpo de la aspiradora y luego
empuje el conjunto de tubo y manguera hacia el
cuerpo.
• Coloque la punta de la herramienta de la grieta en
el jefe y luego empuje la herramienta de la grieta
para fijar en la parte posterior del cuerpo.
PRECAUCIÓN
• El almacenamiento de la manguera
consisten en dos fuertes magnéticos.
Mantener alejado de equipos electrónicos o
de material de acero peligrosos de el
almacenamiento de la manguera.
Almacenamiento del cordón eléctrico
ESPAÑOL
Para almacenar el cordón:
1. Asegúrese de que el gancho para colgar el
cordón esté en la posición HACIA ARRIBA.
2. Enrolle el cordón alrededor del gancho para
colgar y el gancho inferior, luego trabe el enchufe
en el cordón eléctrico.
NOTA: A fin de reducir el riesgo de descarga
eléctrica, esta aspiradora cuenta con un enchufe
polarizado; una punta es más ancha que la otra.
Este enchufe se adaptará a un tomacorriente
polarizado en una sola dirección.
Para soltar el cordón eléctrico:
1. Haga girar el gancho superior a la posición
HACIA ABAJO.
2. Destrabe el enchufe y extienda el cordón
eléctrico.
9
Page 33

10
OPERACIÓN
POWER
POWER
POWER
POWER
POWER
POWER
ADVERTENCIA
Peligro de lesiones personales
No coloque la aspiradora en las escaleras, siempre mantenga el aparato sobre el piso.
Operación de los controles
1
2
3
1. Alfombra/Piso: Para alternar entre cepillo
rotativo encendido o apagado.
NOTA: Si la aspiradora está en posición vertical
el cepillo rotativo no funcionará aunque la
potencia de la aspiradora esté encendida.
2. ALTO MEDIANO BAJO: Para seleccionar la
succión adecuada de la aspiradora o sea succión
alta, mediana o baja.
3. Interruptor de encendido/Apagado:
encender y apagar la aspiradora.um on and off.
Para
4
Operación para desacoplar el
cuerpo
• Para poner en marcha la aspiradora, oprima el
pedal del lado izquierdo de la aspiradora e incline
el aparato hacia abajo.
NOTE: El cepillo rotativo no funcionará cuando la
aspiradora esté en posición vertical.
4. Botón de encendido
TEste botón de potencia solamente se necesita
cuando deben cambiarse las pilas en la manija.
Al oprimir los controles de la manija una luz azul en
la parte superior indica que las pilas están
cargadas; si no aparece la luz azul al oprimir los
controles, las pilas deben reemplazarse.
Si todavía necesita pasar la aspiradora y las pilas
de reemplazo no están disponibles, puede utilizar el
botón de encendido en el cuerpo principal para
poner en marcha la aspiradora hasta que cambie
las pilas.
ADVERTENCIA
•
No coloque ningún objeto en el espacio entre
el cuerpo y el cabezal del cepillo rotativo.
Podría ocasionar lesiones personales o daños al
producto o daños a los animales domésticos.
Page 34

OPERACIÓN
Ajuste de altura de la alfombra
Para ajustar la altura de lanilla:
Cuando sea necesario subir o bajar la parte
delantera de la aspiradora para los distintos
espesores de las alfombras, oprima el pedal
derecho para ajustar la altura de lanilla. Cada vez
que presione el cepillo rotativo subirá una muesca.
Ajustes sugeridos de altura de la lanilla:
Puede ser que necesite aumentar la altura para
facilitar ciertas tareas, como pasar la aspiradora a
los tapetes o alfombras con flecos o lanilla más
larga.
ESPAÑOL
Para una limpieza óptima, se recomiendan los
siguientes ajustes de altura de la alfombra.
• L: para todo tipo de alfombras.
• Ajustes superiores: para alfombras de pelo largo
donde se busca una limpieza más cómoda a la
vez que eficaz.
Existen 4 opciones de configuración:
H = High (Alto)
M = Medium (Medio)
ML = Medium Low (Medio bajo)
L = Low (Bajo)
NOTA: Si la aspiradora es difícil de mover, cambie
el ajuste de limpieza al siguiente valor más alto.
Atención: Se necesita cuidado especial al pasar la
aspiradora por ciertos tipos de alfombras o pisos.
Siempre verifique las recomendaciones del fabricante
para la limpieza de la alfombra o del revestimiento
para pisos antes de pasar la aspiradora.
11
Page 35

12
OPERACIÓN
Accesorios
Boquilla turbo para pelo de mascota
Este cepillo accionado por turbina de aire es
fabuloso para las escaleras o espacios interiores,
así como para recoger pelos de mascota, pelusa,
etc. de las telas y alfombras.
NO lo use directamente sobre las mascotas.
Cepillo para el polvo
Utilice el cepillo para el polvo para limpiar los
muebles, las paredes, etc.
Boquilla plana
La boquilla plana puede utilizarse para esquinas
estrechas, espacio entre cojines y otros lugares de
difícil acceso.
PRECAUCIÓN
• Cuando retire el accesorio para espacios
reducidos, no ponga el dedo entre este
accesorio y el soporte del cable.
Cuadro sobre el uso de los accesorios
ÁREA DE LIMPIEZA
Accesorio
Boquilla turbo
para pelo de
mascota
Cepillo para el
polvosh
Boquilla plana
* Siempre asegúrese de que los accesorios estén limpios antes de usar en las telas.
Entre
cojines
Superficies
tapizadas*
Muebles y
superficies
duras*
Cortinas*
(nivel de potencia
más bajo)
Escaleras
Cojines
Pisos
alfombrados/
Alfombras
Paredes
Page 36

OPERACIÓN
Uso del tubo o de la manija del tubo
PRECAUCIÓN
Nunca tome la manguera para jalar la aspiradora.
Al emplear cualquier accesorio en el extremo de la
manija se debe retirar todo el tubo de la base del
cuerpo.
Desenganche del tubo y la manija:
1. Asegúrese de que la aspiradora esté bloqueada
en la posición vertical y sobre una superficie
plana y estable.
2. Oprima el botón de desenganche del tubo que
está en el cuerpo de la aspiradora e incline la
manija del tubo.
3. Levante el tubo para sacarlo.
4. Para usar solamente la manija, oprima el botón
de desenganche de la manija y jale el tubo
directamente hacia afuera de la manija.
ESPAÑOL
5. Para usar el cepillo para el polvo, oprima el
botón de desenganche en la parte delantera del
cepillo para el polvo y jale el tubo directamente
hacia fuera del cepillo para el polvo.
Seguidamente, jale el cepillo para el polvo hacia
la manija. Después de cada uso, oprima el botón
de desenganche y retire el cepillo para el polvo.
NOTA: El cepillo para el polvo está rodeado de un
revestimiento de hule suave para evitar que sus
muebles se dañen.
13
Page 37

14
OPERACIÓN
Instalación de los accesorios
Uso de la boquilla plana:
Deslice la boquilla plana sobre el extremo del tubo
o acóplela dentro de la manija.
Consejos y trucos
Bordes y esquinas de las alfombras:
Para esquinas estrechas, bordes de alfombra y a lo
largo de zócalos, utilice el cepillo para el polvo.
Use la boquilla plana para las áreas muy difíciles
de alcanzar.
Use la boquilla plana para lugares de difícil acceso
como esquinas estrechas y zócalos.
Escaleras y descansillos
Utilice el cepillo para el polvo o la boquilla turbo para
pelo de mascota en las escaleras y los descansillos.
Asegúrese de que la aspiradora esté colocada de tal
manera que no se pueda volcar o caer.
Vea más adelante y la página 12 para las
instrucciones de cómo seleccionar y usar los
accesorios.
Protección de sobrecarga del
motor de cepillo rotativo
El cepillo rotativo tiene incorporada una protección
contra daños al motor en caso de atascamiento del
cepillo rotativo. Si el cepillo rotativo se vuelve lento o
se detiene, el protector de sobrecarga del cepillo
rotativo apaga el motor del cepillo rotativo. El motor de
succión permanecerá encendido en ese momento.
Para corregir el problema: Apague y desenchufe
la aspiradora, elimine la obstrucción y oprima el
botón de restauración.
Uso de la boquilla turbo para pelo
de mascota
La boquilla turbo para pelo de mascota se adapta al
tubo igual que los demás accesorios. Se
caracteriza por un cepillo rotativo accionado por
turbina para ofrecer un poder de limpieza extra
para alfombras y telas. Es magnífico para limpiar
escaleras, cojines y tapicería de vehículos.
Al usar la boquilla turbo para pelo de mascota,
verifique con frecuencia que no se acumule cabello,
fibras, pelusa y otros escombros en el área del cepillo.
La acumulación excesiva puede reducir el rendimiento
y podría dañar la boquilla turbo para pelo de mascota.
Consulte la sección Cuidado y Limpieza para obtener
las instrucciones de limpieza.
Protección de sobrecarga térmica
Esta aspiradora tiene un protector de sobrecarga
térmica que se activa automáticamente para
proteger la aspiradora contra el recalentamiento. Si
una obstrucción altera el flujo normal de aire al
motor, el protector térmico apaga automáticamente
el motor para dejar que el motor se enfríe y así
prevenir daños posibles a la aspiradora.
Para corregir el problema: Apague la aspiradora y
desenchufe el cordón eléctrico. Verifique que no
haya obstrucciones y elimínelas si fuera necesario.
También inspeccione y limpie cualquier filtro sucio.
Espere cerca de 30 minutos y enchufe la
aspiradora y enciéndala de nuevo para ver si el
protector del motor ha sido restaurado. El sistema
de protección térmica no se restaurará hasta que la
aspiradora se haya enfriado totalmente.
Page 38

CUIDADO Y LIMPIEZA
Siempre atienda todas las precauciones de seguridad al limpiar y dar mantenimiento a la aspiradora.
Almacenamiento de la aspiradora
Cuando no esté en uso, enrolle el cordón eléctrico
alrededor de los ganchos según se muestra.
Almacene la boquilla plana en su lugar respectivo
en la parte de atrás de la aspiradora.
ADVERTENCIA
Peligro de descarga eléctrica y lesiones
personales.
Tenga mucho cuidado al enrollar el cordón
eléctrico. Si lo enrolla demasiado apretado
pondrá tensión en el cordón y esto puede
dañarlo. No enrolle en forma cruzada el
cordón eléctrico. Un cordón dañado
representa un peligro de descarga eléctrica y
podría ocasionar lesiones personales o
daños a la propiedad.
Componentes del tanque para polvo
El tanque para polvo consta de varios componentes
principales. Siempre asegúrese de que todas las
piezas estén reinstaladas correctamente después de
vaciar el tanque para polvo.
¡NUNCA haga funcionar la aspiradora sin todos
los filtros en su lugar!
¡NUNCA haga funcionar la aspiradora con filtros
o componentes mojados!
Componentes principales:
1~2. Prefiltro de espuma: Recoge partículas de
medianas a finas. Consta de un portafiltro y el
filtro de espuma. Estos componentes son
lavables.
3. T apa del tanque para polvo: Abra para tener
acceso al prefiltro de espuma.
4. Separador de polvo: Separa el polvo del aire
que entra.
5. Puerta lateral: Abra para quitar el polvo del
separador de polvo.
6. EDesenganche para vaciar la suciedad:
Presione hacia abajo para abrir la placa inferior.
7. DTanque para polvo: Donde se acumula la
suciedad.
Placa inferior: Abra para vaciar el tanque para
8.
polvo.
9.
Palanca de prevención: No la utilice in el filtro
previo de espuma.
ESPAÑOL
1. Porta
filtro
2. Filtro
de espuma
4.
Separador
de polvo
8. Placa
inferior
3. Tapa del
tanque
para polvo
9. Palanca de
prevención
5. Puerta
lateral
6. Desenganche
para vaciar la
suciedad
7. Tanque
para polvo
15
Page 39

16
CUIDADO Y LIMPIEZA
Vaciado del tanque para polvo
ADVERTENCIA
Peligro de descarga eléctrica y lesiones
personales.
Siempre desenchufe el cordón eléctrico del
tomacorriente antes de dar mantenimiento a
la aspiradora. El incumplimiento de esta
advertencia podría provocar descarga
eléctrica o lesiones personales debido a la
puesta en marcha repentina de la aspiradora.
Para obtener el mejor rendimiento, siempre vacíe el
tanque para polvo cuando el nivel de suciedad
alcance la línea MAX.
PARA RETIRAR EL TANQUE PARA POLVO,
oprima el desenganche del tanque para polvo,
incline hacia atrás el tanque para polvo, luego
levántelo para sacarlo de la aspiradora.
PARA REINSTALAR EL TANQUE PARA POLVO,
delante hasta que encaje en su lugar y se oiga un
chasquido. ¡Asegúrese de que el tanque para polvo
esté bien asentado!
No toque el engranaje interior ni el botón.
Limpieza del tanque para polvo
Para un rendimiento óptimo, inspeccione los filtros
periódicamente y límpielos si fuera necesario.
Para limpiar el tanque para polvo:
1. Retire el tanque para polvo de la aspiradora.
2. Oprima el desenganche para vaciar la suciedad
y abra la placa inferior.
3. Limpie el tanque para polvo con un paño suave o
toalla de papel.
PARA VACIAR EL TANQUE PARA POLVO,
oprima el desenganche para vaciar la suciedad y
abra la placa inferior, según se muestra.
4. Desenganche el pestillo de la puerta lateral,
tanto en el lado derecho como el izquierdo.
5. Retire el cabello, las fibras u otros escombros del
separador de polvo.
No retire los conos adheridos a la puerta lateral
para limpiarlos.
¡NUNCA haga funcionar la aspiradora con filtros
o componentes mojados!
Page 40

CUIDADO Y LIMPIEZA
Limpieza del prefiltro de espuma
PRECAUCIÓN
Un filtro húmedo podría causar daños
permanentes a la aspiradora. Asegúrese de
que los filtros estén completamente secos
antes de reinstalarlos.
Para un rendimiento óptimo, inspeccione los
filtros cada tres meses y límpielos si fuera
necesario. No cierre la tapa del tanque para
polvo sin el prefiltro de espuma.
Para limpiar el prefiltro de espuma:
1. Retire el tanque para polvo de la aspiradora.
2. Levante el seguro de la tapa del tanque para
polvo y abra la tapa.
3. Levante el prefiltro de espuma.
¡NUNCA haga funcionar la aspiradora con filtros
o componentes mojados!
If you notice a loss of suction and cleaning the
Foam pre filter does not help, you need to replace
the Foam pre filter. You can purchase additional
foam filters from LG by calling
1-800-243-0000(U.S.A), 1-888-542-2623
(Canada) and asking for parts on page 6.
Limpieza del filtro HEPA
Para un rendimiento óptimo, inspeccione el
filtro cada 6 meses y límpielo si fuera necesario.
Para limpiar el filtro HEPA:
1. Retire la tapa del filtro de aire expulsado.
Tapa del filtro de
aire expulsado
2. Levante el filtro presionado el gancho.
ESPAÑOL
4.
Separe el filtro de espuma del portafiltro.
5.
Sacuda cualquier exceso de suciedad o
escombros y enjuague el filtro de espuma y el
portafiltro con agua limpia. A continuación, escurra
el agua del filtro de espuma.
6. Séquelo completamente alejado del sol.
3. Lave bien el filtro con agua bajo el chorro.
4. Elimine la humedad.
5. Séquelo completamente alejado del sol.
17
Page 41

18
CUIDADO Y LIMPIEZA
Boquilla turbo para pelo de mascota
Para limpiar la boquilla turbo para pelo de
mascota
1. Retire los cuatro tornillos en la parte inferior de la
boquilla turbo para pelo de mascota.
2. Levante la tapa.
3. Elimine todos los escombros.
Para reensamblar:
4. Presione la tapa con cuidado sobre las lengüetas
hasta que encajen en su lugar.
5. Inserte y apriete los tornillos retirados en el
Paso 1. NO apriete demasiado los tornillos.
No utilice la boquilla turbo para pelo de
mascota directamente sobre cualquier animal.
➀
➁
Mantenimiento del cepillo rotativo
4. Retire con cuidado cualquier acumulación de
hilo, cabello, etc. del cepillo rotativo y del área
del cepillo rotativo.
Para instalar de nuevo la tapa.
Revierta los pasos antes mencionados.
Reemplazo de la correa del cepillo
rotativo
ADVERTENCIA
Peligro de descarga eléctrica y lesiones
personales.
Siempre desenchufe la aspiradora antes darle
mantenimiento. El incumplimiento de esta
advertencia podría provocar descarga
eléctrica o lesiones personales.
Si la correa se rompe, siga los pasos siguientes
para reemplazar la correa del cepillo rotativo.
ADVERTENCIA
Peligro de descarga eléctrica y lesiones
personales.
Siempre desenchufe la aspiradora antes
darle mantenimiento. El incumplimiento de
esta advertencia podría provocar descarga
eléctrica o lesiones personales.
Inspeccione con frecuencia que no haya acumulación
de cabello, hilo o pelusa en el área del cepillo rotativo.
Retire la tapa del cepillo rotativo:
1. Desenchufe la aspiradora. Presione el pedal
izquierdo para desacoplar el cabezal. Baje la
manija hasta que la aspiradora repose
horizontalmente sobre el piso.
2. Déle vuelta a la aspiradora, de modo que el
cepillo rotativo quede boca arriba.
3. Coloque el cepillo rotativo sobre un lienzo o una
superficie suave. Retire los seis tornillos de la
parte inferior del cabezal y retire la tapa.
Para reemplazar la correa:
1. Retire la cubierta de la escobilla del agitador
como se describe a continuación.
Levante el cepillo rotativo directamente hacia fuera.
2.
3. Desenganche la correa vieja de la polea motriz.
Asegúrese de que no haya piezas de la correa
rota atrapadas en el cepillo rotativo o en el área
de la polea motriz.
4. Enganche la correa nueva sobre la polea motriz
del motor del cepillo rotativo.
Page 42

CUIDADO Y LIMPIEZA
5. Ajuste el cepillo rotativo a través de la correa,
asegurándose de que la correa esté alineada con
la sección de la polea motriz del cepillo rotativo.
6. Baje el cepillo rotativo a su lugar, asegurándose
de que las lengüetas de forma ovalada encajen
dentro de los surcos en el cabezal.
7. Vuelva a instalar la tapa del cepillo rotativo como
se describió anteriormente.
Para obtener una correa de reemplazo, pídala al
centro de servicio LG usando el número de pieza
MAS61842501.
Reemplazo de las pilas
1. Deslice hacia arriba la tapa de las pilas lejos de
la manguera.
Eliminación de obstrucciones
ADVERTENCIA
Peligro de descarga eléctrica y lesiones
personales.
Siempre desenchufe la aspiradora antes
darle mantenimiento. El incumplimiento de
esta advertencia podría provocar descarga
eléctrica o lesiones personales.
Si nota una pérdida de succión, ante todo
inspeccione los filtros según se describe en las
páginas 15. Si los filtros están limpios, puede
haber una obstrucción. Las flechas indican las
áreas donde es más probable que ocurran
obstrucciones.
Para encontrar las obstrucciones:
1. Inspeccione la manguera donde se conecta con
la manija presionando los dos botones de
desenganche en el extremo superior de la
manguera.
2. Desenganche el tubo de la aspiradora
presionando el botón de desenganche del tubo.
Separe cada accesorio, vea la página 8 e
inspeccione los accesorios.
➀
ESPAÑOL
2. Reemplace las dos pilas y vuelva a instalar la
tapa de las pilas.
NOTA: El reemplazo no ha terminado aún, use el
botón de encendido en el cuerpo de la aspiradora.
➁
3. Retire el tanque para polvo e inspeccione la
entrada del tanque para polvo y la entrada del
cuerpo donde se conecta con el cuerpo de la
aspiradora.
19
Page 43

20
CUIDADO Y LIMPIEZA
4. Inspeccione la manguera donde se conecta a la
parte de atrás del cuerpo de la aspiradora
presionando el botón de desenganche en el
extremo superior de la manguera. dégagement
situé dans le haut du tuyau. Y luego marque las
dos casillas, con la varita instalada y
desinstalada.
5. Déle vuelta a la aspiradora e inspeccione la
entrada del cepillo rotativo.
6. Para inspeccionar más completamente, retire el
tornillo del puerto de acceso.
Limpieza del exterior de la
aspiradora
ADVERTENCIA
Peligro de descarga eléctrica y lesiones
personales.
Siempre desenchufe la aspiradora antes de
darle mantenimiento. El incumplimiento de
esta advertencia podría provocar una
descarga eléctrica o lesiones personales.
Limpie la parte exterior de la aspiradora con un
paño limpio y suave que haya sido sumergido en
agua y retorcido para secarlo.
NO deje que entre agua en cualquiera de las
aberturas de la aspiradora.
NO limpie los accesorios en el lavaplatos o en la
lavadora de ropa. Lave los accesorios en agua tibia
jabonosa, enjuague y deje que se seque al aire en
su totalidad.
NO utilice los accesorios si están húmedos.
Page 44

SOLUCIÓN DE PROBLEMAS
Consulte este cuadro para encontrar soluciones que puede realizar usted mismo cuando surjan problemas
leves de rendimiento.
Todo servicio, o reparación necesaria, que sea distinto a los problemas descritos en esta Guía del Usuario,
deberá ser realizado a través del centro de servicio LGE en su localidad.
ADVERTENCIA
Peligro de descarga eléctrica y lesiones personales.
Siempre desenchufe la aspiradora antes de darle mantenimiento. El incumplimiento de esta
advertencia podría provocar una descarga eléctrica o lesiones personales.
PROBLEMA
La aspiradora no
funciona
No recoge bien la
suciedad
El cepillo rotativo no
gira
El polvo se escapa
del tanque para polvo
La aspiradora recoge
las alfombras pequeñas
o es difícil de empujar
El cepillo de la
boquilla turbo para
pelo de mascota no
funciona
El accesorio no tiene succión
al usar con la manija
Los controles en la
manija no funcionan
La papelera puede
parecer floja al levantarla
por el asa de transporte.
CAUSA POSIBLE SOLUCIÓN POSIBLE
• Está desenchufada del
tomacorriente
• Las pilas están gastadas
• El protector térmico está activado
• El tanque para polvo está lleno u
obstruido
• El tanque para polvo está mal
instalado
• Manguera o tubo obstruido
• Correa rota/mal instalada
• Se ha activado la protección de
sobrecarga del motor del agitador
• Agujero en la manguera
• Cepillo rotativo desgastado
• Uso de un nivel de potencia bajo
El interruptor está apagado (aparato
•
en el modo para pisos desnudos)
• La aspiradora está en posición
vertical
• Se ha disparado la protección de
sobrecarga del motor del agitador
(el cepillo está atascado)
• Correa rota
• El tanque para polvo está mal
instalado
• La tapa del tanque para polvo no
está cerrada
• El pestillo de la placa inferior no
está asegurado
• Ajuste incorrecto de la altura de la
alfombra
Agitador o soporte sucio
•
• Obstrucción del paso de aire en la
turbina
• Débil succión en la aspiradora
• El tubo principal todavía está
conectado a la base del cuerpo
• Se deben cambiar las pilas
• Esto es normal.
• Asegúrese de que el cordón esté enchufado en un
tomacorriente en buen estado.
• Reemplace las pilas. [Vea la página 19]
• Deje que la aspiradora se enfríe. [Vea la página 14]
• Vacíe el tanque para polvo y limpie los filtros.
[Vea la página 16-17]
• Asegúrese de que todos los componentes del tanque
para polvo y los filtros estén bien instalados.
Inspeccione que no haya obstrucciones. [Vea la página 19-20]
•
• Inspeccione la correa y reemplácela si fuera necesario.
[Vea la página 18-19]
• Desenchufe la aspiradora y verifique que no haya
obstrucciones en el cepillo rotativo. Oprima el botón de
restauración. [Vea la página 14]
• Inspeccione la manguera con cuidado. Reemplácela si
fuera necesario.
• Comuníquese con el departamento de servicio.
• Aumente el nivel de potencia. [Vea la página 10]
• Encienda el interruptor de encendido/apagado del cepillo
rotativo. [Vea la página 10]
• Oprima el desenganche del cuerpo e incline hacia atrás
el aparato. [Vea la página 10]
• Desenchufe la aspiradora y verifique que no haya
obstrucciones en el cepillo rotativo; luego restaure el
aparato. [Vea la página 14]
• Reemplace la correa. [Vea la página 18-19]
• Asegúrese de que todos los componentes del tanque y
los filtros estén bien instalados.
• Inspeccione la tapa del tanque para polvo.
• Asegúrese de que la placa inferior esté cerrada y
asegurada.
• Ajuste la altura de la alfombra. [Vea la página 11]
• Limpie la parte interior de la boquilla turbo para pelo de
mascota. [Vea página 18]
• Limpie la parte interior de la boquilla turbo para pelo de
mascota. [Vea la página 18]
Inspeccione que no haya obstrucciones. [Vea la página 19-20]
•
• Retire el tubo. [Vea la página 13]
• Reemplace las pilas en la manija.
[Vea la página 19]
• La aspiradora está diseñada para evitar que la cesta se
separe del cuerpo principal durante el transporte.
ESPAÑOL
21
Page 45

MEMO
Page 46

MANUEL D’UTILISATION
FRANÇAIS
ASPIRATEUR
Avant de mettre votre appareil en fonctionnement, lisez ce manuel attentivement
et rangez-le soigneusement à titre de référence ultérieure.
LuV300
P/NO : MFL62862401
www.lg.com
Page 47

2
TABLE DES MATIÈRES
1
GARANTIE DE L’ASPIRATEUR LG
3
GARANTIE DE L’ASPIRATEUR LG
2
RENSEIGNEMENTS IMPORTANTS SUR
LA SÉCURITÉ
4
RENSEIGNEMENTS IMPORTANTS SUR LA
SÉCURITÉ
3
PIÈCES ET CARACTÉRISTIQUES
6
PIÈCES ET CARACTÉRISTIQUES
4
ASSEMBLAGE
7
Déballage de l’aspirateur
7
Pièces à assembler
8
Pour assembler le tube et le tuyau
8
Pour installer le tuyau
9
Rangement des accessoires
9
Rangement du cordon
6
ENTRETIEN ET NETTOYAGE
Rangement de l’aspirateur
15
Éléments du réservoir à poussière
15
Vidage du réservoir à poussière
16
Nettoyage du réservoir à poussière
16
Nettoyage du préfiltre en mousse
17
Nettoyage du filtre HEPA
17
18
Accessoire à turbine à air pour poils d’animaux
18
Entretien de la brosse de battage
18
Remplacement de la courroie de la brosse
de battage
19
Enlèvement de ce qui peut obstruer l’aspiration
20
Nettoyage de l’extérieur de l’aspirateur
7
DÉPANNAGE
Dépannage 21
5
FONCTIONNEMENT
10
Fonctionnement des commandes
10
Fonctionnement du dégagement du boîtier
11
Réglage selon la hauteur des poils du tapis
12
Accessoires
12
Tableau d’utilisation des accessoires
13
Utilisation du tube ou de la poignée du tube
14
Installation des accessoires
14
Conseils et astuces
14
Utilisation de l’accessoire à turbine à air
pour poils d’animaux
14
Marches et paliers d’escalier
14
Protection contre les surcharges du moteur
de la brosse de battage
14
Protection contre la surcharge thermique
Page 48

GARANTIE DE L'ASPIRATEUR LG
LGE Electronics Inc. réparera ou remplacera, à son choix, votre produit s'il présente un défaut de matériau ou de fabrication,
dans des conditions d’usage domestique, pendant la période de garantie spécifiée ci-dessous, laquelle est en vigueur à compter
de la date d'achat du produit par le premier acheteur. Cette garantie limitée est valable seulement pour l’acheteur original du
produit et en vigueur seulement lorsque le produit est utilisé aux États-Unis et au Canada.
PÉRIODE DE GARANTIE :
Cinq ans
À partir de la date de
l’achat original.
LA PRÉSENTE GARANTIE REMPLACE TOUTE AUTRE GARANTIE, EXPRESSE OU IMPLICITE, Y COMPRIS
SANS S’Y LIMITER, TOUTE GARANTIE DE QUALITÉ MARCHANDE OU D'ADAPTATION À UN USAGE
PARTICULIER. DANS LA MESURE OÙ UNE GARANTIE IMPLICITE EST REQUISE PAR LA LOI, SA DURÉE
SE LIMITE À LA PÉRIODE DE GARANTIE EXPRESSE PRÉCISÉE CI-DESSUS. LG NE SERA PAS TENUE
RESPONSABLE DES DOMMAGES ACCESSOIRES, INDIRECTS OU CONSÉCUTIFS DE QUELQUE NATURE
QUE CE SOIT, Y COMPRIS LA PERTE DE REVENUS OU DE PROFITS EN RAPPORT AVEC LE PRODUIT.
CERTAINS ÉTATS NE PERMETTENT PAS LA LIMITATION DE LA DURÉE DE LA GARANTIE IMPLICITE OU
L’EXCLUSION DES DOMMAGES INDIRECTS OU CONSÉCUTIFS, PAR CONSÉQUENT LES LIMITATIONS OU
EXCLUSIONS MENTIONNÉES PRÉCÉDEMMENT PEUVENT NE PAS S’ADRESSER À VOUS.
Cette garantie ne couvre que les défauts de matériau et de fabrication.
LGE NE paiera PAS pour ce qui suit :
1. Les articles non réutilisables qui peuvent s'user, y compris mais sans s’y limiter, les filtres, les courroies et les piles.
2. Les services d'un technicien pour montrer à l'utilisateur la bonne façon d'assembler, de faire fonctionner ou faire
l’entretien du produit.
3. Un technicien de service pour nettoyer ou faire l’entretien de ce produit.
4. Les dommages au produit ou la défaillance de celui-ci s'il n'est pas assemblé, utilisé ou entretenu conformément à
toutes les directives qui accompagnent le produit.
5. Les dommages au produit ou les défaillances de celui-ci découlant d'un accident, d'un abus, d'une mauvaise
utilisation ou d'une utilisation à des fins autres que celles prévues.
6. Les dommages au produit ou la défaillance de celui-ci découlant de l'utilisation de détergents, de nettoyants, de
produits chimiques ou d’ustensiles autres que ceux recommandés dans toutes les directives qui accompagnent le
produit.
7. Les dommages aux pièces ou aux systèmes ou les défaillances de ceux-ci résultant de modifications non autorisées
effectuées sur le produit.
COMMENT SE FAIT LE SERVICE :
Toute pièce de l’aspirateur qui ne fonctionne pas en raison d’un défaut de matériau ou de
fabrication. Pendant cette période de garantie complète de cinq ans, LG fournira également,
sans frais, la main-d'œuvre et la réparation en atelier pour remplacer la pièce défectueuse.
FRANÇAIS
Cette garantie est valable seulement pour l’acheteur original des produits achetés en vue d'un usage domestique aux ÉtatsUnis. En Alaska, la garantie exclut le coût d'expédition ou des appels de service à votre domicile.
Puisque certains États ne permettent pas l'exclusion ou la limitation des dommages accessoires ou indirects, les limitations ou
exclusions ci-dessus peuvent ne pas s'adresser à vous. Cette garantie vous confère des droits légaux précis, et vous pouvez
également jouir d'autres droits qui peuvent varier d'un État à l'autre ou d'une province à l'autre. Pour connaître vos droits
légaux, consultez le Service aux consommateurs de votre localité ou de votre État ou le procureur général de votre État.
RENSEIGNEMENTS À PROPOS DE L'ASSISTANCE À LA CLIENTÈLE :
Pour obtenir une couverture de
garantie :
Pour connaître l’adresse du
centre de réparation agréé ou du
détaillant le plus près ou pour
obtenir de l'aide ou des
renseignements concernant les
produits
Conservez votre reçu de caisse pour prouver la date d'achat.
Vous devez soumettre une copie de votre reçu lorsqu'une réparation au titre de la
garantie doit être effectuée.
Composez le 1 800 243-0000 (24 heures sur 24, tous les jours) et sélectionnez
l'option du menu appropriée ou visitez notre site Web au http://us.lgservice.
com. (Au Canada, composez le 1 888 542-2623 ou visitez notre site Web au http://
ca.lgservice.com.
3
Page 49

4
RENSEIGNEMENTS IMPORTANTS SUR LA SÉCURITÉ
VEUILLEZ LIRE TOUTES LES CONSIGNES
AVANT D'UTILISER L’APPAREIL
CONSIGNES DE SÉCURITÉ IMPORTANTES
Veuillez lire et suivre toutes les consignes avant d’utiliser votre aspirateur afin de prévenir les risques d’incendie, de choc électrique, de
blessures ou de dommages matériels lorsque vous utilisez l’appareil. Le présent manuel n'aborde pas toutes les situations qui peuvent
survenir. Communiquez toujours avec votre agent de service ou le fabricant en cas de problème que vous ne comprenez pas.
Voici le symbole d'avertissement de danger. Ce symbole vous prévient des risques potentiels
qui peuvent tuer ou blesser des personnes. Tous les messages de sécurité sont précédés du
symbole d'avertissement de danger et du mot « MISE EN GARDE » ou « ATTENTION ».
MISE EN GARDE
peuvent causer des blessures graves ou la mort.
Ce symbole vous prévient des dangers ou des usages dangereux qui
Ce symbole vous prévient des dangers ou des usages dangereux qui
ATTENTION
peuvent causer des blessures ou des dommages matériels.
MISE EN GARDE
• Débranchez le cordon d’alimentation avant de réparer ou de
nettoyer l’appareil ou lorsque vous n’utilisez pas l’aspirateur.
Le non-respect de cette consigne pourrait causer un choc électrique
ou des blessures.
• N'utilisez pas l'aspirateur pour aspirer des objets qui brûlent ou
qui fument, comme des cigarettes ou des cendres chaudes.
Cela pourrait causer la mort, un incendie ou un choc électrique.
• N’utilisez pas l’aspirateur pour aspirer des substances
inflammables ou explosives comme de l’essence, du benzène,
des solvants ou du propane (à l'état liquide ou gazeux).
Les vapeurs dégagées par ces substances peuvent créer un risque
d'incendie ou d'explosion. Le non-respect de cette consigne pourrait
causer la mort ou une blessure grave.
• Ne manipulez pas la fiche ou l'aspirateur lorsque vous avez les
mains humides.
Cela pourrait causer la mort ou un choc électrique.
• Ne tirez pas sur le cordon pour débrancher l’aspirateur.
Cela pourrait endommager l’appareil ou causer un choc électrique.
Pour débrancher l’aspirateur, saisissez la fiche, pas le cordon.
• Gardez les cheveux, les vêtements amples, les doigts et toute
partie du corps loin des ouvertures et des pièces mobiles.
Le non-respect de cette consigne pourrait causer un choc électrique
ou des blessures.
• N'utilisez pas le cordon pour tirer ou transporter l'aspirateur,
n'utilisez pas le cordon en guise de poignée, ne fermez pas une
porte sur le cordon et ne tirez pas le cordon près d'un bord ou
d'un coin tranchant. Ne passez pas l'aspirateur par-dessus le
cordon. Tenez le cordon à l'écart des surfaces chauffées.
Le non-respect de cette consigne pourrait causer un choc électrique
ou des blessures ou endommager l'appareil.
• Ne permettez pas qu'on utilise l'aspirateur comme un jouet.
Une surveillance étroite est requise lorsque des enfants
utilisent l'aspirateur ou que vous l'utilisez en présence
d'enfants.
Cela pourrait causer des blessures ou endommager l’appareil.
• N’utilisez pas l’aspirateur si la fiche ou le cordon est
endommagé ou défectueux.
Cela pourrait causer des blessures ou endommager l'appareil. Dans
de tels cas, communiquez avec l’agent de service de LG Electronics
pour écarter tout danger.
• N’utilisez pas l’aspirateur s’il a été mouillé.
Cela pourrait causer des blessures ou endommager l’appareil. Dans
de tels cas, communiquez avec l’agent de service de LG Electronics
pour écarter tout danger.
• Ne continuez pas à passer l'aspirateur si vous remarquez que
des pièces manquent ou sont endommagées.
Cela pourrait causer des blessures ou endommager l’appareil. Dans
de tels cas, communiquez avec l’agent de service de LG Ele
ctronics pour écarter tout danger.
• N’utilisez pas de rallonge électrique avec cet aspirateur.
Cela pourrait créer un risque d’incendie ou endommager l’appareil.
• Utilisez la tension adéquate.
L’utilisation d’une tension inadéquate pourrait endommager le
moteur et causer des blessures à l'utilisateur. La tension adéquate
est inscrite dans le bas de l’aspirateur.
• Arrêtez toutes les commandes avant de débrancher l'aspirateur.
Le non-respect de cette consigne pourrait causer un choc électrique
ou des blessures.
• Ne changez absolument pas la fiche.
Le non-respect de cette consigne pourrait entraîner un choc
électrique ou des blessures ou endommager l’appareil. Cela
causera la mort. Si la fiche ne s'enfonce pas, demandez à un
électricien qualifié d'installer une prise adéquate.
• Les réparations des appareils électriques doivent être
effectuées seulement par des techniciens d’entretien qualifiés.
Des réparations mal effectuées peuvent représenter des dangers
graves pour l'utilisateur.
• Ne mettez pas les doigts près de l’engrenage.
Le non-respect de cette consigne pourrait causer des blessures.
N’utilisez pas l’appareil à l’extérieur ou sur des surfaces humides.
•
Le non-respect de cette consigne pourrait causer un choc électrique
ou des blessures.
• Ne mettez rien dans l’espace entre le boîtier de l’aspirateur et la
tête de la brosse de battage.
Cela pourrait causer des blessures ou endommager l'appareil ou
porter atteinte aux animaux domestiques.
• Ce produit contient des éléments chimiques réputés dans l’État
de Californie comme étant cancérigènes et de toxicité vis-à-vis
de la fertilité. Se laver les mains après utilisation.
• Faites particulièrement attention lorsque vous nettoyez sur des
escaliers.
CONSERVEZ CES INSTRUCTIONS
Page 50

RENSEIGNEMENTS IMPORTANTS SUR LA SÉCURITÉ
ATTENTION
• Ne placez aucun objet dans les ouvertures.
Le non-respect de cette consigne pourrait endommager l’appareil.
• N'utilisez pas l'aspirateur si des ouvertures sont bloquées; enlevez
la poussière, la charpie, les cheveux et tout autre objet pouvant
réduire le débit d'air.
Le non-respect de cette consigne pourrait endommager l’appareil.
• N'utilisez pas l'aspirateur sans le réservoir à poussière ou les filtres.
Le non-respect de cette consigne pourrait endommager l’appareil.
• Nettoyez toujours le réservoir à poussière après avoir aspiré du
nettoyant ou du désodorisant pour tapis, de la poudre ou de la
poussière fine.
Ces produits bouchent les filtres, réduisent le débit d'air et peuvent
endommager l'aspirateur. Si vous ne nettoyez pas le réservoir à
poussière, vous pourriez endommager l'aspirateur de façon permanente.
• N'utilisez pas l'aspirateur pour aspirer des objets durs et tranchants,
des petits jouets, des épingles, des trombones, etc.
Ces objets peuvent endommager l'aspirateur ou le réservoir à poussière.
• Rangez l’aspirateur à l’intérieur.
Rangez l’aspirateur lorsque vous en avez fini pour éviter de trébucher sur
l'appareil.
• L’aspirateur n’est pas conçu pour être utilisé sans supervision par
de jeunes enfants ou des personnes handicapées.
Le non-respect de cette consigne pourrait causer des blessures ou
endommager l’appareil.
• Utilisez seulement des pièces fabriquées ou recommandées par les
agents de service de LG Electronics.
Le non-respect de cette consigne pourrait endommager l’appareil.
• Utilisez l’appareil seulement comme il est décrit dans le présent
manuel. Utilisez-le seulement avec des accessoires approuvés ou
recommandés par LG.
Protecteur thermique :
Cet aspirateur est doté d’un thermostat spécial qui le protège en cas de surchauffe du moteur.
Si l’aspirateur s’éteint tout à coup, arrêtez-le et débranchez-le.
Vérifiez s'il y a quoi que ce soit qui fait surchauffer l'aspirateur, comme un réservoir à poussière plein, un tuyau bloqué ou un filtre
obstrué. Si c’est le cas, corrigez la situation et attendez au moins 30 minutes avant de réutiliser l'aspirateur. Après un délai de 30
minutes, rebranchez l'aspirateur et remettez-le en marche. Si l’aspirateur ne fonctionne toujours pas, appelez un électricien qualifié.
Le non-respect de cette consigne pourrait causer des blessures ou
endommager l’appareil.
• Pour éviter les blessures et pour empêcher l’appareil de tomber
lorsque vous nettoyez des marches, placez toujours l'aspirateur au
bas de l'escalier.
Le non-respect de cette consigne pourrait causer des blessures ou
endommager l’appareil.
• Assurez-vous que les filtres (le filtre d’évacuation et le filtre de
sécurité du moteur) sont complètement secs avant de les remettre
dans l’appareil.
Le non-respect de cette consigne pourrait endommager l’appareil.
• Ne faites pas sécher le filtre dans le four de la cuisinière ou dans un
four à micro-ondes.
Le non-respect de cette consigne pourrait créer un risque d’incendie.
• Ne faites pas sécher le filtre dans une sécheuse.
Le non-respect de cette consigne pourrait créer un risque d’incendie.
• Ne le faites pas sécher près d’une flamme nue.
Le non-respect de cette consigne pourrait créer un risque d’incendie.
• Arrêtez toujours l'aspirateur avant de brancher ou de débrancher le
tuyau.
Cela pourrait causer des blessures ou endommager l’appareil.
• L'aspirateur est destiné à un usage domestique seulement.
• Il vous incombe de bien assembler l'aspirateur et de l'utiliser de
façon sécuritaire.
• Ne mettez pas les doigts entre le suceur plat et le porte-câble
lorsque vous retirez le suceur plat.
• Le rangement du tuyau consiste en deux forts aimants. Maintenez
tout équipement électronique ou pièce de métal dangereuse éloigné
du rangement du tuyau.
FRANÇAIS
La déclaration de conformité aux directives de la FCC sur les interférences des fréquences radio comprend la mise en garde suivante :
NOTA : Cet appareil a été testé et déclaré conforme aux limitations des appareils numériques de classe B, conformément à l’article 15 des règlements de la
FCC. Ces limitations sont conçues pour fournir une protection raisonnable contre les interférences préjudiciables dans une installation résidentielle.
Cet appareil génère, utilise et peut émettre de l’énergie radio-électrique et, s’il n’est pas installé et utilisé conformément aux directives, peut causer des
interférences préjudiciables aux radiocommunications.
Toutefois, il n’existe aucune garantie qu’il ne se produira pas d’interférence dans une installation donnée. Si cet appareil cause des interférences
préjudiciables à la réception radio ou télévision, qui peuvent être déterminées par la mise en marche ou l’arrêt de l’appareil, l’utilisateur est invité à tenter de
corriger ces interférences en prenant l'une ou plusieurs des mesures suivantes :
• Réorienter ou repositionner l'antenne réceptrice.
• Augmenter la distance qui sépare l’appareil du récepteur.
• Branchez l’appareil dans une prise d’un circuit différent de celui auquel est raccordé le récepteur.
• Consultez le concessionnaire ou un technicien radio/télévision spécialisé pour obtenir de l’aide.
Cet appareil est conforme à l’article 15 du règlement (RSS-210) de la FCC.
L’utilisation de l’appareil est soumis aux deux conditions suivantes : 1) L’appareil ne doit pas provoquer d’interférences préjudiciables et 2) l’appareil doit
accepter toute interférence, y compris celles susceptibles de provoquer un fonctionnement indésirable de l’appareil.
ATTENTION
Tout changement ou modification à la construction de l’appareil qui n’est pas approuvé explicitement par l’entité
responsable de la conformité est susceptible d'annuler le droit de l'utilisateur à faire fonctionner l'appareil.
NOTE IMPORTANTE :
Déclaration de conformité aux directives de la FCC sur l’exposition aux radiations :
L'appareil est conforme aux limitations concernant l’exposition aux radiations établies par la FCC dans un environnement contrôlé.
Vous devez installé et utilisé l’appareil en maintenant une distance minimale de 20 cm entre le radiateur et votre corps. L'appareil ne doit pas être positionné
à proximité d’une autre antenne ou d’un autre émetteur-récepteur ni être utilisé avec une autre antenne ou un autre émetteur-récepteur.
Spécifications de l’émetteur
* Fréquence de porteuse: 2456, 2463, 2470 MHz * Puissance de sortie RF: 0 dBm
5
Page 51

6
PIÈCES ET CARACTÉRISTIQUES
Il est important que vous connaissiez les pièces et les caractéristiques de votre aspirateur afin de
l’utiliser de façon adéquate et sécuritaire. Veuillez donc examiner les pièces ci-dessous avant
d'utiliser votre aspirateur.
Pièces de rechange courantes
Filtre HEPA ADQ72913001
Préltre en mousse Cadre du ltre MDQ61918301
(ADV72987201)
Courroie de la brosse de battage MAS61842501
Filtre en mousse
MDJ61980601
Pour commander ces pièces, téléphonez au
1 800 243-0000.(U.S.A)
1 888 542 2623 (Canada)
Poignée
Commande de mise
en marche
Brosse à épousseter
Bouton de mise en
marche auxiliaire
Dégagement du
réservoir à poussière
Poignée de
transport
Séparateur de
poussière
Réservoir à poussière
Filtre d’évacuation
Indicateurs de
hauteur pour
les tapis
Accessoires
Suceur plat Brosse à épousseter
Accessoire à turbine à air
pour poils d’animaux
Logement des
piles
Tuyau
Porte-cordon à
dégagement
rapide
Suceur plat
Tube
Accessoire à
turbine à air pour
poils d’animaux
Dégagement
du boîtier
Réglage de
la hauteur
Brosse à battage
Porte latérale
Page 52

ASSEMBLAGE
Pour réduire les risques de dommages pendant le transport, l'aspirateur est partiellement démonté
au moment de l'expédition.
Déballage de l'aspirateur
Déballez soigneusement l'aspirateur et vérifiez si
vous avez toutes les pièces avant de jeter
l'emballage. Enlevez le ruban, les cartons de
protection et les pellicules protectrices avant
d'assembler l'aspirateur.
Contenu de l'emballage :
1. Boîtier de l’aspirateur
2. Suceur plat (déjà installé)
3. Poignée
4. Deux piles « AAA » - Voir les directives
d’installation à la page 8
5. Brosse à épousseter
6. Tube réglable
7. Tuyau
8. Accessoire à turbine à air pour poils d’animaux
9. Filtre en mousse supplémentaire
Pièces à assembler
1. Boîtier de l’aspirateur
3. Poignée
5. Brosse à
épousseter
2. Suceur plat
FRANÇAIS
4. Deux piles
« AAA »
6. Tube
réglable
8.
Accessoire à
turbine à air
pour poils
d’animaux
7. Tuyau
9. Filtre en mousse
supplémentaire
7
Page 53

8
ASSEMBLAGE
Pour assembler le tube et le tuyau
1. Faites glisser le couvercle pour l'ouvrir.
2. Insérez les 2 piles « AAA ».
3. Insérez l'accessoire à turbine à air pour poil
d’animaux dans le bas du tube.
Pour installer le tuyau
1. Fixez l'extrémité supérieure du tuyau à la
poignée. L’extrémité supérieure du tuyau se
reconnaît à ses deux pinces de dégagement.
2. Insérez l’extrémité inférieure du tuyau dans le
boîtier principal. L’extrémité inférieure du tuyau se
reconnaît à son unique pince de dégagement.
4. Insérez l’autre extrémité du tube dans la brosse à
épousseter.
5. Insérez la brosse à épousseter dans la poignée.
NOTA: Lorsque vous insérez l’extrémité inférieure
du tuyau dans le boîtier principal, la pince doit être
placée du côté le plus près du plancher et au
centre.
Insérez le tube avec tous les accessoires assemblés
3.
dans le boîtier principal de l’aspirateur.
Page 54

ASSEMBLAGE
MISE EN GARDE
Risques de blessures et de dommages à l’appareil!
N'utilisez PAS les prises situées au-dessus des comptoirs. Cela pourrait endommager les articles
se trouvant à proximité.
Rangement des accessoires
Votre aspirateur comporte un logement pratique
pour ranger le suceur plat.
• Placez l’ensemble tube-tuyau à l’arrière du boîtier
puis poussez-le vers le boîtier.
• Placez l’extrémité saillante du suceur plat dans le
bossage, puis poussez le suceur plat pour fixer à
l’arrière de la caisse.
ATTENTION
• Le rangement du tuyau consiste en deux
forts aimants. Maintenez tout équipement
électronique ou pièce de métal dangereuse
éloigné du rangement du tuyau.
Rangement du cordon
Pour ranger le cordon :
1. Vérifiez si le porte-cordon est tourné vers le haut.
2. Enroulez le cordon autour du porte-cordon et du
crochet, puis fixez la fiche au cordon.
NNOTA: Pour réduire les risques de chocs
électriques, l'aspirateur est doté d'une fiche
polarisée; une broche est plus large que l'autre.
Cette fiche s'insère dans une prise de courant
polarisée, dans un seul sens.
Pour dégager le cordon :
1. Faites pivoter le porte-cordon supérieur vers le
BAS.
2. Sortez la fiche du cordon et dégagez le cordon.
FRANÇAIS
9
Page 55

10
FONCTIONNEMENT
POWER
POWER
POWER
POWER
POWER
POWER
MISE EN GARDE
Risque de blessures
Ne déposez pas l’aspirateur sur une marche, laissez-le toujours sur le plancher.
Fonctionnement des commandes
1
2
3
1. Tapis/Plancher : Pour mettre la brosse de
battage en marche et l’arrêter.
NOTA: Si l’aspirateur est en position verticale, la
brosse de battage ne fonctionnera pas même si
l’aspirateur est en marche.
2. HIGH MED LOW :
succion de l'aspirateur, soit High, Medium ou Low.
3. Mise en marche/arrêt :
marche et pour l'arrêter.
Pour choisir l'intensité de
Pour mettre l’aspirateur en
4
Fonctionnement du dégagement
du boîtier
• Pour commencer l’aspiration, appuyez sur la
pédale du côté gauche de l'aspirateur et tirez vers
le bas.
NOTA: Lorsque l'aspirateur est en position
verticale, la brosse de battage ne fonctionne pas.
4. Bouton de mise en marche
Le bouton de mise en marche sert seulement
lorsque les piles dans la poignée ont besoin d’être
changées. Lorsque vous appuyez sur les
commandes dans la poignée, un voyant bleu
au-dessus de la commande indique que les piles
fonctionnent bien; si le voyant bleu ne s'allume pas,
il faut changer les piles.
Si vous devez continuer de passer l’aspirateur et
que vous ne disposez pas de piles de rechange,
vous pouvez utiliser le bouton sur le boîtier principal
pour faire fonctionner l’aspirateur jusqu'au
remplacement des piles.
MISE EN GARDE
• Ne mettez rien dans l’espace entre le boîtier
de l’aspirateur et la tête de la brosse de
battage.
Cela pourrait causer des blessures ou
endommager l'appareil ou porter atteinte aux
animaux domestiques.
Page 56

FONCTIONNEMENT
Réglage selon la hauteur des poils
du tapis
Pour régler la brosse de battage selon la
hauteur des poils du tapis :
Lorsqu’il faut élever ou abaisser le devant de
l'aspirateur pour l'adapter aux diverses hauteurs
des poils du tapis, appuyez sur la pédale de droite.
Chaque pression du pied élèvera la brosse de
battage d'un cran.
Réglages suggérés selon la hauteur des poils
du tapis :
Vous devrez peut-être augmenter la hauteur pour
faciliter certaines tâches, comme passer l'aspirateur
sur des moquettes et des tapis à poils plus longs.
FRANÇAIS
Pour une meilleure qualité de nettoyage, respectez
les réglages suivants en fonction de la hauteur de
vos tapis ou moquettes :
• L– pour tous types de tapis
• Réglages supérieurs– pour moquettes très
épaisses afin de moins forcer pour pousser
l'aspirateur tout en gardant une bonne qualité de
nettoyage.
4 réglages existent :
H = Haut
M = Moyen
ML = Moyen bas
L = Bas
NOTA: Si vous avez du mal à pousser l'aspirateur,
appuyez sur le bouton pour accéder au réglage de
hauteur supérieur.
Attention:
attention lorsque vous passez l'aspirateur sur certains
types de tapis ou de revêtement de sol.
Lisez toujours les directives d'entretien du fabricant
du tapis ou du revêtement de sol avant de passer
l'aspirateur.
Vous devez faire particulièrement
11
Page 57

12
FONCTIONNEMENT
Accessoires
Accessoire à turbine à air pour poils d’animaux
Cet accessoire à turbine à air convient très bien
pour nettoyer les escaliers et l'intérieur des
véhicules, ainsi que pour enlever les poils
d'animaux, la charpie, etc. sur certains tissus et
tapis.
N'utilisez PAS cette brosse sur des animaux.
Brosse à épousseter
Vous pouvez utiliser le suceur plat pour nettoyer
dans les coins serrés, entre les coussins et dans
les endroits difficiles d'accès.
Suceur plat
Vous pouvez utiliser le suceur plat pour nettoyer
dans les coins serrés, entre les coussins et dans
les endroits difficiles d'accès.
ATTENTION
• Ne mettez pas les doigts entre le suceur plat
et le porte-câble lorsque vous retirez le
suceur plat.
Tableau d’utilisation des accessoires
ZONE À NETTOYER
Accessoire
Accessoire à
turbine à air pour
poils d’animaux
Brosse à
épousseter
Suceur plat
* Vérifiez toujours si les accessoires sont propres avant de les utiliser sur du tissu.
Entre les
coussins
Surfaces
rembourrées*
Mobilier et
surfaces
dures*
Rideaux*
(niveau de
puissance le
plus bas)
Escaliers
Coussins
Moquettes
/ Tapis
Murs
Page 58

FONCTIONNEMENT
Utilisation du tube ou de la poignée
du tube
ATTENTION
N'utilisez jamais le tuyau pour tirer
l'aspirateur.
Si vous utilisez un accessoire à l’extrémité de la
poignée, vous devez enlever le tube au complet du
boîtier.
Pour dégager le tube et la poignée :
1. Vérifiez si l'aspirateur est verrouillé en position
verticale et assurez-vous qu'il repose sur une
surface plane et stable.
2. Appuyez sur le bouton de dégagement du tube
situé sur le boîtier et inclinez la poignée du tube.
3. Soulevez le tube et sortez-le.
4. Si vous voulez utiliser uniquement la poignée,
appuyez sur le bouton de dégagement situé au
bas de la poignée et retirez le tube de la poignée.
5. Pour utiliser la brosse à épousseter, appuyez sur
le bouton de dégagement sur le devant de la
brosse à épousseter et retirez le tube de la brosse
à épousseter. Ensuite, tirez la brosse à épousseter
vers la poignée. Lorsque vous avez terminé,
appuyez sur le bouton de dégagement et retirez la
brosse à épousseter.
FRANÇAIS
NOTA: La brosse à épousseter est entourée d'un
revêtement en caoutchouc souple pour éviter
d’endommager votre mobilier.
13
Page 59

14
FONCTIONNEMENT
Installation des accessoires
Utilisation du suceur plat :
Faites glisser le suceur plat sur l'extrémité du tube
ou insérez-le dans la poignée.
Conseils et astuces
Coins et bords des tapis :
Pour passer l'aspirateur dans les coins serrés, sur
les bords des tapis et le long des plinthes, utilisez la
brosse à épousseter.
Utilisez le suceur plat dans les endroits
particulièrement difficiles d'accès.
Utilisez le suceur plat pour les endroits difficiles
d’accès comme les coins serrés et les plinthes.
Marches et paliers d'escalier
Utilisez la brosse à épousseter ou l’accessoire à
turbine à air pour poils d'animaux dans les marches
et sur les paliers. Assurez-vous de placer l'aspirateur
de façon qu'il ne bascule pas ni ne tombe pas.
Consultez le tableau ci-dessous et celui de la page
12 pour obtenir des directives sur le choix et
l'utilisation des accessoires.
Protection contre les surcharges
du moteur de la brosse de battage
La brosse de battage comprend une protection
intégrée contre les surcharges du moteur au cas où
elle se bloquerait. Si la brosse de battage tourne
plus lentement ou s’arrête, la protection contre les
surcharges coupera l’alimentation du moteur de la
brosse de battage. Le moteur d’aspiration
continuera de fonctionner.
Pour corriger le problème : Arrêtez l’aspirateur et
débranchez-le, dégagez ce qui l’obstrue et appuyez
sur le bouton reset (réinitialiser).
Utilisation de l’accessoire à turbine
à air pour poils d’animaux
L’accessoire à turbine à air pour poils d'animaux se
fixe au tube de la même façon que les autres
accessoires. Il comporte une brosse à turbine à air
qui offre une puissance supplémentaire pour le
nettoyage des tapis et des tissus. Il convient très
bien pour nettoyer les escaliers, les coussins et les
garnitures à l'intérieur des véhicules.
Lorsque vous utilisez l’accessoire à turbine à air
pour poils d’animaux, vérifiez souvent si des
cheveux, des fibres, de la charpie ou d'autres
débris se sont accumulés autour de la brosse.
Une accumulation excessive peut diminuer
l'efficacité de l’accessoire à turbine à air pour poils
d’animaux et l'endommager.
Consultez la section Entretien et nettoyage pour
connaître les directives de nettoyage.
Protection contre la surcharge
thermique
L'aspirateur est muni d'une protection de surcharge
thermique qui s'active automatiquement afin de
protéger l'aspirateur contre une surchauffe. Si le débit
d’air normal vers le moteur est obstrué, la protection
thermique arrête le moteur automatiquement afin de le
laisser refroidir et d'éviter d'endommager l'aspirateur.
Pour corriger le problème :
débranchez le cordon d’alimentation. Vérifiez s'il y a
obstruction et enlevez-en la cause, s'il y a lieu. Vérifiez
également si les filtres sont bouchés et nettoyez-les.
Attendez environ 30 minutes, rebranchez l'aspirateur
et remettez-le en marche pour vérifier si la protection
du moteur s’est réinitialisée. Le système de protection
thermique ne se réinitialisera pas avant que
l'aspirateur ne se soit complètement refroidi.
Arrêtez l’aspirateur et
Page 60

ENTRETIEN ET NETTOYAGE
Respectez toujours toutes les consignes de sécurité lorsque vous nettoyez, entretenez ou réparez
l'aspirateur.
Rangement de l'aspirateur
Lorsque vous n'utilisez pas l'aspirateur, enroulez le
cordon autour du porte-cordon, comme illustré.
Rangez le suceur plat dans son logement respectif
à l'arrière de l'aspirateur.
MISE EN GARDE
Risques de chocs électriques et de blessures.
Faites attention lorsque vous enroulez le
cordon. N'enroulez pas le cordon trop serré
car cela exercerait une contrainte sur celui-ci
qui pourrait l'endommager. N'entrecroisez
pas le cordon en l'enroulant. Un cordon
endommagé peut causer un choc électrique,
des blessures ou des dommages matériels.
Éléments du réservoir à poussière
Le réservoir à poussière comprend plusieurs éléments
clés. Après avoir vidé le réservoir à poussière,
assurez-vous toujours de replacer toutes les pièces de
façon adéquate.
N'utilisez JAMAIS l'aspirateur si tous les filtres
ne sont pas en place!
N'utilisez JAMAIS l'aspirateur si les filtres ou
des éléments sont humides!
Éléments clés :
1~2. Préfiltre en mousse: Retient les particules
moyennes à fines. Il est fait d'un cadre et d'un
filtre en mousse. Ces pièces sont lavables.
3. Couvercle du réservoir à poussière: S’ouvre
pour donner accès au préfiltre en mousse.
4. Séparateur de poussière: Isole la poussière de
l’air entrant.
5. Porte latérale: S’ouvre pour permettre d’enlever
la poussière du séparateur de poussière.
6. Dégagement pour vider la poussière: Appuyez
pour déclencher la plaque inférieure.
7. Réservoir à poussière: Contenant qui recueille
la poussière.
8.
Plaque inférieure: S'ouvre pour permettre de
vider le réservoir à poussière.
9.
Levier de prévention: Empêche toute utilisation
sans préfiltre de mousse.
FRANÇAIS
1. Cadre
du filtre
2. Filtre en
mousse
4.
Séparateur
de poussière
8. Plaque
inférieure
3.
Couvercle
du réservoir
à poussière
9.
Levier de
prévention
5. Porte
latérale
6. Dégagement
pour vider la
poussière
7. Réservoir à
poussière
15
Page 61

16
ENTRETIEN ET NETTOYAGE
Vidage du réservoir à poussière
MISE EN GARDE
Risques de chocs électriques et de blessures.
Débranchez toujours le cordon
d'alimentation de la prise de courant avant
de procéder à un entretien ou à une
réparation. Le non-respect de cette consigne
pourrait causer un choc électrique ou une
blessure par suite du démarrage soudain de
l'aspirateur.
Pour obtenir le meilleur rendement, videz toujours
le réservoir à poussière lorsque le niveau de
poussière atteint la ligne « MAX ».
POUR ENLEVER LE RÉSERVOIR À POUSSIÈRE,
appuyez sur le bouton de dégagement du réservoir
à poussière, inclinez le réservoir à poussière vers
l'arrière, puis retirez-le de l'aspirateur.
POUR RÉINSTALLER LE RÉSERVOIR À
POUSSIÈRE, placez-le dans le support, puis
inclinez-le vers l'avant jusqu'à ce qu’il s’enclenche.
Assurez-vous de bien replacer le réservoir à
poussière!
Ne touchez pas à l’engrenage ni au bouton à l’intérieur.
Nettoyage du réservoir à poussière
Pour obtenir un rendement optimal, inspectez
régulièrement les filtres et nettoyez-les au besoin.
Pour nettoyer le réservoir à poussière :
1.
Retirez le réservoir à poussière de l'aspirateur.
2. Appuyez sur le bouton de dégagement de la
plaque inférieure, puis ouvrez la plaque
inférieure.
3. Essuyez le réservoir à poussière à l'aide d'un
chiffon doux ou d'un essuie-tout.
POUR VIDER LE RÉSERVOIR À POUSSIÈRE,
appuyez sur le bouton de dégagement de la plaque
inférieure, puis ouvrez la plaque inférieure, comme
illustré.
4. Dégagez le loquet de chaque côté de la porte
latérale.
5. Enlevez les cheveux, les fibres ou les autres
débris qui se trouvent dans le séparateur de
poussière.
N’enlevez pas les cônes fixés à la porte latérale
pour les nettoyer.
N'utilisez JAMAIS l'aspirateur si les filtres ou
des éléments sont humides!
Page 62

ENTRETIEN ET NETTOYAGE
Nettoyage du préfiltre en mousse
ATTENTION
Un filtre humide peut endommager
l'aspirateur de façon permanente. Assurezvous que les filtres sont complètement secs
avant de les remettre en place.
Pour obtenir un rendement optimal, inspectez les
filtres aux trois mois et nettoyez-les au besoin. Ne
fermez pas le couvercle du réservoir à poussière
sans y avoir installé le préfiltre en mousse.
Pour nettoyer le préfiltre en mousse :
1. Retirez le réservoir à poussière de l'aspirateur.
2. Levez le loquet du couvercle du réservoir à
poussière et ouvrez le couvercle.
3. Enlevez le préfiltre en mousse.
N'utilisez JAMAIS l'aspirateur si les filtres ou
des éléments sont humides!
Si vous remarquez une perte d'aspiration et que le
nettoyage du préfiltre n'améliore pas le rendement,
vous devez remplacer le préfiltre en mousse. Vous
pouvez vous procurer d’autres filtres en mousse
auprès de LG en appelant au 1 800 243-000 (É.-U.)
ou au 1 888 542-2623 (Canada) et demandez les
pièces présentées à la page 6.
Nettoyage du filtre HEPA
Pour obtenir un rendement optimal, inspectez le
filtre aux six mois et nettoyez-le au besoin.
Pour nettoyer le filtre HEPA :
1. Enlevez le couvercle du filtre d'évacuation.
Couvercle du filtre
d’évacuation
2. Enlevez le filtre en appuyant sur le crochet.
FRANÇAIS
Retirez le préfiltre en mousse du cadre.
4.
5.
Agitez le préfiltre pour enlever la poussière ou les
débris, puis rincez le préfiltre en mousse et le
cadre du filtre sous l'eau du robinet.
Puis éliminez l’excès d’eau du filtre en mousse.
6. Sécher complètement à l’écart des rayons du
soleil.
Lavez soigneusement le filtre sous l’eau du robinet.
3.
4. Enlevez l’excès d’eau.
5. Sécher complètement à l’écart des rayons du
soleil.
17
Page 63

18
ENTRETIEN ET NETTOYAGE
Accessoire à turbine à air pour
poils d’animaux
Pour nettoyer l’accessoire à turbine à air pour
poils d’animaux
1. Enlevez les quatre vis situées au bas de
l’accessoire à turbine à air pour poils d’animaux.
2. Soulevez le couvercle.
3. Retirez les débris.
Pour le réassembler:
4. Enfoncez délicatement le couvercle sur les
languettes jusqu’à ce qu’elles s’enclenchent.
5. Replacez les vis enlevées à l'étape 1. Prenez
garde de NE PAS trop serrer les vis.
N’utilisez PAS l’accessoire à turbine à air pour
poils d'animaux sur des animaux.
➀
Entretien de la brosse de battage
MISE EN GARDE
Risques de chocs électriques et de blessures.
Débranchez toujours l’aspirateur avant de le
nettoyer ou de le réparer. Le non-respect de
cette consigne peut causer un choc
électrique ou des blessures.
➁
4.
Retirez soigneusement les ficelles, les cheveux, etc.
qui se sont accumulés autour de la brosse de battage.
Réinstallation du couvercle
Répétez les étapes en sens inverse.
Remplacement de la courroie de la
brosse de battage
MISE EN GARDE
Risques de chocs électriques et de blessures.
Débranchez toujours l’aspirateur avant de le
nettoyer ou de le réparer. Le non-respect de
cette consigne peut causer un choc électrique
ou des blessures.
Si la courroie de la brosse de battage se brise,
suivez les étapes ci-dessous pour la remplacer.
Pour remplacer la courroie :
1. Déposez le capot de brosse d’agitateur comme
décrit ci-dessus.
Retirez la brosse de battage en la soulevant tout droit.
2.
Vérifiez souvent si des cheveux, des ficelles et de la
charpie se sont accumulés autour de la brosse de battage.
Pour retirer le couvercle de la brosse de battage :
1. Débranchez l'aspirateur. Appuyez sur la pédale
gauche pour dégager la tête. Abaissez la poignée
jusqu'à ce que l'aspirateur repose à plat sur le
plancher.
2. Retournez l'aspirateur pour que la brosse de
battage soit tournée vers le haut.
3. Placez la brosse de battage sur une serviette ou
une surface douce. Enlevez les six vis situées au
bas de la tête et enlevez le couvercle.
3. Décrochez l’ancienne courroie de la poulie
4.
d’entraînement. Veillez à ce qu'aucun morceau
de la courroie brisée ne reste pris dans la brosse
de battage ou la poulie d'entraînement.
Accrochez la nouvelle courroie sur la poulie
d’entraînement du moteur de la brosse de battage.
Page 64

ENTRETIEN ET NETTOYAGE
5. Passez la brosse de battage dans la courroie en
veillant à aligner la courroie avec la poulie de la
brosse de battage.
6. Replacez la brosse de battage en veillant à
insérer les languettes de forme ovale dans les
encoches de la tête.
7. Remettez le couvercle de la brosse de battage
de la manière décrite ci-dessus.
Pour obtenir une courroie de rechange,
commandez la pièce #MAS61842501 auprès du
centre de service LG.
Pour remplacer les piles
1. Ouvrez le couvercle des piles en le glissant vers
le haut.
Enlèvement de ce qui peut
obstruer l’aspiration
MISE EN GARDE
Risques de chocs électriques et de blessures
corporelles.
Débranchez toujours l’aspirateur avant de le
nettoyer ou de le réparer. Le non-respect de
cette consigne peut entraîner un choc
électrique ou des blessures.
Si vous remarquez une perte d’aspiration, inspectez
d’abord les filtres comme on l'explique aux pages
15. Si les filtres sont propres, c’est peut-être le
tuyau qui est obstrué. Les flèches indiquent les
endroits où il peut y avoir obstruction.
Pour vérifier s'il y a obstruction :
1. Inspectez le tuyau à l'endroit où il se raccorde à
la poignée en appuyant sur les deux boutons de
dégagement situés dans le haut du tuyau.
2. Dégagez le tube de l'aspirateur en appuyant sur
le bouton de dégagement du tube.
Détachez tous les accessoires, voir à la page 8,
et inspectez-les.
➀
FRANÇAIS
2. Remplacez les deux piles et refermez le
couvercle.
NOTA : Si vous n’avez pas encore remplacé les
piles, utilisez le bouton de mise en marche sur le
boîtier.
➁
3. Retirez le réservoir à poussière et inspectez
l’entrée du réservoir à poussière à l'endroit où il
se raccorde au boîtier de l'aspirateur.
19
Page 65

20
ENTRETIEN ET NETTOYAGE
4. Inspectez le tuyau à l'endroit où il se raccorde à
l’arrière du boîtier en appuyant sur le bouton de
dégagement situé dans le haut du tuyau. Vérifiez
ensuite les deux casiers, le flexible installé et non
installé.
5. Retournez l'aspirateur et inspectez l’entrée de la
brosse de battage.
6. Pour une inspection plus approfondie, enlevez la
vis sur l’orifice.
Nettoyage de l'extérieur de
l'aspirateur
MISE EN GARDE
Risques de chocs électriques et de
blessures.
Débranchez toujours l’aspirateur avant de le
nettoyer ou de le réparer. Le non-respect de
cette consigne peut causer un choc
électrique ou des blessures.
Essuyez l'extérieur de l'aspirateur à l'aide d'un
chiffon propre et doux que vous aurez trempé dans
l'eau, puis bien essoré.
NE laissez PAS d'eau pénétrer dans les ouvertures
de l'aspirateur.
NE mettez PAS les accessoires dans un lavevaisselle ou dans une laveuse. Lavez-les dans une
eau chaude et savonneuse, rincez-les, puis laissezles sécher complètement à l'air.
N'utilisez PAS les accessoires s'ils sont humides.
Page 66

DÉPANNAGE
Consultez le tableau pour trouver des solutions aux problèmes de rendement mineurs.
Toute autre réparation ou tout autre entretien que ceux décrits dans le présent manuel d'utilisation doivent
être effectués par le centre de service LG de votre localité.
MISE EN GARDE
Risques de chocs électriques et de blessures.
Débranchez toujours l’aspirateur avant de le nettoyer ou de le réparer. Le non-respect de cette
consigne peut causer un choc électrique ou des blessures.
PROBLÈME
L'aspirateur ne
fonctionne pas.
Faible aspiration de
la poussière.
La brosse de
battage ne
fonctionne pas.
De la poussière
s'échappe du
réservoir à
poussière.
L'aspirateur s’agrippe aux
tapis mobiles ou est
difficile à pousser.
L’accessoire à
turbine à air pour
poils d’animaux ne
fonctionne pas.
L’accessoire n'aspire
pas lorsqu'on l’utilise
avec la poignée.
Les commandes de
la poignée ne
fonctionnent pas.
Le sac poussière
semble lâche en le
soulevant avec la
poignée de transport.
CAUSE POSSIBLE SOLUTION POSSIBLE
• L'appareil est débranché.
• Les piles sont usées.
• Le protecteur thermique est activé.
• Le réservoir à poussière est plein ou
bouché.
• Le réservoir à poussière n'est pas
bien installé.
• Le tube ou le tuyau est bloqué.
• La courroie est brisée/n'est pas bien
installée.
• Protection de surcharge du moteur de
l’agitateur activée.
• Le tuyau est percé.
• La brosse de battage est usée.
• Diminuez le niveau de puissance.
•
La brosse n'est pas en marche (l'appareil
est en mode «plancher nu»).
• L’aspirateur est en position verticale.
•
Protection de surcharge du moteur de
l’agitateur déclenchée (la brosse est bloquée).
• La courroie est brisée.
• Le réservoir à poussière n'est pas
bien installé.
• Le couvercle du réservoir à poussière
n’est pas fermé.
• La plaque inférieure n’est pas
verrouillée.
• Mauvais réglage pour la hauteur des
poils du tapis.
• Agitateur sale ou supports d’agitateur
• Obstruction dans le débit d'air de la
turbine
• Faible aspiration.
• Le tube principal est encore raccordé
au boîtier.
• Il faut remplacer les piles.
• Ceci est normal.
•
Vérifiez si le cordon est branché dans une prise fonctionnelle.
• Remplacez les piles. [Voir à la page 19]
• Laissez refroidir l'aspirateur. [Voir à la page 14]
• Videz le réservoir à poussière et nettoyez les filtres.
[Voir à la page 16-17]
• Vérifiez si tous les éléments du réservoir à poussière et les
filtres sont bien installés.
• Vérifiez s'il y a obstruction. [Voir à la page 19-20]
• Inspectez la courroie et remplacez-la, s'il y a lieu.
[Voir à la page 18-19]
•
Débranchez l'aspirateur et vérifiez si la brosse de battage est obstruée.
Appuyez sur le bouton « Reset » (réinitialiser). [Voir à la page 14]
•
Inspectez soigneusement le tuyau. Remplacez-le, s’il y a lieu.
• Communiquez avec le centre de service.
• Augmentez le niveau de puissance. [Voir à la page 10]
• Arrêtez la brosse de battage. [Voir à la page 10]
• Appuyez sur le bouton de dégagement du boîtier et
inclinez l'appareil vers l'arrière. [Voir à la page 10]
•
Débranchez l'aspirateur et vérifiez si la brosse de battage est
obstruée et remettez l'appareil en marche.[Voir à la page 14]
• Remplacez la courroie. [Voir à la page 18-19]
• Vérifiez si tous les éléments du réservoir à poussière et les
filtres sont bien installés.
• Vérifiez le couvercle du réservoir à poussière.
• Vérifiez si la plaque inférieure du réservoir à poussière est
fermée et verrouillée.
• Réglez selon la hauteur des poils du tapis.
[Voir à la page 11]
• Nettoyez l’intérieur de l’accessoire à turbine à air pour poils
d’animaux. [Voir à la page 18]
• Nettoyez l’intérieur de l’accessoire à turbine à air pour poils
d’animaux. [Voir à la page 18]
• Vérifiez s'il y a obstruction. [Voir à la page 19-20]
• Enlevez le tube. [Voir à la page 13]
• Remplacez les piles dans la poignée.
[Voir à la page 19]
• L’aspirateur est conçu ainsi pour éviter que ce sac ne se
sépare de la partie principale de l’appareil lors du
transport.
FRANÇAIS
21
Page 67

MEMO
Page 68

MEMO
Page 69

LG Customer Information Center
1-800-243-0000
1-888-865-3026
1-888-542-2623
USA, Consumer User
USA, Commercial User
CANADA
Register your product Online!
www.lg.com
Printed in Korea
Impreso en Korea
Imprimé en Corée
 Loading...