

Page 1
Model
Language
Page
Date
64
2011.01.28 Dufeng
Chage Record
1
2
3
4
5
6
7
8
9
LuV250C
MFL66993601
Change content
Color(cover/body)
)H*W(eziS lairetaM
Designer
noitpircseD .oN traP
ECO No.
Designer
etaD .oN
Confirm
Page 2
LuV250C
P/No:MFL66993601
Page 3
Page 4
3
Page 5
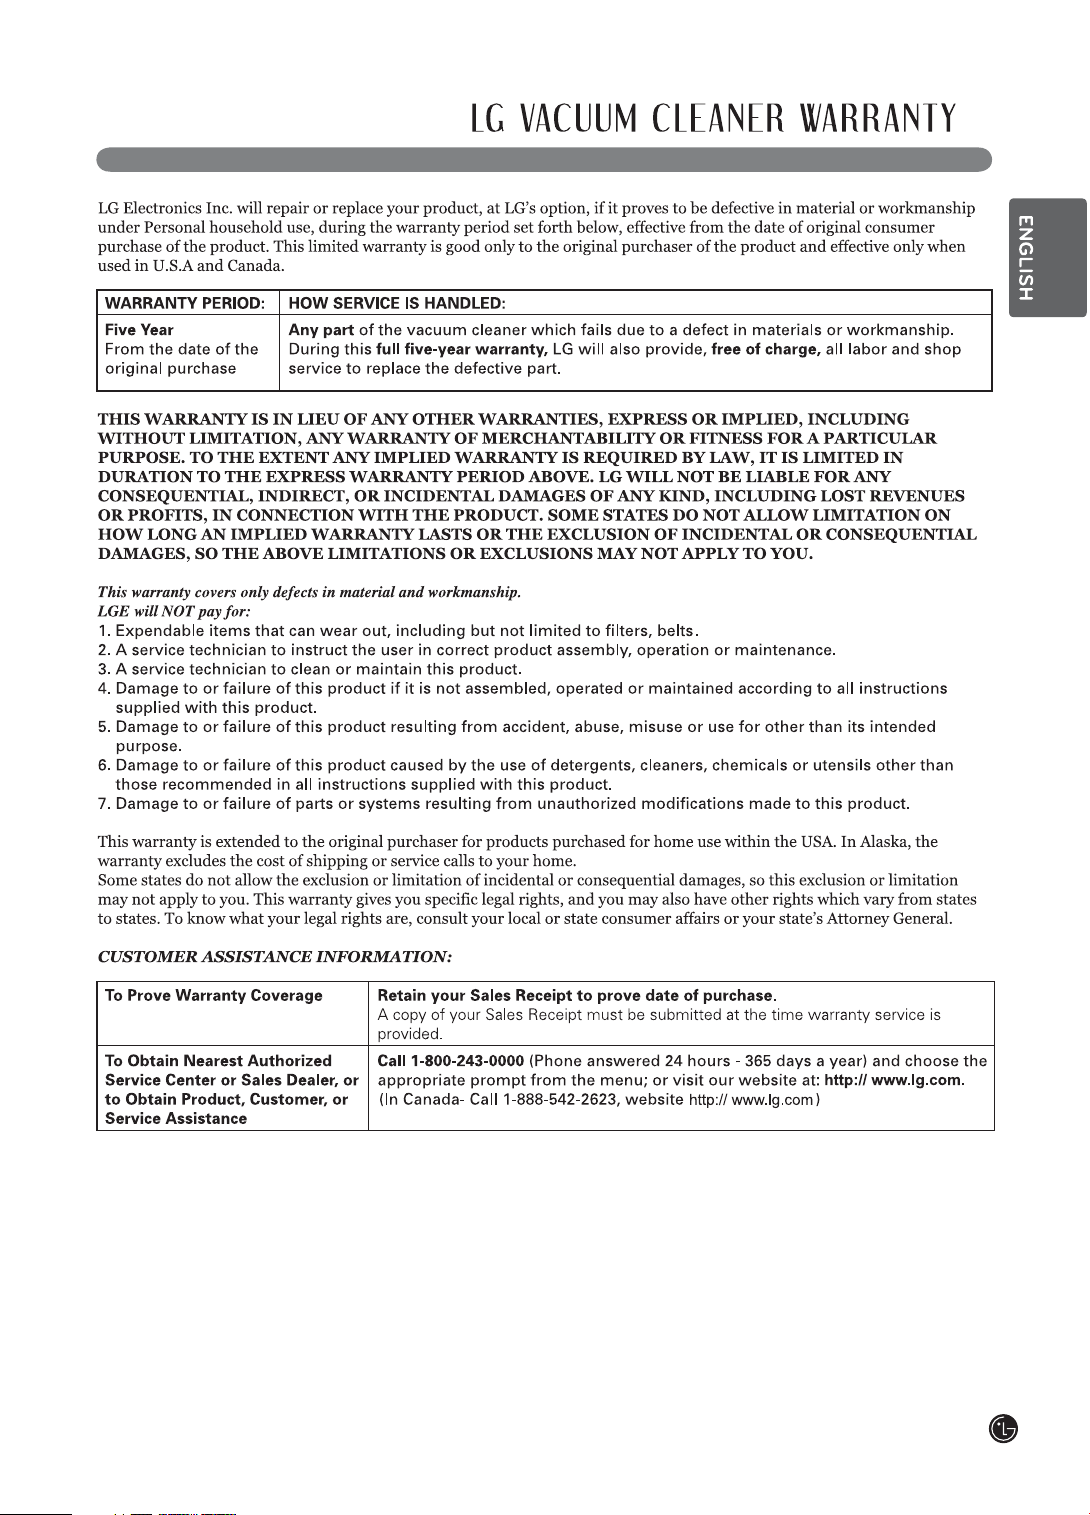
IMPORTANT SAFETY INSTRUCTIONS
This is the safety alert symbol. This symbol alerts you to potential hazards that can result in property
damage and / or serious bodily harm or death.
All safety messages will follow the safety alert symbol and either the word WARNING or CAUTION.
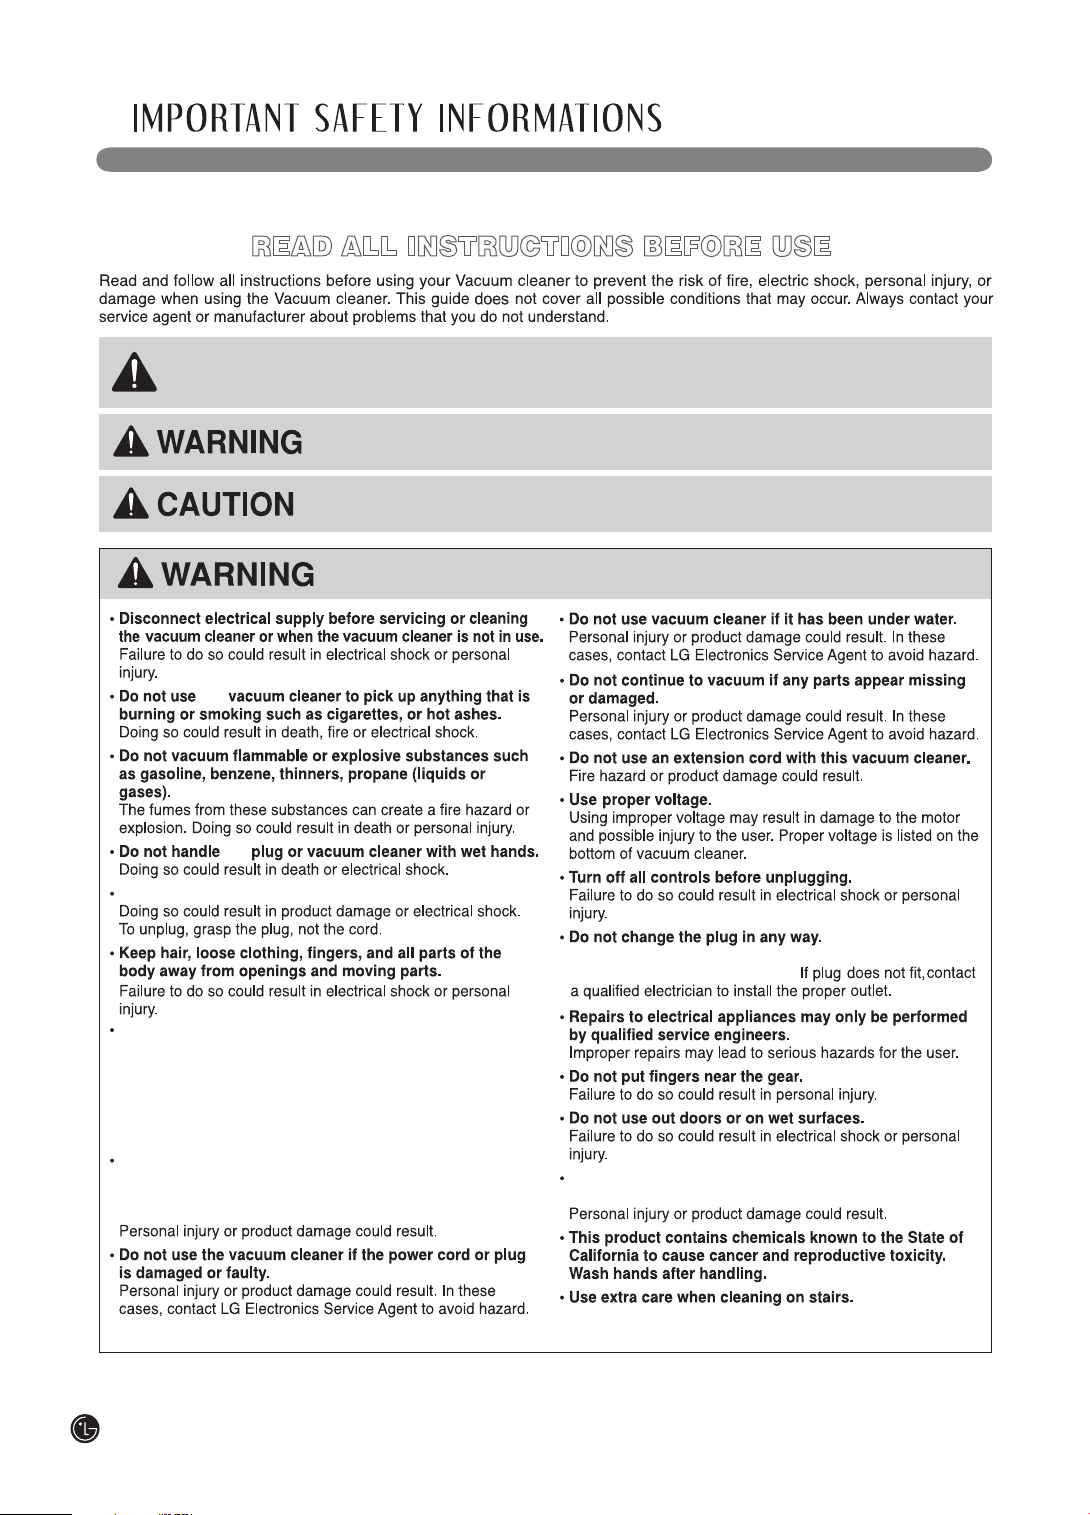
Indicates a hazardous situation which, if not avoided, could result in death or
serious injury.
Indicates a hazardous situation which, if not avoided, could result in minor or
moderate injury.
the
the
Do not unplug the vacuum cleaner by pulling on the cord.
Do not pull or carry the vacuum cleaner by its cord, use
the cord as a handle, close a door on the cord or pull
the cord around sharp edges or corners.
Do not run the vacuum cleaner over the cord. Keep the
cord away from heated surfaces.
Failure to do so could result in electrical shock, personal
injury, fire, or product damage.
The vacuum cleaner is not a toy and should not be
operated by children.
Pay close attention when operating the vacuum cleaner
near children.
SAVE THESE INSTRUCTIONS
4
Failure to do so could result in electrical shock, personal
injury, product damage or death.
Do not put anything between the vacuum cleaner
body and agitator head space.
Page 6
Do not insert objects into vacuum openings.
Failure to follow this instruction could result in product damage.
Do not use the vacuum if any of the openings are blocked.
Keep vacuum openings free of dust, lint, hair and anything
that may reduce air flow.
Failure to follow this instruction could result in product damage.
Do not use the vacuum cleaner without the tank and / or
filters properly installed.
Failure to follow this instruction could result in product damage.
Always clean the dust tank and filters after vacuuming carpet
cleaners or fresheners, powders and fine dust.
These products can clog the filters, reduce airflow and/or cause
damage to the vacuum.
Failure to clean the dust tank and filters could cause permanent
damage to the cleaner.
Do not use the vacuum cleaner to pick up sharp or hard
objects such as small toys, pins, paper clips, etc.
The vacuum cleaner should not be operated by young children.
Failure to follow this instruction could result in personal injury or
product damage.
Follow all instructions in the owner's manual.
Only use LG recommended or approved attachments and
accessories.
Never place the vacuum cleaner at the top of stairs.
Do not dry the filters near an open flame.
Always turn the vacuum cleaner off before connecting or
disconnecting the hose.
The vacuum cleaner is only intended for household use.
You are responsible for proper assembly and use of your
vacuum cleaner.
filters
filters
5
Page 7
MDQ62637901
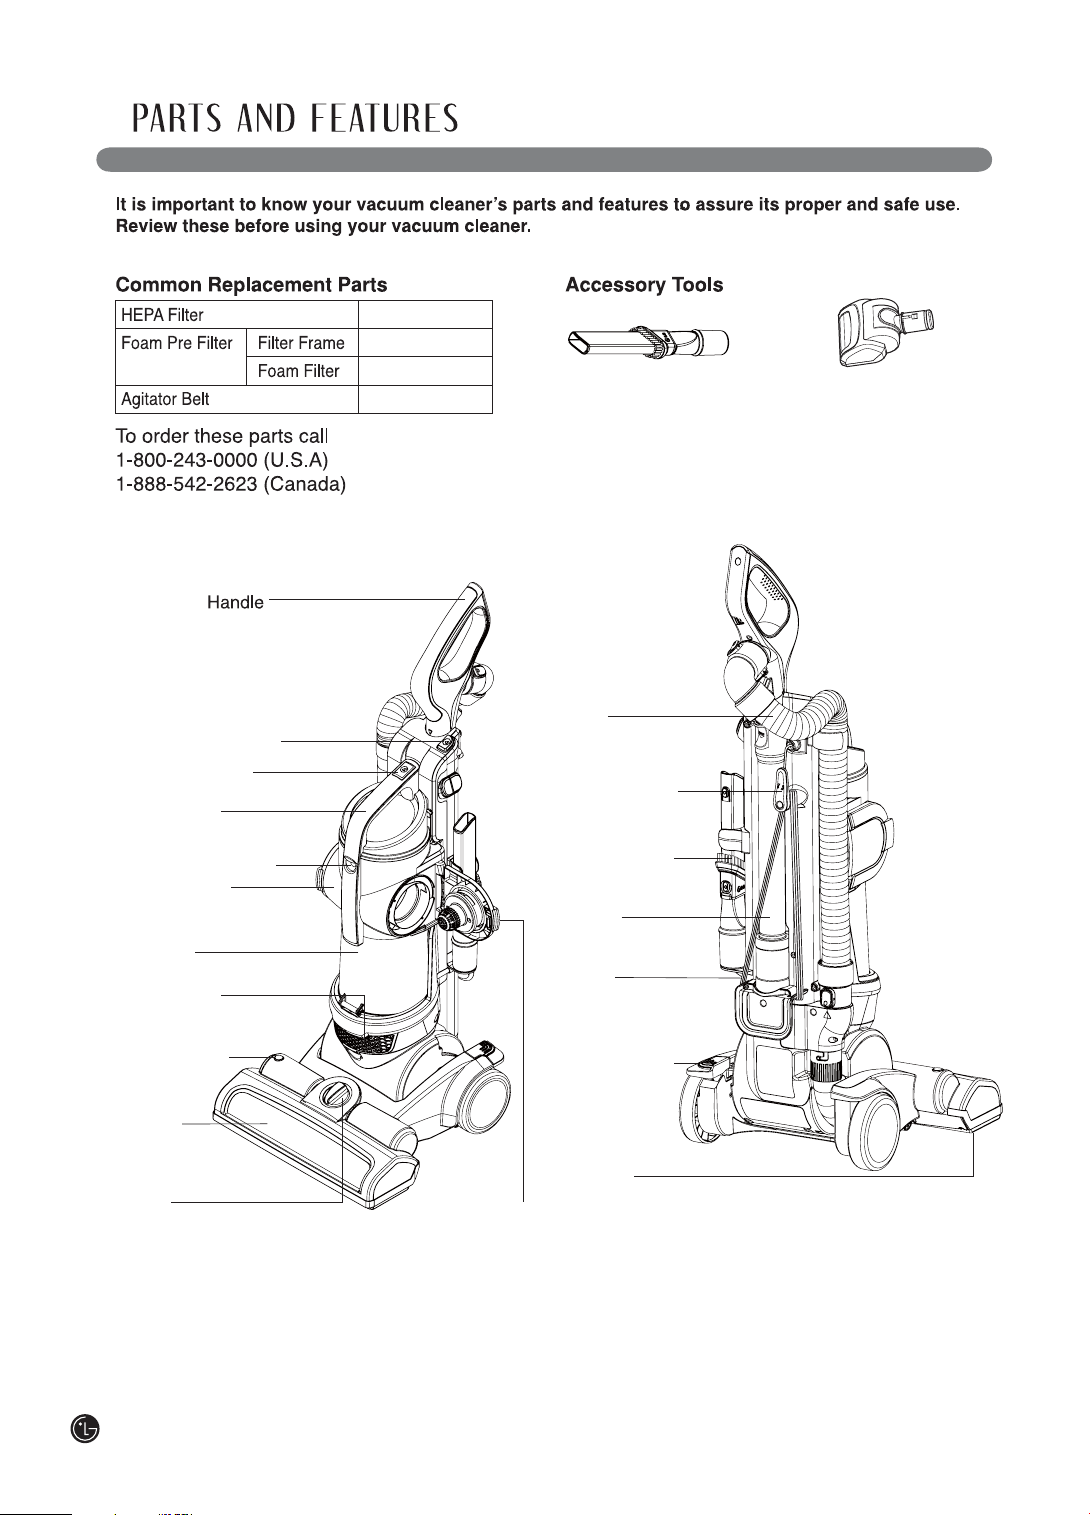
Wand release button
Dust tank release
Carry handle
ADQ73233201
MDQ62637901
MDJ63006101
MAS37628302
Dusting brush & Crevice tool Pet hair turbine tool
Hose
Quick release
Cord hanger
Dust tank lid release
Dust separator
Dust tank
Exhaust filter
Reset Button
Viewing
window
Height
adjustment
6
Dusting brush
& Crevice tool
Wand
Cord
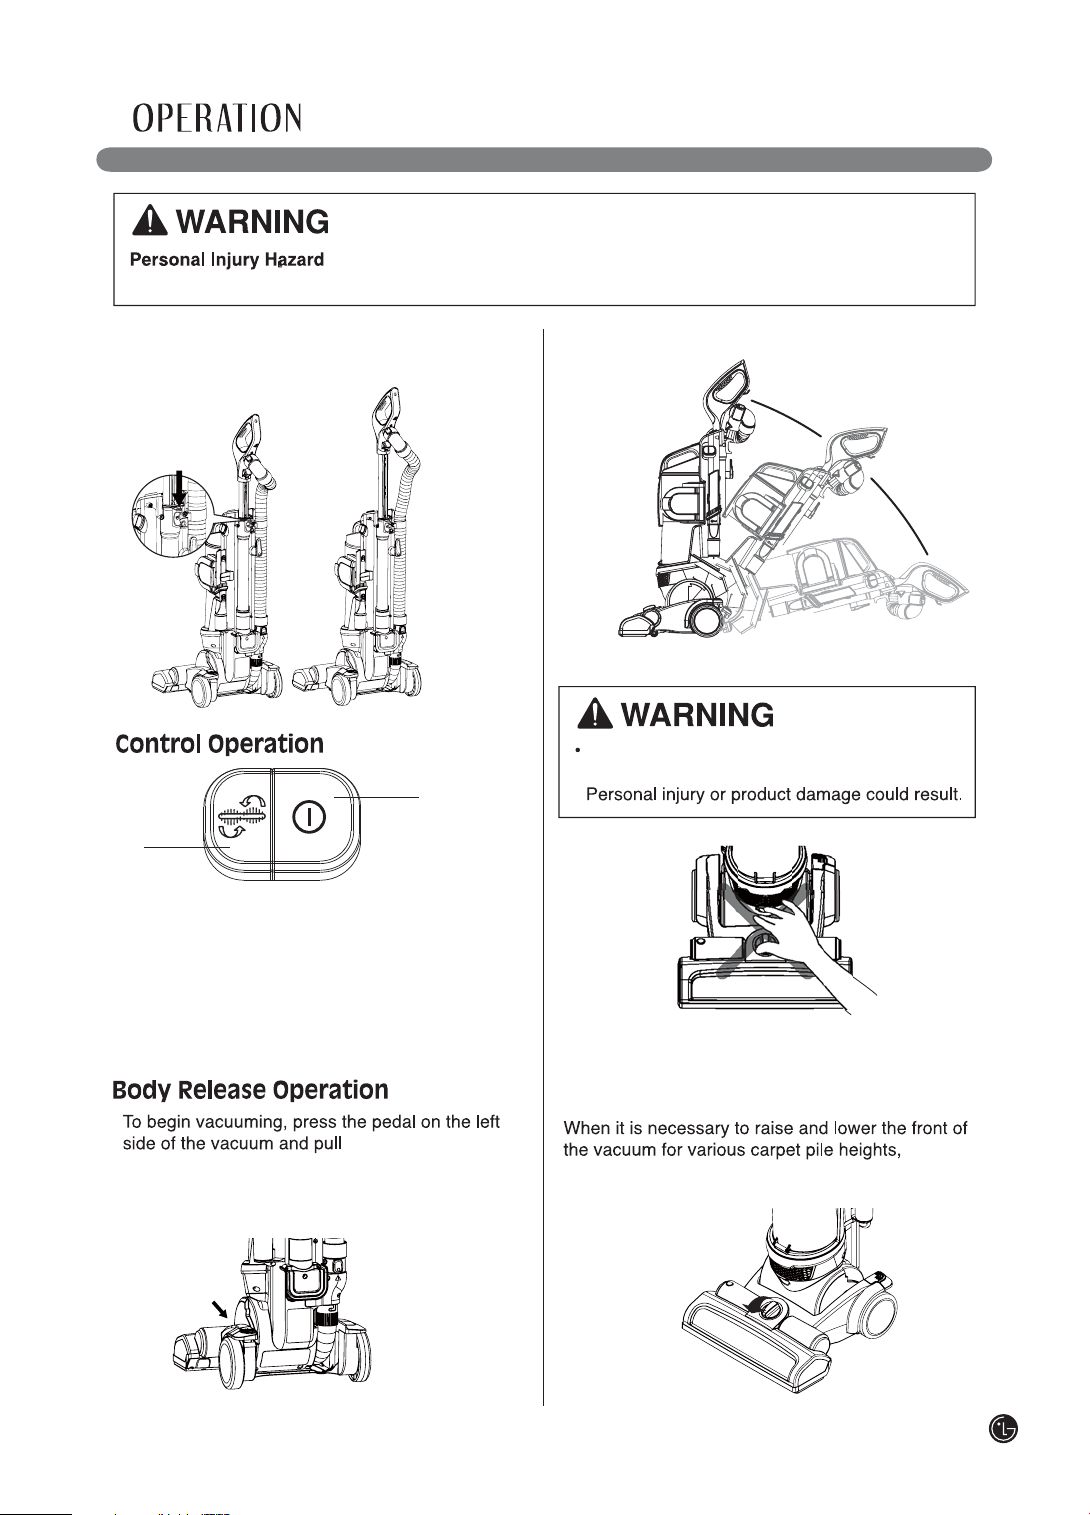
Body release
Agitator
Side door
Page 8
Vacuum Cleaner Body
Dusting Brush & Crevice Tool
1.Vacuum Cleaner Body
2.Dusting Brush and
Crevice Tool
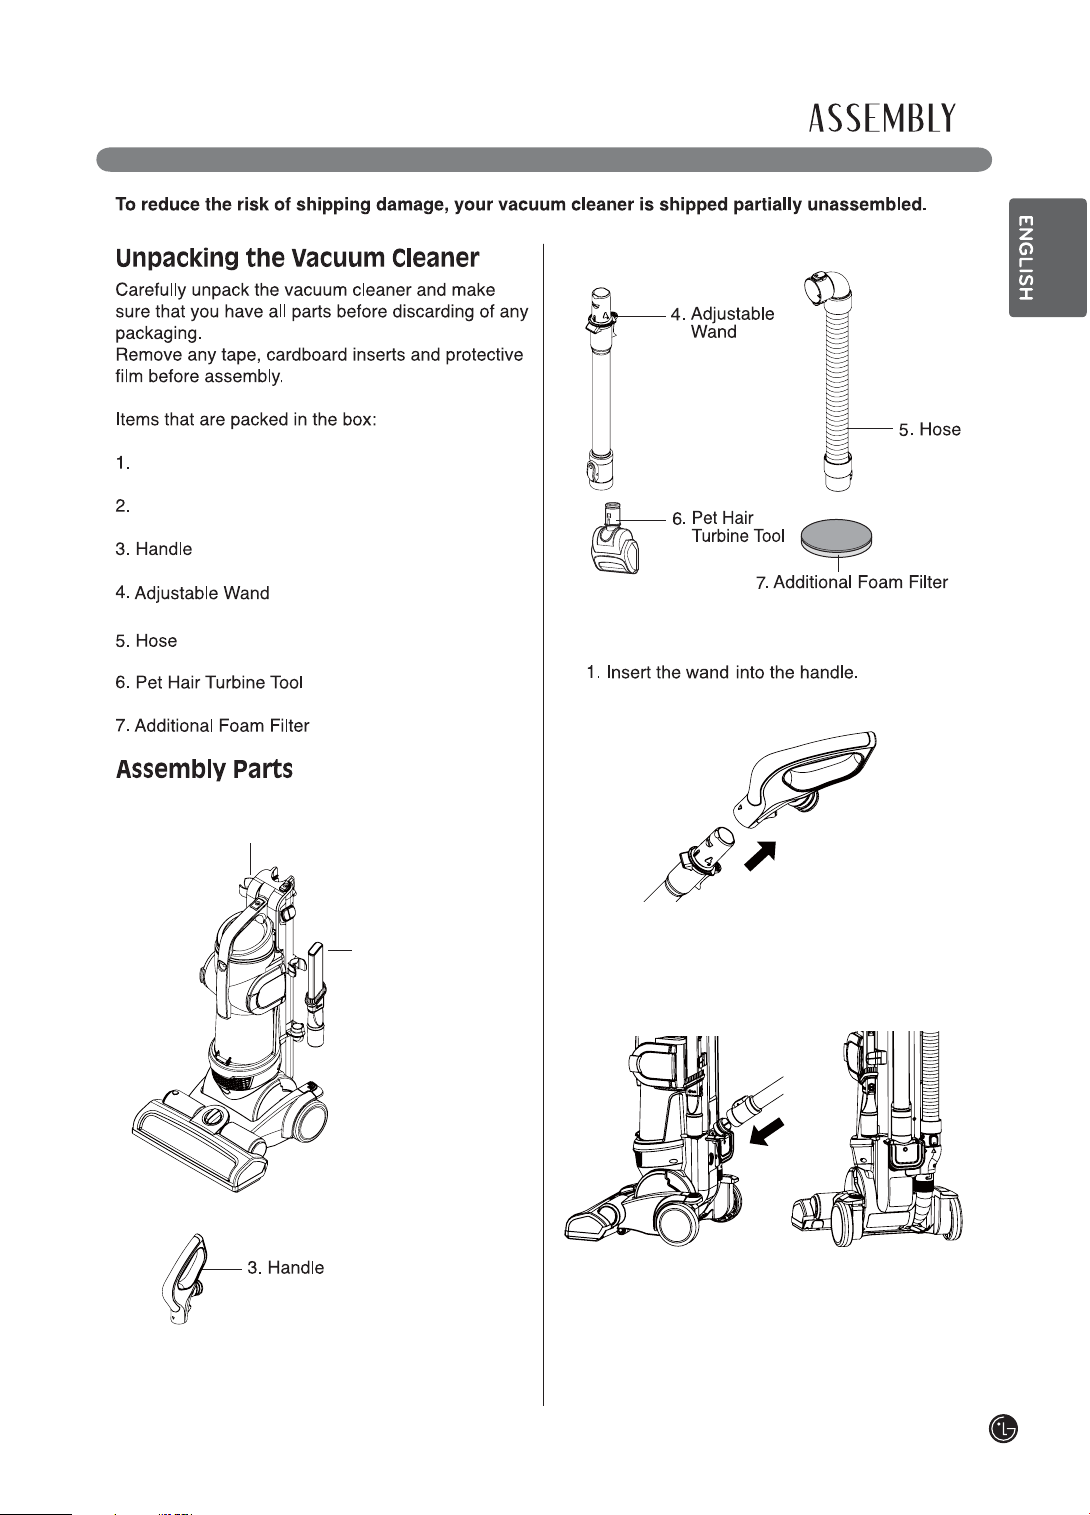
Attaching the Wand
2. Insert the wand into the main body of the
vacuum cleaner.
7
Page 9
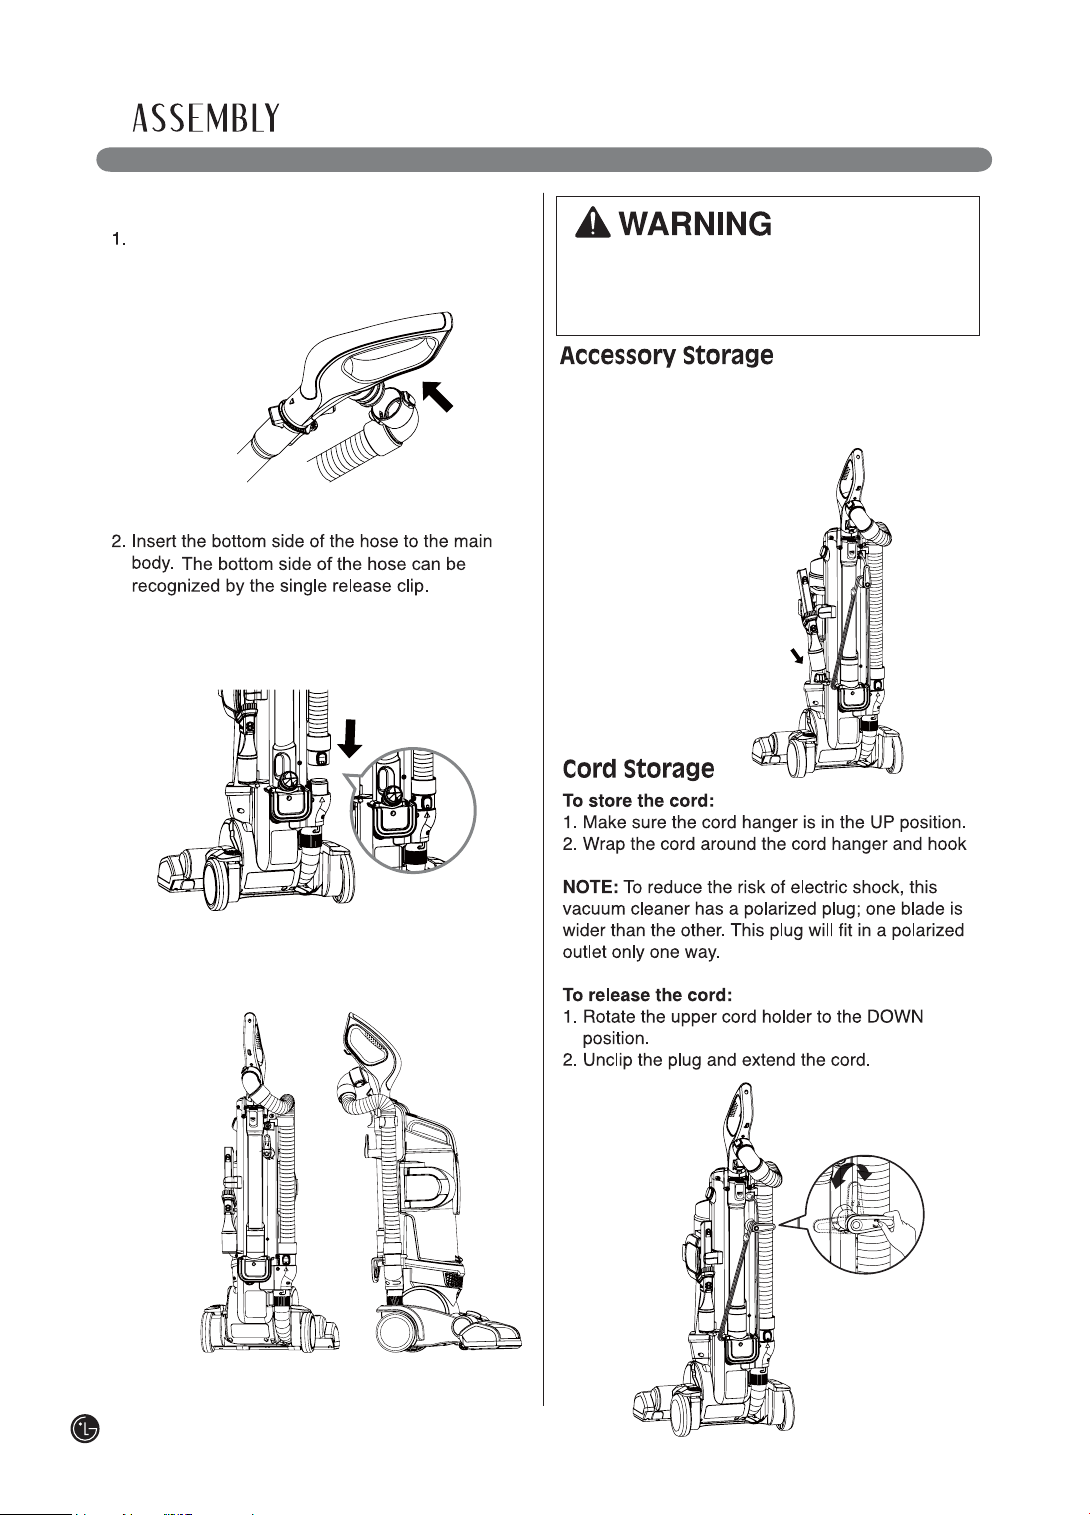
Attaching the Hose
Attach the top side of the hose to the handle.
The top side of the hose can be recognized by
the two release clips.
Personal Injury and Product Damage Hazard!
DO NOT use outlets above counters.
Not following this warning could result in
damage to surrounding items.
Your vacuum cleaner features convenient on-board
storage for the Dusting brush & Crevice tool.
,QVHUWWKH'XVWLQJEUXVK&UHYLFHWRRORQWRWKH
main body.
3. Align the hose with the holder on the side of
the vacuum.
8
into place.Clip the plug onto the cord.
Page 10
Do not set the vacuum cleaner on the stairs; always keep it on the floor.
Wand Release Operation
Press the release button on the wand and pull out
the wand handle.
Do not place anything in the space between
the body and agitator head.
1
2
1.Power On/Off:
To turn the vacuum on and off.
2.Carpet/Floor:
Press this button to turn the
agitator on or off.
Note: The agitator will not spin when the
vacuum is in the upright position.
the handle down.
NOTE: When the vacuum is in the upright position
the agitator will not run.
Adjusting the Vacuum Cleaner for
Carpet Pile Height
Adjusting the height of the vacuum head.
turn the
Control Knob. Each turn
notch.
will raise the agitator one
9
Page 11
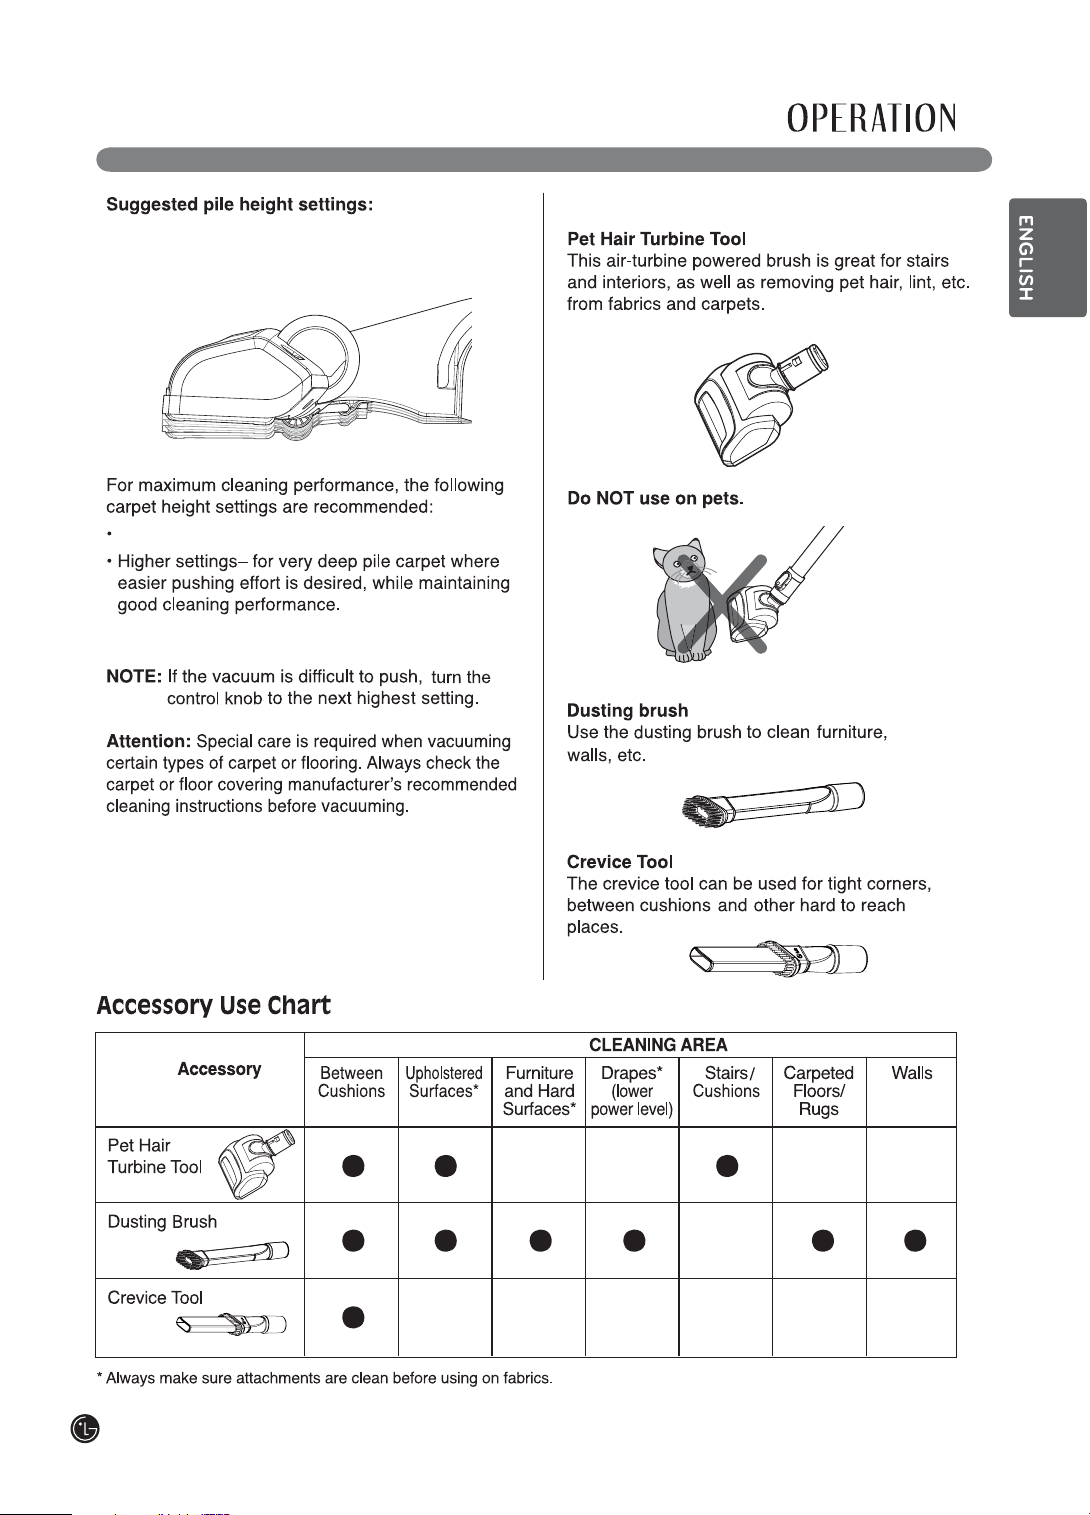
You may need to raise the head of the vacuum
cleaner to make vacuuming area rugs and longer
pile rugs easier.
for standard carpet
LOW-
Accessories
10
Page 12
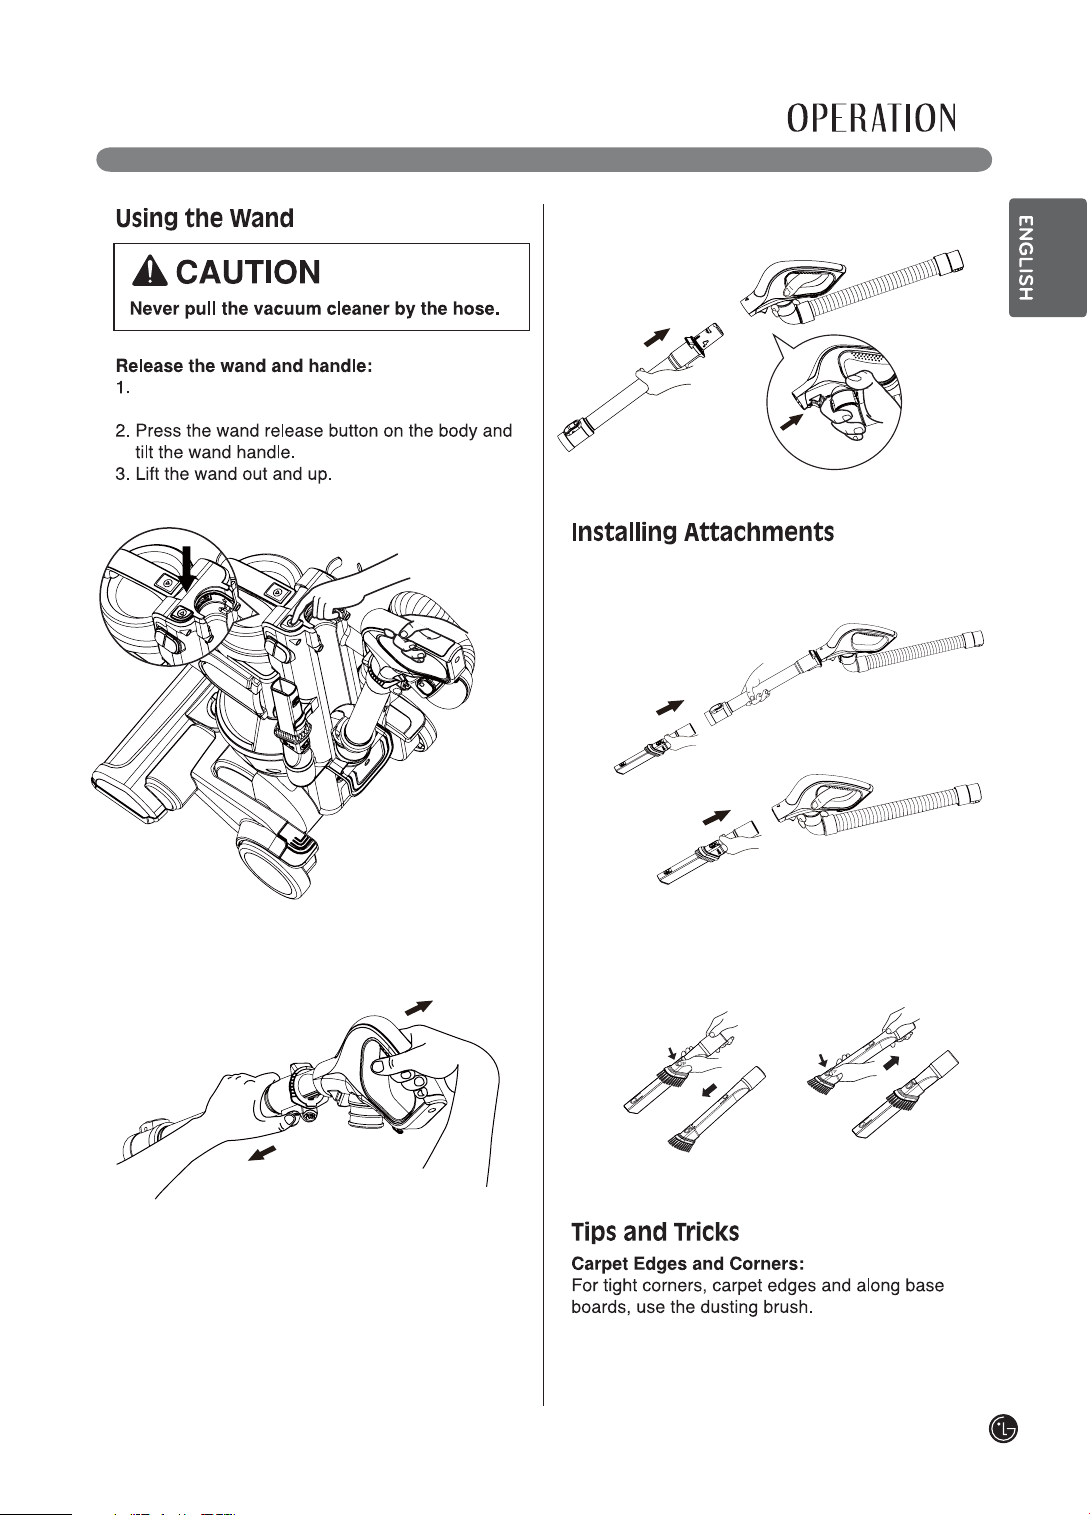
Make sure that the vacuum cleaner is locked in the
upright position on a flat, stable surface.
4. Press the wand release button on the wand and
pull the handle up.
Using the Crevice Tool:
Slide the crevice tool over the end of the wand or
fit it into the handle.
Using the Dusting Brush:
Press the brush release button on the crevice tool
and slide the brush forward.
To use the handle only, press the release
5.
button on the bottom of the handle and pull the
wand straight out of the handle.
Dusting brush Crevice tool
For especially hard to reach areas, use the crevice
tool.
11
Page 13
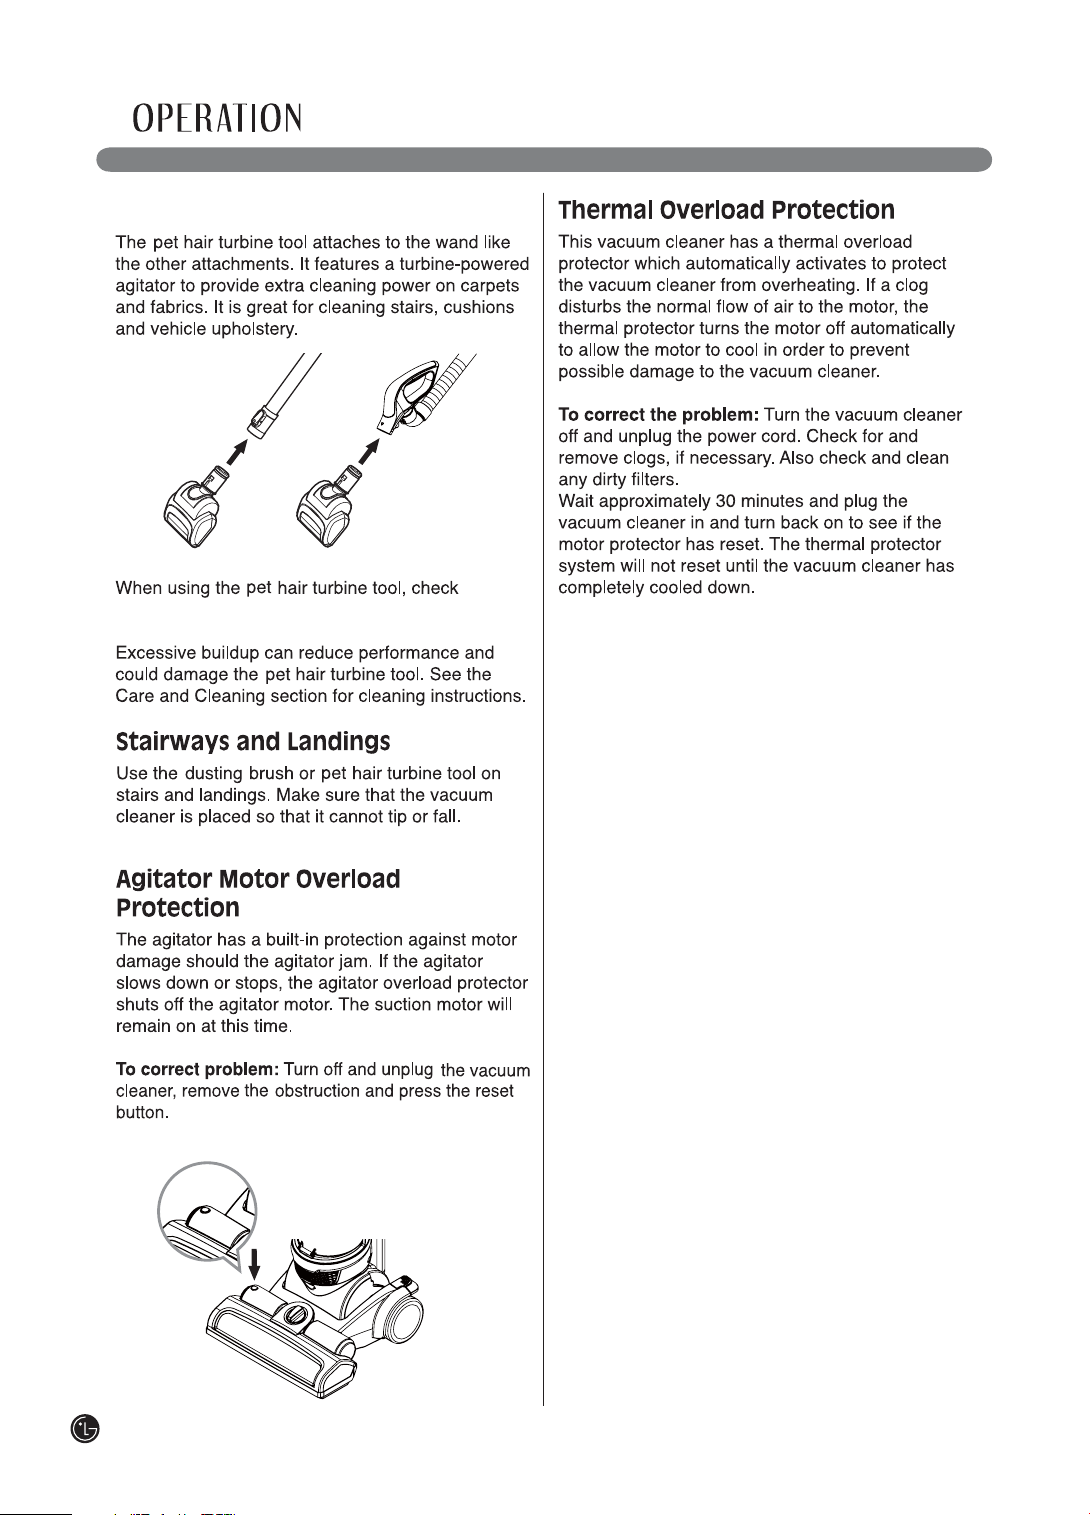
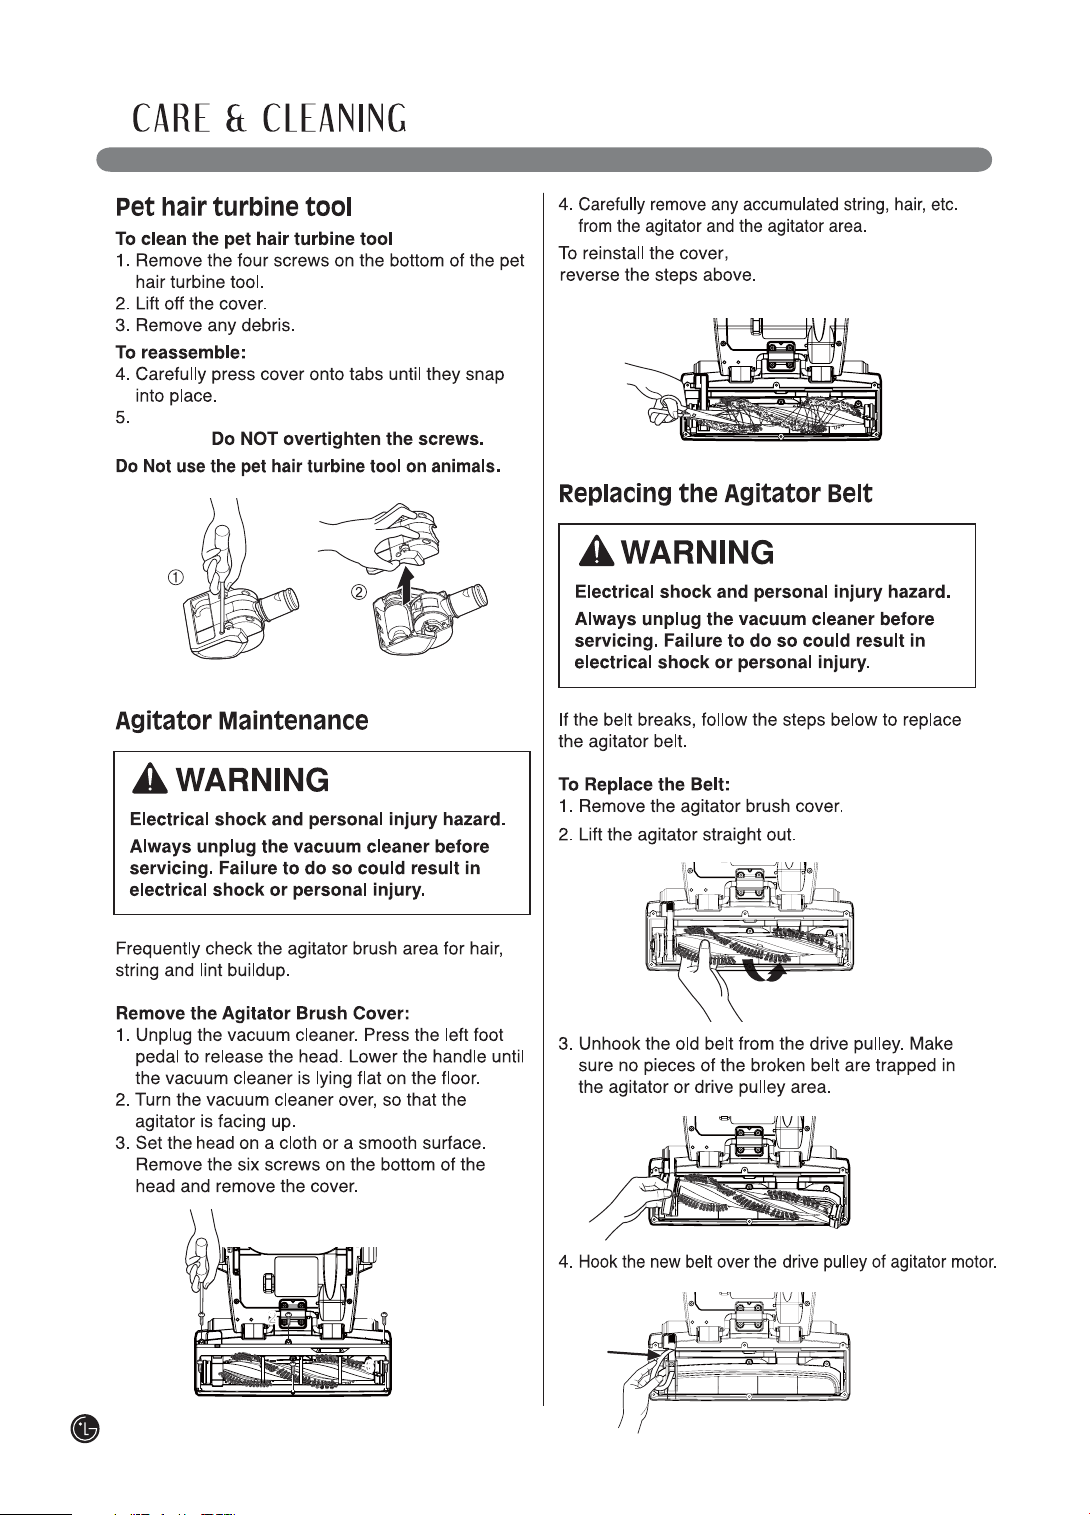
Using the Pet Hair Turbine Tool
the brush area frequently for buildup of hair,
fibers, lint and other debris.
12
Page 14
Store the dusting brush/crevice tool
in its proper place on the left of the vacuum cleaner.
Filter frame and foam pre filter:
the foam pre filter.
1. Filter frame
2. Foam pre filter
4. Dust separator
8. Bottom plate
3. Dust tank lid
5. Side door
6. Emptying
dirt release
7. Dust tank
13
Page 15
Always unplug the power cord from the
electrical outlet before servicing or performing
maintenance on the vacuum cleaner.
Failure to do so could result in electrical
shock or personal injury.
TO REMOVE THE DUST TANK,
clean the dust tank regularly.
14
Page 16
To clean the foam pre filter:
Exhaust filter
cover
Draw out the filter from front cover.
15
Page 17
Insert and tighten the screws that were removed
in step 1.
16
2211
4
4
33
66
Page 18
MAS37628302
17
Page 19
18
Page 20

Belt is broken
Unplug the vacuum cleaner and check the agitator
for obstructions and reset the unit. [See Pages 12&16]
15
14
18
17
17
16
12
9
9
16
12
Cleaner is not in upright position
setting
16
16
18
17
Keep the cleaner in upright position
10
9
19
Page 21

20
Page 22

LuV250C
P/No:MFL66993601
Page 23

Sujeción de la tubo
Operación para desacoplar el tubo
Liberación del tubo
Ajuste según la altura de la alfombra
Uso del tubo
2
Page 24

www.lg.com.
www.lg.com.
3
Page 25

Este es el símbolo de alerta de seguridad. Este símbolo le alertará de peligros potenciales que podrían
causar daños a la propiedad y/o lesiones personales graves o la muerte.
Indica una situación peligrosa que, si no se evita, podría ocasionar la muerte o
lesiones graves.
Indica una situación peligrosa que, si no se evita, podría ocasionar lesiones leves
o moderadas.
No manipule el enchufe o la aspiradora con las manos mojadas.
Al hacer eso, podría ocasionar la muerte o una descarga eléctrica.
No desconecte la aspiradora jalando el cable eléctrico.
Al hacer eso, podría dañar al producto u ocasionar una descarga
eléctrica. Para desconectar, agarre el enchufe, no el cable eléctrico.
No jale ni cargue la aspiradora por el cable eléctrico, no use el
cable como asa, no cierre una puerta sobre el cable y no jale el
cable alrededor de bordes o esquinas afiladas.
No pase la aspiradora por encima del cable eléctrico. Mantenga
el cable eléctrico lejos de las superficies calientes.
El incumplimiento de esta indicación podría ocasionar una descarga
eléctrica, lesiones personales, un incendio o daños al producto.
La aspiradora no es un juguete y no debería ser manejada por
niños.
Preste mucha atención cuando maneja la aspiradora cerca de
niños.
Podría ocasionar lesiones personales o daños al producto.
No cambie el enchufe de ninguna forma.
El incumplimiento de esta indicación podría ocasionar una descarga
eléctrica, lesiones personales, daños al producto o la muerte. Si el
enchufe no encaja, comuníquese con un electricista calificado para
instalar el tomacorriente apropiado.
4
Page 26

No introduzca objetos adentro de las aberturas.
El incumplimiento de esta indicación podría ocasionar daños al
producto.
No use la aspiradora si tiene obstruida cualquiera de sus
aberturas. Mantenga la aspiradora libre de polvo, pelusa, cabellos
y cualquier cosa que pueda reducir el flujo de aire.
El incumplimiento de esta indicación podría ocasionar daños al
producto.
No use la aspiradora sin el tanque y/o los filtros correctamente
colocados.
El incumplimiento de esta indicación podría ocasionar daños al
producto.
Siempre limpie el tanque para polvo y los filtros después de haber
pasado la aspiradora sobre productos de limpieza o refrescantes
para alfombras, polvos y partículas finas.
Estos productos pueden obstruir los filtros, reducir el flujo de aire y/o
pueden causar daños a la aspiradora.
Si no se limpian el tanque para polvo y los filtros, podría ocasionar
daños permanentes a la aspiradora.
No use la aspiradora para aspirar objetos duros o filosos, tales
como juguetes pequeños, alfileres, sujetapapeles, etc.
Podrían dañar la aspiradora o el tanque para polvo.
Guarde la aspiradora dentro de la casa.
Guarde la aspiradora después de cada uso para evitar tropezarse con
ella.
La aspiradora no debería ser manejada por niños pequeños.
El incumplimiento de esta indicación podría ocasionar lesiones
personales o daños al producto.
Solamente use piezas producidas o recomendadas por técnicos
de servico calificados.
El incumplimiento de esta indicación podría provocar daños al
producto.
Siga todas las instrucciones que figuran en el manual del usuario.
Use solamente las piezas o accesorios recomendados o aprobados por LG.
El incumplimiento de esta indicación podría ocasionar lesiones
personales o daños al producto.
Nunca coloque la aspiradora en la parte de arriba de las escaleras.
No seque los filtros cerca de una llama abierta.
La aspiradora ha sido fabricada solamente para uso en el hogar.
Usted es el responsable del montaje correcto y el uso adecuado
de su aspiradora.
5
Page 27

Manija
ADQ73233201
MDQ62637901
MDJ63006101
MAS37628302
Cepillo para polvo
y boquilla plana
Boquilla turbo para
pelo de mascota
Botón de desenganche
del tubo
Desenganche del
tanque para polvo
Asa de transporte
Seguro de la tapa del
tanque para polvo
Separador de polvo
Tanque para polvo
Filtro de aire
expulsado
Botón de
reinicio
Ventana
Ajuste de
la altura
Manguera
Ganchos de
enrollado rápido
del cordón
Cepillo para
polvo y boquilla
plana
Tubo
Cable eléctrico
Desenganche
del cuerpo
Cepillo rotativo
Puerta lateral
6
Page 28

Boquilla turbo para pelo de mascota
4.
5.
1.Cuerpo de la aspiradora
Tubo
ajustable
Manguera
Boquilla turbo
para pelo de
mascota
Filtro de espuma adicional
Sujeción de la tubo
Inserte el tubo dentro del mango.
Manija
2.
Boquilla turbo
para pelo de
mascota
2. Inserte el tubo dentro del cuerpo principal de la
aspiradora.
7
Page 29

Sujete el lado superior de la manguera
al mango. El lado superior de la
manguera puede reconocerse por sus 2
presillas para desacoplar.
Inserte la parte inferior de la manguera
en el cuerpo principal. La parte inferior
de la manguera puede reconocerse por
su presilla para desacoplar.
Su aspiradora cuenta con almacenamiento
incorporado para el cepillo para polvo y la boquilla
plana.
dentro del cuerpo principal.
Alinee la manguera con el soporte sobre
el costado de la aspiradora.
8
Enrolle el cable alrededor del gancho y
enganchélo en su lugar. Trabe el enchufe
en el cable.
Page 30

No coloque la aspiradora en las escaleras, siempre mantenga el aparato sobre el piso.
Operación para desacoplar el tubo
Oprima el botón de desenganche en el tubo y retire
el mango del tubo.
No coloque ningún objeto en el espacio entre
el cuerpo y la cabeza del cepillo rotativo.
1
2
1. Encendido/Apagado:
Para encender y apagar la aspiradora.
2. Alfombra / Piso:
Oprima este botón para encender o apagar el
cepillo rotativo.
Nota:
El cepillo rotativo no dará vueltas cuando
la aspiradora esté en posición vertical.
Para poner en marcha la aspiradora, oprima el
pedal del lado izquierdo de la aspiradora y jale el
mango hacia abajo.
Ajustar la aspiradora según la altura
de la alfombra
Ajustar la altura de la cabeza de la aspiradora.
Cuando sea necesario elevar y bajar la parte delantera
de la aspiradora para diferentes alturas de alfombra,
gire la perilla de control. Cada vez que le de una
vuelta, se subirá el cepillo rotativo de un nivel.
9
Page 31

Puede ser que necesite elevar la cabeza de la
aspiradora para facilitar la limpieza de tapetes y
alfombras con pelos más largos.
BAJO-para las alfombras estándares.
NOTA:Si es difícil empujar la aspiradora, gire la
perilla de control al siguiente ajuste más alto.
Cepillo para polvo
Use el cepillo para el polvo para limpiar los muebles,
las paredes, etc.
10
Boquilla plana
La boquilla plana puede utilizarse para esquinas
estrechas,el espacio entre cojines y otros lugares
de difícil acceso.
Page 32

Uso del tubo
4. Presione el botón para soltar la varilla y tire del
asa hacia arriba.
5.
Uso del cepillo para el polvo:
Oprima el botón de desenganche del cepillo en la
boquilla plana y deslice el cepillo hacia delante.
Cepillo para polvo Boquilla plana
Use la boquilla plana para las áreas muy difíciles
de alcanzar.
11
Page 33

Al usar la boquilla turbo para pelo de mascota,
verifique con frecuencia que no se acumule pelo,
fibras, pelusa y otros escombros en el área del
cepillo.
12
Page 34

Armazón de filtro y prefiltro de espuma:
1. Porta filtro
2. Prefiltro de
espuma
4. Separador
de polvo
8. Placa inferior
3. Tapa del
tanque
para polvo
5. Puerta
lateral
6. Desenganche
para vaciar la
suciedad
7. Tanque
para polvo
13
Page 35

Peligro de descarga eléctrica y lesiones
personales. Siempre desconecte el cable
eléctrico del tomacorriente antes de dar
mantenimiento o hacer reparaciones. El
incumplimiento de esta indicación podría
provocar descarga eléctrica o lesiones
personales.
Para un rendimiento óptimo, limpie el tanque
para polvo con regularidad.
14
Page 36

Para un rendimiento óptimo, inspeccione los
filtros cada mes y límpielos si fuera necesario.
No cierre la tapa del tanque para polvo sin el
prefiltro de espuma.
Si note una pérdida de succión y la limpieza del filtro de
espuma no ayuda, puede ser que tenga que reemplazar
el prefiltro de espuma. Se pueden comprar prefiltros de
espuma adicionales con llamar a LG.
Retire el filtro de la tapa delantera.
Separe el prefiltro de espuma del armazón de filtro.
Lave bien el filtro al chorro de agua.
15
Page 37

Inserte y apriete los tornillos que se retiraron
durante el paso 1.
Tenga cuidado a NO apretar DEMASIADO el
tornillo.
Retire la tapa de escobillas del agitador.
16
2211
4
4
33
66
Page 38

MAS37628302
13
2
17
Page 39

3
4
Déle vuelta a la aspiradora e inspeccione la
entrada del cepillo rotativo.
18
Page 40

Todo servicio o reparación necesaria, que sea distinto a los problemas descritos en este manual del usuario,
deberá ser realizado a través del centro de servicio LGE de su localidad.
Protección de sobrecarga del motor del
cepillo rotativo
Desconecte la aspiradora y verifique que no haya obstrucciones
en el cepillo rotativo; luego reinicie el aparato. [Ver páginas 12 y 16]
14-15
17-18
16-17
12
9
9
12-16
16-17
La aspiradora no está en posición
vertical.
Ajuste según la altura de la alfombra.
9-10
16
16
17-18
Mantenga la aspiradora en posición vertical.
La aspiradora está diseñada así para impedir al tanque
de separarse del cuerpo principal durante el transporte.
19
Page 41

20
Page 42

LuV250C
MFL66993601
Page 43

3
4
13
13
14
14
15
15
16
16
16
6
7
7
Raccordement du tube
7
8
8
8
Fonctionnement du dégagement du tube
9
Fonctionnement du tube rallonge
9
9
9
Réglage selon la hauteur des poils du tapis
9
10
10
Utilisation du tube
11
11
11
12
17
18
19
12
12
12
Page 44

www.lg.com.
http://www.lg.com.
Page 45

Voici le symbole d'avertissement de danger. Ce symbole vous alerte sur les risques potentiels
pouvant entraîner des dommages matériels et/ou des blessures graves ou la mort.
Indique une situation présentant un danger qui, à moins qu'elle ne
soit évitée, pourrait entraîner la mort ou des blessures graves.
Indique une situation présentant un danger qui, à moins qu'elle ne soit
évitée, pourrait entraîner des blessures mineures ou modérées.
Ne manipulez pas la fiche ou l'aspirateur lorsque vous avez les
mains humides.
Cela pourrait causer la mort ou un choc électrique.
Ne débranchez pas l'aspirateur en tirant sur le cordon.
Cela pourrait endommager l'appareil ou causer un choc électrique.
Pour débrancher l'aspirateur, saisissez la fiche, pas le cordon.
N'utilisez pas le cordon pour tirer ou transporter l'aspirateur,
n'utilisez pas le cordon en guise de poignée, ne fermez pas
une porte sur le cordon et ne tirez pas le cordon près d'un
bord ou d'un coin tranchant.
Ne passez pas l'aspirateur par-dessus le cordon. Tenez le
cordon à l'écart des surfaces chauffées.
Le non-respect de cette consigne pourrait causer un choc électrique,
des blessures, un incendie ou endommager l'appareil.
L'aspirateur n'est pas un jouet et ne devrait pas être utilisé
par des enfants.
Une surveillance étroite est requise lorsque vous utilisez
l'aspirateur en présence d'enfants.
Le non-respect de cette consigne pourrait causer des blessures ou
endommager l’appareil.
Ne changez absolument pas la fiche.
Le non-respect de cette consigne pourrait causer un choc électrique,
des blessures, endommager l’appareil ou entraîner la mort. Si la fiche
ne s'enfonce pas, demandez à un électricien qualifié d'installer une
prise adéquate.
Page 46

N'insérez aucun objet dans les ouvertures de l'aspirateur.
Le non-respect de cette consigne pourrait endommager l'appareil.
N'utilisez pas l'aspirateur si une des ouvertures est bloquée.
Enlevez la poussière, la charpie, les cheveux et toute autre
matière pouvant réduire le débit d'air.
Le non-respect de cette consigne pourrait endommager l'appareil.
N'utilisez pas l'aspirateur si le réservoir et/ou les filtres ne sont
pas bien installés.
Le non-respect de cette consigne pourrait endommager l'appareil.
Nettoyez toujours le réservoir à poussière et les filtres après
avoir aspiré du nettoyant ou du désodorisant pour tapis, de la
poudre ou de la poussière fine.
Ces produits peuvent boucher les filtres, réduire le débit d'air et/ou
endommager l'aspirateur.
Si vous ne nettoyez pas le réservoir à poussière et les filtres, vous
pourriez endommager l'aspirateur de façon permanente.
N'utilisez pas l'aspirateur pour aspirer des objets durs ou
tranchants, tels que des petits jouets, des épingles, des
trombones, etc.
Ces objets peuvent endommager l'aspirateur ou le réservoir à
poussière.
Rangez l’aspirateur à l’intérieur.
Rangez l’aspirateur lorsque vous en avez fini pour éviter de
trébucher sur l'appareil.
L'aspirateur ne devrait pas être utilisé par de jeunes enfants.
Le non-respect de cette consigne pourrait causer des blessures ou
endommager l’appareil.
Utilisez seulement des pièces fabriquées ou recommandées
par des réparateurs qualifiés.
Le non-respect de cette consigne pourrait endommager l’appareil.
Suivez toutes les consignes du manuel de l'utilisateur.
Utilisez seulement des accessoires approuvés ou recommandés par LG.
Le non-respect de cette consigne pourrait causer des blessures
ou endommager l’appareil.
Ne placez jamais l'aspirateur en haut des escaliers.
Ne faites pas sécher les filtres près d'une flamme nue.
L'aspirateur est destiné à un usage domestique seulement.
Il vous incombe de bien assembler l'aspirateur et de l'utiliser
de façon adéquate.
Page 47

Poignée
ADQ73233201
MDQ62637901
MDJ63006101
MAS37628302
Brosse à épousseter
et suceur plat
Bouton de dégagement
du tube
Dégagement du
réservoir à poussière
Poignée de transport
Loquet du couvercle du
réservoir à poussière
Séparateur de
poussière
Réservoir à poussière
Filtre d’évacuation
Bouton de
réinitialisation
Fenêtre
Réglage de
la hauteur
Tuyau
Porte-cordon à
dégagement
rapide
Brosse à
épousseter
et suceur plat
Tube
Cordon
Dégagement
du boîtier
Brosse à battage
Porte latérale
Page 48

4.Tube
réglable
5.Tuyau
Brosse à épousseter et suceur plat
4
5
1.Boîtier de l’aspirateur
2.Brosse à épousseter
et suceur plat
6.Accessoire à
turbine à air
pour poils
d’animaux
7.Filtre en mousse
supplémentaire
Raccordement du tube
Insérez le tube dans la poignée.
2. Insérez le tube dans le boîtier principal
de l'aspirateur.
3. Poignée
Page 49

Pour installer le tuyau
Fixez l'extrémité supérieure du tuyau à la
1.
poignée. L'extrémité supérieure du tuyau se
distingue par ses deux pinces de dégagement.
Insérez l'extrémité inférieure du tuyau dans le
2.
boîtier principal. L'extrémité inférieure du tuyau
se distingue par son unique pince de dégagement.
MISE EN GARDE
Risques de blessures et de dommages à l’appareil!
N'utilisez PAS les prises situées au-dessus des
comptoirs. Cela pourrait endommager les articles
se trouvant à proximité.
Rangement des accessoires
Votre aspirateur comporte un logement pratique
intégré pour ranger la brosse à épousseter et le
suceur plat.
Insérez la brosse à épousseter et le suceur plat
dans le boîtier principal.
Alignez le tuyau avec le support sur le côté de
3.
l'aspirateur.
Rangement du cordon
Pour ranger le cordon :
1. Vérifiez si le porte-cordon est tourné vers le haut.
2.
Enroulez le cordon autour du porte-cordon et
accrochez-le en place. Fixez la fiche au cordon.
NNOTA: Pour réduire les risques de chocs
électriques, l'aspirateur est doté d'une fiche
polarisée; une broche est plus large que l'autre.
Cette fiche s'insère dans une prise de courant
polarisée, dans un seul sens.
Pour dégager le cordon :
1. Faites pivoter le porte-cordon supérieur vers le
2. Sortez la fiche du cordon et dégagez le cordon.
BAS.
Page 50

MISE EN GARDE
Risque de blessures
Ne déposez pas l’aspirateur sur une marche, laissez-le toujours sur le plancher.
Fonctionnement du dégagement du tube
Appuyez sur le bouton de dégagement sur le tube et
retirez la poignée du tube.
MISE EN GARDE
Fonctionnement des commandes
1
Ne mettez rien dans l'espace entre le boîtier
de l'aspirateur et la tête de la brosse de battage.
2
1. Mise en marche/arrêt :
Pour mettre l’aspirateur en marche et l’éteindre.
2. Tapis/plancher :
Appuyez sur ce bouton pour activer ou désactiver
la brosse de battage.
NOTA :
La brosse de battage ne tournera pas
lorsque l'aspirateur est en position
verticale.
Fonctionnement du dégagement
du boîtier
Pour commencer l’aspiration, appuyez sur la pédale du
côté gauche de l'aspirateur et tirez la poignée vers le
bas.
NOTA:
Réglage de l'aspirateur selon la hauteur
des poils du tapis
Réglage de la hauteur de la tête de
l'aspirateur.
Lorsqu'il faut élever ou abaisser le devant de l'aspirateur
pour l'adapter aux diverses hauteurs des poils du tapis,
tournez le bouton de commande rotatif. Chaque tour
élèvera la brosse de battage d'un cran.
Page 51

Réglages suggérés selon la hauteur des poils
du tapis :
Vous devrez peut-être élever la tête de l'aspirateur
pour faciliter le nettoyage des petits tapis et des
tapis à poils plus longs.
Accessoires
Accessoire à turbine à air pour poils d’animaux
Cet accessoire à turbine à air convient très bien
pour nettoyer les escaliers et l'intérieur des
véhicules, ainsi que pour enlever les poils
d'animaux, la charpie, etc. sur certains tissus et
tapis.
Pour une meilleure qualité de nettoyage, respectez
les réglages suivants en fonction de la hauteur de
vos tapis ou moquettes :
BAS–pour les tapis standard
Réglages supérieurs– pour moquettes très
épaisses afin de moins forcer pour pousser
l'aspirateur tout en gardant une bonne qualité de
nettoyage.
NOTA: S'il est difficile de pousser l'aspirateur, tournez
le bouton de commande rotatif à la hauteur plus élevée
qui suit.
Attention:
Vous devez faire particulièrement
attention lorsque vous passez l'aspirateur sur certains
types de tapis ou de revêtement de sol.
Lisez toujours les directives d'entretien du fabricant
du tapis ou du revêtement de sol avant de passer
l'aspirateur.
Tableau d’utilisation des accessoires
Accessoire
Accessoire à
turbine à air pour
poils d’animaux
Entre les
coussins
Surfaces
rembourrées*
Mobilier et
surfaces
dures*
N'utilisez PAS cette brosse sur des animaux.
Brosse à épousseter
Utilisez la brosse à épousseter pour nettoyer les
meubles, les murs, etc.
Suceur plat
Vous pouvez utiliser le suceur plat pour nettoyer
dans les coins serrés, entre les coussins et dans
les endroits difficiles d'accès.
ZONE À NETTOYER
Rideaux*
(niveau de
puissance le
plus bas)
Escaliers
Coussins
Moquettes
/ Tapis
Murs
Brosse à
épousseter
Suceur plat
* Vérifiez toujours si les accessoires sont propres avant de les utiliser sur du tissu.
Page 52

Utilisation du tube
ATTENTION
N'utilisez jamais le tuyau pour tirer
Pour dégager le tube et la poignée :
1. Vérifiez si l'aspirateur est verrouillé en position
verticale et assurez-vous qu'il repose sur une
surface plane et stable.
2. Appuyez sur le bouton de dégagement du tube
situé sur le boîtier et inclinez la poignée du tube.
3. Soulevez le tube et sortez-le.
l'aspirateur.
Installation des accessoires
Utilisation du suceur plat :
Faites glisser le suceur plat sur l'extrémité du tube
ou insérez-le dans la poignée.
4. Appuyez sur le bouton de déclenchement sur le
tube rallonge et tirez sa poignée vers le haut.
5. Si vous voulez utiliser uniquement la poignée,
appuyez sur le bouton de dégagement situé au
bas de la poignée et retirez le tube de la poignée.
Utilisation de la brosse à épousseter :
Appuyez sur le bouton de dégagement de la brosse
sur le suceur plat et glissez la brosse vers l'avant.
Brosse à épousseter Suceur plat
Conseils et astuces
Coins et bords des tapis :
Pour passer l'aspirateur dans les coins serrés, sur
les bords des tapis et le long des plinthes, utilisez
la brosse à épousseter.
Utilisez le suceur plat dans les endroits particulièrement difficiles d'accès.
Page 53

Utilisation de l’accessoire à turbine
à air pour poils d’animaux
L’accessoire à turbine à air pour poils d'animaux se
fixe au tube de la même façon que les autres
accessoires. Il comporte une brosse à turbine à air
qui offre une puissance supplémentaire pour le
nettoyage des tapis et des tissus. Il convient très
bien pour nettoyer les escaliers, les coussins et les
garnitures à l'intérieur des véhicules.
Lorsque vous utilisez l'accessoire à turbine à air pour
poils d'animaux, vérifiez souvent si des cheveux, des
fibres, de la charpie ou d'autres débris se sont
accumulés autour de la brosse.
Une accumulation excessive peut diminuer
l'efficacité de l’accessoire à turbine à air pour poils
d’animaux et l'endommager.
Consultez la section Entretien et nettoyage pour
connaître les directives de nettoyage.
Protection contre la surcharge
thermique
L'aspirateur est muni d'une protection de surcharge
thermique qui s'active automatiquement afin de
protéger l'aspirateur contre une surchauffe. Si le débit
d’air normal vers le moteur est obstrué, la protection
thermique arrête le moteur automatiquement afin de le
laisser refroidir et d'éviter d'endommager l'aspirateur.
Pour corriger le problème :
débranchez le cordon d’alimentation. Vérifiez s'il y a
obstruction et enlevez-en la cause, s'il y a lieu. Vérifiez
également si les filtres sont bouchés et nettoyez-les.
Attendez environ 30 minutes, rebranchez l'aspirateur
et remettez-le en marche pour vérifier si la protection
du moteur s’est réinitialisée. Le système de protection
thermique ne se réinitialisera pas avant que
l'aspirateur ne se soit complètement refroidi.
Arrêtez l’aspirateur et
Marches et paliers d'escalier
Utilisez la brosse à épousseter ou l’accessoire à
turbine à air pour poils d'animaux dans les marches
et sur les paliers. Assurez-vous de placer l'aspirateur
de façon qu'il ne bascule pas ni ne tombe pas.
Protection contre les surcharges
du moteur de la brosse de battage
La brosse de battage comprend une protection
intégrée contre les surcharges du moteur au cas où
elle se bloquerait. Si la brosse de battage tourne
plus lentement ou s’arrête, la protection contre les
surcharges coupera l’alimentation du moteur de la
brosse de battage. Le moteur d’aspiration
continuera de fonctionner.
Pour corriger le problème :
débranchez-le, dégagez ce qui l’obstrue et appuyez
sur le bouton reset (réinitialiser).
Arrêtez l’aspirateur et
Page 54

Respectez toujours toutes les consignes de sécurité lorsque vous nettoyez, entretenez ou réparez
l'aspirateur.
Éléments du réservoir à poussière
Rangement de l'aspirateur
Rangez le suceur plat dans son logement respectif
à l'arrière de l'aspirateur.
MISE EN GARDE
Risques de chocs électriques et de blessures.
Faites attention lorsque vous enroulez le
cordon. N'enroulez pas le cordon trop serré
car cela exercerait une contrainte sur celui-ci
qui pourrait l'endommager. N'entrecroisez
pas le cordon en l'enroulant.
Un cordon endommagé peut causer un choc
électrique, des blessures ou des dommages
matériels.
Le réservoir à poussière comprend plusieurs éléments
clés. Après avoir vidé le réservoir à poussière,
assurez-vous toujours de replacer toutes les pièces de
façon adéquate.
N'utilisez JAMAIS l'aspirateur si tous les filtres
ne sont pas en place!
N'utilisez JAMAIS l'aspirateur si les filtres ou
des éléments sont humides!
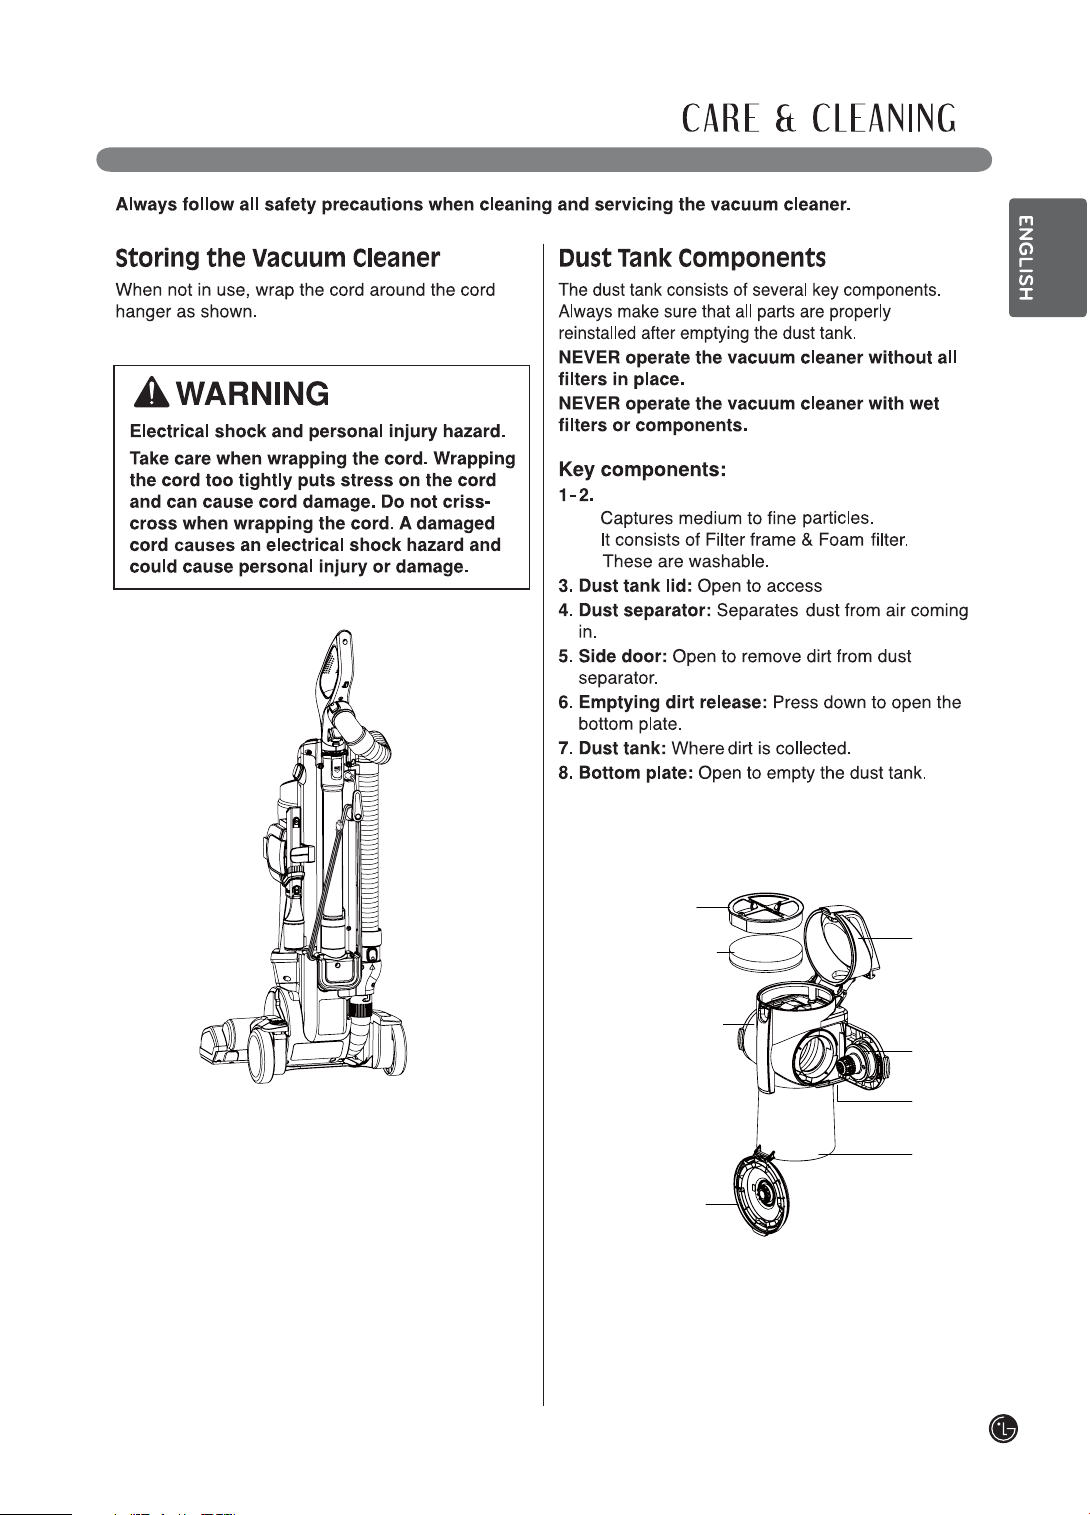
Éléments clés :
1~2. Cadre du filtre et préfiltre en mousse :
Retient les particules moyennes à fines. Il est fait
d'un cadre et d'un filtre en mousse. Ces pièces
sont lavables.
3. Couvercle du réservoir à poussière: S’ouvre
pour donner accès au préfiltre en mousse.
4. Séparateur de poussière: Isole la poussière de
l’air entrant.
5. Porte latérale: S’ouvre pour permettre d’enlever
la poussière du séparateur de poussière.
6. Dégagement pour vider la poussière: Appuyez
pour déclencher la plaque inférieure.
7. Réservoir à poussière: Contenant qui recueille
la poussière.
8.
Plaque inférieure: S'ouvre pour permettre de
vider le réservoir à poussière.
9.
Levier de prévention: Empêche toute utilisation
sans préfiltre de mousse.
1. Cadre du
filtre
2. Préfiltre
en mousse
4. Séparateur
de poussière
8. Plaque
inférieure
3. Couvercle du
réservoir à
poussière
5. Porte latérale
6. Dégagement pour
vider la poussière
7. Réservoir
à poussière
13
Page 55

Vidage du réservoir à poussière
MISE EN GARDE
Risques de chocs électriques et de blessures.
Débranchez toujours le cordon d'alimentation de
la prise de courant avant de procéder à un
entretien ou à une réparation. Le non-respect de
cette consigne pourrait causer un choc
électrique ou des blessures.
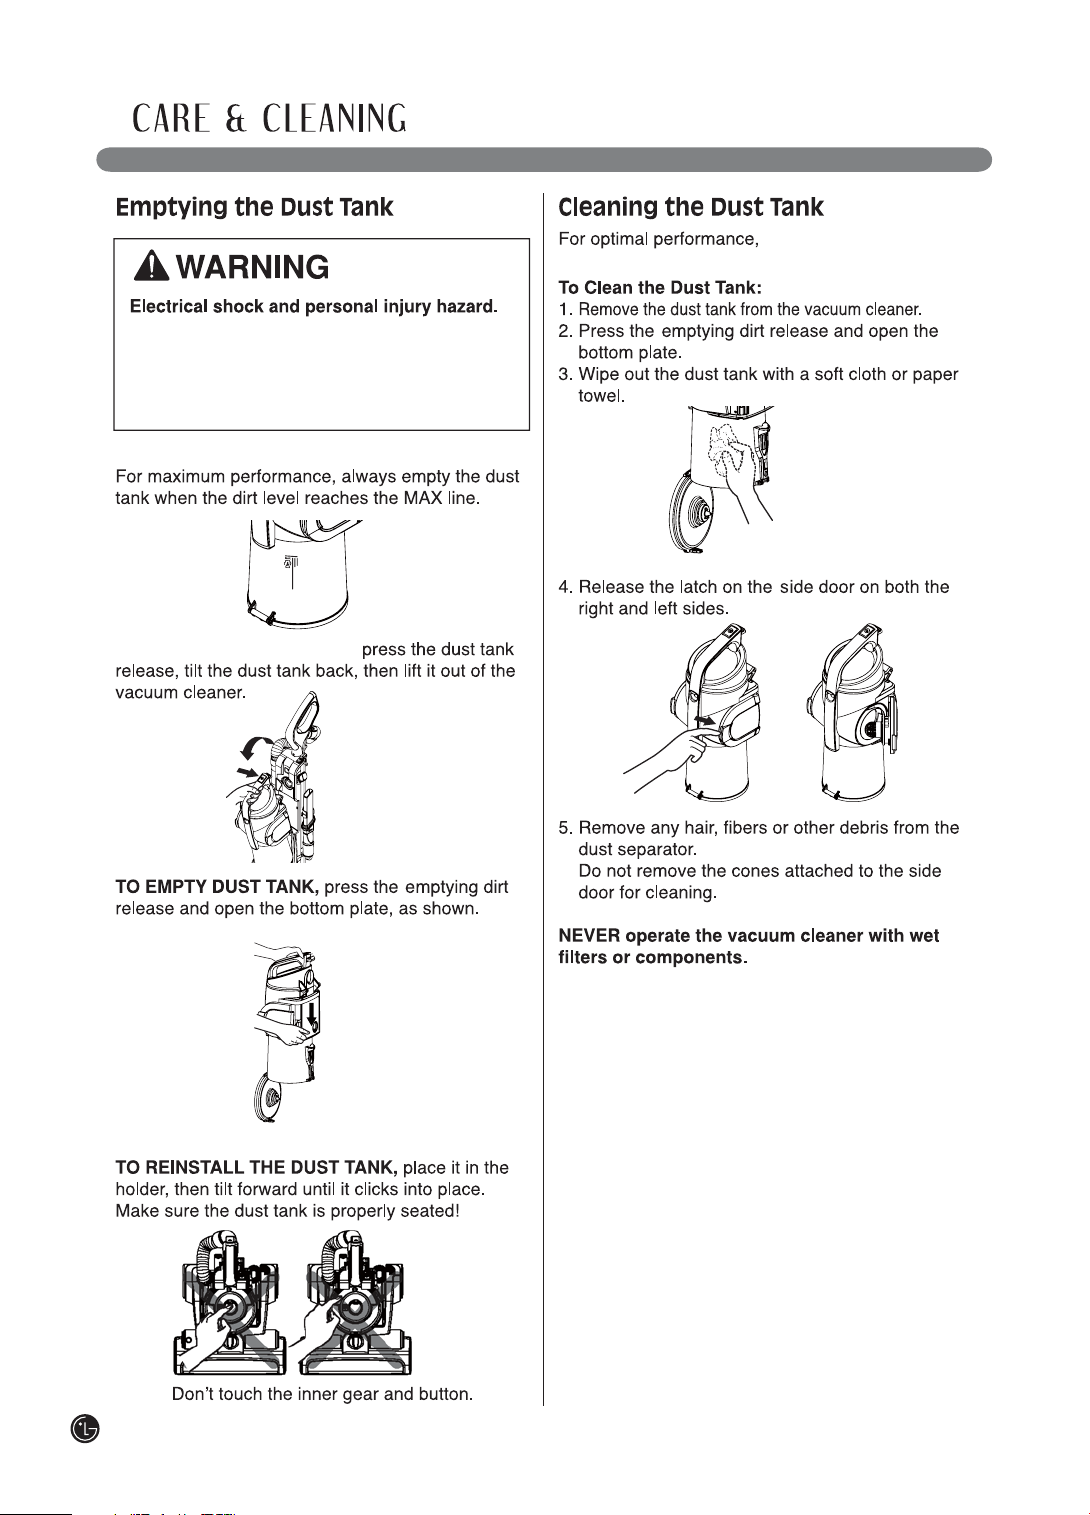
Pour obtenir le meilleur rendement, videz toujours
le réservoir à poussière lorsque le niveau de
poussière atteint la ligne « MAX ».
POUR ENLEVER LE RÉSERVOIR À POUSSIÈRE,
appuyez sur le bouton de dégagement du réservoir
à poussière, inclinez le réservoir à poussière vers
l'arrière, puis retirez-le de l'aspirateur.
POUR RÉINSTALLER LE RÉSERVOIR À
POUSSIÈRE, placez-le dans le support, puis
inclinez-le vers l'avant jusqu'à ce qu’il s’enclenche.
Assurez-vous de bien replacer le réservoir à
poussière!
Ne touchez pas à l’engrenage ni au bouton à l’intérieur.
Nettoyage du réservoir à poussière
Pour obtenir un rendement optimal, nettoyez régulièrement
le réservoir à poussière.
Pour nettoyer le réservoir à poussière :
1.
Retirez le réservoir à poussière de l'aspirateur.
2. Appuyez sur le bouton de dégagement de la
plaque inférieure, puis ouvrez la plaque
inférieure.
3. Essuyez le réservoir à poussière à l'aide d'un
chiffon doux ou d'un essuie-tout.
POUR VIDER LE RÉSERVOIR À POUSSIÈRE,
appuyez sur le bouton de dégagement de la plaque
inférieure, puis ouvrez la plaque inférieure, comme
illustré.
14
4. Dégagez le loquet de chaque côté de la porte
latérale.
5. Enlevez les cheveux, les fibres ou les autres
débris qui se trouvent dans le séparateur de
poussière.
N’enlevez pas les cônes fixés à la porte latérale
pour les nettoyer.
N'utilisez JAMAIS l'aspirateur si les filtres ou
des éléments sont humides!
Page 56

Nettoyage du préfiltre en mousse
ATTENTION
Un filtre humide peut endommager
l'aspirateur de façon permanente. Assurezvous que les filtres sont complètement secs
avant de les remettre en place.
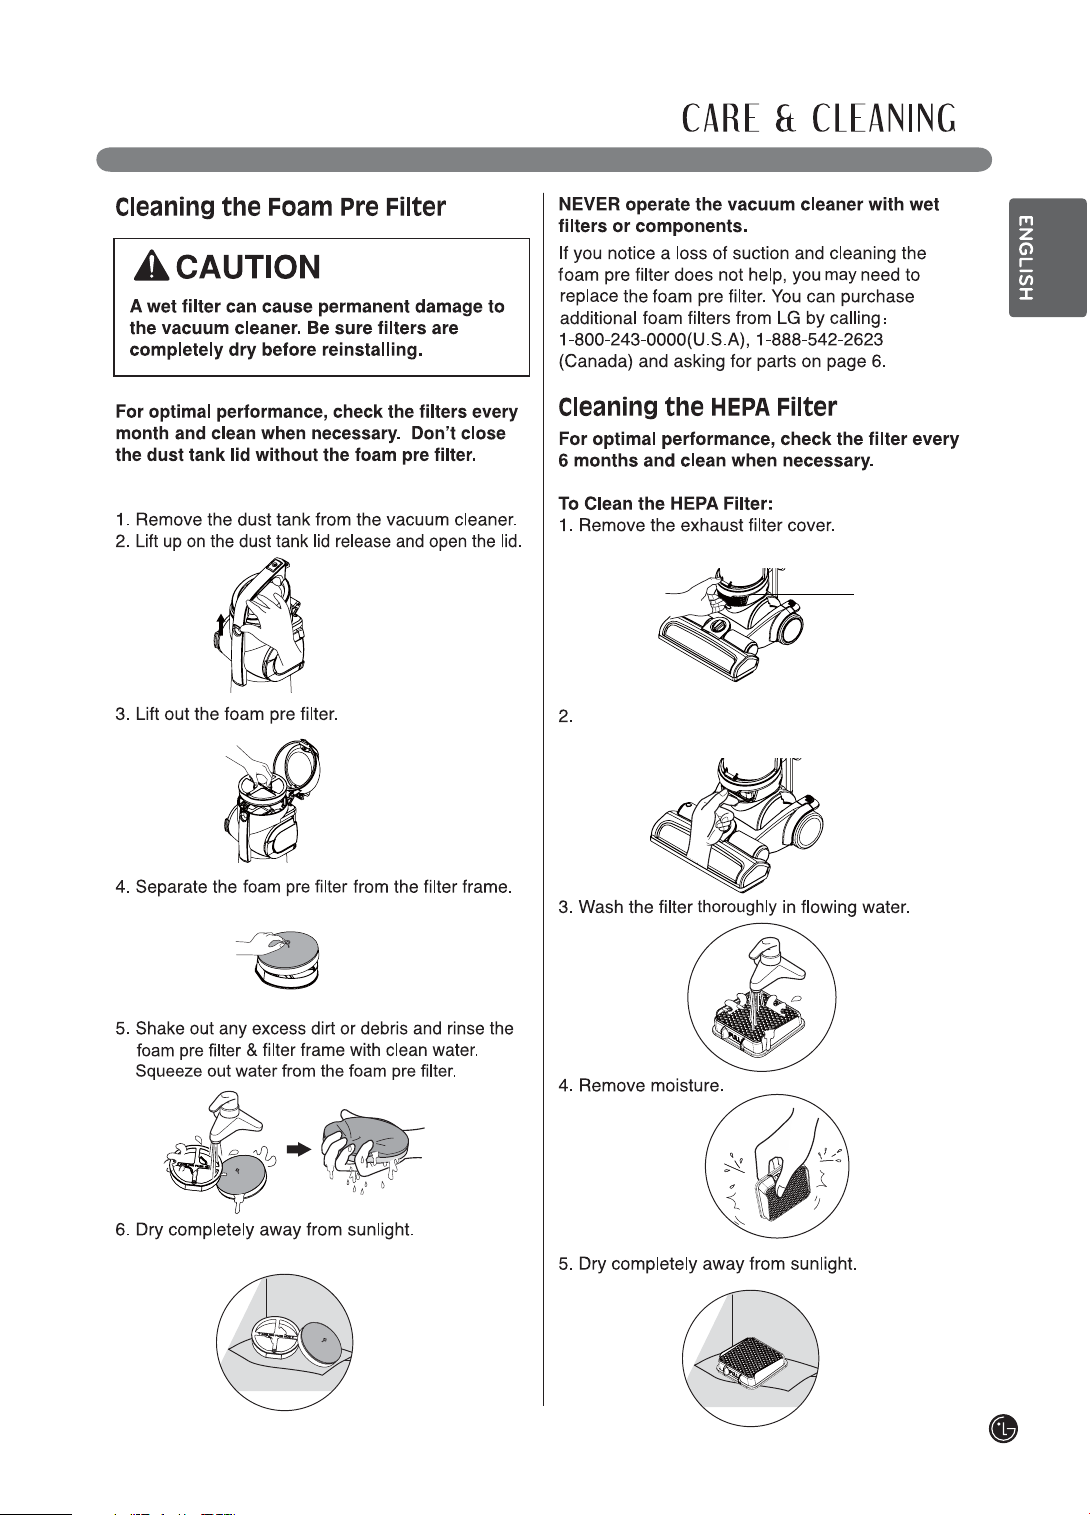
Pour obtenir un rendement optimal, inspectez les
filtres chaque mois et nettoyez-les au besoin. Ne
fermez pas le couvercle du réservoir à poussière
sans y avoir installé le préfiltre en mousse.
Pour nettoyer le préfiltre en mousse :
1. Retirez le réservoir à poussière de l'aspirateur.
2. Levez le loquet du couvercle du réservoir à
poussière et ouvrez le couvercle.
N'utilisez JAMAIS l'aspirateur si les filtres ou
des éléments sont humides!
Si vous remarquez une perte d'aspiration et que le
nettoyage du préfiltre n'améliore pas le rendement,
vous devez peut-être remplacer le préfiltre en
mousse. Vous pouvez vous procurer d'autres filtres
en mousse auprès de LG par téléphone. 1 800
243-000 (É.-U.) ou au 1 888 542-2623 (Canada) et
demandez les pièces présentées à la page 6.
Nettoyage du filtre HEPA
Pour obtenir un rendement optimal, inspectez le
filtre aux six mois et nettoyez-le au besoin.
Pour nettoyer le filtre HEPA :
1. Enlevez le couvercle du filtre d'évacuation.
Couvercle du filtre
d’évacuation
3. Enlevez le préfiltre en mousse.
Retirez le préfiltre en mousse du cadre du filtre.
4.
5.
Agitez le préfiltre pour enlever la poussière ou les
débris, puis rincez le préfiltre en mousse et le
cadre du filtre sous l'eau du robinet.
Pressez le préfiltre en mousse pour y faire sortir l'eau.
6. Sécher complètement à l’écart des rayons du
soleil.
2. Retirez le filtre du couvercle avant.
Lavez complètement le filtre sous l’eau du robinet.
3.
4. Enlevez l’excès d’eau.
5. Sécher complètement à l’écart des rayons du
soleil.
15
Page 57

Accessoire à turbine à air pour
poils d’animaux
Pour nettoyer l’accessoire à turbine à air pour
poils d’animaux
1. Enlevez les quatre vis situées au bas de
l’accessoire à turbine à air pour poils d’animaux.
2. Soulevez le couvercle.
3. Retirez les débris.
Pour le réassembler:
4. Enfoncez délicatement le couvercle sur les
languettes jusqu’à ce qu’elles s’enclenchent.
5. Replacez et serrez les vis enlevées à l'étape 1.
Prenez garde de NE PAS trop serrer les vis.
N’utilisez PAS l’accessoire à turbine à air pour
poils d'animaux sur des animaux.
4.
Retirez soigneusement les ficelles, les cheveux, etc.
qui se sont accumulés autour de la brosse de battage.
Réinstallation du couvercle
Répétez les étapes en sens inverse.
Remplacement de la courroie de la
brosse de battage
MISE EN GARDE
Risques de chocs électriques et de blessures.
Débranchez toujours l’aspirateur avant de le
nettoyer ou de le réparer. Le non-respect de
cette consigne peut causer un choc électrique
ou des blessures.
Entretien de la brosse de battage
MISE EN GARDE
Risques de chocs électriques et de blessures.
Débranchez toujours l’aspirateur avant de le
nettoyer ou de le réparer. Le non-respect de
cette consigne peut causer un choc
électrique ou des blessures.
Vérifiez souvent si des cheveux, des ficelles et de la
charpie se sont accumulés autour de la brosse de battage.
Pour retirer le couvercle de la brosse de battage :
1. Débranchez l'aspirateur. Appuyez sur la pédale
gauche pour dégager la tête. Abaissez la poignée
jusqu'à ce que l'aspirateur repose à plat sur le
plancher.
2. Retournez l'aspirateur pour que la brosse de
battage soit tournée vers le haut.
3. Placez la tête de l'aspirateur sur une serviette ou
une surface douce. Enlevez les six vis situées au
bas de la tête et enlevez le couvercle.
Si la courroie de la brosse de battage se brise,
suivez les étapes ci-dessous pour la remplacer.
Pour remplacer la courroie :
1. Retirez le couvercle brosse agitateur.
2.
Retirez la brosse de battage en la soulevant tout droit.
3. Décrochez l’ancienne courroie de la poulie
d’entraînement. Veillez à ce qu'aucun morceau
de la courroie brisée ne reste pris dans la brosse
de battage ou la poulie d'entraînement.
4.
Accrochez la nouvelle courroie sur la poulie
d’entraînement du moteur de la brosse de battage.
16
2211
4
4
33
66
Page 58

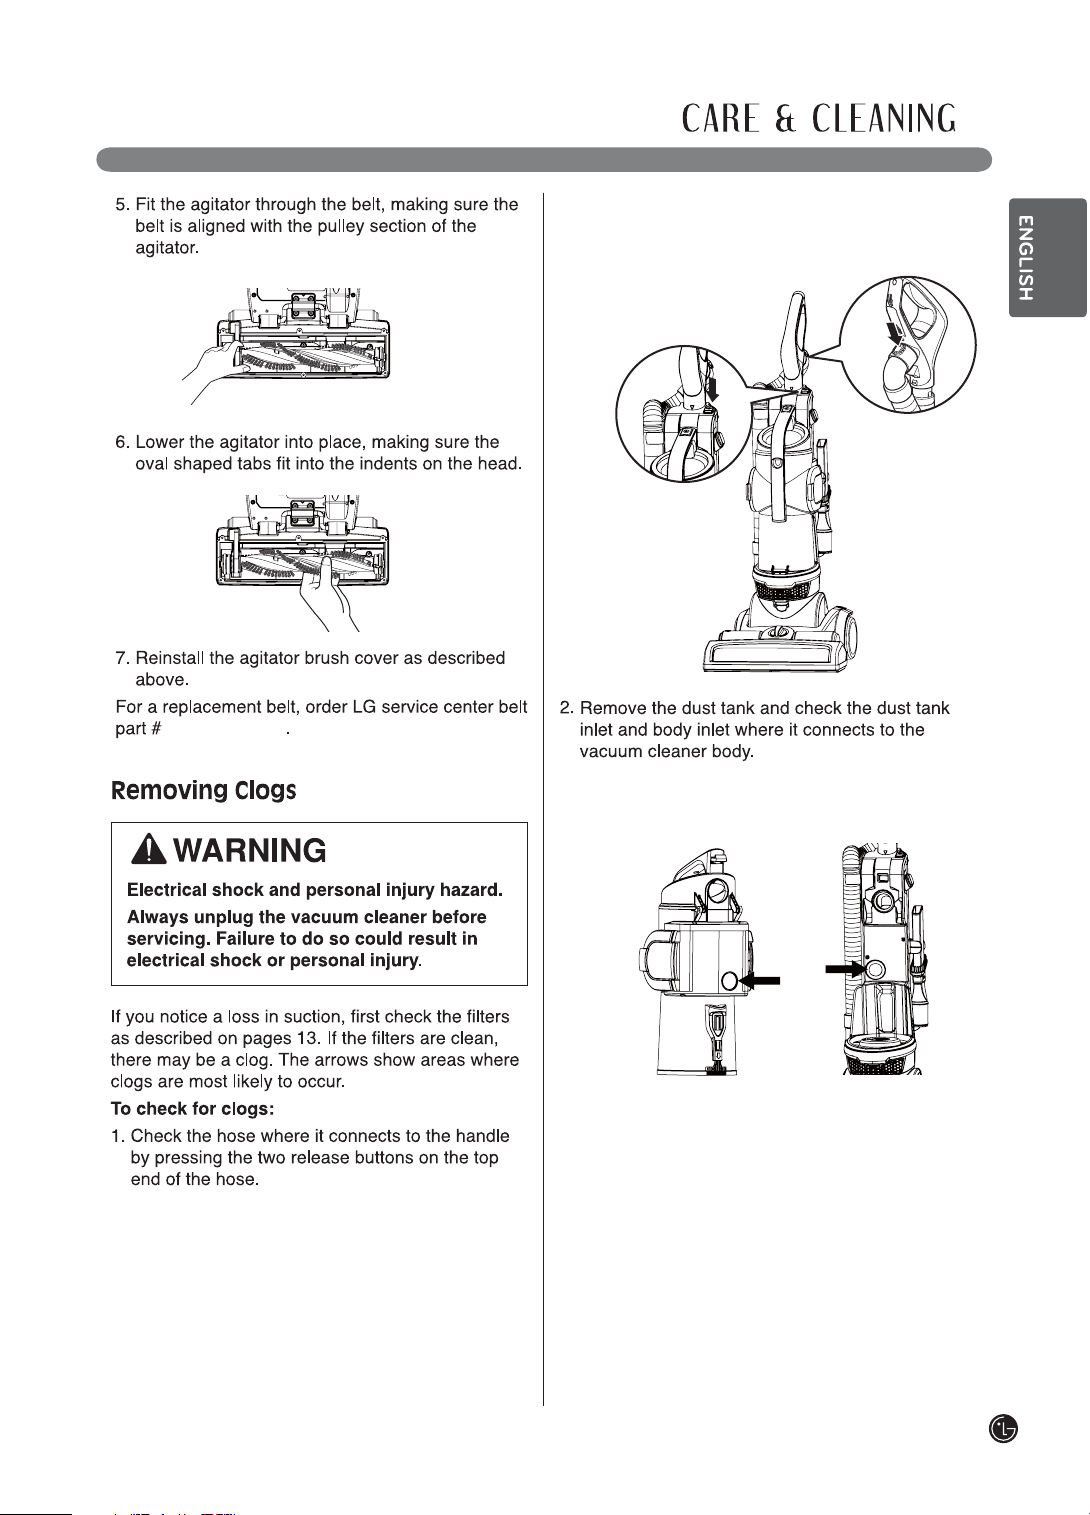
5. Passez la brosse de battage dans la courroie en
veillant à aligner la courroie avec la poulie de la
brosse de battage.
6. Replacez la brosse de battage en veillant à
insérer les languettes de forme ovale dans les
encoches de la tête.
7. Remettez le couvercle de la brosse de battage
de la manière décrite ci-dessus.
Pour obtenir une courroie de rechange,
commandez la pièce #MAS37628302 auprès du
centre de service LG.
Enlèvement de ce qui peut
obstruer l’aspiration
2. Retirez le réservoir à poussière et inspectez
l’entrée du réservoir à poussière à l'endroit où il
se raccorde au boîtier de l'aspirateur.
MISE EN GARDE
Risques de chocs électriques et de blessures
corporelles.
Débranchez toujours l’aspirateur avant de le
nettoyer ou de le réparer. Le non-respect de
cette consigne peut entraîner un choc
électrique ou des blessures.
Si vous remarquez une perte d’aspiration, inspectez
d’abord les filtres comme on l'explique aux pages
13. Si les filtres sont propres, c’est peut-être le
tuyau qui est obstrué. Les flèches indiquent les
endroits où il peut y avoir obstruction.
Pour vérifier s'il y a obstruction :
1. Inspectez le tuyau à l'endroit où il se raccorde à
la poignée en appuyant sur les deux boutons de
dégagement situés dans le haut du tuyau.
17
Page 59

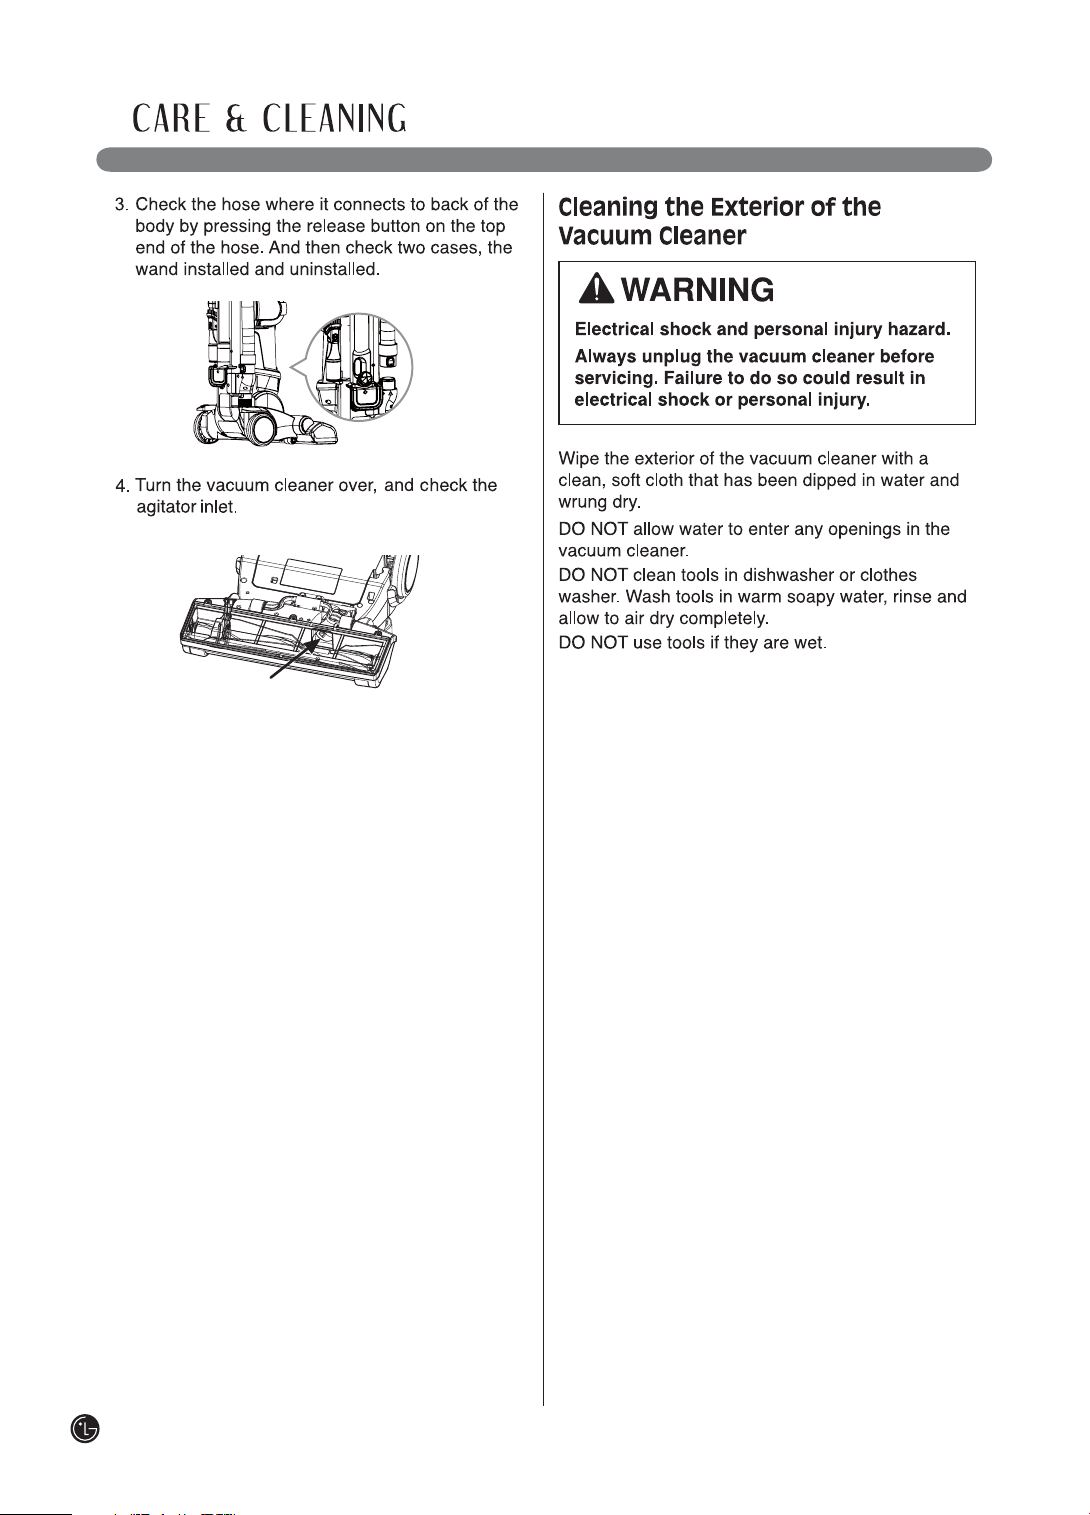
3. Inspectez le tuyau à l'endroit où il se raccorde à
l’arrière du boîtier en appuyant sur le bouton de
dégagement situé dans le haut du tuyau. Vérifiez
ensuite les deux casiers, le flexible installé et non
installé.
Nettoyage de l'extérieur de
l'aspirateur
MISE EN GARDE
Risques de chocs électriques et de
blessures.
Débranchez toujours l’aspirateur avant de le
nettoyer ou de le réparer. Le non-respect de
cette consigne peut causer un choc
électrique ou des blessures.
4. Retournez l'aspirateur et inspectez l’entrée de la
brosse de battage.
Essuyez l'extérieur de l'aspirateur à l'aide d'un
chiffon propre et doux que vous aurez trempé dans
l'eau, puis bien essoré.
NE laissez PAS d'eau pénétrer dans les ouvertures
de l'aspirateur.
NE mettez PAS les accessoires dans un lavevaisselle ou dans une laveuse. Lavez-les dans une
eau chaude et savonneuse, rincez-les, puis laissezles sécher complètement à l'air.
N'utilisez PAS les accessoires s'ils sont humides.
18
Page 60

Consultez le tableau pour trouver des solutions aux problèmes de rendement mineurs.
Toute autre réparation ou tout autre entretien que ceux décrits dans le présent manuel de l'utilisateur doivent
être effectués par le centre de service LG de votre localité.
MISE EN GARDE
Risques de chocs électriques et de blessures.
Débranchez toujours l’aspirateur avant de le nettoyer ou de le réparer. Le non-respect de cette
consigne peut causer un choc électrique ou des blessures.
PROBLÈME
L'aspirateur ne
fonctionne pas.
Faible aspiration de
la poussière.
La brosse de
battage ne
fonctionne pas.
De la poussière
s'échappe du
réservoir à
poussière.
L'aspirateur s’agrippe aux
tapis mobiles ou est
difficile à pousser.
L’accessoire à
turbine à air pour
poils d’animaux ne
fonctionne pas.
L’accessoire n'aspire
pas lorsqu'on l’utilise
avec la poignée.
Le sac poussière
semble lâche en le
soulevant avec la
poignée de transport.
CAUSE POSSIBLE SOLUTION POSSIBLE
Protection contre les surcharges du
moteur de la brosse de battage
Le réservoir à poussière est plein ou
bien installé.
installée.
L’aspirateur est en position verticale.
bien installé.
Le couvercle du réservoir à poussière
n’est pas fermé.
La plaque inférieure n’est pas
verrouillée.
poils du tapis.
turbine
Faible aspiration.
L’aspirateur n’est pas en position
verticale.
Ceci est normal.
Débranchez l'aspirateur et vérifiez si la brosse de battage
est obstruée et réinitialisez l'appareil. [Voir pages 12 et 16]
r.
V
[V
Vérifiez si tous les éléments du réservoir à poussière et les
filtres sont bien installés.
V
[V
V
V
V
V
Vérifiez si tous les éléments du réservoir à poussière et les
filtres sont bien installés.
Vérifiez si la plaque inférieure du réservoir à poussière est
fermée et verrouillée.
Réglez selon la hauteur des poils du tapis.
[V
d’animaux. [V
d’animaux. [V
V
Gardez l’aspirateur en position verticale.
L'aspirateur est conçu de cette façon afin d'éviter que le
réservoir se détache du boîtier principal pendant le transport.
19
Page 61

Page 62

Page 63

LG Customer Information Center
Register your product Online!
www.lg.com
 Loading...