

LG LSC26945TT, LSC26945SW Owner’s Manual

website:http://us.lge.com
1-800-243-0000
24 HOURSA DAY, 7 DAYSAWEEK FORLGCUSTOMERSERVICE
para el Servicio LG(Atenci6n al Cliente) 24 horasal dia, 7 dias a la semana
LSC 26945SW LSC 26945TT
REFRIGERATOR
User's Guide
Please read this guide thoroughly
before operating and keep it handy for
reference at all times.
le
Table of Contents
introduction
Installation
Operation
Entry
Important Safety Instruction
Identification of Parts
Where to install
Door Removal
Mount the freezer and refrigerator compartment doors
Water supply installation
Water Connection Instruction Guide
Operation Instruction Guide
Height Adjustment
Starting
Adjusting the Temperatures and functions
(Dispenser/Automatic Icemaker)
Shelf O
Wine Holder (Applicable to some models only) O
@
@
@
@
@
@
@
@
®
Suggestion on
Food Storage
Care and
Maintenance
Egg Bin (Applicable to some models only) O
Humidity Control in the Vegetable Compartment O
Optichill Temperature Transition Corner (Applicable to some models only)
Temperature Change at Optichill O
Optichill
Location of Foods @
Storing Foods O
How to Dismantle Parts
General Information
Cleaning
Troubleshooting
@
Recommended
Grounding
Method
Accessibility of
Supply Plug
Supply Cord
Replacement
Warning
Entry
The model and serial numbers are tbund on the inner case or back of refrigerator
cmnpartment of this unit. These numbers are unique to this unit and not
available to others. You should record requested information here and retain
this guide as a permanent record of your purchase. Staple your receipt here.
Date of purchase
Dealer
Dealer address
Dealer phone no.
Model no.
Serial no.
Important safety instruction
Before use, this refrigerator must be properly installedand located in accordance with
the installation instructions in this manual.
Never unplug your refrigeratorby pulling on the power cord. Always grip the plug firmly
and pull it straight out from the outlet.
When moving your applianceaway from the wall, be careful not to roll over the power
cord or to damage it in any way. Do net crush or damage the water line.
After your refrigerator is in operation, do not touch the cold surfaces in the freezer
compartment, particularlywhen your handsare damp or wet. Skin could adhere to
these extremely cold surfaces.
Unplugthe power cord from the power outlet for cleaningorother requirements. Never
touch it with wet handsbecauseyou can get an electric shock or be injured.
Never damage,bend, kink, pull out, or twist the power cordbecause damage to the
power cord can causeproduct failure, fire, or electric shock. If you havedoubts the
applianceis properlygrounded, consult a qualified electrician.
Never placeglass products inthe freezer becausethey may be broken from expansion
when their contents are frozen.
Never put your handswithin the ice storage bin of the automatic icemaker.You can be
injured bythe operation of the automatic icemaker.
The appliance is net intended for use by young childrenwithout supervision.
Young childrenshould be supervised to ensure that they do net playwith the appliance.
Never allow anyone to climb, sit, stand, or hangon the door.These actions may
damage the refrigeratorand even tip it over, causing severe personal injury.
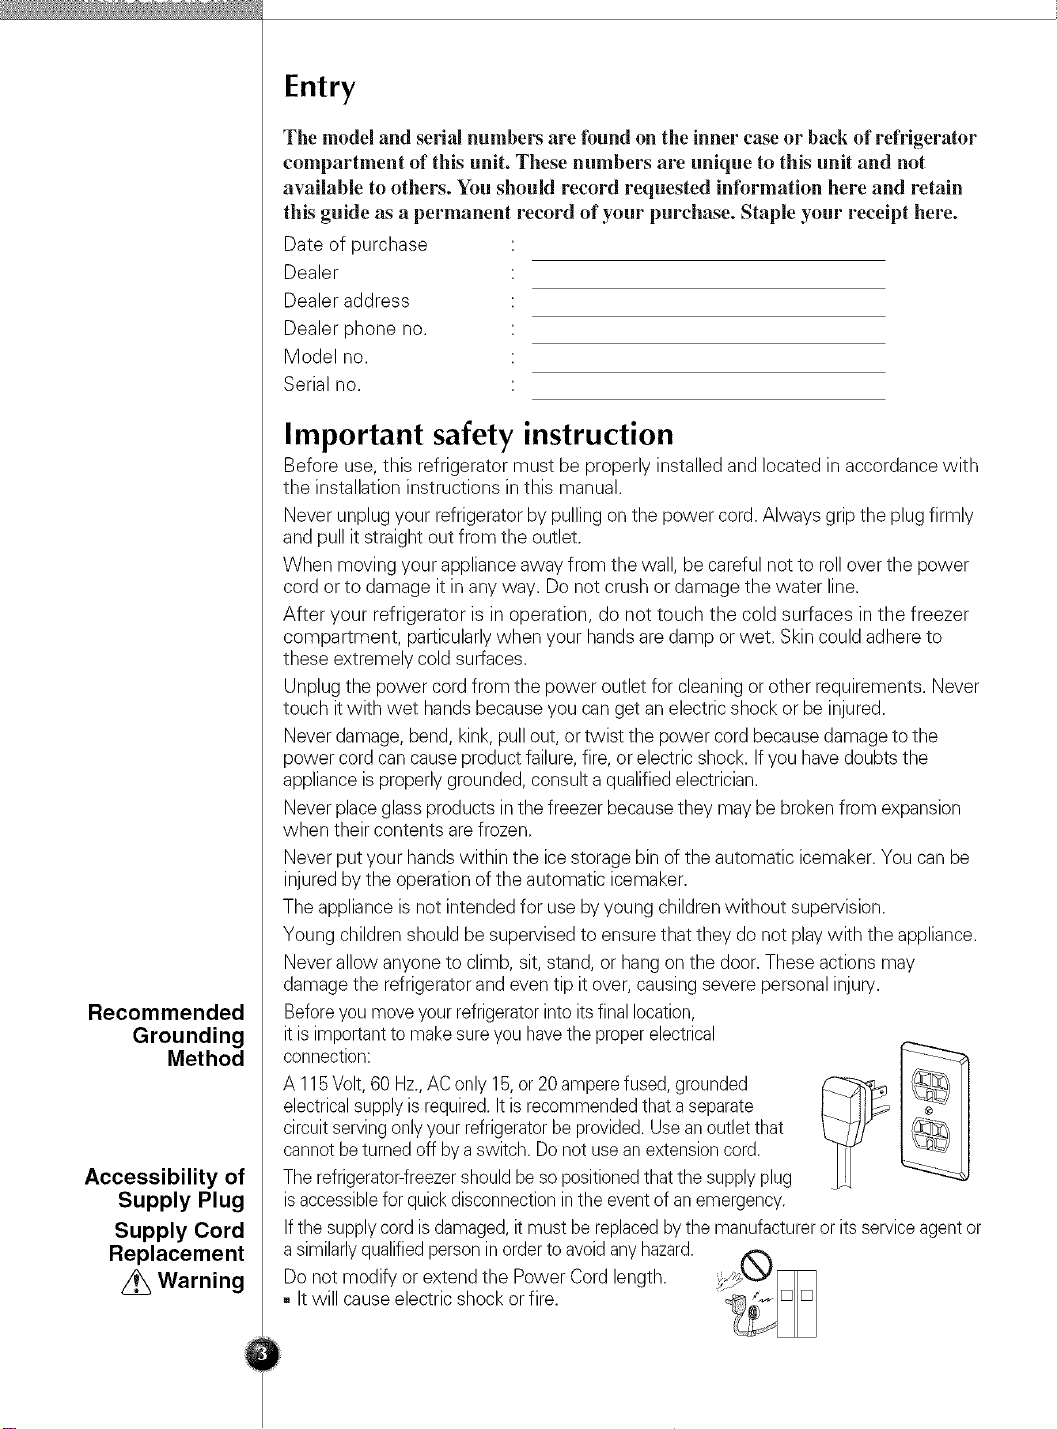
Beforeyou moveyourrefrigeratorinto itsfinallocation,
itis importantto makesureyou havethe properelectrical
A 115Volt,60 Hz.,AConly 15,or20amperefused,grounded
electricalsupplyis required.It is recommendedthata separate
circuitservingonly yourrefrigeratorbe provided.Useanoutlet that
connection: _
cannotbe turnedoff by a switch. Do not usean extensioncord.
Therefrigerator-freezershouldbeso positionedthat the supplyplug
isaccessibleforquickdisconnectioninthe event of an emergency.
Ifthe supplycord isdamaged,it mustbe replacedbythe manufactureror itsserviceagentor
a similarlyqualifiedpersonin orderto avoidanyhazard.
Do not modify or extend the Power Cord length.
, It will cause electric shock or fire.
Child Entrapment
Warning
DANGER: Risk of child entrapment.
Before you throw away your old refrigerator or freezer:
Take off the doors but leavethe shelves in placeso that children may not easily climb
inside.
Theappliance isnot intended for use by young children without supervision.
Young children should be supervised to ensure that they do not playwith the appliance.
Don't Store
Grounding
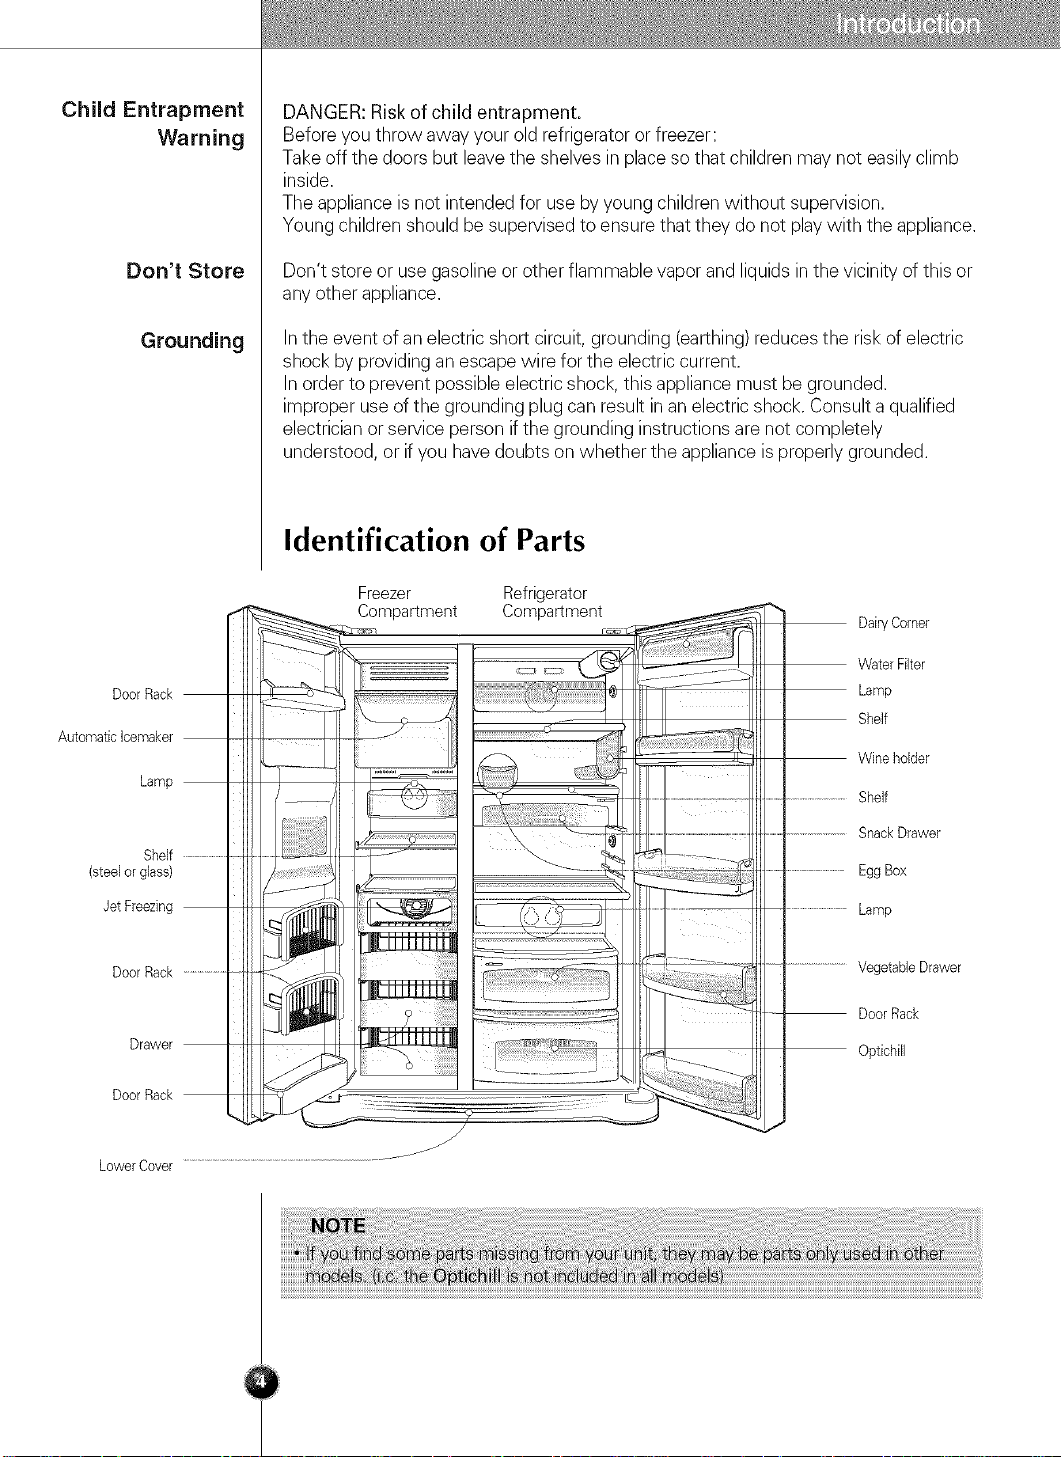
Door Rack
Automatic Icemaker
Lamp
Shelf
(steelorglass)
Jet Freezing
Don't store or usegasoline or other flammable vapor and liquids inthe vicinity of this or
any other appliance.
Inthe event of an electric short circuit, grounding (earthing)reduces the risk of electric
shock by providingan escape wire for the electric current.
Inorder to prevent possible electric shock, this appliancemust be grounded.
improper useof the grounding plug can result in an electricshock. Consulta qualified
electrician or service person ifthe grounding instructions are not completely
understood, or if you havedoubts on whether the appliance is properly grounded.
Identification of Parts
Freezer Refrigerator
Compartment Compartment
.................................Shelf
.........................SnackDrawer
.................................EggBox
..............................Lamp
DairyCorner
WaterFilter
Lamp
Shelf
Wineholder
DoorRack ...................
Drawer
DoorRack
LowerCover
i_!i,i'iiiiiiiiiii_
_iiii_!iiiiiiiii
.........................VegetableDrawer
DoorRack
Optichill
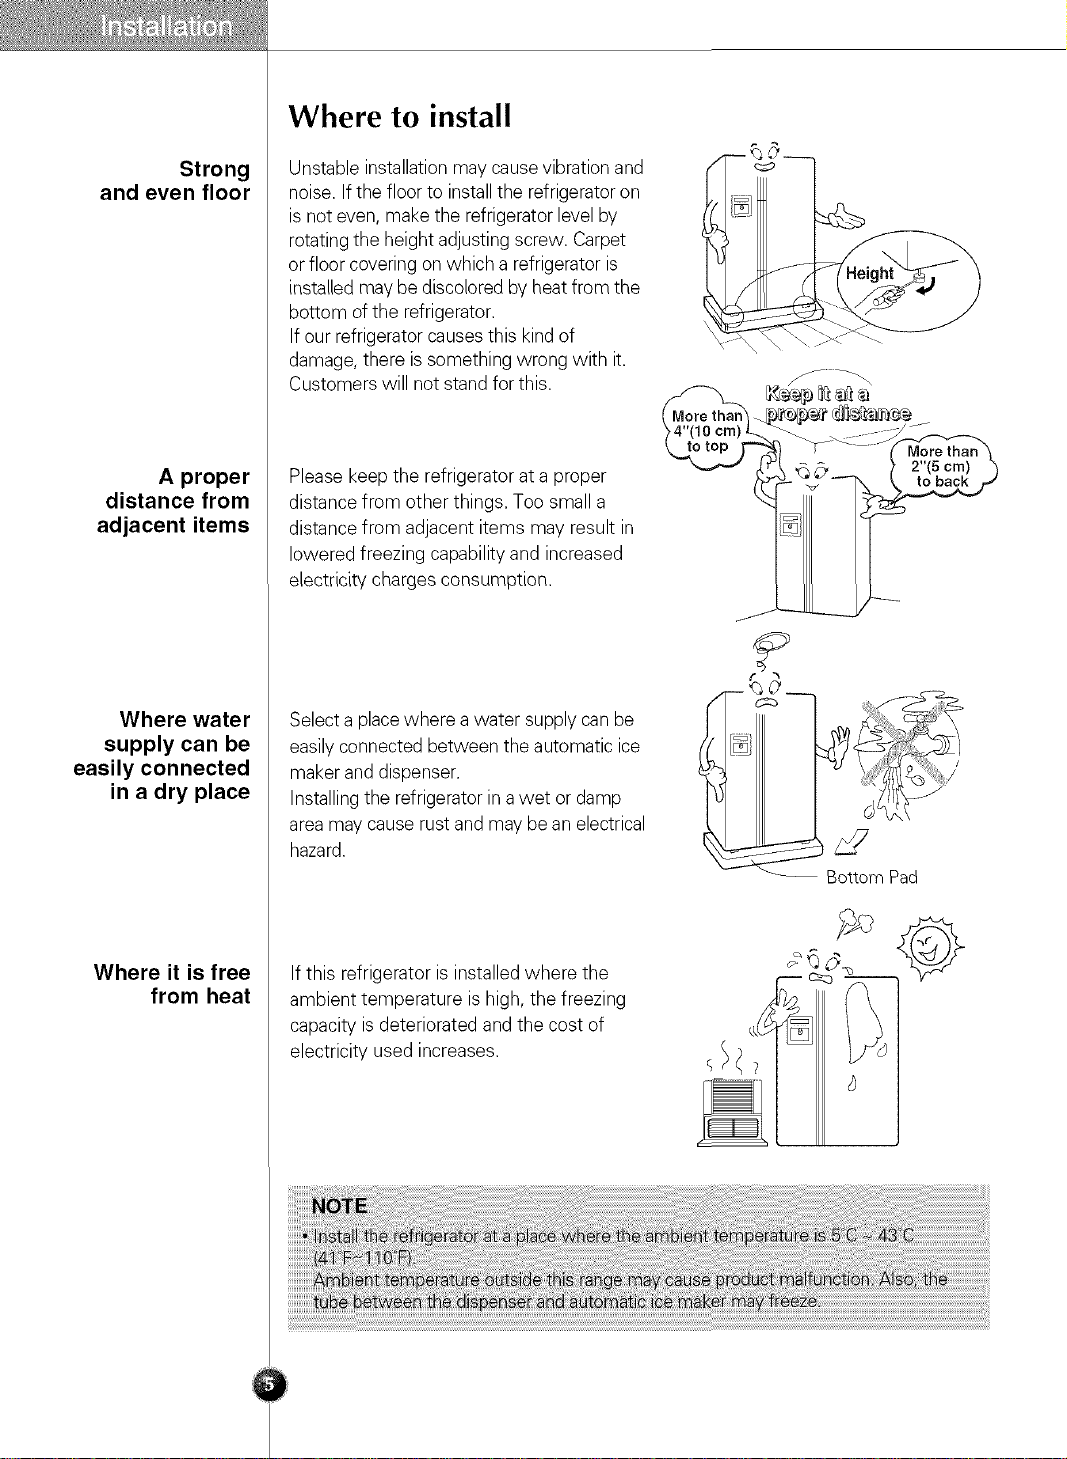
Where to install
Strong
and even floor
A proper
distance from
adjacent items
Where water
supply can be
easily connected
in a dry place
Unstable installation may causevibration and
noise. If the floor to installthe refrigerator on
is not even, make the refrigerator levelby
rotating the height adjusting screw. Carpet
or floor covering on which a refrigerator is
installed may be discolored by heatfrom the
bottom of the refrigerator.
If our refrigerator causesthis kindof
damage, there is something wrong with it.
Customers will not stand for this.
Pleasekeep the refrigerator at a proper
distance from other things. Too small a
distance from adjacent items may result in
lowered freezing capability and increased
electricity charges consumption.
Select a placewhere a water supply canbe
easilyconnected between the automatic ice
maker and dispenser.
Installingthe refrigerator in awet or damp
area may cause rust and may be an electrical
hazard.
Bottom Pad
Where it is free
from heat
If this refrigerator is installed where the
ambient temperature is high, the freezing
capacity is deteriorated and the cost of
electricity used increases.
_ I
Door removal
Z_ Warning
Remove Lower
Cover and
Water Feed Tube
Remove the
Freezer
Compartment
Door
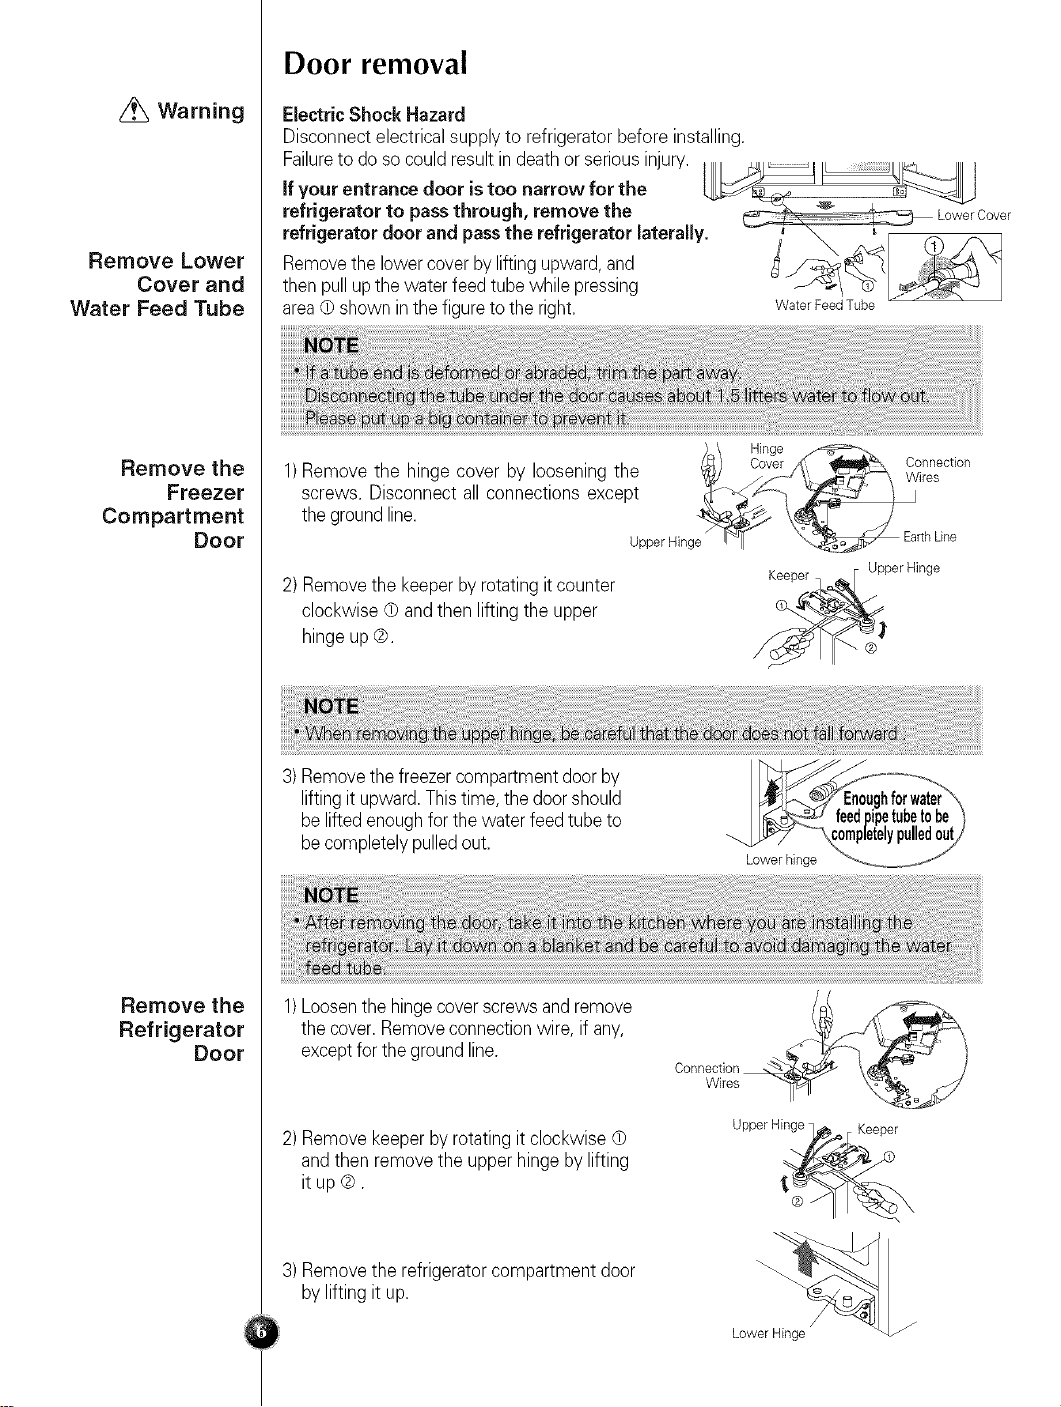
Electric Shock Hazard
Disconnect electricalsupply to refrigerator before installing.
Failureto do socould result in deathor seriousinjury.
if your entrance door is too narrow for the
refrigerator to passthrough, remove the
refrigerator door and pass the refrigerator laterally.
Removethe lowercover by liftingupward,and
thenpull upthe water feedtube while pressing
areaO shown inthe figureto the right.
_\ Hinge /_'b,.
1)Remove the hinge cover by loosening the
_::_; Covebd _ Connection
screws. Disconnectall connections except
the groundline.
Upper Hinge EarthLine
2) Removethe keeperbyrotating it counter
clockwise d) andthen lifting the upper
hinge up®.
Water Feed Tube
#_ _'- Wires
Keeper F Upper Hinge
Remove the
Refrigerator
Door
3) Removethe freezercompartmentdoorby
lifting it upward.Thistime, the doorshould
be lifted enoughfor the water feedtube to
be completelypulledout.
1)Loosenthe hingecoverscrews andremove
the cover.Removeconnectionwire, ifany,
exceptfor the groundline.
2) Removekeeper byrotating it clockwise d)
and then removethe upperhinge by lifting
it up ®.
3) Removethe refrigeratorcompartment door
bylifting it up.
forwat_\
J_._J feedpipetubetobe 'I
Lower hinge *_ _,_Jf
Connection
Wires
Upper Hinge _/'_._E Keeper
Lower Hinge
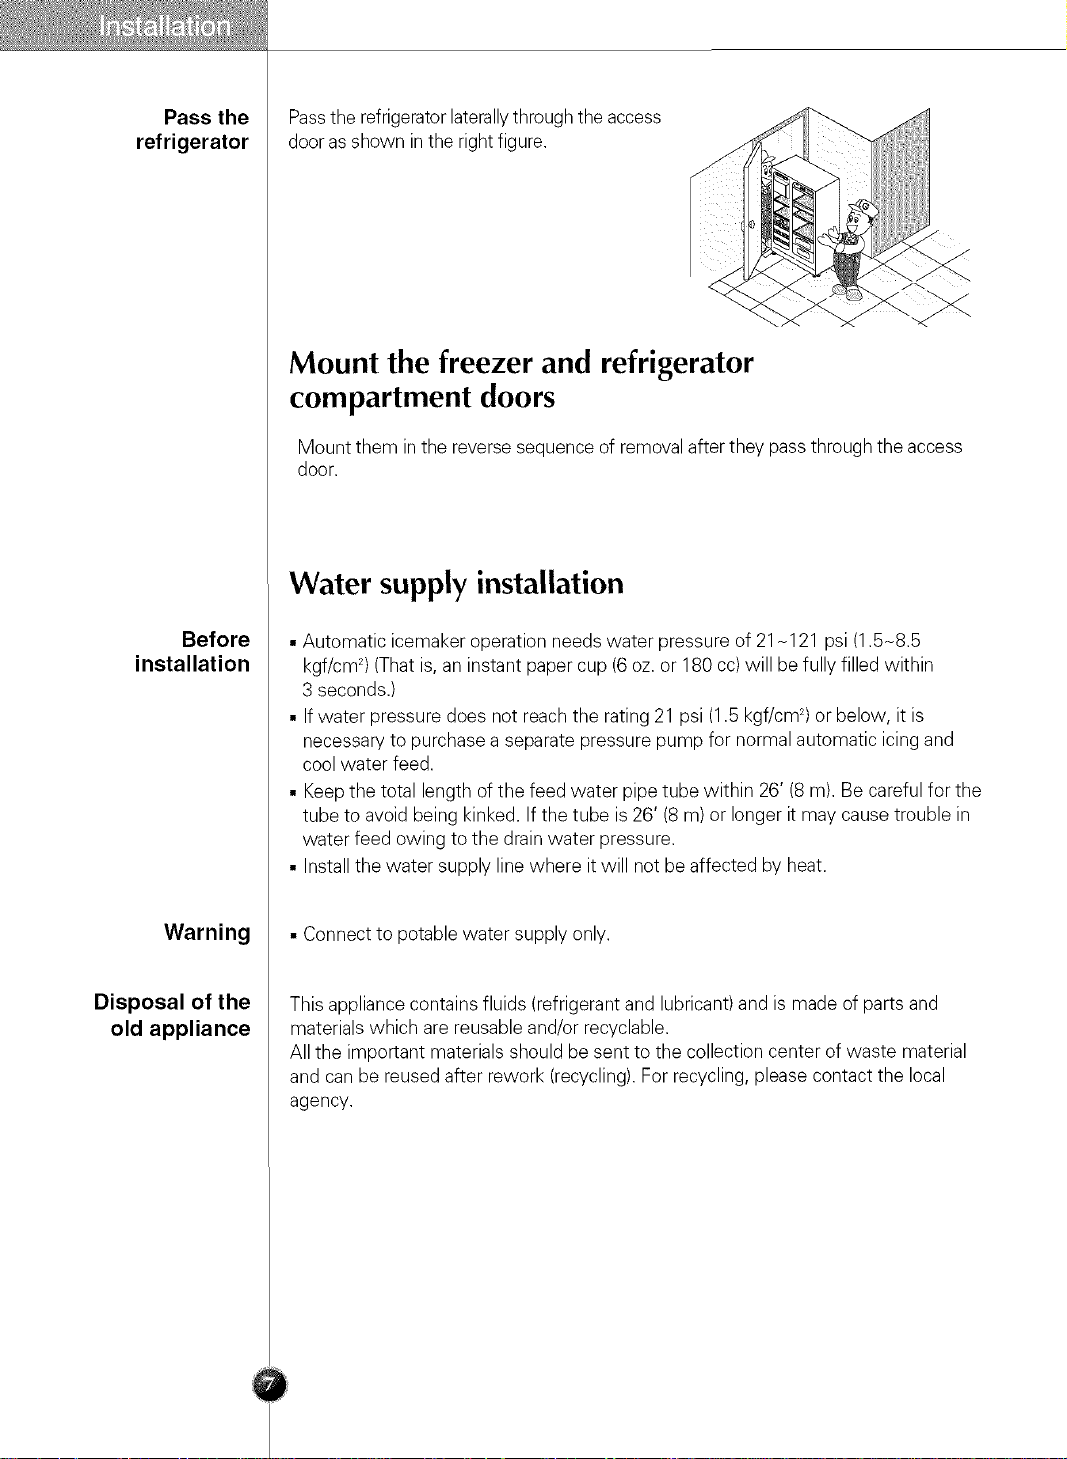
Pass the Passthe refrigeratorlaterallythrough the access
refrigerator door asshown in the right figure.
Mount the freezer and refrigerator
compartment doors
Mount them inthe reverse sequence of removalafterthey passthrough the access
door.
Water supply installation
Before
installation
Warning
Disposal of the
old appliance
• Automatic icemaker operation needs water pressure of 21N121psi (1.5N8.5
kgf/cm2)(That is, an instant paper cup (6 oz. or 180 cc)will be fully filled within
3 seconds.)
• If water pressure does not reach the rating 21 psi (1.5kgf/cm 2)or below, it is
necessary to purchase a separate pressure pump for normal automatic icing and
cool water feed.
• Keepthe total length of the feed water pipe tube within 26' (8 m). Be careful for the
tube to avoid being kinked. If the tube is26' (8 m) or longer it may cause trouble in
water feed owing to the drain water pressure.
• Install the water supply line where it will not be affected by heat.
• Connect to potable water supply only.
This appliance contains fluids (refrigerant and lubricant) and is made of parts and
materials which are reusable and/or recyclable.
All the important materials should be sent to the collection center of waste material
and canbe reused after rework (recycling). For recycling,please contact the local
agency.

Water Connection Instruction Guide
Connecting
the Refrigerator
to a Water Source
Warning
Tools Required
Read all directions carefully before you begin.
Connect to potable water supply only.
• Standard screwdriver
• 7/16-inch and 1/2-inch open-end wrenches or two adjustable wrenches
• 1/4-inch nut driver
• 1/4-inch drill bit
• Hand drill or electric drill (properly grounded)
Cold Water Supply
The icemaker water valve contains a flow washer which is used as awater
pressure regulator.
The icemaker needs to be connected to a cold water line with water pressure
30-120psi(Ib/inch _)
Connect
the Tubing to
Water Line
1. Unplug refrigerator or disconnect power.
2. Turn OFF main water supply. Turn on the nearest faucet to relieve the pressure
on the line. It may help to open an outside faucet to allow the water to drain from
the line in the house.
3. Find a 1/2-inch to 1-1/4-inch vertical COLD water pipe near the refrigerator.
4. To determine the length of copper tubing you will need, measure from the
connection on the lower left rear of the refrigerator to the water pipe. Add 7
feet (2.1m) to allow for moving refrigerator for cleaning. Use 1/4-inch O.D.
(outside diameter) copper tubing. Be sure both ends of copper tubing are cut
square.
5. Using a drill, drill a 1/4-inch hole in the cold water pipe you have selected.
6. Fasten shut-off valve to cold water pipe with pipe clamp. Be sure outlet end is
solidly in the 1/4-inch drilled hole in the water pipe and that the washer is
under the pipe clamp. Tighten packing nut. Tighten the pipe clamp screws
carefully and evenly so washer makes a watertight seal. Do not overtighten or
you may crush the copper tubing, especially if soft (coiled) copper tubing is
used. Now you are ready to connect the copper tubing.
7. Slip compression sleeve and compression nut on copper tubing as shown.
Insert end of tubing into outlet end squarely as far as it will go. Screw
compression nut onto outlet end with adjustable wrench. Do not over tighten.
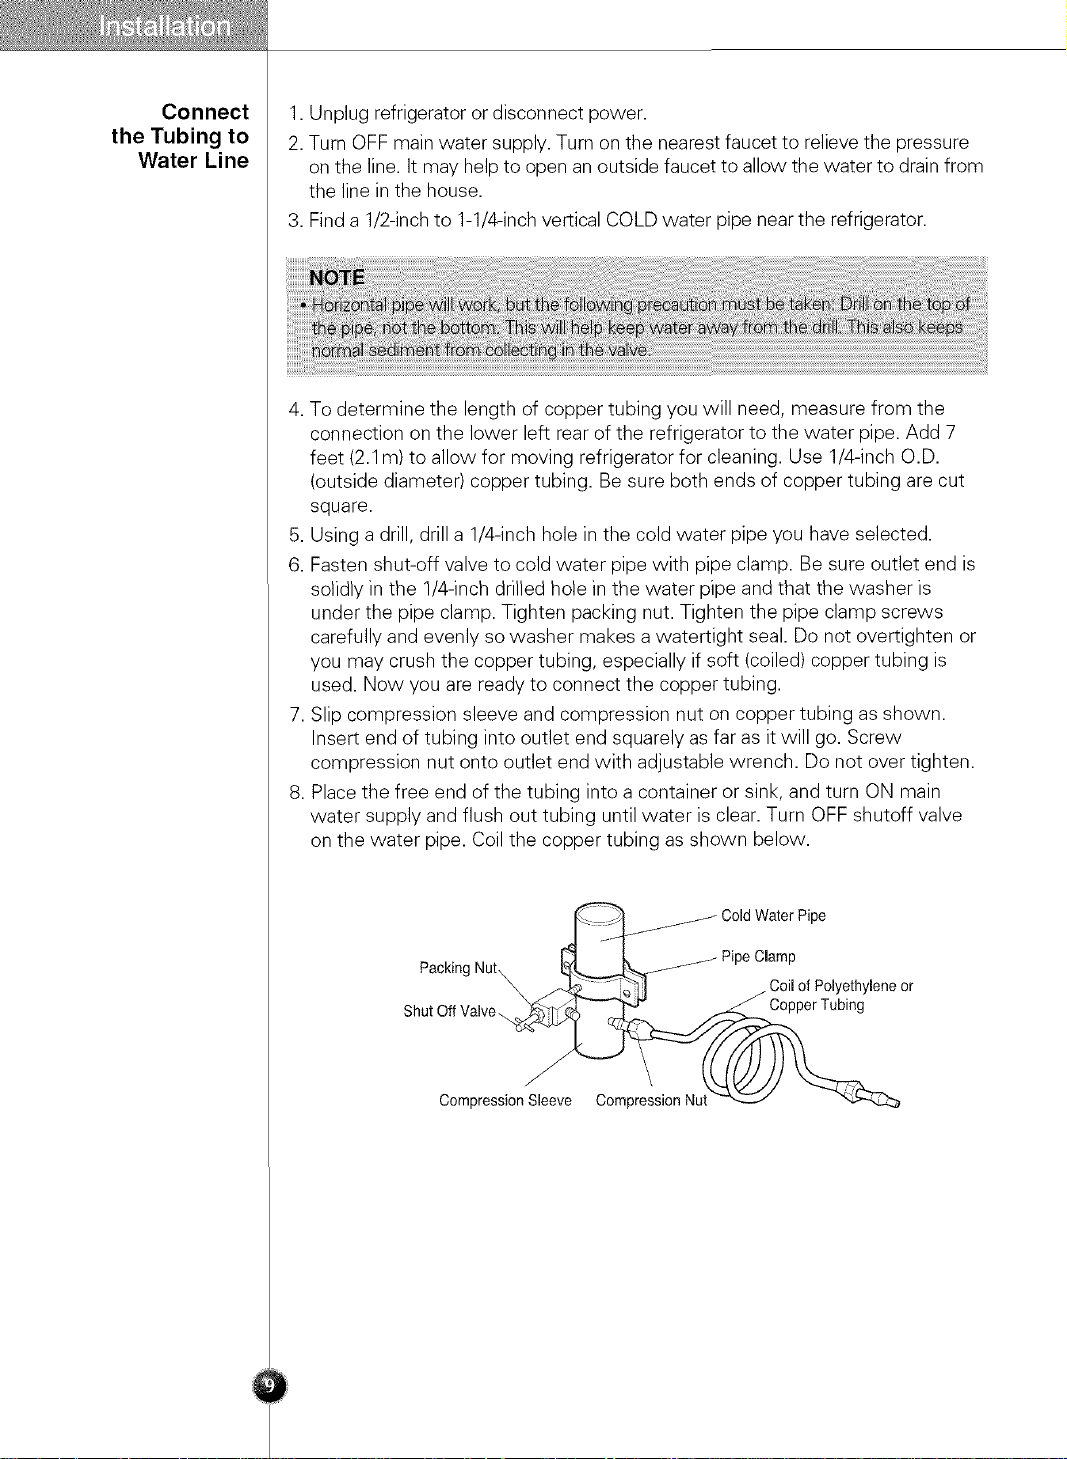
8. Place the free end of the tubing into a container or sink, and turn ON main
water supply and flush out tubing until water is clear. Turn OFF shutoff valve
on the water pipe. Coil the copper tubing as shown below.
Packing
Shut Off
Y
Compression Sleeve Compression Nui
Water Pipe
Coil of Polyethylene or
/ Copper Tubing
Operation Instruction Guide
Connect the Tubing
to the Refrigerator
Turn the Water On at
the Shutoff Valve
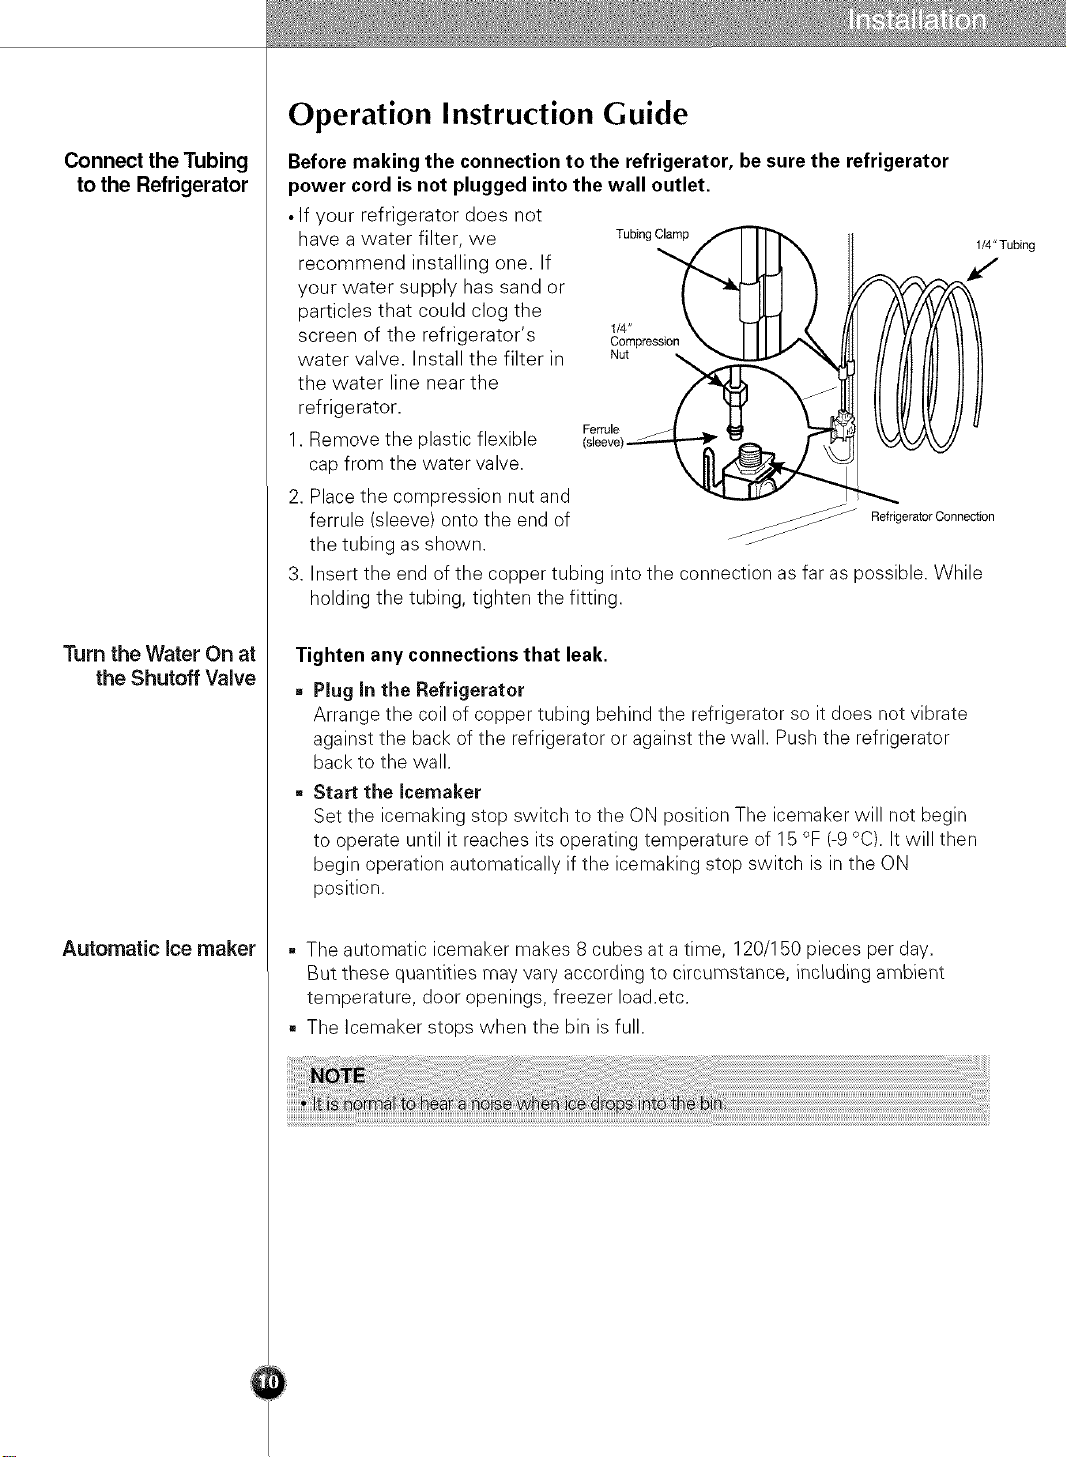
Before making the connection to the refrigerator, be sure the refrigerator
power cord is not plugged into the wall outlet.
• If your refrigerator does not
recommend installing one. If
have a water filter, we Tubing_ _ _//
your water supply has sand or
particles that could clog the 7/4" ssion_kX, [_A( /_ /
screen of the refrigerator's Compre
water valve. Install the filter in
the water line near the
refrigerator.
1. Remove the plastic flexible
Fe_o,o_ "-_ _ \k.
cap from the water valve.
2. Place the compression nut and
ferrule (sleeve) onto the end of
(sleeve) __._
Refrigerator Connection
the tubing as shown.
.
Insert the end of the copper tubing into the connection as far as possible. While
holding the tubing, tighten the fitting.
Tighten any connections that leak.
• Plug in the Refrigerator
Arrange the coil of copper tubing behind the refrigerator so it does not vibrate
against the back of the refrigerator or against the wall. Push the refrigerator
back to the wall.
• Start the Icemaker
Set the icemaking stop switch to the ON position The icemaker will not begin
to operate until it reaches its operating temperature of 15 °F (-9°C). It will then
begin operation automatically if the icemaking stop switch is in the ON
position.
1/4"Tubing
Automatic ice maker
- The automatic icemaker makes 8 cubes at a time, 120/150 pieces per day.
But these quantities may vary according to circumstance, including ambient
temperature, door openings, freezer load.etc.
= The Icemaker stops when the bin is full.
When Icemaker
Does Not Operate
Smoothly
Ice is clumped together
• When ice is clumped together, take the ice clumps out of the ice storage bin,
break them into small pieces, and then place them into the ice storage bin
again.
• When the icemaker produces too small or clumped ice, the amount of water
supplied to the ice maker must be adjusted. Contact the service center.
• If ice is not used frequently, it may clump together.
Power failure
• Water may drop into the freezer compartment. Take the ice storage bin out and
discard all the ice. Dry the bin and replace it.
The unit is newly installed
• It takes about 12 hours for a newly installed refrigerator to make ice.
CAUTION
Warning
Throw away the ice.
The first iceand water may include particles or odor from the feed water pipe or
feed water box.
This is also necessary if the refrigerator has not been used for a long time.
Never store beverage cans or other foods in ice storage bin for the purpose of rapid
cooling.
Suchactions may damage the automatic ice maker.
Never remove the icemaker cover.
Shakethe bin occasionally to cause the ice to settle.
Ice may pile up just around the icemaker causing the icemaker to think that the ice
storage bin isfull.
If discolored ice isdispensed, contact an Authorized Service Center immediately.
Do not use the ice or water until the problem is corrected.
Do not place your hands into the water & ice dispenser
opening. Doing so can result in amputation or cuts.

Height Adjustment
If the freezer
compartment door
is lower than the
refrigerator
compartment door
If the freezer
compartment door
is higher than the
refrigerator
compartment door
Levelthe door byinsertingflat (- type)driverintothe grooveofthe left heightadjusting
screw and rotating it clockwise O.
Height difference
1
Left Height
Adjustment Screw
Levelthe door by inserting flat (- type) driver into the groove of the right height
adjusting screw and rotating it clockwise O.
Height difference
After leveling the
door height
Next
Right Height
Adjustment Screw
The refrigerator doors will close smoothly by adjusting the height adjusting screw. If
the doors do not close correctly, performance may be affected.
1.Wipe off all dust accumulated during shipping and cleanyour appliancethoroughly.
2. Install accessories such as the ice cube box, cover evaporating tray, etc., in their
proper places.They arepacked together to prevent possible damageduring shipping.
3. Connect the power supply cord (or plug) to the outlet. Use this appliance on a
dedicated circuit.
Starting
When your refrigerator is first installed, allow it to stabilize at normal operating
temperatures 2N3 hours prior to filling it with fresh or frozen foods.
If operation is interrupted, wait 5 minutes before restarting.
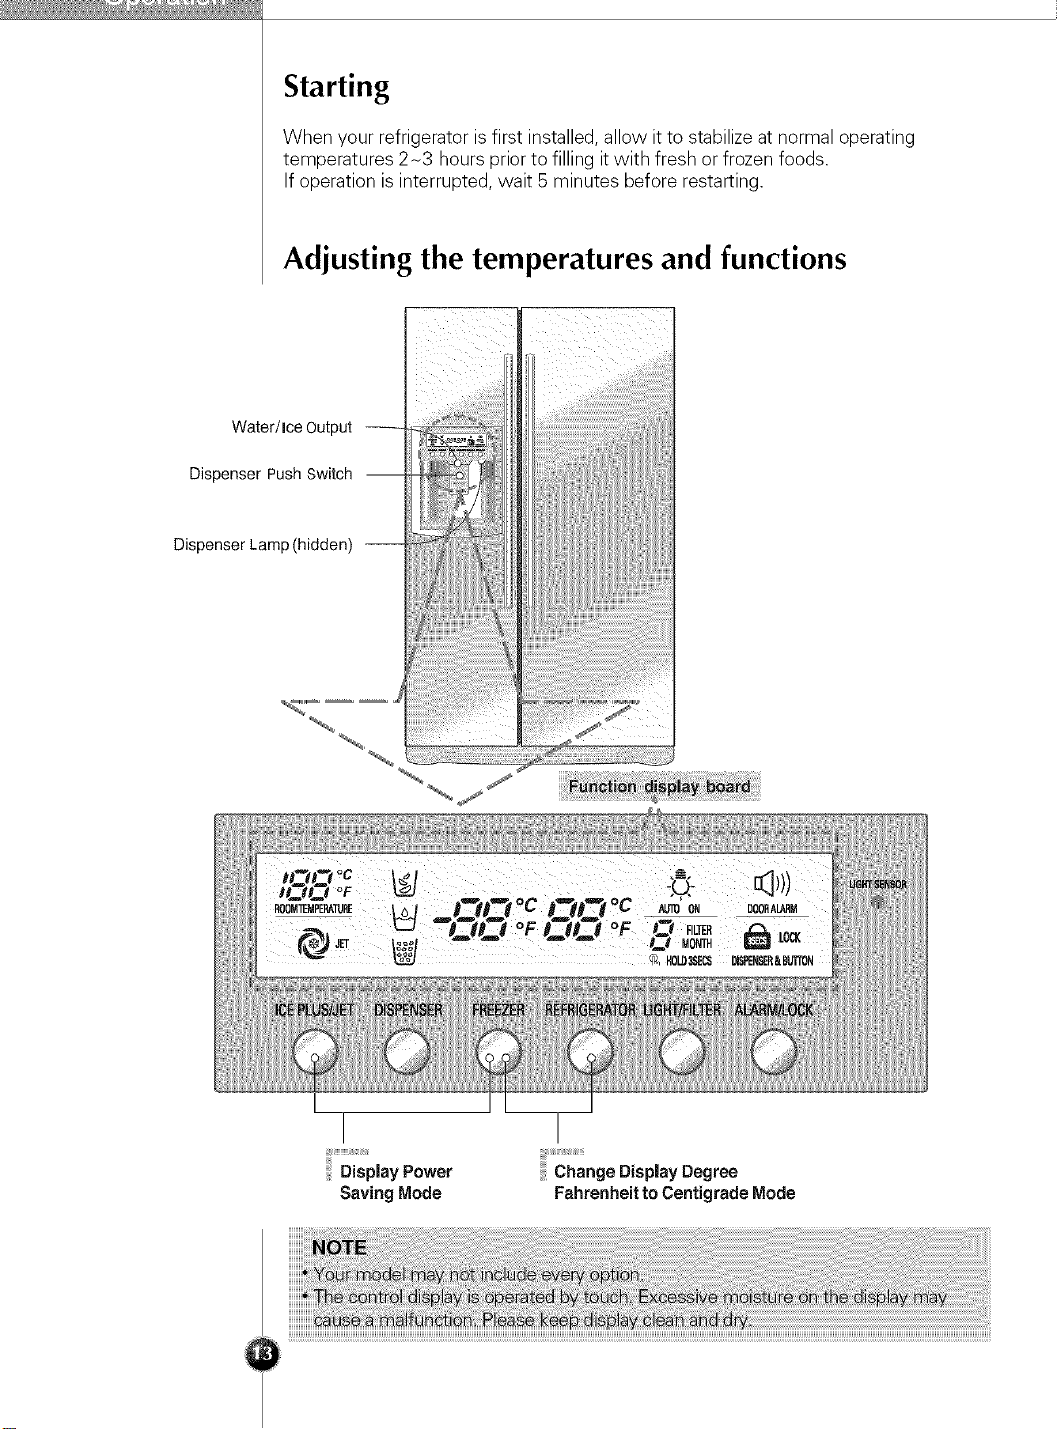
Adjusting the temperatures and functions
I T
DisplayPower ChangeDisplayDegree
SavingMode Fahrenheitto CentigradeMode
1. Display Power Saving Mode
This function places the display into power saving mode until the next time the
door is opened.
Pressthe FREEZERand ICE PLUSbuttons simultaneously and hold them for 5
seconds until the Ding sounds. All LEDs will then turn ON, then OFF.When the
power saving mode is activated, the display will remain off until the next time the
door is opened. Then, itwill come on whenever a door is opened or a button is
pressed and remain on for 20 seconds after the last door opening or button
selection. To deactivate the power saving mode, press the FREEZERand ICE
PLUSbuttons simultaneously and hold them for 5 seconds until the Ding sounds.
2. To change temperature display from Fahrenheitto Celsius press and hold
FREEZERand REFRIGERATORbuttons simultaneously for more than 5 seconds.
Dothe same to convert back to Celsius.
You can adjust temperature of freezer compartment and refrigerator
Compartment.
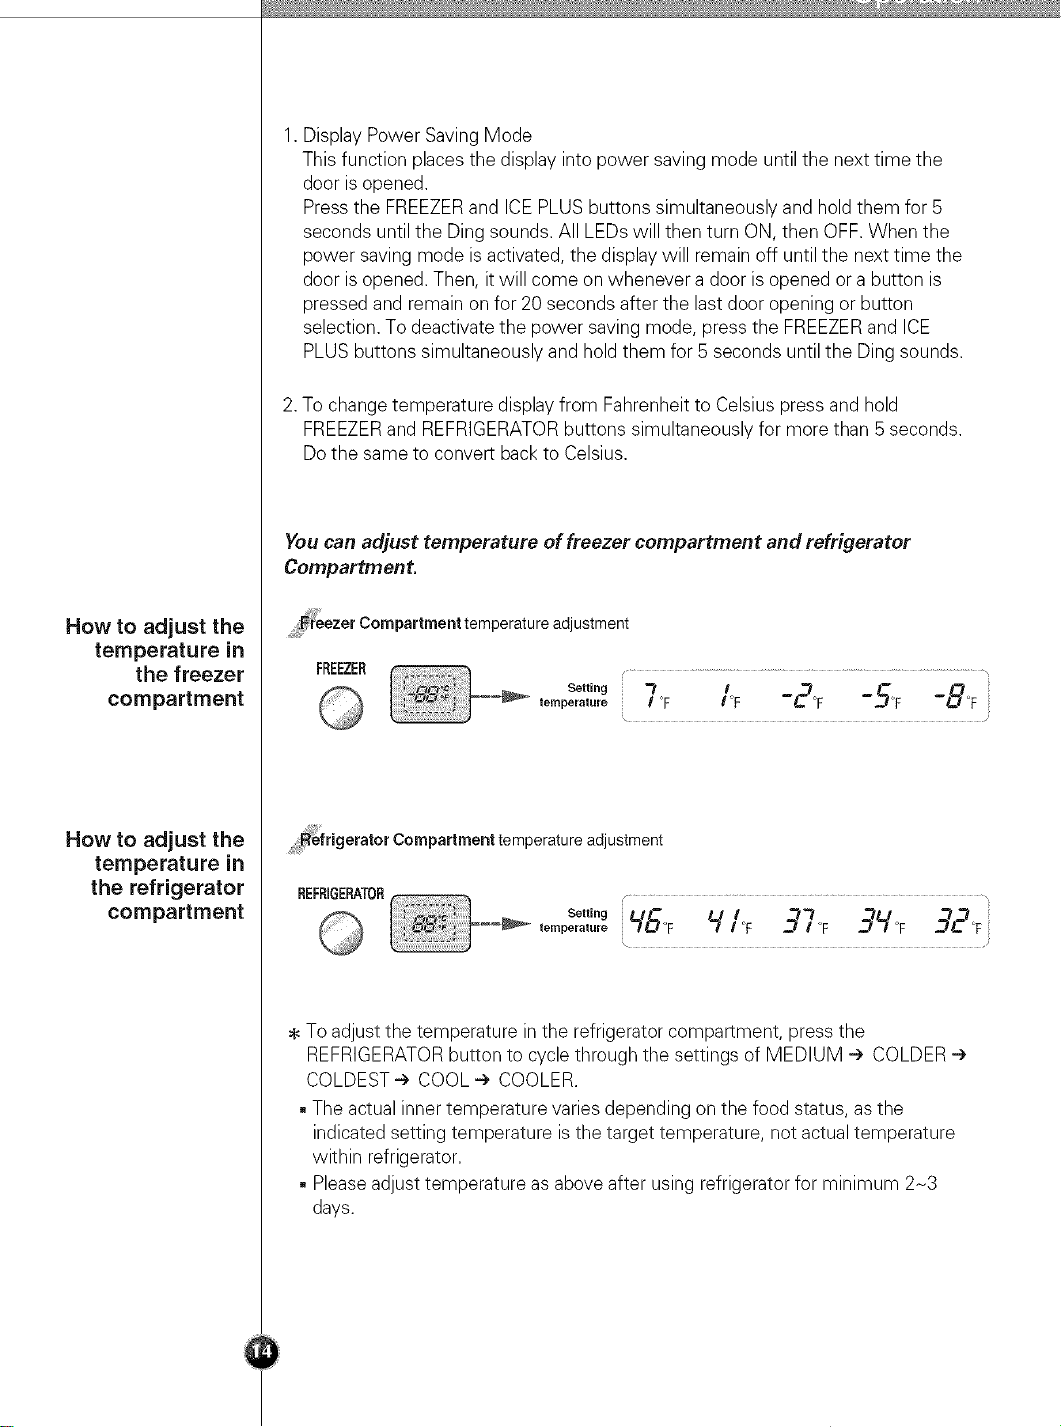
How to adjust the
temperature in
the freezer
compartment
How to adjust the
temperature in
the refrigerator
compartment
_:eezer Compartment temperature adjustment
FREEZER
Setting
tempevatuv_
!Refrigerator Compartment temperature adjustment
f .................... \
temperature
S'5 L/I'F 32F
\
' -do -5o -8oF°F / F
To adjust the temperature in the refrigerator compartment, press the
REFRIGERATORbutton to cycle through the settings of MEDIUM =>COLDER=>
COLDEST=> COOL-> COOLER.
=The actual inner temperature variesdepending on the food status, asthe
indicated setting temperature is the target temperature, not actual temperature
within refrigerator.
=Pleaseadjust temperature as above after using refrigerator for minimum 2N3
days.
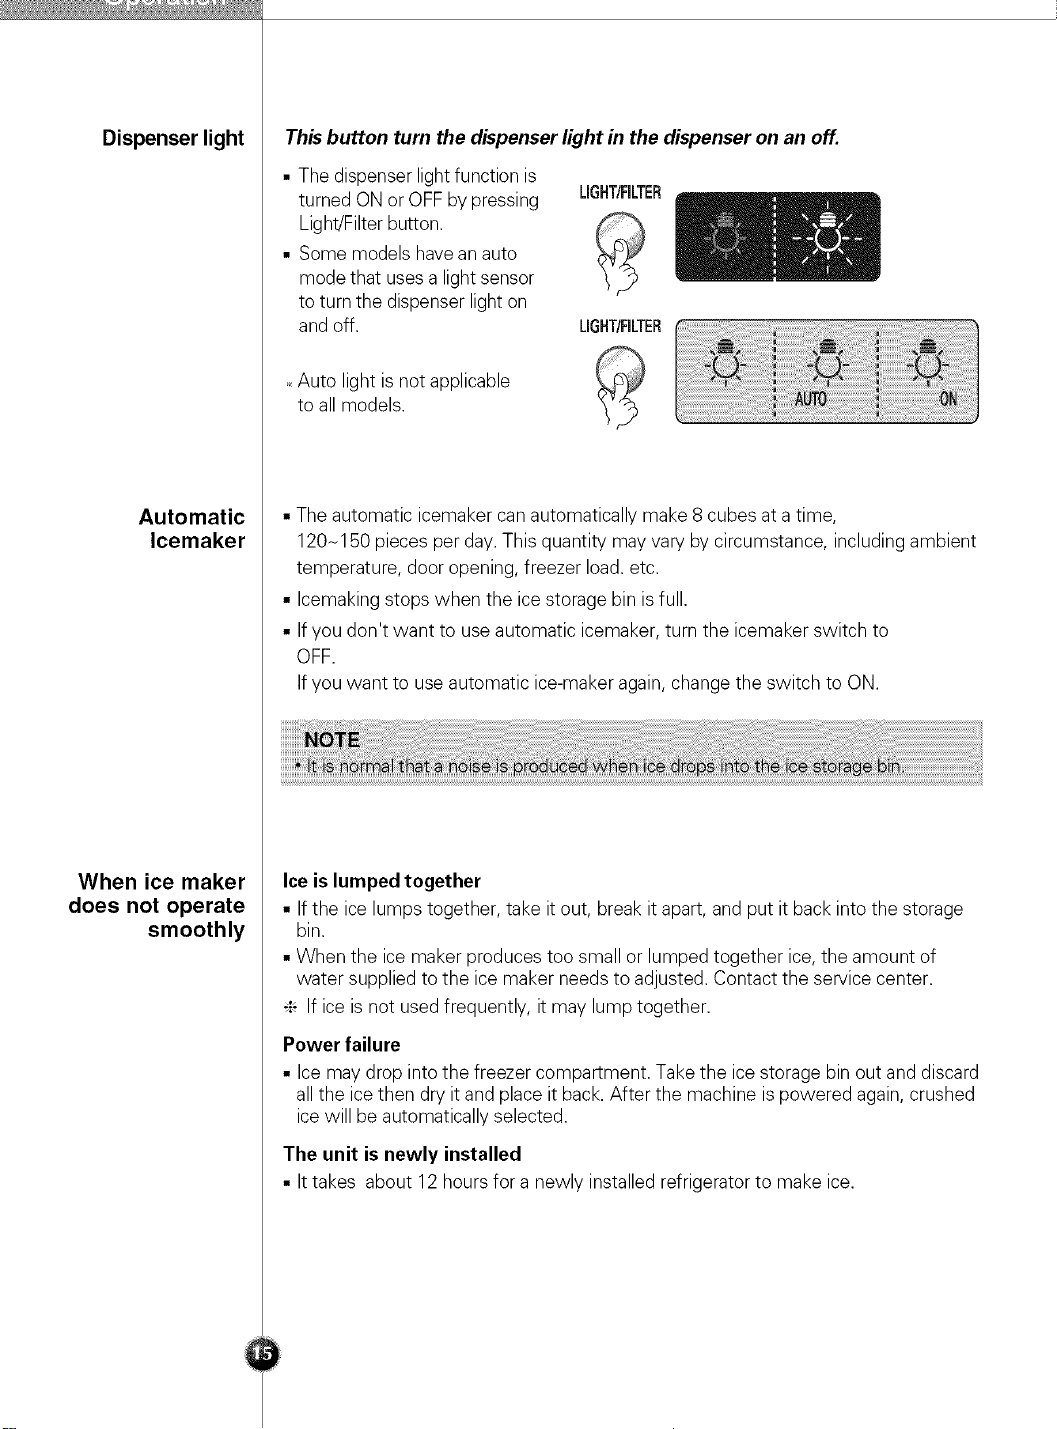
Dispenser light
This button turn the dispenser light in the dispenser on an off.
Automatic
Icemaker
• The dispenser light function is
turned ON or OFF bypressing
LIGHT/RLTER
Light/Filter button.
• Some models havean auto
mode that uses a light sensor
to turn the dispenser light on
and off.
LIGHT/RLTER
Auto light is not applicable
to all models.
• The automatic icemaker can automatically make 8 cubes at a time,
120N150pieces per day. This quantity may vary by circumstance, including ambient
temperature, door opening, freezer load. etc.
• Icemaking stops when the ice storage bin isfull.
• If you don't want to use automatic icemaker, turn the icemaker switch to
OFF.
If you want to use automatic ice-maker again,change the switch to ON.
When ice maker
does not operate
smoothly
Ice is lumped together
• If the ice lumps together, take it out, break it apart, and put it back into the storage
bin.
• When the ice maker produces too small or lumped together ice, the amount of
water supplied to the ice maker needs to adjusted. Contact the service center.
_ If ice is not used frequently, it may lump together.
Power failure
• Ice may drop into the freezer compartment. Take the ice storage bin out and discard
all the icethen dry it and place it back. After the machine ispowered again, crushed
ice will be automatically selected.
The unit is newly installed
• It takes about 12 hours for a newly installed refrigerator to make ice.
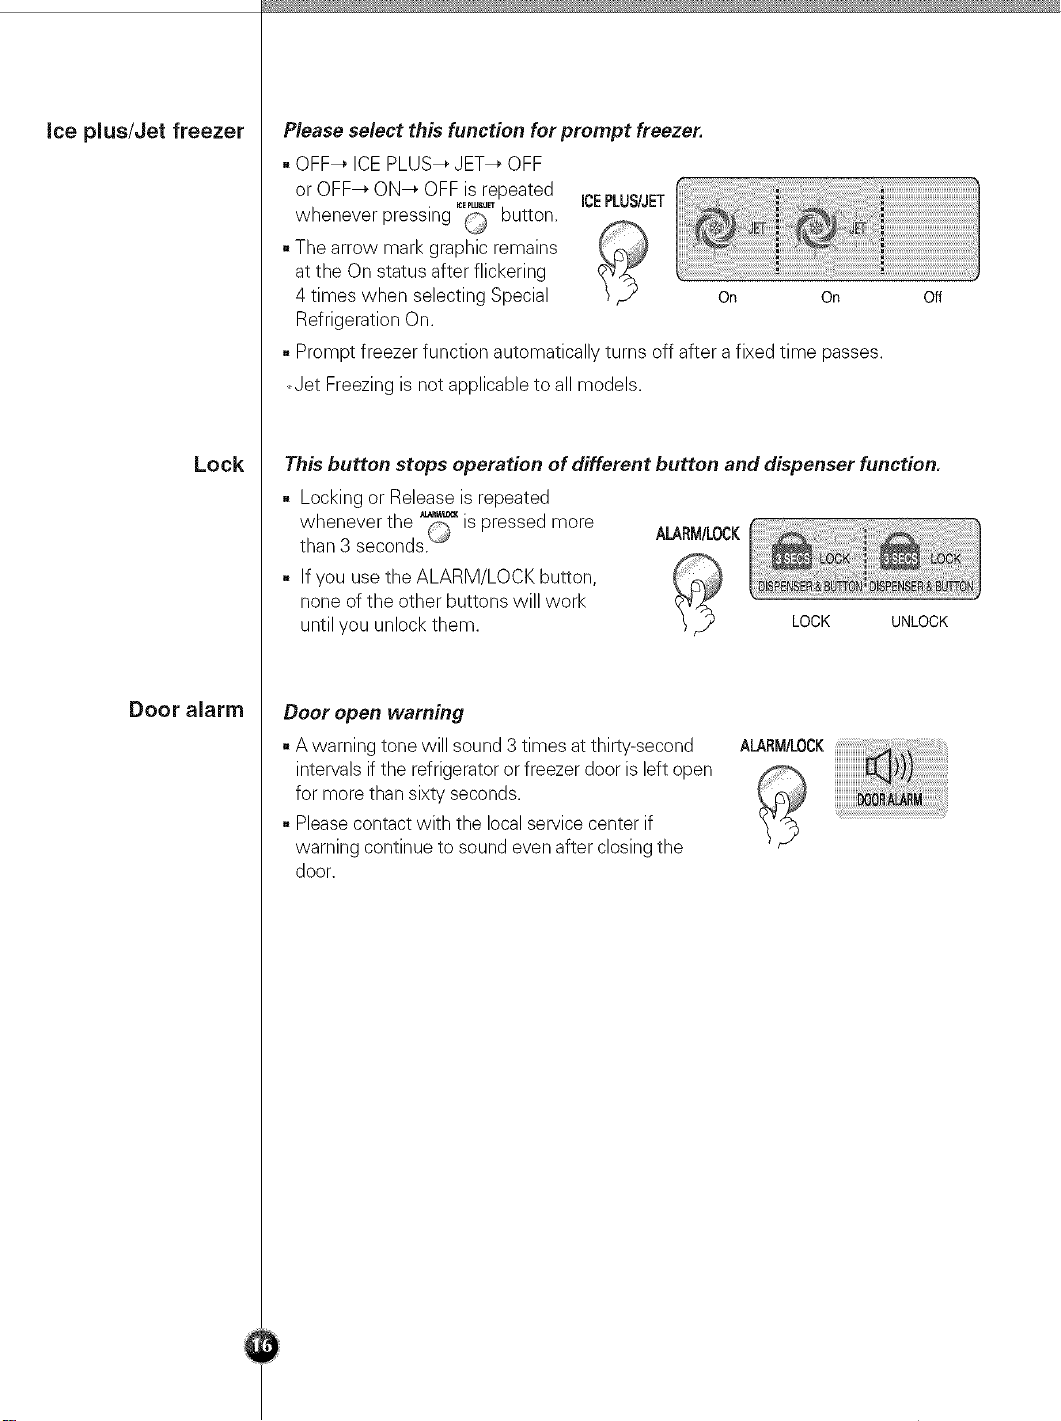
ice plus/Jet freezer
Please select this function for prompt freezer.
. OFF_ ICEPLUS_ JET_ OFF
or OFF_ ON_ OFF is repeated ICEPLUS/JET
• EpLU_J_
whenever pressing (i_ button.
- The arrow mark graphic remains
at the On status after flickering
4 times when selecting Special On On
Refrigeration On.
Prompt freezer function automatically turns off after a fixed time passes.
_Jet Freezing is net applicableto all models.
Off
Lock
Door alarm
This button stops operation of different button and dispenser function.
. Locking or Release is repeated
whenever the '_F_' ispressed more
than 3 seconds._
ALARM/LOCK
. If you use the ALARM/LOCK button,
none of the other buttons will work
until you unlock them. LOCK UNLOCK
Door open warning
. A warning tone will sound 3 times at thirty-second
ALARM/LOCK
intervalsif the refrigeratoror freezer door is left open
for more than sixty seconds.
- Pleasecontact with the localservice center if
warning continue to sound evenafter closing the
door.
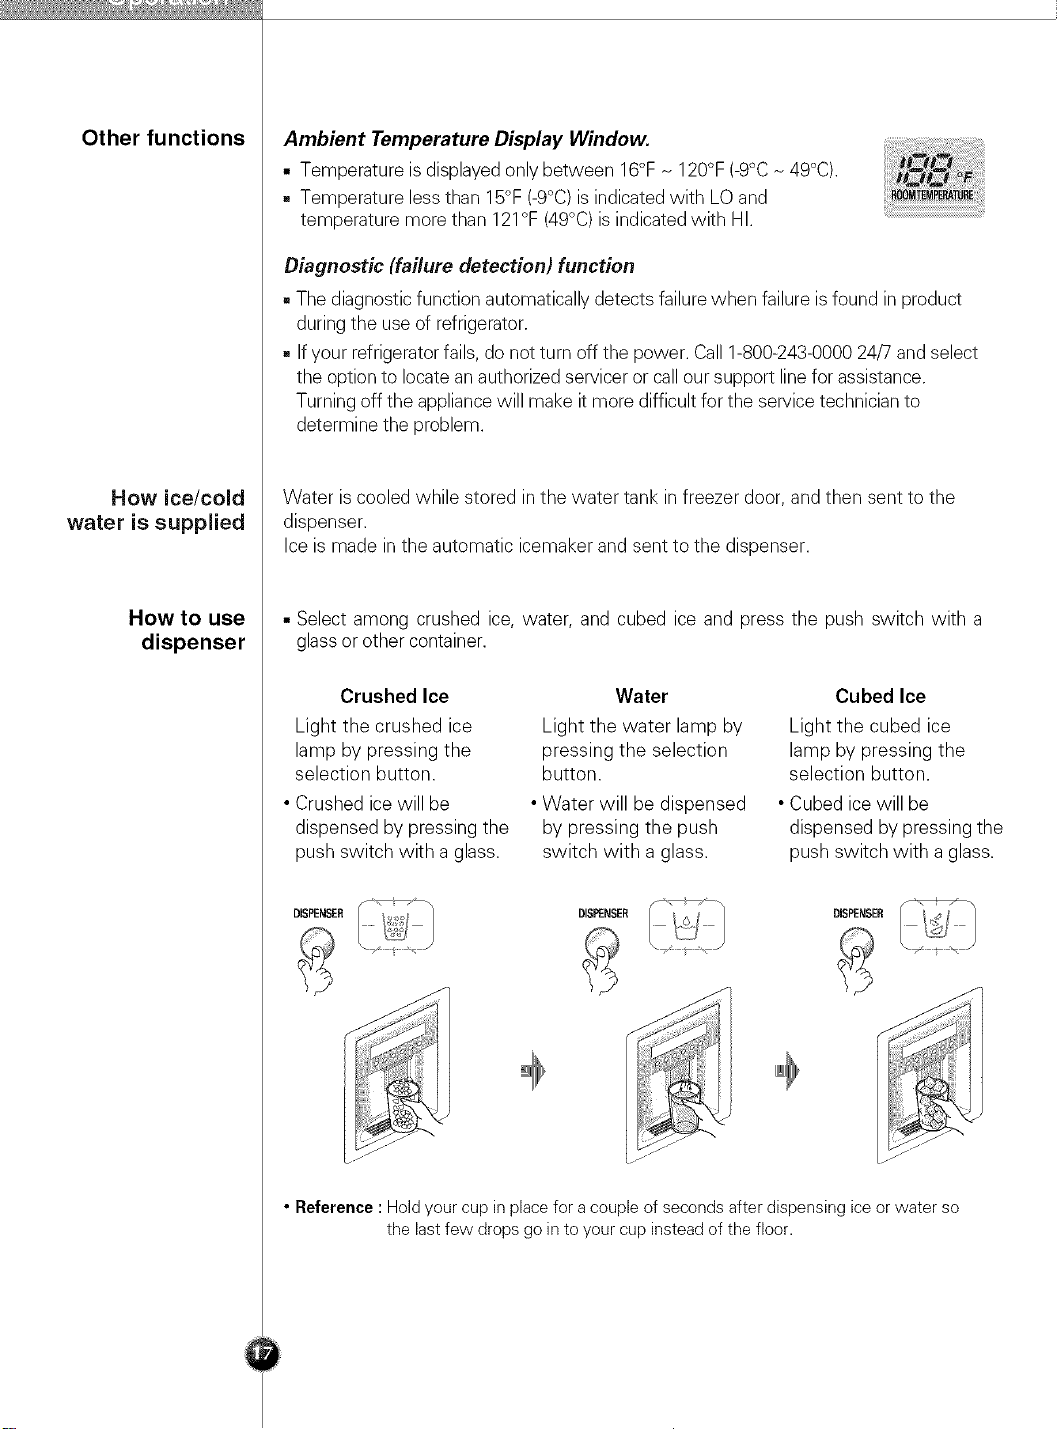
Other functions
Ambient Temperature Display Window.
• Temperature is displayedonly between 16°FN 120°F (-9°CN49°C).
• Temperature less than 15°F (-9°C)is indicatedwith LO and
temperature more than 121°F (49°C)is indicatedwith HI.
Diagnostic (failure detection) function
• Thediagnostic function automatically detects failure when failure is found in product
during the use of refrigerator.
• Ifyour refrigeratorfails, do not turn off the power. Call1-800-243-000024/7 and select
the option to locate an authorizedservicer or call our support linefor assistance.
Turningoff the appliancewill make it more difficult for the servicetechnician to
determine the problem.
How ice/cold
water is supplied
How to use
dispenser
Water is cooled while stored in the water tank in freezer door, and then sent to the
dispenser.
Ice is made in the automatic icemaker and sent to the dispenser.
• Select among crushed ice, water, and cubed ice and press the push switch with a
glass or other container.
Crushed Ice
Light the crushed ice
lamp by pressing the
selection button.
• Crushed ice will be
dispensed by pressing the
push switch with a glass.
DISPENSER
..........;t,?
Light the water lamp by
pressing the selection
button.
• Water will be dispensed
by pressing the push
switch with a glass.
Water
Cubed Ice
Light the cubed ice
lamp by pressing the
selection button.
• Cubed ice will be
dispensed by pressing the
push switch with a glass.
DISF_NSER DISPENSER
• Reference :Hold your cup in place for a couple of seconds after dispensing ice or water so
the last few drops go in to your cup instead of the floor.
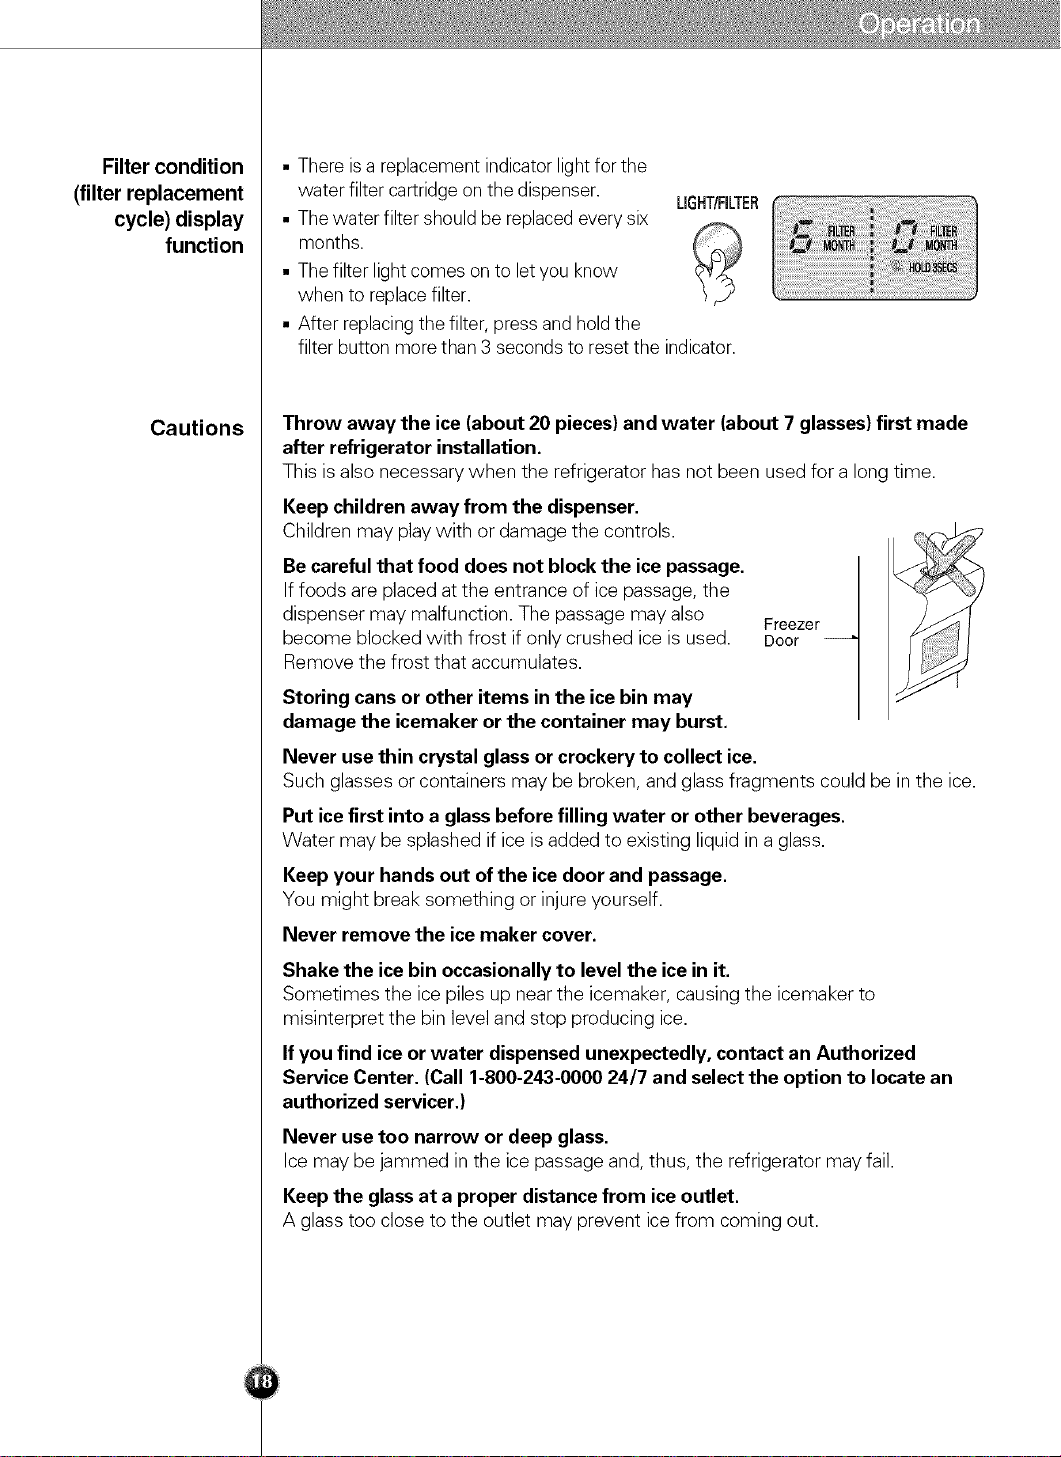
Filter condition
(filter replacement
cycle) display
function
• There isareplacement indicatorlight for the
water filter cartridge on the dispenser.
LIGHT/FILTER
• The water filter should be replacedevery six
months.
• The filter light comes on to let you know
when to replacefilter.
• After replacingthe filter, press and hold the
filter button more than 3 secondsto reset the indicator.
Cautions
Throw away the ice (about 20 pieces) and water (about 7 glasses) first made
after refrigerator installation.
This is also necessary when the refrigerator has not been used for a long time.
Keep children away from the dispenser.
Children may play with or damage the controls.
Be careful that food does not block the ice passage.
If foods are placed at the entrance of ice passage, the
dispenser may malfunction. The passage may also
become blocked with frost if only crushed ice is used.
Remove the frost that accumulates.
Storing cans or other items in the ice bin may
damage the icemaker or the container may burst.
Never usethin crystal glass or crockery to collect ice.
Such glasses or containers may be broken, and glass fragments could be in the ice.
Put ice first into a glass before filling water or other beverages.
Water may be splashed if ice is added to existing liquid in a glass.
Keep your hands out of the ice door and passage.
You might break something or injure yourself.
Never remove the ice maker cover.
Shake the ice bin occasionally to level the ice in it.
Sometimes the ice piles up near the icemaker, causing the icemaker to
misinterpret the bin level and stop producing ice.
If you find ice or water dispensed unexpectedly, contact an Authorized
Service Center. (Call 1-800-243-0000 24/7 and select the option to locate an
authorized servicer.)
Never usetoo narrow or deep glass.
Ice may be jammed in the ice passage and, thus, the refrigerator may fail.
Keep the glass at a proper distance from ice outlet.
A glass too close to the outlet may prevent ice from coming out.
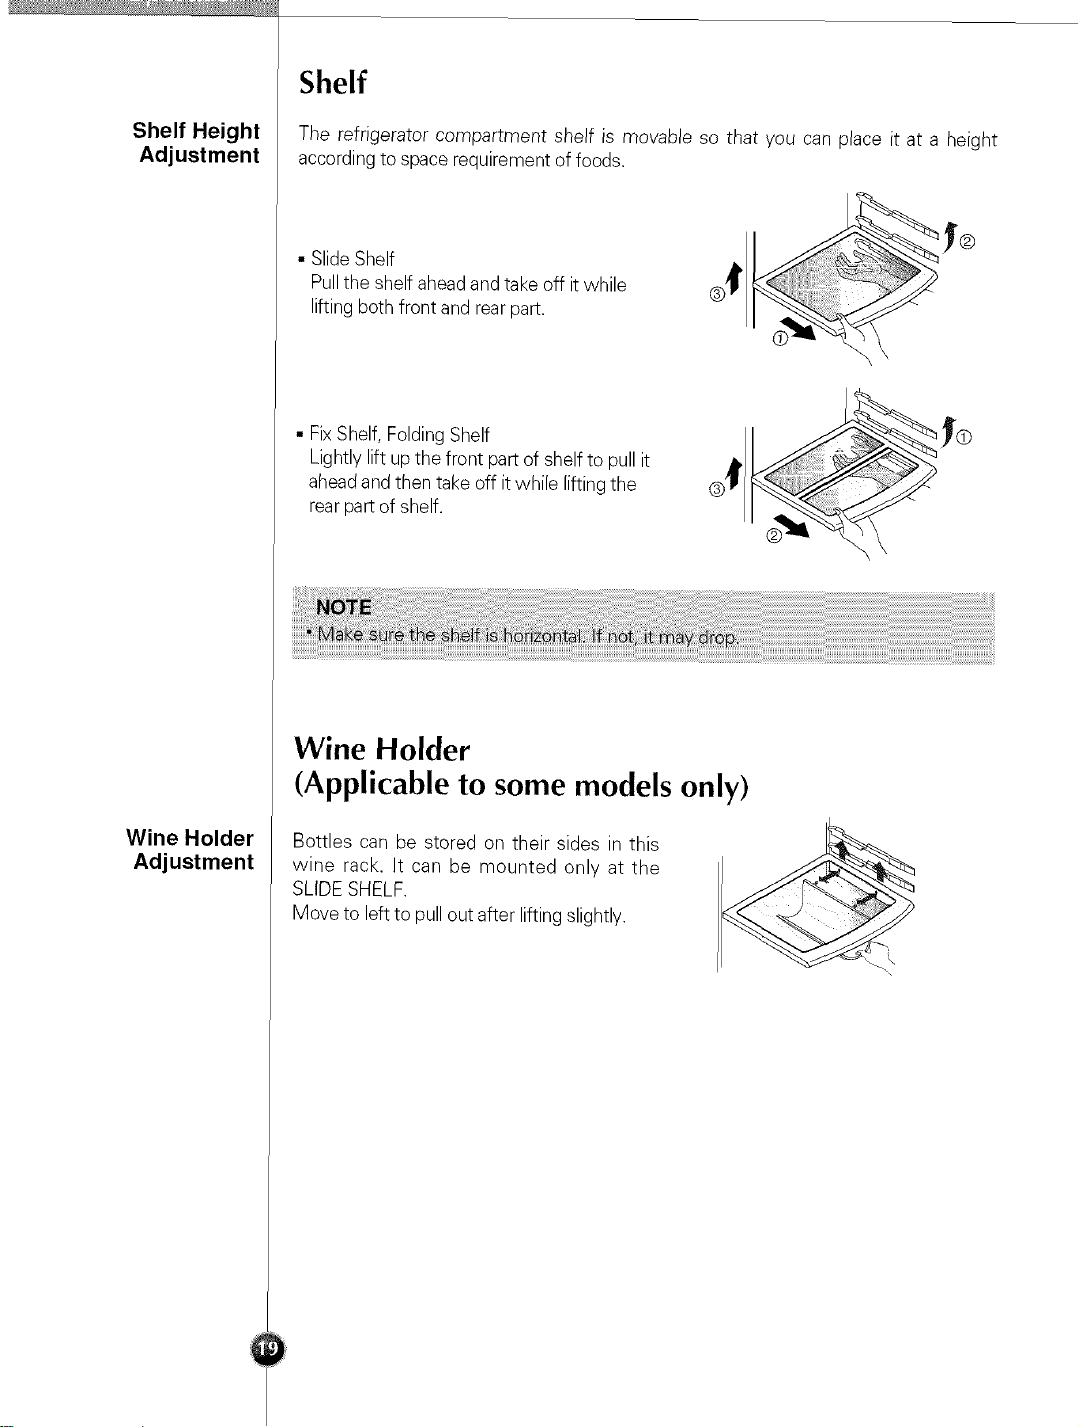
Shelf
Shelf Height
Adjustment
The refrigerator compartment shelf is movable so that you can place it at a height
accordingto space requirement of foods.
• SlideShelf
Pullthe shelf aheadand take off it while
lifting both front and rearpart.
• FixShelf, Folding Shelf
Lightly lift up the front part of shelf to pull it
aheadand then take off it while lifting the
rearpart of shelf.
Wine Holder
Adjustment
Wine Holder
(Applicable to some models only)
Bottles can be stored on their sides in this
wine rack, It can be mounted only at the
SLIDE SHELF.
Move to left to pull out after lifting slightly.

Egg Bin (Applicable to some models only)
You canplace the egg box wherever you want it.
[Normal] [For Many Eggs]
Humidity control in the vegetable compartment
The humidity can be controlled by adjusting the humidity control switch to the left
or right when storing vegetabes or fruits.
Highhumidity
Low humidity
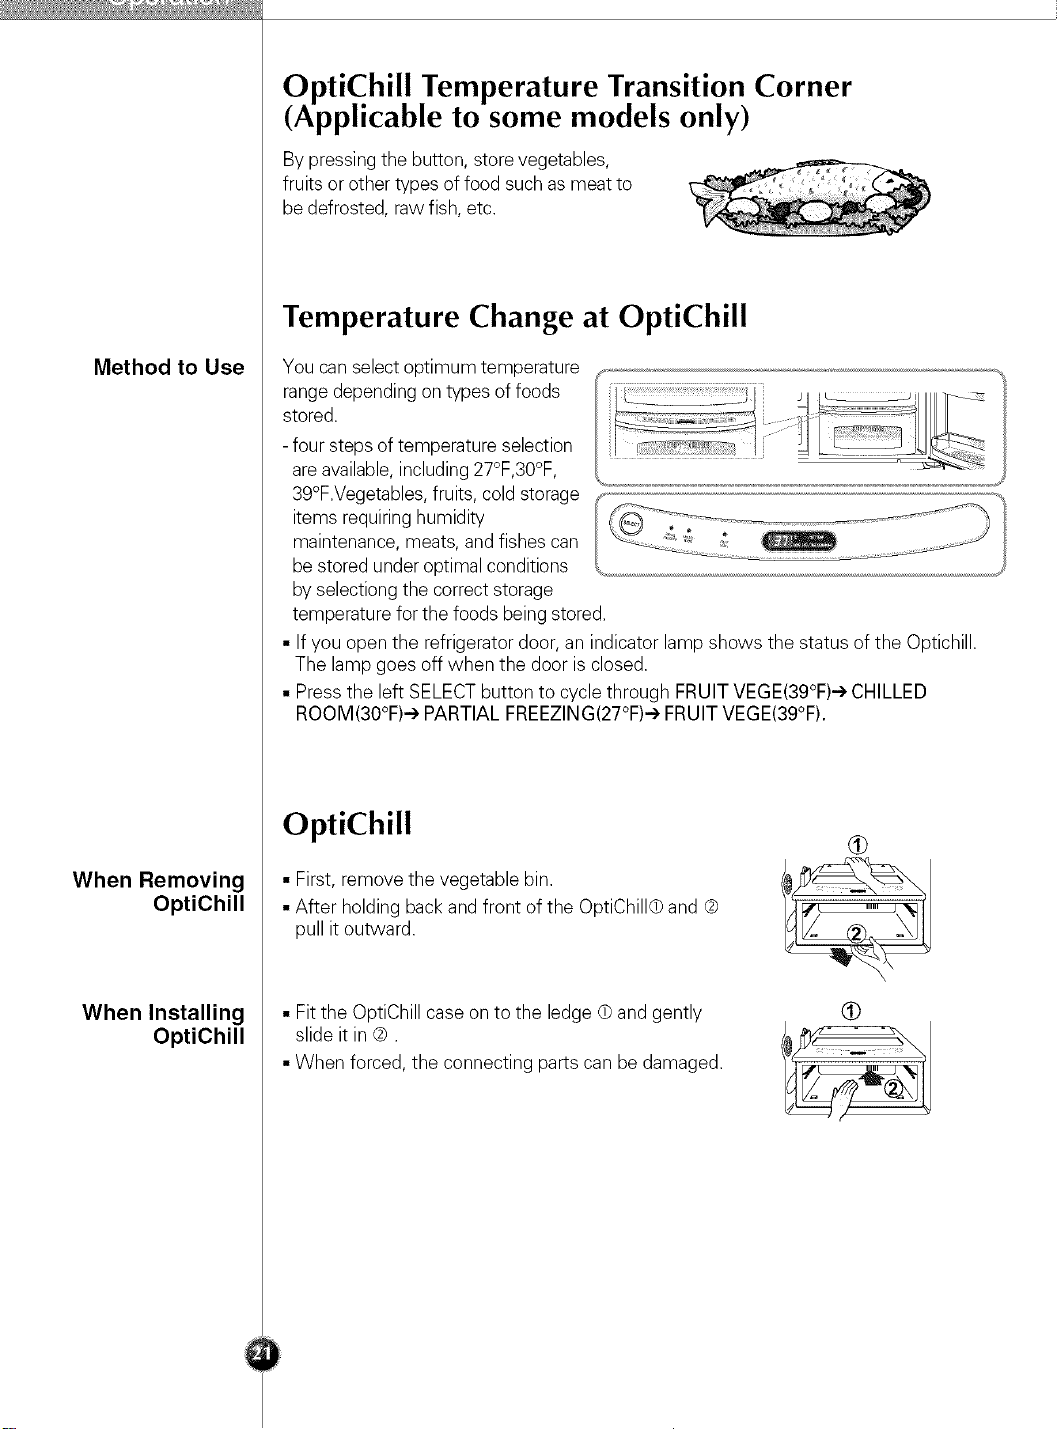
OptiChill Temperature Transition Corner
(Applicable to some models only)
By pressing the button, store vegetables,
fruits or other types of food such as meat to
be defrosted, raw fish, etc.
Temperature Change at OptiChill
Method to Use
When Removing
OptiChill
You can select optimum temperature
range depending on types of foods
stored.
- four steps of temperature selection
areavailable,including 27°F,30°F,
39°F.Vegetables,fruits, cold storage
items requiring humidity
maintenance, meats, and fishes can
be stored under optimal conditions
by selectiong the correct storage
temperature for the foods being stored.
• If you open the refrigerator door, an indicator lamp shows the status of the Optichill.
The lamp goes off when the door is closed.
• Press the left SELECTbutton to cycle through FRUITVEGE(39°F)-) CHILLED
ROOM(30°F)-e PARTIAL FREEZING(27°F)-eFRUIT VEGE(39°F).
OptiChill ¢
• First, remove the vegetable bin. /__::_
When Installing
OptiChill
• Afterpullitholdingoutward.backand front of the OptiChilld) and ® ___
\
• Fit the OptiChill case on to the ledge O and gently
slide it in ®.
• When forced, the connecting parts can be damaged.
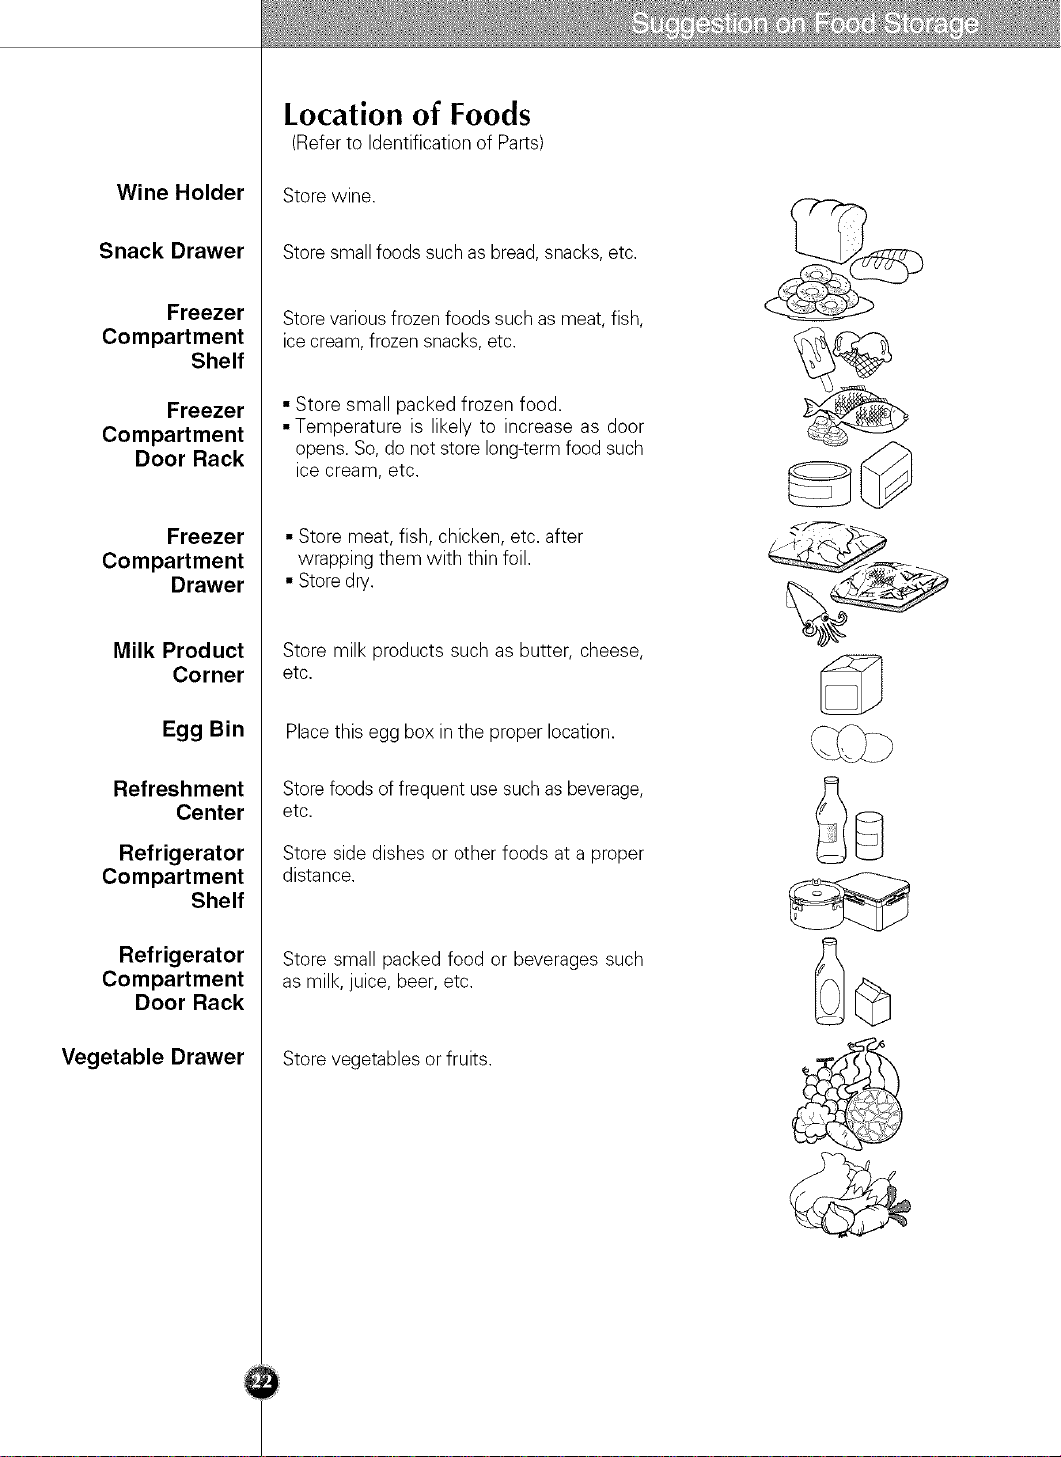
Location of Foods
(Refer to Identification of Parts)
Wine Holder
Snack Drawer
Freezer
Compartment
Shelf
Freezer
Compartment
Door Rack
Freezer
Compartment
Drawer
Milk Product
Corner
Egg Bin
Store wine.
Store small foods suchas bread, snacks,etc.
Store variousfrozen foods such as meat, fish,
ice cream, frozen snacks,etc.
• Store small packed frozen food.
• Temperature is likely to increase as door
opens. So,do not store long-termfood such
ice cream, etc.
• Store meat, fish, chicken, etc. after
wrapping them with thin foil.
• Storedry.
Store milk products such as butter, cheese,
etc.
Placethis egg box inthe proper location.
Refreshment
Center
Refrigerator
Compartment
Shelf
Refrigerator
Compartment
Door Rack
Vegetable Drawer
Storefoods of frequent use such asbeverage,
etc.
Store side dishes or other foods at a proper
distance.
Store small packed food or beverages such
as milk, juice, beer, etc.
Store vegetables or fruits.
Storing Foods
• Storefresh food in the refrigerator compartment. How food isfrozenandthawed isan
important factor in maintaining its freshness and flavor.
• Do not store food which spoils easilyat low temperatures, such as bananasand
melons.
• Allow hot food to cool prior to storing, placinghot food in the refrigerator could spoil
other food, and leadto higher energy consumption.
• When storing the food, cover itwith vinyl wrap or store in a container with a lid. This
prevents moisture from evaporating,and helpsfood to keep itstaste and nutrients.
• Do not block air vents with food. Smooth circulationof chilled air keeps refrigerator
temperatures even.
• Do notopen the door frequently. Openingthe door letswarm air enterthe refrigerator,
and cause temperatures to rise.
• Never keep too much food in door rackbecause they may push against by inner racks
so that the door cannot be fully closed.
Freezer
Compartment
Refrigerator
Compartment
• Do not store bottles in the freezer compartment - they may break when frozen.
• Do not refreeze food that has been thawed. This causes loss of taste and nutrient.
• When storing frozen food like ice cream for a long period, place it on the freezer
shelf, not in the door rack.
• Do not touch the cold foods or containers- especially made of metallic -, with wet
hands and place glass products in the freezer compartment.
-That'swhy you may havechilblainsandthey may be broken when their inner matters
arefrozen,causingpersonal injury.
• Avoid placing moist food intop refrigerator shelves, it could freeze from direct
contact with chilled air.
• Always cleanfood prior to refrigeration.Vegetables and fruits should be washed and
wiped, and packed food should be wiped, to prevent adjacent food from spoiling.
• When storing eggs in their storage rackor box, ensurethat they are fresh,and always
store them inanupright position, which keeps them fresh longer.
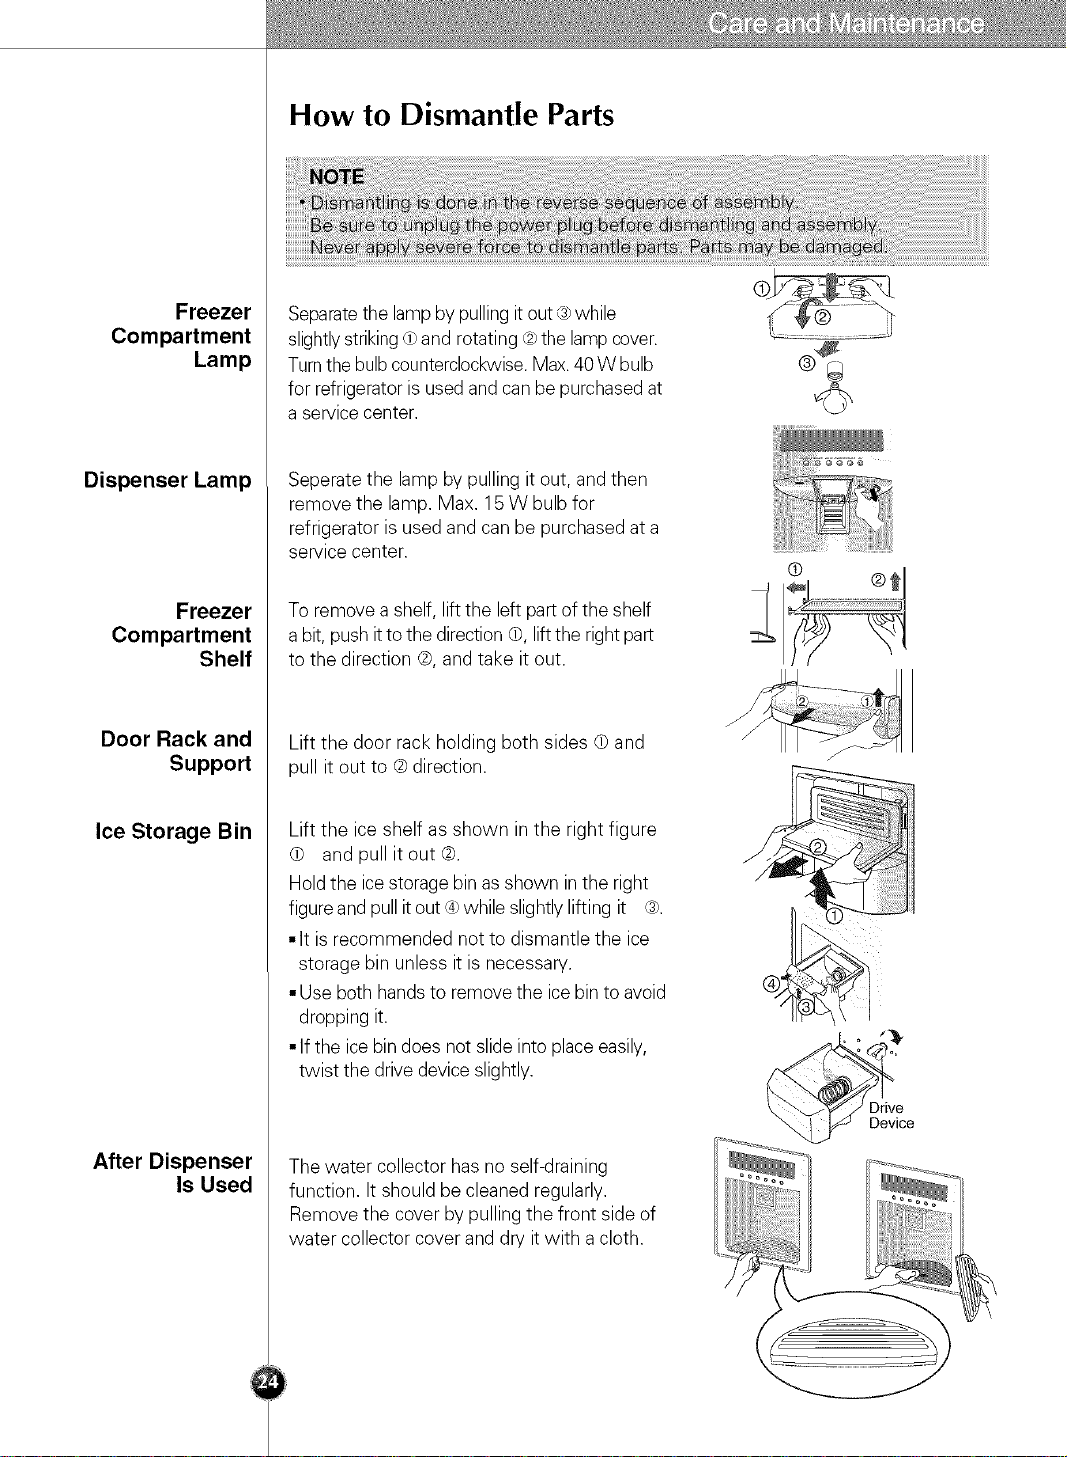
How to Dismantle Parts
Freezer
Compartment
Lamp
Dispenser Lamp
Freezer
Compartment
Shelf
Door Rack and
Support
Ice Storage Bin
Separatethe lampby pulling itout ® while
slightlystrikingd)and rotating ® the lampcover.
Turnthe bulbcounterclockwise.Max.40 W bulb
for refrigerator is used andcanbe purchased at
a servicecenter.
Seperate the lampby pulling it out, and then
remove the lamp. Max. 15 W bulb for
refrigerator is used and can be purchased at a
service center.
To remove a shelf, lift the left part of the shelf
a bit, pushit to the direction @,liftthe rightpart
to the direction ®, and take it out.
Lift the door rack holding both sides (b and
pull it out to ® direction.
Lift the ice shelf as shown in the right figure
@ and pull it out ®.
Hold the ice storage bin as shown inthe right
figureand pull it out ® while slightly lifting it ®.
•It is recommended not to dismantle the ice
storage bin unless it is necessary.
• Use both hands to remove the icebin to avoid
dropping it.
• If the icebin does not slideinto place easily,
twist the drive device slightly.
After Dispenser
Is Used
The water collector has no self-draining
function. Itshould be cleaned regularly.
Remove the cover by pulling the front side of
water collector cover and dry it with a cloth.
Lamp in
Refrigerator
Compartment
To remove the lamp cover, pressthe protrusion under the lamp cover to the front and
then pull the lamp cover out.
Turn the bulb counterclockwise. Max. 40 W bulb for refrigerator is usedand can be
purchased at a service center.
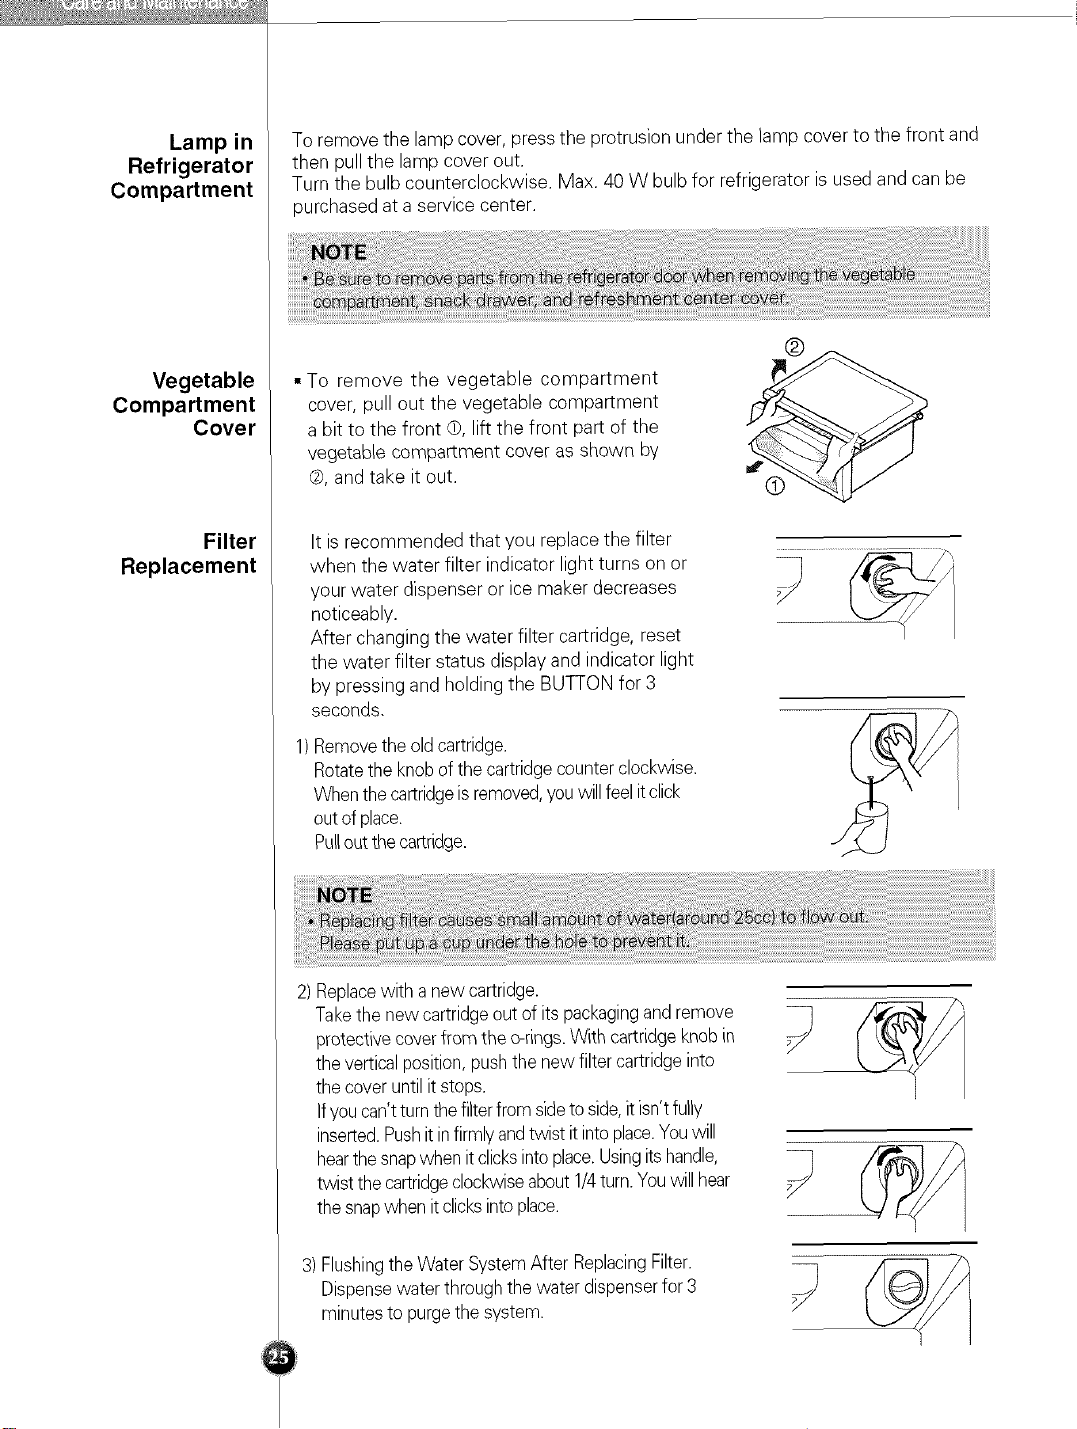
Vegetable
Compartment
Cover
Filter
Replacement
• To remove the vegetable compartment
cover, pull out the vegetable compartment
a bit to the front 0, lift the front part of the
vegetable compartment cover as shown by
¢, and take it out.
It is recommended that you replace the filter
when the water filter indicator light turns on or
your water dispenser or ice maker decreases
noticeably.
After changing the water filter cartridge, reset
the water filter status display and indicator light
by pressing and holding the BUTTON for 3
seconds.
Removethe old cartridge.
Rotatethe knobof the cartridgecounterclockwise.
Whenthe cartridgeisremoved,youwillfeel itclick
outof place.
Pulloutthecartridge.
2) Replacewith anew cartridge.
Takethe new cartridgeout of its packagingand remove
protectivecoverfrom the o-rings.With cartridgeknob in
theverticalposition,push the new filter cartridgeinto
thecover until itstops.
If youcan'tturnthefilterfromsideto side,it isn'tfully
inserted.Pushit infirmlyandtwist itinto place.Youwill
hearthesnapwhen it clicksintoplace.Usingitshandle,
twist thecartridgeclockwiseabout1/4turn.Youwillhear
thesnapwhenit clicksintoplace.
3) FlushingtheWater SystemAfter ReplacingFilter.
Dispensewaterthroughthe water dispenserfor 3
minutesto purgethe system.
General Information
Vacation Time
Power Failure
If You Move
Anti-
Condensation
Pipe
During average length vacations, you will probably find it best to leavethe refrigerator
in operation. Placefreezable items in freezer for longer life.
When you plan to store the refrigerator, remove all food, disconnect the power cord,
cleanthe interior thoroughly, and Block the doors open to prevent mold and mildew.
Be certain the stored refrigerator does not present a child entrapment danger.
Most power failures that are corrected in an hour or two will not affect your
refrigerator temperatures.
However, you should minimize the number of door openings while the power is off.
Remove or securely fasten down all loose items inside the refrigerator.
To avoid damaging the height adjusting screws, turn them all the way into the base.
The outside wall of the refrigerator cabinet may sometimes get warm, especiallyjust
after installation.
Don't be alarmed.This isdue to the anti-condensationpipe, which pumps hot
refrigerant to prevent sweating on the outer cabinet wall.
Cleaning
Exterior
Interior
After Cleaning
Warning
It is important that your refrigerator be kept clean to prevent undesirable odors. Spilled
food should be wiped up immediately, since it may acidify and stain plastic surfaces if
allowed to settle.
Use a lukewarm solution of mild soap or detergent to clean the durablefinish of your
refrigerator. Wipe with a clean damp cloth and then dry.
Regularcleaning is recommended. Wash all compartments with a baking soda
solution or a mild detergent and warm water. Rinse and dry.
Pleaseverify that the power cord is not damaged, power plug is not overheated, or
power plug is well inserted into the power consent.
Always remove power cord from the wall outlet prior to cleaning in the vicinity of
electrical parts (lamps,switches, controls, etc.).
Wipe up excess moisture with a sponge or cloth to prevent water or liquid from
getting into any electrical partand causing an electric shock.
Never use metallic scouring pads, brushes, coarse abrasive cleaners, strong alkaline
solutions, flammable or toxic cleaning liquids on any surface.
Do not touch frozen surfaces with wet or damp hands,because damp object will stick
or adhere to extremely cold surfaces.
Troubleshooting
Before calling for service, review this list. It may save you both time and expense,
This list includes common occurrences that are not the result of defective
workmanship or materials inthis appliance.
Runing of refrigerator
Refrigerator Refrigerator control is off. Set refrigerator control. See setting the
compressor controls.
does not run. Refrigerator is in defrost cycle. This is normal for a fully automatic
defrosting refrigerator. The defrost
cycle occurs periodically.
Plug at wall outlet is disconnected. Make sure plug is tightly pushed into
Power outage. Check house lights. Call local electric company.
Refrigerator Refrigerator is larger than the previous This is normal. Larger, more efficient
runs too much one you owned, units run longer in these conditions.
or too long Room or outside weather is hot. It is normal for the refrigerator to work
Refrigerator has recently been It takes some hours for the refrigerator
disconnected for a period of time. to cool down completely,
Large amounts of warm or hot food Warm food will cause the refrigerator to
may have been stored recently, run longer until the desired temperature
Doors are opened too frequently or too Warm air entering the refrigerator
long. causes it to run longer. Open the door
outlet.
longer under these conditions.
is reached.
less often.
Refrigerator or freezer door may be Make sure the refrigerator is level.
slightly open. Keep food and containers from
blocking door. See problem section.
OPENING/CLOSING of doors.
Refrigerator control is set toe cold. Set the refrigerator control to a
warmer setting until the refrigerator
temperature is satisfactory.
Refrigerator or freezer gasket is dirty, Clean or change gasket. Leaks in the
worn, cracked, or poorly fitted, door seal will cause refrigerator to run
longer in order to maintain desired
temperatures.
Thermostat is keeping the refrigerator This is normal. Refrigerator goes on and
at a constant temperature, off to keepthe temperature constant.
Refrigerator Thermostatiskeepingtherefrigerator Thisisnormal,Therefrigeratorgoeson
compressor ataconstanttemperature, andofftokeepthetemperatureconstant,
doesnotrun.
Temperatures are too cold
Temperature in the Freezercontrol is settoo cold Set the freezer control to a warmer
freezer is too cold setting until the freezer temperature is
but the refrigerator satisfactory,
temperature is
satisfactory.
Temperature in the Refrigerator control is set too cold. Set the refrigerator control to a
refrigerator is too warmer setting
cold and the freezer
temperature
is satisfactory,
Food stored in Refrigerator control is set too cold. See above solution.
drawers freezes.
Temperatures are too warm
Temperatures in Freezer control is set too warm. Setthe freezer or refrigerator control to
the refrigerator acolder setting until the freezer or
or freezer are refrigerator temperature is satisfactory,
too warm.
Refrigerator control is set too warm. Set the freezer or refrigerator control to a
Refrigerator control hassome effect on coldersetting until the freezer or
freezer temperature, refrigerator temperature is satisfactory,
Doors are opened too frequently or too Warm air enters the refrigerator/freezer
long. whenever the door is opened.
Open the door less often.
Door is slightly open. Close the door completely.
Large amounts of warm or hot food Wait until the refrigerator or freezer
may have been stored recently, has a chance to reach its selected
temperature.
Refrigerator has recently been A refrigerator requires some hours to
disconnected for a period of time. cool down completely.
Temperature in the Refrigerator control is set too warm. Set the refrigerator control to a colder
refrigerator setting.
is too warm but
the freezer
temperature is
satisfactory.
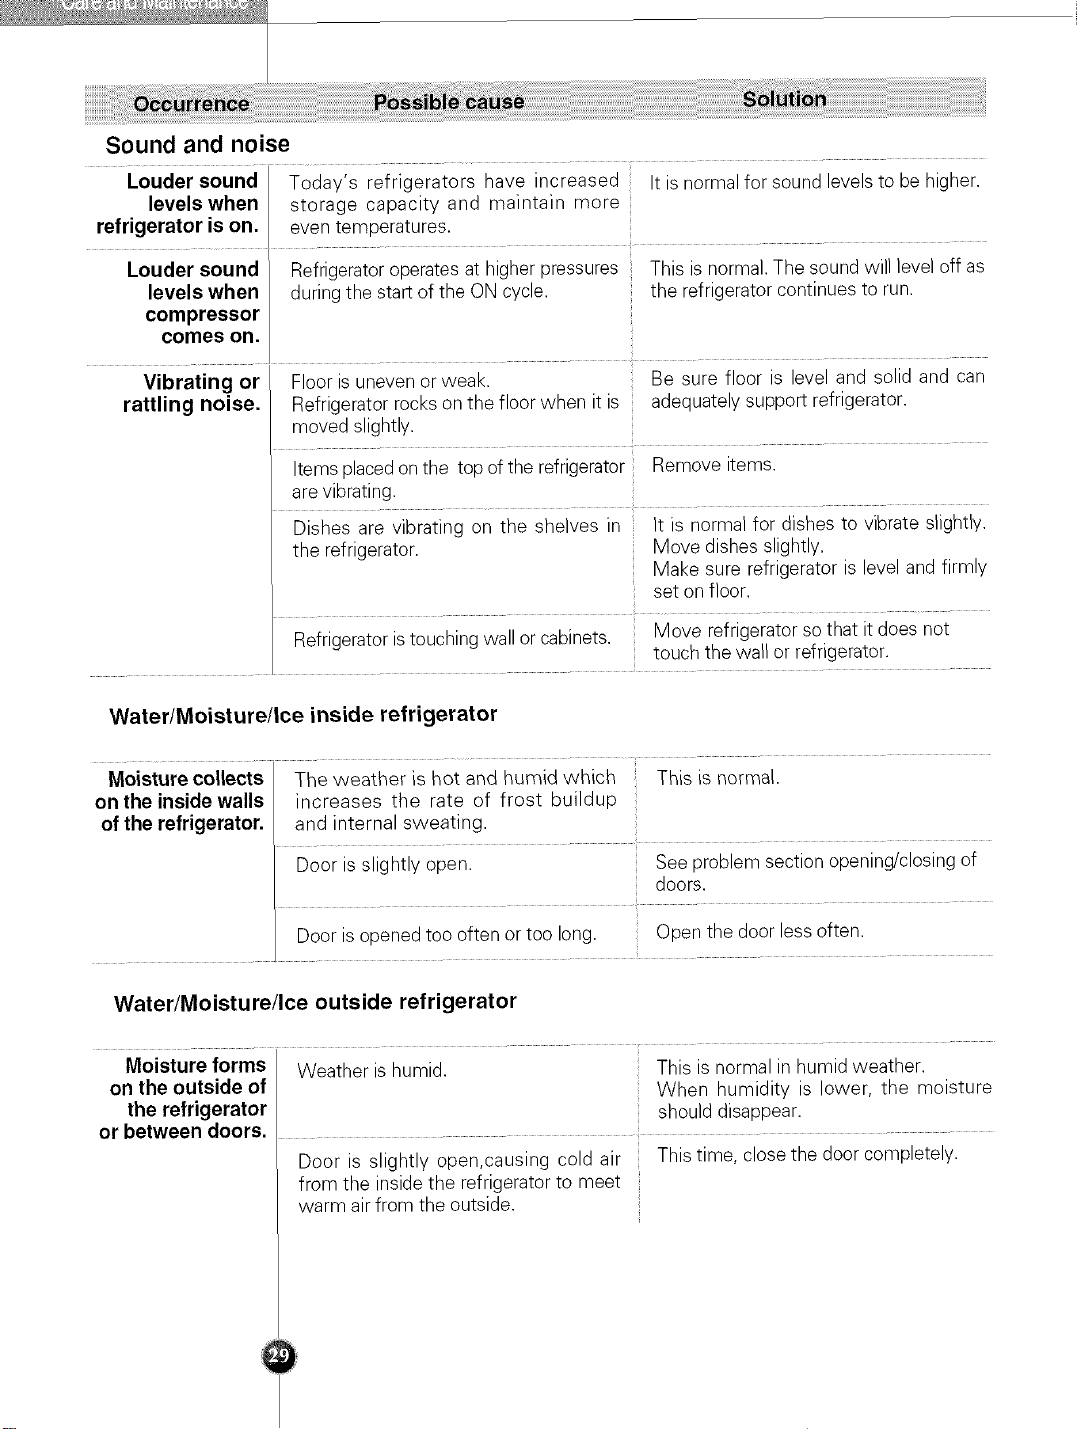
Sound and noise
Louder sound Today's refrigerators have increased It is normalfor sound levels to be higher.
levels when storage capacity and maintain more
refrigerator is on. even temperatures.
Louder sound Refrigeratoroperates at higher pressures This is normal. The sound will level off as
levels when during the start of the ON cycle, the refrigerator continues to run.
compressor
comes on.
Vibrating or Floor is uneven or weak, Be sure floor is level and solid and can
rattling noise. Refrigerator rockson the floor when it is adequately support refrigerator.
moved slightly.
Items placedon the top of the refrigerator Remove items.
are vibrating,
Dishes are vibrating on the shelves in It is normal for dishes to vibrate slightly,
the refrigerator. Move dishes slightly,
Make sure refrigerator is level and firmly
set on floor.
Refrigeratoris touching wall or cabinets. Move refrigerator so that it does not
Water/Moisture/Ice inside refrigerator
Moisture collects The weather is hot and humid which This is normal.
on the inside walls increases the rate of frost buildup
of the refrigerator, and internal sweating.
Door is slightly open. See problem section opening/closing of
Door is opened too often or too long. Open the door less often.
Water/Moisture/Ice outside refrigerator
Moisture forms
on the outside of
the refrigerator
or between doors.
Weather ishumid. This is normal in humid weather.
Door is slightly open,causing cold air This time, close the door completely.
from the inside the refrigerator to meet
warm air from the outside.
touch the wall or refrigerator.
doors.
When humidity is lower, the moisture
should disappear.
 Loading...