

LG LNM1880NNBD User Manual

VEHICLE NAVIGATION SYSTEM OWNER䳓S MANUAL
ENGLISH

Vehicle Navigation system
This owner䳓s manual explains how to use the Kia Vehicle䳓s Navigation system.
Before using the product, read the contents of this owner䳓s manual carefully and use this product safely.
䳜 The navigation screens shown in this manual may differ from the actual screen in your Kia vehicle.
䳜 The design and specification of this product may change without notification.
䳜 It is recommended to secure this owner䳓s manual in the vehicle䳓s glove compartment for future reference.
The Map Database cannot be copied without permission.
Important Notice: @1987-2013 HERE 䳍 All Rights Reserved
You may not otherwise reproduce, modify, and distribute the content without Hyundai MnSoft, INC.䳓s prior written consent.
2
Precautions for safety
Precautions for safety
Safety Notes
CAUTION
RISK OF ELECTRIC
SHOCK
DO NOT OPEN
CAUTION: TO REDUCE THE RISK OF
ELECTRIC SHOCK, DO NOT REMOVE THE
COVER (OR BACK). NO USER SERVICEABLE
PARTS INSIDE. REFER SERVICING TO
QUALIFIED SERVICE PERSONNEL.
The lightning flash with the arrowhead symbol
within an equilateral triangle is intended
to alert the user about the presence of
uninsulated dangerous voltage within the
product䳓s enclosure that may be of sufficient
magnitude to constitute a risk of electric
shock.
The exclamation point within an equilateral
triangle is intended to alert the user to
the presence of important operating and
maintenance (servicing) instructions in the
literature accompanying the appliance.
Always operate the vehicle in a safe manner.
Do not be distracted by the vehicle while
driving and always be fully aware of all driving
conditions. Do not change settings or any
functions.
Pull over in a safe and legal manner before
attempting such operations.
To promote safety, certain functions are
disabled unless the parking brake is on.
To reduce the risk of electric shock, do not
remove the cover or back of this product.
There are no user-serviceable parts inside.
Refer servicing to qualified service personnel.
To reduce the risk of fire or electric shock,
do not expose this product to dripping or
splashing water, rain, or moisture.
When driving your vehicle, be sure to keep the
volume of the unit low enough to allow you to
hear sounds coming from the outside.
Do not drop it and avoid heavy impacts at
anytime.
The driver should not watch the monitor while
driving. If the driver watches the monitor while
driving, it may lead to carelessness and cause
an accident.
3

Precautions for safety
WARNING:
䳜 Don䳓t use a mobile phone when you are
driving. You must stop at a safe place to use
a mobile phone.
䳜 The use of the navigation radio by no means
relieves the driver of his/her responsibilities.
The highway code must always be observed.
Always observe the current traffic situation.
䳜 The applicable traffic regulations and the
prevailing traffic situation always take
precedence over the instructions issued by
the navigation system if they contradict one
another.
䳜 For traffic safety reasons, use the navigation
system menus only before starting a journey
or when the vehicle is stationary.
䳜 In certain areas, one-way streets, turn-
off, and entry prohibitions (e.g. pedestrian
zones), the navigation system will give a
warning. Pay particular attention to these
kind of cases.
䳜 The navigation system does not take the
䳜 The current legal road traffic speed limit
䳜 Do not rely exclusively on the navigation
relative safety of the suggested routes into
consideration:
Road blocks, building sites, height or weight
restrictions, traffic or weather conditions,
or other influences which affect the
route safety or travel time. Use your own
discretion in order to decide on the suitability
of the suggested routes.
always takes priority over the values saved
in the data. It is impossible to provide an
assurance that the speed values of the
navigation system will always match those
of the current traffic regulations in every
situation.
system when attempting to locate an
emergency service (hospital, fire service etc.).
It cannot be guaranteed that all available
emergency services in your vicinity are saved
in the database. Use your own discretion and
abilities to secure help in such situations.
4

Precautions for safety
CAUTION:
䳜 Do not keep the navigation system running
with the engine stopped. Doing so may
discharge the vehicle battery. When you
use the navigation system, always keep the
engine running.
䳜 Do not disassemble or modify this system.
If you do, it may result in accidents, fire, or
electrical shock.
䳜 Some states/provinces may have laws
limiting the use of video screens while
driving. Use the system only where it is legal
to do so.
5

Table of contents
Table of contents
Precautions for safety 3
Safety Notes . . . . . . . . . . . . . . . . . . . . . . . . . . . .3
Table of contents 6
General information 9
About USB . . . . . . . . . . . . . . . . . . . . . . . . . . . . . . 9
Music file information . . . . . . . . . . . . . . . . . . . . .9
Using iPod Devices . . . . . . . . . . . . . . . . . . . . . .10
Precautions upon using iPod................................10
Supported iPod devices .........................................10
Cautions upon using SD cards . . . . . . . . . . . . .10
Ejecting and Inserting SD cards ...........................10
Usage of SD cards ..................................................10
Name of each component 11
Head unit . . . . . . . . . . . . . . . . . . . . . . . . . . . . . .11
Steering wheel remote control . . . . . . . . . . . .13
Basic operation 14
Starting the system for the first time . . . . . .14
Turning the system on . . . . . . . . . . . . . . . . . . .14
Turning the system off . . . . . . . . . . . . . . . . . .14
AV OFF . . . . . . . . . . . . . . . . . . . . . . . . . . . . . . . .14
AV ON . . . . . . . . . . . . . . . . . . . . . . . . . . . . . . . . .14
Adjusting the volume . . . . . . . . . . . . . . . . . . . .14
Resetting the system . . . . . . . . . . . . . . . . . . . .15
[Home] screen . . . . . . . . . . . . . . . . . . . . . . . . . .15
Configuration for Home screen ...........................15
Basic operation for [Home] screen .....................16
Editing the [All menus] .........................................16
Adding your favourite menu items to [My Menu]
Rearranging your favourite menu in [My Menu]
Deleting your favourite menu items in [My Menu]
Playing last media source ....................................18
...17
. . 1 8
....18
Radio operation 19
Listening to AM . . . . . . . . . . . . . . . . . . . . . . . . .19
Opening the station list sorted in numerical
order .........................................................................19
Auto search .............................................................19
Saving AM favourites ............................................19
Listening to DAB/FM . . . . . . . . . . . . . . . . . . . . .20
Opening the station list ........................................21
Saving DAB/FM favourites....................................21
Program guide - DAB only ...................................21
SLS (Slide Show) - DAB only ................................22
Scan . . . . . . . . . . . . . . . . . . . . . . . . . . . . . . . . . .22
Sound settings . . . . . . . . . . . . . . . . . . . . . . . . . .22
USB Operation 23
Playing USB music . . . . . . . . . . . . . . . . . . . . . . .23
Pause ........................................................................23
Skip ...........................................................................23
Search ......................................................................23
Seek ..........................................................................23
Delete current file ..................................................24
Sound settings ........................................................24
List ............................................................................24
Repeat ......................................................................25
Shuffle......................................................................25
iPod Operation 26
Playing iPod . . . . . . . . . . . . . . . . . . . . . . . . . . . .26
Pause ........................................................................26
Skip ...........................................................................26
Search ......................................................................26
Seek ..........................................................................26
List ............................................................................26
Repeat ......................................................................26
Shuffle......................................................................26
Sound settings ........................................................26
Auxiliary device operation 27
Playing an AUX source . . . . . . . . . . . . . . . . . . .27
Sound settings ........................................................27
Bluetooth® audio 28
Playing Bluetooth audio . . . . . . . . . . . . . . . . . .28
Starting the Bluetooth audio ...............................28
Pause ........................................................................28
Skip ...........................................................................28
Repeat ......................................................................28
Shuffle......................................................................28
Connection settings ...............................................28
Sound settings ........................................................28
6

Table of contents
Voice memo 29
Making a voice memo . . . . . . . . . . . . . . . . . . . .29
Start/Pause/Stop the voice memo. ....................29
Playing a voice memo . . . . . . . . . . . . . . . . . . . .29
Pause/Play ..............................................................29
Skip .......................................................................... 29
Search ......................................................................29
Deleting voice memo .............................................30
Saving voice memo on a USB ..............................30
Checking memory space information ................30
Getting started with navigation 31
Precautions for safe driving . . . . . . . . . . . . . .31
What is GNSS? . . . . . . . . . . . . . . . . . . . . . . . . . .31
About satellite signals . . . . . . . . . . . . . . . . . . .31
Acquiring satellite signals . . . . . . . . . . . . . . . . .31
Operating Navigation Screen . . . . . . . . . . . . . .32
Map screen ..............................................................32
Zoom In / Zoom Out ..............................................33
Map scale .................................................................33
Navigation volume .................................................33
Scrolling map ..........................................................33
Making a call to POI ...............................................34
Guidance to previous destinations .....................34
Quick menu . . . . . . . . . . . . . . . . . . . . . . . . . . . .35
Reroute ....................................................................35
Route options .........................................................35
Detour ......................................................................35
Map display .............................................................35
POI ............................................................................36
Traffic .......................................................................36
Save ..........................................................................37
Navigation menu . . . . . . . . . . . . . . . . . . . . . . . .37
Searching for destination 38
Places Search . . . . . . . . . . . . . . . . . . . . . . . . . . .38
Address Search . . . . . . . . . . . . . . . . . . . . . . . . .38
Previous destinations . . . . . . . . . . . . . . . . . . . .39
POI categories . . . . . . . . . . . . . . . . . . . . . . . . . .39
Service stations . . . . . . . . . . . . . . . . . . . . . . . . .40
Restaurants . . . . . . . . . . . . . . . . . . . . . . . . . . . .40
Emergency . . . . . . . . . . . . . . . . . . . . . . . . . . . . .41
Address book . . . . . . . . . . . . . . . . . . . . . . . . . . .41
Adding the position to address book..................41
Exporting address book to USB ...........................42
Importing address book from USB .....................42
Editing address book .............................................43
Deleting address book ...........................................43
Coordinates . . . . . . . . . . . . . . . . . . . . . . . . . . . .43
Home, Office, Favourites . . . . . . . . . . . . . . . . .44
Registering Home, Office or Favourites ............44
Finding your Home, Office, or Favourite place .44
Using the route menu 45
Stop guidance/ Resume guidance . . . . . . . . . .45
Route options . . . . . . . . . . . . . . . . . . . . . . . . . .45
Overview . . . . . . . . . . . . . . . . . . . . . . . . . . . . . . .45
Preview . . . . . . . . . . . . . . . . . . . . . . . . . . . . . . . .46
Edit route . . . . . . . . . . . . . . . . . . . . . . . . . . . . . .46
Route information . . . . . . . . . . . . . . . . . . . . . . .47
Avoid street . . . . . . . . . . . . . . . . . . . . . . . . . . . .47
7
Bluetooth® Wireless Technology 53
Before using the Bluetooth hands-free . . . . .53
What is Bluetooth Wireless Technology? ..........53
Precautions for safe driving ................................53
Cautions upon connecting Bluetooth phone .....53
Pairing and connecting the unit and a
Bluetooth phone . . . . . . . . . . . . . . . . . . . . . . . .53
When no phones have been paired .....................53
When a phone is already paired ..........................54
When pairing additional device ............................54
Disconnecting the connected phone ..................55
Deleting Bluetooth Devices ..................................55
Making a call by entering phone number . . . .55
Making a call by redialling . . . . . . . . . . . . . . . .55
Answering/Rejecting a call . . . . . . . . . . . . . . . .56
Switching call to the mobile phone . . . . . . . . .56
Ending a call . . . . . . . . . . . . . . . . . . . . . . . . . . . .56
Using the menu during a phone call . . . . . . . .56
Calling list . . . . . . . . . . . . . . . . . . . . . . . . . . . . . .57
Making a call from calling list ..............................57
Downloading call history .......................................57
Contacts . . . . . . . . . . . . . . . . . . . . . . . . . . . . . . .57
Making a call from contacts .................................57
Downloading mobile phone contacts ..................58
Searching by name or number ............................58
Favourites . . . . . . . . . . . . . . . . . . . . . . . . . . . . .58
Calling favourites ...................................................58
Adding as a favourite ............................................59
Deleting favourites ................................................59
Messages .................................................................59
Phone settings . . . . . . . . . . . . . . . . . . . . . . . . .59

Table of contents
Settings 60
[Settings] menu overview . . . . . . . . . . . . . . . .60
Navigation . . . . . . . . . . . . . . . . . . . . . . . . . . . . .60
Display ......................................................................60
Guidance ..................................................................60
My data ....................................................................61
Default .....................................................................61
Sound . . . . . . . . . . . . . . . . . . . . . . . . . . . . . . . . .61
Display . . . . . . . . . . . . . . . . . . . . . . . . . . . . . . . .62
Bluetooth . . . . . . . . . . . . . . . . . . . . . . . . . . . . . .63
Bluetooth connections ..........................................63
Auto connection priority .......................................63
System Bluetooth info ..........................................63
Vehicle name ...........................................................63
Passkey ....................................................................64
Default .....................................................................64
Phone projection . . . . . . . . . . . . . . . . . . . . . . . .64
Custom button . . . . . . . . . . . . . . . . . . . . . . . . .64
Date/Time . . . . . . . . . . . . . . . . . . . . . . . . . . . . .65
Language . . . . . . . . . . . . . . . . . . . . . . . . . . . . . .65
Keyboard . . . . . . . . . . . . . . . . . . . . . . . . . . . . . .65
Screen saver . . . . . . . . . . . . . . . . . . . . . . . . . . .66
Advanced . . . . . . . . . . . . . . . . . . . . . . . . . . . . . .66
System info . . . . . . . . . . . . . . . . . . . . . . . . . . . .67
Version info .............................................................67
Update......................................................................67
Memory ...................................................................67
Default .....................................................................68
Using rear camera - Option 69
About Rear Camera . . . . . . . . . . . . . . . . . . . . .69
Turning on the rear camera .................................69
Before thinking there is a product
defect 70
Troubleshooting 72
Trademarks and Licenses 74
Bluetooth® Wireless Technology .........................74
iPod® ........................................................................74
Open Source Software Notice Information .......74
Specification 75
8

General information
General information
About USB
䳜 Take precautions regarding static electricity
when connecting/disconnecting external USB
devices.
䳜 Encoded MP3 Players will not be recognised
when connected as an external device.
䳜 When connecting an external USB device, the
device may not properly recognise the USB in
some states.
䳜 USB devices formatted as FAT 16/32, exFAT
or NTFS are supported.
‐ Read: FAT 16/32, exFAT, NTFS
‐ Write: FAT 16/32 (It may be limited when
using the POI export functions.)
䳜 Some USB devices may not be supported due
to compatibility issues.
䳜 Avoid contact between the USB connector
and bodily parts/foreign objects.
䳜 Repeated connecting/disconnecting of USB
devices within short periods of time may
result in product malfunction.
䳜 The amount of time required to recognise the
external USB device may differ depending on
the type, size, or file formats stored on the
USB. Such differences in required time are
not indications of malfunction.
䳜 The device may not recognise the USB
device if separately purchased USB hubs and
extension cables are being used. Connect the
USB directly with the multimedia terminal of
the vehicle.
䳜 When application programs are installed to a
specific USB, files may not play properly.
䳜 The device may not operate normally if MP3
players, mobile phones, digital cameras,
or other electronic devices (USB devices
not recognised as portable disk drives) are
connected with the device.
䳜 Charging through the USB may not work for
some mobile devices.
䳜 The device may not support normal
operation when using a USB memory type
other than
䳜 The device may not support normal
operation when using formats such as HDD
type, CF, or SD memory.
䳜 The device will not support files locked by
DivX DRM (Digital Rights Management).
䳜 USB memory sticks used by connecting an
Adaptor (SD
properly recognised.
metal cover type USB memory.
type or CF type) may not be
Music file information
䳜 Sampling frequency:
- 32, 44.1, 48 kHz (MP3, WMA, OGG, WAV)
- 1 Hz - 48 kHz (FLAC)
䳜 Bit rate:
- 32 - 320 kbps (MP3, WMA, OGG, FLAC)
- 8 bit/16 bit (WAV)
䳜 Version: Any version
䳜 Playable file format: 䳖.mp3䳗/ 䳖.wma䳗/ 䳖.ogg䳗/
䳖.flac䳗/ 䳖.wav䳗
9

General information
Using iPod Devices
Precautions upon using iPod
iPod® is a registered trademark of Apple Inc.
䳜 Some iPods with unsupported communication
protocols may not operate properly with the
system.
䳜 If the iPod malfunctions due to an iPod device
defect, reset the iPod and try again. To learn
more, refer to your iPod manual.
䳜 During ACC ON state, connecting the iPod
through the iPod cable (the cable that was
supplied when purchasing the iPod/iPhone
product), will charge the iPod through
the system, (However, an iPad cannot be
charged).
䳜 The use of genuine iPod cables supplied by
Apple is recommended. The use of other
products may result in noise or abnormal
operation.
䳜 With some iPhones, streaming audio and iPod
control may occasionally conflict. If problems
persist, remove the iPhone and connect
again.
䳜 Use iPod with complete synchronisation to
iTunes. Unauthorised song addition may
cause abnormal operation.
䳜 If iPod and Bluetooth are connected
simultaneously with the same iPhone, you
cannot use the Bluetooth audio function.
䳜 If iPod touch or iPhone is used, iOS5.0 or a
later version is recommended.
Supported iPod devices
iPhoneSE
iPhone7, iPhone7 Plus
iPhone6, iPhone6 Plus, iPhone6s, iPhone6s Plus
iPhone5C, iPhone5S, iPhone5
iPhone4S, iPhone4
iPhone3GS, iPhone3G
iPod Touch (1st through~ 5th generation)
iPod Nano (1st through~ 7th generation)
iPod Classic (1st through~ 6th generation)
iPad WiFi (1st through~ 4th generation)
iPad Air WiFi (1st ~2nd generation)
iPad Mini (1st ~2nd generation)
Cautions upon using SD cards
Ejecting and Inserting SD cards
䳜 Ejecting and inserting SD cards while the
system is operating may result in SD card or
System errors. To eject or insert the SD card,
first turn off the system and the vehicle.
䳜 Eject/insert SD cards only to update the map
with a new version.
䳜 When a SD Card with the new version of
update software is installed, then the system
will reboot automatically.
Usage of SD cards
䳜 The SD card is formatted to include only map
and new
䳜 The
and play it.
䳜 Do not add, delete, or format files within the
SD card.
navi S/W.
SD card cannot be used to save music
10
Name of each component
Name of each component
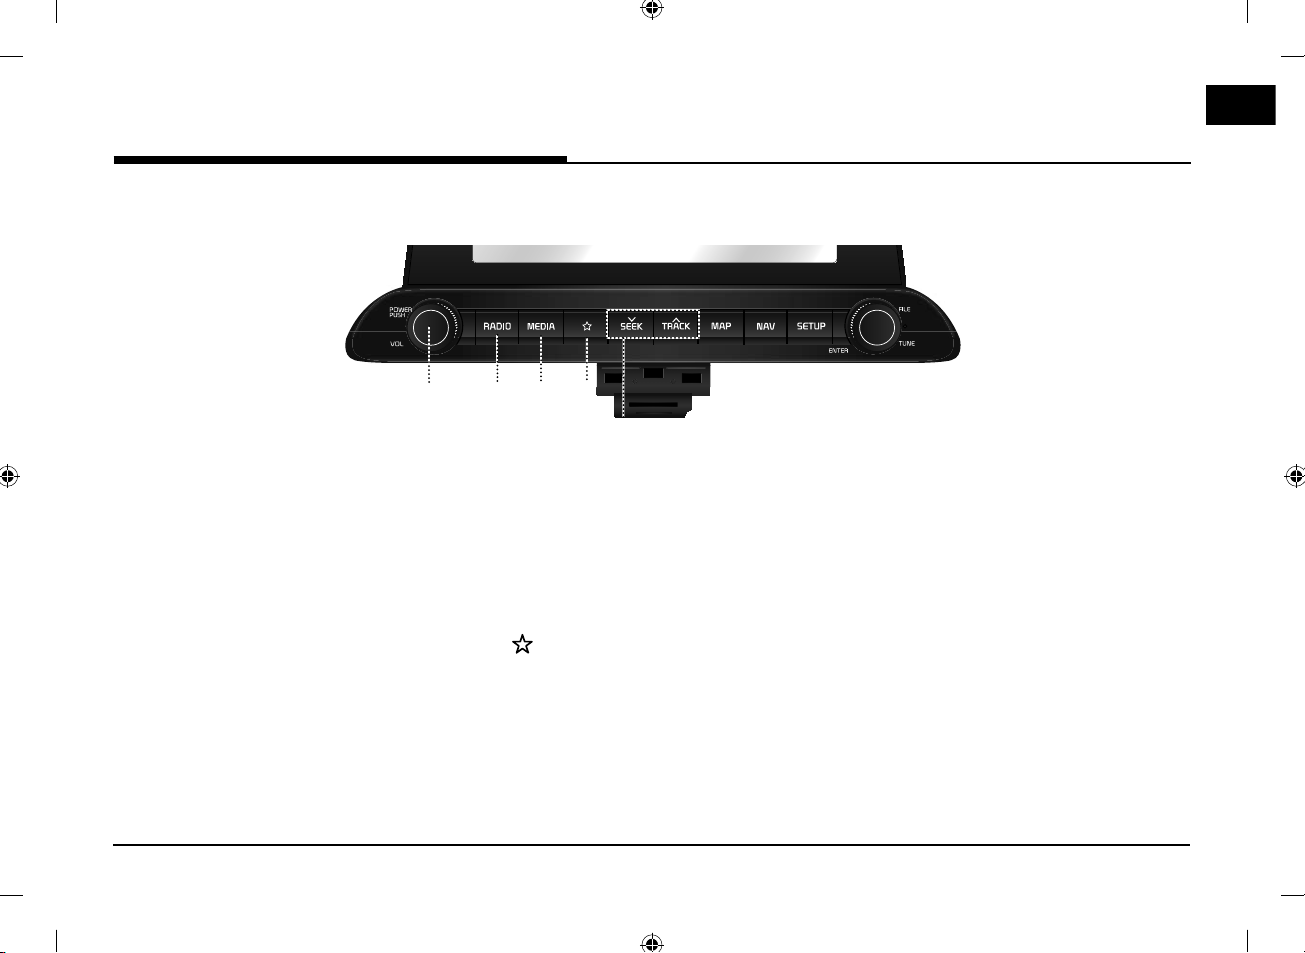
Head unit
a
1. 䳜 POWER PUSH button
‐ Power on
Press this button in system OFF status.
‐ Power off
Press and hold this button in power ON
status.
䳜 Volume control knob (VOL)
Turn anticlockwise or clockwise to control
volume.
䳜 AV on/off
Press this button to turn AV on or off in
power ON status.
2. RADIO button
Converts to the last played radio mode
(DAB/FM, AM).
b
3. MEDIA button
If the playable media source is one, it moves
to the corresponding screen. If the playable
media sources are more than two, it moves
to the [Media] screen. You can select a media
source ([USB Music]/ [iPod]/ [Apple CarPlay]/
[AUX]/[Bluetooth Audio]/[Android Auto]).
4. (Custom button)
Press to go to the [Custom button settings]
menu. After setting, press to use desired
function. Before setting, press and hold to go
to the [Custom button settings] menu.
5. SSEEK/TRACKW button
dc
e
‐ When it is pressed for a short time
䳜 AM mode: plays previous/next available
frequency.
11
䳜 DAB/FM mode: plays previous/next
available station existing within [List]
menu. If there is no or one station
in the [List] menu, the 䳖Auto tuning䳗
function is executed.
䳜 MEDIA mode: plays previous/next file.
(except for AUX)
‐ When it is pressed and held
䳜 AM mode: plays previous/next available
frequency.
䳜 DAB/FM mode: plays previous/next available
station existing within [List] menu.
䳜 MEDIA mode (except for Bluetooth,
AUX and Android Auto): rewinds or fast
forwards the file.
Name of each component
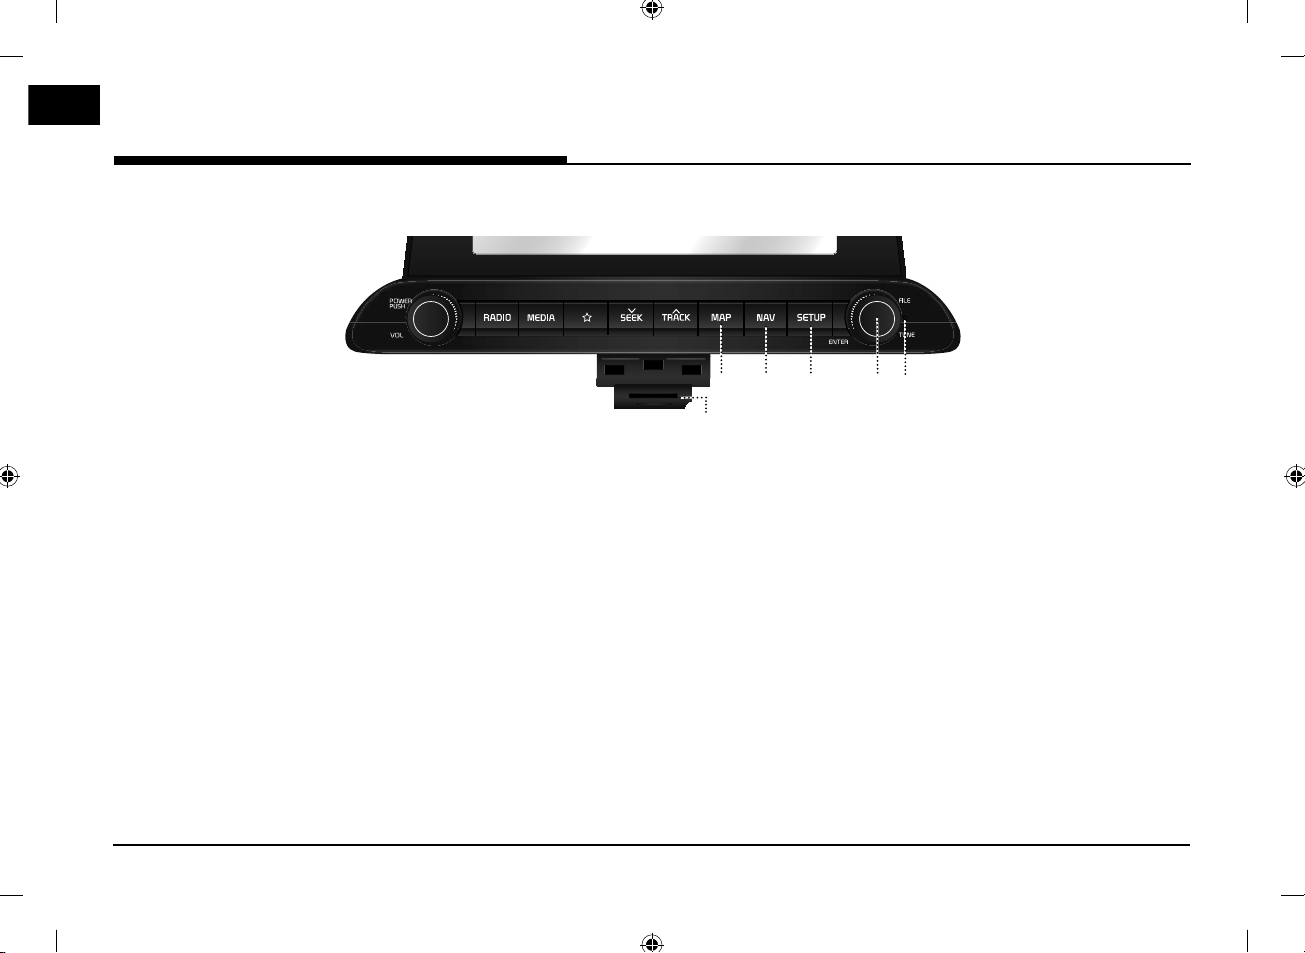
6. MAP button
‐ Press to display the map screen of the
current location.
‐ Press to repeat the voice guidance on
the map screen (Voice guidance for road
names and numbers is not supported in
some countries).
7. NAV button
Press to move to the navigation menu
screen.
8. SETUP button
Press to go to the [Settings] menu.
g
f
k
9. FILE/ENTER/TUNE button
‐ AM mode: turn left/right to tune manually.
‐ DAB/FM mode: turn left/right to search
for a desired station and then press.
‐ MEDIA mode (except for Bluetooth, AUX,
Apple CarPlay and Android Auto): turn
left/right to search for the desired file
and press.
‐ Navigation mode: turn to the left/right to
change the map scale on the map screen.
12
j
h
i
10. Reset hole
Press with a thin object to reset the unit
when it does not operate normally.
11. Cover for protecting SD card
(SD card insert slot)
Insert the SD card into the slot.
Name of each component
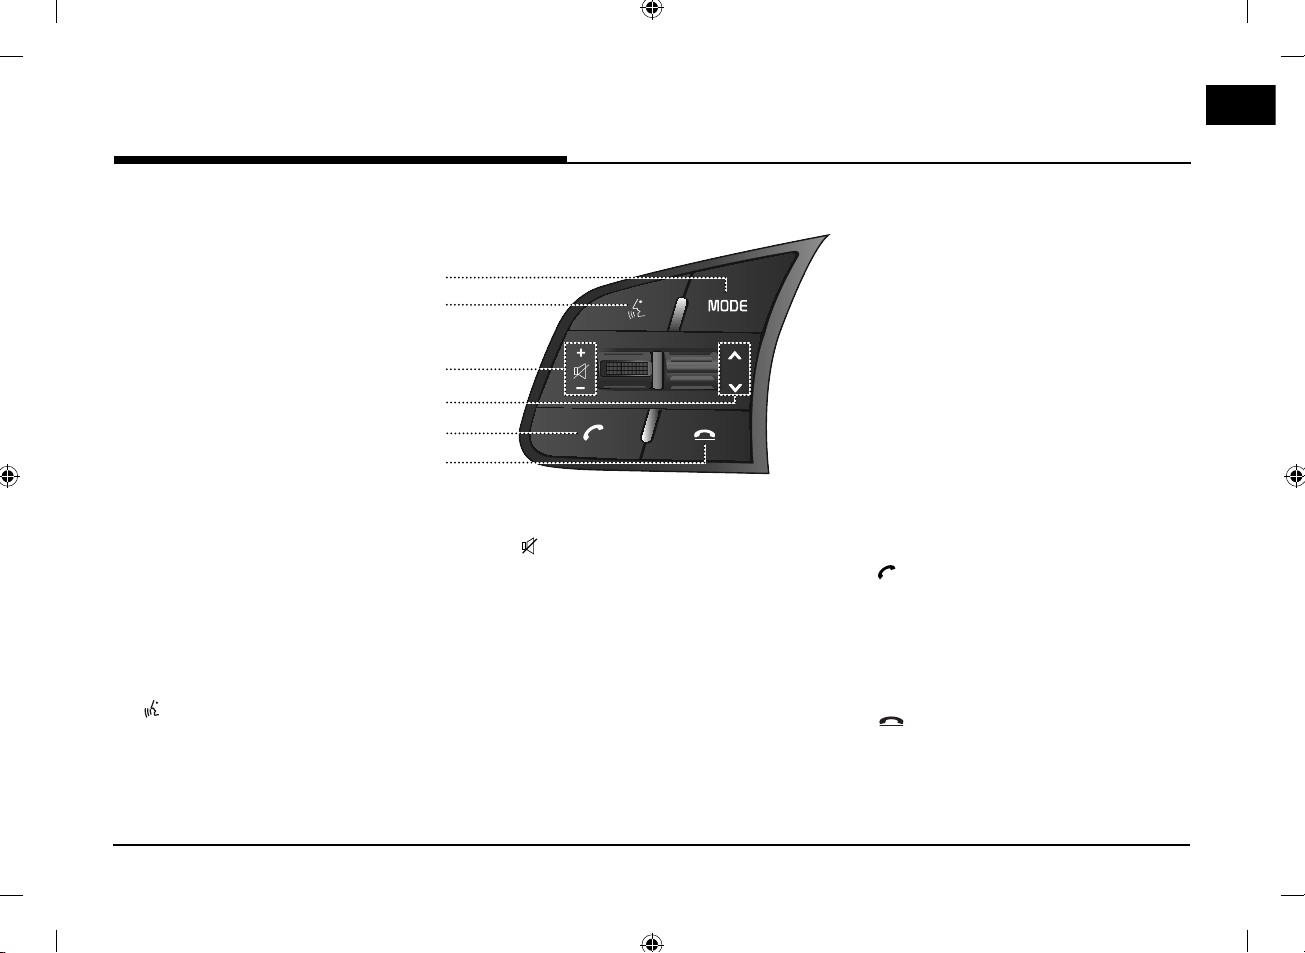
Steering wheel remote control
1
2
3
4
5
6
1. MODE button
䳜 Each time this button is pressed, the
Radio or Media mode is changed. You can
select the modes to toggle, in settings.
䳜 If the media is not connected, it is changed
in the order DAB/FM → AM → DAB/FM.
䳜 When it is pressed and held, AV is
turned off. (But, the voice guidance
works normally in navigation mode.)
2. button
Press to switch to voice recognition mode
when the phone supporting Android
Auto/Apple CarPlay function is connected.
To cancel it, press the button again.
3. 䳜 +/- (Volume button)
Increases or decreases the volume level.
䳜 button
Press to mute the sound (It will be paused
4.
in some media modes).
button
W/S
‐ When it is pressed for a short time
䳜 Radio (DAB/FM, AM) mode: plays
previous/next favourites.
䳜 MEDIA mode: plays previous/next file.
(except for AUX)
‐ When it is pressed and held
䳜 AM mode: plays previous/next
available frequency.
䳜 DAB/FM mode: plays previous/next
stations.
13
䳜 MEDIA mode (except for Bluetooth,
AUX and Android Auto): rewinds or fast
forwards the file.
5. button
Press to operate Bluetooth hands-free
function.
䳜 Press to accept a call.
䳜 Press to make a call from last calls.
䳜 Press and hold for redialling.
6. button
䳜 Press to end the phone call during a call.
䳜 Press to reject the call in the incoming call
screen.
Basic operation
Basic operation
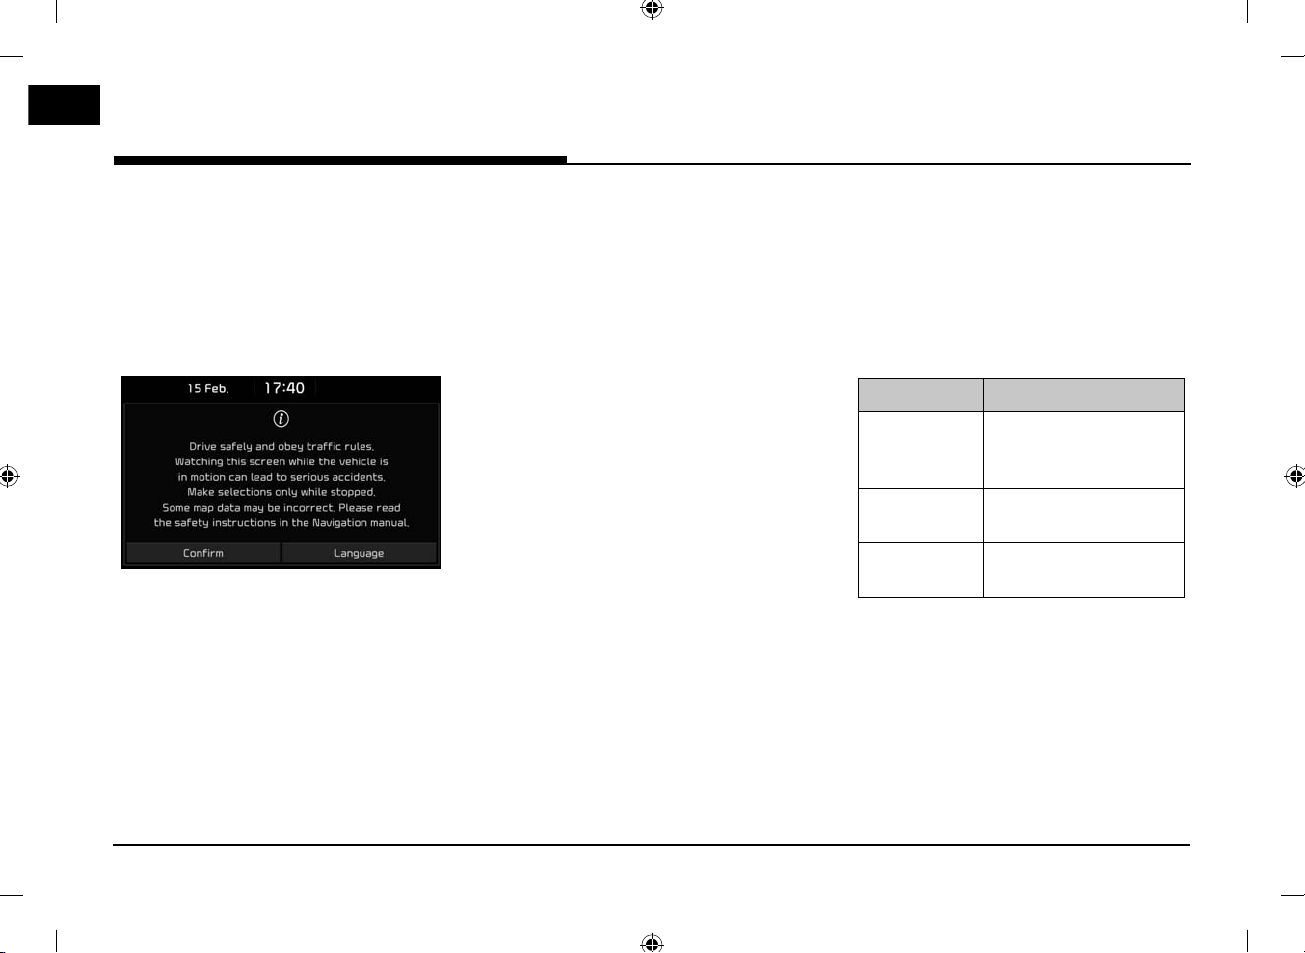
Starting the system for the
first time
1. Press the engine start button or set the
ignition key to On or ACC.
Once the system is turned on, the booting
process will start and the safety warning
page is displayed.
2. Press [Confirm].
If you want to change the system
language, press [Language]. For more
details, refer to 䳖Language䳗 on page 65.
Notes
䳜 You cannot operate the system while it is
booting up. It may take some time for all of
the features to be ready.
䳜 The safety warning page is displayed every
time the ignition is turned on. The displayed
warnings are related to safety. Please read
carefully and comply with the safety warnings.
䳜 If there is no operation for 10 seconds in
the safety warning screen the system
automatically switches to the last played
mode.
Turning the system on
Press [POWER PUSH] on the head unit in
system OFF status.
Note
Pay attention to the volume setting when
turning the system on. A sudden output of
extreme volume upon turning the system on
could lead to hearing impairment. Adjust the
volume to a suitable level before turning the
system off or set the start up volume in the
sound [Settings] menu.
Turning the system off
Press and hold [POWER PUSH] on the head
unit in system ON status.
AV OFF
Press [POWER PUSH] on the head unit to turn
AV off in power ON status.
AV ON
Press [POWER PUSH] on the head unit to turn
AV on in AV OFF status.
Adjusting the volume
Turn the volume control knob (VOL) on the
head unit to the left/right.
Note
When you turn the system off, the current
volume level is automatically memorised.
Whenever you turn the system on, it operates
at the memorised volume level if you do not
set the start up volume in sound [Settings]
menu.
Mode Description
Radio or media During radio or media
playback, turn to the
left/right.
Bluetooth call During a Bluetooth call,
turn to the left/right.
Bluetooth bell During an incoming call,
turn to the left/right.
14
Basic operation
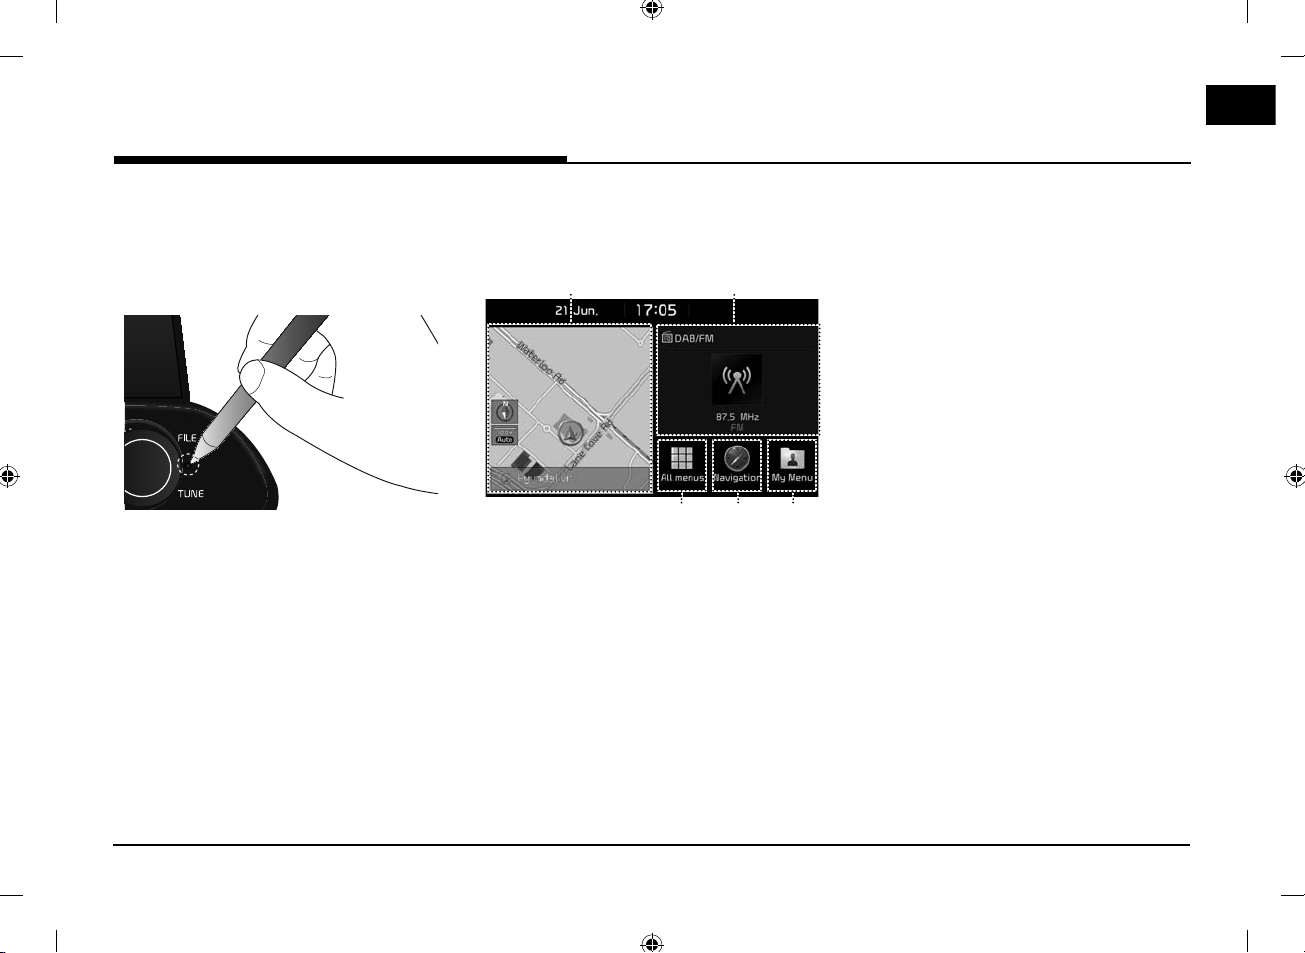
Resetting the system
This feature is used to reset the system in the
occurrence of an unforeseen error or problem.
Press 䳖RESET䳗 button. The use of a clip or pin
is recommended when resetting the system.
[Home] screen
Configuration for Home screen
1
1. Navigation widget
䳜 Provides a brief view of the navigation map
and the route screen.
䳜 Press the area on the widget to move to
the navigation screen.
2. AV widget
䳜 Shows brief information on the radio or
media currently playing.
䳜 Press the area to move to the mode for
what you are listening to.
2
4
53
3. All menus
Press [All menus] to move to all of the items of
the system menu.
䳜 [Phone]: Operates Bluetooth hands-free
function.
䳜 [Information]: Moves to the [Information] menu.
䳜 [Android Auto]: Runs [Android Auto] function.
䳜 [Apple CarPlay]: Runs [Apple CarPlay] function.
䳜 [Quick guide]: Moves to the quick guide menu,
([Using the touch screen], [Home], [Bluetooth],
[Navigation], [Phone projection]).
䳜 [Radio]: Converts to the last played radio
mode.
䳜 [Media]: Converts to the last played media
mode.
䳜 [Current position]: Displays the map screen of
the current position.
䳜 [Navigation]: Moves to the [Navigation] menu.
䳜 [Settings]: Moves to the [Settings] menu.
䳜 [Voice memo]: Moves to the [Voice memo]
menu.
4. Navigation
Moves to the [Navigation] menu.
5. My Menu
䳜 You can add and save up to 24 menu items.
䳜 You can add your favourite menu items to
have quick and easy access.
15
Basic operation
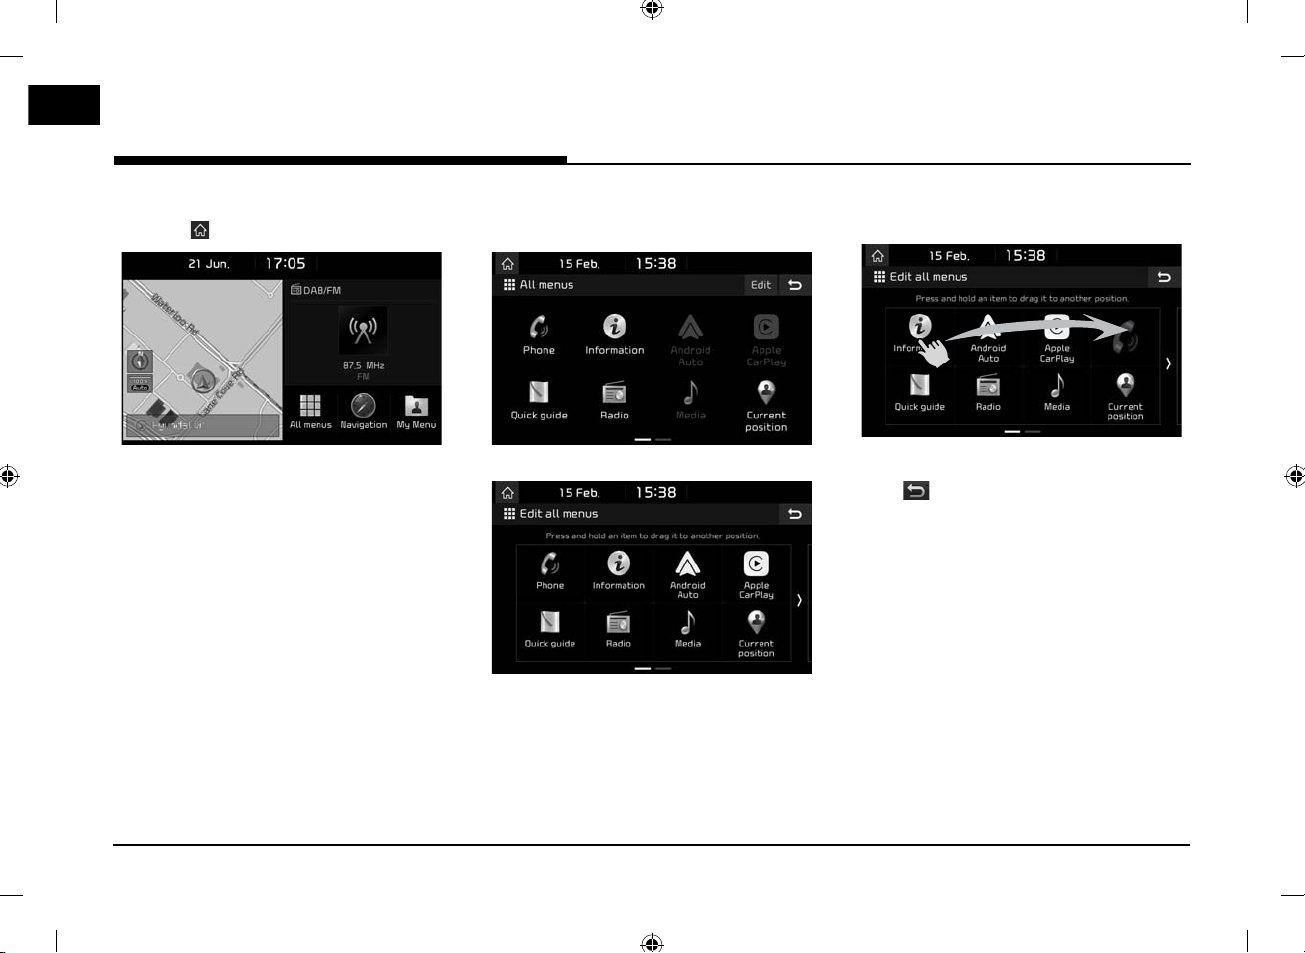
Basic operation for [Home] screen
1. Press [ ] on the screen.
2. Select a desired item and it moves to the
corresponding screen.
Editing the [All menus]
1. Press [All menus] on the [Home] screen.
2. Press [Edit] on the [All menus] screen.
3. Select the desired menu item from the list,
then drag and drop it to a desired place.
Note
Press [ ] to move to the previous screen.
16

Basic operation
Adding your favourite menu items
to [My Menu]
1. Press [My Menu] on the [Home] screen.
2. Press [Add to My Menu].
If your favourite menu items are already
added, press [Menu] > [Add].
3. Select one of the [Navigation favourites],
[Radio favourites] or [Menu Shortcuts].
<For example: the [Menu shortcuts] screen>
4. Select one of the categories.
5. Mark the subcategories.
6. Press [Add] > [Yes].
䳜 [Mark all]: Marks all items.
䳜 [Unmark all]: Unmarks all items.
Notes
䳜 Press [ ] to move to the previous screen.
䳜 Up to 24 menu items can be added to
[My Menu].
䳜 If you select the menu item added to [My
Menu], it moves to the corresponding screen.
17
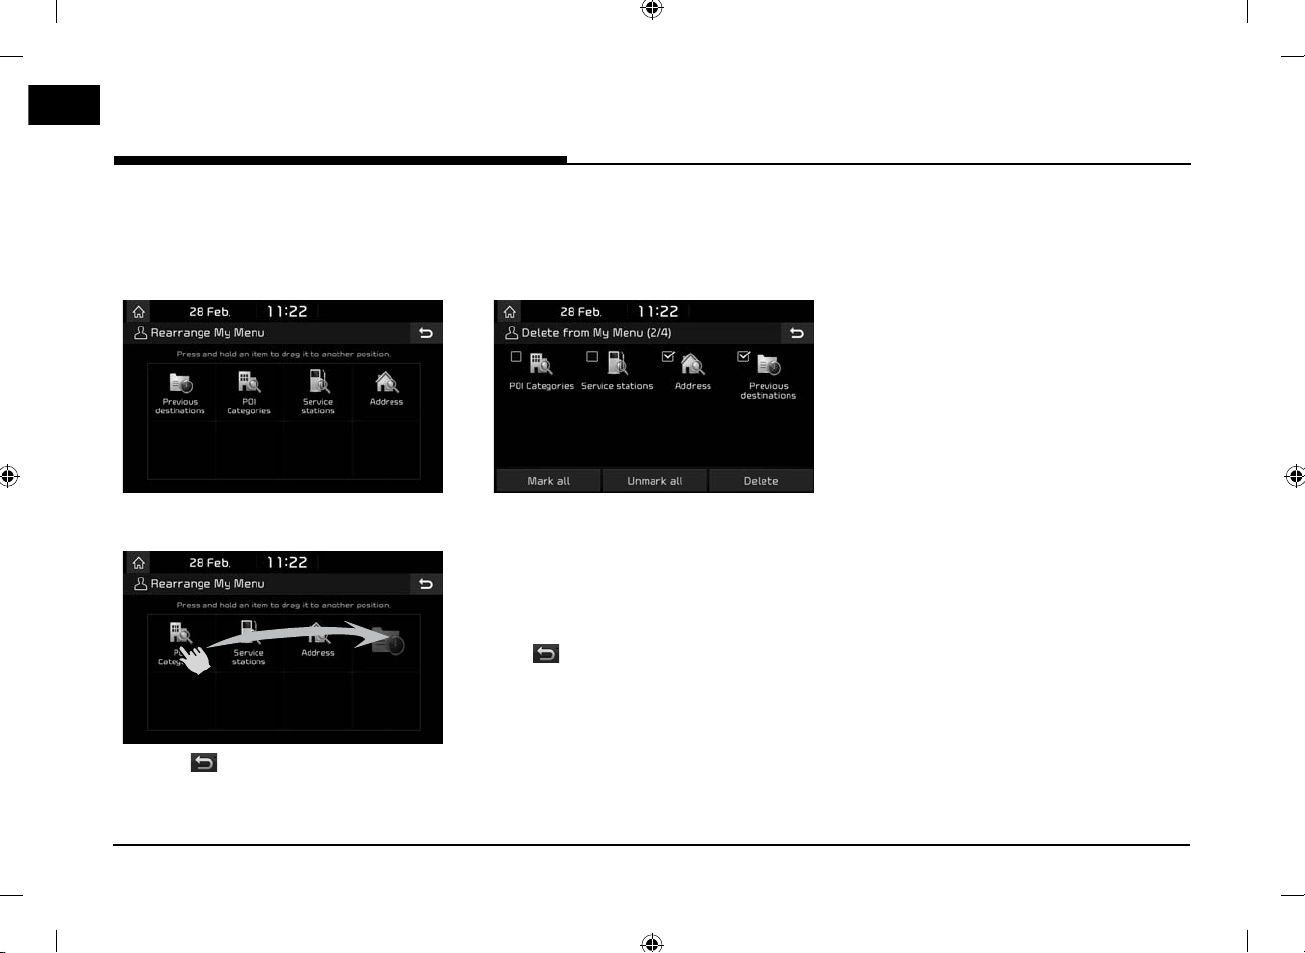
Basic operation
Rearranging your favourite menu in
[My Menu]
1. Press [My Menu] on the [Home] screen.
2. Press [Menu] > [Rearrange].
3. Select the desired menu item from the list,
then drag and drop it to a desired place.
4. Press [ ].
Deleting your favourite menu items
in [My Menu]
1. Press [My Menu] on the [Home] screen.
2. Press [Menu] > [Delete].
3. Select the desired menu items, then press
[Delete] > [Yes]
䳜 [Mark all]: Marks all items.
䳜 [Unmark all]: Unmarks all items.
Note
Press [ ] to move to the previous screen.
Playing last media source
When you press the Engine Start button
or set the ignition key to ON/ACC ON, the
media source played the last time will play
automatically.
But, the message 䳖Reconnect last media
source to play.䳗 is displayed on the home
screen if you set the ignition key to ON/ACC ON
with the existing media source disconnected or
removed.
18

Radio operation
Radio operation
Listening to AM
1. Press [RADIO] on the head unit.
2. Press [AM] on the screen.
The AM screen of the most recently
listened to station is displayed.
Note
Each time the [RADIO] button on the head unit
is pressed, the mode is changed in the order
AM → DAB/FM → AM.
3. Auto tuning:
䳜 Press [
‐ Plays previous/next available station.
Manual tuning:
Turn [FILE/ENTER/TUNE] (anti)clockwise.
‐ The frequency moves up and down
accordingly.
SEEK/TRACK
S
] on the head unit.
W
Favourites tuning:
Opening the station list sorted in
numerical order
You can see the station list with the best
reception.
1. Press [AM] on the screen.
2. Press [List].
Press [Favourites]. Press the favourites
numbers of the desired broadcast station.
Auto search
This function lets you automatically search the
broadcast stations with the best reception.
1. Press [AM] on the screen.
2. Press [List].
3. Press [ ].
Note
If you want to save the stations to the
[Favourites] menu, press [
the desired favourites number.
] and then press
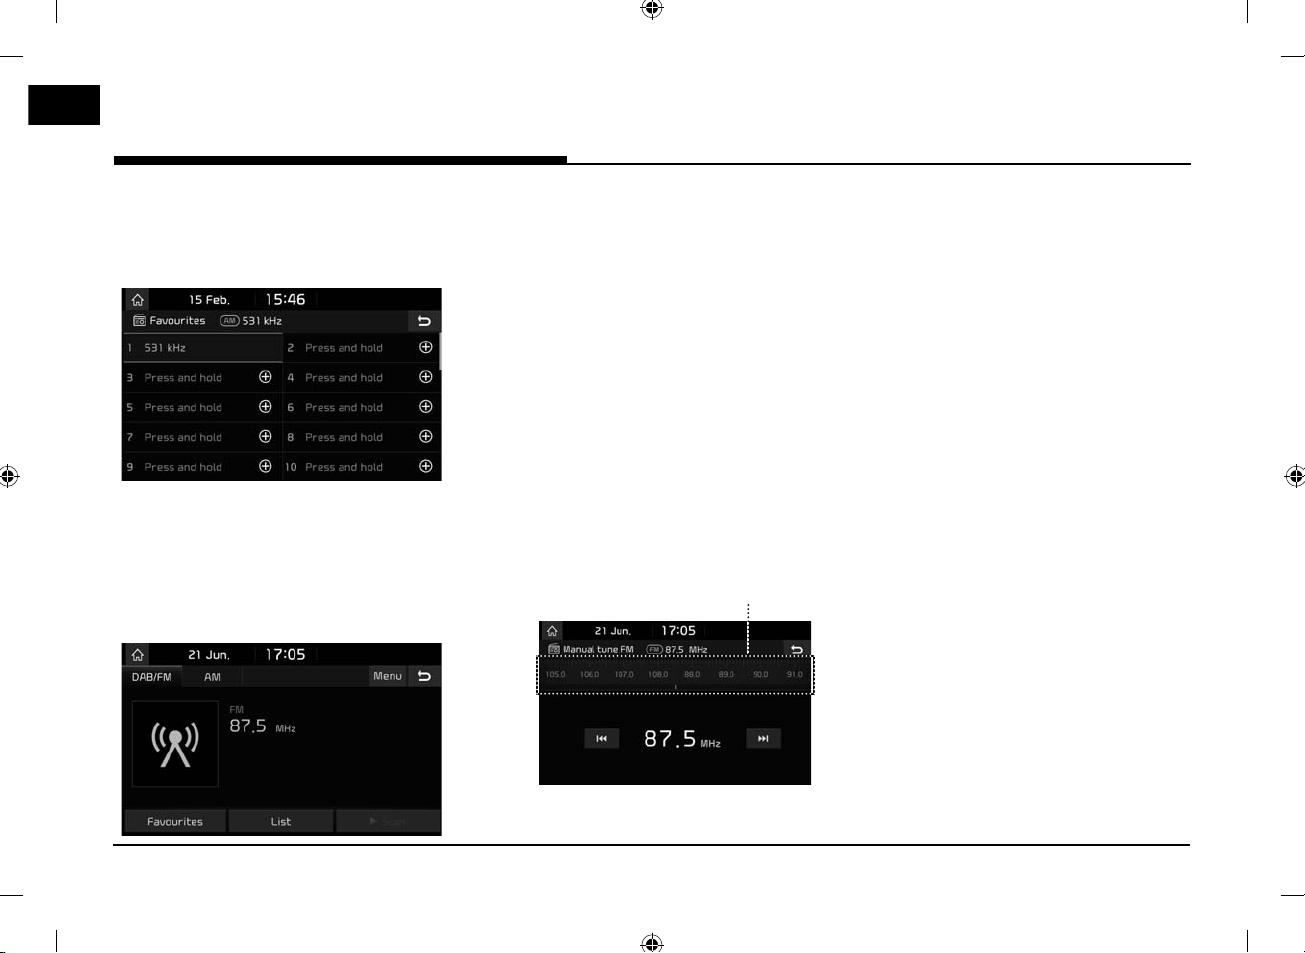
Saving AM favourites
Manually saves the listening frequency to the
desired favourites list.
1. Press [AM] on the screen.
2. Select the frequency to save.
3. Press [Favourites].
19
Radio operation
4. Press the desired favourites number.
If you want to overwrite an existing
favourites, press and hold the respective
favourites number.
Listening to DAB/FM
1. Press [RADIO] on the head unit.
2. Press [DAB/FM] on the screen.
The DAB/FM screen of the most recently
listened to station is displayed.
Note
Each time the [RADIO] button on the head unit
is pressed, the mode is changed in the order
DAB/FM → AM → DAB/FM.
3. Auto tuning (when there are none or one
station in the [List] menu):
䳜 Press [SSEEK/TRACKW] on the head unit.
‐ Plays previous/next available station.
List tuning (when there are two or more
stations in the [List] menu):
䳜 Press [SSEEK/TRACKW] on the head unit.
‐ Plays previous/next available station
existing within [List] menu.
Manual tuning:
DAB/FM mode, press [Menu] >
䳜 In the
[Manual tune FM].
Station bar
‐ Drag the station bar to the left/right to
find the radio station that you want.
Favourites:
Notes
䳜 FM broadcasts are transmitted at high
䳜 When the signal is weak, FM noise is
‐ Press [
C/V
䳜 Turn [FILE/ENTER/TUNE] to the
left/right, then press when the desired
station is displayed in a highlighted
colour.
䳜 Press [Favourites]. Press the favourites
numbers of the desired broadcast
station.
䳜 Press [
frequencies and do not bend to follow
the earth䳓s surface. Because of this, FM
broadcasts generally begin to fade at short
distances from the station. Also, FM signals
are easily affected by buildings, mountains,
or other obstructions.
These can result in undesirable listening
conditions and show wrong information (ex.
RDS PS NAME, etc.), which might lead you to
believe a problem exists with your radio. The
following conditions are normal and do not
indicate radio trouble.
generated and DAB sound is muted.
W/S
remote control.
].
] on the steering wheel
20
Radio operation
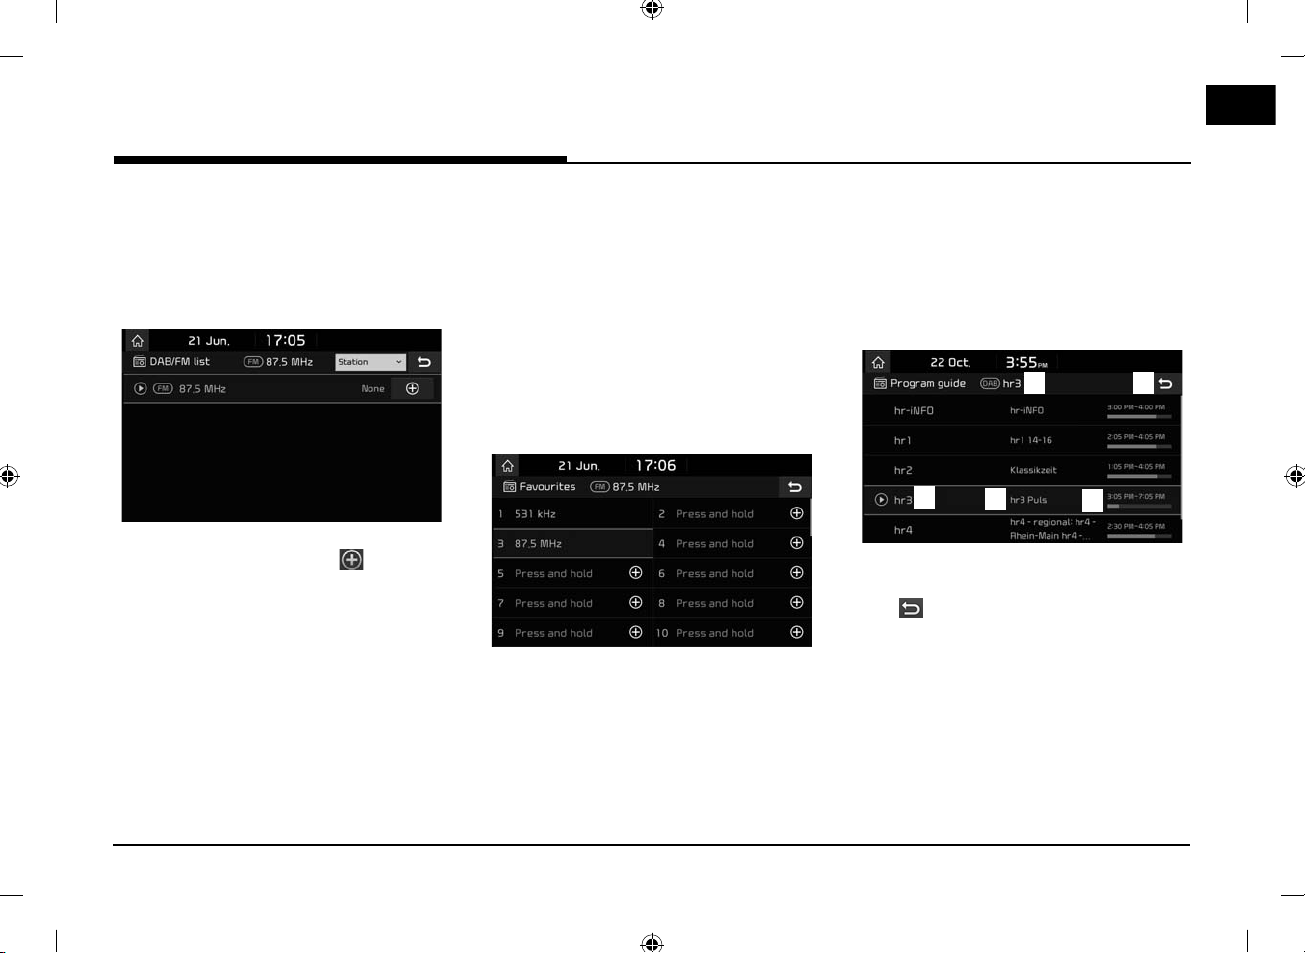
Opening the station list
You can see the station list with superior
reception.
1. Press [DAB/FM] on the screen.
2. Press [List].
䳜 If you want to save the stations to the
[Favourites] menu, press [ ] and then
press the desired favourites number.
䳜 Press [Station] or [Program type] to
arrange the list in station or program
type order.
Saving DAB/FM favourites
It saves the listening station to the desired
favourites list.
1. Press [DAB/FM] or [FM] on the screen.
2. Select the desired station.
3. Press [Favourites].
4. Press the desired favourites number.
If you want to overwrite an existing
favourites, press and hold the respective
favourites number.
Program guide - DAB only
You can view the program information and
the broadcasting station schedule provided by
DAB.
1. Press [DAB/FM] on the screen.
2. Press [Menu] > [Program guide].
A B
A
Broadcast station name: Displays the
A
broadcast station name.
[ ]: Moves to the previous screen.
B
Program name: Displays the program
C
title.
Program time: Displays the program
D
time and duration.
C
D
21
Radio operation
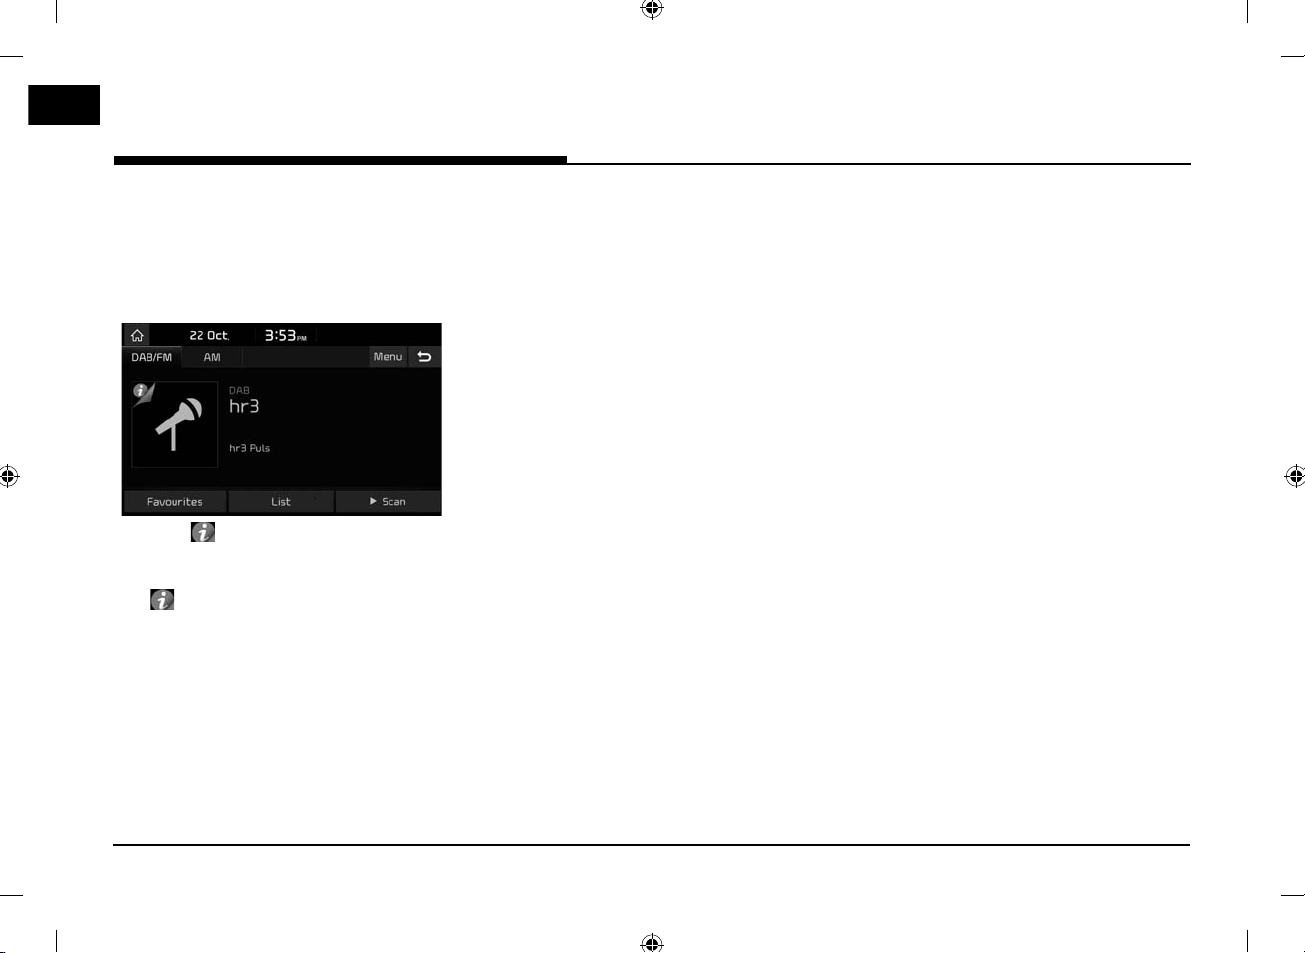
SLS (Slide Show) - DAB only
You can view the slide show image information
when image information is available from the
broadcasting station in the DAB mode.
1. Press [DAB/FM] on the screen.
2. Press [ ].
Note
The [ ] icon may not be displayed if there
is no information being transmitted by the
broadcasting station.
Scan
This function scans all stations and plays
only stations with good signal strength for 5
seconds each.
Press [
Press [
Scan].
d
Stop] to stop the scan function.
Z
Sound settings
1. Press [Menu] > [Sound settings].
2. For details refer to page 61 (䳖Sound䳗).
22
USB Operation
USB Operation
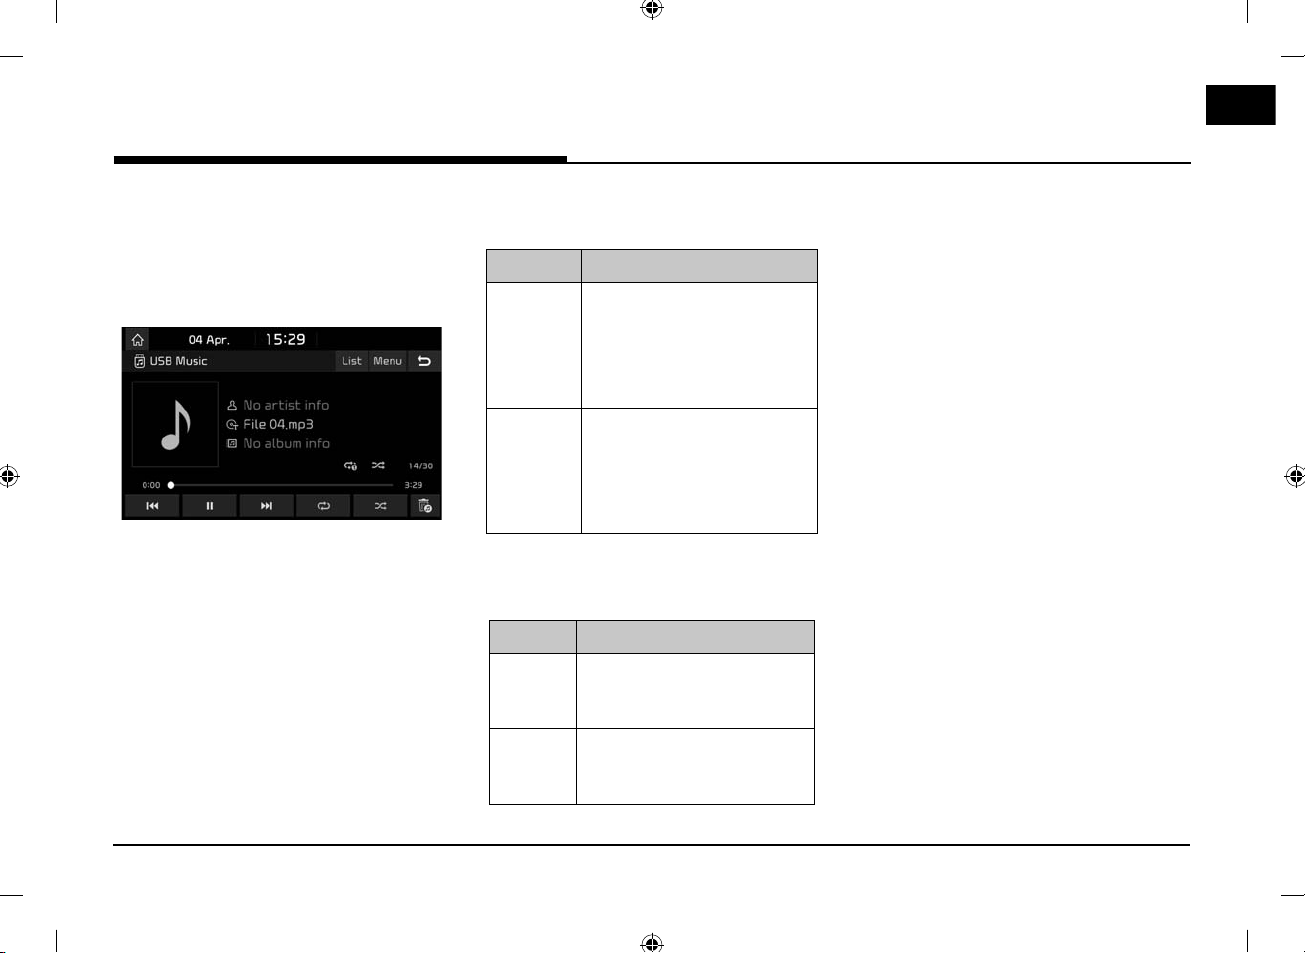
Playing USB music
You can play music files stored on a USB
memory device.
Connect a USB device to the USB port and
playback starts automatically.
Note
To play USB music while a different source is
playing, press [MEDIA] > [USB Music].
Pause
You can pause the playing file.
Press [M] during playback.
Press [
] to play it again.
d
Skip
You can play the previous or next file.
Position Description
C
SEEK
S
].
] after 3
W
] after 3
].
Screen 䳜 Press [
䳜 Pressing [
seconds of playback time
plays the current file from
the beginning.
Head unit 䳜 Press [
䳜 Pressing [
seconds of playback time
plays the current file from
the beginning.
C/V
SEEK/TRACK
S
Search
You can fast rewind/forward to a specific point
of a file.
Position Description
Screen Press and hold [
then release at the point you
want.
Head unit Press and hold [
TRACK
W
the point you want.
C
S
] and then release at
/
V
SEEK/
] and
Note
When you drag or touch the desired part on
the progress bar, the music of the selected
part plays.
Seek
You can play the file directly by searching for
the desired file.
1. Turn [FILE/ENTER/TUNE] to search for a
desired file.
2. If the desired file is displayed, press the
[FILE/ENTER/TUNE] to play the file.
23
USB Operation
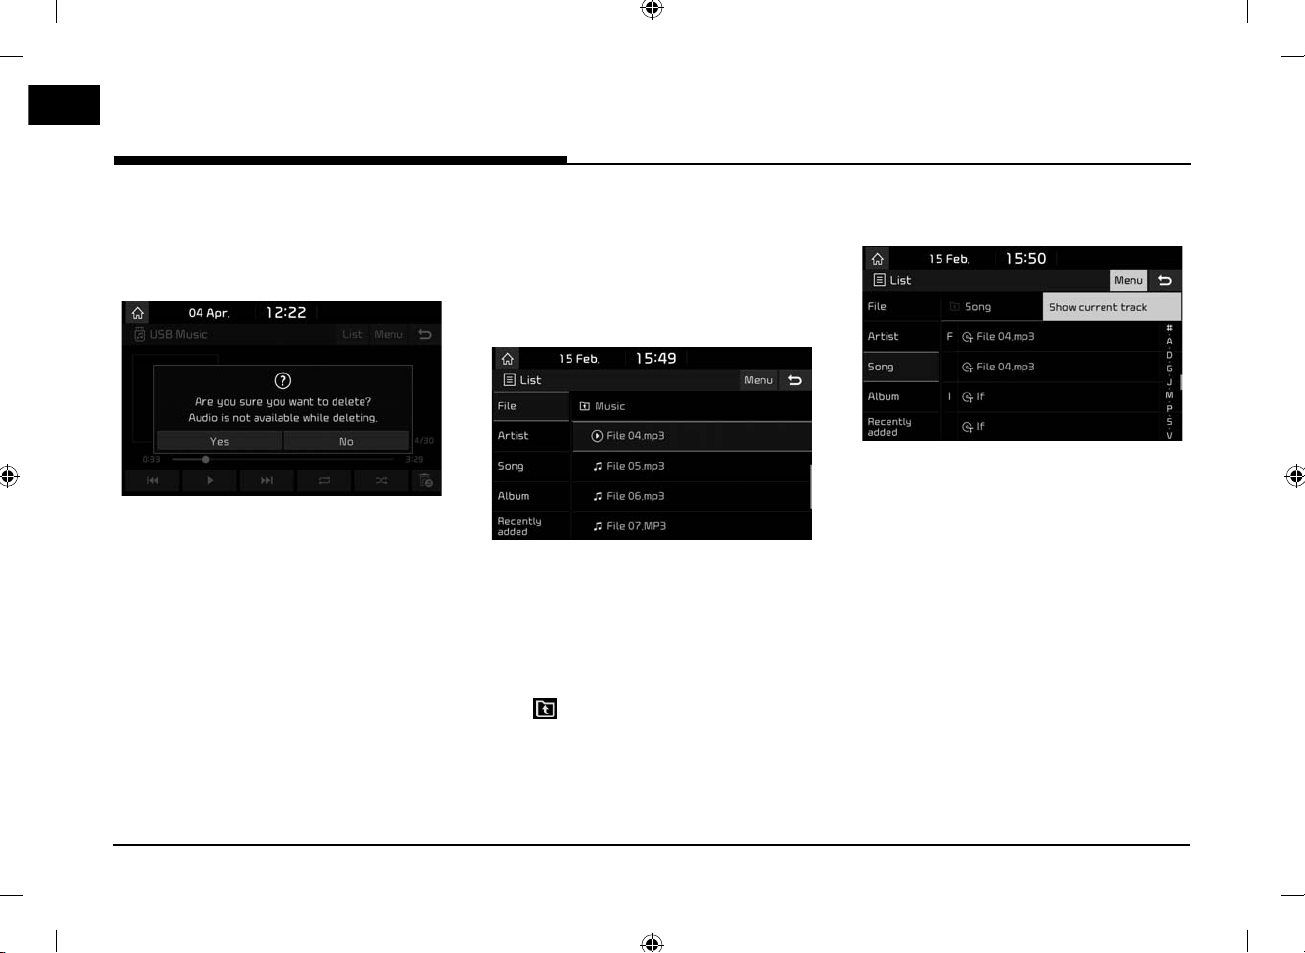
Delete current file
You can delete the currently playing file in the
USB.
1. Press [Menu] > [Delete current file].
2. Press [Yes].
Notes
䳜 The deleted file(s) can be found in the
䳖to_delete䳗 folder.
䳜 It is not available on exFAT or NTFS file
format USB devices.
Sound settings
1. Press [Menu] > [Sound settings].
2. For details refer to page 61 (䳖Sound䳗).
List
You can search for a desired file using the
music list of the USB Menu.
Playing the desired file by searching in
the music list
1. Press [List].
2. Press the desired file after searching for a
category.
The category can be sorted by [File],
[Artist], [Song], [Album], or [Recently
added].
Note
Press [ ] to move up a folder.
Using the list menu
1. Press [Menu] in list screen.
2. Press [Show current track]. The screen
moves to the file list currently playing.
24
 Loading...