

LG LH-T360SE, LH-W760IA, LH-T3602ME, LH-T360, LHS-36SES Owner's Manual
...
R
DVD RECEIVER
OWNER’S MANUAL
MODEL: LH-T360SE
(Main Unit: LH-T360
Speakers: LHS-36SES, LHS-36SEW)
USB
Before connecting up, operating or repairing this product,
please read this instruction booklet carefully and
completely.
CLASS 1 LASER PRODUCT
KLASSE 1
LASER PRODUKT
LUOKAN 1 LASER LAITE
KLASS 1
LASER APPARAT
CLASSE 1
PRODUIT LASER
CAUTION
RISK OF ELECTRIC SHOCK
DO NOT OPEN
CAUTION: The apparatus should not be exposed to water
(dripping or splashing) and no objects filled with liquids, such
as vases, should be placed on the apparatus.
CAUTION concerning the Power Cord
CAUTION: TO REDUCE THE RISK
OF ELECTRIC SHOCK
DO NOT REMOVE COVER (OR BACK)
NO USER-SERVICEABLE PARTS INSIDE
REFER SERVICING TO QUALIFIED SERVICE
PERSONNEL.
This lightning flash with arrowhead symbol within
an equilateral triangle is intended to alert the user
to the presence of uninsulated dangerous voltage
within the product’s enclosure that may be of
sufficient magnitude to constitute a risk of electric
shock to persons.
The exclamation point within an equilateral
triangle is intended to alert the user to the
presence of important operating and maintenance
(servicing) instructions in the literature
accompanying the product.
WARNING: TO PREVENT FIRE OR ELECTRIC SHOCK
HAZARD, DO NOT EXPOSE THIS PRODUCT TO RAIN
OR MOISTURE.
Most appliances recommend they be placed upon
a dedicated circuit;
That is, a single outlet circuit which powers only that
appliance and has no additional outlets or branch
circuits. Check the specification page of this owner's
manual to be certain.
Do not overload wall outlets. Overloaded wall outlets,
loose or damaged wall outlets, extension cords,
frayed power cords, or damaged or cracked wire
insulation are dangerous. Any of these conditions
could result in electric shock or fire. Periodically
examine the cord of your appliance, and if its
appearance indicates damage or deterioration, unplug
it, discontinue use of the appliance, and have the cord
replaced with an exact replacement part by an
authorized servicer.
Protect the power cord from physical or mechanical
abuse, such as being twisted, kinked, pinched, closed
in a door, or walked upon. Pay particular attention to
plugs, wall outlets, and the point where the cord
exits the appliance.
To disconnect power from the mains, pull out the
mains cord plug. When installing the product, ensure
that the plug is easily accessible.
CAUTION: VISIBLE AND INVISIBLE LASER RADIATION
WHEN OPEN AND INTERLOCKS DEFEATED.
CAUTION:
This product employs a Laser System.
To ensure proper use of this product, please read this
owner’s manual carefully and retain it for future reference.
Should the unit require maintenance, contact an authorized
service center.
Use of controls, adjustments or the performance of
procedures other than those specified herein may result in
hazardous radiation exposure.
To prevent direct exposure to laser beam, do not try to open
the enclosure. Visible laser radiation when open. DO NOT
STARE INTO BEAM.
Disposal of your old appliance
1. When this crossed-out wheeled bin symbol is
attached to a product it means the product is
covered by the European Directive
2002/96/EC.
2. All electrical and electronic products should
be disposed of separately from the
municipal waste stream via designated
collection facilities appointed by the
government or the local authorities.
3. The correct disposal of your old appliance
will help prevent potential negative
consequences for the environment and
human health.
4. For more detailed information about disposal
of your old appliance, please contact your
city office, waste disposal service or the
shop where you purchased the product.
This product is manufactured to comply
with the radio interference requirements
of EEC DIRECTIVE 89/336/EEC,
93/68/EEC and 73/23/EEC.
2

Introduction
Maintenance and Service . . . . . . . . . . . . . . . . .3
Before use . . . . . . . . . . . . . . . . . . . . . . . . . . . . .4
Front Panel/Rear Panel . . . . . . . . . . . . . . . . . . .5
Remote Control . . . . . . . . . . . . . . . . . . . . . . . . .6
Maintenance and Service
Refer to the information in this chapter before
contacting a service technician.
Installation and Setup
TV Connections . . . . . . . . . . . . . . . . . . . . . . . . .7
Optional Equipment Connections . . . . . . . . . . .8
Antenna Connections . . . . . . . . . . . . . . . . . . . .8
Speaker System Connection . . . . . . . . . . . . . . .9
Displaying Disc Information on-screen . . . . . .10
Initial Settings . . . . . . . . . . . . . . . . . . . . . . . . .10
General Operation . . . . . . . . . . . . . . . . . . . . . .10
LANGUAGE . . . . . . . . . . . . . . . . . . . . . . . . .10
DISPLAY . . . . . . . . . . . . . . . . . . . . . . . . . . . .11
AUDIO . . . . . . . . . . . . . . . . . . . . . . . . . . . . .12
5.1 SPEAKER SETUP . . . . . . . . . . . . . . . . . .12
LOCK (PARENTAL CONTROL) . . . . . . . . . . .13
OTHERS . . . . . . . . . . . . . . . . . . . . . . . . . . . .13
Operation
General features . . . . . . . . . . . . . . . . . . . . . . .14
Additional features . . . . . . . . . . . . . . . . . . . . .15
Playing an Audio CD or MP3/WMA file . . . . . .16
Programmed Playback . . . . . . . . . . . . . . . . . .16
Viewing a JPEG file . . . . . . . . . . . . . . . . . . . .17
Playing a DivX Movie file . . . . . . . . . . . . . . . . .18
Presetting the Radio Stations . . . . . . . . . . . . .19
Listening to the Radio . . . . . . . . . . . . . . . . . . .19
RDS Operation . . . . . . . . . . . . . . . . . . . . . . . . .20
Sleep Timer Setting . . . . . . . . . . . . . . . . . . . . .21
Dimmer . . . . . . . . . . . . . . . . . . . . . . . . . . . . . . .21
Mute . . . . . . . . . . . . . . . . . . . . . . . . . . . . . . . . .21
Using Headphone Jack . . . . . . . . . . . . . . . . . .21
Selecting input source . . . . . . . . . . . . . . . . . . .21
XTS/XTS pro . . . . . . . . . . . . . . . . . . . . . . . . . . .21
VIRTUAL sound . . . . . . . . . . . . . . . . . . . . . . . .21
Sound Mode . . . . . . . . . . . . . . . . . . . . . . . . . . .21
REFERENCE
Language Codes . . . . . . . . . . . . . . . . . . . . . . .22
Area Codes . . . . . . . . . . . . . . . . . . . . . . . . . . .22
Troubleshooting . . . . . . . . . . . . . . . . . . . . .23-24
Specifications . . . . . . . . . . . . . . . . . . . . . . . . .25
HANDLING THE UNIT
When shipping the unit
Please save the original shipping carton and packing
materials. If you need to ship the unit, for maximum
protection, re-pack the unit as it was originally packed
at the factory.
Keeping the exterior surfaces clean
Do not use volatile liquids such as insecticide spray
near the unit.
Do not leave rubber or plastic products in contact
with the unit for a long period of time. since they
leave marks on the surface.
Cleaning the unit
To clean the player, use a soft, dry cloth. If the
surfaces are extremely dirty, use a soft cloth lightly
moistened with a mild detergent solution.
Do not use strong solvents such as alcohol, benzine,
or thinner, as these might damage the surface of the
unit.
Maintaining the Unit
The DVD/CD Receiver is a high-tech, precision
device. If the optical pick-up lens and disc drive parts
are dirty or worn, the picture quality could be
diminished.
Depending on the operating environment, regular
inspection and maintenance are recommended after
every 1,000 hours of use.
For details, please contact your nearest authorized
service center.
Introduction
3
Introduction
Before use
To ensure proper use of this product, please read this
owner’s manual carefully and retain for future
reference.
This manual provides information on the operation
and maintenance of your DVD/CD Receiver. Should
the unit require service, contact an authorized service
location.
About the Symbol Display
“ ” may appear on your TV display during
operation and indicates that the function explained in
this owner’s manual is not available on that specific
DVD video disc.
Symbol Used in this Manual
Note:
Indicates special notes and operating features.
Tip:
Indicates tips and hints for making the task easier.
A section whose title has one of the following symbols
is applicable only to the disc represented by the
symbol.
DVD-V
VCD
MP3
WMA
JPEG
DivX
DVD and finalized DVD±R/RW
Video CDs
CD
Audio CDs
MP3 Discs
WMA Discs
JPEG Discs
DivX Discs
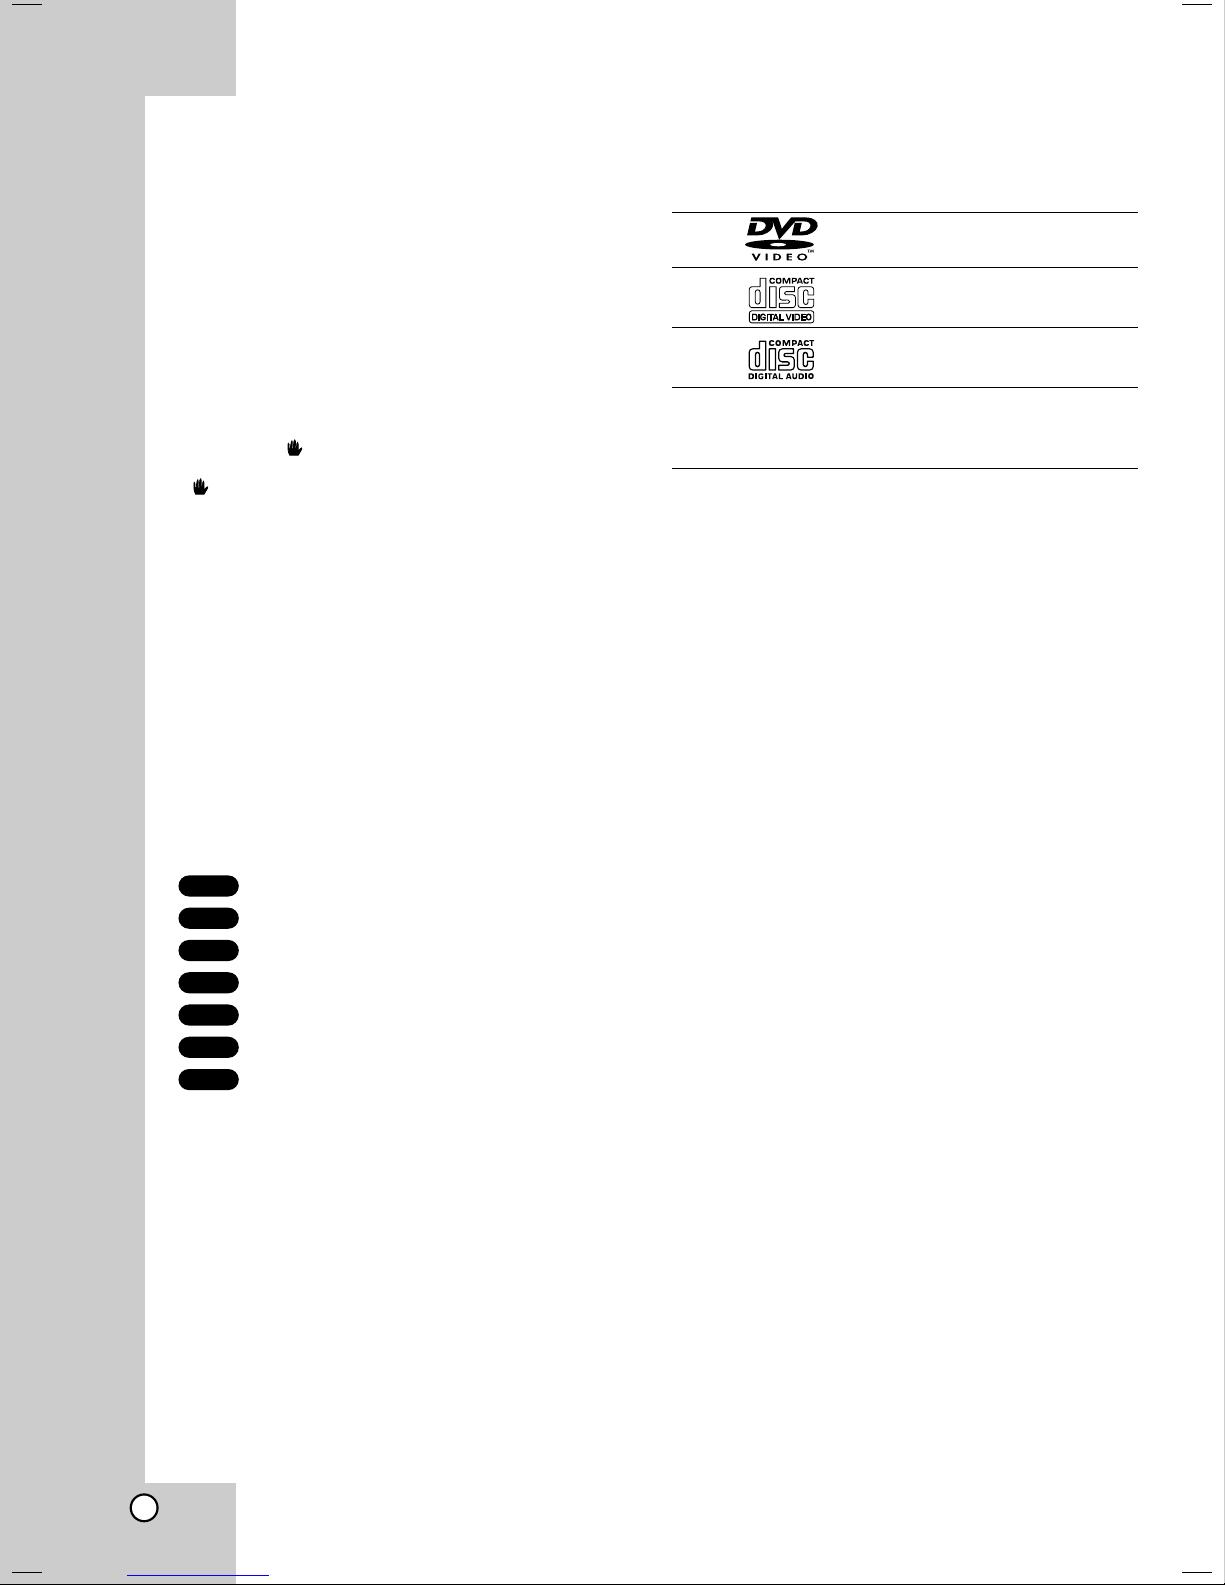
Types of Playable Discs
DVD
(8 cm / 12 cm disc)
Video CD (VCD)
(8 cm / 12 cm disc)
Audio CD
(8 cm / 12 cm disc)
In addition, this unit can play a DVD-RW, DVD+RW,
SVCD and CD-R or CD-RW that contains audio titles,
MP3, WMA, JPEG or DivX files.
Notes:
Depending on the conditions of the recording
equipment or the CD-R/RW (or DVD-RW,
DVD+RW) disc itself, some CD-R/RW (or DVD-RW,
DVD+RW) discs cannot be played on the unit.
Do not attach any seal or label to either side (the
labeled side or the recorded side) of a disc.
Do not use irregularly shaped CDs (e.g., heartshaped
or octagonal). It may result in malfunctions.
Regional Code
This unit has a regional code printed on the rear of the
unit. This unit can play only DVD discs labelled same
as the rear of the unit or “ALL”.
Notes on Regional Codes
Most DVD discs have a globe with one or more
numbers in it clearly visible on the cover. This
number must match your DVD player’s regional
code or the disc cannot play.
If you try to play a DVD with a different regional
code from your player, the message “Check
Regional Code” appears on the TV screen.
Manufactured under license from Dolby Laboratories.
“Dolby”, “Pro Logic”, and the double-D symbol are
trademarks of Dolby Laboratories. Confidential Unpublished
works. Copyright 1992-1997 Dolby Laboratories. All rights
reserved.
Manufactured under license from Digital Theater Systems,
Inc. U.S. Pat. No’s. 5,451,942; 5,956,674; 5,974,380;
5,978,762; 6,226,616; 6,487,535 and other U.S. and worldwide patents issued and pending. "DTS" and "DTS Digital
Surround” are registered trademarks of Digital Theater
Systems, Inc. Copyright 1996, 2003 Digital Theater
Systems, Inc. All Rights Reserved."
4
AUDIO
L
R
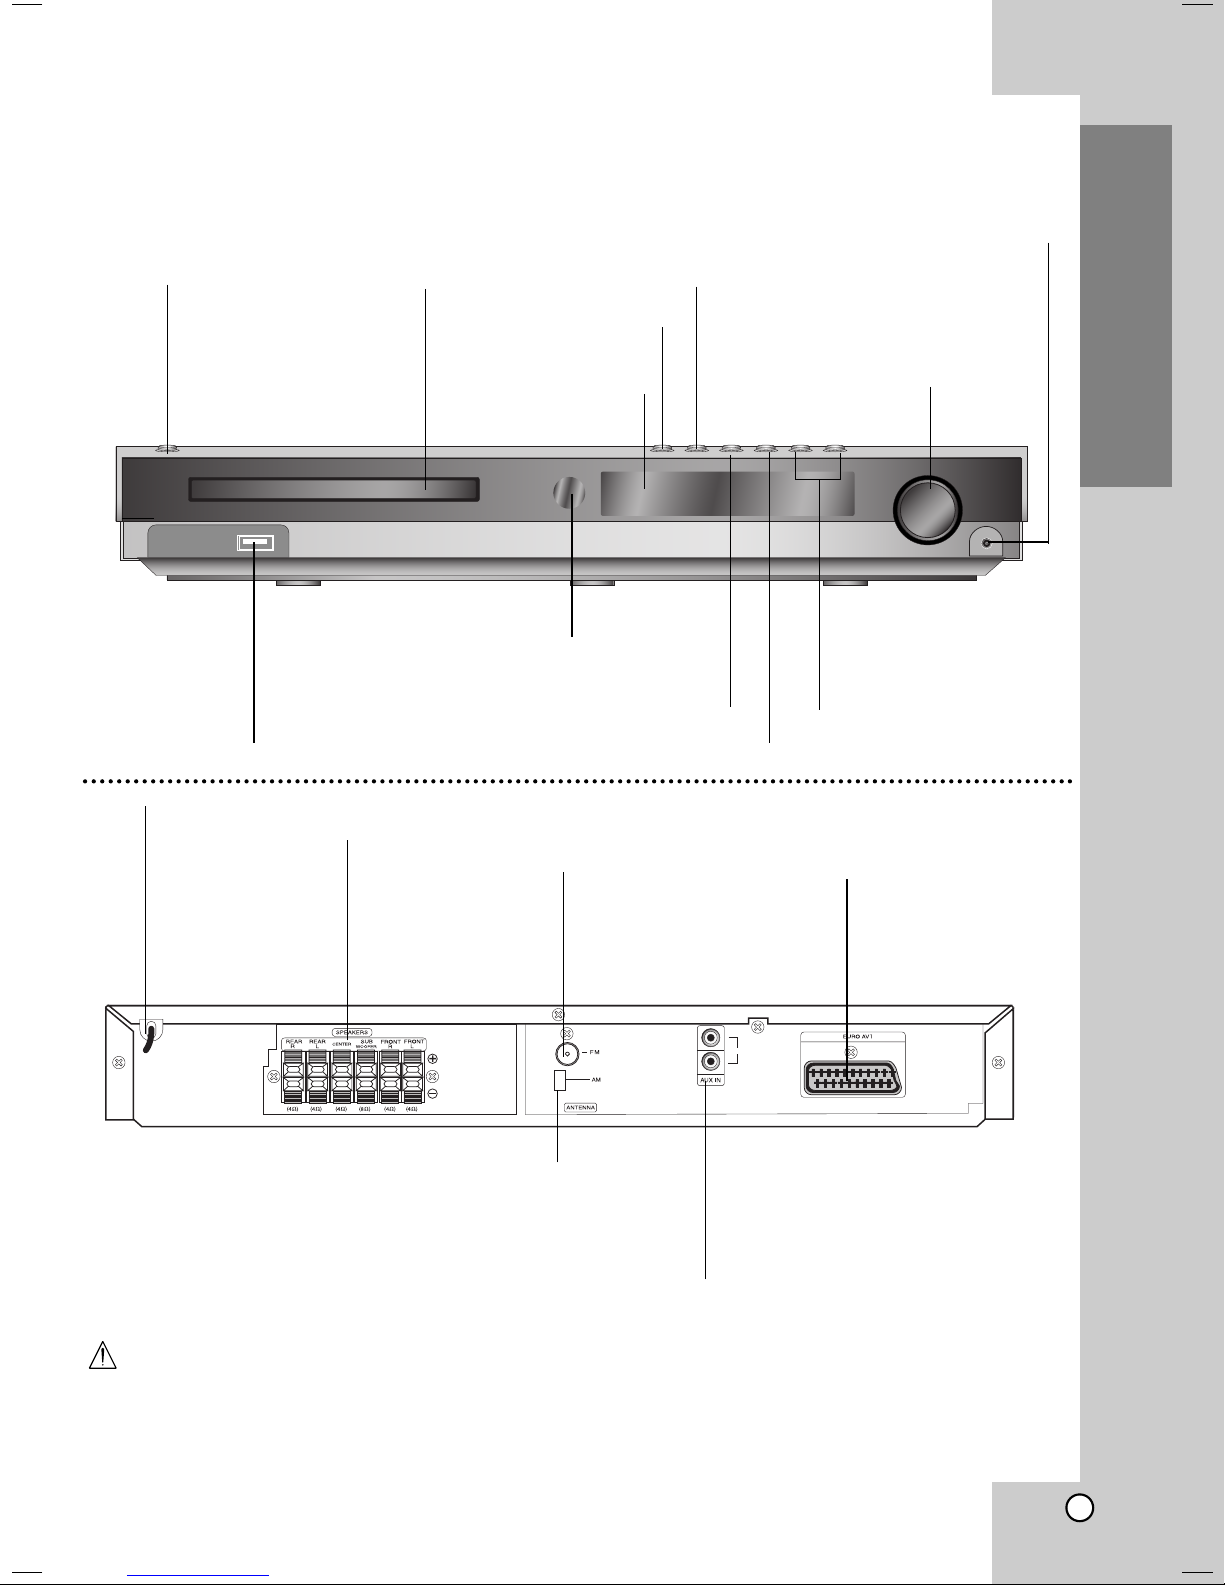
Front Panel/Rear Panel
PHONES connector
STANDBY/ON
STANDBY indicator
Lights red when the
receiver is in Standby
mode (off).
USB Port
Connect to a USB port of
multimedia
(USB memory etc.)
Power Cord
DISC Tray
OPEN/CLOSE button
DISPLAY Window
Remote sensor
SPEAKER connectors
FUNC./PLAY
Press and hold down this button about 3
seconds, then press repeatedly to select
other function.
VOLUME controller
MONO/ST./
P./STEP
STOP
FM Antenna connector
Introduction
TUNING(-/+)
/SKIP(..bb/BB>>)
buttons
OUTPUT (TO TV)
EURO AV socket
Connect to a TV with
SCART jack.
AM Loop Antenna connectors
AUX IN AUDIO Input (L/R) Connectors
Do not touch the inner pins of the jacks on the rear
panel. Electrostatic discharge may cause
permanent damage to the unit.
5
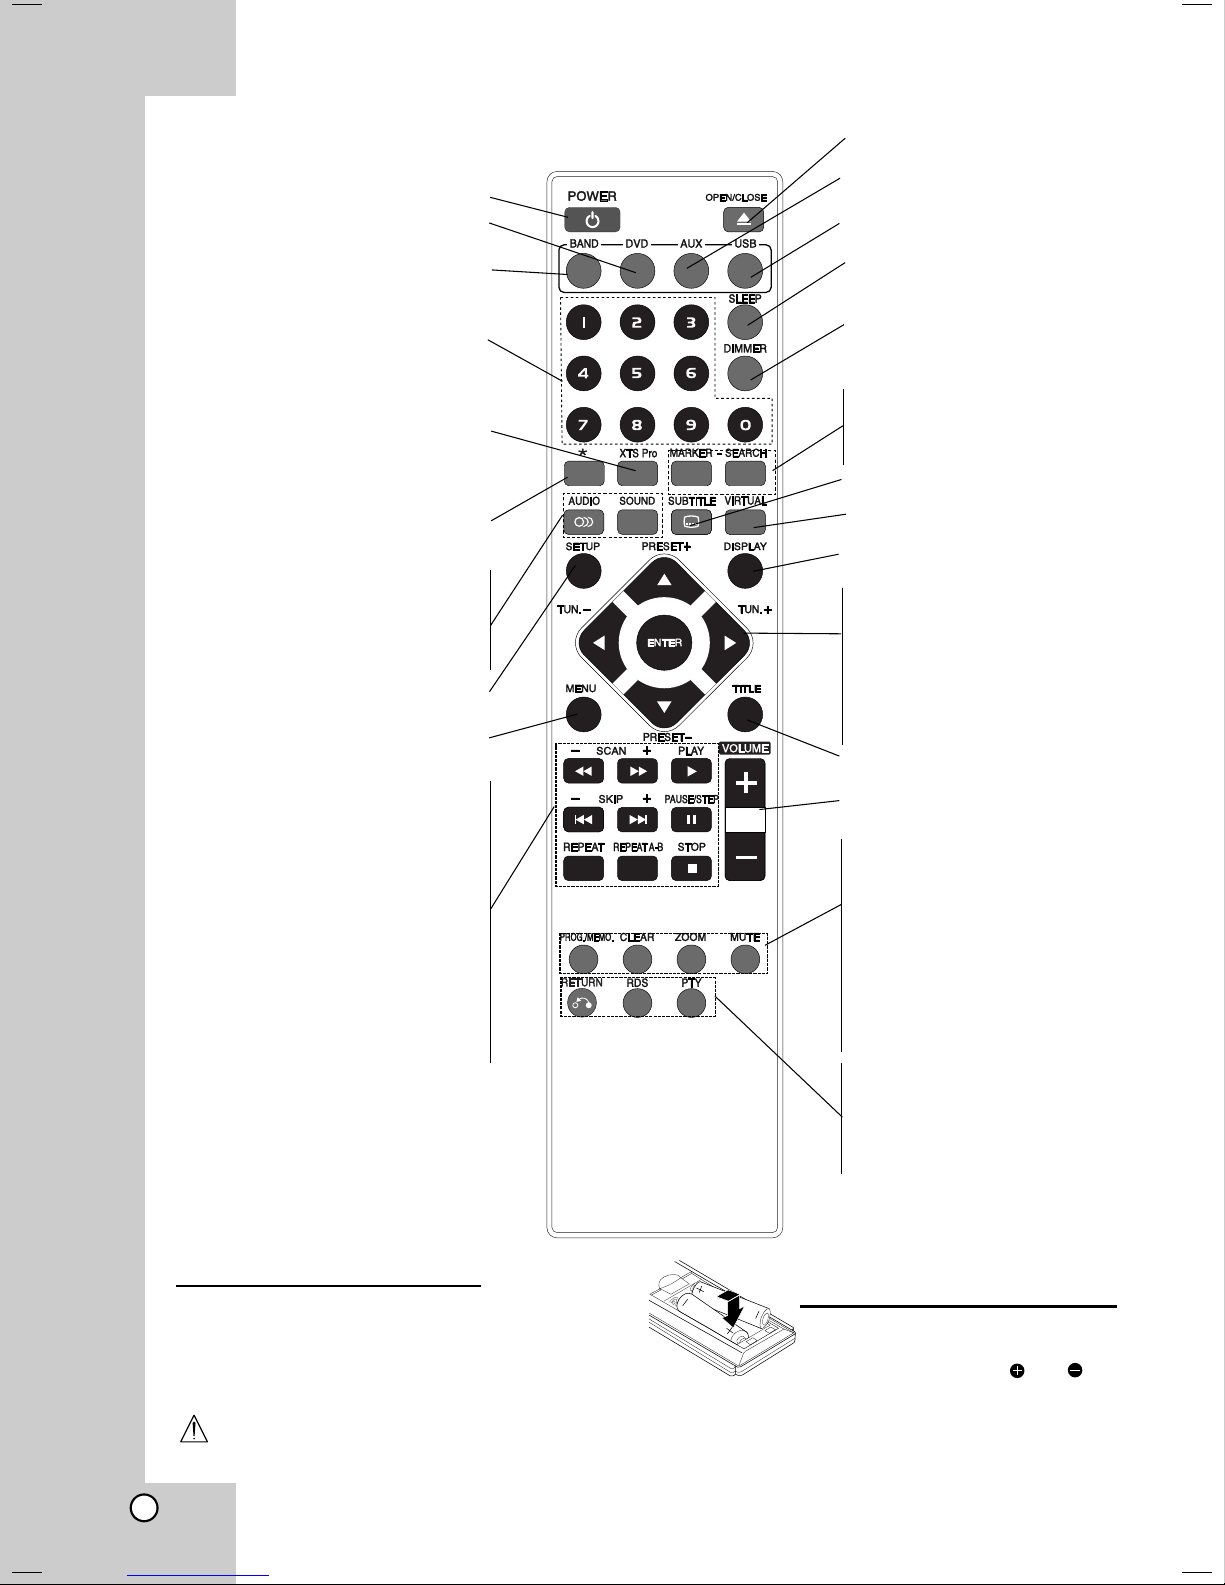
Remote Control
POWER
DVD
Select the output source (CD/DVD)
BAND
Select the System’s tuner (FM and AM
bands)
0-9 numerical buttons
Select a service, programme number
directly or select numbered options in a
menu.
XTS pro
To enjoy more natural and realistic
sound.
To enjoy great sound effect.
This button is not available.
AUDIO
Selects an audio language (DVD) or
an audio channel (CD).
SOUND
Selects the sound mode.
SETUP
Accesses or removes setup menu .
MENU
Accesses the menu on a DVD disc.
SCAN/SLOW(bb/BB)
Search backward or forward.
Reverse/ Forward slow playback.
REVERSE/FORWARD SKIP
(../>>)
STOP (xx)
PAUSE/STEP (XX)
PLAY (B)
REPEAT
Repeat chapter, track, title, all
REPEAT A-B
Repeats sequence.
OPEN/CLOSE (ZZ)
Opens and closes the disc tray.
AUX
Selects input source.
USB
To enjoy the multimedia files.
SLEEP
Set the System to turn off automatically at a specified time.
DIMMER
Press to change brightness of the
display window on the front panel during
in power-on status.
MARKER
Marks a point during playback.
SEARCH
Displays MARKER SEARCH menu.
SUBTITLE
Selects a subtitle language (DVD).
*
VIRTUAL
Selects the VIRTUAL sound
DISPLAY
Accesses On-Screen display.
b/B/v/V (left/right/up/down)
Selects an option in the menu.
ENTER
Acknowledges the menu selection.
PRESET(v/V):
Select programme of Radio.
TUN.(-/+) (b/B):
To tune in the desired radio station.
TITLE
Displays the disc’s Title menu, if available.
VOLUME (+/-)
To adjust speaker volume.
PROG.
Accesses or removes Program menu.
MEMO.
Enter a radio station’s frequency into the
tuner.
CLEAR
Removes a track number on the
program menu or a mark on the
MARKER SEARCH menu.
MUTE
ZOOM
RDS
To view the various displays of the RDS options
PTY
To start a search for a specific PTY type.
RETURN
Removes the setup menu.
Remote Control Operation Range
Point the remote control at the remote sensor and press the
buttons.
Distance: About 23 ft (7 m) from the front of the remote
sensor
Angle: About 30° in each direction in front of the remote
sensor
Caution
Do not mix old and new batteries. Never mix different types of batteries (standard, alkaline, etc.).
6
Remote control battery installation
Remove the battery cover on the rear of
the remote control, and insert two R03
(size AAA) batteries with and
aligned correctly.
Installation and Setup
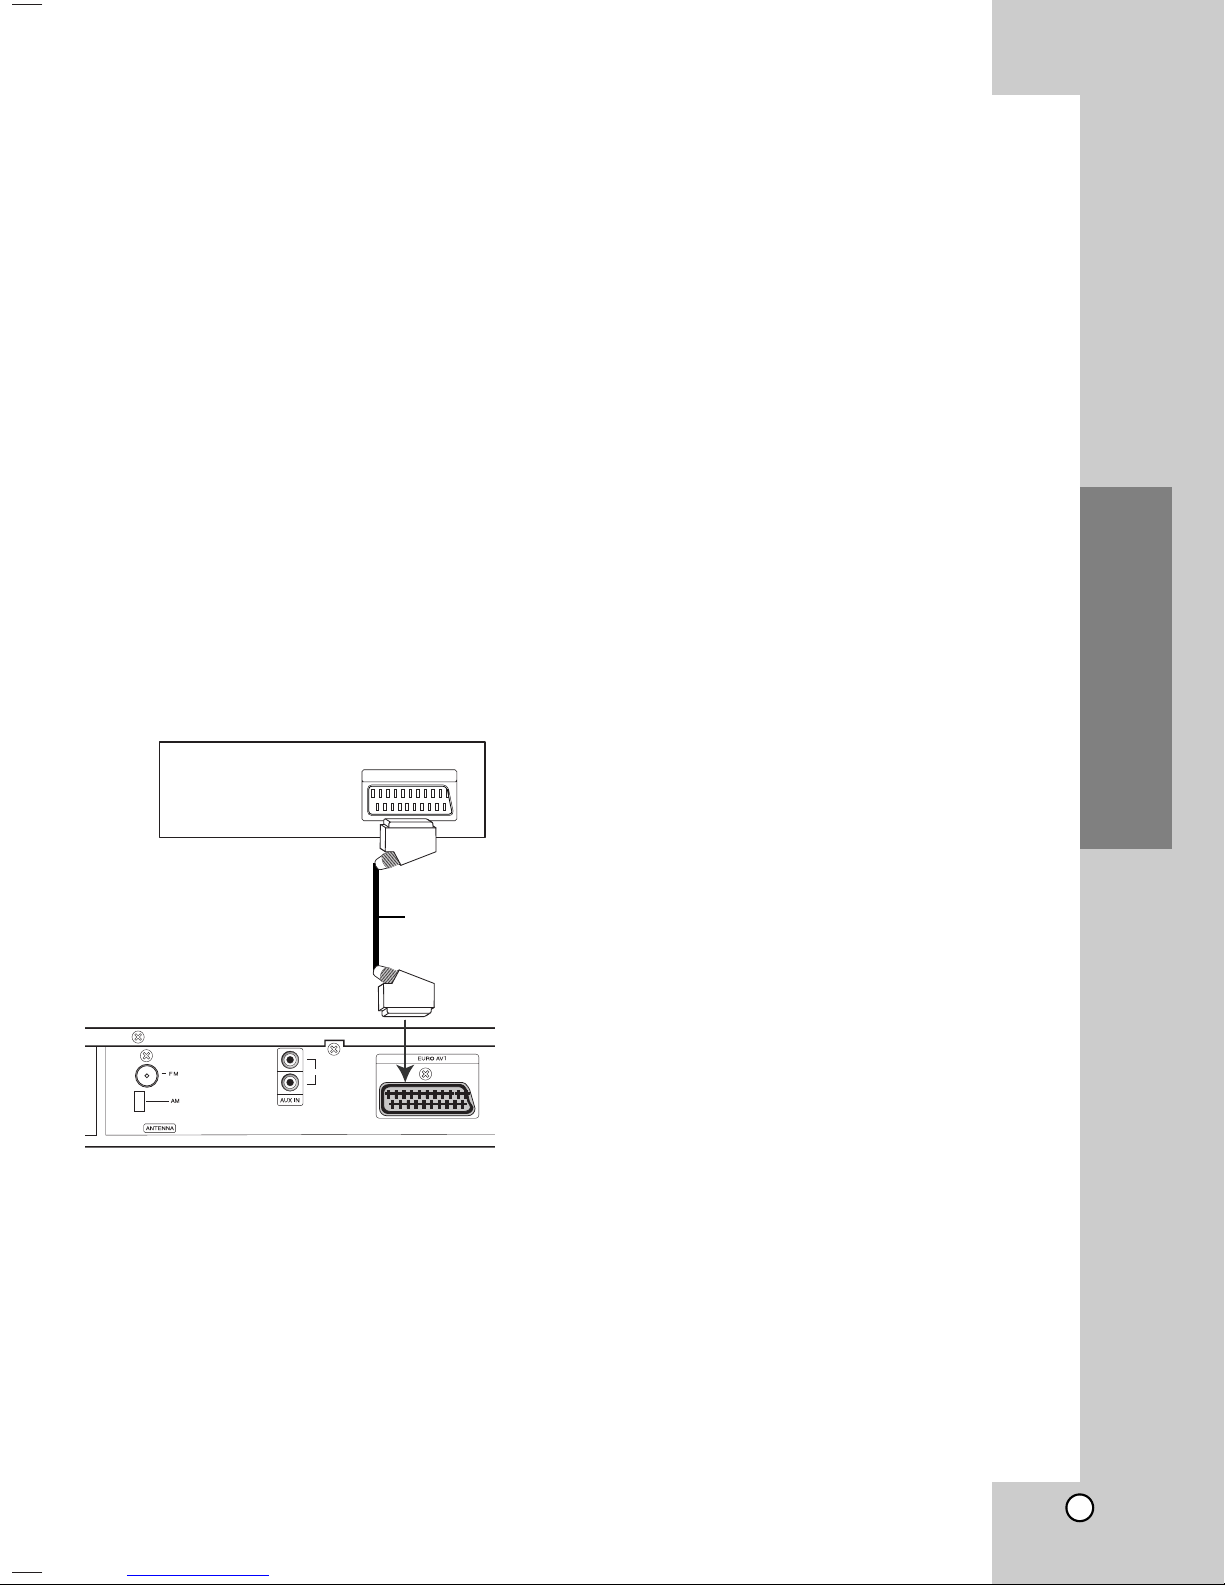
TV Connections
Make one of the following connections, depending on
the capabilities of your existing equipment.
Tips:
Depending on your TV and other equipment you
wish to connect, there are various ways you could
connect the
DVD/CD Receiver
. Use one of the
connections described below.
Please refer to the manuals of your TV, VCR,
Stereo System or other devices as necessary to
make the best connections.
Caution:
Make sure the DVD/CD Receiver is connected
directly to the TV. Select the correct AV input on
your TV.
Do not connect your
DVD/CD Receiver
to TV via
your VCR. The DVD image could be distorted by
the copy protection system.
Rear of TV
SCART INPUT
SCART connection
Connect the EURO AV OUTPUT (TO TV) socket on
the DVD/CD Receiver to the corresponding in jacks
on the TV using the scart cable (T).
Note:
A picture via scart input is not supported.
Installation and Setup
AUDIO
Rear of DVD/CD Receiver
T
L
R
7
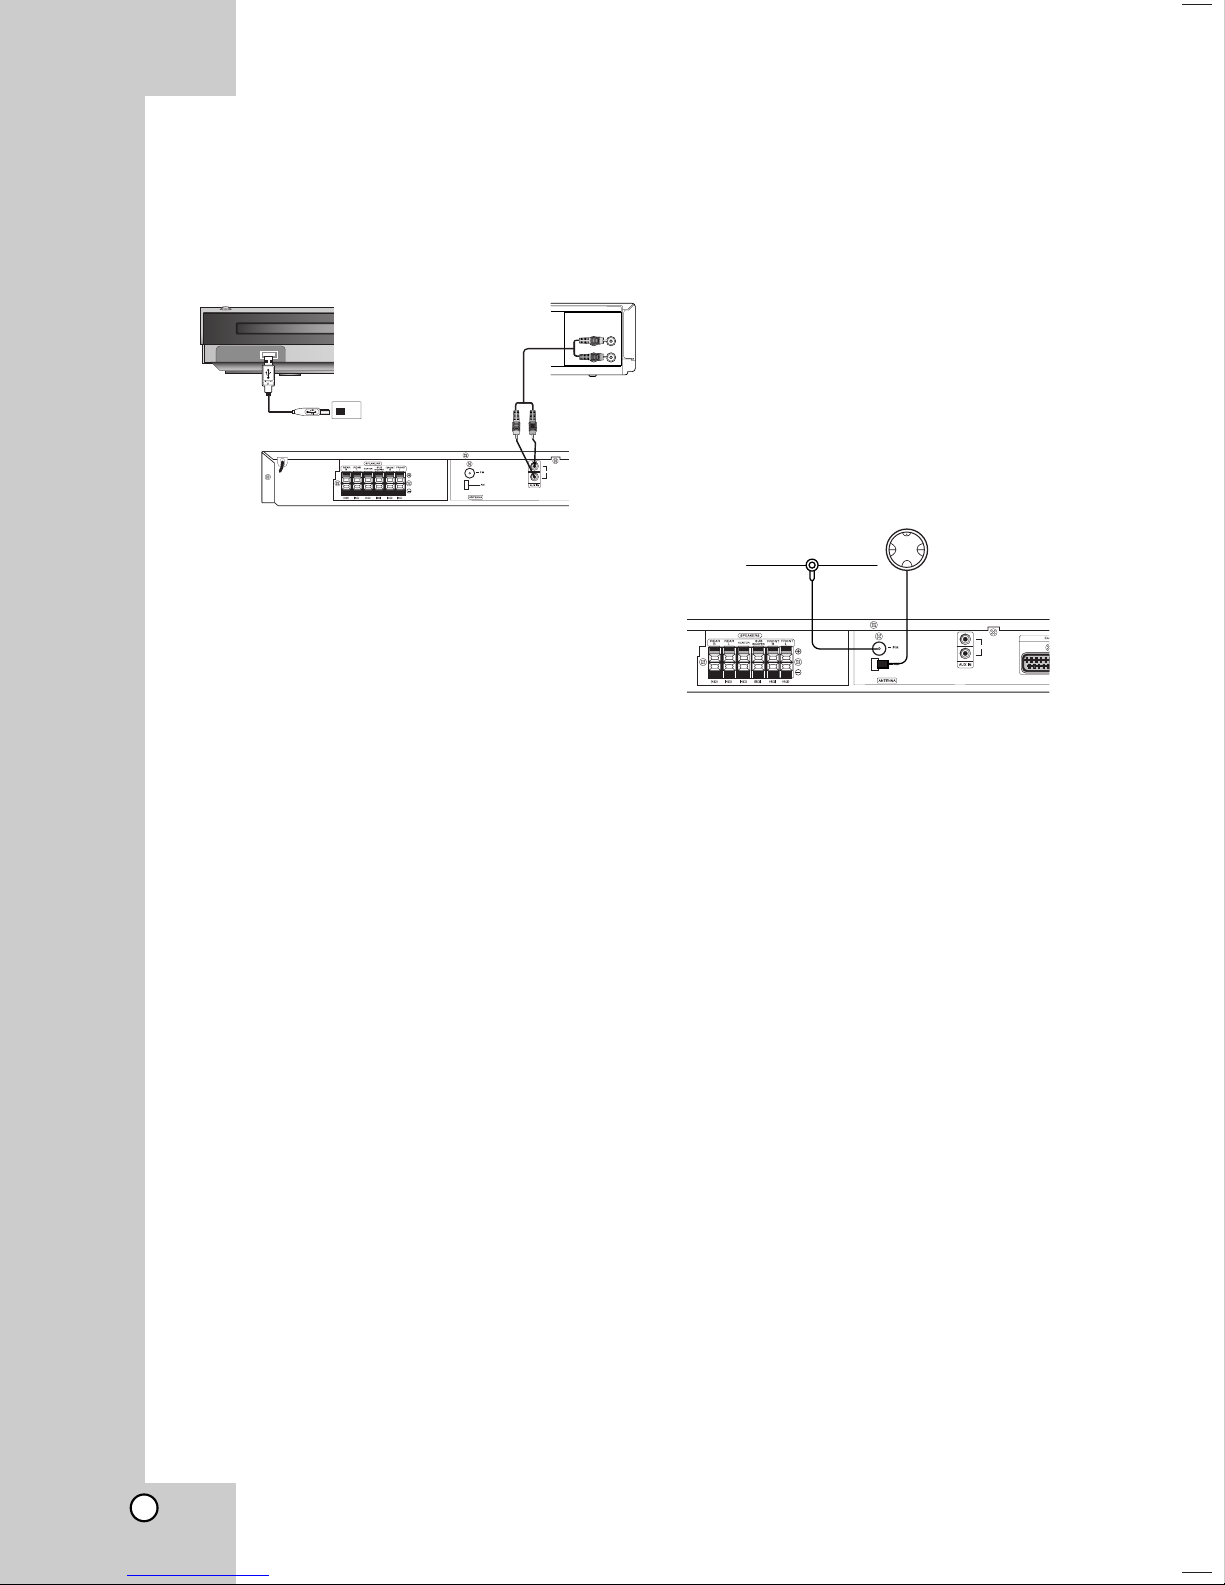
Optional Equipment Connections
AUDIO
L
R
AUDIO (L)
AUDIO (R)
Rear of VCR
To AV IN AUDIO (L/R)
Front of DVD/CD Receiver
To AUDIO OUT (L/R)
USB Memory, MP3 Player (or
Memory Card Reader, etc.)
Antenna Connections
1. Connect a VCR to the AUX IN connectors.
2. Connect the USB port of a USB Memory (or MP3
player, etc.) to the USB port on the front of the unit.
TO AUX IN AUDIO(L/R)
To Remove the USB from the unit
1. Choose a different function mode or press the STOP
(x) twice in a row.
2. Remove the USB from the unit.
Notes:
Don’t extract the USB device in operating.
Music files (MP3/WMA), image files (JPEG) and DivX
files can be played.
This unit can not use USB HUB.
Recommended Memory Card
Compact Flash Card (CFC), Micro Drive (MD), Smart
Media Card (SMC), Memory Stick (MS), Secure Digital
Card (SD), Multi Media Card (MMC), Memory Stick Pro
(MS-Pro)
- Compatable with : FAT16,32
- Only use the memory cards recommended.
Devices which require additional program installation
when you have connected the unit to a computer are
not supported.
In case of a USB HDD, make sure to connect an
auxiliary power cord to the USB HDD for porper
operation. A primary partition of drive is supported up
to four. If there is an extention partition it is not
supported.
If the drive of USB device is two or more, a drive
folder is displayed on the screen. If you want to
move to the previous menu after you select a folder,
press RETURN.
Digital camera and mobile phone are not supported.
Connect the supplied FM/AM aerial for listening to the
radio.
Connect the AM Loop aerial to the AM aerial
connector.
Connect the FM Wire aerial to the FM aerial
connector.
Notes:
To prevent noise pickup, keep the AM Loop aerial away
from the DVD/CD Receiver and other components.
Be sure to fully extend the FM wire aerial.
After connecting the FM Wire aerial, keep it as horizontal as
possible.
AM Loop Antenna
FM Wire Antenna
(supplied)
(supplied)
L
AUDIO
R
8
 Loading...