

LG LHD645 User Guide

SIMPLE MANUAL
DVD Home
Theater
System
To view the instructions of advanced features,
visit http://www.lg.com and then download Owner’s Manual.
Some of the content in this manual may differ from your unit.
MODEL
LHD645
*MFL68922431*
www.lg.com
ENGLISH
Additional Information
Specication
Power
requirements
Power
consumption
Dimensions
(W x H x D)
Net Weight Approx. 2.69 kg
Bus Power Supply
(USB)
Amplier
(Total RMS output
power)
Design and specications are subject to change without
notice.
How to disconnect the wireless network
connection or the wireless device
Turn off the unit by pressing the power button for more
than 5 seconds.
Replacement of battery
Refer to main label.
Refer to main label.
Networked standby : 0.4 W
(If all network ports are
activated.)
Approx. 360 mm x 60.5 mm x
299 mm
5 V 0 500 mA
1,000 W
POWER: This unit operates on a mains supply of 200 240 V ~, 50 / 60 Hz.
Wiring: This unit is supplied with a BS 1363 approved
main plug. When replacing the fuse, always use of the
same rating approved to BS 1362. Never use this plug
with the fuse cover omitted. To obtain a replacement fuse
cover contact your dealer. If the type of plug supplied is not
suitable for the mains sockets in your home, then the plug
should be removed and a suitable type tted. Please refer
to the wiring instructions below:
Warning: A mains plug removed from the mains lead of
this unit must be destroyed. A mains plug with bared wires
is hazardous if inserted in a mains socket. Do not connect
either wire to the earth pin, marked with the letter E or
with the earth symbol 6 or coloured green or green and
yellow. If any other plug is tted, use same rating of fuse in
the plug.
Important: The wires in this mains lead are coloured in
accordance with the following codes:
- BLUE: NEUTRAL, BROWN: LIVE: As the colours of the
wires in the mains lead of this unit may not correspond
with the coloured marking identifying the terminals in your
plug, proceed as follows: The wire which is coloured blue
must be connected to the terminal which is marked with
the letter N or coloured black. The wire which is coloured
brown must be connected to the terminal which is marked
with the letter L or coloured red.
AAA(R03)
LHD645-FB.DKENHLC_NEW SIMPLE_MFL68922431.indd 1-2 2015-10-08 11:36:18
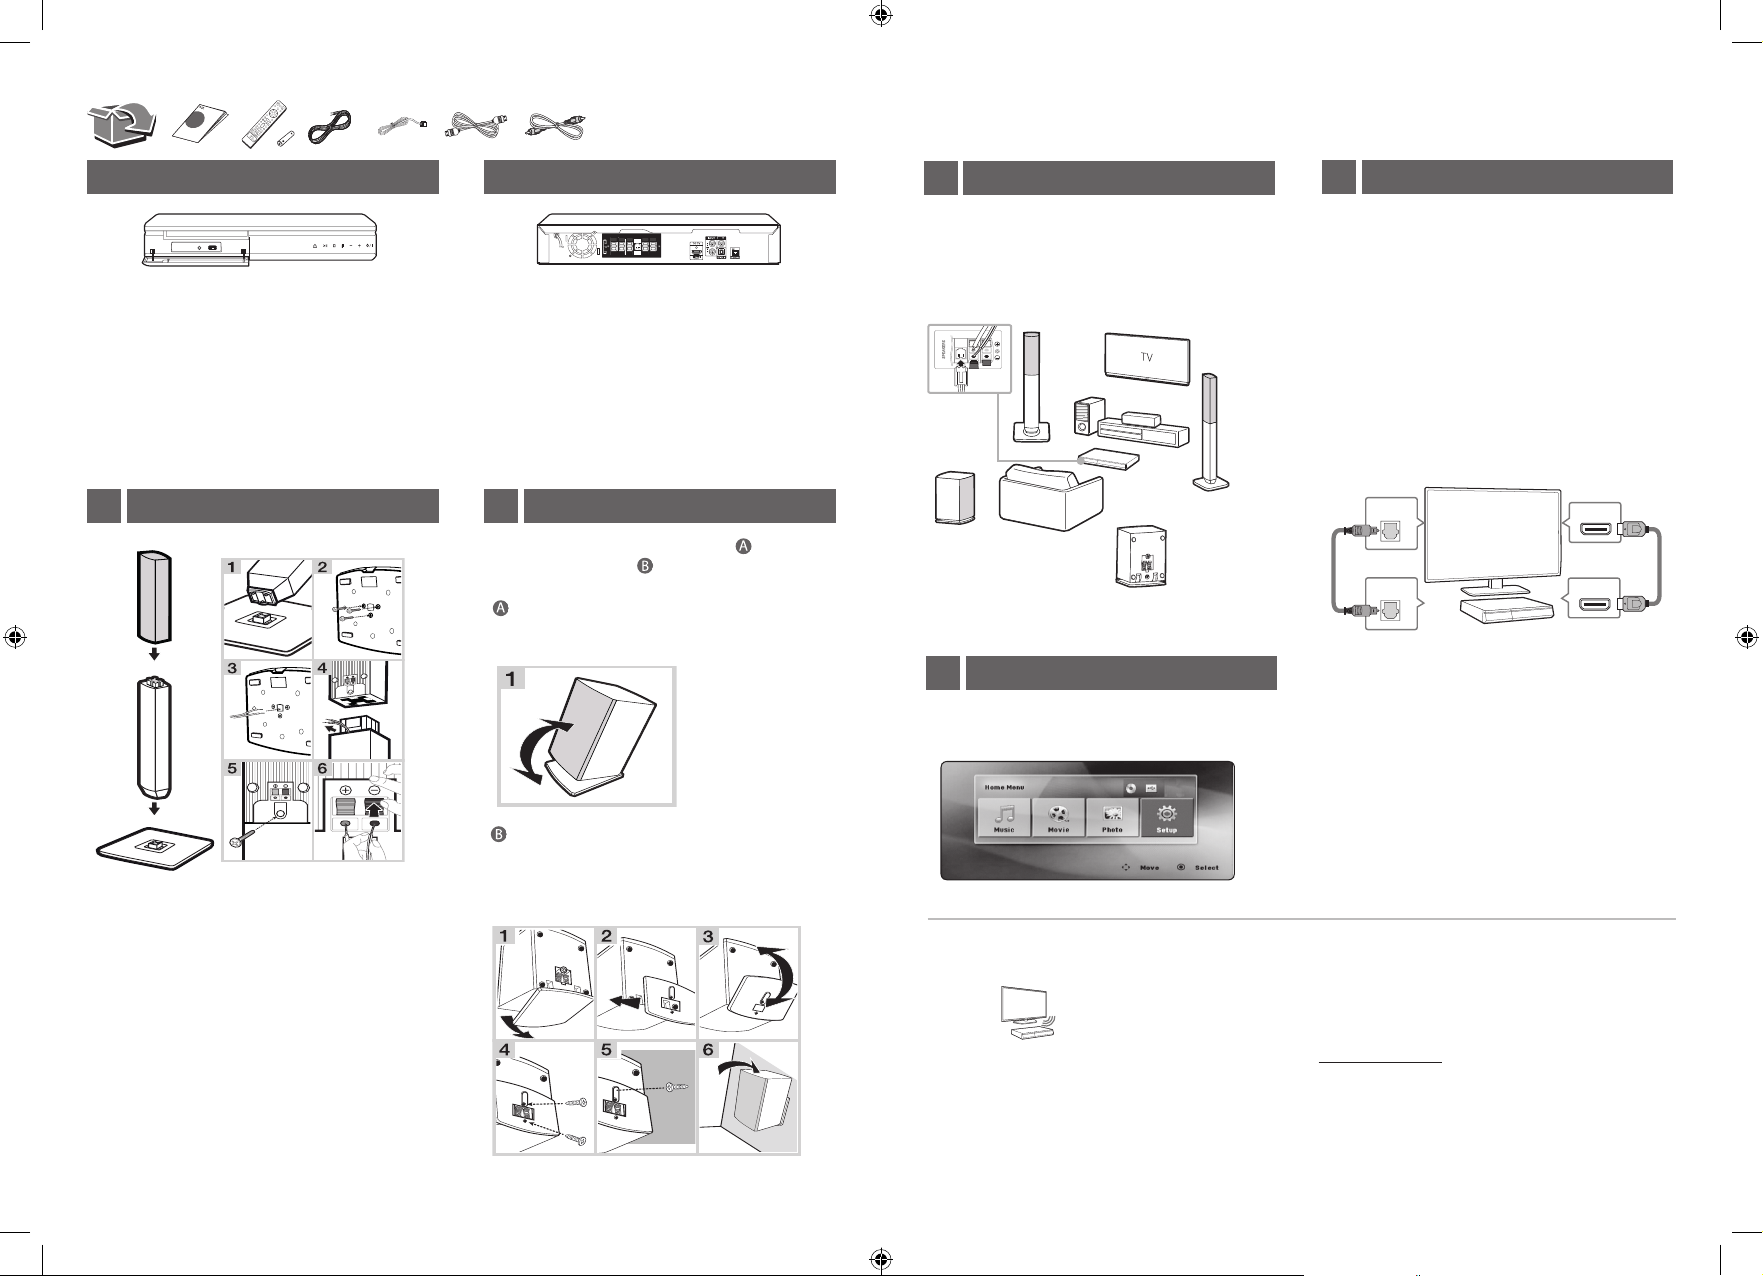
Front Panel Rear Panel
Speaker Connection3
TV Connection4
PORT. IN ··············Connect to a Portable device.
USB Port ····················Connect a USB device.
R·························· Disc Tray Open / Close
T ·······················Starts / Pauses playback.
I ·································Stops playback.
F············· Changes the input source or function.
- / +·······························Adjusts volume.
1/! ······························Power On / Off
Speaker Assembling1
SPEAKERS ··················· Connect to speakers.
HDMI OUT TO TV ··················· Connect to TV.
AUX (L/R) INPUT ······ Connect to analogue device.
VIDEO OUT ························ Connect to TV.
OPTICAL IN··············· Connect to digital device.
ANTENNA FM··········· Connect to radio antenna.
Speaker installation2
You can use the speaker in Stand type ( ) by adjusting
the angle or Wall type ( ) by mounting the speaker
to a wall.
Stand type
You can adjust angle of speaker.
Speaker design and connection method may
,
be different according to models.
Surround
(Left)
Front
(Left)
Subwoofer
Unit
Center
Surround
(Right)
Front
(Right)
Home Menu5
Home menu appears on the TV screen. Enjoy various
functions on the player.
HDMI & Optical Connection
a Connect the Player to the TV using HDMI &
Optical cable.
b Set the input selector to HDMI on the TV.
c Set up [External Speaker (Optical)] on your
TV setting menu.
d Follow the instructions on the TV screen
using remote control.
OPTICAL
OUT
HDMI IN
TV
OPTICAL
IN
HDMI OUT
Wall type (Mounting the speakers to a Wall)
When you want to mount the speaker to a wall, please
refer to below.
LG Sound Sync
(Wireless)
TV
For more information, download the online owner’s manual. http://www.lg.com
LHD645-FB.DKENHLC_NEW SIMPLE_MFL68922431.indd 3-4 2015-10-08 11:36:23
 Loading...