


User Guide
mi;ksxdrkZ ekxZnf’kZdk
LG-T515
P/N :
MFL67202050 (1.1)
E N G L I S H
fganh
www.lg.com

-
LG-T515 User Guide
English
Some of the contents in this manual may differ from your phone
depending on the software of the phone or your service provider.
Disposal of your old appliance
1. When this crossed-out wheeled bin symbol is attached to a product it means the
product is covered by the e-waste (Management and Handling) Rules, 2011.
2. All electrical and elec tronic products should be disposed of separately from the
municipal waste stream via designated collection facilities appointed by the
government or the local authorities.
3. The correct disposal of your old appliance will help prevent potential negative
consequences for the environment and human health.
4. For more detailed information about disposal of your old appliance, please
contact your city oce, waste disposal service or the shop where you purchased
the product.
5. This product does not contain any of the hazardous substances as specied in the
rule 13 (1) and (2) of the e-waste (Management and Handling) Rules, 2011.
Product Registration Program
Dear LG Mobile customer,
You are entitled for one year warranty on this model.
For automatic registration, One SMS containing the IMEI no. of your
phone will be automatically sent to LG servers @ Rs.0.06p only.
In return you will get one year warranty from the date of purchase at
any authorized LG Mobile Service center.
We assure you the information will be kept confidential and used for
internal purpose only.
LG Electronics India Pvt. Ltd. does not have any revenue sharing
with any cellphone operators for proceeds from SMS of automatic
registration.

Contents
Guidelines for safe and
efficient use .......................... 4
Installing the SIM card and
the handset battery ............ 10
Installing the SIM Card .... 10
Illustrations ...................... 10
Installing a Memory Card.. 10
Phone Components ............. 11
Using your touch screen ..... 12
Touch screen tips ............. 12
Control the touch screen ..12
Your home screen ............... 13
Your menu screen ............... 15
Calls .................................... 16
Making a Call ................... 16
Making a call from your
contacts ........................... 16
Answering and rejecting
a call ................................ 17
Changing the call setting .. 17
Changing the common
call setting ....................... 18
2
Contacts .............................. 18
Searching for a contact ...18
Adding a new contact ...... 18
Changing your contact
settings ............................ 19
Messaging .......................... 20
Keypad Information ............ 21
Entering Text ....................... 26
Handwriting recognition .. 26
Setting up your email ...... 26
Changing your text
message settings ........... 27
Changing your
multimedia message
settings ............................ 27
Messenger ......................... 29
Social network services
(SNS) ................................... 29
Games and apps ................. 29
NewsHunt ........................ 30
Camera ...............................30
Taking a quick photo........30
After taking a photo ......... 30

Using the advanced
settings ............................ 31
Video camera ...................... 32
Making a quick video ....... 32
After making a video........ 32
Using the advanced
settings ............................ 33
Music .................................. 33
Transferring music
onto your phone ............... 34
Managing files .................... 34
Application .......................... 35
Adding an event to your
calendar ........................... 35
Setting your alarm ........... 35
Voice recorder.................. 35
Using your calculator ....... 35
Converting a unit ............. 35
PC Suite .............................. 35
The web .............................. 36
Accessing the web .......... 36
Access to Google Service ..36
Profiles................................ 36
Personalising your profiles .. 36
Dual SIM setting ................. 37
Settings .............................. 37
Changing your phone
settings ............................ 37
SOS Service settings ....... 38
Changing your
connectivity settings ........ 38
Sending and receiving
your files using Bluetooth ..38
Pairing with another
Bluetooth device .............. 40
Wi-Fi ...................................40
Software update ................. 41
Phone Software update ... 41
Accessories ........................ 42
Technical data..................... 43
Troubleshooting .................. 44
3

Guidelines for safe and efficient use
Please read these simple
guidelines. Not following these
guidelines may be dangerous
or illegal.
Exposure to radio
frequency energy
Radio wave exposure and
Specific Absorption Rate
(SAR) information
This mobile phone model
LG-T515 has been designed
to comply with applicable
safety requirements for
exposure to radio waves. These
requirements are based on
scientific guidelines that include
safety margins designed to
assure the safety of all users,
regardless of age and health.
• The radio wave exposure
guidelines employ a unit of
measurement known as the
Specific Absorption Rate,
or SAR. Tests for SAR are
conducted using standardised
4
methods with the phone
transmitting at its highest
certified power level in all
used frequency bands.
• While there may be
differences between the
SAR levels of various LG
phone models, they are all
designed to meet the relevant
guidelines for exposure to
radio waves.
• The SAR limit recommended
by the International
Commission on Non-Ionising
Radiation Protection (ICNIRP)
is 2 W/kg averaged over 10g
of tissue.
• The highest SAR value for
this model phone tested by
DASY4 for use close to the
ear is 0.924 W/kg (10g) and
when worn on the body is
0.859 W/kg (10g).
• SAR data information for
residents in countries/regions
that have adopted the SAR
limit recommended by the
Institute of Electrical and
Electronics Engineers (IEEE),
which is 1.6 W/kg averaged
over 1g of tissue.
Product care and
maintenance
WARNING: Only use
batteries, chargers and
accessories approved for use
with this particular phone
model. The use of any other
types may invalidate any
approval or warranty applying
to the phone, and may be
dangerous.
• Do not disassemble this unit.
Take it to a qualified service
technician when repair work
is required.
•
Keep away from electrical
appliances such as TVs, radios,
and personal computers.
• The unit should be kept away
from heat sources such as
radiators or cookers.
• Do not drop.
• Do not subject this unit to
mechanical vibration or shock.
• Switch off the phone in any
area where you are required
by special regulations. For
example, do not use your
phone in hospitals as it may
affect sensitive medical
equipment.
• Do not handle the phone
with wet hands while it is
being charged. It may cause
an electric shock and can
seriously damage your phone.
• Do not charge a handset near
flammable material as the
handset can become hot and
create a fire hazard.
• Use a dry cloth to clean the
exterior of the unit (do not use
solvents such as benzene,
thinner or alcohol).
5

Guidelines for safe and efficient use
• Do not charge the phone
when it is on soft furnishings.
• The phone should be charged
in a well-ventilated area.
• Do not subject this unit to
excessive smoke or dust.
•
Do not keep the phone next to
credit cards or transport tickets;
it can affect the information on
the magnetic strips.
• Do not tap the screen with
a sharp object as it may
damage the phone.
• Do not expose the phone to
liquid, moisture or humidity.
•
Use accessories like earphones
cautiously. Do not touch the
antenna unnecessarily.
• Do not use the phone or
accessories in places with
high humidity such as pools,
greenhouses, solariums or
tropical environments, it may
cause damage to the phone
and invalidation of warranty.
6
Efficient phone
operation
Electronic devices
• Do not use your mobile
phone near medical
equipment without requesting
permission. Avoid placing the
phone over pacemakers, i.e.
in your breast pocket.
• Some hearing aids might be
disturbed by mobile phones.
• Minor interference may affect
TVs, radios, PCs, etc.
Road safety
Check the laws and regulations
on the use of mobile phones in
the area when you drive.
• Do not use a hand-held
phone while driving.
• Give full attention to driving.
• Use a hands-free kit, if
available.

• Pull off the road and park
before making or answering
a call if driving conditions so
require.
• RF energy may affect some
electronic systems in your
vehicle such as car stereos
and safety equipment.
• When your vehicle is
equipped with an air bag, do
not obstruct it with installed or
portable wireless equipment.
It can cause the air bag to fail
or cause serious injury due to
improper performance.
• If you are listening to music
whilst out and about, please
ensure that the volume
is at a reasonable level
so that you are aware of
your surroundings. This is
particularly important when
near roads.
Avoid damage to your
hearing
Damage to your hearing can
occur if you are exposed to loud
sound for long periods of time.
We therefore recommend that
you do not turn the handset on
or off close to your ear. We also
recommend that music and call
volumes are set to a reasonable
level.
NOTE: Excessive sound
pressure from earphones
can cause hearing loss.
Blasting area
Do not use the phone where
blasting is in progress. Observe
restrictions, and follow the rules
and regulations.
7

Guidelines for safe and efficient use
Potentially explosive
atmospheres
• Do not use the phone at a
refuelling point.
• Do not use near fuel or
chemicals.
• Do not transport or store
flammable gas, liquid, or
explosives in the same
compartment of your vehicle
as your mobile phone and
accessories.
In aircraft
Wireless devices can cause
interference in aircraft.
• Turn your mobile phone off
before boarding any aircraft.
• Do not use it on the aircraft
without permission from the
crew.
8
Children
Keep the phone in a safe
place out of the reach of small
children. It includes small parts
which may cause a choking
hazard if detached.
Emergency calls
Emergency calls may not
be available with all mobile
networks. Therefore, you should
never depend solely on the
phone for emergency calls.
Check with your local service
provider.
Battery information and
care
• You do not need to completely
discharge the battery before
recharging. Unlike other
battery systems, there is no
memory effect that could
compromise the battery’s
performance.

• Use only LG batteries and
chargers. LG chargers are
designed to maximise the
battery life.
• Do not disassemble or short-
circuit the battery pack.
• Keep the metal contacts of
the battery pack clean.
• Replace the battery when it
no longer provides acceptable
performance. The battery
pack may be recharged
hundreds of times until it
needs replacing.
• Recharge the battery if it has
not been used for a long time
to maximise usability.
• Do not expose the battery
charger to direct sunlight or
use it in high humidity, such
as in the bathroom.
• Do not leave the battery
in hot or cold places, this
may deteriorate the battery
performance.
• There is a risk of explosion if
the battery is replaced by an
incorrect type.
• Dispose off used
batteries according to the
manufacturer’s instructions.
Please recycle when possible.
Do not dispose as household
waste.
• If you need to replace the
battery, take it to the nearest
authorised LG Electronics
service point or dealer for
assistance.
• Always unplug the charger
from the wall socket after
the phone is fully charged
to save unnecessary power
consumption of the charger.
• Actual battery life will depend
on network configuration,
product settings, usage
patterns, battery and
environmental conditions.
9
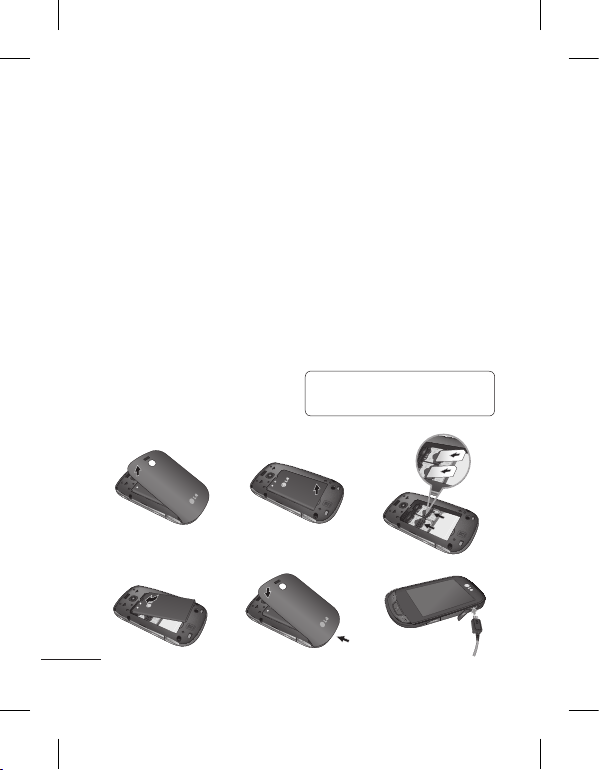
Installing the SIM card and the handset battery
0
1
0
1
0
1
0
1
0
1
0
1
0
1
Installing the SIM Card
When you subscribe to a cellular
network, you are provided with a
plug-in SIM card loaded with your
subscription details, such as your
PIN, any optional services available
and many others.
Important!
The plug-in SIM card and its
contacts can be easily damaged by
scratches or bending, so be careful
when handling, inserting or removing
the card. Keep all SIM cards out of
the reach of small children.
Illustrations
Always switch the device off and
disconnect the charger before
1 2
1
0
4 5 6
removing the battery.
1 Remove the back cover.
2 Lift battery away.
3 Insert the SIM card.
4 Insert the battery pack.
5 Attach the back cover.
6 Charge the battery.
Installing a Memory Card
Remove the Memory card slot cover.
Push the memory card inside with
the gold contact facing upward.
To remove the memory card, gently
push it.
NOTE: A memory card is an
optional accessory.
3
1
0
1
Slot 2
0
Slot 1
1
0
1
0
10
Phone Components
Earpiece
Call key
Dials a phone number and answers
incoming calls.
Back key
Go back to a previous screen.
End key
• End or reject a call.
• Come back to idle screen
from menu.
Volume keys
• When the screen
is at the Home
screen: Ring tone
and touch tone
volume.
• During a call:
Earpiece volume.
• Down volume key:
Press and hold to
activate/ deactivate
Silent mode.
Power/Lock key
• Short press to turn on/off the
screen.
• Long press for power on/off.
Handsfree or Stereo
earphone connector
11
Using your touch screen
Touch screen tips
• To select an item, touch the
centre of the icon.
• Do not press too hard. The
touch screen is sensitive
enough to pick up a light, firm
touch.
• Use the tip of your finger to
touch the option you require.
Be careful not to touch any
other keys.
• Whenever your LG-T515 is
not in use, it will return to the
lock screen.
Control the touch screen
The controls on the LG-T515
touch screen change
dynamically depending on the
task you are carrying out.
Opening Applications
To open any application, simply
touch its icon.
12
Scrolling
Drag from side to side to scroll.
On some screens, such as the
Logs list, you can also scroll up
or down.

Your home screen
1 When you touch on the
bottom right of the screen.
2 Select , the list panel
appears.
3 Select among of Contacts
or Widgets or Shortcut. And
you choice the items what
you want to add on the your
home screen.
TIP! You can use all the three
screens in the same way.
TIP! Live square widget
can be added on home
screen,through which you
can easily make call,send
messages to the number
allocated to an Avatar.
13

TIP! SNS Feeds/Status
widget can be added on
home screen,through which
you can get recent updates
and status from your friends.
TIP! AccuWeather is a
widget where in you can get
the updates on weather of
any selected city.
TIP! You can download
available widgets from
different category from the
Download Widgets link.
14
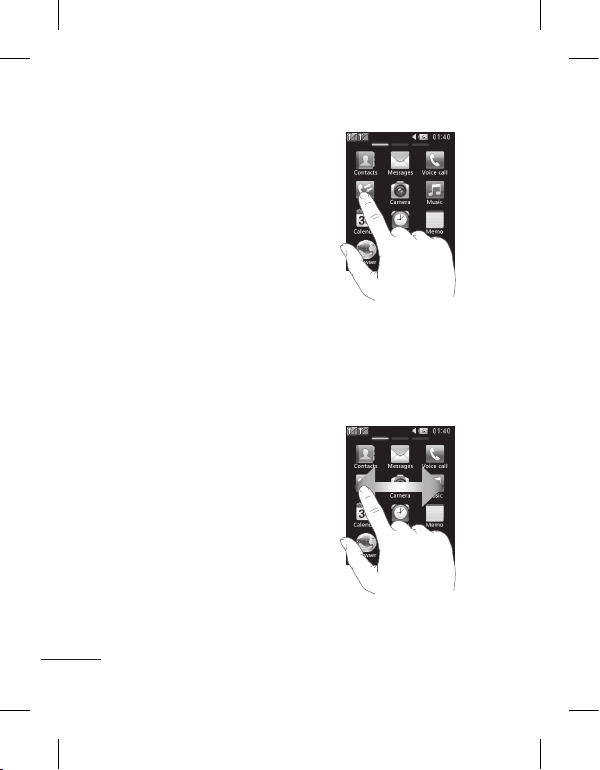
Your menu screen
You can drag from side to
side to scroll what you need
right away in all menu screen.
To swap between the menu
screens just wipe quickly over
the display from left to right, or
right to left.
Screen 1
You can open Contacts,
Messages, Voice call, Logs,
Camera, Music, Calendar,
Alarms, Memo, Browser, Games
and apps and Settings modules
from this screen.
Screen 2
You can open E-mail, SNS,
Google, My stuff, Messenger,
YouTube, Gallery, FM Radio,
Tasks, Date finder, Profiles and
Dual SIM settings modules from
this screen.
Screen 3
You can open Voice recorder,
Bluetooth, Wi-Fi, World clock,
Calculator, Unit converter,
Stopwatch modules from this
screen.
15
Calls
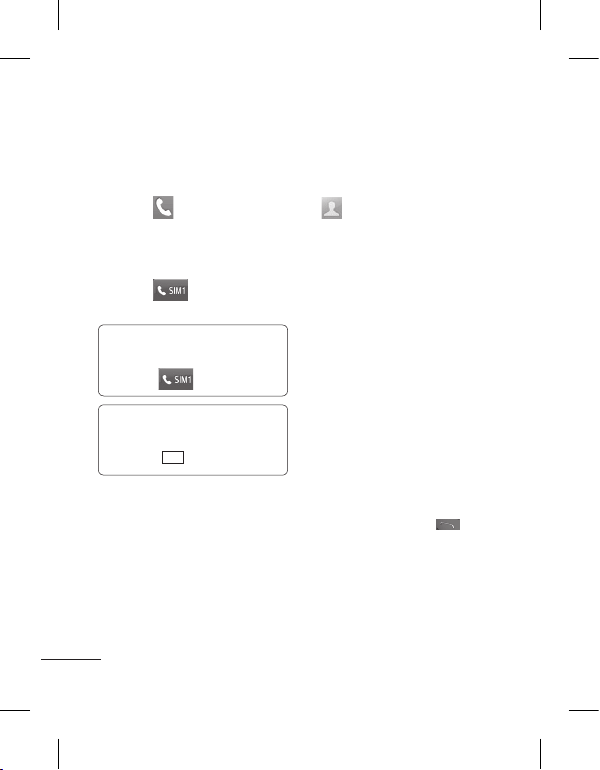
Making a Call
1 Touch to open the
keypad.
2 Key in the number using the
keypad.
3 Touch
call.
NOTE: To make a call from
SIM2 touch the forward arrow
mark on
TIP! To enter + for making
an international call, press
and hold
Press the power key to lock the
touch screen to prevent calls
being made by mistake.
16
to initiate the
icon.
+
0
.
Making a call from your
contacts
1 From the home screen touch
to open the Contacts.
2 Tap the search field box on
the top of the screen and
enter the first few letters of
the contact you would like to
call using the keypad.
3 From the filtered list, touch
the Call icon next to the
contact you want to call.
The call will use the default
number if there is more than
one for that contact.
4 Or, you can touch the contact
name and select the number
to use if there is more than
one for that contact to use.
You can also touch
initiate the call to the default
number.
to

NOTE:
Self call - Self call imitates
a real incoming call. Press
‘#*#’ on the home screen to
make a self call. This doesn’t
charge any fee
Answering and rejecting
a call
When your phone rings, press
key to answer the call.
To mute the ringing, touch on
Silent tab in alerting screen.
This is useful if you forgot to
change your profile to Silent
for a meeting. Touch on Reject
tab to reject an incoming call in
alerting screen.
Changing the call
setting
1 Touch Call settings in the
Settings menu.
2 From the screen touch SIM1/
SIM2.
• Call reject - Slide the switch
left for ON. You can touch
the Reject list to choose
All calls, Contacts, Groups,
All unknown callers and All
unknown numbers.
• Send my number - Choose
whether to display your
number on an outgoing call.
• Auto-redial - Slide the switch
left for ON or right for OFF.
• Minute minder - Slide the
switch left to ON to hear a
tone every minute during
a call.
• Save new number - Select
ON or OFF to save a new
number.
17

Changing the common
call setting
• Answer mode
Press send key: Allows you
to only answer an incoming
call by pressing the
Press any key: Allows you to
answer an incoming call by
pressing any key, except the
key.
• BT answer mode - Select
Always to handsfree to be
able to answer a call using a
Bluetooth headset, or select
Always to handset to press a
handset key to answer a call.
18
Contacts
Searching for a contact
1 Touch Contacts.
2 You see a list of contacts.
key.
Typing in the first letter of a
contact’s name in the Search
field will jump the menu to
that alphabetical area of
the list.
Adding a new contact
1 Touch Contacts and touch
Add.
2 Choose whether to save
the contact to your Internal
memory, SIM1 or SIM2.
3 Enter your first and last name.
4 You can enter up to five
different numbers per
contact.
5 Add an email addresses. You
can enter up to two different
email addresses per contact.
6 Assign the contact to one or
more groups.

7 Touch Save to save the
contact.
Changing your contact
settings
You can adapt your contact
settings so that your Contacts
suits your own preferences.
Touch Options key
touch Settings.
• Display name - Choose
whether to display the first or
last name of a contact first.
• Contacts view - Choose
whether to display Name or
Name & number.
• Copy - Copy your contacts
from your SIM1 to your
handset, SIM2 to your
handset or vice versa,SIM1 to
SIM2 or vice versa. You can
do this one contact at a time,
or all at once.
and
•
Move - This works in the same
way as Copy, but the contact
is stored at the new location
only. Therefore, once a contact
is moved from the SIM to
the Internal memory it will be
deleted from the SIM memory.
• Send all contacts via
Bluetooth - Sends all contacts
to other handset via Bluetooth.
• Back up contacts/ Restore
contacts - Save or restore
the contacts data to the other
storage.
• Delete all contacts - Delete
all your contacts. Touch Yes
if you are sure you want to
delete all your contacts.
TIP: LG Customer Care
number is available by
default in Contact list
(18001809999)
19
Messaging
Your LG-T515 combines SMS
and MMS into one intuitive and
easy-to-use menu.
Sending a message
1
Touch Messages in menu and
touch Write message to begin
composing a new message.
2 Touch Insert to add an
image, video, sound,
template and so on.
3 Touch To at the top of
the screen to enter the
recipients, then enter the
number or touch
select a contact. You can
even add multiple contacts.
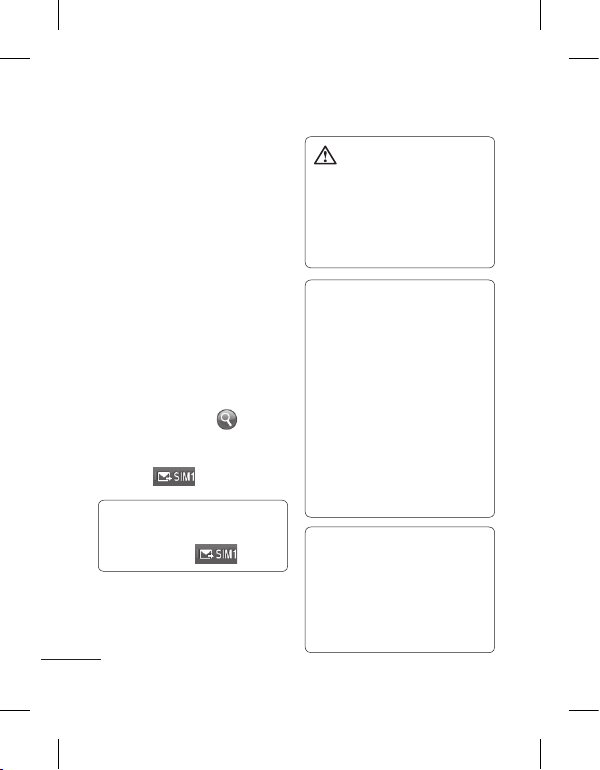
4 Touch
NOTE: To send a message
from SIM2 touch the forward
arrow mark on
20
to
when ready.
icon.
WARNING: If an
image, video, sound, New slide
and so on is added to an SMS it
will be automatically converted
to an MMS and you will be
charged accordingly.
TIP: User can Copy a selected
text from any editor and can
paste the same in any other
editor.
Ex: Go to Message Editor,Type
some text. Now Select the Text
you want to copy by scrolling
over the text. Now Place the
cursor at a point you want to
paste the text. Go to Option and
Click on Paste,so that copied
text will get Pasted.
NOTE: Spam Message - You
can block the unwanted
messages by giving numbers or
specific words.Those messages
will get stored in Spam Box
Folder.
Keypad Information
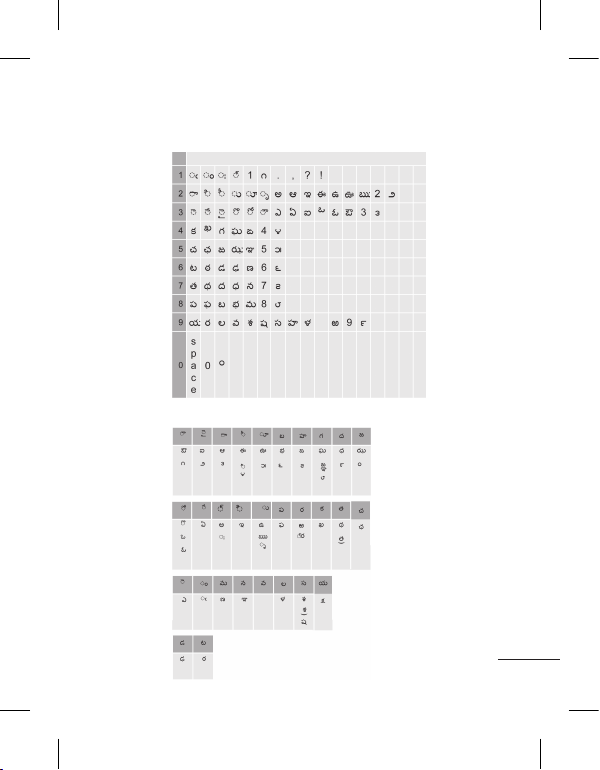
TELUGU (Multitap)
TELUGU (QWERTY)
21
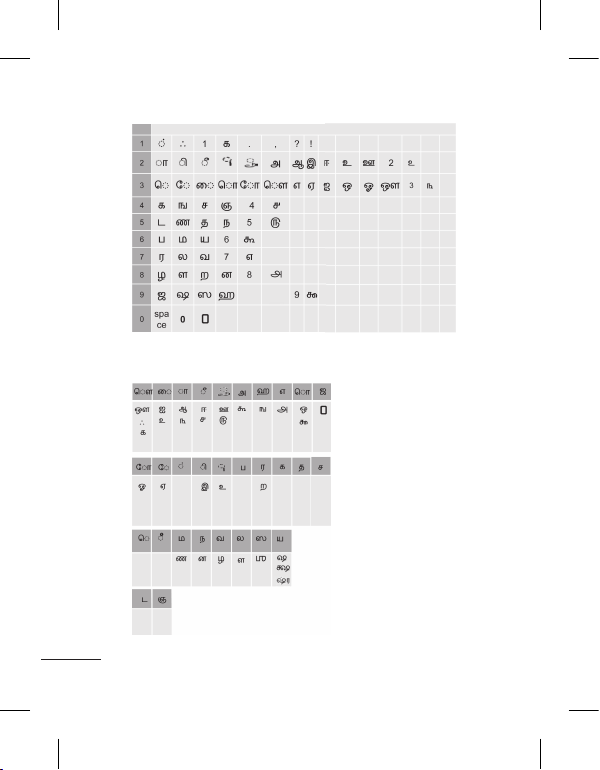
TAMIL (Multitap)
TAMIL (QWERTY)
22
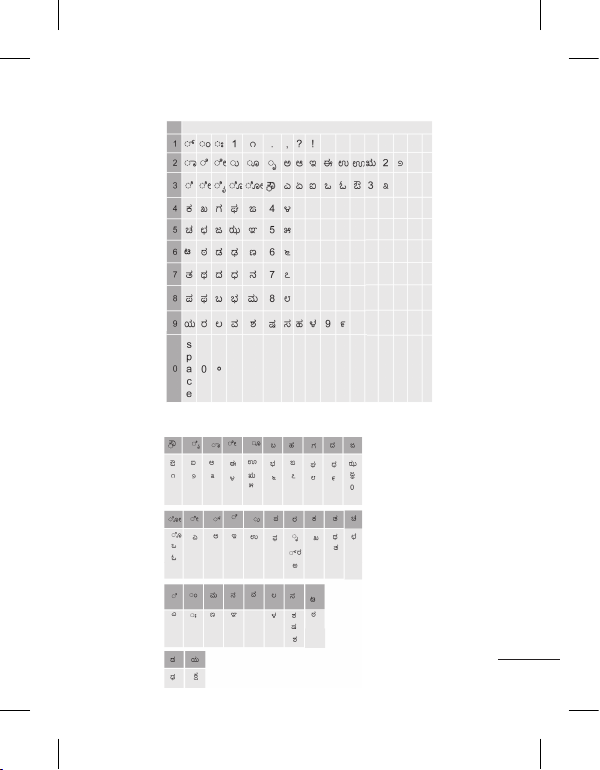
KANNADA (Multitap)
KANNADA (QWERTY)
23
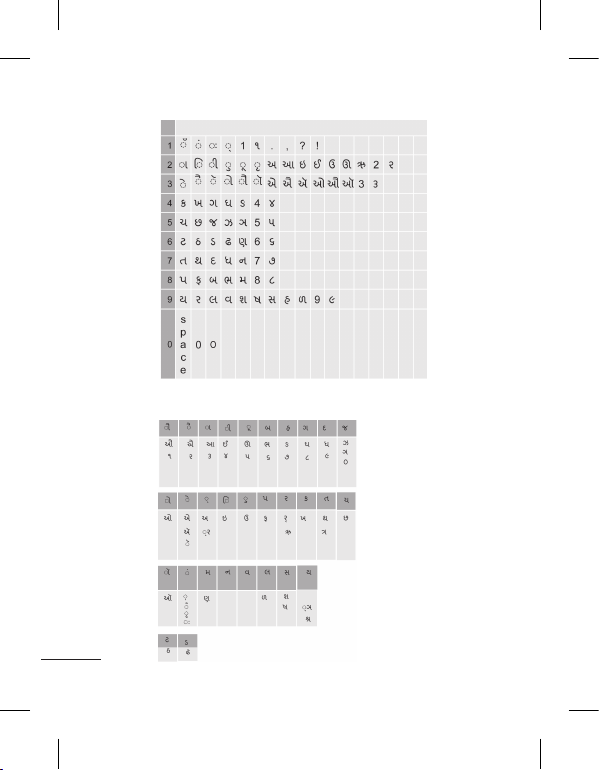
GUJARATI (Multitap)
GUJARATI (QWERTY)
24
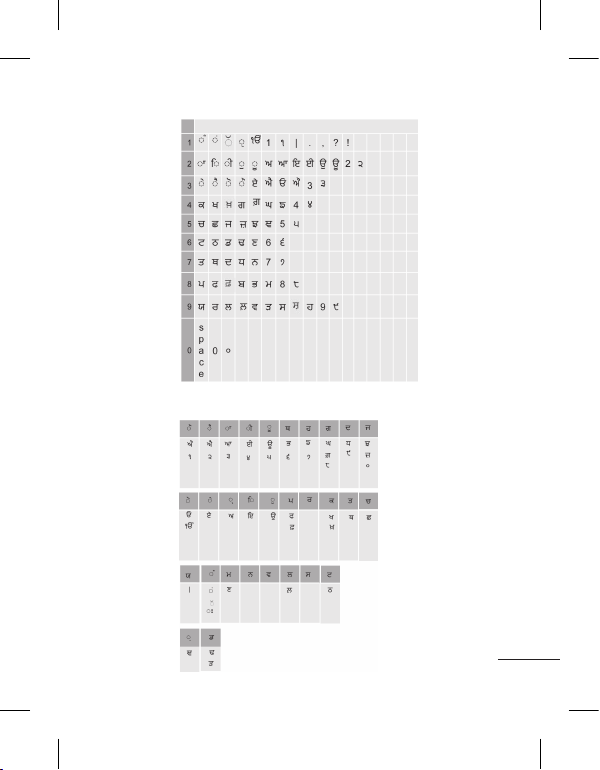
PUNJABI (Multitap)
PUNJABI (QWERTY)
25
Entering Text
You can choose your input
method by tapping
Input method.
Touch
This icon is only shown when
you choose Keypad as the
input method. Touch to
change between numbers,
symbols and text input. U
Shift key to change between
capital or lowercase input.
to turn on T9 mode.
Handwriting recognition
In Handwriting mode you simply
write on the screen and your
LG-T515 will convert your
handwriting into your message.
Setting up your email
Touch E-mail from screen 2.
If the email account is not set
up, start the email set up wizard
and finish it.
You can check and edit
settings also you can check the
26
and
se
additional settings that were
filled in automatically when you
created the account.
Note:
After creating the account,
Go to Settings → Refresh
→ Show amount.
On this screen, 3 options will
be displayed and user can
select any one. By default, only
25 messages will be shown.
If user wants to see more
emails, then either increase
the count to 50 or 100 from
this menu.

Changing your text
message settings
Touch Messages and
touch Settings. Select Text
message.
Text message centre - Enter
the details of your message
centre.
Delivery report - Slide
the switch left to receive
confirmation that your
messages have been delivered.
Validity period - Choose how
long your messages are stored
at the message centre.
Message types - Convert
your text into Text, Voice, Fax,
X.400 or E-mail.
Character encoding - Choose
how your characters are
encoded. This impacts the size
of your messages and therefore
data charges.
Send long text as - Choose
to send long messages as
Multiple SMS or as an MMS.
Changing your
multimedia message
settings
Touch Messages and, touch
Settings and Multimedia
message.
Retrieval mode - Choose
between Home network or
Roaming network. If you then
choose Manual you will receive
only notifications of MMS and
you can then decide whether to
download them in full.
Delivery report - Choose to
request and/or allow a delivery
report.
Read receipt - Choose to
request and/or allow a reply.
Priority - Choose the priority
level of your MMS.
Validity period - Choose how
long your message is stored at
the message centre.
Slide duration - Choose how long
your slides appear on the screen.
27

Unsupported attachment Choose whether the
unsupported attachment is
restricted or not.
Delivery time - Choose how
long to wait before a message
is delivered.
MMS centre - Choose one
from the list or add a new
message centre.
TIP: You can send SMS to
many contacts at a time.
User can select/deselect
all contacts for sending the
message. Only 20 contacts
can be marked and if user
select Select all only first 20
contacts will be marked.
To send the SMS to a
particular group of contacts
select Group Option and
select particular group.
28
NOTE:
Excuse message:
During Incoming call alert,a
preset Message can be send
as SMS on clicking Excuse
msg.
NOTE:
SMS Sorting:
Inbox Messages can be
sorted with the given sorting
options for an easy access
of messages. (Date, Sender
and Read/Unread)

Messenger
It provides MSN chat
application. You can login with
your MSN account.
Social network
services (SNS)
Your LG-T515 has SNS that
lets you enjoy and manage your
social network.
NOTE: SNS feature is a
data intensive application.
An additional costs may be
incurred when connecting
and using online services.
Check your data charges
with your network provider.
TIP: Facebook and Twitter
are java application based
on Java technology.
NOTE: Please ensure Auto
Update is On before using
the SNS Applications.
Facebook (Continued SNS)
Home: Log in and you will see
your friend’s updated status.
Input your comment about new
status or check others.
Profile: You can select the Wall
> Status updates and write the
current status. See your info detail
and see your uploaded photos.
Friends: Search your friends in
facebook by selecting Search
field.
Message: You can see the
Inbox, Sent Folder and Updates.
Twitter
Twitter is a social networking
service which enables its users
to send and read other users’
messages called tweets.
Games and apps
If you choose to download any
additional games or applications
they will be saved into this
folder.
29

NOTE: An additional cost is
incurred when connecting to
this service. Check your data
charges with your network
provider.
To switch to the camera
TIP:
mode or video mode, slide
up/down the camera or video
icon on the centre-right of the
viewfinder.
NewsHunt
News Hunt is a unique mobile
application designed to
enable viewing and reading
newspapers in the regional
languages on the go.
NOTE: Please ensure Auto
Update is On before using
this Applications.
Camera
Taking a quick photo
1 Touch Camera menu.
2 When the camera has focused
on your subject, touch the
on the right-center of the
screen to take a photo.
30
After taking a photo
Your captured photo will appear
on the screen.
The following options are
available.
Touch
Upload - Touch to upload the
photo.
Send Via - Touch to send the
photo as a Message, Email or
via Bluetooth.
Set as - Touch to set as
Homescreen wallpaper,
Lockscreen wallpaper, Contacts
image.
Edit - Touch to edit the photo.
.
Touch to delete the image.

Touch to take another
photo immediately.
Touch to view a gallery of
your saved photos.
Using the advanced
settings
From the viewfinder, touch
to open all advanced settings
options.
After selecting the option, touch
the OK button.
Size - Change the size of the
photo to save memory.
White balance - Choose
between Auto, Incandescent,
Sunny, Fluorescent, and
Cloudy.
Colour effect - Choose a color
tone for your new photo.
Continuous shot - Position the
subject in the viewfinder, then
press the capture button as
if taking a normal photo. The
camera will take shots in quick
succession.
Self-timer - The self-timer
allows you to set a delay after
the shutter is pressed. Select
Off, 3 seconds, 5 seconds, or
10 seconds. This is ideal if you
want to be included in a photo.
Night mode - Useful to user in
dark places.
Select storage - Choose
whether to save your photos to
the Handset memory or to the
External memory.
Show captured image Choose On to check the picture
you took right away.
Shutter sound - Select to
make Shutter Sound On or Off.
Reset settings - Restore all
camera default settings.
31

Video camera
Making a quick video
To switch to the camera mode
or video mode, slide up/down
the camera or video icon on the
right centre of the viewfinder.
Holding the phone horizontally,
1
point the lens towards the
subject of the video.
2 Press the red dot .
3
Rec will appear at the
bottom of the viewfinder
with a timer at the bottom
showing the length of the
video.
4 To pause the video, touch
and resume by selecting
5 Touch
32
on screen to stop
video recording.
After making a video
A still image representing your
captured video will appear on
the screen. The name of the
video runs along the bottom of
the screen together with icons
down the left and right sides.
Touch to play the video.
The following options are
available.
Touch
Send Via - Touch to send the
video as a Message, Email or
via Bluetooth.
.
.
Touch to delete the video
you have just made and
confirm by touching
Yes. The viewfinder will
reappear.
Touch to shoot another
video immediately. Your
current video will be saved.
Touch to view a gallery of
saved videos and images.

Using the advanced
settings
From the viewfinder, touch
to open all advanced settings
options. You can change the
video camera setting after
selecting the option, touch the
OK button.
Colour Effect - Choose a color
tone to use for your new view.
White balance - The white
balance ensures any the white
areas in your video are realistic.
To enable your camera to adjust
the white balance correctly, you
may need to determine the light
conditions. Choose between
Auto, Incandescent, Sunny,
Fluorescent, and Cloudy.
Duration - Set a duration limit
for your video. Choose between
Normal and MMS to limit the
maximum size to send as an
MMS message.
Select storage - Choose
whether to save your videos to
the Handset memory or to the
External memory.
Reset settings - Reset all the
video camera settings.
Music
To access the music player,
touch Music. From here, you
can access a number of folders:
Recently played - Plays the
songs you have played recently.
All tracks - Contains the songs
you have on your phone except
the pre-loaded default music.
Artists - Browse through your
music collection by artist.
Albums - Browse through your
music collection by album.
Genres - Browse through your
music collection by genre.
Playlists - Contains all the
playlists you have created.
Shuffle tracks - Play your
tracks in a random order.
33

Transferring music onto
your phone
The easiest way to transfer
music onto your phone is via
Bluetooth or the data cable.
To transfer music using
Bluetooth:
1 Make sure both devices have
Bluetooth switched on and
are connected to each other.
2 Select the music file on the
other device and select send
via Bluetooth.
3 When the file is sent, you
will have to accept it on your
phone by touching Yes.
4 The file should appear in
Music > All tracks.
34
Managing files
You can store multimedia files
in your phone’s memory so
you have easy access to all
your images, sounds, videos,
documents and Other content.
You can also save your files to a
memory card. Using a memory
card allows you to free up
space in your phone’s memory.
By touching My stuff, you can
open a list of the folders that
store all your multimedia files.
TIP: Secret box
You can add secret data. You
need to enter the security
code to use this menu to
protect your secret data
privacy. In order to hide your
data go through following
> Screen2 > My
step:
stuff > any image,sound or
any file >
Secret box.
> Move to

Application
Adding an event to your
calendar
1 Touch Calendar.
2 Select the date you would
like to add an event to.
3 Touch Add.
TIP: User can schedule an
SMS, so that it can be sent
to the pre define number/
contact on Set date and Set
time from option list
New scheduled SMS.
>
Using your calculator
1 Touch Calculator.
2 Touch the number keys to
enter numbers.
Converting a unit
1 Touch Unit converter.
2 Choose whether you want
to convert Currency, Area,
Length, Weight, Temperature,
Volume or Velocity.
3 Then select the unit and
enter the value you would
like to convert from.
Setting your alarm
1 Touch Alarms.
2 Touch Add, then you can set
and save your alarm in this
menu.
Voice recorder
Use your voice recorder to
record voice memos or other
audio files.
PC Suite
You can synchronise your PC
with your phone to make sure
all your important details and
dates match. You can also
backup your files to put your
mind at ease.
35

NOTE: Install PC Suite using
CD provided and follow the
Installation Guide.
WARNING: Do not
disconnect your phone
during the transfer.
NOTE:
On - Screen Phone:
On-Screen Phone allows you
to view your mobile phone
screen from a PC via a USB
or Bluetooth connection.
The web
Browser gives you a
fast, colourful world of
games, music, news, sport,
entertainment and loads more,
straight to your mobile phone.
Wherever you are and whatever
you’re into.
36
Accessing the web
1 Touch the Browser.
2 To go straight to the browser
home page, select Home.
Alternately, select Enter
address and type in the
URL, followed by Connect.
NOTE: You will incur extra
cost by connecting to these
services and downloading
content. Check data charges
with your network provider.
Access to Google
Service
Touch Google Search to launch
google search application.
Profiles
Personalising your profiles
You can personalise each profile
setting.

1 Touch Profiles.
2 Choose the profile you want
to edit.
3 You can then change all the
sounds and alert options
available in the list, including
your Ringtone and Volume,
Message tone settings and
more.
Dual SIM setting
You can see two Network Signal
icons on the left-top of the
screen when you insert two
SIM-Card.
To select or switch the SIMcard,
press Menu and select Dual SIM
settings.
NOTE: Timed Profile (Menu
> Screen2 > Profiles>Touch
on any Profile > Scroll Down
> Time Settings ) User
can set a required profile
automatically for the pre
define Time.
For Ex: If user wants handset
profile to be silent from 2:00
PM~3:00 PM, then set the
time and select profile as
silent for the time frame.
Settings
Changing your phone
settings
Use the freedom of adapting
the LG-T515 to your own
preferences.
From the home screen, select
and touch Settings then
scroll to Device settings.
37

NOTE: Anti Theft Mobile
Tracker - (
Device settings > Security
> Anti-theft Mobile tracker)
When the handset is stolen,
handset sends the SMS to
the pre-defined numbers
configured by real owner.
ATMT SMS will contain
information about the stolen
phone IMEI, Owners name &
Phone number of the person
who is using that handset.
To activate the ATMT
feature,configure the ATMT
settings with Owner Name,
Alternate numbers(5) and
set ATMT ‘ON’. Default
ATMT code is “0000.”
> Settings >
SOS Service settings
SOS Service- This enables SOS
mode. After enabling if you
press down volume key 4 times
when screen is locked, the SOS
message is sent and the phone
stays in SOS Mode.
38
In the emergency situation
SOS message will be sent to
the assigned receivers and
incoming calls by them will
be automatically accepted. All
notification sound will be muted.
To exit the SOS mode, press the
End key in Homescreen.
Changing your
connectivity settings
Your connectivity settings
have already been set up by
your network operator, so you
can enjoy your new phone
immediately. To change any
settings, use this menu:
Touch Connectivity.
Sending and receiving
your files using Bluetooth
To send a file:
1 Open the file you want to
send, typically this will be a
photo, video or music file.
2 Choose Send via. Choose
Bluetooth.

3 If you have already paired
the Bluetooth device,
your LG-T515 will not
automatically search for other
Bluetooth devices. If not,
your LG-T515 will search
for other Bluetooth enabled
devices within range.
4 Choose the device you want
to send the file to.
5 Your file will be sent.
To receive a file:
1 To receive files, your
Bluetooth must be both ON
and Visible. See Changing
your Bluetooth settings
below for more information.
2 A message will prompt you
to accept the file from the
sender. Touch Yes to receive
the file.
3 You will see where the file
has been saved. For image
files, you can choose to View
the file. Files will usually be
saved to the appropriate
folder in My stuff.
TIP!
1 When you use a
Bluetooth headset ,
A2DP and AVRCP profiles
are not supported
while you play video. It
means you will not listen
video sound if you use
Bluetooth headset.
2 Bluetooth file transferring
function will be blocked
under some applications
running. (Voice call,
Camera, Music Player,
UMS/PCSync)
Changing your Bluetooth
settings:
Touch Bluetooth then select
Options and choose Settings.
39

Pairing with another
Bluetooth device
By pairing your LG-T515 and
another device, you can set up a
passcode protected connection.
1 Check that your Bluetooth
is ON and Visible. You can
change your visibility in the
Settings menu.
2 Touch Search.
3 Your LG-T515 will search for
devices. When the search
is completed, Refresh will
appear on screen.
4 Choose the device you want
to pair with and enter the
passcode, then touch OK.
5 Your phone will then connect
to the other device, on which
you will need to enter the
same passcode.
6 Your passcode protected
oth connection is now
Blueto
ready.
40
Wi-Fi
Wireless Manager allows you
to manage Internet connections
your phone’s Wi-Fi (a wireless
LAN). It allows the phone
to connect to local wireless
networks or access the Internet
wirelessly. Wi-Fi is faster and
has a greater range than
Bluetooth wireless technology.
It allows fast emailing and
Internet browsing.
NOTE: The LG-T515 supports
WEP and WPA/WPA2PSK security. If your Wi-Fi
service provider or network
administrator sets encryption
for network security, fill in the
key in the pop-up window. If
encryption is not set, this popup window will not be shown.
You can obtain the key from
your Wi-Fi service provider or
network administrator.

Software update
Phone Software update
LG Mobile Phone Software
update from internet
For more information on using
this function, please visit the
http://update.lgmobile.com or
http://www.lg.com/common/
index.jsp → select country
and language → Support. This
Feature allows you to update
the firmware of your phone to
the latest version conveniently
from the internet without the
need to visit a service centre.
As the mobile phone firmware
update requires the user’s full
attention for the duration of the
update process, please make
sure to check all instructions
and notes that appear at each
step before proceeding. Please
note that removing the USB
data cable or battery during the
upgrade may seriously damage
you mobile phone.
41

Accessories
There are various accessories for your mobile phone. You can
select these options according to your personal communication
requirements.
Charger
Stereo
headset
Battery Data
cable and
CD
NOTE
• Always use genuine LG accessories.
• Failure to do this may invalidate your warranty.
• Accessories may vary in different regions.
42

Technical data
Ambient Temperatures
Max.: +55°C (discharging) +45°C (charging)
Min.: -10°C
Declaration of Conformity
Suppliers Details
Name
LG Electronics Inc
Address
LG Twin Tower 20,Yeouido-dong, Yeongdeungpo-gu Seoul, Korea 150-721
Product Details
Product Name
GSM 850 / E-GSM 900 / DCS 1800 / PCS 1900 Quad Band Terminal Equipment
Model Name
LG-T515
Trade Name
LG
Applicable Standards Details
R&TTE Directive 1999/5/EC
EN 301 489-01 v1.8.1 / EN 301 489-07 v1.3.1 / EN 301 489-17 v2.1.1
EN 300 328 v1.7.1
EN 60950-1:2006+A11:2009
EN 50360:2001 / AC:2006
EN 62209-1:2006 / EN 62209-2:2010
EN 301 511 v9.0.2
Supplementary Information
The conformity to above standards is verifi ed by the following Notifi ed Body(BABT)
BABT, Forsyth House, Churchfi eld Road, Walton-on-Thames, Surrey, KT12 2TD, United Kingdom
Notifi ed Body Identifi cation Number : 0168
Declaration
I hereby declare under our sole responsibility
that the product mentioned above to which this
declaration relates complies with the above mentioned
standards, regulation and directives
LG Electronics Inc. – EU Representative
Veluwezoom 15, 1327 AE Almere, The Netherlands
Name Issued Date
Doo Haeng Lee / Director 25, May, 2011
Signature of representative
43

Troubleshooting
This chapter lists some problems you might encounter while
using your phone. Some problems require you to call your service
provider, but most are easy to correct yourself.
Message Possible Causes Possible Corrective Measures
There is no USIM
USIM error
No network
connection/
Loosing
network
Codes do
not match
Any
application
cannot be
set
44
card in the phone
or it is inserted
incorrectly.
Weak Signal outside
of GSM network area
Operator applied new
services
To change a security
code, you will need
to confirm the new
code by entering it
again.
The two codes you
have entered do not
match.
Not supported by
service provider or
registration required
Make sure that the SIM card is
correctly inserted.
Move towards a window or into
an open area. Check the network
operator coverage map.
See if the SIM card is older than
6~12 month.
If so, change your SIM at the office
of your network provider.
The default code is [0000]. If you
forget the code, contact your service
provider.
Contact your service provider.

Message Possible Causes Possible Corrective Measures
New network not authorised.
Check for new restrictions.
Contact your service provider or
reset limit with PIN 2.
Press the On/Off key down for at
least two seconds.
Keep charger attached for a longer
time Clean the contacts.
Take out the battery and insert
again.
Calls not
available
Phone
cannot be
switched on
Dialing error
New SIM card
inserted
Prepaid charge limit
reached
On/Off key pressed
long enough
Battery is not
charged
Battery contacts
are dirty
Charging
error
Battery is not
charged
Outside temperature
is too hot or cold
Contact problem
No voltage
Charger defective
Wrong charger
Battery defective
Charge battery.
Make sure phone is charging under
normal temperatures.
Check the charger and connection
to the phone. Check the battery
contacts and clean them if
necessary.
Plug into a different socket.
If the charger does not warm up,
replace it.
Only use original LG accessories.
Replace battery.
45

Troubleshooting
Message Possible Causes Possible Corrective Measures
Touch function
doesn’t work
or is abnormal
Number not
permitted
Impossible to
receive/send
SMS & Picture
Files not
open
The screen
does not
turn on when
I receive a
call.
No sound
Hang up or
freeze
46
Touchpad calibration
fault
The Fixed Dial
Number function
is on.
Memory full
Unsupported file
format
Proximity sensor
problem
Vibration or manner
mode
Intermittent software
problem
Perform the touchpad calibration via
phone setting menu.
Check settings.
Delete some existing messages in
the phone.
Check the file format that can be
supported
If you use any protection tape or
case, check it is covered the area
around proximity sensor
Make sure that the area around the
proximity sensor is clean.
Check the setting status of sound
menu to make sure you are not in
vibrate or silent mode.
Take out the battery and insert
battery.
Turn on the phone.
Try to do software update service
via web site

LG-T515 mi;ksxdrkZ ekxZnf’kZdk
- fganh
bl eSU;qvy dh dqN lkexzh Qksu ds l‚¶Vos;j ;k vkids lsok çnkrk ds vk/kkj
ij vkids Qksu ls vyx gks ldrh gS-
vius iqjkus midj.k dk fuiVku
1. tc ;g ifg;s okys dzkWl fcu dk fpUg fdlh mRikn ds lkFk layXu gksrk
gSa rks bldk vFkZ gS mRikn Ã&osLV ( çca/ku vkSj gSaMfyax ) fu;e 2011 ds
vUrxZr vkrk gS A
2. lHkh bysDVªhdy vkSj bysDVªkWfud mRiknksa dks ljdkj ;k LFkkuh; vf/kdkfj;ksa
ds )kjk fu;qDr uxjikfydk vif’k
lqfo/kkvksa ds ek/;e ls u
3. lgh rjhds ls vius iqjkus midj.kksa dk fuiVku] okrkoj.k vkSj ekkuoh;
LokLF; ds fy, laHkkfor _.kkRed ifj.kkeksa dks jksdus esa enn djsxk A
4. vius iqjkus midj.kksa ds fuiVku ds lac/k esa vkSj vf/kd foLr`r tkudkjh ds
fy,] d`i;k vius uxj dk;kZy;] vif’k
mRikn [kjhnk Fkk] ogka laidZ djsa A
5. bl mRikn esa Ã&osLV ( çca/ku vkSj gSaMfyax ) fu;e] 2011 fu;e 13(1) vkSj
13(2) esa fufnZ
í
V vuqlkj dksà Hkh gkfudkjd inkFkZ ’kkfey ugha gSaA
í
V /kkjk ls vyx çf/kd`r dh xà laxzg
í
V fd;k tkuk pkfg, A
í
V fuiVku lsok ;k tgka ls vkius
mRikn iathdj.k çksxzke
fiz; ,yth eksckby xzkgd]
vki bl ekWMy ij ,d o
í
kZZ dh okjaVh ds iké gaS A
Lor% iathdj.k ds fy, ] ,d ,l,e,l @:-0-06p IMEI lfgr vki ds
Qksu ls ,yth loZj ij Hkstk tk,xk A blds cnys esa vki dks fdlh Hkh
vf/kd`r ,yth eksckby lsok dsaæ ij [kjhn dh rkjh[k ls ,d lky dh
okjaVh feysxh A
ge vkidks fo’okl fnykrs gSa ] dh ;g tkudkjh xksiuh; j[kh tk,xh vkSj
dsoy vkarjhd mÌs’; ds fy, gh bLrseky fd tk;sxh A
,yth bysDVªkWfuDl bafM;k izkbosV fyfeVsM dk Lor% iathdj.k ds ,l,e,l
ls vk; ds fy, fdlh Òh lsy Qksu vkWijsVjksa ds lkFk fdlh Òh izdkj dk
jktLo lk>k ugha gS A

lkexzh
lqjf{kr vkSj çHkkoh mi;ksx ds
fy, ekxZnf’kZdk,¡¡ ........................4
fle dkMZ vkSj gSaMlsV cSVjh
LFkkfir djuk ..........................10
fle dkMZ LFkkfir djuk ......... 10
mnkgj.k ............................... 10
eseksjh dkMZ LFkkfir djuk ....... 10
Qksu ?kVd ..............................11
Vp LØhu dk mi;ksx djuk ....... 12
Vp LØhu fVIl .....................12
Vp LØhu dks fu;af=r djsa ...... 12
vkidh gkse LØhu ..................... 13
vkidh esuw LØhu......................15
d‚Yl ..................................... 18
d‚y djuk ........................... 18
vius laidksaZ ls d‚y djuk .....18
dkWy dks Lohdkj v©j
vLohdkj djuk ..................... 19
lkekU; d‚y lsfVax esa
ifjorZu ...............................19
3 lsfVaXl esuw esa d‚y lsÇVx
Vp djsa vkSj lkekU; lsfVaXl
ij Vp djsa- .......................... 19
2
laidZ ...................................... 20
laidZ [kkstuk ........................20
u;k laidZ tksM+uk ..................20
viuh laidZ lsfVaXl dks
cnyuk ................................20
lans’k Hkstuk ............................21
ikB ntZ djuk ...................... 22
viuh bZesy lsV djuk .......... 23
viuh ikB lans’k lsfVaXl
ifjofrZr djuk
viuh eYVhehfM;k lans’k
lsfVaXl ifjofrZr djuk ........... 24
lans’k okgd ..........................25
lkekftd usVodZ lsok,¡ (SNS).... 25
Facebook ¼tkjh SNS½ ...........26
Twitter ................................ 26
xsEl vkSj ,fIyds’kal .............. 26
NewsHunt ...........................26
dSejk .....................................26
rqjar QksVks ysuk
QksVks ysus ds ckn
mUur lsfVaXl dk mi;ksx
djuk
.................... 23
..................... 26
..................27
...................................
27

ohfM;ks dSejk ........................... 28
rqjar ohfM;ks cukuk
ohfM;ks cukus ds ckn
................28
..............28
mUur lsfVaXl dk mi;ksx
djuk
..................................29
laxhr ..................................... 29
vius Qksu ij laxhr
LFkkukarfjr djuk
...................30
Qkbysa çcaf/kr djuk ..................30
vuqç;ksx ................................. 31
vius dSysaMj ij bosaV tksM+uk ..31
viuk vykeZ lsV djuk ..........31
o‚bl fjd‚MZj ....................... 31
vius dSydqysVj dk mi;ksx
djuk ..................................31
bdkbZ duoVZ djuk ...............32
PC lwV ................................... 32
osc ......................................... 32
osc rd igq¡p çkIr djuk ........ 32
Google lfoZl rd igqpuk .....33
Mqvy fle...............................33
vius çksQkby dks O;fäxr
:i nsuk...............................33
lsfVaXl ...................................33
vius Qksu dh lsfVaXl cnyuk ..33
ladV lans’k lsok lsfVax
............ 34
viuh la;ksstdrk lsfVaXl
cnyuk ................................34
fdlh vU; CywVwFk fMokbl
ls ;qfXer djuk ..................... 36
Wi-Fi ..................................... 36
l‚¶Vos;j uohuhdj.k ................ 37
Qksu l‚¶Vos;j uohuhdj.k ...... 37
lgk;d midj.k ......................38
rduhdh MsVk ...........................39
3

lqjf{kr vkSj çHkkoh mi;ksx ds fy, ekxZnf’kZdk,¡
—i;k bu ljy fn’kkfunsZ’kksa dks i<+sabu fn’kkfunsZ’kksa dk ikyu u djuk
[krjukd ;k xSjdkuwuh gks ldrk gS-
jsfM;ks ÝhDosalh ÅtkZ ds laidZ
esa vkuk
jsfM;ks rjax ,Dlikstj vkSj
LisflfQd vCtkiZ’ku jsV (SAR) dh
tkudkjh
;g eksckby Qksu LG-T515
jsfM;ks rjaxksa ds ,Dlikstj ds fy,
ykxw lqj{kk vko’;drkvksa ds lkFk
vuqikyu djus ds fy, fMtkbu
fd;k x;k gS- ;g vko’;drk,¡ mu
oSKkfud ekxZnf’kZdkvksa ds
vk/kkj ij cukbZ xbZ gSa] tks fd
vk;q vkSj LokLFk ij /;ku fn, fcuk
lHkh mi;ksxdrkZvksa dh lqj{kk dks
lqfuf’pr djus ds fy, fMtkbu
fd, x, lqj{kk mik;ksa dks ’kkfey
djrk gS-
•
jsfM;ks rjax ,Dlikstj fn’kkfunsZ’k]
LisflfQd vCtkiZ’ku jsV ;k SAR
dgykus okyh ,d ekiu bdkbZ dk
mi;ksx djrs gSa- SAR ds ijh{k.k]
mi;ksx fd, x, lHkh ÝhDosalh
cSaM~l esa mPpre
4
çekf.kr i‚oj Lrj ij
djus okys Qksu ds lkFk ekuo
fof/k;ksa ds mi;ksx ls fd, tkrs gSa-
•
oSls rks dbZ LG Qksu e‚My ds
SAR Lrj esa fHkUurk gks ldrh
gS] fdarq mu lHkh dks jsfM;ks rjaxksa
ds çfr ,Dlikstj ds fy, lac)
fn’kkfunsZ’kksa dks iwjk djus ds fy,
cuk;k x;k gS-
•
xSj&vk;ukbftax jsfM;s’ku
çksVsD’ku ¼ICNIRP½ ij
deh’ku }kjk vuq’kaflr SAR
lhek]10g fV’kw ij 2 W/kg dh
vkSlr ls gS-
•
DASY4 }kjk ifjf{kr] dku ds
ikl mi;ksx ds fy, bl e‚My
Qksu dk mPpre SAR eku
0.924W/kg ¼10xzk½ gS vkSj tc
’kjhj ij iguk tk, rks 0.859
W/kg ¼10xzk½ gS-
•
ftu ns’k¨a@{ks=¨a us baLVhVîwV
v‚Q bysfDVªdy ,aM bysDVª‚fuDl
bathfu;lZ ¼IEEE½ }kjk vuq’kaflr
SAR lhek dks Lohdkj fd;k gS]
ogk¡ ds fuokfl;ksa ds fy, SAR
MsVk tkudkjh 1g fV’;w ij
vkSlru 1.6 W/kg gS-

mRikn dh ns[kHkky vkSj
j[kj[kko
psrkouh: bl e‚My
ds fy, Loh—r cSVfj;ksa] pktZlZ
vkSj lgk;d midj.k dk gh
mi;ksx djsa- fdlh Òh nwljs çdkj
dk mi;ksx djus ij Qksu ij
ykxw gksus okys vuqeksnu ;k o‚jaVh
vekU; gks ldrh gSa vkSj ;g
[krjukd gks ldrk gS-
•
bl ;wfuV dks u [kksysasa- lq/kkjus dh
vko’;drk gksus ij bls ;ksX; lsok
rduhf’k;u ds ikl ys tk,¡-
•
fctyh ds midj.kksa tSls Vhoh]
jsfM;ks vkSj ilZuy daI;wVj ls
nwj j[ksa-
•
;wfuV dks xehZ ds lzksrksa tSls
jsfM,VlZ ;k dqdj ls nwj j[kuk
pkfg,-
•
bls fxjk,¡ ugha-
•
;wfuV dks eSdsfudy daiu ;k
>Vdksa ls cpk,¡-
•
ftl fdlh Hkh {ks= esa
fu;e ds rgr vko’;d gks] ogk¡
Qksu can dj nsa- mnkgj.k ds fy,]
vius Qksu dk mi;ksx vLirkyksa
esa u djsa] D;ksafd ;g laosnu’khy
esfMdy midj.kksa dks çHkkfor dj
ldrk gS-
•
pktZ gksrs le; Qksu dks xhys
gkFkksa ls u idM+sa- blls fctyh dk
>Vdk yx ldrk gS vkSj vkids
Qksu dks xaHkhj :i ls {kfr gks
ldrh gS-
•
gSaMlsV dks Toyu’khy inkFkksaZ
ds utnhd pktZ u djsa] D;ksafd
gSaMlsV xeZ gks ldrk gS vkSj vkx
ds [krjs dk dkj.k cu ldrk gS-
•
;wfuV dks ckgj ls lkQ djus ds
fy, lw[ks diM+s dk mi;ksx djsa
¼csathu] fFkuj] ;k ,Ydksgy tSls
foyk;dksa dk mi;ksx u djsa½-
•
Qksu dks gYds lkt&lkeku ij
j[k dj pktZ u djsa-
•
Qksu dks vPNs goknkj {ks= esa pktZ
fd;k tkuk pkfg,-
•
bl ;wfuV dks vR;f/kd /kq,¡ ;k
/kwy esa u j[ksa-
5

lqjf{kr vkSj çHkkoh mi;ksx ds fy, ekxZnf’kZdk,¡
•
Qksu dks ØsfMV dkMZ~l ;k VªkaliksVZ
fVdVksa ds ikl u j[ksa ;g pqacdh;
ifê;ksa ij vafdr tkudkjh dks
çHkkfor dj ldrk gS-
•
LØhu dks uqdhyh oLrq ls u
BdBdk,¡] D;ksafd blls Qksu dks
uqdlku gks ldrk gS-
•
Qksu dks rjy inkFkZ ;k ueh esa
u j[ksa-
• bZ;jQksu tSls lgk;d midj.k dk
mi;ksx lko/kkuh ls djsa- ,aVhuk dks
vuko’;d :i ls u Nq,¡-
dk;Zdq’ky Qksu dk;Zokgh
bysDVª‚fud fMokblst
•
fcuk vuqefr ds vius eksckby
Qksu dk mi;ksx esfMdy midj.k
ds ikl u djsa- Qksu dks islesdj
ds ikl vFkkZr~ vius ’kVZ Åijh
tsc esa u j[ksa-
•
eksckby Qksu }kjk dqN Jo.k
lqfo/kk,¡ ckf/kr gks ldrh gSa-
•
NksVk&lk O;o/kku Hkh Vhoh] jsfM;ks]
ihlh bR;kfn dks çHkkfor dj
ldrk gS-
6
lM+d lqj{kk
ftu {ks=ksa esa vki okgu pykrs
gSa] ogk¡ eksckby Qksu ds mi;ksx
ls lacaf/kr dkuwu vkSj fu;eksa dh
tkudkjh ys ysa-
•
okgu pykrs le; gSaM&gsYM Qksu
dk mi;ksx u djsa-
•
okgu pykus ij iwjk /;ku nsa-
•
;fn miyC/k gks] rks gSaM~l&Ýh
fdV dk mi;ksx djsa-
•
;fn okgu pykrs le; vko’;d
gks] rks d‚y djus ;k mÙkj nsus ls
igys okgu dks lM+d ds fdukjs
yxk,¡-
•
RF ÅtkZ vkids okgu ds dqN
bysDVª‚fud flLVEl tSls dkj
LVhfj;ks vkSj lqj{kk midj.k dks
çHkkfor dj ldrh gS-
•
tc vkidk okgu ,;j cSx ls
lqlfTtr gks] rks blesa LFkkfir ;k
iksVsZcy ok;jysl midj.k ls
ck/kk u Mkysa-
blls ,;j cSx foQy gks ldrk
gS ;k vuqi;qä dk;Z ds pyrs
xaHkhj pksV igq¡pk ldrk gS-

•
;fn vki ;k=k ds le; laxhr
lqu jgs gSa] rks —i;k lqfuf’pr
djsa fd o‚Y;we mfpr Lrj ij jgs]
ftlls vki vius pkjksa vksj ds
okrkoj.k ds çfr lpsr jgsa:i ls lM+dksa ds ikl gksus ij ;g
egRoiw.kZ gksrk gS-
vius lquus dh {kfr ls cpsa
;fn vki yacs le; rd rst /ofu
lqurs gSa rks vkidh lquus dh {kerk
dks {kfr igq¡p ldrh gS- blfy, ge
lykg nsrs gSa fd vki dku ds ikl
gSaMlsV dks pkyw ;k can u djsa- ge
bldh Hkh lykg nsrs gSa fd laxhr
vkSj d‚y o‚Y;we mfpr Lrj ij
lsV gksa-
uksV %
bZ;jQksu ds vf/kd /ofu ncko
ls lquus fd {kerk dks {kfr igq¡p
ldrh gSA
foLQksVu {ks=
Qksu dk mi;ksx ,sls LFkku ij u
djsa tgk¡ foLQksV gks jgs gksa-
çfrca/kksa ij /;ku nsa] vkSj
fu;eksa&fofu;eksa dk ikyu djsa-
laHkkfor :i ls foLQksV okys
okrkoj.k
•
bZa/ku Hkjus ds LFkku ij Qksu dk
mi;ksx u djsa-
•
bZa/ku ;k jlk;uksa ds ikl mi;ksx
u djsa-
•
eksckby Qksu vkSj lgk;d
midj.kksa dks Toyu’khy xSl]
rjy ;k foLQksVdksa ds lkFk vius
okgu esa u ys tk,¡ ;k u gh j[ksa-
foeku esa
ok;jysl fMokbl ls ,;jØ‚¶V esa
O;o/kku mRiUu gks ldrk gS-
•
fdlh Hkh ,;jØ‚¶V esa p<+rs le;
viuk eksckby Qksu can dj nsa-
•
Øw dh vuqefr ds fcuk foekury
ij bldk mi;ksx u djsa-
7

lqjf{kr vkSj çHkkoh mi;ksx ds fy, ekxZnf’kZdk,¡
•
cPps
Qksu dks NksVs cPpksa dh igq¡p ls
nwj fdlh lqjf{kr LFkku ij j[ksablesa NksVs&NksVs Hkkx gksrs gSa tks
;fn vyx gks tk,¡ rks xys esa Q¡l
ldrs gSa-
vkikrdkyhu d‚Yl
vkikrdkyhu d‚Yl lHkh eksckby
usVodZ~l ds lkFk miyC/k gks ldrh
gSa- blfy,] vkidks vkikrdkyhu
d‚Yl ds fy, dsoy Qksu ij
gh fuHkZj ugha jguk pkfg,- vius
LFkkuh; lsok çnkrk ls bldh
tkudkjh ysa-
cSVjh tkudkjh vkSj ns[kHkky
•
cSVjh fjpktZ djus ds igys vkidks
mls iwjh rjg fMLpktZ djus dh
vko’;drk ugha gS- vU; cSVjh
flLVEl ds foijhr] ,slk dksbZ
eseksjh çHkko ugha gS ftlls cSVjh
ds çn’kZu ij vlj iM+rk gS-
8
dsoy LG cSVfj;ksa vkSj pktZlZ dk
mi;ksx djsa- LG pktZlZ] cSVjh dh
vk;q vf/kdre lhek rd c<+kus ds
fy, fMtkbu fd, x, gSa-
•
cSVjh iSd dks vyx&vyx u djsa
;k mls ’kkVZ lfdZV ls cpk,¡-
•
cSVjh iSd ds /kkrq okys fgLlksa dks
lkQ j[ksa-
•
cSVjh dk çn’kZu vis{kkuqlkj u
jgus ij mls cny nsa- cSVjh iSd
dks lSdM+ksa ckj jhpktZ fd;k tk
ldrk gS] tc rd fd bls cnyus
dh vko’;drk u gks-
•
;fn cSVjh dks yacs le; ls
ç;ksx ugha fd;k x;k gS]rks bldh
mi;ksfxrk dks vf/kdre c<+kus ds
fy, bls jhpktZ djsa-
•
cSVjh dks xeZ ;k BaMs LFkkuksa ij u
j[ksa] blls cSVjh ds çn’kZu ij cqjk
vlj gks ldrk gS-
•
;fn cSVjh dks xyr çdkj dh
cSVjh ls cnyk tkrk gS rks
foLQksV dk [krjk gS-

•
mi;ksx dh xbZ cSVfj;ksa dk
fuiVku] fuekZrk ds funsZ’kksa ds
vuqlkj gh djsa- tc Hkh laHko gks
bls jhlk;dy djsa- bls ?kjsyw
dpjs dh rjg u Qsadsa-
•
;fn vkidks cSVjh cnyus dh
vko’;drk gks] rks lgk;rk ds
fy, bls fudVre vf/k—r LG
Electronics lfoZl i‚baV ;k Mhyj
ds ikl ys tk,a-
•
Qksu iwjh rjg pktZ gks tkus ij
pktZj dks o‚y l‚dsV ls fudky
nsa rkfd pktZj dh vuko’;d
ÅtkZ [kir dks cpk;k tk lds-
•
okLrfod cSVjh thou usVodZ
d‚fUQxjs’ku] mRikn lsfVaXl]
mi;ksx i)fr] cSVjh vkSj okrkoj.k
dh ifjfLFkfr;ksa ij fuHkZj djsxk-
9

fle dkMZ vkSj gSaMlsV cSVjh LFkkfir djuk
0
1
0
1
0
1
0
1
0
1
0
1
0
1
fle dkMZ LFkkfir djuk
tc vki fdlh lsY;qyj usVodZ dh lnL;rk
ysrs gSa] rks vkidks vkidh lnL;rk fooj.kksa
ls yksM fd;k x;k ,d Iyx&bu fle dkMZ
çnku fd;k tkrk gS] tSls vkidk fiu] dksbZ
miyC/k oSdfYid lsok,¡ vkSj vusd vU;-
egRoiw.kZ!
Iyx&bu fle dkMZ vkSj mlds laidZ]
[kjkaspusa ;k eqM+us ls vklkuh ls [kjkc gks
ldrs gSa] blfy, dkMZ dks gSaMy djrs le;]
Mkyrs vkSj fudkyrs le; lko/kkuh j[ksa-
lHkh fle dkMZ NksVs cPpksa dh igq¡p ls
nwj j[ksa-
mnkgj.k
cSVjh fudkyus ls igys fMokbl ges’kk can
djsa vkSj pktZj fMLdusDV dj nsa-
1 cSVjh doj fudkysa2 cSVjh ckgj fudkysa3 fle dkMZ Mkysa4 cSVjh iSd Mkysa5 cSd doj layXu djsa6 cSVjh pktZ djsa-
eseksjh dkMZ LFkkfir djuk
eseksjh dkMZ LyV~ doj fudkysa- eseksjh dkMZ
dk xksYM laidZ Hkkx Åij dh rjQ+ dj
mls vanj iq’k djsa A
eseksjh dkMZ fudkyus ds fy, mls /khjs
ls /kdsysa A
uksV % eseksjh dkMZ ,d oSdfYid
lgk;d midj.k gSa A
1 2
1
0
4 5 6
1
0
1
0
1
0
3
1
Slot 2
0
Slot 1
10

Qksu ?kVd
o‚Y;we dqaft;k¡
• tc LØhu gkse LØhu
ij gks: fjax Vksu vkSj
Vp Vksu o‚Y;we-
• d‚y ds nkSjku: b;jihl
o‚Y;we-
• uhps o‚Y;we dqath: ’kkar
eksM dks
djus ds fy, nckdj
j[ksa-
bZ;jihl
d‚y dqath
blls Qksu uacj Mk;y fd, tkrs gSa vkSj
vkod d‚y ds mÙkj fn, tkrs gSa-
lkQ dqath
fdlh fiNyh LØhu ij okil tkus ds fy,.
lekIr dqath
• dky lekIr ;k jÌ djus ds fy,.
• esuq ls vbMy LØhu esa okil
tkus ds fy,.
ikoj/y‚d dqath
• LØhu dks pkyw/can djus ds fy,
de nck,¡-
• ikoj pkyw/can djus ds fy, nsj
rd nck,¡-
gSaM~lÝh ;k LVhfj;ks bZ;jQksu dusDVj
11

Vp LØhu dk mi;ksx djuk
Vp LØhu fVIl
• fdlh vkbVe dk p;u djus ds
fy,] vkbdu ds e/; dks Vp djsa-
• T;knk tksj ls u nck,¡- VpLØhu
ykbV] QeZ Vp dks fid vi djus
ds fy, vf/kd laosnu’khy gS-
• vkidks ftl fodYi dh
vko’;drk gS] mls Vp djus ds
fy, viuh vaxqyh ds fVi dk
mi;ksx djsa- lko/kku jgsa fd vU;
dqaft;k¡ Vp u gks-
• tc Hkh vkidk LG-T515 mi;ksx
eas u gks] rks ;g y‚d LØhu ij
okil pyk tk,xk-
Vp LØhu dks fu;af=r djsa
vki tks dk;Z dj jgsa gSa] ml ij
fuHkZj djrs gq, LG-T515 Vp
LØhu ij fu;a=.k Mk;usfed :i ls
cnyrs gSa-
vuqç;ksx [kksyuk
dksbZ vuqç;ksx [kksyus ds fy,] dsoy
blds vkbdu dks Vp djsa-
12
LØ‚fyax
LØ‚y djus ds fy, fdukjs ls
fdukjs rd [khpsa- dqN LØhuksa ij]
tSls d‚y bfrgkl lwph] vki Åij
;k uhps LØ‚y dj ldrs gSa-

vkidh gkse LØhu
1 tc vki uhps ls nk;sa vksj Li’kZ
djrs gSaa-
3 laidZ ;k foM~tsV~l ;k ’k‚VZdV
ds chp es ls p;u djsa-
vkSj vki vius pqus gq, vkbVeks
dks vius gkse LØhu ij tksMldrs gSa-
2 lwph iSuy esZ
nsxh mls pqusa-
fn[kkbZ
;qfä! vki ,d gh rjg ls] rhuks
LØhuksa dks mi;ksx dj ldrs gSa-
;qfä! foM~tsV~l MkmuyksM djsa%
vki MkmuyksM foM~tsV~l fyad
ls vyXk vyXk oXkZ ds miyC/k
foM~tsV~ MkmuyksM dj ldrs gSa -
;qfä! AccuWeather ,d
foM~tsV~ gSa ] tgk¡ vki fdlh
Hkh p;fur ’kgj ds ekSle ij
v|ru ÁkIr dj ldrs gSa-
13

;qfä! ,l ,u ,l Q+hM@,l
,u ,l fLFkfr foM~tsV gkse LDzhu
es tksM+k tk ldrk gS- ftlds
ek/;e ls vki vius nksLrksa ds
gky gh esa v?kru vkSj fLFkfr ds
tkudkjh dks izkIr dj ldrs gSA
;qfä! gkse LDzhu esa ykbo LDosj
foM~tsV tksM+k tk ldrk gSftlds ek/;e ls vki vklkuh
ls fdlh Hkh tqM+s gq,s laidZ ds
O;Drh dks d‚y ;k lans’k Hkst
ldrs gSA
14

vkidh esuw LØhu
vkidks lHkh esuw LØhu esa ftldh
vko’;drk gS] mls LØ‚y djus
ds fy, vki fdukjs ls fdukjs rd
[khpsa- esuw LØhu ds chp Losi djus
ds fy,] çn’kZu ij ck,¡ ls nk,¡
;k nk,¡ ls ck,¡ dsoy rhozrk ls
okbi djsa-
LØhu 1
vki bl LØhu ls laidZ ]lans’k ]
okWbl dkWy] ykWXl] dSejk] laxhr]
dSysaMj] vykZe ] eseks] czkmtj ]xsEl
vkSj ,fIyds’kal ] lsfVaXl Hkkx [kksy
ldrs gSa A
LØhu 2
vki bl LØhu ls bZ&esy] SNS]
Google] esjh phtsa]lans’k okgd]
YouTube ] xSysjh] FM jsfM;ks ]dk;Z]
izksQkbYl ] frfFk [kkstd ] nksgjk
SIM lsfVaXl Hkkx [kksy ldrs gaS A
LØhu 3
vki bl LØhu ls okWbl fjd‚MZj
, CywVwFk ] Wi-Fi, fo’o ?kMh ]
dSydqysVj ] bdkbZ ifjoRkdZ ]
LVkWiokWp Hkkx [kksy ldrs gSa A
15

Vp djsa A
Vp djsa A
Vp djsa A
Vp djsa A
Vp djsa A
Vp djsa A
Vp djsa A
Vp djsa A
Vp djsa A
Vp djsa A
Vp djsa A
Vp djsa A
Vp djsa A
Vp djsa A
Vp djsa A
Vp djsa A
Vp djsa A
Vp djsa A
Vp djsa A
16

dqathiVy rkfydk
17

d‚Yl
d‚y djuk
1 dhiSM dks [kksyus ds fy,
ij Vp djsasa-
2 dhiSM dk mi;ksx djds la[;k
fy[ksa-
3 d‚y vkjHak djus ds fy,
ij Vp djsasa-
SIM2 ls d‚y djus ds fy,
vkbdu ls QjokZM ,jks
ekdZ ij Vp djsasa
;qfä! d‚y djus
gsrq + ntZ djus ds fy, 0
nck, j[ksa.
xyrh ls d‚y vkjaHk gksus ls cpus
ds fy, VpLØhu dks y‚d djus gsrq
ikoj dqath nck,¡a-
vius laidksaZ ls d‚y djuk
1 gkse LØhu ls liadkZas dks [kkysus
ds fy,
2 LØhu ds ij uke QhYM
c‚Dl FkiFkik,¡a vkSj vki ftl
18
ij Vp djsa-
laidZ dks d‚y djuk pkgrs
gSa] dhiSM dk mi;ksx djrs gq,
mlds uke ds igys dqN v{kj
ntZ djsa-
3 fQYVj dh xbZ lwph ls] vki
ftl laidZ dks d‚y djuk
pkgrs gSa mlds vkxs d‚y
vkbdu dks Vp djsa- ;fn ml
laidZ ds fy, ,d ls vf/kd
uacj gq,] rks d‚y fMQ‚YV uacj
dk mi;ksx djsxh-
4 ;k vki laidZ ds uke dks Vp
dj ldrs gSa vkSj ;fn ml
laidZ ds fy, mi;ksx djus
gsrq ,d ls vf/kd uacj gSa] rks
vki uacj dk p;u dj ldrs
gSa- fMQ‚YV uacj ij d‚y vkjaHk
djus ds fy, Hkh vki
dj ldrs gSaSa-
;qfä!
lsYQ dkWy% lsYQ dkWy ,d
vlyh vkod d‚y dk udy
djrs gSa- lsYQ dkWy djus ds
fy, gkse LØhu ij # * #
nck,¡- ;g dksbZ ’kqYd pktZ ugha
djrk gS A-
Vp

dkWy dks Lohdkj v©j
vLohdkj djuk
tc vkidk Qksu fjax djrk gS rc
dqath nckdj dkWy dk
vki
mRrj ns ldrs gSaA fjax dks e©u
djus ds fy, LØhu ij “e©u“
VSc dks Vp djsa] ;g mi;ksxh gS
vxj vki ehfVax ls igys ÁksQkby
dks e©u djuk Hkwy x, gSaA dkWy
djus ds fy, LØhu ij
“vLohdkjsa” VSc dks Vp djsaA
lkekU; d‚y lsfVax esa ifjorZu
1 lsfVaXl esuw esa d‚y lsÇVx
Vp djsa-
2 SIM1/SIM2 ij Vp djsa-
• d‚y NksM+sa & fLop dks ck,¡
f[kldkdj pkyw djsa- vki] lHkh
d‚Yl] laidZ ;k lewg ;k lfHk
vt+kr dkYklZ] lfHk vt+kr uaclZ
¼vFkZkr~ tks vkidh laidZ lqph eas
usgha gaS½ dks pquus ds fy,] lwph
vLohdkj djas Vp dj ldrs gSaA
• esjk uacj Hkstsa & pqusa fd
vkmVxksbax d‚y ij vkidk uacj
çnf’kZr djsa ;k ugha-
• vkVks-jhMk;y & fLop dks pkyw
djus ds fy, ck,¡ ;k can djus ds
fy, nk,¡ f[kldk,¡-
• feuV ekbaMj & d‚y ds nkSjku
çR;sd feuV ,d Vksu lquus ds
fy, fLop dks pkyw djus ds fy,
ck,¡ f[kldk,¡-
• u;k uacj lgstsa & u;k uacj
lgstus ds fy, pkyw ;k can dk
p;u djsa-
3 lsfVaXl esuw esa d‚y lsÇVx
Vp djsa vkSj lkekU; lsfVaXl
ij Vp djsa-
• mÙkj eksM
Hkstas daqth nck,¡¡: daqth]
vkidks dsoy budfeax d‚y dk
mÙkj nsus dh vueqfr nsrk gSA
dksbZ dqath nck,¡¡: dqath ds
vykok dksbZ Hkh daqth nckdj]
vkidks budfeax d‚y dk mÙkj
nsus dh vuqefr nsrk gSA
• BT mÙkj eksM & CywVwFk gsMlsV ds
mi;ksx ls d‚y dk mÙkj nsus ds
;ksX; gksus ds fy, ges’kk gSaM~lQzh
dk p;u djsa ;k d‚y dk mÙkj
nsus gsrq gSaMlsV dh nckus ds fy,
ges’kk gSaM~lsV dk p;u djsa-
19

laidZ
laidZ [kkstuk
1 laidksaZ dks Vp djsa2 [kkstsa Vp djsa3 vki laidksaZ dh ,d lwph ns[krs
gSa- uke QhYM esa laidZ uke dk
çFke v{kj fy[kus ij esuw dks
lwph ds ml o.kZekyk {ks= ij
ys tk,xk-
u;k laidZ tksM+uk
1 laidksaZ dks Vp djsa vkSj tksM+sa dks
Vp djsa-
2 vkidh vkarfjd esejh ;k SIM
ij laidZ lgstsa, pqusa-
3 viuk çFke vkSj vafre uke
ntZ djsa-
4 ,d laidZ ds lkFk vki ikap
uacjksa rd ntZ dj ldrs gSa-
5 bZesy irk tksM+sa- vki çfr laidZ
nks fHkUu bZesy irs ntZ dj
ldrs gSa-
6 laidZ dks ,d ;k vf/kd lewgksa
dks vlkbu djsa-
20
7 laidZ lgstus ds fy, jf{kr djsa
Vp djsa-
viuh laidZ lsfVaXl dks
cnyuk
vki viuh laidZ lsfVaXl dks vuqdwy
cuk ldrs gSa rkfd vkids laidZ
vkidh viuh çkFkfedrkvksa dks
lwV djsa-
fodYi dqath Vp djsa
lsfVaXl Vp djsa-
• uke n’kkZ,W & igys laidZ dk
çFke ;k vafre uke çnf’kZr djsa
;k ugha] pqusa-
• d‚ih & vius fle ls vius
gSaMlsV esa ;k blds myV laidksaZ
dks d‚ih djsa- vki ,d le; esa
,d laidZ ;k lHkh ,d ckj esa
d‚ih dj ldrs gSa-
• LFkkukarj.k & ;g d‚ih dh rjg
dk;Z djrk gS] ysfdu dsoy laidZ
u, LFkku ij laxzghr fd;k tkrk
gS- blfy,] laidZ dks ,dckj fle
ls vkarfjd eseksjh ij ys tk,
tkus ij mls fle eseksjh ls gVk
fn;k tk,xk-
vkSj

• CywVwFk }kjk lHkh laidZ Hkstsa &
CywVwFk }kjk lHkh laidksaZ dks vU;
gSaMlsV ij Hkstrk gS-
• laidZ dk cSdvi ysa / laidZ dh
iwokZoLFkk dks çkIr djsa & laidksaZ
dk MsVk vU; laxzg.k ij lgstsa ;k
iqulZ~Fkkfir djsa-
• lHkh laidZ gVk,¡ & vius lHkh
laidksaZ dks gVk,¡- ;fn vki
lqfuf’pr gSa fd vki vius lHkh
laidksaZ dks gVkuk pkgrs gSa rks gk¡
Vp djsa-
;qfä% LG dLVej ds;j dk
uacj igys ls gh liadZ fyLV eas
miyC/k gS (18001809999).
lans’k Hkstuk
vkidk LG-T515] SMS vkSj MMS
dks ,d lgt vkSj vklkuh ls
mi;ksx fd, tkus okys esuw esa la;qä
djrk gS-
lans’k Hkstuk
1 esuw esa lans’k dks Vp djsa vkSj
u;k lans’k fy[kuk ’kq: djus ds
fy,]lans’k fy[ksa Vp djsa-
2 fPk=] ohfM;ks] /ofu] VsEiysV vkSj
bR;kfn tksM+us ds fy,] lfEefyr
Vp djsa-
3 çkIrdrkZvksa dks ntZ djus ds
fy, LØhu ds Åijh fgLls esa]
dk ij Vp djsa- laidZ dk p;u
djus ds fy, uacj ntZ djsa ;k
Vp djsa- vki ,dkf/kd
laidZ Hkh tksM+ ldrs gSa-
4 rS;kj gksus ij
sa Vp djsa-
SIM2 ls lans’k Hkstuss ds fy,
vkbdu ls QjokZM ,jks
ekdZ ij Vp djsasa
psrkouh: ;fn fp=] ohfM;ks
;k /ofu SMS ij tksM+s tkrs gSa]
rks os Lopkfyr :i ls MMS ij
duoVZ fd, tk,¡xs vkSj vkidks
mlh ds vuqlkj ’kqYd nsuk gksxk-
21

;fqä!
mi;ksxdrkZ laiknd ls p;fur
ikB dh çfrfyfi cukdj v©j
fdlh vU; laiknd esa mldks
isLV dj ldrs gSaA
mnkgj.k Lo:i : lans’k laiknd
es tkdj dqN ikB Vkbi djsaA
ikB ds Åij LØkWy djds ml
ikB dk p;u djsa] ftldk vki
Áfrfyfi cukuk pkgrs gSaA vki
vc ikB tgk¡ isLV djuk pkgrs
gSa] ml fcanq ij dlZj j[ksa v©j
fodYi esa tkdj isLV pqusa]
rkfd çfrfyfi fd, x, ikB
isLV gks ldsaA
22
uksV %
LiSe lans’k % dksbZ uacj ;k
’kCn nsdj ] vki
vuko’;d lans’kksa dks CykWd dj
ldrs gSa vkSj ogh lkjs lans’k
LiSEk ckWDl QksYMj esa laxzghr
gks tk,¡xs -
ikB ntZ djuk
vki ij VSfiax vkSj
fof/k }kjk viuh
ldrs gSa-
Vp djsa
ds fy,- ;g vkbdu dsoy rHkh
fn[kk;k tkrk gS] tc vki dhiSM dks
fof/k ds :i esa pqurs gSaVp djsa
ikFk buiqV ds chp cnyus ds fy,-
SHIFT dqath dk mi;ksx djsa, dSfiVy
;k yksvjdsl buiqV ds chp cnyus
ds fy,-
fof/k pqu
T9 eksM pkyw djus
uaclZ] çrhdksa vkSj

viuh bZesy lsV djuk
LØhu 2 esa bZ&esy Vp djsa;fn bZesy [kkrk lsV ugha gS] rks
bZesy lsVvi fotkMZ çkjaHk djsa vkSj
lekIr djsa- p;u djus ds }kjk vki
lsfVaXl dh tk¡p vkSj laiknu dj
gSa-
ldrs
vki Lopkfyr :i ls vkids
}kjk [kkrk cuk, tkus ij Hkjh xbZa
vfrfjä lsfVaXl Hkh tk¡p ldrs gSa-
uksV %
vdkmUV cukus ds ckn lsfVaXl
-> iqu’p;Zk -> ek=k fn[kk,¡
ij tk,¡A
bl LØhu ij 3 fodYi fn[ksaxs
vkSj mi;ksxdrkZ dksbZ Hkh ,d
dk p;u dj ldrs gSaA vius
vki flQZ 25 lans’k fn[ksaxsA
vxj vki T;knk bZ&esy ns[kuk
pkgrs gSa rks blh esuq ls vki
la[;k 50 ;k 100 dj ldrs gSa
viuh ikB lans’k lsfVaXl
ifjofrZr djuk
lans’kksa dks Vp djsa vkSj lsfVaXl Vp
djsa- p;u djsa ikBÓ lans’k-
lans’k dsUæ & vius lans’k dsUæ ds
fooj.k ntZ djsa-
Msfyojh fjiksVZ & ;g
çkIr djus ds fy, fLop dks ck,¡
f[kldk,¡ fd vkids lans’k Msfyoj
gks x, gSa-
ekU;rk vof/k & pqusa] lans’k dsaæ
ij vkids lans’k fdrus le; rd
laxzghr jgrs gSa-
lans’k çdkj & vius ikBÓ dks
ikBÓ] okbl] -QSDl] x.400 ;k
bZ&esy esa duoVZ djsa-
o.kZ ,UdksfMax & pqusa] vkids o.kZ
dSls ,udksMsM fd, tkrs gSa- blls
vkids lans’kksa dk vkdkj vkSj Qyr%
MsVk ’kqYd çHkkfor gksrk gS-
yacss lans’kksa dks bl :i esa Òstsa &
cM+s lans’kksa dks ,dkf/kd SMS ;k
MMS ds :i esa Hkstuk pqusa-
23

viuh eYVhehfM;k lans’k
lsfVaXl ifjofrZr djuk
lans’kksa dks Vp djsa vkSj] lsfVaXl
vkSj eYVhehfM;k lans’k Vp djsa-
iquçkZfIr eksM & ?kjsyw ra= ;k jksfeax
ra= ds chp pqusa- ;fn vki pqurs
gSa eSU;qvy] rks vki dsoy MMS
dh lwpuk,¡ çkIr djsaxs vkSj vki
fQj fu.kZ; dj ldrs gSa mUgsa iwjs esa
MkmuyksM djsa ;k ugha-
Msfyojh fjiksVZ & vuqjks/k vkSj/;k
Msfyojh fjiksVZ dh vuqefr nsa] pqusa-
çkfIr i<+uk & vuqjks/k vkSj/;k mÙkj
dh vuqefr nsa] pqusa-
çkFkfedrk & vius MMS dk
çkFkfedrk Lrj pqusa-
ekU;rk vof/k & pqusa fd vkidk
lans’k dc rd lans’k dsaæ esa laxzg
fd;k tkuk gS-
LykbM dh vof/k & vkidh
LykbM~l LØhu ij dc rd çdV
jgsaxh] pqusa-
vlefFkZr layXud & vlefFkZr
layXud çfrcaf/kr gS ;k ugha] pqusasa-
24
forj.k le; & lans’k forj.k fd,
tkus ls igys dc rd çrh{kk djsa]
pqusa-
eYVhehfM;k lans’k dsaæ & lwph ls
,d pqusa ;k ,d u;k lans’k dsaæ
tksM+sa-
uksV %
tkudkjh lsok dks dsoy fle1
ds fy, mi;ksx fd;k x;k gSa A
;qfDr!
mi;ksxdrkZ ,d le; eas dÃ
liadkZs dks ,l,e,l Hkst ldrs
gaS A mi;ksxdrkZ liadkZs dk
p;u@vp;u dj ds lans’k Hkst
ldrs gaSA dsoy 20 liadZ p;u
dj ldrs gSa, vxj mi;kxsdrkZ
“ lHkh Pkqusa ” p;u djrs gSa rks
dsoy igys 20 liadZ fpfUgr
gksaxs A fdlh
,l,e,l Hkstuss ds fy;s Hkstsa
fodYi ls *lewg*a fodYi pqusa
v©j Bhd nck,¡ A
lewg dks

uksV %
buckWDl ds lans’k rd vklkuh
ls igqapus ds fy,] fn, x,
l‚fVaZx fodYiksa ¼ls Øec/n djsa½
ds lkFk l‚VZ fd;k tk ldrk
gS ¼fnukad]
i<+k x;k½A
uksV %
[ksn lans’k: budfeax dkWy ds
n©jku [ksn lans’k ij fDyd
djds ,d iwoZfuf’pr eSlst SMS
ds :i esa Hkstk tk ldrk gSA
] i<+k x;k@u
lans’k okgd
;g MSN pSSV vuqç;ksx çnku djrk
gSaSSa A vki vius MSN [kkrs ds lkFk
y‚x bu dj ldr gSSa A
lkekftd usVodZ lsok,¡ ¼SNS½
vkids LG-T515 esa SNS gS] tks
vkidks vkids lkekftd usVodZ dk
vkuan ysus vkSj mls çcaf/kr djus
nsrk gS-
uksV: SNS lqfo/kk ,d MsVk
ç/kku vuqç;ksx gS- v‚uykbu
lsok,¡ dusDV djus vkSj mi;ksx
djrs le;] vfrfjä
ldrk gS- vius usVodZ çnkrk ls
viuk MsVk
;fqä!
Facebook, vkSj Twitter tkok
vuqÁ;ksx gS tks tkok rduhd
ij vk/kkfjr gSA
uksV%
SNS vuqç;ksx mi;ksx djus ls
igys d`ik;k lqfu’phr djs fd
Lor% v/kre pkyq gSa A
yx
tk¡psa-
25

Facebook ¼tkjh SNS½
gkse: y‚x bu djsa vkSj vki vius
fe= dh v|ru fLFkfr ns[ksaxs- ubZ
fLFkfr ds ckjs esa viuh fVIi.kh
buiqV djsa ;k vU; dh tk¡p djsa-
çksQkby: vki o‚y > fLFkfr viMsV
dk p;u dj ldrs gSa vkSj orZeku
fLFkfr fy[ksa- viuh tkudkjh fooj.k
ns[ksa vkSj ,Yce Vp dj QksVks
viyksM djsa > QksVks viyksM djsa-
fe=: [kkst VSi dk p;u dj
facebook esa vius fe= [kkstsa-
lans’k: vki buc‚Dl/Hkstsa QksYMj
ns[k ldrs gSa A
Twitter
,d lekftd usVoÉdx lsok
gS tks mi;ksxdrkZvksa dks vU;
mi;ksxdrkZvksa ds lans’k Hkstus vkSj
i<us ds fy, mi;ksx gksrk gS bls
tweets dgsrs gSA
xsEl vkSj ,fIyds’kal
vki vkuan ysus ds fy,] vius Qksu
ij u, [ksy vkSj lqfo/kk;sa MkmuyksM
dj ldrs gSa A
26
;fn vki dksbZ Hkh vfrfjä xse ;k
lqfo/kk;sa MkmuyksM djuk pqurs gSa]
rks os bl Q+ksYMj esa lgsts tk,¡xslqfo/kk;sa
esuw nck,¡ , xsEl vkSj ,fIyds’kal ls
lqfo/kk;sa dk p;u djsa-
NewsHunt
jkg eas gksuss ij Hkh {ks=h; esa
U;wt+isilZ ns[kus vkSj i<+us gsrq l{ke
fd, tkus ds fy, fMt+kbu fd;k
x;k ,d eksckby vuqç;ksx gSa A
uksV% ;s vuqç;ksx mi;ksx djus
ls igys d`ik;k lqfu’phr djs
fd Lor% v/kre pkyq gSa A
dSejk
rqjar QksVks ysuk
1 dSejk esuw Vp djsa2 tc dSejs dk Qksdl vkidh
oLrq ij gks] rks QksVks ysus ds
fy, LØhu ds nk,¡&dsaæ ij
dks Vp djsa-

;qfä: dSejk eksM ;k ohfM;ks
eksM ij fLop djus ds fy,]
O;wQkbaMj ds nk,¡&dsaæ esa dSejk
;k ohfM;ks vkbdu dks Åij/uhps
f[kldk,¡-
QksVks ysus ds ckn
vkids }kjk dSIpj fd;k x;k QksVks
LØhu ij çdV gksxk-
fuEu fodYi miyC/k gSa-
-
Vp
Hkstsa &
QksVks dks lans’k] bZesy ds
:i esa ;k CywVwFk }kjk Hkstus ds
fy, Vp djsa-
,sls lsV djsa & LØhu Nfo
LØhu o‚yisij] y‚dLØhu
¼
o‚yisij] laidZ Nfo½ lsV djus ds
fy, Vp djsa-
viyksM & QksVks viyksM djus ds
fy, VPk djsa-
laikfnr djsa & QksVks laikfnr djus
ds fy, Vp djsa-
Nfo gVkus ds fy, Vp djsa rqjar ,d vU; QksVks ysus ds
fy, Vp djsa-
vkidh lgsth xbZ QksVks dh
xSysjh ns[kus ds fy, Vp djsa-
mUur lsfVaXl dk mi;ksx
djuk
O;wQkbaMj ls] lHkh mUur lsfVaXl
fodYi [kksyus ds fy,
fodYi dk p;u djus ds ckn] Bhd
cVu Vp djsa-
vkdkj & eseksjh cpkus ds fy, QksVks
dk vkdkj cnysa-
OgkbV cSysal & v‚Vks] mÌhIr]
/kwi] ÁfrnhIr vkSj esÄkPNkfnr ds
chp pqusa-
jax çHkko & viuh ubZ QksVks ds fy,
,d jax Vksu pqusa-
’kkWV tkjh & O;wQkbaMj esa oLrq dks
mi;qä fLrfFk esa j[ksa] ;fn lkekU;
QksVks ysuh gS] rks fQj dSIpj cVu
nck,¡- dSejk rqjar vuqØe esa ’kkWV
ysxk-
lsYQ-Vkbej & lsYQ-Vkbej] ’kVj
nckus ds ckn vkidks foyac lsV
djus dh vuqefr nsrk gS- 3 lsdaM] 5
lsdaM ;k 10 lsdaM esa can dk p;u
djsa- ;fn vki QksVks esa ’kkfey gksuk
pkgrs gSa] rks ;g mi;qä gS-
Vp djsa-
27

ukbV eksM & mi;ksxdrkZ ds fy,
va/ksjs LFkkuksa esa mi;ksxh gS-
laxzg pqusa & viuh QksVkst gSaMlsV
eseksjh ;k cká eseksjh esa lgstus ds
fy, pqusa-
dSIpj dh xbZ Nfo fn[kk,¡ & vkius
fp= lgh rjhds ls fy;k gS] tkapus
ds fy, pkyw djsa-
’kVj /ofu & ’kVj /ofu dks v‚u
;k v‚Q djsa-
lsfVaXl jhlsV djsa & lHkh fMQ‚YV
dSejk lsfVaXl dks iquZLFkkfir djsa-
ohfM;ks dSejk
rqjar ohfM;ks cukuk
dSejk eksM ;k ohfM;ks eksM ij fLop
djus ds fy,] O;wQkbaMj ds nk,a
dsaæ esa dSejk ;k ohfM;ks vkbdu dks
Åij/uhps LykbM djsa-
1 Qksu dks {kSfrt :i ls idM+
dj] ySal dks ohfM;ks ds
ij dsafær djsa2 yky fcanq nck,a 3 O;wQkbaMj ds uhps Vkbej ds lkFk
28
ohfM;ks dh yackbZ fn[kkrs gq,
Rec fn[kkbZ nsxk-
4 ohfM;ks dks fojke nsus ds fy,]
dk p;u djrs gq, Vp
djsa vkSj nqckjk ’kq: djsa-
5 [kRe djus ds fy, LØhu ij
djsa-
Vp
ohfM;ks cukus ds ckn
LØhu ij vkids dSIpj fd, x,
ohfM;ks dks çLrqr djus okyh ,d
fLFkj Nfo çdV gksxh- LØhu ds uhps
ckbZ~a vkSj nkbZa vksj vkbdUl ds lkFk
ohfM;ks dk uke pyrk gS-
ohfM;ks pykus ds fy, Vp
djsafuEu fodYi miyC/k gSaVp dj
Hkstsa & ohfM;ks dks lans’k] bZesy ds
:i esa ;k CywVwFk ds ek/;e ls Hkstus
ds fy, Vp djsa-
-
vkius vHkh tks ohfM;ks cuk;k
gS] mls gVkus ds fy, Vp djsa
vkSj gk¡ Vp dj
O;wQkbaMj iqu% çdV gksxk-
djsa-

rqjar ,d vU; ohfM;ks ’kwV
djus ds fy, Vp djsa- vkidk
orZeku ohfM;ks lgstk tk,xk-
lgsts x, ohfM;kst vkSj
Nfo;ksa dh xSyjh ns[kus ds
fy, Vp djsa-
mUur lsfVaXl dk mi;ksx
djuk
O;wQkbaMj ls] lHkh mUur lsfVaXl
fodYi [kksyus ds fy,
djsa- vki Oghy dks LØ‚y djrs gq,
ohfM;ks dSejk lsfVaXl cny ldrs
gSa- fodYi dk p;u djus ds ckn]
Bhd cVu Vp djsa-
jax çHkko & vius u, O;w ds fy,
mi;ksx djus gsrq jax Vksu pqusa-
OgkbV cSysal & OgkbV cSysal
lqfuf’pr djrk gS fd vkids ohfM;ks
esa dksbZ Hkh OgkbV {ks= okLrfod
gS- vius dSejs dk OgkbV cSysal
lgh :i ls lek;ksftr djus ds
fy, l{ke djus gsrq] vkidks çdk’k
ifjfLFkfr;ksa dks fu/kkZfjr djus dh
vko’;drk gks ldrh gS- v‚Vks]
mÌhl] /kwi] Áfrnhl vkSj esÄkPNkfnr
ds chp pqusa-
Vp
vof/k & vius ohfM;ks ds fy, vof/k
lhek lsV djsa- MMS lans’k ds :i
esa Hkstus ds fy, vf/kdre vkdkj
lhek gsrq lkekU; vkSj MMS ds
chp pqusa-
laxzg pqusa & pqusa fd vkids
ohfM;kst gSaMlsV eseksjh esa lgstus gSa
;k cká eseksjh esa-s
lsfVaXl jhlsV djsa & ohfM;ks dSejk
dh lHkh lsfVaXl dks jhlsV djsa-
laxhr
E;wftd Iys;j rd igqap us ds fy,]
Vp djsa laxhr- ;gka ls vki vusd
QksYMlZ rd igqap ldrs gSa:
gky gh esa pyk;k x;k & vkids
}kjk gky gh esa pyk, x, xkus
pykrk gS-
lHkh VªSDl & blesa igys ls yksM
fMQ‚YV laxhr dks NksM+ dj os lHkh
xkus gksrs gSa] tks vkids Qksu esa gSa-
dykdkj & laxhr laxzg esa dykdkj
ds vuqlkj czkmt djrk gS-
,YcEl & vkids laxhr laxzg dks
,Yce ds vuqlkj czkmt djrk gS-
29

fo|k & vkids laxhr laxzg esa fo|k
ds vuqlkj czkmt djrk gS-
IysfyLV & blesa vkids }kjk cukbZ
xbZ lHkh IysfyLV~l gksrh gSa-
VªSDl ’kQy djsa & vkids VªSDl dks
vkdfLed Øe esa pykrk gS-
vius Qksu ij laxhr
LFkkukarfjr djuk
laxhr dks vius Qksu ij LFkkukarfjr
djus dk lcls vklku rjhdk CywVwFk
;k MsVk dscy ds ek/;e ls djuk gS-
CywVwFk dk mi;ksx djrs gq, laxhr
LFkkukarfjr djus ds fy,:
1 lqfuf’pr djsa fd nksuksa
fMokblst ij CywVwFk fLop
v‚u gks vkSj os ,d&nwljs ls
dusDV gksa2 vU; fMokbl ij laxhr Qkby
dk p;u djsa vkSj CywVwFk ds
ek/;e ls Hkstus dk p;u djsa3 tc Qkby Hksth tkrh gS] rks
vkidks bls vius Qksu ij gka
Vp djrs gq, Lohdkj djuk
gksxk-
30
4 Qkby laxhr > lHkh VªSDl esa
çdV gksuh pkfg,-
Qkbysa çcaf/kr djuk
vki viuh Qksu eseksjh esa
eYVhehfM;k Qkbyksa dks laxzfgr
dj ldrs gSa] rkfd vki vius lHkh
fp=ksa] /ofu;ksa] ohfM;kst vkSj xsEl
rd vklkuh ls igqapsa- vki viuh
Qkbyksa dks eseksjh dkMZ esa Hkh lgst
ldrs gSa- eseksjh dkMZ dk mi;ksx
djuk] vkidks] vkids Qksu dh
eseksjh esa Lisl eqä djus dh vuqefr
nsrk gS-
esjh phtsa Vp dj] vki mu QksYMlZ
dh lwph [kksy ldrs gSa] ftuesa
vkidh lHkh eYVhehfM;k Qkbysa
laxzfgr gksrh gSa-

lq>kc! xqIr c‚Dl
vki xqIr MsVk tksM+ ldrs
gSa A vkidks viuh xqIr MsVk
xksiuh;rk lqjf{kr djus gsrq ;g
esuw mi;ksx djus ds fy, lqj{kk
dksM ntZ djus dh vko’;drk
gS A vkids MsVk fNikus ds fy,
fuEu pj.k ij tk,¡ A
> LØhu 2 > esjh phtsa >
dksbZ Hkh Nfo] /ofu ;k dksbZ Hkh
Q+kby >
Hkstsa ij tk,¡
> xqIr c‚Dl esa
vuqç;ksx
lq>kc: mi;ksxdrkZ dksbZ SMS
’ksMîwy dj ldrs gS] rkfd
fodYi lwph ls ;g lsV dh xbZ
fnukad vkSj lsV fd, x, le;
ij igys ls fu/kkZfjr uacj/laidZ
dks Hkstk tk lds- fuEu pj.k ij
tk,¡ A (dSysaMj >
’ksM;qy lUns’k )
viuk vykeZ lsV djuk
1 vykeZZ Vp djsa2 Vp djsa tksM+sa] fQj vki bl esuw
esa viuk vykeZ lsV vkSj lgst
ldrs gSa
> u;k
vius dSysaMj ij bosaV tksM+uk
1 dSysaMj Vp djsa2 vki ml fnukad dk p;u djsa]
ftl ij vki bosaV tksM+uk
pkgsaxs-
3 tksM+sa Vp djsa A
o‚bl fjd‚MZj
LØhu 3 esa o‚bl fjd‚MZj Vp djsao‚;l esekst ;k vU; v‚fM;ks Qkbyksa
dks fjd‚MZ djus ds fy, viuk
o‚bl fjd‚MZj mi;ksx djsa A
vius dSydqysVj dk mi;ksx
djuk
1 LØhu 3 esa dSydqysVj Vp djsa2 la[;k,¡ ntZ djus ds fy, la[;k
dqaft;ksa dks Vp djsa A
31

bdkbZ duoVZ djuk
1 LØhu 3 esa bdkbZ ifjorZd
Vp djsa2 pqusa fd vki eqæk] {ks=] yackbZ]
Hkkj] rkieku] o‚Y;we ;k osx
duoVZ djuk pkgrs gSa3 fQj bdkbZ dk p;u djsa vkSj
og eku ntZ djsa] ftlls vki
duoVZ djuk pkgsaxs-
PC lwV
vki vius PC dks vius Qksu ds
lkFk flaØukbt dj ldrs gSa- ;g
vkids lHkh egRoiw.kZ fooj.k vkSj
fnukad dk feyu lqfuf’pr djsxk
vkSj ,d cSdvi ds :i esa Hkh dk;Z
djsxk rkfd vki fuf’par jg ldsa
uksV: çnku fd, x, CD mi;ksx
djds PC lqbV baLVky djsa ,ca
baLVkyslu xkbM dk ikyu djsa
psrkouh% vki vius Qksu dks
Lrkuarfjr ds nkSjku fMLdusDV
uk djsa
32
uksV: vkWu - LDzhu Qksu %
vkWu - LDzhu Qksu ] vkidks vkius
eksckby Qksu ds LDzhu dks USB
;k CywVwFk dusD’ku ds ek/;e ls
PC es ns[kus dh vuqefr nsrk gS++-
osc
czkmtj lh/ks vkids Qksu ij rst]
xsEl] laxhr] lekpkj] [ksy] euksjatu
vkSj vf/kd dh iw.kZ jax nqfu;k nsrk
gS- pkgsa vki dgha Hkh gksa vkSj dqN
Hkh dj jgs gksa-
osc rd igq¡p çkIr djuk
1 czkmtj Vp djsa2 lh/ks czkmtj ds gkse ij
tkus ds fy,] gkse dk p;u djsaoSdfYid :i ls] p;u djsa irk
ntZ djsa vkSj dusDV djus ds
ckn URL esa fy[ksa-
uksV: bu lsokvksa ls dusDV djus
vkSj lkexzh MkmuyksM djus ij
vkidks vfrfjä ’kqYd yxsxkvius usVodZ çnkrk ls MsVk
’kqYd tk¡psa-

Google lfoZl rd igqpuk
Google [kkst vuqÁ;ksx [kksyus ds
fy, “Google” ij Vp djsaA
Mqvy fle
¼esuw > LØhu 2 > nksgjk SIM
lsfVaXl ½ & tc vki nks fle&dkMZ
Mkyrs gSa rks LØhu ds Åijh&ck,¡
rjQ nks usVodZ flXuy vkbdu
ns[k ldrs gSa A
tc nks SIM dkMZ~l LFkkfir gksa] rks
vki nks esa ls ,d ;k nksuksa SIM
dkMZ~l dks lfØ; / fufLØ; dj
ldrs gSa A
vius çksQkby dks O;fäxr
:i nsuk
vki LØhu 2 ls çksQkbYl ds
mi;ksx ls] çR;sd çksQkby lsfVax
dks O;fäxr cuk ldrs gSa-
1 çksQkbYl Vp djsa2 og çksQkby pqusa] ftls vki
laikfnr djuk pkgrs gSa-
3 vki fQj lwph esa miyC/k lHkh /
ofu;k¡ vkSj vyVZ fodYi cny
ldrs gSa] lkFk gh viuh /ofu
vkSj o‚Y;we] lans’k Vksu lsfVaXl,
le; lsfVaXk vkSj vf/kd-
uksV: VkbeM ÁksQkby: (esuw >
LØhu 2 > çksQ+kbYl > dksbZ
Hkh çksQ+kby dks Vp~ djsa > uhps
Ldzy dj le; lsfVaXk pqusa )
vko’;d ÁksQkby dks iwoZfu/
kkZfZjr le; ij Lpkfyr :i ls
lsV dj ldrs gaS A
mnkgj.k Lo:i: ;fn
miHkksxkdrkZ gSaMlsV ÁksQkby
dks 2:00~3:00 cts rd e©u
pkgrs gS rks le; v©j ml
le; lhek ds fy, ÁksQkby dks
e©u ds :i eas pqusaA
lsfVaXl
vius Qksu dh lsfVaXl cnyuk
viuh Lo;a dh çkFkfedrkvksa ds
fy,] LG-T515 :ikUrfjr djus dh
Lora=rk dk mi;ksx djsa-
gkse LØhu ls]
fQj lsfVaXl dk p;u djsa v©j
fMokbl lsfVaXl ij LØ‚y djsa-
dk p;u djsa]
33

;qfRd!
,aVh FksDV eksckby Vsªdj :
> lsfVaXl > fMokbl
lsfVaXl > lqj{kk > ,aVh FksDV
eksckby Vsªdj
ATMT vkidk [kks;k gqvk Qksu
Vsªd djus dh lqfo/kk nsrk gSa A
tc dksb vki dh vuqefr ds
fcuk vkids Qksu dk mi;ksx
djrk gSa rks Vsfªdax lsck
ldzh; gks tk;sxhAvkidks bl
vukf/kd`r mi;ksxdrkZ dks crk,
fcuk lsV fd, x, fMQWYV
Qksu uacj ij Hksts x, ikB
lans’k ökjk ;kn fnyk;k tkrk
gSa A vki gkes’kk ATMT dk
lfdz; dj ldrs gS vkSj viuh
C;fäxr lsfVax dfUQxj djsaA
fMQWkYV ATMT dksM 0000
gSaA ATMT ikB lans’k % pksjh
Qksu IMEI orZeku LFkku vkSj
O;fä dh uacj tks fd gSaMlsV
bLrseky dj jgk gS mlds ckjs
esa tkudkjh nsrk gS-
34
ladV lans’k lsok lsfVax
;g SOS eksM l{ke djrk gS- l{ke
djus ds ckn ykWd LØhu esa ;fn
vki Mkmu okWY;qe dqath dks pkj
ckj rd nckrs gSa] rks SOS lans’k
Hkstk tkrk gS vkSj Q+ksu SOS eksM esa
jsgsrk gSa A
vlkbu fd, x, çkIrdrkZvksa dks
SOS lans’k Hkstk tkrk gS vkSj muds
budfeax d‚y Lopkfyr :i ls
Lohdkj fd, tkrs gSa- lHkh lwpuk /
ofu E;wV fd, tk,axs- SOS eksM ls
ckgj fudyus ds fy,] gkseLØhu esa
lekfIr dqath nck,¡-
viuh la;ksstdrk lsfVaXl
cnyuk
vkidh la;ksstdrk lsfVaXl] vkids
usVodZ v‚ijsVj ds }kjk igys gh
lsV dj nh xbZ gS] rkfd vki vius
u, Qksu dk vkuan rqjar ys ldsa-
dksbZ lsfVaXl cnyus ds fy,] bl esuw
dk mi;ksx djsa:
la;kstdrk Vp djsasa-

CywVwFk dk mi;ksx djds viuh
Qkbyas HksTkuk ;k çkIr djuk-
HksTkus ds fy,%
1 ml Qkby dks [kksysa ftls vki
Hkstuk pkgrs gSa]
:i ls
;g dksbZ QksVks] ohfM;ks ;k laxhr
Qkby gksxh-
2 Hkstsa pqusa- CywVwFk pqusa3
;fn vkius igys ls CywVwFk
fMokbl ;qfXer fd;k gS] rks
vkidk LG-T515 Lopkfyr :i
ls vU; CywVwFk fMokblst ugha
[kkstsxk- ;fn ugha] rks vkidk
LG-T515 lhek ds vanj vU;
CywVwFk l{ke fd, fMokblst
[kkstsxk-
4 og fMokbl pqusa] ftl ij vki
Qkby Hkstuk pkgrs gSa-
5 vkidh Qkby Hksth tk,xhQkby çkIr djus ds fy,:
1 Qkbysa çkIr djus ds fy,]
vkidk CywVwFk pkyw vkSj –’;eku]
nksuksa gksuk vko’;d gS-
vf/kd tkudkjh ds fy, uhps
ns[ksa viuh CywVwFk lsfVaXl
cnyuk-
2 vkidks dh vksj ls Qkby
Lohdkj djus ds fy, ,d lans’k
}kjk ladsr feysxk- Qkby çkIr
djus ds fy, gk¡ Vp djsa-
3 vki ns[ksaxs] Qkby dgk¡ lgsth
xbZ gS- Nfo Qkbyksa ds fy,] vki
Qkby ns[kus ;k o‚yisij ds :i
esa mi;ksx djuk pqu ldrs gSalkekU;r: Qkbysa mfpr QksYMj
esa esjh phtsa ij lgsth tk,¡xh-
;qfRd!
1 tc vki fofM;ks Iys djsxs
rc CywVwFk gsM~lsV]A2DP
v©j AVRCP dk iz;ksx usgha
dj ldrs gSa-;kfu fofM;ks ds
/ofu CywVwFk gsM~lsV ls usgha
lqu ldrs-
2 dqN vuqiz;ksxksa ds varxZr
CywVwFk Qkby LFkkuakrfjr
lekjksg can gks tk,xk- ¼tsls
dh oksbl d‚y] dSesjk]
E;wftdIys;j] UMS/PC Sync½
35

CywVwFk lsfVaxl cnyuk :
CywVwFk Vp djsa fQj fodYi v©j
lsfVaXkl Vp djsaA
fdlh vU; CywVwFk fMokbl ls
;qfXer djuk
viuk LG-T515 vkSj vU; fMokbl
;qfXer dj] vki ikldksM jf{kr
dusD’ku lsV dj ldrs gSa1 tk¡ps fd vkidk CywVwFk pkyw vkSj
–’;eku gS- lsfVaXl esuw esa vki
viuh –’;rk cny ldrs gSa2 [kkstsa Vp djsa3 vkidk LG-T515 fMokblst
[kkstsxk- tc [kkst iw.kZ gks tkrh
gS] rktk djsa LØhu ij çdV
gksxk4 og fMokbl pqusa] ftlds lkFk
vki ;qXe djuk pkgrs gSa vkSj
ikldksM ntZ djsa] fQj Vp
djsa Bhd5 vkidk Qksu fQj vU; fMokbl
ls dusDV gksxk] ftl ij vkidks
ogh ikldksM ntZ djus dh
vko’;drk gksxh6 vc vkidk ikldksM jf{kr
CywVwFk dusD’ku rS;kj gS-
36
Wi-Fi
ok;jysl Áca/kd vkidks vuqerh nsrk
gS fd vki baVjusV dusD’ku dk Áca/
ku vius Qksu ds Wi-Fi ( ok;jysl
ySu ) esa mi;ksx dj ldrs gS A
;g Qksu LFkkuh; ok;jysl usVodZ
ls dusDV djus ds fy, ;k baVjusV
dks fcuk ok;j ds mi;ksx djus
dh vuqerh nsrk gS A Wi-Fi rst gS
vkSj bldh lhek CywVwFk ok;jysl
rduhd ls Hkh T;knk gS A+ ;g rsth
ls Ã&esy vkSj baVjusV czkmftax dh
vuqerh nsrk gS A
uksV% LG-T515 WEP vkSj WPA/
WPA2-PSK lqj{kk dk leFkZu
djrk gS- ;fn vkids Wi-Fi lsok
Ánkrk ;k usVodZ O;oLFkkid usVodZ
lqj{kk ds fy, ,fUØi’ku lsV djs]
rks vki ikWi vi foaMks esa dqath dks
Hkjsa A vxj ,fUØi’ku lsV ugha gS]
rks ikWi vi foaMks fn[kkà ugh nsxk
A vki vius Wi-Fi lsok Ánkrk ;k
usVodZ O;oLFkkid ls dqath ÁkIr dj
ldrs gSa A

l‚¶Vos;j uohuhdj.k
Qksu l‚¶Vos;j uohuhdj.k
LG ekcskby Qksu l‚¶Vos;j
uohuhdj.k çksxzke
bl çksxzke dks LFkkfir vkSj mi;ksx
djus dh vf/kd tkudkjh ds fy,]
—i;k : http://update.lgmobile.
com. vkSj http://www.lg.com/
common/index. Jsp . ij tk,¡ →
ns’k p;u djsa - ;g lqfo/kk vkidks
gekjs lsok dsaæ ij tk, fcuk vkids
l‚¶Vos;j dks baVjusV ij tYnh
vkSj vklkuh ls uohure laLdj.k
esa uohuh—r djus dh vuqefr
nsrk gS A tSls dh eksckby Qksu esa
l‚¶Vos;j viMsV gksrk jsgrk gS ml
oDr mi;ksxdrkZ dk iwjk /;ku jsguk
pkfg, ] Ñi;k vkxs c<us ls isgys
lHkh funsZ’kksa vkSj uksV dks vPNh
rjg tk¡p ysa. Ñi;k /;ku j[ksa fd
uouhdj.k ds nkSjku ;q,lch ;k
MkVk dscy dks fudkyus ls vkids
Qksu dk xaHkhj jwi ls uqdlku gks
ldrk gS
37

lgk;d midj.k
vkids eksckby Qksu ds fy, fofHkUu lgk;d midj.k gSa- vki bu fodYiksa
dk viuh O;fäxr lapkj vko’;drkvksa ds vuqlkj p;u dj ldrs gSa-
pktZj LVhfj;ks
gsMlsV
cSVjh MsVk dscy
v©j lhMh
uksV
• ges’kk çkekf.kd LG lgk;d midj.kksa dk mi;ksx djsa-
• ,slk ugha djus ij vkidh o‚jaVh vekU; gks ldrh gS-
• lgk;d midj.k fofHkUu {ks=ksa esa fHkUu gks ldrs gS-
38

rduhdh MsVk
ifjos’kh rkieku
vf/kdre-: +55°C ¼fMLpkftaZx½ +45°C ¼pkftaZx½
U;wure: &10°C
Declaration of Conformity
Suppliers Details
Name
LG Electronics Inc
Address
LG Twin Tower 20,Yeouido-dong, Yeongdeungpo-gu Seoul, Korea 150-721
Product Details
Product Name
GSM 850 / E-GSM 900 / DCS 1800 / PCS 1900 Quad Band Terminal Equipment
Model Name
LG-T515
Trade Name
LG
Applicable Standards Details
R&TTE Directive 1999/5/EC
EN 301 489-01 v1.8.1 / EN 301 489-07 v1.3.1 / EN 301 489-17 v2.1.1
EN 300 328 v1.7.1
EN 60950-1:2006+A11:2009
EN 50360:2001 / AC:2006
EN 62209-1:2006 / EN 62209-2:2010
EN 301 511 v9.0.2
Supplementary Information
The conformity to above standards is verifi ed by the following Notifi ed Body(BABT)
BABT, Forsyth House, Churchfi eld Road, Walton-on-Thames, Surrey, KT12 2TD, United Kingdom
Notifi ed Body Identifi cation Number : 0168
Declaration
I hereby declare under our sole responsibility
that the product mentioned above to which this
declaration relates complies with the above mentioned
standards, regulation and directives
LG Electronics Inc. – EU Representative
Veluwezoom 15, 1327 AE Almere, The Netherlands
Name Issued Date
Doo Haeng Lee / Director 25, May, 2011
Signature of representative
39

CHOLAMANDALAM MS GENERAL INSURANCE CO. LTD.
Delhi Regional Office Plot no. 6, First Floor,Opp.
HP Petrol Pump, Near Metro Pillar No. 81
Pusa Road, Delhi - 110005
TO
CHOLAMANDALAM MS GENERAL
INSURANCE CO. LTD.
Delhi Regional Office Plot no. 6,
First Floor,Opp. HP Petrol Pump,
Near Metro Pillar No. 81 Pusa Road,
Delhi - 110005

PBG-00030389-000-00.
April 7, 2011 to April 6, 2012.
Dated 07/04/11


Delhi Regional Office Plot no. 6, First
Floor,Opp. HP Petrol Pump, Near Metro Pillar No. 81 Pusa Road,
Delhi - 110005
Tel: +91-11-39813100, Fax: +91-11-39813110
e-mail id : customercare@cholams.murugappa.com

Customer Information Center
For any query related to the after sales service and customer
support please contact us at below details
CALL CENTER
24 × 7
1800 -180 -999 9
(Toll Free)
5757 554
(Send SMS)
www.lg.com
serviceindia@lge.com


 Loading...