

LG LG Optimus F3, Sprint Optimus F3 Getting Started Manual
Get
Started
All you need to know to get going.

Thanks for choosing Sprint. This booklet introduces you to the
basics of getting started with Sprint and your LG Optimus F3™.
ReadyNow – For more help in getting up and running with your
new phone, take advantage of exclusive Ready Now resources
at sprint.com/readynow. You can even schedule a one-on-one
appointment at a Sprint Store near you.
For ongoing support and resources, visit sprint.com/support.
There, you’ll find guides, tutorials, and more to help you get the
most out of your phone.
Note: Available applications and services are subject to change at any time.

Using This Guide
Using This Guide
This Get Started guide is designed to help you set up and use your new
LG Optimus F3. It’s divided into four sections to help you find the information
you need quickly and easily.
Get Ready − page 1 − Find out what
you need to do before you use your
phone the
first time, including inser
ting
a battery and activating Sprint service on
your phone.
Android™ Basics − page 5 − Learn
some basics about how to move around
on your phone, use the Home screen, and
enter text. If you’re familiar with Android
phones, you can probably skip these
pages (although a refresher course never
hurt anyone).
Use Your Phone − page 10 − Take
advantage of your phone’s features
and Sprint services, from the basics
(making calls) to the more advanced
(using Email, YouTube, GPS Navigation,
and more).
Tools & Resources − page 29 − Find
useful tips for your phone and discover
resources and other helpful Sprint
information. For additional information
including the full User Guide, videos,
tutorials, and community forums, visit
sprint.com/support.
visit sprint.com/support for complete user guide 1
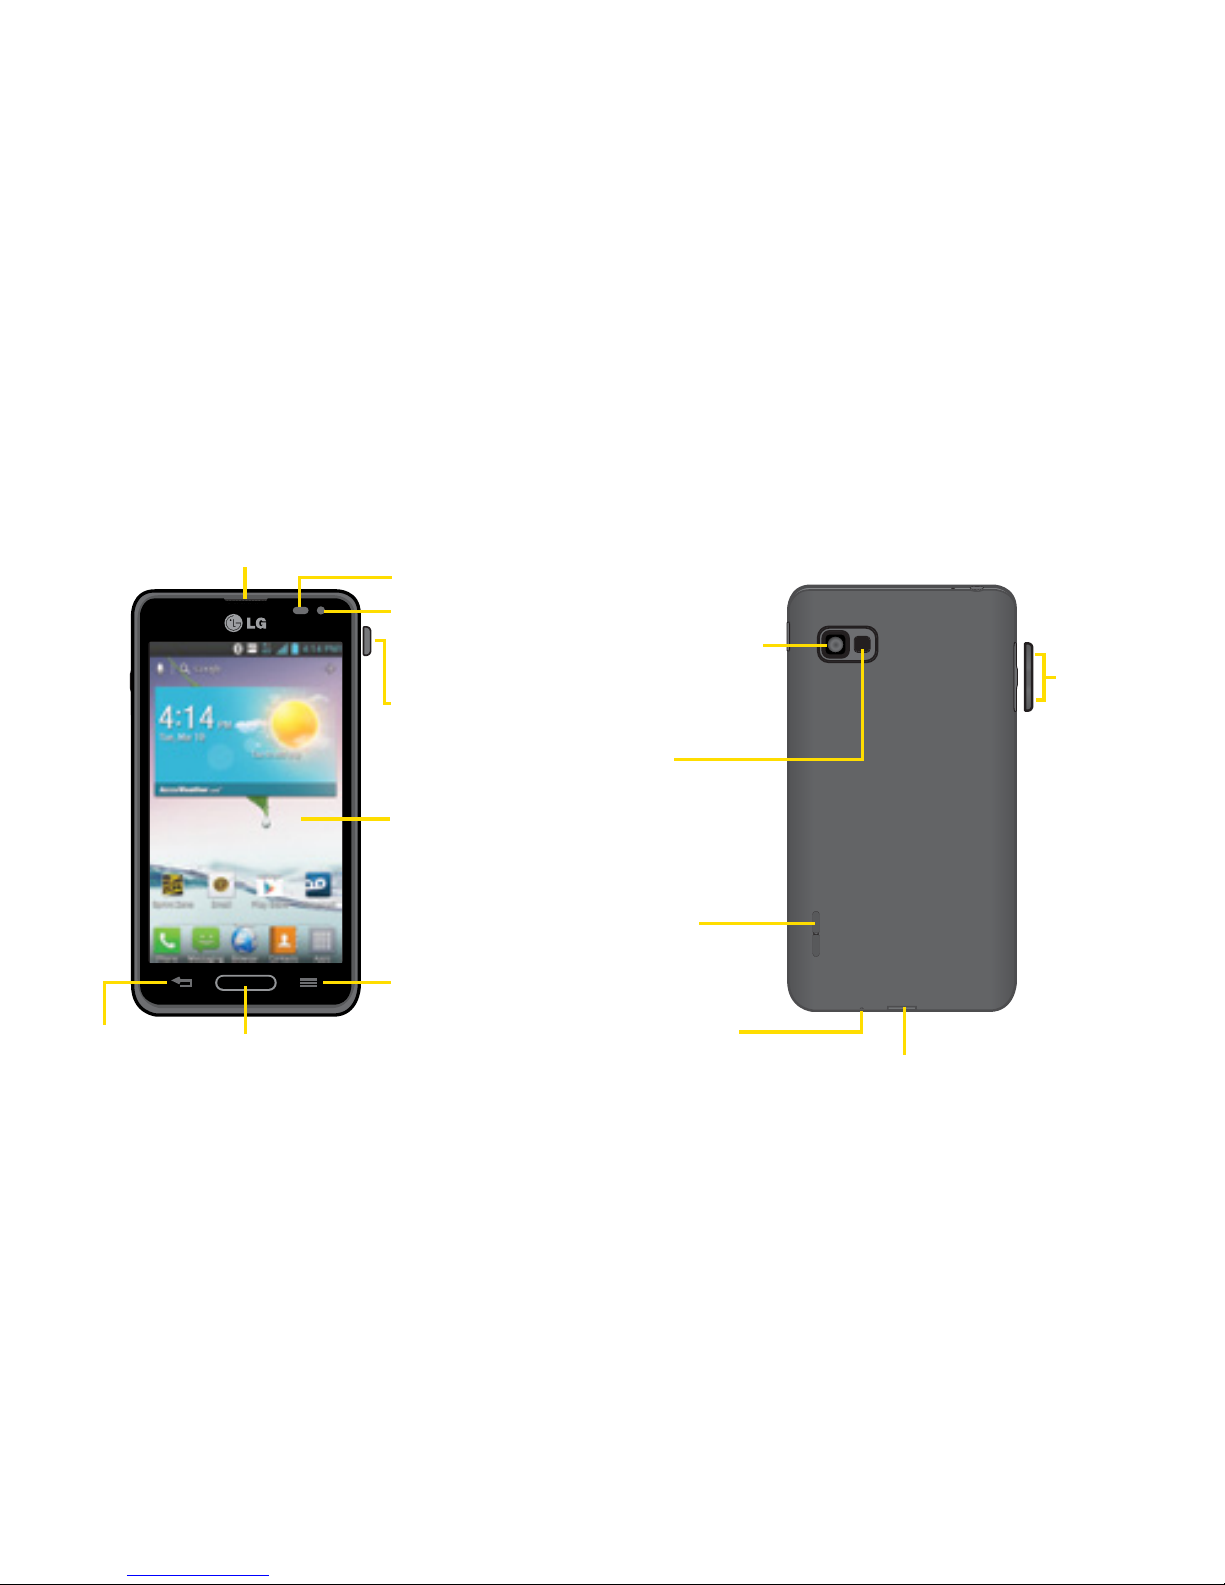
Your LG Optimus F3
Back-Facing
Camera Lens
Speaker
Volume
Buttons
Charger/Accessory Port
Flash
Menu Key
Earpiece
Proximity
Sensor
Front-Facing
Camera Lens
Touchscreen
Home Key
Back
Key
Power/
Lock Button
Microphone

Get Ready
visit sprint.com/support for complete user guide 1
Get Your Phone Ready
Install the Battery
1. Remove the battery from its packaging.
2. Insert the battery into the opening in the back of
the phone, making sure the connectors align.
Gently press down to secure the battery.
3. Position the back cover over the battery
compartment and press down until you hear a
click. Press and hold the Power/Lock Button
located on the top right to turn the phone on.
Charge the Battery
1. Connect the charging adapter and USB cable.
2. Plug one end of the USB cable into the phone's
Charger/Accessory Port and the other end into
an electrical outlet.
Turn the Phone On
► Press and hold the Power/Lock Button
to turn your phone on.
Turn the Screen On and Off
• To quickly turn the display screen off, press
the
Power/Lock button
on the right side
of the phone.
• To turn the screen on and display the unlock
screen, press the Power/Lock Button
.
Unlock the Screen
► Swipe any part of the screen to unlock it.
Turn the Phone Off
• Press and hold the Power/Lock Button
on the
right side of the phone and then tap
Power off >
OK to turn the phone off.
Before you start: Visit sprint.com/readynow to
learn about transferring contacts, calendars, and
more from your old phone.

2
Get Your Phone Ready
TalkBack
Before the activation process can begin, the
device will prompt the TalkBack voice navigation
feature. TalkBack is an Accessibility Service that
helps blind and vision-impaired users interact
with their devices more easily. To bypass this
feature, tap Next.
To disable TalkBack, follow these steps:
1. Press
and tap > System settings.
2. Place two fingers on the screen to activate
scrolling and move your fingers in an upward
direction to scroll.
3. Tap Accessibility > TalkBack.
4. Tap the OFF/ON toggle switch.
Note: When Talkback is turned on, the touchscreen
settings require the user to first tap an item they wish
to select, and then double tap the item again in order
to access the feature.
Get Ready
visit sprint.com/support for complete user guide 3
Activate Your Phone
If you purchased your phone at a
Sprint Store, it is probably activated and
ready to use.
If you received your phone in the mail,
and it is a new Sprint account or a new
phone number, your phone is designed
to activate automatically when you first
turn it on. You will see a Hands Free
Activation screen at startup. When it’s
finished, tap OK to continue. To confirm
your activation, make a phone call.
If you received your phone in the mail
and it is going to be activated on an
existing number (you’re swapping
phones), go to sprint.com/activate and
follow the instructions. When you have
finished, make a phone call to confirm
your activation.
If your phone is still not activated or you do not
have access to the Internet, contact Sprint
Customer Service at 1-888-211-4727 for
assistance.
Activate Your Phone

4
These instructions help you set up various
options and applications, including setting up
your Google™ Account.*
Sprint Connections Optimizer
Following phone activation, you may see a Sprint
Connections Optimizer notice. Read the notice
and tap I Agree to allow your phone to connect
automatically to the best available data network,
including Wi-Fi.
Note: You can turn off Sprint Connections
Optimizer at any time. Press
and tap >
System settings >
More... > Mobile networks >
Connections Optimizer.
Set Up a Google Account
Setting up a Google Account lets you access
many features of your Android phone. It also
allows you to sync Google contacts and apps
you may previously have used.
1. Press
> > System settings >
Accounts & sync.
2. Tap ADD ACCOUNT > Google.
3. Follow the prompts to set up a new Google
Account or sign in to an existing Google Account.
* You do not need to sign up for a Google Account
to use your phone; however, to download content
from the Google Play™ Store app, you must link
your phone to a Google Account.
Phone Basics

Android Basics
visit sprint.com/support for guides, tutorials and more 5
Android™ Basics: Getting Around Your Phone
Move Around Your Phone’s Menus
and Screens Using Gestures
Your phone’s touchscreen lets you control
everything through various types of touches, or
gestures.
Tap: When you want to press onscreen buttons,
select items such as application and settings
icons, or type, simply tap the screen with your
finger. A light tap works best.
Touch and hold: To open the available options for
an item (for example, options for a contact), simply
touch and hold the item.
Drag: To scroll through a list or move slowly, drag
across the touchscreen horizontally or vertically.
For example, tap Contacts and then drag the list
up or down.
Flick: To scroll quickly through a list, flick across
the touchscreen (drag quickly and release). When
you’re flicking through a long list, touch the screen
to stop scrolling.
Tip: When you drag or flick a list, a scroll bar may
appear. For example, in your Contacts list, drag the
scroll bar to move quickly to a specific letter (A-Z).
Zoom: “Pinch” the screen using your thumb and
forefinger to zoom out or zoom in when viewing a
picture or a Web page. (Move fingers inward to
zoom out and outward to zoom in.) You can also
double-touch the screen to zoom in and then
double-touch again to zoom out.
6
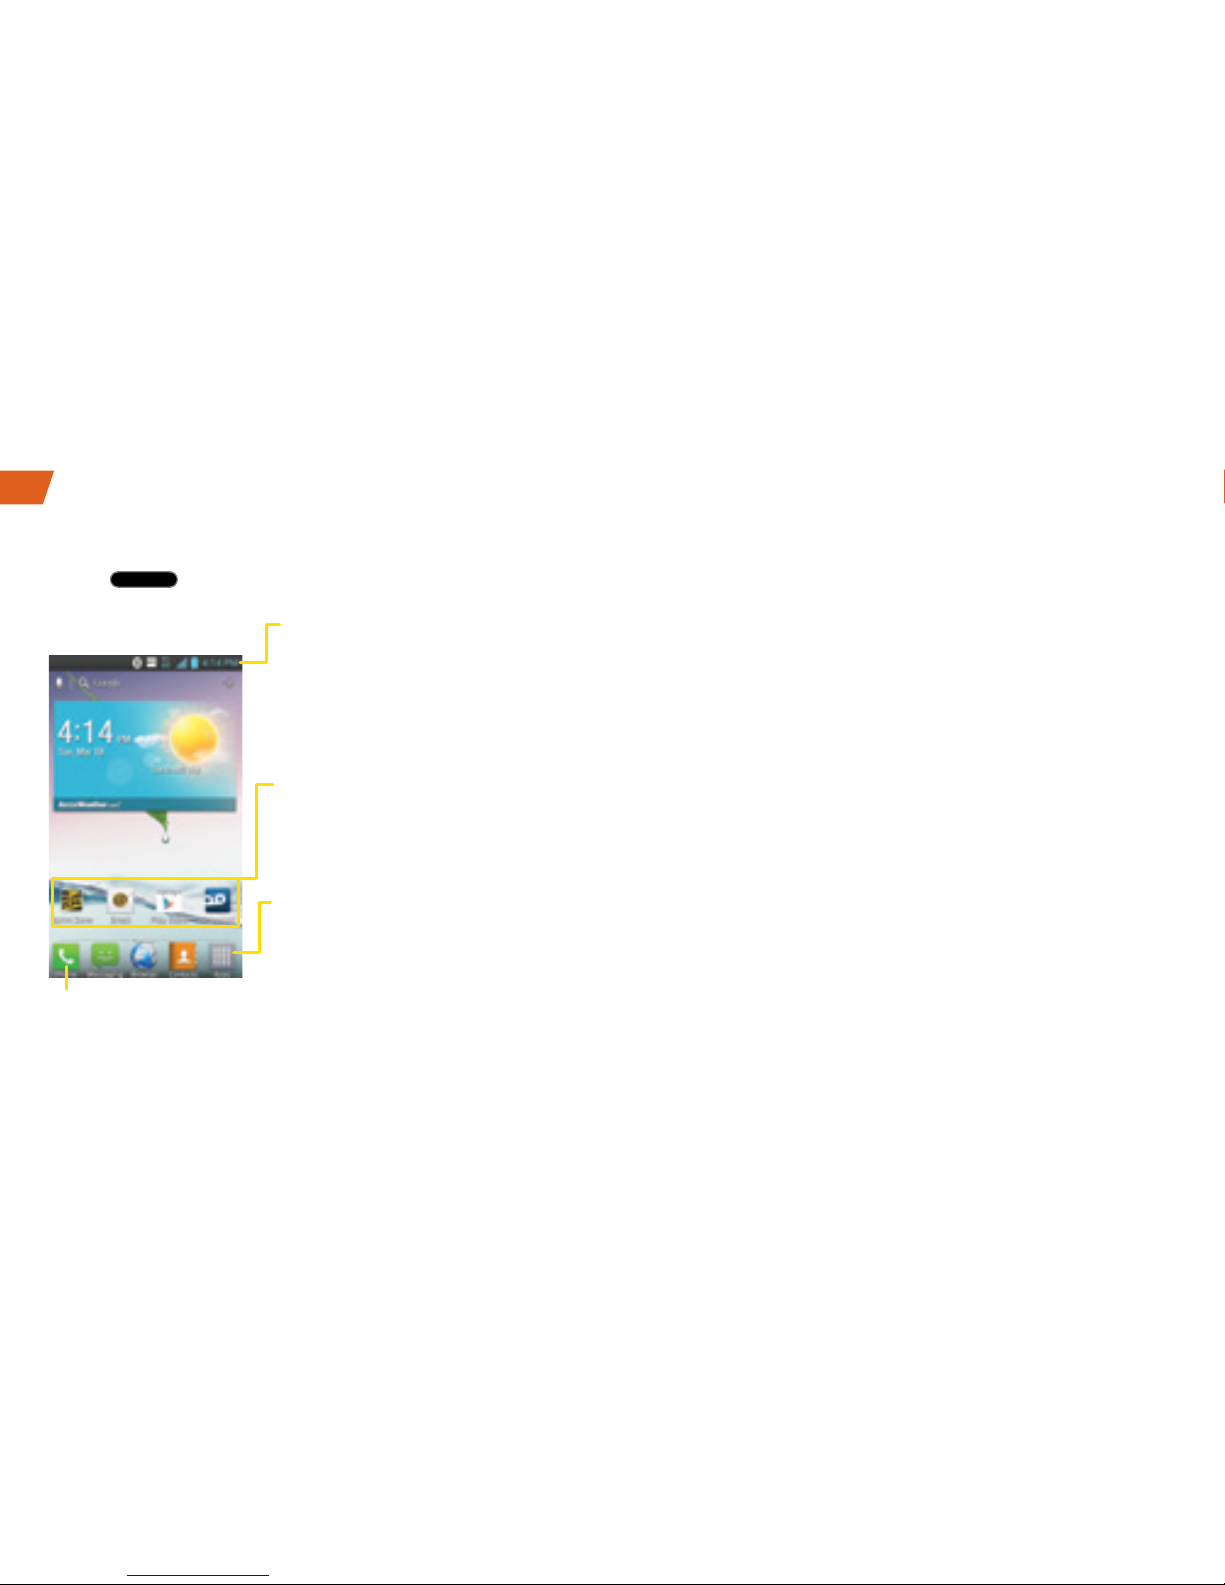
Home Screen
Press to display your Home screen.
Notifications Panel
When you see a notification icon on the left side
of the status bar, drag the Status Bar down to
display the Notifications Panel. Tap a notification
to open the related application, such as
messaging, call list, or event.
To close the panel, drag the bottom bar up.
Status Bar
Shows device status
information including
the
time, signal strength,
battery status, and
notification icons.
Applications Key
Tap to open the
Applications screen to
view installed
applications.
Phone Key
Tap to open the dial pad. Also
provides additional tabs to access
Call logs, Contacts, and your Favorites.
Application Icons
Tap an icon (application,
folder, etc.) to open and
use it.
Your Home Screen
Android Basics
visit sprint.com/support for guides, tutorials and more 7
Add Items to Your Screens
1. Choose a screen and touch and hold an
empty area of the screen.
2. Tap either Apps, Downloads, Widgets, or
Wallpapers.
3. Touch and hold the desired shortcut and
drag to your screen.
4. Release your finger.
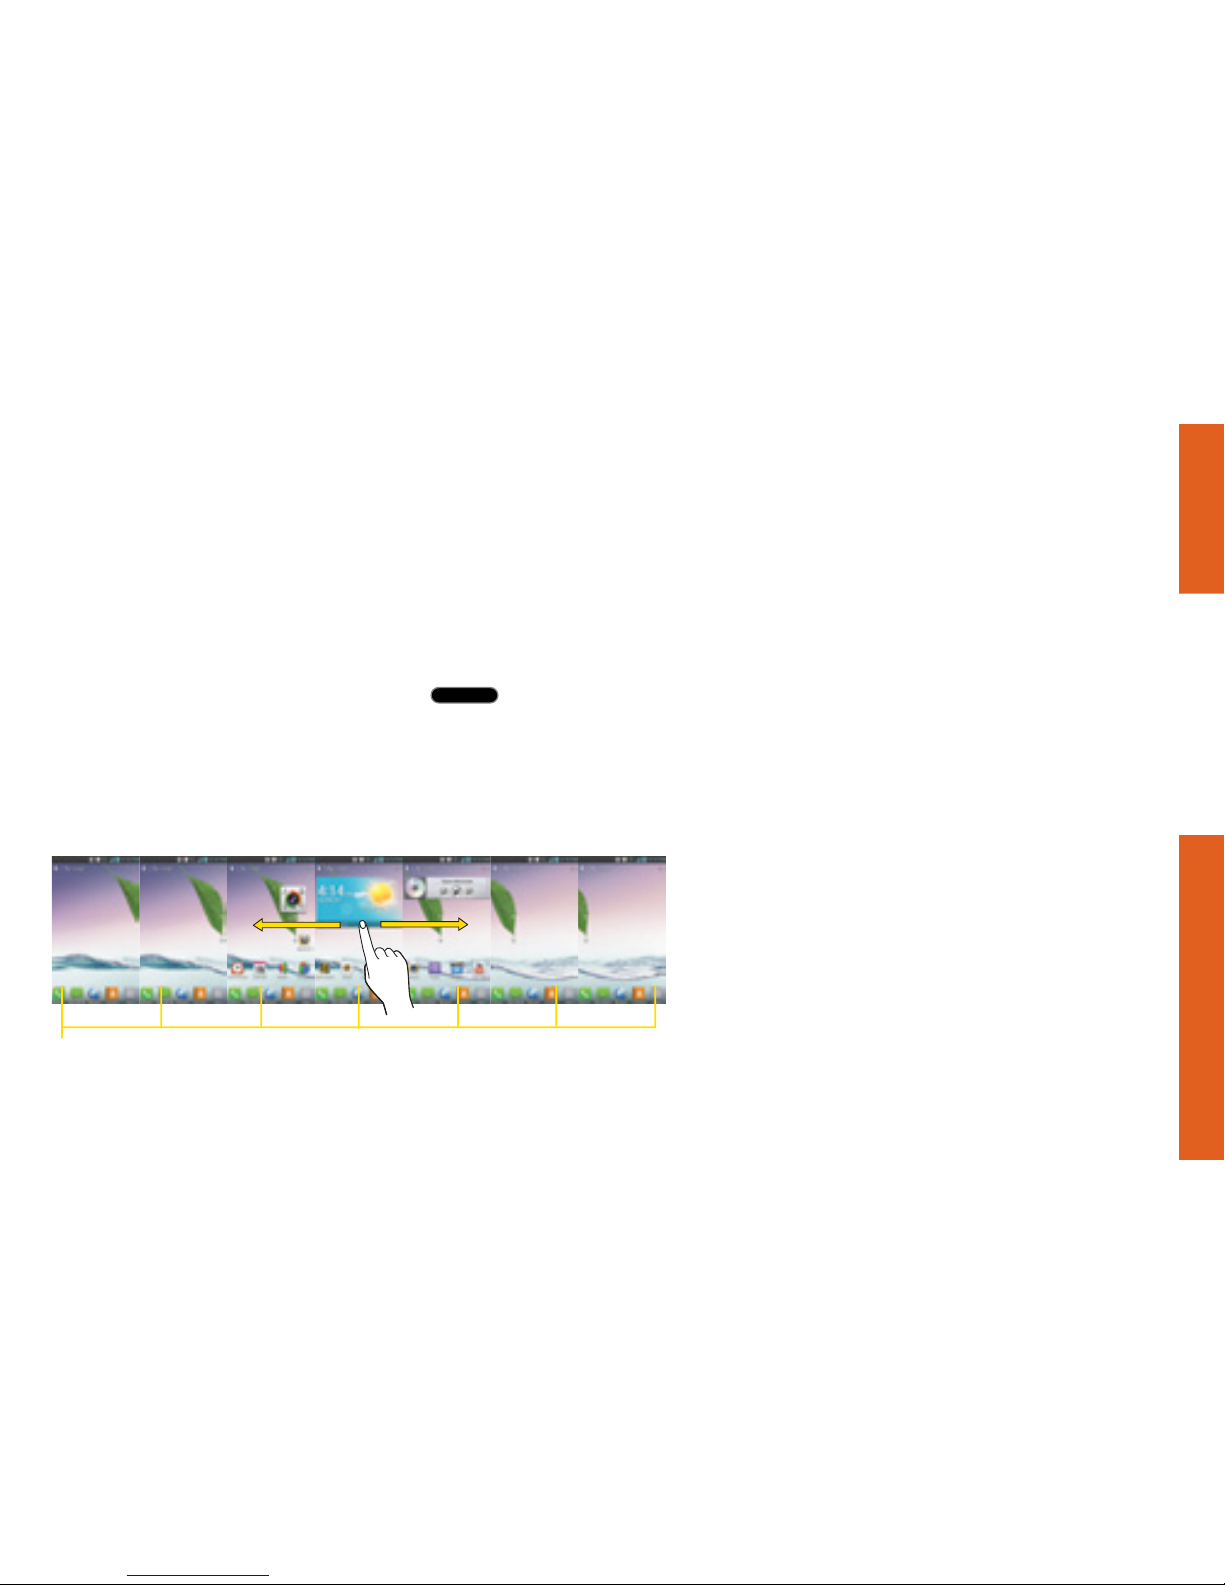
Viewing Extended Screens
Your phone’s Home screen extends horizontally to
six additional screens. This gives you room to
customize your phone and put the things you
need front and center, just a swipe away.
• To display the Home screen, press
from
any screen.
• To view extended screens, flick the screen left or
right. There are three additional screens on each
side of the Home screen.
Location Indicator
The white bar at the bottom of the screen indicates which Home screen canvas you are viewing.
8
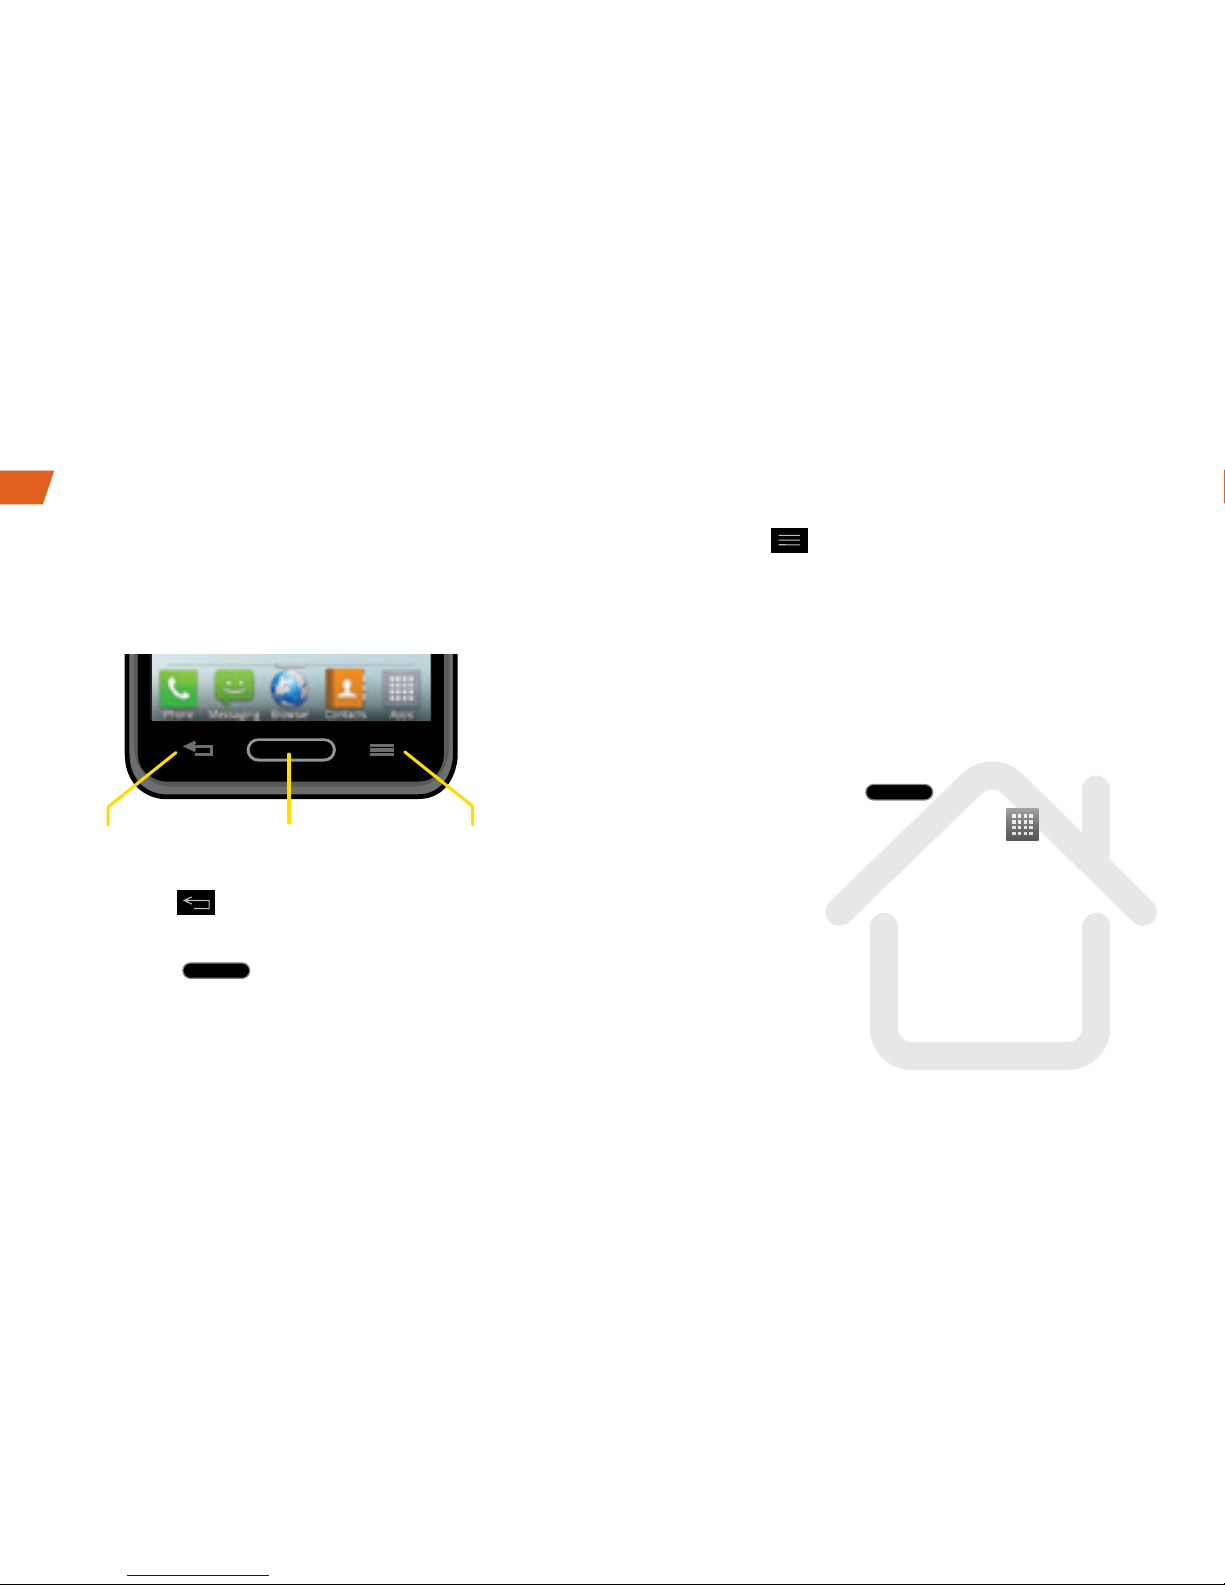
Function Keys
Just below the touchscreen, you’ll find a row of three
static keys that let you perform specific functions.
• Back Key (
) – Tap to return to the previous
screen view.
• Home Key ( ) – Press to return to the Home
screen. Press and hold to view a list of recently-used
apps.
• Menu Key ( ) – Tap to open context-specific
menus. Tap and hold to access Google Now
and the Google search app.
Open Applications
• If an application is on one of your screens, just
tap it to open it.
• If an application is not available from your
Home screen, press (if you’re not
already on the Home screen), tap to display
the applications list, and then tap the
application from the alphabetical list. You may
have to scroll to the side to find the application
you’re looking for.
Keys
BACK Key HOME Key MENU Key
 Loading...