

LG LDG3015SB, LDG3015ST, LDG3015SW, LDG3016ST, LDG3015S Owner's Manual

OWNER’S MANUAL
GAS DOUBLE OVEN RANGE
LDG3016ST
LDG3015ST
LDG3015SB
LDG3015SW
Please read this guide thoroughly before operating
and keep it handy for reference at all times.
MFL33029607
www.lg.com
ENGLISH
ESPAÑOL
2
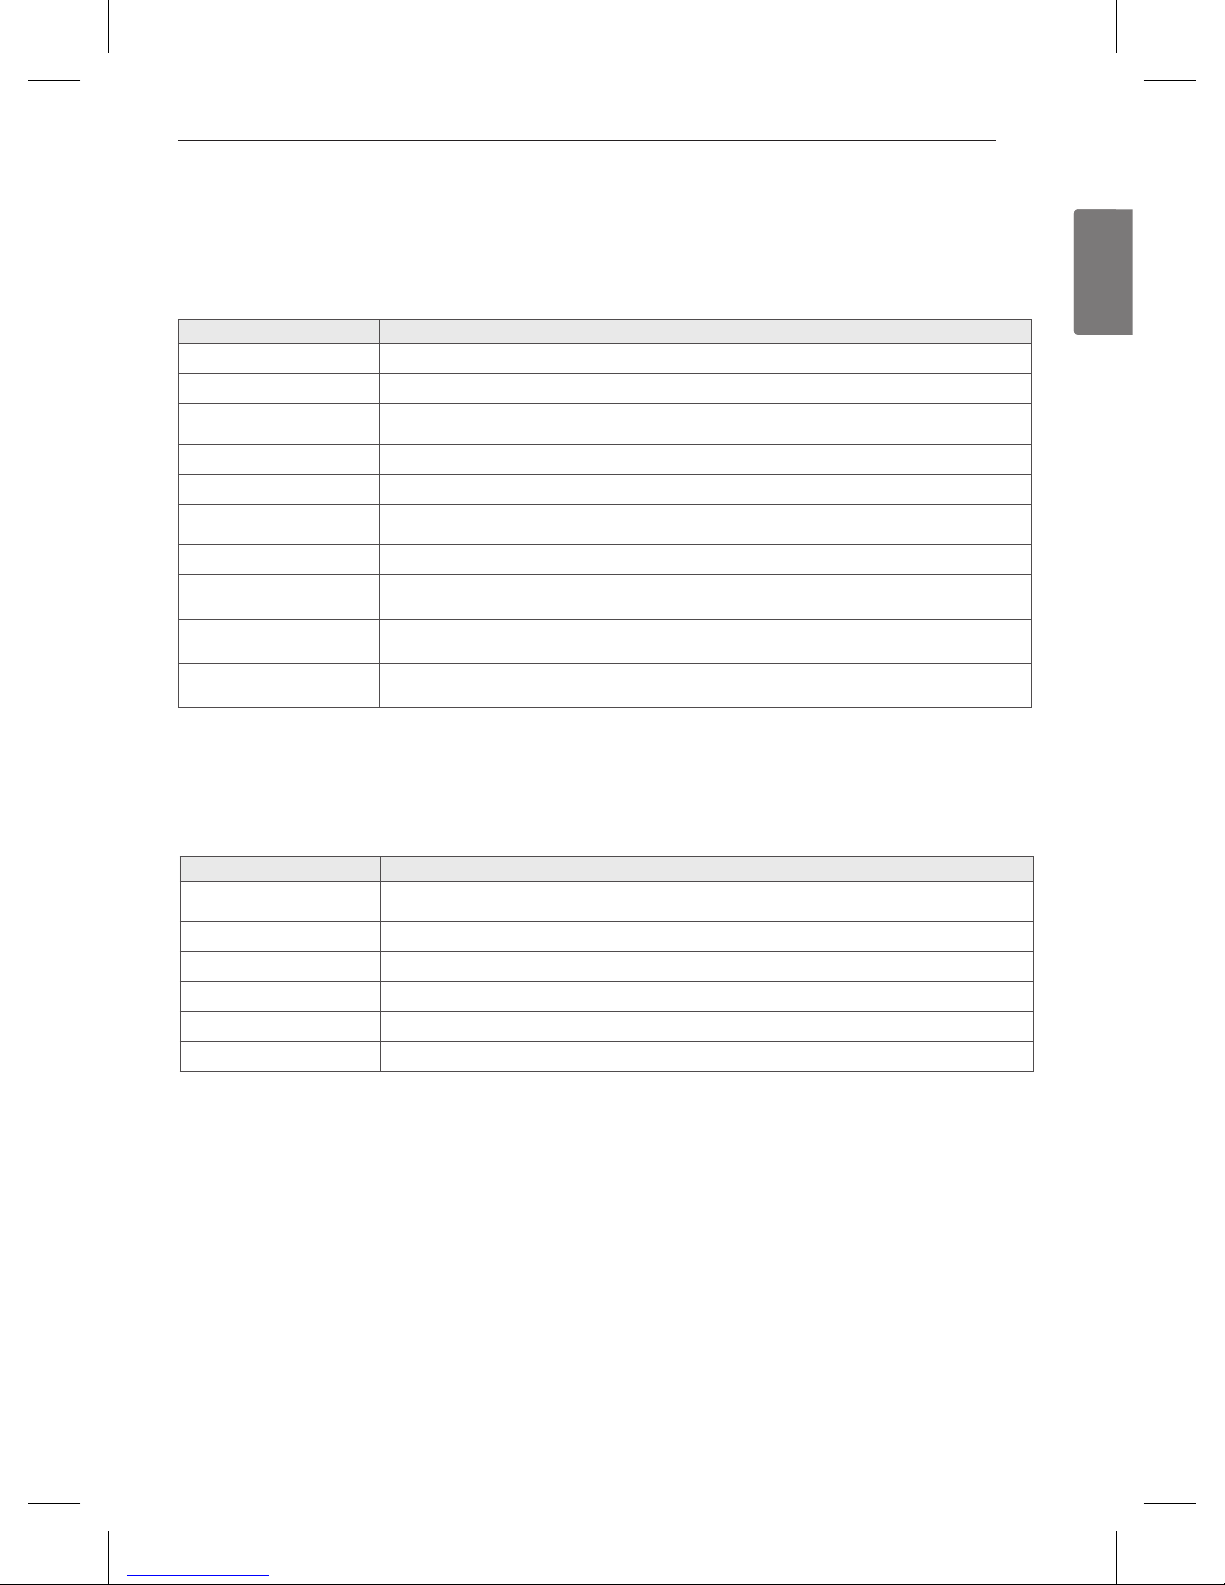
TABLE OF CONTENTS
3
PRODUCT FEATURES
4
IMPORTANT SAFETY INSTRUCTIONS
10
BEFORE USE
10 Accessories
11 Components
12
HOW TO USE
12 Gas Surface Burners
12 - Before Use
13 - Gas Burners
13 - Using the Gas Surface Burners
14 - Top-of-Range Cookware
15 - Using the Griddle (Model LDG3016ST only)
16 How to Use the Oven
16 - Before Use
18 - Using the Control Panel
20 - Operating Instructions
23 - Removing and Replacing the Oven Racks
24 - BAKE (Upper & Lower Oven)
25 - Preheating and Pan Placement
26 - BROIL (Upper Oven)
28 - TIMED COOK (Upper & Lower Oven)
29 How to use convection for the lower oven
(LDG3016ST)
29 - CONVECTION BAKE FOR THE LOWER OVEN
(LDG3016ST)
31 - CONVECTION ROAST FOR THE LOWER OVEN
(LDG3016ST)
32 Special Features
32 - PIZZA (Upper Oven)
32 - WARM (Upper & Lower Oven)
33 - PROOF (Lower Oven)
33 - FAVORITE (LDG3016ST Lower Oven)
34 - SABBATH (Upper & Lower Oven)
35
CARE AND CLEANING
35 Gas Surface Burner
35 - Removing and Replacing the Gas Surface Burner
35 - Burner Heads/Caps
36 - Burner Grates
37 - Cooktop Surface
37 - Stainless Steel Surfaces
37 - Oven Air Vents
37 - Control Panel
37 - Front Manifold Panel and Knobs
37 Outside of the Oven
37 - Painted and Decorative Trim
38 - Oven Door
38 - Removing and Replacing the Doors
40 Inside of the Oven
40 - SELF CLEAN (Upper & Lower Oven)
42 - Changing the Oven Light
42 - Broiler Pan and Grid (Sold separately)
42 - Oven Racks
43
BEFORE REQUESTING SERVICE
45
WARRANTY
3
TABLE OF CONTENTS
ENGLISH
SAFE, CONVENIENT AND GREEN GAS RANGE
Provides safety and convenience for cooking, as well as green technology.
Superboil (17000 BTU) can quickly bring a pot of water to a boil.
MULTIPLE GAS BURNER SIZES
Choose a burner to fit the size of your cookware.
Cooking multiple items at once is possible by using different burners at the same time.
UPPER OVEN / LOWER OVEN
Separate upper and lower ovens.
Choose to use either oven, or both, depending on the size of your food.
SELF CLEAN
Good for easy cleaning.
ENGLISH
4
IMPORTANT SAFETY INSTRUCTIONS
Always comply with the following precautions to avoid dangerous situations and to ensure the peak performance of your product.
WARNING
Indicates a hazardous situation which, if not avoided, could result in death or serious injury.
CAUTION
Indicates a hazardous situation which, if not avoided, could result in minor or moderate injury.
WHAT TO DO IF YOU SMELL GAS
1. Open windows.
2.
DO NOT
try to light any appliance.
3.
DO NOT
touch any electrical switch.
4.
DO NOT
use any phone in your building.
5. Immediately call your gas supplier from a neighbor’s phone. Follow the gas supplier’s instructions.
6. If you cannot reach your gas supplier, call the fire department.
ANTI-TIP DEVICE
WARNING
y
ALL RANGES CAN TIP
y
INJURY TO PERSONS COULD RESULT
y
INSTALL ANTI-TIP DEVICES PACKED WITH RANGE
y
SEE INSTALLATION INSTRUCTIONS
y
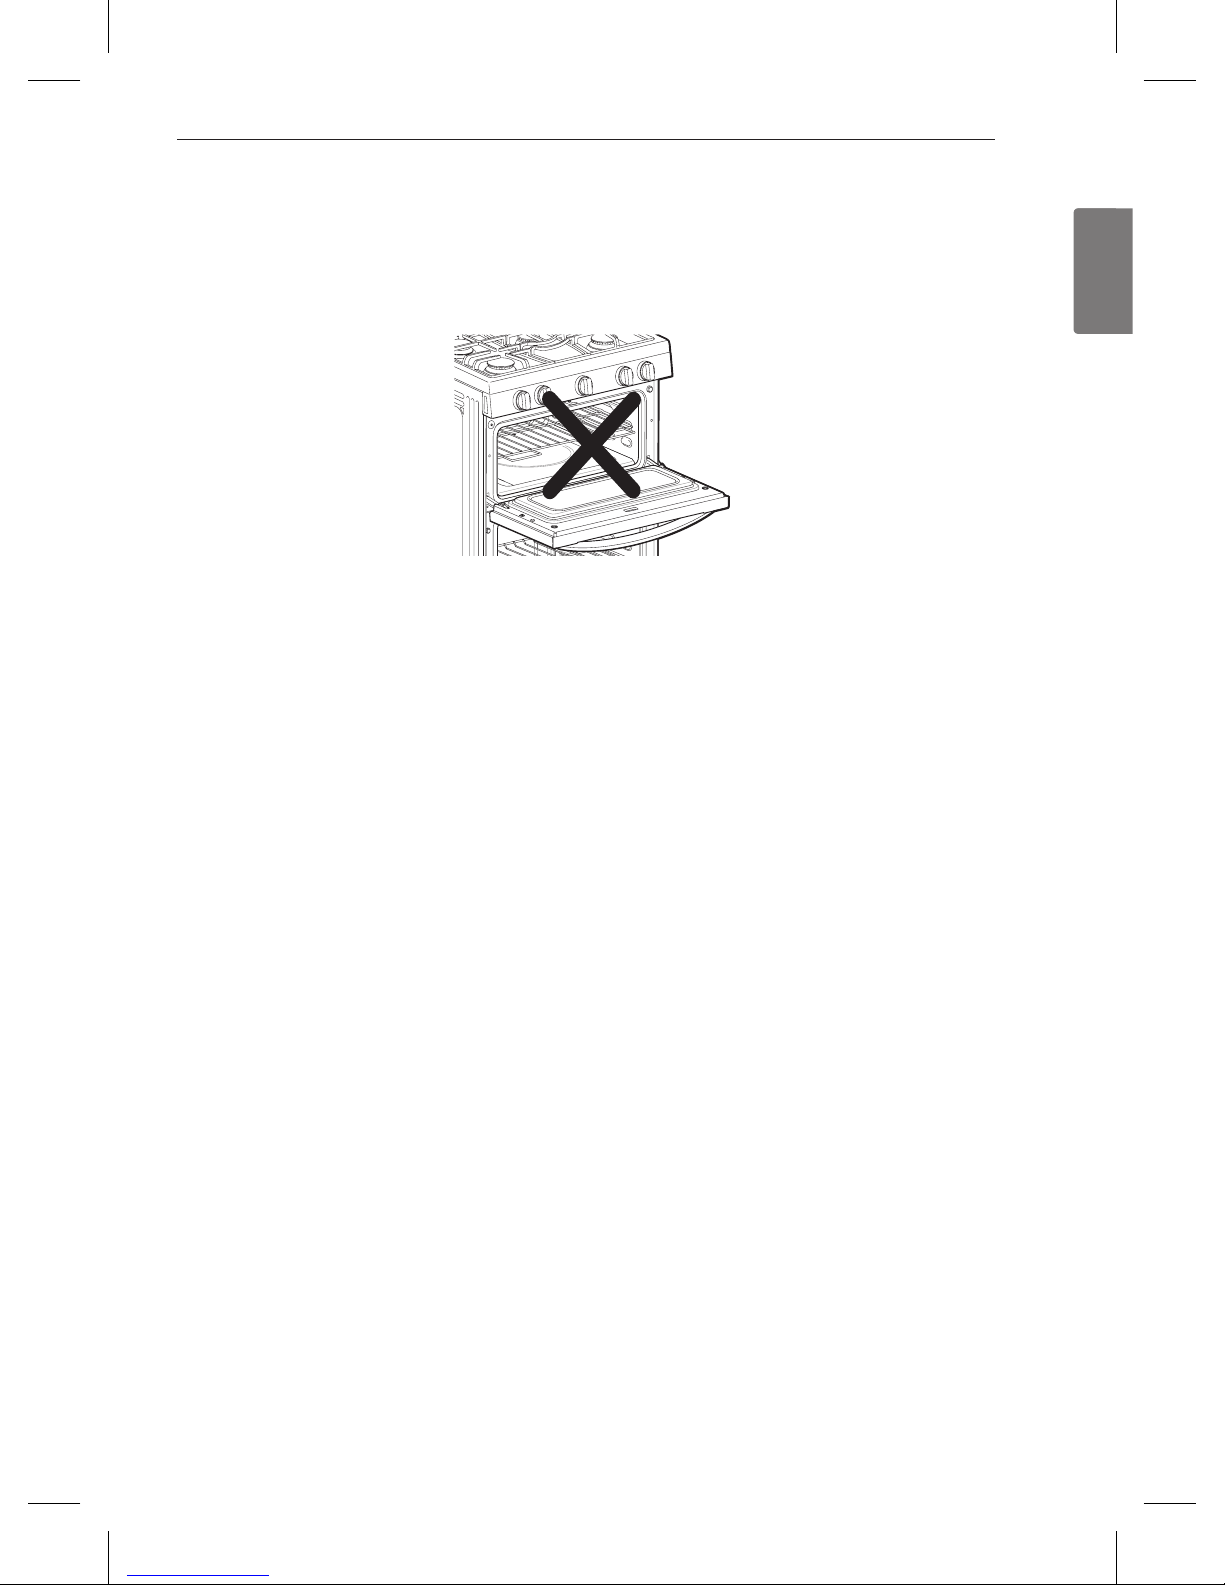
DO NOT step or sit on the door. Install the Anti-Tip Bracket packed with this range.
- The range could be tipped and injury might result from spilled hot liquid, food, or the range itself.
- If the range is pulled away from the wall for cleaning, service, or any other reason, ensure that the Anti-Tip Device is properly
reengaged when the range is pushed back against the wall.
yTo reduce the risk of the range tipping over, the range must be secured by properly installing the anti-tip devices.
yTo check that the anti-tip bracket is properly installed: Remove any items on the cooktop. Grasp the top rear edge of the
range back guard and carefully attempt to tilt it forward. Verify that the ant-itip devices are engaged.
yRemove the warming or storage drawers and visually inspect that the rear leveling leg is fully inserted into the anti-tip
bracket.
yRefer to the installation manual for proper anti-tip bracket installation.
IMPORTANT SAFETY INSTRUCTIONS
5
IMPORTANT SAFETY INSTRUCTIONS
ENGLISH
IMPORTANT SAFETY NOTICE
Enforcement Act requires the Governor of California to publish a list of substances known to the state to cause birth defects or
other reproductive harm, and requires businesses to warn customers of potential exposure to such substances.
Gas appliances can cause minor exposure to four of these substances, namely benzene, carbon monoxide, formaldehyde and
soot, caused primarily by the imperfect combustion of natural or LP gas.
Correctly adjusted burners, indicated by a bluish rather than a yellow flame, will minimize imperfect combustion. Exposure to
these substances can be minimized by opening windows or using a ventilation fan or hood.
SAFETY PRECAUTIONS
Have the installer show you the location of the range gas shut-off valve and how to shut it off if necessary.
Make sure your range is properly installed and grounded by a qualified installer, according to the installation instructions.
Any adjustment and service should be performed only by qualified gas range installers or service technicians.
Plug your range into a 120-volt grounded outlet only. Do not remove the round grounding prong from the plug. If in doubt
about the grounding of the home electrical system, it is your personal responsibility and obligation to have an ungrounded
outlet replaced with a properly grounded, three-prong outlet in accordance with the National Electrical Code. Do not use an
extension cord with this range.
DO NOT
use an adapter plug, an extension cord, or remove the grounding prong from the electrical power cord to prevent
fire hazard or electrical shock. Failure to follow this warning can cause serious injury, fire or death.
To prevent poor air circulation, place the range out of kitchen traffic path and out of drafty locations.
DO NOT
attempt to repair or replace any part of your range unless it is specifically mentioned in this manual. All other services should be referred to a qualified technician.
Make sure that all packaging materials are removed from the range before operating it to prevent fire or smoke damage
should the packaging material ignite.
Make sure your range is properly adjusted by a qualified service technician or installer for the type of gas (natural or LP) that
is to be used. Your range can be converted for use with either type of gas. See the installation instructions.
In an emergency situation or if you want to shut off the gas supply, remove the packing rubber from the regulator in the
backside, and then close the regulator’s valve by positioning the lever as shown in the figure below.
WARNING
These adjustments must be done by a qualified service technician according to the manufacturer’s instructions and all codes and
requirements of the authority having jurisdiction. Failure to follow these instructions could result in serious injury or prope rty damage. The qualified agency performing these adjustments assumes responsibility for the conversion.
After using your range for a long time, high floor temperatures may result and many floor coverings will not withstand this
kind of use.
NEVER
install the range over vinyl tile or linoleum that cannot withstand such type of use. Never install it directly over inte -
rior kitchen carpeting.
CAUTION
Items of interest to children should not be placed in cabinets above a range or on the backsplash of a range—children climbing on
the range to reach items could be seriously injured.
DO NOT
leave children alone or unattended where a range is hot or in operation. They could be seriously burned.
DO NOT
let anyone climb, stand or hang on the oven door, warming drawer or cooktop. They could damage the range and
even tip it over, causing severe personal injury.
Lever’s open position Lever’s open position
(without packing lever)
Lever’s close position
This producto contains chemicals known to the State of California to cause cancer. Wash hands after handing.
WARNING
ENGLISH
6
IMPORTANT SAFETY INSTRUCTIONS
WARNING
y
NEVER
use your range as a space heater to heat or warm the room. Doing so may result in carbon monoxide poisoning and
overheating of the oven.
y
NEVER
wear loose fitting or hanging garments while using the appliance. Be careful when reaching for items placed in
cabinets over the range. Flammable materials could be ignited if brought in contact with flame or hot oven surfaces and may
cause severe burns.
y
DO NOT
place flammable materials in the oven or near the cooktop.
y
DO NOT
place or use combustible materials such as gasoline or other flammable vapors and liquids in the vicinity of this or
any other appliance.
y
DO NOT
allow cooking grease or other flammable materials in or near the range.
y
DO NOT
use water on grease fires. Never touch a flaming pan. Turn the controls off. Smother a flaming pan on a surface
burner by covering the pan completely with a well-fitting lid, cookie sheet or flat tray. Use a multi-purpose dry chemical or
foam-type fire extinguisher.
A grease fire can be put out by covering it with baking soda or, if available, by using a multi-purpose dry chemical or foamtype fire extinguisher.
Flame in the upper oven or lower oven can be smothered completely by closing the oven door and turning the control to off
or by using a multi-purpose dry chemical or foam-type fire extinguisher.
y
DO NOT
use the oven or the drawer for storage.
yLet the burner grates and other surfaces cool before touching them.
y
NEVER
block the vents (air holes) of the range. They provide the air inlet and outlet that are necessary for the range to operate properly with correct combustion. Air openings are located at the rear of the cooktop, at the top and bottom of the oven
door, and at the bottom of the range.
y
NEVER
cover any slots, holes or passages in the oven bottom or cover an entire rack with materials such as aluminum foil.
Doing so blocks air flow through the oven and may cause carbon monoxide poisoning. Aluminum foil linings may also trap
heat, causing a fire hazard.
y
NEVER
obstruct the flow of combustion and ventilation air by blocking the oven vent or air intakes. Doing so restricts air to
the burner and may result in carbon monoxide poisoning.
yLarge scratches or impacts to glass doors can lead to broken or shattered glass.
yStepping, leaning or sitting on the doors or drawers of this range can result in serious injuries and also cause damage to the
range. Do not allow children to climb or play around the range. The weight of a child on an open door may cause the range
to tip, resulting in serious burns or other injury.
yGas leaks may occur in our system and result in a dangerous situation. Gas leaks may not be detected by smell alone. Gas
suppliers recommend you to purchase and install a UL approved gas detector. Install and use in accordance with the gas detector manufacturer’s instructions.
yLeak testing of the appliance shall be conducted according to the manufacturer’s instructions.
y
DO NOT
use commercial oven cleaners on the oven finish or around any part of the oven. They will damage the finish of
parts.
yTo prevent staining or discoloration, clean appliance after each use.
y
DO NOT
attempt to open or close the door or operate the oven until the door is properly installed.
y
NEVER
place fingers between the hinge and front oven frame. Hinge arms are spring mounted. If accidentally hit, the hinge
will slam shut against the oven frame and could injure your fingers.
CAUTION
y
DO NOT
use the oven for storing food or cookware.
yTo prevent damage to the oven door, do not attempt to open the door when Lock is displayed.
y
DO NOT
place excessive weight or stand on an open door. This could cause the range to tip over, break the door, or injure
the user.
y
DO NOT
use delayed baking for highly perishable foods such as dairy products, pork, poultry, or seafood.
WARNING
yDisconnect electrical supply before servicing the appliance.
y
NEVER
use appliance door as a step stool or seat, as this may result in possible tipping of the appliance and serious injuries.
yThis product should not be installed below ventilation type hood systems that directs air in a downward direction.
Doing so may cause ignition and combustion problems with the gas burners resulting in personal injury and may affect the
cooking performance of the unit.
7
IMPORTANT SAFETY INSTRUCTIONS
ENGLISH
SURFACE BURNERS
WARNING
yEven if the top burner flame goes out, gas is still flowing to the burner until the knob is turned to the “OFF” position. If you
smell gas, immediately open a window and ventilate the area for five minutes prior to using the burner. Do not leave the
burners “ON” unattended.
y
Use proper pan size - DO NOT
use pans that are unstable or that can be easily tipped. Select cookware with flat bottoms
large enough to cover burner grates. To avoid spillovers, make sure the cookware is large enough to contain the food properly. This will both save cleaning time and prevent hazardous accumulations of food, since heavy spattering or spillovers left
on the range can ignite. Use pans with handles that can be easily grasped and remain cool.
CAUTION
yBe sure that all surface controls are set in the "OFF" position prior to supplying gas to the range.
y
NEVER
leave the surface burners unattended at high flame settings. Boilovers may cause smoke and greasy spillovers that
may catch on fire.
yAlways turn the knobs to the “LITE” position when igniting the top burners and make sure the burners have ignited.
yControl the top burner flame size so it does not extend beyond the edge of the cookware. Excessive flame is hazardous.
yOnly use dry pot holders—moist or damp pot holders on hot surfaces may result in burns from steam. Do not let pot hold-
ers come near open flames when lifting cookware. Do not use towels or other bulky cloth items. Use a pot holder.
yUsing glass cookware—make sure the cookware is designed for top-of-range cooking.
yTo prevent burns from ignition of flammable materials and spillage, turn cookware handles toward the side or back of the
range without extending over adjacent burners.
y
NEVER
leave any items on the cooktop. The hot air from the vent may ignite flammable items and will increase pressure in
closed containers, which may cause them to burst.
yCarefully watch foods being fried at a high flame setting.
yAlways heat fat slowly, and watch as it heats.
yIf frying combinations of oils and fats, stir together before heating.
yUse a deep fat thermometer if possible to prevent overheating fat beyond the smoking point.
yUse the least possible amount of fat for effective shallow or deep-fat frying. Filling the pan with too much fat can cause
spillovers when food is added.
y
DO NOT
cook foods directly on an open flame on the cooktop.
y
DO NOT
use a wok on the surface burners if the wok has a round metal ring that is placed over the burner grate to support
the wok. This ring acts as a heat trap, which may damage the burner grate and burner head. It may also cause the burner
to work improperly. This may cause carbon monoxide levels which are higher than what is allowed by current standards,
resulting in a health hazard.
yFoods for frying should be as dry as possible. Frost or moisture on foods can cause hot fat to bubble up and spillover the
sides of the pan.
y
NEVER
try to move a pan of hot fat, especially a deep fat fryer. Wait until the fat is cool.
y
DO NOT
place plastic items on the cooktop—they may melt if left too close to the vent.
yKeep all plastics away from the surface burners.
yTo prevent burns, always be sure that the controls for all burners are in the “OFF” position and all grates are cool before at-
tempting to remove them.
yIf you smell gas, turn off the gas to the range and call a qualified service technician. Never use an open flame to locate a
leak.
yAlways turn the knobs to the “
OFF
” position before removing cookware.
y
DO NOT
lift the cooktop. Lifting the cooktop can cause damage and improper operation of the range.
yIf the range is located near a window, do not hang long curtains that could blow over the surface burners and catch on fire.
ENGLISH
8
IMPORTANT SAFETY INSTRUCTIONS
COOK MEAT AND POULTRY THOROUGHLY
To protect against foodborne illnesses, cook meat and poultry thoroughly—meat to at least an INTERNAL temperature of 160°F
and poultry to at least an INTERNAL temperature of 180°F.
SELF CLEANING OVEN
Make sure to wipe off excess spillage before operating the self clean function.
CAUTION
y
DO NOT
leave food, cooking utensils, racks, etc. in the oven during the self clean cycle.
y
DO NOT
use oven cleaners. No commercial oven cleaner or oven liner protective coating of any kind should be used in or
around any part of the oven. Residue from oven cleaners will damage the inside of the oven when the self clean cycle is
used.
yRemove oven racks and other items from both upper and lower ovens before starting the self clean cycle.
yOnly clean the parts listed in this manual.
y
DO NOT
clean the door gasket. The door gasket is necessary for a good seal. Care should be taken not to rub, damage or
move the gasket.
yIf the self cleaning mode malfunctions, turn the range off and disconnect the power supply. Have it serviced by a qualified
technician.
yIt is normal for parts of the oven to become hot during a self clean cycle.
yAvoid touching the door, window or oven vent area during a clean cycle.
OVEN
When opening the door of a hot oven, stand away from the range. The hot air and steam that escape can cause burns to hands,
face and eyes.
WARNING
NEVER
block any slots, holes or passages in the oven bottom or cover an entire rack with materials such as
aluminum foil. Doing so blocks air flow through the oven and may cause carbon monoxide poisoning. Aluminum foil linings may
also trap heat, causing a fire hazard.
y
DO NOT
heat food in closed containers. Pressure inside the container could increase and burst, causing an injury.
y
DO NOT
use aluminum foil anywhere in the oven except as described in this manual. Doing so could create a fire hazard or
cause damage to the range.
y
DO NOT
use the oven for storage. Items stored in the oven can catch on fire.
yKeep the oven free from grease buildup.
yInsert the oven racks in the desired position while the oven is cool.
yTo prevent burns when removing food, slide racks out until the stop engages, then remove food items.
This may also protect you from getting burnt from touching hot surfaces of the door or oven walls.
yWhen placing or removing a griddle, always wear oven mitts.
yWhen using cooking or roasting bags in the oven, follow the manufacturer’s directions.
yUse only glass cookware that is recommended for use in gas ovens.
yAlways remove the broiler pan from the range after you finish broiling. Grease left in the pan can catch fire if oven is used
without removing the grease from the broiler pan.
yIf meat is too close to the flame while broiling, the fat may ignite. Trim excess fat to prevent excessive flare-ups.
yMake sure the broiler pan is in place correctly to minimize the possibility of grease fires.
9
IMPORTANT SAFETY INSTRUCTIONS
ENGLISH
yIf you should have a grease fire in the broiler pan, press the “UPPER CLEAR/OFF” or “LOWER CLEAR/OFF” key, and keep
the oven door closed to contain fire until it burns out.
yFor safety and better cooking performance, always bake and broil with the oven door closed.
Open door baking or broiling can cause damage to the knobs or valves.
DO NOT
leave the oven door open during cooking or cool down.
READ ALL INSTRUCTIONS BEFORE USING THE APPLIANCE.
SAVE THESE INSTRUCTIONS
ENGLISH
10
BEFORE USE
NOTE
yContact LG Customer Service if any accessories are missing.
yFor your safety and for extended product life, only use authorized components.
yThe manufacturer is not responsible for product malfunction or accidents caused by the use of separately purchased, unau-
thorized components or parts.
yThe images in this guide may be different from the actual components and accessories, and are subject to change by the
manufacturer without prior notice for product improvement purposes.
BEFORE USE
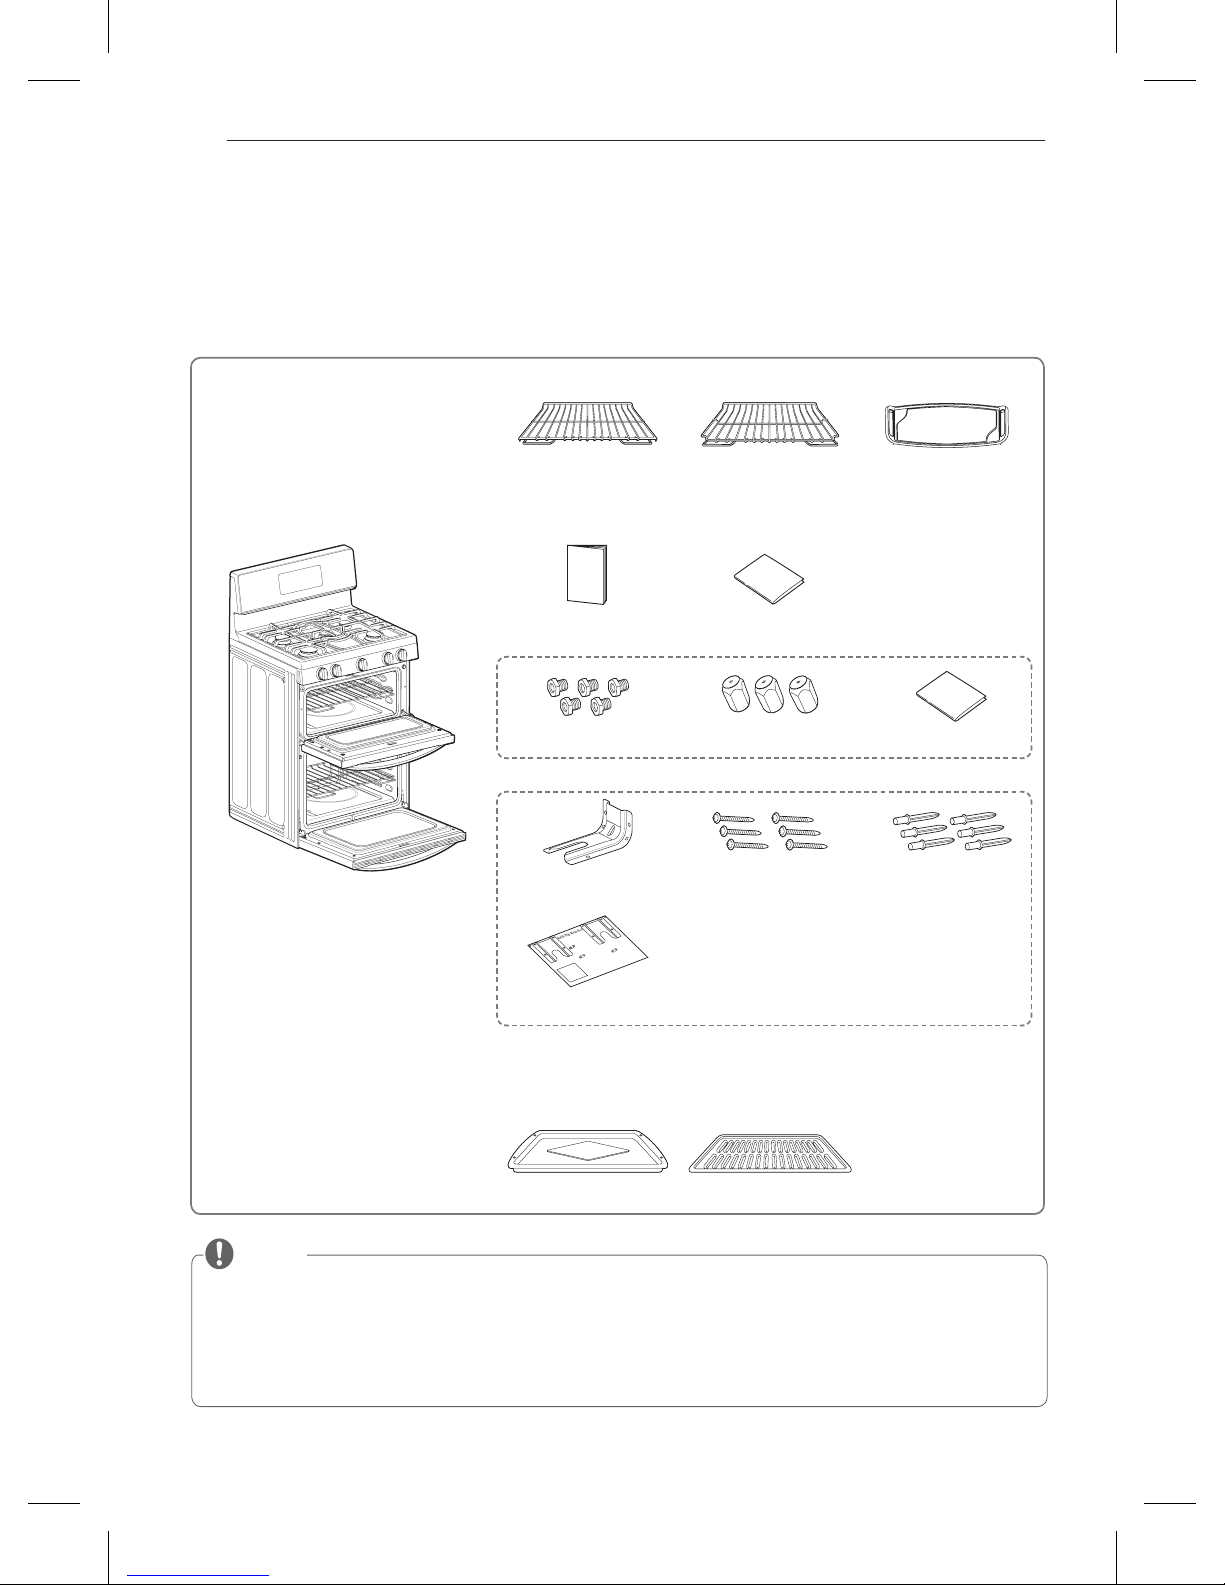
Accessories
Make sure that all parts are included after purchasing this product.
Gas double oven range
Racks
(2)
Offset rack
(1)
Owner’s manual Installation manual
Cooktop nozzles (5) Oven nozzles (3) Installation guide
LP nozzle conversion kit
Anti-tip Screws (6) Anchors (6)
Template
Anti-tip kit
Sold Separately
Broiler pan Grid
Griddle
(Model LDG3016ST only)
11
BEFORE USE
ENGLISH
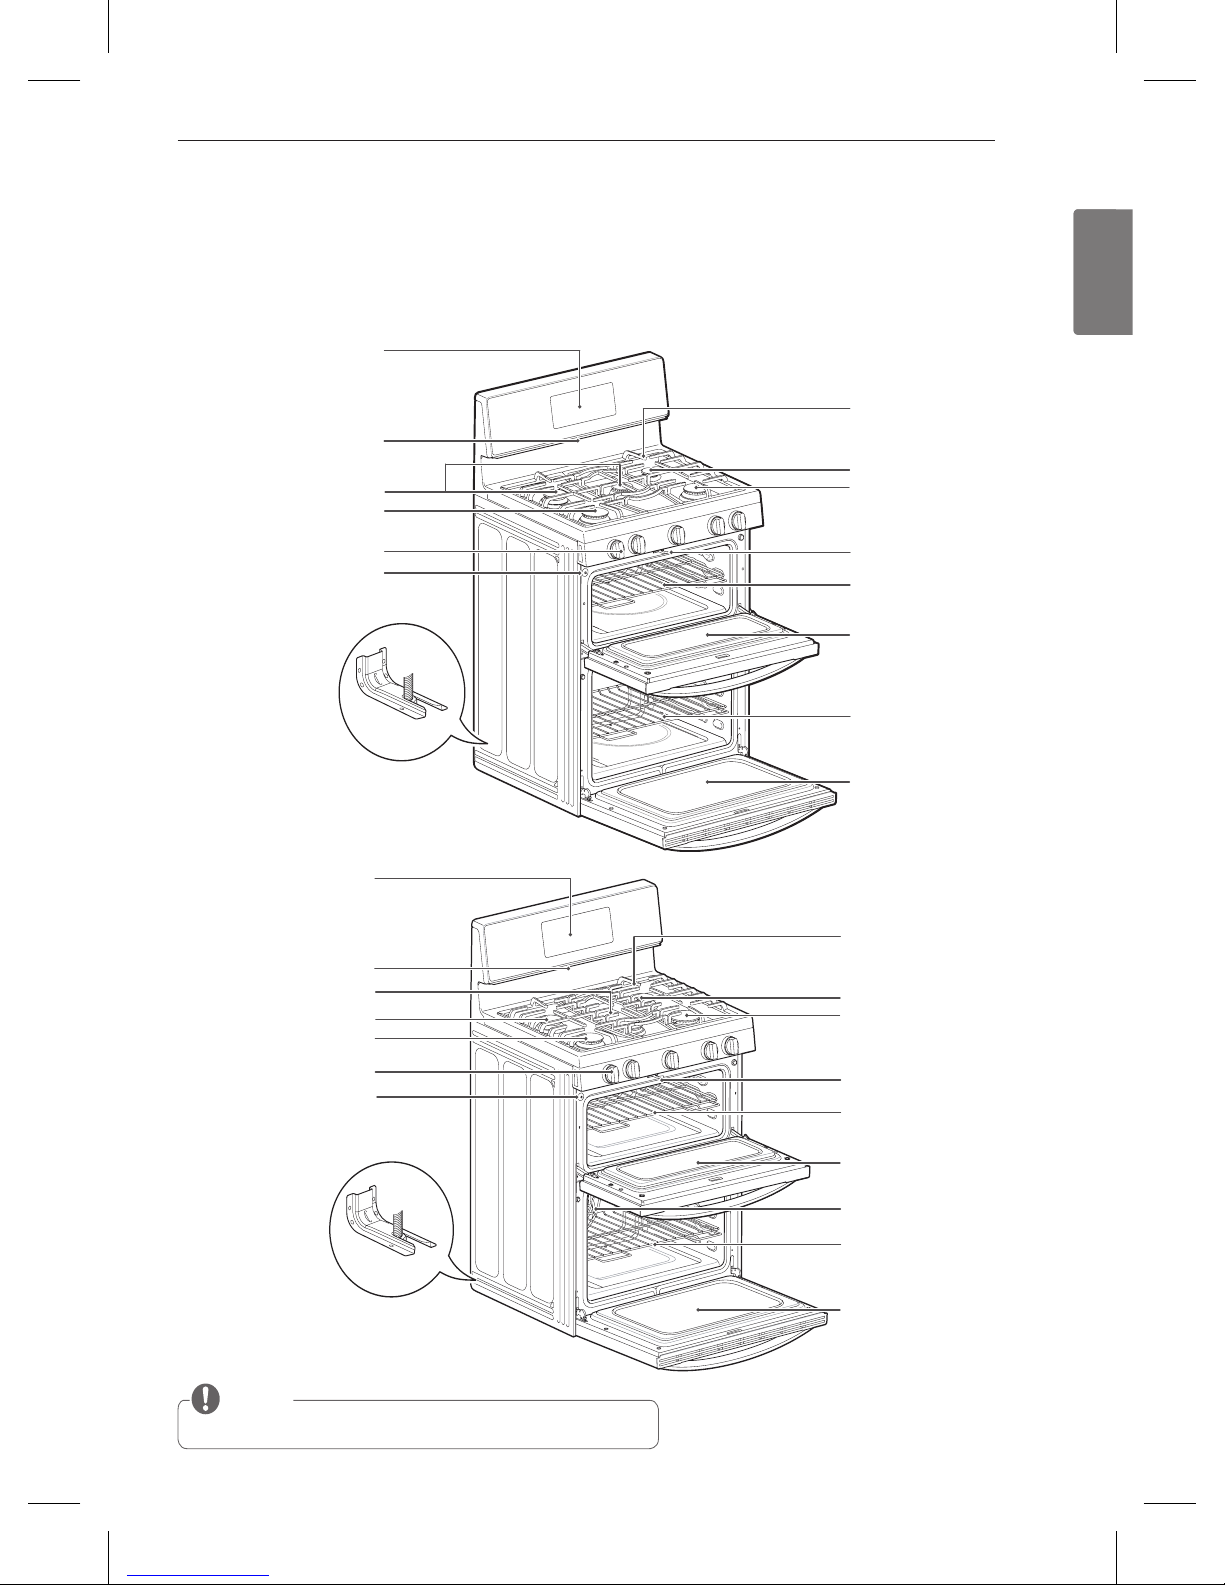
Components
Make sure to understand the names and function of each part.
* Throughout this manual, the features and appearance may vary depending on your model.
NOTE
y The model and serial tag is located behind the control panel.
Anti-tip bracket
Grates
Small burner
Extra large burner
Self clean latch
Rack
Upper oven door
Rack
Convection fan
Lower oven door
Control panel
Oven vent
Medium burner
Large burner
Oval burner
Knobs (5)
Automatic oven light switch
For Model: LDG3016ST
Anti-tip bracket
Grates
Small burner
Extra large burner
Self clean latch
Rack
Upper oven door
Rack
Lower oven door
Control panel
Oven vent
Medium burner
Large burner
Knobs (5)
For Model: LDG3015S
Automatic oven light switch
ENGLISH
12
HOW TO USE
HOW TO USE
Gas Surface Burners
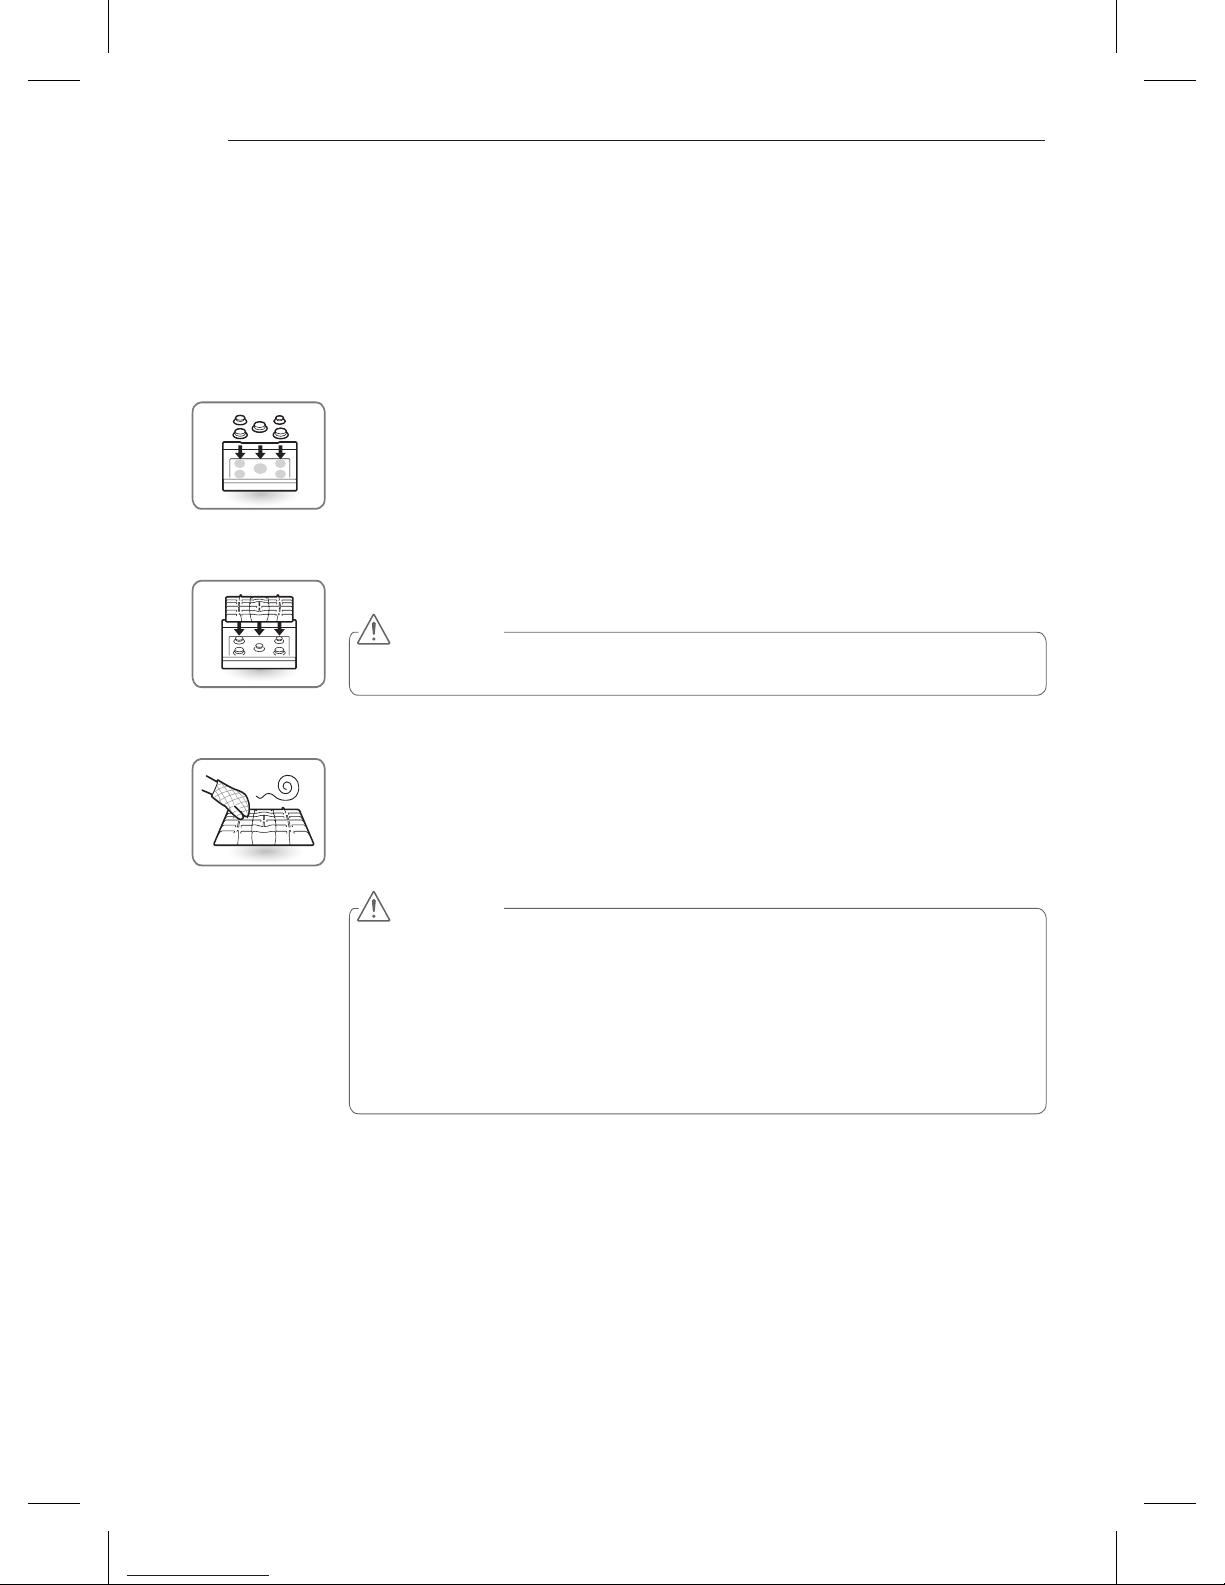
Before use
Read all instructions before using.
Make sure that all burners are properly placed.
Make sure that all grates are properly placed before using the burner.
CAUTION
DO NOT
operate the burner for an extended period of time without cookware on the grate.
The finish on the grate may chip without cookware to absorb the heat.
Make sure the burners and grates are cooled down before you place
your hand, pot holder, cleaning cloth, or other materials on burners and
grates.
Touching grates before cooling down may cause burns.
CAUTION
WHAT TO DO IF YOU SMELL GAS
1. Open windows.
2.
DO NOT
try to light any appliance.
3.
DO NOT
touch any electrical switch.
4.
DO NOT
use any phone in your building.
5. Immediately call your gas supplier from a neighbor’s phone.
Follow the gas supplier’s instructions.
6. If you cannot reach your gas supplier, call the fire department.
13
HOW TO USE
ENGLISH
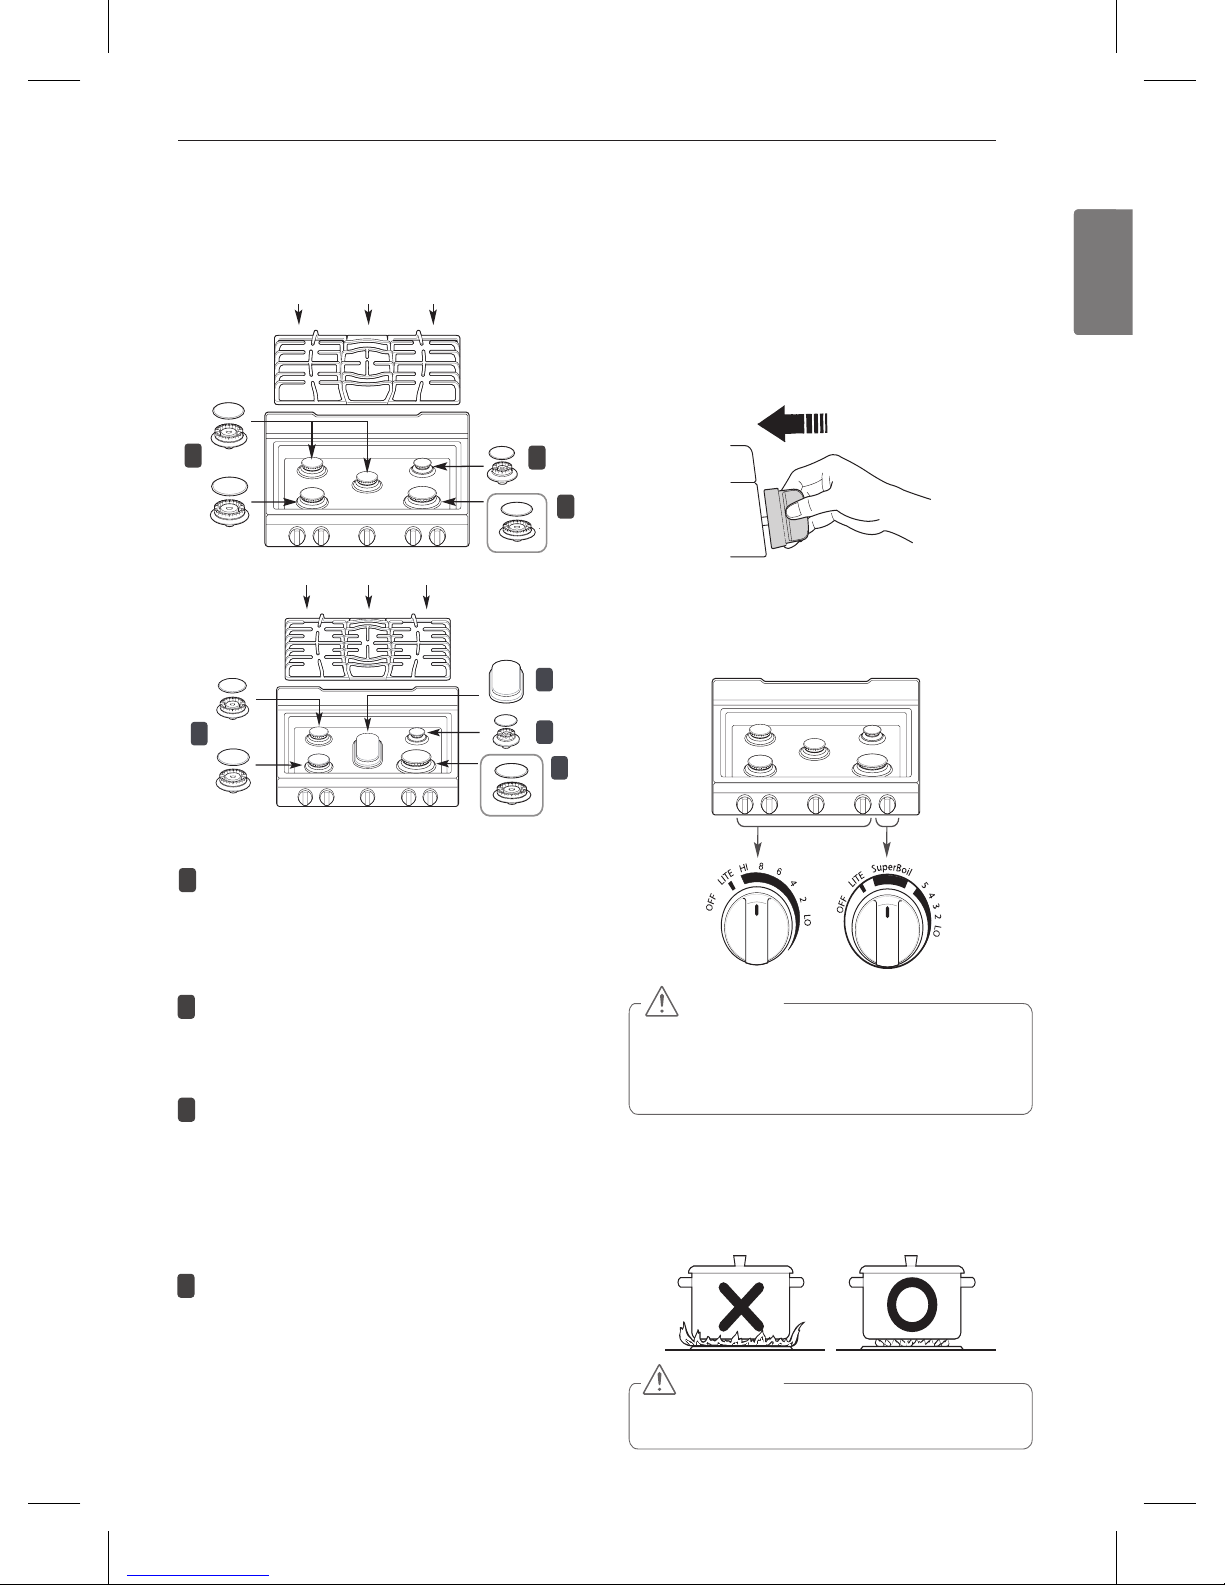
Gas burners
Your gas range cooktop has five sealed gas burners.
These can be assembled and separated. Follow the guide
below.
1234
1
4
2
3
Medium and Large Burner
The medium and large burners are the primary burners
for most cooking. These general purpose burners can be
turned down from “
v
” to “w” to suit a wide range of
cooking needs.
Small Burner
The smallest burner is used for delicate foods such as
sauces or foods that require low heat for a long cooking
time.
Extra large burner
The extra large burner is the maximum output burner.
Like the other four burners, it can be turned down
from “
v
” to “w” for a wide range of cooking applications. This burner is also designed to quickly bring large
amounts of liquid to a boil. It can be used with cookware
10 inches or larger in diameter.
Oval burner (LDG3016ST Model Only)
The oval burner (center) is for use with a griddle or oval
pots.
Using the gas surface burners
1
Be sure that all of the surface burners are placed in the
correct positions.
2
Put cookware on the burner. (Example: pot, frying pan,
etc.)
3
Push and turn the control knob to the “u” position.
You will hear a clicking noise from the electric spark
ignition system.
4
Turn the control knob to control the flame size.
CAUTION
DO NOT
attempt to disassemble or clean around any
burner while another burner is on. When turning a burner
to “
u
”, all the burners spark. An electric shock may re-
sult, which could cause you to knock over hot cookware.
Selecting the Flame Size
Watch the flame, not the knob, as you reduce heat. When
fast heating is desired, the flame size on a gas burner should
match the cookware that you are using.
CAUTION
NEVER
let the flames extend up the sides of the
cookware.
1234
1234
4
LDG3015S
L
DG3016ST
ENGLISH
14
HOW TO USE
In Case of Power Failure:
In case of a power failure, you can light the gas surface burners on your range with a match.
Surface burners in use when an electrical power failure
occurs will continue to operate normally.
1
Hold a lit match to the burner, then push in the control
knob.
2
Turn the control knob to the "Lo” position.
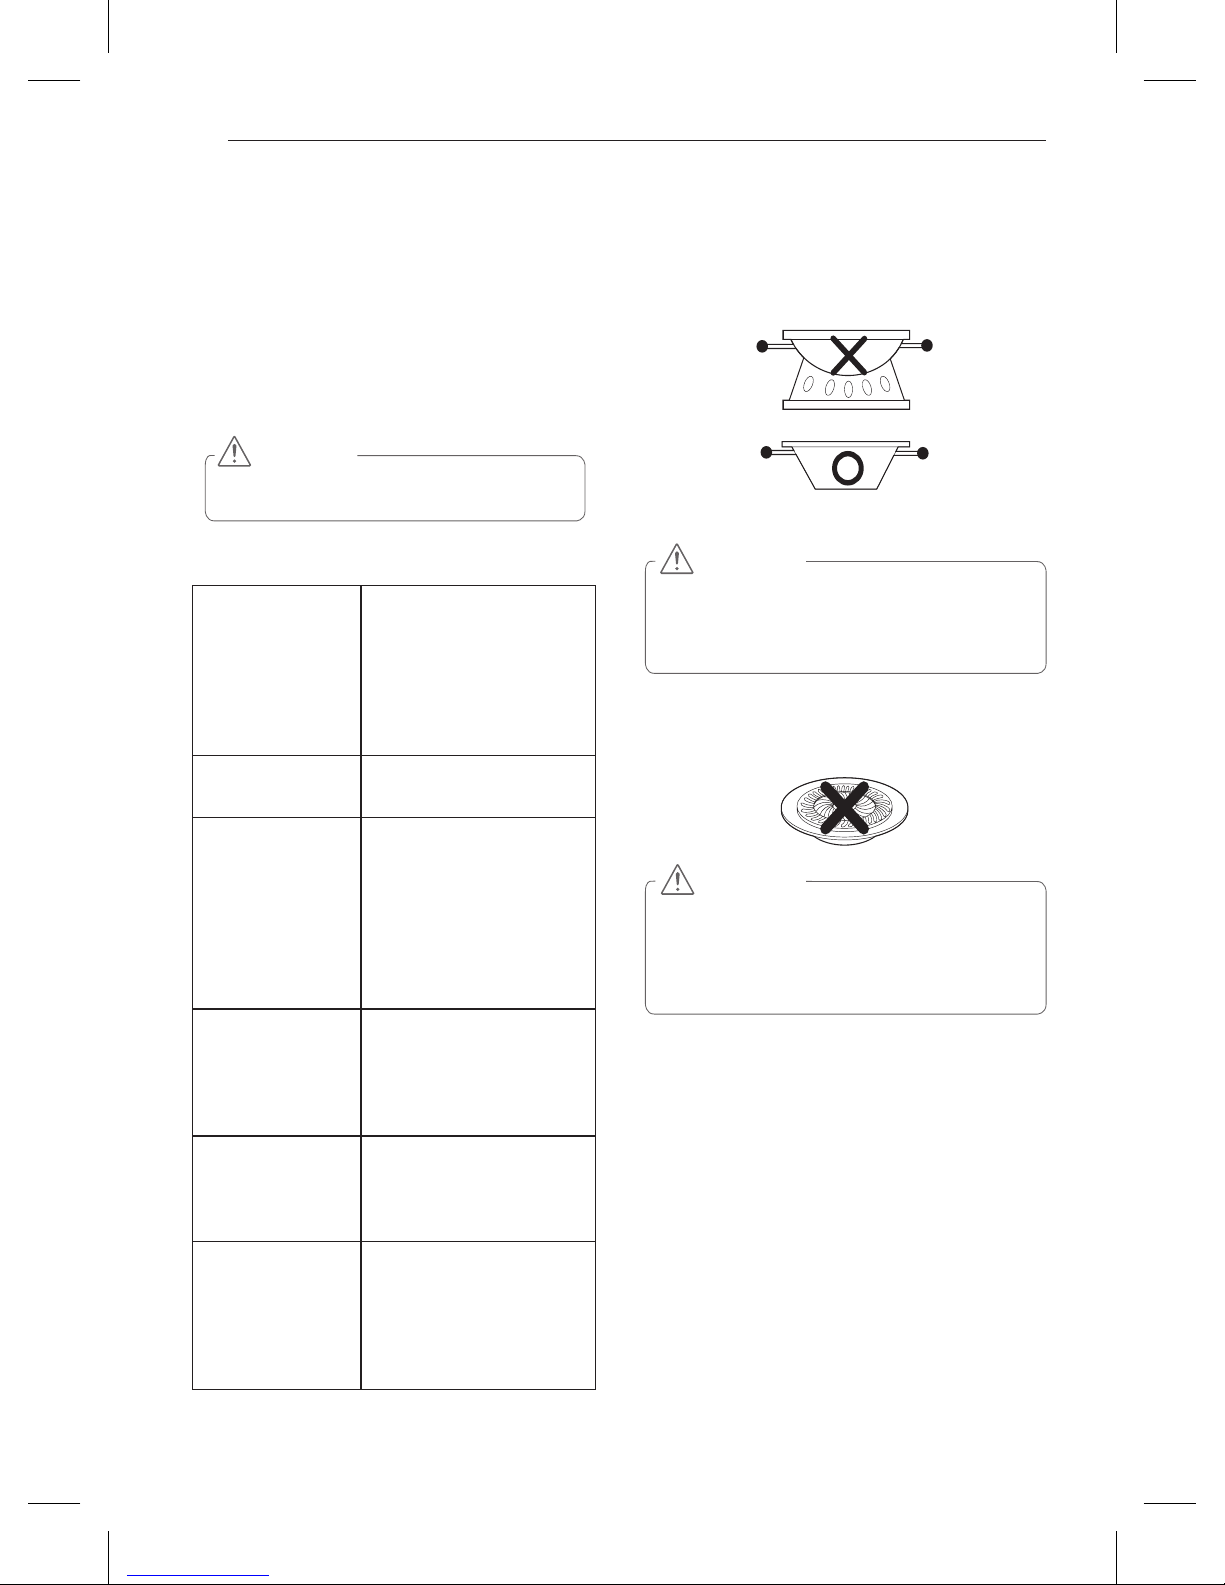
Top-of-range cookware
Use a flat-bottomed wok.
Do not place stove-top grills on the burner.
Aluminum
Medium-weight cookware is
recommended because it heats
quickly and evenly. Most foods
brown evenly in an aluminum
skillet. Use saucepans with tight
fitting lids when cooking with
minimum amounts of water.
Cast-Iron
If heated slowly, most skillets will
give satisfactory results.
Stainless Steel
This metal alone has poor
heating properties and is usually
combined with copper, aluminum
or other metals for improved heat
distribution. Combination metal
skillets work satisfactorily if they
are used with medium heat as the
manufacturer recommends.
Enamelware
Under some conditions, the
enamel of this cookware
may melt. Follow cookware
manufacturer’s recommendations
for cooking methods.
Glass
There are two types of glass
cookware - those for oven use
only and those for top-of-range
cooking.
Heatproof Glass
Ceramic
Can be used for either surface or
oven cooking. It conducts heat
very slowly and cools very slowly.
Check cookware manufacturer’s
directions to be sure it can be
used on gas ranges.
If using a wok, it is recommended that you use a 14-inch or
smaller flat-bottomed wok. Make sure that the wok bottom
sits flat on the grate.
CAUTION
DO NOT
use a wok support ring. Placing the ring over
the burner or grate may cause the burner to work improperly, resulting in carbon monoxide levels above allowable standards. This can be hazardous to your health.
Using a Wok:
Using Stove-top Grills:
CAUTION
DO NOT
use stove top grills on your surface burners.
Using a stove top grill on the surface burner will cause
incomplete combustion and can result in exposure to
carbon monoxide levels above allowable current standards. This can be hazardous to your health.
CAUTION
Use extreme caution when lighting burners with a
match. It can cause burn and damage.
HI 3 min.
5 (MED)
15
HOW TO USE
ENGLISH
CAUTION
DO NOT
remove the griddle plate until the cooktop
grates, surfaces and griddle plate are completely cooled.
CAUTION
The griddle plate on the cooktop may become very hot
when using the cooktop, oven or broiler systems.
Always use oven mitts when placing or removing the
griddle plate.
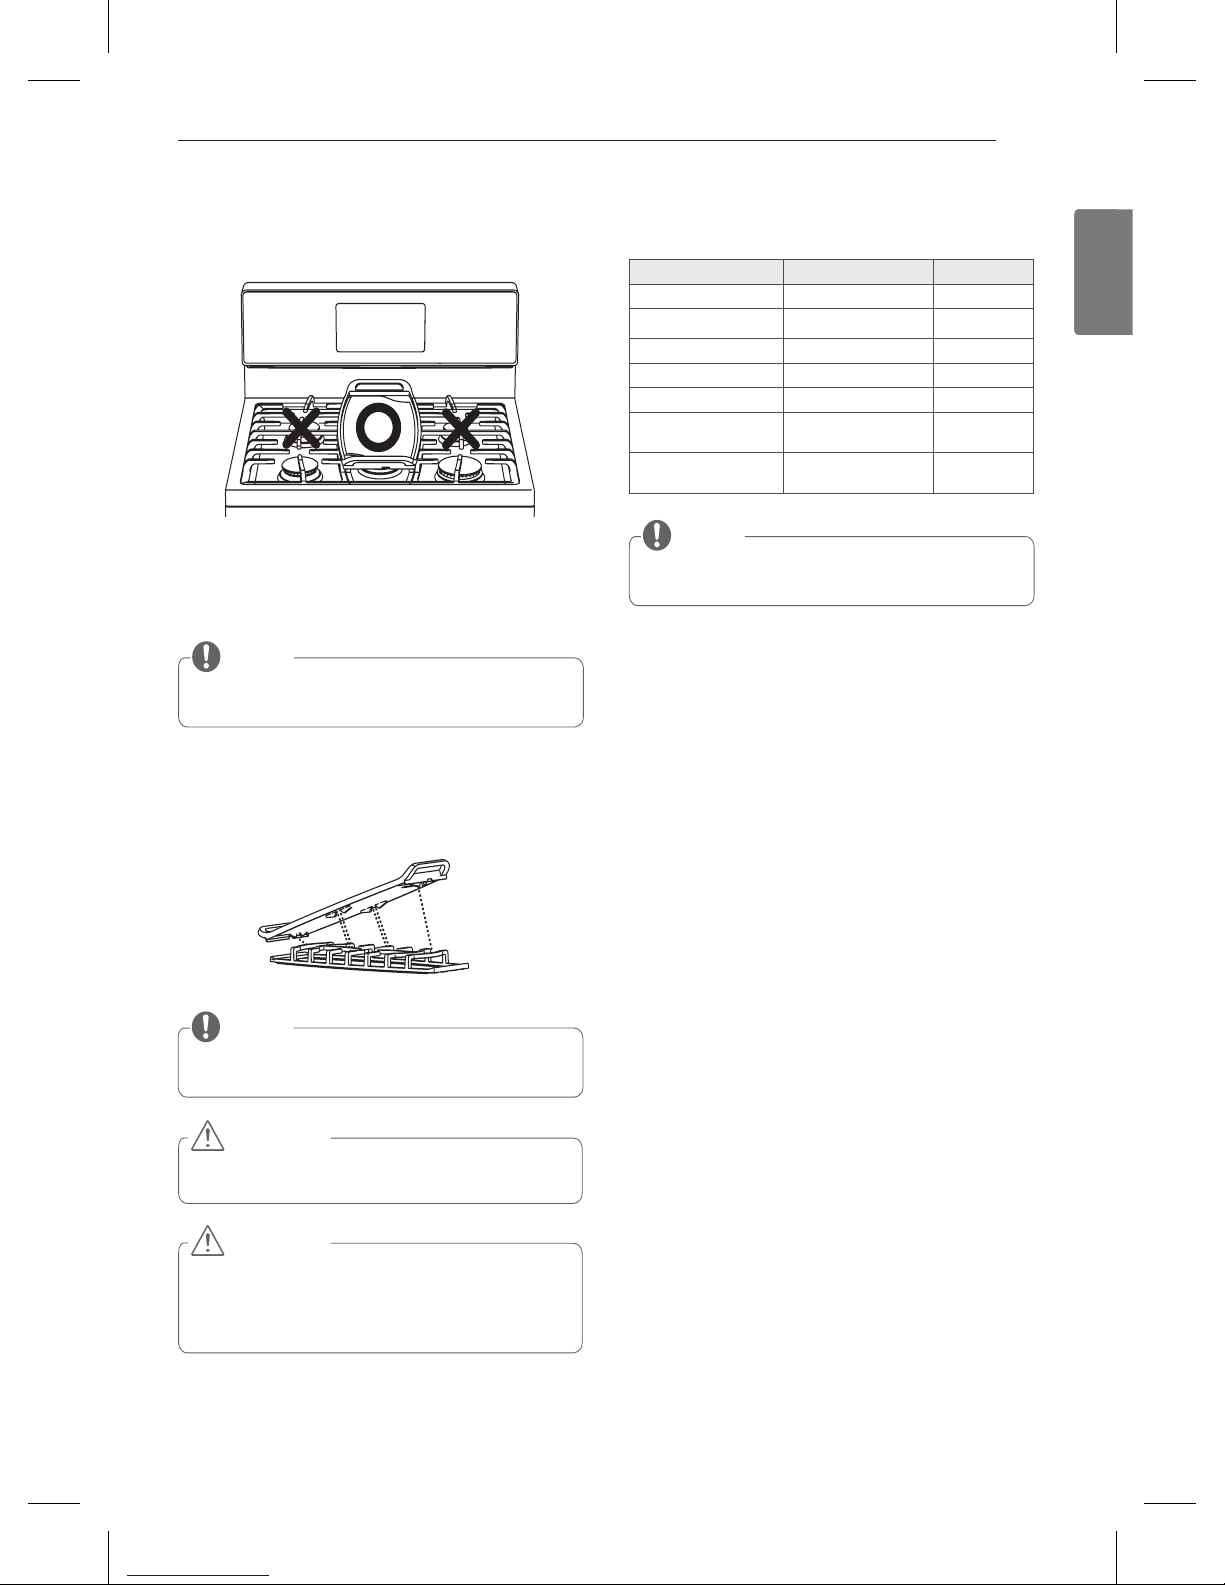
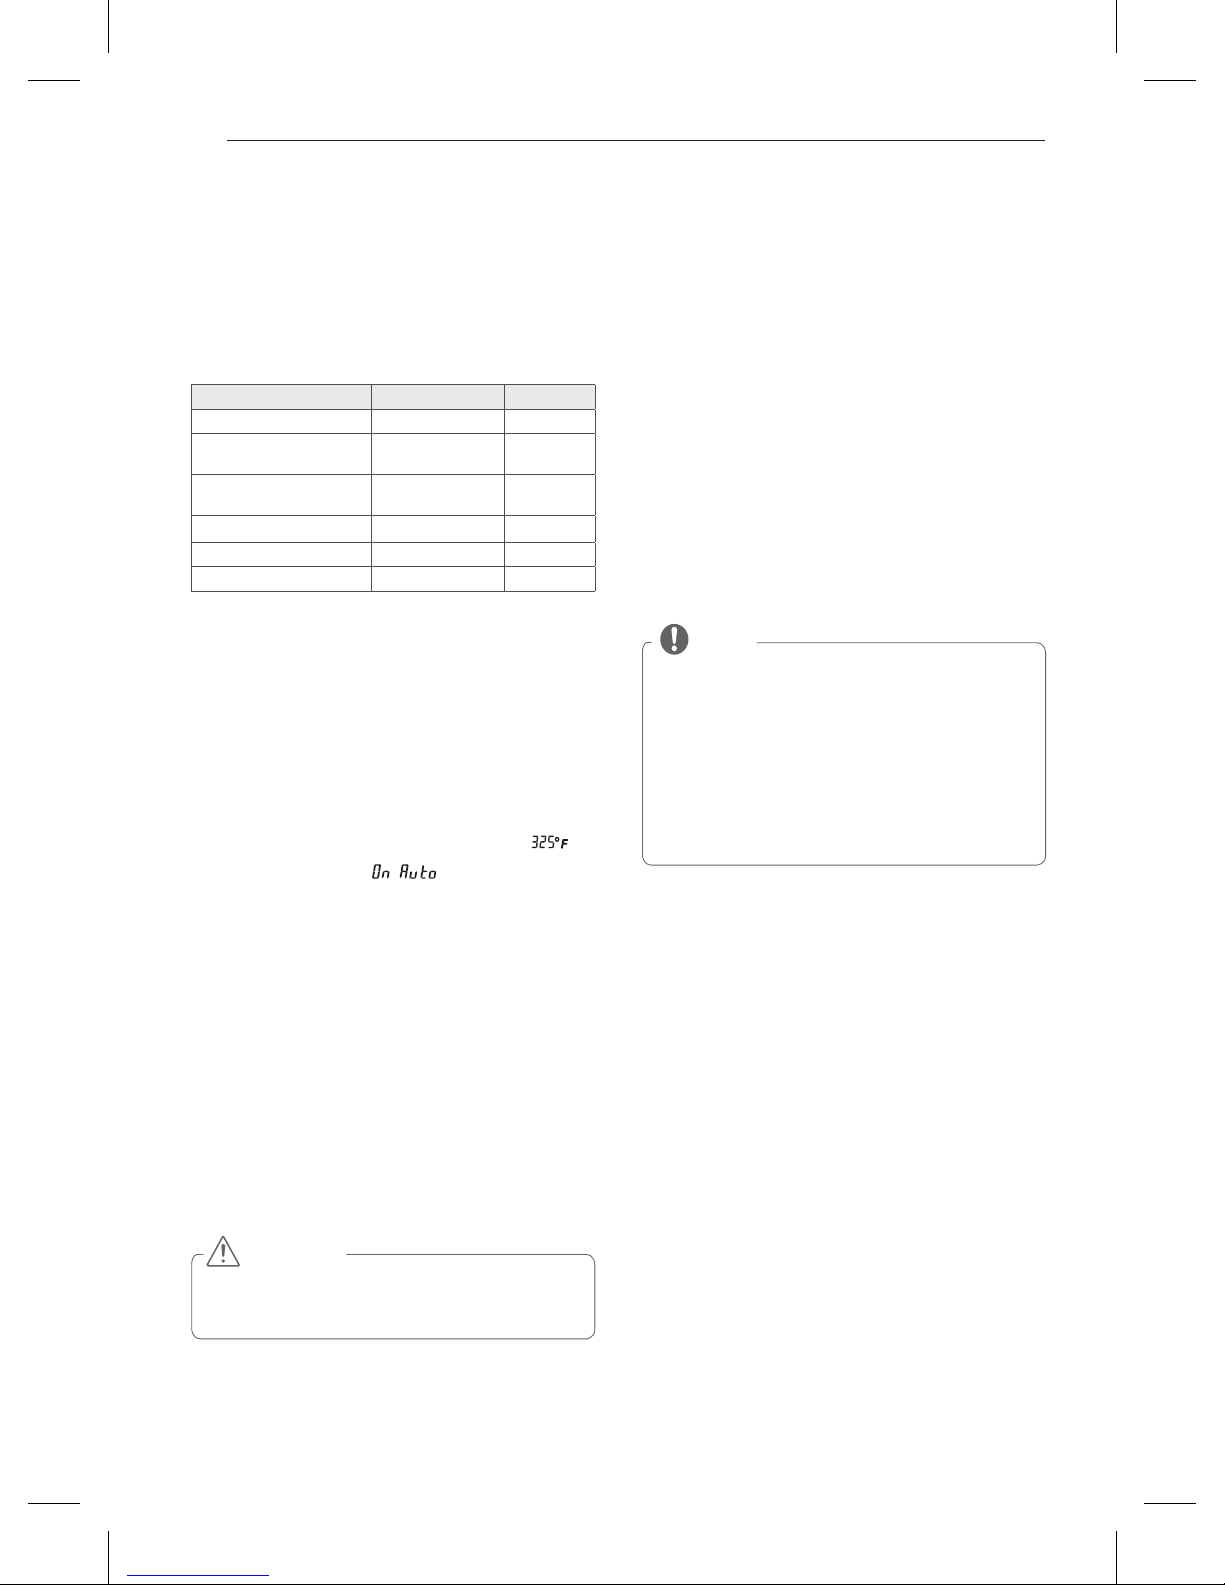
Using the Griddle
(Model LDG3016ST only)
Your non-stick coated griddle provides an extra-large cooking
surface for meats, pancakes or other food usually prepared in
a frying pan or skillet.
How to Place the Griddle:
The griddle can only be used
with the center burner. The griddle must be properly placed
on the center grate, as shown in the below illustration.
Preheat the griddle according to the guide below and
adjust for the desired setting.
IMPORTANT NOTES:
f$YRLGFRRNLQJH[WUHPHO\JUHDV\IRRGVJUHDVHVSLOORYHU
can occur.
f7KHJULGGOHFDQEHFRPHKRWZKHQVXUURXQGLQJEXUQHUVDUH
in use.
f'2127RYHUKHDWWKHJULGGOH7KLVFDQGDPDJHWKHQRQ
stick coating.
f'2127XVHPHWDOXWHQVLOVWKDWFDQGDPDJHWKHJULGGOH
surface. Do not use the griddle as a cutting board.
f'2127SODFHRUVWRUHLWHPVRQWKHJULGGOH
1234
NOTE
yIt is normal for the griddle to become discolored over
time.
NOTE
yGriddle settings may need to be adjusted if the
griddle is used for an extended time.
NOTE
yDO NOT
remove the center grate when using the
griddle.
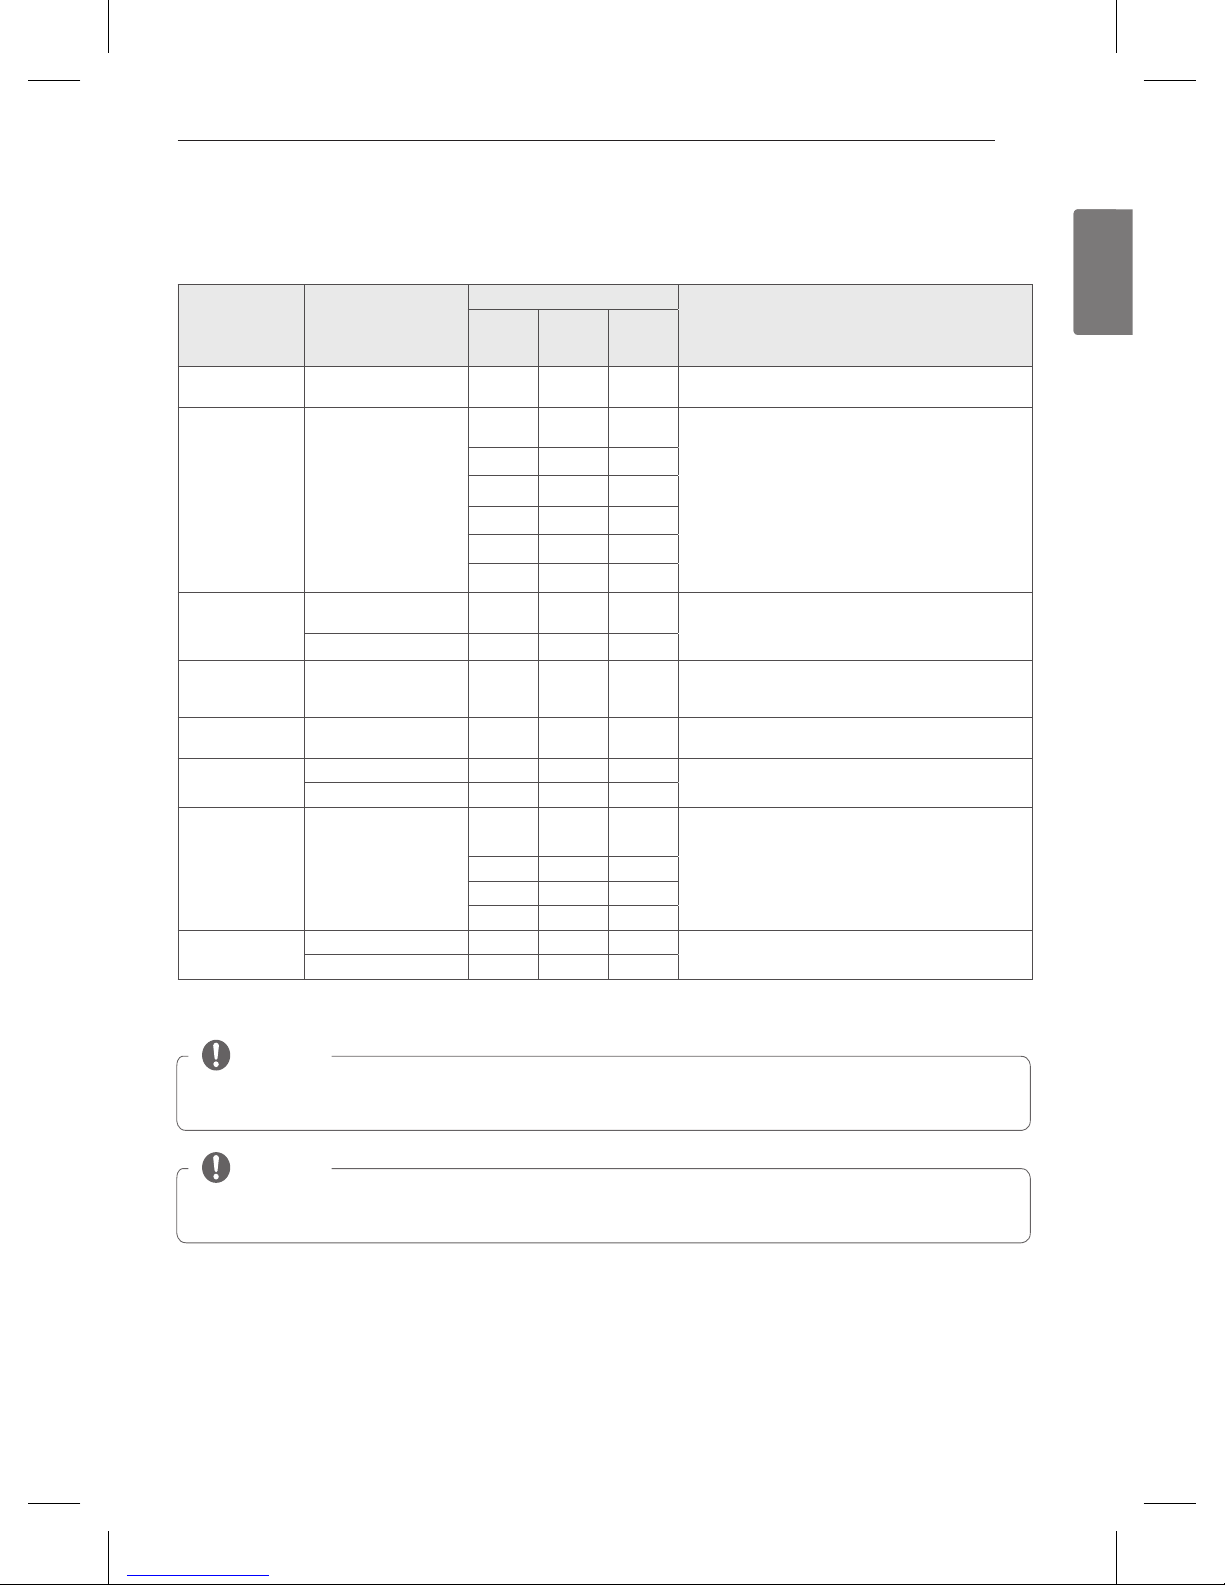
Type of Food Preheat Conditions Cook Setting
Warming Tortillas none
Pancakes
Hamburgers
Fried Eggs HI 5 min.
Bacon
Breakfast
Sausage Links
HI 5 min.
Hot Sandwiches
HI 4 min. HI
Front
HI
HI
HI
HI
HI
HI 5 min.
HI 3 min.
ENGLISH
16
HOW TO USE
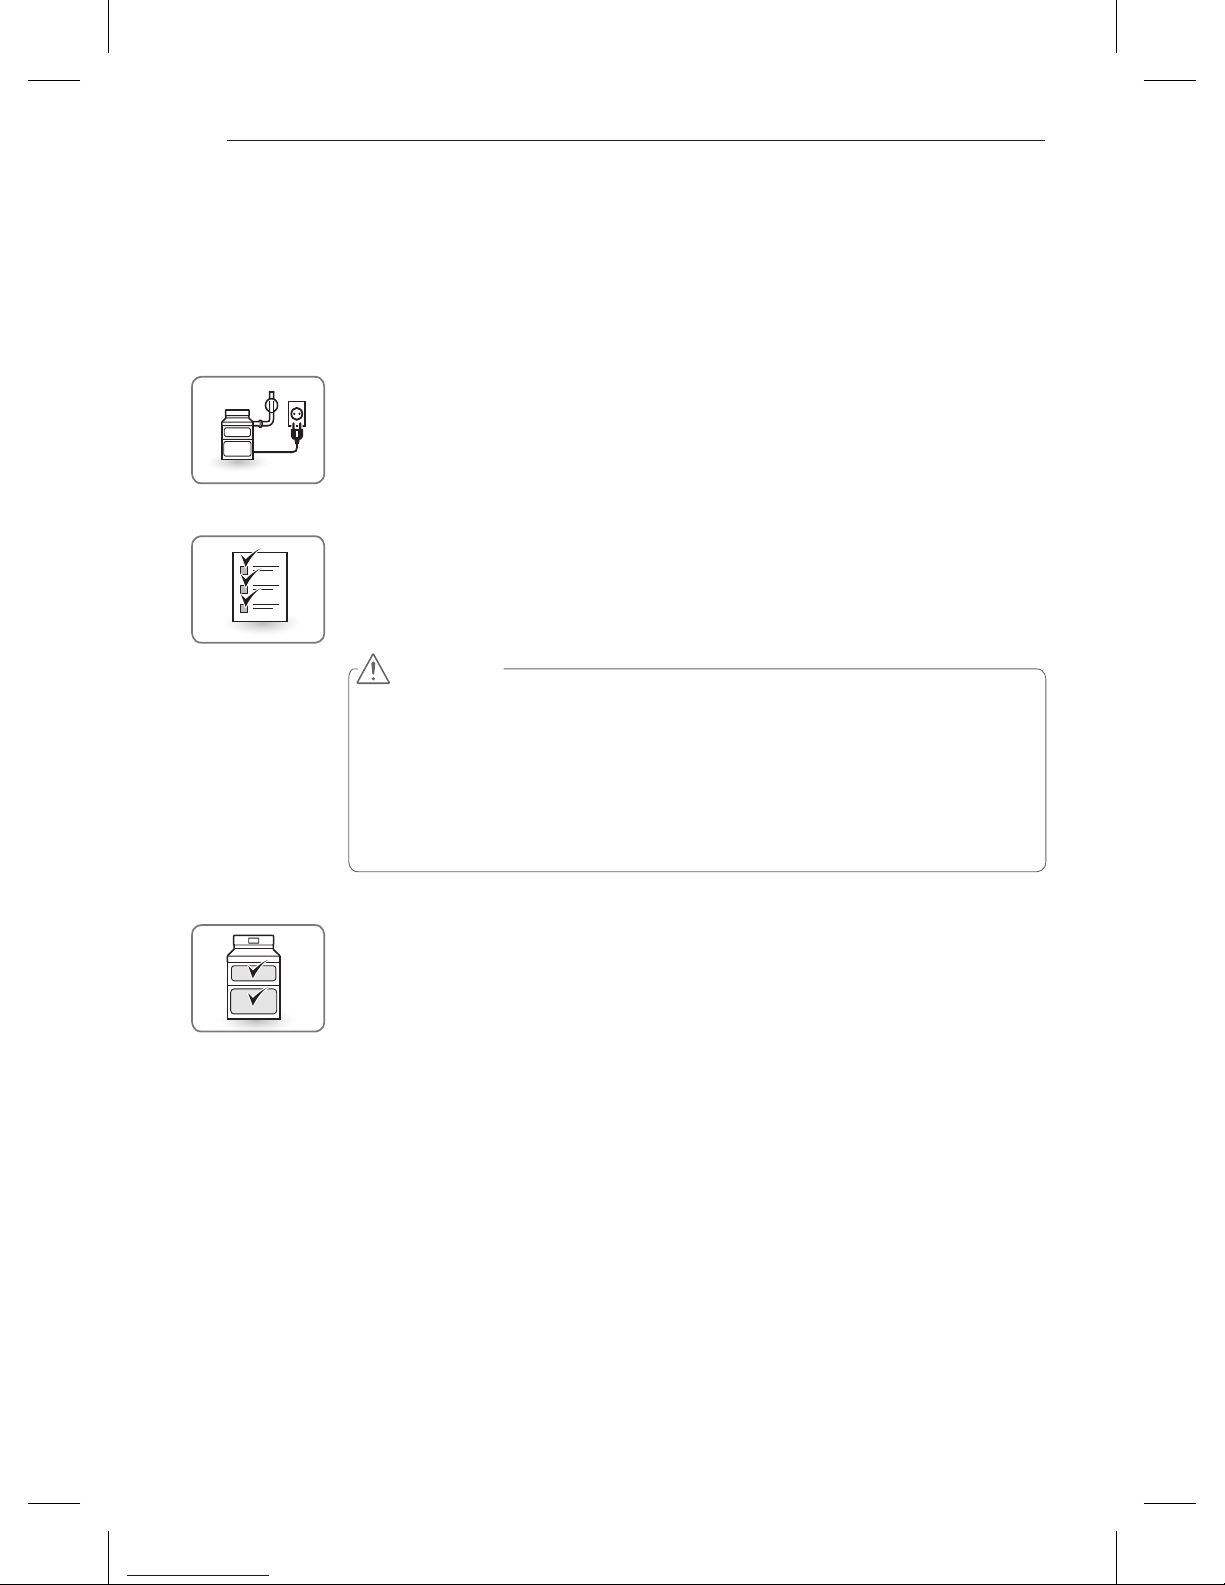
How to Use the Oven
Before use
Read all instructions before using.
Make sure the electrical power cord and the gas valve are properly
connected.
Check it for safety.
Check the correct use of the range depending on the type of food you
will cook.
Make sure you know how to use the oven (temperature setting, time setting and recipe) for best results.
CAUTION
WHAT TO DO IF YOU SMELL GAS
1. Open windows.
2.
DO NOT
try to light any appliance.
3.
DO NOT
touch any electrical switch.
4.
DO NOT
use any phone in your building.
5. Immediately call your gas supplier from a neighbor’s phone.
Follow the gas supplier’s instructions.
6. If you cannot reach your gas supplier, call the fire department.
Choose the upper or lower oven for proper cooking.
Use the upper oven to cook a small amount of food.

17
HOW TO USE
ENGLISH
Do not block, touch or place items around the oven vent during cooking.
Your oven is vented through ducts at the center above the burner grate. Do not block the oven vent when
cooking to allow for proper air flow. Do not touch vent openings or nearby surfaces during the use of any
cooking operation.
As your oven heats up, the temperature increase of the air in the oven
may cause water drops to occur on the door glass.
These water drops are harmless and will evaporate as the oven continues to heat up.
Do not cover rack or bottom with aluminum foil.
In case of power failure, do not use the oven.
The oven and broiler can not be used during a power outage. If the oven is in use when a power failure
occurs, the oven burner shuts off and cannot be re-lit until power is restored. Once power is restored, you
will need to reset the oven (or broil function).
CAUTION
DO NOT
attempt to operate the electric ignition during an electrical power failure.
NOTE
PF (Power Failure) Message
The PF message will appear if the appliance has a power interruption. To clear the PF message, press
Y
or
Z
control key to reset the appliance. Be sure to also reset the clock with the correct time
of day.
CAUTION
y
DO NOT
place plastic or flammable items on the cooktop—they may melt or ignite if left too close
to the vent.
y
DO NOT
place closed containers on the cooktop. The pressure in closed containers may increase,
which may cause them to burst.
yMetal items will become very hot if they are left on the cooktop, and could cause burns.
yHandles of pots and pans on the cooktop may become hot if left too close to the vent.
ENGLISH
18
HOW TO USE
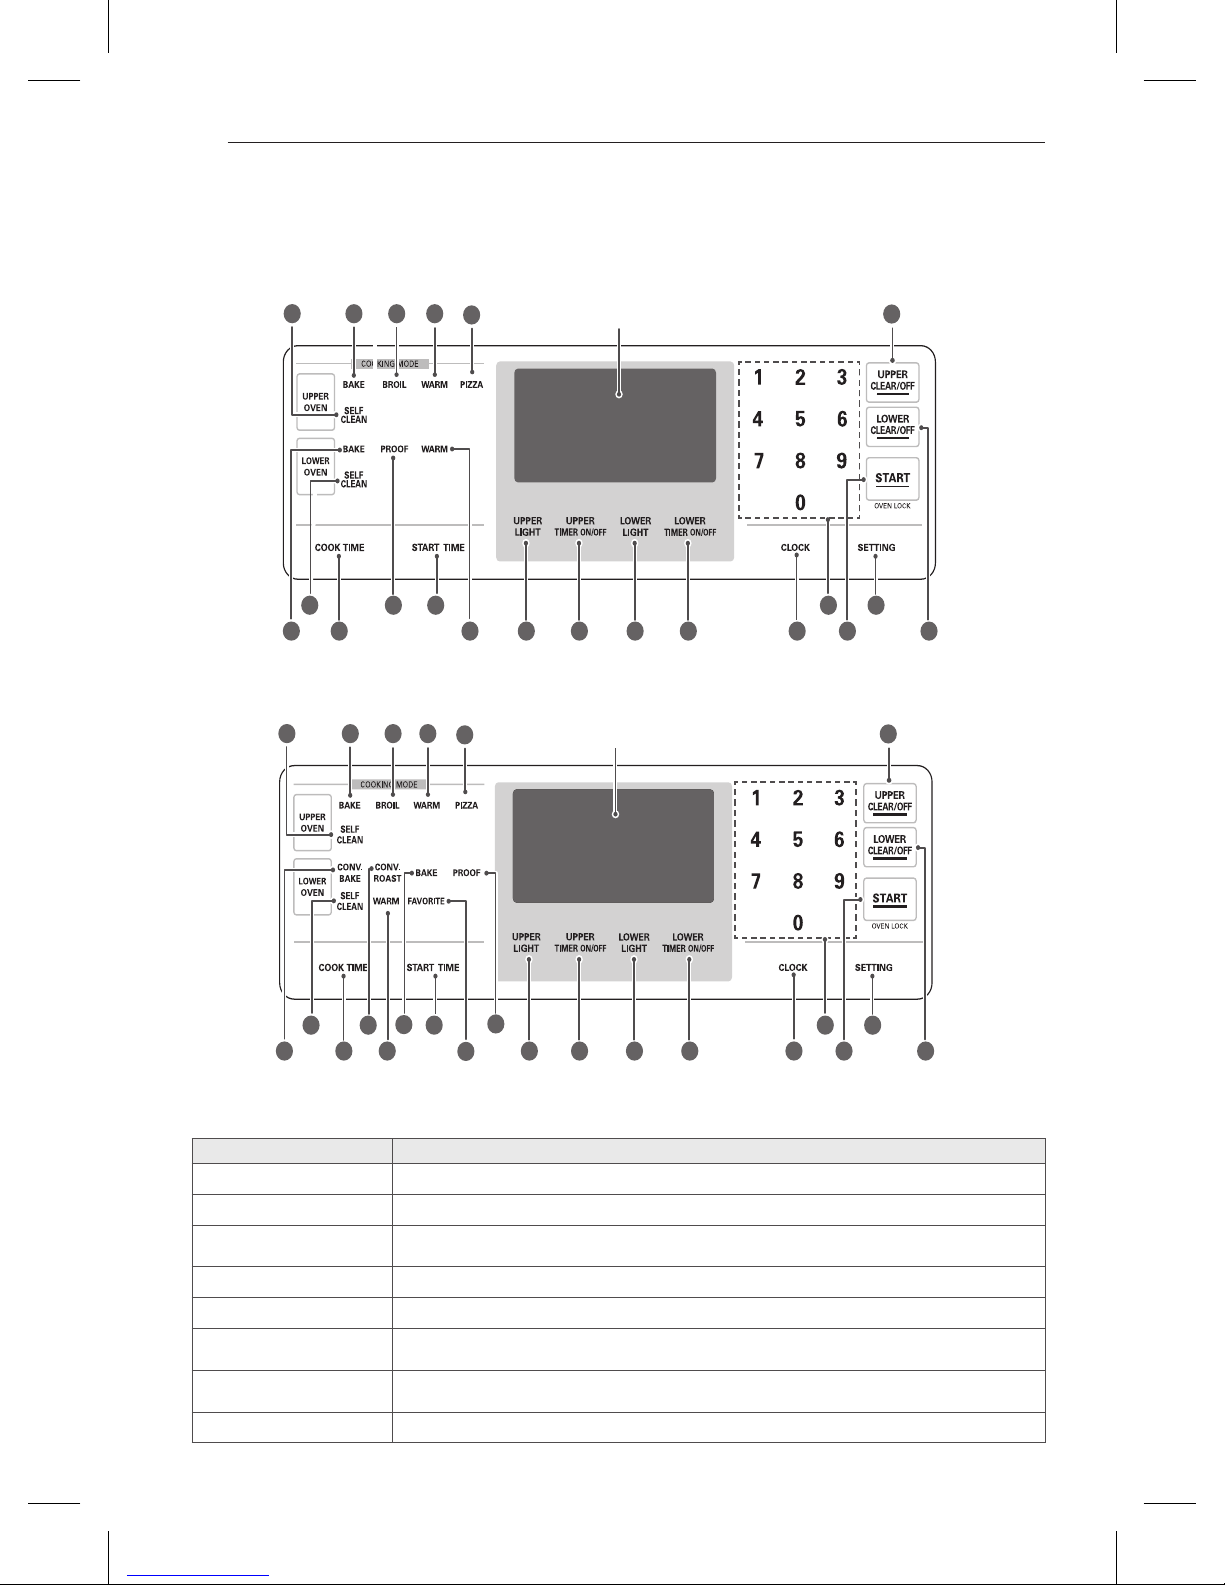
Using the Control Panel
Upper Oven:
Name Description
1
BAKE Traditional bake function. Refer to “BAKE” in the How To Use section.
2
BROIL Traditional broil function. Refer to “BROIL” in the How To Use section.
3
WARM
Warms food in the oven.
Refer to “WARM” in the How To Use section.
4
PIZZA Cooks pizza. Refer to “PIZZA” in the How To Use section.
5
UPPER LIGHT Turns on/off the upper oven light.
6
UPPER SELF CLEAN
Cleans the inside of the UPPER OVEN automatically.
Refer to “SELF CLEAN” in the How To Use section.
7
UPPER TIMER ON/OFF
Sets, starts or cancels the timer function of the UPPER OVEN.
Refer to “How to use the timer” in the Operating Instructions section.
8
UPPER CLEAR/OFF Stops cooking or cancels the setting in the UPPER OVEN.
1
2
3
4
8
15
24
6
5
12
14
11
9
13
10
20
21
19
32
22
7
Display
1
2
3
4
8
15
24
6
5
12
7
14
16
13
17
20
11
10
21
19
32
22
9
18
Display
For Model: LDG3015S
For Model: LDG3016ST
19
HOW TO USE
ENGLISH
Common Functions:
Name Description
o
CLOCK
Sets the time of day.
Refer to “How to set the clock” in the Operating Instructions section.
p
COOK TIME Sets the length of cook time. It is automatically turned off if the desired cook time is reached.
a
START TIME Sets the desired cooking start time. The oven automatically starts cooking at the set time.
s
SETTING Sets various functions.
d
NUMBER KEY Use to set time, timer, temperature and all times.
f
START (CONTROL LOCK) Starts all functions except for the timer. To activate OVEN LOCK, press and hold for three seconds.
Lower Oven:
Name Description
9
BAKE Traditional bake function. Refer to “BAKE” in the Operating Instructions section.
-
PROOF To proof a piece of bread. Refer to “PROOF” in the Operating Instructions section.
q
WARM
Warms food in the oven.
Refer to “WARM” in the Operating Instructions section.
w
LOWER LIGHT Turns on/off the lower oven light.
e
LOWER SELF CLEAN Cleans the inside of the LOWER OVEN automatically.
r
LOWER TIMER ON/OFF
Sets, starts or cancels the timer function of the LOWER OVEN.
Refer to “How to use the timer” in the Operating Instructions section.
t
LOWER CLEAR/OFF Stops cooking or cancels the setting in the LOWER OVEN.
y
CONV.BAKE
(LDG3016ST Model Only)
To use Convection Baking function, Refer to “CONVECTION BAKE” in Operating Instructions section.
u
CONV.ROAST
(LDG3016ST Model Only)
To use Convection Roast function, Refer to “CONVECTION ROAST” in Operating Instructions section.
i
FAVORITE
(LDG3016ST Model Only)
Use to store 3 favorite oven settings. Refer to “Favorite” in Operating Instructions section.
Using the Control Panel (continued)
ENGLISH
20
HOW TO USE
Operating Instructions
The value of setting can be changed by pressing “SETTING”
key.
The items are different from each model. Refer to “Setting
item chart”
SETTING ITEM CHART
How to set convection auto conversion
function for the lower oven (LDG3016ST)
When using convection bake and roast, the convection auto
conversion feature will automatically convert entered regular
baking temperatures to convection baking temperatures.
This feature is activated so that the display will show the
actual converted temperature. For example, if you enter a
regular recipe temperature of 350°F and touch the
q
key,
the display will show the converted temperature of
.
1
Press the
X
key
will appear in the
display.
2
Press the 1 key once for a auto conversion on.
Press it again for a auto conversion off.
3
Press the q Key to accept the change.
1
Determine which oven you would like to adjust (upper or
lower).
2
For the lower oven, Press the SETTING key until e
will appear in the display.
For the upper oven, Press the SETTING key until
f
will appear in the display.
3
Using the number keys, enter the amount of degrees that
you wish to adjust the oven up or down. To adjust the
temperature down, press the
X
key after entering
in the numbers.
Example:
To adjust the oven temperature up 15 degrees, press 1, 5.
To Adjust the oven temperature
down
15 degrees, press
1, 5, X
4
Press the q key to accept the change.
How to Set Preheating Alarm Light On/Off
When the oven reaches its set-temperature, the preheat light
will flash until the oven door is opened. You can activate or
deactivate the preheat alarm light.
1
Press the
X
key until s will display.
2
Press the number 1 key to select R / S.
3
Press the q key to accept the change.
How to turn the interior oven light on/off:
The interior oven light automatically turns on when the oven
door is opened.
Press the
M
or Q key to turn the oven lights on or off.
How to Adjust the Beeper Volume:
1
Press the
X
key until j will display.
2
Press the 1 key continuously to scroll through the volume
options:
m, l, S
.
3
Press the q key to accept the change.
CAUTION
DO NOT
use thermometers, such as those found in
grocery stores, to check the temperature setting of your
oven. These thermometers may vary 20–40 degrees.
NOTE
yThis adjustment will not affect the broiling or the Self
Clean temperatures. The adjustment will be retained in
memory after a power failure. The oven temperature
can be increased (+) or decreased (-) as much as 35°F
or 19°C.
y
To decrease or increase temperature during cooking
1. Using the number keys, enter the new temperature.
2. Press the
X
key once.
3. Press the
q
key to accept the choice.
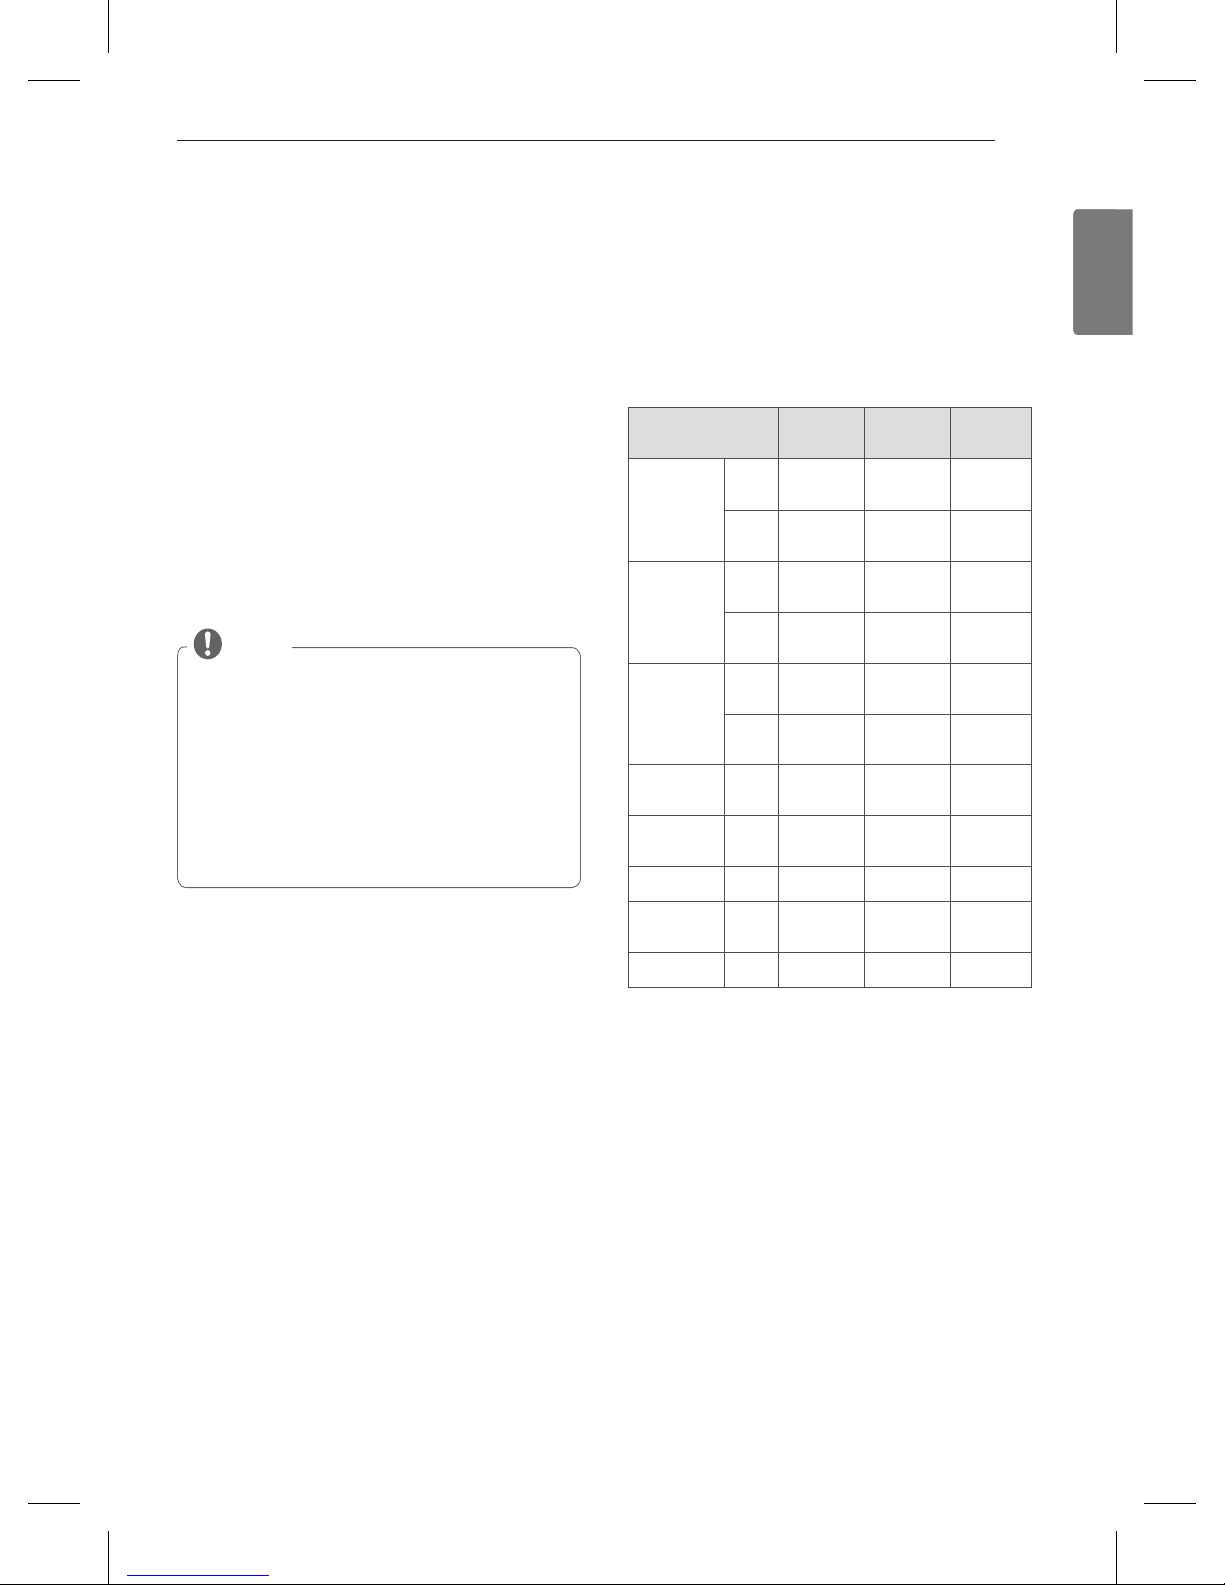
Operating Instruction LDG3015ST/SB/SW LDG3016ST
Convection Auto Conversion - Once
Temperature Setting
(Lower oven)
Once Twice
Temperature Setting
(Upper oven)
Twice Three times
Preheating Alarm light On/off Three times Four times
Beeper Volume Four times Five times
Fahrenheit or Celsius Five times Six times
How to adjust the temperature settings:
You may find that your new oven cooks differently than the
one it replaced. Use your new oven for a few weeks to become more familiar with it before changing the temperature
settings. After familiarizing yourself with the new oven, and
you still think that it is too hot or too cold, you can adjust the
thermostat yourself.
21
HOW TO USE
ENGLISH
How to select Fahrenheit or Celsius
The oven temperature settings can either be set to
Fahrenheit or Celsius. The oven defaults to Fahrenheit unless
changed by the user.
1
Press the
X
key until “i” will display.
2
Press the number 1 key to select Fahrenheit or Celsius.
3
Press the q key to accept the change.
Minimum & Maximum default settings:
All of the features listed have minimum and maximum time
or temperature settings that may be entered into the control.
An entry acceptance beep will sound each time a control key
is pressed.
An entry error tone (two short tones) will sound if the entry
of the temperature or time is below the minimum or above
the maximum settings for the feature.
NOTE
yThe time of day cannot be changed during a timed bak-
ing or Self Clean cycle.
yTo check the time of day when the display is showing
other information, simply press the
U
key.
yIf number keys are not pressed within 30 seconds after
you press the
U
key, the display reverts to the
original setting. If this happens, press the
U
key
and reenter the time of day.
yIf the display time is blinking, you may have
experienced a power failure. Reset the time.
FEATURE MIN. TEMP.
/ TIME
MAX. TEMP.
/ TIME
DEFAULT
CLOCK TIME
12 Hr.
1:00 Hr. /
Min.
11:59 Hr. /
Min.
24 Hr.
0:00 Hr. /
Min.
23:59 Hr. /
Min.
KITCHEN
TIMER
12 Hr. 0:01 Min.
11:59 Hr. /
Min.
24 Hr. 0:01 Min.
11:59 Hr. /
Min.
COOKING
TIME
12 Hr. 0:01 Min.
11:59 Hr. /
Min.
24 Hr. 0:01 Min.
11:59 Hr. /
Min.
BROIL TEMP.
Lo-300°F /
149°C
Hi - 400°F /
204°C
3 Hr.
BAKE TEMP.
170°F /
77°C
550°F /
288°C
12 Hr.
PROOF
12 Hr.
WARM
170°F/75°C,
3 hours
3 Hr
SELF CLEAN
2 Hr. 4 Hr. 3 Hr.
How to Set the Clock (12 or 24 hour):
1
Press and hold the
U
key for three seconds.
2
Press the 1 key once for a 24 hour clock. Press it again for
a 12 hour clock.
3
Press the q key.
How to Set the Clock Time:
The clock must be set to the correct time of day in order for
the automatic oven timing functions to work properly.
1
Press the
U
key once.
2
Press the number keys to select the desired time.
Example
: To set
t
, press the number keys 1, 2, 3 and
4
in that order.
3
Press the q key to accept the change.
ENGLISH
22
HOW TO USE
How to Use the Timer
The upper or lower TIMER ON/OFF serves as an extra timer
in the kitchen that will sound when the set time has run out.
It does not start or stop cooking.
The upper or lower TIMER ON/OFF feature can be used during any of the other oven control functions. The upper and
lower TIMER can be operated independently of each other.
1
To set minutes and seconds:
Press the
P
or
T
key once.
To set hours and minutes:
Press the
P
or
T
key twice.
2
Use the number keys to set the timer.
For Example, to set 5 minutes:
a) Press
P
or
T
key twice.
g
will appear in the display.
b) Press
5
in the number key.
h
will appear in the display.
3
To start the timer, press
P
or
T
key once.
The time will count down and show in the display.
To Cancel the timer before the set time has elapsed,
press
P
or
T
(depending on which oven
timer you would like to cancel).
4
When the time is up, k will appear on the display and
a tone will sound. The tone will sound every 15 seconds
until
P
or
T
is pressed.
How to Use the Oven Lockout Feature
The oven lockout feature automatically locks the oven door
and prevents most oven controls from being turned on. It
does not disable the clock, timer or the interior oven light.
1
Press and hold the q key for three seconds.
A tone will sound, O will appear, and m will blink in the
display. Once the oven door is locked, the oven lockout
indicator will stop blinking and remain on.
2
To deactivate the lockout feature, press and hold the q
key for three seconds.
O and m will disappear from the display once the oven
door and controls are unlocked.
NOTE
If
P
or
T
is not pressed, the timer will
return to the time of day.
NOTE
If the remaining time is not in the display, recall the
remaining time by pressing the
P
or
T
.
NOTE
If the lockout feature is activated with either of the
doors open, the doors will not close completely until
the Lockout feature is deactivated.
23
HOW TO USE
ENGLISH
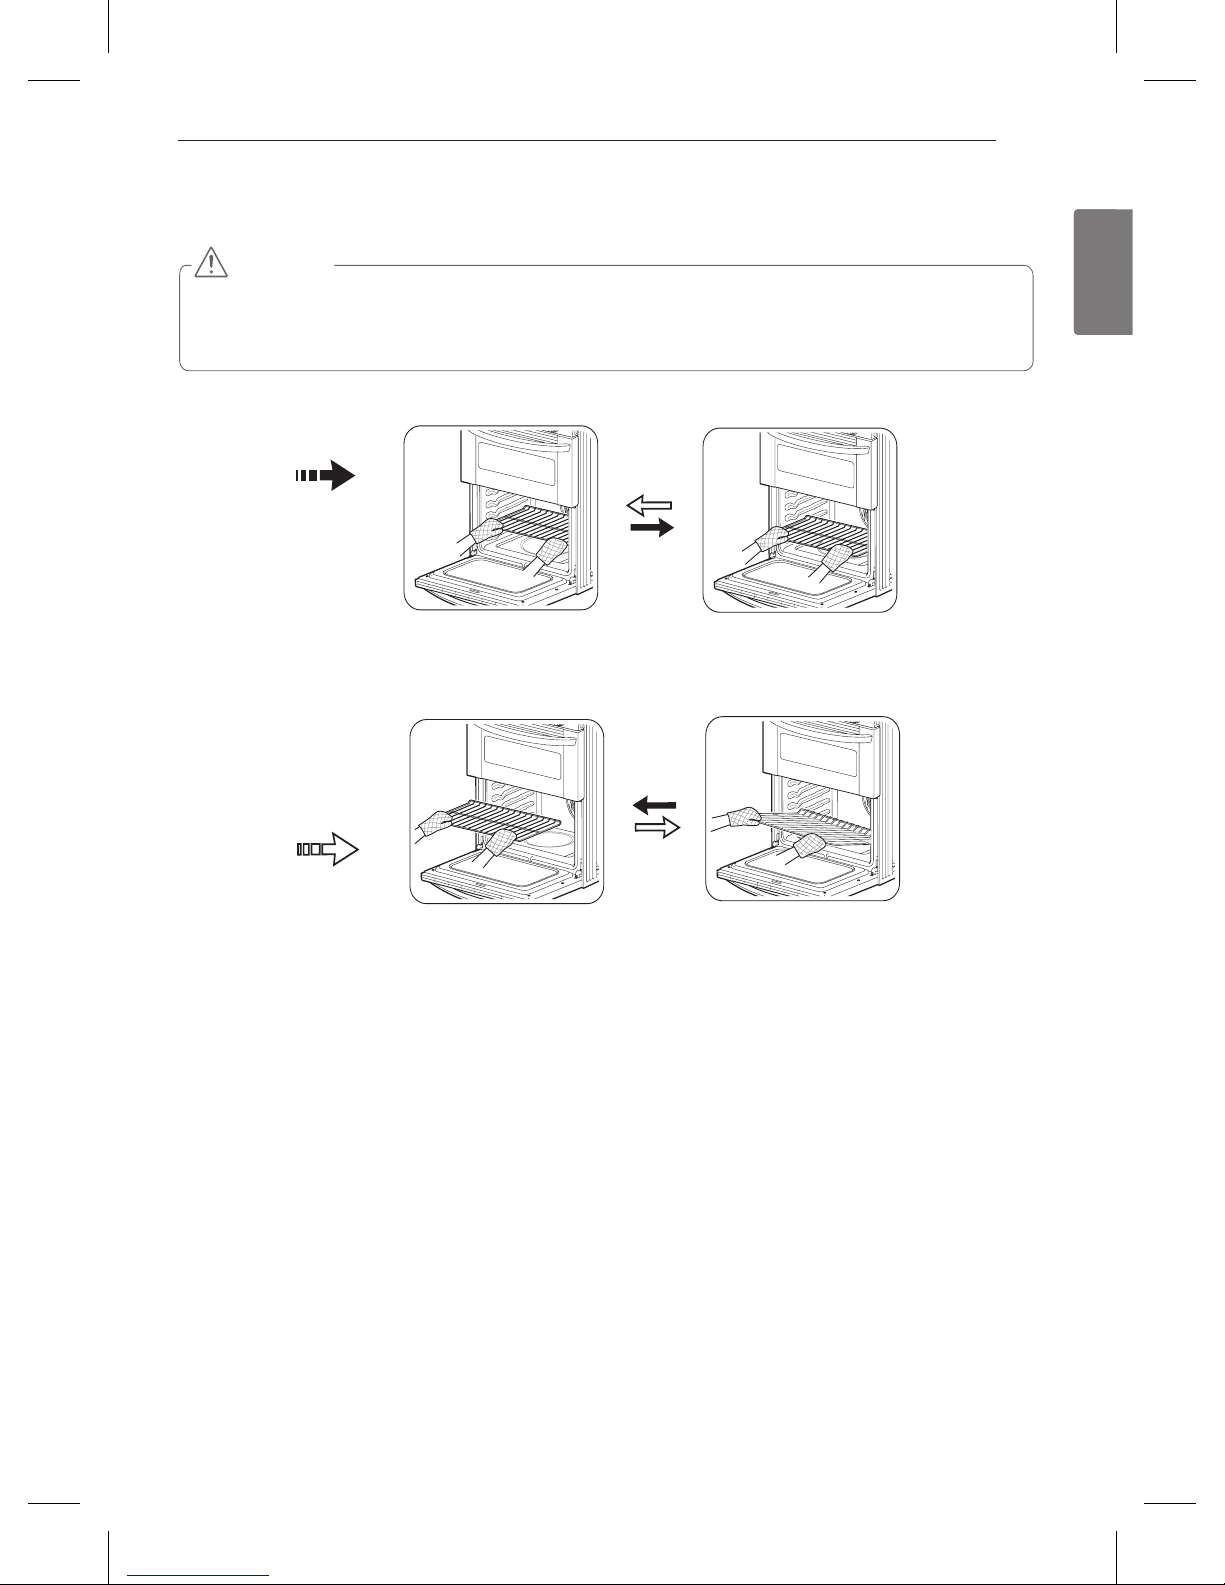
Removing and Replacing the Oven Racks
Remove
Replace
To Remove Racks
1
While wearing oven mitts, grasp the oven rack.
2
Pull the rack straight out until it stops.
3
Lift up the front of the rack.
4
Pull out the rack.
*You can also adjust the racks position before using the oven.
CAUTION
yReplace the oven rack before turning the oven on to prevent burns.
y
DO NOT
cover the rack with aluminum foil, or any other material, or place anything on the bottom of the oven.
Doing so will result in poor baking and may damage the oven bottom.
yOnly arrange oven racks when the oven is cool.
To Replace Racks
1
While wearing oven mitts, place the end of the rack on
the support.
2
Tilt the front end of the rack up.
3
Push the rack in.
4
Check that the rack is properly in place.
ENGLISH
24
HOW TO USE
BAKE (Upper & Lower Oven)
A
is used to prepare foods such as pastries, bread, casseroles and roasts. The oven can be programmed to bake
at any temperature from 170°F (77°C) to 550°F (288°C). The
default temperature is 350°F (177°C).
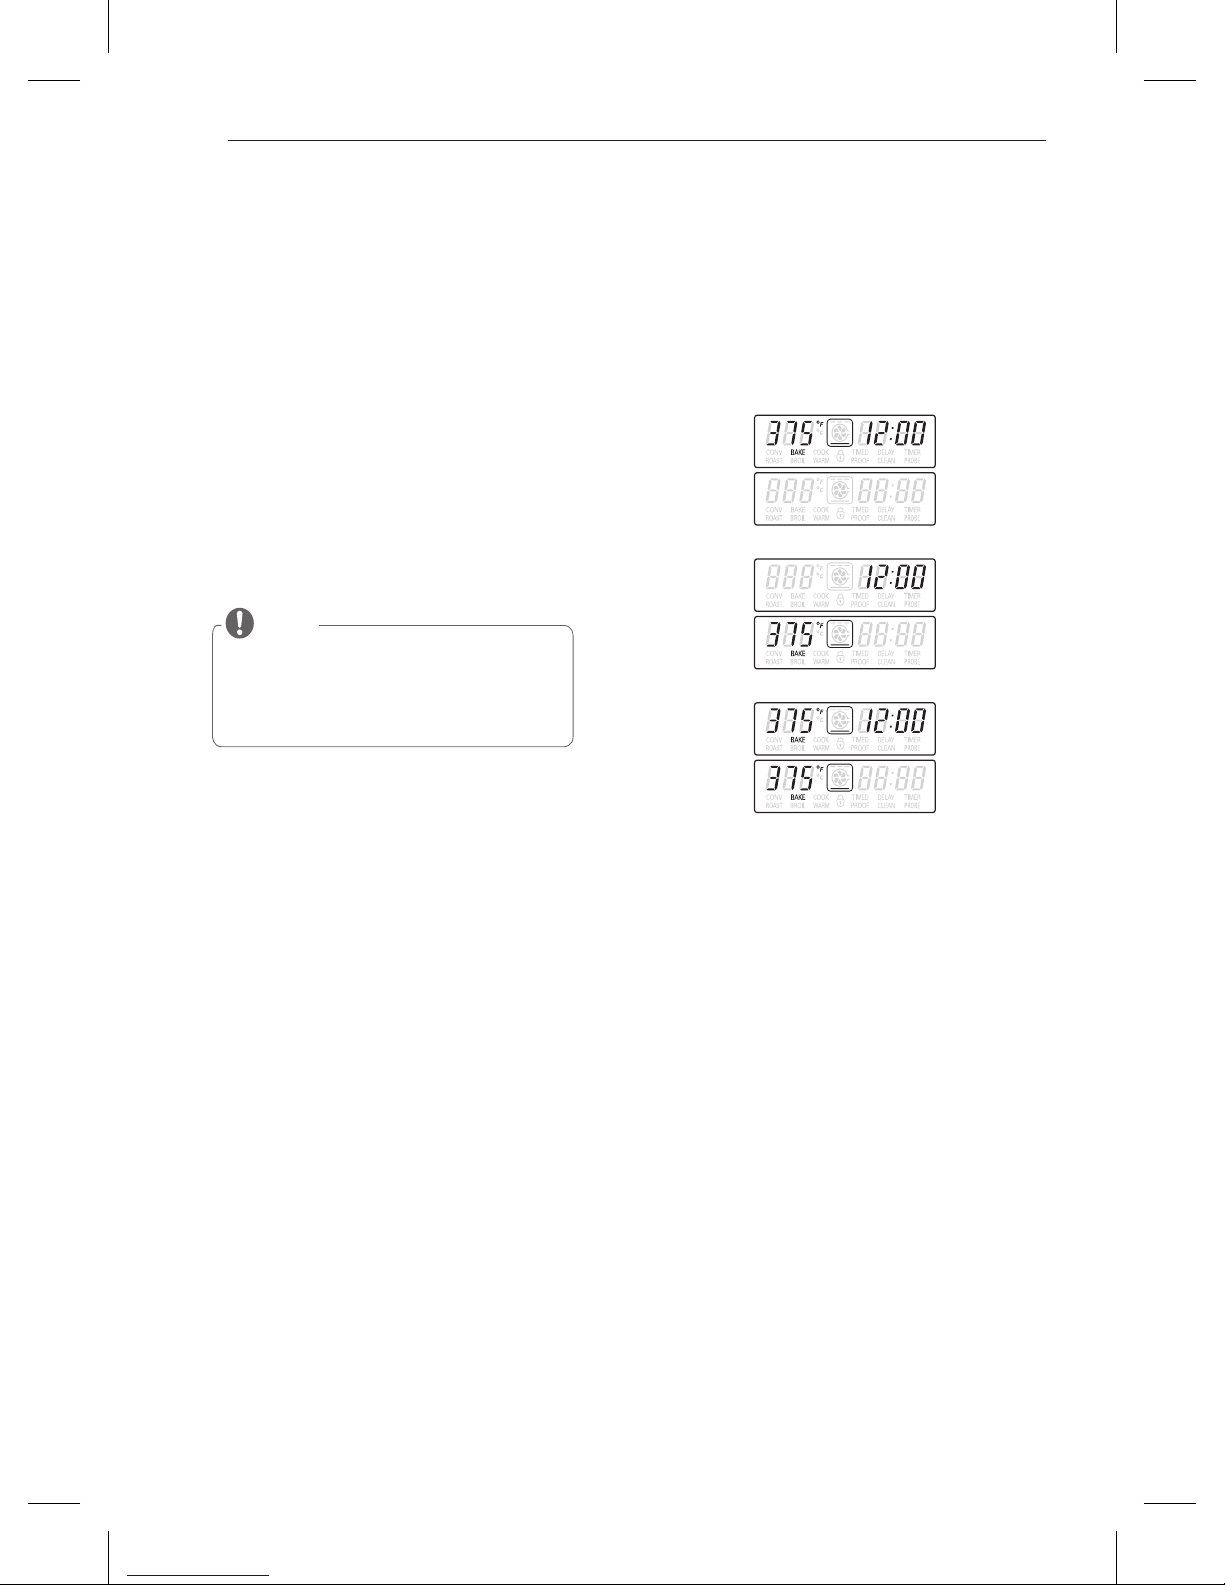
To set the oven to BAKE (example to 375°F):
1
Press the upper or lower oven A key.
2
Set the oven temperature using the number keys
(ex: press
3, 7, 5
).
3
Press the q key.
As the oven preheats, the temperature is displayed and
rises in 5 degree increments. Once the oven reaches the
desired temperature, a tone will sound and the oven light
will blink on and off.
4
When cooking is complete, press the
Y
or
Z
key.
5
Remove food from the oven.
NOTE
yPreheating is necessary for better cooking re-
sults. Place the food in the oven after
preheating.
yYou may also change the temperature while
cooking by following steps 1-3.
Upper oven only
Lower oven only
Upper & Lower oven at the same time
BAKE mode display (Example)
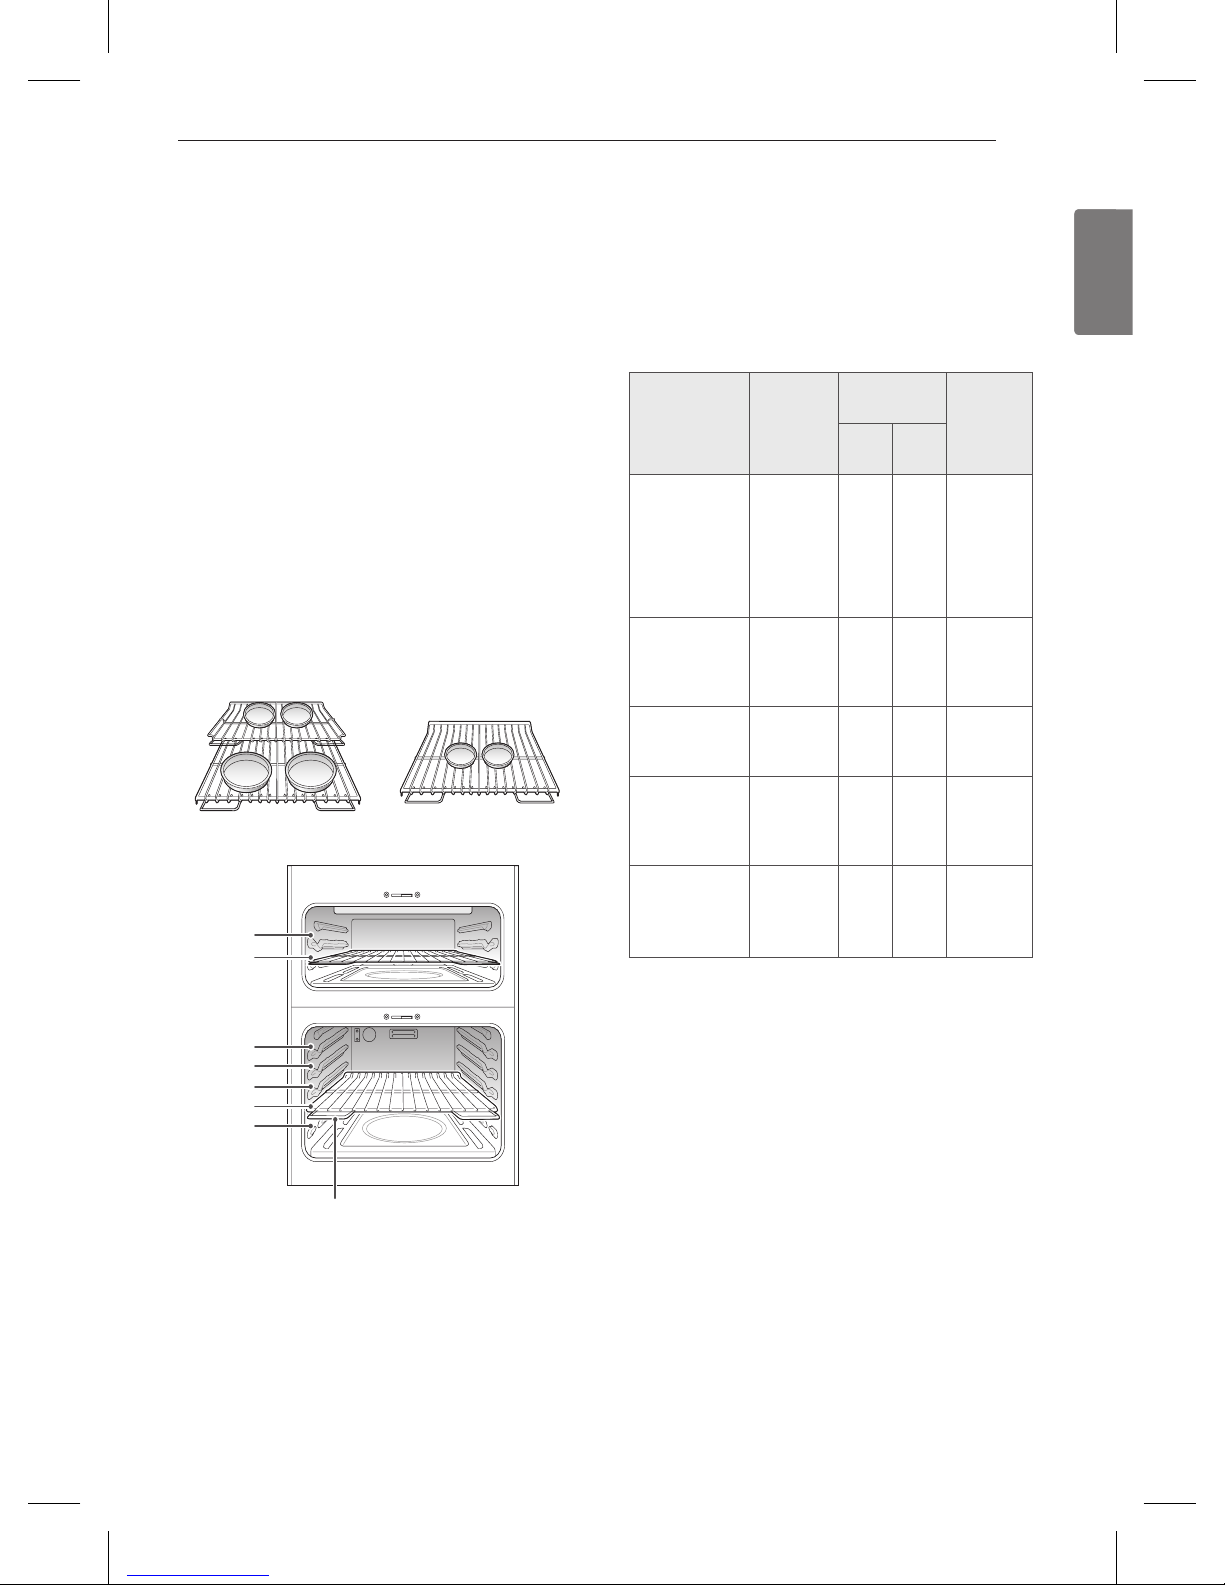
standard rack in the position A.
In the upper oven it is recommended to bake with the
the Fig.2.
oven rack in position D . Place the cookware as show in
oven rack in position A and in the lower oven, please the
If cooking on a single rack in the upper oven, place the
Please the cookware as shown in Fig.1.
the oven racks in position C(rack) and E(offset rack).
25
HOW TO USE
ENGLISH
Preheating and Pan Placement
yTo preheat, set the oven at the required recipe tem-
perature. Wait until the oven reaches its set temperature before placing the food in the oven. Preheating is
necessary for satisfactory results when baking cakes,
cookies, pastry and breads.
yFor best baking results, pans should be centered on the
racks. If baking with more than one pan, place the pans
so that each one has at least 1” to 1
1
/2” of air space
around them.
If cooking on multiple racks in the lower oven, place
Figure 1 Figure 2
Rack
B
A
E
D
C
B
A
Baking chart
This chart is only for reference and can be used for both the
upper and lower ovens. Adjust the cook time according to
your recipe.
Food
Oven
Temperature
Shelf position
baking time
Baking time
(Minutes)
Upper
oven
Lower
oven
Cakes
- Layer cake
- Bundt cake
- Cup cakes
- Pound cake
- Carrot cake
(from scratch)
350°F(177°C)
350°F(177°C)
350°F(177°C)
350°F(177°C)
350°F(177°C)
A
A
A
A
A
C
C
C
C
C
32 - 35
37 - 43
20 - 30
48 - 52
30 - 45
Cookies
- Sugar
- Chocolate chip
- Brownies
350°F(177°C)
350°F(177°C)
350°F(177°C)
A
A
A
C
C
C
12 - 20
9 - 16
30 - 35
Pizza
- Fresh
- Frozen
425°F(218°C)
400°F(204°C)AA
C
C
10 - 15
23 - 27
Breads
- Biscuits (canned)
- Biscuits (scratch)
- Muffins
350°F(177°C)
425°F(218°C)
425°F(218°C)
A
A
A
C
C
C
13 - 17
10 - 12
9 - 15
Fruits and
Vegetables
- Apples (baked)
- Potatoes (baked)
375°F(190°C)
375°F(190°C)AA
C
C
40 - 45
60 - 80
ENGLISH
26
HOW TO USE
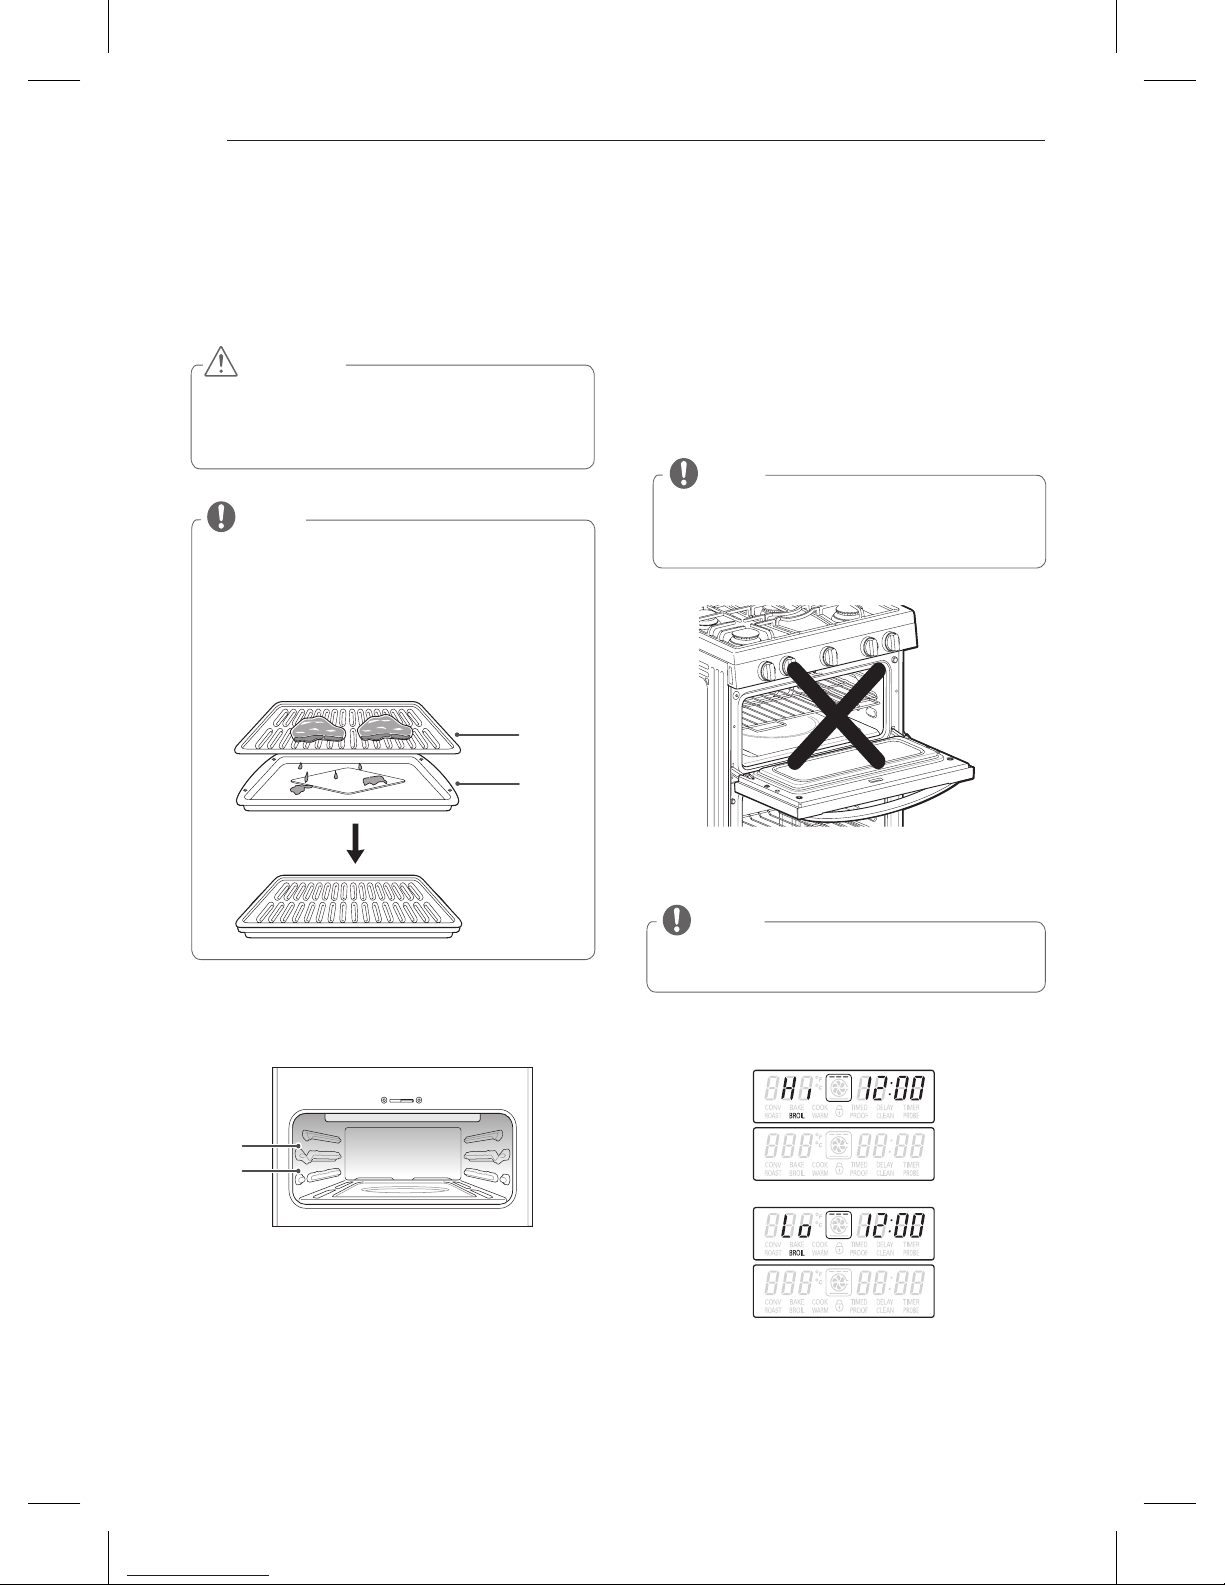
BROIL (Upper Oven)
Your oven is designed for closed door broiling.
B
uses an intense heat radiation from the upper gas
burner. The Broil function works best when broiling thin,
tender cuts of meat (1” or less), poultry or fish.
To set the upper oven to BROIL
1
Press the
B
key once for l and twice for m.
2
Press the q key.
3
Allow the broiler to preheat for five minutes.
4
Place food in the upper oven.
5
Closed the oven door. The oven door must be closed
during broiling.
6
When broiling is finished, press the
Y
key.
BROIL mode display (example)
High temperature
Low temperature
CAUTION
y
DO NOT
use a broiler pan without a grid. Oil can cause
a grease fire.
y
DO NOT
cover the grid and broiler pan with aluminum
foil. Doing so will cause a fire.
NOTE
yUse a m broil to broil foods such as poultry and thick
cuts of meat.
yRemove the pan from the oven to cool down for easy
cleaning.
yFor best results, use a pan designed for broiling, as
shown below. The broiler pan will catch grease spills
and the grid will help prevent grease splatters.
Broiler Pan
Grid
NOTE
If the oven door remains open for more than 15 seconds
during broil, the burner will shut off. The broil burner will
automatically come back on once the door is closed.
NOTE
During any Broil function, it is normal for the broiler to
cycle on and off.
When broiling on rack position ‘B’ in the upper oven, use the
offset rack provided for better cooking results.
B
A
*B: The position where you use the offset rack.
27
HOW TO USE
ENGLISH
Food
Quantity and/or
Thickness
Upper oven
Comments
Shelf
Position
First side
(Minutes)
Second
side
(Minutes)
Ground beef
Well done
1 Ib. (4 patties)
1/2 to 3/4” thick
A 5-7 3-5 Space evenly. Up to 8 patties may be broiled at once.
Beef Steaks
Rare
Medium
Well Done
1” thick
1 to 1 1/2 lbs.
A 6-7 2-3
Steaks less than 1" thick cook through before browning.
Pan frying is recommended. Slash fat
A 7-8 3-4
A 8-9 4-5
Rare
Medium
Well Done
1 1/2” thick
2 to 2 1/2 lbs.
A 8 3-4
A 9 4-5
A 10 5-6
Chicken
1 whole cut up 2 to
21/2lbs., split lengthwise
A 8-10 5-7 Broil skin-side-down first.
2 breasts A 8-9 5-6
Fish Fillets
1/4 to 1/2” thick A 5 2-4 Handle and turn very carefully.
Brush with lemon butter before and during cooking, if
desired.
Ham Slices
(precooked)
1/2” thick A 6-7 2-3 Increase time 5 to 10 minutes pre side for 1
1
2” thick or
home-cured ham.
Pork chops
Well Done
1 (1/2” thick) A 4-6 3-5 Slash fat.
2 (1” thick) about 1lb. A 7-9 5-7
Lamb Chops
Slash fat.
Medium 2 (1” thick) about
10 to 12 oz.
A 7-8 2-3
Well Done A 8-9 3-4
Medium 2 (1/2” thick) about 1lb. A 6-7 2-3
Well done A 7-8 3-4
Salmon Steaks
2 (1” thick) A 7-9 3-5 Grease pan. Brush steaks
with melted butter.
4 (1” thick) about 1lb. A 8-10 3-5
fBroiling times may be affected by the size, weight, thickness, starting temperature and your preference of doneness.
This guide is based on meats at refrigerated temperatures.
NOTE
fThe U.S. Department of Agriculture says "Rare beef is popular, but you should know that cooking it to only 140 °F. means
some food poisoning organisms may survive." (Source: Safe Food Book. Your Kitchen Guide. USDA Rev. June 1985.)
NOTE
BROILING CHART
This chart is only for reference. Adjust cook time according to your preference.
ENGLISH
18
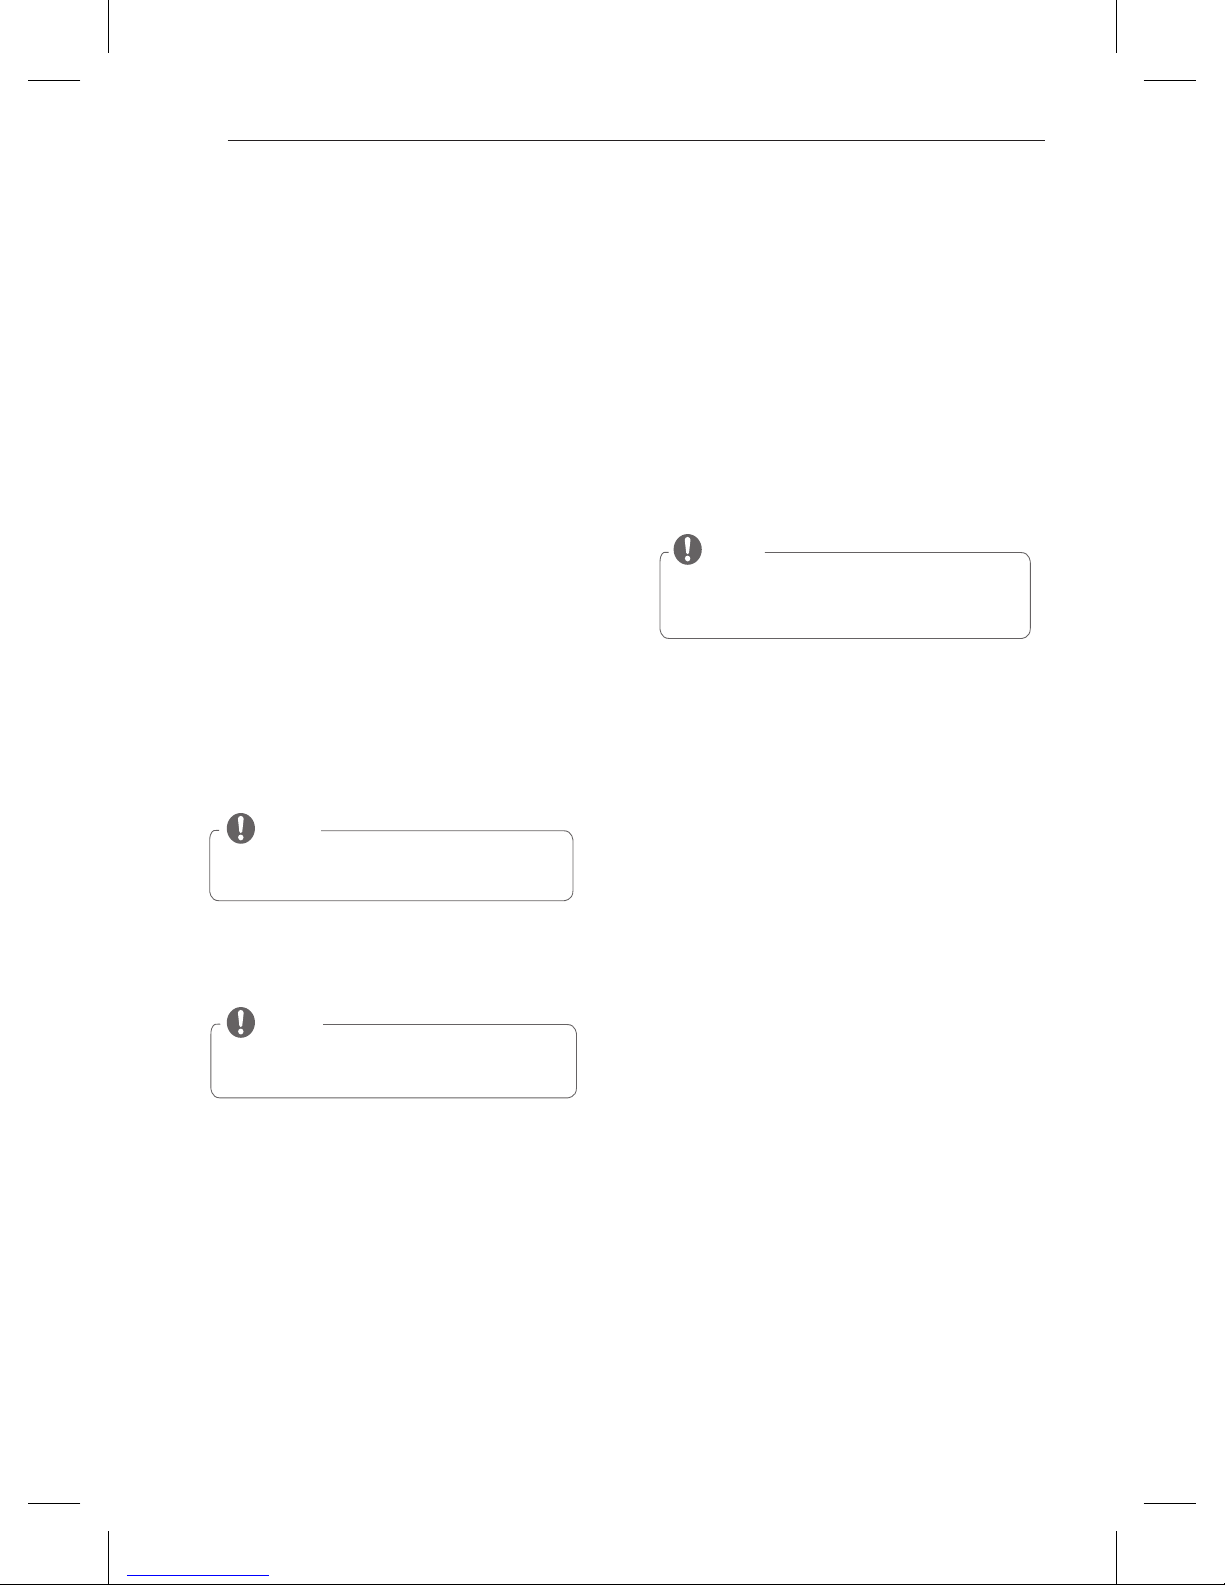
HOW TO USE
Using the Control Panel
Upper Oven:
Name Description
1
BAKE Traditional bake function. Refer to “BAKE” in the How To Use section.
2
BROIL Traditional broil function. Refer to “BROIL” in the How To Use section.
3
WARM
Warms food in the oven.
Refer to “WARM” in the How To Use section.
4
PIZZA Cooks pizza. Refer to “PIZZA” in the How To Use section.
5
UPPER LIGHT Turns on/off the upper oven light.
6
UPPER SELF CLEAN
Cleans the inside of the UPPER OVEN automatically.
Refer to “SELF CLEAN” in the How To Use section.
7
UPPER TIMER ON/OFF
Sets, starts or cancels the timer function of the UPPER OVEN.
Refer to “How to use the timer” in the Operating Instructions section.
8
UPPER CLEAR/OFF Stops cooking or cancels the setting in the UPPER OVEN.
1
2
3
4
8
15
24
6
5
12
14
11
9
13
10
20
21
19
32
22
7
Display
1
2
3
4
8
15
24
6
5
12
7
14
16
13
17
20
11
10
21
19
32
22
9
18
Display
For Model: LDG3015S
For Model: LDG3016ST
28
HOW TO USE
TIMED COOK
(Upper & Lower Oven)
The TIMED COOK feature allows you to set the oven to cook
for a specific length of time. This feature can only be used
while baking.
To set TIMED COOK (example: to BAKE at 300°F for
30 minutes):
1
Press the upper or lower A key.
q
o
will appear in
the display.
2
Use the number keys to set the temperature
(ex. press
3, 0, 0
).
3
Once the oven has preheated to 300°, press the
key.
o
o
will appear in the display.
4
Set the desired baking time (ex. press 3, 0).
The baking time can be set for any amount of time between 1 minute and 11 hours and 59 minutes.
5
Press the q key. The oven will turn on and the display
will show the cooking time countdown.
The oven will continue to cook for the set amount of time
and then turn off automatically. When the cooking time has
elapsed:
To change the cook time while operating the oven:
(example: to change the cook time from 30 minutes to 1
hour 30 minutes):
1
Press the key.
2
Use the number keys to change the baking time
(ex. press
1, 3, 0
).
3
Press q to accept the change.
DELAYED TIMED COOK
(Upper & Lower Oven)
The automatic timer of the DELAYED TIMED COOK will turn
the oven ON and OFF at the time you select. This feature
can only be used for baking.
To set the oven for Delayed Start
(example: to BAKE at
300°F for 30 minutes and start operating the bake mode at
4:30pm):
1
Be sure that the clock is set for the correct time of day.
2
Arrange the interior oven rack(s) and place the food in the
oven.
3
Press the b key.
q
o
will appear on the display.
4
Use the number keys to set the oven temperature
(ex. press
3, 0, 0
).
5
Press the key.
6
Set the desired baking time (ex. press 3, 0).
The baking time can be set for any amount of time from 1
minute to 11 hours and 59 minutes.
7
Press the W key.
8
Set the desired start time (ex. press 4, 3, 0).
9
Press the q key. At the set time, a short beep will
sound and the oven will begin baking.
y
k
and the time of day will show in the display.
yThe cook end indicator tone will sound every 60
seconds until the
Y
or
Z
key is pressed.
yWhen WARM function is set, warm function is acti-
vated after cooking for the set time.
NOTE
If operating both the upper & lower oven at the same
time, press the
key once to set the cook time
for the lower oven and twice for the upper oven.
y
k
and the time of day will show in the display.
yThe cook end indicator tone will sound every 60
seconds until the
Y
or
Z
key is pressed.
yWhen WARM function is set, warm function is acti-
vated after cooking for the set time.
CAUTION
yUse the automatic timer when cooking cured or frozen
meats and most fruits and vegetables. Foods that can
easily spoil, such as milk, eggs, fish, meat or poultry,
should be chilled in the refrigerator. Even when chilled,
they should not stand in the oven for more than 1 hour
before cooking begins, and should be removed promptly when cooking is completed.
yEating spoiled food can result in sickness from food
poisoning.
NOTE
yTo cancel the TIMED COOK function, press
Y
or
Z
key at any time.
yIf you would like to change the cook time, repeat
steps 5-6 and press
q
.
The oven will continue to cook for the set amount of time
and then turn off automatically. When the cooking time has
elapsed:
NOTE
yTo set the WARM function to engage at the end
of the timed cook cycle, repeat steps 1-5 and then
press the
C
key. WARM will appear in the display. (Refer to "WARM" in the How to Use section
for more information on warming.)
yTo cancel the TIMED COOK function, press
Y
or
Z
key at any time.
NOTE
If your oven clock is set as a 12 hour clock, you can delay
the cook time for 12 hours. If your oven clock is set as a
24 hour clock, you can delay the cook time for 24 hours.
 Loading...