

Page 1

ENGLISH MAGYAR Čeština
SLOVENČINA
POLSKI SRPSKI
БЪЛГАРСКИ
OWNER’S MANUAL
CAR CD/MP3/WMA
Receiver
Please read this manual carefully before operating
your set and retain it for future reference.
LCS510IR/LCS510UR/LCF610IR
P/NO : MFL63287365
МАКЕДОНСКИ
HRVATSKI
ROMÂNÃ
Page 2
Getting Started2
Safety Information
1
Getting Started
CAUTION: TO REDUCE THE RISK OF ELECTRIC
SHOCK DO NOT REMOVE COVER (OR BACK) NO
USER-SERVICEABLE PARTS INSIDE REFER SERVICING
TO QUALIFIED SERVICE PERSONNEL.
WARNING: TO PREVENT FIRE OR ELECTRIC SHOCK
HAZARD, DO NOT EXPOSE THIS PRODUCT TO RAIN
OR MOISTURE.
WARNING: Do not install this equipment in a
con ned space such as a book case or similar unit.
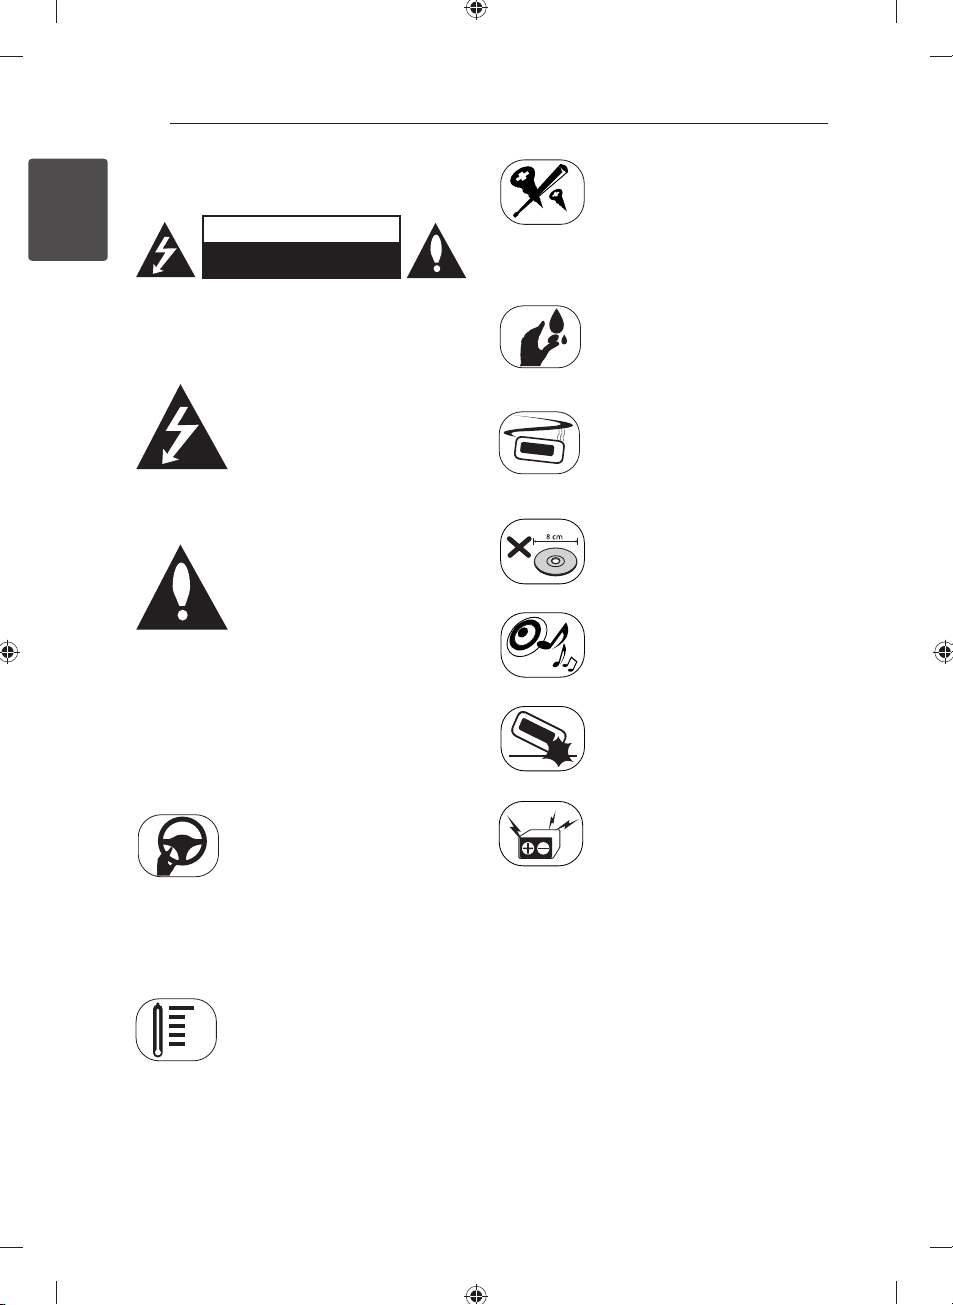
CAUTION
RISK OF ELECTRIC SHOCK
DO NOT OPEN
This lightning ash with arrowhead
symbol within an equilateral
triangle is intended to alert the
user to the presence of uninsulated
dangerous voltage within the
product’s enclosure that may be of
su cient magnitude to constitute
a risk of electric shock to persons.
The exclamation point within an
equilateral triangle is intended
to alert the user to the presence
of important operating and
maintenance (servicing)
instructions in the literature
accompanying the product.
To reduce the risk of electric
shock, do not remove the cover
or back of this product. There are
no user-serviceable parts inside.
Refer servicing to quali ed service
personnel.
To reduce the risk of re or electric
shock, do not expose this product
to dripping or splashing water, rain,
or moisture.
The temperature of unit’s outside
can be extremely high, please use
the unit after proper installation in
your vehicle.
This unit cannot play 8cm disc (use
12cm disc only).
While driving, keep the sound
volume at a proper level.
Do not drop it and avoid heavy
impacts at anytime.
Always operate the vehicle in a safe
manner. Do not become distracted
by the vehicle while driving, and
always be fully aware of all driving
condition. Do not change settings,
or any functions. Pull over in a
safe and legal manner before
attempting such operations.
Do not use for many hours at
extremely low or high temperature.
(-10 °C to 60 °C)
This unit is for vehicles with a
12-volt battery and negative
grounding. Before installing it
in a recreational vehicle, lorry or
bus, check the battery voltage.
To avoid shorts in the electrical
system, be sure to disconnect the E
battery cable before beginning the
installation.
Page 3
Getting Started 3
The unit is compatible with the steering wheel
remote control. The function allows operation
by sending the steering wheel remote control
signal to the unit.
For details, consult with your dealer.
CAUTION: This product employs a Laser System.
To ensure proper use of this product, please read
this owner’s manual carefully and retain it for future
reference. Shall the unit require maintenance,
contact an authorized service centre.
Use of controls, adjustments or the performance of
procedures other than those speci ed herein may
result in hazardous radiation exposure.
To prevent direct exposure to laser beam, do not try
to open the enclosure. Visible laser radiation when
open. DO NOT STARE INTO BEAM.
“This device is equipped with a portable battery or
accumulator.
Safe way to remove the battery or the battery
from the equipment:
Remove the old battery or battery pack, follow the
steps in reverse order than the assembly. To prevent
contamination of the environment and bring on
possible threat to human and animal health, the
old battery or the battery put it in the appropriate
container at designated collection points. Do
not dispose of batteries or battery together with
other waste. It is recommended that you use
local, free reimbursement systems batteries and
accumulators.”
The battery shall not be exposed to excessive heat
such as sunshine, re or the like.
You have to set the disc format option to [Mastered]
in order to make the discs compatible with the LG
players when formatting rewritable discs. When
setting the option to Live File System, you cannot
use it on LG players.
(Mastered/Live File System : Disc format system for
Windows Vista)
Caution
>
When being connected in a wrong way, the
unit displays as follows.
- Antenna port short : "EXTERNAL ON PORT
SHORT CIRCUIT CHECK"
After connecting it again, restart the unit.
Disposal of your old appliance
1. When this crossed-out wheeled bin
symbol is attached to a product it
means the product is covered by the
European Directive 2002/96/EC.
2. All electrical and electronic products
shall be disposed of separately
from the municipal waste stream
via designated collection facilities
appointed by the government or the
local authorities.
3. The correct disposal of your old
appliance will help prevent potential
negative consequences for the
environment and human health.
4. For more detailed information about
disposal of your old appliance, please
contact your city o ce, waste disposal
service or the shop where you
purchased the product.
LG Electronics hereby declares that this/
these product(s) is/are in compliance
with the essential requirements and
other relevant provisions of Directive
2006/28/EC and ECE Regulation 10.03
(3.2.9).
European representative :
LG Electronics Service Europe B.V.
Veluwezoom 15, 1327 AE Almere, The
Netherlands
(Tel : +31-(0)36-547-8888)
The unit is compatible with the steering wheel
remote control. The function allows operation
by sending the steering wheel remote control
signal to the unit.
For details, consult with your dealer.
1
Getting Started
Page 4

Table of Contents4
Table of Contents
1
1 Getting Started
2 Safety Information
5 Front panel [LCS510IR/ LCS510UR]
6 Front panel [LCF610IR]
2
7 Remote control
7 – Battery Installation
2 Connecting
3
8 About detachable control panel
[LCS510IR/LCS510UR]
8 – Attaching the control panel
8 – Detaching the control panel
9 About detachable control panel
4
5
[LCF610IR]
9 – Attaching the control panel
9 – Detaching the control panel
10 Installation
10 – Basic Installation
10 – Removing the existing receiver unit
10 – ISO-DIN Installation
11 Connection
11 – Connecting to a car
3 Operating
12 Operation
12 – Basic operations
12 – Turning off the sound temporarily
12 – Using EQ (Equalizer)
12 – Checking the clock
12 – Turning off the display light
12 – Resetting the unit
13 – Adjusting the general settings
14 Listening to a CD
14 – Pausing or restarting CD playback
14 – Searching for a section within a track/
fi le
15 – Skipping to another track/ fi le
15 – Checking information about your
music
15 – Playing back tracks/ fi les in a way you
want
16 Listening to music from an external
device
16 – Preventing radical changes in volume
as switching sources
17 Listening to the radio
17 – Storing desired frequencies manually
17 – Listening to a preset station
18 – Adjusting TUNER settings
19 Using an USB device
19 – Moving to another drive
19 – Quick Search of a desired fi le
19 – Playable USB device Requirement
19 – Recording to USB from CD or FM
tuner
20 Listening to music by connecting iPod/
iPhone [LCS510IR/LCF610IR]
20 – Pausing or restarting playback
20 – Searching for a section within a track/
fi le
20 – Checking information about your
music
20 – Playing back tracks/ fi les in a way you
want
21 – Playing back fi les by music menus
21 – Compatible iPod models
4 Troubleshooting
22 Troubleshooting
5 Appendix
23 Specifi cations
Page 5
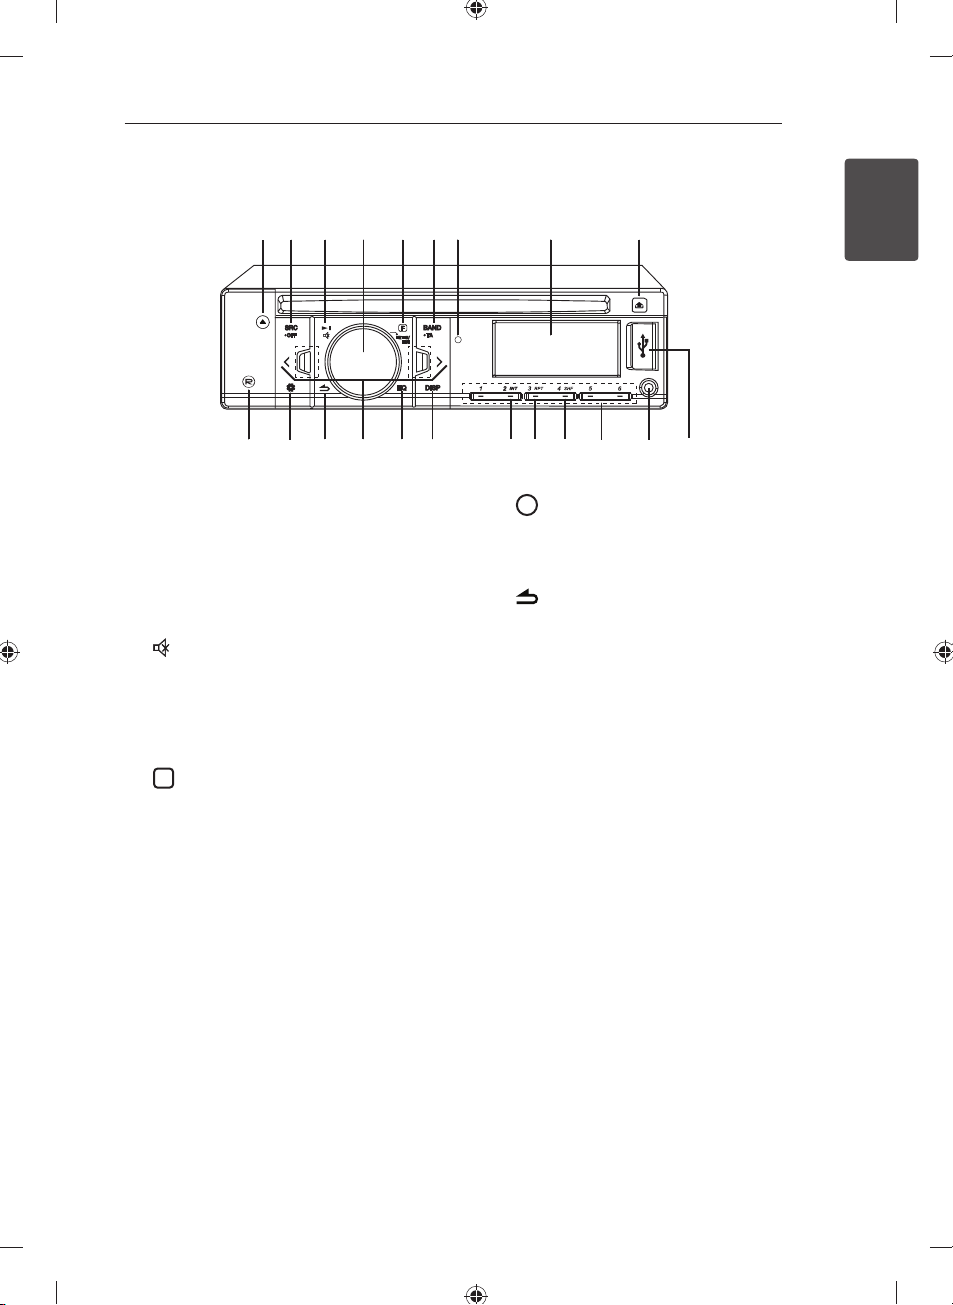
Front panel [LCS510IR/ LCS510UR]
F
bc d efg h i
a
ͶͿ΅Ͷ
ͽͺ΄΅
Getting Started 5
1
Getting Started
k
j
lm
a B
Ejects a disc.
SRC/ • OFF
b
• When pressed, selects function sources.
• When pressed and held, powers unit on or o .
c N
Plays and pauses playback.
Temporarily stops the sound.
Volume knob
d
• Adjusts volume level.
• Con rms the settings.
• Checks tracks, les or preset stations.
e
In each mode, sets playback items.
BAND
f
Selects a band in Tuner mode.
• TA
Searches stations that have TA/ TP information,
when it is pressed and held.
Remote Sensor
g
Display window
h
i 6
Opens the front panel.
n
o
s
tu
j
p
r
q
R
Recording to USB.
k `
Activates setting menu.
l
Returns to the previous step.
m A/D
Skip/ Search/ Seek/ Tune
EQ
n
Improves sound quality.
• When pressed, selects the EQ function.
• When pressed and held, adjusts the sound
level.
DISP
o
• Press it, you can check the clock time.
• Press and hold it, you can turn on/o the
display window and the light of LED buttons.
INT
p
Intro scan
RPT
q
Repeats playback
SHF
r
Randoms playback
Numeric buttons (1 - 6)
s
Selects a numbered preset station in TUNER.
AUX
t
If connected to other portable player, you can
enjoy musics from it on the unit.
USB port
u
Page 6
Getting Started6
F
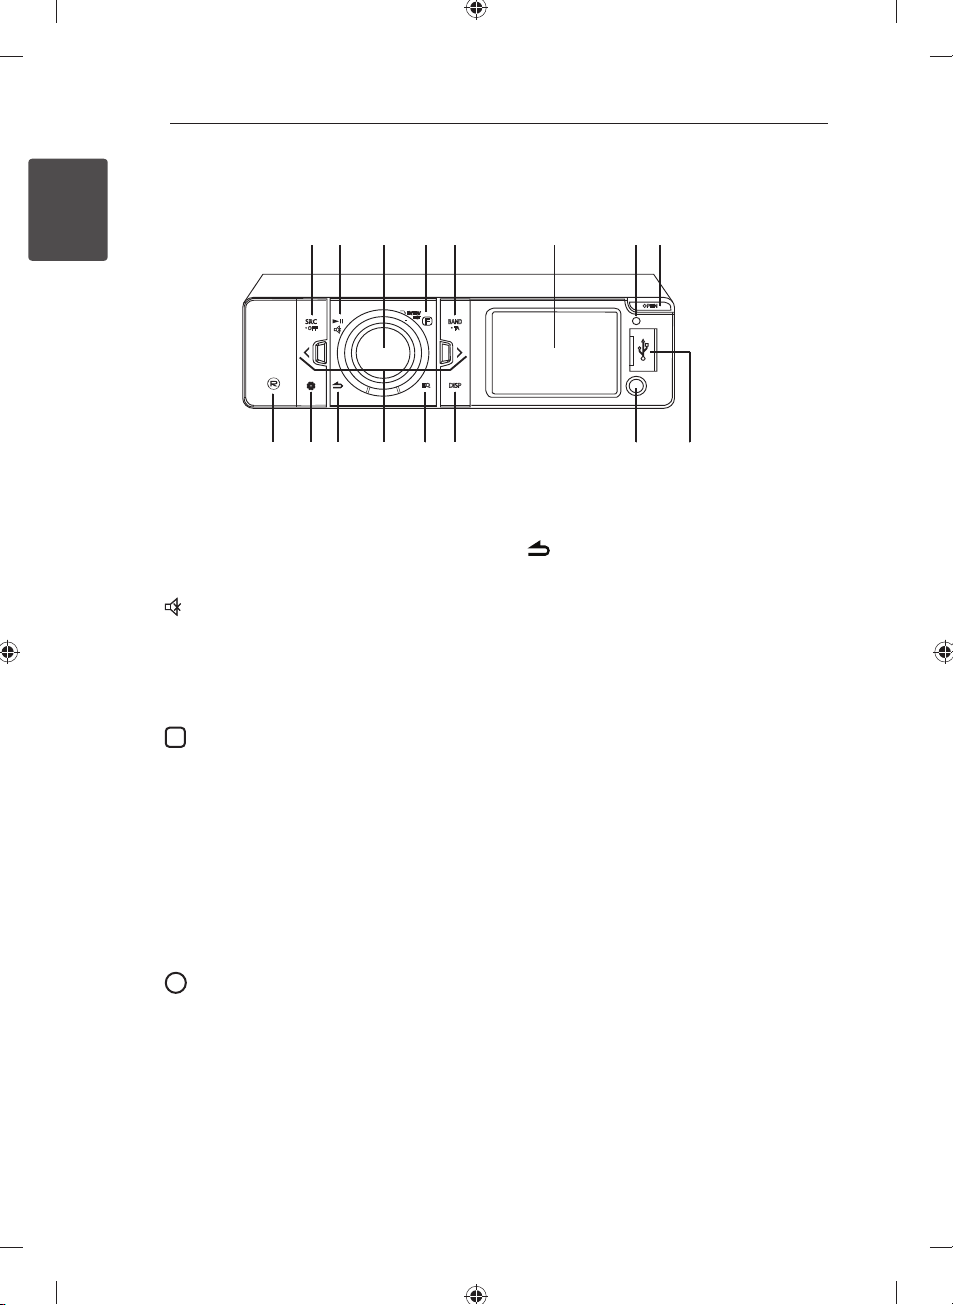
Front panel [LCF610IR]
b
1
Getting Started
SRC/ • OFF
a
• When pressed, selects function sources.
• When pressed and held, powers unit on or o .
b N
Plays and pauses playback.
Temporarily stops the sound.
Volume knob
c
• Adjusts volume level.
• Con rms the settings.
• Checks tracks, les or preset stations.
d
In each mode, sets playback items.
BAND
e
Selects a band in Tuner mode.
• TA
Searches stations that have TA/ TP information,
when it is pressed and held.
Display window
f
Remote Sensor
g
OPEN
h
Opens the front panel.
R
i
Recording to USB.
a
j
i
k
c
d
e
ͶͿ΅Ͷ
ͽͺ΄΅
n
m
l
fg
h
p
o
j `
Activates setting menu.
k
Returns to the previous step.
l A/D
Skip/ Search/ Seek/ Tune
EQ
m
Improves sound quality.
• When pressed, selects the EQ function.
• When pressed and held, adjusts the sound
level.
DISP
n
• Press it, you can check the clock time.
• Press and hold it, you can turn on/o the
display window and the light of LED buttons.
AUX
o
If connected to other portable player, you can
enjoy musics from it on the unit.
USB port
p
Page 7
Remote control
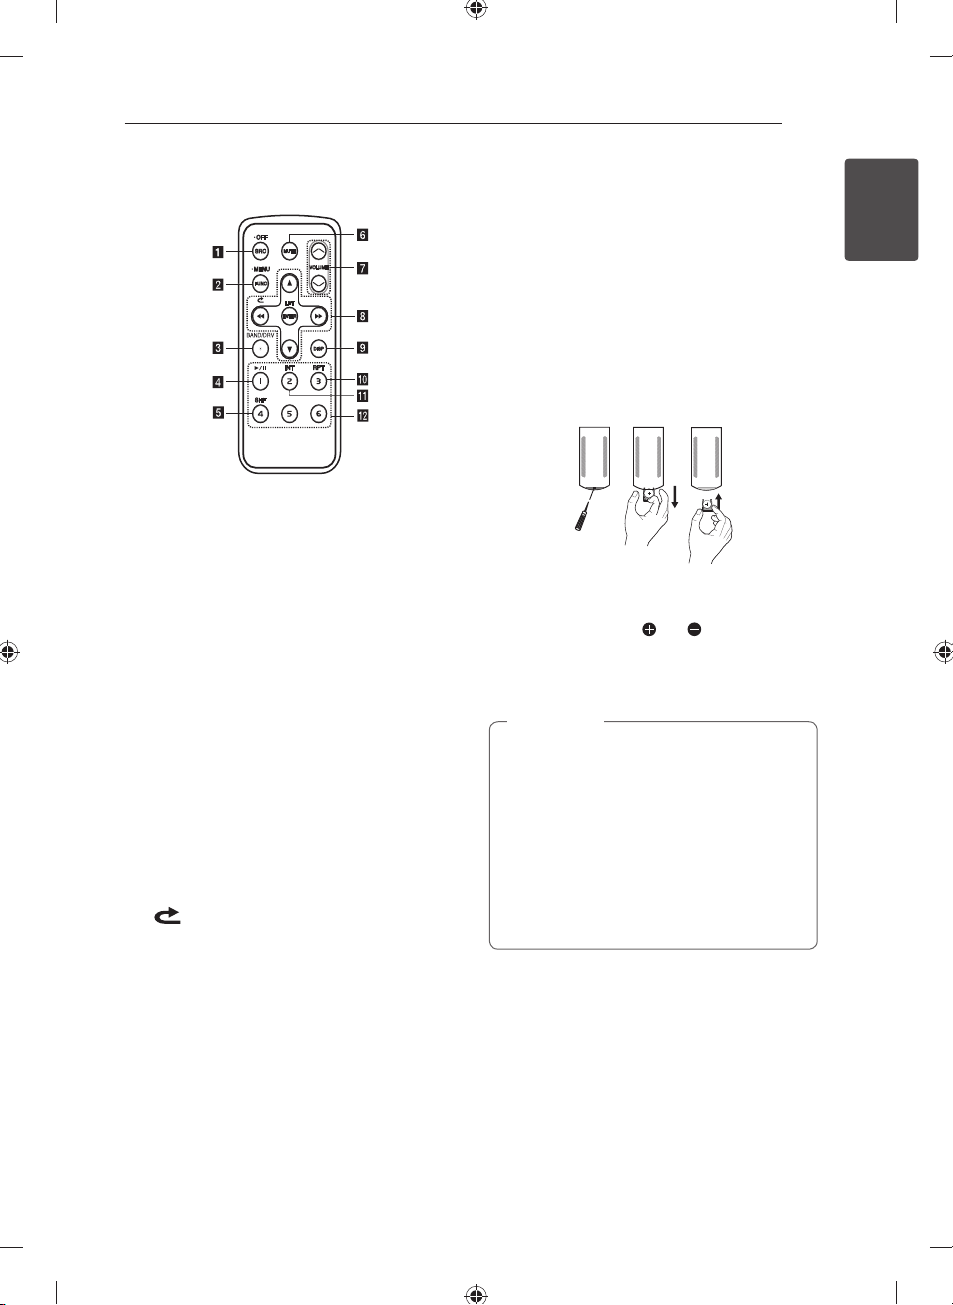
SRC/ • OFF
a
• When pressed, selects function sources.
• When pressed and held, powers unit o .
FUNC
b
When pressed, sets playback items in each
mode.
• MENU
When pressed and held, activates setting
menu.
BAND
c
Selects a band in Tuner mode.
DRV
Moves to a next USB drive.
d d/M
e
f
g
h c/v
Plays or pauses playback.
SHF Randoms playback
MUTE Temporarily stops the sound.
VOLUME W/
Adjusts volume level.
Skip/ Search/ Seek/ Tune
Returns to the previous step.
w/s
• List up/ down
• Adjusts settings.
• Moves 10 MP3/WMA tracks backward or
forward if there is no folder or one folder on a
CD.
• Moves to the previous or next folder if there
are more than 2 folders on a CD.
ENTER/ LIST
• Con rms the settings.
• Checks tracks, les or preset stations.
S
Getting Started 7
DISP
i
• Press it, you can check the clock time.
• Press and hold it, you can turn on/o the
display window and the light of LED buttons.
RPT
j
Repeats playback
INT
k
Intro scan
Numeric buttons (1 - 6)
l
Selects a numbered preset station in TUNER.
Battery Installation
1. Pull out the battery holder with a sharp product
like a ball point pen.
2. Put the battery with
battery holder.
3. Push the battery holder back into its original
position.
Note
,
Use only one CR2025 (3 V) lithium battery.
Remove the battery if the remote control is
not used for a long period of time.
Do not leave the product in a hot or humid
place.
Do not handle the battery with metallic
tools.
Do not store the battery with metallic
materials.
and correctly on the
1
Getting Started
Page 8
Connecting8
About detachable
control panel
[LCS510IR/
LCS510UR]
2
Attaching the control panel
Connecting
1. Align the left side of the panel with the stopper.
2. Push the right side of panel into the unit until it
clicks.
Caution
>
The control buttons may not work properly
if the control panel is not attached properly.
If this occurs, gently press the display.
Do not leave the control panel in any area
exposed to high temperatures or direct
sunlight.
Do not drop the control panel or otherwise
subject it to strong impact.
Do not allow such volatile agents as
benzine, thinner, or insecticides to come
into contact with the surface of the control
panel.
Detaching the control panel
1. Press the 6 to open the control panel.
2. Push the control panel to right.
3. Pull the control panel out of the unit.
4. Put the detached control panel into the
protective case.
Control panel
Protective Case
Note
,
Periodically wipe the contacts on the back
of the control panel with a cotton swap
moistened with alcohol. For safety, turn o the
ignition before cleaning, and remove the key
from the ignition switch.
Page 9

Connecting 9
About detachable
control panel
[LCF610IR]
Attaching the control panel
A
1. Attach part
of the unit.
2. Attach part C of the control panel to part D
of the unit while pushing the control panel to
left.
3. Close the control panel.
The control buttons may not work properly
if the control panel is not attached properly.
If this occurs, gently press the display.
Do not leave the control panel in any area
exposed to high temperatures or direct
sunlight.
Do not drop the control panel or otherwise
subject it to strong impact.
Do not allow such volatile agents as
benzine, thinner, or insecticides to come
into contact with the surface of the control
panel.
C
Caution
>
of the control panel to part
i
h
k
j
C
B
Detaching the control panel
1. Press the OPEN to open the control panel.
2. Push the control panel to left.
3. Pull the control panel out of the unit.
4. Put the detached control panel into the
protective case.
Control panel
Protective Case
Note
,
Periodically wipe the contacts on the back
of the control panel with a cotton swap
moistened with alcohol. For safety, turn o the
ignition before cleaning, and remove the key
from the ignition switch.
2
Connecting
Page 10

Connecting10
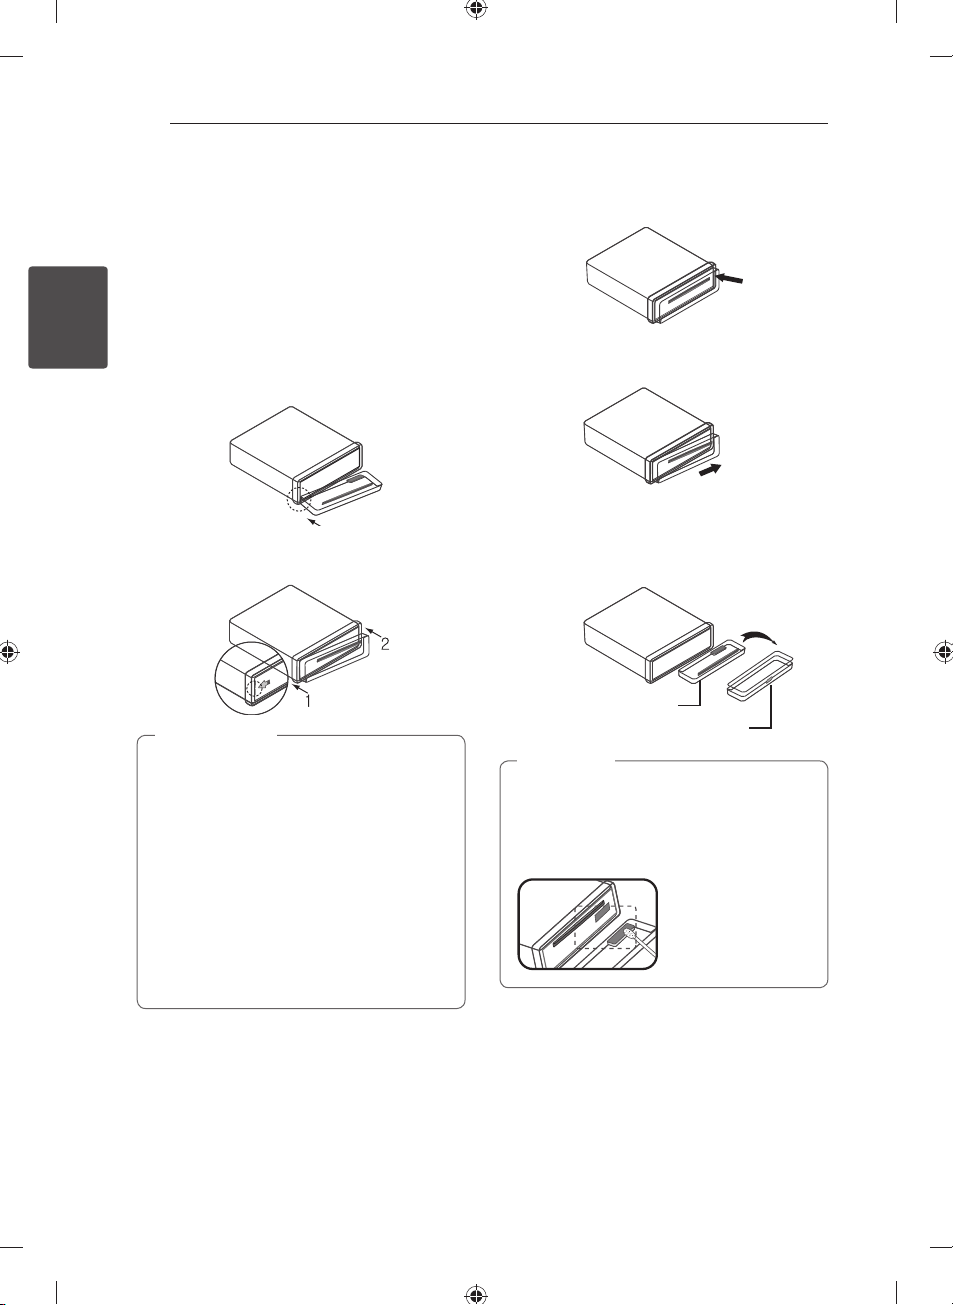
Installation
Basic Installation
Before installing, make sure that the ignition-switch
is set to OFF and remove the terminal of the car
battery to avoid short-circuiting.
2
Connecting
Bend the claws
according to
the thickness
of the
dashboard.
Control panel
1. Remove the existing receiver unit.
2. Make the necessary connections.
3. Install the installation sleeve.
4. Install the unit into the installation sleeve.
ISO-DIN Installation
Control panel
1. Slide the unit into the ISO-DIN frame.
2. Fit screws removed from the old unit.
3. Slide the unit and frame into the dash opening.
4. Install the dash panel or adapter plate.
(According to models, this step may not be
needed.)
5. Install the trim ring to the unit.
6. Install the control panel to the unit.
Removing the existing receiver
unit
If there is already an installation sleeve for the
receiver unit in the dashboard, it must be removed.
1. Remove the rear support from the unit.
2. Remove the control panel and trim ring from
the unit.
3. Insert the lever into the hole on one side of the
unit. Perform the same operation on the other
side and pull the unit out from the mounting
sleeve.
Page 11

Connecting 11
Connection
Connecting to a car
Before installing, make sure that the ignition-switch is set to OFF and remove the terminal of the car battery
to avoid short-circuiting.
Wired remote input (Black): Hard-wired control adapter can be connected.
Rear Left (Sub-woofer Left) Front Left
Rear Right (Sub-woofer Right) Front Right
abc d
abc d
efgh
efgh
B f Power Antenna (Blue)
B g Dimmer (Pink)
B c To Ignition (Red)
B d To Battery (+) (Yellow)
B h Ground (-) (Black)
B e Remote On
(Blue/ White)
B b Phone Mute
(Orange)
B a Not connected
(Optional/ Not supplied)
To Audio out (Optional)
Power
Antenna
Control Relay
Dimmer Switch
Ignition Switch
Ampli er
A a Gray: Front Right +
A b Gray/ Black Stripe: Front Right -
A c Violet: Rear Right +
A d Violet/ Black Stripe: Rear Right -
A e White: Front Left +
A f White/ Black Stripe: Front Left -
A g Green: Rear Left +
A h Green/ Black Stripe: Rear Left -
To Audio in (Optional)
Ampli er
A
a
A
b
A
c
A
d
A
e
A
f
A
g
A
h
2
Connecting
Page 12

Operating12
Operation
Basic operations
1. Turn the unit on by pressing any key on the
unit.
2. Select a source by pressing SRC.
3. Rotate the volume knob to adjust the volume
on the unit.
Or press VOLUME W/S on the remote control.
Note
,
If a source is not connected to the unit, the
3
Operating
source is not recognized.
Turning off the sound
temporarily
1. Press to mute your unit.
Or press MUTE on the remote control.
2. To cancel it, press
Or press MUTE again.
again.
Using EQ (Equalizer)
EQ is to increase or decrease the signal strength of
audio frequencies. The function helps you to enjoy
sound more plentifully.
Press EQ on the unit repeatedly. The indicator lights
up in the following order.
XDSS+ / POP / CLASSIC / ROCK / JAZZ /
VOCAL / SALSA / SAMBA / REGGAE / RUSSY
USER 1 / USER 2 / O (not displayed)
/
Note
,
You can adjust sound level to your preference.
Once you select a USER 1/2 mode and press
on the unit, then adjust the sound level
`
(BASS (bass), MID (middle), TRB (treble), BAL
(left/right speaker), FAD (front/rear speaker),
S--W (Sub-woofer: optional)), it will be
automatically stored for the currently selected
USER 1/2 mode. Refer to the "For [SOUND]
setting" for USER 1/2 mode on the page 13.
Checking the clock
1. Press DISP to check the clock.
2. Press it again to remove it.
Turning off the display light
1. Press and hold DISP.
2. Press and hold it again to turn it on.
Note
,
Under the light-o condition, press any
keys, the light is turned on and then o
automatically if you don't press it within a few
seconds.
Resetting the unit
You can reset the unit when it does not operate
properly.
1. Detach the control panel.
Refer to page 8-9 for detaching the control
panel.
2. Press the RESET hole with a sharp object.
[LCS510IR/ LCS510UR] [LCF610IR]
Page 13

Operating 13
Adjusting the general settings
You can adjust [SOUND], [LIGHT] and [OTHER]
settings.
On the unit
1. Press `.
2. Rotate the volume knob to select [SOUND],
[LIGHT], or [OTHER] and press it.
3. Rotate the volume knob to select the item and
press it.
4. Rotate the volume knob clockwise or
counterclockwise to adjust the level.
5. Press the volume knob to con rm the setting.
If you want to return to the previous step, press
.
On the Remote Control
1. Press and hold FUNC/ • MENU.
2. Press w / s to select [SOUND], [LIGHT], or
[OTHER] and press ENTER.
3. Press w / s to select the mode and press
ENTER.
4. Press w / s to adjust the level.
5. Press ENTER to con rm the setting.
If you want to return to the previous step, press
.
For [LIGHT] setting
You can adjust the light e ects by adjusting LED,
DIM, or DIM L.
LED COL1/ COL2/ AUTO: You can change the
LED window color.
DIM (Dimmer) OFF/ ON/ AUTO: You can change
the brightness of the display window during the
power-on status.
Settings Description
DIM ON The display window
becomes dark.
DIM OFF The display window
becomes bright.
DIM AUTO The dimmer operates
according to the car
dimmer setting.
DIM L (Dimmer Level): When you set DIM to ON/
AUTO, you can adjust the dimmer level. (-2, -1, 0,
+1, +2)
3
Operating
For [SOUND] setting
You can adjust sound quality by adjusting the level
of BASS (bass), MID (middle), TRB (treble), BAL (left/
right speaker), FAD (front/rear speaker) and SWC
(Sub woofer control).
- When you set the EQ to USER 1/2 mode. : You can
adjust the level of BASS (bass), MID (middle), TRB
(treble) BAL (left/right speaker), FAD (front/rear
speaker) and SWC (Sub woofer control).
Page 14

Operating14
F
For [OTHER] setting
AUX (Auxiliary) ON/ OFF
It is possible to use auxiliary equipment with this
unit. Activate the auxiliary setting when using
auxiliary equipment connected to this unit.
DEMO OFF/ ON
You can change the initial indication on the
display to information name (function name, EQ
name, etc...) while listening to a source.
SW (Subwoofer) OFF/ SW 55 Hz/ SW 85 Hz/ SW
120 Hz
You can enable the subwoofer.
SW OFF <-> SW 55 Hz <-> SW 85 Hz <-> SW 120
Hz.
3
Operating
A-EQ (Auto EQ) ON/ OFF
AUTO EQ operates only in the music le
supported with genre in the device. When you
set AUTO EQ to ON, POP, CLASSIC, ROCK, or JAZZ
is automatically selected according to the music
genre.
BEEP 2ND/ ALL
BEEP 2ND: The beep is generated when a key is
pressed for longer than 2 seconds.
BEEP ALL: The beep is generated when any kesy
is pressed.
CLK (Clock)
For the model RDS is not supported unit or even
for a RDS supported unit.
- When RDS CT information is not received and
then you set CT to OFF, you can adjust the time
by yourelf. Set the clock as follows ;
1. Select a source to TUNER.
2. Press the
CT to OFF.
( Refer to the " Adjusting TUNER settings " on
the pages 18 for setting the CT (Clock Time)
ON/ OFF.)
3. Press ` on the unit to select [OTHER] and
then select CLK by rotating the volume
knob.
4. Set the hour by rotating the volume knob.
5. Press the volume knob to con rm the hour.
6. Set the minute by rotating the volume knob.
7. Press the volume knob to con rm the
minute.
- When RDS CT information is received ;
The clock is displayed according to the RDS CT
information.
- When RDS is not supported, set the clock
according to 3-4 steps.
to select the CT and then set
Listening to a CD
[LCS510IR/ LCS510UR]
1. Insert a CD.
2. Rotate the volume knob on the unit to adjust
the volume.
Or press VOLUME W/S on the remote control.
[LCF610IR]
1. Press the OPEN to open the control panel.
2. Insert a CD.
3. Close the control panel.
4. Rotate the volume knob on the unit to adjust
the volume.
Or press VOLUME W/S on the remote control.
Note
,
Make sure to press B after pressing OPEN to
eject a disc. Refer to the picture above.
Pausing or restarting CD
playback
1. Press N on the unit to pause playback.
Or press N on the remote control.
2. Press it to resume playback.
Searching for a section within
a track/ fi le
1. Press and hold A/ D on the unit for about 1
second during playback.
Or press and hold c / v on remote
control.
2. Press N on the unit at the point you want.
Or press N on the remote control.
Page 15

Operating 15
Skipping to another track/ fi le
Press A/ D on the unit.
Or press
c/v
1. Press the volume knob on the unit.
Or press ENTER on the remote control.
2. Rotate the volume knob on the unit to select a
desired ROOT or folder and press it.
Or press w / s and press ENTER on the remote
control.
3. Rotate the volume knob on the unit to select a
desired track/ le and press it.
Or press w / s and press ENTER on the remote
control.
Note
,
To skip to previous track, press brie y A with
in 3 seconds of playing time.
on remote control.
Or
Checking information about
your music
MP3/WMA les often come with tags. The tag gives
the Title, Artist or Album.
Press DISP repeatedly during MP3/WMA/CD TEXT
le playback. If there is no information, "NO TEXT"
will be shown in the display window.
Playing back tracks/ fi les in a
way you want
For using applicable buttons
1. Press INT/ RPT/ SHF.
2. Press it again to cancel.
Or
Using the FUNC button
On the unit
1. Press F.
2. Rotate the volume knob to select an item and
press it.
3. Rotate the volume knob to select the option.
4. Press the volume knob to set the option.
If you want to return to the previous step, press
.
On the Remote Control
1. Press FUNC/ • MENU.
2. Press w / s to select an item and press it.
3. Press w / s to select the option.
4. Press ENTER to set the option.
If you want to return to the previous step, press
.
INT (Intro Scan)
The rst 10 seconds of all tracks/ les (INT ) or
each les in the current selected folder (
on the disc are played.
RPT (Repeat)
The current selected tracks/ les (1 RPT) or folder
RPT) on the disc is played repeatedly.
(
SHF (Shu e)
Each les in the current selected folder
SHF) or all of the tracks/ les (SHF) on
(
the disc is played randomly. During random
playback, even if you press A, you won't go back
to the previous track.
INT)
3
Operating
Page 16

3
Operating
Operating16
Note
,
: The icon is displayed during MP3/WMA
playback.
MP3/WMA Disc compatibility with this
unit is limited as follows:
1. Sampling Frequency / 8 kHz to 48 kHz
(MP3) 22.05 kHz to 48 kHz (WMA).
2. Bit rate / within 8 kbps to 320 kbps (include
VBR) (MP3) 32 kbps to 320 kbps (WMA).
3. CD-R/CD-RW le system should be "ISO
9660".
4. If you record MP3/WMA les using software
which cannot create a FILE SYSTEM, for
example "Direct-CD" etc., it will not be
possible to playback MP3/WMA les. We
recommend that you use "Easy-CD Creator"
which creates an ISO 9660 le system.
You have to set the disc format option
to [Mastered] in order to make the discs
compatible with the LG players when
formatting rewritable discs. When setting the
option to Live File System, you cannot use it
on LG players.
(Mastered/Live File System: Disc format system
for Windows Vista)
Cusotmers should also note that
permission is required in order to
download MP3/WMA les and music from
the Internet. Our company has no right to
grant such permission. Permission should
always be sought from the copyright
owner.
Listening to music
from an external
device
1. Connect an external device to the AUX jack with
line input cable.
2. Select a source to AUX.
3. Play the connected Auxiliary Equipment.
4. Rotate the volume knob on the unit to adjust
the volume.
Or press VOLUME W/S on the remote control.
Preventing radical changes in
volume as switching sources
Only when you set AUX to ON as switching sources,
you can adjust the volume level of each source to
prevent radical changes in volume by selecting
GAIN 0/ +6.
1. Press F on the unit.
Or press FUNC/ • MENU on the remote control.
2. Rotate the volume knob on unit.
Or press w / s on the remote control to set
the option. (GAIN 0/ +6)
3. Press the volume knob on unit.
Or press ENTER on the remote control to
con rm the setting.
4. If you want to return to the previous step, press
.
Page 17

Operating 17
Listening to the radio
1. Press SRC repeatedly to select a source to
TUNER.
2. Press BAND repeatedly to select a desired band.
3. For manual search, press and hold A/ D on
the unit until “MANUAL“ is displayed. Then press
it repeatedly to select a desired frequency.
Or press and hold c / v on the remote
control.
For auto search, press A/ D on the unit until
“SEARCH” is displayed.
Or press c / v on the remote control.
4. Rotate the volume knob on the unit to adjust
the volume.
Or press VOLUME W/S on the remote control.
Storing desired frequencies
manually
1. Press BAND to select a desired band you want
to store.
2. Press and hold A/ D on the unit until the beep
sound is heard.
Or press and hold c / v on the remote
control.
3. Press it repeatedly to select a desired frequency.
4. Press and hold one of preset buttons among
1 to 6 until the beep sound is heard. (Only
LCS510IR/ LCS510UR)
Press the volume knob and rotate the volume
knob to select a preset station among 1 to 6
and then press and hold the volume knob until
the beep sound is heard. (Only LCF610IR)
5. Repeat steps 1 to 4 to preset other stations.
Note
,
When a station is stored on the preset
numbers on which another station of the same
band has already been preset, the previously
preset station is automatically erased.
Listening to a preset station
1. Press BAND repeatedly to select a desired band.
2. Press the volume knob on the unit.
Or press ENTER on the remote control.
3. Rotate the volume knob to select a preset
station.
Or press w / s on the remote control.
4. Press the volume knob.
Or press ENTER on the remote control.
Or
Press BAND and then the desired preset button
among 1 to 6. (Only LCS510IR/ LCS510UR)
3
Operating
Page 18

Operating18
Adjusting TUNER settings
On the unit
1. Press F.
2. Rotate the volume knob to select an item and
press it.
3. Rotate the volume knob to set the option and
press it.
4. If you want to return to the previous step, press
.
On the Remote Control
1. Press FUNC/ • MENU.
3
2. Press w / s to select an item and press ENTER.
Operating
3. Press w / s to set the option and press ENTER.
4. If you want to return to the previous step, press
.
A/S (Auto Store)
The six strongest broadcasting frequencies will
be stored under preset button 1 - 6 in the order
of their signal strength. To cancel, press the
volume knob (or ENTER on the remore control).
P/S (Preset scan)
Each preset station appears. To cancel, press the
volume knob (or ENTER on the remore control).
SENS (Tuner sensitivity) MID/ HI/ LOW
In an area in which signal reception is weak, it
helps the tuner to search more stations. The
weaker the reception is, the lower option you
should set to.
RDS (OPTIONAL)
PTY (Program type)
It searches the radio stations by program type of
FM tuner.
The program types are displayed as follows.
NEWS FINANCE EASY M
AFFAIRS CHILDREN LIGHT M
INFO SOCIAL CLASSICS
SPORT RELIGION OTHER M
EDUCATE PHONE IN JAZZ
DRAMA TRAVEL COUNTRY
CULTURE LEISURE NATION M
SCIENCE DOCUMENT OLDIES
VARIED POP M FOLK M
WEATHER ROCK M
AF (Alternative frequency) ON/ OFF
When the reception quality drops, the tuner
automatically changes to another station in the
network, broadcasting a better reception quality,
using the PI and AF codes.
REG (Region) ON/ OFF
REG ON: The unit switches to another station,
within the same network, broadcasting the same
program when the receiving signals from the
current station become weak.
REG OFF: The unit switches to another station,
within the same network when the receiving
signals from the current station become weak.
( In this mode, the program may di er from the
one currently received.)
TA (Tra c Announcement) ALARM/ SEEK
TA ALARM: When the tuned station has no TP
information for 5 seconds, a double beep sound
is output.
TA SEEK: When the tuned station does not
receive TP information for 5 seconds, the receiver
retunes to the next station that has the TP
information.
PI (Programme Identi cation) SOUND/ MUTE
PI SOUND: When the frequency of a tuned
station switches to an AF (Alternative frequency)
with an unidenti ed PI, it keeps the sound.
PI MUTE: When the frequency of a tuned station
switches to an AF with an unidenti ed PI, it
mutes the sound until the PI is identi ed.
CT (Clock Time) ON/ OFF
You can use the RDS CT information to update
the time. When RDS CT information is not
received and then you set CT to OFF, you can
adjust the time by yourself. Refer to the page 14
for setting the clock.
Page 19

Operating 19
The making of unauthorized copies of copyprotected material, including computer
programs, les, broadcasts and sound
recordings, may be an infringement of
copyrights and constitute a criminal o ense.
This equipment should not be used for such
purposes.
Be responsible
Respect copyrights
Using an USB device
1. Open the USB cover.
2. Connect the USB device.
3. Press SRC repeatedly to select a source to USB.
4. Rotate the volume knob on the unit to adjust
the volume.
Or press VOLUME W/S on the remote control.
Moving to another drive
When connecting this unit to multi reader, press
BAND on the unit (or DRV on remote control) to go
the next drive. Each time you press the button, the
driver modes change.
Quick Search of a desired fi le
You can select and play a desired le regardless of
the order in USB.
1. Press the volume knob on the unit.
Or press ENTER on the remote control.
2. Rotate the volume knob on the unit to select a
desired ROOT or folder and press it.
Or press w / s and press ENTER on the remote
control.
3. Rotate the volume knob on the unit to select a
desired track/ le and press it.
Or press w / s and press ENTER on the remote
control.
Note
,
Other functions are same with "Listening to a
CD". Refer to page 14 -15.
When you connect a partitioned USB device into
the unit, only the rst partition is recognized on
it.
Some USB device may not work with this unit.
Digital camera and mobile phone are not
supported.
USB Port of the unit cannot be connected to PC.
The unit cannot be used as a storage device.
Using NTFS le system is not supported. (Only
FAT (16/ 32) le system is supported.
Recording to USB from CD or
FM tuner
1. Open the USB cover and connect it to the unit.
2. Select CD or FM tuner.
3. Start playback.
4. Press
5. Press it again to stop.
to start recording.
R
For one track CD recoridng, press it once.
For all tracks recording, press and hold it until
the beep is heared.
Note
,
Only in CD and FM tuner, recording is
available.
Do not remove the USB device during
recording, or an incomplete le may be
made and not deleted on PC.
When USB memory is full, “Not Enough
Memory” displays and stops recording.
For tuner recording, the broadcastings are
recorded by 20 moments on a le name.
3
Operating
Playable USB device
Requirement
Do not extract the USB device during operation
(play, etc.).
An USB device which requires additional
programme installation when you have
connected it to a computer, is not supported.
Regular back up is recommended to prevent
data loss.
If you use a USB extension cable, USB HUB, USB
Multi-reader, or external HDD, the USB device
may not be recognized.
The making of unauthorized copies of copyprotected material, including computer
programs, les, broadcasts and sound
recordings, may be an infringement of
copyrights and constitute a criminal o ense.
This equipment should not be used for such
purposes.
Be responsible
Respect copyrights
Page 20

Operating20
Listening to music
by connecting iPod/
iPhone [LCS510IR/
LCF610IR]
You can enjoy iPod/ iPhone-stored music on the
unit by connecting it to the USB connector using
the appropriate cable.
3
Operating
[LCS510IR]
1. Open the USB cover.
2. Connect the iPod/ iPhone.
3. Press SRC to select a source to USB.
4. Rotate the volume knob to adjust the volume
on the unit.
Or press VOLUME W/S on the remote control.
Note
,
Refer to the page 21 to check the compatible
iPod model for this unit.
Pausing or restarting playback
1. Press N on the unit to pause playback.
Or press N on the remote control.
2. Press it to resume playback.
Searching for a section within
a track/ fi le
During playback, press and hold A/ D and then
release at a point you want.
[LCF610IR]
Playing back tracks/ fi les in a
way you want
On the unit
1. Press F.
2. Rotate the volume knob to select an item and
press it.
3. Rotate the volume knob to select the option.
4. Press the volume knob to set the option.
If you want to return to the previous step, press
.
On the Remote Control
1. Press RPT/ SHF.
2. Press it again to cancel.
Or
1. Press FUNC/ • MENU.
2. Press w / s to select an item and press ENTER.
3. Press w / s to select the option.
4. Press ENTER to set the option.
If you want to return to the previous step, press
.
RPT (Repeat)
The current selected tracks/ les (1 RPT) or folder
(
RPT) on the iPod is played repeatedly.
SHF (Shu e)
Each le in the currently selected album
SHF) or all of the tracks/ les (SHF) on the
(
iPod are played randomly.
During random playback, even if you press A,
you won't go back to the previous track.
SPD (BOOK SPEED)
You can adjust the audiobook speed of iPod to
NOR (Normal), SLOW, or FAST.
Checking information about
your music
MP3/WMA les often come with tags. The tag gives
the Title, Artist or Album.
Press DISP repeatedly during MP3/WMA le
playback. If there is no information, "NO TEXT" will
be shown in the display window.
Page 21

Playing back fi les by music
menus
You can check les by music menus and play it
back.
The music menus are as follows.
PLAYLISTS / ARTISTS / ALBUMS / GENRES
SONGS / COMPOSER / AUDIO BOOK /
/
PODCAST / ...
1. Press the volume knob on the unit.
Or press ENTER on the remote control.
2. Rotate the volume knob on the unit to select a
music menu and press it.
Or press w / s on the remote control.
3. Rotate the volume knob on the unit to select a
le.
Or press w / s on the remote control.
4. Press the volume knob on the unit to con rm
the setting.
Or press ENTER on the remote control.
If you want to return to the previous step, press
.
Compatible iPod models
iPod classic (5th/ 6th generation)
iPod nano (1st/ 2nd/ 3rd/ 4th/ 5th generation)
iPod touch (1st/ 2nd/ 3rd generation)
iPhone
iPhone 3G
iPhone 3GS
iPhone 4
Operating 21
“Made for iPod” means that an electronic accessory
has been designed to connect speci cally to iPod
and has been certi ed by the developer to meet
Apple performance standards.
“Works with iPhone” means that an electronic
accessory has been designed to connect
speci cally to iPhone and has been certi ed by the
developer to meet Apple performance standards.
Apple is not responsible for the operation of this
device or its compliance with safety and regulatory
standards.
iPod is a trademark of Apple Inc., registered in the
U.S. and other countries.
iPhone is a trademark of Apple Inc.
3
Operating
We recommend that you use the OS
Version 4.2.1 or more.
Page 22

Troubleshooting22
Troubleshooting
Symptoms Cause Solution
Power doesn't turned on.
The unit doesn't operate.
No sound is heard. Cables are not connected
4
Troubleshooting
There's audio skipping. This unit is not rmly secured. Secure this unit rmly.
The playback is not possible. The disc is dirty. Clean the disc.
Leads and connectors are not
properly.
The fuse is blown. Rectify the problem that caused the fuse
Noise and other factors
are causing the built in
microprocessor to operate
incorrectly.
correctly.
Con rm once more that all connections
are correct.
to blow, and then replace it. Be very sure
to install the correct fuse with the same
rate.
Turn the unit o and then on again.
Connect the cables correctly.
The disc of unplayable type is
loaded.
Radio stations cannot be
tuned in.
iPod/ iPhone does not work. Check whether iPod/ iPhone
The unit does not operate
correctly even when the
appropriate remote control
buttons are pressed.
The signal strength of the
stations is too weak. (when
tuning in with automatic
tuning.)
No station has been preset
or preset stations have been
cleared. (When tuning by
scanning preset stations.)
is connected to the unit
correctly.
Battery power is low. Load a new battery.
Check what type the disc.
Tuned in the stations manually.
Preset the stations. (Refer to the page
17.)
Connect it to the unit correctly.
Page 23

Appendix 23
Specifi cations
General
Output Power: 53 W x 4 CH (Max.)
Power Source: DC 12 V
Speaker impedance: 4 Ω
Ground System: Negative
Dimensions (W x H x D): 178 x 50 x169 mm (without
Control Panel)
Net Weight: 1.37 kg
TUNER
FM Tunning Range:
87.5 to 108.0 MHz
S/N Ratio: 55 dB
Distortion: 0.7 %
Usable Sensitivity: 12 dBμV
AM (MW) Tunning Range:
520 to 1720 kHz or 522 to 1620 kHz
S/N Ratio: 50 dB
Distortion: 1.0 %
Usable Sensitivity: 28 dBμV
CD
Frequency Response: 20 Hz to 20 kHz
S/N Ratio: 80 dB
Distortion: 0.12 %
Channel Separation (1 kHz): 55 dB
USB
Version: USB 1.1 or USB 2.0 Full Speed
Bus Power Supply (USB): DC 5V
1A
Line OUT (OPTIONAL)
Frequency Response: 20 Hz to 20 kHz
Output Voltage: 2 V (Max.)
Subwoofer (OPTIONAL)
Frequency Response: 20 Hz to 120 Hz
Output Voltage: 2 V (Max.)
Design and speci cations are subject to change
without notice.
5
Appendix
AUX
Frequency Response: 20 Hz to 20 kHz
S/N Ratio: 80 dB
Distortion: 0.1 %
Channel Separation (1 kHz): 45 dB
Max Input Level (1 kHz): 1.1 V
Page 24

 Loading...