

Page 1

In Dash Navi & Infotainment System
with Bluetooth
Read the manual carefully before using the unit.
LAN9700R
ENGLISH
LAN9700R.DGBRLLR_LGEUK_ENG_MFL37340895
Page 2
2
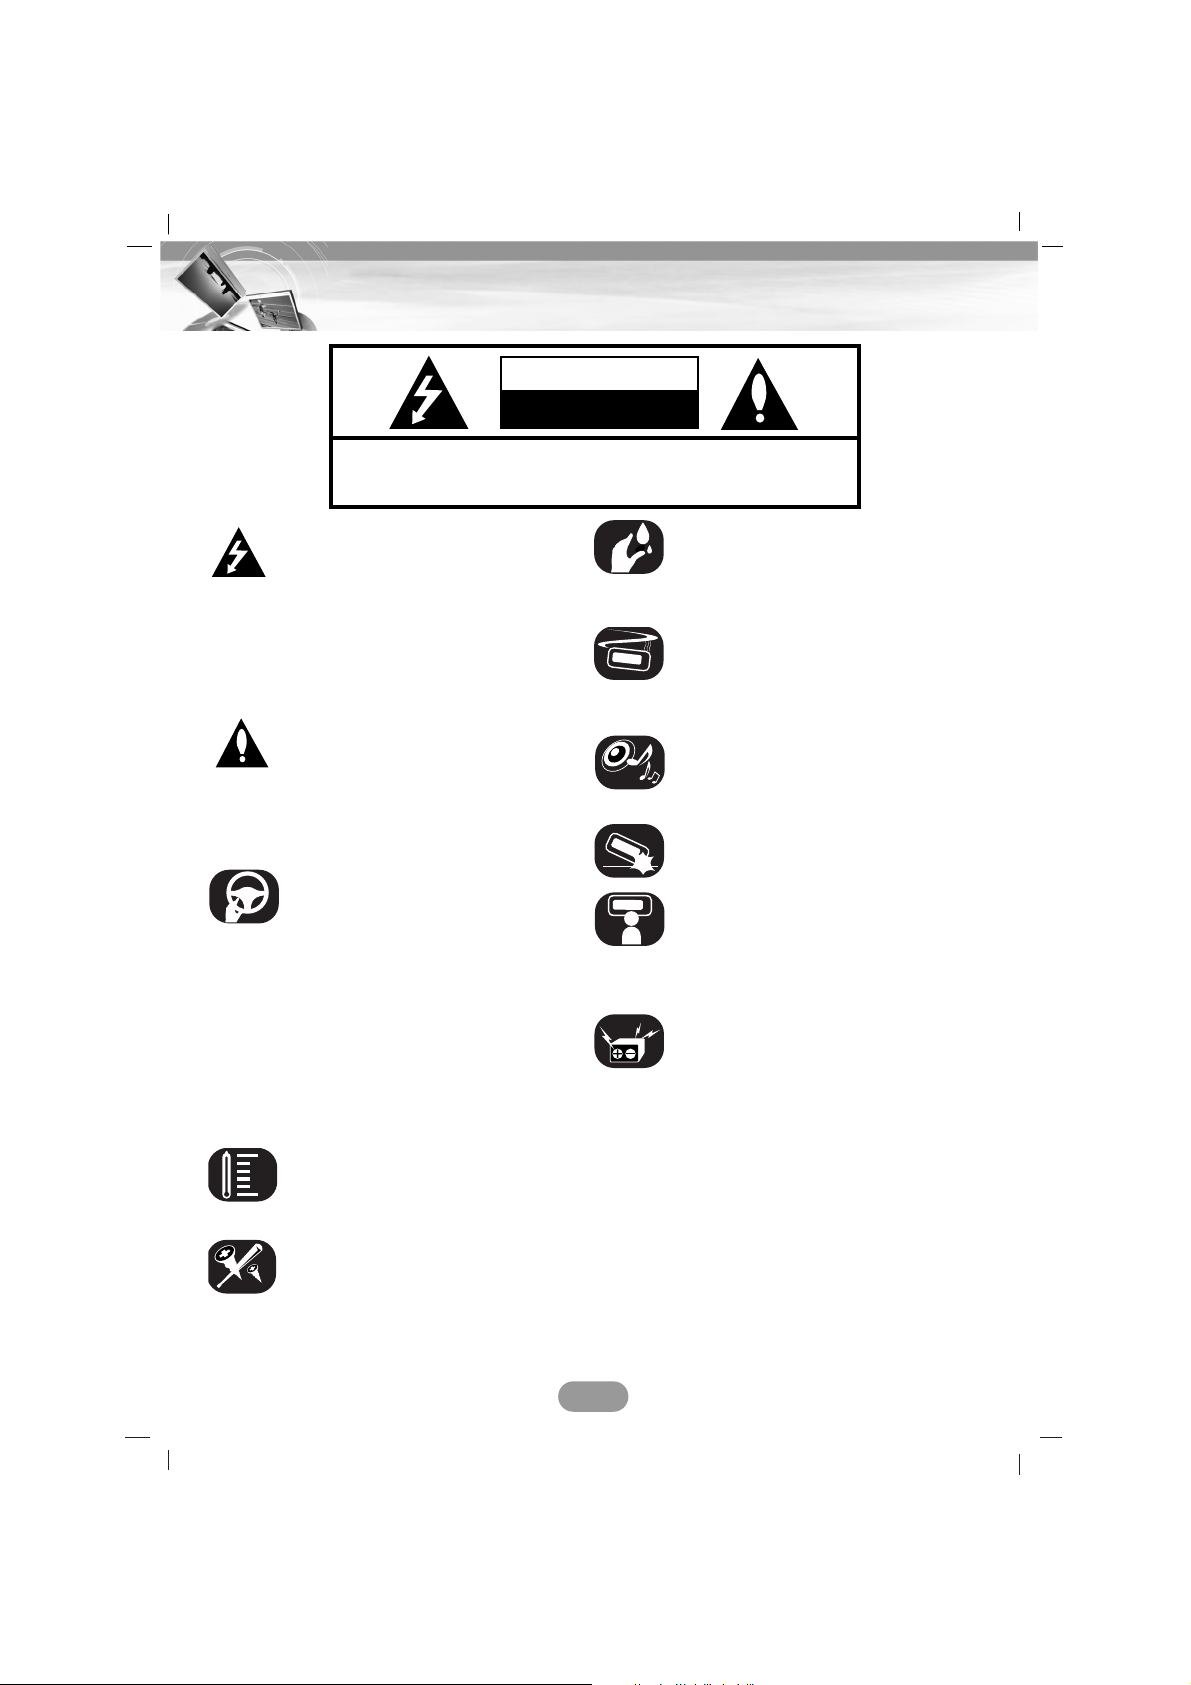
Safety notes
CAUTION : TO REDUCE THE RISK OF ELECTRIC SHOCK DO NOT
SPLIT COVER(OR BACK) NO USER SERVICEABLE PARTS INSIDE.
REFER SERVICING TO QUALIFIED SERVICE PERSONNEL.
CAUTION
RISK OF ELECTRIC SHOCK
DO NOT OPEN
The lightning flash with the
arrowhead symbol, within an
equilateral triangle is intended to alert
the user about the presence of
uninsulated dangerous voltage within
the product’s enclosure that may be
of sufficient magnitude to constitute a
risk of electric shock.
The exclamation point within an equilateral triangle is intended to alert the
user to the presence of important
operating and maintenance (servicing) instructions in the literature
accompanying the appliance.
Always operate the vehicle in a safe
manner. Do not become
distracted by the vehicle while driving, and always be fully aware of all
driving conditions. Do not change
settings, or any functions.
Pull over in a safe and legal manner
before attempting such
operations.
To promote safety, certain functions
are disabled unless the hand break is
on.
Do not use for many hours at
extremely low or high temperature.
(-10°C to 60°C)
To reduce the risk of electric shock,
do not remove the cover or back of
this product. There are no user-serviceable parts inside.
Refer servicing to qualified service
personnel.
To reduce the risk of fire or electric
shock, do not expose this product to
dripping or splashing water, rain, or
moisture.
The temperature of unit’s outside can
be extremely high, please use the
unit after proper installation in your
vehicle.
While driving, keep the sound volume
at a proper level.
Do not drop it and avoid heavy
impacts at anytime.
The driver must not watch the monitor while driving. If the driver watches
the monitor while driving, it may lead
to carelessness and
cause an accident.
This unit is for vehicles with a 12-volt
battery and negative grounding.
Before installing it in a recreational
vehicle, lorry or bus, check the
battery voltage. To avoid shorts in the
electrical system, be sure to
disconnect the E battery cable
before beginning the installation.
Page 3
About this unit
CAUTION :
This product uses a Laser System.
To ensure proper use of this product, please
read this owner’s manual carefully and retain
it for future reference. Should the unit require
maintenance, contact an authorized service
center. Performing controls, adjustments, or
carrying out procedures other than those
specified herein may result in hazardous radiation exposure.
To prevent direct exposure to laser beam, do
not try to open the enclosure.
Visible laser radiation when open. DO NOT
STARE INTO BEAM.
Disposal of your old appliance
1.When this crossed-out wheeled bin
symbol is attached to a product,
it means the product is covered by
the European Directive 2002/96/EC.
2.All electrical and electronic products
should be disposed of separately
from the municipal waste stream via
designated collection facilities
appointed by the government or the
local authorities.
3.The correct disposal of your old
appliance will help prevent potential
negative consequences for the
environment and human health.
4.For more detailed information about
disposal of your old appliance,
please contact your city office, waste
disposal service or the shop where
you purchased the product.
Before installing the unit
• This product is for vehicles with a 12-volt
battery and negative earthing. Check the
battery voltage of your vehicle before
installation.
•To avoid shorts in the electrical system, be
sure to disconnect the (–) battery cable
before beginning installation.
• This product cannot be installed in a vehicle
that does not have an ACC (accessory)
position on the ignition switch.
• The connector wiring may vary depending
on the car manufacturer, even when ISO
connector are used. We recommend to
check the car's wiring provision before connecting the car stereo. Please pay particular
attention to pin 5, where a misconnection
might cause damage to the car or radio.
Take special care when installing into '98 or
later VW/Audi/ Skoda/Seat models as there
may be a 12 V connection on Pin 5, which
could damage the car stereo or into Ford
from '97 or later, with an ISO connector, on
which damage to the car's microcomputers
is possible if misconnected.
Use of ISO connector adapters available on
the market may facilitate installation.
3
Safety notes
Page 4
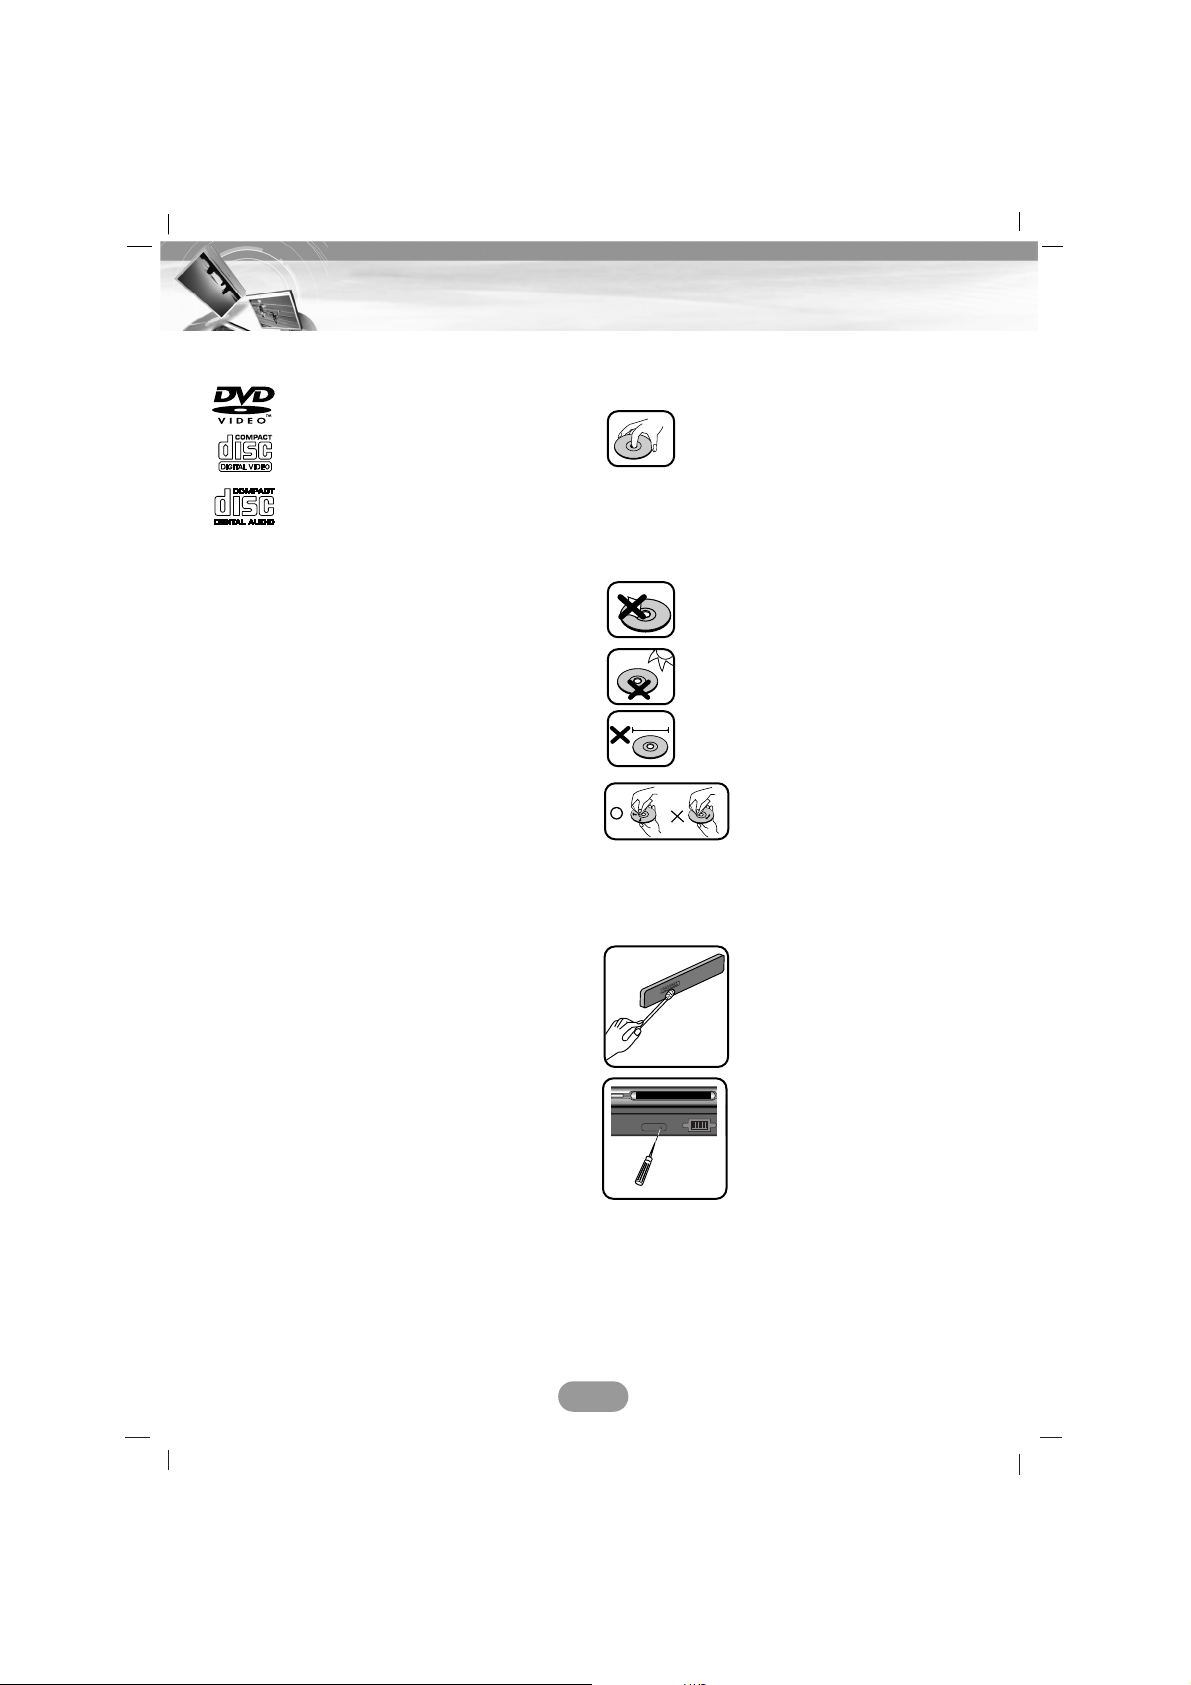
Types of Playable Discs
In addition, this unit plays DVD±R, DVD±RW
and CD-R or CD-RW containing audio titles,
MP3, WMA, JPEG, or DivX files.
• Depending on the conditions of the recording equipment or the CD-R/RW (or
DVD±R/±RW) disc itself, some CD-R/RW
(or DVD±R/±RW) discs cannot be played on
the unit.
• Do not attach any seal or label to either
side (the labeled side or the recorded side)
of a disc.
•
Do not use irregularly shaped CDs (e.g.,
heart-shaped
or octagonal). It may result in
malfunctions.
Precautions of handling discs
and player
• A defective or soiled disc inserted
into the unit can cause sound to
drop during playback.
• Handle the disc by holding its
innerouter edges.
• Do not touch the surface of the
unlabeled side of the disc.
Do not stick paper or tape etc. on
the surface.
Do not expose the disc to direct
sunlight or excessive heat.
This unit cannot play 8cm disc (use
12cm disc only).
• Clean the disc before
playback. Wipe the disc
from the center outward
with a cleaning cloth.
• Never use solvents such
as benzine or alcohol to
clean the disc.
Periodically wipe the
contacts on the back of the
control panel with a cotton
swap moistened with alcohol.
If the unit fails to operate
properly,
remove the control
panel and then
press the
RESET button using a ball
point pen or a similar tool.
4
Safety notes
DVD (12 cm disc)
Video CD (VCD) (12 cm disc)
Audio CD (12 cm disc)
8 cm
P TILT
RESET
Page 5
About the Symbol Display
When you are watching a DVD and attempt to
perform an operation, it may not be performed
due to the programming on the disc. When
this happens, the unit indicates the on the
screen.
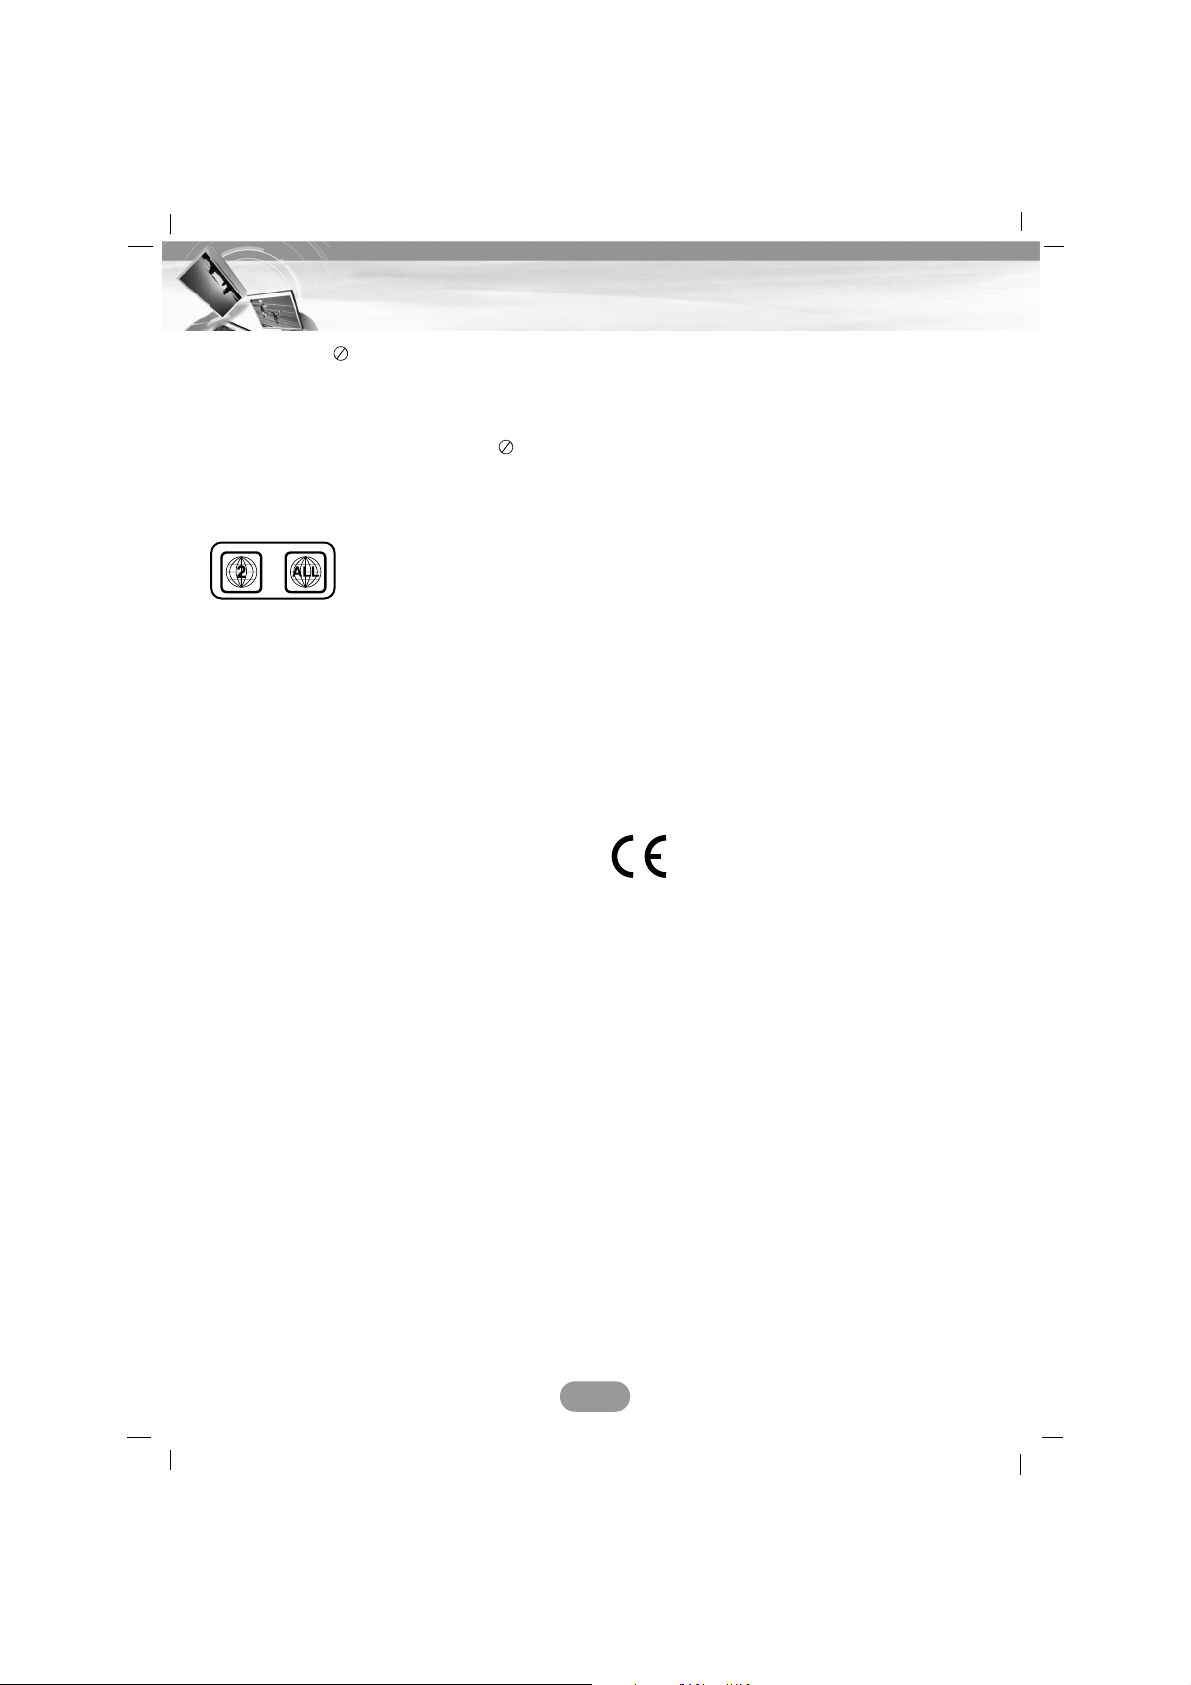
Regional code
This unit is designed and
manufactured for playback of
region “2” encoded DVD soft
ware. This unit can only play
DVD discs labeled “2” or
“ALL”.
Notes on Regional Codes
• Most DVD discs have a globe with one or
more numbers on it clearly visible on the
cover. This number must match your Car
DVD Receiver’s regional code or the disc
cannot play.
• If you try to play a DVD with a different
region code from your player, the message
“Check region code” appears on the screen.
System Selection of monitor
You must select the appropriate system mode
for monitor. If “NO DISC” appears in the display window, press and hold X on remote
control for more than 5 seconds to be able to
select a system (NTSC, PAL).
When the selected system does not coincide
with the system of your monitor, normal colour
picture may not be displayed.
NTSC : Select when the unit is connected
with NTSC monitor.
PAL :
Select when
the unit
is connected
with PAL
monitor
.
NOTES ON COPYRIGHTS
It is forbidden by law to copy, broadcast,
show, broadcast via cable, play in public, or
rent copyrighted material without permission.
This product features the copy protection
function developed by Macrovision. Copy
protection signals are recorded on some
discs. When playing the pictures of these
discs on a unit, picture noise will appear. This
product incorporates copyright protection
technology that is protected by method claims
of certain U.S. patents and other intellectual
property rights owned by Macrovision
Corporation and other rights owners. Use of
this copyright protection technology must be
authorized by Macrovision Corporation, and is
intended for home and other limited viewing
uses only unless otherwise authorized by
Macrovision Corporation. Reverse engineering or disassembly is prohibited.
This product is manufactured to
comply with Directive 2005/83/EEC
(ANNEX I , 3.2.9), 72/245/EEC, and
2006/95/EC.
“Manufactured under license from Dolby
Laboratories. “Dolby” and double-D symbol
are trademarks of Dolby Laboratories”
“DVD Logo is a trademark of DVD
Format/Logo Licensing Corporation”
5
Safety notes
Page 6

Control panel/Monitor . . . . . . . . . . . . . . . . . . . . . . . . . . . . . . . . . . . . . . . . . . . . .8
Remote control . . . . . . . . . . . . . . . . . . . . . . . . . . . . . . . . . . . . . . . . . . . . . . .9-10
Accessories . . . . . . . . . . . . . . . . . . . . . . . . . . . . . . . . . . . . . . . . . . . . . . . . . . .10
Connection . . . . . . . . . . . . . . . . . . . . . . . . . . . . . . . . . . . . . . . . . . . . . . . . . .11-14
Connecting the system . . . . . . . . . . . . . . . . . . . . . . . . . . . . . . . . . . . . . . . . . . . . . . . . . .11
Connecting to serarately sold auxiliary device . . . . . . . . . . . . . . . . . . . . . . . . . . . . . . . .12
Connecting the radio antenna of the vehicle . . . . . . . . . . . . . . . . . . . . . . . . . . . . . . . . . .13
Connecting the GPS antenna . . . . . . . . . . . . . . . . . . . . . . . . . . . . . . . . . . . . . . . . . . . . .13
Connecting to a rear view camera . . . . . . . . . . . . . . . . . . . . . . . . . . . . . . . . . . . . . . . . .14
Installation . . . . . . . . . . . . . . . . . . . . . . . . . . . . . . . . . . . . . . . . . . . . . . . . . . . .15
Basic installation/Removing the existing receiver unit . . . . . . . . . . . . . . . . . . . . . . . . . . .15
ISO-DIN installation/Detaching the control panel/ Attaching the control panel . . . . . . . . .15
Basic operation . . . . . . . . . . . . . . . . . . . . . . . . . . . . . . . . . . . . . . . . . . . . . .16-23
Turning the unit on/ Turning the unit off/ Opening/ Closing the LCD panel . . . . . . . . . . . .16
Inserting a disc/ Ejecting a disc/ Adjusting the volume/ Mute . . . . . . . . . . . . . . . . . . . . . .16
Changing the monitor angle/ Turning the LCD panel horizontal . . . . . . . . . . . . . . . . . . . .16
Selecting a EQ (Equalizer)/ Rear Seat Entertainment . . . . . . . . . . . . . . . . . . . . . . . . . . .17
Selecting a source with remote control/ Selecting a source on the screen . . . . . . . . . . . .18
General operations of SETUP menu
. . . . . . . . . . . . . . . . . . . . . . . . . . . . . . . . . . . . .18-23
Getting started with navigation . . . . . . . . . . . . . . . . . . . . . . . . . . . . . . . . . .24-28
What is GPS?/ About satellite signals/ Acquiring satellite signals . . . . . . . . . . . . . . . . . .24
General operation of navigation . . . . . . . . . . . . . . . . . . . . . . . . . . . . . . . . . . . . . . . .24-26
Indicators of the map screen . . . . . . . . . . . . . . . . . . . . . . . . . . . . . . . . . . . . . . . . . . .27-28
Navigation menu . . . . . . . . . . . . . . . . . . . . . . . . . . . . . . . . . . . . . . . . . . . . .29-38
Navigation menu list/ General operations of navigation menu . . . . . . . . . . . . . . . . . . . . .29
DEST. (DESTINATION) . . . . . . . . . . . . . . . . . . . . . . . . . . . . . . . . . . . . . . . . . . . . . . .30-33
ROUTE . . . . . . . . . . . . . . . . . . . . . . . . . . . . . . . . . . . . . . . . . . . . . . . . . . . . . . . . . . .33-35
RDS TMC . . . . . . . . . . . . . . . . . . . . . . . . . . . . . . . . . . . . . . . . . . . . . . . . . . . . . . . . .35-36
SETUP . . . . . . . . . . . . . . . . . . . . . . . . . . . . . . . . . . . . . . . . . . . . . . . . . . . . . . . . . . .37-38
Bluetooth operation . . . . . . . . . . . . . . . . . . . . . . . . . . . . . . . . . . . . . . . . . . .39-45
Understanding Bluetooth wireless technology . . . . . . . . . . . . . . . . . . . . . . . . . . . . . . . . .39
Connecting your unit and bluetooth phone . . . . . . . . . . . . . . . . . . . . . . . . . . . . . . . .39-40
Disconnecting/Connecting again the bluetooth phone . . . . . . . . . . . . . . . . . . . . . . . . . . .40
Making a call with phone number/ Switching the sound path during a call . . . . . . . . . . . .41
Making a call with speed dial numbers/ Making a call from recent calls . . . . . . . . . . . . .41
Answering calls/ Using your Phone Book . . . . . . . . . . . . . . . . . . . . . . . . . . . . . . . . .42-43
SETUP . . . . . . . . . . . . . . . . . . . . . . . . . . . . . . . . . . . . . . . . . . . . . . . . . . . . . . . . . . .44-45
6
Table of contents
Page 7

DVD/VCD operation . . . . . . . . . . . . . . . . . . . . . . . . . . . . . . . . . . . . . . . . . . .46-48
Playing a DVD/VCD disc . . . . . . . . . . . . . . . . . . . . . . . . . . . . . . . . . . . . . . . . . . . . . . . .46
Play/ Stop/ Pause/ Skip to the next chapter/track . . . . . . . . . . . . . . . . . . . . . . . . . . . . . .46
Skip to the previous chapter/track . . . . . . . . . . . . . . . . . . . . . . . . . . . . . . . . . . . . . . . . .46
Return to the beginning of the current chapter/track . . . . . . . . . . . . . . . . . . . . . . . . . . . .46
Still picture and frame-by-frame playback/ Slow motion . . . . . . . . . . . . . . . . . . . . . . . . .47
SCAN/ MENU/ SEARCH . . . . . . . . . . . . . . . . . . . . . . . . . . . . . . . . . . . . . . . . . . . . . . . .47
REPEAT/ AUDIO/ SUBTITLE/ ANGLE/Using . . . . . . . . . . . . . . . . . . . . . . . . . . . . . .48
DivX operation . . . . . . . . . . . . . . . . . . . . . . . . . . . . . . . . . . . . . . . . . . . . . .49-50
Playing a Divx disc . . . . . . . . . . . . . . . . . . . . . . . . . . . . . . . . . . . . . . . . . . . . . . . . . . . .49
Play/ Stop/ Pause/ Skip to the next file . . . . . . . . . . . . . . . . . . . . . . . . . . . . . . . . . . . . . .49
Skip to the previous file . . . . . . . . . . . . . . . . . . . . . . . . . . . . . . . . . . . . . . . . . . . . . . . . .49
Return to the beginning of the current file . . . . . . . . . . . . . . . . . . . . . . . . . . . . . . . . . . . .49
Still picture and frame-by-frame playback . . . . . . . . . . . . . . . . . . . . . . . . . . . . . . . . . . . .49
Slow motion/ Search/ REPEAT/ AUDIO/ SUBTITLE . . . . . . . . . . . . . . . . . . . . . . . . . . . .50
Locating a folder/file using the list . . . . . . . . . . . . . . . . . . . . . . . . . . . . . . . . . . . . . . . . .50
CD/MP3/WMA operation . . . . . . . . . . . . . . . . . . . . . . . . . . . . . . . . . . . . . . . .51-52
Playing an audio CD and MP3/WMA disc . . . . . . . . . . . . . . . . . . . . . . . . . . . . . . . . . . . .51
INFORMATION . . . . . . . . . . . . . . . . . . . . . . . . . . . . . . . . . . . . . . . . . . . . . . . . . . . . . . .51
SCAN/ REPEAT/ SHUFFLE . . . . . . . . . . . . . . . . . . . . . . . . . . . . . . . . . . . . . . . . . . . . . .52
Locating a folder/file using the list . . . . . . . . . . . . . . . . . . . . . . . . . . . . . . . . . . . . . . . . .52
Photo operation . . . . . . . . . . . . . . . . . . . . . . . . . . . . . . . . . . . . . . . . . . . . . . . .53
Playing photo files/ Picture format . . . . . . . . . . . . . . . . . . . . . . . . . . . . . . . . . . . . . . . . .53
Locating a folder/file using the list . . . . . . . . . . . . . . . . . . . . . . . . . . . . . . . . . . . . . . . . .53
Radio (RDS) operation . . . . . . . . . . . . . . . . . . . . . . . . . . . . . . . . . . . . . . . . .54-55
Listening to radio stations/ AS (Auto search memory) . . . . . . . . . . . . . . . . . . . . . . . . . . .54
Storing and recalling stations/ RDS display options . . . . . . . . . . . . . . . . . . . . . . . . . . . .54
AF (Alternative frequency)/ TA (Traffic announcement identification) . . . . . . . . . . . . . . . .55
PTY (Program type recognition)/ REGION/ R-TEXT (Radio text recognition) . . . . . . . . . .55
Troubleshooting . . . . . . . . . . . . . . . . . . . . . . . . . . . . . . . . . . . . . . . . . . . . . .56-58
Language Codes/Area Codes . . . . . . . . . . . . . . . . . . . . . . . . . . . . . . . . . . . . . .59
Bluetooth phone compatibility list . . . . . . . . . . . . . . . . . . . . . . . . . . . . . . .60-62
Specifications . . . . . . . . . . . . . . . . . . . . . . . . . . . . . . . . . . . . . . . . . . . . . . . . . .63
Support-Hotline
7
Table of contents
Page 8
8
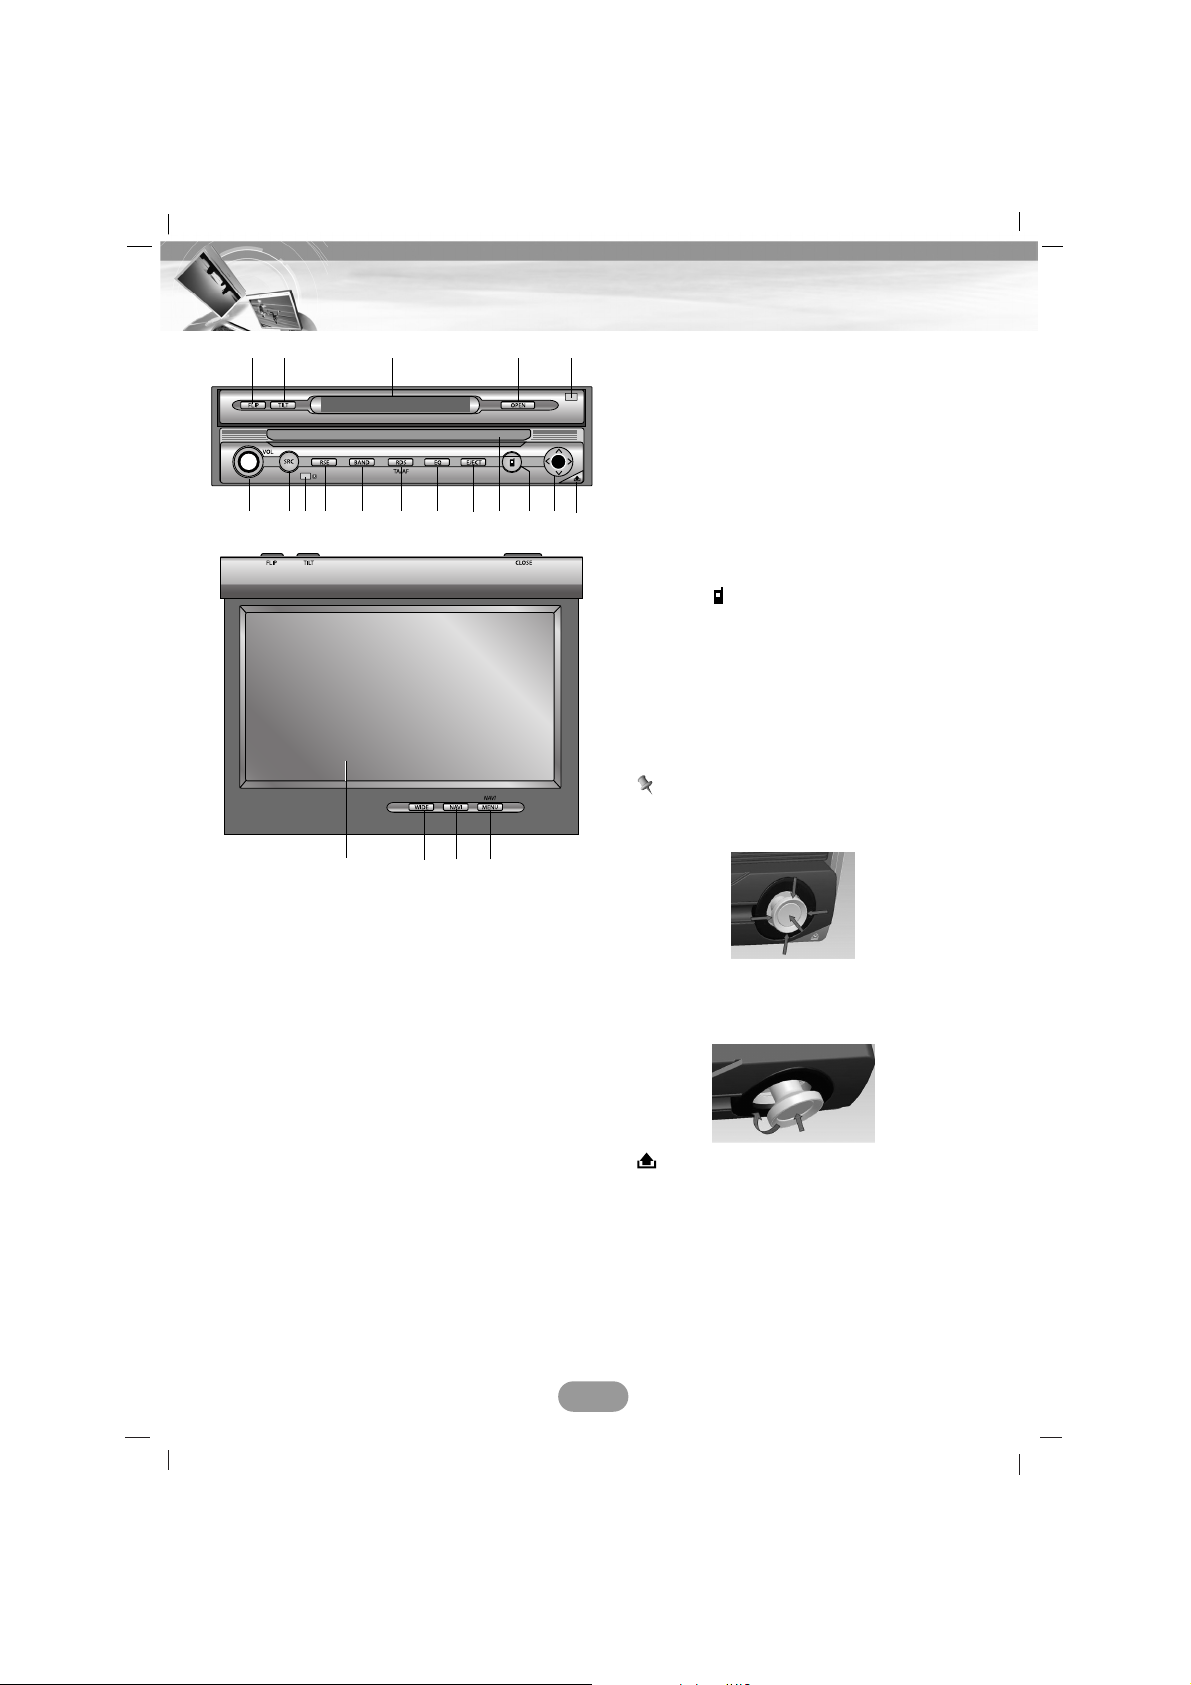
Control Panel/Monitor
1. FLIP
Turns the LCD panel horizontally temporarily
when the LCD panel is upright.
2. TILT
Adjusts the monitor angle.
3. Display window
4. OPEN/CLOSE
Opens (or Closes) the monitor.
5. DIMMER SENSOR
6. Volume knob (VOL)
• Adjusts the volume.
• Power on (Press it.)
• Power off (Press a long time.)
• Mute (Press a short time.)
7. SRC (Source)
Changes the sources.
8. Remote sensor
9. RSE (Rear Seat Entertainment)
10. BAND
Selects the band.
11. RDS
• Selects the TA on/off.
(Press a short time.)
• Selects the AF on/off.
(Press a long time.)
12. EQ
Selects various equalizer curves.
13. EJECT
Ejects a disc from the unit.
14. Disc slot
15. PHONE ( )
Selects the bluetooth mode.
16. Arrow keys (up/down/left/right)
• Selects the folders.
• Selects the menu.
• Skip (Push a short time.)
• Seek (Push a short time.)
• Enter
Notes
• Don’t apply excessive force to the 5-way
button may not work normally.
•When the 5-way button does not return
to the center automatically, move it to the
center position manually.
17.
Detaches the control panel.
18. LCD
19. WIDE
Changes the screen mode.
20. NAVI
Moves to the map screen.
21. NAVI MENU
Moves to the navigation menu.
6879101112 13 1514 1617
1918 20 21
12 3 4 5
Page 9
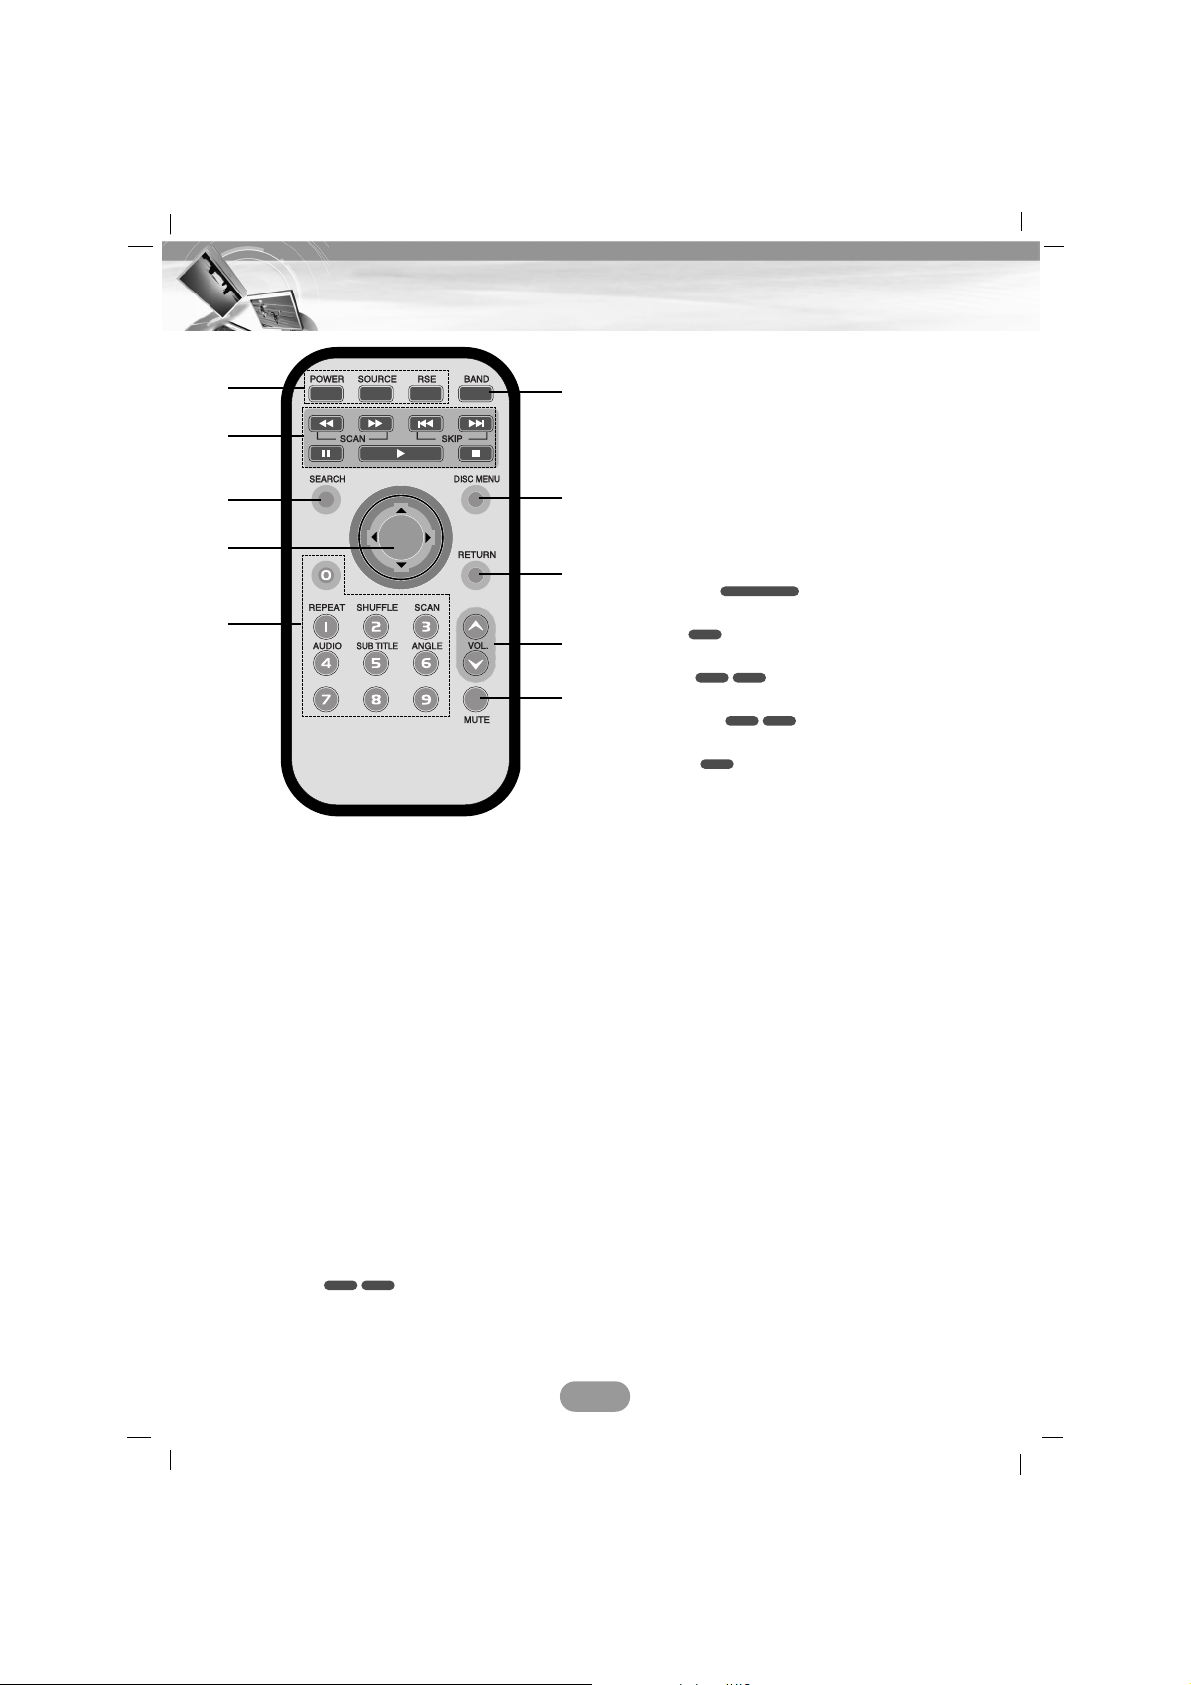
1. POWER
Switches the unit ON/OFF.
SOURCE
Selects a source.
RSE (Rear Seat Entertainment)
2. SCAN mm/
MM
• Backward (Forward) search playback.
• Tunes manually radio station.
SKIP ?m/M?
• Moves to next (previous) chapter, track
or file.
• Returns to the beginning of the current
chapter, track or file.
• Tunes automatically radio station.
PAUSE X
PLAY B
STOP x
3. SEARCH
Selects chapter or title.
4.vv/VV/bb/
BB
(up/down/left/right)
Selects an item in the menu.
ENTER
Confirms menu selection.
5. 0-9 number buttons
• Selects numbered items in the menu.
• Selects a stored radio station frequency
(1-6).
REPEAT
Repeats chapter, track, title or file.
SHUFFLE
Plays tracks or files in random order.
SCAN
Plays the first 10 seconds of all track.
AUDIO
Selects audio language.
SUBTITLE
Selects audio subtitle language.
ANGLE
Selects a DVD camera angle if available.
6. BAND
Selects FM and MW(AM) bands.
7. DISC MENU
Accesses the menu on a DVD disc.
8. RETURN
Displays the disc menu with PBC.
9. VOLUME
Adjusts the volume level.
10. MUTE
Mutes the volume.
DVD
DivXDVD
DivXDVD
CD
CD/MP3/WMA
VCDDVD
9
Remote Control
1
2
3
6
7
8
9
10
4
5
Page 10
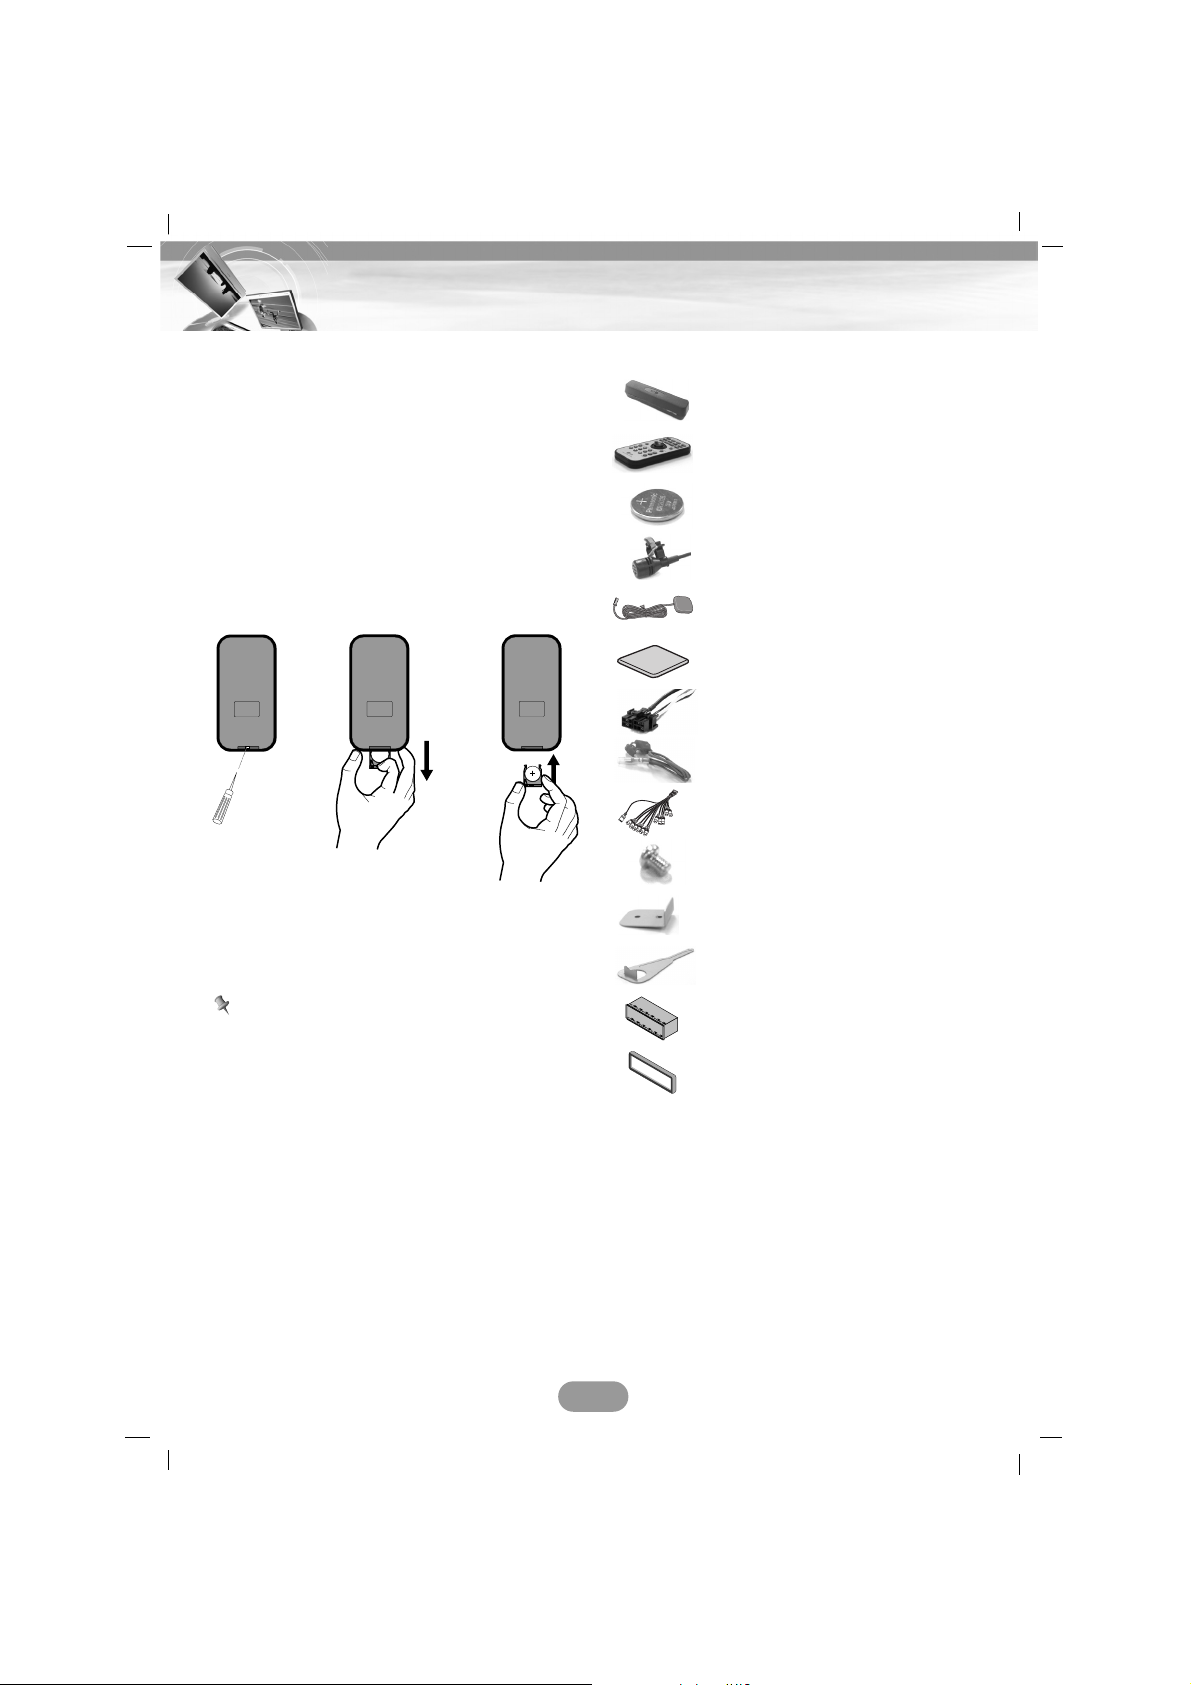
Install the battery of remote
control
Pull the tray on the back of battery of remote
control outward with a pencil or ball point pen
and insert the battery with the plus (+) minus
(-) poles pointing in the proper direction.
1. Remove the battery holder with a pencil or
ball point pen.
2. Install the battery on the battery holder.
3. Install the battery holder back into its
original position.
Using the remote control
Point the remote control in the direction of the
control panel to operate.
Notes
• Use only one CR2025 (3V) lithium battery.
• Remove the battery if the remote control is
not going to be used for a long period of
time.
• Do not leave the product in a hot or humid
place.
• Do not handle the battery with metallic
tools.
• Do not store the battery with metallic mate-
rials.
• In the event of battery leakage, wipe the
remote control completely clean and install
a new battery.
Accessories
10
Remote Control / Accessories
Remote Control
Protective Case
Remote Control Battery
Microphone
GPS Antenna
Metal sheet
Power cord
Reverse Extension Code
RCA and microphone
connector
Round Head Screw x2
Brackets x2
Lever x2
Installation sleeve
Trim ring
Page 11
11
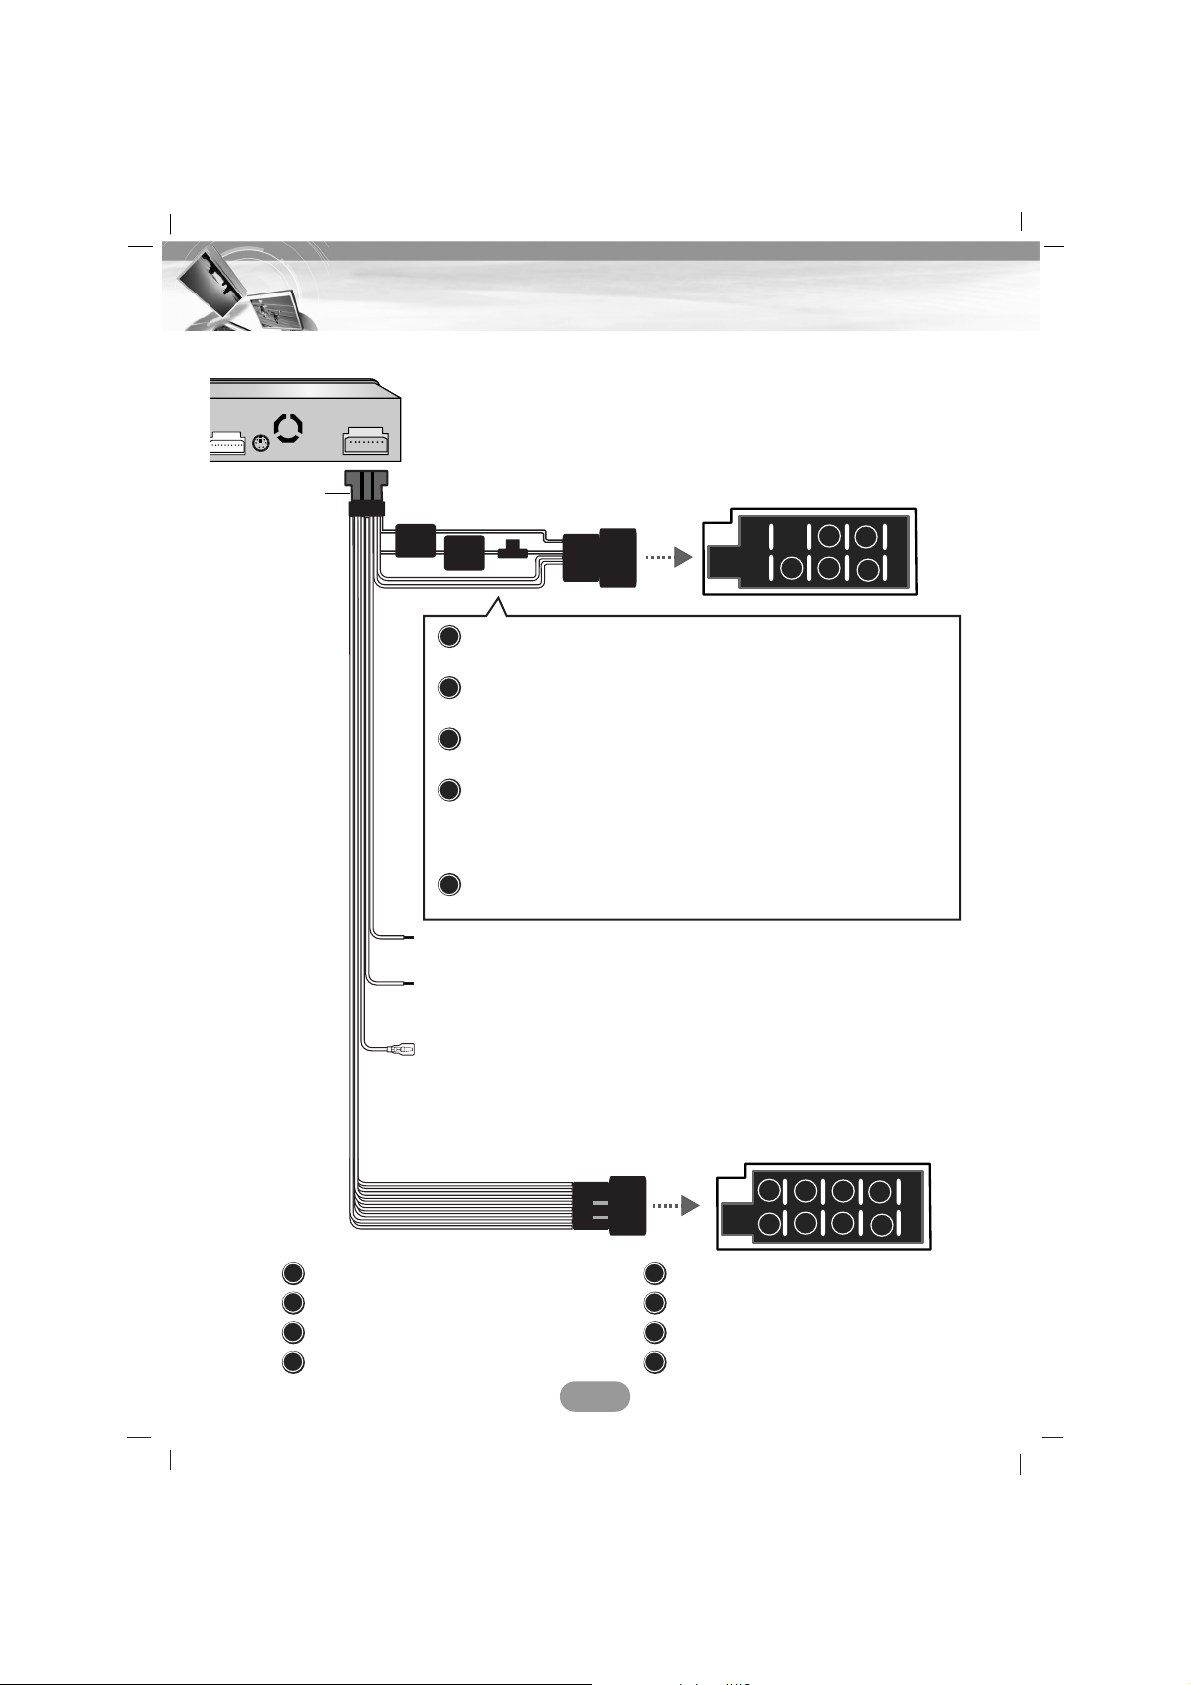
Connection
Connecting the system
: Violet : Rear Right +
: Violet/ Black Stripe : Rear Right –
: Gray : Front Right +
: Gray / Black Stripe : Front Right –
: White : Front Left +
: White/Black Stripe : Front Left –
: Green : Rear Left +
: Green/ Black Stripe : Rear Left –
B8
B7
B6
B5
B4
B3
B2
B1
Yellow
TO BATTERY (+)- To the car battery, continuos +12 V DC.
Blue
POWER ANTENNA- To the power antenna
Orange
DIMMER- This lead is for the dimmer line connection.
Red
TO IGNITION- To the terminal from which the power is
supplied when the ignition switch is set to
ACC.
Black
GROUND (-) - To the car body.
A8
A7
A6
A5
A4
Pink
REVERSE GEAR - When connecting the rear view camera, use
the reverse lead. Use a Reverse Extension if
needed. (Page 14)
Vehicle connector
Speaker connector
Brown
HAND BRAKE- Be sure to wire the hand brake (parking brake)
for safety and preventing accidents.
Power cord
Blue/White
REMOTE ON- To the amplifier remote on.
A5
A7
A4
A6
A8
B1
B3
B4
B2
B5
B7
B6
B8
Page 12

Connecting to serarately sold auxiliary device
12
Connection
FL
(Front Left)
FR
(Front Right)
RL
(Rear Left)
RR
(Rear Right)
CAM V
(Camera Video)
AUX V
(AUX Video)
AUX-L
(AUX Left)
AUX-R
(AUX Right)
To AUDIO IN
To VIDEO IN
To VIDEO IN
To VIDEO OUT
To AUDIO OUT
To AUDIO IN
To AUDIO IN
Microphone
To AUDIO OUT
To AUDIO OUT
To AUDIO OUT
To VIDEO OUT
To VIDEO OUT
To AUDIO IN
To VIDEO IN
Amplifier (Receiver)
Monitor for rear seat
Rear view camera
(Sold seperately.)
(Sold seperately.)
(Sold seperately.)
(Sold seperately.)
Auxiliary Device
(CAR TV, etc)
To MIC IN
Page 13
Connecting the radio antenna of
the vehicle
Connect the radio antenna of the vehicle to
the antenna jack of the unit.
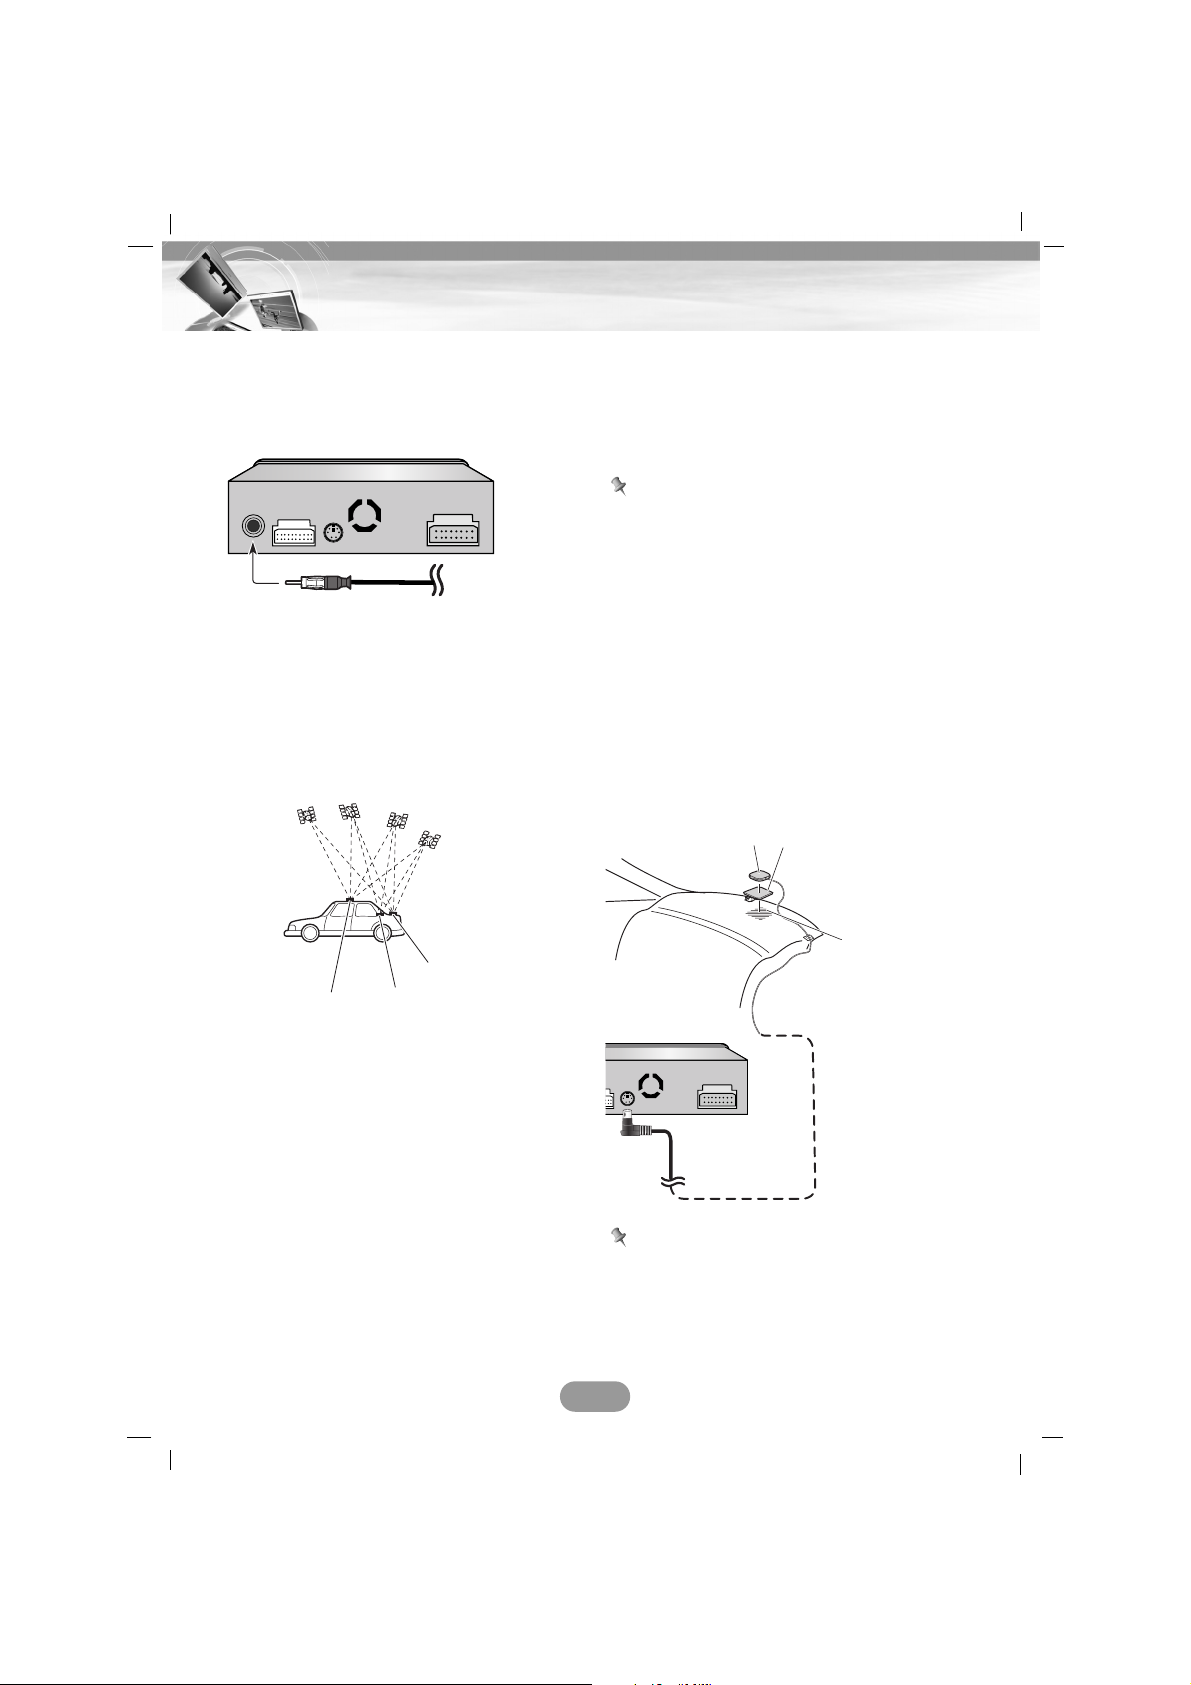
Connecting the GPS antenna
• The antenna should be installed on a level
surface where radio waves will be blocked
as little as possible. Radio waves cannot be
received by the antenna if reception from
the satellite is blocked. Installation on the
vehicle roof or boot lid is recommended to
optimise reception.
• When installing the GPS antenna inside the
vehicle, be sure to use the metal sheet. If
this is not used, the reception sensitivity will
be poor.
• Do not cut the metal sheet. This would
reduce the sensitivity of the GPS antenna.
•Take care not to pull the antenna lead when
removing the GPS antenna. The magnet
attached to the antenna is very powerful,
and the lead may become detached.
• When installing the GPS antenna on the
outside of the vehicle, always put it in the
vehicle when going through an automatic
vehicle wash. If it is left on the outside it
may be knocked off and scratch the vehicle
body.
• The GPS antenna is installed with a magnet.
When installing the GPS antenna, be careful not to scratch the vehicle body.
• Do not paint the GPS antenna, as this may
affect its performance.
Note
Do not cut the GPS antenna lead to shorten it
or use an extension to make it longer. Altering
the antenna cable could result in a short circuit or malfunction and permanent damage to
the unit.
Installing the antenna inside the vehicle (on the rear shelf)
Affix the metal sheet on as level a surface as
possible where the GPS antenna faces the
window.
Place the GPS antenna on the metal sheet.
(The GPS antenna is fastened with its magnet.)
Notes
• When attaching the metal sheet, do not cut it
into small pieces.
• We recommend you install the GPS aerial
on the inside of vehicle.
13
Connection
Roof
Rear shelf
Boot lid
GPS antenna
Metal Sheet
Peel off the protective
sheet on the rear.
Make sure the
surface is free of
moisture, dust,
grime, oil, etc.,
before affixing the
metal sheet.
Page 14
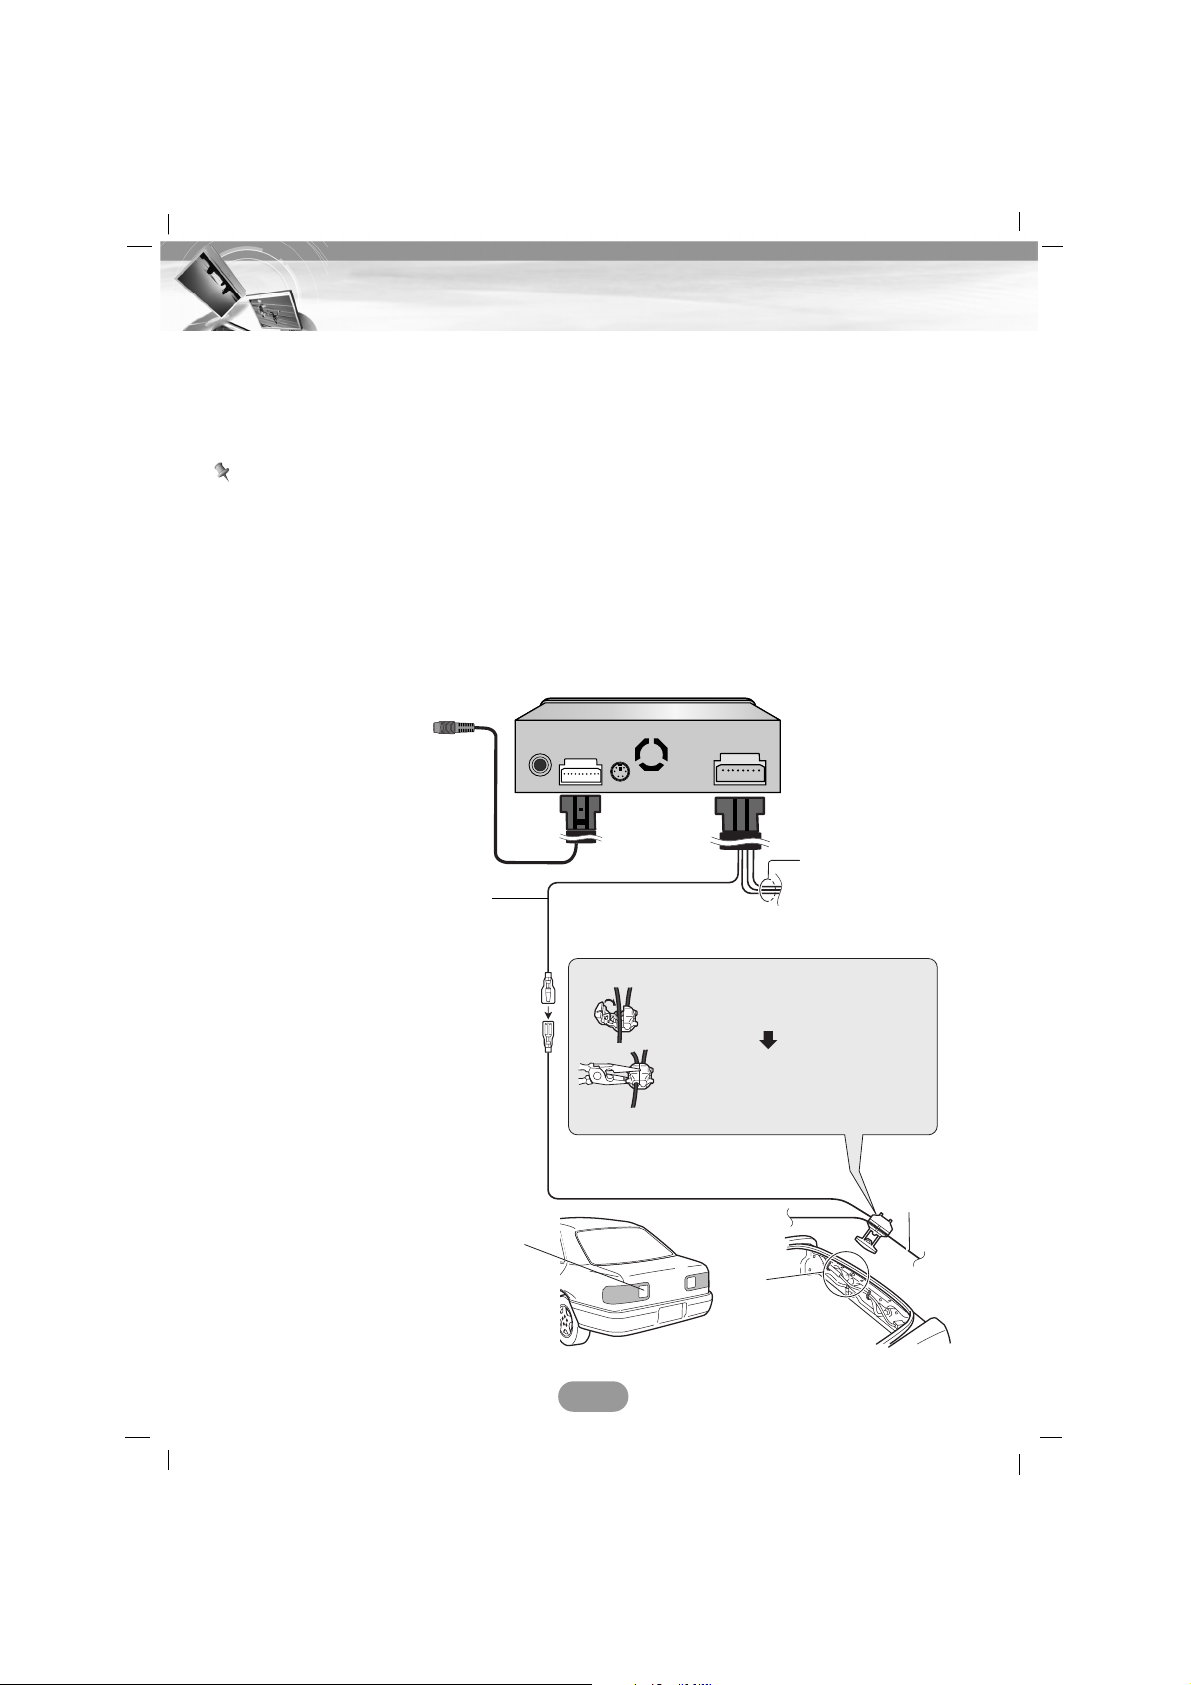
Connecting to a rear view camera
When using the unit with a rear view camera, automatic switching to video from a rear view
camera is possible when the gearshift is moved to REVERSE (R) position.
Rear view mode also allows you to check what is behind you while driving.
Notes
• Use input only for reverse or mirror image rear view camera. Other use may result in injury or
damage.
• The screen image may appear reversed.
• The rear view camera function is to use this product as an aid to keep an eye on trailers, or
backing into a tight parking spot. Do not use this function for entertainment purposes.
• The object in rear view may appear closer or more distant than in reality.
• Please note that the edges of the rear view camera images may differ slightly according to
whether full screen images are displayed when backing, and whether the images are used
for checking the rear when the vehicle is moving forward.
14
Connection
For information on
other leads see page
11.
Use the optional extension lead.
Connection method
Clamp the reversing lamp lead.
Clamp firmly with needle-nosed
pliers.
Check the position of your vehicle’s
reversing lamp (the one that lights
up when the gearstick is in reverse
[R]) and find the reversing lamp lead
in the boot.
Reversing
lamp lead
See Page 12 about
connection method.
CAM V
(Camera Video)
Pink (REVERSEGEAR SIGNAL
INPUT)
This is connected so that the navigation
system can detect whether the vehicle
is moving forwards or backwards.
Connect the pink lead to the lead whose
voltage changes when the reverse gear
is engaged. Unless connected, the
sensor may not detect your vehicle
travelling forward/backward properly,
and thus the position of your vehicle
detected by the sensor may be
misaligned from the actual position.
Page 15
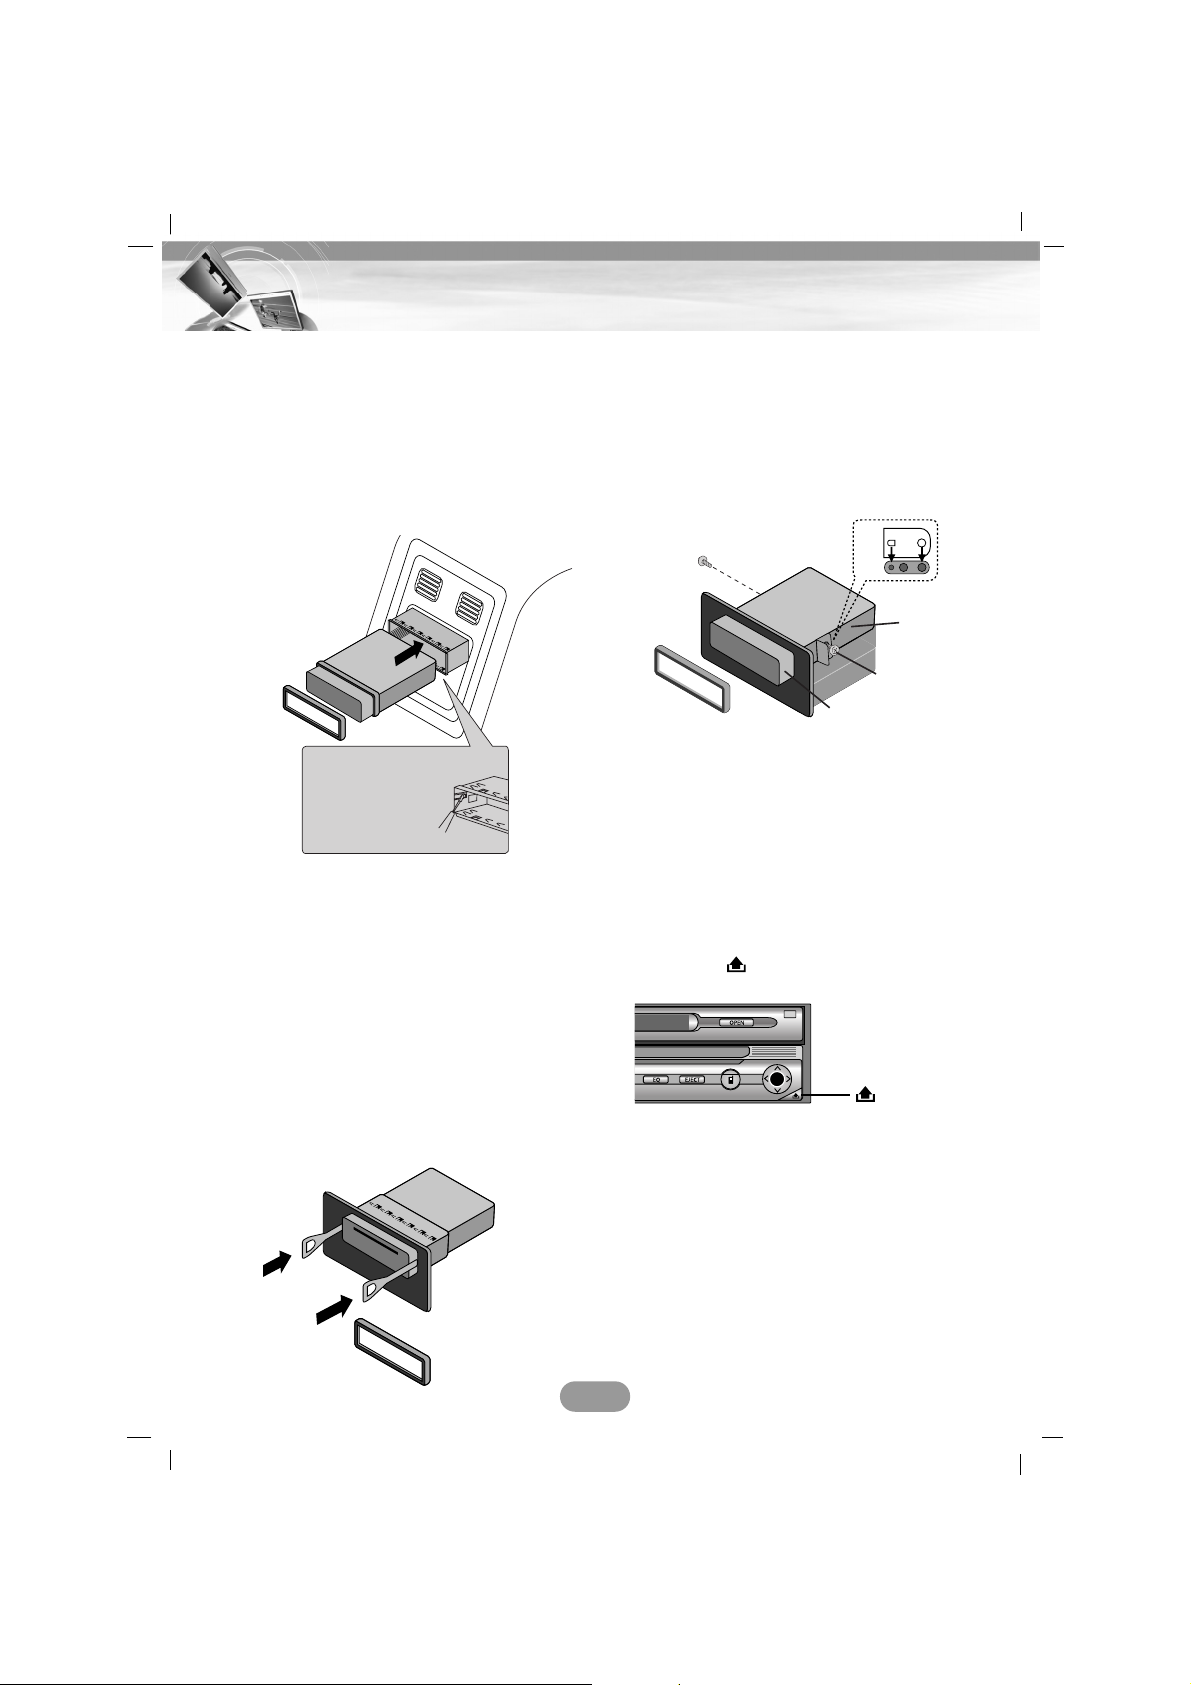
Basic installation
Before installing, make sure that the ignitionswitch is set to OFF and remove the terminal
of the car battery to avoid short-circuiting.
1. Remove the existing receiver unit.
2. Make the necessary connections.
3. Install the installation sleeve.
4. Install the unit into the installation sleeve.
Removing the existing receiver
unit
If there is already an installation sleeve for the
receiver unit in the dashboard, it must be
removed.
1. Remove the rear support from the unit.
2. Remove the control panel and trim ring
from the unit.
3. Insert the lever A into the hole on one
side of the unit. Perform the same
operation on the other side and pull the
unit out from the mounting sleeve.
ISO-DIN Installation
1. Slide the unit into the ISO-DIN frame.
2. Install screws removed from the old unit.
3. Slide the unit and frame into the dash
opening.
4. Install the dash panel or adapter plate.
5. Install the trim ring to the unit.
Detaching the control panel
You can detach the control panel when leaving the car.
When detaching or attaching the control
panel, be careful not to damage the connector
on the back of the control panel and on the
panel holder.
1. Press the “ ” button to unlock the control
panel.
2. Pull the control panel out of the unit.
3. Put the detached control panel into the
provided case.
Attaching the control panel
1. Insert the left side of control panel into the
groove on the panel holder.
2. Press the right side of control panel to fix it
to the panel holder.
15
Installation
Bend the claws
according to the
thickness of the
dashboard.
A
A
5
3
4
1
2
Page 16

Turning the unit on
Press any other buttons (POWER on the
remote control) except or EJECT button
on the control panel.
Note
When you insert the disc in the disc slot, the
unit is turned on automatically.
Turning the unit off
Press and hold “VOL” knob (POWER button
on the remote control).
Opening/ Closing the LCD panel
Press the “OPEN/CLOSE” button.
The LCD panel will be opened or closed.
Note
The LCD panel will be closed automatically
with turning the power off.
Inserting a disc
Insert a disc in the disc slot and playback will
start automatically.
Ejecting a disc
Press the “EJECT” button.
The disc is ejected from the loading slot.
Note
If the ejected disc is not removed in approximately 10 seconds, the disc is automatically
inserted again into the loading slot.
Adjusting the volume
Rotate the VOL” knob (Press VOL. / buttons on the remote control to adjust the sound
level.
Note
When you turn the unit off, the current volume
level is automatically memorized. Whenever
you turn the unit back on, it will operate at the
memorized volume level.
Mute
Press the “VOL” knob while listening to any
source.
To resume the previous volume level, press
the button again.
Changing the monitor angle
Press the “TILT” button to adjust the LCD
panel to an easily viewable angle.
Each time you press the button, the LCD
panel changes its angle step by step.
Note
The adjusted LCD panel angle will be memorized and the monitor panel will automatically
return to this angle next time the monitor
panel is opened.
Turning the LCD panel horizontal
Press the “FLIP” button.
When the LCD panel is upright and hinders
the operation of the air conditioner, the position of the panel can be turned horizontal temporarily.
To return to the original position, press the
“FLIP” button again.
Note
The LCD panel returns to the original position
automatically with beep sounds in 10 seconds
after operation.
16
Basic operation
Page 17
Selecting a EQ (Equalizer)
Press the “EQ” button repeatedly to select a
equalizer.
The mode switches as follows.
FLAT t POP t CLASSIC t ROCK t
JAZZ t VOCAL t SALSA t SAMBA t
USER t XDSS+ t FLAT...
• POP : Optimized for R&B, Soul and Country
music.
• CLASSIC : Optimized for orchestral music.
• ROCK : Optimized for Hard Rock and Heavy
Metal.
• JAZZ : Optimized for jazz music.
• VOCAL : Powerful realism with strong sound
quality.
• SALSA : Reproduces salsa music acoustics.
• SAMBA : Reproduces samba music
acoustics.
• USER : Use the menu to set the sound level
you want.
• XDSS+ : Reinforces treble, bass and
surround effect.
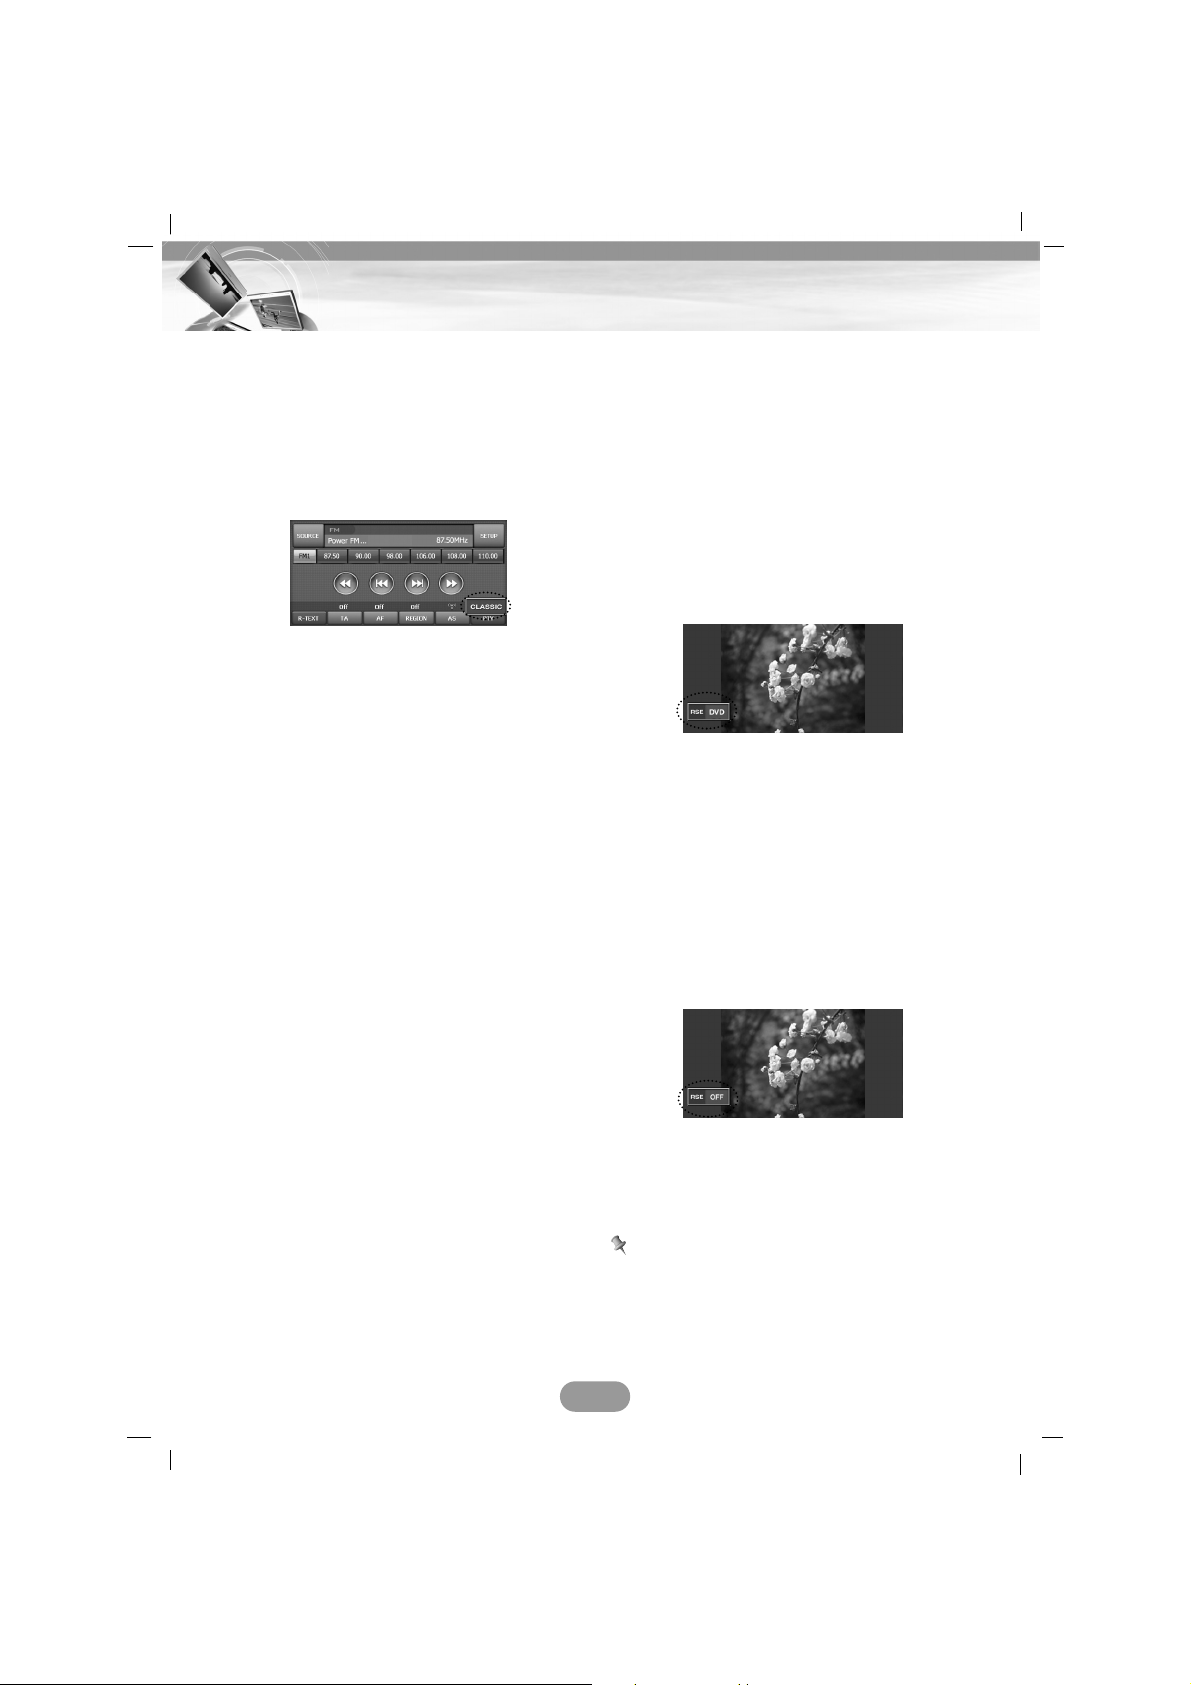
Rear Seat Entertainment
You can output any other sources via front
monitor when you are playing a disc via
monitor for rear seat connected to RSE OUT.
1. Insert a disc in the disc slot and playback
will start automatically.
2. Press the “RSE” button until “RSE DVD”
indicator appears on the screen when you
are playing a disc via monitor for rear
seat.
The “RSE DVD” indicator appears for a
few seconds on the screen and
disappears.
3. Select any other sources except for
DVD/CD source by pressing the “SRC”
button (SOURCE button on the remote
control) repeatedly.
4. To cancel it, press the “RSE” button. “RSE
OFF” indicator appears on the screen.
The “RSE OFF” indicator appears for a
few seconds on the screen and disappears
Notes
• When you select any other sources on the
“RSE OFF” mode, the playback will stop via
monitor for rear seat.
• Set the “Rear Speaker” to “Off” to optimize
this function. (Page 20)
17
Basic operation
Page 18
Selecting a source with remote
control
Press SRC (SOURCE on the remote control)
repeatedly to select a source.
The mode switches as follows.
TUNER t DVD/CD t AUX t TUNER...
Selecting a source on the screen
You can select the source on the screen to
make it operate according to your particular
needs.
1. Turn the unit on.
2. Press OPEN/CLOSE to open the monitor.
3. Select the tuner or DVD/CD source by
pressing SRC (SOURCE on the remote
control).
4. Touch in the left position of the
screen.
Note
Touch the screen on the AUX source.
Press SRC (SOURCE on the remote control)
on the navigation or bluetooth screen and
then touch in the left position of the
screen.
5. Touch a source you want.
:Touch when you want to
listen to the radio broadcasting.
:Touch when you want to play
a disc.
:Touch when you want to enter
the setup menu.
: Touch when you want to
select a bluetooth.
:Touch when you want to play
an auxiliary device.
:Touch when you don’t want to
select a source. (A Time, date and
day appear on the screen.)
If you cancel it, touch the screen.
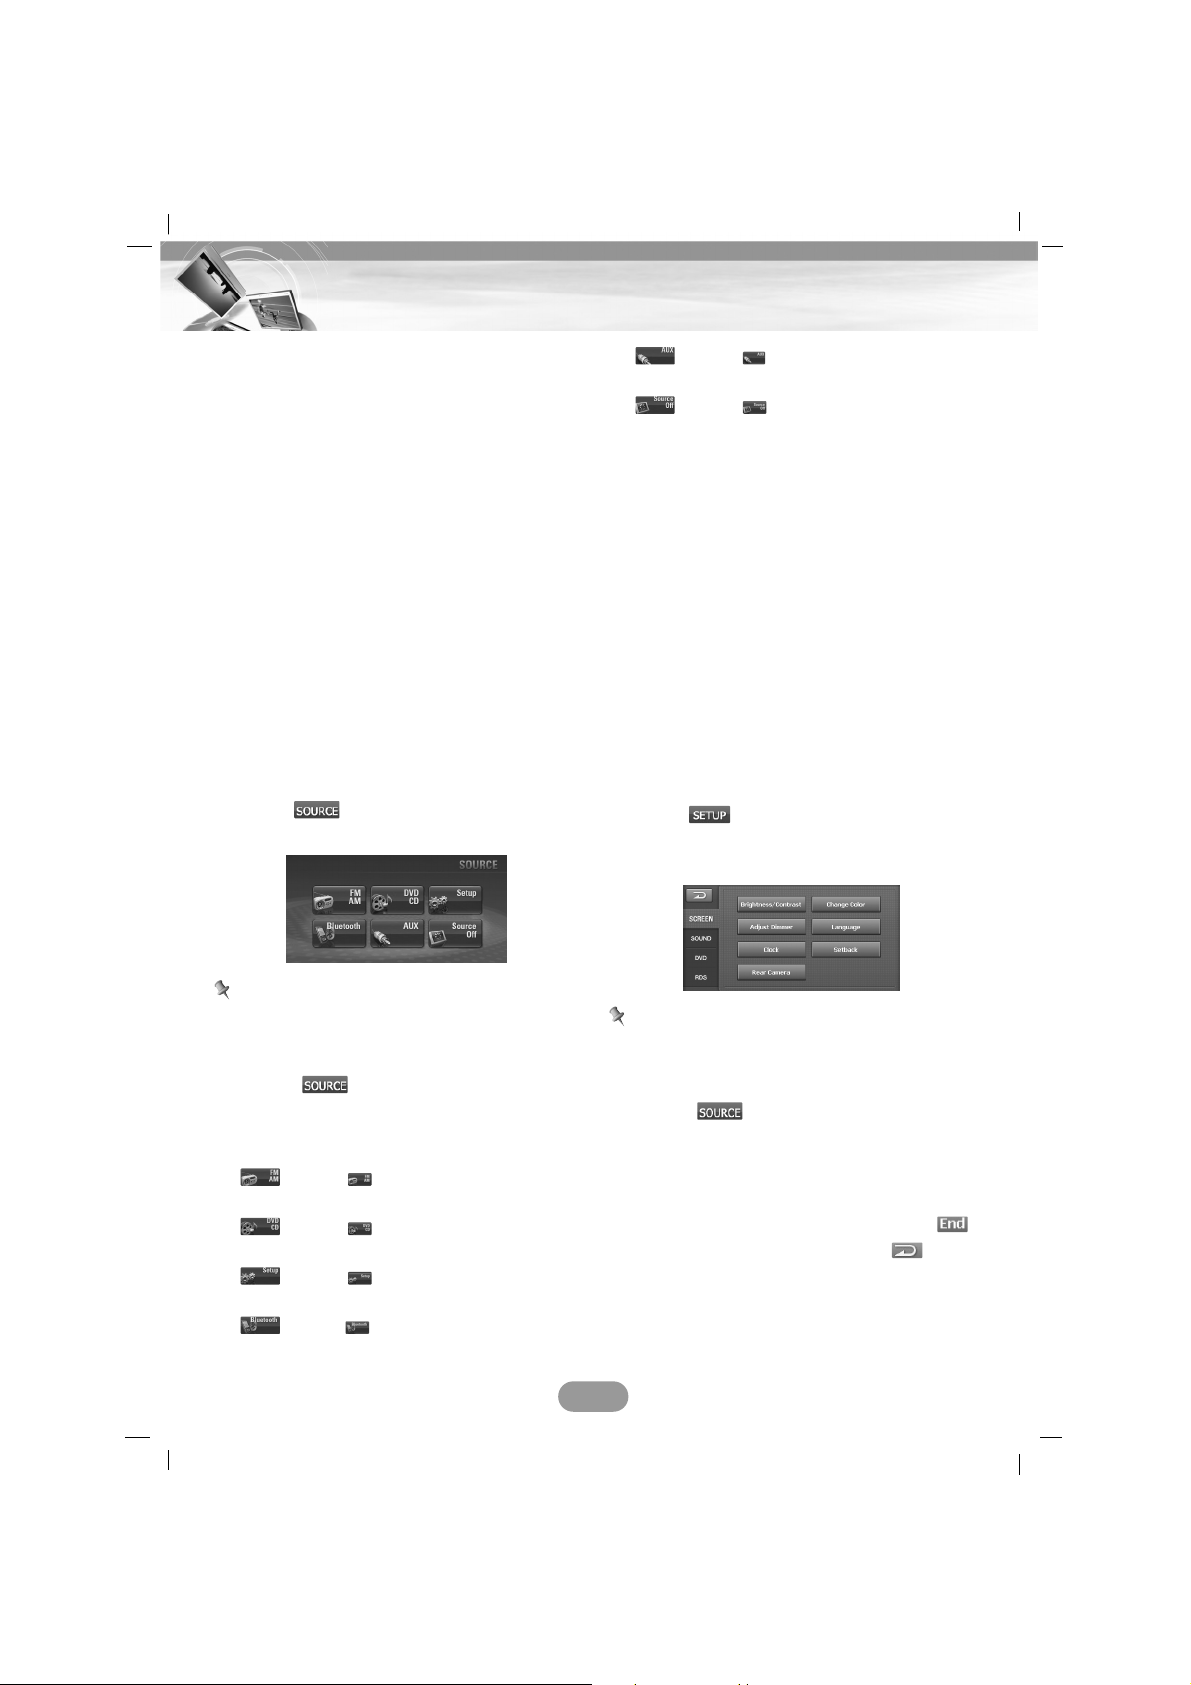
General operations of SETUP
menu
There are four kinds of SETUP menu :
SCREEN, SOUND, DVD, RDS
1. Turn the unit on.
2. Press OPEN/CLOSE to open the monitor.
3. Select the tuner or DVD/CD source by
pressing SRC (SOURCE on the remote
control).
4. Touch in the right position of the
screen.
The “SETUP” menu appears on the screen.
Note
Touch the screen on the AUX source.
Press SRC (SOURCE on the remote control)
on the navigation or bluetooth screen and
then touch in the left position of the
screen.
5. Touch the desired option.
6. Touch
the desired settings then t
ouch
to confirm your selection.
Touch to
move to the “SETUP” menu.
18
Basic operation
Page 19

SCREEN
There are seven kinds of screen menu :
Brightness/Contrast, Change Color, Adjust
Dimmer, Language, Clock, Setback, Rear
Camera
Brightness/Contrast
You can set the brightness and contrast of
screen.
Touch or to adjust the settings.
Change Color
You can set the background color of screen.
Touch the option you want between
and .
Adjust Dimmer
The dimmer adjustments for daytime,
evening, and nighttime ambient lights are
stored separately.
The brightness of LCD screen adjusts automatically to the optimum level in accordance
with the ambient light based on the set values.
• On: Activates the functions.
•Off: Cancels the functions.
Language
You can set the display language.
Touch the language button you want.
Note
Use or to scroll up or down one page
if necessary.
Clock
You can set the summer time.
• On : Activates the functions.
• Off : Cancels the functions.
Touch the + or - buttons to adjust the settings
(-1~3).
Setback
You can move the LCD panel a little forward
or backward.
• On: Activates the functions.
•Off: Cancels the functions.
19
Basic operation
Page 20
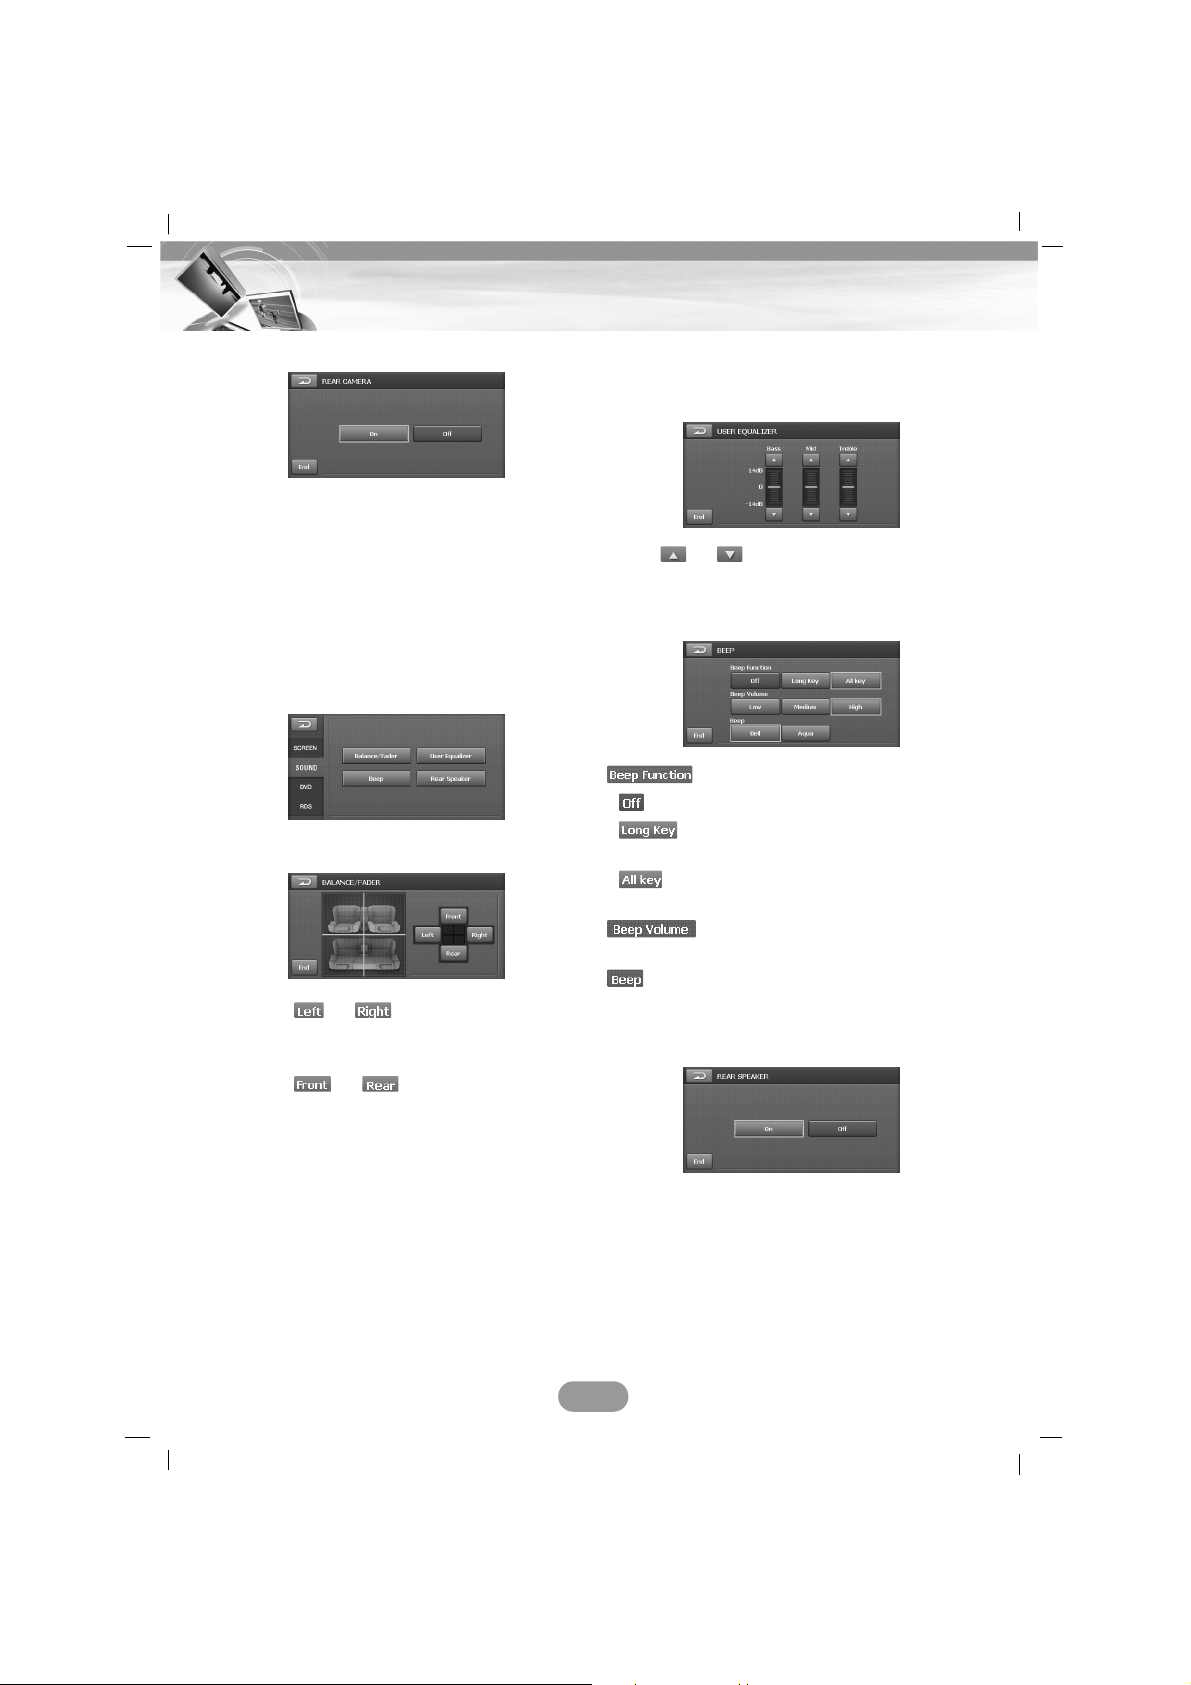
Rear Camera
• On: The rear view through the rear view
camera is automatically displayed on
the monitor when the rear gear is
applied.
•Off: Cancels the function.
SOUND
There are four kinds of sound menu:
Balance/Fader, User Equalizer, Beep, Rear
Speaker
Balance/Fader
1. Touch or .
Adjust the balance—speaker output balance between the left and right speakers.
2. Touch or .
Adjust fader—speaker output balance
between the front and rear speakers.
User Equalizer
You can adjust the sound modes and store
your own adjustments in memory.
Touch or to adjust the level of each
frequency band.
Beep
• : Cancels the function.
• : When long pressed, a beep
sound occurs.
• : When any button is pressed, a beep
sound occurs.
Adjusts the Beep Volume. (Low/Medium/High)
Selects the Beep sound. (Bell/Aqua)
Rear Speaker
• On: Selects this to turn on the rear speaker
output.
• Off : Selects this to turn off the rear speaker
output.
20
Basic operation
Page 21

DVD
There are four kinds of DVD menu:
DVD Language, Aspect Ratio, Lock, DivX
Registration
Note
This is only available only when you select the
DVD/CD source.
DVD Language
If the disc contains multi-audio languages, you
can change to a different audio.
If the disc contains multi-subtitle languages,
you can change to a different subtitle language.
To erase the subtitle, select the “Off” button.
If the disc contains multi-menu languages,
you can change to a different menu language.
If the language you want is not listed in language menu list. Select the appropriate language code after touching . See page
59 to find the language code.
• : Confirm the entered code.
• : Delete the previous character at the
cursor position.
• : Cancels the functions.
Aspect Ratio
Select the monitor type of your unit to play a
DVD recorded with an aspect ratio of 16:9.
Select when your screen’s aspect ratio is
fixed at 16:9 (Wide screen).
Select when your screen’s aspect ratio is
fixed at 4:3 (Conventional screen). While
viewing a wide screen picture, the black bars
appear on the top and the bottom of screen.
Select when your screen’s aspect ratio is
fixed at 4:3.
While viewing a wide screen picture, the black
bars do not appear. The left and right edges
of the pictures will not be shown on the
screen.
21
Basic operation
Number
buttons
Page 22

Lock
You can secure the device against unauthorized use by assigning a password. In addition, you can specify a rating level. If you set
a rating level that is lower than the one found
on the inserted DVD, it can be played only
after entering the password.
If you have already assigned a password, first
enter the old password with the number buttons 0-9.
Select the desired age-appropriate release 1-
8.
To erase the desired age-appropriate release,
select the “Off” button.
Notes
• Rating level means that some DVDs are
equipped with a code that defines the ageappropriate release.
• If you have not yet assigned a password,
the present password is 0000.
• If you forget your password, input the 6-digit
number “210499” on the “DVD” mode of
“SETUP” menu and then touch . The
password is cleared.
You can enter or change password.
1. Touch “Password”.
2. Enter the new password with the number
buttons 0-9. And then touch .
3. Confirm the new password with the num-
ber buttons 0-9.
4. Touch to reset the password to the
newly assigned one.
1. Touch the v or V buttons to select the
area code.
See page 59 to find the area code.
2. Touch the “End” button to exit the setup
menu.
Notes
• If you have not yet assigned a password,
the present password is 0000.
• Do not forget your password. A new pass-
word cannot be set without your old password.
DivX Registration
We provide you with the DivX® VOD (Video
On Demand) registration code that allows you
to rent and purchase videos using the DivX®
VOD service.
For more information, visit www.divx.com/vod.
Use the registration code to purchase or rent
the videos from the DivX® VOD service at
www.divx.com/vod.
Follow the instructions and download the
video onto a disc for playback on this unit.
22
Basic operation
Page 23

RDS
There are two kinds of RDS menu:
PI Mode, TA Mode
PI Mode
If the sound of a station with different PI is
heard intermittently, the receiver mutes the
sound right now.
If the sound of a station with different PI is
heard intermittently, the receiver mutes the
sound after 1 second.
TA Mode
When the newly tuned station does not
receive TP information for 5 seconds, the
receiver retunes to the next station which has
the same TP information as well as the same
PI as the last station.
When a newly tuned station has no TP information for 5 seconds, a beep sound is output.
23
Basic operation
Page 24

What is GPS?
The Global Positioning System (GPS) is a
satellite-based navigation system made up of
a network of 24 satellites placed into orbit by
the U.S. Department of Defense.
GPS was originally intended for military
applications, but in the 1980s, the government
made the system available for civilian use.
GPS works in any weather conditions,
anywhere in the world, 24 hours a day.
There are no subscription fees or setup
charges to use GPS.
About satellite signals
Your unit must acquire satellite signals to
operate. If you are indoors, near tall buildings
or trees, or in a parking garage, the unit
cannot acquire satellites.
Acquiring satellite signals
Before the unit can find your current location
and navigate a route, you must do the
following:
1.Go outside to an area free from tall
obstructions.
2.
Turn on the unit.
Acquiring satellite signals can take a few
minutes.
General opreation
of navigation
Finding and registering a destination
on the map
1. Turn the unit on.
2. Press OPEN/CLOSE to open the monitor.
3. Press NAVI to view the map on the
screen.
4. Select a destination by simply touching
and dragging the map on the screen and
the cross hairs arrears on the screen.
5. Touch on the screen and
**“WHOLE ROUTE OVERVIEW” screen
appears on the screen. (Page 25-26)
Touch if you want to register the
destination. The destination is registered
in the “Favorites” menu automatically.
(Page 30)
Touch if you want to find the destination by searching POI. (Page 31-32)
6. Touch to find a destination.
Drive in accordance with the screen and
voice information. The destination is
stored in the “Recent Destinations” menu
automatically. (Page 30)
24
Getting started with navigation
GPS
GPS
GPS
GPS
Current position
Page 25

Finding the registered the destination
1. Press “NAVI MENU” button on the map
screen.
2. Touch “DEST.” > “Favorites”.
3. Touch the destination you want and then
touch .
4. Touch to find a destination.
Drive in accordance with the screen and
voice information.
Finding the stored the destination
1. Press “NAVI MENU” button on the map
screen.
2. Touch “DEST.” > “Recent Destinations”.
3. Touch the destination you want and then
touch .
4. Touch to find a destination.
Drive in accordance with the screen and
voice information.
**“WHOLE ROUTE OVERVIEW” screen
You can check information about the route
between your current location and destination.
Guide mode
Touch on the screen. (Refer to the
step 6 on the page 24.)
Mode in which guidance is given as you drive
to your destination (the system automatically
switches to this mode as soon as a route has
been set). The map of your surroundings is
shown on the left, and an arrow indicating or
illustrating the direction of travel is shown on
the right.
Drive in accordance with the screen and voice
information. This option also displays onscreen instructions whenever the system is in
guide mode. Here, you will learn how to interpret the various information presented to you
on the screen, and how to customize the guidance information display.
Turn By Turn mode
Touch on the screen.
This view indicates the distance to your next
turn, and the name of the next street immediately after completing the previous turn.
Voice and visual prompts are displayed at
varying intervals to indicate your next turn or
change of direction.
• : Moves to the guide mode.
• : Moves to the WHOLE ROUTE
OVERVIEW screen.
• : Moves to the simulation mode.
(Page 26)
• : Returns to the previous screen.
• : Moves to the map screen.
• / : Scrolls up or down one page.
25
Getting started with navigation
Page 26

Simulation mode
Touch on the screen.
This is a demonstration function for shops.
After a route is set, the simulation of the route
guidance to a destination is automatically displayed.
• : Play
• : Pause
• / : You can simulate at 90 km ( ),
180 km ( ), or 360km ( ) speed
in case of highway.
(In case of general streets, the
simulating speed may be low. )
• : Returns to the previous screen.
Finding the destination by way of the
way point
1. Select a desired way point by simply
touching and dragging the map on the
screen when you are navigating.
2. Touch > .
3. Touch .
**
“WHOLE ROUTE OVERVIEW” screen
appears on the screen.
4. Touch to find a destination.
Drive in accordance with the screen and
voice information.
Notes
• If you want to switch the way point and
destination, touch .
• If you delete the way point or destination,
touch .
X3
X2
X1
26
Getting started with navigation
The selected
way point
The selected
way point
Page 27

Indicators of the map screen
The current location of your vehicle
The arrow icon (or car icon) indicates
your heading, and the display moves
automatically as you drive.
The cross hairs indicate a position
on the map when you scroll away
from your current location.
Compass indicator (The red arrow
indicates north.)
Each touch changes the map’s display direction. (North up, Heading up
or 3D)
North up
The map display always has north at
the top of screen.
Heading up
The map display always shows the
vehicle’s direction as proceeding
towards the top of the screen.
3D
The map displays always the basic
outline and details of the surrounding
roads and general area.
Voice guidance is disabled. To cancel
it, press “NAVI” button for about 2
seconds. The disappears on the
screen and voice guidance is
enabled.
GPS status indicator
You ca n check reception signals from
the GPS satellite, such as information
about your satellite fix, latitude,
longitude and speed of your car.
The color of the icons indicates the
signal reception status. The green
represents a satellite whose signals
are actually being used for
positioning.
The red means that signals are being
picked up but are not currently in use
for positioning.
•
Latitude - The angular distance,
measured north or south
from the equator, of a
point on the earth's
surface.
•
Longitude - The angular distance
east or west on the
earth's surface, as
measured in degrees
from the meridian of a
particular point to the
prime meridian of
Greenwich, England.
•
Speed - The rate of movement, as
expressed by kilometers or
miles per hour.
Distance to the destination
Distance to the way point
If way point is set, the display
changes with each touch. When way
point is set, the distance to the
destination and the distance to the
way point is shown.
You can show and hide the shortcut
icons on the map screen.
27
Getting started with navigation
Page 28

A communication system for
informing drivers of the latest traffic information using FM multiplex
broadcast.
Information such as traffic jams or
accidents can be checked on the
display.
When a route has been calculated,
touch to check whether there is any
traffic jam or closure information on
your route. When no route has been
calculated, touch to display the
traffic list.
- Please see page 35-36 for details.
• Area for a RDS-TMC station with
good reception: Black
• Area for a RDS-TMC station with
poor reception: Gray
• Area for a RDS-TMC station with
good reception.
(When there is new broadcasting:
Green)
• Area for a RDS-TMC station with
good reception.
(When there is no new broadcasting:
No color)
• Area for a RDS-TMC station with
poor reception.
(When there is no broadcasting:
Gray)
Arriving time to the destination
Remaining time to the destination
A speed limit on the road that
you’re driving now.
Extended lane
The indicators for extended lane and speed
limit are displayed only in the region where
their data are included in the map.
Zoom in / Zoom out indicator
The current map scale is indicated by
the map scale indicator toward the
bottom right of the map. You can easily
increase or decrease the map scale
(zoom in or zoom out) using the # and
3 buttons on the Navigation
commander. Each click steps the scale
up or down in the following order:
50 m
n 100 m n 200 m n 400 m
n 800 m n 1 km n 3 km n 5 km
n 10 km n 20 km n 50 km n 100
km n 200 km n 400 km
Map scale indicator
This map scale is indicated by
distance.
28
Getting started with navigation
Page 29

Navigation menu list General operations of naviga-
tion menu
1. Turn the unit on.
2. Press OPEN/CLOSE to open the monitor.
3. Press NAVI MENU. The navigation menu
appears.
4. Touch , , , or to select
the desired option and the menu moves to
the second level.
5. Touch the desired option and the menu
moves to the third level.
6. Touch the desired setting then touch
to confirm your selection. Some items
require additional steps.
7. Press NAVI to move to the map screen.
29
Navigation menu
Page 30

DEST. (DESTINATION)
You can seach the destination by selecting
the registered location.
Favorites
You can register the location up to 100 in the
“Favorites” menu. You can find the registered
destination by using the “Favorites” menu.
1. Press NAVI MENU. > Touch DEST. >
Favorites.
The locacions are displayed in
distance order. When you touch
, appears and
the locacions are displayed in
registered time order.
Scrolls up or down one page.
2. Touch the destination you want.
3. Touch .
4. Touch .
Drive in accordance with the screen and
voice information.
Recent Destinations
You can store the last 20 of your recent finds
in the “Recent Destinations” menu.
1. Press NAVI MENU. > Touch DEST. >
Recent Destinations.
The locacions are displayed in
name order. When you touch
, appears and
the locacions are displayed in
registered time order.
Scrolls up or down one page.
2. Touch > .
Drive in accordance with the screen and
voice information.
30
Navigation menu
Page 31

POI Search
The POI list is a collection of hundreds of
interesting or useful places organized by
easy-to-find categories.
Information about various facilities (Points of
Interest POI), such as gas stations, amusement parks or restaurants is available.
By selecting the category (or entering the POI
Name or Position), you can search for a POI.
Press NAVI MENU. > Touch DEST. > POI
Search.
Category
1. Touch and then touch the
desired item.
2. Touch the desired item.
The items are displayed in distance
order. When you touch ,
appears and the items are dis
played in alphabetical order.
Scrolls up or down one page.
(The category can search up to 100
POI and display 5 POI per a page.
3.
Touch > .
Drive in accordance with the screen and
voice information.
Searching the POI near the point you set
1. Touch .
2. Touch the desired item.
:
You can search the POI near the current
location.
:
You can search the POI within the region
you set.
:
You can search the POI near the home
you set.
:
You can search the POI near the destination you set.
:
You can search the POI near the point you
select the destination on the map screen.
Region
1. Touch
to
search the POI in the
region you want.
2. Touch
the region you want
and the “POI
SEARCH” screen appears.
31
Navigation menu
Page 32

Name search
You can search the POI within the selected
region.
1. Touch .
2. Input the address serach pop-up by touching the keypad buttons.
3.
Touch > .
Drive in accordance with the screen and
voice information.
Address Search
1. Press NAVI MENU. > Touch DEST. >
Address Search.
2. Touch “Region” and then touch the desired
region.
3. Touch the desired items.
:
You can search a city.
:
You can search the address in city, street ,
house number order.
:
You can search the address in postcode,
city, street, house number order.
:
You can search the address in city, street
order.
Note
When you input the house number, input the
house number by touching number buttons
and then touch .
4.
Touch > .
Drive in accordance with the screen and
voice information.
Home/ User1/ User2
Setting home/ User1/ User2
You can set a home location or location you
want for the place you return to most often.
1. Press NAVI MENU. > Touch DEST. >
Home/ User1/ User2. > .
32
Navigation menu
Enter name is displayed.
Keypad
buttons
Delete the previous
character at the cursor position.
Inserts a space at
the cursor position.
Alternates between Number and Symbol lists.
Confirm the
entered name.
Page 33

2. Touch the desired items.
:
You can set the current position to home/
User1/ User2.
:
You can set the address you search to
home/ User1/ User2.
:
You can set the POI you search to home/
User1/ User2.
:
You can set the recent destination you
select to home/ User1/ User2.
Finding home
After you set your home location, you can
route to it at any time.
1. Press NAVI MENU.
2.
Touch DEST. > Home.
Drive in accordance with the screen and
voice information.
Finding User1/ User2 location
After you set your User1/User2 location, you
can route to it at any time.
1. Press NAVI MENU.
2.
Touch DEST. > User1/User2.
3.
Touch .
Drive in accordance with the screen and
voice information.
ROUTE
You can change the route calculation conditions using the Route menu.
Route Overview
You can check information about the route
between your current location and your
destination.
Press NAVI MENU. > Touch ROUTE > Route
Overview.
The “WHOLE ROUTE OVERVIEW” screen
appears on the screen.
Refer to the page 25 for details.
33
Navigation menu
Page 34

Route Summary
Press NAVI MENU. > Touch ROUTE > Route
Summary.
The “TURN BY TURN SUMMARY” screen
appears on the screen.
Refer to the page 25 for details.
Route Options
Press NAVI MENU. > Touch ROUTE > Route
Options.
The “ROUTE OPTIONS” screen appears on
the screen.
Route Condition
Fast: Calculate a route with the travel time to
your destination as a priority.
Short: Calculate a route with the distance to
your destination as a priority.
Avoid
TOLL: This setting controls not-toll roads
(including toll areas) that should be
taken into account.
MOTORWAY:
This setting controls not-motorways
that may be included in the road
calculation. (A route using motorways
may be calculated in some cases,
such as when setting your destination
far away.)
FERRY:This setting controls not-ferry
crossings that should be taken into
account.
Note
The avoid function is used to search for a
path to avoid Tolls, Motorways and Ferry
crossings.
However, Toll, Motorways and Ferry may be
included in some paths where bypass to the
destination is severe.
Recalculate
The route from the current position to your
destination is recalculated.
End
Return to the previous map screen.
Edit Waypoint
You can delete and switch way point (locations you want to visit on the way to your destination) and you can recalculate the route to
pass through these location.
1. Press NAVI MENU. > Touch ROUTE >
Edit Waypoint.
The “EDIT WAYPOINT” screen appears
on the screen.
2. Whenever you set a way point, your point
is added to the “EDIT WAYPOINT”. Switch
the display to search for points. When you
want to display the map for a certain point
after searching for it, you can touch “ADD”
to add that point to the way points.
:
You can set the current position to way
point.
34
Navigation menu
Page 35

:
You can set the address you search to
way point.
:
You can set the POI you search to way
point.
:
You can set the recent destination you
select to way point.
2. When the setting is completed, touch
. And then Touch .
Drive in accordance with the screen and
voice information.
Notes
• If you want to switch the way point and
destination, touch .
• If you delete the way point or destination,
touch .
Cancel Route
If you no longer need to travel to your destination or if you want to change your destination,
press NAVI MENU. > Touch ROUTE. >Cancel
Route.
And then touch . Your route is candelled.
Recalculate
The route from the current position to your
destination is recalculated.
1. Press NAVI MENU. > Touch ROUTE >
Recalculate.
The “WHOLE ROUTE OVERVIEW”
screen appears on the screen.
2.
Touch .
Drive in accordance with the screen and
voice information.
RDS TMC
You can check traffic information transmitted
by the FM radio service through the Radio
Data System (TMC) on the display. Such traffic information is updated periodically. When
you receive traffic information, the Navigation
System automatically displays an icon informing you of the traffic information. You can also
select whether to recalculate the route to
avoid a traffic jam.
1. Press NAVI MENU.
2. Touch “RDS TMC” > “TMC Event”/
“Station Search”/ “Display Icons”/ “TMC
Options”.
TMC Event
Traffic Information is displayed on the screen
in a list format.
This allows you to check how many traffic
incidents have occurred, their location, and
their distance from your current position.
Touching an incident you want to see allows
you to view the detailed information about the
incident. If the information cannot be displayed on one screen, touch v or V to view
the remaining information.
The items are displayed in
alphabetical order. When you touch
appears and the items
are displayed in distance order.
When new traffic information is
received, the current information is
changed, or old information has
been removed, the list is updated
to reflect the new situation.
The traffic-related position is
displayed on the map.
35
Navigation menu
Page 36

Notes
• A line indicates the length of the traffic jam.
It appears only when the scale on the map
is 800 m or lower.
Stop and go : Orange
Stopped traffic : Red
Closed/Blocked : black
• I
con for traffic information appears only when
the scale on the map is 800 m or lower.
• If there is a traffic jam on your route (at
least 1 km ahead on an ordinary road, while
driving on the motorway, 3 km ahead), the
navigation system automatically searches
for detour possibility.
• The version for the location information
received from broadcasting station and
applied by Navigation software may be different. In the case, the location information
of event lists may be incorrect or not exist.
Station Search
The RDS-Tuner of the navigation system
automatically tunes to the radio station to
receive available traffic information (RDSTMC station). If reception is poor, you can
switch to another station manually. Once the
receiving radio station is selected, the system
automatically tunes to stations that provide
traffic information according to the location of
the vehicle.
You can pre-select up to six TMC
stations (Preset Station). From the list
of the TMC stations, you can select the
one you want to receive.
Available radio stations can be
searched automatically.
If a radio station with a good signal is
found, the tuning mode is stopped.
Store the current RDS-TMC station in
the preset list. If there are already 6
stations stored in the list, select one to
be overwritten.
Display Icons
The name of the displayed traffic information
items and list of icons appears on the screen.
1. Select the type of traffic information to display with the navigation system.
2. A yellow tickappears next to the
selected traffic information.
To uching the “All” button selects all the
traffic information.
Note
The traffic information in this section indicated
the following types of traffic information ; stop
and go, stopped traffic, closed/blocked roads.
TMC Options
• Dynamic Recalculation
ON: This function is used to search for a
new path without traffic jam if there
are traffic jam sectors in the forward
traveling direction of the vehicles
during towards to the destination.
OFF: Cancels the function.
• Event Alarm
ON: Alarm sound rings if there are traffic
jam sectors in the direction of the
vehicles during towards the
destination.
OFF: Cancels the function.
• Auto Seek Mode
ON: When you receive traffic information,
the Navigation System automatically
seeks.
OFF: Cancels the function.
36
Navigation menu
Page 37

SETUP
Map Display
• Dimension
2D: The 2D view is the straight-forward
two-dimensional view. This is the
default map view. In this view, the
map is dynamically updated, and
allows for manual panning and
zooming.
3D: The 3D view is a simplified
three-dimensional view showing the
map in a basic 3D relief. It shows the
basic outline and details of the
surrounding roads and general area.
• Auto Zoom
ON: Enlarges or Diminishes automatically
the map level.
OFF: Cancels the auto zoom.
• One Way
ON: Displays to one-way.
OFF: Cancels one-way display.
• Favorites
ON: Sets the favorites search.
OFF: Cancels the favorites search.
• Track
You can set the system to display tracking
dots that show the route you have driven.
ON: Display tracking dots for all journeys.
OFF: Do not display tracking dots.
Volume
You can set the sound volume for navigation.
Touch or buttons to change the guidance volume.
Mute : Mutes navigation volume.
Manage Favorites
You can change the registered location.
•
Changes the home location.
•
Changes the favorites.
•
Changes the User1 Location.
•
Changes the User2 Location.
INITIALIZE
•
You can delete all the listing from the memory.
•
You can set all the function to their default
settings. (The settings are initialized but the
current route remains.)
37
Navigation menu
Page 38

Color Display
You can set the background color.
• Icon Type
You can display the icon type on the map
screen of current position by touching
or
.
• Map Color
Day: Always use day-driving background
color.
Night: Always use night-driving background
color.
Auto: Automatic switch to night-driving
background when headlights are
switched on.
Language
You can set the display language.
Touch the language button you want.
Guidance
• TTS Voice
ON: When the TTS function is active, you
can hear the TTS voice information
(Road name to speech).
OFF: Cancels the function.
Note
You can listen to the voice about road
name only when the language set for TTS
and the nation that you’re driving now. The
voice information and its pronunciation
may not be correct or be played back with
low quality.
• Speed Camera
ON: When the speed camera is active,
you can hear the camera warning
voice information.
OFF: Cancel the function.
Note
Use of the speed camera may be illegal in
some countries.
• Speed Limit
ON: When the speed limit is active, you
can hear the over speed warning
sound effect.
OFF: Cancel the function.
• Favorites
ON: When the favorites is active, you
can hear the registered point voice
information or registered sound effect.
OFF: Cancel the function.
• Junction
ON: When the junction is active, you can
hear the merged road warning voice
information.
OFF: Cancel the function.
SET UNITS
You can set the distance to meter or mile.
38
Navigation menu
Page 39

Understanding Bluetooth
wireless technology
Bluetooth wireless technology establishes a
wireless link between two devices, such as
your phone and the unit.
The first time you use two devices together
you must connect them by establishing a
relationship using a PIN code. After the initial
connecting, the two devices can connect automatically each time you turn them on.
Notes
• There may be restrictions on using Bluetooth
technology in some locations.
• Due to the variety of Bluetooth phones and
their firmware version, your device may
respond differently when performing over
Bluetooth.
• As difference in functional operation by
model is mainly resulted from feature of a
hands-free phone, consult manufacturer of a
phone if you have any question.
Connecting your unit and bluetooth phone
To connect using the unit settings
1. Press the PHONE ( )button on the con-
trol panel. And then touch .
The “SETUP” screen appears.
2. Touch .
The “CONNECT PHONE” screen appears.
3. Touch .
The “ ” pop-up
screen appears on the screen.
It will take about 25 seconds, to continue
the process.
If you want to cancel, touch .
4. Touch a bluetooth phone you desire from
the “SEARCH RESULT” screen.
The “Connecting Bluetooth phone...” popup screen appears.
5. Input the PIN code (1234) in your phone
when the pop-up screen is displayed on
the screen.
When it is successfully connected, the
“This phone is connected.” pop-up screen
appears and then the mark is displayed in the "CONNECT PHONE"
screen.
When it is not connected, the connection
failure message appears and then the
screen moves to the "CONNECT PHONE"
screen.
Notes
• Before connecting, check the PIN code set-
tings. Refer to “Changing the PIN code” on
the page 45.
• This may not connect using the unit settings
depending on the type of phone. Connect
using the phone settings.
39
Bluetooth operation
Page 40

40
Bluetooth operation
To connect using the phone settings
Your phone’s Bluetooth feature may be set to
off by default. To use the Bluetooth feature,
Bluetooth must be turned on in your phone.
Refer to your phone’s user guide.
1. Enable the phone’s Bluetooth component.
This might be in a menu called Settings,
Bluetooth, Connections, or Hands-free.
2. Initiate a search for Bluetooth devices.
These settings might be located in a menu
called Bluetooth, Connections, or Handsfree.
3. Select the your device from the list of
phone.
4. Input the PIN code (1234) in your phone.
When it is successfully connected, the
“This phone is connected.” pop-up screen
appears and then the mark is displayed in the "CONNECT PHONE"
screen.
Notes
• When you connect the headset in your
phone, icon is displayed on the upper
right side.
• It works the same as the wired headset for
mobile phone. The headset functionality is
for telephone conversation. It is not for listening to music.
• Unlike the hands-free functionality, Headset
connection will allow only two functions
“answering calls” and “making a call from the
latest call”. Also the caller’s number is not
displayed when answering calls.
• If connecting through LAN9700R, initiate the
hands-free connection first. If your Bluetooth
phone does not support the hands-free connection, then initiate the headset connection.
• If connecting through a Bluetooth phone, the
hands-free connection or headset connection may not operate depending on the type
of the phone.
Disconnecting/Connecting
again the bluetooth phone
1. Touch the connected phone. And then
touch .
Your phone is disconnected and the
mark disappears.
2. Touch the disconnected phone again to
connect your phone.
The mark appears again.
Page 41

Making a call with phone
number
Connect your unit and bluetooth phone before
you make a call.
1. Press the PHONE ( ) button on the
control panel.
The “PHONE” screen appears.
2. Input the phone number you want to call
by touching the number buttons. And then
touch .
3. Touch to finish the telephone
conversations.
Notes
• If you make a mistake while dialing, touch
to erase one digit at a time.
• Touch for long to make a call from a
latest call.
• The user’s recent call history applies only to
the hands-free connection. (Making a call
from a recent call with the headset connection depends on the call history of the
Bluetooth phone.)
• The headset connection allows only making
a call from a recent call.
• You cannot use and when calling.
Switching the sound path during a call
You can hear sound through the speaker of
unit of phone by touching / .
Making a call with speed dial
numbers
To make a call from a speed dial numbers,
press for a long after pressing the
speed dial number assigned to the Bluetooth
phone, or press the last digit of the speed dial
number for long.
Ex) When making a call from the speed dial
number 10, touch 1 and touch 0 for long.
Note
Make sure that the speed dial functionality in
the Bluetooth phone is enabled before using.
Making a call from recent calls
Your unit keeps a record of your recently
received and dialed calls.
Touch and hold for about 2 seconds.
41
Bluetooth operation
Page 42

Answering calls
1. When you receive a call, your phone rings
and the “Call from” pop-up screen is displayed on the screen.
2. Touch to answer the call.
If you want to reject a call, touch .
Notes
• If the Call-ID service is available, the caller’s
phone number is displayed.
• If the phone number is in the phone book,
phone book entry’s name is displayed.
• If the incoming call is from a number stored
in your Contacts, the entry’s name is displayed. The caller’s phone number may also
be displayed, if available.
• If “Rejecting” function is unusable, then the
phone connected to the device does not
support the rejecting calls function.
Using your Phone Book
You can view all entry’s numbers by Phone,
Home, Office.
1. Press the PHONE ( ) button on the
control panel. And then Touch .
The “PHONE BOOK” screen appears.
2. Touch the phone book entry you want to
call.
Searching the phone number
You can search a contacts entry you want.
1. Touch on the “PHONE BOOK”
screen.
Note
•Touch to change touch button
language into Latin.
Touch to change touch button
language into alphabet on the Latin
touch screen.
•Touch to change touch button type
into number/symbol.
Touch to change touch button
language into alphabet on the number/
symbol touch screen.
2. Enter a part of registration number or letter
to search a contacts entry you want by
using the keypad, , , , .
3. Touch .
42
Bluetooth operation
Page 43

Adding the phone number
You can copy the phone book entries are supplied on the memory of phone to the unit.
1. Touch on the “PHONE BOOK”
screen.
The “Waiting Data...” screen displays on
the screen.
2. When you choose "Telephone No. Item
Transmission" in the bluetooth phone, you
can search LAN9700R.
(The bluetooth phone control method may
differ according to the manufacturer. Refer
to the Owner’s manual.)
3. Press “Sending the phone number” in
Bluetooth phone.
4. The telephone number is transmitted to
the LAN9700R from the Bluetooth phone.
Note
This is only available for
on the “PHONE
BOOK” screen.
Deleting the phone number
You can delete all the list.
1. Touch on the “PHONE BOOK”
screen.
2. Touch .
Editing the phone number
You can edit the information of contacts entry
you want.
1. Touch on the “PHONE BOOK”
screen.
2. Touch . And then change the information.
Note
If the hands-free or headset connection has
already been made, disconnect the corresponding connection to add a new contacts entry.
43
Bluetooth operation
Page 44

SETUP
You can make various adjustments to items
by using the setup menu.
1. Press the PHONE ( ) button on the
control panel. And then Touch .
The “SETUP” screen appears.
2. Set the items you want by touching
, ,
and
.
Note
You can only operate the when
calling.
Connect Phone ( )
Search ( )
You can search and connect a bluetooth
phone. Refer to the “Connecting your unit and
bluetooth phone” on the page 39.
End ( )
You can move to the “PHONE” screen.
Edit ( )
You can edit the information of bluetooth
phone.Touch and the pop-up screen displays in the screen.
- Info. (Information)
Touch and the pop-up screen displays
in the screen.
* Auto Connection
Bluetooth phone can be automatically
connected, if there is a registered
Bluetooth phone in the “CONNECT
PHONE” screen and the “Auto Connection”
is selected on the “INFORMATION” screen.
* Manual Connection
Bluetooth phone can be manually connect
ed using the the function, if there is a reg
istered Bluetooth phone in the “CONNECT
PHONE” screen and the “Manual
Connection” is selected on the “INFOR
MATION” screen.
In these cases, you would try to connect
from the registered list at "CONNECT
PHONE".
- Delete
You can delete the selected list.
- Cancel
Cancels the functions.
Notes
• Touch the button in the current screen
to exit previous screen.
• A maximum of 6 Bluetooth phones can be
registered at one time.
• Touch the or buttons to select the list
you want to view.
44
Bluetooth operation
Page 45

Bluetooth Info. ( )
You can check the Bluetooth phone information.
Name ( )
You can change the Bluetooth phone name.
1. Touch and the “BLUETOOTH
INFORMATION” screen displays in the
screen.
2. Change the Bluetooth phone name using
the keypad, , , , .
3. Touch .
End ( )
You can move to the “PHONE” screen.
Show ( )/ Hide ( )
You can select whether bluetooth phones are
able to search the LAN9700R or not.
Note
Touch the button in the current screen to
exit previous screen.
Save PIN Code ( )
You must select to connect successfully
your unit and bluetooth phone.
On ( )/Off ( )
Touch if you want to connect your unit
and bluetooth phone. Unless, touch
.
Changing the PIN code
1. Touch . And then input the PIN
code you want to change.
2. Touch and the changed PIN code
appears.
Mic Volume ( )
Adjust the microphone volume by touching
/.
45
Bluetooth operation
Page 46

Playing a DVD/VCD disc
The disc is drawn in, and “Disc reading”
appears on the display window, and playback
starts automatically.
If playback does not start, touch the screen
and then touch .
Notes
• If there is no touch input for about 5 seconds, the indicators disappear in the menu
screen.
• It takes several seconds for the unit to
detect a disc type.
• In some cases, the disc menu might appear
instead.
• If “ ” appears on the screen, the disc cannot accept the operation you have tried.
• When VCD with PBC is detected, the PBC
indicator appears on the screen.
If menu screen is displayed
A menu screen may be displayed first after
loading a DVD or Video 2.0 offering a menu.
This is available only for .
1. Touch the screen in the menu screen.
2. Touch the , , , or buttons to
select the title/chapter you want to view.
• : Moves a cursor to up or down.
• : Move a cursor to left or right.
• : Enter to sub menu.
• : Moves to the DVD OSD menu.
3. Touch the “ ” button to start playback.
This is available only for .
1. Touch the screen in the menu screen.
2. Touch the number 0~9 buttons, then
confirm.
• : Move a menu bar to up or down.
• : Return to the previous screen.
• : Moves to the VCD OSD menu.
• : Enter to sub menu.
3. Touch the “ ” button to start playback.
Note
If there is no touch input for about 5 seconds,
the indicators disappear in the menu screen.
Play
Touch the button to start playback.
Stop
Touch the button to stop.
Pause
1.Touch the button during playback.
2.To return to playback, press the button.
Skip to the next chapter/track
To uch briefly the button to select the next
chapter/track.
Skip to the previous chapter/track
To uch briefly the button within 4 seconds
of playing time.
Return to the beginning of the current
chapter/track
To uch briefly the button after 5 seconds of
playing time.
VCD
DVD
46
DVD/VCD operation
DVD OSD menu
VCD OSD menu
Page 47

Still picture and frame-by-frame playback
1.Press (X on the remote control) during
playback.
The unit will now go into the PAUSE mode.
2.You can advance the picture frame-byframe by pressing XXrepeatedly on the
remote control.
3.To return normal playback, press (PLAY
B on the remote control).
Slow motion
1.Press (X on the remote control) during
playback.
The unit will now go into the PAUSE mode.
2.Use SCAN/SLOW
mm/MM
on the remote
control to select the required speed: t
1/16, t 1/8, t 1/4, or t 1/2 (backward),
or T 1/16, T 1/8, T 1/4, or T 1/2 (forward).
With a Video CD, the Slow speed changes:
T 1/16, T 1/8, T 1/4 or T 1/2 (forward).
3.To exit Slow Motion mode, press (PLAY
B on the remote control).
Note
Slow motion playback in reverse is not
possible with Video CDs.
SCAN
Touch the or buttons repeatedly to
select the required speed (X2, X4, X8, X16,
X32, X100).
Notes
•With a VCD, the Search speed changes :
(X2, X4, X8)
•To return to the normal speed, press the
button.
MENU
The menu may contain camera angles, spoken language, subtitle options and chapters
for the title.
1. Touch the screen during playback.
The setup screen displays on the screen.
2. Touch the “ ” button.
3. Touch the , , , or button to
select a title you want.
4. Touch the “ ” button to start playback.
: Enter to sub menu / Playback.
SEARCH
Use the number buttons to select the chapter
or title you want to view.
1. Touch the screen during playback.
The setup screen displays on the screen.
2. Touch the “ ” button.
The number screen displays on the
screen.
3. Touch the number 0~9 buttons, then confirm.
• : Move a cursor to the desired
information point.
(TITLE/CHAPTER/TIME)
• : Delete the inputted number(s).
• : Enter to sub menu.
4. Touch the “ ” button.
DVD
47
DVD/VCD operation
Page 48

REPEAT
Touch the “ ” button during playback.
The menu item changes as follows.
OFF t CHAPTER t TITLE...
ALL t TRACK t ALL...
• CHAPTER:
Plays repeatedly
the
current
chapter.
• TITLE:
Plays repeatedly
the
current title.
• TRACK:
Plays repeatedly
the
current track.
• ALL:
Plays repeatedly
all files on the current
disc.
• OFF: Cancels repeat play.
Note
If you change the source, turn the power off
or eject the disc, next time you select the
DVD/CD player as the source or turn the
power on, disc play back starts from where
playback stoped previously.
AUDIO
Touch the “ ” button during playback.
If the disc contains multi-audio languages, you
can change to a different audio language during playback.
SUBTITLE
Touch the “ ” button during playback.
If the disc contains multi-subtitle languages,
you can change to a different subtitle language during playback.
ANGLE
Touch the “ ” button during playback.
If the disc contains multi-angle views, you can
change to a different camera angle during
playback.
Using
This is available only for .
It is the function to use at the appears requiring menu selection, while playing DVDs.
(The various playing displays are required at
the recorded DVD title during playing.)
The menu screen appears on the screen.
Please see page 46 for details.
DVD
DVD
DVD
DVD
VCD
DVD
48
DVD/VCD operation
Page 49

Playing a DivX disc
The disc is drawn in, and “Disc reading”
appears on the display window, and playback
starts automatically.
If playback does not start, touch the screen
and then touch .
Notes
DivX disc compatibility with this player is limited as follows:
•Available resolution size of the DivX file is
under 720x576 (W x H) pixels.
• The file name of the DivX subtitle has a
length of 25 characters.
• If there is impossible code to express in the
DivX file, it may be displayed as “ * ” mark
on the display.
• If the number of the screen frame is over 30
per 1 second, this unit may not operate normally.
• If the video and audio structure of recorded
file is not interleaved, either video or audio
is output.
• Playable DivX file : *.avi, *.asf, *.div, *.divx,
*.xvid
• Playable Subtitle format
- SubRip (*.srt)
- SAMI (*.smi)
- SubStation Alpha (*.ssa)
- MicroDVD (*.sub)
- SubViewer 2.0 (*.sub)
- TMPlayer (*.txt)
- Advanced SubStation Alpha(*.ass)
- DVD subtitle system (*.txt)
• Playable Codec format
“DIVX3.xx”, “DIVX4.xx”, “DIVX5.xx”, “XVID”,
“MP4S”
• Playable Audio format
“Dolby Digital”, “MP3”
- Sampling frequency: within 8 - 48 kHz
(MP3),
- Bit rate: within 8 - 320kbps (MP3)
Play
Touch the button to start playback.
Stop
Touch the button to stop.
Pause
1.Touch the button during playback.
2.To return to playback, press the button.
Skip to the next file
Touch briefly the button to select the next
file.
Skip to the previous file
Touch briefly the button within 4 seconds
of playing time.
Return to the beginning of the current
file
Touch briefly the button after 4 seconds of
playing time.
Still picture and frame-by-frame playback
1.Press (X on the remote control) during
playback.
The unit will now go into the PAUSE mode.
2.
You can advance the picture frame-by-frame
by pressing
X
repeatedly on the remote con-
trol.
3.To return normal playback, press (PLAY
B on the remote control).
49
DivX operation
Page 50

Slow motion
1.Press (X on the remote control) during
playback.
The unit will now go into the PAUSE mode.
2.Use on the remote control to select the
required speed: T 1/16, T 1/8, T 1/4, or
T 1/2 (forward).
3.To exit Slow Motion mode, press (PLAY
B on the remote control).
Note
Slow motion playback in reverse is not possible with movie file.
Search
Touch the or buttons repeatedly to
select the required speed (X2, X4, X16, X32).
REPEAT
Touch during playback.
The default setting plays
all files in the disc.
The “All” is displayed on the screen.
• File: Touch
on the
default setting
mode
. The unit plays repeatedly the
current file.
• All: Touch again
on the
file repeat
mode
. The unit plays repeatedly all
files in the disc.
• Folder: Touch for about 2 seconds
.
The unit plays repeatedly all files of
the current folder.
AUDIO
Touch the “ ” button during playback.
If the disc contains multi-audio languages, you
can change to a different audio language during playback.
SUBTITLE
Touch the “ ” button during playback.
If the disc contains multi-subtitle languages,
you can change to a different subtitle language during playback.
Notice for displaying the DivX subtitle
If the subtitle does not display properly during
playback, press and hold repeatedly for
about 3 seconds until the subtitle is displayed
properly.
Locating a folder/file using the list
You can display the folder list/file list before
starting play.
1. Touch the “ ” button during playback.
2. Touch the folder button you want.
3. Touch the file you want.
The file will be played.
• Touch the button to select upper folder.
• Touch the button in the current screen
to exit previous screen.
• Touch the or buttons to select the
list you want to view.
: Previous/Next page of the list.
• When you want to classify the list as kind of
file (music file, movie file or photo file),
press the desired file button among the
, or buttons.
50
DivX operation
Page 51

Playing an audio CD and
MP3/WMA disc
The disc is drawn in and play starts automatically.
Notes
• The unit can play MP3/WMA formatted
recordings on CD-ROM, CD-R or CD-RW
(DVD-ROM, DVD-R, DVD+R, DVD-RW,
DVD+RW) discs.
• MP3/WMA Disc compatibility with this unit is
limited as follows:
1. Sampling Frequency / 16 - 48 kHz (MP3) 8
- 44.1 kHz (WMA)
2. Bit rate / within 8 - 320 kbps (include VBR)
(MP3) 5 -160 kbps (WMA)
3. CD-R/CD-RW physical format should be
“ISO 9660”
4. If you record MP3/WMA files using software which cannot create a FILE SYSTEM,
for example “Direct-CD” etc., it will not be
possible to playback MP3/WMA files.
We recommend that you use “Easy-CD
Creator” which creates an ISO9660 file
system.
Customers should also note that permission is required in order to download
MP3/WMA files and music from the
Internet. Our company has no right to grant
such permission. Permission should always
be sought from the copyright owner.
Pause
1.Touch the button during playback.
2To return to playback, press the button.
Skip to the next track/file
Touch briefly the button to select the next
track.
Skip to the previous track/file
Touch briefly the button within 4 seconds
of playing time.
Return to the beginning of the current
track/file
Touch briefly the button after 5 seconds of
playing time.
Search
Touch and hold the or buttons during
playback and then release at the point you
want.
Skip to the previous folder/next folder
This is available only for .
Touch briefly the or buttons to select
the previous folder/the next folder.
INFORMATION
Touch the “ ” button during playback.
When playing a disc containing information,
you can see the CD TEXT/ID3 TAG (artist
name, title name, album name).
In a CD TEXT, some information about the
disc (disc title, performer and track title) is
recorded.
In a ID3 TAG, some information about the file
(album title, Performer name, song title,
recording year, music genre and a brief comment )is recorded.
WMA
MP3
51
CD/MP3/WMA operation
Page 52

SCAN
This is available only for .
Touch the “ ” button during playback.
The item changes as follow.
All t Off (No display) t All...
• All:
Plays
the first 10 seconds of all tracks
on the disc.
REPEAT
Touch during playback.
The default setting plays
all files in the disc.
The “All” is displayed on the screen.
• All : Plays repeatedly all files in the disc.
• Track : Plays repeatedly the current track.
• File: Touch on the default setting
mode. The unit plays repeatedly the
current file.
• All: Touch again on the file repeat
mode. The unit plays repeatedly all
files in the disc.
• Folder: Touch for about 2 seconds.
The unit plays repeatedly all files of
the current folder.
SHUFFLE
Touch the “ ” button during playback.
• All : Plays randomly all files in the disc.
• Off (No display): Cancels SHUFFLE play.
• Off (No display): Cancels SHUFFLE play.
• Folder: Touch .
The unit plays randomly all files
within current folder.
• All: Touch for about 2 seconds.
The unit plays randomly all files in
the disc.
Locating a folder/file using the list
You can display the folder list/file list before
starting to play.
This is available only for .
1. Touch the “ ” button during playback.
2. Touch the folder button you want.
3. Touch the file you want. The file will be
played.
• Touch the button to select upper folder.
• Touch the button in current screen to
exit previous screen
• Touch the or buttons to select the list
you want to view.
: Previous/Next page of the list.
• If you want to classify by kind, press the
, or buttons.
WMA
MP3
WMA
MP3
CD
WMA
MP3
CD
CD
52
CD/MP3/WMA operation
Page 53

Playing photo files
The Photo viewer lets you view pictures from
your device. This application recognizes JPG
files.
The disc is drawn in and play starts automatically.(Slide show mode)
The previous Image and next Image arrow
keys lets you display the previous or next
image in the sequence of image files located
in the selected folder.
The “Rotate” buttons lets you move the image
clockwise (or counter clockwise). Each touch
rotates the image 90 degrees.
The slide show button lets you view all JPG
images in the disc in slide show mode.
Photo viewer shows all pictures in full-screen
mode automatically at a certain rate.
Picture format
The Load Failure warning message is displayed when the image file is too large. The
picture format is not supported warning message is displayed when the image file is not
saved in JPG format.
JPG : Image file size should use less than 2M
pixels as 5120 x 3840 (Baseline).
Locating a folder/file using the list
You can display the folder list/file list before
starting to play.
1. Touch the “ ” button during playback.
2. Touch the folder button you want.
3. Touch the file you want. The file will be
played.
• Touch the button to select upper folder.
• Touch the button in current screen to
exit previous screen
• Touch the or buttons to select the list
you want to view.
: Previous/Next page of the list.
• If you want to classify by kind, press the ,
or buttons.
53
Photo operation
Page 54

Listening to the radio stations
1. Press the “SRC” button to select the radio.
2. Press the “BAND” repeatedly to select a
band.
The mode switches as follows.
FM1 t FM2 t FM3 t MW
3. Seek tuning :
Touch the or buttons.
The tuner will scan the frequencies until a
broadcast with strong enough signal is
found.
Manual tuning :
Touch the
or
buttons repeatedly until
a preset number you want is selected.
AS (Auto search memory)
This function lets you automatically store the
6 strongest broadcast frequencies.
1. Select the band (FM1, FM2, FM3, MW)
you want to store a station into.
2. Touch the “ ” button.
Local stations with the strongest signals
are searched and stored automatically in
the selected radio band.
3. To cancel, touch it again.
Storing and recalling stations
You can easily store up to 6 preset stations
for later recall at the touch of a button.
1.Select the band (FM1, FM2, FM3, MW) you
want to store a station into.
2.Touch the or buttons to select the
desired frequency.
3.Touch and hold one of the preset buttons.
The preset station information will be displayed.
The selected preset station has been stored
in memory.
4.Repeat steps 1 and 3 to preset other stations.
Next time, if you touch the
preset buttons
,
the station is recalled from the memory.
Notes
• As FM1, FM2, FM3 have the same frequency range, up to 18 stations can be preset
for FM.
• When a station is preset on the preset station button number on which another station
of the same band has already been preset,
the previously preset station is automatically
erased.
RDS display options
The RDS system is capable of transmitting a
wide variety of information in addition to the
initial call sign that appears when a station is
first tuned. In normal RDS operation the
display will indicate the station name, broadcast network or call letters.
• AF (Alternative Frequencies for the actual
program)
• TA (Traffic Announcement Identification)
• PTY (Program type recognition)
• RT (Radio text recognition)
• PS (Program Service name)
• PI (Program Identification) :
Contains additional information for regional
program operation
• TP (Traffic Program Identification)
54
Radio (RDS) operation
Page 55

AF (Alternative frequency)
When the reception quality drops, the tuner
automatically changes to another station in
the network, broadcasting a better reception
quality, using the PI and AF codes.
This means : wherever you drive, you can
continue to listen to the same program without
interruptions.
1. Touch the “ ” button.
“AF On” appears on the screen.
2. To cancel, touch it again.
TA (Traffic announcement identification)
This is an ON/OFF switching signal that indicates when a traffic announcement is on air.
1. Touch the “ ” button.
The “TA On” appears on the screen.
2. To cancel, touch it again.
PTY (Program type recognition)
You can select your favorite program type.
1. Touch the “ ” button.
2. The PTY list displays in the screen.
3. Touch one of your favorite program types.
4. Touch one of your favorite PTY code
name.
5. “PTY SEARCH” appears on the screen.
6. To cancel, touch “ ” button.
REGION
1. Touch the “ ” button.
The “On” appears on the screen.
2. To cancel, touch it again.
On: Network-Tracking is activated.
The unit switches to another station,
within the same network, broadcasting
the same program when the receiving
signals from the current station
become weak.
Off: Network-Tracking is activated.
The unit switches to another station,
within the same network when the
receiving signals from the current
station become weak.(In the mode,
the program may differ from the one
currently received.)
Notes
• RDS is only available for FM reception.
• Touch the button in current screen to
exit the previous screen.
R-TEXT (Radio text recognition)
The radio station’s information is displayed on
the screen.
1. Touch the “ ” button.
Radio text appears on the screen.
2. To cancel, touch it again.
Note
Some RDS stations may not choose to
include some of these additional features. If
the data required for the selected mode is not
being transmitted, the screen will show a
“RadioText Information” message.
55
Radio (RDS) operation
Station A
broadcasting
on frequency A.
Station B
broadcasting
on frequency B.
Station C
broadcasting
on frequency C.
Station D
broadcasting
on frequency D.
Station E
broadcasting
on frequency E
Page 56

Cannot identify the current location. (GPS not receiving)
GPS cannot be used indoors and must be
connected to a power source with ACC in a
vehicle in a location where the signal from the
sky can be received easily.
When initially connecting the GPS, it usually
takes about 10 minutes to be working
normally, but the connection speed can differ
depending on the weather condition, and
surrounding obstacles.
If the GPS connection is unstable for a long
period of time, try the following.
• Check if the product is connected to a power
source.
• Check if the back of the GPS product is in a
location where the sky can be seen well.
• If there are high buildings or if you are under
a tree, move to a location where there aren’t
any obstacles.
• Check the GPS receiving condition from the
GPS menu.
Cannot hear the voice guide.
Check that volume is set to Mute to very small
volume in the setup menu.
No guide sound comes out in the case of
straight sector or not in the guide time.
In this case, an appropriate sound in the current position if pressing the NAVI button.
There is a difference between the
driving road and the road on the
map in the product.
Even though GPS is usually very accurate,
there is a small margin for error.
When the GPS receiver is installed, there can
be an error of about 10m. But for newly
built roads, the problem could come from the
data update to the map.
Cannot see the map.
Perhaps you cannot see the map even when
you have executed the navigation menu.
This happens when the data within the memory is damaged. Delete all the data in the
memory and install the data again.
If the issue persists after installation, contact
the A/S center.
Map data is not newly updated.
The information registered in the map data is
not recent.
The information registered in the map data
must be updated on a regular basis.
The path guide can be different
from the actual path.
(Path guide error)
• When the road is closely parallel.
• When the splitting road angle is very small.
• When there is an adjacent road when turning.
• When driving on a road that is narrowing
fast.
• When driving through the mountain or where
the road is too curvy.
• When the starting, passing and arriving locations are too close within 1km.
• When you have set the starting, passing or
arriving location more than 1km away from
the road.
• When driving through the tunnel.
• When driving through high buildings.
56
Troubleshooting
Page 57

Map matching
As mentioned, the GPS systems used by this
Mobile Navigation System are susceptible to
certain errors. Their calculations may on occasion place you in a location the map where no
road exists. In this situation, the processing
system understands that vehicles travel only
on roads, and is able to correct your position
by adjusting it to a nearby road. This is called
map matching.
Can not see extended lane and
speed limit icon.
The indicators for extended lane and speed
limit are displayed only in the region where
their resources are included.
TMC location information are
wrong or can not see the location
information.
The version for the location information
received from broadcasting station and
applied by Navigation software may be different. In the case, the location information of
event lists may be incorrect or not exist.
Can not hear Road name even if
setting TTS.
You can listen to the voice about road name
when the language set for TTS and the nation
that you’re driving now. The voice information
and its pronunciation may not be correct or be
played back with low quality.
Camera data is not newly updated.
The guide information may be incorrect.
Visit the web site and update the previous
data.(charged)
About speed camera
Use of the speed camera may be illegal in
some countries.
How to update the camera data
1. To update camera database, visit the site
www.poicon.com.
2. Download *.lgsf (charged).
3.Turn the ignition switch off.
4. Separate the front panel of LAN9700R
and then SD card on the left.
(Screw drivers may be needed.)
5. Connect the SD card to PC.
(The capacity is 4GB. Connection may
be impossible depending on the OS of
PC. In the case, you have to upgrade the
OS to make PC connection possible.)
6. Copy the downloaded *.lgsf to SD card root
directory\data\cam when the connected SD
card is recognized as a disc driver on PC.
7. Overwrite all of the *lgsf data downloaded
through the step 2 into the 5th directory.
8. Remove the SD Card disc driver from
PC safely after overwriting is completed.
9. Insert the card to the device again, you
can use the updated camera data.
10. Turn the ignition switch on. And then use
the unit.
Note
Do not use the SD card inside the device in
other purpose and the product will not work
correctly if you replace the SD card with what
is not authorized by LG.
57
Troubleshooting
With map matching.
With no map matching.
Page 58

58
Troubleshooting
Symptom Cause Correction
Power doesn’t
turn on.
The unit doesn’t
operate.
Playback is not
possible.
The disc is dirty.
The loaded disc is of a type this
unit cannot play.
Clean disc.
Check what type the disc.
There’s no
sound.
There’s audio
skipping.
The unit does
not operate
correctly even
when the
appropriate
remote control
buttons are
pressed.
The volume level is low.
This unit is not firmly secured.
Adjust the volume.
Secure this unit firmly.
No sound is
heard.
The volume
level will not
rise.
Cables are not connected
correctly.
Connect the cables correctly.
Leads and connector are not
properly connected.
The fuse is blown.
Noise and other factors are
causing the built-in
microprocessor to operate
incorrectly.
Confirm once more that all
connections are correct.
Rectify the problem that caused
the fuse to blow, and then replace
it. Be very sure to install the
correct fuse with the same rate.
Turn the unit off and then on.
Battery power is low.
Some operations are prohibited
with certain discs.
Load new battery.
Check using another disc.
Page 59

59
Language Codes/Area Codes
Area Code
Afghanistan AF
Argentina AR
Australia AU
Austria AT
Belgium BE
Bhutan BT
Bolivia BO
Brazil BR
Cambodia KH
Canada CA
Chile CL
China CN
Colombia CO
Congo CG
Costa Rica CR
Croatia HR
Czech Republic CZ
Denmark DK
Ecuador EC
Egypt EG
El Salvador SV
Area Code
Ethiopia ET
Fiji FJ
Finland FI
France FR
Germany DE
Great Britain GB
Greece GR
Greenland GL
Heard and McDonald Islands
HM
Hong Kong HK
Hungary HU
India IN
Indonesia ID
Israel IL
Italy IT
Jamaica JM
Japan JP
Kenya KE
Kuwait KW
Libya LY
Luxembourg LU
Area Code
Malaysia MY
Maldives MV
Mexico MX
Monaco MC
Mongolia MN
Morocco MA
Nepal NP
Netherlands NL
Netherlands Antilles AN
New Zealand NZ
Nigeria NG
Norway NO
Oman OM
Pakistan PK
Panama PA
Paraguay PY
Philippines PH
Poland PL
Portugal PT
Romania RO
Russian Federation RU
Area Code
Saudi Arabia SA
Senegal SN
Singapore SG
Slovak Republic SK
Slovenia SI
South Africa ZA
South Korea KR
Spain ES
Sri Lanka LK
Sweden SE
Switzerland CH
Taiwan TW
Thailand TH
Turkey TR
Uganda UG
Ukraine UA
United States US
Uruguay UY
Uzbekistan UZ
Vietnam VN
Zimbabwe ZW
Language Code
Abkhazian 6566
Afar 6565
Afrikaans 6570
Albanian 8381
Ameharic 6577
Arabic 6582
Armenian 7289
Assamese 6583
Aymara 6588
Azerbaijani 6590
Bashkir 6665
Basque 6985
Bengali; Bangla 6678
Bhutani 6890
Bihari 6672
Breton 6682
Bulgarian 6671
Burmese 7789
Byelorussian 6669
Cambodian 7577
Catalan 6765
Chinese 9072
Corsican 6779
Croatian 7282
Czech 6783
Danish 6865
Dutch 7876
English 6978
Esperanto 6979
Estonian 6984
Faroese 7079
Language Code
Fiji 7074
Finnish 7073
French 7082
Frisian 7089
Galician 7176
Georgian 7565
German 6869
Greek 6976
Greenlandic 7576
Guarani 7178
Gujarati 7185
Hausa 7265
Hebrew 7387
Hindi 7273
Hungarian 7285
Icelandic 7383
Indonesian 7378
Interlingua 7365
Irish 7165
Italian 7384
Japanese 7465
Javanese 7487
Kannada 7578
Kashmiri 7583
Kazakh 7575
Kirghiz 7589
Korean 7579
Kurdish 7585
Laothian 7679
Latin 7665
Latvian, Lettish 7686
Language Code
Lingala 7678
Lithuanian 7684
Macedonian 7775
Malagasy 7771
Malay 7783
Malayalam 7776
Maltese 7784
Maori 7773
Marathi 7782
Moldavian 7779
Mongolian 7778
Nauru 7865
Nepali 7869
Norwegian 7879
Oriya 7982
Panjabi 8065
Pashto, Pushto 8083
Persian 7065
Polish 8076
Portuguese 8084
Quechua 8185
Rhaeto-Romance 8277
Rumanian 8279
Russian 8285
Samoan 8377
Sanskrit 8365
Scots Gaelic 7168
Serbian 8382
Serbo-Croatian 8372
Shona 8378
Sindhi 8368
Language Code
Singhalese 8373
Slovak 8375
Slovenian 8376
Somali 8379
Spanish 6983
Sudanese 8385
Swahili 8387
Swedish 8386
Tagalog 8476
Tajik 8471
Tamil 8465
Tatar 8484
Telugu 8469
Thai 8472
Tibetan 6679
Tigrinya 8473
Tonga 8479
Turkish 8482
Turkmen 8475
Twi 8487
Ukrainian 8575
Urdu 8582
Uzbek 8590
Vietnamese 8673
Volapük 8679
Welsh 6789
Wolof 8779
Xhosa 8872
Yiddish 7473
Yoruba 8979
Zulu 9085
Language Codes
Use this list to input your desired language for the following initial settings:
Disc Audio, Disc Subtitle, Disc Menu.
Area Codes
Choose a area code from this list.
Page 60

60
Bluetooth phone compatibility list
• If even a phone as described in this list meets requirements of Bluetooth Hand-free Profile
1.0 and Object Push Profile 1.1, it can operate. However, it is noted that we cannot assure
for operation by function.
• As difference in functional operation by model is mainly resulted from feature of a hand-free
phone, consult manufacturer of a phone if you have any question.
Manufacturer
LG
LG
LG
LG
LG
LG
LG
LG
LG
LG
LG
LG
LG
LG
LG
LG
LG
LG
LG
LG
Samsung
Samsung
Samsung
Samsung
Samsung
Samsung
Nokia
Nokia
Nokia
Nokia
Nokia
Nokia
Nokia
Nokia
Nokia
Nokia
Model
KG800
U890
KE970
M4410
ME970
KE850
MG280
KE500
KG290
KU380
KU580 (3G)
KU970 (3G)
KU950
KE600
KG338
CU575 (3G)
SV240
KF1000
LP-3900
LV2400
T509
Z540v
D820
SCH-B380
SPH-V9000
SPH-V7450
3230
3250
6021
6681
6820
8800
5300
5500
N-gage
E50
O
O
O
O
O
O
O
O
O
O
O
O
O
O
O
O
O
O
O
O
O
O
O
O
O
O
O
O
O
O
O
O
O
O
O
O
Remarks
Note3
Note3, Note6
Note3
Note3
Note3
Note3
Note3
Note14
Note3
Note3
Note3
Note3
Note14
Note3
Note3
Note3
Note10
Note3
Note5
Note5
Note5,Note14
Note5,Note14
Note5,Note14
Note5
Note4
Note2,Note4
Note8,Note4
Note4
Note2,Note4
Note7,Note4
Note7,Note4
Note4
Note4
Note4
Search
Pairing
Connect
Disconnect
Search
Pairing
Connect
Disconnect
Reject
Answer
DTMF-Tone
Audio switch
Hang up
Dialing
Last
Memory
Phone book
Set Phone
Dialing
O
O
O
O
O
O
O
O
O
O
O
O
O
O
O
O
O
O
O
O
O
O
O
O
O
O
O
O
O
O
O
O
O
O
O
O
O
O
O
O
O
O
O
O
O
O
O
O
O
O
O
O
O
O
O
O
O
O
O
O
O
O
O
O
O
O
O
O
O
O
O
O
O
O
O
O
O
O
O
O
O
O
O
O
O
O
O
O
O
O
O
O
O
O
O
O
O
O
O
O
O
O
O
O
O
O
O
O
O
O
O
O
O
O
O
O
O
O
O
O
O
O
O
O
O
O
O
O
O
O
O
O
O
O
O
O
O
O
O
O
O
O
O
O
O
O
O
O
O
O
O
O
O
O
O
O
O
O
O
O
O
O
O
O
O
O
O
O
O
O
O
O
O
O
O
O
O
O
O
O
O
O
O
O
O
O
O
O
O
O
O
O
O
O
O
O
O
O
O
O
O
O
O
O
O
O
O
O
O
O
O
O
O
O
O
O
O
O
O
O
O
O
O
O
O
O
O
O
O
O
O
O
O
O
O
O
O
O
O
O
O
O
O
O
O
O
O
O
O
O
O
O
O
X
O
O
O
O
O
O
O
O
O
O
O
O
O
O
X
O
O
X
O
O
O
O
O
O
O
O
O
O
O
O
O
O
O
O
O
O
O
O
O
O
O
O
O
O
O
O
O
O
O
O
O
O
O
O
O
O
O
O
O
O
O
O
O
O
O
O
O
O
O
O
O
O
O
O
O
O
O
O
O
O
O
O
O
O
O
O
O
O
O
O
O
O
O
O
O
O
O
O
O
O
O
O
O
O
O
O
O
O
O
O
O
O
O
O
O
O
O
O
O
O
O
O
O
O
O
O
O
O
O
O
O
O
O
O
O
O
O
O
O
O
O
O
O
O
O
O
O
O
O
O
O
O
O
O
O
O
O
O
O
O
O
O
O
O
O
O
O
O
O
O
O
O
O
O
O
O
O
O
O
O
O
O
O
O
O
O
O
O
O
O
O
O
O
O
O
O
O
O
O
O
O
O
O
O
O
O
O
O
O
O
O
O
O
O
O
O
O
O
O
O
O
O
O
O
O
O
O
O
O
O
O
O
O
O
O
O
O
O
O
O
O
O
O
O
O
O
O
O
O
O
O
O
O
O
O
O
O
O
O
O
O
O
O
O
O
O
O
O
O
O
O
O
O
O
O
O
O
O
O
O
O
X
X
O
O
O
O
O
O
O
O
O
O
O
O
O
O
O
O
O
O
O
O
O
X
O
O
O
O
O
O
O
O
O
O
O
O
O
O
O
O
O
O: Support, X: No support
Page 61

61
Bluetooth phone compatibility list
Manufacturer
Nokia
Nokia
Nokia
Nokia
Nokia
Nokia
Nokia
Nokia
Nokia
Nokia
Nokia
Nokia
Nokia
Nokia
Nokia
Nokia
Nokia
Nokia
Nokia
Nokia
Nokia
Nokia
Nokia
Nokia
Motorola
Motorola
Motorola
Motorola
Motorola
Motorola
Motorola
Motorola
Motorola
Motorola
Motorola
Motorola
Motorola
Motorola
Sony Erricson
Sony Erricson
Sony Erricson
Sony Erricson
Sony Erricson
Model
E62
E70
N73
N80
N92
E60
E61
3650
6103
6131
6230
6230i
6280
6630
6650
6600
6670
6680
6820a
7370
7380
7610
8910i
9500
V500
V360
E680
E680i
A780
V3X
U6
V360
V525
E550
V600
E1000
A1000
RAZR V3i
Z608
T618
T628
K700c
P908
O
O
O
O
O
O
O
O
O
O
O
O
O
O
O
O
O
O
O
O
O
O
O
O
O
O
O
O
O
O
O
O
O
O
O
O
O
O
O
O
O
O
X
Remarks
Note4
Note4
Note4
Note4
Note4
Note4
Note4
Note4
Note8, Note4
Note4
Note4
Note4
Note7, Note4
Note2, Note4
Note2, Note4
Note2, Note4
Note2,Note4
Note2, Note4
Note2, Note4
Note4
Note4
Note4
Note4
Note2, Note4, Note10
Note1
Note1, Note2
Note1
Note1
Note1
Note1 , Note7
Note1
Note1, Note2
Note1, Note2
Note1
Note1, Note2
Note1, Note2
Note1, Note2, Note12
Note1
Note11
Search
Pairing
Connect
Disconnect
Search
Pairing
Connect
Disconnect
Reject
Answer
DTMF-Tone
Audio switch
Hang up
Dialing
Last
Memory
Phone book
Set Phone
Dialing
O
O
O
O
O
O
O
O
O
O
O
O
O
O
O
O
O
O
O
O
O
O
O
O
O
O
O
O
O
O
O
O
O
O
O
O
O
O
O
O
O
O
X
O
O
O
O
O
O
O
O
O
O
O
O
O
O
O
O
O
O
O
O
O
O
O
O
O
O
O
O
O
O
O
O
O
O
O
O
O
O
O
O
O
O
X
O
O
O
O
O
O
O
O
O
O
O
O
O
O
O
O
O
O
O
O
O
O
O
O
O
O
O
O
O
O
O
O
O
O
O
O
O
O
O
O
O
O
X
O
O
O
O
O
O
O
O
O
O
O
O
O
O
O
O
O
O
O
O
O
O
O
O
O
O
O
O
O
O
O
O
O
O
O
O
X
O
O
O
O
O
O
O
O
O
O
O
O
O
O
O
O
O
O
O
O
O
O
O
O
O
O
O
O
O
O
O
O
O
O
O
O
O
O
O
O
O
O
X
O
O
O
O
O
O
O
O
O
O
O
O
O
O
O
O
O
O
O
O
O
O
O
O
O
O
O
O
O
O
O
O
O
O
O
O
O
O
O
O
O
O
X
O
O
O
O
O
O
O
O
O
O
O
O
O
O
O
O
O
O
O
O
O
O
O
O
O
O
O
O
O
O
O
O
O
O
O
O
O
O
O
O
O
O
X
O
O
O
O
O
O
O
O
O
O
O
O
O
O
O
O
O
O
O
O
O
O
O
O
O
O
O
O
O
O
O
O
O
O
O
O
O
O
O
O
O
O
O
O
O
O
O
O
O
O
O
O
O
O
O
O
O
O
O
O
O
O
O
O
O
O
O
O
O
O
O
O
O
O
O
O
O
O
O
O
O
O
O
O
O
O
O
O
O
O
O
O
O
O
O
O
O
O
O
O
O
O
O
O
O
O
O
O
O
O
O
O
O
O
O
O
O
O
O
O
O
O
O
O
O
O
O
O
O
O
O
O
O
O
O
O
O
O
O
O
O
O
O
O
O
O
O
O
O
O
O
O
O
O
O
O
O
O
O
O
O
O
O
O
O
O
O
O
O
O
O
O
O
O
O
O
O
O
O
O
O
O
O
O
O
O
O
O
O
O
O
O
O
O
O
O
O
O
O
O
O
O
O
O
O
O
O
O
O
O
O
O
O
O
O
O
O
O
O
O
O
O
O
O
O
O
O
O
O
O
O
O
O
O
O
O
O
O
O
O
O
O
O
O
O
O
O
O
O
O
O
O
O
O
O
O
O
O
O
O
O
O
O
O
O
O
O
O
O
O
O
O
O
O
O
O
O
O
O
O
O
O
O
O
O
O
O
O
O
O
O
O
O
O
O
O
O
O
O
O
O
O
O
O
O
O
O
O
O
O
O
O
O
O
O
O
O
O
O
X
O
O
O
O
O
O
O
O
O
O
O
O
O
O
O
O
X
O
O
O
O
O
O
O
O
O
O
O
O
O
O
O
O
O
O
O
O
O
O
O
O
O
O
O
O
O
O
O
O
O
O
O
O
X
O
O
O
O
O
O
O
O
O
O
O
O
O
O
O
O
O
O
O
Page 62

62
Bluetooth phone compatibility list
Manufacturer
Sony Erricson
Sony Erricson
Sony Erricson
Sony Erricson
Sony Erricson
Sony Erricson
Sony Erricson
Sony Erricson
Sony Erricson
Sony Erricson
Simens
Simens
Simens
Simens
Pantech
Panasonic
NEC
NEC
Sharp
Sharp
K-JAM
Model
P990i
T610
W710i
K800i
W85Oi
T610
Z600
S700i
K700i
V800
SL75
S65
SX1
SK65
PG6200
X800
N750
N930
GX15
GX30
i_mate
O
O
O
O
O
O
O
O
O
O
O
O
O
O
O
O
X
X
O
O
O
Remarks
Note12
Note4
Note14, Note9
Note10, Note11,Note13
Note10, Note11,Note13
Note10, Note12
Search
Pairing
Connect
Disconnect
Search
Pairing
Connect
Disconnect
Reject
Answer
DTMF-Tone
Audio switch
Hang up
Dialing
Last
Memory
Phone book
Set Phone
Dialing
O
O
O
O
O
O
O
O
O
O
O
O
O
O
O
O
X
X
O
X
O
O
O
O
O
O
O
O
O
O
O
O
O
O
O
O
O
O
O
O
O
O
O
O
O
O
O
O
O
O
O
O
O
O
O
O
O
O
O
O
O
O
O
O
O
O
O
O
O
O
O
O
O
O
O
O
O
O
O
O
O
O
O
O
O
O
O
O
O
O
O
O
O
O
O
O
O
O
O
O
O
O
O
O
O
O
O
O
O
O
O
O
O
O
O
X
O
O
O
O
O
O
O
O
O
O
O
O
O
O
O
O
O
O
O
O
X
O
O
O
O
O
X
O
O
O
O
O
O
O
O
O
O
O
O
O
O
O
O
O
O
O
O
O
O
O
O
O
O
O
O
O
O
O
O
O
O
O
O
O
O
O
O
O
O
O
O
O
O
O
O
O
O
O
O
O
O
O
O
O
O
O
O
X
O
X
O
O
O
O
O
O
O
O
O
O
O
O
O
O
O
O
O
O
O
O
O
O
O
O
O
O
O
O
O
O
O
O
O
O
O
O
O
O
O
O
O
O
O
O
O
O
O
O
O
O
O
O
O
O
O
O
O
O
O
O
O
O
O
O
O
O
O
O
O
O
O
O
O
O
O
O
O
O
O
O
O
O
O
O
O
O
O
O
O
O
O
O
O
O
O
O
O
O
O
O
O
O
O
O
O
O
O
O
O
O
O
O
O
O
O
O
O
O
O
O
O
O
O
O
O
X
X
O
X
O
Remarks
Bluetooth may not operate if you connect the unit to headset or your phone is not initial screen
condition depending on type of phone.
• Note1: Discoverable time is limited.
• Note2: This phone accepts PIN code for limited time.
• Note3: If you connect the unit and your phone at the first time, make a connection at your
phone’s settings first.
• Note4: If you switch the sound path during a call, the connection is broken.
• Note5: Keep your phone “Enable” (Or open a folder or slide-up) for connection or DTMF
function.
• Note6: This phone does not support REJECT function.
• Note7: This phone does not support MEMORY DIAL function.
• Note8: This phone makes a call in a last dialed order without MEMORY DIAL function.
• Note9: This phone does not support DTMF function.
• Note10: This phone does not support PHONEBOOK function.
• Note11: Make a connection at your phone’s settings.
• Note12: Make a connection at your unit’s settings.
• Note13: The Call ID is not displayed.
• Note14: Touch “SEND” twice to get a call with the stored phone number.
Page 63

63
Specifications
GENERAL
Output Power..................................................................................................50W x 4CH (Max.)
Power Source ..................................................................................................................DC 12V
Speaker impedance................................................................................................................4 Ω
Ground System ............................................................................................................. Negative
Dimensions (W x H x D)....................................................................................180 x 53 x 198 mm
Net Weight ........................................................................................................................2.37 kg
DISPLAY
LCD .....................................................................................................................7 inch TFT LCD
Resolution ....................................................................................................................480 X 234
Back Light ......................................................................................................................LED type
CD/DVD/VCD SECTION
Frequency Response..............................................................................................20 Hz-20 kHz
S/N Ratio.............................................................................................................................80 dB
Distortion ...........................................................................................................................0.15 %
Channel Separation (1kHz).................................................................................................60 dB
RADIO SECTION
FM
Frequency Range............................................................................87.5-107.9 or 87.5-108 MHz
S/N Ratio.............................................................................................................................55 dB
Distortion ............................................................................................................................0.7 %
Usable Sensitivity ..........................................................................................................12 dBµV
AM (MW)
Frequency Range ..............................................................................520-1720 or 522-1620 kHz
S/N Ratio.............................................................................................................................45 dB
Distortion .............................................................................................................................1.0 %
Usable Sensitivity ..........................................................................................................32 dBµV
NAVIGATION SECTION
CPU..................................................................................................................................i.Mx31L
OS ......................................................................................................................WinCE Core 5.0
SDRAM ..............................................................................................................................64 MB
Memory (Map) ......................................................................................................4 GB SD Card
Memory (OS) ...............................................................................................64 MB NAND Flash
GPS .................................................................................................................................SIRF III
Map ..................................................................................................................................Navteq
User Interface..........................................................................................................Touch screen
Page 64

“The Bluetooth word mark and logos are owned by the Bluetooth SIG, Inc. and any use of such
marks by LG Electronics is under license. Other trademarks and trade names are those of their
respective owners.”
P/N: MFL37340895
Support-Hotline
* For the latest Call Center numbers, please visit Website (www.lge.com)
You can get the Map Upgrade information from LG Authorized Service Center.
For more information, contact Call Center or Website.
LG Subsidiary Country Service Number
LG Electronics ESPANA S.A. SPAIN
902 500 234
LG Electronics U.K. Ltd U.K. / IRELAND
0870 873 5454
LG Electronics France FRANCE
0825 825 592
LG Electronics Deutschland GmbH GERMANY
01805 4737 84
LG Electronics Italia S.p.A ITALY
199600099
LG Electronics Hellas S.A GREECE
801 11 200 900
LG Electronics Benelux B.V BELGIUM
LUXEMBOURG
Netherlands
015 200 255
0032 15 200 255
0900 543 5454
LG ELECTRONICS MAGYAR KFT
CZECH REPUBLIC
HUNGARY
Bulgaria
CZECH
SLOVAKIA
06 40 545454
0700 1 5454
810 555 810
0850 111 154
LG Electronics Polska Sp. z.o.o
Austria
POLAND
AUSTRIA
SWITZERLAND
0801 54 54 54
LG Electronics Portugal, S,A PORTUGAL
808 78 5454
0810144131
0848 543 543
RUMANIA
RUMANIA
031 228 3542
LG Electronics Nordic AB SWEDEN
DENMARK
FINLAND
NORWAY
0771 41 4379
8088 5758
0800 116 587
800 18 740
 Loading...