

LG LSN180HSV4, LSN243HLV, LSN243HLV3, LAN120HYV, LAN150HYV3 Owner’s Manual
...
OWNER’S MANUAL
AIR CONDITIONER
Read this owner’s manual thoroughly before operating
the appliance and keep it handy for reference at all
times.
TYPE: WALL MOUNTED
ENGLISH FRANÇAIS ESPAÑOL
If Indoor unit are connected with multi split type, It is not Energy Star certified products
MFL69491102
Rev.12_020521
www.lg.com
Copyright © 2017 - 2021 LG Electronics Inc. All Rights Reserved

TABLE OF CONTENTS
2 TABLE OF CONTENTS
3 SAFETY INSTRUCTIONS
3 IMPORTANT SAFETY INSTRUCTIONS
7 OPERATION
7 Notes for Operation
7 Parts and Functions
8 Wireless Remote Control
13 Restarting the Air Conditioner Automatically
13 Using the Mode Function
15 Using the Jet Mode Function
16 Using the Fan Speed Function
16 Using the Air Flow Direction Function
17 Setting the On/Off Timer
18 Using the Sleep Function (Optional)
18 Using the Simple Timer Function (Optional)
19 Using the Energy Display Function (Optional)
19 Using the Light Off Function (Optional)
19 Using the Comfort Air Function (Optional)
20 Using the Energy Saving Function (Optional)
20 Using the Energy Control Function (Optional)
21 Using Special Functions
24 SMART FUNCTIONS
24 LG ThinQ Application
26 Smart Diagnosis
TM
27 MAINTENANCE
29 Clean the Air Filter
30 Clean the Micro Dust and Triple Filter (Optional)
31 TROUBLESHOOTING
35 WARRANTY (USA)
37 WARRANTY (CANADA)
SAFETY INSTRUCTIONS
READ ALL INSTRUCTIONS BEFORE USE
Your safety and the safety of others are very important.
We have provided many important safety messages in this manual and on your appliance. Always
read and follow all safety messages.
3SAFETY INSTRUCTIONS
ENGLISH
This is the safety alert symbol.
This symbol alerts you to potential hazards that can kill or injure you and others.
All safety messages will follow the safety alert symbol and either the word WARNING, or
CAUTION.
WARNING
If you do not follow instructions, it could result in death or serious injury.
CAUTION
If you do not follow instructions, it could result in minor or moderate injury or damage to the
product.
All safety messages will tell you what the potential hazard is, tell you how to reduce the chance of
injury, and tell you what may happen if the instructions are not followed.
IMPORTANT SAFETY INSTRUCTIONS
WARNING
To reduce the risk of explosion, fire, death, electric shock, injury or scalding to persons
when using this product, follow basic precautions, including the following:
• Installation or repairs made by unauthorized persons can pose hazards to you and others.
• Installation MUST conform to the local building codes or, in the absence of local codes, the
National Electrical Code NFPA 70/ANSI C1-1003 or current edition and Canadian Electrical Code
Part1 CSA C.22. 1.
• The information contained in the manual is intended for use by a qualified service technician who
is familiar with the safety procedures and equipped with the proper tools and test instruments.
• Failure to read and follow all instructions in this manual can result in equipment malfunction,
property damage, personal injury and/or death.
• When the power cord is to be replaced, the replacement work shall be performed by authorized
personnel using only genuine replacement parts.
• This appliance is not intended for use by persons (including children) with reduced physical,
sensory or mental capabilities, or lack of experience and knowledge, unless they have been given
supervision or instruction concerning use of the appliance by a person responsible for their safety.
Children should be supervised to ensure that they do not play with the appliance.
FRANÇAIS ESPAÑOL
4 SAFETY INSTRUCTIONS
Installation
• Do not install the air conditioner on an unstable surface or in a place where there is danger of it
falling.
• Contact an authorized service center when installing or relocating the air conditioner.
• Install the panel and the cover of the control box safely.
• Do not install the air conditioner in a place where flammable liquids or gases such as gasoline,
propane, paint thinner, etc., are stored.
• Make sure that the pipe and the power cable connecting the indoor and outdoor units are not
pulled too tight when installing the air conditioner.
• Use standard circuit breaker and fuse that conform to the rating of the air conditioner.
• Do not input air or gas into the system except with the specific refrigerant.
• Use non-flammable gas (nitrogen) to check for leak and to purge air; using compressed air or
flammable gas may cause fire or explosion.
• The indoor/outdoor wiring connections must be secured tightly, and the cable should be routed
properly so that there is no force pulling the cable from the connection terminals. Improper or
loose connections can cause heat generation or fire.
• Install dedicated electric outlet and circuit breaker before using the air conditioner.
• Do not connect the ground wire to a gas pipe, a lightning rod, or a telephone ground wire.
• If the supply cord is damaged, it must be replaced by the manufacturer, its service agent or
similarly qualified person in order to avoid a hazard.
• Do not install the unit in potentially explosive atmospheres.
Operation
• Be sure to use only those parts listed in the service parts list. Never attempt to modify the
equipment.
• Make sure that children do not climb on or hit the outdoor unit.
• Dispose of the batteries in a place where there is no danger of fire.
• Use only the refrigerant specified on the air conditioner label.
• Cut off the power supply if there is any noise, smell, or smoke coming from the air conditioner.
• Do not leave flammable substances such as gasoline, benzene, or thinner near the air conditioner.
• Contact an authorized service center when the air conditioner is submerged by flood waters.
• Do not use the air conditioner for an extended period of time in a small place without proper
ventilation.
• In the event of a gas leak (such as Freon, propane gas, LP gas, etc.) ventilate sufficiently before
using the air conditioner again.
• To clean the interior, contact an authorized service center or dealer. Using harsh detergents may
cause corrosion or damage to the unit.
• Be sure to ventilate sufficiently when the air conditioner and a heating appliance such as a heater
are used simultaneously.
• Do not block the inlet or outlet of air flow.
• Do not insert hands or other objects through the air inlet or outlet while the air conditioner is
operating.
• Make sure that the power cable is neither dirty, loose, nor broken.
• Never touch, operate, or repair the air conditioner with wet hands.
• Do not place any objects on the power cable.
• Do not place a heater or other heating appliances near the power cable.
• Do not modify or extend the power cable. Scratches or peeling insulation on the power cables
may result in fire or electric shock, and should be replaced.
• Cut off the power supply immediately in the event of a blackout or a thunderstorm.
• Take care to ensure that power cable could not be pulled out or damaged during operation.
• Do not touch refrigerant pipe, water pipe and any internal parts while the unit is operating or
immediately after operation.
Maintenance
• Do not clean the appliance by spraying water directly onto the product.
• Before cleaning or performing maintenance, disconnect the power supply and wait until the fan
stops.
5SAFETY INSTRUCTIONS
ENGLISH
FRANÇAIS ESPAÑOL
CAUTION
To reduce the risk of minor injury to persons, malfunction, or damage to the product or
property when using this product, follow basic precautions, including the following:
Installation
• Do not install the air conditioner in an area where it is directly exposed to sea wind (salt spray).
• Install the drain hose properly for the smooth drainage of water condensation.
• Exercise caution when unpacking or installing the air conditioner.
• Do not touch the leaking refrigerant during installation or repair.
• Transport the air conditioner with two or more people or use a forklift.
• Install the outdoor unit such that it is protected from direct sunlight. Do not place the indoor unit in
a place where it is directly exposed to sunlight via the windows.
• Safely dispose of packing materials such as screws, nails, plastic bag or batteries using proper
packaging after installation or repair.
• Install the air conditioner in a place where the noise from the outdoor unit or the exhaust fumes will
not inconvenience the neighbors. Failure to do so may result in conflict with the neighbors.

6 SAFETY INSTRUCTIONS
Operation
• Remove the batteries if the remote control is not to be used for an extended period of time.
• Make sure that the filter is installed before operating the air conditioner.
• Be sure to check if there is a refrigerant leak after installing or repairing the air conditioner.
• Follow the standards of the corresponding region or country for handling the refrigerant and the air
conditioner and for disassembling the air conditioner.
• Do not place any object on the air conditioner.
• Never mix different types of batteries, or old and new batteries for the remote control.
• Do not let the air conditioner run for a long time when humidity is very high or when a door or a
window has been left open.
• Stop using the remote control if there is a fluid leak in the battery. If your clothes or skin are
exposed to the leaking battery fluid, wash off with clean water.
• Do not expose people, animals, or plants to the cold or hot wind from the air conditioner for
extended periods of time.
• If the leaking battery fluid has been swallowed, rinse the inside of the mouth thoroughly and
consult a doctor.
• Do not drink the water drained from the air conditioner.
• Do not use the product for special purposes, such as preserving foods, works of art, and etc. It
is an air conditioner for consumer purposes, not a precision refrigeration system. There is risk of
damage or loss of property.
• Do not recharge or disassemble the batteries.
Maintenance
• Never touch the metal parts of the air conditioner when removing the air filter.
• Use a sturdy stool or ladder when cleaning, maintaining, or repairing the air conditioner at a
height.
• Never use strong cleaning agents or solvents when cleaning the air conditioner or spray water.
Use a smooth cloth.
OPERATION
1
1
Notes for Operation
Suggestion for Energy Saving
• Do not over-cool the space. This may be harmful for your health and may consume more electricity.
• Block sunlight with blinds or curtains while you are operating the air conditioner.
• Keep doors or windows closed tightly while you are operating the air conditioner.
• Adjust the direction of the air flow vertically or horizontally to circulate indoor air.
• Speed up the fan to cool or warm indoor air quickly, within a short period of time.
• Open windows regularly for ventilation. The indoor air quality may deteriorate if the air conditioner is used for
long durations.
• Clean the air filter once every 2 weeks. Dust and impurities collected in the air filter may block the air flow or
reduce the unit performance.
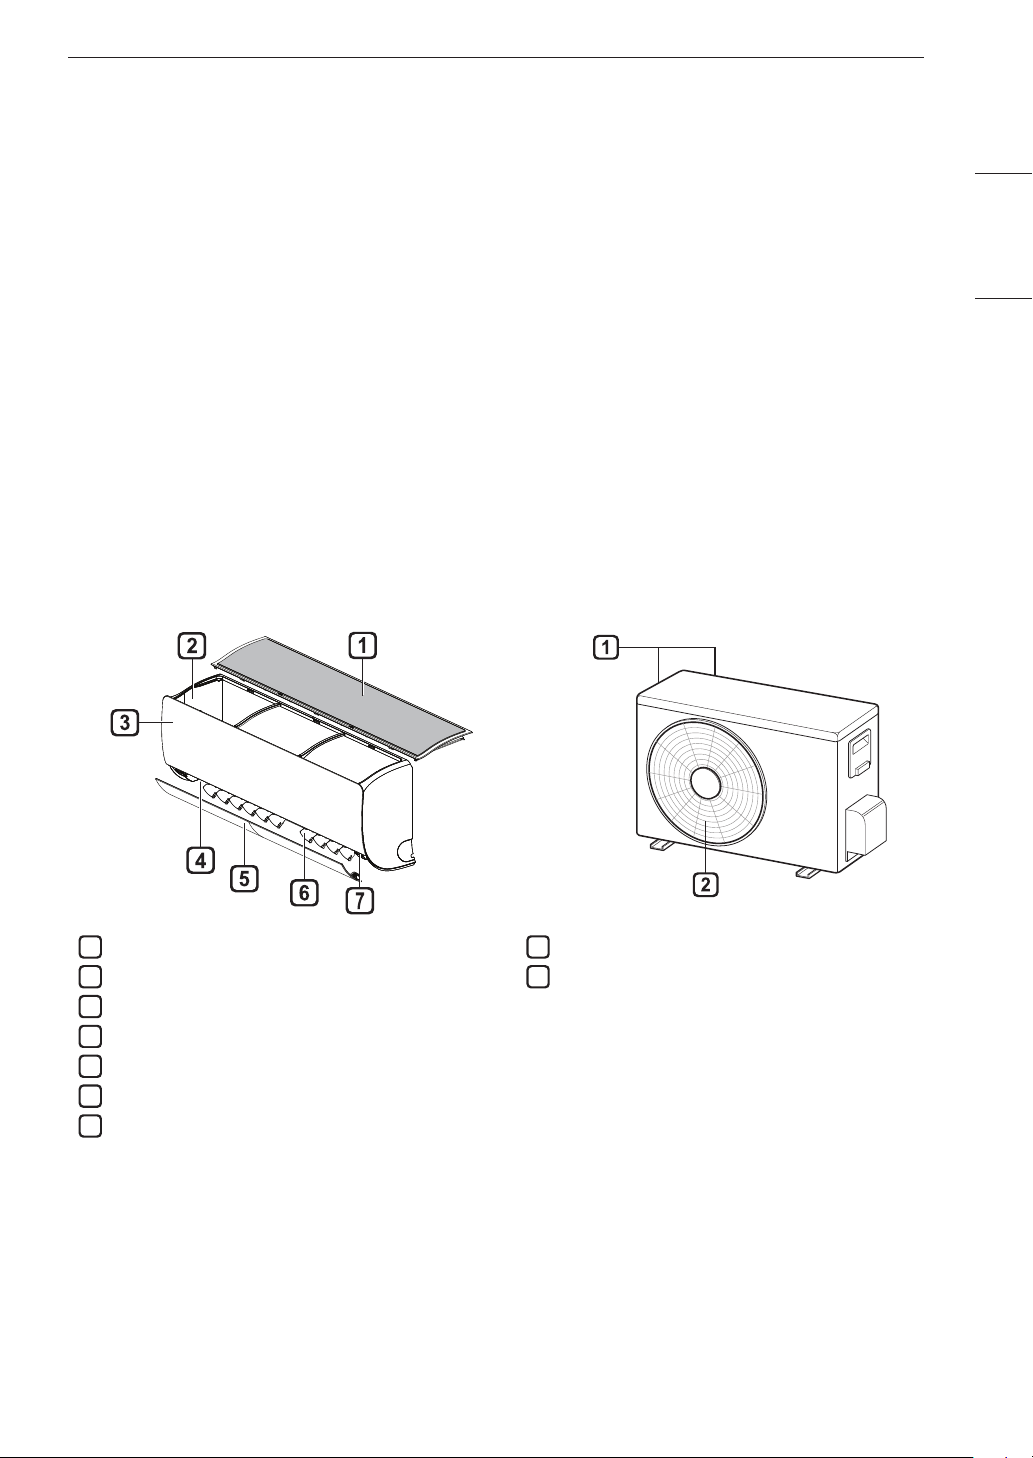
Parts and Functions
Indoor Unit Outdoor Unit
7OPERATION
ENGLISH
FRANÇAIS ESPAÑOL
Air Filter
Air Intake
2
Front Cover
3
Air Outlet
4
Air Deflector (Horizontal Vane)
5
Air Deflector (Vertical Louver)
6
On/Off Button
7
NOTE
• The number and location of operation lamps may vary according to the model of the air conditioner.
• The feature may be changed according to the type of model.
Air Intake Vents
Air Outlet Vents
2
8 OPERATION
SWING
kW [3 s]
Wireless Remote Control
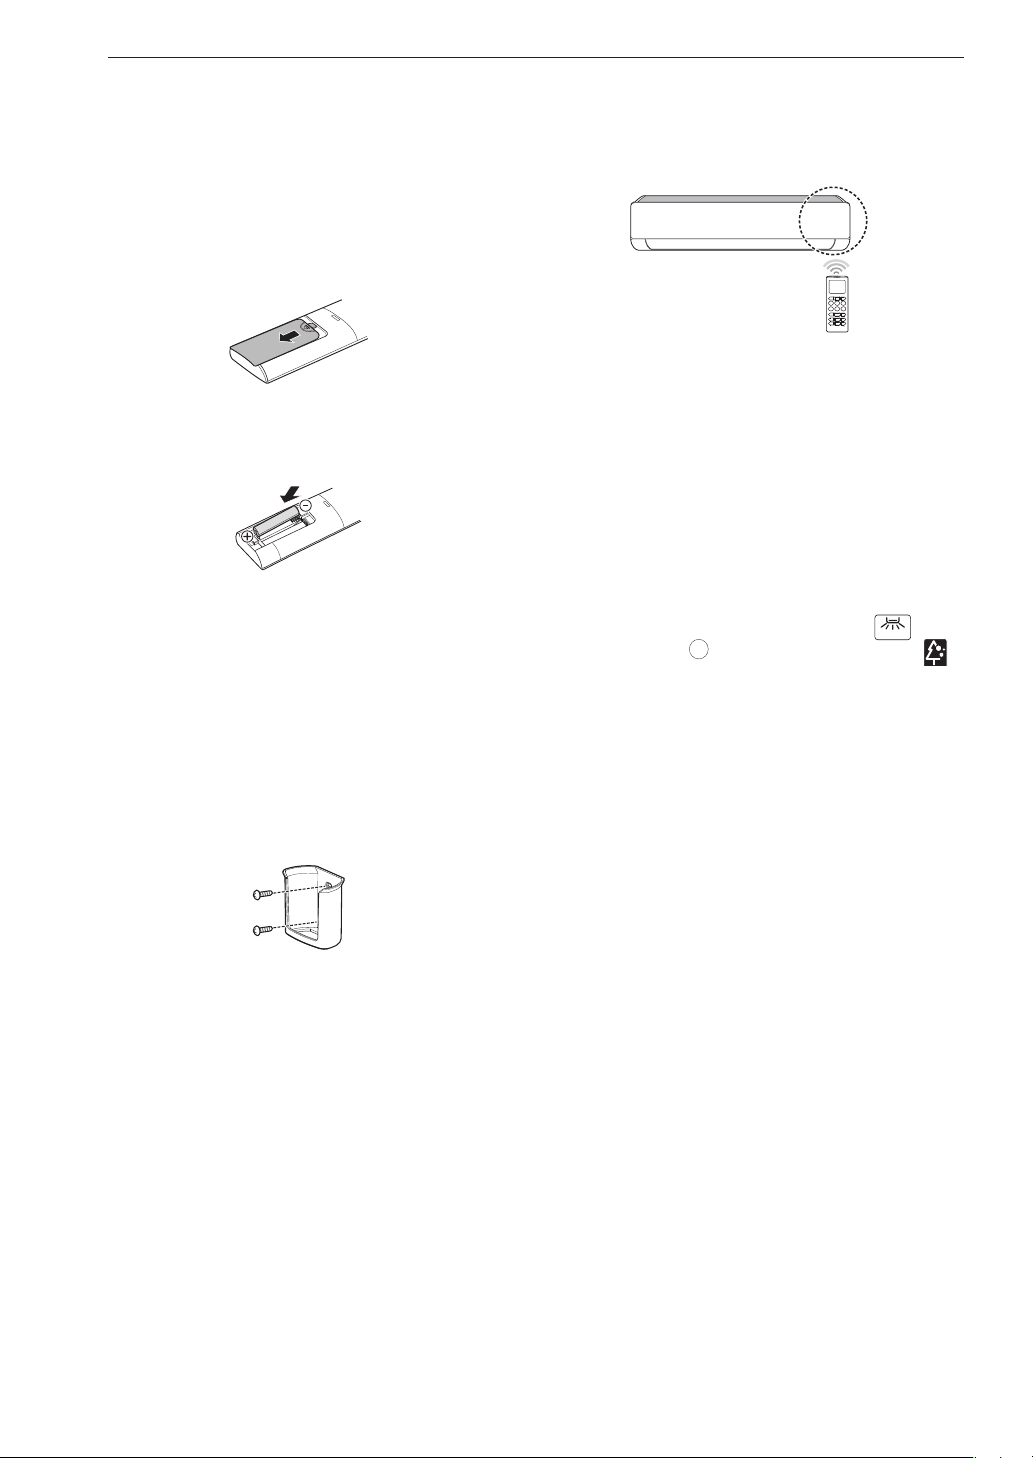
Inserting Batteries
If the display screen of the remote control begins
to fade, replace the batteries. Insert AAA (1.5 V)
batteries before using the remote control.
Remove the battery cover.
1
Insert the new batteries and make sure that the
2
+ and - terminals of the batteries are installed
correctly.
Installing the Remote Control Holder
To protect the remote control, install the holder where
there is no direct sunlight.
Operating Method
Point the remote control towards the signal receiver
at the right side of the air conditioner to operate it.
NOTE
• The remote control may operate other electronic
devices if it is directed towards them. Make sure to
point the remote control towards the air conditioner
signal receiver.
• For proper operation, use a soft cloth to clean the
signal transmitter and receiver.
• In case of a function not provided in the product,
no buzzer sound occurs from the product when
a button for such function on the remote control
is pressed except for Air Flow Direction (
Energy Display (
), Air Purification function ( ).
),
Choose a safe and easily accessible location.
1
Fix the holder by fastening 2 screws firmly with a
2
screwdriver.
9OPERATION
℃↔℉ [5 s]
SWING
ON/OFF
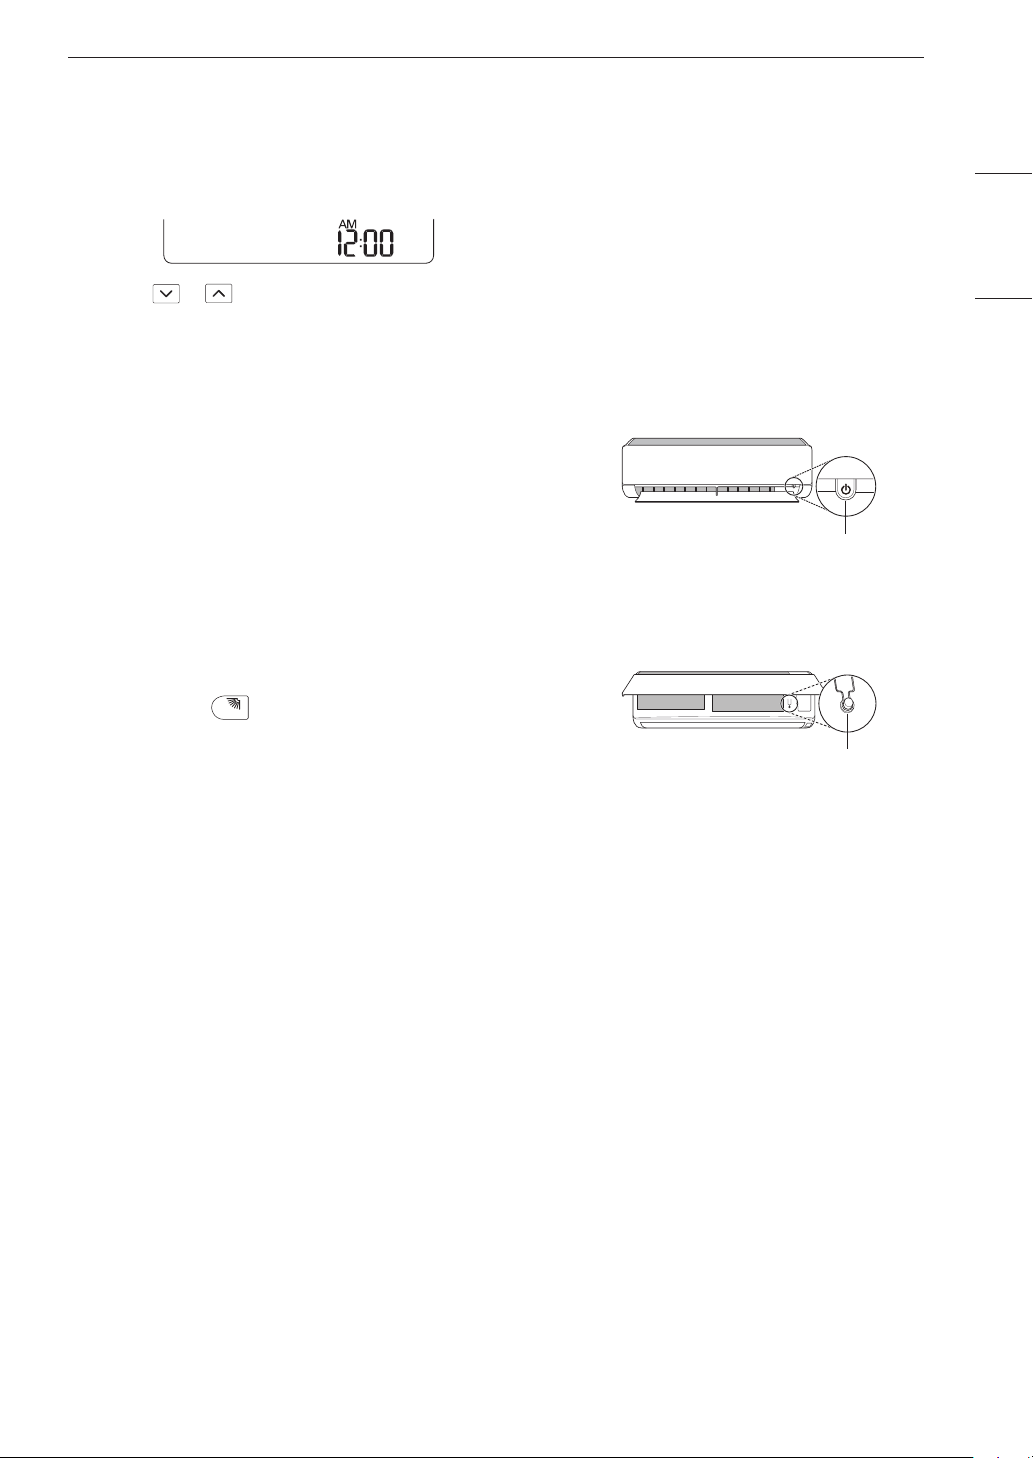
Setting the Current Time
Insert batteries.
1
• The icon below blinks at the bottom of the
display screen.
Press or button to select the minutes.
2
Press SET/CANCEL button to finish.
3
NOTE
• The On/Off Timer is available after setting the
current time.
Using the °C/°F Conversion Function
(Optional)
This function changes unit between °C and °F
Operating the Air Conditioner without
the Remote Control
You can use the ON/OFF button of the indoor unit to
operate the air conditioner when the remote control is
unavailable.
Open the front cover (Type2) or horizontal vane
1
(Type1).
Press the ON/OFF button.
2
Type1
ON/OFF
Type2
ENGLISH
FRANÇAIS ESPAÑOL
• Press and hold
button about 5 seconds.
NOTE
• The stepping motor may be broken, if the horizontal
vane opens rapidly.
• The fan speed is set to high.
• The feature may be changed according to the type
of model.
• The temperature cannot be altered when using this
emergency ON/OFF button.
• For cooling & heating models, the temperature is
set from 22 °C to 24 °C
10 OPERATION
RESET
SWING
SWING
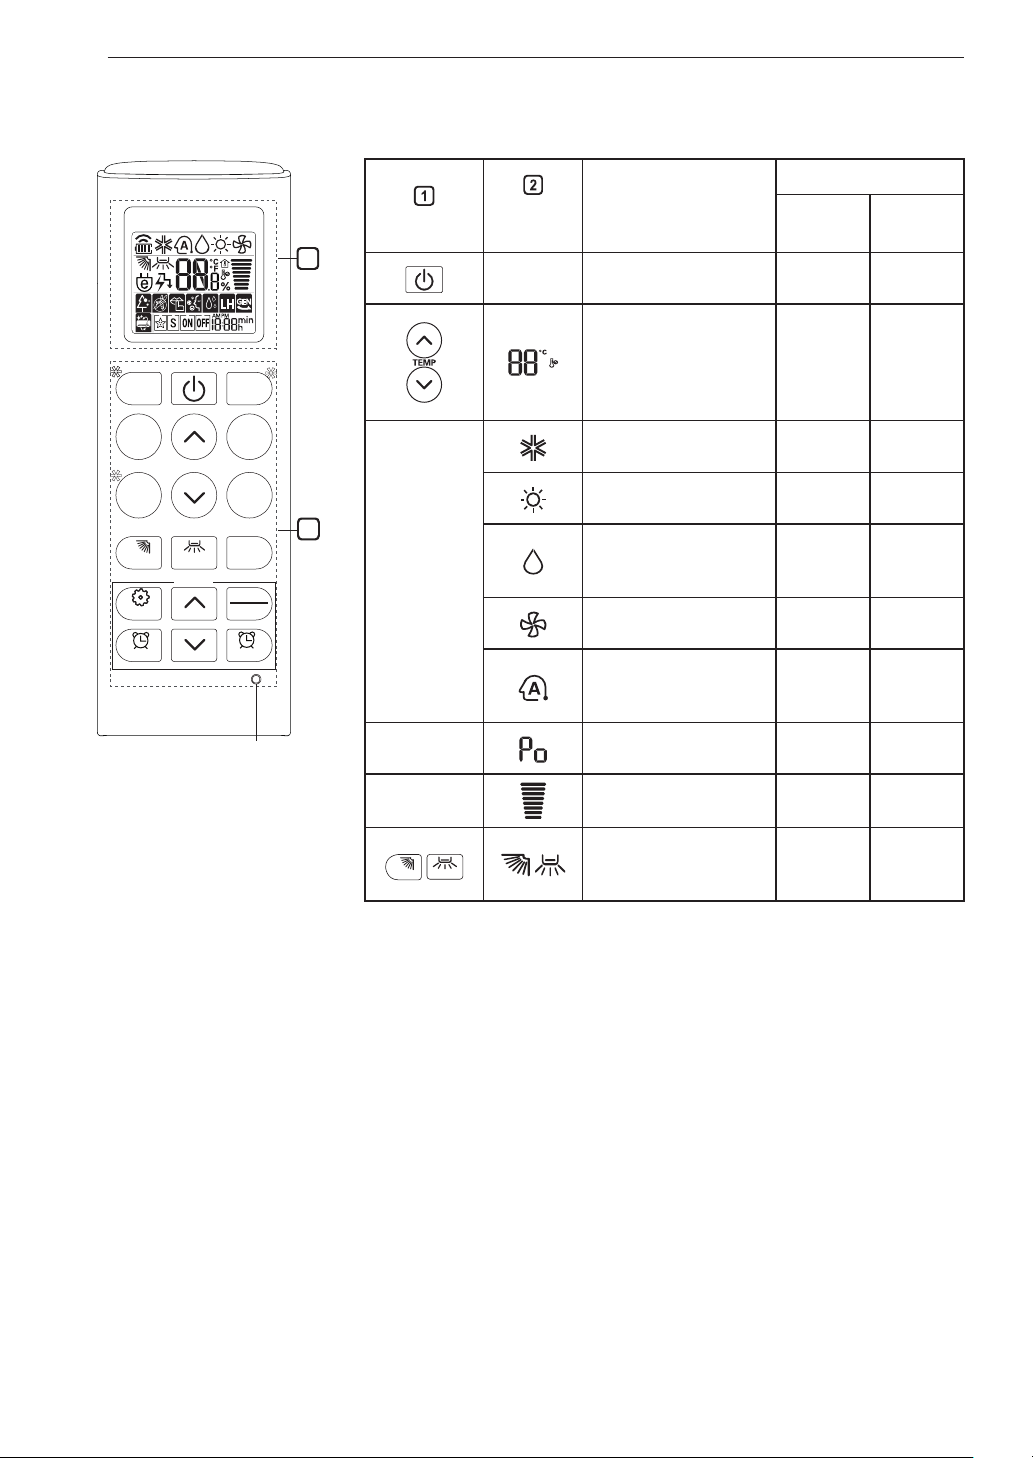
Using Wireless Remote Control
You can operate the air conditioner more conveniently with the remote control.
*
MODE
TEMP
*
kW [3 s]
SWING
SWING
℃↔℉ [5 s]
SET UP
FUNC.
TIMER CANCEL
FAN
SPEED
JET
MODE
ROOM
TEMP
DIAGNOSIS [5 s]
SET
CANCEL
Button
2
Display
Screen
-
Description
To turn on/off the air
conditioner.
Available Function
Single
Split
Multi
O O
To adjust the desired
room temperature
*
or auto changeover
in cooling, heating
O O
mode.
To select the cooling
mode.
To select the heating
mode.
1
MODE
To select the
dehumidification
mode.
To select the fan
mode.
O O
O O
O O
O O
To select the auto
changeover/auto
O O
operation mode.
JET
MODE
FAN
SPEED
To change room
temperature quickly.
To adjust the fan
speed.
O O
O O
To adjust the air flow
direction vertically or
O O
horizontally.
NOTE
• * buttons may be changed according to the type of model.
• When connected to the Multi Outdoor unit, the Energy Display, Energy
Control, Silent and Smart Diagnosis function may not be supported.
11OPERATION
TIMER
CANCEL
*
MODE
TEMP
*
kW [3 s]
SWING
SWING
℃↔℉ [5 s]
SET UP
FUNC.
TIMER CANCEL
FAN
SPEED
JET
MODE
ROOM
TEMP
DIAGNOSIS [5 s]
SET
CANCEL
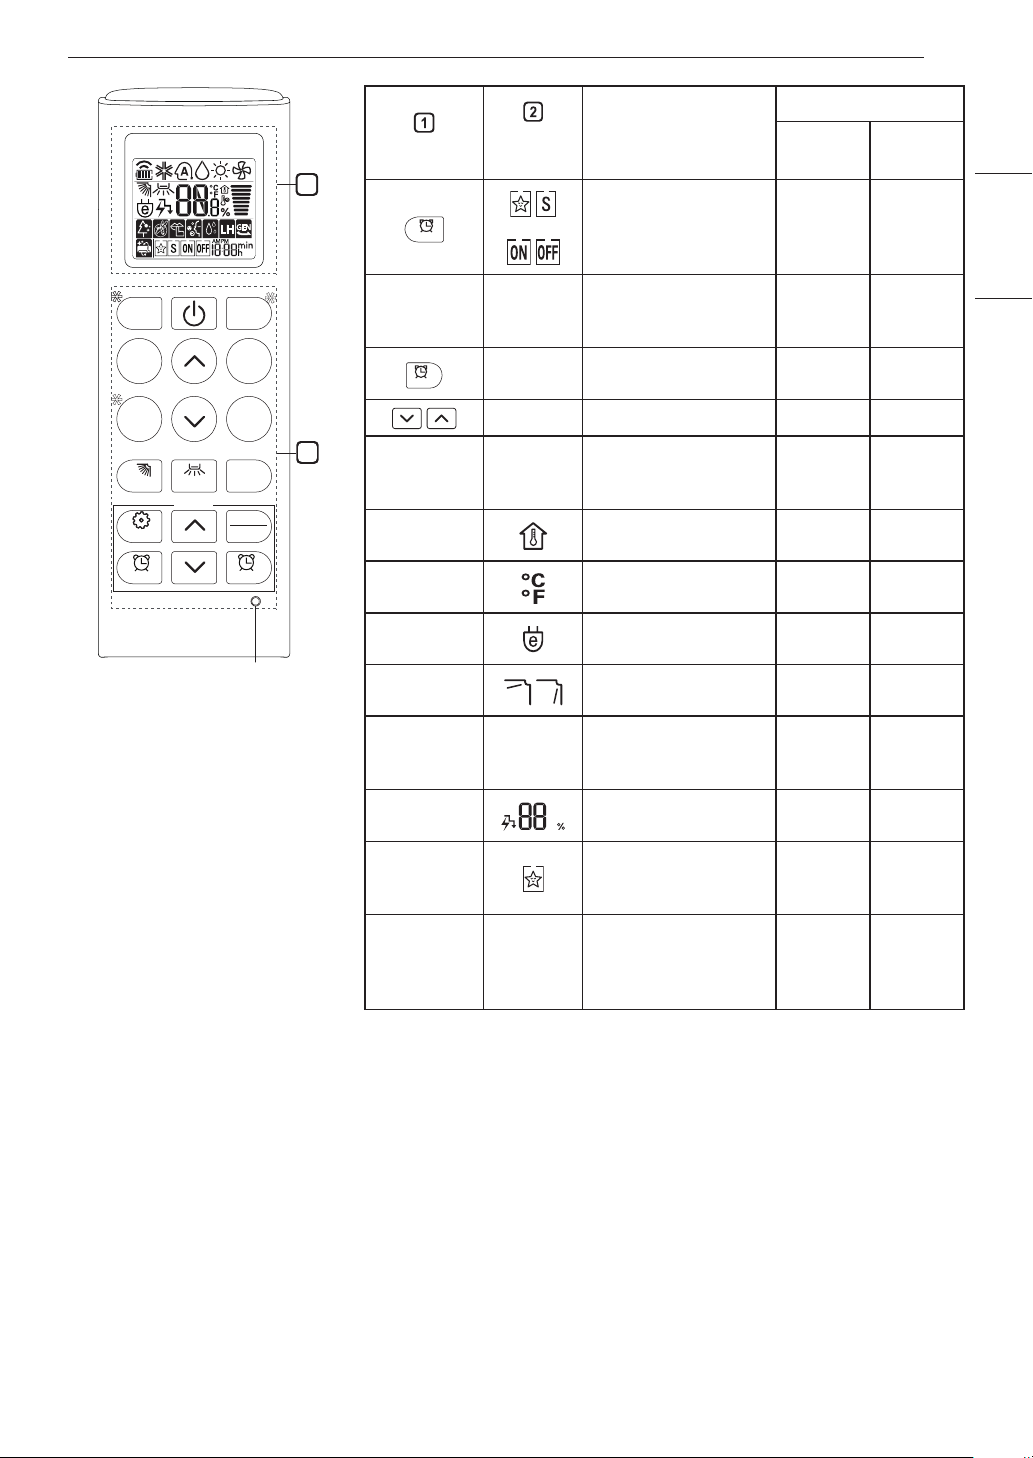
RESET
Button
2
*
SET/
CANCEL
1
*LIGHT
OFF
ROOM
TEMP
°C↔°F
[5 s]
*ENERGY
SAVING
*COMFORT
AIR
kW
[3 s]
*ENERGY
CTRL
*COMFORT
SLEEP
Display
Description
Screen
To turn on/off
air conditioner
automatically at
desired time.
To set/cancel the
-
special functions and
timer.
-
To cancel the timer
settings.
- To adjust time. O O
To set the brightness
-
of the display on the
indoor unit.
To display the room
temperature.
To change unit
between °C and °F
To minimize power
consumption.
To adjust the air flow
to deflect wind.
To set whether or not
-
to display information
regarding energy.
To bring the effect of
the power saving.
To make a
comfortable sleeping
environment.
Available Function
Single
Split
Multi
O O
O O
O O
O O
O O
O O
O O
O O
O X
X X
O X
ENGLISH
FRANÇAIS ESPAÑOL
To conveniently
DIAGNOSIS
[5 s]
-
check maintenance
information of a
O O
product.
12 OPERATION
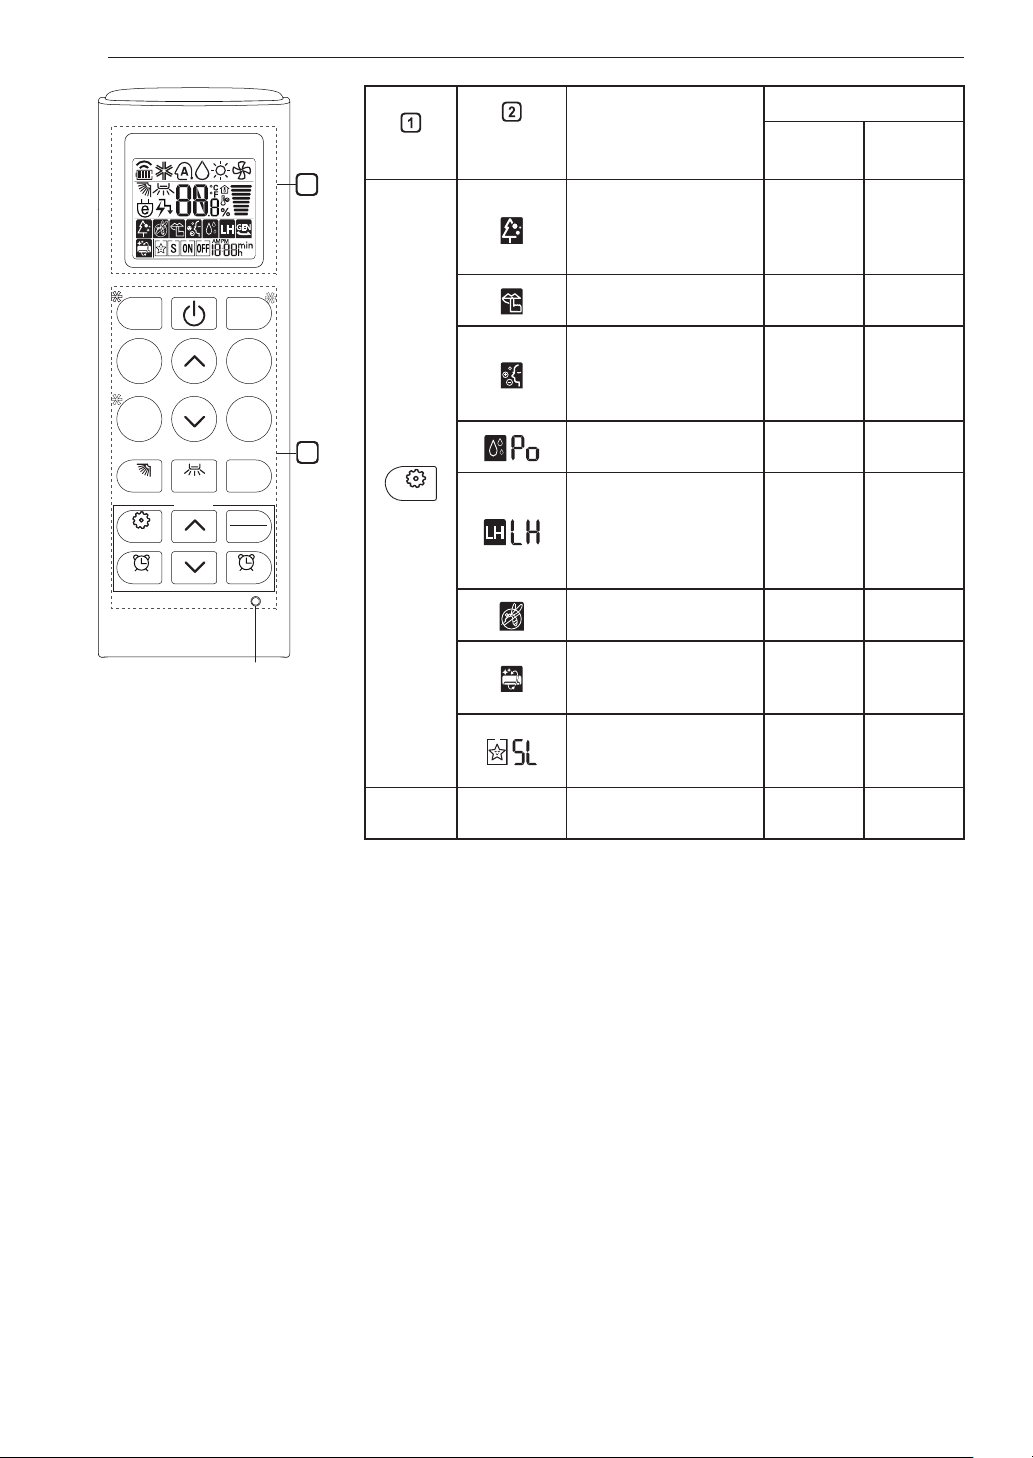
FUNC.
*
MODE
TEMP
*
kW [3 s]
SWING
SWING
℃↔℉ [5 s]
SET UP
FUNC.
TIMER CANCEL
FAN
SPEED
JET
MODE
ROOM
TEMP
DIAGNOSIS [5 s]
SET
CANCEL
RESET
Button
2
Display
Screen
Description
The Ion generator
uses millions of ions
to help improve indoor
Available Function
Single
Split
Multi
X X
air quality.
*
outdoor units.
To reduce noise from
X X
To keep your skin
moisturized by
generating ion
X X
clusters.
1
To lower indoor
humidity quickly.
X X
To maintain a
minimum room
temperature and
prevent objects in the
O
(Optional)
X
room from freezing.
To scare away a
mosquito.
X X
To remove moisture
generated inside the
O O
indoor unit.
To make a
comfortable sleeping
X X
environment.
RESET -
To initialize the remote
control settings.
O O
NOTE
• Some functions may not be supported, depending on the model.
• * buttons may be changed according to the type of model.
• Press the SET/CANCEL button to operate the selected FUNC.
 Loading...