

LG LAC7900N Owner’s Manual
LAC7900N/7901N_HYUNDAI_ENG_MFL62880516
MODEL : LAC7900N / LAC7901N
P/N : MFL62880516
ENGLISH

2
CAR CD/MP3/WMA Receiver
2 Table of Contents
3 Safety Note
4 Front Panel / Remote Control
5 About Detachable Control Panel
6 Installation
Basic installation
Removing the existing receiver unit
ISO-DIN installation
Battery installation
7 Connection
8 Basic operation
Mute
Using the EQ
Adjusting the sound level
XDSS+
Checking the clock
Setting the clock
9 Listening to a CD
Pause or restart a CD
Search for a section within a track / file
Skip to another track / file
Intro scan
Repeat
Shuffle
MP3/WMA Track -10 / +10
MP3/WMA Folder UP/DOWN
Checking information about your music
10 Listening to the radio
Auto search memory
Storing and recalling broadcast frequencies
To scan the preset stations
To tune in the preset stations
Connecting USB device
11 Connecting an Auxiliary Equipment
Changing settings
12-13 Connecting a Bluetooth wireless technology
Disconnecting a phone
Answering and Ending a call
Rejecting a call
Making a call saved preset number
Missed call notification
Audio transfer
Making a call from the latest call
Paring your unit and device with Bluetooth wireless technology
Playing MP3 files
Storing a call number in last answered
Bluetooth wireless technology profiles information
The buttons with bluetooth wireless technology
14 Adjusting the setting (Bluetooth wireless technology)
15-16 Phone compatibility list (Bluetooth wireless technology)
17 Troubleshooting
18 Specifications
Table of Contents
CAR CD/MP3/WMA Receiver 3
Safety Note
This lightning flash with arrowhead symbol within an equilateral triangle is
intended to alert the user to the presence of uninsulated dangerous voltage
within the product’s enclosure that may be of sufficient magnitude to constitute a risk of electric shock to persons.
The exclamation point within an equilateral triangle is intended to alert the
user to the presence of important operating and maintenance (servicing)
instructions in the literature accompanying the product.
Always operate the vehicle in a safe manner.
Do not become distracted by the vehicle while driving, and always be fully
aware of all driving condition. Do not change settings, or any functions.
Pull over in a safe and legal manner before attempting such operations.
Do not use for many hours at extremely low or high temperature.
(-10~60’C)
To reduce the risk of electric shock, do not remove the cover or back of
this product. There are no user-serviceable parts inside.
Refer servicing to qualified service personnel.
To reduce the risk of fire or electric shock, do not expose this product to
dripping or splashing water, rain, or moisture.
The temperature of unit’s outside can be extremely high, please use the
unit after proper installation in your vehicle.
This unit cannot play 8cm disc (use 12cm disc only).
CAUTION : TO REDUCE THE RISK OF ELECTRIC
SHOCK DO NOT SPLIT COVER(OR BACK) NO USER
SERVICEABLE PARTS INSIDE. REFER SERVICING
TO QUALIFIED SERVICE PERSONNEL.
CAUTION
RISK OF ELECTRIC SHOCK
DO NOT OPEN
8 cm
CAUTION : This product uses a Laser System.
To ensure proper use of this product, please read this owner’s manual carefully and
retain it for future reference.
Should the unit require maintenance, contact an authorized service center. Performing
controls, adjustments, or carrying out procedures other than those specified herein
may result in hazardous radiation exposure.
To prevent direct exposure to laser beam, do not try to open the enclosure. Visible
laser radiation when open. DO NOT STARE INTO BEAM.
This device is equipped with a portable battery or accumulator.
Safe way to remove the battery or the battery from the equipment:
Remove the old battery or battery pack, follow the steps in reverse order than
the assembly. To prevent contamination of the environment and bring on possible threat to human and animal health, the old battery or the battery put it in the
appropriate container at designated collection points. Do not dispose of batteries
or battery together with other waste. It is recommended that you use local, free
reimbursement systems batteries and accumulators.
The battery shall not be exposed to excessive heat such as sunshine, fire or the like.
Caution
When being connected in a wrong way, the unit displays as follows.
- Antenna port short : “ANTENNA ON PORT SHORT CIRCUIT CHECK”
After connecting it again, restart the unit.
You have to set the disc format option to [Mastered] in order to make the discs
compatible with the LG players when formatting rewritable discs.
When setting the option to Live File System, you cannot use it on LG players.
(Mastered/Live File System : Disc format system for Windows Vista)
4
CAR CD/MP3/WMA Receiver
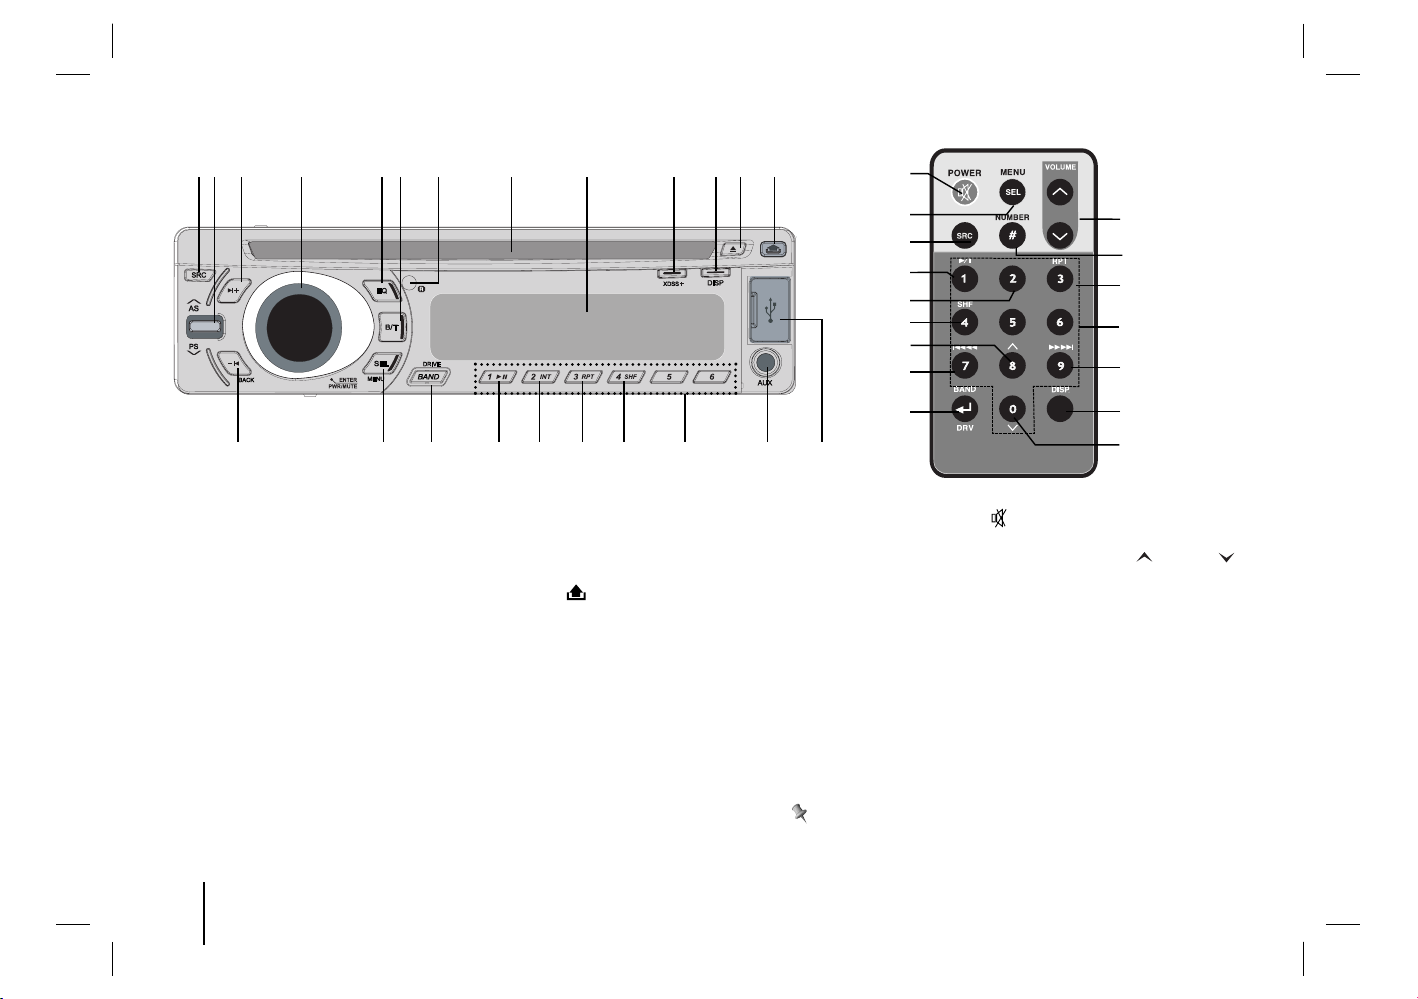
Front Panel / Remote Control
1 Power [POWER] / Mute
2 Select [MENU/SEL]
3 Source [SRC]
4 Play / Pause B/X
5 Intro Scan [INT]
6 Shuffle [SHF]
7 • MP3/WMA Track +10
• Folder Up
UU
8 • CD Skip / Search
• Seek / Tune ?m m
9• [BAND]
• DRIVE [DRV]
10 Volume Up / Down
11 Number [#]
12 Repeat [RPT]
13 Number [0 -9]
14 • CD Skip / Search
• Seek / Tune M M?
15 Display [DISP.]
16 • MP3/WMA Track -10
• Folder Down
uu
p1 SOURCE [SRC]
2 • Auto Store [UU/AS]
• Preset Scan [uu/PS]
• MP3/WMA Track +10/-10 UU/
uu
• Folder Up/Down UU/
uu
3 Skip / Search / Seek / Tune B?+
4 • ENTER
• Volume
• [MUTE]
• Power [PWR]
5 Equalizer [EQ]
6 Bluetooth wireless technology [B/T]
7 Remote Sensor
8 CD slot
9 Display window
10 Extreme Dynamic Sound System
[XDSS+]
11 Display [DISP]
12 Eject
13 Release
14 USB slot
15 AUX in
16 Preset Station [1~6]
17 Shuffle [SHF]
18 Repeat [RPT]
19 Intro Scan [INT]
20 Play/Pause BX
21 • [BAND]
• [DRIVE]
22 Select [SEL] / [MENU]
23 Skip / Search / Seek / Tune / Back
-?b
Note
There is the microphone in the left top position of the unit when you
detach the control panel.
INT
10
12
14
15
16
1
3
8
9
4
5
2
6
7
11
13
1 9765432 10 11 13
15 1416212223 17181920
8 12
CAR CD/MP3/WMA Receiver 5
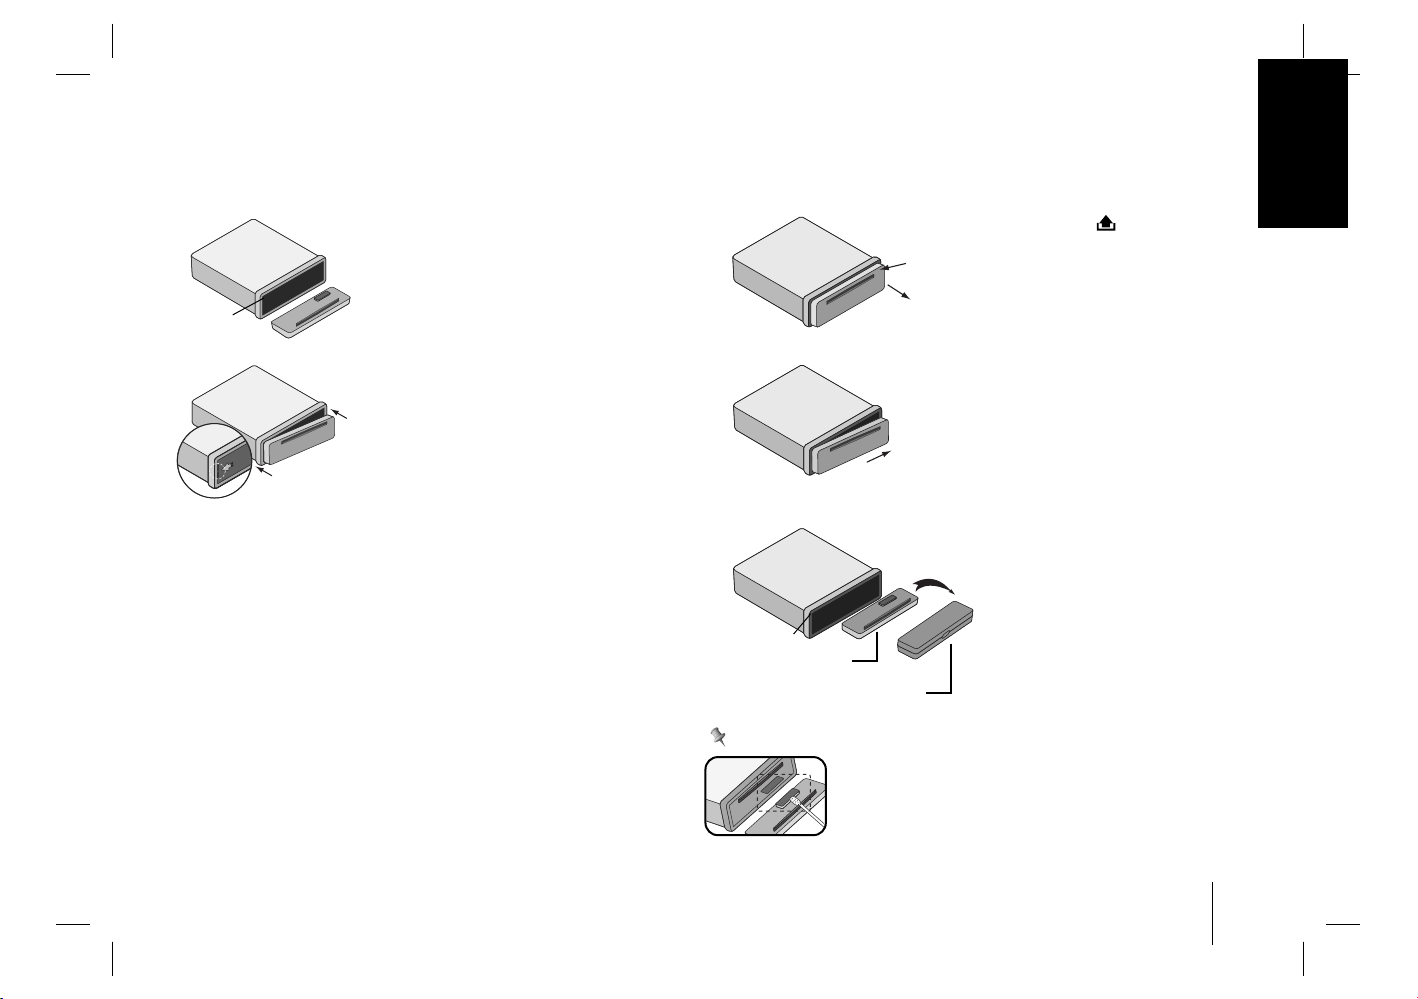
About Detachable Control Panel
Attaching the control panel
1
2
Detaching the control panel
1
2
3
4
Protective Case
Control panel
Periodically wipe the contacts on the back of the control
panel with a cotton swap moistened with alcohol. For safety,
turn off the ignition before cleaning, and remove the key
from the ignition switch.
1 Align the left side of the panel with
the stopper.
2 Push the right side or panel into the
unit until it clicks.
1 Press the “ ” (RELEASE) to
open the control panel.
2 Hold the right part of the control
panel.
3 Pull out the control panel.
4 Place the control panel in the
supplied protective case.
Note
Microphone
Microphone
6
CAR CD/MP3/WMA Receiver
Installation
A
A
If there is already an installation
sleeve for the receiver unit in the
dashboard, it must be removed.
1 Remove the rear support from the
unit.
2 Remove the control panel and trim
ring from the unit.
3 Insert the lever A into the hole on
one side of the unit.
Perform the same operation on
the other side and pull the unit out
from the mounting sleeve.
5
4
3
1
2
6
Control panel
1 Slide the unit into the ISO-DIN
frame.
2 Fit screws removed from the old
unit.
3 Slide the unit and frame into the
dash opening.
4 Install the dash panel or adapter
plate.
5 Install the trim ring to the unit.
6 Install the control panel to the unit.
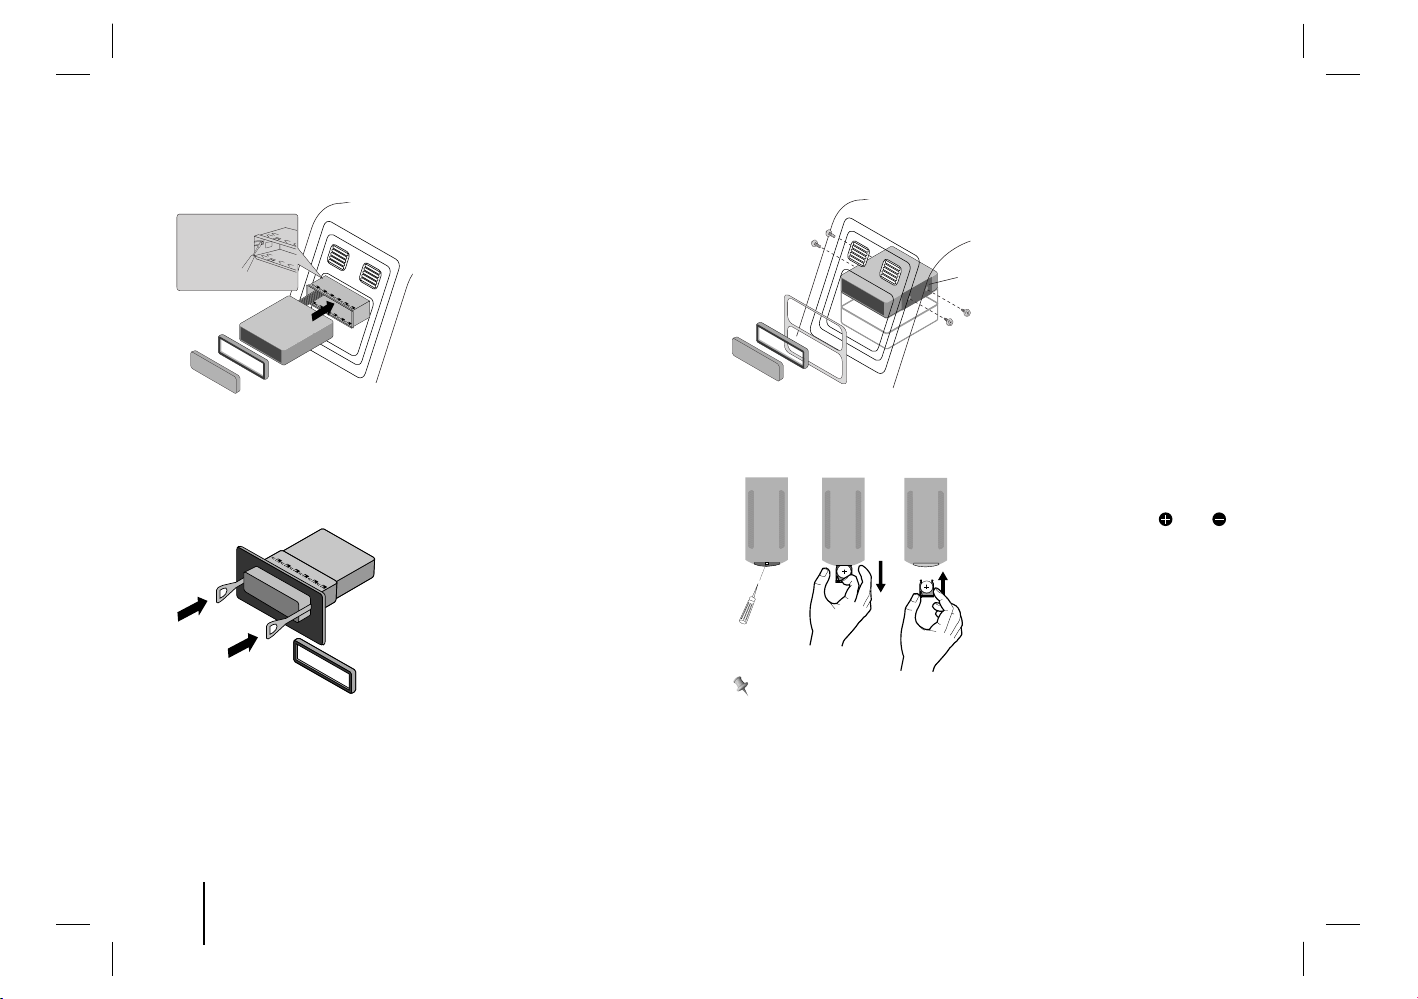
Removing the existing receiver unit
ISO-DIN Installation
Before installing, make sure that the
ignition-switch is set to OFF and
remove the terminal of the car battery
to avoid short-circuiting.
1 Remove the existing receiver unit.
2 Make the necessary connections.
3 Install the installation sleeve.
4 Install the unit into the installation
sleeve.
Bend the claws
according to
the thickness
of the
dashboard
Control panel
Basic Installation
1 Pull out the battery holder with a
sharp product like a ball point pen.
2 Put the battery with and cor-
rectly on the battery holder.
3 Push the battery holder back into its
original position.
Battery Installation
Note
• Use only one CR2025 (3V) lithium battery.
• Remove the battery if the remote control is not used for a long period of
time.
• Do not leave the product in a hot or humid place.
• Do not handle the battery with metallic tools.
• Do not store the battery with metallic materials.
 Loading...