

Page 1

General Inquiries
<LG Customer Information Center>
0844-847-5847
* Make sure the number is correct before making a call.
KS360 User Guide
ELECTRONICS INC.
www.lgmobile.com
P/N : MMBB0303615 (1.2) G
KS360
E N G L I S H
Page 2

Bluetooth QD ID B014200
Page 3

Some of the contents in this manual may
differ from your phone depending on the
software of the phone or your service
provider.
KS360 User Guide
ENGLISH
Page 4

Page 5

Congratulations on your purchase of the
advanced and compact KS360 phone by LG,
designed to operate with the latest digital
mobile communication technology.
Disposal of your old appliance
1 When this crossed-out wheeled bin symbol is attached to a product it
means the product is covered by the European Directive 2002/96/EC.
2 All electrical and electronic products should be disposed of separately
from the municipal waste stream via designated collection facilities
appointed by the government or the local authorities.
3 The correct disposal of your old appliance will help prevent potential
negative consequences for the environment and human health.
4 For more detailed information about disposal of your old appliance,
please contact your city offi ce, waste disposal service or the shop
where you purchased the product.
Page 6

Contents
GUIDELINES
Guidelines for safe and effi cient use ..........7
01 SET UP
Getting to know your phone ..................... 11
Open view ...............................................12
Installing the SIM and battery .................. 14
Memory card ...........................................17
Installing a memory card ........................ 17
Removing a memory card ......................17
Formatting a memory card ..................... 17
Menu map ............................................... 18
02 YOUR STANDBY SCREEN
Your standby screen ................................19
The status bar .......................................19
03 THE BASICS
Calls ........................................................ 20
Making a call .........................................20
Making a call from your address book ..... 20
Answering and rejecting a call ................ 20
Adjusting the call volume .......................21
Speed dialling........................................21
Viewing your call logs ............................21
Using call divert ..................................... 22
Using call barring ...................................22
Changing the call settings ...................... 23
4
LG KS360 | User Guide
Address book ........................................... 24
Searching for a contact .......................... 24
Adding a new contact ............................24
Contact options .....................................24
Adding a contact to a group ...................25
Renaming a group ................................. 25
Adding a picture to a contact .................. 25
Copying your contacts to your SIM .......... 26
Deleting all your contacts ....................... 26
Viewing information ...............................26
Messaging ............................................... 27
Messaging ............................................27
Sending a message ...............................27
Entering text ..........................................28
Text input mode using the keypad ...........28
Setting up your email ............................. 28
Sending an email using your new
account.................................................28
Message folders .................................... 29
Enjoying Orange messenger ................... 29
Managing your messages ......................29
Using templates .....................................30
Changing your text message settings ...... 31
Changing your multimedia message
settings ................................................. 31
Changing your email settings .................32
Changing your other settings .................. 32
Page 7

04 GET CREATIVE
Camera ....................................................33
Taking a quick photo ..............................33
Before you’ve taken your photo ..............33
After you’ve taken your photo .................34
Using the quick settings .........................34
Changing the image size ........................ 35
Viewing your saved photos .....................35
Setting a photo as Wallpaper or Picture ID
Using Orange Photo ............................... 35
Video camera ...........................................36
Shooting a quick video ........................... 36
After you’ve shot your video ...................36
Getting to know the viewfi nder................37
Using the quick settings .........................37
Watching your saved videos ................... 37
Adjusting the volume when
viewing a video ...................................... 37
Orange music ..........................................38
Music player..........................................38
Transferring music onto your phone ........ 38
Playing a song ....................................... 38
Using options while playing music...........38
Creating a playlist .................................. 39
Playing a playlist .................................... 39
Editing a playlist ....................................39
Deleting a playlist ..................................40
.. 35
FM radio ..................................................41
Using the FM radio ................................41
Searching for stations ............................41
Resetting channels ................................41
Listening to the radio .............................41
Media album ............................................42
Images..................................................42
Images options menu.............................42
Sending a photo ....................................43
Organising your images .........................43
Deleting an image .................................43
Deleting multiple images ........................ 43
Creating a slide show.............................44
Sounds .................................................44
Using a sound .......................................44
Videos ..................................................44
Watching a video ................................... 44
Using options while video is paused ........ 45
Sending a video clip ............................... 45
Video options menu ............................... 45
Documents............................................46
Viewing a document ..............................46
Others ..................................................46
External memory ...................................46
Games and Applications ...........................47
Games and Applications .........................47
Playing a game ......................................47
Viewing applications .............................. 47
Changing the network profi le .................. 47
Checking security certifi cates .................47
5
Page 8

Contents
05 GET ORGANISED
Organiser & More ....................................48
Adding an event to your calendar ............48
Editing a calendar event ......................... 48
Sharing a calendar event ........................49
Adding a memo ..................................... 49
Setting your alarm .................................49
Using the voice recorder ........................50
Recording your voice memo ...................50
Sending a voice recording ......................50
Using your calculator .............................50
Using the stopwatch ..............................50
Converting a unit ...................................51
Adding a city to your world clock ............51
SIM services.......................................... 51
06 ORANGE WORLD
Orange World ........................................... 52
Accessing the web.................................52
Adding and accessing your bookmarks ...52
Saving a page .......................................53
Accessing a saved page .........................53
Viewing your browser history .................. 53
Changing the web browser settings ........53
6
LG KS360 | User Guide
07 SETTINGS
Settings ................................................... 54
Changing your profi les ........................... 54
Personalising your profi les ......................54
Changing your date & time ..................... 54
Changing the language ..........................54
Changing your display settings ...............55
Changing your security settings .............. 55
Using fl ight mode...................................56
Using power save ..................................56
Resetting your phone .............................56
Viewing memory status .......................... 56
Changing your Bluetooth settings............56
Changing your connectivity settings ........ 56
Pairing with another Bluetooth device .....57
Using a Bluetooth headset ...................... 57
Using your phone as a mass storage device
Transferring a fi le to your phone .............58
Sending and receiving your fi les using
Bluetooth .............................................. 59
.. 58
08 ACCESSORIES
Accessories ............................................. 60
Network service ....................................... 61
Technical data ......................................... 61
General ................................................. 61
Ambient Temperatures ........................... 61
Page 9

Guidelines for safe and effi cient use
Please read these simple guidelines.
Not following these guidelines may be
dangerous or illegal.
Exposure to radio frequency energy
Radio wave exposure and Specifi c Absorption
Rate (SAR) information This mobile phone
model KS360 has been designed to comply
with applicable safety requirements for
exposure to radio waves. These requirements
are based on scientifi c guidelines that include
safety margins designed to assure the safety
of all persons, regardless of age and health.
• The radio wave exposure guidelines
employ a unit of measurement known as
the Specifi c Absorption Rate, or SAR. Tests
for SAR are conducted using standardised
methods with the phone transmitting at
its highest certifi ed power level in all used
frequency bands.
• While there may be differences between
the SAR levels of various LG phone
models, they are all designed to meet the
relevant guidelines for exposure to radio
waves.
• The SAR limit recommended by the
International Commission on Non-Ionizing
Radiation Protection (ICNIRP) is 2W/kg
averaged over 10g of tissue.
• The highest SAR value for this model
phone tested by DASY4 for use at the ear
is 0.635 W/kg (10g) and when worn on the
body is 0.949 W/kg (10g).
• SAR data information for residents in
countries/regions that have adopted the
SAR limit recommended by the Institute of
Electrical and Electronics Engineers (IEEE),
which is 1.6 W/kg averaged over 1g of
tissue.
Product care and maintenance
WARNING
Only use batteries, chargers and accessories
approved for use with this particular phone
model. The use of any other types may
invalidate any approval or warranty applying
to the phone, and may be dangerous.
• Do not disassemble this unit. Take it to a
qualifi ed service technician when repair
work is required.
• Keep away from electrical appliances such
as TVs, radios, and personal computers.
• The unit should be kept away from heat
sources such as radiators or cookers.
• Do not drop.
7
Page 10

Guidelines for safe and effi cient Use
• Do not subject this unit to mechanical
vibration or shock.
• Switch off the phone in any area where
you are required by special regulations.
For example, do not use your phone in
hospitals as it may affect sensitive medical
equipment.
• Do not handle the phone with wet hands
while it is being charged. It may cause an
electric shock and can seriously damage
your phone.
• Do not to charge a handset near
fl ammable material as the handset can
become hot and create a fi re hazard.
• Use a dry cloth to clean the exterior of the
unit (do not use solvents such as benzene,
thinner or alcohol).
• Do not charge the phone when it is on soft
furnishings.
• The phone should be charged in a well
ventilated area.
• Do not subject this unit to excessive smoke
or dust.
• Do not keep the phone next to credit
cards or transport tickets; it can affect the
information on the magnetic strips.
8
LG KS360 | User Guide
• Do not tap the screen with a sharp object
as it may damage the phone.
• Do not expose the phone to liquid or
moisture.
• Use the accessories like earphones
cautiously. Do not touch the antenna
unnecessarily.
Effi cient phone operation
Electronics devices
All mobile phones may get interference,
which could affect performance.
• Do not use your mobile phone near
medical equipment without requesting
permission. Avoid placing the phone over
pacemakers, for example, in your breast
pocket.
• Some hearing aids might be disturbed by
mobile phones.
• Minor interference may affect TVs, radios,
PCs, etc.
Page 11

Road safety
Check the laws and regulations on the use of
mobile phones in the area when you drive.
•
Do not use a hand-held phone while driving.
• Give full attention to driving.
• Use a hands-free kit, if available.
• Pull off the road and park before making
or answering a call if driving conditions so
require.
• RF energy may affect some electronic
systems in your vehicle such as car
stereos and safety equipment.
• When your vehicle is equipped with an
air bag, do not obstruct with installed or
portable wireless equipment. It can cause
the air bag to fail or cause serious injury
due to improper performance.
• If you are listening to music whilst out and
about, please ensure that the volume is at
a reasonable level so that you are aware
of your surroundings. This is particularly
imperative when near roads.
Avoid damage to your hearing
Damage to your hearing can occur if you are
exposed to loud sound for long periods of
time. We therefore recommend that you do
not turn on or off the handset close to your
ear. We also recommend that music and call
volumes are set to a reasonable level.
Glass Parts
Some parts of your mobile device are made
of glass. This glass could break if your
mobile device is dropped on a hard surface
or receives a substantial impact. If the glass
breaks, do not touch or attempt to remove.
Stop using your mobile device until the glass
is replaced by an authorized service provider.
Blasting area
Do not use the phone where blasting is in
progress. Observe restrictions, and follow any
regulations or rules.
Potentially explosive atmospheres
• Do not use the phone at a refueling point.
• Do not use near fuel or chemicals.
• Do not transport or store fl ammable
gas, liquid, or explosives in the same
compartment of your vehicle as your
mobile phone and accessories.
9
Page 12

Guidelines for safe and effi cient Use G
In aircraft
Wireless devices can cause interference in aircraft.
• Turn your mobile phone off before boarding
any aircraft.
• Do not use it on the ground without
permission from the crew.
Children
Keep the phone in a safe place out of the reach
of small children. It includes small parts which
may cause a choking hazard if detached.
Emergency calls
Emergency calls may not be available
under all mobile networks. Therefore, you
should never depend solely on the phone
for emergency calls. Check with your local
service provider.
Battery information and care
• You do not need to completely discharge
the battery before recharging. Unlike
other battery systems, there is no memory
effect that could compromise the battery’s
performance.
• Use only LG batteries and chargers. LG
chargers are designed to maximize the
battery life.
10
LG KS360 | User Guide
• Do not disassemble or short-circuit the
battery pack.
• Keep the metal contacts of the battery
pack clean.
• Replace the battery when it no longer
provides acceptable performance. The
battery pack maybe recharged hundreds of
times until it needs replacing.
• Recharge the battery if it has not been
used for a long time to maximize usability.
• Do not expose the battery charger to direct
sunlight or use it in high humidity, such as
in the bathroom.
•
Do not leave the battery in hot or cold places,
this may deteriorate the battery performance.
• There is risk of explosion if the battery is
replaced by an incorrect type.
• Dispose of used batteries according to
the manufacturer’s instructions. Please
recycle when possible. Do not dispose as
household waste.
• If you need to replace the battery, take it
to the nearest authorized LG Electronics
service point or dealer for assistance.
•
Always unplug the charger from the wall
socket after the phone is fully charged to save
unnecessary power consumption of the charger.
•
Actual battery life will depend on network
confi guration, product settings, usage patterns,
battery and environmental conditions.
Page 13

Getting to know your phone
Volume key
• In
•
During a call: Controls the r
Main screen
OK key
Left softy key
For one touch access
to Orange Services
from home screen.
Call key
Dials a phone number
and answers incoming
calls.
Touchpad key
Activate the touch screen by
pressing the key. Make a call
by touching the screen.
Navigation keys
• In standby mode:
Up : Orange Messenger
Down : Inbox
Right : Profiles
Left : Favourites
•
In menu: Navigates between menus.
standby mode: Controls the ring volume.
eceiver’s volume.
Charger, cable,
handsfree
connector
Memory card
slot
Camera
Right soft key
For one touch access to Contacts menu from
home screen.
End/Power key
Ends or rejects a call. Turns the phone on/off. Returns
to the standby screen when you use the menu.
Clear key
Deletes a character with each press. Use this key
to go back to the previous screen.
11
Page 14

Open view
Fn key
Change from text
mode to symbol/
numeric mode
and lock keypad.
Symbol key
Enters symbolic character.
Change the text mode
(Capital/ Small)
Alpha numeric keys
12
LG KS360 | User Guide
Left soft key/ Right soft key
Performs the function indicated at the
bottom of the display.
Space Key
Use to enter space
while editing.
Enter key
OK key
Selects menu options and
confirms actions in the
centre of the screen.
Message key
Clear key
•
Clears a character
with each press.
Hold the key down
to clear all input.
•
Use this key to go
back to a previous
screen.
Page 15
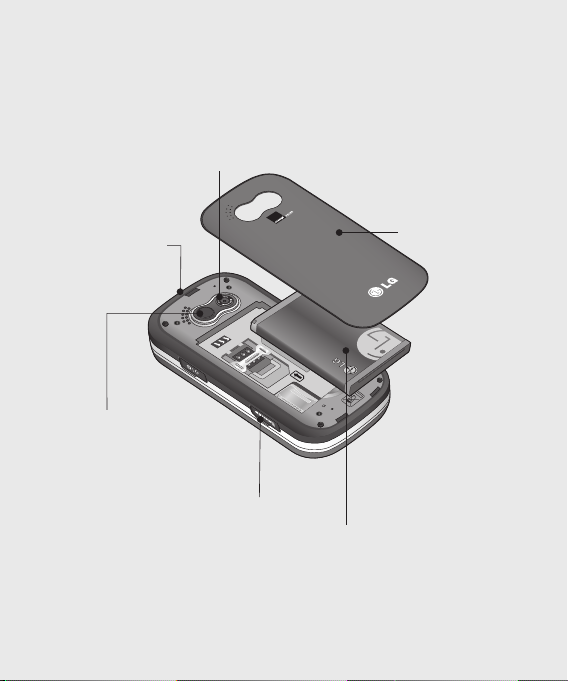
Camera lens
Battery cover
release latch
Mirror
Battery cover
Memory card slot
Battery
13
Page 16

Installing the SIM and battery
1 Remove the battery cover
Press the battery cover release latch. The
battery cover should lift off easily.
14
LG KS360 | User Guide
2 Remove the battery
Lever the bottom edge of the battery
and remove it carefully from the battery
compartment.
WARNING: Do not remove the battery
when the phone is switched on, as this may
damage the phone.
3 Install the SIM card
Slide the SIM card into the SIM card holder.
Make sure that the gold contact area on
the card is facing downwards. To remove
the SIM card, push it out of the holder
from the top.
WARNING: Do not insert the SIM card
when the keypad is open, as this may damage
your phone and SIM card.
Page 17

4 Install the battery
Insert the top of the battery fi rst into the
top edge of the battery compartment.
Ensure the battery contacts align with the
terminals on the phone. Press the bottom
of the battery down until it clips into place.
15
Page 18

Installing the SIM and battery
5 Replace the battery cover
Insert the bottom of the battery cover and
push down until it clicks into place.
16
LG KS360 | User Guide
6 Charging your phone
Pull open the cover of the charger socket
on the side of your KS360. Insert the
charger and plug into a mains electricity
socket. Your KS360 will need to be
charged until a message reading Fully
Charged appears on screen.
WARNING: Do not charge the phone when
it is on soft furnishings. The phone should be
charged in a well ventilated area.
Page 19

Memory card
Installing a memory card
You can expand the memory space available
on your phone using a memory card.
TIP! A memory card is an optional accessory.
Open the slide covering the memory card
slot. Slide the memory card into the slot, until
it clicks into place. Make sure that the gold
contact area is facing downwards.
Removing a memory card
Open the cover and carefully remove the
memory card by gently pushing it in and
releasing it so that it will pop out as shown in
the following diagram:
Formatting a memory card
If your memory card is not already formatted,
you will need to do so before you can begin
using it.
1 From the standby screen press
select Settings. Then choose Phone
Settings.
2 Choose Memory status and select
External memory.
3 Press Format and enter the password,
which is set to 0000 as default. Your card
will be formatted and ready to use.
4 To view the new formatted folders on
your KS360 press
album. Choose External memory.
WARNING: When you format your memory
card, all the content will be wiped. If you do not
want to lose the data on your memory card,
back it up fi rst.
and
and select Media
17
Page 20
Menu map
Games & Apps
1 Games
2 Applications
3 Network
profi le
4 Security
certifi cates
Messaging
1 Create new
message
2 Inbox
3
Orange Messenger
4 Email box
5 Drafts
6 Outbox
7 Sent
8
Listen to voicemail
9 Info messages
0 Templates
* Settings
Camera
1 Camera
2 Video camera
18
LG KS360 | User Guide
Address book
1 Search
2 Add contact
3 Speed dialing
4 Groups
5 Copy all
6 Delete all
7 Settings
8 Information
Orange World
1 Home
2 Bookmarks
3 Enter address
4 History
5 Saved pages
6 Settings
7 Information
8 Orange Plus
Organiser
1 Calendar
2 Alarm clock
3 Memo
4 Voice memo
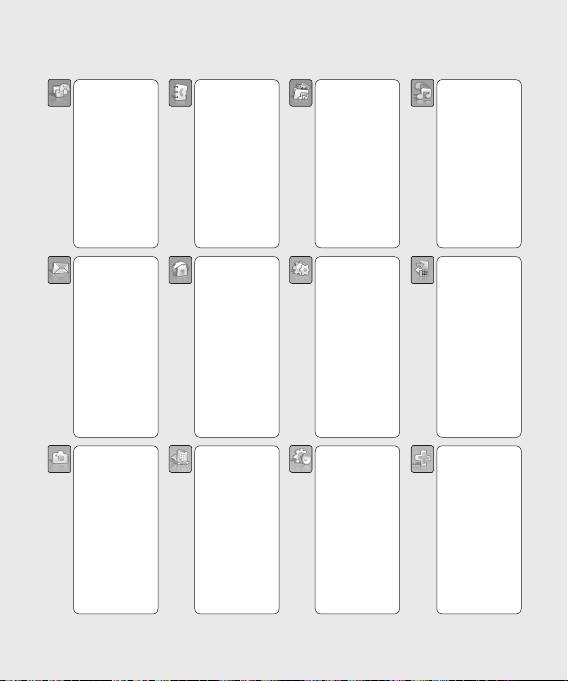
Media album
1 Downloads
2 Images
3 Orange photo
4 Sounds
5 Videos
6 Documents
7 Others
8 External
memory
Settings
1 Connectivity
2 Date & Time
3 Languages
4 Display
5 Call
6 Security
7 Flight mode
8 Power save
9 Reset
0 Memory status
Profi les
1 Normal
2 Silent
3 Vibrate only
4 Outdoor
5 Headset
Orange music
1 Music Store
2 Music player
3 My music
4 FM radio
Call history
1 All calls
2 Missed calls
3 Dialled calls
4 Received calls
5 Call length
6 Call costs
7 Data
information
More
1 Calculator
2 Stopwatch
3 Unit converter
4 World clock
Page 21

Your standby screen
The status bar
The status bar uses various icons to indicate
things like signal strength, new messages
and battery life, as well as telling you whether
your Bluetooth is active.
Below is a table explaining the meaning of
icons you’re likely to see in the status bar.
TIP! You can quickly access chosen menus
using the left and right soft keys. In standby
mode press the left soft key to access Orange
World, Web search, TV & Video, Music & Tones,
MySpace and Your account. Or, open Contacts
directly by pressing the right soft key.
Icon Description
Network signal strength
(number of bars will vary)
No network signal
Roaming service
Bluetooth® is activated
WAP service is connected
An alarm is set
New message
Icon Description
New voice message
General profi le in use
Silent profi le in use
Vibrate profi le in use
Outdoor profi le in use
Headset profi le in use
Remaining battery life
Battery empty
19
Page 22

Calls
Making a call
1 Make sure your phone is on.
2
The fastest way to make a call is to activate
touch mode by pressing
this key, you can touch the screen to enter
the phone number to call. Or, you can use
keypad after opening the slide. To delete a
digit press or the back arrow.
3 Press
to initiate the call.
4 To end the call, press
or close the
slide.
TIP! To enter + when making an international
call, touch and hold 0.
Making a call from your address
book
1 Select Address book in the menu and
choose Search.
2 Using the keypad, enter the fi rst letter of
the contact you want to call and scroll to
the contact.
3 Press
to initiate the call.
20
LG KS360 | User Guide
. If you press
Answering and rejecting a call
When your phone rings, press Accept or
press
to answer the call.
While your phone is ringing, press the camera
key, then select Silent to mute the ringing.
This is great if you have forgotten to change
your profi le to Silent for a meeting.
or select Reject to reject the
Press
incoming call.
TIP! You can change the settings on your phone
to answer your calls in different ways.
Press
, select Settings and choose Call.
Select Answer mode and choose from Slide
open, Any key or Accept key only.
Page 23

Adjusting the call volume
To adjust the volume during a call, press
the volume key on the left hand side of your
phone.
Speed dialling
You can assign a speed dial number to a
contact you call frequently.
1 Press
to open the main menu. Select
Address book, then select Speed
dialing.
2 Your voicemail is set to speed dial 1 and
you cannot change this. Select any other
number either by using the navigation keys
and selecting Assign or by pressing the
hard key number.
3 Your address book will open. Select the
contact you’d like to assign to that number
using the navigation keys, then select OK.
To call a speed dial number, press and
hold the assigned number until the contact
appears on screen. The call will initiate
automatically; there’s no need to press
Viewing your call logs
Press and select Call history. Choose
to view:
All calls - View a complete list of all your
dialled, received and missed calls.
Missed calls - View a list of any calls you
have missed.
Dialled calls - View a list of all the numbers
you have called.
Received calls - View a list of all the
numbers that have called you.
Call length - View details of how long you
have spent on your calls; received and dialled.
Call costs - View the charges applied to your
Last call or All calls. This service is network
dependent, some operators are unable to
support this.
Data information - View the amount of all
your received and sent data for Web, Data or
All, in kilobytes.
TIP! From any call log select Options and
.
choose Delete to delete selected items.
TIP! Using the navigation keys, highlight any
single call entry to view the date and time of the
call. To view the call duration select View.
21
Page 24

Calls
Using call divert
1 Press
, select Settings and choose
Call.
2 Select Call divert.
3 Choose whether to divert all voice calls,
when the line is busy, when there is no
reply, when you are out of reach, all data
calls or all fax calls.
4 Choose Activate and select whether to
divert to voicemail, another number or your
favourite number.
5 Enter your divert number or select Search
to browse Address book for your divert
number.
Note: Charges are incurred for diverting
calls. Please contact your network provider
for details.
TIP! To turn off all call diverts, choose Cancel
all from the Call divert menu.
22
LG KS360 | User Guide
Using call barring
1 Press
, select Settings and choose
Call.
2 Select Call barring.
3 Choose any or all of the seven options:
All outgoing
Outgoing international
O/G international except home country
All incoming
Incoming when abroad
Cancel all barrings
Change password
4 Select Activate and enter the call barring
password. Please check with your network
operator for this service.
TIP! Select Fixed dial number from the Call
menu to turn on and compile a list of numbers
which can be called from your phone. You’ll
need your PIN2 code from your operator. When
activated, only numbers included in the fi xed dial
list can be called from your phone.
Page 25

Changing the call settings
1 Press
, select Settings and choose
Call.
2 From here you can amend the settings for:
Call divert - Choose whether to divert
your calls.
Call barring - Select which calls you
would like to be barred.
Fixed dial number - Choose a list of
numbers that can be called from your
phone.
Answer mode - Choose whether to
answer the phone using only the accept
key, any key or by sliding your handset
open.
Send my number - Choose whether your
number will be displayed when you call
someone.
Call waiting - Be alerted when you have
a call waiting.
Minute minder - Select On to hear a tone
every minute during a call.
Auto redial - Choose that the phone will
automatically try to redial in the case of
failure to connect a call.
Send DTMF tones - You can send the
DTMF (dual tone multi-frequency) tones
of the number on the display during a
call. This option is helpful for entering a
password or account number when you
call an automated system, like a banking
service.
23
Page 26

Address book
Searching for a contact
1 Select Contacts from the standby screen.
2 Using the keypad or touchpad enter the
fi rst letter of the contact you want to call.
3
To scroll through the contacts and their
different numbers use the navigation keys.
Adding a new contact
1 Press
, s
choose Add contact.
2 Choose whether to store your new contact
on your Phone or SIM card.
3 Enter all the information you have in the
fi elds provided and select Save.
Or, use a slightly quicker method…
1 Enter the number you wish to store on the
standby screen and press Options.
2 Choose Save or Add to existing
contact.
3 Enter the relevant information as above
and select Save.
24
LG KS360 | User Guide
elect Address book and
Contact options
There are many things you can do when
viewing a contact. Here’s how to access and
use the Options menu:
1 Open the contact you’d like to use. See
Searching for a contact above.
2 Select Options to open the list of options.
From here you can:
Edit - Change any of the contact’s details.
New message - Send a message to
the contact. If the contact has an email
address, select whether you’d like to send
a Message or Email.
Send via - Send the contact’s details to
another person as a business card. Choose
to send as a Text message, Multimedia
message, via Bluetooth or by Email.
Delete - Delete the contact. Select Yes if
you are sure.
New contact - Add a new contact.
Multi delete - Mark multiple contacts to
delete.
Copy to SIM/phone - Choose to move or
copy to the SIM card or phone (depending
on where you originally saved the contact).
Page 27

Adding a contact to a group
You can save your contacts into groups,
for example, keeping your work colleagues
and family separate. There are a number
of groups including Family, Friends,
Colleague, VIP, Group 1, Group 2 and
No group already set up on the phone.
1 Select Address book and choose
Groups.
2 Scroll to the group you wish to add a
contact to and select View then select
Add.
3 Your address book will open. Scroll to any
contacts you would like to add to the group
and select
4 Select Yes if you are sure.
TIP! You can assign a ringtone or icon to a
group. Select the group you wish to assign the
ringtone or icon to, select Options and choose
the item you want.
, then Done.
Renaming a group
You can rename any of the groups to fi t your
lifestyle.
1 Select Address book and choose
Groups.
2 Select the a group you want to rename.
3 Choose Options, select Rename and
enter your new group name.
4 Select Save.
Note: You can only assign a contact to a
group or add a picture to a contact that is
saved in your phone (not SIM) memory.
Adding a picture to a contact
You can change the appearance of your
contacts in your address book to include a
picture.
1 Select Address book and choose
Settings.
2 Select View options and choose With
picture.
3 Then return to the address book and select
the contact you want to add a picture to.
4 Choose Options and select Edit.
25
Page 28

Address book M
5 Scroll down to the Photo section and
select Edit. Choose Options and select
No picture, Images, or New image.
If you select Images, you can choose an
image that is saved in your phone memory.
If you select New image, your camera
viewfi nder will open, so you can take a
picture of your contact.
6 Select Save.
Copying your contacts to your SIM
You can also choose to copy your contacts
from your SIM to your handset or from your
handset to your SIM.
1 Select Address book and choose Copy
All.
2 Select to copy the contacts from SIM to
phone or Phone to SIM.
3 Choose whether to Keep original or
Delete original.
4 Select Yes if you are sure.
26
LG KS360 | User Guide
Deleting all your contacts
1 Select Address book and choose Delete
all.
2 Select to delete contacts from SIM or
Phone.
3 Select Yes if you are sure.
4 Enter the password, which is set to 0000
as default, and select OK.
Viewing information
Select Address book and choose
Information. From here you can view your
Service dial numbers, your Own number
and your Business card.
TIP! If you haven’t yet created a business card,
the Business card screen will give you the
option to create one. Select New and enter your
details as you would for any contact. Choose
Save.
Page 29

Messaging
Messaging
Your KS360 includes functions related to SMS
(Short Message Service), MMS (Multimedia
Message Service) and email, as well as the
network’s service messages. Simply press
and select Messaging.
Sending a message
1 Press
, select Messaging and choose
Create new message. Or, a quicker way
is to use the navigation keys to select
on the stand by screen to open a new
blank message.
2 Choose Message to send an SMS or
MMS. (If you want to send an Email see
page 27 or if you want to send something
using Bluetooth, see page 59.)
3 A new message editor will open.
Message editor combines SMS and MMS
into one intuitive and easy to switch
between mode. The default setting of the
message editor is SMS mode.
4 Enter your message using the keypad.
5 Select Options and choose Insert to add
an Image, Sound, Video, Symbol, Text
template, Emoticon, Name & Number,
New slide, Subject or More (Contact/
My business card/Schedule).
6 Choose Send to.
7 Enter the phone number, select Contacts
or choose Options and Recent list to
open a list of contacts you have recently
messaged. You can add multiple contacts.
8 Select Send.
WARNING: If an Image, Sound, Video,
New slide or Subject is added to the message
editor, it will be automatically converted to MMS
mode and you will be charged accordingly.
27
Page 30

Messaging
Entering text
You can enter alphanumeric characters
using the phone’s keypad. For example,
storing names in Address book, writing a
message and creating scheduling events in
the calendar all require entering text. The
following text input methods are available in
the phone: ABC manual mode and 123 mode.
Note: Some fi elds may allow only one text
input mode (e.g. telephone number in address
book fi elds).
To input a symbol in the text entry fi eld, press
the
key and select a symbol, then select
OK. Scroll using the navigation keys to show
more symbol options.
Complete each word with a space by
pressing
.
To delete a character, press
key.
Text input mode using the keypad
When you are required to enter text, for
example when writing a message, the keypad
will default to ABC mode. If you are entering
a number, for example when making call, the
keypad number keys will default to numbers.
In ABC mode you can enter numbers by fi rst
pressing
28
LG KS360 | User Guide
and then the number you require.
Setting up your email
You can stay in touch on the move using
email on your KS360. It’s quick and simple to
set up a POP3 or IMAP4 email account.
1 Press
, select Messaging and choose
Settings.
2 Select Email then Email account.
3 Select Options and choose New
account.
4 You can see Orange e-mail as a default.
Sending an email using your new
account
To send/receive an email, you should set up
an email account (see above).
1 Press
, select Messaging and choose
Create new message.
2 Choose Email and a new email will open.
3 Write a subject then press OK.
4 Enter your message using the keypad.
5 Select Options and choose an
attachment to add: Image, Sound,
Video, Document, More (Contact, My
business card or Schedule).
Page 31

6 Press Send and enter the recipient’s
address or press Options and select
Contacts to open your contacts list.
7 Press Send and your email will be sent.
Message folders
Press , select Messaging. The folder
structure used on your KS360 is fairly selfexplanatory.
Inbox - All the messages you receive are
placed into your Inbox. From here you can
reply, forward and more, see below for details.
Orange Messenger - Chat to your friends
using an online instant messaging service.
Email box - Contains all your email
messages. Select the account you want to
use then select Retrieve. Your KS360 will
connect to your email account and retrieve
your new messages.
Drafts - If you don’t have time to fi nish
writing a message, you can save what you
have done so far here.
Outbox - This is a temporary storage folder
while messages are being sent.
Sent - All the messages you send are placed
into your Sent folder.
Listen to voicemail - You can access your
voicemail box (if provided by your network).
When a new voice message is received,
the symbol will be displayed on the standby
screen.
Info messages - All info messages and
updates received from your operator.
Templates - A list of useful messages,
already written for a quick reply.
Enjoying Orange messenger
You can enjoy chatting to your friends using
Orange messenger by Windows Live.
This service is dependent upon registration.
You can access Orange messenger quickly
using the navigation keys to select
from the standby screen. Or, select Orange
messenger from the Messaging menu.
Managing your messages
You can use your Inbox to manage your
messages.
1 Press
, select Messaging and choose
Inbox.
2 Select Options and then choose to:
Delete - Delete the selected message.
Reply - Send a reply to the selected message.
29
Page 32

Messaging
Forward - Send the selected message on
to another person.
Return call - Call the person who sent
you the message.
Threaded/General View - Change the
way you view your message options.
Information - View the details of a
message, for example, the time it was
sent.
Copy/Move - Choose to copy or move
the selected message to the SIM card or
phone.
Multi delete - Delete selected messages.
Delete all read - All opened messages
will be deleted.
Delete all - Delete text messages,
multimedia messages or all messages.
If you see the message No space for SIM
message, you should delete some messages
from your inbox.
If you see the message No space for
messages, you can delete either messages
or saved fi les to create space.
30
LG KS360 | User Guide
Using templates
You can create templates for the Text and
Multimedia messages you send most
frequently. There are some templates already
on your phone, which can be edited if you
wish.
1 Press
, select Messaging and choose
Templates.
2 Choose Text or Multimedia templates.
You can then select Options and choose
Edit to change existing templates, to add
New template or to Delete templates.
3 To send a template, select the one you
want to send, choose Options and select
Send via.
4 Choose how you would like to send the
template, as a Message, Bluetooth
message or Email.
5 Choose a contact and select Send.
Page 33

Changing your text message
settings
Your KS360 message settings are pre-defi ned
so that you can send messages immediately.
If you would like to change the settings, you
can do this using the Settings options.
Press
, select Messaging, then choose
Settings and Text message. You can make
changes to:
Message type - Convert your text into Voice,
Fax, Paging, X.400, Email or ERMES.
Validity period - Choose how long your
message is stored at the message centre.
Delivery report - Choose to receive
confi rmation that your message was
delivered.
Reply charging - Choose to be billed for
your message recipient’s reply.
Message centre number - Enter the details
for your message centre.
Character encoding - Choose how your
characters are encoded. This impacts the size
of your message and therefore data charges.
Send long text as - Choose whether to
send your message as SMS or MMS when
you enter a text longer than 2 pages in the
message fi eld.
Bearer setting - Choose whether to send
your messages via GSM or GPRS.
Changing your multimedia message
settings
Your KS360 message settings are pre-defi ned
so that you can send messages immediately.
If you would like to change the settings, you
can do so using the Settings options.
Press
, select Messaging, then choose
Settings and Multimedia message.
You can make changes to:
Slide duration - Choose how long your
slides appear on screen.
Priority - Choose the priority level of your
multimedia message.
Validity period - Choose how long your
message is stored at the message centre.
Delivery report - Choose to allow and/or
request a delivery report.
31
Page 34

Messaging
Read report - Choose to allow and/or send a
request report/ allow report.
Auto download - Choose to automatically
or manually download multimedia messages
depending on whether you are at home or
roaming.
Creation mode - Choose from Restricted,
Warning or Free mode.
Network profile - Select an operator
specifi c network profi le for sending
multimedia messages.
Permitted message type - Select which
type of multimedia messages to allow.
Changing your email settings
You can adapt your email settings to your own
preferences.
1 Press
, select Messaging and choose
Settings.
2 Select Email then you can adapt the
following settings:
Email account - You can set up an email
account.
Access point - You can set the email
access point.
32
LG KS360 | User Guide
Retrieve interval - Choose how often
your KS360 checks for new email
messages.
Signature - Create an email signature and
switch this feature on.
Changing your other settings
Press , select Messaging, choose
Settings then:
Voicemail number - Your voicemail number
is stored here. Contact your network operator
for more information on the service they
provide.
Service message - Here you can switch
off service message, which means your
messages will no longer be pushed directly to
your device as they are received, only when
you check for new messages. You can also
change your Service security settings.
Info message - Choose the reception status,
alerts and language of your info messages.
Save text message - Choose whether
to save your text messages to the phone
memory or to the external memory.
Page 35

Camera
Taking a quick photo
1 Hold the camera key down on the left side
of the handset. The camera’s viewfi nder
will appear on screen.
2 Holding the phone horizontally, point the
lens towards the subject of the photo.
3 Position the phone so you can see the
subject of your photo.
4 Press
or press the camera key all the
way down to take a photo.
Note: You can also access the camera menu
from the standby screen. Press
select Camera. Choose Camera to open the
viewfi nder.
and
Before you’ve taken your photo
Self timer - The self-timer allows you
to set a delay after the capture button is
pressed. Choose from Off, 3 seconds,
5 seconds,10 seconds. Great for that group
photo you want to be part of.
Multi shot - This enables you to take
up to 9 shots automatically in very quick
succession, great for taking photos of moving
objects or at sporting events.
White balance - The white balance
ensures that any white in your photo is
realistic. In order for your camera to correctly
adjust the white balance you may need to
determine the light conditions. Choose from
Auto, Daylight, Incandescent, Cloudy,
Fluorescent and Night mode.
Colour effect - Choose from four
colour tone options: Off (normal/colour),
Sepia, Mono (black and white) or Negative.
EV - Turn macro mode on if you are
taking a picture very close to the image
subject.
33
Page 36

Camera
After you’ve taken your photo
Your captured photo will appear on the
screen. The name of the image runs along
the bottom of the screen and you will see
six options displayed on the left side of the
screen. You will automatically be given the
option of uploading your image to Orange
Photo.
OK - Select to save your photo.
New image - Select to take another
photo straightaway. Your current photo will be
saved.
Set as - Select to open a sub menu to
set your image as Wallpaper or Picture ID.
Send via - Select to send the photo
Orange Photo, Multimedia message,
Bluetooth or Email. See page 27 for
Sending a message.
Album - Select to look at the other
photos in your album. Your current photo will
be saved. See page 35 for Viewing your
saved photos.
Delete - Delete the photo you have just taken
and confi rm by selecting Yes . The viewfi nder
will reappear.
34
LG KS360 | User Guide
TIP! When using the camera, power consumption
increases. If
recharge the battery before use.
appears indicating low battery,
Using the quick settings
From the viewfi nder, select Options to access
the quick settings options. These include
various options for taking photos.
Video camera - Convert from camera mode
to video camera mode.
Display - Choose Standard or Clean mode.
Resolution - Choose from four image sizes.
See Changing the image size on page 35.
Quality - Choose between Normal, Fine and
Super fine. The fi ner the quality the sharper
a photo will be, but the fi le size will increase
as a result. This means you will be able to
store fewer photos in your memory.
Shutter tone - Select one of the three
shutter sounds.
Save to - Choose whether to save your
photos to the phone memory or to the
external memory.
Reset settings - Choose Yes to reset your
phone to its original camera settings.
Page 37

Changing the image size
You can change the size of the photo to save
memory space. The more pixels, the larger
the fi le size, which in turn means they take up
more of your memory. If you want to fi t more
pictures on to your phone you can alter the
pixel number to make the fi le size smaller.
1 Press Options and select Resolution
from the toolbar.
2 Select a pixel value from the four
numerical options (320x240, 640x480,
1280x960, 1600x1200).
3 Press OK to implement your changes.
Viewing your saved photos
1 You can access your saved photos from
within the camera mode and from the
standby screen. From the viewfi nder,
simply select Album. From the standby
screen you should press
Media album and Images.
2 Your gallery will appear on screen.
3 Use the navigation keys to select the
photo you want to view and select View to
enlarge it.
, then select
Setting a photo as Wallpaper or
Picture ID
From your image gallery, use the navigation
keys to select an image and choose Options
and Set as to use the selected image as
Wallpaper or Picture ID for one of your
contacts.
Note: Picture ID can only be added to
contacts saved to your phone, not your SIM.
Using Orange Photo
You can send, edit, save or share images with
your friends using Orange photo. For more
information on Orange photo please contact
your service provider.
35
Page 38
Video camera
Shooting a quick video
1 Quickly press the camera key on the left
side of the handset.
2 Choose Video camera.
3 Point the camera lens towards the subject
of the video.
4 Press the camera key on the left side of
the handset to start recording.
5 REC will appear in the bottom right corner
of the viewfi nder and a timer will show the
length of your video.
6 To pause the video select Pause and
resume by selecting Resume.
7 Select Stop to stop recording.
Note: You can also access the Video
camera from the standby screen. Press
and select Camera, scroll down and select
Video camera to open the viewfi nder.
TIP! You can adjust the zooming of video camera
by pressing the side key.
36
LG KS360 | User Guide
After you’ve shot your video
The name of the video runs along the bottom
of the screen and six options will be displayed
on the left side of the screen.
OK - Select to record another video straight
away. Your current video will be saved.
New video - Select to shoot another
video straight away. Your current video will be
saved.
Play - Select to play the video you have
just recorded.
Send via - Select to send the video as
a Multimedia message or Email. See page
27 for Sending a message.
Album - Select to look at the other
video clips in your album. Your current video
clip will be saved. See page 37 for Watching
your saved videos.
Delete - Delete the video you have just
recorded and confi rm by selecting Yes. The
viewfi nder will reappear.
Page 39

Getting to know the viewfi nder
Note: You can adjust the zoom using the
volume key on the left side of the phone.
Using the quick settings
Select Options to access the quick settings
options. These include various options for
recording videos.
Camera - Convert from video camera mode
to camera mode.
Display - Choose Standard or Clean mode.
Resolution - If you want to fi t more videos
on your phone you can alter the pixel
number to make the fi le size smaller. Choose
between two options for your video, 176x144,
320x240.
Quality - Choose from Super fi ne, Fine or
Normal.
Save to - Choose whether to save your video
clip to the phone memory or to the external
memory.
Reset settings - Choose Yes to reset your
phone to the original video camera settings.
Watching your saved videos
1 You can access your saved videos either
from within video camera mode or from
the standby screen. From the viewfi nder
select Album. From the standby screen
you should press
album and Videos.
2 Your gallery will appear on screen.
3 Use the navigation keys to select the video
you want to view and press
it.
, then select Media
to watch
Adjusting the volume when viewing
a video
To adjust the volume of the audio on a video
whilst it is playing, use the volume keys on
the left side of the handset.
37
Page 40

Orange music
Music player
Your LG KS360 has a built-in Music player so
you can play all your favourite music.
To access the Music player, press
select Orange music then Music player.
From here you have access to:
All songs - Contains all of the songs you
have on your phone.
My playlist - Contains any playlists you have
created as well as On the go, Recent songs
and Favourite songs.
Settings - Adjust your music settings.
Transferring music onto your phone
The easiest way to transfer music onto your
phone is via Bluetooth or your sync cable. To
transfer using Bluetooth:
1 Make sure both devices have Bluetooth
switched on and are visible to one another.
2 Select the music fi le on the other device
and choose to send it via Bluetooth.
3 When the fi le is sent you will have to
accept it on your phone by selecting Yes .
4 The fi le should appear in All songs.
38
LG KS360 | User Guide
Playing a song
1 Press
and select Orange music, then
choose Music player.
2 Choose All songs then select the song
and
you want to play. Select
3 Select to pause the song.
4 Select to skip to the next song.
5 Select to skip to the previous song.
6 Select
to stop the music and return to
.
All songs.
TIP! To change the volume while listening to
music, use the volume keys on the side of
your phone.
Using options while playing music
Select Options and choose from:
Minimise - Hide the music player screen so
that you can continue using your phone as
normal while music is playing.
View playlist - Look at the playlist you are
currently listening to.
Search - Search for a song in the playlist.
Add to playlist - Adds the current track to
a playlist.
Page 41

Set as - Set the current track as your
Ringtone or Message tone.
Information - You can view information
about the MP3 fi le you are listening to.
Settings - Change the Equalizer, Play or
Shuffl e settings.
Creating a playlist
You can create your own playlists by choosing
a selection of songs from the All songs folder.
1 Press
and select Orange music.
2 Choose Music player, then select My
playlist.
3 Select New, enter the playlist name and
press Save.
4 The New playlist folder will show. Select
all of the songs that you would like to
include in your playlist by scrolling to them
and selecting
5 Select Save to store the playlist.
.
Playing a playlist
1 Press
and select Orange music.
2 Choose Music player, then select My
playlist.
3 Select the playlist you would like to play
and select View, then select
.
Editing a playlist
From time to time, you may want to add new
songs or delete songs from a playlist.
If you want to organise your playlists, you can
edit them using the Options menu.
1 Press
and select Orange music.
2 Choose Music player, then select My
playlist.
3 Scroll to the playlist you want to edit and
select View, then select Options. Choose
from:
Play - You can play the selected music.
Add - You can add songs to the playlist
using this option.
Remove - Remove a song from the
playlist. Select Yes to confi rm.
Move up/down on the playlists.
Multi delete - Select and delete songs
from the playlist.
Remove all - Remove all of the songs
from the playlist.
Information - View the playlist
information.
39
Page 42

Orange music F
Deleting a playlist
1 Press
and select Orange music.
2 Choose Music player, then select My
playlist.
3 Scroll to the playlist you want to delete and
select Options.
4 Select Delete all and select Yes to
confi rm.
Note:
As a result of the Digital Rights Management
(DRM) system, some of the media items
you download from the Internet or receive
by MMS may have a “Purchase right” menu
to access them. You can acquire the key to
purchase the right from the website which
owns the rights to the contents.
Music is copyright protected in international
treaties and national copyright laws. It may be
necessary to obtain permission or a licence to
reproduce or copy music. In some countries
national law prohibits private copying of
copyrighted material. Please check the
national legislation of the applicable country
concerning the use of such material.
40
LG KS360 | User Guide
Page 43

FM radio
Using the FM radio
Your LG KS360 has an FM radio feature so
you can tune in to your favourite stations to
listen on the move.
Note: You will need to insert your headset in
order to listen to the radio. Insert the plug into
the headset socket (this is the same socket
that you plug your charger into).
Searching for stations
You can tune radio stations into your phone
by searching for them either manually or
automatically. They will then be saved to
specifi c channel numbers so you don’t have
to keep re-tuning. You can save up to 12
channels in your phone.
To auto tune:
1 Press
and select Orange music, then
choose FM radio.
2 Select Options and choose Auto scan
then select Yes .
3 Each time a station is found, your KS360
will ask if you want to save it. Select Yes
if you want to store the channel and No if
you don’t. Any stations you choose to save
will automatically be allocated to a channel
number in your phone.
To manually tune:
1 Press
and select Orange music, then
choose FM radio.
2 Select a channel number that you want to
save a station to and choose Edit.
3 To enter your station, use the navigation
keys to search or enter the frequency
using the keypad, then select Save.
Note: You can also edit the stations you have
saved in a channel number.
TIP! To improve the reception extend the headset
cord, which functions as the radio antenna.
Resetting channels
1 Press
and select Orange music, then
choose FM radio.
2
Select Options and select Reset channels.
Choose Yes to confi rm the reset. Each channel
will return to the starting 87.5Mhz frequency.
Listening to the radio
1 Press
and select Orange music, then
choose FM radio.
2 Select the channel number of the station
you would like to listen to.
Note: You can listen to the radio via a built-in
speaker. Press Options, select Listen via
and choose Speaker.
41
Page 44

Media album
You can store any multimedia fi les in your
phone memory so that you have easy access
to all of your pictures, sounds, videos and
games. You can also save your fi les to a
memory card. The advantage of using a
memory card is that you can free up space on
your phone’s memory.
All your multimedia fi les will be saved in
Media album. Press
album to open a list of folders.
then select Media
Images
Images contains a folder of default images
and default fl ash fi les pre-loaded onto your
phone, images downloaded by you and
images taken on your phone’s camera.
Images options menu
The options which are available to you in
Images depend on what type of image
you have selected. All of the options will be
available for pictures you have taken on the
phone’s camera. Only the View, Set as, File
info, Slide show, Sort by and List view
/ Thumbnail view, 3D view1, 3D view2
options are available for default images.
In the Images folder, select Options to bring
up the following options.
42
LG KS360 | User Guide
Delete - Delete the selected image.
Set as - Set the selected image as your
Wallpaper or as a Picture ID.
Send via - Send the selected image using
Orange Photo, Multimedia message,
Bluetooth or Email.
Note: The image may need to be resized
before it can be sent by MMS.
File - Edit image, Rename, Move
to folder, Make animation or view
Information (Name, Size, Date, Time,
Resolution, Type and Copyright) of the
selected image. If you have an external
memory card inserted two additional options
will show: Move to external memory and
Copy to external memory.
Print via - Print an image fi le via Bluetooth
or Pictbridge.
Slide show - View a slide show of your
pictures. See Creating a slide show on
page 44 for more information.
New folder - Create a new folder within the
main Images folder.
Mark/Unmark - Select more than one image
to delete.
Delete all - Delete all the photos in your
Images folder.
Page 45

Sort by - Arrange your images by Date,
Type or Name.
View style - Change the way you view your
photos.
Sending a photo
1 Press
then select Media album.
2 Select Images.
3 Select a photo and choose Options.
4
Select Send via and choose from Orange
Photo, Multimedia message, Bluetooth or
Email.
5 If you choose Multimedia message or
Email, your photo will be attached to the
message and you can write and send
the message as normal. If you choose
Bluetooth, you will be prompted to turn
Bluetooth on and your phone will search
for a device to send the picture to.
Organising your images
1 Press
then select Media album.
2 Select Images.
3 Choose Options then select Sort by.
4 Choose from Date, Type or Name.
Deleting an image
1 Press
then select Media album.
2 Select Images.
3 Select an image and press Options.
4 Select Delete and confi rm by pressing
Yes .
Deleting multiple images
1 Press
then select Media album.
2 Select Images.
3 Choose Options and select Mark/
Unmark and Delete.
4 A box will appear next to each image.
Select
to mark each image. To unmark
an image, select
tick disappears from the box. Or, you can
select Options then choose Mark all or
Unmark all.
5 Once you have marked all of the
appropriate boxes, select Done and
confi rm you want to delete all of the
marked images.
again so that the
43
Page 46

Media album
Creating a slide show
If you want to look at all of the images on
your phone or scan through what you’ve got,
you can create a slide show to save you from
having to open and close each individual
image.
1 Press
then select Media album.
2 Select Images.
3 Choose the photo you would like to begin
the slide show and select Options.
4 Choose Slide show and it will begin.
5 Press Pause to pause the slide show and
Quit to end the slide show and return to
the Images folder.
Selecting Options during the slide show
presents further options:
View - Choose between Full image and Full
screen. Select Landscape to change the
orientation of the image.
Repeat on / off - Decide whether you want
the slide show on repeat or not.
44
LG KS360 | User Guide
Sounds
The Sounds folder contains the Default
sounds, your Voice recordings and all
sound fi les downloaded by you. From here
you can manage, send or set sounds as
ringtones.
Using a sound
1 Press
then select Media album.
2 Scroll to and select Sounds.
3 Select Default sounds or choose from the
list of voice recording fi les.
4 Select a sound and press
5 Select Options, select Set as and
choose from Ringtone, Ringtone ID and
Message tone.
to listen to it.
Videos
The Videos folder shows the list of
downloaded videos and videos you have
recorded on your phone.
Watching a video
1 Press
then select Media album.
2 Scroll to and select Videos.
3 Select a video and press
.
Page 47

Using options while video is paused
By selecting Options, the video you are
playing will be in pause mode and you can
choose from:
Delete - Delete the video.
Send via - Send the video to a friend via
Multimedia message, Email or Bluetooth.
Information - View the Name, Size, Date,
Time, Type and Copyright details of the
selected fi le.
Sending a video clip
1 Press
then select Media album.
2 Scroll to and select Videos.
3 Select the video clip you want and press
Options.
4 Press Send via and choose from
Multimedia message, Email or
Bluetooth.
5 If you choose Message or Email, your
video clip will be attached to the message
and you can write and send the message
as normal. If you choose Bluetooth, you
will be prompted to turn Bluetooth on and
your phone will search for a device to send
the video to.
Note: The video may need to be resized
before it can be sent by MMS. Some videos
may be too large to send by MMS at all.
Video options menu
In the Videos folder, press Options to bring
up the following list of options.
Delete - Delete the selected video.
Send via - Send the selected video to a
friend via Multimedia message, Email or
Bluetooth.
File - Rename the video or view the
Information (Name, Size, Date, Time, Type
and Copyright).
Move to folder - If you have an external
memory card inserted two additional options
will show: Move to external memory and
Copy to external memory.
New folder - Create a new folder within the
main Videos folder.
Mark/Unmark - Select more than one video
clip before selecting Delete, Copy, Move.
Delete all - Delete all the clips in your Videos
folder.
Sort by - Arrange your videos by Date, Type
or Name.
45
Page 48

Media album
Auto next play - Allows to set the play
mode: Off, Repeat once and Repeat all.
• Off: Plays the selected fi le.
• Repeat once: Plays all fi les in a list once.
• Repeat all: Continues to play all fi les in a
list repeatedly.
List view / Thumbnail view - Change the
way you view your videos.
Documents
From the Documents menu, you can view
Excel, PowerPoint, Word, Text and PDF fi les.
Viewing a document
1 Press
then select Media album.
2 Select Documents.
3 Select a document and press View.
46
LG KS360 | User Guide
Others
From the Others menu, you can view the fi les
which are not saved in the Images, Sounds,
Videos or Documents folders.
You may fi nd that when you transfer fi les
from your computer to your phone, they
appear in the Others folder rather than the
Documents folder. If this happens you can
move them.
To move a fi le from Others to Documents:
1 Press
, then select Media album
followed by Others.
2 Select a fi le and select Options.
3 Press Move, then select Move again.
External memory
If you’ve inserted a memory card it will be
displayed as a folder within Media album.
Your external memory folder will be divided
into fi ve further folders: Images, Sounds,
Videos, Documents and Others. Each
folder will contain all the fi les of that type
which are saved to your memory card rather
than your handset.
Page 49

Games and Applications
Games and Applications
Your KS360 comes with preloaded games
to keep you amused when you have time
to spare. If you choose to download any
additional games or applications they will be
saved into this folder.
Playing a game
1 Press
and select Games & Apps,
then choose Games.
2 You can download games from site, and
then enjoy it.
Note: An additional cost is incurred when
connecting to this service. Check your data
charges with your network provider.
Viewing applications
You can manage the Java applications
installed in your phone by using the
Applications menu. You can also delete
downloaded applications.
1 Press
and select Games & Apps,
then choose Applications.
2 View and manage any applications you
have.
Changing the network profi le
To download a game, you can set the value
to connect to the network using Network
profile.
1 Press
and select Games & Apps.
2 Select Network profile.
3 You can add and edit a new network
profi le.
Checking security certifi cates
You can check the version of security
certifi cates in this menu.
47
Page 50

Organiser & More
Adding an event to your calendar
1 From the standby screen press
select Organiser, then Calendar.
2 Select the date you would like to add an
event to. You can choose a date either by
scrolling to it using the navigation keys or
by selecting Options and Go to date in
order to enter a date.
3 Select New schedule and scroll down to
enter the time you would like your event to
begin. Scroll down and enter the end time
of your event.
4 Scroll down again and choose whether you
would like to set an Alarm for the event.
Scroll left or right to see the available
options. You can set the alarm to go off at
the starting time of the event or at a set
period of time before the event starts to
remind you the event is coming up.
5 Scroll down and enter a Subject for the
event. Use the keypad to type letters and
numbers.
48
LG KS360 | User Guide
6 Scroll down once more to select whether
, and
the event is occurring Once or repeated
at Daily, Weekly, Monthly or Yearly
intervals. If the event is repeated, you can
also scroll down to enter an Expiration
date for when the events will stop
completely.
7 Select Save and your event will be saved
in the calendar. A square cursor will mark
the days of any saved events.
Editing a calendar event
1 From the standby screen press
select Organiser, then Calendar.
2 Choose Options and select All schedules
to see a list of all your events. Scroll to
the event you would like to edit and select
View. Alternatively select the day of the
event in the calendar and select View.
3 Select Edit and scroll to the event
detail you want to change. Make your
modifi cations and select Save to store the
edited event.
Note: You can delete an event from your
calendar by viewing the event and then
pressing Options and Delete.
, and
Page 51

Sharing a calendar event
1 From the standby screen press
select Organiser, then Calendar.
2 Choose the event you would like to share
and select Options.
3 Choose Send via and select from Text
message, Mutimedia message,
Bluetooth or Email.
, and
Adding a memo
1 From the standby screen press
select Organiser, then Memo.
2 Select New and type your memo.
3 Select Options then Save.
4 Your memo will appear on screen the next
time you open the memo application.
TIP! You can edit an existing memo. Select
the one you want to edit, press Options and
select Edit.
, and
Setting your alarm
1 From the standby screen press
select Organiser, then Alarm clock.
2 Select New.
3 Scroll down and enter the time you would
like the alarm to sound at.
4 Choose the repeat type to indicate whether
you would like your alarm to sound Once,
Daily, Mon - Fri, Mon - Sat, Sat - Sun,
or Choose weekday.
5 Scroll down and choose whether you
would like the alarm to Always sound,
Always vibrate or Follow profile.
6 Scroll down to choose the alarm tone.
Choose Sounds to select a new sound.
7 Scroll down and enter a name for the
alarm or keep the suggested name.
8 Select Save.
Note: You can set up to 5 alarms.
, and
49
Page 52

Organiser & More
Using the voice recorder
Use your Voice memo to record voice
memos or other sounds.
Recording your voice memo
1 Press
and select Organiser, then
choose Voice memo.
2 Press to begin recording.
3 Select Pause to pause the recording.
4 Choose Stop to end the recording.
5 Select
to listen to the recording.
Note: You can listen to all of the voice
recordings you have saved by selecting
Options and choosing Album.
Sending a voice recording
1 Once you have fi nished recording, select
Options.
2 Select Send via and choose from
Multimedia message, Bluetooth
or Email. If you choose Multimedia
message or Email, the recording will
be added to the message and you can
write and send it as normal. If you choose
Bluetooth, you will be prompted to turn
Bluetooth on.
50
LG KS360 | User Guide
TIP! To send your recording as a message, fi rst
select Options, select Recording mode and
choose MMS. This will ensure that the recording
fi ts into a message.
Using your calculator
1
From the standby screen press
, and
select More, then Calculator.
2 Press the numeric keys to input numbers.
3 For simple calculations, select the
function you require (+, –, ×, ÷) using the
navigation keys followed by =.
4 For more complex calculations, select
Function to choose a command.
5 Select Clear to clear the screen and start
a new calculation.
Using the stopwatch
1
From the standby screen press
select More, then Stopwatch.
2 Select Start to begin the timer.
3 Choose Lap if want to record a lap time.
Up to 20 lap times can be saved.
4 Select Stop to end the timer.
5 Choose Resume to restart the stopwatch
at the time you stopped it at or select
Reset to return to zero.
, and
Page 53

Converting a unit
1 From the standby screen press
select More, then Unit converter.
2 Choose whether you would like to convert
Currency, Area, Length, Weight,
Temperature, Volume or Velocity.
3 Scroll up to choose from the unit of
measurement you want to enter. Scroll left
and right to select a unit, then scroll down
and enter the unit quantity.
4 Scroll down to the unit conversion box and
choose the unit measurement you want
to convert into. The conversion will show
automatically in the line below.
, and
Adding a city to your world clock
1 From the standby screen press
select More, then World clock.
2 Scroll up, down, left or right to navigate the
globe and choose a continent.
3 Select Zoom in to zoom into an area and
choose from the cities in that area.
4 Press Set.
, and
SIM services
This feature depends on SIM and the network
services.
If the SIM card supports SAT (i.e. SIM
Application Toolkit) services, this menu will be
the operator specifi c service name stored on
the SIM card.
51
Page 54

Orange World
With a browser at the tip of your fi ngers,
you can get up to date news and weather
forecasts as well as information on sports or
traffi c whenever you need it. In addition, the
browser allows you to download the latest
music, ringtones, wallpapers and games.
Accessing the web
1 Press
and select Orange World.
2 To access the browser homepage directly,
select Home. Or, select Enter address
and type in your desired URL, followed by
Connect.
Note: An additional cost is incurred when
connecting to this service and downloading
content. Check your data charges with your
network provider.
52
LG KS360 | User Guide
Adding and accessing your
bookmarks
For easy and fast access to your favourite
websites, you can add bookmarks and save
web pages.
1 Press
and select Orange World.
2 Select Bookmarks. A list of your
bookmarks will appear on the screen.
3 To add a new bookmark, select Options
and choose New bookmark. Enter a
name for your bookmark followed by the
URL.
4 Press Save. Your bookmark will now
appear in the list of bookmarks.
5 To access the bookmark simply scroll
to the required bookmark and select
Connect. You will be connected to your
bookmarked page.
Page 55

Saving a page
1 Access your required web page as
described on page 52.
2 Choose Options and scroll to Save, select
This page.
3 Select OK.
Accessing a saved page
1 Press
and select Orange World.
2 Select Saved pages.
3 Select the required page and press Open.
TIP! This menu will also allow you to delete
saved pages.
Viewing your browser history
1 Press
and select Orange World.
2 Select History and select OK.
3 A list of web page titles you have accessed
recently will be displayed. To access one
of these pages, scroll to the required page
and select Connect.
Changing the web browser settings
1 Press
and select Orange World.
2 Select Settings.
3 You can choose the way your mobile
handles, displays and uses information
when browsing the internet. You can
amend settings within Network profiles,
Rendering mode, Cache, Cookies,
Security certificates, Show image,
JavaScript and Storage location.
4 Once you have changed your settings,
select OK.
53
Page 56

Settings
Within this folder you can adapt your settings
to make your KS360 personal to you.
Note: For information on call settings see
page 23.
Changing your profi les
You can quickly change your profi le from the
standby screen. Simply press
navigation keys then the profi le you would
like to activate. Choose from Normal, Silent,
Vibrate only, Outdoor and Headset.
Personalising your profi les
You can personalise each profi le setting.
1 Press
and select Profiles.
2 Choose the profi le you want and select
Personalise.
3 For the Silent and Vibrate only profi les,
you can adapt the vibration. For the other
profi les, you can change all of the sounds
and alert options available in the list.
54
LG KS360 | User Guide
using the
Changing your date & time
You can set functions relating to the date
and time.
1 Press
and choose Settings.
2 Select Date & Time and choose from the
list below:
Set date - You can enter the current date.
Date format - You can set the date format.
(YYYY/MM/DD, DD/MM/YYYY, MM/DD/YYYY).
Set time - You can enter the current time.
Time format - You can set the time format to
either 24 hours or 12 hours.
Auto update - Select On and the phone will
automatically update the date and time.
Changing the language
Go to Settings and select Languages
to change the language for any text in
your phone. Any change will also alter the
language input mode.
Page 57

Changing your display settings
1 Press
and select Settings.
2 Select Display and choose from:
Wallpaper - Choose a wallpaper to appear
on your screen display.
TIP!
Set a fl ash wallpaer on your standby screen
using Live squre. Choose between two styles
of avatars and set a time for the background to
change to night! (This menu may be dependent on
your network provider.)
Clocks - Choose to have the time and date
visible on your standby screen. Choose from
No date & time or Normal.
Backlight timer - Choose how long the
backlight remains on.
TIP! The longer the backlight is on for, the more
battery power is used and you may need to
charge your phone more often.
Brightness - Use the navigation keys to adjust
the brightness. Choose from 40%, 60%, 80%
or 100%, then select OK to save your change.
Home screen shortcut - Select On to
display the shortcuts of four menus as
pictures on the middle of the standby screen.
Font size - Change the font size of the
following : Menu, Dialling and Messaging.
Theme - Quickly change the whole look of
your screen.
Menu style - Change the menu view from
Grid view to List view.
Main font style - Adjust the font type.
Dialling font style - Adjust the font style for
when you are dialling a phone number.
Standby text - Choose to add a message to
your standby screen.
Changing your security settings
Change your security settings to keep your
KS360 and the important information it holds
protected.
1 Press
and choose
2 Select Security and choose from the list
below:
PIN code request - Choose a PIN code to be
requested when you turn your phone on.
Auto key lock - Choose how long before the
key pad locks when the phone is not in use.
Phone lock - Choose a security code to lock
your phone Off
SIM changed or Immediately.
Change codes - Change your Security
code, PIN1 code or PIN2 code.
Settings.
,
When power on, When
55
Page 58

Settings
Using fl ight mode
Use this function to switch the fl ight mode
On or Off. You will not be able to make calls,
connect to the internet or send messages
when Flight mode is switched On.
Using power save
Choose to switch the power saving settings
On or Off.
Resetting your phone
Use Reset in the Settings menu to reset all
the settings to the factory defi nitions. You need
the security code to activate this function.
Viewing memory status
Your KS360 has three memories available:
the phone, the SIM card and an external
memory card (you may need to purchase the
memory card separately).
You can use the memory manager to
determine how each memory is used and see
how much space is available.
Press Settings and select Phone settings.
Choose Memory status and you will then see the
current status of the memories (Common, Reserved,
SIM card and External memory) in your KS360.
TIP! See page 17 for information on inserting
a memory card.
56
LG KS360 | User Guide
Changing your Bluetooth settings
1 Open Settings and select Connectivity,
then choose Bluetooth.
2 Choose Bluetooth settings. Make your
changes to:
My visibility - Choose whether to Show or
Hide your device to others.
My name - Enter a name for your KS360.
My address - View your Bluetooth address.
Changing your connectivity settings
Your connectivity settings have already been
set up by your network operator, so you can
enjoy your new phone from the off. If you
want to change any settings, use this menu.
Open Settings and select Connectivity.
Your options are:
Bluetooth - Set up your KS360 for Bluetooth
use. You can adapt your visibility to other
devices or search through devices your phone
is paired with.
Sync service - Set up your KS360 for sync
service.
Note: When connecting PC sync (CD), this
menu will be displayed.
Page 59

Network - Your KS360 connects
automatically to your preferred network. To
change these settings use this menu. You can
also add new access points using this menu.
USB connection - Choose Data service
and synchronise your KS360 using the LG PC
Suite software to copy fi les from your phone.
If you have a memory card inserted, select
Mass storage to use your phone in the same
way as you would use a USB stick. Connect to
your computer and drag and drop fi les to the
KS360 removable device folder.
Pairing with another Bluetooth
device
By pairing your KS360 and another device,
you can set up a passcode protected
connection. This means your pairing is more
secure.
1 Check your Bluetooth is On and Visible.
You can change your visibility in the
Bluetooth settings menu, by selecting
My visibility, then Show.
2 Select Device list from the Bluetooth
menu and choose New.
3 Your KS360 will search for devices. When
the search is completed Pair and Refresh
will appear on screen.
4 Choose the device you want to pair with,
select Pair and enter a passcode then
choose OK.
5 Your phone will then connect to the other
device, on which you should enter the
same passcode.
6 Your passcode protected Bluetooth
connection is now ready.
Using a Bluetooth headset
1 Check your Bluetooth is On and Visible.
2 Follow the instructions that came with your
headset to place it in pairing mode and
pair your devices.
3 Your KS360 will then automatically connect
to your Bluetooth headset and switch to
headset profi le.
57
Page 60

Settings
Using your phone as a mass
storage device
Your KS360 can be used as a mass storage
device, just like a USB stick. This is a great
way of moving your fi les from your computer
to your phone. If you’ve inserted a memory
card, when connecting as Mass storage, the
phone will be displayed as two drives on your
computer: the handset memory and external
memory.
1 Open Settings and select Connectivity.
2 Select USB Connection.
3 Scroll to Mass storage and select OK.
4 Insert the smaller end of the USB cable
into the USB cable connector on the edge
of the KS360. Plug the larger end into the
USB port of your computer.
5 A removable disk folder will open
automatically on your computer, two if you
have a memory card inserted, showing all
the folders on your phone or memory card.
6 Drag and drop your images, videos, music
or documents into the correct folders.
58
LG KS360 | User Guide
7 Safely remove your phone by clicking on
the Safely remove hardware icon in
your desktop toolbar.
8 When you want to then access a fi le, for
example an image, press
, then select
Media album followed by External
memory then Images. All the images you
transfer will be contained in this fi le.
Transferring a fi le to your phone
You can also transfer fi les from your computer
to your phone using Bluetooth.
1 Make sure your phone and computer have
Bluetooth switched on and are visible to
one another.
2 Use your computer to send the fi le via
Bluetooth.
3 When the fi le is sent you will have to
accept it on your phone by selecting Yes .
4 The fi le will be saved within the appropriate
folder depending on type. So for example,
photographs will be saved in the Images
folder and music in the Sounds folder. If
your phone cannot identify the fi le type, the
fi le will be saved in the Others folder.
Note: Files sent using Bluetooth will be saved
to the phone memory.
Page 61

Sending and receiving your fi les
using Bluetooth
Bluetooth is a great way to send and receive
fi les as no wires are needed and connection
is quick and easy. You can also connect to a
Bluetooth headset to make and receive calls.
Before you can start sharing fi les using
Bluetooth, you will need to pair your phone
with another Bluetooth device. For information
on pairing devices, see Pairing with
another Bluetooth device on page 57.
To switch Bluetooth on:
1 Open Settings and select Connectivity,
then choose Bluetooth.
2 Select Bluetooth on/off and choose On.
3 Select Off to switch Bluetooth off.
To send a file:
1 Open the fi le you want to send, typically
this will be a photo, video or music fi le.
2 Select Options and choose Send via,
then Bluetooth.
3 Select Yes to turn Bluetooth on if it is not
already activated.
4 Your KS360 will automatically search for
other Bluetooth enabled devices within
range.
5 Choose the device you want to send the
fi le to and select Send.
To receive a file:
1 To receive fi les, your Bluetooth must be
both On and Visible. See Changing your
Bluetooth settings on page 56 for more
information.
2 A message will prompt you to accept the
fi le from the sender. Select Yes to receive
the fi le.
TIP! Keep an eye on the progress bar to make
sure your fi le is sent.
Note The Bluetooth® word mark and logos are
owned by the Bluetooth SIG, Inc. and any use of
such marks by LG Electronics is under licence.
Other trademarks and trade names are those of
their respective owners.
59
Page 62

Accessories N
These accessories were supplied with your KS360.
Charger Stereo headset
Battery
60
LG KS360 | User Guide
User Guide
Learn more about your KS360.
Note
• Always use genuine LG accessories.
Failure to do this may invalidate your warranty.
• Accessories may be different in different
regions; please check with our regional
service company or agent for further inquires.
Page 63

Network service
Technical data
The wireless phone described in this guide is
approved for use on the GSM 900, DCS 1800
and PCS1900 networks.
A number of features included in this guide
are called Network Services. These are
special services that you arrange through
your wireless service provider. Before you
can take advantage of any of these Network
Services, you must subscribe to them through
your service provider and obtain instructions
for their use from your service provider.
General
Product name : KS360
System : GSM 900 / DCS 1800 / PCS 1900
Ambient Temperatures
Max : +55°C (discharging)
+45°C (charging)
Min : -10°C
61
Page 64

Page 65

C@D@K<;N8II8EKPJK8K<D<EK
(%N?8KK?@JN8II8EKP:FM<IJ1
C>f]]\ijpflXc`d`k\[nXiiXekpk_Xkk_\\eZcfj\[g_fe\Xe[`kj\eZcfj\[XZZ\jjfi`\jn`ccY\]i\\
]ifd[\]\Zkj`edXk\i`XcXe[nfibdXej_`gXZZfi[`e^kfk_\]fccfn`e^k\idjXe[Zfe[`k`fej1
( K_\c`d`k\[nXiiXekp]fik_\gif[lZk\ok\e[jk_\nXiiXekpg\i`f[Y\^`ee`e^fek_\
[Xk\f]gliZ_Xj\f]k_\gif[lZk%
) K_\c`d`k\[nXiiXekpXggc`\j]fi(p\Xi]ifdk_\fi`^`eXc[Xk\f]gliZ_Xj\Xe[\ok\e[jfecpkf
k_\fi`^`eXcgliZ_Xj\if]k_\gif[lZkXe[`jefkXjj`^eXYc\fikiXej]\iXYc\kfXepjlYj\hl\ek
gliZ_Xj\i&\e[lj\i%@kj_Xcce\`k_\i\oZcl[\efic`d`kXepdXe[XkfipjkXklkfipi`^_kjf]k_\
Zljkfd\ifiXepf]k_\Zljkfd\ii`^_kjX^X`ejkk_\j\cc\i&[\Xc\if]k_\gif[lZk%
* K_`jnXiiXekp`j^ff[fecpkfk_\fi`^`eXcgliZ_Xj\i[li`e^k_\nXiiXekpg\i`f[#Ylk
c`d`k\[kfZ\ikX`eZflekip`]jg\Z`Ô\[%
+ K_\\ok\ieXc_flj`e^Xe[Zfjd\k`ZjgXikjj_XccY\]i\\f][\]\ZkjXkk_\k`d\f]
j_`gd\ekXe[#k_\i\]fi\#j_XccefkY\Zfm\i\[le[\ik_\j\c`d`k\[nXiiXekpk\idj%
, Lgfei\hl\jk]ifdC>%fik_\`i[\j`^eXk\[j\i m`Z\X^\ekk_\Zfejld\idljkgifm`[\
`e]fidXk`fekfi\XjfeXYcpgifm\k_\[Xk\f]gliZ_Xj\%
- Lec\jjfk_\ij\im`Z\XiiXe^\d\ekj_Xm\Y\\ejg\Z`Ô\[k_\Zljkfd\ij_XccY\Xik_\
Zfjkf]j_`gg`e^X[\]\Zk`m\gif[lZkYXZbkfk_\:ljkfd\iJ\im`Z\;\gXikd\ekf]C>%
C>j_XccY\Xik_\Zfjkf]j_`gg`e^k_\gif[lZkYXZbkfk_\Zfejld\iX]k\ik_\
Zfdgc\k`fef]j\im`Z\le[\ik_`jc`d`k\[nXiiXekp%
. ;li`e^k_\nXiiXekpg\i`f[C>fi`kjXlk_fi`j\[j\im`Z\X^\ekn`cci\gX`ifii\gcXZ\Xk
C>Ëjjfc\[`jZi\k`feX[\]\Zk`m\gif[lZk%8i\gX`i\[fii\gcXZ\[gif[lZkn`ccefkY\
^`m\eXgifcfe^\[fii\e\n\[nXiiXekpg\i`f[%
)%N?8KK?@JN8II8EKP;F<JEFK:FM<I1
( ;\]\ZkjFI;XdX^\ji\jlck`e^]ifdlj\f]k_\gif[lZk`efk_\ik_Xe`kjefidXcXe[
ZljkfdXipdXee\i%
) ;\]\Zkjfi[XdX^\j]ifdXYefidXclj\#XYefidXcZfe[`k`fej#`dgifg\ijkfiX^\%
\ogfjli\kfdf`jkli\fi[Xdge\jj#leXlk_fi`j\[df[`ÔZXk`fej#leXlk_fi`j\[
Zfee\Zk`fej#leXlk_fi`j\[i\gX`i#e\^c\Zk#XYlj\#XZZ`[\ek#Xck\iXk`fe#`dgifg\i
`ejkXccXk`fe#fifk_\iXZkjn_`Z_Xi\efkk_\]Xlckf]C>#`eZcl[`e^[XdX^\ZXlj\[Yp
j_`gg`e^#Ycfne]lj\j#jg`ccjf]]ff[fic`hl`[%
Page 66

*
9i\XbX^\fi[XdX^\kfXek\eeXjlec\jjZXlj\[[`i\ZkcpYp[\]\Zkj`edXk\i`XcfinfibdXej_`g%
+ 8nXiiXekpi\gX`i`]k_\:ljkfd\iJ\im`Z\;\gXikd\ekXkC>fifk_\iX^i\\[j\im`Z\
X^\eknXjefkefk`Ô\[Ypk_\Zfejld\if]k_\Xcc\^\[[\]\ZkfidXc]leZk`fef]k_\
gif[lZk[li`e^k_\Xggc`ZXYc\c`d`k\[nXiiXekpg\i`f[%
, Gif[lZkjn_`Z__Xm\_X[k_\j\i`XceldY\ifi@D<@eldY\ii\dfm\[fidX[\`cc\^`Yc\%
- K_`jc`d`k\[nXiiXekp`j`ec`\lf]Xccfk_\inXiiXek`\j#\ogi\jjfi`dgc`\[\`k_\i`e]XZk
fiYpfg\iXk`fejf]cXn#jkXklkfipfifk_\in`j\#`eZcl[`e^#Ylkefkc`d`k\[kfXep`dgc`\[
nXiiXekpf]dXib\kXY`c`kpfiÔke\jj]fiXgXik`ZlcXilj\%
. ;XdX^\i\jlck`e^]ifdlj\f]efe$C>Xggifm\[XZZ\jjfi`\j%
/ 8ccgcXjk`Zjli]XZ\jXe[Xccfk_\i\ok\ieXccp\ogfj\[gXikjk_XkXi\jZiXkZ_\[fi
[XdX^\[[l\kfefidXcZljkfd\ilj\%
0 Gif[lZkjfg\iXk\[flkj`[\glYc`j_\[dXo`dldiXk`e^j%
(' Gif[lZkjlj\[fifYkX`e\[eXi\ekXcgif^iXd%
(( :fejldXYc\jjlZ_Xj]lj\j %
() Jljg\Zk\[[\]\ZkjZXlj\[YpX]X`cli\f]k_\Z\cclcXie\knfib%
*%:FE;@K@FEJ1
Effk_\i\ogi\jjnXiiXekp`jXggc`ZXYc\kfk_`jgif[lZk%
K_\;LI8K@FEF=8EP@DGC@<;N8II8EK@<J#@E:CL;@E>K?<@DGC@<;N8II8EKPF=
D8IB<K89@C@KP#@CC@D@K<;KFK?<;LI8K@FEF=K?<<OGI<JJN8II8EKP?<I@E%C>
<C<:KIFE:J@E:%J?8CCEFK9<C@89C<=FIK?<CFJJF=K?<LJ<F=K?<GIF;L:K#
@E:FM@E@<E:<#CFFFI8EPFK?<I;8D8><J#;@I<:KFI:FEJ<HL<EK@8C#8I@J@E>FLK
F=K?<LJ<F=#FI@E89@C@KPKFLJ<#K?@JGIF;L:KFI=FI8EP<OGI<JJFI@DGC@<;
N8II8EKP#@E:CL;@E>K?<@DGC@<;D8IB<K89C@KP8GGC@:89C<KFK?@JGIF;L:K%
Jfd\[fefkXccfnk_\\oZclj`m\f]c`d`kXk`fef]`eZ`[\ekXcfiZfej\hl\ek`Xc[XdX^\jfi
c`d`kXk`fejfe_fncfe^Xe`dgc`\[nXiiXekpcXjkj2jfk_\j\c`d`kXk`fejfi\oZclj`fejdXpefk
Xggcpkfpfl%K_`jnXiiXekp^`m\jpfljg\Z`ÔZc\^Xci`^_kjXe[pfldXpXcjf_Xm\fk_\i
i`^_kjn_`Z_mXip]ifdZflekipkfZflekip%
 Loading...