

LG KM555 Owner’s Manual [fa]

ﯽﺳﺭﺎﻓ
ENGLISH
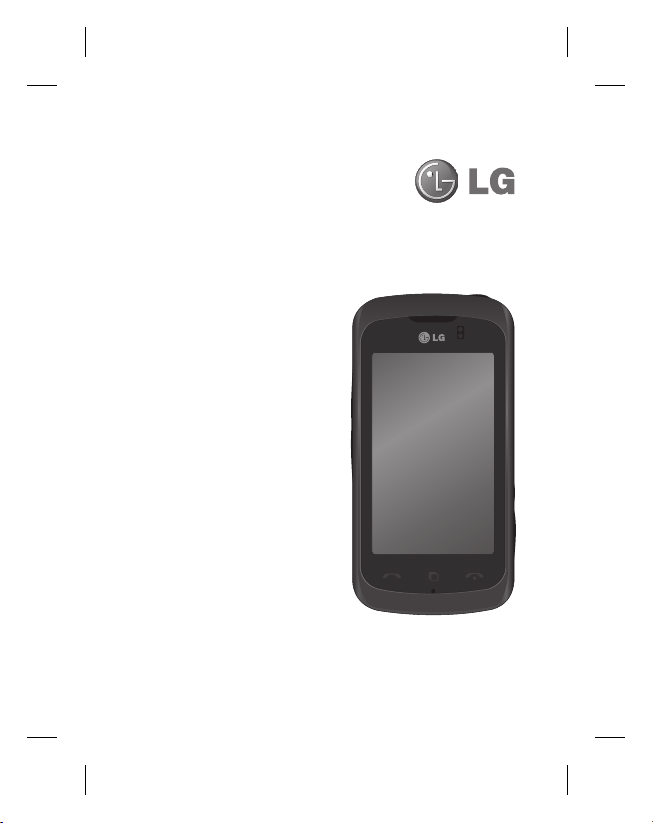
KM555
ENGLISH
ﺮﺑﺭﺎﮐ یﺎﻤﻨﻫﺍﺭ
ELECTRONICS INC.
ﯽﺳﺭﺎﻓ
www.lgmobile.com www.lgmobile.com
P/N : MMBB0360207 (1.0) W P/N : MMBB0360207 (1.0) W
ﺮﺑﺭﺎﮐ یﺎﻤﻨﻫﺍﺭ
KM555 User Guide KM555

Bluetooth QD ID B015952
Some of contents in this
manual may differ from your
phone depending on the
software of the phone or your
service provider.
KM555 User Guide

Congratulations on your purchase of the
advanced and compact KM555 phone by
LG, designed to operate with the latest
digital mobile communication technology.

Contents
Getting to know your phone ......... 6
Open view .................................... 8
Installing the SIM and battery ...... 9
Charging your phone .................. 11
Memory card .............................. 11
Your home screen ...................... 12
Touch screen tips ..........................12
Customising the home screen ........ 13
Quick keys ....................................13
Your standby screen ................... 14
The status bar ...............................14
Changing your Status from the status
bar ................................................14
Using the Multitasking function.......14
Calls ............................................ 15
Making a call .................................15
Making a call from your contacts ....15
In-call options ................................15
Adjusting the call volume ...............16
Speed dialling ................................16
Turning off DTMF ........................... 16
Viewing your call logs ....................17
Using call divert .............................17
Using call barring ...........................18
Changing the common call setting .18
Contacts ..................................... 20
Searching for a contact ..................20
Adding a new contact ....................20
Contact options .............................21
Creating a group............................22
Changing your contact settings ......22
Messaging .................................. 24
Messaging ....................................24
Sending a message .......................24
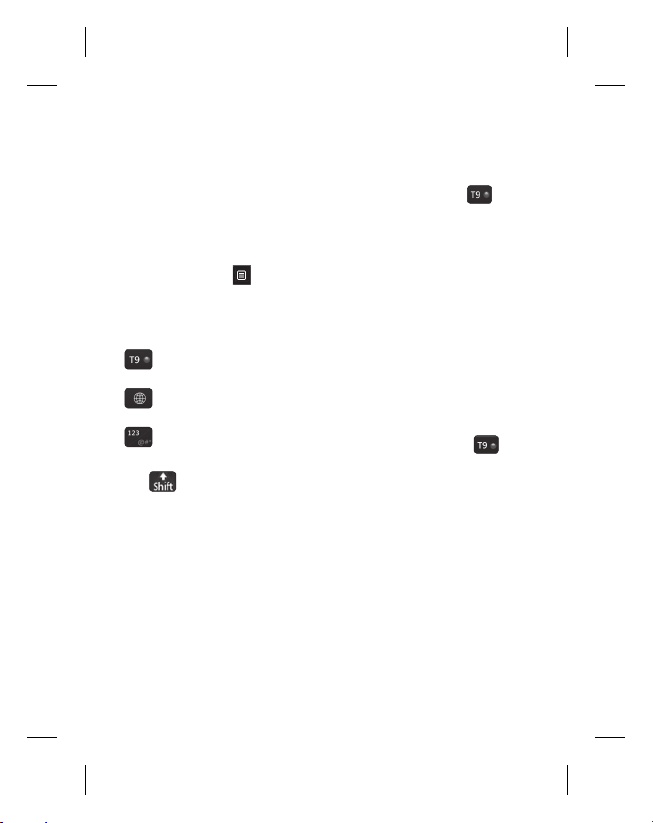
Entering text .................................. 25
T9 predictive .................................25
Abc manual ...................................25
Keyboard .......................................26
Handwriting recognition .................26
Changing your email settings .........28
Message folders ............................ 29
Managing your messages ..............30
Using templates .............................31
Using emoticons ............................ 31
Changing your text message settings
.....................................................31
Changing your multimedia message
settings .........................................32
Changing your other settings ..........33
3

Contents
Taking Photo ............................... 34
Taking a quick photo ......................34
After you’ve taken your photo .........34
Adjusting the Zoom .......................34
Adjusting the exposure ..................34
Camera ....................................... 35
Choosing a shot type .....................35
Selecting view mode ......................35
Using the advanced settings...........35
Preview settings ............................35
Video camera .............................37
Shooting a quick video ...................37
After you’ve shot your video ...........37
Adjusting the Zoom .......................38
Adjusting the Exposure ..................38
Changing the video image size ....... 38
Selecting view mode ......................39
Using the advanced settings...........39
Multimedia ................................. 40
Pictures ........................................40
Images option menus ....................40
Sending a photo ............................41
Using an image .............................41
Printing an image ..........................42
Sounds .........................................42
LG KM555 | User Guide4
Using a sound ...............................42
Videos ..........................................42
Using options while video is paused 43
Editing a video clip .........................43
Sending a video clip .......................44
Using the video options menu ........44
Games and Applications ................44
Documents....................................45
Transferring a file to your phone .....45
Viewing a file .................................45
Music ............................................46
Transferring music onto your phone 46
Playing a song ...............................46
Using the radio ..............................46
Searching for stations ....................47
Resetting channels ........................47
Listening to the radio .....................47
Organiser .................................... 48
Adding an event to your calendar ...48
Changing your default calendar view
.....................................................49
Adding an item to your to do list .....49
Setting your alarm .........................49
Voice recorder ............................... 50
Recording a sound or voice ............ 50
Using your calculator .....................50

Settings ...................................... 51
Changing your screen settings .......51
Changing your phone settings ........ 51
Using memory information .............52
Sending and receiving your files using
Bluetooth ......................................53
Pairing with another Bluetooth device
.....................................................54
Installing LG PC Suite on your
computer ......................................55
Using your phone as Music Sync
device ...........................................55
Wi-Fi ........................................... 56
Phone Software update.............. 56
Quick guide for phone software
update ..........................................57
Preparation and Remarks ...............57
Accessories ................................ 58
Guidelines for safe and efficient
use .............................................. 60
Troubleshooting ..........................66
®
Gracenote
................................. 69
5
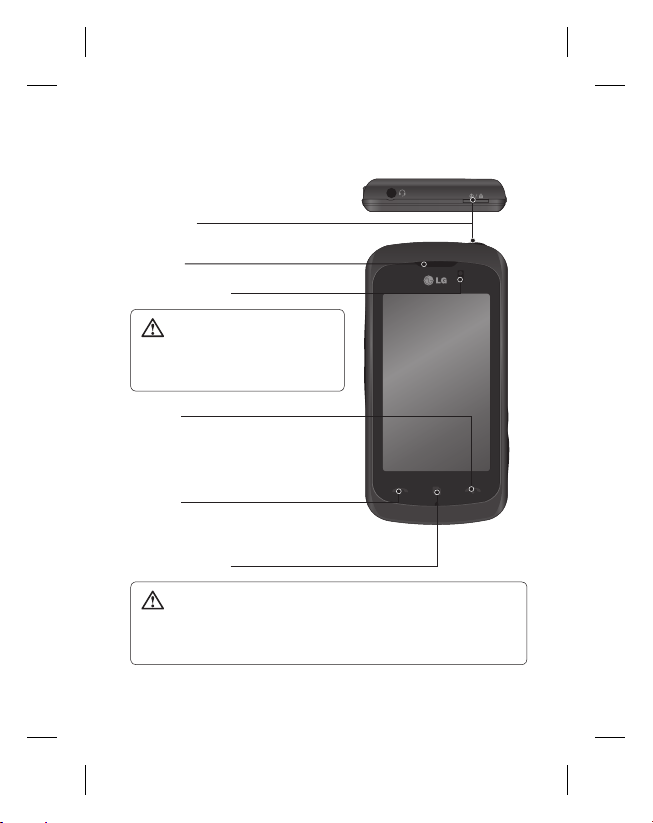
Getting to know your phone
Power key
Turns the phone on/off.
Earpiece
Proximity Sensor
WARNING: Moisture on the
proximity sensor may cause it
to malfunction. Please wipe any
moisture off the sensor surface.
End key
• Rejects a call.
• Press once to return to the home
screen.
Call key
Dials a phone number and answers
incoming calls.
Multitasking key
WARNING: Putting a heavy object on the phone or sitting on it
can damage its LCD and touch screen functionality.
Do not cover the protection fi lm on proximity sensor of LCD.
It can be caused the malfunction of sensor.
LG KM555 | User Guide6
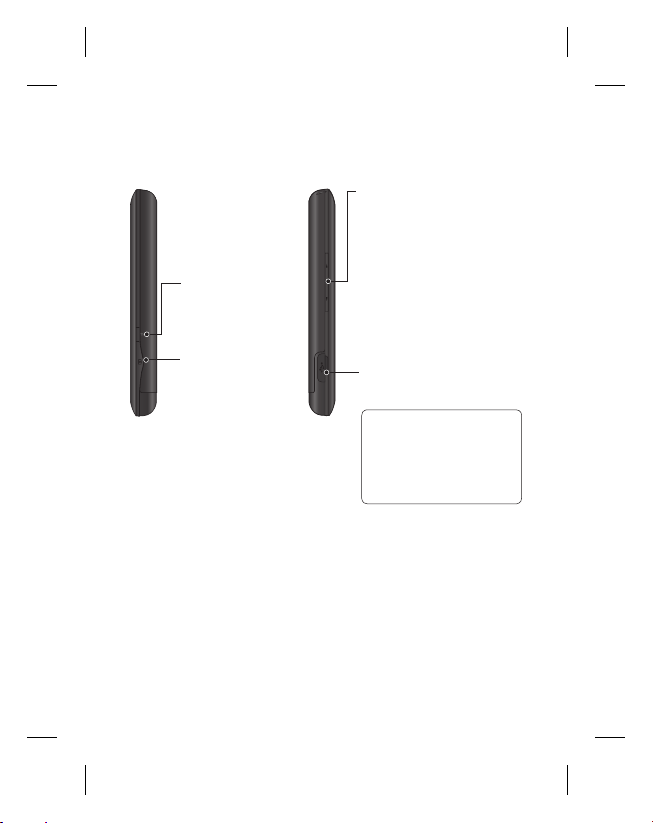
Music key
Volume keys
• When the screen is idle:
key tone volume.
• During a call: earpiece
volume.
• When playing a
track: controls volume
continuously.
Camera key
• Go to the camera
menu directly
by pressing and
holding the key.
Charger, Data cable (USB
cable)
TIP: Before
connecting the USB cable,
wait until the phone has
powered up and has
registered on the network.
7
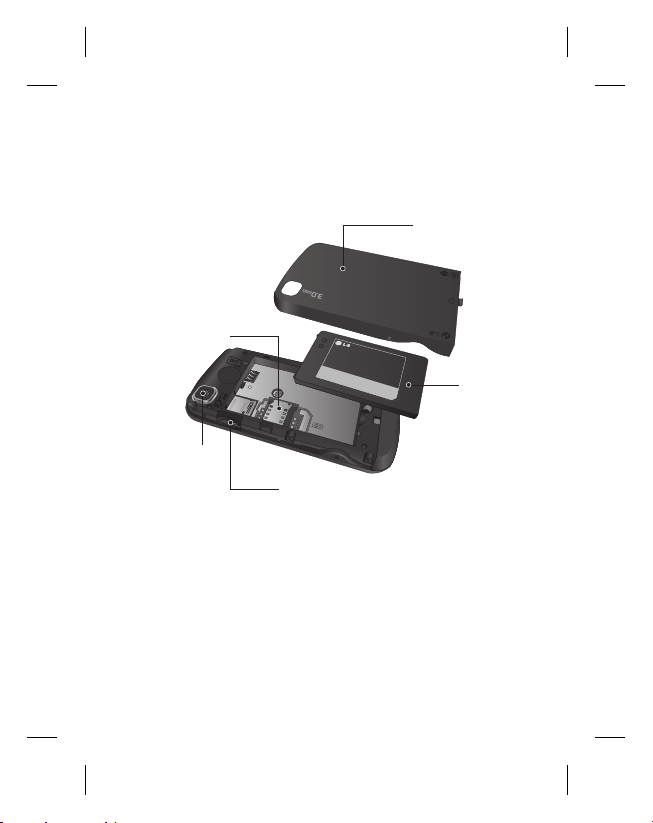
Open view
SIM card socket
Camera lens
LG KM555 | User Guide8
Battery cover
TM
Battery
Memory card socket
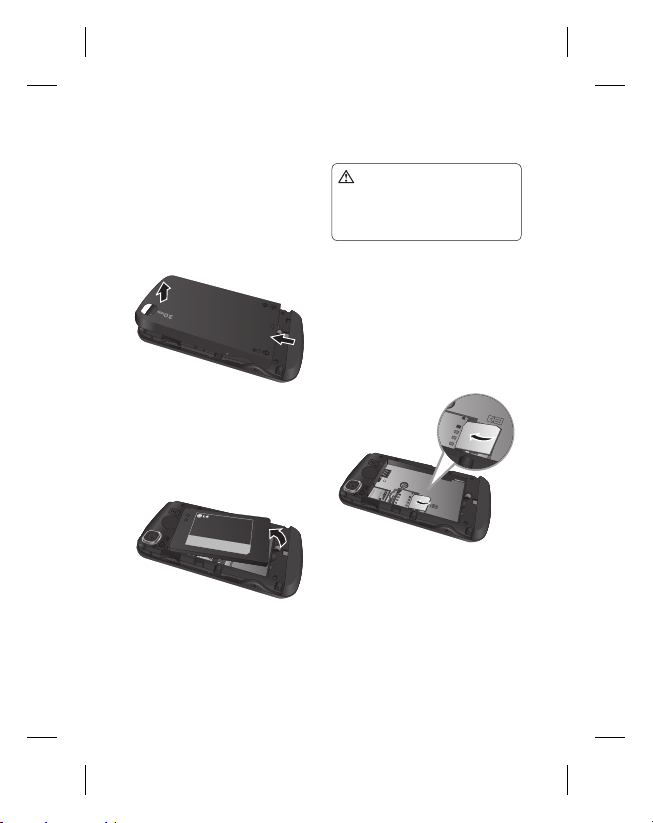
Installing the SIM and battery
1 Remove the battery cover
Press and hold down the
battery release button on the
top of the phone and lift off the
battery cover.
M
T
2 Remove the battery
Hold the top edge of the
battery and lift it away from
the battery compartment.
the battery when the phone
is switched on, as this may
damage the phone.
3 Install the SIM card
WARNING: Do not remove
Slide the SIM card into the
SIM card holder. Make sure
the gold contact area on the
card is facing downwards. To
remove the SIM card, pull it
gently in the outwards.
9
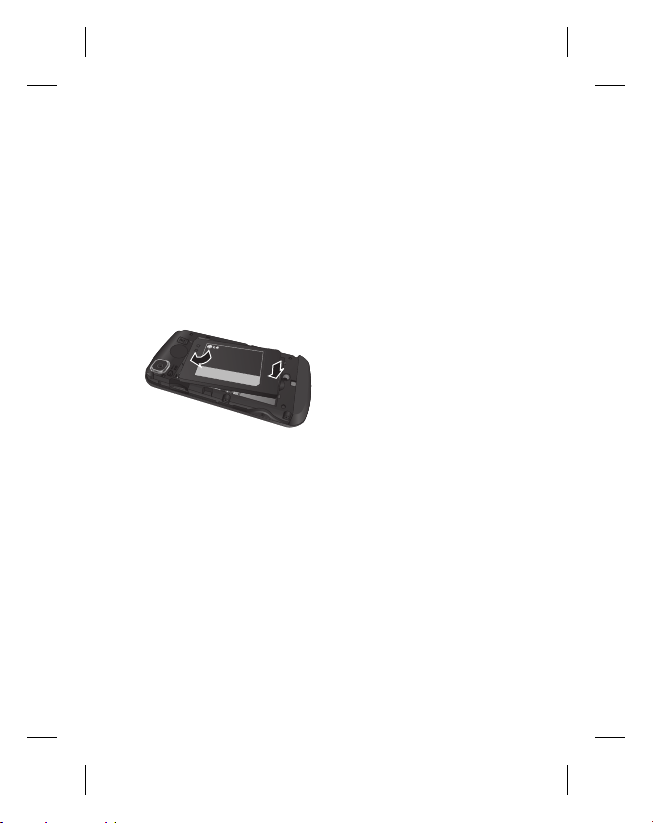
Installing the SIM and battery
4 Install the battery
First insert the top of the
battery into the top edge of the
battery compartment. Ensure
that the battery contacts align
with the phone’s terminals.
Press the bottom of the battery
down until it clips into place.
LG KM555 | User Guide10
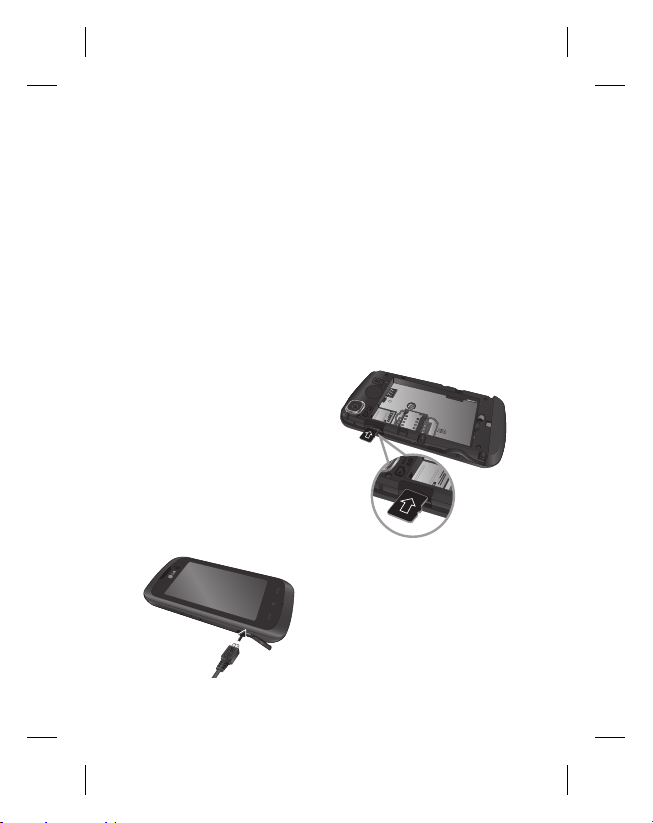
Charging your phone Memory card
1 Ensure the battery is fully
charged before using the
phone for the first time.
2 With the arrow facing you as
shown in the diagram push the
plug on the travel adapter into
the socket on the side of the
phone until it clicks into place.
3 Connect the other end of the
travel adapter to the main
socket. Use only the charger
included in the box.
4 The moving bars of battery
icon will stop after charging is
complete.
NOTE: The battery must be
fully charged initially to improve
battery lifetime. Disregard the first
“Battery full” message and keep
the phone on charge overnight.
Installing a memory card
You can expand the available
memory space on your phone by
using a memory card.
NOTE: A memory card is an
optional accessory.
Slide the memory card into the
slot at the top, until it clicks into
place. Make sure the gold contact
area is facing downwards.
11

Your home screen
From this screen you can access
menu options, make a call, view
the status of your phone and
much more.
Touch screen tips
The home screen is also a great
place to get used to using the
touch screen.
To select an item, touch the
centre of the icon.
Do not to press too hard; the
•
touchscreen is sensitive enough to
pick up on a light, firm touch.
•
Use the tip of your finger to touch
the option you require. Be careful
not to touch any other keys.
•
When the screen light is off, either
press the power key or hold down
the Unlock/Lock key on the touch
screen to return the home screen.
LG KM555 | User Guide12
•
Whenever your KM555 is not in
use, it will return to the lock screen.

Customising the home screen
Contact home
Widget home
1.
screen (active)
Livesquare screen
2.
3.
screen
Quick keys
The quick keys on your home screen provide easy, one-touch access to
the functions you use the most.
Touch to bring up the touch
dialling pad, which lets
you make a call. Enter the
number using the normal
key pad and touch call
icon.
Touch to access the
Messaging menu. From
here you can create a new
SMS.
Touch to open your
contacts. To search for
the number you want
to call: Enter the name
of the contact using the
touchpad. You can also
create new contacts and
edit existing ones.
Touch to open the full Top
menu which is divided
into four categories.
13
Your standby screen
The status bar
The status bar uses various icons
to indicate things like signal
strength, new messages and
battery life.
Below is a table which explains
the meaning of the icons you’re
most likely to see in the status
bar.
Icon Description
Multitasking
Network signal strength
(number of bars will vary)
No network signal
Remaining battery life
Battery empty
New text message
New voice message
Message inbox is full
Message sending failed
An alarm is set
My Profile in use
Normal profile in use
Outdoor profile in use
Silent profile in use
Headset profile in use
LG KM555 | User Guide14
Icon Description
Calls are diverted
EDGE in use
Roaming
Flight mode is on
Bluetooth is active
BGM play
BGM pause
Changing your Status from
the status bar
Touch the status bar to open the
Status Summary. It shows the
current Time, Network, SVC ID,
Battery, Handset memory, External
Memory, Profile, MP3 and
Bluetooth status.
Using the Multitasking
function
Press the multitasking hard key
to open the Multitasking
menu. From here you can view all
the applications you have running
and access them with one touch.
Calls
Making a call
1 Touch to open the keypad.
2 Key in the number using the
keypad. To delete a digit touch
the clear key.
3 Press the
initiate the call.
4 To end the call press the
hard key.
TIP! To enter + for
making an international call,
press and hold .
TIP! To bring up the
keypad during a call, press
the .
Making a call from your
contacts
1 From the standby screen touch
to open the contacts.
2 Enter the first few letters of the
contact you would like to call.
hard key to
3 From the filtered list, touch the
contact you’d like to call and
select the number to use if you
have more than one saved.
4 Touch
.
In-call options
Hold - Touch this icon to put
a call on hold.
Mute - Touch this icon to
turn off the microphone so the
person you are talking to cannot
hear you.
Speaker - Touch this icon to
turn on the speaker phone.
Options - Choose from
a list of further in-call options,
including Go to messages, so
you can check your messages,
Go to contacts to add or search
contacts during a call. You can
also end the call from here by
touching End call.
15
Calls
- Choose to open a
numerical keypad for navigating
menus with numbered options.
For example, when dialling call
centres or other automated
telephone services.
- Choose to add another
person to the call.
- Choose to search your
contacts during a call.
Adjusting the call volume
To adjust the volume during a call,
use the up and down button on
the left edge of the phone.
Speed dialling
You can assign a frequently-called
contact to a speed dial number.
1 From the standby screen touch
and select .
2 Your Voicemail is already set
to speed dial 1. You cannot
change this. Touch any other
number to assign it a speed
dial contact.
LG KM555 | User Guide16
3 Your contacts will open.
Select the contact you’d like
to assign to that number by
touching their phone number
once. To find a contact tap the
Name field box and enter the
first letter of the name of the
contact required.
Turning off DTMF
DTMF allows you to use
numerical commands to navigate
menus within automated calls.
DTMF is switched on as default.
To turn it off during a call (to
make a note of a number for
example) touch
DTMF off.
and select
Viewing your call logs
TIP! To scroll through a list of
options, touch the last item
visible and slide your fi nger
up the screen. The list will
move up so more items are
visible.
Touch and select .
Choose to view:
All - View a complete list of all
your dialled, received and missed
calls.
Dialled - View a list of all the
numbers you have called.
Received - View a list of all the
numbers that have called you.
Missed - View a list of all the
calls you have missed.
TIP! From any call log
touch and Delete all to
delete all the recorded items.
TIP! Touch any single
call log entry to view the
date, time and duration of
the call.
Using call divert
1 Touch , select .
2 Touch Call divert.
3 Choose whether to divert all
calls, when the line is busy,
when there is no answer or
when you are not reachable.
4 Touch “To voice mail centre”
OR “To other number”
5 Input the number you’d like to
divert to.
6 Touch Request to activate.
NOTE: Charges are incurred for
diverting calls. Please contact
your network provider for details.
TIP! To turn off all call
diverts, choose Deactivate all
from the Call divert menu.
17
Calls
Using call barring
1 Touch , select .
2 Touch Call barring.
3 Choose any or all of the six
options:
All outgoing
Outgoing international
Outgoing international calls
except home country
All incoming
Incoming when abroad
Deactivate all
4 Enter the call barring
password. Please check with
your network operator for this
service.
LG KM555 | User Guide18
TIP! Select Fixed dial
number to turn on and
compile a list of numbers
which can be called from
your phone. You’ll need
your PIN2 code from your
operator. Only numbers
included in the fi xed dial
list can be called from your
phone.
Changing the common call
setting
1 Touch , select .
2 Touch Common settings.
From here you can amend the
settings for:
Call reject - Slide the switch to
On to highlight the Reject list.
You can touch the text box to
choose from all calls, contacts
or groups, or those from
unregistered numbers (those
not in your contacts). Touch
Save to change the setting.

Send my number - Choose
whether your number will
be displayed when you call
someone.
Auto redial - Slide the switch
left for On or right for Off.
Minute minder - Slide the
switch left to On to hear a tone
every minute during a call.
BT answer mode - Select
Hands-free to be able to
answer a call using a Bluetooth
headset, or select Handset to
press a key on the handset to
answer a call.
Save new number - Select Ye s
to save a new number.
TIP! To scroll through a
list of options, touch the last
item visible and slide your
fi nger up the screen. The list
will move up so more items
are visible.
19
Contacts
Searching for a contact
There are two ways to search for
a contact:
From the standby screen
1 From the standby screen touch
to open the contacts.
Select the contact from the list
that you want to make a call.
2 Touch the hard key to
initiate the call.
From the main menu
1 Touch
2 Select Search.
3 You see a list of contacts,
TIP! The alphabetical keypad
is displayed once you tap the
blank square.
LG KM555 | User Guide20
, select .
typing in the first letter of a
contact’s name will jump the
menu to that alphabetical area
of the list.
TIP! To scroll through your
list of contacts, touch the last
item visible and slide your
fi nger up the screen. The list
will move up so more items
are visible.
Adding a new contact
1 From the standby screen touch
and touch and select
Add contact.
2 Choose whether to save the
contact to your Handset or
SIM.
3 Enter the first and last name
of your new contact. You do
not have to enter both, but you
must enter one or the other.

4 You can enter up to five
different numbers per contact.
Each entry has a preset type
Mobile, Home, Office, Pager,
Fax, and General. When you
have finished, touch Close.
5 Add an email address.
6 Assign the contact to one or
more groups. Choose from
No group, Family, Friends,
Colleagues, School or VIP.
7 You can also add other
informations.
8 Touch Save to save the
contact.
Contact options
There are many things you can
do when viewing a contact.
Here’s how to access and use the
options menu:
1 Open the contact you’d like
to use.
2 You can call or send a
message directly from here.
3 Press
to open the list of
options.
Delete - Delete the contact.
Touch Yes if you are sure.
Copy or Move to SIM /
Handset - Choose to move
or copy to the SIM card or
handset (depending on where
you originally saved the
contact).
21
Contacts
Send business card - Send
the contact’s details to
another person as a business
card. Choose to send as a
Text message, Multimedia
message, Email or via
Bluetooth.
TIP! Send message
- Send a message to the
contact. If the contact has an
email address, select whether
you’d like to send an email or
Message.
Creating a group
1 Touch and select .
2 Select Groups.
3 Touch
4 Select Add group.
5 Enter a name for your new
6 Touch Save.
LG KM555 | User Guide22
.
group. You can also assign a
ringtone to the group.
NOTE: If you delete a group, the
contacts which were assigned to
that group will not be lost. They
will remain in your contacts.
TIP! You can edit an
existing group by highlighting
it and touching
Add members to the group
from your contacts, assign a
Group ringtone, Rename the
group or Delete a group.
. Choose
Changing your contact
settings
You can adapt your contact
settings so that your address
book suits your own preferences.
TIP! To scroll through a
list of options, touch the last
item visible and slide your
fi nger up the screen. The list
will move up so more items
are visible.
1 From the standby screen
touch .
2 Touch
and select Settings.
3 From here you can adjust the
following settings:
Contact list settings - Choose
whether to view contacts saved
to both your Handset & SIM,
Handset only or SIM only.
You can also choose to show
the first name or last name of a
contact first.
Copy - Copy your contacts
from your SIM to your handset
or from your handset to your
SIM. Choose to do this one at
a time, or all at once. If you
select one at a time, you’ll
need to select each contact to
copy one by one.
Move - This works in the same
way as Copy, but the contact
will only be saved to the
location you’ve moved it to. So
if you move a contact from the
SIM to the handset it will be
deleted from the SIM memory.
Send all contacts via
Bluetooth - Send all of your
contacts to another device
using Bluetooth. You will be
prompted to turn on Bluetooth
if you select this option.
Backup and Restore contacts
- Backup and restore contacts
to the Memory Card.
Clear contacts - Delete all your
contacts. Touch Ye s if you are
sure you want to wipe your
contacts.
23
Messaging
Messaging
Your KM555 combines SMS,
MMS and email into one intuitive
and easy to use menu.
There are two ways to enter the
messaging centre:
1 Touch
2 Or Touch
Sending a message
1 Touch New message to open
2 From here you can send an
LG KM555 | User Guide24
from the standby
screen.
screen, then select .
a blank message.
SMS or MMS. To send an
email, touch
standby screen, them select
from the standby
from the
.
WARNING: You
will be charged per per 1
page text message for each
person that you send the
message to.
WARNING: If an
image, video or sound is
added to an SMS it will be
automatically convert to an
MMS and you will be charged
accordingly.
TIP! Quick reply - Send
a reply promptly to the
selected message using a
template.
Entering text
Keypad, Keyboard, HandwritingScreen, Handwriting-Box,
Handwriting-Double Box.
You can choose your input
method by tapping
method.
Tap the screen once, the
keyboard appears.
Touch to turn on T9
predictive text.
You can choose writing
languages.
Tap to change numbers,
symbols and text keypad.
to scroll through the
Use
different keyboard types in each
text entry mode (for example,
capitals or lowercase).
and Input
T9 predictive
In T9 mode you will see .
T9 mode uses a built-in dictionary
to recognise words you’re writing
based on the key sequences you
touch. Simply touch the number
key associated with the letter you
want to enter, and the dictionary
will predict the word you want
to use.
For example, press 8, 3, 5, 3, 7,
4, 6, 6, 3 to write ‘telephone’.
Abc manual
In Abc mode you will see .
In Abc mode you must touch the
key repeatedly to enter a letter.
For example, to write ‘hello’,
touch 4 twice, 3 twice, 5 three
times, 5 three times again, then 6
three times.
25
Messaging
Keyboard
In Keyboard mode the screen flips
to landscape and a full keyboard
appears on screen.
TIP! Keyboard mode predicts
and shows what you will
type in next. These words
are predicted based on
the sentences you have
typed in so far. If you do not
wish to use the suggested
words, keep typing in new
words. If you wish to use the
suggested words, press the
space bar to confi rm them.
Handwriting recognition
In Handwriting mode you
simply write on the screen and
your KM555 will convert your
handwriting into your message.
Select Handwriting Screen or Box
or Double boxdepending on your
preferred view.
LG KM555 | User Guide26
TIP! You may fi nd it
easier to use the stylus in
this mode, please remember
to press lightly to protect
your screen from damage.
Handwriting recognition translates
stylus gestures into letters,
numbers or other character, and
displays these characters as text.
Handwriting recognition is only
active where text can be entered.
Note: Most letters can be written
using different stroke styles. See
the tables below. The position
on the screen decides case, not
the style.
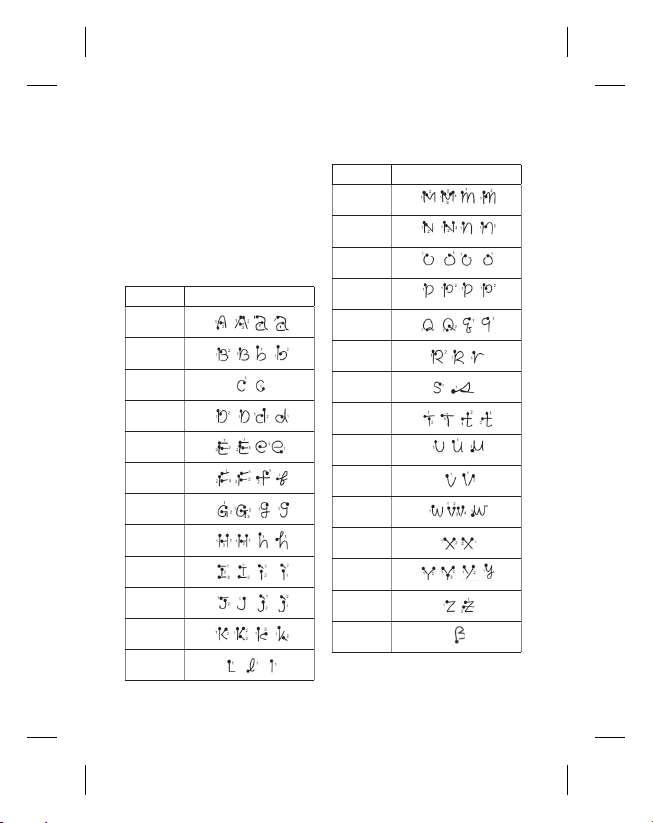
Alphabet
If you select capital letter mode
(ABC), letters you type will be
inserted as capital letters even
if you write in small letters, and
vice versa.
Letter Strokes
A
B
C
D
E
F
G
H
I
J
K
L
Letter Strokes
M
N
O
P
Q
R
S
T
U
V
W
X
Y
Z
ß
27
Messaging
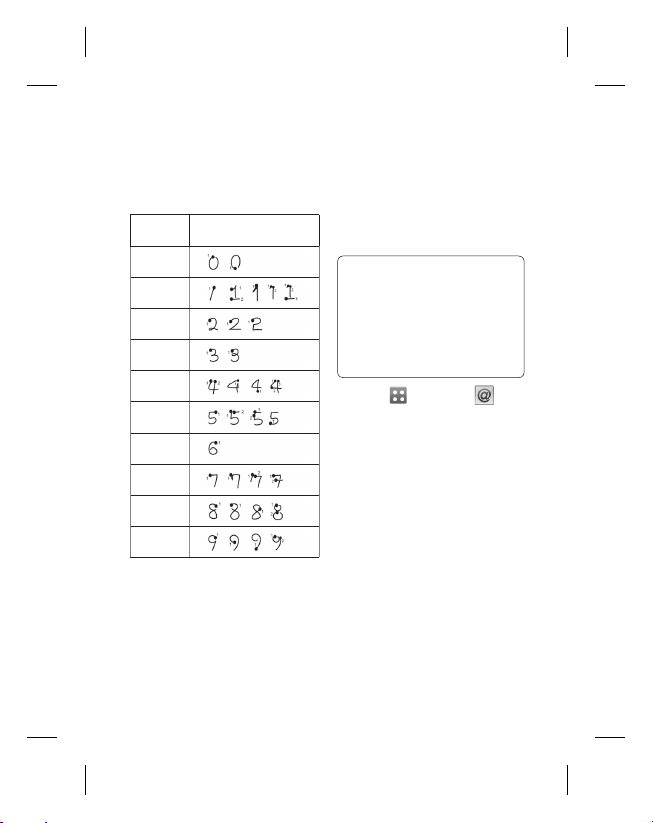
Numbers
Numbers are written above the arrow.
Number Strokes
0
1
2
3
4
5
6
7
8
9
LG KM555 | User Guide28
Changing your email settings
You can change your email
settings according to your own
preferences.
TIP! To scroll through a
list of options, touch the last
item visible and slide your
fi nger up the screen. The list
will move up so more items
are visible.
1 Touch then select .
2 Touch Email settings from
options and select Email
accounts to set up a new
account then you can adapt
the following settings.
Allow reply Email - Choose
to allow the sending of ‘read,
confirmation’ messages.
Request reply Email - Choose
whether to request read
confirmation messages.
 Loading...