

Page 1
Owner's Manual
LG CineBeam Laser 4K
DLP Projector
Please read the safety information carefully before using this product.
HU80KA
HU80KS
Page 2
2
LICENSES
Supported licenses may differ by model. For more information about licenses, visit
www.lg.com.
ENGLISH
The terms HDMI and HDMI High-Denition
Multimedia Interface, and the HDMI Logo are
trademarks or registered trademarks of HDMI
Licensing Administrator, Inc. in the United
States and other countries.
Manufactured under license from Dolby Laboratories. Dolby, Dolby Vision,
Dolby Audio, Dolby Atmos, and the double-D symbol are trademarks of Dolby
Laboratories.
For DTS patents, see http://patents.dts.com. Manufactured under license from
DTS Licensing Limited. DTS, the Symbol, & DTS and the Symbol together, DTS
2.0 Channel, DTS 2.0+Digital Out, DTS-HD, and DTS Virtual:X are registered
trademarks or trademarks of DTS, Inc. in the United States and/or other countries.
© DTS, Inc. All Rights Reserved.
• Images shown in this manual may differ from your projector.
• Your projector’s OSD (On Screen Display) may differ slightly from that
shown in this manual.
Page 3
SAFETY PRECAUTIONS
Please take note of the safety instructions to prevent any potential accident or
misuse of the projector.
Child injuries can be prevented by following these simple safety precautions.
The precautions should be followed in the same manner when you store or move
your existing projector.
• Safety precautions are given in two forms, i.e., WARNING and CAUTION as
detailed below.
WARNING Failure to follow the instructions may cause serious injury and
even death.
CAUTION Failure to follow the instructions may cause personal injury or
product damage.
• Read the owner’s manual carefully and keep it on hand.
3
ENGLISH
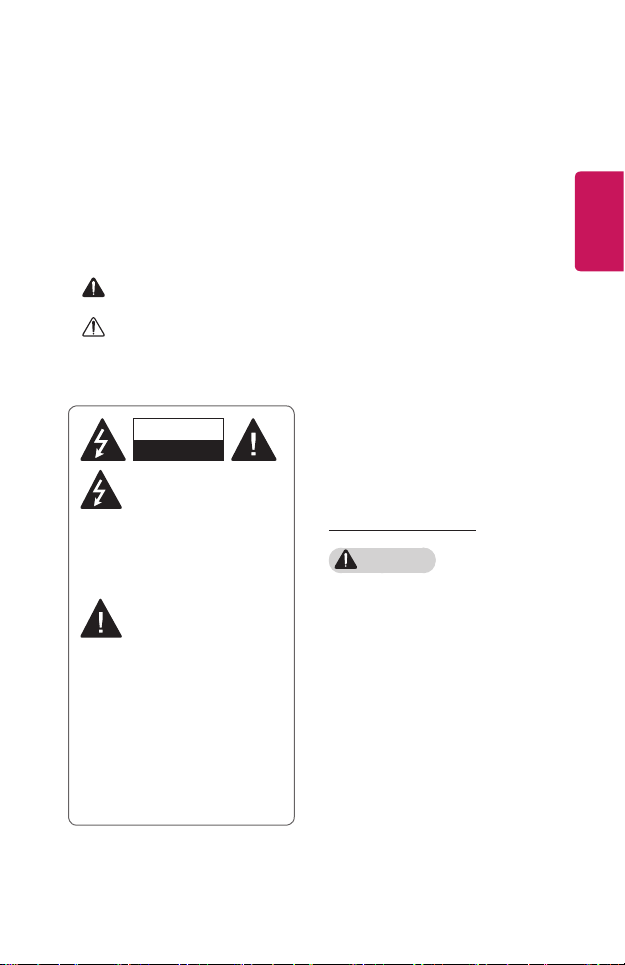
WARNING/CAUTION
RISK OF ELECTRIC SHOCK
DO NOT OPEN
The lightning ash with
arrowhead symbol, within an
equilateral triangle, is intended
to alert the user to the presence of
uninsulated dangerous voltage within
the product’s enclosure that may be of
sufcient magnitude to constitute a risk
of electric shock to persons.
The exclamation point within
an equilateral triangle is
intended to alert the user to
the presence of important operating
and maintenance (servicing) instructions
in the literature accompanying the
device.
WARNING/CAUTION
- TO REDUCE THE RISK OF FIRE
AND ELECTRIC SHOCK, DO NOT
EXPOSE THIS PRODUCT TO RAIN
OR MOISTURE.
Read these instructions.
Keep these instructions.
Heed all warnings.
Follow all instructions.
Indoor Installation
WARNING
• Do not use the projector outside
and do not expose the product to
any humidity or water.
- Since the product is not
waterproof, this may result in a
re or electric shock.
• Do not place the projector in direct
sunlight or near heat sources such
as radiators, fires, stoves, etc.
- This may result in re.
Page 4

4
• Do not place flammable materials
such as aerosols near the projector.
- This may result in re.
• Do not allow children to cling to or
ENGLISH
climb up to the projector.
- This may cause the projector to
fall, causing injury or death.
• Do not install the product in a
place with no ventilation (e.g., on
a bookshelf or in a closet) or on a
carpet or cushion.
- This may result in re due to the
increase in internal temperature.
• Do not place the product close to
sources of steam, oil or oil mist,
such as humidifiers and kitchen
counters.
- Failure to do so may result in
re, electric shock, or corrosion.
• Do not install the product onto
a wall or ceiling that is close to
sources of oil or oil mist.
- The product may be damaged
and fall, resulting in serious
injury.
• Do not place the projector where it
might be exposed to dust.
- This may result in re.
• Do not place the product in a damp
place where it is likely to get wet,
such as in a bathroom, a place
exposed to the wind and rain, or
next to a vase or aquarium.
- This may result in re or electric
shock.
• Do not allow a tablecloth or curtain
to block the air vent.
- This may result in re due to
the increase in the internal
temperature.
• Ensure good ventilation around the
projector. The distance between the
projector and the wall should be at
least 30 cm (11.8 inches).
- This will prevent re due to
the increase in the internal
temperature.
• When installing the product on a
ceiling, a professional technician
should install it using authorized
tools. If installed improperly, the
product may fall.
- This may cause personal injury
or property damage. For
installation of the product,
please contact the customer
support center.
Page 5

5
• If you use a ceiling mounting device,
adhesive to prevent loosening
of screws, or if you apply oil or
lubricant to the product, this may
cause the case to crack and the
product to fall. This may also cause
serious personal injury to the
person below the device (if any) and
damage to the product as well.
• Do not place the product high
up, for example, on a cupboard,
bookcase, or cabinet without
locking equipment to secure it.
- The projector may fall and cause
injury.
• Do not place the product under an
air conditioner or a place directly
exposed to its airflow.
- Doing so may cause a re due to
condensation.
CAUTION
• When moving the projector, make
sure to switch it off and remove the
power plug and cords.
- The power cord may be
damaged, resulting in re or
electric shock.
• Do not place the projector on an
unstable or vibrating surface such
as a wobbly shelf or a slope.
- It may fall and cause injury.
• Be careful not to tip the projector
over when connecting external
devices to the projector.
- This may cause personal injury
or damage to the projector.
• When the projector is installed as
the Table-Type and placed upright
on a table, the projector may fall,
which may cause damage to the
product or personal injury.
- It is recommended that the
product is safely laid down on
the table.
ENGLISH
Page 6

6
Power
WARNING
• DISCONNECTING THE DEVICE
ENGLISH
FROM THE MAIN POWER
- The Power plug is the
disconnecting device. In case of
an emergency, the Power Plug
must remain readily accessible.
• The grounding wire should be
connected. (Except for devices
which are not grounded.)
- Ensure that you connect the
grounding cable to avoid electric
shock. If it is not possible to
ground the unit, have a qualied
electrician install a separate
circuit breaker.
Do not try to ground the
projector by connecting it to
telephone wires, lightning rods
or gas pipes.
• The power plug should be inserted
fully into the power outlet.
- An unstable connection may
cause a re.
• Do not place heavy objects on the
power cord.
- This may result in re or electric
shock.
• Never touch the power plug with
wet hands.
- This may result in electric shock.
• Do not plug too many devices into
one multi-power outlet.
- This may result in re due to the
power outlet overheating.
• Keep the power plug, and the used
power outlet clean from dust or
foreign materials building up.
- This may result in re.
• If there is any smoke or a burning
smell from the projector or power
cord, stop using the product
immediately. Disconnect the power
cord from the power outlet, and
then contact the customer service
center.
- This may result in re.
• To turn off the main power, remove
the power plug, which should be
positioned so it is easy to access for
operation.
• When removing the power plug,
make sure your fingers do not
contact the pin.
- This may result in re or electric
shock.
Page 7

7
CAUTION
• Always grab the plug to remove the
power cord.
- Otherwise, this may result in a
re or may damage the product.
• Refrain from constantly bending the
power cord.
- If the power cord is bent
excessively for a long period
of time, the cord may break
inside. This may result in a re or
electric shock.
• Ensure the power cord and plug are
not damaged, modified, severely
bent, twisted, pulled, sandwiched or
hot. Do not use the product if the
power outlet is loose.
- This may result in re or electric
shock.
• Do not extend the power cord past
the red mark, and hold the plug
when retracting it.
- The plug may whip, inicting
damage on you or items nearby.
• Keep the power cord away from
heating devices.
- The wire’s sheath may melt,
which may result in re or
electric shock.
• Place the projector where people
will not trip over or step on the
power cord to protect the power
cord and plug from any damage.
- This may result in re or electric
shock.
• Do not turn the projector on or
off by plugging in the power plug
or unplugging it from the power
outlet. (Do not use the power plug
as a switch.)
- This may result in electric shock
or damage to the product.
• Do not insert a conductor into the
other side of the wall outlet while
the power plug is inserted into the
wall outlet. In addition, do not touch
the power plug immediately after
it is disconnected from the wall
outlet.
- This may result in electric shock.
• Only use the official power cord
provided by LG Electronics. Do not
use other power cords.
- This may result in re or electric
shock.
ENGLISH
Page 8

8
• If any water or foreign materials
have gone into the power cord, or
the interior of the projector, turn off
the projector by pressing the power
ENGLISH
button. Remove all the cables, and
then contact the customer service
center.
- This may result in re or electric
shock.
• Never disassemble the power
supply devices (power cord, etc.).
- This may damage the power
cord and result in a re or
electric shock.
• Connect the power cord firmly.
- Not doing so may result in a
product failure or re.
• Do not place heavy objects or put
pressure on the power cord and
avoid damage.
- This may result in a re or may
damage the product.
When in Use
WARNING
• Do not place anything containing
liquid on top of the projector
such as a vase, flower pot, cup,
cosmetics, medicine, or ornaments,
candles, etc.
- This may result in re or electric
shock, or cause injury due to
falling.
• In the event that there is a heavy
impact or the cabinet is damaged,
switch it off, unplug it from the
power outlet and contact an
authorized service center.
- This may result in electric shock.
• Do not insert pieces of metal such
as coins, hairpins or metal debris,
nor flammable materials such as
paper or matches into the projector.
- This is to prevent electric shock
or re.
• Make sure that a child does not
swallow the batteries when you
replace the old batteries in the
remote control with new ones. Keep
batteries out of reach of children.
- If a child swallows a battery,
consult a doctor immediately.
Page 9

9
• Never open any cover on the
projector.
- There is a high risk of electric
shock.
• Do not look directly into the lens
when the projector is in use.
- The bright light may damage
your eyes.
• When the lamp is on or has just
been turned off, avoid touching the
air vent or lamp, because these will
be very hot.
• If there is a gas leak in the room
with the projector, do not touch the
projector or power outlet. Open the
windows for ventilation.
- Sparks may cause re or burns.
• Unplug the power cord from the
outlet during a lightning storm.
- This will prevent shock or
damage to the projector.
• Do not use the projector near
electronic devices that generate a
strong magnetic field.
• Keep the plastic film used for
packaging the projector out of the
reach of children.
- If not handled safely, it can
cause suffocation.
• Do not keep your hand on the
projector for a long time when it is
running.
• When you play a game by
connecting a game console to a
projector, it is recommended that
you maintain a distance of more
than four times the diagonal length
of the screen.
- Make sure that the connecting
cable is long enough. Otherwise,
the product may fall causing
personal injury or damage to the
product.
• Do not place the projector or its
remote control with batteries in
an extremely high temperature
environment.
- This may result in re.
ENGLISH
Page 10

10
CAUTION
• Do not place heavy objects on the
projector.
ENGLISH
- It may fall down and cause
personal injury.
• Be careful not to allow any impact
to the lens during transport.
• Do not touch the lens of the
projector.
- The lens may be damaged.
• Do not use any sharp tools on
the projector such as a knife or
hammer, because this may damage
the casing.
• In the event that no image appears
on the screen or no sound is heard,
stop using the projector. Switch
off the projector, unplug it from
the power outlet and contact our
service center.
- This may result in re or electric
shock.
• Do not drop anything onto the
projector or allow anything to bang
into the projector.
- This may cause damage to the
projector or personal injury.
• It is recommended that you
maintain a distance of more than
5 to 7 times the diagonal length of
the screen.
- If you watch the screen at a
close distance for a long time,
your eyesight may become
worse.
• Do not block the light beam emitted
from the projector using a book or
other object.
- Lengthy exposure to the
projector beam may result in
re. In addition, the lens may
be overheated and damaged by
the reected heat. Disable the
AV function to stop projection
temporarily or turn off the
power.
• Do not start the projector with the
volume turned up high.
- High volume may damage
hearing.
• If you use headphones or
earphones, do not use them at high
volume or for a long period of time.
[Only applicable to models that
support headphones (earphones).]
- Doing so may damage your
hearing.
Page 11

11
• Do not use high voltage electrical
equipment near the projector, (e.g.,
a bug zapper). This may result in
product malfunction.
• Please be sure that the projector’s
aperture (lens and mirror) is not
blocked by a person or any objects.
• Be careful of the air vent because
it becomes hot if the projector is
powered on for a long period of
time. Such a rise in temperature in
the air vent is not a defect and does
not cause problems in the product’s
operation.
• Do not hold or move the product
upside down by holding just the
power cord, signal cable, projection
mirror, etc.
- Doing so may damage the
product or cause an electric
shock or re.
• As long as the power cord is
plugged in, the product will not be
completely powered off even after
it is turned off.
Cleaning
WARNING
• Do not spray the projector with
water when cleaning. Make sure
water does not flow into the
projector.
- This may result in re or electric
shock.
• When there is smoke or a strange
smell coming out from the projector
or a foreign object falls into the
projector, please switch it off and
unplug it from the power outlet and
contact our service center.
- Otherwise, this may result in re
or electric shock.
ENGLISH
Page 12

12
CAUTION
• Contact your seller or our service
center once a year to clean the
ENGLISH
internal parts of the projector.
- If you do not clean the projector
for a long period of time, dust
will accumulate, which may
result in re or damage to the
projector.
• When cleaning plastic parts such
as the projector case, unplug the
power first and wipe with a soft
cloth. Do not spray with water
or wipe with a wet cloth. Never
use glass cleaner, automobile or
industrial polish, abrasives, wax,
benzene, or alcohol as these can
damage the projector.
- This can result in re, electric
shock or cause damage to
the product (deformation and
corrosion).
• Do not wipe the optical system
(lens, mirror) right after the product
has been turned off or while the
product is being operated. When
cleaning each part of the product,
remove the power cord and wipe
gently with a soft cloth. Do not
spray with water or wipe with a
wet cloth. Do not use detergents,
automobile or industrial polish,
abrasive substances, wax, benzene,
alcohol, water, etc. on the product’s
main unit or optical system (lens,
mirror) as this may damage the
product.
- This can result in re, electric
shock or cause damage to
the product (deformation and
corrosion).
• Remove the plug from the outlet
before cleaning the product.
- Otherwise, this may result in
electric shock.
Page 13
13
Laser
WARNING
• This product contains a laser
module. Do not disassemble or
modify the product as this could be
dangerous.
• You risk being exposed to laser
radiation if you manipulate or alter
the product in a way not specified in
the user manual.
• To protect your eyes avoid looking
directly into the bright light from
the unit.
• Use of controls or adjustments
or performance of procedures
other than those specified herein
may result in hazardous radiation
exposure.
CAUTION
• This product is a class 1 laser device
that meets IEC 60825-1.
Built-in laser standard (class 4 laser
module)
• Wavelength: 448 nm - 462 nm
• Light output: approx. 4.5 W x 12
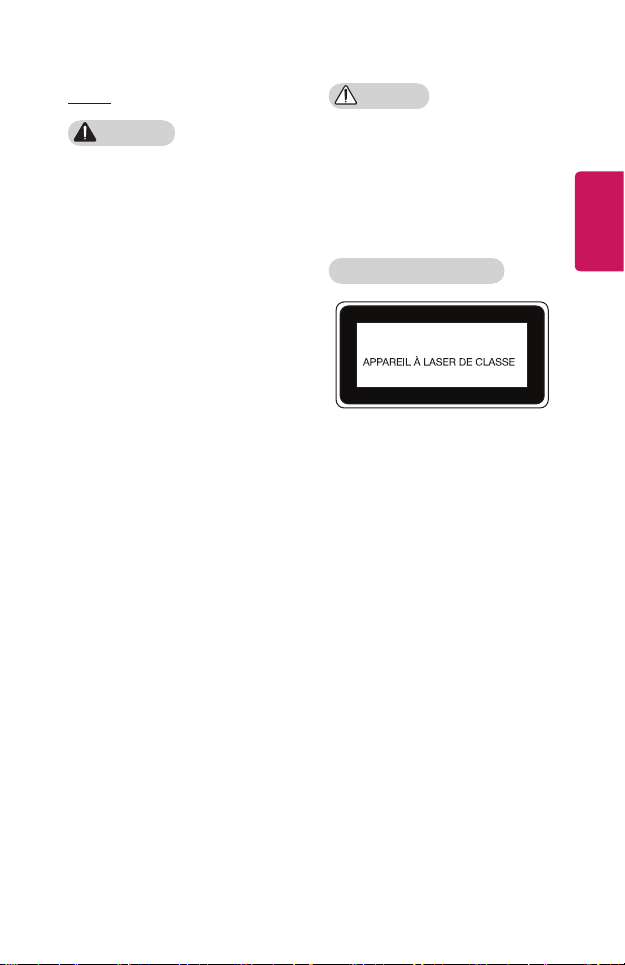
Product Laser Class Label
CLASS 1 LASER PRODUCT
1
The laser class label of product
is attached to the bottom of the
product.
ENGLISH
Page 14

14
Others
WARNING
• When you go out, place the
ENGLISH
projector out of reach of animals,
and remove the power plug from
the wall outlet.
- Using a damaged power cord
may result in short circuit or re.
• Do not use the projector near high-
precision electronic devices or those
that transmit weak radio signal.
- This may affect the operation of
the product, causing an accident.
• Only a qualified technician can
disassemble or modify the
projector. For diagnosis, adjustment,
or repair, contact your seller or our
service center.
- This may result in re or electric
shock.
• Proper ventilation required, do not
block airflow around unit. Doing
so can cause injury and internal
overheating.
• Do not touch the lens; doing so can
result in burns or damage to lens.
Lens and unit may be HOT during
and immediately after use. Use
caution when handling unit, allowing
for proper cool down.
• Only use a grounded electrical
outlet. (Except for devices which
are not grounded.)
• Do not insert anything into or cover
up the exhaust vents.
- This may result in re or electric
shock.
• Follow all maintenance guidelines
for optimal use; service only at an
authorized service center.
• Keep the batteries and remote out
of reach of children.
- This will prevent personal injury
or damage to the product.
Page 15
15
CAUTION
• Do not use or store the projector
outdoors for long periods of time.
• Do not mix new batteries with old
ones.
- Burst or leaking batteries may
result in damage or injury.
• Be sure to unplug if the projector is
not to be used for a long period.
- Accumulated dust may result
in re or electric shock due to
overheating, ignition, or poor
insulation.
• Only use the specified type of
battery.
- Burst or leaking batteries may
result in damage or injury.
• Make sure you use the same type
of battery when replacing.
- In the case of a battery contact
failure, the battery may drain
quickly or the remote control
may not work properly.
• Dispose of used batteries properly.
- This may result in explosion
or re. The correct method of
disposal may vary depending
on your country or region.
Dispose of the battery pack as
instructed.
• Do not throw or disassemble the
battery.
- This may result in re or
explosion due to damage to the
battery.
• Store batteries away from metallic
objects, such as keys and paper
clips.
- Excess current may cause a
rapid increase in temperature,
resulting in re or burns.
• Do not store the batteries near any
heat source, such as a heater.
- This may result in re or damage
to the product.
• Do not store batteries at
temperatures higher than 60 °C
(140 °F) or in high humidity.
- This may result in explosion
or re.
• Make sure that the battery is
installed correctly.
- This prevent explosion or re.
• When replacing batteries, make
sure that the positive and negative
terminals (+, -) are properly
oriented.
- Battery rupture or leakage may
lead to re, explosion, injury or
contamination (damage) of the
surrounding area.
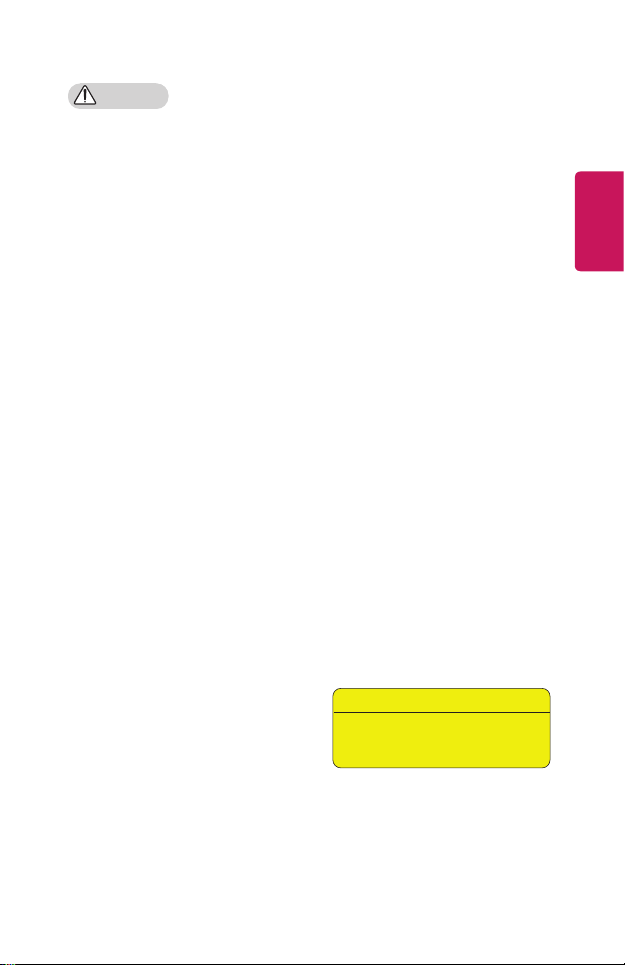
Risk Group 2
CAUTION Possibly hazardous optical radiation
emitted from this product. Do not stare at
operating lamp. May be harmful to the eye.
ENGLISH
This label is attached to the bottom of
the product and language may differ.
Page 16
16
ANTENNA
WARNING
• If you are using an outdoor antenna,
ENGLISH
please install it away from electrical
wires to make sure it does not
touch any nearby wires even when
it falls down due to heavy wind.
- Failure to do so may cause
electric shock or physical injury.
CAUTION
• To prevent any water flowing into
the product, install a drip loop in
the outdoor antenna wire where it
comes indoors.
- Raindrops owing into the
product may cause re or
electric shock.
Outdoor Antenna Grounding
• If an outdoor antenna is installed,
follow the precautions below. An
outdoor antenna system should
not be located in the vicinity of
overhead power lines or other
electric light or power circuits, or
where it can come in contact with
such power lines or circuits as death
or serious injury can occur. Be sure
the antenna system is grounded to
provide some protection against
voltage surges and built-up static
charges. Section 810 of the
National Electrical Code (NEC) in
the U.S.A. provides information with
respect to proper grounding of the
mast and supporting structure,
grounding of the lead-in wire to
an antenna discharge unit, size of
grounding conductors, location of
antenna discharge unit, connection
to grounding electrodes and
requirements for the grounding
electrode.
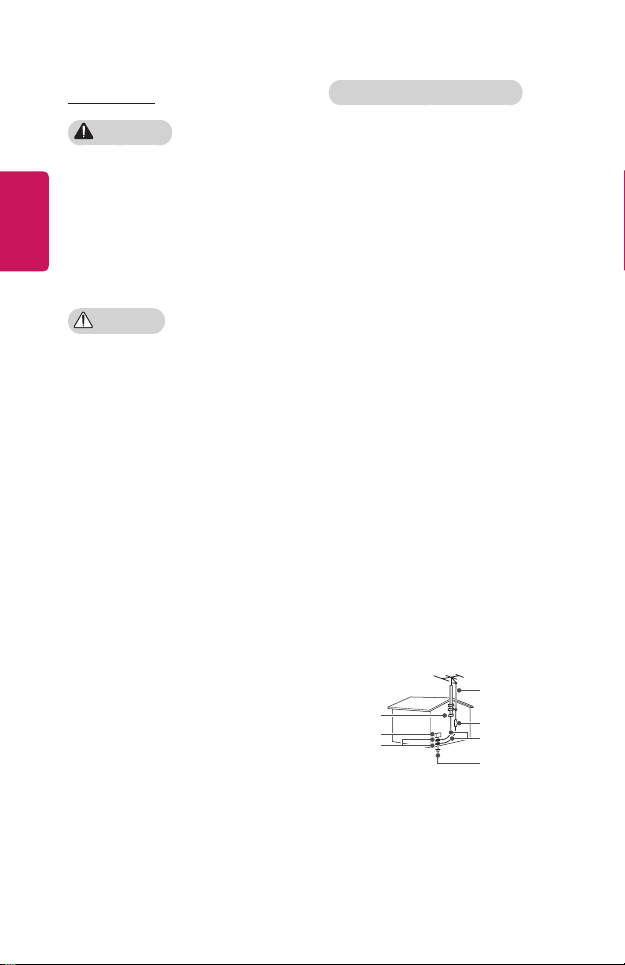
Antenna grounding according to
the National Electrical Code, ANSI/
NFPA 70
Ground Clamp
Electric Service
Equipment
Ground Clamp
NEC: National Electrical Code
Antenna Lead in Wire
Antenna Discharge Unit (NEC
Section 810-20)
Grounding Conductor (NEC
Section 810-21)
Power Service Grounding
Electrode System (NEC Art
250, Part H)
Page 17

For USA
NOTE TO CABLE/TV INSTALLER
This reminder is provided to call the
CATV system installer’s attention
to Article 820 - 40 of the National
Electric Code (U.S.A.). The code
provides guidelines for proper
grounding and, in particular, species
that the cable ground shall be
connected to the grounding system of
the building, as close to the point of
the cable entry as practical.
17
ENGLISH
Page 18

18
CONTENTS
LICENSES 2
ENGLISH
SAFETY PRECAUTIONS 3
PREPARATION 19
Accessories 19
Optional Extras 20
Parts and Components 21
Using the Buttons 25
- Basic functions 25
- Adjusting the menu 26
Projector Status Indicators 27
Installation 28
- Installation Precautions 28
- Mirror Adjustment and
Precautions 30
- Stand-Type Installation 34
- Table-Type Installation for Front
Projection 35
- Ceiling-Type Installation 37
- Projection Distance per Screen
Size 38
- Kensington Security System 41
MAGIC REMOTE CONTROL 42
To Register the Magic Remote
Control 44
To Re-register the Magic Remote
Control 44
Using the Magic Remote Control 45
USING THE PROJECTOR 46
Connecting the Antenna or Cable
46
Focus of the Screen Image 47
Watching With the Projector 48
CONNECTING DEVICES 49
HDMI Connection 50
- Connecting to HD Receiver, DVD,
or External Devices 50
- Connecting a PC 51
- Connecting a Laptop 52
Connecting Headphones 53
- Connecting Headphones 53
Connecting a Digital Amp 54
Connecting a smart device
(smartphone, tablet, etc.) 55
- Slimport supported devices 55
- Apple Lightning Digital AV
adapter supported devices 55
- Apple 30-pin Digital AV adapter
supported devices 55
MAINTENANCE 56
Cleaning 56
- Cleaning the Lens 56
- Cleaning the Projector Case 56
SPECIFICATIONS 57
Open Source Software Notice
Information 61
SYMBOLS 62
Page 19
PREPARATION
The pictures may differ slightly from the actual product.
19
Accessories
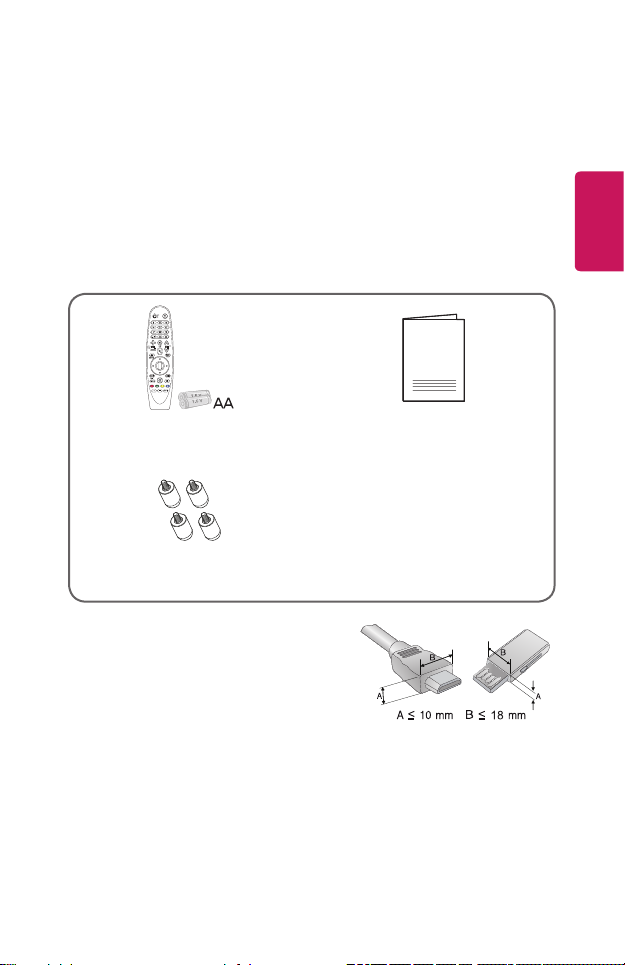
Accessories included with the projector are show below.
Accessories are subject to change without prior notice.
New accessories may be added or old ones removed.
Magic Remote Control
Two AA Batteries
4 Table-Type Screws
• When connecting an HDMI or USB cable, or
connecting a USB flash drive to the HDMI or
USB port, use a product that has a width of
18 mm (0.7 inches) or less and a height of
10 mm (0.3 inches) or less. If the USB cable
or USB flash drive does not fit the USB ports
of the projector, use an extension cable that
supports USB 2.0/USB 3.0.
• Use a certified cable with the HDMI logo attached.
• If you do not use a certified HDMI cable, the screen may not display or a
connection error may occur. (Recommended HDMI cable types)
- High-Speed HDMI®/™ Cable
- High-Speed HDMI®/™ Cable with Ethernet
Owner's Manual
(0.3 inches) (0.7 inches)
ENGLISH
Page 20
20
Optional Extras
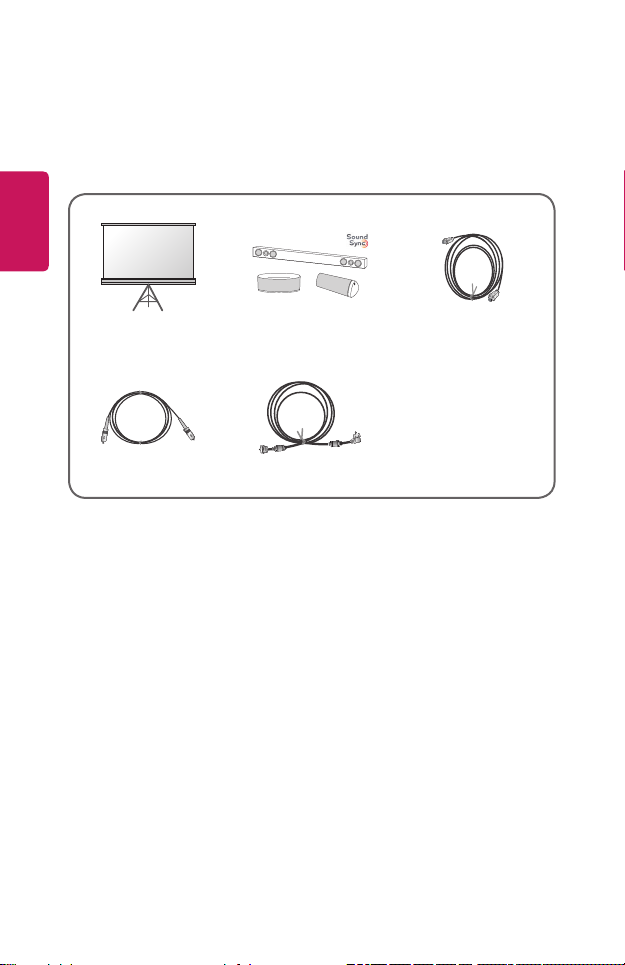
To purchase optional accessories, visit an electronics store or online shopping site
or contact the retail store where you purchased the product. Optional accessories
are subject to change without prior notice.
ENGLISH
Projection Screen LG Audio Device HDMI Cable
Optical Cable RF Cable
Page 21
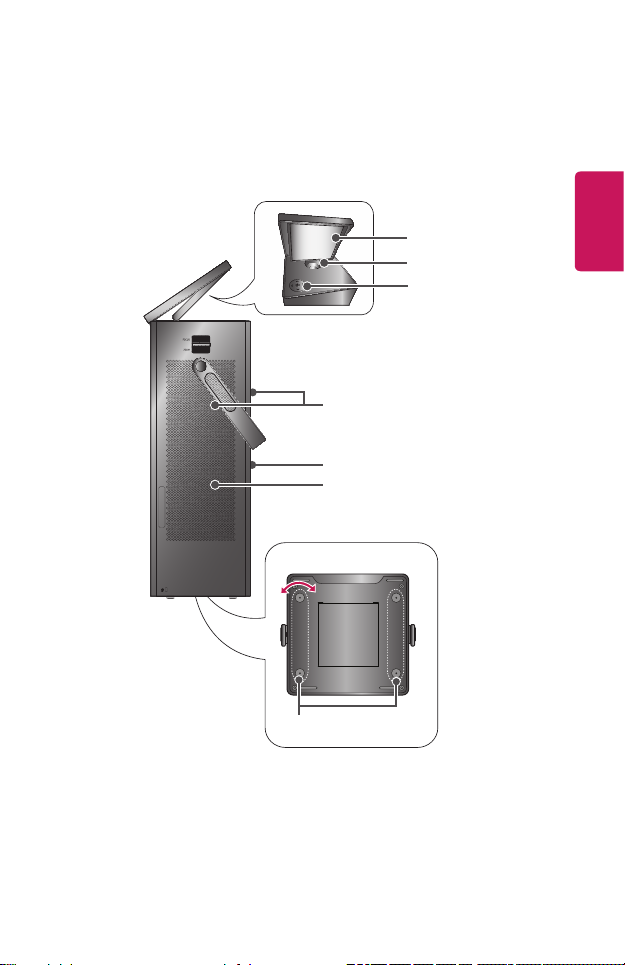
Parts and Components
This projector is manufactured using high-precision technology. You may,
however, see tiny black dots and/or bright colored dots (red, blue, or green)
that continuously appear on the projector screen. This is a normal result of the
manufacturing process and does not indicate a malfunction.
2)
Mirror
2)
Lens
Buttons
Speaker
21
ENGLISH
Inlet Vent
Outlet Vent
1)
Bottom of the Projector
Adjustable leg
3)
1) Due to the high temperature of vent area, do not get close to the vent area.
2) Do not touch the Lens and Mirror when using the projector. The Lens and Mirror
may be damaged. (Keep lens away from sharp objects.)
3) Turn the adjustable leg left or right to adjust the angle.
Page 22
22
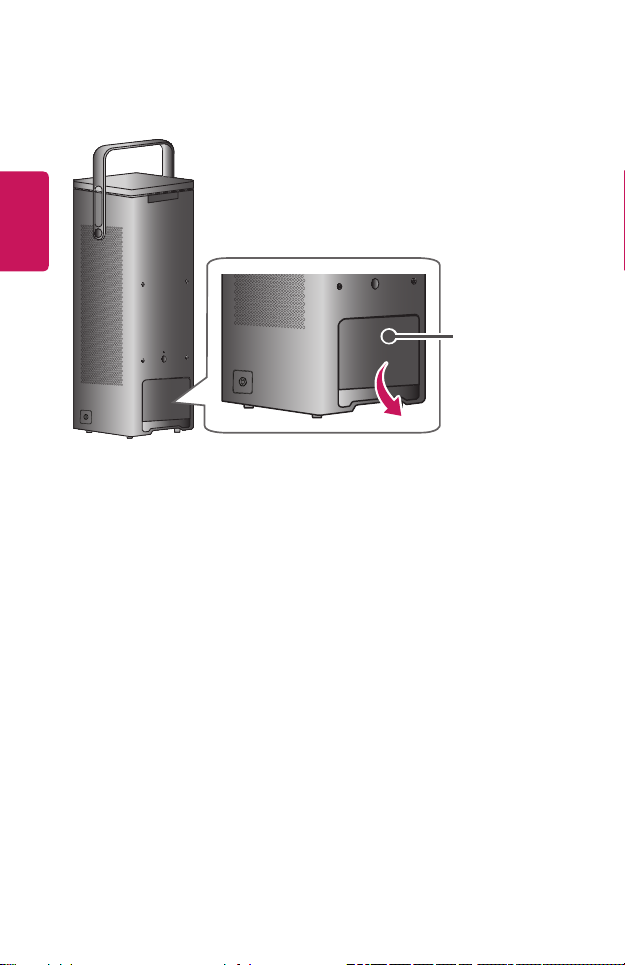
Remove the terminal cover before plugging-in the power cord and cables, as shown
in the picture below.
ENGLISH
Terminal Cover
Page 23
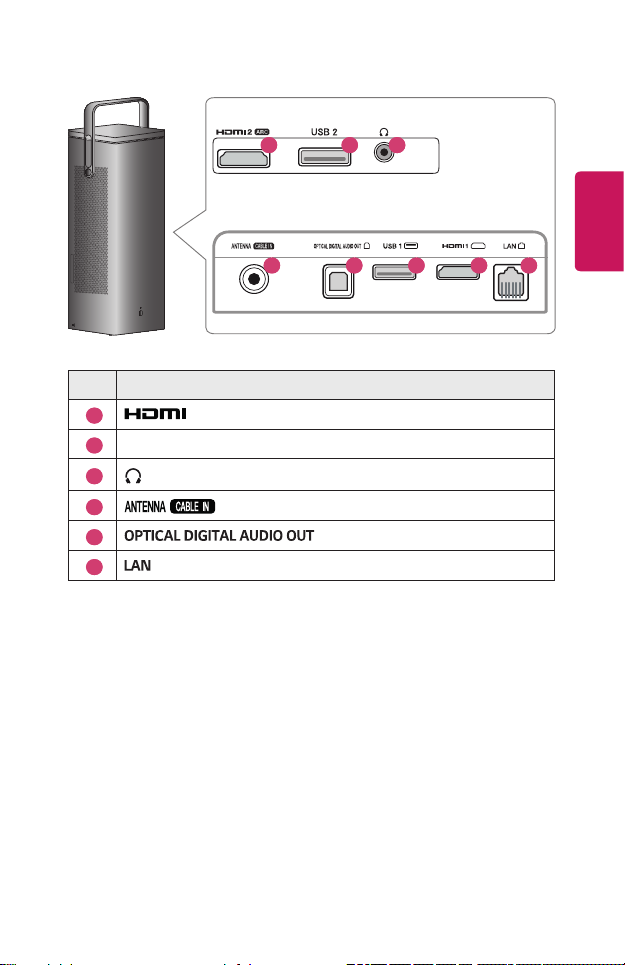
Side
1 2 3
Back
No. Description
1
2
3
4
5
6
USB port
Port
(Headphone Port)
Port
Port
Port
23
ENGLISH
1 6 2 5 4
Page 24
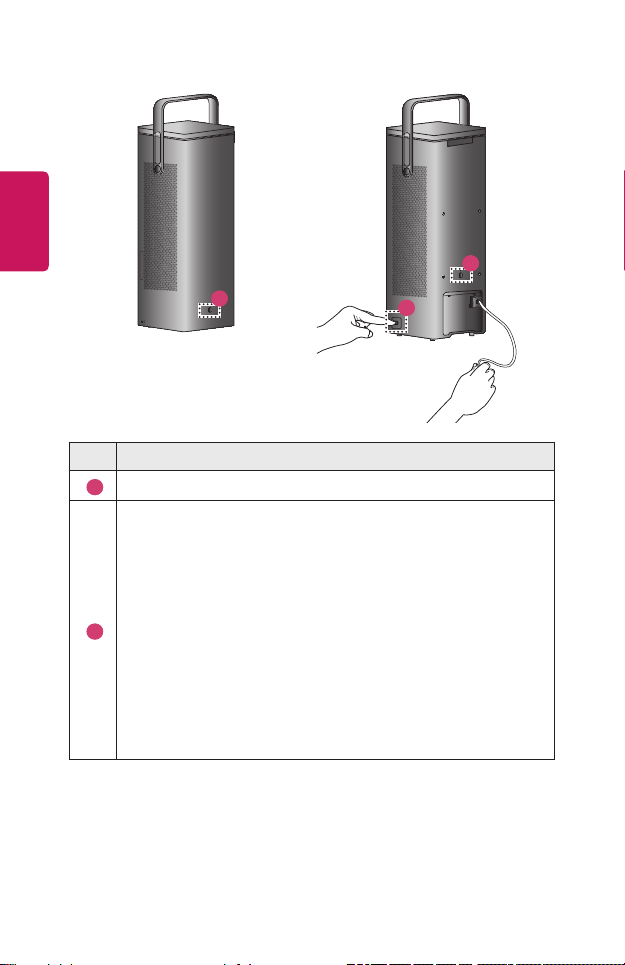
24
ENGLISH
1
1
No. Description
IR Receiver
1
Power Cord Rewind Button
When not using the projector, press the Power Cord Rewind button to
retract the power cord.
• Hold the power cord with one hand and press the Power Cord
Rewind button.
2
- Otherwise, the power plug may hit and damage the product.
• If the power cord does not rewind or come out fully,
- Pull out the cord and rewind again.
- Pull hard if the power cord does not come out.
• Do not extend the power cord past the red mark, and hold the
plug when retracting it.
- The plug may whip, inicting damage on you or items nearby.
2
Page 25
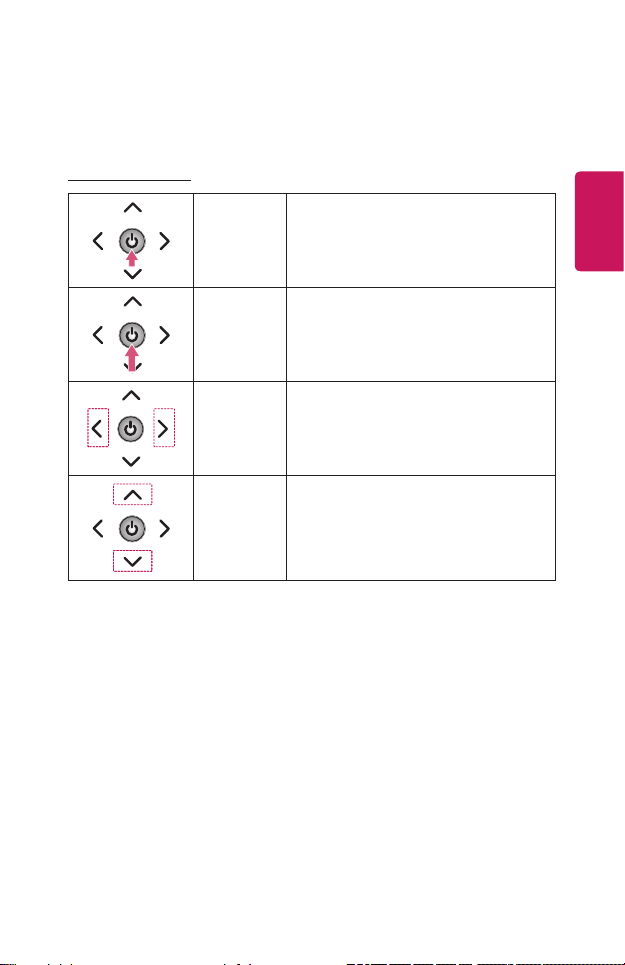
Using the Buttons
You can operate the projector by pressing the button.
25
Basic functions
Power On Press the power button once while the
projector is off.
Power Off
(Press and
Hold)
Volume
Control
Channels
Control
1) The product turns off 1 minute after its mirror is closed, even when the power
off button had not been pressed.
1)
Press and hold the Power button for more
than 3 seconds while the projector is on.
Adjust the volume by pressing the left/
right button.
Change the channel by pressing the up/
down button.
ENGLISH
Page 26
26
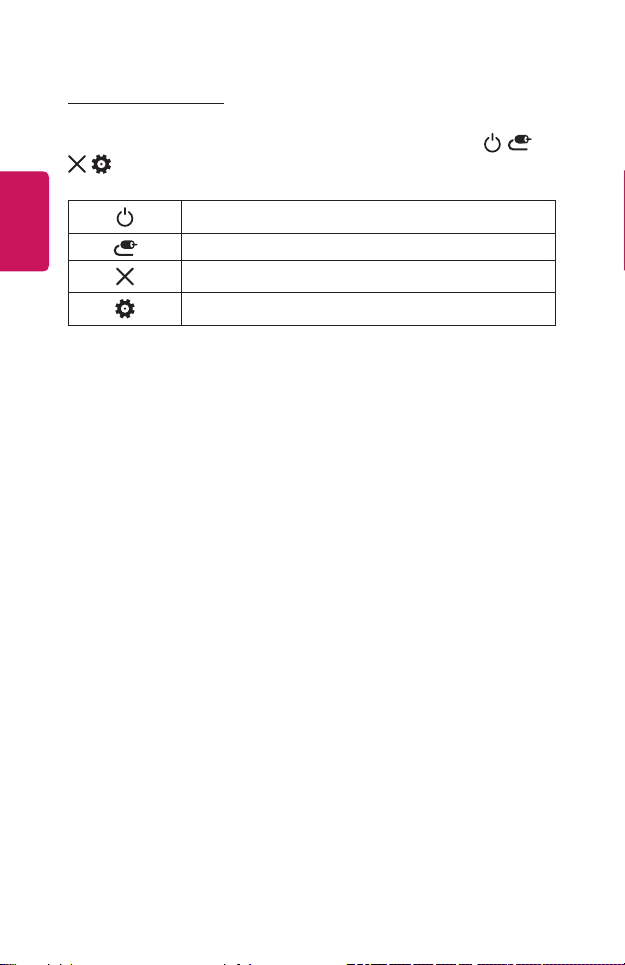
Adjusting the menu
Press the power button once while the projector is on.
Press the top, bottom, left, and right buttons to move to a menu item ( , ,
ENGLISH
, ). After moving to the desired menu item, press the Power button once to
select it.
Turns the power off.
Changes the input source.
Clears on-screen displays and returns to projector viewing.
Displays the Settings menu.
Page 27
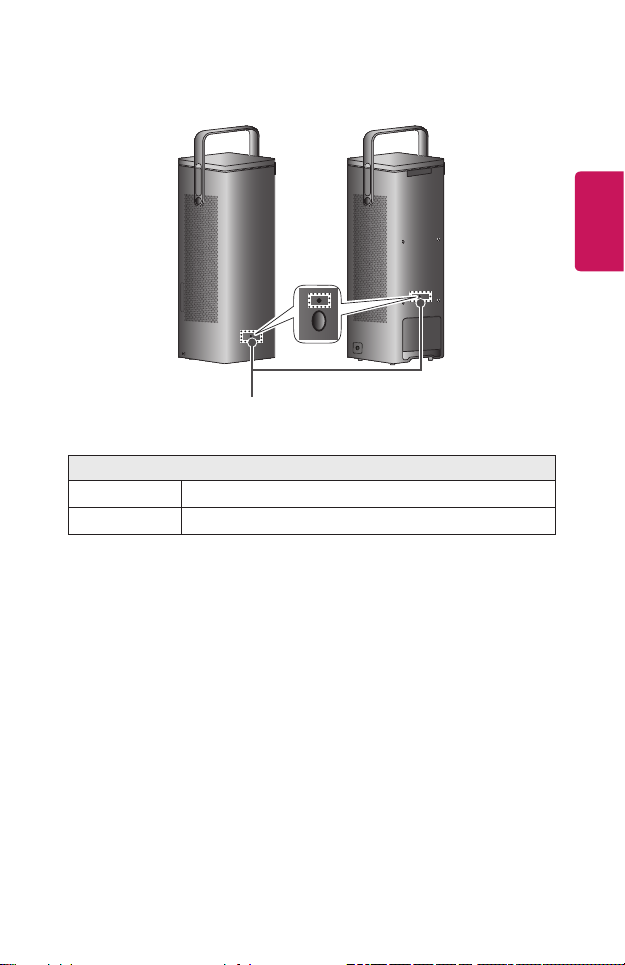
Projector Status Indicators
LED Power Indicator
LED Power Indicator
Red
Off
Power standby state
The projector is operating with the power on.
27
ENGLISH
Page 28
28
Installation
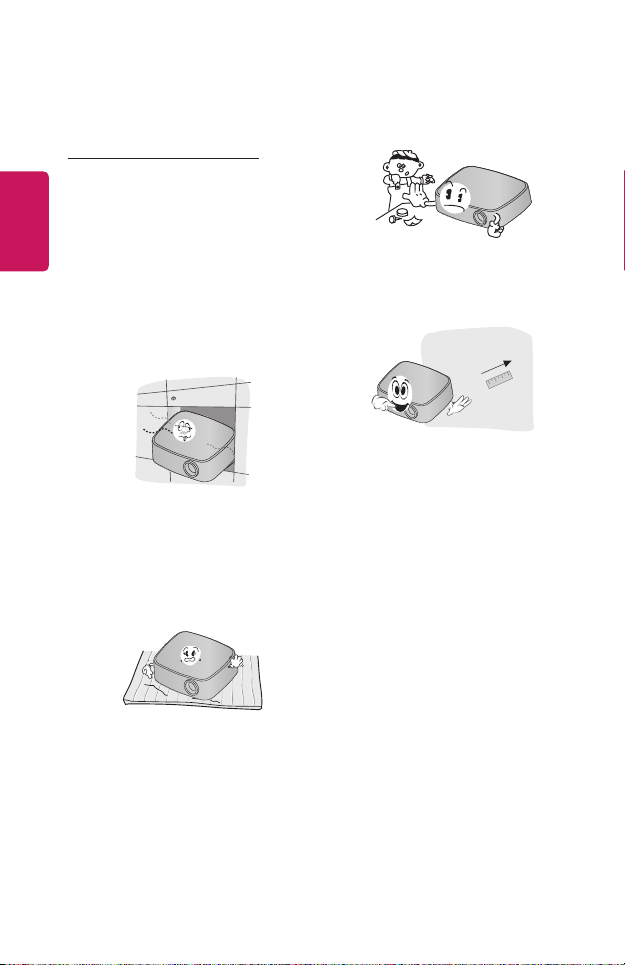
Installation Precautions
ENGLISH
• Place the projector in a well-
ventilated environment.
- To prevent internal overheating,
install the projector in a wellventilated place. Do not place
anything near the projector.
That may block its air vents. If
the air vents are blocked, the
internal temperature of the
projector will increase.
- Do not place the projector on a
carpet or rug. If the projector’s
inlet vent is on the bottom, be
careful not to block the vent and
always use the projector on a
solid, level surface.
- Be sure to prevent foreign
objects such as paper debris
from entering the projector.
- Leave an adequate open area
(30 cm [11.8 inches] or more)
around the projector.
• Do not place the projector in a hot,
cool, or humid environment.
• Do not place the projector in a place
where it will easily attract dust.
- This may result in re.
• Never open any cover on the
projector. There is a high risk of
electric shock.
• The projector is manufactured using
high-precision technology. You may,
however, see tiny black dots and/
or bright colored dots (red, blue or
green) that continuously appear
on the projector screen. This is a
normal result of the manufacturing
process and does not indicate a
malfunction.
Page 29

• The remote control may not work
in an environment where a lamp
equipped with electronic ballasts
or a three-wavelength fluorescent
lamp is installed. Replace the lamp
with an international standard lamp
for the remote control to work
normally.
• To install to the ceiling, attach the
ceiling-type bracket to the projector
with M4 x 8 mm screws.
• Do not overtighten the screws. It
may damage the case, causing the
projector to fall and cause a serious
injury. (Recommended Torque: 4.34 ~
6.94 ibf-in [5~8 kgf·cm])
• Please be sure that the projector’s
aperture (lens and mirror) is not
blocked by a person or any objects.
29
ENGLISH
Page 30
30
Mirror Adjustment and Precautions
Adjust the mirror per the instructions, as shown in the picture below.
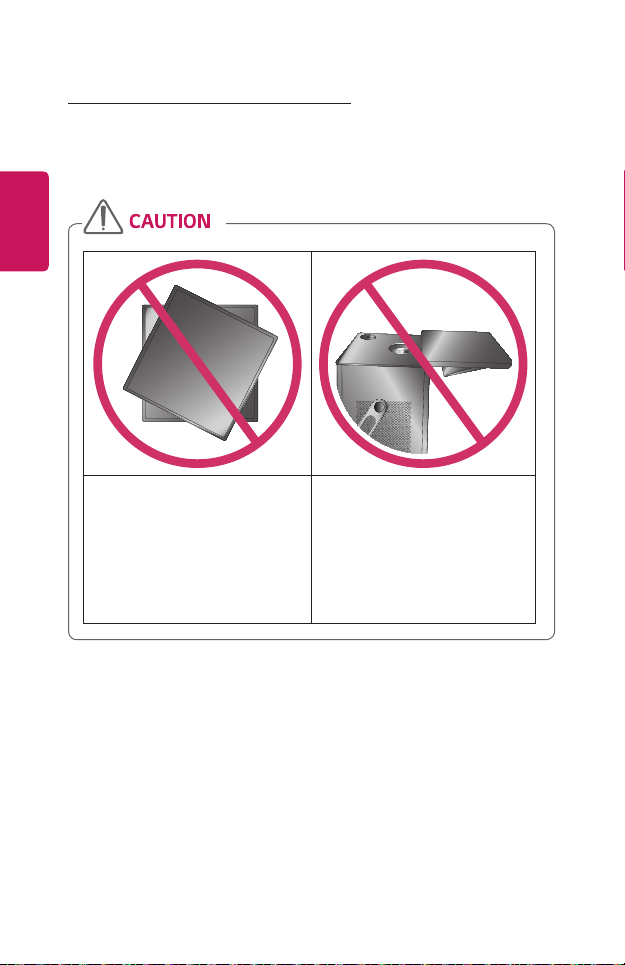
When adjusting the mirror, do not over tilt it backward. Doing so may damage the
product.
ENGLISH
• Do not rotate the mirror while it
is closed.
- Doing so may damage the
mirror.
• Do not adjust the mirror to
make it face the floor.
- You will not see anything on
the screen because the light
is not projected.
- The projector will be turned
off after about 1 minute.
Page 31
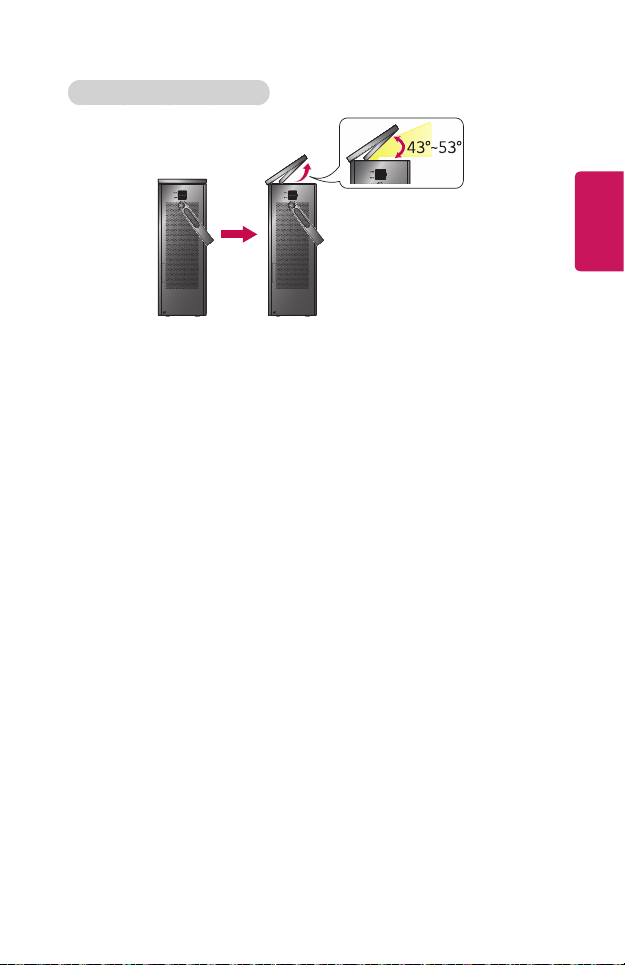
Stand-Type (Front Projection)
• You can adjust the angle of the mirror to change the screen height.
- You can adjust the screen location when the mirror angle is 43–53
degrees.
31
ENGLISH
Page 32
32
ENGLISH
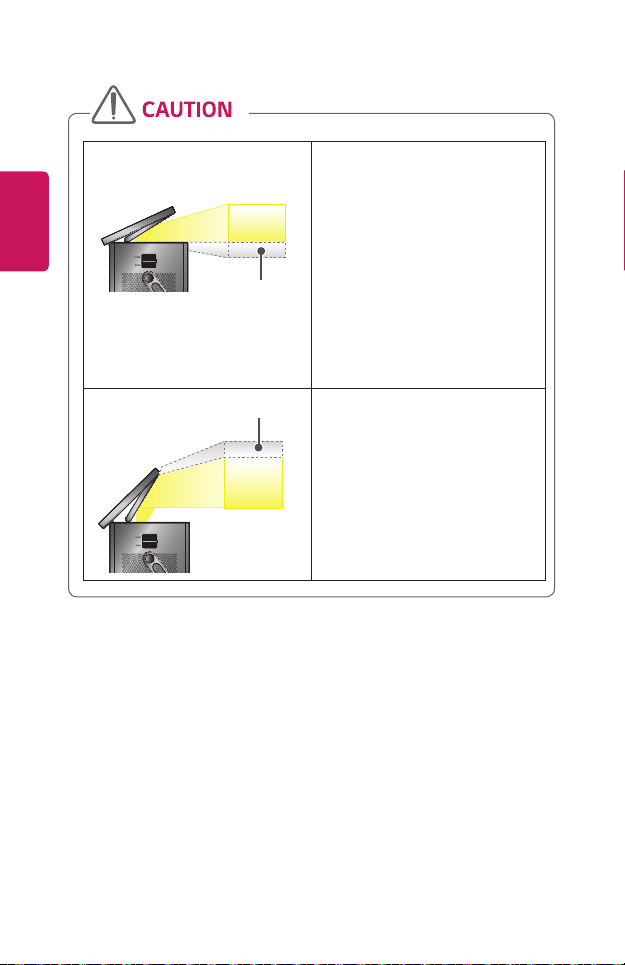
Cropped Display
Cropped Display
When the mirror angle is about 43
degrees or less,
- the projected image is partially
cropped because the projected
light is cut off.
- If you decrease the mirror angle
further or close the cover, you will
not see anything on the screen
because the light is not projected.
- If the mirror is closed, the
projector will be turned off after
about 1 minute.
When the mirror angle is about 54
degrees or more,
- the projected image is partially
cropped because the projected
light escapes the mirror.
Page 33
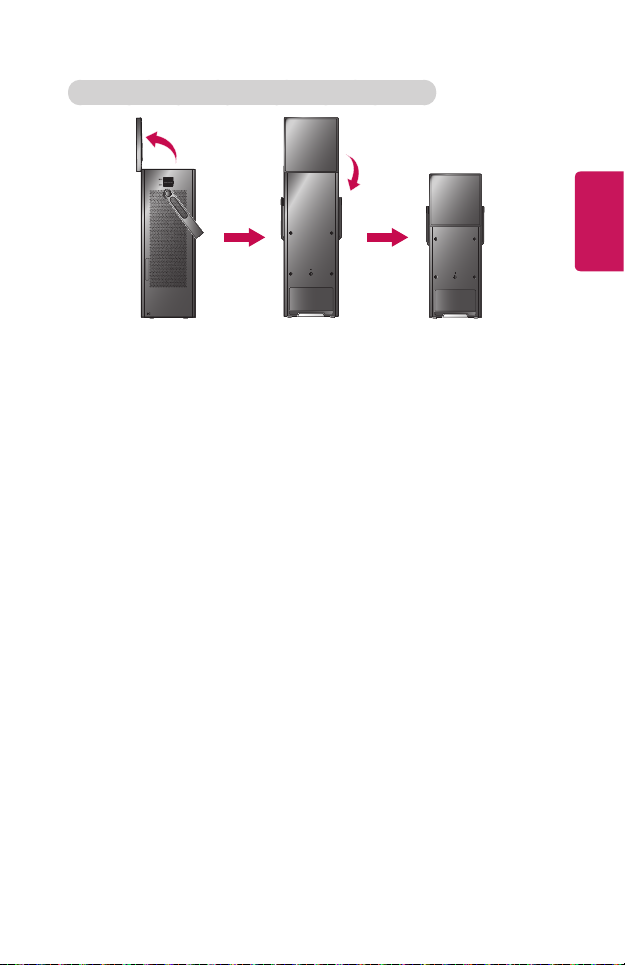
Stand-Type (Ceiling Projection), Table-Type, Ceiling-Type
1 Adjust the mirror angle to 90 degrees.
2 Rotate the mirror 180 degrees clockwise to lower it.
- Follow the steps described above in reverse order to close the mirror.
33
ENGLISH
Page 34
34
Stand-Type Installation
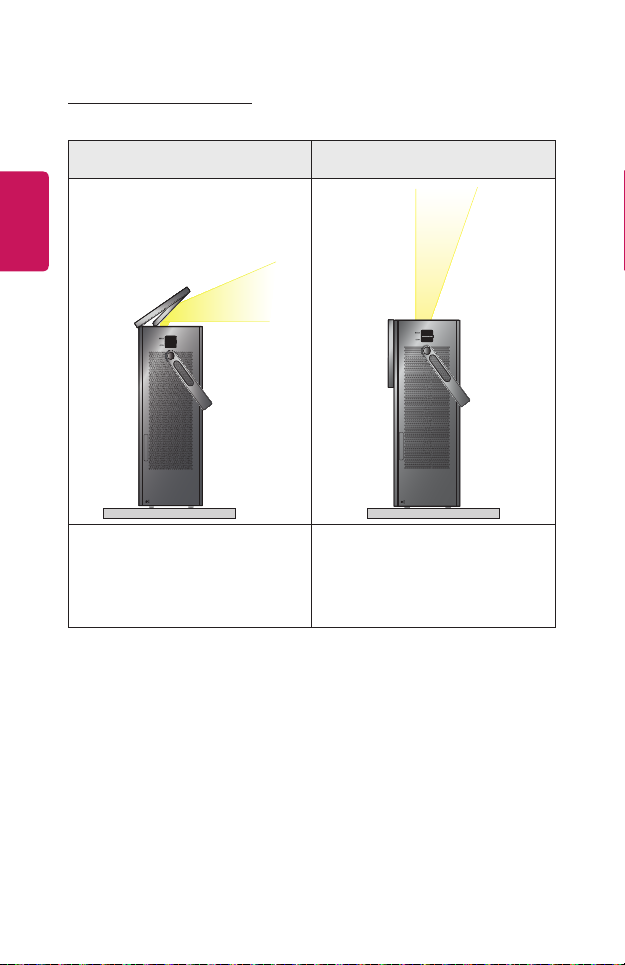
You can install the projector horizontally on the oor, as shown in the picture.
ENGLISH
Front projection Ceiling projection
See page 31 of “Mirror
Adjustment and Precautions” to
adjust the mirror and install the
projector horizontally on the oor, as
shown in the picture.
See page 33 of “Mirror
Adjustment and Precautions” to
adjust the mirror and install the
projector horizontally on the oor, as
shown in the picture.
Page 35
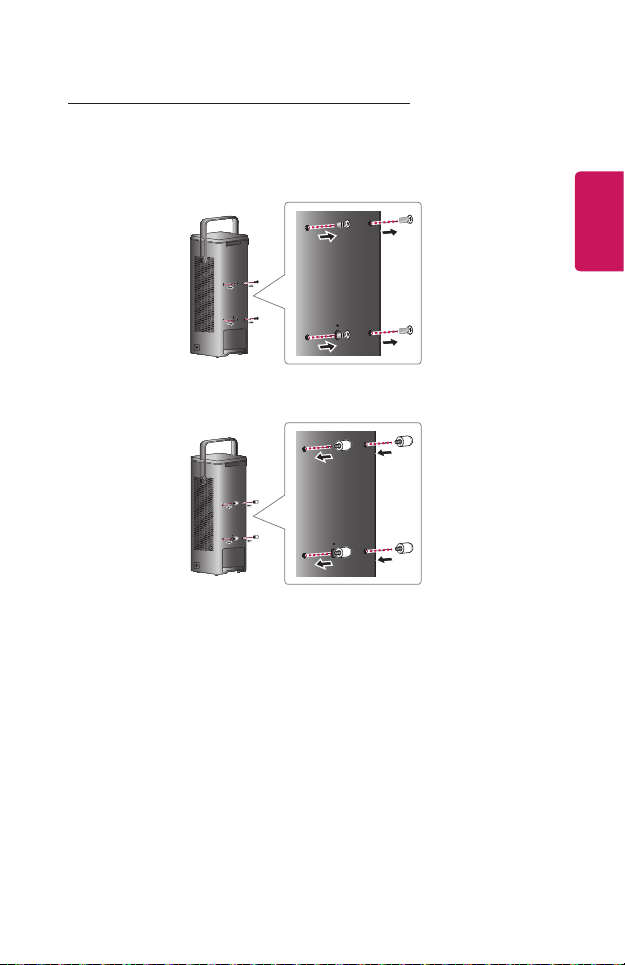
Table-Type Installation for Front Projection
You can install the projector horizontally on a table, as shown in the picture.
1 Remove the screws from the projector before installing the product on a
table.
2 Fasten the 4 table-type screws which are included with the projector.
35
ENGLISH
Page 36
36
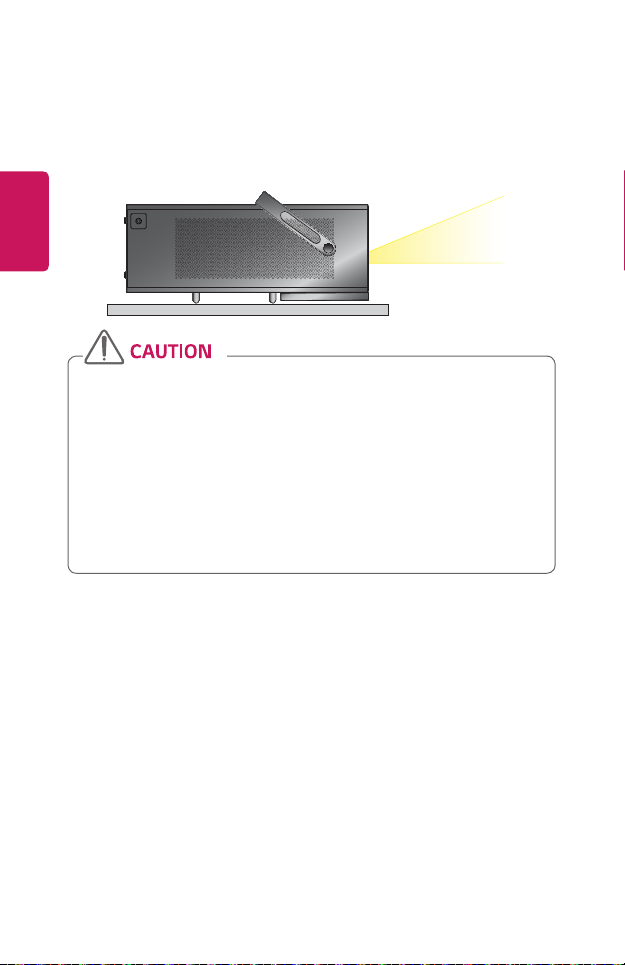
3 See page 33 of “Mirror Adjustment and Precautions” to adjust the mirror
and install the projector horizontally on a table, as shown in the picture.
You can adjust the screen angle up to 2 degrees by changing the height of
ENGLISH
the screws. Stand-Type installation is recommended.
•When the projector is installed as the Table-Type and placed upright on a
table, the projector may fall, which may cause damage to the product or
personal injury.
- It is recommended that the product is safely laid down on the table.
•If you use the product without fastening the table-type screws, scratches
may occur on the mirror case.
•The handle should be positioned upward.
- Otherwise, scratches may occur on the part of the product that is in
contact with the handle.
Page 37
Ceiling-Type Installation
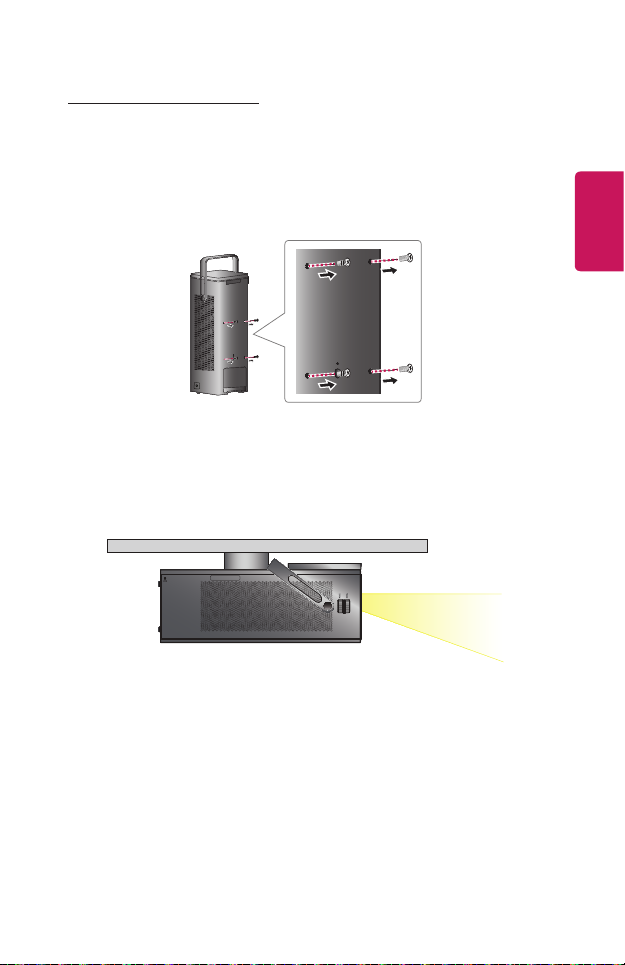
1 Remove the screws from the projector before installing the product on the
ceiling.
- When switching from table-type to ceiling-type installation, make sure
that all table-type screws are removed before re-installing the projector.
(See page 35.)
2 See page 33 of “Mirror Adjustment and Precautions” to adjust the mirror
and install the projector horizontally on the ceiling, as shown in the picture.
See the Ceiling Bracket Manual for more details regarding installation. (The
ceiling bracket necessary for ceiling-type installation must be purchased
separately.)
37
ENGLISH
Page 38
38
X/2 X/2
Y/2 Y/2
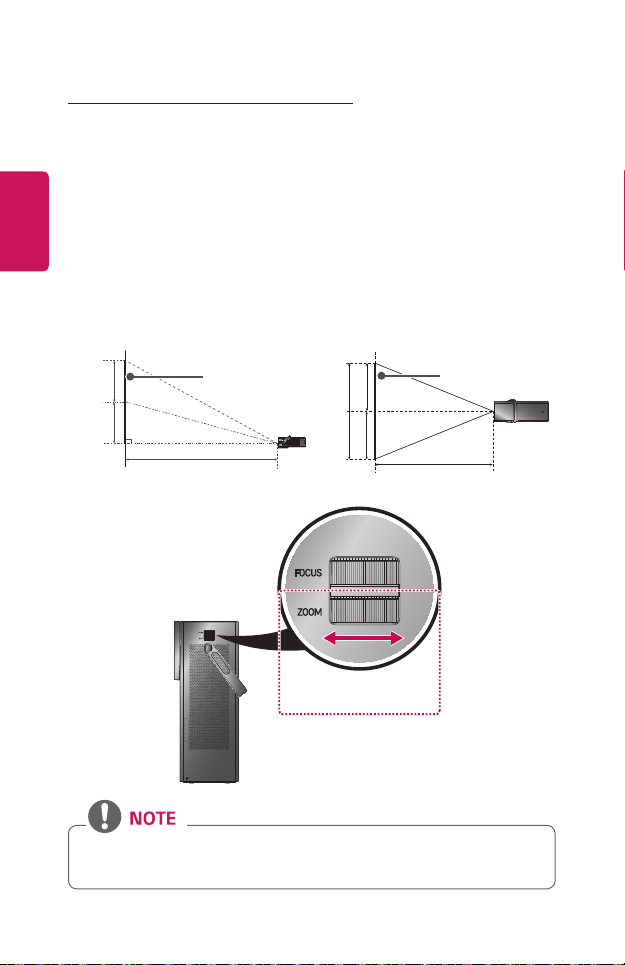
Projection Distance per Screen Size
1 Place the projector on a sturdy, level surface, together with the PC or audio/
video source.
2 Place the projector an appropriate distance away from the screen. The distance
ENGLISH
between the projector and the screen determines the actual size of the image.
3 Position the projector so that the lens is at a right angle to the screen. If the
projector is not at a right angle, the projected image will look distorted. To
correct the distortion, use the Keystone function.
4 Connect the power cord of the projector and the connected device to the wall
outlet.
Screen Height (X)
Ratio of upward projection: 100 %
Screen Width (Y)
Screen
Screen
Projection Distance (D)
• If the projected image looks distorted or bent, check to see if the screen is
installed properly.
Projection Distance (D)
[1.2 x Zoom][1.0 x Zoom]
Page 39
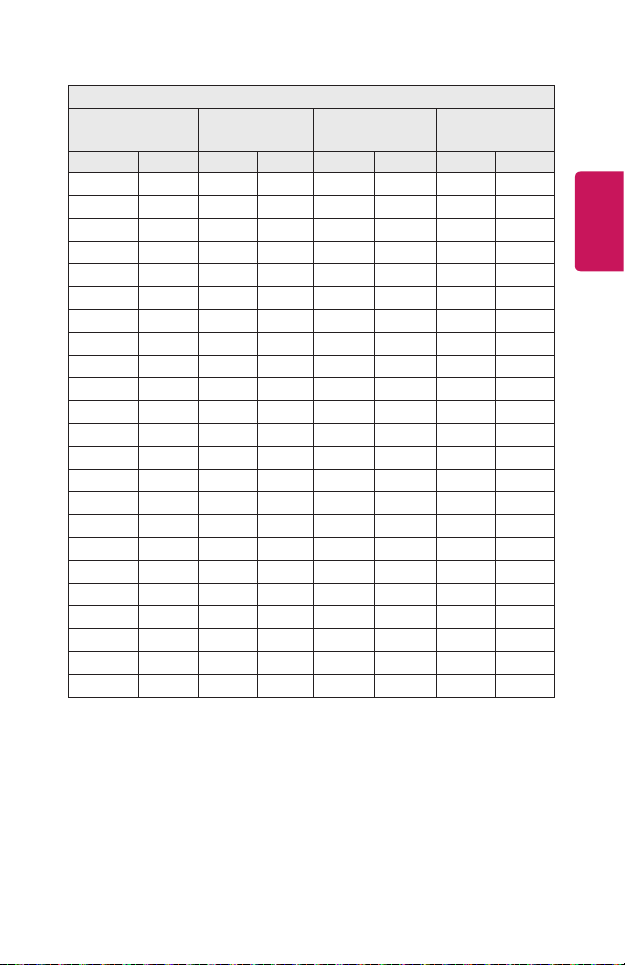
16:9 Aspect Ratio [1.2 x Zoom]
Screen Size Screen Width (Y) Screen Height (X)
(inches) (mm) (inches) (mm) (inches) (mm) (inches) (mm)
40 1016 34.8 886 19.6 498 45.1 1147
45 1143 39.2 996 22.0 560 50.9 1293
50 1270 43.5 1107 24.5 623 56.3 1432
55 1397 47.9 1218 26.9 685 62.2 1580
60 1524 52.2 1328 29.4 747 68.0 1728
65 1651 56.6 1439 31.8 809 73.7 1872
70 1778 61.0 1550 34.3 872 79.3 2016
75 1905 65.3 1660 36.7 934 85 2159
80 2032 69.7 1771 39.2 996 90.6 2303
85 2159 74.0 1882 41.6 1058 96.6 2454
90 2286 78.4 1992 44.1 1121 102.5 2606
95 2413 82.7 2103 46.5 1183 108.1 2746
100 2540 87.1 2214 49.0 1245 113.6 2886
105 2667 91.4 2324 51.4 1308 118.9 3022
110 2794 95.8 2435 53.9 1370 124.2 3157
115 2921 100.2 2546 56.3 1432 130.6 3319
120 3048 104.6 2657 58.8 1494 137.0 3480
125 3175 108.9 2767 61.2 1557 142.5 3621
130 3302 113.3 2878 63.7 1619 148.1 3762
135 3429 117.6 2989 66.1 1681 153.9 3910
140 3556 122.0 3099 68.6 1743 159.8 4059
145 3683 126.3 3210 71.1 1806 165.4 4202
150 3810 130.7 3321 73.5 1868 171.0 4345
• The figures in the above table may differ depending on the installation
environment.
Projection
Distance (D)
39
ENGLISH
Page 40
40
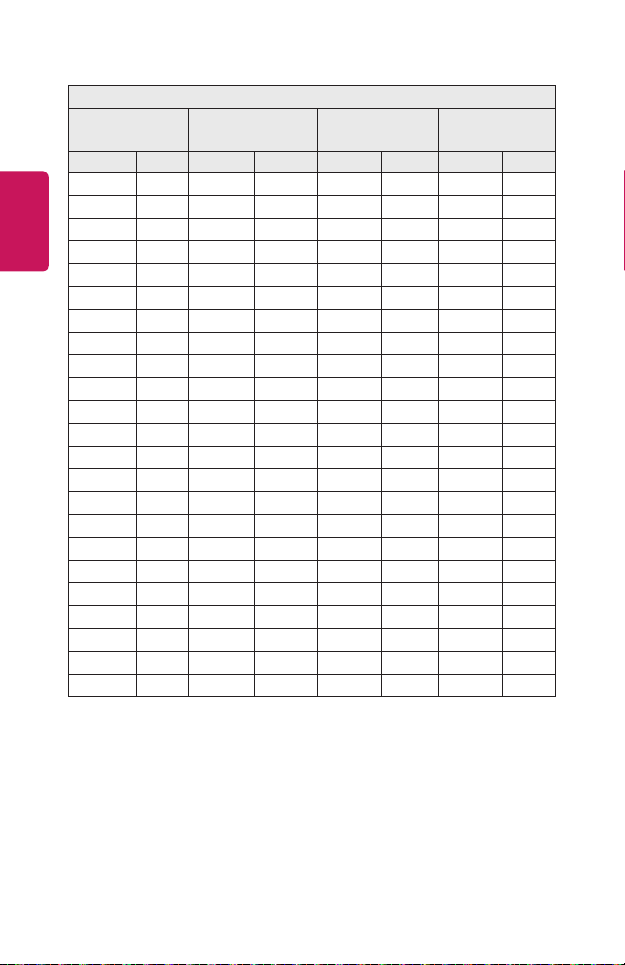
16:9 Aspect Ratio [1.0 x Zoom]
Screen Size Screen Width (Y) Screen Height (X)
ENGLISH
(inches) (mm) (inches) (mm) (inches) (mm) (inches) (mm)
33 847 29.0 738 16.3 415 45.1 1147
38 953 32.6 830 18.3 467 50.9 1293
42 1058 36.2 922 20.4 519 56.3 1432
46 1164 39.9 1015 22.4 571 62.2 1580
50 1270 43.5 1107 24.5 623 68.0 1728
54 1376 47.2 1199 26.5 675 73.7 1872
58 1482 50.8 1291 28.5 726 79.3 2016
63 1588 54.4 1384 30.6 778 85 2159
67 1693 58.1 1476 32.6 830 90.6 2303
71 1799 61.7 1568 34.7 882 96.6 2454
75 1905 65.3 1660 36.7 934 102.5 2606
79 2011 69.0 1753 38.8 986 108.1 2746
83 2117 72.6 1845 40.8 1038 113.6 2886
88 2223 76.2 1937 42.9 1090 118.9 3022
92 2328 79.8 2029 44.9 1141 124.2 3157
96 2434 83.5 2122 46.9 1193 130.6 3319
100 2540 87.1 2214 49.0 1245 137.0 3480
104 2646 90.7 2306 51.0 1297 142.5 3621
108 2752 94.4 2398 53.1 1349 148.1 3762
113 2858 98.0 2491 55.1 1401 153.9 3910
117 2963 101.6 2583 57.2 1453 159.8 4059
121 3069 105.3 2675 59.2 1505 165.4 4202
125 3175 108.9 2767 61.2 1557 171.0 4345
• The figures in the above table may differ depending on the installation
environment.
Projection
Distance (D)
Page 41
41
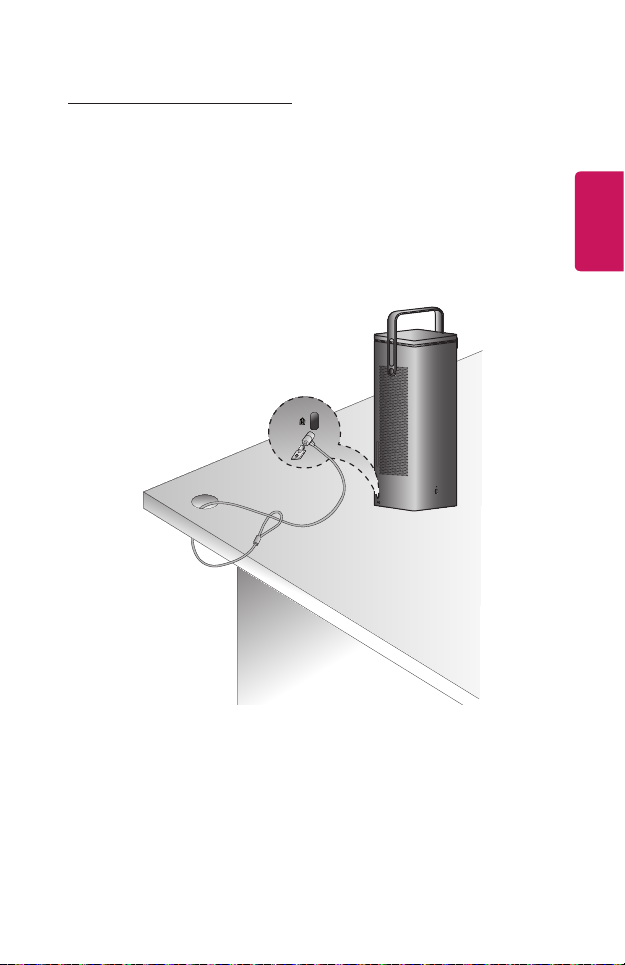
Kensington Security System
• This projector has a Kensington Security Standard connector as an anti-theft
mechanism. Connect a Kensington Security System cable as shown below.
• For more information on installation and use of the Kensington Security System,
refer to the user’s guide provided with the Kensington Security System.
• The Kensington Security System is an optional accessory.
• What is Kensington?
Kensington is a company that provides safety systems for laptops and other
electronic devices. Website: http://www.kensington.com
ENGLISH
Page 42
42
MAGIC REMOTE CONTROL
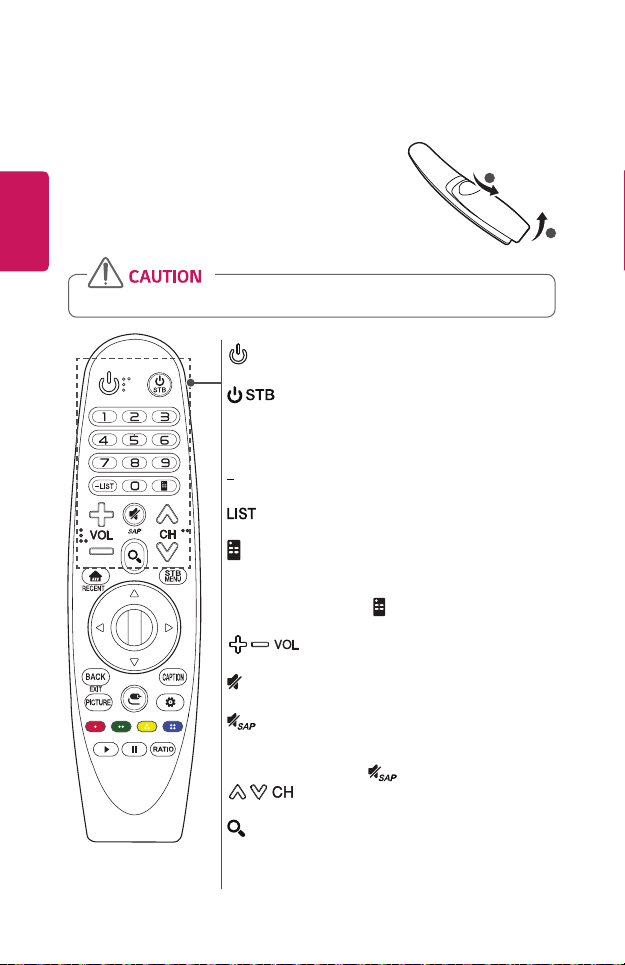
If the battery low message appears while using the
Projector, replace the batteries.
ENGLISH
As shown in the gure, press the top of the battery
cover and slide it down the cover. Insert two new and
identical batteries (1.5 V, AA type) with + and - poles
pointing in the correct direction in the remote control.
• Do not mix new batteries with old ones.
(POWER)
Turns the Projector on or off.
(STB POWER)
You can turn your set-top box on or off by adding the set-top box
to the universal remote control for your Projector.
Number buttons
Enters numbers.
(Dash)
Inserts a dash between numbers such as 2-1 and 2-2.
Accesses the saved channel list.
(Screen Remote)
Displays the Screen Remote.
- Accesses the Universal Control Menu in some regions.
- Pressing and holding the
displays the Accessibility menu.
1
2
(Screen Remote) button
Adjusts the volume level.
(MUTE)
Mutes all sounds.
*
Video descriptions function will be enabled.
- SAP (Secondary Audio Program) Feature can also be
enabled by pressing the
Scrolls through the saved channels.
(SEARCH)
Search for content such as channels, movies and other videos,
or perform a web search by entering your search terms in the
search box.
key.
Page 43
43
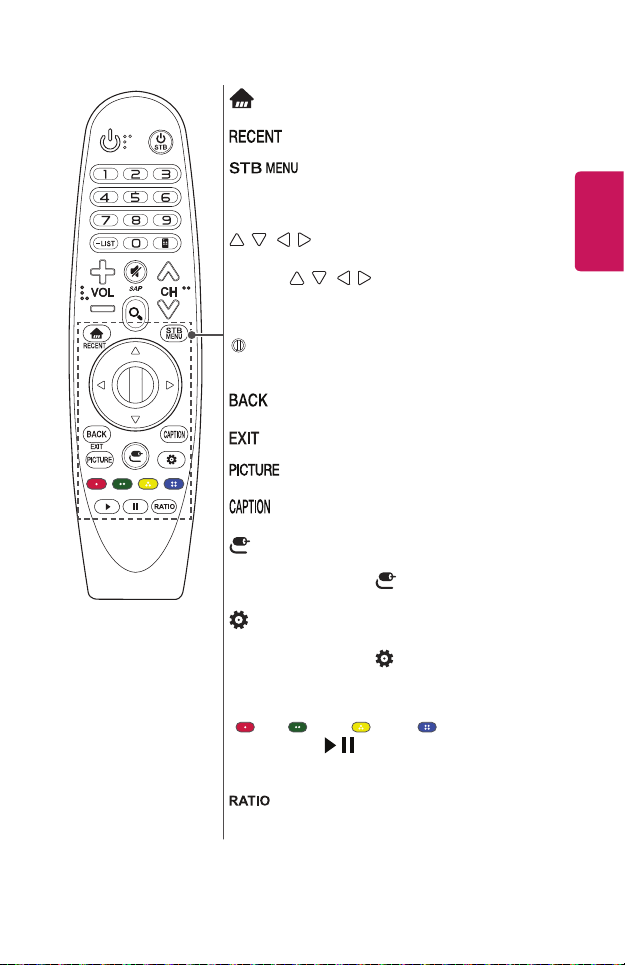
Accesses the Home menu.
*
Shows the previous history.
Displays the set-top box Home menu.
(When you are not watching with a set-top box:
the set-top box screen is displayed.)
Press the up, down, left or right button to scroll the menu.
If you press
the pointer will disappear from the screen and Magic Remote will
operate like a general remote control. To display the pointer on
the screen again, shake Magic Remote to the left and right.
Wheel (OK)
Press the center of the Wheel button to select a menu. You can
change channels by using the Wheel button.
Returns to the previous screen.
Clears all on-screen displays and returns to Projector viewing.
Changes the picture mode.
Activates or deactivates the subtitles.
(INPUT)
Changes the input source.
- Pressing and holding the (INPUT) button displays all
the lists of external inputs.
(Q. Settings)
Accesses the Quick Settings.
- Pressing and holding the (Q. Settings) button displays
the All Settings menu.
Colored buttons
These access special functions in some menus.
(
Control buttons (
You have access to premium content, video content and devices
that support SIMPLINK.
Changes the aspect ratio of the screen per pressing of the
button.
(Up/Down/Left/Right)
buttons while the pointer is in use,
*
: Red, : Green, : Yellow, : Blue)
, )
ENGLISH
* : To use the button, press and hold for more than 3 seconds.
Page 44
44
To Register the Magic Remote Control
To use the Magic Remote control, register it with your projector rst.
1 Put batteries into the Magic Remote and turn the Projector on.
ENGLISH
2 Point the Magic Remote at your projector and press the Wheel (OK) on
the remote control.
• If the projector fails to register the Magic Remote, try again after turning the
projector off and back on.
To Re-register the Magic Remote Control
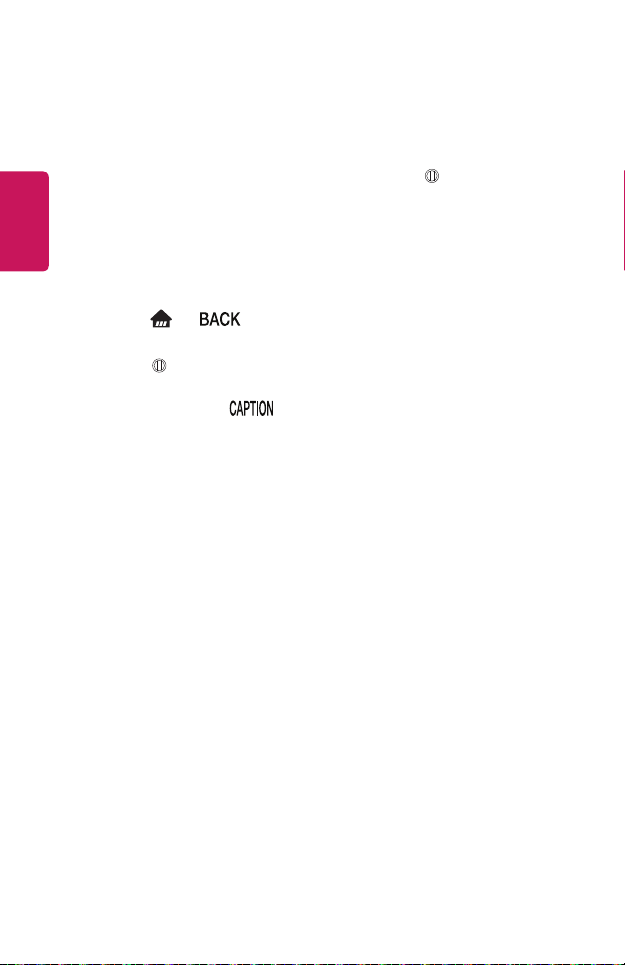
1 Press the and buttons at the same time, for ve seconds, to unpair
the Magic Remote with your projector.
2 Press the Wheel (OK) button towards the projector to re-register the
magic remote control.
• Pressing and holding the button will let you cancel and re-register Magic
Remote at once.
Page 45
Using the Magic Remote Control
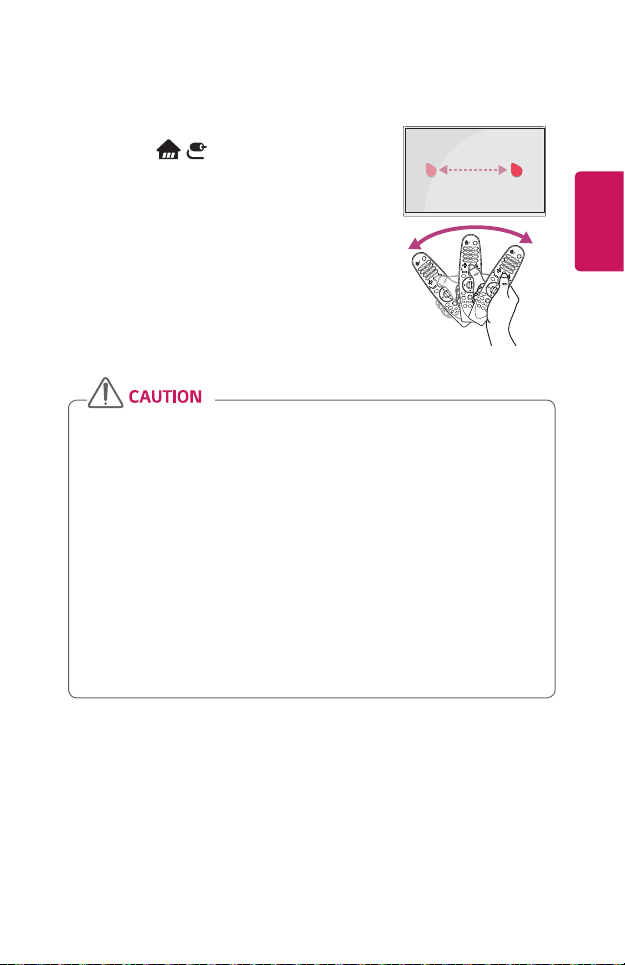
• Shake the Magic Remote slightly to the right and
left or press , (INPUT) buttons to make the
pointer appear on the screen.
• If the pointer has not been used for a certain period
of time or Magic Remote is placed on a flat surface,
then the pointer will disappear.
• If the pointer is not responding smoothly, you can
reset the pointer by moving it to the edge of the
screen.
• The Magic Remote depletes batteries faster than a
normal remote due to the additional features.
•Use the remote control within the specified range (within 10 m [32.8 feet]).
You may experience communication failures when using the device outside
the coverage area or if there are obstacles within the coverage area.
•You may experience communication failures depending on the accessories.
Devices such as a microwave oven and wireless LAN operate in the
same frequency band (2.4 GHz) as the Magic Remote. This may cause
communication failures.
•The Magic Remote may not work properly if a wireless router (AP) is within
1 m (3.2 feet) of the projector. Your wireless router should be more than 1
m (3.2 feet) away from the projector.
•Do not disassemble or heat the batteries.
•Do not drop the battery. Avoid extreme shocks to the battery.
•Inserting a battery in the wrong way may result in explosion.
45
ENGLISH
Page 46
46
USING THE PROJECTOR
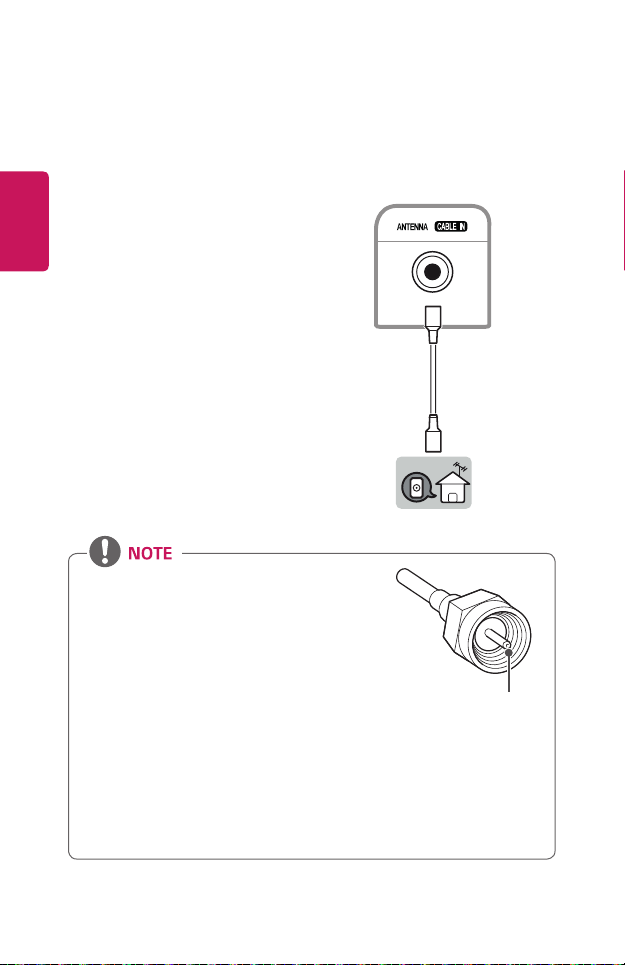
Connecting the Antenna or Cable
ENGLISH
To watch TV using an indoor/outdoor
antenna, connect a wall terminal and the
antenna port of the projector using an RF
cable (75Ω).
You can watch terrestrial or cable
(analog, digital) TV. (The RF cable is sold
separately.)
• Make sure not to bend the copper wire of the
RF cable (75 Ω). Turn the input jack to the right
to fasten it.
• Ensure you use a standard coaxial cable (75
Ω, sold separately) when connecting to the
projector input.
• For better image quality in locations where signal
strength is low, purchase and install a signal
amplifier (booster).
• A signal splitter is required if you want to use two or more projectors
through one antenna.
• If you have any problems when installing the antenna, please consult a
suitable retailer or the store where you purchased the antenna.
Copper wire
Page 47
47
Focus of the Screen Image
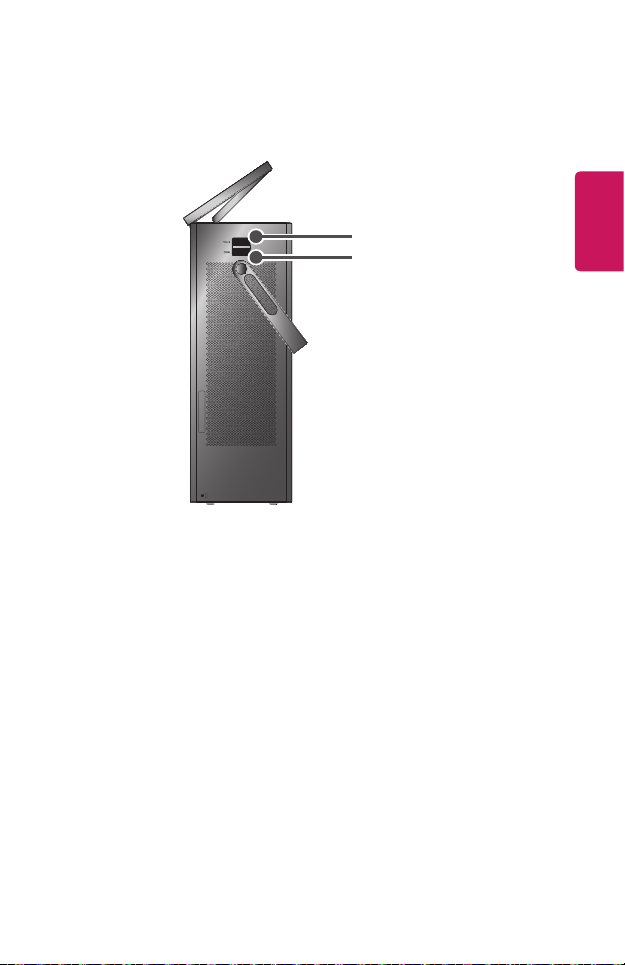
When an image appears on the screen, check if it is in focus and ts the screen
properly.
Focus Ring
Zoom Ring
• To bring images into focus, move the Focus Ring slowly left or right,
concentrating on the upper central part of the screen. Optimal focus is reached
when the left and right sides of the screen appear balanced.
• To adjust the size of the image, rotate the zoom ring. To move the screen image
upward/downward, adjust the height of the foot at the bottom of the projector.
ENGLISH
Page 48
48
Watching With the Projector
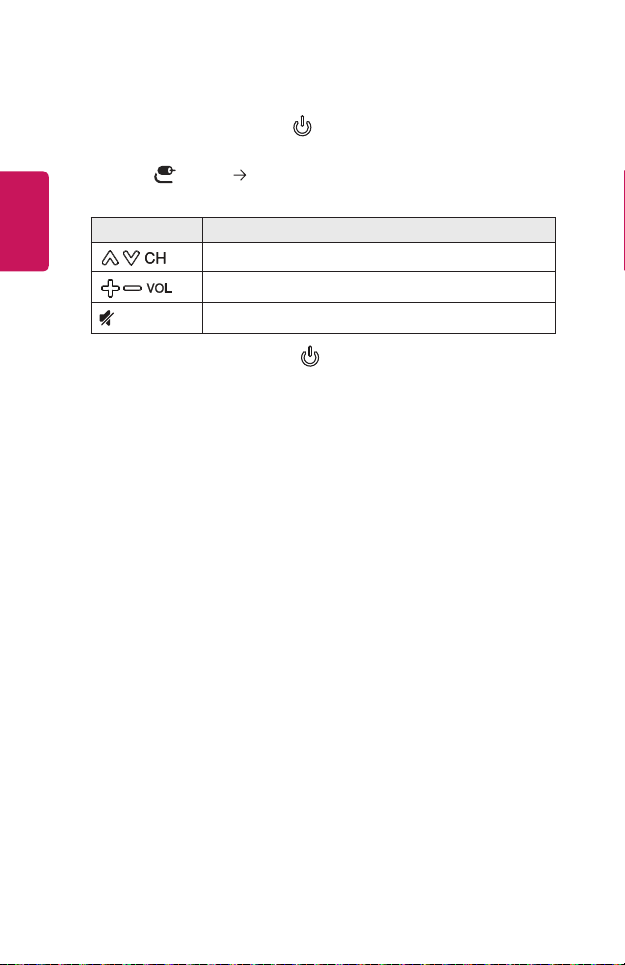
1 When in standby mode, press the (POWER) button to turn the projector
on.
2 Select the (INPUT) All Inputs and select the input signal you want.
ENGLISH
3 Control the projector using the following buttons while watching projector.
Button Description
Scrolls through the saved channels.
Adjusts the volume level.
(MUTE)
Mutes the sound of the projector.
4 To turn the projector off, press the (POWER) button.
Page 49
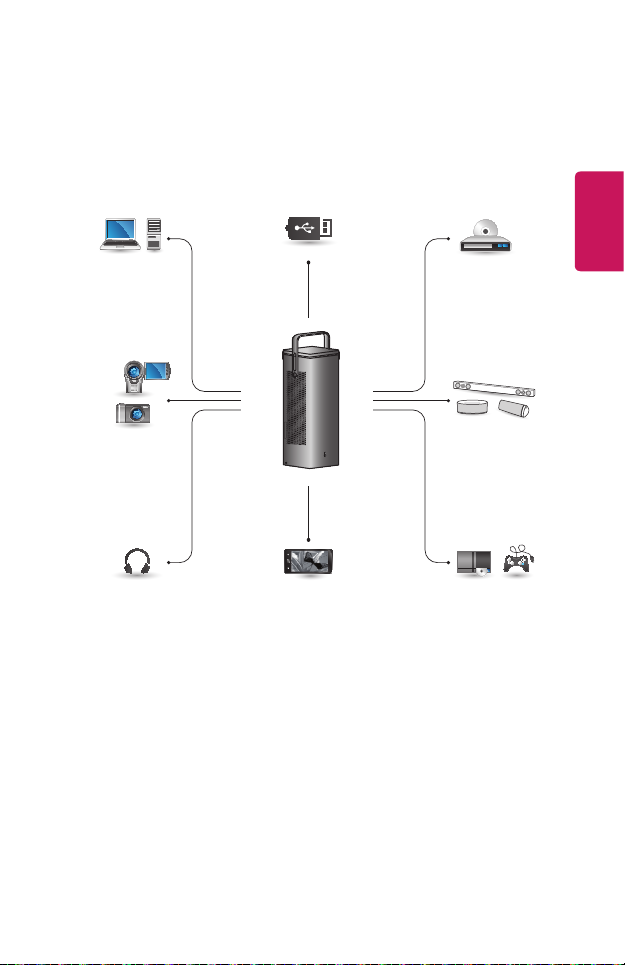
CONNECTING DEVICES
You can connect various external devices to the projector.
Computer/Notebook
USB
49
ENGLISH
DVD
Digital Device
Headphone
Mobile Phone
HDMI - Page 50, 51, 52
Headphone - Page 53
Digital Amp - Page 54
Smart device - Page 55
LG Audio Device
Games Console
Page 50
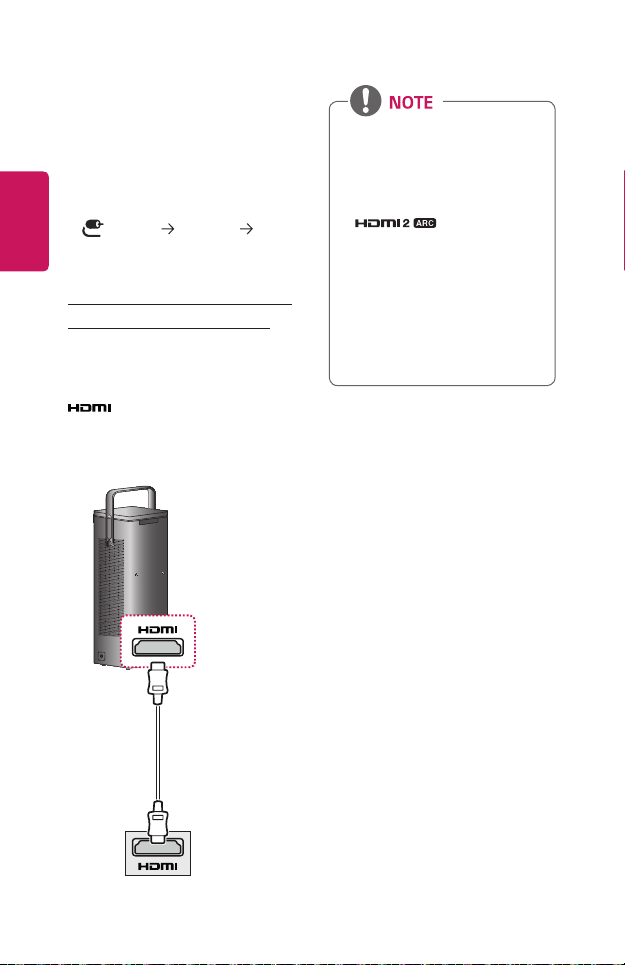
50
HDMI Connection
Connect an HD receiver, DVD, or
external devices to the projector and
select an appropriate input mode.
ENGLISH
You can connect with any HDMI input
port.
• (INPUT) All Inputs
HDMI1/HDMI2
Connecting to HD Receiver, DVD, or External Devices
With an HDMI cable, you can enjoy
high quality picture and sound.
Using a HDMI cable, connect the
port of the projector to the
HDMI output port of the device to
connect. Both video and audio are
output at the same time.
ARC (Audio Return Channel)
• External audio devices that
support SIMPLINK and ARC
must be connected using
port.
• When connected with a high-
speed HDMI
audio devices that support ARC
output or SPDIF work with the
SIMPLINK function without the
need for an additional optical
audio cable.
®
cable, external
Optional Extras
Page 51
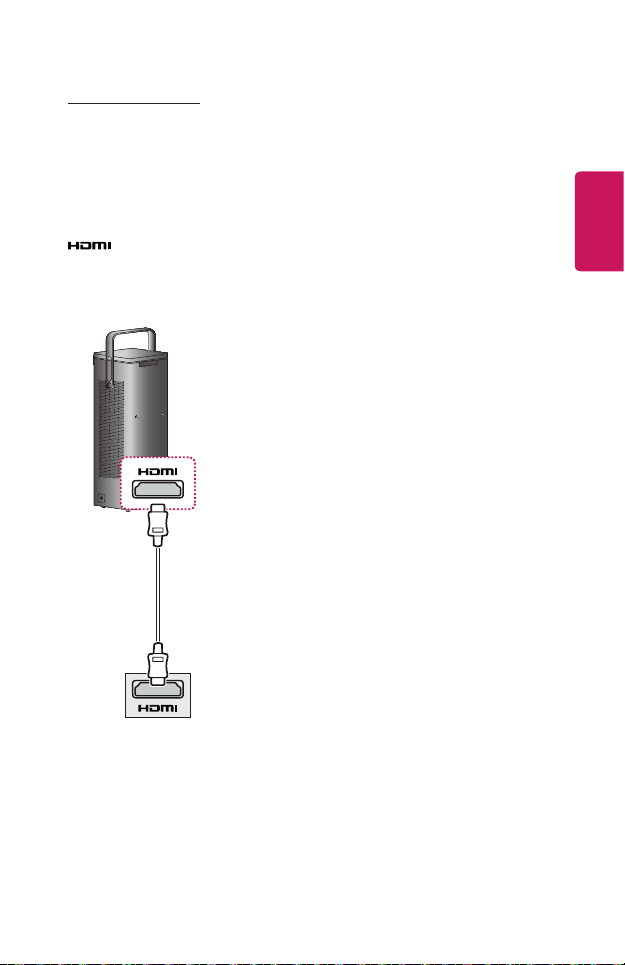
Connecting a PC
The projector supports Plug and Play.
Your PC will automatically detect
the projector and requires no driver
installation.
Using an HDMI cable, connect the
port of the projector to the
HDMI output port of your PC. Both
video and audio are output at the
same time.
Optional Extras
51
ENGLISH
Page 52
52
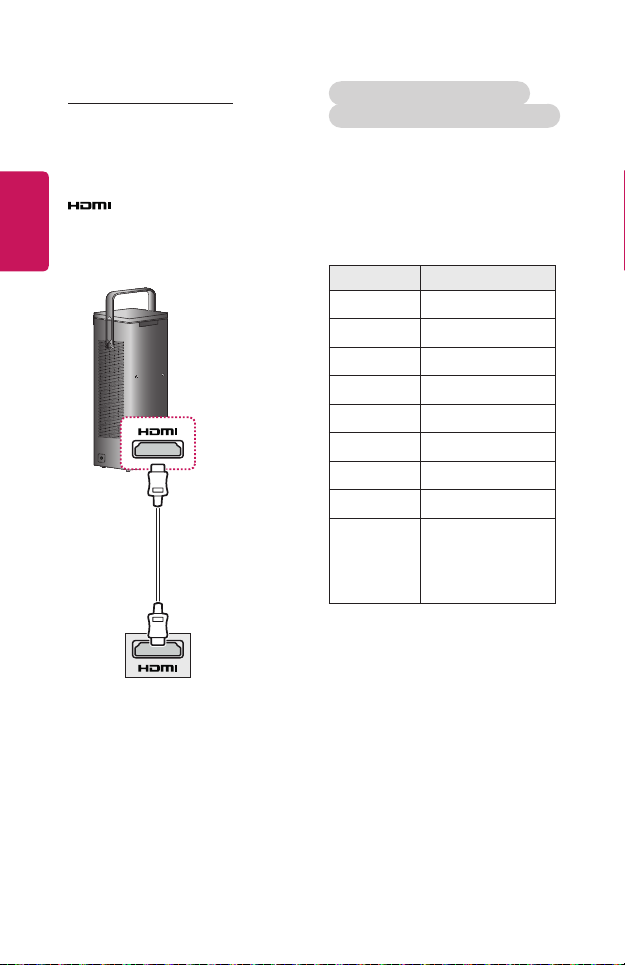
Connecting a Laptop
You can connect the projector to a
laptop to use various functions.
ENGLISH
Using an HDMI cable, connect the
port of the projector to the
HDMI output port of your laptop. Both
video and audio are output at the
same time.
Optional Extras
Examples of switching output
settings when connecting a laptop
The table below shows examples
of switching the output. For more
information, refer to the External
Output, Connecting to an External
Monitor, or similar sections of the
owner’s manual of your computer.
Brand Switching Output
NEC [Fn]+[F3]
Panasonic [Fn]+[F3]
Toshiba [Fn]+[F5]
IBM [Fn]+[F7]
Sony [Fn]+[F7]
Fujitsu
LG [Fn]+[F7]
Samsung [Fn]+[F4]
Macintosh
[Fn]+[F10]
Adjust the control
panel to enable
mirroring after
start-up.
Page 53
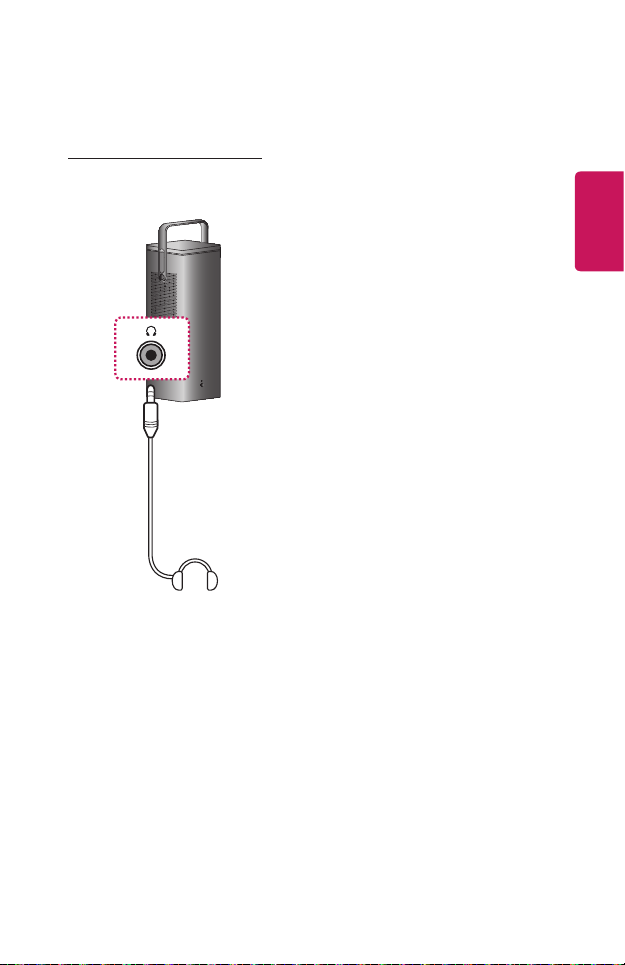
Connecting Headphones
Connecting Headphones
You can listen to the audio through a
headphone.
Not provided
53
ENGLISH
Page 54
54
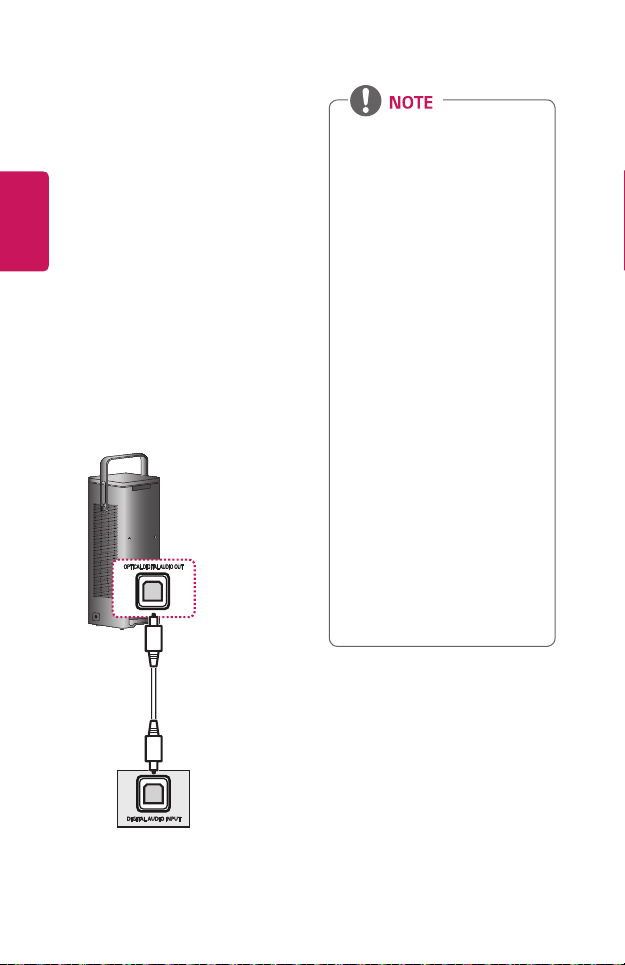
Connecting a Digital Amp
Using an optical cable, connect the
digital audio input port of a digital amp
ENGLISH
to the OPTICAL DIGITAL AUDIO
OUT port of the projector. The output
of an amp with a digital converter
must be set to the desired audio
format. When using a HDMI cable
to connect a home theater or when
connecting an optical output to an
external audio device, set Sound Out
to Audio Out (Optical/HDMI ARC).
If a projector, home theater, or the
speaker of an external audio device is
operating at the same time, there will
be an echo.
• Refer to the user manual of the
audio device to connect.
• When connecting this product
to other devices, make sure
to turn off and unplug all the
devices.
• The audio output of this
product has wide-ranging audio
bandwidth, so the receiver
volume must be adjusted
properly. Speakers can be
damaged by unexpected high
frequencies.
• Connecting the OPTICAL
DIGITAL AUDIO OUT port
of the projector to the digital
audio input port of a digital
amp and the audio input port
of the projector to the analog
audio output port of the digital
amp can cause sound oscillation
due to the closed loop. Remove
one of the two connections to
prevent this. (This also applies
to home theater devices.)
Optional Extras
Page 55
55
Connecting a smart device (smartphone, tablet, etc.)
• (INPUT) All Inputs HDMI1/HDMI2
• The picture may look different from the actual product.
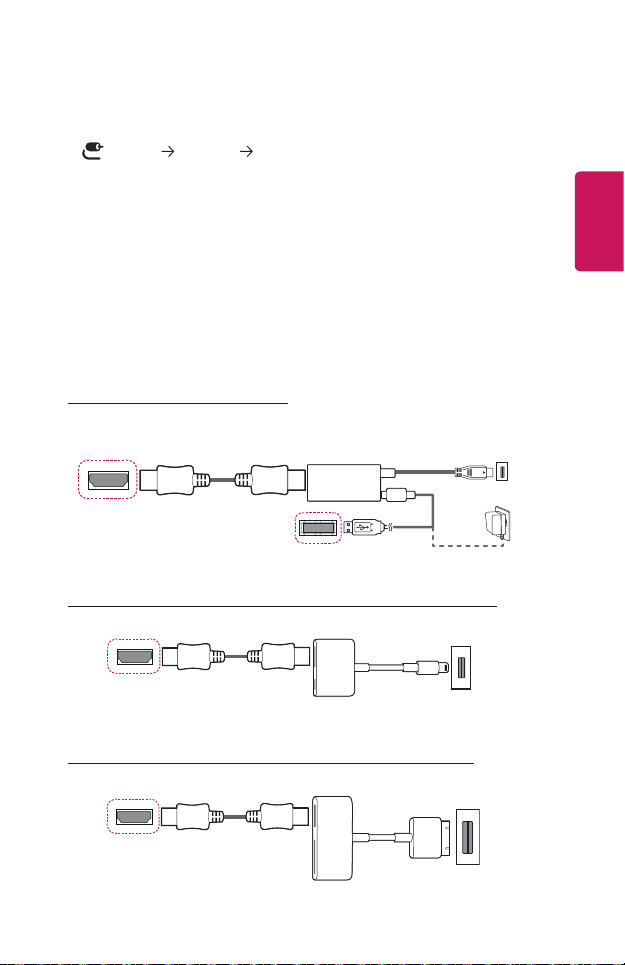
Connect a smart device to the projector using a cable1) and set the external input
of the projector to HDMI. The smart device screen will then be displayed through
the projector. You can connect with any HDMI input port.
For model-specic instructions regarding use of the wired connection, please check
with the smart device manufacturer.
Supported smart devices may change depending on the circumstances of each
manufacturer.
1) Examples of how to connect a cable to different smart devices (cable purchased
separately).
Slimport supported devices
Charging port of a
smart device
Charging
cable of
a smart
device
Charger
Projector HDMI
port
HDMI cable
Slimport adapter
Projector USB port
Apple Lightning Digital AV adapter supported devices
HDMI cable
Lightning Digital AV
adapter
ENGLISH
Projector HDMI port
Charging port of a
smart device
Apple 30-pin Digital AV adapter supported devices
HDMI cable
Projector HDMI port
Apple 30-pin
Digital AV
adapter
Charging port of
a smart device
Page 56

56
MAINTENANCE
Clean your Projector to keep it in optimal condition.
ENGLISH
Cleaning
Cleaning the Lens
• If there is any dust or staining on the lens surface, you must clean the lens.
• To remove dust or stains on the lens, use a compressed air duster, cotton swab,
or soft cloth to gently wipe the lens.
• Do not wipe the lens while the product is in use or immediately after it has been
turned off.
• When cleaning the lens, do not use a cleanser, automobile or industrial shiner,
abrasive, wax, benzene, alcohol, water, etc., as this may damage the product.
Cleaning the Projector Case
• To clean the projector case, first unplug the power cord.
• To remove dust or stains, use only a dry, lint-free, nonabrasive cloth to polish
the lens.
• Do not use alcohol, benzene, thinners, or other chemicals, which may damage
the case.
Page 57
SPECIFICATIONS
57
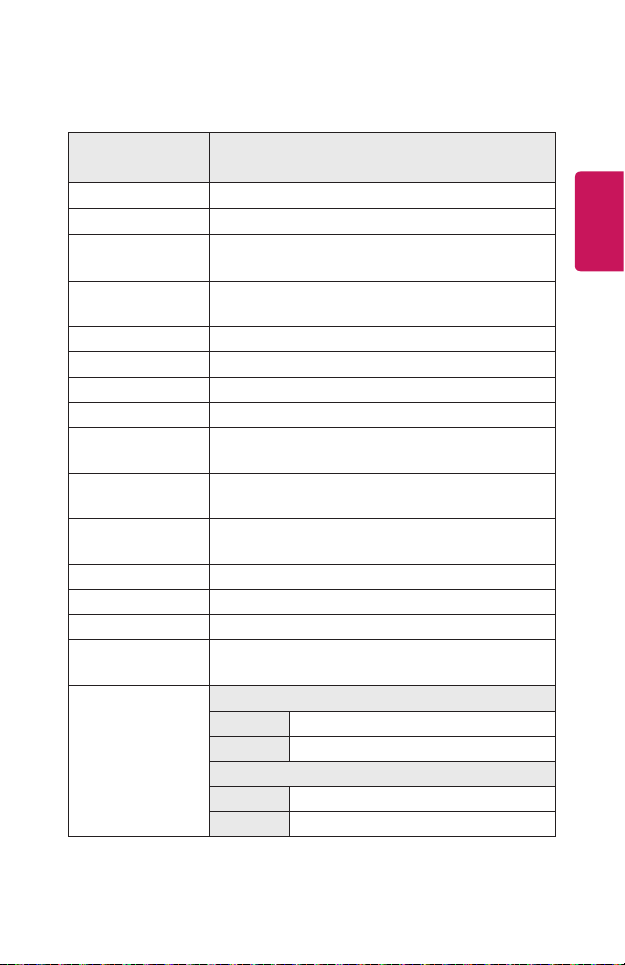
MODEL
Resolution (Pixel) 3840 (Horizontal) × 2160 (Vertical)
Aspect ratio 16:9 (Horizontal:Vertical)
Projection distance
(Screen size)
Ratio of upward
projection
Power AC 100 - 240 V, 50/60 Hz
Power consumption 250 W
Audio Output 7 W + 7 W
Television System ATSC / NTSC-M / 64 & 256 QAM
Program Coverage
External Antenna
Impedance
Height
Width 165 mm (6.4 inches)
Depth 165 mm (6.4 inches)
Weight 6.7 kg (14.7 lbs)
USB Device
Environment
Condition
• Contents in this manual may be changed without prior notice due to upgrade of
product functions.
1) 4K UHD resolution with 8.3 million discrete pixels projected by XPR (Expanded
Pixel Resolution) video processing.
1147 mm ~ 4345 mm (45.1 inches ~ 171.0 inches)
(1016 mm ~ 3810 mm [40 inches ~ 150 inches])
100 %
VHF 02 to 13, UHF 14 to 69, CATV 01 to 135,
DTV 02 to 69, CADTV 01 to 135
75 Ω
470 mm (18.5 inches) (without foot),
474 mm (18.6 inches) (with foot)
USB1 (USB 3.0): 5 V, 1.5 A (Max.)
USB2 (USB 2.0): 5 V, 0.5 A (Max.)
Temperature
Operation 0 °C to 40 °C (32 °F to 104 °F)
Storage -20 °C to 60 °C (-4 °F to 140 °F)
Relative Humidity
Operation 0 % to 80 %
Storage 0 % to 85 %
HU80KA (HU80KA-NA)
HU80KS (HU80KS-NA)
1)
ENGLISH
Page 58
58
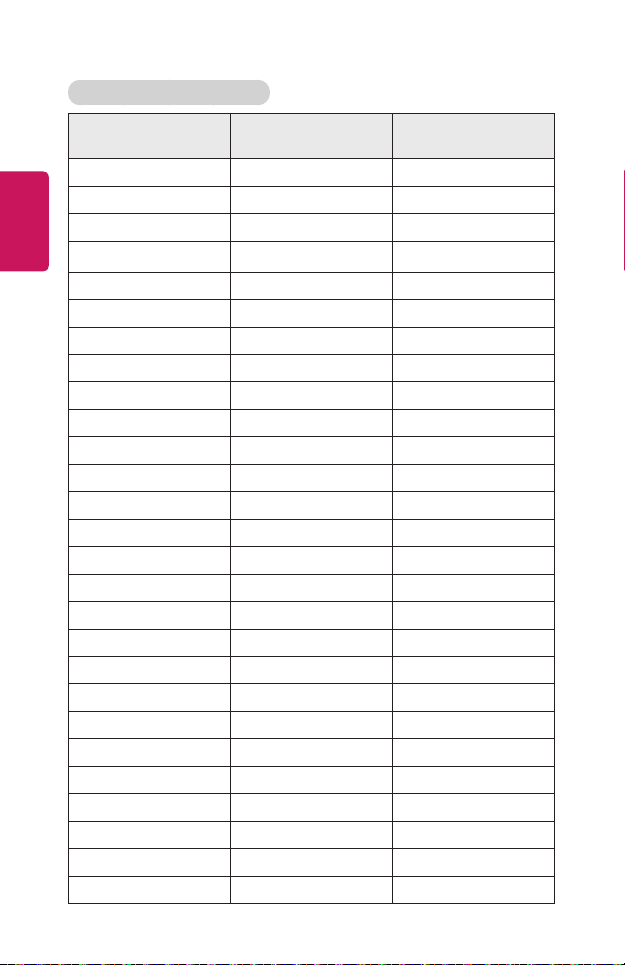
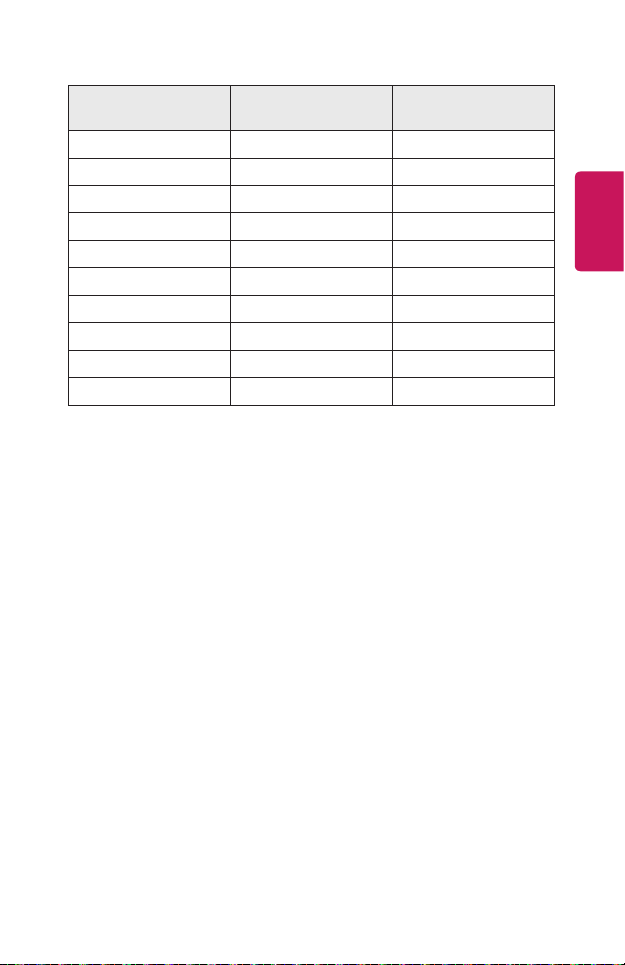
HDMI (DTV) Supported Mode
ENGLISH
Resolution
640 x 480 31.46 59.94
640 x 480 31.5 60.00
720 x 480 31.47 59.94
720 x 480 31.5 60.00
720 x 576 31.25 50.00
1280 x 720 44.96 59.94
1280 x 720 45 60.00
1280 x 720 37.5 50.00
1920 x 1080i 28.12 50.00
1920 x 1080i 33.72 59.94
1920 x 1080i 33.75 60.00
1920 x 1080p 26.97 23.97
1920 x 1080p 27.00 24.00
1920 x 1080p 33.71 29.97
1920 x 1080p 33.75 30.00
1920 x 1080p 56.25 50.00
1920 x 1080p 67.43 59.94
1920 x 1080p 67.5 60.00
1920 x 1080p 112.5 100
1920 x 1080p 134.86 119.88
1920 x 1080p 135.00 120
3840 x 2160p 53.95 23.98
3840 x 2160p 54 24.00
3840 x 2160p 56.25 25.00
3840 x 2160p 61.43 29.97
3840 x 2160p 67.5 30.00
3840 x 2160p 112.5 50.00
Horizontal Frequency
(kHz)
Vertical Frequency
(Hz)
Page 59
59
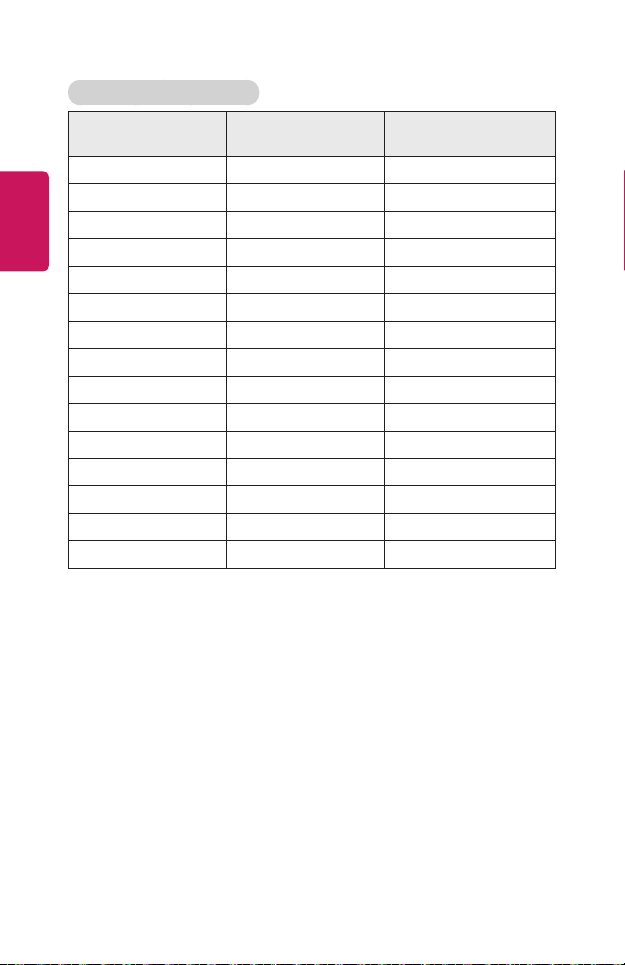
Resolution
3840 x 2160p 134.86 59.94
3840 x 2160p 135 60.00
4096 x 2160p 53.95 23.98
4096 x 2160p 54 24.00
4096 x 2160 56.25 25.00
4096 x 2160 61.43 29.97
4096 x 2160 67.5 30.00
4096 x 2160 112.5 50.00
4096 x 2160 134.86 59.94
4096 x 2160 135 60.00
Horizontal Frequency
(kHz)
Vertical Frequency
(Hz)
ENGLISH
Page 60
60
HDMI (PC) Supported mode
Resolution
ENGLISH
640 x 350 31.46 70.09
720 x 400 31.46 70.08
640 x 480 31.46 59.94
800 x 600 37.87 60.31
1024 x 768 48.36 60.00
1360 x 768 47.71 60.01
1152 x 864 54.34 60.05
1280 x 1024 63.98 60.02
1920 x 1080 67.5 60
1920 x 1080 135 120
3840 x 2160 54 24.00
3840 x 2160 56.25 25.00
3840 x 2160 67.5 30.00
4096 x 2160 53.95 23.97
4096 x 2160 54 24
• If an invalid signal is input into the projector, it will not be displayed properly on
the screen or a message such as No Signal or Invalid Format will be displayed.
• The projector supports the DDC1/2B type as the Plug and Play function (Auto-
recognition of PC monitor).
• 3840 x 2160 is recommended as the best picture quality in the PC mode.
Horizontal Frequency
(kHz)
Vertical Frequency
(Hz)
Page 61

Open Source Software Notice Information
61
To obtain the source code under GPL, LGPL, MPL, and other open source licenses,
that is contained in this product, please visit http://opensource.lge.com.
In addition to the source code, all referred license terms, warranty disclaimers and
copyright notices are available for download.
LG Electronics will also provide open source code to you on CD-ROM for a charge
covering the cost of performing such distribution (such as the cost of media,
shipping, and handling) upon email request to [email protected].
This offer is valid for a period of three years after our last shipment of this product.
This offer is valid to anyone in receipt of this information.
ENGLISH
Page 62
62
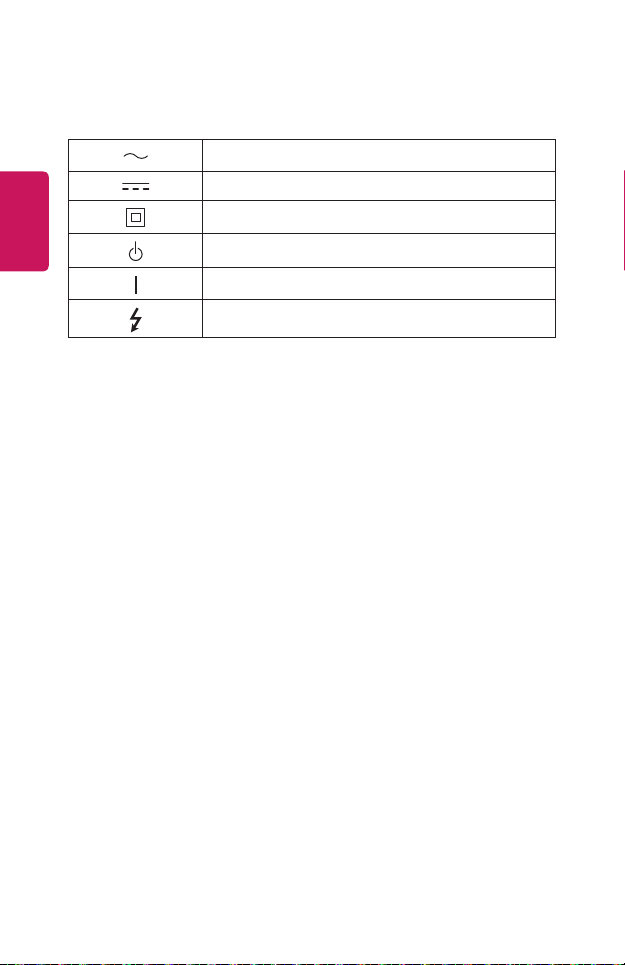
SYMBOLS
ENGLISH
Refers to alternating current (AC).
Refers to direct current (DC).
Refers to class II equipment.
Refers to stand-by.
Refers to “ON” (power).
Refers to dangerous voltage.
Page 63

Page 64

ABOUT LG PROJECTOR
Image shown may differ from your projector.
Your projector’s OSD (On Screen Display) may differ slightly from that shown in this
manual.
Green: the buttons and the text to be displayed on the projector screen.
P/NO : SAC37813513 (1903-REV01)
Copyright © 2018 LG Electronics Inc. All Rights Reserved.
Page 65

2
CONTENTS
ABOUT LG PROJECTOR 4
ENGLISH
Home Tutorial 4
- Using the Home feature of the
LG Projector 4
Prepare Live TV 8
- Watching TV broadcasting 8
Network Setting 9
- Network Setting 9
HOW TO OPERATE
PROJECTOR 11
Using the Screen Remote 11
Setting Universal Control 13
SIMPLINK (HDMI-CEC) 14
- Using SIMPLINK 14
Using the LG TV Plus App 16
Magic Mobile Connection 18
- Using Magic Mobile Connection
18
Using a Keyboard and Mouse 19
- Using a USB Wired/Wireless
Mouse 19
- Using a USB Wired/Wireless
Keyboard 19
Using a Gamepad 20
ENJOY LIVE TV 21
Live Menu 21
- Using Live Menu 21
My Channels 23
- Using My Channels 23
Guide 24
- Viewing Guide 24
Checking Program Info 26
- Viewing Program Information 26
Using MAGIC LINK 28
Using Advanced Broadcast
Settings 29
HOW TO USE VARIETY OF
CONTENTS 30
LG Content Store 30
Creating Wish List 31
- Using My Content 31
Account Creating 32
- Creating LG Account 32
Account Management 33
- Managing your LG Account 33
Search Content 34
- Search 34
- Searching for Content 34
Use App & Contents 35
- Installing Apps 35
Watching VOD Content 36
Page 66

3
PLAY OTHER DEVICE FILES 37
Photo & Video 37
- Viewing Photos and Videos 37
- Photo Player 38
- Video Player 40
- Supported Video Files 42
- Cautions for Video Playback 44
Music 45
- Playing Music 45
- Using the Music Player 46
File Viewer 49
- Viewing Files 49
- Browsing File Viewer 50
Connecting USB 52
- Tips for Using a USB storage
device 53
Share Smart Phone 54
- Content Share with Smartphone
54
View Smart Phone 56
- To see the Mobile Device's
screen on the projector 56
Share PC 57
- What Is Content Share? 57
View PC 60
- To see the PC screen on the
projector 60
BENEFITS OF SMART
PROJECTOR 61
Zooming in the Projector Display 61
Zoom Recording 63
- Running Zoom Recording 63
Using My Starter 65
Enjoying Internet 67
- Using the Web Browser 67
Notifications 70
- Using Notifications 70
TOUR LIST OF SETTINGS 71
Quick Settings 71
- To use Setting function quickly
71
Picture Settings 72
Sound Settings 80
Channels Settings 87
Network 91
General 93
Safety Settings 101
Accessibility 104
TO UPDATE SOFTWARE 106
TROUBLESHOOTING 107
Abnormal Operation 107
Screen Problems 108
Sound Problems 110
PC Connection Problems 112
Photo & Video Movie Playback
Problems 113
Network Connection Problems 115
LG Account Problems 117
Contents Problems 118
Internet Browser Problems 118
ENGLISH
Page 67
4
ABOUT LG PROJECTOR
Home Tutorial
ENGLISH
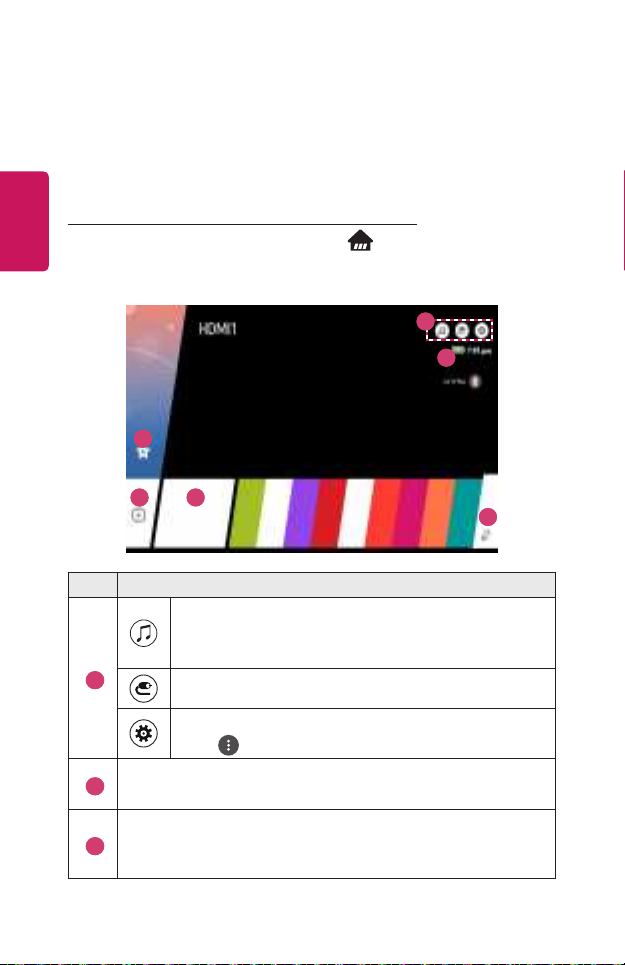
Using the Home feature of the LG Projector
You can open the Home screen by pressing the button on your remote
control. You can combine frequently used apps on a single screen and use
whichever you want at any time.
3
1
2
4 5
Description
You can use your projector’s other features while listening to
music.
• This feature is available on certain models only.
1
2
3
You can switch to another input or change your settings.
You can easily change the settings of your projector.
Select for advanced setup.
Displays the remaining battery life.
• This feature is available on certain models only.
Add content you like to use, easily and quickly. (This feature is not
supported in some countries. When you select the feature, you will be
directed to the LG Content Store.)
6
Page 68
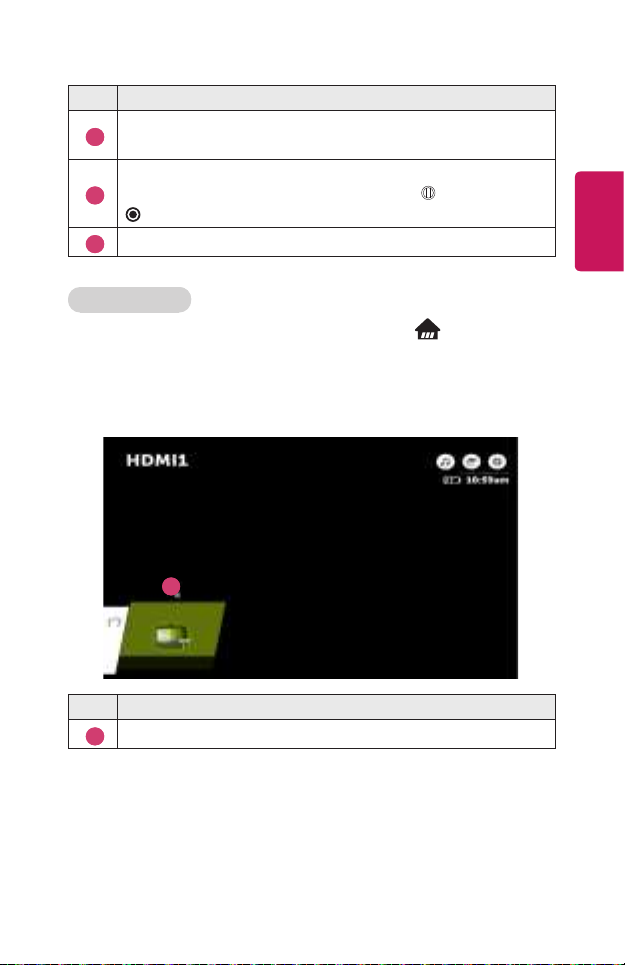
Description
By adding channels you like, you can check channel information and
4
watch your desired channel easily and quickly.
This is a list of recently used apps. To access the list of recently used
apps, select this item and then press and hold the Wheel (OK) or
5
OK button. You can view all the apps you used recently in the list.
You can run, move, and delete all the apps installed on your projector.
6
Using Recent List
To access the list of recently used apps, press and hold the button on your
remote control, or press and hold a recently used item on the Home screen. You
can run or exit all the apps you’ve used recently.
• The On Screen Display (OSD) of the projector may differ depending on the
model.
1
5
ENGLISH
1
Description
Exit the app.
Page 69
6
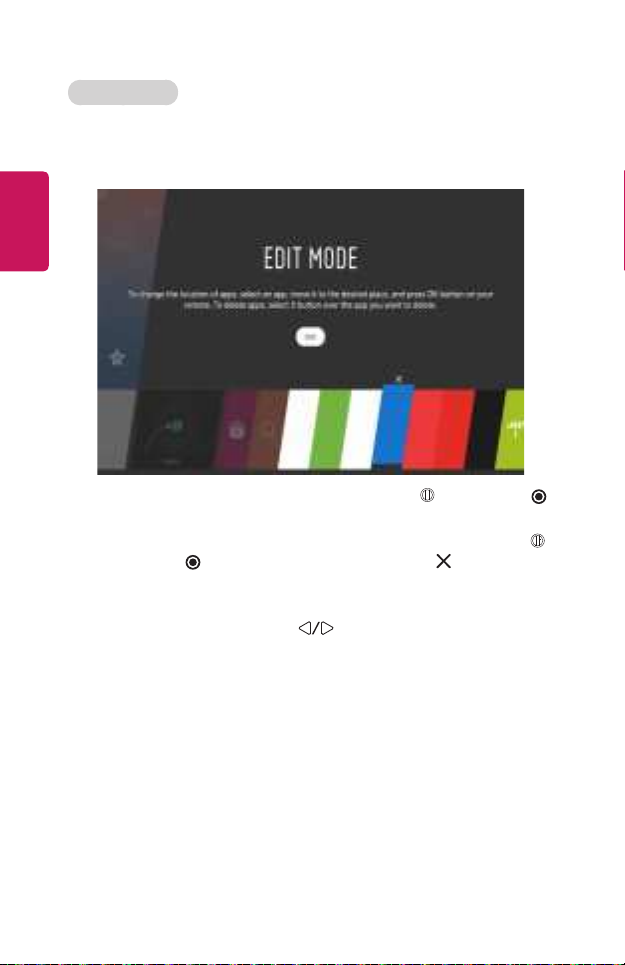
Managing Apps
You can view a list of all apps installed on your projector, change their positions, or
delete them.
• Some apps cannot be edited.
ENGLISH
1 Select the app you want to edit, and press and hold the Wheel (OK) or
OK button on the Remote Control. This will activate the app edit mode.
2 To move the app to your desired position, go to the position and press the
Wheel (OK) or OK button. To delete an app, select the above the app.
• You can move and delete as many apps as you wish before exiting the edit
mode.
• You can also move apps with the buttons on your remote control.
3 When you have completed the edit, click DONE to exit the app edit mode.
Page 70
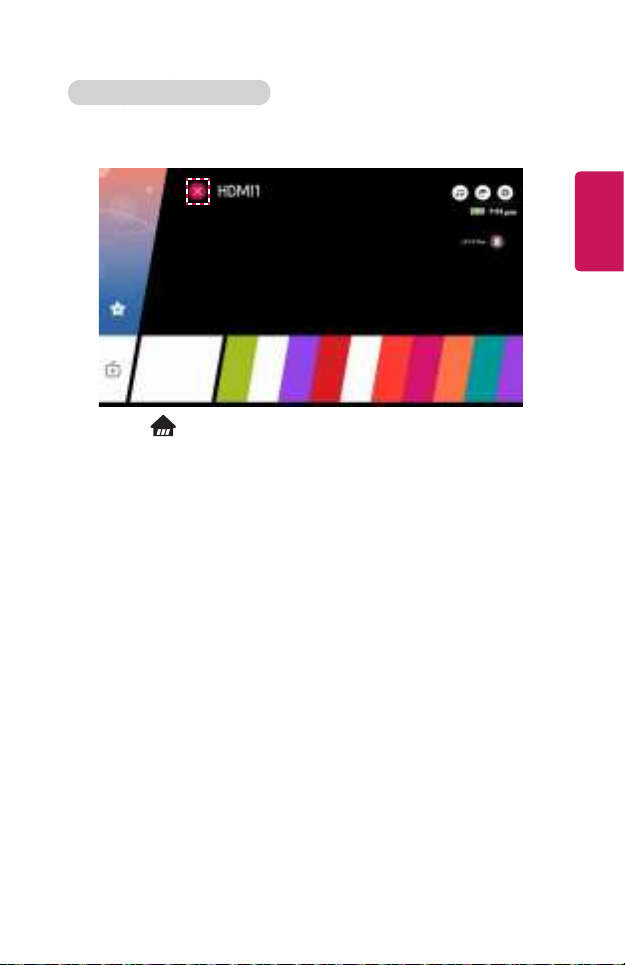
Stopping the current function
• The On Screen Display (OSD) of the projector may differ depending on the
model.
1 Press the button on the remote control.
2 Select the application name at the top left corner of the screen by the Remote
Control to display the Close icon.
3 Select the Close icon displayed next to the application name to quit the
function in use.
7
ENGLISH
Page 71

8
Prepare Live TV
Watching TV broadcasting
ENGLISH
1 Connect the broadcast antenna/cable to the projector. You may also connect
a piece of equipment that can receive broadcasting such as a set-top box
instead of the antenna/cable. Press the button on the remote control. To
see the details, select Set-Top Box from the device list that is displayed when
operating the Device Connector.
2 Start the (Q. Settings) Channels Channel Tuning Auto
Tuning. Finds and adds only channels being broadcast.
Page 72
Network Setting
Network Setting
If you congure settings for the network, you can use various services such as
online contents and applications.
Setting a Wired Network
1 Connect the LAN port of the projector and the router using a LAN cable. The
router should be connected to the Internet beforehand.
2 Press the (Q. Settings) button on the remote control and select
Network Wired Connection (Ethernet). This will start the wired network
connection.
• If the router supports DHCP, the projector is automatically connected to the
network when you connect the projector to the network with a LAN cable.
Setting a Wireless Network
1 Turn on the power of the router connected to the Internet.
2 Press the (Q. Settings) button on the remote control and select
Network Wi-Fi Connection. This will start the Wireless network
connection.
3 When the network search is complete, the list of networks available for
connection is shown.
4 Select a network to connect. If your Wireless Router is password protected,
enter the password congured for the router.
9
ENGLISH
Page 73

10
Network Setting Warnings
• Use standard LAN cable (connect to Cat7 or higher with RJ45 connector, 10
Base-T, or 100 Base TX LAN port).
• Resetting the modem may fix some network connection problems. Turn the
ENGLISH
power OFF, disconnect and reconnect it, and then turn the power on to solve
the problem.
• LG Electronics is not responsible for any network connection problems or any
faults, malfunctions, or errors caused by network connection.
• The network connection may not work properly because of network settings or
the Internet service provider.
• DSL service must use a DSL modem; and cable service must use a cable modem.
Since only a limited number of network connections may be available, projector
network setting may not be used depending on the contract with Internet
service provider. (If the contract does not allow more than one device per line,
only the already-connected PC may be used.)
• A wireless network can experience interference from other devices that use
the 2.4 GHz frequency (wireless phone, Bluetooth device, or microwave oven).
Although interference can also happen when using the 5 GHz frequency, it is
less likely to occur.
• The wireless environment can make wireless network service run slowly.
• Failure to turn off all local home networks may cause excessive traffic on some
devices.
• The access point device must support wireless connections and wireless
connection feature must be enabled on the device to have AP (access point)
connection. Contact the service provider for availability of wireless connections
on the access point.
• Check SSID and security settings of the AP. Refer to the appropriate
documentation for SSID and security settings of the AP.
• Invalid settings of network devices (wired/wireless line sharer, hub) can cause
the projector to operate slowly or not operate properly. Install the devices
correctly according to the appropriate manual and network.
• The connection method may differ depending on the AP manufacturer.
Page 74
HOW TO OPERATE PROJECTOR
11
Using the Screen Remote
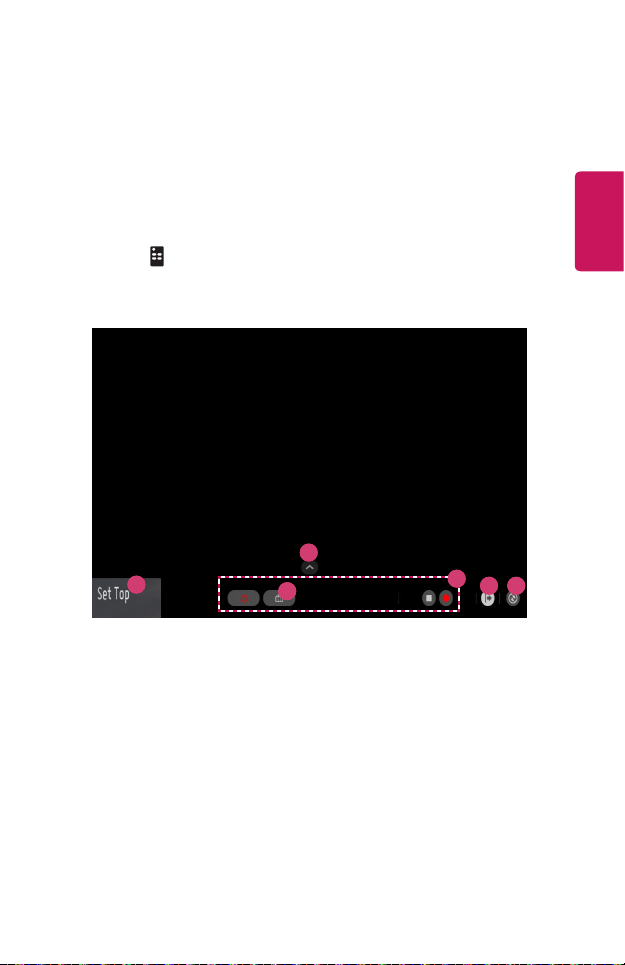
You can control external devices connected to your projector by using the Screen
Remote displayed on your projector screen.
• This feature is available on certain models only.
1 Press the button on the Magic Remote.
2 Using the Magic Remote, select your desired button on the Screen Remote
displayed on your projector screen.
6
1
3
2
4 5
ENGLISH
Page 75
12
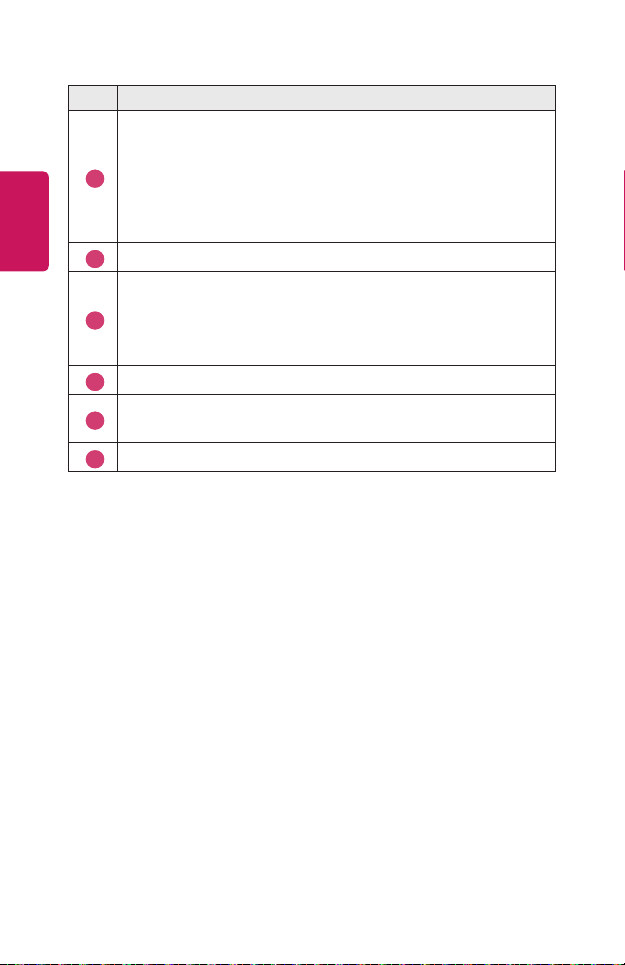
Description
Congure Set Up Universal Control for external devices connected to
your projector.
ENGLISH
When you select a device, the Screen Remote turns into the remote
1
control for the device.
If a sound bar is connected, the Screen Remote can be used as a
remote control for the sound bar.
The buttons suitable for the selected device appear.
2
You can capture your projector screen.
• This feature is available on certain models only.
3
• You can view/delete screen-captured images in the Photo & Video
app.
You will see more remote control buttons.
4
You can start the Device Connector app. You can set the universal
5
remote control.
You can change the position of the screen remote control.
6
• This feature can only be used with the Magic Remote.
• You can purchase the Magic Remote separately if it is not provided.
• The types of buttons appearing on the Screen Remote vary, depending on the
region and the type of connected device.
• Some features and services may not be provided depending on models or
regions.
Page 76
13
Setting Universal Control
You can control devices such as Set-Top Box, Blu-ray Player, or Home Theater
using by Magic Remote or Slim Remote.
• This feature is available on certain models only.
1 Check that the device you want to set is connected to your projector.
2 Press the button on the remote control and select at the top right.
(Press the button on the remote control.)
3 Select All Inputs and go to INPUTS.
4 Select the input mode that the device is connected to in INPUTS.
5 If you press Set Up Universal Control, you can set up the Universal Control.
Follow the instructions on the screen to nish the setup.
• If you want to change or cancel Universal Control Settings, go to All
Inputs and select Edit Universal Control.
• You can also set the Universal Control in Device Connector.
• You can use this only with the Magic Remote or Slim Remote. (The provided
remote control differ depending upon model.)
• You can purchase the Magic Remote separately if it is not provided.
• This feature is available in certain countries only.
• When changing the settings, check that the device to be changed is turned on.
• You can set one device per type.
• If you connect to a network before setting the Universal Control, the latest
update for the supported manufacturer list becomes available.
• Some buttons may not work depending upon the model of the external device.
• Place the device near the projector for seamless operation.
• If there is an obstacle in front of the device, it may not be able to receive the
signal properly. If the device is in a drawer, open the drawer.
ENGLISH
Page 77

14
SIMPLINK (HDMI-CEC)
Using SIMPLINK
You can conveniently control and use various multimedia devices connected
ENGLISH
through HDMI with the projector’s remote control.
1 Connect the SIMPLINK HDMI Output port to the projector’s HDMI IN port with
an HDMI cable.
2 Press the (Q. Settings) button on the remote control and select
General SIMPLINK (HDMI-CEC).
3 Set SIMPLINK (HDMI-CEC) to On.
4 Congure the Auto Power Sync settings to On or Off. (If Auto Power Sync
is set to On, turning on a SIMPLINK-linked device will turn the projector on.
When you turn off the projector, the device will also be turned off.)
5 Turn on the connected device. When the projector automatically connects to
the device, the input will switch. If the device is not automatically connected to
the projector, click the (INPUT) button.
• This feature works only with devices with the logo. Check for the
SIMPLINK logo on the external device. There may be a problem using the device
if the device does not meet the required specifications.
• A high-speed HDMI® cable with CEC (Consumer Electronics Control) function
is required to use SIMPLINK. Pin 13 of the high-speed HDMI® cable is used for
data transfer between devices.
• If you want to output sound to the external audio equipment connected through
the HDMI cable, set SIMPLINK (HDMI-CEC) to On.
Page 78

Supported SIMPLINK Functions
• Instant Play
When you start a multimedia device, you can immediately watch content from
the device on the projector without having to control anything.
• Controlling devices with the projector remote control
Enables the user to control multimedia devices with the projector remote
control to watch content.
- The pointer function of the Magic Remote can be limited.
• Main Power Off
If Auto Power Sync is set to On in the SIMPLINK (HDMI-CEC) settings and
the projector is turned off, the devices connected to your projector via SIMPLINK
will also be turned off. Likewise, your projector will be turned off if you turn off a
device connected to your projector via SIMPLINK.
- This feature is only available in certain devices.
• Main Power On
If Auto Power Sync is set to On in the SIMPLINK (HDMI-CEC) settings,
turning on a SIMPLINK-linked device will turn the projector on.
- If SIMPLINK (HDMI-CEC) is set to Off, Auto Power Sync can not be set
to On.
15
ENGLISH
Page 79

16
Using the LG TV Plus App
You can control the functions of your projector by using the app installed on your
smart device.
1 Download LG TV Plus app from the Apple App Store or the Google Play Store,
ENGLISH
depending on the OS of each smart device.
2 Press the (Q. Settings) button on the remote control and select
Network.
3 Set LG Connect Apps to On.
4 Connect the projector and your smart device on the same Wi-Fi network.
5 Launch the LG TV Plus app on your smart device.
6 Tap the Start button to scan for projectors that can be connected to your
smart device.
7 Select the projector you want from the list of search results. A PIN code
appears on the projector screen.
8 Enter the PIN code in the LG TV Plus app to pair your smart device with the
projector.
9 You can tap the buttons on your smart device’s screen to control the projector.
Page 80
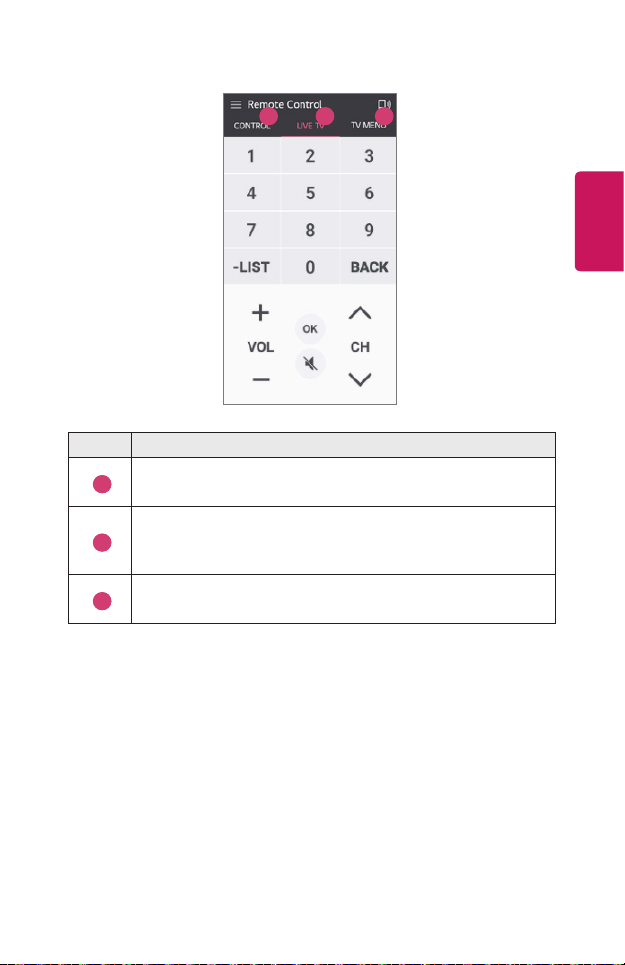
17
1 2 3
Description
You can use the same functions as the Magic Remote’s pointer and
1
arrow keys.
You can change the channel, adjust the volume, or make other
adjustments without using the remote control while watching a
2
broadcast.
You can open an app installed on your projector or congure settings
3
for functions such as switching input or adding favorite channels.
• Some controls may be limited in external input mode.
• The app’s screen and functionality are subject to change without prior notice.
• Available features may differ depending on your country and OS.
ENGLISH
Page 81
18
Magic Mobile Connection
Using Magic Mobile Connection
Magic Mobile Connection lets you share and enjoy the content stored on people’s
ENGLISH
smart devices through your projector.
• It is recommended that your Android smart devices run Lollipop or later versions
of Android.
Connecting a Smart Device with Magic Mobile Connection
Set up a connection following the guide below:
1 Install the LG TV Plus app on the smart device.
2 Connect both your projector and the smart device to the same network.
3 Run the LG TV Plus app and set up a connection to your projector following
the instructions shown on the screen.
4 Press the button, and a list of connected smart devices will appear on the
right side of the screen.
5 Select your desired smart device.
• Android smart devices will automatically attempt to reconnect when they enter
the network zone after the initial connection has been established.
Sharing Content with Magic Mobile Connection
You can share and enjoy the content stored on your smart device through your
projector.
1 Run the LG TV Plus app installed on your smart device.
2 Set up your desired content on your projector.
• Supported features may vary depending on the country.
• Supported features may vary depending on the version of your smart device’s
operating system.
Page 82

19
Using a Keyboard and Mouse
Using a USB Wired/Wireless Mouse
Connect your mouse to the USB port. Use the mouse to move the pointer on the
projector screen and select the menu you want.
• The right button and the special buttons on the mouse do not work.
• When using a wireless USB mouse/keyboard, the experience may be affected by
the distance and wireless condition.
Using a USB Wired/Wireless Keyboard
Connect your keyboard to the USB port. You can enter text with the connected
keyboard device.
• It is not possible to enter text on some screens.
• It is recommended that you use a product that has been tested for compatibility
with LG projectors.
- LOGITECH K360, LOGITECH K400, LOGITECH K750, LG Electronics MKS-
1200
• You can change the input language by pressing the language switch key or the
right Alt key. It can also be changed by pressing the Ctrl key and the Space key
at same time.
• Wireless USB keyboard use may be affected by the usage range and the wireless
environment.
• To enter text in the text field, use the on-screen keyboard on your projector
screen or a USB keyboard.
ENGLISH
Page 83

20
Using a Gamepad
Connect your gamepad to the USB port on the projector if the game requires a
gamepad.
• It is recommended that you use a gamepad that has been tested for
ENGLISH
compatibility with LG projectors.
- LOGITECH F310, LOGITECH F510, LOGITECH F710, LOGITECH Rumblepad
2, LOGITECH Cordless Rumblepad 2, LOGITECH Dual Action Gamepad,
MICROSOFT Xbox 360 Controller (cable), SONY Playstation(R)3 Controller
Page 84
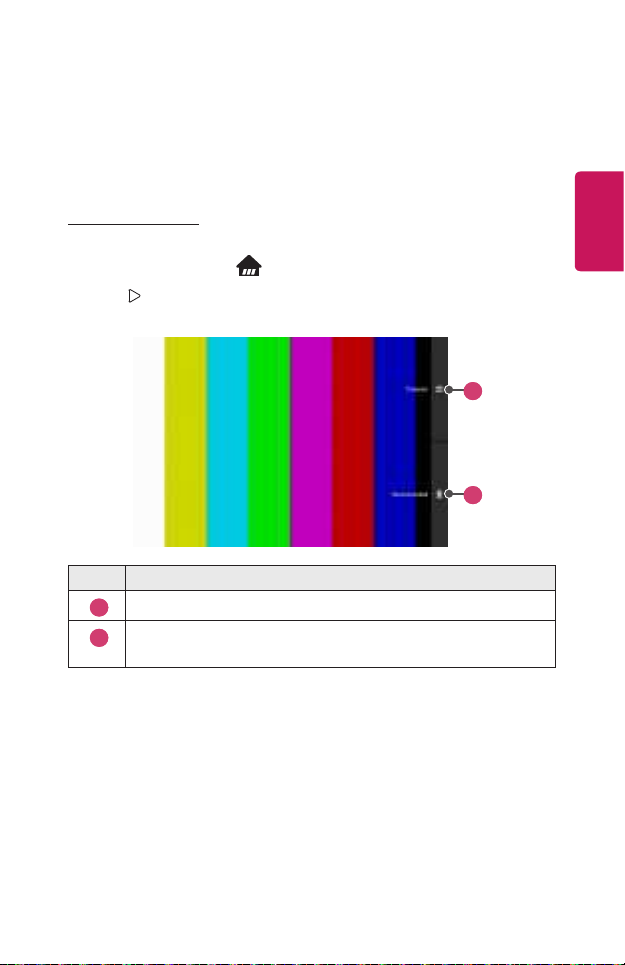
ENJOY LIVE TV
21
Live Menu
Using Live Menu
You can use the relevant features with ease when watching TV broadcasts.
1 Run Live TV by pressing .
2 Press button (on the right) on the remote control or move the Magic
Remote pointer to the right side of the projector screen.
1
2
Description
View a list of broadcast content that is currently being broadcast.
1
Get channel and program recommendations based on your viewing
2
history.
ENGLISH
Page 85

22
• The channels displayed in Channel List are a configuration of channels provided
by the broadcast service provider. Therefore, if the broadcast service provider
has changed its channel configuration without notice, the channels displayed in
Channel List may differ from the actual TV channels.
• Because channel information displayed in Channel List includes information
ENGLISH
provided by external Electronic Program Guide (EPG) providers, it may differ
from the actual TV channels.
• You must have a network connection with Internet access to use the Program
Recommendation feature in Recommended List.
• To receive proper recommendation services, you need to set up your network,
region and auto tuning.
• Options may vary depending on the country.
Page 86

23
My Channels
Using My Channels
If you add channels to My Channels, you can check and watch the programs being
broadcast in the added channels of any app.
Adding a Channel
1 Press the button on your remote control.
2 Select My Channels at the bottom left of the screen.
3 Selecting Add Channel displays a list of channels.
Select the channel you want to add from the channel list.
- You can continue to add other channels to My Channels in the same way.
• To add set-top box channels, you need to set Setup universal control in Device
Connector and use a Magic Remote. (This feature is available on certain models
only.)
• To switch to a set-top box channel, you need to select among the added
channels using your Magic Remote. (This feature is available on certain models
only.)
• If you select a channel already added in My Channels, you can access the
channel in other apps as well.
• You can move/delete added channels in the same way as when you manage
apps.
ENGLISH
Page 87
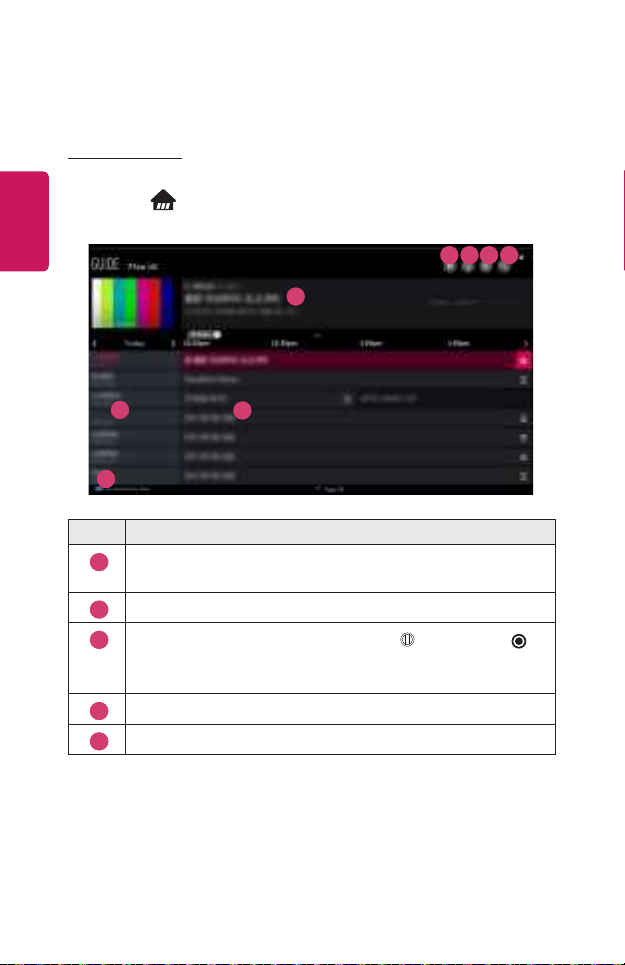
24
Guide
Viewing Guide
You can view programs and the schedule of each program.
ENGLISH
1 Press the button on the remote control.
2 You can launch the Guide application.
1
4 5 6 7
2
3
8
Description
You can view information about the program you are currently
1
watching as well as the focused program information.
Displays the information of the broadcasting company.
2
3
Navigate to a desired program and press the Wheel (OK) or
OK. You can view more information on the program and perform
WATCH or REMINDER, etc.
Sets the lter.
4
Launch CHANNEL MANAGER.
5
Page 88
Description
Launch TV Scheduler.
6
Launch SEARCH.
7
Press the remote control’s button to navigate to the Guide
8
screen for the current date and time.
Viewing Set-Top Box Guide
After connecting the Set-Top Box, you can view programs and the schedule of the
Set-Top Box and use the Magic Remote.
• This function is available on certain models or in certain countries only.
25
ENGLISH
Page 89
26
Checking Program Info
Viewing Program Information
Information about the program you are currently watching, the current time, etc.
ENGLISH
are displayed.
• The On Screen Display (OSD) of the projector may differ depending on the
model.
1 While watching a live broadcast press the Wheel (OK) or OK button.
The Channel Banner appears.
Page 90
27
2 Select the Channel Banner. You can view detailed information about the
program you are currently watching.
Using the buttons on your remote control, you can view information
about upcoming programs or other channels without changing the channel.
• You can view broadcast information about other channels using the
buttons.
• You can view broadcast information about the channel you are currently
watching using the buttons.
ENGLISH
Page 91
28
Using MAGIC LINK
It offers various videos and information related to the program you are currently
watching.
If you are watching a program via a set-top box, you should complete the universal
ENGLISH
remote control settings to use the MAGIC LINK function properly.
1 Press the remote control’s Wheel (OK) or OK button or move the
pointer to the top of the screen. The Channel Banner appears.
2 Press the MAGIC LINK button in the Channel Banner.
3 Various kinds of information related to the program you are watching will
appear at the bottom of the screen. Select the desired information.
• The search range may vary depending on the country.
• While MAGIC LINK is in use, the content provided may not always match the
program that you are watching at the time. Change the channel with the Magic
Remote before using MAGIC LINK.
• Some adult-only channels or locked channels do not support this function.
• The search results may vary depending on the information on the program you
are watching.
• The MAGIC LINK feature via set-top box is supported in some countries or
models only.
• Some set-top boxes may not support the MAGIC LINK function.
• Only set-top boxes connected via HDMI input are supported.
Page 92
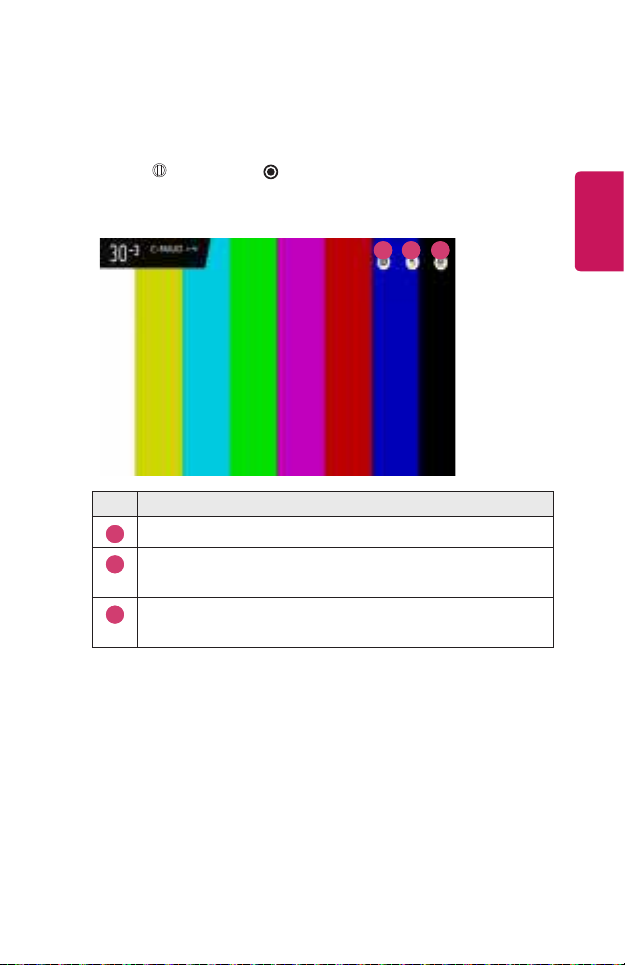
29
Using Advanced Broadcast Settings
If the broadcast you are watching contains Closed Caption, AUDIO LANGUAGE,
or Multi Audio information, you can use such features.
1 Press the Wheel (OK) or OK button on your remote control.
2 Select your desired feature in the top of the screen and set the feature to your
desired value.
1 2 3
Description
You can set Closed Caption.
1
You can set AUDIO LANGUAGE.
2
• Only available with digital broadcasts.
You can set Multi Audio.
3
• Only available with analog broadcasts.
• Available features may vary depending on the broadcast signal.
ENGLISH
Page 93
30
HOW TO USE VARIETY OF CONTENTS
LG Content Store
ENGLISH
You can quickly and conveniently browse for TV Shows, Movies, and more to watch
immediately.
You can also download and use apps from various categories such as education,
entertainment, lifestyle, news, and games.
1 Press the button on the remote control.
2 Launch the LG Content Store application.
• This feature is available in certain countries only.
• Features may be limited in certain countries.
• Content may differ depending upon the model or country.
• Exercise caution when in used by children. Children may have access to
inappropriate online content through this product.
• You can block inappropriate online content by restricting access to some apps
such as the Internet browser. Restrictions can be set in (Q. Settings)
Safety Application Locks.
Recommended Content on the Main Screen
The main screen of the LG Content Store shows the most popular content for
each category. Select any content to view its details.
• Internet connection is required to use this feature.
Page 94

31
Creating Wish List
Using My Content
By adding your desired content to My Content, you can use the content easily and
quickly anytime.
1 Press the button on your remote control.
2 Select My Content in the top left of the screen.
3 Select Add Content.
4 Search for content.
5 Select your desired content from the search results to add it to My Content.
• You can also select from among recommended content shown under the
search box and directly add it to My Content.
• This feature is only available in certain countries.
• The type of content you can add to My Content may vary depending on the
country.
• You must have a network connection to use this feature.
• You can move/delete added content in the same way you manage apps.
• Some of the content services added to My Content may not be available if the
service has been terminated due to the provider’s circumstances.
ENGLISH
Page 95

32
Account Creating
Creating LG Account
In Account Management, you can use your email address to create a new LG
ENGLISH
account.
1 Press the (Q. Settings) button on the remote control and select
General Account Management.
2 Select CREATE ACCOUNT. Read and accept the Terms of Service.
3 Enter an ID and a password. Your ID must be your email address.
4 Enter your birthday.
5 Select OK. Go to your email to verify your email address. Please verify your
email before the time expires.
6 Log in with your new account to start using the service.
• Internet connection is required to create an account.
• Required information may vary depending upon the country.
• Existing IDs that do not use an email address can be converted to your email
address.
• You can log in with your Facebook or Google account. (Features other than login
may not be available.)
• You may be restricted from the service depending upon your age.
Page 96

Account Management
Managing your LG Account
You can manage the information of your LG account.
1 Press the (Q. Settings) button on the remote control.
2 Go to General Account Management to log in.
Personal Information
You can view or edit your information of the account currently logged in.
You can change the password or press EDIT to edit your personal information.
This feature is available in certain countries only.
33
ENGLISH
Page 97
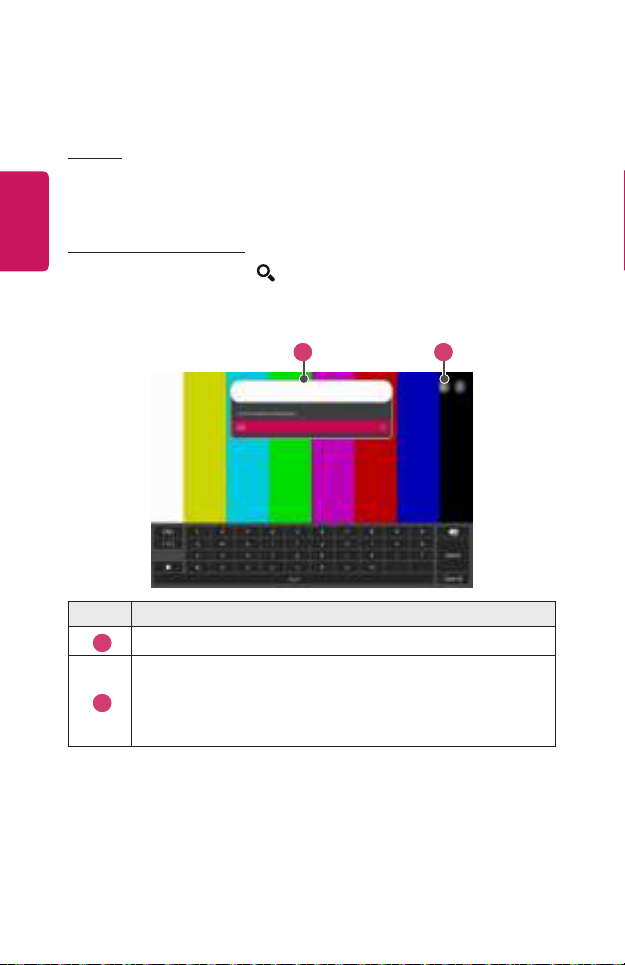
34
Search Content
Search
Search allows you to nd and use a variety of content and information. You can
ENGLISH
search for les, including image, video, audio, and recording les.
Searching for Content
1 Run Search by pressing the (SEARCH) button on your remote control.
2 Search for a variety of content and information by typing in your desired
search terms.
2 1
Description
Enter your desired search term.
1
Change the settings of the features provided by Search.
• Some apps provide a feature that lets you search within your
2
• Search results may vary depending on the channel, region, network settings, and
whether you have agreed to the terms and conditions.
projector. If you run a search in such apps, the search will be
carried out in Search.
Page 98

Use App & Contents
Installing Apps
You can use your LG account to install various apps on your projector.
1 Press the button on the remote control.
2 Launch the LG Content Store application.
3 Select your desired category from the categories shown at the top of the
screen. The list of available apps in the selected category will be shown.
4 Select an app to set up from the list.
5 Read the details of the app and then press Install.
6 When the installation is complete, you can run the app immediately.
• Available categories may vary depending on the country or service status.
• If the storage on your projector is insufficient, you can install the apps by
connecting an external memory device.
• Some USB storage devices may not be supported or may not work properly.
• USB drivers containing apps from other LG TVs or LG Projectors may not be
used.
35
ENGLISH
Page 99

36
Watching VOD Content
You can immediately enjoy dramas, movies, and more with real-time streaming.
1 Press the button on the remote control.
ENGLISH
2 Launch the LG Content Store application.
3 Select your desired category from the categories shown at the top of the
screen, such as TV Shows and Movies. The list of available content in the
selected category will be shown.
4 Select an item from the list.
5 Read the details of the content and then press Watch Now.
6 Select a playback option. An app may be required to play the content with the
selected playback option. If not installed, install the app to play the content.
7 The content is played using the selected option.
• This feature is only available in certain countries.
• Available categories may vary depending on the country or service status.
• Adult authentication is required for playing adult content.
Page 100
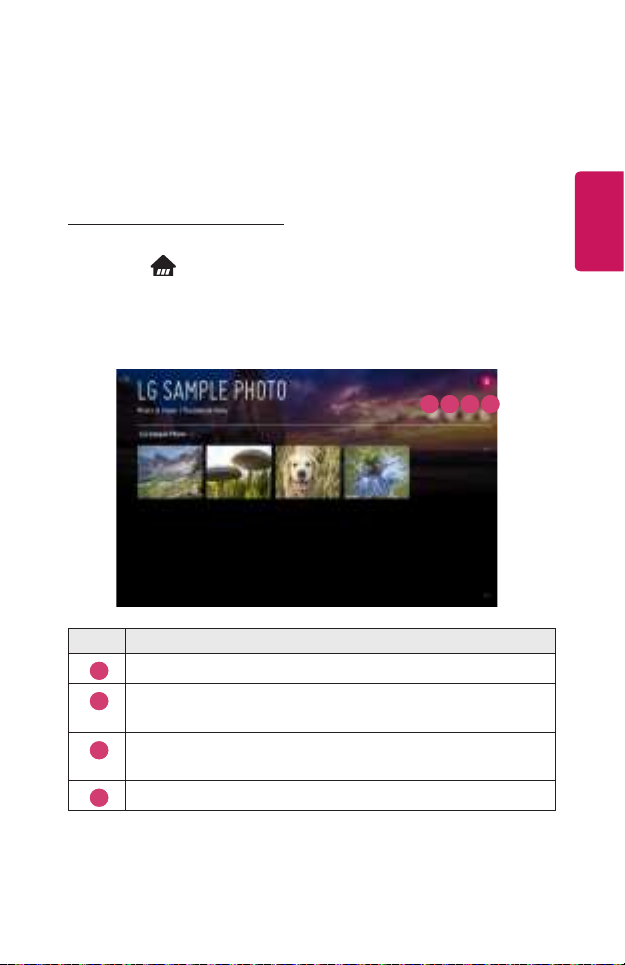
PLAY OTHER DEVICE FILES
37
Photo & Video
Viewing Photos and Videos
You can view photos and videos using the Photo & Video app.
1 Press the button on your remote control.
2 Launch the Photo & Video application.
3 Select your desired storage device.
4 Select and view your desired photo or video.
Description
Select your desired type of content and viewing method.
1
Select and delete your desired content.
2
(You cannot delete les that are shared from other devices.)
Select the content you want to play. You can only select the same
3
type of content as you rst selected.
Launch Search.
4
ENGLISH
1 2 3 4
• Certain content may not be displayed on the list if the number of all content
exceeds 40,000.
 Loading...