

Page 1

LG
Room
Air Conditioner
OWNER'S MANUAL
LG
IMPORTANT
• Please read this owner's manual carefully and thoroughly
before
installing and operating your room air conditioner.
• Please retain this owner's manual for future reference after
reading
it thoroughly.
Prior
to installation, this air-
conditioning
unit must be
submitted
for approval by the
utility
service which provides
electricity
(EN 61000-2,
EN
61000-3 Norm).
website http://www.lgservice.com
MODELS : S4/S5 Chassis
INDONESIAENGLISH
Page 2

2 Room Air Conditioner
Room Air Conditioner Owner’s Manual
TABLE OF CONTENTS
FOR YOUR RECORDS
Write the model and serial numbers here:
Model #
Serial #
You can find them on a label on the side of each unit.
Dealer's Name
Date Purchased
Staple your receipt to this page in the event you need
it to prove date of purchase or for warranty issues.
READ THIS MANUAL
Inside you will find many helpful hints on how to use
and
maintain your air conditioner properly. Just a little
preventive
care on your part can save you a great deal
of time and money over the life of your air conditioner.
You'll
find many answers to common problems in the
chart of troubleshooting tips. If you review our chart of
Troubleshooting
Tips first, you may not need to call
for service at all.
PRECAUTION
• Contact the authorized service technician for
repair or maintenance of this unit.
• Contact the installer for installation of this unit.
• The air conditioner is not intended for use by
young children or invalids without supervision.
• Young children should be supervised to ensure
that they do not play with the air conditioner.
• Wh en t he po wer co rd is to b e r eplac ed ,
re pla ce me nt
wor k s hal l b e pe rf orm ed by
aut hori zed
personn el only using only genuine
replacement parts.
• In sta ll at ion wo rk m us t be p er fo rme d i n
accordance
with the Nation al Electri c Code by
qualified and authorized personnel only.
Safety Precautions.........................3
Prior to Operation ..........................9
Introduction ..................................10
Electrical Safety ...........................11
Operating Instructions.................13
Maintenance and Service ............26
Page 3

Owner's Manual 3
Safety Precautions
HSI
L
GNE
Safety Precautions
To prevent the injury of the user or other people and property damage, the following instructions must be
followed.
Incorrect operation due to ignoring instruction will cause harm or damage. The seriousness is classified
by the following indications.
This symbol indicates the possibility of death or serious injury.
This symbol indicates the possibility of injury or damage to properties only.
The meanings of the symbols used in this manual are as shown below.
Be sure not to do.
Be sure to follow the instruction.
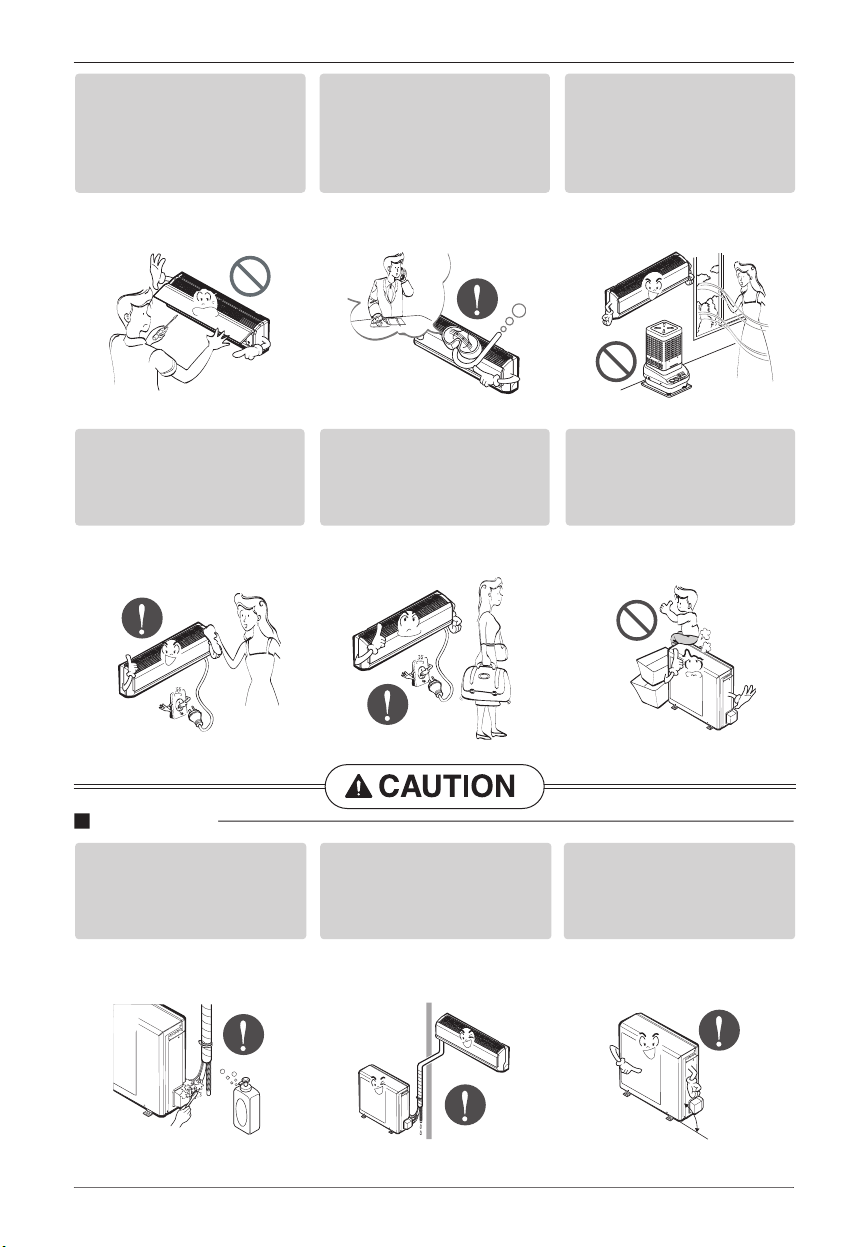
Installation
Do not use damaged power
cords, plugs, or a loose
socket.
• There is risk of fire or electric
shock.
For electrical work, contact
the dealer, seller, a qualified
electrician, or an Authorized
Service Center.
• There is risk of fire or electric
shock.
Always use the power plug
and socket with the ground
terminal.
• There is risk of electric shock.
Install the panel and the
cover of control box
securely.
• There is risk of fire or electric
shock.
Do not modify or extend the
power cord.
• There is risk of fire or electric
shock.
Do not install, remove, or
re-install the unit by
yourself (customer).
• There is risk of fire, electric
shock, explosion, or injury.
Page 4

4 Room Air Conditioner
Safety Precautions
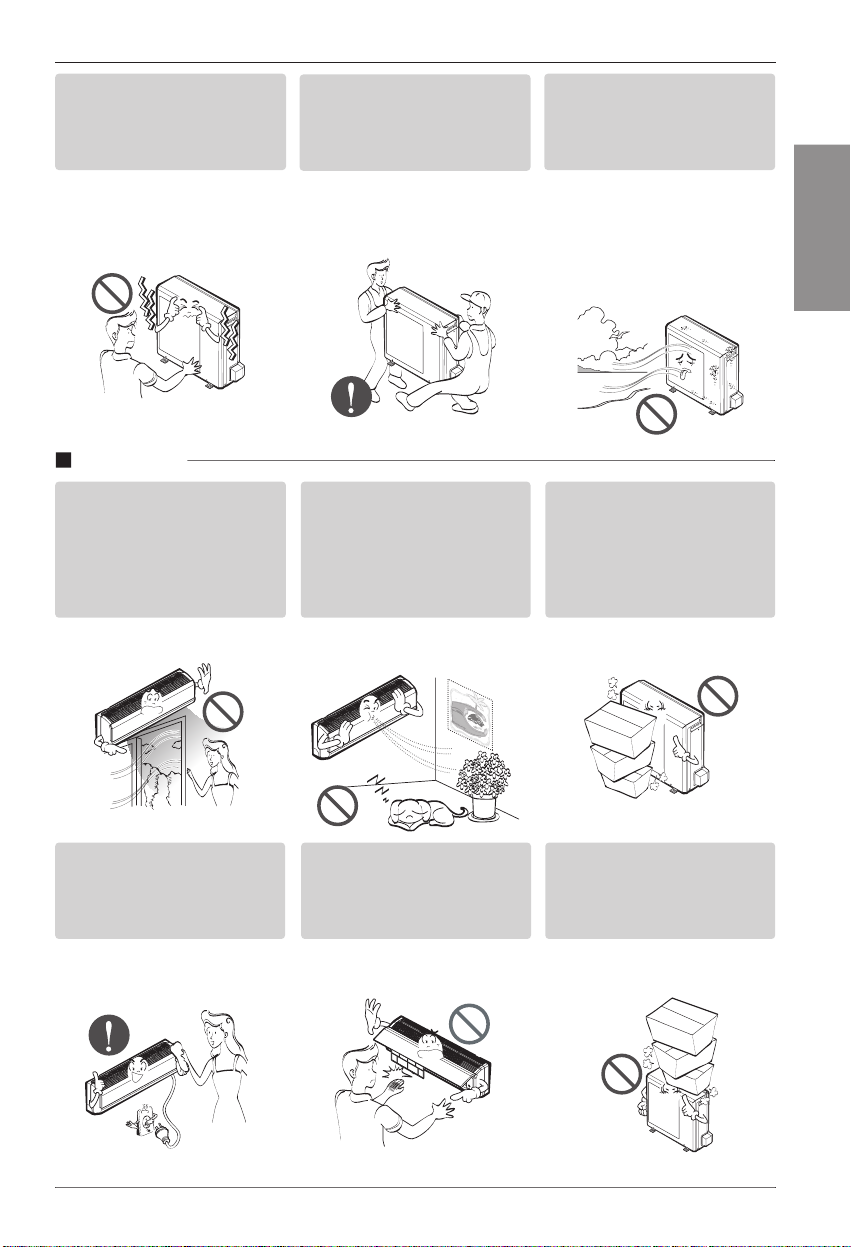
Be cautious when
unpacking and installing
the product.
• Sharp edges could cause injury.
Be especially careful of the
case edges and the fins on the
condenser and evaporator.
For installation, always
contact the dealer or an
Authorized Service Center.
• There is risk of fire, electric
shock, explosion, or injury.
Do not install the product
on a defective installation
stand.
• It may cause injury, accident, or
damage to the product.
Be sure the installation area
does not deteriorate with
age.
•
If the base collapses, the air
conditioner could fall with it, causing
property damage, product failure,
and personal injury.
Do not let the air conditioner
run for a long time when the
humidity is very high and a
door or a window is left open.
• Moisture may condense and
wet or damage furnishings.
Take care to ensure that
power cords could not be
pulled out or damaged
during operation.
• There is risk of fire or electrical
shock.
Do not place anything on
the power cord.
• There is risk of fire or electric
shock.
Do not turn the
air-conditioner ON or OFF
by plugging or unplugging
the power plug.
• There is risk of fire or electrical
shock.
Operation
Page 5

Owner's Manual 5
Safety Precautions
Use a dedicated outlet for
this appliance.
• There is risk of fire or electrical
shock.
Grasp the plug to remove
the cord from the outlet. Do
not touch it with wet hands.
• There is risk of fire or electrical
shock.
Do not place a heater or
other appliances near the
power cable.
• There is risk of fire and electric
shock.
Do not allow water to run
into electric parts.
• It may cause There is risk of
fire, failure of the product, or
electric shock.
Do not store or use
flammable gas or
combustibles near the air
conditioner.
• There is risk of fire or failure of
product.
Do not use the product in a
tightly closed space for a
long time.
• Oxygen deficiency could occur.
When flammable gas leaks,
turn off the gas and open a
window for ventilation
before turn the product on.
DO NOT use the telephone
or turn switches on or off.
• There is risk of explosion or fire.
Unplug the unit if strange
sounds, odors, or smoke
comes from it.
• There is risk of electrical shock
or fire
Stop operation and close
the window in storm or
hurricane. If possible,
remove the air conditioner
from the window before the
hurricane arrives.
• There is risk of property
damage, failure of product, or
electric shock.
ENGLISH
x
a
Thinner
W
Page 6
6 Room Air Conditioner
Safety Precautions
Always check for gas
(refrigerant) leakage after
installation or repair of
product.
• Low refrigerant levels may
cause failure of product.
Install the drain hose to
ensure that water is drained
away properly.
• A bad connection may cause
water leakage.
Keep level even when
installing the product.
• To avoid vibration or water
leakage.
Installation
Unplug the appliance before
performing cleaning or
maintenance.
• There is risk of electrical shock.
When the product is not be
used for a long time,
disconnect the power supply
plug or turn off the breaker.
• There is risk of product damage
or failure, or unintended
operation.
Take care to ensure that
nobody could step on or fall
onto the outdoor unit.
• This could result in personal
injury and product damage.
Do not open the inlet grill of
the product during
operation. (Do not touch the
electrostatic filter, if the unit
is so equipped.)
• There is risk of physical injury,
electric shock, or product
failure.
When the product is soaked
(flooded or submerged),
contact an Authorized
Service Center.
• There is risk of fire or eletric
shock.
Ventilate the product from
time to time when operating
it together with a stove, etc.
• There is risk of fire or electrical
shock.
90˚
Page 7
Owner's Manual 7
Safety Precautions
Do not install the product
where the noise or hot air
from the outdoor unit could
damage the neighborhoods.
• It may cause a problem for your
neighbors.
Use two or more people to
lift and transport the air
conditioner.
• Avoid personal injury.
Do not install the product
where it will be exposed to
sea wind (salt spray)
directly.
•
It may cause corrosion on the
product. Corrosion, particularly on
the condenser and evaporator fins,
could cause product malfunction
or inefficient operation.
Do not direct airflow at
room occupants. (Don't sit
in the draft.)
• This could damage your health.
Do not use the product for
special purposes, such as
preserving foods, works of
art, etc. It is a consumer air
conditioner, not a precision
refrigeration system.
• There is risk of damage or loss
of property.
Do not block the inlet or
outlet of air flow.
• It may cause product failure.
Use a soft cloth to clean. Do
not use harsh detergents,
solvents, etc.
• There is risk of fire, electric
shock, or damage to the plastic
parts of the product.
Do not touch the metal
parts of the product when
removing the air filter. They
are very sharp!
• There is risk of personal injury.
Do not step on or put
anyting on the product.
(outdoor units)
• There is risk of personal injury
and failure of product.
Operation
ENGLISH
Page 8
8 Room Air Conditioner
Safety Precautions
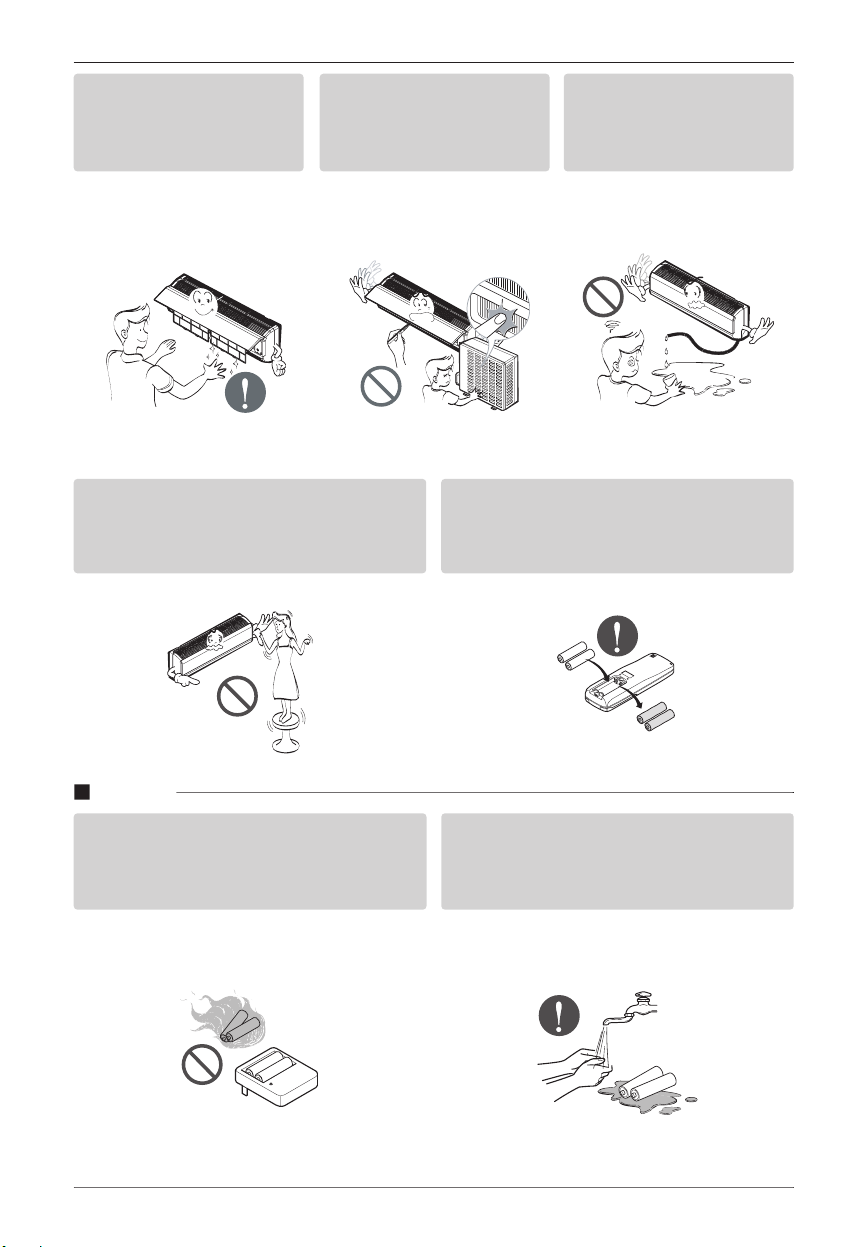
Do not recharge or disassemble the
batteries. Do not dispose of batteries in a
fire.
• They may burn or explode.
If the liquid from the batteries gets onto
your skin or clothes, wash it well with clean
water. Do not use the remote if the batteries
have leaked.
• The chemicals in batteries could cause burns or
other health hazards.
Always insert the filter
securely. Clean the filter
every two weeks or more
often if necessary.
• A dirty filter reduces the
efficiency of the air conditioner
and could cause product
malfunction or damage.
Do not insert hands or other
objects through the air inlet
or outlet while the air
conditioner is plugged in.
• There are sharp and moving
parts that could cause personal
injury.
Do not drink the water
drained from the unit.
• It is not sanitary and could
cause serious health issues.
Disuse
Use a firm stool or ladder when cleaning or
maintaining the air conditioner.
• Be careful and avoid personal injury.
Replace the all batteries in the remote
control with new ones of the same type. Do
not mix old and new batteries or different
types of batteries.
• There is risk of fire or explosion
Page 9

Owner's Manual 9
Prior to Operation
Prior to Operation
1. Contact an installation specialist for installation.
2. Plug in the power plug properly.
3. Use a dedicated circuit.
4. Do not use an extension cord.
5. Do not start/stop operation by plugging/unplugging the power cord.
6.
If the cord/plug is damaged, replace it with only an authorized replacement part.
1.
Being exposed to direct airflow for a long time may be hazardous to your health. Do not expose
occupants, pets, or plants to direct airflow for a long time.
2.
Due to the possibility of oxygen deficiency, ventilate the room when using the appliance together with
stoves or other heating devices.
3.
Do not use this air conditioner for non-specified special purpose (e.g. preserving precision devices,
food, pets, plants, or art objects). Such use may damage your properties.
1.
Do not touch the metal parts of the unit when removing the filter. Injury can occur.
2.
Do not use water to clean inside the air conditioner. Exposure to water can destroy the insulation,
leading to electric shock.
3.
When cleaning the unit, first make sure that the power and breaker are turned off. The fan rotates at a
very high speed during operation. There is a possibility of injury if the unit
’s power is triggered while
cleaning inner parts of the unit.
For repair and maintenance, contact your authorized service dealer.
Preparing for Operation
Usage
Cleaning and Maintenance
Service
ENGLISH
Page 10
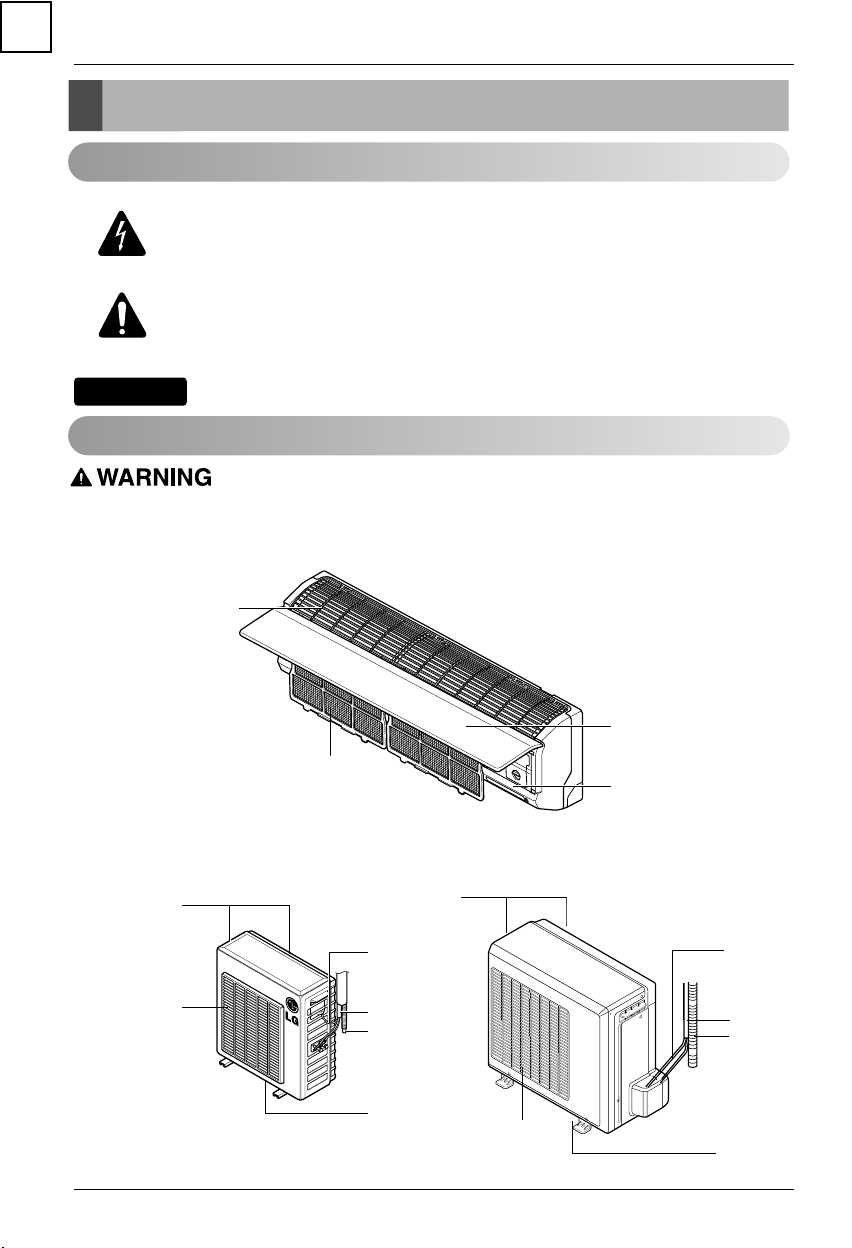
Air Intake Vents
Air Outlet Vents
Air Intake Vents
Air Outlet Vents
Connecting
Wires
Connecting
Wires
Piping
Piping
Drain Hose
Drain Hose
Base Plate
Base Plate
Front Panel
Air Inlet
Signal Receptor
Air Filter
Introduction
Introduction
Symbols used in this Manual
This symbol alerts you to the risk of electric shock.
This symbol alerts you to hazards that may cause harm to the
air conditioner.
NOTICE
Features
This appliance should be installed in accordance with national wiring regulations. This guide acts as a
guide to help to explain product features.
INDOOR
OUTDOOR
This symbol indicates special notes.
10 Room Air Conditioner
Page 11
Electrical Safety
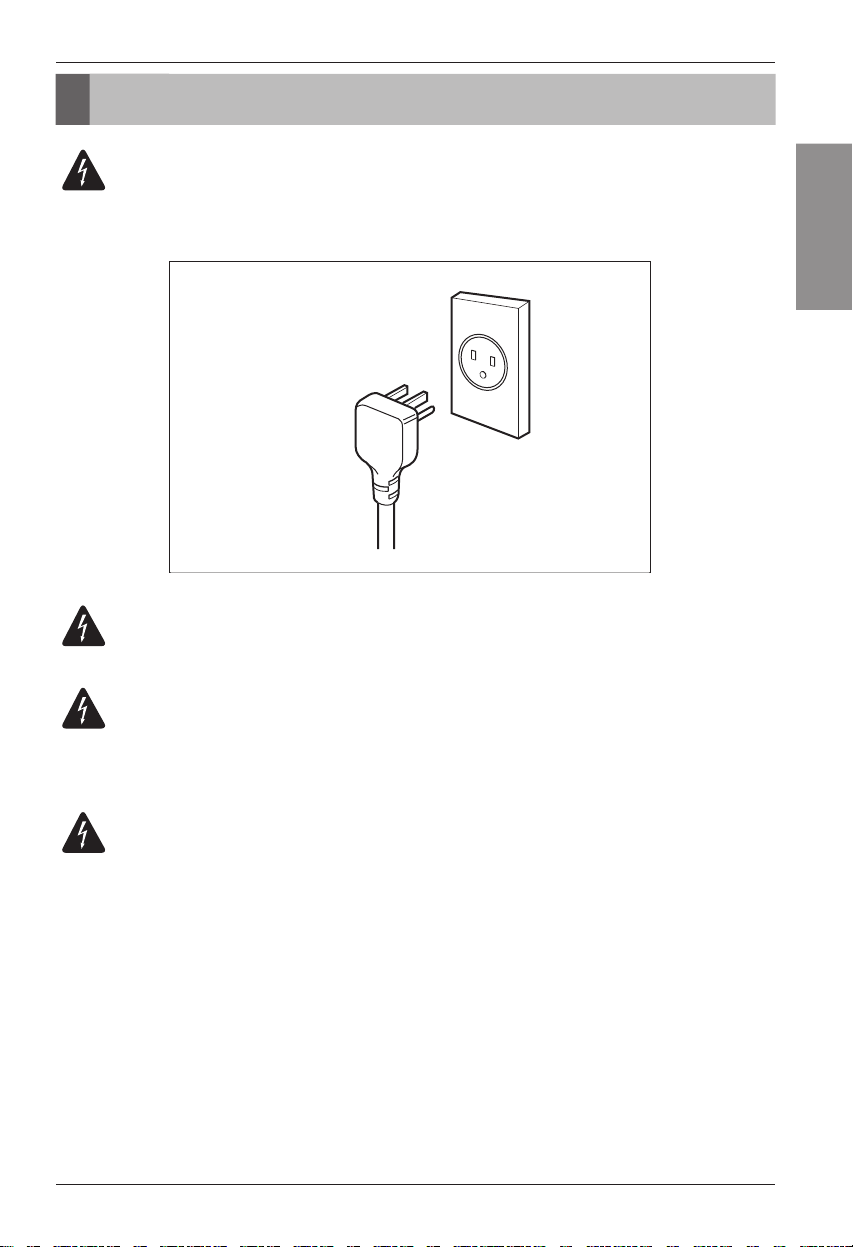
WARNING: This appliance must be properly grounded.
To minimize the risk of electric shock, you must alway plug into a grounded oulet.
WARNING: Do not cut or remove the grounding prong from the
power plug.
WARNING: Attaching the adapter ground terminal to the wall
receptacle cover screw does not ground the appliance unless the
cover screw is metal and not insulated, and the wall receptacle is
grounded through the house wiring.
WARNING: If you have any doubt whether the air conditioner is
properly grounded, have the wall receptacle and circuit checked by
a qualified electrician.
Preferred method
Ensure proper ground
exists before use
Safety Precautions
ENGLISH
Owner's Manual 11
Page 12
Introduction
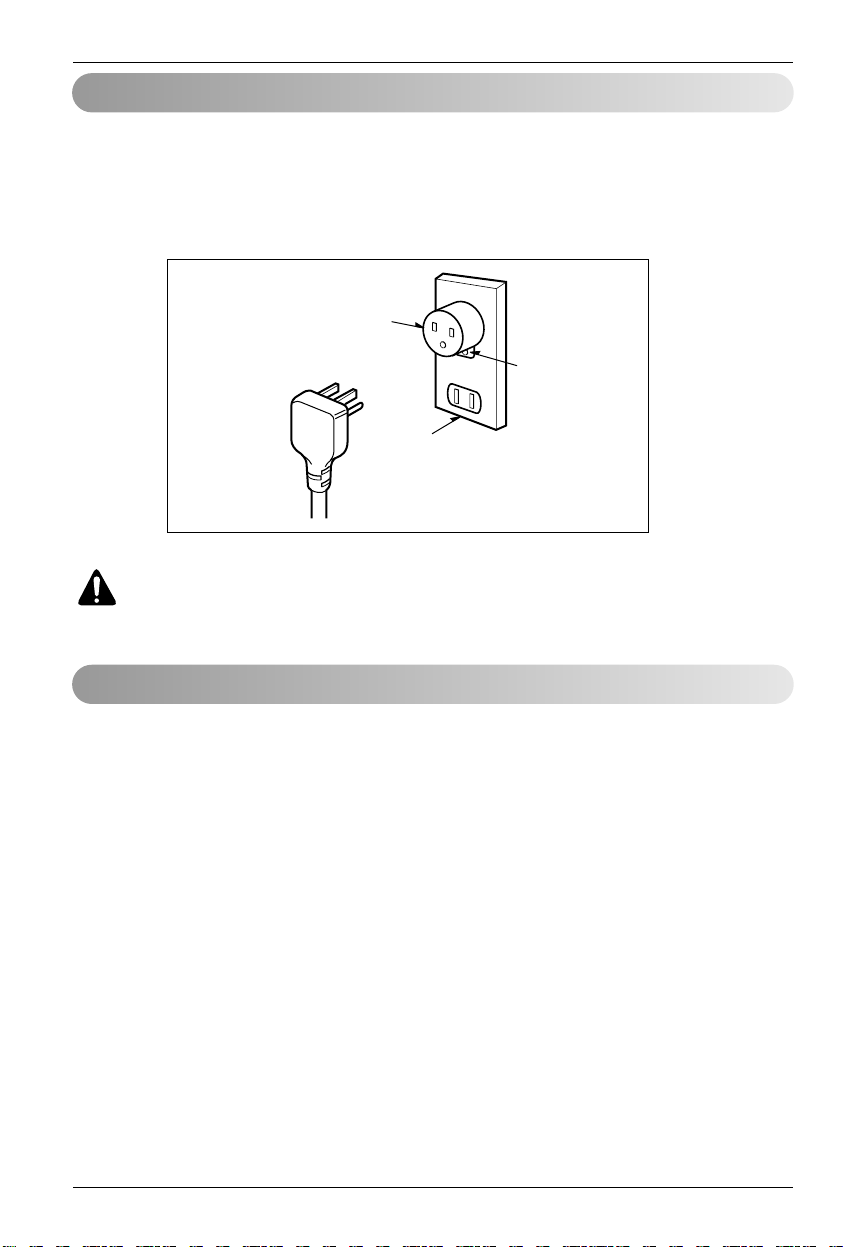
Temporary Use of an Adapter
We strongly discourage the use of an adapter due to potential safety hazards. For temporary
connections, use only a UL-listed adapter, available from most local hardware stores. Ensure that the
large slot in the adapter is aligned with the large slot in the receptacle for a proper polarity connection.
To disconnect the power cord from the adapter, use one hand on each to avoid damaging the ground
terminal. Avoid frequently unplugging the power cord as this can lead to eventual ground terminal
damage.
WARNING: Never use the appliance with a broken adapter.
We strongly discourage the use of an extension cord due to potential safety hazards. For temporary
situations, use only CSA certified and UL listed 3-wire grounded extension cords, rated 15 A, 125 V.
Temporary Use of an Extension Cord
Temporary method
Adapter Plug
Receptacle Cover
Metal Screw
12 Room Air Conditioner
Page 13
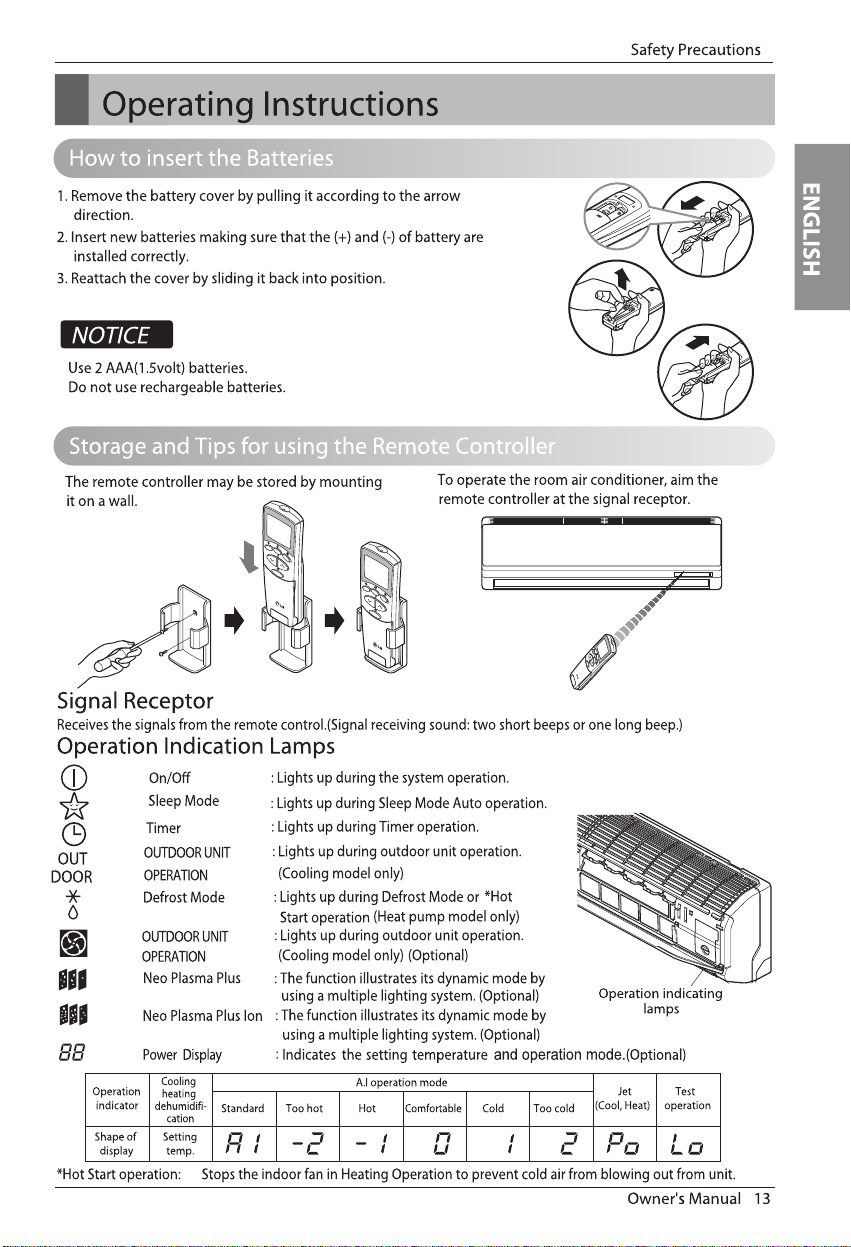
Page 14
Introduction
ON
OFF
CANCEL
AUTO CLEAN
SET
1
3
5
4
9
10
12
14
16
7
2
8
13
15
11
6
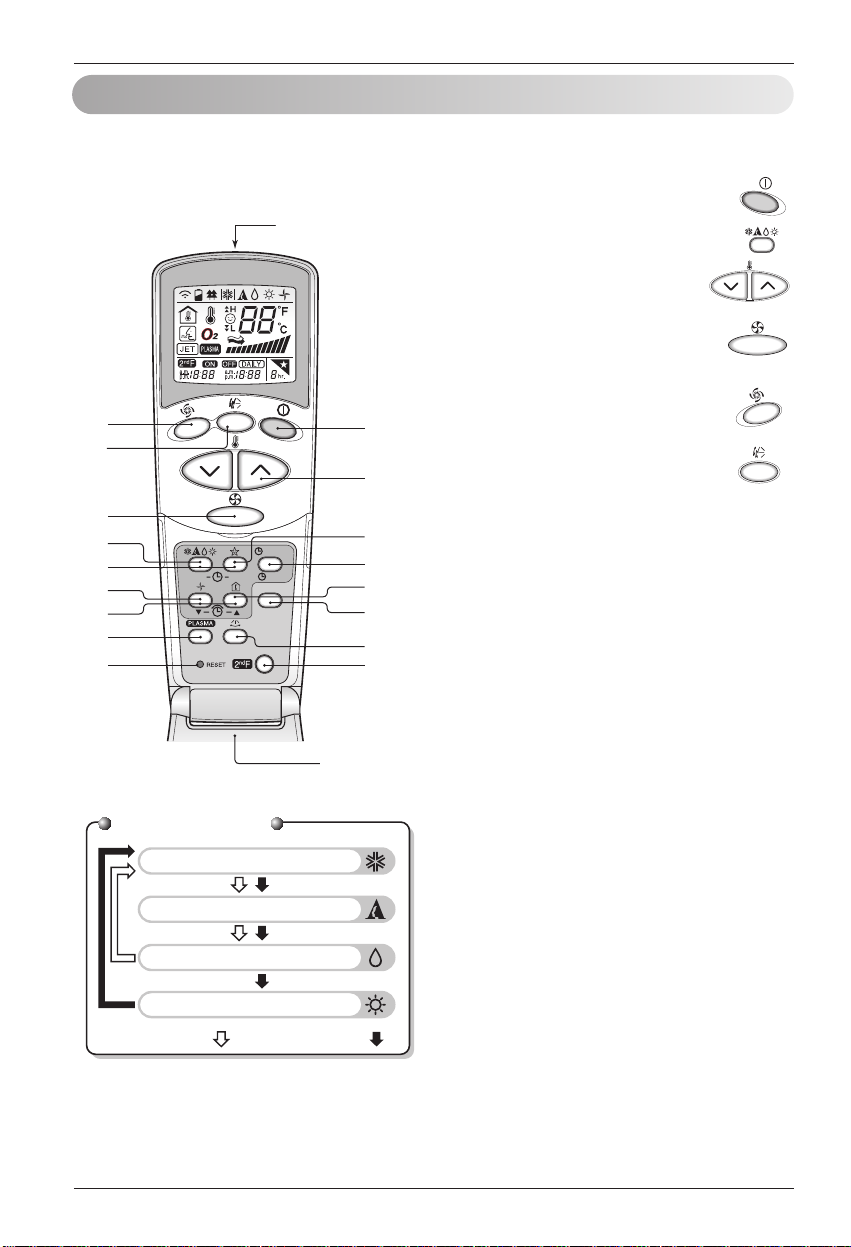
Cooling Operation
Auto Operation or Auto Changeover
Healthy Dehumidification Operation
Flip-up door
(opened)
Heating Operation
Signal transmitter
•
Cooling Model( ), Heat Pump Model( )
17
Operation Mode
Controls
The controls will look like the following.
Remote Control Operations
1. START/STOP BUTTON
Operation starts when this button is pressed
and stops when the button is pressed again.
2. OPERATION MODE SELECTION BUTTON
Used to select the operation mode.
3. ROOM TEMPERATURE SETTING
BUTTONS
Used to select the room temperature.
4. INDOOR FAN SPEED SELECTOR
Used to select fan speed in four steps
low, medium, high and CHAOS.
5.
JET COOL
Used to start or stop the speed cooling.(speed
cooling operates super high fan speed in
cooling mode.)
6. CHAOS SWING BUTTON
Used to stop or start louver movement and
set the desired up/down airflow direction.
7. ON/OFF TIMER BUTTONS
Used to set the time of starting and stopping
operation. (See page 23)
8. TIME SETTING BUTTONS
Used to adjust the time. (See page 23)
9. TIMER SET/CANCEL BUTTON
Used to set the timer when the desired time
is obtained and to cancel the Timer
operation. (See page 23)
10. SLEEP MODE AUTO BUTTON
Used to set Sleep Mode Auto operation.
(See page 23)
11. AIR CIRCULATION BUTTON
Used to circulate the room air without
cooling or heating. (See page 24)
12. ROOM TEMPERATURE CHECKING
BUTTON
Used to check the room temperature.
13. NEO PLASMA(OPTIONAL)
Used to start or stop the
plasma-purification function. (See page 21)
14. HORIZONTAL AIRFLOW DIRECTION
CONTROL BUTTON (OPTIONAL)
Used to set the desired horizontal airflow
direction.
15. RESET BUTTON
Used prior to resetting time.
16. 2nd F Button
Used prior to using modes printed in blue
at the bottom of buttons. (See page 22)
17. AUTO CLEAN (OPTIONAL)
Used to set Auto Clean mode.
14 Room Air Conditioner
Page 15

ON
Cooling
Healthy
Dehumidification
Auto
Changeover
Heating
(Heat pump model only)
To lower the temperature
To raise the temperature
Press the Start/Stop button.
The unit will respond with
a beep.
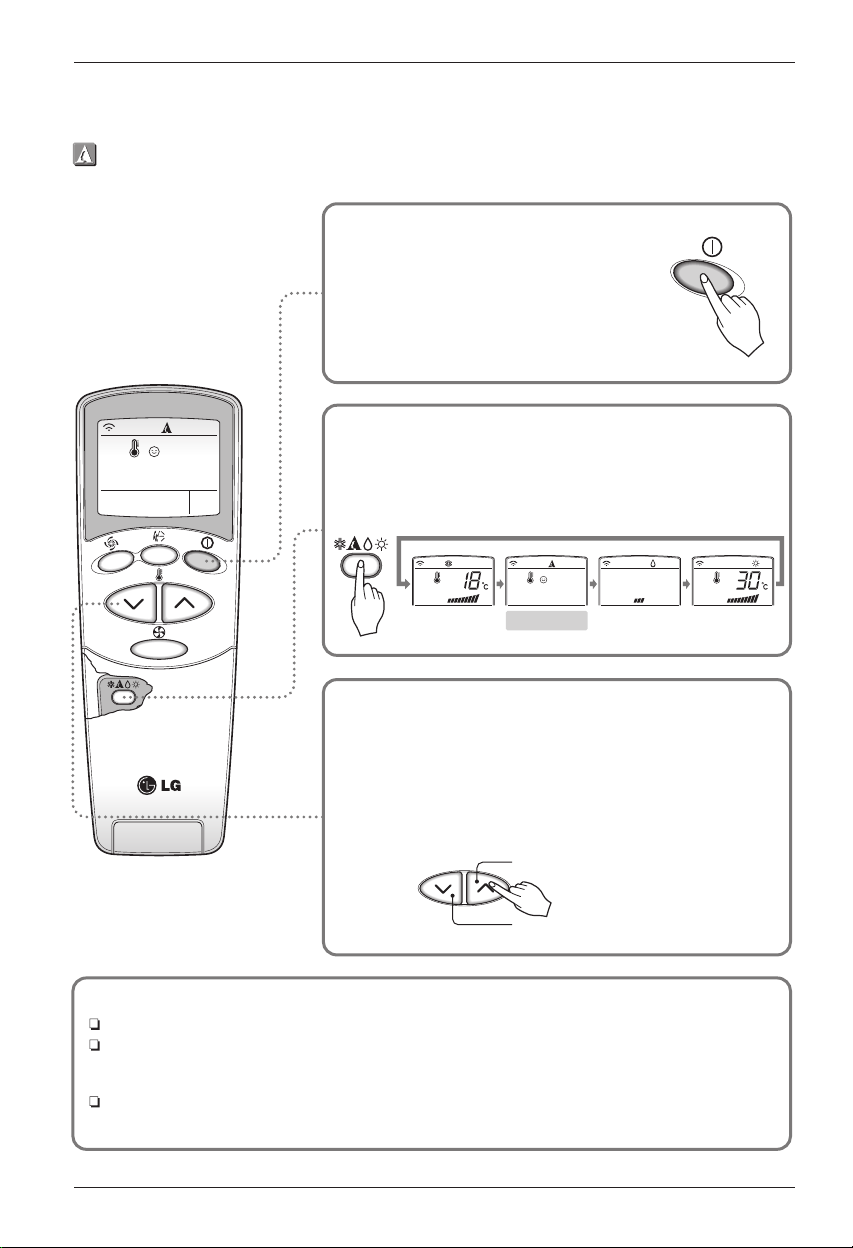
Open the door of the remote controller. To select Cooling
Operation, press the Operation Mode Selection button.
Each time the button is pressed, the operation mode is
shifted in the direction of the arrow.
Close
the door of the remote controller. Set the temperature
lower
than the room temperature. The temperature can be
set within a range of 18
°C~30°C at intervals of 1°C.
Set the fan speed again with the door
of the remote controller still closed.
You can select the fan speed in four
steps-low, medium, high and CHAOS.
Each time the button is pressed, the
fan speed mode is shifted.
1
2
3
4
Natural wind by the CHAOS logic
For fresher feeling, press the Indoor fan speed selector and set to CHAOS mode. In this mode, the wind
blows like a natural breeze by automatically changing fan speed according to the CHAOS logic.
Cooling operation
Safety Precautions
ENGLISH
Owner's Manual 15
Page 16
ON
Cooling
Healthy
Dehumidification
Auto
Heating
(Heat pump model only)
To lower the temperature
To raise the temperature
Press the Start/Stop button.
The unit will respond with
a beep.
Open the door of the remote controller. To select Auto
Operation, press the operation mode selection button.
Each time the button is pressed, the operation mode is
shifted in the direction of the arrow.
The
temperature and fan speed are automatically set by the
electronic
controls based on the actual room temperature. If
you
want to change the set temperature, press the Room
Temperature
Setting buttons. The cooler or warmer you feel,
the
more times (up to two times) you should press the button.
The set temperature will be changed automatically.
During Auto Operation
You cannot control the indoor fan speed. It has already been set by the Fuzzy rule.
If the system is not operating as desired, manually switch to another mode. The system will not
automatically
switch from the cooling mode to the heating mode, or from heating mode to cooling
mode, it must be done by manually resetting.
During Auto Operation, pressing the chaos swing button makes the horizontal louvers swing up and
down automatically. If you want to stop auto-swing, press the chaos swing button again.
1
2
3
Auto operation (Optional)
Introduction
16 Room Air Conditioner
Page 17
ON
Cooling
Healthy
Dehumidification
Auto
Changeover
Heating
(Heat pump model only)
To lower the temperature
To raise the temperature
Auto changeover operation(Optional)
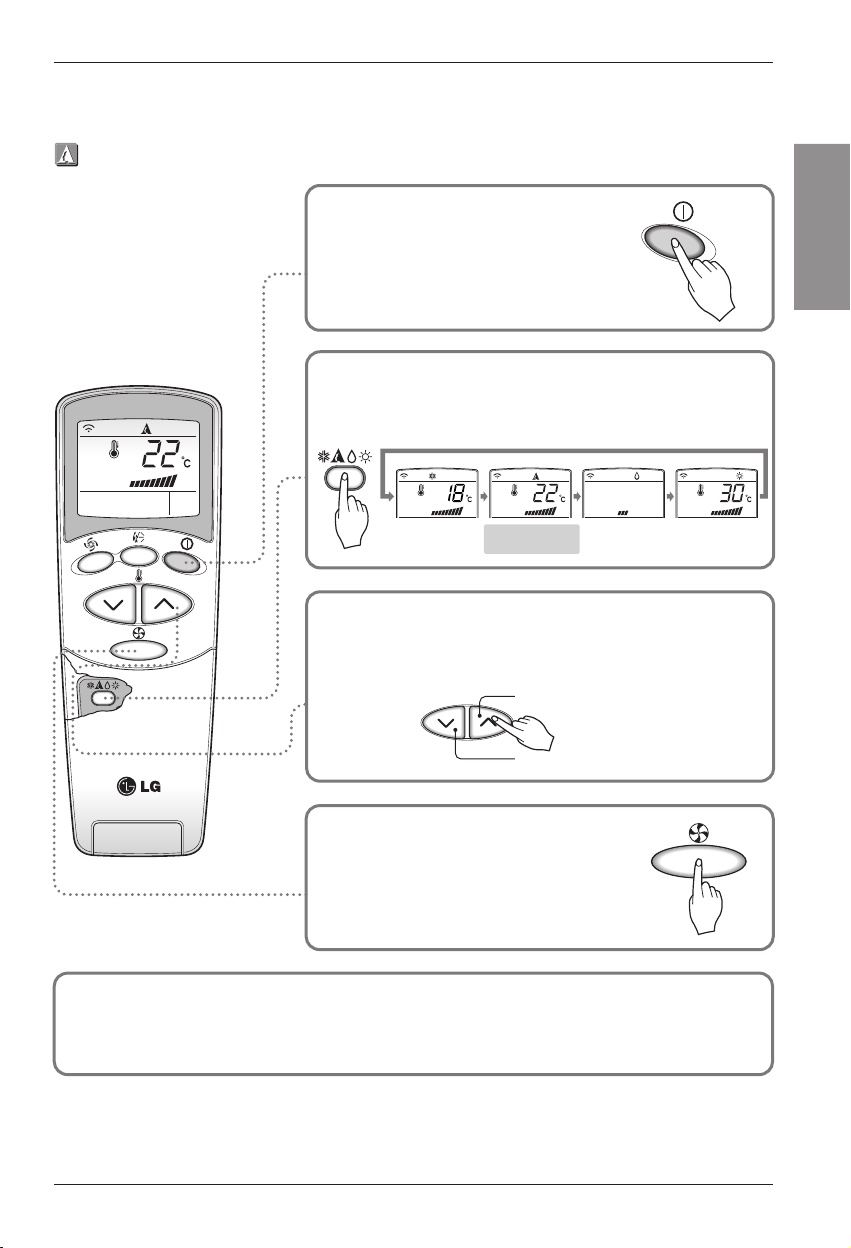
Press the Start/Stop button.
The unit will respond with
a beep.
Open the door of the remote controller. To select Auto Changeover
Operation, press the Operation Mode Selection button.
Each time the button is pressed, the operation mode is shifted in the
direction of the arrow.
1
2
Close the door of the remote controller. Set the temperature
lower
than the room temperature. The temperature can be
set within a range of 18
°C~30°C at intervals of 1°C.
Set the fan speed again with the door
of the remote controller still closed.
You can select the fan speed in four
steps-low, medium, high and CHAOS.
Each time the button is pressed, the
fan speed mode is shifted.
3
4
During Auto changeover Operation
The air conditioner changes the operation mode automatically to keep indoor temperature. When room
temperature
vary over ±2°C with respect to setting temperature, air conditioner keeps the room
temperature within ±2
°C with respect to setting temperature by auto changeover mode.
Safety Precautions
ENGLISH
Owner's Manual 17
Page 18

ON
Cooling
Healthy
Dehumidification
Heating
(Heat pump model only)
Auto
Changeover
Press the Start/Stop button.
The unit will respond with
a beep.
Open the door of the remote controller. To select Healthy
Dehumidification Operation, press the Operation Mode
Selection button.
Each time the button is pressed, the operation mode is
shifted in the direction of the arrow.
1
2
Set the fan speed again with the door
of
the remote controller still closed.
You
can select the fan speed in four
steps-low,
medium, high, or CHAOS.
Each
time the button is pressed, the
fan speed mode is shifted.
3
Natural wind by the CHAOS logic
For fresher feeling, press the Indoor Fan Speed Selector and set
to CHAOS mode. In this mode, the wind blows like a natural
breeze
by automatically changing fan speed according to the
CHAOS logic.
Healthy dehumidification operation
During Healthy Dehumidification Operation
If you select the dehumidification mode on the operation selection button, the product starts to run the
dehumidification function. It automatically sets the room temp. and airflow volume to the best condition
for dehumidification, based on the sensed current room temp.
In this case, however, the setting temp. is not displayed on the remote controller and you are not able to
control the room temp. either.
During the healthy dehumidification function, the airflow volume is automatically set according to the
optimization
algorithm responding to the current room temp. status, so that the room condition is kept
healthy and comfortable even in the very humid season.
Introduction
18 Room Air Conditioner
Page 19
ON
Cooling
Healthy
Dehumidification
Heating
(Heat pump model only)
To lower the temperature
To raise the temperature
Auto
Changeover
Heating operation (Heat pump model only)
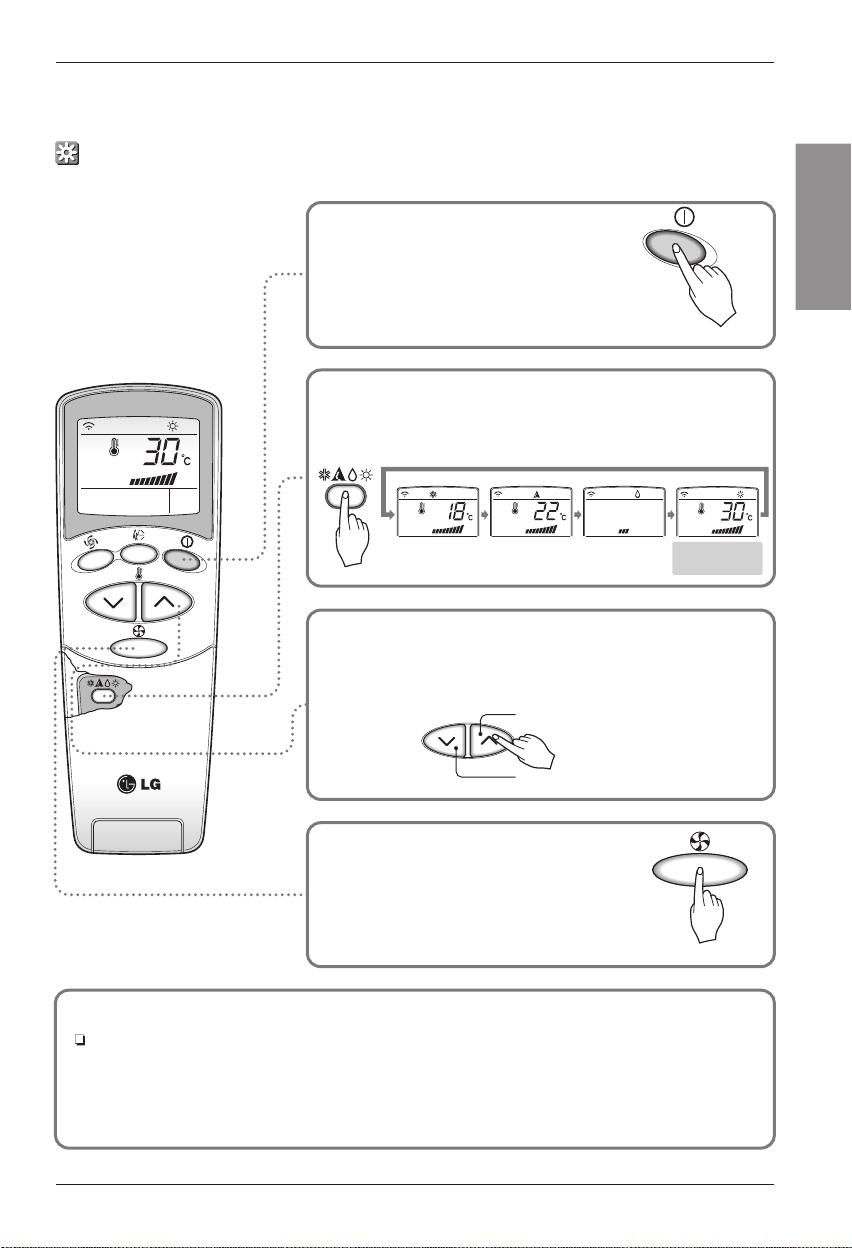
Press the Start/Stop button.
The unit will respond with
a beep.
Open the door of the remote controller. To select Heating
Operation, press the Operation Mode Selection button.
Each time the button is pressed, the operation mode is
shifted in the direction of the arrow.
Close the door of the remote controller.
Set the temperature higher than the room temperature.
The temperature can be set within a range of 16
°C~30°C at
intervals of 1
°C.
Set
the fan speed again with the door of the
re mote
co nt ro ller st ill c lo sed. Yo u can
se
lect the fan spee d in four steps–low,
medium,
high and CHAOS. Each time the
button
is pressed, the fan speed mode is
shifted.
1
2
3
4
Natural wind by the CHAOS logic
For fresher feeling, press the Indoor Fan Speed Selector and set to CHAOS mode. In this mode, the
wind blows like a natural breeze by automatically changing fan speed according to the CHAOS logic.
Safety Precautions
ENGLISH
Owner's Manual 19
Page 20

or or
During the JET COOL function at any moment, the A/C starts to blow the cool air at extremely
high speed for 30 minutes setting the room temp. automatically to 18
°C. It is especially used to
cool the room temp. quickly in a hot summer.
In heat pump mode or auto changeover mode, however, the JET COOL function is not available.
In order to return to the normal cooling mode from the JET COOL mode, just press the operation
mode selection button, airflow volume selection, temp. setting button or the JE
T COOL button
again.
NOTICE
Press the Start/Stop button.
The unit will respond with
a beep.
Press the Jet Cool button to operate
the speed cooling mode and the unit
will operate at super high fan speed
on cooling mode for 30 minutes.
To
cancel the Jet Cool mode, press the Jet Cool button, the
fan
speed button or the room temperature setting button
again
and the unit will operate at high fan speed on cooling
mode.
1
2
3
Jet cool operation
Introduction
20 Room Air Conditioner
Page 21

Press the Start/Stop button.
The unit will respond with a
beep.
1
Open the door of the remote
controller. Press the PLASMA
button.
Operation will start when the button
is pressed and stop when the button
is pressed again.
2
Set the fan speed again with the door of the remote
controller closed. You can select the fan speed in four
steps-low, medium, high or CHAOS.
Each time the button is pressed, the fan
speed mode is shifted.
Air purifying operation (NEO PLASMA) can be
with cooling, Heating or any other operations.
NEO PLASMA Air Purifying Operation only
If you press the only PLASMA button, only
PLASMA purification function operates.
Then, fan speed is low. You can select the fan
speed in four steps-low, medium, high or
CHAOS.
Each time the Indoor Fan Speed Selector
button is pressed, the fan speed mode is
shifted.
3
NEO PLASMA purification operation(Optional)
Safety Precautions
ENGLISH
Owner's Manual 21
Page 22

ON
OFF
CANCEL
SET
AUTO CLEAN
Press the Start/Stop button.
The unit will respond with
a beep.
Open the door of the remote controller and press the 2nd
Function button to operate functions printed blue color under
buttons.
(Check the indication of 2nd function on the display of the
remote controller.)
2nd function disappears in a short time automatically or when
the button is pressed again.
1
2
3
2nd F operation
For more details, refer to functions next pages.
Introduction
22 Room Air Conditioner
Page 23

Delay OFF Timer Delay ON Timer Delay OFF and ON Timer Delay ON and OFF Timer
Sleep mode
1. Press the Sleep Mode Auto button to set the time you want the unit to stop automatically.
2. The Timer is programmed in one-hour increments by pressing the Sleep Mode Auto button 1 to 7 times. The
sleep mode is available for 1 to 7 times. To alter the time period in steps of 1 hour, press the Sleep Mode
Button while aiming at air conditioner.
3. Make sure the Sleep Mode Auto LED lights up.
To cancel the Sleep Mode, press the sleep Mode Auto button several times until the star
( ) disappears from the operation display.
The Sleep Mode will be operated at slow fan speed (cooling) or medium fan speed (heat pump only) for
a comfortable sleep.
In cooling mode or healthy dehumidification mode:
The setting temperature will automatically rise by 1°C over the next 30 minutes and by 2°C in 1 hour for a comfortable
sleep.
NOTICE
Setting the time
1. Time can be set only when you press the Reset button. Having replacing the batteries,
you should press the reset buttons to reset the time. Press the Start/Stop button.
2. Press 2nd F button and check if 2nd F icon is on.
3. Press the Time Setting buttons until the desired time is set.
4. Press the Timer SET button.
Check the indicator for A.M. and P.M.
NOTICE
1. Make sure the time is set correctly on the display of the remote controller.
2.
Press 2nd F button.
3. Press the ON/OFF Timer buttons to turn Timer on or off.
4. Press the Time Setting buttons until the desired time is set.
5. To set the selected time, press the Timer setting button aiming the remote controller at the
signal receptor.
To cancel the timer setting
Check if 2nd F icon is off.
Press the Timer Cancel button aiming the remote controller at the signal receptor.
(The timer lamp on the air conditioner and the display will go out.)
Delay start/Pre-set stop
Select one of the following four types of operation.
NOTICE
with the unit running
ON
OFF
CANCEL
SET
CANCEL
SET
CANCEL
SET
Additional Features
Safety Precautions
ENGLISH
Owner's Manual 23
Page 24

Fan speed is on low. Fan speed is on medium. Fan speed is on high.CHAOS Air
Vertical Airflow Direction Control
The up/down airflow (Vertical Airflow) can be
adjusted by using the remote control.
1. Press the Start/Stop button to start the unit.
2.
Press Chaos Swing button and the louvers will
swing up and down. Press the Chaos Swing
button again to set the vertical louver at the
desired airflow direction.
If you press the Chaos Swing button, the
horizontal airflow direction is changed
automatically based on the CHAOS algorithm to
distribute the air in the room evenly and at the
same time to make the human body feel most
comfortable, as if enjoying a natural breeze.
Always use the remote control to adjust the
up/down airflow direction. Manually moving the
vertical airflow direction louver by hand, could
damage the air conditioner.
When the unit is shut off, the up/down airflow
direction louver will close the air outlet vent of
the system.
NOTICE
Horizontal Airflow Direction Control (Optional)
The left/right(Horizontal Airflow) can be adjusted by using the remote control.
Press the Start/Stop button to start the unit.
Open the door on the remote control. Press the Horizontal Airflow Direction
button and the louvers will swing left and right. Press the Horizontal Airflow
Direction Control Button again to set the horizontal louver at the desired airflow
direction.
Air circulation mode
Circulates the room air without cooling or heating.
1. Press the Start/Stop button. the unit will respond with a beep.
2. Open the door on the remote control. Press the Air Circulation button. Close the door on the remote control.
Now each time that you press the Indoor Fan Speed Selector button, the fan speed is shifted from low to
CHAOS and back to low again.
CHAOS Air economizes power consumption and prevents overcooling. The fan speed is automatically
changed from high to low or vice versa, depending on the ambient temperature.
NOTICE
Introduction
24 Room Air Conditioner
Page 25

AUTO CLEAN
ON/OFF
button
During Auto Clean function, moistures left in indoor units after Cooling Operation or Healthy
Dehumidification Operation can be removed.
During Auto Clean function, only Start/Stop button, Plasma button and AUTO CLEAN button are
available.
NOTICE
Auto clean (Optional)
1. Whenever you press the AUTO CLEAN button, Auto Clean Function will be
reserved and cancelled.
2.
Auto Clean function works before and after cooling or dehumidification mode.
For details, refer to the below points.
3.
When the unit is started after the reservation of Auto Clean ,the Cool Start
function operates and indoor Fan is started after 20 seconds.
4.
When you press Start/Stop button to turn off the unit after the you have reserved
Auto Clean function, the air-conditioner circulates the indoor air in the Auto
Clean mode with no more Cooling or Dehumidification operation. It lasts for 30
minutes.
5.
If you press the AUTO CLEAN button again during the product operation , Auto
Clean function will be cancelled.
Operation procedures when the remote control can't be used.
The operation will be started if the ON/OFF button is pressed.
If you want to stop operation, re-press the button.
Forced operation
Heat pump Model
Cooling Model
Room Temp.
≥ 24°C 21°C ≤ Room Temp. < 24°C Room Temp. < 21°C
Operating mode Cooling Cooling Healthy Dehumidification Heating
Indoor FAN Speed
High High High High
Setting Temperature
22°C 22°C 23°C 24°C
Test operation
During the TEST OPERATION, the unit operates in cooling mode at high speed fan, regardless of room
temperature and resets in 18 minutes.
During test operation, if remote controller signal is received, the unit operates as remote controller sets.
If you want to use this operation, Press and hold the ON/OFF button for 3~5 seconds, then the buzzer sound 1
"beep".
If you want to stop the operation, re-press the button.
Safety Precautions
ENGLISH
Owner's Manual 25
Page 26

High
Speed
Auto restart
In case the power comes on again after a power failure, Auto Restarting Operation is the function to operate
procedures automatically to the previous operating conditions.
So there is no need of activating this function by pressing any key or button.
In the initial mode, the fan operates at a low speed and the compressor starts 2.5~3 minutes later.
As the compressor starts, the fan speed also resumes its previous setting mode.
Auto restart function has set enable as factory default.
But customer can set up by following this instruction.
To be disable function
- Press and hold the ON/OFF button for 6 seconds, then the buzzer sound 2 "beep" and the indicator lamp (1)
blinks 4 times.
To be enable function
- Press and hold the ON/OFF button for 6 seconds, then the buzzer sound 2 "beep" and the indicator lamp (1)
brights 4 times.
NOTICE
Helpful information
Fan speed and cooling capacity.
The cooling capacity indicated in the specification is the value
when the fan speed is set to high, and the capacity will be lower
at low or medium fan speed.
High fan speed is recommended when you wish to cool the room
quickly.
Introduction
26 Room Air Conditioner
Page 27

Page 28

(Side)
(Rear)
Air intake
vents
Air outlet
vents
Piping
Drain Hose
(Side)
(Rear)
Air intake
vents
Air outlet
vents
Piping
Drain Hose
(Side)
(Rear)
Air intake
vents
Air outlet
vents
Piping
Drain Hose
TRIPLE
DEODORIZING
Filter
3
2
Outdoor Unit
The heat exchanger coils and panel vents of the outdoor unit should be checked regularly.
If clogged with dirt or soot, the heat exchanger
and panel vents may be professionally steam cleaned.
Dirty or clogged coils will reduce the
operating efficiency of the system and
cause higher operating costs.
NOTICE
Replacement of purifying filter (Optional)
Recomended use period : About 2 years
1. Remove front panel and air filters.
2. Remove air purifying filters.
3. Insert new air purifying filters.
4.
Reinsert air filters and close front panel.
Introduction
Air filter
28 Room Air Conditioner
Page 29

Safety Precautions
Common Problems and Solutions
Before calling for service
If you have problems with your air conditioner, read the following information and try to solve
the problem. If you cannot find a solution, turn off the air conditioner and contact your dealer.
Air conditioner does not operate
1. Ensure that the air conditioner is plugged into a proper outlet.
2. Check the fuse or circuit breaker.
3. Check whether the voltage is unusually high or low.
Air does not feel cold enough on the cooling setting
1. Ensure that the temperature settings are correct.
2. Check to see if the air filter is clogged with dust. If so, replace the filter.
3. Ensure that the air flow from the outside is not obstructed and that there is a clearance of
over 20" between the back of the air conditioner and the wall or fence behind it.
4. Close all doors and windows and check for any source of heat in the room.
Before calling for service, please review the following list of common problems and
solutions.
The air conditioner is operating normally when:
• You hear a pinging noise. This is caused by water being picked up by the fan on rainy days
or in highly humid conditions. This feature is designed to help remove moisture in the air
and improve cooling efficiency.
• You see water dripping from the rear of the unit. Water may be collected in the base pan in
highly humid conditions or on rainy days. This water overflows and drips from the rear of
the unit.
• You hear the fan running while the compressor is silent. This is a normal operational
feature.
ENGLISH
Owner's Manual 29
Page 30

Introduction
Troubleshooting
The air conditioner may be operating abnormally when:
Problem
The air conditioner is
unplugged.
The fuse is blown/circuit
breaker is tripped.
Power failure.
Airflow is restricted.
The air filter is dirty.
The room may have been
hot.
Cold air is escaping.
Cooling coils have iced up.
Air
conditioner
does not start
Air
conditioner
does not cool
as it should
• Make sure the air conditioner plug is
pushed completely into the outlet.
• Check the house fuse/circuit breaker
box and replace the fuse or reset the
breaker.
• If power failure occurs, turn the mode
control to Off.
When power is restored, wait 3
minutes to restart the air conditioner
to prevent tripping of the compressor
overload.
• Make sure there are no curtains,
blinds, or furniture blocking the front of
the air conditioner.
• Clean the filter at least every 2 weeks.
See the care and Maintenance
section.
• When the air conditioner is first turned
on, you need to allow time for the
room to cool down.
• Check for open furnace floor registers
and cold air returns.
• See Air Conditioner Freezing Up
below.
What To DoPossible Causes
* You can refer to the Energy Star program in detail at www.energystar.gov.
30 Room Air Conditioner
Page 31

LG AC Ruang.
BUKU PANDUAN PEMILIK
PENTING
• Mohon buku panduan pemilik ini dibaca dengan cermat
dan
menyeluruh sebelum memasang dan mengoperasikan
AC
Anda.
• Setelah buku panduan pemilik ini dibaca, mohon disimpan
untuk
digunakan lagi di masa depan.
Sebelum dipasang, unit AC
ini
harus dimintakan
persetujuan
dari perusahaan
listrik
yang menyediakan
listrik
(EN 61000-2, EN 61000-
3 Norm).
Page 32

2 Unit Penyejuk Ruangan
Panduan bagi Pemilik Unit Penyejuk Ruangan
DAFTAR ISI
UNTUK CATATAN ANDA
Tulislah model dan nomor seri dari unit ini di sini:
Nomor Model #
Nomor Seri #
Anda dapat menemukannya di label di sisi dari setiap unit
Nama Dealer
Tanggal Pembelian
? Tempelkan tanda pembelian Anda ke halaman ini
jika sewaktu-waktu Anda memerlukannya untuk
membuktikan tanggal pembelian atau untuk
keperluan garansi.
BACALAH PANDUAN INI
Di dalamnya Anda akan menjumpai banyak tips yang
membantu
tentang bagaimana cara menggunakan dan
cara
merawat unit penyejuk ruangan dengan benar.
Cu
kup dengan tindakan preventif yang sederhana,
An da dap at menghem at banyak wak tu dan ua ng
selama
Anda menggunakan unit penyejuk ruangan ini.
Anda
akan menjumpai banyak jawaban atas masalah
yan g umum dijumpai pada bagan tips pemecahan
masala h
. Jika Anda men yem pat kan diri membaca
terlebih
dahulu Bagan Tips Pemecahan Masalah, Anda
mungkin tidak perlu memanggil petugas servis lagi.
PERHATIAN
• Hubungi teknisi servis resmi untuk memperbaiki
dan merawat unit ini.
• Hubungi petugas pemasang unit ini.
• Unit penyejuk ruangan tidak dimaksudkan untuk
digunakan oleh anak kecil atau orang yang cacat
tanpa pengawasan.
• Anak-anak harus diawasi untuk memastikan
bahwa mereka tidak bermain-main dengan unit
penyejuk ruangan.
• Jika kabel listrik perlu diganti, pekerjaan
penggantian harus dilakukan oleh petugas resmi
saja dan dengan menggunakan onderdil asli saja.
• Pekerjaan pemasangan harus dilakukan sesuai
dengan Kode Perlistrikan Nasional oleh petugas
resmi yang ahli.
Tindakan Pengamanan..................3
Sebelum Mengoperasikan.............9
Pendahuluan.................................10
Pengamanan Listrik ....................11
Petunjuk Pengoperasian .............13
Pemeliharaan dan Perbaikan ......27
Page 33

3
Tindakan Pengamanan
Tindakan Pengamanan
Untuk mencegah terjadinya luka pada diri pemilik atau orang lain serta tidak terjadi kerusakan
barang-barang, petunjuk berikut ini harus diikuti.
Pengoperasian yang salah akibat mengabaikan petunjuk dapat menyebabkan luka atau kerusakan.
Tingkat keseriusannya dapat diklasifikasikan dengan simbol-simbol berikut ini.
AWAS
PERHATIAN
Makna dari simbol-simbol yang dipakai di panduan ini ditunjukkan di bawah ini.
Simbol ini menunjukkan kemungkinan terjadinya kematian atau luka serius.
Simbol ini menunjukkan kemungkinan terjadinya luka atau kerusakan barang saja.
Jangan lakukan.
Ikuti petunjuknya.
AWAS
Pemasangan
Jangan gunakan kabel,
steker, atau stopkontak
yang sudah rusak.
• Ada resiko kebakaran atau unit
dapat menyetrum.
Untuk pekerjaan listrik,
hubungi dealer, penjual,
tukang listrik yang ahli, atau
Pusat Servis Resmi.
• Ada resiko kebakaran atau unit
dapat menyetrum.
Selalu gunakan steker dan
stopkontak yang sudah
di-ground.
• Ada resiko unit menyetrum.
INDONESIA
Pasanglah panel dan
penutup kotak kontrol
dengan benar.
• Ada resiko kebakaran atau unit
dapat menyetrum.
Jangan mengubah atau
memanjangkan sendiri
kabel listriknya.
• Ada resiko kebakaran atau unit
dapat menyetrum.
Jangan memasang, memindahkan,
atau memasang ulang unit oleh
Anda (pemilik) sendiri.
Ada resiko kebakaran, unit dapat
menyetrum, dan dapat terjadi ledakan,
serta dapat menimbulkan luka.
Panduan bagi Pemilik
Page 34

4
•
Tindakan Pengamanan
Berhati-hatilah saat
membongkar kemasan dan
memasang produk.
Bagian tepi unit yang tajam dapat
menimbulkan luka. Berhati-hatilah
khususnya terhadap bagian tepi dan
sirip dari kondensor dan evaporator.
Pastikan bahwa daerah
pemasangan tidak rusak
akibat usia.
Jika dudukannya runtuh, unit
penyejuk ruangan dapat terjatuh serta
dapat merusakkan barang-barang,
menyebabkan kerusakan unit, atau
menimbulkan luka badan.
Untuk pemasangan unit,
hubungi selalu dealer atau
Pusat Servis Resmi.
Ada resiko kebakaran, unit dapat
menyetrum, dan dapat terjadi ledakan,
serta dapat menimbulkan luka.
Jangan memasang produk
pada dudukan yang tidak
stabil.
• Dapat menyebabkan luka,
kecelakaan, atau kerusakan
produk.
Jangan biarkan unit penyejuk ruangan
bekerja dalam waktu lama di ruangan
yang sangat lembab atau di tempat yang
pintu dan jendelanya dibiarkan terbuka.
• Lembab dapat mengkondensasi
atau mengembun dan dapat
membasahi atau merusak
perabotan.
Pengoperasian
Berhati-hatilah jangan
sampai kabel listrik ditarik
atau rusak selama unit
beroperasi.
• Ada resiko kebakaran atau unit
dapat menyetrum.
Unit Penyejuk Ruangan
Jangan menempatkan apa
pun di atas kabel listrik.
• Ada resiko kebakaran atau unit
dapat menyetrum.
Jangan mematikan atau
menghidupkan unit penyejuk
ruangan dengan cara mencolokkan
atau mencabut steker.
• Ada resiko kebakaran atau unit
dapat menyetrum.
Page 35

Jangan sampai air tumpah
ke bagian-bagian yang
dialiri listrik.
• IAda risiko kebakaran,
kegagalan produk, atau unit
dapat menyetrum.
Tindakan Pengamanan
Gunakan stopkontak yang
khusus digunakan untuk
unit ini.
• Ada resiko kebakaran atau unit
dapat menyetrum.
Peganglah kepala steker ketika
mencabut kabel dari stopkontak.
Jangan menyentuhnya dengan
tangan yang basah.
• Ada resiko kebakaran atau unit
dapat menyetrum.
Jangan menyimpan atau
menggunakan gas atau
bahan yang mudah terbakar
di dekat unit.
• Ada resiko kebakaran atau unit
menjadi rusak.
Jangan menempatkan
pemanas atau peralatan
listrik lain di dekat kabel
listrik.
• Ada resiko kebakaran atau unit
Jangan menggunakan
produk di tempat yang
benar-benar tertutup rapat
dalam waktu yang lama.
• Dapat terjadi penurunan kadar
dapat menyetrum.
INDONESIA
oksigen di udara.
Jika terjadi kebocoran gas
yang mudah terbakar,
matikan sumber gas dan
bukalah jendela untuk
ventilasi sebelum
menyalakan kembali unit.
• Ada resiko terjadi ledakan atau
kebakaran.
x
a
Thinner
W
Lepaskan steker dari
stopkontak jika muncul
suara, bau, atau asap yang
tidak wajar dari unit.
• Ada resiko terjadi kebakaran
atau ledakan.
Hentikan pengoperasian dan
tutup jendela jika terjadi badai
atau angin ribut. Jika mungkin,
lepaskan unit penyejuk
ruangan dari tempatnya
sebelum angin ribut datang.
Ada resiko kerusakan barang-barang,
unit menjadi tidak dapat difungsikan,
atau unit dapat menyetrum.
Panduan bagi Pemilik
5
Page 36

• • •
• • •
Tindakan Pengamanan
Jangan membuka kisi-kisi
udara masuk selama unit
beroperasi. Jangan menyentuh
filter elektrostatis, jika unit
Jika produk terendam
(karena banjir atau
tenggelam), hubungi Pusat
Servis Resmi.
dilengkapi dengan fasilitas itu.)
Ada resiko dapat menimbulkan
luka, unit dapat menyetrum, dan
dapat terjadi kerusakan unit.
Lepaskan steker unit
sebelum membersihkannya
atau melakukan tindakan
pemeliharaan.
Ada resiko kebakaran atau
unit dapat menyetrum.
Jika produk akan tidak
digunakan dalam waktu
yang lama, putuskan listrik
ke catu daya atau matikan
pemutus sirkuitnya.
Ada resiko unit menyetrum.
Ada resiko unit menjadi rusak,
atau mungkin unit akan
beroperasi tanpa pengawasan.
Berikan ventilasi
secukupnya ke produk
sepanjang waktu jika
dioperasikan di ruangan
tempat memasak dll.
Ada resiko kebakaran atau unit
dapat menyetrum.
Pastikan bahwa tidak ada
seorang pun yang dapat
melangkah atau terjatuh ke
atas unit-luar.
Ini dapat mengakibatkan luka
badan dan unit dapat rusak.
Pemasangan
Selalu periksa kebocoran
gas (pendingin) setelah
memasang atau
memperbaiki unit.
Kadar gas pendingin yang
rendah dapat merusakkan unit.
Unit Penyejuk Ruangan
6
PERHATIAN
Pasanglah selang
pembuangan untuk
memastikan bahwa air
terbuang dengan benar.
Sambungan yang buruk dapat
menyebabkan kebocoran air.
Usahakan unit tidak miring
saat memasangnya.
Untuk mencegah terjadinya
getaran atau kebocoran air.
90˚
Page 37

• • •
• • •
• • •
Tindakan Pengamanan
Jangan memasang produk di
tempat yang suara atau udara
panas yang keluar dari
unit-luar dapat mengganggu
Gunakan tenaga dua orang
atau lebih untuk
mengangkat dan
mengangkut unit.
kehidupan bertetangga.
Ini dapat menimbulkan masalah
dengan tetangga Anda.
Untuk menghindari luka badan.
Pengoperasian
Jangan mengarahkan udara
keluar langsung ke kamar
yang dihuni. (Jangan duduk
di aliran udara.)
Ini dapat mengganggu
kesehatan Anda.
Jangan menggunakan produk
untuk tujuan tertentu, seperti
mengawetkan makanan,
benda seni dll. Unit ini adalah
unit penyejuk ruangan dan
bukan sistem pendingin.
Ada resiko kerusakan atau
kehilangan barang atau nilai
seni dll.
Jangan memasang produk
di tempat di mana akan
terkena udara laut (cipratan
air laut) secara langsung.
Dapat menimbulkan korosi
pada produk. Korosi, khususnya
pada sirip kondensor dan
evaporator, dapat
menyebabkan produk rusak ata
beroperasi secara tidak efisien.
INDONESIA
Jangan menghalangi udara
masuk atau keluar.
Ini dapat menyebabkan unit
rusak.
Gunakan kain lembut untuk
membersihkan. Jangan
gunakan deterjen yang
keras atau pelarut dll.
Ada resiko kebakaran, unit
menyetrum, atau kerusakan
pada benda-benda yang terbuat
dari plastik.
Jangan menyentuh benda
logam pada produk ketika
melepaskan filter udara.
Bagian itu sangat tajam!
Ada resiko luka badan.
Jangan melangkah ke atas
produk atau menempatkan
benda-benda di atasnya
(unit-luar).
Ada resiko luka badan dan unit
menjadi rusak.
Panduan bagi Pemilik
7
Page 38

• •
• • •
• •
Tindakan Pengamanan
Pasanglah filter dengan
kencang. Bersihkan filter
setiap dua minggu sekali
atau lebih sering jika perlu.
Filter yang kotor akan
mengurangi efisiensi unit
penyejuk ruangan dan dapat
menyebabkan produk rusak
atau tidak dapat bekerja.
Gunakan panjatan atau tangga yang kokoh
di saat membersihkan atau merawat unit
penyejuk ruangan.
Jangan memasukkan tangan
atau benda lain melalui lubang
udara masuk atau keluar di saat
unit penyejuk ruangan bekerja.
Ada benda-benda tajam dan
bergerak yang dapat
menimbulkan luka badan.
Gantilah semua baterai pada remote control
dengan yang baru dari tipe yang sama.
Jangan campur baterai lama dan baru atau
jenis baterai yang berbeda.
Berhati-hatilah jangan sampai terluka.
Ada resiko terjadi ledakan atau kebakaran.
Jangan meminum air yang
keluar dari unit.
Air tidak memenuhi sanitasi dan
dapat menimbulkan masalah
kesehatan yang serius.
Saat tidak Dipakai
Jangan mengecas atau membongkar
baterai. Jangan membuang baterai ke
dalam nyala api.
Bisa terbakar atau meledak.
Unit Penyejuk Ruangan
8
Jika cairan dari baterai mengenai kulit atau
pakaian, cucilah dengan air bersih. Jangan
gunakan remote control jika baterai telah
bocor.
Bahan kimia pada baterai dapat menyebabkan
kebakaran atau bahaya kesehatan lainnya.
Page 39

Sebelum Mengoperasikan
1. Hubungi ahli pemasangan untuk memasang unit.
2. Masukkan steker dengan benar.
3. Gunakan sirkuit khusus untuk unit.
4. Jangan gunakan kabel tambahan.
5. Jangan menghidupkan atau mematikan dengan cara mencolokkan atau mencabut kabel listrik.
6. Jika kabel atau steker telah rusak, gantilah dengan yang baru dan asli.
1.
Terpapar ke aliran udara langsung dalam waktu yang lama dapat membahayakan kesehatan. Jangan
mengarahkan secara langsung aliran udara ke penghuni, hewan piaraan, atau tanaman untuk waktu
yang lama.
2.
Mengingat ada kemungkinan terjadi penurunan kadar oksigen, berikan ventilasi ke ruangan ketika
menggunakan unit bersama-sama dengan kompor atau alat pemanas lainnya.
3.
Jangan gunakan unit penyejuk ruangan ini untuk tujuan tertentu (misalnya, sebagai alat ukur, atau
untuk mengawetkan makanan dan benda seni, atau untuk mengatur suhu pemeliharaan hewan
piaraan atau tanaman dll.). Pemakaian semacam itu dapat merusak benda-benda atau mengganggu
kehidupan hewan/tanaman.
1.
Jangan menyentuh benda logam pada produk ketika melepaskan filter udara. Dapat menimbulkan
luka.
2.
Jangan gunakan air untuk membersihkan unit penyejuk ruangan. Jika terkena air insulasi dapat
rusak, dan dapat menyebabkan unit menyetrum.
3.
Saat membersihkan unit, pertama-tama pastikan bahwa aliran listrik dan pemutus sirkuit telah
dimatikan. Dapat menimbulkan luka bada jika aliran listrik dinyalakan lagi ketika unit masih
dibersihkan bagian dalamnya.
Untuk perbaikan dan pemeliharaan, hubungi dealer servis resmi.
Sebelum Mengoperasikan
Pemakaian
Pembersihan dan Pemeliharaan
Perawatan
Tindakan Pengamanan
INDONESIA
Panduan bagi Pemilik
9
Page 40

Tindakan Pengamanan
Pendahuluan
Simbol-simbol pada Panduan ini
Simbol ini menunjukkan resiko unit dapat menyetrum.
Simbol ini menunjukkan potensi bahaya kerusakan unit penyejuk
ruangan.
PERHATIAN
Fitur
AWAS: Unit ini harus dipasang sesuai dengan peraturan perkabelan nasional. Panduan
ini hanyalah merupakan penuntun untuk membantu menjelaskan fitur-fitur produk.
Unit-Dalam
Saluran Udara Masuk
Unit-Luar
Lubang Udara
Masuk
Simbol ini menunjukkan adanya catatan khusus.
Filter Udara
Lubang Udara Masuk
Menyambung
Kabel
Panel Depan
Penerima Sinyal
Menyambung
Kabel
Lubang Udara
Keluar
Unit Penyejuk Ruangan
10
Pipa
Selang
Pembuangan
Pelat Dasar
Lubang Udara Keluar
Pipa
Selang
Pembuangan
Pelat Dasar
Page 41

Pengamanan Listrik
AWAS: Alat ini harus diberi ground dengan benar.
Untuk meminimalkan resiko unit menyetrum, Anda harus selalu memasang kawat ground.
AWAS: Jangan memotong atau melepaskan sambungan ground
dari kabel listrik.
AWAS: Menyambung terminal ground pada steker adaptor pada
sekrup penutup stopkontak di dinding tidak akan
menyediakanground bagi unit ini kecuali jika sekrup itu terbuat dari
logam dan tidak diinsulasi, dan stopkontak telah terhubung ke kawat
ground untuk rumah.
AWAS: Jika Anda ragu-ragu apakah unit penyejuk ruangan telah
diberi ground dengan benar ataukah belum, mintalah petugas listrik
yang berpengalaman untuk mengeceknya.
Metode yang disukai
Pastikan ground telah dipasang
dengan benar sebelum dipakai
Tindakan Pengamanan
INDONESIA
Panduan bagi Pemilik
11
Page 42

Tindakan Pengamanan
Penggunaan Steker Adapter untuk Sementara
Kami sangat menyarankan untuk tidak menggunakan steker adapter mengingat potensi bahaya yang
ditimbulkan. Untuk hubungan sementara, gunakan hanya steker adapter yang terdaftar pada UL, yang
tersedia di setiap toko alat listrik setempat. Pastikan bahwa slot besar pada steker adapter sesuai dengan
slot besar pada stopkontak untuk sambungan polaritas yang benar. Untuk memutus aliran listrik dari
steker adapter, gunakan satu tangan untuk masing-masing steker yang tergabung untuk mencegah
rusaknya terminal ground. Hindari seringnya mencopot dan memasang steker karena ini dapat merusak
terminal ground.
AWAS: Jangan gunakan unit dengan steker yang sudah rusak.
Kami sangat menyarankan untuk tidak menggunakan kabel gulung mengingat potensi bahaya yang
ditimbulkan. Untuk kondisi sementara, gunakan hanya kabel gulung 3-kawat dengan ground yang telah
terdaftar pada CSA dan UL, dengan rating 15 A, 125 V.
Penggunaan Kabel Gulung untuk Sementara
Metode sementara
Colokan Steker Adapter
Penutup stopkontak
Sekrup Logam
12
Unit Penyejuk Ruangan
Page 43

•
•
: Lights up during Sleep Mode Auto operation.
*
Operasi Hot Start: Hentikan kipas unit-dalam pada Operasi Pemanasan untuk mencegah keluarnya udara
dingin dari unit.
Petunjuk Pengoperasian
Cara Memasang Baterai
1. Lepaskan penutup baterai dengan menariknya sesuai dengan
arah tanda panah.
2.
Masukkan baterai baru dan pastikan bahwa kutub (+) dan (
telah terpasang dengan benar.
3.
Pasang kembali penutup dengan menggeser kembali ke
posisinya.
Tindakan Pengamanan
PERHATIAN
Gunakan 2 baterai AAA (1.5 volt).
Jangan gunakan baterai isi-ulang.
Penyimpanan dan Tips Menggunakan Remote Control
Remote control dapat diletakkan di wadahnya di
Penyimpanan dan Tips Menggunakan Remote Control
dinding.
Penerima sinyal
Menerima sinyal dari remote control. (Suara penerimaan sinyal: dua 'bip' pendek atau satu 'bip' panjang.)
Lampu penunjuk operasi
On/Off
Sleep Mode
Timer
Unit luar ruang
OUT
DOOR
Pengoperasian
Defrost Mode
Unit luar ruang
Pengoperasian
Neo Plasma
Neo Plasma Plus Ion
Power Display
Pendinginan
Indikator
Pemanasan
operasi
Dehumidifi-
Bentuk
tampilan
kasi
Mengutur
suhu
: Menyala selama unit beroperasi.
: Menyala selama operasi Timer.
: Menyala selama pengoperasian unit luar ruang.
(cooling model saja)
: Menyala selama Defrost Mode atau Hot
Pengoperasian mulai (heat pump model saja)
: Menyala selama pengoperasian unit luar ruang.
(cooling model saja)
: Fungsi ini melukiskan mode dinamik dengan
menggunakan sistem pencahayaan multipel.
: Fungsi ini melukiskan mode dinamik dengan
menggunakan sistem pencahayaan multipel.
: Mengindikasikan pengaturan temperatur dan mode pengoperasian. (Pilihan)"
Standar Panas
Terlalu
panas
Mode operasi A.I
Untuk mengoperasikan unit penyejuk ruangan,
arahkan remote control ke penerima sinyal.
Lampu penunjuk operasi
Jet
Nyaman Dingin
Terlalu
dingin
(Dingin,
Panas)
Operasi uji
Panduan bagi Pemilik
INDONESIA
13
Page 44

Tindakan Pengamanan
Kontrol-kontrol
ON
OFF
CANCEL
AUTO CLEAN
SET
1
3
5
4
9
10
12
14
16
7
2
8
13
15
11
6
Tutup lipat
(terbuka)
Pemancar sinyal
17
Kontrol-kontrol akan tampak seperti di bawah ini.
Operasi Remote Control
1. TOMBOL “ START/STOP”
Operasi akan mulai bila tombol ini ditekan dan
berhenti bila tombol ini ditekan lagi.
2.
TOMBOL “ OPERATION MODE SELECTION”
Digunakan untuk memilih mode operasi.
3.
TOMBOL “ ROOM TEMPERATURE SETTING”
Digunakan untuk memilih temperatur ruang
4.
“ INDOOR FAN SPEED SELECTOR”
Digunakan untuk memilih kecepatan kipas dalam
empat tingkat: rendah, sedang, tinggi dan ACAK.
5.
“ JET COOL”
Digunakan untuk memulai atau menghentikan
speed cooling: (speed cooling mengoperasikan
kipas dengan kecepatan super tinggi dalam mode
penyejukan.)
6.
TOMBOL “ CHAOS SWING”
Digunakan untuk mematikan atau menghidupkan
gerakan louver dan mengeset arah aliran udara
naik/turun seperti yang dikehendaki.
7.
TOMBOL “ ON/OFF TIMER”
Digunakan untuk menyetel waktu dimulainya dan
dihentikannya pengoperasian. (Lihat halaman 23)
8.
TOMBOL “ TIME SETTING”
Digunakan untuk menyetel waktu (Lihat halaman
23)
9.
TOMBOL “ TIMER SET/CANCEL”
Digunakan untuk menyetel timer ketika waktu
yang dikehendaki dicapai dan untuk membatalkan
operasi Timer. (Lihat halaman 23)
10.
TOMBOL “ SLEEP MODE AUTO”
Digunakan untuk menyetel operasi Sleep Mode
Auto (Lihat halaman 23)
11.
TOMBOL “ AIR CIRCULATION”
Digunakan untuk mensirkulasikan udara ruangan
tanpa penyejukan atau pemanasan. (Lihat
halaman 24)
12.
TOMBOL "ROOM TEMPERATURE
CHECKING
”
Digunakan untuk mengecek temperatur ruang
13.
NANO PLASMA (opsional)
Digunakan untuk memulai atau menghentikan
fungsi pemurnian plasma: (Lihat halaman 21)
14.
TOMBOL HORIZONTAL AIRFLOW DIRECTION
CONTROL (opsional)
Digunakan untuk menyetel arah aliran udara
horizontal seperti yang diinginkan.
15.
TOMBOL RESET
Digunakan untuk menyetel ulang waktu
16.
TOMBOL 2nd F
Digunakan sebelum menggunakan mode-mode
yang dicetak dalam warna biru pada bawah
tombol. (Lihat halaman 22)
17.
AUTO CLEAN (opsional)
Digunakan untuk menyetel mode Auto Clean.
Mode Operasi
Operasi Penyejukan
Operasi Otomatis atau Pergantian Otomatis
Operasi Anti Lembab Sehat
Operasi Pemanasan
•
Cooling model ( ), Heat pump model ( )
Unit Penyejuk Ruangan
14
Page 45

ON
1
2
3
4
Operasi Pemanasan (Heat pump model saja)
Tekan tombol Start/Stop
Unit akan merespons
dengan suara bip.
Buka pintu remote control. Untuk memilih Operasi
Pemanasan,.tekan tombol Operation Mode Selection.
Setiap kali tombol ditekan, mode operasi akan berubah
sesuai arah panah.
Tindakan Pengamanan
INDONESIA
Penyejukan
Tutup pintu remote control.
Setel temperaturnya lebih rendah daripada temperatur ruang
Temperatur bisa disetel da lam kisaran 16°C~30°C pada
interval 1
°C.
Setel kecepatan kipas lagi dengan pintu
rem o
te control dalam keadaan tertutup.
Anda
dapat memilih kecepatan kipas dalam
empat
tingkat: rendah, medium, tinggi atau
ACAK. Setiap kali tombol ditekan, mode
kecepatan kipas akan berubah.
Angin alami dengan logika CHAOS
Untuk
menikmati perasaan yang lebih segar, tekan selektor kecepatan kipas dalam ruang dan setel ke
mode
CHAOS. Dalam mode ini, angin akan bertiup seperti angin alami dengan secara otomatis
mengubah kecepatan kipas sesuai dengan logika CHAOS.
Otomatis
Untuk menurunkan temperatur
Untuk menaikkan temperatur
Anti Lembab Sehat
Pemanasan
(Model pompa
panas saja)
Panduan bagi Pemilik
19
Page 46

ON
1
2
3
4
Operasi Pendinginan
Tindakan Pengamanan
Tekan tombol Start/Stop.
Unit akan merespons dengan
bunyi 'bip'.
Buka pintu dari remote control. Untuk memilih Operasi
Pendinginan, tekan tombol Pemilihan Mode Operasi. Setiap
kali tombol ditekan, mode operasi akan bergeser dengan
arah sesuai tanda panah.
INDONESIA
Penyejukan
pintu dari remote control. Setel suhu lebih rendah
Tutup
daripada
Angin alami dengan logika CHAOS
Untuk
mendapatkan suasana yang lebih segar, tekan selektor kecepatan kipas Unit-Dalam dan pilih
mode
CHAOS. Dengan mode ini, udara akan berembus seperti hembusan udara alami dengan cara
mengubah kecepatan kipas secara otomatis ke logika CHAOS.
suhu ruangan. Suhu dapat disetel dengan kisaran
18
°C~30 C pada interval 1°C.
Setel kecepatan kipas dengan pintu
remote control tetap tertutup. Anda
dapat memilih kecepatan kipas dalam
empat langkah: lambat, medium,
cepat, dan CHAOS.
Setiap kali tombol ditekan, mode
kecepatan kipas akan bergeser.
Otomatis
Anti Lembab Sehat
Untuk menaikkan suhu
Untuk menurunkan suhu
Pemanasan
(Model pompa panas saja)
Panduan bagi Pemilik
15
Page 47

ON
Auto
1
2
3
Tindakan Pengamanan
Operasi Otomatis (model Pendinginan saja)
Tekan tombol Start/Stop.
Unit akan merespons dengan
bunyi 'bip'.
Buka pintu dari remote control. Untuk memilih Operasi
Otomatis, tekan tombol Pemilihan Mode Operasi. Setiap kali
tombol ditekan, mode operasi akan bergeser dengan arah
sesuai tanda panah.
Pendinginan
Suhu dan kecepatan kipas akan disetel secara otomatis oleh
e lek tro nik be rd a sa rka n s uhu r u an gan ya ng
kon tr o l
sesungguhnya.
ditetapkan,
dingin
(hingga
ditetapkan akan berubah-ubah secara otomatis.
Selama Operasi Otomatis
Anda tidak dapat mengontrol kecepatan kipas unit-dalam. Kecepatan ini akan ditentukan oleh aturan Fuzzy.
Jika sistem tidak beroperasi sebagaimana yang diinginkan, pindahlah secara manual ke mode lain.
Sistem
tidak dapat berpindah secara otomatis dari mode pendinginan ke mode pemanasan, atau
sebaliknya, dan ini harus dilakukan secara manual.
Selama
Operasi Otomatis, penekanan tombol ayunan CHAOS akan membuat bilah horisontal berayun
ke atas dan ke bawah secara otomatis.
Unit Penyejuk Ruangan
16
tekan tombol Pengaturan Suhu Ruangan. Semakin
atau hangat yang ingin Anda rasakan, semakin sering
dua kali) Anda perlu menekan tombol. Suhu yang
Jika Anda ingin mengubah suhu yang telah
Untuk menaikkan suhu
Untuk menurunkan suhu
Dehumidifikasi
Sehat
Pemanasan
(Model pompa panas saja)
Page 48

ON
1
2
3
4
Operasi Pergantian Otomatis (model pompa panas saja)
Tekan tombol Start/Stop
Unit akan merespons dengan
suara bip.
Buka pintu remote control. Untuk memilih Pergantian
Otomatis,.tekan tombol Operation Mode Selection.
Setiap kali tombol ditekan, mode operasi akan berubah
sesuai arah panah.
Tindakan Pengamanan
INDONESIA
Penyejukan
Tutup pintu remote control. Setel temperaturnya lebih rendah
daripada
kisaran 18
Setel kecepatan kipas lagi dengan pintu
remote control dalam keadaan tertutup. Anda
dapat memilih kecepatan kipas dalam empat
tingkat: rendah, medium, tinggi atau ACAK.
Setiap kali tombol ditekan, mode kecepatan
kipas akan berubah.
Selama Operasi Pergantian Otomatis
AC
akan mengubah mode operasinya secara otomatis untuk mempertahankan temperatur dalam ruang.
Ketika
temperatur ruang ±2°°C lebih tinggi daripada seting temperatur, AC akan mempertahankan temperatur
ruang dalam kisaran
±2 C terhadap seting temperatur melalui mode pergantian otomatis.
tem peratur ruang Temperatur bi sa diset dalam
°C-30°C pada interval 1°C.
Pergantian
otomatis
Untuk menaikkan temperatur
Untuk menurunkan temperatur
Anti Lembab Sehat
Pemanasan
(Model pompa
panas saja)
Panduan bagi Pemilik
17
Page 49

ON
1
2
3
Tindakan Pengamanan
Operasi Anti Lembab Sehat
Tekan tombol Start/Stop
Unit akan merespons
dengan suara bip.
Buka pintu remote control. Untuk memilih Operasi Anti
Lembab Sehat, tekan tombol Operation Mode Selection.
Setiap kali tombol ditekan, mode operasi akan berubah
sesuai arah panah.
Penyejukan
Setel kecepatan kipas sekali lagi dengan pintu
remote control masih tertutup.
Anda bisa memilih kecepatan kipas dalam empat
tingkat: rendah, sedang, tinggi dan CHAOS.
Setiap kali tombol ditekan, mode kecepatan kipas
akan berubah.
Angin alami dengan logika CHAOS
Untuk menikmati perasaan yang lebih segar, tekan selektor
kecepatan kipas dalam ruang dan setel ke mode CHAOS. Dalam
mode ini, angin akan bertiup seperti angin alami dengan secara
otomatis mengubah kecepatan kipas sesuai dengan logika CHAOS.
Selama Operasi Anti Lembab Sehat
Jika Anda memilih mode anti lembab pada tombol pilihan operasi, maka AC akan mulai menjalankan
fungsi anti lembab. Fungsi ini secara otomatis akan mengeset temperatur ruang dan volume aliran
udara ke kondisi terbaik untuk anti lembab, berdasarkan temperatur ruang terakhir yang dideteksi.
Tetapi dalam hal ini temperatur yang dihasilkan tidak tampak pada remote kontrol dan Anda juga tidak
bisa mengontrol temperatur ruang.
Selama fungsi anti lembab sehat ini, volume aliran udara secara otomatis diset menurut algoritma
optimalisasi yang merespons status temperatur ruang saat itu, sehingga kondisi ruang terjaga sehat
dan nyaman meskipun dalam cuaca yang sangat lembab.
Otomatis
Anti Lembab
Sehat
Pemanasan
(Model pompa
panas saja)
Unit Penyejuk Ruangan
18
Page 50

atau atau
• Selama fungsi JET COOL sewaktu-waktu AC akan mulai meniupkan udara dingin dengan
kecepatan yang sangat tinggi selama 30 menit sehingga temperatur ruang secara otomatis akan
menjadi 18°C. Fungsi ini secara khusus digunakan untuk mendinginkan ruangan secara cepat di
musim panas.
Dalam mode pompa panas atau mode neuro fuzzy, fungsi JET COOL tidak tersedia.
• Untuk kembali dari mode JET COOL ke mode penyejukan normal, tekan tombol pilihan mode
operasi, pilihan volume aliran udara, tombol pengatur temperatur atau tombol JET COOL lagi.
PERHATIAN
Tekan tombol Start/Stop
Unit akan merespons dengan
suara bip..
Tekan tombol Jet Cool untuk
mengoperasikan mode penyejukan
kecepatan dan unit akan beroperasi
pada kecepatan super tinggi pada
mode penyejukan selama 30 menit.
Untuk
membatalkan mode Jet Cool, tekan tombol Jet Cool,
tombol
kecepatan kipas atas tombol pengatur temperatur
raung
sekali lagi dan unit akan beroperasi dengan kecepatan
kipas tinggi pada mode penyejukan.
1
2
3
Operasi Jet Cool
Tindakan Pengamanan
20
Unit Penyejuk Ruangan
Page 51

Tekan tombol Start/Stop
Unit akan merespons dengan
suara bip.
1
Buka pintu remote control Tekan
tombol NEO PLASMA
Operasi akan mulai ketika tombol ini
ditekan dan berhenti ketika tombol ini
ditekan lagi.
2
Setel kecepatan kipas lagi dengan pintu remote
control dalam keadaan tertutup. Anda dapat
memilih kecepatan kipas dalam empat tingkat:
rendah, medium, tinggi atau ACAK.
Setiap kali tombol ditekan, kecepatan kipas
akan berubah.
• Operasi pemurnian udara (NEO PLASMA)
dapat dilakukan bersamaan dengan operasi
penyejukan (cooling), pemanasan (heating)
atau operasi lain.
Operasi pemurnian udara NEO PLASMA saja
Apabila Anda menekan tombol NEO
PLASMA, hanya fungsi pemurnian NEO
PLASMA saja yang beroperasi.
Maka, kecepatan kipas rendah. Anda dapat
memilih kecepatan kipas dalam empat tingkat:
rendah, medium, tinggi atau ACAK.
Setiap kali tombol ( ) ditekan, kecepatan
kipas akan berubah.
3
Pengoperasian pemurnian NEO PLASMA
Tindakan Pengamanan
INDONESIA
Panduan bagi Pemilik
21
Page 52

ON
OFF
CANCEL
SET
ON
OFF
SET
AUTO CLEAN
Petunjuk Pengoperasian
Tekan tombol Start/Stop.
Unit akan merespons dengan
bunyi 'bip'.
Bukalah pintu dari remote control dan tekan tombol 2nd F
(Fungsi ke-2) untuk mengoperasikan fungsi yang tercetak
dengan warna biru pada bagian bawah setiap tombol.
(Periksa indikasi dari fungsi ke-2 pada layar remote control.)
Tombol ini dapat menyetel timer sebagai berikut:
Fungsi ke-2 akan hilang segera secara otomatis atau ketika
tombol ditekan sekali lagi.
1
2
3
Operasi 2nd F
Untuk rincian lebih lanjut, bacalah fungsi-fungsi di halaman berikutnya.
Tindakan Pengamanan
Unit Penyejuk Ruangan
22
Page 53

Delay OFF Timer Delay ON Timer Delay OFF and ON Timer Delay ON and OFF Timer
Mode Sleep
1. Tekan tombol Mode Sleep Otomatis untuk menyetel waktu untuk menghentikan kerja unit secara otomatis.
2. Timer diprogram dengan interval 1-jam dengan menekan tombol Mode Sleep Otomatis 1 kali hingga 7 kali.
Mode Sleep tersedia untuk 1 kali hingga 7 kali. Untuk mengubah masa waktu dalam langkah-langkah interval
1 jam, tekan tombol Mode Sleep dengan mengarahkan remote control ke unit.
3. Pastikan LED dari Model Sleep Otomatis menyala.
Untuk membatalkan Mode Sleep, tekan tombol Mode Otomatis beberapa kali hingga tanda bintang ( )
menghilang dari layar remote control.
Mode Sleep akan bekerja pada kecepatan kipas yang rendah (pendinginan) atau kecepatan
kipas yang medium (pompa panas saja) untuk mendapatkan suasana tidur yang nyaman.
Pada Mode Sleep: Fungsi Ayunan Chaos tidak bekerja.
Pada mode pendinginan atau mode dehumidifikasi sehat:
Suhu akan secara otomatis meningkat dengan 1
°C selama 30 menit berikutnya dan dengan 2°C selama 1 jam
untuk mendapatkan suasana tidur yang nyaman.
PERHATIAN
Menyetel waktu
1. Waktu hanya dapat disetel jika Anda menekan tombol Reset. Setelah mengganti baterai,
Anda harus menekan tombol reset untuk menyetel waktu. Tekan tombol Start/Stop.
2. Tekan tombol 2nd F dan periksalah apakah ikon 2nd F telah menyala.
3. Tekan tombol Penyetelan Waktu hingga diperoleh waktu yang diinginkan.
4. Tekan tombol SET Timer.
Periksa untuk indikator A.M. dan P.M.
PERHATIAN
1. Pastikan waktu telah disetel dengan benar pada layar remote control.
2. Tekan tombol 2nd F.
3. Tekan tombol Timer ON/OFF untuk menghidupkan atau mematikan Timer.
4. Tekan tombol Penyetelan Waktu hingga diperoleh waktu yang diinginkan.
5.
Untuk menyetel waktu yang telah dipilih, tekan tombol Penyetelan Timer sambil mengarahkan
remote control ke penerima sinyal.
Membatalkan penyetelan timer
Periksalah apakah ikon 2nd F telah mati.
Tekan tombol Batalkan Timer sambil mengarahkan remote control ke penerima sinyal.
(Lampu timer pada unit penyejuk ruangan dan pada layar remote control akan mati.)
Start yang Tertunda/Stop yang telah Ditentukan
Pilih salah satu dari empat tipe operasi berikut ini.
PERHATIAN
with the unit running
ON
OFF
CANCEL
SET
CANCEL
SET
CANCEL
SET
Fitur Tambahan
Tindakan Pengamanan
INDONESIA
Panduan bagi Pemilik
23
Page 54

Tindakan Pengamanan
Kontrol Arah Udara Vertikal
Aliran udara naik/turun (Aliran Udara Vertikal) dapat
diatur dengan menggunakan remote control.
1. Tekan tombol Start/Stop untuk mengoperasikan
unit AC.
2.
Tekan tombol Chaos Swing dan bilah-bilah akan
bergerak naik dan turun. Tekan tombol Chaos
swing untuk menyetel bilah vertikal pada arah
aliran udara yang diinginkan.
PERHATIAN
PERHATIAN
Apabila Anda menekan tombol CHAOS swing,
arah aliran udara horizontal diubah secara
otomatis berdasarkan algoritma CHAOS untuk
mendistribusikan udara di dalam ruangan secara
merata dan pada saat yang sama untuk membuat
tubuh manusia merasa nyaman, seperti sedang
menikmati sepoi-sepoi angin alami.
Selalu gunakan remote control untuk mengatur
arah aliran udara naik/turun. Mengubah posisi
bilah pengatur arah aliran udara vertikal secara
manual dapat merusak AC.
Apabila unit AC dimatikan, bilah pengatur arah
aliran udara naik/turun akan menutup saluran
keluar udara dari unit AC.
Kontrol Arah Aliran Udara Horizontal (Tambahan)
Aliran udara kiri/kanan (Horizontal) dapat diatur dengan menggunakan remote control.
Tekan tombol Start/Stop untuk mengoperasikan unit.
Buka pintu remote control. Tekan tombol Start/Stop untuk Airflow Direction (Arah Aliran
Udara) dan bilah-bilah akan berayun ke kiri dan ke kanan. Tekan tombol kontrol Arah
Aliran Udara Horizontal lagi untuk menyetel bilah horizontal pada arah aliran udara
yang diinginkan.
Mode sirkulasi udara
Mensirkulasikan udara ruang tanpa mendinginkan atau menghangatkannya.
1. Tekan tombol Start/Stop sampai unit AC merespons dengan suara bip.
2. Buka pintu remote control. Tekan tombol Air Circulation (Sirkulasi Udara). Tutup pintu remote control.
Setelah itu, setiap kali Anda menekan Selektor Kecepatan Kipas Indoor (Indoor Fan Speed Selector),
kecepatan kipas diubah dari rendah ke CHAOS (ACAK) dan kembali ke rendah lagi.
Kecepatan Kipas rendah. Kecepatan Kipas menengah. Fan speed is on high.Udara ACAK (CHAOS)
PERHATIAN
PERHATIAN
24
Udara ACAK (CHAOS) menghemat konsumsi listrik dan mencegah penyejukan berlebih.
Kecepatan kipas secara otomatis diubah dari tinggi ke rendah atau sebaliknya, bergantung
pada temperatur lingkungan.
Unit Penyejuk Ruangan
Page 55

AUTO CLEAN
22°C 22°C 23°C 24°C
Tindakan Pengamanan
Pembersihan Otomatis (Tambahan)
1. Kapan pun Anda menekan tombol Auto Clean, Fungsi Auto Clean akan dijadwalkan
PERHATIAN
During Auto Clean function, moistures left in indoor units after Cooling Operation or Healthy
Operation atau Healthy
Dehumidification Operation dapat dihilangkan.
Selama fungsi Auto Clean, hanya tombol Start/Stop, tombol Plasma dan tombol Auto Clean
yang dapat digunakan.
dan batalkan.
2.
Fungsi Auto Clean bekerja sebelum dan setelah mode penyejukan dan anti lembab.
Untuk keterangan rinci, lihat beberapa poin berikut:
3.
Apabila unit AC dinyalakan setelah reservasi (penjadwalan) Auto Clean, maka fungsi
Cool Start akan beroperasi dan Kipas luar ruang dinyalakan.
Apabila Anda menekan tombol Start/Stop untuk mematikan unit setelah Anda
4.
menjadwalkan fungsi Auto Clean, maka AC mensirkulasikan udara ruang dalam
mode Auto Clean tanpa operasi Cooling atau Dehimidification. Untuk model Cooling
saja, sirkulasi udara seperti ini berlangsung selama 30 menit dan untuk model Heat
Pump selama 16 menit.
Apabila Anda menekan tombol Auto Clean lagi pada saat unit AC bekerja, maka
5.
fungsi Auto Clean akan dibatalkan.
INDONESIA
Operasi Paksa
Prosedur pengoperasian unit jika remote control tidak dapat dipakai.
Operasi unit akan dimulai jika tombol Power ditekan.
Jika Anda ingin menghentikan operasi, tekan sekali lagi tombol Power.
Tombol Power
Model
Pendinginan
Mode operasi Pendinginan Pendinginan Dehumidifikasi Sehat Pemanasan
Kecep. Kipas Unit-dalam
Penyetelan Suhu
Tinggi Tinggi Tinggi Tinggi
Suhu Ruang ≥ 24°C 21°C Suhu Ruang < 24°C Suhu Ruang < 21°C
Model Pompa Panas
≤
Operasi pengujian
Selama OPERASI PENGUJIAN, unit akan bekerja pada mode pendinginan pada kecepatan kipas yang tinggi, tanpa
mempedulikan suhu ruangan, dan ini akan di-reset setelah 18 menit.
Selama operasi pengujian, jika sinyal remote control diterima, maka unit akan beroperasi sesuai dengan yang ditetapkan pada
remote control.
Jika Anda ingin menggunakan operasi ini, tekan tombol ON/OFF selama 3!5 detik, dan akan terdengar suara 'bip' satu kali.
Jika Anda ingin menghentikan operasi, tekan sekali lagi tombol ini.
Panduan bagi Pemilik
25
Page 56

Tindakan Pengamanan
Restart otomatis
Dalam hal listrik menyala lagi setelah mati, Operasi Restart Otomatis akan berfungsi menjalankan prosedur secara
otomatis ke kondisi operasi yang terakhir.
Jadi tidak diperlukan lagi aktivasi fungsi dengan menekan tombol mana pun.
Pada mode awal, kipas akan bekerja pada kecepatan rendah dan kompresor bekerja 2.5 hingga 3 menit kemudian.
Begitu kompresor bekerja, kecepatan kipas akan kembali ke mode penyetelan sebelumnya.
Informasi penting
Kecepatan kipas dan kapasitas pendinginan.
Kapasitas pendinginan yang ditunjukkan pada spesifikasi
merupakan nilai di mana kecepatan kipas disetel ke tinggi,
sedagkan kapasitas akan menurun pada kecepatan kipas lambat
atau medium.
Kecepatan kipas yang tinggi disarankan jika Anda ingin
mendinginkan ruangan dengan cepat.
PERHATIAN
Fungsi restart otomatis telah diaktifkan sebagai default pabrik.
Namun pengguna dapat menyetelnya dengan mengikuti petunjuk berikut ini.
Menonaktifkan fungsi
- Tekan tombol ON/OFF selama 6 detik, dan akan terdengar 'bip 2 kali, dan lampu indikator (1) akan berkedip
4 kali.
Mengaktifkan fungsi
- Tekan tombol ON/OFF selama 6 detik, dan akan terdengar 'bip 2 kali, dan lampu indikator (1) akan menyala
terang 4 kali.
K
e
c
e
p
a
t
a
n
T
i
n
g
g
i
Unit Penyejuk Ruangan
26
Page 57

Tindakan Pengamanan
Pemeliharaan dan Perbaikan
Unit-Dalam
Sebelum melakukan kegiatan pemeliharaan apa pun, matikan dahulu sumber listrik utama sistem.
Kisi-kisi, Kotak, dan Remote Control
Matikan sistem sebelum membersihkan unit. Untuk membersihkan,
usaplah dengan kain kering yang lembut. Jangan gunakan obat
pemutih atau ampelas. Jangan Dicuci
Aliran listrik harus dimatikan sebelum membersihkan unit-dalam.
Filter Udara
Filter udara di belakang kisi-kisi depan harus dicek dan dibersihkan
setiap 2 minggu sekali atau lebih jika diperlukan.
1. Tarik kedua sisi unit dan lepaskan panel depan.
2. Tarik tab filter sedikit ke depan untuk melepaskan filter.
3. Bersihkan filter dengan penyedot debu atau air sabun yang hangat.
• Jika debu sudah mengerak, bersihkan dengan larutan
deterjen dengan air hangat.
• Jika digunakan air panas (40°C atau lebih), filter bisa
berubah bentuk.
4. Setelah membersihkan dengan air, keringkan di tempat yang teduh.
5. Pasang kembali filter udara.
Filter NEO PLASMA (Opsional)
Filter NEO PLASMA yang berada di belakang filter udara harus
diperiksa dan dibersihkan setiap 3 bulan sekali atau lebih sering
lagi, jika diperlukan.
1. Setelah melepaskan filter udara, tarik sedikit untuk
melepaskan filter NEO PLASMA.
2. Bersihkan filter NEO PLASMA dengan penyedot debu.
Jika filter sangat kotor, cucilah dengan air.
3. Perlu diperhatikan adanya kabel-kabel listrik.
4. Pasang kembali filter NEO PLASMA ke posisi semula.
Filter TRIPLE DEODORIZER (Opsional)
1. Setelah melepaskan filter udara, tarik sedikit untuk
melepaskan filter TRIPLE DEODORIZER.
2. Keringkan di bawah cahaya matahari selama dua jam.
3. Pasang kembali filter TRIPLE DEODORIZER ke posisi
semula.
Jangan menyentuh Filter NEO PLASMA dalam 10 detik setelah pembukaan
kisi-kisi udara masuk, karena mungkin masih mengandung aliran listrik.
Jangan gunakan bahan-bahan berikut:
• Air yang lebih panas dari 40°C
Ini dapat menyebabkan filter berubah bentuk atau pudar warnanya.
• Bahan mudah menguap
Ini dapat merusak permukaan unit.
Bilah vertikal
Bilah horisontal
Filters Udara
(Di belakang panel depan )
Ventilasi udara
keluar
Ventilasi udara
masuk
G
a
s
o
l
i
n
e
P
o
w
d
e
r
Filter
NEO PLASMA
Filter
TRIPLE
DEODORIZER
PERHATIAN
PERHATIAN
INDONESIA
PERHATIAN
Panduan bagi Pemilik
27
Page 58

Tindakan Pengamanan
Filter TRIPLE
DEODORIZING
3
2
Outdoor Unit
Penggantian filter pemurnian (Opsional)
Masa pemakaian yang disarankan : Sekitar 2 tahun
1. Lepaskan panel depan dan filter udara.
2. Lepaskan filter pemurnian udara.
3. Masukkan filter pemurnian udara yang baru.
4. Pasang kembali filter udara dan tutup panel depan.
Filter UDARA.
Koil pentransfer panas dan lubang panel unit luar ruang harus diperiksa secara teratur.
Apabila unit tersumbat lumpur atau jelaga, pentransfer dan lubang panel dapat dibersihkan secara
profesional dengan uap.
PERHATIAN
Koil yang kotor atau tersumbat akan
menurunkan efisiensi pengoperasian
(samping)
Lubang
Masuk Udara
sistem dan menyebabkan biaya
pengoperasian lebih tinggi.
(samping)
Lubang
Masuk Udara
Lubang keluar
Udara
Unit Penyejuk Ruangan
28
(belakang)
Pipa
Selang
pengurasan
Lubang keluar
Udara
(samping)
Lubang
Masuk Udara
Lubang keluar
Udara
(belakang)
(belakang)
Pipa
Selang
pengurasan
Pipa
Selang
pengurasan
Page 59

Masalah yang Umum Dijumpai dan Pemecahannya
Sebelum memanggil petugas servis
Jika Anda menjumpai masalah pada unit penyejuk ruangan, bacalah dahulu informasi di bawah ini
untuk mencoba memecahkan masalah. Jika Anda tidak menemukan jalan pemecahan, matikan
unit dan hubungi dealer.
Unit penyejuk ruangan tidak bekerja
1. Lihatlah apakah steker untuk unit penyejuk ruangan telah benar-benar masuk ke stopkontak.
2. Periksalah sekering atau pemutus sirkuit.
3. Periksalah apakah voltase terlalu tinggi atau terlalu rendah.
Udara tidak terasa cukup dinginnya pada penyetelan pendinginan
1. Pastikan bahwa suhu telah disetel dengan benar.
2. Periksalah apakah filter udara tersumbat oleh kotoran. Jika ya, lepaskan filter.
3. Pastikan bahwa udara yang mengalir dari luar tidak terhalang dan ada jarak sekitar 50 cm
antara bagian belakang unit dan dinding yang ada di belakangnya.
4. Tutuplah semua pintu dan jendela dan periksalah apakah ada sumber panas di dalam ruangan.
Sebelum memanggil petugas servis, bacalah daftar masalah umum dan upaya
pemecahannya.
Unit penyejuk ruangan akan bekerja normal jika:
• Anda mendengar suara mendengung. Ini disebabkan oleh air yang diambil oleh kipas pada
musim hujan atau pada kondisi sangat lembab. Fitur ini dirancang untuk membantu
menghilangkan kelembaban di udara dan meningkatkan efisiensi pendinginan.
• Anda mendengar termostat berbunyi 'klik'. Ini disebabkan oleh siklus kompresor yang
bekerja dan berhenti.
• Anda melihat air menetes dari bagian belakang unit. Air mungkin terkumpul di baki di dasar
unit ketika kondisinya sangat lembab atau di musim hujan. Air mungkin meluap dan
menetes dari bagian belakang unit.
• Anda mendengar kipas berputar ketika kompresor tidak berbunyi. Ini normal.
Tindakan Pengamanan
INDONESIA
Panduan bagi Pemilik
29
Page 60

Tindakan Pengamanan
Ruangan terlalu panas.
Udara dingin lolos keluar
ruangan.
Koil pendingin tertutup es
beku.
•
•
•
•
•
• Jika unit penyejuk ruangan untuk
pertama kalinya dinyalakan, Anda
memerlukan beberapa waktu untuk
memperoleh ruangan yang dingin.
• Periksalah lubang pemanas ruangan
dan lubang lepasnya udara dingin.
• Bacalah bagian 'Unit Penyejuk Ruangan
Mengalami Pembekuan' di bawah ini.
Pemecahan Masalah
Unit penyejuk ruangan akan bekerja tidak normal jika:
Masalah
Unit penyejuk
ruangan tidak
bekerja
Unit penyejuk
ruangan tidak
sedingin yang
diharapkan
Unit tidak mendapat aliran listrik.
Sekering putus atau pemutus sirkuit
Listrik mati.
Aliran udara terhalangi.
Filter udaranya kotor.
Pastikan steker dari unit penyejuk ruangan telah
terpasang dengan benar pada stopkontak.
periksa sekering rumah dan ganti sekering, atau
periksa kotak MCB dan pulihkan aliran
listriknya.
Jika listrik mati, setel kontrol mode ke Off.
Jika listrik sudah menyala kembali, tunggu 3
menit untuk me-restart unit penyejuk ruangan
untuk mencegah kompresor mengalami
kelebihan beban.
Pastikan tidak ada tirai, kerai, atau perabotan
yang menghalangi jalan udara di muka unit.
Bersihkan filter sekurang-kurangnya setiap 2
minggu sekali. Bacalah bagian 'Perawatan dan
Pemeliharaan'.
What To DoPossible Causes
* Anda dapat melihat di program Energy Star pada www.energystar.gov.
Unit Penyejuk Ruangan
30
Page 61

P/No.:3828A20864E
 Loading...