

LG LSXS22423, GS66SVS, GS68SGS User Manual

ENGLISH
OWNER’S MANUAL
SIDE BY SIDE
REFRIGERATOR
Please read this owner’s manual thoroughly before
operating and keep it handy for reference at all times.
Model Name*=color number
LSXS22423*
GS68SGS
GS66SVS
MFL62884312-4
www.lg.com

2 TABLE OF CONTENTS
ENGLISH
TABLE OF CONTENTS
3 PRODUCT FEATURES
4 IMPORTANT SAFETY
INSTRUCTIONS
7 COMPONENTS
7 Refrigerator Exterior
8 Refrigerator Interior
9 INSTALLATION
9 Installation Overview
9 Specifi cations
10 Unpacking Your Refrigerator
10 Choosing the Proper Location
10 - Flooring
11 - Ambient Temperature
11 - Measuring the Clearances
11 Installing the Base Grille
11 Removing/Assembling the Refrigerator
12 Removing/Assembling the Refrigerator
12 - Removing the Right (Refrigerator) Door
12 - Removing the Left (Freezer) Door
13 - Reinstalling the Right (Refrigerator) Door
13 - Reinstalling the Left (Freezer) Door
14 Connecting the Water Line
14 - Before You Begin
14 - Water Pressure
14 - What You Will Need
16 - Water Line Installation Instructions
17 Turning On the Power
18 Leveling and Door Alignment
18 - Leveling
18 - Door Alignment
Door Handles
Doors
19 HOW TO USE
19 Before Use
20 Control Panel
20 - Airfl ow
21 - Control Panel Features
23 Automatic Icemaker
23 - When You Should Turn the Icemaker Off
23 - Normal Sounds You May Hear
23 - Preparing for Vacation
24 Ice Storage Bin
25 Ice and Water Dispenser
26 Storing Food
26 - Food Preservation Location
27 - Food Storage Tips
27 - Storing Frozen Food
28 Humidity Controlled Crisper
29 Detaching and Assembling the Storage Bins
30 Adjusting the Refrigerator Shelves
31 MAINTENANCE
31 Cleaning
32 Replacing the Water Filter
36 SMART DIAGNOSIS
36 Using Smart Diagnosis
TM
TM
37 TROUBLESHOOTING
37 Common Product Questions
38 Noises You Might Hear
39 Before Calling for Service
48 WARRANTY
3PRODUCT FEATURES
PRODUCT FEATURES
* Depending on the model, some of the following functions may not be available.
FILTERED WATER AND ICE DISPENSER
The water dispenser dispenses fresh, chilled water.
The ice dispenser dispenses cubed and crushed ice
HUMIDITY CONTROLLED CRISPER
The Humidity Controlled Crisper is designed to help keep your fruits and
vegetables fresh and crisp. You can control the amount of humidity in the
crisper by adjusting the setting between Vegetables and Fruits.
DOOR ALARM
The Door Alarm function is designed to prevent refrigerator malfunctioning
that could occur if a refrigerator door remains open. If a refrigerator door
or freezer drawer is left open for more than 60 seconds, a warning alarm
sounds at 30 second intervals.
ENGLISH
ICE PLUS
Ice production can be increased by approximately 20 percent when the
freezer section is maintained at the coldest temperature for a 24-hour
period.
4 IMPORTANT SAFETY INSTRUCTIONS
ENGLISH
IMPORTANT SAFETY INSTRUCTIONS
READ ALL INSTRUCTIONS BEFORE USING THE APPLIANCE.
This guide contains many important safety messages. Always read and obey
Indicates an imminently hazardous situation which,
if not avoided, may result in minor or moderate
injury, or product damage.
shock, or personal injury when using your
product, basic safety precautions should be
followed, including the following:
Power
Installation
This is the safety alert symbol. It alerts you to safety messages that inform you of hazards
that can kill or hurt you or others, or cause damage to the product.
All safety messages will be preceded by the safety alert symbol and the hazard
signal word WARNING or CAUTION. These words mean:
WARNING
You can be killed or seriously injured if you do not follow instructions.
CAUTION
WARNING
To reduce the risk of fire, electric
NEVER unplug your refrigerator by pulling
on the power cord. Always grip the plug
firmly and pull it straight out from the
outlet.
Immediately repair or replace all power
cords that have become frayed or
otherwise damaged. Do not use a cord
that shows cracks or abrasion damage
along its length or at either the plug or
connector end.
Do not use an uncertified power outlet.
Unplug the power plug immediately in the
event of a blackout or thunderstorm.
Plug in the power plug with the power
cord facing downward.
Contact an authorized service center when
you install or relocate the refrigerator.
When moving your refrigerator away
from
the wall, be careful not to roll over or
damage the power cord.
Your refrigerator must always be plugged to
its own outlet which is adequately
grounded. The energy current should only
be 115 V ~ 60 Hz, 127 V ~ 60 Hz or 220 V~
50/60 Hz, AC (according to the National
rating type). with a 15 A fuse for voltages
between 115 and 127 V or 10 A to 220 V
independent voltage protection system
from the main supply of your home. (The
electrical installation must be verified by a
qualified technician).
Do not install the refrigerator where there
may be a danger of the unit falling.
all safety messages.
Type 1 Type 2
3 prong 3 prong Ensure
grounding type wall grounding type wall proper
receptacle. receptacle. ground
exists
before
use.
3 prong
grounding 3 prong
plug Ensure proper grounding
ground exists before use. plug
Type 3 Type 4
3 prong 2 prong
grounding type wall grounding type wall
receptacle. receptacle.
3 prong 2 prong
grounding grounding
plug
Ensure proper Ensure proper
ground exists before use. ground exists before use.
Use
DO NOT allow children to climb, stand,
or hang on the refrigerator doors or on
the shelves in the refrigerator. They could
damage the refrigerator and seriously
injure themselves.
Do not hang on to or place heavy objects
on the refrigerator’s dispenser.
Do not place heavy or dangerous objects
(bottles with liquid) on the refrigerator.
Do not put live animals inside the
refrigerator.
Do not allow children to climb into the
product when it is in use.
In the event of a gas leak (propane/
LPG), ensure adequate ventilation and
contact an authorized service center
before resuming use. Do not touch or
disassemble the electrical outlet of the
refrigerator.
In the event of a refrigerant leak, move
flammable objects away from the
refrigerator. Ensure adequate ventilation
and contact an authorized service center.
Do not use or place flammable substances
(chemicals, medicine, cosmetics, etc) near
the refrigerator or store them inside the
refrigerator. Do not place the refrigerator
in the vicinity of flammable gas.
Do not overfill or pack items too tightly into
door bins. Doing so may cause damage
to the bin or personal injury if items are
removed with excessive force.
Do not use extension cords or adapters
ungrounded ground.
Under any circumstances cut the third terminal (ground connection)
5IMPORTANT SAFETY INSTRUCTIONS
IMPORTANT SAFETY INSTRUCTIONS
READ ALL INSTRUCTIONS BEFORE USING THE APPLIANCE.
To reduce the risk of fire, electric shock, or personal injury when using your product, basic
safety precautions should be followed, including the following:
This product is not to be used for special
purposes such as the storage of medicine
or test materials or for use on ships, etc.
Unplug the power plug before cleaning or
repairing the refrigerator.
When you replace the light LED in the
refrigerator by a LG sevice techitian or a
qualified technitian, unplug the refrigerator
or turn off the power.
Do not modify or extend the power cord.
Do not use a dryer to dry the interior. Do
not light a candle to remove interior odors.
We do not recommend the use of extension cables. However, if you still choose
to utilize an extension cable, it is
absolutely necessary that it is listed in the
UL (in the United States) or CSA (in
Canada), that it supports three-pronged
plugs and that the electrical current
support a 15 A fuse for voltages between
115 and 127 V or 10 A to 220 V. (Verify the
electric specification of your country.)
Do not use an outlet that can be turned
off with a switch. Do not use an extension
cord. It is the user’s responsibility to
replace a standard 2-prong wall outlet
with a standard 3-prong wall outlet.
Do not, under any circumstances, cut or
remove the third (ground) prong from the
power cord
of your country.)
Do not use an adapter plug and plug the
power plug into a multi-outlet extension
cord.
Disconnect the power cord immediately if
you hear a noise, smell a strange odor or
detect smoke coming from the appliance.
Turn the power off if water or dust
penetrates into the refrigerator. Call a
service agent.
Do not disassemble or modify the
refrigerator.
Do not put hands, feet, or metal objects
below or behind the refrigerator.
(Verify the electric specification
Do not operate the refrigerator or touch
the power cord with wet hands.
In refrigerators with automatic icemakers,
avoid contact with the moving parts
of the ejector mechanism or with the
heating element that releases the cubes.
Do not place fingers or hands on the
automatic ice-making mechanism while
the refrigerator is plugged in.
When dispensing ice from the dispenser,
do not use crystal ceramics.
Do not touch the cold surfaces in the
freezer compartment with wet or damp
hands, when your refrigerator is in
operation.
Do not put glass containers, glass bottles
or soda in the freezer.
Children should be supervised to ensure
they do not use the device as a toy.
This appliance is not intended for use by
persons (including children) with reduced
physical, sensory or mental capabilities,
or lack of experience and knowledge,
unless they have been given supervision
or instruction concerning the use of the
appliance by a person responsible for their
safety.
Do not refreeze frozen food that has
thawed completely. Doing so may result
in a serious health issue.
If you are throwing away your old
refrigerator, make sure the CFC or HCFC
coolant is removed for proper disposal
by a qualified servicer. If you release
CFC/HCFC coolant, you may be fined or
imprisoned in accordance with the relevant
environmental law.
Junked or abandoned refrigerators are
dangerous, even if they are sitting for
only a few days. When disposing of the
refrigerator, remove the packing materials
from the door or take off the doors but
leave the shelves in place so that children
may not easily climb inside.
If the refrigerator is connected to a circuit
protected b
y fuses, use time delay fuses.
ENGLISH
WARNING:
This product contains chemicals known to the State of California to cause
cancer and birth defects or other reproductive harm.
Wash hands after handling.
6 IMPORTANT SAFETY INSTRUCTIONS
ENGLISH
IMPORTANT SAFETY INSTRUCTIONS
READ ALL INSTRUCTIONS BEFORE USING THE APPLIANCE.
To reduce the risk of fire, electric shock, or personal injury when using your product, basic
safety precautions should be followed, including the following:
Installation
Use
CAUTION
The refrigerator must be properly
installed in accordance with the Installer
Instructions that were taped to the front
of the refrigerator.
Be careful when you unpack and install
the refrigerator. Immediately dispose of
plastic and other packing materials out of
the reach of children.
The appliance must be positioned for
easy access to a power source.
Do not use extension cords or adapters
ungrounded.
Keep fingers out of pinch point areas;
clearances between the doors and cabinets are necessarily small. Be careful
closing doors when children are nearby.
If you store food improperly, be aware
that it may fall and cause injury.
Do not use aerosols near the refrigerator.
Do not store articles on the top of the
appliance.
To avoid hazard, damaged power
cords must be replaced by the manufacturer or its service agent or a
similarly qualified technician. Do no
operate the appliance with
power cord
This appliance is intended to be used
in domestic and similar applications
such as: staff kitchen areas in shops,
offices and other working environments;
cottages and clients in hotels, motels
and other residential type environments;
environments type bed and breakfast;
hotels and similar non-commercial
applications.
a damage
Maintenance
Do not use strong detergents like wax or
thinners for cleaning. Clean with a soft
cloth.
Wipe foreign objects (such as dust and
water) off the prongs of the power plug
and contact areas regularly.
Do not store, disassemble or repair the
refrigerator by yourself.
Remove any dust or foreign matter from
the po
wer plug pins.
Do not use a wet or damp cloth when
cleaning the plug.
If the refrigerator is disconnected from
the power supply, wait for at least five
minutes before plugging it back in.
If you notice a chemical or burning
plastic smell or see smoke, unplug the
refrigerator immediately and contact
your LG Electronics Service Center,
refer to the Service Center information
including on this Owner’s Manual or in
the card warranty included according
your country.
The insulation in this unit contains
cyclopentane or a pentane-like gas
which is fl ammable and requires a
special elimination process. Before
discontinuing use of this refrigerator,
contact local authorities to arrange for
safe disposal of the unit.
IMPORTANT : Use only new water
hose-sets, do not reuse old water hose -sets
SAVE THESE INSTRUCTIONS
7COMPONENTS
COMPONENTS
Use this page to become more familiar with the parts and features of your refrigerator.
*The appearance and specifications of the actual product may differ depending on the model.
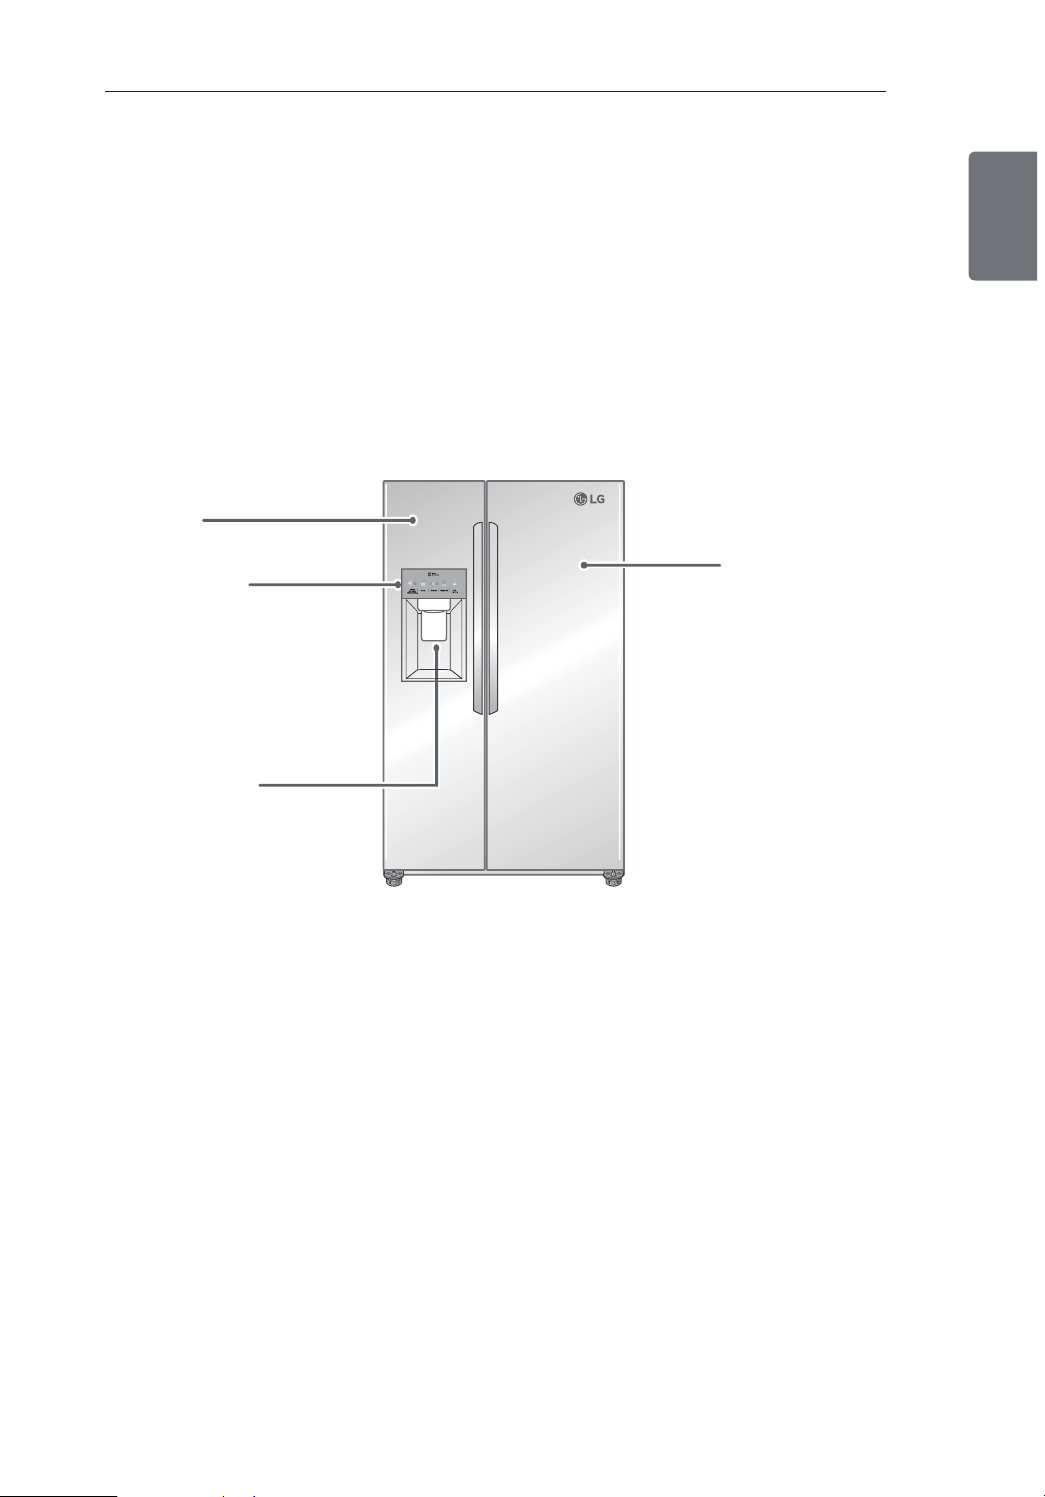
Refrigerator Exterior
Freezer
Preserves frozen food.
Control Panel
Sets the refrigerator and
freezer temperatures, the
water filter condition and the
dispenser mode.
Off Off
O
Refrigerator
Preserves food.
ENGLISH
Filtered Water
and Ice Dispenser
Dispenses purified
water and ice.
8 COMPONENTS
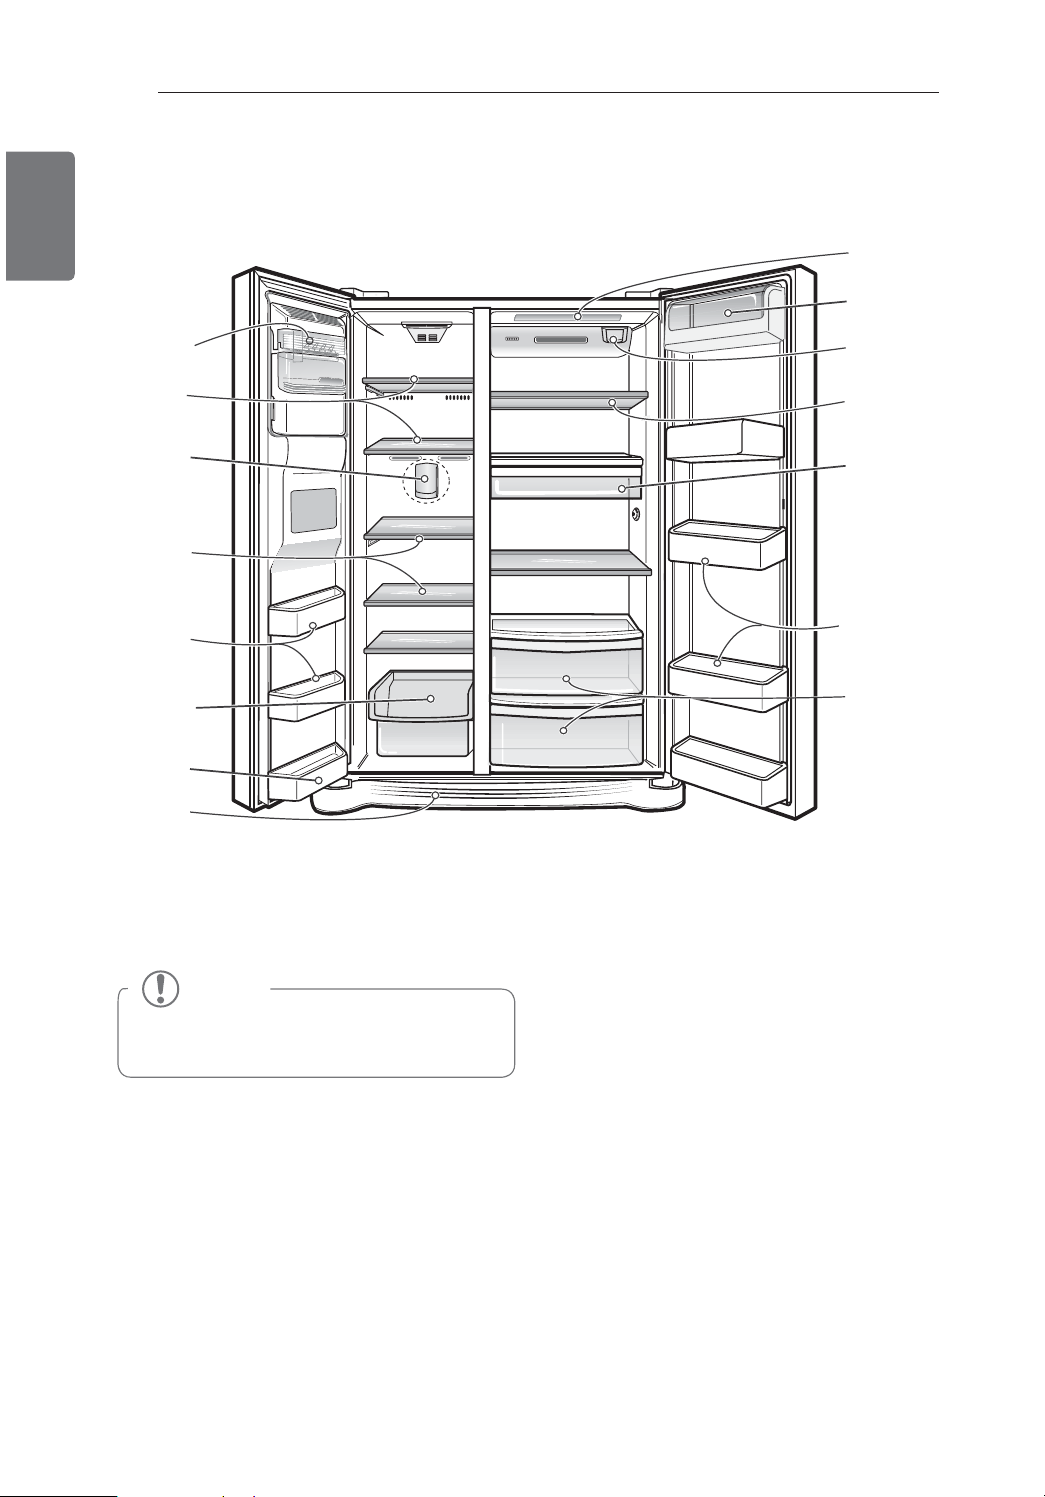
ENGLISH
Refrigerator Interior
Light (LED)
Automatic
Icemaker
Freezer
Shelves
Freezer
Freezer
Shelves
Freezer
Door Bins
Freezer
Drawer
Freezer
Compartment
Refrigerator
Compartment
Refrigerator
Light (LED)
Dairy Corner
Water Filter
Refrigerator
Shelf
Snack
Pan
Refrigerator
Door Bins
Vegetable
Drawers
Freezer
Door Bin
Base
Grille
NOTE
Parts, features and options vary by model.
Your model may not include every option.
9INSTALLATION
INSTALLATION
Installation Overview
Please read the following installation instructions first after purchasing this product or transporting it
to another location.
Max
Max
Min
Min
ffOffO
Off Off
O
1 Unpacking your
refrigerator
Max
Max
Min
Min
ffOffO
2 Choosing the proper
location
Max
Max
Min
Min
ffOffO
Max
Max
Min
Min
ffOffO
3 Disassembling/Assembling
Max
Max
Min
Min
ffOffO
ENGLISH
NOTE
Connect to potable water
supply only,
4 Connecting the water
supply and water line
5 Leveling and Door
Alignment
Specifications
The appearance and specifications listed in this manual may vary due to constant product improvements.
Side by Side refrigerator model
Description Side by Side refrigerator
Electrical requirements
Min. / Max. Water pressure 20 - 120 psi (138 - 827 kPa) on models without water filter,
Dimensions
115 V ~ 60 Hz, 127 V ~ 60 Hz with a 15 A fuse or 220 V~ 50/60 Hz,
AC with a 10 A fuse. (according to the National rating type)
40 - 120 psi ( 276 – 827 kPa ) on models with filter
33”(W) X 32”(D) X 67”(H), 49
1/4 “ (D w/ door open)
840 mm (W) X 880 mm (D) X 1694 mm (H), 1264 mm
(D w/ door open)
Net weight
264.5 lb. (120 kg)

10 INSTALLATION
ENGLISH
Unpacking Your Refrigerator
Remove tape and any temporary labels from
your refrigerator before using. Do not remove
any warning-type labels, the model and serial
number label, or the circuit diagram that is located
in the back of the refrigerator
To remove any remaining tape or glue, rub
the area briskly with your thumb. Tape or glue
residue can also be easily removed by rubbing
a small amount of liquid dish soap over the
adhesive with your fingers. Wipe with warm
water and dry.
Do not use sharp instruments, rubbing alcohol,
flammable fluids, or abrasive cleaners to remove tape or glue. These products can damage
the surface of your refrigerator.
Refrigerator shelves are installed in the shipping position. Please reinstall shelves according
to your individual storage needs.
WARNING
Use two or more people to move and
install the refrigerator. Failure to do so
can result in back or other injury.
Your refrigerator is heavy. When moving
the refrigerator for cleaning or service,
be sure to protect the floor. Always pull
the refrigerator straight out when moving it. Do not wiggle or walk the refrigerator when trying to move it, as floor
damage could occur.
Keep flammable materials and vapors, such as gasoline, away from the
refrigerator. Failure to do so can result
in fire, explosion, or death.
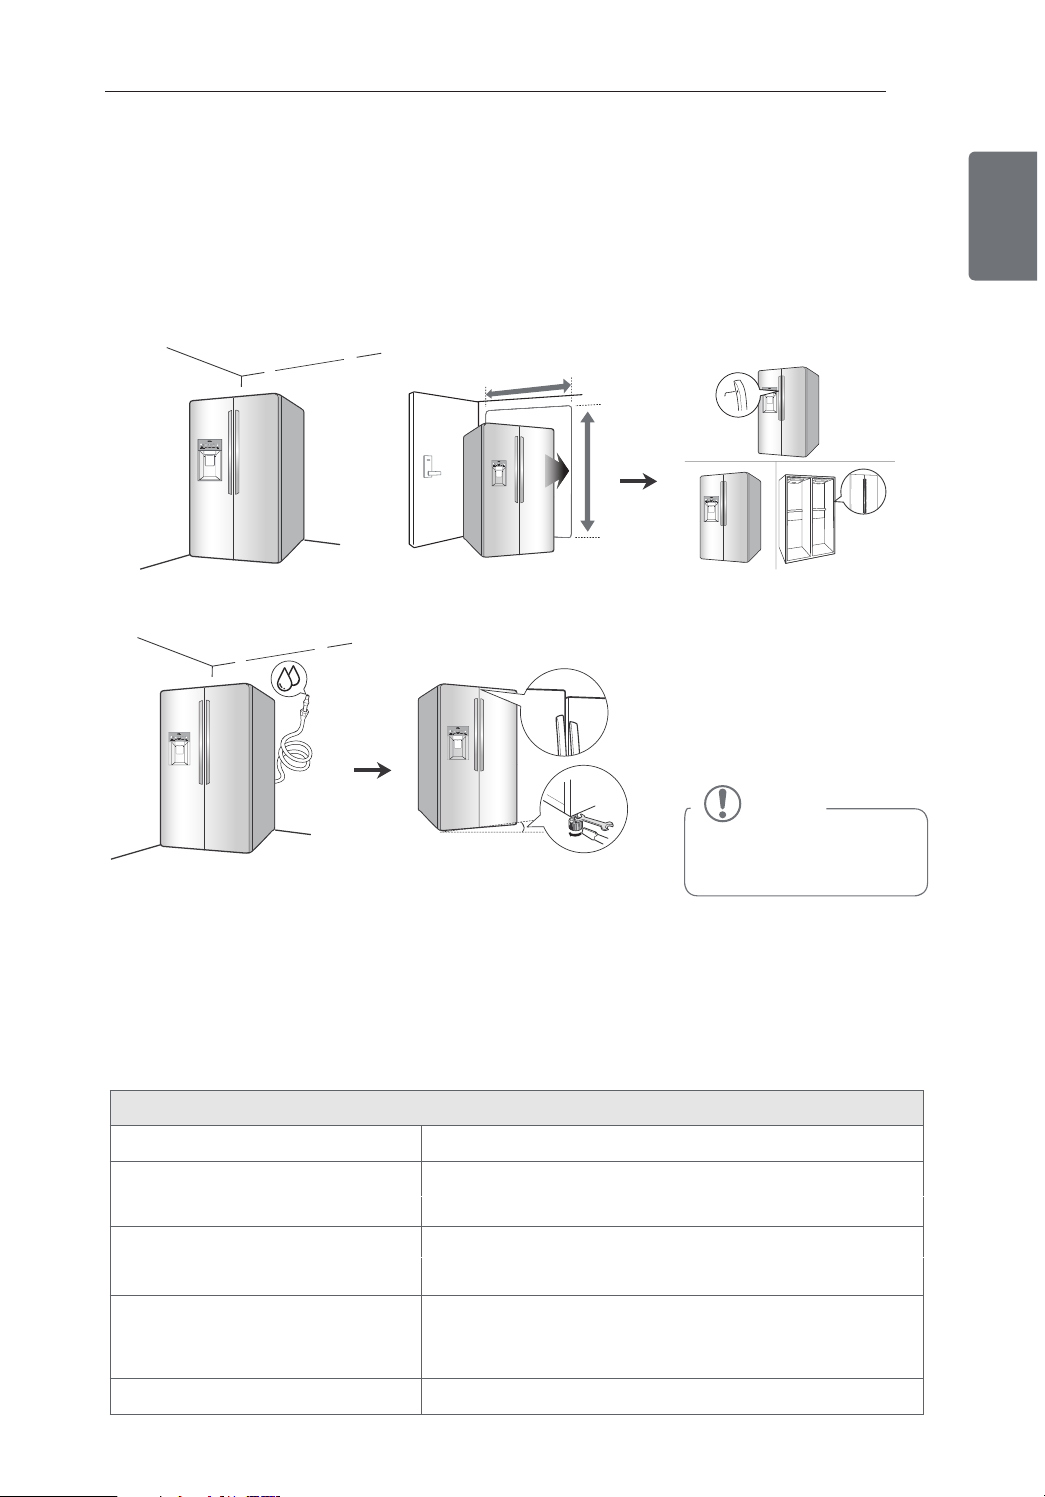
Choosing the Proper Location
Select a place where a water supply can
be easily connected for the automatic
icemaker.
NOTE
The water pressure must be between 20
and 120 psi (138 - 827 kPa) on models
without a water filter and between 40 and
120 psi (276 - 827 kPa) on models with a
water filter.
The refrigerator should always be plugged
into its own individual properly grounded
electrical outlet according the National
Rating on the product characteristic you
purchased rated for 115 - 127 v, 60 Hz or 220
v, 50/60 Hz. AC only, and fused at 15 or 20
amperes.This provides the best performance and also prevents overloading
house wiring circuits which could cause a
fire hazard from overheated wires. It is
recommended that a separate circuit
serving only this appliance be provided.
WARNING
To reduce the risk of electric shock, do not
install the refrigerator in a wet or damp area.
Flooring
To avoid noise and vibration, the unit must be
leveled and installed on a solidly constructed
floor. If required, adjust the leveling legs to
compensate for unevenness of the floor. The
front should be slightly higher than the rear to
aid in door closing. Leveling legs can be turned
easily by tipping the cabinet slightly. Turn the
leveling legs to the left to raise the unit or to
the right to lower it. (See Leveling and Door
AlIgnment.)
NOTE
Installing on carpeting, soft tile surfaces, a
platform or weakly supported structure is
not recommended.
11INSTALLATION
Ambient Temperature
Install this appliance in an area where the
temperature is between 55°F (13°C) and 110°F
(43°C). If the temperature around the appliance is too low or high, cooling ability may be
adversely affected.
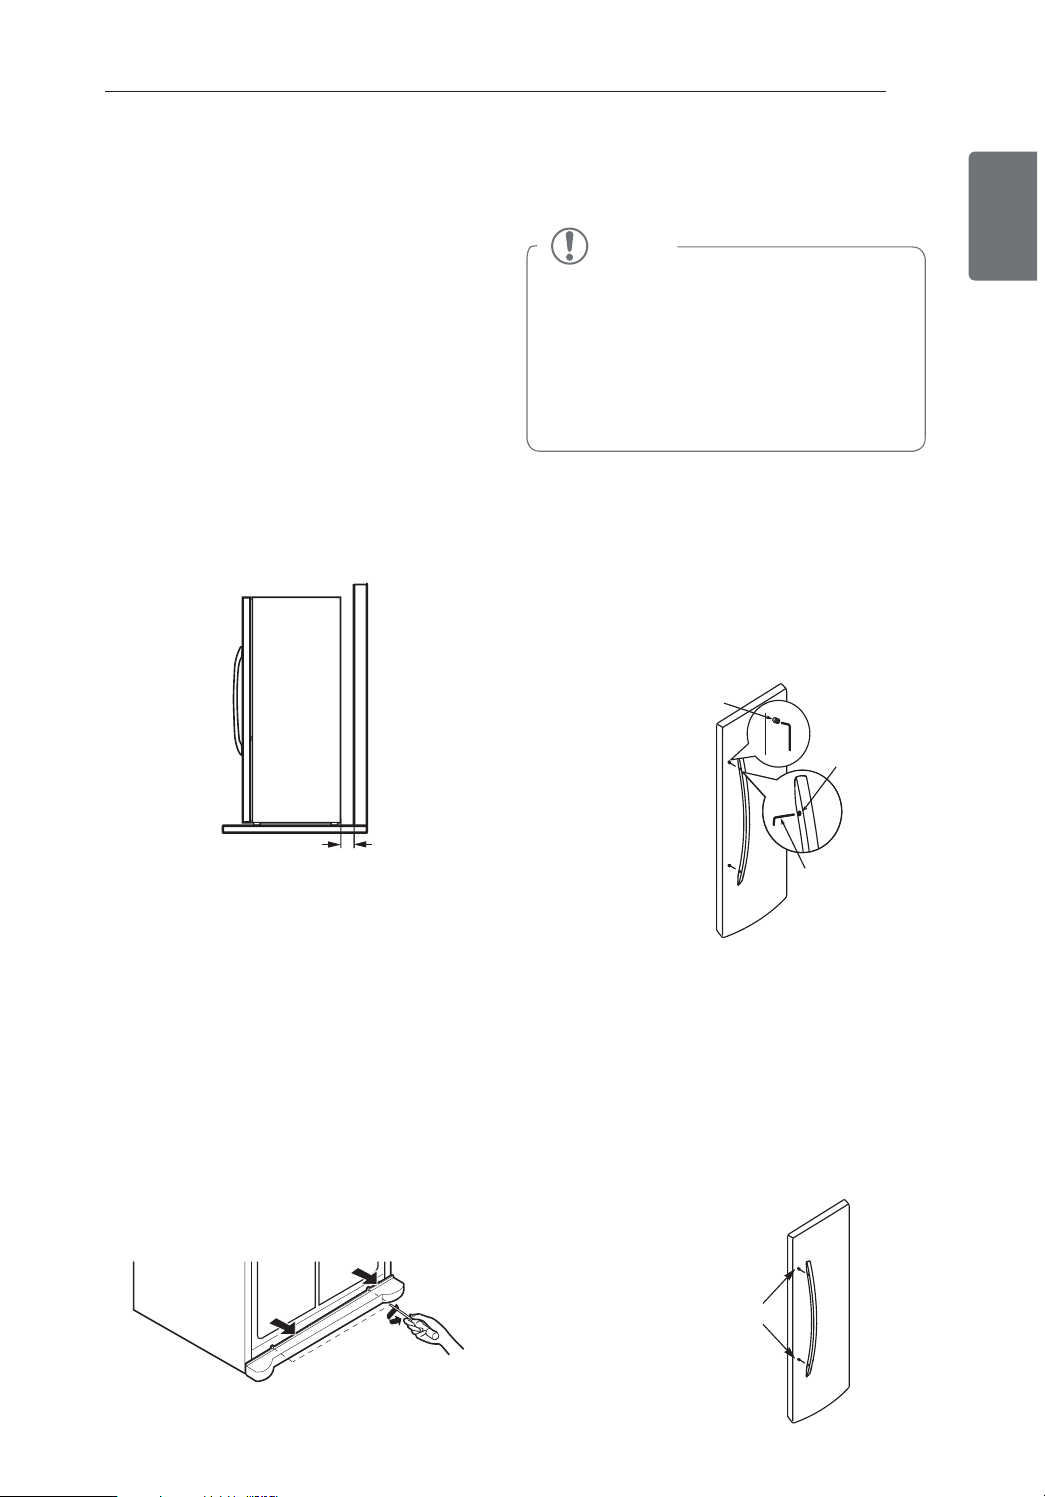
Measuring the Clearances
Too small of a distance from adjacent items
may result in lowered freezing capability and
increased electricity consumption charges.
Allow at least 24 inches (61 cm) in front of the
refrigerator to open the doors, and at least
2 inches (5.08 cm) between the back of the
refrigerator and the wall.
24” (61 cm)
Removing/Assembling the
Refrigerator Door Handles
NOTE
When it is necessary to move the refrigerator
through a narrow opening, removing the
doors is the recommended procedure. If it
is necessary to remove the handles, follow
the directions below. The appearance of the
handle may vary from what is shown in the
illustrations
Removing the Handles
1
Loosen the set screws with a 3/32 in (2.5mm).
Allen wrench and remove the handle.
2 Loosen the mounting fasteners that connect
to the refrigerator door and handle using a
¼ in (6.4mm). Allen wrench, remove the mounting
fasteners.
Mounting
Fasteners
ENGLISH
2” (5.08 cm)
Installing the Base Grille
Removing the Base Grille
Open the doors (refrigerator and freezer).
1
With doors open, remove screws from base
2
grille. Remove base grille and set safely
aside.
Assembling the Base Grille
Place base grille into position and insert and
1
tighten screws.
Set Screw
Allen Wrench
Assembling the Handles
1
Assemble the mounting fasteners at both
ends of the handle using a ¼ in (6.4mm).
Allen wrench.
2 Place the handle on the door by fitting
the handle footprints over the mounting
fasteners and tightening the set screws
with a 3/32 in (2.5mm). Allen wrench.
Mounting Fasteners
12 INSTALLATION
ENGLISH
Removing/Assembling the
Refrigerator Doors
When it is necessary to move the refrigerator
through a narrow opening, removing the doors
is the recommended procedure.
NOTE: Before removing the doors, remove the
base grille. See Installing the Base Grille for
instructions.
Removing the Right (Refrigerator) Door
WARNING
y If your entrance door is too narrow
for the refrigerator to pass through,
remove the refrigerator doors and move
the refrigerator sideways through the
doorway.
y Use two or more people to remove and
install the refrigerator doors. Failure to do
so can result in back or other injury.
y Disconnect the electrical supply to the
refrigerator before installation. Failure
to do so could result in serious injury or
death.
y Do not put hands, feet or other objects
into the air vents or bottom of the
refrigerator. You may be injured or receive
an electrical shock.
y Be careful when handling the hinge and
stopper. You may be injured.
y Remove food and bins before detaching
the doors and drawers.
(1)
(2)
3. Rotate the hinge lever (3) clockwise. Lift
the upper hinge (4) free of the hinge lever
latch (5).
NOTE: Regardless of hinge lever type, removal
process is the same.
CAUTION
When lifting the hinge free of the latch, be
careful that the door does not fall forward.
4. Lift the door from the lower hinge pin.
5. Place the door, inside facing up, on a nonscratching surface.
Removing the Left (Freezer) Door with
Water Line Connection
Pull up the water feed tube while pressing the
area (Figure 1) shown in the figure below. Make
sure the color of the water lines match.
NOTE:
trim the part away. Disconnecting the tube
under the door causes about 0.13 gallons (0.5
liters) of water to flow out. Put a large container
at the end of the tube to prevent water from
draining onto the floor.
If a tube end is deformed or abraded,
Figure 1
)
(3
( 4)
Type 1
(5)
( 4)
(5)
)
(3
Type 2
Rivet
1. Open the door. Remove the top hinge cover
screw (1).
2. Use a flat blade screwdriver to pry back the
hooks (not shown) of the hinge cover (2)
from the top of the refrigerator cabinet. Lift
up the cover.
(2)
(1)
(6)
Rivet
Type 2
(5)
(7)
(4)
(5)
(6)
(7)
Type 1
(3)
1. Open the door. Remove the top hinge cover
screw (1).
13INSTALLATION
2. Use a fl at blade screwdriver to pry back the
hooks (not shown) of the hinge cover (2)
from the top of the refrigerator cabinet. Lift
up the cover.
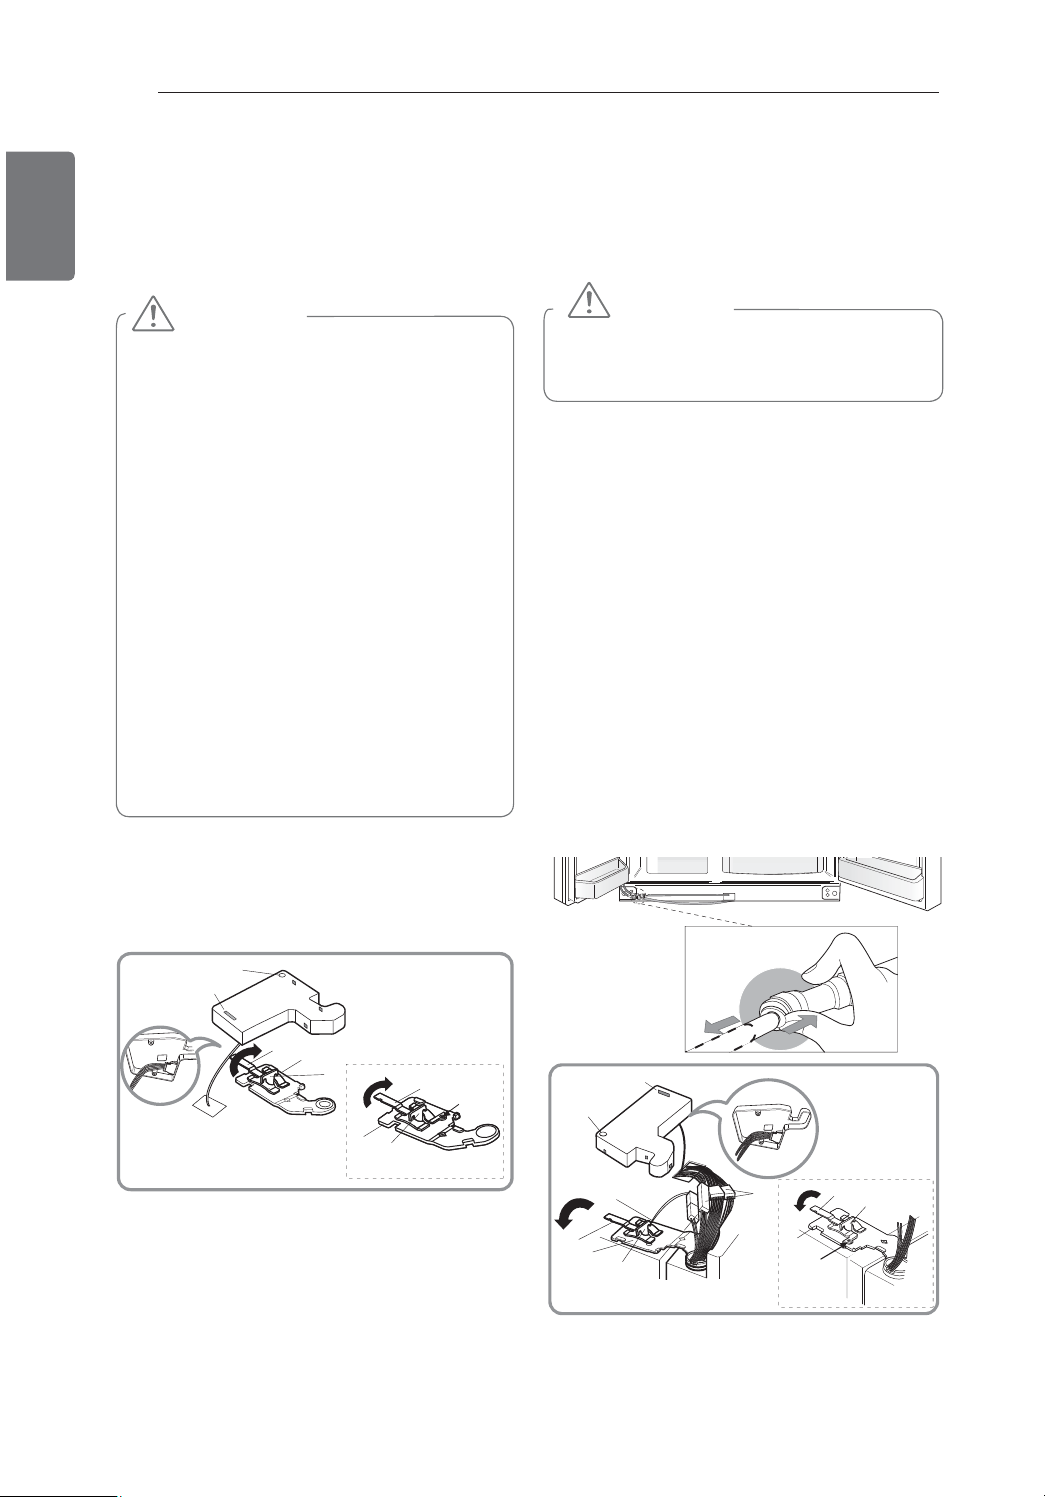
3. Disconnect all the wire harnesses (3).
4. Remove the grounding screw (4).
5. Rotate the hinge lever (5)
counterclockwise. Lift the upper hinge (6)
free of the hinge lever latch (7).
NOTE: R
egardless of hinge lever type, removal
process is the same.
CAUTION
When lifting the hinge free of the latch, be
careful that the door does not fall forward.
5. Lift the door from the lower hinge pin, being
careful to pull the water lines through the
lower hinge pin.
6. Place the door, inside facing up, on a
non-scratching surface. Be careful not to
damage the water feed tube.
Reinstalling the Right (Refrigerator) Door
(1)
(2)
Reinstalling the Left (Freezer) Door
(2)
(1)
(4)
(5)
(6)
(7)
Type 1
1. Feed the water tubes through the lower
hinge pin and place the door onto the
lower hinge pin. Water hoses should be
behind the leg to prevent damage.
2. Fit the top hinge (6) over hinge lever latch
(7)and into place. Rotate the lever (5)
clockwise to secure the hinge.
NOTE: R
egardless of hinge lever type, removal
process is the same.
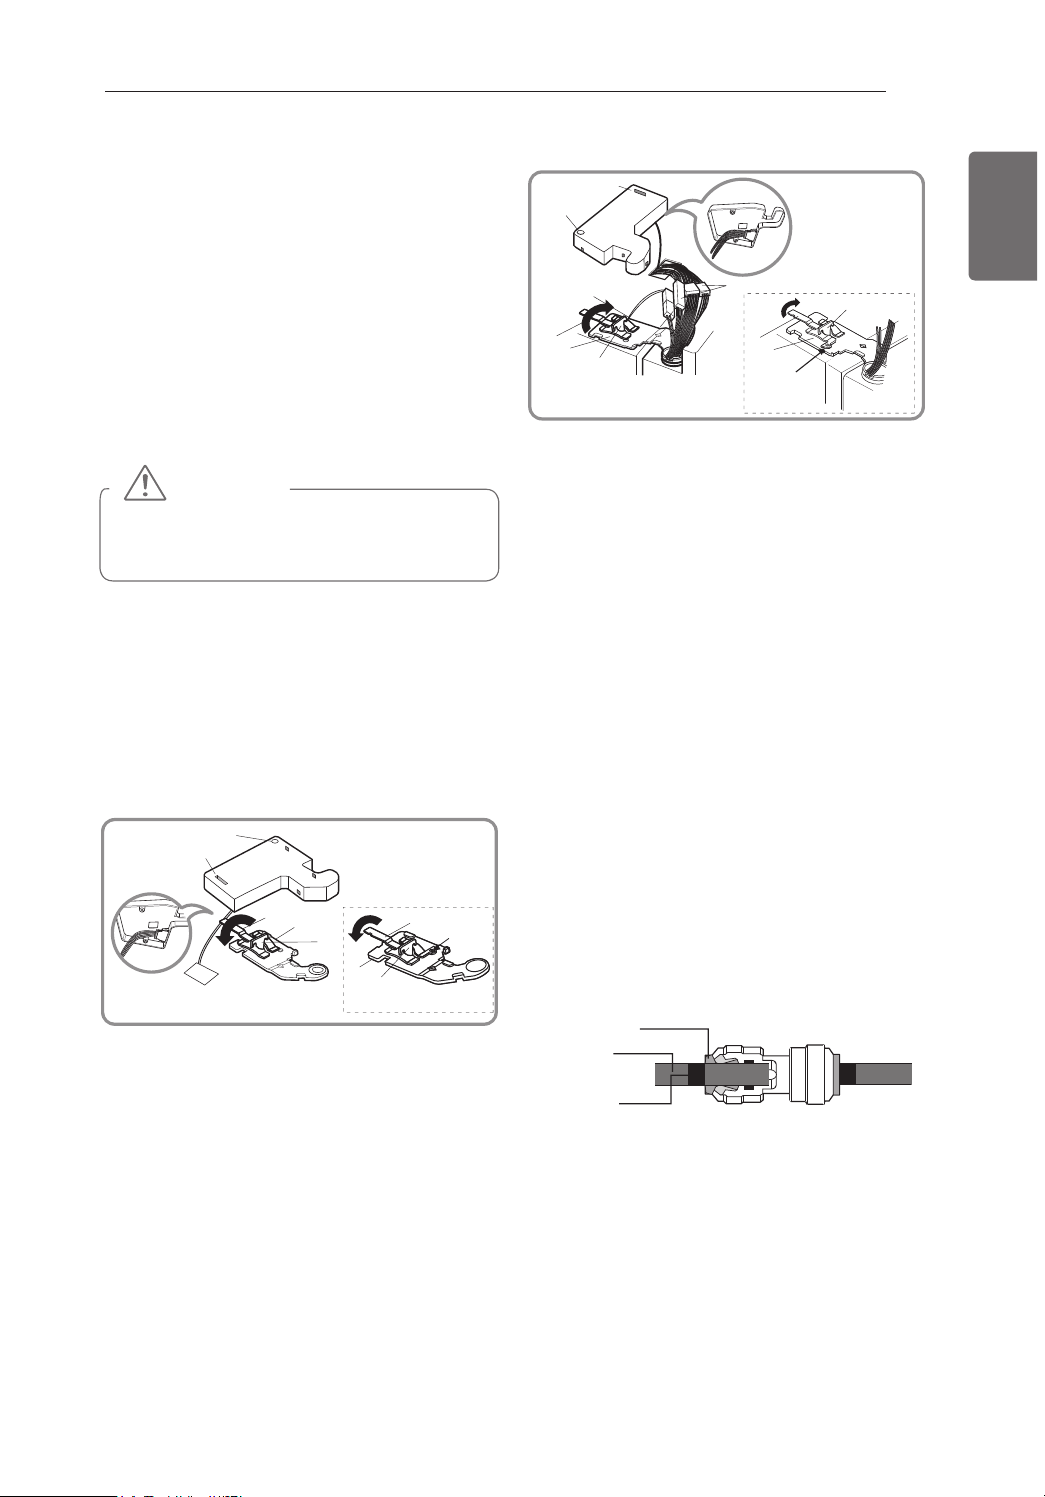
3. Install the grounding screw (4) and connect
all the wire harnesses (3).
4. Hook the t
ab on the door switc
the cover (2) under the edge of the wire
opening in the cabinet top. Position the
cover into place. Insert and tighten the
cover screw (1).
(3)
(7)
(5)
(6)
Rivet
Type 2
h side of
ENGLISH
Type 1
(3)
(4)
(5)
(4)
(5)
Type 2
)
(3
Rivet
1. Place the door onto the lower hinge pin.
2. Fit the upper hinge (4) over the hinge lever
latch (5) and into place. Rotate the lever (3)
counterclockwise to secure the hinge.
NOTE: R
egardless of hinge lever type, reinstallation
process is the same.
3. Hook the tab on the switch side of the cover
under the edge of the wire opening in
the cabinet top. P
osition the cover (2) and
replace the screw (1).
5. Reconnect the water tubes by inserting
the tubes into the connectors. The tube is
inserted correctly when only one guide line
is showing out of two.
Collet
Tube
Insert Line
NOTE: When replacing the door, make sure to
connect the water tubes so the colors
match.
14 INSTALLATION
ENGLISH
Connecting the Water Line
Before You Begin
This water line installation is not covered by the
refrigerator warranty. Follow these instructions
carefully to minimize the risk of expensive water
damage.
Water hammer (water banging in the pipes)
in house plumbing can cause damage to
refrigerator parts and can lead to water leakage
or flooding. Call a qualified plumber to correct
water hammer before installing the water
supply line to the refrigerator.
If you use your refrigerator before connecting
the water line, make sure the icemaker power
switch is in the OFF (O) position.
Water Pressure
You will need a cold water supply. The water
pressure must be between 20 and 120 psi
(138 - 827 kPa) on models without a water
filter and between 40 and 120 psi (276 - 827
kPa) on models with a water filter. If the water
pressure does not reach the minimum required
pressure, a separate booster pump may be
required for normal automatic icemaker and
cool water dispensing operation.
If a reverse osmosis water filtration system is
connected to your cold water supply, this water
line installation is not covered by the refrigerator
warranty. Follow these instructions carefully to
minimize the risk of expensive water damage.
If a reverse osmosis water filtration system is
connected to your cold water supply, the water
pressure to the reverse osmosis system needs
to be a minimum of 40 to 60 psi (276 kPa
~ 414 kPa, or less than 2.0~3.0 sec. to fill a
cup of 7 oz (0.1 L) capacity).
CAUTION
To prevent burns and product damage, only
connect the refrigerator water line to a cold
water supply.
CAUTION
Do not install the icemaker tubing in areas
where temperatures fall below freezing.
CAUTION
Wear eye protection during installation to
prevent injury.
If the water pressure from the reverse osmosis
system is less than 21 psi or (145 kPa)
(takes more than 4.0 sec to fill a cup of 7 oz (0.1 liters
capacity):
Check to see if the sediment filter in
the reverse osmosis system is blocked.
Replace the filter if necessary.
Allow the storage tank on the reverse
osmosis system to refill after heavy usage.
If the issue concerning water pressure
from reverse osmosis remains, call a
licensed, qualified plumber.
All installations must be in accordance
with local plumbing code requirements.
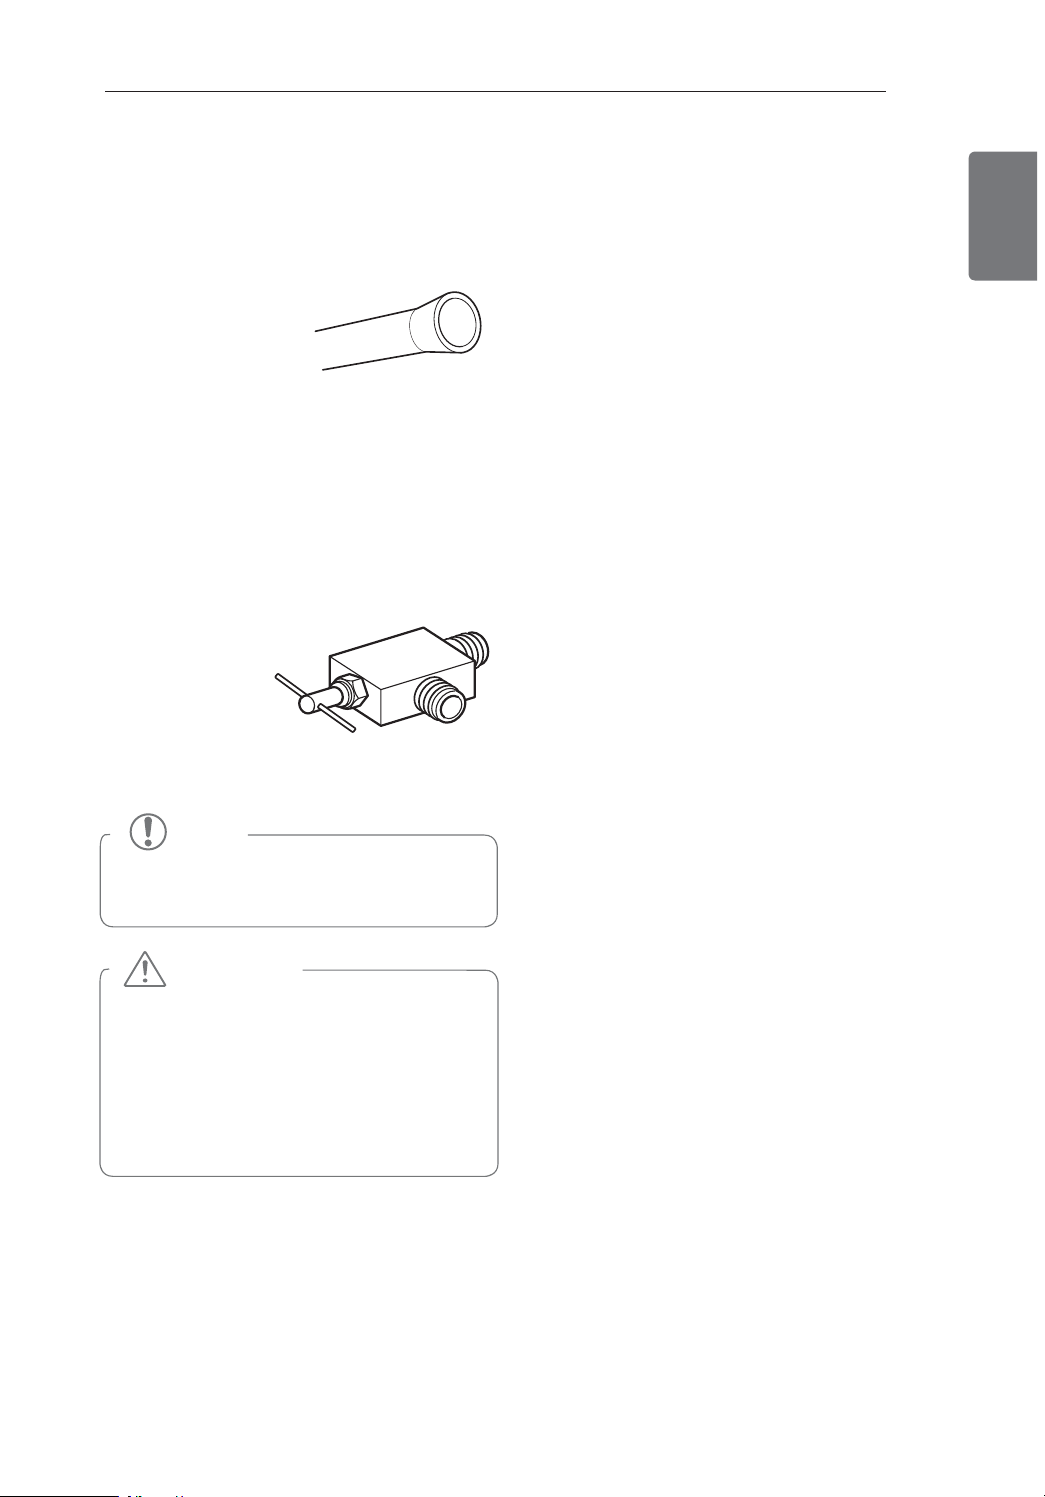
What You Will Need
Copper Tubing, ¼ in (6.4mm). outer diameter,
to connect the refrigerator to the water
supply. Be sure both ends of the tubing
are cut square.
To determine how
much tubing you
need: measure the
distance from the
water valve on the back of the refrigerator
to the water supply pipe. Then, add 8 feet
(2.4 m). Be sure there is sufficient extra
tubing (about 8 feet [2.4 m] coiled into 3
turns of about 10 in. [25 cm] diameter) to
allow the refrigerator to move out from
the wall after installation. Keep the total
length of the feed water pipe tube within
26 ft (8 m). Be careful to avoid getting a
kink in the tube. If the tube is longer than
26 ft (8 m), it may cause the water feed to
malfunction.
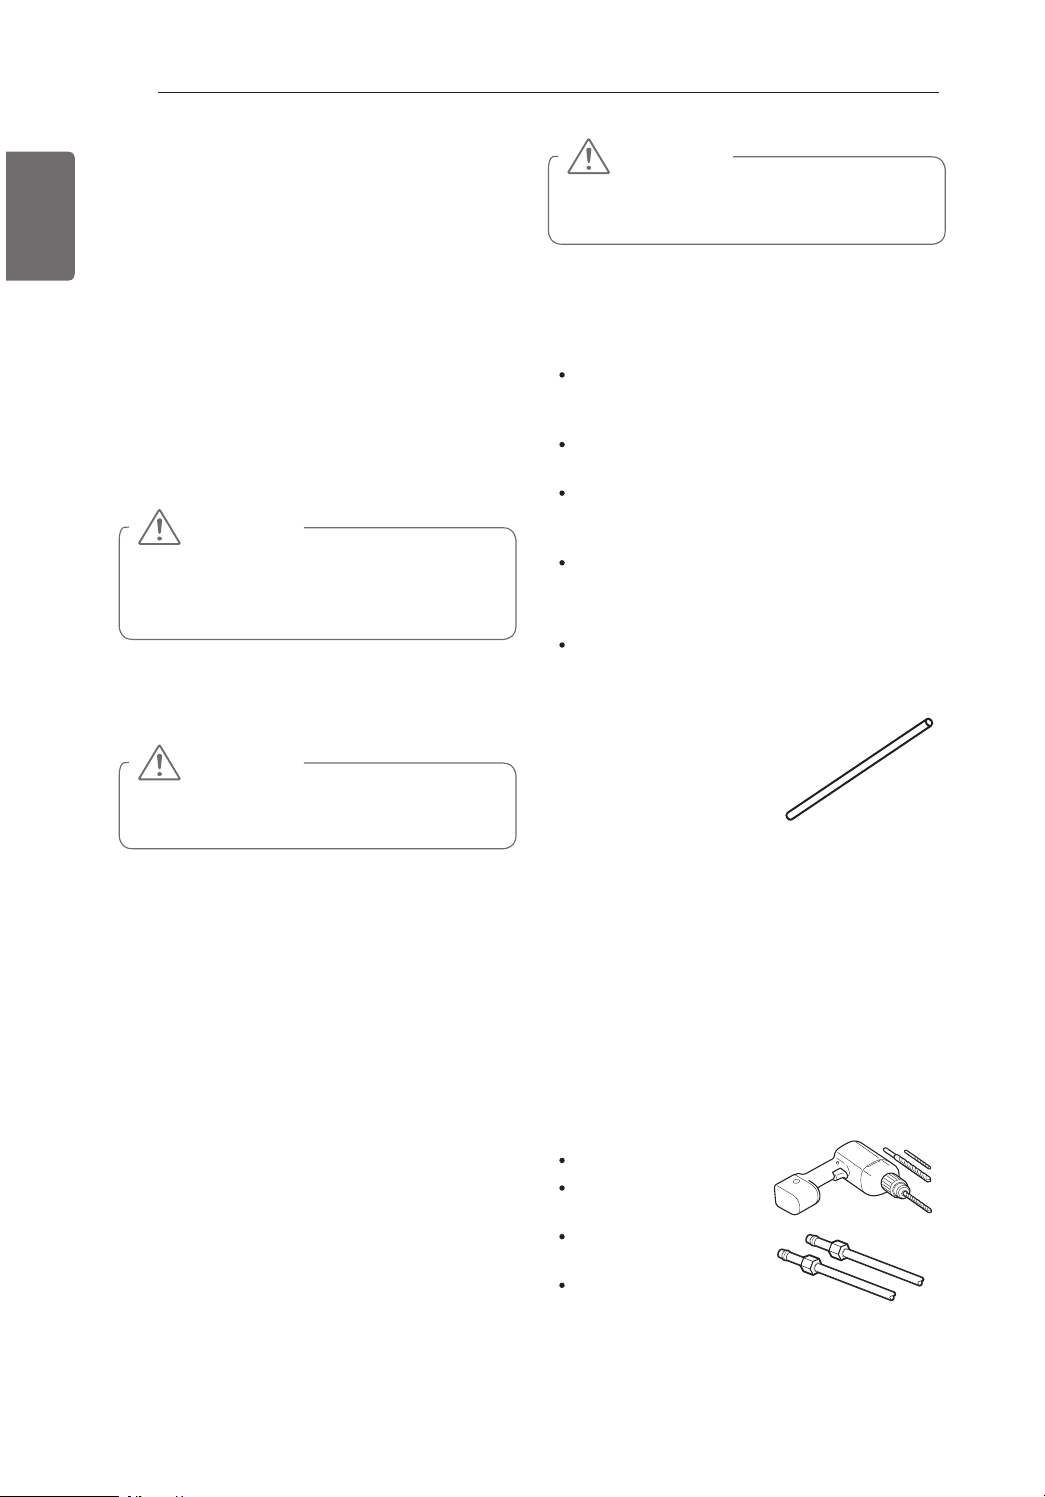
Power drill.
½ in (2.7 mm). or
adjustable wrench.
Flat blade and Phillips
head screwdrivers.
Two ¼ in (6.4mm). outer
diameter compression
nuts and 2 ferrules (sleeves) to connect
the copper tubing to the shutoff valve and
the refrigerator water valve.
y If your existing copper water line
has a flared fitting at the end, you
will need an adapter (available at
plumbing supply stores) to connect
the water line
to the
refrigerator OR
you can cut off
the flared fitting with a tube cutter
and then use a compression fitting.
y Shutoff valve to connect to the cold
water line. The shutoff valve should
have a water inlet with a minimum
inside diameter of 5/32 in (4mm). at the
point of connection to the COLD
WATER LINE. Saddle-type shutoff
valves are included in many water
supply kits.
Before
purchasing,
make sure
a saddle-
type valve complies with your local
plumbing codes.
15INSTALLATION
ENGLISH
NOTE
A self-piercing saddle type water valve
should not be used.
WARNING
Electrical Shock Hazard:
When using any electrical device (such as a
power drill) during installation, be sure the
device is battery powered, double insulated
or grounded in a manner that will prevent the
hazard of electric shock.
 Loading...