

Page 1
Page 2

Table of Contents
3
Introduction
Installation
Operation
Suggestion On
Food storage
Registration
Important Safety Instruction
Identification of Parts
Installation
Starting
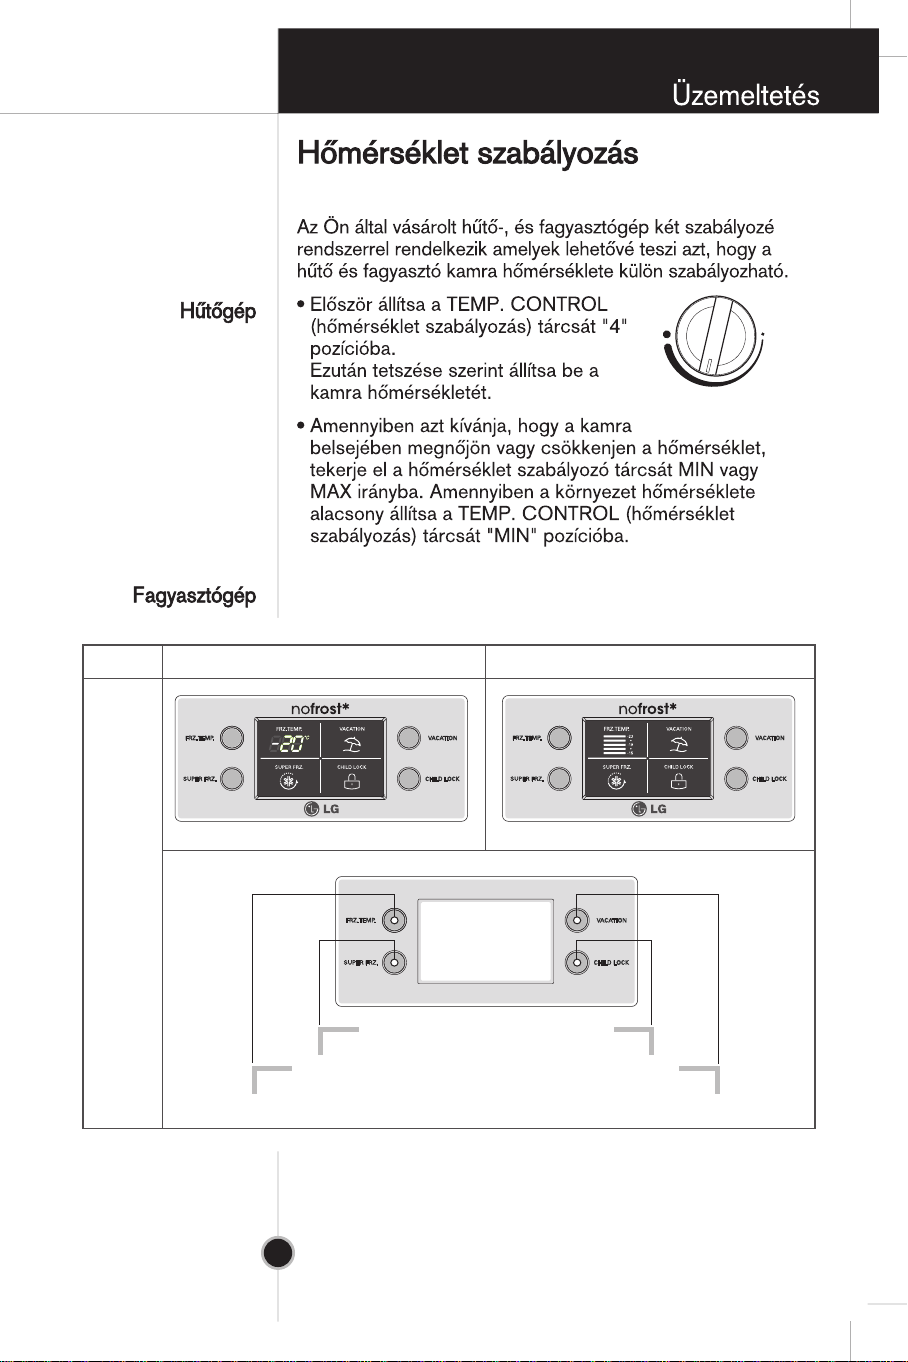
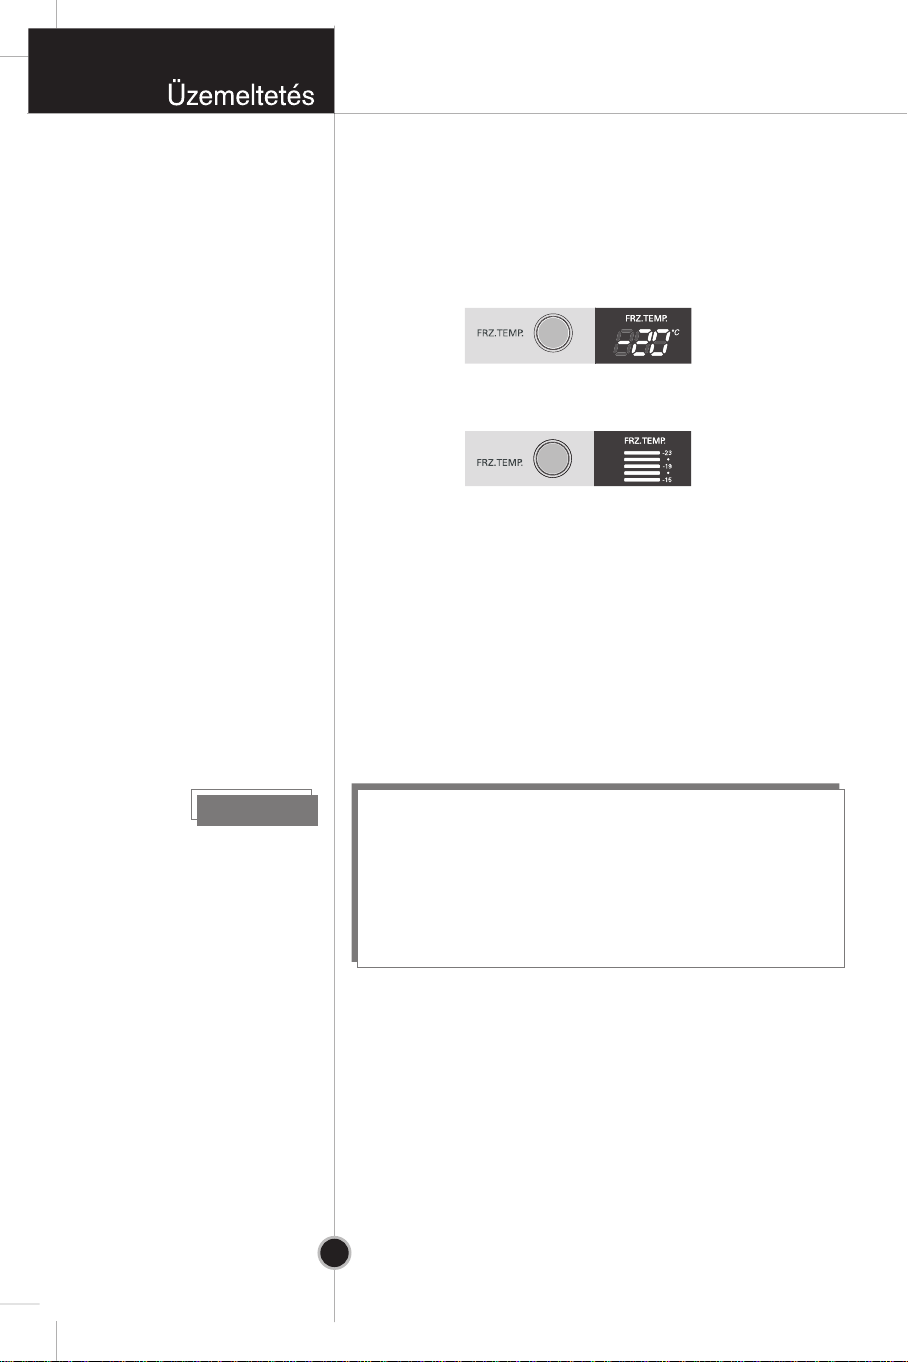
Temperature Control
Refrigerator
Freezer
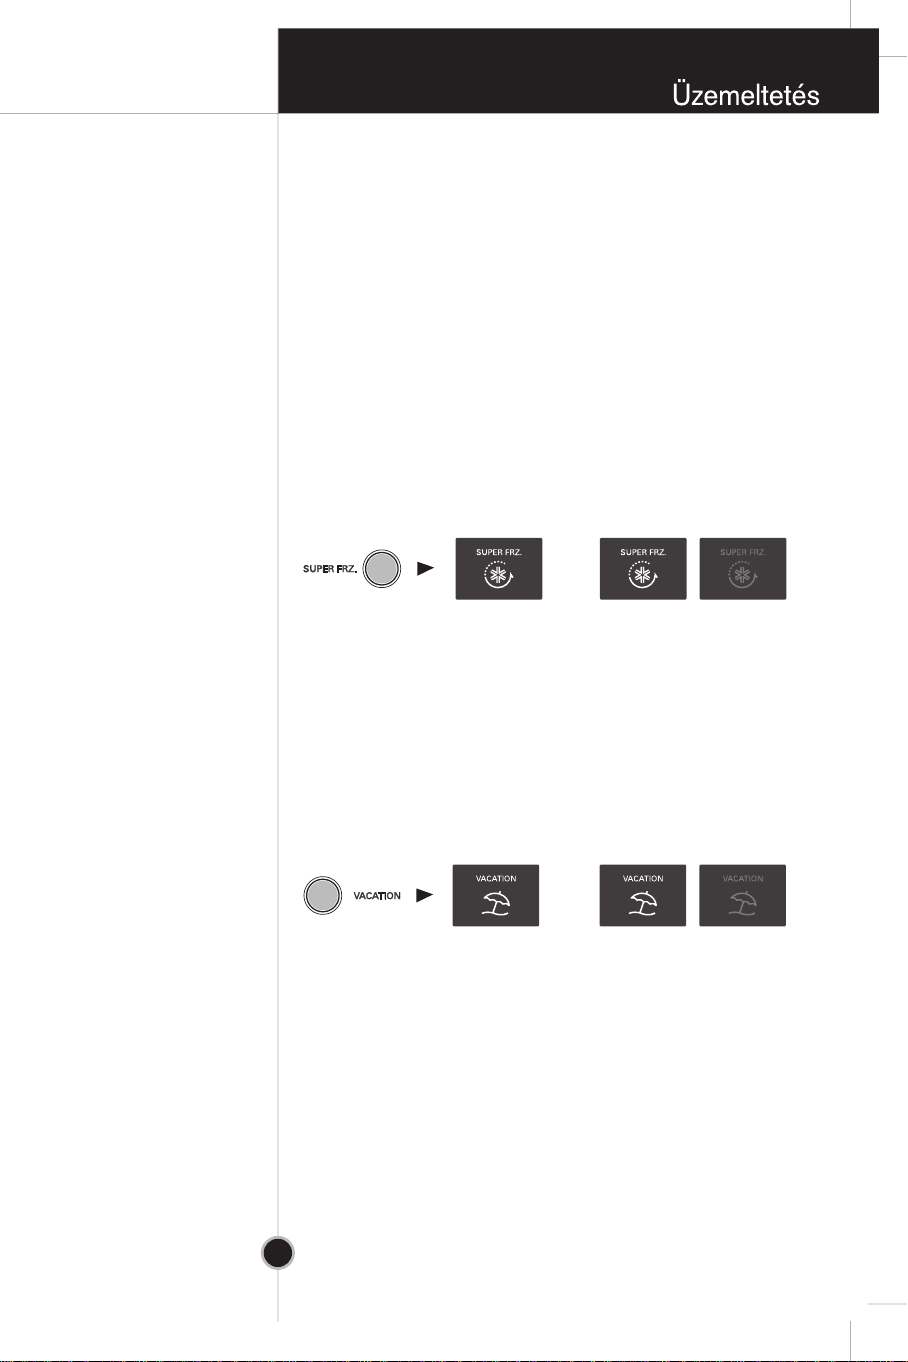
Function
Super Freezer
Vacation
Lock
Self Test
Ice Making
Defrosting
Storing Food
4
4
7
8
8
9
9
9
11
11
11
12
12
12
12
13
Care and
Maintenance
Trouble Shooting
To Reverse
the Doors
General Information
Lamp Replacement
Cleaning
Trouble Shooting
To Reverse the Doors
14
14
15
16
18
Page 3

Introduction
4
Registration
Introduction
Precaution
The model and serial number are found on the rear of
this unit. This number is unique to this unit and not
available to others. You should record requested
information here and retain this guide as a permanent
record of your purchase. Staple your receipt here.
Date of Purchase
Dealer Purchased From
Dealer Address
Dealer Phone No.
Model No.
Serial No.
:
:
:
:
:
:
Important Safety Instruction
This fridge-freezer must be properly installed and
located in accordance with the Installation
Instruction before it is used.
Never unplug your fridge-freezer by pulling on the
power cord. Always grip plug firmly and pull straight
out from the outlet.
When moving your appliance away from the wall,
be careful not to roll over or damage the power
cord.
After your fridge-freezer is in operation, do not
touch the cold surfaces in the freezer compartment,
particularly when hands are damp or wet. Skin may
adhere to these extremely cold surfaces.
Children should be supervised to ensure that they
do not play with the appliance.
Page 4
Introduction
Important Safety Instruction
Don't Use an
Extension Cord
If possible, connect the fridge-freezer to its own individual
electrical outlet to prevent it and other appliances or household
lights from causing an overload.
Accessibility of
Supply Plug
The supply plug of the refrigerator-freezer should be placed in
easy accessible position for quick disconnection in emergency.
Supply Cord
Replacement
If the supply cord is damaged, it must be replaced by the
manufacturer or its service agent or a similarly qualified person
in order to avoid a hazard.
Don't store
Don't store or use gasoline or other flammable vapors and
liquids in t
he vicinity of this or any other appliance.
Grounding
(Earthing)
In the event of an electric short circuit, grounding (earthing)
reduces the risk of electric shock by providing an escape wire for
the electric current. In order to prevent possible electric shock,
this appliance must be grounded. Improper use of the
grounding plug can result in an electric shock. Consult a
qualified electrician or service person if the grounding
instructions are not completely understood, or if you have
doubts on whether the appliance is properly grounded.
Danger
Risk of child entrapment. Before you throw away your old
refrigerator or freezer: Take off the doors.
Leave the shelves in place so that children may not easily
climb inside.
It will cause electric shock or fire.
Do not modify or
extend the Powe
r
Cord lengt
h
5
Precaution
Pull out the power plug prior to cleaning the fridgefreezer.
Never damage, serverely bend, pull out, or twist the
power cord because power cord damage may cause a
fire or electronic shock. Never place glass products in the
freezer because they may be broken when their inner
contents are frozen.
Page 5
I
6
ww
ww
ww
ww
ww
ww
m
p
o
t
n
noi
cud
or
I
tn
u
t
t
a
r
n
e
yt
f
S
a
I
n
r
t
s
o
t
i
c
Warning
e
li
v p
a
K
o
D
a
D
D
s
a
T
a
d
s
r
e
moc
a
p
R
2
m1
d
n
t
e
e
ub
t
r
i
n
o
l
e
c
c
mocer
o
o
r
a
t
o
o
er
h
e
il
a
p
p
s
i
p
o
mi
i
ppa sihT
girfe
norivn
b
i
h
e
e
on
t
u
s
a
t
e
et
h
r
nem
d
e
on
t
d
a
e
on
e
t
u
s
e
moc
g
e
f
t
h
t
r
i
eg
fer
e
c
n
p
,l
s
a
au
ylral
q
n
are
m
rac
,ecnailpp
.ecnailppa
e
i
o
o n
-
i
s n
tl
t
a
cem
n
ci
h
s
e
orf
e
d
eht
d
yb
r
egam
eht
l
ac
e
rtc
i
a
mtr
p
r
e
epy
moc
nar
l
i
ni
a t
n
d
e
uqer
i
r
n
esael
oc
e
d
f
i
n
atnoc ecnail
i
hW .elbitsu
.setunim lareves
ni ,sg
n
e
a
,er
cur
t
u
a
g
ni
t
e
us
lus
n
osrep
s
r
l
c
e
s
ived l
c
ecorp
cafunam
cn
ailppa l
e
eht fo stne
e
d
dnem
i
l
no
a
t
s
d
psi
o
laiceps
tiw t
.
llams a
larutan ,)a006R( t
sag
,yti
ibitapmoc latne
ub
l
at eb dluohs e
iucric gnitaregirfer eht fo stra
egirfer fo tnuoma ehT .ecnailppa
ruoy tlusnoc ,tbuod ni fI .egama
il
a
pa eht
cn
p
s
fo
r
bo
a
nar
t
h
re
o ro
t
.rerut
u
ti
.
ric tnaregirf
c
m
f
eht e
eht
ag
niwolb
g
co
rude
tnega ecivres h
t
o
nu
gih htiw
h
sla si ti t
o
tsni dna gnitropsnart ne
sne
eru
a
m
d era t
lu
oc se
,
detceted si kael a fI .yrujni eye na esuac
ya
ni tnare
.re
di
ni s
s
yb
rp l
ma
o
ot nek
pip eht fo tuo gnitriuqs tnaregirfe
malf a fo noitaerc eht diova ot redro nI
m ecnailppa eht hcihw ni moor eht fo
girfer a006R fo g8 yreve rof ezis ni
laed
u
cne e
r
l
e
so
.noitcu
t snaem
o
naht rehto ,ss
esoht
o
do
y
eh
t sselnu ,ecnailppa
.rerutcafunam
i
u s
ro
lla
d
ova
noitingi fo secruos laitnetop ro semalf dekan
ht n
es
.se
a
ni
i
disni etalp noitacifitnedi eht no nwohs si ecnailppa
fo sngis yna gniwohs ecnailppa na pu trats reveN
d
W
bosi f
g
e
n
eh
tu
ena
eht
on taht
.dega
r
o
ng
eti
yna
di
ria
dna
rof gnidnats si ecnailppa eht hcihw ni moor eht
ria sag elba
ezis eht ,srucco tiucric gnitaregirfer eht ni kael a fi erutxim
sdneped detis eb
eb tsum moor ehT .desu tnaregirfer fo tnuoma eht no
eht edis
ralucitrap ruoy ni t
eht e
ni
p
t
Page 6
Introduction
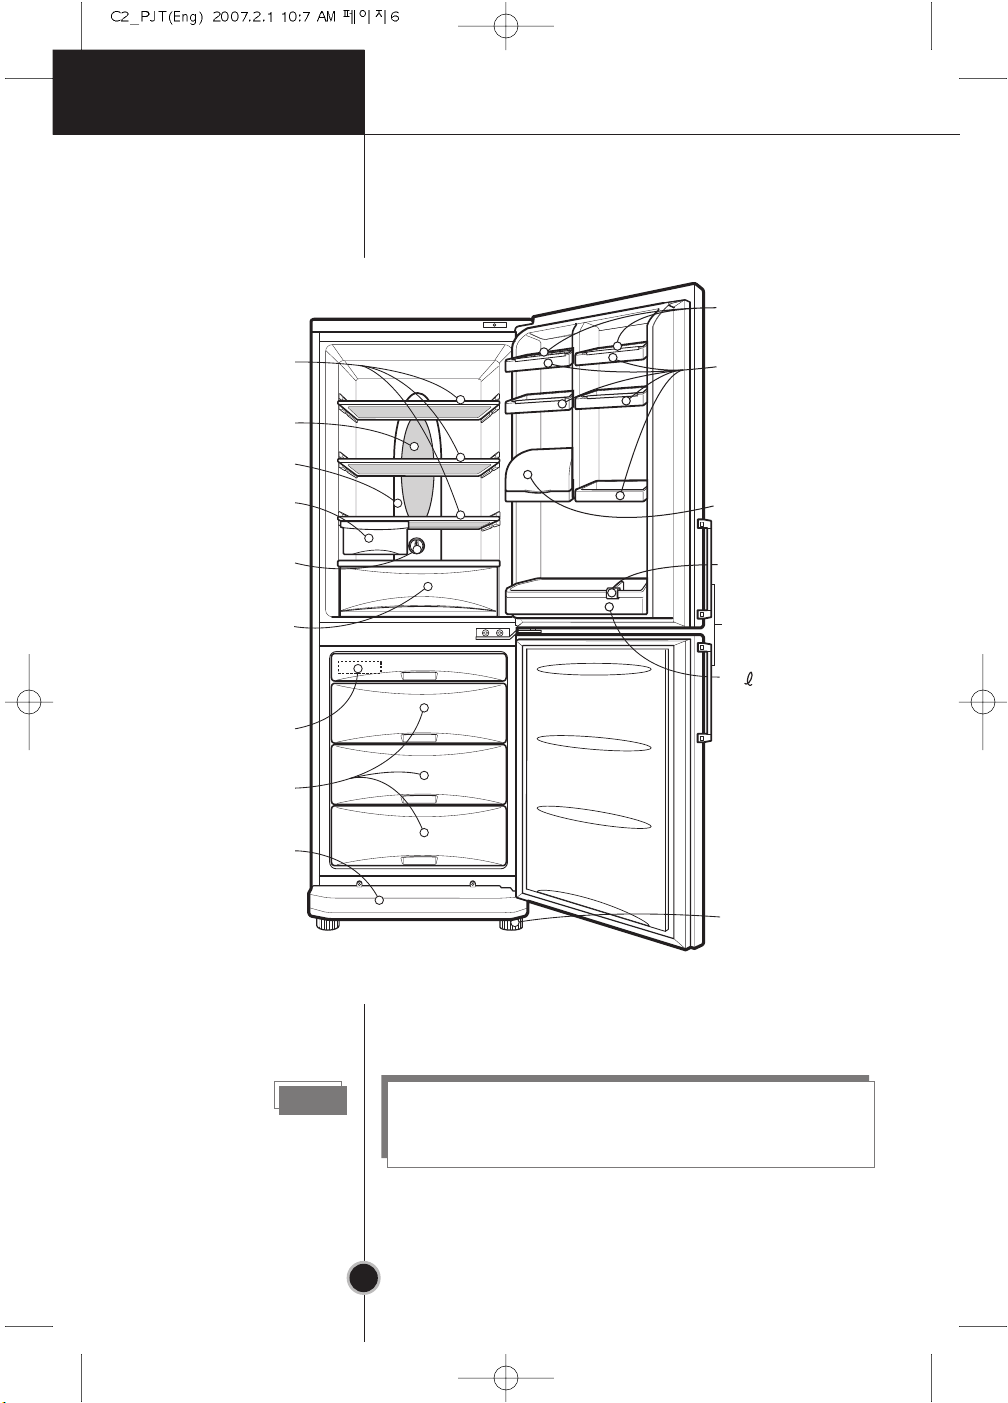
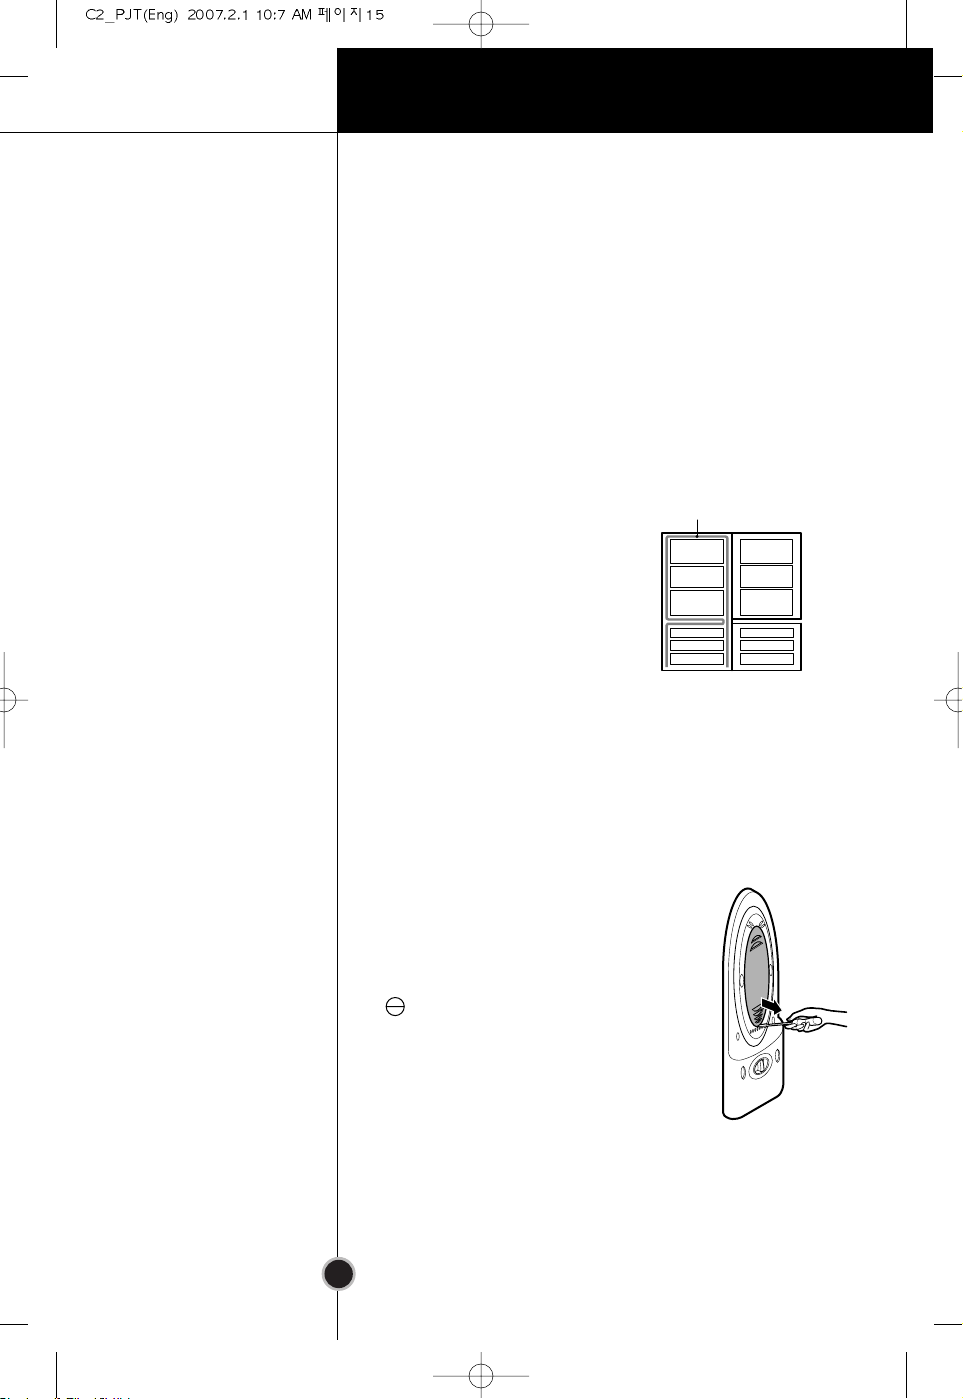
Identification of Parts
Note
If you find some parts missing from your unit, they
may be parts only used in other models.
7
Egg Tray(1 or 2)
Removable
Glass Shelf(2 or 3)
Lamp
Multi-air Flow Duct
Fresh Zone (Optional)
Refrigerator
Temperatur
Vegetable Drawer
Used to keep fruits
and vegetables, etc.
e Control
fresh and crisp.
(1 or 2)
Ice Cube Tray
Freezer
Compartment
Removable
Plinth
Rotatable
Door Basket
(3 or 5)
Utility Corner
(movable)
Bottle Holder
Handle
(Optional)
2
Bottle
Door Basket
Leveling Screw
Page 7
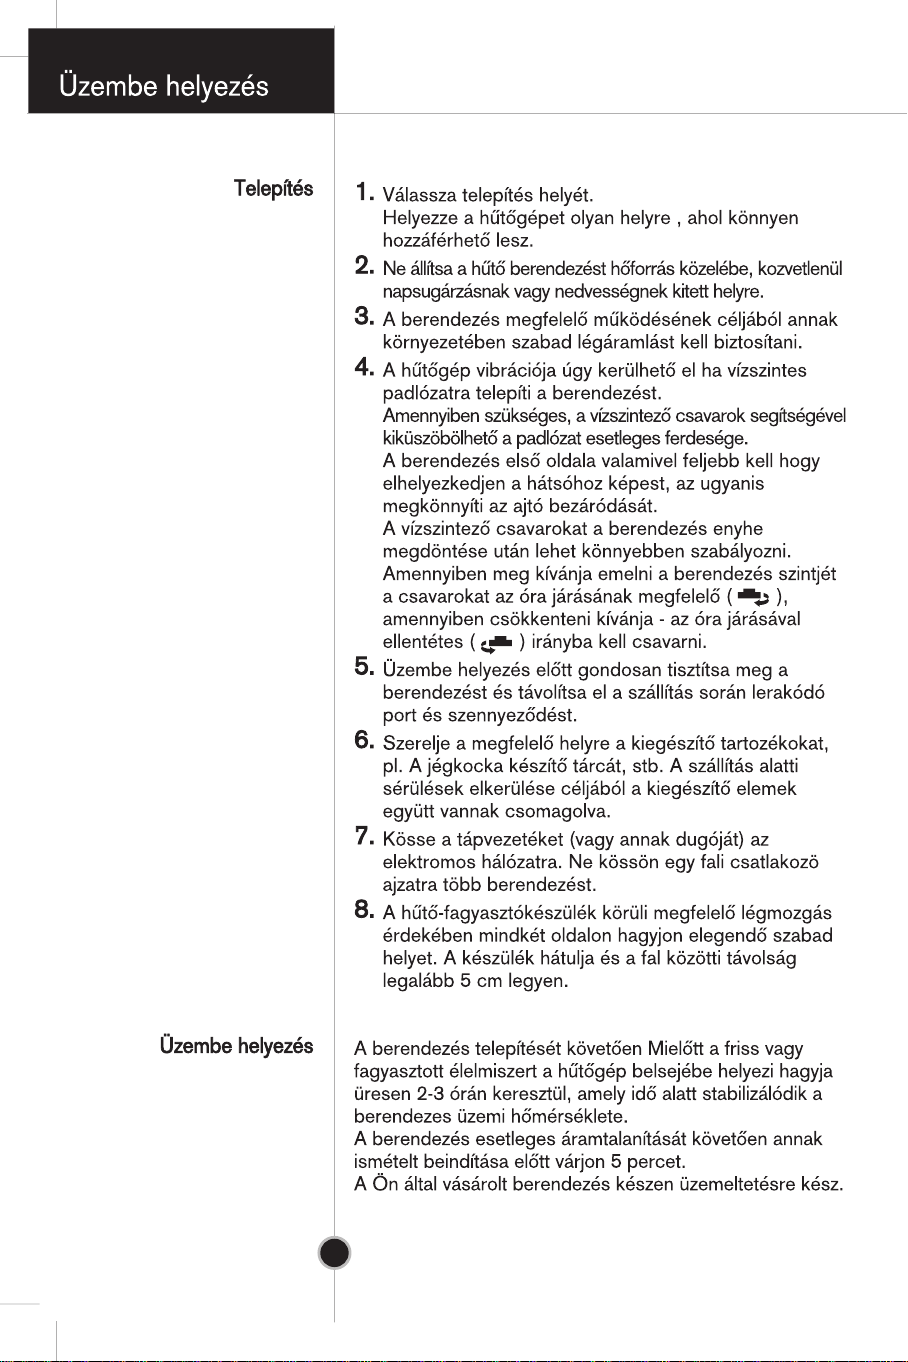
Installation
8
1.
Select a good location.
Place your fridge-freezer where it is easy to use.
2.
Avoid placing the unit near heat sources,
direct sunlight or moisture.
3.
There must be proper air circulation around your
fridge-freezer to keep it operating efficiently.
4.
To avoid vibration, the unit must be leveled.
If required, adjust the leveling screws to compensate
for the uneven floor.
The front should be slightly higher than the rear to aid
in door closing.
Leveling screws can be turned easily by tipping the
cabinet slightly.
Turn the leveling screws counterclockwise( ) to
raise the unit, clockwise( ) to lower it.
5.
Clean your fridge-freezer thoroughly and wipe off all
dust accumulated during shipping.
6.
Install accessories such as ice cube box, etc., in their
proper places.They are packed together to prevent
possible damage during shipment.
7.
Connect the power supply cord (or plug) to the outlet.
Don't double up with other appliances on the same
outlet.
8.
To ensure proper air circulation around the fridge freezer, please maintain sufficient space on both the
sides as well as top and maintain at least 2 inches (5
cm) from the rear wall.
When your fridge-freezer is installed, allow it 2-3 hours to
stabilize at normal operating temperature prior to filling
it with fresh or frozen foods.
If power plug is disconnected, allow 5 minutes delay
before restarting.
Your fridge-freezer is now ready for use.
Installation
Starting
Page 8
Operation
9
Temperature Control
Your fridge-freezer has two controls that let you regulate
the temperature in the fridge and freezer compartments.
Refrigerator
Freezer
• Initially set the TEMP. CONTROL at
"4". Then adjust the compartment
temperature according to your
desire.
• If you want an inside temperature
slightly less cold or colder, turn the
MAX MIN
7
6
5
3
4
TEMP. CONTROL
knob towards MIN or MAX,
respectively. When the surrounding
temperature is low, adjust the TEMP. CONTROL 'MIN'.
Display Panel For Temperature Control
1
2
Page 9
Operation
10
• The initial Temperature of the Freezer Compartment is
-18°C . You can now adjust the temperature of the
compartment as you want.
< LED 88 Type >
< LED BAR Type >
• When you press the temperature control buttons, the
temperature of Freezer compartment is repeated in the
following order.
LED 88 Type Freezer Compartment :
-18°C → -19°C → -20°C → -21°C → -22°C → -23°C
→ -15°C → -16°C → -17°C
Note
LED BAR Type Freezer Compartment :
-19°C → -21°C→ -23°C → -15°C → -17°C
The actual inner temperature varies depending on the
food status, as the indicated setting temperature is a
target temperature, not actual temperature within
refrigerator.
Refrigeration function is weak in the initial time.
Please adjust temperature as above after using
refrigerator for minimum 2~3 days.
Page 10
Operation
11
Function
Super Freezer
Vacation
• Please select this function for prompt freezer.
• This function is used when you want to freeze the
foods quickly. Press the ‘SUPER FRZ.’ (Super Freezer)
button once, and then the quick freeze operation starts
with the lamp on.
• The Super Freeze operation takes about 3 hours. When
its operation ends, it automatically returns to the
previous temperature setting. If you want to stop the
quick freeze operation, press the ‘SUPER FRZ.’ button
once more, the lamp goes out, and the Super Freeze
operation stops and the refrigerator returns to the
previous temperature setting.
• This function makes the fridge-freezer work in a power
saving mode which is useful for when you are away on
holiday, by reducing energy consumption as much as
possible.
Pressing ‘VACATION’ starts operation with lamp on
and pressing it again stops the operation.
Page 11
Operation
12
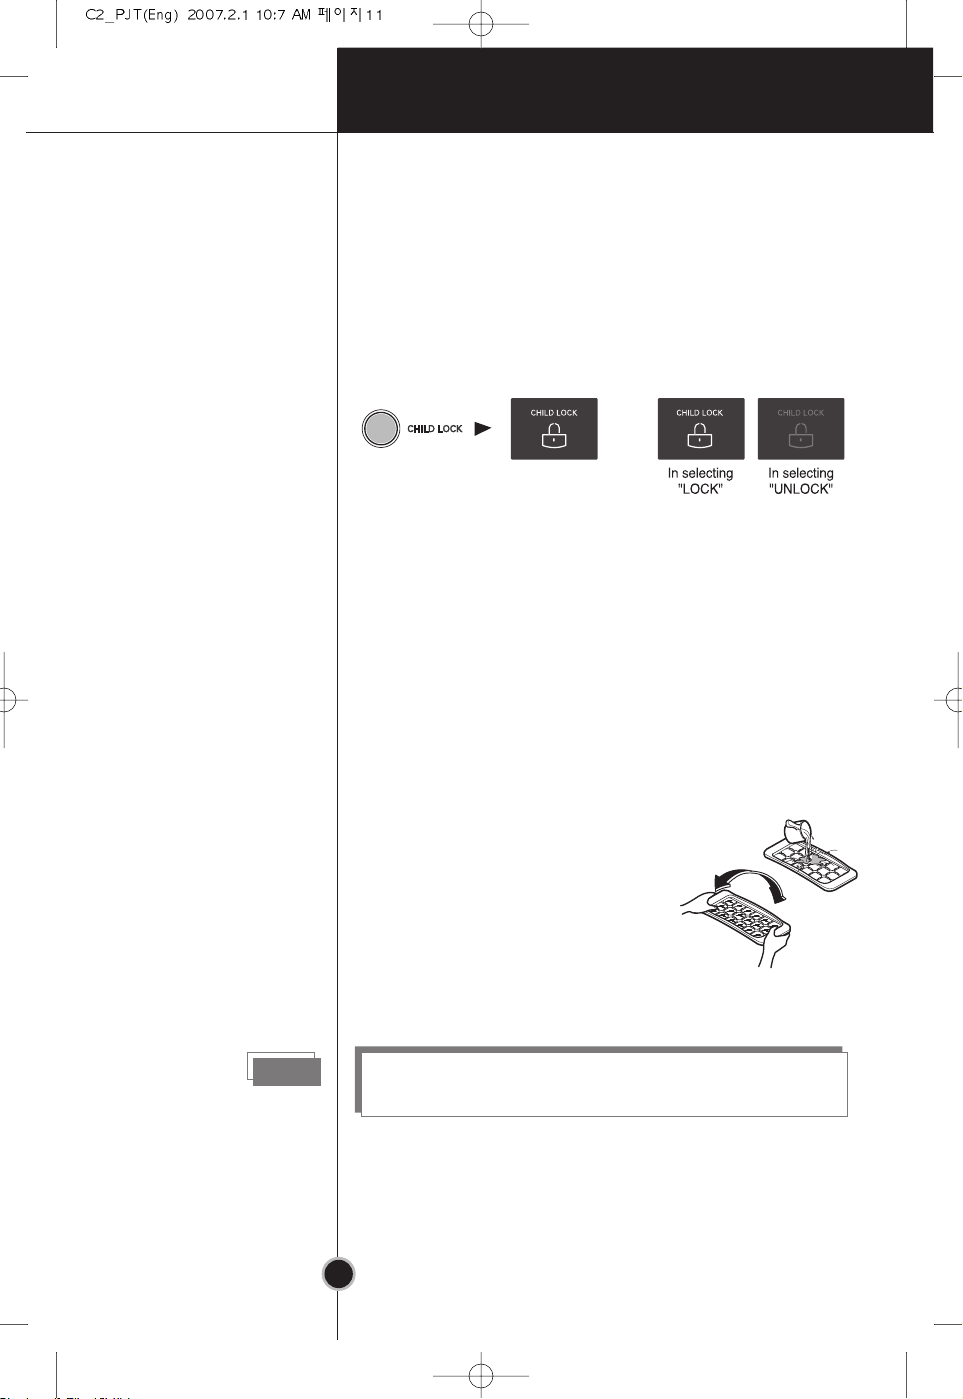
Lock
Self Test
Ice Making
• Pressing this button stops operation of other buttons.
• ”Locking” or “Un-Locking” is repeated whenever
pressing the ‘CHILD LOCK’ button. (For “Locking” or
“Un-Locking” press the ‘CHILD LOCK’ button for 2 secs.)
• When ‘CHILD LOCK’ is activated, pressing the other
buttons would not work.
This function allows you to check for operational
problems. If you think you have a problem with your
fridge-freezer, then press the temperature control
button:
- If the indicate lights move up or down, then there is no
problem with your fridge-freezer.
- If the indicate lights do not move up or down, then
please leave the power connected and call your nearest
service agent.
• To make ice cubes, fill the ice
tray to the water level and place
it in the freezer.
• If ice cubes are required fast,
press the ‘SUPER FRZ.’button.
• To remove ice cubes, hold the
tray at its ends and twist gently.
Tip
Defrosting
To remove ice cubes easily, run water on the tray
before twisting.
Defrosting takes place automatically.
The defrosting water flows down to the evaporating tray
and is evaporated automatically.
Page 12
Suggestions on food storage
13
Storing Food
Storing Food
• Do not store food which goes bad easily at low
temperature, such as banana, and melon.
• Allow hot food to cool prior to storing. Placing hot
food in the fridge-freezer could spoil other food, and
lead to higher electric bills.
• When storing the food, use a container with a lid. This
prevents moisture from evaporating, and helps food to
keep its taste and nutrients.
• Do not block air vents with food. Smooth circulation of
cold air keeps fridge-freezer temperature even.
• Do not open the door frequently. Opening the door
lets warm air enter the fridge-freezer, and cause
temperature to rise.
• To adjust the temperature control easily, do not store
food near the temperature control dial.
• Never keep too many foods in door rack, as this may
stop the door from fully closing.
• Do not store bottles in the freezer compartment - they
may break when frozen.
Note
• Do not refreeze food that has been thawed. This
causes loss of taste and nutrition.
If you keep the fridge-freezer in a hot, and humid
place, frequently open its door or put a lot of
vegetables in it, dew may form in it, which has no
effect on its performance.
Remove the dew with dust cloth free from care.
Page 13
Care and Maintenance
Anti-Condensation
Pipe
14
General Information
Power Failure
If You Move
Anti
Condensation
Pipe
• 1~2 hour power failure does no harm to the foods
stores. Try to avoid opening and closing the door too
frequently.
• Take out foods from the fridge-freezer and firmly fix
the loose items with tape.
• Turn the leveling screws until they stop before moving
the fridge-freezer. Otherwise the screw may scratch
the floor or the fridge-freezer cannot move.
• The Anti-Condensation
pipe is installed around the
front side of fridge-freezer
as well as on the partition
between fridge
compartment and freezer
compartment to prevent
dewing.
• Especially after installation
or when ambient
temperature is high, the fridge-freezer may feel hot,
which is quite normal.
Lamp Replacement
1.Unplug the power cord from the
outlet.
2.Remove fridge shelves.
3.To remove the lamp cover, insert
type driver in the underside of
the lamp cover and pull it out
forwards.
4.Turn the lamp counterclockwise.
5.Assemble in reverse order of
disassembly.
Replacement lamp must be the same specification as
original.
• You must check the O-RING, which is made by
rubber and prevent electric spark.
Page 14
Care and Maintenance
15
Cleaning
Before Cleaning
Exterior
Interior
After Cleaning
ww
Warning
Be sure to unplug the power.
Clean the outside of the fridge-freezer with a soft cloth
soaked with hot water or liquid detergent. If you use a
detergent, be sure to wipe it with a clean wet cloth.
As above.
Check that the power cord is not damaged, power plug
has not overheated, and that the power plug is tightly
inserted into the outlet.
Be sure to dry the appliance with a cloth after washing
it with water.
Do not use abrasive, petroleum, benzene, thinner,
hydrochloride acid, boiling water, rough brush, etc, as
they may damage parts of the fridge-freezer.
Page 15
Trouble Shooting
16
Trouble Shooting
Before calling for service, check this list.
It may save you both time and expense.
This list includes common occur
the result of defective workmanship or materials in
this appliance.
rences that are not
Problem
Fridge-Freezer
does not operate
Fridge or Freezer
Compartment
Temperature too
warm
Vibration or
Rattling or
Abnormal Noise
Possible Causes
• Power plug may be unplugged from the electric
outlet.
Plug it in securely.
• House fuse has blown or circuit breaker has
tripped.
Check and/or replace fuse and reset circuit breaker.
• Power cut.
Check house lights.
• Temperature control not set on proper position.
Refer to Temperature Control section.
• Appliance is placed close to heat source.
• Warm weather-frequent door openings.
• Door left open for a long time.
• Package holding door open or blocking air duct in
freezer compartment.
• The floor on which the fridge-freezer is installed
may be uneven or the fridge-freezer may be
unstable.
Make it even by rotating the leveling screw.
• Unnecessary objects placed in the back side of the
fridge-freezer.
Frost or Ice
Crystals on frozen
Food
Moisture forms on
Cabinet Surface
• Door may have been left ajar or package holding
door open.
• Too frequent or too long door openings.
• Frost within package is normal.
• This phenomenon is likely to occur in a wet space.
Wipe it with a dry towel.
Page 16
Problem Possible Causes
17
Trouble Shooting
Moisture collects
inside
Fridge has odor
Door not closing
properly
Interior light does
not work
• Too frequent or too long door openings.
• In humid weather, air carries moisture into fridge when
doors are opened.
• Foods with strong odors should be tightly covered or
wrapped.
• Check for spoiled food.
• Interior needs cleaning.
Refer to CLEANING section
• Food package is keeping door open.
Move packages that keep door from closing.
• Fridge-freezer is not level.
Adjust the leveling screws.
• The floor on which the fridge-freezer is installed
may be uneven or the fridge-freezer may be
unstable.
Slightly raise the front side with the leveling screw.
• No power at outlet.
• Light lamp needs replacing.
Refer to the Lamp Replacement section
Disposal of your old appliance
1. When this crossed-out wheeled bin symbol is attached to a
produ
Directive 2002/
2. All electrical and electronic products should be disposed o
separately from the municipal waste stream via designate
collection facilities appointed by the government or the loca
authorit
3. The correct disposal of your old appliance will help prevent
potential negative consequences for the environment and
human health.
4. For more detailed information about disposal of your old
appliance, please contact your city office, waste disposal
service or the shop where you purchased the product.
ct it means the product is covered by the European
96/EC.
ies.
Information for customer. Noise regarding EN :
60704-2-11 42dB(A)
f
d
l
Page 17
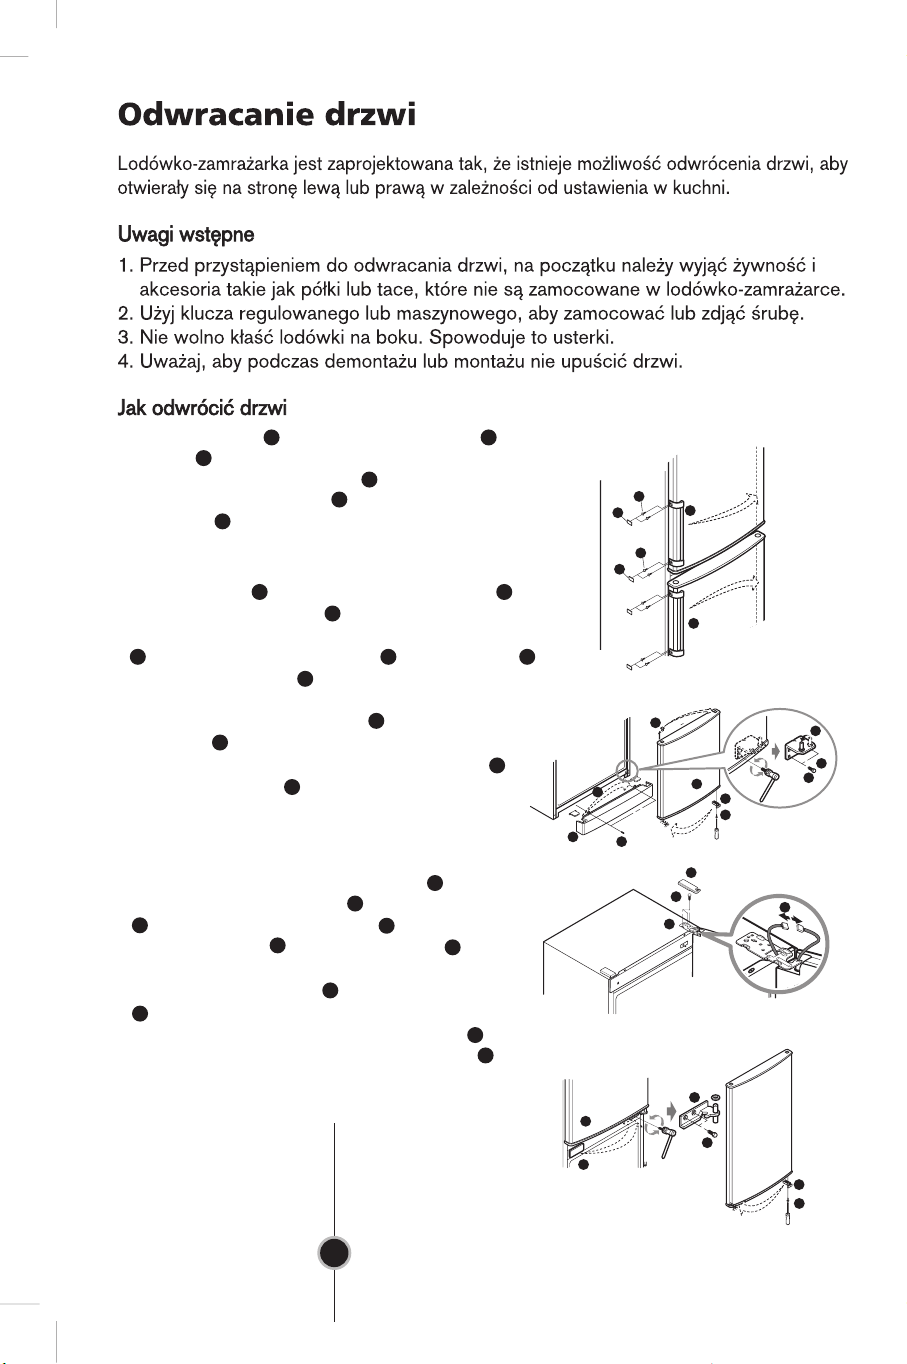
To Reverse the Doors
18
Your fridge-freezer is designed with reversible doors, so that they may open from either
the left or right hand side to suit your kitchen design.
Precaution
1.
Before reversing the door, first of all, you should take out food and accessories like
shelves
or trays which are not fixed in the fridge-freezer.
2.
Use Torque Wrench or Spanner to fix or remove the bolt.
3.
Do not lay the fridge-freezer down. This will
cau
se problems.
4.
Be careful not to drop the doors in disassembling
or assembling.
How to Reverse the Door
1. Separate the screw after separating the nut on the
left of the refrigerator door handle , then separate th
refrigerator door handle . Separate the freezer door handle
4
in the order in which you separating the refrigerato
door handle . (The hidden handle does not need this
procedure)
2. Separate the screw and bottom cover , then separate
the cap of bottom cover and install it on the
7
3
1
1
1
5
corresponding position on the right side. Separate the
hinge lower right and the pin after separating the
screw . Install the pin into the corresponding left hole
8
9
10
10
on the hinge lower. Separate the freezer door , then
remove the cap on the door and install it on the
12
corresponding position on the right side. Separate the door
4
1
stop after your separating the screw , then install th
13
door stop on the corresponding position on the left.
2
e
r
6
11
e
6
3
2
2
3
2
12
7
5
15
23
24
1
4
10
9
11
14
13
8
16
3. Separate the cover of hinge upper , separate the two
16
wire . Separate the screw , separate the hinge middle
18
, then separate the refrigerator door .Separate cap
and install it on the corresponding position on the right.
Separate the door stop after your separating the screw
21
, then install the door stop on the corresponding position
on the left. Separate the screw , then separate the hinge
upper right .
24
22
15
17
19
20
23
18
19
20
17
22
21
Page 18

4. Destroy the two small caps on the front of the cover front
19
with a screw driver, then separate the screw and . Separate
2
the cover front . Move the wire to left, install the cover
front and the screw. Take the small caps out of the alternate
23
23
6
24
23
25
bag, then install the small caps.
25
26
34
23
24
28
29
5. Remove the small cap of the refrigerator door ,then
separate the small cap . Move the cable from left to the
27
28
corresponding position on the right. Install the small cap ,
then install the small cap on the corresponding position on
ig
the r
ht.
6. Install the hinge lower and the freezer door , then install
the hinge middle . Separate the cap on upper left. Instal
the refrigerator door , take the hinge upper out of th
27
9
18 34
19
alternate bag and install it on upper left. Pull out the wire
19
29
28
11
l
30
e
26 29
from the individual holes and connect these cables. Take the
31
small caps out of the alternate bag, then install the small
caps
. Install base cover .
7. Separate the cap on the right side of the door, then install it
32
6
33
into the left screw hole (you can see this hole after the left handle
is removed). Install the handle and the screw which previously
separated on the corresponding position on the right. ( The
hidden handle does not need this procedure). Then Installation
completed.
27
19
17
18
11
9
6
31
30
2
2
32
26
3
3
5
29
33
33
Note
Reversing the doors is not covered by the warranty.
Page 19
22
22
25
26
26
27
27
27
27
29
29
30
30
30
21
30
31
32
32
33
34
36
36
Page 20
22
Page 21

23
Page 22
24
Page 23
(3 vagy 5)
Eszköztartó
(kivehető)
Palack rögzítő
Megjegyzés
25
Page 24
26
Page 25
A hőmérséklet-beállítás kijelzőpanelje
MAX MIN
7
6
5
4
TEMP. CONTROL
2
3
1
Funkciókijelző
LED (SZÁM)
Szuperfagyasztás gomb
A fagyasztószekrény
hőmérséklet-beállító gombja
LED (OSZLOP)
Lezárás gomb
Szabadság gomb
27
Page 26
• A fagyasztószekrény hőmérsékletének gyári beállítása
-18 °C. Ezt tetszés szerint meg lehet változtatni.
< LED - SZÁMKIJELZÉS >
< LED – OSZLOP-KIJELZÉS >
• A hőmérséklet-beállító gombok mindenmegnyomásakor
a hőmérséklet-érték az alábbi sorrendben változik:
LED (SZÁM) típusú kijelzés:
-18°C → -19°C → -20°C → -21°C → -22°C → -23°C
→ -15°C → -16°C → -17°C
LED (OSZLOP) típusú kijelzés:
-19°C → -21°C → -23°C → -15°C → -17°C
Megjegyzés
Az aktuális hőmérséklet az élelmiszer állapotától
függően változik, mivel a kijelzett hőmérséklet a
beállított hőmérséklet és nem a fagyasztószekrény
tényleges belső hőmérséklete.
A készülék első bekapcsolása után a hűtés lassú.
Ezért a fenti hőmérséklet-beállítás előtt várjon
legalább 2-3 napot.
28
Page 27
Funkciók
Szuperfagyasztás
Szabadság
• Ez a funkciók gyorsfagyasztást végez.
• Akkor használható, ha az élelmiszert gyorsan kell
lefagyasztani. Nyomja meg egyszer a ‘SUPER FRZ.’
(Super Freezer) gombot, a kijelzés bekapcsolása jelzi,
hogy a gyorsfagyasztást elindul.
• A gyorsfagyasztást művelet kb. 3 óráig tart. A művelet
végrehajtása után a készülék automatikusan az előző
hőmérséklet-beállításra tér vissza. Ha a gyorsfagyasztást
előbb le szeretné állítani, akkor nyomja meg még egyszer
a ‘SUPER FRZ.’ gombot, a kijelzés kialszik és a készülék
az előző hőmérséklet-beállításra tér vissza.
Bekapcsolva
Kikapcsolva
• Ezzel a funkcióval a hűtőgép energia-takarékos üzemmódba
kapcsolható, ami akkor hasznos, ha pl. Ön szabadságra megy.
Ilyenkor a készülék energia-felvétele a lehető legkisebbre
csökken.
A ‘VACATION’ gombot megnyomva a kijelzés világít, a gombot
ismét megnyomva a funkció és a kijelzés kikapcsolódik.
29
Bekapcsolva
Kikapcsolva
Page 28

Lezárás
• A gomb megnyomása után a többi gomb nem használható.
• A ‘CHILD LOCK’ gomb minden megnyomásakor a “Lezárt”
és “Nem lezárt” állapot váltakozik (a gombot mindig kb. 2
mp-ig nyomva kell tartani).
• A ‘CHILD LOCK’ bekapcsolt állapotában a többi gomb
megnyomása hatástalan marad.
SUPER FRZ.
Bekapcsolva
Kikapcsolva
30
Page 29

Megjegyzés
31
Page 30

32
Page 31

33
Page 32

34
Page 33

Zajszint :.......(42dB/A)
35
Page 34

1.A hűtőszekrény ajtófogantyújának bal oldalán
vegye le az anyát , majd vegye ki a csavart
és vegye le az ajtófogantyút . A fagyaszt
ajtófogantyúját ugyanígy kell leszerelni. (
rejtett fogantyú esetén erre nincs szükség.
2
4
1
1
ó
A
)
3
2
2
3
2
1
3
4
Vegye ki a csavart és az alsó takarólemezt ,
2.
vegye le az alsó takarólemez sapkáját , majd
jobb oldalon szerelje fel a megfelelő helyre.
csavar eltávolítása után vegye le a jobb als
8
forgópántot az alsó forgópánt jobb oldalát és
csapot . A csapot helyezze a bal oldal
10
alsó forgópánt megfelelő furatába szerelje a
5 6
9
10
7
A
i
z
forgópánt bal oldali megfelelő helyére. Vegye le
fagyasztó ajtaját , majd vegye le az ajtóról
fedőkupakot és tegye át a jobb oldalra.
13
csavar eltávolítása után vegye le az ajt
ütközőjét és szerelje át a bal oldal megfelel
.
e
helyér
3.Vegye le a felső forgópánt fedőkupakját és
válassza le a két vezetéket . Vegye ki
csavart , vegye le a középső forgópántot
majd vegye le a hűtő ajtaját . Vegye le
fedőkupakot és helyezze át a jobb oldalra
A csavar eltávolítása után vegye le a
ajtóütközőt és helyezze át a bal oldalra
Vegye ki a csavart és vegye le a jobb fels
forgópántot
17 18
11
12
A
ó
14
15
16
19
20
21
22
23
24
.
a
a
.
z
.
ő
a
ó
a
a
a
6
ő
12
7
5
11
14
13
15
23
24
10
9
8
16
o
,
18
19
17
20
22
21
36
Page 35

25
26
4.Csavarhúzóval törje ki a takarólemez két kis kupakját és
25
vegye ki a két csavart és . Vegye le a takarólemezt
23
. A vezetéket helyezze át a bal oldalra, majd helyezze
vissza a takarólemezt és a csavart. A tartozékcsomagból
24
26
23
23
vegyen ki két ki kupakot és tegye őket a helyükre
5.Távolítsa el a kis kupakot a hűtőajtóról , majd vegye ki
28
a kupakot. A kábelt helyezze át a jobb oldal
29
27
19
megfelelő helyére. A jobb oldalon tegye a megfelelő helyre
28
27
a és kupakot.
6. Szerelje fel az alsó forgópántot és a fagyasztó ajtaját
és a középső forgópántot . A fagyasztóból vegye ki a
zárókupakot Vegye ki a bal felső zárókupakot . Helyezze
fel a hűtő ajtaját , a tartozékzacskóból vegye elő a felső
forgópántot és szerelje fel a bal felső oldalra. A furatokból
húzza ki a vezetékeket és csatlakoztassa őket. A
19
30
26 29
9
18
34
tartozékcsomagból vegyen ki két kis zárókupakot és
tegye őket a helyükre. Szerelje fel az alsó takarólemezt .
11
32
31
6
34
23
24
28
27
19
18
9
31
30
29
17
11
6
32
26
5
29
7.Az ajtó jobb oldalából vegye ki a kupakot és helyezze át a
33
bal oldali csavar furatába (ez a bal oldali fogantyú eltávolítása
után válik láthatóvá ). A korábban eltávolított fogantyút a
csavarral szerelje fel a jobb oldal megfelelő helyére. (Rejtett
fogantyú esetén erre nincs szükség. Ezzel az ajtók áthelyezése
megtörtént
37
33
3
2
3
2
33
Page 36

40
40
43
44
44
45
45
45
47
47
47
Blokování
48
48
48
48
49
49
49
50
52
54
54
39
Page 37

40
Page 38

41
Page 39

42
Page 40

Poznámka
43
Page 41

44
Page 42

Přístrojová
deska
Panel s displejem na ovládání teploty
MAX MIN
7
6
5
4
2
3
TEMP. CONTROL
1
Tlačítko rychlého
mražení
Tlačítko pro nastavení
teploty v mrazničce.
45
Tlačítko pro
blokování tlačítek
Tlačítko Dovolená
Page 43

• Počáteční teplota v mrazničce je -18 °C. Tuto teplotu
můžete změnit na požadovanou hodnotu.
< LED 88 Type >
< LED BAR Type >
• Po stisknutí tlačítek na ovládání teploty se teplota v
mrazničce opakuje v následujícím pořadí.
Mraznička typu LED 88:
-18°C → -19°C → -20°C → -21°C → -22°C → -23°C
→ -15°C → -16°C → -17°C
Mraznička typu LED BAR:
-19°C → -21°C → -23°C → -15°C → -17°C
Poznámka
Skutečná vnitřní teplota závisí na stavu potravin.
Zobrazená nastavená teplota je cílová teplota, nikoliv
aktuální teplota v mrazničce.
Při prvním spuštění je výkon mrazničky omezený.
Po používání chladničky 2-3 dny upravte teplotu
podle uvedeného postupu.
46
Page 44

Funkce
Silné mražení
Dovolená
• Tuto funkci vyberte, potřebujete-li rychlé mražení.
• Tato funkce se používá k rychlému mražení potravin.
Jednou stiskněte tlačítko ‘SUPER FRZ.’ (rychlé mražení).
Spustí se funkce rychlého mražení a indikátor se rozsvítí.
• Funkce rychlého mražení zůstane spuštěná přibližně tři
hodiny. Mraznička se potom automaticky vrátí do
předcházejícího nastavení teploty. Chcete-li zastavit funkci
rychlého mražení, stiskněte tlačítko ‘SUPER FRZ.’ (rychlé
mražení) znovu, čímž se indikátor vypne, funkce rychlého
mražení se zastaví a mraznička se vrátí do předcházejícího
nastavení teploty.
Nastavenie
Zapnuté
Nastavenie
Vypnuté
• Tato funkce přepne chladničku s mrazničkou do úsporného
režimu, který je užitečný například při odjezdu na dovolenou
a v maximální možné míře snižuje spotřebu energie.
Stisknutím tlačítka ‘VACATION’ (dovolená) se funkce spustí a
indikátor se rozsvítí. Opakovaným stisknutím se funkce vypne.
47
Nastavenie
Zapnuté
Nastavenie
Vypnuté
Page 45

Blokování
• Stisknutím tohoto tlačítka přestanou fungovat další
tlačítka.
• Stisknutím tlačítka ‘CHILD LOCK’ (rodičovský zámek)
se funkce aktivuje nebo deaktivuje. (Pro zablokování
nebo odblokování ostatních tlačítek stiskněte tlačítko
‘CHILD LOCK’ (rodičovský zámek) alespoň na 2
sekundy.)
• Je-li funkce ‘CHILD LOCK’ (rodičovský zámek) aktivní,
stisknutí ostatní tlačítek nebude fungovat.
Nastavení
Zablokované
Nastavení
Odblokované
48
Page 46

49
Page 47

50
Page 48

51
Page 49

52
Page 50

53
42
Page 51

Otočení dveří
Chladnička s mrazničkou je navrhnuta s oboustrannými dveřmi, které je
možné otvírat zprava i zleva tak, aby to vyhovovalo situaci ve vaší kuchyni.
Varování
1.
Před otočením dveří na chladničce s mrazničkou nejdříve vyberte jídlo a
příslušenství, které není upevněné, jako jsou například poličky a tácky.
2.
Na upevnění nebo povolení šroubů použijte jednorázový nebo obyčejný
klíč na matky.
3.
Chladničku s mrazničkou nesklápějte na zem. Způsobilo by to problémy.
4.
Dejte pozor, aby dveře při demontáži nebo montáži nespadly.
1.
Odšroubujte šroub po odšroubování
matice na na levé straně držadla dveří
chladničky , potom držadlo dveří
chladničky oddělte. Oddělte držadlo dveří
mrazničky stejným postupem, jako jste
2
1
4
1
oddělili držadlo dveří chladničky . (Tento
postup není vyžadován u ukrytého držadla.)
2.
Odšroubujte šroub a spodní kryt ,
potom oddělte krytku spodního krytu
a namontujte ji do příslušné polohy na
pravé straně. Odšroubujte šroub a
potom oddělte spodní pravý závěs
a kolík . Vložte kolík do příslušného
10 10
levého otvoru na spodním závěsu.
Oddělte dveře mrazničky , potom
vyjměte krytku na dveřích a vložte jí
do příslušné polohy na pravé straně.
Odšroubujte šroub zarážky dveří a
samotnou zarážku , potom ji
3
3
2
2
2
1
5
7
11
12
13
6
8
9
14
7
6
5
1
3
4
12
11
14
13
15
23
24
10
9
8
16
namontujte do příslušné polohy vlevo.
3.
Oddělte kryt horního závěsu , oddělte
dva dráty . Odšroubujte šroub ,
oddělte střední závěs a potom vyjměte
dveře chladničky . Oddělte krytku a
16
18
19
vložte ji do příslušné polohy vpravo.
Odšroubujte šroub zarážky dveří a
samotnou zarážku , potom ji namontujte
21
15
17
20
22
19
20
18
17
22
21
do příslušné polohy vlevo. Odšroubujte
šroub a poté oddělte levý horní závěs .
23
24
54
Page 52

4.
Vyjměte dvě malé krytky v přední části předního
krytu pomocí šroubováku a potom odšroubujte
šrouby a . Oddělte přední kryt . Přesuňte drát
doleva, namontujte přední kryt a šroub. Vyjměte
23
25
24
26
23
23
malé krytky z tašky s náhradním materiálem a
namontujte je.
5.
Vyjměte krytku z dveří chladničky , potom oddělte
28
kryt . Přesuňte kabel zleva do příslušné polohy
vpravo. Namontujte kryt a potom namontujte krytku
27
do příslušné polohy vpravo.
6.
Namontujte spodní závěs a dveře mrazničky ,
27
29
28
9
potom namontujte střední závěs . Oddělte krytku
34
na mrazničce. Namontujte dveře chladničky a
vyberte horní závěs z tašky s náhradním
30
19
11
18
19
materiálem a namontujte jej vlevo nahoře. Vytáhněte
dráty z jednotlivých otvorů a spojte je. Vyjměte
malé krytky z tašky s náhradním materiálem a
namontujte je. Namontujte spodní kryt .
26 29
31
32
6
25
26
34
23
24
28
27
19
18
9
31
29
17
11
6
32
5
7.
Oddělte krytku na pravé straně dveří a potom ji
33
namontujte do levého otvoru na šroub (tento otvor
uvidíte po demontování levého držadla). Namontujte
držadlo a šroub, které jste předtím oddělili, do
příslušné polohy vpravo. (Tento postup není vyžadován
u ukrytého držadla.) Tím je montáž dokončená.
Poznámka
55
30
3
2
3
2
26
29
33
33
Page 53

58
58
61
62
62
63
63
63
65
65
65
66
66
66
66
57
67
68
68
69
70
72
72
Page 54

58
Page 55

59
Page 56
60
Page 57

61
Page 58

62
Page 59

Wyświetlacz sterowania temperaturą
MAX MIN
7
6
5
4
TEMP. CONTROL
2
3
1
Wyświetlacz
funkcji
LED (cyfrowy 88)
Przycisk zamrażania
Super
Przycisk regulacji temperatury
dla komory zamrażarki
LED (PASKOWY)
Przycisk blokady
Przycisk wakacji
63
Page 60

• Temperatura początkowa dla komory zamrażarki to
-18°C . Można teraz dowolnie dokonać regulacji
temperatury komory.
< typu cyfrowego - 88 >
< LED typu paskowego >
• Podczas naciskania przycisków sterowania
temperaturą, zmienia się ona w następujący
sposób.
Wyświetlacz LED typu cyfrowego - 88:
-18°C → -19°C → -20°C → -21°C → -22°C → -23°C
→ -15°C → -16°C → -17°C
Wyświetlacz LED typu paskowego:
-19°C → -21°C→ -23°C → -15°C → -17°C
Uwaga
Właściwa wewnętrzna temperatura może być różna
i zależy od stanu żywności, ustawiona temperatura
jest docelową, nie aktualną panująca wewnątrz
urządzenia.Wydajność zamrażania jest słaba zaraz
po uruchomieniu urządzenia.
Prosimy dokonać ustawienia temperatury, tak jak to
podano powyżej, po minimum 2~3 dniach od
uruchomienia.
64
Page 61

Funkcja
Super zamrażanie
Wakacje
• Proszę wybrać tę funkcję dla szybkiego zamrażania.
• Funkcje tą należy uruchamiać jeżeli chcesz szybko
zamrozić produkty żywnościowe. Naciśnij raz przycisk
‘SUPER FRZ.’ (Super Freezer) a zapali się kontrolka i
uruchomiona zostaje funkcja szybkiego zamrażania.
• Funkcje tą należy uruchamiać jeżeli chcesz szybko
zamrozić produkty żywnościowe. Naciśnij raz przycisk
‘SUPER FRZ.’ (Super Freezer) a zapali się kontrolka i
uruchomiona zostaje funkcja szybkiego zamrażania.
Funkcja
włączona ON
Funkcja
wyłączona OFF
• Funkcja jest użyteczna np. gdy wyjeżdżasz na wakacje,
powoduje ona że lodówko-zamrażarka zostaje przełączona
w tryb jak najmniejszego zużycia energii.Naciśnięcie
przycisku ‘VACATION’ uruchamia funkcję i kontrolkę,
natomiast ponowne naciśnięcie powoduje jej wyłączenie.
65
Funkcja
włączona ON
Funkcja
wyłączona OFF
Page 62

Blokada
• Naciśnięcie tego przycisku powoduje zablokowanie
działania innych.
• Za każdym naciśnięciem przycisku ‘CHILD LOCK’
pojawiają się komunikaty ”Locking” lub “Un-Locking”.
(Aby “zablokować” (Locking) lub “odblokować”
(Un-Locking) naciśnij przycisk ‘CHILD LOCK’ na 2
sekundy.
• Jeżeli aktywna j
est funkcja blokady ‘CHILD LOCK’,
inne przyciski nie będą działać.
‘SUPER FRZ.’
Podczas
blokady - LOCK
Jeżeli blokada
nie działa - UNLOCK
66
Page 63

67
Page 64

68
Page 65

69
Page 66

70
Page 67

42
71
Page 68
1.Odkręć nakrętkę a następnie wyjmij śrubę z
uchwytu po lewej stronie, następnie zdejmij
1
uchwyt drzwi komory lodówki . Zdejmij uchwyt
drzwi komory zamrażarki w taki sam sposób
jak uchwyt drzwi chłodziarki.(Ukryty uchwyt nie
2
1
4
1
3
wymaga tej procedury)
2.Wykręć śrubę oraz zdejmij dolną osłonę ,
następnie jej nakładkę i załóż w odpowiednim
5 6
7
miejscu po prawej stronie. Po wykręceniu śruby
8
wyjmij prawy dolny zawias oraz sworzeń .
Zainstaluj sworzeń w odpowiednim otworze
10
9
10
po lewej stronie w dolnym zawiasie. Wymontuj
drzwi komory zamrażalnika , następn
zatyczkę z drzwi i zamontuj ją w odpowiednim
12
miejscu po prawej stronie. Wykręć śrubę i
ogranicznik drzwi , następnie zainstaluj go
14
11
ie
13
w odpowiedniej pozycji po lewej stronie.
3.Oddziel pokrywę górnego zawiasu ,
następnie dwa przewody . Wykręć śrubę
17
, zdejmij środkowy zawias i drzwi
komory lodówki . Zdejmij zatyczkę i
19
16
15
18
20
załóż ją w odpowiednim miejscu po prawej
stronie. Wykręć śrubę i ogranicznik drzwi
22
, następnie zainstaluj go w odpowiedniej
pozycji po lewej stronie. Wykręć śrubę ,
a następnie zdejmij górny prawy zawias .
21
23
24
3
2
2
2
7
6
5
1
3
4
12
11
14
13
15
23
24
10
9
8
16
72
18
19
17
20
22
21
Page 69

25
26
4.Przy pomocy śrubokręta zniszcz dwie małe zatyczki znajdujące
się z przodu pokrywy przedniej , następnie wykręć śruby
25
oraz . Zdejmij pokrywę przednią . Przesuń kabel na lewą
stronę, zainstaluj pokrywę przednią oraz śrubę. Wyjmij małe
zatyczki z woreczka i zainstaluj je
5.Usuń małą zatyczkę z drzwi komory zamrażarki , następnie
wyjmij małą zatyczkę . Przesuń kabel z lewej strony w
27
28
23
23
23
.
19
29
odpowiednie miejsce po prawej. Załóż małe zatyczki , a
następnie w odpowiednie miejsca po prawej stronie
6.Zainstaluj dolny zawias oraz drzwi komory zamrażarki ,
następnie zawias środkowy . Wyjmij zatyczkę zamrażarki.
Załóż drzwi komory zamrażarki , wyjmij zawias górny z
27
9
18
19
34
24
26
28
.
11
30
woreczka i zainstaluj go u góry po lewej stronie. Wyciągnij kabl
32
26
29
i z otworów i podłącz je. Wyjmij małe zatyczki oraz z
woreczka i zainstaluj je. Załóż pokrywę podstawy
31
6
.
34
27
19
23
24
28
18
29
17
11
9
e
31
30
6
32
26
5
29
6.Wyjmij zatyczkę po prawej stronie drzwi, następnie zainstaluj
ją w otworze po śrubie (zobaczysz ten otwór po zdjęciu uchwytu
po lewej stronie). Zainstaluj wcześniej zdjęty uchwyt oraz śrubę w
33
odpowiednim miejscu po prawej stronie. (Ukryty uchwyt nie wymaga
tej procedury). Instalacja jest zakończona
.
73
33
3
2
3
2
33
Page 70

76
76
79
80
80
81
81
81
83
83
83
84
84
84
84
75
85
86
86
87
88
90
90
Page 71

76
Page 72

77
Page 73
78
Page 74

79
Page 75

80
Page 76

Prístrojová
doska
MAX MIN
7
6
5
4
2
3
TEMP. CONTROL
1
Tlačidlo rýchleho
mrazenia
Tlačidlo na nastavenie
teploty v mrazničke
81
Tlačidlo blokovania
tlačidiel
Tlačidlo Dovolenka
Page 77

• Počiatočná teplota v mazničke je -18 °C. Túto teplotu
môžete zmeniť na požadovanú hodnotu.
< LED 88 Type >
< LED BAR Type >
• Po stlačení tlačidiel na ovládanie teploty sa teplota
v mrazničke opakuje v nasledovnom poradí.
Mraznička typu LED 88:
-18°C → -19°C → -20°C → -21°C → -22°C → -23°C
→ -15°C → -16°C → -17°C
Mraznička typu LED BAR:
-19°C → -21°C → -23°C → -15°C → -17°C
Poznámka
Skutočná vnútorná teplota závisí od stavu potravín.
Zobrazená nastavená teplota je cieľová teplota,
nie aktuálna teplota v mrazničke.
Pri úvodnom spustení je výkon mrazničky
obmedzený. Po používaní chladničky 2-3 dni upravte
teplotu podľa uvedeného postupu.
82
Page 78

Funkcia
Silné mrazenie
Dovolenka
• Túto funkciu vyberte, keď požadujete rýchle mrazenie.
• Táto funkcia sa používa na rýchle zmrazenie potravín.
Jedenkrát stlačte tlačidlo ‘SUPER FRZ.’ (Rýchle mrazenie).
Spustí sa funkcia rýchleho mrazenia a indikátor bude svietiť.
• Funkcia rýchleho mrazenia zostane spustená približne tri
hodiny. Mraznička sa potom automaticky vráti do
predchádzajúceho nastavenia teploty. Ak chcete zastaviť
funkciu rýchleho mrazenia, stlačte tlačidlo ‘SUPER FRZ.’
(Rýchle mrazenie) znova, čím sa indikátor vypne, funkcia
rýchleho mrazenia sa zastaví a mraznička sa vráti do
predchádzajúceho nastavenia teploty.
Nastavenie
Zapnuté
Nastavenie
Vypnuté
• Táto funkcia prepne chladničku s mrazničkou do úsporného
režimu, ktorý je užitočný napr. pri odchode na dovolenku a v
maximálnej miere znižuje spotrebu energie.Stlačením tlačidla
‘VACATION’ (DOVOLENKA) sa funkcia spustí a indikátor sa
rozsvieti. Opätovným stlačením sa funkcia vypne.
83
Nastavenie
Zapnuté
Nastavenie
Vypnuté
Page 79

Blokovanie
• Stlačením tohto tlačidla prestanú fungovať ďalšie
tlačidlá.
• Stlačením tlačidla ‘CHILD LOCK’ (RODIČOVSKÝ
ZÁMOK) sa funkcia aktivuje alebo deaktivuje. (Pre
zablokovanie alebo odblokovanie ostatných tlačidiel
stlačte tlačidlo ‘CHILD LOCK’ (RODIČOVSKÝ ZÁMOK)
aspoň na 2 sekundy.)
• Ak je funkcia ‘CHILD LOCK’ (RODIČOVSKÝ ZÁMOK)
aktívna, stlačenie ostatných tlačidiel nebude fungovať.
Nastavenie
Zablokované
Nastavenie
Odblokované
84
Page 80

85
Page 81

86
Page 82

87
Page 83

88
Page 84

89
42
Page 85

Postup otočenia dverí
1.
Odskrutkujte skrutku po odskrutkovaní matice na
ľavej strane rúčky dverí chladničky , potom oddeľte
rúčku dverí chladničky . Oddeľte rúčku dverí mrazničky
4
v rovnakom poradí, ako ste oddelili rúčku dverí
chladničky .(Pre skrytú rúčku sa tento postup nevyžaduje
1
3
1
1
2
3
2
2
2
)
1
3
4
2.
Odskrutkujte skrutku a spodný kryt , potom oddeľte
7
krytku spodného krytu a namontujte ju do príslušnej
5
polohy na pravej strane. Odskrutkujte skrutku a potom
oddeľte spodný pravý záves a kolík . Vložte kolík
9
6
8
10
do príslušného ľavého otvoru na spodnom závese.
Oddeľte dvere mrazničky , potom vyberte krytku na
11
dverách a vložte ju do príslušnej polohy na pravej strane.
Odskrutkujte skrutku zarážky dverí a samotnú zarážk
14
, potom ju namontujte do príslušnej polohy vľavo
3.
Oddeľte kryt horného závesu , oddeľte dva drôty .
Odskrutkujte skrutku , oddeľte stredný záves a
17
potom vyberte dvere chladničky . Oddeľte krytku a
13
15
18
19
vložte ju do príslušnej polohy vpravo. Odskrutkujte
skrutku zarážky dverí a samotnú zarážku , potom ju
21
22
namontujte do príslušnej polohy vľavo. Odskrutkujte
skrutku a potom oddeľte ľavý horný záves
23 24
.
90
10
12
6
u
.
16
12
7
5
11
14
13
15
23
24
10
9
8
16
20
18
19
17
20
22
21
Page 86

25
26
4.Vyberte dve malé krytky v prednej časti predného krytu
pomocou skrutkovača a potom odskrutkujte skrutky a .
Oddeľte predný kryt . Presuňte drôt doľava, namontujte
predný kryt a skrutku. Vyberte malé krytky s vrecka s
23
náhradným materiálom a namontujte ich
5.Vyberte krytku z dverí chladničky , potom oddeľte kryt .
Presuňte kábel zľava do príslušnej polohy vpravo.
Namontujte kryt a potom namontujte krytku do príslušnej
polohy vpravo
6.Namontujte spodný záves a dvere mrazničky , potom
namontujte stredný záves . Oddeľte krytku na mrazničke.
Namontujte dvere chladničky , vyberte horný záves z
23
26
.
27
29
28
19
27
.
9
18
19
34
23
25
24
28
11
30
vrecka s náhradným materiálom a namontujte ho vľavo hore.
Vytiahnite drôty z jednotlivých otvorov a spojte ich.
Vyberte malé krytky s vrecka s náhradným materiálom
a namontujte ich. Namontujte spodný kryt
26 29
31
32
6
.
34
23
24
28
27
19
29
17
18
11
9
6
31
30
32
26
5
29
7.Oddeľte krytku na pravej strane dverí a potom ju namontujte .
33
do ľavého otvoru na skrutku (tento otvor uvidíte po demontovaní
ľavej rúčky). Namontujte rúčku a skrutku, ktoré ste predtým
oddelili, do príslušnej polohy vpravo. (Pre skrytú rúčku sa tento
postup nevyžaduje.) Tým je montáž dokončená
.
91
33
3
2
3
2
33
Page 87

 Loading...