


MANUAL DEL PROPIETARIO
REFRIGERADOR
DEL HOGAR
Lea atentamente este manual del usuario antes de utilizar el aparato y
téngalo a mano para consultarlo en todo momento.
GR-B333WLRU
ES ESPAÑOL EN ENGLISH
MFL67704810
Rev.00_042418
www.lg.com
Copyright © 2018 LG Electronics Inc. Todos los Derechos Reservados.

TABLA DE
CONTENIDOS
CARACTERÍSTICAS DEL PRODUCTO ............................................3
INSTRUCCIONES DE SEGURIDAD ..................................................4
INSTRUCCIONES IMPORTANTES DE SEGURIDAD ...........................................4
INSTALACIÓN ..................................................................................12
Compartimientos ..................................................................................................12
Notas para Movimiento y Transporte ....................................................................13
Notas para Instalación ..........................................................................................13
Dimensiones y separaciones ...............................................................................14
Temperatura Ambiente .........................................................................................14
Nivelación .............................................................................................................15
FUNCIONAMIENTO ..........................................................................16
Antes de usar .......................................................................................................16
Componentes y funciones (aplicable sólo a algunos modelos) ............................17
Panel de control (aplicable sólo a algunos modelos) ...........................................19
Notas para la operación .......................................................................................22
Almacenamiento de alimentos .............................................................................23
Ajuste de los estantes de la heladera ...................................................................27
Cajón CustomChill ................................................................................................28
Este manual puede contener imágenes o
contenido diferente al modelo que compró.
Este manual está sujeto a revisión por
parte del fabricante.
FUNCIONES SMART ........................................................................29
Utilización de la aplicación LG SmartThinQ .........................................................29
Uso de Smart Diagnosis™ ...................................................................................31
MANTENIMIENTO ............................................................................32
Limpieza ...............................................................................................................32
SOLUCIÓN DE PROBLEMAS ..........................................................34
ES
CARACTERÍSTICAS DEL PRODUCTO
•Dependiendo del modelo, algunas de las siguientes funciones pueden no estar disponibles.
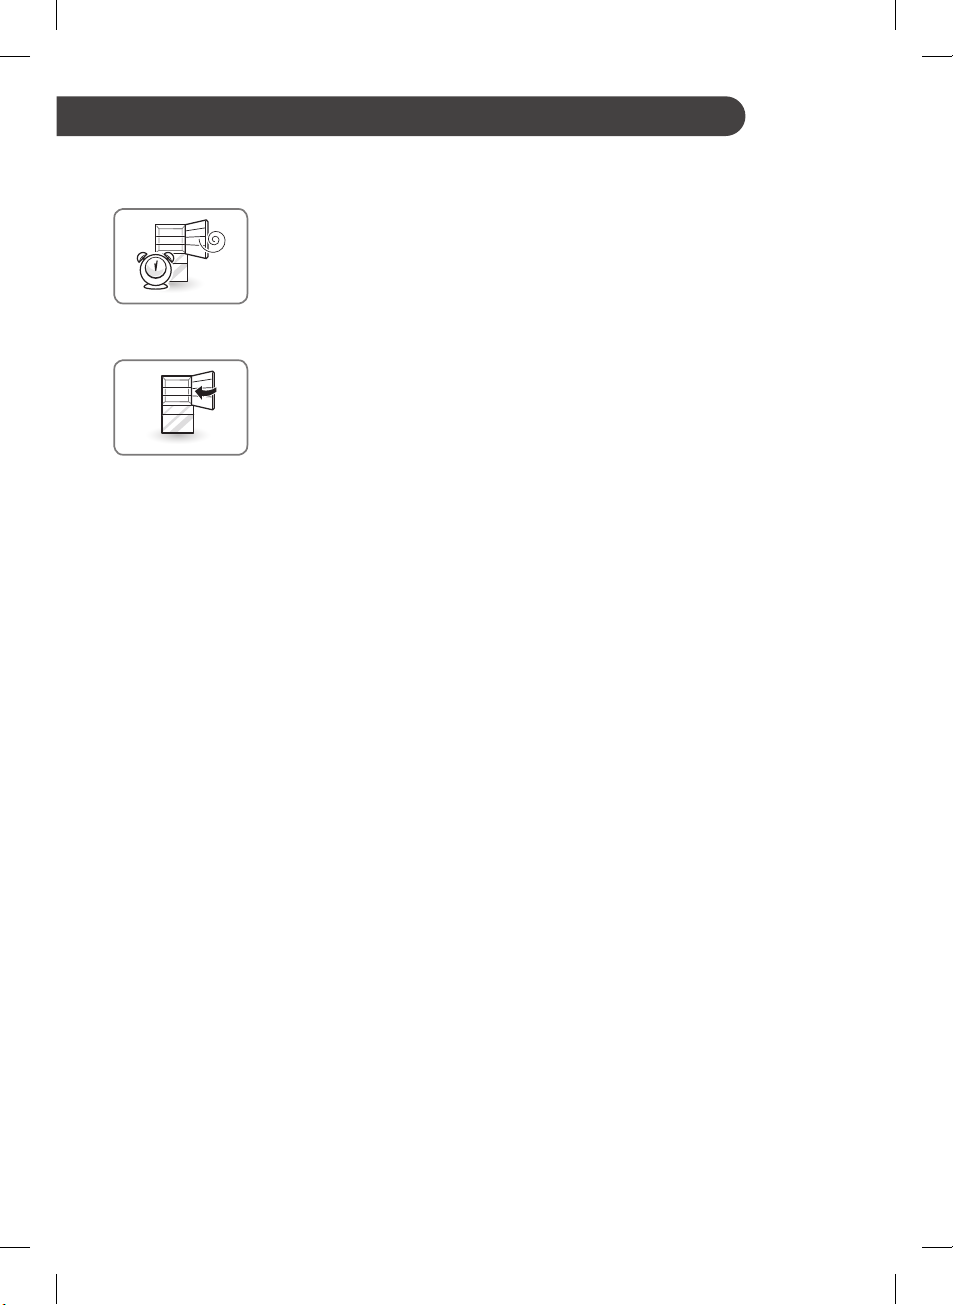
ALARMA DE LA PUERTA
La función de alarma de puerta está diseñada para prevenir el mal funcionamiento
de la heladera que podría ocurrir si la puerta de la heladera o la puerta del
congelador permanecen abiertas. Si la puerta de la heladera o del congelador se
deja abierta durante más de 60 segundos, suena una alarma de aviso en intervalos
de 30 segundos hasta que se cierre.
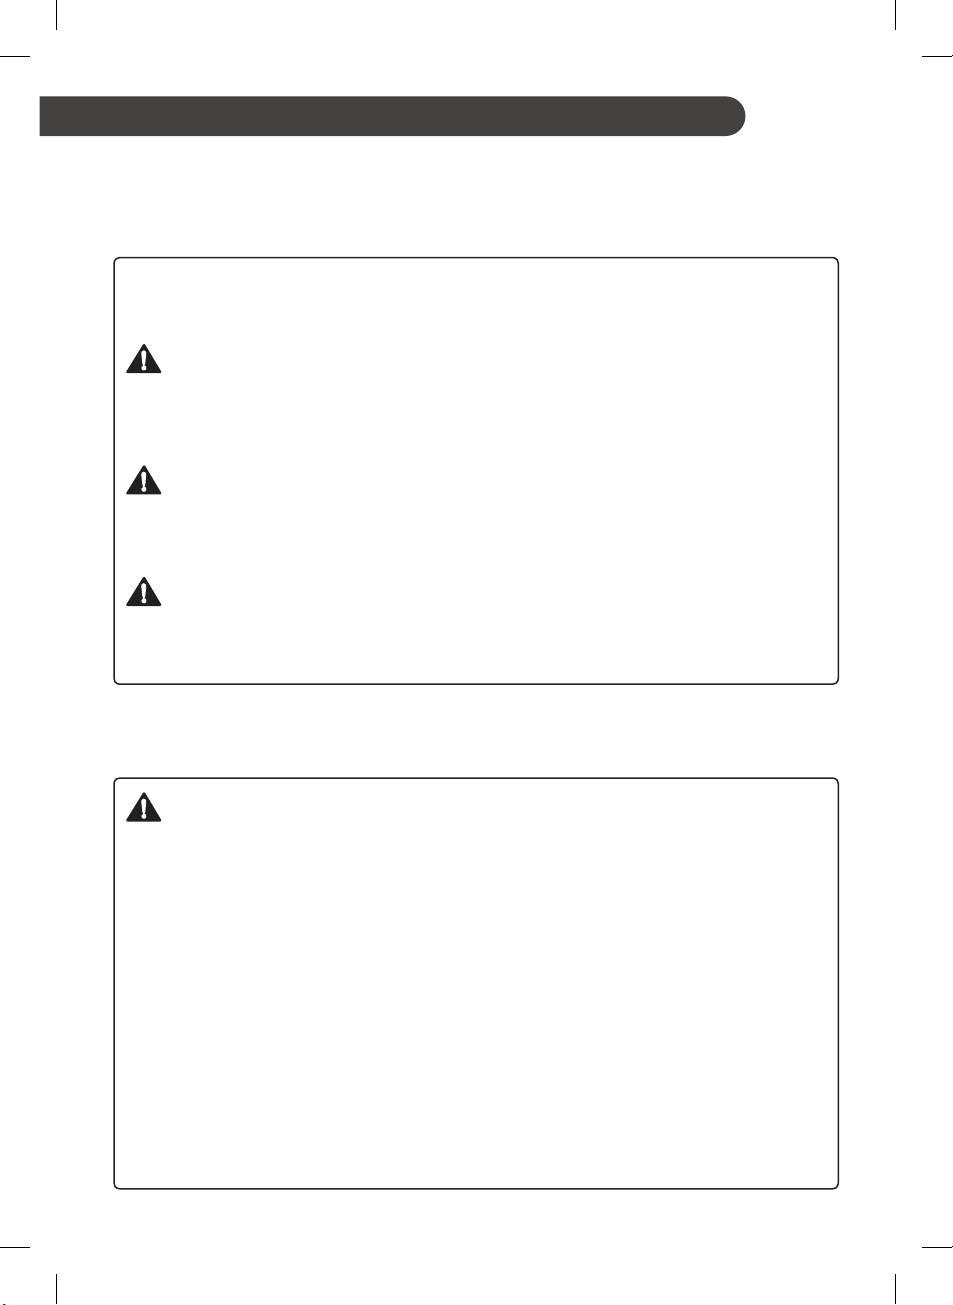
BISAGRA DE CIERRE AUTOMÁTICO
Las puertas de la heladera se cierran automáticamente con un ligero empuje. (La
puerta sólo se cierra automáticamente cuando está abierta en un ángulo inferior a
30 °.)
3
ES
INSTRUCCIONES DE SEGURIDAD
LEA TODAS LAS INSTRUCCIONES ANTES DE USAR EL APARATO.
Esta guía contiene muchos mensajes de seguridad importantes. Siempre
lea y obedezca todos los mensajes de seguridad.
Éste es el símbolo de alerta de seguridad. Los mensajes de
seguridad le informan sobre los peligros que podrían matar o
lastimar a usted u otras personas, o causar daños al producto.
Todos los mensajes de seguridad estarán precedidos por el
símbolo de alerta de seguridad y la palabra ADVERTENCIA o
PRECAUCIÓN. Estas palabras signican:
ADVERTENCIA
Usted puede morir o resultar seriamente lesionado si no sigue las
instrucciones.
PRECAUCIÓN
Indica una situación peligrosa inminente que, si no se evita, puede
provocar lesiones leves o moderadas o daños al producto.
INSTRUCCIONES IMPORTANTES DE SEGURIDAD
ADVERTENCIA
Para reducir el riesgo de incendio, descarga eléctrica o lesiones
personales al usar su producto, se deben seguir las precauciones
básicas de seguridad que incluyen lo siguiente.
Alimentación
•NUNCA desenchufe su heladera tirando del cable de alimentación.
Siempre sujete rmemente el enchufe y tire de él hacia afuera desde
la toma de corriente.
•Si el cable de alimentación está dañado, debe ser reemplazado por el
fabricante o su agente de servicio o una persona calicada para evitar
inconvenientes. No utilice un cable que muestre grietas o daños por
abrasión a lo largo o en el extremo del enchufe o del conector.
4

•No utilice una toma de corriente no certicada.
•Desconecte el enchufe de alimentación inmediatamente en caso de un
apagón o tormenta eléctrica.
•Conecte el enchufe de alimentación con el cable de alimentación hacia
abajo.
Instalación
•Póngase en contacto con un centro de servicio autorizado cuando
instale o reubique la heladera.
•Cuando aleje la heladera de la pared, tenga cuidado de no girar o
dañar el cable de alimentación.
•Conecte este producto a un tomacorriente especial con conexión a
tierra de acuerdo con la potencia antes de usarlo. Es responsabilidad
del usuario reemplazar un tomacorriente de pared de 2 clavijas
estándar por un tomacorriente de pared estándar de 3 clavijas.
•No instale la heladera donde pueda haber peligro de que se caiga. La
instalación en un piso de madera no resistente puede causar dicultad
en la alineación de la puerta y hacer que el gabinete se deforme.
Uso
•NO permita que los niños se suban, se paren o se cuelguen en las
puertas o estantes de la heladera.
Podrían dañar la heladera y lesionarse seriamente.
•Cuando esté instalado, no coloque objetos pesados sobre el
dispensador de la heladera ni le cuelgue nada encima.
•No coloque objetos pesados o peligrosos (botellas o vasos con líquido)
en la heladera.
•No coloque animales vivos dentro de la heladera.
•No permita que los niños entren en el producto cuando esté dentro o
fuera de uso.
•En caso de una fuga de gas (propano / GLP), ventile bien y póngase
en contacto con el centro de servicio autorizado antes de usarla. No
toque ni desmonte el enchufe eléctrico de la heladera.
5ES5

•En el caso de una fuga de refrigerante, aleje los objetos inamables de
la heladera. Ventile lo suciente y póngase en contacto con el centro
de servicio autorizado.
•No utilice ni coloque sustancias inamables (productos químicos,
medicinas, cosméticos, etc.) cerca de la heladera ni las guarde dentro.
No coloque la heladera cerca de gases inamables.
•Este aparato está destinado a ser utilizado en el hogar o para usos
similares tales como
- Áreas de cocina del personal en tiendas, ocinas y otros entornos de
trabajo;
- Casas rurales y clientes en hoteles, moteles y otros entornos de tipo
residencial;
- Ambientes tipo bed y breakfast;
- Servicios de catering y usos no comerciales similares.
•No utilice este producto para nes especiales o para usos móviles
(almacenamiento de medicamentos o materiales de prueba o en
barcos, etc.).
•Desconecte el enchufe antes de limpiar o reparar la heladera.
•Si la heladera está equipada con bombillas y necesita reemplazarlas,
desenchufe la heladera o apague la unidad antes de hacerlo.
•No modique ni extienda el cable de alimentación.
•No utilice un secador de pelo para secar el interior. No encienda una
vela para eliminar cualquier olor del interior.
•Para su seguridad, este aparato debe estar debidamente conectado a
tierra. Haga revisar el tomacorriente y el circuito por un electricista
calicado para asegurarse de que el tomacorriente esté debidamente
conectado a tierra.
•No utilice un tomacorriente que pueda apagarse mediante un
interruptor remoto. No utilice un cable de extensión. Es responsabilidad
del usuario reemplazar un tomacorriente de pared de 2 clavijas
estándar por un tomacorriente de pared estándar de 3 clavijas.
•Nunca, bajo ninguna circunstancia, corte o quite la tercera clavija
(tierra) del cable de alimentación.
6ES6

•No utilice un enchufe adaptador y toma de corriente en un cable de
extensión de múltiples enchufes.
•Desconecte el cable de alimentación inmediatamente si oye un ruido,
huele un olor extraño o detecta humo.
•Apague la unidad si el polvo o el agua de arriba o de abajo penetra en
la heladera. Llame a un agente de servicio.
•No desmonte ni modique la heladera.
•No ponga manos, pies ni objetos metálicos debajo o detrás de la
heladera.
•No use la heladera ni toque el cable de alimentación con las manos
mojadas.
•En las heladeras con máquinas de fabricación hielo automáticas, evite
el contacto con las partes móviles del mecanismo de expulsión o con
el elemento de calefacción que libera los cubos. No coloque los dedos
ni las manos en el mecanismo automático de fabricación de hielo
mientras la heladera está enchufada.
•Al dispensar hielo del dispensador, no utilice cerámicas de vidrio.
•No toque las supercies frías del congelador con las manos mojadas o
húmedas, cuando la heladera esté en funcionamiento.
•No coloque envases de vidrio, botellas de vidrio o latas de bebidas en
el congelador.
•No almacene sustancias explosivas tales como latas de aerosol con
un propulsor inamable en este aparato.
•Este aparato no está diseñado para ser utilizado por personas
(incluyendo niños) con capacidades físicas, sensoriales o mentales
reducidas, o por falta de experiencia y conocimiento, a menos que
hayan recibido supervisión o instrucciones sobre el uso del aparato por
parte de una persona responsable por su seguridad.
•No vuelva a congelar los alimentos congelados que se han
descongelado completamente. Podría causar problemas de salud
graves.
7ES7

•Si está tirando su heladera vieja, asegúrese de que el refrigerante CFC
sea retirado de manera adecuada por un servicio técnico calicado. Si
libera refrigerante CFC, puede ser multado o encarcelado de acuerdo
con la ley ambiental pertinente.
•Las heladeras desechadas o abandonadas son peligrosas, incluso si
están sólo por unos días. Cuando deseche la heladera, retire los
materiales de empaque de la puerta o saque las puertas, pero deje los
estantes en su lugar para que los niños no puedan subirse dentro
fácilmente.
•Si el gas refrigerante se ha ltrado, no toque la heladera o la toma de
corriente y ventile la habitación inmediatamente. Una chispa podría
desencadenar una explosión causando un incendio o quemaduras.
Debido a que esta heladera utiliza gas natural (isobuteno, R600a)
como refrigerante ecológico, incluso una pequeña cantidad (50 ~ 80 g)
es combustible. Si hay fugas de gas causadas por daños severos
durante la entrega, instalación o uso de la heladera, cualquier chispa
podría provocar incendios o quemaduras.
•Si existe algún daño en el riel del cajón o si no funciona bien, no lo
use, y póngase en contacto con el centro de servicio para recibir
mantenimiento antes de usarlo.
•Cuando abra o cierre la puerta del producto, podría causar lesiones a
personas que estén cerca, así que tenga cuidado.
• No coloque recipientes de vidrios, botellas o latas (especialmente las
que contienen bebidas carbonatadas) en el compartimiento, en los
estantes o en el recipiente del congelador, ya que se verán expuestos
a temperaturas de congelación.
• Si el aparato está equipado con un candado (solo en algunos países),
mantenga la llave fuera del alcance de los niños.
8ES8
PRECAUCIÓN
Para reducir el riesgo de incendio, descarga eléctrica o lesiones
personales al usar su producto, se deben seguir las precauciones
básicas de seguridad que incluyen lo siguiente.
Instalación
•La heladera debe estar instalada correctamente de acuerdo con las
instrucciones del instalador que fueron pegadas en la parte frontal de
la heladera.
•Tenga cuidado al desembalar e instalar la heladera. Deseche
inmediatamente los materiales de embalaje (plástico) fuera del alcance
de los niños.
Uso
•Cierre las puertas con cuidado cuando los niños estén alrededor.
•Mantenga los dedos alejados de las áreas de los puntos de pellizco;
las separaciones entre las puertas y los gabinetes son necesariamente
pequeñas. Tenga cuidado al cerrar las puertas cuando los niños están
en el área.
•Si los alimentos se apilan o se almacenan mal en los estantes, podrían
caerse y causar lesiones cuando se abre la puerta.
•No mueva la heladera mientras esté funcionando. Un ruido de
traqueteo del compresor puede producirse como resultado y sólo se
detendrá cuando el compresor se apague, o cuando la unidad se
apague y se vuelva a encender. (Esto es normal y no afectará al
rendimiento ni a la vida útil del compresor. El traqueteo se detendrá
después de que el compresor llegue a un descanso.)
Mantenimiento
•No utilice detergentes fuertes como cera o diluyentes para limpiar.
Limpie con un tejido suave.
•Limpie los objetos extraños (polvo, agua, etc.) de las clavijas del
enchufe de alimentación y las áreas de contacto antes de conectar.
9ES9
ADVERTENCIA
•Utilice agua potable para hacer hielo.
ADVERTENCIA
•Mantenga las aberturas de ventilación, en la caja del aparato o en la
estructura incorporada, sin obstrucción.
•No utilice dispositivos mecánicos u otros medios para acelerar el
proceso de descongelación que no sean los recomendados por el
fabricante.
•No dañe el circuito del refrigerante.
•No utilice electrodomésticos dentro de los compartimentos de
almacenamiento de alimentos del aparato, a menos que sean del tipo
recomendado por el fabricante.
•El refrigerante y el gas para expansión de aislantes utilizado en el
aparato requieren procedimientos especiales de eliminación. Cuando
lo deseche, por favor consulte con el agente de servicio o una persona
calicada en el tema.
10ES10
Este aparato contiene una pequeña cantidad de refrigerante
isobutano (R600a), gas natural con alta compatibilidad
medioambiental, pero también es combustible. Al transportar e
instalar el aparato, debe tenerse cuidado de no dañar ninguna
parte del circuito de refrigeración. El refrigerante que salga de las
tuberías podría encenderse o causar una lesión ocular. Si se
detecta una fuga, evite las llamas o posibles fuentes de ignición y
ventile la habitación en la que el aparato esté parado durante
varios minutos.
Con el n de evitar la creación de una mezcla de aire inamable de
gas si se produce una fuga en el circuito de refrigeración, el
tamaño de la habitación en la que se puede colocar el aparato
depende de la cantidad de refrigerante utilizado. La habitación
debe tener un tamaño de 1 m2 por cada 8 g de refrigerante R600a
dentro del aparato. La cantidad de refrigerante en su aparato
particular se muestra en la placa de identicación dentro del
aparato. Nunca encienda un aparato que muestre signos de daños.
En caso de duda, consulte a su distribuidor.
GUARDE ESTAS INSTRUCCIONES
11ES11
ES
INSTALACIÓN
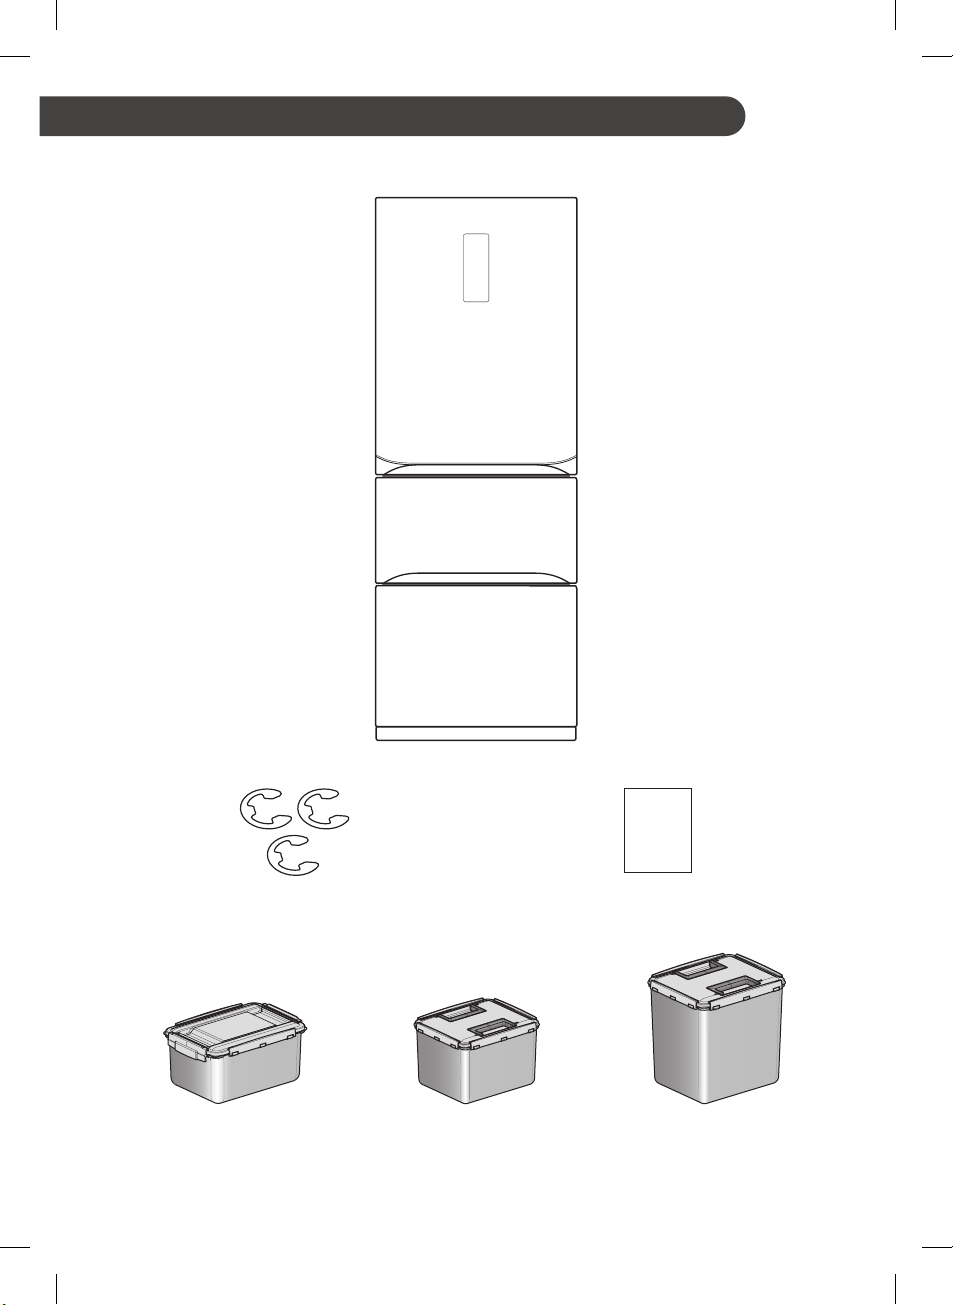
Compartimientos
Recipiente de almacenamiento
(AKC67523415 : 11,7L)
12
Placa de Anillo Manual del Propietario
Kimchi 1
Recipiente de almacenamiento
(AKC67523721 : 11,3L)
Kimchi 2
Recipiente de almacenamiento Kimchi 3
(AKC67523722 : 17,1L)

ES
Notas para Movimiento y
Transporte
•Remueva todos los alimentos del interior del
electrodoméstico. Luego, transporte el
electrodoméstico únicamente después de haber
sujetado con cinta adhesiva las partes frágiles
como los estantes y la manija de la puerta. No
hacerlo podría causarle daño al electrodoméstico.
•Desconecte el enchufe de poder, insértelo y fíjelo
en el gancho para el mismo, ubicado en la parte
posterior o superior del electrodoméstico. No
hacerlo podría causarle daño al enchufe de poder
o rayar el piso.
•El transporte del electrodoméstico debe ser
llevado a cabo por más de dos personas de
manera cuidadosa. Dejar caer el
electrodoméstico, el cual es extremadamente
pesado, podría causar una lesión personal o
fallos en él.
•Mantenga el electrodoméstico en posición vertical
al transportarlo por una larga distancia. El
electrodoméstico podría caerse, causando fallos
de funcionamiento. Nunca transporte el
electrodoméstico de forma recostada, pues esto
puede causar fallos en el funcionamiento de la
circulación del refrigerante al regresarlo a su
posición.
Notas para Instalación
•Instale el aparato en un piso nivelado y rme.
−Si el electrodoméstico es instalado en un piso
irregular, esto podría generar vibración y ruido
causando la caída del mismo y resultando en
una lesión. También podría causar que las
puertas no cierren correctamente y que ingrese
humedad dentro de la unidad durante su
operación.
−Si la parte frontal o lateral del electrodoméstico
no está nivelada, ajuste las patas delanteras
para que esto pueda ser corregido. En casos
severos puede ser necesario proteger el piso
con tiras delgadas de madera.
•Evite colocar la unidad cerca de fuentes de
calefacción, luz solar directa o humedad.
•Conecte el cable de alimentación (o enchufe) al
tomacorriente. No duplique la conexión con otros
aparatos en el mismo tomacorriente.
•Luego de conectar el cable de alimentación (o
enchufe) al tomacorriente, espere dos o tres
horas previo a introducir los alimentos en el
electrodoméstico. Si introduce alimentos previo a
que el electrodoméstico se haya enfriado
completamente, estos pueden echarse a perder.
•Tras instalar el aparato, conecte el enchufe a una
toma de corriente. Antes de mover el aparato y
deshacerse de él, desconecte el enchufe de la
toma de corriente.
13
ES
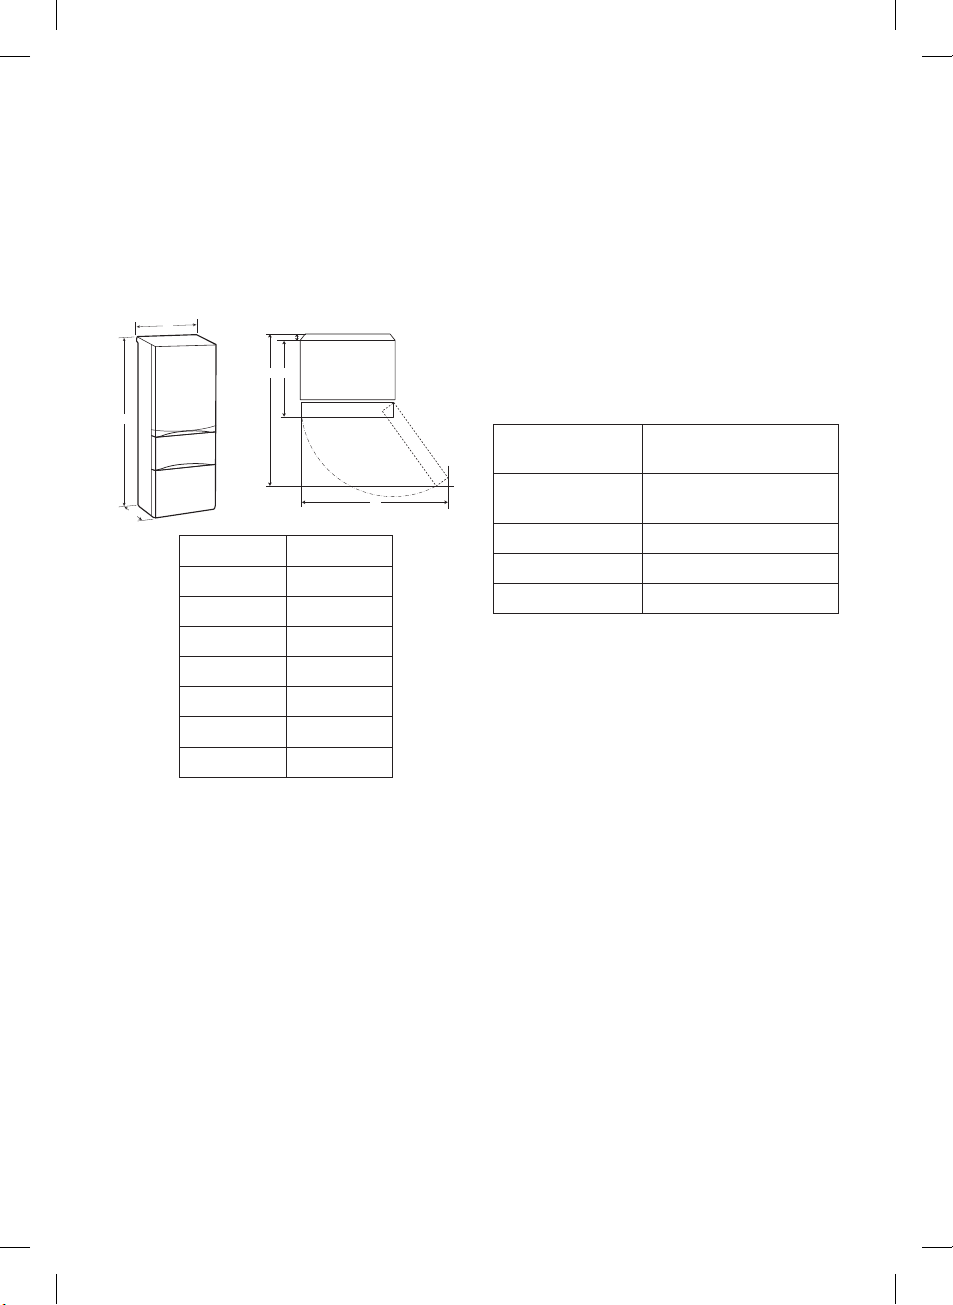
Dimensiones y separaciones
A
•Colocar objetos a una distancia demasiado
reducida puede provocar una disminución de la
capacidad de congelación y aumentar el coste de
la electricidad. Cuando instale el aparato, deje
una separación de más de 50 mm con respecto a
cada pared adyacente.
D
F
E
B
C
- Tamaño
A 666 mm
B
1 797 mm
C 735 mm
D 28 mm
E 707 mm
F
1 290 mm
G 920 mm
G
Temperatura Ambiente
•El aparato está diseñado para funcionar dentro
de un intervalo de temperaturas ambiente
limitado, en función de la zona climática. No
utilice el aparato a una temperatura que supere
el límite.
•La temperaturas internas pueden verse afectadas
por la ubicación del aparato, la temperatura
ambiente, la frecuencia de apertura de la puerta
y otros factores.
•La clase climática se puede consultar en la
etiqueta de características.
Clasificación
climática
SN (Templado
Intervalo de temperatura
ambiente en °C
+10 - +32
Ampliado)
N (Templado) +16 - +32
ST (Subtropical) +16 - +38
T (Tropical) +16 - +43 / +10 - +43*
*Australia, India y Kenia
NOTA
•Los aparatos con calificación de SN a T están
diseñados para ser utilizados a una temperatura
ambiente que oscile entre los 10 °C y los 43 °C.
NOTA
•Puede ver qué tipo de electrodomésticos tiene
mirando la etiqueta dentro de la caja del
refrigerador.
14
ES
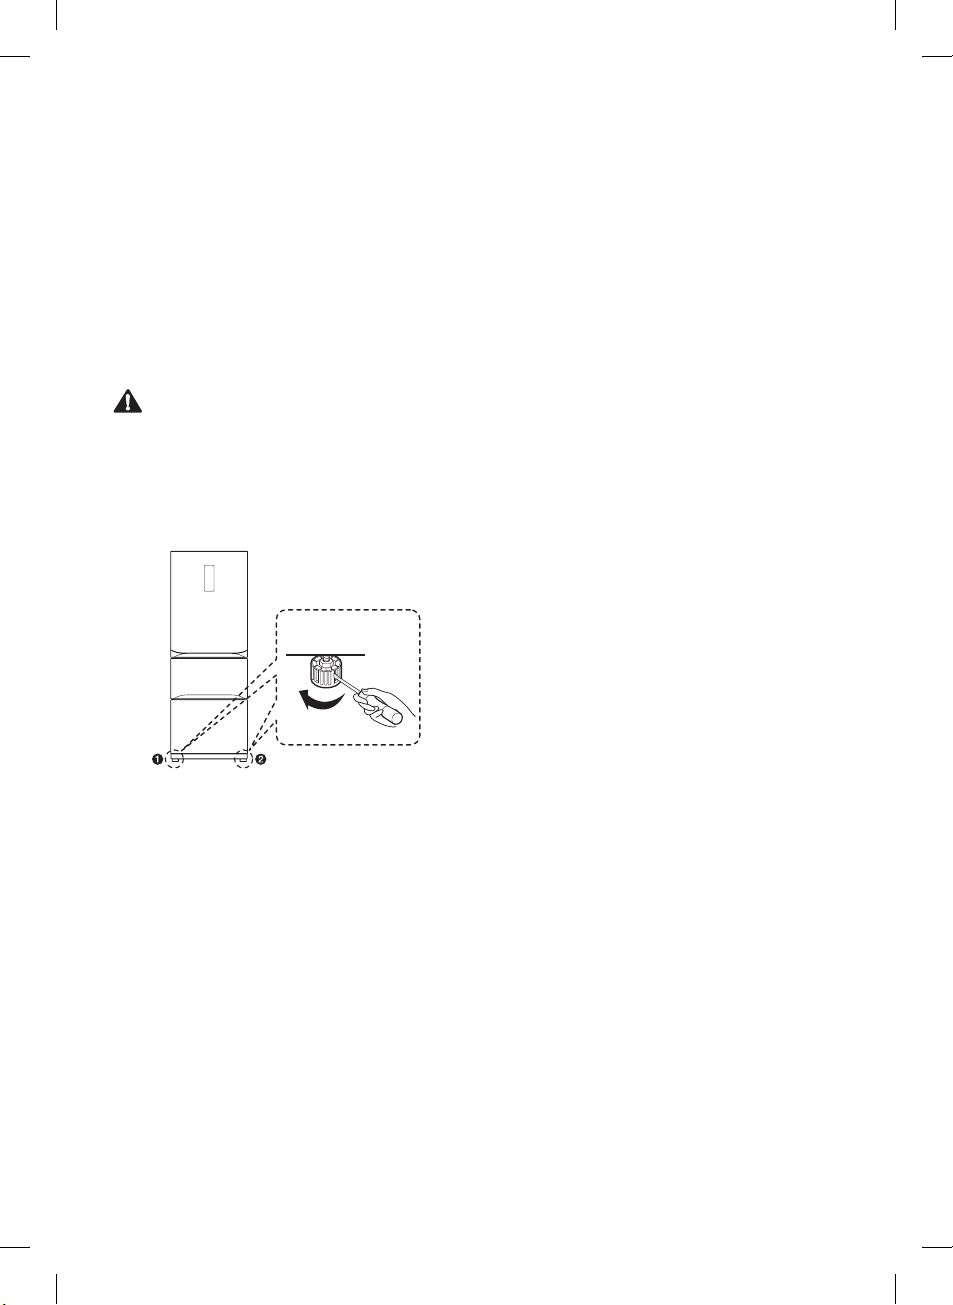
Nivelación
•Alineación de las puertas puede no ser posible si
el suelo no está nivelado, o es de construcción
débil o pobre.
El refrigerador es muy pesado y debe ser
instalado sobre una supercie rígida y sólida. El
piso de madera puede causar dicultades de
nivelación si se exiona en exceso.
•Si el suelo es irregular, nivelar el refrigerador
para evitar el ruido y la vibración.
PRECAUCIÓN
•Ajuste las patas niveladoras delanteras para que
estén más bajas que las ruedas. El peso del
refrigerador debe apoyarse en los pies, no en las
ruedas, para evitar el riesgo de desplazamiento
de volcar.
Usando
destornillador
Para nivelar el refrigerador, use un destornillador
para girar los pies de nivelación hasta que estén
en contacto firme con el piso. La parte delantera
del refrigerador puede estar ligeramente más alta
que la parte posterior para facilitar el cierre de las
puertas.
15
ES
FUNCIONAMIENTO
Antes de usar
Limpie la heladera.
Limpie bien su heladera y limpie todo el polvo que se haya acumulado durante el
transporte.
AVISO
Conecte la fuente de alimentación.
Compruebe si la fuente de alimentación está conectada antes de usarla.
Lea la sección “Encendido de la unidad”. (Su tipo de enchufe puede ser diferente al de
la imagen.)
Espere a que la heladera se enfríe.
Deje que su heladera funcione por lo menos de tres a cuatro horas antes de ponerle
comida. Compruebe el flujo de aire frío en el compartimiento del congelador para
asegurar una refrigeración adecuada.
PRECAUCIÓN
•No raye la heladera con un objeto alado ni use detergente que contenga alcohol,
líquido inamable o abrasivo cuando quite la etiqueta o el adhesivo de la heladera.
•No despegue la etiqueta del número de modelo o de serie ni la información técnica
en la supercie posterior de la heladera.
•Quite el residuo del adhesivo limpiándolo con el dedo pulgar o detergente para lavar
platos.
16
PRECAUCIÓN
•Poner los alimentos en la heladera antes de que se enfríe podría hacer que los
alimentos se estropeen, o podría haber mal olor dentro de la heladera.
La heladera hace un ruido fuerte después de la puesta en marcha
inicial.
Esto es normal. El volumen disminuirá a medida que la temperatura baje.
Antes de enchufar, abra las puertas de la heladera para ventilar el
interior.
El interior de la heladera puede oler a plástico al principio. Retire toda cinta adhesiva
del interior de la heladera y abra las puertas de la heladera para ventilar hasta que los
olores se hayan apaciguado.

ES
Utilice esta página para familiarizarse con las piezas y características de su heladera.
Se incluyen las referencias de página para su conveniencia.
*El aspecto y las especificaciones del producto real pueden diferir dependiendo del modelo.
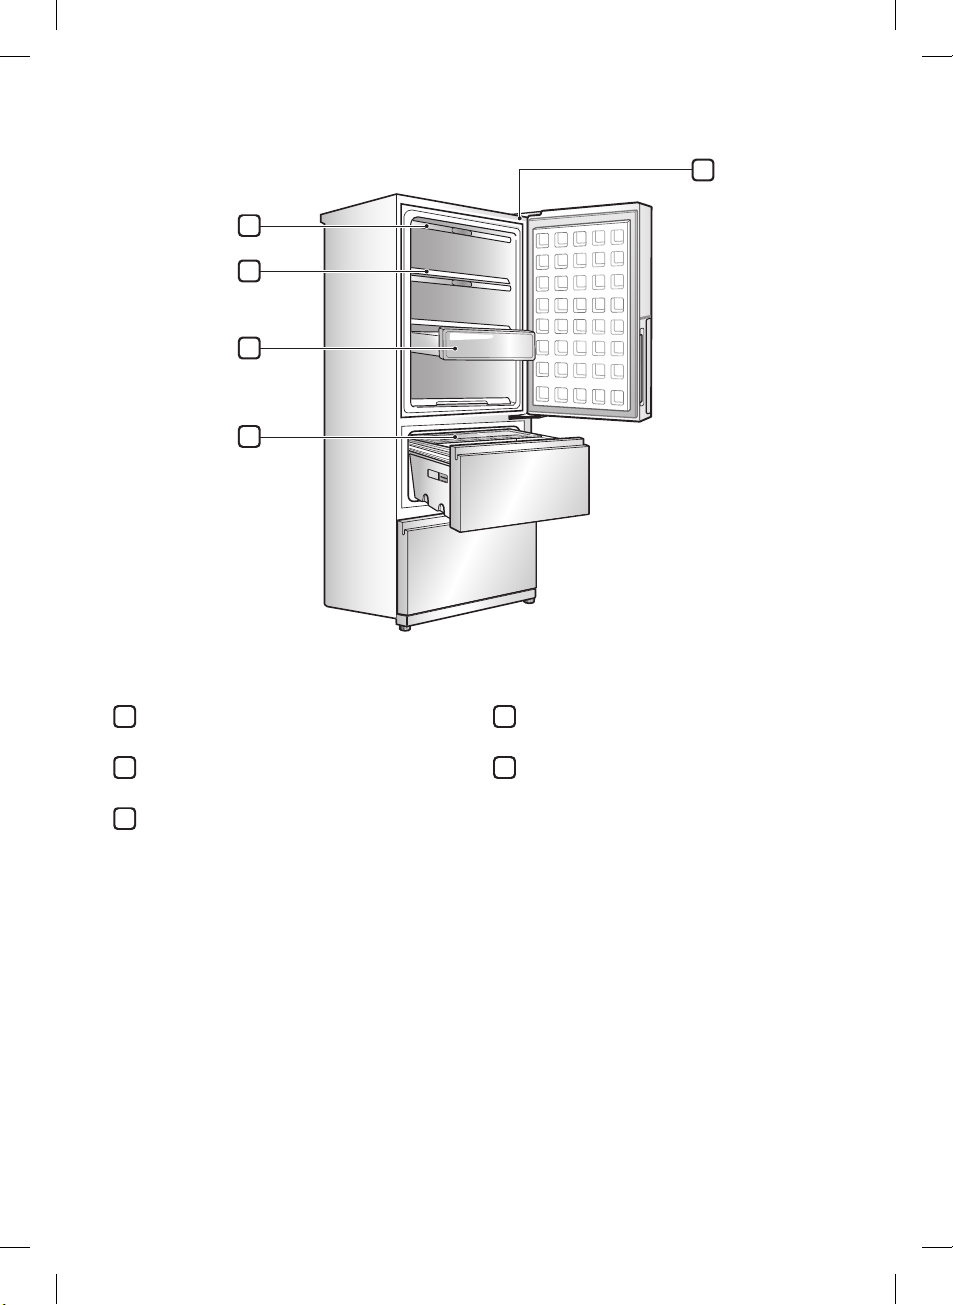
Componentes y funciones (aplicable sólo a algunos modelos)
1
2
3
4
Pantalla LED
1
Muestra la temperatura meta de la heladera y
el congelador y la configuración de
CustomChill.
Superior
2
3
4
Medio
Inferior
17
ES
5
1
2
3
4
Tapa solapa
1
Estante
2
Canasta del estante
3
18
Canasta multi
4
Smart Diagnosis
5
ES
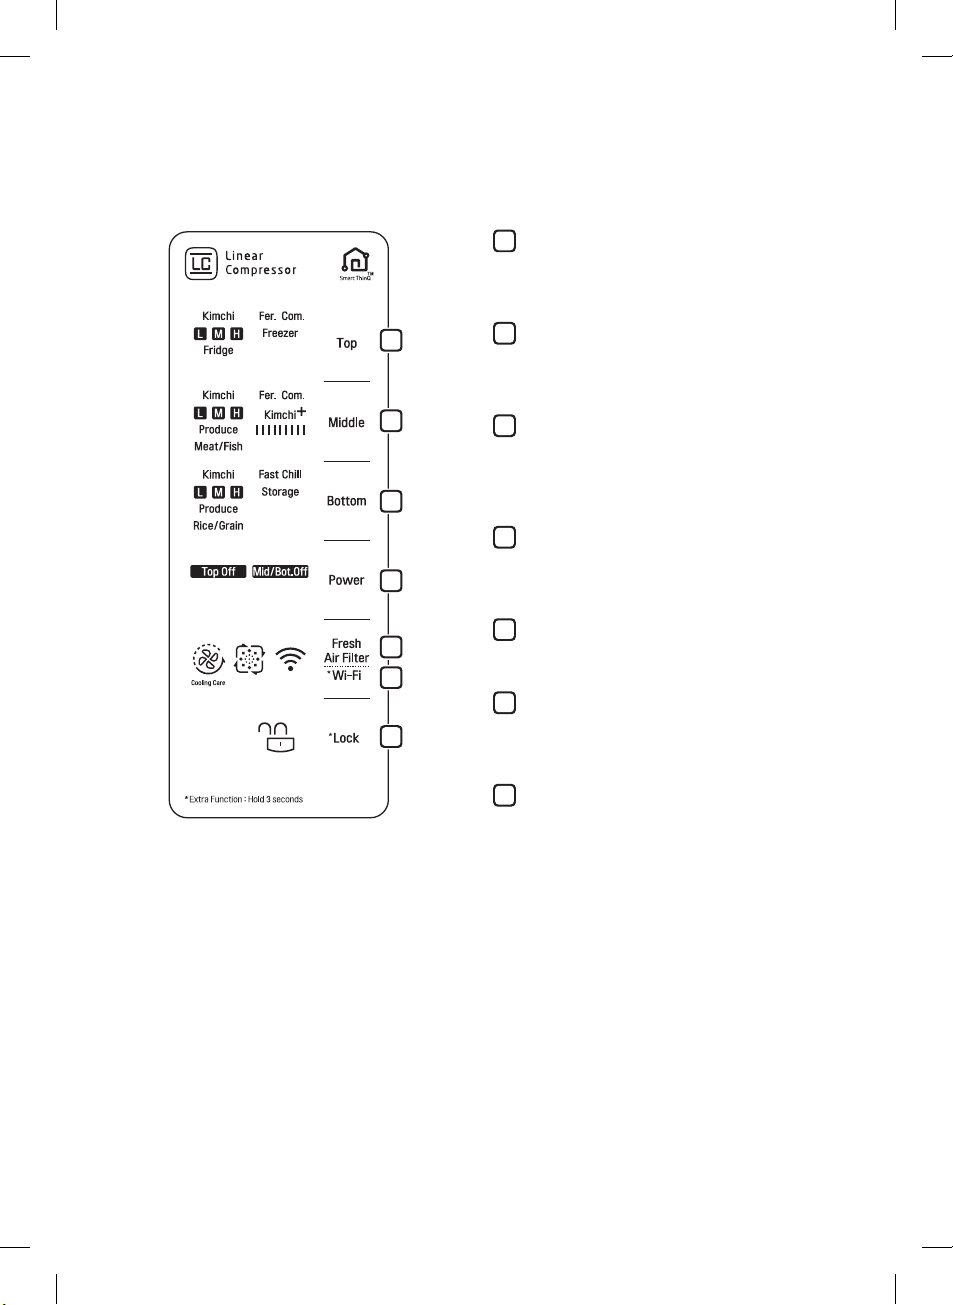
Panel de control (aplicable sólo a algunos modelos)
Características del panel de control
1
Top (Superior)
•Esto conigura el Kimchi, la heladera, el
congelador y Fermentación.
2
1
Middle (Medio)
•Esto congura el Kimchi, Producir, Carne/
Pescado, Kimchi+ y Fermentación.
2
3
4
5
3
Bottom (Inferior)
•Esto congura Kimchi, Producir, Arroz/
Granos, Enfriamiento rápido y
Almacenamiento.
4
Power (Encendido)
•Esto congura the desconectar en Top o
Medio/Inferior.
5
Fresh Air Filter (Filtro de aire fresco)
•Esto congura el ltro de aire fresco.
6
6
Wi-Fi
7
•Esto congura la heladera para conectarse a
la red Wi-Fi de su casa.
7
Lock (Bloqueo)
•Esto bloquea los botones del panel de
control.
19

ES
Notas para el uso del panel de
control
•El panel de control se encenderá en cualquiera
de los siguientes casos.
−Cuando se enciende la electricidad
−Cuando se pulsa un botón
−Cuando se abre la puerta del aparato
•El panel de control se apagará automáticamente
para ahorrar energía en cualquiera de los
siguientes casos.
−Cuando haya pasado un minuto después de
encender la electricidad
−Si no se ejecuta ningún botón durante 60
segundos después de pulsar el botón deseado
−Cuando hayan transcurrido 60 segundos
después de abrir y cerrar la puerta del aparato
•Cuando la función de ahorro de energía está
operativa, la ventana del panel de control se
apagará, excepto la indicación de bloqueo.
Fer. Com(Fermentación)
•Esta función detecta la temperatura externa y
luego madura el Kimchi.
•Seleccione otra función si desea cancelar “Fer.”.
•Si establece la función de maduración, “Fer.” se
activará.
•Una vez que la maduración se ha completado,
“Fer. Com.”se encenderá y se establecerá el
Kimchi M.
•Si presiona el botón de bloqueo cuando la
maduración se haya completado, “Fer. Com.” se
apagará.
AVISO
•El tiempo de nalización está sujeto a cambios
que dependen de la estacionalidad, la
temperatura ambiente y la temperatura del
Kimchi.
Heladera
•Almacena alimentos refrigerados.
Funciones de conguración
•Seleccione el botón para la función deseada.
•Cada vez que pulse el botón, aparecerán
secuencialmente las siguientes funciones:
[Top (Superior)]
Kimchi : M → H → L
Heladera : M → H → L
Fer. Com.
[Middle (Medio)]
Kimchi : M → H → L
Producir : M → H → L
Kimchi+ Fer
[Bottom (Inferior)]
Kimchi : M → H → L
Producir : M → H → L
Almacenamiento Enfriamiento rápido
20
Congelador
Carne/Pescado
. Com.
Arroz/Granos
AVISO
•Si usted almacena Kimchi después de congurar
la heladera, el Kimchi tendrá un sabor amargo
rápidamente.
Congelador
•Almacena alimentos congelados.
AVISO
•Si usted almacena Kimchi después de congurar
la heladera, el Kimchi se congelará.
Produce
•Puede almacenar las verduras y frutas y
mantenerlos frescos durante mucho tiempo.

ES
Carne/Pescado
•Puede almacenar carne y pescado y mantenerlos
frescos.
AVISO
•Si se almacena Kimchi después de congurar
carne/pescado, el Kimchi se congelará.
Kimchi+
•Implementar una temperatura en la que el
Leuconostoc crezca bien y luego se enfríe
rápidamente para que el Kimchi se pueda
almacenar conservando un buen sabor durante
mucho tiempo.
•El indicador muestra el grado de madurez. Una
vez que el indicador se llena, sírvase Kimchi. (Se
requieren aproximadamente 6 días).
•Aplique sólo al Kimchi recién preparado.
AVISO
•Aplique una sola vez. Si se aplica dos veces o
más, el Kimchi podría tener un sabor amargo.
•Aplique al repollo Kimchi. El Kimchi ligeramente
salado puede congelarse.
Almacenamiento
•Minimiza los cambios en el gusto para almacenar
Kimchi durante mucho tiempo.
Filtro de aire fresco
•Esta es la función para circular rápidamente el
aire dentro de la heladera para la desodorización
dentro del refrigerador.
Wi-Fi
•El botón Wi-Fi, cuando se utiliza con la aplicación
LG Smart ThinQ, permite que la heladera se
conecte a una red Wi-Fi doméstica.
•El icono Wi-Fi muestra el estado de conexión de
red de la heladera. El icono se ilumina cuando la
heladera está conectada a la red Wi-Fi.
•Mantenga presionado el botón Wi-Fi durante 3
segundos para conectarse a la red. El icono
parpadea mientras se realiza la conexión, y luego
se enciende una vez que la conexión se ha
realizado correctamente.
Enfriamiento rápido
•Use esta conguración para almacenar. Kimchi
comprado en una tienda ya ha sido fermentado,
lo que es mejor para que se enfríe lo más
rápidamente posible.
21

ES
Notas para la operación
•No use el tanque dispensador de agua helada
para bebidas que no sean agua potable.
•Los usuarios deben tener en cuenta que se
puede formar escarcha. Si la puerta no se cierra
completamente, si la humedad es alta durante el
verano o si la puerta del congelador se abre con
frecuencia.
•Asegúrese de que haya suciente espacio entre
los alimentos almacenados en el estante o en el
cesto de la puerta para permitir que la puerta se
cierre completamente.
•Al abrir la puerta, deja entrar aire caliente al
aparato y puede hacer que la temperatura interna
aumente.
•No abra ni cierre excesivamente la puerta del
electrodoméstico.
•La lámpara LED solo está diseñada para su uso
en electrodomésticos y no es adecuada para la
iluminación de la sala de estar.
•Si va a dejar el aparato apagado durante un
periodo de tiempo prolongado, saque todos los
alimentos y desenchufe el cable de alimentación.
Limpie el interior y deje las puertas ligeramente
entreabiertas para evitar la proliferación de moho
en el aparato.
Sugerencia para ahorro de energía
•Asegúrese de que haya suciente espacio entre
los alimentos almacenados. Esto permite que el
aire frío circule de manera uniforme y reduce las
facturas de electricidad.
•Almacene alimentos calientes solo después de
que se haya enfriado para evitar el rocío o la
escarcha.
•Cuando almacene alimentos en el compartimento
del congelador, ajuste la temperatura del
congelador por debajo de la temperatura indicada
en el aparato.
•No coloque alimentos cerca del sensor de
temperatura del compartimiento del refrigerador.
Mantenga una distancia de al menos 3 cm del
sensor.
•Tenga en cuenta que un aumento de temperatura
después de la descongelación tiene un rango
permitido en las especicaciones del aparato. Si
desea minimizar el impacto que esto puede tener
en el almacenamiento de alimentos debido a un
aumento de temperatura, selle o envuelva los
alimentos almacenados en varias capas.
•El sistema de descongelación automática del
aparato garantiza que el compartimiento se
mantiene libre de escarcha en condiciones de
funcionamiento normales.
22

ES
Almacenamiento de alimentos
Almacenar alimentos de manera
efectiva
•Almacene alimentos congelados o alimentos
refrigerados dentro de recipientes herméticos.
•Verique la fecha de vencimiento y la etiqueta
(instrucciones de almacenamiento) antes de
almacenar alimentos en el aparato.
•No almacene alimentos durante un período
prolongado (más de cuatro semanas) si se
deteriora fácilmente a baja temperatura.
•Coloque la comida refrigerada o alimentos
congelados en cada refrigerador o compartimento
congelador inmediatamente después de la compra.
•Evite volver a congelar cualquier alimento que
haya sido completamente descongelado.
Congelar cualquier alimento que haya sido
completamente descongelado reducirá su sabor
y nutrición.
•No envuelva ni almacene verduras con periódico.
El material de impresión de periódicos u otras
sustancias extrañas puede manchar y contaminar
los alimentos.
•No llene demasiado el aparato. Llene menos del
70% del espacio. El aire frío no puede circular
correctamente si el artefacto está demasiado lleno.
•Enfríe la comida caliente antes de guardarla. Si
se colocan demasiados alimentos calientes
dentro, la temperatura interna del aparato puede
aumentar y afectar negativamente a otros
alimentos almacenados en el aparato.
•Si establece una temperatura excesivamente
baja para los alimentos, puede congelarse. No
congure una temperatura inferior a la
temperatura requerida para que la comida se
almacene correctamente.
•Mantenga siempre limpio el aparato.
•Si el aparato incluye compartimientos de
refrigeración elevada, no guarde verduras y frutas
con un alto contenido de humedad en ellos, ya
que podrían congelarse debido a las bajas
temperaturas.
•En caso de producirse un corte del suministro
eléctrico, llame a la compañía eléctrica y
pregunte cuánto va a durar.
−Debe evitar abrir las puertas mientras no haya
suministro eléctrico.
−Cuando se recupere el suministro eléctrico
normal, compruebe el estado de los alimentos.
Almacenamiento máximo
•Para obtener una mejor circulación de aire,
inserte todos los contenedores de
almacenamiento Kimchi.
•Si se almacenan grandes cantidades de
alimentos, todos los recipientes de
almacenamiento Kimchi y las fundas plegables
se sacarán del aparato y los alimentos se
apilarán directamente en los estantes del
congelador en el compartimento del congelador.
NOTA
•La forma de cada contenedor puede ser
diferente, inserte en la posición correcta.
Consejos de almacenamiento de
alimentos
•Almacenar verduras y fruta
La humedad que queda en las verduras después
del lavado puede hacer que se eche a perder
más rápido. Espere a lavar las verduras hasta
justo antes de usar. Las verduras de hojas verdes
como la col rizada o la lechuga tienen una vida
de almacenamiento limitada. Envuélvalos en
papel de periódico o en envases sellados para
ayudarlos a mantenerse frescos por más tiempo.
•No almacene frutas tropicales en el refrigerador.
Plátanos o piñas sin cortar son dañados por las
bajas temperaturas.
•Para almacenar marisco seco, seleccione
“Producir” para el compartimento central y ajuste
la temperatura de almacenamiento a “baja”.
•Guarde las verduras o frutas en los recipientes
designados para evitar que se congelen en el
compartimento central o inferior.
•Guarde el arroz o el grano en el compartimento
inferior usando la conguración Arroz / Grano.
•Para evitar congelar las verduras, no las
almacene utilizando la conguración de
Almacenamiento en el compartimiento inferior.
•Para evitar congelar el kimchi, no lo almacene
utilizando el ajuste de carne / pescado en el
compartimento central.
23

ES
Consejos de almacenamiento de
Kimchi
•No llene demasiado los contenedores de kimchi.
Por favor, liberar espacio en el aumento de chucrut
o contenido puede rebosar del recipiente cuando se
fermenta el kimchi. Cierre rmemente la tapa del
recipiente de modo que no se produzca el kimchi o
demasiado rápido hongo de la levadura de
fermentación.
Llene el contenedor con kimchi hasta la línea de
llenado y asegúrese de que la tapa esté bien
cerrada antes de guardarla. Cubra la supercie del
kimchi con una envoltura de plástico para prolongar
el tiempo de almacenamiento.
•No coloque el kimchi directamente en el
compartimento del refrigerador ni lo guarde en
una bolsa de plástico.
Utilice el contenedor de kimchi proporcionado para
almacenar kimchi. El kimchi colocado directamente
en el compartimiento del refrigerador puede
congelarse y perder sabor
aire dentro del refrigerador con comida. Si lo hace,
podría congelar los alimentos, afectar el rendimiento
del producto o provocar una descarga eléctrica o
lesiones.
•Para obtener los mejores resultados, verique el
kimchi dentro de 3 a 4 días después de haberlo
guardado.
Si el kimchi se ha desbordado del contenedor, puede
fermentar demasiado rápido y no almacenarse bien.
•No coloque alimentos que requieran diferentes
condiciones de almacenamiento en el mismo
compartimento.
Seleccione la conguración adecuada para la
comida que se almacena.
•Asegúrese de usar suciente sal cuando prepare
kimchi para un almacenamiento más
prolongado.
La tasa de fermentación está determinada
principalmente por la cantidad de sal en el kimchi.
Pequeños lotes de kimchi suave se pueden
almacenar con éxito durante períodos cortos, pero
agregan más sal si se almacenan grandes
cantidades para su uso durante un período
prolongado.
•Tenga cuidado al colocar los recipientes de
kimchi en el refrigerador.
Levante el contenedor por las asas y evite impactos
en el fondo del contenedor
(La apariencia de los contenedores de kimchi puede
variar según el modelo).
. No bloquee la salida de
.
Una guía para Kimchi
•El primer paso en la fermentación de kimchi
es el decapado de sal.
La sal reacciona con las enzimas del repollo para
descomponer las proteínas y comenzar la
fermentación de inmediato. Este proceso
continúa incluso a bajas temperaturas.
Tradicionalmente, el kimchi podía fermentar
lentamente durante el frío clima invernal.
•El sabor del kimchi también depende de los
condimentos utilizados.
Los condimentos típicos incluyen cebolla verde,
ajo, jengibre, pescado salado y chile en polvo. La
combinación de especias elegida determina el
sabor general del kimchi.
•Tasas de fermentación para Kimchi
Agregar mucho ajo, mariscos, cebollas, chile en
polvo, pepino o cebollas verdes hace que el
kimchi fermente más rápido.La tasa de
fermentación será más rápida si agrega ostras
saladas, camarones salados y salsa. Por otro
lado, agregar puerros, mostaza o ginseng
ralentiza la fermentación.
•Kimchi comienza a fermentar tan pronto como
está preparado.
El contacto con el aire hará kimchi sour. Si el
kimchi no está cubierto de salsa o tiene muy
poca sal, se formará una na capa de levadura
en su supercie. Mantenga el aire alejado de los
vegetales cubriéndolos en salsa o colocando el
kimchi
en una bolsa de plástico o cubriéndolo con
plástico.
•Cómo afecta la temperatura a Kimchi
La temperatura afecta la velocidad de
fermentación del kimchi.
para el almacenamiento a largo plazo, mantenga
la temperatura por debajo de 10 °C.
•Almacenamiento a largo plazo de Kimchi
Al igual que el queso, el kimchi es un organismo
vivo y cambiará con el tiempo. Para mantener el
kimchi fresco por períodos prolongados, aumente
el contenido de sal y almacene a baja
temperatura, cerca de 0 °C.
Presione las verduras hacia abajo para que estén
cubiertas con salsa y cubra el recipiente con
envoltura de plástico o una capa de hojas de
repollo para mantener el aire fresco y mantener
el kimchi fresco durante más tiempo.
Al preparar el kimchi
24

ES
•Elegir el repollo adecuado para Kimchi
Hay muchos tipos diferentes de col disponibles.
Para el kimchi, elija un repollo de tamaño
mediano que sea redondo en lugar de largo y
delgado. Las hojas internas deben ser dulces y
más pálidas que las hojas externas. Las hojas
externas deben ser delgadas y de color verde
claro.
•Selección de rábanos para Kimchi
Hay muchos tipos de kimchi de rábano, y
diferentes rábanos se usan para diferentes tipos
de kimchi.
Para el kimchi de rábano, use rábanos coreanos
que tengan hojas verdes pálidas y hojas bien
extendidas.
Para el kimchi chonggak (rábano joven), use
rábanos de Seúl que tengan fondos redondos y
gruesos. Para kkakdugi (kimchi de rábano en
cubos), intente encontrar rábanos con tapas
blancas en lugar de verdes. Para dongchimi, use
rábanos con hojas suaves y blancos en vez de
verdes.
Técnicas adecuadas de
almacenamiento de alimentos
•Guarde el kimchi en el contenedor de kimchi.
Llene el contenedor con kimchi solo hasta la
línea de llenado y asegúrese de que la tapa esté
bien cerrada antes de guardarla. Si la tapa no se
cierra correctamente, se puede formar una na
capa de levadura en la supercie del kimchi o el
kimchi puede fermentar demasiado rápido. Cubra
la supercie del kimchi con una envoltura de
plástico o una capa de hojas de col antes de
guardarla para evitar que se forme la levadura.
•Almacene verduras o frutas en el recipiente
designado.
Algunas verduras y frutas son dañadas por el aire
frío. Para mejores resultados, no lave las
verduras antes de guardarlas.
No refrigere frutas tropicales como plátanos o
piñas, que son dañadas por temperaturas frías.
•Deje que los alimentos calientes se enfríen a
temperatura ambiente antes de refrigerarlos.
Colocar alimentos calientes directamente en el
refrigerador puede elevar la temperatura de los
alimentos que los rodean, lo que puede ocasionar
desperfectos y facturas más altas.
•Almacenamiento a largo plazo de Kimchi
Coloque el kimchi recién preparado en el
refrigerador y seleccione la setting. Según el tipo
y la salinidad del kimchi, seleccione la
conguración Baja(Low), Media(Mididum) o
Alta(High). Para un mejor almacenamiento a
largo plazo, asegúrese de que las verduras estén
completamente sumergidas en la salsa y cubra el
kimchi con plástico.
•Almacenamiento de kimchi comprado
Si el kimchi se consumirá en poco tiempo,
seleccione la “Fast Chill”. Si el kimchi se
almacenará durante un tiempo prolongado,
seleccione la “Storage”.
•Antes de almacenar aceites vegetales en el
refrigerador, lea las instrucciones de
almacenamiento en el recipiente.
Las botellas de aceite vegetal pueden volverse
desordenadas con el uso. Coloque las botellas
de aceite en recipientes de plástico desechables
o desechables para evitar tener que limpiar los
estantes del refrigerador.
25

ES
•Seleccione la temperatura adecuada de los
alimentos almacenados.
Almacenar kimchi en un ambiente de
fermentación puede hacerte daño.
Algunos tipos de kimchi pueden congelarse si los
guarda como conguración alta. Compruebe el
kimchi con frecuencia cuando usa la
conguración alta.
Si coloca otros alimentos junto con kimchi en un
recipiente de almacenamiento, otros alimentos
pueden congelarse.
•Usa otros contenedores de almacenamiento
Para obtener los mejores resultados al usar la
conguración del refrigerador, mantenga
recipientes de tamaño similar, recipientes
pequeños o botellas.
−Si almacena kimchi en la caja de
almacenamiento designada de kimchi, se
convierte en el kimchi más delicioso.
−No guarde el Kimchi en una botella de vidrio.
Durante la congelación, el kimchi puede
expandirse y la botella puede dañarse, lo que
puede provocar lesiones.
−No coloque el recipiente cerca de las salidas
de aire en el refrigerador. Los alimentos pueden
congelarse.
•Fermentación del kimchi
No abra la puerta del compartimiento de
fermentación siendo kimchi.
El aire caliente del exterior puede afectar el sabor
del Kimchi.
•Para quitar olores de los alimentos
Cubra el recipiente de envasado de alimentos
con una bolsa de plástico antes de guardarlo
para que no se transmita el olor dentro del
refrigerador.
•Asegúrese de que el refrigerador se enfría por
completo antes de guardar los alimentos
después de la instalación.
Antes de que el refrigerador alcance la
temperatura establecida, la comida puede
derretirse y dejar el olor.
26

ES
Ajuste de los estantes de la
heladera
Los estantes en su heladera son ajustables para
satisfacer sus necesidades particulares de
almacenamiento. Su modelo puede tener estantes
de vidrio o de alambre.
•Cuando retire el estante, retire todo el contenido
de éste, tire de él hasta el fondo, sujete la parte
delantera del estante con ambas manos,
levántelo en ángulo y extráigalo.
Ajustar los estantes para adaptarlos a las
diferentes alturas de los elementos hará más fácil
que encuentre el elemento exacto que desee. Esto
también reducirá la cantidad de tiempo en el que la
puerta de la heladera esté abierta, lo que ahorrará
energía.
Desmontaje del estante
•Sostenga un lado del estante y tire de él hacia
afuera mientras lo aprieta al otro lado.
•Levante ligeramente la parte trasera y extráigala.
•Al retirar la canasta superior de la 3ª capa,
levante levemente la canasta y tire de ella hacia
afuera. Al reinsertar la canasta, alinearla con las
ranuras en ambos extremos y empujarla hacia
adentro. (Quite todo el contenido dentro de las
canastas antes de retirarlas de la heladera.)
•Después de retirar el estante de la cuarta capa
de los compartimentos izquierdo / derecho, sujete
el desodorante con la mano y retírelo de la pared
posterior de la heladera. El desodorizador es
reutilizable.
※
Levante suavemente y saque el estante.
※
Dependiendo del modelo, los estantes y la
cubierta de aislamiento frío podrían no estar
presentes o diferir de las figuras en sus formas.
27

ES
Cajón CustomChill
El cajón CustomChill proporciona espacio de
almacenamiento con un control de temperatura
variable que se puede ajustar para mantener el
compartimiento más frío o más caliente que la
heladera.
Utilícelo para almacenar carne y mariscos, bebidas
frías, fiambres, o vino frío.
Cajón desmontable CustomChill
El cajón medio
Levante levemente el cajón medio, levante la
canasta hacia arriba y retírelo mientras el rodillo se
extrae a mitad de camino. (La canasta se libera
cuando la puerta superior está abierta.)
Cuando vuelva a insertar la canasta, coloque la
canasta mientras el rodillo se extrae a mitad de
camino, levante el cajón levemente hacia arriba,
alinéelo con el rodillo y empújelo.
※
Al retirar o montar el cajón central, asegúrese de
abrir la puerta en el compartimento superior.
Cuando vuelva a insertar el canasto, inserte el
cajón en la heladera y levante el rodillo izquierdo
del cajón para alinearlo y empujarlo hacia adentro.
Si oye un sonido de golpeteo, levántelo
ligeramente y siga empujándolo.
※
Al retirar o montar el cajón central, asegúrese de
abrir las puertas en los compartimientos
izquierdo / derecho.
※
Usted necesita quitar las canastas junto con los
cajones medios/inferiores. Eliminar sólo las
canastas es imposible.
PRECAUCIÓN
•Al quitar el cajón inferior, tenga cuidado ya que
puede lastimarse el pie.
•Las puertas inferiores podrían ser pesadas, y su
espalda puede resultar herida al retirarlas.
Asegúrese de eliminar el contenido antes de
quitarlos.
El cajón inferior
Abra completamente el cajón.
1
Levante el cajón levemente y tire de él hacia
2
afuera.
(Cuando escuche el sonido de golpeo, el cajón
ya no será tirado o empujado.)
Retire el cajón inferior levantándolo con la
3
máxima potencia como se muestra en la
figura.
28

ES
FUNCIONES SMART
Utilización de la aplicación LG
SmartThinQ
Cosas a vericar previo a utilizar
LG SmartThinQ
•Para dispositivos con el logotipo o
Revise la distancia entre el electrodoméstico
1
y el enrutador inalámbrico (Red Wi-Fi).
•Si la distancia entre el electrodoméstico y el
enrutador inalámbrico es muy grande, la
señal será débil. Puede que le tome más
tiempo registrarse o que falle la instalación.
Desactive los Datos Móviles o Datos
2
Celulares en su teléfono inteligente.
•Para iPhones, apague la red al dirigirse a
Conguración → Datos Celulares →
Datos Celulares.
Conecte su teléfono inteligente al enrutador
3
inalámbrico.
AVISO
•Para vericar la conexión Wi-Fi, compruebe que
el icono Wi-Fi
iluminado.
•El electrodoméstico funciona únicamente con
redes Wi-Fi de 2.4 GHz. Contacte a su proveedor
de servicios de internet o verique el manual del
enrutador inalámbrico para revisar la frecuencia
de su red.
•LG SmartThinQ no se hace responsable de
ningún problema o fallo de conexión a la red, mal
funcionamiento o errores causados por la
conexión de red.
•Si el aparato tiene algún problema para
conectarse a la red Wi-Fi, es posible que sea
porque está demasiado lejos del router. Adquiera
un repetidor Wi-Fi (un ampliador de alcance
inalámbrico) para incrementar la señal Wi-Fi.
•Es posible que la conexión Wi-Fi no se
establezca o se vea interrumpida debido al
entorno de la red doméstica.
•La conexión de red podría no funcionar
correctamente con algunos proveedores de
servicios de Internet.
•El entorno inalámbrico circundante puede hacer
que el servicio de red inalámbrica tenga un
funcionamiento muy lento.
•El electrodoméstico no puede registrarse debido
a problemas con la transmisión de la señal
inalámbrica. Desconecte el electrodoméstico y
espere alrededor de un minuto previo a intentarlo
de nuevo.
•Si el cortafuegos de su enrutador inalámbrico
está activado, desactivelo o añada una excepción
a éste.
•El nombre de la red inalámbrica (SSID) debe ser
una combinación de letras y números. (No utilice
caracteres especiales)
•La interfaz de usuario (IU) del teléfono inteligente
puede variar dependiendo del sistema operativo
(OS) del móvil y del fabricante.
•Puede que no logre congurar la red si el
protocolo de seguridad del router está en WEP.
Por favor cambie este protocolo por otro (es
recomendado el WPA2) y registre el producto de
nuevo.
del panel de control esté
29

ES
Instalación de LG SmartThinQ
Busque la aplicación LG SmartThinQ en Google
Play Store & Apple App Store en un smartphone.
Siga las instrucciones para descargar e instalar la
aplicación.
Función Wi-Fi
•Para dispositivos con el logotipo o
Comuníquese con el aparato desde un teléfono
inteligente utilizando las cómodas funciones
inteligentes.
Actualización de rmware
Actualice el sistema para mejorar el rendimiento
del electrodoméstico.
Smart Diagnosis™
Si utiliza la función Smart Diagnosis, se le
proporcionará información útil, como una forma
correcta de utilizar el aparato basada en el patrón
de uso.
Ajustes
Le permite configurar varias opciones en el
refrigerador y en la aplicación.
AVISO
•Si cambia el router inalámbrico, el proveedor de
servicios de Internet o la contraseña, elimine el
aparato registrado de la aplicación LG
SmartThinQ y regístrelo de nuevo.
•El aparato podría verse modicado para realizar
mejoras en él sin previo aviso a los usuarios.
•Las funciones pueden variar según el modelo.
Conexión a Wi-Fi
El botón Wi-Fi se puede usar con la aplicación LG
SmartThinQ para conectar el refrigerador a la red
Wi-Fi de su hogar. El ícono de Wi-Fi muestra el
estado de conexión de la red del refrigerador. Este
icono se enciende cuando el refrigerador está
conectado a una red Wi-Fi.
Registro inicial del dispositivo
Ejecute la aplicación LG SmartThinQ y siga las
instrucciones en la aplicación para registrar el
dispositivo.
Vuelva a registrar el dispositivo o
registre a otro usuario
Mantenga presionado el botón Wi-Fi durante 3
segundos para apagarlo temporalmente. Ejecute la
aplicación LG SmartThinQ y siga las instrucciones
en la aplicación para registrar el dispositivo.
Software de código abierto
Para obtener el código fuente bajo GPL, LGPL,
MPL y otras licencias de código abierto que
contiene este producto, visite
http://opensource.lge.com.
Además del código fuente, se pueden descargar
los términos de la licencia, las anulaciones de la
garantía y los avisos de derechos de autor.
LG Electronics también le proporcionará el código
abierto en un CD-ROM por un costo que cubra los
gastos de dicha distribución (como el costo del
medio, del envío y de la manipulación) una vez
realizado el pedido por correo electrónico a la
dirección opensource@lge.com.
Esta oferta es válida solo durante un período de
tres años después de que se envíe el último
cargamento de este producto. Esta oferta es válida
para todo aquel que reciba esta información.
Smart Diagnosis™ Uso de un
teléfono inteligente
•Para dispositivos con el logotipo o
Utilice esta función si necesita un diagnóstico
preciso de un centro de información de clientes de
LG Electronics cuando el dispositivo funcione mal
o falle.
Smart Diagnosis™ no se puede activar a menos
que el aparato esté conectado al suministro
eléctrico. Si el aparato no puede encenderse, la
solución de problemas debe realizarse sin utilizar
Smart Diagnosis™.
30

ES
Uso de Smart Diagnosis™
Smart Diagnosis ™ a través del
Centro de Información al Cliente
Utilice esta función si necesita un diagnóstico
preciso del centro de información de clientes de LG
Electronics cuando el dispositivo funcione mal o
falle. Utilice esta función sólo para contactar al
representante del servicio, no durante el normal
funcionamiento.
Pulse el botón de bloqueo para activar la
1
función de bloqueo.
•Si ya se ha activado la función de bloqueo,
pulse el botón Bloquear para desactivar la
función de bloqueo y, a continuación, pulse
de nuevo el botón Bloquear para activar la
función de bloqueo.
•Tenga en cuenta que la función Smart
Diagnosis no funcionará hasta que hayan
transcurrido cinco minutos desde que se
activó la función de bloqueo.
Abra la puerta superior y luego sujete el
2
teléfono en el orificio del altavoz superior
derecho.
•Coloque el teléfono de forma que su
micrófono esté alineado con el oricio del
altavoz.
AVISO
•Coloque el teléfono de modo que su micrófono
esté alineado con el oricio del altavoz.
•El sonido Smart Diagnosis™ se genera después
de unos tres segundos.
•No extraiga el teléfono del oricio del altavoz
mientras se transmiten los datos.
•Sujete el teléfono al oricio del altavoz superior
derecho y espere mientras se transmiten los
datos.
•El sonido de transferencia de datos puede ser
estridente para el oído mientras se están
transmitiendo los datos de Smart Diagnosis™,
pero no retire el teléfono del oricio del altavoz
para un diagnóstico preciso hasta que se detenga
el sonido de transferencia de datos.
•Cuando se complete la transferencia de datos, se
muestra el mensaje de nalización de la
transferencia y el panel de control se apaga
automáticamente y se vuelve a encender
después de unos segundos. Luego el centro de
información del cliente explica el resultado del
diagnóstico.
•La función Smart Diagnosis™ depende de la
calidad de la llamada local.
•El rendimiento de la comunicación mejorará y se
puede transmitir una mejor señal si se utiliza un
teléfono jo de línea.
•Si la transferencia de datos de Smart Diagnosis™
es mala debido a la mala calidad de la llamada,
es posible que no reciba el mejor servicio Smart
Diagnosis™.
Mantenga presionado el botón inferior durante
3
tres segundos o más mientras continúa
manteniendo el teléfono en el altavoz.
Una vez finalizada la transferencia de datos, el
4
agente de servicio le explicará el resultado de
Smart Diagnosis ™.
31

ES
MANTENIMIENTO
Limpieza
•Tanto la heladera como el congelador
descongelan automáticamente, pero limpie
ambas secciones una vez al mes para evitar
olores.
•Limpie los derrames inmediatamente.
•Desconecte siempre la heladera antes de
limpiarla.
Consejos generales de limpieza
•Desconecte la heladera de la corriente eléctrica.
•Retire todas las piezas extraíbles, tales como
estantes, cajones, etc.
•Use una esponja limpia o un paño suave y
solamente detergente suave en agua tibia. No
utilice limpiadores abrasivos o duros.
•Lave a mano, enjuague y seque todas las
supercies a fondo.
Exterior
El encerado de superficies metálicas pintadas
externas ayuda a proteger del óxido. No encere las
piezas de plástico. Encerar superficies pintadas de
metal por lo menos dos veces al año usando cera
para electrodomésticos (o cera en pasta). Aplique
cera con un paño limpio y suave.
Para productos con un exterior de acero inoxidable,
utilice una esponja limpia o un paño suave y
detergente suave en agua tibia. No utilice
limpiadores abrasivos o duros. Seque
completamente con un paño suave.
PRECAUCIÓN
•No utilice un paño o esponja ásperos cuando
limpie el interior y el exterior de la heladera.
•No coloque la mano sobre la supercie inferior de
la heladera al abrir y cerrar.
ADVERTENCIA
Utilice un limpiador no inflamable. Si no lo hace,
puede provocar un incendio, una explosión o la
muerte. Siempre retire el cable de alimentación de
la toma de corriente antes de limpiar cerca de las
partes eléctricas (lámparas, interruptores, tapas,
controles, etc.).
Limpie el exceso de humedad con una esponja o
un paño para evitar que el agua o el líquido entre
en cualquier parte eléctrica y provoque una
descarga eléctrica.
Nunca utilice limpiadores metálicos, cepillos,
limpiadores abrasivos gruesos, soluciones
alcalinas fuertes, detergente industrial
(blanqueador que contiene detergente) líquidos de
limpieza inflamables o tóxicos en cualquier
superficie. No utilice agua caliente para limpiar el
interior o cualquier parte interior de la unidad
cuando están fríos.
32

ES
Dentro de las paredes (permita
que el congelador se caliente para
que el paño no se pegue)
Para ayudar a eliminar los olores, puede lavar el
interior de la heladera con una mezcla de
bicarbonato de sodio y agua tibia. Mezcle 2
cucharadas de bicarbonato sódico cada 1 litro de
agua tibia. Asegúrese de que el bicarbonato de
sodio está completamente disuelto para que no
raye las superficies de la heladera.
Revestimientos de puertas y
juntas
Utilice una esponja limpia o un paño suave y un
detergente suave en agua tibia. No utilice ceras
limpiadoras, detergentes concentrados,
blanqueadores o limpiadores que contengan
petróleo en las piezas de plástico de la heladera.
Piezas de plástico (cubiertas y
paneles)
Utilice una esponja limpia o un paño suave y un
detergente suave en agua tibia. No utilice
pulverizadores de ventana, limpiadores abrasivos
o líquidos inflamables.
Estos pueden rayar o dañar el material.
Cubierta del serpentín del
condensador
Utilice una aspiradora con un accesorio para
limpiar la cubierta del condensador y las rejillas de
ventilación situadas en la parte posterior del
aparato. No quite el panel que cubre el área del
serpentín del condensador. Siempre desconecte la
corriente eléctrica principal antes de limpiarla.
33

ES
SOLUCIÓN DE PROBLEMAS
Revise la sección de solución de problemas antes de llamar al servicio técnico, el hacerlo le ahorrará
tiempo y dinero.
Problema Posibles causas Soluciones
No hay refrigeración ni
congelación.
Hay mala refrigeración
o congelación.
¿Hay una interrupción de
energía?
¿El enchufe de corriente se
desconectó de la toma de
corriente?
¿La fuente de alimentación es
de 220 V?
Si está utilizando un
transformador, ¿está apagada la
lámpara de alimentación?
¿La temperatura de
almacenamiento está ajustada
en ‘L’?
¿La temperatura de la heladera
o del congelador está ajustada a
su temperatura más alta?
¿Está el aparato a luz directa del
sol, o cerca de un objeto
generador de calor como un
horno de cocción o un
calentador?
¿Almacenó alimentos calientes
sin enfriar primero?
¿Puso demasiada comida? •Mantenga un espacio apropiado entre
¿Están completamente cerradas
las puertas del aparato?
¿Hay espacio suficiente
alrededor del aparato?
¿Instaló el producto donde la
temperatura ambiente se
encuentra entre 5°C y 43°C?
¿Está la panel de control
ajustada a “Vege/Fruit” o
“Grain”?
¿Está el estante medio o inferior
montado incorrectamente?
•Compruebe que otros aparatos estén
energizados.
•Conecte el enchufe de alimentación
en el tomacorriente correctamente.
•Si es 110 V, utilice un transformador.
•Encienda la lámpara de alimentación
del transformador.
•Póngalo en ‘M’.
•Ajuste la temperatura de la heladera o
del congelador a ‘M’.
•Compruebe el área de instalación y
vuelva a instalarlo lejos de objetos
generadores de calor.
•Enfriar la comida caliente primero
antes de ponerla dentro de la heladera
o congelador.
los alimentos.
•Cierre completamente la puerta y
asegúrese de que los alimentos
almacenados no obstruyan la puerta.
•Ajuste la posición de instalación para
hacer suciente espacio alrededor del
aparato.
•Instale el producto donde la
temperatura ambiente esté entre 5°C
y 43°C.
•En la panel de control, seleccione la
función adecuada para el tipo de
alimentos almacenados.
•Ensamble el estante central o inferior
correctamente.
34

Problema Posibles causas Soluciones
Los alimentos
refrigerados están
congelados.
El aparato presenta un
mal olor.
La lámpara interior del
aparato no enciende.
La puerta del aparato
no está bien cerrada.
¿La temperatura de
almacenamiento está ajustada a
‘H’?
¿Colocó alimentos húmedos y
fáciles de congelar cerca de la
salida de aire frío?
¿Colocó alimentos húmedos y
fáciles de congelar en el estante
superior del compartimento de
refrigeración?
¿Está el panel de control
ajustado a Meat/Fish, Kimchi o
Long term?
¿Puso los alimentos en el
recipiente proporcionado?
¿La temperatura de
almacenamiento está ajustada
en ‘L’?
¿Puso comida con olor fuerte? •Guarde los alimentos con olores
¿Está abierta la tapa del
contenedor Kimchi?
¿Se apaga la lámpara interior
del aparato?
¿El aparato está inclinado hacia
adelante?
¿Están los estantes
correctamente montados?
¿Cerró la puerta con demasiada
fuerza?
¿Están los alimentos
almacenados en el estante
tocando el techo del producto?
•Establecer a ‘M’ o inferior.
•Póngalos en el borde exterior del
estante.
•Póngalos en el estante inferior.
•En el panel de control, seleccione la
función adecuada para el tipo de
alimentos almacenados.
•Ponga los alimentos en el recipiente
provisto.
•Póngalo en ‘M’.
fuertes en recipientes sellados.
•Cierre completamente la tapa del
contenedor Kimchi.
•Es difícil para los clientes reemplazar
la lámpara interior en el aparato, ya
que no son reparables. Si la lámpara
interior no se enciende, póngase en
contacto con el centro de información
de clientes de LG Electronics
•Ajuste los pies delanteros para
levantar levemente el lado delantero.
•Vuelva a colocar los estantes si es
necesario.
•Si aplica demasiada fuerza o
velocidad al cerrar la puerta, puede
permanecer abierta por un tiempo
antes de cerrarla. Asegúrese de no
cerrar la puerta de un portazo.
Cierre sin fuerza.
•No deje que los alimentos toquen el
techo.
35ES35

Problema Posibles causas Soluciones
Es difícil abrir la puerta
del aparato.
Hay condensación
dentro del aparato o en
la parte inferior de la
tapa del cajón de
verduras.
Se forma escarcha en
el compartimiento
configurado en
Congelar.
Se ha formado
escarcha o
condensación dentro o
fuera del aparato.
¿Abrió la puerta justo después
de cerrarla?
¿Almacenó alimentos calientes
sin enfriar primero?
¿Dejó abierta la puerta del
aparato?
¿Abre y cierra la puerta del
aparato frecuentemente?
¿Colocó comida caliente o
húmeda dentro sin sellarla en
un recipiente?
¿Las puertas no pueden
cerrarse adecuadamente?
¿Almacenó alimentos calientes
sin enfriar primero?
¿Está bloqueada la entrada o
salida de aire del congelador?
¿El congelador está demasiado
lleno?
¿Abrió y cerró la puerta del
aparato con frecuencia o la
puerta del aparato está cerrada
incorrectamente?
¿El ambiente de instalación es
húmedo?
•Si intenta abrir la puerta del aparato
dentro del primer minuto después de
haberla cerrado, puede tener
dicultades debido a la presión dentro
del aparato. Intente abrir de nuevo la
puerta del aparato en unos minutos
para que la presión interna se
estabilice.
•Enfriar la comida caliente primero
antes de ponerla dentro de la heladera
o congelador.
•Aunque la condensación
desaparecerá poco después de cerrar
la puerta del aparato, puede limpiarla
con un paño seco.
•La condensación puede formarse
debido a la diferencia de temperatura
del exterior.
Limpie la humedad con un paño seco.
•Almacene los alimentos en un
recipiente cubierto o sellado.
•Compruebe si el alimento dentro del
aparato está bloqueando la puerta y
asegúrese de que la puerta esté bien
cerrada.
•Enfríe la comida caliente primero
antes de ponerla dentro de la heladera
o congelador.
•Asegúrese de que la entrada o salida
de aire no esté bloqueada para que el
aire pueda circular por dentro.
•Mantenga un espacio apropiado entre
los elementos.
•Se pueden formar escarchas o
condensaciones si el aire exterior
penetra en el interior del aparato.
•Si el área de instalación está
demasiado húmeda o en un día
húmedo, como un día lluvioso, puede
aparecer condensación en el exterior
del aparato. Limpie la humedad con
un paño seco.
36ES36

Problema Posibles causas Soluciones
El aparato es ruidoso y
genera sonidos
anormales.
El lado o el frente del
aparato está caliente.
La parte inferior del
producto está caliente
o hay aire caliente
procedente de la parte
posterior.
La pared interna del
producto está caliente.
Chasquidos El control de descongelación
¿El aparato está instalado en un
suelo débil o nivelado
incorrectamente?
¿La parte trasera del aparato
toca la pared?
¿Hay objetos dispersos detrás
del aparato?
¿Hay un objeto en la parte
superior del aparato?
Hay tuberías anti condensación
instaladas en estas áreas del
aparato para reducir la
formación de condensación
alrededor del área de la puerta.
¿Instaló el producto no hace
mucho tiempo?
¿La tocó cuando el producto
estaba funcionando?
hará clic cuando el ciclo de
descongelación automático
comience y termine. El control
del termostato (o el control del
aparato en algunos modelos)
también hará clic al encender y
apagar el ciclo.
•Instale el aparato en un área sólida y
plana.
•Ajuste la posición de instalación para
permitir una holgura suciente
alrededor del aparato.
•Retire los objetos dispersos de detrás
del aparato.
•Retire el objeto encima del aparato.
•El tubo de liberación de calor para
evitar la condensación se instala en la
parte delantera y lateral del aparato.
Puede sentirlo sobre todo caliente
justo después de instalar el aparato o
durante el verano. Puede estar seguro
de que esto no es un problema y es
bastante normal.
•Justo después de la instalación, el
compresor funcionará mucho para
enfriar rápidamente. Por lo tanto,
usted puede esperar calor o aire
caliente en la parte inferior derecha.
Después de enfriarse, el aire caliente
desaparecerá. Así que no se
preocupe.
•Para mantener la temperatura óptima,
el aire frío y el aire caliente se
turnarán para controlar las
temperaturas, haciendo que la pared
interior esté caliente. No es un mal
funcionamiento, así que siga usando
el producto como de costumbre.
•Funcionamiento normal
37ES37

Problema Posibles causas Soluciones
Ruidos de chirrido Los ruidos de chirrido pueden
Sonido tipo zumbido El motor del ventilador del
Ruidos de gorgoteos El refrigerante que fluye a través
Ruidos de golpeteo Contracción y expansión de las
Vibración Si el lado o la parte trasera del
Kimchi se agria
demasiado rápido.
provenir del flujo de
refrigerante, la línea de agua en
la parte posterior de la unidad
(sólo para modelos con tubería)
o artículos almacenados encima
o alrededor del aparato.
El aparato no descansa
uniformemente sobre el piso.
El aparato con compresor lineal
fue movido mientras
funcionaba.
evaporador está circulando aire
por los compartimentos de la
heladera y el congelador.
El ventilador del condensador
está forzando el aire sobre el
condensador.
del sistema de enfriamiento
paredes interiores debido a
cambios de temperatura.
aparato está tocando un mueble
o una pared, algunas de las
vibraciones normales pueden
producir un sonido audible.
¿El control de la panel está
configurado a “Fer. Com”,
“Kimchi+”
¿Está la ventana de control
ajustada a “Kimchi L”?
¿La puerta o estantería está
bien cerrada?
o “Fridge”?
•Funcionamiento normal
•El piso es débil o irregular o las
piernas niveladoras necesitan ser
ajustadas. Vea la sección de
alineación de la puerta.
•Funcionamiento normal si el
compresor no deja de hacer ruido
después de 3 minutos, apague y
vuelva a encender el aparato.
•Funcionamiento normal
•Funcionamiento normal
•Funcionamiento normal
•Funcionamiento normal
•Para eliminar el ruido, asegúrese de
que los lados y la parte trasera no
hagan contacto contra cualquier pared
o gabinete.
•En la panel de control, seleccione la
función adecuada para el tipo de
alimentos almacenados.
•Congurar a “Kimchi M” o superior.
Tenga en cuenta que si selecciona
“Kimchi H”, el Kimchi puede
congelarse.
•Cierre la puerta o el estante
correctamente.
38ES38

Problema Posibles causas Soluciones
Hay hongos blancos
en la superficie del
Kimchi.
La energía está
apagada para algunos
compartimientos.
El Kimchi está pastoso
y menos gomoso.
El electrodoméstico de
su hogar y su teléfono
inteligente no están
conectados a la red
Wi-Fi.
¿Está abierta la tapa del
contenedor Kimchi?
¿Está el panel de control
configurado como “Top Off” o
“Mid/Bot. Off”?
¿Añadió una cantidad adecuada
de sal o condimento de marisco
cuando hizo el Kimchi?
La contraseña para la red Wi-Fi
a la que se está intentando
conectar es incorrecta.
Los Datos Móviles para su
teléfono inteligente están
activados.
El nombre de la red inalámbrica
(SSID) se ha configurado
incorrectamente.
La frecuencia del enrutador no
es de 2,4 GHz.
La distancia entre el enrutador y
el electrodoméstico es muy
grande.
•Cierre completamente la tapa. Si la
tapa no se cierra completamente, el
Kimchi puede entrar en contacto con
el aire para generar levaduras de
oxidación (hongo blanco).
•Cubrir la supercie de Kimchi con
envolturas o vinilo higiénico para
almacenarlo por un tiempo más largo.
•Cambiar a otros ajustes.
•Si agrega poca sal, entonces se verá
bien, pero la enzima contenida en el
Kimchi lo hará menos masticable y
pastoso.
Además, el condimento de mariscos
puede afectar a Kimchi en términos de
maduración rápida o hacer que se
empaste.
•Busque la red Wi-Fi conectada a su
teléfono inteligente y remuévala, luego
registre su electrodoméstico en LG
SmartThinQ.
•Desactive la Datos Móviles en su
teléfono inteligente y registre el
electrodoméstico utilizando la red
Wi-Fi.
•El nombre de la red inalámbrica
(SSID) debe ser una combinación de
letras y números. (No utilice
caracteres especiales)
Sólo se admite una frecuencia de
•
enrutador de 2,4 GHz. Configure el
enrutador inalámbrico a 2,4 GHz y
conecte el electrodoméstico a éste.
Para vericar la frecuencia del
enrutador, consulte con su proveedor
de servicios de internet o con el
fabricante del enrutador.
•Si la distancia entre el
electrodoméstico y el enrutador es
muy grande, la señal puede ser débil
y puede que no se congure la
conexión correctamente. Reubique el
enrutador de manera que esté más
cerca del electrodoméstico.
39ES39

Memo

OWNER'S MANUAL
FRIDGE&
FREEZER
Read this owner’s manual thoroughly before operating the appliance and keep
it handy for reference at all times.
GR-B333WLRU
www.lg.com
Copyright © 2018 LG Electronics Inc. All Rights Reserved.

TABLE OF CONTENTS
PRODUCT FEATURES .......................................................................3
SAFETY INSTRUCTIONS ..................................................................4
IMPORTANT SAFETY INSTRUCTIONS ................................................................4
INSTALLATION .................................................................................12
Compartments ......................................................................................................12
Notes for Movement and Transport ......................................................................13
Notes for Installation .............................................................................................13
Dimensions and Clearances ................................................................................14
Ambient Temperature ...........................................................................................14
Leveling ................................................................................................................15
OPERATION .....................................................................................16
Before use ............................................................................................................16
Parts and Functions (Applicable to some models only) ........................................17
Control Panel (Applicable to some models only) ..................................................19
Notes for Operation ..............................................................................................22
Storing Food .........................................................................................................23
Adjusting the Refrigerator Shelves .......................................................................27
CustomChill Drawer .............................................................................................28
This manual may contain images or
content different from the model you
purchased.
This manual is subject to revision by the
manufacturer.
SMART FUNCTIONS ........................................................................29
Using LG SmartThinQ Application ........................................................................29
Using Smart Diagnosis™ .....................................................................................31
MAINTENANCE ................................................................................32
Cleaning ...............................................................................................................32
TROUBLESHOOTING ......................................................................34

EN
PRODUCT FEATURES
•Depending on the model, some of the following functions may not be available.
DOOR ALARM
The Door Alarm function is designed to prevent refrigerator malfunctioning that
could occur if a refrigerator door or freezer door remains open. If a refrigerator
door or freezer door is left open for more than 60 seconds, a warning alarm
sounds in 30 second intervals until it is closed.
AUTO CLOSING HINGE
The refrigerator doors close automatically with a slight push. (The door only
closes automatically when it is open at an angle less than 30°.)
3

EN
SAFETY INSTRUCTIONS
READ ALL INSTRUCTIONS BEFORE USING THE APPLIANCE.
This guide contains many important safety messages. Always read and
obey all safety messages.
This is the safety alert symbol. It alerts you to safety
messages that inform you of hazards that can kill or hurt
you or others, or cause damage to the product.
All safety messages will be preceded by the safety alert
symbol and the hazard signal word WARNING or
CAUTION. These words mean:
WARNING
You can be killed or seriously injured if you do not follow
instructions.
CAUTION
Indicates an imminently hazardous situation which, if not
avoided, may result in minor or moderate injury, or product
damage.
IMPORTANT SAFETY INSTRUCTIONS
WARNING
To reduce the risk of re, electric shock, or personal injury
when using your product, basic safety precautions should be
followed, including the following.
Power
•NEVER unplug your refrigerator by pulling on the power cord.
Always grip the plug rmly and pull it straight out from the outlet.
•If the supply cord is damaged, it must be replaced by the manufacturer
or its service agent or a similarly qualied person in order to avoid a
hazard. Do not use a cord that shows cracks or abrasion damage
along its length or at either the plug or connector end.
4

•Do not use an uncertied power outlet.
•Unplug the power plug immediately in the event of a blackout or
thunderstorm.
•Plug in the power plug with the power cord facing downward.
Installation
•Contact an authorized service center when you install or relocate
the refrigerator.
•When moving your refrigerator away from the wall, be careful not to
roll over or damage the power cord.
•Connect this product to a dedicated grounded electric outlet
conforming with the rating prior to use. It is the user’s responsibility
to replace a standard 2-prong wall outlet with a standard 3-prong
wall outlet.
•Do not install the refrigerator where there may be a danger of it
falling. Installation on a non sturdy timber oor may cause difculty
in door alignment and cause the cabinet to deform.
Use
•DO NOT allow children to climb, stand, or hang on the refrigerator
doors or shelves in the refrigerator. They could damage the
refrigerator and seriously injure themselves.
•Where tted, do not place heavy objects on the dispenser of the
refrigerator or hang onto it.
•Do not place heavy or dangerous objects (bottles or vases with
liquid) on the refrigerator.
•Do not put live animals inside of the refrigerator.
•Do not allow children to climb into the product when it is in or out of
use.
•In the event of a gas leak (propane/LPG), ventilate sufciently and
contact an authorized service center before use. Do not touch or
disassemble the electric outlet of the refrigerator.
5EN5

•In the event of a refrigerant leak, move ammable objects away
from the refrigerator. Ventilate sufciently and contact an authorized
service center.
•Do not use or place ammable substances (chemicals, medicine,
cosmetics, etc) near the refrigerator or store them inside the
refrigerator. Do not place the refrigerator in the vicinity of ammable
gas.
•This appliance is intended to be used in household and similar
applications such as
- Staff kitchen areas in shops, ofces and other working
environments;
- Farm houses and by clients in hotels, motels and other residential
type environments;
- Bed and breakfast type environments;
- Catering and similar non-retail applications.
•Do not use this product for special purposes or mobile applications
(storage of medicine or test materials or on ships, etc).
•Unplug the power plug before cleaning or repairing the refrigerator.
•If the refrigerator is tted with light bulbs and require replacing,
unplug the refrigerator or turn off the power before doing so.
•Do not modify or extend the power cord.
•Do not use a hair dryer to dry the interior. Do not light a candle to
remove any interior odor.
•For your safety, this appliance must be properly grounded. Have
the wall outlet and the circuit checked by a qualied electrician to
make sure the outlet is properly grounded.
•Do not use an outlet that can be turned off via a remote switch. Do
not use an extension cord. It is the user’s responsibility to replace a
standard 2-prong wall outlet with a standard 3-prong wall outlet.
•Do not, under any circumstances, cut or remove the third (ground)
prong from the power cord.
•Do not use an adapter plug and plug the power plug into a multioutlet extension cord.
6EN6

•Disconnect the power cord immediately if you hear a noise, smell a
strange odor or detect smoke.
•Turn the power off if dust or water from above or below penetrates
into the refrigerator. Call a service agent.
•Do not disassemble or modify the refrigerator.
•Do not put hands, feet, or metal objects below or behind the
refrigerator.
•Do not operate the refrigerator or touch the power cord with wet
hands.
•In refrigerators with automatic icemakers, avoid contact with the
moving parts of the ejector mechanism or with the heating element
that releases the cubes. Do not place ngers or hands on the
automatic ice-making mechanism while the refrigerator is plugged
in.
•When dispensing ice from the dispenser, do not use crystal
ceramics.
•Do not touch the cold surfaces in the freezer compartment with wet
or damp hands, when your refrigerator is in operation.
•Do not put glass containers, glass bottles or beverage cans in the
freezer.
•Do not store explosive substances such as aerosol cans with a
ammable propellant in this appliance.
•This appliance is not intended for use by persons (including
children) with reduced physical, sensory or mental capabilities, or
lack of experience and knowledge, unless they have been given
supervision or instruction concerning the use of the appliance by a
person responsible for their safety.
•Do not refreeze frozen foods that have thawed completely. It may
result in serious health issues.
•If you are throwing away your old refrigerator, make sure the CFC
coolant is removed for proper disposal by a qualied servicer. If you
release CFC coolant, you may be ned or imprisoned in
accordance with the relevant environmental law.
7EN7

•Disposed or abandoned refrigerators are dangerous, even if they
are sitting for only a few days. When disposing the refrigerator,
remove the packing materials from the door or take off the doors
but leave the shelves in place so that children may not easily climb
inside.
•If the refrigerant gas has leaked, do not touch the refrigerator or the
power outlet and ventilate the room immediately. A spark could
trigger an explosion causing a re or burns. Because this
refrigerator uses natural gas (isobutene, R600a) as the
environment-friendly refrigerant, even a small amount (50~80g) is
combustible. If gas leaks from severe damage during delivering,
installing or using the refrigerator, any spark may cause re or
burns.
•If there is a damage of the drawer rail or if the operation is not
uent, do not use it, and contact the servcie center to receive
service before using it.
•When you open or close the door of the product, it may cause
injury to nearby people, so be carfeful.
•Do not place glass containers, bottles or cans (especially those
containing carbonated drinks) in the freezer compartment, shelves
or ice bin that will be exposed to temperatures below freezing.
•If the appliance is equipped with a lock (some countries only), keep
the key out of reach of children.
8EN8

CAUTION
To reduce the risk of re, electric shock, or personal injury
when using your product, basic safety precautions should be
followed, including the following.
Installation
•The refrigerator must be properly installed in accordance with the
Installer Instructions that were taped to the front of the refrigerator.
•Be careful when you unpack and install the refrigerator.
Immediately dispose of packing materials (plastic) out of reach of
children.
Use
•Close the doors carefully when children are around.
•Keep ngers out of pinch point areas; clearances between the
doors and cabinets are necessarily small. Be careful closing doors
when children are in the area.
•If food is stacked or stored poorly on the shelves, it may fall and
cause injury when the door is opened.
•Do not move refrigerator while the refrigerator is operating. A
Compressor rattling noise may occur as a result and will only stop
when the compressor cycles off, or when the power to the unit is
turned off and back on again. (This is normal and will not impact on
the performance or the life of the compressor. The rattling will stop
after the compressor comes to a rest.)
Maintenance
•Do not use strong detergents like wax or thinners for cleaning.
Clean with a soft fabric.
•Wipe foreign objects (dust, water, etc) off the prongs of the power
plug and contact areas before connecting.
9EN9

WARNING
•Use drinkable water for ice making.
WARNING
•Keep ventilation openings, in the appliance enclosure or in the
built-in structure, clear of obstruction.
•Do not use mechanical devices or other means to accelerate the
defrosting process, other than those recommended by the
manufacturer.
•Do not damage the refrigerant circuit.
•Do not use electrical appliances inside the food storage
compartments of the appliance, unless they are of the type
recommended by the manufacturer.
•The refrigerant and insulation blowing gas used in the appliance
require special disposal procedures. When disposal, please consult
with service agent or a similarly qualied person.
10EN10

This appliance contains a small amount of isobutane refrigerant
(R600a), natural gas with high environmental compatibility, but
it is also combustible. When transporting and installing the
appliance, care should be taken to ensure that no parts of the
refrigerating circuit are damaged. Refrigerant squirting out of
the pipes could ignite or cause an eye injury. If a leak is
detected, avoid any naked ames or potential sources of
ignition and air the room in which the appliance is standing for
several minutes.
In order to avoid the creation of a ammable gas air mixture if a
leak in the refrigerating circuit occurs, the size of the room in
which the appliance may be sited depends on the amount of
refrigerant used. The room must be 1m2 in size for every 8g of
R600a refrigerant inside the appliance. The amount of
refrigerant in your particular appliance is shown on the
identication plate inside the appliance. Never start up an
appliance showing any signs of damage. If in doubt, consult
your dealer.
SAVE THESE INSTRUCTIONS
11EN11

EN
INSTALLATION
Compartments
Kimchi storage contaner 1
(AKC67523415 : 11.7L)
12
Ring Sheet Owner’s Manual
Kimchi storage contaner 2
(AKC67523721 : 11.3L)
Kimchi storage contaner 3
(AKC67523722 : 17.1L)

EN
Notes for Movement and
Transport
•Remove all food from inside the appliance.
Then, transport the appliance only after xing
fragile parts such as shelves and the door
handle with tape. Failure to do so may cause
appliance damage.
•Pull the power plug out, insert and x it into the
power plug hook at the rear or on top of the
appliance. Failure to do so may cause damage
to the power plug or oor scratch.
•When transporting the appliance, more than
two people should transport the appliance
carefully. Dropping the appliance, which is
extremely heavy, may cause personal injury or
appliance failure.
•When transporting the appliance over a long
distance, keep the appliance upright. The
appliance may fall over, causing malfunctions.
Never transport the appliance laying down as it
can cause a refrigerant circulation malfunction
when it is turned back on again.
Notes for Installation
•Install the appliance on a solid and at area.
−If the appliance is installed on an uneven
oor, it can cause vibration and noise causing
the appliance to fall resulting in injury. It could
also cause the doors not to close correctly
and introduce moisture inside the unit during
operation.
−If the appliance front or rear is not level,
adjust the front feet so that it can be
corrected. Severe cases may need the oor
to be packed out with strips of thin timber.
•Avoid placing the unit near heat sources, direct
sunlight or moisture.
•Connect the power supply cord (or plug) to the
outlet. Don’t double up with other appliances
on the same outlet.
•After connecting the power supply cord (or
plug) to the outlet, Wait two or three hours
before you put food into the appliance. If you
add food before the appliance has cooled
completely, your food may spoil.
•After installing the appliance, connect the
power plug into a socket outlet. Before moving
and discarding the appliance, disconnect the
plug from the socket outlet.
13

EN
Dimensions and Clearances
A
•Too small of a distance from adjacent items
may result in degradation of freezing capability
and increased electricity costs. Allow over
50mm clearance from each adjacent wall when
installing the appliance.
D
F
E
B
C
- Size
A 666 mm
B 1797 mm
C 735 mm
D 28 mm
E 707 mm
F 1290 mm
G 920 mm
G
Ambient Temperature
•The appliance is designed to operate within a
limited range of ambient temperatures,
depending on the climate zone. Do not use the
appliance at a temperature exceeding the limit.
•The internal temperatures could be affected by
the location of the appliance, the ambient
temperature, the frequency of door opening
and so on.
•The climate class can be found on the rating
label.
Climate Class Ambient Temperature
Range °C
SN (Extended
+10 - +32
Temperate)
N (Temperate) +16 - +32
ST (Subtropical) +16 - +38
T (Tropical) +16 - +43 / +10 - +43*
*Australia, India, Kenya
NOTE
•The appliances rated from SN to T are intended
to be used at an ambient temperature between
10 °C and 43 °C.
NOTE
•You can determine what type of appliance it is
by looking at the label inside the fridge
compartment.
14

EN
Leveling
•Aligning the doors may not be possible if the
oor is not level, or is of weak or poor
construction.
The refrigerator is heavy and should be
installed on a rigid and solid surface. Wood
ooring may cause leveling difculties if it
exes excessively.
•If the oor is uneven, level the refrigerator to
avoid noise and vibration.
CAUTION
•Adjust the front leveling feet so they are lower
than the wheels. The weight of the refrigerator
must rest on the feet, not the wheels, to avoid
risk of movement of tipover.
Using
Screwdriver
To level the refrigerator, use a screwdriver to turn
the leveling feet until they are in firm contact with
the floor. The front of the refrigerator can be
slightly higher than the rear to make shutting the
doors easier.
15

EN
OPERATION
Before use
Clean the refrigerator.
Clean your refrigerator thoroughly and wipe off all dust that may have accumulated
during shipping.
CAUTION
•Do not scratch the refrigerator with a sharp object or use a detergent that
contains alcohol, a ammable liquid or an abrasive when removing any tape or
adhesive from the refrigerator,.
•Do not peel off the model or serial number label or the technical information on
the rear surface of the refrigerator.
NOTE
•Remove adhesive residue by wiping it off with your thumb or dishwashing
detergent.
Connect the power supply.
Check if the power supply is connected before use.
Read the “Turning On The Power” section. (Your plug type might be different from
the picture.)
Wait for the refrigerator to cool.
Allow your refrigerator to run for at least three to four hours before putting food in
it. Check the flow of cold air in the freezer compartment to ensure proper cooling.
16
CAUTION
•Putting food in the refrigerator before it has cooled could cause the food to spoil,
or a bad odor could remain inside the refrigerator.
The refrigerator makes a loud noise after initial operation.
This is normal. The loudness will decrease as the temperature lowers.
Before Plugging in, open the refrigerator doors to ventilate the
interior.
The inside of the refrigerator may smell like plastic at first. Remove any adhesive
tape from inside the refrigerator and open the refrigerator doors for ventilation until
any odors have subsided.

EN
Use this page to become more familiar with the parts and features of your refrigerator.
Page references are included for your convenience.
*The appearance and specifications of the actual product may differ depending on the model.
Parts and Functions (Applicable to some models only)
1
2
3
4
LED Display
1
Displays the refrigerator and freezer’s target
temperature and CustomChill settings.
Top
2
3
4
Middle
Bottom
17

EN
5
1
2
3
4
Flap-up Cover
1
Shelf
2
Shelf Basket
3
18
Multi Basket
4
Smart Diagnosis
5

EN
Control Panel (Applicable to some models only)
Control Panel Features
Top
1
•This sets Kimchi, Fridge, Fer. Com. and
Freezer.
Middle
1
2
•This sets Kimchi, Produce, Meat/Fish, Fer.
Com. And Kimchi+.
2
3
Bottom
3
•This sets Kimchi, Produce, Rice/Grain,
Fast Chill And Storage.
4
Power
•This sets the power off of the Top or
Middle/Bottom.
4
5
Fresh Air Filter
•This sets the Fresh Air Filter.
5
6
7
6
Wi-Fi
•This sets the refrigerator to connect to
your home’s Wi-Fi network.
7
Lock
•This locks the buttons on the control panel.
19

EN
Notes for Use of the Control Panel
•The control panel will turn on in any of the
following cases.
−When the power is turned on
−When a button is pressed
−When the appliance door is opened
•The control panel will turn off automatically for
energy saving in any of the following cases.
−When one minute has passed after turning
on the power
−When no button operation is carried out for
60 seconds after a desired button is pressed
−When 60 seconds has passed after the
appliance door is opened and closed
•When the power-saving function is operational,
the control panel window will turn off except the
Lock lamp.
Setting Functions
•Select the button for your desired function.
•Each time you press the button, the following
functions will show up sequentially:
[Top]
Kimchi : M → H → L
Fridge : M → H → L → Freezer Fer. Com.
[Middle]
Kimchi : M → H → L
Produce : M → H → L Meat/Fish
Kimchi+ Fer. Com.
[Bottom]
Kimchi : M → H → L
Vege/Fruit : M → H → L Rice/Grain
Storage Fast Chill
Fer. Com(Fermentation)
•This function detects the external temperature
and then ripens Kimchi.
•Select another function if you wish to cancel
“Fer.”.
•If you set the Ripen function, “Fer.” will be
turned on.
•Once Ripen has been completed, “Fer. Com.”
will be turned on and Kimchi M will be set.
•If you press the Lock button when Ripen has
been completed, “Fer. Com.” will be turned off.
NOTE
•The completion time is subject to change
depending on seasonality, surrounding
temperature and Kimchi temperature.
Fridge
•Stores refrigerated foods.
NOTE
•If you store Kimchi after setting the Fridge, the
Kimchi will get sour in taste fast.
Freezer
•Stores frozen foods.
NOTE
•If you store Kimchi after setting the Freezer,
the Kimchi will get frozen.
Produce
•You can store vegetables and fruits and keep
them fresh for a long time.
20

EN
Meat/Fish
•You can store meat and sh and keep them
fresh.
NOTE
•If you store Kimchi after setting Meat/Fish, the
Kimchi will get frozen.
Kimchi+
•Implement a temperature at which Leuconostoc
grows well and then cool rapidly so that Kimchi
can be stored preserving good taste for a long
time.
•The gauge displays the degree of ripeness.
Once the gauge gets lled up, help yourself to
Kimchi. (About 6 days are required.)
•Apply to freshly prepared Kimchi only.
NOTE
•Apply once only. If you apply twice or more
times, Kimchi may get sour in taste.
•Notice) Apply to cabbage Kimchi. Lightly-salted
Kimchi can get frozen.
Storage
•Minimizes changes in taste in order to store
Kimchi for a long time.
Fresh Air Filter
•This is the function to quickly circulate the air
inside the refrigerator for deodorization inside
the refrigerator.
Wi-Fi
•The Wi-Fi button, when used with the LG
Smart ThinQ application, allows the refrigerator
to connect to a home Wi-Fi network.
•The Wi-Fi icon shows the status of the
refrigerator’s network connection. The icon
illuminates when the refrigerator is connected
to the Wi-Fi network.
•Press and hold the Wi-Fi button for 3 seconds
to connect to the network. The icon blinks while
the connection is being made, then turns on
once the connection is successfully made.
Fast Chill
•Use this setting to store commercially prepared
kimchi. Kimchi purchased in a store has
already been fermented, so it is best to cool it
as rapidly as possible.
21

EN
Notes for Operation
•Do not use the ice water dispenser tank for
beverages other than drinking water.
•Users should keep in mind that frost can form.
If the door is not closed completely, if the
humidity is high during the summer, or if the
freezer door is opened frequently.
•Ensure there is sufcient space between food
stored on the shelf or door basket to allow the
door to close completely.
•Opening the door lets warm air enter the
appliance, and may cause the internal
temperature to rise.
•Do not open or close the appliance door
excessively.
•The LED lamp is only intended for use in
domestic appliances and is not suitable for
household room illumination.
•If you are leaving the appliance turned off for
an extended period of time, remove all food
and unplug the power cord. Clean the interior,
and leave the doors slightly ajar to prevent
mold from growing in the appliance.
Suggestion for Energy Saving
•Ensure there is sufcient space between stored
foods. This allows cold air to be circulated
evenly and lowers electricity bills.
•Store hot food only after it has cooled in order
to prevent dew or frost.
•When storing food in the freezer compartment,
set the freezer temperature lower than the
temperature indicated on the appliance.
•Do not put food near the temperature sensor of
the fridge compartment. Keep a distance of at
least 3 cm from the sensor.
•Please note that a temperature rise after
defrosting has a permissible range in the
appliance specications. If you wish to
minimise the impact this may have on the food
storage due to a temperature rise, seal or wrap
the stored food in several layers.
•The automatic defrosting system in the
appliance ensures that the compartment
remains free of ice buildup under normal
operating conditions.
22

EN
Storing Food
Storing Foods Effectively
•Store frozen food or refrigerated food inside
sealed containers.
•Check the expiration date and label (storage
instructions) before storing food in the
appliance.
•Do not store food for a long period of time
(more than four weeks) if it spoils easily at a
low temperature.
•Place the refrigerated food or frozen food in
each fridge or freezer compartment
immediately after purchasing.
•Avoid refreezing any food which has been
completely thawed. Freezing any food which
has been completely thawed again will lower
its taste and nutrition.
•Do not wrap and store vegetables with
newspaper. Printing material of newspaper or
other foreign substances may smear and
contaminate food.
•Do not overll the appliance. Fill less than 70%
of the space. Cold air can not circulate properly
if the appliance is overlled.
•Cool hot food before storing. If too much hot
food is placed inside, the internal temperature
of the appliance can increase and negatively
affect other foods stored in the appliance.
•If you set an excessively low temperature for
food, it may become frozen. Do not set a
temperature lower than the required
temperature for the food to be stored correctly.
•Always keep the appliance clean.
•If there are chill compartments in the appliance,
do not store vegetables and fruits with higher
moisture content in the chill compartments as
they may freeze due to the lower temperature.
•In the event of a blackout, call the electricity
company and ask how long it is going to last.
−You should avoid door openings while the
power is off.
−When the power supply gets back to normal,
check the condition of the food.
Maximum Storage
•To get better air circulation, insert all Kimchi
Storage Containers.
••If large quantities of food are to be stored, all
the Kimchi storage containers and Flip-up
covers shall be taken out of the appliance and
the food shall be stacked directly on the freezer
shelves in the freezer compartment.
NOTE
•The shape of each container may be different,
insert in the right position.
Food Storage Tips
•Storing Vegetables and Fruit
The moisture left on vegetables after washing
can make them spoil faster. Wait to wash
vegetables until just before use. Leafy greens
like kale or lettuce have a limited storage life.
Wrap them in newspaper or in sealed
containers to help them stay fresh longer.
•Do not store tropical fruits in the refrigerator.
Bananas or uncut pineapples are damaged by
cold temperatures.
•To store dried seafood, select “Produce” for the
middle compartment and adjust the storage
temperature to “low”.
•Store vegetables or fruit in the designated
containers to prevent them from freezing in the
middle or lower compartment.
•Store rice or grain in the bottom compartment
using the Rice/Grain setting.
•To avoid freezing vegetables, do not store them
using the Storage setting on the bottom
compartment.
•To avoid freezing kimchi, do not store it using
the Meat/Fish setting on the middle
compartment.
23

EN
Tips for Storing Kimchi
•Do not overll the kimchi containers.
Allow space for the kimchi to expand as it
ferments or the contents may overow the
container. Close the container lids completely
to prevent the kimchi from fermenting too
quickly or developing yeast mold.
Fill the container with kimchi up to the ll line
and make sure the lid is tightly closed before
storing. Cover the surface of the kimchi with
plastic wrap to extend the storage time.
•Do not place kimchi directly into the
refrigerator compartment or store it in a
plastic bag.
Use the kimchi container provided to store
kimchi. Kimchi placed directly into the
refrigerator compartment may freeze and taste
off. Do not block the air outlet inside the
refrigerator with food. Doing so could cause the
food to freeze, affect product performance, or
result in electric shock or injury.
•For best results, check on kimchi within 3
to 4 days of storing it.
If the kimchi has overowed from the container,
it may ferment too quickly and not store well.
•Do not place foods that require different
storage conditions in the same
compartment.
Select the appropriate settings for the food
being stored.
•Be sure to use enough salt when preparing
kimchi for longer storage.
The rate of fermentation is mostly determined
by the amount of salt in the kimchi.
Small batches of mild kimchi can be
successfully stored for short periods, but add
more salt if storing large amounts for use over
an extended period.
•Use care when placing kimchi containers in
the refrigerator.
Lift the container by the handles and avoid
impacts to the bottom of the container.
(The appearance of kimchi containers may
vary by model.)
A Guide to Kimchi
•The rst step in fermenting kimchi is salt
pickling.
The salt reacts with enzymes in the cabbage to
break down proteins and begin fermentation
immediately. This process continues even at
cold temperatures. Traditionally, kimchi was
allowed to ferment slowly during the cold winter
weather.
•The taste of kimchi also depends on the
seasonings used.
Typical seasonings include green onion, garlic,
ginger, salted sh, and chili powder. The
combination of spices chosen determines the
overall taste of the kimchi.
•Fermentation Rates for Kimchi
Adding a lot of garlic, seafood, onions, chili
powder, cucumber or green onions makes
kimchi ferment more quickly. Adding salted
oysters, salted shrimp or persimmon sauce
really speeds up fermentation. On the other
hand, adding leeks, mustard or ginseng slows
down fermentation.
•Kimchi begins fermenting as soon as it is
prepared.
Contact with air will make kimchi sour. If the
kimchi is not covered in sauce or has too little
salt, a thin skin of yeast will form on its surface.
Keep air away from the vegetables by covering
them in sauce or placing the kimchi in a plastic
bag or covering it with plastic wrap.
•How Temperature Affects Kimchi
Temperature affects the fermentation rate of
kimchi. When preparing kimchi for long-term
storage, keep the temperature below 10 °C.
•Long-Term Storage of Kimchi
Like cheese, kimchi is a living organism and
will change over time. To keep kimchi fresh for
long periods, increase the salt content and
store at a low temperature, near 0°C.
Press vegetables down so they are covered
with sauce and cover the container with plastic
wrap or a layer of cabbage leaves to keep air
out and keep kimchi fresh longer.
24

EN
•Choosing the Right Cabbage for Kimchi
There are many different kinds of cabbage
available. For kimchi, choose a medium sized
cabbage which is rounded rather than long and
thin. The inner leaves should be sweet and
paler than the outer leaves. Outer leaves
should be thin and light green.
•Selecting Radishes for Kimchi
There are many types of radish kimchi, and
different radishes are used for different types of
kimchi.
For radish kimchi, use Korean radishes that
have pale green tops and well-spread leaves.
For chonggak (young radish) kimchi, use Seoul
radishes that have round, thick bottoms. For
kkakdugi (cubed radish kimchi), try to nd
radishes with white rather than green tops. For
dongchimi, use radishes with soft leaves and
white rather than green tops.
Proper Food Storage Techniques
•Store kimchi in the kimchi container.
Fill the container with kimchi only up to the ll
line and make sure the lid is tightly closed
before storing.
If the lid is not closed properly, a thin lm of
yeast can form on the surface of the kimchi or
the kimchi may ferment too quickly. Cover the
surface of the kimchi with plastic wrap or a
layer of cabbage leaves before storing it to
prevent yeast from forming.
•Store vegetables or fruits in the designated
container.
Some vegetables and fruits are damaged by
cold air. For best results, don’t wash vegetables
before storing them.
Do not refrigerate tropical fruits like bananas or
pineapples, which are damaged by cold
temperatures.
•Allow hot food to cool to room temperature
before refrigerating it.
Placing hot food directly into the refrigerator
can raise the temperature of surrounding food
items, leading to spoilage and higher utility
bills.
•Long-Term Storage of Kimchi
Place newly prepared kimchi into the
refrigerator and select the Kimchi setting.
Depending on the type and saltiness of the
kimchi, select the Low, Medium, or High
setting. For best long-term storage, make sure
the vegetables are completely submerged in
the sauce and cover the kimchi with plastic
wrap.
•Storing Purchased Kimchi
If kimchi will be consumed within a short time,
select the Fast Chill setting. If kimchi will be
stored for a long time, select the Storage
setting.
•Before storing vegetable oils in the
refrigerator, read the storage instructions
on the container.
Vegetable oil bottles can become messy with
use. Place oil bottles in disposable or left over
plastic containers to avoid having to clean
refrigerator shelves.
25

EN
•Select the appropriate temperature for the
Food being stored.
Storing kimchi at the Fermentation setting may
cause it to spoil.
Some types of kimchi may freeze if stored at
the High setting. Check on kimchi often when
using the High setting. Storing other food along
with kimchi in a storage container may result in
the other food freezing.
•Using the Different Containers
For best results when using the Fridge setting,
store containers which are similar in size,
smaller containers, or bottles.
−Storing kimchi in the provided kimchi
container in the designated position makes
the most delicious kimchi.
−Do not store kimchi in glass bottles. The
kimchi will expand when frozen and the bottle
may break, causing a risk of injury.
−Do not place containers near the air outlet in
the refrigerator. The food may freeze.
•Fermenting Kimchi
Avoid opening the compartment door while
kimchi is fermenting. Allowing the warmer
outside air in during fermentation can affect the
taste of the kimchi.
•Getting Rid of Food Odors
Cover open food containers with plastic wrap
before storing to prevent transfer of odors
inside the refrigerator.
•After installation, allow the refrigerator to
cool completely before storing food.
Food may spoil and cause odors to linger if it is
stored before the refrigerator has been allowed
to reach the set temperature.
26

EN
Adjusting the Refrigerator
Shelves
The shelves in your refrigerator are adjustable to
meet your individual storage needs. Your model
may have either glass or wire shelves.
Adjusting the shelves to fit different heights of
items will make finding the exact item you want
easier. Doing so will also reduce the amount of
time the refrigerator door is open which will save
energy.
Detaching the Shelf
•Hold one side of the shelf and pull it out while
squeezing it to the other side.
•Lift the rear part slightly and pull it out.
•When removing the shelf, remove all content
on it, pull the basket all the way out, hold the
front of th e shelf with both hands, lift it up at an
angle and pull it out.
•After removing the 4th-layer shelf at the left/
right compartments, hold the deodorizer with
the hand and remove it from the back wall of
the refrigerator. The deodorizer is reusable.
※
Gently lift and pull out the shelf.
※
Depending on the model, the shelves and cold
insulation cover may not be present or differ
from the figures in their shapes.
•When removing the upper 3rd-layer basket, lift
the basket up slightly and pull it out. When
reinserting the basket, align it with the grooves
at both ends and push it inside.(Remove all
content inside the baskets before removing it
from the refrigerator.)
27

EN
CustomChill Drawer
The CustomChill Drawer provides storage space
with a variable temperature control that can be
adjusted to keep the compartment either colder
or warmer than the refrigerator.
Use it to store meat and seafood, cold drinks,
deli snacks, or chilled wine.
CustomChill Drawer Disassembly
The Mid Drawer
Raise the Mid drawer slightly, lift the basket up
and remove it while the roller is pulled out
halfway. (The basket is released when the upper
door is open.)
When reinserting the basket, put the basket in
while the roller is pulled out halfway, lift the
drawer up slightly, align it with the roller, and
push it in.
※
When removing or mounting the middle
drawer, be sure to open the door at the upper
compartment.
When reinserting the basket, insert the drawer to
the refrig erator and lift the left roller of the
drawer to align and push it in. If you hear a
knocking sound, lift it up slightly and keep
pushing it in.
※
When removing or mounting the middle
drawer, be sure to open the doors at the left/
right compartments.
※
You need to remove the baskets together with
the middle/lower drawers. Removing only the
baskets is impossible.
CAUTION
•When removing the lower drawer, be careful as
you may hurt your foot.
•The lower doors may be heavy, and your back
may be hurt when removing them. Be sure to
remove the content before removing them.
The Bottom Drawer
Open the drawer completely.
1
Pull up the drawer slightly and pull it out.
2
(When you hear the knocking sound, the
drawer will no longer be pulled or pushed.)
Remove the Bottom drawer by lifting it with
3
full power as shown in the figure.
28

EN
SMART FUNCTIONS
Using LG SmartThinQ
Application
Things to check before using LG
SmartThinQ
•For appliances with the or logo
Check the distance between the appliance
1
and the wireless router (Wi-Fi network).
•If the distance between the appliance and
the wireless router is too far, the signal
strength becomes weak.
It may take a long time to register or
installation may fail.
Turn off the Mobile data or Cellular Data
2
on your smartphone.
•For iPhones, turn data off by going to
Settings → Cellular → Cellular Data.
Connect your smartphone to the wireless
3
router.
NOTE
•To verify the Wi-Fi connection, check that Wi-Fi
icon on the control panel is lit.
•The appliance supports 2.4 GHz Wi-Fi
networks only. To check your network
frequency, contact your Internet service
provider or refer to your wireless router manual.
•LG SmartThinQ is not responsible for any
network connection problems or any faults,
malfunctions, or errors caused by network
connection.
•If the appliance is having trouble connecting to
the Wi-Fi network, it may be too far from the
router. Purchase a Wi-Fi repeater (range
extender) to improve the Wi-Fi signal strength.
•The Wi-Fi connection may not connect or may
be interrupted because of the home network
environment.
•The network connection may not work properly
depending on the Internet service provider.
•The surrounding wireless environment can
make the wireless network service run slowly.
•The appliance cannot be registered due to
problems with the wireless signal transmission.
Unplug the appliance and wait about a minute
before trying again.
•If the rewall on your wireless router is
enabled, disable the rewall or add an
exception to it.
•The wireless network name (SSID) should be a
combination of English letters and numbers.
(Do not use special characters.)
•Smartphone user interface (UI) may vary
depending on the mobile operating system
(OS) and the manufacturer.
•If the security protocol of the router is set to
WEP, you may fail to set up the network.
Please change it to other security protocols
(WPA2 is recommended) and register the
product again.
29

EN
Installing LG SmartThinQ
Search for the LG SmartThinQ application from
the Google Play Store or Apple App Store on a
smart phone. Follow instructions to download
and install the application.
Wi-Fi Function
•For appliances with the or logo
Communicate with the appliance from a smart
phone using the convenient smart features.
Firmware Update
Keep the appliance performance updated.
Smart Diagnosis™
If you use the Smart Diagnosis function, you will
be provided with the useful information such as
a correct way of using the appliance based on
the pattern of use.
Settings
Allows you to set various options on the
refrigerator and in the application.
NOTE
•If you change your wireless router, Internet
service provider, or password, delete the
registered appliance from the LG SmartThinQ
application and register it again.
•The application is subject to change for
appliance improvement purposes without
notice to users.
•Functions may vary by model.
Connecting to Wi-Fi
The Wi-Fi button, when used with the LG
SmartThinQ application, allows the refrigerator
to connect to a home Wi-Fi network. The Wi-Fi
icon shows the status of the refrigerator’s
network connection. The icon illuminates when
the refrigerator is connected to the Wi-Fi
network.
Initial Appliance Registration
Run the LG SmartThinQ application and follow
the instructions in the application to register the
appliance.
Re-registering the Appliance or
Registering Another User
Press and hold the Wi-Fi button for 3 seconds to
temporarily turn it off. Run the LG SmartThinQ
application and follow the instructions in the
application to register the appliance.
Open Source Software Notice
Information
To obtain the source code under GPL, LGPL,
MPL, and other open source licenses, that is
contained in this product, please visit
http://opensource.lge.com.
In addition to the source code, all referred
license terms, warranty disclaimers and
copyright notices are available for download.
LG Electronics will also provide open source
code to you on CD-ROM for a charge covering
the cost of performing such distribution (such as
the cost of media, shipping, and handling) upon
email request to opensource@lge.com.
This offer is valid for a period of three years after
our last shipment of this product. This offer is
valid to anyone in receipt of this information.
Smart Diagnosis™ Using a Smart
Phone
•For appliances with the or logo
Use this function if you need an accurate
diagnosis by an LG Electronics customer
information centre when the appliance
malfunctions or fails.
Smart Diagnosis™ can not be activated unless
the appliance is connected to power. If the
appliance is unable to turn on, then
troubleshooting must be done without using
Smart Diagnosis™.
30

EN
Using Smart Diagnosis™
Smart Diagnosis™ Through the
Customer Information Centre
Use this function if you need an accurate
diagnosis by an LG Electronics customer
information center when the appliance
malfunctions or fails. Use this function only to
contact the service representative, not during
normal operation.
Press the Lock button to activate the lock
1
function.
•If the lock function has been activated
already, press the Lock button to
deactivate the lock function, and then
press the Lock button again to activate the
lock function.
•Please note that the Smart Diagnosis
function will not operate until ve minutes
has passed since the lock function was
activated.
Open the top door and then hold the phone
2
on the upper right speaker hole.
•Position the phone so that its microphone
is aligned with the speaker hole.
NOTE
•Position the phone so that its microphone is
aligned with the speaker hole.
•The Smart Diagnosis™ sound is generated
after around three seconds.
•Do not take the phone off the speaker hole
while the data is transmitted.
•Hold the phone to the upper right speaker hole
and wait while the data is transmitted.
•The data transfer sound may be harsh to the
ear while the Smart Diagnosis™ data is being
transmitted, but do not take the phone off the
speaker hole for accurate diagnosis until the
data transfer sound has stopped.
•When the data transfer is complete, the
transfer completion message is displayed and
the control panel is automatically turned off and
then on again after a few seconds. After the
customer information centre explains the
diagnosis result.
•The Smart Diagnosis™ function depends on
the local call quality.
•The communication performance will improve
and you can transmit a better signal if you use
a land line home phone.
•If the Smart Diagnosis™ data transfer is poor
due to poor call quality, you may not receive
the best Smart Diagnosis™ service.
Press and hold the Bottom button for three
3
seconds or longer while continuing to hold
your phone to the speaker.
After the data transfer is complete, the
4
service agent will explain the result of the
Smart Diagnosis™.
31

EN
MAINTENANCE
Cleaning
•Both the refrigerator and freezer sections
defrost automatically; however, clean both
sections about once a month to prevent odors.
•Wipe up spills immediately.
•Always unplug the refrigeration before
cleaning.
General Cleaning Tips
•Unplug refrigerator or disconnect power.
•Remove all removable parts, such as shelves,
crispers, etc.
•Use a clean sponge or soft cloth and a mild
detergent in only warm water. Do not use
abrasive or harsh cleaners.
•Hand wash, rinse and dry all surfaces
thoroughly.
Exterior
Waxing external painted metal surfaces helps
provide rust protection. Do not wax plastic parts.
Wax painted metal surfaces at least twice a year
using appliance wax (or auto paste wax). Apply
wax with a clean, soft cloth.
For products with a stainless steel exterior, use a
clean sponge or soft cloth and a mild detergent
in warm water. Do not use abrasive or harsh
cleaners. Dry thoroughly with a soft cloth.
CAUTION
•Do not use a rough cloth or sponge when
cleaning the interior and exterior of the
refrigerator.
•Do not place your hand on the bottom surface
of the refrigerator when opening and closing.
WARNING
Use non-flammable cleaner. Failure to do so can
result in fire, explosion, or death. Always remove
power cord from the wall outlet prior to cleaning
in the vicinity of electrical parts (lamps, switches,
covers, controls, etc.).
Wipe up excess moisture with a sponge or cloth
to prevent water or Liquid from getting into any
electrical part and causing an electric shock.
Never use metallic scouring pads, brushes,
coarse abrasive cleaners, Strong alkaline
solutions, industrial detergent (bleach containing
detergent) Flammable or toxic cleaning liquids
on any surface. Do not use Hot water to clean
the interior or any interior parts of the unit when
they are cold.
32

EN
Inside Walls (allow freezer to warm
up so the cloth will not stick)
To help remove odors, you can wash the inside
of the refrigerator with a mixture of baking soda
and warm water. Mix 2 tablespoons of baking
soda to 1 litre of warm water. Be sure the baking
soda is completely dissolved so it does not
scratch the surfaces of the refrigerator.
Door Liners and Gaskets
Use a clean sponge or soft cloth and a mild
detergent in warm water. Do not use cleaning
waxes, concentrated detergents, bleaches, or
cleaners containing petroleum on plastic
refrigerator parts.
Plastic Parts (covers and panels)
Use a clean sponge or soft cloth and a mild
detergent in warm water. Do not use window
sprays, abrasive cleansers, or flammable fluids.
These can scratch or damage the material.
Condenser Coil Cover
Use a vacuum cleaner with an attachment to
clean the condenser cover and vents located at
the rear of the appliance. Do not remove the
panel covering the condenser coil area. Always
disconnect the main power before cleaning.
33
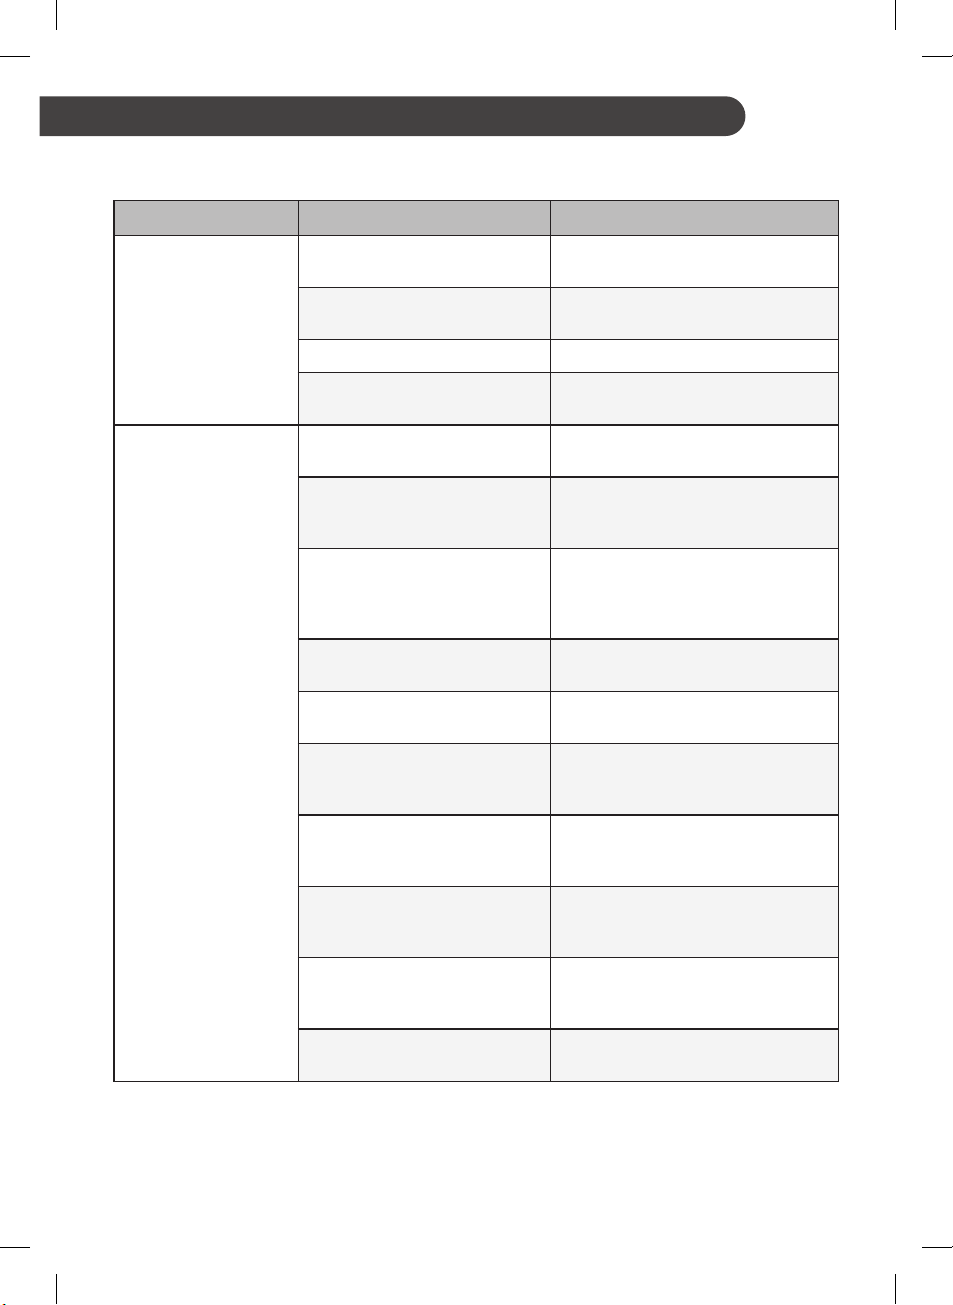
EN
TROUBLESHOOTING
Review the Troubleshooting section before calling for service; doing so will save you both time and
money.
Problem Possible Causes Solutions
There is no
refrigeration or
freezing.
There is poor
refrigeration or
freezing.
Is there a power interruption? •Check the power of other
If the power plug unplugged
from the outlet?
Is the power supply 220 V? •If it is 110 V, then use a transformer.
If you are using a transformer,
is the power lamp off?
Is the storage temperature set
to ‘L’?
Is the fridge or freezer
temperature set to its warmest
setting?
Is the appliance in direct
sunlight, or is it near a heat
generating object such as
cooking oven or heater?
Did you store hot food without
cooling it first?
Did you put in too much food? •Maintain an appropriate space
Are the appliance doors
completely closed?
Is there enough space around
the appliance?
Did you install the product
where the ambient temperature
is between 5°C and 43°C?
Is the control panel set to
vegetable/fruit or Grain?
Is the middle or bottom shelf
incorrectly assembled?
appliances.
•Plug the power plug in the outlet
properly.
•Turn on the power lamp for the
transformer.
•Set it to ‘M’.
•Set the fridge or freezer temperature
to ‘M’.
•Check the installation area and
reinstall it away from heat generating
objects.
•Cool the hot food rst before putting
it inside the fridge or freezer.
between food.
•Completely close the door and make
sure that stored food is not
obstructing in the door.
•Adjust the installation position to
make enough space around the
appliance.
•Install the product where the ambient
temperature is between 5°C and
43°C.
•In the Control panel, select the
proper function for the type of foods
stored.
•Assemble the middle or bottom shelf
correctly.
34

Problem Possible Causes Solutions
Refrigerated foods
are frozen.
The appliance
contains a bad smell.
The inside lamp in the
appliance does not
turn on.
The appliance door is
not closed tightly.
Is the storage temperature set
to ‘H’?
Did you put moist and easytofreeze foods near the cold
air exit?
Did you put moist and easytofreeze foods on the upper
shelf of the refrigeration
compartment?
Is the control panel set to
Meat/Fish, Kimchi or Long
term?
Did you put foods in the
container provided?
Is the storage temperature set
to ‘L’?
Did you put in food with a
strong smell?
Is the Kimchi container cover
open?
Does the inside lamp in the
appliance turn off?
Is the appliance leaning
forward?
Were the shelves properly
assembled?
Did you close the door with
excessive force?
Are the foods stored on the
shelf touching the ceiling of
the product?
•Set it to ‘M’ or lower.
•Put them on the outer edge of the
shelf.
•Put them on the bottom shelf.
•In the Control panel, select the
proper function for the type of foods
stored.
•Put foods in the container provided.
•Set it to ‘M’.
•Store foods with strong smells in
sealed containers.
•Completely close the Kimchi
container cover.
•It is hard for customers to replace
the inside lamp in the appliance as
they are not serviceable. If the inside
lamp does not turn on, please
contact the LG Electronics customer
information center.
•Adjust the front feet to raise the front
side slightly.
•Ret the shelves if needed.
•If you apply too much force or speed
when closing the door, it may remain
briey open before closing. Make
sure that you do not slam the door
closed. Close without force.
•Do not let the foods touch the
ceiling.
35EN35

Problem Possible Causes Solutions
It is difficult to open
the appliance door.
There is condensation
inside the appliance
or on the bottom of
the vegetable drawer
cover.
Frost is formed in the
compartment set to
Freeze.
Frost or condensation
has formed inside or
outside the appliance.
Did you open the door right
after you closed it?
Did you store hot food without
cooling it first?
Did you leave the appliance
door open?
Do you open and close the
appliance door frequently?
Did you put warm or moist
food inside without sealing it
in a container?
Doors may not be closed
properly?
Did you store hot food without
cooling it first?
Is the air entry or exit of the
freezer blocked?
Is the freezer overfilled? •Maintain an appropriate space
Did you open and close the
appliance door frequently or is
the appliance door improperly
closed?
Is the installation environment
humid?
•If you try to open the appliance door
within 1 minute after you closed it,
you may have difculties because of
the pressure inside the appliance.
Try to open the appliance door again
in a few minutes so that the internal
pressure stabilizes.
•Cool the hot food rst before putting
it inside the fridge or freezer.
•Although the condensation will
disappear soon after you close the
appliance door, you can wipe it with
a dry cloth.
•Condensation can form due to the
temperature difference from the
outside. Wipe out the dampness
with a dry cloth.
•Store food in a covered or sealed
container.
•Check if the food item inside the
appliance is blocking the door and
make sure that the door is tightly
closed.
•Cool the hot food rst before putting
it inside the fridge or freezer.
•Make sure that air entry or exit is not
blocked so that the air can circulate
inside.
between items.
•Frosts or condensation can form if
the outside air penetrates inside the
appliance.
•Condensation can appear on the
exterior of the appliance if the
installation area is too humid or on a
humid day such as a rainy day. Wipe
off any moisture with a dry cloth.
36EN36

Problem Possible Causes Solutions
The appliance is
noisy and generates
abnormal sounds.
The side or front of
the appliance is
warm.
The bottom side of
the product is warm
or there is warm air
coming from the
back.
The internal wall of
the product is warm.
Clicking noises The defrost control will click
Is the appliance installed on a
weak floor or improperly
leveled?
Does the rear of the appliance
touch the wall?
Are objects scattered behind
the appliance?
Is there an object on top of the
appliance?
There are anti condensation
pipes fitted to these areas of
the appliance to reduce
condensation forming from
around the door area.
Did you install the product not
too long ago?
Did you touch it when the
product is operating?
when the automatic defrost
cycle begins and ends. The
thermostat control (or
appliance control on some
models) will also click when
cycling on and off.
•Install the appliance on a solid and
at area.
•Adjust the installation position to
allow enough clearance around the
appliance.
•Remove the scattered objects from
behind the appliance.
•Remove the object on top of the
appliance.
•The heat releasing pipe to prevent
condensation is installed on the front
and side of the appliance. You may
feel it particularly hot right after the
appliance is installed or during the
summer. You can be assured that
this is not a problem and is quite
normal.
•Right after installation, the
compressor will operate very hard to
cool it down quickly. So, you can
expect warmth or warm air at the
bottom right.
After cooling down, the warm air will
be gone. So do not worry.
•To maintain the optimal temperature,
the cold air and the hot air will take
turns to control the temperatures,
causing the inner wall to be warm. It
is not a malfunction, so keep using
the product as usual.
•Normal Operation
37EN37

Problem Possible Causes Solutions
Rattling nosies Rattling noises may come
Whooshing nosies Evaporator fan motor is
Gurgling nosies Refrigerant flowing through
Popping nosies Contraction and expansion of
Vibrating If the side or back of the
Kimchi gets sour too
quickly.
from the flow of refrigerant,
the water line on the back of
the unit (for plumbed models
only), or items stored on top of
or around the appliance.
Appliance is not resting evenly
on the floor.
Appliance with linear
compressor was moved while
operating.
circulating air through the
fridge and freezer
compartments.
Air is being forced over the
condenser by the condenser
fan.
the cooling system
the inside walls due to
changes in temperature.
appliance is touching a cabinet
or wall, some of the normal
vibrations may make an
audible sound.
Is the control panel set to
Fer. Com”, “Kimchi+” or
“
“Fridge”?
Is the control panel set to
Fresh Kimchi (MIN)?
Is the door or shelf closed
properly?
•Normal Operation
•Floor is weak or uneven or leveling
legs need to be adjusted. See the
door alignment section.
•Normal operation. If the compressor
does not stop rattling after 3
minutes, turn the power to the
appliance off and then on again.
•Normal Operation
•Normal Operation
•Normal Operation
•Normal Operation
•To eliminate the noise, make sure
that the sides and back do not make
any contact with any wall or cabinet.
•In the control panel, select the
proper function for the type of foods
stored.
•Set it to Fresh Kimchi (MID) or
higher.
Please note that if you select Fresh
Kimchi (MAX), Kimchi may get
frozen.
•Close the door or shelf properly.
38EN38

Problem Possible Causes Solutions
There are white
fungus on the surface
of Kimchi.
The power is off for
some compartments.
Kimchi is soggy and
less chewy.
Your home appliance
and smartphone is
not connected to the
Wi-Fi network.
Is the Kimchi container cover
open?
Is the control panel set to “Top
Off” or “Mid/Bot. Off”?
Did you add an adequate
amount of salt or seafood
seasoning when you made
Kimchi?
The password for the Wi-Fi
that you are trying to connect
to is incorrect.
Mobile data for your
smartphone is turned on.
The wireless network name
(SSID) is set incorrectly.
The router frequency is not 2.4
GHz.
The distance between the
appliance and the router is too
far.
•Close the cover completely. If the
cover does not close completely, the
Kimchi may contact with air to
generate oxidation yeasts (white
fungus).
Cover up the surface of Kimchi with
wraps or hygienic vinyl to store it for
a longer time.
•Change to other settings.
•If you add too little salt then it will
look good but the enzyme contained
in the Kimchi will make it less chewy
and soggy.
Also, seafood seasoning can affect
Kimchi in terms of ripening it quickly
or making it soggy.
•Find the Wi-Fi network connected to
your smartphone and remove it,
then register your appliance on LG
SmartThinQ.
•Turn off the Mobile data of your
smartphone and register the
appliance using the Wi-Fi network.
•The wireless network name (SSID)
should be a combination of English
letters and numbers. (Do not use
special characters.)
•Only a 2.4 GHz router frequency is
supported. Set the wireless router to
2.4 GHz and connect the appliance
to the wireless router. To check the
router frequency, check with your
Internet service provider or the
router manufacturer.
•If the distance between the
appliance and the router is too far,
the signal may be weak and the
connection may not be congured
correctly. Move the location of the
router so that it is closer to the
appliance.
39EN39

128, Yeoui-daero, Yeongdeungpo-gu,
Seoul, 150-721 Korea
Printed in Korea
 Loading...