


ﯽﺴﻴﻠﮕﻧﺍ
E N G L I S H
ﺮﺑﺭﺎﮐ یﺎﻤﻨﻫﺍﺭ GM360
E N G L I S H
ﯽﺴﻴﻠﮕﻧﺍ
ﺮﺑﺭﺎﮐ یﺎﻤﻨﻫﺍﺭ
GM360
www.lg.com www.lg.com
P/N : MMBB0383437 (1.0)
WR
USER GUIDE
GM360
P/N : MMBB0383437 (1.0)
WR

ﺙﻮﺗﻮﻠﺑ QD ID B016467
GM360
ﺖﺳﺍ ﻦﮑﻤﻣ ﺎﻤﻨﻫﺍﺭ ﻪﭼﺮﺘﻓﺩ ﻦﻳﺍ ﺕﺎﻳﻮﺘﺤﻣ ﺯﺍ ﯽﺧﺮﺑ
ﻦﻳﺍ ﺎﺑ ،ﺎﻤﺷ ﯽﺗﺍﺮﺑﺎﺨﻣ ﻪﮑﺒﺷ ﺎﻳ ﻦﻔﻠﺗ ﺭﺍﺰﻓﺍ ﻡﺮﻧ ﻪﺑ ﻪﺘﺴﺑ
.ﺪﺷﺎﺑ ﺕﻭﺎﻔﺘﻣ ﻦﻔﻠﺗ
ﺮﺑﺭﺎﮐ یﺎﻤﻨﻫﺍﺭ
GM360

GM360 ﻢﺠﺣ ﻢﮐ ﻭ ﻪﺘﻓﺮﺸﻴﭘ ﯽﺷﻮﮔ ﺪﻳﺮﺧ ﻭ ﺏﺎﺨﺘﻧﺍ ﻦﺴﺣ
ﻦﻳﺮﺗﺪﻳﺪﺟ ﺯﺍ ﯽﺷﻮﮔ ﻦﻳﺍ .ﻢﻴﻳﻮﮔ ﯽﻣ ﮏﻳﺮﺒﺗ ﺎﻤﺷ ﻪﺑ ﺍﺭ
یﺭﻭﺁ ﻦﻓ ﻦﻳﺮﺧﺁ ﺎﺑ ﻖﺑﺎﻄﻣ ﻪﮐ ﺖﺳﺍ LG ﺖﮐﺮﺷ ﺕﻻﻮﺼﺤﻣ
.ﺖﺳﺍ ﻩﺪﺷ ﯽﺣﺍﺮﻃ ﻝﺎﺘﻴﺠﻳﺩ ﺭﺎﻴﺳ ﺕﺎﻃﺎﺒﺗﺭﺍ

21.........................................ﻦﻴﺒﻃﺎﺨﻣ
21...............................ﺐﻃﺎﺨﻣ یﻮﺠﺘﺴﺟ
21...........................ﺪﻳﺪﺟ ﺐﻃﺎﺨﻣ ﻥﺩﻭﺰﻓﺍ
22................................. ﻩﻭﺮﮔ ﮏﻳ ﺩﺎﺠﻳﺍ
22.........................ﺐﻃﺎﺨﻣ ﺕﺎﻤﻴﻈﻨﺗ ﺮﻴﻴﻐﺗ
23................................ﺕﺎﻋﻼﻃﺍ ﻩﺪﻫﺎﺸﻣ
24...................................... ﯽﻧﺎﺳﺭ ﻡﺎﻴﭘ
24.......................................ﯽﻧﺎﺳﺭ ﻡﺎﻴﭘ
24.......................................ﻡﺎﻴﭘ ﻝﺎﺳﺭﺍ
24................................. ﻦﺘﻣ ﻥﺩﺮﮐ ﺩﺭﺍﻭ
24........................................T9 ﺖﻟﺎﺣ
24..............................ﻂﺧ ﺖﺳﺩ ﺺﻴﺨﺸﺗ
25...................................... ﻞﻴﻤﻳﺍ ﻢﻴﻈﻨﺗ
25................................ ﺎﻫ ﻞﻴﻤﻳﺍ ﯽﺑﺎﻳﺯﺎﺑ
25...... ﺪﻳﺪﺟ کﺍﺮﺘﺷﺍ ﺯﺍ ﻩﺩﺎﻔﺘﺳﺍ ﺎﺑ ﻞﻴﻤﻳﺍ ﻝﺎﺳﺭﺍ
25............................ﻞﻴﻤﻳﺍ ﺕﺎﻤﻴﻈﻨﺗ ﺮﻴﻴﻐﺗ
26...................................ﻡﺎﻴﭘ یﺎﻫ ﻪﺷﻮﭘ
26....................... ﯽﻨﺘﻣ ﻡﺎﻴﭘ ﺕﺎﻤﻴﻈﻨﺗ ﺮﻴﻴﻐﺗ
27..............یﺍ ﻪﻧﺎﺳﺭﺪﻨﭼ ﻡﺎﻴﭘ ﺕﺎﻤﻴﻈﻨﺗ ﺮﻴﻴﻐﺗ
27............................ ﺕﺎﻤﻴﻈﻨﺗ ﺮﻳﺎﺳ ﺮﻴﻴﻐﺗ
28............... (SNS)ﯽﻋﺎﻤﺘﺟﺍ ﻪﮑﺒﺷ ﺕﺎﻣﺪﺧ
28................................... Facebook
29.................................... Linkbook
30.......................................... ﻦﻴﺑﺭﻭﺩ
30................................ ﺏﺎﻳﺎﻤﻧ ﺎﺑ ﯽﻳﺎﻨﺷﺁ
3
ﺐﻟﺎﻄﻣ ﺖﺳﺮﻬﻓ
6............................. ﻩﺍﺮﻤﻫ ﻦﻔﻠﺗ ﺎﺑ ﯽﻳﺎﻨﺷﺁ
7...........................................ﺯﺎﺑ یﺎﻤﻧ
8....................... یﺮﺗﺎﺑ ﻭ ﺕﺭﺎﮐ ﻢﻴﺳ ﺐﺼﻧ
9................................ﺪﻴﻨﮐ ژﺭﺎﺷ ﺍﺭ ﻦﻔﻠﺗ
10....................................ﻪﻈﻓﺎﺣ ﺕﺭﺎﮐ
11 ........................ﯽﺴﻤﻟ ﻪﺤﻔﺻ ﺯﺍ ﻩﺩﺎﻔﺘﺳﺍ
11 .................... ﯽﺴﻤﻟ ﻪﺤﻔﺻ ﻩﺭﺎﺑﺭﺩ ﯽﺗﺎﮑﻧ
11 .............................ﯽﺴﻤﻟ ﻪﺤﻔﺻ ﻝﺮﺘﻨﮐ
13.............................. ﻦﻔﻠﺗ ﯽﻠﺻﺍ ﻪﺤﻔﺻ
14...................................ﻊﻳﺮﺳ یﺎﻫﺪﻴﻠﮐ
15................................... ﺖﻴﻌﺿﻭ ﺭﺍﻮﻧ
16.......ﺖﻴﻌﺿﻭ ﺭﺍﻮﻧ ﻖﻳﺮﻃ ﺯﺍ ﺖﻴﻌﺿﻭ ﺮﻴﻴﻐﺗ
16........... ﻪﻧﺎﮔﺪﻨﭼ ﻒﻳﺎﻇﻭ ﺩﺮﮑﻠﻤﻋ ﺯﺍ ﻩﺩﺎﻔﺘﺳﺍ
17......................................... ﺎﻫ ﺱﺎﻤﺗ
17..................................ﺱﺎﻤﺗ یﺭﺍﺮﻗﺮﺑ
17.... ﻦﻔﻠﺗ ﻪﭼﺮﺘﻓﺩ ﺯﺍ ﻩﺩﺎﻔﺘﺳﺍ ﺎﺑ ﺱﺎﻤﺗ یﺭﺍﺮﻗﺮﺑ
17...................ﻥﺁ ﺩﺭ ﺎﻳ ﺱﺎﻤﺗ ﻪﺑ ﻥﺩﺍﺩ ﺦﺳﺎﭘ
18.......................... ﺱﺎﻤﺗ ﻦﻴﺣ یﺎﻫ ﻪﻨﻳﺰﮔ
19............................. ﻊﻳﺮﺳ یﺮﻴﮔ ﻩﺭﺎﻤﺷ
19.............................ﻡﻭﺩ ﺱﺎﻤﺗ یﺭﺍﺮﻗﺮﺑ
19.......................... ﺱﺎﻤﺗ ﺵﺭﺍﺰﮔ ﻩﺪﻫﺎﺸﻣ
20..........................ﺱﺎﻤﺗ ﻝﺎﻘﺘﻧﺍ ﺯﺍ ﻩﺩﺎﻔﺘﺳﺍ
20.....................ﺱﺎﻤﺗ ﺖﻳﺩﻭﺪﺤﻣ ﺯﺍ ﻩﺩﺎﻔﺘﺳﺍ
20..................ﺱﺎﻤﺗ کﺮﺘﺸﻣ ﺕﺎﻤﻴﻈﻨﺗ ﺮﻴﻴﻐﺗ

41..........................یﺮﻳﻮﺼﺗ ﭗﻴﻠﮐ ﻝﺎﺳﺭﺍ
41........................... ﺎﻫ ﻪﻣﺎﻧﺮﺑ ﻭ ﺎﻫ یﺯﺎﺑ
41................................ یﺯﺎﺑ ﻥﺩﺍﺩ ﻡﺎﺠﻧﺍ
41............................................ ﺩﺎﻨﺳﺍ
41............................ ﯽﺷﻮﮔ ﻪﺑ ﻞﻳﺎﻓ ﻝﺎﻘﺘﻧﺍ
41..................................... ﺮﮕﻳﺩ ﺩﺭﺍﻮﻣ
42..........................................ﯽﻘﻴﺳﻮﻣ
42........................ﯽﺷﻮﮔ ﻪﺑ ﯽﻘﻴﺳﻮﻣ ﻝﺎﻘﺘﻧﺍ
42..................................... ﮓﻨﻫﺁ ﺶﺨﭘ
43.............................ﺶﺨﭘ ﺖﺳﺮﻬﻓ
43...................................... FM ﻮﻳﺩﺍﺭ
43........................... ﺎﻫ ﻩﺎﮕﺘﺴﻳﺍ یﻮﺠﺘﺴﺟ
43...............................ﺎﻫ ﻝﺎﻧﺎﮐ ﯽﻧﺎﺸﻧﺯﺎﺑ
ﺩﺎﺠﻳﺍ
44...................................ﻩﺪﻨﻫﺩ ﻥﺎﻣﺯﺎﺳ
44................... ﻢﻳﻮﻘﺗ ﻪﺑ ﺩﺍﺪﻳﻭﺭ ﮏﻳ ﻥﺩﻭﺰﻓﺍ
44............... ﻒﻳﺎﻇﻭ ﺖﺴﻴﻟ ﻪﺑ ﺩﺭﻮﻣ ﻥﺩﻭﺰﻓﺍ
44........................... ﺏﺎﻳ ﺦﻳﺭﺎﺗ ﺯﺍ ﻩﺩﺎﻔﺘﺳﺍ
45................................ ﺖﺷﺍﺩﺩﺎﻳ ﻥﺩﻭﺰﻓﺍ
45..............................ﺭﺍﺪﺸﻫ ﮓﻧﺯ ﻢﻴﻈﻨﺗ
45..ﯽﺷﺎﻘﻧ یﻮﻠﺑﺎﺗ ﺯﺍ ﻩﺩﺎﻔﺘﺳﺍ ﺎﺑ ﺖﺷﺍﺩﺩﺎﻳ ﻥﺩﻭﺰﻓﺍ
46................................ ﻪﺤﻔﺻ ﺯﺍ ﺲﮑﻋ
46.....................................ﺕﻮﺻ ﻂﺒﺿ
46...................... ﺕﻮﺻ ﺎﻳ ﺍﺪﺻ ﮏﻳ ﻂﺒﺿ
46 .......................ﺏﺎﺴﺣ ﻦﻴﺷﺎﻣ ﺯﺍ ﻩﺩﺎﻔﺘﺳﺍ
47 ......................................ﺪﺣﺍﻭ ﻞﻳﺪﺒﺗ
47............ﯽﻧﺎﻬﺟ ﺖﻋﺎﺳ ﻪﺑ ﺮﻬﺷ ﮏﻳ ﻥﺩﻭﺰﻓﺍ
ﺐﻟﺎﻄﻣ ﺖﺳﺮﻬﻓ
31.............................یﺭﻮﻓ ﺲﮑﻋ ﻦﺘﻓﺮﮔ
31............................ ﺲﮑﻋ ﻦﺘﻓﺮﮔ ﺯﺍ ﺪﻌﺑ
32....................ﻪﺘﻓﺮﺸﻴﭘ ﺕﺎﻤﻴﻈﻨﺗ ﺯﺍ ﻩﺩﺎﻔﺘﺳﺍ
33.............................یﺭﺍﺩﺮﺒﻤﻠﻴﻓ ﻦﻴﺑﺭﻭﺩ
33................................ ﺏﺎﻳﺎﻤﻧ ﺎﺑ ﯽﻳﺎﻨﺷﺁ
34...............................یﺭﻮﻓ یﺭﺍﺩﺮﺒﻤﻠﻴﻓ
34.............................. یﺭﺍﺩﺮﺒﻤﻠﻴﻓ ﺯﺍ ﺪﻌﺑ
35....................ﻪﺘﻓﺮﺸﻴﭘ ﺕﺎﻤﻴﻈﻨﺗ ﺯﺍ ﻩﺩﺎﻔﺘﺳﺍ
36...................... ﺎﻤﺷ یﺎﻫ ﻢﻠﻴﻓ ﻭ ﺎﻫ ﺲﮑﻋ
36.....................ﺎﻫ ﻢﻠﻴﻓ ﻭ ﺎﻫ ﺲﮑﻋ ﻩﺪﻫﺎﺸﻣ
36.......................ﻢﻠﻴﻓ ﮏﻳ ﺯﺍ ﺲﮑﻋ ﻦﺘﻓﺮﮔ
36...ﺪﻳﻼﺳﺍ ﺶﻳﺎﻤﻧ ﺕﺭﻮﺻ ﻪﺑ ﺎﻫ ﺲﮑﻋ ﻩﺪﻫﺎﺸﻣ
37..
ﯽﻠﺻﺍ ﻪﺤﻔﺻ ﺮﻳﻮﺼﺗ ﺕﺭﻮﺻ ﻪﺑ ﺲﮑﻋ ﻢﻴﻈﻨﺗ
37...............................ﺎﻫ ﺲﮑﻋ ﺶﻳﺍﺮﻳﻭ
38..........................ﺲﮑﻋ ﻪﺑ ﻩﻮﻠﺟ ﻥﺩﻭﺰﻓﺍ
39...................................یﺍ ﻪﻧﺎﺳﺭ ﺪﻨﭼ
39.........................................ﺎﻫ ﺲﮑﻋ
39.................................... ﺲﮑﻋ ﻝﺎﺳﺭﺍ
39...............................ﺮﻳﻮﺼﺗ ﺯﺍ ﻩﺩﺎﻔﺘﺳﺍ
39.................................... ﺮﻳﻮﺼﺗ پﺎﭼ
40..................ﻞﻳﺎﻓ ﻥﺩﺮﮐ ﯽﭙﮐ ﺎﻳ ﻥﺩﺍﺩ ﻝﺎﻘﺘﻧﺍ
40........................................... ﺎﻫﺍﺪﺻ
40..................................ﺍﺪﺻ ﺯﺍ ﻩﺩﺎﻔﺘﺳﺍ
40............................................ﺎﻫ ﻢﻠﻴﻓ
40......................................ﻢﻠﻴﻓ یﺎﺷﺎﻤﺗ
ﺮﺑﺭﺎﮐ یﺎﻤﻨﻫﺍﺭ | LG GM360
4

54.......................... ﻝﺎﺼﺗﺍ ﺕﺎﻤﻴﻈﻨﺗ ﺮﻴﻴﻐﺗ
55...ﺙﻮﺗﻮﻠﺑ ﻖﻳﺮﻃ ﺯﺍ ﺎﻫ ﻞﻳﺎﻓ ﺖﻓﺎﻳﺭﺩ ﻭ ﻝﺎﺳﺭﺍ
56......................... ﺙﻮﺗﻮﻠﺑ ﺕﺎﻤﻴﻈﻨﺗ ﺮﻴﻴﻐﺗ
56................ ﺮﮕﻳﺩ ﺙﻮﺗﻮﻠﺑ ﻩﺎﮕﺘﺳﺩ ﺎﺑ ﻝﺎﺼﺗﺍ
57...................... ﺙﻮﺗﻮﻠﺑ ﺖﺳﺪﻫ ﺯﺍ ﻩﺩﺎﻔﺘﺳﺍ
57................................ﺭﺍﺰﻓﺍ ﻡﺮﻧ یﺎﻘﺗﺭﺍ
58.....................................ﯽﺒﻧﺎﺟ ﻡﺯﺍﻮﻟ
59................................... ﯽﻨﻓ ﺕﺎﻋﻼﻃﺍ
60..........
ﺮﺛﻮﻣ ﻭ ﻦﻤﻳﺍ ﻩﺩﺎﻔﺘﺳﺍ یﺎﻫ ﻞﻤﻌﻟﺍﺭﻮﺘﺳﺩ
5
47.......................... ﺞﻨﺳ ﻥﺎﻣﺯ ﺯﺍ ﻩﺩﺎﻔﺘﺳﺍ
48............................ ﻪﻧﺎﻳﺍﺭ یﺯﺎﺳ ﻡﺎﮕﻤﻫ
48............ﻪﻧﺎﻳﺍﺭ ﺭﺩ LG PC Suite ﺐﺼﻧ
48................ﯽﺼﺨﺷ ﻪﻧﺎﻳﺍﺭ ﻭ ﯽﺷﻮﮔ ﻝﺎﺼﺗﺍ
48...... ﯽﺷﻮﮔ ﺕﺎﻋﻼﻃﺍ ﯽﺑﺎﻳﺯﺎﺑ ﻭ ﻥﺎﺒﻴﺘﺸﭘ ﻪﻴﻬﺗ
48.. ﯽﺼﺨﺷ ﻪﻧﺎﻳﺍﺭ ﺭﺩ ﯽﺷﻮﮔ یﺎﻫ ﻞﻳﺎﻓ ﻩﺪﻫﺎﺸﻣ
49......................... ﻦﻴﺒﻃﺎﺨﻣ یﺯﺎﺳ ﻡﺎﮕﻤﻫ
49 ...........................ﺎﻫ ﻡﺎﻴﭘ یﺯﺎﺳ ﻡﺎﮕﻤﻫ
یﺯﺎﺳ ﻡﺎﮕﻤﻫ ﻩﺎﮕﺘﺳﺩ ﻥﺍﻮﻨﻋ ﻪﺑ ﻦﻔﻠﺗ ﺯﺍ ﻩﺩﺎﻔﺘﺳﺍ
49......................................... ﯽﻘﻴﺳﻮﻣ
50.............................................. ﺏﻭ
50.............................. ﻪﮑﺒﺷ ﻪﺑ ﯽﺳﺮﺘﺳﺩ
50........... ﺎﻫ ﺏﺎﻳ ﻞﺤﻣ ﻪﺑ ﯽﺳﺮﺘﺳﺩ ﻭ ﻥﺩﻭﺰﻓﺍ
50........................ ﻥﺍﻮﺧ RSS ﺯﺍ ﻩﺩﺎﻔﺘﺳﺍ
51 ...................................ﻪﺤﻔﺻ ﻩﺮﻴﺧﺫ
51................ ﻩﺪﺷ ﻩﺮﻴﺧﺫ ﻪﺤﻔﺻ ﻪﺑ ﯽﺳﺮﺘﺳﺩ
51......................ﺮﮔﺭﻭﺮﻣ ﻪﭽﺨﻳﺭﺎﺗ ﻩﺪﻫﺎﺸﻣ
51...................ﺏﻭ ﺮﮔﺭﻭﺮﻣ ﺕﺎﻤﻴﻈﻨﺗ ﺮﻴﻴﻐﺗ
51.............. ﻡﺩﻮﻣ ﻥﺍﻮﻨﻋ ﻪﺑ ﯽﺷﻮﮔ ﺯﺍ ﻩﺩﺎﻔﺘﺳﺍ
52......................... Google ﻪﺑ ﯽﺳﺮﺘﺳﺩ
53......................................... ﺕﺎﻤﻴﻈﻨﺗ
53...................... ﻪﺼﺨﺸﻣ یﺯﺎﺳ ﯽﺼﺨﺷ
53.......................... ﻪﺤﻔﺻ ﺕﺎﻤﻴﻈﻨﺗ ﺮﻴﻴﻐﺗ
53............................. ﻦﻔﻠﺗ ﺕﺎﻤﻴﻈﻨﺗ ﺮﻴﻴﻐﺗ
54......................... ﻪﻈﻓﺎﺣ ﺮﻳﺪﻣ ﺯﺍ ﻩﺩﺎﻔﺘﺳﺍ
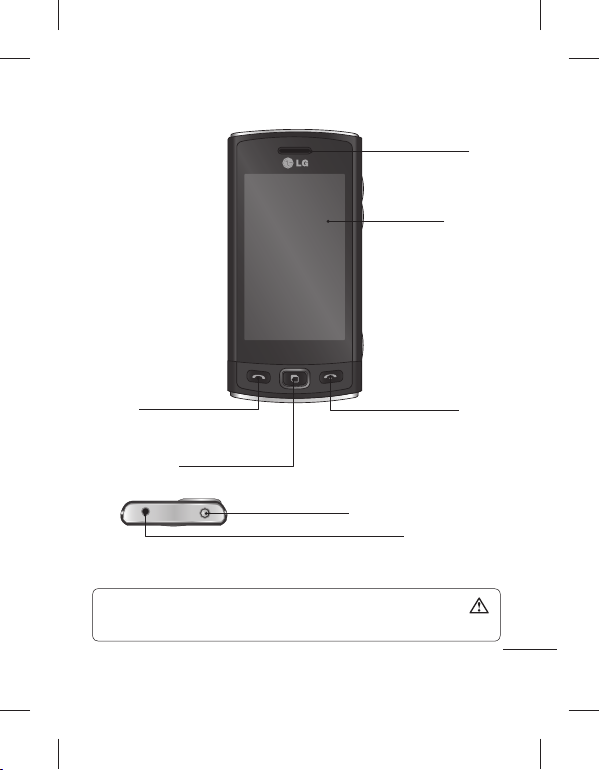
ﻩﺍﺮﻤﻫ ﻦﻔﻠﺗ ﺎﺑ ﯽﻳﺎﻨﺷﺁ
ﯽﺷﻮﮔ
ﯽﻠﺻﺍ ﻪﺤﻔﺻ
ﺱﺎﻤﺗ ﻪﺑ ﻭ ﺩﺮﻴﮔ ﯽﻣ ﺍﺭ ﻦﻔﻠﺗ ﻩﺭﺎﻤﺷ •
.ﺪﻫﺩ ﯽﻣ ﺦﺳﺎﭘ یﺩﻭﺭﻭ یﺎﻫ
ﻪﻧﺎﮔﺪﻨﭼ ﻒﻳﺎﻇﻭ ﺪﻴﻠﮐ
ﻮﻳﺮﺘﺳﺍ ﯽﺷﻮﮔ ﺎﻳ یﺮﻓﺯﺪﻨﻫ ﻝﺎﺼﺗﺍ ﻞﺤﻣ
ﻞﻔﻗ/ﻦﺷﻭﺭ/ﺵﻮﻣﺎﺧ ﺪﻴﻠﮐ
.ﺶﻳﺎﻤﻧ ﻪﺤﻔﺻ ﻥﺩﺮﮐ ﻞﻔﻗ یﺍﺮﺑ ﺮﺼﺘﺨﻣ ﺭﺎﺸﻓ •
.ﻦﻔﻠﺗ ﻥﺩﺮﮐ ﻦﺷﻭﺭ/ﺵﻮﻣﺎﺧ یﺍﺮﺑ ﯽﻧﻻﻮﻃ ﺭﺎﺸﻓ •
ﺖﺳﺍ ﺎﻤﺷ ﺐﻴﺟ ﺭﺩ ﻪﮐ ﯽﻟﺎﺣ ﺭﺩ ﻥﺁ یﻭﺭ ﻦﺘﺴﺸﻧ ﺎﻳ ﯽﺷﻮﮔ یﻭﺭ ﻦﻴﮕﻨﺳ ﻢﺴﺟ ﮏﻳ ﻥﺩﺍﺩ ﺭﺍﺮﻗ :ﺭﺍﺪﺸﻫ
.ﺩﻮﺷ ﻥﺁ ﯽﺴﻤﻟ ﻪﺤﻔﺻ ﺩﺮﮑﻠﻤﻋ ﻭ ﯽﺷﻮﮔ LCD ﻪﺤﻔﺻ ﻪﺑ ﺐﻴﺳﺁ ﺚﻋﺎﺑ ﺖﺳﺍ ﻦﮑﻤﻣ
ﺮﺑﺭﺎﮐ یﺎﻤﻨﻫﺍﺭ | LG GM360
ﻥﺎﻳﺎﭘ ﺪﻴﻠﮐﺱﺎﻤﺗ ﺪﻴﻠﮐ
6
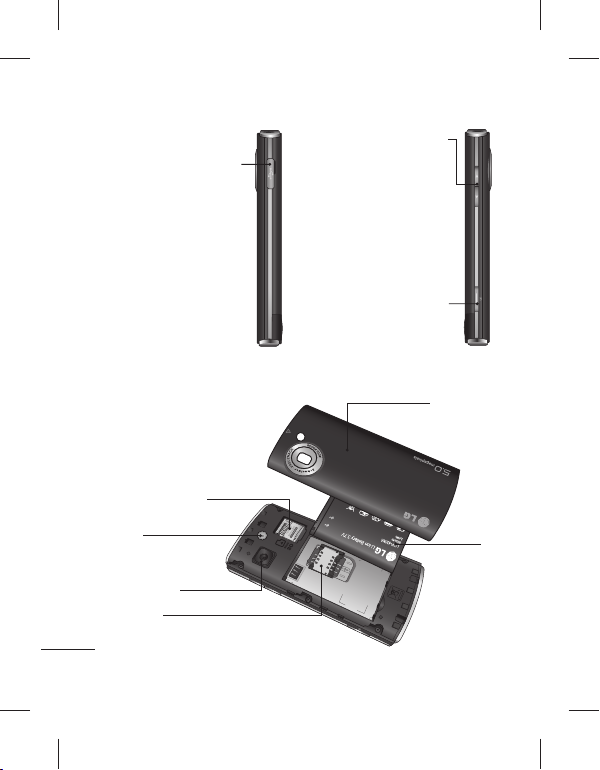
ﻞﺑﺎﮐ ،ﺭژﺭﺎﺷ
ﺯﺎﺑ یﺎﻤﻧ
ﯽﺒﻧﺎﺟ یﺎﻫﺪﻴﻠﮐ
ﺭﺩ ﺶﻳﺎﻤﻧ ﻪﺤﻔﺻ ﯽﺘﻗﻭ •
ﻥﺍﺰﻴﻣ :ﺖﺳﺍ ﯽﻠﺻﺍ ﻪﺤﻔﺻ
ﮓﻨﻫﺁ ﻭ ﮓﻧﺯ ﮓﻨﻫﺁ یﺍﺪﺻ
.ﺪﻴﻠﮐ ﻪﺤﻔﺻ
ﻥﺍﺰﻴﻣ ﻢﻴﻈﻨﺗ :ﺱﺎﻤﺗ ﻦﻴﺣ ﺭﺩ •
.ﯽﺷﻮﮔ یﺍﺪﺻ
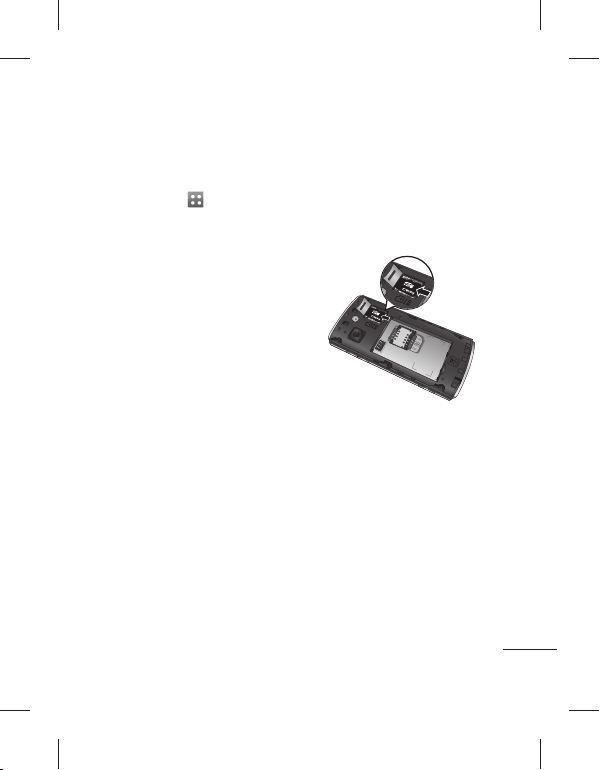
MicroSD ﺕﺭﺎﮐ ﻑﺎﮑﺷ
ﺵﻼﻓ ﺭﻮﻧ
ﻦﻴﺑﺭﻭﺩ ﯽﺟﺭﺎﺧ ﺰﻨﻟ
ﺕﺭﺎﮐ ﻢﻴﺳ ﻞﺤﻣ
7
،ﺪﻴﻠﮐ ﻦﺘﺷﺍﺪﻬﮕﻧ ﻭ ﻥﺩﺍﺩ ﺭﺎﺸﻓ ﺎﺑ •
.ﺪﻳﻭﺮﺑ ﻦﻴﺑﺭﻭﺩ یﻮﻨﻣ ﻪﺑ
ﻦﻴﺑﺭﻭﺩ ﺪﻴﻠﮐ
ً
ﺎﻤﻴﻘﺘﺴﻣ
یﺮﺗﺎﺑ ﻪﻈﻔﺤﻣ ﺏﺭﺩ
یﺮﺗﺎﺑ
ﻥﺩﺮﮐ ﺝﺭﺎﺧ یﺍﺮﺑ ﺩﻮﺧ ﻦﺧﺎﻧ ﺯﺍ :ﺭﺍﺪﺸﻫ
.ﺪﻴﻨﮑﻧ ﻩﺩﺎﻔﺘﺳﺍ یﺮﺗﺎﺑ
یﺮﺗﺎﺑ ﺖﺳﺍ ﻦﺷﻭﺭ ﯽﺷﻮﮔ ﯽﺘﻗﻭ :ﺭﺍﺪﺸﻫ
ﻦﻔﻠﺗ ﻪﺑ ﺐﻴﺳﺁ ﺚﻋﺎﺑ ﺭﺎﮐ ﻦﻳﺍ ،ﺪﻴﻨﮑﻧ ﺝﺭﺎﺧ ﺍﺭ
.ﺩﻮﺷ ﯽﻣ
ﺪﻴﻨﮐ ﺐﺼﻧ ﺍﺭ یﺮﺗﺎﺑ 3
ﯽﻳﻻﺎﺑ ﺖﻤﺴﻗ ﺭﺩ ﺍﺭ یﺮﺗﺎﺑ ﭗﭼ ﻪﺒﻟ ﺍﺪﺘﺑﺍ
.ﺪﻴﻨﮐ ﺩﺭﺍﻭ یﺮﺗﺎﺑ ﻪﻈﻔﺤﻣ
یﺎﻫ ﻪﻧﺎﻳﺎﭘ یﻭﺭ یﺮﺗﺎﺑ ﺱﺎﻤﺗ ﺢﻄﺳ ﺪﻴﻨﮐ ﺖﻗﺩ
ﺍﺭ یﺮﺗﺎﺑ ﺖﺳﺍﺭ ﺖﻤﺳ .ﺪﺷﺎﺑ ﻪﺘﻓﺮﮔ ﺭﺍﺮﻗ ﻦﻔﻠﺗ
.ﺪﺘﻔﻴﺑ ﺎﺟ ﮏﻴﻠﮐ یﺍﺪﺻ ﺎﺑ ﺎﺗ ﺪﻴﻫﺩ ﺭﺎﺸﻓ
یﺮﺗﺎﺑ ﻭ ﺕﺭﺎﮐ ﻢﻴﺳ ﺐﺼﻧ
ﺪﻳﺭﺍﺩﺮﺑ ﺍﺭ یﺮﺗﺎﺑ ﻪﻈﻔﺤﻣ ﺏﺭﺩ 1
ﻭ ﺪﻴﺸﮑﺑ ﻦﻔﻠﺗ ﻦﻴﻳﺎﭘ ﺖﻤﺳ ﻪﺑ ﺍﺭ یﺮﺗﺎﺑ ﺶﮐﻭﺭ
.ﺪﻳﺭﺍﺩﺮﺑ ﺍﺭ ﻥﺁ
ﺪﻴﻨﮐ ﺩﺭﺍﻭ ﺍﺭ ﺕﺭﺎﮐ ﻢﻴﺳ 2
ﺩﺭﺍﻭ ﺕﺭﺎﮐ ﻢﻴﺳ ﻩﺎﮕﻳﺎﺟ ﺭﺩ ﺍﺭ ﺕﺭﺎﮐ ﻢﻴﺳ
ﻭﺭ ﺕﺭﺎﮐ ﯽﻳﻼﻃ ﺱﺎﻤﺗ ﺢﻄﺳ ﺪﻴﻨﮐ ﺖﻗﺩ .ﺪﻴﻨﮐ
،ﺕﺭﺎﮐ ﻢﻴﺳ ﺐﺼﻧ ﺯﺍ ﻞﺒﻗ ﺎﻔﻄﻟ .ﺪﺷﺎﺑ ﻦﻴﻳﺎﭘ ﻪﺑ
ﻥﺩﺮﮐ ﺝﺭﺎﺧ یﺍﺮﺑ .ﺪﻴﻨﮐ ﺝﺭﺎﺧ ﺍﺭ یﺮﺗﺎﺑ
ﻥﻭﺮﻴﺑ ﻑﺮﻃ ﻪﺑ ﺍﺭ ﻥﺁ ﯽﻣﺍﺭﺁ ﻪﺑ ،ﺕﺭﺎﮐ ﻢﻴﺳ
.ﺪﻴﺸﮑﺑ
ﺮﺑﺭﺎﮐ یﺎﻤﻨﻫﺍﺭ | LG GM360
8
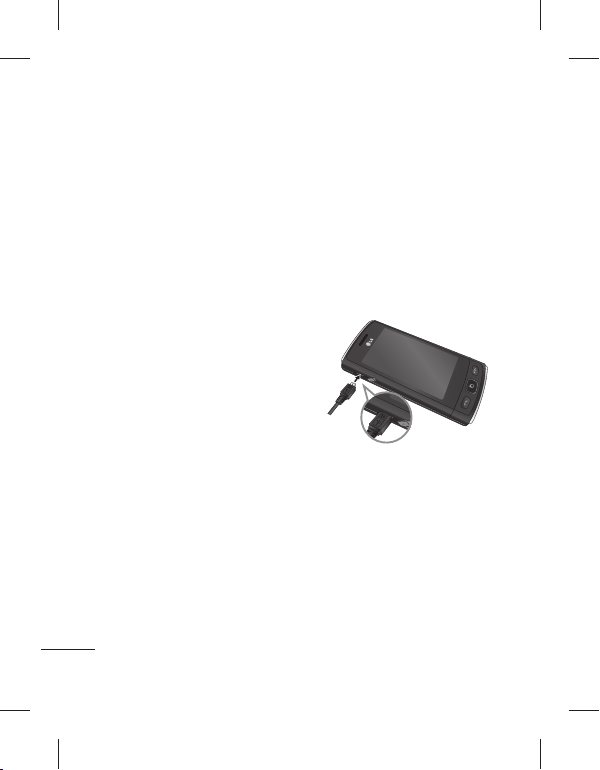
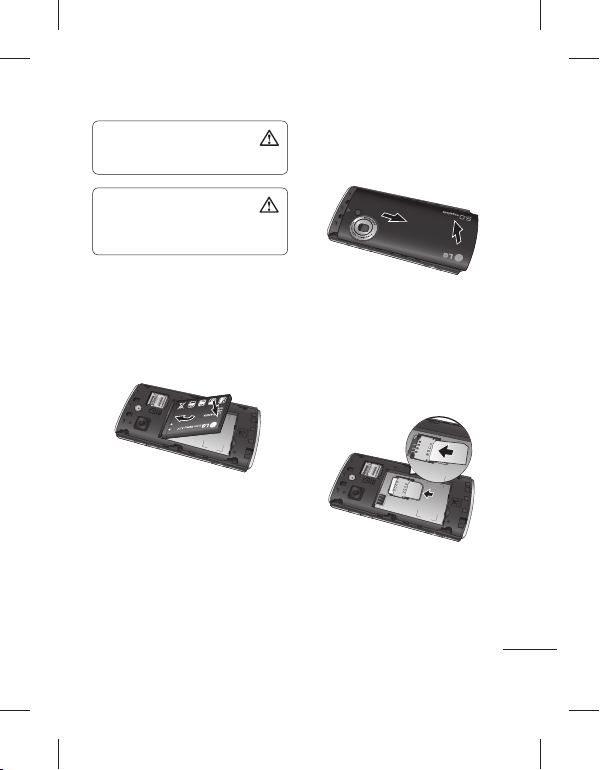
ﺪﻴﻨﮐ ژﺭﺎﺷ ﺍﺭ ﻦﻔﻠﺗ
GM360 ﯽﺷﻮﮔ ﺭﺎﻨﮐ ﺭﺩ ﺭژﺭﺎﺷ ﺖﮐﻮﺳ ﺵﻮﭘﺭﺩ
ﻞﺑﺎﮐ ﻭ (ﺭژﺭﺎﺷ) ﯽﺗﺮﻓﺎﺴﻣ ﺭﻮﺘﭘﺍﺩﺁ .ﺪﻳﺭﺍﺩﺮﺑ ﺍﺭ
ﻦﻔﻠﺗ ﻪﺑ ﺍﺭ USB ﻞﺑﺎﮐ .ﺪﻴﻨﮐ ﻞﺼﺘﻣ ﺍﺭ USB
ﯽﺷﻮﮔ ژﺭﺎﺷ .ﺪﻴﻧﺰﺑ ﺰﻳﺮﭘ ﻪﺑ ﻭ ﻩﺩﺮﮐ ﻞﺼﺘﻣ
یﺮﺗﺎﺑ” ﻡﺎﻴﭘ ﻪﮐ ﯽﺘﻗﻭ ﺎﺗ ﺪﺑﺎﻳ ﻪﻣﺍﺩﺍ ﺪﻳﺎﺑ GM360
.ﺩﻮﺷ ﺮﻫﺎﻇ ﺶﻳﺎﻤﻧ ﻪﺤﻔﺻ یﻭﺭ “ﺖﺳﺍ ﺮﭘ
ﺖﺳﺍ ﻡﺯﻻ ،یﺮﺗﺎﺑ ﺮﻤﻋ ﻝﻮﻃ ﺶﻳﺍﺰﻓﺍ
ژﺭﺎﺷ ًﻼﻣﺎﮐ یﺮﺗﺎﺑ ،ﻦﻔﻠﺗ ﺯﺍ ﻩﺩﺎﻔﺘﺳﺍ ﻉﻭﺮﺷ ﺯﺍ ﻞﺒﻗ
ﻡﺎﻴﭘ ،ﺪﻴﻨﮐ ﯽﻣ ژﺭﺎﺷ ﺍﺭ ﻦﻔﻠﺗ ﻪﮐ یﺭﺎﺑ ﻦﻴﻟﻭﺍ .ﺩﻮﺷ
ﻦﻔﻠﺗ ﺪﻳﺭﺍﺬﮕﺑ ﻭ ﺪﻳﺮﻴﮕﺑ ﻩﺪﻳﺩﺎﻧ ﺍﺭ “ﺖﺳﺍ ﺮﭘ یﺮﺗﺎﺑ”
.ﺪﻫﺩ ﻪﻣﺍﺩﺍ ﻥﺪﺷ ژﺭﺎﺷ ﻪﺑ ﺐﺷ ﻝﻮﻃ ﺭﺩ
9
یﺍﺮﺑ :ﻪﺟﻮﺗ
ﺮﮔﺍ .ﺖﺳﺍ ﻩﺪﺷ ﺖﻣﺮﻓ ﻞﺒﻗ ﺯﺍ ﻪﻈﻓﺎﺣ ﺕﺭﺎﮐ ًﻻﻮﻤﻌﻣ
،ﻩﺩﺎﻔﺘﺳﺍ ﻪﺑ ﻉﻭﺮﺷ ﺯﺍ ﻞﺒﻗ ﺪﻳﺎﺑ ،ﺖﺳﺍ ﻩﺪﺸﻧ ﺖﻣﺮﻓ
ﻭ ﻩﺩﺮﮐ ﺏﺎﺨﺘﻧﺍ ﺍﺭ
ﻦﻔﻠﺗ ﺕﺎﻤﻴﻈﻨﺗ ﻪﺑ ،ﺕﺎﻤﻴﻈﻨﺗ ﻪﻧﺎﺑﺯ ﺭﺩ ﺲﭙﺳ
ﻪﻈﻓﺎﺣ ﺲﭙﺳ ﻭ ﻩﺩﺮﮐ ﺲﻤﻟ ﺍﺭ ﻪﻈﻓﺎﺣ ﺕﺎﻋﻼﻃﺍ 2
ﺩﻮﺧ ﺏﺎﺨﺘﻧﺍ ﺲﭙﺳ ﻭ ﻩﺩﺮﮐ ﺲﻤﻟ ﺍﺭ ﺖﻣﺮﻓ 3
ﺩﺭﺍﻭ ،ﻥﺪﺷ ﻢﻴﻈﻨﺗ ﺕﺭﻮﺻ ﺭﺩ ﺍﺭ ﺩﻭﺭﻭ ﺰﻣﺭ 4
یﺍﺮﺑ ﻭ
ﺩﻮﺟﻭ ﯽﺗﺎﻋﻼﻃﺍ ﻪﻈﻓﺎﺣ ﺕﺭﺎﮐ ﺭﺩ ﺮﮔﺍ :ﻪﺟﻮﺗ
ﻪﺷﻮﭘ ﺭﺎﺘﺧﺎﺳ ﻥﺩﺮﮐ ﺖﻣﺮﻓ ﺯﺍ ﺪﻌﺑ ،ﺪﺷﺎﺑ ﻪﺘﺷﺍﺩ
.ﺪﺷ ﺪﻨﻫﺍﻮﺧ ﻑﺬﺣ ﺎﻫ ﻞﻳﺎﻓ ﻪﻤﻫ ﻥﻮﭼ ﺪﻨﮐ ﯽﻣ ﺮﻴﻴﻐﺗ
ﻪﻈﻓﺎﺣ ﺕﺭﺎﮐ ﻥﺩﺮﮐ ﺖﻣﺮﻓ
.ﺪﻴﻨﮐ ﺖﻣﺮﻓ
،ﯽﻠﺻﺍ ﻪﺤﻔﺻ ﺯﺍ 1
.ﺪﻳﻭﺮﺑ
.ﺪﻴﻨﮐ ﺏﺎﺨﺘﻧﺍ ﺍﺭ ﯽﺟﺭﺎﺧ
.ﺪﻴﻨﮐ ﺪﻴﻳﺄﺗ ﺍﺭ
ﻩﺪﺷ ﺖﻣﺮﻓ ﻪﻈﻓﺎﺣ ﺕﺭﺎﮐ ﺲﭙﺳ .ﺪﻴﻨﮐ
.ﺩﻮﺷ ﯽﻣ ﻩﺩﺎﻣﺁ ﻩﺩﺎﻔﺘﺳﺍ
ﺍﺭ ﻥﺁ
ﻪﻈﻓﺎﺣ ﺕﺭﺎﮐ
ﻪﻈﻓﺎﺣ ﺕﺭﺎﮐ ﺐﺼﻧ
ﺕﺭﺎﮐ ﺯﺍ ﻩﺩﺎﻔﺘﺳﺍ ﺎﺑ ﺍﺭ ﻦﻔﻠﺗ ﺭﺩ ﺩﻮﺟﻮﻣ ﻪﻈﻓﺎﺣ
.ﺪﻴﻫﺩ ﺶﻳﺍﺰﻓﺍ MicroSD ﻪﻈﻓﺎﺣ
یﺭﺎﻴﺘﺧﺍ ﯽﺒﻧﺎﺟ ﻪﻠﻴﺳﻭ ﮏﻳ ﻪﻈﻓﺎﺣ ﺕﺭﺎﮐ :ﻪﺟﻮﺗ
.ﺖﺳﺍ
ﻪﺒﻟ ﺭﺩ microSD ﺕﺭﺎﮐ ﻑﺎﮑﺷ ﺵﻮﭘﺭﺩ 1
.ﺪﻴﻨﮐ ﺯﺎﺑ ﺍﺭ ﻦﻔﻠﺗ ﭗﭼ ﺖﻤﺳ
ﺎﺗ ﺪﻴﻨﮐ ﺩﺭﺍﻭ ﻑﺎﮑﺷ ﺭﺩ ﺍﺭ microSD ﺕﺭﺎﮐ 2
ﺢﻄﺳ ﻪﮐ ﺪﻴﻨﮐ ﺖﻗﺩ .ﺪﺘﻔﻴﺑ ﺎﺟ ﮏﻴﻠﮐ یﺍﺪﺻ ﺎﺑ
ﻪﺘﻓﺮﮔ ﺭﺍﺮﻗ ﻦﻴﻳﺎﭘ ﻪﺑ ﻭﺭ ﮓﻧﺭ ﯽﻳﻼﻃ ﺱﺎﻤﺗ
.ﺪﺷﺎﺑ
ﺮﺑﺭﺎﮐ یﺎﻤﻨﻫﺍﺭ | LG GM360
10
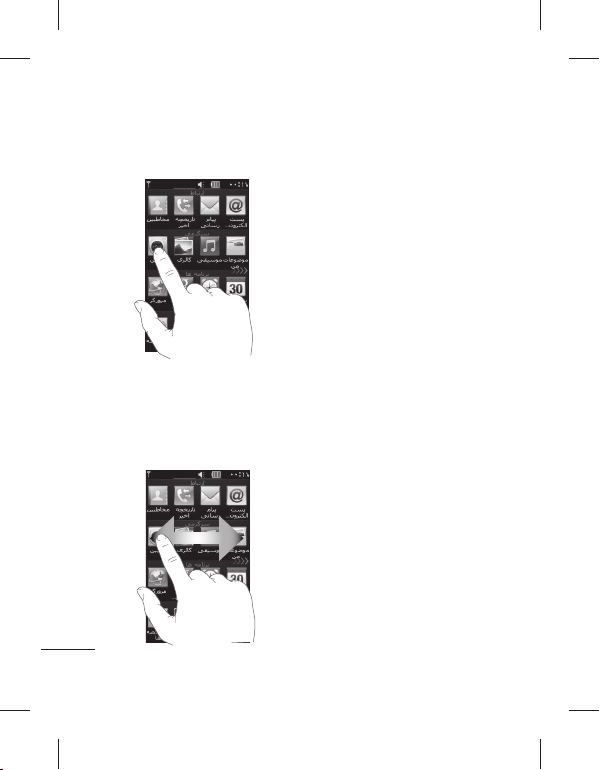
ﻥﺁ ﺩﺎﻤﻧ ﺖﺳﺍ ﯽﻓﺎﮐ ،ﻪﻣﺎﻧﺮﺑ ﺮﻫ ﻥﺩﺮﮐ ﺯﺎﺑ یﺍﺮﺑ
ﺎﻫ ﻪﻣﺎﻧﺮﺑ ﻥﺩﺮﮐ ﺯﺎﺑ
.ﺪﻴﻫﺩ ﺭﺎﺸﻓ ﺍﺭ
ﻪﺑ ﺖﻤﺳ ﮏﻳ ﺯﺍ ﺍﺭ ﺩﻮﺧ ﺖﺸﮕﻧﺍ ،ﺶﻳﺎﻤﻴﭘ یﺍﺮﺑ
ﯽﺸﻳﺎﻤﻧ ﺕﺎﺤﻔﺻ ﺯﺍ ﯽﺧﺮﺑ ﺭﺩ .ﺪﻴﺸﮑﺑ ﺮﮕﻳﺩ ﺖﻤﺳ
ﺎﻳ ﻻﺎﺑ ﻪﺑ ﺪﻴﻧﺍﻮﺗ ﯽﻣ ﺎﻫ ﺱﺎﻤﺗ ﻪﭽﺨﻳﺭﺎﺗ ﺖﺴﻴﻟ ﺪﻨﻧﺎﻣ
.ﺪﻴﻨﮐ ﺖﮐﺮﺣ ﻦﻴﻳﺎﭘ
11
ﯽﺴﻤﻟ ﻪﺤﻔﺻ ﺯﺍ ﻩﺩﺎﻔﺘﺳﺍ
ﯽﺴﻤﻟ ﻪﺤﻔﺻ ﻩﺭﺎﺑﺭﺩ ﯽﺗﺎﮑﻧ
ﺲﻤﻟ ﺍﺭ ﺩﺎﻤﻧ ﻂﺳﻭ ،ﺩﺭﻮﻣ ﮏﻳ ﺏﺎﺨﺘﻧﺍ یﺍﺮﺑ •
ﯽﻓﺎﮐ ﻩﺯﺍﺪﻧﺍ ﻪﺑ ﯽﺴﻤﻟ ﻪﺤﻔﺻ .ﺪﻴﻫﺪﻧ ﺭﺎﺸﻓ ﺩﺎﻳﺯ •
.ﺪﻴﻫﺩ ﺭﺎﺸﻓ ﯽﻣﺍﺭﺁ ﻪﺑ ،ﺖﺳﺍ ﺱﺎﺴﺣ
کﻮﻧ ﺯﺍ ،ﺮﻈﻧ ﺩﺭﻮﻣ یﺎﻫ ﻪﻨﻳﺰﮔ ﺏﺎﺨﺘﻧﺍ یﺍﺮﺑ •
یﺎﻫ ﻪﻨﻳﺰﮔ ﺪﻴﻨﮐ ﺖﻗﺩ .ﺪﻴﻨﮐ ﻩﺩﺎﻔﺘﺳﺍ ﺩﻮﺧ ﺖﺸﮕﻧﺍ
ﻪﺑ ،ﺩﻮﺷ ﯽﻤﻧ ﻩﺩﺎﻔﺘﺳﺍ GM360
GM360 ﯽﺴﻤﻟ ﻪﺤﻔﺻ ﺭﺩ ﺩﻮﺟﻮﻣ یﺎﻫ ﻝﺮﺘﻨﮐ
.ﺪﻨﻨﮐ ﯽﻣ ﺮﻴﻴﻐﺗ ﺪﻴﻫﺩ ﯽﻣ ﻡﺎﺠﻧﺍ ﻪﮐ یﺭﺎﮐ ﻪﺑ ﻪﺘﺴﺑ
ﺶﻳﺎﻤﻴﭘ
.ﺪﻴﻨﮐ
.ﺪﻴﻨﮑﻧ ﺲﻤﻟ ﺍﺭ ﻑﺍﺮﻃﺍ
ﺯﺍ ﻪﮐ ﻥﺎﻣﺯ ﺮﻫ •
.ﺩﺩﺮﮔ ﯽﻣ ﺮﺑ ﻞﻔﻗ ﻪﺤﻔﺻ
ﯽﺴﻤﻟ ﻪﺤﻔﺻ ﻝﺮﺘﻨﮐ

ﻞﻔﻗ ﺩﺎﻤﻧ یﻮﻨﻣ ﻪﺑ ﻭ ﺪﻴﻨﮐ ﻢﻴﺳﺮﺗ ؟ ﺩﺎﻤﻧ !ﻪﺘﮑﻧ
.ﺪﻳﻭﺮﺑ ﻞﻔﻗ ﻪﺤﻔﺻ ﺭﺩ ﻪﺤﻔﺻ
ﻪﮐ ﺖﺳﺍ ﺱﺮﺘﺳﺩ ﺭﺩ ﯽﺘﻗﻭ ﻂﻘﻓ ﺩﺮﮑﻠﻤﻋ ﻦﻳﺍ !ﻪﺘﮑﻧ
.ﺪﻨﺷﺎﺑ ﻩﺪﺷ ﻞﻔﻗ ﺭﺎﮐ ﻪﺑ ﻩﺩﺎﻣﺁ ﻪﺤﻔﺻ ﺯﺍ ﺎﻫﺪﻴﻠﮐ
ﯽﺴﻤﻟ ﻪﺤﻔﺻ ﺯﺍ ﻩﺩﺎﻔﺘﺳﺍ
ﻪﺤﻔﺻ ﻞﻔﻗ ﺩﺎﻤﻧ
ﺮﺒﻧﺎﻴﻣ ﻪﻣﺎﻧﺮﺑ 9 یﺍﺮﺑ ﺩﺎﻤﻧ ﮏﻳ - ﻪﺤﻔﺻ ﻞﻔﻗ ﺩﺎﻤﻧ
ﻥﺍﺮﺑﺭﺎﮐ ﻪﺑ ﻩﺪﺷ ﻞﻔﻗ ﻪﺤﻔﺻ ﺭﺩ ﺩﺎﻤﻧ .ﺪﻴﻨﮐ ﻢﻴﻈﻨﺗ
ﻦﻔﻠﺗ ،ﻪﺤﻔﺻ ﺭﺩ ﺩﺎﻤﻧ ﮏﻳ ﻢﻴﺳﺮﺗ ﺎﺑ ﺪﻫﺩ ﯽﻣ ﻥﺎﮑﻣﺍ
.ﺪﻨﻨﮐ ﺍﺮﺟﺍ ًﺎﻤﻴﻘﺘﺴﻣ ﺍﺭ ﺎﻫ ﻪﻣﺎﻧﺮﺑ ﻭ ﻩﺩﺮﮐ ﺯﺎﺑ ﺍﺭ
،ﯽﮔﮋﻳﻭ ﻦﻳﺍ ﻢﻴﻈﻨﺗ یﺍﺮﺑ
ﺍﺭ ﻪﺤﻔﺻ ﻞﻔﻗ ﺩﺎﻤﻧ - ﻪﺤﻔﺻ ﺕﺎﻤﻴﻈﻨﺗ -
ﺪﻴﻨﮐ ﺏﺎﺨﺘﻧﺍ
ﻪﻣﺎﻧﺮﺑ ﻪﺑ ﻪﺤﻔﺻ ﻦﻴﻳﺎﭘ ﺯﺍ ﺍﺭ ﺩﻮﺧ ﻩﺪﻳﺰﮔﺮﺑ ﺩﺎﻤﻧ 2
.ﺪﻴﻫﺩ ﺹﺎﺼﺘﺧﺍ ﻭ ﺪﻴﺸﮑﺑ ﺮﻈﻧ ﺩﺭﻮﻣ یﺎﻫ
1
23
6
5
ﺮﺑﺭﺎﮐ یﺎﻤﻨﻫﺍﺭ | LG GM360
1
4
12
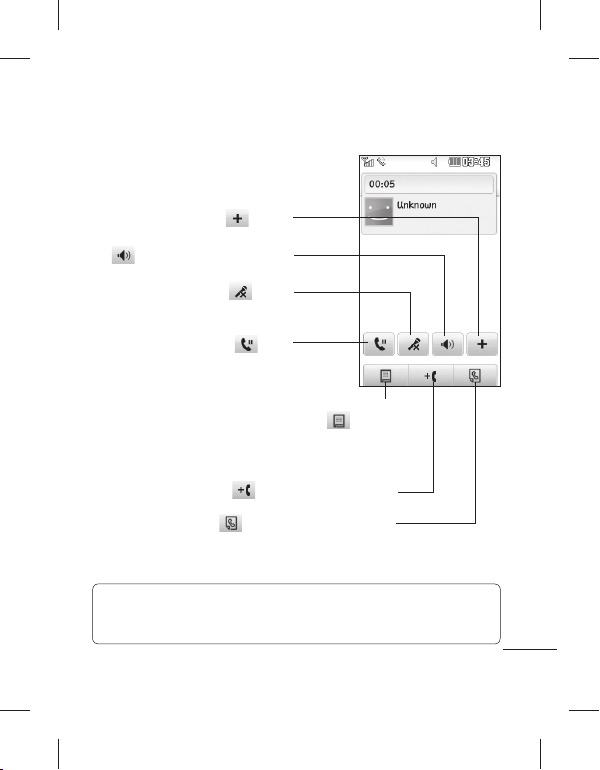
ﻦﻔﻠﺗ ﯽﻠﺻﺍ ﻪﺤﻔﺻ
ﮏﻴﻠﮐ ﻭ ﺪﻴﺸﮑﺑ ﻪﺤﻔﺻ یﻭﺭ ﺪﻴﻫﺍﻮﺧ ﯽﻣ ﺍﺭ ﻪﭼ ﻥﺁ ًﺍﺭﻮﻓ ﺪﻴﻧﺍﻮﺗ ﯽﻣ ،ﯽﻠﺻﺍ ﻪﺤﻔﺻ ﺖﻟﺎﺣ ﻉﺍﻮﻧﺍ ﻪﻤﻫ ﺭﺩ
.ﺪﻴﻨﮐ
ﻩﺭﺎﻤﺷ ﯽﻠﺻﺍ ﻪﺤﻔﺻ
ﺲﻤﻟ ﺎﺑ - ﻊﻳﺮﺳ یﺮﻴﮔ
ﻩﺭﺎﻤﺷ ﺖﺴﻴﻟ ،
ﺱﺎﻤﺗ ﺪﻴﻧﺍﻮﺗ ﯽﻣ ﺎﻤﺷ .ﺩﻮﺷ
ﺪﻴﻨﮐ ﻝﺎﺳﺭﺍ ﯽﻣﺎﻴﭘ ،ﺪﻳﺮﻴﮕﺑ
ﺭﺩ ﺎﻤﻴﻘﺘﺴﻣ ﺍﺭ ﺐﻃﺎﺨﻣ ﺎﻳ
ﻥﺩﺮﮐ
ﯽﻣ ﺮﻫﺎﻇ ﻊﻳﺮﺳ یﺮﻴﮔ
ﺶﻳﺍﺮﻳﻭ ﯽﻠﺻﺍ ﻪﺤﻔﺻ
.ﺪﻴﻳﺎﻤﻧ
ﻪﺤﻔﺻ ﻉﻮﻧ ﻪﺳ ﻪﻳﺎﭘ ﺮﺑ ﺮﺑﺭﺎﮐ ﻂﺑﺍﺭ !ﻪﺘﮑﻧ
ﯽﻠﺻﺍ ﺕﺎﺤﻔﺻ ﻪﺑ ﻦﺘﻓﺭ یﺍﺮﺑ .ﺪﺷﺎﺑ ﯽﻣ ﯽﻠﺻﺍ
ﭗﭼ ﻪﺑ ﺖﺳﺍﺭ ﺯﺍ ﺍﺭ ﻪﺤﻔﺻ ﺖﺳﺍ ﯽﻓﺎﮐ ،ﻒﻠﺘﺨﻣ
.ﺪﻴﻨﮐ کﺎﭘ ﺖﻋﺮﺳ ﻪﺑ ﺖﺳﺍﺭ ﻪﺑ ﭗﭼ ﺯﺍ ﺎﻳ
13
ﻝﺎﻌﻓ
- ﺖﺠﻳﻭ ﯽﻠﺻﺍ ﻪﺤﻔﺻ
ﺖﻤﺳ ﺭﺩ ﺍﺭ
ﺶﻳﺎﻤﻧ ﻪﺤﻔﺻ ﻦﻴﻳﺎﭘ ﺖﺳﺍﺭ
ﻪﺤﻔﺻ ،ﺪﻴﻨﮐ ﯽﻣ ﺲﻤﻟ
ﺎﺑ ﻪﮐ ﯽﻣﺎﮕﻨﻫ .ﺩﻮﺷ ﯽﻣ
ﺖﺒﺛ ﺍﺭ ﻥﺁ ،ﺖﺠﻳﻭ ﻥﺪﻴﺸﮐ
ﺭﺩ ﺖﺠﻳﻭ ،ﺪﻴﻨﮐ ﯽﻣ ﻡﺎﻧ
ﺩﻮﺷ ﯽﻣ ﺎﻫﺭ ﻪﮐ ﯽﻠﺤﻣ
- ﺏﻮﭼﺭﺎﭼ ﯽﻠﺻﺍ ﻪﺤﻔﺻ
ﻪﺑ ،ﺏﻮﭼﺭﺎﭼ ﻪﺤﻔﺻ ﺭﺩ
ﯽﺳﺎﻤﺗ ﺪﻴﻧﺍﻮﺗ ﯽﻣ ﯽﻧﺎﺳﺁ
ﻪﺑ ﯽﻣﺎﻴﭘ ﻭ ﻩﺩﺮﮐ ﺭﺍﺮﻗﺮﺑ
ﻩﺪﺷ ﻩﺩﺍﺩ ﺹﺎﺼﺘﺧﺍ ﻩﺭﺎﻤﺷ
کﺮﺤﺘﻣ ﺮﻳﻮﺼﺗ ﮏﻳ ﻪﺑ
ﺯﺍ ﻩﺩﺎﻔﺘﺳﺍ یﺍﺮﺑ .ﺪﻴﻨﮐ ﻝﺎﺳﺭﺍ
ﯽﻧﺎﺳﺭ ﻡﺎﻴﭘ ،ﺱﺎﻤﺗ ﺩﺮﮑﻠﻤﻋ
ﺮﻳﻮﺼﺗ ﮏﻳ ،ﻦﻴﺒﻃﺎﺨﻣ ﺎﻳ
ﻭ ﻩﺩﺮﮐ ﺏﺎﺨﺘﻧﺍ ﺍﺭ کﺮﺤﺘﻣ
ﺮﻈﻧ ﺩﺭﻮﻣ یﺭﻮﻓ ﺪﻴﻠﮐ ﺩﺎﻤﻧ
ﯽﺘﻗﻭ
ﺮﻫﺎﻇ ﻞﻳﺎﺑﻮﻣ ﺖﺠﻳﻭ
.ﺩﺩﺮﮔ ﯽﻣ ﺩﺎﺠﻳﺍ
.ﺪﻴﻨﮐ ﺏﺎﺨﺘﻧﺍ ﺍﺭ
ﻝﺎﻌﻓ
ﻝﺎﻌﻓ
ﻦﻔﻠﺗ ﯽﻠﺻﺍ ﻪﺤﻔﺻ
ﯽﻣ ﻩﺩﺎﻔﺘﺳﺍ ﻪﻤﻫ ﺯﺍ ﺶﻴﺑ ﻪﮐ ﯽﻳﺎﻫﺩﺮﮑﻠﻤﻋ ﻪﺑ ﯽﺴﻤﻟ ﮏﺗ ﻭ ﻥﺎﺳﺁ ﯽﺳﺮﺘﺳﺩ ،ﯽﻠﺻﺍ ﻪﺤﻔﺻ ﺭﺩ ﻊﻳﺮﺳ یﺎﻫﺪﻴﻠﮐ
ﻊﻳﺮﺳ یﺎﻫﺪﻴﻠﮐ
.ﺪﻨﻨﮐ ﯽﻣ ﻢﻫﺍﺮﻓ ﺍﺭ ﺪﻧﻮﺷ
.ﺩﻮﺷ ﺯﺎﺑ ﻦﻴﺒﻃﺎﺨﻣ ﺎﺗ ﺪﻴﻨﮐ ﺲﻤﻟ
ﺮﻈﻧ ﺩﺭﻮﻣ ﻩﺭﺎﻤﺷ یﻮﺠﺘﺴﺟ یﺍﺮﺑ
ﺐﻃﺎﺨﻣ ﻡﺎﻧ ،ﺱﺎﻤﺗ یﺭﺍﺮﻗﺮﺑ ﺖﻬﺟ
ﺩﺭﺍﻭ ﯽﺴﻤﻟ ﻪﺤﻔﺻ ﺯﺍ ﻩﺩﺎﻔﺘﺳﺍ ﺎﺑ ﺍﺭ
ﻦﻴﺒﻃﺎﺨﻣ ﺪﻴﻧﺍﻮﺗ ﯽﻣ ﻦﻴﻨﭽﻤﻫ .ﺪﻴﻨﮐ
ﺍﺭ ﺩﻮﺟﻮﻣ ﻦﻴﺒﻃﺎﺨﻣ ﺎﻳ ﻭ ﺩﺎﺠﻳﺍ یﺪﻳﺪﺟ
ﺭﻮﻃ ﻪﺑ ﯽﻠﺻﺍ یﻮﻨﻣ ﺎﺗ ﺪﻴﻨﮐ ﺲﻤﻟ
ﻢﻴﺴﻘﺗ ﻩﻭﺮﮔ ﻪﺑ ﻮﻨﻣ ﻦﻳﺍ .ﺩﻮﺷ ﺯﺎﺑ ﻞﻣﺎﮐ
.ﺪﻴﻨﮐ ﺶﻳﺍﺮﻳﻭ
.ﺖﺳﺍ ﻩﺪﺷ
ﻩﺭﺎﻤﺷ ی ﻪﺤﻔﺻ ﺎﺗ ﺪﻴﻫﺩ ﺭﺎﺸﻓ
ﺱﺎﻤﺗ ﺪﻴﻧﺍﻮﺘﺑ ﻭ ﻩﺪﻣﺁ ﻥﻭﺮﻴﺑ یﺮﻴﮔ
،ﯽﻧﺎﺳﺭ ﻡﺎﻴﭘ یﻮﻨﻣ ﻪﺑ ﯽﺳﺮﺘﺳﺩ یﺍﺮﺑ
ﮏﻳ ﺪﻴﻧﺍﻮﺗ ﯽﻣ ﺎﺠﻨﻳﺍ ﺯﺍ .ﺪﻴﻨﮐ ﺲﻤﻟ
ﺎﻳ ،ﺪﻴﻨﮐ ﺩﺎﺠﻳﺍ ﺪﻳﺪﺟ MMS ﺎﻳ SMS
.ﺪﻴﻳﺎﻤﻧ ﻩﺪﻫﺎﺸﻣ ﺍﺭ ﻡﺎﻴﭘ ﻪﺷﻮﭘ
ﺮﺑﺭﺎﮐ یﺎﻤﻨﻫﺍﺭ | LG GM360
.ﺪﻴﻨﮐ ﺭﺍﺮﻗﺮﺑ
14
ﻝﺎﺣ ﺭﺩ ﯽﺷﺭﺎﻔﺳ ﻪﺼﺨﺸﻣ
(ﺖﺳﺍ ﺕﻭﺎﻔﺘﻣ ﺩﺎﻤﻧ ﺭﺩ ﻩﺭﺎﻤﺷ)
ﺖﺳﺍ ﻩﺩﺎﻔﺘﺳﺍ ﻝﺎﺣ ﺭﺩ یﺩﺎﻋ ﻪﺼﺨﺸﻣ
ﺩﺭﻮﻣ ﺪﻨﻠﺑ یﺍﺪﺻ ﻪﺼﺨﺸﻣ
ﻩﺩﺎﻔﺘﺳﺍ ﻝﺎﺣ ﺭﺩ ﺍﺪﺼﻴﺑ ﻪﺼﺨﺸﻣ
ﺖﺳﺍ ﻩﺩﺎﻔﺘﺳﺍ ﻝﺎﺣ ﺭﺩ ﺖﺳﺪﻫ
ﺪﺑﺎﻳ ﯽﻣ ﻝﺎﻘﺘﻧﺍ ﺎﻫ ﺱﺎﻤﺗ
ﺖﺳﺍ ﻩﺩﺎﻔﺘﺳﺍ ﻝﺎﺣ ﺭﺩ EDGE
ﺖﺳﺍ ﻦﺷﻭﺭ ﺯﺍﻭﺮﭘ ﺖﻟﺎﺣ
ﺖﺳﺍ ﻝﺎﻌﻓ ﺙﻮﺗﻮﻠﺑ
ﻪﻨﻴﻣﺯ ﺲﭘ ﮓﻨﻫﺁ ﺶﺨﭘ
ﻪﻨﻴﻣﺯ ﺲﭘ ﮓﻨﻫﺁ ﺚﮑﻣ
ﻝﺎﻌﻓ ﻩﺩﺎﻔﺘﺳﺍ یﺍﺮﺑ ﻪﻈﻓﺎﺣ ﺕﺭﺎﮐ
15
ﺖﺳﺍ ﻩﺩﺎﻔﺘﺳﺍ
ﺖﺳﺍ ﻩﺩﺎﻔﺘﺳﺍ
ﺖﺳﺍ
ﮓﻨﻴﻣﻭﺭ
ﺖﺳﺍ
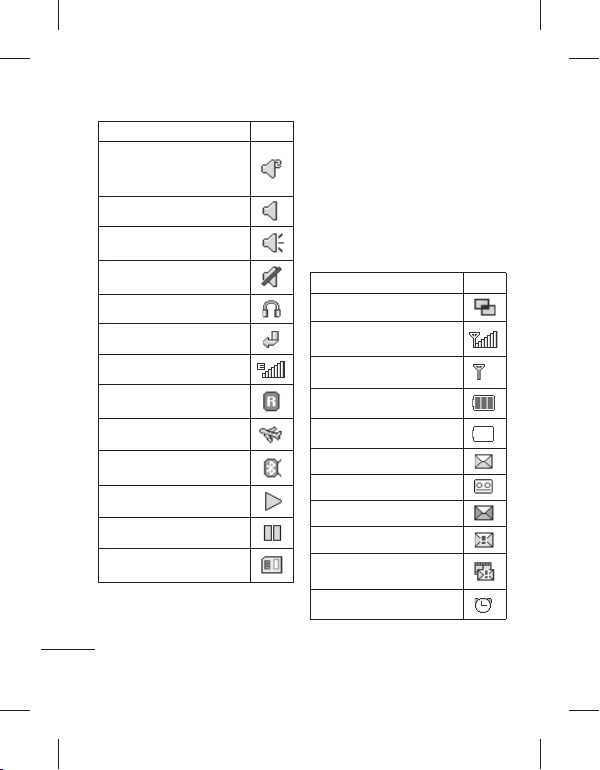
ﺩﺎﻤﻧﺡﺮﺷ
ﯽﻔﻠﺘﺨﻣ یﺮﻳﻮﺼﺗ یﺎﻫﺩﺎﻤﻧ ﺖﻴﻌﺿﻭ ﺭﺍﻮﻧ ﺭﺩ
ﺪﻳﺪﺟ یﺎﻫ ﻡﺎﻴﭘ ،ﻝﺎﻨﮕﻴﺳ ﺕﺭﺪﻗ یﺎﻫﺩﺎﻤﻧ ﺪﻨﻧﺎﻣ
ﺎﻳ ﻝﺎﻌﻓ ﻪﮐ ﯽﻳﺎﻫﺩﺎﻤﻧ ﻦﻴﻨﭽﻤﻫ ﻭ یﺮﺗﺎﺑ ژﺭﺎﺷ ﻭ
ﯽﻣ ﻥﺎﺸﻧ ﺍﺭ GPRS ﺎﻳ ﺙﻮﺗﻮﻠﺑ ﻥﺩﻮﺑ ﻝﺎﻌﻓﺮﻴﻏ
ﺭﺍﻮﻧ ﺭﺩ ًﻻﺎﻤﺘﺣﺍ ﻪﮐ ﯽﻳﺎﻫﺩﺎﻤﻧ ﻡﻮﻬﻔﻣ ﺮﻳﺯ ﻝﻭﺪﺟ ﺭﺩ
.ﺖﺳﺍ ﻩﺪﺷ ﻩﺩﺭﻭﺁ ﺪﻴﻨﻴﺑ ﯽﻣ ﺖﻴﻌﺿﻭ
ﻪﻧﺎﮔﺪﻨﭼ ﻒﻳﺎﻇﻭ
ﺎﻫﺭﺍﻮﻧ ﺩﺍﺪﻌﺗ) ﻪﮑﺒﺷ ﻝﺎﻨﮕﻴﺳ ﺕﺭﺪﻗ
(ﺩﻮﺑ ﺪﻫﺍﻮﺧ ﺕﻭﺎﻔﺘﻣ
ﺩﺭﺍﺪﻧ ﺩﻮﺟﻭ یﺍ ﻪﮑﺒﺷ ﻝﺎﻨﮕﻴﺳ ﭻﻴﻫ
یﺮﺗﺎﺑ ﻩﺪﻧﺎﻣ ﯽﻗﺎﺑ ﺮﻤﻋ
ﺖﺳﺍ ﯽﻟﺎﺧ یﺮﺗﺎﺑ
ﺪﻳﺪﺟ ﯽﻨﺘﻣ ﻡﺎﻴﭘ
ﺪﻳﺪﺟ ﯽﺗﻮﺻ ﻡﺎﻴﭘ
ﺖﺳﺍ ﺮﭘ ﻡﺎﻴﭘ ﺖﻓﺎﻳﺭﺩ ﻕﻭﺪﻨﺻ
ﺪﺸﻧ ﻡﺎﺠﻧﺍ ﻡﺎﻴﭘ ﻝﺎﺳﺭﺍ
ﺪﺸﻧ ﻡﺎﺠﻧﺍ یﺍ ﻪﻧﺎﺳﺭﺪﻨﭼ ﻡﺎﻴﭘ ﻝﺎﺳﺭﺍ
ﺖﺳﺍ ﻩﺪﺷ ﻢﻴﻈﻨﺗ ﺭﺍﺪﺸﻫ ﮓﻧﺯ ﮏﻳ
ﺖﻴﻌﺿﻭ ﺭﺍﻮﻧ
.ﺩﺭﺍﺩ ﺩﻮﺟﻭ ﺪﻫﺩ
ﺩﺎﻤﻧﺡﺮﺷ
ﺩﻮﺷ ﯽﻣ ﺍﺮﺟﺍ ﻪﻨﻴﻣﺯ ﺲﭘ ﺭﺩ یﺍ ﻪﻣﺎﻧﺮﺑ ﻪﮐ ﯽﻣﺎﮕﻨﻫ
ﺖﻴﻌﺿﻭ ﺭﺍﻮﻧ ﺭﺩ
،( ﻮﻳﺩﺍﺭ ﺎﻳ یﺯﺎﺑ ،ًﻼﺜﻣ)
.ﺪﺷ ﺪﻫﺍﻮﺧ ﺮﻫﺎﻇ
ﻦﻔﻠﺗ ﯽﻠﺻﺍ ﻪﺤﻔﺻ
ﺩﺎﻤﻧﺡﺮﺷ
ﻩﺩﺍﺩ ﻝﺎﺳﺭﺍ ﻞﻴﻤﻳﺍ ،یﺩﻭﺭﻭ ﻞﻴﻤﻳﺍ یﺍﺮﺑ
ﯽﻣﺮﮔﺮﺳ ﺭﺩ ﺍﺭ ﺎﻫ ﻪﻣﺎﻧﺮﺑ ﻭ ﺎﻫ یﺯﺎﺑ
،ﻢﻴﺳ ﺭﻮﺗﺍﺮﭘﺍ ﺎﻳ ﻪﻘﻄﻨﻣ ﻪﺑ ﻪﺘﺴﺑ :ﻪﺟﻮﺗ*
ﻝﺎﺳﺭﺍ ﻞﻴﻤﻳﺍ ﺯﺍ ﺪﻧﺍﻮﺘﻧ ﺮﺑﺭﺎﮐ ﺖﺳﺍ ﻦﮑﻤﻣ
ﺎﻳ) WAP ﻪﺑ ﻥﺎﻣﺰﻤﻫ ﻭ ﺪﻨﮐ ﻩﺩﺎﻔﺘﺳﺍ ﻩﺩﺍﺩ
ﺖﻴﻌﺿﻭ ﺭﺍﻮﻧ ﻖﻳﺮﻃ ﺯﺍ ﺖﻴﻌﺿﻭ ﺮﻴﻴﻐﺗ
ﻪﺻﻼﺧ ﻥﺩﺮﮐ ﺯﺎﺑ یﺍﺮﺑ ﺍﺭ ﺖﻴﻌﺿﻭ ﺭﺍﻮﻧ ﻂﺳﻭ
ﺪﻨﻧﺎﻣ ﯽﺗﺎﻋﻼﻃﺍ ﻪﺤﻔﺻ ﻦﻳﺍ ﺭﺩ .ﺪﻴﻨﮐ ﺲﻤﻟ ﺖﻴﻌﺿﻭ
ﻪﻈﻓﺎﺣ ،یﺮﺗﺎﺑ ،ﺕﺎﻣﺪﺧ ﻪﺳﺎﻨﺷ ،ﻪﮑﺒﺷ ،ﯽﻠﻌﻓ ﻥﺎﻣﺯ
ﻭ MP3s ، ﻪﺼﺨﺸﻣ ،ﯽﺟﺭﺎﺧ ﻪﻈﻓﺎﺣ ،ﯽﺷﻮﮔ
ﺪﻴﻧﺍﻮﺗ ﯽﻣ ﺎﺠﻨﻳﺍ ﺭﺩ .ﺩﻮﺷ ﯽﻣ ﻩﺩﺍﺩ ﺶﻳﺎﻤﻧ ﺙﻮﺗﻮﻠﺑ
/ﺶﺨﭘ ﺍﺭ MP3 ،ﻩﺩﺮﮐ ﻢﻴﻈﻨﺗ ﺍﺭ ﻪﺼﺨﺸﻣ ﻉﻮﻧ
.ﺪﻴﻳﺎﻤﻧ ﻝﺎﻌﻓﺮﻴﻏ/ﻝﺎﻌﻓ ﺍﺭ ﺙﻮﺗﻮﻠﺑ
ﻪﻧﺎﮔﺪﻨﭼ ﻒﻳﺎﻇﻭ ﺩﺮﮑﻠﻤﻋ ﺯﺍ ﻩﺩﺎﻔﺘﺳﺍ
ﺎﺗ ﺪﻴﻫﺩ ﺭﺎﺸﻓ ﺍﺭ ﻪﻧﺎﮔﺪﻨﭼ ﻒﻳﺎﻇﻭ ﺪﻴﻠﮐ
ﺪﻴﻧﺍﻮﺗ ﯽﻣ ﺎﺠﻨﻳﺍ ﺯﺍ .ﺩﻮﺷ ﺯﺎﺑ ﻪﻧﺎﮔﺪﻨﭼ ﻒﻳﺎﻇﻭ یﻮﻨﻣ
ﮏﻳ ﺎﺑ ﻭ ﻩﺪﻫﺎﺸﻣ ﺍﺭ ﺍﺮﺟﺍ ﻝﺎﺣ ﺭﺩ یﺎﻫ ﻪﻣﺎﻧﺮﺑ ﻪﻤﻫ
:ﺪﻴﻨﮐ ﯽﺳﺭﺮﺑ ﺍﺭ
ﺍﺭ ﺎﻫ ﻪﻣﺎﻧﺮﺑ ﺲﭙﺳ ﻭ ﻩﺩﺮﮐ ﺲﻤﻟ
.ﺪﺷﺎﺑ ﻪﺘﺷﺍﺩ ﯽﺳﺮﺘﺳﺩ
.ﺪﻴﻨﮐ ﺲﻤﻟ
(MMS
.ﺪﻴﻨﮐ ﺍﺪﻴﭘ ﯽﺳﺮﺘﺳﺩ ﺎﻬﻧﺁ ﻪﺑ ﺲﻤﻟ
ﻭ ﺪﻴﻨﮐ ﺚﮑﻣ
ﺮﺑﺭﺎﮐ یﺎﻤﻨﻫﺍﺭ | LG GM360
16
ﻪﭼﺮﺘﻓﺩ ﺯﺍ ﻩﺩﺎﻔﺘﺳﺍ ﺎﺑ ﺱﺎﻤﺗ یﺭﺍﺮﻗﺮﺑ
ﺎﺗ ﺪﻴﻨﮐ ﺲﻤﻟ ﺍﺭ ،ﯽﻠﺻﺍ ﻪﺤﻔﺻ ﺯﺍ 1
ﺶﻳﺎﻤﻧ ﻪﺤﻔﺻ یﻻﺎﺑ ﺭﺩ ﻡﺎﻧ ﻪﻨﻴﻣﺯ ﺭﺩﺎﮐ یﻭﺭ 2
ﻪﻴﻟﻭﺍ ﻑﻭﺮﺣ ،ﺪﻴﻠﮐ ﻪﺤﻔﺻ ﺎﺑ ﻭ ﺪﻴﻧﺰﺑ ﻪﺑﺮﺿ
.ﺪﻴﻨﮐ ﺩﺭﺍﻭ ﺍﺭ ﺱﺎﻤﺗ یﺍﺮﺑ ﺮﻈﻧ ﺩﺭﻮﻣ ﺐﻃﺎﺨﻣ
ﺭﺎﻨﮐ ﺭﺩ ﺱﺎﻤﺗ ﺩﺎﻤﻧ ،ﻩﺪﺷ ﺮﺘﻠﻴﻓ ﺖﺴﻴﻟ ﺯﺍ 3
ﺮﺘﺸﻴﺑ ﺮﮔﺍ .ﺪﻴﻨﮐ ﺲﻤﻟ ﺍﺭ ﺮﻈﻧ ﺩﺭﻮﻣ ﺐﻃﺎﺨﻣ
ﻪﺘﺷﺍﺩ
ﺩﻮﺟﻭ ﺐﻃﺎﺨﻣ یﺍﺮﺑ ﻩﺭﺎﻤﺷ ﮏﻳ ﺯﺍ
ﻩﺩﺎﻔﺘﺳﺍ ﺽﺮﻓ ﺶﻴﭘ ﻩﺭﺎﻤﺷ ﺯﺍ ﺱﺎﻤﺗ ﻦﻳﺍ ،ﺪﺷﺎﺑ
ﺮﮔﺍ ﻭ ﻩﺩﺮﮐ ﺲﻤﻟ ﺍﺭ ﺐﻃﺎﺨﻣ ﻡﺎﻧ ﺪﻴﻧﺍﻮﺗ ﯽﻣ ﺎﻳ 4
ﺩﻮﺟﻭ ﺐﻃﺎﺨﻣ یﺍﺮﺑ ﻩﺭﺎﻤﺷ ﮏﻳ ﺯﺍ ﺮﺘﺸﻴﺑ
.ﺪﻴﻨﮐ ﺏﺎﺨﺘﻧﺍ ﺍﺭ ﺮﻈﻧ ﺩﺭﻮﻣ ﻩﺭﺎﻤﺷ ،ﺪﺷﺎﺑ ﻪﺘﺷﺍﺩ
ﻩﺭﺎﻤﺷ ﺎﺑ ﺱﺎﻤﺗ ﻉﻭﺮﺷ یﺍﺮﺑ ﺪﻴﻧﺍﻮﺗ ﯽﻣ ﻦﻴﻨﭽﻤﻫ
.ﺩﻮﺷ ﺯﺎﺑ ﻦﻴﺒﻃﺎﺨﻣ
.ﺪﻴﻨﮐ
ﺲﻤﻟ ﺍﺭ ،ﺽﺮﻓ ﺶﻴﭘ
ﻥﺁ ﺩﺭ ﺎﻳ ﺱﺎﻤﺗ ﻪﺑ ﻥﺩﺍﺩ ﺦﺳﺎﭘ
ﺭﺎﺸﻓ ﺍﺭ ﺪﻨﻤﺷﻮﻫ ﺪﻴﻠﮐ ،ﺪﻧﺯ ﯽﻣ ﮓﻧﺯ ﻦﻔﻠﺗ ﯽﺘﻗﻭ
ﺍﺭ ﯽﻳﻮﺸﮐ ﻪﺤﻔﺻ ،ﮓﻧﺯ ﻥﺩﺮﮐ ﺍﺪﺻ ﯽﺑ یﺍﺮﺑ
ﺯﺎﺑ ﻥﺁ ﻞﻔﻗ ،ﺪﺷﺎﺑ ﻞﻔﻗ ﻦﻔﻠﺗ ﺮﮔﺍ ﺭﺎﮐ ﻦﻳﺍ ﺎﺑ .ﺪﻳﺪﻨﺒﺑ
ﻦﻳﺍ ﺎﺑ .ﺪﻴﻧﺰﺑ ﻪﺑﺮﺿ
ﻪﺼﺨﺸﻣ ﺪﻴﻨﮐ ﺵﻮﻣﺍﺮﻓ ﻪﺴﻠﺟ ﻡﺎﮕﻨﻫ ﺮﮔﺍ ﺭﺎﮐ
ﯽﺑ ﻞﺒﻗ ﺯﺍ ﮓﻧﺯ ،ﺪﻴﻫﺩ ﺮﻴﻴﻐﺗ ﺍﺪﺼﻴﺑ ﻪﺑ ﺍﺭ ﺩﻮﺧ
17
.ﺪﻴﻫﺩ ﺦﺳﺎﭘ ﺱﺎﻤﺗ ﻪﺑ ﻭ ﻩﺩﺍﺩ
یﻭﺭ ﺲﭙﺳ ،ﺩﻮﺷ ﯽﻣ
،یﺩﻭﺭﻭ ﺱﺎﻤﺗ ﺩﺭ یﺍﺮﺑ .ﺖﺳﺍ ﻩﺪﺷ ﺍﺪﺻ
.ﺪﻴﻨﮐ ﺲﻤﻟ ﺍﺭ
.ﺪﻨﮐ ﯽﻣ
ﺲﻤﻟ ﺪﻴﻠﮐ ﻪﺤﻔﺻ ﻥﺩﺮﮐ ﺯﺎﺑ یﺍﺮﺑ ﺍﺭ 1
ﻦﻔﻠﺗ
ﺩﺭﺍﻭ ﺪﻴﻠﮐ ﻪﺤﻔﺻ ﺯﺍ ﻩﺩﺎﻔﺘﺳﺍ ﺎﺑ ﺍﺭ ﻦﻔﻠﺗ ﻩﺭﺎﻤﺷ 2
.ﺪﻴﻨﮐ ﺲﻤﻟ ﺱﺎﻤﺗ ﻉﻭﺮﺷ یﺍﺮﺑ ﺍﺭ
ﺍﺭ ﺪﻨﻤﺷﻮﻫ ﺪﻴﻠﮐ ،ﺱﺎﻤﺗ ﻪﺑ ﻥﺩﺍﺩ ﻥﺎﻳﺎﭘ یﺍﺮﺑ 4
یﺭﺍﺮﻗﺮﺑ ﺖﻬﺟ + ﻥﺩﺮﮐ ﺩﺭﺍﻭ یﺍﺮﺑ !ﻪﺘﮑﻧ
ﻭ ﻩﺩﺍﺩ ﺭﺎﺸﻓ ﺍﺭ
ﺎﺗ ﺪﻴﻫﺩ ﺭﺎﺸﻓ ﺍﺭ ﺵﻮﻣﺎﺧ/ﻦﺷﻭﺭ ﺪﻴﻠﮐ !ﻪﺘﮑﻧ
ﯽﻗﺎﻔﺗﺍ یﺮﻴﮔ ﻩﺭﺎﻤﺷ ﺯﺍ ﻭ ﻩﺪﺷ ﻞﻔﻗ ﯽﺴﻤﻟ ﻪﺤﻔﺻ
ﺎﻫ ﺱﺎﻤﺗ
ﺱﺎﻤﺗ یﺭﺍﺮﻗﺮﺑ
.ﺪﻴﻨﮐ
.ﺪﻴﻨﮐ
3
.ﺪﻴﻫﺩ ﺭﺎﺸﻓ
،ﯽﻠﻠﻤﻟﺍ ﻦﻴﺑ ﺱﺎﻤﺗ
.ﺪﻳﺭﺍﺩ ﻪﮕﻧ
.ﺩﻮﺷ یﺮﻴﮔﻮﻠﺟ
ﺎﻫ ﺱﺎﻤﺗ
ﺱﺎﻤﺗ ﻦﻴﺣ یﺎﻫ ﻪﻨﻳﺰﮔ
ﻪﻨﻳﺰﮔ ﺯﺍ ﯽﺘﺴﻴﻟ ﺎﺗ ﺪﻴﻨﮐ ﺲﻤﻟ ﺍﺭ - ﺎﻫ ﻪﻨﻳﺰﮔ
ﺵﻮﻣﺎﺧ ﻦﻓﻭﺮﮑﻴﻣ ﺎﺗ ﺪﻴﻫﺩ ﺭﺎﺸﻓ ﺍﺭ
ﺪﻧﺍﻮﺘﻧ ﺪﻴﻨﮐ ﯽﻣ ﺖﺒﺤﺻ ﻭﺍ ﺎﺑ ﻪﮐ ﯽﺼﺨﺷ ﻭ ﺩﻮﺷ
ﺖﻟﺎﺣ ﺭﺩ ﺱﺎﻤﺗ ﺎﺗ ﺪﻴﻫﺩ ﺭﺎﺸﻓ ﺍﺭ
.ﺩﻮﺷ ﺮﻫﺎﻇ ﺱﺎﻤﺗ ﻦﻴﺣ یﺎﻫ
،ﻦﻔﻠﺗ یﻮﮔﺪﻨﻠﺑ ﻥﺩﺮﮐ ﻦﺷﻭﺭ یﺍﺮﺑ - ﻮﮔﺪﻨﻠﺑ
.ﺪﻴﻫﺩ ﺭﺎﺸﻓ ﺍﺭ
- ﺍﺪﺻ ﯽﺑ
.ﺩﻮﻨﺸﺑ ﺍﺭ ﺎﻤﺷ یﺍﺪﺻ
- ﺭﺎﻈﺘﻧﺍ
.ﺩﺮﻴﮔ ﺭﺍﺮﻗ ﺭﺎﻈﺘﻧﺍ
یﺭﺍﺮﻗﺮﺑ یﺍﺮﺑ یﺩﺪﻋ ﺪﻴﻠﮐ ﻪﺤﻔﺻ ﻥﺩﺮﮐ ﺯﺎﺑ یﺍﺮﺑ
ﺎﻤﺷ ﻪﺑ ﺩﺮﮑﻠﻤﻋ ﻦﻳﺍ .ﺪﻴﻨﮐ ﺲﻤﻟ ﺍﺭ ،ﻡﻭﺩ ﺱﺎﻤﺗ
ﺰﮐﺍﺮﻣ ﺪﻨﻧﺎﻣ ﺭﺎﮐﺩﻮﺧ ﯽﻨﻔﻠﺗ ﺕﺎﻣﺪﺧ ﯽﺘﻗﻭ ﺪﻫﺩ ﯽﻣ ﻥﺎﮑﻣﺍ
یﺩﺪﻋ یﺎﻫ ﻪﻨﻳﺰﮔ ﺎﺑ ،ﺪﻴﻨﮐ ﯽﻣ یﺮﻴﮔ ﻩﺭﺎﻤﺷ ﺍﺭ ﺱﺎﻤﺗ
ﺍﺭ
،ﺱﺎﻤﺗ ﻪﺑ ﺮﮕﻳﺩ ﺺﺨﺷ ﻥﺩﻭﺰﻓﺍ یﺍﺮﺑ
ﺍﺭ
،ﺱﺎﻤﺗ ﻦﻴﺣ ﺭﺩ ﻦﻴﺒﻃﺎﺨﻣ یﻮﺠﺘﺴﺟ یﺍﺮﺑ
.ﺪﻴﻳﺎﻤﻧ ﺖﮐﺮﺣ ﺎﻫﻮﻨﻣ ﻦﻴﺑ ﺭﺩ
.ﺪﻴﻨﮐ ﺲﻤﻟ
.ﺪﻴﻨﮐ ﺲﻤﻟ
ﻪﺤﻔﺻ ﺭﺩ ﺖﻳﻭﺭ ﻞﺑﺎﻗ ﻪﻨﻳﺰﮔ ﻦﻳﺮﺧﺁ ،ﻦﻴﺒﻃﺎﺨﻣ ﺖﺴﻴﻟ ﺎﻳ ﺎﻫ ﻪﻨﻳﺰﮔ ﺖﺴﻴﻟ ﺭﺩ ﺖﮐﺮﺣ یﺍﺮﺑ !ﻪﺘﮑﻧ
ﻭ ﻩﺩﺮﮐ ﺖﮐﺮﺣ ﻻﺎﺑ ﻪﺑ ﺖﺴﻴﻟ .ﺪﻴﺸﮑﺑ ﺶﻳﺎﻤﻧ ﻪﺤﻔﺻ یﻻﺎﺑ ﻪﺑ ﺍﺭ ﺩﻮﺧ ﺖﺸﮕﻧﺍ ﻭ ﻩﺩﺍﺩ ﺭﺎﺸﻓ ﺍﺭ ﺶﻳﺎﻤﻧ
.ﺩﻮﺑ ﺪﻨﻫﺍﻮﺧ ﻩﺪﻫﺎﺸﻣ ﻞﺑﺎﻗ یﺮﺘﺸﻴﺑ یﺎﻫ ﻪﻨﻳﺰﮔ
ﺮﺑﺭﺎﮐ یﺎﻤﻨﻫﺍﺭ | LG GM360
18
ﻭ ﻩﺩﺮﮐ ﺲﻤﻟ ﺍﺭ ،ﻪﻴﻟﻭﺍ ﺱﺎﻤﺗ ﻝﻮﻃ ﺭﺩ 1
.ﺪﻴﻨﮐ ﺲﻤﻟ ﺱﺎﻤﺗ یﺍﺮﺑ ﺍﺭ ﺮﻈﻧ ﺩﺭﻮﻣ ﻩﺭﺎﻤﺷ
.ﺪﻴﻨﮐ ﺲﻤﻟ ﺱﺎﻤﺗ یﺭﺍﺮﻗﺮﺑ یﺍﺮﺑ ﺍﺭ
ﺪﻫﺍﻮﺧ ﺮﻫﺎﻇ ﺱﺎﻤﺗ ﻪﺤﻔﺻ یﻭﺭ ﺱﺎﻤﺗ ﻭﺩ ﺮﻫ 3
ﻩﺪﻧﺮﻴﮔ ﺱﺎﻤﺗ ﻭ ﻩﺪﺷ ﻞﻔﻗ ﺎﻤﺷ ﻝﻭﺍ ﺱﺎﻤﺗ .ﺪﺷ
.ﺩﺮﻴﮔ ﯽﻣ ﺭﺍﺮﻗ ﺭﺎﻈﺘﻧﺍ ﺖﻟﺎﺣ ﺭﺩ
ﺎﻳ ﺪﻴﻨﮐ ﺲﻤﻟ ﺍﺭ
.ﺪﻴﻫﺩ ﺭﺎﺸﻓ ﺍﺭ ﻩﺪﺷ ﻪﺘﺷﺍﺪﻬﮕﻧ ﺱﺎﻤﺗ ی ﻩﺭﺎﻤﺷ
یﻭﺩ ﺮﻫ ﺎﻳ ﺎﻫ ﺱﺎﻤﺗ ﺯﺍ ﯽﮑﻳ ﻥﺩﺍﺩ ﻥﺎﻳﺎﭘ یﺍﺮﺑ 5
ﺲﭙﺳ ﻭ ﻥﺎﻳﺎﭘ ﻭ ﺪﻴﻫﺩ ﺭﺎﺸﻓ ﺍﺭ
.ﺪﻴﻨﮐ ﺏﺎﺨﺘﻧﺍ ﺍﺭ ﻝﺎﻌﻓ ﺎﻳ ﻦﺘﺷﺍﺩ ﻪﮕﻧ ،ﻪﻤﻫ
،ﺱﺎﻤﺗ ﺕﺪﻣ ﻭ ﺦﻳﺭﺎﺗ ،ﻥﺎﻣﺯ ﻩﺪﻫﺎﺸﻣ یﺍﺮﺑ !ﻪﺘﮑﻧ
ﺱﺎﻤﺗ ﺭﺎﻣﺁ یﺎﻫ یﺩﻭﺭﻭ ﺯﺍ ﮏﻳﺮﻫ ﺪﻴﻧﺍﻮﺗ ﯽﻣ
ﺮﺑ ﺭﺩ یﺍ ﻪﻨﻳﺰﻫ ﺪﻳﺮﻴﮔ ﯽﻣ ﻪﮐ ﯽﺳﺎﻤﺗ ﺮﻫ :ﻪﺟﻮﺗ
،ﺎﻫ ﺱﺎﻤﺗ ﺾﻳﻮﻌﺗ یﺍﺮﺑ 4
ﺪﻴﻠﮐ ،ﺎﻬﻧﺁ
.ﺪﻴﻨﮐ ﺲﻤﻟ ﺍﺭ
.ﺖﺷﺍﺩ ﺪﻫﺍﻮﺧ
ﺱﺎﻤﺗ ﺵﺭﺍﺰﮔ ﻩﺪﻫﺎﺸﻣ
.ﺪﻴﻨﮐ ﺲﻤﻟ ﺍﺭ ﺮﻴﺧﺍ ﻪﭽﺨﻳﺭﺎﺗ ،ﻁﺎﺒﺗﺭﺍ ﻪﻧﺎﺑﺯ ﺭﺩ
،ﺱﺎﻤﺗ ﺕﺪﻣ ﻭ ﺦﻳﺭﺎﺗ ،ﻥﺎﻣﺯ ﻩﺪﻫﺎﺸﻣ یﺍﺮﺑ !ﻪﺘﮑﻧ
ﻡﻭﺩ ﺱﺎﻤﺗ یﺭﺍﺮﻗﺮﺑ
ﺱﺎﻤﺗ ﺭﺎﻣﺁ یﺎﻫ یﺩﻭﺭﻭ ﺯﺍ ﮏﻳﺮﻫ ﺪﻴﻧﺍﻮﺗ ﯽﻣ
19
.ﺪﻴﻨﮐ ﺲﻤﻟ ﺍﺭ
ﯽﻣ ﺱﺎﻤﺗ ﻭﺍ ﺎﺑ ﻢﺋﺍﺩ ﻪﮐ ﯽﺒﻃﺎﺨﻣ ﻪﺑ ﺪﻴﻧﺍﻮﺗ ﯽﻣ
ﻊﻳﺮﺳ یﺮﻴﮔ ﻩﺭﺎﻤﺷ
ﺹﺎﺼﺘﺧﺍ ﻊﻳﺮﺳ یﺮﻴﮔ ﻩﺭﺎﻤﺷ ﺎﺑ ﻩﺭﺎﻤﺷ ﮏﻳ ﺪﻳﺮﻴﮔ
2
ﻭ ﻩﺩﺮﮐ ﺏﺎﺨﺘﻧﺍ ﻁﺎﺒﺗﺭﺍ ﻪﻧﺎﺑﺯ ﺭﺩ ﺍﺭ ﻦﻴﺒﻃﺎﺨﻣ 1
.ﺪﻴﻨﮐ ﺏﺎﺨﺘﻧﺍ ﺍﺭ ﻊﻳﺮﺳ یﺎﻫ ﻩﺭﺎﻤﺷ ﺲﭙﺳ
ﺎﻤﺷ ﯽﺗﻮﺻ ﺖﺴﭘ ﻪﺑ ﻞﺒﻗ ﺯﺍ 1 ﻊﻳﺮﺳ ﻩﺭﺎﻤﺷ 2
ﻩﺭﺎﻤﺷ ﻦﻳﺍ ﺪﻴﻧﺍﻮﺗ ﯽﻤﻧ .ﺖﺳﺍ ﻩﺪﺷ
ﺯﺍ ﺮﻴﻏ ﻪﺑ یﺮﮕﻳﺩ ﻩﺭﺎﻤﺷ ﺮﻫ .ﺪﻴﻫﺩ ﺮﻴﻴﻐﺗ ﺍﺭ
یﺍﺮﺑ ﺐﻃﺎﺨﻣ ﻪﺑ ﻥﺩﺍﺩ ﺹﺎﺼﺘﺧﺍ یﺍﺮﺑ ﺍﺭ 1
ﺍﺭ ﻭﺍ ﻦﻔﻠﺗ ﻩﺭﺎﻤﺷ ﺭﺎﮐ ﻦﻳﺍ یﺍﺮﺑ .ﺪﻴﻨﮐ ﺏﺎﺨﺘﻧﺍ
ﻭ ﺪﻴﻧﺰﺑ ﻪﺑﺮﺿ ﻡﺎﻧ ﺭﺩﺎﮐ یﻭﺭ ،ﺐﻃﺎﺨﻣ ﻦﺘﻓﺎﻳ
.ﺪﻴﻨﮐ ﺲﻤﻟ ﻊﻳﺮﺳ یﺮﻴﮔ ﻩﺭﺎﻤﺷ
ﯽﻣ ﻪﮐ ﯽﺒﻃﺎﺨﻣ .ﺪﻧﻮﺷ ﯽﻣ ﺯﺎﺑ ﻦﻴﺒﻃﺎﺨﻣ 3
ﺍﺭ ﺪﻴﻫﺩ ﺹﺎﺼﺘﺧﺍ ﻭﺍ ﻪﺑ ﺍﺭ ﻩﺭﺎﻤﺷ ﺪﻴﻫﺍﻮﺧ
یﺍﺮﺑ .ﺪﻴﻨﮐ
ﺲﻤﻟ ﺶﻳﺎﻤﻧ ﻪﺤﻔﺻ ﺭﺩ ﺭﺎﺑ ﮏﻳ
ﺩﺭﺍﻭ ﺍﺭ ﺮﻈﻧ ﺩﺭﻮﻣ ﺐﻃﺎﺨﻣ ﻡﺎﻧ ﻝﻭﺍ ﻑﺮﺣ
ﻩﺩﺍﺩ ﺺﻴﺼﺨﺗ
.ﺪﻴﻫﺩ
.ﺪﻴﻳﺎﻤﻧ

ﺍﺭ ﺎﻫ ﻥﺁ ﻪﻤﻫ ﺎﻳ ﻪﻨﻳﺰﮔ ﺶﺷ ﺯﺍ ﻡﺍﺪﮐ ﺮﻫ 3
ﺩﻮﺧ ﺭﻮﺸﮐ ﺰﺟ ﻪﺑ ﯽﻠﻠﻤﻟﺍ ﻦﻴﺑ یﺎﻫ ﺱﺎﻤﺗ
.ﺪﻴﻨﮐ ﺩﺭﺍﻭ ﺍﺭ ﺱﺎﻤﺗ ﺖﻳﺩﻭﺪﺤﻣ ﺩﻭﺭﻭ ﺰﻣﺭ 4
ﺩﻮﺧ ﺭﻮﺗﺍﺮﭘﺍ ﺎﺑ ،ﺕﺎﻣﺪﺧ ﻦﻳﺍ ﺯﺍ ﻉﻼﻃﺍ ﺖﻬﺟ
یﻮﻨﻣ ﺯﺍ ﺍﺭ ﺖﺑﺎﺛ یﺮﻴﮔ ﻩﺭﺎﻤﺷ ﻪﻨﻳﺰﮔ !ﻪﺘﮑﻧ
ﺯﺍ ﯽﺘﺳﺮﻬﻓ ﺎﺗ ﺪﻴﻨﮐ ﺏﺎﺨﺘﻧﺍ ﺱﺎﻤﺗ ﺕﺎﻤﻴﻈﻨﺗ
ﺎﻬﻧﺁ ﺎﺑ ﺎﻤﺷ ﯽﺷﻮﮔ ﺯﺍ ﻥﺍﻮﺗ ﯽﻣ ﻪﮐ ﯽﻳﺎﻫ ﻩﺭﺎﻤﺷ
ﻪﺑ ﺭﺎﮐ ﻦﻳﺍ یﺍﺮﺑ .ﺩﺩﺮﮔ یﺭﻭﺁ ﻊﻤﺟ ﺖﻓﺮﮔ ﺱﺎﻤﺗ
ﺎﻤﺷ ﯽﺷﻮﮔ ﺯﺍ .ﺪﻳﺭﺍﺩ ﺯﺎﻴﻧ ﺭﻮﺗﺍﺮﭘﺍ ﺯﺍ 2 ﻦﻴﭘ ﺪﮐ
ﺖﺳﺮﻬﻓ ﺭﺩ ﺝﺭﺪﻨﻣ یﺎﻫ ﻩﺭﺎﻤﺷ ﺎﺑ ﻥﺍﻮﺗ
.ﺖﻓﺮﮔ ﺱﺎﻤﺗ ﺖﺑﺎﺛ یﺮﻴﮔ ﻩﺭﺎﻤﺷ
:ﺪﻴﻨﮐ ﺏﺎﺨﺘﻧﺍ
ﯽﺟﻭﺮﺧ یﺎﻫ ﺱﺎﻤﺗ ﻪﻤﻫ
ﯽﻠﻠﻤﻟﺍ ﻦﻴﺑ ﯽﺟﻭﺮﺧ
یﺩﻭﺭﻭ یﺎﻫ ﺱﺎﻤﺗ ﻪﻤﻫ
ﺝﺭﺎﺧ ﺭﺩ یﺩﻭﺭﻭ ﺱﺎﻤﺗ
ﻪﻤﻫ ﻥﺩﺮﮐ ﻝﺎﻌﻓﺮﻴﻏ
.ﺪﻳﺮﻴﮕﺑ ﺱﺎﻤﺗ
ﯽﻣ ﻂﻘﻓ
ﺎﻫ ﺱﺎﻤﺗ
ﺏﺎﺨﺘﻧﺍ ﺍﺭ ﺱﺎﻤﺗ ﺕﺎﻤﻴﻈﻨﺗ ،ﺕﺎﻤﻴﻈﻨﺗ ﻪﻧﺎﺑﺯ ﺭﺩ 1
ﻪﺑ ،ﺖﺳﺍ ﻝﻮﻐﺸﻣ ﻂﺧ ﻪﮐ ﯽﻣﺎﮕﻨﻫ ﺪﻴﻨﮐ ﺏﺎﺨﺘﻧﺍ 3
ﺎﻤﺷ ﺎﺑ ﺱﺎﻤﺗ ﯽﺘﻗﻭ ﺎﻳ ﺩﻮﺸﻧ ﻩﺩﺍﺩ ﺦﺳﺎﭘ ﺱﺎﻤﺗ
ﻞﻘﺘﻨﻣ ﯽﺗﻮﺻ یﺎﻫ ﺱﺎﻤﺗ ﻪﻤﻫ ،ﺖﺴﻴﻧ ﻦﮑﻤﻣ
ﻥﺁ ﻪﺑ ﺱﺎﻤﺗ ﻝﺎﻘﺘﻧﺍ یﺍﺮﺑ ﺍﺭ ﺮﻈﻧ ﺩﺭﻮﻣ ﻩﺭﺎﻤﺷ 4
ًﺎﻔﻄﻟ .ﺩﺭﺍﺩ ﺮﺑ ﺭﺩ ﻪﻨﻳﺰﻫ ﺎﻫ ﺱﺎﻤﺗ ﻝﺎﻘﺘﻧﺍ :ﻪﺟﻮﺗ
ﺩﻮﺧ ﻪﮑﺒﺷ ﻩﺪﻨﻫﺩ ﻪﺋﺍﺭﺍ ﺎﺑ ﺮﺘﺸﻴﺑ ﺕﺎﻴﺋﺰﺟ یﺍﺮﺑ
،ﺎﻫ ﺱﺎﻤﺗ ﻪﻤﻫ ﻝﺎﻘﺘﻧﺍ ﻥﺩﺮﮐ ﺵﻮﻣﺎﺧ یﺍﺮﺑ !ﻪﺘﮑﻧ
ﻝﺎﻘﺘﻧﺍ یﻮﻨﻣ ﺯﺍ ﺍﺭ ﻪﻤﻫ ﻥﺩﺮﮐ ﻝﺎﻌﻓ ﺮﻴﻏ ﻪﻨﻳﺰﮔ
ﺱﺎﻤﺗ ﻝﺎﻘﺘﻧﺍ ﺯﺍ ﻩﺩﺎﻔﺘﺳﺍ
.ﺪﻴﻨﮐ ﺲﻤﻟ ﺍﺭ ﺱﺎﻤﺗ ﻝﺎﻘﺘﻧﺍ 2
.ﺪﻴﻨﮐ ﺩﺭﺍﻭ
.ﺩﻮﺷ ﻝﺎﻌﻓ ﺎﺗ ﺪﻴﻨﮐ ﺲﻤﻟ ﺍﺭ ﺖﺳﺍﻮﺧﺭﺩ 5
.ﺪﻳﺮﻴﮕﺑ ﺱﺎﻤﺗ
.ﺪﻴﻨﮐ ﺏﺎﺨﺘﻧﺍ ﺱﺎﻤﺗ
.ﺪﻴﻨﮐ
.ﺪﻧﻮﺷ
ﺱﺎﻤﺗ کﺮﺘﺸﻣ ﺕﺎﻤﻴﻈﻨﺗ ﺮﻴﻴﻐﺗ
ﺲﻤﻟ ﺍﺭ ﺱﺎﻤﺗ ﺕﺎﻤﻴﻈﻨﺗ ،ﺕﺎﻤﻴﻈﻨﺗ ﻪﻧﺎﺑﺯ ﺭﺩ 1
.ﺪﻴﻨﮐ
.ﺪﻴﻨﮐ ﺲﻤﻟ ﺍﺭ ﻥﺁ ﻭ ﻪﺘﻓﺭ کﺮﺘﺸﻣ ﺕﺎﻤﻴﻈﻨﺗ ﻪﺑ 2
ﻡﺎﺠﻧﺍ ﺍﺭ ﺮﻳﺯ ﺕﺎﻤﻴﻈﻨﺗ ﺪﻴﻧﺍﻮﺗ ﯽﻣ ﺎﺠﻨﻳﺍ ﺭﺩ
:ﺪﻴﻫﺩ
ﺱﺎﻤﺗ ﺖﻳﺩﻭﺪﺤﻣ ﺯﺍ ﻩﺩﺎﻔﺘﺳﺍ
ﺲﻤﻟ ﺍﺭ ﺱﺎﻤﺗ ﺕﺎﻤﻴﻈﻨﺗ ،ﺕﺎﻤﻴﻈﻨﺗ ﻪﻧﺎﺑﺯ ﺭﺩ 1
.ﺪﻴﻨﮐ
.ﺪﻴﻨﮐ ﺲﻤﻟ ﺍﺭ ﺱﺎﻤﺗ ﺖﻳﺩﻭﺪﺤﻣ 2
20
ﺮﺑﺭﺎﮐ یﺎﻤﻨﻫﺍﺭ | LG GM360

ﻦﻴﺒﻃﺎﺨﻣ
:ﺩﺭﺍﺩ ﺩﻮﺟﻭ ﺐﻃﺎﺨﻣ یﻮﺠﺘﺴﺟ یﺍﺮﺑ ﺵﻭﺭ ﻭﺩ
.ﺪﻴﻨﮐ ﺲﻤﻟ ﺍﺭ ﻦﻴﺒﻃﺎﺨﻣ ،ﻁﺎﺒﺗﺭﺍ ﻪﻧﺎﺑﺯ ﺭﺩ 1
.ﺪﻴﻨﮐ ﻩﺪﻫﺎﺸﻣ ﺍﺭ ﻦﻴﺒﻃﺎﺨﻣ ﺯﺍ ﯽﺘﺴﻴﻟ ﺪﻴﻧﺍﻮﺗ ﯽﻣ 3
،ﻡﺎﻧ ﺖﻤﺴﻗ ﺭﺩ ﺐﻃﺎﺨﻣ ﻡﺎﻧ ﻑﺮﺣ ﻦﻴﻟﻭﺍ ﭗﻳﺎﺗ ﺎﺑ
.ﺪﻳﻭﺭ ﯽﻣ ﺖﺴﻴﻟ یﺍ ﻩﺭﺎﻤﺷ ﯽﻤﺳﺍ یﻮﻨﻣ ﻪﺑ
،ﺪﻴﻧﺯ ﯽﻣ ﻪﺑﺮﺿ ﻡﺎﻧ ﺖﻤﺴﻗ یﻭﺭ ﯽﺘﻗﻭ !ﻪﺘﮑﻧ
.ﺩﻮﺷ ﯽﻣ ﺮﻫﺎﻇ ﺎﺒﻔﻟﺍ ﻑﻭﺮﺣ ﺪﻴﻠﮐ ﻪﺤﻔﺻ
ﻭ ﻩﺩﺮﮐ ﺲﻤﻟ ﻁﺎﺒﺗﺭﺍ ﻪﻧﺎﺑﺯ ﺭﺩ ﺍﺭ ﻦﻴﺒﻃﺎﺨﻣ 1
.ﺪﻴﻨﮐ ﺏﺎﺨﺘﻧﺍ ﺍﺭ ﺐﻃﺎﺨﻣ ﻥﺩﻭﺰﻓﺍ ﺲﭙﺳ
ﺩﻮﺷ ﻩﺮﻴﺧﺫ ﯽﺷﻮﮔ ﺭﺩ ﺐﻃﺎﺨﻣ ﻪﮐ ﺪﻴﻨﮐ ﺏﺎﺨﺘﻧﺍ 2
.ﺪﻴﻨﮐ ﺩﺭﺍﻭ ﺍﺭ ﺩﻮﺧ ﯽﮔﺩﺍﻮﻧﺎﺧ ﻡﺎﻧ ﻭ ﻡﺎﻧ 3
ﺮﻫ یﺍﺮﺑ ﺍﺭ ﻒﻠﺘﺨﻣ ﻩﺭﺎﻤﺷ ﺞﻨﭘ ﺎﺗ ﺪﻴﻧﺍﻮﺗ ﯽﻣ 4
ﮏﻳ یﺍﺭﺍﺩ یﺩﻭﺭﻭ ﺮﻫ .ﺪﻴﻨﮐ ﺩﺭﺍﻭ
،ﻪﻧﺎﺧ ،ﻞﻳﺎﺑﻮﻣ ،ﺖﺳﺍ ﻩﺪﺷ ﻢﻴﻈﻨﺗ ﺶﻴﭘ ﺯﺍ ﻉﻮﻧ
ﻭﺩ ﺎﺗ ﺪﻴﻧﺍﻮﺗ ﯽﻣ .ﺪﻴﻨﮐ ﺩﺭﺍﻭ ﻞﻴﻤﻳﺍ ﺱﺭﺩﺁ ﮏﻳ 5
ﺩﺭﺍﻭ ﺐﻃﺎﺨﻣ ﺮﻫ یﺍﺮﺑ ﻒﻠﺘﺨﻣ ﻞﻴﻤﻳﺍ ﺱﺭﺩﺁ
ﺹﺎﺼﺘﺧﺍ ﻩﻭﺮﮔ ﺪﻨﭼ ﺎﻳ ﮏﻳ ﻪﺑ ﺍﺭ ﺐﻃﺎﺨﻣ 6
ﺮﻫ ﻪﺑ ﻩﻭﺮﮔ ﻪﺳ ﺎﺗ ﺪﻴﻧﺍﻮﺗ ﯽﻣ ﺎﻤﺷ
یﺎﻫ ﻪﻨﻳﺰﮔ ﻦﻴﺑ ﺯﺍ .ﺪﻴﻫﺩ ﺹﺎﺼﺘﺧﺍ ﺐﻃﺎﺨﻣ
،ﻥﺍﺭﺎﮑﻤﻫ ،ﻥﺎﺘﺳﻭﺩ ،ﻩﺩﺍﻮﻧﺎﺧ ،ﻩﻭﺮﮔ ﻥﻭﺪﺑ
21
ﺐﻃﺎﺨﻣ یﻮﺠﺘﺴﺟ
.ﺪﻴﻨﮐ ﺲﻤﻟ ﺍﺭ ﻮﺠﺘﺴﺟ 2
ﺪﻳﺪﺟ ﺐﻃﺎﺨﻣ ﻥﺩﻭﺰﻓﺍ
ﺐﻃﺎﺨﻣ
.ﺮﺑﺎﻤﻧ ﻭ ﺮﺠﻴﭘ ،ﺭﺎﮐ ﺮﺘﻓﺩ
.ﺪﻴﻨﮐ ﺏﺎﺨﺘﻧﺍ ﻢﻬﻣ ﺩﺍﺮﻓﺍ ﺎﻳ ﻪﺳﺭﺪﻣ
ﺎﺗ ﺪﻴﻫﺩ ﺭﺍﺮﻗ ﻦﺷﻭﺭ یﻭﺭ ﺍﺭ ﺪﻴﻠﮐ - ﺱﺎﻤﺗ ﺩﺭ
ﯽﻣ .ﺩﻮﺷ ﻪﺘﺴﺟﺮﺑ ﻩﺪﺷ ﺩﺭ یﺎﻫ ﻩﺭﺎﻤﺷ ﺖﺳﺮﻬﻓ
ﺱﺎﻤﺗ ﻪﻤﻫ ﺯﺍ ﻭ ﺪﻴﻨﮐ ﺲﻤﻟ ﺍﺭ ﻦﺘﻣ ﺭﺩﺎﮐ ﺪﻴﻧﺍﻮﺗ
ﻩﺭﺎﻤﺷ ﺎﻳ ،ﻩﮋﻳﻭ یﺎﻫ ﻩﻭﺮﮔ ﺎﻳ ﻦﻴﺒﻃﺎﺨﻣ ،ﺎﻫ
ﻦﻴﺒﻃﺎﺨﻣ ﺭﺩ ﻪﮐ ﯽﻳﺎﻫ ﻩﺭﺎﻤﺷ) ﻩﺪﺸﻧ ﺖﺒﺛ یﺎﻫ
ﻩﺪﻧﺮﻴﮔ ﺱﺎﻤﺗ ﻪﺳﺎﻨﺷ ﻥﻭﺪﺑ ﺎﻳ ،(ﺖﺴﻴﻧ
ﺍﺭ ﻩﺮﻴﺧﺫ ،ﺕﺎﻤﻴﻈﻨﺗ ﺮﻴﻴﻐﺗ یﺍﺮﺑ .ﺪﻴﻨﮐ ﺏﺎﺨﺘﻧﺍ
ﻡﺎﮕﻨﻫ ﺎﻳﺁ ﻪﮐ ﺪﻴﻨﮐ ﺏﺎﺨﺘﻧﺍ - ﻦﻣ ﻩﺭﺎﻤﺷ ﻝﺎﺳﺭﺍ
ﺶﻳﺎﻤﻧ ﺎﻤﺷ ﻩﺭﺎﻤﺷ ﺮﻈﻧ ﺩﺭﻮﻣ ﺐﻃﺎﺨﻣ ﺎﺑ ﺱﺎﻤﺗ
ﺭﺎﺸﻓ ﭗﭼ ﻪﺑ ﺍﺭ ﺪﻴﻠﮐ - ﺩﺪﺠﻣ یﺮﻴﮔ ﻩﺭﺎﻤﺷ
ﺖﺳﺍﺭ ﻪﺑ ﺎﻳ ﺩﻮﺷ ﻦﺷﻭﺭ ﯽﮔﮋﻳﻭ ﻦﻳﺍ ﺎﺗ ﺪﻴﻫﺩ
ﺎﺑ ﺎﻳﺁ ﻪﮐ ﺪﻴﻨﮐ ﺏﺎﺨﺘﻧﺍ - ﯽﻳﻮﮕﺨﺳﺎﭘ ﺖﻟﺎﺣ
.ﻢﻴﺳ ﺎﻳ
.ﺪﻴﻫﺩ
ﺎﻳ ﺪﻴﻫﺩ ﺦﺳﺎﭘ ﺱﺎﻤﺗ ﻪﺑ ﻝﺎﺳﺭﺍ ﺪﻴﻠﮐ ﺯﺍ ﻩﺩﺎﻔﺘﺳﺍ
ﺎﺗ ﺪﻴﻫﺩ ﺭﺎﺸﻓ ﭗﭼ ﻪﺑ ﺍﺭ ﺪﻴﻠﮐ - ﻪﻘﻴﻗﺩ ﺭﻭﺁﺩﺎﻳ
ﺪﻌﺑ ﺱﺎﻤﺗ ﻦﻴﺣ ﺭﺩ ﻭ ﺩﻮﺷ ﻦﺷﻭﺭ ﯽﮔﮋﻳﻭ ﻦﻳﺍ
.ﺪﻳﻮﻨﺸﺑ ﻪﻘﻴﻗﺩ ﺭﻭﺁﺩﺎﻳ ﻕﻮﺑ ﮏﻳ ﻪﻘﻴﻗﺩ ﺮﻫ ﺯﺍ
ﺍﺭ
یﺮﻓﺯﺪﻨﻫ ﻪﻨﻳﺰﮔ - BT ﺎﺑ ﯽﻳﻮﮕﺨﺳﺎﭘ ﺖﻟﺎﺣ
ﺙﻮﺗﻮﻠﺑ ﺖﺳﺪﻫ ﮏﻳ ﺯﺍ ﻩﺩﺎﻔﺘﺳﺍ ﺎﺑ ﻭ ﺪﻴﻨﮐ ﺏﺎﺨﺘﻧﺍ
ﻩﺩﺮﮐ ﺏﺎﺨﺘﻧﺍ ﺍﺭ ﯽﺷﻮﮔ ﺎﻳ ﺪﻴﻫﺩ ﺦﺳﺎﭘ ﺱﺎﻤﺗ ﻪﺑ
ﻪﺑ ﻭ ﺪﻴﻫﺩ ﺭﺎﺸﻓ ﺍﺭ ﯽﺷﻮﮔ یﻭﺭ ﺪﻴﻠﮐ ﮏﻳ ﻭ
.ﺪﻴﻨﮐ
ﻩﺭﺎﻤﺷ ﻩﺮﻴﺧﺫ یﺍﺮﺑ - ﺪﻳﺪﺟ ﻩﺭﺎﻤﺷ ﻩﺮﻴﺧﺫ
.ﺪﻴﻨﮐ ﺲﻤﻟ
.ﺮﻴﺧ ﺎﻳ ﺩﻮﺷ ﻩﺩﺍﺩ
.ﺩﻮﺷ ﺵﻮﻣﺎﺧ
ﺎﺗ ﺪﻴﻫﺩ ﺭﺎﺸﻓ
.ﺮﮕﻳﺩ یﺎﻫﺪﻴﻠﮐ ﺯﺍ ﮏﻳﺮﻫ
.ﺪﻴﻫﺩ ﺦﺳﺎﭘ ﺱﺎﻤﺗ
.ﺪﻴﻨﮐ ﺏﺎﺨﺘﻧﺍ ﺍﺭ ﻪﻠﺑ ،ﺪﻳﺪﺟ
ﺎﻤﺷ
یﺭﻮﻃ ﺍﺭ ﺩﻮﺧ ﺐﻃﺎﺨﻣ ﺕﺎﻤﻴﻈﻨﺗ ﺪﻴﻧﺍﻮﺗ ﯽﻣ
ﺐﻃﺎﺨﻣ ﺕﺎﻤﻴﻈﻨﺗ ﺮﻴﻴﻐﺗ
ﻩﺪﻳﺰﮔﺮﺑ ﺩﺭﺍﻮﻣ ﺎﺑ ﺐﺳﺎﻨﺘﻣ ﻦﻴﺒﻃﺎﺨﻣ ﻪﮐ ﺪﻴﻨﮐ ﻢﻴﻈﻨﺗ
ﻭ ﻩﺩﺮﮐ ﺲﻤﻟ ﻁﺎﺒﺗﺭﺍ ﻪﻧﺎﺑﺯ ﺭﺩ ﺍﺭ ﻦﻴﺒﻃﺎﺨﻣ 1
.ﺪﻴﻨﮐ ﺏﺎﺨﺘﻧﺍ ﺍﺭ ﺕﺎﻤﻴﻈﻨﺗ ﺲﭙﺳ
ﻡﺎﺠﻧﺍ ﺍﺭ ﺮﻳﺯ ﺕﺎﻤﻴﻈﻨﺗ ﺪﻴﻧﺍﻮﺗ ﯽﻣ ﺎﺠﻨﻳﺍ ﺯﺍ 2
،ﻦﻴﺒﻃﺎﺨﻣ ﻞﺤﻣ - ﻦﻴﺒﻃﺎﺨﻣ ﺖﺴﻴﻟ ﺕﺎﻤﻴﻈﻨﺗ
.ﺪﻴﻨﮐ ﻢﻴﻈﻨﺗ ﺍﺭ یﺭﻮﻓ
ﻪﺑ ﯽﺷﻮﮔ ﺯﺍ ﺍﺭ ﺩﻮﺧ ﻦﻴﺒﻃﺎﺨﻣ - ﻥﺩﺮﮐ ﯽﭙﮐ
ﺪﻴﻧﺍﻮﺗ ﯽﻣ .ﺪﻴﻨﮐ ﯽﭙﮐ ﯽﺷﻮﮔ ﻪﺑ ﻢﻴﺳ ﺯﺍ ﺎﻳ ﻢﻴﺳ
ﻢﻫ ﺎﺑ ﺍﺭ ﺩﺭﺍﻮﻣ ﻪﻤﻫ ﺎﻳ ﺩﺭﻮﻣ ﮏﻳ ﺭﺎﺑ ﺮﻫ
ﻞﻤﻋ ﻥﺩﺮﮐ ﯽﭙﮐ ﺪﻨﻧﺎﻣ ﺰﻴﻧ ﻪﻨﻳﺰﮔ ﻦﻳﺍ - ﻝﺎﻘﺘﻧﺍ
ﺍﺭ ﻥﺁ ﻪﮐ ﯽﻠﺤﻣ ﺭﺩ ﻂﻘﻓ
ﻥﺎﻣﺮﻓ ﺪﻴﻠﮐ ﻭ ﻡﺎﻧ ﺶﻳﺎﻤﻧ
.ﺩﻮﺷ ﯽﻣ ﻩﺮﻴﺧﺫ ﺪﻳﺍ ﻩﺩﺍﺩ ﻝﺎﻘﺘﻧﺍ
.ﺪﺷﺎﺑ ﺎﻤﺷ
:ﺪﻴﻫﺩ
.ﺪﻴﻨﮐ ﺏﺎﺨﺘﻧﺍ
ﺐﻃﺎﺨﻣ ﺎﻣﺍ ،ﺪﻨﮐ ﯽﻣ
ﻦﻴﺒﻃﺎﺨﻣ
ﺯﻭﺭ ،ﮓﻧﺯ ﮓﻨﻫﺁ ﮏﻳ ﺪﻴﻧﺍﻮﺗ ﯽﻣ ﻦﻴﻨﭽﻤﻫ 7
ﻡﺎﻧ ،ﻝﺰﻨﻣ ﺱﺭﺩﺁ ،ﯽﻠﺻﺍ ﻪﺤﻔﺻ ،ﺩﺮﮕﻟﺎﺳ ،ﺪﻟﻮﺗ
ﻭ ﺖﺷﺍﺩﺩﺎﻳ ،ﺖﮐﺮﺷ ﺱﺭﺩﺁ ،ﺭﺎﮐ ﻥﺍﻮﻨﻋ ،ﺖﮐﺮﺷ
.ﺪﻴﻨﮐ ﺲﻤﻟ ﺍﺭ ﻩﺮﻴﺧﺫ ،ﺐﻃﺎﺨﻣ ﻩﺮﻴﺧﺫ یﺍﺮﺑ 8
ﻪﺑ ﺪﻴﻧﺍﻮﺗ ﯽﻣ ، ﺩﺎﻤﻧ ﺏﺎﺨﺘﻧﺍ ﺎﺑ !ﻪﺘﮑﻧ
ﻩﺪﺷ ﻩﺮﻴﺧﺫ ﺪﻟﻮﺗ یﺎﻫﺯﻭﺭ ﯽﺳﺭﺮﺑ ﺎﺑ ﺩﺎﻤﻧ ﻦﻳﺍ
ﺐﻴﺗﺮﺗ ﻪﺑ ﺍﺭ ﻩﺪﻨﻳﺁ ﺪﻟﻮﺗ یﺎﻫﺯﻭﺭ ،ﻦﻴﺒﻃﺎﺨﻣ ﺭﺩ
،ﺱﺎﻤﺗ ﻥﺎﮑﻣﺍ ﺎﺑ ﺖﺠﻳﻭ ﻦﻳﺍ .ﺪﻫﺩ ﯽﻣ ﺶﻳﺎﻤﻧ ﻩﺎﻣ
ﺯﻭﺭ ﻪﮐ ﯽﺒﻃﺎﺨﻣ ﺎﺑ ﻁﺎﺒﺗﺭﺍ ،ﻞﻴﻤﻳﺍ ﻭ ﯽﻧﺎﺳﺭ ﻡﺎﻴﭘ
ﻭ .ﺪﻴﻨﮐ ﺲﻤﻟ ﺍﺭ ﻦﻴﺒﻃﺎﺨﻣ ،ﻁﺎﺒﺗﺭﺍ ﻪﻧﺎﺑﺯ ﺭﺩ 1
ﻭ ﻩﺩﺮﮐ ﺲﻤﻟ ﺍﺭ
.ﺪﻴﻨﮐ ﺩﺭﺍﻭ ﺩﻮﺧ ﺪﻳﺪﺟ ﻩﻭﺮﮔ یﺍﺮﺑ ﻡﺎﻧ ﮏﻳ 3
ﻩﻭﺮﮔ ﻪﺑ ﮓﻧﺯ ﮓﻨﻫﺁ ﮏﻳ ﺪﻴﻧﺍﻮﺗ ﯽﻣ ﻦﻴﻨﭽﻤﻫ
ﻪﮐ ﯽﻨﻴﺒﻃﺎﺨﻣ ،ﺪﻴﻨﮐ ﻑﺬﺣ ﺍﺭ ﯽﻫﻭﺮﮔ ﺮﮔﺍ :ﻪﺟﻮﺗ
ﻦﻴﺑ ﺯﺍ ﺖﺳﺍ ﻩﺪﺷ ﻩﺩﺍﺩ ﺺﻴﺼﺨﺗ ﻩﻭﺮﮔ ﻥﺁ ﻪﺑ ﻪﮐ
.ﺪﻨﻧﺎﻣ ﯽﻣ ﯽﻗﺎﺑ ﻦﻴﺒﻃﺎﺨﻣ ﺭﺩ ﻭ .ﺖﻓﺭ ﺪﻫﺍﻮﺨﻧ
.ﺪﻴﻨﮐ ﻪﻓﺎﺿﺍ ﻩﺪﻧﺯ ﺩﺎﻤﻧ
.ﺪﻴﺷﺎﺑ ﻪﺘﺷﺍﺩ ﯽﺳﺮﺘﺳﺩ ﺪﻟﻮﺗ ﺖﺠﻳﻭ
.ﺪﻨﮐ ﯽﻣ ﻥﺎﺳﺁ ﺍﺭ ﺖﺳﺍ ﺵﺪﻟﻮﺗ
ﻩﻭﺮﮔ ﮏﻳ ﺩﺎﺠﻳﺍ
.ﺪﻴﻨﮐ ﺲﻤﻟ ﺍﺭ ﺎﻫ ﻩﻭﺮﮔ
ﺎﻳ ﻩﻭﺮﮔ ﻥﺩﻭﺰﻓﺍ 2
.ﺪﻴﻨﮐ ﺏﺎﺨﺘﻧﺍ ﺍﺭ ﻩﻭﺮﮔ ﻥﺩﻭﺰﻓﺍ
.ﺪﻴﻫﺩ ﺹﺎﺼﺘﺧﺍ
.ﺪﻴﻨﮐ ﺲﻤﻟ ﺍﺭ ﻩﺮﻴﺧﺫ 4
ﺮﺑﺭﺎﮐ یﺎﻤﻨﻫﺍﺭ | LG GM360
22
ﻦﻴﺒﻃﺎﺨﻣ ﺭﺩ ﻩﺮﻴﺧﺫ ﯽﮔﮋﻳﻭ ﺯﺍ ﻩﺩﺎﻔﺘﺳﺍ !ﻪﺘﮑﻧ
ﺖﻴﻌﺿﻭ ﺪﻫﺩ ﯽﻣ ﻥﺎﮑﻣﺍ ﺎﻤﺷ ﻪﺑ Facebook
Facebook ﺮﺑﺭﺎﮐ ﯽﺼﺨﺷ ﺕﺎﻋﻼﻃﺍ ﻭ
ﺲﮑﻋ ﻭ ﻞﻴﻤﻳﺍ ،ﺱﺎﻤﺗ ﻩﺭﺎﻤﺷ ،ﻡﺎﻧ ﻞﻣﺎﺷ ﺍﺭ
،ﺪﻨﮐ ﺶﻳﺍﺮﻳﻭ ﺍﺭ ﺕﺎﻋﻼﻃﺍ ﻦﻳﺍ ﺪﻧﺍﻮﺗ ﯽﻤﻧ ﺮﺑﺭﺎﮐ
ﺭﺩ یﺯﺎﺳﻮﻧ یﻭﺭ ﺮﺑ ﮏﻴﻠﮐ ﺎﺑ ﺪﻧﺍﻮﺗ ﯽﻣ ﻂﻘﻓ
.ﺪﻨﮐ ﺯﻭﺭ ﻪﺑ ﺍﺭ ﺕﺎﻋﻼﻃﺍ ،ﺶﻳﺎﻤﻧ
ﺭﺩ ﻩﺮﻴﺧﺫ ﻩﺭﺎﺑﺭﺩ ﺮﺘﺸﻴﺑ ﺕﺎﻋﻼﻃﺍ یﺍﺮﺑ
Linkbook ﻪﺑ ﺎﻔﻄﻟ ،Facebook ﻦﻴﺒﻃﺎﺨﻣ
23
.ﺪﻴﻳﺎﻤﻧ ﻩﺪﻫﺎﺸﻣ
ﻪﺤﻔﺻ
.ﺪﻴﻨﮐ ﻪﻌﺟﺍﺮﻣ
ﻪﻤﻫ - ﺙﻮﺗﻮﻠﺑ ﻪﻠﻴﺳﻮﺑ ﻦﻴﺒﻃﺎﺨﻣ ﻪﻤﻫ ﻝﺎﺳﺭﺍ
ﺮﮕﻳﺩ ﻩﺎﮕﺘﺳﺩ ﻪﺑ ﺙﻮﺗﻮﻠﺑ ﻪﻠﻴﺳﻮﺑ ﺍﺭ ﻦﻴﺒﻃﺎﺨﻣ
ﺯﺍ ،ﺪﻴﻨﮐ ﺏﺎﺨﺘﻧﺍ ﺍﺭ ﻪﻨﻳﺰﮔ ﻦﻳﺍ ﺮﮔﺍ .ﺪﻴﻫﺩ ﻝﺎﻘﺘﻧﺍ
.ﺪﻴﻨﮐ ﻦﺷﻭﺭ ﺍﺭ ﺙﻮﺗﻮﻠﺑ ﺩﻮﺷ ﯽﻣ ﻪﺘﺳﺍﻮﺧ ﺎﻤﺷ
ﻥﺎﺒﻴﺘﺸﭘ ﻪﻴﻬﺗ ﻪﺑ - ﻦﻴﺒﻃﺎﺨﻣ ﺯﺍ ﻥﺎﺒﻴﺘﺸﭘ ﻪﻴﻬﺗ
.ﺪﻴﻨﮐ ﻪﻌﺟﺍﺮﻣ ﻦﻔﻠﺗ ﺭﺩ ﺕﺎﻋﻼﻃﺍ ﯽﺑﺎﻳﺯﺎﺑ ﻭ
ﯽﺑﺎﻳﺯﺎﺑ ﻭ ﻥﺎﺒﻴﺘﺸﭘ ﻪﻴﻬﺗ ﻪﺑ -
ﻦﻴﺒﻃﺎﺨﻣ ﯽﺑﺎﻳﺯﺎﺑ
.ﺪﻴﻨﮐ ﻪﻌﺟﺍﺮﻣ ﻦﻔﻠﺗ ﺭﺩ ﺕﺎﻋﻼﻃﺍ
ﻑﺬﺣ ﺍﺭ ﻦﻴﺒﻃﺎﺨﻣ ﻪﻤﻫ - ﻦﻴﺒﻃﺎﺨﻣ ﻥﺩﺮﮐ کﺎﭘ
ﺏﺎﺨﺘﻧﺍ ﺍﺭ ﯽﮑﻳ ﻢﻴﺳ ﻭ ﯽﺷﻮﮔ ﻦﻴﺑ ﺯﺍ .ﺪﻨﮐ ﯽﻣ
ﻦﻴﺒﻃﺎﺨﻣ ﺪﻴﻫﺍﻮﺧ ﯽﻣ ﻪﮐ ﺪﻴﻨﺌﻤﻄﻣ ﺮﮔﺍ ﻭ ﻩﺩﺮﮐ
.ﺪﻴﻨﮐ ﺲﻤﻟ ﺍﺭ ﻪﻠﺑ ،ﺪﻴﻨﮐ کﺎﭘ ﺍﺭ
ﺕﺎﻋﻼﻃﺍ ﻩﺪﻫﺎﺸﻣ
ﻭ ﻩﺩﺮﮐ ﺲﻤﻟ ﻁﺎﺒﺗﺭﺍ ﻪﻧﺎﺑﺯ ﺭﺩ ﺍﺭ ﻦﻴﺒﻃﺎﺨﻣ 1
.ﺪﻴﻨﮐ ﺏﺎﺨﺘﻧﺍ ﺍﺭ ﺕﺎﻋﻼﻃﺍ ﺲﭙﺳ
،ﺕﺎﻣﺪﺧ یﺎﻫ ﻩﺭﺎﻤﺷ ﺪﻴﻧﺍﻮﺗ ﯽﻣ ﺎﺟ ﻦﻳﺍ ﺯﺍ 2
ﺶﻳﺎﻤﻧ) ﻪﻈﻓﺎﺣ ﺕﺎﻋﻼﻃﺍ ،ﯽﺼﺨﺷ ﻩﺭﺎﻤﺷ
ﺍﺭ ﻦﻣ ﻪﺼﺨﺸﻣ ﻭ (ﻪﻈﻓﺎﺣ ﻩﺪﺷ ﻩﺩﺎﻔﺘﺳﺍ ﺖﻤﺴﻗ
ﯽﺼﺨﺷ ﺖﻳﺰﻳﻭ ﺕﺭﺎﮐ ﻥﺩﻭﺰﻓﺍ یﺍﺮﺑ !ﻪﺘﮑﻧ
ﻪﻤﻫ ﻭ ﻩﺩﺮﮐ ﺏﺎﺨﺘﻧﺍ ﺍﺭ ﻦﻣ ﻪﺼﺨﺸﻣ ،ﺩﻮﺧ
ﻦﻴﺒﻃﺎﺨﻣ یﺍﺮﺑ ﻪﮐ ﺭﻮﻄﻧﺎﻤﻫ ﺍﺭ ﺩﻮﺧ ﺕﺎﻴﺋﺰﺟ
،ﻥﺎﻳﺎﭘ ﺭﺩ .ﺪﻴﻳﺎﻤﻧ ﺩﺭﺍﻭ ،ﺪﻴﻨﮐ ﯽﻣ ﺩﺭﺍﻭ ﺮﮕﻳﺩ
.ﺪﻴﻨﮐ ﻩﺪﻫﺎﺸﻣ
.ﺪﻴﻨﮐ ﺲﻤﻟ ﺍﺭ ﻩﺮﻴﺧﺫ
:ﺩﺭﺍﺩ ﺩﻮﺟﻭ ﻦﺘﻣ ﻥﺩﺮﮐ ﺩﺭﺍﻭ یﺍﺮﺑ ﺵﻭﺭ ﺞﻨﭘ
ﺖﺳﺩ ﻪﺤﻔﺻ ،ﺪﻴﻠﮐ ﻪﺤﻔﺻ ،یﺩﻮﻤﻋ ﺪﻴﻠﮐ ﻪﺤﻔﺻ
. ﻂﺧ ﺖﺳﺩ ﯽﻳﺎﺗﻭﺩ ﻪﺒﻌﺟ ،ﻂﺧ ﺖﺳﺩ ﻕﻭﺪﻨﺻ ،ﻂﺧ
ﻪﺑﺮﺿ ﺎﺑ ﺍﺭ ﻦﺘﻣ ﻥﺩﺮﮐ ﺩﺭﺍﻭ ﺵﻭﺭ ﺪﻴﻧﺍﻮﺗ ﯽﻣ
.ﺪﻴﻨﮐ ﺏﺎﺨﺘﻧﺍ یﺩﻭﺭﻭ ﺵﻭﺭ ﻭ
ﺲﻤﻟ T9 ﺖﻟﺎﺣ ﻥﺩﺮﮐ ﻦﺷﻭﺭ یﺍﺮﺑ ﺍﺭ
ﻪﮐ ﺩﻮﺷ ﯽﻣ ﻩﺩﺍﺩ ﺶﻳﺎﻤﻧ ﯽﺘﻗﻭ ﻂﻘﻓ ﺩﺎﻤﻧ ﻦﻳﺍ .ﺪﻴﻨﮐ
یﺩﻭﺭﻭ ﺵﻭﺭ ﻥﺍﻮﻨﻋ ﻪﺑ ﺍﺭ یﺩﻮﻤﻋ ﺪﻴﻠﮐ ﻪﺤﻔﺻ
.ﺪﻴﻨﮐ ﺲﻤﻟ ﻦﺘﺷﻮﻧ ﻥﺎﺑﺯ ﺏﺎﺨﺘﻧﺍ یﺍﺮﺑ ﺍﺭ
ﻭ ﺎﻫ ﺖﻣﻼﻋ ،ﺩﺍﺪﻋﺍ ﺖﻟﺎﺣ ﻦﻴﺑ ﺾﻳﻮﻌﺗ یﺍﺮﺑ
.ﺪﻴﻨﮐ ﺲﻤﻟ ﺍﺭ
ﻭ گﺭﺰﺑ ﻑﻭﺮﺣ ﺖﻟﺎﺣ ﻦﻴﺑ ﺾﻳﻮﻌﺗ یﺍﺮﺑ
.ﺪﻴﻨﮐ ﻩﺩﺎﻔﺘﺳﺍ shift ﺪﻴﻠﮐ ﺯﺍ ،ﮏﭼﻮﮐ
یﻭﺭ
.ﺪﻴﻳﺎﻤﻧ ﺏﺎﺨﺘﻧﺍ
،ﻦﺘﻣ یﺩﻭﺭﻭ
T9 ﺖﻟﺎﺣ
ﻦﺘﻣ ﻥﺩﺮﮐ ﺩﺭﺍﻭ
یﺍﺮﺑ ﯽﻠﺧﺍﺩ ﺕﺎﻐﻟ ﮓﻨﻫﺮﻓ ﮏﻳ ﺯﺍ T9 ﺖﻟﺎﺣ
ﯽﻟﺍﻮﺗ ﺱﺎﺳﺍﺮﺑ ﻭ ﻩﺪﺷ ﻪﺘﺷﻮﻧ ﺕﺎﻐﻟ ﺺﻴﺨﺸﺗ
ﯽﺘﻐﻟ ﺖﻟﺎﺣ ﻦﻳﺍ .ﺪﻨﮐ ﯽﻣ ﻩﺩﺎﻔﺘﺳﺍ ﻩﺪﺷ ﺲﻤﻟ یﺎﻫﺪﻴﻠﮐ
ﺍﺭ ﯽﺗﺎﻐﻟ ﻭ ﻩﺩﺮﮐ ﯽﻨﻴﺑ ﺶﻴﭘ ﺪﻴﻨﮐ ﯽﻣ ﺩﺭﺍﻭ ﻪﮐ ﺍﺭ
.ﺪﻨﮐ ﯽﻣ ﺩﺎﻬﻨﺸﻴﭘ
ﻂﺧ ﺖﺳﺩ ﺺﻴﺨﺸﺗ
ﻪﺤﻔﺻ یﻭﺭ ﯽﮔﺩﺎﺳ ﻪﺑ ،ﻂﺧ ﺖﺳﺩ ﺖﻟﺎﺣ ﺭﺩ
ﻂﺧ ﺖﺳﺩ GM360 ﯽﺷﻮﮔ ﻭ ﺪﻴﺴﻳﻮﻧ ﯽﻣ ﺶﻳﺎﻤﻧ
ﺎﻳ ﻂﺧ ﺖﺳﺩ ﻪﺤﻔﺻ .ﺪﻨﮐ ﯽﻣ ﻞﻳﺪﺒﺗ ﻡﺎﻴﭘ ﻪﺑ ﺍﺭ ﺎﻤﺷ
ﺩﻮﺧ ﻩﺪﻳﺰﮔﺮﺑ یﺎﻤﻧ ﻖﺒﻃ ﺮﺑ ﺍﺭ ﻂﺧ ﺖﺳﺩ ﻕﻭﺪﻨﺻ
.ﺪﻴﻨﮐ ﺏﺎﺨﺘﻧﺍ
ﯽﻧﺎﺳﺭ ﻡﺎﻴﭘ
ﻭ SMS ﺯﺍ ﯽﺒﻴﮐﺮﺗ GM360 ﻝﺪﻣ ﯽﺷﻮﮔ
ﻢﻬﻓ ﻞﺑﺎﻗ ﻭ ﻩﺩﺎﺳ یﻮﻨﻣ ﮏﻳ ﺭﺩ ﺍﺭ MMS
ﻭ .ﺪﻴﻨﮐ ﺲﻤﻟ ﺍﺭ ﯽﻧﺎﺳﺭ ﻡﺎﻴﭘ ،ﻁﺎﺒﺗﺭﺍ ﻪﻧﺎﺑﺯ ﺭﺩ 1
ﺍﺭ ﺪﻳﺪﺟ ﻡﺎﻴﭘ ،ﺪﻳﺪﺟ ﻡﺎﻴﭘ ﻦﺘﺷﻮﻧ ﻉﻭﺮﺷ یﺍﺮﺑ
ﻭ ﻮﮕﻟﺍ ،ﺍﺪﺻ ،ﻢﻠﻴﻓ ،ﺮﻳﻮﺼﺗ ﻥﺩﻭﺰﻓﺍ یﺍﺮﺑ 2
.ﺪﻴﻨﮐ ﺲﻤﻟ ﺍﺭ ﻥﺩﺮﮐ ﺩﺭﺍﻭ ،ﻩﺮﻴﻏ
ﻭ ﻩﺩﺮﮐ ﺲﻤﻟ ﺶﻳﺎﻤﻧ ﻪﺤﻔﺻ ﻦﻴﻳﺎﭘ ﺭﺩ ﺍﺭ ﻩﺪﻧﺮﻴﮔ 3
ﺩﺭﺍﻭ ﺍﺭ ﻩﺭﺎﻤﺷ ﺲﭙﺳ .ﺪﻴﻨﮐ ﺩﺭﺍﻭ
ﺍﺭ
،ﺐﻃﺎﺨﻣ ﮏﻳ ﺏﺎﺨﺘﻧﺍ یﺍﺮﺑ ﺎﻳ ﺪﻴﻨﮐ
ﻪﻓﺎﺿﺍ ﺐﻃﺎﺨﻣ ﺪﻨﭼ ﺪﻴﻧﺍﻮﺗ ﯽﻣ ﯽﺘﺣ .ﺪﻴﻨﮐ ﺲﻤﻟ
.ﺪﻴﻨﮐ ﺲﻤﻟ ﺍﺭ ﻝﺎﺳﺭﺍ ،ﺪﺷ ﻩﺩﺎﻣﺁ ﯽﺘﻗﻭ 4
ﻪﺑ ﯽﻳﺍﺪﺻ ﺎﻳ ﻢﻠﻴﻓ ،ﺮﻳﻮﺼﺗ ﺮﮔﺍ :ﺭﺍﺪﺸﻫ
ﺭﺎﮐﺩﻮﺧ ﺭﻮﻃ ﻪﺑ SMS ،ﺩﻮﺷ ﻩﺩﻭﺰﻓﺍ SMS
MMS ﻝﺎﺳﺭﺍ ﻪﻨﻳﺰﻫ ﻭ ﻩﺪﺷ MMS ﻪﺑ ﻞﻳﺪﺒﺗ
ﯽﻧﺎﺳﺭ ﻡﺎﻴﭘ
.ﺖﺳﺍ ﻩﺪﻧﺎﺠﻨﮔ
ﻡﺎﻴﭘ ﻝﺎﺳﺭﺍ
.ﺪﻴﻨﮐ ﺲﻤﻟ
ﺍﺭ ﻥﺎﮔﺪﻧﺮﻴﮔ
.ﺪﻴﻨﮐ
.ﺩﻮﺷ ﯽﻣ ﺖﻓﺎﻳﺭﺩ ﺎﻤﺷ ﺯﺍ
ﺮﺑﺭﺎﮐ یﺎﻤﻨﻫﺍﺭ | LG GM360
24
.ﺪﻴﻨﮐ ﺲﻤﻟ ﺍﺭ ﻞﻴﻤﻳﺍ ،ﻁﺎﺒﺗﺭﺍ ﻪﻧﺎﺑﺯ ﺭﺩ 1
ﻞﻴﻤﻳﺍ ﺕﺎﻤﻴﻈﻨﺗ ﺮﻴﻴﻐﺗ
ﺍﺭ
ﻞﻴﻤﻳﺍ ﺕﺎﻤﻴﻈﻨﺗ
ﺍﺭ ﺮﻳﺯ ﺕﺎﻤﻴﻈﻨﺗ ﺪﻴﻧﺍﻮﺗ ﯽﻣ ﺲﭙﺳ ،ﺪﻴﻨﮐ ﺏﺎﺨﺘﻧﺍ
ﺏﺎﺨﺘﻧﺍ ﺍﺭ ﻪﻨﻳﺰﮔ ﻦﻳﺍ - ﺯﺎﺠﻣ ﻞﻴﻤﻳﺍ ﻪﺑ ﺦﺳﺎﭘ
.ﺩﻮﺷ ﻝﺎﺳﺭﺍ ﻥﺪﺷ ﻩﺪﻧﺍﻮﺧ ﺪﻴﻳﺎﺗ یﺎﻫ ﻡﺎﻴﭘ ﺎﺗ ﺪﻴﻨﮐ
ﺏﺎﺨﺘﻧﺍ ﺍﺭ ﻪﻨﻳﺰﮔ ﻦﻳﺍ - ﻞﻴﻤﻳﺍ ﺦﺳﺎﭘ ﺖﺳﺍﻮﺧﺭﺩ
ﺖﺳﺍﻮﺧﺭﺩ ﻥﺪﺷ ﻩﺪﻧﺍﻮﺧ ﺪﻴﻳﺄﺗ یﺎﻫ ﻡﺎﻴﭘ ﺎﺗ ﺪﻴﻨﮐ
ﯽﺷﻮﮔ ﻪﮐ
ﻞﻴﻤﻳﺍ ﺭﺎﺑ ﮏﻳ ﺖﻗﻭ ﺪﻨﭼ ﺮﻫ ﺎﻤﺷ GM360
ﺭﺎﺑ ﺮﻫ ﻪﮐ ﯽﻳﺎﻫ ﻞﻴﻤﻳﺍ ﺩﺍﺪﻌﺗ - ﯽﺑﺎﻳﺯﺎﺑ ﻥﺍﺰﻴﻣ
ﺪﻴﻨﮐ ﺏﺎﺨﺘﻧﺍ - ﺦﺳﺎﭘ ﻭ ﻝﺎﻘﺘﻧﺍ ﺭﺩ ﻡﺎﻴﭘ ﻞﻣﺎﺷ
.ﺩﻮﺷ ﻩﺪﻧﺎﺠﻨﮔ ﺎﻤﺷ ﺦﺳﺎﭘ ﺭﺩ ﯽﻠﺻﺍ ﻡﺎﻴﭘ
ﯽﻠﺻﺍ ﺖﺳﻮﻴﭘ ﺎﺗ ﺪﻴﻨﮐ
ﺪﻴﻨﮐ ﺏﺎﺨﺘﻧﺍ - ﮓﻨﻴﻣﻭﺭ ﻡﺎﮕﻨﻫ ﺭﺎﮐﺩﻮﺧ ﯽﺑﺎﻳﺯﺎﺑ
ﻞﻴﻤﻳﺍ ،(ﮓﻨﻴﻣﻭﺭ) ﺪﻴﺘﺴﻫ ﺭﻮﺸﮐ ﺯﺍ ﺝﺭﺎﺧ ﯽﺘﻗﻭ
.ﺩﻮﺷ ﯽﺑﺎﻳﺯﺎﺑ ﺭﺎﮐﺩﻮﺧ ﺭﻮﻃ ﻪﺑ ﺎﻤﺷ یﺎﻫ
ﺖﻓﺎﻳﺭﺩ ﺎﻳﺁ ﻪﮐ ﺪﻴﻨﮐ ﺏﺎﺨﺘﻧﺍ - ﺪﻳﺪﺟ ﻞﻴﻤﻳﺍ ﻡﻼﻋﺍ
ﮏﻳ ﻭ ﻩﺩﺮﮐ ﻦﺷﻭﺭ ﺍﺭ
25
ﻭ ﻩﺩﺮﮐ ﺲﻤﻟ ﺍﺭ 2
:ﺪﻴﻫﺩ ﻡﺎﺠﻧﺍ
ﻞﻴﻤﻳﺍ یﺎﻫ کﺍﺮﺘﺷﺍ
ﻩﺪﻳﺰﮔﺮﺑ ﻞﻴﻤﻳﺍ
.ﺩﺩﺮﮔ
ﺪﻴﻨﮐ ﺏﺎﺨﺘﻧﺍ - ﯽﺑﺎﻳﺯﺎﺑ ﯽﻧﺎﻣﺯ ﻪﻠﺻﺎﻓ
.ﺪﻨﮐ ﯽﺳﺭﺮﺑ ﺍﺭ ﺪﻳﺪﺟ یﺎﻫ
.ﺪﻴﻨﮐ ﺏﺎﺨﺘﻧﺍ ﺍﺭ ﺪﻧﻮﺷ ﯽﺑﺎﻳﺯﺎﺑ
ﺏﺎﺨﺘﻧﺍ - ﺖﺳﻮﻴﭘ ﻞﻣﺎﺷ
.ﺩﻮﺷ ﻩﺪﻧﺎﺠﻨﮔ ﯽﺨﺳﺎﭘ ﺮﻫ ﺭﺩ
.ﺮﻴﺧ ﺎﻳ ﺩﻮﺷ ﻡﻼﻋﺍ ﺪﻳﺪﺟ یﺎﻫ ﻞﻴﻤﻳﺍ
ﯽﮔﮋﻳﻭ ﻦﻳﺍ - ﺎﻀﻣﺍ
.ﺪﻴﻨﮐ ﺩﺎﺠﻳﺍ ﻞﻴﻤﻳﺍ یﺎﻀﻣﺍ
.ﺪﻴﻨﮐ ﺲﻤﻟ ﺍﺭ ﻞﻴﻤﻳﺍ ،ﻁﺎﺒﺗﺭﺍ ﻪﻧﺎﺑﺯ ﺭﺩ
ﻪﻣﺎﻧﺮﺑ ،ﺖﺳﺍ ﻩﺪﺸﻧ ﻢﻴﻈﻨﺗ ﻞﻴﻤﻳﺍ کﺍﺮﺘﺷﺍ ﺮﮔﺍ
ﻪﺑ ﻭ ﺪﻴﻨﮐ یﺯﺍﺪﻧﺍ ﻩﺍﺭ ﺍﺭ ﻞﻴﻤﻳﺍ ﻢﻴﻈﻨﺗ ﯽﻳﻭﺩﺎﺟ
ﻭ ﯽﺳﺭﺮﺑ
ﺕﺎﻤﻴﻈﻨﺗ ﺩﻮﺑ ﺪﻴﻫﺍﻮﺧ ﺭﺩﺎﻗ ﻦﻴﻨﭽﻤﻫ .ﺪﻴﻨﮐ ﺶﻳﺍﺮﻳﻭ
ﻢﻴﻈﻨﺗ ﺭﺎﮐﺩﻮﺧ ﺭﻮﻃ ﻪﺑ کﺍﺮﺘﺷﺍ ﺩﺎﺠﻳﺍ ﺎﺑ ﻪﮐ یﺮﮕﻳﺩ
.ﺪﻴﻫﺩ ﻥﺎﻳﺎﭘ ﺐﺼﻧ
ﺏﺎﺨﺘﻧﺍ ﺎﺑ ﺍﺭ ﺕﺎﻤﻴﻈﻨﺗ ﺪﻴﻧﺍﻮﺗ ﯽﻣ
.ﺪﻴﻨﮐ ﯽﺳﺭﺮﺑ ﺍﺭ ﺪﻧﺍ ﻩﺪﺷ
ﺎﻫ ﻞﻴﻤﻳﺍ ﯽﺑﺎﻳﺯﺎﺑ
ﻞﻴﻤﻳﺍ ﻢﻴﻈﻨﺗ
یﺎﻫ ﻞﻴﻤﻳﺍ ﯽﺘﺳﺩ ﺎﻳ ﺭﺎﮐﺩﻮﺧ ﺭﻮﻃ ﻪﺑ ﺪﻴﻧﺍﻮﺗ ﯽﻣ
:ﯽﺘﺳﺩ ﯽﺳﺭﺮﺑ یﺍﺮﺑ .ﺪﻴﻨﮐ ﯽﺳﺭﺮﺑ ﺍﺭ ﺩﻮﺧ ﺪﻳﺪﺟ
.ﺪﻴﻨﮐ ﺲﻤﻟ ﺍﺭ ﻞﻴﻤﻳﺍ ،ﻁﺎﺒﺗﺭﺍ ﻪﻧﺎﺑﺯ ﺭﺩ 1
.ﺪﻴﻨﮐ ﺲﻤﻟ ﻩﺩﺎﻔﺘﺳﺍ یﺍﺮﺑ ﺍﺭ ﺮﻈﻧ ﺩﺭﻮﻣ کﺍﺮﺘﺷﺍ 2
ﺪﻴﻨﮐ ﺏﺎﺨﺘﻧﺍ ﺍﺭ ﺖﻓﺎﻳﺭﺩ ﻕﻭﺪﻨﺻ 3
ﻡﺎﮕﻤﻫ ﺎﻳ ﯽﺑﺎﻳﺯﺎﺑ ،ﻞﻴﻤﻳﺍ ﮏﻳ ﺖﻓﺎﻳﺭﺩ یﺍﺮﺑ 4
.ﺪﻴﻨﮐ ﺏﺎﺨﺘﻧﺍ ﺎﻫ
ﻪﻨﻳﺰﮔ یﻮﻨﻣ ﺭﺩ ﺍﺭ یﺯﺎﺳ
ﺪﻳﺪﺟ کﺍﺮﺘﺷﺍ ﺯﺍ ﻩﺩﺎﻔﺘﺳﺍ ﺎﺑ ﻞﻴﻤﻳﺍ ﻝﺎﺳﺭﺍ
ﺯﺎﺑ ﺪﻳﺪﺟ ﻞﻴﻤﻳﺍ ﮏﻳ ،ﺪﻴﻨﮐ ﺲﻤﻟ ﺍﺭ ﺪﻳﺪﺟ ﻞﻴﻤﻳﺍ 1
.ﺪﻴﻨﮐ ﺲﻤﻟ ﺍﺭ ﻝﺎﺳﺭﺍ ،ﻞﻴﻤﻳﺍ ﻝﺎﺳﺭﺍ یﺍﺮﺑ 3
.ﺩﻮﺷ ﯽﻣ
.ﺪﻴﻨﮐ ﻞﻣﺎﮐ ﺍﺭ ﻡﺎﻴﭘ 2

ﺲﭙﺳ ﻭ ﻩﺩﺮﮐ ﺲﻤﻟ ﻁﺎﺒﺗﺭﺍ ﻪﻧﺎﺑﺯ ﺭﺩ ﺍﺭ ﯽﻧﺎﺳﺭ ﻡﺎﻴﭘ
ﯽﻨﺘﻣ ﻡﺎﻴﭘ ﺕﺎﻤﻴﻈﻨﺗ ﺮﻴﻴﻐﺗ
ﺏﺎﺨﺘﻧﺍ ﺍﺭ ﯽﻨﺘﻣ ﻡﺎﻴﭘ ﻪﻨﻳﺰﮔ .ﺪﻴﻨﮐ ﺲﻤﻟ ﺍﺭ ﺕﺎﻤﻴﻈﻨﺗ
ﺩﺭﺍﻮﻣ ﺹﻮﺼﺧ ﺭﺩ ﺍﺭ ﯽﺗﺍﺮﻴﻴﻐﺗ ﺪﻴﻧﺍﻮﺗ ﯽﻣ .ﺪﻴﻨﮐ
ﺩﺭﺍﻭ ﺍﺭ ﻡﺎﻴﭘ ﺰﮐﺮﻣ ﺕﺎﻴﺋﺰﺟ - ﯽﻨﺘﻣ ﻡﺎﻴﭘ ﺰﮐﺮﻣ
ﺪﻴﻫﺩ ﺭﺎﺸﻓ ﭗﭼ ﺖﻤﺳ ﻪﺑ ﺍﺭ ﺪﻴﻠﮐ - ﻞﻳﻮﺤﺗ ﺵﺭﺍﺰﮔ
.ﺪﻴﻨﮐ ﺖﻓﺎﻳﺭﺩ
ﻪﭼ ﺎﺗ ﺎﻤﺷ یﺎﻫ ﻡﺎﻴﭘ ﻪﮐ ﺪﻴﻨﮐ ﺏﺎﺨﺘﻧﺍ - ﺭﺎﺒﺘﻋﺍ ﻩﺭﻭﺩ
.ﺪﻨﻧﺎﻤﺑ ﻩﺮﻴﺧﺫ ﻡﺎﻴﭘ ﺰﮐﺮﻣ ﺭﺩ ﺕﺪﻣ
،ﯽﺗﻮﺻ ،ﯽﻨﺘﻣ ﻡﺎﻴﭘ ﻪﺑ ﺍﺭ ﺩﻮﺧ ﻦﺘﻣ - ﻡﺎﻴﭘ ﻉﺍﻮﻧﺍ
.ﺪﻴﻨﮐ ﻞﻳﺪﺒﺗ ﻞﻴﻤﻳﺍ ﺎﻳ X.400 ،یﺮﺑﺎﻤﻧ
ﻪﺴﻳﻮﻧ یﺭﺍﺬﮔﺰﻣﺭ ﻩﻮﺤﻧ - ﺎﻫ ﻪﺴﻳﻮﻧ یﺭﺍﺬﮔﺰﻣﺭ
ﻩﺩﺮﺸﻓ ﻡﺎﻴﭘ ﻩﺯﺍﺪﻧﺍ ﺭﺎﮐ ﻦﻳﺍ
ﺶﻫﺎﮐ ﺰﻴﻧ ﺎﻫ ﻩﺩﺍﺩ ﻝﺎﻘﺘﻧﺍ ﻪﻨﻳﺰﻫ ﻪﺠﻴﺘﻧ ﺭﺩ ﻭ ﻩﺪﺷ
ﻡﺎﻴﭘ ﻝﺎﺳﺭﺍ یﺍﺮﺑ - ﺕﺭﻮﺻ ﻪﺑ ﺪﻨﻠﺑ ﻡﺎﻴﭘ ﻝﺎﺳﺭﺍ
ﮏﻳ ﺕﺭﻮﺻ ﻪﺑ ﺎﻳ sms ﻪﻧﺎﮔﺪﻨﭼ ﺕﺭﻮﺻ ﻪﺑ ﺪﻨﻠﺑ
.ﺪﻴﻨﮐ ﺏﺎﺨﺘﻧﺍ ﺍﺭ ﻪﻨﻳﺰﮔ ﻦﻳﺍ MMS
:ﺪﻴﻫﺩ ﻡﺎﺠﻧﺍ ﺮﻳﺯ
.ﺪﻴﻨﮐ
ﺍﺭ ﺎﻫ ﻡﺎﻴﭘ ﻞﻳﻮﺤﺗ ﺪﻴﻳﺄﺗ ﻡﺎﻴﭘ ﺎﺗ
ﺎﺑ .ﺪﻴﻨﮐ ﺏﺎﺨﺘﻧﺍ ﺍﺭ ﺎﻫ
.ﺪﺑﺎﻳ ﯽﻣ
ﯽﻧﺎﺳﺭ ﻡﺎﻴﭘ
ﺖﺴﭘ یﺎﻫ ﻡﺎﻴﭘ ﺖﻳﻮﻟﻭﺍ ﻥﺍﺰﻴﻣ - ﺖﻳﻮﻟﻭﺍ
.ﺪﻴﻨﮐ ﺏﺎﺨﺘﻧﺍ ﺍﺭ ﺩﻮﺧ ﮏﻴﻧﻭﺮﺘﮑﻟﺍ
ﻝﺎﺳﺭﺍ ﺮﺜﮐﺍﺪﺣ ﻩﺯﺍﺪﻧﺍ - ﻝﺎﺳﺭﺍ ﻩﺯﺍﺪﻧﺍ ﺮﺜﮐﺍﺪﺣ
ﺩﺭﺍﻭ ﺍﺭ ﺮﻈﻧ ﺩﺭﻮﻣ ﺦﻳﺭﺎﺗ - ﻞﻴﻤﻳﺍ ﺮﮕﺷﺭﺎﻤﺷ
ﺕﺪﻣ ﻥﺁ ﺭﺩ ﻪﮐ ﺍﺭ ﯽﻳﺎﻫ ﻞﻴﻤﻳﺍ ﺪﻴﻧﺍﻮﺗ ﯽﻣ .ﺪﻴﻨﮐ
.ﺩﺭﺍﺩ ﺩﻮﺟﻭ ﯽﻧﺎﺳﺭ ﻡﺎﻴﭘ یﻮﻨﻣ ﺭﺩ ﻪﺷﻮﭘ ﺞﻨﭘ
ﯽﻣ ﺖﻓﺎﻳﺭﺩ ﻪﮐ ﯽﻳﺎﻫ ﻡﺎﻴﭘ ﻪﻤﻫ - ﺖﻓﺎﻳﺭﺩ ﻕﻭﺪﻨﺻ
.ﺩﺮﻴﮔ ﯽﻣ ﺭﺍﺮﻗ ﺎﻤﺷ ﺖﻓﺎﻳﺭﺩ ﻕﻭﺪﻨﺻ ﺭﺩ ﺪﻴﻨﮐ
ﻡﺎﻴﭘ ﻦﺘﺷﻮﻧ یﺍﺮﺑ ﯽﻓﺎﮐ ﺖﻗﻭ ﺮﮔﺍ - ﺎﻫ ﺲﻳﻮﻧ ﺶﻴﭘ
ﻪﺷﻮﭘ ﻦﻳﺍ ﺭﺩ ﺪﻴﻧﺍﻮﺗ ﯽﻣ ﺍﺭ ﺪﻳﺍ ﻪﺘﺷﻮﻧ ﻪﭽﻧﺁ ،ﺪﻳﺭﺍﺪﻧ
ﻝﺎﺳﺭﺍ ﻝﺎﺣ ﺭﺩ ﺎﻫ ﻡﺎﻴﭘ ﻪﮐ
ﻩﺮﻴﺧﺫ ﻪﺷﻮﭘ ﮏﻳ ﻥﺍﻮﻨﻋ ﻪﺑ ﻕﻭﺪﻨﺻ ﻦﻳﺍ ،ﺪﻨﺘﺴﻫ
ﺭﺩ ﺎﻤﺷ ﻝﺎﺳﺭﺍ یﺎﻫ ﻡﺎﻴﭘ ﻪﻴﻠﮐ - ﻩﺪﺷ ﻝﺎﺳﺭﺍ ﺩﺭﺍﻮﻣ
یﺎﻫ ﻡﺎﻴﭘ ﻩﺮﻴﺧﺫ یﺍﺮﺑ ﯽﻳﺎﻫ ﻪﺷﻮﭘ - ﻦﻣ یﺎﻫ ﻪﺷﻮﭘ
.ﺪﻴﻨﮐ ﻢﻴﻈﻨﺗ ﺍﺭ ﻞﻴﻤﻳﺍ
.ﺪﻴﻳﺎﻤﻧ ﯽﺳﺭﺮﺑ ،ﺪﻳﺍ ﻩﺩﺮﮐ ﻝﺎﺳﺭﺍ
ﻡﺎﻴﭘ یﺎﻫ ﻪﺷﻮﭘ
.ﺪﻴﻨﮐ ﻩﺮﻴﺧﺫ
ﯽﻧﺎﻣﺯ - ﻝﺎﺳﺭﺍ ﻕﻭﺪﻨﺻ
.ﺪﻨﮐ ﯽﻣ ﻞﻤﻋ ﺖﻗﻮﻣ
.ﺩﺮﻴﮔ ﯽﻣ ﺭﺍﺮﻗ ﻪﺷﻮﭘ ﻦﻳﺍ
.ﺪﻴﻨﮐ ﺩﺎﺠﻳﺍ ﺩﻮﺧ
ﺮﺑﺭﺎﮐ یﺎﻤﻨﻫﺍﺭ | LG GM360
26
ﻡﺎﻴﭘ ﺮﻫ ﻞﺒﻗ ﺕﺪﻣ ﻪﭼ ﺪﻴﻨﮐ ﺏﺎﺨﺘﻧﺍ - ﻞﻳﻮﺤﺗ ﻥﺎﻣﺯ
.ﺖﺳﺍ ﻩﺪﺷ ﻝﺎﺳﺭﺍ
ﻡﺎﻴﭘ ﺰﮐﺮﻣ ﮏﻳ - یﺍ ﻪﻧﺎﺳﺭﺪﻨﭼ ﻡﺎﻴﭘ ﺰﮐﺮﻣ
.ﺪﻴﻨﮐ ﻪﻓﺎﺿﺍ ﺎﻳ ﺏﺎﺨﺘﻧﺍ یﺍ ﻪﻧﺎﺳﺭﺪﻨﭼ
ﺕﺎﻤﻴﻈﻨﺗ ﺮﻳﺎﺳ ﺮﻴﻴﻐﺗ
ﻭ .ﺪﻴﻨﮐ ﺲﻤﻟ ﺍﺭ ﯽﻧﺎﺳﺭ ﻡﺎﻴﭘ ،ﻁﺎﺒﺗﺭﺍ ﻪﻧﺎﺑﺯ ﺭﺩ
.ﺪﻴﻨﮐ ﺲﻤﻟ ﺍﺭ ﺕﺎﻤﻴﻈﻨﺗ
،ﯽﺗﻮﺻ ﺖﺴﭘ ﺕﺎﻣﺪﺧ ﻥﺩﻭﺰﻓﺍ یﺍﺮﺑ - ﯽﺗﻮﺻ ﺖﺴﭘ
ﺮﺘﺸﻴﺑ ﺕﺎﻋﻼﻃﺍ ﺐﺴﮐ یﺍﺮﺑ .ﺪﻴﻨﮐ ﺲﻤﻟ ﺍﺭ
ﺭﻮﺗﺍﺮﭘﺍ ﺎﺑ ﺩﻮﺷ ﯽﻣ ﻪﺋﺍﺭﺍ ﻪﮐ ﯽﺗﺎﻣﺪﺧ ﻪﺑ ﻊﺟﺍﺭ
.ﺪﻳﺮﻴﮕﺑ ﺱﺎﻤﺗ ﻪﮑﺒﺷ
ﻡﺎﻴﭘ ﻥﺩﺮﮐ ﺩﻭﺪﺴﻣ ﺎﻳ ﺖﻓﺎﻳﺭﺩ یﺍﺮﺑ - ﺕﺎﻣﺪﺧ ﻡﺎﻴﭘ
ﻦﻴﻨﭽﻤﻫ .ﺪﻴﻨﮐ ﺏﺎﺨﺘﻧﺍ ﺍﺭ ﻪﻨﻳﺰﮔ ﻦﻳﺍ ﯽﺗﺎﻣﺪﺧ یﺎﻫ
ﺖﺳﺮﻬﻓ ﺩﺎﺠﻳﺍ ﺎﺑ ﺍﺭ ﺩﻮﺧ ﻡﺎﻴﭘ ﺖﻴﻨﻣﺍ ﺪﻴﻧﺍﻮﺗ ﯽﻣ
ﻥﺎﻨﻴﻤﻃﺍ ﻞﺑﺎﻗﺮﻴﻏ ﻭ ﻥﺎﻨﻴﻤﻃﺍ ﻞﺑﺎﻗ یﺎﻫ ﻩﺪﻨﻨﮐ ﻝﺎﺳﺭﺍ
.ﺪﻴﻨﮐ ﻢﻴﻈﻨﺗ ﺕﺎﻣﺪﺧ ﺖﻴﻨﻣﺍ ﻪﻨﻳﺰﮔ
یﺍﺮﺑ ﻥﺎﻣﺯ ﺕﺪﻣ ﻪﮐ ﺪﻴﻨﮐ ﺏﺎﺨﺘﻧﺍ - ﻡﺎﻴﭘ ﺮﮕﺷﺭﺎﻤﺷ
.ﺩﻮﺷ ﻢﻴﻈﻨﺗ ﺎﻫ ﻡﺎﻴﭘ ﺵﺭﺎﻤﺷ
ﯽﻟﻮﻠﺳ ﺶﺨﭘ ﺪﻴﻨﮐ ﺏﺎﺨﺘﻧﺍ - ﺕﺎﻋﻼﻃﺍ ﺕﺎﻣﺪﺧ
یﺎﻫ ﻥﺎﺑﺯ ﻭ ﺎﻫ ﻝﺎﻧﺎﮐ ﻭ ﺪﺷﺎﺑ ﺵﻮﻣﺎﺧ ﺎﻳ ﻦﺷﻭﺭ
.ﺪﻴﻨﮐ ﺏﺎﺨﺘﻧﺍ ﺍﺭ ﺩﻮﺧ
27
یﺍ ﻪﻧﺎﺳﺭﺪﻨﭼ ﻡﺎﻴﭘ ﺕﺎﻤﻴﻈﻨﺗ ﺮﻴﻴﻐﺗ
ﺖﮐﺮﺣ .ﺪﻴﻨﮐ ﺲﻤﻟ ﺍﺭ ﯽﻧﺎﺳﺭ ﻡﺎﻴﭘ ،ﻁﺎﺒﺗﺭﺍ ﻪﻧﺎﺑﺯ ﺭﺩ
ﺏﺎﺨﺘﻧﺍ ﺍﺭ یﺍ ﻪﻧﺎﺳﺭﺪﻨﭼ ﻡﺎﻴﭘ ﻭ ﺕﺎﻤﻴﻈﻨﺗ ﻭ ﺪﻴﻨﮐ
ﺩﺭﺍﻮﻣ ﺹﻮﺼﺧ ﺭﺩ ﺍﺭ ﯽﺗﺍﺮﻴﻴﻐﺗ ﺪﻴﻧﺍﻮﺗ ﯽﻣ .ﺪﻴﻳﺎﻤﻧ
ﮓﻨﻴﻣﻭﺭ ﻪﮑﺒﺷ ﺎﻳ ﯽﮕﻧﺎﺧ ﻪﮑﺒﺷ - ﯽﺑﺎﻳﺯﺎﺑ ﺖﻟﺎﺣ
ﺍﺭ ﯽﺘﺳﺩ ﻪﻨﻳﺰﮔ ﺮﮔﺍ ﻦﻳﺍﺮﺑﺎﻨﺑ .ﺪﻴﻨﮐ ﺏﺎﺨﺘﻧﺍ ﺍﺭ
MMS ﻪﺑ ﻁﻮﺑﺮﻣ یﺎﻫ ﻥﻼﻋﺍ ﻂﻘﻓ ،ﺪﻴﻨﮐ
ﻢﻴﻤﺼﺗ ﺪﻴﻧﺍﻮﺗ ﯽﻣ ﺲﭙﺳ ﻭ ﺩﺮﮐ ﺪﻴﻫﺍﻮﺧ ﺖﻓﺎﻳﺭﺩ ﺍﺭ
یﺮﻴﮔﺭﺎﺑ ﻞﻣﺎﮐ ﺭﻮﻃ ﻪﺑ ﺍﺭ ﺎﻬﻧﺁ ﺎﻳﺁ ﻪﮐ ﺪﻳﺮﻴﮕﺑ
ﻞﻳﻮﺤﺗ ﺵﺭﺍﺰﮔ ﺪﻴﻨﮐ ﺏﺎﺨﺘﻧﺍ -ﻞﻳﻮﺤﺗ ﺵﺭﺍﺰﮔ
.ﺩﻮﺷ ﻩﺩﺍﺩ ﺖﻓﺎﻳﺭﺩ ﻩﺯﺎﺟﺍ ﻥﺁ ﻪﺑ ﺎﻳﻭ ﺩﻮﺷ ﺖﺳﺍﻮﺧﺭﺩ
ﻥﺪﻧﺍﻮﺧ ﺦﺳﺎﭘ ﻪﮐ ﺪﻴﻨﮐ ﺏﺎﺨﺘﻧﺍ - ﻥﺪﻧﺍﻮﺧ ﺦﺳﺎﭘ
.ﺩﻮﺷ ﻩﺩﺍﺩ ﺖﻓﺎﻳﺭﺩ ﻩﺯﺎﺟﺍ ﻥﺁ ﻪﺑ ﺎﻳﻭ
ﺍﺭ ﺩﻮﺧ یﺍ ﻪﻧﺎﺳﺭﺪﻨﭼ یﺎﻫ ﻡﺎﻴﭘ ﺖﻳﻮﻟﻭﺍ - ﺖﻳﻮﻟﻭﺍ
ﺭﺩ
ﻪﭼ ﺎﺗ ﺎﻤﺷ یﺎﻫ ﻡﺎﻴﭘ ﻪﮐ ﺪﻴﻨﮐ ﺏﺎﺨﺘﻧﺍ - ﺭﺎﺒﺘﻋﺍ ﻩﺭﻭﺩ
ﻪﺑ ﺎﻫﺪﻳﻼﺳﺍ ﻪﮐ ﺪﻴﻨﮐ ﺏﺎﺨﺘﻧﺍ - ﺪﻳﻼﺳﺍ ﻥﺎﻣﺯ ﺕﺪﻣ
یﺍ ﻪﻧﺎﺳﺭﺪﻨﭼ یﺎﻫ ﻡﺎﻴﭘ ﺪﻴﻨﮐ ﺏﺎﺨﺘﻧﺍ - ﺩﺎﺠﻳﺍ ﺖﻟﺎﺣ
.ﺪﻨﻧﺎﻤﺑ ﻩﺮﻴﺧﺫ ﻡﺎﻴﭘ ﺰﮐﺮﻣ ﺭﺩ ﺕﺪﻣ
.ﺪﻧﺎﻤﺑ ﻪﺤﻔﺻ یﻭﺭ ﺕﺪﻣ ﻪﭼ ﺽﺮﻓ ﺶﻴﭘ ﺭﻮﻃ
.ﺪﻧﻮﺷ ﺩﺎﺠﻳﺍ ﺖﻳﺩﻭﺪﺤﻣ ﺎﺑ ﺎﻳ ﺖﻳﺩﻭﺪﺤﻣ ﻥﻭﺪﺑ
:ﺪﻴﻫﺩ ﻡﺎﺠﻧﺍ ﺮﻳﺯ
ﺏﺎﺨﺘﻧﺍ
.ﺮﻴﺧ ﺎﻳ ﺪﻴﻨﮐ
ﺩﻮﺷ ﺖﺳﺍﻮﺧﺭﺩ
.ﺪﻴﻨﮐ ﺏﺎﺨﺘﻧﺍ

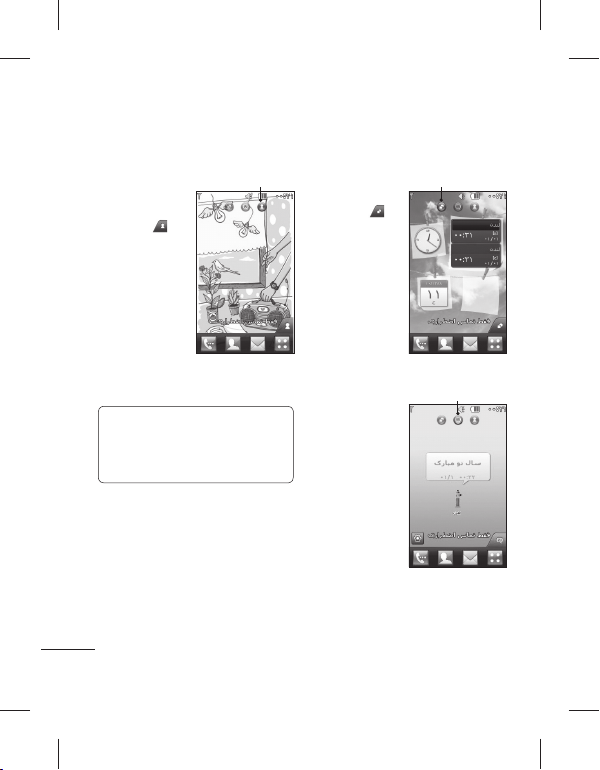
ﺪﻳﺪﺟ ﺖﻴﻌﺿﻭ ﻭ ﻩﺪﺷ ﻢﺘﺴﻴﺳ ﺩﺭﺍﻭ :ﯽﻠﺻﺍ ﻪﺤﻔﺻ
Facebook
ﺍﺭ ﺩﻮﺧ ﺕﺍﺮﻈﻧ .ﺪﻴﻨﮐ ﻩﺪﻫﺎﺸﻣ ﺍﺭ ﺩﻮﺧ ﻥﺎﺘﺳﻭﺩ
ﺕﺍﺮﻈﻧ ﺮﻳﺎﺳ ﺎﻳ ﻩﺩﺮﮐ ﺩﺭﺍﻭ ﺪﻳﺪﺟ ﺖﻴﻌﺿﻭ ﻪﺑ ﻊﺟﺍﺭ
ﻦﻴﺑ ﺯﺍ ﻭ ﻩﺩﺮﮐ ﺲﻤﻟ ﺍﺭ ﺎﻫ ﻪﻨﻳﺰﮔ .ﺪﻴﻨﮐ ﯽﺳﺭﺮﺑ ﺍﺭ
ﺯﻭﺭ ﻪﺑ ﺩﺭﺍﻮﻣ) یﺮﺒﺧ یﺎﻫﺪﻴﻓ ﺮﺘﻠﻴﻓ ،یﺯﺎﺳﻮﻧ
.ﺪﻴﻨﮐ ﺏﺎﺨﺘﻧﺍ ﺕﺎﻤﻴﻈﻨﺗ ﺎﻳ ﻑﺬﺣ ،(ﺲﮑﻋ
ﺮﻈﻧ ،+ ﺖﻣﻼﻋ ﺏﺎﺨﺘﻧﺍ ﺎﺑ ﺪﻴﻧﺍﻮﺗ ﯽﻣ ﻦﻴﻨﭽﻤﻫ
ﺍﺭ ﺖﻴﻌﺿﻭ ﺪﻳﺪﺟ ﺩﺭﺍﻮﻣ < ﺭﺍﻮﻳﺩ : ﻪﺼﺨﺸﻣ
.ﺪﻴﺴﻳﻮﻨﺑ ﺍﺭ ﺩﻮﺧ ﯽﻠﻌﻓ ﺖﻴﻌﺿﻭ ﻭ ﻩﺩﺮﮐ ﺏﺎﺨﺘﻧﺍ
ﺍﺭ ﺲﮑﻋ ﻭ ﻩﺩﺮﮐ ﻩﺪﻫﺎﺸﻣ ﺍﺭ ﺩﻮﺧ ﺕﺎﻋﻼﻃﺍ
یﺭﺍﺬﮔﺭﺎﺑ < ﻡﻮﺒﻟﺁ ﺭﺎﮐ ﻦﻳﺍ یﺍﺮﺑ ،ﺪﻴﻨﮐ یﺭﺍﺬﮔﺭﺎﺑ
ﻪﺑ ﻭﺮﺑ یﺎﻫ ﻪﻨﻳﺰﮔ ﺯﺍ .ﺪﻴﻨﮐ ﺲﻤﻟ ﺍﺭ ﺲﮑﻋ
ﻭ ﻩﺩﺮﮐ ﺏﺎﺨﺘﻧﺍ ﺍﺭ ﯽﮑﻳ ﺲﮑﻋ ﻦﺘﻓﺮﮔ ﺎﻳ ﺮﻳﻭﺎﺼﺗ
.ﺪﻴﻨﮐ ﺩﺭﺍﻭ ﺮﻳﻭﺎﺼﺗ یﺍﺮﺑ ﯽﺴﻳﻮﻧﺮﻳﺯ ﺲﭙﺳ
SNS ﺭﺩ یﺩﺎﻳﺯ ﻥﺎﺘﺳﻭﺩ ﺪﻴﻧﺍﻮﺗ ﯽﻣ ﺎﻤﺷ :ﻥﺎﺘﺳﻭﺩ
ﻥﺎﺘﺳﻭﺩ .ﺪﻴﻨﮐ ﻩﺪﻫﺎﺸﻣ ﺍﺭ ﺎﻫ ﻥﺁ ﺖﻴﻌﺿﻭ ﻭ ﻪﺘﻓﺎﻳ
،ﻮﺠﺘﺴﺟ ﻪﻧﺎﺑﺯ ﺏﺎﺨﺘﻧﺍ ﺎﺑ facebook ﺭﺩ ﺍﺭ ﺩﻮﺧ
ﺶﻳﺎﻤﻧ ﺍﺭ ﺎﻤﺷ SN یﺎﻫ ﻡﺎﻴﭘ ﻪﻤﻫ ﻪﻨﻳﺰﮔ ﻦﻳﺍ :ﻡﺎﻴﭘ
ﻝﺎﺳﺭﺍ/ﺖﻓﺎﻳﺭﺩ
ﻕﻭﺪﻨﺻ ﻪﺷﻮﭘ ﺪﻴﻧﺍﻮﺗ ﯽﻣ .ﺪﻫﺩ ﯽﻣ
.ﺪﻴﺴﻳﻮﻨﺑ SN ﻡﺎﻴﭘ ﮏﻳ ﻭ ﻩﺩﺮﮐ ﻩﺪﻫﺎﺸﻣ ﺍﺭ ﻩﺪﺷ
،ﺖﻴﻌﺿﻭ
.ﺪﻴﺴﻳﻮﻨﺑ ﺍﺭ ﺩﻮﺧ
.ﺪﻴﻨﮐ ﻮﺠﺘﺴﺟ
ﯽﻧﺎﺳﺭ ﻡﺎﻴﭘ
(SNS) ﯽﻋﺎﻤﺘﺟﺍ ﻪﮑﺒﺷ ﺕﺎﻣﺪﺧ
ﻪﺑ ﻪﮐ ﺖﺳﺍ SNS ﺩﺮﮑﻠﻤﻋ ﻪﺑ ﺰﻬﺠﻣ GM360
ﺕﺬﻟ ﺩﻮﺧ ﯽﻋﺎﻤﺘﺟﺍ ﻪﮑﺒﺷ ﺯﺍ ﺪﻫﺩ ﯽﻣ ﻥﺎﮑﻣﺍ ﺎﻤﺷ
ﺖﻴﻌﺿﻭ ﺪﻴﻧﺍﻮﺗ ﯽﻣ .ﺪﻴﻨﮐ ﺖﻳﺮﻳﺪﻣ ﺍﺭ ﻥﺁ ﻭ ﺪﻳﺮﺒﺑ
SN ﺯﻭﺭ ﻪﺑ ﺩﺭﺍﻮﻣ ﻭ ﻩﺩﺮﮐ ﺯﻭﺭ ﻪﺑ ﺍﺭ ﺩﻮﺧ SN
ﺖﻳﺎﺳ ﮏﻳ ﻭ ﻩﺩﺮﮐ ﺲﻤﻟ ﺍﺭ ﯽﻋﺎﻤﺘﺟﺍ ﻪﮑﺒﺷ یﻮﻨﻣ
Myspace ﻭ Facebook، Twitter :
.ﺖﺳﺍ ﯽﺗﺎﻋﻼﻃﺍ ﻪﻣﺎﻧﺮﺑ ﮏﻳ SNS ﯽﮔﮋﻳﻭ :ﻪﺟﻮﺗ
ﻩﺩﺎﻔﺘﺳﺍ ﻭ ﻝﺎﺼﺗﺍ ﺎﺑ ﺖﺳﺍ ﻦﮑﻤﻣ ﯽﻓﺎﺿﺍ یﺎﻫ ﻪﻨﻳﺰﻫ
ﻩﺭﺎﺑﺭﺩ .ﺩﻮﺷ ﺖﻓﺎﻳﺭﺩ ﺎﻤﺷ ﺯﺍ ﻦﻳﻼﻧﺁ ﺕﺎﻣﺪﺧ ﺯﺍ
ﺩﻮﺧ ﻪﮑﺒﺷ ﻩﺪﻨﻫﺩ ﻪﺋﺍﺭﺍ ﺎﺑ ﻩﺩﺍﺩ ﻝﺎﻘﺘﻧﺍ یﺎﻫ ﻪﻨﻳﺰﻫ
.ﺪﻴﻳﺎﻤﻧ ﻩﺪﻫﺎﺸﻣ ﺍﺭ ﺩﻮﺧ ﻥﺎﺘﺳﻭﺩ
ﻞﻣﺎﺷ
.ﺪﻴﻨﮐ ﺏﺎﺨﺘﻧﺍ ﺍﺭ
یﺩﺮﺑﺭﺎﮐ ﻪﻣﺎﻧﺮﺑ ﮏﻳ Facebook !ﻪﺘﮑﻧ
ﻩﺪﺷ یﺮﻴﮔﺭﺎﺑ ﺎﻤﺷ ﻦﻔﻠﺗ ﺭﺩ ﻞﺒﻗ ﺯﺍ ﻪﮐ ﺖﺳﺍ
ﮏﻳ Twitter .ﺖﺳﺍ ﻥﺎﺳﺁ ﻥﺁ ﻪﺑ ﯽﺳﺮﺘﺳﺩ ﻭ
Java یﺭﻭﺁ ﻦﻓ ﻪﻳﺎﭘ ﺮﺑ ﻭ java ﻪﻣﺎﻧﺮﺑ
WAP ﺕﺎﻣﺪﺧ ﻪﺑ ﺎﻫ ﻪﻣﺎﻧﺮﺑ ﺮﻳﺎﺳ .ﺪﺷﺎﺑ ﯽﻣ
.ﺪﻧﺭﺍﺩ ﯽﺳﺮﺘﺳﺩ (ﻢﻴﺳ ﯽﺑ ﻪﻣﺎﻧﺮﺑ ﻞﮑﺗﻭﺮﭘ)
.ﺪﻳﺮﻴﮕﺑ ﺱﺎﻤﺗ
ﺮﺑﺭﺎﮐ یﺎﻤﻨﻫﺍﺭ | LG GM360
28

29
Facebook ﺪﻴﻓ ﺖﺠﻳﻭ ﺯﺍ ﻩﺩﺎﻔﺘﺳﺍ ﺎﺑ !ﻪﺘﮑﻧ
ﻪﺑ ﺍﺭ Facebook ﺪﻴﻓ ﺖﺠﻳﻭ ﺪﻴﻧﺍﻮﺗ ﯽﻣ
ﺪﻴﻓ ﺖﺠﻳﻭ .ﺪﻴﻨﮐ ﻪﻓﺎﺿﺍ ﺩﻮﺧ ﯽﻠﺻﺍ ﻪﺤﻔﺻ
ﻭ ﺪﻴﺸﮑﺑ ﺖﺠﻳﻭ ﻩﺎﮕﻳﺎﺟ ﺯﺍ ﺍﺭ Facebook
ﺖﺒﺛ ﯽﻠﺻﺍ ﻪﺤﻔﺻ ﺭﺩ facebook ﺖﺠﻳﻭ ﺮﮔﺍ
ﺶﻳﺎﻤﻧ ﺍﺭ SN ﺖﻳﺎﺳ ﺯﺍ ﺮﻴﺧﺍ ﺪﻴﻓ ﻪﺳ ،ﺪﺷﺎﺑ ﻩﺪﺷ
ﺲﻤﻟ ﺎﺑ ﺎﻤﻴﻘﺘﺴﻣ ﺪﻴﻧﺍﻮﺗ ﯽﻣ
ﯽﺳﺮﺘﺳﺩ facebook ﻪﻣﺎﻧﺮﺑ ﻪﺑ ،ﺪﻴﻓ ﺖﺠﻳﻭ
.ﺪﻴﻨﮐ ﺲﻤﻟ ﺍﺭ ﺪﻴﻳﺎﺗ
ﻦﻴﻨﭽﻤﻫ .ﺪﻫﺩ ﯽﻣ
.ﺪﻴﺷﺎﺑ ﻪﺘﺷﺍﺩ
/ﻦﺷﻭﺭ SNS یﺎﻫ ﻪﻨﻳﺰﮔ ،SNS ﺕﺎﻤﻴﻈﻨﺗ ﺭﺩ
.ﺩﺭﺍﺩ ﺩﻮﺟﻭ (ﻢﺘﺴﻴﺳ ﺯﺍ ﺝﻭﺮﺧ) ﻑﺬﺣ ﻭ ﺵﻮﻣﺎﺧ
ﻝﺎﺼﺗﺍ یﻮﻨﻣ ﺭﺩ ﻦﻴﻌﻣ ﻥﺎﻣﺯ ﺕﺪﻣ ﮏﻳ ﻢﻴﻈﻨﺗ ﺎﺑ
ﺵﻮﻣﺎﺧ/ﻦﺷﻭﺭ ﺭﺎﮐﺩﻮﺧ ﺭﻮﻃ ﻪﺑ SNS ،ﺭﺎﮐﺩﻮﺧ
.ﺩﻮﺷ ﯽﻣ
Linkbook
ﻩﺪﺷ ﻢﻴﻈﻨﺗ ﻦﺷﻭﺭ یﻭﺭ SNS ﺖﻟﺎﺣ ﺮﮔﺍ
ﻦﻴﺒﻃﺎﺨﻣ ﯽﺼﺨﺷ ﺕﺎﻋﻼﻃﺍ ﺪﻴﻧﺍﻮﺗ ﯽﻣ ،ﺪﺷﺎﺑ
،ﻦﻔﻠﺗ ﻩﺭﺎﻤﺷ ،ﻡﺎﻧ ﻞﻣﺎﺷ ﺍﺭ ﺩﻮﺧ Facebook
.ﺪﻴﻨﮐ ﻩﺮﻴﺧﺫ ﻦﻴﺒﻃﺎﺨﻣ ﺭﺩ ،ﺲﮑﻋ ﻭ ،ﻞﻴﻤﻳﺍ ﺱﺭﺩﺁ
Facebook ﺭﺩ ﻦﻴﺒﻃﺎﺨﻣ ﺭﺩ ﻩﺮﻴﺧﺫ ﻪﻤﮐﺩ ﺯﺍ
.ﺪﻴﻨﮐ ﻩﺩﺎﻔﺘﺳﺍ ﺎﻫ ﻥﺁ ﯽﺼﺨﺷ ﺕﺎﻋﻼﻃﺍ ﻩﺮﻴﺧﺫ یﺍﺮﺑ
یﺎﻤﻧ ﺭﺩ ﺍﺭ ﻩﺪﺷ ﻩﺮﻴﺧﺫ ﺕﺎﻋﻼﻃﺍ ﺪﻴﻧﺍﻮﺗ ﯽﻣ ﺎﻤﺷ
یﻭﺭ
SNSﺖﻟﺎﺣ ﺮﮔﺍ .ﺪﻴﻳﺎﻤﻧ ﯽﺳﺭﺮﺑ ﺐﻃﺎﺨﻣ
ﺭﺩ SNS ﺕﺎﻋﻼﻃﺍ ،ﺪﺷﺎﺑ ﻩﺪﺷ ﻢﻴﻈﻨﺗ ﺵﻮﻣﺎﺧ
.ﺩﻮﺷ ﯽﻤﻧ ﻩﺩﺍﺩ ﺶﻳﺎﻤﻧ ﻦﻴﺒﻃﺎﺨﻣ ﺖﺴﻴﻟ
ﺖﺳﺍ ﻦﮑﻤﻣ ،ﺪﺷﺎﺑ ﻢﮐ ﻥﺁ ﺡﻮﺿﻭ ﻪﮐ یﺮﻳﻮﺼﺗ - ﯽﻫﺩﺭﻮﻧ
ﻪﮐ یﺮﻳﻮﺼﺗ ﻪﮑﻧﺁ ﻝﺎﺣ ،ﺪﺳﺮﺑ ﺮﻈﻧ ﻪﺑ ﻢﻬﺒﻣ ﻭ ﺩﻮﻟﺁ ﻪﻣ
ﺮﻈﻧ ﻪﺑ ﺮﺗ ﺢﺿﺍﻭ ﺐﺗﺍﺮﻣ ﻪﺑ ﺖﺳﺍ ﻻﺎﺑ ﺡﻮﺿﻭ یﺍﺭﺍﺩ
ﻦﻳﺍ .ﺪﻴﻨﮐ ﮏﭼﻮﮐ ﺎﻳ گﺭﺰﺑ ﺍﺭ ﺮﻳﻮﺼﺗ - ﯽﻳﺎﻤﻨﮔﺭﺰﺑ
.ﺩﻮﺷ ﯽﻣ ﻝﺎﻌﻓ ﻩﺪﺷ ﻪﺘﻓﺮﮔ ﺲﮑﻋ ﻩﺯﺍﺪﻧﺍ ﻪﺑ ﻪﺘﺴﺑ
ﻦﻳﺍ ،ﺕﺎﻤﻴﻈﻨﺗ یﻮﻨﻣ ﻥﺩﺮﮐ ﺯﺎﺑ یﺍﺮﺑ - ﺕﺎﻤﻴﻈﻨﺗ
ﻪﺘﻓﺮﺸﻴﭘ ﺕﺎﻤﻴﻈﻨﺗ ﺯﺍ ﻩﺩﺎﻔﺘﺳﺍ ﻪﺑ .ﺪﻴﻫﺩ ﺭﺎﺸﻓ ﺍﺭ ﺩﺎﻤﻧ
یﺎﻫ ﺲﮑﻋ ﻦﺘﻓﺮﮔ یﺍﺮﺑ ﺍﺭ ﻪﻨﻳﺰﮔ ﻦﻳﺍ – ﻭﺮﮐﺎﻣ
،ﺭﺎﮐﺩﻮﺧ یﻭﺭ ﺍﺭ ﺵﻼﻓ ﺭﻮﻧ ﺖﻟﺎﺣ - ﺵﻼﻓ ﺖﻴﻌﺿﻭ
.ﺪﻴﻨﮐ ﻢﻴﻈﻨﺗ ﺵﻮﻣﺎﺧ ﻪﺸﻴﻤﻫ ﺎﻳ ﻦﺷﻭﺭ ﻪﺸﻴﻤﻫ
.ﺪﻴﺳﺭ ﺪﻫﺍﻮﺧ
ﺩﺮﮑﻠﻤﻋ
.ﺪﻴﻨﮐ ﻪﻌﺟﺍﺮﻣ
.ﺪﻴﻨﮐ ﻦﺷﻭﺭ ﮏﻳﺩﺰﻧ
ﻦﻴﺑﺭﻭﺩ
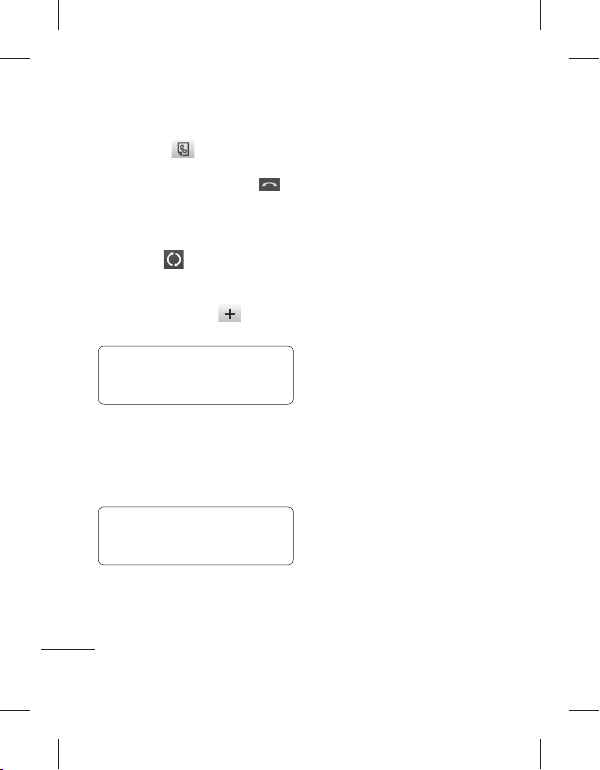
ﺏﺎﻳﺎﻤﻧ ﺎﺑ ﯽﻳﺎﻨﺷﺁ
ﺖﺸﮔﺮﺑ
ﺲﮑﻋ ﻦﺘﻓﺮﮔ
ﻪﺑ ﻦﺘﻓﺭ یﺍﺮﺑ - ﻢﻠﻴﻓ ﺖﻟﺎﺣ
.ﺪﻳﺪﻨﺒﺑ ﺍﺭ ﺩﺎﻤﻧ ﻦﻳﺍ ﻢﻠﻴﻓ ﺖﻟﺎﺣ
ﺎﻤﺷ ﻪﺑ ﻮﻨﻣ ﻦﻳﺍ - یﺮﻟﺎﮔ
یﺎﻫ ﺲﮑﻋ ﻪﺑ ﺪﻫﺩ ﯽﻣ ﻥﺎﮑﻣﺍ
ﺖﻟﺎﺣ ﺯﺍ ﺩﻮﺧ ﻩﺪﺷ ﻩﺮﻴﺧﺫ
.ﺪﻴﺷﺎﺑ ﻪﺘﺷﺍﺩ ﯽﺳﺮﺘﺳﺩ ﻦﻴﺑﺭﻭﺩ
ﺪﻴﻨﮐ ﺲﻤﻟ ﺍﺭ ﻥﺁ ﺖﺳﺍ ﯽﻓﺎﮐ
ﺶﻳﺎﻤﻧ ﻪﺤﻔﺻ ﺭﺩ یﺮﻟﺎﮔ ﺎﺗ
.ﺩﻮﺷ ﺮﻫﺎﻇ
ﺪﻨﭼ ﺯﺍ ﺪﻌﺑ ﺎﻫ ﻪﻨﻳﺰﮔ ﻦﻳﺍ .ﺪﻴﻨﮐ ﻩﺪﻫﺎﺸﻣ ﺍﺭ ﺎﻫ ﻪﻨﻳﺰﮔ ،ﺶﻳﺎﻤﻧ ﻪﺤﻔﺻ یﻭﺭ ﻥﺩﺯ ﻪﺑﺮﺿ ﺎﺑ ﺪﻴﻧﺍﻮﺗ ﯽﻣ !ﻪﺘﮑﻧ
.ﺪﻧﻮﺷ ﯽﻣ ﺵﻮﻣﺎﺧ ﻪﻴﻧﺎﺛ
ﺮﺑﺭﺎﮐ یﺎﻤﻨﻫﺍﺭ | LG GM360
30

.ﺪﺷ ﺪﻫﺍﻮﺧ ﺮﻫﺎﻇ ﻪﺤﻔﺻ یﻭﺭ ﻩﺪﺷ ﻪﺘﻓﺮﮔ ﺲﮑﻋ
ﺲﮑﻋ ﻦﺘﻓﺮﮔ ﺯﺍ ﺪﻌﺑ
.ﺩﻮﺷ ﯽﻣ ﺮﻫﺎﻇ ﻪﺤﻔﺻ ﻦﻴﻳﺎﭘ ﻪﻴﺷﺎﺣ ﺭﺩ ﺮﻳﻮﺼﺗ ﻡﺎﻧ
،ﻡﺎﻴﭘ ﮏﻳ ﺕﺭﻮﺻ ﻪﺑ ﺲﮑﻋ ﺎﺗ ﺪﻴﻨﮐ ﺲﻤﻟ
.ﺩﻮﺷ ﻝﺎﺳﺭﺍ ﺙﻮﺗﻮﻠﺑ ﺎﻳ ﻞﻴﻤﻳﺍ
ﻢﻴﻈﻨﺗ ﯽﻠﺻﺍ ﻪﺤﻔﺻ ﺮﻳﻮﺼﺗ ﺎﺗ ﺪﻴﻨﮐ ﺲﻤﻟ
.ﺪﻴﻨﮐ ﺶﻳﺍﺮﻳﻭ ﺍﺭ ﺲﮑﻋ ﻭ ﺪﻴﻨﮐ ﺲﻤﻟ
ﺍﺭ ﯽﺑﺎﺨﺘﻧﺍ ﺲﮑﻋ ﻡﺎﻧ ﻭ ﻩﺩﺮﮐ ﺲﻤﻟ
.ﺪﻴﻨﮐ ﺶﻳﺍﺮﻳﻭ
ﻩﺪﺷ ﻪﺘﻓﺮﮔ ﺲﮑﻋ ﺎﺗ ﺪﻴﻫﺩ ﺭﺎﺸﻓ ﺍﺭ ﺪﻴﻠﮐ ﻦﻳﺍ
ﻡﺎﻴﭘ .ﺪﻴﻨﮐ ﺲﻤﻟ ﺍﺭ ﻪﻠﺑ ﺪﻴﻳﺄﺗ یﺍﺮﺑ ﻭ ،ﺩﻮﺷ ﻑﺬﺣ
.ﺩﻮﺷ ﯽﻣ ﺮﻫﺎﻇ “ﺪﺷ ﻑﺬﺣ”
.ﺪﻳﻮﺷ ﺩﺭﺍﻭ یﺮﻟﺎﮔ ﻪﺑ ﻭ ﻩﺩﺮﮐ ﺲﻤﻟ
31
ﺭﺎﺸﻓ ﺍﺭ ﯽﺷﻮﮔ ﺖﺳﺍﺭ ﺖﻤﺳ ﺭﺩ ﺪﻴﻠﮐ 1
،ﺩﺮﮐ ﺱﻮﮐﻮﻓ ﻩژﻮﺳ یﻭﺭ ﻦﻴﺑﺭﻭﺩ ﯽﺘﻗﻭ 2
ﺪﻴﻨﮐ ﺲﻤﻟ ﻪﺤﻔﺻ ﺖﺳﺍﺭ ﺖﻤﺳ ﺰﮐﺮﻣ ﺭﺩ ﺍﺭ
ﺪﻴﻠﮐ ﺪﻴﻧﺍﻮﺗ ﯽﻣ ﻦﻴﻨﭽﻤﻫ .ﺩﻮﺷ ﻪﺘﻓﺮﮔ ﺲﮑﻋ ﺎﺗ
.ﺪﻴﻫﺩ ﺭﺎﺸﻓ ﻢﮑﺤﻣ ﯽﺷﻮﮔ ﺭﺎﻨﮐ ﺭﺩ ﺍﺭ
.ﺩﻮﺷ
ﻦﻴﺑﺭﻭﺩ ﺖﻟﺎﺣ ﻦﻴﺑ ﺖﻴﻌﺿﻭ ﺮﻴﻴﻐﺗ یﺍﺮﺑ !ﻪﺘﮑﻧ
ﺰﮐﺮﻣ ﺭﺩ ﻢﻠﻴﻓ ﺎﻳ ﻦﻴﺑﺭﻭﺩ ﺩﺎﻤﻧ ،ﻢﻠﻴﻓ ﺖﻟﺎﺣ ﺎﻳ
.ﺪﻴﻧﺍﺰﻐﻠﺑ ﻦﻴﻳﺎﭘ/ﻻﺎﺑ ﻪﺑ ﺍﺭ ﺏﺎﻳﺎﻤﻧ ﺖﺳﺍﺭ ﺖﻤﺳ
یﺭﻮﻓ ﺲﮑﻋ ﻦﺘﻓﺮﮔ
.ﺪﻴﻫﺩ

.ﺪﻨﮐ ﯽﻣ ﻢﻴﻈﻨﺗ ﺍﺭ ﻦﻴﺑﺭﻭﺩ ﺱﻮﮐﻮﻓ - ﺱﻮﮐﻮﻓ
ﻞﻣﺎﮐ ﺮﻳﻮﺼﺗ یﺎﻫ ﻪﻨﻳﺰﮔ ﻦﻴﺑ ﺯﺍ - ﻩﺪﻫﺎﺸﻣ
ﻡﺎﻤﺗ ﺖﻟﺎﺣ ﺭﺩ .ﺪﻴﻨﮐ ﺏﺎﺨﺘﻧﺍ ﺍﺭ ﯽﮑﻳ ﻪﺤﻔﺻ ﻡﺎﻤﺗ ﺎﻳ
ﺭﺩ ﺎﺗ ﺩﻮﺷ ﻩﺩﺍﺩ ﺵﺮﺑ ﺮﻳﻮﺼﺗ ﺖﺳﺍ ﻦﮑﻤﻣ ،ﻪﺤﻔﺻ
ﺲﮑﻋ ﻪﮐ ﺪﻴﻨﮐ ﺏﺎﺨﺘﻧﺍ - ﻩﺮﻴﺧﺫ ﻞﺤﻣ ﺏﺎﺨﺘﻧﺍ
ﻪﻈﻓﺎﺣ ﺎﻳ ﺩﻮﺷ ﻩﺮﻴﺧﺫ ﯽﺷﻮﮔ ﻪﻈﻓﺎﺣ ﺭﺩ ﺎﻤﺷ یﺎﻫ
ﺲﮑﻋ ﻪﮐ ﺪﻴﻨﮐ ﺏﺎﺨﺘﻧﺍ - ﻩﺪﺷ ﻪﺘﻓﺮﮔ ﺲﮑﻋ ﺶﻳﺎﻤﻧ
ﺶﻳﺎﻤﻧ ﺎﻫ
ﻦﻴﺑﺭﻭﺩ ﻢﻴﻈﻨﺗ یﺎﻫﺩﺎﻤﻧ - ﺎﻫﺩﺎﻤﻧ ﻥﺩﺮﮐ ﯽﻔﺨﻣ
ﺭﺎﮐﺩﻮﺧ ﺎﻳ ﯽﺘﺳﺩ ﺕﺭﻮﺻ ﻪﺑ ﻪﮐ ﺪﻴﻨﮐ ﺏﺎﺨﺘﻧﺍ ﺍﺭ
.ﺖﺳﺍ ﺩﻮﺟﻮﻣ ﺮﺗﺎﺷ یﺍﺪﺻ ﻉﻮﻧ ﻪﺳ ﺮﺗﺎﺷ یﺍﺪﺻ
ﺎﻳ ﻩﺩﺎﺳ ﻝﻭﺪﺟ ،ﺵﻮﻣﺎﺧ ﻦﻴﺑ ﺯﺍ - یﺍ ﻪﮑﺒﺷ ﻪﺤﻔﺻ
ﺍﺭ ﻦﻴﺑﺭﻭﺩ
.ﺩﻮﺷ ﺎﺟ ﺶﻳﺎﻤﻧ ﻪﺤﻔﺻ
ﻪﻨﻳﺰﮔ ﺎﺑ ﻩﺍﺮﻤﻫ ﻥﺪﺷ ﻪﺘﻓﺮﮔ ﺯﺍ ﺪﻌﺑ
.ﺪﻴﻨﮐ ﺏﺎﺨﺘﻧﺍ ﯽﺸﺨﺑ ﻪﺳ
ﺕﺎﻤﻴﻈﻨﺗ ﻪﻤﻫ - ﺕﺎﻤﻴﻈﻨﺗ ﯽﻧﺎﺸﻧﺯﺎﺑ
ﺖﻟﺎﺣ
.ﯽﺟﺭﺎﺧ
.ﺩﻮﺷ ﻩﺩﺍﺩ
.ﺪﻧﻮﺷ ﯽﻔﺨﻣ
.ﺪﻴﻨﮐ ﯽﻧﺎﺸﻧﺯﺎﺑ
ﻦﻴﺑﺭﻭﺩ
یﺎﻫ ﻪﻨﻳﺰﮔ ﻪﻤﻫ ﺎﺗ ﺪﻴﻫﺩ ﺭﺎﺸﻓ ﺍﺭ ،ﺏﺎﻳﺎﻤﻧ ﺯﺍ
ﺪﻫﺩ ﯽﻣ ﻥﺎﮑﻣﺍ ﺎﻤﺷ ﻪﺑ ﻪﻨﻳﺰﮔ ﻦﻳﺍ - ﯽﺳﺎﮑﻋ ﺖﻟﺎﺣ
یﺍﺮﺑ ﺎﺗ ﺪﻴﻨﮐ ﺏﺎﺨﺘﻧﺍ ﮓﻧﺭ ﺡﺮﻃ ﮏﻳ - ﮓﻧﺭ ﻩﻮﻠﺟ
ﺡﺮﻃ ﻪﻨﻳﺰﮔ ﺞﻨﭘ .ﺩﻮﺷ ﻝﺎﻤﻋﺍ ﺪﻳﺮﻴﮔ ﯽﻣ ﻪﮐ ﯽﺴﮑﻋ
ﻮﻴﺗﺎﮕﻧ ،ﺪﻴﻔﺳ ﻭ ﻩﺎﻴﺳ ،ﺵﻮﻣﺎﺧ :ﺩﺭﺍﺩ ﺩﻮﺟﻭ ﮓﻧﺭ
،ﻥﺎﺑﺎﺗ ،ﺭﺎﮐﺩﻮﺧ یﺎﻫ ﻪﻨﻳﺰﮔ ﻦﻴﺑ ﺯﺍ - یﺪﻴﻔﺳ ﻝﺩﺎﻌﺗ
.ﺪﻴﻨﮐ ﺏﺎﺨﺘﻧﺍ ﺍﺭ ﯽﮑﻳ یﺮﺑﺍ ﺎﻳ ﺖﻨﺳﺭﻮﺋﻮﻠﻓ ،ﯽﺑﺎﺘﻓﺁ
ﺪﻌﺑ ﻭ ﻦﻴﺑﺭﻭﺩ ﻂﺳﻮﺗ ﺲﮑﻋ ﻦﺘﻓﺮﮔ ﺯﺍ ﻞﺒﻗ ﻦﻴﺑ ﺪﻫﺩ
یﺎﻫ ﺲﮑﻋ یﺍﺮﺑ ﺖﻴﻠﺑﺎﻗ ﻦﻳﺍ .ﺪﻴﻨﮐ ﺏﺎﺨﺘﻧﺍ ﺍﺭ ﯽﮑﻳ
ﻪﺘﻓﺮﺸﻴﭘ ﺕﺎﻤﻴﻈﻨﺗ ﺯﺍ ﻩﺩﺎﻔﺘﺳﺍ
.ﺩﻮﺷ ﺯﺎﺑ ﻪﺘﻓﺮﺸﻴﭘ ﺕﺎﻤﻴﻈﻨﺗ
.ﺪﻴﻨﮐ ﺏﺎﺨﺘﻧﺍ ﺍﺭ ﯽﺳﺎﮑﻋ ﺖﻟﺎﺣ ﻭﺩ
.یﺍ
ﻩﻮﻬﻗ ﺰﻣﺮﻗ ﺎﻳ
ﯽﮑﻳﺭﺎﺗ ﺭﺩ ﺲﮑﻋ ﻦﺘﻓﺮﮔ یﺍﺮﺑ - ﺐﺷ ﺖﻟﺎﺣ
ﯽﻣ ﻥﺎﮑﻣﺍ ﺎﻤﺷ ﻪﺑ ﺭﺎﮐﺩﻮﺧ ﺮﻤﻳﺎﺗ - ﺭﺎﮐﺩﻮﺧ ﺮﻤﻳﺎﺗ
.ﺪﺷﺎﺑ ﻪﺘﺷﺍﺩ ﺩﻮﺟﻭ
ﻪﻴﻧﺎﺛ10 ﺎﻳ ﻪﻴﻧﺎﺛ 5 ،ﻪﻴﻧﺎﺛ 3 یﺎﻫ ﻪﻨﻳﺰﮔ ﻦﻴﺑ ﺯﺍ
ﺎﻬﻧﺁ ﺭﺩ ﺭﻮﻀﺣ ﻪﺑ ﻞﻳﺎﻣ ﻢﻫ ﺎﻤﺷ ﺩﻮﺧ ﻪﮐ ﯽﻫﻭﺮﮔ
ﻭ ﺏﻮﺧ ،ﺏﻮﺧ ﯽﻠﻴﺧ یﺎﻫ ﻪﻨﻳﺰﮔ ﻦﻴﺑ ﺯﺍ - ﺖﻴﻔﻴﮐ
ﺮﺘﻬﺑ ﺖﻴﻔﻴﮐ ﻪﭼ ﺮﻫ .ﺪﻴﻨﮐ ﺏﺎﺨﺘﻧﺍ ﺍﺭ ﯽﮑﻳ یﺩﺎﻋ
،ﺖﺒﺴﻧ ﻪﺑ ﺎﻣﺍ ﺖﺳﺍ ﺮﺘﺸﻴﺑ ﺲﮑﻋ ﺡﻮﺿﻭ ،ﺪﺷﺎﺑ
ﻪﺠﻴﺘﻧ ﺭﺩ .ﺪﻨﮐ ﯽﻣ ﺍﺪﻴﭘ ﺶﻳﺍﺰﻓﺍ ﺰﻴﻧ ﻞﻳﺎﻓ ﻩﺯﺍﺪﻧﺍ
.ﺖﺳﺍ ﺐﺳﺎﻨﻣ ﺭﺎﻴﺴﺑ ﺪﻴﺷﺎﺑ ﯽﻣ
ﻪﻈﻓﺎﺣ ﺭﺩ ﺪﻴﻧﺍﻮﺗ ﯽﻣ ﺍﺭ یﺮﺘﻤﮐ یﺎﻫ ﺲﮑﻋ
.ﺖﺳﺍ ﺐﺳﺎﻨﻣ
یﺍ ﻪﻔﻗﻭ ﻪﻤﮐﺩ ﻥﺩﺍﺩ ﺭﺎﺸﻓ ﺯﺍ
.ﺪﻴﻨﮐ ﻩﺮﻴﺧﺫ
ﺮﺑﺭﺎﮐ یﺎﻤﻨﻫﺍﺭ | LG GM360
32

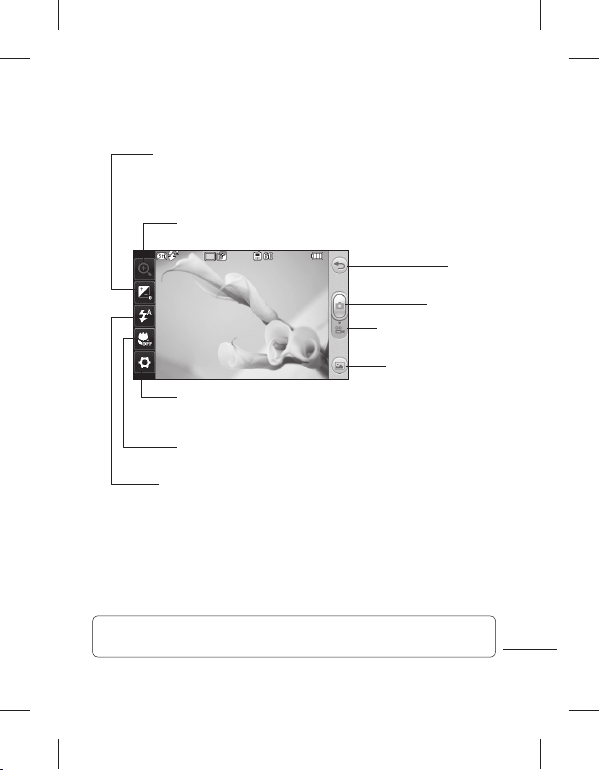
یﺭﺍﺩﺮﺒﻤﻠﻴﻓ ﻦﻴﺑﺭﻭﺩ
ﺏﺎﻳﺎﻤﻧ ﺎﺑ ﯽﻳﺎﻨﺷﺁ
ﺎﻳ گﺭﺰﺑ ﺍﺭ ﺮﻳﻮﺼﺗ - ﯽﻳﺎﻤﻨﮔﺭﺰﺑ
ﺰﮐﺮﻣ ﺖﺳﺍ ﯽﻓﺎﮐ .ﺪﻳﺪﻨﺒﺑ ﺮﺗ ﺢﺿﺍﻭ ﺏﺎﻳﺎﻤﻧ ﻪﺤﻔﺻ ﻦﺘﺷﺍﺩ یﺍﺮﺑ ﺍﺭ ﺮﺒﻧﺎﻴﻣ یﺎﻫ ﻪﻨﻳﺰﮔ ﻪﻴﻠﮐ ﺪﻴﻧﺍﻮﺗ ﯽﻣ !ﻪﺘﮑﻧ
.ﺪﻴﻨﮐ ﺲﻤﻟ ﺍﺭ ﺶﻳﺎﻤﻧ ﻪﺤﻔﺻ ﺮﮕﻳﺩ ﺭﺎﺑ ﮏﻳ ،ﺎﻫ ﻪﻨﻳﺰﮔ ﻥﺪﻧﺍﺩﺮﮔﺯﺎﺑ یﺍﺮﺑ .ﺪﻴﻨﮐ ﺲﻤﻟ ﺭﺎﺑ ﮏﻳ ﺍﺭ ﺏﺎﻳﺎﻤﻧ
.ﺪﻴﻨﮐ ﮏﭼﻮﮐ
ﻦﻳﺍ ،ﺕﺎﻤﻴﻈﻨﺗ یﻮﻨﻣ ﻥﺩﺮﮐ ﺯﺎﺑ یﺍﺮﺑ - ﺕﺎﻤﻴﻈﻨﺗ
ﻪﺘﻓﺮﺸﻴﭘ ﺕﺎﻤﻴﻈﻨﺗ ﺯﺍ ﻩﺩﺎﻔﺘﺳﺍ ﻪﺑ .ﺪﻴﻫﺩ ﺭﺎﺸﻓ ﺍﺭ ﺩﺎﻤﻧ
ﺎﻳ QVGA ( 320*240) ﻦﻴﺑ ﺯﺍ - ﻢﻠﻴﻓ ﻩﺯﺍﺪﻧﺍ
.ﺪﻴﻨﮐ ﺏﺎﺨﺘﻧﺍ QCIF ( 176*144)
.ﺪﻴﻨﮐ ﺵﻮﻣﺎﺧ ﺎﻳ ﻢﻴﻈﻨﺗ ﺍﺭ ﺵﻼﻓ - ﺵﻼﻓ ﺖﻴﻌﺿﻭ
ﺖﺳﺍ ﻦﮑﻤﻣ ،ﺪﺷﺎﺑ ﻢﮐ ﻥﺁ ﺡﻮﺿﻭ ﻪﮐ ﯽﻤﻠﻴﻓ - ﯽﻫﺩﺭﻮﻧ
ﻪﮐ ﯽﻤﻠﻴﻓ ﻪﮑﻧﺁ ﻝﺎﺣ ،ﺪﺳﺮﺑ ﺮﻈﻧ ﻪﺑ
ﺮﻈﻧ ﻪﺑ ﺮﺗ ﺢﺿﺍﻭ ﺐﺗﺍﺮﻣ ﻪﺑ ﺖﺳﺍ ﻻﺎﺑ ﺡﻮﺿﻭ یﺍﺭﺍﺩ
ﯽﺟﺭﺎﺧ ﻪﻈﻓﺎﺣ/ﯽﺷﻮﮔ ﻪﻈﻓﺎﺣ ﺭﺩ ﻩﺮﻴﺧﺫ
.ﺪﻴﻨﮐ ﻪﻌﺟﺍﺮﻣ
ﻢﻬﺒﻣ ﻭ ﺩﻮﻟﺁ ﻪﻣ
.ﺪﻴﺳﺭ ﺪﻫﺍﻮﺧ
ﺮﻳﻮﺼﺗ ﻩﺯﺍﺪﻧﺍ
ﻦﺘﻓﺭ یﺍﺮﺑ - ﻦﻴﺑﺭﻭﺩ ﺖﻟﺎﺣ
ﺍﺭ ﺩﺎﻤﻧ ﻦﻳﺍ ﻦﻴﺑﺭﻭﺩ ﺖﻟﺎﺣ ﻪﺑ
ﺏﺎﺨﺘﻧﺍ ﻢﻠﻴﻓ ﺖﻟﺎﺣ - ﻢﻠﻴﻓ ﺖﻟﺎﺣ
33
ﺖﺸﮔﺮﺑ
.ﺪﻴﻫﺩ ﺭﺎﺸﻓ
ﻂﺒﺿ ﻉﻭﺮﺷ
یﺮﻟﺎﮔ
.ﺩﻮﺷ ﯽﻣ

ﻩﺪﺷ ﻪﺘﻓﺮﮔ ﻢﻠﻴﻓ ﻩﺪﻨﻫﺩ ﻥﺎﺸﻧ ﻪﮐ ﺖﺑﺎﺛ ﺮﻳﻮﺼﺗ ﮏﻳ
یﺭﺍﺩﺮﺒﻤﻠﻴﻓ ﺯﺍ ﺪﻌﺑ
ﺭﺩ ﻢﻠﻴﻓ ﻡﺎﻧ .ﺩﻮﺷ ﯽﻣ ﺮﻫﺎﻇ ﻪﺤﻔﺻ یﻭﺭ ﺖﺳﺍ
ﺖﻤﺴﻗ ﺭﺩ ﺩﺎﻤﻧ ﺖﻔﻫ ﻩﺍﺮﻤﻫ ﻪﺑ ﻪﺤﻔﺻ ﻦﻴﻳﺎﭘ ﻪﻴﺷﺎﺣ
.ﺩﻮﺷ ﯽﻣ ﺮﻫﺎﻇ ﭗﭼ ﻭ ﺖﺳﺍﺭ ﺖﻤﺳ ﻦﻴﻳﺎﭘ
.ﺩﻮﺷ ﺶﺨﭘ ﻢﻠﻴﻓ ﺎﺗ ﺪﻴﻨﮐ ﺲﻤﻟ
ﺎﻳ ﻡﺎﻴﭘ ﮏﻳ ﺕﺭﻮﺻ ﻪﺑ ﻢﻠﻴﻓ ﺎﺗ ﺪﻴﻨﮐ ﺲﻤﻟ
.ﺪﻴﻨﮐ ﺪﻴﻳﺎﺗ ﻪﻠﺑ ﺲﻤﻟ ﺎﺑ ﺍﺭ ﻥﺁ ﻭ ﺪﻴﻨﮐ ﻑﺬﺣ ﺍﺭ ﺪﻳﺍ
ﺲﮑﻋ ﻭ ﺎﻫ ﻢﻠﻴﻓ ﺯﺍ یﺮﻟﺎﮔ ﮏﻳ ﻭ ﻩﺩﺮﮐ ﺲﻤﻟ
.ﺩﻮﺷ ﻝﺎﺳﺭﺍ ﺙﻮﺗﻮﻠﺑ ﺎﺑ ﺎﻳ ﻞﻴﻤﻳﺍ
.ﺪﻴﻨﮐ ﺶﻳﺍﺮﻳﻭ ﺍﺭ ﻢﻠﻴﻓ ﻭ ﻩﺩﺮﮐ ﺲﻤﻟ
ﺍﺭ ﯽﺑﺎﺨﺘﻧﺍ ﺲﮑﻋ ﻡﺎﻧ ﻭ ﻩﺩﺮﮐ ﺲﻤﻟ
ﻪﺘﻓﺮﮔ ﯽﮔﺯﺎﺗ ﻪﺑ ﻪﮐ ﯽﻤﻠﻴﻓ ﻭ ﻩﺩﺮﮐ ﺲﻤﻟ
.ﺪﺷ ﺪﻫﺍﻮﺧ ﺮﻫﺎﻇ
یﺮﮕﻳﺩ ﻢﻠﻴﻓ ﻪﻠﺻﺎﻓﻻﺎﺑ ﺎﺗ ﺪﻴﻨﮐ ﺲﻤﻟ ﺍﺭ
.ﺪﻴﻨﮐ ﻩﺪﻫﺎﺸﻣ ﺍﺭ ﻩﺪﺷ ﻩﺮﻴﺧﺫ یﺎﻫ
.ﺪﻴﻨﮐ ﺶﻳﺍﺮﻳﻭ
ً
ﺍﺩﺪﺠﻣ ﺏﺎﻳﺎﻤﻧ
.ﺩﻮﺷ ﻪﺘﻓﺮﮔ
یﺭﺍﺩﺮﺒﻤﻠﻴﻓ ﻦﻴﺑﺭﻭﺩ
ﯽﺷﻮﮔ ﺖﺳﺍﺭ ﺖﻤﺳ ﺭﺎﻨﮐ ﺭﺩ ﺍﺭ ﻦﻴﺑﺭﻭﺩ ﺪﻴﻠﮐ 1
ﺎﻳ ﻦﻴﺑﺭﻭﺩ ﺖﻟﺎﺣ ﻦﻴﺑ ﺖﻴﻌﺿﻭ ﺮﻴﻴﻐﺗ یﺍﺮﺑ !ﻪﺘﮑﻧ
ﺖﻤﺳ ﺰﮐﺮﻣ ﺭﺩ ﻢﻠﻴﻓ ﺎﻳ ﻦﻴﺑﺭﻭﺩ ﺩﺎﻤﻧ ،ﻢﻠﻴﻓ ﺖﻟﺎﺣ
.ﺪﻴﻧﺍﺰﻐﻠﺑ ﻦﻴﻳﺎﭘ/ﻻﺎﺑ ﻪﺑ ﺍﺭ ﺏﺎﻳﺎﻤﻧ ﺖﺳﺍﺭ
ﻪﮕﻧ ﯽﻘﻓﺍ ﺕﺭﻮﺻ ﻪﺑ ﺍﺭ ﯽﺷﻮﮔ ﻪﮐ ﯽﻟﺎﺣ ﺭﺩ 2
ﻩژﻮﺳ ﺖﻤﺳ ﻪﺑ ﺍﺭ ﻦﻴﺑﺭﻭﺩ ﯽﺳﺪﻋ ،ﺪﻳﺍ ﻪﺘﺷﺍﺩ
ﺭﺎﺸﻓ ﺭﺎﺑ ﮏﻳ
ﺰﻣﺮﻗ ﻪﻄﻘﻧ ﺎﻳ .ﺩﻮﺷ ﻉﻭﺮﺷ ﻂﺒﺿ ﺎﺗ ﺪﻴﻫﺩ
ﮏﻳ .ﺩﻮﺷ ﯽﻣ ﺮﻫﺎﻇ ﺏﺎﻳﺎﻤﻧ ﻦﻴﻳﺎﭘ ﺭﺩ ﻂﺒﺿ 4
ﺩﻮﺷ ﯽﻣ ﻩﺩﺍﺩ ﻥﺎﺸﻧ ﻪﺤﻔﺻ ﻦﻴﻳﺎﭘ ﺭﺩ ﺰﻴﻧ ﺮﻤﻳﺎﺗ
ﺍﺭ
ﺪﻴﻠﮐ ،یﺭﺍﺩﺮﺒﻤﻠﻴﻓ ﻥﺩﺮﮐ ﻒﻗﻮﺘﻣ یﺍﺮﺑ 5
ﺍﺭ
،ﻥﺁ یﺮﻴﮔﺮﺳ ﺯﺍ یﺍﺮﺑ ﻭ ﺪﻴﻨﮐ ﺲﻤﻟ
ﺍﺭ
.ﺩﻮﺷ ﻒﻗﻮﺘﻣ ﻂﺒﺿ ﺎﺗ ﺪﻴﻫﺩ ﺭﺎﺸﻓ ﻡﻭﺩ ﺭﺎﺑ یﺍﺮﺑ
یﺭﻮﻓ یﺭﺍﺩﺮﺒﻤﻠﻴﻓ
.ﺪﻴﻫﺩ ﺭﺎﺸﻓ ﻪﻴﻧﺎﺛ ﺪﻨﭼ
.ﺪﻳﺮﻴﮕﺑ ﺮﻈﻧ ﺩﺭﻮﻣ
ﺍﺭ ﻦﻔﻠﺗ یﻭﺭ ﻦﻴﺑﺭﻭﺩ ﺪﻴﻠﮐ 3
.ﺪﻴﻨﮐ ﺲﻤﻟ ﺍﺭ
.ﺖﺳﺍ ﻢﻠﻴﻓ ﺕﺪﻣ ﻝﻮﻃ ﺮﮕﻧﺎﺸﻧ ﻪﮐ
.ﺪﻴﻨﮐ ﺏﺎﺨﺘﻧﺍ
ﺎﻳ ﺪﻴﻨﮐ ﺲﻤﻟ ﻪﺤﻔﺻ یﻭﺭ ﺍﺭ 6
ﺮﺑﺭﺎﮐ یﺎﻤﻨﻫﺍﺭ | LG GM360
34

یﺎﻫ ﻢﻠﻴﻓ ﻪﮐ ﺪﻴﻨﮐ ﺏﺎﺨﺘﻧﺍ - ﻩﺮﻴﺧﺫ ﻞﺤﻣ ﺏﺎﺨﺘﻧﺍ
ﯽﺟﺭﺎﺧ ﻪﻈﻓﺎﺣ ﺭﺩ ﺎﻳ ﯽﺷﻮﮔ ﻪﻈﻓﺎﺣ ﺭﺩ ﺎﻤﺷ
.ﺮﻴﺧ ﺎﻳ ﺩﻮﺷ ﻂﺒﺿ ﺍﺪﺻ ﺎﺑ ﻢﻠﻴﻓ ﺪﻴﻨﮐ ﺏﺎﺨﺘﻧﺍ - ﺍﺪﺻ
ﻦﻴﺑﺭﻭﺩ ﻢﻴﻈﻨﺗ یﺎﻫﺩﺎﻤﻧ - ﺎﻫﺩﺎﻤﻧ ﻥﺩﺮﮐ ﯽﻔﺨﻣ
ﺭﺎﮐﺩﻮﺧ ﺎﻳ ﯽﺘﺳﺩ ﺕﺭﻮﺻ ﻪﺑ ﻪﮐ ﺪﻴﻨﮐ ﺏﺎﺨﺘﻧﺍ ﺍﺭ
ﻦﻴﺑﺭﻭﺩ ﺕﺎﻤﻴﻈﻨﺗ ی ﻪﻤﻫ - ﺕﺎﻤﻴﻈﻨﺗ ﯽﻧﺎﺸﻧﺯﺎﺑ
35
.ﺪﻴﻨﮐ ﯽﻧﺎﺸﻧﺯﺎﺑ ﺍﺭ یﺭﺍﺩﺮﺒﻤﻠﻴﻓ
.ﺩﻮﺷ ﻩﺮﻴﺧﺫ
.ﺪﻧﻮﺷ ﯽﻔﺨﻣ
ﻪﺘﻓﺮﺸﻴﭘ ﺕﺎﻤﻴﻈﻨﺗ ﺯﺍ ﻩﺩﺎﻔﺘﺳﺍ
ﻪﻨﻳﺰﮔ ﻪﻤﻫ ﺎﺗ ﺪﻴﻫﺩ ﺭﺎﺸﻓ ﺍﺭ ﺕﺎﻤﻴﻈﻨﺗ ،ﺏﺎﻳﺎﻤﻧ ﺯﺍ
ﺭﺩ ﺎﺗ ﺪﻴﻨﮐ ﺏﺎﺨﺘﻧﺍ ﮓﻧﺭ ﺡﺮﻃ ﮏﻳ - ﮓﻧﺭ ﻩﻮﻠﺟ
ﻪﮐ ﺩﻮﺷ ﯽﻣ ﺚﻋﺎﺑ یﺪﻴﻔﺳ ﻝﺩﺎﻌﺗ - یﺪﻴﻔﺳ ﻝﺩﺎﻌﺗ
.ﺪﻨﺳﺮﺑ ﺮﻈﻧ ﻪﺑ ﯽﻌﻴﺒﻃ ﺎﻫ ﻢﻠﻴﻓ
ﺭﻮﻧ ﻂﻳﺍﺮﺷ ﻪﮐ ﺪﺷﺎﺑ ﻡﺯﻻ ﺪﻳﺎﺷ ،ﺪﻨﮐ ﻢﻴﻈﻨﺗ ﯽﺘﺳﺭﺩ
،ﻥﺎﺑﺎﺗ ،ﺭﺎﮐﺩﻮﺧ یﺎﻫ ﻪﻨﻳﺰﮔ ﻦﻴﺑ ﺯﺍ .ﺪﻴﻨﮐ ﻦﻴﻴﻌﺗ ﺍﺭ
.ﺪﻴﻨﮐ ﺏﺎﺨﺘﻧﺍ ﺍﺭ ﯽﮑﻳ یﺮﺑﺍ ﺎﻳ ﺖﻨﺳﺭﻮﺌﻠﻓ ،ﯽﺑﺎﺘﻓﺁ
ﻭ ﺏﻮﺧ ،ﺏﻮﺧ ﯽﻠﻴﺧ یﺎﻫ ﻪﻨﻳﺰﮔ ﻦﻴﺑ ﺯﺍ - ﺖﻴﻔﻴﮐ
ﺮﺘﻬﺑ
ﻩﺯﺍﺪﻧﺍ ،ﺖﺒﺴﻧ ﻪﺑ ﺎﻣﺍ ﺖﺳﺍ ﺮﺘﺸﻴﺑ ﻢﻠﻴﻓ ﺡﻮﺿﻭ ،ﺪﺷﺎﺑ
یﺎﻫ ﻢﻠﻴﻓ ﻪﺠﻴﺘﻧﺭﺩ .ﺪﻨﮐ ﯽﻣ ﺍﺪﻴﭘ ﺶﻳﺍﺰﻓﺍ ﺰﻴﻧ ﻞﻳﺎﻓ
.ﺪﻴﻨﮐ ﻩﺮﻴﺧﺫ ﻦﻔﻠﺗ ﻪﻈﻓﺎﺣ ﺭﺩ ﺪﻴﻧﺍﻮﺗ ﯽﻣ ﺍﺭ یﺮﺘﻤﮐ
ﮏﻳ ﺕﺭﻮﺻ ﻪﺑ ﻢﻠﻴﻓ ﺪﻴﻨﮐ ﺏﺎﺨﺘﻧﺍ .ﺪﻴﻨﮐ ﻦﻴﻴﻌﺗ
.ﺩﻮﺷ ﺯﺎﺑ ﻪﺘﻓﺮﺸﻴﭘ ﺕﺎﻤﻴﻈﻨﺗ یﺎﻫ
،ﺪﻴﻔﺳ ﻭ ﻩﺎﻴﺳ ،ﺵﻮﻣﺎﺧ .ﺩﻮﺷ ﻝﺎﻤﻋﺍ ﺪﻳﺪﺟ ﻢﻠﻴﻓ
.یﺍ ﻩﻮﻬﻗ ﺰﻣﺮﻗ ،ﻮﻴﺗﺎﮕﻧ
ﺭﺩ ﮓﻧﺭ ﺪﻴﻔﺳ ءﺎﻴﺷﺍ
ﻪﺑ ﺍﺭ یﺪﻴﻔﺳ ﻝﺩﺎﻌﺗ ﺪﻧﺍﻮﺘﺑ ﻦﻴﺑﺭﻭﺩ ﻪﮑﻧﺁ یﺍﺮﺑ
ﺖﻴﻔﻴﮐ ﻪﭼ ﺮﻫ .ﺪﻴﻨﮐ ﺏﺎﺨﺘﻧﺍ ﺍﺭ ﯽﮑﻳ یﺩﺎﻋ
ﻢﻠﻴﻓ یﺍﺮﺑ ﺍﺭ ﯽﺻﺎﺧ ﻥﺎﻣﺯ ﺕﺪﻣ - ﻥﺎﻣﺯ ﺕﺪﻣ
.ﺮﻴﺧ ﺎﻳ ﺩﻮﺷ ﻝﺎﺳﺭﺍ MMS
ﯽﻣ ﺏﺎﺨﺘﻧﺍ ﺍﺭ MMS ﻥﺎﻣﺯ ﺕﺪﻣ ﺮﮔﺍ !ﻪﺘﮑﻧ
ﺏﺎﺨﺘﻧﺍ ﺍﺭ یﺮﺗ ﻦﻴﻳﺎﭘ ﺖﻴﻔﻴﮐ ﺪﻴﻨﮐ ﯽﻌﺳ ،ﺪﻴﻨﮐ
.ﺪﻳﺮﻴﮕﺑ یﺮﺗ ﯽﻧﻻﻮﻃ ﻢﻠﻴﻓ ﺪﻴﻧﺍﻮﺘﺑ ﺎﺗ ﺪﻴﻨﮐ
ﺩﻮﺧ

ﺭﺩ یﺍ ﻪﻧﺎﺳﺭﺪﻨﭼ ﻞﻳﺎﻓ ﻪﭽﻧﺎﻨﭼ :ﺭﺍﺪﺸﻫ
ﺯﺍ ﯽﺧﺮﺑ ﺖﺳﺍ ﻦﮑﻤﻣ ،ﺪﺷﺎﺑ ﻩﺪﺸﻧ ﻂﺒﺿ ﯽﺷﻮﮔ
.ﺪﻨﻨﮑﻧ ﺭﺎﮐ ﯽﺘﺳﺭﺩ ﻪﺑ ﺎﻫﺩﺮﮑﻠﻤﻋ
ﺶﻳﺎﻤﻧ ﺕﺭﻮﺻ ﻪﺑ ﺎﻫ ﺲﮑﻋ ﻩﺪﻫﺎﺸﻣ
ﺭﺩ ﺩﻮﺟﻮﻣ یﺎﻫ ﺲﮑﻋ ﻪﻴﻠﮐ ﺪﻳﻼﺳﺍ ﺶﻳﺎﻤﻧ ﺖﻟﺎﺣ
ﺶﺨﭘ ﺪﻳﻼﺳﺍ ﺕﺭﻮﺻ ﻪﺑ ﻭ ﯽﮑﻳ ﯽﮑﻳ ﺍﺭ یﺮﻟﺎﮔ
ﺪﻳﻼﺳﺍ ﺕﺭﻮﺻ ﻪﺑ ﻥﺍﻮﺗ ﯽﻤﻧ ﺍﺭ ﺎﻫ ﻢﻠﻴﻓ .ﺪﻨﮐ ﯽﻣ
.ﺩﺮﮐ ﻩﺪﻫﺎﺸﻣ
ﺖﮐﺮﺣ ﺲﭙﺳ ﻭ ﻩﺩﺮﮐ ﺲﻤﻟ یﺮﻟﺎﮔ ﺭﺩ ﺍﺭ
.ﺪﻴﻳﺎﻤﻧ ﺏﺎﺨﺘﻧﺍ ﺍﺭ ﺪﻳﻼﺳﺍ ﺶﻳﺎﻤﻧ ﻭ ﺪﻴﻨﮐ
.ﺩﻮﺷ ﯽﻣ ﻉﻭﺮﺷ ﺪﻳﻼﺳﺍ ﺶﻳﺎﻤﻧ 2
ﺩﻮﺟﻮﻣ ﺮﻳﺯ یﺎﻫ ﻪﻨﻳﺰﮔ ،ﺪﻳﻼﺳﺍ ﺶﻳﺎﻤﻧ ﻦﻴﺣ ﺭﺩ
.ﺪﻴﻨﮐ ﺲﻤﻟ ﺍﺭ ،ﺖﺸﮔﺯﺎﺑ یﺍﺮﺑ
ﺲﮑﻋ ﮏﻳ یﻭﺭ ﺪﻳﻼﺳﺍ ﺶﻳﺎﻤﻧ ﺎﺗ ﺪﻴﻨﮐ ﺲﻤﻟ
.ﺪﻨﮐ ﺚﮑﻣ ﺹﺎﺧ
ﻪﺘﻓﺮﮔﺮﺳ ﺯﺍ ﺪﻳﻼﺳﺍ ﺶﻳﺎﻤﻧ ﺎﺗ ﺪﻴﻨﮐ ﺲﻤﻟ
ﺶﻳﺎﻤﻧ ﯽﻓﺩﺎﺼﺗ ﺭﻮﻃ ﻪﺑ ﺎﺗ ﺪﻴﻨﮐ ﺲﻤﻟ
.ﺩﻮﺷ ﻩﺩﺍﺩ
ﺶﻳﺍﺰﻓﺍ ﺪﻳﻼﺳﺍ ﺶﻳﺎﻤﻧ ﺖﻋﺮﺳ ﺎﺗ ﺪﻴﻨﮐ ﺲﻤﻟ
.ﺪﺑﺎﻳ ﺶﻫﺎﮐ ﺎﻳ
ﺎﻤﺷ یﺎﻫ ﻢﻠﻴﻓ ﻭ ﺎﻫ ﺲﮑﻋ
ﺎﻫ ﻢﻠﻴﻓ ﻭ ﺎﻫ ﺲﮑﻋ ﻩﺪﻫﺎﺸﻣ
ﺎﻳ .ﺪﻴﻨﮐ ﺲﻤﻟ ﺍﺭ یﺮﻟﺎﮔ ،ﯽﻣﺮﮔﺮﺳ ﻪﻧﺎﺑﺯ ﺭﺩ 1
ﺲﻤﻟ ﺍﺭ
،ﻦﻴﺑﺭﻭﺩ ﺶﻳﺎﻤﻧ ﺶﻴﭘ ﻪﺤﻔﺻ ﺭﺩ
ﺍﺭ ﺩﻮﺧ یﺎﻫ ﻢﻠﻴﻓ ﻭ ﺎﻫ ﺲﮑﻋ ﺪﻴﻧﺍﻮﺗ ﯽﻣ .ﺪﻴﻨﮐ
ﺪﻳﻼﺳﺍ
1
:ﺖﺳﺍ
.ﺩﻮﺷ
.ﺩﻮﺷ ﯽﻣ ﺮﻫﺎﻇ ﻪﺤﻔﺻ یﻭﺭ یﺮﻟﺎﮔ 2
ﺯﺎﺑ ﻞﻣﺎﮐ ﺭﻮﻃ ﻪﺑ ﺎﺗ ﺪﻴﻨﮐ ﺲﻤﻟ ﺍﺭ ﺲﮑﻋ ﺎﻳ ﻢﻠﻴﻓ 3
یﺍﺮﺑ .ﺪﻴﻨﮐ ﺲﻤﻟ ﺍﺭ
.ﺪﻴﻫﺩ ﺭﺎﺸﻓ ﺍﺭ
ﺲﮑﻋ ﻭ ﻩﺩﺮﮐ ﺖﮐﺮﺣ ﭗﭼ ﺎﻳ ﺖﺳﺍﺭ ﻪﺑ !ﻪﺘﮑﻧ
.ﺪﻴﻨﮐ ﻩﺪﻫﺎﺸﻣ ﺍﺭ ﺎﻫ ﻢﻠﻴﻓ ﺎﻳ ﺎﻫ
ﻢﻠﻴﻓ ﮏﻳ ﺯﺍ ﺲﮑﻋ ﻦﺘﻓﺮﮔ
ﺍﺭ ﺪﻳﺮﻴﮕﺑ ﺲﮑﻋ ﻥﺁ ﺯﺍ ﺪﻴﻫﺍﻮﺧ ﯽﻣ ﻪﮐ ﯽﻤﻠﻴﻓ 1
ﻞﻳﺎﻣ ﻪﮐ یﺭﺩﺎﮐ ﻞﺧﺍﺩ ﻢﻠﻴﻓ ﻥﺩﺮﮐ ﻒﻗﻮﺘﻣ یﺍﺮﺑ 2
ﻭ
ﺪﻴﻠﮐ ،ﺪﻴﺘﺴﻫ ﺲﮑﻋ ﻪﺑ ﻥﺁ ﻞﻳﺪﺒﺗ ﻪﺑ
یﻮﻨﻣ ﺎﺗ ﺪﻴﻫﺩ ﺭﺎﺸﻓ ﺍﺭ ﻪﺤﻔﺻ ﭗﭼ ﺖﻤﺳ ﺲﭙﺳ
.ﺪﻴﻨﮐ ﺏﺎﺨﺘﻧﺍ ﺍﺭ ،ﺎﻫ ﻪﻨﻳﺰﮔ یﻮﻨﻣ ﺯﺍ 3
ﺮﻫﺎﻇ ﻪﺤﻔﺻ ﺭﺩ ،ﺩﻮﺧ ﯽﺸﻳﺎﻤﻧ ﻡﺎﻧ ﺎﺑ ﺮﻳﻮﺼﺗ 4
.ﺪﻴﻨﮐ ﺲﻤﻟ ﻢﻠﻴﻓ ﻪﺑ ﺖﺸﮔﺯﺎﺑ یﺍﺮﺑ ﺍﺭ 5
ﻭ ﻩﺪﺷ ﻩﺮﻴﺧﺫ ﻦﻣ ﺕﺎﻋﻮﺿﻮﻣ ﻪﺷﻮﭘ ﺭﺩ ﺮﻳﻮﺼﺗ 6
.ﺩﺩﺮﮔ ﯽﻣ ﺮﻫﺎﻇ یﺮﻟﺎﮔ ﺭﺩ
.ﺪﻴﻨﮐ ﯽﺳﺭﺮﺑ
.ﺩﻮﺷ
،ﻢﻠﻴﻓ ﺶﺨﭘ یﺍﺮﺑ 4
،ﺶﺨﭘ ﺖﻗﻮﻣ ﻒﻗﻮﺗ
.ﺪﻴﻨﮐ ﺏﺎﺨﺘﻧﺍ
.ﺩﻮﺷ ﺯﺎﺑ
.ﺩﻮﺷ ﯽﻣ
ﺮﺑﺭﺎﮐ یﺎﻤﻨﻫﺍﺭ | LG GM360
36
ﺯﺍ ..ﺪﻴﻨﮐ ﻦﻴﺋﺰﺗ ﺮﺒﻤﺗ ﺎﺑ ﺍﺭ ﺩﻮﺧ ﺲﮑﻋ
ﻩﺩﺮﮐ ﺏﺎﺨﺘﻧﺍ ﻒﻠﺘﺨﻣ یﺎﻫ ﮓﻧﺭ ﻭ ﺎﻫﺮﻬﻣ ﻦﻴﺑ
ﻥﺁ ﻥﺩﺍﺩ ﺭﺍﺮﻗ یﺍﺮﺑ ﺍﺭ ﺮﻈﻧ ﺩﺭﻮﻣ ﺲﮑﻋ ﻭ
.ﺪﻴﻫﺩ ﺭﺎﺸﻓ ﺎﻫ
.ﺪﻴﻨﮐ کﺎﭘ ﺪﻳﺍ ﻩﺩﺮﮐ ﻢﻴﺳﺮﺗ ﺍﺭ ﻪﭼ ﺮﻫ
ﻢﻴﻈﻨﺗ ﺍﺭ ﻦﮐ کﺎﭘ ﻩﺯﺍﺪﻧﺍ ﺪﻴﻧﺍﻮﺗ ﯽﻣ ﻦﻴﻨﭽﻤﻫ
.ﺪﻴﻨﮐ ﺲﻤﻟ یﺮﻟﺎﮔ ﻪﺑ ﺖﺸﮔﺯﺎﺑ یﺍﺮﺑ
ﻝﺎﻤﻋﺍ ﺎﻫ ﺲﮑﻋ یﻭﺭ ﻪﮐ ﯽﺗﺍﺮﻴﻴﻐﺗ
ﻪﮐ ﺪﻴﻨﮐ ﺏﺎﺨﺘﻧﺍ .ﺪﻴﻳﺎﻤﻧ ﻩﺮﻴﺧﺫ ﺍﺭ ﺪﻳﺍ ﻩﺩﺮﮐ
ﻪﺑ ﺎﻳ ﺩﻮﺷ ﻝﺎﻤﻋﺍ ﯽﻠﺻﺍ ﻞﻳﺎﻓ یﻭﺭ ﺕﺍﺮﻴﻴﻐﺗ
ﻞﻳﺎﻓ ﻪﻨﻳﺰﮔ ﺮﮔﺍ .ﺩﺩﺮﮔ ﻩﺮﻴﺧﺫ ﺪﻳﺪﺟ ﻞﻳﺎﻓ ﻥﺍﻮﻨﻋ
ﻞﻳﺎﻓ ﻡﺎﻧ ﮏﻳ ﺪﻳﺎﺑ ،ﺪﻴﻨﮐ ﯽﻣ ﺏﺎﺨﺘﻧﺍ ﺍﺭ ﺪﻳﺪﺟ
.ﺪﻴﻳﺎﻤﻧ ﺩﺭﺍﻭ ﺍﺭ
یﻭﺭ ﻪﮐ ﯽﺸﻳﺍﺮﻳﻭ ﺎﻳ ﻩﻮﻠﺟ ﻦﻳﺮﺧﺁ
.ﺪﻴﻨﮐ ﻞﻃﺎﺑ ﺍﺭ ﺪﻳﺍ ﻩﺩﺍﺩ ﻡﺎﺠﻧﺍ ﺲﮑﻋ
.ﺩﻮﺷ ﺯﺎﺑ ﺮﺘﻠﻴﻓ یﺎﻫ ﻪﻨﻳﺰﮔ ﺎﺗ ﺪﻴﻨﮐ ﺲﻤﻟ
.ﺪﻴﻨﮐ ﻢﻴﻈﻨﺗ ﺍﺭ ﯽﺑﺎﺨﺘﻧﺍ ﺲﮑﻋ ﺪﻴﻧﺍﻮﺗ ﯽﻣ
37
ﻪﺤﻔﺻ ﺮﻳﻮﺼﺗ ﺕﺭﻮﺻ ﻪﺑ ﺲﮑﻋ ﻢﻴﻈﻨﺗ
.ﺪﻴﻨﮐ ﺲﻤﻟ ﺍﺭ یﺮﻟﺎﮔ ،ﯽﻣﺮﮔﺮﺳ ﻪﻧﺎﺑﺯ ﺭﺩ 1
ﺮﻳﻮﺼﺗ ﻥﺍﻮﻨﻋ ﻪﺑ ﺪﻴﺘﺴﻫ ﻞﻳﺎﻣ ﻪﮐ ﯽﺴﮑﻋ 2
.ﺪﻴﻨﮐ ﺲﻤﻟ ﺍﺭ ﺩﻮﺷ ﻩﺩﺎﻔﺘﺳﺍ ﯽﻠﺻﺍ ﻪﺤﻔﺻ
.ﺪﻴﻨﮐ
.ﺩﻮﺷ ﺯﺎﺑ ﻮﻨﻣ ﺎﺗ ﺪﻴﻨﮐ ﺲﻤﻟ ﺍﺭ ﺶﻳﺎﻤﻧ ﻪﺤﻔﺻ 3
ﺮﻴﻴﻐﺗ
ﺎﺑ ﺍﺭ ﺲﮑﻋ ﻩﺯﺍﺪﻧﺍ ﺪﻴﻧﺍﻮﺗ ﯽﻣ ﻥﻮﻨﮐﺍ 5
ﻢﻴﻈﻨﺗ ،ﺪﻳﺩﺍﺩ ﻡﺎﺠﻧﺍ ﺍﺭ ﺩﻮﺧ ﺏﺎﺨﺘﻧﺍ ﻪﮑﻧﺁ ﺯﺍ ﺪﻌﺑ 6
،ﻪﻤﻫ :ﺪﻴﻨﮐ ﺏﺎﺨﺘﻧﺍ ﺮﻳﺯ یﺎﻫ ﻪﻨﻳﺰﮔ ﻦﻴﺑ ﺯﺍ 7
ﻩﺭﺎﻤﺷ ﯽﻠﺻﺍ ﻪﺤﻔﺻ ،ﺖﺠﻳﻭ ﯽﻠﺻﺍ ﻪﺤﻔﺻ
ﻩﺩﺮﮐ ﺯﺎﺑ ﺶﻳﺍﺮﻳﻭ یﺍﺮﺑ ﺍﺭ ﺮﻈﻧ ﺩﺭﻮﻣ ﺲﮑﻋ 1
ﺭﺎﺸﻓ ﺍﺭ
ﻥﺁ یﺎﻫ ﻪﻨﻳﺰﮔ ﺶﻳﺎﻤﻧ یﺍﺮﺑ ﻭ
:ﺪﻴﻨﮐ ﺲﻤﻟ ﺍﺭ ﺎﻫﺩﺎﻤﻧ ،ﺩﻮﺧ ﺲﮑﻋ ﺮﻴﻴﻐﺗ یﺍﺮﺑ 2
ﺶﻳﺎﻤﻧ ﻪﺤﻔﺻ ﺽﺮﻋ ﺭﺩ ﺍﺭ ﺩﻮﺧ ﺖﺸﮕﻧﺍ
.ﺩﻮﺷ ﺏﺎﺨﺘﻧﺍ ﺮﻈﻧ ﺩﺭﻮﻣ ﻪﻴﺣﺎﻧ ﺎﺗ ﺪﻴﺸﮑﺑ
ﺖﺧﺎﺳ ﺖﺳﺩ ﺲﮑﻋ یﻭﺭ ﺍﺭ ﯽﻠﮑﺷ
ﺭﺎﻬﭼ ﺯﺍ ﺍﺭ ﻂﺧ ﺖﻣﺎﺨﺿ .ﺪﻴﻨﮐ ﻢﻴﺳﺮﺗ ﺩﻮﺧ
،ﺪﻴﻨﮐ ﻩﺩﺎﻔﺘﺳﺍ ﺪﻴﻠﻳﺎﻣ ﻪﮐ ﯽﮕﻧﺭ ﻭ ﺩﻮﺟﻮﻣ ﻪﻨﻳﺰﮔ
.ﺪﻴﻨﮐ ﻪﻓﺎﺿﺍ ﺲﮑﻋ ﻪﺑ ﺍﺭ یﺍ ﻪﺘﺷﻮﻧ
ﯽﻠﺻﺍ
.ﺪﻴﻨﮐ ﺲﻤﻟ ﺍﺭ
.ﺪﻴﻫﺩ
.ﺪﻴﻨﮐ ﺲﻤﻟ ﺍﺭ
.ﻊﻳﺮﺳ یﺮﻴﮔ
ﺎﻫ ﺲﮑﻋ ﺶﻳﺍﺮﻳﻭ
.ﺪﻴﻫﺩ
.ﺪﻴﻳﺎﻤﻧ ﺏﺎﺨﺘﻧﺍ
4

.ﺪﻫﺩ ﯽﻣ ﺲﮑﻋ ﻪﺑ ﯽﻤﻳﺪﻗ ﻩﻮﻠﺟ ﮏﻳ - ﯽﻤﻳﺪﻗ
ﯽﻣ ﺲﮑﻋ ﻪﺑ ﯽﻧﺍﺭﻮﻧ ﻪﻌﺷﺍ ﻩﻮﻠﺟ - ﯽﻧﺍﺭﻮﻧ
.ﺪﻫﺩ ﯽﻣ ﺲﮑﻋ ﻪﺑ ﯽﻧﻮﺗﺭﺎﮐ ﻩﻮﻠﺟ - ﯽﻧﻮﺗﺭﺎﮐ
ﺲﮑﻋ ﻪﺑ ﺏﺁ ﮓﻧﺭ ﺪﻨﻧﺎﻣ ﻩﻮﻠﺟ ﮏﻳ - ﮓﻧﺭ ﺏﺁ
ﺖﺸﮔﺮﺑ ،ﻩﺪﺷ ﻝﺎﻤﻋﺍ ی ﻩﻮﻠﺟ ﻮﻐﻟ یﺍﺮﺑ 3
.ﺪﻫﺩ
.ﺪﻫﺩ ﯽﻣ
.ﺪﻴﻨﮐ ﺏﺎﺨﺘﻧﺍ ﺍﺭ
ﺎﻤﺷ یﺎﻫ ﻢﻠﻴﻓ ﻭ ﺎﻫ ﺲﮑﻋ
ﺲﮑﻋ ﻪﺑ ﻩﻮﻠﺟ ﻥﺩﻭﺰﻓﺍ
.ﺪﻴﻨﮐ ﺲﻤﻟ ﺍﺭ ،ﺶﻳﺍﺮﻳﻭ ﻪﺤﻔﺻ ﺯﺍ 1
یﻭﺭ ﺍﺭ ﺮﻳﺯ یﺎﻫ ﻪﻨﻳﺰﮔ ﺯﺍ ﮏﻳﺮﻫ ﺪﻴﻧﺍﻮﺗ ﯽﻣ 2
ﻩﺮﻬﭼ ﺭﺎﮐﺩﻮﺧ ﺭﻮﻃ ﻪﺑ - ﺕﺭﻮﺻ ﻥﺩﺮﮐ ﺎﺒﻳﺯ
ﺍﺭ ﻥﺁ ﻭ ﻩﺩﺮﮐ ﯽﻳﺎﺳﺎﻨﺷ ﺮﻳﻮﺼﺗ ﮏﻳ ﺭﺩ ﺍﺭ یﺍ
.ﻦﻴﺑﺭﻭﺩ یﺭﻮﻓ ﺲﮑﻋ ﻩﻮﻠﺟ - ﯽﻠﻧﻮﺗ ﻩﻮﻠﺟ
.ﮓﻧﺭ ﻮﻴﺗﺎﮕﻧ ﻩﻮﻠﺟ - ﮓﻧﺭ
.ﺪﻴﻔﺳ ﻭ ﻩﺎﻴﺳ ﮓﻧﺭ ﻩﻮﻠﺟ - ﺪﻴﻔﺳ ﻭ ﻩﺎﻴﺳ
.یﺍ ﻩﻮﻬﻗ ﺰﻣﺮﻗ ﻩﻮﻠﺟ - یﺍ ﻩﻮﻬﻗ ﺰﻣﺮﻗ
ﺭﺍﻮﻧ ﺩﺍﺪﺘﻣﺍ ﺭﺩ ﺍﺭ ﺮﮐﺭﺎﻣ - ﻥﺩﺮﮐ ﺢﺿﺍﻭ
ﺩﺎﻤﻧ .ﺩﻮﺷ ﺢﺿﺍﻭ ﺲﮑﻋ ﻥﻮﻧﺎﮐ ﺎﺗ ﺪﻴﻨﮐ ﺎﺠﺑﺎﺟ
ﺎﻳ ﺩﻮﺷ ﻝﺎﻤﻋﺍ ﺕﺍﺮﻴﻴﻐﺗ ﺎﺗ ﺪﻴﻨﮐ ﺏﺎﺨﺘﻧﺍ ﺍﺭ OK
.ﺩﺩﺮﮔ ﻮﻐﻟ ﺎﺗ ﺪﻴﻨﮐ ﺏﺎﺨﺘﻧﺍ ﺍﺭ
،ﺲﮑﻋ ﻥﺩﺮﮐ ﯽﺠﻧﺮﻄﺷ یﺍﺮﺑ - ﺕﺎﻣ ﯽﺠﻧﺮﻄﺷ
ﯽﻣ ﺲﮑﻋ ﻪﺑ ﻦﻏﻭﺭ ﮓﻧﺭ ﻩﻮﻠﺟ - ﻦﻏﻭﺭ ﮓﻧﺭ
ﺪﻨﻧﺎﻣ ﺲﮑﻋ ،ﻩﻮﻠﺟ ﻦﻳﺍ ﻝﺎﻤﻋﺍ ﺎﺑ - ﯽﺷﺎﻘﻧ
ﯽﻣ ﺲﮑﻋ ﻪﺑ ﻪﺘﺴﺟﺮﺑ ﻩﻮﻠﺟ ﮏﻳ - ﻪﺘﺴﺟﺮﺑ
ﯽﻣ ﺲﮑﻋ ﻪﺑ ﻑﺎﻔﺷ ﻭ ﻩﺪﻧﺯ ﻩﻮﻠﺟ - ﺢﺿﺍﻭ
ﻩﺎﻣ ﺭﻮﻧ ﻪﺑ ﻪﻴﺒﺷ ﺎﺗ ﺪﻴﻫﺩ ﺮﻴﻴﻐﺗ ﺍﺭ ﺭﻮﻧ- ﯽﺑﺎﺘﻬﻣ
:ﺪﻴﻨﮐ ﻝﺎﻤﻋﺍ ﺲﮑﻋ
.ﺪﻨﮐ ﯽﻣ ﻦﺷﻭﺭ ﻭ ﺢﺿﺍﻭ
ﻮﻴﺗﺎﮕﻧ
.ﺕﺎﻣ ﻩﻮﻠﺟ- ﺕﺎﻣ
.ﺪﻴﻨﮐ ﺲﻤﻟ ﺍﺭ ﻥﺁ
.ﺪﻫﺩ
.ﺪﺳﺭ ﯽﻣ ﺮﻈﻧ ﻪﺑ ﯽﺷﺎﻘﻧ
.ﺪﻫﺩ
.ﺪﻫﺩ
.ﺩﻮﺷ
38
ﺮﺑﺭﺎﮐ یﺎﻤﻨﻫﺍﺭ | LG GM360
ﻦﻴﺑ ﺯﺍ ﻭ ﻩﺩﺮﮐ ﺲﻤﻟ ﺍﺭ ﻥﺍﻮﻨﻋ ﻪﺑ ﻩﺩﺎﻔﺘﺳﺍ 2
:ﺪﻴﻨﮐ ﺏﺎﺨﺘﻧﺍ ﺮﻳﺯ یﺎﻫ ﻪﻨﻳﺰﮔ
یﺍﺮﺑ ﺍﺭ ﺮﻳﻮﺼﺗ - ﯽﻠﺻﺍ ﻪﺤﻔﺻ ﺮﻳﻮﺼﺗ
ﻪﺤﻔﺻ یﺍﺮﺑ ﺍﺭ ﺮﻳﻮﺼﺗ - ﻞﻔﻗ ﻪﺤﻔﺻ ﺮﻳﻮﺼﺗ
ﯽﺻﺎﺧ ﺩﺮﻓ ﻪﺑ ﺍﺭ یﺮﻳﻮﺼﺗ - ﻦﻴﺒﻃﺎﺨﻣ ﺮﻳﻮﺼﺗ
ﺩﺭﺍﺩ ﺩﻮﺟﻭ
ﺱﺎﻤﺗ ﺎﻤﺷ ﺎﺑ یﻭ ﻪﮐ ﯽﻧﺎﻣﺯ ﺎﺗ ،ﺪﻴﻫﺩ ﺹﺎﺼﺘﺧﺍ
یﺍﺮﺑ ﺍﺭ یﺮﻳﻮﺼﺗ - ﻉﻭﺮﺷ ﻪﺤﻔﺻ ﺮﻳﻮﺼﺗ
.ﺪﻴﻨﮐ ﻦﻴﻴﻌﺗ ﺩﻮﺷ ﯽﻣ ﻦﺷﻭﺭ ﻦﻔﻠﺗ ﻪﮑﻴﻧﺎﻣﺯ
یﺍﺮﺑ ﺍﺭ یﺮﻳﻮﺼﺗ - ﺵﻮﻣﺎﺧ ﻪﺤﻔﺻ ﺮﻳﻮﺼﺗ
.ﺪﻴﻨﮐ ﻦﻴﻴﻌﺗ ﺩﻮﺷ ﯽﻣ ﺵﻮﻣﺎﺧ ﻦﻔﻠﺗ ﻪﮑﻴﻧﺎﻣﺯ
.ﺪﻴﻨﮐ ﻢﻴﻈﻨﺗ ﯽﻠﺻﺍ ﻪﺤﻔﺻ
.ﺪﻴﻨﮐ ﻢﻴﻈﻨﺗ ﻞﻔﻗ
ﺎﻤﺷ ﻦﻴﺒﻃﺎﺨﻣ ﺖﺳﺮﻬﻓ ﺭﺩ ﻪﮐ
.ﺩﻮﺷ ﻩﺩﺍﺩ ﻥﺎﺸﻧ ﺮﻳﻮﺼﺗ ،ﺩﺮﻴﮔ ﯽﻣ
ﺮﻳﻮﺼﺗ پﺎﭼ
ﺲﻤﻟ ﯽﻣﺮﮔﺮﺳ ﻪﻧﺎﺑﺯ ﺭﺩ ﺍﺭ ﻦﻣ ﺕﺎﻋﻮﺿﻮﻣ 1
ﺩﺭﻮﻣ ﺲﮑﻋ .ﺪﻴﻨﮐ ﺏﺎﺨﺘﻧﺍ ﺍﺭ ﺮﻳﻭﺎﺼﺗ ﻭ ﻩﺩﺮﮐ
.ﺪﻴﻨﮐ ﺲﻤﻟ ﺍﺭ
ﻭ ﺙﻮﺗﻮﻠﺑ ﻦﻴﺑ ﺯﺍ ﺲﭙﺳ ﻭ ﻩﺩﺍﺩ ﺭﺎﺸﻓ ﺍﺭ پﺎﭼ 2
PictBridge ﺭﺎﮔﺯﺎﺳ ﺮﮕﭘﺎﭼ ﮏﻳ ﻪﺑ ﻝﺎﺼﺗﺍ
39
ﻭ .ﺪﻴﻨﮐ ﺏﺎﺨﺘﻧﺍ ﺍﺭ ﺮﻈﻧ
.ﺪﻴﻨﮐ ﺏﺎﺨﺘﻧﺍ PictBridge
ﺎﺑ ﺎﻳ ﺙﻮﺗﻮﻠﺑ ﻖﻳﺮﻃ ﺯﺍ ﺪﻴﻧﺍﻮﺗ ﯽﻣ !ﻪﺘﮑﻧ
.ﺪﻴﻨﮐ پﺎﭼ
یﺍ ﻪﻧﺎﺳﺭ ﺪﻨﭼ
ﺭﺩ ﺍﺭ یﺍ ﻪﻧﺎﺳﺭ ﺪﻨﭼ ﻞﻳﺎﻓ ﻉﻮﻧ ﺮﻫ ﺪﻴﻧﺍﻮﺗ ﯽﻣ
،ﺎﻫﺍﺪﺻ ،ﺮﻳﻭﺎﺼﺗ ﻪﺑ ﺎﺗ ﺪﻴﻨﮐ ﻩﺮﻴﺧﺫ ﯽﺷﻮﮔ ﻪﻈﻓﺎﺣ
ﻊﻳﺮﺳ ﻭ ﻥﺎﺳﺁ ﯽﺳﺮﺘﺳﺩ ﺩﻮﺧ یﺎﻫ یﺯﺎﺑ ﻭ ﺎﻫ ﻢﻠﻴﻓ
ﺩﻮﺧ یﺎﻫ ﻞﻳﺎﻓ ﺪﻴﻧﺍﻮﺗ ﯽﻣ ﻦﻴﻨﭽﻤﻫ .ﺪﻴﺷﺎﺑ ﻪﺘﺷﺍﺩ
ﻩﺩﺎﻔﺘﺳﺍ .ﺪﻴﻨﮐ ﻩﺮﻴﺧﺫ ﻪﻈﻓﺎﺣ ﺕﺭﺎﮐ ﮏﻳ یﻭﺭ ﺍﺭ
ﻪﻈﻓﺎﺣ ﺪﻫﺩ ﯽﻣ ﻥﺎﮑﻣﺍ ﺎﻤﺷ ﻪﺑ
ﻦﻳﺍ ﺪﻴﻧﺍﻮﺗ ﯽﻣ ﺎﻤﺷ .ﺪﻴﻨﮐ ﯽﻟﺎﺧ ﺍﺭ ﺩﻮﺧ ﻦﻔﻠﺗ
ﻪﻧﺎﺑﺯ ﺭﺩ ﻦﻣ ﺕﺎﻋﻮﺿﻮﻣ یﻮﻨﻣ ﺭﺩ ﺍﺭ ﺎﻫ ﻞﻳﺎﻓ
ﺯﺍ ﻢﻋﺍ ﺮﻳﻭﺎﺼﺗ ﺯﺍ ﯽﺘﺳﺮﻬﻓ یﻭﺎﺣ ﺮﻳﻭﺎﺼﺗ
ﯽﺷﻮﮔ یﻭﺭ ﻞﺒﻗ ﺯﺍ ﻪﮐ ﺽﺮﻓ ﺶﻴﭘ ﺮﻳﻭﺎﺼﺗ
ﻥﺎﺗﺩﻮﺧ ﻪﮐ یﺮﻳﻭﺎﺼﺗ ﺰﻴﻧ ﻭ ﺖﺳﺍ ﻩﺪﺷ یﺮﻴﮔﺭﺎﺑ
.ﺪﺷﺎﺑ ﯽﻣ ﺪﻳﺍ ﻪﺘﻓﺮﮔ ﻦﻴﺑﺭﻭﺩ ﺎﺑ ﺎﻳ ﻩﺩﺮﮐ یﺮﻴﮔﺭﺎﺑ
ﺲﻤﻟ ﯽﻣﺮﮔﺮﺳ ﻪﻧﺎﺑﺯ ﺭﺩ ﺍﺭ ﻦﻣ ﺕﺎﻋﻮﺿﻮﻣ 1
ﺩﺭﻮﻣ ﺲﮑﻋ .ﺪﻴﻨﮐ ﺏﺎﺨﺘﻧﺍ ﺍﺭ ﺮﻳﻭﺎﺼﺗ ﻭ ﻩﺩﺮﮐ
ﻡﺎﻴﭘ یﺎﻫ ﻪﻨﻳﺰﮔ ﻦﻴﺑ ﺯﺍ ﻭ ﻩﺩﺮﮐ ﺲﻤﻟ ﺍﺭ ﻝﺎﺳﺭﺍ 2
.ﺪﻴﻨﮐ ﺏﺎﺨﺘﻧﺍﺙﻮﺗﻮﻠﺑ ﻭ ﻞﻴﻤﻳﺍ ،یﺍ ﻪﻧﺎﺳﺭﺪﻨﭼ
ﻪﺤﻔﺻ ﺮﻳﻮﺼﺗ ﻥﺍﻮﻨﻋ ﻪﺑ ﺮﻳﻭﺎﺼﺗ ﺯﺍ ﺪﻴﻧﺍﻮﺗ ﯽﻣ
ﺱﺎﻤﺗ ﯽﻳﺎﺳﺎﻨﺷ یﺍﺮﺑ ﯽﺘﺣ ﻭ ﻞﻔﻗ ﻪﺤﻔﺻ ،ﯽﻠﺻﺍ
ﺲﻤﻟ ﯽﻣﺮﮔﺮﺳ ﻪﻧﺎﺑﺯ ﺭﺩ ﺍﺭ ﻦﻣ ﺕﺎﻋﻮﺿﻮﻣ 1
ﺩﺭﻮﻣ ﺲﮑﻋ .ﺪﻴﻨﮐ ﺏﺎﺨﺘﻧﺍ ﺍﺭ ﺮﻳﻭﺎﺼﺗ ﻭ ﻩﺩﺮﮐ
.ﺪﻴﻨﮐ ﺲﻤﻟ ﺍﺭ
ﻪﻈﻓﺎﺣ ﺕﺭﺎﮐ ﺯﺍ
.ﺪﻴﺑﺎﻴﺑ ﯽﻣﺮﮔﺮﺳ
ﺎﻫ ﺲﮑﻋ
ﺲﮑﻋ ﻝﺎﺳﺭﺍ
.ﺪﻴﻨﮐ ﺏﺎﺨﺘﻧﺍ ﺍﺭ ﺮﻈﻧ
ﺮﻳﻮﺼﺗ ﺯﺍ ﻩﺩﺎﻔﺘﺳﺍ
.ﺪﻴﻨﮐ ﻩﺩﺎﻔﺘﺳﺍ ﻩﺪﻧﺮﻴﮔ
ﻭ .ﺪﻴﻨﮐ ﺏﺎﺨﺘﻧﺍ ﺍﺭ ﺮﻈﻧ

ﺲﻤﻟ ﯽﻣﺮﮔﺮﺳ ﻪﻧﺎﺑﺯ ﺭﺩ ﺍﺭ ﻦﻣ ﺕﺎﻋﻮﺿﻮﻣ 1
ﺍﺪﺻ ﺯﺍ ﻩﺩﺎﻔﺘﺳﺍ
.ﺪﻴﻨﮐ ﺏﺎﺨﺘﻧﺍ ﺍﺭ ﺎﻫﺍﺪﺻ ﻭ ﻩﺩﺮﮐ
ﻡﺎﻴﭘ ﮏﻳ .ﺪﻴﻨﮐ ﺏﺎﺨﺘﻧﺍ ﺍﺭ ﺮﻈﻧ ﺩﺭﻮﻣ یﺍﺪﺻ 2
.ﺩﻮﺷ ﯽﻣ ﺮﻫﺎﻇ ﺪﻴﻳﺎﺗ
.ﺩﻮﺷ ﯽﻣ ﻉﻭﺮﺷ ﺶﺨﭘ .ﺪﻴﻨﮐ ﺲﻤﻟ ﺍﺭ ﻪﻠﺑ 3
ﺍﺭ ﻥﺍﻮﻨﻋ ﻪﺑ ﻩﺩﺎﻔﺘﺳﺍ ﻭ ﻩﺩﺮﮐ ﺲﻤﻟ ﺍﺭ
.ﺪﻴﻨﮐ ﺏﺎﺨﺘﻧﺍ
،ﻡﺎﻴﭘ ﮓﻨﻫﺁ ،ﮓﻧﺯ ﮓﻨﻫﺁ یﺎﻫ ﻪﻨﻳﺰﮔ ﻦﻴﺑ ﺯﺍ 5
.ﺪﻴﻨﮐ ﺏﺎﺨﺘﻧﺍ ﻥﺪﺷ ﺵﻮﻣﺎﺧ ﺎﻳ ﻉﻭﺮﺷ
ﺎﻫ ﻢﻠﻴﻓ
ﻭ ﻩﺪﺷ یﺮﻴﮔﺭﺎﺑ یﺎﻫ ﻢﻠﻴﻓ یﻭﺎﺣ ﺎﻫ ﻢﻠﻴﻓ ﻪﺷﻮﭘ
ﻩﺮﻴﺧﺫ ﻭ ﻪﺘﻓﺮﮔ ﻦﻔﻠﺗ ﺭﺩ ﻪﮐ ﺖﺳﺍ ﯽﻳﺎﻫ ﻢﻠﻴﻓ ﺰﻴﻧ
.ﺪﻳﺍ ﻩﺩﺮﮐ
ﻢﻠﻴﻓ یﺎﺷﺎﻤﺗ
ﺲﻤﻟ ﺍﺭ ﻦﻣ ﺕﺎﻋﻮﺿﻮﻣ ،ﯽﻣﺮﮔﺮﺳ ﻪﻧﺎﺑﺯ ﺭﺩ 1
.ﺪﻴﻨﮐ ﺏﺎﺨﺘﻧﺍ ﺍﺭ ﺎﻫ ﻢﻠﻴﻓ ﻭ ﻩﺩﺮﮐ
.ﺪﻴﻨﮐ ﺏﺎﺨﺘﻧﺍ ﺶﺨﭘ یﺍﺮﺑ ﺍﺭ ﯽﻤﻠﻴﻓ 2
یﺍ ﻪﻧﺎﺳﺭﺪﻨﭼ
ﻞﻳﺎﻓ ﻥﺩﺮﮐ ﯽﭙﮐ ﺎﻳ ﻥﺩﺍﺩ ﻝﺎﻘﺘﻧﺍ
ﺕﺭﺎﮐ ﻭ ﻦﻔﻠﺗ ﻪﻈﻓﺎﺣ ﻦﻴﺑ ﺍﺭ ﯽﻠﻳﺎﻓ ﺪﻴﻧﺍﻮﺗ ﯽﻣ
ﯽﻟﺎﺧ یﺍﺮﺑ ﺍﺭ ﺭﺎﮐ ﻦﻳﺍ .ﺪﻴﻨﮐ ﯽﭙﮐ ﺎﻳ ﺎﺠﺑﺎﺟ ﻪﻈﻓﺎﺣ
ﻥﺪﺷ ﻢﮔ ﺯﺍ ﺮﻳﻭﺎﺼﺗ ﺯﺍ ﺖﺒﻗﺍﺮﻣ ﺎﻳ ﻪﻈﻓﺎﺣ ﻥﺩﺮﮐ
ﺲﻤﻟ ﯽﻣﺮﮔﺮﺳ ﻪﻧﺎﺑﺯ ﺭﺩ ﺍﺭ ﻦﻣ ﺕﺎﻋﻮﺿﻮﻣ 1
ﺲﭙﺳ ﻭ ﺪﻴﻨﮐ ﺏﺎﺨﺘﻧﺍ ﺍﺭ ﺮﻳﻭﺎﺼﺗ ،ﻩﺩﺮﮐ
4
ﻥﺁ یﻭﺭ ﻥﺩﺯ ﻪﺑﺮﺿ ﺎﺑ ﺍﺭ ﺮﻳﻭﺎﺼﺗ ﺪﻴﻧﺍﻮﺗ ﯽﻣ 3
یﺮﻳﻮﺼﺗ .ﺪﻴﻨﮐ ﺖﻣﻼﻋ ﯽﺑ ﺎﻳ ﺭﺍﺩ ﺖﻣﻼﻋ ،ﺎﻫ
ﺍﺭ ﺪﻴﻨﮐ ﯽﭙﮐ ﺎﻳ ﺪﻴﻫﺩ ﻝﺎﻘﺘﻧﺍ ﺪﻴﻫﺍﻮﺧ ﯽﻣ ﻪﮐ
.ﺪﻴﻨﮐ ﺲﻤﻟ ﺍﺭ ﻝﺎﻘﺘﻧﺍ/ﯽﭙﮐ ﻭ ﻩﺩﺯ
یﺎﻫﺍﺪﺻ ﻞﻣﺎﺷ ﺎﻫﺍﺪﺻ ﺯﺍ ﯽﺘﺳﺮﻬﻓ یﻭﺎﺣ ﺎﻫﺍﺪﺻ
یﺎﻫﺍﺪﺻ ﻭ ﺽﺮﻓ ﺶﻴﭘ یﺎﻫﺍﺪﺻ ،ﻩﺪﺷ یﺮﻴﮔﺭﺎﺑ
ﺍﺭ ﺎﻫﺍﺪﺻ ﺪﻴﻧﺍﻮﺗ ﯽﻣ ﺎﺠﻨﻳﺍ ﺭﺩ .ﺪﻨﺷﺎﺑ ﯽﻣ ﻩﺪﺷ ﻂﺒﺿ
ﮓﻨﻫﺁ ﻥﺍﻮﻨﻋ ﻪﺑ ﺍﺭ ﺎﻬﻧﺁ ﺎﻳ ﻭ ﺪﻴﻨﮐ ﻝﺎﺳﺭﺍ ﻭ ﺖﻳﺮﻳﺪﻣ
.ﺪﻴﻳﺎﻤﻧ ﺲﻤﻟ ﺍﺭ
.ﺪﻴﻨﮐ ﺏﺎﺨﺘﻧﺍ ﺍﺭ ﯽﭙﮐ ﺎﻳ ﻝﺎﻘﺘﻧﺍ 2
.ﺪﻴﻳﺎﻤﻧ ﻢﻴﻈﻨﺗ ﮓﻧﺯ
.ﺪﻴﻫﺩ ﻡﺎﺠﻧﺍ
ﺖﻣﻼﻋ
ﺎﻫﺍﺪﺻ
ﺮﺑﺭﺎﮐ یﺎﻤﻨﻫﺍﺭ | LG GM360
40

ﻞﻳﺎﻓ ﻝﺎﻘﺘﻧﺍ یﺍﺮﺑ ﻩﺍﺭ ﻦﻳﺮﺗ ﻥﺎﺳﺁ ًﻻﺎﻤﺘﺣﺍ ﺙﻮﺗﻮﻠﺑ
ﺯﺍ ﺪﻴﻧﺍﻮﺗ ﯽﻣ ﻦﻴﻨﭽﻤﻫ .ﺖﺳﺍ ﺎﻤﺷ ﻦﻔﻠﺗ ﻪﺑ ﻪﻧﺎﻳﺍﺭ ﺯﺍ
ﻡﺎﮕﻤﻫ ﻞﺑﺎﮐ ﺎﺑ LG PC Suite ﺎﻳ ﻩﻮﺒﻧﺍ ﻩﺮﻴﺧﺫ
:ﺙﻮﺗﻮﻠﺑ ﻖﻳﺮﻃ ﺯﺍ ﻞﻳﺎﻓ ﻝﺎﻘﺘﻧﺍ یﺍﺮﺑ
ﻦﺷﻭﺭ ﻪﻧﺎﻳﺍﺭ ﻭ ﯽﺷﻮﮔ ﺙﻮﺗﻮﻠﺑ ﻪﮐ ﺪﻴﻨﮐ ﯽﺳﺭﺮﺑ 1
ﻖﻳﺮﻃ ﺯﺍ ﻞﻳﺎﻓ ﻝﺎﺳﺭﺍ
ﻦﻔﻠﺗ ﺭﺩ ﺍﺭ ﻥﺁ ﺪﻳﺎﺑ ﺩﻮﺷ ﯽﻣ ﻝﺎﺳﺭﺍ ﻞﻳﺎﻓ ﯽﺘﻗﻭ 3
.ﺪﻴﻨﮐ ﺲﻤﻟ ﺍﺭ ﻪﻠﺑ ﻭ ﻪﺘﻓﺮﻳﺬﭘ ﺩﻮﺧ
،ﻦﻣ ﻪﺷﻮﭘ ﺭﺩ ﺽﺮﻓ ﺶﻴﭘ ﺕﺭﻮﺻ ﻪﺑ ﺪﻳﺎﺑ ﻞﻳﺎﻓ 4
.ﺩﻮﺷ ﺮﻫﺎﻇ ﻦﻣ ﺕﺎﻋﻮﺿﻮﻣ ﺭﺩ ﻪﻧﺎﺑﺯ ﻦﻴﻣﻭﺩ
ﻢﺸﭼ ﻞﻳﺎﻓ ﺯﺍ ﺪﻴﻧﺍﻮﺗ ﯽﻣ ﺖﺳﺍ ﺮﭘ
.ﺪﻴﻨﮐ ﻩﺩﺎﻔﺘﺳﺍ یﺯﺎﺳ
.ﺪﺷﺎﺑ ﺖﻳﺅﺭ ﻞﺑﺎﻗ ﻭ
یﺍﺮﺑ ﺩﻮﺧ ﻪﻧﺎﻳﺍﺭ ﺯﺍ 2
.ﺪﻴﻨﮐ ﻩﺩﺎﻔﺘﺳﺍ ﺙﻮﺗﻮﻠﺑ
ﻪﺷﻮﭘ ﺮﮔﺍ
.ﺪﻴﻨﮐ ﯽﺷﻮﭘ
ﺮﮕﻳﺩ ﺩﺭﺍﻮﻣ
ﯽﻳﺎﻫ ﻞﻳﺎﻓ ﺯﺍ ﯽﺘﺳﺮﻬﻓ یﻭﺎﺣ ﺮﮕﻳﺩ ﺩﺭﺍﻮﻣ ﻪﺷﻮﭘ
ﯽﺷﻮﮔ ﻪﺑ ﻞﻳﺎﻓ ﻝﺎﻘﺘﻧﺍ
ﺎﻳ ﺎﻫ یﺯﺎﺑ ،ﺩﺎﻨﺳﺍ ،ﻢﻠﻴﻓ ،ﺍﺪﺻ ،ﺲﮑﻋ ﻪﮐ ﺖﺳﺍ
41
.ﺪﻨﺘﺴﻴﻧ ﺎﻫ ﻪﻣﺎﻧﺮﺑ
یﺮﻳﻮﺼﺗ ﭗﻴﻠﮐ ﻝﺎﺳﺭﺍ
.ﺪﻴﻨﮐ ﺏﺎﺨﺘﻧﺍ ﺍﺭ ﯽﻤﻠﻴﻓ 1
ﻦﻴﺑ ﺯﺍ ﻭ ﻩﺩﺮﮐ ﺲﻤﻟ ﺍﺭ ﻝﺎﺳﺭﺍ ﺲﭙﺳ ﻭ
.ﺪﻴﻨﮐ ﺏﺎﺨﺘﻧﺍ ﺙﻮﺗﻮﻠﺑ ،ﻞﻴﻤﻳﺍ ،ﻡﺎﻴﭘ یﺎﻫ ﻪﻨﻳﺰﮔ
ﺎﻫ ﻪﻣﺎﻧﺮﺑ ﻭ ﺎﻫ یﺯﺎﺑ
ﺍﺭ یﺪﻳﺪﺟ یﺎﻫ ﻪﻣﺎﻧﺮﺑﻭ ﺎﻫ یﺯﺎﺑ ﺪﻴﻧﺍﻮﺗ ﯽﻣ
ﻭ ﺪﻴﻳﺎﻤﻧ ﻩﺮﻴﺧﺫ ﺩﻮﺧ ﯽﺷﻮﮔ یﻭﺭ ﻭ ﻩﺩﺮﮐ یﺮﻴﮔﺭﺎﺑ
.ﺪﻴﻨﮐ ﺮﭘ ﺍﺭ ﺩﻮﺧ ﺖﻏﺍﺮﻓ ﺕﺎﻗﻭﺍ ﺎﻬﻧﺁ ﺯﺍ ﻩ ﺩﺎﻔﺘﺳﺍ ﺎﺑ
ﺎﻫ ﻪﻣﺎﻧﺮﺑ ﻭ ﺎﻫ یﺯﺎﺑ یﻮﻨﻣ ﺯﺍ ﻩﺩﺎﻔﺘﺳﺍ ﺎﺑ ﻦﻴﻨﭽﻤﻫ
ﺎﻫ ﻪﻣﺎﻧﺮﺑ ﻦﻳﺍ ﻪﺑ ﺪﻴﻧﺍﻮﺗ ﯽﻣ ،ﯽﻣﺮﮔﺮﺳ ﻪﻧﺎﺑﺯ ﺭﺩ
.ﺪﻴﺷﺎﺑ ﻪﺘﺷﺍﺩ ﯽﺳﺮﺘﺳﺩ
یﺯﺎﺑ ﻥﺩﺍﺩ ﻡﺎﺠﻧﺍ
ﺍﺭ ﺎﻫ ﻪﻣﺎﻧﺮﺑ ﻭ ﺎﻫ یﺯﺎﺑ ،ﯽﻣﺮﮔﺮﺳ ﻪﻧﺎﺑﺯ ﺭﺩ 1
.ﺪﻴﻨﮐ ﺲﻤﻟ
یﺯﺎﺑ ﮏﻳ ﺲﭙﺳ ﻭ ﺪﻴﻨﮐ ﺏﺎﺨﺘﻧﺍ ﺍﺭ ﺎﻫ یﺯﺎﺑ 2
.ﺪﻴﻳﺎﻤﻧ ﺏﺎﺨﺘﻧﺍ ﺍﺮﺟﺍ یﺍﺮﺑ
ﺩﺎﻨﺳﺍ
ﺪﻴﻧﺍﻮﺗ ﯽﻣ ،ﻦﻣ ﺕﺎﻋﻮﺿﻮﻣ ﺭﺩ ﺩﺎﻨﺳﺍ یﻮﻨﻣ ﺯﺍ
ﺎﺠﻨﻳﺍ ﺯﺍ .ﺪﻴﻨﮐ ﻩﺪﻫﺎﺸﻣ ﺍﺭ ﺩﻮﺟﻮﻣ یﺎﻫ ﻞﻳﺎﻓ ﻪﻤﻫ
Excel، Powerpoint، یﺎﻫ ﻞﻳﺎﻓ ﺪﻴﻧﺍﻮﺗ ﯽﻣ
.ﺪﻴﻳﺎﻤﻧ ﻩﺪﻫﺎﺸﻣ ﺍﺭ pdf ﻭ ،ﻦﺘﻣ ،Word
2
ﺕﺭﻮﺻ ﻪﺑ ﺎﻫ ﮓﻨﻫﺁ ﻪﺑ - ﯽﻓﺩﺎﺼﺗ یﺎﻫ ﮓﻨﻫﺁ
.ﺪﻴﻫﺩ ﺵﻮﮔ ﻢﻫ ﺭﺩ ﻭ ﯽﻓﺩﺎﺼﺗ
ﯽﺷﻮﮔ ﻪﺑ ﯽﻘﻴﺳﻮﻣ ﻝﺎﻘﺘﻧﺍ
،ﯽﺷﻮﮔ ﻪﺑ ﯽﻘﻴﺳﻮﻣ ﻝﺎﻘﺘﻧﺍ یﺍﺮﺑ ﻩﺍﺭ ﻦﻳﺮﺗ ﻩﺩﺎﺳ
.ﺖﺳﺍ یﺯﺎﺳ ﻡﺎﮕﻤﻫ ﻞﺑﺎﮐ ﺎﻳ ﺙﻮﺗﻮﻠﺑ ﺯﺍ ﻩﺩﺎﻔﺘﺳﺍ
ﻩﺩﺎﻔﺘﺳﺍ LG PC Suite ﺯﺍ ﺪﻴﻧﺍﻮﺗ ﯽﻣ ﻦﻴﻨﭽﻤﻫ
:ﺙﻮﺗﻮﻠﺑ ﻖﻳﺮﻃ ﺯﺍ ﻞﻳﺎﻓ ﻝﺎﻘﺘﻧﺍ یﺍﺮﺑ .ﺪﻴﻨﮐ
ﻦﺷﻭﺭ ﻩﺎﮕﺘﺳﺩ ﻭﺩ ﺮﻫ ﺙﻮﺗﻮﻠﺑ ﻪﮐ ﺪﻴﻨﮐ ﯽﺳﺭﺮﺑ 1
.ﺪﻨﺷﺎﺑ ﺖﻳﻭﺭ ﻞﺑﺎﻗ ﺮﮕﻳﺪﮑﻳ یﺍﺮﺑ ﻭ ﻩﺩﻮﺑ
ﻪﻨﻳﺰﮔ ،ﺮﻈﻧ ﺩﺭﻮﻣ ﯽﻘﻴﺳﻮﻣ ﻞﻳﺎﻓ ﺏﺎﺨﺘﻧﺍ
.ﺪﻴﻨﮐ ﺏﺎﺨﺘﻧﺍ ﺍﺭ ﺙﻮﺗﻮﻠﺑ ﻖﻳﺮﻃ ﺯﺍ ﻥﺁ ﻝﺎﺳﺭﺍ
ﺎﺑ ﺍﺭ ﻥﺁ ،ﺖﺳﺍ ﻩﺩﺎﻣﺁ ﻝﺎﺳﺭﺍ یﺍﺮﺑ ﻞﻳﺎﻓ ﯽﺘﻗﻭ 3
.ﺪﻳﺮﻳﺬﭙﺑ ﺩﻮﺧ ﻦﻔﻠﺗ ﺭﺩ ﻪﻠﺑ ﻥﺩﺍﺩ ﺭﺎﺸﻓ
ﺮﻫﺎﻇ ﺎﻫ ﮓﻨﻫﺁ ﻪﻤﻫ < ﯽﻘﻴﺳﻮﻣ ﺭﺩ ﺪﻳﺎﺑ ﻞﻳﺎﻓ 4
ﺯﺍ ﺪﻌﺑ 2
.ﺩﻮﺷ
ﮓﻨﻫﺁ ﺶﺨﭘ
.ﺪﻴﻨﮐ ﺲﻤﻟ ﺍﺭ ﯽﻘﻴﺳﻮﻣ ،ﯽﻣﺮﮔﺮﺳ ﻪﻧﺎﺑﺯ ﺭﺩ 1
یﺍﺮﺑ ﺮﻈﻧ ﺩﺭﻮﻣ ﻪﻧﺍﺮﺗ ﻭ ﺎﻫ ﻪﺷﻮﭘ ﺯﺍ ﯽﮑﻳ 2
.ﺪﻴﻨﮐ ﺲﻤﻟ ﮓﻨﻫﺁ ﺚﮑﻣ یﺍﺮﺑ ﺍﺭ
.ﺪﻴﻨﮐ ﺲﻤﻟ یﺪﻌﺑ ﮓﻨﻫﺁ ﻪﺑ ﻦﺘﻓﺭ یﺍﺮﺑ ﺍﺭ 4
ﺲﻤﻟ ﺍﺭ
ﯽﻘﻴﺳﻮﻣ یﻮﻨﻣ ﻪﺑ ﺖﺸﮔﺯﺎﺑ یﺍﺮﺑ ﺍﺭ 6
،ﻮﻨﻣ ﻪﺑ ﺖﺸﮔﺯﺎﺑ یﺍﺮﺑ ﺪﻴﻧﺍﻮﺗ ﯽﻣ .ﺪﻴﻫﺩ ﺭﺎﺸﻓ
.ﺪﻴﻨﮐ ﺏﺎﺨﺘﻧﺍ ﺍﺭ ﺶﺨﭘ
،ﻞﺒﻗ ﻪﻧﺍﺮﺗ ﻪﺑ ﺖﺸﮔﺯﺎﺑ یﺍﺮﺑ 5
.ﺪﻴﻨﮐ
.ﺪﻴﻨﮐ ﺲﻤﻟ ﺭﺎﺑ ﮏﻳ ﺯﺍ ﺮﺘﺸﻴﺑ
یﺍ ﻪﻧﺎﺳﺭﺪﻨﭼ
ﯽﻘﻴﺳﻮﻣ ﻩﺪﻨﻨﮐ ﺶﺨﭘ ﮏﻳ LG GM360 ﯽﺷﻮﮔ
ﻩﺍﻮﺨﻟﺩ یﺎﻫ ﮓﻨﻫﺁ ﻪﻴﻠﮐ ﺪﻧﺍﻮﺗ ﯽﻣ ﻪﮐ ﺩﺭﺍﺩ ﯽﻠﺧﺍﺩ
ﻩﺪﻨﻨﮐ ﺶﺨﭘ ﻪﺑ ﯽﺳﺮﺘﺳﺩ یﺍﺮﺑ .ﺪﻨﮐ ﺶﺨﭘ ﺍﺭ ﺎﻤﺷ
ﺲﻤﻟ ﯽﻣﺮﮔﺮﺳ ﻪﻧﺎﺑﺯ ﺭﺩ ﺍﺭ ﯽﻘﻴﺳﻮﻣ ،ﯽﻘﻴﺳﻮﻣ
ﺎﻫ ﻪﺷﻮﭘ ﺯﺍ یﺩﺍﺪﻌﺗ ﻪﺑ ﺪﻴﻧﺍﻮﺗ ﯽﻣ ﺎﺠﻨﻳﺍ ﺯﺍ .ﺪﻴﻨﮐ
ﺶﺨﭘ ﺍﺮﻴﺧﺍ ﻪﮐ ﯽﻳﺎﻫ ﻪﻧﺍﺮﺗ - ﻩﺪﺷ ﺶﺨﭘ
ﺖﺳﺍ ﻦﮑﻤﻣ ﯽﻘﻴﺳﻮﻣ یﺎﻫ ﻞﻳﺎﻓ ﯽﭙﮐ ﻖﺣ
ﻪﺘﺷﺍﺩ ﺭﺍﺮﻗ ﯽﻠﻠﻤﻟﺍ ﻦﻴﺑ ﻭ ﯽﻠﻣ ﻦﻴﻧﺍﻮﻗ ﺖﻇﺎﻔﺣ ﺖﺤﺗ
ﺯﺎﻴﻧ ،ﯽﻘﻴﺳﻮﻣ ﯽﭙﮐ ﺎﻳ ﺮﻴﺜﮑﺗ یﺍﺮﺑ ﺖﺳﺍ ﻦﮑﻤﻣ .ﺪﺷﺎﺑ
،ﺎﻫﺭﻮﺸﮐ ﺯﺍ ﯽﺧﺮﺑ ﺭﺩ .ﺪﺷﺎﺑ ﺯﻮﺠﻣ ﺎﻳ ﻩﺯﺎﺟﺍ ﺬﺧﺍ ﻪﺑ
ﻪﮐ ﯽﺒﻟﺎﻄﻣ ﯽﭙﮐ ﻭ ﺮﻴﺜﮑﺗ ﺭﻮﺸﮐ ﯽﻠﻣ ﻦﻴﻧﺍﻮﻗ ﻖﺒﻃ
ﻞﺒﻗ .ﺖﺳﺍ ﻉﻮﻨﻤﻣ ﺩﺭﺍﺩ ﺭﺍﺮﻗ ﯽﭙﮐ ﻖﺣ ﺖﻇﺎﻔﺣ ﺖﺤﺗ
ﯽﻠﻣ ﻦﻴﻧﺍﻮﻗ ًﺎﻔﻄﻟ ،ﺎﻫ
ﺩﺭﺍﻮﻣ ﻦﻳﺍ ﺯﺍ ﻩﺩﺎﻔﺘﺳﺍ ﺹﻮﺼﺧ ﺭﺩ ﻪﻃﻮﺑﺮﻣ ﺭﻮﺸﮐ
ﻪﺑ ﻦﻔﻠﺗ یﺎﻫ ﮓﻨﻫﺁ ﻪﻤﻫ ﻞﻣﺎﺷ - ﺎﻫ ﮓﻨﻫﺁ ﻪﻤﻫ
ﻩﺪﺷ یﺭﺍﺬﮔﺭﺎﺑ ﻞﺒﻗ ﺯﺍ ﺽﺮﻓ ﺶﻴﭘ ﯽﻘﻴﺳﻮﻣ ﺰﺟ
3
ﺱﺎﺳﺍ ﺮﺑ ﺩﻮﺧ ﯽﻘﻴﺳﻮﻣ ﻪﻋﻮﻤﺠﻣ ﺭﺩ - ﻥﺍﺪﻨﻣﺮﻨﻫ
ﺱﺎﺳﺍ ﺮﺑ ﺩﻮﺧ ﯽﻘﻴﺳﻮﻣ ﻪﻋﻮﻤﺠﻣ ﺭﺩ - ﺎﻫ ﻡﻮﺒﻟﺁ
ﺱﺎﺳﺍ ﺮﺑ ﺩﻮﺧ ﯽﻘﻴﺳﻮﻣ ﻪﻋﻮﻤﺠﻣ ﺭﺩ - ﺎﻫ ﮏﺒﺳ
ﯽﺸﺨﭘ یﺎﻫ ﺖﺴﻴﻟ ﻪﻴﻠﮐ یﻭﺎﺣ - ﺶﺨﭘ یﺎﻫ ﺖﺴﻴﻟ
ﺮﺑﺭﺎﮐ یﺎﻤﻨﻫﺍﺭ | LG GM360
:ﺪﻴﻨﮐ ﺍﺪﻴﭘ ﯽﺳﺮﺘﺳﺩ
.ﺪﻨﮐ ﯽﻣ ﺶﺨﭘ ﺍﺭ ﺪﻳﺍ ﻩﺩﺮﮐ
ﻞﻳﺎﻓ ﻥﺩﺮﮐ ﯽﭙﮐ ﺎﻳ یﺮﻴﮔﺭﺎﺑ ﺯﺍ
.ﺪﻴﻨﮐ ﻮﺠﺘﺴﺟ ﺪﻨﻣﺮﻨﻫ
.ﺪﻴﻨﮐ ﻮﺠﺘﺴﺟ ﻡﻮﺒﻟﺁ
.ﺪﻴﻨﮐ ﻮﺠﺘﺴﺟ
.ﺪﺷﺎﺑ ﯽﻣ ﺪﻳﺍ ﻩﺩﺮﮐ ﺩﺎﺠﻳﺍ ﻪﮐ
ﯽﻘﻴﺳﻮﻣ
ﺍﺮﻴﺧﺍ
:ﻪﺟﻮﺗ
.ﺪﻴﻨﮐ ﯽﺳﺭﺮﺑ ﺍﺭ
.ﺪﺷﺎﺑ ﯽﻣ
ﯽﻘﻴﺳﻮﻣ ﮏﺒﺳ
42

ﻪﺑ ﺎﻳ ﯽﻳﻮﻳﺩﺍﺭ یﺎﻫ ﻩﺎﮕﺘﺴﻳﺍ یﻮﺠﺘﺴﺟ ﺎﺑ ﺪﻴﻧﺍﻮﺗ ﯽﻣ
ﻩﺎﮕﺘﺴﻳﺍ ،ﺭﺎﮐﺩﻮﺧ ﺕﺭﻮﺻ ﻪﺑ ﺎﻳ ﻭ ﯽﺘﺳﺩ ﺕﺭﻮﺻ
ﺎﻫ ﻩﺎﮕﺘﺴﻳﺍ ﻦﻳﺍ .ﺪﻴﻨﮐ ﻢﻴﻈﻨﺗ ﺍﺭ ﺩﻮﺧ ﻩﺍﻮﺨﻟﺩ ﯽﻳﻮﻳﺩﺍﺭ
ﺪﻨﻫﺍﻮﺧ ﻩﺮﻴﺧﺫ ﺺﺨﺸﻣ ﻩﺭﺎﻤﺷ ﺎﺑ ﯽﻳﺎﻫ ﻝﺎﻧﺎﮐ ﺭﺩ
ﯽﻣ ﻪﮐ ﺭﺎﺑ ﺮﻫ ﻪﮐ ﺖﺴﻴﻧ یﺯﺎﻴﻧ ﻦﻳﺍﺮﺑﺎﻨﺑ ،ﺪﺷ
.ﺪﻴﻨﮐ ﺭﺍﺮﮑﺗ ﺍﺭ ﻮﺠﺘﺴﺟ ،ﺪﻴﻫﺩ ﺵﻮﮔ ﺎﻬﻧﺁ
ﻥﺍﻮﻨﻋ ﻪﺑ ﺎﺗ ﺪﻴﻨﮐ ﻞﺻﻭ ﻦﻔﻠﺗ ﻪﺑ ﺍﺭ ﺖﺳﺪﻫ ﺍﺪﺘﺑﺍ ﺪﻳﺎﺑ
ﻪﻧﺎﺑﺯ ﺭﺩ FM ﻮﻳﺩﺍﺭ ﻪﺑ ،ﯽﻣﺮﮔﺮﺳ ﻪﻧﺎﺑﺯ ﺭﺩ 1
.ﺪﻴﻨﮐ ﺲﻤﻟ ﺍﺭ
ﺪﻴﻳﺎﺗ ﻡﺎﻴﭘ ﮏﻳ .ﺪﻴﻨﮐ ﺲﻤﻟ ﺍﺭ ﺭﺎﮐﺩﻮﺧ ﻦﮑﺳﺍ 2
ﺎﻫ ﻩﺎﮕﺘﺴﻳﺍ ،ﺪﻴﻨﮐ ﺏﺎﺨﺘﻧﺍ ﺍﺭ ﻪﻠﺑ .ﺩﻮﺷ ﯽﻣ ﺮﻫﺎﻇ
ﺭﺩ ﻝﺎﻧﺎﮐ ﮏﻳ ﻪﺑ ﻭ ﻩﺪﺷ ﺖﻓﺎﻳ ﺭﺎﮐﺩﻮﺧ ﺭﻮﻃ ﻪﺑ
ﻩﺩﺍﺩ ﺶﻳﺎﻤﻧ
.ﺪﻧﻮﺷ ﯽﻣ ﻩﺩﺍﺩ ﺹﺎﺼﺘﺧﺍ ﻦﻔﻠﺗ
ﺭﺩ ﺰﻴﻧ ﯽﺘﺳﺩ ﺕﺭﻮﺻ ﻪﺑ ﺪﻴﻧﺍﻮﺗ ﯽﻣ ﺎﻤﺷ :ﻪﺟﻮﺗ
ﻭ ﺯﺍ ﻩﺩﺎﻔﺘﺳﺍ ﺎﺑ ﻭ ﻩﺎﮕﺘﺴﻳﺍ ﮏﻳ
ﺮﮔﺍ .ﺪﻳﻮﺷ ﺩﺭﺍﻭ ﺶﻳﺎﻤﻧ ﻪﺤﻔﺻ ﺰﮐﺮﻣ ﺭﺩ ﻩﺪﺷ
ﻪﺑ ﺎﻫ ﻩﺎﮕﺘﺴﻳﺍ ،ﺪﻳﺭﺍﺩ ﻪﮕﻧ ﻭ ﻩﺩﺍﺩ ﺭﺎﺸﻓ ﺍﺭ
.ﺪﻧﻮﺷ ﯽﻣ ﺖﻓﺎﻳ ﺭﺎﮐﺩﻮﺧ ﺭﻮﻃ
.ﺪﻨﮐ ﻞﻤﻋ ﻦﺘﻧﺁ
:ﺭﺎﮐﺩﻮﺧ ﻢﻴﻈﻨﺗ یﺍﺮﺑ
ﺲﭙﺳ ﻭ ﻪﺘﻓﺭ ﯽﻣﺮﮔﺮﺳ
ﺎﻫ ﻝﺎﻧﺎﮐ ﯽﻧﺎﺸﻧﺯﺎﺑ
ﺎﻫ ﻩﺎﮕﺘﺴﻳﺍ یﻮﺠﺘﺴﺟ
ﺲﭙﺳ ﻭ ﻪﺘﻓﺭ ﯽﻣﺮﮔﺮﺳ ﻪﻧﺎﺑﺯ ﺭﺩ FM ﻮﻳﺩﺍﺭ ﻪﺑ 1
ﯽﻧﺎﺸﻧﺯﺎﺑ ﻪﻨﻳﺰﮔ ،ﯽﻠﻌﻓ ﻝﺎﻧﺎﮐ ﯽﻧﺎﺸﻧﺯﺎﺑ یﺍﺮﺑ 2
،ﺎﻫ ﻝﺎﻧﺎﮐ ﻪﻤﻫ ﯽﻧﺎﺸﻧﺯﺎﺑ یﺍﺮﺑ ﻭ ﻝﺎﻧﺎﮐ
ﻪﻤﻫ .ﺪﻴﻨﮐ ﺏﺎﺨﺘﻧﺍ ﺍﺭ ﺎﻫ ﻝﺎﻧﺎﮐ ﻪﻤﻫ ﯽﻧﺎﺸﻧﺯﺎﺑ
ﺮﺑ ﻪﻴﻟﻭﺍ ﺰﺗﺮﻫﺎﮕﻣ 87.5 ﺲﻧﺎﮐﺮﻓ ﻪﺑ ﺎﻫ ﻝﺎﻧﺎﮐ
43
.ﺪﻴﻨﮐ ﺲﻤﻟ ﺍﺭ
.ﺪﻧﺩﺮﮔ ﯽﻣ
،ﺶﺨﭘ یﺎﻫ ﺖﺴﻴﻟ ﻪﺷﻮﭘ ﺯﺍ ﯽﻳﺎﻫ ﮓﻨﻫﺁ ﺏﺎﺨﺘﻧﺍ ﺎﺑ
.ﺪﻴﻨﮐ ﺩﺎﺠﻳﺍ ﯽﺼﺨﺷ ﺶﺨﭘ یﺎﻫ ﺖﺴﻴﻟ
.ﺪﻴﻨﮐ ﺲﻤﻟ ﺍﺭ ﯽﻘﻴﺳﻮﻣ ،ﯽﻣﺮﮔﺮﺳ ﻪﻧﺎﺑﺯ ﺭﺩ 1
ﺶﺨﭘ ﺖﺴﻴﻟ ﻥﺩﻭﺰﻓﺍ ﺲﭙﺳ ﻭ ﺶﺨﭘ یﺎﻫ ﺖﺴﻴﻟ 2
ﺩﺭﺍﻭ ﺍﺭ ﺶﺨﭘ ﺖﺴﻴﻟ ﻡﺎﻧ ﻭ ﻩﺩﺮﮐ ﺲﻤﻟ ﺍﺭ ﺪﻳﺪﺟ
ﻪﺑ ﺪﻴﻫﺍﻮﺧ
FM ﻮﻳﺩﺍﺭ ﮏﻳ یﺍﺭﺍﺩ ﺎﻤﺷ LG GM360 ﯽﺷﻮﮔ
ﻭ
.ﺪﻴﻨﮐ ﺲﻤﻟ ﺍﺭ ﻩﺮﻴﺧﺫ ﺲﭙﺳ .ﺪﻴﻨﮐ
ﺍﺭ ﻦﻔﻠﺗ
یﺎﻫ ﻪﻧﺍﺮﺗ ﻪﻴﻠﮐ ،ﺎﻫ ﮓﻨﻫﺁ ﻪﻤﻫ ﻪﺷﻮﭘ 3
ﻞﻳﺎﻣ ﻪﮐ ﯽﻳﺎﻫ ﻪﻧﺍﺮﺗ ﻪﻤﻫ .ﺩﺍﺩ ﺪﻫﺍﻮﺧ ﺶﻳﺎﻤﻧ
ﺍﺭ ﺪﻴﺘﺴﻫ ﺩﻮﺧ ﺶﺨﭘ ﺖﺴﻴﻟ ﻪﺑ ﺎﻬﻧﺁ ﻥﺩﻭﺰﻓﺍ ﻪﺑ
ﺎﻬﻧﺁ ﺭﺎﻨﮐ ﺭﺩ ﮏﻴﺗ ﺖﻣﻼﻋ ﮏﻳ ،ﺪﻴﻫﺩ ﺭﺎﺸﻓ
یﺎﻫ ﻪﻣﺎﻧﺮﺑ ﻪﺑ ﻥﺁ ﻖﻳﺮﻃ ﺯﺍ ﺪﻴﻧﺍﻮﺗ ﯽﻣ ﻪﮐ ﺖﺳﺍ
ﻪﺑ ﺍﺭ ﺎﻫ ﻥﻮﻓﺪﻫ ﺪﻳﺎﺑ ،ﻮﻳﺩﺍﺭ ﻪﺑ ﻥﺩﺍﺩ ﺵﻮﮔ یﺍﺮﺑ
.ﺪﻴﻨﮐ ﺵﻮﮔ ﺩﻮﺧ ﻩﺍﻮﺨﻟﺩ ﯽﻳﻮﻳﺩﺍﺭ
ﺶﺨﭘ ﺖﺳﺮﻬﻓ ﺩﺎﺠﻳﺍ
.ﺩﻮﺷ ﯽﻣ ﺮﻫﺎﻇ
.ﺪﻴﻨﮐ ﺲﻤﻟ ﺍﺭ ﺪﺷ ﻡﺎﺠﻧﺍ 4
FM ﻮﻳﺩﺍﺭ
.ﺪﻴﻨﮐ ﻞﺻﻭ ﻦﻔﻠﺗ

ﻒﻳﺎﻇﻭ ﺖﺴﻴﻟ ﻪﺑ ﻪﻔﻴﻇﻭ ﻥﺩﻭﺰﻓﺍ
ﺲﻤﻟ ﺎﻫ ﻪﻣﺎﻧﺮﺑ ﻪﻧﺎﺑﺯ ﺭﺩ ﺍﺭ ﻩﺪﻨﻫﺩ ﻥﺎﻣﺯﺎﺳ 1
ﺍﺭ ﻪﻔﻴﻇﻭ ﻥﺩﻭﺰﻓﺍ ﻭ ﻩﺩﺮﮐ ﺏﺎﺨﺘﻧﺍ ﺍﺭ ﻒﻳﺎﻇﻭ 2
،ﻩﺩﺮﮐ ﻢﻴﻈﻨﺗ ﺩﻮﺧ ﺭﺎﮐ یﺍﺮﺑ ﺍﺭ ﯽﺨﻳﺭﺎﺗ 3
ﺲﭙﺳ ﻭ ﺪﻴﻨﮐ ﻪﻓﺎﺿﺍ ﻥﺁ ﻪﺑ ﯽﻳﺎﻫ ﺖﺷﺍﺩﺩﺎﻳ
ﺎﻳ ﻂﺳﻮﺘﻣ ،ﻻﺎﺑ :ﺪﻴﻳﺎﻤﻧ ﺏﺎﺨﺘﻧﺍ ﺍﺭ ﺎﻫ ﻥﺁ ﺖﻳﻮﻟﻭﺍ
.ﺪﻴﻨﮐ ﻩﺮﻴﺧﺫ ﺍﺭ
ﺩﻮﺧ ﻪﻔﻴﻇﻭ ،ﻩﺮﻴﺧﺫ ﺏﺎﺨﺘﻧﺍ ﺎﺑ 4
.ﺪﻴﻨﮐ
.ﺪﻴﻨﮐ ﺲﻤﻟ
.ﻢﮐ
ﺏﺎﻳ ﺦﻳﺭﺎﺗ ﺯﺍ ﻩﺩﺎﻔﺘﺳﺍ
ﻪﺒﺳﺎﺤﻣ ﺭﺩ ﻪﮐ ﺖﺳﺍ یﺪﻴﻔﻣ ﺭﺎﻴﺴﺑ ﺭﺍﺰﺑﺍ ﺏﺎﻳ ﺦﻳﺭﺎﺗ
،ﻝﺎﺜﻣ ﻥﺍﻮﻨﻋ ﻪﺑ .ﺪﻨﮐ ﯽﻣ ﮏﻤﮐ ﺎﻤﺷ ﻪﺑ ﺎﻫ ﺦﻳﺭﺎﺗ
ﺪﻫﺍﻮﺧ ﺮﺑﺍﺮﺑ 10.10.07 ﺦﻳﺭﺎﺗ ﺯﺍ ﺲﭘ ﺯﻭﺭ 60
ﺲﻤﻟ ﺎﻫ ﻪﻣﺎﻧﺮﺑ ﻪﻧﺎﺑﺯ ﺭﺩ ﺍﺭ ﻩﺪﻨﻫﺩ ﻥﺎﻣﺯﺎﺳ 1
.ﺪﻴﻨﮐ ﻢﻴﻈﻨﺗ ﺯﺍ ﻪﻧﺎﺑﺯ ﺭﺩ ﺍﺭ
.ﺪﻴﻨﮐ ﻢﻴﻈﻨﺗ ﺯﺍ ﺪﻌﺑ ﻪﻧﺎﺑﺯ ﺭﺩ ﺍﺭ ﺎﻫﺯﻭﺭ ﺩﺍﺪﻌﺗ 4
.ﺩﻮﺷ ﯽﻣ ﻩﺩﺍﺩ ﻥﺎﺸﻧ ﺮﻳﺯ ﺭﺩ ﺪﺼﻘﻣ ﺦﻳﺭﺎﺗ 5
.09.12.2007 ﺎﺑ ﺩﻮﺑ
.ﺪﻴﻨﮐ
.ﺪﻴﻨﮐ ﺏﺎﺨﺘﻧﺍ ﺍﺭ ﺏﺎﻳ ﺦﻳﺭﺎﺗ ﻪﻨﻳﺰﮔ 2
ﺯﺎﻴﻧ ﺩﺭﻮﻣ ﺦﻳﺭﺎﺗ 3
ﻩﺪﻨﻫﺩ ﻥﺎﻣﺯﺎﺳ
ﻢﻳﻮﻘﺗ ﻪﺑ ﺩﺍﺪﻳﻭﺭ ﮏﻳ ﻥﺩﻭﺰﻓﺍ
ﺲﻤﻟ ﺎﻫ ﻪﻣﺎﻧﺮﺑ ﻪﻧﺎﺑﺯ ﺭﺩ ﺍﺭ ﻩﺪﻨﻫﺩ ﻥﺎﻣﺯﺎﺳ 1
ﻪﻓﺎﺿﺍ ﻥﺁ ﻪﺑ یﺩﺍﺪﻳﻭﺭ ﺪﻴﻫﺍﻮﺧ ﯽﻣ ﻪﮐ ﯽﺨﻳﺭﺎﺗ 2
ﺭﺎﮐ ﻭﺩ ﺭﺩ ﻢﻫ ﺍﺭ ﺩﺍﺪﻳﻭﺭ ﻥﺎﻳﺎﭘ ﻥﺎﻣﺯ ﺩﺮﮕﻟﺎﺳ
ﺭﺩ ﺮﻈﻧ ﺩﺭﻮﻣ ﺩﺍﺪﻳﻭﺭ ﺎﺗ ﺪﻴﻨﮐ ﺏﺎﺨﺘﻧﺍ ﺍﺭ ﻩﺮﻴﺧﺫ 8
ﻞﮑﺷ ﻊﺑﺮﻣ یﺎﻤﻧ ﻥﺎﮑﻣ ﮏﻳ .ﺩﻮﺷ ﻩﺮﻴﺧﺫ ﻢﻳﻮﻘﺗ
ﻥﺁ ﻉﻭﺮﺷ ﺎﺑ ﻭ ﺪﻨﮐ
ﺎﻫﺩﺍﺪﻳﻭﺭ ﻪﻤﻫ ﻩﺪﺷ یﺰﻳﺭ ﻪﻣﺎﻧﺮﺑ ﻭ ﻢﻈﻨﻣ ﺐﻴﺗﺮﺗ
.ﺪﻴﻨﮐ ﺏﺎﺨﺘﻧﺍ ﺍﺭ ﻢﻳﻮﻘﺗ ﻭ ﻩﺩﺮﮐ
.ﺪﻴﻨﮐ ﺲﻤﻟ ﺍﺭ ﺩﺍﺪﻳﻭﺭ ﻥﺩﻭﺰﻓﺍ ﺲﭙﺳ ﻭ
،ﺕﺎﻗﻼﻣ ﺭﺍﺮﻗ ﺲﭙﺳ ﻭ ﻩﺩﺮﮐ ﺏﺎﺨﺘﻧﺍ ﺍﺭ ﻪﻘﺑﻁ 4
ﺍﺭ ﺮﻈﻧ ﺩﺭﻮﻣ ﺩﺍﺪﻳﻭﺭ ﻉﻭﺮﺷ ﻥﺎﻣﺯ ﻭ ﺦﻳﺭﺎﺗ 6
ﻭ ﺎﻫ ﺕﺎﻗﻼﻣ یﺍﺮﺑ .ﺪﻴﻨﮐ ﺩﺭﺍﻭ ﻭ ﯽﺳﺭﺮﺑ
ﺭﺍﺮﻗ ﺮﮔﺍ .ﺪﻴﻨﮐ
.ﺪﻴﻨﮐ ﺩﺭﺍﻭ ﺍﺭ ﻥﺁ ﻞﺤﻣ ،ﺩﺭﺍﺩ ﺩﻮﺟﻭ ﺕﺎﻗﻼﻣ
ﻩﺩﻭﺰﻓﺍ ﺎﻬﻧﺁ ﻪﺑ یﺩﺍﺪﻳﻭﺭ ﻪﮐ ﯽﻳﺎﻫﺯﻭﺭ ﻪﻤﻫ
ﻦﻳﺪﺑ .ﺩﻮﺷ ﯽﻣ ﻩﺪﻴﻨﺷ ﯽﮕﻧﺯ یﺍﺪﺻ ،ﺩﺍﺪﻳﻭﺭ
.ﺪﻴﻨﮐ ﺏﺎﺨﺘﻧﺍ ﺍﺭ ﺩﻮﺷ
.ﺪﻴﻨﮐ ﺏﺎﺨﺘﻧﺍ ﺪﻟﻮﺗ ﺯﻭﺭ ﺎﻳ ﺩﺮﮕﻟﺎﺳ
.ﺪﻴﻨﮐ ﺩﺭﺍﻭ ﺍﺭ ﻉﻮﺿﻮﻣ 5
ﺩﺭﺍﻭ ﻦﻴﻳﺎﭘ ﺭﺩ ﺦﻳﺭﺎﺗ ﻭ ﻥﺎﻣﺯ
.ﺪﻴﻨﮐ ﻢﻴﻈﻨﺗ ﺍﺭ ﺭﺍﺮﮑﺗ ﻭ ﺭﺍﺪﺸﻫ 7
ﯽﻣ ﺺﺨﺸﻣ ﺍﺭ ﺖﺳﺍ ﻩﺪﺷ
.ﺩﻮﺷ ﯽﻣ ﻡﻼﻋﺍ ﺎﻤﺷ ﻪﺑ
3
ﺮﺑﺭﺎﮐ یﺎﻤﻨﻫﺍﺭ | LG GM360
44

ﻉﻮﻧ ﻭ ﻩﺩﺮﮐ ﺏﺎﺨﺘﻧﺍ ﺍﺭ ﺭﺍﺪﺸﻫ ﮓﻧﺯ ﻉﻮﻧ 5
.ﺪﻴﻨﮐ ﺏﺎﺨﺘﻧﺍ ﺍﺭ ﺮﻈﻧ ﺩﺭﻮﻣ ﮓﻧﺯ
ﺍﺪﺻ ﮏﻳ ﻭ ﻩﺩﺮﮐ ﺏﺎﺨﺘﻧﺍ ﺍﺭ ﺭﺍﺪﺸﻫ ﮓﻧﺯ 6
ﻪﺑ ﻥﺩﺍﺩ ﺵﻮﮔ یﺍﺮﺑ .ﺪﻴﻳﺎﻤﻧ ﺏﺎﺨﺘﻧﺍ ﻪﺷﻮﭘ ﺯﺍ
ﺍﺭ
ﺲﭙﺳ ﻭ ﺮﻈﻧ ﺩﺭﻮﻣ یﺍﺪﺻ ،ﺎﻫﺍﺪﺻ
ﺖﺷﺍﺩﺩﺎﻳ ﺭﺩﺎﮐ ﺭﺩ ﺭﺍﺪﺸﻫ یﺍﺮﺑ ﺍﺭ ﯽﺘﺷﺍﺩﺩﺎﻳ 7
ﮓﻧﺯ ﻪﮐ ﯽﻧﺎﻣﺯ ﻞﺻﺍﻮﻓ ﺪﻴﻧﺍﻮﺗ ﯽﻣ ﺮﺧﺁ ﺭﺩ ﻭ 8
30، 20، 10 ،5 یﻭﺭ ﺍﺭ ﺪﻳﺎﻴﺑ ﺭﺩ ﺍﺪﺻ ﻪﺑ
.ﺪﻴﻨﮐ ﻢﻴﻈﻨﺗ ﺵﻮﻣﺎﺧ ﺎﻳ ﺖﻋﺎﺳ 1 ﻪﻘﻴﻗﺩ
ﺲﻤﻟ ﺍﺭ ﻩﺮﻴﺧﺫ ،ﺭﺍﺪﺸﻫ ﮓﻧﺯ ﻢﻴﻈﻨﺗ ﺯﺍ
ﻪﻠﻤﺟ ﺯﺍ ﺭﺍﺪﺸﻫ ﮓﻧﺯ 5 ﺎﺗ ﺪﻴﻧﺍﻮﺗ ﯽﻣ :ﻪﺟﻮﺗ
ﺵﻮﻣﺎﺧ/ﻦﺷﻭﺭ ﻑﺮﻃ ﻪﺑ ﺍﺭ ﭻﻴﻳﻮﺳ !ﻪﺘﮑﻧ
ﺍﺭ ﻥﺁ ﻭ ﺪﻳﻭﺮﺑ ﺭﺍﺪﺸﻫ ﮓﻧﺯ ﻪﺑ ﻭ ﺪﻴﻧﺍﺰﻐﻠﺑ
.ﺪﻴﻨﮐ ﺲﻤﻟ
.ﺪﻴﻨﮐ ﻪﻓﺎﺿﺍ
.ﺪﻴﻨﮐ ﻢﻴﻈﻨﺗ ﺭﺍﺪﺸﻫ ﺖﺠﻳﻭ
.ﺪﻴﻨﮐ ﻢﻴﻈﻨﺗ
یﻮﻠﺑﺎﺗ ﺯﺍ ﻩﺩﺎﻔﺘﺳﺍ ﺎﺑ ﺖﺷﺍﺩﺩﺎﻳ ﻥﺩﻭﺰﻓﺍ
ﻭ ﻪﺘﻓﺭ ﯽﺷﺎﻘﻧ یﻮﻠﺑﺎﺗ ﻪﺑ ،ﺎﻫ ﻪﻣﺎﻧﺮﺑ ﻪﻧﺎﺑﺯ ﺭﺩ 1
ﯽﺴﻤﻟ ﺶﻳﺎﻤﻧ ﻪﺤﻔﺻ ﺭﺩ ﺍﺭ ﺩﻮﺧ ﺖﺷﺍﺩﺩﺎﻳ 3
ﺭﺩ ﺎﻤﺷ ﺖﺷﺍﺩﺩﺎﻳ ﺲﭙﺳ ،ﺪﻴﻨﮐ ﺲﻤﻟ ﺍﺭ ﻪﻠﺑ 4
ﯽﻣ ﺮﻫﺎﻇ ﯽﺷﺎﻘﻧ یﻮﻠﺑﺎﺗ ﻪﻣﺎﻧﺮﺑ ﺭﺩ ﻭ ﻪﺤﻔﺻ
45
.ﺪﻴﻨﮐ ﺲﻤﻟ ﺍﺭ ﻥﺁ
.ﺪﻴﻨﮐ ﺲﻤﻟ ﺍﺭ ﯽﺷﺎﻘﻧ ﻥﺩﻭﺰﻓﺍ 2
.ﺪﻴﻫﺩ ﺭﺎﺸﻓ ﺍﺭ ﻭ ﻩﺪﻴﺸﮐ
.ﺪﻴﻨﮐ ﺲﻤﻟ ﺎﻫ ﻪﻣﺎﻧﺮﺑ ﻪﻧﺎﺑﺯ ﺭﺩ ﺍﺭ ﺖﺷﺍﺩﺩﺎﻳ 1
.ﺪﻴﻨﮐ ﺏﺎﺨﺘﻧﺍ ﺍﺭ ﺖﺷﺍﺩﺩﺎﻳ ﻥﺩﻭﺰﻓﺍ 2
ﺲﻤﻟ ﺍﺭ ﻩﺮﻴﺧﺫ ﻭ ﻩﺩﺮﮐ ﭗﻳﺎﺗ ﺍﺭ ﺩﻮﺧ ﺖﺷﺍﺩﺩﺎﻳ 3
ﺖﺷﺍﺩﺩﺎﻳ ﻪﻣﺎﻧﺮﺑ ﺭﺩ ﻭ ﻪﺤﻔﺻ ﺭﺩ ﺖﺷﺍﺩﺩﺎﻳ 4
.ﺪﻴﻨﮐ ﺲﻤﻟ ﺎﻫ ﻪﻣﺎﻧﺮﺑ ﻪﻧﺎﺑﺯ ﺭﺩ ﺍﺭ ﺭﺍﺪﺸﻫ 1
ﺪﻌﺑ 9
.ﺪﻴﻨﮐ
.ﺩﻮﺷ
ﺮﻫﺎﻇ ﺽﺮﻓ ﺶﻴﭘ ﻥﺍﻮﻨﻋ ﻪﺑ ﺖﺴﻴﻟ ﻦﻳﺍ ﺭﺩ ﺪﻳﺎﺑ
.ﺪﻴﻨﮐ ﻑﺬﺣ ﺍﺭ ﻥﺁ ﺪﻴﻧﺍﻮﺗ ﯽﻤﻧ ﻪﮐ ﺩﻮﺷ
ﮓﻧﺯ ﻥﺪﻣﺁﺭﺩﺍﺪﺻ ﻪﺑ یﺍﺮﺑ ﺮﻈﻧ ﺩﺭﻮﻣ ﻥﺎﻣﺯ 3
ﺭﺩﺎﮐ ﺭﺩ ﻪﻧﻮﮕﭼ ﺎﻤﺷ ﺭﺍﺪﺸﻫ ﮓﻧﺯ ﺪﻴﻨﮐ ﺏﺎﺨﺘﻧﺍ 4
ﻪﺒﻨﺸﺠﻨﭘ_ﻪﺒﻨﺷ ، ﻪﺒﻨﺷﺭﺎﻬﭼ_ﻪﺒﻨﺷ ، ﻪﺒﻨﺸﮑﻳ
ﯽﺷﺎﻘﻧ
ﺏﺎﺨﺘﻧﺍ ﻪﮐ ﺍﺭ یﺍ ﻪﺘﻔﻫ ﺯﻭﺭ ﺎﻫﺩﺎﻤﻧ ﻦﻳﺍ ﺲﭙﺳ
.ﺪﻴﻨﮐ ﺲﻤﻟ ﺍﺭ ﺭﺍﺪﺸﻫ ﻥﺩﻭﺰﻓﺍ 2
.ﺪﻴﻨﮐ ﻢﻴﻈﻨﺗ ﻥﺎﻣﺯ ﺭﺩﺎﮐ ﺭﺩ ﺍﺭ ﺭﺍﺪﺸﻫ
،ﻪﻧﺍﺯﻭﺭ ،ﺭﺍﺮﮑﺗ ﻥﻭﺪﺑ :ﺩﻮﺷ ﺭﺍﺮﮑﺗ ﺭﺍﺮﮑﺗ
- ﻪﺒﻨﺷ ، ﻪﺒﻨﺷ - ﻪﺒﻨﺷﻭﺩ ، ﻪﻌﻤﺟ - ﻪﺒﻨﺷﻭﺩ
ﺎﻳ ﻞﻴﻄﻌﺗ ﺯﻭﺭ ﺰﺟ ﻪﺑ ، ﻪﺒﻨﺸﺠﻨﭘ_ﻪﺒﻨﺸﮑﻳ ،
ﺖﺷﺍﺩﺩﺎﻳ ﻥﺩﻭﺰﻓﺍ
.ﺩﻮﺷ ﯽﻣ ﺮﻫﺎﻇ
ﺭﺍﺪﺸﻫ ﮓﻧﺯ ﻢﻴﻈﻨﺗ
ﺭﺍﺪﺸﻫ ﺖﺠﻳﻭ
.ﺯﻭﺭ ﺏﺎﺨﺘﻧﺍ
.ﺪﻨﻫﺩ ﯽﻣ
ﻥﺎﺸﻧ ﺪﻳﺍ ﻩﺩﺮﮐ
.ﺪﻴﻨﮐ

ﯽﺗﻮﺻ یﺎﻫ ﺖﺷﺍﺩﺩﺎﻳ ﻂﺒﺿ یﺍﺮﺑ ﺕﻮﺻ ﻂﺒﺿ ﺯﺍ
.ﺪﻴﻨﮐ ﻩﺩﺎﻔﺘﺳﺍ ﺮﮕﻳﺩ ﯽﺗﻮﺻ یﺎﻫ ﻞﻳﺎﻓ ﺎﻳ
ﻭ ﻩﺩﺮﮐ ﺲﻤﻟ ﺎﻫ ﻪﻣﺎﻧﺮﺑ ﻪﻧﺎﺑﺯ ﺭﺩ ﺍﺭ ﺕﻮﺻ ﻂﺒﺿ
ﺍﺭ ﺕﺎﻤﻴﻈﻨﺗ ﺲﭙﺳ ﻭ
.ﺪﻴﻨﮐ ﻢﻴﻈﻨﺗ ﺍﺭ ﻂﺒﺿ ﻥﺎﻣﺯ ﺕﺪﻣ – ﻥﺎﻣﺯ ﺕﺪﻣ
ﻡﺎﻴﭘ ﻩﺯﺍﺪﻧﺍ ،ﺖﻳﺩﻭﺪﺤﻣ ﻥﻭﺪﺑ یﺎﻫ ﻪﻨﻳﺰﮔ ﻦﻴﺑ ﺯﺍ
ﻦﻴﺑ ﺯﺍ .ﺪﻴﻨﮐ ﺏﺎﺨﺘﻧﺍ ﺍﺭ ﺍﺪﺻ ﺖﻴﻔﻴﮐ – ﺖﻴﻔﻴﮐ
کﺮﺘﺸﻣ ﺎﻳ ﺏﻮﺧ ،ﺏﻮﺧ ﯽﻠﻴﺧ یﺎﻫ ﻪﻨﻳﺰﮔ
یﺎﻫ ﻞﻳﺎﻓ ﺪﻴﻨﮐ ﺏﺎﺨﺘﻧﺍ - ﻩﺩﺎﻔﺘﺳﺍ ﺩﺭﻮﻣ ﻪﻈﻓﺎﺣ
ﯽﺟﺭﺎﺧ ﻪﻈﻓﺎﺣ ﻦﻴﺑ ﺯﺍ .ﺪﻧﻮﺷ ﻩﺮﻴﺧﺫ ﺎﺠﮐ ﺭﺩ ﯽﺗﻮﺻ
،ﺕﺎﻤﻴﻈﻨﺗ ﺮﻴﻴﻐﺗ یﺍﺮﺑ
.ﺪﻴﻨﮐ ﺏﺎﺨﺘﻧﺍ
.ﺪﻴﻨﮐ ﺏﺎﺨﺘﻧﺍ ﻪﻘﻴﻗﺩ 1 ﺎﻳ MMS
.ﺪﻴﻨﮐ ﺏﺎﺨﺘﻧﺍ
.ﺪﻴﻨﮐ ﺏﺎﺨﺘﻧﺍ ﯽﺷﻮﮔ ﻪﻈﻓﺎﺣ ﻭ
ﺕﻮﺻ ﺎﻳ ﺍﺪﺻ ﮏﻳ ﻂﺒﺿ
.ﺪﻴﻨﮐ ﺲﻤﻟ ﻂﺒﺿ ﻉﻭﺮﺷ یﺍﺮﺑ ﺍﺭ 1
.ﺪﻴﻨﮐ ﺲﻤﻟ ﻂﺒﺿ ﺚﮑﻣ یﺍﺮﺑ ﺍﺭ 2
.ﺪﻴﻨﮐ ﺲﻤﻟ ﻂﺒﺿ ﻥﺎﻳﺎﭘ یﺍﺮﺑ ﺍﺭ
ﻂﺒﺿ یﺎﻫﺍﺪﺻ ﻪﺑ ﻥﺩﺍﺩ ﺵﻮﮔ یﺍﺮﺑ ﺍﺭ
.ﺪﻴﻨﮐ ﺲﻤﻟ ﻩﺪﺷ
ﺏﺎﺴﺣ ﻦﻴﺷﺎﻣ ﺯﺍ ﻩﺩﺎﻔﺘﺳﺍ
.ﺪﻴﻨﮐ ﺲﻤﻟ ﺎﻫ ﻪﻣﺎﻧﺮﺑ ﻪﻧﺎﺑﺯ ﺭﺩ ﺍﺭ ﺎﻫﺭﺍﺰﺑﺍ 1
.ﺪﻴﻨﮐ ﺏﺎﺨﺘﻧﺍ ﺍﺭ ﺏﺎﺴﺣ ﻦﻴﺷﺎﻣ 2
ﺪﻴﻠﮐ ﻪﺤﻔﺻ ﺯﺍ ﻩﺩﺎﻔﺘﺳﺍ ﺎﺑ ﺍﺭ یﺩﺪﻋ یﺎﻫﺪﻴﻠﮐ 3
.ﺪﻴﻨﮐ ﺩﺭﺍﻭ ﺍﺭ ﺩﺍﺪﻋﺍ ﻭ ﻩﺩﺮﮐ ﺲﻤﻟ
ﻦﻔﻠﺗ ﺖﺳﺍﺭ ﺖﻤﺳ ﺭﺩ ﻦﻴﺑﺭﻭﺩ ﺪﻴﻠﮐ
ﺪﻴﻠﮐ ﻥﺩﺍﺩ ﺭﺎﺸﻓ ﺭﺎﺑ ﻭﺩ ﺎﺑ .ﺩﺭﺍﺩ ﺭﺍﺮﻗ
ﺲﮑﻋ ﻪﺤﻔﺻ ﺯﺍ ﻥﺍﻮﺗ ﯽﻣ ،ﻦﻴﺑﺭﻭﺩ
ﻭ یﺮﻟﺎﮔ ﺭﺩ ﻩﺪﺷ ﻪﺘﻓﺮﮔ ﺲﮑﻋ .ﺖﻓﺮﮔ
ﻩﺮﻴﺧﺫ ﻦﻣ ﺕﺎﻋﻮﺿﻮﻣ ﺭﺩ ﺮﻳﻮﺼﺗ ﺭﺩ
ﺲﮑﻋ ﺮﻳﺯ ﺕﺎﺤﻔﺻ ﺯﺍ ﯽﮔﮋﻳﻭ ﻦﻳﺍ
ﻭ ﺩﺎﺠﻳﺍ ﻪﺤﻔﺻ ،WAP، SNS
ﯽﺘﻓﺎﻳﺭﺩ یﺎﻫ
ﻡﺎﻴﭘ ﻪﺤﻔﺻ ،ﻞﻴﻤﻳﺍ ﻩﺪﻫﺎﺸﻣ
.ﻩﺮﻴﻏ ﻭ ﻡﺎﻴﭘ ﺩﺎﺠﻳﺍ ﻭ
3
4
ﺯﺍ ﻥﺍﻮﺗ ﯽﻣ ،ﻦﻴﺑﺭﻭﺩ ﺪﻴﻠﮐ ﻥﺩﺍﺩ ﺭﺎﺸﻓ ﺭﺎﺑ ﻭﺩ ﺎﺑ
ﻩﺪﻨﻫﺩ ﻥﺎﻣﺯﺎﺳ
ﻪﺤﻔﺻ ﺯﺍ ﺲﮑﻋﺕﻮﺻ ﻂﺒﺿ
.ﺩﻮﺷ ﯽﻣ
:ﺩﺮﻴﮔ ﯽﻣ
ﻦﻴﺑﺭﻭﺩ ﺪﻴﻠﮐ
¨
.ﺖﻓﺮﮔ ﺲﮑﻋ ﻪﺤﻔﺻ
ﺮﺑﺭﺎﮐ یﺎﻤﻨﻫﺍﺭ | LG GM360
46

ﺍﺭ ﺮﻈﻧ ﺩﺭﻮﻣ ﻪﻘﻄﻨﻣ ،ﻩﺩﺮﮐ ﺖﮐﺮﺣ ﻥﺎﻬﺟ ﺭﺩ 4
.ﺪﻴﻳﺎﻤﻧ ﺏﺎﺨﺘﻧﺍ ﻪﺸﻘﻧ ﺭﺩ ﺍﺭ ﺮﻬﺷ ﻭ ﺪﻴﻨﮐ ﺲﻤﻟ
ﺮﻈﻧ ﺩﺭﻮﻣ ﺮﻬﺷ ﻡﺎﻧ ﻭ ﻩﺩﺮﮐ ﺲﻤﻟ ﺍﺭ
.ﺪﻴﻨﮐ ﭗﻳﺎﺗ ﻮﺠﺘﺴﺟ ﺭﺩﺎﮐ ﺭﺩ ﺍﺭ
ﺞﻨﺳ ﻥﺎﻣﺯ ﺯﺍ ﻩﺩﺎﻔﺘﺳﺍ
.ﺪﻴﻨﮐ ﺲﻤﻟ ﺎﻫ ﻪﻣﺎﻧﺮﺑ ﻪﻧﺎﺑﺯ ﺭﺩ ﺍﺭ ﺎﻫﺭﺍﺰﺑﺍ 1
ﺎﺗ ﺪﻴﻨﮐ ﺲﻤﻟ ﺶﻳﺎﻤﻧ ﻪﺤﻔﺻ ﻦﻴﻳﺎﭘ ﺭﺩ ﺍﺭ ﻉﻭﺮﺷ 3
ﺍﺭ ﺭﻭﺩ ،ﺪﻴﻨﮐ ﺖﺒﺛ ﺍﺭ ﺭﻭﺩ ﮏﻳ ﺪﻴﻫﺍﻮﺧ ﯽﻣ ﺮﮔﺍ 4
ﻒﻗﻮﺗ ﻥﺎﻣﺯ ﺯﺍ
ﻉﻭﺮﺷ یﺍﺮﺑ ﻭ ﺪﻴﻫﺩ ﺭﺎﺸﻓ ﺍﺭ یﺮﻴﮔﺮﺳ ﺯﺍ ،ﻥﺁ
47
.ﺪﻴﻨﮐ ﺏﺎﺨﺘﻧﺍ ﺍﺭ ﺞﻨﺳ ﻥﺎﻣﺯ 2
.ﺩﻮﺷ ﻉﻭﺮﺷ ﺮﻤﻳﺎﺗ
.ﺪﻴﻳﺎﻤﻧ ﺏﺎﺨﺘﻧﺍ
.ﺪﻴﻨﮐ ﺲﻤﻟ ﺍﺭ ﻒﻗﻮﺗ ،ﺮﻤﻳﺎﺗ ﻒﻗﻮﺗ یﺍﺮﺑ 5
ﺞﻨﺳ ﻥﺎﻣﺯ ﺩﺪﺠﻣ ﻉﻭﺮﺷ یﺍﺮﺑ 6
.ﺪﻴﻨﮐ ﺏﺎﺨﺘﻧﺍ ﺍﺭ ﯽﻧﺎﺸﻧﺯﺎﺑ ،ﺍﺪﺘﺑﺍ ﺯﺍ ﻥﺎﻣﺯ
،+) ﺮﻈﻧ ﺩﺭﻮﻣ ﺩﺮﮑﻠﻤﻋ ،ﻩﺩﺎﺳ ﺕﺎﺒﺳﺎﺤﻣ یﺍﺮﺑ 4
.ﺪﻴﻫﺩ ﺭﺎﺸﻓ ﺍﺭ = ﺲﭙﺳ ﻭ (÷ ،× ،–
ﻩﺩﺍﺩ ﺭﺎﺸﻓ ﺍﺭ
ﺎﻳ 5
ﻞﻳﺪﺒﺗ یﺍﺮﺑ ﺍﺭ ﺖﻋﺮﺳ ﺎﻳ ﻢﺠﺣ،ﺎﻣﺩ ،ﻥﺯﻭ ،ﻝﻮﻃ
ﺲﭙﺳ ﻭ ﺪﻴﻳﺎﻤﻧ ﺩﺭﺍﻭ ﻞﻳﺪﺒﺗ یﺍﺮﺑ
.ﺪﺷ ﺪﻫﺍﻮﺧ ﺮﻫﺎﻇ ﻪﺤﻔﺻ یﻭﺭ ﺮﻇﺎﻨﺘﻣ ﺭﺍﺪﻘﻣ 5
،ﺮﺗ ﻩﺪﻴﭽﻴﭘ ﺕﺎﺒﺳﺎﺤﻣ یﺍﺮﺑ 5
sin، cos، tan، log، ln، ﻦﻴﺑ ﺯﺍ ﻭ
.ﺪﻴﻨﮐ ﺏﺎﺨﺘﻧﺍ rad ﺎﻳ exp، sqrt، deg
.ﺪﻴﻨﮐ ﺲﻤﻟ ﺎﻫ ﻪﻣﺎﻧﺮﺑ ﻪﻧﺎﺑﺯ ﺭﺩ ﺍﺭ ﺎﻫﺭﺍﺰﺑﺍ 1
.ﺪﻴﻨﮐ ﺏﺎﺨﺘﻧﺍ ﺍﺭ ﺪﺣﺍﻭ ﻞﻳﺪﺒﺗ 2
،ﺢﻄﺳ ،ﻝﻮﭘ ﺪﺣﺍﻭ ﻞﻣﺎﺷ ﺮﻈﻧ ﺩﺭﻮﻣ ﺪﺣﺍﻭ 3
ﺭﺍﺪﻘﻣ ﻭ ﺏﺎﺨﺘﻧﺍ ﺍﺭ ﺪﺣﺍﻭ ﺪﻴﻧﺍﻮﺗ ﯽﻣ ﻥﻮﻨﮐﺍ 4
.ﺪﻴﻳﺎﻤﻧ ﺏﺎﺨﺘﻧﺍ ﺍﺭ ﻞﻳﺪﺒﺗ ﺪﺣﺍﻭ
ﯽﻧﺎﻬﺟ ﺖﻋﺎﺳ ﻪﺑ ﺮﻬﺷ ﮏﻳ ﻥﺩﻭﺰﻓﺍ
.ﺪﻴﻨﮐ ﺲﻤﻟ ﺎﻫ ﻪﻣﺎﻧﺮﺑ ﻪﻧﺎﺑﺯ ﺭﺩ ﺍﺭ ﺎﻫﺭﺍﺰﺑﺍ 1
.ﺪﻴﻨﮐ ﺏﺎﺨﺘﻧﺍ ﺍﺭ ﯽﻧﺎﻬﺟ ﺖﻋﺎﺳ ﻪﻨﻳﺰﮔ 2
.ﺪﻴﻨﮐ ﺲﻤﻟ ﺍﺭ ﺪﻳﺪﺟ ﺮﻬﺷ ﺲﭙﺳ ﻭ
ﺪﺣﺍﻭ ﻞﻳﺪﺒﺗ
.ﺪﻴﻨﮐ ﺏﺎﺨﺘﻧﺍ
ﺍﺭ ﺮﻈﻧ ﺩﺭﻮﻣ
3

ﯽﺷﻮﮔ ﺕﺎﻋﻼﻃﺍ ﯽﺑﺎﻳﺯﺎﺑ ﻭ ﻥﺎﺒﻴﺘﺸﭘ ﻪﻴﻬﺗ
ﺖﺳﺍ ﻩﺩﺍﺩ ﺡﺮﺷ ﻻﺎﺑ ﺭﺩ ﻪﮐ یﻮﺤﻧ ﻪﺑ ﺍﺭ ﯽﺷﻮﮔ 1
.ﺪﻴﻨﮐ ﻞﺻﻭ ﺩﻮﺧ ﯽﺼﺨﺷ ﻪﻧﺎﻳﺍﺭ ﻪﺑ
ﮏﻴﻠﮐ ﺎﻫﺭﺍﺰﺑﺍ ﺭﺩ ﺍﺭ ﯽﺑﺎﻳﺯﺎﺑ ﻭ ﻥﺎﺒﻴﺘﺸﭘ ﻪﻴﻬﺗ 2
ﺎﻳ ﻥﺎﺒﻴﺘﺸﭘ ﻪﻴﻬﺗ یﺍﺮﺑ ﺍﺭ ﺮﻈﻧ ﺩﺭﻮﻣ ﺕﺎﻳﻮﺘﺤﻣ 3
ﺪﻴﻫﺍﻮﺧ ﯽﻣ ﻪﮐ ﯽﻠﺤﻣ .ﺪﻴﻧﺰﺑ ﺖﻣﻼﻋ ﯽﺑﺎﻳﺯﺎﺑ
ﯽﻧﺎﺒﻴﺘﺸﭘ ﻥﺁﺭﺩ ﺎﻳ ﯽﺑﺎﻳﺯﺎﺑ ﻥﺁ ﺯﺍ ﺍﺭ
Start ﺩﺎﻤﻧ یﻭﺭ .ﺪﻴﻳﺎﻤﻧ ﺏﺎﺨﺘﻧﺍ ﺍﺭ ﺪﻴﻨﮐ
.ﺪﻴﻨﮐ ﮏﻴﻠﮐ (ﻉﻭﺮﺷ)
ﯽﺑﺎﻳﺯﺎﺑ ﺎﻳ ﻩﺪﺷ ﻪﻴﻬﺗ ﻥﺎﺒﻴﺘﺸﭘ ﺎﻤﺷ ﺕﺎﻋﻼﻃﺍ ﺯﺍ 4
.ﺪﻴﻨﮐ
ﺕﺎﻋﻼﻃﺍ
.ﺪﻧﻮﺷ ﯽﻣ
ﻪﻧﺎﻳﺍﺭ ﺭﺩ ﯽﺷﻮﮔ یﺎﻫ ﻞﻳﺎﻓ ﻩﺪﻫﺎﺸﻣ
ﯽﺼﺨﺷ
ﻪﺑ ﺪﺷ ﻩﺩﺍﺩ ﺡﺮﺷ ًﻼﺒﻗ ﻪﮐ یﻮﺤﻧ ﻪﺑ ﺍﺭ ﯽﺷﻮﮔ 1
.ﺪﻴﻨﮐ ﻞﺻﻭ ﺩﻮﺧ ﯽﺼﺨﺷ ﻪﻧﺎﻳﺍﺭ
.ﺪﻴﻨﮐ ﮏﻴﻠﮐ (ﺎﻫ ﺲﮑﻋ) Photos ﺩﺎﻤﻧ یﻭﺭ 2
ﯽﻣ یﺮﻴﮔﺭﺎﺑ ﻪﻧﺎﻳﺍﺭ ﺭﺩ یﺮﻳﻮﺼﺗ یﺎﻫ ﻞﻳﺎﻓ 3
،ﺪﻴﻨﮐ ﯽﻣ ﮏﻴﻠﮐ ﻦﻔﻠﺗ ﻪﻈﻓﺎﺣ یﻭﺭ ﯽﺘﻗﻭ .ﺪﻧﻮﺷ
.ﺪﻴﻨﮐ ﮏﻴﻠﮐ (ﺎﻫ ﻢﻠﻴﻓ) Videos ﺩﺎﻤﻧ
ﯽﻣ یﺮﻴﮔﺭﺎﺑ ﻪﻧﺎﻳﺍﺭ ﺭﺩ ﯽﻳﻮﺋﺪﻳﻭ یﺎﻫ ﻞﻳﺎﻓ 5
،ﺪﻴﻨﮐ ﯽﻣ ﮏﻴﻠﮐ ﻦﻔﻠﺗ ﻪﻈﻓﺎﺣ یﻭﺭ ﯽﺘﻗﻭ .ﺪﻧﻮﺷ
.ﺪﻧﻮﺷ ﯽﻣ ﻩﺩﺍﺩ ﺶﻳﺎﻤﻧ
یﻭﺭ 4
.ﺪﻧﻮﺷ ﯽﻣ ﻩﺩﺍﺩ ﺶﻳﺎﻤﻧ
ﻪﻧﺎﻳﺍﺭ یﺯﺎﺳ ﻡﺎﮕﻤﻫ
ﺎﺗ ﺪﻴﻨﮐ یﺯﺎﺳ ﻡﺎﮕﻤﻫ ﻪﻧﺎﻳﺍﺭ ﺎﺑ ﺍﺭ ﯽﺷﻮﮔ ﺪﻴﻧﺍﻮﺗ ﯽﻣ
ﻢﻬﻣ یﺎﻫ ﺦﻳﺭﺎﺗ ﻭ ﺕﺎﻋﻼﻃﺍ ﻪﻤﻫ ﻪﮐ ﺪﻳﻮﺷ ﻦﺌﻤﻄﻣ
ﺪﻴﻧﺍﻮﺗ ﯽﻣ ،ﻩﻭﻼﻋ ﻪﺑ .ﺖﺳﺍ ﻥﺎﺴﮑﻳ ﻪﻧﺎﻳﺍﺭ ﺎﺑ ﻦﻔﻠﺗ
.ﺪﻴﻨﮐ ﻪﻴﻬﺗ ﻥﺎﺒﻴﺘﺸﭘ ،ﻦﻔﻠﺗ یﺎﻫ ﻩﺩﺍﺩ ﺯﺍ
ﻪﻧﺎﻳﺍﺭ ﺭﺩ LG PC Suite ﺐﺼﻧ
ﻭ ﻩﺩﺮﮐ ﺏﺎﺨﺘﻧﺍ ﺍﺭ ،ﯽﻠﺻﺍ ﻪﺤﻔﺻ ﺯﺍ 1
ﺏﺎﺨﺘﻧﺍ ﺍﺭ ﻝﺎﺼﺗﺍ ،ﺕﺎﻤﻴﻈﻨﺗ ﻪﻧﺎﺑﺯ ﺭﺩ ﺲﭙﺳ
PC ﻭ ﻩﺩﺮﮐ ﺏﺎﺨﺘﻧﺍ ﺍﺭ USB ﻝﺎﺼﺗﺍ ﺖﻟﺎﺣ 2
ﻩﺩﺮﮐ ﻞﺻﻭ ﻪﻧﺎﻳﺍﺭ ﻪﺑ ﺍﺭ ﯽﺷﻮﮔ USB ﻞﺑﺎﮐ ﺎﺑ 3
ﺶﻳﺎﻤﻧ ﺐﺼﻧ یﺎﻤﻨﻫﺍﺭ ﻡﺎﻴﭘ .ﺪﻴﻨﮐ ﺮﺒﺻ ﯽﻤﮐ ﻭ
LG PC ﻞﻴﻤﮑﺗ یﺍﺮﺑ ﺍﺭ ﺐﺼﻧ ﻞﺣﺍﺮﻣ 4
ﯽﻳﻭﺩﺎﺟ ﻪﻣﺎﻧﺮﺑ) Suite Installer wizard
.ﺪﻴﻨﮐ ﻝﺎﺒﻧﺩ (LG PC Suite ﻩﺪﻨﻨﮐ ﺐﺼﻧ
LG PC Suite ﺩﺎﻤﻧ ،ﺪﺷ ﻞﻣﺎﮐ ﺐﺼﻧ ﯽﺘﻗﻭ 5
.ﺪﻴﻨﮐ ﺲﻤﻟ ﺍﺭ Suite
.ﺩﻮﺷ ﯽﻣ ﺮﻫﺎﻇ پﺎﺗ ﮏﺳﺩ ﺭﺩ
ﯽﺼﺨﺷ ﻪﻧﺎﻳﺍﺭ ﻭ ﯽﺷﻮﮔ ﻝﺎﺼﺗﺍ
ﻭ ﻩﺩﺮﮐ ﺏﺎﺨﺘﻧﺍ ﺍﺭ ،ﯽﻠﺻﺍ ﻪﺤﻔﺻ ﺯﺍ 1
ﺏﺎﺨﺘﻧﺍ ﺍﺭ ﻝﺎﺼﺗﺍ ،ﺕﺎﻤﻴﻈﻨﺗ ﻪﻧﺎﺑﺯ ﺭﺩ ﺲﭙﺳ
.ﺪﻴﻨﮐ ﺏﺎﺨﺘﻧﺍ ﺍﺭ USB ﻝﺎﺼﺗﺍ ﺖﻟﺎﺣ 2
.ﺪﻴﻨﮐ ﺲﻤﻟ ﺍﺭ PC Suite 3
ﻞﺻﻭ ﻪﻧﺎﻳﺍﺭ ﻪﺑ ﺍﺭ ﯽﺷﻮﮔ USB ﻞﺑﺎﮐ ﺎﺑ 4
ﺭﻮﻃ ﻪﺑ PC Suite .ﺪﻴﻨﮐ ﺮﺒﺻ ﯽﻤﮐ ﻭ ﻩﺩﺮﮐ
.ﺩﻮﺷ ﯽﻣ ﺍﺮﺟﺍ ﺭﺎﮐﺩﻮﺧ
.ﺪﻴﻨﮐ
.ﺩﻮﺷ ﯽﻣ ﻩﺩﺍﺩ
.ﺪﻴﻨﮐ
ﺮﺑﺭﺎﮐ یﺎﻤﻨﻫﺍﺭ | LG GM360
48

ﻩﺎﮕﺘﺳﺩ ﻥﺍﻮﻨﻋ ﻪﺑ ﻦﻔﻠﺗ ﺯﺍ ﻩﺩﺎﻔﺘﺳﺍ
ﯽﻘﻴﺳﻮﻣ یﺯﺎﺳ ﻡﺎﮕﻤﻫ
ﻡﺎﮕﻤﻫ ﻩﺎﮕﺘﺳﺩ ﻥﺍﻮﻨﻋ ﻪﺑ ﺩﻮﺧ ﻦﻔﻠﺗ ﺯﺍ ﺪﻴﻧﺍﻮﺗ ﯽﻣ
یﺎﻫ ﻞﻳﺎﻓ یﺯﺎﺳ ﻡﺎﮕﻤﻫ یﺍﺮﺑ ﻂﻘﻓ ﯽﻘﻴﺳﻮﻣ یﺯﺎﺳ
ﺯﺍ ﻩﺩﺎﻔﺘﺳﺍ ﺎﺑ ﻥﺍﻮﺗ ﯽﻣ ﺍﺭ ﯽﻘﻴﺳﻮﻣ یﺯﺎﺳ ﻡﺎﮕﻤﻫ
ﻡﺎﺠﻧﺍ Windows Media Player 10/11
ﻪﻈﻓﺎﺣ ﺕﺭﺎﮐ ﻢﻫ ﻭ ﯽﺷﻮﮔ ﻪﻈﻓﺎﺣ ﺯﺍ ﻢﻫ ﻪﮐ ﺩﺍﺩ
.ﺪﻴﻨﮐ ﻊﻄﻗ ﻪﻧﺎﻳﺍﺭ ﺎﺑ ﺍﺭ ﯽﺷﻮﮔ
ﻭ ﻩﺩﺮﮐ ﺏﺎﺨﺘﻧﺍ ﺍﺭ ،ﯽﻠﺻﺍ ﻪﺤﻔﺻ ﺯﺍ 2
ﺏﺎﺨﺘﻧﺍ ﺍﺭ ﻝﺎﺼﺗﺍ ،ﺕﺎﻤﻴﻈﻨﺗ ﻪﻧﺎﺑﺯ ﺭﺩ ﺲﭙﺳ
.ﺪﻴﻨﮐ ﺏﺎﺨﺘﻧﺍ ﺍﺭ USB ﻝﺎﺼﺗﺍ ﺖﻟﺎﺣ 3
.ﺪﻴﻨﮐ ﺲﻤﻟ ﺍﺭ ﯽﻘﻴﺳﻮﻣ یﺯﺎﺳ ﻡﺎﮕﻤﻫ 4
ﺕﺭﺎﺒﻋ ﺎﻤﺷ ﻦﻔﻠﺗ .ﺪﻴﻨﮐ ﻞﺼﺘﻣ ﻪﻧﺎﻳﺍﺭ ﻪﺑ ﺍﺭ ﻦﻔﻠﺗ 5
49
.ﺪﻴﻨﮐ ﻩﺩﺎﻔﺘﺳﺍ ﯽﻘﻴﺳﻮﻣ
.ﺪﻨﮐ ﯽﻣ ﯽﻧﺎﺒﻴﺘﺸﭘ ﯽﺟﺭﺎﺧ
ﻝﺎﺼﺗﺍ 1
.ﺪﻫﺩ ﯽﻣ ﻥﺎﺸﻧ ﺍﺭ ﺪﺷ ﻞﺼﺘﻣ
ﺎﻤﺷ ﻪﺑ ﻪﻧﺎﻳﺍﺭ ﺭﺩ ﻦﻔﻠﺗ ﺕﺎﻳﻮﺘﺤﻣ ﻩﺪﻫﺎﺸﻣ !ﻪﺘﮑﻧ
،ﻩﺩﺮﮐ ﺐﺗﺮﻣ ﺍﺭ ﺎﻫ ﻞﻳﺎﻓ ﻪﮐ ﺪﻫﺩ ﯽﻣ ﻥﺎﮑﻣﺍ
ﻪﮐ ﯽﻓﺎﺿﺍ ﺕﺎﻳﻮﺘﺤﻣ ﻭ ﯽﻫﺪﻧﺎﻣﺯﺎﺳ ﺍﺭ ﺩﺎﻨﺳﺍ
.ﺪﻴﻨﮐ ﻑﺬﺣ ﺍﺭ ﺪﻳﺭﺍﺪﻧ ﺎﻫ ﻥﺁ ﻪﺑ یﺯﺎﻴﻧ ﺮﮕﻳﺩ
.ﺪﻴﻨﮐ ﻞﺼﺘﻣ ﻪﻧﺎﻳﺍﺭ ﻪﺑ ﺍﺭ ﻦﻔﻠﺗ 1
.ﺪﻴﻨﮐ ﮏﻴﻠﮐ ﻦﻴﺒﻃﺎﺨﻣ ﺩﺎﻤﻧ یﻭﺭ 2
ﻩﺪﺷ ﻩﺮﻴﺧﺫ ﻦﻴﺒﻃﺎﺨﻣ ﻪﻤﻫ ﻪﻧﺎﻳﺍﺭ ﺐﻴﺗﺮﺗ ﻦﻳﺍ ﻪﺑ 3
ﺶﻳﺎﻤﻧ ﻭ ﻩﺩﺮﮐ ﺩﺭﺍﻭ ﯽﺷﻮﮔ ﺯﺍ ﺍﺭ ﯽﺷﻮﮔ یﻭﺭ
ﮏﻴﻠﮐ ﻦﻴﺒﻃﺎﺨﻣ یﺯﺎﺳ ﻡﺎﮕﻤﻫ یﻭﺭ) .ﺪﻫﺩ ﯽﻣ
ﯽﻣ یﺮﻴﮔﺭﺎﺑ ﻦﻔﻠﺗ ﻦﻴﺒﻃﺎﺨﻣ ﺐﻴﺗﺮﺗ ﻦﻳﺪﺑ ،ﺪﻴﻨﮐ
.ﺪﻴﻨﮐ
Export ﻭ ﻩﺩﺮﮐ ﮏﻴﻠﮐ (ﻞﻳﺎﻓ) File
ﺪﻴﻧﺍﻮﺗ ﯽﻣ ﻥﻮﻨﮐﺍ .ﺪﻴﻨﮐ ﺏﺎﺨﺘﻧﺍ ﺍﺭ (ﺭﻭﺪﺻ)
.ﺪﻴﻨﮐ ﺏﺎﺨﺘﻧﺍ ﺍﺭ ﻦﻴﺒﻃﺎﺨﻣ ﻩﺮﻴﺧﺫ ﻞﺤﻣ
.ﺪﻴﻨﮐ ﮏﻴﻠﮐ ﺎﻫ ﻡﺎﻴﭘ ﺩﺎﻤﻧ یﻭﺭ 2
ﺮﺑ ﯽﻳﺎﻫ ﻪﺷﻮﭘ ﺐﻟﺎﻗ ﺭﺩ ﯽﺷﻮﮔ یﺎﻫ ﻡﺎﻴﭘ ﻪﻴﻠﮐ 3
.ﺪﺷ ﺪﻫﺍﻮﺧ ﺮﻫﺎﻇ ﻪﺤﻔﺻ یﻭﺭ
یﺎﻫ ﻡﺎﻴﭘ ﺎﺗ ﺪﻴﻨﮐ ﮏﻴﻠﮐ ﺎﻫ ﻥﻮﺘﺳ ﻥﺍﻮﻨﻋ یﻭﺭ 4
ﻭ ﻦﻴﺒﻃﺎﺨﻣ ،ﻩﺪﻨﻨﮐ ﻝﺎﺳﺭﺍ ﺱﺎﺳﺍ ﺮﺑ ﻩﺪﺷ ﺐﺗﺮﻣ
.ﺪﻧﻮﺷ ﺐﺗﺮﻣ ﻩﺭﺎﺑﻭﺩ ﯽﺘﻓﺎﻳﺭﺩ
ﻦﻴﺒﻃﺎﺨﻣ یﺯﺎﺳ ﻡﺎﮕﻤﻫ
(ﺪﻧﻮﺷ
یﻭﺭ 4
ﺎﻫ ﻡﺎﻴﭘ یﺯﺎﺳ ﻡﺎﮕﻤﻫ
.ﺪﻴﻨﮐ ﻞﺻﻭ ﻪﻧﺎﻳﺍﺭ ﻪﺑ ﺍﺭ ﻦﻔﻠﺗ 1
یﺎﻫ ﻩﺩﺍﺩ

ﺩﺎﻤﻧ ﺖﺳﺍ
ﯽﻓﺎﮐ ﺏﺎﻳ ﻞﺤﻣ ﻪﺑ ﯽﺳﺮﺘﺳﺩ یﺍﺮﺑ 5
ﺎﻳ ﺪﻴﻨﮐ ﺲﻤﻟ ﺏﺎﻳ ﻞﺤﻣ ﺭﺎﻨﮐ ﺭﺩ ﺍﺭ ﻝﺎﺼﺗﺍ
.ﺪﻴﻨﮐ ﺲﻤﻟ ﺍﺭ ﻝﺎﺼﺗﺍ ﺲﭙﺳ ﻭ ﺏﺎﻳ ﻞﺤﻣ ﻥﺍﻮﻨﻋ
ﻞﺻﻭ ﺮﻈﻧ ﺩﺭﻮﻣ ﺏﺎﻳ ﻞﺤﻣ ﻪﺑ ،ﺐﻴﺗﺮﺗ ﻦﻳﺍ ﻪﺑ
.ﺪﺷ ﺪﻴﻫﺍﻮﺧ
ﻥﺍﻮﺧ RSS ﺯﺍ ﻩﺩﺎﻔﺘﺳﺍ
ﺯﺍ RSS (really simple syndication)
یﺍﺮﺑ ﻪﮐ ﺖﺳﺍ ﺏﻭ یﺮﺒﺧ ﺲﻳﻭﺮﺳ یﺎﻫ ﺐﻟﺎﻗ
یﺎﻫ یﺩﻭﺭﻭ ﺪﻨﻧﺎﻣ ﻩﺪﺷﺯﻭﺭ ﻪﺑ ﺕﺎﻳﻮﺘﺤﻣ ﺭﺎﺸﺘﻧﺍ
ﺎﻫ ﺖﺴﮐﺩﺎﭘ ﺎﻳ ﺭﺎﺒﺧﺍ یﺎﻫ ﻥﺍﻮﻨﻋﺮﺳ ،گﻼﺑﻭ
ﺲﻳﻭﺮﺳ ﻪﮐ RSS ﺪﻨﺳ ﮏﻳ .ﺩﻮﺷ ﯽﻣ ﻩﺩﺎﻔﺘﺳﺍ
ﯽﻣ ﻩﺪﻴﻣﺎﻧ ﻝﺎﻧﺎﮐ ﺎﻳ ﺏﻭ یﺮﺒﺧ ﺲﻳﻭﺮﺳ ،یﺮﺒﺧ
ﺖﻳﺎﺳ ﺏﻭ ﺕﺎﻳﻮﺘﺤﻣ ﺯﺍ یﺍ ﻪﺻﻼﺧ یﻭﺎﺣ ،ﺩﻮﺷ
RSS .ﺪﺷﺎﺑ ﯽﻣ ﺎﻫ ﻥﺁ
ﺏﻭ ﺎﺑ ﺭﺎﮐﺩﻮﺧ ﺭﻮﻃ ﻪﺑ ﺪﻫﺩ ﯽﻣ ﻥﺎﮑﻣﺍ ﺩﺍﺮﻓﺍ ﻪﺑ
ﻦﻳﺍ .ﺪﻨﺷﺎﺑ ﻁﺎﺒﺗﺭﺍ ﺭﺩ ﺩﻮﺧ ﻪﻗﻼﻋ ﺩﺭﻮﻣ یﺎﻫ ﺖﻳﺎﺳ
ﺕﺭﻮﺻ ﻪﺑ ﺎﻫ ﻥﺁ ﯽﺳﺭﺮﺑ ﺯﺍ ﺮﺗ ﻥﺎﺳﺁ ﺭﺎﻴﺴﺑ ﺭﺎﮐ
ﺭﺩ یﺮﺒﺧ ﺲﻳﻭﺮﺳ ﺪﻧﻮﻴﭘ ﻥﺩﺮﮐ ﺩﺭﺍﻭ ﺎﺑ ﺮﺑﺭﺎﮐ
ﺭﺩ RSS ﺩﺎﻤﻧ یﻭﺭ ﮏﻴﻠﮐ ﺎﺑ ﺎﻳ ﻥﺍﻮﺧ RSS
ﺪﻨﮐ ﯽﻣ ﻉﻭﺮﺷ ﺍﺭ کﺍﺮﺘﺷﺍ ﺪﻨﻳﺍﺮﻓ ﻪﮐ یﺮﮔﺭﻭﺮﻣ
یﺎﻫ ﺲﻳﻭﺮﺳ ﻥﺍﻮﺧ RSS .ﺩﻮﺷ ﯽﻣ کﺮﺘﺸﻣ
ﺪﻳﺪﺟ یﺍﻮﺘﺤﻣ یﺍﺮﺑ
ﺍﺭ ﻩﺪﺷ ﺖﻓﺎﻳ ﺯﻭﺭ ﻪﺑ ﺩﺭﺍﻮﻣ ﻪﻤﻫ ﻭ ﻩﺩﺮﮐ ﯽﺳﺭﺮﺑ
ﻞﻣﺎﮐ ﻦﺘﻣ ﺎﻳ ﻪﻃﻮﺑﺮﻣ
.ﺖﺳﺍ ﯽﺘﺳﺩ
ً
ﺎﺒﺗﺮﻣ ﺍﺭ کﺮﺘﺸﻣ یﺮﺒﺧ
.ﺪﻨﮐ ﯽﻣ یﺮﻴﮔﺭﺎﺑ
ﺏﻭ
.ﺪﻴﻨﮐ ﺲﻤﻟ ﺎﻫ ﻪﻣﺎﻧﺮﺑ ﻪﻧﺎﺑﺯ ﺭﺩ ﺍﺭ ﺮﮔﺭﻭﺮﻣ 1
ﯽﻠﺻﺍ ﻪﺤﻔﺻ ﻪﺑ ﻢﻴﻘﺘﺴﻣ ﯽﺳﺮﺘﺳﺩ یﺍﺮﺑ 2
ﻥﺩﺮﮐ ﺩﺭﺍﻭ ﺎﻳ .ﺪﻴﻨﮐ ﺏﺎﺨﺘﻧﺍ ﺍﺭ ﯽﻠﺻﺍ ،ﺮﮔﺭﻭﺮﻣ
ﺍﺭ ﺮﻈﻧ ﺩﺭﻮﻣ URL ﻭ ﻩﺩﺮﮐ ﺏﺎﺨﺘﻧﺍ ﺍﺭ ﺱﺭﺩﺁ
.ﺪﻴﻳﺎﻤﻧ ﺏﺎﺨﺘﻧﺍ ﺍﺭ ﻦﻴﺒﻃﺎﺨﻣ ﺲﭙﺳ ﻭ ﺪﻴﻨﮐ ﭗﻳﺎﺗ
،یﺮﻴﮔﺭﺎﺑ ﻭ ﺕﺎﻣﺪﺧ ﻦﻳﺍ ﻪﺑ ﻝﺎﺼﺗﺍ :ﻪﺟﻮﺗ
ﻩﺭﺎﺑﺭﺩ .ﺖﺷﺍﺩ ﺪﻫﺍﻮﺧ ﺮﺑ ﺭﺩ ﯽﻓﺎﺿﺍ ﻪﻨﻳﺰﻫ
ﻪﮑﺒﺷ ﻩﺪﻨﻫﺩ ﻪﺋﺍﺭﺍ ﺎﺑ ﻩﺩﺍﺩ ﻝﺎﻘﺘﻧﺍ یﺎﻫ ﻪﻨﻳﺰﻫ
ﺎﻫ ﺏﺎﻳ ﻞﺤﻣ ﻪﺑ ﯽﺳﺮﺘﺳﺩ ﻭ ﻥﺩﻭﺰﻓﺍ
یﺎﻫ ﺖﻳﺎﺳ ﺏﻭ ﻪﺑ ﻊﻳﺮﺳ ﻭ ﻥﺎﺳﺁ ﯽﺳﺮﺘﺳﺩ یﺍﺮﺑ
ﻭ ﻩﺩﺮﮐ ﻪﻓﺎﺿﺍ ﯽﻳﺎﻫ ﺏﺎﻳ ﻞﺤﻣ ﺪﻴﻧﺍﻮﺗ ﯽﻣ ،ﻩﺍﻮﺨﻟﺩ
.ﺪﻴﻨﮐ ﺲﻤﻟ ﺎﻫ ﻪﻣﺎﻧﺮﺑ ﻪﻧﺎﺑﺯ ﺭﺩ ﺍﺭ ﺮﮔﺭﻭﺮﻣ 1
ﻞﺤﻣ ﺯﺍ ﯽﺘﺳﺮﻬﻓ .ﺪﻴﻨﮐ ﺏﺎﺨﺘﻧﺍ ﺍﺭ ﺎﻫ ﺏﺎﻳ ﻞﺤﻣ 2
.ﺪﺷ ﺪﻫﺍﻮﺧ ﺮﻫﺎﻇ ﻪﺤﻔﺻ یﻭﺭ ﺎﻤﺷ یﺎﻫ ﺏﺎﻳ
ﻥﺩﻭﺰﻓﺍ ،ﺪﻳﺪﺟ
ﻞﺤﻣ یﺍﺮﺑ ﻡﺎﻧ ﮏﻳ .ﺪﻴﻨﮐ ﺲﻤﻟ ﺍﺭ ﺏﺎﻳ ﻞﺤﻣ
ﺍﺭ URL ﻥﺁ ﻝﺎﺒﻧﺩ ﻪﺑ ﻭ ﻩﺩﺮﮐ ﺏﺎﺨﺘﻧﺍ ﺩﻮﺧ ﺏﺎﻳ
ﺏﺎﻳ ﻞﺤﻣ ،ﺐﻴﺗﺮﺗ ﻦﻳﺍ ﻪﺑ .ﺪﻴﻨﮐ ﺲﻤﻟ ﺍﺭ ﻩﺮﻴﺧﺫ 4
ﺪﻫﺍﻮﺧ ﺮﻫﺎﻇ ﺎﻫ ﺏﺎﻳ ﻞﺤﻣ ﺖﺳﺮﻬﻓ ﺭﺩ ﺎﻤﺷ
ﻪﮑﺒﺷ ﻪﺑ ﯽﺳﺮﺘﺳﺩ
.ﺪﻳﺮﻴﮕﺑ ﺱﺎﻤﺗ ﺩﻮﺧ
.ﺪﻴﻨﮐ ﻩﺮﻴﺧﺫ ﺍﺭ ﺕﺎﺤﻔﺻ
ﺏﺎﻳ ﻞﺤﻣ ﮏﻳ ﻥﺩﻭﺰﻓﺍ یﺍﺮﺑ 3
.ﺪﻴﻨﮐ ﺩﺭﺍﻭ ﻪﻃﻮﺑﺮﻣ ﺭﺩﺎﮐ ﺭﺩ
.ﺪﺷ
ﺮﺑﺭﺎﮐ یﺎﻤﻨﻫﺍﺭ | LG GM360
50

ﻡﺩﻮﻣ ﻥﺍﻮﻨﻋ ﻪﺑ ﯽﺷﻮﮔ ﺯﺍ ﻩﺩﺎﻔﺘﺳﺍ
یﺍﺮﺑ ﻡﺩﻮﻣ ﻥﺍﻮﻨﻋ ﻪﺑ ﺪﻧﺍﻮﺗ ﯽﻣ GM360 ﯽﺷﻮﮔ
ﯽﻤﻧ ﻪﮐ ﯽﻧﺎﻣﺯ ﻪﮑﻨﻳﺍ ﯽﻨﻌﻳ ،ﺪﻨﮐ ﻞﻤﻋ ﺰﻴﻧ ﻪﻧﺎﻳﺍﺭ
،ﺪﻳﻮﺷ ﻞﺻﻭ ﺖﻧﺮﺘﻨﻳﺍ ﻪﺑ ﺖﺑﺎﺛ ﻦﻔﻠﺗ ﻖﻳﺮﻃ ﺯﺍ ﺪﻴﻧﺍﻮﺗ
ﯽﺳﺮﺘﺳﺩ ﺖﻧﺮﺘﻨﻳﺍ ﻭ ﻞﻴﻤﻳﺍ ﻪﺑ ﺪﻴﻧﺍﻮﺗ ﯽﻣ ﻢﻫ ﺯﺎﺑ
ﺙﻮﺗﻮﻠﺑ ﺎﻳ USB ﻞﺑﺎﮐ ﺯﺍ ﺪﻴﻧﺍﻮﺗ ﯽﻣ .ﺪﻴﺷﺎﺑ ﻪﺘﺷﺍﺩ
.ﺪﻴﻨﮐ ﻩﺩﺎﻔﺘﺳﺍ
:USB ﻞﺑﺎﮐ ﺯﺍ ﻩﺩﺎﻔﺘﺳﺍ
ﻪﻧﺎﻳﺍﺭ ﺭﺩ LG PC Suite ﺪﻴﻨﮐ ﯽﺳﺭﺮﺑ 1
.ﺪﺷﺎﺑ ﻩﺪﺷ ﺐﺼﻧ
ﻪﮐ ﺭﻮﻄﻧﺎﻤﻫ ﺍﺭ ﻪﻧﺎﻳﺍﺭ ﻭ GM360 ﯽﺷﻮﮔ 2
ﻢﻫ ﻪﺑ USB ﻞﺑﺎﮐ ﺯﺍ ﻩﺩﺎﻔﺘﺳﺍ ﺎﺑ ﺪﺷ ﻪﺘﻔﮔ ﻼﺒﻗ
ﺍﺭ LG PC Suite ﺭﺍﺰﻓﺍ ﻡﺮﻧ ﻭ ﺪﻴﻨﮐ ﻞﺻﻭ
.ﺪﻴﻨﮐ ﺍﺮﺟﺍ
ﺭﺩ (ﺖﻧﺮﺘﻨﻳﺍ ﺖﻴﮐ) InternetKit یﻭﺭ 3
ﺍﺭ (ﻥﺩﻭﺰﻓﺍ) Add ﻪﻤﮐﺩ .ﺪﻴﻨﮐ ﮏﻴﻠﮐ ﻪﻧﺎﻳﺍﺭ
ﺏﺎﺨﺘﻧﺍ ﺍﺭ (ﻡﺩﻮﻣ) Modem ﻭ ﻩﺩﺮﮐ ﮏﻴﻠﮐ
ﻞﺼﺘﻣ ﺖﻧﺮﺘﻨﻳﺍ ﻪﺑ ﺪﻧﺍﻮﺗ ﯽﻣ ﻪﮐ یﺍ ﻪﺼﺨﺸﻣ 4
.ﺪﻴﻨﮐ ﻩﺮﻴﺧﺫ ﺍﺭ ﺮﻳﺩﺎﻘﻣ ﻭ ﻩﺩﺮﮐ ﺩﺭﺍﻭ ﺍﺭ ﺩﻮﺷ
ﻪﺤﻔﺻ ﺭﺩ ﺪﻴﻨﮐ ﯽﻣ ﺩﺎﺠﻳﺍ ﻪﮐ یﺍ ﻪﺼﺨﺸﻣ 5
ﻭ ﻩﺩﺮﮐ ﺏﺎﺨﺘﻧﺍ ﺍﺭ ﻥﺁ .ﺩﻮﺷ ﯽﻣ ﺮﻫﺎﻇ ﻪﻧﺎﻳﺍﺭ
.ﺪﻴﻨﮐ ﮏﻴﻠﮐ (ﻝﺎﺼﺗﺍ) Connect یﻭﺭ
ﻞﺼﺘﻣ GM360 ﻖﻳﺮﻃ ﺯﺍ ﺎﻤﺷ ﻪﻧﺎﻳﺍﺭ
.ﺩﻮﺷ ﯽﻣ
ﻡﺎﮕﻤﻫ ﻩﺭﺎﺑﺭﺩ ﺮﺘﺸﻴﺑ ﺕﺎﻋﻼﻃﺍ یﺍﺮﺑ :ﻪﺟﻮﺗ
.LG PC Suite ﺯﺍ ﻩﺩﺎﻔﺘﺳﺍ ﺎﺑ یﺯﺎﺳ
51
ﻪﺤﻔﺻ ﻪﺑ ﺪﺷ ﻩﺩﺍﺩ ﺡﺮﺷ ﻻﺎﺑ ﺭﺩ ﻪﮐ یﺍ ﻩﻮﻴﺷ ﻪﺑ 1
.ﺪﻴﻨﮐ ﺍﺪﻴﭘ ﯽﺳﺮﺘﺳﺩ ﺩﻮﺧ ﺮﻈﻧ ﺩﺭﻮﻣ ﺏﻭ
ﻦﻳﺍ ﻩﺮﻴﺧﺫ ﻪﻨﻳﺰﮔ ﺲﭙﺳ ﻭ ﺲﻤﻟ ﺍﺭ
ﺪﻴﻧﺍﻮﺘﺑ ﺎﺗ ﺪﻴﻨﮐ ﺩﺭﺍﻭ ﺏﻭ ﻪﺤﻔﺻ یﺍﺮﺑ ﺍﺭ ﯽﻣﺎﻧ 3
.ﺪﻴﻫﺩ ﺺﻴﺨﺸﺗ ﺍﺭ ﻥﺁ ﯽﺘﺣﺍﺭ ﻪﺑ
ﻩﺪﺷ ﻩﺮﻴﺧﺫ ﻪﺤﻔﺻ ﻪﺑ ﯽﺳﺮﺘﺳﺩ
ﻭ .ﺪﻴﻨﮐ ﺲﻤﻟ ﺎﻫ ﻪﻣﺎﻧﺮﺑ ﻪﻧﺎﺑﺯ ﺭﺩ ﺍﺭ ﺮﮔﺭﻭﺮﻣ
ﺪﻴﻧﺍﻮﺗ ﯽﻣ .ﺪﻴﻨﮐ ﺏﺎﺨﺘﻧﺍ ﺍﺭ ﻩﺪﺷ ﻩﺮﻴﺧﺫ ﺕﺎﺤﻔﺻ
.ﺪﻴﻨﮐ ﻩﺪﻫﺎﺸﻣ ﺎﺠﻨﻳﺍ ﺭﺩ ﺍﺭ ﻩﺪﺷ ﻩﺮﻴﺧﺫ ﺕﺎﺤﻔﺻ
ﺮﮔﺭﻭﺮﻣ ﻪﭽﺨﻳﺭﺎﺗ ﻩﺪﻫﺎﺸﻣ
ﻭ .ﺪﻴﻨﮐ ﺲﻤﻟ ﺎﻫ ﻪﻣﺎﻧﺮﺑ ﻪﻧﺎﺑﺯ ﺭﺩ ﺍﺭ ﺮﮔﺭﻭﺮﻣ
.ﺪﻴﻨﮐ
ﺏﻭ ﺮﮔﺭﻭﺮﻣ ﺕﺎﻤﻴﻈﻨﺗ ﺮﻴﻴﻐﺗ
ﻭ .ﺪﻴﻨﮐ ﺲﻤﻟ ﺎﻫ ﻪﻣﺎﻧﺮﺑ ﻪﻧﺎﺑﺯ ﺭﺩ ﺍﺭ ﺮﮔﺭﻭﺮﻣ
،یﺮﻫﺎﻇ ﺕﺎﻤﻴﻈﻨﺗ ، ﻪﺼﺨﺸﻣ ﻪﮐ ﺪﻴﻨﮐ ﺏﺎﺨﺘﻧﺍ
ﺖﻴﻨﻣﺍ ﺕﺎﻤﻴﻈﻨﺗ ﺎﻳ ،ﺎﻫ ﯽﮐﻮﮐ ،ﻥﺎﻬﻨﭘ ﻪﻈﻓﺎﺣ
ﻪﺤﻔﺻ ﻩﺮﻴﺧﺫ
ﺪﻴﻠﮐ 2
.ﺪﻴﻨﮐ ﺏﺎﺨﺘﻧﺍ ﺍﺭ ﻪﺤﻔﺻ
.ﺪﻴﻨﮐ ﺲﻤﻟ ﺍﺭﻩﺮﻴﺧﺫ ﺪﻴﻠﮐ 4
.ﺪﻴﻨﮐ ﺏﺎﺨﺘﻧﺍ ﺍﺭ ﻪﭽﺨﻳﺭﺎﺗ
.ﺪﻴﻨﮐ ﺏﺎﺨﺘﻧﺍ ﺍﺭ ﺕﺎﻤﻴﻈﻨﺗ
.ﺩﻮﺷ ﺶﻳﺍﺮﻳﻭ

Google ﻪﺑ ﯽﺳﺮﺘﺳﺩ
Google ﺕﺎﻣﺪﺧ ﺯﺍ ﻮﻨﻣ ﻦﻳﺍ ﺯﺍ ﻩﺩﺎﻔﺘﺳﺍ ﺎﺑ
.ﺪﻴﻨﮐ ﻩﺩﺎﻔﺘﺳﺍ
ﺪﻫﺩ ﯽﻣ ﻥﺎﮑﻣﺍ ﺮﺑﺭﺎﮐ ﻪﺑ Google ﺕﺎﻣﺪﺧ
.ﺪﻨﮐ ﻮﺠﺘﺴﺟ ﺍﺭ ﻒﻠﺘﺨﻣ ﺐﻟﺎﻄﻣ
ﺏﻭ
یﺍﺮﺑ ﻢﻫ ﻭ ﻩﺩﻮﺑ ﻦﺷﻭﺭ ﺙﻮﺗﻮﻠﺑ ﺪﻴﻨﮐ ﯽﺳﺭﺮﺑ 1
ﻞﺑﺎﻗ GM360 ﯽﺷﻮﮔ یﺍﺮﺑ ﻢﻫ ﻭ ﻪﻧﺎﻳﺍﺭ
ﻪﻧﻮﮔ ﻪﺑ ﺍﺭ ﺩﻮﺧ GM360 ﯽﺷﻮﮔ ﻭ ﻪﻧﺎﻳﺍﺭ 2
یﺭﺍﺮﻗﺮﺑ یﺍﺮﺑ ﻪﮐ ﺪﻴﻨﮐ ﻞﺻﻭ ﺮﮕﻳﺪﮑﻳ ﻪﺑ یﺍ
Connection wizard ﺯﺍ ﻩﺩﺎﻔﺘﺳﺍ ﺎﺑ 3
LG PC Suite ﺭﺩ (ﻝﺎﺼﺗﺍ ﯽﻳﻭﺩﺎﺟ ﻪﻣﺎﻧﺮﺑ)
.ﺪﻴﻨﮐ
ﻪﻧﺎﻳﺍﺭ ﺭﺩ ﺍﺭ (ﺖﻧﺮﺘﻨﻳﺍ ﺖﻴﮐ) Internet Kit 4
ﺍﺭ (ﺪﻳﺪﺟ) New ﻪﻤﮐﺩ ﺲﭙﺳ .ﺪﻴﻨﮐ ﮏﻴﻠﮐ
LG Mobile USB Modem ﻪﻨﻳﺰﮔ 5
OK ﺲﭙﺳ ﻭ (LG Mobile USB ﻡﺩﻮﻣ)
ﻪﺤﻔﺻ یﻭﺭ ﻝﺎﺣ .ﺪﻴﻨﮐ ﺏﺎﺨﺘﻧﺍ ﺍﺭ (ﺪﻴﻳﺄﺗ)
ﻞﺼﺘﻣ ﺖﻧﺮﺘﻨﻳﺍ ﻪﺑ ﺪﻧﺍﻮﺗ ﯽﻣ ﻪﮐ یﺍ ﻪﺼﺨﺸﻣ 6
.ﺪﻴﻨﮐ ﻩﺮﻴﺧﺫ
ﻪﺤﻔﺻ ﺭﺩ ﺪﻴﻨﮐ ﯽﻣ ﺩﺎﺠﻳﺍ ﻪﮐ یﺍ ﻪﺼﺨﺸﻣ 7
ﻭ ﻩﺩﺮﮐ ﺏﺎﺨﺘﻧﺍ ﺍﺭ ﻥﺁ .ﺩﻮﺷ ﯽﻣ ﺮﻫﺎﻇ ﻪﻧﺎﻳﺍﺭ
.ﺪﻴﻨﮐ ﮏﻴﻠﮐ (ﻝﺎﺼﺗﺍ) Connect یﻭﺭ
ﻞﺼﺘﻣ GM360 ﻖﻳﺮﻃ ﺯﺍ ﺎﻤﺷ ﻪﻧﺎﻳﺍﺭ
:ﺙﻮﺗﻮﻠﺑ ﺯﺍ ﻩﺩﺎﻔﺘﺳﺍ
.ﺪﺷﺎﺑ ﺖﻳﻭﺭ
.ﺪﺷﺎﺑ ﺯﺎﻴﻧ ﺩﻭﺭﻭ ﺪﮐ ﻪﺑ ﻝﺎﺼﺗﺍ
ﺩﺎﺠﻳﺍ ﺙﻮﺗﻮﻠﺑ ﻝﺎﻌﻓ ﻝﺎﺼﺗﺍ ﮏﻳ
.ﺪﻴﻨﮐ ﮏﻴﻠﮐ
.ﺪﺷ ﺪﻫﺍﻮﺧ ﺮﻫﺎﻇ
ﺍﺭ ﺮﻳﺩﺎﻘﻣ ﻭ ﻩﺩﺮﮐ ﺩﺭﺍﻭ ﺍﺭ ﺩﻮﺷ
.ﺩﻮﺷ ﯽﻣ
ﺮﺑﺭﺎﮐ یﺎﻤﻨﻫﺍﺭ | LG GM360
52

ﻞﻔﻗ ﻪﺤﻔﺻ ﺭﺩ ﺍﺭ ﺩﺎﻤﻧ ﻉﻮﻧ - ﻪﺤﻔﺻ ﻞﻔﻗ ﺩﺎﻤﻧ
.ﺪﻴﻨﮐ ﻢﻴﻈﻨﺗ ﺍﺭ ﻩﺭﺎﻤﺷ
ﻪﻨﻳﺰﮔ ﺭﺎﻬﭼ .ﺪﻴﻨﮐ ﻢﻴﻈﻨﺗ ﺍﺭ ﻢﻠﻗ ﻩﺯﺍﺪﻧﺍ - ﻢﻠﻗ
ﺭﺎﻴﺴﺑ ﻭ گﺭﺰﺑ ،ﻂﺳﻮﺘﻣ ،ﮏﭼﻮﮐ :ﺩﺭﺍﺩ ﺩﻮﺟﻭ
،ﺪﺷﺎﺑ ﻦﺷﻭﺭ ﺮﺘﺸﻴﺑ ﻪﻨﻴﻣﺯ ﺭﻮﻧ ﻪﭼ ﺮﻫ :ﻪﺟﻮﺗ
ﻦﻳﺍ .ﺩﻮﺷ ﯽﻣ ﻩﺩﺎﻔﺘﺳﺍ یﺮﺘﺸﻴﺑ یﺮﺗﺎﺑ یﻭﺮﻴﻧ
ﺭﺩ ﻦﻔﻠﺗ ﻥﺩﺮﮐ ژﺭﺎﺷ ﻪﺑ ﺯﺎﻴﻧ ﺚﻋﺎﺑ ﺖﺳﺍ ﻦﮑﻤﻣ
.ﺪﻴﻨﮐ ﻢﻴﻈﻨﺗ ﺍﺭ ﻪﺤﻔﺻ ﯽﻳﺎﻨﺷﻭﺭ - ﯽﻳﺎﻨﺷﻭﺭ
ﺏﺎﺨﺘﻧﺍ ﺍﺭ ﺵﻮﻣﺎﺧ ﺎﻳ ﻦﺷﻭﺭ - ﺪﻣﺁ ﺵﻮﺧ ﻡﺎﻴﭘ
ﯽﻨﺘﻣ ﺖﻤﺴﻗ ﺭﺩ ﺍﺭ ﯽﺳﺮﭘ ﻝﺍﻮﺣﺍ ﻡﺎﻴﭘ ﻭ ﻩﺩﺮﮐ
ﻪﺤﻔﺻ ﻥﻮﻤﻀﻣ - ﻥﺪﺷ ﺵﻮﻣﺎﺧ/ﻉﻭﺮﺷ
.ﺪﻴﻨﮐ ﺏﺎﺨﺘﻧﺍ ﺍﺭ ﻥﺪﺷ ﺵﻮﻣﺎﺧ/ﻉﻭﺮﺷ
.ﺪﻴﻨﮐ ﺏﺎﺨﺘﻧﺍ
ﮓﻧﺭ - یﺮﻴﮔ ﻩﺭﺎﻤﺷ
.گﺭﺰﺑ
.ﺩﻮﺷ ﺮﺘﺸﻴﺑ ﺕﺎﻌﻓﺩ ﺩﺍﺪﻌﺗ
.ﺪﻴﻨﮐ ﺩﺭﺍﻭ
ﻦﻔﻠﺗ ﺕﺎﻤﻴﻈﻨﺗ ﺮﻴﻴﻐﺗ
ﺎﻤﺷ یﺍﺮﺑ GM360 ﯽﺷﻮﮔ ﻪﮐ ﯽﻠﻤﻋ یﺩﺍﺯﺁ ﺯﺍ
ﯽﻣ ﻞﻤﻋ ﺎﻤﺷ یﺎﻫ ﺖﻳﻮﻟﻭﺍ ﺎﺑ ﻖﺑﺎﻄﻣ ﻭ ﻩﺩﺮﮐ ﻢﻫﺍﺮﻓ
ﻩﺩﺮﮐ ﺏﺎﺨﺘﻧﺍ ﺍﺭ ﻦﻔﻠﺗ ﺕﺎﻤﻴﻈﻨﺗ ،ﺕﺎﻤﻴﻈﻨﺗ ﻪﻧﺎﺑﺯ ﺭﺩ
.ﺪﻴﻨﮐ ﺏﺎﺨﺘﻧﺍ ﺮﻳﺯ ﺖﺴﻴﻟ ﺯﺍ ﺲﭙﺳ ﻭ
ﻥﺎﻣﺯ ﻭ ﺦﻳﺭﺎﺗ ﺕﺎﻤﻴﻈﻨﺗ - ﻥﺎﻣﺯ ﻭ ﺦﻳﺭﺎﺗ
ﺭﻮﻃ ﻪﺑ ﻥﺎﻣﺯ ﺪﻴﻨﮐ ﺏﺎﺨﺘﻧﺍ ﺎﻳ
ﻩﺮﻴﺧﺫ ﻪﻨﻳﺰﮔ ﺯﺍ ﺎﻳ ﺩﻮﺷ ﺯﻭﺭ ﻪﺑ ﺭﺎﮐﺩﻮﺧ
53
.ﺪﻳﺮﺒﺑ ﺕﺬﻟ ،ﺪﻨﮐ
ﻦﻔﻠﺗ ﺕﺎﻤﻴﻈﻨﺗ
ﺪﻴﻨﮐ ﻢﻴﻈﻨﺗ ﺍﺭ
.ﺪﻴﻨﮐ ﻩﺩﺎﻔﺘﺳﺍ ﺯﻭﺭ ﯽﻳﺎﻨﺷﻭﺭ
ﺕﺎﻤﻴﻈﻨﺗ
ﻪﺤﻔﺻ ﺭﺩ ﺍﺭ ﺩﻮﺧ ﻪﺼﺨﺸﻣ ﯽﺘﺣﺍﺭ ﻪﺑ ﺪﻴﻧﺍﻮﺗ ﯽﻣ
ﺯﺍ ﻩﺩﺎﻔﺘﺳﺍ ﺎﺑ ﺍﺭ ﻪﺼﺨﺸﻣ ﻢﻴﻈﻨﺗ ﺮﻫ ﺪﻴﻧﺍﻮﺗ ﯽﻣ
.ﺪﻴﻨﮐ ﺲﻤﻟ ﺍﺭ ﻪﺼﺨﺸﻣ ،ﺕﺎﻤﻴﻈﻨﺗ ﻪﻧﺎﺑﺯ ﺭﺩ 1
ﺍﺭ ﺪﻴﻨﮐ ﺶﻳﺍﺮﻳﻭ ﺪﻴﻫﺍﻮﺧ ﯽﻣ ﻪﮐ یﺍ ﻪﺼﺨﺸﻣ 2
یﺎﻫ ﻪﻨﻳﺰﮔ ﻭ ﺎﻫﺍﺪﺻ
ﺕﺎﻤﻴﻈﻨﺗ ﻪﻠﻤﺟ ﺯﺍ ﺍﺭ ﺖﺴﻴﻟ ﺭﺩ ﺩﻮﺟﻮﻣ ﺭﺍﺪﺸﻫ
ﺍﺭ ﺶﻳﺎﻤﻧ ﻪﺤﻔﺻ ﺕﺎﻤﻴﻈﻨﺗ ،ﺕﺎﻤﻴﻈﻨﺗ ﻪﻧﺎﺑﺯ ﺭﺩ
یﺍﺮﺑ ﺍﺭ ﯽﻧﻮﻤﻀﻣ - ﯽﻠﺻﺍ ﻪﺤﻔﺻ ﺮﻳﻮﺼﺗ
ﻪﺤﻔﺻ یﻮﮕﻟﺍ - ﺖﺠﻳﻭ ﯽﻠﺻﺍ ﻪﺤﻔﺻ یﻮﮕﻟﺍ
ﺪﻴﻨﮐ ﺏﺎﺨﺘﻧﺍ ﺍﺭ ﺪﻴﻔﺳ ﺎﻳ ﻩﺎﻴﺳ - ﯽﺷﻮﮔ ﻥﻮﻤﻀﻣ
ﺏﺎﺨﺘﻧﺍ ﺍﺭ ﻞﻔﻗ ﻥﺪﺷ ﺯﺎﺑ ﺵﻭﺭ - ﻞﻔﻗ ﻪﺤﻔﺻ
ﻪﺼﺨﺸﻣ یﺯﺎﺳ ﯽﺼﺨﺷ
.ﺪﻴﻫﺩ ﺮﻴﻴﻐﺗ ﻦﻔﻠﺗ ﯽﻠﺻﺍ
.ﺪﻴﻨﮐ یﺯﺎﺳ ﯽﺼﺨﺷ ﺕﺎﻤﻴﻈﻨﺗ یﻮﻨﻣ
.ﺪﻴﻳﺎﻤﻧ ﺏﺎﺨﺘﻧﺍ
ﻪﻴﻠﮐ ﺪﻴﻧﺍﻮﺗ ﯽﻣ ﻥﻮﻨﮐﺍ 3
ﻭ ﻡﺎﻴﭘ ﮓﻨﻫﺁ ،ﺍﺪﺻ ﻥﺍﺰﻴﻣ ﻭ ﮓﻧﺯ ﮓﻨﻫﺁ
.ﺪﻴﻫﺩ ﺮﻴﻴﻐﺗ ،ﺮﮕﻳﺩ ﺩﺭﺍﻮﻣ یﺭﺎﻴﺴﺑ
ﻪﺤﻔﺻ ﺕﺎﻤﻴﻈﻨﺗ ﺮﻴﻴﻐﺗ
.ﺪﻴﻨﮐ ﺲﻤﻟ
ﺶﻳﺎﻤﻧ ﻪﺤﻔﺻ ﺕﺎﻤﻴﻈﻨﺗ
.ﺪﻴﻨﮐ ﺏﺎﺨﺘﻧﺍ ﻞﻔﻗ ﻪﺤﻔﺻ ﺎﻳ ﯽﻠﺻﺍ ﻪﺤﻔﺻ
.ﺪﻴﻨﮐ ﺏﺎﺨﺘﻧﺍ ﺍﺭ ﺖﺠﻳﻭ ﯽﻠﺻﺍ
یﺍﺮﺑ ﺍﺭ ﺏﻮﭼﺭﺎﭼ یﺎﻤﻨﻫﺍﺭ - ﺏﻮﭼﺭﺎﭼ
.ﺪﻴﻨﮐ ﺲﻤﻟ ﻥﺁ یﺎﻫﺩﺮﮑﻠﻤﻋ ﯽﺳﺭﺮﺑ
.(ﯽﻧﻮﺗﺭﺎﮐ ﺮﺑﺭﺎﮐ ﻂﺑﺍﺭ)
ﻞﻣﺎﺷ ﯽﻠﺻﺍ یﻮﻨﻣ ﮏﺒﺳ - ﯽﻠﺻﺍ یﻮﻨﻣ
ﺍﺭ ﻪﺤﻔﺻ ﻪﺑ ﻪﺤﻔﺻ ﺎﻳ ﺶﻳﺎﻤﻴﭘ ،گﺍﺰﮕﻳﺯ
.ﺪﻴﻨﮐ ﺏﺎﺨﺘﻧﺍ
.ﺪﻴﻨﮐ

ﺭﺩ ﺩﻮﺟﻮﻣ ﻪﻈﻓﺎﺣ - ﯽﺷﻮﮔ ﻩﺪﺷ ﻩﺮﻴﺧﺫ ﻪﻈﻓﺎﺣ
ﺖﺴﻴﻟ ،ﻢﻳﻮﻘﺗ ،ﻦﻴﺒﻃﺎﺨﻣ ،SMS یﺍﺮﺑ ﺍﺭ ﯽﺷﻮﮔ
ﻞﺤﻣ ،ﺱﺎﻤﺗ ﻪﭽﺨﻳﺭﺎﺗ ،ﺭﺍﺪﺸﻫ ،ﺖﺷﺍﺩﺩﺎﻳ ،ﺎﻫﺭﺎﮐ
.ﺪﻴﻨﮐ ﯽﺳﺭﺮﺑ ﺮﮕﻳﺩ ﻒﻠﺘﺨﻣ ﺩﺭﺍﻮﻣ ﻭ ،ﺎﻫ ﺏﺎﻳ
ﺍﺭ
ﺕﺭﺎﮐ ﻢﻴﺳ ﺭﺩ ﺩﻮﺟﻮﻣ ﻪﻈﻓﺎﺣ - ﻢﻴﺳ ﻪﻈﻓﺎﺣ
ﻪﻈﻓﺎﺣ ﺕﺭﺎﮐ ﺭﺩ ﺩﻮﺟﻮﻣ ﻪﻈﻓﺎﺣ - ﯽﺟﺭﺎﺧ ﻪﻈﻓﺎﺣ
ﺪﺷﺎﺑ ﻡﺯﻻ ﺖﺳﺍ ﻦﮑﻤﻣ) ﺪﻴﻨﮐ ﯽﺳﺭﺮﺑ ﺍﺭ ﯽﺟﺭﺎﺧ
.(ﺪﻴﻨﮐ یﺭﺍﺪﻳﺮﺧ ﻪﻧﺎﮔﺍﺪﺟ ﺍﺭ ﻪﻈﻓﺎﺣ ﺕﺭﺎﮐ ﻦﻳﺍ
ﺢﻴﺟﺮﺗ ﻪﮐ ﺍﺭ ﯽﻠﺤﻣ - ﻪﻴﻟﻭﺍ ﻩﺮﻴﺧﺫ ﻞﺤﻣ ﺕﺎﻤﻴﻈﻨﺗ
ﻞﻣﺎﺷ ،ﺩﻮﺷ ﻩﺮﻴﺧﺫ ﻥﺁ ﺭﺩ ﺩﺭﺍﻮﻣ ﻦﻳﺍ ﺪﻴﻫﺩ ﯽﻣ
.ﺪﻴﻨﮐ ﺏﺎﺨﺘﻧﺍ
ﯽﺟﺭﺎﺧ ﻪﻈﻓﺎﺣ ﻭ ﯽﺷﻮﮔ ﻪﻈﻓﺎﺣ
.ﺪﻴﻨﮐ ﯽﺳﺭﺮﺑ
ﻝﺎﺼﺗﺍ ﺕﺎﻤﻴﻈﻨﺗ ﺮﻴﻴﻐﺗ
ﺭﻮﺗﺍﺮﭘﺍ ﻂﺳﻮﺗ ﻞﺒﻗ ﺯﺍ ﯽﺷﻮﮔ ﻝﺎﺼﺗﺍ ﺕﺎﻤﻴﻈﻨﺗ
ﺯﺍﺪﻴﻧﺍﻮﺗ ﯽﻣ ﻦﻳﺍﺮﺑﺎﻨﺑ ﺖﺳﺍ ﻪﺘﻓﺮﮔ ﻡﺎﺠﻧﺍ ﺎﻤﺷ ﻪﮑﺒﺷ
.ﺪﻳﺮﺒﺑ ﺕﺬﻟ ﺍﺪﺘﺑﺍ ﻥﺎﻤﻫ ﺯﺍ ﺩﻮﺧ ﺪﻳﺪﺟ ﯽﺷﻮﮔ
ﻮﻨﻣ ﻦﻳﺍ ﺯﺍ ،ﺕﺎﻤﻴﻈﻨﺗ ﺯﺍ ﮏﻳ ﺮﻫ ﺮﻴﻴﻐﺗ یﺍﺮﺑ
.ﺪﻴﻨﮐ ﺲﻤﻟ ﺍﺭ ﻝﺎﺼﺗﺍ ،ﺕﺎﻤﻴﻈﻨﺗ ﻪﻧﺎﺑﺯ ﺭﺩ
،ﺪﻴﻨﮐ ﺏﺎﺨﺘﻧﺍ ﺍﺭ ﺭﺎﮐﺩﻮﺧ ﺮﮔﺍ - ﻪﮑﺒﺷ ﺏﺎﺨﺘﻧﺍ
ﻮﺠﺘﺴﺟ ﺍﺭ ﻪﮑﺒﺷ ﺭﺎﮐﺩﻮﺧ ﺭﻮﻃ ﻪﺑ GM360
ﻦﻳﺍ .ﺪﻨﮐ ﯽﻣ ﺖﺒﺛ ﻪﮑﺒﺷ ﺭﺩ ﺍﺭ ﯽﺷﻮﮔ ﻭ ﻩﺩﺮﮐ
ﯽﻣ ﻪﻴﺻﻮﺗ ﺮﺘﻬﺑ ﺖﻴﻔﻴﮐ ﻭ ﺕﺎﻣﺪﺧ یﺍﺮﺑ ﻢﻴﻈﻨﺗ
ﻪﮑﺒﺷ ﻪﻤﻫ ،ﺪﻴﻨﮐ ﺏﺎﺨﺘﻧﺍ ﺍﺭ ﯽﺘﺳﺩ ﺮﮔﺍ .ﺩﻮﺷ
ﯽﮑﻳ ﺪﻴﻧﺍﻮﺗ ﯽﻣ ﻭ ﻩﺪﺷ ﻩﺩﺍﺩ ﺶﻳﺎﻤﻧ ﺩﻮﺟﻮﻣ یﺎﻫ
.ﺪﻴﻨﮐ ﺏﺎﺨﺘﻧﺍ ﻡﺎﻧ ﺖﺒﺛ یﺍﺮﺑ ﺍﺭ ﺎﻫ ﻥﺁ ﺯﺍ
:ﺪﻴﻨﮐ ﻩﺩﺎﻔﺘﺳﺍ
ﻪﮑﺒﺷ ﺕﺎﻤﻴﻈﻨﺗ
ﺕﺎﻤﻴﻈﻨﺗ
ﻩﺮﻴﺧﺫ ﺕﺎﻤﻴﻈﻨﺗ ﻪﮐ ﺪﻴﻨﮐ ﺏﺎﺨﺘﻧﺍ - ﻭﺮﻴﻧ ﻩﺮﻴﺧﺫ
ﺎﻳ ﺵﻮﻣﺎﺧ/ﻦﺷﻭﺭ ﻪﻧﺎﺧﺭﺎﮐ ﺽﺮﻓ ﺶﻴﭘ یﻭﺮﻴﻧ
ﺍﺭ ﺩﻮﺧ GM360 ﺶﻳﺎﻤﻧ ﻪﺤﻔﺻ ﻥﺎﺑﺯ - ﻥﺎﺑﺯ
ﺭﻮﻃ ﻪﺑ ﺍﺭ ﺪﻴﻠﮐ ﻪﺤﻔﺻ - ﺭﺎﮐﺩﻮﺧ ﺪﻴﻠﮐ ﻞﻔﻗ
.ﺪﻴﻨﮐ ﻞﻔﻗ ﯽﻠﺻﺍ ﻪﺤﻔﺻ ﺭﺩ ﺭﺎﮐﺩﻮﺧ
یﺎﻫﺪﮐ ﻞﻣﺎﺷ ﺍﺭ ﺩﻮﺧ ﯽﺘﻴﻨﻣﺍ ﺕﺎﻤﻴﻈﻨﺗ - ﺖﻴﻨﻣﺍ
ﻪﺑ ﺮﺘﺸﻴﺑ ﺕﺎﻋﻼﻃﺍ یﺍﺮﺑ - ﻪﻈﻓﺎﺣ ﺕﺎﻋﻼﻃﺍ
.ﺪﻴﻨﮐ ﻪﻌﺟﺍﺮﻣ ﻪﻈﻓﺎﺣ ﺮﻳﺪﻣ ﺯﺍ ﻩﺩﺎﻔﺘﺳﺍ
ﺖﻟﺎﺣ ﻪﺑ ﺍﺭ ﺕﺎﻤﻴﻈﻨﺗ ﻪﻤﻫ - ﺕﺎﻤﻴﻈﻨﺗ ﯽﻧﺎﺸﻧﺯﺎﺑ
ﻩﺭﺎﺑﺭﺩ ﯽﻨﻓ ﺕﺎﻋﻼﻃﺍ ﻩﺪﻫﺎﺸﻣ یﺍﺮﺑ - ﺕﺎﻋﻼﻃﺍ
ﻩﺩﺎﻔﺘﺳﺍ ﻩﻮﺤﻧ ﻦﻴﻴﻌﺗ یﺍﺮﺑ ﻪﻈﻓﺎﺣ ﺮﻳﺪﻣ ﺯﺍ ﺪﻴﻧﺍﻮﺗ ﯽﻣ
ﺩﺭﺍﻮﻣ ﺮﻳﺎﺳ ﻭ Java یﺎﻫ ﻪﻣﺎﻧﺮﺑ ،ﻞﻴﻤﻳﺍ ،MMS
.ﺪﻴﻧﺍﺩﺮﮔﺮﺑ ﻪﻧﺎﺧﺭﺎﮐ ﺽﺮﻓ ﺶﻴﭘ
ﺏﺎﺨﺘﻧﺍ ﺍﺭ ﺎﻤﻨﻫﺍﺭ ﻪﻨﻳﺰﮔ ،GM360 ﯽﺷﻮﮔ
ﺭﺍﺰﻓﺍ ﻡﺮﻧ ،ﯽﺷﻮﮔ ﺕﺎﻋﻼﻃﺍ ﺎﺑ ﺪﻴﻧﺍﻮﺗ ﯽﻣ .ﺪﻴﻨﮐ
ﻢﻴﺳ ،ﻦﻔﻠﺗ :ﺩﺭﺍﺩ ﺩﻮﺟﻮﻣ ﻪﻈﻓﺎﺣ ﻪﺳ GM360
یﺎﻀﻓ ﺯﺍ ﯽﻫﺎﮔﺁ ﺰﻴﻧ ﻭ ﺎﻫ ﻪﻈﻓﺎﺣ ﺯﺍ ﮏﻳ ﺮﻫ ﺯﺍ
ﺲﭙﺳ ﻭ ﻦﻔﻠﺗ ﺕﺎﻤﻴﻈﻨﺗ ،ﺕﺎﻤﻴﻈﻨﺗ ﻪﻧﺎﺑﺯ ﺭﺩ
ﺭﺩ
ﺩﻮﺟﻮﻣ ﻪﻈﻓﺎﺣ - ﯽﺷﻮﮔ ﯽﻟﻮﻤﻌﻣ ﻪﻈﻓﺎﺣ
،ﺎﻫ ﻢﻠﻴﻓ ،ﺎﻫﺍﺪﺻ ،ﺮﻳﻭﺎﺼﺗ یﺍﺮﺑ ﺍﺭ GM360
ﺮﺑﺭﺎﮐ یﺎﻤﻨﻫﺍﺭ | LG GM360
.ﺪﺷﺎﺑ ﺐﺷ ﻂﻘﻓ
.ﺪﻴﻫﺩ ﺮﻴﻴﻐﺗ
.ﺪﻴﻨﮐ ﻢﻴﻈﻨﺗ
،ﯽﺷﻮﮔ ﻞﻔﻗ ﻭ ﻦﻴﭘ
.ﺪﻴﻫﺩ
ﺎﻘﺗﺭﺍ ﺍﺭ ﺩﻮﺧ
ﻪﻈﻓﺎﺣ ﺮﻳﺪﻣ ﺯﺍ ﻩﺩﺎﻔﺘﺳﺍ
.ﯽﺟﺭﺎﺧ ﻪﻈﻓﺎﺣ ﺕﺭﺎﮐ ﻭ ﺕﺭﺎﮐ
.ﺪﻴﻨﮐ ﻩﺩﺎﻔﺘﺳﺍ ﺎﻫ ﻥﺁ ﺩﻮﺟﻮﻣ ﯽﻟﺎﺧ
.ﺪﻴﻨﮐ ﺲﻤﻟ ﺍﺭ ﻪﻈﻓﺎﺣ ﺕﺎﻋﻼﻃﺍ
.ﺪﻴﻨﮐ ﯽﺳﺭﺮﺑ
54

ﻖﻳﺮﻃ ﺯﺍ ﺎﻫ ﻞﻳﺎﻓ ﺖﻓﺎﻳﺭﺩ ﻭ ﻝﺎﺳﺭﺍ
،ﺪﻴﻨﮐ ﺯﺎﺑ ﺍﺭ ﺪﻴﻳﺎﻤﻧ ﻝﺎﺳﺭﺍ ﺪﻴﻫﺍﻮﺧ ﯽﻣ ﻪﮐ ﯽﻠﻳﺎﻓ 1
.ﺖﺳﺍ ﯽﻘﻴﺳﻮﻣ ﺎﻳ ﻢﻠﻴﻓ ،ﺲﮑﻋ ﻞﻳﺎﻓ ﻦﻳﺍ ًﻻﻮﻤﻌﻣ
.ﺪﻴﻨﮐ ﺏﺎﺨﺘﻧﺍ ﺍﺭ ﺙﻮﺗﻮﻠﺑ ﻪﻨﻳﺰﮔ
،ﺪﻳﺍ ﻩﺩﺮﮐ ﻞﺼﺘﻣ ﺍﺭ ﺙﻮﺗﻮﻠﺑ ﻩﺎﮕﺘﺳﺩ ﻼﺒﻗ ﺮﮔﺍ 3
ﻩﺎﮕﺘﺳﺩ ﺭﺎﮐﺩﻮﺧ ﺭﻮﻃ ﻪﺑ ﺮﮕﻳﺩ GM360
ﺭﺩ .ﺪﻨﮐ ﯽﻤﻧ ﻮﺠﺘﺴﺟ
ﺭﺎﮐﺩﻮﺧ ﺭﻮﻃ ﻪﺑ GM360 ،ﺕﺭﻮﺼﻨﻳﺍﺮﻴﻏ
ﻝﺎﻌﻓ ﺎﻫ ﻥﺁ ﺙﻮﺗﻮﻠﺑ ﻪﮐ یﺮﮕﻳﺩ یﺎﻫ ﻩﺎﮕﺘﺳﺩ
ﻮﺠﺘﺴﺟ ﺍﺭ ﺩﺭﺍﺩ ﺭﺍﺮﻗ ﻩﺩﻭﺪﺤﻣ ﻥﺎﻤﻫ ﺭﺩ ﻭ ﺖﺳﺍ
ﻥﺁ ﻪﺑ ﻞﻳﺎﻓ ﻝﺎﺳﺭﺍ یﺍﺮﺑ ﺍﺭ ﺮﻈﻧ ﺩﺭﻮﻣ ﻩﺎﮕﺘﺳﺩ 4
ﯽﻣ ﻝﺎﺳﺭﺍ ﻞﻳﺎﻓ ﻪﮑﻨﻳﺍ ﺯﺍ ﻥﺎﻨﻴﻤﻃﺍ یﺍﺮﺑ !ﻪﺘﮑﻧ
.ﺪﻴﻨﮐ ﯽﺳﺭﺮﺑ ﺍﺭ ﻪﺘﻓﺮﺸﻴﭘ ﺭﺍﻮﻧ ،ﺩﻮﺷ
ﻦﺷﻭﺭ ﻢﻫ ﺪﻳﺎﺑ ﺙﻮﺗﻮﻠﺑ ،ﺎﻫ ﻞﻳﺎﻓ ﺖﻓﺎﻳﺭﺩ یﺍﺮﺑ 1
ﺮﺘﺸﻴﺑ ﺕﺎﻋﻼﻃﺍ یﺍﺮﺑ .ﺪﺷﺎﺑ ﺖﻳﻭﺭ ﻞﺑﺎﻗ ﻢﻫ ﻭ
ﻪﻌﺟﺍﺮﻣ ﺮﻳﺯ ﺭﺩ ﺙﻮﺗﻮﻠﺑ ﺕﺎﻤﻴﻈﻨﺗ ﺮﻴﻴﻐﺗ ﻪﺑ
ﻪﮐ ﺪﻫﺍﻮﺧ ﯽﻣ ﺎﻤﺷ ﺯﺍ ﻭ ﺩﻮﺷ ﯽﻣ ﺮﻫﺎﻇ ﯽﻣﺎﻴﭘ 2
یﺍﺮﺑ .ﺪﻴﻨﮐ ﺖﻓﺎﻳﺭﺩ ﻩﺪﻨﻨﮐ ﻝﺎﺳﺭﺍ ﺯﺍ ﺍﺭ ﻞﻳﺎﻓ
.ﺪﻴﻨﮐ ﺏﺎﺨﺘﻧﺍ ﺍﺭ
55
:ﻞﻳﺎﻓ ﻝﺎﺳﺭﺍ یﺍﺮﺑ
.ﺪﻴﻨﮐ ﺏﺎﺨﺘﻧﺍ ﺍﺭ ﻝﺎﺳﺭﺍ 2
ﺍﺭ ﺮﮕﻳﺩ ﺙﻮﺗﻮﻠﺑ یﺎﻫ
.ﺪﻨﮐ ﯽﻣ
.ﺪﻴﻨﮐ ﺏﺎﺨﺘﻧﺍ
.ﺪﺷ ﺪﻫﺍﻮﺧ ﻝﺎﺳﺭﺍ ﻞﻳﺎﻓ 5
:ﻞﻳﺎﻓ ﺖﻓﺎﻳﺭﺩ یﺍﺮﺑ
ﻪﻠﺑ ،ﻞﻳﺎﻓ ﺖﻓﺎﻳﺭﺩ
ﻪﮑﺒﺷ ﮏﻳ ﺪﻴﻧﺍﻮﺗ ﯽﻣ - ﻩﺪﻳﺰﮔﺮﺑ یﺎﻫ ﺖﺴﻴﻟ
ﺙﻮﺗﻮﻠﺑ
.ﺪﻴﻨﮐ
ﺮﮔﺍ .ﺪﻴﻨﮐ ﻪﻓﺎﺿﺍ ﻝﺎﺼﺗﺍ یﺍﺮﺑ ﺍﺭ ﻩﺪﻳﺰﮔﺮﺑ
ﯽﻓﺎﮐ ،ﺪﻨﮐ ﯽﻣ ﻮﺠﺘﺴﺟ ﺭﺎﮐﺩﻮﺧ ﺭﻮﻃ ﻪﺑ ﻪﮑﺒﺷ
ﻪﮑﺒﺷ ﺖﺴﻴﻟ ﺯﺍ ﺍﺭ ﺎﻫ ﻪﮑﺒﺷ ﺯﺍ ﯽﮑﻳ ﺖﺳﺍ
ﻪﮑﺒﺷ ﮏﻳ ،ﺕﺭﻮﺻ ﻦﻳﺍ ﺮﻴﻏ ﺭﺩ ،ﺪﻴﻨﮐ ﺏﺎﺨﺘﻧﺍ
.ﺪﻴﻳﺎﻤﻧ ﻪﻓﺎﺿﺍ ﯽﺘﺳﺩ ﺕﺭﻮﺻ ﻪﺑ ﺪﻳﺪﺟ
ی ﻪﺼﺨﺸﻣ ﻮﻨﻣ ﻦﻳﺍ - ﯽﺘﻧﺮﺘﻨﻳﺍ
ﻪﺑ ﻪﺘﺴﺑ ﺩﻮﺟﻭ ﻦﻳﺍ ﺎﺑ .ﺪﻫﺩ ﯽﻣ ﻥﺎﺸﻧ ﺍﺭ ﯽﺘﻧﺮﺘﻨﻳﺍ
ﺽﺮﻓ ﺶﻴﭘ یﺎﻫ یﺪﻨﺑﺮﮑﻴﭘ ﺪﻴﻧﺍﻮﺗ ﯽﻤﻧ ،ﺩﻮﺧ ﺭﻮﺸﮐ
.ﺪﻴﻨﮐ ﺶﻳﺍﺮﻳﻭ ﺎﻳ ﻑﺬﺣ ﺍﺭ
ﻦﻳﺍ ﻞﺒﻗ ﺯﺍ ﺎﻤﺷ ﻪﮑﺒﺷ ﺭﻮﺗﺍﺮﭘﺍ - ﯽﺑﺎﻴﺘﺳﺩ ﻁﺎﻘﻧ
ﺎﺑ ﺪﻴﻧﺍﻮﺗ ﯽﻣ .ﺖﺳﺍ ﻩﺩﺮﮐ ﻩﺮﻴﺧﺫ ﺍﺭ ﺕﺎﻋﻼﻃﺍ
ﺍﺭ یﺪﻳﺪﺟ ﯽﺑﺎﻴﺘﺳﺩ ﻁﺎﻘﻧ ،ﻮﻨﻣ ﻦﻳﺍ ﺯﺍ ﻩﺩﺎﻔﺘﺳﺍ
ﻊﻗﻮﻣ ﻪﭼ ﺪﻴﻨﮐ ﺏﺎﺨﺘﻧﺍ - یﺍ ﻪﺘﺴﺑ یﺎﻫ ﻩﺩﺍﺩ ﻝﺎﺼﺗﺍ
ﻪﮑﺒﺷ ﻪﺑ ،یﺍ ﻪﺘﺴﺑ یﺎﻫ ﻩﺩﺍﺩ یﺍﺮﺑ ﺎﻤﺷ ﻩﺎﮕﺘﺳﺩ
ﺏﺎﺨﺘﻧﺍ ﺍﺭ یﺍ ﻩﺩﺍﺩ ﺕﺎﻣﺪﺧ - USB ﻝﺎﺼﺗﺍ ﺖﻟﺎﺣ
ﺯﺍ ﻩﺩﺎﻔﺘﺳﺍ ﺎﺑ ﺍﺭ ﺩﻮﺧ GM360 ﯽﺷﻮﮔ ﻭ ﻩﺩﺮﮐ
ﺪﻴﻨﮐ یﺯﺎﺳ ﻡﺎﮕﻤﻫ LG PC Suite ﺭﺍﺰﻓﺍ ﻡﺮﻧ
یﺍﺮﺑ .ﺪﻴﻳﺎﻤﻧ ﯽﭙﮐ ﻪﻧﺎﻳﺍﺭ ﻪﺑ ﻦﻔﻠﺗ ﺯﺍ ﺍﺭ ﺎﻫ ﻞﻳﺎﻓ
ﻡﺎﮕﻤﻫ ﻪﺑ ،یﺯﺎﺳ ﻡﺎﮕﻤﻫ ﻩﺭﺎﺑﺭﺩ ﺮﺘﺸﻴﺑ ﺕﺎﻋﻼﻃﺍ
.ﺪﻴﻨﮐ ﻪﻌﺟﺍﺮﻣ ﻪﻧﺎﻳﺍﺭ یﺯﺎﺳ
ﺎﺑ ﻩﺍﺮﻤﻫ ﯽﻘﻴﺳﻮﻣ یﺯﺎﺳ ﻡﺎﮕﻤﻫ ﺯﺍ ﺮﮔﺍ
،ﺪﻴﻨﮐ ﯽﻣ ﻩﺩﺎﻔﺘﺳﺍ Windows Media Player
ﺏﺎﺨﺘﻧﺍ ﻮﻨﻣ ﻦﻳﺍ ﺭﺩ ﺍﺭ ﯽﻘﻴﺳﻮﻣ یﺯﺎﺳ ﻡﺎﮕﻤﻫ
یﺍﻮﺘﺤﻣ یﺍﺮﺑ ﻂﻘﻓ ﯽﻘﻴﺳﻮﻣ یﺯﺎﺳ ﻡﺎﮕﻤﻫ .ﺪﻴﻨﮐ
ی ﻪﺼﺨﺸﻣ
.ﺪﻴﻨﮐ ﻪﻓﺎﺿﺍ
.ﺩﻮﺷ ﻞﺼﺘﻣ
ﻭ
.ﺖﺳﺍ ﺩﻮﺟﻮﻣ ﯽﻘﻴﺳﻮﻣ

ﺮﮕﻳﺩ ﺙﻮﺗﻮﻠﺑ ﻩﺎﮕﺘﺳﺩ ﺎﺑ ﻝﺎﺼﺗﺍ
ﻩﺎﮕﺘﺳﺩ ﮏﻳ ﺎﺑ GM360 ﯽﺷﻮﮔ ﻥﺪﺷ ﻞﺼﺘﻣ ﺎﺑ
یﺍﺭﺍﺩ ﻩﺪﺷ ﺖﻇﺎﻔﺣ ﻝﺎﺼﺗﺍ ﮏﻳ ﺪﻴﻧﺍﻮﺗ ﯽﻣ ،ﺮﮕﻳﺩ
ﻞﺑﺎﻗ ﻭ ﻩﺩﻮﺑ ﻦﺷﻭﺭ ﺙﻮﺗﻮﻠﺑ ﻪﮐ ﺪﻴﻨﮐ ﯽﺳﺭﺮﺑ 1
ﻥﺩﻮﺑ ﺖﻳﻭﺭ ﻞﺑﺎﻗ ﺪﻴﻧﺍﻮﺗ ﯽﻣ ﺎﻤﺷ .ﺪﺷﺎﺑ ﺖﻳﻭﺭ
.ﺪﻴﻫﺩ ﺮﻴﻴﻐﺗ ﺕﺎﻤﻴﻈﻨﺗ یﻮﻨﻣ ﺭﺩ ﺍﺭ ﺩﻮﺧ ﻩﺎﮕﺘﺳﺩ
ﯽﻣ ﻮﺠﺘﺴﺟ
ﺍﺭ ﺎﻫ ﻩﺎﮕﺘﺳﺩ GM360 ﯽﺷﻮﮔ 3
ﻪﺤﻔﺻ ﺭﺩ یﺯﺎﺳﻮﻧ ،ﻮﺠﺘﺴﺟ ﺯﺍ ﺲﭘ .ﺪﻨﮐ
ﻥﺁ ﺎﺑ ﺍﺭ ﯽﺷﻮﮔ ﺪﻴﻫﺍﻮﺧ ﯽﻣ ﻪﮐ ﯽﻫﺎﮕﺘﺳﺩ 4
ﺍﺭ ﺩﻭﺭﻭ ﺪﮐ ﻭ ﺏﺎﺨﺘﻧﺍ ﺍﺭ ﺪﻴﻨﮐ یﺯﺎﺳ ﻞﺼﺘﻣ
.ﺪﻴﻨﮐ ﺲﻤﻟ ﺍﺭ ﺪﻴﻳﺄﺗ ﺲﭙﺳ ،ﺪﻴﻨﮐ ﺩﺭﺍﻭ
ﻪﮐ ﺩﻮﺷ ﯽﻣ ﻞﺼﺘﻣ ﺮﮕﻳﺩ ﻩﺎﮕﺘﺳﺩ ﻪﺑ ﺎﻤﺷ ﻦﻔﻠﺗ 5
.
ﺪﻴﻳﺎﻤﻧ ﺩﺭﺍﻭ ﺍﺭ ﺩﻭﺭﻭ ﺪﮐ ﺪﻳﺎﺑ ﻥﺁ یﺍﺮﺑ
ﺩﻭﺭﻭ ﺪﮐ ﺎﺑ ﻩﺪﺷ ﺖﻇﺎﻔﺣ ﺙﻮﺗﻮﻠﺑ ﻝﺎﺼﺗﺍ ﻥﻮﻨﮐﺍ 6
.ﺪﻴﻨﮐ ﺩﺎﺠﻳﺍ ﺩﻭﺭﻭ ﺪﮐ
.ﺪﻴﻨﮐ ﺲﻤﻟ ﺍﺭ ﻮﺠﺘﺴﺟ 2
.ﺩﻮﺷ ﯽﻣ ﺮﻫﺎﻇ
.ﺖﺳﺍ ﻩﺩﺎﻣﺁ
ﺕﺎﻤﻴﻈﻨﺗ
ﻞﻳﺎﻓ یﺍﺮﺑ .ﺪﻳﺩ ﺪﻴﻫﺍﻮﺧ ﺍﺭ ﻞﻳﺎﻓ ﻩﺮﻴﺧﺫ ﻞﺤﻣ 3
ﺎﻳ ﻞﻳﺎﻓ ﻩﺪﻫﺎﺸﻣ ﺪﻴﻧﺍﻮﺗ ﯽﻣ ،یﺮﻳﻮﺼﺗ یﺎﻫ
ﺍﺭ ﯽﻠﺻﺍ ﻪﺤﻔﺻﺮﻳﻮﺼﺗ ﻥﺍﻮﻨﻋ ﻪﺑ ﻩﺩﺎﻔﺘﺳﺍ
ﻪﻃﻮﺑﺮﻣ ﻪﺷﻮﭘ ﺭﺩ ﻻﻮﻤﻌﻣ ﺎﻫ ﻞﻳﺎﻓ .ﺪﻴﻨﮐ ﺏﺎﺨﺘﻧﺍ
.ﺪﻧﻮﺷ ﯽﻣ ﻩﺮﻴﺧﺫ ﻦﻣ ﺕﺎﻋﻮﺿﻮﻣ ﺭﺩ ﻊﻗﺍﻭ
ﻭ .ﺪﻴﻨﮐ ﺲﻤﻟ ﺍﺭ ﺙﻮﺗﻮﻠﺑ ،ﺕﺎﻤﻴﻈﻨﺗ ﻪﻧﺎﺑﺯ ﺭﺩ
:ﺪﻴﻫﺩ ﻡﺎﺠﻧﺍ ﺮﻳﺯ ﺩﺭﺍﻮﻣ ﺹﻮﺼﺧ ﺭﺩ ﺍﺭ ﯽﺗﺍﺮﻴﻴﻐﺗ
ﺪﻴﻨﮐ ﺏﺎﺨﺘﻧﺍ - ﻦﻣ ﻩﺎﮕﺘﺳﺩ ﻥﺩﻮﺑ ﺖﻳﻭﺭ ﻞﺑﺎﻗ
ﺖﻳﻭﺭ ﻞﺑﺎﻗ ﺎﻳ ﯽﻔﺨﻣ ﺎﻳ ﺖﻳﻭﺭ ﻞﺑﺎﻗ ﺎﻤﺷ ﻩﺎﮕﺘﺳﺩ
ﺏﺎﺨﺘﻧﺍ ﺍﺭ ﻒﻠﺘﺨﻣ ﺕﺎﻣﺪﺧ ﺎﺑ ﻪﻄﺑﺍﺭ ﺭﺩ ﺙﻮﺗﻮﻠﺑ
ﺍﺭ ﺵﻮﻣﺎﺧ ﺎﻳ ﻦﺷﻭﺭ - ﺭﻭﺩ ﻩﺍﺭ ﻢﻴﺳ ﺖﻟﺎﺣ
ﻩﺪﻫﺎﺸﻣ ﺍﺭ ﺩﻮﺧ ﺙﻮﺗﻮﻠﺑ ﺱﺭﺩﺁ - ﻦﻣ ﺱﺭﺩﺁ
:ﺙﻮﺗﻮﻠﺑ ﺕﺎﻤﻴﻈﻨﺗ ﺮﻴﻴﻐﺗ
.ﺪﻴﻨﮐ ﺏﺎﺨﺘﻧﺍ ﺍﺭ ﺕﺎﻤﻴﻈﻨﺗ ﺲﭙﺳ
ﯽﺷﻮﮔ یﺍﺮﺑ ﺍﺭ ﯽﻣﺎﻧ - ﻦﻣ ﻩﺎﮕﺘﺳﺩ ﻡﺎﻧ
ﻩﺩﺎﻔﺘﺳﺍ ﻩﻮﺤﻧ - ﻩﺪﺷ ﯽﻧﺎﺒﻴﺘﺸﭘ ﺕﺎﻣﺪﺧ
ﺯﺍ
.ﺪﺷﺎﺑ ﻪﻘﻴﻗﺩ 1 یﺍﺮﺑ
.ﺪﻴﻨﮐ ﺩﺭﺍﻭ GM360
.ﺪﻴﻨﮐ
.ﺪﻴﻨﮐ ﺏﺎﺨﺘﻧﺍ
.ﺪﻴﻨﮐ
ﺮﺑﺭﺎﮐ یﺎﻤﻨﻫﺍﺭ | LG GM360
56

57
ﻭ ﻩﺩﻮﺑ ﻦﺷﻭﺭ ﯽﺷﻮﮔ ﺙﻮﺗﻮﻠﺑ ﻪﮐ ﺪﻴﻨﮐ ﯽﺳﺭﺮﺑ 1
ﻥﺪﺷ ﻞﺼﺘﻣ ﺖﻟﺎﺣ ﺭﺩ ﯽﺷﻮﮔ ﻥﺩﺍﺩ ﺭﺍﺮﻗ ﻩﻮﺤﻧ 2
.ﺪﻴﻨﮐ ﻞﺼﺘﻣ ﺍﺭ ﺎﻫ ﻩﺎﮕﺘﺳﺩ ﻭ ﻩﺩﺮﮐ ﻝﺎﺒﻧﺩ ﺍﺭ
ﻪﺸﻴﻤﻫ ﺎﻳ ﺩﻮﺷ ﻝﺍﺆﺳ ﻝﺎﺼﺗﺍ ﺯﺍ ﻞﺒﻗ یﺎﻫ ﻪﻨﻳﺰﮔ
ﺍﺭ ﻪﻠﺑ ﻝﺎﺼﺗﺍ یﺍﺮﺑ ﻭ ﻩﺩﺮﮐ ﺲﻤﻟ ﺍﺭ ﺩﻮﺷ ﻞﺻﻭ
ﺭﺎﮐﺩﻮﺧ ﺭﻮﻃ ﻪﺑ GM360 ﯽﺷﻮﮔ .ﺪﻴﻨﮐ ﺲﻤﻟ
.ﺩﺍﺩ ﺪﻫﺍﻮﺧ ﺖﻴﻌﺿﻭ ﺮﻴﻴﻐﺗ ﺖﺳﺪﻫ ﻪﺼﺨﺸﻣ ﻪﺑ
.ﺪﺷﺎﺑ ﺖﻳﻭﺭ ﻞﺑﺎﻗ
ﺭﺍﺰﻓﺍ ﻡﺮﻧ یﺎﻘﺗﺭﺍ
LG Mobile ﻦﻔﻠﺗ ﺭﺍﺰﻓﺍ ﻡﺮﻧ یﺎﻘﺗﺭﺍ ﻪﻣﺎﻧﺮﺑ
ﺙﻮﺗﻮﻠﺑ ﺖﺳﺪﻫ ﺯﺍ ﻩﺩﺎﻔﺘﺳﺍ
ﻩﺩﺎﻔﺘﺳﺍ ﻭ ﺐﺼﻧ ﻪﺑ ﻊﺟﺍﺭ ﺮﺘﺸﻴﺑ ﺕﺎﻋﻼﻃﺍ یﺍﺮﺑ
http://update. ﺯﺍ
ﺎﻤﺷ ﻪﺑ ﻪﻣﺎﻧﺮﺑ ﻦﻳﺍ .ﺪﻴﻨﮐ ﺪﻳﺩﺯﺎﺑ lgmobile.com
ﺖﺣﺍﺭ ﻭ ﻊﻳﺮﺳ ﺍﺭ ﺩﻮﺧ ﺭﺍﺰﻓﺍ ﻡﺮﻧ ﺪﻫﺩ ﯽﻣ ﻥﺎﮑﻣﺍ
ﻩﺩﺍﺩ ﺎﻘﺗﺭﺍ ﻪﺨﺴﻧ ﻦﻳﺮﺗﺪﻳﺪﺟ ﻪﺑ ﺖﻧﺮﺘﻨﻳﺍ ﻖﻳﺮﻃ ﺯﺍ
.ﺪﻴﺷﺎﺑ ﻪﺘﺷﺍﺩ ﺎﻣ ﺕﺎﻣﺪﺧ ﺰﮐﺮﻣ ﻪﺑ یﺯﺎﻴﻧ
ﻪﺟﻮﺗ ﻪﺑ ﻞﻳﺎﺑﻮﻣ ﺭﺍﺰﻓﺍ ﻡﺮﻧ یﺎﻘﺗﺭﺍ ﻪﻣﺎﻧﺮﺑ ﻪﮐﺎﺠﻧﺁ ﺯﺍ
ً
ﻞﺒﻗ
ﺎﻔﻄﻟ ،ﺩﺭﺍﺩ ﺯﺎﻴﻧ ﺎﻘﺗﺭﺍ ﺪﻧﻭﺭ ﺖﻬﺟ ﺮﺑﺭﺎﮐ ﻞﻣﺎﮐ
ﺭﺩ ﻪﮐ ﯽﺗﺎﮑﻧ ﻭ ﺎﻫ ﻞﻤﻌﻟﺍﺭﻮﺘﺳﺩ ﻪﻴﻠﮐ ،ﺭﺎﮐ ﺮﻫ ﺯﺍ
ﯽﺳﺭﺮﺑ ﺖﻗﺩ ﻪﺑ ﺍﺭ ﺩﻮﺷ ﯽﻣ ﺮﻫﺎﻇ ﻪﻠﺣﺮﻣ ﺮﻫ
ﺝﺭﺎﺧ ﻪﮐ ﺪﻴﺷﺎﺑ ﻪﺘﺷﺍﺩ ﻪﺟﻮﺗ
ﺎﻫ یﺮﺗﺎﺑ ﺎﻳ USB یﺎﻫ ﻩﺩﺍﺩ ﯽﻃﺎﺒﺗﺭﺍ ﻞﺑﺎﮐ ﻥﺩﺮﮐ
ﻪﺑ ﺪﻳﺪﺷ ﺐﻴﺳﺁ ﺚﻋﺎﺑ ﺖﺳﺍ ﻦﮑﻤﻣ ﺎﻘﺗﺭﺍ ﻝﻮﻃ ﺭﺩ
ﻩﺪﻧﺯﺎﺳ ﻪﮐ ﻦﻳﺍ ﻪﺑ ﻪﺟﻮﺗ ﺎﺑ .ﺩﻮﺷ ﺎﻤﺷ ﻞﻳﺎﺑﻮﻣ ﻦﻔﻠﺗ
ﺖﺳﺩ ﺯﺍ ﻝﺎﺒﻗ ﺭﺩ ﯽﺘﻴﻟﻮﺌﺴﻣ ﭻﻴﻫ ،ﻪﻣﺎﻧﺮﺑ ﻦﻳﺍ
ﯽﻤﻧ ﺎﻘﺗﺭﺍ ﺕﺎﻴﻠﻤﻋ ﻦﻴﺣ ﺭﺩ ﻦﻔﻠﺗ ﺕﺎﻋﻼﻃﺍ ﻥﺩﺍﺩ
،ﺮﺘﺸﻴﺑ ﺖﻴﻨﻣﺍ ﺭﻮﻈﻨﻣ ﻪﺑ ﻢﻴﻨﮐ ﯽﻣ ﻪﻴﺻﻮﺗ ،ﺩﺮﻳﺬﭘ
ﻭ
ﻩﺩﺮﮐ ﯽﺳﺭﺮﺑ ﺶﻴﭘﺎﺸﻴﭘ ﺍﺭ ﻢﻬﻣ ﺕﺎﻋﻼﻃﺍ ﻪﻴﻠﮐ
ً
ﺎﻔﻄﻟ ،ﻪﻣﺎﻧﺮﺑ ﻦﻳﺍ ﺯﺍ
ﻪﮑﻨﻳﺍ ﻥﻭﺪﺑ
ً
ﺎﻔﻄﻟ .ﺪﻴﻨﮐ ﺍﺮﺟﺍ ﻭ
.ﺪﻴﻳﺎﻤﻧ ﺖﺷﺍﺩﺩﺎﻳ
3

ﯽﺒﻧﺎﺟ ﻡﺯﺍﻮﻟ
.ﺪﻧﺍ ﻩﺪﺷ ﻪﺋﺍﺭﺍ GM360 ﻩﺍﺮﻤﻫ ﻪﺑ ﯽﺒﻧﺎﺟ ﻡﺯﺍﻮﻟ ﻦﻳﺍ
ﺎﻫ ﻩﺩﺍﺩ ﻞﺑﺎﮐ
.ﺪﻴﻨﮐ ﻩﺩﺎﻔﺘﺳﺍ LG ﻞﺻﺍ ﯽﺒﻧﺎﺟ ﻡﺯﺍﻮﻟ ﺯﺍ ﻂﻘﻓ ﻪﺸﻴﻤﻫ •
.ﺪﻨﮐ ﻂﻗﺎﺳ ﺭﺎﺒﺘﻋﺍ ﻪﺟﺭﺩ ﺯﺍ ﺍﺭ ﻪﻣﺎﻧ ﺖﻧﺎﻤﺿ ﺖﺳﺍ ﻦﮑﻤﻣ ﻢﻬﻣ ﻞﺻﺍ ﻦﻳﺍ ﺖﻳﺎﻋﺭ ﻡﺪﻋ •
ﻪﺑ ًﺎﻔﻄﻟ ،ﺮﺘﺸﻴﺑ ﺕﺎﻋﻼﻃﺍ ﺐﺴﮐ یﺍﺮﺑ ؛ﺪﺷﺎﺑ ﺕﻭﺎﻔﺘﻣ ﻒﻠﺘﺨﻣ ﯽﺣﺍﻮﻧ ﺭﺩ ﺖﺳﺍ ﻦﮑﻤﻣ ﯽﺒﻧﺎﺟ ﻡﺯﺍﻮﻟ •
.ﺪﻴﻨﮐ ﻪﻌﺟﺍﺮﻣ ﺩﻮﺧ ﻞﺤﻣ ﺭﺩ ﺎﻣ ﺕﺎﻣﺪﺧ ﯽﮔﺪﻨﻳﺎﻤﻧ ﺎﻳ ﺖﮐﺮﺷ
ﺮﺑﺭﺎﮐ یﺎﻤﻨﻫﺍﺭ | LG GM360
ﺭژﺭﺎﺷ
یﺮﺗﺎﺑ
ﺖﺳﺪﻫ
ﻮﻳﺮﺘﺳﺍ
:ﻪﺟﻮﺗ
58

ﯽﻨﻓ ﺕﺎﻋﻼﻃﺍ
GSM 850 / E-GSM 900 / DCS 1800 / PCS 1900 :ﻢﺘﺴﻴﺳ
GM360 :ﻝﻮﺼﺤﻣ ﻡﺎﻧ
ﯽﻣﻮﻤﻋ
59
،(ژﺭﺎﺷﺩ) ﺩﺍﺮﮔ ﯽﺘﻧﺎﺳ ﻪﺟﺭﺩ +55 :ﺮﺜﮐﺍﺪﺣ
ﻂﻴﺤﻣ یﺎﻫﺎﻣﺩ
(ژﺭﺎﺷ) ﺩﺍﺮﮔ ﯽﺘﻧﺎﺳ ﻪﺟﺭﺩ +45
ﺩﺍﺮﮔ ﯽﺘﻧﺎﺳ ﻪﺟﺭﺩ-10 :ﻞﻗﺍﺪﺣ
ﺮﺛﻮﻣ ﻭ ﻦﻤﻳﺍ ﻩﺩﺎﻔﺘﺳﺍ یﺎﻫ ﻞﻤﻌﻟﺍﺭﻮﺘﺳﺩ
ﻦﻴﺑ ﻥﻮﻴﺴﻴﻤﮐ ﻂﺳﻮﺗ ﻩﺪﺷ ﻪﻴﺻﻮﺗ SAR ﻥﺍﺰﻴﻣ •
ﻩﺰﻴﻧﻮﻳ ﺮﻴﻏ ﺕﺎﻌﺸﺸﺗ ﺮﺑﺍﺮﺑ ﺭﺩ ﺖﻈﻓﺎﺤﻣ ﯽﻠﻠﻤﻟﺍ
ﺭﻮﻃ ﻪﺑ ﻡﺮﮔﻮﻠﻴﮐﺮﺑ ﺕﺍﻭ 2 ﺮﺑﺍﺮﺑ ،(ICNIRP)
.ﺖﺳﺍ ﻥﺪﺑ ﺖﻓﺎﺑ ﻡﺮﮔ 10 ﺭﺩ
ﻂﺳﻮﺗ ﻩﺪﺷ یﺮﻴﮔ ﻩﺯﺍﺪﻧﺍ SAR ﺭﺍﺪﻘﻣ ﻦﻳﺮﺗﻻﺎﺑ
ﺭﺎﻨﮐ ﻩﺩﺎﻔﺘﺳﺍ ﻡﺎﮕﻨﻫ ﻝﺪﻣ ﻦﻳﺍ یﺍﺮﺑ DASY4
ﻭ ﺖﺳﺍ (ﻡﺮﮔ 10) ﻡﺮﮔﻮﻠﻴﮐ ﺮﺑ ﺕﺍﻭ 1.33 ﺵﻮﮔ
ﻡﺮﮔﻮﻠﻴﮐ ﺮﺑ ﺕﺍﻭ 1.31 ﻥﺪﺑ یﻭﺭ ﻩﺩﺎﻔﺘﺳﺍ یﺍﺮﺑ
/ﺎﻫﺭﻮﺸﮐ ﻦﻴﻨﮐﺎﺳ یﺍﺮﺑ SAR یﺍ ﻩﺩﺍﺩ ﺕﺎﻋﻼﻃﺍ •
ﻂﺳﻮﺗ ﻩﺪﺷ ﻪﻴﺻﻮﺗ SAR ﻥﺍﺰﻴﻣ ﻪﮐ ﯽﺣﺍﻮﻧ
(IEEE) ﮏﻴﻧﻭﺮﺘﮑﻟﺍ ﻭ ﻕﺮﺑ ﻦﻴﺳﺪﻨﻬﻣ ﻦﻤﺠﻧﺍ
ﻡﺮﮔ 1 ﺭﺩ ﻡﺮﮔﻮﻠﻴﮐ ﺮﺑ ﺕﺍﻭ 1.6 ،ﺪﻧﺍ ﻪﺘﻓﺮﻳﺬﭘ ﺍﺭ
ﻩﺎﮕﺘﺳﺩ ﺯﺍ یﺭﺍﺪﻬﮕﻧ ﻭ ﺖﺒﻗﺍﺮﻣ
ﺕﺍﺰﻴﻬﺠﺗ ﻭ ﺎﻫﺭژﺭﺎﺷ ،ﺎﻫ یﺮﺗﺎﺑ ﺯﺍ ﻂﻘﻓ
ﺹﺎﺧ ﻝﺪﻣ ﻦﻳﺍ ﺎﺑ ﻩﺩﺎﻔﺘﺳﺍ یﺍﺮﺑ ﻪﮐ ﯽﺒﻧﺎﺟ
ﺮﻳﺎﺳ ﺯﺍ ﻩﺩﺎﻔﺘﺳﺍ .ﺪﻴﻨﮐ ﻩﺩﺎﻔﺘﺳﺍ ﺪﻧﺍ ﻩﺪﺷ ﻪﻴﺻﻮﺗ
ﻪﻴﺻﻮﺗ ﻉﺍﻮﻧﺍ ﺯﺍ ﺮﻴﻏ ﻪﺑ ،ﺕﺍﺰﻴﻬﺠﺗ ﻉﺍﻮﻧﺍ
ﺖﻧﺎﻤﺿ ﻥﺪﺷ ﻞﻃﺎﺑ ﺚﻋﺎﺑ ﺖﺳﺍ ﻦﮑﻤﻣ ،ﻩﺪﺷ
.ﺪﺷﺎﺑ ﻦﻳﺮﻓﺁ ﺮﻄﺧ ﻭ ﻩﺪﺷ ﻪﻣﺎﻧ
.ﺪﻴﻨﮐ یﺭﺍﺩﺩﻮﺧ
ﻪﺑ ﻂﻘﻓ ،ﺪﺷﺎﺑ ﻪﺘﺷﺍﺩ ﺮﻴﻤﻌﺗ ﻪﺑ ﺯﺎﻴﻧ ﯽﺷﻮﮔ ﻪﭽﻧﺎﻨﭼ
،ﻥﻮﻳﺰﻳﻮﻠﺗ ﺪﻨﻧﺎﻣ ﯽﻗﺮﺑ ﻞﻳﺎﺳﻭ ﺯﺍ ﺭﻭﺩ ﺍﺭ ﯽﺷﻮﮔ •
،یﺭﺎﺨﺑ ﺪﻨﻧﺎﻣ ﯽﺗﺭﺍﺮﺣ ﻊﺑﺎﻨﻣ ﺯﺍ ﺭﻭﺩ ﺪﻳﺎﺑ ﻩﺎﮕﺘﺳﺩ •
ً
ﺍﺪﻴﮐﺍ ﻩﺎﮕﺘﺳﺩ ﻦﻳﺍ ﻥﺩﺮﮐ ﺯﺎﺑ ﺯﺍ •
.ﺪﻴﻨﮐ ﻪﻌﺟﺍﺮﻣ ﺯﺎﺠﻣ یﺎﻫ ﻦﻴﺴﻨﮑﺗ
.ﺪﻴﻫﺩ ﺭﺍﺮﻗ ﻪﻧﺎﻳﺍﺭ ﻭ ،ﻮﻳﺩﺍﺭ
.ﺩﻮﺷ یﺭﺍﺩ ﻪﮕﻧ ﻥﺁ
ﻂﺳﻮﺘﻣ
.ﺪﺷﺎﺑ ﯽﻣ (ﻡﺮﮔ 10)
.ﺖﺳﺍ ﻥﺪﺑ ﺖﻓﺎﺑ
ﺭﺍﺪﺸﻫ
ﻝﺎﺜﻣﺍ ﻭ ﻕﺎﺟﺍ
ﻪﻌﻟﺎﻄﻣ ﺖﻗﺩ ﻪﺑ ﺍﺭ ﺮﻳﺯ یﺎﻫ ﻞﻤﻌﻟﺍﺭﻮﺘﺳﺩ ًﺎﻔﻄﻟ
ﻦﮑﻤﻣ ﺎﻫ ﻞﻤﻌﻟﺍﺭﻮﺘﺳﺩ ﻦﻳﺍ ﺖﻳﺎﻋﺭ ﻡﺪﻋ .ﺪﻴﻨﮐ
ﺾﻘﻧ ﺐﺟﻮﻣ ﺎﻳ ﻪﺘﺷﺍﺩ ﯽﭘ ﺭﺩ ﯽﻳﺎﻫﺭﺮﺿ ﺖﺳﺍ
•
ﺲﻧﺎﮐﺮﻓ یژﺮﻧﺍ ﺽﺮﻌﻣ ﺭﺩ ﻦﺘﻓﺮﮔ ﺭﺍﺮﻗ
ﺽﺮﻌﻣ ﺭﺩ ﻦﺘﻓﺮﮔ ﺭﺍﺮﻗ ﻪﺑ ﻁﻮﺑﺮﻣ ﺕﺎﻋﻼﻃﺍ
ﻦﻳﺍ .(SAR) ﻩﮋﻳﻭ ﺏﺬﺟ ﻥﺍﺰﻴﻣ ﻭ ﯽﻳﻮﻳﺩﺍﺭ ﺝﺍﻮﻣﺍ
یﺍ ﻪﻧﻮﮔ ﻪﺑ GM360 ﻝﺪﻣ ﻩﺍﺮﻤﻫ ﻦﻔﻠﺗ ﯽﺷﻮﮔ
ﻡﺯﻻ ﻂﻳﺍﺮﺷ ﻭ ﺕﺍﺭﺮﻘﻣ ﻊﺑﺎﺗ ﻪﮐ ﺖﺳﺍ ﻩﺪﺷ ﯽﺣﺍﺮﻃ
ﯽﻳﻮﻳﺩﺍﺭ ﺝﺍﻮﻣﺍ ﺽﺮﻌﻣ ﺭﺩ ﻦﺘﻓﺮﮔ ﺭﺍﺮﻗ ﻪﺑ ﻁﻮﺑﺮﻣ
یﺎﻫ ﻞﻤﻌﻟﺍﺭﻮﺘﺳﺩ ﺮﺑ ﯽﻨﺘﺒﻣ ﻡﺯﻻ ﻂﻳﺍﺮﺷ ﻦﻳﺍ .ﺪﺷﺎﺑ
ﯽﺘﻴﻨﻣﺍ یﺎﻫ ﻪﻴﺷﺎﺣ ﺯﺍ
ﻪﻴﻠﮐ ﯽﻨﻤﻳﺍ ﻪﮐ ﺪﻧﺍ ﻩﺪﺷ ﯽﺣﺍﺮﻃ یﺍ ﻪﻧﻮﮔ ﻪﺑ ﻪﮐ
ﺍﺭ ،ﺎﻬﻧﺁ ﯽﺘﻣﻼﺳ ﻊﺿﻭ ﻭ ﻦﺳ ﺯﺍ ﺮﻈﻨﻓﺮﺻ ،ﺩﺍﺮﻓﺍ
ﺭﺩ ﻦﺘﻓﺮﮔ ﺭﺍﺮﻗ ﻪﺑ ﻁﻮﺑﺮﻣ یﺎﻫ ﻞﻤﻌﻟﺍﺭﻮﺘﺳﺩ •
ﻩﺯﺍﺪﻧﺍ ﺪﺣﺍﻭ ﮏﻳ ﺯﺍ ﯽﻳﻮﻳﺩﺍﺭ ﺝﺍﻮﻣﺍ ﺽﺮﻌﻣ
ﺏﺬﺟ ﺐﻳﺮﺿ” ﻥﺍﻮﻨﻋ ﺖﺤﺗ ﺹﻮﺼﺨﻣ یﺮﻴﮔ
یﺎﻫ ﺖﺴﺗ .ﺪﻨﻨﮐ
ﻭ ،ﺩﺭﺍﺪﻧﺎﺘﺳﺍ یﺎﻫ ﺵﻭﺭ ﺯﺍ ﻩﺩﺎﻔﺘﺳﺍ ﺎﺑ SAR
یﻭﺮﻴﻧ ﻥﺍﺰﻴﻣ ﻦﻳﺮﺗﻻﺎﺑ ﺭﺩ ﯽﺷﻮﮔ ﻪﮐ ﯽﻟﺎﺣ ﺭﺩ
،ﻪﺘﺷﺍﺩ ﺭﺍﺮﻗ ﺲﻧﺎﮐﺮﻓ یﺎﻫﺪﻧﺎﺑ ﻪﻴﻠﮐ ﺭﺩ ﻩﺪﺷ ﺪﻴﻳﺄﺗ
ﺡﻮﻄﺳ ﻦﻴﺑ ﯽﻳﺎﻫ ﺕﻭﺎﻔﺗ ﺖﺳﺍ ﻦﮑﻤﻣ ﻪﭼﺮﮔﺍ •
LG یﺎﻫ ﯽﺷﻮﮔ ﻒﻠﺘﺨﻣ یﺎﻫ ﻝﺪﻣ ﺭﺩ SAR
یﺍ ﻪﻧﻮﮔ ﻪﺑ ﺎﻫ
ﻪﺑ ﻁﻮﺑﺮﻣ یﺎﻫ ﻞﻤﻌﻟﺍﺭﻮﺘﺳﺩ ﻪﮐ ﺪﻧﺍ ﻩﺪﺷ ﯽﺣﺍﺮﻃ
ﺎﻬﻧﺁ ﺭﺩ ﯽﻳﻮﻳﺩﺍﺭ ﺝﺍﻮﻣﺍ ﺽﺮﻌﻣ ﺭﺩ ﻦﺘﻓﺮﮔ ﺭﺍﺮﻗ
ﻩﺩﺎﻔﺘﺳﺍ ﻪﻠﻤﺟ ﺯﺍ ﺖﺳﺍ ﯽﻤﻠﻋ
ﯽﻣ ﻩﺩﺎﻔﺘﺳﺍ ،SAR ﺎﻳ “ﻩﮋﻳﻭ
.ﺖﺳﺍ ﻪﺘﻓﺮﮔ ﻡﺎﺠﻧﺍ
ﻝﺪﻣ ﻪﻤﻫ ﺎﻣﺍ ،ﺪﺷﺎﺑ ﻪﺘﺷﺍﺩ ﺩﻮﺟﻭ
.ﺪﺷﺎﺑ ﻩﺪﺷ ﺖﻳﺎﻋﺭ
ﺮﺑﺭﺎﮐ یﺎﻤﻨﻫﺍﺭ | LG GM360
.ﺩﺩﺮﮔ ﻦﻴﻧﺍﻮﻗ
ﯽﻳﻮﻳﺩﺍﺭ
.ﺪﻨﮐ ﯽﻣ ﻦﻴﻤﻀﺗ
60

ﺎﻳ ﺕﺎﻌﻳﺎﻣ ﺽﺮﻌﻣ ﺭﺩ ﯽﺷﻮﮔ ﻥﺩﺍﺩ ﺭﺍﺮﻗ ﺯﺍ •
ﻩﺩﺎﻔﺘﺳﺍ ﻁﺎﻴﺘﺣﺍ ﺎﺑ ﻥﻮﻓﺪﻫ ﺪﻨﻧﺎﻣ ﯽﺒﻧﺎﺟ ﻡﺯﺍﻮﻟ ﺯﺍ •
.ﺪﻴﻨﮐ یﺭﺍﺩﺩﻮﺧ ﺖﺑﻮﻃﺭ
.ﺪﻴﻧﺰﻧ ﺖﺳﺩ ﻦﻔﻠﺗ ﻦﺘﻧﺁ ﻪﺑ ﻞﻴﻟﺩ ﯽﺑ .ﺪﻴﻨﮐ
ﯽﺷﻮﮔ ﺯﺍ ﻪﻨﻴﻬﺑ ﻩﺩﺎﻔﺘﺳﺍ
ﻞﺧﺍﺪﺗ ﺭﺎﭼﺩ ﺖﺳﺍ ﻦﮑﻤﻣ ﻩﺍﺮﻤﻫ یﺎﻫ ﻦﻔﻠﺗ ﻪﻤﻫ
ﺮﻴﺛﺄﺗ ﺎﻬﻧﺁ ﺩﺮﮑﻠﻤﻋ ﺮﺑ ﺪﻧﺍﻮﺗ ﯽﻣ ﻪﮐ ﺪﻧﻮﺷ ﯽﻳﺎﻫ
ﻦﻔﻠﺗ ﺯﺍ ،ﻪﻃﻮﺑﺮﻣ ﻦﻴﻟﻮﺌﺴﻣ ﺯﺍ ﻩﺯﺎﺟﺍ ﻥﻭﺪﺑ •
ﻩﺩﺎﻔﺘﺳﺍ ﯽﮑﺷﺰﭘ ﺕﺍﺰﻴﻬﺠﺗ ﺕﺭﻭﺎﺠﻣ ﺭﺩ ﻩﺍﺮﻤﻫ
ﻩﺎﮕﺘﺳﺩ یﻭﺭ ﻩﺍﺮﻤﻫ ﻦﻔﻠﺗ ﻥﺩﺍﺩ ﺭﺍﺮﻗ ﺯﺍ .ﺪﻴﻨﮑﻧ
،ﻦﻫﺍﺮﻴﭘ یﻮﻠﺟ ﺐﻴﺟ ﺭﺩ ًﻼﺜﻣ ﺐﻠﻗ ﻥﺎﺑﺮﺿ ﻢﻴﻈﻨﺗ
ﺖﺳﺍ ﻦﮑﻤﻣ ﯽﻳﺍﻮﻨﺷ ﮏﻤﮐ ﻞﻳﺎﺳﻭ ﺯﺍ ﯽﺧﺮﺑ •
ﺭﺎﭼﺩ ﻩﺍﺮﻤﻫ یﺎﻫ ﻦﻔﻠﺗ ﺎﺑ ﺕﺭﻭﺎﺠﻣ ﺮﺛﺍ ﺭﺩ
،ﻥﻮﻳﺰﻳﻮﻠﺗ یﻭﺭ ﺖﺳﺍ ﻦﮑﻤﻣ ﯽﺋﺰﺟ ﻞﺧﺍﺪﺗ •
.ﺩﺭﺍﺬﮕﺑ ﺮﻴﺛﺄﺗ ﻩﺮﻴﻏ ﻭ ﺎﻫ ﻪﻧﺎﻳﺍﺭ ،ﻮﻳﺩﺍﺭ
ﯽﮑﻴﻧﻭﺮﺘﮑﻟﺍ یﺎﻫﺭﺍﺰﺑﺍ
.
ﺪﻴﻨﮐ یﺭﺍﺩﺩﻮﺧ
.ﺪﻧﺩﺮﮔ ﻝﻼﺘﺧﺍ
ﻩﺩﺎﺟ ﯽﻨﻤﻳﺍ
ﻩﺩﺎﻔﺘﺳﺍ ﻪﺑ ﻁﻮﺑﺮﻣ ﺕﺍﺭﺮﻘﻣ ﻭ ﻦﻴﻧﺍﻮﻗ ﯽﮔﺪﻨﻧﺍﺭ ﻡﺎﮕﻨﻫ
.ﺪﻴﻨﮐ ﺖﻳﺎﻋﺭ ﺍﺭ ﻒﻠﺘﺨﻣ ﯽﺣﺍﻮﻧ ﺭﺩ ﻩﺍﺮﻤﻫ ﻦﻔﻠﺗ ﺯﺍ
ﻦﻴﺣ ﺭﺩ ﯽﺘﺳﺩ یﺎﻫ ﯽﺷﻮﮔ ﻥﺩﺮﺑ ﺭﺎﮐ ﻪﺑ ﺯﺍ •
یﺮﻓﺯﺪﻨﻫ ﺖﻴﮐ ﮏﻳ ﺯﺍ ،ﻥﺎﮑﻣﺍ ﺕﺭﻮﺻ ﺭﺩ •
61
.ﺪﻴﻨﮐ یﺭﺍﺩﺩﻮﺧ ﯽﮔﺪﻨﻧﺍﺭ
.ﺪﻴﻫﺪﺑ ﯽﮔﺪﻨﻧﺍﺭ ﻪﺑ ﺍﺭ ﺩﻮﺧ ﺱﺍﻮﺣ ﻪﻤﻫ •
.ﺪﻴﻨﮐ ﻩﺩﺎﻔﺘﺳﺍ
ﺪﻳﺪﺷ یﺎﻫ ﻥﺎﮑﺗ ﺎﻳ ﺵﺯﺮﻟ ﺽﺮﻌﻣ ﺭﺩ ﺍﺭ ﯽﺷﻮﮔ •
ﯽﻣ ﺏﺎﺠﻳﺍ یﺍ ﻩﮋﻳﻭ ﻦﻴﻧﺍﻮﻗ ﻪﮐ ﯽﻳﺎﻫ ﻥﺎﮑﻣ ﺭﺩ •
،ﺪﻳﺭﺍﺩ ﻪﮕﻧ ﺵﻮﻣﺎﺧ ﺍﺭ ﺩﻮﺧ ﻩ ﺍﺮﻤﻫ ﻦﻔﻠﺗ ﻪﮐ ﺪﻨﮐ
ﺩﺮﺑﺭﺎﮐ ﺯﺍ ،ًﻼﺜﻣ .ﺪﻴﻨﮐ ﺵﻮﻣﺎﺧ ﺍﺭ ﯽﺷﻮﮔ ًﺎﻤﺘﺣ
ﻪﻧﺮﮔﻭ ،ﺪﻴﻨﮐ یﺭﺍﺩﺩﻮﺧ ﻥﺎﺘﺳﺭﺎﻤﻴﺑ
ﺱﺎﺴﺣ ﯽﮑﺷﺰﭘ ﺕﺍﺰﻴﻬﺠﺗ یﻭﺭ ﺖﺳﺍ ﻦﮑﻤﻣ
.ﺩﺭﺍﺬﮕﺑ
ﺭﺩ ﺍﺭ ﯽﺷﻮﮔ ،ﺩﻮﺷ ﯽﻣ ژﺭﺎﺷ یﺮﺗﺎﺑ ﻪﮐ ﯽﻣﺎﮕﻨﻫ •
ﻕﺮﺑ ﺚﻋﺎﺑ ﺪﻧﺍﻮﺗ ﯽﻣ ﺭﺎﮐ ﻦﻳﺍ .ﺪﻳﺭﺍﺪﻧ ﻪﮕﻧ ﺖﺳﺩ
.ﺪﻧﺎﺳﺮﺑ ﺐﻴﺳﺁ ﻦﻔﻠﺗ ﻪﺑ
ﻝﺎﻌﺘﺷﺍ ﻞﺑﺎﻗ ﺩﺍﻮﻣ ﺭﺎﻨﮐ ﺭﺩ ﯽﺷﻮﮔ ﻥﺩﺮﮐ ژﺭﺎﺷ ﺯﺍ •
ﻭ ﻩﺪﺷ
ﻍﺍﺩ ﯽﺷﻮﮔ ﺖﺳﺍ ﻦﮑﻤﻣ ﻥﻮﭼ ،ﺪﻴﻨﮐ ﺰﻴﻫﺮﭘ
ﺡﻮﻄﺳ ﻥﺩﺮﮐ ﺰﻴﻤﺗ یﺍﺮﺑ ﮏﺸﺧ ﻪﭼﺭﺎﭘ ﺯﺍ •
کﺎﭘ یﺎﻬﻟﻮﻠﺤﻣ ﺯﺍ) ﺪﻴﻨﮐ ﻩﺎﻔﺘﺳﺍ ﻩﺎﮕﺘﺳﺩ ﯽﺟﺭﺎﺧ
.(ﺪﻴﻨﮑﻧ ﻩﺩﺎﻔﺘﺳﺍ ﻞﮑﻟﺍ ﺎﻳ ﺮﻨﻴﺗ ،ﻦﻳﺰﻨﺑ ﺪﻨﻧﺎﻣ ﻩﺪﻨﻨﮐ
ﺭﺍﺮﻗ ﻡﺮﻧ ﻪﻴﺛﺎﺛﺍ یﻭﺭ ژﺭﺎﺷ ﻡﺎﮕﻨﻫ ﺍﺭ ﯽﺷﻮﮔ •
ﻭ ﺩﺮﮔ ﺎﻳ ﺩﻭﺩ ﺽﺮﻌﻣ ﺭﺩ ﯽﺷﻮﮔ ﻥﺩﺍﺩ ﺭﺍﺮﻗ ﺯﺍ •
یﺭﺎﺒﺘﻋﺍ یﺎﻫ ﺕﺭﺎﮐ ﺕﺭﻭﺎﺠﻣﺭﺩ ﺍﺭ ﯽﺷﻮﮔ •
ﺭﺎﮐ ﻦﻳﺍ .ﺪﻴﻫﺪﻧ ﺭﺍﺮﻗ ﻞﻘﻧ ﻭ ﻞﻤﺣ یﺎﻫ ﻂﻴﻠﺑ ﺎﻳ
یﺎﻫﺭﺍﻮﻧ ﺭﺩ ﺩﻮﺟﻮﻣ ﺕﺎﻋﻼﻃﺍ یﻭﺭ ﺖﺳﺍ ﻦﮑﻤﻣ
ﻪﺑﺮﺿ ﻦﻔﻠﺗ ﻪﺤﻔﺻ یﻭﺭ ﺰﻴﺗ
.ﺪﺘﻓﺎﻴﻧ ﯽﺷﻮﮔ ﺪﻴﺷﺎﺑ ﺐﻗﺍﺮﻣ •
.ﺩﻮﺷ یﺯﻮﺳ ﺶﺗﺁ ﺚﻋﺎﺑ
ﯽﻓﺎﮐ ﻪﻳﻮﻬﺗ ﺯﺍ ژﺭﺎﺷ ﻡﺎﮕﻨﻫ ﺪﻳﺎﺑ
.ﺪﻴﻨﮐ یﺭﺍﺩﺩﻮﺧ ﻆﻴﻠﻏ ﺭﺎﺒﻏ
.ﺩﺭﺍﺬﮕﺑ ﺮﻴﺛﺄﺗ ﯽﺴﻴﻃﺎﻨﻐﻣ
.ﺪﻧﺎﺳﺭ ﯽﻣ ﺐﻴﺳﺁ ﻦﻔﻠﺗ ﻪﺑ ﺭﺎﮐ ﻦﻳﺍ ،ﺪﻴﻧﺰﻧ
.ﺪﻴﻫﺪﻧ ﺭﺍﺮﻗ
ﺭﺩ ﻩﺍﺮﻤﻫ ﻦﻔﻠﺗ
.ﺩﺭﺍﺬﮕﺑ ﺮﻴﺛﺄﺗ
ً
ﺍﺪﻳﺪﺷ ﻭ ﻩﺪﺷ ﯽﮕﺘﻓﺮﮔ
.ﺪﻴﻫﺪﻧ
ﯽﺷﻮﮔ •
.ﺪﺷﺎﺑ ﺭﺍﺩﺭﻮﺧﺮﺑ
کﻮﻧ ﻞﻳﺎﺳﻭ ﺎﺑ •

ﺮﺛﻮﻣ ﻭ ﻦﻤﻳﺍ ﻩﺩﺎﻔﺘﺳﺍ یﺎﻫ ﻞﻤﻌﻟﺍﺭﻮﺘﺳﺩ
ﯽﻣ ﻪﺸﻴﺷ ﺲﻨﺟ ﺯﺍ ﻩﺍﺮﻤﻫ ﻦﻔﻠﺗ ﺕﺎﻌﻄﻗ ﺯﺍ یﺩﺍﺪﻌﺗ
ﺎﻳ ﺖﺨﺳ ﺡﻮﻄﺳ یﻭﺭ ﻩﺍﺮﻤﻫ ﻦﻔﻠﺗ ﻥﺩﺎﺘﻓﺍ ﺎﺑ .ﺪﻨﺷﺎﺑ
ﺕﺎﻌﻄﻗ ﺖﺳﺍ ﻦﮑﻤﻣ ﻥﺁ ﻪﺑ ﻢﮑﺤﻣ ﻪﺑﺮﺿ ﻥﺪﻣﺁ ﺩﺭﺍﻭ
ﺖﺴﮑﺷ یﺍ ﻪﺸﻴﺷ ﺕﺎﻌﻄﻗ ﺮﮔﺍ .ﺪﻨﻨﮑﺸﺑ یﺍ ﻪﺸﻴﺷ
.ﺪﻴﻨﮐ ﺝﺭﺎﺧ ﺍﺭ ﻥﺁ ﺪﻴﻨﮑﻧ ﯽﻌﺳ ﻭ ﺪﻴﻧﺰﻧ ﺖﺳﺩ ﻥﺁ ﻪﺑ
ﻩﺪﺷ ﻪﺘﺴﮑﺷ ﺕﺎﻌﻄﻗ ﺎﺗ
ﺎﻤﺷ یﺍﺮﺑ ﻩﺍﺮﻤﻫ ﻦﻔﻠﺗ ﺯﺎﺠﻣ ﯽﺗﺎﻣﺪﺧ ﺰﮐﺮﻣ ﻂﺳﻮﺗ
ﺕﺎﻴﻠﻤﻋ ﻪﮐ ﯽﻳﺎﻫ ﻞﺤﻣ ﺭﺩ ﻩﺍﺮﻤﻫ ﻦﻔﻠﺗ ﺩﺮﺑﺭﺎﮐ ﺯﺍ
.ﺪﻴﻨﮐ یﺭﺍﺩﺩﻮﺧ ﺖﺳﺍ ﻡﺎﺠﻧﺍ ﻝﺎﺣ ﺭﺩ ﺭﺎﺠﻔﻧﺍ
ﻭ ﻦﻴﻧﺍﻮﻗ ﻪﻴﻠﮐ ﺯﺍ ﻭ ﻩﺩﺮﮐ ﺖﻳﺎﻋﺭ ﺍﺭ ﺎﻫ ﺖﻳﺩﻭﺪﺤﻣ
ﺎﻬﻧﺁ ﺭﺩ ﺭﺎﺠﻔﻧﺍ ﻝﺎﻤﺘﺣﺍ ﻪﮐ ﯽﻳﺎﻫ ﻂﻴﺤﻣ
یﺎﻫ ﻞﺤﻣ ﺭﺩ ﻩﺍﺮﻤﻫ ﻦﻔﻠﺗ ﻥﺩﺮﺑ ﺭﺎﮐ ﻪﺑ ﺯﺍ •
ﯽﻳﺎﻴﻤﻴﺷ ﺎﻳ ﯽﺘﺧﻮﺳ ﺩﺍﻮﻣ ﺕﺭﻭﺎﺠﻣ ﺭﺩ ﻩﺎﮕﺘﺳﺩ ﺯﺍ •
ﻞﺑﺎﻗ ﺕﺎﻌﻳﺎﻣ ﺎﻳ ﺎﻫﺯﺎﮔ ﻥﺩﺮﮐ ﺭﺎﺒﻧﺍ ﺎﻳ ﻞﻤﺣ ﺯﺍ •
ﻪﻴﻠﻘﻧ ﻪﻠﻴﺳﻭ ﺯﺍ ﯽﺘﻤﺴﻗ ﺭﺩ ﻩﺮﺠﻔﻨﻣ ﺩﺍﻮﻣ ﺎﻳ ﻝﺎﻌﺘﺷﺍ
ﺭﺍﺮﻗ ﻥﺁ ﯽﺒﻧﺎﺟ ﻡﺯﺍﻮﻟ ﺎﻳ ﻩﺍﺮﻤﻫ
ﺭﺩ ﺍﺭ ﯽﺗﻻﻼﺘﺧﺍ ﺪﻨﻧﺍﻮﺗ ﯽﻣ ﻢﻴﺳ ﯽﺑ یﺎﻫ ﻩﺎﮕﺘﺳﺩ
یﺍ ﻪﺸﻴﺷ ﺕﺎﻌﻄﻗ
ﺪﻴﻨﮑﻧ ﻩﺩﺎﻔﺘﺳﺍ ﻩﺍﺮﻤﻫ ﻦﻔﻠﺗ ﺯﺍ
.ﺩﻮﺷ ﺾﻳﻮﻌﺗ
ﺭﺎﺠﻔﻧﺍ ﻪﻴﺣﺎﻧ
.ﺪﻴﻨﮐ یﻭﺮﻴﭘ ﺕﺍﺭﺮﻘﻣ
ﺩﺭﺍﺩ ﺩﻮﺟﻭ
.ﺪﻴﻨﮐ یﺭﺍﺩﺩﻮﺧ یﺮﻴﮔ ﺖﺧﻮﺳ
.ﺪﻴﻨﮑﻧ ﻩﺩﺎﻔﺘﺳﺍ
ﻦﻔﻠﺗ ﯽﺷﻮﮔ ﻪﮐ
.ﺪﻴﻨﮐ یﺭﺍﺩﺩﻮﺧ ﺩﺭﺍﺩ
ﺎﻤﻴﭘﺍﻮﻫ ﺭﺩ
.ﺪﻨﻨﮐ ﺩﺎﺠﻳﺍ ﺎﻤﻴﭘﺍﻮﻫ یﺎﻫ ﻢﺘﺴﻴﺳ
ﺱﺎﻤﺗ ﺯﺍ ﻞﺒﻗ ،ﺪﻨﮐ ﺏﺎﺠﻳﺍ ﯽﮔﺪﻨﻧﺍﺭ ﻂﻳﺍﺮﺷ ﻪﭽﻧﺎﻨﭼ •
ﯽﻨﻣﺍ ﻞﺤﻣ ﺭﺩ ﺱﺎﻤﺗ ﮏﻳ ﻪﺑ ﻥﺩﺍﺩ ﺦﺳﺎﭘ ﺎﻳ ﻦﺘﻓﺮﮔ
ﯽﺧﺮﺑ ﺮﺑ ﺖﺳﺍ ﻦﮑﻤﻣ ﯽﻳﻮﻳﺩﺍﺭ ﺲﻧﺎﮐﺮﻓ یژﺮﻧﺍ •
ﯽﮑﻴﻧﻭﺮﺘﮑﻟﺍ یﺎﻫ ﻢﺘﺴﻴﺳ ﺯﺍ
ﻭ ﻭﺭﺩﻮﺧ یﺎﻫﻮﻳﺮﺘﺳﺍ ﺪﻨﻧﺎﻣ ﺎﻤﺷ ﻪﻴﻠﻘﻧ ﻪﻠﻴﺳﻭ
.ﺩﺭﺍﺬﮕﺑ ﺮﻴﺛﺄﺗ ﻥﺁ ﯽﻨﻤﻳﺍ ﺕﺍﺰﻴﻬﺠﺗ
ﺍﻮﻫ ﻪﺴﻴﮐ ﻪﺑ ﺰﻬﺠﻣ ﺎﻤﺷ
ﻞﺑﺎﻗ ﻢﻴﺳ ﯽﺑ ﺎﻳ ﻩﺪﺷ ﺐﺼﻧ ﺕﺍﺰﻴﻬﺠﺗ ﺎﺑ ،ﺖﺳﺍ
ﺍﺮﻳﺯ .ﺪﻴﻫﺪﻧ ﺭﺍﺮﻗ ﻥﺁ ﻩﺍﺭ ﺮﺳ ﺮﺑ ﯽﻌﻧﺎﻣ ،ﻞﻤﺣ
ﺩﺮﮑﻠﻤﻋ ﺎﻳ ﻭ ﻥﺩﺮﮑﻧ ﻞﻤﻋ ﻞﻴﻟﺩ ﻪﺑ ﺖﺳﺍ ﻦﮑﻤﻣ
.ﺪﻨﮐ ﺩﺎﺠﻳﺍ یﺪﺟ یﺎﻫ ﺐﻴﺳﺁ ،ﺖﺳﺭﺩﺎﻧ
،ﺪﻴﻫﺩ ﯽﻣ ﺵﻮﮔ ﯽﻘﻴﺳﻮﻣ ﻪﺑ ﺖﮐﺮﺣ ﻡﺎﮕﻨﻫ ﺮﮔﺍ •
ﺪﻴﻧﺍﻮﺘﺑ ﺎﺗ ﺪﺷﺎﺒﻧ ﺪﻨﻠﺑ
ﻪﺘﮑﻧ ﻦﻳﺍ .ﺪﻴﺷﺎﺑ ﺰﻴﻧ ﺩﻮﺧ ﻑﺍﺮﻃﺍ ﻂﻴﺤﻣ ﻪﺟﻮﺘﻣ
یﺭﻭﺮﺿ ﺭﺎﻴﺴﺑ ﺎﻫ ﻥﺎﺑﺎﻴﺧ ﻭ ﺎﻫ ﻩﺩﺎﺟ ﺭﺎﻨﮐ ﺭﺩ
.ﺪﻴﻨﮐ کﺭﺎﭘ
ﻭﺭﺩﻮﺧ ﻪﮐ ﯽﺗﺭﻮﺻ ﺭﺩ •
ﺩﺎﻳﺯ ﺍﺪﺻ ﻪﮐ ﺪﻴﻨﮐ ﺖﻗﺩ
.ﺖﺳﺍ
ﯽﻳﺍﻮﻨﺷ ﻪﺑ ﻪﮐ ﺪﻴﻨﮑﻧ ﺩﺎﻳﺯ ﺭﺪﻗ ﻥﺁ ﺍﺭ ﺍﺪﺻ
.ﺪﻨﮐ ﺩﺭﺍﻭ ﺐﻴﺳﺁ ﺎﻤﺷ
ﺪﻨﻠﺑ یﺍﺪﺻ ﺽﺮﻌﻣ ﺭﺩ ﯽﻧﻻﻮﻃ ﯽﺗﺪﻣ یﺍﺮﺑ ﺮﮔﺍ
.ﺪﻨﻴﺒﺑ ﺐﻴﺳﺁ ﺎﻤﺷ ﯽﻳﺍﻮﻨﺷ ﺖﺳﺍ ﻦﮑﻤﻣ ،ﺪﻳﺮﻴﮕﺑ ﺭﺍﺮﻗ
ﺵﻮﻣﺎﺧ ﺎﻳ ﻦﺷﻭﺭ ﺯﺍ ﻢﻴﻨﮐ ﯽﻣ ﻪﻴﺻﻮﺗ ﻦﻳﺍﺮﺑﺎﻨﺑ
.ﺪﻴﻨﮐ ﺏﺎﻨﺘﺟﺍ ﺩﻮﺧ ﺵﻮﮔ ﺭﺎﻨﮐ ﺭﺩ ﯽﺷﻮﮔ ﻥﺩﺮﮐ
ﻭ ﯽﻘﻴﺳﻮﻣ یﺍﺪﺻ ﻥﺍﺰﻴﻣ ﻢﻴﻨﮐ ﯽﻣ ﻪﻴﺻﻮﺗ ﻦﻴﻨﭽﻤﻫ
ﯽﻘﻄﻨﻣ ﻭ ﺐﺳﺎﻨﻣ ﺢﻄﺳ ﮏﻳ ﺭﺩ ﻪﺑ ﺎﻫ ﺱﺎﻤﺗ ﺰﻴﻧ
.
ﺩﻮﺷ ﻢﻴﻈﻨﺗ
ﺮﺑﺭﺎﮐ یﺎﻤﻨﻫﺍﺭ | LG GM360
62

،ﺩﺭﺍﺪﻧ ﯽﺑﻮﻠﻄﻣ ﺩﺮﮑﻠﻤﻋ یﺮﺗﺎﺑ ﺮﮕﻳﺩ ﻪﮐ ﯽﻧﺎﻣﺯ •
ﺎﻫﺪﺻ ﻥﺍﻮﺗ ﯽﻣ ﺍﺭ یﺮﺗﺎﺑ .ﺪﻴﻨﮐ ﺾﻳﻮﻌﺗ ﺍﺭ ﻥﺁ
ﺾﻳﻮﻌﺗ ﻪﺑ ﺯﺎﻴﻧ ﻪﮐ ﯽﻧﺎﻣﺯ ﺎﺗ
ﺭﺍﺮﻗ ﻩﺩﺎﻔﺘﺳﺍ ﺩﺭﻮﻣ یﺩﺎﻳﺯ ﺕﺪﻣ یﺍﺮﺑ یﺮﺗﺎﺑ ﺮﮔﺍ •
ﺮﻤﻋ ﺎﺗ ﺪﻴﻨﮐ ژﺭﺎﺷ ًﺍﺩﺪﺠﻣ ﺍﺭ ﻥﺁ ،ﺪﺷﺎﺑ ﻪﺘﻓﺮﮕﻧ
ﻢﻴﻘﺘﺴﻣ ﺭﻮﻧ ﺽﺮﻌﻣ ﺭﺩ یﺮﺗﺎﺑ ﻥﺩﺍﺩ ﺭﺍﺮﻗ ﺯﺍ •
ﺭﺎﻴﺴﺑ یﺎﻫ ﻂﻴﺤﻣ ﺭﺩ ﻥﺁ ﺯﺍ ﻩﺩﺎﻔﺘﺳﺍ ﺎﻳ ﻭ ﺪﻴﺷﺭﻮﺧ
.ﺪﻴﻨﮐ یﺭﺍﺩﺩﻮﺧ ﻥﺁ ﻝﺎﺜﻣﺍ
ﺎﻫﺭ ﺩﺮﺳ ﺎﻳ ﻡﺮﮔ ﺭﺎﻴﺴﺑ یﺎﻫ ﻥﺎﮑﻣ ﺭﺩ ﺍﺭ یﺮﺗﺎﺑ •
یﺮﺗﺎﺑ ﺩﺮﮑﻠﻤﻋ ﺮﺑ ﺖﺳﺍ ﻦﮑﻤﻣ ﺭﺎﮐ ﻦﻳﺍ ،ﺪﻴﻨﮑﻧ
ﯽﻣ ﺐﺳﺎﻨﻣﺎﻧ یﺮﺗﺎﺑ ﺎﺑ ﯽﺷﻮﮔ یﺮﺗﺎﺑ ﺾﻳﻮﻌﺗ •
.ﺪﺷﺎﺑ ﻪﺘﺷﺍﺩ ﯽﭘ ﺭﺩ ﺍﺭ ﯽﺷﻮﮔ ﺭﺎﺠﻔﻧﺍ ﺮﻄﺧ ﺪﻧﺍﻮﺗ
یﺎﻫ ﻞﻤﻌﻟﺍﺭﻮﺘﺳﺩ ﻖﺒﻃ ﺍﺭ ﻞﻤﻌﺘﺴﻣ یﺎﻫ
.ﺪﻳﺯﺍﺪﻧﺎﻴﺑ ﺭﻭﺩ ﻩﺪﻧﺯﺎﺳ ﻪﻧﺎﺧﺭﺎﮐ ﻂﺳﻮﺗ ﻩﺪﺷ ﻪﺋﺍﺭﺍ
ﺖﻓﺎﻳﺯﺎﺑ ﺍﺭ ﺎﻬﻧﺁ ﻥﺎﮑﻣﺍ ﺕﺭﻮﺻ ﺭﺩ
ﺭﻭﺩ ﯽﮕﻧﺎﺧ یﺎﻫ ﻪﻟﺎﺑﺯ ﺎﺑ ﻩﺍﺮﻤﻫ ﺍﺭ ﺎﻬﻧﺁ .ﺪﻴﻳﺎﻤﻧ
یﺍﺮﺑ ،ﺪﻴﻨﮐ ﺾﻳﻮﻌﺗ ﺍﺭ یﺮﺗﺎﺑ ﺖﺳﺍ ﻡﺯﻻ ﺮﮔﺍ •
ﺎﻳ ﺵﻭﺮﻓ ﺰﮐﺮﻣ ﻦﻳﺮﺘﮑﻳﺩﺰﻧ ﻪﺑ ﺍﺭ ﻥﺁ ﮏﻤﮐ
.ﺪﻳﺮﺒﺑ LG Electronics ﺯﺎﺠﻣ ﺕﺎﻣﺪﺧ ﺰﮐﺮﻣ
ﺭﻮﻈﻨﻣ ﻪﺑ ،ﻦﻔﻠﺗ
ﺍﺭ ﻥﺁ ،ﺭژﺭﺎﺷ یﻭﺮﻴﻧ ﻑﺮﺼﻣ ﺭﺩ ﯽﻳﻮﺟ ﻪﻓﺮﺻ
ﻭ یﺮﺗﺎﺑ ،ﻩﺩﺎﻔﺘﺳﺍ یﺎﻫﻮﮕﻟﺍ ،ﻝﻮﺼﺤﻣ ﺕﺎﻤﻴﻈﻨﺗ
63
ﻞﻣﺎﮐ ﻥﺪﺷ ژﺭﺎﺷ ﺯﺍ ﺪﻌﺑ ﻪﺸﻴﻤﻫ •
،ﻪﮑﺒﺷ یﺪﻨﺑﺮﮑﻴﭘ ﻪﺑ یﺮﺗﺎﺑ ﯽﻌﻗﺍﻭ ﺮﻤﻋ ﻝﻮﻃ •
ﺩﺮﮐ ژﺭﺎﺷ ﺭﺎﺑ
.ﺪﺷﺎﺑ ﻪﺘﺷﺍﺩ
.ﺪﺑﺎﻳ ﺶﻳﺍﺰﻓﺍ ﻥﺁ ﺪﻴﻔﻣ
ﻭ ﻡﺎﻤﺣ ﺪﻨﻧﺎﻣ ﺏﻮﻃﺮﻣ
.ﺪﺷﺎﺑ ﻪﺘﺷﺍﺩ ﺏﻮﻠﻄﻣﺎﻧ ﺮﻴﺛﺄﺗ
.ﺪﻴﺸﮑﺑ ﺰﻳﺮﭘ ﺯﺍ
.ﺩﺭﺍﺩ ﯽﻄﻴﺤﻣ ﻂﻳﺍﺮﺷ
ﺩﻮﺧ ﻩﺍﺮﻤﻫ ﻦﻔﻠﺗ ،ﺎﻤﻴﭘﺍﻮﻫ ﻪﺑ ﻥﺪﺷ ﺭﺍﻮﺳ ﺯﺍ ﻞﺒﻗ •
ﺐﺴﮐ ﻥﻭﺪﺑ ﺖﺳﺍ ﻦﻴﻣﺯ یﻭﺭ ﺎﻤﻴﭘﺍﻮﻫ ﻪﮐ ﯽﻣﺎﮕﻨﻫ •
.ﺪﻴﻨﮑﻧ ﻦﺷﻭﺭ ﺍﺭ ﻦﻔﻠﺗ ﺯﺍﻭﺮﭘ ﺭﺩﺎﮐ ﺯﺍ ﻩﺯﺎﺟﺍ
ﻥﺎﮐﺩﻮﮐ ﺱﺮﺘﺳﺩ ﺯﺍ ﺭﻭﺩ ﻦﻣﺍ ﯽﻧﺎﮑﻣ ﺭﺩ ﺍﺭ ﻦﻔﻠﺗ
ﯽﮑﭼﻮﮐ ﺕﺎﻌﻄﻗ ﻦﻔﻠﺗ ﺭﺩ .ﺪﻴﻫﺪﺑ ﺭﺍﺮﻗ ﻝﺎﺳﺩﺮﺧ
ﺖﺳﺍ ﻦﮑﻤﻣ ﻥﺪﺷ ﺍﺪﺟ ﺕﺭﻮﺻ ﺭﺩ ﻪﮐ ﺩﺭﺍﺩ ﺩﻮﺟﻭ
.ﺩﻮﺷ ﯽﮕﻔﺧ ﺚﻋﺎﺑ ﻭ ﻩﺪﺷ ﻩﺪﻴﻌﻠﺑ ﻥﺎﮐﺩﻮﮐ ﻂﺳﻮﺗ
یﺎﻫ ﺱﺎﻤﺗ یﺭﺍﺮﻗﺮﺑ ﻥﺎﮑﻣﺍ ﺖﺳﺍ ﻦﮑﻤﻣ
ﺩﻮﺟﻮﻣ ﻩﺍﺮﻤﻫ ﻦﻔﻠﺗ یﺎﻫ ﻪﮑﺒﺷ ﻪﻤﻫ ﺭﺩ یﺭﺍﺮﻄﺿﺍ
ﺱﺎﻤﺗ ﺹﻮﺼﺧ ﺭﺩ ﺪﻳﺎﺒﻧ ﺰﮔﺮﻫ ،ﻦﻳﺍﺮﺑﺎﻨﺑ .ﺪﺷﺎﺒﻧ
.ﺪﻴﻨﮐ ﺎﮑﺗﺍ ﺩﻮﺧ ﻩﺍﺮﻤﻫ ﻦﻔﻠﺗ ﻪﺑ ﻂﻘﻓ یﺭﺍﺮﻄﺿﺍ یﺎﻫ
یﺮﺗﺎﺑ •
ﺩﻮﺧ ﯽﺗﺍﺮﺑﺎﺨﻣ ﻪﮑﺒﺷ ﺎﺑ ﺮﺘﺸﻴﺑ ﺕﺎﻋﻼﻃﺍ یﺍﺮﺑ
ً
ﺎﻔﻄﻟ
ﻥﺁ ﺯﺍ ﺖﺒﻗﺍﺮﻣ ﻭ یﺮﺗﺎﺑ ﺕﺎﻋﻼﻃﺍ
.ﺪﻳﺯﺍﺪﻧﺎﻴﻧ
ﻥﺁ ﺎﺗ ﺩﻮﺷ ﯽﻟﺎﺧ ﻼﻣﺎﮐ یﺮﺗﺎﺑ ژﺭﺎﺷ ﺖﺴﻴﻧ ﻡﺯﻻ •
یﺎﻫ ﻢﺘﺴﻴﺳ ﺮﻳﺎﺳ ﻑﻼﺧﺮﺑ .ﺪﻴﻨﮐ ژﺭﺎﺷ ﺍﺩﺪﺠﻣ ﺍﺭ
ﻪﮐ ﺩﺭﺍﺪﻧ ﺩﻮﺟﻭ یﺍ ﻪﻈﻓﺎﺣ ﺮﻴﺛﺄﺗ ﭻﻴﻫ ،یﺮﺗﺎﺑ
.ﺪﻨﮐ ﺩﺭﺍﻭ ﻪﻣﺪﺻ یﺮﺗﺎﺑ ﺩﺮﮑﻠﻤﻋ ﻪﺑ ﺪﻧﺍﻮﺘﺑ
ﻩﺩﺎﻔﺘﺳﺍ LG یﺎﻫﺭژﺭﺎﺷ ﻭ ﺎﻫ یﺮﺗﺎﺑ ﺯﺍ ﻂﻘﻓ •
ﻩﺪﺷ ﯽﺣﺍﺮﻃ یﺍ ﻪﻧﻮﮔ ﻪﺑ LG یﺎﻫﺭژﺭﺎﺷ .ﺪﻴﻨﮐ
.ﺪﻨﻧﺎﺳﺮﺑ ﺮﺜﮐﺍﺪﺣ
ﺭﺩ ﻩﺎﺗﻮﮐ ﻝﺎﺼﺗﺍ ﺭﺍﺪﻣ ﺩﺎﺠﻳﺍ ﺎﻳ ﻥﺩﺮﮐ ﺯﺎﺑ ﺯﺍ •
.ﺪﻳﺭﺍﺩ ﻪﮕﻧ ﺰﻴﻤﺗ ﺍﺭ یﺮﺗﺎﺑ یﺰﻠﻓ ﻝﺎﺼﺗﺍ ﺡﻮﻄﺳ •
.ﺪﻴﻨﮐ ﺵﻮﻣﺎﺧ ﺍﺭ
ﻥﺎﮐﺩﻮﮐ
یﺭﺍﺮﻄﺿﺍ یﺎﻫ ﺱﺎﻤﺗ
.ﺪﻳﺮﻴﮕﺑ ﺱﺎﻤﺗ
ﻪﺑ ﺍﺭ یﺮﺗﺎﺑ ﺮﻤﻋ ﻪﮐ ﺪﻧﺍ
.ﺪﻴﻨﮐ یﺭﺍﺩﺩﻮﺧ یﺮﺗﺎﺑ

Memo
GM360
Some of the contents in this manual may
differ from your phone depending on
the software of the phone or your service
provider.
GM360 User Guide

Congratulations on your purchase of the
advanced and compact GM360 phone by LG,
designed to operate with the latest digital
mobile communication technology.

Contents
Getting to know your phone .............6
Open view .................................................7
Installing the SIM and battery ...........8
Charging your phone ............................9
Memory card ......................................... 10
Using your touch screen ................... 11
Touch screen tips ................................. 11
Control the touch screen ..................11
Your home screen ............................... 13
The quick keys ....................................... 14
The status bar ........................................ 15
Changing your Status from
the status bar ......................................... 16
Using the Multi-tasking
function ................................................... 16
Calls .......................................................... 17
Making a call .......................................... 17
Making a call from your contacts ... 17
Answering and rejecting a call ........ 17
In-call options ....................................... 18
Speed dialling .......................................19
Making a second call ..........................19
Viewing your call logs ........................19
Using call divert .................................... 20
Using call barring ................................. 20
Changing the common call setting
.................................................................... 20
Contacts .................................................. 21
Searching for a contact ...................... 21
Adding a new contact ........................ 21
Creating a group .................................. 22
Changing your contact settings ..... 22
Viewing information ........................... 23
Messaging .............................................. 24
Messaging .............................................. 24
Sending a message .............................24
Entering text .......................................... 24
T9 mode ..................................................24
Handwriting recognition ..................24
Setting up your email ......................... 25
Retrieving your emails .......................25
Sending an email using your new
account .................................................... 25
Changing your email settings ......... 25
Message folders .................................... 26
Changing your text message
settings .................................................... 26
Changing your multimedia message
settings .................................................... 27
Changing your other settings .........27
3

Contents
Social Network Services (SNS) ........ 28
Social network services (SNS) .......... 28
Facebook .................................................28
Linkbook ................................................. 29
Camera .................................................... 30
Getting to know the view nder .....30
Taking a quick photo .......................... 31
After taking a photo............................ 31
Using the advanced settings ........... 32
Video camera ........................................ 33
Getting to know the view nder .....33
Making a quick video ......................... 34
After making a video ..........................34
Using the advanced settings ........... 35
Your photos and videos .................... 36
Viewing your photos and videos ...36
Capturing an image from a video .. 36
Viewing your photos as a slide show
.................................................................... 36
Setting a photo as wallpaper........... 37
Editing your photos ............................37
Adding an e ect to a photo ............. 38
Multimedia............................................. 39
Pictures .................................................... 39
4
LG GM360 | User Guide
Sending a photo ................................... 39
Using an image ..................................... 39
Printing an image ................................39
Moving or copying a le .................... 40
Sounds ..................................................... 40
Using a sound ....................................... 40
Videos ...................................................... 40
Watching a video ................................. 40
Sending a video clip ........................... 40
Games & Apps ...................................... 40
Playing a game .....................................40
Documents ............................................ 41
Transferring a le to your phone .... 41
Others ...................................................... 41
Music ........................................................ 42
Transferring music onto your phone
.................................................................... 42
Playing a song ....................................... 42
Creating a playlist ................................ 43
FM Radio .................................................43
Searching for stations ........................ 43
Resetting channels .............................. 43
Utilities .................................................... 44
Adding an event to your calendar . 44
Adding an item to your task list ..... 44
Using date nder ................................. 44

Adding a memo .................................... 45
Setting your alarm ............................... 45
Adding a memo with the
drawing Panel ....................................... 45
Screen Capture .....................................46
Voice recorder ....................................... 46
Recording a sound or voice ............46
Using your calculator ......................... 46
Converting a unit ................................ 47
Adding a city to your World clock .. 47
Using the stopwatch .......................... 47
PC Sync .................................................... 48
Installing LG PC Suite on your
computer ................................................ 48
Connecting your phone and PC ..... 48
Backing up and restoring the
information on your phone .............48
Viewing phone les on your PC ...... 48
Synchronising your contacts ........... 49
Synchronising your messages ........ 49
Using your phone as a Music Sync
device ....................................................... 49
The web ..................................................50
Accessing the web .............................. 50
Adding and accessing your
bookmarks ............................................. 50
Using RSS reader .................................. 50
Saving a page ....................................... 51
Accessing a saved page .................... 51
Viewing your browser history ......... 51
Changing the web browser settings
.................................................................... 51
Using your phone as a modem ....... 51
Access to Google .................................. 52
Settings ................................................... 53
Personalising your pro les ............... 53
Changing your screen settings ....... 53
Changing your phone settings ....... 54
Using memory manager ...................55
Changing your connectivity settings
.................................................................... 55
Sending and receiving your les
using Bluetooth .................................... 56
Changing your Bluetooth settings: 57
Pairing with another Bluetooth
device ....................................................... 57
Using a Bluetooth headset ............... 58
Software Upgrade ............................... 58
Accessories ............................................ 59
Technical data ....................................... 60
Guidelines for safe and e cient use
.61
5
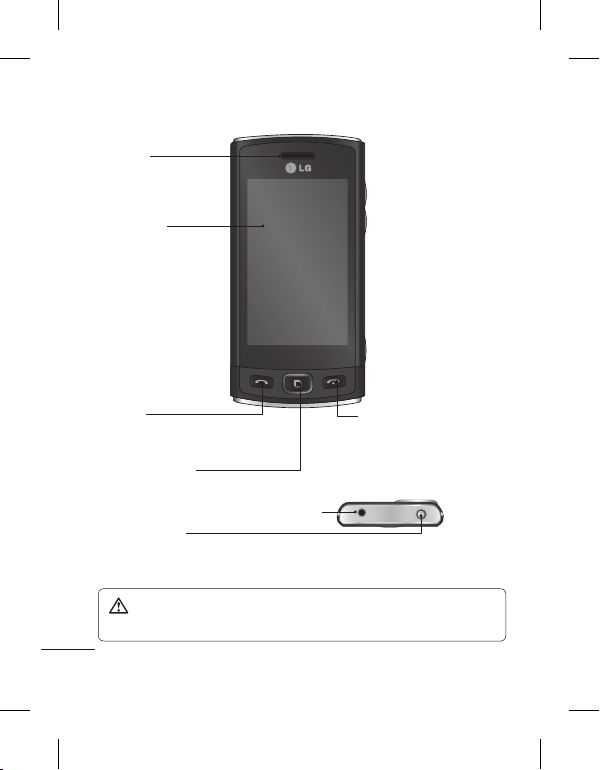
Getting to know your phone
Earpiece
Main screen
Call key
• Dials a phone number and answers
incoming calls.
Multitasking key
• Press to open the multitasking menu.
Handsfree or Stereo earphone connector
Power/Lock key
• Short press to turn on/off the screen.
• Long press for power on/off.
WARNING: Placing a heavy object on the phone or sitting on it can damage
the phone’s LCD and touch screen functionality.
6
LG GM360 | User Guide
End key

Open view
Side keys
• When the screen is at
the Home screen: Ring
tone and Touch tone
volume
• During a call: Earpiece
volume.
Camera key
• Go to the camera menu
directly by pressing and
holding the key.
MicroSD Card Slot
Charger, cable
Battery cover
Flashlight
External camera lens
SIM Card Tray
Battery
7

Installing the SIM and battery
1 Remove the battery cover
Slide the battery cover towards the
bottom of the phone and away
from it.
2 Install the SIM card
Slide the SIM card into the SIM card
holder making sure that the gold
contact area on the card is facing
downwards. To remove the SIM
card, pull it gently outwards.
8
LG GM360 | User Guide
WARNING: Do not use your
ngernail to remove the battery.
WARNING: Do not remove
the battery when the phone is
switched on, as this may damage
the phone.
3 Install the battery
Insert the left side of the battery
into the top edge of the battery
compartment first.
Ensure that the battery contacts
align with the phone’s terminals.
Press the right side of the battery
until down it clicks into place.

Charging your phone
Remove the charger socket cover
on the side of your GM360. Connect
the Travel Adapter (Charger) and the
included USB cable. Connect the USB
cable into the phone and plug it into
a power socket. Your GM360 must
be charged until the “Battery full“
message appears on the screen.
NOTE: The battery must be fully
charged initially to improve battery
lifetime.
9

Memory card
Installing a memory card
You can expand the memory space
on your phone by using a MicroSD
memory card.
NOTE: A memory card is an optional
accessory.
1 Open the microSD card slot cover
on the left-hand edge of the
phone.
2 Slide the microSD card into the
slot until it clicks into place. Make
sure the gold contact area is facing
downwards.
10
LG GM360 | User Guide
Formatting the memory card
Your memory card may already be
formatted. If it isn’t, you will need to
format it before you can start to use it.
1 From the Home screen select
then Phone settings in SETTINGS
tab.
2 Touch Memory info then choose
External memory.
3 Touch Format and then confirm
your choice.
4 Enter the password, if one is set.
Your card will then be formatted
and ready to use.
NOTE: If there is existing content
on your memory card, the folder
structure may be different after
formatting since all files will have
been deleted.
,

Using your touch screen
Touch screen tips
• To select an item, touch the centre
of the icon.
• Do not press too hard. The
touchscreen is sensitive enough to
pick up a light, firm touch.
• Use the tip of your finger to touch
the option you require. Be careful
not to touch any other keys.
• Whenever your GM360 is not in use,
it will return to the lock screen.
Control the touch screen
The controls on the GM360
touch screen change dynamically
depending on the task you are
carrying out.
Opening Applications
To open any application, simply touch
its icon.
Scrolling
Drag from side to side to scroll. On
some screens, such as the call history
list, you can also scroll up or down.
11

Using your touch screen
Lock screen gesture
Lock screen gesture - set a gesture to
the 9 extended shortcut applications.
Gesture in Lock screen allows users
to unlock the phone and execute the
applications directly as they draw a
gesture on the screen.
To set up this feature,
1 Select
- Screen settings - Lock
screen gesture
2 Drag & drop the prefered gesture
TIP! Draw ? shape to go to Lock screen
gesture menu in the lock screen.
TIP! This function is only available
keylocked from Idle screen.
from the bottom of the screen to
the applications you want to assign
them to.
1
4
12
LG GM360 | User Guide
23
5
6

Your home screen
You can drag and click what you need right away in all home screen types.
Active
Active
Widget home screen
- When you touch
on the bottom
right of the screen,
the mobile widget
panel appears. When
you register widget
by dragging it, the
created in
widget is
the spot where it
was dropped.
Livesquare home
screen - On the
Livesquare screen, You
can easily make a call
and send a message to
the number allocated
to an avatar. To use
the call, messaging
or contacts function,
select an avatar and
choose the Quick key
icon you want to use.
Active
Speed dial home
screen - When you
, the
touch
speed dial
list appears. You
can call, send a
message, edit or
delete the contact
directly in this
home screen.
TIP! The User Interface is based on
three types of Homescreen. To swap
between the home screens just
wipe quickly over the display from
left to right, or from right to left.
13

Your home screen
The quick keys
The quick keys on your home screen provide easy, one-touch access to the
functions you use the most.
Touch to bring up the touch
dialling pad to make a call.
Touch to access the
Messaging menu. From here
you can create a new SMS or
MMS, or view your message
folder.
14
LG GM360 | User Guide
Touch to open your Contacts.
To search for the number
you want to call, enter the
name of the contact at the
top of the screen using
the touchpad. You can also
create new contacts and edit
existing ones.
Touch to open the full Top
menu which is divided into
four categories.
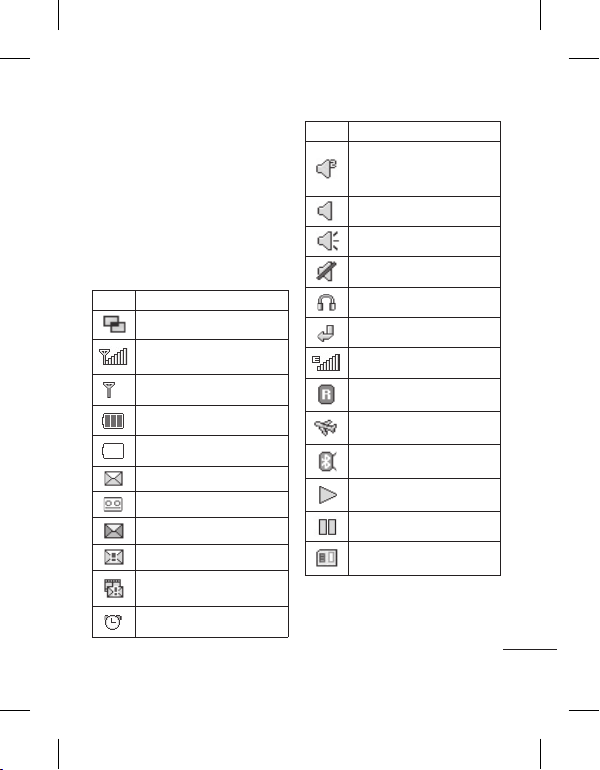
The status bar
The status bar uses various icons to
indicate things like signal strength,
new messages and battery life, as well
as telling you whether your Bluetooth
or GPRS is active.
Below is a table which explains the
meaning of the icons you’re most
likely to see in the status bar.
Icon Description
Multitasking
Network signal strength
(number of bars will vary)
No network signal
Remaining battery life
Battery empty
New text message
New voice message
Message inbox is full
Message sending failed
Multimedia message
sending failed
An alarm is set
Icon Description
Customised Profile in use
(The number in the icon
will vary)
Normal profile in use
Outdoor profile in use
Silent profile in use
Headset in use
Calls are diverted
EDGE in use
Roaming
Flight mode is on
Bluetooth is active
BGM play
BGM pause
Memory card is enabled
for use
15

Your home screen
Icon Description
For incoming Push email
Check Push email:
Touch Games & Applications
in the Entertainment and then
touch Applications.
*Attention: Depending on the
region or SIM operator, user
may not be able to use push
e-mail and access WAP (or MMS)
simultaneously.
Changing your Status from
the status bar
Touch the centre of the status bar to
open the Status Summary. It shows
the current Time, Network, SVC ID,
Battery, Handset memory, External
Memory, Profile, MP3s and Bluetooth
status. Here you can set the Profile
type, play/pause MP3s and activate/
deactivate Bluetooth.
16
LG GM360 | User Guide
Using the Multi-tasking
function
Press the multi-tasking hard key
to open the Multitasking menu. From
here you can view all the applications
that are running and access them with
one touch.
When you have an application
running in the background (e.g.
a game or the FM radio),
appear in the status bar.
will

Calls
Making a call
1 Touch to open the keypad.
2 Key in the number using the
keypad.
3 Touch
4 To end the call, press the Smart key.
TIP! Press the power key to lock the
touchscreen to prevent calls being
made by mistake.
to initiate the call.
TIP! To enter + for making
an international call, press and
.
hold
Making a call from your
contacts
1 From the home screen touch
to open the Contacts.
2 Tap the Name field box on the top
of the screen and enter the first few
letters of the contact you would
like to call using the keypad.
3 From the filtered list, touch the Call
icon next to the contact you want
to call. The call will use the default
number if there is more than one
for that contact.
4 Or, you can touch the contact
name and select the number to
use if there is more than one for
that contact to use. You can also
touch
to initiate the call to the
default number.
Answering and rejecting a call
When your phone rings, touch the
Smart key to answer the call.
To mute the ringing, slide up the
cover. This will unlock the phone if it
is locked, then tap
if you forgot to change your profile
to Silent for a meeting. Touch
reject an incoming call.
. This is useful
to
17

Calls
In-call options
Hold - Touch to put a call on hold.
Mute - Touch
microphone so the person you are
talking to cannot hear you.
Speaker - Touch
phone on.
Options - Touch
further in-call options.
Touch
to search your contacts
during a call.
Touch
to add another person to
the call.
to open a numerical keypad
Touch
for making a second call. This function
also allows you to navigate menus
with numbered options when you dial
automated telephone services, such as
call centres.
TIP! To scroll through a list of options or your
list of contacts, touch the last item visible and slide your nger up the
screen. The list will move up so more items become visible.
18
LG GM360 | User Guide
to turn off the
to turn the speaker
to bring up a list of

Speed dialling
You can assign a frequently-called
contact to a speed dial number.
1 Select Contacts in the
COMMUNICATION tab and select
Speed dials.
2 Your voicemail is already set to
speed dial 1. You cannot change
this. Touch any other number to
assign it a speed dial contact.
3 Your Contacts will open. Select the
contact you want to assign to that
number by touching their phone
number once. To find a contact,
tap the Name field box and enter
the first letter of the name of the
contact required.
Making a second call
1 During your initial call, touch
and type the number you want to
call.
2 Touch
3 Both calls will be displayed on the
4 To change between the calls, touch
5 To end one or both calls press
TIP! Touch any single call log entry
to view the date, time and duration
of the call.
NOTE: You will be charged for each
call you make.
to connect the call.
call screen. Your initial call will be
locked and the caller put on hold.
or press the number of the
held call.
and select End Calls followed by
Active, Held or All calls.
Viewing your call logs
Touch Recent history in the
COMMUNICATION tab.
TIP! Touch any single call log entry
to view the date, time and duration
of the call.
19

Calls
Using call divert
1 Touch Call settings in the
SETTINGS tab.
2 Touch Call divert.
3 Choose whether to divert all voice
calls, when the line is busy, when
there is no answer or when you
cannot be contacted.
4 Enter the number you want to
divert to.
5 Touch Request to activate.
NOTE: Charges are incurred for
diverting calls. Please contact your
network provider for details.
TIP! To turn o all call diverts, select
Deactivate all from the Call divert
menu.
Outgoing international calls
except home country
All incoming
Incoming when abroad
4 Enter the call barring password.
Please check with your network
operator about this service.
5 To turn off all call barrings, select
Deactivate all from the Call barring
menu.
TIP! Select Fixed dial numbers from
the Call settings options to turn on
and compile a list of numbers which
can be called from your phone. You’ll
need your PIN2 code from your
operator. Only numbers included in
the xed dial list can be called from
your phone.
Using call barring
1 Touch Call settings in the
SETTINGS tab.
2 Touch Call barring.
3 Choose any or all of the Five
options:
All outgoing
Outgoing international
20
LG GM360 | User Guide
Changing the common call
setting
1 Touch Call settings in the
SETTINGS tab.
2 Scroll and touch Common settings.
From here you can adjust the
settings for:
Call reject - Slide the switch to
ON to highlight the Reject list. You
can touch the text box to choose

from all calls, specific contacts or
groups, or those from unregistered
numbers (those not in your
contacts) or with no caller ID. Touch
Save to change the setting.
Send my number - Choose
whether your number will be
displayed when you call someone.
Auto redial - Slide the switch left
for ON or right for OFF.
Answer mode - Choose whether to
answer the phone using the send
key or any key.
Minute minder - Slide the switch
left to ON to hear a tone every
minute during a call.
BT answer mode - Select Hands-
free to be able to answer a call
using a Bluetooth headset, or select
Handset to press a key on the
handset to answer a call.
Save new number - Select Ye s to
save a new number.
Contacts
Searching for a contact
There are two ways to search for a
contact:
1 Touch Contacts in the
COMMUNICATION tab.
2 Touch Search.
3 You see a list of contacts. Typing in
the first letter of a contact’s name
in the Name field will jump the
menu to that alphabetical area of
the list.
TIP! The alphabetical keypad is
displayed once you tap the Name
eld.
Adding a new contact
1 Touch Contacts in the
COMMUNICATION tab and touch
Add contact.
2 Choose whether to save the
contact to your Handset or SIM.
3 Enter your first and last name.
4 You can enter up to five different
numbers per contact. Each entry
has a preset type Mobile, Home,
Office, Pager, Fax and General.
5 Add an email addresses. You can
enter up to two different email
addresses per contact.
21

Contacts
6 Assign the contact to one or more
groups. You can assign up to
three groups per contact. Choose
between No group, Family,
Friends, Colleagues, School or VIP.
7 You can also add a Ringtone,
Birthday, Anniversary, Homepage,
Home address, Company name,
Job title, Company address, Memo
and Livecon.
8 Touch Save to save the contact.
TIP! Birthday widget can be
accessed by selecting the icon
It displays upcoming birthdays
chronologically for the month by
taking birthdays that are saved in
Contacts. This widget also facilitates
communication to a contact that
has birthday by allowing features
such as Call, Messaging and Email.
Creating a group
1 Touch Contacts in the
COMMUNICATION tab. And touch
Groups.
2 Touch Add group or touch
select Add group.
3 Enter a name for your new group.
You can also assign a ringtone to
the group.
22
LG GM360 | User Guide
4 Touch Save.
NOTE: If you delete a group, the
contacts which were assigned to
that group will not be lost. They will
remain in your Contacts.
Changing your contact
settings
You can adapt your contact settings
so that your Contacts suits your own
preferences.
1 Touch Contacts in the
.
COMMUNICATION tab and touch
Settings.
2 From here, you can adjust the
following settings:
Contact list settings - Adjust the
Contacts location, Name display
and Quick command key settings.
Copy - Copy your contacts from
your handset to your SIM or from
your SIM to your handset. You can
choose one at a time, or all at once.
Move - This works in the same way
and
as Copy, but the contact will only
be saved to the location you’ve
moved it to.

Send all contacts via Bluetooth -
Send all of your contacts to another
device using Bluetooth. You will be
prompted to turn on Bluetooth if
you select this option.
Backup contacts - See Backing up
information on your phone.
Restore contacts - See restoring
information on your phone.
Clear contacts - Delete all your
contacts. Choose between Handset
and SIM and touch Ye s if you
are sure you want to wipe your
contacts.
Viewing information
1 Touch Contacts in the
COMMUNICATION tab and touch
Information.
2 From here you can view your
Service dial numbers, your Own
number, your Memory info.
(showing your memory usage) and
My profile.
TIP! To add your own
business card, select My pro le and
enter your details as you would for
any contact. Touch Save to nish.
TIP! Using Save to Contact on
Facebook allows you to see personal
information and status of Facebook
user including name, contact
number, email and photo.
User is not allowed to edit those
information and can update the
information by clicking refresh on
the screen.
Please refer to Linkbook for more
about Save to Contact on Facebook.
23

Messaging
Messaging
Your GM360 combines SMS and MMS
into one intuitive and easy-to-use
menu.
Sending a message
1 Touch Messaging in the
COMMUNICATION tab. And touch
New message to begin composing
a new message.
2 Touch Insert to add an image,
video, sound, template and so on.
3 Touch Recipient at the bottom of
the screen to enter the recipients.
Then enter the number or touch
to select a contact. You can
even add multiple contacts.
4 Touch Send when ready.
WARNING: If an image, video
or sound is added to an SMS it
will be automatically converted to
an MMS and you will be charged
accordingly.
Entering text
There are five ways to enter text:
Keypad, Keyboard, HandwritingScreen, Handwriting-Box,
Handwriting-Double Box.
24
LG GM360 | User Guide
You can choose your input method by
tapping
Touch
icon is only shown when you choose
Keypad as the input method.
Touch
language.
Touch
numbers, symbols and text input.
Use Shift key to change between
capital or lowercase input.
and Input method.
to turn on T9 mode. This
to choose the writing
to change between
T9 mode
The T9 mode uses a built-in dictionary
to recognise the words you’re writing
based on the sequence of keys you’ve
touched. It predicts the word you are
inputting and suggests alternatives.
Handwriting recognition
In Handwriting mode you simply write
on the screen and your GM360 will
convert your handwriting into your
message. Select Handwriting-Screen
or Handwriting-Box according to
your preferred view.
Setting up your email
Touch E-mail in the COMMUNICATION
tab.
If the email account is not set up, start
the email set up wizard and finish it.
You can check and edit settings by
selecting
additional settings that were filled in
automatically when you created the
account.
. You can also check the
Retrieving your emails
You can automatically or manually
check your account for new emails. To
check manually:
1 Touch E-mail in the
COMMUNICATION tab.
2 Touch the account you want to use.
3 Select Inbox
4 To receive an E-mail, choose either
Retrieve or Synchronisation in
Option menu.
Sending an email using your
new account
1 Touch New e-mail and a new email
will open.
2 Complete the message.
3 Touch Send and your email will be
sent.
Changing your email settings
1 Touch E-mail in the
COMMUNICATION tab.
2 Touch
Include message in Fwd. & Reply
Include attachment - Choose to
Auto retrieval in roaming - Choose
and select
settings
and then you can adapt
the following settings:
E-mail accounts
Preferred e-mail
Allow reply e-mail - Choose
to allow the sending of read
confirmation messages.
Request reply e-mail - Choose
whether to request read
confirmation messages.
Retrieve interval - Choose how
often your GM360 checks for new
email messages.
Retrieve amount - Choose the
number of emails to be retrieved at
any one time.
- Choose to include the original
message in your reply.
include the original attachment in
any reply.
whether to retrieve your messages
automatically when abroad
(roaming).
E-mail
25

Messaging
New e-mail notification - Choose
whether to be alerted to new
emails.
Signature - Switch this feature ON
and create an email signature.
Priority - Choose the priority level
of your email messages.
Maximum sending size - Set the
maximum size of sending mail.
E-mail counter - Input the date you
want. You can check emails you
sent during that period.
Message folders
There are five folders in Messaging
menu
.
Inbox - All the messages you receive
are placed into your inbox.
Drafts - If you do not finish writing a
message, you can save what you have
done in this folder.
Outbox - This is a temporary storage
folder while messages are being sent.
Sent items - All the messages you
have sent are placed in this folder.
My folders - Create folders to store
your messages.
26
LG GM360 | User Guide
Changing your text message
settings
Touch Messaging in the
COMMUNICATION tab and touch
Settings. Select Text message. You
can make changes to:
Text message centre - Enter the
details of your message centre.
Delivery report - Slide the switch
left to receive confirmation that your
messages have been delivered.
Validity period - Choose how long
your messages are stored at the
message centre.
Message types - Convert your text
into Te xt , Voice, Fax, X.400 or E-mail.
Character encoding - Choose how
your characters are encoded. This
impacts the size of your messages and
therefore data charges.
Send long text as - Choose to send
long messages as Multiple SMS or
as an MMS.

Changing your multimedia
message settings
Touch Messaging in the
COMMUNICATION tab. Scroll and
choose Settings and Multimedia
message. You can make changes to:
Retrieval mode - Choose between
Home network or Roaming network.
If you then choose Manual you will
receive only notifications of MMS
and you can then decide whether to
download them in full.
Delivery report - Choose to request
and/or allow delivery reports.
Read reply - Choose to request and/or
allow read replies.
Priority - Choose the priority level of
your multimedia message.
Validity period - Choose how long
your messages are stored at the
message centre.
Slide duration - Choose how long
your slides appear on the screen by
default.
Creation mode - Choose to create
multimedia messages freely or
restrictively.
Delivery time - Choose how long to
wait before a message is delivered.
Multi msg centre - Choose or add a
multimedia message centre.
Changing your other settings
Touch Messaging in the
COMMUNICATION tab. And touch
Settings.
Voicemail - Touch
new Voicemail service. Contact
your network operator for more
information about the service they
provide.
Service message - Choose to receive
or block service messages. You can
also set your message security by
creating trusted and untrusted lists of
senders in Service security option.
Message counter - Choose to set
period for counting messages.
Info. service - Choose whether to turn
Cell broadcast on/off and select your
channels and languages.
to add a
27

Social Network Services (SNS)
Social network services (SNS)
Your GM360 has SNS that lets you
enjoy and manage your social
network. You can update your own
SN place status and view your friends’
SN updates.
Touch Social network menu and
select the site as below: Orkut,
Facebook, Twitter, Picasa, Flickr and
Myspace.
TIP! Facebook is a native
application preloaded onto your
phone, and easy to access. Twitter
is a java application based on Java
technology. Other applications
access to the WAP( Wireless
Application Protocol) services.
NOTE: SNS feature is a data intensive
application. An additional costs may
be incurred when connecting and
using online services. Check your data
charges with your network provider.
Facebook
Home: Log in and you will see your
friend’s updated status. Input your
comment about new status or check
others. Touch Options to choose
Refresh, News Feed filter(Status
28
LG GM360 | User Guide
updates, Photo), Delete or Settings.
You can also write comments by
selecting + icon.
Profile: You can select the Wall >
Status updates and write the current
status. See your info detail and upload
the photo by touching Album >
Upload Photo. Choose from Go to
images or Take a picture, and then
input some caption with images.
Friends: You can find many friends
in SNS and view their status. Search
your friends in facebook by selecting
Search tap.
Message: It will show all your SN
messages. You can see the Inbox/Sent
folder, and write a SN message.
TIP! Using Facebook Feed Widget
You can add the facebook feed
widget to your home screen. Drag
the facebook feed widget from
widget tray and touch OK.
If the facebook widget registered
on home screen, it will show
latest 3 feeds from your SN site.
You can also access the facebook
application directly by touching up
the feed widget.

There are SNS on/off, SNS account
login & Delete(logout) in SNS setting.
And SNS can be on/off automatically
by setting a certain period of time in
Auto connection menu.
Linkbook
If the SNS Mode is set to On, you can
save the personal information of your
Facebook contacts, such as name,
phone number, email address, and
photo, into Contacts. Use the Save to
Contact button on Facebook to save
their personal information. You can
check the stored information in the
Contact view. If the SNS Mode is set to
off, SNS information is not displayed
in Contacts list.
29

Camera
Getting to know the viewfinder
Exposure - A low contrast image will
appear foggy, whereas a high contrast
image will appear much sharper.
Zoom - zoom in or zoom out. This
function is enabled depending on the
picture size you take.
Back
Taking a photo
Video mode - Slide
down this icon to
switch to video mode.
Gallery -This enables
Settings - Touch this icon to open the
settings menu. See Using the advanced
settings.
Macro - Switch this on to take close-up
shots.
Flash Status - Set flash light mode to
Auto, Always on, or Always off.
TIP! You can bring up the options by tapping the screen. They automatically
turn o after a few seconds.
30
LG GM360 | User Guide
you to access your
saved photos from
within the camera
mode. Simply touch,
and your gallery will
appear on the screen.

Taking a quick photo
1 Press the key on the right side
of the phone.
2 When the camera has focused on
your subject, touch the
right-centre of the screen to take a
photo. You can also press the
key on the side of the phone firmly.
TIP! To switch to the camera mode
or video mode, slide up/down the
camera or video icon on the centreright of the view nder.
on the
After taking a photo
Your captured photo will appear on
the screen. The name of the image
runs along the bottom of the screen.
Touch to send the photo as a
message, email or via Bluetooth.
Touch to set a Home screen,
contacts, startup or shutdown image.
Touch to edit the photo.
Touch to edit the name of the
selected picture.
Touch to delete the photo you
have just taken and confirm by
touching Ye s . The “Deleted” message
appears.
Touch to move to your gallery.
31

Camera
Using the advanced settings
From the viewfinder, touch
to open all the advanced settings
options.
Size - Change the size of the photo to
save memory space or take a picture
preset to the correct size for a contact.
Select a pixel value from the seven
numerical options: 5M (2560x1920),
3M (2048x1536), 2M (1600x1200), 1M
(1280x960), VGA (640x480), WQVGA
(400x240), QVGA (320x240).
Shot mode - This enables you to
select the two shooting modes.
Colour Effect - Choose a colour tone
to apply to the photo you’re taking.
There are four colour tone options:
Off, Black & White, Negative or Sepia.
White balance - Choose from Auto,
Incandescent, Sunny, Fluorescent
or Cloudy.
Night mode - Useful to use in dark
places.
Self-timer - The self-timer allows you
to set a delay before the camera takes
the picture, after the capture button
is pressed. Choose from 3 seconds, 5
seconds or 10 seconds. Great for the
32
LG GM360 | User Guide
group photo you want to be part of.
Quality - Choose between Super fine,
Fine and Normal. The finer the quality
the sharper a photo will be, but the
file size will increase. This means you’ll
be able to store fewer photos in your
memory.
Focus - Sets the focus of camera.
View mode - Choose between Full
screen or Full image. In Full screen,
the image may be cropped to fit the
screen.
Select storage - Choose whether
to save your photos to the Handset
memory or to the External memory.
Show captured image - Choose to
view the picture with options after
taking a photo.
Hide icons - Choose the camera
settings icons to be hidden manually
or automatically.
Shutter sound - Select one of the
three shutter sounds.
Grid screen - Choose from Off, Simple
cross or Trisection.
Reset settings - Reset all the camera
settings.

Video camera
Getting to know the viewfinder
Image size
Zoom - zoom in or zoom out.
Settings - Touch this icon to open the
settings menu. See Using the advanced
settings.
Video size - Choose from QVGA(320x240)
or QCIF(176x144).
Flash Status - Set or turn off the flash.
Exposure - A low contrast video will
appear foggy, whereas a high contrast
video will appear much sharper.
TIP! You can close all shortcut options for a
clearer view nder screen. Simply touch the centre of the view nder once. To
recall the options, touch the screen again.
Saving to handset memory/
external memory
Back
Camera mode - Touch
this icon to switch to
camera mode.
Start recording
Gallery
Video mode - Video
mode is selected.
33

Video camera
Making a quick video
1 Press the camera key on the
right side of the phone for a few
seconds.
TIP! To switch to the camera mode
or video mode, slide up/down the
camera or video icon on the right
centre of the view nder.
2 Holding the phone horizontally,
point the lens towards the subject
of the video.
3 Press the camera key on the
phone once to start recording. Or
touch the red dot
4 Rec will appear at the bottom of
the viewfinder with a timer at the
bottom showing the length of the
video.
5 To pause the video, touch
resume by selecting
6 Touch
the a second time to stop
recording.
34
LG GM360 | User Guide
.
.
on screen or press
After making a video
A still image representing your
captured video will appear on the
screen. The name of the video runs
along the bottom of the screen
together with seven icons down the
left and right sides .
Touch to play the video.
Touch to send the video as a
Message or Email or by Bluetooth.
Touch to edit the video.
Touch to edit the name of the
selected picture.
Touch to delete the video you
have just made and confirm by
touching Ye s . The viewfinder will
reappear.
Touch
to shoot another video
straight away.
and
Touch to view a gallery of saved
videos and images.
 Loading...