

Page 1
USER GUIDE
ENGLISH
Copyright ©2019 LG Electronics Inc. All rights reserved.
MFL71669201 (1.0)
www.lg.com
Page 2

About this user guide
Thank you for choosing this LG product. Please carefully read this user
guide before using the device for the first time to ensure safe and proper
use.
• Always use genuine LG accessories. The supplied items are designed
only for this device and may not be compatible with other devices.
• Descriptions are based on the device default settings.
• Default apps on the device are subject to updates, and support for
these apps may be withdrawn without prior notice. If you have any
questions about an app provided with the device, please contact an
LG Service Center. For user-installed apps, please contact the relevant
service provider.
• Modifying the device’s operating system or installing software from
unofficial sources may damage the device and lead to data corruption
or data loss. Such actions will violate your LG licence agreement and
void your warranty.
• Some content and illustrations may differ from your device, depending
on the area, service provider, software version, or OS version, and are
subject to change without prior notice.
• Software, audio, wallpaper, images, and other media supplied with
your device are licenced for limited use. If you extract and use these
materials for commercial or other purposes, you may be infringing
copyright laws. As a user, you are fully responsible for the illegal use of
media.
• Additional charges may incur for data services, such as messaging,
uploading, downloading, auto-syncing and location services. To avoid
additional charges, select a data plan suitable to your needs. Contact
your service provider to obtain additional details.
• Failure to follow the instructions in this guide and improper use may
damage the device.
1
Page 3
Instructional notices
WARNING: Situations that could cause injury to the user and third
CAUTION: Situations that may cause minor injury or damage to the
NOTE: Notices or additional information.
parties.
device.
2About this user guide
Page 4

Table of contents
01
Custom-designed
Features
7 Camera features
10 Gallery features
16 Floating Bar
19 Google Assistant
21 HD Audio Recorder
23 Fingerprint recognition
27 Multi-tasking feature
28 AOD (always-on display)
29 Notes on Water Resistant
Properties
02
Basic Functions
33 Product components and
accessories
34 Parts overview
37 Getting to Know Stereo Ear
Microphone
38 Turning the power on or off
39 Installing the SIM card and
memory card
41 Removing the memory card
41 Battery
45 Touch screen
49 Home screen
59 Screen lock
63 Memory card encryption
65 Entering text
72 Content sharing
74 Do not disturb
3
Page 5

03
04
Useful Apps
76 Installing and uninstalling apps
78 App Shortcuts
79 Phone
84 Messages
88 Camera
118 Gallery
123 Contacts
126 QuickMemo+
128 Clock
129 Music
130 Game Launcher
130 Calculator
131 LG Health
133 LG Mobile Switch
133 App trash
134 SmartWorld
134 Google apps
Settings
138 Settings
138 Network & internet
146 Connected devices
151 Sound
153 Display
155 Lock screen & security
157 Extensions
161 Digital Wellbeing
161 Apps & notifications
161 Battery
162 Storage
162 Accounts
163 Google
166 Accessibility
4Table of contents
Page 6

05
07
Appendix
170 LG Language Settings
170 LG Bridge
171 Phone software update
173 Anti-Theft Guide
174 Open Source Software Notice
Information
174 Regulatory information
(FCC ID number, etc.)
175
Trademarks
176 Laser safety statement
177 More information
179 FAQ
06
For Your Safety
LIMITED WARRANTY
STATEMENT
08
LG Dual Screen (LMV515N)
215 Getting to Know LG Dual Screen
216 Guidelines for safe and efficient
use
221 Product components and
accessories
222 Parts overview
223 Inserting the mobile phone to
Dual Screen
225 Removing the mobile phone
from Dual Screen
228 Using Charging Adapter
230 Using the Dual Screen
251 Trademarks
251 More information
5Table of contents
Page 7

01
Custom-designed
Features
Page 8
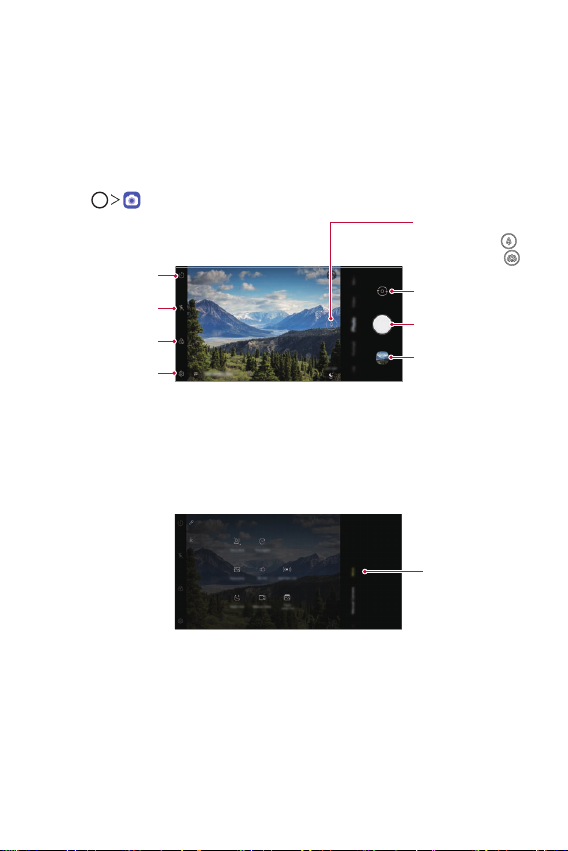
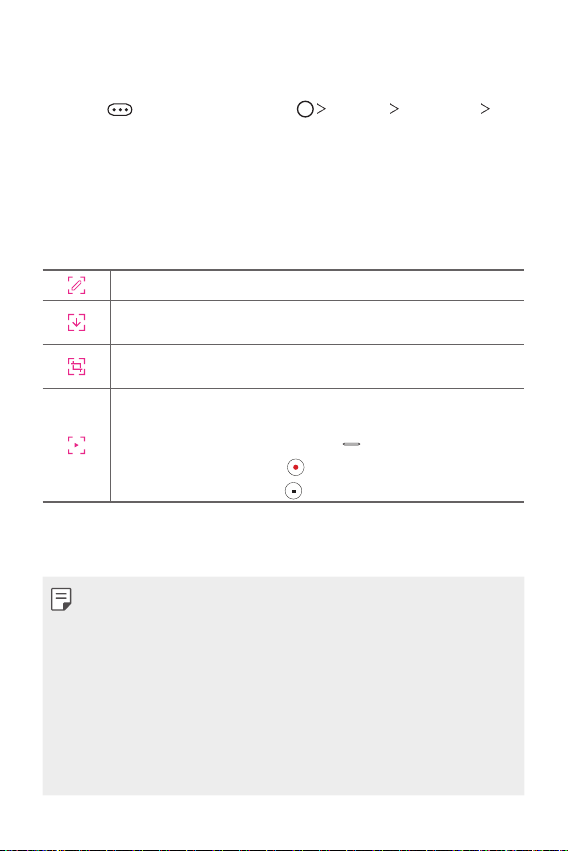
Camera features
Switch between
Main features
This chapter describes the main features that the camera app provides.
Open the camera and explore various features.
Tap .
1
standard angle
and wide-angle
Change timer
settings
Change flash
settings
Apply filter/sticker
Set camera options
2
effects
Tap More on the camera screen to view various camera modes.
• Select a desire mode from Night view, Panorama, Story shot,
Manual Video, Slo-mo, Time-lapse, Flash Jump-Cut and YouTube
Live.
cameras
Switch between front
and rear cameras
Take photos
Open Gallery
Tap More
Custom-designed Features 7
Page 9
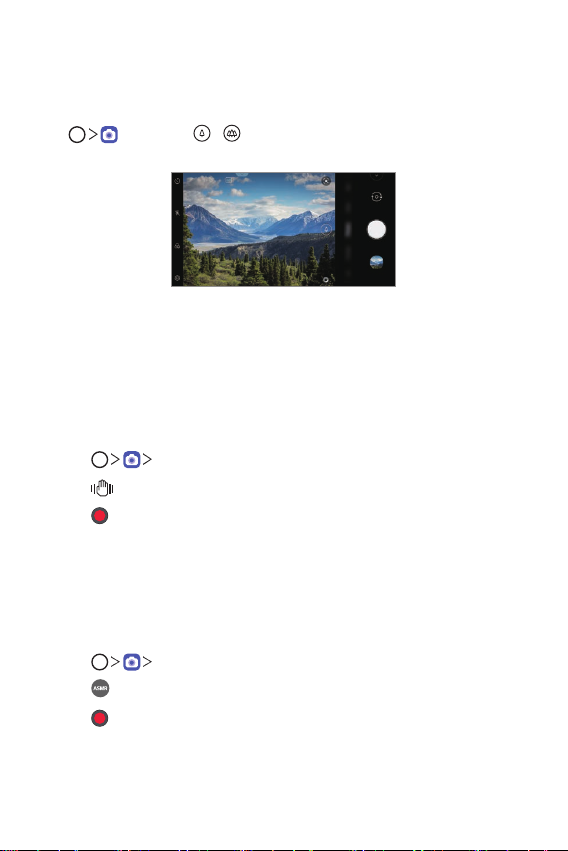
Dual cameras
The dual cameras, which are located on the back of the device, allow you
to take photos or record videos with two different angles of view.
, and select / while taking photos or recording videos
Tap
with the rear camera.
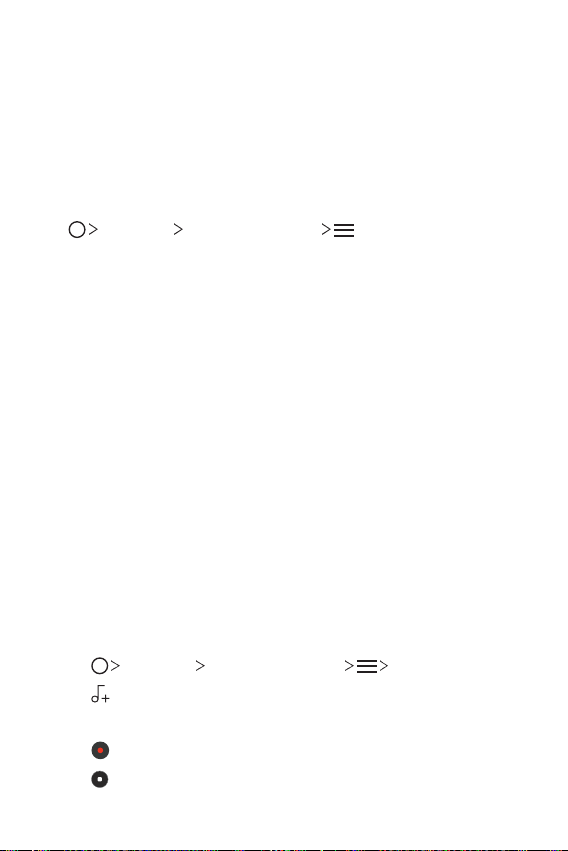
Rear Camera
Steady recording
Use Steady recording to prevent the camera from shaking when recording
a video while walking or making large movements.
Activate Anti-shake to reduce or eliminate motion blur in videos.
Tap Video.
1
Tap .
2
Tap to record a video.
3
Recording ASMR
With the high-sensitivity microphone installed on the device, you can pick
up even the softest sound to record an ASMR video with vivid and clear
sound quality.
Tap Video.
1
Tap to activate the function.
2
Tap to start recording an ASMR video.
3
Custom-designed Features 8
Page 10
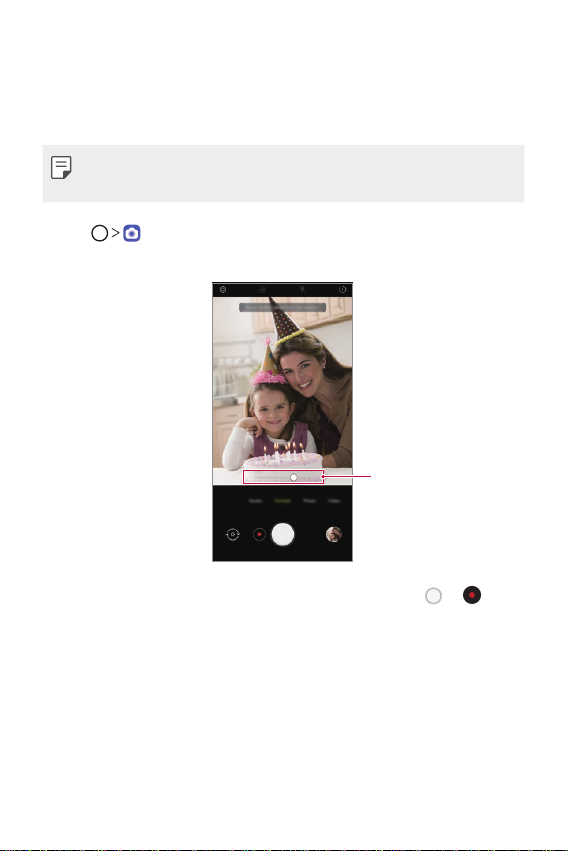
Portrait
You can create an artistic portrait photo, whereby the subject is in focus
and the background is blurred. You can also edit the image by applying
lighting or color effect to the background.
• While taking a photo, keep the distance to your subject to 1.3 ~ 5 feet.
• This feature is not available if the surroundings are too dark.
Tap , and tap Portrait.
1
Drag the slide bar to the left or right to adjust the blur strength.
2
Adjust blur strength.
When Portrait is available. appears on the screen, tap or to
3
take a photo.
• The Portrait feature may not work if the camera cannot recognize
the subject.
Custom-designed Features 9
Page 11
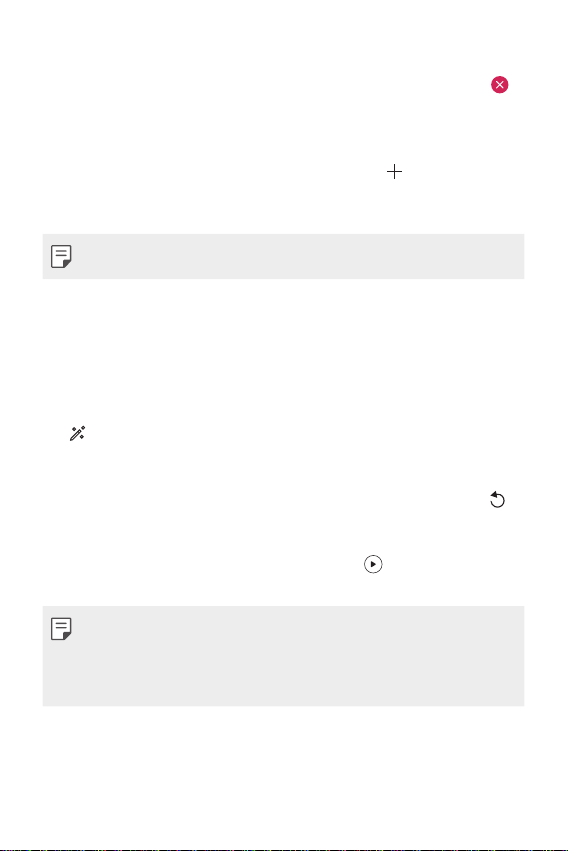
Gallery features
Related content
You can edit and customize related content in the Gallery.
While viewing a picture preview, tap .
1
When the date or location icon appears with related contents, tap the
2
desired icon.
• A video clip is automatically created with related contents selected
according to your choice.
to access additional options.
• Tap
Making a GIF
You can create a GIF file from Gallery.
While viewing an album, tap Create GIF.
1
Custom-designed Features 10
Page 12
Select the desired photos and videos to create a GIF file and then tap
2
NEXT.
• You can also add/delete a photograph, adjust the speed or screen
ratio, set the photograph order, etc.
Tap SAVE.
3
• A maximum of 100 images can be used to create a GIF file.
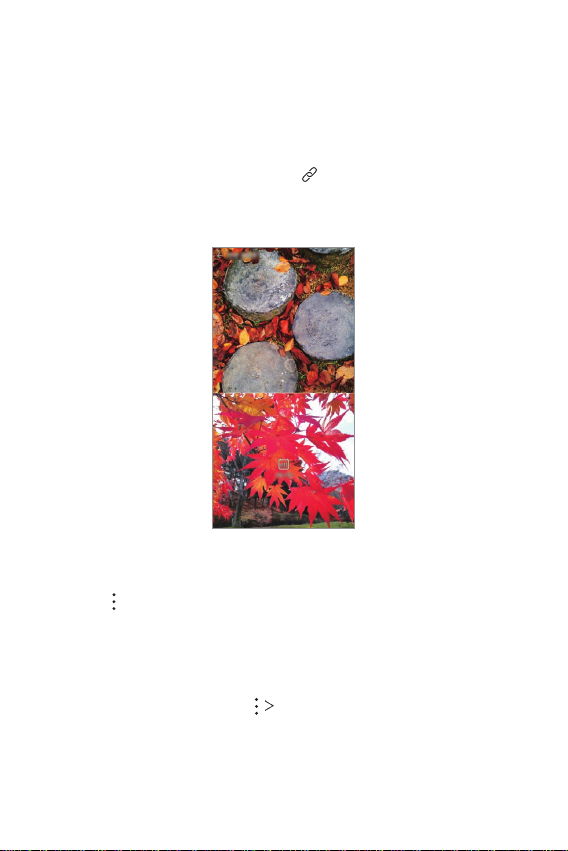
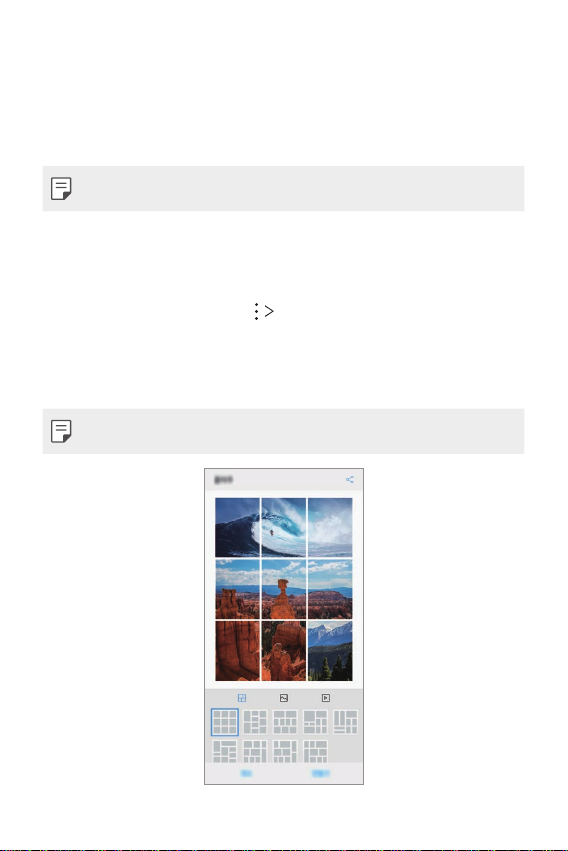
Making a collage
You can make a collage from the associated content.
While viewing an album, tap Make collage.
1
Select the desired images to add to the a collage and then tap NEXT.
2
• Select the desired layout from the bottom of the screen.
Tap MAKE.
3
• A maximum of 9 images can be used to create a collage.
Custom-designed Features 11
Page 13
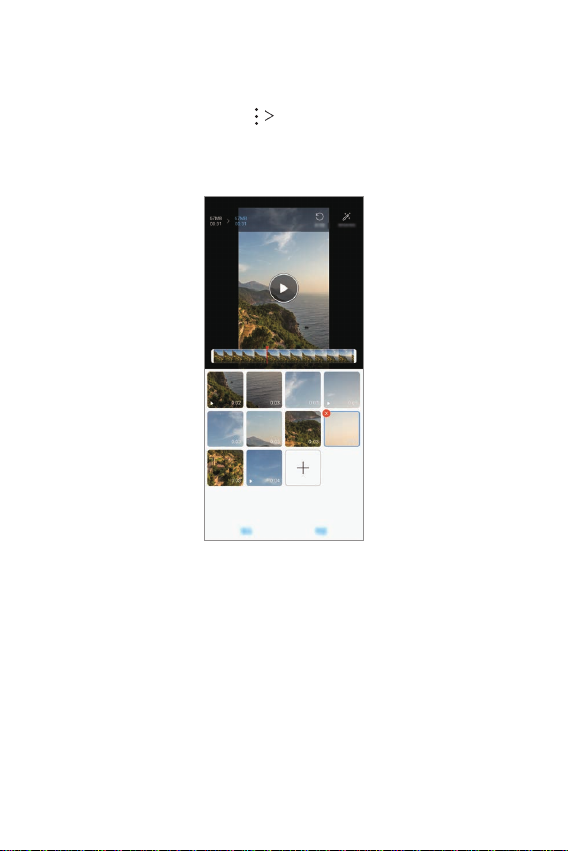
Creating a movie
You can create a new movie by putting images and videos together.
While viewing an album, tap Create movie.
1
Select images or videos for your movie and tap Next.
2
Edit the selected images and videos and then tap Save.
3
Custom-designed Features 12
Page 14
Deleting files
You can select images or videos to delete from your video by tapping
at the top right corner of its thumbnail.
Adding files
You can select images or videos to add after tapping at the bottom
of the screen. You can also select the images or videos you have already
previously added.
• Touch and hold a file, and then tap another file for multiple selection.
Rearranging files
To rearrange the images and videos, touch and hold the file you want to
move, then dragging it to the desired location.
Adding file effects
Tap to add a theme or background music, or change the font.
Resetting the movie edits
You can reset the edits made to the movie (e.g. play time) by tapping .
Previewing a file
Check your new video before saving it by tapping . After the playback
time elapses, the next file is played automatically.
• A maximum of 50 images and videos can be used to create a video.
• The playback time for an image is 3 seconds by default and it cannot be
changed. Videos can be trimmed down to a minimum of 1 second.
• This feature may not support some image or video formats.
Custom-designed Features 13
Page 15
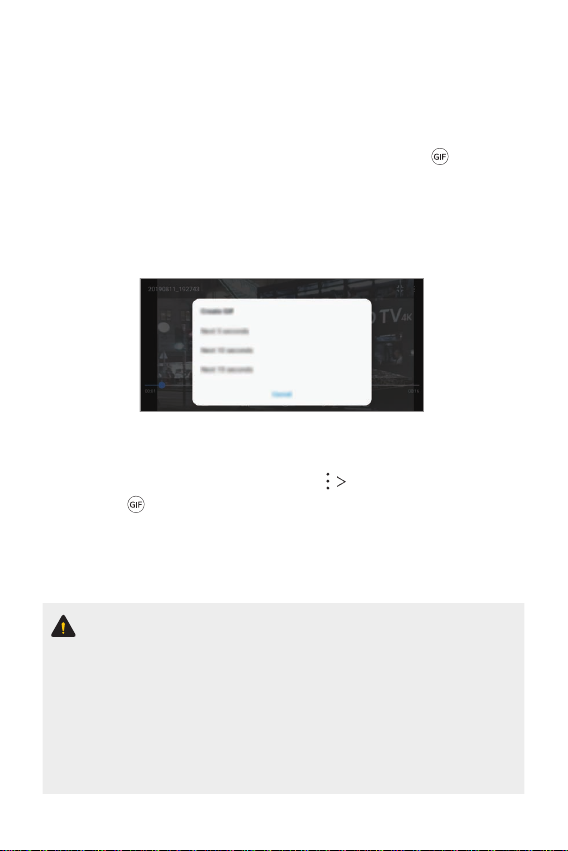
Making a GIF
You can easily make a GIF file using recorded video.
Creating video
At the desired starting point while watching a video, tap .
1
Select the length of the GIF you want to create.
2
• GIF is generated for the time selected from the current time.
• For videos less than 5 seconds, GIF images are automatically
generated for the remaining time.
Creating GIF Photographs
In the photograph list in the gallery, tap Create GIF.
1
• Or, tap
Select a picture to turn into a GIF photograph, and then tap Next.
2
• You can add/delete a photograph, adjust the speed or screen ratio,
and set the photograph order.
under the Play tab in the gallery.
• Creating GIF photographs is a function provided for the user to produce
creative images. Violating rights such as intellectual property right
or defaming the reputation of another person by using the creating
GIF photographs function may lead to a civil or criminal liability in
accordance with the related laws. Be cautious not to copy or transmit
another person’s work without authorization. LG Electronics is not liable
in any way for such acts by users.
• You can select up to 100 copies to produce when you create a GIF
photograph.
Custom-designed Features 14
Page 16

Sound quality and effects
DTS:X 3D Surround
You can play a song or video in three-dimensional, immersive and vivid
sound. To use this feature, connect earphones, speaker or other external
audio devices to your device.
Settings Sound Sound quality and effects, then tap DTS:X
Tap
3D Surround
• You can also bring down the status bar from the top of the screen and
tap the icon for DTS:X 3D Surround to activate the function.
If you connect external sound devices such as earphones and speakers
to your device, a pop up appears where you can turn on the DTS:X 3D
Surround or Hi-Fi Quad DAC function.
to activate this feature.
Custom-designed Features 15
Page 17
Floating Bar
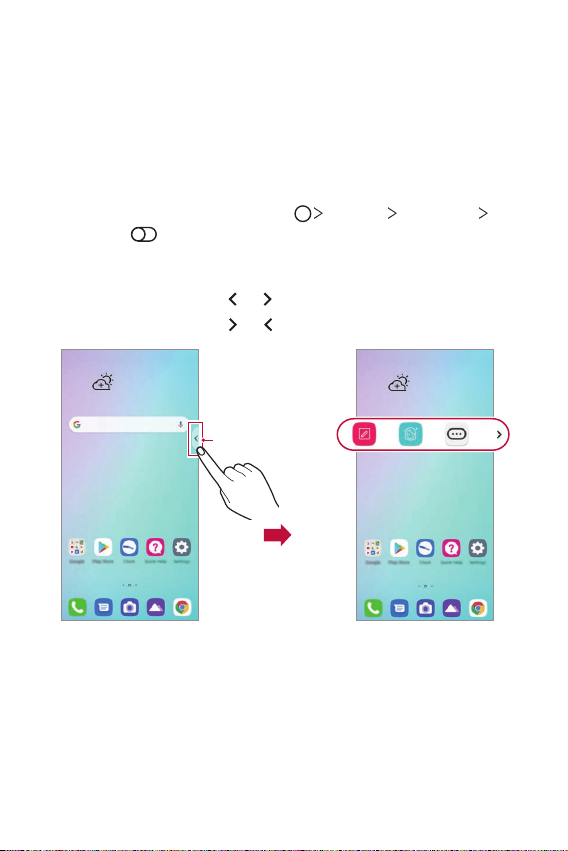
Floating Bar overview
You can access frequently used features, including shortcuts, screen
capture, music player, and quick contacts, by touching and then swiping
Floating Bar on the screen.
To enable the Floating Bar feature, tap
Floating Bar
.
Opening and closing Floating Bar
• To open Floating Bar: Tap or .
• To close Floating Bar: Tap
or .
Floating Bar
Settings Extensions
Custom-designed Features 16
Page 18
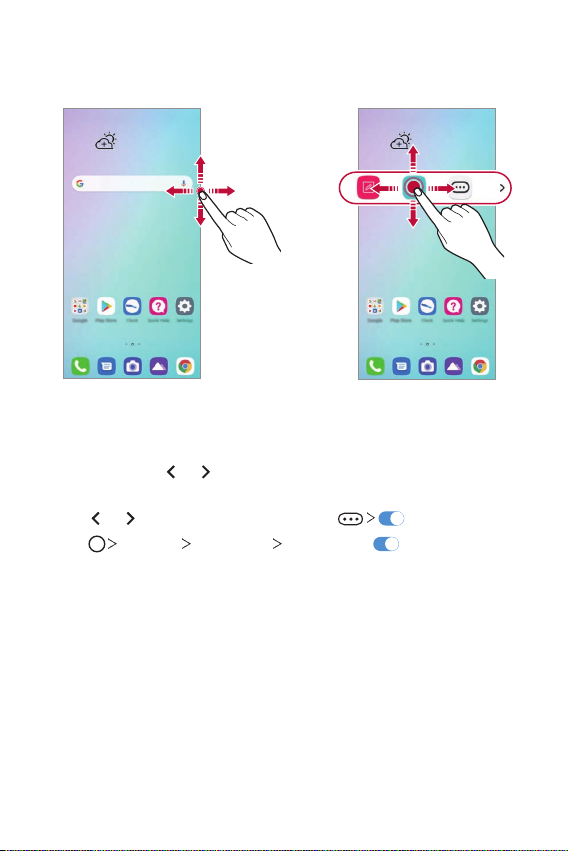
Moving the Floating Bar position
Touch and hold Floating Bar, then drag it to a desired location.
Disabling Floating Bar
You can disable Floating Bar by using one of the following methods:
• Touch and hold
area at the top of the screen.
or to open Floating Bar, then tap .
• Tap
Settings Extensions Floating Bar .
• Tap
or on Floating Bar and then drag it to the Hide
Custom-designed Features 17
Page 19
Setting Floating Bar
You can select features to display on Floating Bar and change their display
order. Tap
Floating Bar.
• Position: You can set an area within which you can move the floating
bar.
• Shortcuts: Quickly access frequently used apps or features.
• Screen capture: Capture the screen to crop the desired part or to
create a GIF file.
• Music player: Control the music you are listening to.
• Quick contacts: Call or message people set as quick contacts.
from Floating Bar or tap Settings Extensions
You can use Capture+ on the desired screen.
You can capture a scrolling screenshot and use it for Q Memo+ or
save it in the gallery.
You can capture a desired area and use it for Q Memo+ or save it in
the gallery.
Save a current screen as a GIF file. You can adjust the size of the
image you want to capture.
•To move to the desired location, drag
•To start recording a GIF, tap
•To stop recording a GIF, tap
• A maximum of 5 apps or features can be added to the shortcuts.
• A maximum of 5 contacts can be added as quick contacts.
• GIF capture is a function provided for the user to produce creative
images. Violating rights such as intellectual property right or defaming
the reputation of another person by using the GIF capture function may
lead to a civil or criminal liability in accordance with the related laws.
Be cautious not to copy or transmit another person’s work without
authorization. LG Electronics is not liable in any way for such acts by
users.
• A GIF can be created up to 15 seconds long.
.
.
.
Custom-designed Features 18
Page 20
Google Assistant
Google Assistant overview
Your device has the built-in Google Assistant feature. Find answers and
get things done while on-the-go.
• To use this feature, first connect to the network and sign in to your
Google Account.
Launching Google Assistant
Touch and hold from the Home screen to launch Google Assistant
1
or press the Google Assistant key on the left side of the device.
Tap GET STARTED.
2
Follow the on-screen instructions and say “Ok Google”or “Hey
3
Google”.
• The device saves your voice data for recognition.
Set whether to use the voice match unlock function.
4
• If you use the voice match unlock function, you can unlock the
device even when the device screen is turned off or the device is
charging by saying “OK Google” or “Hey Google.”.
Custom-designed Features 19
Page 21

• This feature may be more vulnerable to security than the other screen
locks, such as Pattern, PIN, and Password.
When a similar voice or your recorded voice is used, the screen may be
unlocked.
• To use this feature, tap
Secure lock settings
method you set to unlock the device. Tap Voice Match, then tap Access
with Voice Match
again. Note that Swipe is excluded.
• You need to unlock the device by using the specified method if you fail
to unlock the device with voice recognition. See
for details.
Tap Save.
5
Settings Lock screen & security
Smart Lock, and then use the screen lock
, then enter the currently used unlock method
Setting a screen lock
Accessing by Voice
When the home screen is turned off or locked, say “OK Google” or
1
“Hey Google.”.
When the Google Assistant screen appears, say a command or ask a
2
question.
Accessing from Home Screen
Touch and hold on the Home screen.
1
Say a command or question when you see on the bottom of the
2
screen.
• In an environment where wireless performance of Wi-Fi or mobile data
is poor, the Google Assistant function may be restricted and the speech
recognition accuracy rate may be lowered.
• If the speech is ambiguous, the microphone is covered, a media player is
playing, or the surrounding is loud, the speech recognition accuracy rate
may be lowered. When you are using the product via voice commands,
say with accurate pronunciation in a quite environment for better
speech recognition accuracy rate.
Custom-designed Features 20
Page 22
HD Audio Recorder
The HD Audio Recorder allows you to configure the audio settings
manually so that you can record audio based on your environment.
Recording modes
You can record a high definition audio file by selecting and configuring the
desired audio mode to suit the recording environment.
Essentials HD Audio Recorder .
Tap
Normal
You can record audio without extra settings.
ASMR
You can use a highly sensitive microphone to record minute details of the
sound vividly.
Concert
You can record audio in a concert or other music event.
Custom
You can manually configure the desired settings to record audio.
Studio Mode
With Studio mode, you can play an audio file or music and record your
voice at the same time, create a chord by recording your voice multiple
times, and record your comments over the presenter’s or speaker’s original
audio file.
Tap Essentials HD Audio Recorder Custom.
1
Tap .
2
Select an audio file to use as background music.
3
Tap to record voice.
4
Tap
5
Custom-designed Features 21
to save the recorded file.
Page 23
• Background music can only be played through earphones. Make sure to
plug in earphones before using this feature.
Other useful features of the HD Audio Recorder app
GAIN
You can adjust the sensitivity of the sound recorded by the microphone.
The higher the GAIN value is set, the more sensitively the sound is
recorded.
LCF
You can filter any low-pitched noises such as the low hum of the air
conditioner.
The higher the LCF (Low Cut Filter) value is set, the better high-frequency
noises are filtered.
LMT
It can prevent clipping of the recorded sound.
The higher the LMT (Limiter) value is set, the more low frequency sounds
that will not get clipped.
• To change additional settings, tap Settings, then customize the file
type, bit depth, sampling rate and other settings.
• When you select the Concert or Custom mode with earphones
connected,
• You can monitor the the sound quality with the connected earpiece
while recording audio. While recording audio in Studio mode, sound
monitoring is not supported. You can hear only the background music.
appears. Tap. and then select the microphone to use.
Custom-designed Features 22
Page 24
Fingerprint recognition
Fingerprint recognition overview
You must register your fingerprint on your device first before using the
fingerprint recognition function.
You can use the fingerprint recognition function in the following cases:
• To unlock the screen.
• To access locked contents in Gallery or QuickMemo+.
• Confirm a purchase by signing in to an app or identifying yourself with
your fingerprint.
• You can use fingerprint data for user authentication. There is a
possibility that the fingerprint sensor might recognize a different but
very similar fingerprint as the same registered fingerprint. To strengthen
security, it is recommended that you use the pattern, PIN, or password
method for unlocking the screen.
• If the device cannot detect your fingerprint, or you forgot the value
specified for registration, visit the nearest LG Customer Service Center
with your device and ID card.
Precautions for fingerprint recognition
Fingerprint recognition accuracy may decrease due to a number of
reasons. To maximize the recognition accuracy, check the following before
using the device.
• At the bottom center of the product’s screen, there is a built-in sensor
that recognizes fingerprints. Be careful not to scratch or damage the
fingerprint sensor with metal objects such as coins or keys.
• If there are foreign substances (sweat, lotion, water, dirt, grease, etc.)
on the fingerprint sensor or on the finger to be put on the sensor,
fingerprint recognition may not work properly. Wipe the sensor and the
finger clean and remove all moisture before putting the finger on the
sensor.
Custom-designed Features 23
Page 25
• If the finger’s surface is rough due to it being scarred or pruney from
water, the sensor may not be able to recognize the fingerprint. In such
a case, register another finger’s fingerprint.
• If you bend your finger or use the fingertip only, your fingerprint may
not be recognized. Make sure that your finger covers the entire surface
of the fingerprint sensor.
• Scan only one finger for each registration. Scanning more than one
finger may affect fingerprint registration and recognition.
• The device may generate static electricity if the surrounding air is dry.
If the surrounding air is dry, avoid scanning fingerprints, or touch a
metallic object such as a coin or a key before scanning fingerprints to
remove static electricity.
Registering fingerprints
You can register and save your fingerprint on the device to use fingerprint
identification.
Tap Settings Lock screen & security Fingerprints.
1
• A lock screen must be set in order to be able to use this feature.
• If the screen lock is not active, configure the lock screen by following the
on-screen instructions. See
Check the location of the fingerprint sensor at the bottom center of
2
the screen, and lightly place your finger on the sensor.
• Make sure that the finger fully covers the fingerprint sensor.
Setting a screen lock
for details.
Custom-designed Features 24
Page 26
Follow the on-screen instructions.
3
• Place your finger on the sensor and hold it until you feel a vibration.
• Move the same finger around on the sensor a little by little until the
fingerprint registration is complete.
When the fingerprint registration is done, tap OK.
4
• Tap ADD MORE to register another fingerprint. Since the
fingerprint recognition success rate depends on the condition of the
registered fingerprint, it is recommended that you register several
different fingerprints.
Managing fingerprints
You can edit or delete registered fingerprints.
Tap Settings Lock screen & security Fingerprints.
1
Unlock according to the specified lock method.
2
From the fingerprint list, tap a fingerprint to rename it. To delete it, tap
3
.
Custom-designed Features 25
Page 27
Displaying the fingerprint icon when the
screen is off
You can set to display the fingerprint sensor location on the screen when
the screen is off.
Tap Settings Lock screen & security Fingerprints.
1
Unlock according to the specified lock method.
2
Tap Tap to show icon when screen is off to enable the option.
3
Unlocking the screen with a fingerprint
You can unlock the screen or view locked contents by using your
fingerprint. Activate the desired function:
Tap Settings Lock screen & security Fingerprints.
1
Unlock according to the specified lock method.
2
On the fingerprint settings screen, activate the desired function:
3
• Screen lock: Unlock the screen with a fingerprint.
• Content lock: Unlock contents you have locked in Gallery and
QuickMemo+ with a fingerprint.
Custom-designed Features 26
Page 28
Multi-tasking feature
Multi window
You can use two apps at the same time by separating the screen into the
multiple windows.
Tap from the Home touch buttons.
1
• Recently-used apps appear.
Tap at the top of the desired app to use the Multi window feature.
2
• The selected app appears at the top half of the screen.
Recent Uses Screen
You can view the app screens that you used recently by using the
overview function.
To view the list of apps that you used recently, tap
buttons.
You can also swipe the Home button upward to view the recent use
history if you enable the option by tapping
Home touch buttons
Gesture and buttons.
of the home touch
Settings Display
Custom-designed Features 27
Page 29
AOD (always-on display)
You can view the date, time or signature when the main screen is turned
of f.
Swipe the bottom of the AOD (always-on display) screen to activate
features including Camera, Capture+, Wi-Fi, sound settings, Bluetooth
Flash, Music and more.
Settings Display AOD (always-on display).
Tap
• Tap the desired image among Digital clock, Analog clock, Dual clock,
Signature or Image, configure its settings as desired, then tap Save.
• Tap Quick tools & music player
Quick tools and the music player.
• Tap AI Pick
to see useful information provided based on Context
Awareness.
• To set a daily time to turn off the AOD (always-on display) feature, tap
Daily timeout.
• To enhance brightness for the AOD (always-on display) feature, tap
Brighter display.
• The battery may drain faster when you use AOD (always-on display).
Turn this feature off to save battery power.
• To deactivate AOD (always-on display) feature, tap
Display
AOD (always-on display), and then tap .
to swipe over the status icons for
Settings
®
,
Custom-designed Features 28
Page 30
Notes on Water Resistant
Properties
This product is water and dust resistant in compliance with the Ingress
Protection rating IP68.
Your product has undergone testing in a controlled environment and is
proven to be water and dust resistant in certain circumstances (meets
the requirements of classification IP68 as described by the international
standard IEC 60529 - Degrees of Protection provided by Enclosures [IP
Code];testconditions:15-35ºC,86-106kPa,1.5meter,for30minutes).
Do not expose the device in conditions that are different from the test
conditions. Results may vary in actual use.
WARNING
Despite a rating of IP68, your device is not impervious to conditions not
tested in LG’s controlled environment. Please note that any damages that
occur due to such causes changes the color of the LDI (Liquid Damage
Indicator). If the color of LDI located inside the product changes, the
product may be considered ineligible for any free-of-charge repair services
provided under the product’s limited warranty.
Avoid excessive dust or moisture as it may cause damages to the LDI
or other internally sealed components and therefore may render your
product ineligible for repair services provided under the product’s limited
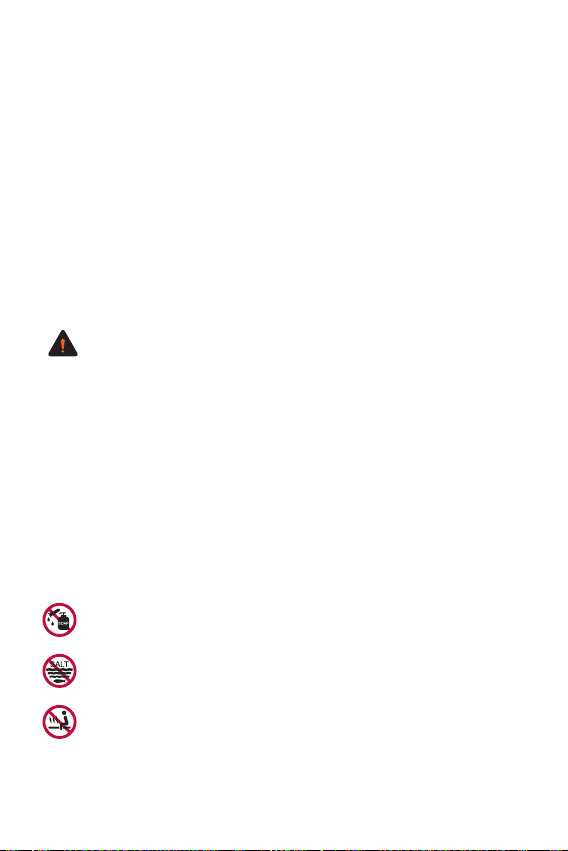
warranty. Do not use the product in the following environments.
Do not immerse the product in any liquid chemicals (soap, etc.)
other than water.
Do not immerse the product in salt water, including seawater.
Do not immerse the product in a hot spring.
Custom-designed Features 29
Page 31

Do not swim with this product.
Do not place the product directly on sand (such as at a beach) or
mud.
Do not immerse your product in water deeper than approximately
1.5 meters.
Do not immerse your product in water for longer than 30 minutes.
• If your product becomes wet be sure to wipe the microphone, speaker,
and stereo jack with a dry cloth before use.
• Should your product or your hands become wet, dry them before
handling the product.
• Do not use the product in places where it may be sprayed with high
pressure water (e.g. near a faucet or shower head) or submerge it in
water for extended periods of time, as the product is not designed to
withstand high water pressure.
• This product is not resistant to shock. Do not drop the product or
subject it to shock. Doing so might damage or deform the main unit,
causing water leakage.
• The product’s water and dust resistant features may be damaged by
dropping or receiving an impact.
• If the product gets wet, use a clean, soft cloth to dry it thoroughly.
• The touch screen and other features may not work properly if the
device is used while wet.
• Your product is water resistant only when the SIM/Memory card tray is
properly inserted into the product.
• Do not open or close the SIM/Memory card tray while the product is
wet or immersed in water. Exposing the open tray to water or moisture
may damage the product.
• The SIM/Memory card tray contains rubber [packing] to help prevent
dust, water, or moisture from entering the product. Do not damage the
rubber [packing] as this may allow dust, water, or moisture to enter
your product and cause damage.
Custom-designed Features 30
Page 32

• Failure to follow the provided instructions may invalidate your device’s
limited warranty.
• If the device is wet, the LDI located inside the device changes in color. In
this case, the device is ineligible for any free-of-charge repair services
provided under the device’s limited warranty.
• Despite a rating of IP68, your device is not completely impervious to
water in any situation.
Custom-designed Features 31
Page 33

02
Basic Functions
Page 34

Product components and
accessories
The following items are included with your device.
• Device
• Stereo headset
• USB cable
• Jelly Phone Case
• The items described above may be optional.
• The items supplied with the device and any available accessories may
vary depending on the area and service provider.
• Always use genuine LG Electronics accessories. Using accessories made
by other manufacturers may affect your device's call performance or
cause malfunctions. This may not be covered by LG's repair service.
• Some of the device parts are made of tempered glass. If you drop your
device on a hard surface or subject it to severe impact, the tempered
glass may be damaged. If this happens, stop using your device
immediately and contact an LG Customer Service Center.
• If any of these basic items are missing, contact the dealer from which
you purchased your device.
• To purchase additional items, contact an LG Customer Service Center.
• Some items in the product box are subject to change without notice.
• The appearance and specifications of your device are subject to change
without notice.
• Device specifications may vary depending on the area or service provider.
• Remove the protective film from the Fingerprint sensor before use of
the fingerprint recognition feature.
• Ejection pin
• Charger
• Quick Start Guide
Basic Functions 33
Page 35

Parts overview
Front camera lens
Proximity/Ambient light
Nano-SIM card tray
Volume keys (+/-)
Google Assistant key
Stereo headset jack Charger/USB cable port
Rear camera lenses
sensor
Earpiece
Microphone
Power/Lock key
Touch screen
Fingerprint sensor
Flash/Flicker Sensor
NFC
Wireless charging
antenna area
Speaker
Microphone
Basic Functions 34
Page 36

Do NOT attempt to remove the back cover by yourself.
Doing so may severely damage the battery and device, which could cause
overheating, fire, and injury. This device’s back cover and battery are not to
be removed or replaced by a non-qualified professional.
• Proximity/Ambient light sensor
- Proximity sensor: During a call, the proximity sensor turns off the
screen and disables touch functionality when the device is in close
proximity to the human body. It turns the screen back on and enables
touch functionality when the device is outside a specific range.
- Ambient light sensor: The ambient light sensor analyzes the ambient
light intensity when the auto-brightness control mode is turned on.
• Volume keys
- Adjust the volume for ringtones, calls or notifications.
- While using the Camera, gently press a Volume key to take a photo.
To take continuous photos, press and hold the Volume key.
- Press the Volume Down key twice to launch the Camera app when
the screen is locked or turned off. Press the Volume Up key twice to
launch Capture+.
• Power/Lock key
- Briefly press the key when you want to turn the screen on or off.
- Press and hold the key when you want to select a power control
option.
• Google Assistant key
- You can press it to run Google Assistant.
Google Assistant
- See
for details.
• Fingerprint sensor
- You can use the fingerprint sensor at the bottom center of the
screen to use the fingerprint recognition function. See
recognition overview
for details.
Fingerprint
Basic Functions 35
Page 37

• Some functions may be restricted depending on the region and product
Good example Bad example
Do not cover
specifications of different telecommunications providers.
• There are NFC chip and wireless charging antennas built into the rear
part of the product. Be careful not to damage or cover the NFC chip or
wireless charging antennas.
• Do not put heavy objects on the device or sit on it. Failure to do so may
damage the touch screen.
• Screen-protective film or accessories may interfere with the proximity
sensor.
• If your device is wet or is being used in a humid place, the touch screen
or buttons may not function properly.
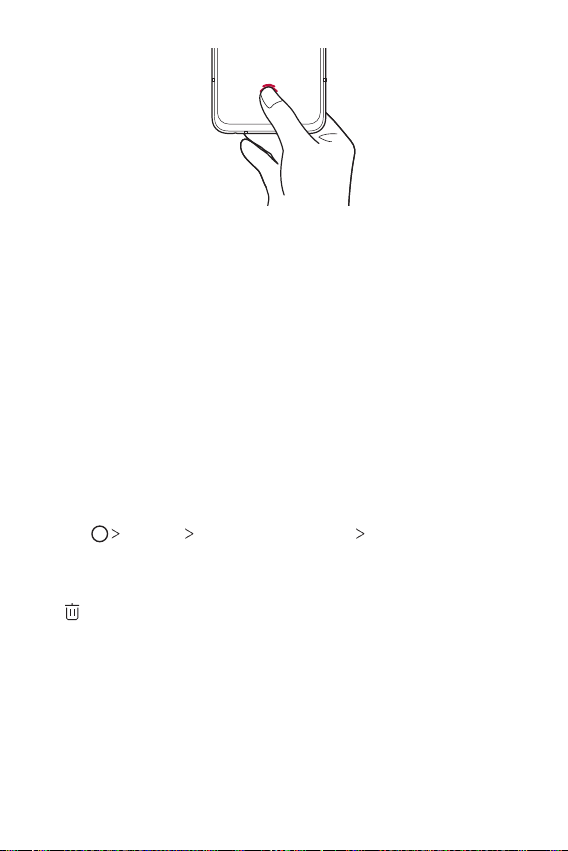
There are two microphones built into this product. Be careful not to cover
the microphones. While you are talking on the phone, do not cover the
microphone with your hand or fingers.
Do not use a phone case that is not a genuine product or cover the
microphone with accessories, tape, etc.
Hold the product correctly as shown in the image when you are using it.
Microphone
Do not cover the microphone.Microphone
Basic Functions 36
the
microphone.
Page 38

Getting to Know Stereo Ear
Microphone
You can connect the stereo ear microphone to the device to use it when
you talk on the phone, listen to music, record voice, etc.
• Check the left and right earpieces, and insert them into ears until they
are securely placed. Adjust the earphone angle to an optimal position in
order to enjoy high-quality sounds.
• You can press the Answer/Disconnect Phone button to answer or end
a call.
• You can press the Volume Up/Down button to adjust the sound
volume.
• The product specifications of the stereo ear microphones may differ by
region.
• If the stereo ear microphone malfunctions or gets broken during use,
bring the product to the nearest LG Service Center.
• If you insert the stereo ear microphone into the device while pressing its
buttons, it may not operate normally. With the stereo ear microphone
inserted into the ears, bring down the status bar on the screen to check
if
appears. If it does, you can use the buttons on the stereo ear
microphone.
Basic Functions 37
Page 39

Turning the power on or off
Turning the power on
When the power is turned off, press and hold the Power/Lock key.
• When the device is turned on for the first time, initial configuration
takes place. The first booting time for the smart phone may be longer
than usual.
Turning the power off
Press and hold the Power/Lock key, then select Power off.
Restarting the device
When the device is not working properly or does not respond, restart it by
following the instructions below.
Press and hold the Power/Lock key and the Volume Down key at the
1
same time until the power is turned off.
When the device restarts, release the key.
2
• This feature does not work when the phone is attached to LG Dual
Screen.
Power control options
Press and hold the Power/Lock key, then select an option.
• Power off: Turn the device off.
• Power off and restart: Restart the device.
Basic Functions 38
Page 40

Installing the SIM card and
memory card
Insert the SIM (Subscriber Identity Module) card provided by your service
provider to start using your device.
• Be careful with the ejection pin since it has a sharp edge.
• In order for the water-resistant and dust-resistant features to work
effectively, the card tray must be inserted correctly.
Insert the ejection pin into the hole in the card tray and then pull out
1
the card tray from the device.
Place the SIM card or memory card on the card tray and then insert
2
the card tray into the device in the direction of the arrow.
Memory card
(optional-sold separately)
SIM card
Basic Functions 39
Page 41

• This device supports only Nano SIM cards.
Nano Micro Standard
• For problem-free performance, it is recommended to use the device
with the correct type of SIM card. Always use a factory-made SIM card
supplied by the operator.
• Do not lose your SIM card. LG is not responsible for damage and other
issues caused by loss or transfer of a SIM card.
• Be careful not to damage the SIM card when you insert or remove it.
• When you insert the SIM card or memory card, place it on the card tray
correctly.
• When you insert the card tray back into the device, insert it horizontally
in the direction of arrow as shown in the figure. Make sure that the card
placed on the card tray does not move out of its position.
• Insert the SIM card with the gold-colored contacts facing downwards.
• Be sure to insert the SIM card into the device by following the
instructions in the user manual.
• If you insert to or remove the card tray from the device, be careful not
to let water or other liquids enter into the card tray. If a wet card tray or
card is inserted into the device, your device may get damaged.
• Memory card is an optional item.
• Frequent writing and erasing of data may shorten the memory card
lifespan.
• Some memory cards may not be fully compatible with the device. If you
use an incompatible card, it may damage the device or the memory card,
or corrupt the data stored in it.
Basic Functions 40
Page 42

Removing the memory card
Unmount the memory card before removing it for safety.
Tap Settings Storage .
1
Insert the ejection pin into the hole in the card tray and then pull out
2
the card tray from the device.
Remove the memory card from the card tray.
3
Insert the card tray back into the slot.
4
• Do not remove the memory card while the device is transferring or
accessing information. This may cause data to be lost or corrupted, or
may damage the memory card or the device. LG is not responsible for
losses that result from the abuse or improper use of memory cards,
including the loss of data.
Battery
Charging the battery
Before using the device, fully charge the battery.
Charge the device with the USB Type-C cable.
Charging cable terminal
Basic Functions 41
Page 43

• If there is moisture on the charging port, exposed terminals, charging
cable, gender, etc., do not use or charge the product. The product may
malfunction or get broken or damaged, and there is risk of injury caused
by electric shock, fire, overheating, explosion, etc. If you find moisture
on such areas, stop using or charging the product immediately and
completely remove the moisture.
• Do not separate the battery cover.
This product uses a non-removable battery. Do not remove or replace
the batt
ery cover or the battery. If you remove or replace the battery
cover or the battery, the product may be damaged, overheated or
explode.
• Only the USB cable and gender provided with the product as basic
components.
• Your device has an internal rechargeable battery. For your safety, do not
remove the embedded battery.
• Using the device when it is charging may cause electric shock. To use the
device, stop charging it.
• Remove the charger from the power socket after the device is fully
charged. This prevents unnecessary power consumption.
• A charging adapter that supports fast charging is included with the
product. The fast charging feature may not work if a fast charging
adapter other than the genuine adapter provided with the product is
used.
• Another way to charge the battery is by connecting a USB cable
between the device and a desktop or laptop computer. This may take a
longer time than plugging the adapter to a wall outlet.
• Do not charge the battery by using a USB hub that is unable to maintain
the rated voltage. Charging may fail or unintentionally stop.
• When you are vising the Service Center with a battery issue, bring the
product and the charger with you Since the battery is a consumable, the
battery life may be shortened as times goes.
Basic Functions 42
Page 44

Precautions when using the device
• Make sure to use the USB cable provided; do not use third party USB
cables or chargers with your device. The LG limited warranty does not
cover the use of third party accessories.
• Failure to follow the instructions in this guide and improper use may
damage the device.
Wireless charging
This device supports wireless charging feature. Charge the device with a
Qi certified wireless charger (optional, sold separately).
Charging the battery with a wireless charger
Place your device on the center of the wireless charger aligned with
1
the wireless charging antenna on the back of the device.
• To check the wireless charging antenna area, see
When the battery is fully charged, remove the device from the charger.
2
• When you charge the battery with a wireless charger, do not put a
magnetic, metallic or conductive materials between the device and the
charger. This may disturb charging or the device and the charger may
become heated. In this case, the device, charger or SIM/Memory cards
may be damaged.
Parts overview
.
Basic Functions 43
Page 45

• If the battery temperature exceeds a certain level while charging the
device, charging may be stopped.
• If magnetic, metallic or conductive materials are attached on the back
of the device or a protective case is inserted, the device may not charge
properly.
• If you charge the battery with a wireless charger in areas where the
network signal strength is weak, the network performance of your
device may be further degraded.
• Charge the device with a Qi certified wireless charger (optional, sold
separately). Because the LG limited warranty does not cover the use of
third party accessories, contact the third party manufacturer.
• This product supports wireless charging. Use a Qi certified wireless
charger (sold separately) to charge the product. Some coiled wireless
chargers may not support wireless charging. Wireless chargers that
support EPP (Extended Power Profile) allow high-speed wireless
charging.
• LG Electronics is not responsible for any issues concerning accessories
of other brands. For such issues, contact the manufacturer of the
accessory product.
Using the battery efficiently
Battery lifespan may decrease if you keep many apps and functions
running simultaneously and continuously.
Cancel background operations to increase battery life.
To minimize battery consumption, follow these tips:
• Turn off the Bluetooth or Wi-Fi network function when not using
them.
• Set the screen timeout to as short a time as possible.
• Minimize the screen brightness.
• Set a screen lock when the device is not in use.
• Check the battery level while using any downloaded apps.
Basic Functions 44
Page 46

Touch screen
You can familiarize yourself with how to control your device by using
touch screen gestures.
Tapping
Lightly tap with your fingertip to select or run an app or option.
Touching and holding
Touch and hold for several seconds to display a menu with available
options.
Basic Functions 45
Page 47

Double-tapping
Tap twice quickly to zoom in or out on a web page or map.
Dragging
Touch and hold an item, such as an app or widget, then move your finger
to another location in a controlled motion. You can use this gesture to
move an item.
Basic Functions 46
Page 48

Swiping
Touch the screen with your finger and move it quickly without pausing.
You can use this gesture to scroll through a list, a web page, photos,
screens, and more.
Pinching and spreading
Pinch two fingers to zoom out such as on a photo or map. To zoom in,
spread your fingers apart.
• Do not expose the touch screen to excessive physical shock. You might
damage the touch sensor.
Basic Functions 47
Page 49

• A touch screen failure may occur if you use the device near a magnetic,
metallic or conductive material.
• If you use the device under bright lights, such as direct sunlight, the
screen may not be visible, depending on your position. Use the device
in a shady location or a location with an ambient light that is not too
bright and bright enough to read books.
• Do not press the screen with excessive force.
• Gently tap with your fingertip on the desired option.
• Touch control may not work properly if you tap while wearing a glove or
by using the tip of your fingernail.
• Touch control may not work properly if the screen is moist or wet.
• The touch screen may not function properly if a screen-protective film
or accessory purchased from a third party store is attached to the
device.
• Displaying a static image for extended periods of time may result in
after-images or screen burn-in. Turn off the screen or avoid displaying
the same image for a long time when you do not use the device.
Basic Functions 48
Page 50

Home screen
Status bar
Home screen overview
The Home screen is the starting point for accessing various functions
and apps on your device. Tap
screen.
You can manage all apps and widgets on the Home screen. Swipe the
screen left or right to view all installed apps at a glance.
Home screen layout
You can view all apps and organize widgets and folders on the Home
screen.
Weather widget
Home touch buttons
on any screen to directly go to the Home
Google Search widget
Folder
Page icon
Quick access area
• The Home screen may differ depending on the manufacturer policy, user
settings, software version or service provider.
Basic Functions 49
Page 51

• Status bar: View status icons, the time and the battery level.
• Weather widget: View the information of weather and time for a
specific area.
• Google Search widget: Type or speak to open Google Search.
• Folder: You can create folders to classify the app based on desired
criteria.
• Page icon: Display the total number of Home screen canvases. You
can tap the desired page icon to go to the page. The icon reflecting the
current canvas will be highlighted.
• Quick access area: Fix main apps at the bottom of the screen so that
they can be accessed from any Home screen canvas.
• Home touch buttons
: Return to the previous screen. Close the keypad or pop-up
windows.
: Tap to go to the Home screen. To launch Google Assistant, touch
and hold.
: Tap to view a list of recently used apps or run an app from the
list. To delete all the recently used apps, tap CLEAR ALL. To use two
apps at the same time with the Multi window feature, touch and
hold the button while using an app.
Basic Functions 50
Page 52

Changing the style of the Home touch buttons
You can change the style of the Home touch buttons.
Tap Settings Display Home touch buttons.
1
Under STYLE, select Gesture and buttons or Buttons only to suit
2
your preferences.
• Gesture and buttons: Back button
available. To see recent apps, swipe the Home button
• Buttons only:
/ / are available. Tap to see recent apps.
and Home button are
up.
Editing the Home touch buttons
You can rearrange the Home touch buttons or add frequently used
functions to the Home touch buttons area.
Settings Display Home touch buttons Button
Tap
combination and customize the settings.
• Several functions, including QSlide, Notification and Capture+, are
provided. A maximum of two additional items can be added.
Basic Functions 51
Page 53

Lock/hide icon
The icon to lock or hide the Home touch buttons appears at the bottom
left of the screen.
If you want to lock the Home touch buttons while shown, tap
left of the Home touch buttons.
To hide the Home touch buttons again, double-tap
To deactivate the Lock/hide buttons feature, tap
Home touch buttons Show lock/hide icon, then tap .
• Some features may not be supported while the Home touch buttons
are hidden.
.
Settings Display
on the
Hiding the Home touch buttons
You can hide the Home touch buttons to view in a larger screen while
using an app.
Tap Settings Display Home touch buttons Hide Home
1
touch buttons.
Select apps you want to use with the Home touch buttons hidden, and
2
.
tap
• The Home touch buttons disappear 3 seconds after the last touch.
• To view the Home touch buttons again, drag the bottom of the
screen upwards.
Basic Functions 52
Page 54

Status icons
When there is a notification for an unread message, calendar event or
alarm, the status bar displays the corresponding notification icon. Check
your device’s status by viewing notification icons displayed on the status
bar.
No signal
Data is being transmitted over the network
Alarm is set
Vibrate mode is on
Bluetooth is on
Connected to a computer via USB
Battery level
Airplane mode is on
Missed calls
Wi-Fi is connected
Mute mode is on
Checking the current location via GPS
Hotspot is on
No SIM card
The NFC mode is on
• Some of these icons may appear differently or may not appear at all,
depending on the device's status. Refer to the icons according to the
actual environment and area in which you are using the device and your
service provider.
• Displayed icons may vary, depending on the area or service provider.
Basic Functions 53
Page 55

Notifications panel
You can open the notifications panel by dragging the status bar
downward on the main screen.
• You can drag down the notice window or tap the arrow icon to open
the list of quick setting icons.
• You can tap
• If you touch and hold the icon, the settings screen for the
corresponding function appears.
• You can use the notifications panel even on the lock screen. Drag the
to add, delete or arrange icons in the notice window.
notifications panel while the screen is locked to quickly access the
desired features.
Basic Functions 54
Page 56

Switching the screen orientation
You can set the screen orientation to automatically switch according to
the device’s physical orientation.
On the notification panel, tap Rotation from the quick access icon list.
You can also tap
screen.
Settings Display and activate Auto-rotate
Editing the Home screen
On the Home screen, touch and hold on an empty space, then select the
desired action from below.
• To rearrange the Home screen canvases, touch and hold on a canvas,
then drag it to a desired location.
• To add a widget to the Home screen, touch and hold on a blank area of
the Home screen, then select Widgets.
• To change wallpapers, themes, icon styles and AOD options, touch and
hold on a blank area of the Home screen, then select Wallpaper &
theme.
You can also tap
select desired options from Wallpaper, Theme, Icon and AOD to apply
to the device.
Settings Display Wallpaper & theme, then
Basic Functions 55
Page 57

• To configure the Home screen settings, touch and hold on a blank area
of the Home screen, then select Home screen settings. See
screen settings
for details.
Home
• To view or reinstall the uninstalled apps, touch and hold on a blank area
of the Home screen, then select App trash. See
App trash
for details.
• To change the default screen, touch and hold on a blank area of the
Home screen, move to desired screen, tap
, then tap the screen once
more.
Default screen
Basic Functions 56
Page 58

Viewing the background theme
You can view only the background image by hiding the apps and widgets
on the Home screen.
Spread two fingers apart on the Home screen.
• To return to the original screen, which displays apps and widgets, pinch
your fingers on the Home screen or tap
.
Moving apps on the Home screen
On the Home screen, touch and hold an app, then drag it to a desired
location.
• To keep frequently used apps at the bottom of the Home screen, touch
and hold an app, then drag it to the quick access area at the bottom.
• To remove an icon from the quick access area, drag the icon to the
Home screen.
Basic Functions 57
Page 59

Using folders from the Home screen
Creating folders
On the Home screen, touch and hold an app, then drag it over another
app.
• A new folder is created and the apps are added to the folder.
Editing folders
On the Home screen, tap a folder and do one of the following actions.
• To edit the folder name and color, tap the folder name.
• To add apps, touch and hold an app, then drag it over the folder and
release it.
• To remove an app from the folder, touch and hold the app and drag it to
outside the folder. If the removed app is the only one app that existed
in the folder, the folder is removed automatically.
• You can also add or remove apps after tapping
• You cannot change the folder color while using downloaded theme.
in the folder.
Home screen settings
You can customize the Home screen settings.
Tap Settings Display Home screen.
1
Customize the following settings:
2
• Select Home: Select a Home screen mode.
• Wallpaper: Change the Home screen background wallpaper.
• Screen swipe effect: Select an effect to apply when the Home
screen canvas switches.
• Icon shape: Choose a desired shape for icons from the options
provided.
Basic Functions 58
Page 60

• Left Home screen: Select what to display on the screen located left
to the main Home screen.
• Sort apps by: Set how apps are sorted on the Home screen.
• Grid: Change the app arrangement mode for the Home screen.
• Hide apps: Select apps you want to hide from the Home screen.
• Loop Home screen: Enable to allow continuous Home screen
scrolling (loop back to the first screen after the last screen).
• This function is not available when Google feed is selected for Left
Home screen.
• Search: Search by swiping down on the Home screen.
• Home screen lock: Enable to prevent apps and widgets from being
rearranged or removed.
Screen lock
Screen lock overview
Your device’s screen turns off and locks itself if you press the Power/Lock
key. This also happens after the device is left idle for a specified period of
time.
If you press the Power/Lock key when a screen lock is not set, the Home
screen appears immediately.
To ensure security and prevent unwanted access to your device, set a
screen lock.
• A screen lock also prevents unnecessary touch input on the device
screen and reduces battery consumption. We recommend that you
activate the screen lock while not using the device.
Basic Functions 59
Page 61

Setting a screen lock
There are several options available for configuring the screen lock settings.
Tap Settings Lock screen & security Select screen lock and
1
then select the method you prefer.
Customize the following settings:
2
• None: Deactivate the screen lock function.
• Swipe: Swipe on the screen to unlock the screen.
• Pattern: Draw a pattern to unlock the screen.
• PIN: Enter a numeric password to unlock the screen.
• Password: Enter an alphanumeric password to unlock the screen.
• Fingerprints: Unlock the screen by using your fingerprint.
• If you incorrectly attempt to unlock the device 5 times, the screen is
blocked for 30 seconds.
Secure start-up settings
When you select Pattern, PIN or Password as a screen lock method, you
can configure your device to be locked whenever turning on the device in
order to secure your data.
• You cannot use all functions, except for emergency calls until you
unlock the device.
• If you forget your decryption password, you cannot restore encrypted
data and personal information.
Basic Functions 60
Page 62

Precautions for the secure start-up feature
• If you forget your decryption password, you cannot restore encrypted
data and personal information.
• Be sure to keep your screen lock passwords separately.
• If you enter the screen lock passwords incorrectly more than the
specified times, the device automatically resets itself and the encrypted
data and your personal information are deleted automatically and they
cannot be restored.
• Be cautious not to enter incorrect screen lock passwords more than
the specified times.
• When you turn on the device right after the device resets, encryption
also starts. If you stop the encryption arbitrarily, the data may be
damaged. Be sure to wait until the reset is completed.
Customize Lock screen
You can customize lock screen.
Tap Settings Lock screen & security Customize Lock
1
screen.
Select a function you want to set.
2
• Wallpaper: Allow you to set the background for your Lock screen.
• Clock: Allow you to set where to position the clock on the Lock
screen.
• Shortcuts: Allow you to choose apps to run on your Lock screen.
This setting appears only when a screen lock is set.
• Weather animation: Enable this option to display weather
animations for the current location on the Lock screen.
• Contact info for lost phone: Allow you to set text to be displayed
on the Lock screen to identify the phone’s owner.
Basic Functions 61
Page 63

Secure lock settings
You can set secure lock settings.
Tap Settings Lock screen & security Secure lock settings.
1
Select a function you want to set.
2
• Make pattern visible (shown only when Pattern is set as a screen
lock): Turn on to make pattern visible.
• Lock timer: Allows you to set the amount of time before the screen
automatically locks after the backlight turns off (time-out due to
inactivity).
• Power key instantly locks: Enable this option to instantly lock
the screen when the Power/Lock button is pressed. This setting
overrides the Security Lock timer setting.
• Show lockdown option (shown only when a screen lock is set):
Enable this option to display the Lockdown icon when you press
and hold the Power/Lock button. Tap the Lockdown icon to turn off
Lock screen notifications, Smart Lock and biometric locks.
• Smart Lock: Allows you to set trusted devices, places, voice, and/or
on-body detection that will allow your phone to remain unlocked.
• Available menu options may vary depending on the lock screen method
selected.
KnockON
You can turn the screen on or off by double-tapping the screen.
Settings Extensions KnockON to enable the option.
Tap
• This option is available only on the Home screen provided by LG. It may
not function properly on a custom launcher or on the Home screen
installed by the user.
• When tapping the screen, use your fingertip. Do not use a fingernail.
• To use the KnockON feature, make sure that the proximity/light sensor
is not blocked by a sticker or any other foreign substance.
Basic Functions 62
Page 64

Turning the screen on
Double-tap the middle of the screen.
• Tapping the top or bottom of the screen may decrease the recognition
rate.
Turning the screen off
Double-tap on an empty space on the Home screen and Lock screen.
You can also double-tap an empty space on the status bar.
Memory card encryption
You can encrypt and protect data saved on the memory card. The
encrypted data in the memory card cannot be accessed from another
device.
Tap Settings Lock screen & security Encryption &
1
credentials
Read the on-screen overview of memory card encryption and then tap
2
Continue to continue.
Select an option and tap Encrypt now.
3
• New data encryption: Encrypt only data that is saved on the
memory card after encryption.
• Full encryption: Encrypt all the data currently saved on the memory
card.
• Exclude media files: Encrypt all files, except for media files such as
music, photos and videos.
Encrypt SD card.
Basic Functions 63
Page 65

• Once memory card encryption starts, some functions are not available.
• If the device is turned off while encryption is underway, the encryption
process will fail, and some data may be damaged. Therefore, be sure to
check if the battery level is sufficient before starting encryption.
• Encrypted files are accessible only from the device where the files were
encrypted.
• The encrypted memory card cannot be used on another LG device. To
use the encrypted memory card on another mobile device, format the
card.
• You can activate memory card encryption even when no memory card
is installed into the device. Any memory card that is installed after
encryption will automatically be encrypted.
Taking screenshots
You can take screenshots of the current screen you are viewing.
Via a shortcut
Press and hold the Power/Lock key and the Volume Down key at the
same time for at least two seconds.
• Screenshots can be viewed from the Screenshots folder in Gallery.
Via Capture+
On the screen where you want to take a screenshot, drag the status bar
downwards, then tap
• When the screen is turned off or locked, you can access Capture+
by pressing the Volume Up key twice. To use this feature, tap
Settings
Writing notes on a screenshot
• See
.
Extensions Shortcuts and turn on Open Capture+.
for details.
Basic Functions 64
Page 66

Entering text
Smart
Using the Smart toolbar
You can use various keyboard input methods in one place. You can select
the desired input method from the top of the keyboard.
Select the desired keyboard input method from the Smart toolbar.
1
Tap , then touch and drag each tool to reorganize as desired.
2
toolbar
• You can add up to 6 tools to Smart Tools.
• Some supporting input methods may differ depending on the device
you have.
• You can turn on or off the Smart tool feature from the keyboard
settings.
• You can also configure the keyboard input methods by tapping
• : Add emojis.
: Add avatar stickers.
•
: Add ani-stickers.
•
: Open Draw chat.
•
: Access keyboard settings.
•
: Take an instant screenshot.
•
- When the phone is connected to LG Dual Screen (LM-V515N),
it captures the screen of LG Dual Screen and attaches to the
message instantly. For more details, refer to
on Dual Screen
.
Using Dual Keyboard
.
Basic Functions 65
Page 67

• : Tap to enter text with your voice.
- To maximize the voice command recognition, speak clearly.
- To enter text with your voice, make sure that your device is
connected to a network.
- To select the language for voice recognition, tap
Languages
on the voice recognition screen.
- This function may not be supported, or the supported languages
may differ depending on the service area.
: Open the clip tray. See
•
: Activate floating keyboard when you use the Multi-window
•
Clip Tray
for details
feature. You can also move the keyboard to the desired location.
: Use the dual keyboard.
•
- If the phone is connected to LG Dual Screen (LM-V515N), you
can expand the keyboard vertically and use the upper screen as
an app screen and the bottom screen as a keyboard screen. For
more details, refer to
Using Dual Keyboard on Dual Screen
.
Basic Functions 66
Page 68

Clip Tray
If you copy or cut an image or text, it is automatically saved to the clip tray
and can be pasted to any space at any time.
On the Smart tool, select .
1
You can also touch and hold the text input window, then select Clip
Tray.
Select and paste an item from the clip tray.
2
• A maximum of 20 items can be saved to the clip tray.
to lock saved items in order not to delete them, even when
• Tap
the maximum quantity is exceeded. A maximum of ten items can be
locked. To delete locked items, unlock them first.
to delete the items saved to the clip tray.
• Tap
• The clip tray may not be supported by some downloaded apps.
• Deleted clipboard items cannot be restored.
Using the Smart keyboard
You can use the Smart keyboard to enter and edit text.
With the Smart keyboard, you can view text as you type without
bothering to alternate between the screen and a conventional keyboard.
This allows you to easily find and correct errors when typing.
Moving the cursor
With the Smart keyboard, you can move the cursor to the exact position
you want. When typing text, touch and hold on the space bar and then
drag left or right.
Basic Functions 67
Page 69

• This option is available only on the QWERTY keyboard.
Suggesting words
Smart keyboard automatically analyzes your usage patterns to suggest
frequently used words as you type. The longer you use your device, the
more precise the suggestions are.
Enter text, then tap a suggested word or gently drag the left or right side
of the keyboard upwards.
• The selected word is automatically entered. You do not need to
manually type every letter of the word.
Basic Functions 68
Page 70

Changing the QWERTY keyboard layout
You can add, delete or rearrange keys on the bottom row of the keyboard.
Tap Settings System Language & keyboard Manage
1
Keyboards
Keyboard layout.
You can select and organize frequently used symbols.
2
LG Keyboard Keyboard height and layout QWERTY
• Some languages may have a different layout.
Customizing the keyboard height
You can customize the keyboard height to maximize hand comfort when
typing.
Tap Settings System Language & keyboard Manage
1
Keyboards
height.
Adjust the keyboard height.
2
LG Keyboard Keyboard height and layout Keyboard
Selecting a landscape keyboard mode
You can select a landscape keyboard mode from several choices.
Tap Settings System Language & keyboard Manage
1
Keyboards
type in landscape.
Basic Functions 69
LG Keyboard Keyboard height and layout Keyboard
Page 71

Select a keyboard mode.
2
Splitting the keyboard
You can split the keyboard in half and place each piece on either side of
the screen when the screen is in landscape mode.
To split the keyboard, turn the device horizontally and spread it apart on
the keyboard with two fingers. To attach the keyboard, close it by pinching
two fingers.
• Even if QWERTY keyboard is not in use, it switches to QWERTY
keyboard for horizontal screen view.
One-handed operation mode
You can move the keyboard to one side of the screen so that you can use
the keyboard with one hand.
Tap Settings System Language & keyboard Manage
1
Keyboards
handed operation.
Tap the arrow displayed next to the keyboard to move the keyboard in
2
the desired direction.
LG Keyboard Keyboard height and layout One-
Basic Functions 70
Page 72

Adding languages to the keyboard
You can make additional languages available for keyboard input.
Tap Settings System Language & keyboard Manage
1
Keyboards
languages.
Select the languages you want to use on the keyboard.
2
LG Keyboard Language & Keyboard layout Select
Copy and Paste
You can cut or copy text from an app, and then paste the text into the
same app. Or, you can run other apps and paste the text into them.
Touch and hold around the text you want to copy or cut.
1
Drag / to specify the area to copy or cut.
2
Select either Cut or Copy.
3
• Cut or copied text is automatically added to the clip tray.
Touch and hold the text input window, then select Paste.
4
• If there is no item that has been copied or cut, the Paste option will not
appear.
Basic Functions 71
Page 73

Content sharing
Playing content from another device
You can play photos, videos or songs saved on your device from a TV.
Connect the TV and your device to the same Wi-Fi network.
1
While viewing the items from the Gallery or Music app, tap or
2
Play on other device.
Or tap
tap
Select the TV you want to connect to.
3
Viewing content from nearby devices
You can view content from various devices, such as a computer, NAS or
mobile device, by using the Gallery or Music apps.
Tap
Content sharing
Connecting the devices
Connect both your device and a device that supports DLNA function to
the same wireless network.
Settings Connected devices Screen sharing and then
to activate it.
• For use with Chromecast, Google Play services should be up to date.
Settings Connected devices Media server, then tap
to activate it.
• Make sure that File sharing (DLNA) is activated on both devices.
Searching for nearby devices
You can view a list of DLNA devices on the same network by selecting the
Nearby devices menu in each app.
Use content from nearby devices as if you were using it on your device.
Basic Functions 72
Page 74

Sending or receiving files
You can share files between your device and another LG device, tablet or
computer.
Sending files
From the Gallery or File Manager app, tap Share or , then select a
device on the file sharing list.
Receiving files
Drag the status bar downward and then tap File sharing.
If your device does not support the file sharing feature, tap
Connected devices File sharing SmartShare Beam .
• You can share files with certain devices that support DLNA.
Settings
Basic Functions 73
Page 75

Do not disturb
You can limit or mute notifications to avoid disturbances for a specific
period of time.
Settings Sound Do not disturb.
Tap
• Mode and select the mode you want:
- Priority only: Receive sound or vibrate notifications for the selected
apps. Even when Priority only is turned on, alarms still sound.
- Total silence: Disable both the sound and vibration.
• Select priorities: Receive alarms and the notifications for the selected
apps.
- App notifications: Select apps to receive the notifications.
- Calls from: Set up a range of notifications when receiving a call.
• Repeated calls: Second call from same caller within 15 min is not
silenced.
- Messages from: Set up a range of notifications when receiving a
message.
• Use Do not disturb: Turn on the Do not disturb feature.
• SCHEDULE: Set the schedule for which you want to turn on the Do
not disturb feature.
• Help: View the help for Do not disturb.
Basic Functions 74
Page 76

03
Useful Apps
Page 77

Installing and uninstalling apps
Installing apps
Access an app store to search and download apps.
• You can use SmartWorld, Play Store or the app store provided by your
service provider.
• Some app stores may require you to create an account and sign in.
• Some apps may charge fees.
• If you use mobile data, you may be charged for data usage, depending
on your pricing plan.
• SmartWorld may not be supported depending on the area or service
provider.
Uninstalling apps
Uninstall apps that you no longer use from your device.
Uninstalling with the touch and hold gesture
Touch and hold any empty area of the Home screen, and then tap of
the app you want to delete.
• Uninstalled apps can be reinstalled within 24 hours of uninstallation.
App trash
See
Uninstalling by using the settings menu
Tap Settings Apps & notifications App info, select an app, then
tap Uninstall.
for details.
• Some apps cannot be uninstalled by users.
Useful Apps 76
Page 78

Uninstalling apps from the app store
To uninstall an app, access the app store from which you downloaded the
app and uninstall it.
Installing and uninstalling apps during the
setup
When you turn on the device for the first time, you can download
recommended apps.
You can skip to the next step without installation.
App trash
You can view the uninstalled apps on the Home screen. You can also
reinstall apps within 24 hours of uninstallation.
Tap Management App trash.
1
You can also touch and hold an empty area of the Home screen, then
tap App trash.
Choose the desired option.
2
• Restore: Restore the selected app.
: Remove the uninstalled apps permanently from the device.
•
• Uninstalled apps are automatically removed from the device 24 hours
after they were uninstalled. If you want to reinstall the uninstalled apps,
you must download them again from the app store.
• This feature is activated on the default Home screen only. If you
uninstall apps while using the EasyHome screen or other launcher, they
are immediately and permanently removed from the device.
Useful Apps 77
Page 79

App Shortcuts
On the Home screen, touch and hold an app icon such as Call, Messages,
Camera, Gallery and Settings to display a quick access menu. Use apps
more easily through App Shortcuts.
to set a widget for the app.
• Tap
to check the app information.
• Tap
• This feature is available only on some apps.
Useful Apps 78
Page 80

Phone
Voice call
Make a phone call by using one of the available methods, such as manually
entering a phone number and making a call from the contact list or the
list of recent calls.
Making a call from the keypad
Tap Dial.
1
Make a call by using a method of your choice:
2
• Enter a phone number and tap
• Touch and hold a speed dial number.
• Search for a contact by tapping the initial letter of a contact name
in the contact list, and then tap
• To enter "+" when making an international call, touch and hold number
0.
• See
Adding contacts
speed dial list.
for details on how to add phone numbers to the
Making Calls from Contacts
Contacts.
1
After selecting the number you want to call from the list of contacts,
2
tap
.
.
.
Useful Apps 79
Page 81

Answering a call
To answer a call, drag on the incoming call screen.
• When the stereo headset is connected, you can make calls by using the
call/end button on the headset.
• To end a call with the Power key, tap
internet
with the Power key.
Call Answer and end calls and then activate End call
Settings Network &
Rejecting a call
To reject an incoming call, drag across the incoming call screen.
• To send a rejection message, drag the rejection message option
across the screen.
• To add or edit a rejection message, tap
internet
with message.
• When a call is coming in, press the Volume Up, Volume Down or Power/
Lock key to mute ringtone or vibration, or to hold the call.
Call Call blocking & Decline with message Decline
Settings Network &
Useful Apps 80
Page 82

Checking an incoming call while using an app
When a call comes in while using an app, a pop-up notification can be
displayed at the top of the screen. You can receive the call, reject the call,
or send message from the pop-up screen.
• Tap Settings Network & internet Call Additional settings
Show voice calls while in an app and then select the desired way you
would like to display the incoming call while using an app.
• Floating bar must be enabled if you want to check the calls received
using the floating bar while using an app. For more details, refer to
Floating Bar Overview
.
Viewing missed calls
If there is a missed call, the status bar at the top of the screen displays .
To view missed call details, drag the status bar downwards. You can also
Call logs.
tap
Useful Apps 81
Page 83

Functions accessible during a call
During a call, you can access a variety of functions by tapping the
on-screen buttons:
: Start a video call (if available).
•
• Contacts: View the contact list during a call.
• Hold: Place the current call on hold.
• Dialpad: Display or hide the dial pad.
• Speaker: Turn on the speakerphone function.
• Mute: Mute your voice so that your voice cannot be heard by the other
party.
• Bluetooth: Switch the call to a Bluetooth device that is paired and
connected.
: End a call.
•
: Access additional call options.
•
• Some functions are not available during a video call.
• Available setting items may vary depending on the area or service
provider.
Making a three-way calling
You can make a call to another contact during a call.
During a call, tap Add call.
1
Enter a phone number and tap .
2
• The two calls are displayed on the screen at the same time, and the
first call is put on hold.
To start a conference call, tap Merge calls.
3
• You may be charged a fee for each call. Consult with your service
provider for more information.
Useful Apps 82
Page 84

Viewing call records
To view recent call records, tap Call logs. Then, you can use the
following functions:
• To view detailed call records, select a contact. To make a call to the
selected contact, tap
• To delete call records, tap
• The displayed call duration may differ from the call charge. Consult with
your service provider for more information.
• The deleted call history can not be restored.
• Pinch two fingers or spread your fingers apart to adjust the font size of
call logs or contacts.
.
Delete.
Configuring call options
You can configure various call options.
Tap Dial or Call logs.
1
Tap Call settings and then configure the options to suit your
2
preferences.
Useful Apps 83
Page 85

Messages
Sending a text message
Quickly compose and send text messages (SMS) on your phone.
• See your service plan for applicable charges for text messaging.
Tap .
1
Tap Start chat.
2
Tap the To field and enter a contact’s names, phone numbers, or email
3
addresses that you’d like to message. You can also pick from your top
contacts or your whole contact list.
Tap the desired number or contact.
4
Tap the text field and enter your message.
5
• To enter a emoji, tap
selection from the list to insert it into your current message.
Review your message and tap .
6
Sending a multimedia message (MMS)
When you need to add a little more to a text message, you can send a
multimedia message (MMS) with the contents such as images, videos, etc.
• See your service plan for applicable charges for multimedia messaging.
and tap . Select a category and make a
Compose multimedia messages
Tap .
1
Tap Start chat.
2
Tap the To field and enter a contact’s names, phone numbers, or email
3
addresses that you’d like to message. You can also pick from your top
contacts or your whole contact list.
Useful Apps 84
Page 86

Tap the desired number or contact.
4
Tap the text field and enter your message.
5
Tap to attach photos or videos.
6
Tap for other types of attachments.
7
• To remove or replace a picture or an audio attachment, on the Compose
screen, tap
When you are finished creating your new MMS message, tap .
8
next to the attachment.
Saving and resuming a draft message
While composing a text or multimedia message, tap to automatically
save your message as a draft.
To resume composing the message:
On the screen with all message threads, tap the message. The Draft
1
label is shown if a saved draft is available.
When you finish editing the message, tap .
2
New messages notification
Depending on your notification settings, the phone will play a ringtone,
vibrate, or display the message briefly in the status bar when you receive a
new text or multimedia message.
A new message icon
status bar to notify you of a new text or multimedia message. The
Messages application icon (if shown on the home screen) also displays
the number of new messages
• To open the message, pull down the status bar to open the notification
panel. Tap the new message to open and read it. For information
on reading and replying to messages see
conversations
also appears in the notifications area of the
.
Managing message
.
Useful Apps 85
Page 87

Managing message conversations
Text and multimedia messages that are sent to and received from a
contact (or a number) are grouped into conversations or message threads
in the Messages screen. This allows you to see exchanged messages
(similar to a chat program) with a contact on the same screen.
Read a text message
• Do one of the following:
- On the Messages screen, tap the message thread to open and read
it.
- If you have a new message notification, drag the status bar down to
open the notification panel. Tap the new message to open and read
it.
View a multimedia message (MMS)
Tap .
1
On the Messages screen, tap a message thread to open it.
2
While viewing a message, tap the play icon (on the video or audio file)
3
to playback the file or tap the image to view the picture.
• Tip
The file attachment on the multimedia message can be saved to your
phone
’s internal storage. To save the attachment, touch and hold the file
and tap
• When Auto-download MMS is disabled, only the message header is
downloaded. To download the entire message, tap the Download button
in the message.
.
Useful Apps 86
Page 88

Reply to a message
Tap .
1
On the Messages screen, tap a message thread to open it.
2
While viewing a message, tap the text field and type your reply
3
message.
Once completed, tap .
4
To return to the Messages screen from a text message thread, tap
• To view the details of a particular message, in the message thread, touch
and hold the message to open the options menu, and then tap
• If a message contains a link to a web page, tap the link to open it in the
web browser.
• If a message contains a phone number, tap the phone number to dial the
number or add it to your contacts.
Delete conversations
Tap .
1
On the Messages screen, touch and hold a message thread to display
2
.
To select multiple conversations, tap each conversation to delete.
3
will be shown.
Tap and then tap DELETE to confirm.
4
• Tip
You can also delete a conversation while you’re viewing it. While viewing
a c
onversation, tap
Delete.
.
.
Useful Apps 87
Page 89

Delete a single message
While viewing a conversation, touch and hold the message that you
1
want to delete.
Tap and then tap DELETE to confirm.
2
View contact information from a message
When you have received a message from someone in your stored
contacts, you can tap the contact’s photo or icon in the message thread
to open a menu of options. Depending on the stored contact information,
you can view the contact details, place a phone call, send an email
message to the contact, and more.
Camera
Starting the camera
You can take a photo or record a video to cherish all of your memorable
moments.
.
Tap
• Before taking a photo or recording a video, wipe the camera lens with a
soft cloth.
• Be careful not to stain the camera lens with your fingers or other
foreign substance.
• Even when the phone is on vibrate or silent, shutter sound is activated
when taking photos.
• Images included in this user guide may be different from the actual
device.
• Photos and videos can be viewed or edited in Gallery. See
overview
for details.
• Refrain from using the product for a purpose that may violate someone
else’s privacy or rights.
Gallery
Useful Apps 88
Page 90

Auto mode
You can take photos or record videos by selecting a variety of camera
modes and options.
Tap .
1
To take a photo, tap Photo, then tap . To record a video, tap Video,
2
then tap
Taking a photo
Select a camera mode and tap the subject to focus the camera on.
1
Tap to take a photo.
2
• You can also press the Volume Down or Volume Up key to take a
• You can take a photo while recording a video by tapping
.
Rear Camera
photo.
on the
screen.
• When the screen is turned off or locked, start the camera by pressing
the Power or Volume Down key twice. Tap
Shortcuts and enable Open Camera under POWER and/or VOLUME
to use this feature.
Settings Extensions
Useful Apps 89
Page 91

Recording a video
Select a camera mode and tap the subject to focus the camera on.
1
Tap .
2
• To take a photo while recording a video, tap
• To pause the video recording, tap
.
tap
• While recording a video, you may spread or pinch two fingers to
zoom in or out.
• While recording a video, you may tap the desired area to adjust the
brightness.
• You can switch between the front camera and rear camera while
recording a video by tapping
Tap to end the video recording.
3
. To resume the video recording,
.
.
Customizing the camera options
You can customize a variety of camera options to suit your preferences.
on the camera screen.
Tap
• Available options vary depending on the selected camera (front or rear
camera) and the selected camera mode.
• : Take a photo in FullVision.
: Select values for aspect ratio and size for taking photos.
•
Useful Apps 90
Page 92

Auto scene
optimizer
Action shot Freezes a moving subject.
AI Composition
Tips
HDR
Live photo Record the action before and after you take a photo.
Cheese shutter Take photos with voice commands.
Tracking focus
Tag locations Save the image with GPS location data.
Grid
Add signature Displays a personalized signature on the photos.
Storage
Help
Recognizes the scene that is being recorded and applies
the optimal resolution setting automatically.
Recognizes the human figure when taking a portrait
and recommends the optimal composition.
Notifies the user when the subject’s eyes were closed
or the picture is blurry for an optimal result.
Obtain photos in vivid color and get compensated
effects even when they are taken against the light.
These functions are provided by the High Dynamic
Range (HDR) technology equipped in the camera.
Enables the camera to remain focused on the subject
you touch on the screen, even if the subject is moving.
(Available when the Standard camera is in use.)
Displays guide grids so that you can take photos or
record videos based on the horizontal and vertical
reference lines.
Select if you want to store the pictures and videos
in the Internal storage or SD card. (Available when a
memory card is inserted.)
Provides the help information Help for each camera
menu.
Useful Apps 91
Page 93

Additional options on the front camera
Selfie shot
Save as flipped Save as flipped images after taking selfies.
• You can apply a make-up effect when taking a selfie using the front
camera by tapping
Take a selfie by selecting its option between Gesture
shot and Auto shot.
.
Various camera modes
You can conveniently select from the modes provided based on your need.
, then tap More.
Tap
• You can rearrange the camera modes by dragging mode icons.
• You can download various camera modes from the SmartWorld app
by tapping
.
Tap More
Useful Apps 92
Page 94

Story Shot
You can immediately composite photos taken from the rear camera and
the front camera.
Tap , then tap More .
1
Tap to take photos.
2
• Take a photo that will serve as the background of the composite
image.
• After a short while, the front camera will automatically take a photo.
• You can also tap and then select a photo from Gallery to use as the
background of the composite image.
Useful Apps 93
Page 95

Panorama
You can create a panoramic photo by moving the camera in one direction
to photograph and stitch continuous shots of a wide view.
Tap , then tap More .
1
Tap and then slowly move the camera in one direction.
2
• Move the device by following the direction of the arrow in the
guideline.
Tap to stop capturing the panoramic.
3
Useful Apps 94
Page 96

Slo-mo
You can create an entertaining video by changing the moving speeds of
subjects in your video. This feature allows you to record a video at a faster
rate of speed and then play it at the standard speed so that the video
appears to be slowed down.
• Slow motion for the entire video
- The slow motion effect is applied to the entire video.
• Slow motion for sections
- The slow motion effect is applied to certain sections of the video.
Tap , then tap More .
1
Tap to select between Part and All.
2
Tap to shoot video.
3
• If you selected All, the slow motion effect will be applied to the
entire video.
• If you selected Part, the slow motion effect will be applied only to
the sections where
- Tap
- You can tap
If you want to finish shooting, tap
4
at the moment where you want the slow motion effect
to be applied.
: With a short-touch, the slow motion effect will be applied for
ond.
0.5 sec
: With a long-touch, the slow motion effect will be applied until
elease your finger.
you r
was tapped.
up to five times.
.
Useful Apps 95
Page 97

YouTube Live
You can record a video and directly upload to YouTube.
To use this feature, you need to verify your phone number.
, then tap More .
Tap
• YouTube Live is available only when your device is connected to the
Internet. If you use mobile data, you may be charged for data usage,
depending on your pricing plan.
Night view
You can take vivid and clear night photos.
While taking a photo, hold the device steady.
You can adjust the brightness by dragging the slider left and right.
, then tap More .
Tap
Useful Apps 96
Page 98

Manual Video
Reset the settings
Adjust shutter
speed
Adjust ISO speed.
Adjust brightness.
Adjust focus.
Adjust white
balance.
You can manually customize various options to record a video. Adjust the
audio, white balance, focus, brightness, ISO, shutter speed, and more.
Tap , then tap More .
1
Manually adjust the camera settings as desired.
2
Adjust audio
balance
Tap to start recording.
3
Customizing the camera options
You can customize a variety of camera options to suit your preferences.
on the camera screen.
Tap
: Directly switch over to FullVision
•
: Select video resolution and size.
•
Frame rate Select the frames per second value.
Bit rate Select the image quality for videos.
Hi-Fi Record a video with Hi-Fi quality sound.
Save as HDR10
Useful Apps 97
Save a video in the HDR10 format for high definition and
vivid color.
Page 99

Steady recording Minimizes motion blur while recording a video.
Enables the camera to remain focused on the subject you
Tracking focus
Tag locations Save the image with GPS location data.
touch on the screen, even if the subject is moving.
(Available when the Standard camera is in use.)
Grid
Storage
Help Provides the help information for each camera menu.
Displays guide grids so that you can take photos or record
videos based on the horizontal and vertical reference lines.
Select if you want to store the pictures and videos in the
Internal storage or SD card. (Available when a memory
card is inserted.)
Time-lapse
You can take a sequence of frames at set intervals to record changes that
take place slowly over time, such as cloud movements, celestial motions,
traffic, and more.
Tap , then tap MODE .
1
Tap and record a video.
2
Tap to end the video recording.
3
• While recording a Time-lapse, voices are not recorded.
Useful Apps 98
Page 100

Flash Jump-Cut
You can take photos at a regular interval and save as a GIF file.
Tap , then tap More .
1
Tap to select the number of photos you want to take.
2
• You can select one among 4, 8, 12, 16 and 20 copies.
Tap to take a photo.
3
• Photos are taken every 3 seconds and saved as a GIF file.
• You can tap
stop shooting.
- Photos taken are saved as a GIF file in Gallery.
• At the moment when the camera takes the photograph, a flash comes
on.
• The current shot and the total number of shots are displayed at the
bottom of the screen.
• The photographs taken are saved in the GIF format only.
before taking the prescribed number of photos to
Useful Apps 99
 Loading...