

LG G820UM Users manual
USER GUIDE
LM-G820UM
ENGLISH
Copyright ©2018 LG Electronics Inc. All rights reserved.
MFLXXXXXXXX (1.0) www.lg.com

ENGLISH
About this user guide
Thank you for choosing this LG product. Please carefully read this user
guide before using the device for the first time to ensure safe and proper
use.
• Always use genuine LG accessories. The supplied items are designed
only for this device and may not be compatible with other devices.
• Descriptions are based on the device default settings.
• Default apps on the device are subject to updates, and support for
these apps may be withdrawn without prior notice. If you have any
questions about an app provided with the device, please contact an
LG Service Center. For user-installed apps, please contact the relevant
service provider.
• Modifying the device’s operating system or installing software from
unofficial sources may damage the device and lead to data corruption
or data loss. Such actions will violate your LG license agreement and
void your warranty.
• Some content and illustrations may differ from your device, depending
on the area, service provider, software version, or OS version, and are
subject to change without prior notice.
• Software, audio, wallpaper, images, and other media supplied with
your device are licensed for limited use. If you extract and use these
materials for commercial or other purposes, you may be infringing
copyright laws. As a user, you are fully responsible for the illegal use of
media.
• Additional charges may incur for data services, such as messaging,
uploading, downloading, auto-syncing and location services. To avoid
additional charges, select a data plan suitable to your needs. Contact
your service provider to obtain additional details.
1
Instructional notices
WARNING: Situations that could cause injury to the user and third
CAUTION: Situations that may cause minor injury or damage to the
NOTE: Notices or additional information.
parties.
device.
2About this user guide

Table of contents
01
Custom-designed
Features
6 Camera features
17 Gallery features
23 Sound quality and effects
24 Floating bar
27 Google Assistant
28 Audio recording features
30 Fingerprint recognition
33 Face recognition
37 Multi-tasking feature
38 Always-on display
39 Notes on Water Resistant
Properties
02
Basic Functions
43 Product components and
accessories
44 Parts overview
47 Turning the power on or off
48 Installing the SIM card and
memory card
50 Removing the memory card
50 Battery
53 Touch screen
56 Home screen
66 Screen lock
71 Memory card encryption
72 Taking screenshots
73 Entering text
79 Content sharing
81 Do not disturb
03
Useful Apps
83 Installing and uninstalling apps
84 App trash
85 App Shortcuts
86 Phone
90 Messaging
91 Camera
107 Gallery
111 Chrome
112 Google apps
3

114 Contacts
116 QuickMemo+
118 Clock
120 Calendar
120 Tasks
121 Music
122 Calculator
122 LG Health
124 Email
124 File Manager
125 Smart cleaning
125 LG Mobile Switch
126 LG SmartWorld
04
05
Appendix
155 LG Language Settings
155 LG Bridge
156 Phone software update
158 Anti-Theft Guide
159 Open Source Software Notice
Information
159 Regulatory information
(FCC ID number, etc.)
160 Trademarks
161 More information
163 FAQ
Settings
128 Settings
128 Network
140 Sound
141 Display
143 General
06
For Your Safety
07
LIMITED WARRANTY USA
4Table of contents

01
Custom-designed
Features
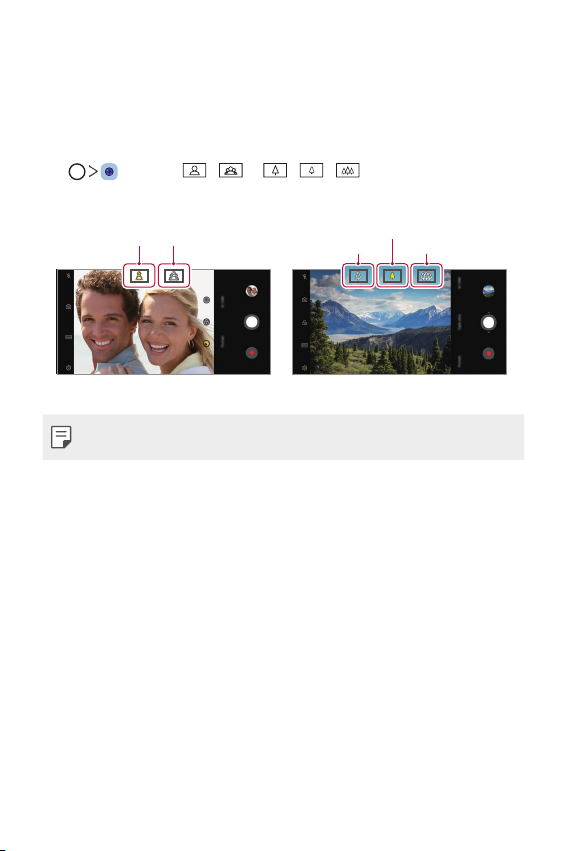
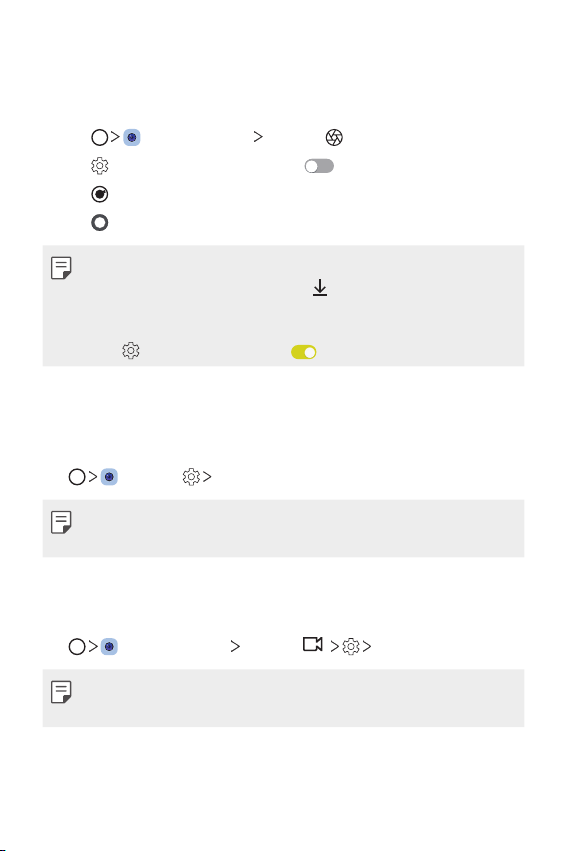
Camera features
Various angles camera
You can take photos or record videos with various angles on the camera.
, then tap / or / / to switch between
Tap
various angles.
Standard angle
• See
Starting the camera
Wide-angle
Front camera Rear camera
for details.
Telephoto
Standard angle
Super Wide-angle
Custom-designed Features 6
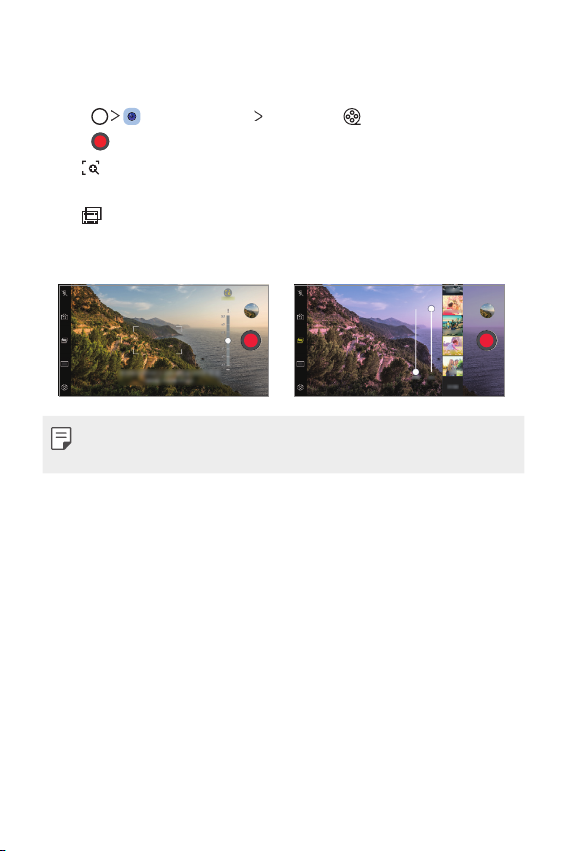
Portrait
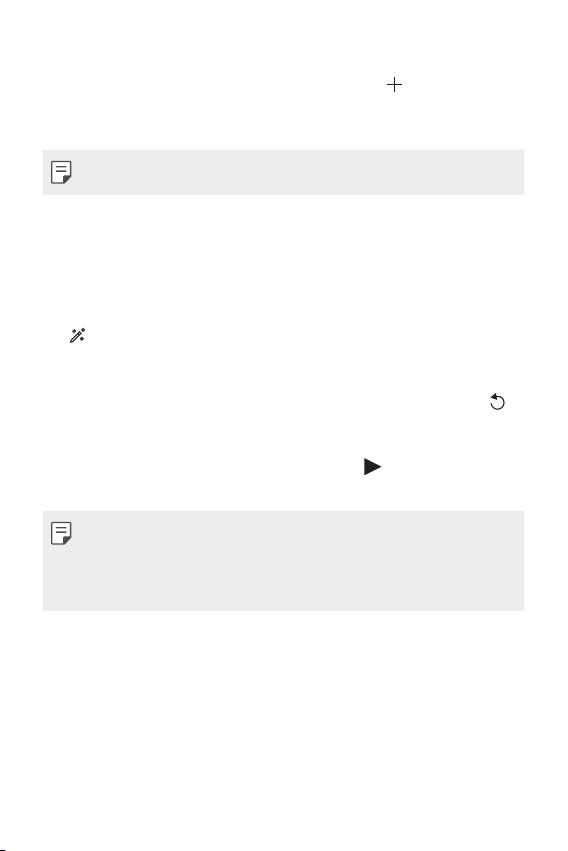
You can create an artistic portrait photo, whereby the subject is in focus
and the background is blurred. You can also edit the image by applying
lighting or color effect to the background.
Tap , and tap Portrait.
1
Drag the slide bar to the left or right to adjust the blur strength.
2
• You can take photos with clear subject and blurred background.
Adjust blur strength.
Select color effect.
Select 3D Lighting Effect.
• 3D Lighting Effect: Tap to select a lighting effect.
Custom-designed Features 7
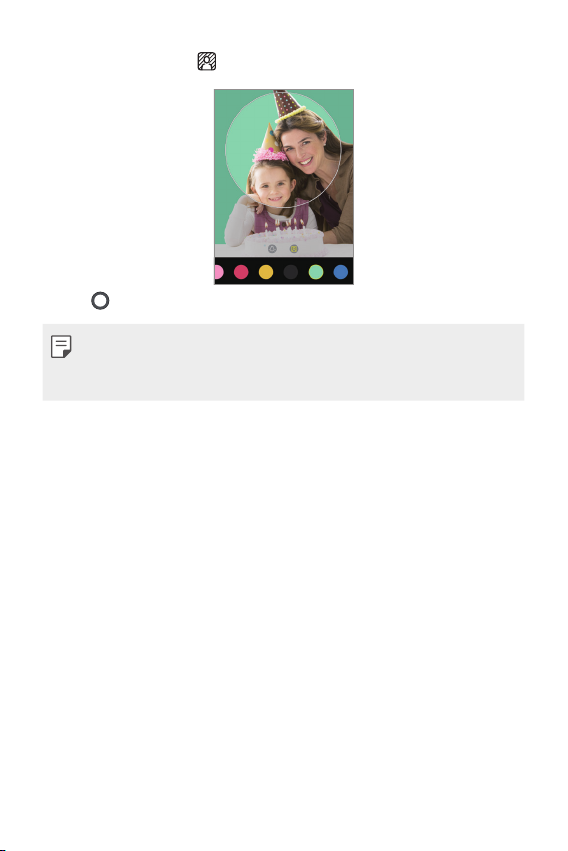
• Color effect: Tap to select a background color.
Tap to take a photo.
3
• While taking a photo with rear camera, keep the distance to your
subject to 1.3 ~ 5 feet.
• This feature is not available if the surroundings are too dark.
Custom-designed Features 8
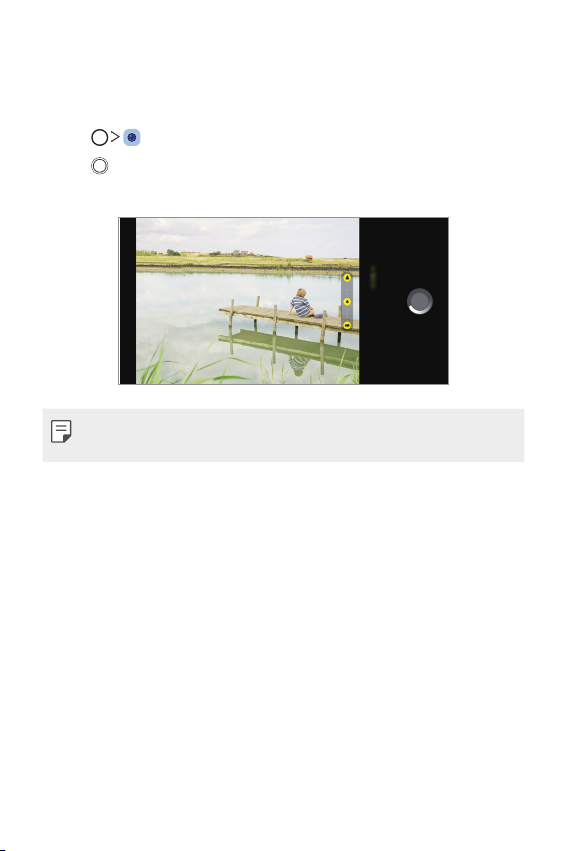
Triple shot
You can take a series of photos with different angles of view and save as a
video with slide effect.
Tap , then tap Triple shot.
1
Tap to take a photo.
2
• The triple cameras take photos automatically in sequence.
• While taking a photo, hold the device steady until all 3 photos have
been taken.
Custom-designed Features 9
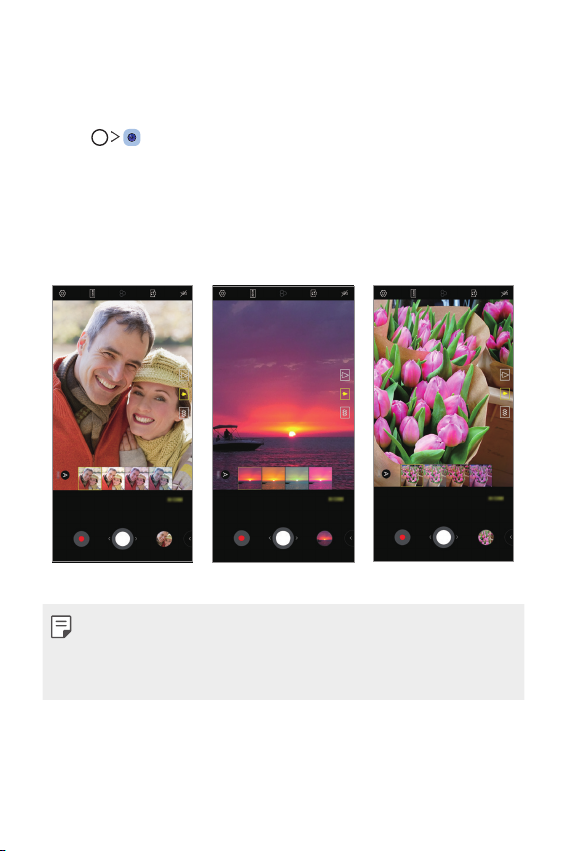
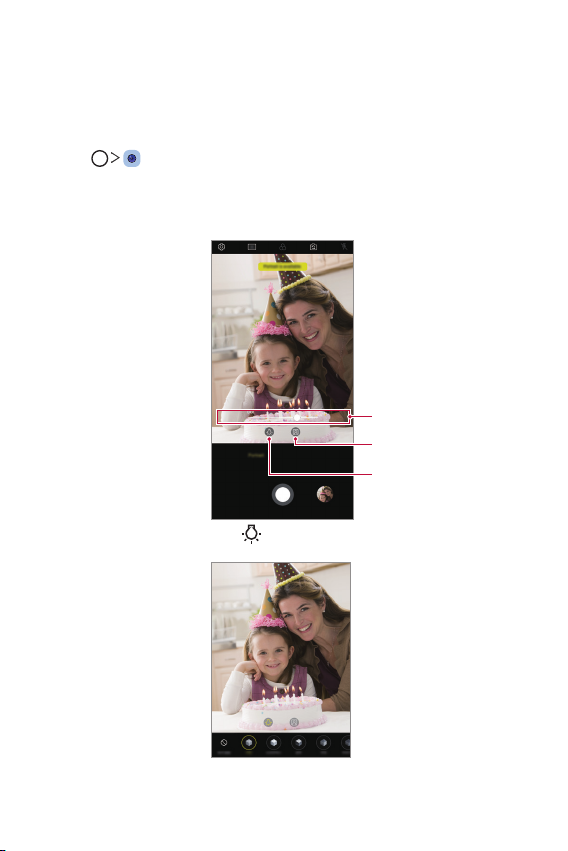
AI CAM
Portrait Sunset Flower
You can use the AI Cam feature to automatically recognize the object
when taking a photo or recording a video for an optimal quality.
Tap , then tap AI CAM.
1
When the object is recognized, the best effect for the scene is applied.
2
• To apply other effects, tap the scene icon.
• A wide range of categories, such as portrait, pets, food, sunrise,
sunset, scenery, city view, flowers and text, can be recognized
automatically.
• Associated keywords for the object are displayed on the screen.
Keywords do not appear on the actual photos or videos.
• This feature is available only when the front and rear cameras are in the
Auto mode.
Custom-designed Features 10
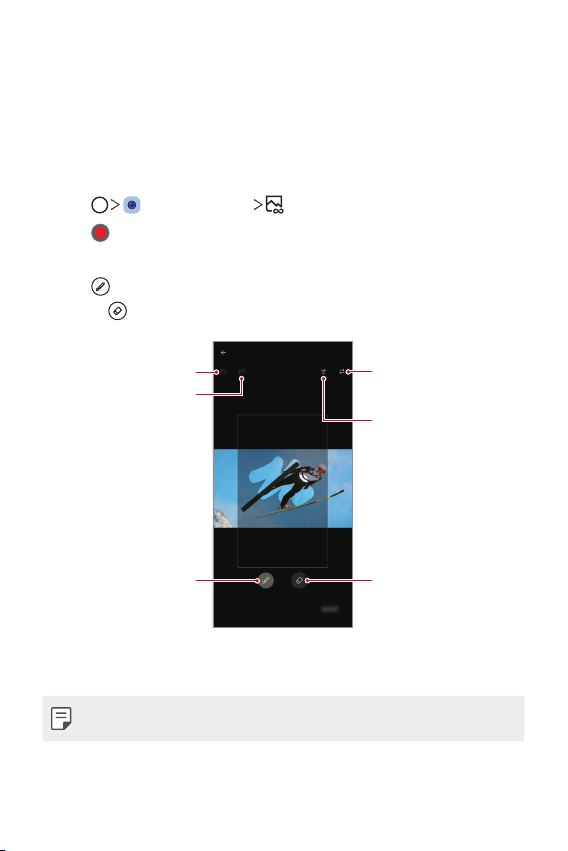
Cine shot
Play forward and backward
You can record a moment and make a video with only a part of the scene
in motion.
While recording a video, hold the device steady. After recorded, rub an area
in the video you want in motion. The selected area starts moving and the
rest of the video remains still.
Tap , then tap MODE .
1
Tap
2
3
to record a 3 second video.
• Hold the device steady while recording the video.
Tap and rub the area you want in motion with the Cine shot effect.
to erase the selected area.
• Tap
Select the area to move.
Tap SAVE.
4
Undo
Redo
repeatedly.
Play forward repeatedly.
Erase the selected area.
• The selected area will be in motion.
• Cine shot is recorded in the FHD 16:9 aspect ratio.
Custom-designed Features 11
Cine Video
You can record a movie-like video.
Tap , then tap MODE Cine Video .
1
Tap to record a video.
2
: Select the point zoom feature to zoom in/out around a specific
•
area.
: Select an effect to apply to the recording. You can also adjust
•
the vignette and strength for each Cine effect. This feature cannot
be changed after you have started recording.
• The Point Zoom feature supports a zoom speed of up to 3x.
• This feature only supports video recordings in standard angle.
Custom-designed Features 12
Makeup Pro
While taking selfies, you can apply various makeup techniques.
When using the front camera, adjust the skin tone and apply eye and lip
makeups.
Tap , switch to the front camera, then tap .
1
Select a desired makeup option, then drag the slide bar to the left or
2
right to adjust the effect.
• When you select None, the slide bar disappears.
Tap to take a photo.
3
Custom-designed Features 13
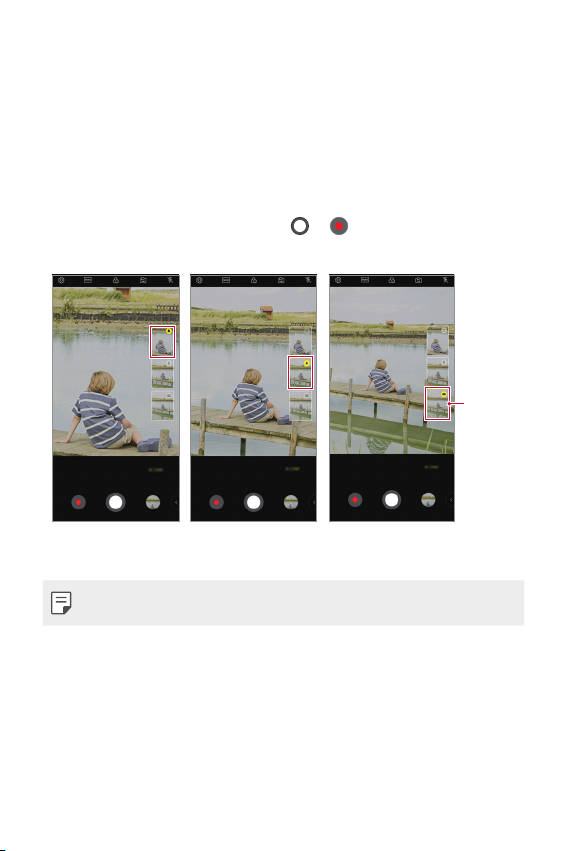
Preview
You can preview images of different angles taken by the triple cameras
located on the back of the device and select a desired angle to take a
photo or record a video.
Before taking a photo, touch and hold a camera view icon to display
preview icons of three angles on the right.
• The screen displays the preview image of the selected angle of view.
• After selecting a desired angle, tap
a video.
or to take a photo or record
Select
preview
icon.
Telephoto camera view Standard angle camera
view
• This feature is available only in the Auto mode and AI Cam.
Custom-designed Features 14
Wide-angle camera
view
Flash Jump-Cut
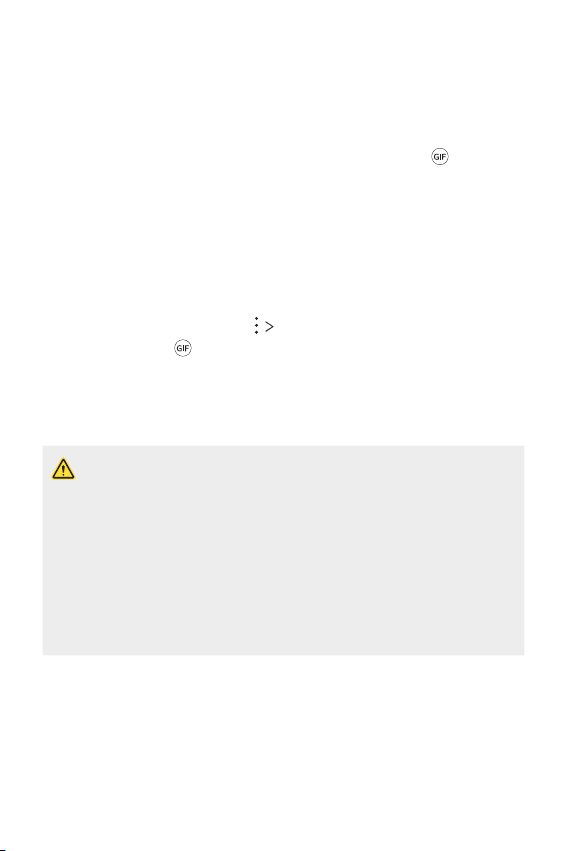
Photos taken at a regular interval are saved as GIF files.
Tap , then tap MODE Flash Jump-Cut .
1
Tap to take a photo.
2
• Photos are taken every 3 seconds and saved as a GIF file.
on the screen to select the number of photos you want to
• Tap
take.
• While taking photos, tap
photos.
• The flash automatically turns on while taking photos.
• The current shot and the total number of shots are displayed at the
bottom of the screen.
• All taken photos are saved as GIF files only.
• The GIF speed and image order cannot be changed.
to create GIF files with previously taken
Custom-designed Features 15
Graphy
You can adjust the white balance, ISO and shutter speed referring to the
recommended images.
Tap , then tap MODE Manual ( ).
1
Tap and then tap Graphy photos to activate the feature.
2
Tap and select the desired scene from the recommended images.
3
Tap to take a photo.
4
• This feature is available only in Manual camera mode.
• You can add more scenes by tapping
app from Play Store. You may be charged for data usage, depending on
your pricing plan.
• Tap
, then tap Graphy photos to deactivate this feature.
and downloading the Graphy
Steady recording
You can use the Steady recording feature to minimize motion blur while
recording a video.
, then tap Steady recording.
Tap
• See
Starting the camera
• This feature is available only in specific modes.
for details.
Hi-Fi video recording
You can record a high quality video with Hi-Fi sound.
, then tap MODE Manual ( ) Hi-Fi.
Tap
• See
Starting the camera
• Hi-Fi videos can only be played in apps that support Hi-Fi.
Custom-designed Features 16
for details.
Gallery features
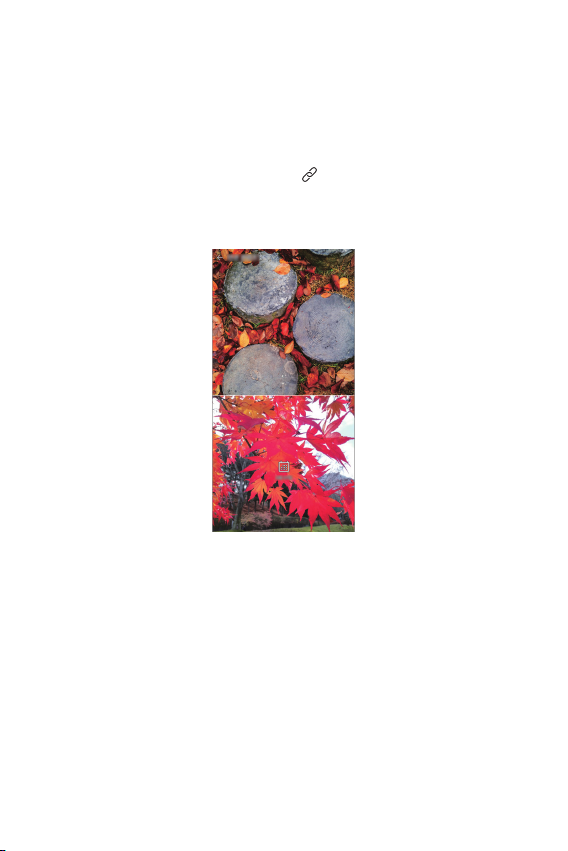
Related content
You can edit and customize related content in Gallery.
While viewing a picture preview, tap .
1
When the icon related with the date or location where you took the
2
photo appears, touch the screen.
Custom-designed Features 17
• You can view a group of photos taken on the same day or at the
same location.
• Tap to access additional options.
Custom-designed Features 18

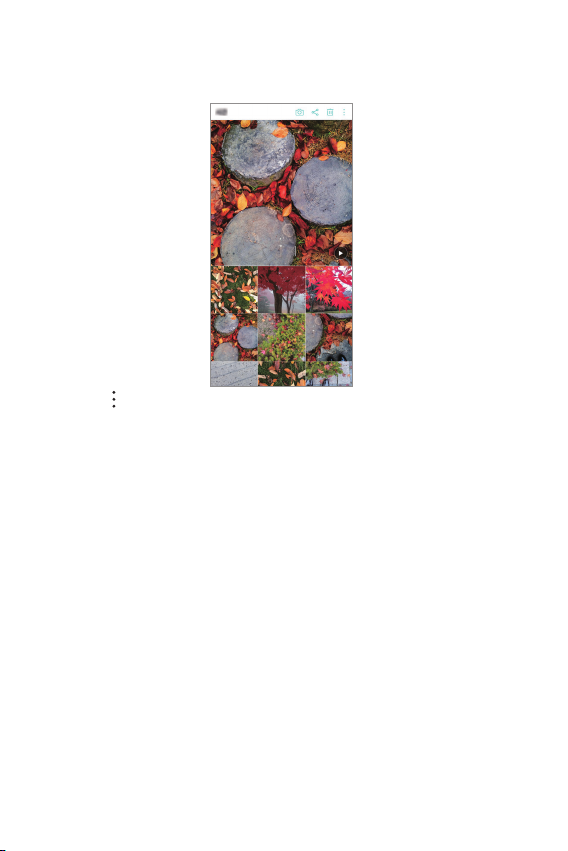
Making a video from the related content
You can gather related contents to make a video clip by tapping on the
video displaying the date or location.
Select the theme and background music, adjust caption effects and order
or add date and your signature and then tap SAVE.
: Select the video theme.
•
: Add background music or adjust the playback time.
•
- To select a file for the background music, tap
- To adjust the volume of background music and original video, tap
: Select a font face.
•
: Change the order of files to play as a video.
•
- To add files, tap
.
.
.
Custom-designed Features 19
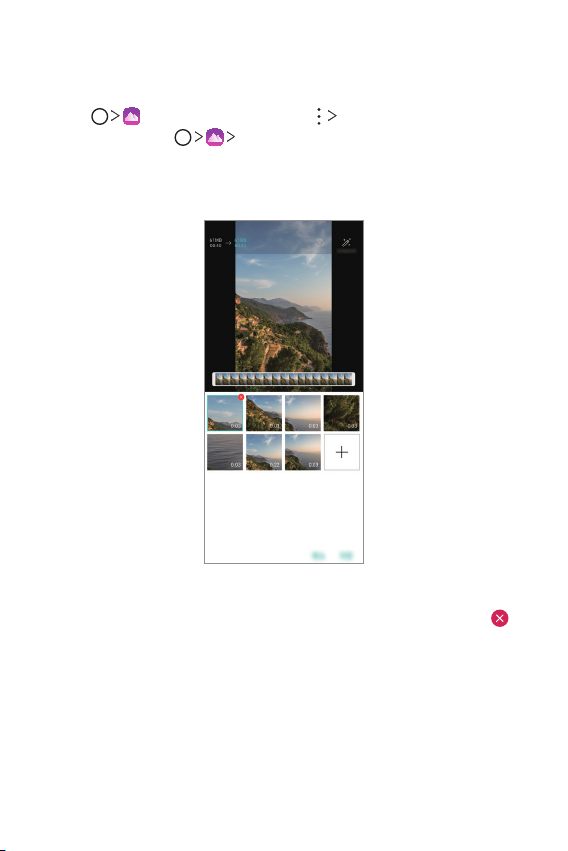
Creating a movie
You can create a new movie by putting images and videos together.
Tap , select an album, then tap Create movie.
1
You can also tap
Select images or videos for your movie and tap NEXT.
2
Edit the selected images and videos and then tap SAVE.
3
Deleting files
You can select images or videos to delete from your video by tapping
at the top right corner of its thumbnail.
Play tab, then tap Create movie.
Custom-designed Features 20
Adding files
You can select images or videos to add after tapping at the bottom of
the screen. You can also select the images or videos you have previously
added.
• Touch and hold a file, and then tap another file for multiple selection.
Rearranging files
To rearrange the images and videos, touch and hold the file you want to
move, then dragging it to the desired location.
Adding file effects
Tap to add a theme or background music, or change the font.
Resetting the movie edits
You can reset the edits made to the movie (e.g. play time) by tapping .
Previewing a file
Check your new video before saving it by tapping . After the playback
time elapses, the next file is played automatically.
• A maximum of 50 images and videos can be used to create a video.
• The playback time for an image is 3 seconds by default and it cannot be
changed. Videos can be trimmed down to a minimum of 1 second.
• This feature may not support some image or video formats.
Custom-designed Features 21
Making a GIF
You can easily make a GIF file using recorded videos or photos.
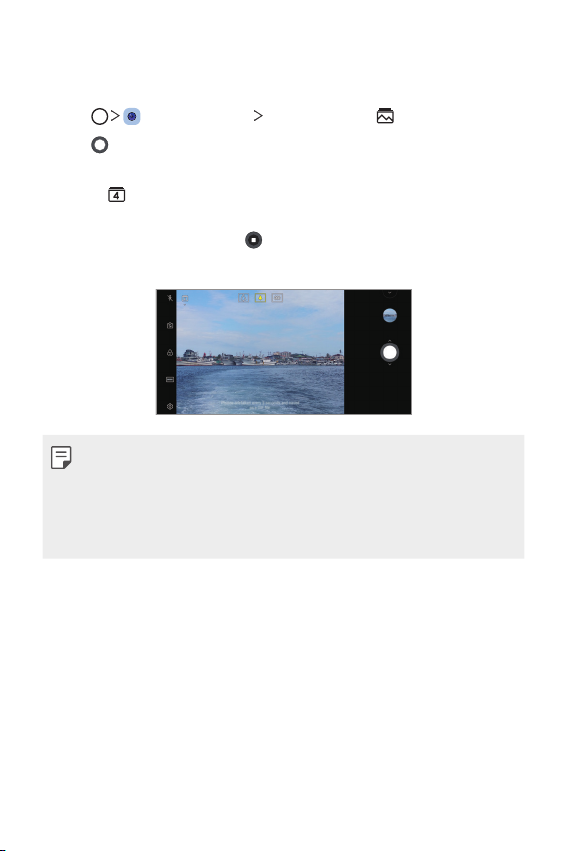
Making a GIF by using recorded videos
At the desired starting point while watching a video, tap .
1
Select the length of the GIF you want to create.
2
• GIF is generated for the time selected from the current time.
• For videos less than 5 seconds, GIF images are automatically
generated for the remaining time.
Making a GIF by using photos
While viewing an album, tap Create GIF.
1
You can also tap
Select the desired photos to create a GIF file and then tap NEXT.
2
• You can add more images and adjust the GIF speed, screen ratio,
and file order.
• You may use this feature solely for creative purposes. The use of this
feature involving infringement of any other person’s rights, such as
copyright or defamatory or offensive statements, may be subject to civil,
criminal, or administrative liabilities and/or penalties under applicable
laws. You shall not copy, reproduce, distribute, or otherwise make illegal
use of any copyrighted materials without permission of the rightful
owner or copyright holder. To the fullest extent permitted by applicable
law, LG Electronics disclaims all expressed and implied warranties as well
as liabilities associated thereto.
• A maximum of 100 images can be used to create a GIF file.
on Play tab in the Gallery app.
Custom-designed Features 22
Sound quality and effects
DTS:X 3D Surround
You can play a song or video in three-dimensional, immersive and vivid
sound. Connect to an earphone, speaker or other external audio devices
to use this feature.
Settings Sound Sound quality and effects DTS:X 3D
Tap
Surround, then tap
Adjusting the sound direction
You can adjust the sound direction as desired.
Tap Settings Sound Sound quality and effects DTS:X 3D
1
Surround.
Select the desired sound direction.
2
to activate this feature.
Custom-designed Features 23
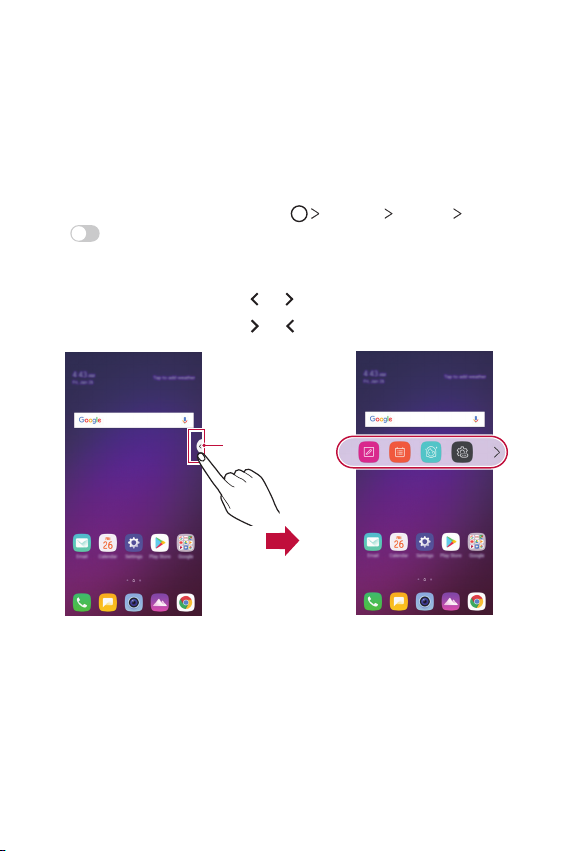
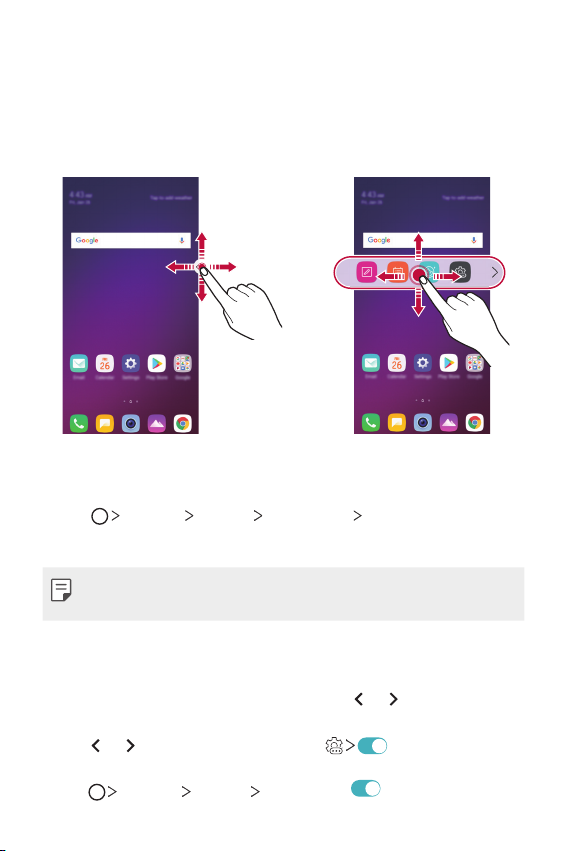
Floating bar
Floating bar overview
You can access frequently used features, such as Shortcuts, Screen
capture, Music player, and Quick contacts, by tapping and swiping the
floating bar on the screen.
To enable the floating bar feature, tap
.
Bar
Opening and closing the floating bar
• To open the floating bar: Tap or .
• To close the floating bar: Tap
Floating Bar
• To access the rest of the bar options, swipe left or right on the floating
bar.
Settings General Floating
or .
Custom-designed Features 24
Moving the floating bar position
• Floating bar open: Touch and hold the floating bar, then drag it to the
desired location.
• Floating bar closed: Touch and hold the floating bar, then drag it to
the desired location along the edge of the screen.
Changing the position of the floating bar
You can set the area in which the floating bar can move or be pinned.
Tap Settings General Floating Bar Position.
1
Tap the desired option and tap OK.
2
• The floating bar can only be moved within the area between the Status
bar and Quick access bar. See
Home screen layout
for details.
Disabling the floating bar
You can disable the floating bar by using one of the following methods:
• With the floating bar closed, touch and hold
bar and then drag it to the Remove area at the top of the screen.
or on the floating bar, then tap at the top of the
• Tap
screen.
Settings General Floating Bar .
• Tap
Custom-designed Features 25
or on the floating

Setting the floating bar
You can select contents to display on the floating bar and change their
display order. Tap
Floating Bar.
• Shortcuts: Quickly access frequently used apps or features.
• Screen capture: Capture the screen to crop the desired part or to
create a GIF file.
• Music player: Control the music you are listening to.
• Quick contacts: Call or message people set as quick contacts.
• A maximum of 5 apps or features can be added to the shortcuts.
• A maximum of 5 contacts can be added as quick contacts.
• A GIF can be created up to 15 seconds long.
from the floating bar or tap Settings General
Launch Capture+ on the current screen to capture a screenshot.
Launch Extended capture to capture a scrolling screen.
Capture a desired part of a screen.
Save part of the current screen as a GIF file. You can adjust the size
of the image you want to capture.
•To move to the desired location, drag
•To start recording a GIF, tap
•To stop recording a GIF, tap
.
.
.
Custom-designed Features 26
Google Assistant
You can manage tasks, plan your day, get answers, and much more.
• To use this feature, first connect to the network and sign in to your
Google account.
Launching Google Assistant
Press and hold from the Home screen to launch Google Assistant.
1
Tap GET STARTED.
2
Follow the on-screen instructions to configure the voice settings.
3
• The device saves your voice data for recognition.
Launching Google Assistant with your voice
Say “Ok Google” when the screen is turned off or locked.
1
Say a command or question when
2
the screen.
Launching Google Assistant from the Home
screen
Touch and hold from the Home screen.
1
Say a command or question when
2
the screen.
• Voice recognition accuracy may decrease if you speak with an unclear
voice or in a noisy place. When you use the voice recognition feature,
increase its accuracy by speaking with a clear voice in a quiet place.
Hi, how can I help?*
Hi, how can I help?*
appears on
appears on
* The prompt message may vary depending on the software version.
Custom-designed Features 27
Audio recording features
The HD Audio Recorder feature allows you to configure the audio settings
manually so that you can record audio based on your environment.
Recording modes
You can record a high definition audio file by selecting and configuring the
desired audio mode to suit the recording environment.
Other Apps HD Audio Recorder .
Tap
Normal
You can record audio without extra settings.
Concert
You can record audio in a concert or other music event.
Custom
You can manually personalize the settings to record audio.
Studio Mode
With Studio mode, you can play an audio file or music and record your
voice at the same time, create a chord by recording your voice multiple
times, and record your comments over the presenter’s or speaker’s original
audio file.
Tap Other Apps HD Audio Recorder Custom.
1
Tap .
2
Select an audio file to use as background music.
3
Tap to record voice.
4
Tap to save the recorded file.
5
• Background music can only be played through earphones. Make sure to
plug in earphones before using this feature.
Custom-designed Features 28
Other useful features on the HD Audio Recorder app
GAIN
You can adjust the sensitivity of the sound recorded by the microphone.
The higher the GAIN value is set, the more sensitively the sound is
recorded.
LCF
You can filter any low-pitched noises such as the low hum of the air
conditioner.
The higher the LCF (Low Cut Filter) value is set, the better high-frequency
noises are filtered.
LMT
It can prevent clipping of the recorded sound. The higher the LMT (Limiter)
value is set, the more low frequency sounds that will not get clipped.
• To change additional settings, tap Settings, then customize the file
type, bit depth, sampling rate and other settings.
• You can monitor sound quality with the connected earpiece while
recording audio. While recording audio in Studio mode, sound
monitoring is not supported. You can hear only the background music.
Custom-designed Features 29
 Loading...