

LG FB164-A0P User Manual
P/NO : MFL62755714
User Guide
FB164 (FB164-A0P, FBS164V)
As an ENERGY STA R®Partner,
LG has determined that this
product or product models meet
the ENERGY STA R®guidelines for
energy efficiency.
E
NERGY STA R
®
is a U.S. registered mark.
iPod is a trademark of Apple Computer, Inc, registered in the U.S. and other countries.
Before connecting, operating or adjusting this product, please read this instruction booklet carefully and completely.
ENGLISH
FB164-A0P_DPERLLK_ENG_5714 11/18/09 2:58 PM Page 1
2
CAUTION : TO REDUCE THE RISK OF ELECTRIC SHOCK DO NOT REMOVE
COVER (OR BACK) NO USER-SERVICEABLE PARTS INSIDE REFER SERVICING
TO QUALIFIED SERVICE PERSONNEL.
This lightning flash with arrowhead symbol within an equilateral triangle is
intended to alert the user to the presence of uninsulated dangerous voltage
within the product’s enclosure that may be of sufficient magnitude to
constitute a risk of electric shock to persons.
The exclamation point within an equilateral triangle is intended to alert the
user to the presence of important operating and maintenance (servicing)
instructions in the literature accompanying the product.
WARNING : TO PREVENT FIRE OR ELECTRIC SHOCK HAZARD, DO NOT
EXPOSE THIS PRODUCT TO RAIN OR MOISTURE.
WARNING : Do not install this equipment in a confined space such as a book case or
similar unit.
CAUTION : This product employs a Laser System.
To ensure proper use of this product, please read this owner’s manual carefully and
retain it for future reference. Shall the unit require maintenance, contact an authorized
service center.
Use of controls, adjustments or the performance of procedures other than those
specified herein may result in hazardous radiation exposure.
To prevent direct exposure to laser beam, do not try to open the enclosure. Visible
laser radiation when open. DO NOT STARE INTO BEAM.
CAUTION : The apparatus shall not be exposed to water (dripping or splashing) and
no objects filled with liquids, such as vases, shall be placed on the apparatus.
CAUTION concerning the Power Cord
Most appliances recommend they be placed upon a dedicated circuit ;
That is, a single outlet circuit which powers only that appliance and has no additional
outlets or branch circuits. Check the specification page of this owner's manual to be
certain.
Do not overload wall outlets. Overloaded wall outlets, loose or damaged wall outlets,
extension cords, frayed power cords, or damaged or cracked wire insulation are
dangerous. Any of these conditions could result in electric shock or fire. Periodically
examine the cord of your appliance, and if its appearance indicates damage or
deterioration, unplug it, discontinue use of the appliance, and have the cord replaced
with an exact replacement part by an authorized service center.
Protect the power cord from physical or mechanical abuse, such as being twisted,
kinked, pinched, closed in a door, or walked upon. Pay particular attention to plugs,
wall outlets, and the point where the cord exits the appliance.
To disconnect power from the mains, pull out the mains cord plug. When installing the
product, ensure that the plug is easily accessible.
This device is equipped with a portable battery or accumulator.
Safe way to remove the battery or the battery from the equipment:
Remove the old battery or battery pack, follow the steps in reverse order than the
assembly. To prevent contamination of the environment and bring on possible threat
to human and animal health, the old battery or the battery put it in the appropriate
container at designated collection points. Do not dispose of batteries or battery
together with other waste. It is recommended that you use local, free reimbursement
systems batteries and accumulators.
The battery shall not be exposed to excessive heat such as sunshine, fire or the like.
Safety Precaution
CAUTION
RISK OF ELECTRIC SHOCK
DO NOT OPEN
FB164-A0P_DPERLLK_ENG_5714 11/18/09 2:58 PM Page 2

3
Welcome to your New DVD MICRO Hi-Fi SYSTEM
Contents
Setting up 4
Main Unit 5
Remote control 6
OSD initial language settings - Optional 7
Initial settings the Area Code - Optional 7
Adjusting the general settings 8-9
Setting the Clock 10
TV sound EZ setup 10
Displaying disc information 11
Playing a Disc or file 11-13
Listening to the radio 14
Listening to music from your portable player 15
Using an USB device 15
Recording to USB 16
Playing the iPod 17
Language Codes 18
Area Codes 18
Troubleshooting 19
Types of Playable Discs 20
Specifications 21
Precautions in using the touch buttons
• Use the touch buttons with clean and dry hands.
- In a humid environment, wipe out any moisture on the touch buttons
before using.
• Do not press the touch buttons hard to make it work.
- If you apply too much strength, it can damage the sensor of the
touch buttons.
• Touch the button that you want to work in order to operate the function
correctly.
• Be careful not to have any conductive material such as metallic object
on the touch buttons, and it can cause malfunctions.
FB164-A0P_DPERLLK_ENG_5714 11/18/09 2:58 PM Page 3

4
Setting up
Connecting your unit to your TV and aerials.
Component Video connection (B)
Connect the COMPONENT VIDEO
(PROGRESSIVE SCAN) OUTPUT jacks
on the unit to the corresponding input
jacks on your TV using a Y PB PR cable.
- If your TV accepts progressive format
signals, you must use this connection
and set [Progressive Scan] in [Display]
setup to [On] (See page 8).
Stretch the FM aerial.
The reception will be at its best
when the end of the aerial is
stretched to be in a straight line
and horizontal.
Fit the AM loop aerial to its
stand
Connect the AM loop aerial to
the unit.
b Plug the unit plug into a wall socket.
O
P
T
I
C
A
L
I
N
ANTENNA
OUT PUT
C
O
M
P
O
M
E
N
T
C
O
M
P
O
M
E
N
T
V
ID
E
O
(P
R
O
G
R
E
S
S
IV
E
S
C
A
N
)
V
ID
E
O
(
PR
O
G
R
E
S
S
IV
E
SC
A
N)
P
R
P
B
Y
MONITOR
+
C
O
M
P
O
M
E
N
T VID
E
O
(P
R
O
G
R
E
S
S
IV
E S
C
A
N
)
a Connect jacks on the unit and your TV (DVD player or Digital Device etc.) using the cables.
Check the jacks of your TV and choose the A, B connection. Picture quality improves in order from A to B.
Video Out connection
(A)
Connect the VIDEO
OUTPUT(MONITOR) jack on
the unit to the corresponding
input jack on your TV using a
Video cable.
Connect the speaker cables to the player
To connect the cable to the unit, press each plastic
finger pad to open the connection terminal. Insert
the wire and release the finger pad.
Connect the black end of each wire to the
terminals marked -(minus) and the other end to the
terminals marked + (plus).
FB164-A0P_DPERLLK_ENG_5714 11/18/09 2:58 PM Page 4
5
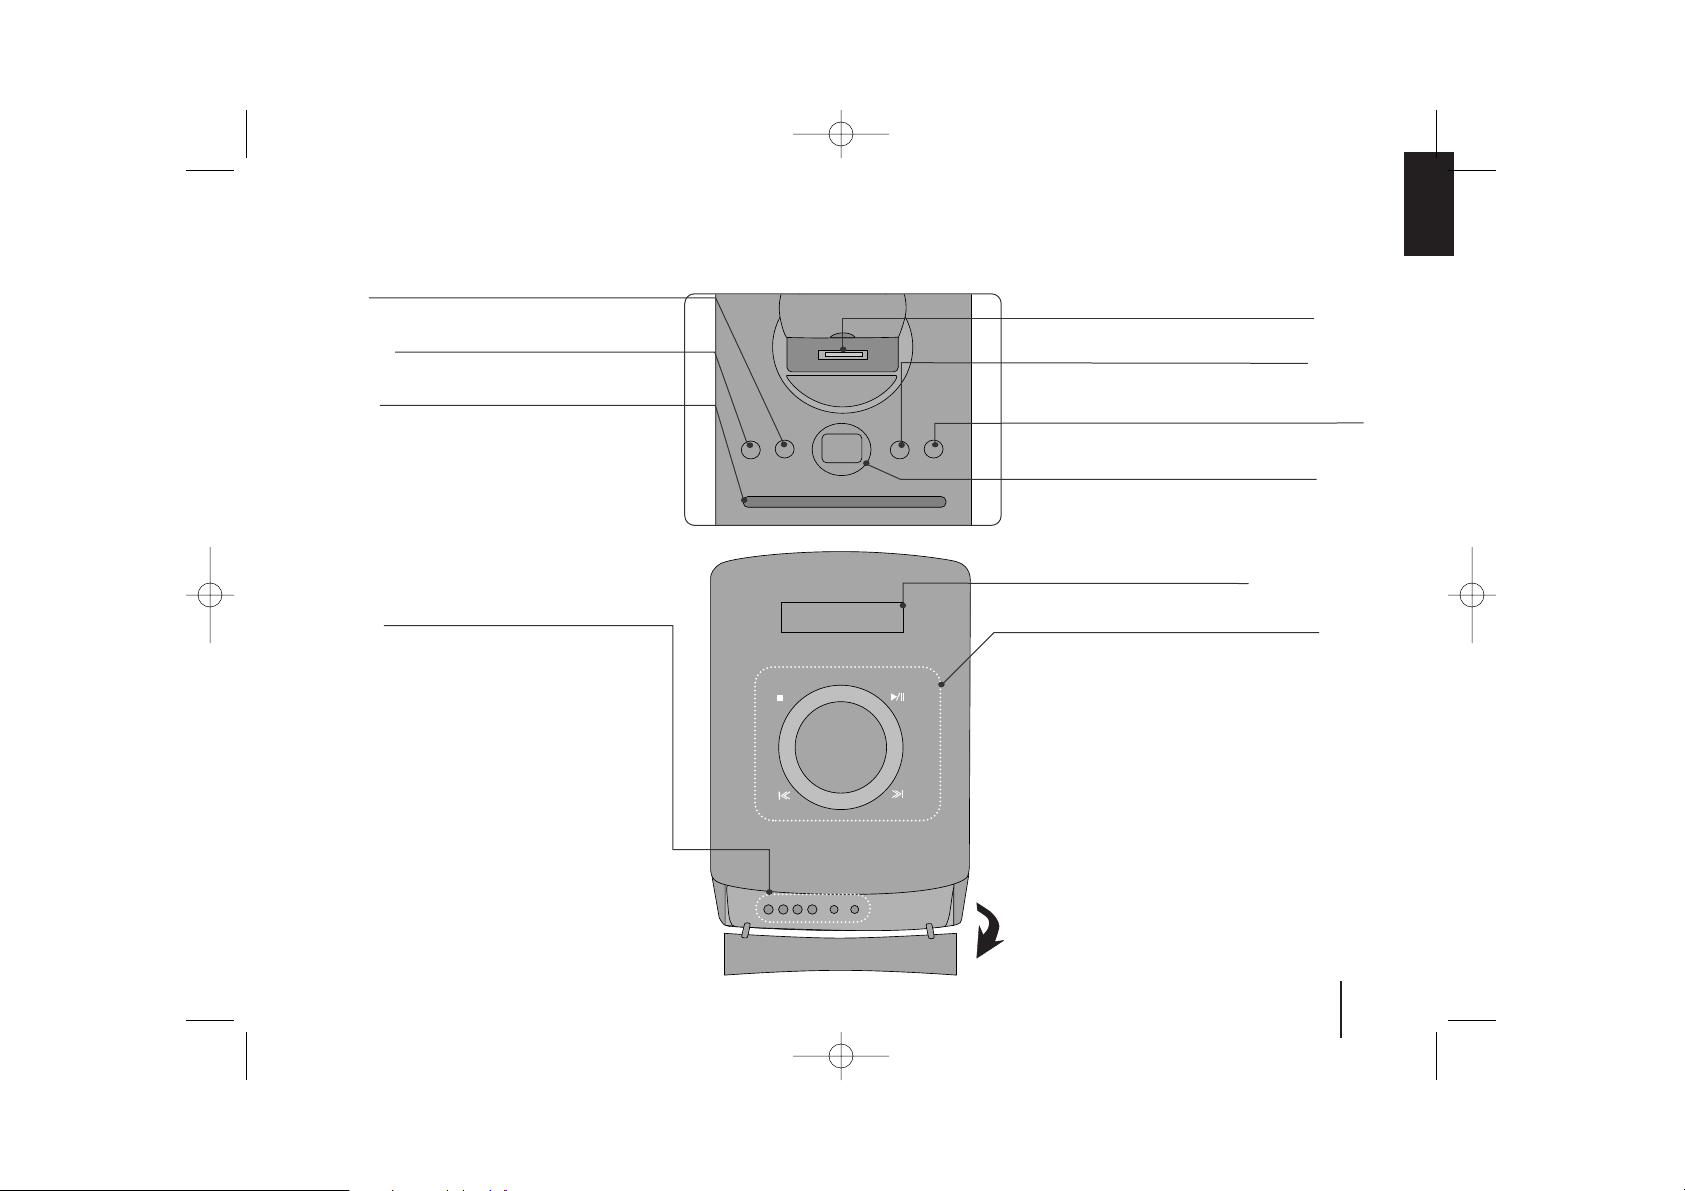
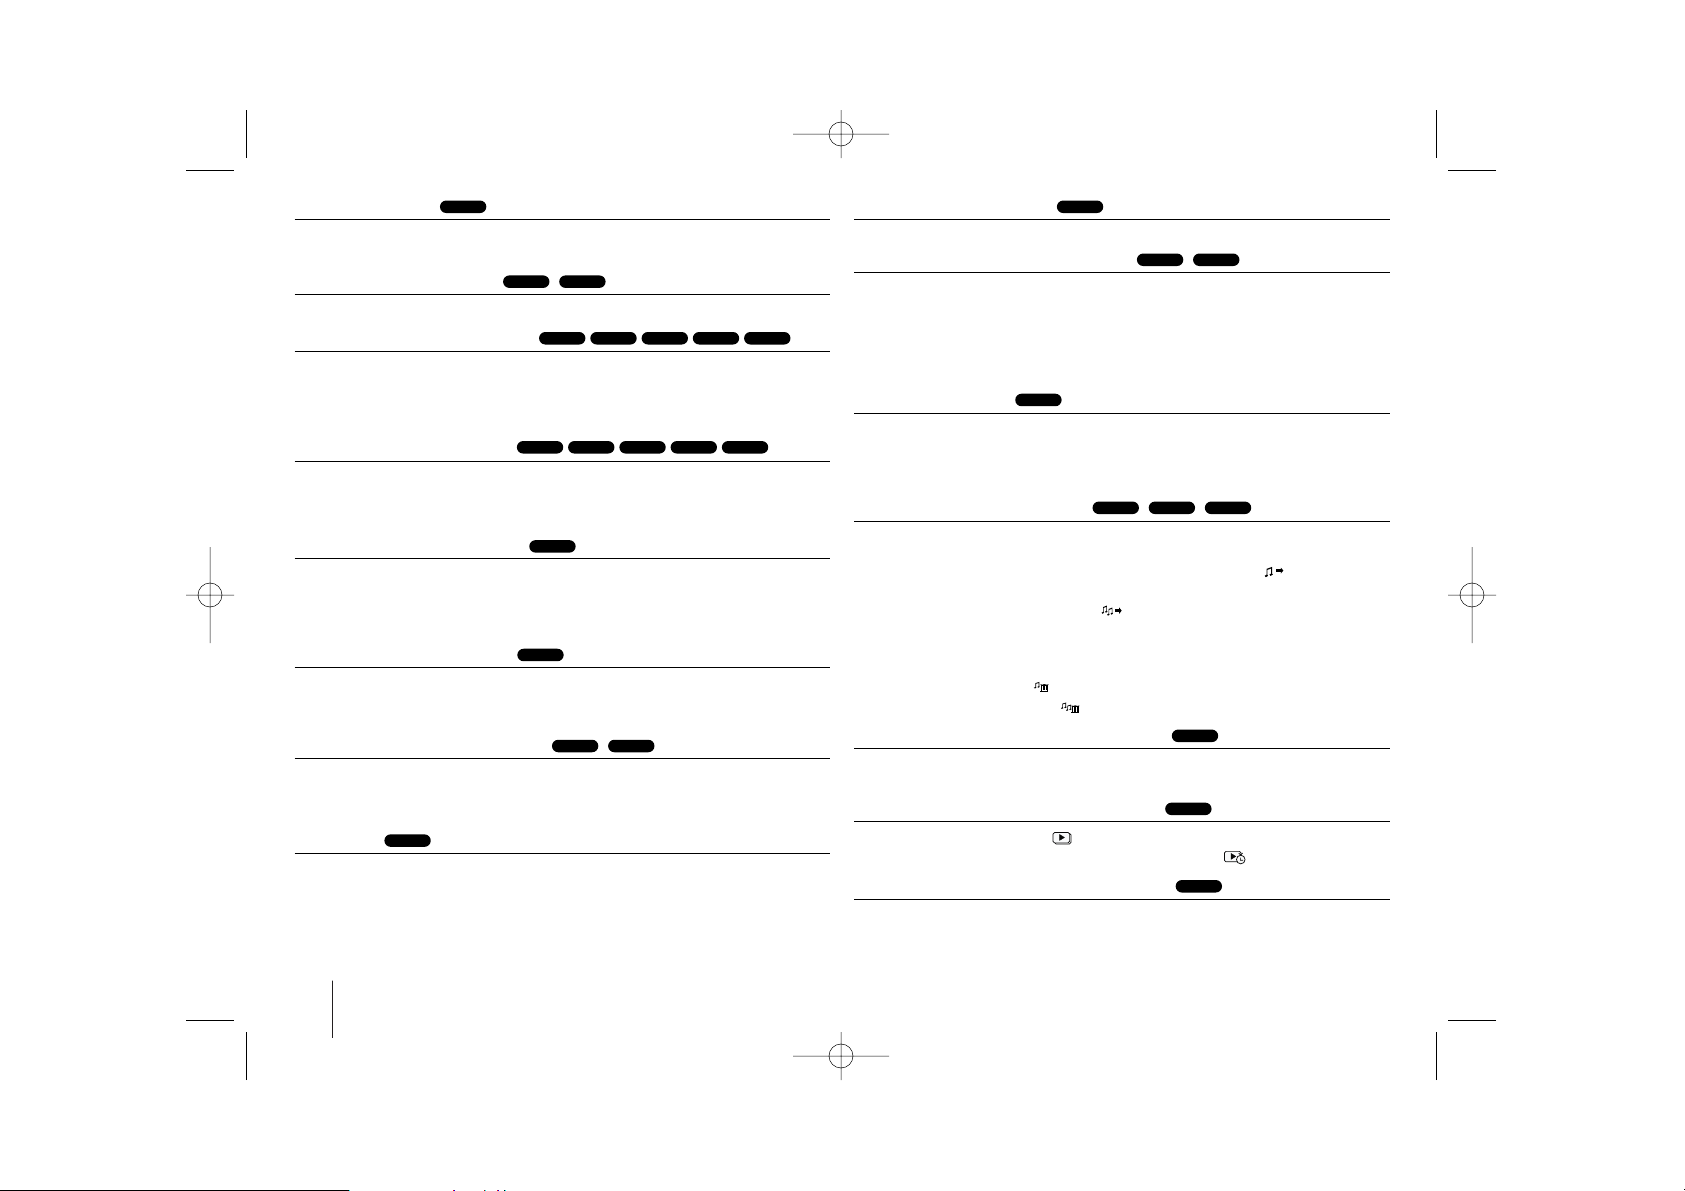
Main Unit
USB REC.
Recording to USB.
11/]]
(Power)
Turn the unit on and off.
USB Port
iPod Dock
Display Window
EQ/ DEMO
You can choose fixed sound impression.
Press DEMO in power off state to demonstrate the
function on display window.
CLOCK
(See “Setting the Clock” )
TIMER
(See the “Using your player as an alarm clock”)
SET
Confirms the settings.
PORTABLE IN
For connecting a portable device and listening to
sound of it through this system’s speakers.
PHONES
Headphone jack
xx
STOP
Stop
]] IIII/ iiii ]]
Scanning/ Tuning/ Searching
BB// XX
Play/ Pause
VOL +/-
Volume control
FUNC.
(Function) Selects the function.
Disc Slot
• Do not push a disc forcibly into the CD slot.
• Do not pull or push a disc while a disc is ejected.
• Press ZZagain to reinsert the disc after ejecting it.
• pick it to the CD slot with the label side toward
ZZ
Ejects or insert the disc from slot loader.
TOP
FRONT
FB164-A0P_DPERLLK_ENG_5714 11/18/09 2:58 PM Page 5
VOL +
VOL
-
6
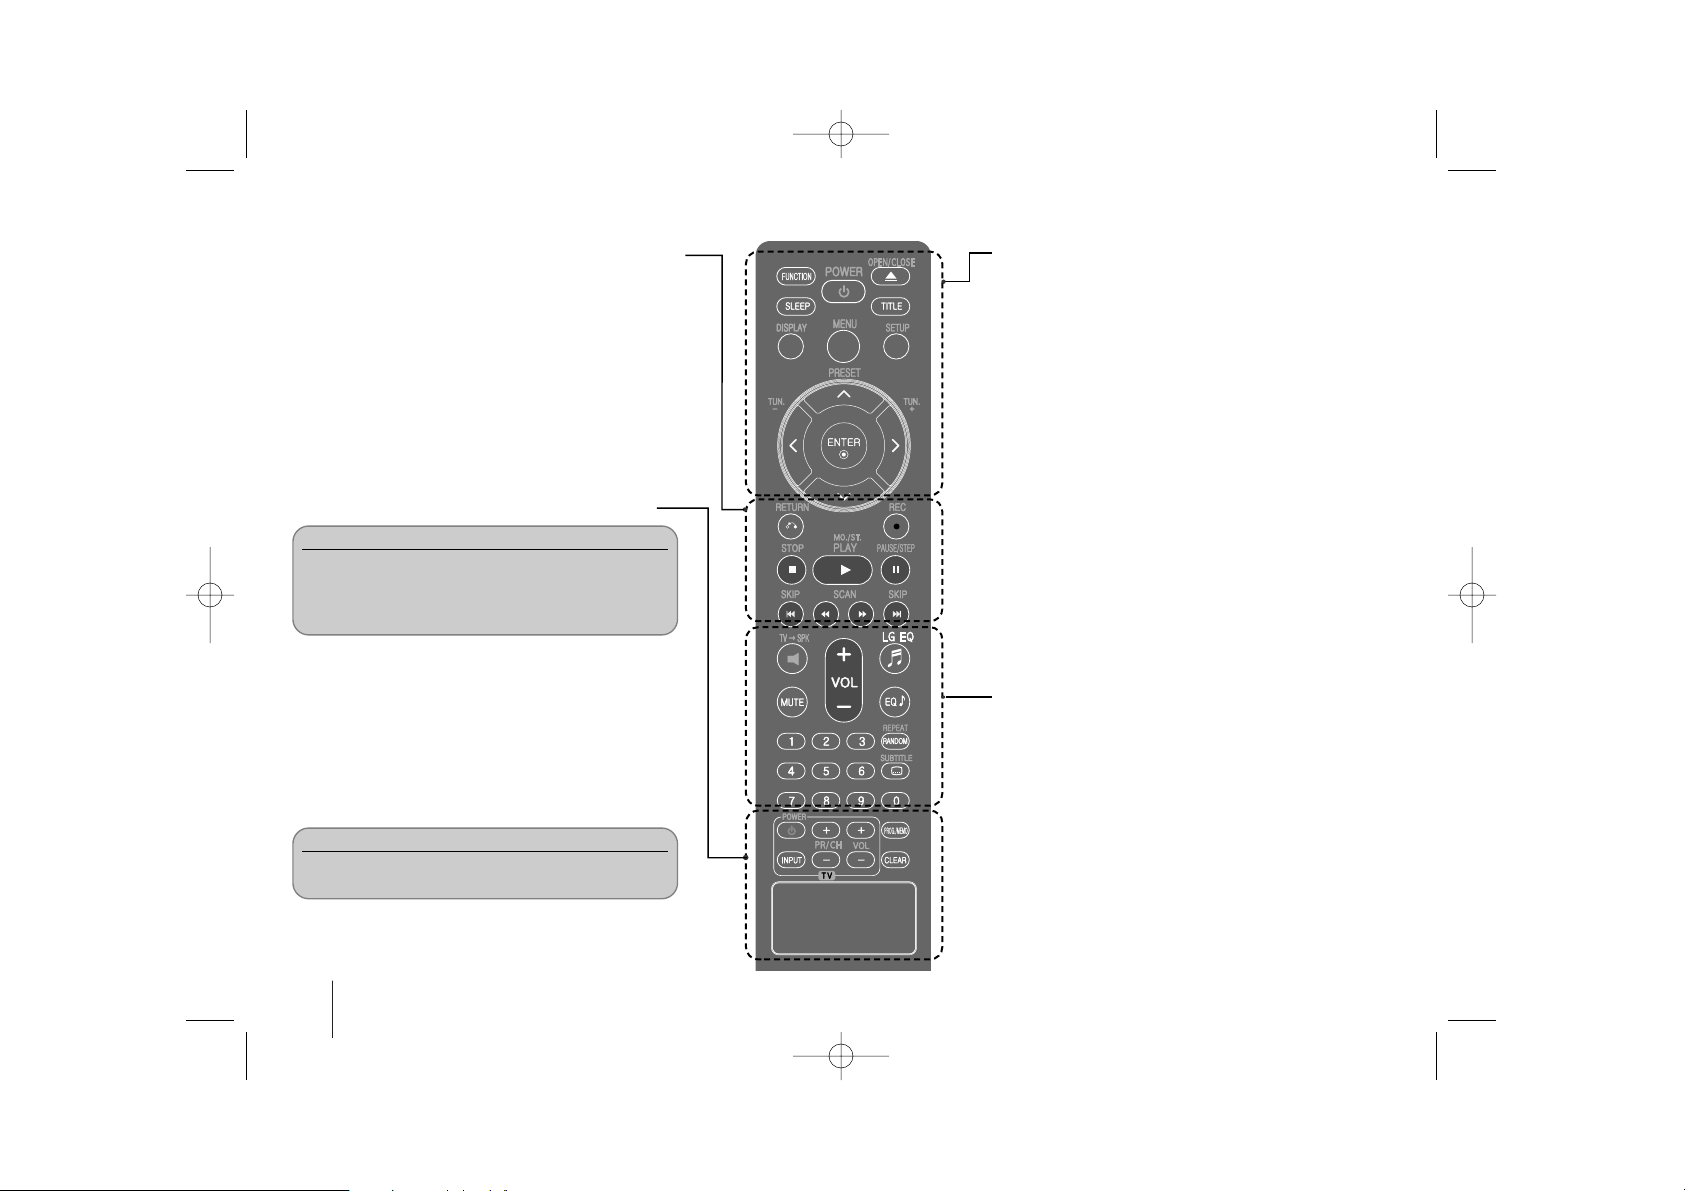
Remote control
RETURN (O) : Moving backwards in the menu or exited
the setup menu.
REC (z):USB Direct Recording
STOP (x) : Stops playback or recording.
PLAY (B), MO./ST. : Starts playback. Selects Mono/
Stereo.
PAUSE/STEP (X) : Pause playback
SKIP (./>) : Go to next or previous chapter/ track/
file.
SCAN (
bbbb//BBBB
) : Search backward or forward.
FUNCTION : Selects the function and input source.
SLEEP : You can select delay time between 10 and 180
minutes, after the player will turn off. To check the
remaining time, press SLEEP. (Dimmer : Press SLEEP
once. Dims the LED (Light-emitting diode) of front panel by
half in power-on status.)
1 POWER : Switches the unit ON or OFF.
Z OPEN/CLOSE : Opens and closes the disc Drawer.
TITLE : If the current DVD title has a menu, the title menu
appears on the screen. Otherwise, the disc menu may not
appear.
DISPLAY : Accesses On-Screen Display.
MENU : Accesses the menu on a DVD disc.
SETUP : Accesses or removes setup menu
PRESET (U u) : Selects programme of Radio.
TUN. (-/+) : Tunes in the desired radio station.
U u I i (up/ down/ left/ right ): Used to navigate onscreen
displays.
ENTER : Acknowledges menu selection.
TVttSPK : To select the AUX OPT directly.
MUTE : To mute the sound.
VOL (Volume) (+/-) : Adjusts speaker volume.
EQ/ LG EQ (Equalizer effect) : You can choose sound
impressions.
REPEAT/RANDOM : To select a play mode. (repeat/
random)
SUBTITLE : During playback, you can select a desired
subtitle language.
0-9 numerical buttons : Selects numbered options in a
menu.
TV Control buttons : Controls the TV. (LG TV only)
PROG./MEMO. : Accesses or removes Program menu.
CLEAR : Removes a track number on the Program List.
Controlling the TV.
You can control the sound level, input source, and
power switching of LG TVs as well. Hold POWER (TV)
and press PR/CH (+/–) button repeatedly until the TV
turns on or off.
Put the battery into the remote control.
Make sure that the + (plus) and - (minus) on the
battery match those on the remote control.
FB164-A0P_DPERLLK_ENG_5714 11/18/09 2:58 PM Page 6
OSD initial language settings
- Optional
7
1 Turn the power on POWER
The language list appears
2 Select the language
II ii UU uu
3 Press ENTER
4 To confirm press ENTER
During the first use of this unit, the initial language setup menu
appears on your TV screen. You must complete initial language
selection before using the unit.
ON REMOTE
Initial settings the Area Code
- Optional
1 Display setup menu SETUP
2 Select LOCK menu on the first level
UU uu
3 Move to second level
ii
The activated Area Code appears on the
second level.
4 Move to the third level
ii
5 Enter a new password Numeric (0-9)
and ENTER
6 Recheck the entered new password Numeric (0-9)
and ENTER
7 Select a code for a geographic area
UU uu II ii
After select, Rating and Password will be
activated.
8 To confirm what you press ENTER
Make sure to finish setting the Area Code.
When you use this unit for the first time, you have to set the Area Code
as shown below.
ON REMOTE
FB164-A0P_DPERLLK_ENG_5714 11/18/09 2:58 PM Page 7
Adjusting the general settings - more you can do
Adjusting the language settings
OSD (Menu Language) – Select a language for the Setup menu and on-
screen display.
Disc Audio/ Disc Subtitle/ Disc Menu – Select a language for the Disc Audio/
Disc Subtitle/ Disc Menu.
[Original] : Refers to the original language in which the disc was recorded.
[Other] : To select another language, press number buttons then ENTER to
enter the corresponding 4-digit number according to the language
code list in the reference chapter (Page 18). If you make a mistake
before pressing ENTER, press CLEAR.
[Off] (for Disc Subtitle) : Turn off Subtitle.
Adjusting the display settings
TV Aspect – Select which screen aspect to use based on the shape of your TV
screen.
[4:3] Select when a standard 4:3 TV is connected.
[16:9] Select when a 16:9 wide TV is connected.
Display Mode – If you selected 4:3, you’ll need to define how you would like
wide screen programs and films to be displayed on your TV
screen.
[Letterbox] This displays a wide screen picture with black bands at
the top and bottom of the screen.
[Panscan] This fills the entire 4:3 screen, cropping the picture as
necessary.
Progressive Scan (For Component Video connections) – Selects whether
the COMPONENT/PROGRESSIVE SCAN OUTPUT jacks output progressive
signal. If your TV accepts progressive format signals, you will enjoy accurate
color reproduction and high quality image by selecting [On]. If your TV does not
accept progressive format signals, select [Off].
If you set Progressive Scan to [On] in error, you must reset the unit. First,
remove the disc in the unit. Next, press and hold STOP for five seconds. The
video output will be restored to the standard setting, and a picture will be visible
on your TV.
Adjusting the general settings
8
1 Display setup menu SETUP
2 Select a desired option on the first level
UU uu
3 Move to the second level
ii
4 Select a desired option on the second level
UU uu
5 Move to the third level
ii
6 Change the setting
UU uu
, ENTER
ON REMOTE
FB164-A0P_DPERLLK_ENG_5714 11/18/09 2:58 PM Page 8

9
Adjusting the audio settings
DRC (Dynamic Range Control) – Make the sound clear when the volume is
turned down (Dolby Digital only). Set to [On] for this effect.
Vocal – Select [On] to mix karaoke channels into normal stereo.
This function is effective for multi-channel karaoke DVDs only.
Adjusting the lock settings
To access the lock options, you must enter the 4-digit password. If you have not
yet entered a password you are prompted to do so.
1 Enter a 4-digit password then press ENTER.
2 Enter it again then press ENTER to verify. If you make a mistake while
entering number, press CLEAR then correct it.
Area Code – Select a code for a geographic area as the playback rating level.
This determines which area’s standards are used to rate DVDs controlled by the
parental lock. See the Area Codes on page 18.
Rating – Select a rating level. The higher the level is, the stricter the rating.
Select [Unlock] to deactivate the rating.
Password – Sets or changes the password for lock settings.
[New] Enter a new 4-digit password using the numerical buttons then press
ENTER. Enter the password again to confirm.
[Change] Enter the new password twice after entering the current password.
If you forget your password you can reset it.
1 Remove the disc in the unit.
2 Press SETUP to display the Setup menu. Input ‘210499’ and press ENTER.
The password has now been cleared.
Adjusting the others settings
DivX(R) Registration – We provide you with the DivX®VOD (Video On Demand)
registration code that allows you to rent and purchase videos using the DivX
®
VOD service.
For more information, visit www.divx.com/vod.
Press ENTER and you can view the registration code of the unit.
Enjoying a pre-programmed sound field
The system has a number of pre-set surround sound fields. You can select a
desired sound mode by using EQ/ LG EQ. The displayed items for the
Equalizer may be different depending on sound sources and effects.
NATURAL You can enjoy comfortable and natural sound.
Local Regionally optimized sound effect. (DANGDUT/
specialization ARABIC/ PERSIAN/INDIA/ REGUETON/ MERENGUE/
equalizer SAMBA/ SALSA)
AUTO EQ Realizes the sound equalizer that is the most similar to the
genre of which is included in the MP3 ID3 tag of song
files.
POP This program lends an enthusiastic atmosphere to the
CLASSIC sound, giving you the feeling you are at an actual rock
JAZZ pop, jazz or classic concert.
ROCK
MP3 OPT This function is optimized for compressible MP3/WMA file.
It improves the bass sound.
XDSS ON Reinforce the treble, bass and surround sound effect.
VIRTUAL You can enjoy more virtual surround sound.
NORMAL You can enjoy the sound without equalizer effect.
FB164-A0P_DPERLLK_ENG_5714 11/18/09 2:58 PM Page 9
10
Using your player as an alarm clock
1.Turn the power on.
2 Press TIMER. Each functions flashes.
3 Press SET when the function you want to be woken by is showing.
4 “ON TIME” will be displayed. This is where you set the time you want the
alarm to start. Use
]] IIII/ ii ii ]]
to change the hours and minutes and SET to
save.
5 The “OFF TIME” will be displayed. This is where you set the time you want
the function to stop.
6 Use
]] IIII/ ii ii ]]
to change the hours and minutes and press SET
to save.
7 You will be shown the volume (VOL) you want to be woken by. Use
]] IIII/ ii ii ]]
to change the volume and SET to save. The clock icon “ ”
shows that the alarm is set.
8 Press TIMER button 2times. You can check the setting status.
Note
• If you set the clock time, you can check the time by pressing CLOCK even
when the player is turned off.
• If you set the clock time and alarm, you can check the alarm icon “ ” by
pressing CLOCK even when the player is turned off.
Setting the Clock
1 Turn the power on
11/]]
2 Press for at least 2 seconds CLOCK
3 Choose from either
]] IIII/ ii ii ]]
AM 12:00 (for an AM and PM display) or
0:00 (for a 24 hour display)
4 Confirm your selection SET
5 Select the hours
]] IIII/ ii ii ]]
6 Press SET
7 Select the minutes
]] IIII/ ii ii ]]
8 Press SET
ON UNIT
TV sound EZ setup
1 Connect the unit’s OPTICAL IN jack
to jack on optical out of your
TV (or Digital Device etc).
2 Select the AUX OPT TVtSPK
To select the AUX OPT directly.
3 Enjoy sound
4 To escape from AUX OPT TVtSPK
You can enjoy to sound from TV, DVD and Digital Device. Even in
power off mode, if you press TVtSPK, then power is on and
automatically changed to AUX OPT mode.
ON REMOTE
O
P
T
I
C
A
L
I
N
A
N
T
E
N
N
A
OUT PUT
C
O
M
P
O
M
E
N
T
C
O
M
P
O
M
E
N
T
V
I
D
E
O
(
P
R
O
G
R
E
S
S
I
V
E
S
C
A
N
)
V
I
D
E
O
(
P
R
O
G
R
E
S
S
I
V
E
S
C
A
N
)
Y
M
O
N
I
T
O
R
+
FB164-A0P_DPERLLK_ENG_5714 11/18/09 2:58 PM Page 10
11
Displaying Disc Information - more you can do
You can select an item by pressing
UU uu
and change or select the setting by
pressing
II ii
.
Current title (or track/ file)
number/ total number of titles (or tracks/ files)
Current chapter number/ total number of chapters
Elapsed playing time
Selected audio language or channel
Selected subtitle
Selected angle/ total number of angles
Selected sound/ EQ mode
Symbol Used in this Manual
All discs and file listed below MP3 files
DVD and finalized DVD±R/RW WMA files
DivX files
Audio CDs
JPEG files
Playing a Disc or file - more you can do
Mixed disc or USB Flash Drive – DivX, MP3/ WMA and JPEG
When playing a disc or USB Flash Drive containing with DivX, MP3/ WMA and
JPEG files together, you can select menu of files which you would like to play
by pressing MENU.
Moving to the previous/ next page on the file list menu
Press and hold
UU uu
to move to the previous or next page.
Playing a DVD that has a menu
Most DVDs now have menus which load first before the film begins to play.
1 You can navigate these menus using
UU uu II ii
to highlight an option.
2 Press PLAY to select.
Skipping to the next/ previous chapter/ track/ file
Press SKIP (>) to move to the next chapter/ track/ file.
Press SKIP (.) to return to the beginning of the current chapter/ track/ file.
Press SKIP (.) twice briefly to step back to the previous chapter/ track/ file.
ACDDivXDVDWMAMP3
DVD
JPGACDDivXWMAMP3
JPG
ACDDivX
WMA
DVD
MP3
ALL
Displaying Disc information Playing a Disc or file
1 Press
DISPLAY
2 Select an item
UU uu
3 Adjust the display menu settings
II ii
4 To return the exit
OO
RETURN
ON REMOTE
ON UNIT
ON REMOTE
1 Insert a disc on unit
2 Select a DVD/CD FUNC. FUNCTION
3 Adjust the menu settings /
II ii UU uu
Select a file from the menu
4 Start the Disc playing
BB // XX
BB
PLAY
5 To stop the Disc playing
xx xx
STOP
FB164-A0P_DPERLLK_ENG_5714 11/18/09 2:58 PM Page 11
12
Pausing playback
1 Press PAUSE/STEP (X) to pause playback.
2 Press PLAY (B) to continue playback.
Frame-by-Frame playback
Press PAUSE/STEP (X) repeatedly to play title Frame-by-Frame.
Playing repeatedly or randomly
Press REPEAT/RANDOM repeatedly, and the current title, chapter or track will
be played back repeatedly or randomly.
To return to normal playback, press REPEAT/RANDOM repeatedly.
- Random play mode : only music files.
Fast forward or fast reverse
Press SCAN (m or M) to play fast forward or fast reverse during playback.
You can change the playback speed by pressing SCAN (m or M)
repeatedly. Press PLAY (B) to continue play at normal speed.
Slow down the playing speed
While playback is paused, press SCAN (bb or BB) to slow down forward or
reverse playback. You can change the various playback speed by pressing
SCAN (m or M) repeatedly. Press PLAY (B) to continue play at normal
speed.
1.5 times faster playback
Press PLAY (B) when a DVD is already playing to watch and listen to a DVD
1.5 times faster than normal playback speed. “B x1.5” will appear in the screen.
Press PLAY (B) again to return to normal playback speed.
Selecting a subtitle language
During playback, press SUBTITLE repeatedly to select a desired subtitle
language.
Changing the character set to display DivX®subtitle correctly
- Optional
1 If the subtitle does not display properly during playback, press and hold
SUBTITLE for about 3 seconds to display the language code menu.
2 Press SUBTITLE repeatedly to change the language code until the subtitle is
displayed properly.
Viewing the Title menu
Press TITLE to display the disc's title menu, if available.
Starting play from selected time
Searches for the starting pointing of entered time code.
1 Press DISPLAY then select clock icon.
2 Enter a time then press ENTER.
For example, to find a scene at 1 hour, 10 minutes, and 20 seconds, enter
“11020” by using numerical buttons and press ENTER. if you enter the wrong
number, press CLEAR to enter again.
Last Scene Memory
This unit memorizes the last scene from the last disc that is viewed. The last
scene remains in memory even if you remove the disc from the player or switch
off (Stand-by mode) the unit. If you load a disc that has the scene memorized,
the scene is automatically recalled.
Creating your own program
You can play the contents of a disc in the order you want by arranging the order
of the music on the disc. The program is cleared when the disc is removed.
1 Select a desired music then press PROG./MEMO. or select “ “ and then
press ENTER to add the music to the program list.
2 To add all music in the disc, select “ ” and then press ENTER.
3 Select a music from the program list then press ENTER to start programmed
playback.
4 To clear a music from the program list, select the music you want to clear then
press CLEAR or select “
”
icon and then press ENTER. To clear all music
from the program list, select “ ” then press ENTER.
Displaying file information (ID3 TAG)
You can check the ID3 TAG information of MP3 files only in discs by pressing
DISPLAY repeatedly.
Viewing photo files as a slide show
1 Use
UU uu II ii
to highlight ( ) icon then press ENTER to start slide Show.
2 You can change slide show speed using
II ii
when ( ) icon is highlighted.
Skipping to the next/ previous photo
Press SKIP (. or >) or
II ii
to view the previous/ next photo.
JPG
JPG
MP3
WMAMP3ACD
DVD
DivXDVD
DVD
DivX
DivXDVD
DVD
DVD
ACDDivXDVDWMAMP3
ACDDivXDVDWMAMP3
DivXDVD
ALL
FB164-A0P_DPERLLK_ENG_5714 11/18/09 2:58 PM Page 12

13
Rotating a photo
Use
UU uu
to rotate the photo in full screen counterclockwise or clockwise while
viewing a photo in full screen.
Screen Saver
The screen saver appears when you leave the unit in Stop mode for about five
minutes.
System Select - Optional
You must select the appropriate system mode for your TV system. If “NO DISC”
appears in the display window, press and hold PAUSE/STEP (X) for more
than five seconds to be able to select a system. (PAL/ NTSC/ AUTO)
Playable file requirement
DivX
• Available resolution: within 800x600 (W x H) pixels
• The file name of the DivX subtitle should be entered within 45 characters.
• If there is impossible code to express in the DivX file, it may be displayed as
“ _ ” mark on the display.
• If the video and audio structure of recorded files is not interleaved, either
video or audio is outputted.
• Playable DivX file : “.avi”, “.mpg”, “.mpeg”, “.divx”
• Playable Subtitle format : SubRip (*.srt/ *.txt), SAMI (*.smi), SubStation Alpha
(*.ssa/ *.txt), MicroDVD (*.sub/ *.txt), SubViewer 2.0 (*.sub/ *.txt)
• Playable Codec format : “DIVX3.xx”, “DIVX4.xx”, “DIVX5.xx”, “MP4V3”,
“3IVX”
• Playable Audio format : “AC3”, “PCM”, “MP3”, “WMA”
• For Discs formatted in Live file system, you can not it on this player.
• If the name of movie file is different from that of the subtitle file, during
playback of a DivX file, subtitle may not be display.
• If you play a DivX file differ from DivX spec, it may not operate normally.
JPG
MP3/ WMA
• Sampling frequency : within 32 - 48kHz (MP3/ WMA)
• Bit rate : within 32 - 320 kbps (MP3), 40 - 192 kbps (WMA)
• File extensions : “.mp3”/ “.wma”
• CD-ROM file format : ISO9660 LEVEL 1 / JOLIET
• We recommend that you use Easy-CD Creator, which creates an ISO 9660
file system.
• They should not contain special letters such as / ? * : “ < > l etc.
• The total number of files on the disc should be less than 999.
This unit requires discs and recordings to meet certain technical standards
in order to achieve optimal playback quality. Pre-recorded DVDs are
automatically set to these standards. There are many different types of
recordable disc formats (including CD-R containing MP3 or WMA files) and
these require certain pre-existing conditions (see above) to ensure
Compatible playback.
Customers should note that permission is required in order to
download MP3/ WMA files and music from the Internet. Our company
has no right to grant such permission. Permission should always be
sought from the copyright owner.
JPG
• Normal: 5120 x 3840, Progressive jpeg : 2043 x 1536
• Recording condition: ISO9660 LEVEL 1/ JOLIET
• Maximum files : Under 999.
• Some discs may not operate due to a different recording format or the
condition of disc.
• File extensions: “.jpg”
FB164-A0P_DPERLLK_ENG_5714 11/18/09 2:58 PM Page 13
14
Listening to the radio - More you can do
Looking for radio stations automatically
Press and hold TUN.-/ TUN.+ for more than a second. The tuner will scan
automatically and stop when it finds a radio station.
Deleting all the saved stations
1 Press and hold PROG./MEMO. for two seconds.
- “ERASE ALL” will flash up on the display.
2 Press PROG./MEMO. to erase all saved radio stations.
Improving poor FM reception
Press PLAY (B) (MO./ST.) on the remote control. This will change the tuner
from stereo to mono and usually improve the reception.
Listening to the radio
1 Select FM or AM FUNC. FUNCTION
2 Select a radio station
]] IIII/ ii ii ]]
TUN.- / +
3 To sa ve a rad io station PROG./MEMO.
A preset number will show in
the display.
4 Select the preset number PRESET
UU uu
Up to 50 radio stations can
be saved.
5 To confirm press PROG./MEMO.
Make sure both for the FM and AM aerial to be stretched to the most.
ON REMOTE
ON UNIT
FB164-A0P_DPERLLK_ENG_5714 11/18/09 2:58 PM Page 14
 Loading...