

global_main.book.book Page 1 Thursday, October 22, 2020 2:22 PM
OWNER'S MANUAL
WASHING MACHINE
ENGLISH
F1608*D
MFL71764281
Rev.00_102320
Before beginning installation, read these instructions
carefully. This will simplify installation and ensure that the
product is installed correctly and safely. Leave these
instructions near the product after installation for future
reference.
www.lg.com
Copyright © 2020 LG Electronics Inc. All Rights Reserved.
global_main.book.book Page 2 Thursday, October 22, 2020 2:22 PM
TABLE OF CONTENTS
This manual may contain images or
content that may be different from the
model you purchased.
This manual is subject to revision by the
manufacturer.
SAFETY INSTRUCTIONS
READ ALL INSTRUCTIONS BEFORE USE........................................................... 3
WARNING............................................................................................................3
INSTALLATION
Parts and Specifications ....................................................................................8
Installation Place Requirements ....................................................................10
Unpacking the Appliance ................................................................................11
Levelling the Appliance ...................................................................................12
Connecting the Water Supply Hose...............................................................13
Installing the Drain Hose ................................................................................16
OPERATION
Operation Overview.........................................................................................17
Control Panel ....................................................................................................18
Preparing the Wash Load ...............................................................................20
Adding Detergents and Softeners .................................................................20
Programme Table ............................................................................................23
Extra Options and Functions ..........................................................................27
SMART FUNCTIONS
LG ThinQ Application.......................................................................................30
Smart Diagnosis ...............................................................................................30
MAINTENANCE
Cleaning After Every Wash..............................................................................31
Cleaning the Appliance Periodically & Performing an Emergency Water
Evacuation.........................................................................................................32
TROUBLESHOOTING
Before Calling for Service................................................................................35

WARNING
global_main.book.book Page 3 Thursday, October 22, 2020 2:22 PM
SAFETY INSTRUCTIONS
SAFETY INSTRUCTIONS
READ ALL INSTRUCTIONS BEFORE USE
The following safety guidelines are intended to prevent unforeseen
risks or damage from unsafe or incorrect operation of the appliance.
The guidelines are separated into ‘WARNING’ and ‘CAUTION’ as
described below.
Safety Messages
This symbol is displayed to indicate matters and operations
that can cause risk. Read the part with this symbol carefully
and follow the instructions in order to avoid risk.
WARNING
This indicates that the failure to follow the instructions can
cause serious injury or death.
CAUTION
This indicates that the failure to follow the instructions can
cause the minor injury or damage to the product.
3
ENGLISH
WARNING
To reduce the risk of explosion, fire, death, electric shock, injury or
scalding to persons when using this product, follow basic precautions,
including the following:
Technical Safety
• This appliance is not intended for use by persons (including children)
with reduced physical, sensory or mental capabilities, or lack of
experience and knowledge, unless they have been given supervision
or instruction concerning use of the appliance by a person
responsible for their safety.
global_main.book.book Page 4 Thursday, October 22, 2020 2:22 PM
4
SAFETY INSTRUCTIONS
• Children should be supervised to ensure that they do not play with
the appliance.
• If the power cord is damaged, it must be replaced by the
manufacturer, its service agent or similarly qualified persons in order
to avoid a hazard.
• Use a new hose or hose-set supplied with the appliance. Reusing old
hoses can cause a water leak and subsequent property damage.
• Ventilation openings must not be obstructed by a carpet.
• This appliance is intended to be used in household only.
• The inlet water pressure must be between 50 kPa and 800 kPa.
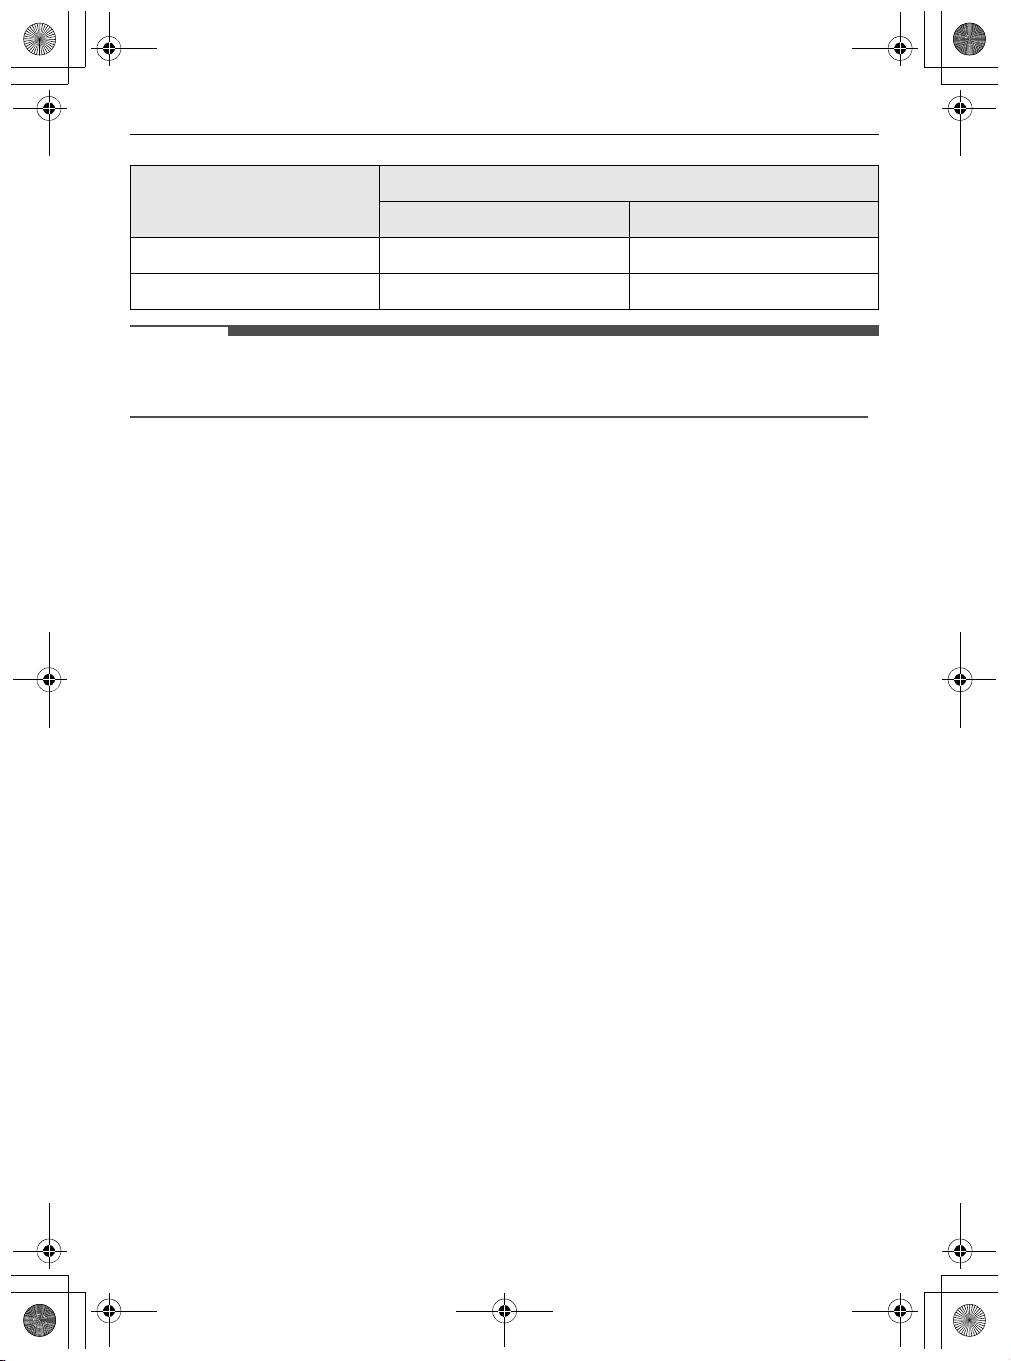
Maximum Capacity
The maximum capacity in some cycles for dry clothes to be washed is
kg
.
8
The recommended maximum capacity for each washing programme
may differ. To get good wash results, please refer to
Table
in
OPERATION
chapter for further details.
Programme
Installation
• Never attempt to operate the appliance if it is damaged,
malfunctioning, partially disassembled, or has missing or broken
parts, including a damaged cord or plug.
• This appliance should only be transported by two or more people
holding the appliance securely.
• Do not install the appliance in a damp and dusty place. Do not install
or store the appliance in any outdoor area, or any area that is subject
to weathering conditions such as direct sunlight, wind, rain, or
temperatures below freezing.
• Make sure the power plug is completely pushed into the power
outlet.
• Do not plug the appliance into multiple outlet sockets, power boards,
or an extension power cable.

global_main.book.book Page 5 Thursday, October 22, 2020 2:22 PM
SAFETY INSTRUCTIONS
5
• Do not modify the power plug provided with the appliance. If it does
not fit the power outlet, have a proper outlet installed by a qualified
electrician.
• This appliance is equipped with a power cord having an equipmentearthing / grounding conductor (earthing pin) and a grounding
power plug. The power plug must be plugged into an appropriate
outlet socket that is installed and earthed / grounded in accordance
with all local codes and ordinances.
• Improper connection of the equipment-grounding conductor can
result in risk of electric shock. Check with a qualified electrician or
service personnel if you are in doubt as to whether the appliance is
properly grounded.
• This appliance must not be installed behind a lockable door, a sliding
door or a door with a hinge on the opposite side to that of the
appliance, in such a way that a full opening of the appliance door is
restricted.
Operation
ENGLISH
• Do not apply any sharp objects to the control panel in order to
operate the appliance.
• Do not attempt to separate any panels or disassemble the appliance.
• Do not repair or replace any part of the appliance. All repairs and
servicing must be performed by qualified service personnel unless
specifically recommended in this Owner's Manual. Use only
authorized factory parts.
• Do not push down the door excessively, when the appliance door is
open.
• Do not put animals, such as pets into the appliance.
• Do not wash rugs, mats, shoes or pet blankets, stuffed toys, or any
other items other than clothes or sheets, in this machine.
• Keep the area underneath and around the appliance free of
combustible materials such as lint, paper, rags, chemicals, etc.
• Do not leave the appliance door open. Children may hang on the door
or crawl inside the appliance, causing damage or injury.

global_main.book.book Page 6 Thursday, October 22, 2020 2:22 PM
6
SAFETY INSTRUCTIONS
• Do not put in, wash or dry articles that have been cleaned in, washed
in, soaked in, or spotted with combustible or explosive substances
(such as waxes, wax removers, oil, paint, gasoline, degreasers,
drycleaning solvents, kerosene, petrol, spot removers, turpentine,
vegetable oil, cooking oil, acetone, alcohol, etc.). Improper use can
cause fire or explosion.
• Do not use or store flammable or combustible substances (ether,
benzene, alcohol, chemical, LPG, combustible spray, gasoline,
thinner, petroleum, insecticide, air freshener, cosmetics, etc.) near
the appliance.
• Never reach into the appliance while it is operating. Wait until the
drum has completely stopped.
• Do not touch the door during a high temperature programme.
• In case of a water leak from the appliance or flood, disconnect the
power plug and contact the LG Electronics customer information
centre.
• Turn off water taps to relieve pressure on hoses and valves and to
minimize leakage if a break or rupture should occur. Check the
condition of the fill hoses; they should be replaced after 5 years.
• If there is a gas leakage (isobutane, propane, natural gas, etc.) within
the home, do not touch the appliance or power plug and ventilate the
area immediately.
• If the drain hose or inlet hose is frozen during winter, use it only after
thawing.
• Keep all washing detergents, softener and bleach away from
children.
• Do not touch the power plug or the appliance controls with wet
hands.
• Do not bend the power cable excessively or place a heavy object on it.
• Avoid touching any water that is drained from the appliance during
the wash.
• Make sure that drainage is working properly. If water is not drained
properly, your floor may get flooded.
global_main.book.book Page 7 Thursday, October 22, 2020 2:22 PM
SAFETY INSTRUCTIONS
• When the air temperature is high and the water temperature is low,
condensation may occur and thus wet the floor.
• Wipe off dirt or dust on the contacts of the power plug.
Maintenance
• Disconnect the appliance from the power supply before cleaning the
appliance. Setting the controls to the OFF or stand by position does
not disconnect this appliance from the power supply.
• Securely plug the power plug in the outlet socket after completely
removing any moisture and dust.
• Do not spray water inside or outside the appliance to clean it.
• Never unplug the appliance by pulling on the power cable. Always
grip the power plug firmly and pull straight out from the outlet
socket.
• Only qualified service personnel from LG Electronics service centre
should disassemble, repair, or modify the appliance. Contact an LG
Electronics customer information centre if you move and install the
appliance in a different location.
7
ENGLISH
Disposal
• Before discarding an old appliance, unplug it. Cut off the cable
directly behind the appliance to prevent misuse.
• Dispose of all packaging materials (such as plastic bags and
styrofoam) away from children. The packaging materials can cause
suffocation.
• Remove the door before disposing of or discarding this appliance to
avoid the danger of children or small animals getting trapped inside.
NOTE
global_main.book.book Page 8 Thursday, October 22, 2020 2:22 PM
8
INSTALLATION
INSTALLATION
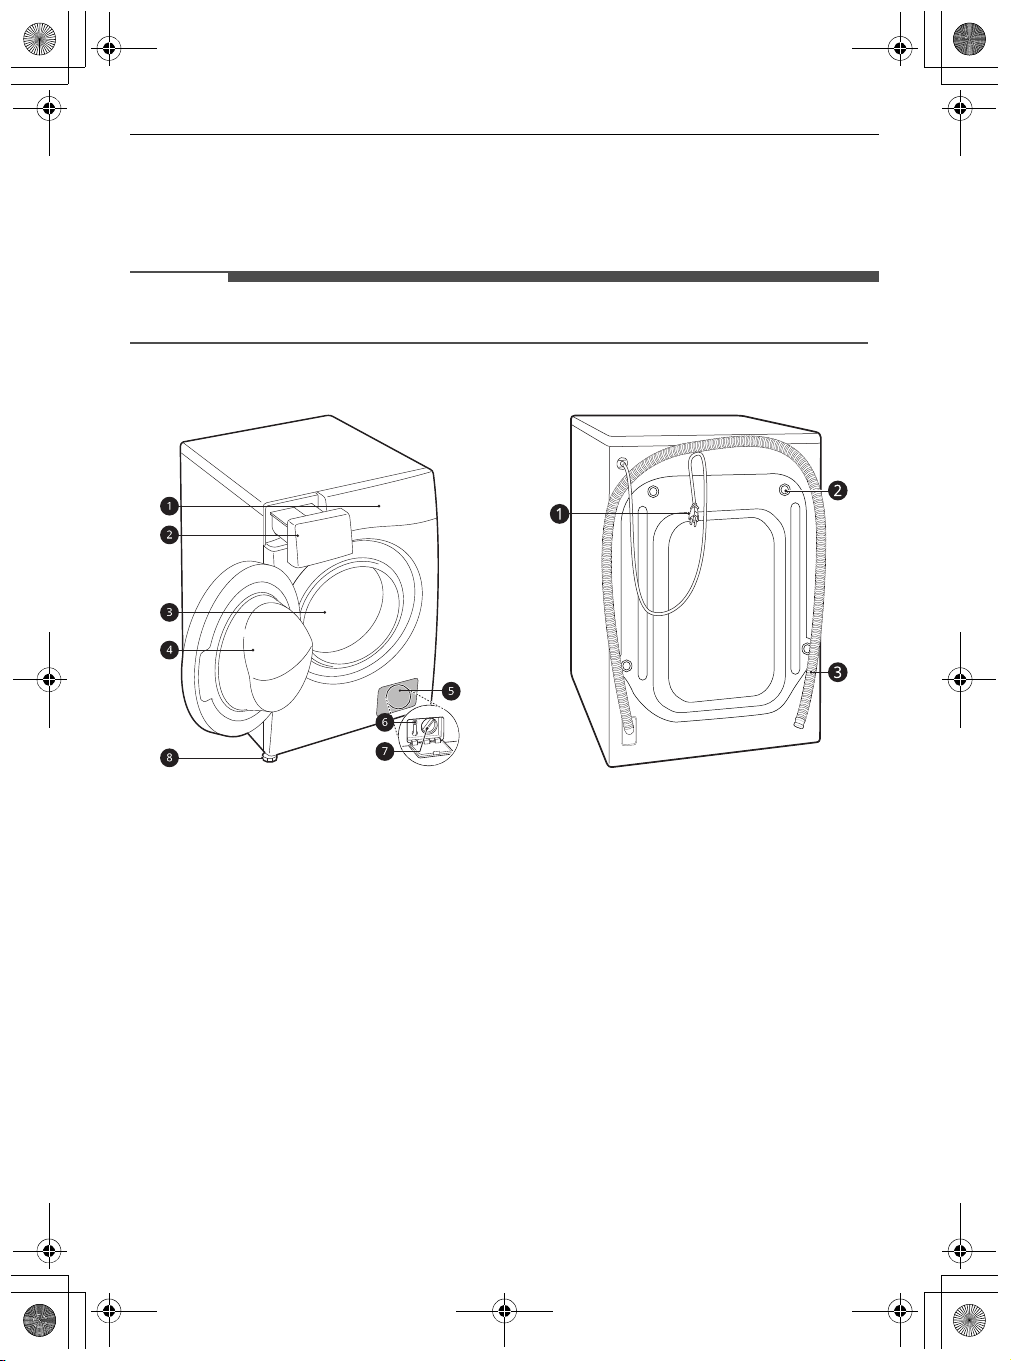
Parts and Specifications
• Appearance and specifications may change without notice to improve the quality of the appliance.
Front View
a
Control Panel
b
Detergent Dispenser Drawer
c
Drum
d
Door
e
Cover Cap
f
Drain Plug
g
Drain Pump Filter
h
Levelling Feet
Rear View
a
Power Plug
b
Transit Bolts
c
Drain Hose

global_main.book.book Page 9 Thursday, October 22, 2020 2:22 PM
INSTALLATION
Accessories
*1 The included accessories vary depending on the model you purchased.
Cold Supply Hose
a
Spanner
b
Caps for Covering Transit Bolt Holes
c
d
Anti–slip Sheets
Elbow Bracket for Securing Drain Hose
e
f
Tie Strap
*1
*1
Specifications
Model F1608*D
Power Supply 220‒240 V~, 50 Hz
Product Weight 66 kg
Dimension(mm)
W
D’’
D’
D
9
ENGLISH
H
W 600 D 565 D'' 1100
H850D'620
WARNING
NOTE
CAUTION
global_main.book.book Page 10 Thursday, October 22, 2020 2:22 PM
10
INSTALLATION
Installation Place
Requirements
Before installing the appliance, check the following
information to make sure that the appliance
should be installed in a correct place.
Installation Location
• This appliance must be installed on firm flooring
to minimize vibration during the spin cycle.
Concrete flooring is best, being far less prone to
vibration during the spin cycle than wooden
floorboards or a carpeted surface.
• If it is impossible to avoid positioning the
appliance next to a gas cooker or coal burning
stove, an insulation (850 X 600 mm) covered with
aluminum foil on the side facing the cooker or
stove must be inserted between the two
appliances.
• Ensure that when the appliance is installed, it is
easily accessible for an engineer in the event of a
breakdown.
• When installing the appliance, adjust all four feet
using the transit bolt spanner provided to
ensure the appliance is stable.
• This appliance must only be used for domestic
household purposes and should not be used in
mobile applications.
• Never try to level any uneven floor by putting
pieces of wood, cardboard or similar materials
under the appliance.
Wooden Floors (Suspended
Floors)
When installing the appliance on wooden floors,
use rubber cups to reduce excessive vibration and
unbalance. Timber or suspended type flooring may
contribute to excessive vibration and unbalance,
errors and malfunction.
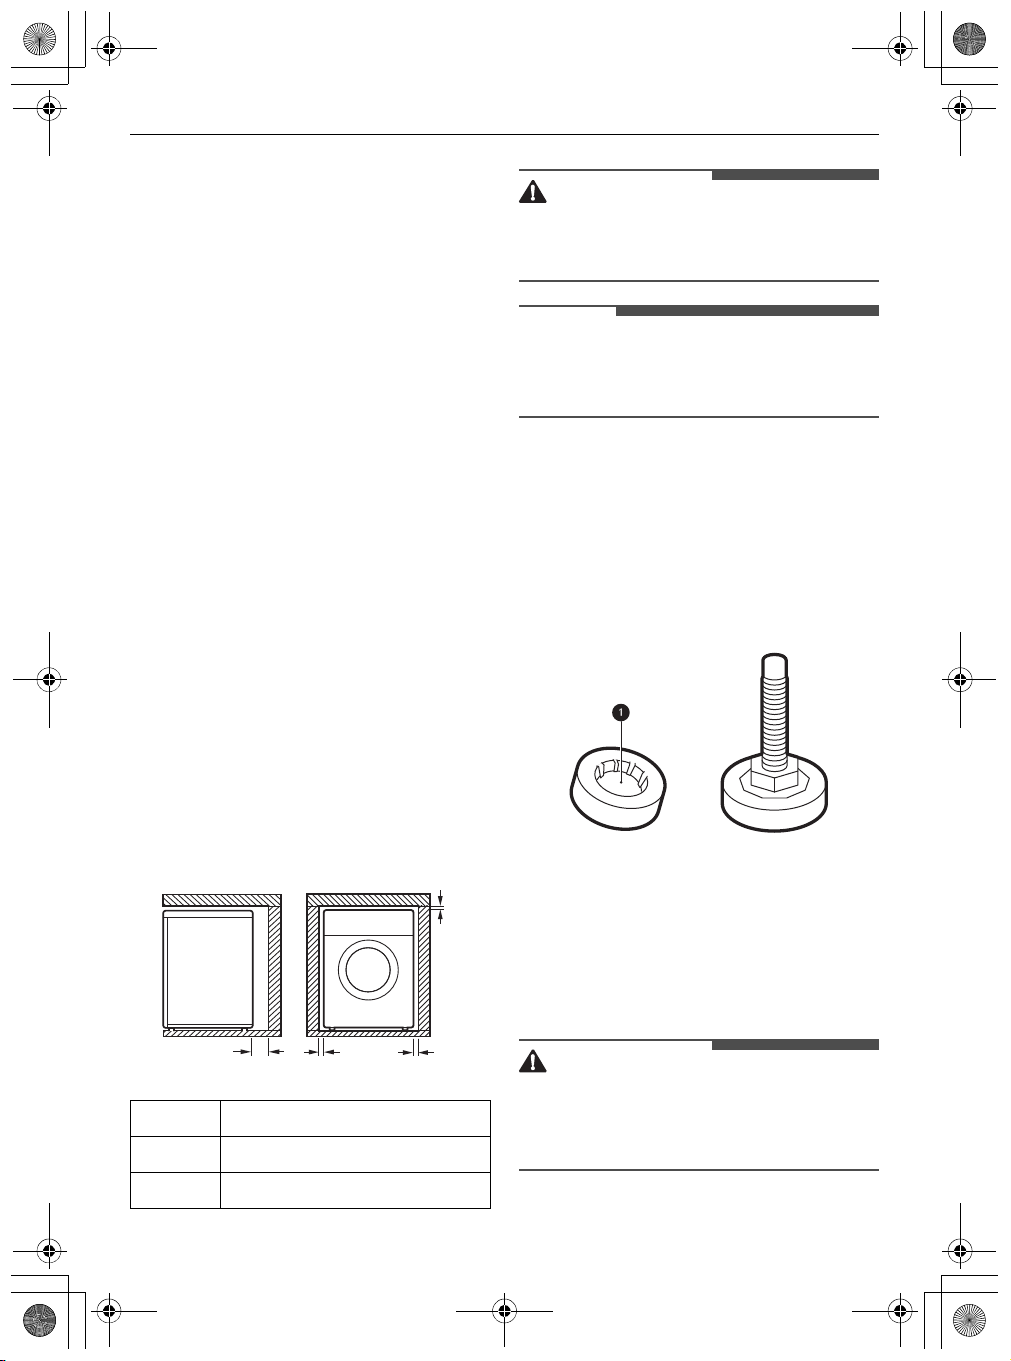
Floor Installation
To ensure sufficient clearance for water inlet hoses,
drain hose and airflow, allow minimum clearances
of at least 20 mm at the sides and 100 mm behind
the appliance. Be sure to allow for wall, door, or
floor moldings that may increase the required
clearances.
B
A
A
B
C
C
100 mm
5 mm
20 mm
C
• To reduce vibration, we recommend placing at
least 15 mm thickness of rubber cups
each adjusting foot of the appliance, secured to
at least two floor beams with screws.
• If possible, install the appliance in one of the
corners of the room, where the floor is more
stable.
• Fit the rubber cups to reduce vibration.
• If the appliance is installed on the unstable floor
(e.g. wooden floor), the warranty does not cover
any damages and cost occurred due to the
installation on the unstable floor.
a
under
NOTE
WARNING
global_main.book.book Page 11 Thursday, October 22, 2020 2:22 PM
• You can purchase rubber cups (part No.
4620ER4002B
) from the LG service centre.
Ventilation
• Make sure that air circulation around the
appliance should not be impeded by carpets,
rugs, etc.
Ambient Temperature
• Do not install the appliance in rooms where
freezing temperatures may occur. Frozen hoses
may burst under pressure. The reliability of the
electronic control unit may be impaired at
temperatures below freezing point.
• If the appliance is delivered in winter and
temperatures are below freezing, place the
appliance at room temperature for a few hours
before putting it into operation.
INSTALLATION
grounded/earthed in accordance with all local
codes and ordinances.
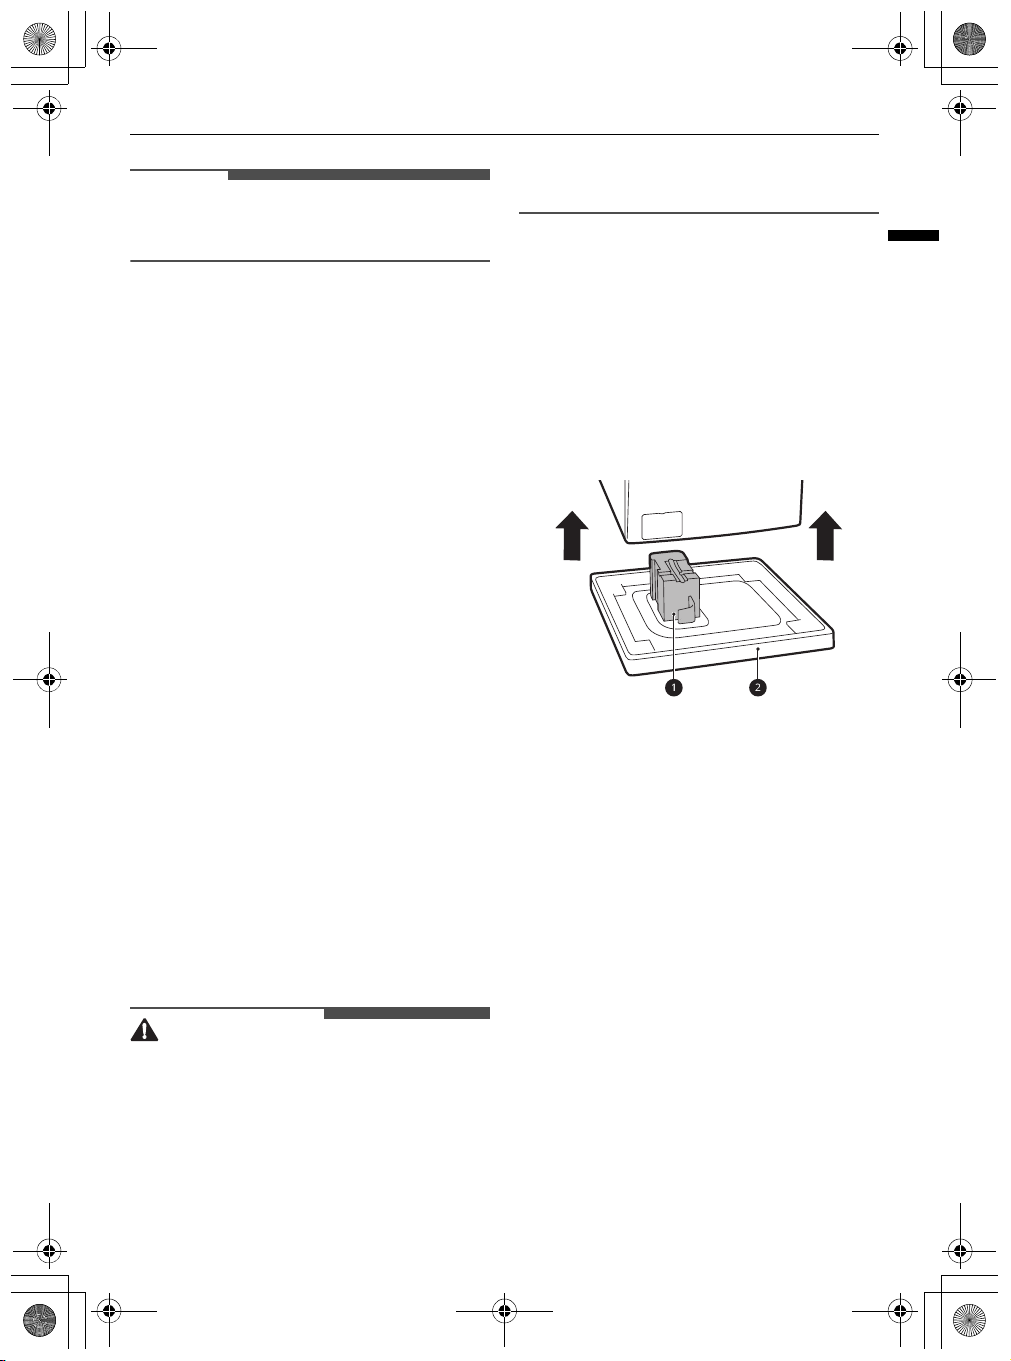
Unpacking the Appliance
Lifting the Appliance Off the
Foam Base
* This feature may vary depending on the model
purchased.
After removing the carton and shipping material,
lift the appliance off the foam base.
*
11
ENGLISH
Electrical Connection
• Do not use an extension cord or double adapter.
• Always unplug the appliance and turn off the
water supply after use.
• Connect the appliance to an earthed socket in
accordance with current wiring regulations.
• The appliance must be positioned so that the
plug is easily accessible.
• Power outlet must be within 1 meter of either
side of the appliance.
• Repairs to the appliance must only be carried out
by qualified personnel. Repairs carried out by
inexperienced persons may cause injury or
serious malfunctioning. Contact your local
authorised LG repairer.
• The power plug must be plugged into an
appropriate outlet socket that is installed and
• Make sure the tub support
the base and is not stuck to the bottom of the
appliance.
• If you must lay the appliance down to remove
the carton base
appliance and lay it carefully on its side. Do not
lay the appliance on its front or back.
b
, always protect the side of the
a
* comes off with
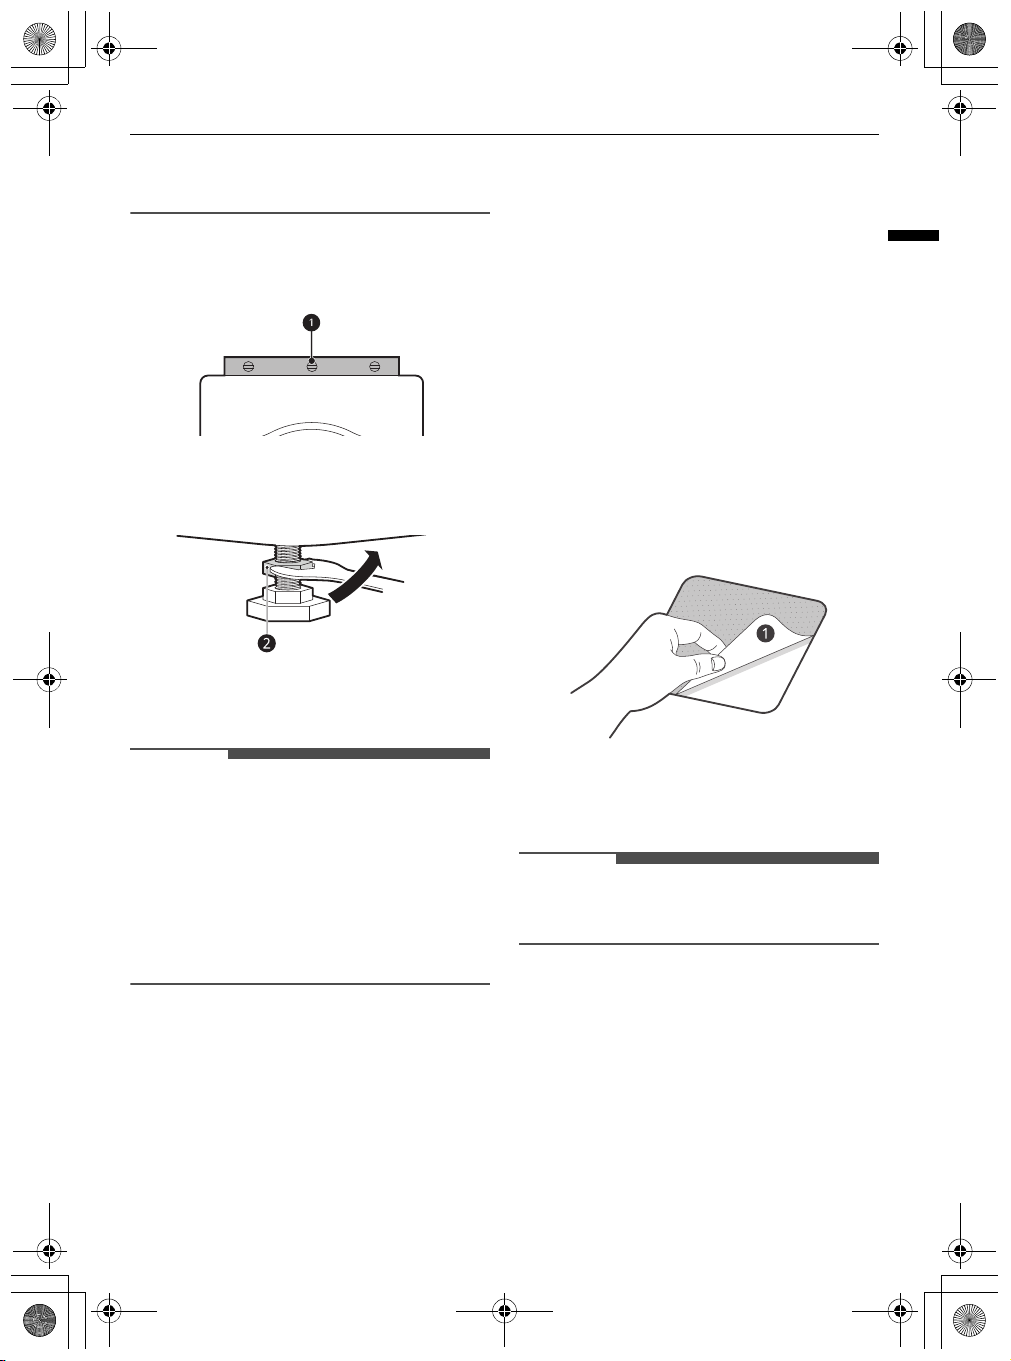
Removing the Transit Bolt
Assemblies
To prevent the appliance from severe vibration and
breakage, remove transit bolts and retainers.

NOTE
NOTE
NOTE
global_main.book.book Page 12 Thursday, October 22, 2020 2:22 PM
12
INSTALLATION
1
Starting with the bottom two transit bolts a,
use the spanner (included) to fully loosen all
transit bolts by turning them counterclockwise.
2
Remove the bolt assemblies by wiggling them
slightly while pulling them out.
3
Install the hole caps.
b
• Locate the hole caps
accessory pack or attached on the back.
included in the
• If the appliance rocks when pushing the top
plate of the appliance diagonally, adjust the feet
again.
• Check whether the appliance is perfectly level
after installation.
• Timber or suspended type flooring may
contribute to excessive vibration and unbalance.
Reinforcement or bracing of the timber floor
may need to be considered to stop or reduce
excessive noise and vibration.
Adjusting and Levelling the
Feet
When installing the appliance, the appliance
should be aligned and perfectly level. If the
appliance is not aligned and level properly, the
appliance may be damaged or may not operate
properly.
1
Turn the levelling feet as required if the floor is
uneven.
• Do not insert pieces of wood etc. under the
feet.
• Make sure that all four feet are stable and
resting on the floor.
• Save the transit bolts and retainers for future
use.
• Transport this appliance for the prevention of
breakage as below:
- The transit bolts are reinstalled.
- The power cord is secured to the back of the
appliance.
Levelling the Appliance
Checking the Level
When pushing down the edges of the top plate
diagonally, the appliance should not move up and
down at all (check both directions).
• Do not install the washing machine on a plinth,
stand or elevated surface unless it is
NOTE
NOTE
global_main.book.book Page 13 Thursday, October 22, 2020 2:22 PM
manufactured by LG Electronics for use with this
model.
2
Check if the appliance is perfectly level using a
spirit level
3
Secure the levelling feet with the lock nuts b
by turning anti-clockwise against the bottom of
the appliance.
a
.
INSTALLATION
slip sheets under the levelling feet and adjust the
level.
1
Clean the floor to attach the anti-slip sheets.
• Use a dry rag to remove and clean foreign
objects and moisture. If moisture remains,
the anti-slip sheets may slip.
2
Adjust the level after placing the appliance in
the installation area.
3
Place the adhesive side a of the anti-slip
sheets on the floor.
• The most effective way is to install the antislip sheets under the front feet. If it is
difficult to place the sheets under the front
feet of the appliance, attach them under the
rear feet.
13
ENGLISH
4
Check if all lock nuts at the bottom of the
appliance are secured properly.
• Proper placement and levelling of the appliance
will ensure long, regular, and reliable operation.
• The appliance must be 100% horizontal and
stand firmly in position on a hard flat floor.
• It must not ‘Seesaw’ across corners under the
load.
• Do not let the feet of the appliance get wet.
Failure to do so may cause vibration or noise.
Using Anti-Slip Sheets
This feature may vary depending on the model
purchased.
If you install the appliance on a slippery surface, it
may move because of excessive vibration.
Incorrect levelling may cause malfunction through
noise and vibration. If this occurs, install the anti-
4
Put the appliance on the anti-slip sheets.
a
• Do not attach the adhesive side
slip sheets to the feet of the appliance.
• Additional anti-slip sheets are available at LG
Electronics service centre.
of anti-
Connecting the Water
Supply Hose
Note for Connection
• Water pressure must be between
800 kPa
(0.5‒8.0 kgf/cm²). If the water pressure
is more than
should be installed.
800 kPa
, a decompression device
50 kPa
and
NOTE
global_main.book.book Page 14 Thursday, October 22, 2020 2:22 PM
14
INSTALLATION
• Periodically check the condition of the water
supply hose and replace the water supply hose if
necessary.
• Do not overtighten the water supply hose or use
mechanical devices to tighten onto the inlet
valves.
• No further backflow protection required for
connection to the water inlet.
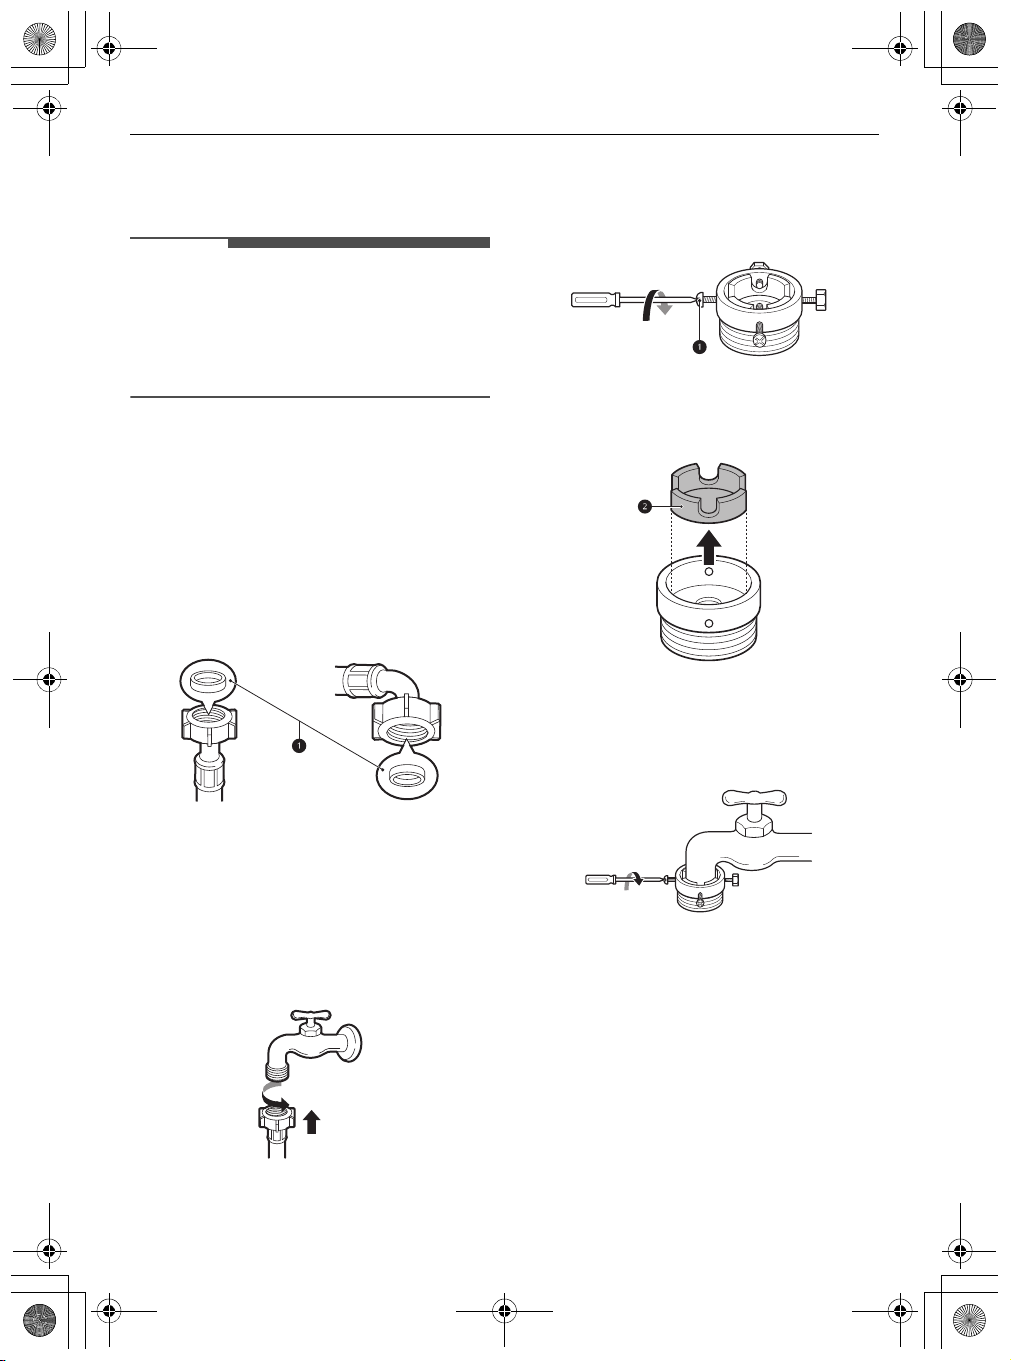
Checking the Rubber Seal
Two rubber seals a are supplied with the water
supply hose. They are used to prevent water leaks.
Connection to taps is sufficiently tight.
• Do not use mechanical devices such as multi
grips to tighten the water supply hose. Ensure
that the curved end of the water supply hose is
connected to the appliance.
Connecting Screw-Type Hose to Tap Without
Thread
1
Loose the 4 fixing screws a.
2
Remove the guide plate b if the tap is too large
to fit the adapter.
3
Push the adapter onto the end of the tap so
that the rubber seal is connected to be
watertight. Tighten the 4 fixing screws.
Connecting the Hose to the
Water Tap
Connecting Screw-Type Hose to Tap with Thread
Screw the supply hose connector onto the water
supply tap.
4
Push the inlet hose c vertically upwards so
that the rubber seal within the hose can adhere
NOTE
global_main.book.book Page 15 Thursday, October 22, 2020 2:22 PM
completely to the tap and then tighten the
hose by screwing it to the right.
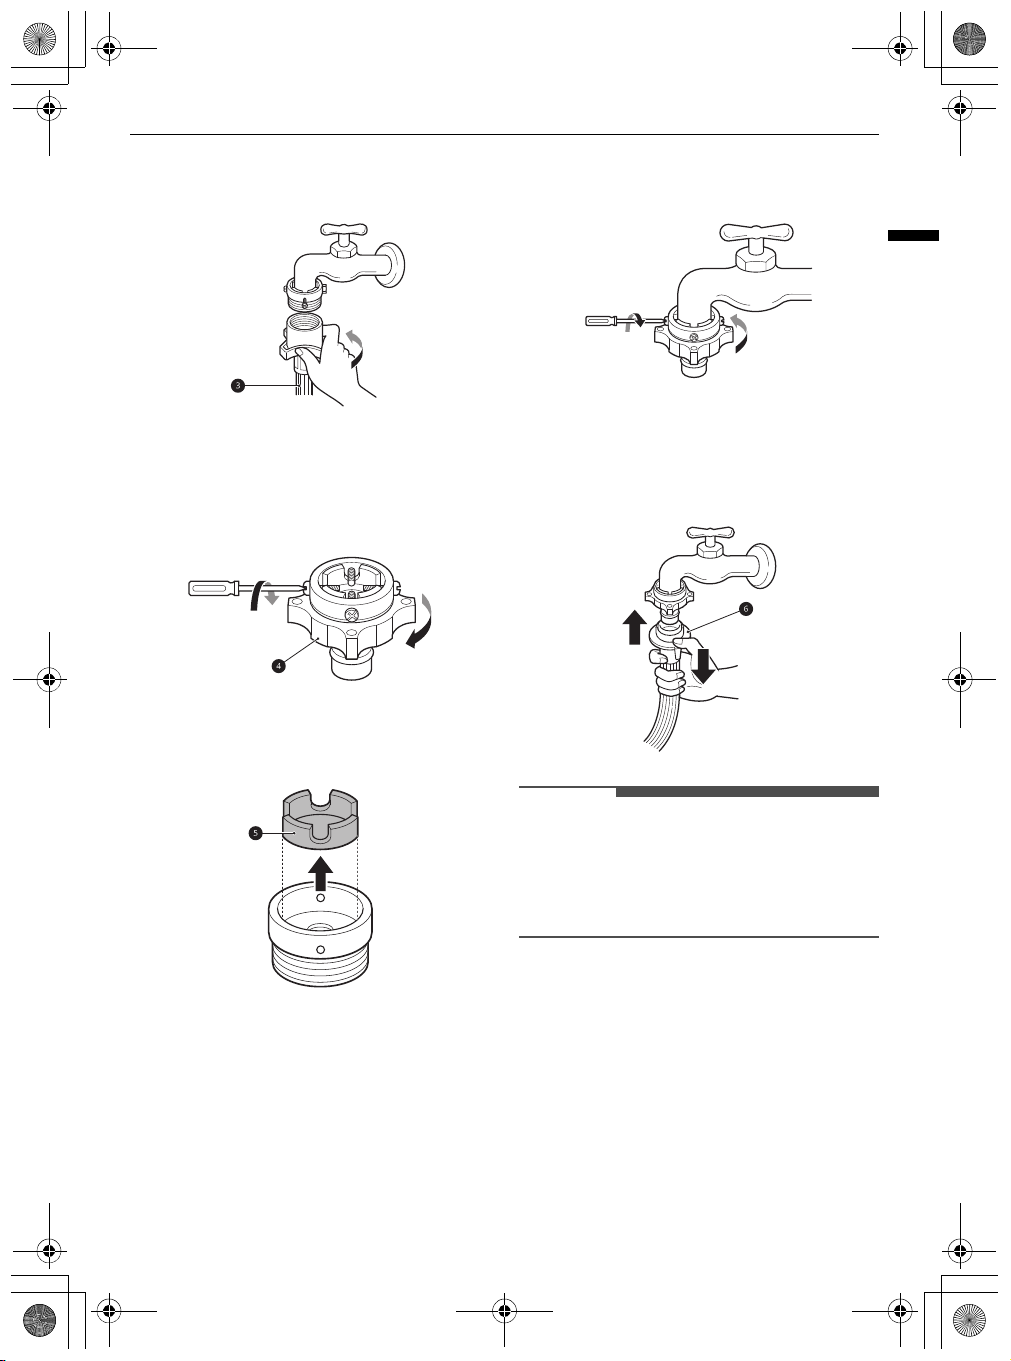
Connecting One Touch Type Hose to Tap
Without Thread
1
Unscrew the adapter ring plate d and loose
the 4 fixing screws.
INSTALLATION
watertight. Tighten the 4 fixing screws and the
adapter ring plate.
4
Pull the connector latch plate f down, push
the inlet hose onto the adapter, and release the
connector latch plate. Make sure the adapter
locks into place.
15
ENGLISH
2
Remove the guide plate e if the tap is too large
to fit the adapter.
3
Push the adapter onto the end of the tap so
that the rubber seal is connected to be
• After connecting the water inlet hose to the
water tap, turn on the water tap to flush out
foreign substances (dirt, sand, sawdust, and etc.)
in the water lines. Let the water drain into a
bucket, and check the water temperature.
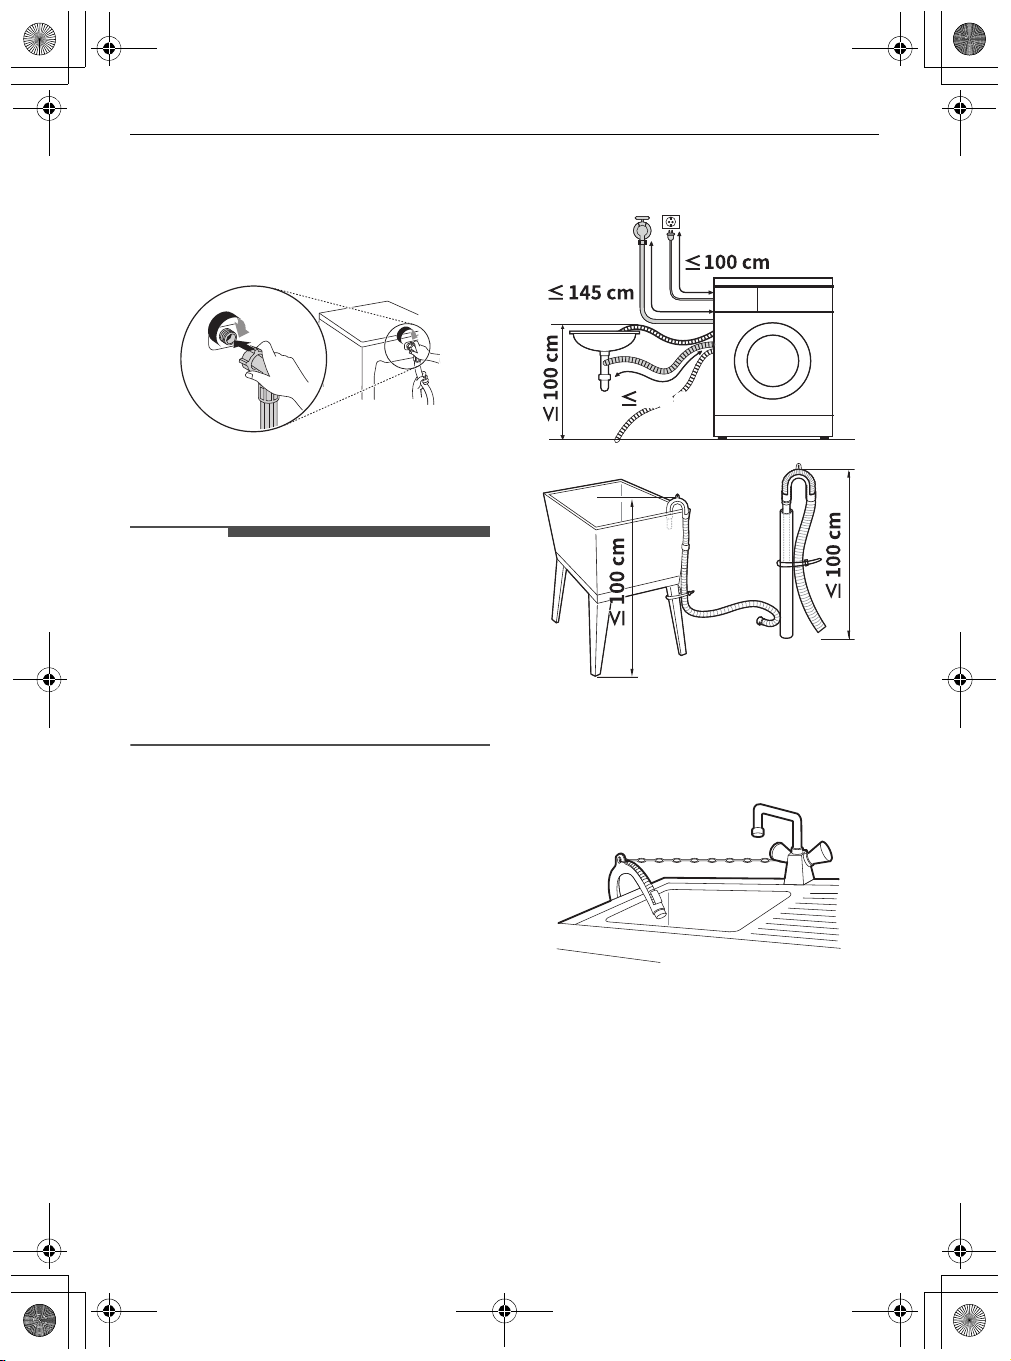
NOTE
global_main.book.book Page 16 Thursday, October 22, 2020 2:22 PM
16
INSTALLATION
Connecting the Hose to the
Appliance
Screw the supply hose to the water inlet valve on
the back of the appliance.
• Do not connect the hose to the hot water supply
for models with one water inlet. Connect to the
cold water supply only.
• After completing connection, if water leaks from
the hose, repeat the same steps. Use the most
conventional type of tap for the water supply. In
case that the tap is square or too big, remove the
guide plate before inserting the tap into the
adaptor.
• Make sure that the hose should not be kinked or
trapped.
• Securing the drain hose correctly will protect the
floor from damage due to water leakage.
105 cm
• If the drain hose is too long, do not force it back
into the appliance. This will cause abnormal
noise.
• When installing the drain hose to a sink, secure it
tightly with string.
Installing the Drain Hose
Installing the Drain Hose with
the Elbow Bracket
The drain hose should not be placed higher than
100 cm
above the floor. Water in the appliance may
not drain or may drain slowly.
CAUTION
global_main.book.book Page 17 Thursday, October 22, 2020 2:22 PM
OPERATION
Operation Overview
Using the Appliance
Before the first wash, select the
programme and add a half amount of the
detergent. Start the appliance without clothes. This
will remove possible residues and water from the
drum that may have been left during
manufacturing.
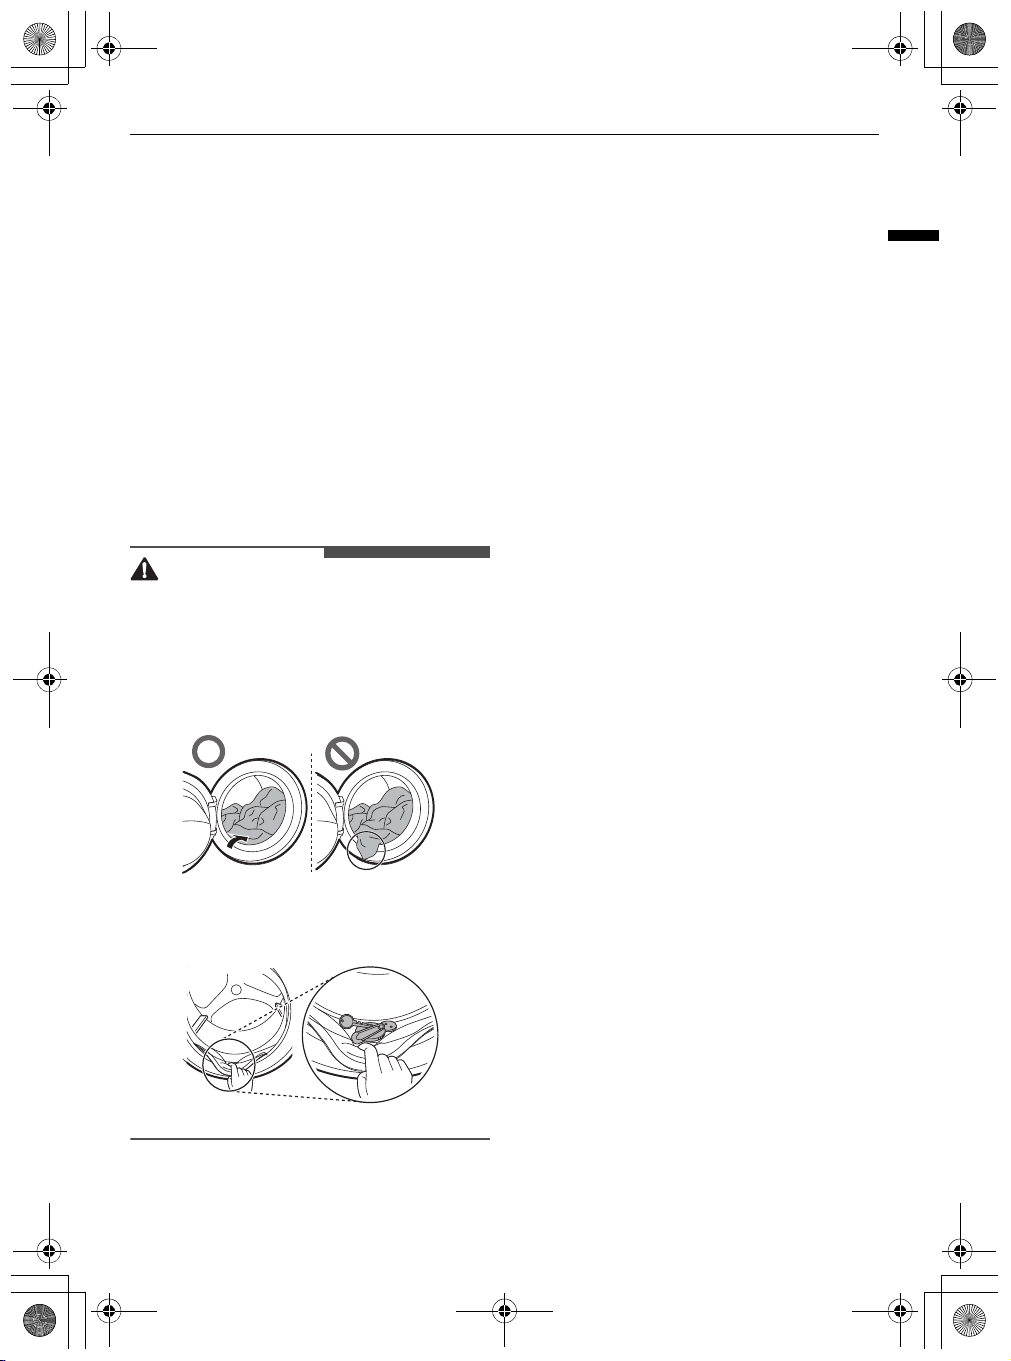
1
Sort clothes and load items.
• Sort clothes by fabric type, soil level, colour
and load size as needed. Open the door and
load items into the appliance.
• Before closing the door, ensure that all clothes
and items are inside the tub and not
overhanging on the rubber door seal where they
will become caught when the door is closed.
Failing to do so will cause damage to the door
seal and the clothes.
Cotton
wash
OPERATION
• Add the proper amount of detergent to the
detergent dispenser. If desired, add bleach
or fabric softener to the appropriate areas of
the dispenser.
3
Turn on the appliance.
Power
•Press the
appliance.
4
Choose the desired cycle.
• Press the cycle button repeatedly or turn the
cycle selector knob until the desired cycle is
selected.
• Now select a wash temperature and spin
speed. Pay attention to the fabric care label
of your clothes.
5
Begin cycle.
•Press the
cycle. The appliance will agitate briefly
without water to measure the weight of the
load. If the
pressed within a certain time, the appliance
will shut off and all settings will be lost.
button to turn on the
Start/Pause
Start/Pause
button to begin the
button is not
17
ENGLISH
• Remove items from the flexible door seal gasket
to prevent clothing and door seal damage.
2
Add cleaning products or detergent and
softener.
6
End of cycle.
• When the cycle is finished, a melody will
sound. Immediately remove your clothing
from the appliance to reduce wrinkling.
Check around the door seal when removing
the load for small items that may be caught
in the seal.
global_main.book.book Page 18 Thursday, October 22, 2020 2:22 PM
18
OPERATION
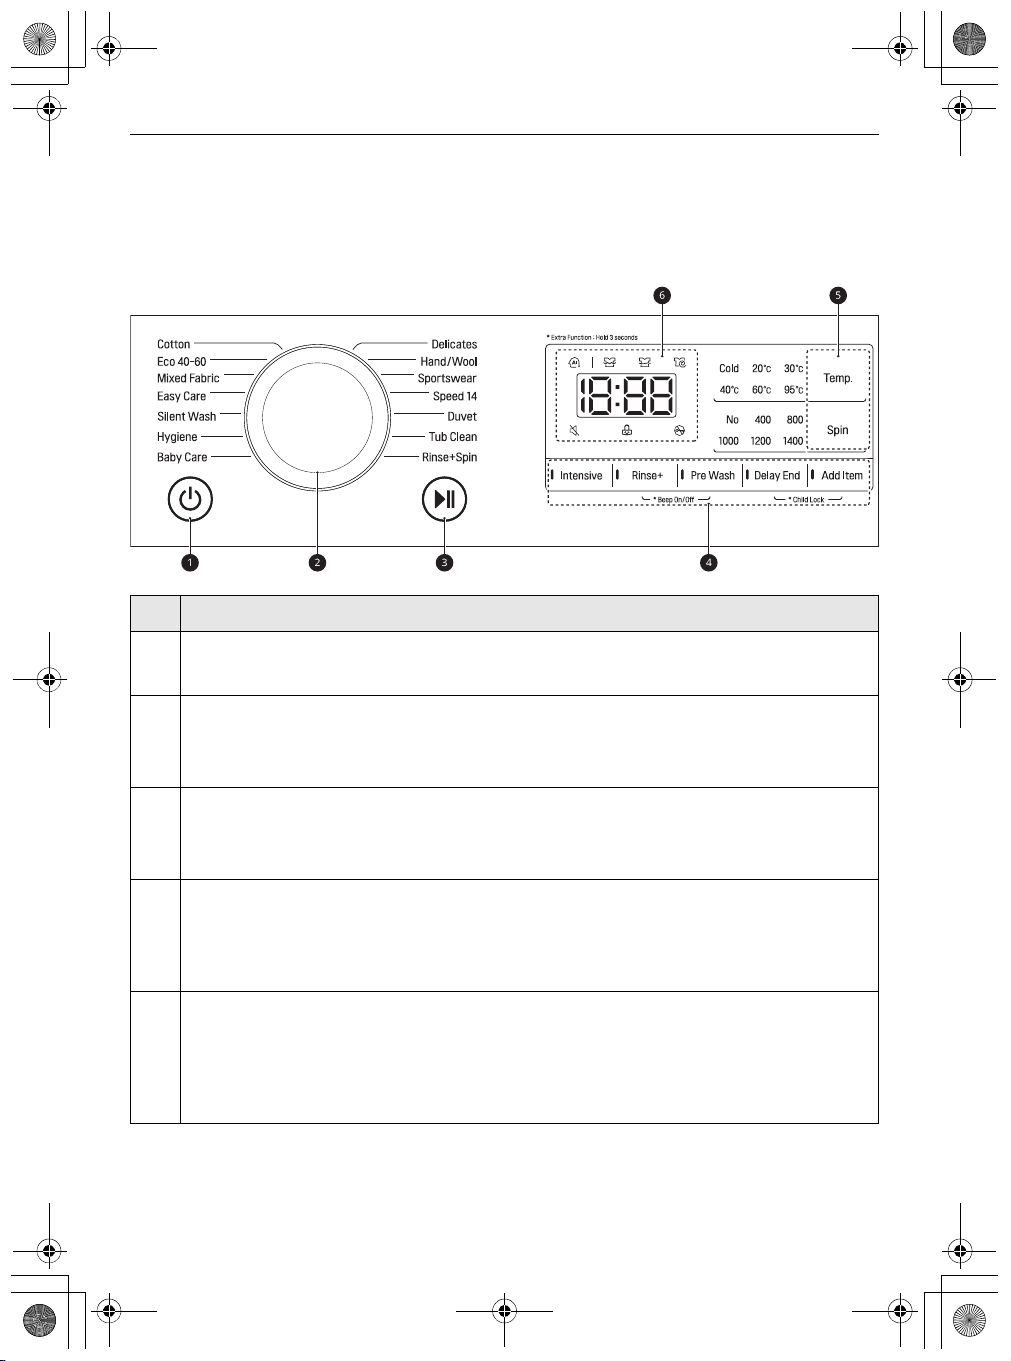
Control Panel
The actual control panel may differ from model to model.
Control Panel Features
Description
Power On/Off Button
a
• Press this button to turn the washing machine on.
Programme Knob
b
• Programmes are available according to the clothes type.
• The lamp will light up to indicate the selected programme.
Start/Pause Button
c
• This button is used to start the wash cycle or pause the wash cycle.
• If a temporary stop of the wash cycle is needed, press this button.
Extra Options and Functions
d
• To use the extra functions, press and hold the corresponding button for 3 seconds. The
corresponding symbol lights up in the display.
• This allows you to select an additional programmes and will light when selected.
Customizing Washing Programme Buttons
e
Use these buttons to adjust the water temperature or spin speed settings for the selected
programme.
• The current settings are shown in the display.
• Press the button for that option to select other settings.
global_main.book.book Page 19 Thursday, October 22, 2020 2:22 PM
Description
Display
f
• The display shows the settings, estimated remaining time, options, and status messages.
When the appliance is turned on, the default settings in the display will illuminate.
• While the load weight is sensed automatically, the display on the control panel blinks.
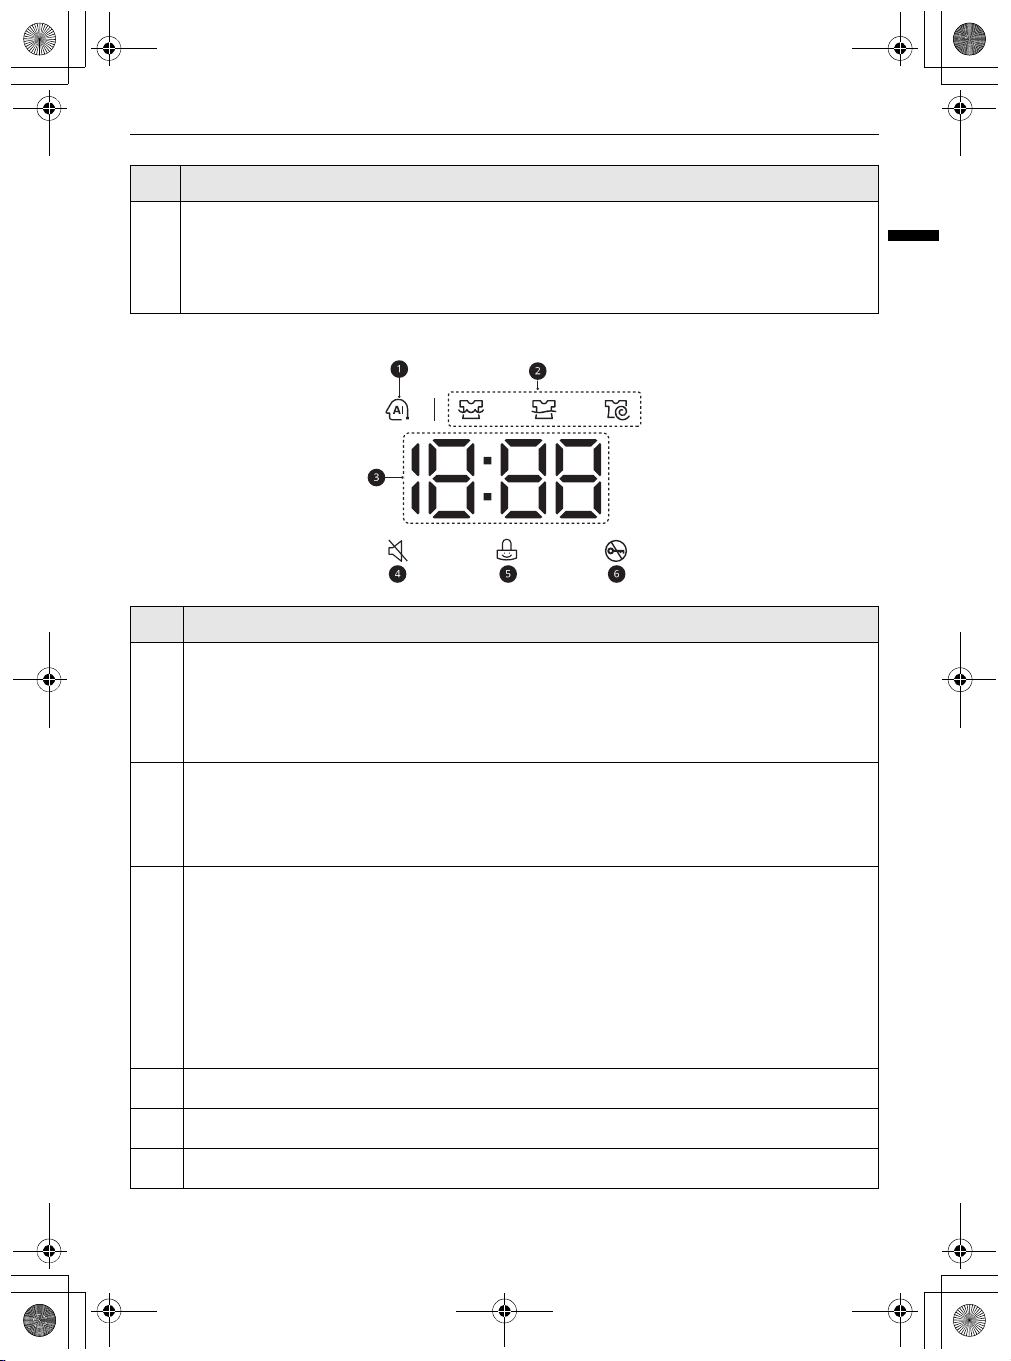
Time and Status Display
Description
AI DD
a
•
AI DD
M provides the appropriate drum rotation actions after load sensing is completed.
M
is activated when the
•
operated.
Cotton, Mixed Fabric
, and
Easy Care
programmes are selected and
OPERATION
19
ENGLISH
Programme Status Indicators
b
• When a washing programme is running, LED for the active stage will blink, and the LEDs for
the remaining stages will remain steady. Once a stage is complete, the LED will turn off. If a
cycle is paused, the active stage LED will stop blinking.
Estimated Time Remaining
c
• When a washing programme is selected, the default time for that programme is displayed.
This time will change as options are selected.
---
• If the display shows
the load size. This is normal.
• The time shown is only an estimate. This time is based on normal operating conditions.
Several external factors (load weight, room temperature, incoming water temperature, etc.)
can affect the actual time.
d
q
lights up when the beep is off.
e
i
lights up when the control panel is locked except for the
f
H
lights up when the programme starts and the door is locked.
, then the time will be displayed after the load sensing has detected
Power
button.
NOTE
global_main.book.book Page 20 Thursday, October 22, 2020 2:22 PM
20
OPERATION
Preparing the Wash Load
Sort the wash load for best washing results, and
then prepare the clothes according to the symbols
on their care labels.
Sorting the Clothes
• For best washing results, sort your clothes
according to the care label stating fabric type
and washing temperature. Adjust the spin speed
or spin intensity in accordance with the fabric
type.
• Soil level (Heavy, Normal, Light): Separate
clothes according to soil level. If possible, do not
wash heavily soiled items with lightly soiled
ones.
• Colour (White, Lights, Darks): Wash dark or dyed
clothes separately from whites or light colours.
Mixing dyed clothes with light clothes can result
in dye transfer or discolouration of lighter
clothes.
• Lint (Lint producers, Collectors): Wash separately
lint producing fabrics from lint collecting fabrics.
Lint producers can result in pilling and linting on
the lint collectors.
• The dashes under the symbol give you
information about the type of fabric and the
maximum allowance of mechanical stress.
Checking the Clothes before
Loading
• Combine large and small items in a load. Load
large items first.
• Large items should not be more than half of the
total wash load. Do not wash single items. This
may cause an unbalanced load. Add one or two
similar items.
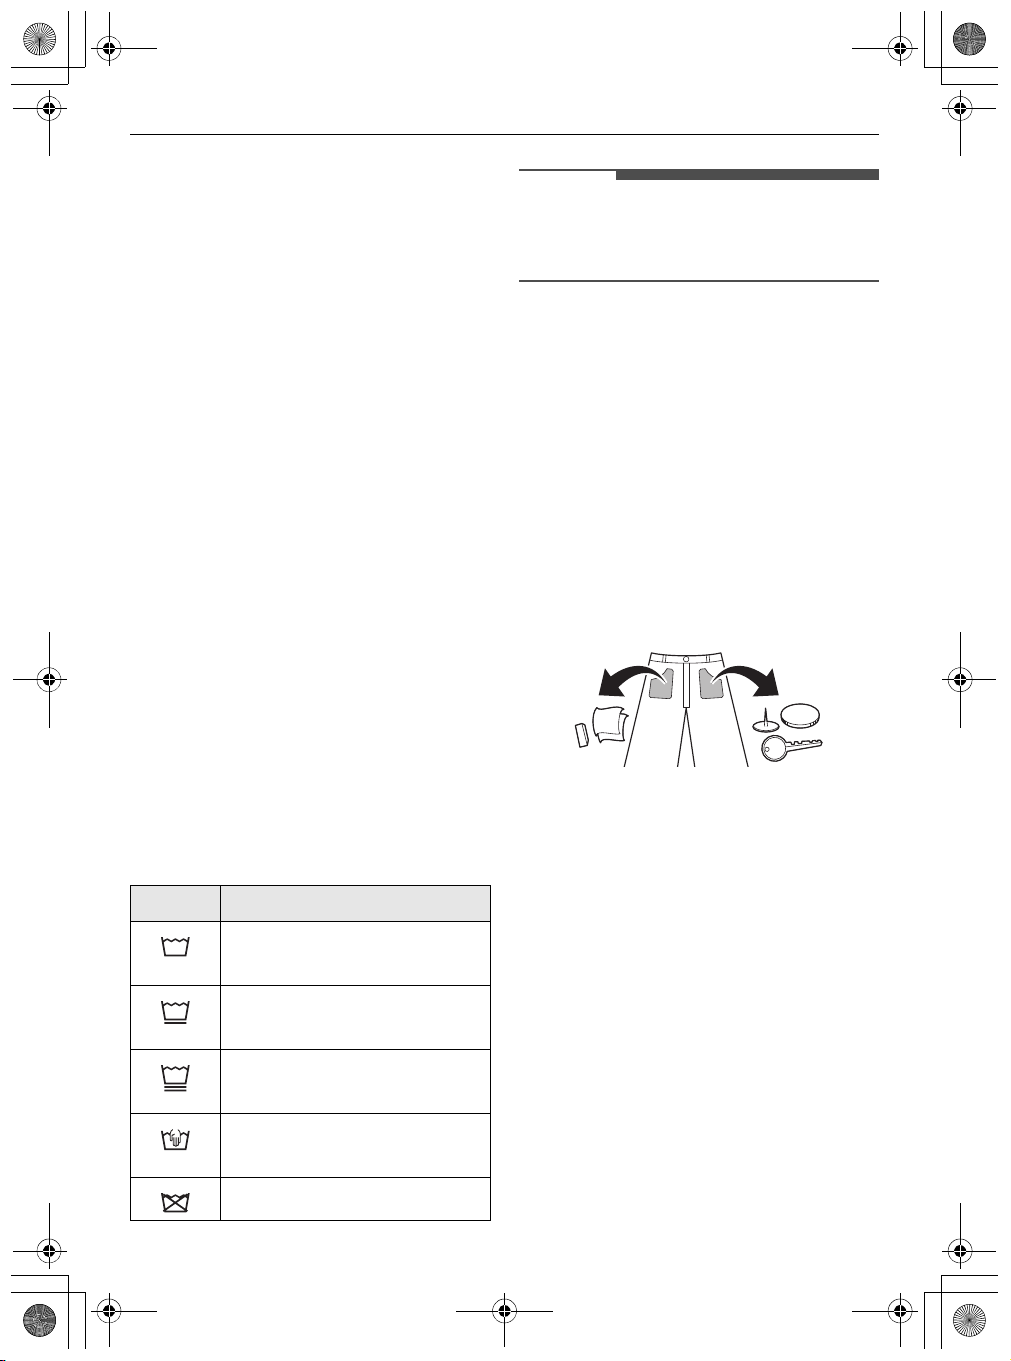
• Check all pockets to make sure that they are
empty. Items such as nails, hair clips, matches,
pens, coins and keys can damage both your
appliance and clothes.
Checking the Clothes Care Label
The symbols tell you about the fabric content of
your garment and how it should be washed.
Symbols on the Care Labels
Symbol Wash / Fabric type
• Normal Wash
• Cotton, Mixed Fabrics
• Easy Care
• Synthetic, Mixed Fabrics
• Special Delicate Wash
• Delicates
• Hand Wash Only
• Wool, Silk
• Do not wash
• Wash delicates (stockings, underwired bras) in a
wash net.
• Close zippers, hooks and strings to make sure
that these items do not snag on other clothes.
• Pre-treat dirt and stains by brushing a small
amount of detergent dissolved water onto stains
to help lift dirt.
Adding Detergents and
Softeners
Detergent Dosage
• Detergent should be used according to the
instruction of the detergent manufacturer and
selected according to type, colour, soiling of the
fabric and the washing temperature. Use only
NOTE
global_main.book.book Page 21 Thursday, October 22, 2020 2:22 PM
detergents that are suitable for Drum (front
load) type washers.
• If too many suds occur, reduce the detergent
amount.
• If too much detergent is used, too many suds
can occur and this will result in poor washing
results or cause heavy load to the motor.
• If you wish to use liquid detergent, follow the
guidelines provided by the detergent
manufacturer.
• You can pour liquid detergent directly into the
main detergent drawer if you are starting the
wash cycle immediately.
• Do not use liquid detergent if you are using the
Delay End
Wash
immediately and may harden in the drawer or
the tub.
• Detergent usage may need to be adjusted for
water temperature, water hardness, size and soil
level of the load. For best results, avoid
overdosing the detergent. Failing to do so will
cause oversudsing.
• Refer to the label of the clothes, before adding
the detergent and choosing the water
temperature.
• Use only suitable detergents for the respective
type of clothing:
- Liquid detergent is often designed for special
- Powdered detergent is suitable for all types of
- For better washing results of white and pale
- Detergent is flushed from the dispenser at the
function, or if you have selected
option, as the liquid will dispense
applications, e.g. for coloured fabric, wool,
delicate or dark clothes.
fabric.
garments, use powdered detergent with
bleach.
beginning of the wash cycle.
Pre
OPERATION
• Minimum load: 1/3 of full load.
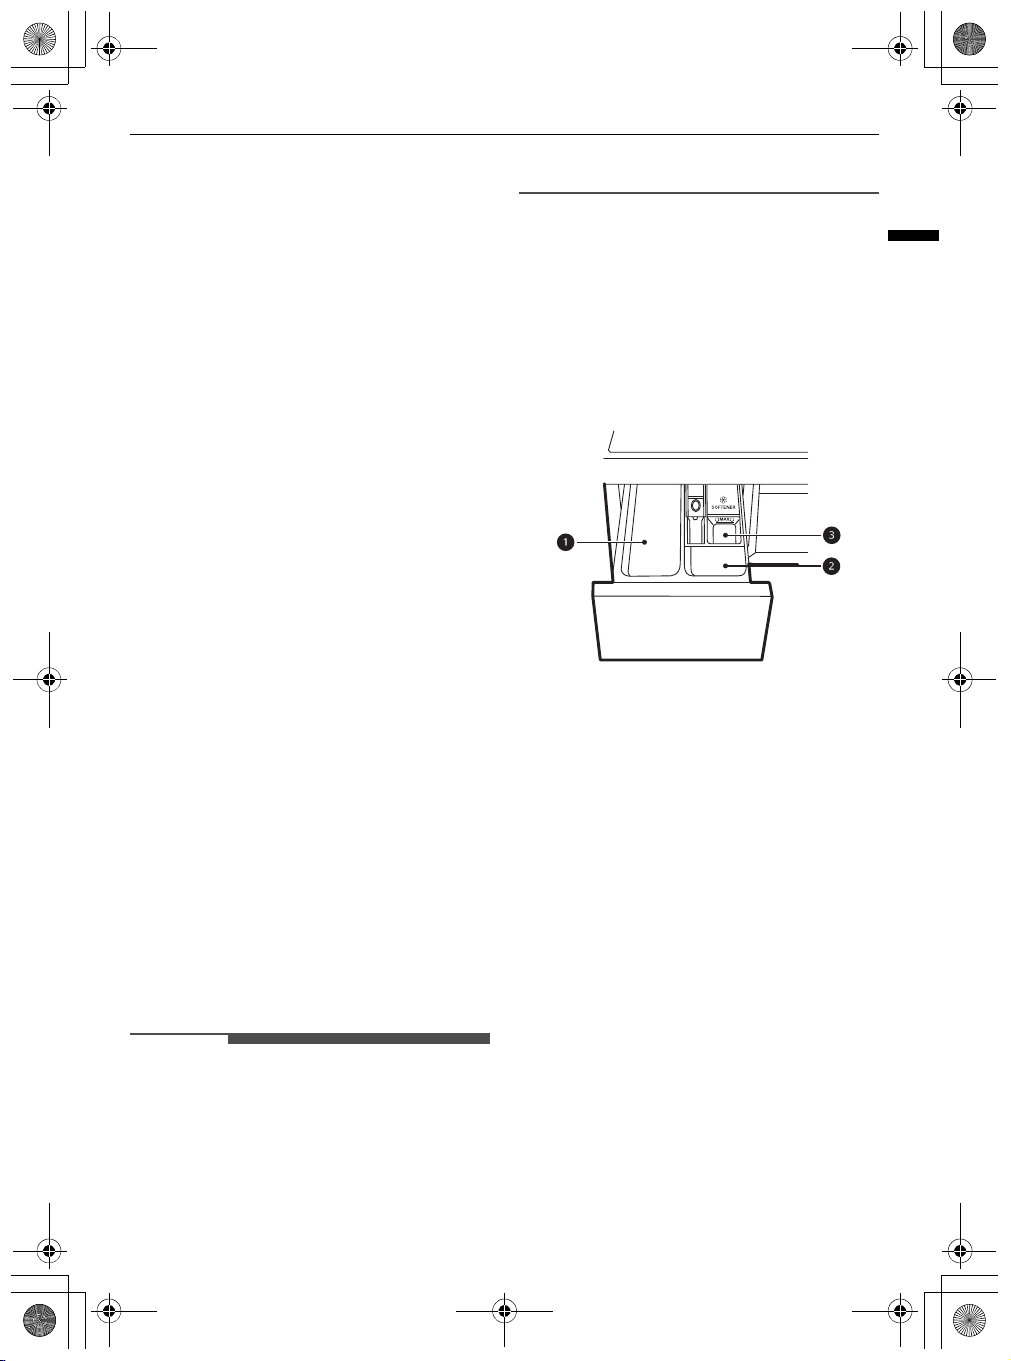
Using the Dispenser
To add detergent dosage to the dispenser:
1
Open the dispenser drawer.
2
Add the detergent and softener into the
appropriate compartments.
a
Main wash detergent compartment
b
Pre-wash detergent compartment
c
Liquid fabric softener compartment
3
Gently close the detergent dispenser drawer
before starting the cycle.
• Slamming the drawer closed may result in
the detergent overflowing into another
compartment or dispensing into the drum
earlier than programmed.
• Be careful not to get a hand caught in the
drawer while closing.
• It is normal for a small amount of water to
remain in the dispenser compartments at
the end of the cycle.
21
ENGLISH
• Do not let the detergent harden. Doing so may
lead to blockages, poor rinse performance or
odour.
• Full load: According to manufacturer’s
recommendation.
• Part load: 1/2 of the normal amount.
Fabric Softener Compartment
This compartment holds liquid fabric softener,
which is automatically dispensed during the final
rinse cycle. Either powdered or liquid fabric
softener may be used.
• Pour fabric softer to the maximum fill line.
Pouring excessive fabric softener over the
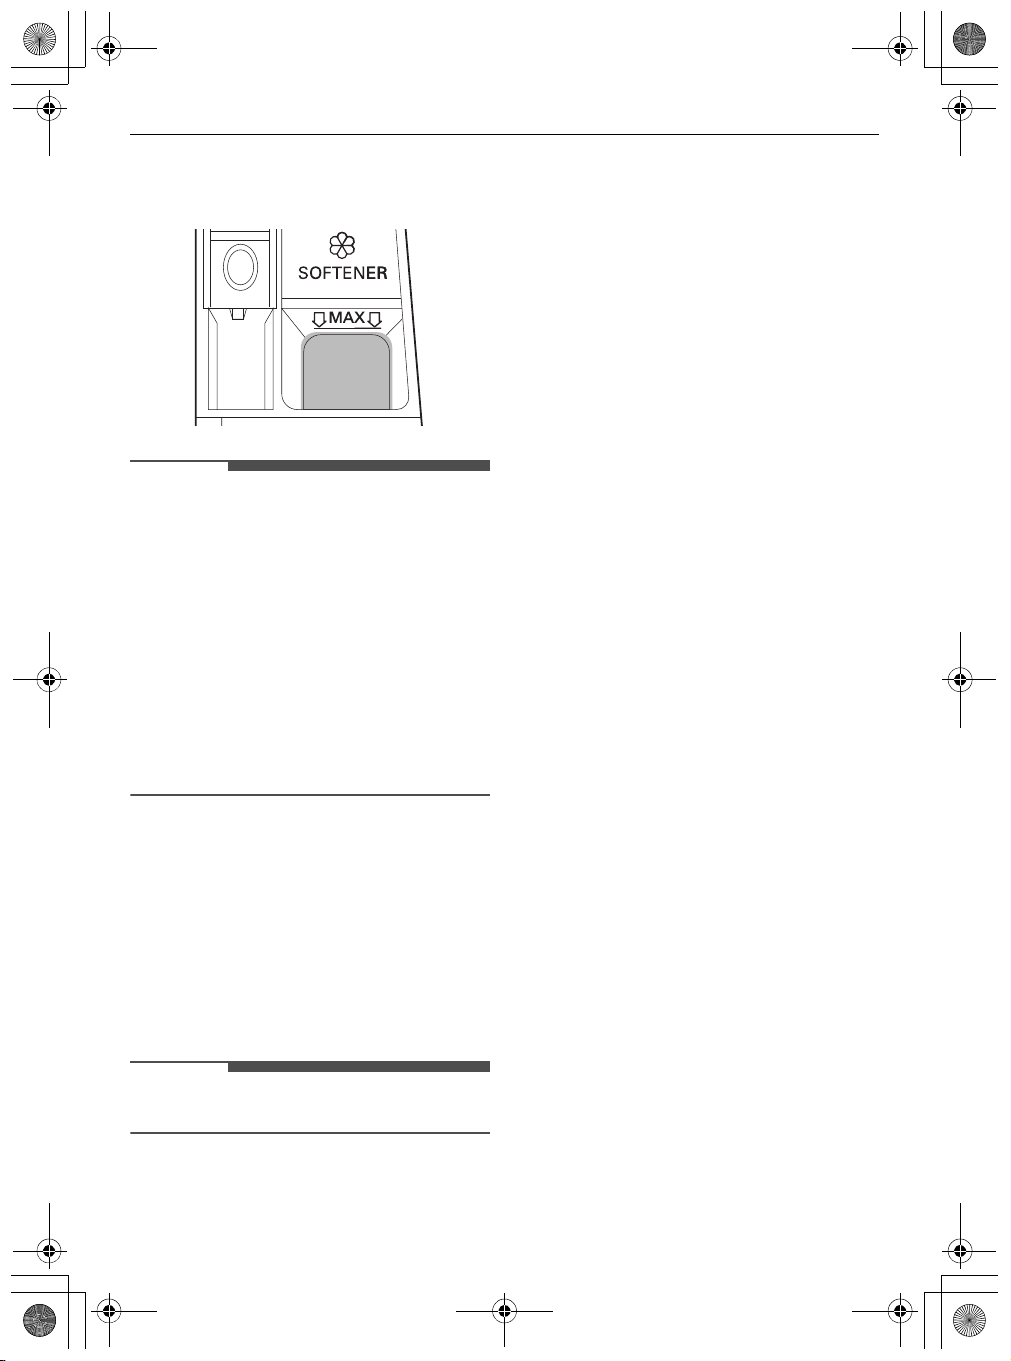
NOTE
NOTE
global_main.book.book Page 22 Thursday, October 22, 2020 2:22 PM
22
OPERATION
maximum fill line can cause it to dispense too
early, which may stain the clothes.
• Do not pour fabric softener directly onto the
clothes in the wash drum, doing so will cause
dark staining on the clothes that will be difficult
to remove.
• Do not leave the fabric softener in the detergent
drawer for more than 1 day. Fabric softener may
harden. Softener may remain in the dispenser if
it is too thick. The softener should be diluted if
the consistency is too thick so that it can flow
easily.
• Do not open the drawer when water is being
supplied during the wash.
• Solvents (benzene, etc.) must never be used.
Adding Water Softener
A water softener, such as anti-limescale can be
used to cut down on the use of detergent in areas
with high water hardness level.
• First add detergent, and then the water softener.
Dispense according to the amount specified on
the packaging.
Adding Detergent Tablets
Detergent tablets can also be used when washing.
1
Open the door and put detergent tablets into
the drum before loading the clothes.
2
Load the clothes into the drum and close the
door.
• Do not put tablets into the dispenser.
global_main.book.book Page 23 Thursday, October 22, 2020 2:22 PM
OPERATION
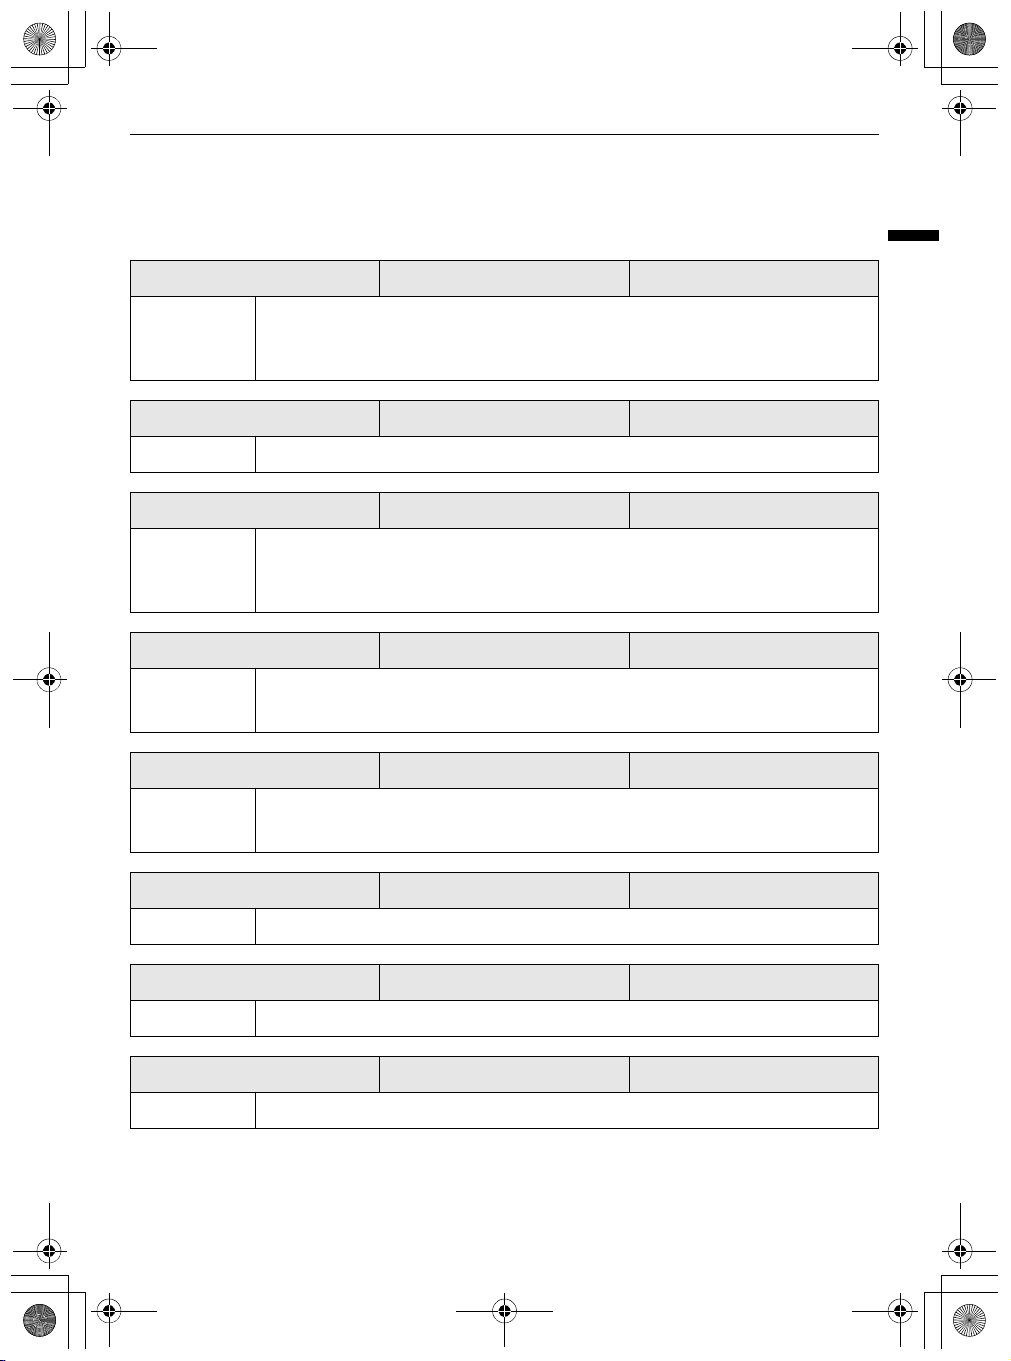
Programme Table
Washing Programme
Cotton 40 ℃ (Cold to 95 ℃) Max. Load: Rating
Description Washes normally soiled clothes by combining various drum motions.
•Pressing the
Cotton
Eco 40-60 40 ℃ (40 ℃ to 60 ℃) Max. Load: Rating
Description Washes normally soiled cotton clothes declared to be washable at 40 ℃ or 60 ℃.
Mixed Fabric 40 ℃ (Cold to 60 ℃) Max. Load 4 kg
Description Washes mixed fabrics simultaneously.
• Use for various kind of fabrics except special garments (silk/delicate, sports wear,
dark clothes, wool, duvet/curtains).
Easy Care 40 ℃ (Cold to 60 ℃) Max. Load 4 kg
Description Washes clothes that do not need ironing after washing.
• Use for Polyamide, acrylic, polyester.
Start/Pause
programme to begin immediately, using the default settings.
button without selecting a programme will cause the
23
ENGLISH
Silent Wash 40 ℃ (Cold to 60 ℃) Max. Load 5 kg
Description Washes clothes with less noise and vibration than other washing programmes.
• Use for lightly soiled white cotton (underwear).
Hygiene 60 ℃ Max. Load 4 kg
Description Washes clothes at a high temperature.
Baby Care 60 ℃ Max. Load 4 kg
Description Washes baby clothes with gentle motion and better performance.
Delicates 20 ℃ (Cold to 40 ℃) Max. Load 3 kg
Description Washes machine-washable lingerie, sheer and lacy clothes.
NOTE
NOTE
global_main.book.book Page 24 Thursday, October 22, 2020 2:22 PM
24
OPERATION
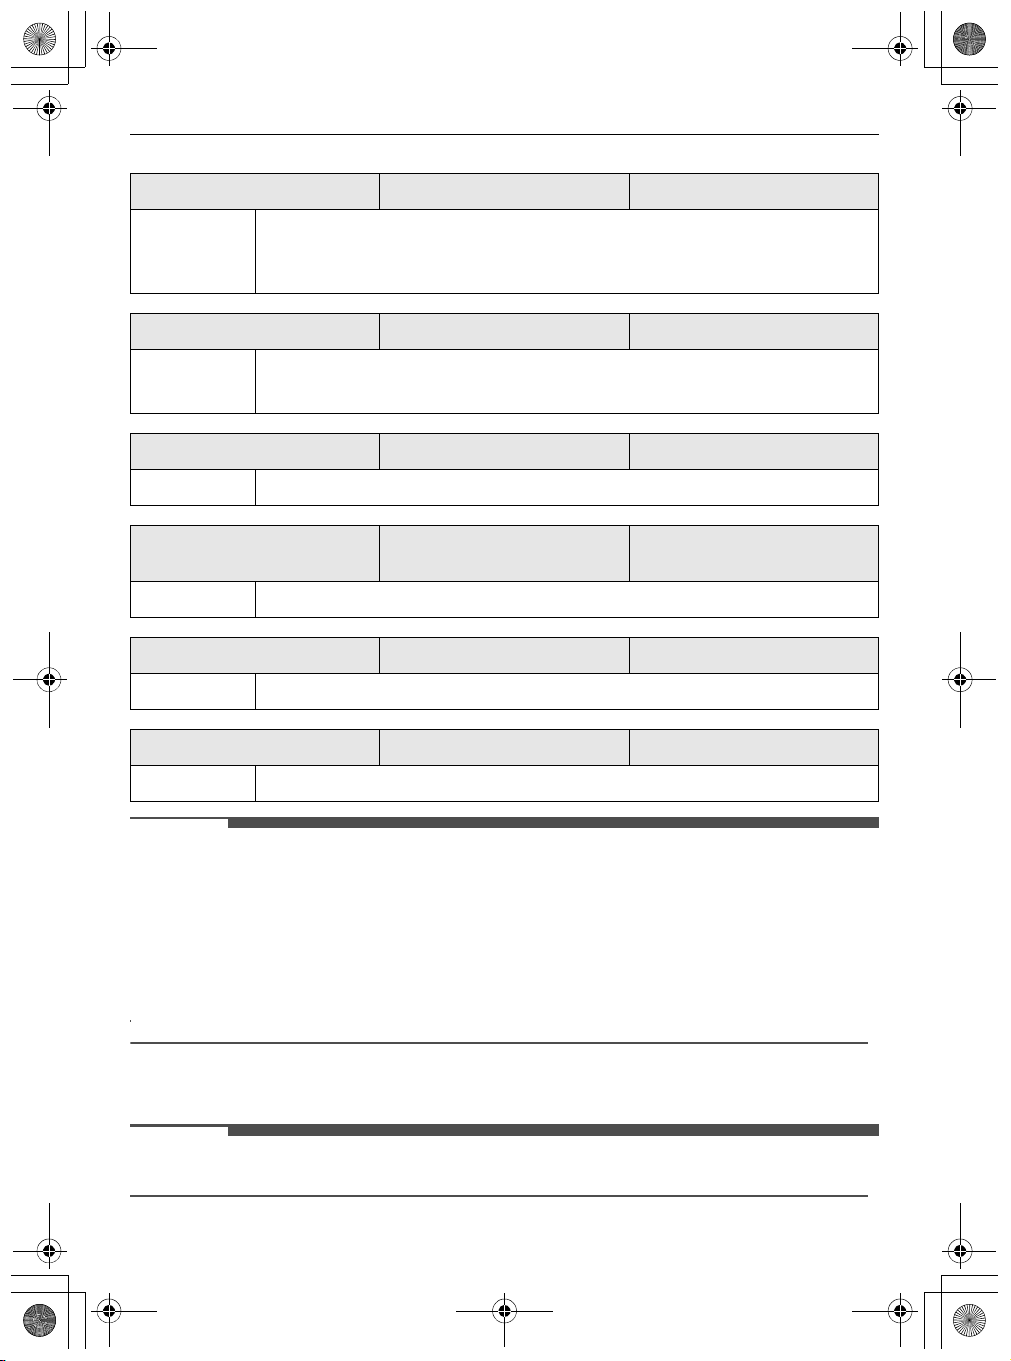
Hand/Wool 30 ℃ (Cold to 40 ℃) Max. Load 2 kg
Description Washes hand-washable and machine-washable delicate clothes such as washable
wool, lingerie, dresses etc.
• Use detergent for machine washable woolens
Sportswear 40 ℃ (Cold to 40 ℃) Max. Load 3 kg
Description Washes special garments like sports and outdoor wear.
• Use for water-repellent fabric laminate used on clothing.
Speed 14 20 ℃ (20 ℃ to 40 ℃) Max. Load 2 kg
Description Washes small loads of lightly soiled clothes for approximately 14 minutes.
Duvet Cold (Cold to 40 ℃)
Description Washes large items such as bed covers, pillows, sofa covers, etc.
Tub Clean - -
Description This function helps clean the inside of your appliance's tub.
Rinse+Spin - Max. Load: Rating
Description Rinses and spins clothes. Use fabric softener if needed.
• Set program at “
IEC60456.
• Select the appropriate water temperature for chosen wash programme. Always follow garment
manufacturer’s care label or inst ructions when washing to avoid damage to clothes.
• Select the proper wash temperature and spin speed for the desired progra mmes.
• Actual water temperature may differ from the declared cycle temperature.
• Neutral detergent is recommended.
Eco 40-60, Intensive
+ 60 ℃ + 1400 rpm” option for test in conformity with
Max. Load 2.5 kg (1 down
duvet)
Extra Options
•
Rinse+, Delay End
and
Add Item
options can be selected for every washing programme in this table.
global_main.book.book Page 25 Thursday, October 22, 2020 2:22 PM
OPERATION
Programme Intensive Pre Wash
Cotton
Eco 40-60
Mixed Fabric
Easy Care
Silent Wash
Hygiene
Baby Care
Delicates
Hand/Wool
Sportswear
Speed 14
Duvet
##
##
##
##
#
#
#
#
#
#
#
25
ENGLISH
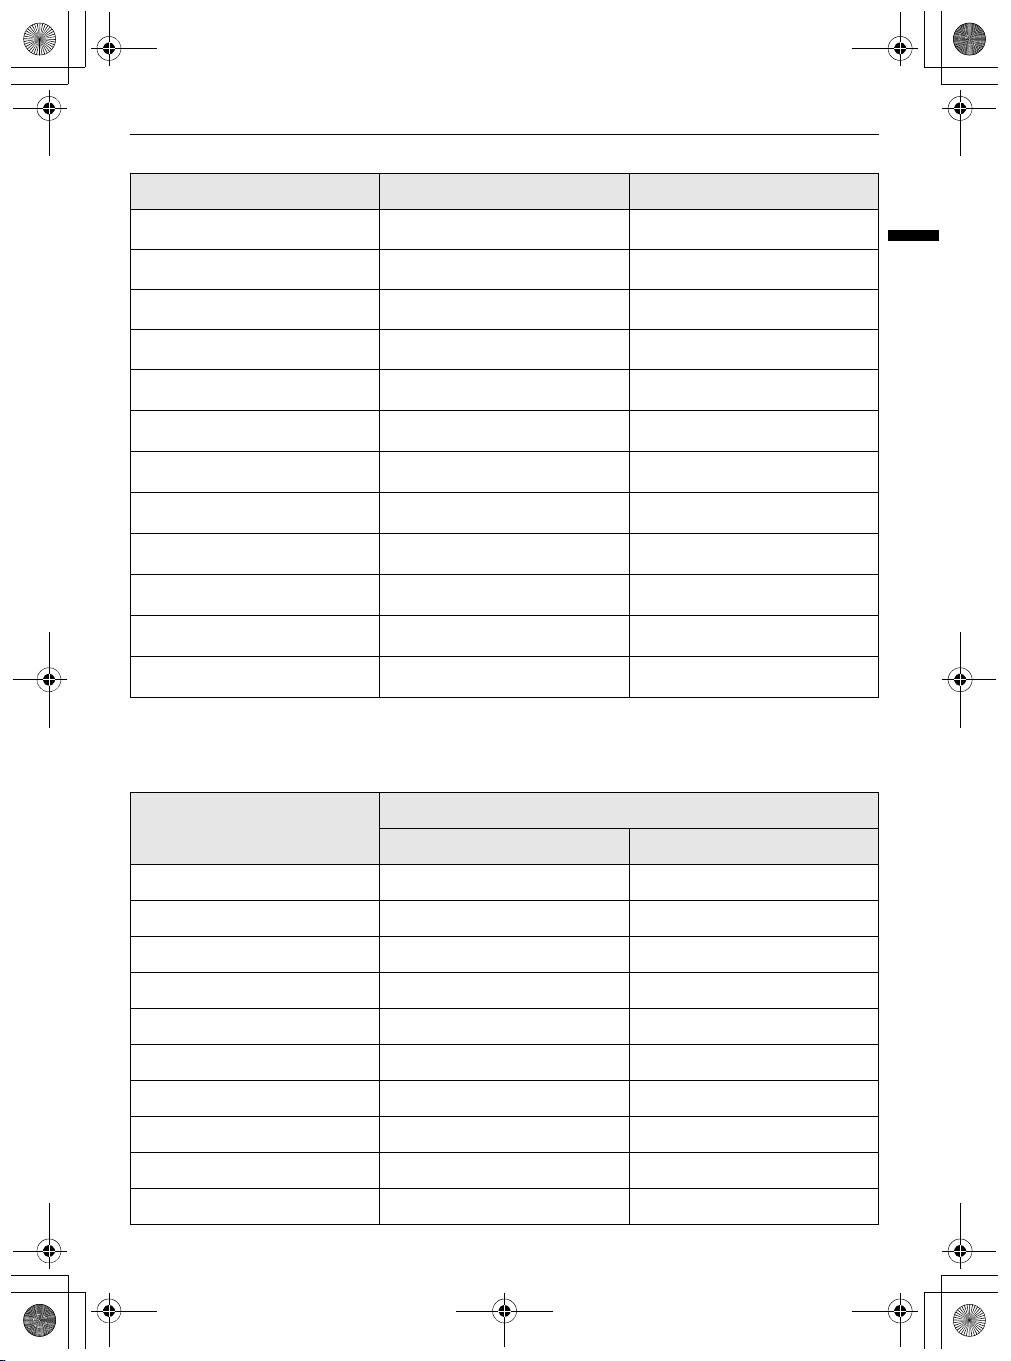
Selectable Maximum Spin Speed
Programme
Cotton
Eco 40-60
Mixed Fabric
Easy Care
Silent Wash
Hygiene
Baby Care
Delicates
Hand/Wool
Sportswear
Default Available
1400 rpm All
1400 rpm All
1000 rpm All
1400 rpm All
800 rpm Up to 1000 rpm
1400 rpm All
1000 rpm Up to 1000 rpm
800 rpm Up to 800 rpm
800 rpm Up to 800 rpm
800 rpm Up to 800 rpm
Spin Speed
NOTE
global_main.book.book Page 26 Thursday, October 22, 2020 2:22 PM
26
OPERATION
Programme
Speed 14
Duvet
• Actual maximum spin speed may vary depending on the load conditions. The values above are rounded
to the nearest hundred.
Default Available
400 rpm All
1000 rpm Up to 1000 rpm
Spin Speed
NOTE
NOTE
global_main.book.book Page 27 Thursday, October 22, 2020 2:22 PM
Extra Options and
Functions
You can use the extra options and functions to
customize the programmes.
Customizing a Washing
Programme
Each programme has default settings that are
selected automatically. You may also customize
these settings using these buttons.
Temp.
This button selects the wash temperature for the
selected programme.
Pre
•
is lit.
• Select the water temperature suitable for the
type of load you are washing. Follow the
garment fabric care labels for best results.
Spin
The spin intensity level can be selected by pressing
this button repeatedly.
Pre
•
ss the
ss the
Temp.
button until the desired setting
Spin
button to select spin speed.
OPERATION
3
Add detergent.
4
Select a washing programme.
5
Customize the washing programme (
Spin, Rinse+
6
Press the
and
Intensive
Start/Pause
) as necessary.
button.
Only Using a Spin Function
1
Prepare the clothes and load the drum.
2
Press the
• Do not select a washing programme and do
3
Press the
4
Press the
Power
button.
not add a detergent.
Spin
button.
Start/Pause
button.
Temp.
27
ENGLISH
,
• If No is selected by pressing the
will still rotate for a short time to drain quickly.
Rinse+
This function is recommended for people with
detergent allergies.
Pre
•
Intensive
This function is used to wash normal and heavily
soiled clothes.
Pre
•
ss the
ss the
Rinse+
button for adding rinse once.
Intensive
button.
Spin
button, it
Follow the next steps to customize a
washing programme:
1
Prepare the clothes and load the drum.
2
Press the
Power
button.
• If you select the washing programme, you will be
unable to select a spin only. If this occurs, press
Power
button twice to cycle the machine off and
back on.
Using Basic Options
You can customize the programmes by using the
following basic options:
Pre Wash
This option is recommended when washing a
heavily soiled load.
1
Press the
2
Select a washing programme.
3
Press the
4
Press the
Power
button.
Pre Wash
Start/Pause
button as necessary.
button.
NOTE
NOTE
NOTE
global_main.book.book Page 28 Thursday, October 22, 2020 2:22 PM
28
OPERATION
Add Item
You can use this option in order to add or remove
clothes after the washing programme has started.
1
Press the
2
Select a washing programme.
3
Press the
4
Press the
5
Open the door after it unlocks itself and add or
remove necessary clothing items.
6
Close the door and press the
button.
• For safety reasons, the door remains locked
when the water level or temperature inside of
the drum is high. It is not possible to add clothes
at this time.
Power
button.
Start/Pause
Add Item
button as necessary.
button.
Start/Pause
time may vary due to water temperature, clothes
and other factors.
Power
• To cancel the function, the
be pressed.
• Avoid using liquid detergent for this function.
button should
Settings
Child Lock
Use this option to disable the controls. This
function can prevent children from changing cycles
or operating the appliance.
• Once this function is set, all buttons are locked
except the
• When the controls are locked,
remaining time are alternatively shown on the
display during the wash while this function is
engaged.
• Turning off the power will not reset this function.
You must deactivate this function before you can
access any other functions.
Power
button.
[L
and the
Delay End
You can set this function so that the appliance
starts automatically and finishes after a specified
time interval.
1
Press the
2
Select a washing programme.
3
Press the
4
Press the
• Except for LED of the
on the control panel will be turned off within 20
minutes. This feature may vary depending on
the model purchased.
• The delay time is the time to the end of the
programme, not the start. The actual running
Power
button.
Delay End
Start/Pause
Delay End
button as necessary.
button.
button, all LEDs
Locking the Control Panel
1
Turn on the power.
2
Press and hold the
bu
ttons at the same time for 3 seconds to
activate this function.
• A beeper will sound, and
the display.
Unlocking the Control Panel
1
Turn on the power.
2
Press and hold the
ttons at the same time for 3 seconds to
bu
deactivate this function.
Beep On/Off
This appliance plays a melody when it starts and
stops.
Delay End
Delay End
and
Add Item
CL
will appear on
and
Add Item

global_main.book.book Page 29 Thursday, October 22, 2020 2:22 PM
• Press and hold the
buttons simultaneously for 3 seconds to
deactivate/activate this function.
Rinse+
and
Pre Wash
OPERATION
29
ENGLISH
NOTE
NOTE
global_main.book.book Page 30 Thursday, October 22, 2020 2:22 PM
30
SMART FUNCTIONS
SMART FUNCTIONS
LG ThinQ Application
The
LG ThinQ
communicate with the appliance using a
smartphone.
application allows you to
LG ThinQ Application Feature
Communicate with the appliance from a
smartphone using the convenient smart features.
Smart Diagnosis
This function provides useful information for
diagnosing and solving issues with the appliance
based on the pattern of use.
Installing the LG ThinQ
Application
Search for the
Google Play Store or Apple App Store on a
smartphone. Follow instructions to download and
install the application.
LG ThinQ
application from the
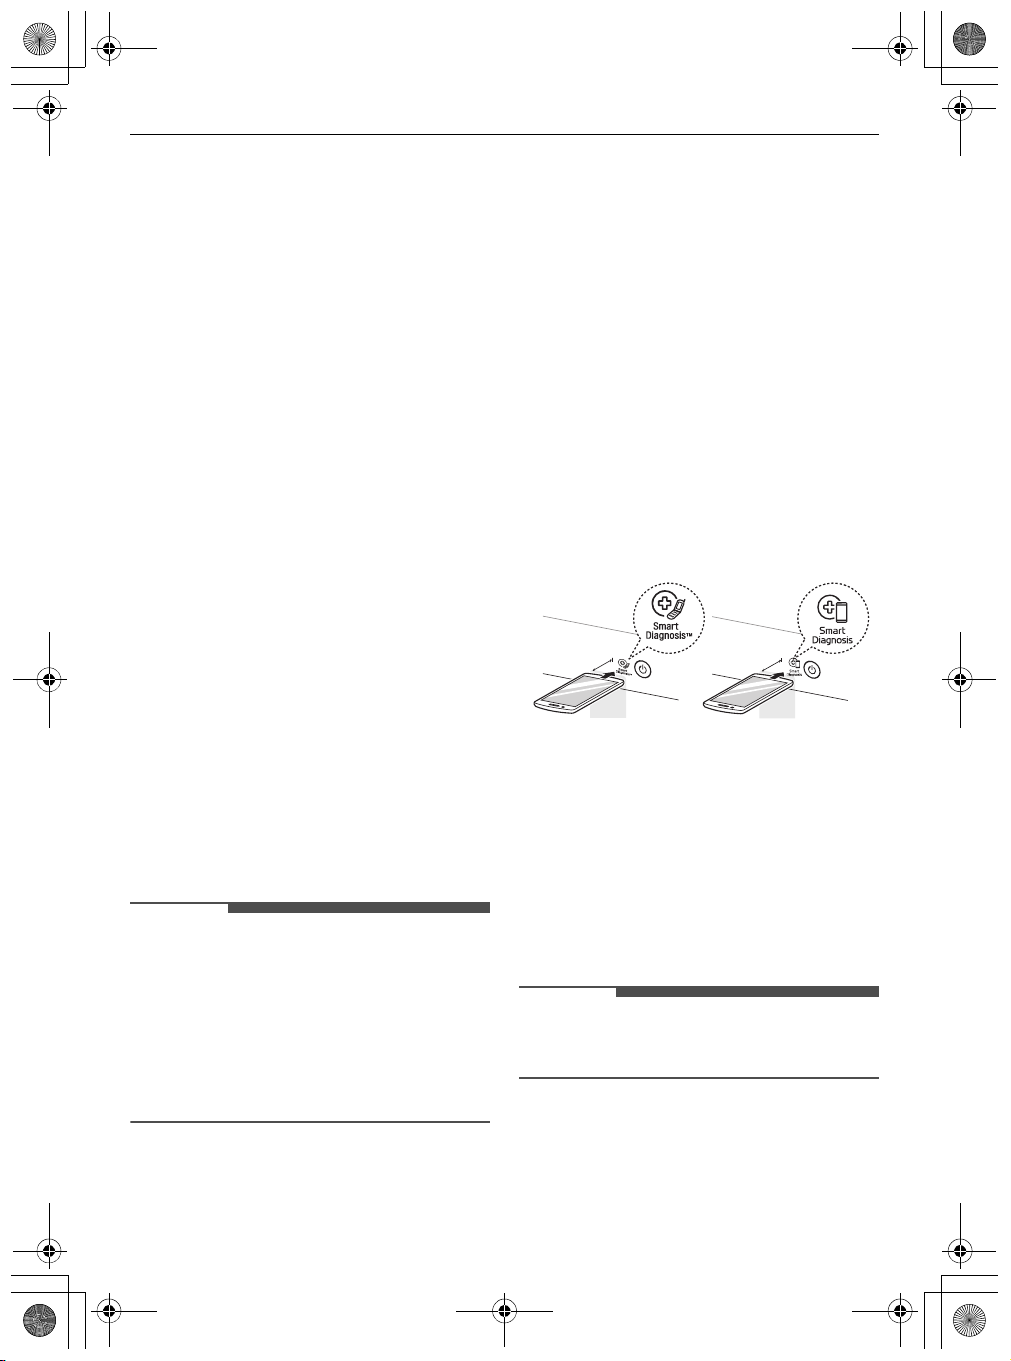
Smart Diagnosis
This feature is only available on models with the c
d
logo.
or
Use this feature to help you diagnose and solve
problems with your appliance.
Using Audible Diagnosis to
Diagnose Issues
Follow the instructions below to use the audible
diagnosis method.
• Launch the
Smart Diagnosis
the instructions for audible diagnosis provided
in the
1
Press the
appliance.
• Do not press any other buttons.
2
Place the mouthpiece of your smartphone
close to the
3
Press and hold the
or longer while holding the smartphone
mouthpiece to the logo until the data transfer
is complete.
• Keep the smartphone in place until the data
LG ThinQ
LG ThinQ
Power
Max.
10 mm
transfer has finished. Time remaining for
data transfer is displayed.
application and select the
feature in the menu. Follow
application.
button to turn on the
c
or d logo.
Max.
10 mm
Temp.
button for 3 seconds
• For reasons not attributable to LGE’s negligence,
the service may not operate due to external
factors such as, but not limited to, Wi-Fi
unavailability, Wi-Fi disconnection, local app
store policy, or app unavailability.
• The feature may be subject to change without
prior notice and may have a different form
depending on where you are located.
4
After the data transfer is complete, the
diagnosis will be displayed in the application.
• For best results, do not move the smartphone
while the tones are being transmitted.

WARNING
WARNING
WARNING
global_main.book.book Page 31 Thursday, October 22, 2020 2:22 PM
MAINTENANCE
31
MAINTENANCE
• Unplug the appliance before cleaning to avoid the risk of electric shock. Failure to follow this warning
may result in serious injury, fire, electric shock, or death.
• Never use harsh chemicals, abrasive cleaners, or solvents to clean the appliance. They may damage the
finish.
Cleaning After Every Wash
What to Clean
Always remove items from the washing machine as
soon as the cycle is complete. Leaving damp items
in the washing machine can cause wrinkling, colour
transfer, and odour.
• After the wash cycle is finished, wipe the door
and door seal to remove any moisture.
• Leave the door slightly open to dry the drum.
• Wipe the appliance with a dry cloth to remove
any moisture.
Cleaning the Exterior
Proper care of your appliance can extend the
service life.
Exterior
• Immediately wipe off any spills.
• Wipe with a damp cloth and then again with a
dry cloth ensuring there is no moisture in
cabinet joints or crevices.
• Do not press on the surface or the display with
sharp objects.
Door
• Wash with a damp cloth on the outside and
inside and then dry with a soft cloth.
ENGLISH
• Leave the door open to dry inside of the
appliance only if the children are supervised at
home.
• Do not attempt to separate any panels or
disassemble the appliance. Do not apply any
sharp objects to the control panel in order to
operate the appliance.

NOTE
WARNING
global_main.book.book Page 32 Thursday, October 22, 2020 2:22 PM
32
MAINTENANCE
Cleaning the Appliance
Periodically & Performing
an Emergency Water
Evacuation
Tub Clean
This is a special function to help clean the inside of
the appliance by soaking, washing, rinsing and
spinning.
Run this function
needed) to reduce build-up of detergent and
softener and other residue.
• If there is a bad smell or mildew inside the
appliance, run this function
weeks
intervals.
• The
tcL
recommendation of operating this function.
1
Remove any clothing or items from the
appliance and close the door.
once a month
in addition to the regularly prompted
message will be displayed to alert to the
(or more often if
once a week for 3
• Leave the door open to dry inside of the
appliance only if the children are supervised at
home.
Cleaning the Water Inlet Filter
The water inlet filter collects lime or any sediment
that may be in water that is supplied to the
appliance. Clean the inlet filter every six months or
so, or more often if the water is very hard or
contains traces of limescale.
• Turn off the water supply taps to the appliance if
the appliance is to be left for a certain period of
time (e.g. holiday), especially if there is no floor
drain (gully) in the immediate vicinity.
•
1E
error message will be displayed on the
control panel when the water is not entering the
detergent drawer.
1
Turn off the power and the water tap and then
unscrew the water inlet hose.
2
Open the dispenser drawer and add anti
limescale powder to the main wash
compartment.
• Tablets can be placed directly into the drum
as an alternative to powder.
3
Close the dispenser drawer slowly.
4
Turn on the power, and then select the
.
Clean
5
Press the
6
Leave the door open to dry the inside of the
appliance completely.
• When the inside of the appliance is not dried
Start/Pause
completely, it may cause a bad smell or
mildew.
button to start.
Tub
2
Remove the water inlet filter with small pliers
and then clean the filter using a medium bristle
tooth brush.

CAUTION
global_main.book.book Page 33 Thursday, October 22, 2020 2:22 PM
Cleaning the Drain Pump Filter
and Performing an Emergency
Water Evacuation
The drain filter collects threads and small objects
that may have been accidentally left in the clothes.
Make sure that the filter is clean every six months
to ensure smooth running of your appliance.
Allow the water to cool before cleaning the drain
pump filter. Open the door in an emergency or
perform an emergency water evacuation.
1
Unplug the appliance.
2
Open the cover cap and pull out the drain tube.
MAINTENANCE
• Be careful when draining, as the water may be
hot.
• Run the drum cleaning programme once a
month (or more often, as needed) to remove
excess detergent and other debris.
33
Cleaning the Dispenser Drawer
Detergent and fabric softener can build up in the
dispenser drawer. Liquid detergents can remain
under the dispenser drawer and not dispense
completely. Remove the drawer and inserts and
check for build-up of cleaning products
twice a month
1
Remove the detergent dispenser drawer by
pulling the drawer straight out until the drawer
stops.
• Then gently pull the drawer outward while
pressing hard the disengage button.
.
once or
ENGLISH
3
Remove the drain plug from the drain tube first
a
, and then drain the water. Then slowly
unscrew the drain pump filter
remaining water and then proceed to remove
any debris or objects from the filter.
4
After cleaning the drain pump filter, carefully
reinsert the filter and screw the drain cap back
in clockwise carefully to avoid cross threading
and leakage. Reinsert the plug back into the
drain tube and place the tube into its holder.
5
Close the cover cap.
b
to drain the
2
Remove the build-up of detergent and
softener.
• Rinse the drawer and the components of the
drawer with warm water to remove the
build-up from detergent and softener. Use
only water to clean the dispenser drawer.
Dry the drawer and the components of the
drawer with a soft cloth or towel.
3
To clean the drawer opening, use a cloth or
small, non-metal brush to clean the recess.
• Remove all residue from the upper and
lower parts of the recess.
4
Wipe any moisture off the recess with a soft
cloth or towel.

global_main.book.book Page 34 Thursday, October 22, 2020 2:22 PM
34
MAINTENANCE
5
Reassemble the components of the drawer to
the proper compartments and insert the
drawer.

global_main.book.book Page 35 Thursday, October 22, 2020 2:22 PM
TROUBLESHOOTING
35
TROUBLESHOOTING
Operation of your appliance can lead to errors and malfunctions. The following tables contain possible
causes and notes for resolving an error message or malfunction. It is recommended to read the tables
carefully below in order to save your time and money that may cost for calling to LG Electronics service
centre.
Before Calling for Service
Your appliance is equipped with an automatic error-monitoring system to detect and diagnose problems
at an early stage. If the appliance does not function properly or does not function at all, check the following
tables before calling to LG Electronics service centre.
Error Messages
Symptoms Possible Cause & Solution
1E
INLET ERROR
UE
UNBALANCE ERROR
Water supply is not adequate in that location. Water does not enter
appliance or it enters slowly.
• Check another tap in the house.
Water supply tap is not completely open. Water does not enter the
appliance or it enters slowly.
• Open fully tap.
Water supply hose(s) are kinked.
• Straighten hose or reinstall the water inlet hose
The filter of the supply hose(s) are clogged.
• Check and clean the inlet valve filter after turning off the taps and
removing the hose connections to the washing machine.
The appliance has a system which detects and corrects the unbalance of
the appliance.
• The clothes may be too wet at the end of the cycle, rearrange the load to
allow proper spinning. Close the door and press
may take a few moments before the appliance begins to spin. The door
must be locked before spin can be achieved.
Load is too small. This system may stop spinning or even interrupt the
spin cycle altogether if individual heavy articles (e.g. bath mat, bath
robe, etc.) are loaded.
• Add 1 or 2 similar items or smaller articles of clothes to help balance the
load. Close the door and press
moments before the appliance begins to spin. The door must be locked
before spin can be achieved.
Start/Pause
Start/Pause
button. It may take a few
button. It
ENGLISH

global_main.book.book Page 36 Thursday, October 22, 2020 2:22 PM
36
TROUBLESHOOTING
Symptoms Possible Cause & Solution
OE
WATER OUTLET ERROR
dE dE1 dEz dE4
DOOR ERROR
tE
CONTROL ERROR
LE
MOTOR LOCKED ERROR
FE
OVERFLOW ERROR
PE
PRESSURE SENSOR
ERROR
vs
VIBRATION SENSOR
ERROR
FF
FROZEN FAILURE
AE
WATER LEAKAGE
PF
POWER FAILURE
Drain hose is kinked or clogged. Water in the appliance does not drain
or drains slowly.
• Clean and straighten the drain hose.
The drain filter is clogged.
• Check and clean the drain filter.
Door sensor malfunctions.
• Please call LG service centre. You can find your local LG service centre
phone number in the warranty card.
This is a control error.
• Unplug the power plug and call for service.
Over load in motor.
• Let the appliance wait for 30 minutes until the motor is cooled down and
then, restart the cycle.
Water overfills due to a possible faulty water valve.
• Close the water tap. Unplug the power plug. Call for service.
Water level sensor malfunctions.
• Close the water tap. Unplug the power plug. Call for service.
Vibration sensor malfunctions.
• Call for service.
Is supply/drain hose or drain pump frozen?
• Supply warm water into the drum in order to unfreeze the drain hose and
the drain pump. Cover the supply hose with wet and warm towel.
Water leaks.
• Call for service.
The appliance experienced a mains power failure.
• Restart the cycle.
Noises You Might Hear
Symptoms Possible Cause & Solution
Rattling and clanking
noise
Foreign objects, such as keys, coins, or safety pins may be in the drum.
• Stop the appliance, check the drum for foreign objects. If the noise
continues after the appliance is restarted, call for service.

global_main.book.book Page 37 Thursday, October 22, 2020 2:22 PM
TROUBLESHOOTING
Symptoms Possible Cause & Solution
Thumping sound Heavy clothes may produce a thumping sound. This is usually normal.
• If the sound continues, the appliance is probably out of balance. Stop and
redistribute the clothes.
The clothes may be out of balance.
• Pause the programme and redistribute the clothes after the door unlocks.
Vibrating noise Package materials are not removed.
• Remove package materials.
The clothes may be unevenly distributed in the drum.
• Pause the programme and redistribute the clothes after the door unlocks.
Not all levelling feet are resting firmly and evenly on the floor.
• See the
Floor not rigid enough.
• Check if the floor is sold and does not flex. See the
Levelling the Appliance
appliance.
Requirements
instruction to adjust the levelling of the
Installation Place
to select the proper location.
Operation
37
ENGLISH
Symptoms Possible Cause & Solution
Water is leaking. House drain pipes are clogged.
• Unclog waste pipes. Contact plumber if necessary.
Leakage is caused by improper installation of drain hose or clogged
drain hose.
• Clean and straighten the drain hose. Check and clean the drain filter
regularly.
Drain pump filter cap is not fitted correctly.
• Refit the drain pump filter.

global_main.book.book Page 38 Thursday, October 22, 2020 2:22 PM
38
TROUBLESHOOTING
Symptoms Possible Cause & Solution
Appliance does not
operate.
Buttons may not
function properly.
Door does not open. The door cannot be opened for safety reasons once the appliance starts.
Control panel has powered off due to inactivity.
• This is normal. Press the
Appliance is unplugged.
• Make sure that the cord is plugged securely into a working outlet.
Water supply is turned off.
• Turn the water supply tap completely.
Controls are not set properly.
• Make sure that the programme is correctly set. Close the door and press
the
Start/Pause
Door is open.
• Close the door and make sure that nothing is caught under the door
preventing it from closing completely.
Circuit breaker/fuse is tripped/blown.
• Check house circuit breakers/fuses. Replace fuses or reset breaker. The
appliance should be on a dedicated branch circuit. The appliance will
resume the programme where it stopped once power is restored.
Control needs to be reset.
• Press the
the
Start/Pause
Start/Pause was not pressed after a programme was set.
• Press the
the
Start/Pause
button is not pressed within a certain time.
Extremely low water pressure.
• Check another tap in the house to make sure that household water
pressure is adequate.
Appliance is heating the water or making steam.
• The drum may stop operating temporarily during certain cycles, while
water is safely heated to a set temperature.
The Child Lock option is activated.
• Deactivate the
• This is normal. You can safely open the door after H turns off.
button.
Power
button.
Power
button. The appliance is turned off if the
Child Lock
Power
button to turn the appliance on.
button, then reselect the desired programme and press
button, then reselect the desired programme and press
option if necessary.
Start/Pause

global_main.book.book Page 39 Thursday, October 22, 2020 2:22 PM
TROUBLESHOOTING
Symptoms Possible Cause & Solution
Appliance is not filling
properly.
Appliance does not
drain water.
Detergent is not
dispensed
incompletely or not
dispensed at all.
Cycle time is longer
than usual.
Cycle end is delayed Unbalance is detected or suds removing programme is on.
Inlet filter clogged.
• Make sure the inlet filters on the fill valves are not clogged.
Inlet hoses may be kinked.
• Check that inlet hoses are not kinked or clogged.
Insufficient water supply.
• Make sure that both hot and cold water taps are turned on all the way.
Hot and cold supply hoses are reversed.
• Check supply hose connections.
Kinked drain hose.
• Ensure that the drain hose is not kinked.
Drain located higher than 1.2 m above the floor.
• Make sure that the drain hose is no higher than 1.2 m above the bottom of
the appliance.
Too much detergent is used.
• Follow the guidelines provided by the detergent manufacturer.
Drain Pump Filter may be blocked.
• Clean the Drain filter.
The load is too small.
• Add more items to allow the appliance to balance the loads.
Heavy articles are mixed with lighter items.
• Always try to wash articles with similar weight in order to allow the
appliance to evenly distribute the weight of the load for spinning.
The load is out of balance.
• Manually redistribute the load if articles have become tangled.
• This is normal. The time remaining shown on the display is only an
estimated duration. Actual time may vary.
39
ENGLISH
Performance
Symptoms Possible Cause & Solution
Poor stain removal Previously set stains.
• Articles that have been previously washed may have stains which have
been set. These stains may be difficult to remove and may require hand
washing or pre-treating to aid in stain removal.

global_main.book.book Page 40 Thursday, October 22, 2020 2:22 PM
40
TROUBLESHOOTING
Symptoms Possible Cause & Solution
Staining Bleach or softener is dispensed too soon.
• Dispenser compartment is overfilled. It makes bleach or softer dispensed
rapidly. Always measure bleach or softener to prevent overfilling.
• Close the detergent dispenser slowly.
Bleach or softener was added directly to the clothes in the drum.
• Always use the detergent dispenser to ensure that bleach or softener is
properly dispensed at the right time in the programme.
Clothes were not properly sorted.
• Always wash dark colours separately from light colours and whites to
prevent discoloration.
• Never wash heavily soiled items with lightly soiled items.
Wrinkling Appliance is not unloaded promptly.
• Always remove items from the appliance as soon as the programme is
complete.
Appliance is overloaded.
• The appliance can be fully loaded, but the drum should not be tightly
packed with items. The door of the appliance should be closed easily.
Hot and cold water supply hoses are reversed.
• Hot water rinse can set wrinkles in garments. Check the supply hose
connections.
Spin speed may be too high.
• Set the spin speed to suit the garment type.
Odour
Symptoms Possible Cause & Solution
Musty or mildewy
odour in appliance
Inside of drum is not cleaned properly.
• Run the
Odours can occur if the drain hose is not properly installed, causing
siphoning (water flowing back inside of the appliance).
• When installing the drain hose, make sure that it does not get kinked or
blocked.
If the detergent dispenser is not cleaned regularly, odours can occur
from mold or foreign substances.
• Remove and clean the detergent dispenser, especially the top and bottom
of the dispenser’s opening.
Tub Clean
function regularly.

ar_main.book.book Page 36 Thursday, October 22, 2020 4:16 PM
ﺓﺭﻛﺫﻣ

ar_main.book.book Page 35 Thursday, October 22, 2020 4:16 PM
35
ﺎﻬﺣﻼﺻﺇﻭ ﻝﺎﻁﻋﻷﺍ ﻑﺎﺷﻛﺗﺳﺍ
ﺍﻟﻌﺭﺑﻳﺔ
.ﻝﺳﻐﻟﺍ ﺽﻭﺣ ﻲﻓ ﺱﺑﻼﻣﻟﺍ ﻰﻠﻋ ﺓﺭﺷﺎﺑﻣ ﻡﻌﻧﻣﻟﺍ ﻭﺃ ﺽّﻳﺑﻣﻟﺍ ﺔﻓﺎﺿﺇ ﺕﻣﺗ
.ﺔﺣﻳﺣﺻ ﺔﻘﻳﺭﻁﺑ ﺱﺑﻼﻣﻟﺍ ﺯﺭﻓ ﻡﺗﻳ ﻡﻟ
.ﺔﻟﻭﻬﺳﺑ ﺔﻟﺎﺳﻐﻟﺍ ﺏﺎﺑ ﻕﻼﻏﺇ ﻡﺗﻳ ﻥﺃ
.ﺩﺭﺎﺑﻟﺍ ءﺎﻣﻟﺍﻭ ﻥﺧﺎﺳﻟﺍ ءﺎﻣﻟﺍ ﺩﺍﺩﻣﺇ ﻲﻣﻭﻁﺭﺧ ﺱﻛﻋ ﻡﺗ
.ﺍًﺩﺟ ﺔﻌﻔﺗﺭﻣ ﻥﺍﺭﻭﺩﻟﺍ ﺔﻋﺭﺳ ﻥﻭﻛﺗ ﺩﻗ
ﺽﺍﺭﻋﻷﺍﻝﺣﻟﺍﻭ ﻝﻣﺗﺣﻣﻟﺍ ﺏﺑﺳﻟﺍ
ﻊﻘﺑﻟﺍ.ﺓﺭﻭﺩﻟﺍ ﻥﻣ ﺭﻛﺑﻣ ﺕﻗﻭ ﻲﻓ ﻡّﻌﻧﻣﻟﺍ ﻭﺃ ﺽّﻳﺑﻣﻟﺍ ﻊﻳﺯﻭﺗ ﻡﺗﻳ
• ﺏﻧﺟﺗﻟ ﺽّﻳﺑﻣﻟﺍ ﺓﺭﻳﺎﻌﻣﺑ ﺎًﻣﺋﺍﺩ ﻡﻗ .ﺔﻋﺭﺳﺑ ﻡﻌﻧﻣﻟﺍ ﻭﺃ ﺽّﻳﺑﻣﻟﺍ ﻊﻳﺯﻭﺗ ﺏﺑﺳﻳ ﺎﻣﻣ ،ﺩﺋﺍﺯ ﻝﻛﺷﺑ ﺓءﻭﻠﻣﻣ ﻉﺯﻭﻣﻟﺍ ﺓﺩﺣﻭ
.ﻁﺭﻔﻣﻟﺍ ءﻝﻣﻟﺍ
•.ءﻭﺩﻬﺑ ﺕﺎﻔﻅﻧﻣﻟﺍ ﻉﺯﻭﻣ ﻖﻠﻏﺃ
• ءﺎﻧﺛﺃ ﺏﺳﺎﻧﻣﻟﺍ ﺕﻗﻭﻟﺍ ﻲﻓﻭ ﺔﺣﻳﺣﺻ ﺔﻘﻳﺭﻁﺑ ﻡﻌﻧﻣﻟﺍ ﻭﺃ ﺽﻳﺑﻣﻟﺍ ﻊﻳﺯﻭﺗ ﻥﺎﻣﺿﻟ ﺕﺎﻔﻅﻧﻣﻟﺍ ﻉﺯﻭﻣ ﺎًﻣﺋﺍﺩ ﻡﺩﺧﺗﺳﺍ
.ﺞﻣﺎﻧﺭﺑﻟﺍ
• ءﺎﺿﻳﺑﻟﺍﻭ ﺔﺣﺗﺎﻔﻟﺍ ﻥﺍﻭﻟﻷﺍ ﺕﺍﺫ ﺱﺑﻼﻣﻟﺍ ﻥﻋ ﻝﺻﻔﻧﻣ ﻝﻛﺷﺑ ﺔﻘﻣﺎﻐﻟﺍ ﻥﺍﻭﻟﻷﺍ ﺕﺍﺫ ﺱﺑﻼﻣﻟﺍ ﻝﺳﻏ ﻰﻠﻋ ﺎًﻣﺋﺍﺩ ﺹﺭﺣﺍ
.ﺎﻬﻧﺍﻭﻟﺃ ﺭّﻳﻐﺗ ﺏﻧﺟﺗﻟ
•.ﺥﺎﺳﺗﻻﺍ ﺔﻠﻳﻠﻗ ﺽﺍﺭﻏﻷﺍ ﻊﻣ ﺥﺎﺳﺗﻻﺍ ﺓﺩﻳﺩﺷ ﺽﺍﺭﻏﻷﺍ ﻝﺳﻐﺑ ﺍًﺩﺑﺃ ﻡﻘﺗ ﻻ
ﺱﺑﻼﻣﻟﺍ ﺩﻳﻋﺎﺟﺗ.ﺔﻋﺭﺳﺑ ﻝﻳﺳﻐﻟﺍ ﺔﻟﻭﻣﺣ ﻎﻳﺭﻔﺗ ﻡﺗﻳ ﻻ
•.ﺞﻣﺎﻧﺭﺑﻟﺍ ﻝﺎﻣﺗﻛﺍ ﺩﺭﺟﻣﺑ ﺯﺎﻬﺟﻟﺍ ﻥﻣ ﺽﺍﺭﻏﻷﺍ ﺝﺍﺭﺧﺇ ﻰﻠﻋ ﺎًﻣﺋﺍﺩ ﺹﺭﺣﺍ ﺍﺫﻟ
.ﻁﺭﻔﻣ ﻝﻛﺷﺑ ﻝﻣﺣﻣ ﺯﺎﻬﺟﻟﺍ
• ﻲﻐﺑﻧﻳ .ﻝﺳﻐﻟﺍ ﺽﻭﺣ ﻝﺧﺍﺩ ﺽﺍﺭﻏﻷﺍ ﻥﻣ ﺓﺭﻳﺑﻛ ﺔﻳﻣﻛ ﺱﻳﺩﻛﺗ ﺏﺟﻳ ﻻ ﻥﻛﻟﻭ ،ﺯﺎﻬﺟﻟﺍ ﻲﻓ ﺔﻠﻣﺎﻛ ﺔﻟﻭﻣﺣﻟﺍ ﻊﺿﻭ ﻥﻛﻣﻳ
•.ﺩﺍﺩﻣﻹﺍ ﻡﻭﻁﺭﺧ ﺕﻼﻳﺻﻭﺗ ﺹﺣﻓﺍ .ﺱﺑﻼﻣﻟﺎﺑ ﺔﺷﻣﺭﻛ ﺙﺍﺩﺣﺇ ﻰﻟﺇ ﻥﺧﺎﺳﻟﺍ ءﺎﻣﻟﺎﺑ ﻑﻁﺷﻟﺍ ﻱﺩﺅﻳ ﻥﺃ ﻥﻛﻣﻳ
•.ﺱﺑﻼﻣﻟﺍ ﻉﻭﻧ ﻡﺋﻼﺗﻟ ﻥﺍﺭﻭﺩﻟﺍ ﺔﻋﺭﺳ ﻁﺑﺿﺍ
.ﺔﺣﻳﺣﺻ ﺔﻘﻳﺭﻁﺑ ﻝﺧﺍﺩﻟﺍ ﻥﻣ ﻝﺳﻐﻟﺍ ﺽﻭﺣ ﻑﻳﻅﻧﺗ ﻡﺗﻳ ﻡﻟ
.ﻡﺎﻅﺗﻧﺎﺑ
ﻉﺎﺟﺗﺭﺍ) ﻁﻔﺷ ﺙﻭﺩﺣ ﺏﺑﺳﻳ ﺎﻣﻣ ،ﺢﻳﺣﺻ ﻝﻛﺷﺑ ﻑﻳﺭﺻﺗﻟﺍ ﻡﻭﻁﺭﺧ ﺏﻳﻛﺭﺗ ﻡﺗﻳ ﻻ ﺎﻣﺩﻧﻋ ﺔﻬﻳﺭﻛﻟﺍ ﺢﺋﺍﻭﺭﻟﺍ ﺙﻌﺑﻧﺗ ﺩﻗ
.ﺔﺑﻳﺭﻐﻟﺍ ﺩﺍﻭﻣﻟﺍ ﻭﺃ ﺏﻟﺎﻘﻟﺍ ﻥﻣ ﺔﻬﻳﺭﻛﻟﺍ ﺢﺋﺍﻭﺭﻟﺍ ﺙﻌﺑﻧﺗ ،ﻡﺎﻅﺗﻧﺎﺑ ﺕﺎﻔﻅﻧﻣﻟﺍ ﻉﺯﻭﻣ ﻑﻳﻅﻧﺗ ﻰﻠﻋ ﺔﺑﻅﺍﻭﻣﻟﺍ ﻡﺩﻋ ﺩﻧﻋ
Tub Clean(ﺽﻭﺣﻟﺍ ﻑﻳﻅﻧﺗ)
.(ﺯﺎﻬﺟﻟﺍ ﻰﻟﺇ ﻯﺭﺧﺃ ﺓﺭﻣ ءﺎﻣﻟﺍ
ﺽﺍﺭﻋﻷﺍﻝﺣﻟﺍﻭ ﻝﻣﺗﺣﻣﻟﺍ ﺏﺑﺳﻟﺍ
ﻥﻣ ﺔﻬﻳﺭﻛ ﻭﺃ ﺔﻧﻔﻋ ﺔﺣﺋﺍﺭ ﺙﻌﺑﻧﺗ
• ﺔﻔﻳﻅﻭ ﻝﻳﻐﺷﺗﺑ ﻡﻗ
•.ﻩﺩﺍﺩﺳﻧﺍ ﻭﺃ ﻪﺋﺍﻭﺗﻟﺍ ﻡﺩﻋ ﻰﻠﻋ ﺹﺭﺣﺍ ،ﻑﻳﺭﺻﺗﻟﺍ ﻡﻭﻁﺭﺧ ﺏﻳﻛﺭﺗ ﺩﻧﻋ
•.ﻉﺯﻭﻣﻟﺍ ﺔﺣﺗﻓ ﻝﻔﺳﺃﻭ ﻰﻠﻋﺃ ﺎﻣﻳﺳﻻﻭ ﻪﻔﻅﻧﻭ ﺕﺎﻔﻅﻧﻣﻟﺍ ﻉﺯﻭﻣ ﺝﺭﺧﺃ
ﺔﺣﺋﺍﺭﻟﺍ
ﺯﺎﻬﺟﻟﺍ

ar_main.book.book Page 34 Thursday, October 22, 2020 4:16 PM
ﺎﻬﺣﻼﺻﺇﻭ ﻝﺎﻁﻋﻷﺍ ﻑﺎﺷﻛﺗﺳﺍ
.ﺔﻳﻭﺗﻠﻣ ﻩﺎﻳﻣﻟﺍ ﻝﺎﺧﺩﺇ ﻡﻳﻁﺍﺭﺧ ﻥﻭﻛﺗ ﺩﻗ
.ٍﻑﺎﻛ ﺭﻳﻏ ءﺎﻣﻟﺍ ﺩﺍﺩﻣﺇ
.ﺩﺭﺎﺑﻟﺍ ءﺎﻣﻟﺍﻭ ﻥﺧﺎﺳﻟﺍ ءﺎﻣﻟﺍ ﺩﺍﺩﻣﺇ ﻲﻣﻭﻁﺭﺧ ﺱﻛﻋ ﻡﺗ
ﻥﻣ ﻰﻠﻋﺃ ﻉﺎﻔﺗﺭﺍ ﻰﻠﻋ ﻑﻳﺭﺻﺗﻟﺍ ﻡﻭﻁﺭﺧ ﻊﺿﻭ1.2.ﺔﻳﺿﺭﻷﺍ ﺢﻁﺳ ﻕﻭﻓ ﻡ
.ﻑﻅﻧﻣﻟﺍ ﻥﻣ ﺭﻳﺑﻛ ﺭﺍﺩﻘﻣ ﻡﺍﺩﺧﺗﺳﺍ
.ﺩﺳﻧﻣ ﻑﻳﺭﺻﺗﻟﺍ ﺔﺧﺿﻣ ﺭﺗﻠﻓ ﻥﻭﻛﻳ ﺩﻗ
.ﺔﻔﻳﻔﺧﻟﺍ ﺱﺑﻼﻣﻟﺍ ﻊﻣ ﺔﻠﻳﻘﺛﻟﺍ ﺱﺑﻼﻣﻟﺍ ﻁﻠﺧ ﻡﺗ
.ﺭﺻﻌﻟﺍ ﺔﻠﺣﺭﻣ ﻲﻓ
.ﺔﻧﺯﺍﻭﺗﻣ ﺕﺳﻳﻟ ﺔﻟﻭﻣﺣﻟﺍ
ﺽﺍﺭﻋﻷﺍﻝﺣﻟﺍﻭ ﻝﻣﺗﺣﻣﻟﺍ ﺏﺑﺳﻟﺍ
.ﺔﺣﻳﺣﺻ ﺔﻘﻳﺭﻁﺑ ﺯﺎﻬﺟﻟﺍ ءﻝﻣ ﻡﺗﻳ ﻻ.ﻝﺎﺧﺩﻹﺍ ﺭﺗﻠﻓ ﺩﺍﺩﺳﻧﺍ
•.ﺓﺩﻭﺩﺳﻣ ﺭﻳﻏ ءﻝﻣﻟﺍ ﺕﺎﻣﺎﻣﺻ ﺩﻧﻋ ﺓﺩﻭﺟﻭﻣﻟﺍ ﻩﺎﻳﻣﻟﺍ ﻝﺎﺧﺩﺇ ﺭﺗﻼﻓ ﻥﺃ ﻥﻣ ﺩﻛﺄﺗ
•.ﻩﺎﻳﻣﻟﺍ ﻝﺎﺧﺩﺇ ﻡﻳﻁﺍﺭﺧ ﺩﺍﺩﺳﻧﺍ ﻭﺃ ءﺍﻭﺗﻟﺍ ﻡﺩﻋ ﻥﻣ ﺩﻛﺄﺗ
•.ﻝﻣﺎﻛ ﻝﻛﺷﺑ ﺩﺭﺎﺑﻟﺍﻭ ﻥﺧﺎﺳﻟﺍ ءﺎﻣﻟﺍ ﻱﺭﻭﺑﻧﺻ ﺢﺗﻓ ﻥﻣ ﺩﻛﺄﺗ
•.ﺩﺍﺩﻣﻹﺍ ﻡﻭﻁﺭﺧ ﺕﻼﻳﺻﻭﺗ ﺹﺣﻓﺍ
.ﻩﺎﻳﻣﻟﺍ ﻑﻳﺭﺻﺗﺑ ﺯﺎﻬﺟﻟﺍ ﻡﻭﻘﻳ ﻻ.ٍﻭﺗﻠﻣ ﻑﻳﺭﺻﺗﻟﺍ ﻡﻭﻁﺭﺧ
•.ٍﻭﺗﻠﻣ ﺭﻳﻏ ﻑﻳﺭﺻﺗﻟﺍ ﻡﻭﻁﺭﺧ ﻥﺃ ﻥﻣ ﺩﻛﺄﺗ
• ﻥﻣ ﻰﻠﻋﺃ ﻉﺎﻔﺗﺭﺍ ﻰﻠﻋ ﻑﻳﺭﺻﺗﻟﺍ ﻡﻭﻁﺭﺧ ﻊﺿﻭ ﻡﺩﻋ ﻥﻣ ﺩﻛﺄﺗ1.2.ﺯﺎﻬﺟﻟﺍ ﺓﺩﻋﺎﻗ ﻥﻣ ﻡ
ﻻ ﻭﺃ ﻝﻣﺎﻛ ﻝﻛﺷﺑ ﻑﻅﻧﻣﻟﺍ ﻊﻳﺯﻭﺗ ﻡﺗﻳ ﻻ
•.ﻑﻅﻧﻣﻟﺍ ﻊﻳﻧﺻﺗ ﺔﻬﺟ ﺕﺍﺩﺎﺷﺭﺇ ﻊﺑﺗﺍ
•.ﻑﻳﺭﺻﺗﻟﺍ ﺭﺗﻠﻓ ﻑﻳﻅﻧﺗﺑ ﻡﻗ
•.ﺔﻟﻭﻣﺣﻟﺍ ﺔﻧﺯﺍﻭﻣ ﻥﻣ ﺯﺎﻬﺟﻟﺍ ﻥﻛﻣﺗﻳ ﻲﻛ ﺽﺍﺭﻏﻷﺍ ﻥﻣ ﺍًﺩﻳﺯﻣ ﻑﺿﺃ
• ﻱﻭﺎﺳﺗﻟﺎﺑ ﺔﻟﻭﻣﺣﻟﺍ ﻥﺯﻭ ﻊﻳﺯﻭﺗ ﻥﻣ ﺯﺎﻬﺟﻟﺍ ﻥﻛﻣﺗﻳ ﻰﺗﺣ ﺎًﻌﻣ ﺔﻬﺑﺎﺷﺗﻣﻟﺍ ﻥﺍﺯﻭﻷﺍ ﺕﺍﺫ ﺱﺑﻼﻣﻟﺍ ﻊﻁﻗ ﻝﺳﻏ ﺎًﻣﺋﺍﺩ ﻝﻭﺎﺣ
•.ﺔﻛﺑﺎﺷﺗﻣ ﺱﺑﻼﻣﻟﺍ ﻊﻁﻗ ﺕﻧﺎﻛ ﺍﺫﺇ ﺎﻳﻭﺩﻳ ﺔﻟﻭﻣﺣﻟﺍ ﻊﻳﺯﻭﺗ ﺓﺩﺎﻋﺈﺑ ﻡﻗ
•.ﻲﻠﻌﻔﻟﺍ ﺕﻗﻭﻟﺍ ﻑﻠﺗﺧﻳ ﺩﻗ ﻡﺛ ﻥﻣﻭ .ﺔﻳﺭﻳﺩﻘﺗ ﺓﺩﻣ ﻻﺇ ﻭﻫ ﺎﻣ ﺽﺭﻌﻟﺍ ﺔﺷﺎﺷ ﻰﻠﻋ ﺭﻫﺎﻅﻟﺍ ﻲﻘﺑﺗﻣﻟﺍ ﺕﻗﻭﻟﺎﻓ ،ﻲﻌﻳﺑﻁ ﺭﻣﺃ ﺍﺫﻫ
.ﻕﻼﻁﻹﺍ ﻰﻠﻋ ﻪﻌﻳﺯﻭﺗ ّﻡﺗﻳ
.ﺩﺎﺗﻌﻣﻟﺍ ﻥﻣ ﻝﻭﻁﺃ ﺓﺭﻭﺩﻟﺍ ﺕﻗﻭ.ﺔﻳﺎﻐﻠﻟ ﺓﺭﻳﻐﺻ ﺔﻟﻭﻣﺣﻟﺍ
.ﺓﺭﻭﺩﻟﺍ ﺔﻳﺎﻬﻧ ءﺎﻐﻟﺇ ّﻡﺗ.ﻥﻭﺑﺎﺻﻟﺍ ﺓﻭﻏﺭ ﺔﻟﺍﺯﺇ ﺞﻣﺎﻧﺭﺑ ﻝﻳﻐﺷﺗ ّﻡﺗ ﻭﺃ ﻥﺯﺍﻭﺗﻟﺍ ﻲﻓ ﻝﻠﺧ ﺩﻭﺟﻭ ﻥﻋ ﻑﺷﻛﻟﺍ ّﻡﺗ
34
.ﻊﻘﺑﻟﺍ ﺔﻟﺍﺯﺇ ﻲﻓ ﺓﺩﻋﺎﺳﻣﻠﻟ ﺎًﻘﺑﺳﻣ ﺎﻬﺗﺟﻟﺎﻌﻣ ﻭﺃ ﺎًﻳﻭﺩﻳ
ءﺍﺩﻷﺍ
ﺽﺍﺭﻋﻷﺍﻝﺣﻟﺍﻭ ﻝﻣﺗﺣﻣﻟﺍ ﺏﺑﺳﻟﺍ
ﻊﻘﺑﻠﻟ ﺔﻔﻳﻌﺿ ﺔﻟﺍﺯﺇ.ﺔﺑﻌﺻﻟﺍ ﻊﻘﺑﻟﺍ ﺔﻟﺍﺯﺇ ﺔﻟﻭﺎﺣﻣ
• ﺎﻬﻠﺳﻏ ﺭﻣﻷﺍ ﺏﻠﻁﺗﻳ ﺩﻗﻭ ﻊﻘﺑﻟﺍ ﻩﺫﻫ ﺔﻟﺍﺯﺇ ﺏﻌﺻﻳ ﺎﻣﺑﺭ .ﺔﻳﺳﺎﻗ ﻊﻘﺑﺑ ﺔﺛﻭﻠﻣ ﺎًﻘﺑﺎﺳ ﺎﻬﻠﺳﻏ ﻡﺗ ﻲﺗﻟﺍ ﺽﺍﺭﻏﻷﺍ ﻥﻭﻛﺗ ﺎﻣﺑﺭ

ar_main.book.book Page 33 Thursday, October 22, 2020 4:16 PM
33
ﺎﻬﺣﻼﺻﺇﻭ ﻝﺎﻁﻋﻷﺍ ﻑﺎﺷﻛﺗﺳﺍ
ﺍﻟﻌﺭﺑﻳﺔ
.ﻩﺩﺍﺩﺳﻧﺍ ﺏﺑﺳﺑ ﻭﺃ ﻑﻳﺭﺻﺗﻟﺍ ﻡﻭﻁﺭﺧﻟ ﺢﻳﺣﺻﻟﺍ ﺭﻳﻏ ﺏﻳﻛﺭﺗﻟﺍ ﺏﺑﺳﺑ ﺏﻳﺭﺳﺗ ﺙﻭﺩﺣ
.ﺔﺣﻳﺣﺻ ٍﺔﻘﻳﺭﻁﺑ ﺏّﻛﺭُﻣ ﺭﻳﻏ ﻑﻳﺭﺻﺗﻟﺍ ﺔﺧﺿﻣ ﺭﺗﻠﻓ
.ﺯﺎﻬﺟﻟﺍ ﻝﻳﻐﺷﺗﻟ
ﺕﻗﺅﻣ ﻑﺎﻘﻳﺇ/ءﺩﺑ
.
.ﺔﻗﺎﻁﻟﺍ ﺓﺩﺎﻌﺗﺳﺍ ﺩﺭﺟﻣﺑ ﻑﻗﻭﺗ ﺙﻳﺣ ﻥﻣ ﺞﻣﺎﻧﺭﺑﻟﺍ ﺯﺎﻬﺟﻟﺍ ﻑﻧﺄﺗﺳﻳﺳ .ﺯﺎﻬﺟﻟﺎﺑ ﺔﺻﺎﺧ ﺔﻳﻋﺭﻓ ﺔﻳﺋﺎﺑﺭﻬﻛ
ﺭﺯ ﻰﻠﻋ ﻁﻐﺿﺍﻭ ﺎﻬﻳﻓ ﺏﻭﻏﺭﻣﻟﺍ ﺞﻣﺍﺭﺑﻟﺍ ﺩﻳﺩﺣﺗ ﺩﻋﺃ ﻡﺛ ،
ﺭﺯﻟﺍ ﻰﻠﻋ ﻁﻐﺿﺍﻭ ﺏﻭﻠﻁﻣﻟﺍ ﺞﻣﺎﻧﺭﺑﻟﺍ ﺩﻳﺩﺣﺗ ﺩﻋﺃ ﻡﺛ ،
.ﻥﻳﻌﻣ ﺕﻗﻭ ﻝﻼﺧ
ﺕﻗﺅﻣ ﻑﺎﻘﻳﺇ/ءﺩﺑ
.ﺔﺟﺎﺣﻟﺍ ﺩﻧﻋ
H
.
ﻑﻗﻭﺗﻳ ﻑﻭﺳ .
ﺕﻗﺅﻣ ﻑﺎﻘﻳﺇ/ءﺩﺑ
.
ﺕﻗﺅﻣ ﻑﺎﻘﻳﺇ/ءﺩﺑ
ﺔﻗﺎﻁﻟﺍ
.ﻲﺋﺎﺑﺭﻬﻛﻟﺍ ﺭﺎﻳﺗﻟﺎﺑ ﻝﺻﺗﻣ ﺭﻳﻏ ﺯﺎﻬﺟﻟﺍ
.ﺔﺣﻳﺣﺻ ﺔﻘﻳﺭﻁﺑ ﺓﺩﺩﺣﻣ ﺭﻳﻏ ﻡﻛﺣﺗﻟﺍ ﺭﺻﺎﻧﻋ
.ﻕﺭﺗﺣﻣ ﻭﺃ ﻝﻭﺻﻔﻣ ﺭﻬﺻﻣﻟﺍ/ﺭﺎﻳﺗﻟﺍ ﻊﻁﺎﻗ
ﺭﺯﻟﺍ ﻰﻠﻋ ﻁﻐﺿﻟﺍ ﻡﺗﻳ ﻡﻟ ﺍﺫﺇ ﻝﻳﻐﺷﺗﻟﺍ ﻥﻋ ﺯﺎﻬﺟﻟﺍ
.ﺍًﺭﺎﺧﺑ ﺙﺩﺣﻳ ﻭﺃ ءﺎﻣﻟﺍ ﺔﻧﻭﺧﺳ ﺯﺎﻬﺟﻟﺍ ﺏﺑﺳﻳ
Child Lock(ﻝﺎﻔﻁﻷﺍ ﻝﻔﻗ)
.ءﺎﻣﻟﺍ ﺩﺍﺩﻣﺇ ﻑﻗﻭﺗ
.ﺡﻭﺗﻔﻣ ﺏﺎﺑﻟﺍ
.ﻪﻁﺑﺿ ﺓﺩﺎﻋﺇ ﻡﺯﻠﻳ ﻡﻛﺣﺗﻟﺍ ﺭﺻﻧﻋ
ﺔﻗﺎﻁﻟﺍ
ﺕﻗﺅﻣ ﻑﺎﻘﻳﺇ/ءﺩﺑ.ﺞﻣﺎﻧﺭﺑﻟﺍ ﺩﻳﺩﺣﺗ ﺩﻌﺑ ﻪﻳﻠﻋ ﻁﻐﺿﻟﺍ ﻡﺗﻳ ﻡﻟ
ﺔﻗﺎﻁﻟﺍ
.ﺔﻳﺎﻐﻠﻟ ﺽﻔﺧﻧﻣ ءﺎﻣﻟﺍ ﻁﻐﺿ
.ﺓﺩﺩﺣﻣﻟﺍ ﺓﺭﺍﺭﺣﻟﺍ
ﻝﻳﻐﺷﺗﻟﺍ
ﺽﺍﺭﻋﻷﺍﻝﺣﻟﺍﻭ ﻝﻣﺗﺣﻣﻟﺍ ﺏﺑﺳﻟﺍ
ءﺎﻣﻟﺍ ﺏّﺭﺳﺗ.ﻝﺯﻧﻣﻟﺎﺑ ﻑﻳﺭﺻﺗﻟﺍ ﺏﻳﺑﺎﻧﺃ ﺩﺍﺩﺳﻧﺍ
•.ﺭﻣﻷﺍ ﻡﺯﻟ ﺍﺫﺇ ﻙﺎﺑﺳﻟﺎﺑ ﻝﺻﺗﺍ .ﻑﻳﺭﺻﺗﻟﺍ ﺏﻳﺑﺎﻧﺃ ﻥﻣ ﻖﺋﺍﻭﻌﻟﺍ ﻝﺯﺃ
•.ﻡﺎﻅﺗﻧﺎﺑ ﻪﻔﻳﻅﻧﺗﺑ ﻡﻗﻭ ﻑﻳﺭﺻﺗﻟﺍ ﺭﺗﻠﻓ ﺹﺣﻓﺍ .ﻪﺗﻳﻭﺳﺗﻭ ﻑﻳﺭﺻﺗﻟﺍ ﻡﻭﻁﺭﺧ ﻑﻳﻅﻧﺗﺑ ﻡﻗ
•.ﻑﻳﺭﺻﺗﻟﺍ ﺔﺧﺿﻣ ﺭﺗﻠﻓ ﺏﻳﻛﺭﺗ ﺩﻋﺃ
.ﻝﻣﻌﻳ ﻻ ﺯﺎﻬﺟﻟﺍ.ﺕﺍءﺍﺭﺟﺈﺑ ﻡﺎﻳﻘﻟﺍ ﻡﺩﻋ ﺏﺑﺳﺑ ﻝﻣﻌﻟﺍ ﻥﻋ ﻡﻛﺣﺗﻟﺍ ﺔﺣﻭﻟ ﺕﻔﻗﻭﺗ
• ﺭﺯﻟﺍ ﻰﻠﻋ ﻁﻐﺿﺍ ،ﻲﻌﻳﺑﻁ ﺭﻣﺃ ﺍﺫﻫ
•.ﻝﻣﻌﻳ ﺱﺑﻘﻣ ﻲﻓ ﻥﺎﻣﺄﺑ ﻙﻠﺳﻟﺍ ﻝﻳﺻﻭﺗ ﻥﻣ ﺩﻛﺄﺗ
•.ﻝﻣﺎﻛﻟﺎﺑ ﻩﺎﻳﻣﻟﺍ ﺭﻭﺑﻧﺻ ﺭﺩﺃ
• ﺭﺯﻟﺍ ﻰﻠﻋ ﻁﻐﺿﺍﻭ ﺏﺎﺑﻟﺍ ﻖﻠﻏﺃ .ﺢﻳﺣﺻ ٍﻝﻛﺷﺑ ﻁﻭﺑﺿﻣ ﺞﻣﺎﻧﺭﺑﻟﺍ ﻥﺃ ﻥﻣ ﺩﻛﺄﺗ
•.ﻝﻣﺎﻛ ﻝﻛﺷﺑ ﻕﻼﻏﻹﺍ ﻥﻣ ﻪﻌﻧﻣﻳ ﺎﻣﻣ ﺏﺎﺑﻟﺍ ﺕﺣﺗ ﺽﺍﺭﻏﻷﺍ ﻥﻣ ﻱﺃ ﺭﺎﺷﺣﻧﺍ ﻡﺩﻋ ﻥﻣ ﺩﻛﺄﺗﻭ ﺏﺎﺑﻟﺍ ﻖﻠﻏﺃ
• ﺓﺭﺋﺍﺩ ﺹﻳﺻﺧﺗ ﻲﻐﺑﻧﻳ .ﻊﻁﺎﻘﻟﺍ ﻁﺑﺿ ﺩﻋﺃ ﻭﺃ ﺕﺍﺭﻬﺻﻣﻟﺍ ﻝﺩﺑﺗﺳﺍ .ﻝﺯﻧﻣﻟﺎﺑ ﺕﺍﺭﻬﺻﻣﻟﺍ/ﺭﺎﻳﺗﻟﺍ ﻊﻁﺍﻭﻗ ﺹﺣﻓﺍ
• ﺭﺯ ﻰﻠﻋ ﻁﻐﺿﺍ
• ﺭﺯﻟﺍ ﻰﻠﻋ ﻁﻐﺿﺍ
•.ﺏﺳﺎﻧﻣ ﻝﺯﻧﻣﻟﺎﺑ ءﺎﻣﻟﺍ ﻁﻐﺿ ﻥﺃ ﻥﻣ ﺩﻛﺄﺗﻠﻟ ﻝﺯﻧﻣﻟﺎﺑ ﺭﺧﺁ ﺍًﺭﻭﺑﻧﺻ ﺹﺣﻓﺍ
• ﺔﺟﺭﺩ ﺩﻧﻋ ﻥﻣﺁ ﻝﻛﺷﺑ ءﺎﻣﻟﺍ ﻥﻳﺧﺳﺗ ﻡﺗﻳ ﻰﺗﺣ ﺔﻧﻳﻌﻣ ﺕﺍﺭﻭﺩ ﻝﻼﺧ ﺔﺗﻗﺅﻣ ﺓﺭﺗﻔﻟ ﻝﻣﻌﻟﺍ ﻥﻋ ﻝﺳﻐﻟﺍ ﺽﻭﺣ ﻑﻗﻭﺗﻳ ﺩﻗ
.ﺔﺣﻳﺣﺻ ﺔﻘﻳﺭﻁﺑ ﻝﻣﻌﺗ ﻻ ﺩﻗ ﺭﺍﺭﺯﻷﺍ ﺭﺎﻳﺧﻟﺍChild Lock(ﻝﺎﻔﻁﻷﺍ ﻝﻔﻗ) .ﻁﻳﺷﻧﺗﻟﺍ ﺩﻳﻗ
• ﺭﺎﻳﺧﻟﺍ ﻝﻳﻌﻔﺗ ﻑﺎﻘﻳﺈﺑ ﻡﻗ
.ﺢﺗﻔُﻳ ﻻ ﺏﺎﺑﻟﺍ.ﺔﻣﻼﺳﻟﺎﺑ ﻖﻠﻌﺗﺗ ﺏﺎﺑﺳﻷ ﺯﺎﻬﺟﻟﺍ ﻝﻳﻐﺷﺗ ﺩﺭﺟﻣﺑ ﺏﺎﺑﻟﺍ ﺢﺗﻓ ﻥﻛﻣُﻳ ﻻ
• ﻝﻳﻐﺷﺗ ﻑﺎﻘﻳﺇ ﺩﻌﺑ ﻥﺎﻣﺄﺑ ﺏﺎﺑﻟﺍ ﺢﺗﻓ ﻙﻧﻛﻣﻳ .ﻲﻌﻳﺑﻁ ﺭﻣﺃ ﺍﺫﻫ

ar_main.book.book Page 32 Thursday, October 22, 2020 4:16 PM
ﺎﻬﺣﻼﺻﺇﻭ ﻝﺎﻁﻋﻷﺍ ﻑﺎﺷﻛﺗﺳﺍ
.ﻙﺭﺣﻣﻟﺍ ﻰﻠﻋ ﺓﺩﺋﺍﺯ ﺔﻟﻭﻣﺣ
.ءﺎﻣﻟﺍ ﻡﺎﻣﺻ ﻲﻓ ﺏﻳﻋ ﺩﻭﺟﻭ ﻰﻟﺇ ﺍًﺭﻅﻧ ءﺎﻣﻟﺍ ﻖﻓﺩﺗﻳ
.ﻩﺎﻳﻣﻟﺍ ﺏﻭﺳﻧﻣ ﺭﻌﺷﺗﺳﻣ ﻝﻁﻌﺗ
.ﺯﺍﺯﺗﻫﻻﺍ ﺭﻌﺷﺗﺳﻣ ﻝﻁﻌﺗ
؟ﺓﺩﻣﺟﻣ ﻑﻳﺭﺻﺗﻟﺍ ﺔﺧﺿﻣ ﻭﺃ ،ﻑﻳﺭﺻﺗﻟﺍ /ﺩﺍﺩﻣﻹﺍ ﻡﻭﻁﺭﺧ ﻝﻫ
.ﺔﺋﻓﺍﺩﻭ ﺔﻠﻠﺑﻣ ﺔﻔﺷﻧﻣﺑ ﺩﺍﺩﻣﻹﺍ ﻡﻭﻁﺭﺧ
.ءﺎﻣﻟﺍ ﺕﺎﺑﻳﺭﺳﺗ
.ﻲﺋﺎﺑﺭﻬﻛﻟﺍ ﺭﺎﻳﺗﻟﺍ ﻉﺎﻁﻘﻧﻻ ﺯﺎﻬﺟﻟﺍ ﺽّﺭﻌﺗ
ﺽﺍﺭﻋﻷﺍﻝﺣﻟﺍﻭ ﻝﻣﺗﺣﻣﻟﺍ ﺏﺑﺳﻟﺍ
• ﺓﺩﻣﻟ ﺯﺎﻬﺟﻟﺍ ﻙﺭﺗﺍ30.ﺓﺭﻭﺩﻟﺍ ﻝﻳﻐﺷﺗ ﺩﻋﺃ ﻡﺛ ،ﻙﺭﺣﻣﻟﺍ ﺩﺭﺑﻳ ﻰﺗﺣ ﺔﻘﻳﻗﺩ
•.ﺔﻣﺩﺧﻟﺍ ﺯﻛﺭﻣﺑ ﻝﺻﺗﺍ .ﺱﺑﺎﻗ ﻥﻋ ﺔﻗﺎﻁﻟﺍ ﻝﺻﻓﺍ .ﻩﺎﻳﻣﻟﺍ ﺭﻭﺑﻧﺻ ﻖﻠﻏﺃ
•.ﺔﻣﺩﺧﻟﺍ ﺯﻛﺭﻣﺑ ﻝﺻﺗﺍ .ﺱﺑﺎﻗ ﻥﻋ ﺔﻗﺎﻁﻟﺍ ﻝﺻﻓﺍ .ﻩﺎﻳﻣﻟﺍ ﺭﻭﺑﻧﺻ ﻖﻠﻏﺃ
•.ﺔﻣﺩﺧﻟﺍ ﺯﻛﺭﻣﺑ ﻝﺻﺗﺍ
• ﺔﻳﻁﻐﺗﺑ ﻡﻗ .ﻑﻳﺭﺻﺗﻟﺍ ﺔﺧﺿﻣﻭ ﻑﻳﺭﺻﺗﻟﺍ ﻡﻭﻁﺭﺧ ﻱﺭﺗﻌﻳ ﻱﺫﻟﺍ ﺩﻳﻣﺟﺗﻟﺍ ﻙﻔﻟ ﻝﺳﻐﻟﺍ ﺽﻭﺣ ﻰﻟﺇ ﺊﻓﺍﺩ ءﺎﻣ ﺔﻓﺎﺿﺈﺑ ﻡﻗ
•.ﺔﻣﺩﺧﻟﺍ ﺯﻛﺭﻣﺑ ﻝﺻﺗﺍ
•.ﺓﺭﻭﺩﻟﺍ ﻝﻳﻐﺷﺗ ﺓﺩﺎﻋﺈﺑ ﻡﻗ
ﻙﺭﺣﻣﻟﺍ ﻑﻗﻭﺗ ﺄﻁﺧ
ﻖﻓﺩﺗﻟﺍ ﺓﺩﺎﻳﺯ ﺄﻁﺧ
ﻁﻐﺿﻟﺍ ﺭﻌﺷﺗﺳﻣ ﻲﻓ ﺄﻁﺧ
ﺯﺍﺯﺗﻫﻻﺍ ﺭﻌﺷﺗﺳﻣ ﻲﻓ ﺄﻁﺧ
ﺩﻣﺟﺗﻟﺍ ﺏﺑﺳﺑ ﺄﻁﺧ
ﻲﺋﺎﺑﺭﻬﻛﻟﺍ ﺭﺎﻳﺗﻟﺍ ﻉﺎﻁﻘﻧﺍ
ﺎﻬﻋﺎﻣﺳ ﻝﻣﺗﺣُﻳ ءﺎﺿﻭﺿ
32
LE
FE
PE
vs
FF
AE
ءﺎﻣﻟﺍ ﺏﻳﺭﺳﺗ
PF
.ﺯﺎﻬﺟﻟﺍ ﻊﺿﻭﻟ ﺏﺳﺎﻧﻣﻟﺍ ﻥﺎﻛﻣﻟﺍ ﺩﻳﺩﺣﺗﻟ
.ﺔﻣﺩﺧﻟﺍ ﺏﻠﻁﻟ ﻝﺻﺗﺎﻓ ،ﺯﺎﻬﺟﻟﺍ ﻝﻳﻐﺷﺗ ﺓﺩﺎﻋﺇ
.ﺱﺑﻼﻣﻟﺍ ﻊﻳﺯﻭﺗ ﺩﻋﺃﻭ
.ﺔﻧﺯﺍﻭﺗﻣ ﺭﻳﻏ ﺱﺑﻼﻣﻟﺍ ﻥﻭﻛﺗ ﺩﻗ
.ﻝﻳﺳﻐﻟﺍ ﺽﻭﺣ ﻲﻓ ٍﻭﺎﺳﺗﻣ ﺭﻳﻏ ٍﻝﻛﺷﺑ ﺔﻋﺯﻭﻣ ﺱﺑﻼﻣﻟﺍ ﻥﻭﻛﺗ ﺩﻗ
.ﺔﺗﺑﺎﺛ ﺭﻳﻏﻭ ﻱﻭﺎﺳﺗﻟﺎﺑ ﺽﺭﻷﺍ ﻰﻠﻋ ﺓﺭﻘﺗﺳﻣ ﺭﻳﻏ ءﺍﻭﺗﺳﻻﺍ ﻝﺟﺭﺃ ﻊﻳﻣﺟ
.ﻩﺍﻭﺗﺳﻣ ﻁﺑﺿﻟ
ﺏﻳﻛﺭﺗﻟﺍ ﻥﺎﻛﻣ ﺕﺎﺑﻠﻁﺗﻣ
ﺯﺎﻬﺟﻟﺍ ﻯﻭﺗﺳﻣ ﻁﺑﺿ
.ﻲﻔﻛﻳ ﺎﻣﺑ ﺔﺑﻠﺻ ﺕﺳﻳﻟ ﺽﺭﻷﺍ
ﺽﺍﺭﻋﻷﺍﻝﺣﻟﺍﻭ ﻝﻣﺗﺣﻣﻟﺍ ﺏﺑﺳﻟﺍ
ﺔﻌﻘﻌﻘﻟﺍﻭ ﺝﺎﺟﺗﺭﻻﺍ ﺕﻭﺻ.ﻥﺎﻣﻷﺍ ﺱﻳﺑﺎﺑﺩ ﻭﺃ ﺔﻳﻧﺩﻌﻣﻟﺍ ﻊﻁﻘﻟﺍ ﻭﺃ ﺢﻳﺗﺎﻔﻣﻟﺍ ﻝﺛﻣ ﻝﺳﻐﻟﺍ ﺽﻭﺣ ﻲﻓ ﺔﺑﻳﺭﻏ ﻡﺎﺳﺟﺃ ﺩﺟﻭﺗ ﺩﻗ
• ﺩﻌﺑ ﺞﻳﺟﺿﻟﺍ ﺕﻭﺻ ﺭﻭﺩﺻ ﺭﻣﺗﺳﺍ ﺍﺫﺇ .ﺔﺑﻳﺭﻏ ﻡﺎﺳﺟﺃ ﻥﻋ ﺎًﺛﺣﺑ ﻝﺳﻐﻟﺍ ﺽﻭﺣ ﺹﺣﻓﺍﻭ ،ﺯﺎﻬﺟﻟﺍ ﻝﻳﻐﺷﺗ ﻑﺎﻘﻳﺈﺑ ﻡﻗ
ﻱﺩﺎﻳﺗﻋﺍ ﺭﻳﻏ ﺎًﺗﻭﺻ ﺭﺩﺻﺗ ﺔﻟﺎﺳﻐﻟﺍ.ﺓﺩﺎﻋ ﻲﻌﻳﺑﻁ ﺭﻣﺃ ﺍﺫﻫ .ﻱﺩﺎﻳﺗﻋﺍ ﺭﻳﻏ ﺕﻭﺻ ﺭﺍﺩﺻﺇ ﺔﻠﻳﻘﺛﻟﺍ ﺱﺑﻼﻣﻟﺍ ﻥﻋ ﺞﺗﻧﻳ ﺩﻗ
• ﻝﻳﻐﺷﺗﻟﺍ ﻑﺎﻘﻳﺈﺑ ﻡﻗ .ﻥﺯﺍﻭﺗﻣ ﺭﻳﻏ ٍﻝﻛﺷﺑ ﺎًﺗﺑﺛﻣ ﺯﺎﻬﺟﻟﺍ ﻥﻭﻛﻳ ﻥﺃ ﻝﻣﺗﺣﻣﻟﺍ ﻥﻣﻓ ،ﺕﻭﺻﻟﺍ ﺭﺍﺩﺻﺇ ﺭﺍﺭﻣﺗﺳﺍ ﺔﻟﺎﺣ ﻲﻓ
•.ﺏﺎﺑﻟﺍ ﻝﻔﻗ ﻙﻓ ﺩﻌﺑ ﺱﺑﻼﻣﻟﺍ ﻊﻳﺯﻭﺗ ﺩﻋﺃﻭ ﺎًﺗﻗﺅﻣ ﺓﺭﻭﺩﻟﺍ ﻝﻳﻐﺷﺗ ﻑﺎﻘﻳﺈﺑ ﻡﻗ
ﺯﺍﺯﺗﻫﻻﺍ ءﺎﺿﻭﺿ.ﻑﻳﻠﻐﺗﻟﺍ ﺩﺍﻭﻣ ﺔﻟﺍﺯﺇ ﻡﺗﺗ ﻡﻟ
•.ﻑﻳﻠﻐﺗﻟﺍ ﺩﺍﻭﻣ ﺔﻟﺍﺯﺈﺑ ﻡﻗ
•.ﺏﺎﺑﻟﺍ ﻝﻔﻗ ﻙﻓ ﺩﻌﺑ ﺱﺑﻼﻣﻟﺍ ﻊﻳﺯﻭﺗ ﺩﻋﺃﻭ ﺎًﺗﻗﺅﻣ ﺓﺭﻭﺩﻟﺍ ﻝﻳﻐﺷﺗ ﻑﺎﻘﻳﺈﺑ ﻡﻗ
• ﺕﺎﻣﻳﻠﻌﺗ ﻰﻟﺇ ﺭﻅﻧﺍ
• ﺭﻅﻧﺍ .ﺎﻬﺗﻧﻭﻳﻟ ﻡﺩﻋﻭ ﺽﺭﻷﺍ ﺔﺑﻼﺻ ﻥﻣ ﻖﻘﺣﺗ

ar_main.book.book Page 31 Thursday, October 22, 2020 4:16 PM
31
ﺎﻬﺣﻼﺻﺇﻭ ﻝﺎﻁﻋﻷﺍ ﻑﺎﺷﻛﺗﺳﺍ
ﺎﻬﺣﻼﺻﺇﻭ ﻝﺎﻁﻋﻷﺍ ﻑﺎﺷﻛﺗﺳﺍ
.ﻝﻁﻋ ﻭﺃ ﺄﻁﺧ ﺔﻟﺎﺳﺭ ﻱﺃ ﺔﺟﻟﺎﻌﻣﺑ ﻡﻭﻘﺗ ﻲﺗﻟﺍ ﺕﺎﻅﺣﻼﻣﻟﺍﻭ ﺔﻠﻣﺗﺣﻣﻟﺍ ﺏﺎﺑﺳﻷﺍ ﻰﻠﻋ ﺔﻳﻟﺎﺗﻟﺍ ﻝﻭﺍﺩﺟﻟﺍ ﻱﻭﺗﺣﺗ .ﻝﺎﻁﻋﺃﻭ ءﺎﻁﺧﺃ ﺙﻭﺩﺣ ﻰﻟﺇ ﻙﺯﺎﻬﺟ ﻝﻳﻐﺷﺗ ﻱﺩﺅﻳ ﺩﻗ
ﺔﻣﺩﺧ ﺯﻛﺭﻣ ﻊﻣ ﻝﺻﺍﻭﺗﻟﺍ ﺩﻧﻋ ﻩﺩﺑﻛﺗﺗ ﺩﻗ ﻱﺫﻟﺍ ﻝﺎﻣﻟﺍﻭ ﺕﻗﻭﻠﻟ ﺍًﺭﻳﻓﻭﺗ ﺔﻳﺎﻧﻌﺑ ﺔﻳﻟﺎﺗﻟﺍ ﻝﻭﺍﺩﺟﻟﺍ ﺓءﺍﺭﻘﺑ ﻰﺻﻭُﻳLG Electronics.
ﺍﻟﻌﺭﺑﻳﺔ
ﺔﻣﺩﺧﻟﺍ ﺯﻛﺭﻣﺑ ﻝﺎﺻﺗﻻﺍ ﻝﺑﻗ
ﻥﻣ ﻖﻘﺣﺗﻓ ،ﻕﻼﻁﻹﺍ ﻰﻠﻋ ﻝﻣﻌﻳ ﻡﻟ ﻭﺃ ﺢﻳﺣﺻ ﻝﻛﺷﺑ ﺯﺎﻬﺟﻟﺍ ﻝﻣﻌﻳ ﻡﻟ ﺍﺫﺇﻭ .ﺓﺭﻛﺑﻣ ﺔﻠﺣﺭﻣ ﻲﻓ ﺎﻬﺻﻳﺧﺷﺗﻭ ﺕﻼﻛﺷﻣﻟﺍ ﻑﺷﻛﻟ ﺎًﻳﻟﺁ ﺄﻁﺧﻟﺍ ﺩﺻﺭ ﻡﺎﻅﻧﺑ ﺯﺎﻬﺟﻟﺍ ﺩﻳﻭﺯﺗ ﻡﺗ
ﺔﻣﺩﺧ ﺯﻛﺭﻣﺑ ﻝﺎﺻﺗﻻﺍ ﻝﺑﻗ ﺔﻳﻟﺎﺗﻟﺍ ﻝﻭﺍﺩﺟﻟﺍLG Electronics.
ﺄﻁﺧﻟﺍ ﻝﺋﺎﺳﺭ
ﺽﺍﺭﻋﻷﺍﻝﺣﻟﺍﻭ ﻝﻣﺗﺣﻣﻟﺍ ﺏﺑﺳﻟﺍ
.ءﻁﺑﺑ ﻝﺧﺩﺗ ﻭﺃ ﺯﺎﻬﺟﻟﺍ ﻰﻟﺇ ﻩﺎﻳﻣﻟﺍ ﻝﺧﺩﺗ ﻻ .ﻊﻗﻭﻣﻟﺍ ﺍﺫﻫ ﻲﻓ ٍﻑﺎﻛ ﺭﻳﻏ ءﺎﻣﻟﺍ ﺩﺍﺩﻣﺇ
.ءﻁﺑﺑ ﻝﺧﺩﺗ ﻭﺃ ﺯﺎﻬﺟﻟﺍ ﻰﻟﺇ ﻩﺎﻳﻣﻟﺍ ﻝﺧﺩﺗ ﻻ .ﻝﻣﺎﻛﻟﺎﺑ ﺡﻭﺗﻔﻣ ﺭﻳﻏ ﻩﺎﻳﻣﻟﺎﺑ ﺩﺍﺩﻣﻹﺍ ﺭﻭﺑﻧﺻ
.ٍﻭﺗﻠﻣ ءﺎﻣﻟﺎﺑ ﺩﺍﺩﻣﻹﺍ (ﻡﻳﻁﺍﺭﺧ) ﻡﻭﻁﺭﺧ
.ﺩﻭﺩﺳﻣ ءﺎﻣﻟﺎﺑ ﺩﺍﺩﻣﻹﺍ (ﻡﻳﻁﺍﺭﺧ) ﻡﻭﻁﺭﺧ ﺭﺗﻠﻓ
.ﺎﻬﺣﻳﺣﺻﺗﻭ ﺯﺎﻬﺟﻟﺎﺑ ﻥﺯﺍﻭﺗﻟﺍ ﻡﺩﻋ ﺕﻻﺎﺣ ﻑﺎﺷﺗﻛﺍ ﻰﻠﻋ ﺭﺩﺎﻗ ﻡﺎﻅﻧ ﺩﻭﺟﻭﺑ ﺯﺎﻬﺟﻟﺍ ﺯﻳﻣﺗﻳ
ﺏﺟﻳ ﺙﻳﺣ ،ﺭﺻﻌﻟﺍ ﻲﻓ ﺯﺎﻬﺟﻟﺍ ﺃﺩﺑﻳ ﻥﺃ ﻝﺑﻗ ﺔﻠﻳﻠﻗ ﺕﺎﻅﺣﻟ ﺭﻣﻷﺍ ﻕﺭﻐﺗﺳﻳ ﺩﻗ .
ﻰﻟﺇ ﺎﻣﻭ ﻡﺎﻣﺣﻟﺍ ﺱﻧﺍﺭﺑﻭ ﻡﺎﻣﺣﻟﺍ ﺓﺩﺎﺟﺳ ﻝﺛﻣ) ﺔﻬﺑﺎﺷﺗﻣﻟﺍ ﺭﻳﻏ ﺔﻠﻳﻘﺛﻟﺍ ﺽﺍﺭﻏﻷﺍ ﻝﻳﻣﺣﺗ ﺩﻧﻋ .ﺔﻳﺎﻐﻠﻟ ﺓﺭﻳﻐﺻ ﺔﻟﻭﻣﺣﻟﺍ
.ﻝﻣﺎﻛﻟﺎﺑ ﺭﺻﻌﻟﺍ ﺓﺭﻭﺩ ﺔﻗﺎﻋﺇ ﻭﺃ ﺭﺻﻌﻟﺍ ﻑﺎﻘﻳﺇ ﻰﻟﺇ ﻙﻟﺫ ﻱﺩﺅﻳ ﺩﻗ ،(ﻙﻟﺫ
ﺏﺟﻳ .ﺭﺻﻌﻟﺍ ﺔﻳﻠﻣﻋ ﻲﻓ ﺯﺎﻬﺟﻟﺍ ﺃﺩﺑﻳ ﻥﺃ ﻝﺑﻗ ﺔﻠﻳﻠﻗ ﺕﺎﻅﺣﻟ ﺭﻣﻷﺍ ﻕﺭﻐﺗﺳﻳ ﺩﻗ .
.ﻥﺍﺭﻭﺩﻟﺍ ﻲﻓ ﺔﻟﺎﺳﻐﻟﺍ ﺃﺩﺑﺗ ﻥﺃ ﻝﺑﻗ ﺏﺎﺑﻟﺍ ﻖﻠﻏ ﻡﺎﻛﺣﺇ
.ءﻁﺑﺑ ﻪﻔﻳﺭﺻﺗ ﻡﺗﻳ ﻭﺃ ﺯﺎﻬﺟﻟﺍ ﻲﻓ ﺩﻭﺟﻭﻣﻟﺍ ءﺎﻣﻟﺍ ﻑﻳﺭﺻﺗ ﻡﺗﻳ ﻻ .ﺩﻭﺩﺳﻣ ﻭﺃ ٍﻭﺗﻠﻣ ﻑﻳﺭﺻﺗﻟﺍ ﻡﻭﻁﺭﺧ
ﺕﻗﺅﻣ ﻑﺎﻘﻳﺇ/ءﺩﺑ
.ﺭﺻﻌﻟﺍ ءﺩﺑ ﻝﺑﻗ ﺎًﻘﻠﻐﻣ ﺏﺎﺑﻟﺍ ﻥﻭﻛﻳ ﻥﺃ
ﺕﻗﺅﻣ ﻑﺎﻘﻳﺇ/ءﺩﺑ
ﻰﻠﻋ ﻁﻐﺿﺍﻭ ﺏﺎﺑﻟﺍ
ﺭﺯ ﻰﻠﻋ ﻁﻐﺿﺍﻭ
.ﺩﻭﺩﺳﻣ ﻑﻳﺭﺻﺗﻟﺍ ﺭﺗﻠﻓ
.ﺏﺎﺑﻟﺍ ﺭﺎﻌﺷﺗﺳﺍ ﺯﺎﻬﺟ ﻝﻁﻌﺗ
.ﻥﺎﻣﺿﻟﺍ
.ﻡﻛﺣﺗﻟﺍ ﺓﺩﺣﻭ ﻲﻓ ﻝﻁﻋ ﺔﻣﺛ
•.ﻝﺯﻧﻣﻟﺍ ﻲﻓ ﺭﺧﺁ ﺍًﺭﻭﺑﻧﺻ ﻡﺩﺧﺗﺳﺍ
•.ﻝﻣﺎﻛﻟﺎﺑ ﻩﺎﻳﻣﻟﺍ ﺭﻭﺑﻧﺻ ﺢﺗﻓﺍ
•.ءﺎﻣﻟﺍ ﻝﺎﺧﺩﺇ ﻡﻭﻁﺭﺧ ﺏﻳﻛﺭﺗ ﺩﻋﺃ ﻭﺃ ﻡﻭﻁﺭﺧﻟﺍ ﺔﻳﻭﺳﺗﺑ ﻡﻗ
•.ﺔﻟﺎﺳﻐﻟﺍ ﻥﻣ ﻡﻭﻁﺭﺧﻟﺍ ﺕﻼﺻﻭ ﺔﻟﺍﺯﺇﻭ ﺭﻳﺑﺎﻧﺻﻟﺍ ﻕﻼﻏﺇ ﻝﺑﻗ ﻪﻔﻅﻧﻭ ﻝﺎﺧﺩﻹﺍ ﻡﺎﻣﺻ ﺭﺗﻠﻓ ﺹﺣﻓﺍ
• ﻕﻼﻏﺈﺑ ﻡﻗ .ﺔﺣﻳﺣﺻ ﺔﻘﻳﺭﻁﺑ ﺭﺻﻌﻟﺍ ﻡﺗﻳ ﻲﻛ ﺔﻟﻭﻣﺣﻟﺍ ﻁﺑﺿ ﺓﺩﺎﻋﺈﺑ ﻡﻗ ﺍﺫﻟ ،ﺓﺭﻭﺩﻟﺍ ﺔﻳﺎﻬﻧ ﻲﻓ ﺔﻠﻠﺑﻣ ﺱﺑﻼﻣﻟﺍ ﻥﻭﻛﺗ ﺩﻗ
• ﺏﺎﺑﻟﺍ ﻕﻼﻏﺈﺑ ﻡﻗ .ﺔﻟﻭﻣﺣﻟﺍ ﻥﺯﺍﻭﺗ ﻰﻠﻋ ﺔﻅﻓﺎﺣﻣﻠﻟ ﺱﺑﻼﻣﻟﺍ ﺽﺍﺭﻏﺃ ﻥﻣ ﻥﻳﻬﺑﺎﺷﺗﻣ ﻥﻳﻧﺛﺍ ﻭﺃ ﺍًﺩﺣﺍﻭ ﺎًﺿﺭﻏ ﻑﺿﺃ
•.ﻪﺗﻳﻭﺳﺗﻭ ﻑﻳﺭﺻﺗﻟﺍ ﻡﻭﻁﺭﺧ ﻑﻳﻅﻧﺗﺑ ﻡﻗ
•.ﻪﻔﻳﻅﻧﺗﺑ ﻡﻗﻭ ﻑﻳﺭﺻﺗﻟﺍ ﺭﺗﻠﻓ ﺹﺣﻓﺍ
ﻝﺎﺧﺩﻹﺍ ﻡﻳﻁﺍﺭﺧ ﻲﻓ ﺄﻁﺧ
ﻥﺯﺍﻭﺗﻟﺍ ﻡﺩﻋ ﻲﻓ ﺄﻁﺧ
ﻩﺎﻳﻣﻟﺍ ﻑﻳﺭﺻﺗ ﻲﻓ ﺄﻁﺧ
dE dE1 dEz dE4
• ﺔﻣﺩﺧ ﺯﻛﺭﻣﺑ ﻝﺎﺻﺗﻻﺍ ﻰﺟﺭﻳLG ﺔﻣﺩﺧ ﺯﻛﺭﻣ ﻑﺗﺎﻫ ﻡﻗﺭ ﻰﻠﻋ ﺭﻭﺛﻌﻟﺍ ﻥﻛﻣُﻳ .LG ﺔﻗﺎﻁﺑ ﻰﻠﻋ ﺎًﺑﻭﺗﻛﻣ ﻲﻠﺣﻣﻟﺍ
•.ﺓﺩﻋﺎﺳﻣﻟﺍ ﻰﻠﻋ ﻝﻭﺻﺣﻠﻟ ﺔﻣﺩﺧﻟﺍ ﺯﻛﺭﻣﺑ ﻝﺻﺗﺍﻭ ﺔﻗﺎﻁﻟﺍ ﺱﺑﺎﻗ ﻝﺻﻓﺍ
ﻡﻛﺣﺗﻟﺍ ﺓﺩﺣﻭ ﻲﻓ ﻝﻁﻋ
1E
UE
OE
ﺏﺎﺑﻟﺍ ﻲﻓ ﺄﻁﺧ
tE

ar_main.book.book Page 30 Thursday, October 22, 2020 4:16 PM
ﺔﻧﺎﻳﺻﻟﺍ
30
ﻉﺯﻭﻣﻟﺍ ﺝﺭﺩ ﻑﻳﻅﻧﺗ
ﻑﻅﻧﻣﻟﺍ ﻝﻅﻳ ﻥﺃ ﻥﻛﻣﻳ .ﻉﺯﻭﻣﻟﺍ ﺝﺭﺩ ﻲﻓ ﺵﺎﻣﻘﻟﺍ ﻡﻌﻧﻣﻭ ﻑﻅﻧﻣﻟﺍ ﻡﻛﺍﺭﺗﻳ ﺩﻗ
ﻖﻘﺣﺗﻭ ﺕﺎﻘﺣﻠﻣﻟﺍﻭ ﺝﺭﺩﻟﺍ ﻝﺯﺃ .ﺎًﻳﻠﻛ ﻪﻔﻳﺭﺻﺗ ّﻡﺗﻳ ﻻﻭ ﻉﺯﻭﻣﻟﺍ ﺝﺭﺩ ﺕﺣﺗ ﻝﺋﺎﺳﻟﺍ
ﺭﻬﺷﻟﺍ ﻲﻓ ﻥﻳﺗﺭﻣ ﻭﺃ ﺓﺭﻣ
.
ﻡﻳﻘﺗﺳﻣ ﻝﻛﺷﺑ ﺝﺭﺎﺧﻟﺍ ﻰﻟﺇ ﻪﺑﺣﺳ ﻖﻳﺭﻁ ﻥﻋ ﻑﻅﻧﻣﻟﺍ ﻉﺯﻭﻣ ﺝﺭﺩ ﺝﺭﺧﺃ
ﻲﻓ ﻁﻘﻓ ءﺎﻣﻟﺍ ﻡﺩﺧﺗﺳﺍ .ﺵﺎﻣﻘﻟﺍ ﻡﻌﻧﻣﻭ ﻑﻅﻧﻣﻟﺍ ﻥﻣ ﺔﻣﻛﺍﺭﺗﻣﻟﺍ ﺩﺍﻭﻣﻟﺍ
ﻡﺍﺩﺧﺗﺳﺎﺑ ﻪﺑ ﺔﺻﺎﺧﻟﺍ ءﺍﺯﺟﻷﺍﻭ ﺝﺭﺩﻟﺍ ﻑﻔﺟ .ﻉﺯﻭﻣﻟﺍ ﺝﺭﺩﻟﺍ ﻑﻳﻅﻧﺗ
ﻑﻳﻅﻧﺗﻟﺍ ﺕﺎﺟﺗﻧﻣ ﻥﻣ ﺔﻣﻛﺍﺭﺗﻣ ءﺍﺯﺟﺃ ﻙﺎﻧﻫ ﻥﺎﻛ ﺍﺫﺇ
.ﻑﻗﻭﺗﻳ ﻰﺗﺣ
.ﻝﺻﻔﻟﺍ
.ﺵﺎﻣﻘﻟﺍ ﻡﻌﻧﻣﻭ ﻑﻅﻧﻣﻟﺍ ﻥﻣ ﺔﻣﻛﺍﺭﺗﻣﻟﺍ ﺩﺍﻭﻣﻟﺍ ﺔﻟﺍﺯﺈﺑ ﻡﻗ
.ﺔﻣﻋﺎﻧ ﺔﻔﺷﻧﻣ ﻭﺃ ﺵﺎﻣﻗ ﺔﻌﻁﻗ
1
• ﺭﺯ ﻰﻠﻋ ﺓﺩﺷﺑ ﻁﻐﺿﻟﺍ ءﺎﻧﺛﺃ ﻑﻁﻠﺑ ﺝﺭﺎﺧﻟﺍ ﻰﻟﺇ ﺝﺭﺩﻟﺍ ﺏﺣﺳﺍ ﻡﺛ
2
• ﺔﻟﺍﺯﻹ ﺊﻓﺍﺩﻟﺍ ءﺎﻣﻟﺍ ﻡﺍﺩﺧﺗﺳﺎﺑ ﻪﺑ ﺔﺻﺎﺧﻟﺍ ءﺍﺯﺟﻷﺍﻭ ﺝﺭﺩﻟﺍ ﻑﻁﺷﺍ
ﺓﺭﻳﻐﺻ ﺔﻳﻧﺩﻌﻣ ﺭﻳﻏ ﺓﺎﺷﺭﻓ ﻭﺃ ﺵﺎﻣﻗ ﺔﻌﻁﻗ ﻡﺩﺧﺗﺳﺍ ،ﺝﺭﺩﻟﺍ ﺔﺣﺗﻓ ﻑﻳﻅﻧﺗﻟ
.ﻑﻳﻭﺟﺗﻟﺍ ﻑﻳﻅﻧﺗﻟ
.ﺔﻣﻋﺎﻧ ﺔﻁﻭﻓ ﻭﺃ ﺵﺎﻣﻗ ﺔﻌﻁﻗ ﻡﺍﺩﺧﺗﺳﺎﺑ ﻑﻳﻭﺟﺗﻟﺍ ﻲﻓ ﺔﺑﻭﻁﺭ ﻱﺃ ﺢﺳﻣﺍ
ﻡﺛ ﺎﻬﻟ ﺔﺻﺻﺧﻣﻟﺍ ﻥﻛﺎﻣﻷﺍ ﻲﻓ ﺎﻬﻌﺿﻭﺑ ﺝﺭﺩﻟﺍ ءﺍﺯﺟﺃ ﻊﻳﻣﺟﺗ ﺓﺩﺎﻋﺈﺑ ﻡﻗ
.ﺝﺭﺩﻟﺍ ﻝﺧﺩﺃ
3
•.ﻑﻳﻭﺟﺗﻠﻟ ﺔﻳﻠﻔﺳﻟﺍﻭ ﺔﻳﻭﻠﻌﻟﺍ ءﺍﺯﺟﻷﺍ ﻥﻣ ﺏﺳﺍﻭﺭﻟﺍ ﻊﻳﻣﺟ ﻝﺯﺃ
4
5

ﺭﻳﺫﺣﺗ
ﻪﻳﺑﻧﺗ
ar_main.book.book Page 29 Thursday, October 22, 2020 4:16 PM
29
ﺔﻧﺎﻳﺻﻟﺍ
ﻎﻳﺭﻔﺗﻟﺎﺑ ﻡﺎﻳﻘﻟﺍﻭ ﻑﻳﺭﺻﺗﻟﺍ ﺔﺧﺿﻣ ﺭﺗﻠﻓ ﻑﻳﻅﻧﺗ
ءﺎﻣﻠﻟ ءﻱﺭﺎﻁﻟﺍ
ﻝﻛﺷﺑ ﺱﺑﻼﻣﻟﺍ ﻲﻓ ﺔﻳﻘﺑﺗﻣﻟﺍ ﺓﺭﻳﻐﺻﻟﺍ ﻡﺎﺳﺟﻷﺍﻭ ﻁﻭﻳﺧﻟﺍ ﻑﻳﺭﺻﺗﻟﺍ ﺭﺗﻠﻓ ﻁﻘﺗﻠﻳ
ﻥﺎﻣﺿﻟ ﺭﻬﺷﺃ ﺔﺗﺳ ﻝﻛ ﺭﺗﻠﻔﻟﺍ ﺔﻓﺎﻅﻧ ﻥﻣ ﺩﻛﺄﺗ ﻥﺃ ﻥﻣ ﻡﺎﻅﺗﻧﺎﺑ ﻖﻘﺣﺗ .ﻲﺿﺭﻋ
ﺍﻟﻌﺭﺑﻳﺔ
ﺔﻟﺎﺣ ﻲﻓ ﺏﺎﺑﻟﺍ ﺢﺗﻓﺍ .ﻑﻳﺭﺻﺗﻟﺍ ﺔﺧﺿﻣ ﺭﺗﻠﻓ ﻑﻳﻅﻧﺗ ﻝﺑﻗ ﺩﺭﺑﻳ ﻰﺗﺣ ءﺎﻣﻟﺍ ﻙﺭﺗﺍ
.ﺔﻗﺎﻁﻟﺍ ﺭﺩﺻﻣ ﻥﻋ ﺯﺎﻬﺟﻟﺍ ﻝﺻﻓﺍ
.ﺝﺭﺎﺧﻠﻟ ﻑﻳﺭﺻﺗﻟﺍ ﺽﻭﺣ ﺏﺣﺳﺍ ﻡﺛ ﻑﻼﻐﻟﺍ ءﺎﻁﻏ ﺢﺗﻓﺍ
ًﻻﻭﺃ ﻑﻳﺭﺻﺗﻟﺍ ﺽﻭﺣ ﻥﻣ ﻑﻳﺭﺻﺗﻟﺍ ﺓﺩﺍﺩﺳ ﺔﻟﺍﺯﺈﺑ ﻡﻗ
a
ﻡﻗ ﻡﺛ ،
b
ﻙﻟﺫﻭ ءﻁﺑﺑ
ﻑﻳﺭﺻﺗﻟﺍ ﺔﺧﺿﻣ ﺭﺗﻠﻓ ﻙﻔﺑ ﻡﻗ ﻙﻟﺫ ﺩﻌﺑ .ﻩﺎﻳﻣﻟﺍ ﻑﻳﺭﺻﺑ
.ﺭﺗﻠﻔﻟﺍ ﻲﻓ ﺔﻘﻟﺎﻌﻟﺍ ﻡﺎﺳﺟﻷﺍ ﻭﺃ ﺕﺎﻔﻠﺧﻣﻟﺍ ﺔﻟﺍﺯﺇ ﻡﺛ ﻥﻣﻭ ﻩﺎﻳﻣﻟﺍ ﻑﻳﺭﺻﺗﻟ
.ﻙﺯﺎﻬﺟﻟ ﺱﻠﺳﻟﺍ ﻝﻳﻐﺷﺗﻟﺍ
.ءﺎﻣﻠﻟ ﺉﺭﺎﻁﻟﺍ ﻎﻳﺭﻔﺗﻟﺍ ﻭﺃ ﺉﺭﺍﻭﻁﻟﺍ
.ءﻁﺑﺑ ﻉﺯﻭﻣﻟﺍ ﺝﺭﺩ ﻖﻠﻏﺃ
.
Tub Clean(ﺽﻭﺣﻟﺍ ﻑﻳﻅﻧﺗ)
.ﺎًﻣﺎﻣﺗ ﺯﺎﻬﺟﻟﺍ ﻥﻣ ﻲﻠﺧﺍﺩﻟﺍ ءﺯﺟﻟﺍ ﻑﺟﻳ ﻰﺗﺣ ﺎًﺣﻭﺗﻔﻣ ﺏﺎﺑﻟﺍ ﻙﺭﺗﺍ
ﺩﺩﺣ ﻡﺛ ،ﻝﻳﻐﺷﺗﻠﻟ ﺔﻗﺎﻁﻟﺍ ﺭﺯ ﻁﻐﺿﺍ
ﺕﻗﺅﻣ ﻑﺎﻘﻳﺇ/ءﺩﺑ
.ءﺩﺑﻠﻟ
ﺭﺯﻟﺍ ﻰﻠﻋ ﻁﻐﺿﺍ
1
2
.ﻙﻟﺫﺑ ﻡﺎﻳﻘﻟﺍ ﺩﻧﻋ ﻝﺯﻧﻣﻟﺎﺑ ﻝﺎﻔﻁﻷﺍ
ءﺎﻣﻟﺍ ﻝﺎﺧﺩﺇ ﺭﺗﻠﻓ ﻑﻳﻅﻧﺗ
ﻲﻓ ﻥﻭﻛﺗ ﺩﻗ ﺏﺳﺍﻭﺭ ﻱﺃ ﻭﺃ ﺭﻳﺟﻟﺍ ﺏﻳﺳﺭﺗ ﻊﻣﺟ ﻰﻠﻋ ﻩﺎﻳﻣﻟﺍ ﻝﺎﺧﺩﺇ ﺭﺗﻠﻓ ﻝﻣﻌﻳ
ﻭﺣﻧ ﻭﺃ ﺭﻬﺷﺃ ﺔﺗﺳ ﻝﻛ ﻝﺧﺩﻣﻟﺍ ﺢﺷﺭﻣ ﻑﻳﻅﻧﺗﺑ ﻡﻗ .ﺯﺎﻬﺟﻟﺍ ﻰﻟﺇ ﺔﻠﺧﺩﻣﻟﺍ ﻩﺎﻳﻣﻟﺍ
3
ﺕﺎﺑﺳﺭﺗﻟﺍ ﻥﻣ ﺭﺎﺛﺁ ﻰﻠﻋ ﻱﻭﺗﺣﻳ ﻭﺃ ﺍًﺩﺟ ﺍًﺭﺳﻋ ءﺎﻣﻟﺍ ﻥﺎﻛ ﺍﺫﺇ ﺭﺛﻛﺃ ﻭﺃ ، ﻙﻟﺫ
ﺇ ﺯﺎﻬﺟﻟﺍ ﻰﻟﺇ ءﺎﻣﻟﺍ ﻝﺎﺧﺩﺇ ﺭﻭﺑﻧﺻ ﻖﻠﻏﺃ
ﻲﻓ ﻑﺭﺻ ﺩﻭﺟﻭ ﻡﺩﻋ ﺩﻧﻋ ﺎﻣﻳﺳﻻ ،(ﺔﻠﻁﻋ ﻝﺎﺛﻣﻟﺍ ﻝﻳﺑﺳ ﻰﻠﻋ) ﺔﻳﻧﻣﺯ ﺓﺭﺗﻔﻟ
.ﺓﺭﺷﺎﺑﻣ ﺭﻭﺎﺟﻣ ﻥﺎﻛﻣ ﻲﻓ (ﻑﺭﺻﻣ) ﺔﻳﺿﺭﻷﺍ
ﻰﻟﺇ ءﺎﻣﻟﺍ ﻝﻭﺧﺩ ﻡﺩﻋ ﺩﻧﻋ ﻡﻛﺣﺗﻟﺍ ﺔﺣﻭﻟ ﻰﻠﻋ
1E
.ﻝﻳﺳﻐﻟﺍ ﺕﺎﻔﻅﻧﻣ ﺝﺭﺩ
3
4
5
6
• ﻲﻠﺧﺍﺩﻟﺍ ءﺯﺟﻟﺍ ﻑﺟﻳ ﻡﻟ ﺎﻣ ﺔﻧﻔﻋ ﻭﺃ ﺔﻬﻳﺭﻛ ﺔﺣﺋﺍﺭ ﺯﺎﻬﺟﻟﺍ ﻥﻣ ﺙﻌﺑﻧﺗ ﺩﻗ
.ﺎًﻣﺎﻣﺗ ﻪﻧﻣ
• ﺔﺑﻗﺍﺭﻣ ﺔﻟﺎﺣ ﻲﻓ ﻁﻘﻓ ،ﻝﺧﺍﺩﻟﺍ ﻥﻣ ﺯﺎﻬﺟﻟﺍ ﻑﺟﻳ ﻲﺗﺣ ًﺎﺣﻭﺗﻔﻣ ﺏﺎﺑﻟﺍ ﻙﺭﺗﺍ
.ﺔﻳﺳﻠﻛﻟﺍ
• ﻡﺍﺩﺧﺗﺳﺍ ﻥﻭﺩ ﺯﺎﻬﺟﻟﺍ ﻙﺭﺗﺗﺳ ﺕﻧﻛ ﺍﺫ
•ﺄﻁﺧﻟﺍ ﺔﻟﺎﺳﺭ ﺭﻬﻅﺗ ﻑﻭﺳ
ءﺎﻁﻏ ﺕﺑﺛﻭ ﺔﻳﺎﻧﻌﺑ ﺭﺗﻠﻔﻟﺍ ﻝﺎﺧﺩﺇ ﺩﻋﺃ ،ﻑﻳﺭﺻﺗﻟﺍ ﺔﺧﺿﻣ ﺭﺗﻠﻓ ﻑﻳﻅﻧﺗ ﺩﻌﺑ
ﻁﻭﻳﺧﻟﺍ ﻙﺑﺎﺷﺗ ﺏﻧﺟﺗﻟ ﺭﺫﺣﺑ ﺔﻋﺎﺳﻟﺍ ﺏﺭﺎﻘﻋ ﻩﺎﺟﺗﺍ ﻲﻓ ﻑﻳﺭﺻﺗﻟﺍ
ﻲﻓ ﺽﻭﺣﻟﺍ ﻊﺿ ﻡﺛ ﻑﻳﺭﺻﺗﻟﺍ ﺽﻭﺣ ﻲﻓ ﺓﺩﺍﺩﺳﻟﺍ ﻝﺎﺧﺩﺇ ﺩﻋﺃ .ﺏﻳﺭﺳﺗﻟﺍﻭ
.ﻑﻼﻐﻟﺍ ءﺎﻁﻏ ﻖﻠﻏﺃ
ﻣ ﻥﻣ ﺭﺛﻛﺃ ﻭﺃ) ﺭﻬﺷﻟﺍ ﻲﻓ ﺓﺩﺣﺍﻭ ﺓﺭﻣ ﻝﺳﻐﻟﺍ ﺽﻭﺣ ﻑﻳﻅﻧﺗ ﺞﻣﺎﻧﺭﺑ ﻝﻐﺷ
ﺕﺎﻔﻠﺧﻣﻟﺍﻭ ﻑﻅﻧﻣﻟﺍ ﻥﻣ ﺔﻣﻛﺍﺭﺗﻣﻟﺍ ﺩﺍﻭﻣﻟﺍ ﺔﻟﺍﺯﻹ ﻙﻟﺫﻭ (ﺔﺟﺎﺣﻟﺍ ﺏﺳﺣ
.ﻪﻠﻣﺎﺣ
.ﻯﺭﺧﻷﺍ
.ءﺎﻣﻟﺍ ﻝﺎﺧﺩﺇ ﻡﻭﻁﺭﺧ ﻙﻓ ﻡﺛ ءﺎﻣﻟﺍ ﺭﻭﺑﻧﺻﻭ ﻲﺋﺎﺑﺭﻬﻛﻟﺍ ﺭﺎﻳﺗﻟﺍ ﻖﻠﻏﺃ
4
ﺓﺎﻔﺻﻣﻟﺍ ﻑﻅﻧ ﻡﺛ ﺓﺭﻳﻐﺻ ﺔﻳﺩﺍﺭﺯ ﻡﺍﺩﺧﺗﺳﺎﺑ ﺔﻠﺧﺩُﻣﻟﺍ ﻩﺎﻳﻣﻟﺍ ﺓﺎﻔﺻﻣ ﻝﺯﺃ
5
•.ﺎًﻧﺧﺎﺳ ﻥﻭﻛﻳ ﺩﻗ ءﺎﻣﻟﺍ ﻥﺇ ﺙﻳﺣ ﻑﻳﺭﺻﺗﻟﺍ ﺩﻧﻋ ﺱﺭﺗﺣﺍ
• ﺓﺭ
.ﺔﻁﺳﻭﺗﻣ ﺕﺍﺭﻳﻌﺷ ﺕﺍﺫ ﻥﺎﻧﺳﺃ ﺓﺎﺷﺭﻓ ﻡﺍﺩﺧﺗﺳﺎﺑ
1
2

ﺭﻳﺫﺣﺗ
ﺭﻳﺫﺣﺗ
ﺭﻳﺫﺣﺗ
ﺔﻅﺣﻼﻣ
ar_main.book.book Page 28 Thursday, October 22, 2020 4:16 PM
.ﻕﻭﻘﺷﻟﺍ ﻭﺃ ﺔﻧﻳﺑﺎﻛﻟﺍ ﻝﺻﺎﻔﻣ ﻲﻓ ﺔﺑﻭﻁﺭ ﺩﻭﺟﻭ
ﺏﺎﺑﻟﺍ
.ﺔﻣﻋﺎﻧ ﺵﺎﻣﻗ ﺔﻌﻁﻗ ﻡﺍﺩﺧﺗﺳﺎﺑ
.ﺯﺎﻬﺟﻟﺍ ﻝﻳﻐﺷﺗﻟ ﻡﻛﺣﺗﻟﺍ ﺔﺣﻭﻟ ﻰﻠﻋ ﺓﺩﺎﺣ
.ﺓﺎﻓﻭ ﺙﻭﺩﺣ ﻭﺃ ،ﺔﻳﺋﺎﺑﺭﻬﻛ ﺔﻣﺩﺻﻟ ﺽﺭﻌﺗﻟﺍ
• ﻡﺩﻋ ﻥﺎﻣﺿﻟ ﺔﻓﺎﺟ ﺵﺎﻣﻗ ﺔﻌﻁﻘﺑ ﻯﺭﺧﺃ ﺓﺭﻣ ﻡﺛ ﺔﻠﻠﺑﻣ ﺵﺎﻣﻗ ﺔﻌﻁﻘﺑ ﺢﺳﻣﺍ
•.ﺓﺩﺎﺣ ﺕﺍﻭﺩﺃ ﻡﺍﺩﺧﺗﺳﺎﺑ ﺽﺭﻌﻟﺍ ﺔﺷﺎﺷ ﻰﻠﻋ ﻭﺃ ﺢﻁﺳﻟﺍ ﻰﻠﻋ ﻁﻐﺿﺗ ﻻ
ﺱﺑﻼﻣﻟﺍ ﻙﺭﺗ ﺏﺑﺳﺗﻳ ﺩﻗ .ﺓﺭﻭﺩﻟﺍ ﻝﺎﻣﺗﻛﺍ ﺩﺭﺟﻣﺑ ﺔﻟﺎﺳﻐﻟﺍ ﻥﻣ ﺽﺍﺭﻏﻷﺍ ﺎًﻣﺋﺍﺩ ﻝﺯﺃ
.ﺎﻬﺗﺣﺋﺍﺭ ﺭﻳﻐﺗﻭ ،ﺎﻬﻧﻭﻟ ﻥﺍﺩﻘﻓﻭ ،ﺎﻬﺗﺷﻣﺭﻛ ﻲﻓ ﺔﻟﺎﺳﻐﻟﺍ ﻝﺧﺍﺩ ﺔﻠﻠﺑﻣ
• ﻑﻔﺟ ﻡﺛ ﺔﻠﻠﺑﻣ ﺵﺎﻣﻗ ﺔﻌﻁﻗ ﻡﺍﺩﺧﺗﺳﺎﺑ ﻲﺟﺭﺎﺧﻟﺍﻭ ﻲﻠﺧﺍﺩﻟﺍ ءﺯﺟﻟﺍ ﺢﺳﻣﺍ
• ﺕﺍﻭﺩﺃ ﻱﺃ ﻡﺩﺧﺗﺳﺗ ﻻ .ﺯﺎﻬﺟﻟﺍ ﻙﻓ ﻭﺃ ﺡﺍﻭﻟﻷﺍ ﻥﻣ ﺡﻭﻟ ﻱﺃ ﻝﺻﻓ ﻝﻭﺎﺣﺗ ﻻ
ﺔﻠْﺳﻏ ّﻝﻛ ﺩﻌﺑ ﻑﻳﻅﻧﺗﻟﺍ
ﻪﻠﺳﻏ ﺏﺟﻳ ﻱﺫﻟﺍ ﺎﻣ
.ﺔﺑﻭﻁﺭﻠﻟ ﺭﺎﺛﺁ ﻱﺃ
ﻟﺍﺯﻹ ﺔﻓﺎﺟ ﺵﺎﻣﻗ ﺔﻌﻁﻘﺑ ﺯﺎﻬﺟﻟﺍ ﺢﺳﻣﺍ
ﺔﻧﺎﻳﺻﻟﺍ
ﺔﻧﺎﻳﺻﻟﺍ
28
• ﻭﺃ ،ﻖﻳﺭﺣ ﺏﻭﺷﻧ ﻭﺃ ،ﺓﺭﻳﻁﺧ ﺔﺑﺎﺻﺇ ﻰﻟﺇ ﺽﺭﻌﺗﻟﺍ ﻰﻟﺇ ﺭﻳﺫﺣﺗﻟﺍ ﺍﺫﻫ ﻉﺎﺑﺗﺍ ﻡﺩﻋ ﻱﺩﺅﻳ ﺩﻗ .ﺔﻳﺋﺎﺑﺭﻬﻛ ﺔﻣﺩﺻﻟ ﺽﺭﻌﺗﻟﺍ ﺭﻁﺧ ﺏﻧﺟﺗﻟ ﻑﻳﻅﻧﺗﻟﺍ ﻝﺑﻗ ﺯﺎﻬﺟﻟﺍ ﻝﺻﻓﺍ
•.ﺔﻟﺎﺳﻐﻟﺍ ﺏﻳﻁﺷﺗ ﻑﻠﺗ ﻲﻓ ﻙﻟﺫ ﺏﺑﺳﺗﻳ ﺩﻗ .ﺯﺎﻬﺟﻟﺍ ﻑﻳﻅﻧﺗﻟ ﺕﺎﺑﻳﺫﻣ ﻭﺃ ،ﺔﻁﺷﺎﻛ ﺕﺎﻔﻅﻧﻣ ﻭﺃ ،ﺓﺯﻛﺭﻣ ﺔﻳﺋﺎﻳﻣﻳﻛ ﺍًﺩﺍﻭﻣ ﺍًﺩﺑﺃ ﻡﺩﺧﺗﺳﺗ ﻻ
• ﺔﻟﺍﺯﻹ ﺏﺎﺑﻟﺍ ﻲﻓ ﺏﺭﺳﺗﻟﺍ ﻊﻧﺎﻣ ﺓﺩﺍﺩﺳﻭ ﺏﺎﺑﻟﺍ ﺢﺳﻣﺍ ،ﻝﻳﺳﻐﻟﺍ ﺓﺭﻭﺩ ءﺎﻬﺗﻧﺍ ﺩﻌﺑ
•.ﻝﺳﻐﻟﺍ ﺽﻭﺣ ﻑﻳﻔﺟﺗﻟ ﺎًﻳﺋﺯﺟ ﺎًﺣﻭﺗﻔﻣ ﺏﺎﺑﻟﺍ ﻙﺭﺗﺍ
•.ﺔﺑﻭﻁﺭﻠﻟ ﺭﺎﺛﺁ ﻱﺃ ﺔ
ﻡﺎﻳﻘﻟﺍﻭ ﺔﻳﺭﻭﺩ ﺓﺭﻭﺻﺑ ﺯﺎﻬﺟﻟﺍ ﻑﻳﻅﻧﺗ
ءﺎﻣﻠﻟ ءﻱﺭﺎﻁﻟﺍ ﻎﻳﺭﻔﺗﻟﺎﺑ
ﺽﻭﺣﻟﺍ ﻑﻳﻅﻧﺗ
ﻝﺳﻐﻟﺍﻭ ﻊﻘﻧﻟﺎﺑ ﻝﺧﺍﺩﻟﺍ ﻥﻣ ﺯﺎﻬﺟﻟﺍ ﻑﻳﻅﻧﺗ ﻲﻓ ﺓﺩﻋﺎﺳﻣﻠﻟ ﺓﺯﻳﻣﻣ ﺔﻳﺻﺎﺧ ﻲﻫﻭ
.ﺭﺻﻌﻟﺍﻭ ﻑﻁﺷﻟﺍﻭ
ﻡﻛﺭﺗ ﻥﻣ ﺩﺣﻠﻟ (ﺭﻣﻷﺍ ﻡﺯﻟ ﺍﺫﺇ ﺭﺛﻛﺃ ﻭﺃ)
ﺓﺭﻣ
.ﺔﻔﻳﻅﻭﻟﺍ ﻩﺫﻫ ﻝﻳﻐﺷﺗﻟ ﺔﻳﺩﺎﻌﻟﺍ ﺕﺍﺭﺗﻔﻟﺍ ﺏﻧﺎﺟ ﻰﻟﺇ
.ﺎﻬﺑ ﻰﺻﻭﻣﻟﺍ ﺔﻔﻳﻅﻭﻟﺍ ﻝﻳﻐﺷﺗ ﻰﻟﺇ ﻡﺩﺧﺗﺳﻣﻟﺍ ﻪﻳﺑﻧﺗﻟ
.ﺏﺎﺑﻟﺍ ﻖﻠﻏﺃﻭ ﺯﺎﻬﺟﻟﺍ ﻥﻣ ﺽﺍﺭﻏﺃ ﻭﺃ ﺱﺑﻼﻣ ﻱﺃ ﻝﺯﺃ
ﻲﻓ ﺔﻳﺳﻠﻛﻟﺍ ﺏﺳﺍﻭﺭﻠﻟ ﻡﻭﺎﻘﻣﻟﺍ ﻕﻭﺣﺳﻣﻟﺍ ﻑﺿﺃﻭ ﻉﺯﻭﻣﻟﺍ ﺝﺭﺩ ﺢﺗﻓﺍ
ﺩﺑﻛ ﻝﺳﻐﻟﺍ ﺽﻭﺣ ﻲﻓ ًﺓﺭﺷﺎﺑﻣ ﺹﺍﺭﻗﻷﺍ ﻊﺿﻭ ﻥﻛﻣﻳ
ﺭﻬﺷﻟﺍ ﻲﻓ ﺓﺭﻣ
.ﻯﺭﺧﻷﺍ ﺏﺳﺍﻭﺭﻟﺍﻭ ﻡّﻌﻧﻣﻟﺍﻭ ﻑﻅﻧﻣﻟﺍ ءﺍﺯﺟﺃ
ﺔﻔﻳﻅﻭﻟﺍ ﻩﺫﻫ ﻝﻳﻐﺷﺗﺑ ﻡﻗ
ﺓﺩﻣﻟ ﻉﻭﺑﺳﻷﺍ ﻲﻓ3ﻊﻳﺑﺎﺳﺃ
tcL
.ﺔﻳﺳﻳﺋﺭﻟﺍ ﻝﻳﺳﻐﻟﺍ ﺓﺭﻳﺟﺣ
• ﺔﻔﻳﻅﻭﻟﺍ ﻩﺫﻫ ﻝﻳﻐﺷﺗﺑ ﻡﻘﻓ ،ﺔﻧﻔﻋ ﻭﺃ ﺔﻬﻳﺭﻛ ﺔﺣﺋﺍﺭ ﺯﺎﻬﺟﻟﺍ ﻥﻣ ﺕﺛﻌﺑﻧﺍ ﺍﺫﺇ
.ﻙﻟﺫﺑ ﻡﺎﻳﻘﻟﺍ ﺩﻧﻋ ﻝﺯﻧﻣﻟﺎﺑ ﻝﺎﻔﻁﻷﺍ
• ﺔﻟﺎﺳﺭ ﺭﻬﻅﺗﺳ
• ﺔﺑﻗﺍﺭﻣ ﺔﻟﺎﺣ ﻲﻓ ﻁﻘﻓ ،ﻝﺧﺍﺩﻟﺍ ﻥﻣ ﺯﺎﻬﺟﻟﺍ ﻑﺟﻳ ﻲﺗﺣ ًﺎﺣﻭﺗﻔﻣ ﺏﺎﺑﻟﺍ ﻙﺭﺗﺍ
ﻲﺟﺭﺎﺧﻟﺍ ﻝﻛﻳﻬﻟﺍ ﻑﻳﻅﻧﺗ
1
2
•.ﻕﻭﺣﺳﻣﻠﻟ ﻝﻳ
.ﻲﺿﺍﺭﺗﻓﻻﺍ ﺭﻣﻌﻟﺍ ﺔﻟﺎﻁﺇ ﻰﻠﻋ ﺯﺎﻬﺟﻟﺎﺑ ﺓﺩﻳﺟﻟﺍ ﺔﻳﺎﻧﻌﻟﺍ ﺩﻋﺎﺳﺗ
ﻲﺟﺭﺎﺧﻟﺍ ﻝﻛﻳﻬﻟﺍ
•.ﺭﻭﻔﻟﺍ ﻰﻠﻋ ﺕﺎﺑﻳﺭﺳﺗ ﻱﺃ ﺢﺳﻣﺍ

ﺔﻅﺣﻼﻣ
ﺔﻅﺣﻼﻣ
Max.
10 mm
Max.
10 mm
ar_main.book.book Page 27 Thursday, October 22, 2020 4:16 PM
27
ﺔﻳﻛﺫﻟﺍ ﻑﺋﺎﻅﻭﻟﺍ
ﺔﻳﻛﺫﻟﺍ ﻑﺋﺎﻅﻭﻟﺍ
ﺯﻣﺭﻟﺍ ﻥﻣ ﺏﺭﻘﻟﺎﺑ ﻲﻛﺫﻟﺍ ﻙﻔﺗﺎﻫ ﻲﻓ ﻡﻠﻛﺗﻟﺍ ﻥﺍﻭﺻ ﻊﺿ
c
ﻭﺃ d.
ﺍﻟﻌﺭﺑﻳﺔ
ﺭﺯﻟﺍ ﻰﻠﻋ ﺭﺍﺭﻣﺗﺳﻻﺍ ﻊﻣ ﻁﻐﺿﺍ
ﺓﺩﻣﻟ 3 ٍﻥﺍﻭﺛ
ﻥﻣ ﻲﻛﺫﻟﺍ ﻙﻔﺗﺎﻫ ﻲﻓ ﻡﻠﻛﺗﻟﺍ ﻥﺍﻭﺻﺑ ﻙﺎﺳﻣﻹﺍ ﻲﻓ ﺭﺍﺭﻣﺗﺳﻻﺍ ﻊﻣ ﺭﺛﻛﺃ ﻭﺃ
.ﻖﻳﺑﻁﺗﻟﺍ ﺔﺷﺎﺷ ﻰﻠﻋ ﺹﻳﺧﺷﺗﻟﺍ ﺭﻬﻅﻳﺳ ،ﺕﺎﻧﺎﻳﺑﻟﺍ ﻝﻘﻧ ﻡﺎﻣﺗﺇ ﺩﻌﺑ
.Temp(ﺓﺭﺍﺭﺣﻟﺍ ﺔﺟﺭﺩ)
.ﺕﺎﻧﺎﻳﺑﻟﺍ ﻝﻘﻧ ءﺎﻬﺗﻧﺍ ﻰﺗﺣ ﺯﻣﺭﻟﺍ
.ﺕﺎﻧﺎﻳﺑﻟﺍ ﻝﻘﻧﻟ ﻲﻘﺑﺗﻣﻟﺍ
2
.ﻲﻛﺫ ﻑﺗﺎﻫ ﻡﺍﺩﺧﺗﺳﺎﺑ ﺯﺎﻬﺟﻟﺍ ﻊﻣ ﻝﺻﺍﻭﺗﻟﺎﺑ ﻙﻟ
LG ThinQ
ﻖﻳﺑﻁﺗLG ThinQ
ﻖﻳﺑﻁﺗ ﺢﻣﺳﻳ
ﻖﻳﺑﻁﺗ ﺎﻳﺍﺯﻣLG ThinQ
.ﺔﻣﺋﻼﻣﻟﺍ ﺔﻳﻛﺫﻟﺍ ﺹﺋﺎﺻﺧﻟﺍ ﻡﺍﺩﺧﺗﺳﺎﺑ ﻲﻛﺫ ﻑﺗﺎﻫ ﺭﺑﻋ ﺯﺎﻬﺟﻟﺍ ﻊﻣ ﻝﺻﺍﻭﺗ
LG ThinQ
ﻰﻠﻋ Apple App Store ﻭﺃ Google
Smart Diagnosis(ﻲﻛﺫﻟﺍ ﺹﻳﺧﺷﺗﻟﺍ)
.ﻡﺍﺩﺧﺗﺳﻻﺍ ﻁﻣﻧ
ﻖﻳﺑﻁﺗ ﺕﻳﺑﺛﺗLG ThinQ
ﻖﻳﺑﻁﺗ ﻥﻋ ﺙﺣﺑﺍ
Play Store.ﻪﺗﻳﺑﺛﺗﻭ ﻖﻳﺑﻁﺗﻟﺍ ﻝﻳﺯﻧﺗﻟ ﺕﺎﻣﻳﻠﻌﺗﻟﺍ ﻊﺑﺗﺍ .ﻲﻛﺫ ﻑﺗﺎﻫ ﻰﻠﻋ ﻥﻣ
ﺏﺳﺣ ﺎﻬﻠﺣﻭ ﺯﺎﻬﺟﻟﺍ ﺕﻼﻛﺷﻣ ﺹﻳﺧﺷﺗ ﻝﻭﺣ ﺓﺩﻳﻔﻣ ﺕﺎﻣﻭﻠﻌﻣ ﺔﻔﻳﻅﻭﻟﺍ ﻩﺫﻫ ﺭﻓﻭﺗ
3
• ﺕﻗﻭﻟﺍ ﺽﺭﻋ ﻡﺗﻳﻭ .ﺕﺎﻧﺎﻳﺑﻟﺍ ﻝﻘﻧ ءﺎﻬﺗﻧﺍ ﻰﺗﺣ ﻪﻧﺎﻛﻣ ﻲﻓ ﻑﺗﺎﻬﻟﺍ ﻖﺑﺃ
4
Smart Diagnosis ﺹﻳﺧﺷﺗﻟﺍ)
•.ﺕﺎﻣﻐﻧﻟﺍ ﻝﻘﻧ ءﺎﻧﺛﺃ ﻲﻛﺫﻟﺍ ﻑﺗﺎﻬﻟﺍ ﻙﺭﺣﺗ ﻻ ،ﺞﺋﺎﺗﻧﻟﺍ ﻝﺿﻓﺃ ﻰﻠﻋ ﻝﻭﺻﺣﻠﻟ
ﺔﻣﻼﻌﻟﺍ ﻝﻣﺣﺗ ﻲﺗﻟﺍ ﺯﺭﻁﻟﺍ ﻲﻓ ﻁﻘﻓ ﺓﺯﻳﻣﻟﺍ ﻩﺫﻫ ﺭﻓﻭﺗﺗ
c
ﻭﺃ
d
.
ﻡﺍﺩﺧﺗﺳﺍ ءﺎﻧﺛﺃ ﻙﻬﺟﺍﻭﺗ ﻲﺗﻟﺍ ﺕﻼﻛﺷﻣﻟﺍ ﺹﻳﺧﺷﺗﻟ ﺓﺯﻳﻣﻟﺍ ﻩﺫﻬﺑ ﺔﻧﺎﻌﺗﺳﻻﺍ ﻙﻧﻛﻣﻳ
(ﻲﻛﺫﻟﺍ
.ﺎﻬﻠﺣﻭ ﺯﺎﻬﺟﻟﺍ
ﺔﻛﺑﺷ ﺭﻓﻭﺗ ﻡﺩﻋ ،ﺭﺻﺣﻟﺍWi-Fi ﺔﻛﺑﺷﺑ ﻝﺎﺻﺗﻻﺍ ﻉﺎﻁﻘﻧﺍ ﻭﺃ Wi-Fi ﻭﺃ
ﻡﻧﺗ ﻻ ﺏﺎﺑﺳﺃ ﻩﺫﻫﻭ ﻖﻳﺑﻁﺗﻟﺍ ﺭﻓﻭﺗ ﻡﺩﻋ ﻭﺃ ﺕﺎﻘﻳﺑﻁﺗﻟﺍ ﺭﺟﺗﻣﻟ ﺔﻳﻠﺣﻣﻟﺍ ﺔﺳﺎﻳﺳﻟﺍ
ﻥﻣ ﺭﻳﺻﻘﺗ ﻥﻋLGE.
ﻌﺗﺗ ﺩﻗ
.ﺎﻬﻳﻓ ﻥﻛﺳﺗ ﻲﺗﻟﺍ ﺔﻘﻁﻧﻣﻠﻟ
ﺹﻳﺧﺷﺗ ﺽﺭﻐﺑ "ﻉﻭﻣﺳﻣﻟﺍ ﺹﻳﺧﺷﺗﻟﺍ" ﻡﺍﺩﺧﺗﺳﺍ
ﺕﻼﻛﺷﻣﻟﺍ
.ﻉﻭﻣﺳﻣﻟﺍ ﺹﻳﺧﺷﺗﻟﺍ ﺔﻘﻳﺭﻁﺑ ﺔﻧﺎﻌﺗﺳﻼﻟ ﻩﺎﻧﺩﺃ ﺕﺎﻣﻳﻠﻌﺗﻟﺍ ﻊﺑﺗﺍ
Smart Diagnosis
"
ﻖﻳﺑﻁﺗ ﻲﻓ ﺓﺩﺭﺍﻭﻟﺍ ﻉﻭﻣﺳﻣﻟﺍ ﺹﻳﺧﺷﺗﻟﺍ ﻡﺍﺩﺧﺗﺳﺍ ﺕﺎﻣﻳﻠﻌﺗ ﻊﺑﺗﺍ .ﺔﻣﺋﺎﻘﻟﺍ ﻥﻣ
" ﺓﺯﻳﻣ ﺭﺗﺧﺍﻭ
LG ThinQ
.ﺯﺎﻬﺟﻟﺍ ﻝﻳﻐﺷﺗﻟ
ﺭﺯﻟﺍ ﻰﻠﻋ ﻁﻐﺿﺍ
ﺔﻗﺎﻁﻟﺍ
LG ThinQ
.
•.ﻯﺭﺧﺃ ﺭﺍﺭﺯﺃ ﻱﺃ ﻰﻠﻋ ﻁﻐﺿﺗ ﻻ
• ﻻ ﻝﺎﺛﻣﻟﺍ ﻝﻳﺑﺳ ﻰﻠﻋ ﺔﻳﺟﺭﺎﺧ ﻝﻣﺍﻭﻌﻟ ﺩﻭﻌﻳ ﻙﻟﺫﻭ ﺔﻣﺩﺧﻟﺍ ﻩﺫﻫ ﻝﻣﻌﺗ ﻻ ﺩﻗ
• ﺎًﻘﻓﻭ ﺎﻬﻠﻛﺷ ﻑﻠﺗﺧﻳ ﺩﻗﻭ ﺭﺍﺫﻧﺇ ﻖﺑﺎﺳ ﻥﻭﺩ ﺕﺍﺭﻳﻐﺗﻟ ﺓﺯﻳﻣﻟﺍ ﻩﺫﻫ ﺽﺭ
• ﻖﻳﺑﻁﺗ ﻝﻳﻐﺷﺗﺑ ﻡﻗ
1

ﺔﻅﺣﻼﻣ
ﺔﻅﺣﻼﻣ
ﺔﻅﺣﻼﻣ
ar_main.book.book Page 26 Thursday, October 22, 2020 4:16 PM
.ﻯﺭﺧﺃ ﻑﺋﺎﻅﻭ ﻱﺃ ﻰﻟﺇ ﻝﻭﺻﻭﻟﺍ ﻥﻣ ﻥﻛﻣﺗﺗﻟ ﺔﻔﻳﻅﻭﻟﺍ ﻩﺫﻫ ﻝﻳﻌﻔﺗ
ﺭﺯﻭ
Add
.ﺔﻔﻳﻅﻭﻟﺍ ﻩﺫﻫ ﻝﻳﻌﻔﺗﻟ ٍﻥﺍﻭﺛ ﺙﻼﺛ ﺓﺩﻣﻟ ﺎًﻌﻣ
.ﺽﺭﻌﻟﺍ ﺔﺷﺎﺷ ﻰﻠﻋ
ﺭﺯﻭ
Add
.ﺔﻔﻳﻅﻭﻟﺍ ﻩﺫﻫ ﻝﻳﻌﻔﺗ ﻑﺎﻘﻳﻹ ٍﻥﺍﻭﺛ ﺙﻼﺛ ﺓﺩﻣﻟ ﺎًﻌﻣ
Pre Washو (+فطﺷ) Rinse
Delay End(ﻰﻬﺗﻧﺍ ﺭﻳﺧﺄﺗﻟﺍ ﺕﻗﻭ)
CL
Delay End(ﻰﻬﺗﻧﺍ ﺭﻳﺧﺄﺗﻟﺍ ﺕﻗﻭ)
.ﻪﻓﺎﻘﻳﺇﻭ ﻪﻠﻳﻐﺷﺗ ﺩﻧﻋ ﻰﻘﻳﺳﻭﻣ ﺯﺎﻬﺟﻟﺍ ﺍﺫﻫ ﻑﺯﻌﻳ
+ نﯾرزﻟا ﻰﻠﻋ رارﻣﺗﺳﻻا ﻊﻣ طﻐﺿا
ﺓﺩﻣﻟ ﻪﺳﻔﻧ ﺕﻗﻭﻟﺍ ﻲﻓ 3 ﻩﺫﻫ ﻝﻳﻌﻔﺗ/ﻝﻳﻌﻔﺗ ﻑﺎﻘﻳﻹ ٍﻥﺍﻭﺛ
ﻡﻛﺣﺗﻟﺍ ﺔﺣﻭﻟ ﻝﻔﻗ
.ﻝﻳﻐﺷﺗﻠﻟ ﺔﻗﺎﻁﻟﺍ ﺭﺯ ﻁﻐﺿﺍ
ﺭﺯ ﻰﻠﻋ ﻁﻐﺿﺍ
Item(ﺭﺻﻧﻋ ﺔﻓﺎﺿﺍ)
ﻡﻛﺣﺗﻟﺍ ﺔﺣﻭﻟ ﻝﻔﻗ ءﺎﻐﻟﺇ
.ﻝﻳﻐﺷﺗﻠﻟ ﺔﻗﺎﻁﻟﺍ ﺭﺯ ﻁﻐﺿﺍ
ﺭﺯ ﻰﻠﻋ ﻁﻐﺿﺍ
Item(ﺭﺻﻧﻋ ﺔﻓﺎﺿﺍ)
Beep On/Off(ﺓﺭﻓﺎﺻﻟﺍ ﻝﻳﻐﺷﺗ ﻑﺎﻘﻳﺇ/ﻝﻳﻐﺷﺗ)
( ﻲﺋﺩﺑﻣ ﻝﻳﺳﻏ)
.ﺔﻔﻳﻅﻭﻟﺍ
26
5
.ﺔﺟﺎﺣﻟﺍ
6
• ءﺎﻐﻟﺇ ﺏﺟﻳ .ﺔﻔﻳﻅﻭﻟﺍ ﻩﺫﻫ ﻥﻳﻳﻌﺗ ﺓﺩﺎﻋﺇ ﻰﻟﺇ ﺔﻗﺎﻁﻟﺍ ﻝﻳﻐﺷﺗ ﻑﺎﻘﻳﺇ ﻱﺩﺅﻳ ﻥﻟ
ﺏﺳﺣ ﺎﻬﺟﺭﺧﺃ ﻭﺃ ﺱﺑﻼﻣﻟﺍ ﻊﻁﻗ ﻑﺿﺃﻭ ﺎًﻳﺗﺍﺫ ﺢﺗﻔُﻳ ﺎﻣﺩﻌﺑ ﺏﺎﺑﻟﺍ ﺢﺗﻓﺍ
ﺕﻗﺅﻣ ﻑﺎﻘﻳﺇ/ءﺩﺑ
.
ﺭﺯ ﻰﻠﻋ ﻁﻐﺿﺍ ﻡﺛ ﺏﺎﺑﻟﺍ ﻖﻠﻏﺃ
ﻝﻳﻐﺷﺗﻟﺍ
1
2
• ﺭﻬﻅﻳﺳﻭ ،ﺓﺭﻓﺎﺻ ﺕﻭﺻ ﺭﺩﺻﻳﺳ
ﺓﺭﺗﻔﻟﺍ ﺩﻌﺑ ﻲﻬﺗﻧﻳﻭ ﺎًﻳﺋﺎﻘﻠﺗ ﺯﺎﻬﺟﻟﺍ ﻝﻳﻐﺷﺗ ﺃﺩﺑﻳ ﺙﻳﺣﺑ ﺔﻔﻳﻅﻭﻟﺍ ﻩﺫﻫ ﻁﺑﺿ ﻙﻧﻛﻣﻳ
1
2
.ﺔﺟﺎﺣﻟﺍ ﺏﺳﺣ
•
.ءﺎﻧﺛﻷﺍ ﻩﺫﻫ ﻲﻓ ﺱﺑﻼﻣ ﻊﻁﻗ ﺔﻓﺎﺿﺇ ﻥﻛﻣﻳ ﻻﻭ .ﺓﺭﺍﺭﺣﻟﺍ
Delay End(ﻰﻬﺗﻧﺍ ﺭﻳﺧﺄﺗﻟﺍ ﺕﻗﻭ)
.ﺓﺩﺩﺣﻣﻟﺍ ﺔﻳﻧﻣﺯﻟﺍ
ﺭﺯﻟﺍ ﻰﻠﻋ ﻁﻐﺿﺍ
ﺔﻗﺎﻁﻟﺍ
.
.ﻝﻳﺳﻐﻟﺍ ﺞﻣﺎﻧﺭﺑ ﺩﺩﺣ
Delay End(ﻰﻬﺗﻧﺍ ﺭﻳﺧﺄﺗﻟﺍ ﺕﻗﻭ)
ﺕﻗﺅﻣ ﻑﺎﻘﻳﺇ/ءﺩﺑ
.
ﺭﺯﻟﺍ ﻰﻠﻋ ﻁﻐﺿﺍ
ﺭﺯﻟﺍ ﻰﻠﻋ ﻁﻐﺿﺍ
• ﺔﺟﺭﺩ ﻉﺎﻔﺗﺭﺍ ﻭﺃ ﻩﺎﻳﻣﻟﺍ ﻯﻭﺗﺳﻣ ﻉﺎﻔﺗﺭﺍ ﺩﻧﻋ ﺎًﻘﻠﻐﻣ ﺏﺎﺑﻟﺍ ﻝﻅﻳ ،ﻥﺎﻣﻸﻟ
1
2
3
4
Delay End ﺭﻳﺧﺄﺗﻟﺍ ﺕﻗﻭ)
ﺢﻳﺑﺎﺻﻣ ﻊﻳﻣﺟ ءﺎﻔﻁﺇ ﻡﺗﻳﺳ ،LED ﻲﻓ ﻡﻛﺣﺗﻟﺍ ﺔﺣﻭﻟ ﻰﻠﻋ ﺓﺩﻭﺟﻭﻣﻟﺍ
.ﻯﺭﺧﺃ ﻝﻣﺍﻭﻋﻭ ،ﺱﺑﻼﻣﻟﺍﻭ ،ءﺎﻣﻟﺍ ﺓﺭﺍﺭﺣ ﺔﺟﺭﺩ ﺏﺑﺳﺑ ﻲﻠﻌﻔﻟﺍ ﻝﻳﻐﺷﺗﻟﺍ
ﺔﻗﺎﻁﻟﺍ
.
(ﻰﻬﺗﻧﺍ
ﻥﻭﺿﻏ20.ﻩﺅﺍﺭﺷ ﻡﺗ ﻱﺫﻟﺍ ﺯﺍﺭﻁﻟﺍ ﻑﻼﺗﺧﺎﺑ ﺓﺯﻳﻣﻟﺍ ﻩﺫﻫ ﻑﻠﺗﺧﺗ ﺩﻗ .ﺔﻘﻳﻗﺩ
ﺕﺍﺩﺍﺩﻋﻹﺍ
ﻝﺎﻔﻁﻷﺍ ﺓﺯﻳﻣﻟﺍ ﻩﺫﻫ ﻊﻧﻣﺗ ﻥﺃ ﻥﻛﻣﻳ .ﻡﻛﺣﺗﻟﺍ ﺕﺍﻭﺩﺃ ﻝﻳﻁﻌﺗﻟ ﺭﺎﻳﺧﻟﺍ ﺍﺫﻫ ﻡﺩﺧﺗﺳﺍ
.ﺯﺎﻬﺟﻟﺍ ﻝﻳﻐﺷﺗ ﻭﺃ ﺕﺍﺭﻭﺩﻟﺍ ﺭﻳﻳﻐﺗ ﻥﻣ
ﻰﻠﻋ ﺏﻭﺎﻧﺗﻟﺎﺑ ﻥﺍﺭﻬﻅﻳ ﻲﻘﺑﺗﻣﻟﺍ ﺕﻗﻭﻟﺍﻭ
]L
.ﺔﻔﻳﻅﻭﻟﺍ ﻩﺫﻫ ﻝﻳﻐﺷﺗﻭ ﻝﻳﺳﻐﻟﺍ ءﺎﻧﺛﺃ ﺔﺷﺎﺷﻟﺍ
Child Lock(ﻝﺎﻔﻁﻷﺍ ﻝﻔﻗ)
ﺔﻗﺎﻁﻟﺍ
.
• ﺢﻳﺑﺎﺻﻣ ءﺎﻧﺛﺗﺳﺎﺑLED ﺭﺯﺑ ﺔﺻﺎﺧﻟﺍ
• ﺕﻗﻭ ﻑﻠﺗﺧﻳ ﺎﻣﺑﺭ .ءﺩﺑﻟﺍ ﺕﻗﻭ ﺱﻳﻟﻭ ،ﺞﻣﺎﻧﺭﺑﻟﺍ ءﺎﻬﺗﻧﺍ ﺕﻗﻭ ﻭﻫ ﺭﻳﺧﺄﺗﻟﺍ ﺕﻗﻭ
• ﺭﺯ ﻰﻠﻋ ﻁﻐﺿﻟﺍ ﺏﺟﻳ ،ﺔﻔﻳﻅﻭﻟﺍ ﻩﺫﻫ ءﺎﻐﻟﻹ
•.ﺔﻔﻳﻅﻭﻟﺍ ﻩﺫﻫ ﻊﻣ ﻝﺋﺎﺳﻟﺍ ﻑﻅﻧﻣﻟﺍ ﻡﺍﺩﺧﺗﺳﺍ ﺏﻧﺟﺗ
• ﺭﺯ ءﺎﻧﺛﺗﺳﺎﺑ ﺭﺍﺭﺯﻷﺍ ﻊﻳﻣﺟ ﻝﻔﻗ ﻡﺗﻳ ،ﺔﻔﻳﻅﻭﻟﺍ ﻩﺫﻫ ﻥﻳﻳﻌﺗ ﻡﺗﻳ ﻥﺃ ﺩﺭﺟﻣﺑ
• .،ﻡﻛﺣﺗﻟﺍ ﻝﺋﺎﺳﻭ ﻕﻼﻏﺇ ﺩﻧﻋ

ﺔﻅﺣﻼﻣ
ﺔﻅﺣﻼﻣ
ar_main.book.book Page 25 Thursday, October 22, 2020 4:16 PM
25
ﻝﻳﻐﺷﺗﻟﺍ
ﺍﻟﻌﺭﺑﻳﺔ
.ﺎﻬﻠﻳﻐﺷﺗ ﺓﺩﺎﻋﺇﻭ ﺔﻟﺎﺳﻐﻟﺍ ﻑﺎﻘﻳﻹ ﻥﻳﺗﺭﻣ
:ﺔﻳﺗﻵﺍ ﺔﻳﺳﺎﺳﻷﺍ ﺕﺍﺭﺎﻳﺧﻟﺍ ﻡﺍﺩﺧﺗﺳﺎﺑ ﺞﻣﺍﺭﺑﻟﺍ ﺹﻳﺻﺧﺗ ﻙﻧﻛﻣﻳ
.ﺥﺎﺳﺗﻻﺍ ﺓﺩﻳﺩﺷ ﺔﻟﻭﻣﺣﻟﺍ ﻝﺳﻏ ﺩﻧﻋ ﺭﺎﻳﺧﻟﺍ ﺍﺫﻫ ﻡﺍﺩﺧﺗﺳﺎﺑ ﻰﺻﻭُﻳ
.ﺔﺟﺎﺣﻟﺍ ﺏﺳﺣ
ﺕﻗﺅﻣ ﻑﺎﻘﻳﺇ/ءﺩﺑ
.
ﺭﺯﻟﺍ ﻰﻠﻋ ﻁﻐﺿﺍ
ﻁﻘﻓ ﻥﺍﺭﻭﺩﻟﺍ ﺔﻔﻳﻅﻭ ﻡﺍﺩﺧﺗﺳﺍ
.ﻝﺳﻐﻟﺍ ﺽﻭﺣ ﻝﺧﺍﺩ ﺎﻬﻌﺿﻭ ﺱﺑﻼﻣﻟﺍ ﺯ
ﺭﺯﻟﺍ ﻰﻠﻋ ﻁﻐﺿﺍ
ﺔﻗﺎﻁﻟﺍ
.
ﺭﺯﻟﺍ ﻰﻠﻋ ﻁﻐﺿﺍ
Spin(ﻥﺍﺭﻭﺩ)
.
ﺕﻗﺅﻣ ﻑﺎﻘﻳﺇ/ءﺩﺑ
.
ﺭﺯﻟﺍ ﻰﻠﻋ ﻁﻐﺿﺍ
ﺭﺯﻟﺍ ﻰﻠﻋ ﻁﻐﺿﺍ ،ﻙﻟﺫ
ﺔﻗﺎﻁﻟﺍ
ﺔﻳﺳﺎﺳﻷﺍ ﺕﺍﺭﺎﻳﺧﻟﺍ ﻡﺍﺩﺧﺗﺳﺍ
Pre Wash( ﻲﺋﺩﺑﻣ ﻝﻳﺳﻏ)
ﺭﺯﻟﺍ ﻰﻠﻋ ﻁﻐﺿﺍ
ﺔﻗﺎﻁﻟﺍ
.
.ﻝﻳﺳﻐﻟﺍ ﺞﻣﺎﻧﺭﺑ ﺩﺩﺣ
Pre Wash( ﻲﺋﺩﺑﻣ ﻝﻳﺳﻏ)
ﺭﺯﻟﺍ ﻰﻠﻋ ﻁﻐﺿﺍ
6
.ﺞﻣﺍﺭﺑﻟﺍ ﺹﻳﺻﺧﺗﻟ ﺔﻳﻓﺎﺿﻹﺍ ﻑﺋﺎﻅﻭﻟﺍﻭ ﺕﺍﺭﺎﻳﺧﻟﺍ ﻡﺍﺩﺧﺗﺳﺍ ﻙﻧﻛﻣُﻳ
1
ﻬﺟ
ّ
ِ
ﺕﺍﺩﺍﺩﻋﻹﺍ ﻩﺫﻫ ﺹﻳﺻﺧﺗ ﻙﻟﺫﻛ ﻙﻧﻛﻣﻳﻭ .ﺔﻳﺿﺍﺭﺗﻓﺍ ﺕﺍﺩﺍﺩﻋﺈﺑ ﺞﻣﺎﻧﺭﺑ ﻝﻛ ﺯﻳﻣﺗﻳ
2
.ﻑﻅﻧﻣﻟﺍ ﻑﺿﺗ ﻻﻭ ﻝﻳﺳﻐﻟﺍ ﺞﻣﺎﻧﺭﺑ ﺩﺩﺣﺗ ﻻ
3
ﻱﺫﻟﺍ ﺩﺍﺩﻋﻹﺍ ﺊﺿﻳ ﻰﺗﺣ
4
• ﺙﺩﺣ ﺍﺫﺇﻭ .ﻁﻘﻓ ﻥﺍﺭﻭﺩﻟﺍ ﺭﺎﻳﺧ ﺩﻳﺩﺣﺗ ﻊﻳﻁﺗﺳﺗ ﻥﻠﻓ ،ﻝﻳﺳﻐﻟﺍ ﺞﻣﺎﻧﺭﺑ ﺕﺩﺩﺣ ﺍﺫﺇ
1
2
3
.ﺕﺍﺭﻣ ﺓﺩﻋ ﺭﺯﻟﺍ ﺍﺫﻫ ﻰﻠﻋ ﻁﻐﺿﻟﺎﺑ ﻥﺍﺭﻭﺩﻟﺍ ﺓﺩﺷ ﻯﻭﺗﺳﻣ ﺩﻳﺩﺣﺗ ﻙﻧﻛﻣﻳ
.ﻥﺍﺭﻭﺩﻟﺍ ﺔﻋﺭﺳ ﺩﻳﺩﺣﺗﻟ
ﺭﺯﻟﺍ ﻰﻠﻋ ﻁﻐﺿﻟﺍ ﻝﻼﺧ ﻥﻣ
Spin(ﻥﺍﺭﻭﺩ)
،
.ﺔﻋﺭﺳﺑ ءﺎﻣﻟﺍ ﻑﻳﺭﺻﺗﻟ ﺓﺭﻳﺻﻗ ﺓﺭﺗﻔﻟ ﻥﺍﺭﻭﺩﻟﺍ ﺭﻣﺗﺳﻳﺳ
ﺔﯾﺳﺎﺳﺣ نﻣ نوﻧﺎﻌﯾ نﻣﻣ صﺎﺧﺷﻷا ﻊﻣ ﺔﻔﯾظوﻟا هذھ مادﺧﺗﺳﺎﺑ ﻰﺻوُﯾ
ةرﻣﻟ فطﺷﻟا ﺔﻓﺎﺿﻹ
.ﺥﺎﺳﺗﻻﺍ ﺓﺩﻳﺩﺷﻭ ﺔﻳﺩﺎﻌﻟﺍ ﺱﺑﻼﻣﻟﺍ ﻝﺳﻐﻟ ﺔﻔﻳﻅﻭﻟﺍ ﻩﺫﻫ ﻡﺩﺧﺗﺳُﺗ
.ﻝﻳﺳﻐﻟﺍ ﺞﻣﺎﻧﺭﺑ ﺹﻳﺻﺧﺗﻟ ﺔﻳﻟﺎﺗﻟﺍ ﺕﺍﻭﻁﺧﻟﺍ ﻊﺑﺗﺍ
ﺔﻳﻓﺎﺿﺇ ﻑﺋﺎﻅﻭﻭ ﺕﺍﺭﺎﻳﺧ
ﻝﻳﺳﻐﻟﺍ ﺞﻣﺎﻧﺭﺑ ﺹﻳﺻﺧﺗ
.ﺭﺍﺭﺯﻷﺍ ﻩﺫﻫ ﻡﺍﺩﺧﺗﺳﺎﺑ
.ﺩﺩﺣﻣﻟﺍ ﺞﻣﺎﻧﺭﺑﻠﻟ ﻝﻳﺳﻐﻟﺍ ﺓﺭﺍﺭﺣ ﺔﺟﺭﺩ ﺭﺯﻟﺍ ﺍﺫﻫ ﺩﺩﺣﻳ
.Temp(ﺓﺭﺍﺭﺣﻟﺍ ﺔﺟﺭﺩ)
.ﻪﺑ ﺏﻏﺭﺗ
.ﺞﺋﺎﺗﻧﻟﺍ ﻝﺿﻓﺃ ﻰﻠﻋ ﻝﻭﺻﺣﻠﻟ ﺱﺑﻼﻣﻟﺍ ﺞﻳﺳﻧﺑ ﺔﻳﺎﻧﻌﻟﺍ
Spin(ﻥﺍﺭﻭﺩ)
Spin(ﻥﺍﺭﻭﺩ)
No(ﻻ)
(+فطﺷ) Rinse+
.تﺎﻔظﻧﻣﻟا هﺎﺟﺗ
(+فطﺷ)Rinse
.
+ رزﻟا ﻰﻠﻋ طﻐﺿا
.ةدﺣاو
Intensive(ﻑﻳﺛﻛ)
Intensive(ﻑﻳﺛﻛ)
.Temp(ﺓﺭﺍﺭﺣﻟﺍ ﺔﺟﺭﺩ)
• ﺭﺯ ﻰﻠﻋ ﻁﻐﺿﺍ
• ﺕﺎﻘﺻﻠﻣ ﻊﺑﺗﺍﻭ .ﺎﻬﻠﺳﻐﺗ ﻲﺗﻟﺍ ﺔﻟﻭﻣﺣﻟﺍ ﻉﻭﻧﻟ ﺔﺑﺳﺎﻧﻣﻟﺍ ءﺎﻣﻟﺍ ﺓﺭﺍﺭﺣ ﺔﺟﺭﺩ ﺩﺩﺣ
• ﺭﺯﻟﺍ ﻰﻠﻋ ﻁﻐﺿﺍ
• ﺭﺎﻳﺧﻟﺍ ﺩﻳﺩﺣﺗ ﺩﻧﻋ
•
• ﺭﺯﻟﺍ ﻰﻠﻋ ﻁﻐﺿﺍ
ﺕﻗﺅﻣ ﻑﺎﻘﻳﺇ/ءﺩﺑ
.
ﺞﻣﺎﻧﺭﺑ ءﺩﺑ ﺩﻌﺑ ﻰﺗﺣ ﺎﻬﺗﻟﺍﺯﺇ ﻭﺃ ﺱﺑﻼﻣ ﺔﻓﺎﺿﻹ ﺭﺎﻳﺧﻟﺍ ﺍﺫﻫ ﻡﺍﺩﺧﺗﺳﺍ ﻙﻧﻛﻣﻳ
ﺕﻗﺅﻣ ﻑﺎﻘﻳﺇ/ءﺩﺑ
.
.ﺔﺟﺎﺣﻟﺍ ﺏﺳﺣ
Add Item(ﺭﺻﻧﻋ ﺔﻓﺎﺿﺍ)
ﺭﺯﻟﺍ ﻰﻠﻋ ﻁﻐﺿﺍ
ﺭﺯﻟﺍ ﻰﻠﻋ ﻁﻐﺿﺍ
ﺔﻗﺎﻁﻟﺍ
.
.ﻝﻳﺳﻐﻟﺍ ﺞﻣﺎﻧﺭﺑ ﺩﺩﺣ
ﺭﺯﻟﺍ ﻰﻠﻋ ﻁﻐﺿﺍ
ﺭﺯﻟﺍ ﻰﻠﻋ ﻁﻐﺿﺍ
Add Item(ﺭﺻﻧﻋ ﺔﻓﺎﺿﺍ)
.ﻝﻳﺳﻐﻟﺍ
+ و ،
ﻬﺟ
ّ
ِ
(نارود
.ﺔﺟﺎﺣﻟﺍ
1
2
3
4
5
4
1
2
3
Spin
بﺳﺣ (
.ﻝﺳﻐﻟﺍ ﺽﻭﺣ ﻝﺧﺍﺩ ﺎﻬﻌﺿﻭ ﺱﺑﻼﻣﻟﺍ ﺯ
و ،
(ةرارﺣﻟا ﺔﺟرد) Temp.
(فﯾﺛﻛ) Intensive
و ،
ﺭﺯﻟﺍ ﻰﻠﻋ ﻁﻐﺿﺍ
ﺔﻗﺎﻁﻟﺍ
.
.ﻑﻅﻧﻣﻟﺍ ﻑﺿﺃ
.ﻝﻳﺳﻐﻟﺍ ﺞﻣﺎﻧﺭﺑ ﺩﺩﺣ
) لﯾﺳﻐﻟا ﺞﻣﺎﻧرﺑ صﺻﺧ
(+فطﺷ) Rinse
4

ﺔﻅﺣﻼﻣ
ar_main.book.book Page 24 Thursday, October 22, 2020 4:16 PM
ﻥﺍﺭﻭﺩﻟﺍ ﺔﻋﺭﺳ
ﻝﻳﻐﺷﺗﻟﺍ
ﻲﺿﺍﺭﺗﻓﻻﺍﺡﺎﺗﻣﻟﺍ
1000ﺔﻘﻳﻗﺩﻟﺍ ﻲﻓ ﺓﺭﻭﺩ ﻰﻟﺇ ﻝﺻﺗ1000ﺔﻘﻳﻗﺩﻟﺍ ﻲﻓ ﺓﺭﻭﺩ
800ﺔﻘﻳﻗﺩﻟﺍ ﻲﻓ ﺓﺭﻭﺩ ﻰﻟﺇ ﻝﺻﺗ800ﺔﻘﻳﻗﺩﻟﺍ ﻲﻓ ﺓﺭﻭﺩ
800ﺔﻘﻳﻗﺩﻟﺍ ﻲﻓ ﺓﺭﻭﺩ ﻰﻟﺇ ﻝﺻﺗ800ﺔﻘﻳﻗﺩﻟﺍ ﻲﻓ ﺓﺭﻭﺩ
800ﺔﻘﻳﻗﺩﻟﺍ ﻲﻓ ﺓﺭﻭﺩ ﻰﻟﺇ ﻝﺻﺗ800ﺔﻘﻳﻗﺩﻟﺍ ﻲﻓ ﺓﺭﻭﺩ
400ﺔﻘﻳﻗﺩﻟﺍ ﻲﻓ ﺓﺭﻭﺩ ﻊﻳﻣﺟ
1000ﺔﻘﻳﻗﺩﻟﺍ ﻲﻓ ﺓﺭﻭﺩ ﻰﻟﺇ ﻝﺻﺗ1000ﺔﻘﻳﻗﺩﻟﺍ ﻲﻓ ﺓﺭﻭﺩ
ﺞﻣﺎﻧﺭﺑﻟﺍ
Baby Care(ﻝﺎﻔﻁﻷﺍ ﺱﺑﻼﻣﺑ ﺔﻳﺎﻧﻋ)
Hand/Wool(ﻑﻭﺻﻟﺍ / ﺔﻳﺣﺎﻧ ﻥﻣﻭ)
Sportswear(ﺔﻳﺿﺎﻳﺭﻟﺍ ﺱﺑﻼﻣﻟﺍ)
24
Delicates(ﺔﺳﺎﺳﺣﻟﺍ ﺱﺑﻼﻣﻟﺍ)
Speed 14 ﻊﻳﺭﺳ ﻝﻳﺳﻏ) 14(ﺔﻘﻳﻗﺩ
Duvet(ﻑﺎﺣﻠﻟﺍ)
•.ﺔﺋﺎﻣ ﺏﺭﻗﻷ ﺔﺑﺭﻘﻣ ﻩﻼﻋﺃ ﻡﻳﻘﻟﺍ .ﺔﻟﻭﻣﺣﻟﺍ ﻑﻭﺭﻅﻟ ﺎًﻘﻓﻭ ﺔﻳﻠﻌﻔﻟﺍ ﻯﻭﺻﻘﻟﺍ ﻥﺍﺭﻭﺩﻟﺍ ﺔﻋﺭﺳ ﻑﻠﺗﺧﺗ ﺩﻗ

ﺔﻅﺣﻼﻣ
ar_main.book.book Page 23 Thursday, October 22, 2020 4:16 PM
23
ﻝﻳﻐﺷﺗﻟﺍ
ﺔﻳﻓﺎﺿﺇ ﺕﺍﺭﺎﻳﺧ
اذھ ﻲﻓ لﯾﺳﻐﻟا ﺞﻣارﺑ لﻛﻟ
ﺍﻟﻌﺭﺑﻳﺔ
)رﺻﻧﻋ ﺔﻓﺎﺿا( Add Item
و
)ﻰﮭﺗﻧا رﯾﺧﺄﺗﻟا تﻗو( Delay End
##
##
##
##
#
#
#
#
#
#
#
و ،
(+فطﺷ) Rinse
+ تارﺎﯾﺧﻟا دﯾدﺣﺗ كﻧﻛﻣﯾ
ﺞﻣﺎﻧﺭﺑﻟﺍIntensive(ﻑﻳﺛﻛ) Pre Wash( ﻲﺋﺩﺑﻣ ﻝﻳﺳﻏ)
Cotton(ﻥﻁﻘﻟﺍ)
Eco 40-60
Mixed Fabric(ﺔﻁﻠﺗﺧﻣ ﺔﺷﻣﻗﺃ)
Easy Care(ﺔﻠﻬﺳﻟﺍ ﺔﻳﺎﻧﻌﻟﺍ)
Silent Wash(ﺉﺩﺎﻫ ﻝﻳﺳﻏ)
Hygiene(ﻡﻘﻌﻣ ﻝﻳﺳﻏ)
Baby Care(ﻝﺎﻔﻁﻷﺍ ﺱﺑﻼﻣﺑ ﺔﻳﺎﻧﻋ)
Delicates(ﺔﺳﺎﺳﺣﻟﺍ ﺱﺑﻼﻣﻟﺍ)
Hand/Wool(ﻑﻭﺻﻟﺍ / ﺔﻳﺣﺎﻧ ﻥﻣﻭ)
Sportswear(ﺔﻳﺿﺎﻳﺭﻟﺍ ﺱﺑﻼﻣﻟﺍ)
Speed 14 ﻊﻳﺭﺳ ﻝﻳﺳﻏ) 14(ﺔﻘﻳﻗﺩ
Duvet(ﻑﺎﺣﻠﻟﺍ)
•
.لودﺟﻟا
ﻥﺍﺭﻭﺩﻟﺍ ﺔﻋﺭﺳ
ﺩﻳﺩﺣﺗﻠﻟ ﺔﻠﺑﺎﻘﻟﺍ ﻯﻭﺻﻘﻟﺍ ﻥﺍﺭﻭﺩﻟﺍ ﺔﻋﺭﺳ
ﻲﺿﺍﺭﺗﻓﻻﺍﺡﺎﺗﻣﻟﺍ
1400ﺔﻘﻳﻗﺩﻟﺍ ﻲﻓ ﺓﺭﻭﺩ ﻊﻳﻣﺟ
1400ﺔﻘﻳﻗﺩﻟﺍ ﻲﻓ ﺓﺭﻭﺩ ﻊﻳﻣﺟ
1000ﺔﻘﻳﻗﺩﻟﺍ ﻲﻓ ﺓﺭﻭﺩ ﻊﻳﻣﺟ
1400ﺔﻘﻳﻗﺩﻟﺍ ﻲﻓ ﺓﺭﻭﺩ ﻊﻳﻣﺟ
800ﺔﻘﻳﻗﺩﻟﺍ ﻲﻓ ﺓﺭﻭﺩ ﻰﻟﺇ ﻝﺻﺗ1000ﺔﻘﻳﻗﺩﻟﺍ ﻲﻓ ﺓﺭﻭﺩ
1400ﺔﻘﻳﻗﺩﻟﺍ ﻲﻓ ﺓﺭﻭﺩ ﻊﻳﻣﺟ
ﺞﻣﺎﻧﺭﺑﻟﺍ
Cotton(ﻥﻁﻘﻟﺍ)
Eco 40-60
Mixed Fabric(ﺔﻁﻠﺗﺧﻣ ﺔﺷﻣﻗﺃ)
Easy Care(ﺔﻠﻬﺳﻟﺍ ﺔﻳﺎﻧﻌﻟﺍ)
Silent Wash(ﺉﺩﺎﻫ ﻝﻳﺳﻏ)
Hygiene(ﻡﻘﻌﻣ ﻝﻳﺳﻏ)

ﺔﻅﺣﻼﻣ
ar_main.book.book Page 22 Thursday, October 22, 2020 4:16 PM
ﻝﻳﻐﺷﺗﻟﺍ
ﺔﻟﻭﻣﺣﻠﻟ ﻰﺻﻗﻷﺍ ﺩﺣﻟﺍ3ﻡﺟﻛ
ﺔﻟﻭﻣﺣﻠﻟ ﻰﺻﻗﻷﺍ ﺩﺣﻟﺍ2ﻡﺟﻛ
ﺔﻟﻭﻣﺣﻠﻟ ﻰﺻﻗﻷﺍ ﺩﺣﻟﺍ3ﻡﺟﻛ
ﺔﻟﻭﻣﺣﻠﻟ ﻰﺻﻗﻷﺍ ﺩﺣﻟﺍ2ﻡﺟﻛ
20) ﺔﻳﻭﺋﻣ ﺔﺟﺭﺩ Cold(ﺩﺭﺑﻟﺍ) ﻰﺗﺣ 40 ﺔﺟﺭﺩ
(ﺔﻳﻭﺋﻣ
30) ﺔﻳﻭﺋﻣ ﺔﺟﺭﺩ Cold(ﺩﺭﺑﻟﺍ) ﻰﺗﺣ 40 ﺔﺟﺭﺩ
(ﺔﻳﻭﺋﻣ
40) ﺔﻳﻭﺋﻣ ﺔﺟﺭﺩ Cold(ﺩﺭﺑﻟﺍ) ﻰﺗﺣ 40 ﺔﺟﺭﺩ
(ﺔﻳﻭﺋﻣ
20 ﻥﻣ) ﺔﻳﻭﺋﻣ ﺔﺟﺭﺩ 20 ﻰﻟﺇ ﺔﻳﻭﺋﻣ ﺔﺟﺭﺩ 40
(ﺔﻳﻭﺋﻣ ﺔﺟﺭﺩ
Hand/Wool(ﻑﻭﺻﻟﺍ / ﺔﻳﺣﺎﻧ ﻥﻣﻭ)
.ﻝﻳﺳﻐﻠﻟ ﺔﻠﺑﺎﻘﻟﺍ
•ﺔﻟﺎﺳﻐﻟﺍ ﻲﻓ ﻝﻳﺳﻐﻠﻟ ﻝﺑﺎﻘﻟﺍ ﻑﻭﺻﻟﺎﺑ ﺹﺎﺧﻟﺍ ﻑﻅﻧﻣﻟﺍ ﻡﺍﺩﺧﺗﺳﺎﺑ ﺢﺻﻧُﻳ
Sportswear(ﺔﻳﺿﺎﻳﺭﻟﺍ ﺱﺑﻼﻣﻟﺍ)
•.ﺱﺑﻼﻣﻟﺍ ﻲﻓ ﺔﻣﺩﺧﺗﺳﻣﻟﺍﻭ ﻩﺎﻳﻣﻠﻟ ﺓﺩﺭﺎﻁﻟﺍ ﺵﺎﻣﻘﻟﺍ ﺔﻘﺑﻁ ﻊﻣ ﻪﻣﺩﺧﺗﺳﺍ
22
Delicates(ﺔﺳﺎﺳﺣﻟﺍ ﺱﺑﻼﻣﻟﺍ)
ﻑﺻﻭﻟﺍ.ﺔﻣﺭﺧﻣﻟﺍﻭ ﺔﻓﺎﻔﺷﻟﺍﻭ ﺔﻳﻠﺧﺍﺩﻟﺍ ﺱﺑﻼﻣﻟﺍ ﻝﻳﺳﻐﻟ ﺔﺑﺳﺎﻧﻣ
ﻑﺻﻭﻟﺍ ﺱﺑﻼﻣﻟﺍ ﻥﻣ ﺎﻫﺭﻳﻏﻭ ﻥﻳﺗﺎﺳﻔﻟﺍﻭ ﺔﻳﻠﺧﺍﺩﻟﺍ ﺱﺑﻼﻣﻟﺍﻭ ﻑﻭﺻﻟﺍ ﻝﺛﻣ ،ﺔﻟﺎﺳﻐﻟﺍ ﻝﺧﺍﺩ ﻭﺃ ﺩﻳﻟﺎﺑ ﺎﻬﻠﺳﻏ ﻥﻛﻣﻳ ﻲﺗﻟﺍ ﺔﻘﻳﻗﺭﻟﺍ ﺱﺑﻼﻣﻠﻟ ﺏﺳﺎﻧﻣ
ﻑﺻﻭﻟﺍ.ﺝﻭﺭﺧﻟﺍ ﺱﺑﻼﻣﻭ ﺔﻳﺿﺎﻳﺭﻟﺍ ﺱﺑﻼﻣﻟﺍ ﻝﺛﻣ ﺱﺑﻼﻣﻟﺍ ﻥﻣ ﺔﺻﺎﺧ ﻉﺍﻭﻧﻷ ﺏﺳﺎﻧﻣ
Speed 14 ﻊﻳﺭﺳ ﻝﻳﺳﻏ) 14(ﺔﻘﻳﻗﺩ
ﻑﺻﻭﻟﺍ ﺓﺩﻣﻟ ﺥﺎﺳﺗﻻﺍ ﺔﻠﻳﻠﻗ ﺱﺑﻼﻣﻟﺍﻭ ﺓﺭﻳﻐﺻﻟﺍ ﺕﻻﻭﻣﺣﻟﺍ ﻝﺳﻐﻟ ﺏﺳﺎﻧﻣ14.ﺎًﺑﻳﺭﻘﺗ ﺔﻘﻳﻗﺩ
ﺔﻟﻭﻣﺣﻠﻟ ﻰﺻﻗﻷﺍ ﺩﺣﻟﺍ2.5) ﻡﺟﻛ 1(ﻑﺎﺣﻟ
رﺎﯾﻌﻣﻟا ﻊﻣ ﺞﻣﺎﻧرﺑﻟا ﻖﻓاوﺗ ىدﻣ رﺎﺑﺗﺧﻻ "rpm 1400 + ℃60
نﻣ رﻛُذ ﺎﻣ وأ سﺑﻼﻣﻠﻟ ﺔﻌﻧﺻﻣﻟا ﺔﻛرﺷﻟا نﻣ ﺔﻣدﻘﻣﻟا ﺔﯾﺎﻧﻌﻟا تﺎﻘﺻﻠﻣ عﺎﺑﺗا ﻰﻠﻋ بظاو .ﮫﺗرﺗﺧا يذﻟا لﯾﺳﻐﻟا ﺞﻣﺎﻧرﺑﻟ ﺔﺑﺳﺎﻧﻣﻟا ةرارﺣﻟا ﺔﺟرد ددﺣ
+(فﯾﺛﻛ)
Intensive,(
Cold(ﺩﺭﺑﻟﺍ) ) Cold(ﺩﺭﺑﻟﺍ) ﻰﺗﺣ 40 ﺔﺟﺭﺩ
(ﺔﻳﻭﺋﻣ
Tub Clean(ﺽﻭﺣﻟﺍ ﻑﻳﻅﻧﺗ) --
Rinse+Spin(ﻑﻳﺷﻧﺗ + ﻑﻁﺷ) -ﻥﻧﻘﻣ :ﺔﻟﻭﻣﺣﻠﻟ ﻰﺻﻗﻷﺍ ﺩﺣﻟﺍ
ﻌﻧﻣ ﻡﺩﺧﺗﺳﺍ .ﻝﻳﺳﻐﻟﺍ ﻥﺍﺭﻭﺩﻭ ﻑﻁﺷﻟ ﺔﺑﺳﺎﻧﻣ
ِ
ّ
Eco 40-60 )Eco 40-60
.سﺑﻼﻣﻟﺎﺑ ررﺿ عوﻗو بﻧﺟﺗﻟ كﻟذو لﯾﺳﻐﻟا ةرﺷﺎﺑﻣ دﻧﻋ تﺎﻣﯾﻠﻌﺗ
" رﺎﯾﺧ ﻰﻠﻋ ﺞﻣﺎﻧرﺑﻟا طﺑﺿا
. IEC60456
Duvet(ﻑﺎﺣﻠﻟﺍ)
ﻑﺻﻭﻟﺍ.ﻙﻟﺫ ﻰﻟﺇ ﺎﻣﻭ ،ﺔﻛﻳﺭﻷﺍ ﺔﻳﻁﻏﺃﻭ ،ﺩﺋﺎﺳﻭﻟﺍﻭ ،ﺭﻳﺭﺳﻟﺍ ﺔﻳﻁﻏﺃ ﻝﺛﻣ ﻡﺟﺣﻟﺍ ﺓﺭﻳﺑﻛ ﻊﻁﻗ ﻝﻳﺳﻏ ﻲﻓ ﻡﺩﺧﺗﺳﺗ
ﻑﺻﻭﻟﺍ.ﺯﺎﻬﺟﻟﺍ ﺽﻭﺣ ﻥﻣ ﻲﻠﺧﺍﺩﻟﺍ ءﺯﺟﻟﺍ ﻑﻳﻅﻧﺗ ﻲﻓ ﺔﻔﻳﻅﻭﻟﺍ ﻩﺫﻫ ﺩﻋﺎﺳﺗ
ﻑﺻﻭﻟﺍ.ﺔﺟﺎﺣﻟﺍ ﺏﺳﺣ ﺔﺷﻣﻗﻸﻟ ﻡ
•
•
•.ﺎﻫﺩﻳﺭﺗ ﻲﺗﻟﺍ ﺞﻣﺍﺭﺑﻠﻟ ﻥﻳﺗﺑﺳﺎﻧﻣﻟﺍ ﻥﺍﺭﻭﺩﻟﺍ ﺔﻋﺭﺳﻭ ﻝﻳﺳﻐﻟﺍ ﺓﺭﺍﺭﺣ ﺔﺟﺭﺩ ﺩﺩﺣ
•.ﺔﺣﺿﻭﻣﻟﺍ ﺓﺭﻭﺩﻟﺍ ﺓﺭﺍﺭﺣ ﺔﺟﺭﺩ ﻥﻋ ﺔﻳﻠﻌﻔﻟﺍ ﻩﺎﻳﻣﻟﺍ ﺓﺭﺍﺭﺣ ﺔﺟﺭﺩ ﻑﻠﺗﺧﺗ ﺩﻗ
•.ﺩﻳﺎﺣﻣ ﻑﻅﻧﻣ ﻡﺍﺩﺧﺗﺳﺎﺑ ﻰﺻﻭﻳ

ar_main.book.book Page 21 Thursday, October 22, 2020 4:16 PM
21
ﻝﻳﻐﺷﺗﻟﺍ
ﺞﻣﺍﺭﺑﻟﺍ ﻝﻭﺩﺟ
ﻝﻳﺳﻐﻟﺍ ﺞﻣﺎﻧﺭﺑ
ﺍﻟﻌﺭﺑﻳﺔ
ﻥﻧﻘﻣ :ﺔﻟﻭﻣﺣﻠﻟ ﻰﺻﻗﻷﺍ ﺩﺣﻟﺍ
ﺭﻭﻔﻟﺍ ﻰﻠﻋ
ﻥﻧﻘﻣ :ﺔﻟﻭﻣﺣﻠﻟ ﻰﺻﻗﻷﺍ ﺩﺣﻟﺍ
ﺔﻟﻭﻣﺣﻠﻟ ﻰﺻﻗﻷﺍ ﺩﺣﻟﺍ4ﻡﺟﻛ
ﺔﻟﻭﻣﺣﻠﻟ ﻰﺻﻗﻷﺍ ﺩﺣﻟﺍ4ﻡﺟﻛ
ﺞﻣﺎﻧﺭﺑﻟﺍ ﻝﻳﻐﺷﺗ ءﺩﺑ ﻲﻓ ﺏﺑﺳﺗﻳ ﻝﻣﻌﻠﻟ ﺞﻣﺎﻧﺭﺑ ﺩﻳﺩﺣﺗ ﻥﻭﺩ
Cotton(ﻥﻁﻘﻟﺍ)
40) ﺔﻳﻭﺋﻣ ﺔﺟﺭﺩ Cold(ﺩﺭﺑﻟﺍ) ﻰﺗﺣ 95 ﺔﺟﺭﺩ
(ﺔﻳﻭﺋﻣ
ﺕﻗﺅﻣ ﻑﺎﻘﻳﺇ/ءﺩﺑ
.ﺔﻳﺿﺍﺭﺗﻓﻻﺍ ﺕﺍﺩﺍﺩﻋﻹﺍ ﻡﺍﺩﺧﺗﺳﺎﺑ
40 ﻥﻣ) ﺔﻳﻭﺋﻣ ﺔﺟﺭﺩ 40 ﻰﻟﺇ ﺔﻳﻭﺋﻣ ﺔﺟﺭﺩ 60
(ﺔﻳﻭﺋﻣ ﺔﺟﺭﺩ
40) ﺔﻳﻭﺋﻣ ﺔﺟﺭﺩ Cold(ﺩﺭﺑﻟﺍ) ﻰﺗﺣ 60 ﺔﺟﺭﺩ
(ﺔﻳﻭﺋﻣ
.(ﺭﺋﺎﺗﺳﻟﺍ/ﺔﻔﺣﻟﻷﺍﻭ ﻑﻭﺻﻟﺍﻭ ﺔﻣﺗﺎﻘﻟﺍ ﺱﺑﻼﻣﻟﺍﻭ ﺔﻳﺿﺎﻳﺭﻟﺍ
40) ﺔﻳﻭﺋﻣ ﺔﺟﺭﺩ Cold(ﺩﺭﺑﻟﺍ) ﻰﺗﺣ 60 ﺔﺟﺭﺩ
(ﺔﻳﻭﺋﻣ
Cotton(ﻥﻁﻘﻟﺍ)
ﻑﺻﻭﻟﺍ.ﺔﻔﻠﺗﺧﻣﻟﺍ ﻝﺳﻐﻟﺍ ﺽﻭﺣ ﺕﺎﻛﺭﺣ ﻥﻳﺑ ﻊﻣﺟﻟﺍ ﻝﻼﺧ ﻥﻣ ﻱﺩﺎﻌﻟﺍ ﺦﺳﺗﻣﻟﺍ ﻝﻳﺳﻐﻟﺍ ﻝﺳﻐﺑ ﻡﻭﻘﻳ
• ﺭﺯﻟﺍ ﻰﻠﻋ ﻁﻐﺿﻟﺍ
Eco 40-60
ﻑﺻﻭﻟﺍ ﺩﻧﻋ ﻝﻳﺳﻐﻠﻟ ﺔﻠﺑﺎﻗ ﺎﻬﻧﺃ ﺎﻬﻳﻓ ﺔﻳﺎﻧﻌﻟﺍ ﺕﺎﻘﺻﻠﻣ ﺭﻛﺫﺗ ﻲﺗﻟﺍﻭ ﻲﻌﻳﺑﻁ ﻝﻛﺷﺑ ﺔﺧﺳﺗﻣﻟﺍ ﺔﻳﻧﻁﻘﻟﺍ ﺱﺑﻼﻣﻟﺍ ﻝﺳﻐﻟ40 ﻭﺃ ﺔﻳﻭﺋﻣ ﺔﺟﺭﺩ 60 ﺔﺟﺭﺩ
.ﺔﻳﻭﺋﻣ
Mixed Fabric(ﺔﻁﻠﺗﺧﻣ ﺔﺷﻣﻗﺃ)
ﻑﺻﻭﻟﺍ.ﻪﺳﻔﻧ ﺕﻗﻭﻟﺍ ﻲﻓ ﺔﻁﻠﺗﺧﻣﻟﺍ ﺔﺟﺳﻧﻷﺍ ﻝﺳﻐﻟ ﺏﺳﺎﻧﻣ
• ﺱﺑﻼﻣﻟﺍﻭ ﺔﻣﻋﺎﻧﻟﺍ ﺱﺑﻼﻣﻟﺍ/ﺭﻳﺭﺣﻟﺍ) ﻝﺛﻣ ﺱﺑﻼﻣﻟﺍ ﻥﻣ ﺔﺻﺎﺧﻟﺍ ﻉﺍﻭﻧﻷﺍ ﺽﻌﺑ ءﺎﻧﺛﺗﺳﺎﺑ ﺔﺷﻣﻗﻷﺍ ﻥﻣ ﺔﻔﻠﺗﺧﻣ ﻉﺍﻭﻧﺃ ﻊﻣ ﻡﺩﺧﺗﺳﻳ
Easy Care(ﺔﻠﻬﺳﻟﺍ ﺔﻳﺎﻧﻌﻟﺍ)
ﻑﺻﻭﻟﺍ.ﺎﻬﻠﺳﻏ ﺩﻌﺑ ﻲﻛﻟﺍ ﻰﻟﺇ ﺝﺎﺗﺣﺗ ﻻ ﻲﺗﻟﺍ ﺱﺑﻼﻣﻟﺍ ﻝﺳﻐﻟ ﺏﺳﺎﻧﻣ
•.ﺭﺗﺳﻳﻟﻭﺑﻟﺍﻭ ،ﻙﻳﻠﻳﺭﻛﻷﺍﻭ ،ﺩﻳﻣﺃ ﻲﻟﻭﺑﻟﺍ ﻊﻣ ﻡﺩﺧﺗﺳﻳ
ﺔﻟﻭﻣﺣﻠﻟ ﻰﺻﻗﻷﺍ ﺩﺣﻟﺍ5ﻡﺟﻛ
40) ﺔﻳﻭﺋﻣ ﺔﺟﺭﺩ Cold(ﺩﺭﺑﻟﺍ) ﻰﺗﺣ 60 ﺔﺟﺭﺩ
(ﺔﻳﻭﺋﻣ
Silent Wash(ﺉﺩﺎﻫ ﻝﻳﺳﻏ)
ﻑﺻﻭﻟﺍ.ﻯﺭﺧﻷﺍ ﻝﻳﺳﻐﻟﺍ ﺞﻣﺍﺭﺑ ﻥﻣ ﻝﻗﺃ ﺯﺍﺯﺗﻫﺍﻭ ءﺎﺿﻭﺿﺑ ﺱﺑﻼﻣﻟﺍ ﻝﺳﻐﻟ ﺏﺳﺎﻧﻣ
•.(ﺔﻳﻠﺧﺍﺩﻟﺍ ﺱﺑﻼﻣﻟﺍ) ًﻼﻳﻠﻗ ﺔﺧﺳﺗﻣﻟﺍ ءﺎﺿﻳﺑﻟﺍ ﺔﻳﻧﻁﻘﻟﺍ ﺱﺑﻼﻣﻠﻟ ﺩﺍﺩﻋﻹﺍ ﺍﺫﻫ ﻡﺩﺧﺗﺳﺍ
Hygiene(ﻡﻘﻌﻣ ﻝﻳﺳﻏ) 60ﺔﻳﻭﺋﻣ ﺔﺟﺭﺩ ﺔﻟﻭﻣﺣﻠﻟ ﻰﺻﻗﻷﺍ ﺩﺣﻟﺍ4ﻡﺟﻛ
ﻑﺻﻭﻟﺍ.ﺔﻌﻔﺗﺭﻣ ﺓﺭﺍﺭﺣ ﺔﺟﺭﺩ ﻰﻠﻋ ﺱﺑﻼﻣﻟﺍ ﻝﻳﺳﻐﻟ ﺏﺳﺎﻧﻣ
Baby Care(ﻝﺎﻔﻁﻷﺍ ﺱﺑﻼﻣﺑ ﺔﻳﺎﻧﻋ) 60ﺔﻳﻭﺋﻣ ﺔﺟﺭﺩ ﺔﻟﻭﻣﺣﻠﻟ ﻰﺻﻗﻷﺍ ﺩﺣﻟﺍ4ﻡﺟﻛ
ﻑﺻﻭﻟﺍ.ﻝﺿﻓﺃ ءﺍﺩﺃﻭ ﺔﻁﻳﺳﺑ ﺕﺎﻛﺭﺣﺑ ﻝﺎﻔﻁﻷﺍ ﺱﺑﻼﻣ ﻝﺳﻐﺑ ﻡﻭﻘﻳ

ar_main.book.book Page 20 Thursday, October 22, 2020 4:16 PM
ﻝﻳﻐﺷﺗﻟﺍ
20
ءﺎﻣﻟﺍ ﻲﻘﻧﻣ ﺔﻓﺎﺿﺇ
ﻡﺍﺩﺧﺗﺳﺍ ﻥﻣ ﺩﺣﻠﻟ ،ﺔﻳﺳﻠﻛﻟﺍ ﺏﺳﺍﻭﺭﻟﺍ ﻡﻭﺎﻘﻣ ﻝﺛﻣ ءﺎﻣﻟﺍ ﻲﻘﻧﻣ ﻡﺍﺩﺧﺗﺳﺍ ﻥﻛﻣُﻳ
ﺗﻟﺍ ﻡﺗﻳﻭ .ءﺎﻣﻟﺍ ﻲﻘﻧﻣ ﻡﺛ ﻑﻅﻧﻣﻟﺍ ﺔﻓﺎﺿﺇ ًﻻﻭﺃ ﻙﻳﻠﻋ ﻥﻳﻌﺗﻳ
.ءﺎﻣﻟﺍ ﺭﺳﻋ ﻖﻁﺎﻧﻣ ﻲﻓ ﺕﺎﻔﻅﻧﻣﻟﺍ
.ﺓﻭﺑﻌﻟﺍ ﻰﻠﻋ ﺓﺩﺩﺣﻣﻟﺍ
• ﺔﻳﻣﻛﻠﻟ ﺎًﻘﻓﻭ ﻊﻳﺯﻭ

ﺔﻅﺣﻼﻣ
ﺔﻅﺣﻼﻣ
ﺔﻅﺣﻼﻣ
ar_main.book.book Page 19 Thursday, October 22, 2020 4:16 PM
19
ﻝﻳﻐﺷﺗﻟﺍ
.ﻲﻌ
ﺵﺎﻣﻘﻟﺍ ﻡّﻌﻧﻣ ﺓﺭﻳﺟﺣ
.ﻑﻁﺷ ﺓﺭﻭﺩ ﺭﺧﺁ ﻝﻼﺧ ﺎًﻳﺋﺎﻘﻠﺗ ﻉَﺯﻭﻳ ﻱﺫﻟﺍ ﻝﺋﺎﺳﻟﺍ ﺵﺎﻣﻘﻟﺍ ﻡّﻌﻧﻣ ﺓﺭﻳﺟﺣﻟﺍ ﻱﻭﺣﺗ
ﺍﻟﻌﺭﺑﻳﺔ
ﻪﻧﺍﻭﺃ ﻝﺑﻗ ﻪﻌﻳﺯﻭﺗ ﻲﻓ ﺏﺑﺳﺗﻳ ﺩﻗ ءﻝﻣﻠﻟ ﺩﺣ ﻰﺻﻗﺃ ﻁﺧ ﺯﻭﺎﺟﺗﻳ ﺙﻳ
ﻲﻐﺑﻧﻳ .ﻙﻣُﺳﻟﺍ ﺩﻳﺩﺷ ﻥﺎﻛ ﺍﺫﺇ ﻉﺯﻭﻣﻟﺍ ﻝﺧﺍﺩ ﻝﻅﻳ ﺩﻘﻓ .ﺵﺎﻣﻘﻟﺍ ﻡﻌﻧﻣ ﺏﻠﺻﺗﻳ
.ﻪﻧﻣ ﻝﺋﺎﺳﻟﺍ ﻉﻭﻧﻟﺍ ﻭﺃ ﺵﺎﻣﻘﻟﺍ ﻡّﻌﻧﻣ ﻕﻭﺣﺳﻣ ﻡﺍﺩﺧﺗﺳﺍ ﻙﻧﻛﻣﻳ
.ﺱﺑﻼﻣﻟﺍ ﻰﻠﻋ ﻊﻘﺑ ﺭﻭﻬﻅ ﻲﻟﺎﺗﻟﺎﺑﻭ
.ﺎﻬﺗﻟﺍﺯﺇ ﺏﻌﺻﻳ ﺱﺑﻼﻣﻟﺍ ﻰﻠﻋ ﻊﻘﺑ ﻥﻳﻭﻛﺗ ﻰﻟﺇ ﻙﻟﺫ
.ﺔﻟﻭﻬﺳﺑ ﻖﻓﺩﺗﻳ ﻰﺗﺣ ﺔﻳ
ﺎﻐﻠﻟ ﺎًﻔﻳﺛﻛ ﻥﺎﻛ ﺍﺫﺇ ﻡّﻌﻧﻣﻟﺍ ﻑﻳﻔﺧﺗ
ﻳﺑﻁ
ﺣﺑ ﺵﺎ
• ﺭﻣﺃ ﺓﺭﻭﺩﻟﺍ ﺔﻳﺎﻬﻧ ﻲﻓ ﻉﺯﻭﻣﻟﺍ ﺕﺍﺭﻳﺟﺣ ﻝﺧﺍﺩ ﻩﺎﻳﻣﻟﺍ ﻥﻣ ﻝﻳﻠﻘﻟﺍ ﺩﻭﺟﻭ
.ﺔﻘﻣﺎﻐﻟﺍ ﻭﺃ ﺔﺳﺎﺳﺣﻟﺍ ﺱﺑﻼﻣﻟﺍ ﻭﺃ ﻑﻭﺻﻟﺍﻭ ﺔﻧﻭﻠﻣﻟﺍ ﺔﺟﺳﻧﻸﻟ ،ﻝﺎﺛﻣﻟﺍ
ﻣﻘﻟﺍ
• ﻡّﻌﻧﻣ ﺏﻛﺳ .ءﻝﻣﻠﻟ ﺩﺣ ﻰﺻﻗﺃ ﻁﺧ ﻰﻟﺇ ﻝﺻﻳ ﻥﺃ ﻰﻟﺇ ﺵﺎﻣﻘﻟﺍ ﻡّﻌﻧﻣ ﺏﻛﺳﺍ
.ﺽﻳﺑﻣ ﻰﻠﻋ ﻱﻭﺗﺣﻳ ﻝﻳﺳﻏ ﻕﻭﺣﺳﻣ ﻡﺩﺧﺗﺳﺍ ،ﺔﺣﺗﺎﻔﻟﺍ
ﻓﺃ ﻝﻳﺳﻏ ﺞﺋﺎﺗﻧ ﻰﻠﻋ ﻝﻭﺻﺣﻠﻟ
.ﺔﺣﺋﺍﺭ ﻭﺃ ،ﻑﻁﺷﻟﺍ ءﺍﺩﺃ ﻲﻓ ﻑﻌﺿ ﻭﺃ
•.ءﺎﻣﻟﺍ ﺓﺭﺍﺭﺣ ﺔﺟﺭﺩ ﺭﺎﻳﺗﺧﺍﻭ ﻑﻅﻧﻣﻟﺍ ﺔﻓﺎﺿﺇ ﻝﺑﻗ ،ﺱﺑﻼﻣﻟﺍ ﻖﺻﻠﻣ ﻊﺟﺍﺭ
•:ﺱﺑﻼﻣﻟﺍ ﻥﻣ ﻉﻭﻧ ﻝﻛﻟ ﺔﺻﺻﺧﻣﻟﺍ ﺕﺎﻔﻅﻧﻣﻟﺍ ﻡﺩﺧﺗﺳﺍ
- ﻝﻳﺑﺳ ﻰﻠﻋ ،ﺓﺩﺩﺣﻣ ﺕﺎﻣﺍﺩﺧﺗﺳﻻ ﻝﺋﺎﺳﻟﺍ ﻑﻅﻧﻣﻟﺍ ﻊﻳﻧﺻﺗ ﻡﺗﻳ ﺎﻣ ﺎًﺑﻟﺎﻏ
-.ﺔﺟﺳﻧﻷﺍ ﻉﺍﻭﻧﺃ ﻊﻳﻣﺟﻟ ﺎًﻣﺋﻼﻣ ﻥﻭﻛﻳ ﻝﻳﺳﻐﻟﺍ ﻕﻭﺣﺳﻣ
- ﻥﺍﻭﻟﻷﺍ ﺕﺍﺫﻭ ءﺎﺿﻳﺑﻟﺍ ﺱﺑﻼﻣﻠﻟ ﻝﺿ
-.ﻝﻳﺳﻐﻟﺍ ﺓﺭﻭﺩ ﺔﻳﺍﺩﺑ ﻲﻓ ﻉﺯﻭﻣﻟﺍ ﻥﻣ ﻑﻅﻧﻣﻟﺍ ﻖﻓﺩﺗﻳ
• ،ﺩﺍﺩﺳﻧﺍ ﺙﻭﺩﺣ ﻰﻟﺇ ﻙﻟﺫ ﻱﺩﺅﻳ ﻥﺃ ﻥﻛﻣﻳ ﺙﻳﺣ .ﺏﻠﺻﺗﺗ ﺕﺎﻔﻅﻧﻣﻟﺍ ﻙﺭﺗﺗ ﻻ
•.ﺔﻌﻧﺻﻣﻟﺍ ﺔﻛﺭﺷﻟﺍ ﺕﺎﻳﺻﻭﺗﻟ ﺎًﻘﻓﻭ :ﺔﻠﻣﺎﻛﻟﺍ ﺔﻟﻭﻣﺣﻟﺍ
• :ﺔﻳﺋﺯﺟﻟﺍ ﺔﻟﻭﻣﺣﻟﺍ1/2.ﺓﺩﺎﺗﻌﻣﻟﺍ ﺔﻳﻣﻛﻟﺍ
• :ﺔﻟﻭﻣﺣﻠﻟ ﻰﻧﺩﻷﺍ ﺩﺣﻟﺍ1/3.ﺔﻠﻣﺎﻛﻟﺍ ﺔﻟﻭﻣﺣﻟﺍ
ﻉﺯﻭﻣﻟﺍ ﻡﺍﺩﺧﺗﺳﺍ
• ﻱﺩﺅﻳ ﺩﻘﻓ ،ﻝﺳﻐﻟﺍ ﺽﻭﺣ ﻝﺧﺍﺩ ًﺓﺭﺷﺎﺑﻣ ﺱﺑﻼﻣﻟﺍ ﻰﻟﺇ ﺵﺎﻣﻘﻟﺍ ﻡّﻌﻧﻣ ﻑﺿﺗ ﻻ
• ﻥﺃ ﻥﻛﻣﻳ ﺙﻳﺣ .ﻡﻭﻳ ﻥﻣ ﺭﺛﻛﻷ ﺕﺎﻔﻅﻧﻣﻟﺍ ﺝﺭﺩ ﻲﻓ ﺵﺎﻣﻘﻟﺍ ﻡّﻌﻧﻣ ﻙﺭﺗﺗ ﻻ
.ﺔﻣﺋﻼﻣﻟﺍ ﺕﺍﺭﻳﺟﺣﻟﺍ ﻝﺧﺍﺩ ﻡّﻌﻧﻣﻟﺍﻭ ﻑﻅﻧﻣﻟﺍ ﻑﺿﺃ
•.ءﺎﻣﻟﺎﺑ ﺩﺍﺩﻣﻹﺍ ءﺎﻧﺛﺃ ﻲﻓ ﺝﺭﺩﻟﺍ ﺢﺗﻔﺗ ﻻ ،ﻝﻳﺳﻐﻟﺍ ﺭَﺷﺎﺑﻳ ﺎﻣﻧﻳﺑ
•.(ﻙﻟﺫ ﻰﻟﺇ ﺎﻣﻭ ،ﻥﻳﺯﻧﺑﻟﺍ) ﺕﺎﺑﻳﺫﻣﻟﺍ ﻡﺍﺩﺧﺗﺳﺍ ﻡﺩﻋ ﺏﺟﻳ
:ﻉﺯﻭﻣﻟﺍ ﻰﻟﺇ ﻑﻅﻧﻣﻟﺍ ﻥﻣ ﺭﺍﺩﻘﻣ ﺔﻓﺎﺿﻹ
.ﻉﺯﻭﻣﻟﺍ ﺝﺭﺩ ﺢﺗﻓﺍ
1
2
ﻑﻳﻅﻧﺗﻟﺍ ﺹﺍﺭﻗﺃ ﺔﻓﺎﺿﺇ
.ﻝﻳﺳﻐﻟﺍ ءﺎﻧﺛﺃ ﻑﻳﻅﻧﺗﻟﺍ ﺹﺍﺭﻗﺃ ﻡﺍﺩﺧﺗﺳﺍ ﻙﻧﻛﻣﻳ
ﻊﺿﻭ ﻝﺑﻗ ﻝﺳﻐﻟﺍ ﺽﻭﺣ ﻝﺧﺍﺩ ﻑﻳﻅﻧﺗﻟﺍ ﺹﺍﺭﻗﺃ ﻊﺿﻭ ﺏﺎﺑﻟﺍ ﺢﺗﻓﺍ
.ﺱﺑﻼﻣﻟﺍ
.ﺏﺎﺑﻟﺍ ﻖﻠﻏﺃﻭ ﻝﺳﻐﻟﺍ ﺽﻭﺣ ﻲﻓ ﺱﺑﻼﻣﻟﺍ ﻊﺿ
1
2
•.ﻉﺯﻭﻣﻟﺍ ﻝﺧﺍﺩ ﻑﻳﻅﻧﺗﻟﺍ ﺹﺍﺭﻗﺃ ﻊﺿﺗ ﻻ
.ﺓﺭﻭﺩﻟﺍ ءﺩﺑ ﻝﺑﻗ ءﻭﺩﻬﺑ ﺕﺎﻔﻅﻧﻣﻟﺍ ﻉﺯﻭﻣ ﺝﺭﺩ ﻖﻠﻏﺃ
.ﺞﻣﺎﻧﺭﺑﻟﺍ ﻁﺑﺿ ﻝﺑﻗ ﻝﺳﻐﻟﺍ ﺽﻭﺣ ﻝﺧﺍﺩ ﻪﻌﻳﺯﻭﺗ ﻭﺃ ﻯﺭﺧﺃ
ﻲﺳﻳﺋﺭﻟﺍ ﻝﻳﺳﻐﻟﺍ ﻑﻅﻧﻣ ﺓﺭﻳﺟﺣ
ﻲﺋﺩﺑﻣﻟﺍ ﻝﻳﺳﻐﻟﺍ ﻑﻅﻧﻣ ﺓﺭﻳﺟﺣ
ﻝﺋﺎﺳﻟﺍ ﺵﺎﻣﻘﻟﺍ ﻡّﻌﻧﻣ ﺓﺭﻳﺟﺣ
a
b
c
3
• ﺓﺭﻳﺟﺣ ﻝﺧﺍﺩ ﻑﻅﻧﻣﻟﺍ ﻖﻓﺩﺗ ﺓﺩﺎﻳﺯ ﻲﻓ ﺏﺑﺳﺗﻳ ﺩﻗ ﺓﻭﻘﺑ ﺝﺭﺩﻟﺍ ﻕﻼﻏﺇ
•.ﻪﻘﻠﻏ ءﺎﻧﺛﺃ ﺝﺭﺩﻟﺍ ﻲﻓ ﻙﺩﻳ ﻖﻠﻌﺗ ﻻ ﻰﺗﺣ ﺍًﺭﺫﺣ ﻥﻛ

ﺔﻅﺣﻼﻣ
ar_main.book.book Page 18 Thursday, October 22, 2020 4:16 PM
ﺔﻟﻭﻣﺣﻟﺍ ﻊﺿﻭ ﻝﺑﻗ ﺱﺑﻼﻣﻟﺍ ﺹﺣﻓ
.ًﻻﻭﺃ ﺓﺭﻳﺑﻛﻟﺍ
ﻑﺿﺃﻭ .ﺔﻟﻭﻣﺣﻟﺍ ﻲﻓ ﻥﺯﺍﻭﺗﻟﺍ ﻡﺩﻋ ﻰﻟﺇ ﺍﺫﻫ ﻱﺩﺅﻳ ﺩﻗ ﺙﻳﺣ .ﺔﻳﺩﺭﻓ ﺎًﺿﺍﺭﻏﺃ
.ﻥﻳﺗﻬﺑﺎﺷﺗﻣ ﻥﻳﺗﻌﻁﻗ ﻭﺃ ﺔﻌﻁﻗ
ﺟﻟﺍ ﻊﻳﻣﺟ ﺹﺣﻓﺍ
ﺙﺍﺩﺣﺇ ﻰﻟﺇ ﺢﻳﺗﺎﻔﻣﻟﺍﻭ ،ﺔﻳﻧﺩﻌﻣﻟﺍ ﻊﻁﻘﻟﺍﻭ ،ﻡﻼﻗﻷﺍﻭ ،ﺏﺎﻘﺛﻟﺍﻭ ،ﺭﻌﺷﻟﺍ ﻙﺑﺎﺷﻣﻭ
.ﻙﺳﺑﻼﻣﻭ ﺯﺎﻬﺟﻟﺍ ﻥﻣ ﻝﻛ ﻲﻓ ﺭﺭﺿ
.ﻝﻳﺳﻐﻟﺍ ﺔﻛﺑﺷ ﻲﻓ (ﺔﻳﻠﺧﺍﺩ
.ﻯﺭﺧﻷﺍ ﺱﺑﻼﻣﻟﺎﺑ
ﻘﺑﻟﺍﻭ ﺥﺎﺳﻭﻷﺍ ﺢﺳﻣﺍ
.ﺥﺎﺳﻭﻷﺍ ﺔﻟﺍﺯﺇ ﻲﻓ ﺓﺩﻋﺎﺳﻣﻠﻟ ﺎﻬﻠﺳﻏﻭ ﻊﻘﺑﻟﺍ ﻰﻠﻋ ءﺎﻣﻟﺍ ﻲﻓ
ﻝﻳﺳﻐﻟﺍ ﺔﻟﻭﻣﺣ ﺯﻳﻬﺟﺗ
• ﺽﺍﺭﻏﻷﺍ ﻊﺿﻭ .ﺔﻟﻭﻣﺣﻟﺍ ﻲﻓ ﺓﺭﻳﻐﺻﻟﺍﻭ ﺓﺭﻳﺑﻛﻟﺍ ﺽﺍﺭﻏﻷﺍ ﻥﻳﺑ ﻊﻣﺟﺍ
ﺱﺑﻼﻣﻟﺍ ﺯﻳﻬﺟﺗﺑ ﻡﻗ ﺎﻫﺩﻌﺑﻭ ،ﺞﺋﺎﺗﻧﻟﺍ ﻝﺿﻓﺃ ﻰﻠﻋ ﻝﺻﺣﺗﻟ ﻝﻳﺳﻐﻟﺍ ﺔﻟﻭﻣﺣ ﺯﺭﻓﺍ
.ﺔﻳﺎﻧﻌﻟﺍ ﺕﺎﻘﺻﻠﻣ ﻰﻠﻋ ﺓﺩﻭﺟﻭﻣﻟﺍ ﺯﻭﻣﺭﻟﺍ ﺏﺳﺣ
• ﻝﺳﻐﺗ ﻻﻭ .ﺔﻟﻭﻣﺣﻟﺍ ﻲﻟﺎﻣﺟﺇ ﻑﺻﻧ ﻥﻋ ﺓﺭﻳﺑﻛﻟﺍ ﺽﺍﺭﻏﻷﺍ ﺩﻳﺯﺗ ﻥﺃ ﺏﺟﻳ ﻻ
• ،ﺭﻳﻣﺎﺳﻣﻟﺍ ﻝﺛﻣ ءﺎﻳﺷﺃ ﻱﺩﺅﺗ ﺩﻘﻓ .ﺔﻏﺭﺎﻓ ﺎﻬﻧﺃ ﻥﻣ ﺩﻛﺄﺗﻠﻟ ﺏﻭﻳ
ﻝﻳﺩﻌﺗﺑ ﻡﻗ .ﻝﺳﻐﻟﺍ ﺓﺭﺍﺭﺣ ﺔﺟﺭﺩﻭ ﺞﻳﺳﻧﻟﺍ ﻉﻭﻧ ﻰﻠﻋ ﻱﻭﺗﺣﻳ ﻱﺫﻟﺍ ﻖﺻﻠﻣﻟﺍ
.ﺞﻳﺳﻧﻟﺍ ﻉﻭﻧﻟ ﺎًﻘﻓﻭ ﻥﺍﺭﻭﺩﻟﺍ ﺓﺩﺷ ﻭﺃ ﻥﺍﺭﻭﺩﻟﺍ ﺔﻋﺭﺳ
ﺱﺑﻼﻣﻟﺍ ﻊﻣ ﺥﺎﺳﺗﻻﺍ ﺓﺩﻳﺩﺷ ﺱﺑﻼﻣﻟﺍ ﻝﺳﻐﺑ ﻡﻘﺗ ﻼﻓ ،ﺎًﻧﻛﻣﻣ ﻙﻟ
ﻁﻠﺧ ﻥﻋ ﺞﺗﻧﻳ ﻥﺃ ﻥﻛﻣﻳ .ﺔﺣﺗﺎﻔﻟﺍ ﻭﺃ ءﺎﺿﻳﺑﻟﺍ ﺕﺎﺟﻭﺳﻧﻣﻟﺍ ﻥﻋ ﻝﺻﻔﻧﻣ ﻝﻛﺷﺑ
ﻥﻭﻟ ﺭﻳﻳﻐﺗ ﻭﺃ ﻥﻭﻠﻟﺍ ﻝﺎﻘﺗﻧﺍ ﺔﻏﻭﺑﺻﻣﻟﺍ ﺕﺎﺟﻭﺳﻧﻣﻟﺎﺑ ﺔﺣﺗﺎﻔﻟﺍ ﺕﺎﺟﻭﺳﻧﻣﻟﺍ
ﻡﻛﺍﺭﺗ ﻰﻟﺇ ﺔﻳﻧﺎﺗﻛﻟﺍ ﺕﺎﺟﺗﻧﻣﻟﺍ ﻝﻣﻌﺗ ﻥﺃ ﻥﻛﻣﻳ .ﻥﺎﺗﻛﻟﺍ ﻊﻣﺟﺗ ﻲﺗﻟﺍ ﺕﺎﺟﺗﻧﻣﻟﺍﻭ
• ﻙﻼﺳﺄﺑ ﺓﺩﻭﺯﻣﻟﺍ ﺭﺩﺻﻟﺍ ﺕﻻﺎﻣﺣ ﻭﺃ ﺏﺭﺍﻭﺟﻟﺍ) ﺔﺳﺎﺳﺣﻟﺍ ﺔﺷﻣﻗﻷﺍ ﻝﺳﻏﺍ
• ﻖﻠﻌﺗ ﻥﻟ ءﺎﻳﺷﻷﺍ ﻩﺫﻫ ﻥﺃ ﻥﻣ ﺩﻛﺄﺗﻠﻟ ﻝﺳﻼﺳﻟﺍﻭ ﺕﺎﻓﺎﻁﺧﻟﺍﻭ ﺕﺎﺑﺎﺣﺳﻟﺍ ﻖﻠﻏﺃ
• ﺏﺍﺫﻣﻟﺍ ﻑﻅﻧﻣﻟﺍ ﻥﻣ ﺭﻳﻐﺻ ﺭﺍﺩﻘﻣ ﻊﺿﻭ ﻝﻼﺧ ﻥﻣ ﻊ
ﺱﺑﻼﻣﻟﺎﺑ ﺔﻳﺎﻧﻌﻟﺍ ﻖﺻﻠﻣ ﻥﻣ ﻖﻘﺣﺗﻟﺍ
.ﺎﻬﻠﺳﻏ ﺔﻘﻳﺭﻁﻭ ﺱﺑﻼﻣﻟﺍ ﺞﻳﺳﻧ ﺕﺎﻧﻭﻛﻣ ﺯﻭﻣﺭﻟﺍ ﻙﻟ ﺢﺿﻭﺗﺳ
ﺱﺑﻼﻣﻟﺍ ﻑﻳﻧﺻﺗ
.ﺎًﻧﻭﻟ ﺢﺗﻓﻷﺍ ﺱﺑﻼﻣﻟﺍ
.ﻥﺎﺗﻛﻠﻟ ﺔﻌﻣﺟﻣﻟﺍ ﺩﺍﻭﻣﻟﺍ ﻰﻠﻋ ﻥﺎﺗﻛﻟﺍ
ﻝﻳﻐﺷﺗﻟﺍ
ﺫ ﻥﺎﻛ ﺍﺫﺇﻭ
.ﺥﺎﺳﺗﻻﺍ ﺔﻔﻳﻔﺧ
ﺎﺟﺗﻧﻣ) ﻥﺎﺗﻛﻟﺍ
18
• ﻰﻠﻋ ﺏﻭﺗﻛﻣﻠﻟ ﺎًﻘﻓﻭ ﺱﺑﻼﻣﻟﺍ ﻑﻳﻧﺻﺗﺑ ﻡﻗ ،ﺞﺋﺎﺗﻧﻟﺍ ﻝﺿﻓﺃ ﻰﻠﻋ ﻝﻭﺻﺣﻠﻟ
• .ﺎﻬﺧﺎﺳﺗﺍ ﺔﺟﺭﺩﻟ ﺎًﻘﻓﻭ ﺱﺑﻼﻣﻟﺍ ﺯﺭﻓﺍ :(ﻑﻳﻔﺧ ،ﻱﺩﺎﻋ ،ﺩﻳﺩﺷ) ﺥﺎﺳﺗﻻﺍ ﺔﺟﺭﺩ
• ﺔﻏﻭﺑﺻﻣﻟﺍ ﻭﺃ ﺔﻘﻣﺎﻐﻟﺍ ﺕﺎﺟﻭﺳﻧﻣﻟﺍ ﻝﺳﻏﺍ :(ﻖﻣﺎﻏ ،ﺢﺗﺎﻓ ،ﺽﻳﺑﺃ) ﻥﻭﻠﻟﺍ
• ﺔﻳﻧﺎﺗﻛﻟﺍ ﺕﺎﺟﺗﻧﻣﻟﺍ ﻝﺻﻔﺑ ﻡﻗ : (ﻥﺎﺗﻛﻟﺍ ﻊﻣﺟﺗ ﺕﺎﺟﺗﻧﻣ ،ﺔﻳﻧﺎﺗﻛ ﺕ
ﺔﻣﻌﻧﻣﻟﺍ ﺩﺍﻭﻣﻟﺍﻭ ﺕﺎﻔﻅﻧﻣﻟﺍ ﺔﻓﺎﺿﺇ
ﻑﻅﻧﻣﻟﺍ ﺭﺍﺩﻘﻣ
ﻡﺩﺧﺗﺳﺍ .ﻝﺳﻐﻟﺍ ﺓﺭﺍﺭﺣ ﺔﺟﺭﺩﻭ ﻪﺧﺎﺳﺗﺍ ﻯﺩﻣﻭ ﻪﻧﻭﻟﻭ ﺞﻳﺳﻧﻟﺍ ﻉﻭﻧﻟ ﺎًﻘﻓﻭ
ﻥﻣ ﻉﻭﻧﻟﺍ ﺍﺫﻬﻟ (ﻲﻣﺎﻣﻷﺍ ﻝﻳﻣﺣﺗﻟﺍ) ﻝﺳﻐﻟﺍ ﺽﻭﺣ ﻁﻘﻓ ﺔﺑﺳﺎﻧﻣﻟﺍ ﺕﺎﻔﻅﻧﻣﻟﺍ
ﺣﺗ ﺩﻘﻓ ،ﻑﻅﻧﻣﻟﺍ ﻥﻣ ﺭﻳﺑﻛ ﺭﺍﺩﻘﻣ ﻡﺍﺩﺧﺗﺳﺍ ﺩﻧﻋ
.ﻙﺭﺣﻣﻟﺍ ﻰﻠﻋ ﺔﻟﻭﻣﺣﻟﺍ ﻝﻘﺛ ﻰﻟﺇ ﻱﺩﺅﻳ ﻭﺃ ﻝﻳﺳﻐﻟﺍ ﺓءﺎﻔﻛ ﻥﻣ
.ﻑﻅﻧﻣﻠﻟ ﺔﻌﻧﺻﻣﻟﺍ ﺔﻛﺭﺷﻟﺍ
.ﺭﻭﻔﻟﺍ ﻰﻠﻋ ﻝﻳﺳﻐﻟﺍ ﺓﺭﻭﺩ ﺃﺩﺑﺗﺳ
Delay End ﺕﻗﻭ)
.ﺽﻭﺣﻟﺍ ﻭﺃ ﺝﺭﺩﻟﺍ ﻲﻓ ﺏﻠﺻﺗﻳ ﺩﻗﻭ ﺭﻭﻔﻟﺍ ﻰﻠﻋ ﻝﺋﺎﺳﻟﺍ ﻊﻳﺯﻭﺗ ﻡﺗﻳﺳ ﺙﻳﺣ
ﻝﺿﻓﺃ ﻰﻠﻋ ﻝﻭﺻﺣﻠﻟ .ﺥﺎﺳﻭﻷﺍ ﻯﻭﺗﺳﻣﻭ ،ﺔﻟﻭﻣﺣﻟﺍ ﻡﺟﺣﻭ ،ءﺎﻣﻟﺍ ﺭﺳﻋﻭ
ﻱﺩﺅﻳ ﻙﻟﺫ ﻝﻌﻓ ﻥﻋ ﺱﻋﺎﻘﺗﻟﺍ .ﻑﻅﻧﻣﻟﺍ ﻡﺍﺩﺧﺗﺳﺍ ﻲﻓ ﻁﺍﺭﻓﻷﺍ ﺏﻧﺟﺗ ،ﺞﺋﺎﺗﻧﻟﺍ
Pre Wash( ﻲﺋﺩﺑﻣ ﻝﻳﺳﻏ)
ﺗﺳﺗ ﺕﻧﻛ ﺍﺫﺇ ﻝﺋﺎﺳﻟﺍ ﻑﻅﻧﻣﻟﺍ ﻡﺩﺧﺗﺳﺗ ﻻ
ﺭﺎﻳﺧ ﺩﻳﺩﺣﺗﺑ ﺕﻣﻗ ﺍﺫﺇ ﻭﺃ
.ﺩﺣﻟﺍ ﻥﻋ ﺓﺩﺋﺍﺯ ٍﻭﺎﻏﺭ ﺙﻭﺩﺣ ﻰﻟﺇ
.ﺕﻼﺳﻐﻟﺍ
(ﻰﻬﺗﻧﺍ ﺭﻳﺧﺄﺗﻟﺍ
ﺔﻳﺎﻧﻌﻟﺍ ﺕﺎﻘﺻﻠﻣ ﻰﻠﻋ ﺓﺩﻭﺟﻭﻣﻟﺍ ﺯﻭﻣﺭﻟﺍ
ﺯﻣﺭﻟﺍﺞﻳﺳﻧﻟﺍ ﻉﻭﻧ/ﻝﻳﺳﻐﻟﺍ
•ﻱﺩﺎﻋ ﻝﻳﺳﻏ
• ﻩﺭﺎﻳﺗﺧﺍﻭ ،ﻑﻅﻧﻣﻠﻟ ﺔﻌﻧﺻﻣﻟﺍ ﺔﻛﺭﺷﻟﺍ ﺕﺎﻣﻳﻠﻌﺗﻟ ﺎًﻘﻓﻭ ﻑﻅﻧﻣﻟﺍ ﻡﺍﺩﺧﺗﺳﺍ ﺏﺟﻳ
•.ﻑﻅﻧﻣﻟﺍ ﺔﻳﻣﻛ ﻝﻳﻠﻘﺗ ﻙﻳﻠﻋ ﻥﻳﻌﺗﻳ ،ﻱﻭﺎﻏﺭﻟﺍ ﻥﻣ ﺭﻳﺛﻛﻟﺍ ﺙﻭﺩﺣ ﺔﻟﺎﺣ ﻲﻓ
• ﻝﻠﻘﻳ ﺍﺫﻫﻭ ﺍًﺩﺟ ﺓﺭﻳﺛﻛ ﺓﻭﻏﺭ ﺙﺩ
• ﺎﻫﺭﻓﻭﺗ ﻲﺗﻟﺍ ﺕﺍﺩﺎﺷﺭﻹﺍ ﻊﺑﺗﺎﻓ ،ﻝﺋﺎﺳ ﻑﻅﻧﻣ ﻡﺍﺩﺧﺗﺳﺍ ﻲﻓ ﺏﻏﺭﺗ ﺕﻧﻛ ﺍﺫﺇ
• ﺕﻧﻛ ﺍﺫﺇ ﻲﺳﻳﺋﺭﻟﺍ ﺕﺎﻔﻅﻧﻣﻟﺍ ﺝﺭﺩ ﻲﻓ ًﺓﺭﺷﺎﺑﻣ ﻝﺋﺎﺳﻟﺍ ﻑﻅﻧﻣﻟﺍ ﺏﻛﺳ ﻙﻧﻛﻣﻳ
• ﺔﻔﻳﻅﻭ ﻡﺩﺧ
• ،ءﺎﻣﻟﺍ ﺓﺭﺍﺭﺣ ﺔﺟﺭﺩ ﺏﺳﺣ ﻑﻅﻧﻣﻟﺍ ﻡﺍﺩﺧﺗﺳﺍ ﺭﺍﺩﻘﻣ ﻝﻳﺩﻌﺗ ﻰﻟﺇ ﺝﺎﺗﺣﺗ ﺩﻗ
.ﺡﻭﻣﺳﻣﻟﺍ ﻰﺻﻗﻷﺍ ﻲﻛﻳﻧﺎﻛﻳﻣﻟﺍ ﻁﻐﺿﻟﺍ ﺭﺍﺩﻘﻣ ﻙﻟﺫﻛﻭ
•ﺔﻁﻠﺗﺧﻣ ﺔﺟﺳﻧﺃ ،ﻥﻁﻗ
•ﺔﻠﻬﺳ ﺔﻳﺎﻧﻋ
•ﺔﻁﻠﺗﺧﻣ ﺔﺟﺳﻧﺃ ،ﻲﻋﺎﻧﺻ
•ﺹﺎﺧ ﺱﺎﺳﺣ ﻝﻳﺳﻏ
•ﺔﺳﺎﺳﺣ ﺱﺑﻼﻣ
•ﻁﻘﻓ ﻱﻭﺩﻳ ﻝﻳﺳﻏ
•ﺭﻳﺭﺣ ،ﻑﻭﺻ
•ﻝﺳﻐﻟﺍ ﻉﻭﻧﻣﻣ
• ﺞﻳﺳﻧﻟﺍ ﻉﻭﻧﺑ ﺔﻘﻠﻌﺗﻣﻟﺍ ﺕﺎﻣﻭﻠﻌﻣﻟﺍ ﺯﻣﺭﻟﺍ ﻝﻔﺳﺃ ﺔﻋﻭﺿﻭﻣﻟﺍ ﻁﺭُﺷﻟﺍ ﻙﻳﻁﻌﺗ

ar_main.book.book Page 17 Thursday, October 22, 2020 4:16 PM
17
ﻝﻳﻐﺷﺗﻟﺍ
ﺍﻟﻌﺭﺑﻳﺔ
ﻑﺻﻭﻟﺍ
ﺔﻟﺎﺣﻟﺍﻭ ﺕﻗﻭﻟﺍ ﺔﺷﺎﺷ
.ﺔﻟﻭﻣﺣﻟﺍ ﺭﺎﻌﺷﺗﺳﺍ ﻥﻣ ءﺎﻬﺗﻧﻻﺍ ﺩﻌﺑ ﻙﻟﺫﻭ ﻝﺳﻐﻟﺍ ﺔﻠﺣﻟ ﺔﺑﺳﺎﻧﻣ ﺔﻳﻧﺍﺭﻭﺩ ﺕﺎﻛﺭﺣ ءﺍﺭﺟﺇ ﺢﻳﺗﻳ
ﺞﻣﺍﺭﺑﻟﺍ ﺩﻳﺩﺣﺗ ﺩﻧﻋ ﻁﻳﺷﻧﺗﻟﺍ ﺩﻳﻗ ﻥﻭﻛﻳ
Cotton(ﻥﻁﻘﻟﺍ)
Easy Care(ﺔﻠﻬﺳﻟﺍ ﺔﻳﺎﻧﻌﻟﺍ)
ﻟﻭﻣﺣﻟﺍ ﻥﺯﻭ) ﺓﺭﻳﺛﻛ ﺔﻳﺟﺭﺎﺧ ﻝﻣﺍﻭﻋ ﺭﺛﺅﺗ ﺩﻗ .ﺔﻳﻌﻳﺑﻁﻟﺍ ﻝﻳﻐﺷﺗﻟﺍ ﻑﻭﺭﻅ ﻰﻠﻋ ﺕﻗﻭﻟﺍ ﻑﻗﻭﺗﻳ ﺫﺇ .ﺏﺳﺣﻓ ﻱﺭﻳﺩﻘﺗ ﺕﻗﻭ ﻭﻫ ﺭﻫﺎﻅﻟﺍ ﺕﻗﻭﻟﺍ
ﻭ
.ﻲﻌﻳﺑﻁ ﺭﻣﻷﺍ ﺍﺫﻫ .ﺎﻬﻣﺟﺣ ﻥﻋ ﺔﻟﻭﻣﺣﻟﺍ ﺭﺎﻌﺷﺗﺳﺍ ﺭﺎﻳﺧ ﻑﺷﻛﻳ ﺎﻣﺩﻌﺑ ﺕﻗﻭﻟﺍ ﺭﻬﻅﻳﺳﻓ ،ﺔﺷﺎﺷﻟﺍ ﻰﻠﻋ
Mixed Fabric(ﺔﻁﻠﺗﺧﻣ ﺔﺷﻣﻗﺃ)
ﻭ ،
ﺡﺎﺑﺻﻣ ﻖَﻠﻐﻳﺳ ،ﺔﻠﺣﺭﻣﻟﺍ ﻝﺎﻣﻛﺗﺳﺍLED ﺡﺎﺑﺻﻣ ﻑﻗﻭﺗﻳﺳﻓ ،ﺎًﺗﻗﺅﻣ ﺓﺭﻭﺩﻟﺍ ﻑﺎﻘﻳﺇ ﻡﺗ ﺍﺫﺇ .LED.ﺽﻳﻣﻭﻟﺍ ﻥﻋ ﺔﻁﺷﻧﻟﺍ ﺔﻠﺣﺭﻣﻠﻟ
.ﻲﻘﻳﻘﺣﻟﺍ ﺕﻗﻭﻟﺍ ﻲﻓ (ﺎﻫﺭﻳﻏﻭ ﻝﺧﺍﺩﻟﺍ ءﺎﻣﻟﺍ ﺓﺭﺍﺭﺣ ﺔﺟﺭﺩﻭ ،ﺔﻓﺭﻐﻟﺍ ﺓﺭﺍﺭﺣ
.ﺓﺭﻓﺎﺻﻟﺍ ﺕﻭﺻ ﻝﻳﻐﺷﺗ ﻑﺎﻘﻳﺇ ﺩﻧﻋ ﺎًﺋﻳﺿﻣ ﻥﻭﻛﻳ
ﺭﺯﻟﺍ ءﺎﻧﺛﺗﺳﺎﺑ ﻡﻛﺣﺗﻟﺍ ﺔﺣﻭﻟ ﻕﻼﻏﺇ ﺩﻧﻋ ﺓءﺎﺿﻹﺍ ﺩﻳﻗ ﻥﻭﻛﻳ
ﺔﻗﺎﻁﻟﺍ
.
.ﺏﺎﺑﻟﺍ ﻕﻼﻏﺇﻭ ﺞﻣﺎﻧﺭﺑﻟﺍ ءﺩﺑ ﺩﻧﻋ ﺓءﺎﺿﻹﺍ ﺩﻳﻗ ﻥﻭﻛﻳ
AI DD
AI DD
M
M
.ﺎﻬﻠﻳﻐﺷﺗﻭ
ﺞﻣﺎﻧﺭﺑﻟﺍ ﺔﻟﺎﺣ ﺕﺍﺭﺷﺅﻣ
ﻲﻘﺑﺗﻣﻟﺍ ﻱﺭﻳﺩﻘﺗﻟﺍ ﺕﻗﻭﻟﺍ
---
q
i
H
a
•
•
b
• ﺡﺎﺑﺻﻣ ﺽﻣﻭﻳﺳLED ﺢﻳﺑﺎﺻﻣ ﻝﻅﺗﺳ ﺎﻣﻧﻳﺑ ﻝﻳﺳﻐﻟﺍ ﺞﻣﺎﻧﺭﺑ ﻝﻳﻐﺷﺗ ﺩﻧﻋ ﺔﻁﺷﻧﻟﺍ ﺔﻠﺣﺭﻣﻠﻟ LED ﺩﻌﺑ .ﺭﺍﺭﻘﺗﺳﻻﺍ ﺔﻳﻌﺿﻭ ﻲﻓ ﻯﺭﺧﻷﺍ ﻝﺣﺍﺭﻣﻠﻟ
c
•.ﺓﺩﺩﺣﻣﻟﺍ ﺕﺍﺭﺎﻳﺧﻠﻟ ﺎًﻌﺑﺗ ﺕﻗﻭﻟﺍ ﺍﺫﻫ ﺭﻳﻐﺗﻳﺳ .ﺞﻣﺎﻧﺭﺑﻟﺍ ﺍﺫﻬﻟ ﺩﺩﺣﻣﻟﺍ ﻲﺿﺍﺭﺗﻓﻻﺍ ﺕﻗﻭﻟﺍ ﺽﺭﻋ ﻡﺗﻳ ،ﻝﻳﺳﻐﻟﺍ ﺞﻣﺎﻧﺭﺑ ﺩﻳﺩﺣﺗ ﺩﻧﻋ
• ﺭﻬﻅ ﺍﺫﺇ
• ﺔﺟﺭﺩﻭ ،ﺔ
d
e
f

ar_main.book.book Page 16 Thursday, October 22, 2020 4:16 PM
ﻑﺻﻭﻟﺍ
ﻝﻳﻐﺷﺗﻟﺍ
16
ﻡﻛﺣﺗﻟﺍ ﺔﺣﻭﻟ
.ﺭﺧﻵ ﺯﺍﺭﻁ ﻥﻣ ﺔﻘﻳﻘﺣﻟﺍ ﻡﻛﺣﺗﻟﺍ ﺔﺣﻭﻟ ﻑﻠﺗﺧﺗ ﺩﻗ
ﻡﻛﺣﺗﻟﺍ ﺔﺣﻭﻟ ﺹﺍﻭﺧ
ﺔﻗﺎﻁﻟﺍ
ﻝﻳﻐﺷﺗﻟﺍ ﻑﺎﻘﻳﺇ/ﻝﻳﻐﺷﺗﻟﺍ ﺭﺯ
a
•.ﺔﻟﺎﺳﻐﻟﺍ ﻝﻳﻐﺷﺗﻟ ﺭﺯﻟﺍ ﺍﺫﻫ ﻰﻠﻋ ﻁﻐﺿﺍ
ﺞﻣﺎﻧﺭﺑﻟﺍ ﺽﺑﻘﻣ
ﺕﻗﺅﻣ ﻑﺎﻘﻳﺇ/ءﺩﺑ
ﺔﻳﻓﺎﺿﺇ ﻑﺋﺎﻅﻭﻭ ﺕﺍﺭﺎﻳﺧ
ﻝﻳﺳﻐﻟﺍ ﺞﻣﺎﻧﺭﺑ ﺭﺍﺭﺯﺃ ﺹﻳﺻﺧﺗ
.ﺩﺩﺣﻣﻟﺍ ﺞﻣﺎﻧﺭﺑﻠﻟ ﻥﺍﺭﻭﺩﻟﺍ ﺔﻋﺭﺳ ﺕﺍﺩﺍﺩﻋﺇ ﻭﺃ ،ءﺎﻣﻟﺍ ﺓﺭﺍﺭﺣ ﺔﺟﺭﺩ ﻁﺑﺿﻟ ﺭﺍﺭﺯﻷﺍ ﻩﺫﻫ ﻡﺩﺧﺗﺳﺍ
.ﺽﺭﻌﻟﺍ ﺔﺷﺎﺷ ﻲﻓ ﺔﻳﺿﺍﺭﺗﻓﻻﺍ
ﺣﺗﻟﺍ ﺔﺣﻭﻟ ﻰﻠﻋ ﺓﺩﻭﺟﻭﻣﻟﺍ ﺔﺷﺎﺷﻟﺍ ﺽﻣﻭﺗ ،ﺎًﻳﺋﺎﻘﻠﺗ ﺔﻟﻭﻣﺣﻟﺍ ﻥﺯﻭ ﺭﺎﻌﺷﺗﺳﺍ ﻡﺗﻳ ﺎﻣﻧﻳﺑ
ﺽﺭﻌﻟﺍ ﺔﺷﺎﺷ
b
•.ﺱﺑﻼﻣﻟﺍ ﻉﻭﻧﻟ ﺎًﻘﻓﻭ ﺞﻣﺍﺭﺑﻟﺍ ﺭﻓﻭﺗﺗ
•.ﺩﺩﺣﻣﻟﺍ ﺞﻣﺎﻧﺭﺑﻟﺍ ﻰﻟﺇ ﺓﺭﺎﺷﻺﻟ ﺡﺎﺑﺻﻣﻟﺍ ﺊﻳﺿﻳﺳ
ﺭﺯ
c
•.ﺎًﺗﻗﺅﻣ ﺎﻬﻓﺎﻘﻳﺇ ﻭﺃ ﻝﻳﺳﻐﻟﺍ ﺓﺭﻭﺩ ءﺩﺑﻟ ﺭﺯﻟﺍ ﺍﺫﻫ ﻡﺩﺧﺗﺳُﻳ
•.ﺭﺯﻟﺍ ﺍﺫﻫ ﻰﻠﻋ ﻁﻐﺿﺍ ،ﺎًﺗﻗﺅﻣ ﻝﻳﺳﻐﻟﺍ ﺓﺭﻭﺩ ﻑﺎﻘﻳﺇ ﻰﻟﺇ ﺔﺟﺎﺣﻟﺍ ﺔﻟﺎﺣ ﻲﻓ
d
• ﺓﺩﻣﻟ ﻝﺑﺎﻘﻣﻟﺍ ﺭﺯﻟﺍ ﻰﻠﻋ ﺭﺍﺭﻣﺗﺳﻻﺍ ﻊﻣ ﻁﻐﺿﺍ ،ﺔﻳﻓﺎﺿﻹﺍ ﻑﺋﺎﻅﻭﻟﺍ ﻡﺍﺩﺧﺗﺳﻻ3.ﺽﺭﻌﻟﺍ ﺔﺷﺎﺷ ﻰﻠﻋ ﻝﺑﺎﻘﻣﻟﺍ ﺯﻣﺭﻟﺍ ﺊﺿﻳ ﻑﻭﺳ ﺎﻫﺩﻧﻋﻭ .ٍﻥﺍﻭﺛ
•.ﻩﺩﻳﺩﺣﺗ ﻡﺗﻳ ﺎﻣﺩﻧﻋ ﺊﺿﻳﺳﻭ ﻲﻓﺎﺿﺇ ﺞﻣﺎﻧﺭﺑ ﺩﻳﺩﺣﺗﺑ ﺭﺎﻳﺧﻟﺍ ﺍﺫﻫ ﻙﻟ ﺢﻣﺳﻳ
e
•.ﺔﺷﺎﺷﻟﺍ ﻲﻓ ﺔﻳﻟﺎﺣﻟﺍ ﺕﺍﺩﺍﺩﻋﻹﺍ ﺭﻬﻅﺗ
•.ﻯﺭﺧﺃ ﺕﺍﺩﺍﺩﻋﺇ ﺩﻳﺩﺣﺗﻟ ﺭﺎﻳﺧﻟﺍ ﺍﺫﻫ ﺭﺯ ﻰﻠﻋ ﻁﻐﺿﺍ
f
• ﺕﺍﺩﺍﺩﻋﻹﺍ ءﻲﺿﺗﺳ ،ﺯﺎﻬﺟﻟﺍ ﻝﻳﻐﺷﺗ ﻡﺗﻳ ﺎﻣﺩﻧﻋ .ﺔﻟﺎﺣﻟﺍ ﻝﺋﺎﺳﺭﻭ ،ﺕﺍﺭﺎﻳﺧﻟﺍﻭ ،ﺭﺩﻘُﻣﻟﺍ ﻲﻘﺑﺗﻣﻟﺍ ﺕﻗﻭﻟﺍﻭ ،ﺕﺍﺩﺍﺩﻋﻹﺍ ﺽﺭﻌﻟﺍ ﺔﺷﺎﺷ ﺽﺭﻌﺗ
•.ﻡﻛ

ﻪﻳﺑﻧﺗ
ar_main.book.book Page 15 Thursday, October 22, 2020 4:16 PM
15
ﻝﻳﻐﺷﺗﻟﺍ
ﻝﻳﻐﺷﺗﻟﺍ
.ﺔﺑﻭﻠﻁﻣﻟﺍ ﻝﻳﺳﻐﻟﺍ ﺓﺭﻭﺩ ﺭﺗﺧﺍ
ﺍﻟﻌﺭﺑﻳﺔ
ﺔﻟﺎﺳﻐﻟﺍ ﻙﺭﺣﺗﺗﺳ .ﺓﺭﻭﺩﻟﺍ ءﺩﺑﻟ
ﻰﻠﻋ ﻁﻐﺿﻟﺍ ﻡﺗﻳ ﻡﻟ ﺍﺫﺇ .ﺔﻟﻭﻣﺣﻟﺍ ﻥﺯﻭ ﺱﺎﻳﻘﻟ ﻩﺎﻳﻣ ﻥﻭﺩﺑ ﺓﺯﻳﺟﻭ ﺓﺭﺗﻔﻟ
ﺔﻟﺎﺳﻐﻟﺍ ﻝﻳﻐﺷﺗ ﻑﻗﻭﺗﻳﺳﻓ ،ﻥﻳﻌﻣ ﺕﻗﻭ ﻝﻼﺧ
ﺩﻧﻋ ﺏﺎﺑﻟﺍ ﻲﻓ ﺏﺭﺳﺗﻟﺍ ﻊﻧﺎﻣ ﺹﺣﻓﺍ .ﺩﻳﻋﺎﺟﺗﻟﺍ ﻝﻳﻠﻘﺗﻟ ﺯﺎﻬﺟﻟﺍ ﻥﻣ
.ﺏﻳﺭﺳﺗﻟﺍ ﺔﻌﻧﺎﻣ ﻲﻓ ﻖﻠﻌﺗ ﻥﺃ ﻥﻛﻣﻳ ﺓﺭﻳﻐﺻ ﺱﺑﻼﻣ ﺔﻟﻭﻣﺣ ﺝﺍﺭﺧﺇ
.ﺔﺑﻭﻠﻁﻣﻟﺍ ﺓﺭﻭﺩﻟﺍ ﺭﺎﻳﺗﺧﺍ ﻡﺗﻳ ﻰﺗﺣ
.ﻙﺳﺑﻼﻣ ﻰﻠﻋ ﺩﻭﺟﻭﻣﻟﺍ ﺞﻳﺳﻧﻟﺎﺑ ﺔﻳﺎﻧﻌﻟﺍ
ﺕﻗﺅﻣ ﻑﺎﻘﻳﺇ/ءﺩﺑ
ﺕﻗﺅﻣ ﻑﺎﻘﻳﺇ/ءﺩﺑ
.ﺕﺍﺩﺍﺩﻋﻹﺍ ﻊﻳﻣﺟ ﺩﻘﻔﺗﺳﻭ
.ﺓﺭﻭﺩﻟﺍ ءﺩﺑ
ﺭﺯﻟﺍ
.ﺓﺭﻭﺩﻟﺍ ءﺎﻬﻧﺇ
4
• ﺓﺭﻭﺩﻟﺍ ﺭﺎﻳﺗﺧﺍ ﺽﺑﻘﻣ ﻑﻠﺑ ﻡﻗ ﻭﺃ ﺭﺭﻛﺗﻣ ﻝﻛﺷﺑ ﺓﺭﻭﺩﻟﺍ ﺭﺯ ﻰﻠﻋ ﻁﻐﺿﺍ
ﻝﻳﻐﺷﺗﻟﺍ ﻰﻠﻋ ﺔﻣﺎﻋ ﺓﺭﻅﻧ
ﺯﺎﻬﺟﻟﺍ ﻡﺍﺩﺧﺗﺳﺍ
• ﻖﺻﻠﻣ ﻰﻟﺇ ﻪﺑﺗﻧﺍ .ﻥﺍﺭﻭﺩﻟﺍ ﺔﻋﺭﺳﻭ ﻝﻳﺳﻐﻟﺍ ﺓﺭﺍﺭﺣ ﺔﺟﺭﺩ ﻥﻵﺍ ﺭﺗﺧﺍ
ﻑﺻﻧ ﻑﺿﺃﻭ
ﺏﺳﺍﻭﺭﻟﺍ ﻝﻳﺯﻳ ﺍﺫﻫ .ﺱﺑﻼﻣ ﻊﺿﻭ ﻥﻭﺩﺑ ﻝﻣﻌﻳ ﺯﺎﻬﺟﻟﺍ ﻙﺭﺗﺍﻭ ،ﺕﺎﻔﻅﻧﻣﻟﺍ ﺔﻳﻣﻛ
.ﻊﻳﻧﺻﺗﻟﺍ ءﺎﻧﺛﺃ ﻰﻘﺑﺗ ﺩﻗ ﻲﺗﻟﺍﻭ ﻝﻳﺳﻐﻟﺍ ﺽﻭﺣ ﻥﻣ ﺔﻠﻣﺗﺣﻣﻟﺍ
ﻝﻳﺳﻏ ﺞﻣﺎﻧﺭﺑ ﺭﺗﺧﺍ ،ﻝﻭﻷﺍ ﻝﻳﺳﻐﻟﺍ ﻝﺑﻗ
Cotton(ﻥﻁﻘﻟﺍ)
5
• ﺭﺯﻟﺍ ﻰﻠﻋ ﻁﻐﺿﺍ
ﻲﻓ ﺽﺍﺭﻏﻷﺍ ﻝّﻣﺣﻭ ﺏﺎﺑﻟﺍ ﺢﺗﻓﺍﻭ ،ﺔﺟﺎﺣﻟﺍ ﺏﺳﺣ ﻝﻳﺳﻐﻟﺍ ﻝﻣِﺣ
.ﺱﺑﻼﻣﻟﺍ ﻊﺿﻭ ﻝﻳﺳﻐﻟﺍ ﺯﺭﻓﺍ
.ﺔﻟﺎﺳﻐﻟﺍ
1
• ﻡﺟﺣﻭ ﻥﻭﻟﻭ ،ﺥﺎﺳﺗﻻﺍ ﺔﺟﺭﺩﻭ ،ﺞﻳﺳﻧﻟﺍ ﻉﻭﻧ ﺏﺳﺣ ﻝﻳﺳﻐﻟﺍ ﻑﻳﻧﺻﺗﺑ ﻡﻗ
6
• ﺱﺑﻼﻣﻟﺍ ﺝﺭﺧﺃ ،ﺭﻭﻔﻟﺍ ﻰﻠﻋ .ﺓﺭﻭﺩﻟﺍ ءﺎﻬﻧﺇ ﺩﻧﻋ ﺔﻣﻐﻧ ﺕﻭﺻ ﺭﺩﺻﻳﺳ
.ﻪﻗﻼﻏﺇ ﺩﻧﻋ ﻖﻠﻌﺗﺳ ﺙﻳﺣ ﺔﻳﻁﺎﻁﻣﻟﺍ ﺏﺎﺑﻟﺍ ﺓﺩﺍﺩﺳ ﻰﻠﻋ ﺔﻳﻟﺩﺗﻣ ﺭﻳﻏﻭ ﺽﻭﺣﻟﺍ
.ﺱﺑﻼﻣﻟﺎﺑﻭ ﺏﺎﺑﻟﺍ ﺓﺩﺍﺩﺳﺑ ﺭﺭﺿ ﻉﻭﻗﻭ ﻪﻧﻋ ﺞﺗﻧﻳﺳ ﻙﻟﺫ ﻝﻌﻓ ﻥﻋ ﺱﻋﺎﻘﺗﻟﺍ ﻥﺇ
.ﺓﺩﺍﺩﺳﻟﺍﻭ ﺱﺑﻼﻣﻟﺍ ﻲﻓ
• ﻝﺧﺍﺩ ﺓﺩﻭﺟﻭﻣ ﺽﺍﺭﻏﻷﺍﻭ ﺱﺑﻼﻣﻟﺍ ﻊﻳﻣﺟ ﻥﺃ ﻥﻣ ﺩﻛﺄﺗ ،ﺏﺎﺑﻟﺍ ﻕﻼﻏﺇ ﻝﺑﻗ
• ﻑﻠﺗ ﺙﺍﺩﺣﺇ ﻊﻧﻣﻟ ﺏﺎﺑﻟﺍ ﺓﺩﺍﺩﺳﺑ ﺔﺻﺎﺧﻟﺍ ﺔﻧﺭﻣﻟﺍ ﺔﻳﺷﺣﻟﺍ ﻥﻣ ﻊﻁﻗ ﻱﺃ ﺝﺭﺧﺃ
.ﻡّﻌﻧﻣﻟﺍﻭ ﻑﻅﻧﻣﻟﺍ ﻭﺃ ﻑﻳﻅﻧﺗﻟﺍ ﺕﺎﺟﺗﻧﻣ ﻑﺿﺃ
.ﻉﺯﻭﻣﻟﺍ ﻲﻓ ﺔﺑﺳﺎﻧﻣﻟﺍ ﻖﻁﺎﻧﻣﻟﺍ ﻰﻟﺇ ﺵﺎﻣﻘﻟﺍ ﻡﻌﻧﻣ ﻭﺃ ﺽﻳﺑﻣﻟﺍ ﻑﺿﺃ
.ﺯﺎﻬﺟﻟﺍ ﻝﻳﻐﺷﺗﺑ ﻡﻗ
.ﺯﺎﻬﺟﻟﺍ ﻝﻳﻐﺷﺗﻟ
ﺔﻗﺎﻁﻟﺍ
2
• ،ﺔﺟﺎﺣﻟﺍ ﺩﻧﻋﻭ .ﻑﻅﻧﻣﻟﺍ ﻉﺯﻭﻣ ﻰﻟﺇ ﻑﻅﻧﻣﻟﺍ ﻥﻣ ﺔﺑﺳﺎﻧﻣ ﺔﻳﻣﻛ ﻑﺿﺃ
3
• ﺭﺯﻟﺍ ﻰﻠﻋ ﻁﻐﺿﺍ

ﺔﻅﺣﻼﻣ
ar_main.book.book Page 14 Thursday, October 22, 2020 4:16 PM
ﺳﻠﺳ ﻡﺍﺩﺧﺗﺳﺎﺑ ﻪﺗﻳﺑﺛﺗ ﻡﻛﺣﺃ ،ﺔﻋﻭﻟﺎﺑﻟﺍ ﻲﻓ ﻑﻳﺭﺻﺗﻟﺍ ﻡﻭﻁﺭﺧ ﺏﻳﻛﺭﺗ ﺩﻧﻋ
•.ﺔﻠ
ﺍﺫﺇ .ﻩﺎﻳﻣﻟﺍ ﺩﺍﺩﻣﺇ ﺭﻭﺑﻧﺻﻟ ﺔﻳﺩﻳﻠﻘﺗ ﺭﺛﻛﻷﺍ ﻉﺍﻭﻧﻷﺍ ﻡﺩﺧﺗﺳﺍ .ﺎﻬﺳﻔﻧ ﺕﺍﻭﻁﺧﻟﺍ
ﻝﺎﺧﺩﺇ ﻝﺑﻗ ﻪﻳﺟﻭﺗﻟﺍ ﺔﺣﻭﻟ ﻉﺯﻧﺎﻓ ،ﺔﻳﺎﻐﻠﻟ ﺍًﺭﻳﺑﻛ ﻭﺃ ﻝﻛﺷﻟﺍ ﻊﺑﺭﻣ ﺭﻭﺑﻧﺻﻟﺍ ﻥﺎﻛ
.ﻝﻭﺣﻣﻟﺍ ﻲﻓ ﺭﻭﺑﻧﺻﻟﺍ
ﻑﻳﺭﺻﺗﻟﺍ ﻡﻭﻁﺭﺧ ﺏﻳﻛﺭﺗ
ﺔﻣﺎﻋﺩ ﻡﺍﺩﺧﺗﺳﺎﺑ ﻑﻳﺭﺻﺗﻟﺍ ﻡﻭﻁﺭﺧ ﺏﻳﻛﺭﺗﺑ ﻡﻗ
ﻥﻣ ﻰﻠﻋﺃ ﻑﻳﺭﺻﺗﻟﺍ ﻡﻭﻁﺭﺧ ﻊﺿﻭ ﻡﺩﻋ ﺏﺟﻳ
.ﺽﺭﻷﺍ ﻯﻭﺗﺳﻣ ﻥﻣ
100ﻡﺳ
.ءﻁﺑﺑ ﻪﻔﻳﺭﺻﺗ ﻡﺗﻳ ﻭﺃ ﺯﺎﻬﺟﻟﺍ ﻲﻓ ءﺎﻣﻟﺍ ﻑﻳﺭﺻﺗ ﻡﺗﻳ ﻻ ﺩﻗ
.ءﺎﻣﻟﺍ ﺏﺭﺳﺗ ﻥﻋ ﺞﺗﺎﻧﻟﺍ ﺭﺭﺿﻟﺍ
ﺏﻳﻛﺭﺗﻟﺍ
14
• ﺭﺭﻛ ،ﻡﻭﻁﺭﺧﻟﺍ ﻥﻣ ءﺎﻣ ﺏﺭﺳﺗ ﺩﻭﺟﻭ ﺔﻟﺎﺣ ﻲﻓﻭ ،ﻝﻳﺻﻭﺗﻟﺍ ﻥﻣ ءﺎﻬﺗﻧﻻﺍ ﺩﻌﺑ
•.ﻪﻘﻠﻌﺗ ﻭﺃ ﻡﻭﻁﺭﺧﻟﺍ ءﺍﻭﺗﻟﺍ ﻡﺩﻋ ﻥﻣ ﺩﻛﺄﺗ
ﺔﻳﻘﻓﺭﻣ
• ﻥﻣ ﺔﻳﺿﺭﻷﺍ ﺔﻳﺎﻣﺣ ﻰﻟﺇ ﺔﺣﻳﺣﺻ ﺔﻘﻳﺭﻁﺑ ﻑﻳﺭﺻﺗﻟﺍ ﻡﻭﻁﺭﺧ ﺕﻳﺑﺛﺗ ﻱﺩﺅﻳﺳ
105 cm
• ﺓﻭﻘﻟﺎﺑ ﻯﺭﺧﺃ ﺓﺭﻣ ﻪﻟﺎﺧﺩﺇ ﻝﻭﺎﺣﺗ ﻼﻓ ،ﺍًﺩﺟ ًﻼﻳﻭﻁ ﻑﻳﺭﺻﺗﻟﺍ ﻡﻭﻁﺭﺧ ﻥﺎﻛ ﺍﺫﺇ
.ﻱﺩﺎﻋ ﺭﻳﻏ ﺞﻳﺟﺿ ﺙﺍﺩﺣﺇ ﻰﻟﺇ ﻱﺩﺅﻳ ﺩﻗ ﺙﻳﺣ .ﺯﺎﻬﺟﻟﺍ ﻝﺧﺍﺩ

ﺔﻅﺣﻼﻣ
ar_main.book.book Page 13 Thursday, October 22, 2020 4:16 PM
13
ﺏﻳﻛﺭﺗﻟﺍ
ﺔﻠﺻﻭ ﺔﻳﻁﺎﻁﻣﻟﺍ ﺓﺩﺍﺩﺳﻟﺍ ﻝﻛﺷﺗ ﺙﻳﺣﺑ ﺭﻭﺑﻧﺻﻟﺍ ﻑﺭﻁ ﻰﻟﺇ ﻝﻭﺣﻣﻟﺍ ﻊﻓﺩﺍ
.ﻝﻭﺣﻣﻠﻟ ﺔﻳﻘﻠﺣﻟﺍ ﺔﺣﻭﻠﻟﺍﻭ ﺔﻌﺑﺭﻷﺍ ﺕﻳﺑﺛﺗﻟﺍ ﺭﻳﻣﺎﺳﻣ ﻁﺑﺭ ﻡﻛﺣﺃ .ءﺎﻣﻠﻟ ﺔﻌﻳﻧﻣ
ﺍﻟﻌﺭﺑﻳﺔ
ﻝﺻﻭﻣﻟﺍ ﺝﻻﺯﻣ ﺔﺣﻭﻟ ﺏﺣﺳﺍ
ﻰﻟﺇ ﻝﺎﺧﺩﻹﺍ ﻡﻭﻁﺭﺧ ﻊﻓﺩﺍﻭ ،ﻝﻔﺳﺃ ﻰﻟﺇ
ﻲﻓ ﻝﻭﺣﻣﻟﺍ ﻝﺎﻔﻗﺃ ﻥﺃ ﺩﻛﺄﺗﻭ .ﻝﺻﻭﻣﻟﺍ ﺝﻻﺯﻣ ﺔﺣﻭﻟ ﺭﺭﺣﻭ ،ﻝﻭﺣﻣﻟﺍ
f
.ﺎﻬﻧﺎﻛﻣ
ﺔﻳﻁﺎﻁﻣﻟﺍ ﺓﺩﺍﺩﺳﻟﺍ ﻝﻳﺻﻭﺗ ﻡﺗﻳ ﺙﻳﺣﺑ ﺭﻭﺑﻧﺻﻟﺍ ﻑﺭﻁ ﻰﻟﺇ ﻝﻭﺣﻣﻟﺍ ﻊﻓﺩﺍ
3
.ﺔﻌﺑﺭﻷﺍ ﺕﻳﺑﺛﺗﻟﺍ ﺭﻳﻣﺎﺳﻣ ﻁﺑﺭ ﻡﻛﺣﺃﻭ .ءﺎﻣﻠﻟ ﺔﻌﻳﻧﻣ ﺔﻠﺻﻭ ﺢﺑﺻﺗﻟ
ﺓﺩﺍﺩﺳﻠﻟ ﻥﻛﻣﻳ ﺙﻳﺣﺑ ﻰﻠﻋﻷ ﻱﺩﻭﻣﻋ ﻝﻛﺷﺑ
ﻡﻛﺣﺃ ﻡﺛ ﺎًﻣﺎﻣﺗ ﺭﻭﺑﻧﺻﻟﺎﺑ ﻖﺻﺗﻠﺗ ﻥﺃ ﻡﻭﻁﺭﺧﻟﺍ ﻝﺧﺍﺩ ﺓﺩﻭﺟﻭﻣﻟﺍ ﺔﻳﻁﺎﻁﻣﻟﺍ
4
ﻥﺎﻧﺳﺄﺑ ﺩﻭﺯﻣﻟﺍ ﺭﻳﻏ ﺭﻭﺑﻧﺻﻟﺎﺑ ﺓﺩﺣﺍﻭﻟﺍ ﺔﺳﻣﻠﻟﺍ ﻉﻭﻧ ﻥﻣ ﻡﻭﻁﺭﺧ ﻝﻳﺻﻭﺗ
.ﺔﻌﺑﺭﻷﺍ ﺕﻳﺑﺛﺗﻟﺍ ﺭﻳﻣﺎﺳﻣ ﺭﺭﺣﻭ
c
.ﻥﻳﻣﻳﻟﺍ ﻰﻟﺇ ﻩﺭﻳﻭﺩﺗ ﻖﻳﺭﻁ ﻥﻋ ﻪﻁﺑﺭ
ﻝﻭﺣﻣﻠﻟ ﺔﻳﻘﻠﺣﻟﺍ ﺔﺣﻭﻠﻟﺍ ﻙﻔﺑ ﻡﻗ
d
ﻝﺎﺧﺩﻹﺍ ﻡﻭﻁﺭﺧ ﻊﻓﺩﺍ
3
4
1
ﻲﻓ ﺓﺩﻭﺟﻭﻣﻟﺍ (ﻙﻟﺫ ﻰﻟﺇ ﺎﻣﻭ ،ﺏﺷﺧﻟﺍ ﺓﺭﺎﺷﻧﻭ ،ﻝﻣﺭﻟﺍﻭ ،ﺭﺎﺑﻐﻟﺍ) ﺔﺑﻳﺭﻐﻟﺍ
ﺓﺭﺍﺭﺣ ﺔﺟﺭﺩ ﻥﻣ ﻖﻘﺣﺗﻭ ،ﻭﻟﺩ ﻲﻓ ﻪﻔﻳﺭﺻﺗ ﻡﺗﻳ ءﺎﻣﻟﺍ ﻝﻌﺟﺍﻭ .ءﺎﻣﻟﺍ ﻁﻭﻁﺧ
.ءﺎﻣﻟﺍ
ﺯﺎﻬﺟﻟﺎﺑ ﻡﻭﻁﺭﺧﻟﺍ ﻝﻳﺻﻭﺗ
.ﺯﺎﻬﺟﻟﺍ ﻥﻣ ﻲﻔﻠﺧﻟﺍ ءﺯﺟﻟﺎﺑ ﺩﻭﺟﻭﻣﻟﺍ ﻩﺎﻳﻣﻟﺍ ﻝﺎﺧﺩﺇ ﻡﺎﻣﺻﺑ ﺩﺍﺩﻣﻹﺍ ﻡﻭﻁﺭﺧ ﺕﺑﺛ
.ﻁﻘﻓ ﺓﺩﺭﺎﺑ ﻩﺎﻳﻣ ﻉﺯﻭﻣﺑ ﻪﻠﻳﺻﻭﺗﺑ ﻡﻗ ﻝﺑ ﺔﻧﺧﺎﺳ ﻩﺎﻳﻣ
• ﺩﺍﻭﻣﻟﺍ ﺩﺭﻁﻟ ءﺎﻣﻟﺍ ﺭﻭﺑﻧﺻ ﻝﻳﻐﺷﺗﺑ ﻡﻗ ،ءﺎﻣﻟﺍ ﻝﺎﺧﺩﺇ ﻡﻭﻁﺭﺧ ﻝﻳﺻﻭﺗ ﺩﻌﺑ
.ﻝﻭﺣﻣﻟﺍ ﻡﺋﻼﻳ ﻰﺗﺣ ﺍًﺩﺟ ﺍًﺭﻳﺑﻛ ﺭﻭﺑﻧﺻﻟﺍ ﻥﺎﻛ ﺍﺫﺇ
• ﻉﺯﻭﻣﺑ ﻡﻭﻁﺭﺧﻟﺍ ﻝﻳﺻﻭﺗﺑ ﻡﻘﺗ ﻻ ،ﺩﺣﺍﻭ ﻩﺎﻳﻣ ﻝﺎﺧﺩﺈﺑ ﺓﺩﻭﺯﻣﻟﺍ ﺯﺭﻁﻠﻟ ﺔﺑﺳﻧﻟﺎﺑ
ﻪﻳﺟﻭﺗﻟﺍ ﺔﺣﻭﻟ ﻝﺯﺃ
e
2

ﺔﻅﺣﻼﻣ
ﺔﻅﺣﻼﻣ
ar_main.book.book Page 12 Thursday, October 22, 2020 4:16 PM
ﺣﺗ .ﻝﺎﺧﺩﻹﺍ ﻡﻳﻁﺍﺭﺧ ﻁﺑﺭ ﻡﺎﻛﺣﻹ ﺔﺷﺎﻣﻛﻟﺍ ﻝﺛﻣ ﺔﻳﻟﻵﺍ ﺕﺍﺩﻌﻣﻟﺍ ﻡﺩﺧﺗﺳﺗ ﻻ
ﻖﻘ
.ﺯﺎﻬﺟﻟﺎﺑ ﻩﺎﻳﻣﻟﺍ ﻝﺎﺧﺩﺇ ﻡﻭﻁﺭﺧ ﻲﻓ ﻲﻧﺣﻧﻣﻟﺍ ﻑﺭﻁﻟﺍ ﻝﻳﺻﻭﺗ ﻥﻣ
ءﺎﻣﻟﺍ ﺭﻭﺑﻧﺻﺑ ﻡﻭﻁﺭﺧﻟﺍ ﻝﻳﺻﻭﺗ
ﻥﺎﻧﺳﺄﺑ ﺩﻭﺯﻣﻟﺍ ﺭﻭﺑﻧﺻﻟﺎﺑ ﻲﺑﻟﻭﻠﻟﺍ ﻡﻭﻁﺭﺧﻟﺍ ﻝﻳﺻﻭﺗ
.ءﺎﻣﻟﺍ ﺩﺍﺩﻣﺇ ﺭﻭﺑﻧﺻﺑ ﻡﻭﻁﺭﺧﻟﺍ ﻝﺻﻭﻣ ﺕﺑﺛ
•
ﺔﻌﻧﺎﻣﻟﺍ ﺢﺋﺍﺭﺷﻟﺍ ﺕﻳﺑﺛﺗ ﺩﻌﻳ .ﺔﻳﻔﻠﺧﻟﺍ ﻝﺟﺭﻷﺍ ﺕﺣﺗ ﺎﻬﻌﺿﻓ ،ﺔﻳﻣﺎﻣﻷﺍ
.ﺔﻳﻟﺎﻌﻓ ﺭﺛﻛﻷﺍ ﺭﺎﻳﺧﻟﺍ ﻭﻫ ﺔﻳﻣﺎﻣﻷﺍ ﻡﺍﺩﻗﻷﺍ ﺕﺣﺗ ﻕﻻﺯﻧﻼﻟ
.ﻕﻻﺯﻧﻼﻟ ﺔﻌﻧﺎﻣﻟﺍ ﺢﺋﺍﺭﺷﻟﺍ ﻰﻠﻋ ﺯﺎﻬﺟﻟﺍ ﻊﺿ
.ﺯﺎﻬﺟﻟﺍ ﻝﺟﺭﺄﺑ
a
ءﺎﻣﻟﺍ ﺩﺍﺩﻣﺇ ﻡﻭﻁﺭﺧ ﻝﻳﺻﻭﺗ
ﺏﻳﻛﺭﺗﻟﺍ
Electronics.
12
• ﻝﺟﺭﻷﺍ ﺕﺣﺗ ﻕﻻﺯﻧﻼﻟ ﺔﻌﻧﺎﻣﻟﺍ ﺢﺋﺍﺭﺷﻟﺍ ﻊﺿﻭ ﺏﻌﺻﻟﺍ ﻥﻣ ﻥﺎﻛ ﺍﺫﺇ
4
• ﻕﻻﺯﻧﻼﻟ ﺔﻌﻧﺎﻣﻟﺍ ﺢﺋﺍﺭﺷﻠﻟ ﻖﺻﻠﺗ ﻻ
• ﺔﻣﺩﺧ ﺯﻛﺭﻣ ﻥﻣ ﻕﻻﺯﻧﻼﻟ ﺔﻌﻧﺎﻣ ﺢﺋﺍﺭﺷ ﻰﻠﻋ ﻝﻭﺻﺣﻟﺍ ﻥﻛﻣﻳLG
ﻥﺎﻧﺳﺄﺑ ﺩﻭﺯﻣﻟﺍ ﺭﻳﻏ ﺭﻭﺑﻧﺻﻟﺎﺑ ﻲﺑﻟﻭﻟ ﻡﻭﻁﺭﺧ ﻝﻳﺻﻭﺗ
ﺔﻌﺑﺭﻷﺍ ﺕﻳﺑﺛﺗﻟﺍ ﺭﻳﻣﺎﺳﻣ ﻙﻓ
a
.
.ﻝﻭﺣﻣﻟﺍ ﻡﺋﻼﻳ ﻰﺗﺣ ﺍًﺩﺟ ﺍًﺭﻳﺑﻛ ﺭﻭﺑﻧﺻﻟﺍ ﻥﺎﻛ ﺍﺫﺇ
ﻪﻳﺟﻭﺗﻟﺍ ﺔﺣﻭﻟ ﻝﺯﺃ
b
1
800 ﻭﻠﻳﻛ
2
.ﻡﺎﻣﺻﻟﺎﺑ ﻩﺎﻳﻣﻟﺍ ﻝﺎﺧﺩﺇ ﻡﻳﻁﺍﺭﺧ ﻊﻣ
ﻝﻳﺻﻭﺗﻠﻟ ﺔﻅﻭﺣﻠﻣ
ﻭ
800ﻝﺎﻛﺳﺎﺑ ﻭﻠﻳﻛ
50ﻝﺎﻛﺳﺎﺑ ﻭﻠﻳﻛ
.ﻁﻐﺿﻟﺍ ﻑﻳﻔﺧﺗ ﺯﺎﻬﺟ ﺏﻳﻛﺭﺗ ﺏﺟﻳﻓ ،
.ﻝﺎﺧﺩﻹﺍ ﻡﺎﻣﺻﺑ ﺎﻬﻁﺑﺭﻟ ﺔﻳﻟﻵﺍ
)0.5‒8.0ﻡﺳ/ﻡﺟﻛ ﻝﻘﺛ ² ﻥﻣ ﻰﻠﻋﺃ ءﺎﻣﻟﺍ ﻁﻐﺿ ﻥﺎﻛ ﺍﺫﺇ .(
ﻝﺎﻛﺳﺎﺑ
.ءﺎﻣﻟﺍ
ﺔﻳﻁﺎﻁﻣﻟﺍ ﺓﺩﺍﺩﺳﻟﺍ ﻥﻣ ﻖﻘﺣﺗﻟﺍ
ﺔﻳﻁﺎﻁﻣﻟﺍ ﺕﺍﺩﺍﺩﺳﻟﺍ ﻥﻣ ﻥﺎﺗﻧﺛﺍ ﺭﻓﻭﺗﺗ
a
.ﺭﻳﺑﺎﻧﺻﻟﺎﺑ ﻝﻳﺻﻭﺗﻟﺍ ﻡﺎﻛﺣﺇ ﻡﺗﻳ .ءﺎﻣﻟﺍ ﺏﻳﺭﺳﺗ ﻊﻧﻣ ﻲﻓ ﻥﻼﻣﻌﺗﺳﺗ
• ﻥﻳﺑ ﺎﻣ ءﺎﻣﻟﺍ ﻁﻐﺿ ﻥﻭﻛﻳ ﻥﺃ ﺏﺟﻳ
•.ﺭﻣﻷﺍ ﻡﺯﻟ ﺍﺫﺇ ﻪﻟﺩﺑﺗﺳﺍﻭ ﺔﻳﺭﻭﺩ ﺓﺭﻭﺻﺑ ءﺎﻣﻟﺍ ﺩﺍﺩﻣﺇ ﻡﻭﻁﺭﺧ ﺔﻟﺎﺣ ﻥﻣ ﻖﻘﺣﺗ
• ﺕﺍﺩﻌﻣﻟﺍ ﻡﺩﺧﺗﺳﺍ ﻭﺃ ﻡﺎﻣﺻﻟﺎﺑ ﻩﺎﻳﻣﻟﺍ ﻝﺎﺧﺩﺇ ﻡﻳﻁﺍﺭﺧ ﻁﺑﺭ ﻡﺎﻛﺣﺇ ﻲﻓ ﻎﻟﺎﺑﺗ ﻻ
• ﻝﺎﺧﺩﺇ ﺔﻠﺻﻭﻟ ﻲﻋﺎﺟﺗﺭﻻﺍ ﻖﻓﺩﺗﻟﺍ ﺩﺿ ﺔﻳﺎﻣﺣﻟﺍ ﻥﻣ ﺩﻳﺯﻣﻟ ﺔﺟﺎﺣ ﻙﺎﻧﻫ ﺱﻳﻟ

ﺔﻅﺣﻼﻣ
ﺔﻅﺣﻼﻣ
ﺔﻅﺣﻼﻣ
ar_main.book.book Page 11 Thursday, October 22, 2020 4:16 PM
11
ﺏﻳﻛﺭﺗﻟﺍ
ﻝﻔﻘﻟﺍ ﻝﻳﻣﺍﻭﺻ ﻡﺍﺩﺧﺗﺳﺎﺑ ﻝﺟﺭﻷﺍ ﻁﺑﺿ ﻡﻛﺣﺃ
ﺎﻫﺭﻳﻭﺩﺗ ﻖﻳﺭﻁ ﻥﻋ
.ﺯﺎﻬﺟﻟﺍ ﻥﻣ ﻲﻠﻔﺳﻟﺍ ءﺯﺟﻟﺍ ﻩﺎﺟﺗﺍ ﺱﻛﻌﺑ ﺔﻋﺎﺳﻟﺍ ﺏﺭﺎﻘﻋ ﻩﺎﺟﺗﺍ ﺱﻛﻋ
b
ﺍﻟﻌﺭﺑﻳﺔ
ﻥﻣ ﻲﻠﻔﺳﻟﺍ ءﺯﺟﻟﺍ ﻲﻓ ﺓﺩﻭﺟﻭﻣﻟﺍ ﻝﻔﻘﻟﺍ ﻝﻳﻣﺍﻭﺻ ﻊﻳﻣﺟ ﻡﺎﻛﺣﺇ ﻥﻣ ﻖﻘﺣﺗ
.ﺢﻳﺣﺻ ﻝﻛﺷﺑ ﺯﺎﻬﺟﻟﺍ
.ﺔﻟﺎّﻌﻓﻭ ،ﺔﻣﻅﺗﻧﻣﻭ
.ﺔﺣﻁﺳﻣﻭ ﺔﺑﻠﺻ ﺔﻳﺿﺭﺃ ﻰﻠﻋ
ﻕﻻﺯﻧﻼﻟ ﺔﻌﻧﺎﻣ ﺢﺋﺍﺭﺷ ﻡﺍﺩﺧﺗﺳﺍ
.ﻩﺅﺍﺭﺷ ﻡﺗ ﻱﺫﻟﺍ ﺯﺍﺭﻁﻟﺍ ﻉﻭﻧﻟ ﺎًﻘﻓﻭ ﺔﻳﺻﺎﺧﻟﺍ ﻩﺫﻫ ﻑﻠﺗﺧﺗ
.ﺩﻳﺩﺷﻟﺍ ﺯﺍﺯﺗﻫﻼﻟ ﺔﺟﻳﺗﻧ ﺔﻟﺎﺳﻐﻟﺍ ﻙﺭﺣﺗﺗ ﺩﻗ ،ﻖﻟﺯ ٍﺢﻁﺳ ﻰﻠﻋ ﺯﺎﻬﺟﻟﺍ ﺏﻳﻛﺭﺗ ﺩﻧﻋ
ءﺎﺿﻭﺿﻟﺍ ﻝﻼﺧ ﻥﻣ ﻝﻁﻋ ﺙﻭﺩﺣ ﻰﻟﺇ ﺔﺣﻳﺣﺻﻟﺍ ﺭﻳﻏ ﺔﻳﻭﺳﺗﻟﺍ ﻱﺩﺅﺗ ﻥﺃ ﻥﻛﻣﻳﻭ
ﻕﻻﺯﻧﻼﻟ ﺔﻌﻧﺎﻣ ﺢﺋﺍﺭﺷ ﺏﻳﻛﺭﺗ ﻙﻳﻠﻋ ﻥﻳﻌﺗﻳ ،ﻙﻟﺫ ﺙﻭﺩﺣ ﺔﻟﺎﺣ ﻲﻓ .ﺯﺍﺯﺗﻫﻻﺍﻭ
.ﻯﻭﺗﺳﻣﻟﺍ ﻁﺑﺿﻭ ءﺍﻭﺗﺳﻻﺍ ﻝﺟﺭﺃ ﻝﻔﺳﺃ
.ءﺎﺿﻭﺿﻟﺍ
3
ءﺎﺿﻭﺿﻟﺍ ﻝﻳﻠﻘﺗ ﻭﺃ ﻑﺎﻘﻳﺇ ﻰﻟﺇ ﻱﺩﺅﻳ ﺩﻗ ﺎﻬﺗﻳﺑﺛﺗ ﻭﺃ ﺔﻳﺑﺷﺧﻟﺍ ﺕﺎﻳﺿﺭﻷﺍ ﺯﻳﺯﻌﺗ
4
ءﺍﻭﺗﺳﺍ ﻊﺿﻭ ﻲﻓﻭ ﺔﻳﺫﺎﺣﺗﻣ ﺯﺎﻬﺟﻟﺍ ﻝﺟﺭﺃ ﻥﻭﻛﺗ ﻥﺃ ﺏﺟﻳ ،ﺯﺎﻬﺟﻟﺍ ﺏﻳﻛﺭﺗ ﺩﻧﻋ
ﻝﺟﺭﺃ ﻥﻛﺗ ﻡﻟ ﺍﺫﺇ ﺢﻳﺣﺻ ﻝﻛﺷﺑ ﻝﻣﻌﻳ ﻻ ﺩﻗ ﻭﺃ ﻑﻠﺗﻠﻟ ﺯﺎﻬﺟﻟﺍ ﺽﺭﻌﺗﻳ ﺩﻗ .ﻡﺎﺗ
.ﻡﻳﻠﺳ ءﺍﻭﺗﺳﺍ ﻊﺿﻭ ﻲﻓﻭ ﺔﻳﺫﺎﺣﺗﻣ ﺯﺎﻬﺟﻟﺍ
• ،ﺔﻠﻳﻭﻁ ﺓﺭﺗﻔﻟ ﻝﻳﻐﺷﺗ ﺔﻟﺎﺳﻐﻠﻟ ﻥﻳﺑﺳﺎﻧﻣﻟﺍ ﻯﻭﺗﺳﻣﻟﺍﻭ ﻥﺎﻛﻣﻟﺍ ﺩﻳﺩﺣﺗ ﻥﻣﺿﻳ
• ﻲﻘﻓﺃ ﻊﺿﻭ ﻲﻓ ﺯﺎﻬﺟﻟﺍ ﻥﻭﻛﻳ ﻥﺃ ﺏﺟﻳ100 ﻪﻧﺎﻛﻣ ﻲﻓ ﺕﺎﺑﺛﺑ ﺎًﺑﻭﺻﻧﻣﻭ %
•.ﻝﻣﺣﻣ ﻭﻫﻭ ﺎﻳﺍﻭﺯﻟﺍ ﻥﻳﺑ "ﺎًﺣﺟﺭﺄﺗﻣ" ﻥﻭﻛﻳ ﻻﺃ ﺏﺟﻳﻭ
• ﻭﺃ ﺯﺍﺯﺗﻫﻻﺍ ﻰﻟﺇ ﻙﻟﺫﺑ ﻡﺎﻳﻘﻟﺍ ﻡﺩﻋ ﻱﺩﺅﻳ ﺩﻗ .ﻝﺗﺑﺗ ﺔﻟﺎﺳﻐﻟﺍ ﻡﺍﺩﻗﺃ ﻉﺩﺗ ﻻ
.ﺔﻳﻭﺗﺳﻣ ﺭﻳﻏ ﺔﻳﺿﺭﻷﺍ ﺕﻧﺎﻛ ﺍﺫﺇ ﺔﺟﺎﺣﻟﺍ ﺏﺳﺣ ﻝﺟﺭﻷﺍ ﺔﻳﻭﺳﺗﺑ ﻡﻗ
.ﺯﺍﺯﺗﻫﻻﺍ ﻭﺃ ﺓﺩﻳﺩﺷﻟﺍ
ﻡﺍﺩﻗﻷﺍ ﺔﻳﻭﺳﺗﻭ ﻁﺑﺿ
• .ﻥﺍﺯﺗﺍ ﻡﺩﻋﻭ ﺎًﻔﻳﻧﻋ ﺍًﺯﺍﺯﺗﻫﺍ ﺔﻘﻠﻌﻣﻟﺍ ﻭﺃ ﺔﻳﺑﺷﺧﻟﺍ ﺕﺎﻳﺿﺭﻷﺍ ﺙﺩﺣُﺗ ﻥﺃ ﻥﻛﻣﻳ
1
•.ﺯﺎﻬﺟﻟﺍ ﻝﺟﺭﺃ ﺕﺣﺗ ﻙﻟﺫ ﻰﻟﺇ ﺎﻣﻭ ﺏﺷﺧﻟﺍ ﻊﻁﻗ ﻊﺿﺗ ﻻ
•.ﺔﻳﺿﺭﻷﺍ ﻰﻠﻋ ﺎﻬﺗﺎﺑﺛﻭ ﺔﻌﺑﺭﻷﺍ ﻝﺟﺭﻷﺍ ﺭﺍﺭﻘﺗﺳﺍ ﻥﻣ ﺩﻛﺄﺗ
.ﻕﻻﺯﻧﻼﻟ ﺔﻌﻧﺎﻣﻟﺍ ﺢﺋﺍﺭﺷﻟﺍ ﻊﺿﻭﻟ ﺔﻳﺿﺭﻷﺍ ﻑّﻅﻧ
ﻭﻁﺭﻟﺍﻭ ﺔﺑﻳﺭﻐﻟﺍ ﻡﺎﺳﺟﻷﺍ ﺔﻟﺍﺯﻹ ﺔﻓﺎﺟ ﺵﺎﻣﻗ ﺔﻌﻁﻗ ﻡﺩﺧﺗﺳﺍ
ﺢﺋﺍﺭﺷﻟﺍ ﻖﻟﺯﻧﺗ ﺩﻘﻓ ،ﺔﺑﻭﻁﺭﻟﺍ ﺽﻌﺑ ﻥﺎﻛﻣﻟﺎﺑ ﻝﻅ ﺍﺫﺇﻭ .ﺎﻬﻔﻳﻅﻧﺗﻭ
.ﻕﻻﺯﻧﻼﻟ ﺔﻌﻧﺎﻣﻟﺍ
.ﺏﻳﻛﺭﺗﻟﺍ ﺔﻘﻁﻧﻣ ﻲﻓ ﺯﺎﻬﺟﻟﺍ ﻊﺿﻭ ﺩﻌﺑ ﻯﻭﺗﺳﻣﻟﺍ ﻁﺑﺿﺍ
ﻖﺻﻼﻟﺍ ﺏﻧﺎﺟﻟﺍ ﻊﺿ
a
.ﺽﺭﻷﺍ ﻰﻠﻋ ﻕﻻﺯﻧﻼﻟ ﺔﻌﻧﺎﻣﻟﺍ ﺢﺋﺍﺭﺷﻠﻟ
1
• ﺔﺑ
ءﺎﻣﻟﺍ ﻥﺍﺯﻳﻣ ﺎًﻣﺩﺧﺗﺳﻣ ﺎًﻣﺎﻣﺗ ﺽﺭﻷﺍ ﻰﻠﻋ ﺯﺎﻬﺟﻟﺍ ءﺍﻭﺗﺳﺍ ﻥﻣ ﺩﻛﺄﺗ
a
.
LG Electronics.ﺯﺍﺭﻁﻟﺍ ﺍﺫﻫ ﻊﻣ ﻡﺩﺧﺗﺳُﻳﻟ ﻪﺗﻋﺎﻧﺻﺑ
• ﻡﻘﺗ ﻡﻟ ﺎﻣ ﻊﻔﺗﺭﻣ ﺢﻁﺳ ﻭﺃ ﺔﺻﻧﻣ ﻭﺃ ﺩﻭﻣﻋ ﺓﺩﻋﺎﻗ ﻰﻠﻋ ﺔﻟﺎﺳﻐﻟﺍ ﺏﻳﻛﺭﺗﺑ ﻡﻘﺗ ﻻ
2
2
3

ﺭﻳﺫﺣﺗ
ﺔﻅﺣﻼﻣ
ar_main.book.book Page 10 Thursday, October 22, 2020 4:16 PM
ﻝﻘﻧﻟﺍ ﻱﺭﺎﻣﺳﻣﺑ ﺃﺩﺑﺍ
ﻁﺑﺭﻟﺍ ﺡﺎﺗﻔﻣ ﻡﺍﺩﺧﺗﺳﺎﺑ ،ﻝﻔﺳﻷﺎﺑ ﻥﻳﺩﻭﺟﻭﻣﻟﺍ ,
ﺱﻛﻋ ﻲﻓ ﺎﻫﺭﻳﻭﺩﺗ ﻖﻳﺭﻁ ﻥﻋ ﻝﻣﺎﻛﻟﺎﺑ ﻝﻘﻧﻟﺍ ﺭﻳﻣﺎﺳﻣ ﻊﻳﻣﺟ ﻙﻔﻟ (ﻖﻓﺭﻣﻟﺍ)
.ﺝﺭﺎﺧﻟﺍ ﻰﻟﺇ ﺎﻬﺑﺣﺳ ﻊﻣ ﻑﻁﻠﺑ ﺎﻫﺯﻫ ﻖﻳﺭﻁ ﻥﻋ ﺭﻳﻣﺎﺳﻣﻟﺍ ﻊﻣﺟﻣ ﺝﺭﺧﺃ
ﻭﺃ ﺕﺎﻘﺣﻠﻣﻟﺍ ﺓﻭﺑﻋ ﻲﻓ ﺓﺩﻭﺟﻭﻣﻟﺍ
.ﺔﻟﺎﺳﻐﻟﺍ ﻥﻣ ﻲﻔﻠﺧﻟﺍ ءﺯﺟﻟﺎﺑ ﺔﺗﺑﺛﻣﻟﺍ
a
.ﺔﻋﺎﺳﻟﺍ ﺏﺭﺎﻘﻋ ﻩﺎﺟﺗﺍ
.ﺕﺎﺣﺗﻔﻟﺍ ﺔﻳﻁﻏﺃ ﺏﻳﻛﺭﺗ
b
ﺏﻳﻛﺭﺗﻟﺍ
1
ﺟﻟﺍ ﻲﺑﻧﺎﺟ ﻼﻛ ﻥﻣ ﺭﺗﻣ
ﻰﻟﺇ ﺽﺭﻌﺗﻟﺍ ﻰﻟﺇ ﺓﺭﺑﺧ ﻡﻬﻳﺩﻟ ﺱﻳﻟ ﺹﺎﺧﺷﺃ ﻝﺑﻗ ﻥﻣ ﻡﺗﺗ ﻲﺗﻟﺍ ﺕﺎﺣﻼﺻﻹﺍ
2
ﻥﻣ ﺩﻣﺗﻌﻣﻟﺍ ﻲﻠﺣﻣﻟﺍ ﺡﻼﺻﻹﺍ ﻲﻧﻔﺑ ﻝﺻﺗﺍ .ﺭﻳﻁﺧ ﻝﻁﻋ ﻭﺃ ﺔﺑﺎﺻﺇLG.
3
• ﺭﻳﻣﺎﺳﻣﻟﺍ ﺔﻳﻁﻏﺃ ﺏﻳﻛﺭﺗﺑ ﻡﻗ
ﺔﻳﺋﺎﺑﺭﻬﻛﻟﺍ ﺕﻼﻳﺻﻭﺗﻟﺍ
.ﺔﻳﻟﺎﺣﻟﺍ ﺔﻳﺋﺎﺑﺭﻬﻛﻟﺍ
.ﺔﻳﻠﺣﻣﻟﺍ ﺢﺋﺍﻭﻠﻟﺍﻭ ﻥﻳﻧﺍﻭﻘﻟﺍ ﻊﻳﻣﺟﻟ ﺎًﻘﻓﻭ
10
•.ﺎًﺟﻭﺩﺯﻣ ًﻻﻭﺣﻣ ﻻﻭ ﺔﻟﺎﻁﺇ ﻙﻠﺳ ﻡﺩﺧﺗﺳﺗ ﻻ
•.ﻡﺍﺩﺧﺗﺳﻻﺍ ﺩﻌﺑ ءﺎﻣﻟﺍ ﺩﺍﺩﻣﺇ ﻑﺎﻘﻳﺇﻭ ﺯﺎﻬﺟﻟﺍ ﻝﺻﻓ ﻰﻠﻋ ﺎًﻣﺋﺍﺩ ﺹﺭﺣﺍ
• ﻙﻼﺳﻷﺍ ﻝﻳﺻﻭﺗ ﺢﺋﺍﻭﻠﻟ ﺎًﻘﻓﻭ ﺽﺭﺅﻣ ﺱﺑﻘﻣﺑ ﺯﺎﻬﺟﻟﺍ ﻝﻳﺻﻭﺗ ﻥﻳﻌﺗﻳ
•.ﺔﻟﻭﻬﺳﺑ ﺱﺑﺎﻘﻟﺍ ﻰﻟﺇ ﻝﻭﺻﻭﻟﺍ ﻥﻛﻣﻳ ﺙﻳﺣﺑ ﺯﺎﻬﺟﻟﺍ ﻊﺿﻭ ﺏﺟﻳ
• ﻝﻭﻁﺑ ﻲﺑﺭﻬﻛﻟﺍ ﺭﺎﻳﺗﻟﺍ ﺫﺧﺄﻣ ﻥﻭﻛﻳ ﻥﺃ ﺏﺟﻳ1.ﺯﺎﻬ
• ﻱﺩﺅﺗ ﻥﺃ ﻥﻛﻣﻳ ﺙﻳﺣ ،ﻝﻫﺅﻣ ﺹﺧﺷ ﺔﻁﺳﺍﻭﺑ ﻻﺇ ﺯﺎﻬﺟﻟﺍ ﺡﻼﺻﺇ ﻡﺩﻋ ﺏﺟﻳ
• ﺽﺭﺅﻣﻭ ﺏﱠﻛﺭﻣ ﺏﺳﺎﻧﻣ ﻲﺑﺭﻬﻛ ﺭﺎﻳﺗ ﺱﺑﻘﻣﺑ ﺔﻗﺎﻁﻟﺍ ﺱﺑﺎﻗ ﻝﻳﺻﻭﺗ ﺏﺟﻳ
ﺯﺎﻬﺟﻟﺍ ﻑﻳﻠﻐﺗ ﺢﺗﻓ
ﻥﻳﻠﻔﻟﺍ ﺓﺩﻋﺎﻗ ﻥﻋ ﺯﺎﻬﺟﻟﺍ ﻊﻓﺭ
.ﻩﺅﺍﺭﺷ ﻡﺗ ﻱﺫﻟﺍ ﺯﺍﺭﻁﻟﺍ ﺏﺳﺣ ﺔﻳﺻﺎﺧﻟﺍ ﻩﺫﻫ ﻑﻠﺗﺧﺗ *
.ﻡﻭﻔﻟﺍ ﺓﺩﻋﺎﻗ ﻰﻠﻋ ﻥﻣ ﺯﺎﻬﺟﻟﺍ ﻊﻓﺭﺍ ،ﻥﺣﺷﻟﺍ ﺩﺍﻭﻣﻭ ﺔﻧﻭﺗﺭﻛﻟﺍ ﺔﻟﺍﺯﺇ ﺩﻌﺑ
-.ﻝﻘﻧﻟﺍ ﺭﻳﻣﺎﺳﻣ ﺏﻳﻛﺭﺗ ﺩﺎﻌُﻳ
-.ﺯﺎﻬﺟﻟﺍ ﻥﻣ ﻲﻔﻠﺧﻟﺍ ءﺯﺟﻟﺎﺑ ﺔﻗﺎﻁﻟﺍ ﻙﻠﺳ ﺕﺑﺛُﻳ
ﺯﺎﻬﺟﻟﺍ ﻯﻭﺗﺳﻣ ﻁﺑﺿ
ﻯﻭﺗﺳﻣﻟﺍ ﻁﺑﺿ ﻥﻣ ﻖﻘﺣﺗﻟﺍ
ﻙﺭﺣﺗﻳ ّﻻﺃ ﺏﺟﻳﻓ ،ﻱﺭﻁﻗ ﻝﻛﺷﺑ ﺯﺎﻬﺟﻠﻟ ﺔﻳﻭﻠﻌﻟﺍ ﺔﺣﻭﻠﻟﺍ ﻑﺍﻭﺣ ﻰﻠﻋ ﻁﻐﺿﻟﺍ ﺩﻧﻋ
.(ﻥﻳﻫﺎﺟﺗﻻﺍ ﻼﻛ ﺹﺣﻓﺍ) ﻕﻼﻁﻹﺍ ﻰﻠﻋ ﻝﻔﺳﻷﻭ ﻰﻠﻋﻷ ﺯﺎﻬﺟﻟﺍ
.ﻯﺭﺧﺃ ﺓﺭﻣ ﻡﺍﺩﻗﻷﺍ ﻝﻳﺩﻌﺗﺑ ﻡﻗ ،ﻱﺭﻁﻗ
•.ًﻼﺑﻘﺗﺳﻣ ﺎﻬﻣﺩﺧﺗﺳﺗﻟ ﺕﻳﺑﺛﺗﻟﺍ ﺭﺻﺎﻧﻋﻭ ﻝﻘﻧﻟﺍ ﺭﻳﻣﺎﺳﻣﺑ ﻅﻔﺗﺣﺍ
•:ﺭﺳﻛﻠﻟ ﻪﺿﺭﻌﺗ ﺏﻧﺟﺗﻟ ﻩﺎﻧﺩﺃ ﺢﺿﻭﻣ ﻭﻫ ﺎﻣﻛ ﺯﺎﻬﺟﻟﺍ ﻝﻘﻧﺍ
*
ﻝﻔﺳﺄﺑ ﻖﺻﺗﻠﺗ ﻻﻭ ﺓﺩﻋﺎﻘﻟﺍ ﻥﻋ ﺓﺩﻳﻌﺑ *
ﺎًﻣﺋﺍﺩ ﻙﻳﻠﻋ ﺏﺟﻳﻓ ،
ﺏﻧﺎﺟﻟﺍ ﻰﻠﻋ ﺯﺎﻬﺟﻟﺍ ﺏﻠﻘﺗ ﻻ .ﺎﻬﺑﻧﺎﺟ ﻰﻠﻋ ﺭﺫﺣﺑ ﺎﻬﺑﻠﻗﻭ ﺔﻟﺎﺳﻐﻟﺍ ﺏﻧﺎﺟ ﺔﻳﺎﻣﺣ
• ﻝﻛﺷﺑ ﺯﺎﻬﺟﻠﻟ ﺔﻳﻭﻠﻌﻟﺍ ﺔﺣﻭﻠﻟﺍ ﻰﻠﻋ ﻁﻐﺿﻟﺍ ﺩﻧﻋ ﺯﺎﻬﺟﻟﺍ ﺢﺟﺭﺄﺗ ﺔﻟﺎﺣ ﻲﻓ
.ﺕﻳﺑﺛﺗﻟﺍ ﺭﺻﺎﻧﻋﻭ ﻝﻘﻧﻟﺍ ﺭﻳﻣﺎﺳﻣ ﻝﺯﺃ ،ﺯﺎﻬﺟﻠﻟ ﺭﺳﻛﻭ ﺩﻳﺩﺷ ﺯﺍﺯﺗﻫﺍ ﺙﻭﺩﺣ ﻊﻧﻣﻟ
•.ﻪﺑﻳﻛﺭﺗ ﺩﻌﺑ ﺢﻳﺣﺻ ٍﻭﺣﻧ ﻰﻠﻋ ﺔﻳﻭﺗﺳﻣ ﺔﻳﻌﺿﻭ ﻲﻓ ﺯﺎﻬﺟﻟﺍ ﻊﺿﻭ ﻥﻣ ﻖﻘﺣﺗ
b
a
.ﻲﻔﻠﺧﻟﺍ ﻭﺃ ﻲﻣﺎﻣﻷﺍ
ﻝﻘﻧﻟﺍ ﺭﻳﻣﺎﺳﻣ ﺕﺎﻋﻭﻣﺟﻣ ﺔﻟﺍﺯﺇ
• ﺽﻭﺣﻟﺍ ﺔﻣﺎﻋﺩ ﻥﺃ ﻥﻣ ﺩﻛﺄﺗ
.ﺯﺎﻬﺟﻟﺍ
• ﺔﻳﻧﻭﺗﺭﻛﻟﺍ ﺓﺩﻋﺎﻘﻟﺍ ﺔﻟﺍﺯﻹ ﻝﻔﺳﻷ ﺔﻟﺎﺳﻐﻟﺍ ﺏﻠﻗ ﻡﺯﻟ ﺍﺫﺇ

ﺭﻳﺫﺣﺗ
ﺔﻅﺣﻼﻣ
ﻪﻳﺑﻧﺗ
ﺔﻅﺣﻼﻣ
ar_main.book.book Page 9 Thursday, October 22, 2020 4:16 PM
9
ﺏﻳﻛﺭﺗﻟﺍ
(ﺔﻘﻠﻌﻣﻟﺍ ﺕﺎﻳﺿﺭﻷﺍ) ﺔﻳﺑﺷﺧﻟﺍ ﺕﺎﻳﺿﺭﻷﺍ
ﻥﻣ ﺩﺣﻠﻟ ﺔﻳﻁﺎﻁﻣ ﺎًﺑﺍﻭﻛﺃ ﻡﺩﺧﺗﺳﺍ ﺔﻳﺑﺷﺧ ﺕﺎﻳﺿﺭﺃ ﻰﻠﻋ ﺯﺎﻬﺟﻟﺍ ﺏﻳﻛﺭﺗ ﺩﻧﻋ
ﻭﺃ ﺔﻳﺑﺷﺧﻟﺍ ﺕﺎﻳﺿﺭﻷﺍ ﺙﺩﺣُﺗ ﻥﺃ ﻥﻛﻣﻳ .ﻥﺍﺯﺗﻻﺍ ﻲﻓ ﻝﻠﺧﻭ ﻱﻭﻗ ﺯﺍﺯﺗﻫﺍ ﺙﻭﺩﺣ
.ًﻻﺎﻁﻋﺃﻭ ًءﺎﻁﺧﺃﻭ ﻥﺍﺯﺗﻻﺍ ﻲﻓ ًﻼﻠﺧﻭ ﺎًﻳﻭﻗ ﺍًﺯﺍﺯﺗﻫﺍ ﺔﻘﻠﻌﻣﻟﺍ
ﺍﻟﻌﺭﺑﻳﺔ
ﻥﻋ ﻝﻘﻳ ﻻ ﺎﻬﻛﻣﺳ 15
ﻝﻗﻷﺍ ﻰﻠﻋ ﻥﻳﺗﺿﺭﺎﻋ ﻰﻠﻋ ﺎﻬﺗﻳﺑﺛﺗ ﻡﺗﻳﻭ ،ﺯﺎﻬﺟﻟﺍ ﻝﺟﺭﺃ ﻥﻣ ﻝﺟﺭ ﻝﻛ ﻝﻔﺳﺃ ﻡﻣ
ﺢﻁﺳ ﻰﻠﻋ ﺕﻳﺑﺛﺗﻟﺍ ﺏﺑﺳﺑ ﺔﺟﺗﺎﻧﻟﺍ ﻑﻳﻟﺎﻛﺗﻟﺍﻭ ﺭﺍﺭﺿﻷﺍ ﻲﻁﻐﻳ ﻻ ﻥﺎﻣﺿﻟﺍ
a
.ﻲﻏﺍﺭﺑ ﻡﺍﺩﺧﺗﺳﺎﺑ ﺔﻳﺿﺭﻷﺍ ﺽﺭﺍﻭﻋ ﻥﻣ
.ﺎًﺗﺎﺑﺛ ﺭﺛﻛﺃ ﺔﻳﺿﺭﻷﺍ
.ﺭﻘﺗﺳﻣ ﺭﻳﻏ
ﺏﻳﻛﺭﺗﻟﺍ ﻥﺎﻛﻣ ﺕﺎﺑﻠﻁﺗﻣ
ﻥﺎﻛﻣﻟﺍ ﻲﻓ ﻪﺑﻳﻛﺭﺗ ﻥﻣ ﺩّﻛﺄﺗﻠﻟ ﺯﺎﻬﺟﻟﺍ ﺏﻳﻛﺭﺗ ﻝﺑﻗ ﺔﻳﻟﺎﺗﻟﺍ ﺕﺎﻣﻭﻠﻌﻣﻟﺍ ﻥﻣ ﻖﻘﺣﺗ
ﺏﻳﻛﺭﺗﻟﺍ ﻥﺎﻛﻣ
ﻝﻗﺃ ﻲﻬﻓ ،ﺭﺎﻳﺗﺧﺍ ﻝﺿﻓﺃ ﻲﻫ ﺔﻳﻧﺎﺳﺭﺧﻟﺍ ﺔﻳﺿﺭﻷﺍ .ﻑﻳﺷﻧﺗﻟﺍ ﺓﺭﻭﺩ ءﺎﻧﺛﺃ
ﺔﻳﺿﺭﻷﺍ ﺡﺍﻭﻟﻷﺎﺑ ﺔﻧﺭﺎﻘﻣ ﻑﻳﺷﻧﺗﻟﺍ ﺓﺭﻭﺩ ءﺎﻧﺛﺃ ﺙﺩﺣﻳ ﻱﺫﻟﺍ ﺯﺍﺯﺗﻫﻼﻟ ﺔﺿﺭﻋ
.ﻥﻳﺯﺎﻬﺟﻟﺍ ﻥﻳﺑ ﺩﻗﻭﻣﻟﺍ ﻭﺃ ﻥﺭﻔﻠﻟ ﻪﺟﺍﻭﻣﻟﺍ ﺏﻧﺎﺟﻟﺍ ﻰﻠﻋ
• ﺔﻳﻁﺎﻁﻣ ﺏﺍﻭﻛﺃ ﻊﺿﻭﺑ ﻙﺣﺻﻧﻧ ،ﺯﺍﺯﺗﻫﻻﺍ ﻝﻳﻠﻘﺗﻟ
• ﻥﻭﻛﺗ ﺙﻳﺣﺑ ،ﺔﻓﺭﻐﻟﺍ ﺎﻳﺍﻭﺯ ﻥﻣ ﺔﻳﻭﺍﺯ ﻲﻓ ﺯﺎﻬﺟﻟﺍ ﺏﻳﻛﺭﺗﺑ ﻡﻗ ،ﻥﻛﻣﺃ ﻥﺇ
ﻑﻳﺭﺻﺗﻟﺍ ﻡﻭﻁﺭﺧﻭ ﻡﺎﻣﺻﻟﺎﺑ ﻩﺎﻳﻣﻟﺍ ﻝﺎﺧﺩﺇ ﻡﻳﻁﺍﺭﺧﻟ ﺔﻳﻓﺎﻛ ﺔﻓﺎﺳﻣ ﺩﻭﺟﻭ ﻥﺎﻣﺿﻟ
•.ﺯﺍﺯﺗﻫﻻﺍ ﻥﻣ ﺩﺣﻠﻟ ﺔﻳﻁﺎﻁﻣﻟﺍ ﺏﺍﻭﻛﻷﺍ ﺕﺑﺛ
ﺍﺫﻟ ،ﺔﻓﺎﺳﻣﻟﺍ ﺓﺩﺎﻳﺯ ﺔﻳﺿﺭﻷﺍ ﺔﺑﻟﻭﻘﻟﺍﻭ ،ﺏﺎﺑﻟﺍﻭ ،ﻁﺋﺎﺣﻟﺍ ﺏﻠﻁﺗﻳ .ﺯﺎﻬﺟﻟﺍ ﻑﻠﺧ ﻡﻣ
• ﻥﺈﻓ (ﺔﻳﺑﺷﺧ ﺔﻳﺿﺭﺃ ﻝﺛﻣ) ﺓﺭﻘﺗﺳﻣ ﺭﻳﻏ ﺔﻳﺿﺭﺃ ﻰﻠﻋ ﺯﺎﻬﺟﻟﺍ ﺏﻳﻛﺭﺗ ﻡﺗ ﺍﺫﺇ
.ﺩﺎﺟﺳﻟﺎﺑ ﺓﺎﻁﻐﻣﻟﺍ ﺢﻁﺳﻷﺍ ﻭﺃ
) ﻝﺯﺎﻋ ﻊﺿ
.ﺯﺎﻬﺟﻟﺍ ﺭﺍﺭﻘﺗﺳﺍ ﻥﺎﻣﺿﻟ ﺓﺭﻓﻭﻣﻟﺍ ﻝﻘﻧﻟﺍ
ﻲﺿﺭﻷﺍ ﺏﻳﻛﺭﺗﻟﺍ
ﻥﻋ ﻝﻘﺗ ﻻ ﺔﻓﺎﺳﻣ ﻙﺭﺗﺍ ،ءﺍﻭﻬﻟﺍ ﻖﻓﺩﺗﻭ20ﻭ ﺏﻧﺍﻭﺟﻟﺍ ﺩﻧﻋ ﻰﻧﺩﺃ ﺩﺣﻛ ﻡﻣ 100
.ﺢﻳﺣﺻﻟﺍ
• ﺯﺍﺯﺗﻫﺍ ﺙﻭﺩﺣ ﻥﻣ ﺩﺣﻠﻟ ﻙﻟﺫﻭ ﺔﺗﺑﺎﺛ ﺔﻳﺿﺭﺃ ﻰﻠﻋ ﺯﺎﻬﺟﻟﺍ ﺍﺫﻫ ﺏﻳﻛﺭﺗ ﺏﺟﻳ
• ﻝﻣﻌﻳ ﺩﻗﻭﻣ ﻭﺃ ﺯﺎﻏ ﺩﻗﻭﻣ ﺏﻧﺎﺟﺑ ﺯﺎﻬﺟﻟﺍ ﻊﺿﻭ ﺏﻧﺟﺗ ﻝﻳﺣﺗﺳﻣﻟﺍ ﻥﻣ ﻥﺎﻛ ﺍﺫﺇ
ﻭ ﺏﺟﻳﻓ ،ﻡﺣﻔﻟﺎﺑ850 × 600 ﻡﻭﻳﻧﻣﻭﻟﻷﺍ ﻖﺋﺎﻗﺭﺑ ﻰﻁﻐﻣ (ﻡﻣ
•.ﻪﻠﻁﻌﺗ ﺔﻟﺎﺣ ﻲﻓ ﻪﻳﻟﺇ ﺱﺩﻧﻬﻣﻟﺍ ﻝﻭﺻﻭ ﺔﻟﻭﻬﺳ ﻥﻣ ﺯﺎﻬﺟﻟﺍ ﺏﻳﻛﺭﺗ ﺩﻧﻋ ﺩﻛﺄﺗ
• ﻝﻳﻣﺍﻭﺻ ﺡﺎﺗﻔﻣ ﻡﺍﺩﺧﺗﺳﺎﺑ ﺔﻌﺑﺭﻷﺍ ﻡﺍﺩﻗﻷﺍ ﻝﻛ ﻁﺑﺿﺍ ،ﺯﺎﻬﺟﻟﺍ ﺏﻳﻛﺭﺗ ﺩﻧﻋ
.ﺎﻫﺭﻓﻭﺗ ﻥﻣ ﺩﻛﺄﺗ
B
4620ER4002B
ﺯﻛﺭﻣ ﻥﻣ (
ﺔﻣﺩﺧLG.
ﺔﻳﻭﻬﺗﻟﺍ
.ﺯﺎﻬﺟﻟﺍ
ﺔﻁﻳﺣﻣﻟﺍ ﺓﺭﺍﺭﺣﻟﺍ ﺔﺟﺭﺩ
ﺓﺩﺣﻭ ﺓءﺎﻔﻛ ﻝﻘﺗ ﻥﺃ ﻥﻛﻣﻳ .ﻁﻐﺿﻟﺍ ﺕﺣﺗ ﺓﺩﻣﺟﺗﻣﻟﺍ ﻡﻳﻁﺍﺭﺧﻟﺍ ﺭﺟﻔﻧﺗ ﻥﺃ ﻥﻛﻣﻳ
.ﺩﻣﺟﺗﻟﺍ ﺔﺟﺭﺩ ﻥﻣ ﻝﻗﻷﺍ ﺓﺭﺍﺭﺣﻟﺍ ﺕﺎﺟﺭﺩ ﻝﻅ ﻲﻓ ﺔﻳﻧﻭﺭﺗﻛﻟﻹﺍ ﻡﻛﺣﺗﻟﺍ
ﺃ ﺓﺭﺍﺭﺣﻟﺍ ﺕﺎﺟﺭﺩ ﺕﻧﺎﻛﻭ ءﺎﺗﺷﻟﺍ ﻲﻓ ﺯﺎﻬﺟﻟﺍ ﻰﻠﻋ ﻝﻭﺻﺣﻟﺍ ﺔﻟﺎﺣ ﻲﻓ
ﻝﺑﻗ ﺕﺎﻋﺎﺳ ﻊﺿﺑﻟ ﺔﻓﺭ
ﻐﻟﺍ ﺓﺭﺍﺭﺣ ﺔﺟﺭﺩ ﻲﻓ ﺯﺎﻬﺟﻟﺍ ﻊﺿﻓ ،ﺩﻣﺟﺗﻟﺍ ﺔﺟﺭﺩ
.ﻪﻠﻳﻐﺷﺗ
• ﺔﻌﻁﻘﻟﺍ ﻡﻗﺭ) ﺔﻳﻁﺎﻁﻣ ﺏﺍﻭﻛﺃ ءﺍﺭﺷ ﻥﻛﻣﻳ
A
• ﻝﻭﺣ ءﺍﻭﻬﻟﺍ ﻥﺍﺭﻭﺩﻟ ﻙﻟﺫ ﻰﻟﺇ ﺎﻣ ﻭﺃ ﻁُﺳُﺑﻟﺍ ﻭﺃ ﺩﺎﺟﺳﻟﺍ ﺔﻗﺎﻋﺇ ﻡﺩﻋ ﻥﻣ ﺩﻛﺄﺗ
• ﺙﻳﺣ ،ﺩﻣﺟﺗﻟﺍ ﻰﻟﺇ ﺎﻬﺗﺭﺍﺭﺣ ﺔﺟﺭﺩ ﻝﺻﺗ ﻥﺃ ﻥﻛﻣﻳ ﻑﺭﻏ ﻲﻓ ﺯﺎﻬﺟﻟﺍ ﺏﻛﺭﺗ ﻻ
• ﻥﻣ ﻝﻗ
C
100ﻡﻣ
5ﻡﻣ
20ﻡﻣ
.ﺯﺎﻬﺟﻟﺍ ﺕﺣﺗ ﺔﻬﺑﺎﺷﻣ ﺩﺍﻭﻣ ﻭﺃ ﻯﻭﻘﻣﻟﺍ ﻕﺭﻭﻟﺍ
C
A
B
C
• ﻲﻓ ﻪﻣﺍﺩﺧﺗﺳﺍ ﻲﻐﺑﻧﻳ ﻻﻭ ﻁﻘﻓ ﺔﻳﻟﺯﻧﻣﻟﺍ ﺽﺍﺭﻏﻸﻟ ﻻﺇ ﺯﺎﻬﺟﻟﺍ ﺍﺫﻫ ﻡﺩﺧﺗﺳﻳ ﻻ
.ﺔﻠﻘﻧﺗﻣﻟﺍ ﺕﺎﻣﺍﺩﺧﺗﺳﻻﺍ
• ﻭﺃ ﺏﺷﺧﻟﺍ ﻥﻣ ﻊﻁﻗ ﻊﺿﻭﺑ ﺔﻳﻭﺗﺳﻣ ﺭﻳﻏ ﺔﻳﺿﺭﺃ ﻱﺃ ﺔﻳﻭﺳﺗ ﺍًﺩﺑﺃ ﻝﻭﺎﺣﺗ ﻻ

ar_main.book.book Page 8 Thursday, October 22, 2020 4:16 PM
*1
ﻕﻻﺯﻧﻼﻟ ﺔﻌﻧﺎﻣ ﺢﺋﺍﺭﺷ
ﻑﻳﺭﺻﺗﻟﺍ ﻡﻭﻁﺭﺧ ﺕﻳﺑﺛﺗﻟ ﺔﻳﻘﻓﺭﻣ ﺔﻣﺎﻋﺩ
*1
ﻁﺑﺭﻟﺍ ﻡﺍﺯﺣ
W
d
e
f
ﺏﻳﻛﺭﺗﻟﺍ
8
ﺕﺎﻘﺣﻠﻣﻟﺍ
*1 .ﻪﺗﻳﺭﺗﺷﺍ ﻱﺫﻟﺍ ﻝﻳﺩﻭﻣﻠﻟ ﺎًﻌﺑﺗ ﺔﻘﻓﺭﻣﻟﺍ ﺕﺎﻘﺣﻠﻣﻟﺍ ﻑﻠﺗﺧﺗ
ءﺎﻣﻟﺍ ﺩﺍﺩﻣﺇ ﻡﻭﻁﺭﺧ
ﻁﺑﺭ ﺡﺎﺗﻔﻣ
ﻝﻘﻧﻟﺍ ﺭﻳﻣﺎﺳﻣ ﺕﺎﺣﺗﻓ ﺔﻳﻁﻐﺗﻟ ﺔﻳﻁﻏﺃ
a
b
c
ﺕﺎﻔﺻﺍﻭﻣﻟﺍ
ﺯﺍﺭﻁﻟﺍF1608*D
ﺔﻗﺎﻁﻟﺍ ﺭﺩﺻﻣ220-240 ،~ﺕﻟﻭﻓ 50ﺯﺗﺭﻫ،
ﺞﺗﻧﻣﻟﺍ ﻥﺯﻭ66ﻡﺟﻛ
(ﻡﻠﻣ)ﺩﺎﻌﺑﻷﺍ
D’’
D’
D
H
W600D565D''1100
H850D'620

ﺔﻅﺣﻼﻣ
ar_main.book.book Page 7 Thursday, October 22, 2020 4:16 PM
7
ﺏﻳﻛﺭﺗﻟﺍ
ﺍﻟﻌﺭﺑﻳﺔ
ﺏﻳﻛﺭﺗﻟﺍ
ﺕﺎﻔﺻﺍﻭﻣﻟﺍﻭ ءﺍﺯﺟﻷﺍ
•.ﺯﺎﻬﺟﻟﺍ ﺓﺩﻭﺟ ﻥﻳﺳﺣﺗ ﻝﺟﺃ ﻥﻣ ﻙﻟﺫﺑ ﺭﺎﻁﺧﻹﺍ ﻥﻭﺩ ﺕﺎﻔﺻﺍﻭﻣﻟﺍﻭ ﻝﻛﺷﻟﺍ ﺭﻳﻳﻐﺗ ﻥﻛﻣُﻳ
ﻑﻠﺧﻟﺍ ﻥﻣ ﺯﺎﻬﺟﻟﺍ ﻝﻛﺷ
ﺔﻗﺎﻁﻟﺍ ﺱﺑﺎﻗ
ﻝﻘﻧﻟﺍ ﺭﻳﻣﺎﺳﻣ
ﻑﻳﺭﺻﺗﻟﺍ ﻡﻭﻁﺭﺧ
a
b
c
ﻲﻣﺎﻣﻷﺍ ﻝﻛﺷﻟﺍ
ﻡﻛﺣﺗﻟﺍ ﺔﺣﻭﻟ
ﻑﻅﻧﻣﻟﺍ ﻉﺯﻭﻣ ﺝﺭﺩ
ﻝﺳﻐﻟﺍ ﺽﻭﺣ
ﺏﺎﺑﻟﺍ
ﻑﻼﻐﻟﺍ ءﺎﻁﻏ
ﻑﻳﺭﺻﺗﻟﺍ ﺓﺩﺍﺩﺳ
ﻑﻳﺭﺻﺗﻟﺍ ﺔﺧﺿﻣ ﺭﺗﻠﻓ
ﺔﻳﻭﺳﺗﻟﺍ ﻡﺍﺩﻗﺃ
a
b
c
d
e
f
g
h

ar_main.book.book Page 6 Thursday, October 22, 2020 4:16 PM
ﺔﻣﻼﺳﻟﺍ ﺕﺍﺩﺎﺷﺭﺇ
.ﺽﺭﻷﺍ ﻝﻼﺗﺑﺍ ﻰﻟﺇ
ﺔﻧﺎﻳﺻﻟﺍ
.ﺯﺎﻬﺟﻟﺍ ﺍﺫﻫ ﻥﻋ ﺔﻗﺎﻁﻟﺍ ﻝﺻﻓ ﻰﻟﺇ
ﻰﻠﻋ ﺎًﻣﺋﺍﺩ ﺹﺭﺣﺍ .ﺔﻗﺎﻁﻟﺍ ﻝﺑﺎﻛ ﺩﺷ ﻝﻼﺧ ﻥﻣ ﺯﺎﻬﺟﻟﺍ ﻥﻋ ﺔﻗﺎﻁﻟﺍ ﻝﺻﻓ ﻡﺩﻋ ﻰﻠﻋ ﺎًﻣﺋﺍﺩ ﺹﺭﺣﺍ
.ﺔﻣﻳﻘﺗﺳﻣ ﺔﻳﻌﺿﻭ ﻲﻓ ﻲﺑﺭﻬﻛﻟﺍ ﺭﺎﻳﺗﻟﺍ ﺫﺧﺄﻣ ﻥﻣ ﻪﺑﺫﺟﺑ ﻡﻗﻭ ﻡﺎﻛﺣﺈﺑ ﻪﺑ
ﺔﻛﺭﺷ ﻲﻓ ءﻼﻣﻌﻟﺍ ﺕﺎﻣﻭﻠﻌﻣ ﺯﻛﺭﻣ ﻊﻣ
ﻝﺻﺍﻭﺗ .ﻪﻠﻳﺩﻌﺗ ﻭﺃ ﻪﺣﻼﺻﺇLG Electronics ﻝﻘﻧﺗ ﺕﻧﻛ ﻝﺎﺣ ﻲﻓ
.ﻑﻠﺗﺧﻣ ﻊﻗﻭﻣ ﻲﻓ ﻪﺑﻳﻛﺭﺗﺑ ﻡﻭﻘﺗﻭ ﺯﺎﻬﺟﻟﺍ
ﺹﻠﺧﺗﻟﺍ
6
• ﻱﺩﺅﻳ ﻡﺛ ﻥﻣﻭ ﻑﻳﺛﻛﺗ ﺙﺩﺣﻳ ﺩﻗ ،ﺔﺿﻔﺧﻧﻣ ءﺎﻣﻟﺍ ﺓﺭﺍﺭﺣ ﺔﺟﺭﺩﻭ ﺔﻌﻔﺗﺭﻣ ءﺍﻭﻬﻟﺍ ﺓﺭﺍﺭﺣ ﺔﺟﺭﺩ ﻥﻭﻛﺗ ﺎﻣﺩﻧﻋ
•.ﺔﻗﺎﻁﻟﺍ ﺱﺑﺎﻗ ﺱﻣﻼﺗ ءﺍﺯﺟﺃ ﻰﻠﻋ ﻥﻣ ﺔﺑﺭﺗﻷﺍ ﻭﺃ ﺭﺎﺑﻐﻟﺍ ﺢﺳﻣﺍ
• ﺩﺍﺩﻌﺗﺳﻻﺍ ﻊﺿﻭ ﻰﻟﺇ ﻭﺃ ﻑﺎﻘﻳﺇ ﻰﻟﺇ ﻡﻛﺣﺗﻟﺍ ﺭﺻﺎﻧﻋ ﻁﺑﺿ ﻱﺩﺅﻳ ﻻ .ﻪﻔﻳﻅﻧﺗ ﻝﺑﻗ ﺯﺎﻬﺟﻟﺍ ﻥﻋ ﺔﻗﺎﻁﻟﺍ ﻝﺻﻓﺍ
•.ﺭﺎﺑﻏ ﻭﺃ ﺔﺑﻭﻁﺭ ﻱﻷ ﺔﻠﻣﺎﻛﻟﺍ ﺔﻟﺍﺯﻹﺍ ﺩﻌﺑ ﻲﺑﺭﻬﻛﻟﺍ ﺭﺎﻳﺗﻟﺍ ﺫﺧﺄﻣ ﻲﻓ ﻡﺎﻛﺣﺈﺑ ﺔﻗﺎﻁﻟﺍ ﺱﺑﺎﻗ ﻝﺧﺩﺃ
•.ﻪﻔﻳﻅﻧﺗﻟ ﻪﺟﺭﺎﺧ ﻭﺃ ﺯﺎﻬﺟﻟﺍ ﻝﺧﺍﺩ ءﺎﻣﻟﺍ ﺵﺭﺑ ﻡﻘﺗ ﻻ
• ﻙﺎﺳﻣﻹﺍ
• ﺔﻛﺭﺷ ﺔﻣﺩﺧ ﺯﻛﺭﻣ ﻥﻣ ﻝﻫﺅﻣ ﺔﻣﺩﺧ ﻑﻅﻭﻣ ﻁﻘﻓ ﻡﻭﻘﻳ ﻥﺃ ﺏﺟﻳLG Electronics ﻭﺃ ﺯﺎﻬﺟﻟﺍ ﻙﻳﻛﻔﺗﺑ
.ﻕﺎﻧﺗﺧﻻﺍ ﺏﺑﺳﺗ ﻥﺃ ﻑﻳﻠﻐﺗﻟﺍ ﺩﺍﻭﻣﻟ ﻥﻛﻣﻳ
•.ﻪﻣﺍﺩﺧﺗﺳﺍ ءﻭﺳ ﻊﻧﻣﻟ ًﺓﺭﺷﺎﺑﻣ ﺯﺎﻬﺟﻟﺍ ﻑﻠﺧ ﺩﻭﺟﻭﻣﻟﺍ ﻝﺑﺎﻛﻟﺍ ﻊﻁﻗﺍ .ﻪﻠﺻﻔﺑ ﻡﻗ ،ﻡﻳﺩﻗ ﺯﺎﻬﺟ ﻥﻣ ﺹﻠﺧﺗﻟﺍ ﻝﺑﻗ
• ﺫﺇ ،ﻝﺎﻔﻁﻷﺍ ﻝﻭﺎﻧﺗﻣ ﻥﻋ ﺍًﺩﻳﻌﺑ (ﻡﻭﻓﻭﺭﻳﺎﺗﺳﻟﺍ ﺓﺩﺎﻣﻭ ﻙﻳﺗﺳﻼﺑﻟﺍ ﺱﺎﻳﻛﺃ ﻝﺛﻣ) ﺔﺋﺑﻌﺗﻟﺍ ﺩﺍﻭﻣ ﻊﻳﻣﺟ ﻥﻣ ﺹﻠﺧﺗ
•.ﻪﻠﺧﺍﺩﺑ ﺓﺭﻳﻐﺻﻟﺍ ﺕﺎﻧﺍﻭﻳﺣﻟﺍ ﻭﺃ ﻝﺎﻔﻁﻷﺍ ﺱﺎﺑﺗﺣﺍ ﺭﻁﺧﻟ ﺎًﻳﺩﺎﻔﺗ ﺯﺎﻬﺟﻟﺍ ﺍﺫﻫ ﻥﻣ ﺹﻠﺧﺗﻟﺍ ﻝﺑﻗ ﺏﺎﺑﻟﺍ ﺔﻟﺍﺯﺈﺑ ﻡﻗ

ar_main.book.book Page 5 Thursday, October 22, 2020 4:16 PM
5
ﺔﻣﻼﺳﻟﺍ ﺕﺍﺩﺎﺷﺭﺇ
ﺍﻟﻌﺭﺑﻳﺔ
.ﺔﻟﺎﺳﻐﻟﺍ ﻩﺫﻫ ﻲﻓ ﺕﺍءﻼﻣﻟﺍﻭ ﺱﺑﻼﻣﻟﺍ ﻑﻼﺧﺑ ﻯﺭﺧﺃ ﺭﺻﺎﻧﻋ ﻱﺃ
•.ﺎًﺣﻭﺗﻔﻣ ﺯﺎﻬﺟﻟﺍ ﺏﺎﺑ ﻥﻭﻛﻳ ﺎﻣﺩﻧﻋ ﺓﺩﺷﺑ ﻝﻔﺳﻸﻟ ﺏﺎﺑﻟﺍ ﻰﻠﻋ ﻁﻐﺿﺗ ﻻ
•.ﺯﺎﻬﺟﻟﺍ ﻝﺧﺍﺩ ﺔﻔﻳﻟﻷﺍ ﺕﺎﻧﺍﻭﻳﺣﻟﺍ ﻝﺛﻣ ﺔﻳﺣﻟﺍ ﺕﺎﻧﺍﻭﻳﺣﻟﺍ ﻊﺿﺗ ﻻ
• ﻭﺃ ﺓﻭﺷﺣﻣﻟﺍ ﺏﺎﻌﻟﻷﺍ ﻭﺃ ﺔﻔﻳﻟﻷﺍ ﺕﺎﻧﺍﻭﻳﺣﻟﺎﺑ ﺔﺻﺎﺧﻟﺍ ﺔﻳﻁﻏﻷﺍ ﻭﺃ ﺔﻳﺫﺣﻷﺍ ﻭﺃ ﺔﻁﺳﺑﻷﺍ ﻭﺃ ﺩﺎﺟﺳﻟﺍ ﻝﺳﻐﺑ ﻡﻘﺗ ﻻ
• ،ﻕﺭﻭﻟﺍﻭ ،ﻥﺎﺗﻛﻟﺍ ﻝﺛﻣ ﻕﺍﺭﺗﺣﻼﻟ ﺔﻠﺑﺎﻘﻟﺍ ﺩﺍﻭﻣﻟﺍ ﻥﻣ ﺔﻳﻟﺎﺧ ﻪﻟﻭﺣﻭ ﺯﺎﻬﺟﻟﺍ ﻝﻔﺳﺃ ﺓﺩﻭﺟﻭﻣﻟﺍ ﺔﻘﻁﻧﻣﻟﺍ ﻰﻠﻋ ﻅﻓﺎﺣ
.ﻙﻟﺫ ﻰﻟﺇ ﺎﻣﻭ ،ﺔﻳﺋﺎﻳﻣﻳﻛﻟﺍ ﺩﺍﻭﻣﻟﺍﻭ ،ﺵﺎﻣﻘﻟﺍ ﻊﻁﻗﻭ
• ﺩﻗ ﺎﻣﻣ ،ﺯﺎﻬﺟﻟﺍ ﻝﺧﺍﺩ ﻰﻟﺇ ﺍﻭﻔﺣﺯﻳ ﻭﺃ ﺏﺎﺑﻟﺎﺑ ﻝﺎﻔﻁﻷﺍ ﻖﻠﻌﺗﻳ ﻥﺃ ﻥﻛﻣﻳ ﺙﻳﺣ .ﺎًﺣﻭﺗﻔﻣ ﺯﺎﻬﺟﻟﺍ ﺏﺎﺑ ﻙﺭﺗﺗ ﻻ
.ﺔﺑﺎﺻﻺﻟ ﺽﺭﻌﺗﻟﺍ ﻭﺃ ﻑﻠﺗﻟﺍ ﺏﺑﺳﻳ
ﺎﻬﻌﻘﻧ ﻭﺃ ﺎﻬﻠﺳﻏ ﻭﺃ ﺎﻬﻔﻳﻅﻧﺗ ﻡﺗ ﻲﺗﻟﺍ ﺽﺍﺭﻏﻷﺍ ﻑﻔﺟﺗ ﻭﺃ ﻝﺳﻐﺗ ﻭﺃ ﻊﺿﺗ ﻻ
ﻡﻭﺣﺷﻟﺍ ﺕﻼﻳﺯﻣﻭ ﻥﻳﻟﻭﺯﺎﺟﻟﺍﻭ ءﻼﻁﻟﺍﻭ ﺕﻳﺯﻟﺍﻭ ﺔﻳﻌﻣﺷﻟﺍ ﻊﻘﺑﻟﺍ ﺕﻼﻳﺯﻣﻭ ﻊﻣﺷﻟﺍ ﻝﺛﻣ) ﻕﺍﺭﺗﺣﻼﻟ ﺔﻠﺑﺎﻗ ﻭﺃ
ﺕﻭﻳﺯﻭ ﺔﻳﺗﺎﺑﻧﻟﺍ ﺕﻭﻳﺯﻟﺍﻭ ﻥﻳﺗﻧﺑﺭﺗﻟﺍ ﺕﻳﺯﻭ ﻊﻘﺑﻟﺍ ﺕﻼﻳﺯﻣﻭ ﻥﻳﺯﻧﺑﻟﺍﻭ ﻥﻳﺳﻭﺭﻳﻛﻟﺍﻭ ﻑﺎﺟﻟﺍ ﻑﻳﻅﻧﺗﻟﺍ ﺕﺎﺑﻳﺫﻣﻭ
ﻉﻭﻗﻭ ﻭﺃ ﻖﻳﺭﺣ ﺏﻭﺷﻧ ﻲﻓ ﻡﻳﻠﺳﻟﺍ ﺭﻳﻏ ﻡﺍﺩﺧﺗﺳﻻﺍ ﺏﺑﺳﺗﻳ ﺩﻘﻓ .(.ﻙﻟﺫ
ﻰﻟﺇ ﺎﻣﻭ ،ﻝﻭﺣﻛﻟﺍ ﻭ ﻥﻭﺗﻳﺳﻷﺍﻭ ﻲﻬﻁﻟﺍ
.ﺭﺎﺟﻔﻧﺍ
،ﺔﻳﻟﻭﺭﺗﺑﻟﺍ ﺩﺍﻭﻣﻟﺍﻭ ،"ﺭﻧﺗﻟﺍ" ﻥﺎﻫﺩﻟﺍ ﻑﻳﻔﺧﻣﻭ ،ﻥﻳﻟﻭﺯﺎﺟﻟﺍﻭ ،ﻕﺍﺭﺗﺣﻼﻟ ﻝﺑﺎﻗ ﺫﺍﺫﺭﻟﺍﻭ ،ﻝﺎﺳﻣﻟﺍ ﻲﻁﻔﻧﻟﺍ ﺯﺎﻐﻟﺍﻭ
.ﺯﺎﻬﺟﻟﺍ ﻥﻣ ﺏﺭﻘﻟﺎﺑ ﺎﻬﻧﺯﺧﺗ ﻭﺃ (ﻙﻟﺫ ﻰﻟﺇ ﺎﻣﻭ ،ﻝﻳﻣﺟﺗﻟﺍ ﺕﺍﺭﺿﺣﺗﺳﻣﻭ ،ءﺍﻭﻬﻟﺍ ﺭﻁﻌﻣﻭ ،ﺕﺍﺭﺷﺣﻟﺍ ﺩﻳﺑﻣﻭ
.ءﻼﻣﻌﻟﺍ ﻰﻟﺇ ﺕﺎﻣﻭﻠﻌﻣﻟﺍ ﻡﻳﺩﻘﺗﻟ
ﺩﻌﺑ ﺎﻬﻟﺍﺩﺑﺗﺳﺍ ﺏﺟﻳ ﺙﻳﺣ ءﺎﻣﻟﺍ ﺔﻳﺫﻐﺗ ﻡﻳﻁﺍﺭﺧ ﺔﻟﺎﺣ ﻥﻣ ﺩﻛﺄﺗ .ﻕﺯﻣﺗ5.ﺕﺍﻭﻧﺳ
.ﺭﻭﻔﻟﺍ ﻰﻠﻋ ﺔﻘﻁﻧﻣﻟﺍ ﺔﻳﻭﻬﺗﺑ ﻡﻗﻭ ﺔﻗﺎﻁﻟﺍ ﺱﺑﺎﻗ ﻭﺃ ﺯﺎﻬﺟﻟﺍ ﺱﻣﻠﺗ
.ﻥﺎﺑﻭﺫﻟﺍ
• ﻝﺎﻌﺗﺷﻼﻟ ﺔﻠﺑﺎﻗ ﺩﺍﻭﻣﺑ ﺕﺧﺳﺗﺍ ﻭﺃ
• ،ﺔﻳﺋﺎﻳﻣﻳﻛﻟﺍ ﺩﺍﻭﻣﻟﺍﻭ ،ﻝﻭﺣﻛﻟﺍﻭ ،ﻥﻳﺯﻧﺑﻟﺍﻭ ،ﺭﺛﻳﻹﺍ ﻝﺛﻣ) ﻝﺎﻌﺗﺷﻼﻟ ﺔﻠﺑﺎﻗ ﻭﺃ ﻕﺍﺭﺗﺣﻼﻟ ﺔﻠﺑﺎﻗ ﺩﺍﻭﻣ ﻡﺩﺧﺗﺳﺗ ﻻ
•.ﺎًﻣﺎﻣﺗ ﻝﺳﻐﻟﺍ ﺽﻭﺣ ﻑﻗﻭﺗﻳ ﻰﺗﺣ ﺭﻅﺗﻧﺍ .ﻪﻠﻳﻐﺷﺗ ءﺎﻧﺛﺃ ﻲﻓ ﺯﺎﻬﺟﻟﺍ ﻥﻣ ﺍًﺩﺑﺃ ﺏﺭﺗﻘﺗ ﻻ
•.ﺔﻌﻔﺗﺭﻣﻟﺍ ﺓﺭﺍﺭﺣﻟﺍ ﺔﺟﺭﺩ ﺕﺍﺫ ﺞﻣﺍﺭﺑﻟﺍ ءﺎﻧﺛﺃ ﺏﺎﺑﻟﺍ ﺱﻣﻟ ﻡﺩﻋ ﺏﺟﻳ
• ﺯﻛﺭﻣﺑ ﻝﺻﺗﺍﻭ ﺔﻗﺎﻁﻟﺍ ﺱﺑﻘﻣ ﻝﺻﻓﺍ ،ﺯﺎﻬﺟﻟﺍ ﻥﻣ ﺎﻬﺿﻳﻓ ﻭﺃ ﻩﺎﻳﻣﻟﺍ ﺏﺭﺳﺗ ﻝﺎﺣ ﻲﻓLG Electronics
• ﻭﺃ ﻊﻁﻗ ﺙﻭﺩﺣ ﺩﻧﻋ ﺏﺭﺳﺗﻟﺍ ﻥﻣ ﺩﺣﻟﺍﻭ ﺕﺎﻣﺎﻣﺻﻟﺍﻭ ﻡﻳﻁﺍﺭﺧﻟﺍ ﻥﻋ ﻁﻐﺿﻟﺍ ﺭﻳﺭﺣﺗﻟ ﻩﺎﻳﻣﻟﺍ ﺭﻳﺑﺎﻧﺻ ﻖﻠﻏﺃ
• ﻻ ،ﻝﺯﻧﻣﻟﺍ ﻲﻓ (ﻙﻟﺫ ﻰﻟﺇ ﺎﻣ ﻭﺃ ،ﻲﻌﻳﺑﻁﻟﺍ ﺯﺎﻐﻟﺍ ﻭﺃ ،ﻥﺎﺑﻭﺭﺑﻟﺍ ﻭﺃ ،ﻥﻳﺗﻭﻳﺑﻭﺳﻳﺃ) ﺯﺎﻏ ﺏﺭﺳﺗ ﺩﻭﺟﻭ ﺔﻟﺎﺣ ﻲﻓ
• ﺩﻌﺑ ﻻﺇ ءﺎﺗﺷﻟﺍ ﻝﺻﻓ ﻝﻼﺧ ﺎﻣﻫﺩﻣﺟﺗ ﺔﻟﺎﺣ ﻲﻓ ﻝﺎﺧﺩﻹﺍ ﻡﻭﻁﺭﺧ ﻭﺃ ﻑﻳﺭﺻﺗﻟﺍ ﻡﻭﻁﺭﺧ ﻡﺍﺩﺧﺗﺳﺍ ﻙﻧﻛﻣﻳ ﻻ
•.ﻝﺎﻔﻁﻷﺍ ﻝﻭﺎﻧﺗﻣ ﻥﻋ ﺍًﺩﻳﻌﺑ ﺕﺎﺿﻳﺑﻣﻟﺍﻭ ،ﺔﻣﻌﻧﻣﻟﺍ ﺩﺍﻭﻣﻟﺍﻭ ،ﻝﻳﺳﻐﻟﺍ ﺕﺎﻔﻅﻧﻣ ﻊﻳﻣﺟ ﻅﻔﺣﺍ
.ﻩﺎﻳﻣﻟﺎﺑ ﻙﺗﻳﺿﺭﺃ
•.ﻥﻳﺗﻠﺗﺑﻣ ﻥﻳﺩﻳﺑ ﺯﺎﻬﺟﻟﺍ ﻲﻓ ﻡﻛﺣﺗﻟﺍ ﺭﺻﺎﻧﻋ ﻭﺃ ﺔﻗﺎﻁﻟﺍ ﺱﺑﺎﻗ ﺱﻣﻟ ﺏﻧﺟﺗ
•.ﻪﻳﻠﻋ ﻝﻳﻘﺛ ءﻲﺷ ﻊﺿﻭ ﻭﺃ ﻁﺭﻔﻣ ﻝﻛﺷﺑ ﺔﻗﺎﻁﻟﺍ ﻝﺑﺎﻛ ﻲﻧﺛ ﻡﺩﻋ ﻰﻠﻋ ﺹﺭﺣﺍ
•.ﻝﺳﻐﻟﺍ ءﺎﻧﺛﺃ ﺯﺎﻬﺟﻟﺍ ﻥﻣ ﺎﻬﻔﻳﺭﺻﺗ ﻡﺗ ﻩﺎﻳﻣ ﻱﺃ ﺱﻣﻟ ﺏﻧﺟﺗ
• ﺭﻣﻏ ﻰﻟﺇ ﻙﻟﺫ ﻱﺩﺅﻳ ﺩﻗ ،ﺢﻳﺣﺻ ﻝﻛﺷﺑ ﻑﻳﺭﺻﺗﻟﺍ ﻡﺩﻋ ﻝﺎﺣ ﻲﻓ .ﺢﻳﺣﺻ ﻝﻛﺷﺑ ﻑﻳﺭﺻﺗﻟﺍ ﻝﻣﻋ ﻥﻣ ﺩﻛﺄﺗ

ar_main.book.book Page 4 Thursday, October 22, 2020 4:16 PM
ﺔﻣﻼﺳﻟﺍ ﺕﺍﺩﺎﺷﺭﺇ
• ﻥﻳﺑ ﺎﻣ ﻩﺎﻳﻣﻟﺍ ﻝﺎﺧﺩﺇ ﻁﻐﺿ ﺡﻭﺍﺭﺗﻳ ﻥﺃ ﺏﺟﻳ50 ﻭ ﻝﺎﻛﺳﺎﺑ ﻭﻠﻳﻛ 800.ﻝﺎﻛﺳﺎﺑ ﻭﻠﻳﻛ
ﻯﻭﺻﻘﻟﺍ ﺔﻌﺳﻟﺍ
ﺎﻬﻠﺳﻏ ﺭﺭﻘﻣﻟﺍ ﺔﻓﺎﺟﻟﺍ ﺱﺑﻼﻣﻟﺍ ﺕﺍﺭﻭﺩ ﺽﻌﺑ ﻲﻓ ﻯﻭﺻﻘﻟﺍ ﺔﻌﺳﻟﺍ ﻎﻠﺑﺗ
8ﻡﺟﻛ
.
،ﺞﺋﺎﺗﻧ ﻝﺿﻓﺃ ﻰﻠﻋ ﻝﻭﺻﺣﻠﻟ .ﻝﻳﺳﻐﻟﺍ ﺞﻣﺍﺭﺑ ﻥﻣ ﺞﻣﺎﻧﺭﺑ ﻝﻛﻟ ﺎﻬﻣﺍﺩﺧﺗﺳﺍ ﻰﺻﻭﻣﻟﺍ ﻯﻭﺻﻘﻟﺍ ﺔﻌﺳﻟﺍ ﺕﻭﺎﻔﺗﺗ ﺩﻗ
.ﻝﻳﺻﺎﻔﺗﻟﺍ ﻥﻣ ﺩﻳﺯﻣ ﻰﻠﻋ ﻝﻭﺻﺣﻠﻟ
ﻝﻳﻐﺷﺗﻟﺍ
ﻝﺻﻓ ﻲﻓ
ﺞﻣﺍﺭﺑﻟﺍ ﻝﻭﺩﺟ
ﻰﻠﻋ ﻉﻼﻁﻻﺍ ﻰﺟﺭُﻳ
ﺏﻳﻛﺭﺗﻟﺍ
• ﻭﺃ ﺓﺩﻭﻘﻔﻣ ءﺍﺯﺟﺃ ﻪﺑ ﻭﺃ ،ﻲﺋﺯﺟ ﻝﻛﺷﺑ ﺎًﻛﻛﻔﻣ ﻭﺃ ،ﻝﻁﻋ ﻪﺑ ﻭﺃ ،ﺎًﻔﻟﺎﺗ ﻥﺎﻛ ﺍﺫﺇ ﺯﺎﻬﺟﻟﺍ ﺍﺫﻫ ﻝﻳﻐﺷﺗ ﺍًﺩﺑﺃ ﻝﻭﺎﺣﺗ ﻻ
.ﻑﻟﺎﺗ ﺱﺑﺎﻗ ﻭﺃ ﻙﻠﺳ ﻙﻟﺫ ﻲﻓ ﺎﻣﺑ ،ﺔﻣﻁﺣﻣ
•.ﻡﺎﻛﺣﺈﺑ ﻪﺑ ﻙﺎﺳﻣﻺﻟ ﺭﺛﻛﺃ ﻭﺃ ﻥﻳﺻﺧﺷ ﺭﻓﻭﺗ ﻲﻐﺑﻧﻳ ،ﺯﺎﻬﺟﻟﺍ ﺍﺫﻫ ﻝﻘﻧ ﺩﻧﻋ
• ﻲﻓ ﻭﺃ ﻖﻠﻁﻟﺍ ءﺍﻭﻬﻟﺍ ﻲﻓ ﺯﺎﻬﺟﻟﺍ ﻥﻳﺯﺧﺗ ﻭﺃ ﺏﻳﻛﺭﺗ ﺏﻧﺟﺗ .ﺭﺎﺑﻐﻟﺍﻭ ﺔﺑﻭﻁﺭﻟﺍ ﻥﻛﺎﻣﺃ ﻲﻓ ﺯﺎﻬﺟﻟﺍ ﺏﻳﻛﺭﺗ ﺏﻧﺟﺗ
ﻥﻭﺩ ﺓﺭﺍﺭﺣﻟﺍ ﺕﺎﺟﺭﺩ ﻭﺃ ﺭﻁﻣﻟﺍ ﻭﺃ ﺡﺎﻳﺭﻟﺍ ﻭﺃ ﺭﺷﺎﺑﻣﻟﺍ ﺱﻣﺷﻟﺍ ءﻭﺿﻛ ﺔﻳﻭﺟﻟﺍ ﺕﺍﺭﻳﺛﺄﺗﻠﻟ ﺔﺿﺭﻌﻣ ﺔﺣﺎﺳﻣ
.ﺩﻣﺟﺗﻟﺍ ﺔﺟﺭﺩ
•.ﻲﺑﺭﻬﻛﻟﺍ ﺭﺎﻳﺗﻟﺍ ﺫﺧﺄﻣﺑ ﻝﻣﺎﻛ ﻝﻛﺷﺑ ﻝﺻﻭﻣ ﺔﻗﺎﻁﻟﺍ ﺱﺑﺎﻗ ﻥﺃ ﻥﻣ ﺩﻛﺄﺗ
•.ﺔﻗﺎﻁﻠﻟ ﺩﻳﺩﻣﺗ ﻝﺑﻛ ﻭﺃ ءﺎﺑﺭﻬﻛﻟﺎﺑ ﻡﻛﺣﺗ ﺕﺎﺣﻭﻟ ﻭﺃ ﺓﺩﺩﻌﺗﻣ ﺱﺑﺎﻘﻣﺑ ﺯﺎﻬﺟﻟﺍ ﻝﻳﺻﻭﺗﺑ ﻡﻘﺗ ﻻ
4
.ﻝﻫﺅﻣ ﻲﺋﺎﺑﺭﻬﻛ ﻝﻼﺧ ﻥﻣ ﺏﺳﺎﻧﻣ ﺭﺎﻳﺗ
ﻥﻳﻧﺍﻭﻘﻟﺍ ﻊﻳﻣﺟﻟ ﺎًﻘﻓﻭ ﺽﺭﺅﻣﻭ ﺕﺑﺛﻣ ﺏﺳﺎﻧﻣ ﻲﺑﺭﻬﻛ ﺭﺎﻳﺗ ﺫﺧﺄﻣﺑ ﺔﻗﺎﻁﻟﺍ ﺱﺑﺎﻗ ﻝﻳﺻﻭﺗ ﺏﺟﻳ .ﺽﻳﺭﺄﺗ ﺔﻠﺻﻭﺑ
.ﺔﻳﻠﺣﻣﻟﺍ ﺢﺋﺍﻭﻠﻟﺍﻭ
ﺢﻳﺣﺻ ﻝﻛﺷﺑ ﺎًﺿﺭﺅﻣ ﺯﺎﻬﺟﻟﺍ ﻥﺎﻛ ﺍﺫﺇ ﺎﻣ ﻝﻭﺣ ﻙﺷ ﻱﺃ ﻙﻳﺩﻟ ﻥﺎﻛ ﺍﺫﺇ ًﻼﻫﺅﻣ ﺔﻣﺩﺧ ﻑﻅﻭﻣ ﻭﺃ ﺎًﻳﺋﺎﺑﺭﻬﻛ ﺭﺷﺗﺳﺍ
.ﻻ ﻡﺃ
.ﻝﻣﺎﻛﻟﺎﺑ ﺯﺎﻬﺟﻟﺍ ﺏﺎﺑ ﺢﺗﻓ ﺔﻗﺎﻋﺇ ﻰﻟﺇ ﺍﺫﻫ ﻱﺩﺅﻳ ﺙﻳﺣ ،ﺯﺎﻬﺟﻠﻟ ﻝﺑﺎﻘﻣﻟﺍ
ﻝﻳﻐﺷﺗﻟﺍ
.ﺓﺩﻣﺗﻌﻣﻟﺍ ﻊﻧﺻﻣﻟﺍ ءﺍﺯﺟﺃ ﻁﻘﻓ ﻡﺩﺧﺗﺳﺍ .ﺩﺩﺣﻣ ﻝﻛﺷﺑ ﻙﻟﺫ ﺭﻳﻐﺑ ﻲﻟﺎﺣﻟﺍ ﻙﻟﺎﻣﻟﺍ ﻝﻳﻟﺩ ﻰﺻﻭﺃ ﺍﺫﺇ ﻻﺇ ﻝﻫﺅﻣ ﺔﻣﺩﺧ
• ﺫﺧﺄﻣ ﺕﻳﺑﺛﺗ ﻙﻧﻛﻣﻳﻓ ،ﺭﺎﻳﺗﻟﺍ ﺫﺧﺄﻣﻟ ﺎًﺑﺳﺎﻧﻣ ﺱﺑﺎﻘﻟﺍ ﻥﻛﻳ ﻡﻟ ﺍﺫﺇ .ﺯﺎﻬﺟﻟﺍ ﻊﻣ ﺭﻓﻭﺗﻣﻟﺍ ﺔﻗﺎﻁﻟﺍ ﺱﺑﺎﻗ ﻝﻳﺩﻌﺗﺑ ﻡﻘﺗ ﻻ
• ﺔﻗﺎﻁ ﺱﺑﺎﻗﻭ (ﺽﻳﺭﺄﺗ ﺭﺎﻣﺳﻣ) ﺯﺎﻬﺟﻠﻟ ﺽﻳﺭﺄﺗ ﻝﺻﻭﻣ ﻰﻠﻋ ﻱﻭﺗﺣﻳ ﺔﻗﺎﻁ ﻙﻠﺳﺑ ﺍًﺩﻭﺯﻣ ﺯﺎﻬﺟﻟﺍ ﺍﺫﻫ ﻲﺗﺄﻳ
• .ﺔﻳﺋﺎﺑﺭﻬﻛ ﺔﻣﺩﺻﻟ ﺽﺭﻌﺗﻟﺍ ﺭﻁﺧ ﻰﻟﺇ ﺯﺎﻬﺟﻠﻟ ﺽﻳﺭﺄﺗ ﻝﺻﻭﻣﻟ ﺏﺳﺎﻧﻣﻟﺍ ﺭﻳﻏ ﻝﻳﺻﻭﺗﻟﺍ ﻱﺩﺅﻳ ﻥﺃ ﻥﻛﻣﻳ
• ﺏﻧﺎﺟﻟﺍ ﻰﻠﻋ ﺔﻠﺻﻔﻣﺑ ﺩﻭﺯﻣ ﺏﺎﺑ ﻭﺃ ،ﻖﻟﺯﻧﻣ ﺏﺎﺑ ﻭﺃ ،ﻝﻔﻘﻠﻟ ﻝﺑﺎﻗ ﺏﺎﺑ ﻑﻠﺧ ﺯﺎﻬﺟﻟﺍ ﺍﺫﻫ ﺏﻳﻛﺭﺗ ﻡﺩﻋ ﺏﺟﻳ
•.ﺯﺎﻬﺟﻟﺍ ﻝﻳﻐﺷﺗﻟ ﻡﻛﺣﺗﻟﺍ ﺔﺣﻭﻟ ﻊﻣ ﺓﺩﺎﺣ ﺕﺍﻭﺩﺃ ﻱﺃ ﻡﺩﺧﺗﺳﺗ ﻻ
•.ﺯﺎﻬﺟﻟﺍ ﻙﻓ ﻭﺃ ﺡﺍﻭﻟﻷﺍ ﻥﻣ ﺡﻭﻟ ﻱﺃ ﻝﺻﻓ ﻝﻭﺎﺣﺗ ﻻ
• ﻑﻅﻭﻣ ﻝﻼﺧ ﻥﻣ ﺔﻣﺩﺧﻟﺍﻭ ﺕﺎﺣﻳﻠﺻﺗﻟﺍ ﻊﻳﻣﺟ ءﺍﺭﺟﺇ ﺏﺟﻳ .ﺯﺎﻬﺟﻟﺍ ﻥﻣ ءﺯﺟ ﻱﺃ ﻝﺍﺩﺑﺗﺳﺍ ﻭﺃ ﺡﻼﺻﺇ ﺏﻧﺟﺗ

ﺭﻳﺫﺣﺗ
ar_main.book.book Page 3 Thursday, October 22, 2020 4:16 PM
3
ﺔﻣﻼﺳﻟﺍ ﺕﺍﺩﺎﺷﺭﺇ
ﺔﻣﻼﺳﻟﺍ ﺕﺍﺩﺎﺷﺭﺇ
ﻡﺍﺩﺧﺗﺳﻻﺍ ﻝﺑﻗ ﺕﺍﺩﺎﺷﺭﻹﺍ ﻊﻳﻣﺟ ﺃﺭﻗﺍ
ﺭﺍﺭﺿﻷﺍ ﻭﺃ ﺔﻌﻗﻭﺗﻣﻟﺍ ﺭﻳﻏ ﺭﻁﺎﺧﻣﻟﺍ ﻉﻭﻗﻭ ﻥﻭﺩ ﺔﻟﻭﻠﻳﺣﻟﺍ ﻲﻓ ﺔﻳﻟﺎﺗﻟﺍ ﺔﻣﻼﺳﻟﺍ ﺕﺍﺩﺎﺷﺭﺇ ﻥﻣ ﺽﺭﻐﻟﺍ ﻝﺛﻣﺗﻳ
ﺍﻟﻌﺭﺑﻳﺔ
.ﻩﺎﻧﺩﺃ ﺢﺿﻭﻣﻟﺍ ﻭﺣﻧﻟﺍ ﻰﻠﻋ "ﻪﻳﺑﻧﺗ"ﻭ "ﺭﻳﺫﺣﺗ" ﻰﻟﺇ ﺕﺍﺩﺎﺷﺭﻹﺍ ﻡﻳﺳﻘﺗ ﻡﺗﻳ
،ﺭﻁﺎﺧﻣ ﺏﺑﺳﺗ ﻥﺃ ﻥﻛﻣﻳ ﻲﺗﻟﺍ ﻝﻳﻐﺷﺗﻟﺍ ﺕﺎﻳﻠﻣﻋﻭ ﺭﻭﻣﻷﺍ ﻰﻟﺇ ﺓﺭﺎﺷﻺﻟ ﺯﻣﺭﻟﺍ ﺍﺫﻫ ﺽﺭﻋ ﻡﺗﻳ
.ﺭﻁﺎﺧﻣﻟﺍ ﺏﻧﺟﺗﻟ ﺕﺍﺩﺎﺷﺭﻹﺍ ﻊﺑﺗﺍﻭ ﺔﻳﺎﻧﻌﺑ ﺯﻣﺭﻟﺍ ﺍﺫﻫ ﻝﻣﺣﻳ ﻱﺫﻟﺍ ءﺯﺟﻟﺍ ﺓءﺍﺭﻗ ﻰﻠﻋ ﺹﺭﺣﺎﻓ
.ﺓﺎﻓﻭﻟﺍ ﻭﺃ ﺓﺭﻳﻁﺧ ﺔﺑﺎﺻﺇ ﻉﻭﻗﻭ ﺏﺑﺳﻳ ﺩﻗ ﺕﺍﺩﺎﺷﺭﻹﺍ ﻉﺎﺑﺗﺍ ﻡﺩﻋ ﻥﺃ ﻰﻟﺇ ﺍﺫﻫ ﺭﻳﺷﻳ
.ﺞﺗﻧﻣﻟﺍ ﻑﻠﺗ ﻭﺃ ﺔﻔﻳﻔﻁ ﺔﺑﺎﺻﺇ ﻉﻭﻗﻭ ﻲﻓ ﺏﺑﺳﺗﻳ ﺩﻗ ﺕﺍﺩﺎﺷﺭﻹﺍ ﻉﺎﺑﺗﺍ ﻡﺩﻋ ﻥﺃ ﻰﻟﺇ ﺍﺫﻫ ﺭﻳﺷﻳ
.ﺞﺗﻧﻣﻠﻟ ﺢﻳﺣﺻﻟﺍ ﺭﻳﻏ ﻭﺃ ﻥﻣﻵﺍ ﺭﻳﻏ ﻝﻳﻐﺷﺗﻟﺍ ﻥﻋ ﺔﻣﺟﺎﻧﻟﺍ
ﺔﻣﻼﺳﻟﺍ ﻝﺋﺎﺳﺭ
ﺭﻳﺫﺣﺗ
ﻪﻳﺑﻧﺗ
ﺭﻳﺫﺣﺗ
،ﺔﺑﺎﺻﺇ ﺙﻭﺩﺣ ﻭﺃ ،ﺔﻳﺑﺭﻬﻛ ﺔﻣﺩﺻﻟ ﺽﺭﻌﺗﻟﺍ ﻭﺃ ،ﺓﺎﻓﻭ ﺙﻭﺩﺣ ﻭﺃ ،ﻖﻳﺭﺣ ﺏﻭﺷﻧ ﻭﺃ ،ﺭﺎﺟﻔﻧﺍ ﻉﻭﻗﻭ ﺭﻁﺎﺧﻣ ﻝﻳﻠﻘﺗﻟ
:ﻲﻠﻳ ﺎﻣ ﺎﻬﻳﻓ ﺎﻣﺑ ،ﺔﻳﺳﺎﺳﻷﺍ ﺔﻣﻼﺳﻟﺍ ﺕﺎﻁﺎﻳﺗﺣﺍ ﻉﺎﺑﺗﺍ ﺏﺟﻳ ،ﺞﺗﻧﻣﻟﺍ ﻡﺍﺩﺧﺗﺳﺍ ﺩﻧﻋ ﺹﺎﺧﺷﻸﻟ ﻕﻭﺭﺣ ﻭﺃ
ﺔﻳﻧﻔﻟﺍ ﺔﻣﻼﺳﻟﺍ
ﺕﺍﺩﺎﺷﺭﻹﺍ ﻡﻬﻟ ﻡﺩﻘﺗ ﻭﺃ ﻡﻬﻳﻠﻋ ﻑﺍﺭﺷﻹﺍ ﻡﺗﻳ ﻡﻟ ﺎﻣ ،ﺔﻓﺭﻌﻣﻭ ﺓﺭﺑﺧ ﻡﻬﻳﺩﻟ ﺱﻳﻟ ﻭﺃ ،ﺔﻳﻠﻘﻌﻟﺍ ﻭﺃ ﺔﻳﺳﺣﻟﺍ ﻭﺃ ﺔﻳﻧﺩﺑﻟﺍ
.ﻡﻬﺗﻣﻼﺳ ﻥﻋ ﻝﻭﺅﺳﻣ ﺹﺧﺷ ﻝﺑﻗ ﻥﻣ ﺯﺎﻬﺟﻟﺍ ﻡﺍﺩﺧﺗﺳﺎﺑ ﺔﻘﻠﻌﺗﻣﻟﺍ
.ﺭﻁﺎﺧﻣﻟﺍ ﺏﻧﺟﺗﻟ ﺭﺩﻘﻟﺍ ﺱﻔﻧﺑ ﻥﻳﻠﻫﺅﻣ ﺹﺎﺧﺷﺃ ﻭﺃ ﺎﻬﻟ ﻊﺑﺎﺗﻟﺍ
.ﺕﺎﻛﻠﺗﻣﻣﻟﺍ ﻑﻠﺗ ﻲﻟﺎﺗﻟﺎﺑﻭ ﻩﺎﻳﻣﻟﺍ ﺏﺭﺳﺗ ﻰﻟﺇ ﻱﺩﺅﺗ ﺩﻗ
• ﻡﻬﺗﺍﺭﺩﻗ ﻲﻓ ﺹﻘﻧ ﻥﻣ ﻥﻭﻧﺎﻌﻳ ﻥﻳﺫﻟﺍ (ﻝﺎﻔﻁﻷﺍ ﻙﻟﺫ ﻲﻓ ﺎﻣﺑ) ﺩﺍﺭﻓﻷﺍ ﻡﺍﺩﺧﺗﺳﻻ ﺹﺻﺧﻣ ﺭﻳﻏ ﺯﺎﻬﺟﻟﺍ ﺍﺫﻫ
•.ﺯﺎﻬﺟﻟﺎﺑ ﻡﻬﺛﺑﻋ ﻡﺩﻋ ﻥﻣ ﺩﻛﺄﺗﻠﻟ ﻝﺎﻔﻁﻷﺍ ﻰﻠﻋ ﻑﺍﺭﺷﻹﺍ ﺏﺟﻳ ﻙﻟﺫﻛ
• ﺔﻣﺩﺧﻟﺍ ﻝﻳﻛﻭ ﻭﺃ ﺔﻌﻧﺻﻣﻟﺍ ﺔﻛﺭﺷﻟﺍ ﺔﻁﺳﺍﻭﺑ ﻪﻟﺍﺩﺑﺗﺳﺍ ﺏﺟﻳ ،ﺔﻳﺋﺎﺑﺭﻬﻛﻟﺍ ﺔﻗﺎﻁﻟﺍ ﻝﻳﺻﻭﺗ ﻙﻠﺳ ﻑﻠﺗ ﺔﻟﺎﺣ ﻲﻓ
• ﺔﻣﻳﺩﻘﻟﺍ ﻡﻳﻁﺍﺭﺧﻟﺍ ﻡﺍﺩﺧﺗﺳﺍ ﺓﺩﺎﻋﺇ ﻥﺄﺑ ﺎًﻣﻠﻋ .ﺯﺎﻬﺟﻟﺍ ﻊﻣ ﺔﻘﻓﺭﻣﻟﺍ ﻡﻳﻁﺍﺭﺧﻟﺍ ﺔﻋﻭﻣﺟﻣ ﻭﺃ ﺍًﺩﻳﺩﺟ ﺎًﻣﻭﻁﺭﺧ ﻡﺩﺧﺗﺳﺍ
•.ﺓﺩﺎﺟﺳ ﻊﺿﻭﺑ ﺔﻳﻭﻬﺗﻟﺍ ﺕﺎﺣﺗﻓ ﺔﻗﺎﻋﺇ ﻡﺩﻋ ﺏﺟﻳ
•.ﻁﻘﻓ ﺔﻳﻟﺯﻧﻣﻟﺍ ﺽﺍﺭﻏﻷﺍ ﻲﻓ ﻡﺍﺩﺧﺗﺳﻼﻟ ﻻﺇ ﺹﺻﺧﻣ ﺭﻳﻏ ﺯﺎﻬﺟﻟﺍ ﺍﺫﻫ

ar_main.book.book Page 2 Thursday, October 22, 2020 4:16 PM
ﺯﺍﺭﻁﻟﺍ ﻥﻋ ﻑﻠﺗﺧﻳ ﻯﻭﺗﺣﻣ ﻭﺃ ﺭﻭﺻ ﻰﻠﻋ ﻝﻳﻟﺩﻟﺍ ﺍﺫﻫ ﻱﻭﺗﺣﻳ ﺩﻗ
.ﻪﺋﺍﺭﺷﺑ ﺕﻣﻗ ﻱﺫﻟﺍ
.ﺔﻌّﻧﺻﻣﻟﺍ ﺔﻛﺭﺷﻟﺍ ﻥﻣ ﺔﻌﺟﺍﺭﻣﻠﻟ ﻝﻳﻟﺩﻟﺍ ﺍﺫﻫ ﻊﺿﺧﻳ
ﺕﺎﻳﻭﺗﺣﻣﻟﺍ ﻝﻭﺩﺟ
ﺔﻣﻼﺳﻟﺍ ﺕﺍﺩﺎﺷﺭﺇ
ﻡﺍﺩﺧﺗﺳﻻﺍ ﻝﺑﻗ ﺕﺍﺩﺎﺷﺭﻹﺍ ﻊﻳﻣﺟ ﺃﺭﻗﺍ..................................................................................3
ﺭﻳﺫﺣﺗ...................................................................................................................3
ﺏﻳﻛﺭﺗﻟﺍ
ﺕﺎﻔﺻﺍﻭﻣﻟﺍﻭ ءﺍﺯﺟﻷﺍ..................................................................................................7
ﺏﻳﻛﺭﺗﻟﺍ ﻥﺎﻛﻣ ﺕﺎﺑﻠﻁﺗﻣ................................................................................................9
ﺯﺎﻬﺟﻟﺍ ﻑﻳﻠﻐﺗ ﺢﺗﻓ....................................................................................................10
ﺯﺎﻬﺟﻟﺍ ﻯﻭﺗﺳﻣ ﻁﺑﺿ................................................................................................10
ءﺎﻣﻟﺍ ﺩﺍﺩﻣﺇ ﻡﻭﻁﺭﺧ ﻝﻳﺻﻭﺗ.........................................................................................12
ﻑﻳﺭﺻﺗﻟﺍ ﻡﻭﻁﺭﺧ ﺏﻳﻛﺭﺗ...........................................................................................14
ﻝﻳﻐﺷﺗﻟﺍ
ﻝﻳﻐﺷﺗﻟﺍ ﻰﻠﻋ ﺔﻣﺎﻋ ﺓﺭﻅﻧ............................................................................................15
ﻡﻛﺣﺗﻟﺍ ﺔﺣﻭﻟ..........................................................................................................16
ﻝﻳﺳﻐﻟﺍ ﺔﻟﻭﻣﺣ ﺯﻳﻬﺟﺗ................................................................................................18
ﺔﻣﻌﻧﻣﻟﺍ ﺩﺍﻭﻣﻟﺍﻭ ﺕﺎﻔﻅﻧﻣﻟﺍ ﺔﻓﺎﺿﺇ...................................................................................18
ﺞﻣﺍﺭﺑﻟﺍ ﻝﻭﺩﺟ........................................................................................................21
ﺔﻳﻓﺎﺿﺇ ﻑﺋﺎﻅﻭﻭ ﺕﺍﺭﺎﻳﺧ...........................................................................................25
ﺔﻳﻛﺫﻟﺍ ﻑﺋﺎﻅﻭﻟﺍ
ﻖﻳﺑﻁﺗLG ThinQ................................................................................................27
Smart Diagnosis(ﻲﻛﺫﻟﺍ ﺹﻳﺧﺷﺗﻟﺍ) ........................................................................27
ﺔﻧﺎﻳﺻﻟﺍ
ﺔﻠْﺳﻏ ّﻝﻛ ﺩﻌﺑ ﻑﻳﻅﻧﺗﻟﺍ...............................................................................................28
ءﺎﻣﻠﻟ ءﻱﺭﺎﻁﻟﺍ ﻎﻳﺭﻔﺗﻟﺎﺑ ﻡﺎﻳﻘﻟﺍﻭ ﺔﻳﺭﻭﺩ ﺓﺭﻭﺻﺑ ﺯﺎﻬﺟﻟﺍ ﻑﻳﻅﻧﺗ....................................................28
ﺎﻬﺣﻼﺻﺇﻭ ﻝﺎﻁﻋﻷﺍ ﻑﺎﺷﻛﺗﺳﺍ
ﺔﻣﺩﺧﻟﺍ ﺯﻛﺭﻣﺑ ﻝﺎﺻﺗﻻﺍ ﻝﺑﻗ.........................................................................................31

ar_main.book.book Page 1 Thursday, October 22, 2020 4:16 PM
ﺱﺑﻼﻣﻟﺍ ﺔﻟﺎﺳﻏ
ﻙﻟﺎﻣﻟﺍ ﻝﻳﻟﺩ
ﺏﻳﻛﺭﺗﻟﺍ ﺔﻳﻠﻣﻋ ﻙﻟﺫ ﻁﺳﺑﻳﺳ ﺙﻳﺣ .ﺔﻳﺎﻧﻌﺑ ﺕﺎﻣﻳﻠﻌﺗﻟﺍ ﻩﺫﻫ ﺃﺭﻗﺍ ،ﺯﺎﻬﺟﻟﺍ ﺏﻳﻛﺭﺗ ﻲﻓ ءﺩﺑﻟﺍ ﻝﺑﻗ
ﺩﻌﺑ ﺞﺗﻧﻣﻟﺍ ﻥﻣ ﺏﺭﻘﻟﺎﺑ ﺕﺎﻣﻳﻠﻌﺗﻟﺍ ﻩﺫﻬﺑ ﻅﻔﺗﺣﺍﻭ .ﻥﻣﺁﻭ ﺢﻳﺣﺻ ﻝﻛﺷﺑ ﺯﺎﻬﺟﻟﺍ ﺏﻳﻛﺭﺗ ﻥﻣﺿﻳﻭ
.ﻝﺑﻘﺗﺳﻣﻟﺍ ﻲﻓ ﺎﻬﻳﻟﺇ ﻉﻭﺟﺭﻠﻟ ﺏﻳﻛﺭﺗﻟﺍ
www.lg.com
ﺭﺷﻧﻟﺍ ﻕﻭﻘﺣ2020ﺔﻅﻭﻔﺣﻣ ﻕﻭﻘﺣﻟﺍ ﻝﻛ .ﺕﺎﻳﻧﻭﺭﺗﻛﻟﻼﻟ ﻲﺟ ﻝﺇ
ﺔﻳﺑﺭﻌﻟﺍ
F1608*D

iw_main.book.book Page 39 Friday, October 23, 2020 5:31 PM

iw_main.book.book Page 38 Friday, October 23, 2020 5:54 PM
ריכזת


iw_main.book.book Page 37 Friday, October 23, 2020 5:54 PM
37
תולקתב לופיטו רותיא
.רתי יולימ עונמל ידכ ךכרמ וא ןיבלמ רמוח דודמל שי דימת
עברית
.ףותה ךותב הסיבכה לע תורישי ףסוה ךכרמ וא ןיבלמ רמוח
.ךופה םירבוחמ םימחהו םירקה םימה תקפסא תורוניצ
םינימסתןורתפו ירשפא םרוג
םימתכ.דימ םדקומ ררחתשמ ךכרמ וא ןיבלמ רמוח
• .תוריהמב ררחתשהל ךכרמל וא ןיבלמה רמוחל םרוג הז רבד .ידמ אלמ הסיבכה ירמוח את
•.טאל יוקינה ןקתמ תא רוגס
• ןוכנה ןמזב יוארכ וקפוי ךכרמ וא הקימונוקא יכ חיטבהל ידכב יוקינה תנוכמב דימת שמתשה
.תינכותב
.יוארכ וניומ אל םידגבה
•.המתכה עונמל ידכ םינבל םידגבו םיריהב םיעבצמ דרפנב דימת סבכל שי ההכ הסיבכ
•.תולק םיכלכולמ םיטירפ םע דואמ םיכלכולמ םיטירפ סבכל ןיא םלועל
טומיק.םדקהב ןקורמ אל רישכמה
•.תינכותה תמלשה עגרב רישכמהמ םיטירפה תא דימת ריסהל שי
.הדימה לע רתי סומע רישכמה
• רישכמה תלד .ףותב םיסוחד ויהי םיטירפהש רוסא לבא ,ירמגל אלמ תויהל לוכי רישכמה
.תולקב רגסיהל הרומא
• תקפסא תורוניצ ירוביח תא קודבל שי .םידגבב םיטמקל םורגל הלולע םימח םימב הפיטש
.םימה
.ידמ הריהמ הטיחסה תוריהמ
•.דגבה גוסל םיאתתש ךכ הטיחסה תוריהמ תא רדגה
.עובק ןפואב
םימ) ןופיס טקפאל םרוגש רבד ,יוארכ ןקתומ אל זוקינה רוניצ םא םרגיהל םילולע תוחיר
וא שבוע בקע םרגיהל םילולע תוחיר ,עובק ןפואב יוקינ תרבוע אל יוקינה ירמוח תריגמ םא
Tub Clean(ימינפ יוקינ)
.(רישכמה ךותל הרזח םימרוז
.םירז םירמוח
חיר
םינימסתןורתפו ירשפא םרוג
רישכמב בוחט וא שפועמ חיר.הכלהכ יוקינ רבוע אל ףותה לש ימינפה קלחה
• היצקנופה תא ליעפהל שי
•.םותס וא ףפוכמ אל אוהש אדוול שי ,זוקינה רוניצ תנקתה תעב
•.הריגמה חתפ לש ןותחתהו ןוילעה קלחה טרפב ,יוקינה ירמוח תריגמ תא תוקנלו ריסהל שי

iw_main.book.book Page 36 Friday, October 23, 2020 5:54 PM
תולקתב לופיטו רותיא
.םיפפוכמ םימה תקפסא תורוניצש ןכתיי
.תקפסמ הניא םימה תקפסא
.ךופה םירבוחמ םימחהו םירקה םימה תקפסא תורוניצ
לעמ םקוממ זוקינה חתפ1.2.הפצרל לעמ רטמ
.יוקינ רמוח ידמ רתויב שומיש השענ
.םוסח תויהל יושע זוקינ תבאשמ ןנסמ
.רתוי םילק םיטירפ םע םיבברועמ םידבכ םיטירפ
.הטיחסל הסיבכה
.תנזואמ הניא הסיבכה
םינימסתןורתפו ירשפא םרוג
.הכלהכ אלמתמ וניא רישכמה.םותס הסינכה ןנסמ
•.םימותס םניא יולימה ימותסשב םימה תסינכ יננסמש אדוול שי
•.םימותס וא םיפפוכמ םניא םימה תקפסא תורוניצש קודבל שי
•.ףוסה דע םיחותפ םימחהו םירקה םימה יזרבש אדוול שי
•.םימה תקפסא תורוניצ ירוביח תא קודבל שי
.םימ זקנמ וניא רישכמה.ףפוכמ זוקינ רוניצ
•.ףפוכמ וניא זוקינה רוניצש אדוול שי
•-מ הובג וניא זוקינה רוניצש אדוול שי1.2.רישכמה לש ןותחתה קלחה הבוגל לעמ רטמ
וא תיקלח סנכנ יוקינ רמוח
•.יוקינה ירמוח ןרצי ןתונש םיחנמה םיווקה רחא ואלמ
•.זוקינה ןנסמ תא תוקנל שי
.ליגרהמ ךורא תינכתה ןמז.ידמ הנטק תומכה
•.םיסמוע ןזאל ידכ רישכמל םיפסונ םיטירפ ףיסוהל שי
• לקשמ תא הווש הדימב רזפל רישכמל רשפאל תנמ לע המוד לקשמב םיטירפ סבכל תוסנל שי
•.הזב הז וכבתסה םיטירפ םא הסיבכה תא תינדי רזפל שי
בכעתמ רוזחמה םויס.תלעופ ףצק תרסה תינכתש וא ןוזיא רסוח ההוז
•.תונתשהל לוכי לעופב ןמזה .הכרעה קר אוה הגוצתב גצומש רתונה ןמזה .הליגר העפות וז
36
.אל ללכב
.םתכה תרסהב עייסל ידכ םדקומ לופיט וא דיב הסיבכ בייחלו םימתכה
םיעוציב
םינימסתןורתפו ירשפא םרוג
העורג םימתכ תרסה.ןכל םדוק ועבקתהש םימתכ
• תא ריסהל השק היהיש ןכתיי .ועבקתהש םימתכ תויהל םילוכי ןכל םדוק וסבוכש םיטירפב

iw_main.book.book Page 35 Friday, October 23, 2020 5:54 PM
35
תולקתב לופיטו רותיא
.רישכמה תא ליעפהל ידכ
לחתה
עברית
יוביכהלעפה
.
.למשחה תקפסא תרזח רחאל קספוהש םוקמהמ תינכותב ךישמי רישכמה .ולשמ ילמשח
.הרקבה תא שדחמ רידגהל ךרוצ שי
רותפכה לע וצחלו היוצרה תינכתה תא שדחמ ורחב ןכמ רחאל ,
רותפכ לע וצחלו היוצרה תינכתה תא שדחמ ורחב ןכמ רחאל ,
.םיוסמ ןמז ךות ץחלנ אל
.ךרוצ ךכב שי םא
.הבכנ
יוביכהלעפה
H
רותפכ םא הבכ רישכמה
.םידא רצוי וא םימה תא םמחמ רישכמה
Child Lock(םידלי תליענ)
.למשחה עקשמ קתונמ רישכמה
.היובכ םימה תקפסא
.יוארכ תורדגומ ןניא תורקבה
.החותפ תלדה
.ףרשנ/ץפק ךתנ/קספמ
לחתה
יוביכהלעפה
.
יוביכהלעפה.תינכות תריחב רחאל ץחלנ אל
לחתה
יוביכהלעפה
.דואמ ךומנ םימ ץחל
.העבקנש הרוטרפמטל
תורשפאהChild Lock(םידלי תליענ) .תלעפומ
םינימסתןורתפו ירשפא םרוג
.לעופ אל רישכמה.תוליעפ רסוח בקע הבכ הרקבה חול
• רותפכ לע ץוחלל שי .הליגר העפות יהוז
•.ןיקת למשח עקשל בטיה רבוחמ למשחה לבכש אדוול שי
•.םימה תקפסא זרב תא ףוסה דע חותפל שי
• רותפכה לע ץוחללו תלדה תא רוגסל שי .הכלהכ תרדגומ תינכתהש אדוול ש
•.ירמגל רגסיהל הנממ ענומו תלדל תחתמ ספתנ אל רבדש אדוולו תלדה תא רוגסל שי
• לגעמל רבוחמ תויהל ךירצ רישכמה .תיבה לש םיכיתנהו םייטמוטואה םיקספמה תא קודבל שי
• רותפכה לע וצחל
• רותפכה לע וצחל
•.קפסמ תיבב םימה ץחלש אדוול תנמ לע תיבב רחא םימ זרב קודבל שי
• םיממחתמ םימה רשאכ ,תמיוסמ תינכת ךלהמב תינמז לועפל קיספי ףותהש ןכתיי
ודקפתי אל םירותפכהש ןכתיי
• תורשפאה תא תבשה
.תחתפנ אל תלדה.רישכמה תלועפ תליחת רחאל תויתוחיטב תוביסמ תלדה תא חותפל ןתינ אל
•-הש ירחא החטבב תלדה תא חותפל לוכי התא .ילמרונ הז
.הכלהכ

iw_main.book.book Page 34 Friday, October 23, 2020 5:54 PM
םוקימל תושירד
.םותס זוקינ רוניצ וא זוקינה רוניצ לש הניקת אל הנקתה בקע המרגנש הפילד
תולקתב לופיטו רותיא
.ףותה ךותב הווש הדימב תרזופמ אל הסיבכהש ןכתיי
.הפצרה לע הדיחאו הביצי הרוצב םיבשוי ןוזיאה ילגר לכ אל
רישכמה ןוזיא
.
.קיפסמ השק הניא הפצרהו ןכתיי
.
הנקתה
.הכלהכ ןקתומ וניא זוקינה תבאשמ לש ןנסמה הסכמ
34
םינימסתןורתפו ירשפא םרוג
טטר לש שער.ורסוה אל הזירא ירמוח
•.הזיראה ירמוח תא ריסהל שי
•.לטובת תלדה תליענש רחאל הנוכמה תלוכת תא שדחמ רדסלו תינכתה תא קיספהל שי
• תויחנה ואר ,רישכמה לש ןוזיאה ןונווכל
• ואר ,םיאתמ םוקימ תריחבל .תפפוכתמ הניאו החישק הפצרה םא וקדב
הלעפה
םינימסתןורתפו ירשפא םרוג
.םיפלוד םימ.םימוסח תיבב זוקינה תורוניצ
•.ךרוצה הרקמב ברברש םע רשק רוציל שי .תלוספה רוניצב המיסחה תא חותפל שי
•.זוקינה ןנסמ תא תועיבקב תוקנלו קודבל שי .זוקינה רוניצ תא רשיילו תוקנל שי
•.ומוקמל זוקינה תבאשמ ןנסמ תא רזחה

iw_main.book.book Page 33 Friday, October 23, 2020 5:54 PM
33
תולקתב לופיטו רותיא
עברית
.םימה םותסשב ירשפא םגפ לשב םימ לש הפצה
?םיאופק זוקינה תבאשמ וא זוקינ/הקפסאה רוניצ םאה
.המחו הבוטר תבגמב םימה תקפסא רוניצ תא
.תשרב למשח תקספה הווח רישכמה
.הרקב תאיגש יהוז
.עונמב רתי סמוע
.תינכותה
.םימה סלפמ ןשייחב תולקת
.תודיערה ןשייחב תולקת
.םימ תפילד
םינימסתןורתפו ירשפא םרוג
tE
•.תורישל אורקלו למשחה עקת תא איצוהל שי
הטילש תאיגש
LE
• ךשמב ןיתמהל רישכמל חינהל שי30 תא שדחמ ליעפהל ןכמ רחאלו ררקתי עונמהש דע תוקד
עונמ תליענ תאיגש
FE
•.תורישל רשקתה .למשחה עקת תא קתנ .םימה זרב תא רוגס
םימ ףדוע תאיגש
PE
•.תורישל רשקתה .למשחה עקת תא קתנ .םימה זרב תא רוגס
ץחל ןשייח תאיגש
vs
•.תורישל אורקל שי
תודיער ןשייח תאיגש
FF
• תוסכל שי .זוקינה תבאשמו זוקינה רוניצ תא רישפהל תנמ לע ףותה ךותל םימח םימ קפסל שי
ןואפיק תלקת
AE
•.תורישל אורקל שי
םימ תפילד
PF
•.תינכותה תא שדחמ ליעפהל שי
למשח תקספה
.תורישל ורשקתה ,רישכמה לש שדחמ הלעפה
.תנזואמ אל הסיבכהש ןכתיי
עמשיהל םייושעש םישער
םינימסתןורתפו ירשפא םרוג
השיקנו שוקרק לש שער.ףותה ךותב םיאצמנ ,ןוחטיב תוכיס וא תועבטמ ,תוחתפמ ומכ ,םירז םימצעש ןכתיי
• רחאל ךישממ שערה םא .ףותה ךותב םירז םימצע שי םא וקדבו רישכמה תלועפ תא וקיספה
זרפומ שער.ללכ ךרדב ליגר הז .זרפומ שערל םורגל הלולע הסיבכ לש הדבכ הסמעה
•.הסיבכה סמוע תא תיחפהלו רוצעל שי .ןוזיאמ אצי רישכמהש יאדוול בורק ,ךישממ שערה םא
•.לטובת תלדה תליענש רחאל הנוכמה תלוכת תא שדחמ רדסלו תינכתה תא קיספהל שי

iw_main.book.book Page 32 Friday, October 23, 2020 5:54 PM
תולקתב לופיטו רותיא
32
תולקתב לופיטו רותיא
רותפל דציכ תורעהו םיירשפא םימרוג תוליכמ תואבה תואלבטה .תולקתבו תואיגשב לקתיהל םילולע םתא רישכמה תלעפה תעב
זכרמל ורשקתת םא םלשל םייושע םתאש ףסכו ןמז ךוסחל תנמ לע ןלהל תואלבטה תא בטיה אורקל ץלמומ .הלקת וא האיגש תעדוה
לש תורישהLG Electronics.
תורישל םילצלצמש ינפל
אל וא הכלהכ לעופ אל רישכמה םא .םדקומ בלשב תויעב ןחבאלו תולגל תנמ לע תואיגש רוטינל תיטמוטוא תכרעמב דיוצמ רישכמה
לש תורישה זכרמל תורשקתה ינפל םיאבה םירבדה תא קודבל שי ,ללכב לעופLG Electronics.
תועט לש תועדוה
םינימסתןורתפו ירשפא םרוג
.תיטיא המירזהש וא רישכמה ךותל םימרוז אל םימ .הז םוקימב המיאתמ הניא םימה תקפסא
.תיטיא המירזהש וא רישכמה ךותל םימרוז אל םימ .ירמגל חותפ וניא םימה תקפסא זרב
.םילתופמ הסינכה תורוניצ וא רוניצ
.םוסח הסינכה תורוניצ וא רוניצ לש ןנסמה
.הסיבכה
.רישכמה לש ןוזיא רסוח תנקתמו ההזמש תכרעמב דיוצמ הז רישכמ
ליחתי רישכמהש דע םיעגר רפסמ ופלחיש ןכתיי .
.בבותסי רישכמהש תנמ לע הלוענ תויהל תבייח תלדה .בבותסהל
רוזחמ תא קיספהל וליפא וא טוחסל קיספהל היושע וז תכרעמ .ידמ הנטק הסיבכה תומכ
.(המודכו קולח ,היטבמא חיטש ,המגודל) םידדוב םידבכ םיטירפ םיסנכומ םא ירמגל הטיחסה
ליחתי רישכמהש דע םיעגר רפסמ ופלחיש ןכתיי .
.בבותסי רישכמהש תנמ לע הלוענ תויהל תבייח תלדה .בבותסהל
.תויטיאב םיזקנתמ וא םיזקנתמ םניא רישכמב םימה .םותס וא ףפוכמ זוקינה רוניצ
יוביכהלעפה
יוביכהלעפה
רותפכ לע וצחלו תלדה תא ורגס
רותפכ לע וצחלו תלדה תא
.םוסח זוקינה ןנסמ
.תלדה ןשייחב תולקת
לשLG.תוירחאה סיטרכב
•.תיבב ףסונ זרב קודבל שי
•.ףוסה דע זרבה תא חותפל שי
•.םימה תסינכ רוניצ תא שדחמ ןיקתהל וא תורוניצ רשייל שי
• תנוכמל רוניצה ירוביח תרסהו םיזרבה תריגס רחאל הסינכה ימותסש ןנסמ תא הקנו קודב
• .הכלהכ בוביס רשפאל ידכ הסיבכה תא שדחמ רדסל שי ,תינכת ףוסב ידמ הבוטר הסיבכה םא
• ורגס .סמועה ןוזיאב עייסל ידכ רתוי םינטק םיטירפ וא ,םימוד םיינש וא דחא טירפ ףיסוהל שי
•.זוקינה רוניצ תא רשיילו תוקנל שי
•.זוקינה ןנסמ תא תוקנלו קודבל שי
םימ תסינכ תאיגש
ןוזיא רסוח תאיגש
םימ תאיצי תאיגש
dE dE1 dEz dE4
• לש תורישה זכרמ לא ורשקתהLG ימוקמה תורישה זכרמ לש ןופלטה רפסמ תא אוצמל ולכות .
1E
UE
OE
תלד תאיגש

תוריהז
iw_main.book.book Page 31 Friday, October 23, 2020 5:54 PM
31
הקזחא
.תבגמ וא הכר תילטמ םע תערגמהמ תוחל לכ תוקנל שי
םימיאתמה םיאתב הריגמה לש םיביכרה תא שדחמ וביכרה
.הריגמה תא וסינכהו
עברית
4
5
ןנסמה תא בוש סנכה ,זוקינה תבאשמ ןנסמ יוקינ רחאל
ןועשה ןוויכב הרזחב זוקינה הסכמ תא גרבהו תוריהזב
תא בוש סנכה .הליזנו תבלוצ הגרבה עונמל ידכ תוריהזב
.וקיזחמ ךותל רוניצה תא חנהו זוקינה רוניצל עקתה
.יוסיכה הסכמ תא רוגסל שי
יוקינ רמוח לש םיפדוע קלסל תנמ לע (שרדנכ ,תובורק רתוי
.תורחא תויראשו
הריגמה יוקינ
ירמוח .ןקתמה תריגמב רבטצהל לוכי הסיבכ ךכרמו יוקינ רמוח
ץיפהל אלו ןקתמה תריגמל תחתמ ראשיהל םילוכי םיילזונ יוקינ
תורבטצה םא קודבו תופסותה תאו הריגמה תא רסה .ןיטולחל
שדוחב םיימעפ וא םעפ
.
רשייה התכישמ ידי לע יוקינה ירמוח תריגמ תא ואיצוה
.רצעיתש דע הצוחה
.תוקתנתהה רותפכ לע
4
5
•.םימח תויהל םילולע םימהש ןוויכמ ,זוקינה תעב רהזיהל שי
• םיתעל וא) שדוחב םעפ ףותה יוקינ תינכת תא ליעפהל שי
יוקינ ירצומ לש
1
• הקזח הציחל ךות הצוחה הריגמה תא תונידעב ךושמ זאו
.ךכרמו יוקינ רמוח לש תורבטצהה תא וריסה
.ךכרמהו יוקינה רמוחמ הרצונש תורבטצהה תא ריסהל
.הריגמה תא תוקנל תנמ לע דבלב םימב שמתשהל שי
וא הכר תילטמב הריגמה יביכרו הריגמה תא ושבי
.תבגמב
וא תילטמב שמתשהל שי ,הריגמה חתפ תא תוקנל תנמ לע
תא תוקנל תנמ לע תיתכתמ הניאש הנטק תשרבמב
.תערגמה
לחהמ םיעקשמה לכ תא ריסהל שי
.תערגמה לש םינותחתהו
2
• תנמ לע םימח םימב הריגמה יביכרו הריגמה תא ופטש
3
• םינוילעה םיק

הרהזא
iw_main.book.book Page 30 Friday, October 23, 2020 5:54 PM
הקנ זאו הנטק תבצ תרזעב םימה תסינכ רטליפ תא רסה
.ינוניב קזוחב םיפיז םע םייניש תשרבמ תרזעב ןנסמה תא
2
ימ יוניפ עוציבו זוקינה תבאשמ ןנסמ יוקינ
םוריח
תועטב וראשוה ילואש םינטק םיצפחו םיטוח ףסוא זוקינה ןנסמ
הלועפ חיטבהל ידכ הנש יצח לכ יקנ ןנסמהש אדוו .םידגבב
.ךלש רישכמה לש הקלח
וחתפ .זוקינה תבאשמ ןנסמ יוקינ ינפל ררקתהל םימל רשפאל שי
.םוריח ימ יוניפ ועצב וא םוריח הרקמב תלדה תא
.רישכמה תא וקתנ
רוניצ תא הצוחה ךושמלו יוסיכה הסכמ תא חותפל שי
1
2
.זוקינה
הקזחא
אתל תינבא דגנ הקבא ףיסוהלו הריגמה תא חותפל שי
.ישארה הסיבכה
.תויטיאב הריגמה תא רוגסל שי
Tub Cleanיוקינ)
לש ימינפה קלחה תא שבייל ידכ החותפ תלדה תא ראשה
.חוקיפ תחת םיאצמנ םה םא קר רישכמה םינפ תא שבייל
ורחב ןכמ רחאלו הנוכמה תא וליעפה
.ליחתהל תנמ לע
יוביכהלעפה
.בחטל וא ער חירל םורגל לולע אוה
.
(ימינפ
רותפכ לע וצחל
.ןיטולחל רישכמה
הסינכה רוניצ ןנסמ לש יוקינ
30
2
•.הקבאל הפולחכ ףותל תורישי תוילבט סינכהל ןתינ
3
4
5
6
• ,ןיטולחל שבוימ וניא רישכמה לש ימינפה קלחה רשאכ
• ידכ החותפ תלדה תא ריאשהל רשפא ,תיבב םידלי שי םא
זוקינה רוניצמ זוקינה קקפ תא הליחת רסה
תא זקנ זאו ,
a
זוקינה תבאשמ ןנסמ תא טאל ררחש זאו .םימה
b
ידכ
וא תלוספ ריסהל ךישמהל זאו םירתונה םימה תא זקנל
.רטליפהמ םיצפח
םימב תויהל םילוכיש םיעקשמ לכ וא דיס ףסוא םימה תסינכ ןנסמ
,ךרעב הנש יצח לכ הסינכה ןנסמ תא הקנ .רישכמל םיקפוסמש
ידירש םיליכמ וא דואמ םישק םימה םא רתוי תובורק םיתיעל וא
,לשמל) םיוסמ ןמז קרפל הלעפה אלל ראשיי רי
.םוקמ תברקב הפצר זוקינ ןיא םא דחוימב ,(השפוח
םיסנכנ אל םימה רשאכ הרקבה חולב גצות
3
תסינכ רוניצ תא גרבה זאו םימה זרב תאו למשחה תא הבכ
1E
.תינבא
• םא רישכמה לש םימה לש הקפסאה זרב תא רוגסל שי
שכמה
• האיגש תעדוה
.יוקינה תריגמל
1
.םימה

הרהזא
הרהזא
הרהזא
הרעה
iw_main.book.book Page 29 Friday, October 23, 2020 5:54 PM
29
הקזחא
הקזחא
עברית
.םיצירחבו םירוביחב
ליעפהל תנמ לע הרקבה חולל םהשלכ םידח םיצפח סינכהל
עוציבו תעל תעמ רישכמה יוקינ
םוריח םימ יוניפ
טבמא יוקינ
תלד
.ךר דב םע
.רישכמה תא
• םורגל לולע וז הרהזא לע הדפקה רסוח .תולמשחתה לש ןוכיסמ ענמיהל תנמ לע ,יוקינה ינפל למשחהמ רישכמה תא קתנל שי
.תוומ וא תולמשחתה ,הפירש ,השק העיצפל
•.רומיגב עוגפל םילולע םה .רישכמה תא תוקנל תנמ לע םיסממ וא ,םיקחוש יוקינ ירמוח ,םיקזח םיימיכ םירמוחב שמתשהל ןיא
• תוחל ןיאש חיטבהל ידכ שבי דב םע בוש זאו חל דב םע ובגנ
•.םידח םיצפח םע הגוצתה לע וא הנוכמה ינפ לע ץוחלל ןיא
דימ הסיבכה תנוכממ םיטירפה תא איצוהל דימת ךירצ
תנוכמ ךותב םיחל םיטירפ תראשה .תמייתסמ תינכתהשכ
• שבייל ןכמ רחאלו םינפבמו ץוחבמ החל תילטמ םע ץוחרל שי
• רוסא .רישכמה תא קרפל וא תוחול ריסהל תוסנל רוסא
.חירלו עבצ תרבעה ,םיטמקל םורגל הלולע הסיבכה
הסיבכ לכ ירחא יוקינ
תוקנל המ
.תוחל קלסל תנמ
לטמב רישכמה תא בגנל שי
• לע תלדה םטא תאו תלדה תא תוקנל שי ,תינכתה םויס ירחא
•.ףותה תא שבייל תנמ לע טעמ החותפ תלדה תא ריאשהל שי
•.תוחל קלסל תנמ לע השבי תי
רישכמה םינפ יוקינב עייסל הננכותש תדחוימ היצקנופ יהוז
.הטיחסו הפיטש ,הסיבכ ,היירשה ירוזחמ תועצמאב
תדימב רתוי תובורק םיתיעל וא)
תויראשו ךכרמו יוקינ ירמוח תורבטצה תיחפהל ידכ (ךרוצה
םעפ
ןפואב םישקבתמה םיחוורמל ףסונב
היצקנופ תלעפה תצלמה לע עירתהל ידכ גצות
תא רוגסלו רישכמהמ םהשלכ םיטירפ וא םידגב איצוהל שי
שדוחב םעפ
וז היצקנופ לעפה
ךשמל עובשב3תועובש
.עובק
tcL
.תלדה
.תורחא
.וז
1
• וז היצקנופ לעפה ,רישכמה ךותב בחט וא ער חיר שי םא
.חוקיפ תחת םיאצמנ םה םא קר רישכמה םינפ תא שבייל
• העדוהה
.ולש תורישה ייח תא ךיראי רישכמב םלוה לופיט
• ידכ החותפ תלדה תא ריאשהל רשפא ,תיבב םידלי שי םא
ינוציח יוקינ
ינוציח קלח
•.ךפשנש רמוח לכ דימ תוקנל שי

הרעה
הרעה
iw_main.book.book Page 28 Friday, October 23, 2020 5:54 PM
למסל בורק ןופטראמסה לש היפה תא ומקמ
c
למסל וא
Max.
10 mm
רותפכ לע הכורא הציחל וצחל
ךשמב
.גצומ םינותנה תרבעהל רתונש ןמזה .תמייתסמ םינותנה
גצוי ןוחבאה ,המלשוה םינותנה תרבעהש רחאל
.Temp(הרוטרפמט)
.םינותנה תרבעה תמלשהל
Max.
10 mm
.היצקילפאב
טראמס תויצקנופ
28
טראמס תויצקנופ
•םיפסונ םירותפכ לע ץוחלל ןיא
תועצמאב ןקתהה םע רשקתל ךל רשפאמ
2
d
.
היצקילפאה תנוכתLG ThinQ
תונוכתה תועצמאב ןופטראמסמ רישכמה םע רשקתל שי
תויעב לש ןורתפלו ןוחבאל ישומיש עדימ תקפסמ וז היצקנופ
3
3 דע למסל בורק ןופטראמסה תייפ תקזחה ךות תוינש
• תרבעהש דע ומוקמב ןופטראמסה תא חינהל ךירצ
היצקילפאה תנקתהLG ThinQ
LG ThinQ
-ב Google Play Store וא
.היצקילפאה תא ןיקתהלו דירוהל
4
Smart Diagnosis™
היצקילפאLG ThinQ
LG ThinQ
Smart Diagnosis™
.שומיש יסופד יפל רישכמב
היצקילפאה תא ושפח
םושייה
.ןופטראמסה
.תוחונה תומכחה
-בApple App Store ידכ תוארוהה יפל ולעפ .ןופטראמסב
.םילילצה לש רודיש ונשיש ןמזב
למסב םינמוסמה דבלב םימיוסמ םימגדב הנימז וז הנוכת
c
וא
• ןופטראמסה תא זיזהל ןיא ,רתויב תובוטה תואצותה רובע
רישכמב תולקת רותפלו ןחבאל ךל עייסל ידכ וז הנוכתב שמתשה
רסוח ,קר אל ךא ,ןוגכ םיינוציח םימרוג ללגב לועפל אלש
.תויצקילפא לש תונימז רסוח וא תימוקמ
.ךמוקימל םאתהב הנוש הרוצ תלעב תויהל היושעו
-ב שומישAudible Diagnosis ןוחבאל
ןוחבא תטישב שמתשהל ידכ ןלהל תוארוהה רחא בוקעל שי
' הנוכתב רחבו
Smart
עמש ןוחבא תוארוה רחא בוקע .טירפתב '
.רישכמה תא ליעפהל תנמ לע
LG ThinQ
LG ThinQ
.
Diagnosis
היצקילפאב תועיפומה
רותפכ לע וצחל
לחתה
d
.
.ךלש
תונימזWi-Fi קותינ ,Wi-Fi תויצקילפא תונח תוינידמ ,
תולקת
.תילוק
1
• לש תונלשרל סחייל ןתינ אלש תוביסמLGE יושע תורישה ,
• תמדקומ העדוה אלל תונתשהל היושע וז הנוכתש ןכתיי
• היצקילפאה תא לעפה

הרעה
הרעה
הרעה
iw_main.book.book Page 27 Friday, October 23, 2020 5:54 PM
27
הלעפה
וז היצקנופ .תורקבה תא קתנל תנמ לע וז היצקנופב ושמתשה
.רישכמה תא ליעפהל וא תוינכת תונשל םידלימ עונמל הלוכי
עברית
לחתה
.
]L
.םידליה תליענ תלעפהל דע ,ןיפוליחל רתונה ןמזהו
.תורחא תויצקנופל תשגל היהי ןתינש ידכ
הרקבה חול תליענ
.רישכמה תא וליעפה
Delay End(םויס בכע)
לע תינמז וב הכורא הציחל ץחל
ךשמב 3 ליעפהל ידכ תוינש
.הגוצתה לע
CL
Add Item(טירפ ףסוה)
.וז היצקנופ
הרקבה חול תליענ רורחש
.רישכמה תא וליעפה
תורדגה
Child Lock(םידלי תליענ)
רותפכ
לע
ו
• עיפויו םוזמז לוק עמשי
.הסיבכ תינכת רוחבל שי
יוביכהלעפה
.
.ךרוצה יפל
• דבלמ ,םילוענ םירותפכה לכ ,תלעפומ וז היצקנופ רשאכ
יטירפ רסה וא ףסוהו תחתפנ הליענהשכ תלדה תא וחתפ
• הסיבכה ךלהמב גצה לע ועיפוי ,םילוענ םירותפכה רשאכ
יוביכהלעפה
• וז היצקנופ לרטנל הבוח .וז היצקנופ ספאמ אל רישכמה יוביכ
.
הסיבכ ףיסוהל ןתינ אל .םיהובג ףותה ךותב הרוטרפמטה
Add Item(טירפ ףסוה)
.ךרוצה יפ לע דוגיב
רותפכ לע וצחלו תלדה תא ורגס
1
2
םייסיו תיטמוטוא ליחתי רישכמהש ךכ וז היצקנופ רידגהל ןתינ
.רדגומ ןמז קרפ רחאל
לחתה
.
.הסיבכ תינכת רוחבל שי
1
רותפכ לע וצחל
רותפכ לע וצחל
.הזה ןמזב
Delay End(םויס בכע)
רותפכ לע וצחל
2
3
4
5
6
• וא םימה סלפמשכ הרוגס תראשנ תלדה ,תוחיטב לש תוביסמ
1
2
.ךרוצה יפל
תוירונ לכ ,
,םימה תרוטרפמטל םאתהב תונתשהל לוכי ישממה הלעפהה
לחתה
.
לע
2
ו
• לע הכו
Delay End(םויס בכע)
.קיספמ וא ליחתמ אוה רשאכ לילצ עימשמ רישכמה
Pre Wash
לעו
לע תינמז וב הכורא הציחל ץחל
ךשמב 3 תנמ לע תוינש
Add Item(טירפ ףסוה)
.וז היצקנופ תוהשהל
+Rinse(+הפיטש)
ךשמב 3 ליעפהל/תוהשהל תנמ לע תוינש
Beep On/Off הקלדה ףוצפצ) (יוביכ
רא הציחל ץחל
(הפיטש םדק)
.וז היצקנופ
Delay End(םויס בכע)
יוביכהלעפה
.
Delay End(םויס בכע)
.שכרנש םגדל םאתהב תונתשהל
.םירחא םימרוגו הסיבכה סמוע
רותפכ לע וצחל
רותפכ לע וצחל
3
4
•-המ ץוחLED-ה ןצחל לש
-הLED ךותב ובכי הרקבה חולב 20 הלוכי וז הנוכת .תוקד
• ןמז .התליחתל אל ,תינכתה ףוסל דע ןמזה אוה היהשה ןמז
• רותפכ לע ץוחלל שי ,היצקנופה תא לטבל תנמ לע
•.וז הלועפל ילזונ יוקינ רמוחב שומישמ ענמיהל שי

הרעה
הרעה
iw_main.book.book Page 26 Friday, October 23, 2020 5:54 PM
) הסיבכה תינכות תא םאתה
,
Spin
(
Intensive(יביסנטניא)
.Temp(הרוטרפמט)
-ו
יוביכהלעפה
.
+Rinse(+הפיטש)
.ךרוצה יפ לע
רותפכ לע וצחל
דבלב הטיחס תלועפב שומיש
ףות) הסיבכה את תא ונעטו הסיבכל םידגבה תא וניכה
רותפכ לע וצחל
לחתה
.
רותפכ לע וצחל
Spin(בוביס)
.
רותפכ לע וצחל
.בוש הליעפהלו הנוכמה
תא תובכל ידכ םיימעפ
יוביכהלעפה
.
לחתה
רותפכ לע וצחל ,הרוק הז םא
,
(בוביס)
.(הנוכמה
הלעפה
5
6
.יטמוטוא ןפואב תורחבנש לדחמ תרירב תורדגה שי תינכות לכל
.הלא םירותפכ תועצמאב הלא תורדגה תישיא םיאתהל םג לכות
תופסונ תויצקנופו תויורשפא
םיאתהל ידכ תופסונה תויצקנופבו תויורשפאב שמתשהל ןתינ
.תוינכתה תא תישיא
הסיבכ תינכות לש תישיא המאתה
1
תינכותה רובע הסיבכה תרוטרפמט תא רחוב הז רותפכ
2
•.הסיבכ ןובס ופיסות לאו הסיבכ תינכתב ורחב
3
4
• .דבלב הטיחס רוחבל ולכות אל ,הפיטשה תינכתב ורחבת םא
הרדגההש דע
יגירא לש לופיטה תויוות תא קודבל שי .םיסבכמ םתאש
.רתויב תובוטה תואצותה תא לבקל תנמ לע םידגבה
לע תרזוח הציחל ידי לע הטיחסה תמצוע תמר תא רוחבל ןתינ
.הטיחס תוריהמ רוחבל ידכ
רותפכה לע הציחל ידי לע
Spin(בוביס)
.תוריהמב זקנתהל ידכ רצק ןמזל בבותסי ןיידע אוה
.Temp(הרוטרפמט)
.תקלדנ היוצרה
Spin(בוביס)
No(אל)
26
.Temp(הרוטרפמט)
.הרחבנש
• רותפכה לע וצחל
• הסמעהה גוסל המיאתמה םימה תרוטרפמט תא רוחבל שי
Spin(בוביס)
.הז רותפכ
• רותפכ לע וצחל
• רחבנ םא
תויסיסב תויורשפאב שומיש
שומיש ידי לע תוינכתה לש תישיא המאתה עצבל ןתינ
:תואבה תויסיסבה תויורשפאב
.דואמ תכלכולמ הסיבכב רבודמ רשאכ תצלמומ וז תורשפא
לחתה
.
.הסיבכ תינכת רוחבל שי
.ךרוצה יפל
רחאל הסיבכ ריסהל וא ףיסוהל ידכ וז תורשפאב שמתשהל ןתינ
Pre Wash(הפיטש םדק)
יוביכהלעפה
.
לחתה
.
Pre Wash(הפיטש םדק)
רותפכ לע וצחל
רותפכ לע וצחל
רותפכ לע וצחל
Add Item(טירפ ףסוה)
.הסיבכ תינכת תליחת
רותפכ לע וצחל
1
2
3
4
1
.יוקינ ירמוחל היגרלא םע םישנאל תצלמומ וז היצקנופ
םעפ הפיטש תפסוהל
.תודבכב םיכלכולמו םיליגר םידגב תפיטשל תשמשמ וז היצקנופ
.
+Rinse(+הפיטש)
.תחא
Intensive(יביסנטניא)
Intensive(יביסנטניא)
תישיא םיאתהל ידכ םיאבה םיבלשה תא עצב
:הסיבכה תינכות תא
ףות) הסיבכה את תא ונעטו הסיבכל םידגבה תא וניכה
לחתה
.
.הסיבכ ןובס ופיסוה
.הסיבכ תינכת רוחבל שי
.(הנוכמה
רותפכ לע וצחל
+Rinse(+הפיטש)
• רותפכה לע וצחל
• רותפכ לע וצחל
1
2
3
4

הרעה
iw_main.book.book Page 25 Friday, October 23, 2020 5:54 PM
25
הלעפה
הטיחס תוריהמ
:לדחמ תרירב:ןימז
400ד"לס לוכה
עברית
1000ד"לס דע1000ד"לס
תינכת
Speed 14-ב הסיבכ) 14('קד
Duvet(הטימ יוסיכ)
•.הבורקה האמל םילגועמ ליעל םיכרעה .סמועה יאנתל םאתהב תונתשהל היושע לעופב תיברמה הטיחסה תוריהמ

iw_main.book.book Page 24 Friday, October 23, 2020 5:54 PM
הלעפה
תינכתIntensive(יביסנטניא) Pre Wash(הפיטש םדק)
##
##
##
##
#
#
#
#
#
#
#
Cotton(הנתוכ)
Eco 40-60
Mixed Fabric(םיברועמ םידב)
Easy Care(לק לופיט)
Silent Wash(הטקש הסיבכ)
Hygiene(ינייגיה)
Baby Care(תוקונית ידגב)
Delicates(םינידע םידגב)
Hand/Woolדיב הסיבכ) (רמצ
Sportswear(טרופס ידגב)
Speed 14-ב הסיבכ) 14('קד
Duvet(הטימ יוסיכ)
24
הטיחס תוריהמ
הריחבל תנתינה תיברמ הטיחס תוריהמ
:לדחמ תרירב:ןימז
1400ד"לס לוכה
1400ד"לס לוכה
1000ד"לס לוכה
1400ד"לס לוכה
800ד"לס דע1000ד"לס
1400ד"לס לוכה
1000ד"לס דע1000ד"לס
800ד"לס דע800ד"לס
800ד"לס דע800ד"לס
800ד"לס דע800ד"לס
תינכת
Cotton(הנתוכ)
Eco 40-60
Mixed Fabric(םיברועמ םידב)
Easy Care(לק לופיט)
Silent Wash(הטקש הסיבכ)
Hygiene(ינייגיה)
Baby Care(תוקונית ידגב)
Delicates(םינידע םידגב)
Hand/Woolדיב הסיבכ) (רמצ
Sportswear(טרופס ידגב)

הרעה
iw_main.book.book Page 23 Friday, October 23, 2020 5:54 PM
23
הלעפה
עברית
Hand/Woolדיב הסיבכ) (רמצ30° C) Cold(רק) דע 40° C( :יברמ סמוע2ג"ק
רואית ,הנותחת השבלה ,רמצ ןוגכ הנוכמב וא דיב הסיבכל םידעוימה םינידע םידגב לש הסיבכל תדעוימ וז תינכות
.'וכו תולמש
•רמצ יטירפ סוביכל םיאתמה הסיבכ ןובסב ושמתשה
Sportswear(טרופס ידגב) 40° C) Cold(רק) דע 40° C( :יברמ סמוע3ג"ק
רואית.םילויטל םידגבו טרופס ידגב ןוגכ ,םידחוימ םידגב לש הסיבכל תדעוימ וז תינכות
•.םידגבל תדעוימה םימ החוד דבמ היצנימלב שמתשה
Speed 14-ב הסיבכ) 14('קד 20° C) 20 ° C דע 40 ° C( :יברמ סמוע2ג"ק
רואית-כ לש הסיבכל תדעוימ וז תינכות14.הלק ךולכל תגרדב תונטק הסיבכ תויומכ לש תוקד
Duvet(הטימ יוסיכ) Cold(רק) ) Cold(רק) דע 40° C( :יברמ סמוע2.5 ךופ תכימש) ג"ק 1(
רואית.'וכו תופס ייוסיכ ,תוירכ ,הטימ ייוסיכ ומכ םילודג םיטירפ לש הסיבכל תדעוימ וז תינכות
Tub Clean(ימינפ יוקינ) --
רואית.רישכמה לש היטבמאה םינפ יוקינב תעייסמ וז היצקנופ
Rinse+Spin(הטיחסו הפיטש) -גוריד :יברמ סמוע
רואית.ךרוצה תדימב הסיבכ ךכרמב ושמתשה .הסיבכה לש הטיחסלו הפיטשל תדעוימ וז תינכות
הרעה
. IEC60456 םע תומיאתל הקידבל ”ד"לס 1400 + ℃ 60
תעב םידגבה ןרצי לש תוארוהה וא לופיטה תיוות רחא דימת בוקע .הרחבנש הסיבכה תינכותל המיאתמה םימה תרוטרפמט תא רחב
+
(יביסנטניא)
.תויוצרה תוינכתה רובע תומיאתמה הטיחסה תוריהמו הסיבכה תרוטרפמט תא רוחבל שי
.תרהצומה רוזחמה תרוטרפמטמ הנוש תויהל היושע לעופב םימה תרוטרפמט
Intensive,(
Eco 40-60)Eco 40-60
.םידגבל קזנ עונמל ידכ הסיבכה
.ילארטינ יוקינ רמוחב שמתשהל ץלמומ
“
תורשפאל תינכות רדגה
תופסונ תויורשפא
הסיבכ תינכות לכ רובע
Add Item(טירפ ףסוה)
Delay End(םויס בכע)
,
+Rinse(+הפיטש)
.וז הלבטב
•
•
•
•
•
•
• תויורשפאה תא רוחבל ןתינ

iw_main.book.book Page 22 Friday, October 23, 2020 5:54 PM
יפל ,דימ ליחתהל
תינכותל םורגת תינכות תריחב אלל
Cotton(הנתוכ)
יוביכהלעפה
.לדחמה תרירב תורדגה
.(תונוליו/ךופ תוכימש
הלעפה
22
תוינכת תלבט
הסיבכ תינכת
Cotton(הנתוכ) 40° C) Cold(רק) דע 95° C(גוריד :יברמ סמוע
רואית.תונווגמ ףות תועונת בוליש תועצמאב הליגר ךולכל תמר םע םידגב לש הסיבכ
• ןצחלה לע הציחל
Eco 40-6040° C) 40° Cל 60° C(גוריד :יברמ סמוע
רואית הרוטרפמטב דבכל ןתינש הליגר ךולכל תמרב םידגב סבכמ40° C וא 60° C.
Mixed Fabric(םיברועמ םידב) 40° C) Cold(רק) דע 60° C( :יברמ סמוע4ג"ק
רואית.תינמז וב ברועמ דב ףטוש
• ,רמצ ,םיהכ םידגב ,טרופס ידגב ,םינידע/ישמ) םידחוימ םידבל טרפ ,םיגירא לש םינוש םיגוסל שמשמ
Easy Care(לק לופיט) 40° C) Cold(רק) דע 60° C( :יברמ סמוע4ג"ק
רואית.הסיבכה ירחא ץוהיג םיכירצמ םניאש םידגב תסיבכל תדעוימ וז תינכות
•.רטסאילופ ,קילירקא ,דימאילופל שמשמ
תחת) תמתכומ הנבל הנתוכל דעוימ
Silent Wash(הטקש הסיבכ) 40° C) Cold(רק) דע 60° C( :יברמ סמוע5ג"ק
רואית.תורחא הסיבכ תוינכותל האוושהב תודיער תוחפ םעו רתוי הטקש הרוצב הסיבכל תדעוימ וז תינכות
•.(םינו
Hygiene(ינייגיה) 60° C :יברמ סמוע4ג"ק
רואית.ההובג הרוטרפמטב םידגב תסבכמ וז תינכות
Baby Care(תוקונית ידגב) 60° C :יברמ סמוע4ג"ק
רואית.רתוי םיבוט םיעוציב םע הנידע העונתב תוקונית ידגב תסבכמ וז תינכות
Delicates(םינידע םידגב) 20° C) Cold(רק) דע 40° C( :יברמ סמוע3ג"ק
רואית.הנוכמב הסיבכל םידעוימה הרחתו תשר םידגבו הנותחת השבלה יטירפ לש הסיבכל תדעוימ וז תינכות

הרעה
iw_main.book.book Page 21 Friday, October 23, 2020 5:54 PM
21
הלעפה
עברית
• רתוי ךשמל יוקינה תריגמב הסיבכה ךכרמ תא ריאשת לא
םוימ1 ראשיהל יושע ךכרמ .תושקתהל לולע הסיבכ ךכרמ .
הבע אוה םא ךכרמה תא ללדל שי .ידמ הבע אוה םא ןקתמב
.תולקב םורזל לכויש ךכ ידמ
•.הסיבכ ךלהמב םימ םימרזומ רשאכ הריגמה תא חותפל רוסא
•.('וכו ןיזנב) םיסממב שמתשהל רוסא
יוקינ רמוח תוילבט תפסוה
.הסיבכה ןמזב יוקינ תוילבטב םג שמתשהל ןתינ
תסמעה ינפל ףותל יוקינ תוילבט סינכהו תלדה תא חתפ
.םידגבה
.תלדה תא רוגסלו ףותה ךותל הסיבכה תא סינכהל שי
םימ ךכרמ תפסוה
םצמצל ידכ ,תינבא דגנ רמוח ןוגכ ,םימ ךכרמב שמתשהל ןתינ
.םישק םימה םהבש םירוזאב יוקינ רמוחב שומישה תא
רמ תא ןכמ רחאלו יוקינה רמוח תא ףיסוהל שי הליחת
.הזיראה לע תוארוהל םאתהב תומכ סינכהל שי .םימה
1
2
•.הריגמה ךותל תוילבט סינכהל ןיא
• ךכ

הרעה
הרעה
iw_main.book.book Page 20 Friday, October 23, 2020 5:54 PM
.םימיאתמה םיאתל ךכרמהו יוקינה רמוח תא ףסוה
ישאר הסיבכ יוקינ את
הסיבכה ינפל הפיטש את
ילזונ הסיבכ ךכרמ את
.רוזחמה תליחת ינפל יוקינה ןקתמ תריגמ תא תונידעב רוגס
.תנכותמהמ םדקומ ףותל רזפתהל וא רחא אתל
a
b
c
.רוזחמה
הלעפה
2
.יוקינה רמוח ןרצי ידי לע ונתינש
.דיימ לעפות תינכתה םא ,ירקיעה
תורשפאב תרחב םא וא ,
Pre
יושעו דימ רזפתי לזונהש ןוויכ ,
תמרו לדוג ,םימה לש ישוקה תדימ ,םימה תרוטרפמטל
תואצותה תא לבקל תנמ לע .סוביכל םיטירפה לש ךולכלה
רבדה תרחא .תועוב ידמ רתוימ ענמיהל שי ,רתויב תובוטה
ח תא םיפיסומש ינפל ,םידגבה לעש תיוותל סחייתהל שי
.ההכ וא הנידע הסיבכ ,רמצ ,םיינועבצ םידב ,ןוגכ ,םידחוימ
3
• שולגל יוקינה רמוחל םורגל הלולע הרוגס הריגמה תקירט
•.הריגסה ןמזב הריגמב ספתית אל ךדילש רהזיה
• ףוסב ןקתמה יאתב ראשית הנטק םימ תומכש ילמרונ הז
.ןיבלמ םע יוקינ רמוחב שמתשהל שי ,םיריהבו
.אתב וא הריגמב תושקתהל
.תועוב ידמ רתויל ליבוהל יושע
.םימה תרוטרפמט תא םירחובו יוקינה
בוט הסיבכ תואצות תלבקל
Delay End(םויס בכע)
.הסיבכה
20
• תויחנהה יפל לועפל שי ,ילזונ יוקינ רמוחב שמתשהל וצרת םא
• יוקינה רמוח לש הריגמל תורישי ילזונ יוקינ רמוח ךופשל ןתינ
• היצקנופב שמתשמ התא םא ילזונ יוקינ רמוחב שמתשת לא
Wash(הפיטש םדק)
• םאתהב יוקינה רמוחב שומישה תא תונשל ךרוצ היהיש ןכתיי
• רמו
•:םידגבה גוסל םימיאתמש יוקינ ירמוחב קרו ךא שמתשהל שי
- םימושייל םידעוימ םיילזונ יוקינ ירמוח תובורק םיתעל
-.םידבה יגוס לכל תומיאתמ יוקינ תוקבא
- םינבל םידגב לש רתוי תו
- תינכת תליחתב הריגמה ךותמ ףטשנ יוקינה רמוח
הסיבכ ךכרמ את
ךלהמב תיטמוטוא ץפומ רשא ,ילזונ הסיבכ ךכרמ ליכמ הז את
וא יתקבא הסיבכ ךכרמב שמתשהל ןתינ .יפוסה הפיטשה רוזחמ
.ילזונ
,ידמ םדקומ ררחתשהל ול םורגל לולע ןוילעה יולימה וק לעמ
.םידגב םיתכהלו
השק היהיש םידגבה לע םיהכ םימתכל םורגת וז הלועפ
.םתוא ריסהל
• לולע הז תאז ושעת םא .תושקתהל יוקינה רמוחל רשפאל ןיא
.חירל וא הפיטש לש בוט אל עוציב ,המיסחל םורגל
• ךכרמ ףדועב שומיש .יברמה יולימה וקל הסיבכ ךכרמ םיגזומ
•.ןרציה תוצלמהל םאתהב :האלמ הסמעה
• :תיקלח הסמעה1/2הליגרה תומכהמ
• :תילמינימ הסמעה1/3.האלמה הסמעהמ
ןקתמב שומיש
:ןקתמל יוקינ ירמוח ןונימ ףיסוהל ידכ
.ןקתמה תריגמ תא חתפ
• ,הסיבכה ףותב םידגבה לע תורישי הסיבכ ךכרמ ךופשת לא
1

הרעה
iw_main.book.book Page 19 Friday, October 23, 2020 5:54 PM
19
הלעפה
,הסיבכה רוזחמ תא ןיימל שי ,תויבטימ הסיבכ תואצות תלבקל
• תדימו דבה גוס יבגל עדימ םיקפסמ למסל תחתמש םיספה
.תרתומה ינכמה ץמאמה
הסיבכל םידגבה תנכה
.םידגבה תויוות לע םילמסה יפל התוא ןיכהל ןכמ רחאלו
עברית
הנוכמל הסנכה ינפל םידגבה תקידב
.הליחת םילודג
םורגל לולע רבדה .םידדוב םיטירפ סבכל ןיא .הסיבכ התואב
םיטירפ ינש וא דחא טירפ ףיסוהל שי . הנוכמה לש ןוזיא רסוחל
עבטמ ,םיטע ,םירורפג ,רעיש תוכיס ,םירמסמ ומכ
תו
.םידגבל ןהו רישכמל ןה קזנ םורגל םילולע תוחתפמו
.םירחא םידגבב וספתיי אל
תנמ לע םימתכה לע םימב סמומ יוקינ רמוח לש הנטק תומכב
.ךולכלה תא ריסהל
.םימוד
.הסיבכ תשר
טל שי
םידגבה ןוימ
.הסיבכה תרוטרפמטו דבה גוס תא תנייצמה תיוותה תמר
םאתהב בוביסה תמצוע תא וא בוביסה תוריהמ תא םאתה
• םיטירפ סינכהל שי .הנוכמב םינטקו םילודג םיטירפ ףרצל
• תומכה תיצחממ רתוי סופתל םיכירצ אל םילודג םיטירפ
םע השק ךולכל םע םיטירפ וסבכת לא ,ןתינ םא .ךולכלה
.לק ךולכל ילעב םיטירפ
במ םיהכ םידגב דרפנב וסבכ :(ההכ ,ריהב ,ןבל) עבצ
• םיטירפ .םיקיר םהש אדוול תנמ לע םיסיכה לכ תא קודבל שי
םידגב םע םיינועבצ םידגב לש בוברע .םיריהב וא םינבל
םיריהבה םידגבב עבצ תדירי וא העיבצל םורגל יושע םיריהב
ךומ תריבצל םורגל םילולע ךומ ינרצי .ךומ םיפסואה םידבמ
.ךומ יפ
לעש הסיבכה תוארוה תויוות תקידב
דציכו דגבה לש גיראה תלוכתל עגונה עדימ םיקפסמ הלא םילמס
• ךותב (םילזרב םע תויזח ,ןוליינ יברג) םינידע םידגב סבכל שי
• ולא םיטירפש אדוול תנמ לע םיטוחו םיוו ,םינסכור רוגסל שי
• השרבה ידי לע םימתכבו ךולכלב םדקומ לופיט לפ
לופיטה תויוות לע םילמס
.ותוא סבכל ךירצ
•הליגר הסיבכ
•םיברועמ םידב ,הנתוכ
• יפל םכלש םידגבה תא וניימ ,רתויב תובוטה הסיבכה תואצותל
.דבה גוסל
• תמר יפל םידגב וניימ :(הלק ,הליגר ,השק) ךולכלה תמר
• םידג
.רתוי
• ךומ םירציימה םידב דרפנב וסבכ :(ךומ יפסוא ,ךומ ינרצי) ךומ
סוא םידבב
םידגבה
למסדב גוס / הסיבכ
םיככרמו יוקינ ירמוח תפסוה
יוקינה ירמוח ןונימ
גיראה ךולכלו עבצ ,גוסל םאתהב ותוא רוחבלו יוקינה
םימיאתמה יוקינ ירמוחב קר שמתשה .הסיבכה תרוטרפמטו
.(ימדק סמוע) ףות גוסמ הסיבכ תונוכמל
שמ םא
םורגל וא סוביכ לש תובוט אל תואצותל םורגל לולע הזו תועוב
.עונמה לע ידמ הדבכ הסמעהל
•לק לופיט
•םיברועמ םידב ,יטתניס
•תדחוימ הנידע הסיבכ
כל רוסא
•םינידע
•דבלב דיב הסיבכ
•ישמ ,רמצ
•
• רמוח ןרצי לש תויחנהל םאתהב יוקינ רמוחב שמתשהל שי
•.יוקינה רמוח תומכ תא תיחפהל שי ,תועוב ידמ רתוי שי םא
• ידמ רתוי תויהל תולולע ,יוקינ רמוח ידמ רתויב םישמת
סב

iw_main.book.book Page 18 Friday, October 23, 2020 5:54 PM
ורחבנ
הלעפה
18
בצמו ןמז תגוצת
רואית
AI DD
AI DD
.סמועה בושיח תמלשה רחאל תומיאתמה ףותה בוביס תולועפ תא קפסמ
תוינכותה רשאכ לעפומ
Cotton(הנתוכ)
Easy Care(לק לופיט)
-ו ,
Mixed Fabric(םיברועמ םידב)
,
M
M
.ולעפוהו
תינכות בצמ ינווחמ
-ה ,בלשLED.בהבהל קיספת הליעפה המבה תירונ ,ההשומ רוזחמ םא .הבכי
a
•
•
b
• תמלשה רחאל .תוביצי וראשיי תורתונה םיבלשה תוירונו ,בהבהת ליעפה בלשה תירונ ,תלעופ הסיבכ תינכות רשאכ
.ילמרונ הז .סמועה לדוג תא ההיז סמועה בושיחש רחאל גצוי ןמזה ,
.לעופב ןמזה לע עיפשהל םילוכי (' וכו תסנכנ םימ תרוטרפמט ,רדחה
.יובכ ףוצפצהשכ קלדנ
רותפכה טעמל לוענ הרקבה חול רשאכ קלדנ
לחתה
.
.הלוענ תלדהו הליחתמ תינכותה רשאכ תקלדנ
רתונש רעושמ ןמז
.הרחבנש
---
q
i
H
c
• תורשפאל םאתהב הנתשמ לדחמה תרירב ןמז .גצומ תינכתה רובע לדחמה תרירב ןמז ,הסיבכ תינכת תריחב תעב
• הארמ גצה םא
• תרוטרפמט ,סמוע לקשמ) םיינוציח םימרוג המכ .םיליגר הלעפה יאנת לע ססובמ הז ןמז .דבלב ןדמוא אוה גצומה ןמזה
d
e
f

iw_main.book.book Page 17 Friday, October 23, 2020 5:54 PM
17
הלעפה
עברית
רואית
הרקב חול
.םגדל םגדמ הנוש תויהל יושע הרקבה חול
הרקב חול תונוכת
לחתה
יוביכ/הלעפה ןצחל
ןצחל
תופסונ תויצקנופו תויורשפא
הסיבכ תינכות ינצחל תמאתה
.הרחבנש תינכותה רובע בוביסה תוריהמ תא וא םימה תרוטרפמט תורדגה תא םיאתהל ידכ הלא םינצחלב שמתשה
.וראוי הגוצתב לדחמה
.תב
הבהמ הרקבה חולב הגוצתה ,יטמוטוא ןפואב בשוחמ סמועה לקשמש ןמזב
תונכת רותפכ
יוביכהלעפה
.הגוצתב
הגוצת
a
•.הסיבכה תנוכמ תא ליעפהל תנמ לע הז ןצחל לע וצחל
b
•.הסיבכה גוס יפל תונימזה תונוש תוינכות ןנשי
•.הרחבנש תינכתה תא ןייצתו קלדית הרונה
c
•.הסיבכה תינכת תא רוצעל תנמ לע וא הסיבכה תינכת תלועפ תא ליחתהל תנמ לע הז רותפכב םישמתשמ
•.הז ןצחל לע וצחל ,הסיבכה תינכת לש תינמז הריצעב ךרוצ שי םא
d
• ךשמב םיאתמה רותפכה לע הכורא הציחל ץוחלל שי ,תופסונ תויצקנופב שמתשהל ידכ3 ריאי םיאתמה למסה .תוינש
•.הריחבה רחאל ריאיו תפסונ תינכת רוחבל רשפאמ הז רבד
e
•.הגוצתב תוגצומ תויחכונה תורדגהה
•.תורחא תורדגה רוחבל ידכ וז תורשפאל ןצחלה לע ץחל
f
• תרירב תורדגה ,לעפומ רישכמה רשאכ .בצמ תועדוהו תויורשפא ,רתונש רעושמה ןמזה ,תורדגהה תא הארמ הגוצתה
•
 Loading...