

Page 1

OWNER’S MANUAL
WASHING MACHINE
F1400HT1B
MFL69042505
Before beginning installation, read these instructions carefully.
This will simplify installation and ensure that the washer is installed
correctly and safely. Leave these instructions near the washer
after installation for future reference.
www.lg.com/id
PT. LG Electronics Indonesia
Gandaria 8 Office Tower, 31
st
Floor
Jl. Sultan Iskandar Muda,
Kebayoran Lama Utara–Kebayoran Lama
11240, INDONESIA
ENGLISH BAHASA
Page 2
2
Contents....................................2
Product Features......................3
Important safety instructions
Important safety instructions .................4
Basic safety precautions .......................5
Save these instructions.........................6
Safety instructions for use.....................7
Specifications...........................8
Installation
Removing packing ................................9
Removing transit bolts ..........................9
Installation place requirements ...........10
Connecting water supply hose............12
Installation of drain hose .....................14
Leveling...............................................15
How to use washer
Operating washing machine ...............17
Care before washing...........................18
Washing program table.......................19
Drying Program Table.........................20
Extra options .......................................21
Operating data ....................................21
Control panel.......................................22
Options................................................23
- Pre Wash ..........................................23
- Favorite.............................................23
- Steam (Wash and Softener) .............23
- Delay.................................................24
- Wash.................................................24
- Temp.................................................24
- Rinse.................................................24
- Spin...................................................24
Child Lock ...........................................25
Beep On/Off ........................................25
Tub Clean ...........................................26
Door Lock & Detecting ........................26
Dry ......................................................27
Before using the Tag On function
Turning on the NFC function of the
smart phone...........................................29
The Tag On guide..................................30
Thank you for buying a LG Fully
Automatic Washing Machine.
Please read your owner’s manual
carefully, it provides instruction on safe
installation, use and maintenance.
Retain it for future reference.
Record the model and serial number of
your washing machine.
Model No.
Serial No.
Date of Purchase
Adding detergent
Adding detergent and fabric softener..31
Maintenance
The water inlet filter.............................33
The drain pump filter ...........................34
Dispenser drawer................................35
The washing drum ..............................36
Cleaning your washer .........................36
Cold conditions ...................................36
Troubleshooting guide
Diagnosing problems ..........................37
Error messages...................................39
Using SmartDiagnosis™.....................40
Terms of warranty ..................41
Contents
Page 3
3
ENGLISH
추가선택 예약
Inverter Direct Drive system
The advanced Brushless DC motor directly drives the drum without
belt and pulley.
Low noise speed control system
By sensing the amount of load and balance, it evenly distributes load
to minimize the spinning noise level.
Child Lock
The Child Lock prevents children from pressing any button to change
the settings during operation.
More economical with Intelligent Wash system
Intelligent Wash System detects the size of load and water temperature,
and then determines the optimum water level and washing time to
minimize energy and water consumption.
Protection against creases
With the alternating rotation of the drum, creasing is minimized.
6 Motion
Washer is able to perform various drum actions or a combination of
different actions depending on the wash program selected.
Combined with a controlled spin speed and the ability of the drum to
rotate both left and right, the wash performance of the machine is greatly
improved, giving you perfect results every time.
Product Features
Tag on
This is a function that may use Diagnosis, Download Cycle, Washing
Coach, One Touch Washing, etc. when you touch the Tag On logo of
the washing machine by using your smartphone with NFC.
SmartDiagnosis™
Should you experience any technical difficulty with your washing
machine, it has the capability of transmitting data by phone to the
Customer Information Center. The call center agent records the data
transmitted from your machine and uses it to analyze the issue,
providing a fast and effective diagnosis.
Auto Restart
Auto Restart allows the program to restart all by itself in case of power
failure. It does from the stage where it stopped.
Page 4
4
Important safety instructions
For your safety, the information in this manual must be followed to minimize the risk of fire or
explosion, electric shock, or to prevent property damage, injury to persons, or death.
READ ALL INSTRUCTIONS AND EXPLANATION OF THE INSTALLATION
BEFORE USE.
WARNING
You can be killed or seriously injured if you don’t follow instructions.
Your Safety and the safety of others are very important.
We have provided many important safety messages in this manual and on your appliance.
Always read and obey all safety messages.
This is the safety alert symbol.
This symbol alerts you to potential hazards that can kill or hurt you and others.
All safety messages will follow the safety alert symbol and either the word DANGER,
WARNING or CAUTION.
These words mean:
WARNING
You may be slightly injured or cause damage to the product if you do not follow instructions.
All safety messages will tell you what the potential hazard is, tell you how to reduce the chance
of injury, and tell you what can happen if the instructions are not followed.
CAUTION
You will be killed or seriously injured if you don’t immediately follow instructions.
DANGER
Page 5

5
ENGLISH
Important safety instructions
To reduce the risk of fire, electric shock, or injury to persons when using the washer, follow basic
precautions, including the following:
WARNING
• Before installation, check exterior
damages. If it has, do not install.
• Do not install or store the washer
where it will be exposed to the
weather.
• Do not tamper with controls.
• Do not repair or replace any part of
the washer or attempt any servicing
unless specifically recommended in
the user-maintenance instructions or
published user-repair instructions
that you understand and have the
skills to carry out.
• Keep the area underneath and around
your appliances free of combustible
materials such as lint, paper, rags,
chemicals, etc.
• The appliance is not intended for use
by young children or infirm persons
without supervision. Do not allow
children to play on, with, or inside this
or any other appliance.
• Keep small animals away from the
appliance.
• Do not leave the washer door open.
An open door could entice children to hang
on the door or crawl inside the washer.
• Never reach into washer while it is
moving. Wait until the drum has
completely stopped.
• The laundry process can reduce the flame
retardant of fabrics.
To avoid such a
result, carefully follow the garment
manufacturer’s wash and care
instructions.
• Do not wash or dry articles that have
been cleaned in, washed in, soaked
in, or spotted with combustible or
explosive substances (such as wax,
oil, paint, gasoline, degreasers, drycleaning solvents, kerosene, etc.)
which may ignite or explode. Oil may
remain in the tub after a whole cycle resulting
in fire during drying.
So, do not load oiled clothes.
• Do not slam the washer door closed
or try to force the door open when
locked. This could result in damage to the
washer.
• When the machine runs high
temperature, the front door may be
very hot. Don’t touch it.
• To minimize the possibility of electric
shock, unplug this appliance from the
power supply or disconnect the
washer at the household distribution
panel by removing the fuse or
switching off the circuit breaker
before attempting any maintenance or
cleaning.
• When unplugging power cord, do not
pull out by grasping the cord.
Otherwise, the power cord may be damaged.
• Never attempt to operate this
appliance if it is damaged,
malfunctioning, partially
disassembled, or has missing or
broken parts, including a damaged
cord or plug.
■ Basic safety precautions
Page 6
6
Important safety instructions
■ Basic safety precautions
To reduce the risk of fire, electric shock, or injury to persons when using the washer, follow basic
precautions, including the following:
WARNING
• Before discarding an old machine
unplug it. Render the plug useless.
Cut off the cable directly behind the
appliance to prevent misuse.
• When a product was under water,
Please call service center. There is a
risk of electric shock and fire.
• Appliance connected to the water
mains using new hose-sets. Old hosesets should not be reused.
• To reduce the risk of personal injury,
adhere to all industry recommended
safety procedures including the use
of long sleeved gloves and safety
glasses. Failure to follow all of the safety
warnings in this manual could result in
property, personal injury or death.
• Do not push down the door
excessively, when washer door open.
This could topple over the washer.
■ Save these instructions
Improper connection of the equipment-grounding conductor can result in electric shock.
Check with a qualified electrician or serviceman if you are in doubt as to whether the appliance is
properly grounded. Do not modify the plug provided with the appliance - if it does not fit the
outlet, have a proper outlet installed by a qualified electrician.
GROUNDING INSTRUCTIONS
This appliance must be grounded. In the event of malfunction or breakdown, grounding will
reduce the risk of electric shock by providing a path of least resistance for electric current.
This appliance is equipped with a cord having an equipment-grounding conductor and
grounding plug. The plug must be plugged into an appropriate outlet that is properly installed
and grounded in accordance with all local codes and ordinance.
• Do not use an adapter this will defeat the grounding plug.
• If you don’t have the proper outlet, consult an electrician.
WARNING
Page 7
7
ENGLISH
Important safety instructions
To minimize the risk of fire within the inner bowl, the following should be observed:
• Items that have been spotted or
soaked with vegetable or cooking oil
constitute a fire hazard and should
not be placed in a tumble dryer.
Oil-affected items can ignite spontaneously,
especially when exposed to heat sources
such as in a tumble dryer.
The items become warm, causing an
oxidation reaction in the oil. Oxidation
creates heat. If the heat cannot escape, the
items can become hot enough to catch fire.
Piling, stacking or storing oil-affected items
can prevent heat from escaping and so
create a fire hazard. If it is unavoidable that
fabrics that contain vegetable or cooking oil
or have been contaminated by hair care
products be placed in a tumble dryer they
should first be washed in hot water with
extra detergent-this will reduce, but not
eliminate, the hazard.
The ‘cool down’ cycle of tumble dryers
should be used to reduce the temperature of
the items.
They should not be removed from the tumble
dryer or piled or stacked while hot.
• Items that have been previously
cleaned in, washed in, soaked in or
spotted with petrol/gasoline, drycleaning solvents or other flammable
or explosive substances should not
be placed in a tumble dryer. Highly
flammable substances commonly used in
domestic environments include acetone,
denatured alcohol, petrol/gasoline,
kerosene, spot removers (some brands),
turpentine, waxes and wax removers.
• Items containing foam rubber (also
known as latex foam) or similarly
textured rubber like materials should
not be dried in a tumble dryer on a
heat setting. Foam rubber materials can,
when heated, produce fire by spontaneous
combustion.
• Fabric softeners or similar products
should not be used during a drying
cycle, to eliminate the effects of static
electricity unless this practice is specifically
recommended by the manufacturer of the
fabric softener or product.
• Undergarments that contain metal
reinforcements should not be placed
in a tumble dryer.
Damage to the tumble dryer can result if
metal reinforcements come loose during
drying. When available a drying rack could
be used for such items.
• Plastic articles such as shower caps
or babies waterproof napkin covers
should not be placed in a tumble
dryer.
• Rubber-backed articles, clothes fitted
with foam rubber pads, pillows,
rubber boots and rubber-coated
tennis shoes should not be placed in
a tumble dryer.
■ Safety instructions for use
Page 8
8
■ Name : Front loading washing machine
■ Power supply : 220 V~, 50 Hz
■ Size : 600 mm (W) 610 mm (D) 850 mm (H)
■ Weight : 72 kg
■ Max.Watt : 2100 W (Wash) / 1600 W (Dry)
■ Wash capacity : 10 kg (Wash) / 7 kg (Dry)
■ Permissible water pressure : 100 - 1000 kPa (1.0 - 10.0 kgf / cm
2
)
The appearance and specifications may vary without notice to improve the quality of the unit.
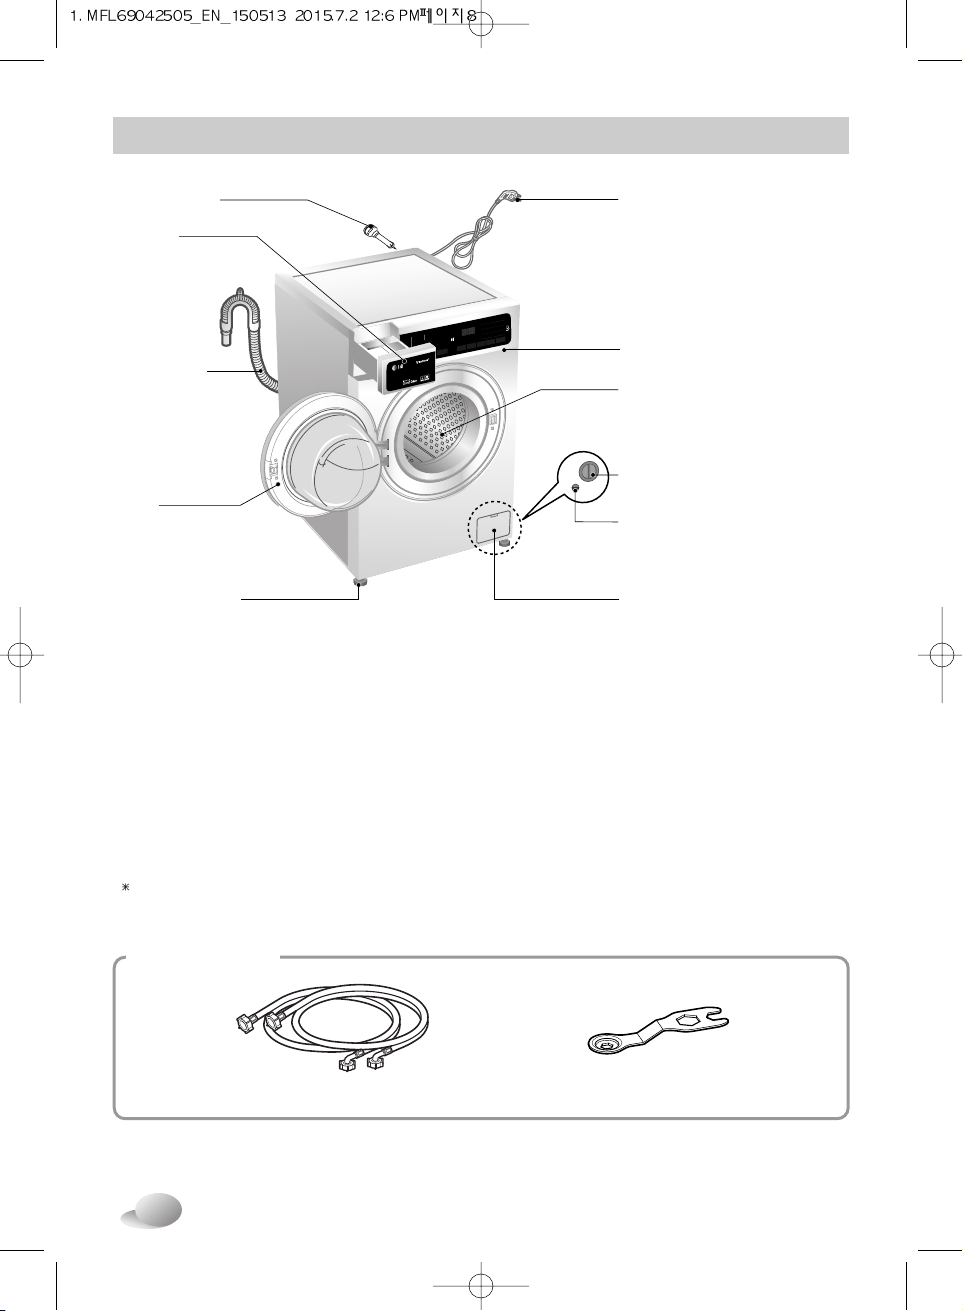
(For detergent and
fabric softener)
Drawer
Drain hose
Transit bolts
Power plug
Control panel
Drain pump filter
Lower cover cap
• If the supply cord is damaged,
it must be replaced by the
manufacturer or its service agents
or a similarly qualified person in
order to avoid a hazard.
Drum
Door
Drain plug
Adjustable feet
Specifications
■
Accessories
Inlet hose(1EA) Option : Hot/Cold(2EA)
Spanner
Page 9
9
ENGLISH
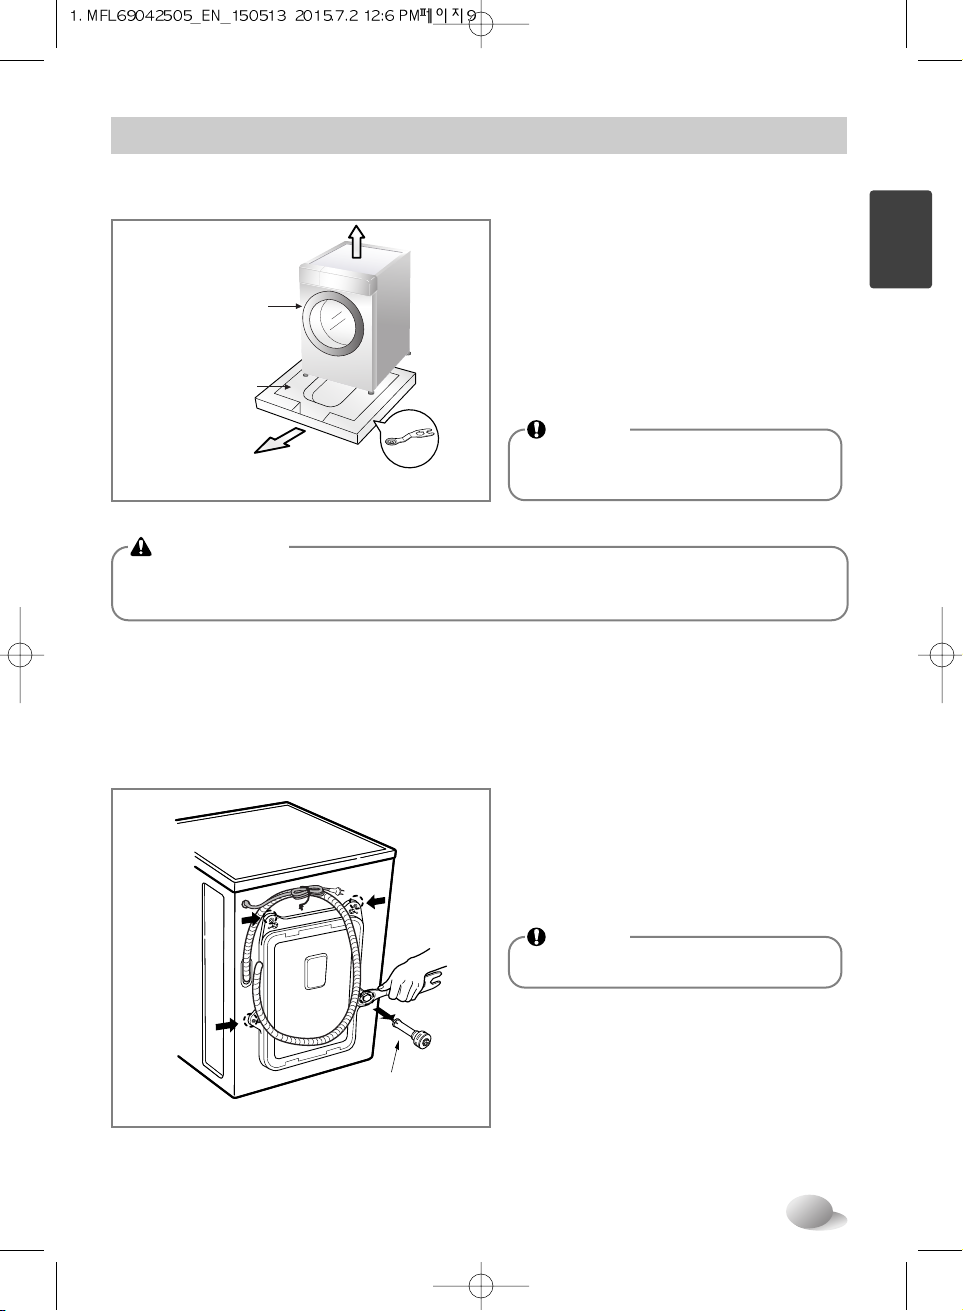
■ Removing packing
1. Remove the cardboard box and
styrofoam packing.
2. Lift the washing machine and remove
the base packing.
3. Remove the tape securing the power
supply cord and drain hose.
4. Remove the inlet hose from the drum.
1. Unscrew the 4 bolts with
the spanner supplied.
2. Take out the 4 bolts along with the
rubber bungs by slightly twisting the
bung.
3. Close the holes with the caps supplied.
To prevent internal damage during transport, the 4 special bolts are locked.
Before operating the washer, remove the bolts along with the rubber bungs.
If they are not removed, it may cause heavy vibration, noise and malfunction.
■ Removing transit bolts
Transit bolt
Installation
WARNING
• Packaging material (e.g. Films, Styrofoam) can be dangerous for children.
There is a risk of suffocation ! Keep all packaging well away from children.
NOTE
• Keep the spanner provided for
future use.
NOTE
• Keep the transit bolts for future use.
Spanner
Washer
Base Packing
Page 10
10
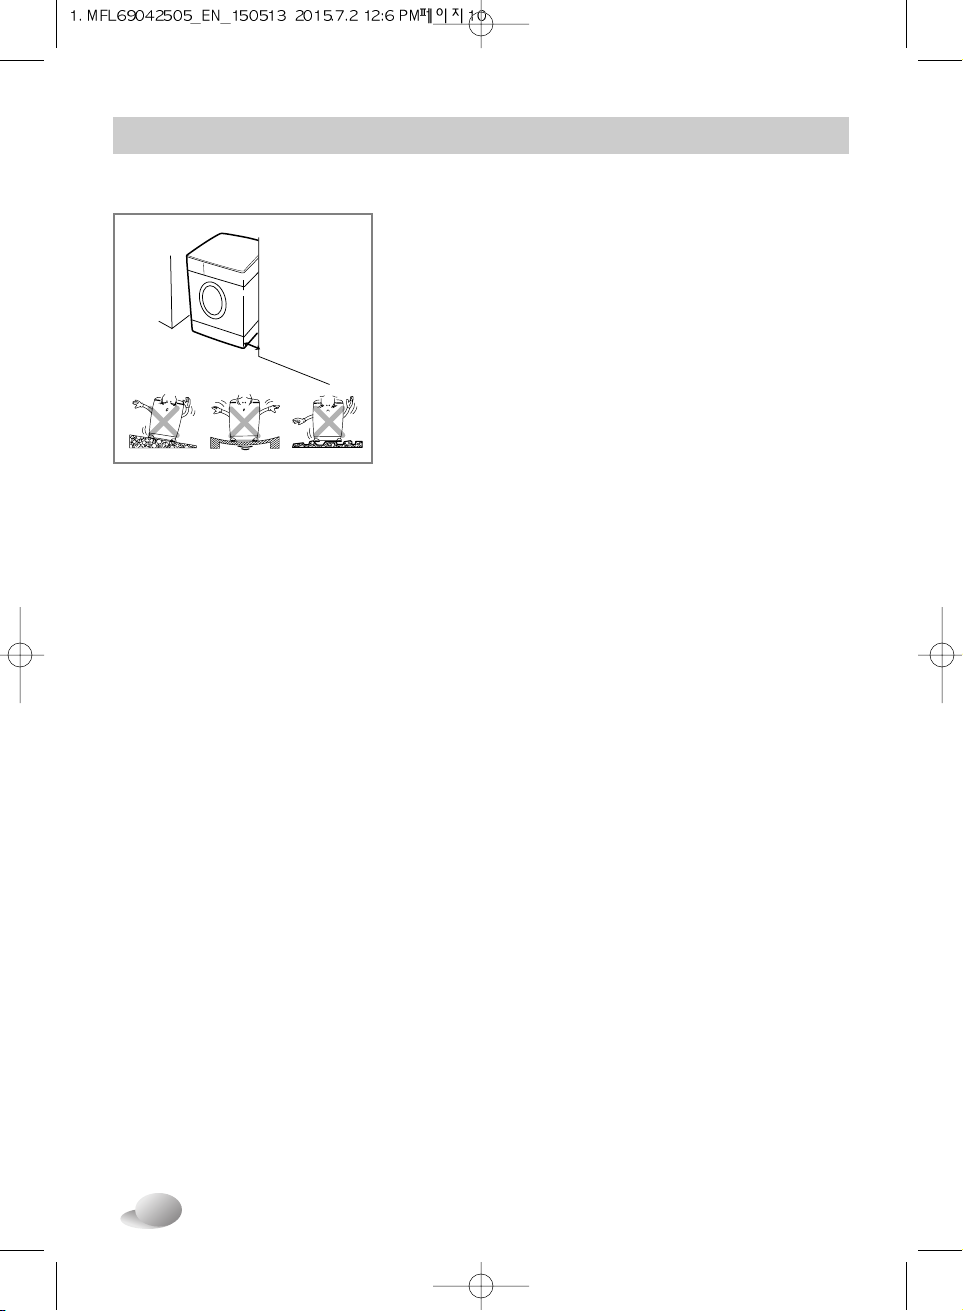
• Level floor :
Allowable slope under entire washer is 1˚.
• Power outlet :
Must be within 1.5 meters of either side of location of washer.
Do not overload the outlet with more than one appliance.
• Additional Clearance :
For Wall, 10cm:rear / 2cm : right & left side
Do not place or store laundry products on top of washer at
any time.
They can damage the finish or controls.
■ Installation place requirements
Positioning
Location
• Install the washer on a flat hard floor.
• Make sure that air circulation around the washer is not impeded by carpets, rugs, etc.
• Never try to correct any unevenness in the floor with pieces of wood, cardboard or similar materials under
the washer.
• If it is impossible to avoid positioning the washer next to a gas cooker or coal burning stove,an
insulating(85x60cm) covered with aluminum foil on the side facing the cooker or stove,must be inserted
between the two appliance.
• The washer must not be installed in rooms where the temperature can drop below 0°C.
• Please ensure that when the washer is installed, it is easily accessible for the engineer in the event of a
breakdown.
• With the washer installed, adjust all four feet using the transit bolt spanner provided ensuring the appliance
is stable, and a clearance of approximately 20mm is left between the top of the washer and the underside of
any work-top.
• This equipment is not designed for maritime use or for use in a mobile installations such as caravans,
aircraft etc.
• Do not use an extension cord or double adapter.
• If the supply cord is damaged, it must be replaced by the manufacturer or its service agents or similarly
qualified person in order to avoid a hazard.
• Always unplug the machine and turn off the water supply after use.
• Connect the machine to an earthed socket in accordance with current wiring regulations.
• The appliance must be positioned so that the plug is easily accessible.
• Repairs to the washing machine must only be carried out by qualified personnel.
Repairs carried out by inexperienced persons may cause injury or serious malfunctioning. Contact your
local service center
• Do not install your washing machine in rooms where temperature below freezing may occur. Frozen
hoses may burst under pressure. The reliability of the electronic control unit may be impaired at
temperatures below freezing point.
• If the appliance is delivered in the winter months and temperatures are below freezing : Place the
washing machine at room temperature for a few hours before putting it into operation.
Electrical connection
Installation
Washer
approx.
2cm
Page 11
11
ENGLISH
Installation
CAUTION
CAUTION concerning the Power cord
• Most appliances recommend they be placed upon a dedicated circuit; that is, a single
outlet circuit which powers only that appliance and has no additional outlets or branch
circuits. Check the specification page of this owner's manual to be certain.
• Do not overload wall outlets. Overloaded wall outlets, loose or damaged wall outlets,
extension cords, frayed power cords, or damaged or cracked wire insulation are
dangerous. Any of these conditions could result in an electric shock or fire.
• Periodically examine the cord of your appliance, and if its appearance indicates
damage or deterioration, unplug it, discontinue use of the appliance, and have the cord
replaced with an exact replacement part by an authorized servicer.
• Protect the power cord from physical or mechanical abuse, such as being twisted,
kinked, pinched, closed in a door, or walked upon. Pay particular attention to plugs,
wall outlets, and the point where the cord exits the appliance.
If the appliance is supplied from a cord extension set or an electrical portable outlet
device, The cord extension set on electrical portable outlet device must be positioned
so that it is not subject to splashing or ingress of moisture.
CAUTION
• The appliance is not intended for use by young children or infirm persons without
supervision.
• Young children should be supervised to ensure that they do not play with appliance.
Page 12
12
1. Unscrew the adapter ring plate and the 4
adapter retaining screws.
2. Push the adapter onto the end of the tap
so that the rubber seal forms a watertight
connection. Tighten the adapter ring plate
and the 4 screws.
3. Push the water supply hose vertically
upwards so that the rubber packing within
the hose can adhere completely to the
tap and then tighten it by screwing it to
the right.
• Water supply pressure must be between 100 kPa and 1000 kPa (1.0 - 10.0 kgf / cm2).
• Do not strip or crossthread when connecting inlet hose to the valve.
• If the water supply pressure is more than 1000 kPa, a decompression device should be installed.
• Periodically check the condition of the hose and replace the hose if necessary.
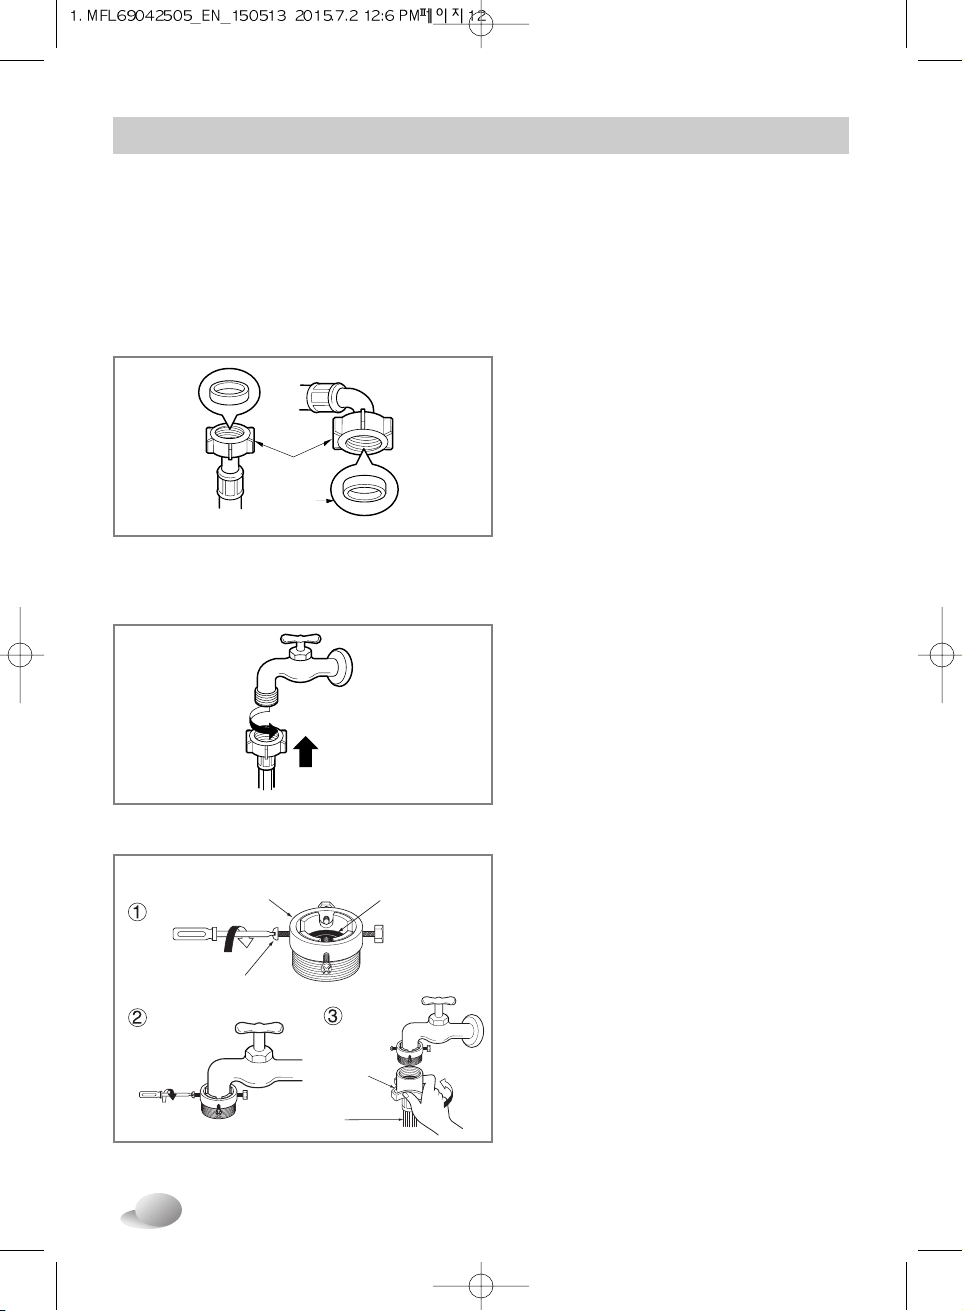
Type-A : Connecting Screw-type hose to tap with thread
• Screw the hose connector onto water
supply tap.
■ Connecting water supply hose
Step1 : Check rubber seal inlet hose
Step2 : Connect hose to water tap
• Two rubber seals are supplied with the
water inlet hoses.
They are used for preventing water leaks.
Make sure the connection to taps is
sufficiently tight.
Upper
connector
Rubber
packing
Plate
Water supply
hose
Fixing screw
Hose
connector
Rubber
seal
Type-B : Connecting Screw-type hose to tap without thread
Installation
Page 13
13
ENGLISH
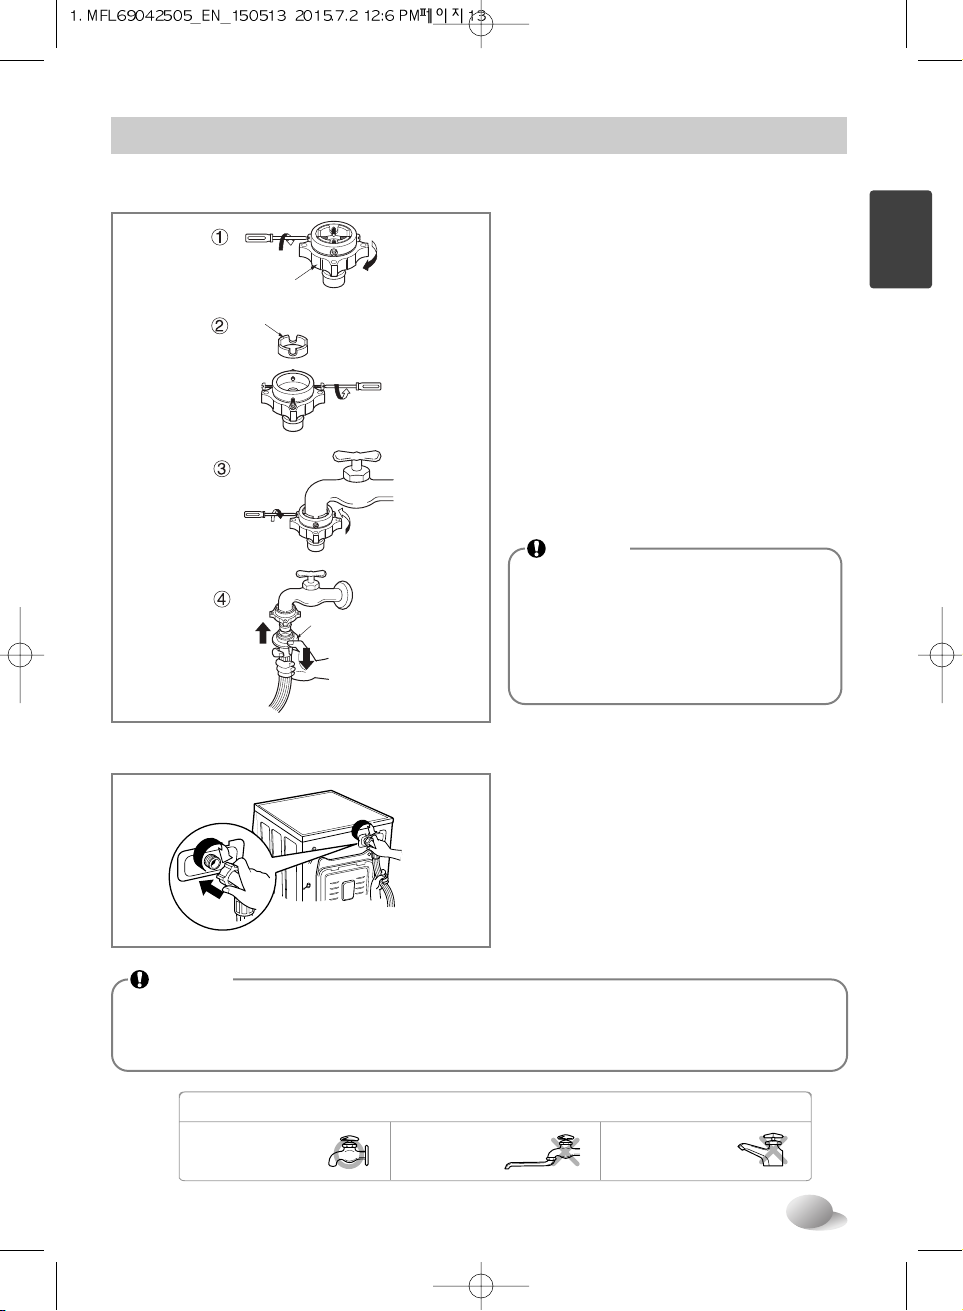
1. Unscrew the adapter ring plate and
the 4 adapter retaining screws.
2. Remove the guide plate if the tap is
too large to fit the adapter.
3. Push the adapter onto the end of
the tap so that the rubber seal forms
a watertight connection.
Tighten the adapter ring plate and
the 4 screws.
4. Pull the connector latch plate down,
push the inlet hose onto the adapter,
and release the connector latch plate.
Make sure the adapter locks into place.
Please use the horizontal tap
Horizontal tap Extension tap Square tap
Ring plate
Guide plate
Latch plate
Type-C : Connecting one touch type hose to tap without thread
Step3: Connect hose to washer
• Make sure that there are no kinks in the
hose and that they are not crushed.
When your washer has two valves.
• The Inlet hose which has red connector is
for the hot water tap.
• If the washer has two valves, the energy is
saved by using hot valve.
Installation
NOTE
• After completing connection, if water leaks from the hose, repeat the same steps.
Use the most conventional type of faucet for water supply. In case the faucet is square or
too big, remove the spacing ring before inserting the faucet into the adaptor.
NOTE
• After connecting inlet hose to water
tap, turn on the water tap to flush
out foreign substances (dirt, sand or
sawdust) in the water lines. Let
water drain into a bucket, and
check the water temperature.
Page 14
14
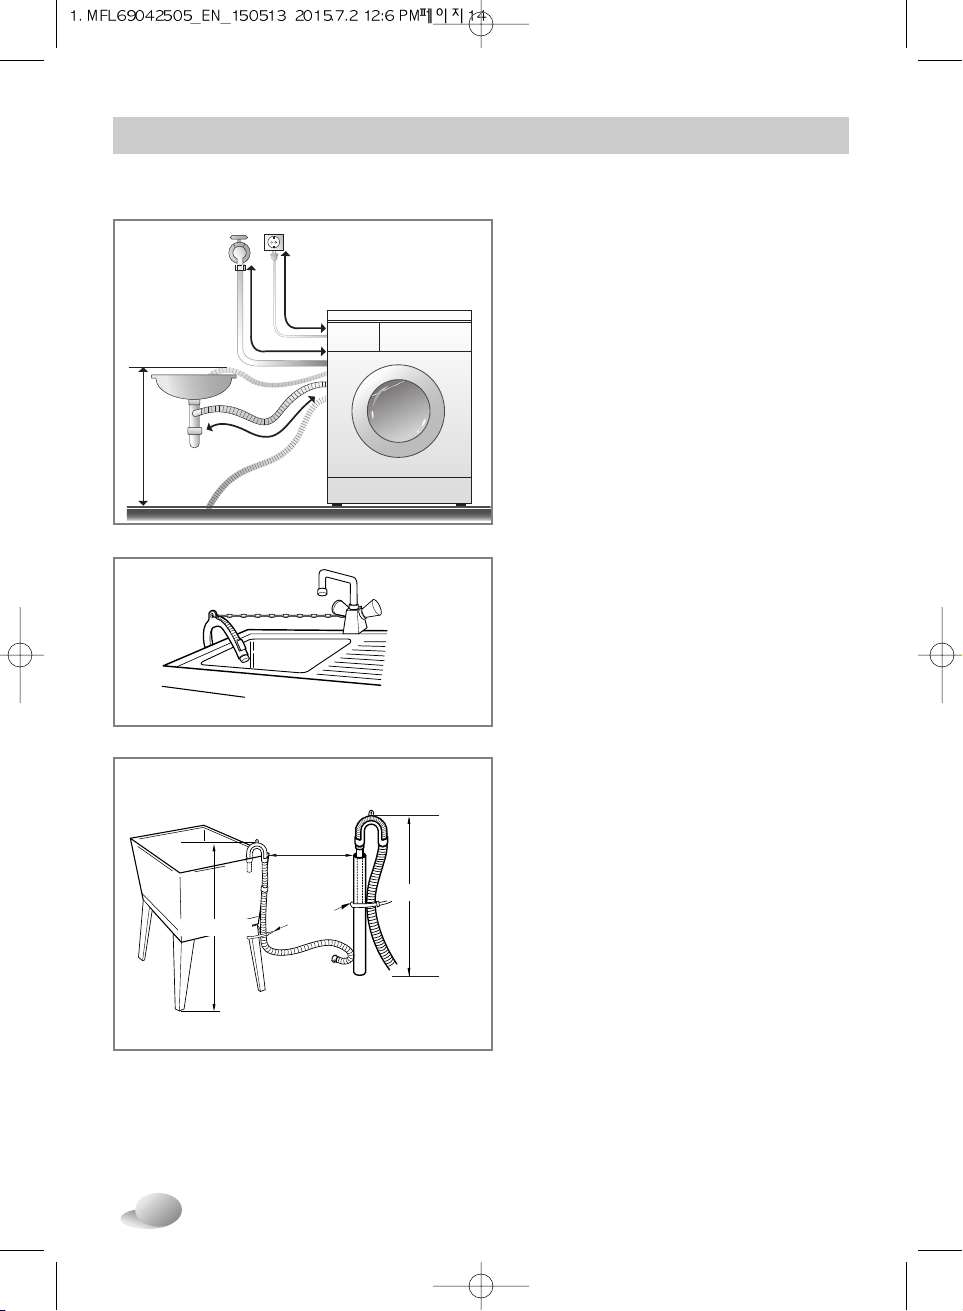
Installation of drain hose
• The drain hose should not be placed
higher than 100 cm above the floor.
Water in the washer does not drain or
drains slowly.
• Securing the drain hose correctly will
protect the floor from damage due to
water leakage.
• If the drain hose is too long, do not force
back into the washer.
This will cause abnormal noise.
• When installing the drain hose to a sink,
secure it tightly with string.
• Securing the drain hose correctly will
protect the floor from damage due to
water leakage.
about 100 cm
about 145 cm
about 105 cm
max. 100 cm
Hose
Retainer
Tie strap
Laundry tub
max. 100 cm
max. 100 cm
Installation
Page 15
15
ENGLISH
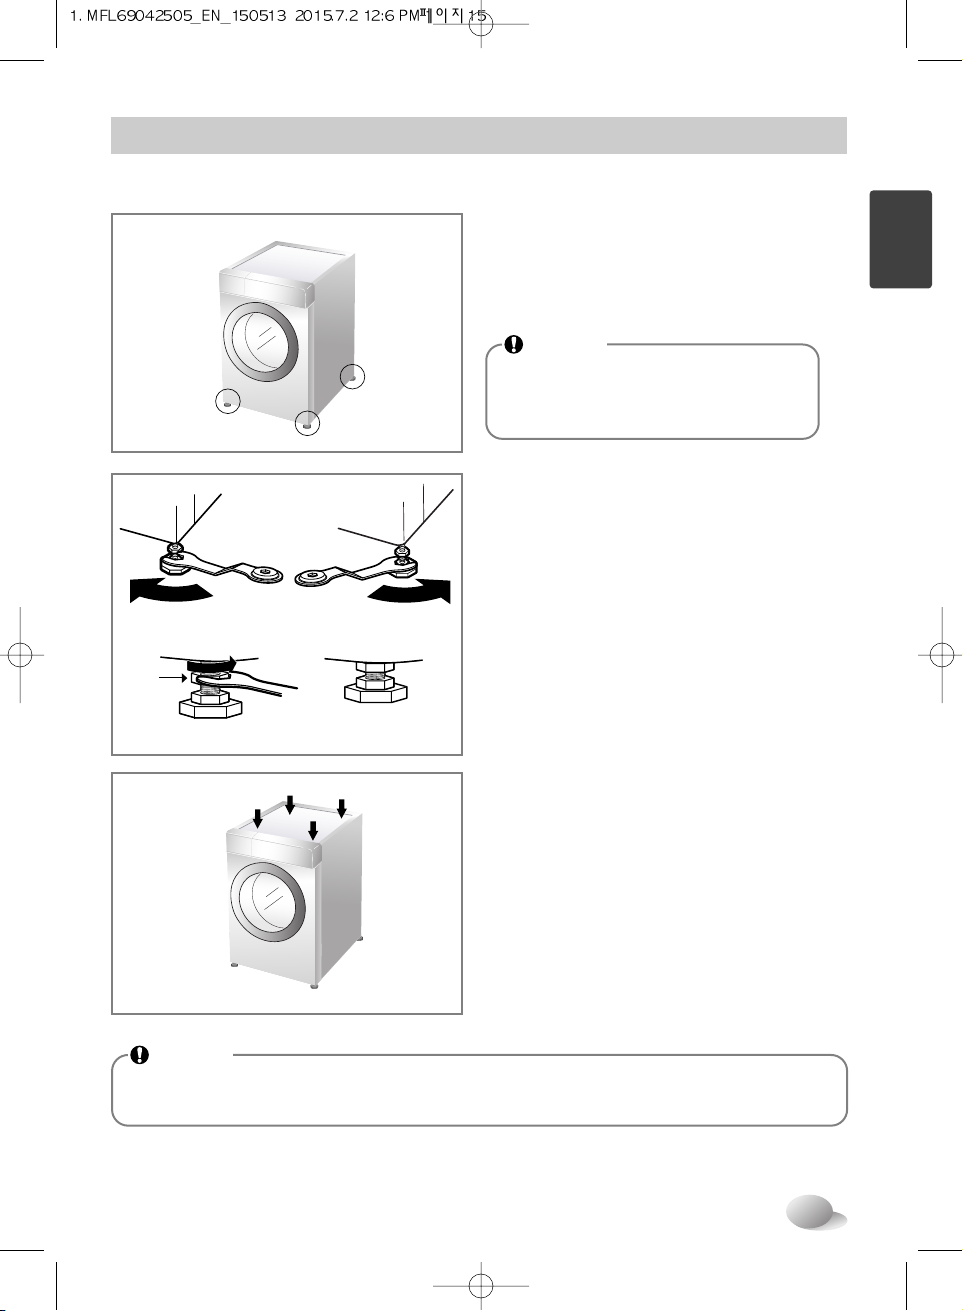
•
Diagonal Check
When pushing down the edges of the
washing machine top plate diagonally,
the machine should not move up and down
at all (Please, check both directions). If
machine rocks when pushing the machine
top plate diagonally, adjust the feet again.
2. If the floor is uneven, turn the adjustable feet
as required. (do not insert pieces of wood
etc. under the feet)
Make sure that all four feet are stable and
resting on the floor and then check that the
appliance is perfectly level. (use a spirit
level)
1. Leveling the washing machine properly
prevents excessive noise and vibration.
Install the appliance on a solid and level
floor surface, preferably in a corner of the
room.
■ Leveling
•
Once the washer is level, tighten the lock
nuts up towards the base of the washer.
All lock nuts must be tightened.
Raise Lower
Lock
Nut
Tighten all 4
locknuts securely
Installation
NOTE
• Timber or suspended type flooring
may contribute to excessive
vibration and unbalance.
NOTE
• If the washing machine is installed on a raised platform, it must be securely fastened in
order to eliminate the risk of falling off.
Page 16

16
Concrete floors
Wooden floors (Suspended floors)
• The installation surface must be clean, dry and level.
• Install washer on a flat hard floor.
Tile floors (Slippery floors)
• Position each foot on the Tread Mate and level the machine to suit. (Cut Tread Mate into
70x70 mm sections and stick the pieces on to the dry tile where machine is to be placed.)
• Tread Mate is a self adhesive material used on ladders & steps that prevents slipping.
•
Wooden floors are particularly susceptible to vibration.
•
To prevent vibration we recommend you place rubber cups under
each foot under washer at least 15mm thick, secured to at least
2 floor beams with screws.
•
If possible install the washer in one of the corners of the room, where the floor is more stable.
•
Fit the rubber cups to reduce vibration.
•
You can obtain the rubber cups (p/no.4620ER4002B) from the LG spares dept.
Rubber Cup
Installation
NOTE
• Proper placement and leveling of the washer will ensure long, regular and reliable
operation.
• The washer must be 100% horizontal and stand firmly in position.
• It must not “Seesaw” across corners under load.
• The installation surface must be clean, free from floor wax and other lubricant coatings.
• Do not let the feet of the washer get wet. If feet of the washer get wet, slipping may occur.
Page 17
17
ENGLISH
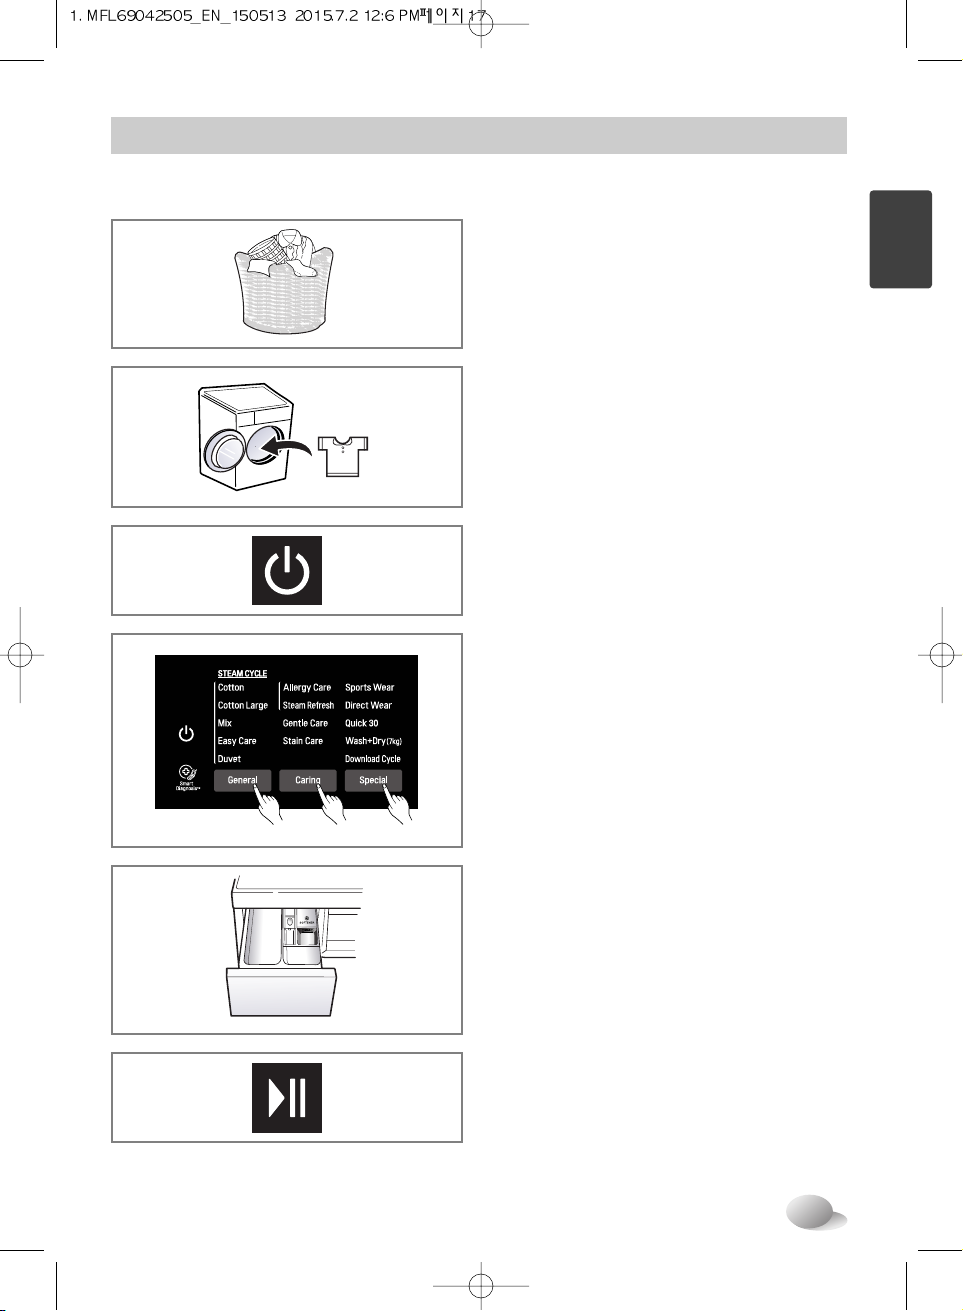
Operating washing machine
2. Open the door and load laundry.
1. Sort Laundry.
(Refer to 18 page)
3. Press the Power button.
4. Select a Program.
(Refer to 19~21 page)
5. Add detergent.
(Refer to 31~32 page)
6. Press the Start/Pause button.
Select options at this time
(Refer to 23~28 page)
■ Additional Program
■ Temperature
■ Spin Speed
■ Other functions
How to use washer
Page 18
18
How to use washer
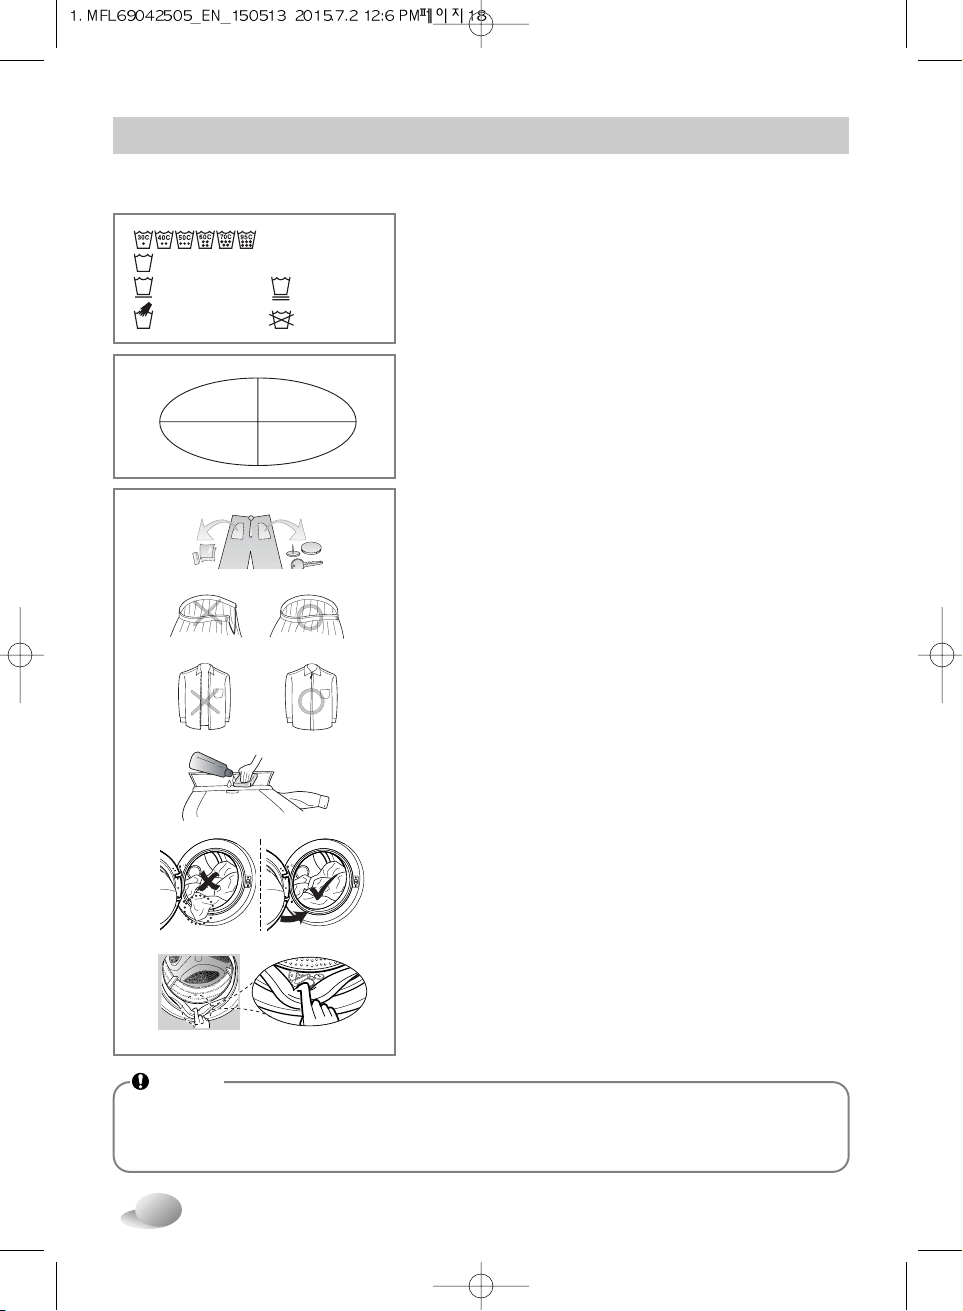
■ Care before washing
3. Caring before loading
Combine large and small items in a load. Load large items first.
Large items should not be more than half the total wash load. Do
not wash single items.
This may cause an out-of-balance load. Add one or two similar
items.
• Check all pockets to make sure that they are empty. Items such
as nails, hair clip, matches, pens, coins and keys can damage
both your washer and your clothes.
• Close zippers, hooks and strings to make sure that these items
don’t snag on other clothes.
• Pre treat dirt and stains by brushing a little detergent dissolved in
water onto stains like collars and cuffs to help lift dirt.
• Check the folds of the flexible gasket (gray) and remove any
small articles.
• Check inside of the drum and remove any item from a previous
wash.
• Remove any clothing or items from the flexible gasket to prevent
clothing and gasket damage.
2. Sorting
To get the best results, sort clothes into loads that can be
washed with the same wash cycle.
Water temperature and spin speed and different fabrics need to
be washed in different ways.
Always sort dark colors from pale colors and whites. Wash
separately as dye and lint transfer can occur causing
discolouration of white etc. If possible, do not wash heavily
soiled items with lightly soiled one.
• Soil (Heavy, Normal, Light)
Separate clothes according to amount of soil.
• Color (White, Lights, Darks)
Separate white fabrics from colored fabrics.
• Lint (Lint producers, Collectors)
Wash lint producers and lint collectors separately.
1. Care Labels
Look for a care label on your clothes.
This will tell you about the fabric content of your garment and
how it should be washed.
Wash temperature
Normal machine wash
Permanent press
Hand wash
Sort laundry by...
Soiling
Colour
Wash
temperature
Fabric type
Delicate
Do not wash
NOTE
• Before the first wash, select a cycle (Cotton 60°C, add a half load of detergent) allow the unit to
wash without clothing. This will remove residues and water from the drum that may have been
left during manufacturing.
Page 19
19
ENGLISH
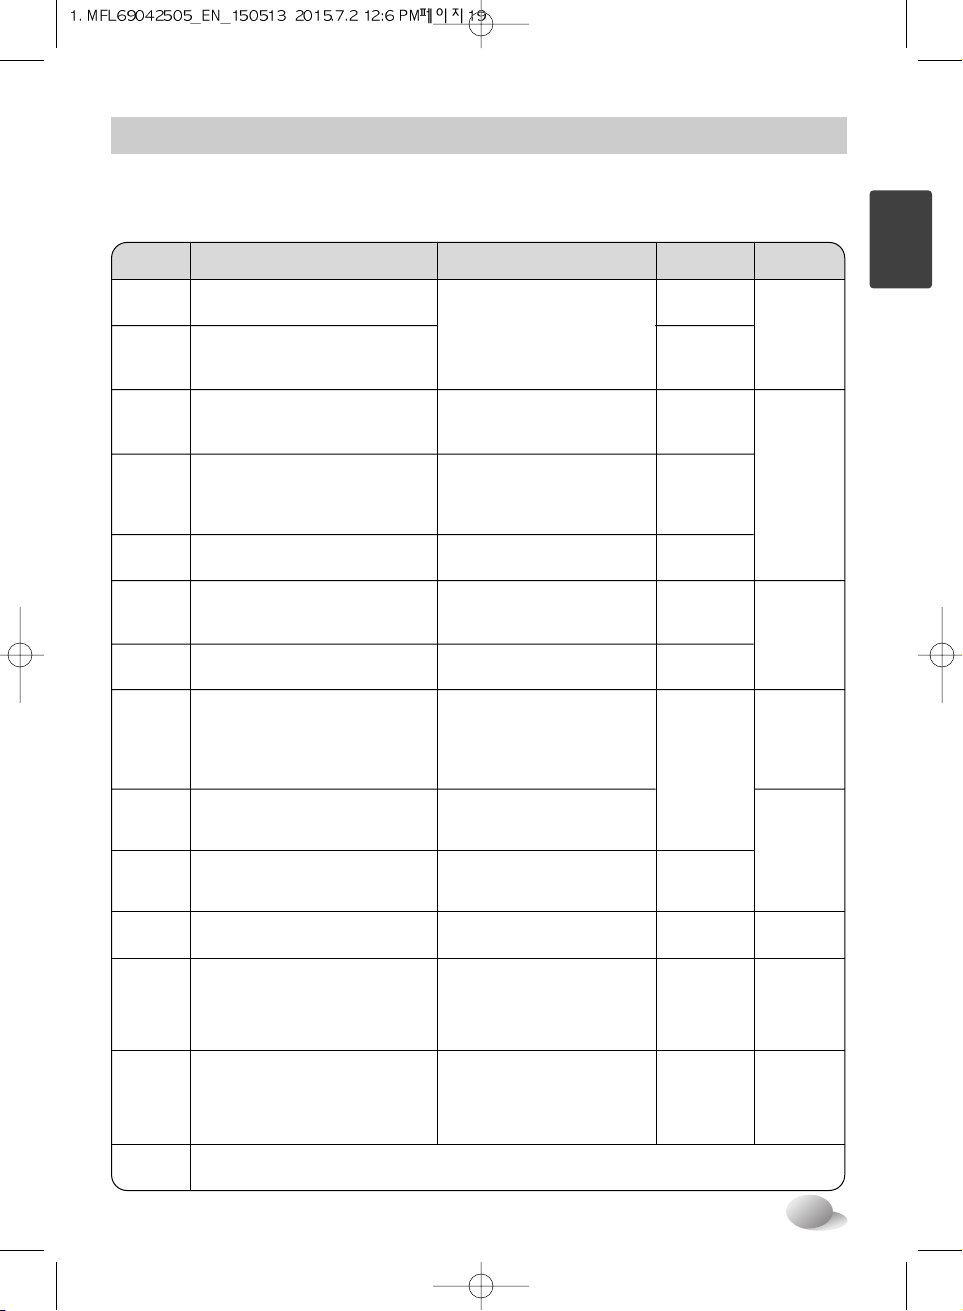
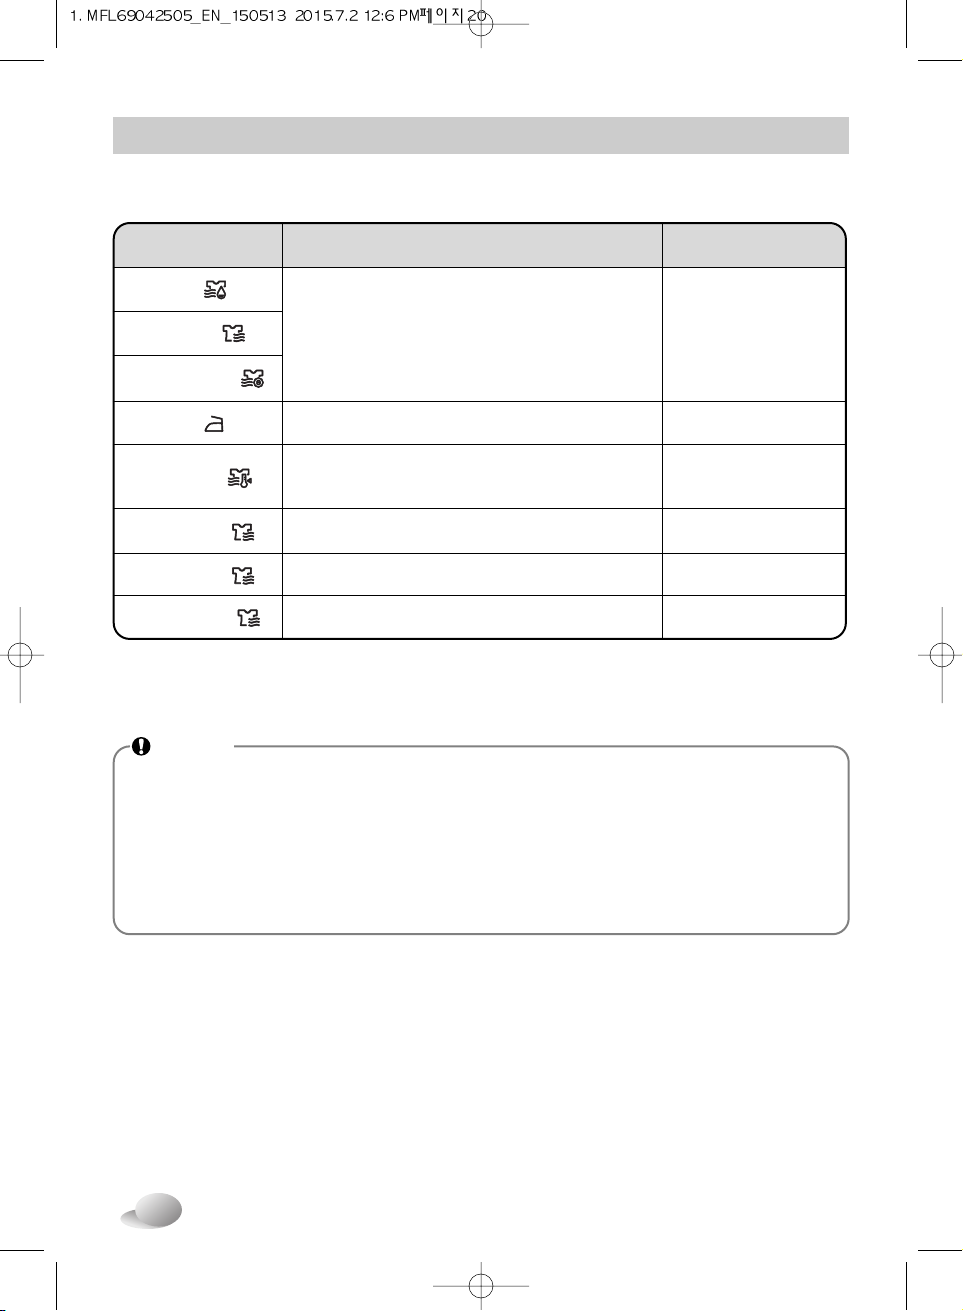
Washing program table
•
Recommended courses according to the laundry type.
How to use washer
Program
Description
Fabric type
Proper
Temp.
Maximum
Load
Cotton
Provides better performance by
combining various drum motions.
Provides optimized washing
performance for large amount of
laundry with less energy consumption.
Cotton
Large
40°C
(Cold to 95°C)
60°C
(Cold to 60°C)
Rating
3 items
Color fast garments (shirts,
nightdresses, pajamas, etc)
and normally soiled cotton
load (underwear).
This cycle provides nonstop process
from washing to drying at once.
Wash+
Dry
This cycle is suitable for casual
shirts that do not need ironing
after washing.
Polyamide, Acrylic, Polyester.
Easy
Care
40°C
(Cold to 60°C)
Less than
4.0 kg
Enables various fabrics to be
washed simultaneously.
Various kind of fabrics except
special garments.
(Silk/delicate, sports wear, dark
clothes, wool, Duvet/Curtains).
Mix
40°C
(Cold to 40°C)
Allergy
Care
Removes allergens such as
house mites, pollen, and cat fur.
Cotton, underwear, pillow
covers, bed sheets, baby wear.
60°C
Direct
Wear
This cycle provides washing to
drying within 1 hour at once for light
soiled 1~3 shirts.
Cotton Mixed, Polyester mixed
Dress shirts, blouses.
20°C
No choice
40°C
(Cold to 95°C)
Removes wrinkles within
20mins with steam.
Steam
Refresh
Cotton mixed, Polyester
mixed Dress shirts, blouses.
1 single size
This cycle is for large items
such as bed cover, pillows,
sofa covers, etc.
Cotton bedding except special
garments (delicates, wool, silk,
etc.) with filling: duvets, pillows,
blankets, sofa covers with light
filling.
Duvet
40°C
(Cold to 40°C)
Sports
Wear
This cycle is suitable for sports
wear such as jogging clothes
and running wear.
Less than
3.0 kg
Less than
7.0 kg
Coolmax, Gore-tex, fleece
and Sympatex.
Quick 30
This cycle provides fast washing
time for small loads and lightly
soiled clothes.
Colored laundry which is
lightly soiled fast.
A small amount of laundry
which can be dried.
20°C
(Cold to 40°C)
Wool, hand washable clothes.
Delicate, easily damaged
laundry.
Stain
Care
Cotton blended fabrics.
NOT delicate clothes.
40°C
(30°C to 60°C)
20°C
(Cold to 30°C)
Less than
3.0 kg
Gentle
Care
This cycle is for hand and machine
washable delicate clothes such as
washable wool, lingerie, dresses etc.
(Please use detergent for machine
washable woolens).
Wash off several kinds of stain such
as wine, juice, dirt, etc.
(Water temperature is increased
step by step for washing various
stains.)
Less than
1.5 kg
Download
Cycle
For downloadable cycles.
If you did not download any cycles, ‘Rinse+Spin’ is set.
Page 20
20
•
Water Temperature: Select water temperature to suit wash cycles.
Always follow garment manufacture’s care label or instructions when washing.
Drying Program Table
Program Fabric type
Maximum Load
Eco ( )
Cupboard ( )
Normal Eco Dry ( )
Less than 3.0 kg
Less than 7.0 kg
Less than 7.0 kg
Less than 7.0 kg
Less than 0.5 kg
Less than 1.5 kg
Cotton or Linen Fabrics
such as cotton towel, t-shirts, linen laundries.
Cotton or Linen Fabrics for ready to ironing. Iron ( )
Easy Care Textiles, Synthetic Fabrics
Suitable for Easy care, Mix programm washable clothes
Low Temp. ( )
Time 30 min. ( )
Time 60 min. ( )
Time 120 min. ( )
–
–
–
How to use washer
NOTE
• Neutral detergent is recommended.
• Select maximun selectable spin speed of washing programme to ensure the drying
result.
• Where the amount of laundry to be washed and dried in one programme does not
exceed the maximum weight permitted for the drying programme, washing and drying
in one continuous sequence is recommended.
Page 21
21
ENGLISH
How to use washer
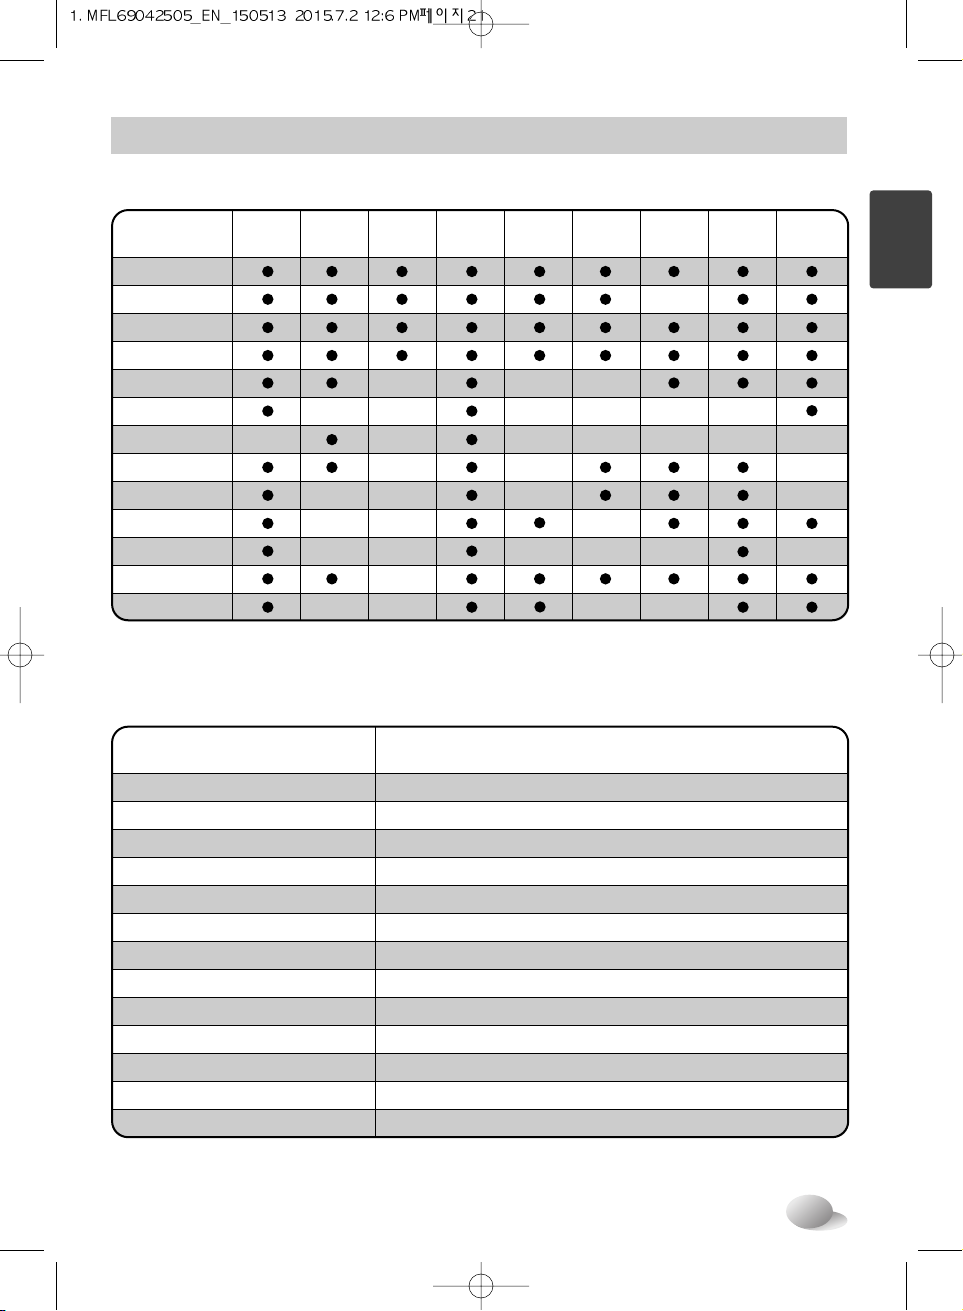
Extra options
* : This option is automatically included in the cycle and can not be deleted.
Cotton
Cotton Large
Easy Care
Mix
Allergy Care
Direct Wear
Steam Refresh
Duvet
Sports Wear
Quick 30
Gentle Care
Wash+Dry
Stain Care
Time
Delay
Steam
Wash
Intensive
Program
Operating data
Cotton
Cotton Large
Easy Care
Mix
Allergy Care
Direct Wear
Steam Refresh
Duvet
Sports Wear
Quick 30
Gentle Care
Wash+Dry
Stain Care
1400
1400
1000
1400
1400
1000
-
1000
800
1400
800
1400
1500
Program
Max RPM
Pre
Wash
Time
Save
Rinse
+
Dry
*
*
*
*
*
Steam
Softener
Favorite
Page 22
22
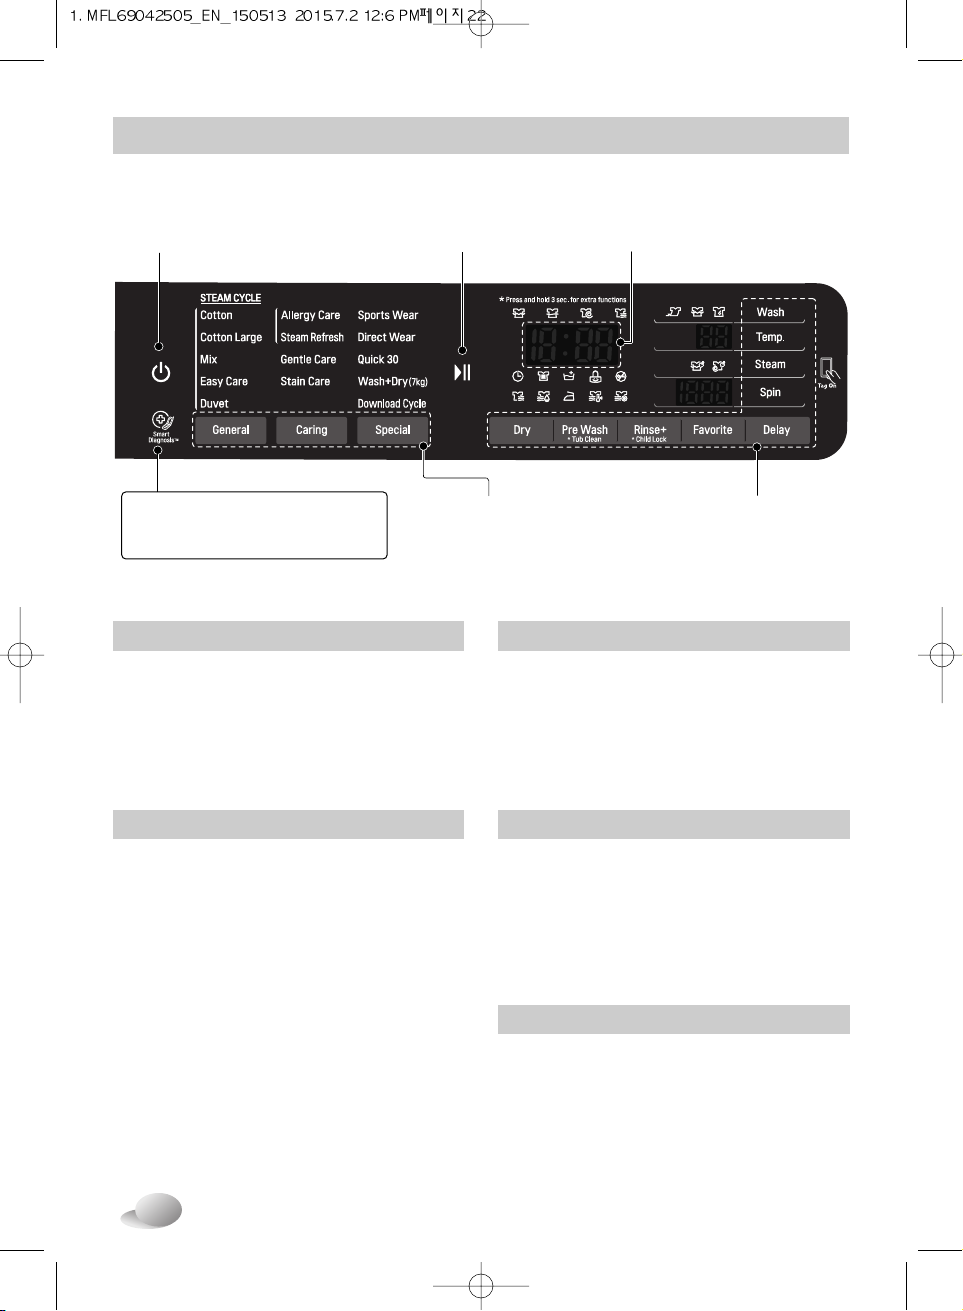
■ Control panel
How to use washer
Start/Pause Button LED display
SmartDiagnosis™ function is
available only for the products with
a SmartDiagnosis™ mark.
Power Button
Program Button Options
Power
• Touch and release your fingers to turn it
on.
• Touch and release your fingers after 1
second to turn it off.
Program button
• Programs are available according to the
laundry type.
• Lamp will light up to indicate selected
program.
LED display
• The display shows the settings, estimated
time remaining, options, and status
messages for your washer.
The display will remain on through the
cycle.
Start/Pause
• This Start/Pause button is used to start
wash cycle or pause the wash cycle.
• If temporary stop of wash cycle is
needed, touch the Start/Pause button.
• When in Pause, the power is turned off
automatically after 4 minutes.
Options
• This allows you to select an additional
cycle and will light when selected.
• Use these buttons to select the desired
cycle options for the selected cycle.
Page 23
23
ENGLISH
How to use washer
If the laundry is heavily soiled, “Pre Wash”
cycle is effective.
1. Touch the Power button.
2. Select a cycle.
3. Touch the Pre Wash button.
4. Touch the Start/Pause button.
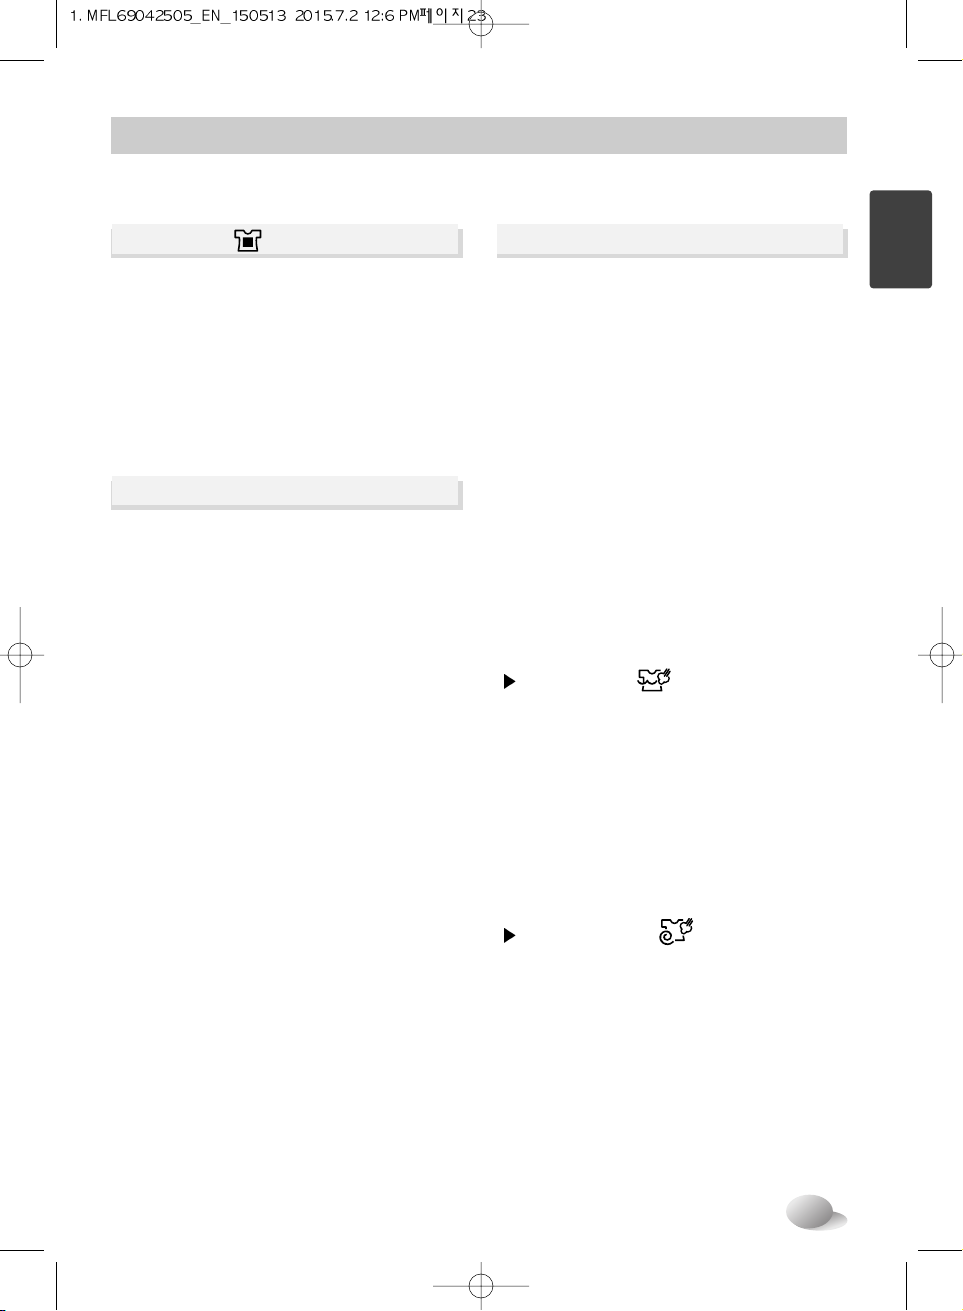
Pre Wash ( )
■ Options
Favorite program allows you to store
a customized wash cycle for future use.
1. Touch the Power button.
2. Select a cycle.
3. Select the cycle.
(Washing method, number of rinses, spin
speed, water temperature etc.)
4. Touch and hold Favorite program button
for 3 seconds.
The Favorite program is now stored for future
use.
To reuse the program, select Favorite
program and touch the Start/Pause.
Favorite
Steam Wash features enhanced washing
performance with low energy consumption.
Steam Softener sprays steam after spinning
cycle to reduce creases and makes the
laundry fluffy.
1. Touch the Power button.
2. For Steam Wash option, select steam
cycles. For Steam Softener option, select
Cotton or Cotton Large, Mix, Easy Care.
3. Touch the Steam button once for Steam
Wash. Touch the Steam button one more
time (twice) for Steam Softener.
Touch the Steam button one more time
(three time) for Steam Wash and Steam
Softener together.
4. Touch the Start/Pause button.
Steam Wash ( )
• For heavily stained clothes, underwear or
baby clothes.
• Available with the Cotton, Cotton Large,
Mix, Easy Care, Duvet, Allergy Care,
Wash+Dry, Steam Refresh cycles.
• Do not use Steam Wash for easily
discoloured clothes and delicates such as
wool, silk.
Steam Softener ( )
• Good to make Softens and fluffs fabrics
after air drying.
• Available with the Cotton, Cotton Large,
Mix, Easy Care cycles.
• Do not use Steam Softener for easily
discoloured clothes and delicates such as
wool, silk.
• Depending on the kind of fabrics, softening
performance may be different.
Steam (Wash and Softener)
Page 24
24
How to use washer
• Spin Speed level can be selected by
touching 'Spin' button repeatedly.
• Spin Only
1. Touch the Power button.
2. Touch the Spin button to select RPM.
3. Touch the Start/Pause.
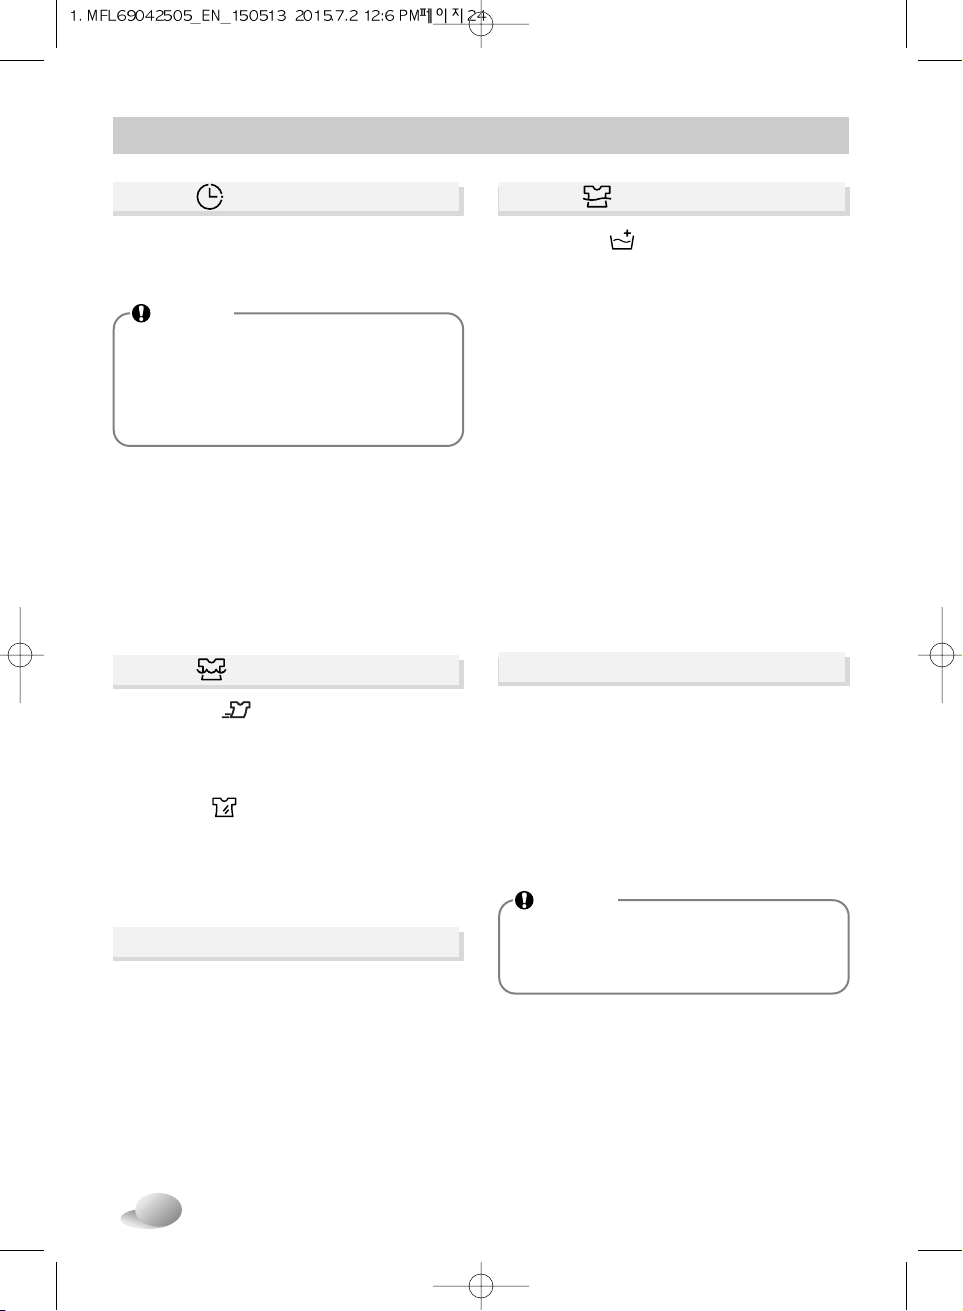
• Time Save ( ) :
This option can be used to reduce the time
of a wash program.
It is best used on lightly soiled loads.
• Intensive ( ) :
If the laundry is normal and heavily soiled,
“Intensive” option is effective.
Wash ( )
Spin
• By touching the Temp. button the water
temperature can be selected.
- Cold (0)
- 20°C, 30°C, 40°C, 60°C, 95°C
• Water temperature can be selected
according to the program.
Temp.
• Rinse plus ( ) :Add rinse once.
Rinse ( )
1. Touch the Power button.
2. Select a cycle.
3. Touch the Time Delay button and set time
required.
4. Touch the Start/Pause button.
You can set a time delay so that the washing
machine will start automatically and finish
after a specified time interval.
Delay ( )
NOTE
• The delay time is the time to the end
of the programme, not the start.
The actual running time may vary
due to water temperature, wash load
and other factors.
When you select "No Spin(0)", it will still
rotate for a short time with low speed to
drain quickly.
NOTE
Page 25
25
ENGLISH
1. Touch the Power button.
2. Touch the Start/Pause button.
3. Touch and hold the Temp. and Steam button
simultaneously for three seconds to set Beep
on/off function.
Once the Beep on/off function is set, the setting
is memorized even after the power is turned off.
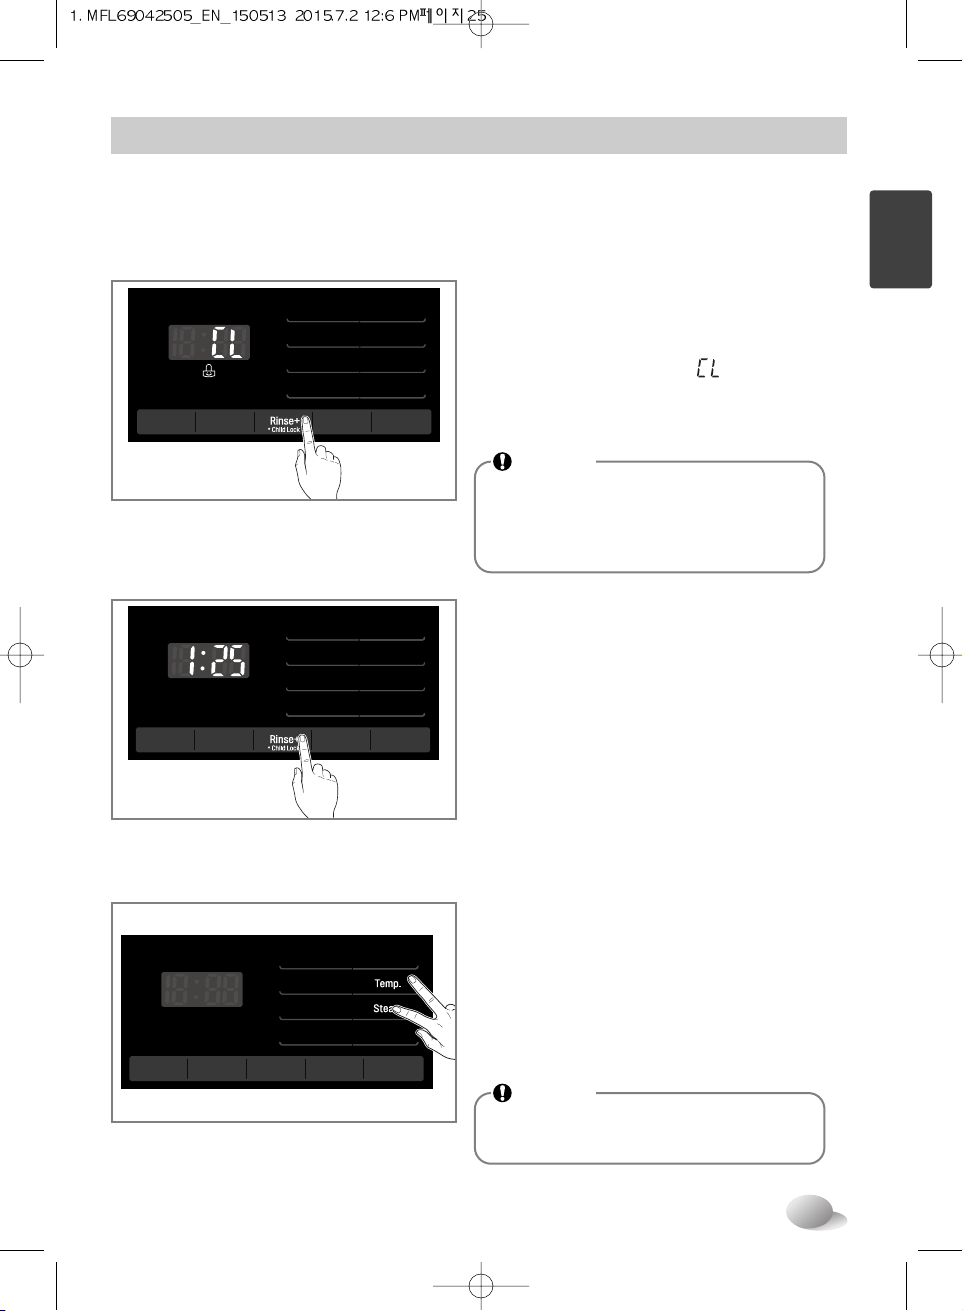
Locking the control panel
1. Touch and hold the Child Lock button for
3 seconds.
2. A beeper will sound, and ' ' will appear on
the LED display.
When the child lock is set, all buttons are
locked except the Power button.
Select this function to lock the buttons on the control assembly to prevent tampering.
"Child Lock" can be set only during the washing cycle.
Unlocking the control panel
1. Touch and hold the Child Lock button for
3 seconds.
2. A beeper will sound and the remaining time
for the current programme will reappear on
the LED display.
■ Child Lock
■ Beep On / Off
How to use washer
NOTE
•
Turning off the power will not reset the
child lock function. You must deactivate
child lock before you can access any
other functions.
NOTE
•
If you want to turn the Beeper off,
simply repeat this process.
Page 26
26
How to use washer
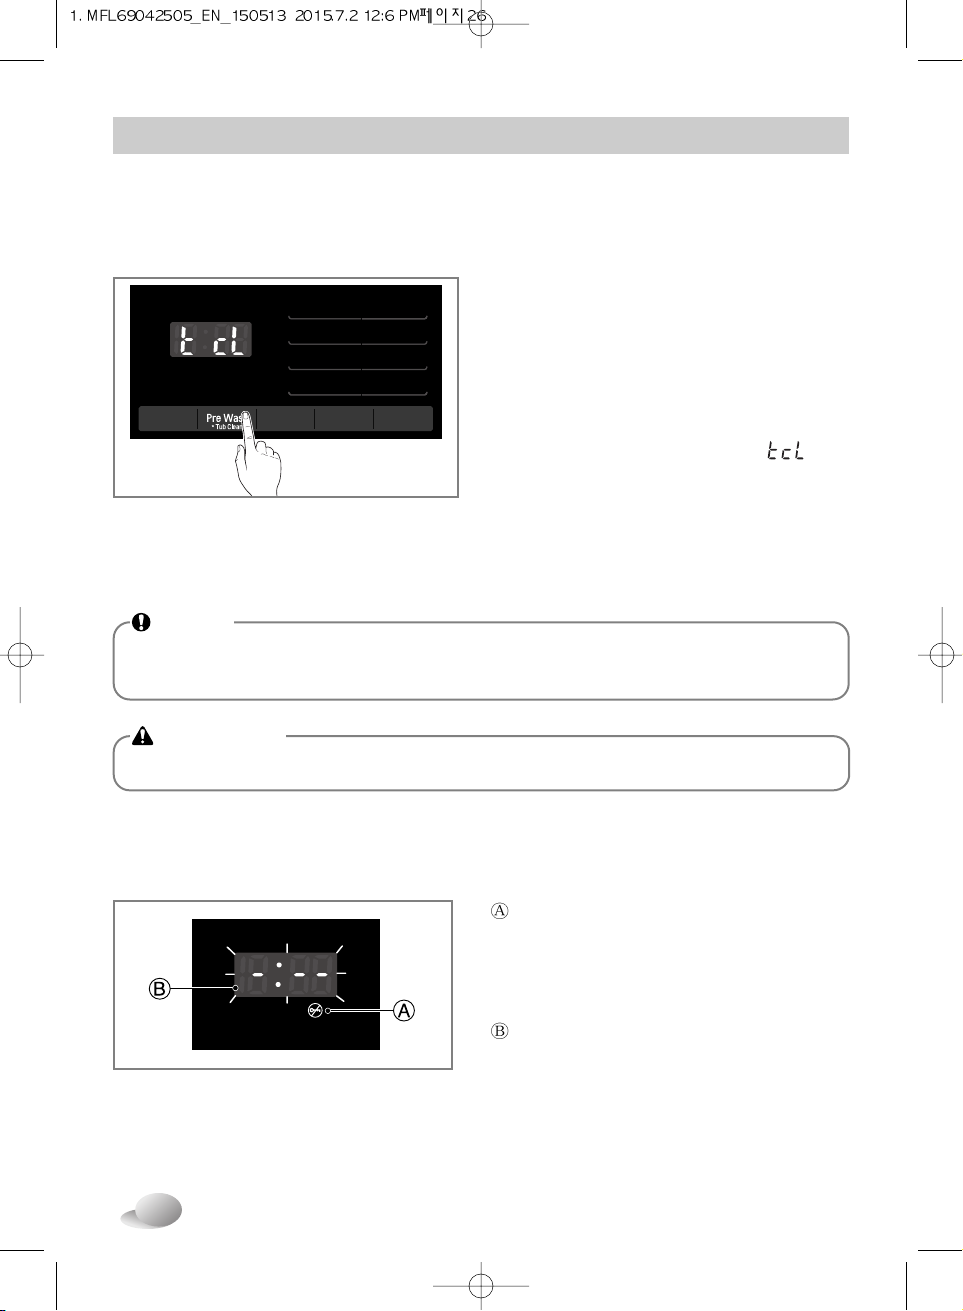
Tub Clean is a special cycle to clean the inside of the washing machine.
A higher water level is used in this cycle at higher spin speed. Perform this cycle regularly.
1. Remove any clothing or items from the
washer and close the door.
2. Open the dispenser drawer and add Anti
limescale(e.g. Calgon) to the main wash
compartment.
3. Close the dispenser drawer slowly.
4.
Power On and then touch and hold Tub
Clean button for 3 seconds. Then
' '
and
tub clean pictogram will be displayed on the
LED display.
5. Touch the Start/Pause button to start.
6. After the cycle is complete, leave the door
open to allow the washer door opening,
flexible gasket and door glass to dry.
•
“Door Lock” - For safety reasons, the
door will lock while machine is in use and the
“Door Lock” icon will light up. You can safely
open the door after the “Door Lock” icon
turns off.
•
While "Detecting" is shown on the
display the washing machine rotates slowly
and detects how much laundry is loaded in
the drum.
It will take a short time.
■ Tub Clean
■ Door Lock & Detecting
NOTE
• Do not add any detergent to the detergent compartments.
• Excessive suds may generate and leak from the washer.
CAUTION
• If there is a child, be careful not to leave the door open for too long.
Page 27

27
ENGLISH
• This washer-dryer’s automatical process
from washing to drying can be selected
easily.
• For most even drying, make sure all articles
in the clothes load are similar in material and
thickness.
• Do not overload dryer by stuffing too many
articles into drum. Items must be able to
tumble freely
• If you open door and remove load before
dryer has finished its cycle, remember to
press the Start/Pause button.
• By touching the Dry button, you can select :
Cupboard - Time (30 - 60 - 120) - Eco - Iron
- Low Temp. - Normal Eco
• After the end of dry, “ ” is displayed.
By pressing the “Start/Pause” button the
program can be ended. If you not press the
“Start/Pause” button, the program is ended
after about 4 hours. “ ” Cooling Cycle.
• Cold water tap must be left on during drying
cycles.
■ Dry
1. Drying Automatic guide
How to use washer
NOTE
•
The estimated drying time varies from
the actual drying time with an Automatic.
The type of fabric, size of the load, and
the dryness selected affect drying time.
NOTE
• When you turn off the machine under
drying cycle, drying fan motor can be
operated to save itself for 30 seconds.
And then the machine displays
„ ”
on the panel.
• Use your Automatic Cycles to dry most
loads. Electronic sensors measures the
temperature of the exhaust to increase or
decrease drying temperatures for faster
reaction time and tighter temperature control.
• Recommend Automatic drying course as a
kind of clothes.
a) Cupboard : For Cottons select
- This Cycle to reduce cycle time and
energy usage during the dry cycle.
b) Eco : A special cycle to reduce water
usage during the dry cycle.
c) Time (30/60/120 minutes)
- 30 min. : Cotton/Towel 0.5 kg
- 60 min. : Cotton/Towel 1.5 kg
- 120 min. : Cotton/Towel 3.0 kg
d) Low Temp. : For Synthetics select
e) Iron : If you want to iron clothes
f) Normal Eco : For Energy Dry Course
Page 28

28
- Do not tumble dry woolen articles. Pull them to
their original shape and dry them flat.
Woolen Articles
- Some woven and loopknit materials may
shrinks, by varying amounts, depending on
their quality.
- Always stretch them out immediately after
drying.
Woven and Loopknit Materials
- Do not overload your dryer
- Take out permanent press articles as soon as
the dryer stops to reduce wrinkles.
Permanent Press and Synthetics
- Always check the manufacture’s instructions.
Fiber or Leather Materials
- Always check the manufacture’s instructions.
Baby clothes and Night Gowns
- Do not dry any items mode from or containing
rubber or plastics, such as:
a) aprons, bibs, chair covers
b) curtains and table cloths
c) bathmats
Rubber and Plastics
- Do not dry fiberglass articles in your dryer.
Glass particles left in the dryer could be picked
up by your clothes the next time you use the
dryer and irri tate your skin.
Fiber glass
• When drying cycle is completed, “ ” [Cool
Down] is displayed on the Multi display.
• The Cool Down is setting automatically when
a drying cycle is complete.
• When you are not remove a loaf of clothes
from the dryer as soon as it stops, wrinkles
can form.
• The Cool Down operating periodically tumbles,
rearranges and fluffs the load to tumbles,
rearranges and fluffs the load to hours.
• The “ ” message will continue to display
until the clothes are removed or the
Start/Pause button is pressed.
3. Completion of Drying
• By touching the Dry button, the drying time
can be selected.
• Drying course can last up to 430min.
• When selecting drying only, spinning is
included in case of necessity such as
improving energy efficiency.
• These drying times are given as a guide to
help you set your dryer for manual drying.
Drying times can vary greatly depending on
dampness, room temperature and type of
fabric and your own experience will be your
best guide.
2. Drying time guide
How to use washer
Page 29

29
ENGLISH
Before using the Tag On function
• The Tag On function allows you to conveniently use the LG SmartDiagnosis™ and Cycle
Download features to communicate with your appliance right from your own smart phone.
• To use the Tag On function:
1. Download the LG Smart Laundry & DW App to your smart phone.
2. Turn on the NFC (Near Field Communication) function in your smart phone.
• The Tag On function can only be used with most smart phones equipped with the NFC
function and based on the Android operating system (OS).
1. Enter the "Settings" menu of the smart phone and
select "Share & Connect" under "WIRELESS &
NETWORKS".
2. Set "NFC" and "Direct Android Beam" to ON and
select "NFC".
3. Check "Use Read and Write/P2P receive".
■ Turning on the NFC function of the smart phone
NOTE
• Depending on the smart phone manufacturer and
Android OS version, the NFC activation process
may differ.
• Refer to the manual of your smart phone for
details.
Page 30

30
Before using the Tag On function
■ The Tag On guide
Tag On position
•
Tag On:
Look for the Tag On icon next to the LCD screen on the
control panel.
This is where you position your smart phone when
using the Tag On function with the LG
SmartDiagnosis™ and Cycle Download features of the
LG Smart Laundry & DW App.
•
When you use the Tag On function, position your
smart phone so that the NFC antenna on the back of
your smart phone matches the position of the Tag On
icon on the appliance.
If you do not know the position of your NFC antenna,
move your smart phone very slightly in a circular
motion until the application verifies the connection.
•
Because of the characteristics of NFC, if the transmission distance is too far, or if there is a
metal sticker or a thick case on the phone, transmission will not be good. In some cases,
NFC-equipped phones may be unable to transmit successfully.
•
Press in the LG Smart Laundry & DW app for a more detailed guide on how to use
the Tag On function.
Page 31

31
ENGLISH
• Main wash only ➔
• Pre Wash + Main Wash ➔
• Do not exceed the maximum fill line.
Overfilling can cause early dispensing of the
fabric softener which could stain clothes.
Close the dispenser drawer slowly.
• Do not leave the fabric softener in the detergent
drawer for more than 2 days.
(Fabric softener could be harden)
• Softener will automatically be added during
the last rinse cycle.
• Do not open the drawer when water is supplied.
• Solvents(benzene, etc) should not be used.
The dispenser drawer
Adding fabric softener
■ Adding detergent and fabric softener
Adding detergent
WARNING
• Keep all washing detergents away from
children as there is danger of poisoning.
• Too much detergent, bleach or softener
may cause an overflow.
• Be sure to use the appropriate amount of
detergent.
NOTE
• Do not pour fabric softener directly on the clothes.
Detergent for
main wash
Detergent for
pre wash
Fabric
softener
Page 32

32
Adding detergent
• A water softener, such as Anti-limescale (e.g.
Calgon) can be used to cut down on the use of
detergent in extremely hard water areas.
Dispense according to the amount specified on
the packaging. First add detergent and then the
water softener.
• Use the quantity of detergent as for soft water.
• Detergent is flushed from the dispenser at the beginning of the cycle.
1. Open the door and put tablets into
the drum.
Detergent dosage
Adding water softener
Using tablet
2. Load the laundry into the drum and
close the door.
• Do not let the detergent harden.
Doing so may lead to blockages, poor rinse performance or bad odor.
• Full load : according to manufacturer’s recommendation.
• Part load : 3/4 of the normal amount.
• Minimum load : 1/2 of full load.
NOTE
WARNING
• Detergent should be used according to the instruction of the detergent manufacturer and selected
according to type, colour, soiling of the fabric and washing temperature.
• If too much detergent is used, too many suds can occur and this will decrease the washing result or
cause heavy load to the motor.
• It is recommended that you use powdered detergent for best results.
• If you wish to use liquid detergent follow guidelines provided by the detergent manufacturer.
• You can pour liquid detergent directly into the main detergent drawer if you are starting the cycle
immediately.
• Please do not use liquid detergent if you are using ‘Time Delay’ as the liquid may harden, or if you
have selected ‘Pre Wash’.
• If too many suds occur, please reduce the detergent amount.
• Detergent usage may need to be adjusted for water temperature, water hardness, size and soil level
of the load. For best results, avoid oversudsing.
• Refer to the label of the clothes, before choose the detergent and water temperature.
• To use the washing machine, put the designated detergent only.
- General powdered detergents for all types of fabric (Cold - 95°C)
- Powdered detergents for delicate fabric (Cold - 40°C)
- Liquid detergents for all types of fabric (Cold - 95°C) or designated detergents only for wool
(Cold - 40°C)
• For better washing performance and whitening, use the detergent with the General powdered bleach.
Page 33

33
ENGLISH
The water inlet filter
•
" " icon will be displayed on the control panel when water does not enter the
detergent drawer.
•
If water is very hard or contains traces of lime deposit, the water inlet filter may become
clogged.
It is therefore a good idea to clean it from time to time.
•
Before cleaning the washer interior, unplug the electrical power cord to avoid electrical
shock hazards.
•
Turn off the stopcock if the machine is to be left for any length of time (e.g. holiday),
especially if there is no floor drain(gully) in the immediate vicinity.
1. Turn off the water tap.
2. Unscrew the water inlet hose.
3. Clean the filter using a hard bristle brush.
4. Tighten up the inlet hose.
Maintenance
Page 34

34
•
Allow the water to cool down before cleaning the drain pump, carrying out emergency
emptying or opening the door in an emergency.
•
The drain filter collects threads and small objects left in the laundry.
Check regularly that the filter is clean to ensure smooth running of your machine.
The drain pump filter
1. Open the lower cover cap.
pull out the hose.
2. Unplug the drain plug.
Open the filter by turning to the left.
3. Remove any extraneous matter from
the pump filter.
4. After cleaning, turn the pump filter and insert
the drain plug.
5. Close the lower cover cap.
1
2
Container to
collect the
drained water.
Maintenance
CAUTION
•
First drain using the drain hose and then open the pump filter to remove any threads or objects.
Be careful when draining if the water is hot.
Page 35

35
ENGLISH
Dispenser drawer
• After a while, detergents and fabric softeners leave a deposit in the drawer.
• It should be cleaned from time to time with a jet of running water.
• If necessary it can be removed completely from the machine by pressing the catch
downwards and by pulling it out.
• To facilitate cleaning, the upper part of the fabric softener compartment can be removed.
1. Pull out the dispenser drawer.
4. Insert the dispenser drawer.
2. Clean the dispenser drawer under water.
3. Clean inside the recess with an old toothbrush.
Maintenance
Page 36

36
Maintenance
• Proper care of your washer can extend its life.
• The outside of the machine can be cleaned with warm water and a neutral non abrasive household
detergent.
• Immediately wipe off any spills. Wipe with damp cloth.
• Try not to hit surface with sharp objects.
• Do not use methylated spirits, diluents or similar products.
If the washer is stored in an area where freezing may occur or moved in freezing temperatures, follow
these instructions to prevent damage to the washer:
• Turn off water supply tap.
• Disconnect hoses from water supply and drain water from hoses.
• Plug electrical cord into a properly grounded electrical outlet.
• Add 1gallon (3.8L) of nontoxic recreational vehicle(RV) antifreeze into an empty wash drum. Close the
door.
• Set spin cycle and let washer spin for 1minute to drain out all water. Not all of the RV antifreeze will be
expelled.
• Unplug electrical power cord, dry the drum interior, and close the door.
• Remove dispenser drawer, drain and dry excess water from the compartments.
• Store washer in an upright position.
• To remove antifreeze from washer after storage, run empty washer through a complete cycle using
detergent. Do not add wash load.
■ Cleaning your washer
■ Cold conditions
The washing drum
• If you live in a hard water area, limescale may build up continuously in places where it cannot be seen
and thus not easily removed. Over time the build up of scale clogs appliances, and if it is not kept in
check these may have to be replaced.
• Although the washing drum is made of Stainless steel, specks of rust can be caused by small metal
articles (paper clips, safety pins) which have been left in the drum.
• The washing drum should be cleaned from time to time.
• If you use descaling agents, dyes or bleaches, make sure they are suitable for washing machine use.
• Descaler may contain chemicals that may damage part of your washing machine.
• Remove any spots with a stainless steel cleaning agent.
• Never use steel wool.
Exterior
Interior
• To remove hard water deposits, use only cleaners labelled washer safe.
NOTE
• Dry around the washer door opening, flexible gasket and door glass.
• Run washer through a complete cycle using hot water.
• Repeat process if necessary.
• Dilute 5g of bleach with 5
l
of warm water. (1000 times dilution)
• Wipe the gasket by using diluted bleach. (MUST wear the rubber gloves)
• Dry up the gasket by using a dry cloth.
• Open the door until it is completely dry.
• Clean the gasket more than once a month.
* use of undiluted bleach may damage parts of the washing machine.
Page 37

37
ENGLISH
• This washing machine is equipped with automatic safety functions which detect and
diagnose faults at an early stage and react appropriately.
When the machine does not function properly or does not function at all, check the
following points before you contact your service provider.
Symptom Possible Cause Solution
Rattling and
clanking noise
Thumping sound
Vibrating noise
Water leaks.
Oversudsing
Water does not enter
washer or it enters
slowly
Water in the washer
does not drain or
drains slowly.
• Foreign objects such as coins or
safety pins maybe in drum or
pump.
• Heavy wash loads may produce
a thumping sound. This is usually
normal.
• Have all the transit bolts and
packing been removed?
• Are all the feet resting firmly on
the ground?
• Fill hoses or drain hose are loose
at tap or washer.
• House drain pipes are clogged.
• Water supply is not adequate in
area.
• Water supply tap is not
completely open.
• Water inlet hose(s) are kinked.
• The filter of the inlet hose(s)
clogged.
• Drain hose is kinked or clogged.
• The drain filter is clogged.
Stop washer, check drum and drain
filter.
If noise continues after washer
is restarted, call your authorised
service centre.
If sound continues, washer is
probably out of balance. Stop and
redistribute wash load.
If not removed during
installation, refer to Installation guide
for removing transit bolts.
Wash load may be unevenly
distributed in drum. Stop washer and
rearrange wash load.
Check and tighten hose connections.
Unclog drain pipe. Contact plumber
if necessary.
Too much detergent or unsuitable
detergent may cause excessive
foaming which may result in water
leaks.
Check another tap in the house.
Fully open tap.
Straighten hose.
Check the filter of the inlet hose.
Clean and straighten the drain hose.
Clean the drain filter
Diagnosing Problems
Troubleshooting guide
Page 38

38
Washer does not
start
Washer will not
spin
Door does not
open
Wash cycle time
delayed
Fabric softener
overflow
Softeners
dispensed
too early
Dry problem
• Electrical power cord may not be
plugged in or connection may be
loose.
• House fuse blown, circuit breaker
tripped,or a power outage has
occurred.
• Water supply tap is not turned on.
• Check that the door is firmly shut.
Too much softener may cause an
overflow.
• Does not dry
Make sure plug fits tightly in wall
outlet.
Reset circuit breaker or replace
fuse. Do not increase fuse capacity.
If problem is a circuit overload, have
it corrected by a qualified electrician.
Turn on water supply tap.
Close the door and press the
Start/Pause button. After pressing
the Start/Pause button, it may take a
few moments before the washer
begins to spin. The door must be
locked before spin can be achieved.
Add 1 or 2 similar items to help
balance the load. Rearrange load to
allow proper spinning.
Once machine has started, the door
cannot be opened for safety
reasons. Check if the "Door Lock"
icon is illuminated. You can safely
open the door after the "Door Lock"
icon turns off.
The washing time may vary by the
amount of laundry, water
pressure, water temperature and
other usage conditions.
If an imbalance is detected or if the
suds removing programme is on, the
wash time shall be increased.
Follow softener guidelines to ensure
appropriate amount is used.
Do not exceed the maximum fill line
Close the dispenser drawer slowly.
Do not open the drawer during the
wash cycle.
Do not overload.
Check that the washer is draining
properly to extract adequate water
from the load.
Clothes load is too small to tumble
property. Add a few towels.
Symptom Possible Cause Solution
Troubleshooting guide
Page 39

39
ENGLISH
Symptom Possible Cause Solution
• Water supply is not adequate in area.
• Water supply taps are not completely open.
• Water inlet hose(s) are kinked.
• The filter of the inlet hose(s) are clogged.
• Drain hose is kinked or clogged.
• The drain filter is clogged.
• Load is too small.
• Load is out of balance.
• The appliance has an imbalance detection
and correction system. If individual heavy
articles are loaded (e.g. bath mat, bath
robe, etc.) this system may stop spinning or
even interrupt the spin cycle altogether.
• If the laundry is still too wet at the end of
the cycle, add smaller articles of laundry to
balance the load and repeat the spin cycle.
• Ensure door is not open.
• Water overfills due to the faulty water
valve.
• Water level sensor has malfunctioned.
• Over load in motor.
• Water leaks.
• Check water supply.
Check another tap in the house.
Fully open tap.
Straighten hose(s).
Check the filter of the inlet hose.
Clean and straighten the drain hose.
Clean the drain filter.
Add 1 or 2 similar items to help
balance the load.
Rearrange load to allow proper
spinning.
Close the door completely.
If “ , ” is not released, call
for service.
Unplug the power plug and call for
service.
Close the water tap.
Unplug the power plug.
Call for service.
Allow the washer to stand for 30
minutes to allow the motor to cool;
then restart the cycle.
Call for service.
Turn the tap on. If “ ” is not
released, unplug power plug and call
for service.
Error Messages
Troubleshooting guide
Page 40

40
Troubleshooting guide
NOTE
• SmartDiagnosis™ function is available only for the products with a SmartDiagnosis™ mark.
In case of a mobile phone with static option, the SmartDiagnosis™ function might not operate.
• Only use this feature when instructed to do so by the call center.
The transmission sounds similar to a fax machine, and so has no meaning except to the call center.
• SmartDiagnosis™ cannot be activated if the washer does not power up.
If this happens, then troubleshooting must be done without SmartDiagnosis™.
If you experience problems with your washer, call to Customer Information Center.
Follow the call center agent's instructions, and do the following steps when requested:
Using SmartDiagnosis™
1. Press the Power button to turn on the washer. Do not press any
other buttons or turn the cycle selector knob.
2. When instructed to do so by the call center, place the mouthpiece
of your phone very close to the Power button.
3. Touch and hold the “Temp.” button for three seconds, while holding the phone mouthpiece to the icon or
Power button.
4. Keep the phone in place until the tone transmission has finished.
This takes about 6 seconds, and the display will count down the time.
• For best results, do not move the phone while the tones are being transmitted.
• If the call center agent is not able to get an accurate recording of the data, you may be asked to try
again.
5. Once the countdown is over and the tones have stopped, resume your conversation with the call center
agent, who will then be able to assist you using the information transmitted for analysis at the call to
Customer information center.
• Smart Diagnosis is a troubleshooting feature designed to assist, not replace, the traditional method of
troubleshooting through service calls. The effectiveness of this feature depends upon various factors,
including, but not limited to, the reception of the cellular phone being used for transmission, any external
noise that may be present during the transmission, and the acoustics of the room where the machine is
located.
Accordingly, LG does not guarantee that Smart Diagnosis would accurately troubleshoot any given issue.
Max. 10 mm
Page 41

41
ENGLISH
What Is Not Covered:
• Service trips to your home to teach you how to use the product.
• If the product is connected to any voltage other than that shown on the rating plate.
• If the fault is caused by accident, neglect, misuse or Act of God.
• If the fault is caused by factors other than normal domestic use or use in accordance with the owner's
manual.
• Provide instruction on use of product or change the set-up of the product.
• If the fault is caused by pests for example, rats or cockroaches, etc.
• Noise or vibration that is considered normal, for example water drain sound,
spin sound, or warning beeps.
• Correcting the installation. For example, levelling the product, adjustment of drain.
• Normal maintenance which is recommended by the owner's manual.
• Removal of foreign objects / substances from the machine, including the pump and inlet hose filter, For
example, grit, nails, bra wires, buttons etc.
• Replace fuses in or correct house wiring or correct house plumbing.
• Correction of unauthorized repairs.
• Incidental or consequential damage to personal property caused by possible defects with this appliance.
• If this product is used for commercial purpose, it is not warranted.
(Example : Public places such as public bathroom, lodging house, training center, dormitory)
If the product is installed outside the normal service area, any cost of transportation involved in the repair
of the product, or the replacement of a defective part, shall be borne by the owner.
NOTE
• When disposing of the appliance, cut off the mains cable, destroy the plug and
disable the door lock to prevent children being trapped inside.
Terms of Warranty
Page 42

Page 43

F1400HT1B
BUKU PETUNJUK
MESIN CUCI
Sebelum mulai memasang, baca dahulu petunjuknya dengan hati-hati.
Ini akan menyederhanakan pemasangan dan memastikan bahwa mesin
cuci telah dipasang dengan benar dan aman. Letakkan petunjuk ini di
dekat mesin cuci setelah memasang untuk referensi di masa mendatang.
www.lg.com/id
PT. LG Electronics Indonesia
Gandaria 8 Office Tower, 31st Floor
Jl. Sultan Iskandar Muda,
Kebayoran Lama Utara–Kebayoran Lama
11240, INDONESIA
BAHASA
Page 44

2
Daftar isi....................................2
Fitur Produk..............................3
Petunjuk keselamatan penting
Petunjuk keselamatan penting ..............4
Petunjuk keselamatan dasar.................5
Simpanlah petunjuk ini. .........................6
Petunjuk keselamatan penggunaan......7
Spesifikasi ................................8
Pemasangan
Membuka kemasan...............................9
Membuka baut transit............................9
Persyaratan tempat pemasangan. ......10
Menghubungkan selang pasokan air ..12
Pemasangan selang penguras ...........14
Meratakan. ..........................................15
Cara menggunakan pencuci
Mengoperasikan mesin cuci................17
Yang perlu diperhatikan sebelum
mencuci...............................................18
Tabel program pencucian ...................19
Tabel Program Pengeringan ...............20
Pilihan ekstra.......................................21
Data operasi........................................21
Panel kontrol.. .....................................22
Pilihan. ................................................23
- Pre Wash (Pra-Pencucian) ...............23
- Favorite (Favorit)...............................23
- Steam (Wash and Softener)
[Uap (Cuci dan Pelembut)]................23
- Time Delay (Waktu Tunggu) .............24
- Wash (Cuci) ......................................24
- Temp.................................................24
- Rinse (Bilas)......................................24
- Spin (putaran) ...................................24
Pengaman Anak..................................25
Bip Hidup/Mati.....................................25
Tabung Bersih.....................................26
Pengunci Pintu & Deteksi....................26
Pengeringan........................................27
Sebelum menggunakan fungsi
Tag On
Sebelum menggunakan fungsi Tag On .29
Panduan Tag On ...................................30
Terima kasih, Anda telah membeli
Mesin Cuci Otomatis LG.
Silakan baca buku petunjuk Anda
dengan seksama, buku ini menyajikan
petunjuk tentang pemasangan,
penggunaan, dan perawatan yang
aman. Simpanlah buku ini untuk
referensi di masa mendatang.
Catatlah model dan nomor seri mesin
cuci Anda.
Model No.
Serial No.
Tanggal Pembelian
Menambahkan detergen
Menambahkan detergen dan pelembut
kain......................................................31
Pemeliharaan
Filter masukan air................................33
Filter pompa penguras ........................34
Laci dispenser .....................................35
Drum pencucian ..................................36
Membersihkan mesin cuci...................36
Kondisi dingin......................................36
Pedoman penyelesaian masalah
Mendiagnosis masalah .......................37
Pesan kesalahan.................................39
Menggunakan SmartDiagnosis™ .........40
Ketentuan garansi..................41
Daftar Isi
Page 45

3
BAHASA
추가선택 예약
Sistem Inverter Direct Drive
Motor Brushless DC yang canggih langsung menggerakkan drum tanpa
sabuk dan kerekan.
Sistem kontrol kecepatan berkebisingan rendah
Dengan mendeteksi jumlah muatan dan keseimbangan, sistem ini
mendistribusikan muatan secara merata untuk meminimalkan level
kebisingan perputaran.
Pengaman Anak
Pengaman Anak mencegah anak menekan tombol untuk mengganti
pengaturan selama pengoperasian.
Lebih hemat dengan sistem Pencucian Cerdas
Sistem Pencucian Cerdas mendeteksi ukuran muatan dan suhu air, lalu
menentukan waktu pencucian dan level air optimal untuk meminimalkan
konsumsi air dan energi.
Pemanas built-in
Pemanas internal otomatis memanaskan air hingga temperatur terbaik
pada putaran yang dipilih.
Perlindungan terhadap kekusutan
Dengan putaran drum yang berubah-ubah, kekusutan dapat
diminimalkan.
6 Gerakan
Mesin cuci mampu melakukan berbagai tindakan drum atau kombinasi
tindakan yang berbeda-beda, tergantung program pencucian yang
dipilih. Dikombinasikan dengan kecepatan perputaran terkontrol dan
kemampuan drum untuk berotasi ke kiri maupun ke kanan, kinerja
pencucian mesin meningkat pesat, yang memberi Anda hasil sempurna
setiap kali mencuci.
Fitur Produk
Tag on
Ini adalah fungsi yang dapat menggunakan Diagnosis, Download Course
(Unduhan Siklus), Washing Coach (Pemandu Mencuci), One Touch
Washing (Pencucian Sekali Sentuh), dll. jika Anda menyentuh logo Tag On
pada mesin cuci menggunakan smartphone Anda dengan NFC.
SmartDiagnosis™
Apabila Anda mengalami kesulitan teknis dengan mesin cuci, maka
mesin dapat mengirimkan data melalui ponsel ke Pusat Informasi
Pelanggan. Agen dari pusat panggilan akan mencatat data yang
dikirimkan mesin Anda dan menggunakannya untuk menganalisis
masalah, lalu menyediakan diagnosis yang cepat dan efektif.
Auto Restart
Auto Restart memungkinkan program untuk me-restart dengan sendirinya
dalam hal kekuasaan kegagalan. Itu dari tahap di mana ia berhenti.
Page 46

4
Petunjuk keselamatan penting
Untuk keselamatan Anda, informasi di buku petunjuk ini harus diikuti untuk meminimalkan risiko
kebakaran atau ledakan, kejutan listrik, atau mencegah kerugian harta, cedera diri, atau
ancaman keselamatan jiwa.
BACALAH SEMUA PETUNJUK DAN PENJELASAN PEMASANGAN SEBELUM
ANDA MENGGUNAKAN.
PERINGATAN
Anda dapat terbunuh atau terluka parah apabila tidak mengikuti petunjuk.
Keselamatan Anda dan orang lain sangatlah penting.
Kami telah menyediakan banyak pesan keselamatan penting di manual ini dan di mesin cuci.
Selalu baca dan patuhi semua pesan keselamatan.
Ini adalah simbol peringatan keselamatan.
Simbol ini memperingatkan potensi bahaya yang dapat membunuh atau melukai Anda
dan orang lain.
Semua pesan keselamatan akan mengikuti simbol peringatan keselamatan dan atau
dengan kata BAHAYA, PERINGATAN atau HATI-HATI.
Kata-kata ini berarti:
PERINGATAN
Anda dapat terluka ringan atau menyebabkan kerusakan pada produk, apabila tidak mengikuti
petunjuk.
Semua pesan keselamatan akan memberitahukan potensi bahaya yang ada, cara mengurangi
kemungkinan cedera, dan apa yang dapat terjadi apabila petunjuk tidak diikuti.
PERHATIAN
Anda dapat terbunuh atau mengalami cedera parah apabila tidak segera mengikuti petunjuk.
BAHAYA
Page 47

5
BAHASA
Petunjuk keselamatan penting
Untuk mengurangi risiko kebakaran, kejutan listrik, atau cedera pada seseorang ketika
menggunakan mesin cuci, ikutilah upaya pencegahan dasar, yang meliputi hal berikut:
PERINGATAN
• Sebelum pemasangan, periksalah
apakah ada kerusakan di luar mesin.
Jika ada, jangan pasang mesin.
• Jangan pasang atau letakkan mesin
cuci di tempat yang akan terpapar
pada cuaca.
• Jangan rusak panel kontrol.
• Jangan perbaiki atau ganti bagian
pencuci mana pun atau mencoba
melakukan servis apa pun kecuali
dianjurkan secara khusus dalam
petunjuk perawatan pengguna atau
petunjuk reparasi pengguna yang
Anda pahami dan terampil Anda
lakukan.
• Jagalah areal di bawah dan di sekitar
peralatan Anda dari bahan-bahan yang
mudah terbakar, seperti serat kain,
kertas, permadani, bahan kimia, dll.
• Peralatan ini tidak boleh digunakan
oleh anak kecil atau orang yang lemah
tanpa pengawasan. Jangan biarkan
anak-anak bermain di, dengan, atau di
dalam peralatan ini atau peralatan
lainnya.
• Jauhkan hewan kecil dari peralatan.
• Jangan biarkan pintu mesin cuci terbuka.
Pintu yang terbuka dapat menarik anak-anak
untuk bergelantungan di pintu atau memasuki
bagian dalam mesin cuci.
• Jangan masukkan tangan ke dalam
mesin cuci di saat sedang bergerak.
Tunggulah hingga drum berhenti
sempurna.
• Proses pencucian dapat mengurangi sifat
tahan api kain.
Untuk menghindari hal
itu, ikutilah petunjuk pencucian dan
perawatan dari produsen garmen.
• Jangan cuci atau keringkan kain yang
telah dibersihkan, dicuci, dicelup,
atau ditatah dengan bahan mudah
terbakar atau meledak (seperti lilin,
minyak, cat, bensin, penghilang
lemak, pelarut pembersih kering (dry
cleaning), minyak tanah, dll.) yang
mungkin terbakar atau meledak.
Minyak mungkin tetap tinggaldi tabung
setelah seluruh putaran, yang mengakibatkan
kebakaran selama pengeingan.
Karena itu,
jangan masukkan pakaian yang
berminyak.
• Jangan banting pintu pencuci atau
memaksa membuka pintu saat
dikunci. Hal ini dapat mengakibatkan
kerusakan mesin cuci.
• Ketika mesin berjalan di temperatur
tinggi, pintu depan mungkin akan
sangat panas. Jangan sentuh pintu
itu.
• Untuk meminimalkan kemungkinkan
kejutan listrik, cabutlah kabel catu
daya dari peralatan atau putuskan
sambungan listrik pencuci di panel
distribusi rumah tangga dengan
melepaskan sekring atau mematikan
pemutus sirkuit sebelum berusaha
melakukan perawatan atau
pembersihan.
• Ketika melepaskan kabel daya, jangan
tarik dengan memegang kabelnya. Bila
Anda lakukan, kabel daya bisa rusak.
• Jangan mencoba mengoperasikan
peralatan ini jika rusak, tak berfungsi,
terbongkar sebagian, atau kehilangan
atau mengalami rusak komponen,
termasuk steker atau kabel yang rusak.
■ Petunjuk keselamatan dasar
Page 48

6
Petunjuk keselamatan penting
■ Basic safety precautions
Untuk mengurangi risiko kebakaran, kejutan listrik, atau cedera pada seseorang ketika
menggunakan mesin cuci, ikutilah upaya pencegahan dasar, yang meliputi hal berikut:
PERINGATAN
• Sebelum membuang mesin lama,
lepaskan kabel dan stekernya.
Rusaklah stekernya. Potong kabel
langsung di belakang peralatan untuk
mencegah penyalahgunaan.
• Bila produk terendam air, harap
hubungi pusat servis. Hal itu berisiko
menimbulkan kebakaran dan kejutan listrik.
• Peralatan harus terhubung ke pipa
saluran air dengan menggunakan
seperangkat selang baru. Perangkat
selang lama tidak boleh digunakan.
• Untuk mengurangi risiko cedera diri,
ikutilah prosedur keselamatan yang
direkomendasikan seluruh industri,
yang meliputi penggunaan kacamata
pengaman dan sarung tangan
panjang. Jika Anda tidak mengikuti seluruh
peringatan keselamatan di dalam buku
petunjuk ini, hal itu dapat mengakibatkan
kerugian harta, cedera, atau kematian.
• Jangan dorong pintu berlebihan,
ketika pintu mesin cuci terbuka. Hal ini
dapat merobohkan mesin cuci.
■ Simpanlah petunjuk ini
Penyambungan konduktor grounding peralatan yang tidak benar dapat menimbulkan kejutan
listrik. Tanyakanlah kepada petugas listrik atau servis yang berkualifikasi, bila Anda ragu apakah
peralatan telah di-groundkan dengan baik. Jangan modifikasi steker yang disediakan bersama
peralatan ini - jika tidak cocok dengan stopkontak, pasanglah stopkontak yang benar dengan
bantuan petugas listrik yang berkualifikasi.
PETUNJUK GROUNDING
Peralatan ini harus di-ground-kan. Bila terjadi gangguan fungsi atau kemacetan, grounding
akan mengurangi risiko kejutan listrik dengan menyediakan jalur hambatan minimal untuk
arus listrik. Peralatan ini dilengkapi dengan kabel yang memiliki steker grounding dan
konduktor grounding peralatan. Steker ini harus dicolokkan ke stopkontak yang cocok yang
dipasang dengan benar dan di-groundkan sesuai seluruh peraturan dan perundangan
setempat.
• Jangan gunakan adaptor karena akan menonaktifkan steker grounding.
• Jika Anda tidak memiliki stopkontak yang memadai, hubungilah petugas listrik.
PERINGATAN
Page 49

7
BAHASA
Petunjuk keselamatan penting
Untuk mengurangi resiko munculnya api pada tabung, beberapa hal perlu diperhatikan :
• Benda yang sudah ditatah atau
direndam dengan sayuran atau
minyak untuk masak dapat
menimbulkan api dan tidak boleh
dimasukkan kedalam tabung
pengeringan.
Benda yang berminyak dapat cepat
bereaksi, terutama jika dekat dengan
sumber panas seperti tabung pengeringan.
Benda menjadi hangat, dan menyebabkan
oksidasi di dalam minyak. Oksidasi
menciptakan panas. Jika panas tidak
tersalurkan, benda dapat menjadi
sedemikian panassampai menghasilkan api.
Menumpuk benda-benda yang mengandung
minyak dapat mencegah panas keluar
sehingga menyebabkan bahaya kebakaran.
Pakaian yang mengandung noda minyak
masak atau produk-produk perawatan
rambut harus dicuci dahulu di air panas
dengan deterjen extra - ini dapat
mengurangi bahaya yang dapat muncul.
“Cool down” cycle dari pengering digunakan
untuk mengurangi temperatur bahan-bahan
pakaian.
Pakain-pakaian yang berada di dalam
pengering tidak boleh dikeluarkan dari dalam
pengering ketika masih panas.
• Pakaian yang sebelumnya sudah
dibersihkan, dicuci, terkena, ato
terendam bensin, cairan drycleaning, atau bahan-bahan mudah
terbakar lainnya tidak boleh
dimasukan ke dalam tabung
pengeringan. Bahan-bahan atau
substansi yang mudah terbakar antara lain:
acetone, alkohol, bensin, kerosene,
penghilang noda (beberapa brand),
turpentine, wax dan penghilang wax.
• Benda-benda yang mengandung
karet (juga dikenal dengan busa
latex) atau yang memiliki kemiripan
tekstur dengan karet tidak boleh
dikeringkan di dalam tabung
pengeringan. Busa karet dapat
menyebabkan ledakan api apabila
dipanaskan.
• Pelembut pakaian atau produk
sejenisnya tidak boleh digunakan
pada saat siklus pengeringan, agar
tidak menyebabkan listrik statis kecuali jika
disarankan oleh produsen dari produk
tersebut.
• Kain yang mengandung metal tidak
boleh dimasukkan dalam tabung
pengeringan.
Tabung pengeringan dapat rusak oleh
benda metal yang lepas dari pakaian ketika
proses pengeringan.
• Ornamen plastik seperti topi mandi
atau sapu tangan tahan air tidak
boleh dimasukkan dalam tabung
pengeringan.
• Pakaian yang mengandung karet,
busa, bantal, sepatu boots dan
sepatu tenis yang dilapisi karet tidak
boleh dimasukkan ke dalam tabung
pengeringan.
■ Petunjuk Keselamatan Penggunaan
Page 50

8
■ Nama : Mesin cuci muat depan
■ Catu daya : 220 V~, 50 Hz
■ Ukuran : 600 mm(W) 610 mm(D) 850 mm(H)
■ Berat : 71 kg
■ Watt Maks. : 2100 W (Cuci) / 1600 W (Kering)
■ Kapasitas pencucian : 10 kg (Cuci) / 7 kg (Kering)
■ Tekanan air yang diizinkan : 100 - 1.000 kPa (1.0 - 10.0 kgf / cm
2
)
Tampilan dan spesifikasi mungkin beragam tanpa pemberitahuan untuk memperbaiki kualitas
unit.
(Untuk deterjen dan
pelembut pakaian)
Laci
Selang
penguras
Baut transit
Steker daya
Panel kontrol
Filter pompa penguras
Sumbat tutup bawah
• Jika kabel daya rusak, kabel
harus diganti oleh produsen atau
agen servisnya atau orang
dengan kualifikasi yang sama,
untuk menghindari bahaya.
Drum
Pintu
Steker penguras
Dudukan yang dapat
disesuaikan
Spesifikasi
■
Aksesori
Selang inlet(1EA)
pilihan: Panas/Dingin(2EA)
Kunci Pas
Page 51

9
BAHASA
■ Membuka kemasan
1. Bukalah boks karton dan kemasan
stirofom.
2. Angkat mesin cuci dan lepaskan
kemasan dasar.
3. Lepaskan plester yang menutup kabel
catu daya dan selang penguras.
4. Lepaskan selang inlet dari drum.
1. Lepaskan keempat baut itu dengan
kunci pas yang disediakan.
2. Lepaskan keempat baut bersama tutup
karetnya dengan sedikit memutar tutup
itu.
3. Tutuplah lubang dengan penutup yang
disediakan.
Untuk mencegah kerusakan internal selama pengangkutan, 4 baut khusus berposisi
terkunci.
Sebelum mengoperasikan mesin cuci, lepaskanlah baut-baut itu bersama tutup karetnya.
Jika tidak dilepas, mungkin dapat menimbulkan getaran hebat, kebisingan, dan gangguan
fungsi.
■ Melepaskan baut transit
Baut transit
Pemasangan
PERINGATAN
• Bahan kemasan (seperti Film, Stirofom) bisa berbahaya bagi anak-anak.
Ada risiko tersedak ! Jauhkan semua kemasan dengan baik dari anak-anak.
CATATAN
• Simpanlah kunci pas yang
disediakan untuk digunakan kelak.
CATATAN
• Simpanlah kunci pas yang
disediakan untuk digunakan kelak.
Kunci Pas
Pencuci
Kemasan
Dasar
Page 52

10
• Lantai yang datar :
Kemiringan yang diizinkan di bawah keseluruhan mesin cuci
adalah 1˚.
• Stopkontak daya :
Harus dalam jarak 1,5 meter dari setiap sisi lokasi mesin cuci.
Jangan colokkan steker lebih dari satu peralatan ke
stopkontak.
• Jarak Tambahan :
Untuk Dinding, 10 cm:belakang / 2 cm : sisi kanan & kiri.
Jangan pernah menaruh atau menyimpan hasil cucian di atas
pencuci.
Jika dilakukan, dapat merusak hasil akhir atau pengendalian.
Pencuci
kira-kira
2cm
■ Persyaratan tempat pemasangan
Pemosisian
Lokasi
• Pasanglah mesin cuci di lantai keras yang datar.
• Pastikan sirkulasi udara di sekitar mesin cuci tidak terhalang oleh karpet, permadani, dll.
• Jangan pernah membetulkan ketidakrataan lantai dengan sumpalan kayu, karton, atau bahan serupa di
bawah pencuci.
• Jika mustahil menghindari pemosisian mesin cuci di dekat pemasak gas atau kompor batu bara, sekat
(85x60cm) yang ditutup dengan foil aluminium di sisi yang menghadap ke kompor atau alat masak, harus
disisipkan di antara kedua peralatan itu.
• Mesin cuci tidak boleh dipasang di ruangan yang temperaturnya dapat turun di bawah 0°C.
• Harap pastikan bahwa ketika mesin cuci dipasang, mesin cuci mudah dijangkau oleh petugas bila terjadi
kemacetan.
• Setelah mesin cuci dipasang, setelah keempat dudukan dengan menggunakan kunci pas baut transit yang
disediakan yang memastikan peralatan stabil, dan jarak ruang sekitar 20 mm sudah disisakan antara
bagian atas mesin cuci dengan sisi bawah segala alas kerja.
• Peralatan ini tidak dirancang untuk digunakan di laut atau digunakan di instalasi bergerak seperti mobil
karavan, pesawat, dll.
• Jangan pernah gunakan kabel perpanjangan atau adaptor ganda.
• Jika kabel daya rusak, kabel harus diganti oleh produsen atau agen servisnya atau orang dengan
kualifikasi yang sama, untuk menghindari bahaya.
• Cabutlah selalu kabel mesin dan matikan pasokan air setelah digunakan.
• Sambungkan mesin ke stopkontak yang sudah dihubungkan ke ground sesuai regulasi perkabelan
terkini.
• Peralatan harus diposisikan agar steker mudah dijangkau.
• Reparasi mesin cuci hanya boleh dilakukan oleh petugas berkualifikasi.
Reparasi yang dilakukan oleh orang tak berpengalaman mungkin menimbulkan cedera atau gangguan
fungsi serius. Hubungi pusat servis di tempat Anda.
• Jangan pasang mesin cuci Anda di ruangan yang temperaturnya bisa turun di bawah titik beku. Selang
yang beku bisa pecah bila tertekan. Keandalan unit kontrol elektronik bisa terganggu pada temperatur di
bawah titik beku.
• Jika peralatan dikirimkan di bulan-bulan musim dingin dan temperaturnya berada di bawah titik beku :
Letakkan mesin cuci pada suhu kamar beberapa jam sebelum mengoperasikannya.
Sambungan listrik
Pemasangan
Page 53

11
BAHASA
Pemasangan
PERHATIAN
PERHATIAN menyangkut kabel daya
• Sebagian besar peralatan dianjurkan diletakkan di sirkuit yang diperuntukkan khusus;
yaitu, satu sirkuit stopkontak yang memberi daya ke peralatan itu saja dan tidak ada
stopkontak tambahan atau sirkuit cabang. Periksa halaman spesifikasi buku
petunjuk pengguna ini untuk memastikan.
• Jangan sambungkan banyak steker ke stopkontak dinding. Stopkontak dinding
yang kelebihan beban, rusak atau longgar, menggunakan kabel perpanjangan, kabel
daya yang berjumbai, atau sekat kawat yang rusak atau retak bisa berbahaya. Semua
kondisi ini dapat menimbulkan kebakaran atau kejutan listrik.
• Periksalah secara berkala kabel peralatan Anda, dan jika tampilannya menunjukkan
kerusakan atau kemunduran performa, lepaskanlah, jangan gunakan lagi peralatan itu,
dan perbaikilah kabel itu dengan komponen pengganti yang tepat oleh petugas
servisresmi.
• Lindungilah kabel daya dari kesalahan mekanis atau fisik, seperti terpuntir,
terbengkokkan, terlubangi, terjepit pintu, atau terinjak. Perhatikan dengan seksama
steker, stopkontak dinding, dan titik tempat kabel keluar dari peralatan.
Apabila produk disuplai listriknya dari kabel perpanjangan atau perangkat pembangkit
daya listrik portabel, kabel perpanjangan yang dipasang ke perangkat pembangkit
daya listrik portabel harus dipasang sedemikian rupa sehingga tidak terkena percikan
air atau kelembapan.
PERHATIAN
• Peralatan ini tidak boleh digunakan oleh anak kecil atau orang yang lemah tanpa
pengawasan.
• Anak kecil harus diawasi untuk memastikan mereka tidak bermain dengan peralatan.
Page 54

12
1. Lepaskan pelat ring adaptor dan 4 sekrup
pengunci adaptor.
2. Dorong adaptor ke ujung keran sehingga
segel karet membentuk sambungan
kedap air. Eratkan pelat ring adaptor dan
keempat sekrup.
3. Dorong selang pasokan air secara
vertikal ke atas sehingga kemasan karet
di dalam selang dapat menempel
sempurna ke keran lalu eratkan dengan
menyekrupkannya ke kanan.
• Tekanan pasokan air haruslah antara 100 kPa dan 1.000 kPa (1,0 - 10,0 kgf / cm
2
).
• Jangan patahkan atau salah menyambung selang ketika menyambungkan selang masukan ke
katup.
• Jika tekanan pasokan air lebih dari 1.000 kPa, Anda harus memasang perangkat penghilang
tekanan.
• Periksalah secara berkala kondisi selang dan gantilah selang bila perlu.
Tipe-A : Menyambungkan selang tipe Sekrup ke keran yang bergalur
• Sekrupkan konektor selang ke keran
pasokan air.
■ Menghubungkan selang pasokan air
Langkah 1 : Periksa segel karet selang masukan
Langkah 2 : Sambungkan selang ke keran air
• Dua segel karet sudah disertakan dengan
selang masukan air.
Keduanya digunakan untuk mencegah
kebocoran air. Pastikan sambungan ke
keran sudah cukup erat.
Sambungan
atas
Kemasan
karet
Pelat
Selang
pasokan air
Mengencangkan
baut
Sambungan
selang
Segel
Karet
Tipe-B : Menyambungkan selang tipe Sekrup ke keran tanpa galur
Pemasangan
Page 55

13
BAHASA
1. Lepaskan pelat ring adaptor dan 4
sekrup pengunci adaptor.
2. Lepaskan pelat pedoman jika keran
terlalu besar untuk menempelkan
adaptor.
3. Dorong adaptor ke ujung keran
sehingga segel karet membentuk
sambungan kedap air.
Eratkan pelat ring adaptor dan keempat
sekrup.
4. Tarik pelat gerendel konektor ke
bawah, dorong selang masukan ke
atas adaptor, dan lepaskan pelat
gerendel konektor. Pastikan adaptor
terkunci ke tempatnya.
Harap gunakan keran horizontal
Keran horizontal Keran perpanjangan Keran persegi
Pelat ring
Pelat pedoman
Pelat gerendel
Tipe-C : Menyambungkan selang tipe satu sentuhan ke keran tanpa galur
Langkah 3: Sambungkan selang ke mesin cuci
• Pastikan tidak ada bengkokan di selang
dan tidak ada selang yang terhimpit.
Bila mesin cuci Anda memiliki dua katup.
• Selang Masukan yang memiliki konektor
merah adalah untuk keran air panas.
• Jika mesin cuci memiliki dua katup, energi
dihemat dengan menggunakan katup panas.
Pemasangan
CATATAN
• Setelah merampungkan sambungan, jika air bocor dari selang, ulangi langkah yang sama.
Gunakan tipe keran yang paling konvensional untuk pasokan air. Jika keran berbentuk
persegi atau terlalu besar, lepaskan ring jarak sebelum memasukkan keran ke dalam adaptor.
CATATAN
• Setelah menyambungkan selang ke
keran air, hidupkan keran air untuk
membilas benda asing (kotoran,
pasir, atau serbuk gergaji) di
saluran air. Kuras air ke ember, dan
periksalah temperatur air.
Page 56

14
Pemasangan selang penguras
• Selang penguras harus ditempatkan
lebih tinggi dari 100 cm di atas lantai.
Air di dalam mesin cuci tidak terkuras
atau terkuras perlahan.
• Mengencangkan selang penguras
dengan benar akan melindungi lantai
dari kerusakan karena kebocoran air.
• Jika selang penguras terlalu besar,
dorong balik ke dalam mesin cuci.
Hal ini bisa menimbulkan kebisingan
abnormal.
• Ketika memasang selang penguras ke
wastafel, kencangkan dengan erat
dengan tali.
• Mengencangkan selang penguras
dengan benar akan melindungi lantai
dari kerusakan karena kebocoran air.
sekitar 100 cm
sekitar 145 cm
sekitar 105 cm
maks. 100 cm
Segel
Pengikat
Tali pengikat
Tabung Cucian
maks. 100 cm
maks. 100 cm
Pemasangan
Page 57

15
BAHASA
•
Pemeriksaan Diagonal
Ketika menekan pinggiran pelat atas mesin
cuci secara diagonal, mesin seharusnya
tidak terjungkat-jungkit (Harap periksa
kedua arah) Jika mesin terguncang ketika
mendorong pelat atas mesin secara
diagonal, sesuaikan lagi dudukannya.
2. Jika lantai tidak rata, putar dudukan yang
bisa disesuaikan sesuai keperluan.
(jangan menyisipkan sebilah kayu atau
benda lainnya di bawah dudukan).
Pastikan semua dudukan stabil dan
menempel ke lantai dan periksalah
apakah peralatan sudah rata sempurna.
(gunakan waterpas)
1. Meratakan mesin cuci dengan baik dapat
mencegah kebisingan dan getaran
berlebihan. Pasanglah peralatan di
permukaan lantai yang rata dan padat,
lebih baik bila berada di sudut ruangan.
■ Meratakan
• Setelah mesin cuci datar, eratkan mur-mur
pengunci menuju dasar mesin cuci. Semua
mur pengunci harus dikencangkan.
Angkat Mur Pengunci
Bawah
Kencangkan keempat mur
pengunci dengan erat
Pemasangan
CATATAN
• Lantai kayu atau tipe suspensi dapat
menimbulkan ketidakseimbangan
dan getaran berlebihan.
CATATAN
• Jika mesin cuci dipasang di panggung yang ditinggikan, maka harus dikencangkan
dengan erat untuk menghindari risiko terguling.
Page 58

16
Lantai beton
Lantai kayu (Lantai suspensi)
• Permukaan pemasangan haruslah bersih, kering, dan rata.
• Pasanglah mesin cuci di lantai keras yang datar.
Lantai ubin (Lantai licin)
• Posisikan setiap dudukan di alas khusus Tread Mate dan datarkan mesin agar cocok.
(Potong Tread Mate hingga potongan 70x70 mm dan tempelkan bagian-bagiannya ke
ubin kering tempat mesin akan diletakkan.)
• Tread Mate adalah zat perekat otomatis yang digunakan di tangga & anak tangga untuk
mencegah terpeleset.
• Lantai kayu amat rentan terhadap getaran.
• Untuk mencegah getaran, Anda dianjurkan menempatkan cawan
tempel karet di setiap dudukan di bawah mesin cuci setidaknya
setebal 15mm, yang dikencangkan ke minimal 2 balok lantai
dengan sekrup.
• Jika mungkin pasanglah mesin cuci di salah satu sudut ruang yang lantainya lebih stabil.
• Pasang cawan tempel karet untuk mengurangi getaran.
• Anda bisa memperoleh cawan tempel karet (p/no.4620ER4002B) dari departemen suku
cadang LG.
Cawan
Tempel Karet
Pemasangan
CATATAN
• Penempatan dan perataan mesin cuci yang baik akan memastikan pengoperasian
yang tahan lama, teratur, dan andal.
• Mesin cuci harus 100% horizontal dan berdiri kokoh di posisinya.
• Mesin tidak boleh ter-"jungkat-jungkit" jika diberi beban.
• Permukaan pemasangan haruslah bersih, bebas dari lilin lantai dan selaput pelumas
lain.
• Jangan biarkan dudukan mesin cuci menjadi basah. Jika mesin cuci basah, Anda bisa
terpeleset.
Page 59

17
BAHASA
Mengoperasikan mesin cuci
2. Bukalah pintu dan muat cucian.
1. Pisahkan cucian Anda.
(Lihat halaman 18)
3. Tekan tombol Power.
4. Pilih Program.
(Lihat halaman 19~21)
5. Tambahkan detergen.
(Lihat halaman 31~32)
6. Tekan tombol Start/Pause. (Mulai/Jeda)
Pilih pilihan pada saat ini
(Lihat halaman 23~28)
■ Additional Program (Program Tambahan)
■ Temperature (Temperature)
■ Spin Speed (Kecepatan Putaran)
■ Other functions (Fungsi-fungsi lainnya)
Cara menggunakan mesin cuci
Page 60

18
■ Yang perlu diperhatikan sebelum mencuci
3. Perhatian sebelum memuat cucian
Menggabungkan pakaian yang besar dan kecil dalam satu
muatan. Muat pakaian besar terlebih dahulu. Pakaian besar tidak
boleh dicuci lebih dari setengah muatan cuci total. Jangan cuci
satu pakaian saja. Hal ini dapat menimbulkan muatan keluar dari
keseimbangan. Tambahkan satu atau dua pakaian serupa.
• Periksalah semua saku untuk memastikannya sudah kosong.
Benda seperti paku, jepit rambut, pentul korek api, bolpen, uang
logam, dan kunci dapat merusak mesin cuci maupun pakaian
Anda.
• Tutuplah resleting, sangkutan, dan temali untuk memastikannya
tidak merobek baju lain.
• Bersihkan dulu kotoran dan noda dengan menyikatkan sedikit
detergen yang dilarutkan di air pada noda seperti kerah dan
manset untuk membantu mengangkat kotoran.
• Periksalah lipatan paking fleksibel (abu-abu) dan bersihkan
segala benda kecil.
• Periksalah bagian dalam drum dan bersihkan segala benda dari
pencucian sebelumnya.
• Bersihkan segala benda atau pakaian dari paking fleksibel untuk
mencegah kerusakan paking dan pakaian.
2. Memisahkan
Untuk mendapatkan hasil terbaik, pisahkan pakaian ke dalam
muatan yang bisa dicuci dengan siklus pencucian yang sama.
Temperatur air dan kecepatan putaran serta kain yang berbeda
perlu dicuci dengan cara berbeda pula. Pisahkan selalu warna
gelap dari warna pucat dan putih. Cucilah secara terpisah
karena noda warna dan serat-serat kain dapat muncul karena
kelunturan pada warna putih dll. Jika mungkin, jangan cuci baju
yang sangat kotor bersama dengan yang tidak begitu kotor.
• Soil (Heavy, Normal, Light) [Kotoran (Sangat, Normal, Sedikit)]
Pisahkan pakaian sesuai kadar kekotoran.
• Color (White, Lights, Darks) [Warna (Putih, Pucat, Gelap)]
Pisahkan kain putih dari yang berwarna.
• Lint (Lint producers, Collectors) [Bulu kain (yang mudah
berbulu, yang mudah ditempeli bulu]
Cucilah kain yang mudah berbulu dan yang mudah ditempeli
bulu secara terpisah.
1. Label Perawatan
Carilah label perawatan di pakaian Anda. Label ini memberi
tahu Anda kandungan kain garmen Anda dan cara mencucinya.
Temperatur pencucian
Pencucian mesin Normal
Permanent press
Cuci tangan
Pisahkan cucian menurut ...
Kekotoran
Warna
Temperatur
pencucian
Tipe kain
Lembut
Jangan cuci
Cara menggunakan mesin cuci
CATATAN
• Sebelum melakukan pencucian pertama, pilihlah putaran (Katun 60°C, tambahkan setengah
muatan detergen) biarkan unit mencuci tanpa pakaian. Cara ini akan membersihkan endapan
dan air dari drum yang mungkin tersisa selama produksi.
Page 61

19
BAHASA
Tabel program pencucian
•
Prosedur yang dianjurkan menurut tipe cucian.
Program
Uraian
Tipe kain
Anjuran
Muatan
maksimum
Cotton
Memberikan performa lebih baik dengan
menggabungkan berbagai gerakan drum.
Menyediakan performa pencucian optimal
dengan mengurangi konsumsi energi.
Cotton
Eco
40°C
(Dingin hingga 95°C)
60°C
(Dingin hingga 60°C)
Peringkat
3 item
Garmen tidak luntur (baju, gaun
malam, piyama, dll) dan katun
putih sedikit kotor (pakaian dalam).
Putaran ini menyediakan proses nonstop
dari pencucian hingga pengeringan
sekaligus.
Wash+
Dry
Putaran ini cocok untuk baju santai yang
tidak perlu diseterika setelah dicuci.
Poliamida, Akrilik, Poliester
Easy
Care
40°C
(Dingin hingga 60°C)
Kurang
dari 4,0 kg
Memungkinkan pencucian
berbagai kain secara serentak.
Berbagai jenis kain kecuali garmen
khusus. (Sutra/lembut, pakaian
olahraga, kain gelap, wol,
Duvet/Gorden
Mix
40°C
(Dingin hingga 40°C)
Allergy
Care
Membersihkan pencetus alergi seperti
kutu busuk di rumah, serbuk sari, dan
bulu kucing.
Katun, pakaian dalam, sarung
bantal, seprei, pakaian bayi.
60°C
No choice
(Tanpa pilihan)
40°C
(Dingin hingga 95°C)
20°C
(Dingin hingga 30°C)
40°C
(30°C hingga 60°C)
Menghilangkan kekusutan dalam 20
menit dengan uap.
Refresh
Katun campuran, baju campuran
poliester, blus.
1 ukuran
tunggal
Alas tempat tidur katun, kecuali
garmen khusus (kain lembut, wol,
sutra, dll) dengan isian: duvet, bantal,
selimut, tutup sofa dengan isian
ringan.
Duvet
40°C
(Dingin hingga 40°C)
Sports
Wear
Putaran ini cocok untuk baju olahraga
seperti baju jogging dan baju lari.
Kurang
dari 3,0 kg
Kurang
dari 7,0 kg
Coolmax, Gore-tex, bulu domba,
dan Sympatex
Quick 30
Putaran ini menyediakan waktu
pencucian yang cepat untuk muatan kecil
dan pakaian berkotoran sedikit.
Cucian berwarna yang tahan
sedikit kotoran.
Sejumlah kecil cucian yang dapat
dikeringkan.
20°C
(Dingin hingga 40°C)
Cara menggunakan mesin cuci
Putaran ini adalah untuk pakaian
besar seperti seprei, bantal, tutup sofa,
dll.
Direct
Wear
Siklus ini memberikan cuci untuk
pengeringan dalam waktu 1 jam
sekaligus untuk cahaya kotor 1 ~ 3
kemeja.
Cotton Campuran, Polyester
dicampur Kemeja, blus.
20°C
Pakaian harus dicuci dengan
tangan. Kainnya sangat lembut
dan mudah rusak.
Stain
Care
Kain mengandung katun. BUKAN
kain lembut.
Kurang
dari 3,0 kg
Gentle
Care
Siklus ini digunakan untuk pakaian yang
harus dicuci dengan tangan dan pakaian
yang lembut seperti pakaian dalam,
lingerie, blus, wol yang dapat dicuci, gaun,
dll.(Gunakan deterhen untuk wol yang
boleh dicuci dengan mesin).
Membersikan noda-noda seperti bekas
sirup, jus, tanah, dll.
(Suhu air akan meningkat sedikit demi
sedikit untuk membersihkan berbagai
noda.)
Kurang
dari 1,5 kg
Download
Cycle
Untuk siklus yang dapat diunduh.
Jika Anda belum mengunduh siklus apa pun, ‘Rinse+Spin’ (Cuci+Keringkan) akan ditetapkan.
Page 62

20
•
Temperatur Air: Pilihlah temperatur air agar cocok dengan siklus pencucian.
Ikuti selalu petunjuk atau label perawatan produsen saat mencuci.
Tabel Program Pengeringan
Cara menggunakan mesin cuci
CATATAN
• Dianjurkan menggunakan detergen netral.
• Pilih kecepatan maksimum spin dari program pencucian untuk mendapatkan hasil
pengeringan yang terbaik.
• Pastikan bahwa kapasitas cucian yang dicuci dan dikeringkan dalam satu program
tidak melebihi kapasitas maksimum yang diizinkan untuk mengeringkan.
Program Tipe kain Muatan maksimum
Eco ( )
Cupboard ( )
Normal Eco Dry ( )
Kurang dari 3.0 kg
Kurang dari 7.0 kg
Kurang dari 7.0 kg
Kurang dari 7.0 kg
Kurang dari 0.5 kg
Kurang dari 1.5 kg
Katun atau Kain Linen
Seperti handuk katun, t-shirt, dan kain linen
Katun atau Kain Linen yang siap disetrika.Iron ( )
Bahan yang lembut, Kain Sintetis
Cocok untuk bahan yang lembut, dapat digunakan untuk
berbagai jenis program
Low Temp. ( )
Time 30 min. ( )
Time 60 min. ( )
Time 120 min. ( )
–
–
–
Page 63

21
BAHASA
* : pilihan ini otomatis disertakan dalam putaran dan tidak bisa dihapus.
Data operasi
Cara menggunakan mesin cuci
Pilihan ekstra
Cotton
Cotton Large
Easy Care
Mix
Allergy Care
Direct Wear
Steam Refresh
Duvet
Sports Wear
Quick 30
Gentle Care
Wash+Dry
Stain Care
Time
Delay
Steam
Wash
Intensive
Program
Cotton
Cotton Large
Easy Care
Mix
Allergy Care
Direct Wear
Steam Refresh
Duvet
Sports Wear
Quick 30
Gentle Care
Wash+Dry
Stain Care
1400
1400
1000
1400
1400
1000
-
1000
800
1400
800
1400
1400
Program
Max RPM
Pre
Wash
Time
Save
Rinse
+
Dry
*
*
*
*
*
Steam
Softener
Favorite
Page 64

22
■ Panel kontrol
Tombol
Start/Pause
Tombol
Power.
Tombol
Option
Layar LED
Tombol
Program
Power (Daya)
• Tekan tombol Power untuk mematikan
dan menghidupkan mesin.
• Sentuh dan lepaskan jari Anda setelah 1
detik untuk mematikan.
Tombol Program
• Program disediakan menurut tipe cucian.
• Lampu akan menyala untuk menunjukkan
program yang dipilih.
Layar LED
• Layar ini menunjukkan pengaturan,
estimasi waktu yang tersisa, pilihan, dan
pesan status untuk mesin cuci Anda.
Layar akan tetap aktif di sepanjang
putaran.
Start/Pause (Mulai/Jeda)
• Tombol Start/Pause (Mulai/Jeda) ini
digunakan untuk memulai putaran
pencucian atau menjeda putaran pencucian.
• Jika Anda memerlukan penghentian
putaran pencucian sementara, tekanlah
tombol Start/Pause (Mulai/Jeda).
• Ketika mesin berada dikondisi Pause
(Jeda), daya dimatikan otomatis setelah 4
menit.
Pilihan
• Hal ini memungkinkan Anda memilih
putaran lain dan akan menyala bila dipilih.
• Gunakan tombol-tombol ini untuk memilih
pilihan putaran yang diinginkan untuk
putaran yang dipilih.
Fungsi SMARTDIAGNOSIS™
hanya tersedia untuk produk yang
bertanda SMARTDIAGNOSIS™.
Cara menggunakan mesin cuci
Page 65

23
BAHASA
Jika cucian sangat kotor,
prosedur “Pre Wash” akan efektif.
1. Tekan tombol Power.
2. Pilih putaran (cycle).
3. Tekan tombol Pre Wash.
4. Tekan tombol Start/Pause (Mulai/Jeda).
Pre Wash (Pra-Pencucian) ( )
■ Pilihan
Program Favorite memungkinkan Anda
menyimpan putaran pencucian kesukaan
Anda untuk digunakan di waktu mendatang.
1. Tekan tombol Power.
2. Pilih putaran (cycle).
3. Pilih prosedur (courses).
(Metode pencucian, jumlah bilasan,
kecepatan putaran, temperatur air, dll.)
4. Tekan dan tahan tombol program Favorite
selama 3 detik.
Program Favorite sekarang disimpan untuk
digunakan lain kali.
Untuk menggunakan kembali program
tersebut, pilih program Favorite dan tekan
Start/Pause.
Favorite (Favorit)
Cara menggunakan mesin cuci
Fitur Steam Wash (Cuci Uap) meningkatkan
performa pencucian dengan konsumsi energi
rendah. Steam Softener(Pelembut dengan Uap)
menyemprotkan uap setelah siklus mencuci
putar untuk mengurangi kusut dan melembutkan
pakaian.
1. Tekan tombol Power.
2. Untuk opsi Steam Wash(Pencucian dengan
Uap), pilihlah siklus penguapan. Untuk opsi
Steam Softener(Pelembut dengan Uap), pilih
Cotton atau Cotton Large, Mix, Easy Care .
3. Tekan tombol Steam (Uap) untuk Steam
Wash (Pencucian dengan Uap). Tekan
tombol Steam (Uap) sekali lagi (menjadi 2
kali) untuk mengubah ke Steam Softener
(Pelembut dengan Uap). Tekan tombol Steam
(Uap) sekali lagi (menjadi 3 kali) untuk Steam
Wash (Pencucian dengan Uap) dan Steam
Softener (Pelembut dengan Uap) bersamaan.
4. Tekan tombol Start/Pause (Mulai/Jeda).
Steam Wash (Uap cuci) ( )
• Untuk pakaian bayi, pakaian dalam, atau
pakaian yang sangat bernoda.
• Tersedia dalam program Cotton, Cotton
Large, Mix, Easy Care, Duvet, Allergy Care,
Wash+Dry, Steam Refresh programs.
• Jangan menggunakan Steam
Wash(Pencucian dengan Uap) untuk pakaian
yang mudah luntur dan pakaian yang lembut
seperti wol dan sutra.
Steam Softener (Pelembut dengan Uap)
( )
• Cocok untuk membuat tekstur yang lembut
setelah dikeringkan dengan udara.
• Tersedia dalam program Cotton, Cotton
Large, Mix, Easy Care programs.
• Jangan gunakan Steam Wash untuk kain
lembut seperti wol, sutra, dan pakaian yang
mudah luntur.
• Tergantung jenis kainnya, performa
melembutkan dapat berbeda-beda.
Steam (Wash and Softener)
[Uap (Cuci dan Pelembut)]
Page 66

24
• Level Kecepatan Putaran bisa dipilih dengan
menekan tombol 'Spin’ berulang kali.
• Spin only (Putaran Saja)
1. Tekan tombol Power.
2. Tekan tombol Spin untuk memilih RPM.
3. Tekan tombol Start/Pause (Mulai/Jeda)
• Time Save (Penghematan Waktu) ( ):
Pilihan ini bisa digunakan untuk mengurangi
waktu program pencucian.
• Intensive (Intensif) ( ):
Jika cucian sangat kotor, prosedur
“Intensive” akan efektif.
Wash (Cuci) ( )
• Rinse+( ):
Tambahkan sekali pembilasan.
Rinse (Bilas) ( )
Spin (putaran)
• Dengan menekan tombol Temp., temperatur
air bisa dipilih.
- Cold (Dingin, 0)
- 20°C, 30°C, 40°C, 60°C, 95°C
• Temperatur air bisa dipilih menurut program.
Temp.
Cara menggunakan mesin cuci
Apabila anda memilih “No Spin(0)”,
mesin tetap akan berputar dalam jangka
waktu yang singkat dengan kecepatan
yang rendah untuk mengeringkan
dengan lebih cepat.
CATATAN
1. Tekan tombol Power.
2. Pilih putaran (cycle).
3. Tekan tombol Time Delay (Waktu Tunggu)
dan atur waktu yang diperlukan.
4. Tekan tombol Start/Pause (Mulai/Jeda)
Anda bisa mengatur waktu tunggu sehingga
mesin cuci akan otomatis dimulai dan selesai
setelah interval waktu yang ditentukan.
Time Delay (Waktu Tunggu) ( )
CATATAN
• Waktu Tunggu adalah waktu untuk
menyelesaikan program, bukan
memulai. Waktu operasi aktual mungkin
bervariasi menurut temperatur air,
muatan cucian, dan faktor-faktor lain.
Page 67

25
BAHASA
Mengunci panel kontrol
1. Tekan tombol-tombol Pengaman Anak secara
serentak selama 3 detik.
2. Suara bip akan terdengar, dan ‘ ’ akan
ditampilkan di layar LED.
Ketika pengaman anak disetel, semua tombol
akan terkunci, kecuali tombol Power.
Pilihlah fungsi ini untuk mengunci tombol di panel kontrol guna mencegahnya dari pengrusakan.
“Child Lock (Pengaman Anak)” hanya bisa disetel selama putaran pencucian.
Membuka kunci panel kontrol
1. Tekan tombol-tombol Pengaman Anak secara
serentak selama 3 detik.
2. Suara bip akan terdengar, dan sisa waktu
program saat ini akan ditampilkan kembali di
layar LED.
■ Pengaman Anak
■ Bip Hidup/Mati
Cara menggunakan mesin cuci
CATATAN
•
Mematikan daya tidak akan mereset
fungsi pengaman anak. Anda harus
menonaktifkan pengaman anak sebelum
bisa mengakses fungsi-fungsi lain.
CATATAN
•
Jika Anda ingin mematikan suara bip,
cukup ulangi proses ini.
1. Tekan tombol Power.
2. Tekan tombol Start/Pause (Mulai/Jeda)
3. Tekan dan tahan tombol Temp. and Steam
secara serentak selama tiga detik untuk
menyetel fungsi Beep on/off.
Begitu fungsi Beep on/off function disetel,
pengaturan akan diingat, meskipun daya dimatikan.
Page 68

26
Tub Clean (Tabung Bersih) adalah putaran khusus untuk membersihkan bagian dalam mesin
cuci. Dalam putaran ini, level air yang lebih tinggi digunakan dengan kecepatan putaran yang
lebih tinggi. Lakukan putaran seperti ini secara teratur.
1. Bersihkan segala pakaian atau benda dari
mesin cuci dan tutuplah pintunya.
2. Buka laci dispenser dan tambahkan
Anti-endapan kapur (seperti Calgon) ke
kompartemen pencucian utama.
3. Tutup laci dispenser dengan perlahan.
4. Nyalakan mesin lalu tekan dan tahan tombol
Tabung Bersih selama 3 detik, maka “ ”
akan ditampilkan di layar LED.
5. Tekan tombol Start/Pause (Mulai/Jeda).
6. Setelah putaran selesai, biarkan pintu terbuka
agar bukaan pintu mesin cuci, paking fleksibel,
dan kaca pintu mengering.
• “Door Lock (Pengunci Pintu)” - Untuk
alasan keselamatan akan terkunci saat mesin
digunakan dan ikon “Door Lock” akan menyala.
Anda bisa membuka pintu dengan aman
setelah ikon “Door Lock” padam.
•
Saat "Detecting (Deteksi)" ditampilkan di
layar mesin cuci berputar perlahan dan
mendeteksi berapa banyak cucian yang dimuat
di dalam drum.
Prosedur ini akan memerlukan sedikit waktu.
■ Tabung Bersih
■ Pengunci Pintu & Deteksi
Cara menggunakan mesin cuci
CATATAN
• Jangan tambahkan detergen lagi pada kompartemen detergen.
• Busa berlebihan bisa terjadi dan bisa bocor dari mesin cuci.
PERHATIAN
• Jika ada anak kecil di lokasi, berhati-hatilah, jangan tinggalkan pintu mesin
terbuka terlalu lama.
Page 69

27
BAHASA
• Gunakan Automatic Cycles (Putaran
Otomatis) untuk mengeringkan sebagian
besar muatan. Sensor elektronik mengukur
temperatur gas buang untuk meningkatkan
atau menurunkan temperatur pengeringan
untuk waktu reaksi yang lebih cepat dan
kontrol temperatur yang lebih ketat.
• Rekomendasi prosedur pengeringan
otomatis menurut jenis pakaian.
a) Cupboard (Jemur) : Untuk pilihan pakaian
Katun
b) Eco (Hemat) : Putaran khusus untuk
mengurangi penggunaan air selama
putaran pengeringan.
c) Time (Waktu) (30/60/120 menit)
- 30 menit : Katun/Handuk 0,5 kg
- 60 menit : Katun/Handuk 1,5 kg
- 120 menit : Katun/Handuk 3,0 kg
d) Low Temp. (Temperatur Rendah) :
Untuk pilihan pakaian Sintetis
e) Iron (Seterika) : Jika Anda ingin
menyeterika pakaian
f) Normal Eco (Normal Echo) : Untuk energi
kering course
• Proses otomatis pengering-pencuci dari
pencucian hingga pengeringan bisa dipilih
dengan mudah.
• Untuk pengeringan yang paling merata,
pastikan semua pakaian di muatan pakaian
memiliki kemiripan bahan dan ketebalan.
• Jangan memuat pengering secara
berlebihan dengan memasukkan terlalu
banyak artikel ke dalam drum. Pakaian
harus dapat bolak-balik dengan bebas.
• JIka Anda membuka pintu dan mengambil
muatan sebelum pengering selesai berputar,
ingatlah untuk menekan tombol Start/Pause.
• Dengan memutar tombol DRY, Anda bisa
memilih: Cupboard (Jemur) - Time (Waktu)
(30 - 60 - 120) - Eco (Hemat) - Iron
(Seterika) - Low Temp. (Temperatur
Rendah) - Normal Eco (Normal Echo)
• Setelah rampungnya pengeringan, “ ”
akan ditampilkan. Dengan menekan tombol
“Start/Pause” program akan ditutup. Jika
Anda tidak menekan tombol “Start/Pause”
program akan ditutup setelah sekitar 4 jam.
“ ” Putaran Pendinginan.
• Keran air dingin harus dibiarkan hidup
selama putaran pengeringan.
■ Dry (Pengeringan)
1. Pedoman Otomatis Pengeringan
Cara menggunakan mesin cuci
CATATAN
•
Estimasi waktu pengeringan bervariasi
dari waktu pengeringan aktual dengan
yang otomatis. Tipe kain, ukuran
muatan, dan kekeringan yang dipilih
memengaruhi waktu pengeringan.
CATATAN
•
Jika Anda menghentikan mesin selama
dalam siklus pengeringan, motor kipas
pengering dap at dioperasikan untuk
berhenti selama 30 detik demi
keamanan.
Kemudian pada panel mesin akan
ditampilkan “ ”.
Page 70

28
- Jangan lakukan putaran bolak-balik pada
bahan wol kering. Regangkanlah bahan sesuai
ukuran sebenarnya, lalu keringkan dalam
posisi mendatar.
Bahan Wol
- Beberapa bahan tenunan dan rajutan dapat
menciut, dengan tingkat beragam, tergantung
kualitasnya.
- Regangkanlah bahan-bahan itu selalu setelah
melakukan pengeringan.
Bahan Tenunan dan Rajutan
- Jangan memuat pengering secara berlebihan
- Keluarkan bahan permanent press segera
setelah pengering berhenti untuk mengurangi
kerutan.
Bahan Permanent Press dan Sintetis
- Periksalah selalu petunjuk produsen.
Bahan Serat atau Kulit
- Periksalah selalu petunjuk produsen.
Pakaian bayi dan gaun malam
- Jangan keringkan mode item mana pun dari
atau meliputi karet atau plastik, seperti:
a) celemek, cukin, penutup kursi
b) gorden dan taplak meja
c) keset kamar mandi
Karet dan Plastik
- Jangan keringkan bahan serat kaca di dalam
pengering Anda. Partikel kaca yang tertinggal
di pengering bisa menempel di pakaian Anda
pada kali berikutnya Anda menggunakan
pengering dan dapat membuat kulit teriritasi.
Serat kaca
• Ketika putaran pengeringan selesai,
“ ” [Cool Down (Pendinginan)] akan
ditampilkan di layar Multi.
• Cool Down diatur otomatis ketika putaran
pengeringan rampung.
• Bila Anda tidak mengeluarkan kain dari
pengering begitu berhenti, kerutan akan
muncul.
• Bila Anda tidak mengeluarkan kain dari
pengering begitu berhenti, kerutan akan
muncul.
• Pesan “ ” akan terus tertampil hingga
pakaian dikeluarkan atau tombol Start/Pause
button ditekan.
3. Menyelesaikan Pengeringan
• Dengan memutar tombol DRY, waktu
pengeringan dapat dipilih.
• Prosedur pengeringan bisa berlangsung
hingga 430 menit.
• Ketika memilih pengeringan saja, berputar
adalah termasuk dalam hal kebutuhan
seperti meningkatkan efisiensi energi.
• Waktu pengeringan ini diberikan sebagai
pedoman untuk membantu Anda menyetel
pengering untuk pengeringan manual. Waktu
pengeringan bisa bervariasi menurut
kelembapan, suhu kamar, dan tipe kain.
Namun pengalaman Anda sendiri
merupakan pedoman terbaik Anda.
2. Pedoman waktu pengeringan
Cara menggunakan mesin cuci
Page 71

29
BAHASA
Sebelum menggunakan fungsi Tag On
• Fungsi Tag On dapat Anda pakai untuk menggunakan LG Smart Diagnosis™ dan fitur
Cycle Download (Unduhan Siklus) dengan mudah untuk menghubungi mesin cuci dari
smartphone Anda.
• Untuk menggunakan fungsi Tag On:
1. Unduh Aplikasi LG Smart Laundry&DW ke dalam smartphone.
2. Hidupkan fungsi NFC (Near Field Communication) di smartphone Anda.
• Fungsi Tag On hanya dapat digunakan dengan sebagian besar smartphone yang
dipasangi fungsi NFC dan memiliki sistem operasi Android.
1. Buka menu "Settings" (Pengaturan) di smartphone
lalu pilih "Share & Connect" (Bagi & Sambungkan) di
bawah "WIRELESS & NETWORKS" (Wireless &
Jaringan).
2. Setel "NFC“ dan “Direct Android Beam” (Sinar
Android Langsung) ke ON lalu pilih “NFC“.
3. Centang "Use Read and Write/P2P receive"
(Gunakan Baca dan Tulis/ Penerimaan P2P).
■ Hidupkan fungsi NFC di smartphone
CATATAN
• Tergantung produsen smartphone Anda dan versi
OS Android, proses aktivasi NFC dapat berbedabeda.
• Bacalah panduan smartphone Anda untuk
rinciannya.
Page 72

30
Sebelum menggunakan fungsi Tag On
■ Panduan Tag On
Posisi Tag On
•
Tag On:
Carilah ikon Tag On di sebelah layar LCD di panel
kontrol.
Ini adalah tempat Anda menaruh smartphone saat
menggunakan fungsi Tag On dengan LG Smart
Diagnosis™ dan fitur Cycle Download (Unduhan siklus)
dari aplikasi LG Smart Laundry & DW.
•
Saat menggunakan fungsi Tag On, letakkan
smartphone sehingga antena NFC di belakang
smartphone cocok dengan posisi ikon Tag On pada
mesin cuci.
Jika Anda tidak mengetahui posisi antena NFC, putar
perlahan smartphone hingga aplikasi sudah
menunjukkan adanya sambungan.
•
Karena karakteristik NFC, jika jarak transmisi terlalu jauh, atau jika ada stiker logam, atau
casing ponsel yang tebal juga akan menghambat transmisi.
•
Tekan aplikasi LG Smart Laundry & DW untuk panduan yang lebih rinci mengenai
cara penggunaan fungsi Tag On.
Page 73

31
BAHASA
• Hanya untuk cucian utama ➔
• Pra Pencucian + Cucian Utama ➔
• Jangan melebihi garis isian maksimum.
Pengisian berlebihan bisa menimbulkan
pemisahan dini pelembut kain yang dapat
menodai pakaian. Tutup laci dispenser dengan
perlahan.
• Jangan tinggalkan pelembut kain dalam laci
detergen lebih dari 2 hari. (Pelembut kain bisa
mengeras)
• Pelembut akan otomatis ditambahkan selama
putaran pembilasan terakhir.
• Jangan buka laci ketika air diisikan.
• Pelarut (benzena, dll) tidak boleh digunakan.
Laci dispenser
Menambahkan pelembut kain
■ Menambahkan detergen dan pelembut kain
Menambahkan detergen
PERINGATAN
• Jauhkan semua deterjen dari anak-anak
karena dapat menimbulkan bahaya
keracunan.
• Terlalu banyak detergen, pemutih, atau
pelembut dapat membuat air meluap.
• Pastikan Anda menggunakan jumlah
detergen yang tepat.
CATATAN
• Jangan tuangkan pelembut langsung ke pakaian.
Pelembut
kain
Detergen untuk
pra-pencucian
Detergen untuk
pencucian utama
Page 74

32
• Detergen dibilas dari dispenser pada awal putaran.
Dosis detergen
Menambahkan detergen
CATATAN
• Muatan penuh : menurut rekomendasi produsen.
• Muatan sebagian : 3/4 dari jumlah normal
• Muatan minimum : 1/2 muatan penuh
PERINGATAN
• Jangan biarkan detergen mengeras. Hal itu dapat menimbulkan sumbatan,
performa pembilasan yang buruk, atau bau tak sedap.
• Deterjen harus digunakan sesuai dengan petunjuk dari produsen deterjen dan dipilih berdasarkan
jenis, warna, jenis kotoran pada kain dan suhu pencucian.
• Jika Anda menggunakan terlalu banyak deterjen, busa yang banyak bisa timbul dan dapat
menurunkan performa pencucian
• Jike busa terlalu banyak, harap kurangi jumlah deterjen
• Gunakan deterjen yang direkomendasikan untuk mesin cuci muatan depan.
• Jika anda ingin menggunakan deterjen cair, ikutilah pedoman yang disediakan oleh produsen
deterjen.
• Anda bisa menuangkan deterjen cair langsung ke laci deterjen utama apabila Anda ingin memulai
pencucian dengan segera.
• Harap tidak menggunakan deterjen cair jika anda menggunakan fitur “Pre Wash” (Pra Pencucian)
atau jika anda menggunakan “Time Delay” (Waktu Tunggu) karena deterjen cair bisa mengeras.
• Jumlah deterjen harus disesuaikan menurut temperatur air, kekerasan air, dan berat muatan. Untuk
hasil terbaik, gunakan jumlah deterjen optimal yang direkomendasikan oleh produsen deterjen.
• Baca label pada pakaian sebelum memilih deterjen dan suhu air.
• Untuk menggunakan mesin cuci, masukkan hanya deterjen yang sesuai.
- Deterjen bubuk secara umum untuk semua jenis kain (Dingin - 95°C)
- Deterjen bubuk untuk kain yang lembut (Dingin - 40°C)
- Deterjen cair untuk semua jenis kain (Dingin - 95°C) atau deterjen khusus untuk kain wol
(Dingin - 40°C)
• Untuk proses pencucian dan pemutihan yang lebih baik, gunakan pemutih bubuk pada umumnya.
• Pelembut air, seperti Anti-endapan kapur (seperti
Calgon) dapat digunakan untuk menurunkan
penggunaan detergen dalam area air yang sangat
keras. Lakukan pemisahan sesuai jumlah yang
ditentukan dalam kemasan. Pertama tambahkan
detergen, lalu pelembut air.
• Gunakan kuantitas detergen seperti untuk air
lembut.
1. Buka pintu mesin dan letakkan
tablet ke dalam drum.
Menambahkan pelembut air
Menggunakan tablet
2. Muat cucian ke dalam drum dan
tutup pintunya.
Page 75

33
BAHASA
Filter masukan air
•
Ikon " " akan ditampilkan pada panel kontrol bila air tidak memasuki laci detergen.
•
Jika air sangat keras dan mengandung bahan endapan kapur, filter masukan air mungkin
bisa tersumbat.
Karena itu ada baiknya membersihkannya secara teratur.
•
Sebelum membersihkan bagian dalam mesin cuci, lepaskan kabel daya listrik untuk
menghindari bahaya kejutan listrik.
• Tutup katup air jika mesin akan ditinggalkan dalam waktu lama (misalnya liburan),
khususnya jika tidak ada lobang kuras air di lantai (selokan) langsung di dekat mesin.
1. Matikan keran air.
2. Buka sekrup selang masukan air.
3. Bersihkan filter dengan sikat bulu keras.
4. Kencangkan selang masukan.
Pemeliharaan
Page 76

34
•
Biarkan air mendingin sebelum membersihkan pompa penguras, melakukan pengosongan
darurat, atau membuka pintu saat darurat.
•
Filter penguras mengumpulkan benang dan benda-benda kecil yang tertinggal di cucian.
Periksalah secara teratur apakah filter sudah bersih untuk memastikan kerja mesin yang
lancar.
Filter pompa penguras
1. Bukalah sumbat tutup bawah, tarik
selang keluar.
2. Buka sumbat penguras.
Buka filter dengan memutar ke kiri.
3. Bersihkan segala benda asing dari filter
pompa.
4. Setelah pembersihan, putar filter pompa dan
masukkan sumbat penguras.
5. Tutuplah sumbat tutup bawah.
1
2
Wadah untuk
mengumpulkan
air kurasan.
Pemeliharaan
PERHATIAN
•
Mula-mula kuraslah dengan menggunakan selang penguras, lalu buka filter pompa untuk
membersihkan segala benang atau benda.
Berhati-hatilah saat menguras jika airnya panas.
Page 77

35
BAHASA
Laci dispenser
• Setelah beberapa saat, detergen dan pelembut kain akan meninggalkan endapan di laci.
• Ini harus dibersihkan secara teratur dengan semprotan air mengalir.
• Jika perlu, endapan bisa dibersihkan sepenuhnya dari mesin dengan menekan pegangan
ke bawah dan dengan menariknya keluar.
• Agar bisa dibersihkan, bagian atas kompartemen pelembut kain bisa dilepaskan.
1. Tarik keluar laci dispenser.
4. Masukkan laci dispenser.
2. Bersihkan laci dispenser di dalam air.
3. Bersihkan bagian dalam ceruk dengan sikat gigi
usang.
Pemeliharaan
Page 78

36
• Perawatan mesin cuci yang baik dapat memperpanjang usia pakainya.
• Bagian luar mesin dapat dibersihkan dengan air hangat dan detergen rumah-tangga non-abrasif netral.
• Sekalah segala tumpahan dengan segera. Sekalah dengan kain lembab.
• Usahakan untuk tidak memukul permukaan dengan benda tajam.
• Jangan gunakan spiritus metil, bahan pencair, atau produk serupa.
Jika mesin cuci disimpan di area di mana pembekuan dapat terjadi atau dipindahkan dalam temperatur beku,
ikutilah petunjuk ini untuk mencegah kerusakan pada mesin cuci.
• Matikan keran air.
• Lepaskan selang dari pasokan air dan kuraslah air dari selang.
• Pasang kabel listrik ke stopkontak listrik yang telah di-groundkan dengan baik.
• Tambahkan 1 galon (3,8L) antibeku kendaraan rekreasi (RV) non-toksik ke dalam drum cuci kosong. Tutup
pintu.
• Atur siklus putaran dan biarkan mesin berputar selama 1 menit untuk menguras seluruh air. Tidak semua
antibeku RV akan dibuang.
• Lepaskan kabel daya listrik, kosongkan bagian dalam drum, dan tutuplah pintu.
• Bersihkan laci dispenser, kuras dan keringkan kelebihan air dari kompartemen.
• Simpan mesin cuci dalam posisi tegak.
• Untuk membersihkan antibeku dari mesin cuci setelah penyimpanan, jalankan mesin cuci yang kosong dalam
putaran penuh dengan menggunakan detergen. Jangan tambahkan muatan cuci.
■ Membersihkan mesin cuci
■ Kondisi dingin
Drum pencucian
• Jika Anda tinggal di area air keras, endapan kapur bisa terbentuk terus-menerus di tempat-tempat
yang tidak dapat dilihat sehingga tidak mudah dibersihkan. Dari waktu ke waktu, pembentukan
endapan ini menyumbat peralatan, dan jika tidak terus diperiksa, mesin harus diganti.
• Meskipun drum pencucian terbuat dari baja antikarat, bintik karat bisa ditimbulkan oleh bahan logam
kecil (klip kertas, pin pengaman) yang tertinggal di dalam drum.
• Drum pencucian harus dibersihkan dari waktu ke waktu.
• Jika Anda menggunakan bahan anti-endapan, pewarna, atau pemutih, pastikan semua itu cocok
untuk digunakan di mesin cuci.
• Anti-endapan mungkin berisi bahan kimia yang dapat merusak sebagian mesin cuci Anda.
• Bersihkan segala noda dengan bahan pembersih anti-karat.
• Jangan gunakan wol baja.
Bagian luar
Bagian dalam
Pemeliharaan
CATATAN
• Untuk membersihkan endapan air keras, gunakan hanya pembersih yang sudah diberi label
aman untuk mesin cuci.
• Keringkan bagian sekitar bukaan pintu mesin cuci, paking fleksibel, dan kaca pintu.
• Lakukan putaran penuh mesin cuci dengan menggunakan air panas.
• Ulangi proses ini jika perlu.
• Encerkan 5g pemutih oksigen dengan 5lair hangat. (diencerkan 1/1000)
•
Seka gasket menggunakan pemutih yang diencerkan. (Anda MUST menggunakan sarung tangan karet)
• Keringkat gasket menggunakan pakaian kering.
• Buka pintu hingga benar-benar kering.
• Bersihkan gasket lagi sebulan sekali.
* Penggunaan pemutih yang tidak diencerkan dapat merusak gasket atau komponen mesin cuci.
Page 79

37
BAHASA
• Mesin cuci ini dilengkapi dengan fungsi keselamatan otomatis yang mendeteksi dan
mendiagnosis kesalahan di tahap dini dan bereaksi dengan tepat.
Ketika mesin tidak berfungsi baik atau tidak berfungsi sama sekali, periksalah poin-poin
berikut sebelum Anda menghubungi penyedia jasa servis.
Gejala Kemungkinan Penyebab Solusi
Suara berderak
dan berdentam
Suara gedebuk
Suara bergetar
Kebocoran air.
Terlalu banyak
busa
Air tidak memasuki
mesin cuci atau
memasukinyasecar
a perlahan
Air di dalam mesin
cuci tidak terkuras
atau terkuras
perlahan.
• Benda asing seperti uang logam
atau pin pengaman mungkin
berada di drum atau pompa.
• Beban cucian berat mungkin
menghasilkan bunyi gedebuk
Hal ini adalah normal.
• Sudahkah Anda melepaskan
semua baut transit dan
kemasan?
• Apakah semua sandaran
dudukan sudah menempel erat
ke tanah?
• Selang isian atau selang
penguras kendor di keran atau
mesin cuci.
• Pipa penguras rumah
tersumbat.
• Pasokan air tidak memadai di
area.
• Keran pasokan air tidak terbuka
sempurna.
• Selang masukan air bengkok.
• Filter selang masukan
tersumbat.
• Selang penguras bengkok atau
tersumbat.
• Filter penguras tersumbat.
Hentikan mesin cuci, periksa drum,
dan kuraslah filter.
Jika suara berisik terus terdengar
setelah mesin cuci dinyalakan ulang,
hubungilah pusat servis resmi.
Jika suara terus terdengar, mesin
cuci mungkin kehilangan
keseimbangan. Hentikan dan
distribusikan ulang muatan cucian.
Jika tidak dilepaskan selama
pemasangan, bacalah pedoman
Pemasangan untuk melepaskan
baut transit.
Muatan cuci mungkin terdistribusi
tidak merata di dalam drum.
Hentikan mesin cuci dan atur
kembali muatan cucian.
Periksa dan eratkan sambungan
selang.
Bersihkan sumbat pipa penguras.
Hubungi ahli pompa bila perlu.
Terlalu banyak detergen atau
detergen yang tidak cocok mungkin
menyebabkan busa berlebihan yang
menyebabkan kebocoran air.
Periksa keran lain di rumah.
Buka keran dengan sempurna.
Eratkan selang.
Periksa filter selang masukan.
Bersihkan dan eratkan selang
penguras.
Bersihkan filter penguras
Mendiagnosis masalah
Pedoman penyelesaian masalah
Page 80

38
Mesin cuci
tidak berputar
Mesin cuci
tidak berputar
Pintu tidak
terbuka
Waktu putaran
pencucian
tertunda
Pelembut kain
meluap
Pelembut
dipisahkan
terlalu dini
Masalah
pengeringan
• Kabel daya mungkin belum
dihubungkan atau
sambungannya mungkin longgar.
• Sekring rumah putus, pemutus
sirkuit macet, atau telah terjadi
kebocoran daya.
• Keran pasokan air belum
dihidupkan.
• Periksalah apakah pintu sudah
ditutup dengan erat.
Terlalu banyak pelembut dapat
menyebabkan air meluap.
• Tidak bisa mengering
Pastikan steker cocok dengan stopkontak
dinding. Resetlah pemutus sirkuit atau
gantilah sekring.
Jangan naikkan kapasitas sekring. Jika
masalahnya adalah kelebihan beban sirkuit,
koreksilah dengan bantuan petugas listrik
berkualifikasi.
Hidupkan keran pasokan air.
Tutup pintu dan tekan tombol Start/Pause
(Mulai/Jeda) Setelah menekan tombol
Start/Pause, akan perlu beberapa saat
sebelum mesin cuci mulai berputar. Pintu
harus terkunci sebelum putaran bisa dicapai.
Tambahkan 1 atau 2 pakaian yang serupa
untuk membantu menyeimbangkan putaran.
Atur kembali muatan agar muncul putaran
yang baik.
Begitu mesin diaktifkan, pintu tidak akan bisa
dibuka demi alasan keselamatan. Periksalah
apakah ikon “Door Lock (Pengunci Pintu)”
sudah menyala. Anda bisa membuka pintu
dengan aman setelah ikon “Door Lock”
padam.
Waktu pencucian dapat beragam tergantung
jumlah cucian, tekanan air, temperatur air,
dan kondisi penggunaan lainnya. Jika
terdeteksi ketidakseimbangan atau jika
program pembersihan busa hidup, waktu
pencucian akan dinaikkan.
Ikutilah pedoman pelembut untuk memastikan
bahwa Anda telah menggunakan jumlah yang
tepat. Jangan melebihi garis isian maksimum.
Tutup laci dispenser dengan perlahan. Jangan
buka laci selama putaran pencucian.
Jangan melebihi muatan yang dianjurkan.
Periksalah apakah mesin cuci sudah terkuras
dengan baik untuk mengeluarkan air yang
memadai dari muatan. Muatan pakaian terlalu
kecil untuk dibolak-balikkan. Tambahkan
beberapa handuk.
Gejala Kemungkinan Penyebab Solusi
Pedoman penyelesaian masalah
Page 81

39
BAHASA
Gejala Kemungkinan Penyebab Solusi
• Pasokan air tidak memadai di area.
• Keran pasokan air tidak terbuka sempurna.
• Selang masukan air bengkok.
• Filter selang masukan tersumbat.
• Selang penguras bengkok atau tersumbat.
• Filter penguras tersumbat.
• Muatan pakaian terlalu kecil.
• Muatan di luar keseimbangan.
• Peralatan ini memiliki sistem koreksi dan
deteksi ketidakseimbangan. Jika Anda
memuat bahan individual (seperti keset kamar
mandi, jubah mandi, dll.), sistem ini dapat
berhenti berputar atau bahkan mengganggu
siklus putaran keseluruhan.
• Jika cucian masih terlalu basah di akhir putaran,
tambahkan bahan cucian yang lebih kecil untuk
menyembangkan putaran dan mengulangi siklus
putaran.
• Pastikan pintu tidak terbuka.
• Air terlalu banyak karena katup air rusak.
• Sensor level air telah mengalami malafungsi.
• Beban berlebihan di motor.
• Kebocoran air.
• Periksa pasokan air.
Periksa keran lain di rumah.
Buka keran dengan sempurna.
Eratkan selang.
Periksa filter selang masukan.
Bersihkan dan eratkan selang penguras.
Bersihkan filter penguras
Tambahkan 1 atau 2 pakaian yang
serupa untuk membantu
menyeimbangkan putaran. Atur kembali
muatan agar muncul putaran yang baik.
Tutup pintu dengan sempurna.
Jika “ , ” tidak terlepas,
hubungi petugas servis.
Lepaskan steker daya dan hubungi
petugas servis.
Tutuplah keran air. Lepaskan steker
daya. Hubungi petugas servis.
Biarkan mesin cuci diam selama 30 menit
agar motor bisa mendingin; lalu ulangi
lagi putaran.
Hubungi petugas servis.
Hidupkan keran. Jika “ ” tidak
terlepas, lepaskan steker daya dan
hubungi teknisi servis.
Pesan kesalahan
Pedoman penyelesaian masalah
Page 82

40
• Gunakan fitur ini hanya bila pusat bantuan meminta Anda untuk melakukannya.
Transmisi memiliki suara yang mirip dengan mesin faks sehingga tidak ada maknanya, kecuali
bagi pusat panggilan.
• SmartDiagnosis™ tidak dapat diaktifkan bila mesin cuci tidak dinyalakan.
Jika ini terjadi, maka penyelesaian masalah harus dilakukan tanpa SmartDiagnosis™.
Jika Anda mengalami masalah dengan mesin cuci Anda, hubungilah pusat informasi Pelanggan.
Ikutilah petunjuk agen pusat bantuan, dan lakukan langkah berikut bila diminta:
Menggunakan SmartDiagnosis™
1. Tekan tombol Power untuk menyalakan mesin cuci. Jangan
tekan tombol lain atau putar knop selektor putaran.
2. Ketika diminta melakukannya oleh pusat bantuan, taruhlah
speaker telepon Anda sangat dekat dengan tombol Power.
3. Tekan dan tahan tombol "Temp" selama tiga detik, sembari memegang speaker telepon ke
ikon atau tombol Power.
4. Tetap letakkan telepon di tempatnya hingga transmisi nada selesai. Prosedur ini akan
memerlukan waktu 6 detik, dan layar akan menghitung mundur waktu.
• Untuk hasil terbaik, jangan pindahkan telepon saat nada ditransmisikan.
• Jika agen pusat bantuan tidak mampu mendapatkan pencatatan data yang akurat, Anda
mungkin diminta untuk mencoba kembali.
5. Begitu penghitungan mundur selesai dan nada berhenti, lanjutkan percakapan dengan agen
pusat bantuan, yang akan dapat membantu Anda menggunakan transmisi informasi tersebut
untuk analisis panggilan ke pusat informasi Pelanggan.
• Smart Diagnosis adalah fitur yang dibuat untuk membantu, bukan menggantikan, metode
tradisional yang dilakukan melalui telepon ke pusat pelayanan. Efektifitas dari fitur ini
tergantung dari beberapa faktor, termasuk, tetapi tidak terbatas pada, pengecualian dari
telepon genggam yang digunakan untuk transmisi, bunyi dari luar yang hadir pada saat proses
transmisi dilakukan, serta lokasi di mana mesin cuci diletakkan.
Maka dari itu, LG tidak menjamin Smart Diagnosis dapat secara akurat menyelesaikan segala
masalah.
Pedoman penyelesaian masalah
CATATAN
• Fungsi SmartDiagnosis™ hanya tersedia untuk produk yang bertanda SmartDiagnosis™. Bila
telepon seluler memiliki opsi statis, fungsi smart diagnosis ini mungkin tidak bisa beroperasi.
Maks. 10 mm
Page 83

41
BAHASA
Hal yang Tidak Tercakup dalam Garansi:
• Perjalanan servis ke rumah Anda untuk mengajari Anda cara menggunakan produk ini.
• Jika produk disambungkan ke voltase apa pun selain yang ditunjukkan di pelat peringkat.
• Jika kesalahan ditimbulkan oleh kecelakaan, kelalaian, kesalahan penggunaan, dan Takdir Ilahi.
• Jika kesalahan disebabkan oleh faktor-faktor selain penggunaan rumah tanga yang normal atau selain
penggunaan yang sesuai dengan buku petunjuk pemilik ini.
• Memberikan petunjuk tentang penggunaan produk atau mengganti setelan produk.
• Jika kesalahan disebabkan oleh hama, misalnya tikus atau kecoa, dll.
• Kebisingan atau getaran yang dianggap normal, misalnya suara pengurasan air, suara putaran, atau
bip peringatan.
• Mengoreksi pemasangan. Misalnya, meratakan produk, menyesuaikan pengurasan.
• Perawatan normal yang dianjurkan oleh buku petunjuk pemilik.
• Pembersihan zat/benda asing dari mesin, yang meliputi filter selang masukan dan pompa. Misalnya,
pasir halus, paku, kawat bra, kancing, dll.
• Mengganti sekring atau membetulkan perkabelan rumah atau membetulkan perpipaan rumah.
• Membetulkan reparasi tak resmi.
• Kerusakan insidental atau konsekuensial terhadap harta pribadi yang ditimbulkan oleh kemungkinan
cacat peralatan ini.
• Jika produk ini digunakan untuk tujuan komersial, maka tidak akan diberi garansi.
(Misalnya: tempat publik seperti kamar mandi publik, kos-kosan, pusat pelatihan, asrama)
Jika produk dipasang di luar area layanan normal, segala biaya transportasi yang terlibat dalam reparasi
produk, atau penggantian komponen yang rusak, akan dibebankan kepada pemilik.
Ketentuan garansi
CATATAN
• Saat membuang peralatan, potonglah kabel saluran air utama, musnahkan stekernya, dan
nonaktifkan pengunci pintu untuk mencegah anak-anak terjebak di dalamnya.
Page 84

Gandaria 8 Office Tower, 31st Floor
Jl. Sultan Iskandar Muda,
Kebayoran Lama Utara–Kebayoran Lama
11240, INDONESIA
PT. LG Electronics Indonesia
LAYANAN KONSUMEN/CUSTOMER INFORMATION CENTER:
TANDA PENDAFTARAN
PETUNJUK PENGGUNAAN MANUAL DAN
KARTU JAMINAN/GARANSI
DALAM BAHASA INDONESIA BAGI PRODUK ELEKTRONIK
Nomor I.14.LG1.02003.0505
14010
 Loading...