

Page 1
Quick Start
Page 2
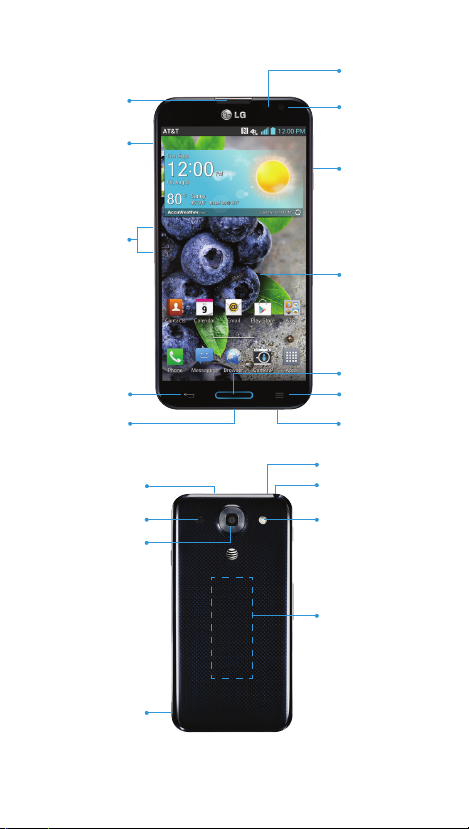
Get to Know Your Phone
Earpiece
QuickButton
(customizable)
Volume
up/down keys
Back key
Micro USB
charging port
Microphone
Speaker
Camera lens
Proximity
sensor
Camera lens
Power/lock key
Touchscreen
Home key
Menu key
Microphone
Infrared sensor
3.5 mm
headset jack
Flash
NFC touch point
Back cover
notch
Note: For more information on your device, visit
att.com/Tutorials.
Page 3
Set Up Your Phone
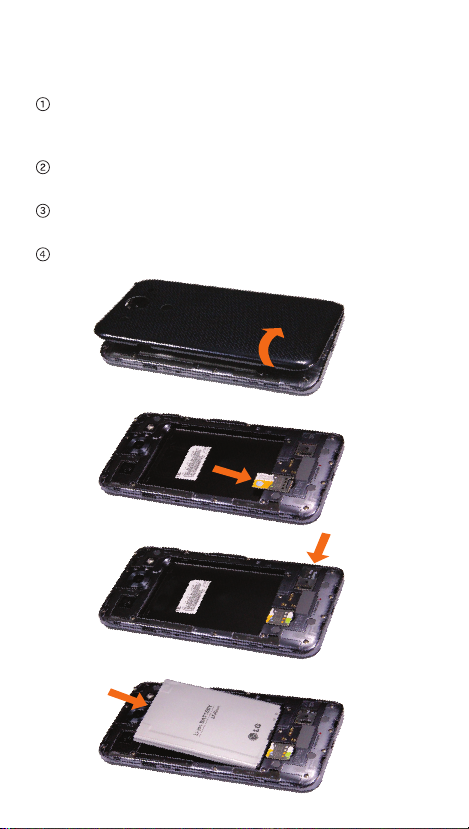
Install a MicroSIM and microSD™ Card
With your phone off, remove the phone’s back
cover using the notch on the side. Remove the
battery using the notch at the corner.
Slide a microSIM card into its slot with the gold
contacts facing downward.
Slide the microSD card into its slot with the gold
contacts facing downward.
Replace the battery and back cover.
Page 4
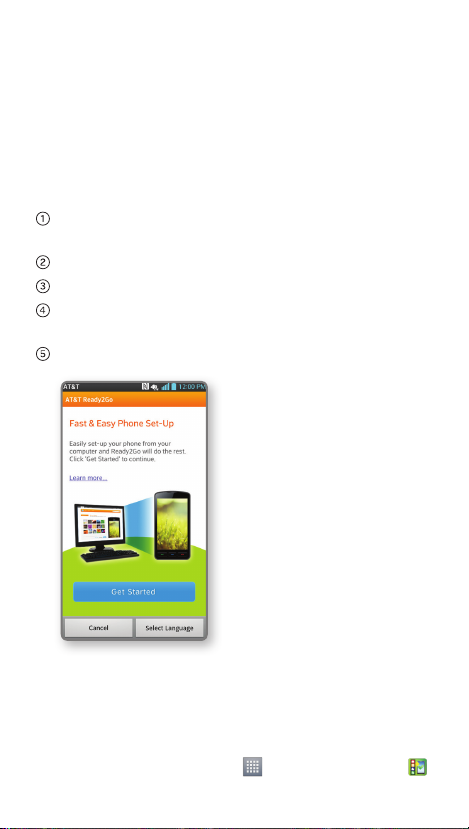
AT&T Ready2Go
Ready2Go helps you set up your device by using
your computer.
• Congure email, contacts, and Wi-Fi
• Customize your home screen, wallpaper,
ringtones, and more.
Get Started
When your phone rst starts up, you’ll see the
AT&T Ready2Go wizard.
Tap Get Started. You will see a web address.
On your computer’s browser, go to the web page.
Enter the information and choose the setup
you want.
Save your prole to update your device.
®
.
Note: To skip the wizard and update later, tap Cancel at
the bottom of the screen. To return to the wizard from
the home screen, tap Apps > AT&T Ready2Go
and follow the steps above.
Page 5
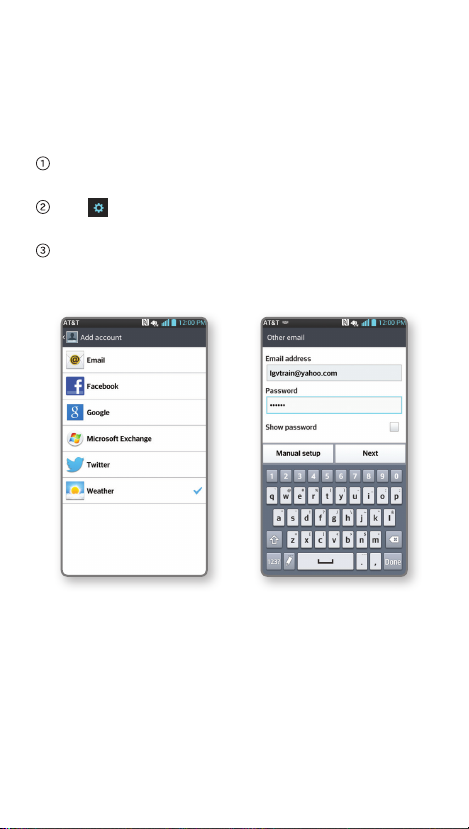
Set Up Your Accounts
Adding accounts will populate email, contacts,
calendar, and other information on your device. You
may want to set up accounts over Wi-Fi to save on
your data plan usage.
On any screen, swipe down from the top of the
screen to bring down the Notications Panel.
Tap > General > Accounts & sync > Add
Account.
Select the type of account you would like to add.
Enter your information and follow any additional
on-screen instructions.
Note: Contact your IT administrator to help set up your
corporate Microsoft
®
Exchange account.
Page 6
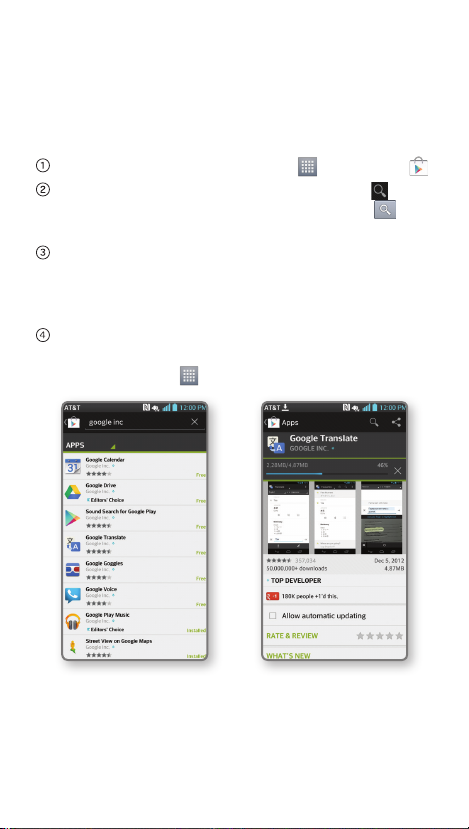
Download Apps with Google Play™
Once you have set up your Google™ account, you
can download apps from the Play Store. You may
want to download apps over Wi-Fi to save on your
data plan usage.
From the home screen, tap Apps > Play Store .
Tap a category to browse selections, or tap
search for an item. Enter a keyword and tap
the keypad.
Tap an app and follow the on-screen installation
instructions. Once the app has been downloaded
and installed, you will see a notication in the
Notications Bar.
To open the app, swipe down from the top of the
screen and tap the notication. You can also nd
the app in Apps
.
to
on
Note: To purchase a paid app, you will need to set up
a payment method with Google Wallet.™
Page 7

Customize Your Phone
Customize a Home Screen
Press and hold an empty spot on a home screen
and choose a category:
• Apps: Add application shortcuts from the
app tray.
• Downloads: Add downloaded application
shortcuts.
• Widgets: Add dynamically updating widgets.
• Wallpapers: Change your home screen
wallpaper.
To move an item, press and hold it and drag it to a
new location. To delete it, drag it to Remove.
Customize Your Sounds
On any screen, swipe down from the top of the
screen to bring down the Notications Panel.
Tap > Sound. You can change your ringtones,
set notication sounds, and adjust your touch
feedback options.
Note:
To customize the QuickButton press the
Key
and tap All settings > General > QuickButton.
Menu
Page 8

Calling and Voicemail
Make a Call
From the home screen, tap Phone .
Enter a phone number or spell the name of a
contact. Tap the contact and then tap
the call.
Access Voicemail
From the home screen, tap Phone .
Tap .
Follow voice prompts to listen to messages.
Access Call Logs
From the home screen, tap Phone .
Tap Call logs.
Tap an entry to view it.
Tap to call or to send a message. Tap
to create a new contact or add the number to an
existing entry.
to place
Page 9

Text and Picture Messaging
From the home screen, tap Messaging .
Tap .
In the To eld, enter a number or tap to select a
name from your contact list. You can enter several
names to send your message to multiple people.
Enter your message.
Tap to attach a le.
Tap Send to send the message.
Please don’t text and drive.
Messaging rates apply.
Page 10

Browse the Web
From the home screen, tap Browser .
Tap the address bar at the top of the page and
enter an address. You may need to scroll to the
top of the page to access the address bar.
Tap Go on the keyboard.
Use the Browser Bar
Access Facebook® and news feeds, nd related
apps, share content, and more.
To reveal the Browser Bar, swipe up from the
bottom of the browser screen.
To add a button, tap Add More and select a
choice or create one of your own.
Go to Settings > Disable Browser Bar to
remove the Browser Bar.
Page 11

Take a Picture/Record a Video
From the home screen, tap Camera .
Tap to take a photo.
Tap to switch to the camcorder.
T a p to start recording. To take a still shot while
recording, tap
Tap to stop recording.
Share Photos
From the home screen, tap Apps > Gallery .
Tap an album.
Tap and then tap the image(s) you wish
to share.
T a p Share.
Select how to share and follow the on-screen
instructions.
.
Note: To access the front-facing camera or
camcorder, tap
camera/camcorder settings.
. Tap to view and change
Page 12

Get Connected
Use Bluetooth®
On any screen, swipe down from the top of the
screen to bring down the Notications Panel and
tap
> Networks > Bluetooth.
If Bluetooth is off, tap
LG Optimus G Pro™ will automatically search for
devices. Tap the name of the device you wish to
pair with. See the Bluetooth device’s user manual
for more information on pairing.
Connect to Wi-Fi
On any screen, swipe down from the top of the
screen to bring down the Notications Panel and
tap
> Networks > Wi-Fi.
If Wi-Fi is off, tap to enable it.
Tap a network name. Enter a password if required
and then tap Connect.
to enable it.
Note: The Notications Panel contains Quick Settings
for Bluetooth, Wi-Fi, and more. Tap a button to toggle
the setting on or off.
Page 13

Transfer Music and Pictures
Connect your Optimus G Pro to your computer
with a USB cable. Steps may vary depending on
your operating system.
You may be prompted to install PC programs.
Tap OK.
T a p Media sync (MTP).
On your PC, choose Open device to view files
using Windows Explorer.
Your phone will appear as another hard drive on
your computer. Click on the drive to view it.
Drag and drop your les* into the corresponding
folders, such as Music, Movies, or Pictures. You
can also transfer les from your PC to your phone.
When you’re nished transferring les, return
to the USB connection type screen and choose
Charge only. You may now safely unplug
your device.
*Files must be Digital Rights Management (DRM) free.
Page 14

Multitask with QSlide Function
From any screen, bring up a notepad, calendar, or
calculator as a window inside your screen.
From any screen, swipe down from the top of the
screen to bring down the Notications Panel.
Tap one of the QSlide apps: Videos, Note Pad,
Calendar, or Calculator. The app will appear as a
resizable, moveable window on the screen.
Drag the corner to enlarge the window and drag
the top bar to move it. Tap
app full size. Tap
Use the slider to adjust the transparency of the
window.
To exit the QSlide function, tap .
to make the app smaller again.
to make the QSlide
Note: The QSlide function is also available for
Note Pad, QuickMemo, Calculator, Calendar, and
user-generated videos.
Page 15

AT&T Services
myA T&T: Track your usage, review and pay
your bill, and update your data plan services.
AT&T DriveMode™: Silence notications, set an
auto-reply so people will know you’re driving,
and more.
AT&T Locker™: Safely store and share all your
photos, videos, and documents with up to 5 GB
of free storage.
AT&T Navigator
turn driving directions and trafc updates.
AT&T Smart Wi-Fi: Maximize your battery
performance and data plan, simplify access
to AT&T Hot Spots and Wi-Fi networks,
automate your Wi-Fi connections, and
track your data usage.
Mobile TV: Watch LIVE, on-demand, and
downloadable mobile TV.
Messages: Manage your text messages,
call history, voicemail, and more, all in one
convenient place.
Mobile Hotspot: Share your mobile network
data connection with other Wi-Fi devices.
®
: Get voice-guided, turn-by-
Data rates may apply. Mobile TV and AT&T Navigator
require a separate subscription. Mobile TV requires mobile
broadband service. Service not available in all areas.
Programming subject to blackout restrictions. Download
and watch capability available for select content, requires
Wi-Fi connection, and is available for viewing for limited
time periods.
Page 16

Jot a QuickMemo™
Capture screens, draw on them, and share them with
family and friends with QuickMemo.
To use QuickMemo, swipe down on the
Notications Bar and tap QuickMemo.
Use your ngertip to draw or write on the screen.
Tap to change the pen type or color.
If you make a mistake, tap to access the
eraser, or tap
T a p to interact with your phone while keeping
the memo on top.
To return to your memo, tap . You will return
to the screen where you were when you started
QuickMemo.
To save your creation, tap . Tap and follow
on-screen instructions to share it.
To exit QuickMemo at any time, press the
Back Key
to undo your last pen stroke.
.
Note: You can also access QuickMemo by quickly
pressing the QuickButton.
Page 17

Share Files with Android™ Beam
Android Beam uses Near Field Communication
(NFC) to quickly and easily share les such as
browser pages, contacts, images, and music with
another NFC-capable device.
Before you begin, make sure NFC and Direct/
Android Beam are enabled on your phone.
With the content you want to send on the screen,
place your Optimus G Pro back to back with another
NFC-capable device to activate data exchange.
Tap the content to send it. The other device may
need to accept the transfer.
Use NFC Tags
With NFC you can instantly change your phone
settings to suit your environment.
• Touch the back of your phone to an NFC tag to
automatically change your phone’s settings.
Note: To turn NFC and Direct/Android Beam on
or off, swipe down from the top of the screen and
tap
> Networks > Share & Connect.
NFC tags are sold separately.
Page 18

Make Your Battery Last
From the home screen, press the
Tap All settings > General > Battery.
Tap Battery saver to select the features you’d
like to turn off or change when Battery saver is
enabled, such as Wi-Fi or screen brightness.
Tap to turn on Battery saver.
Menu Key
.
Page 19

Network Indicators
Your 4G LTE wireless device will indicate which of
the AT&T wireless networks you are connected to.
A network indicator does not necessarily mean
that you will experience any particular upload or
download data speeds.
4G LTE: Connected to the AT&T 4G LTE network.
4G: Connected to the AT&T HSPA+ network. The
AT&T HSPA+ network is capable of delivering
4G speeds when combined with enhanced
backhaul. 4G availability is increasing with
ongoing backhaul deployment.
E: Connected to the AT&T EDGE/2G network.
Actual data upload and download speeds depend
on various factors, including the device, network
utilization, le characteristics, terrain, etc. Learn
more at: wireless.att.com/learn/articles-
resources/wireless-terms.jsp, your AT&T
Wireless Customer Agreement, Section 3.2
“Where and How Does AT&T Service Work?” The
AT&T HSPA+ network can deliver 4G speeds when
combined with enhanced backhaul. Your wireless
device can’t distinguish between HSPA+ cell
sites with enhanced backhaul and those without.
Enhanced backhaul not available everywhere.
Learn more at att.com/network.
Limited 4G LTE availability in select markets. 4G speeds
delivered by LTE, or HSPA+ with enhanced backhaul, where
available. Deployment ongoing. Compatible device and
data plan required. LTE is a trademark of ETSI.
Page 20

Find More Information
On The Web:
• Find tutorials at att.com/Tutorials.
• Find device specications, user manuals,
troubleshooting, and user forums at
att.com/DeviceSupport.
• Manage your wireless account, including
suspending service if your phone is stolen,
at www.att.com/myatt.
Apps on Your Phone:
• Access how-to videos for Optimus G Pro at
Apps > Device Help.
• Access your account at Apps > myAT&T .
Give Us a Call:
Call AT&T Customer Care at 1-800-331-0500 or dial
611 from any AT&T mobile phone for assistance with
your service or device.
Find Accessories
Accessories for your smartphone are available
at att.com/WirelessAccessories or visit your local
AT&T store.
LG and the LG logo are registered trademarks of LG Corp.
Optimus G Pro is a trademark of LG Electronics USA, Inc.
© 2013 AT&T Intellectual Property. All rights reserved. AT&T,
the AT&T logo and all other AT&T marks contained herein
are trademarks of AT&T Intellectual Property. All other
marks contained herein are the property of their
respective owners.
Printed in Korea
P/N XXXXXXXXXXX(XX)
 Loading...