

Page 1
User Guide
All screen shots in this guide are simulated.
Actual displays and the color of the phone may vary.
Some of the contents in this manual may differ from your phone depending
on the software of the phone or your service provider.
MFL68560601 (1.0)
www.lg.com
Page 2

LIMITED WARRANTY STATEMENT
1. WHAT THIS WARRANTY COVERS :
LG offers you a limited warranty that the enclosed
subscriber unit and its enclosed accessories will be free
from defects in material and workmanship, according to
the following terms and conditions:
1. The limited warranty for the product extends for TWELVE
(12) MONTHS beginning on the date of purchase of the
product with valid proof of purchase, or absent valid
proof of purchase, FIFTEEN (15) MONTHS from date of
manufacture as determined by the unit’s manufacture
date code.
2. The limited warranty extends only to the original
purchaser of the product and is not assignable or
transferable to any subsequent purchaser/end user.
3. This warranty is good only to the original purchaser of
the product during the warranty period as long as it is
in the U.S, including Alaska, Hawaii, U.S. Territories and
Canada.
4. The external housing and cosmetic parts shall be free of
defects at the time of shipment and, therefore, shall not
be covered under these limited warranty terms.
5. Upon request from LG, the consumer must provide
information to reasonably prove the date of purchase.
6. The customer shall bear the cost of shipping the product
to the Customer Service Department of LG. LG shall bear
the cost of shipping the product back to the consumer
after the completion of service under this limited
warranty.
2. WHAT THIS WARRANTY DOES NOT
COVER :
1. Defects or damages resulting from use of the product in
other than its normal and customary manner.
2. Defects or damages from abnormal use, abnormal
conditions, improper storage, exposure to moisture or
dampness, unauthorized modifications, unauthorized
connections, unauthorized repair, misuse, neglect, abuse,
accident, alteration, improper installation, or other acts
which are not the fault of LG, including damage caused
by shipping, blown fuses, spills of food or liquid.
3. Breakage or damage to antennas unless caused directly
by defects in material or workmanship.
4. That the Customer Service Department at LG was
not notified by consumer of the alleged defect or
malfunction of the product during the applicable limited
warranty period.
5. Products which have had the serial number removed or
made illegible.
6. This limited warranty is in lieu of all other warranties,
express or implied either in fact or by operations of
law, statutory or otherwise, including, but not limited
to any implied warranty of marketability or fitness for a
particular use.
7. Damage resulting from use of non-LG approved
accessories.
8. All plastic surfaces and all other externally exposed parts
that are scratched or damaged due to normal customer
use.
Page 3

9. Products operated outside published maximum ratings.
10. Products used or obtained in a rental program.
11. Consumables (such as fuses).
Some states do not allow the exclusive of limitation of
3. WHAT LG WILL DO:
LG will, at its sole discretion, either repair, replace or
refund the purchase price of any unit that does not
conform to this limited warranty. LG may choose at its
discretion to use functionally equivalent reconditioned,
refurbished or new units or parts or any units. In
addition, LG will not re-install or back-up any data,
applications or software that you have added to your
phone. It is therefore recommended that you back-up
any such data or information prior to sending the unit to
LG to avoid the permanent loss of such information.
4. STATE LAW RIGHTS :
No other ex warranty is applicable to this product.
THE DURATION OF ANY IMPLIED WARRANTIES,
INCLUDING THE IMPLIED WARRANTY OF
MARKETABILITY, IS LIMITED TO THE DURATION OF
THE EXPRESS WARRANTY HEREIN. LG INFOCOMM
INC. SHALL NOT BE LIABLE FOR THE LOSS OF THE
USE OF THE PRODUCT, INCONVENIENCE, LOSS OR
ANY OTHER DAMAGES, DIRECT OR CONSEQUENTIAL,
ARISING OUT OF THE USE OF, OR INABILITY TO
USE, THIS PRODUCT OR FOR ANY BREACH OF ANY
EXPRESS OR IMPLIED WARRANTY, INCLUDING THE
IMPLIED WARRANTY OF MARKETABILITY APPLICABLE
TO THIS PRODUCT.
5. HOW TO GET WARRANTY
To obtain warranty service, please call or fax to the
Tel. 1-800-793-8896 or Fax. 1-800-448-4026
Or visit www.lg.com.
LG Electronics MobileComm U.S.A., Inc.
201 James Record Road Huntsville, AL 35824
DO NOT RETURN YOUR PRODUCT TO THE ABOVE
incidental or consequential damages or limitations on
how long an implied warranty lasts; so these limitations
or exclusions may not apply to you. This warranty gives
you specific legal rights and you may also have other
rights which vary from state to state.
SERVICE :
following telephone numbers from anywhere in the
continental United States:
Correspondence may also be mailed to:
ADDRESS.
Please call or write for the location of the LG authorized
service center nearest you and for the procedures for
obtaining warranty claims.
Page 4

Table of Contents
Important Notice ..............................8
Your Phone ......................................13
Getting Started ...............................15
Installing the SIM card and battery ..15
Charging your phone .........................16
Inserting a microSD card...................17
Removing the microSD card..............18
Formatting the microSD card ............18
Switching between and exiting
applications .......................................18
Your Home screen .........................20
Touch screen tips ..............................20
Proximity sensor ................................20
Lock your phone ................................21
Quick Switch to Silent/Vibrate Mode 21
Home Screen Overview ...................22
Navigating Through the Home Screen
Canvases ...........................................22
Navigating Through the Sub-Menus 22
Customizing your Home screen.........22
Customizing apps icons on the Home
screen ................................................23
Creating Application Folders on the
Home screen .....................................24
Customizing the Apps screen............24
Home screen clean view ...................25
Notifications ......................................25
Entering text ......................................28
123 Mode ..........................................30
Entering Special Characters..............30
Google Account Setup ..................31
Creating your Google account...........31
Signing into your Google account .....31
Calls .................................................33
Making a call.....................................33
Calling your contacts.........................33
Answering and rejecting a call .........33
Adjusting the in-call volume .............33
Making a second call ........................34
Viewing your call logs .......................34
Call settings ......................................34
Contacts...........................................35
Searching for a contact .....................35
Adding a new contact .......................35
Favorite Contacts ..............................35
AT&T Address Book (AAB) ................36
Messaging/Email ...........................37
Messaging.........................................37
Email..................................................38
Page 5

Social Networking ........................41
Adding an account to your phone .....41
Adding a social networking widget
on the Home screen ..........................41
Viewing and updating your status ...42
Syncing accounts on your phone ......42
Removing accounts on your phone ...42
Camera.............................................43
Getting to know the viewfinder ........43
Taking a photo ..................................44
Once you’ve taken the photo ............44
Using the advanced settings.............44
Viewing your saved photos ...............45
Setting a photo as the wallpaper .....46
Video Camera .................................47
Getting to know the viewfinder ........47
Recording a video..............................48
Using the advanced settings.............48
After recording a video .....................49
Watching your saved videos .............49
Adjusting the volume when viewing a
video ..................................................49
Dual recording ...................................50
Audio zoom........................................51
Tracking focus ...................................51
Live Zooming .....................................52
Multimedia......................................53
Gallery ...............................................53
Video Wiz ..........................................53
How to save music/video files to the
phone.................................................54
How to play music/video files on the
phone.................................................54
Playing a song ...................................54
Working with Playlists ......................55
To add a song to a playlist ................55
To remove a song from a playlist ......55
To rename a playlist ..........................55
To delete a playlist ............................55
Using SmartShare .............................56
Google Applications .....................57
About Google applications................57
Maps .................................................57
Searching For Locations and Places .57
Getting Directions .............................58
Play Store ..........................................58
Gmail .................................................58
Hangouts ...........................................59
Page 6

Table of Contents
Utilities ............................................61
QSlide ................................................61
QuickMemo .......................................61
QuickRemote .....................................62
Setting the alarm ..............................63
Using the calculator ..........................63
Adding an event to your calendar .....64
Task Manager ....................................64
Tasks ..................................................64
Polaris Office 4 ..................................65
Voice Command ................................66
LG Tag+ ..............................................66
The Web ..........................................67
Browser .............................................67
Using options ....................................67
Adding bookmarks.............................68
Changing the Browser settings.........68
Settings............................................69
Networks tab.....................................69
Airplane mode ..................................69
Wi-Fi ..................................................69
Bluetooth ...........................................70
Data Manager ..................................72
Call ....................................................72
Share & connect................................73
NFC ....................................................73
Android Beam ...................................73
SmartShare Beam .............................74
Media Server.....................................74
Miracast ............................................74
Wireless storage ...............................75
Tethering & networks ........................75
Mobile Hotspot .................................75
Bluetooth tethering ...........................75
Help ...................................................76
Mobile networks ...............................76
Default SMS app ..............................76
VPN....................................................76
Sound tab ..........................................77
Sound profile .....................................77
Volumes ............................................77
Vibrate strength ................................77
Quiet time..........................................77
Phone ringtone .................................77
Smart ringtone .................................77
Ringtone with vibration.....................77
Incoming call vibration ......................77
Gentle vibration.................................77
Default notification sound ................78
Touch feedback & system ...............78
Display tab ........................................78
Home screen .....................................78
Page 7

Lock screen........................................78
Brightness ........................................79
Screen timeout .................................79
Auto-rotate screen ...........................79
Daydream .........................................79
Font type ...........................................79
Font size ...........................................79
Smart screen ....................................80
Smart video ......................................80
Front touch key light .........................80
Home button LED ..............................80
Quick Cover ......................................80
General tab........................................80
Gestures ............................................80
One-handed operation ......................81
Storage ..............................................81
Battery ...............................................81
Apps ..................................................82
Tap & pay ..........................................82
Accounts & sync................................82
Location ............................................83
Security .............................................83
Language & input .............................84
Backup & reset ..................................84
Browser Bar.......................................85
QuickButton .......................................85
Date & time ......................................85
Accessibility ......................................85
PC connection....................................87
About phone ......................................88
LG On-Screen Phone .....................89
Software Update ............................91
Phone Software Update ....................91
LG Mobile Phone Software update
via Over-the-Air (OTA) .......................91
Trademarks .....................................92
Trademarks ........................................92
DivX Mobile.......................................92
Dolby Digital Plus .............................92
Q&A ..................................................93
Accessories ....................................94
For Your Safety ...............................95
Safety Guidelines ........................100
Page 8

Important Notice
Please check to see if any problems you have
encountered with your phone are described
in this section before taking the phone in for
service or calling a service representative.
1. Phone Memory
In order to make more memory available, you
will have to manage your applications and
delete some data, such as applications or
messages.
Managing Applications
1 From the Home screen, tap the
and tap
> Apps
.
2 Tap one of the available tabs at the top of
the screen and select the application you
want to uninstall.
Uninstall
3 Tap
that you want to uninstall the desired
application.
Menu Key
All settings > General tab
and then tap OK to confirm
2. Optimizing Battery Life
You can extend your battery's life between
charges by turning off features that you don't
need to run constantly in the background. You
can also monitor how applications and system
8
resources consume battery power.
To extend the life of your battery
- Turn off radio communications that you aren't
using, such as Wi-Fi, Bluetooth, or GPS.
Wi-Fi will be set to On the first time you use
your newly purchased phone.
- Lower screen brightness and set a shorter
screen timeout.
- Turn off automatic syncing for Gmail,
Calendar, Contacts, and other applications.
- Some applications you have downloaded may
cause your battery power to be reduced.
- While using downloaded applications, check
the battery charge level.
To view the battery charge level
1 From the Home screen, tap the Menu Key
and tap
and tap
Battery .
All settings
All settings
> Battery.
2 The battery status (charging or discharging)
and level are displayed on the screen.
To monitor and control what uses the
battery
1 From the Home screen, tap the
>
> General tab
Menu Key
> General tab
Page 9

Important notice
2
Tap the battery icon.
3 A list all of the applications or services using
battery power from the greatest amount
of energy used to the least amount. You
can also use it to turn off applications or
services, if they are consuming too much
power. Tap any of the listed items for more
options.
3. Installing an Open Source
Operating System
Installing an open source operating system
on your phone and not using the operating
system provided by the manufacturer can
cause your phone to malfunction.
%
Warning
•
If you install and use an operating system
other than the one provided by the
manufacturer, your phone is no longer
covered by the warranty.
•
To protect your phone and personal data,
download applications only from trusted
sources, such as Play Store. If some
applications are not properly installed
on your phone, your phone may not work
properly- or serious errors may occur. You
will need to uninstall those applications
and all of its data and settings from the
phone.
4. Using Swipe, Face Unlock,
Pattern, PIN, or Password
Set Swipe, Face Unlock, Pattern, PIN, or
Password to secure your phone. To set the
screen lock, follow the process below.
From the Home screen, tap the
,
tap
Lock screen settings > Select
screen lock
from
PIN and Password
%
In case that you have trouble with Face Unlock,
you can unlock the screen a Backup Pattern
or PIN.
%
Take precautions when using an unlock
Pattern, PIN, or Password. It is very
important that you remember the screen
unlock information you set. You are allowed
5 attempts to enter your screen unlock
information. If you used up all 5 opportunities,
and select a desired screen lock
None, Swipe, Face Unlock, Pattern,
NOTE
Warning
Menu Key
.
9
Page 10

Important notice
you will have to wait 30 seconds to attempt
unlocking the phone again.
When you can’t recall your Unlock
Pattern, PIN, or Password:
If you logged into a Google account on
the phone and failed to use the correct
pattern 5 times, tap Forgot pattern? You
will be required to sign in with your Google
account and prompted to create a new
unlock pattern.
If you have set a backup PIN, you can
unlock the screen with keying in the backup
PIN.
If you haven’t created a Google account on
the phone or you forgot your PIN, Password,
and the backup PIN, you need to perform a
hard reset.
%
Caution
If you perform a hard reset, all user
applications and user data will be deleted.
Please remember to back up any important
data before performing a hard reset.
10
Read ALL steps before attempting.
1 Turn the phone off.
2 Press and hold V
Power/Lock Key
3 Release the keys when the FACTORY HARD
RESET screen appears.
4 Read the warning and press the Power/
Lock Key
Keys
5 Press the Power/Lock Key
once more or press the Volume Keys
to cancel.
6 Your device will perform a hard reset.
olume Down Key +
at the same time.
to confirm. Press the Volume
to cancel.
to confirm
5. Using Safe Mode
Using Safe mode
To recover your phone when malfunctioning.
1 Turn off your phone and reboot. When you
see the AT&T booting animation press and
hold the Volume Down Key
see the Home screen
OR
While the phone is on, press and hold
the Power/Lock Key
options menu is displayed. Then press and
hold Power off > OK. Your Home screen
until you
.
until the Phone
Page 11

Important notice
will then be displayed with the words "Safe
mode" in lower left corner.
2 From the Home screen, tap the
and tap All settings > General tab
> Apps.
3 Tap one of the available tabs at the top of
the screen and select the application you
wish to uninstall.
4 Tap Uninstall and OK to confirm.
5 After uninstalling the application, turn off
and reboot your phone.
Menu Key
6. Using a microSD Card
Pictures, music and video files can be saved to
external memory. Before saving these files to
external memory, you need to insert a microSD
card. If you have not inserted a microSD card,
you will not be able to save these items on
external memory.
%
Warning
Do not remove the microSD card without
unmounting it first. Otherwise, it may damage
the microSD card as well as your phone, and
the data stored on the microSD card may be
corrupted. To remove the microSD card safely,
from the Home screen, tap the
Menu Key
and tap
All settings
>
Unmount SD card
7.
Connecting your phone to a
> General tab >
.
Storage
computer via USB
1 Use the USB cable that was provided with
your phone to connect the phone to a USB
port on your computer. You'll receive a
notification that the USB is connected and
can see USB connection mode screen.
2 Tap Media sync (MTP) or Send images
(PTP) to confirm that you want to transfer files
between your phone and the computer.
When the phone is connected as USB storage,
you receive a notification. Your phone is
recognized as a device on your computer. You can
now copy files to and from the phone.
%
TIP
You can access your phone's storages including
the microSD card from your phone while
connected as USB storage. So you cannot use
applications that rely on the storages, such
as Music.
11
Page 12

Important notice
8. Unlock screen when using
data connection
Your screen will go dark if untouched
for a period of time when using a data
connection. To turn on your LCD screen,
Power/Lock Key
press the
length of time the screen takes to turn off, tap
the Menu Key > All settings > Display
tab > Screen timeout and select the desired
amount.
. To change the
9. Internal antenna
Please hold the mobile phone straight up
as a regular phone.
While making/receiving calls or sending/
receiving data, try to avoid holding the lower
part of the phone where the antenna is
located. It may affect call quality.
10. When the screen freezes
If the phone does not respond to user
input or the screen freezes:
Press and hold the Power/Lock Key for 10
seconds to reboot it.
12
11. Do not connect your phone
when you power on/off
your PC
Make sure to disconnect your phone from the
PC when powering your PC on or off as it might
result in PC errors.
Page 13
Your Phone
To turn on the phone, press and hold the Power/Lock Key on the right side of the phone for 3 seconds.
To turn off the phone, press the Power/Lock Key
Power off and OK to confirm.
Front view
Proximity Sensor
- Senses proximity toward other
objects, such as your head
during a call, so that you do not
accidentally activate unwanted
features.
Quick Keys
- Gives you quick access to your
most used applications.
- To add an icon, drag and drop it
in the bar.
- To remove an icon, touch and hold
it and remove it from the bar.
Back Key
- Returns to the previous screen.
- Closes pop-up menus and dialog
boxes.
Home Key
- Returns to the Home screen from any screen.
- Press and hold to access your most recently
used applications.
%
Warning
Placing a heavy object on the phone or sitting on it can damage its LCD and touch screen
functionalities. Do not cover the LCD’s proximity sensor with a protective film. This can
cause the sensor to malfunction.
on the right side of the phone for 3 seconds and tap
Front Camera Lens
- Use to take a picture of
yourself or to video chat on
supported applications.
Earpiece
Power/Lock Key
- Press and hold to power on
and off, restart, enable or
disable Airplane mode, and
change the ringer type.
- Turns your screen on and
off and locks it.
Menu Key
- Displays available options for
the current screen or
application.
13
Page 14
Your Phone
%
TIPS
- Tap the Menu Key whenever you open an application to check what options are available.
Side view
3.5mm Headset Jack
QuickButton
- Press for quick access to your
favorite app. Default app is
QuickMemo.
Volume Keys
- Allows you to adjust the ringer
and media volumes, or to adjust
the in-call volume during a call.
- Press and hold the Volume Down
Key to switch to the silent mode.
Microphone
Power/Lock Key
Microphone
Charger/Accessory Port
Rear view
Back Camera Lens
Speaker
Battery
Micro SIM Card slot
%
Notice
The NFC antenna for this model is on the back cover.
LED Flash
Back Cover
Fingertip cutout
microSD Card Slot
14
Page 15
Getting Started
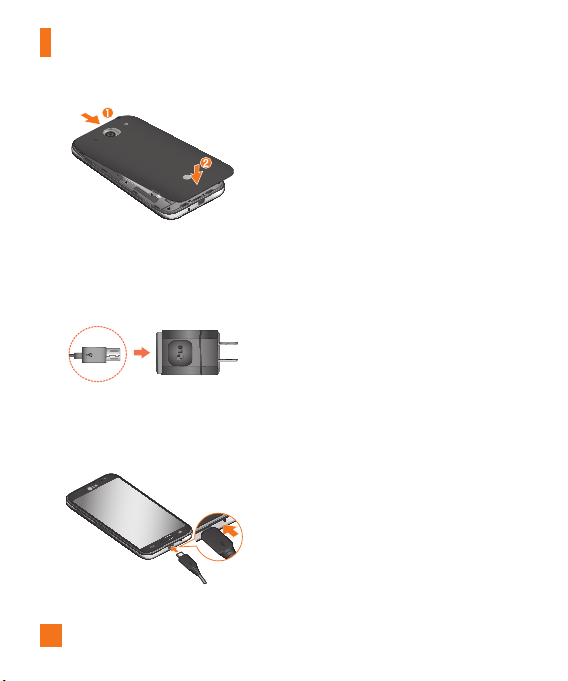
Installing the SIM card and
battery
Before you can start exploring your new phone,
you’ll need to set it up. To insert the SIM card
and battery:
1 Hold the phone on your hand firmly. With
the other hand, lift the back cover using the
fingertip cutout located on the side of the
cover and remove it.
2 Slide the SIM card into the SIM card slot.
Make sure the gold contact area on the card
is facing downwards.
%
NOTE
Please insert the notched side of the SIM card
first. Refer to the image inscribed below the
SIM card slot.
3 Insert the battery into place by aligning the
gold contacts on the phone and the battery
and press the battery down until it clicks
into place .
4 Replace the back cover of the phone .
Apply a steady downward pressure until the
back cover clicks into place .
15
Page 16
Getting Started
Charging your phone
1 Connect the wall adapter and USB cable as
shown below. The USB symbol on the USB
cable should face toward you.
2 Plug the USB cable (as shown below) into
the phone's Charger/Accessory Port. Make
sure the USB symbol is facing upwards.
Always unplug the charger from the wall
socket after the phone is fully charged to
save unnecessary power consumption of
the charger.
%
NOTE
The battery must be fully charged initially
to improve battery lifetime.
%
NOTE
Your phone has an internal antenna. Be
careful not to scratch or damage this
rear area, as that will cause loss of
performance.
When the battery becomes fully discharged
and you connect the phone to a charger
LED lights for the keys at the bottom of the
phone will blink. This is normal operation
for a completely discharged battery to
prevent overflowing current because the
phone is designed to provide reasonable
protection against damage to the battery.
Once the battery has enough charge, the
screen will turn on and display a battery
image.
, the
16
Page 17
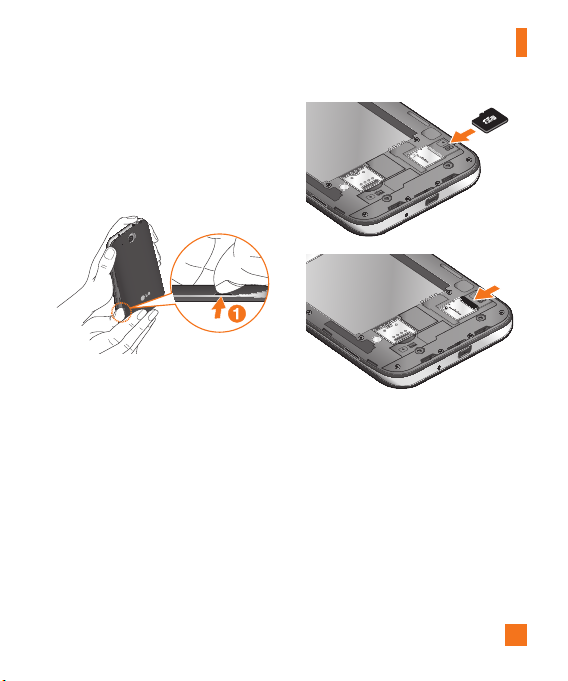
Inserting a microSD card
%
NOTE
This device supports up to a 64GB microSD
card.
1 Remove the back cover.
2 Gently insert the microSD card into the slot.
Make sure the gold contact area is facing
downwards.
%
NOTE
Please insert the notched side of the
microSD card first. Refer to the image next
to the microSD card slot.
Getting Started
%
NOTE
Some downloaded applications store data
on the microSD card as well as on the
phone. Due to this feature, if you skip the
unmount procedure, it can cause an error
because information between the microSD
card and the phone is not accorded
properly. In the worst case, the microSD
card can be corrupted or damaged.
17
Page 18

Getting Started
Removing the microSD card
To safely remove the microSD card from your
phone, you must first unmount it.
1 From the Home screen, tap the
and tap All settings > General tab >
Storage > Unmount SD card > OK.
2 Remove the back cover and gently pull the
microSD card from the slot.
%
Warning
Do not remove the microSD card without
unmounting it first. Otherwise, it may
damage the microSD card as well as your
phone, and the data stored on the microSD
card may be corrupted.
Menu Key
Formatting the microSD card
Your microSD card may already be formatted.
If it isn’t, you must format it before you can
use it.
%
NOTE
All files on the card are deleted when you
format the microSD card.
1 From the Home screen, tap the
and tap All settings > General tab >
Storage > Unmount SD card > OK.
2 Tap
Erase SD card
18
Menu Key
twice.
3 If you set an unlock pattern, enter it and tap
Erase everything.
formatted and ready to use.
%
NOTE
If there is content on your microSD card,
the folder structure may be different after
formatting since all the files will have been
deleted.
The card will then be
Switching between and exiting applications
Multi-tasking is easy with Android because
open applications keep running even when you
open another application. There is no need to
quit an application before opening another. Use
and switch among several open applications.
Android manages each application, stopping
and starting them as needed, to ensure that
idle applications don’t consume resources
unnecessarily.
Switching between applications
- Press and hold the Home Key
recently used applications will be displayed.
Then tap the application you want to access.
- To remove an application from the list, swipe
the app preview to the left or right.
. A list of
Page 19

To stop/exit an application
1 From the Home screen, tap the
and tap All settings > General tab
>
Apps.
2 Tap one of the tabs at the top of the
screen, choose the desired application
and tap
Force stop
application.
Menu Key
(or Stop) to stop the
Getting Started
19
Page 20

Your Home screen
Touch screen tips
With the touch of your finger, you can access
available applications, make menu selections, and
access data saved to your phone. The following
terms are used for describing the different
available actions using the touchscreen:
Tap - A single finger tap selects items, links,
shortcuts and letters on the on-screen keyboard.
Touch and hold the screen by touching it and not lifting your
finger until an action occurs. For example, to
open a contact's available options, touch and
hold the contact in the Contacts list until the
context menu opens.
Drag - Touch and hold an item for a moment
and then, without lifting your finger, move your
finger on the screen until you reach the target
position. You can drag items on the Home screen
to reposition them.
Swipe or slide move your finger across the surface of the
screen, without pausing when you first touch
it (so you don’t drag an item instead). For
example, you can slide the screen up or down
to scroll through a list, or browse through the
different Home screens by swiping from left to
right (and vice versa).
20
Touch and hold an item on
To swipe or slide, quickly
Double-tap - Double-tap to zoom on a Web
page or a map. For example, quickly double-tap a
section of a Web page to adjust that section to fit
the width of the screen. You can also double-tap
to zoom in and out when using Maps.
Pinch-to-Zoom thumb in a pinch or spread motion to zoom in
or out when using the browser, Maps, Camera,
or browsing pictures.
Rotate the screen - From many applications
and menus, the orientation of the screen adjusts
to the device's physical orientation.
%
NOTE
•
To select an item, tap the center of the icon.
•
Do not to press too hard; the touch screen is
sensitive enough to pick up a light, firm touch.
• Use the tip of your finger to tap the option
you want. Be careful not to tap any other
keys or icons.
Use your index finger and
Proximity sensor
When receiving and making calls, this sensor
automatically turns the backlight off and locks
the touch keypad by sensing when the phone
is near your ear. This extends battery life and
prevents the touch keypad from activating
unintentionally during calls.
Page 21

Your Home screen
Lock your phone
When you are not using the phone, press the
Power/Lock Key
This helps prevent accidental presses and saves
battery power.
Also, if you do not use the phone for a while, the
Home screen, or other screen you are viewing, is
automatically replaced with the lock screen after
30 seconds (depending on the screen timeout
settings) of inactivity to conserve the battery and
prevent pocket dialing.
To wake up your phone, press the
Lock Key
Swipe the screen in any direction to unlock.
The last screen you were working on opens.
%
NOTE
•
The automatic screen timeout can be
configured manually in Settings. To change
it, tap the
Display tab > Screen timeout.
• If there are any programs running when you
lock the phone, they may still be running in
lock mode. It is recommended that you exit
all programs before entering the lock mode
to avoid unnecessary charges (e.g., phone
call, web access and data communications).
to lock your phone.
.
The lock screen will appear.
Menu Key
> All settings >
Power/
Setting Swipe, Face Unlock, Pattern,
PIN, Password to unlock your phone
You can slide the screen without entering any
information, utilize facial recognition, draw your
own unlock Pattern or enter a PIN or Password to
add more security to your device. To set Swipe,
Face Unlock, Pattern, PIN, or Password, from the
Home screen tap the Menu Key
screen settings > Select screen lock. Then
choose from Swipe, Face Unlock, Pattern,
PIN, or Password and enter the desired
information.
%
Caution
You are allowed 5 attempts to enter your
screen unlock information. If you used up all 5
opportunities, you will have to wait 30 seconds
to attempt unlocking the phone again.
> Lock
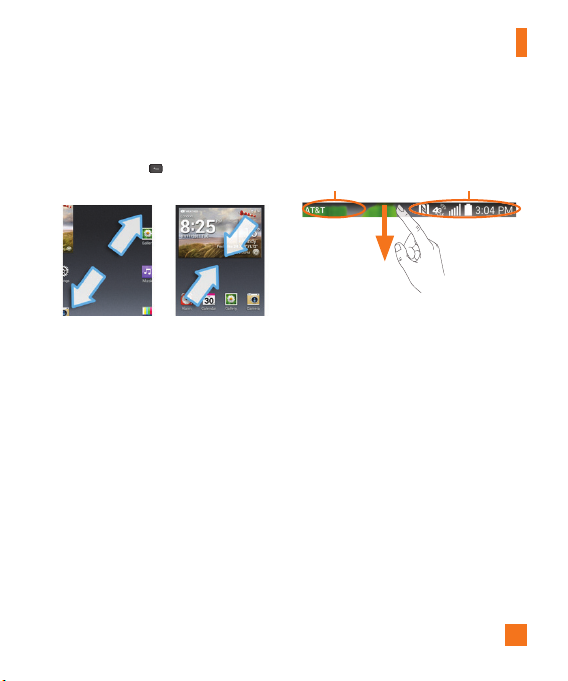
Quick Switch to Silent/Vibrate Mode
To quickly set your phone to silent or vibrate
mode, slide the Status Bar down and tap
until
or appears.
21
Page 22

Your Home screen
Home Screen Overview
The main Home screen is the starting point
for many applications and functions, and it
allows you to add items like application icons,
shortcuts, folders or widgets to give you
instant access to information and applications.
This is the default page and accessible from
any menu by pressing
On your Home screen, you can view menu
icons at the bottom of the screen. Menu icons
provide easy and one-touch access to the
functions you use the most.
Home Key
.
Navigating Through the Home Screen Canvases
Your phone has several Home screen canvases.
If you like, you can place different applications
on each of the Home screen canvases.
From the main Home screen canvas, swipe the
screen with your finger in either direction. The
main Home screen canvas is located in the
middle. To add more canvases, pinch in on the
Home screen and tap
You can also customize each canvas with
shortcuts, folders, and widgets, which are
shortcuts to your favorite applications.
22
.
%
NOTE
On the Home screen, you can view the Quick
Keys at the bottom of the screen. The Quick
Keys provide easy, one-touch access to the
functions you use the most.
Navigating Through the SubMenus
Sub-menus are available when you are at
any Home screen or have selected a feature
or application such as Phone, Contacts,
Messaging or Internet.
1 Touch the Menu Key
displays at the bottom of the phone screen.
2 Tap an option.
. A sub-menu
Customizing your Home screen
You can customize your Home screen by
adding quick access items, such as shortcuts
to an application, widgets, or changing the
wallpaper.
Apps
: Add shortcuts to applications on the
•
Home screen.
Widgets
•
: Add dynamically updating
widgets to your Home screen to allow quick
access to applications without opening the
full application
Page 23
Your Home screen
•
Wallpapers
wallpaper.
To add shortcuts to apps or widgets on
the Home screen:
1 Select a location (Home screen canvas) to
add an item by swiping the Home screen
from left to right or vice versa.
2 Touch and hold an empty part of the Home
screen.
3 Tap the type of item you want to add on the
screen:
4 Tap the desired app or widget.
5 You will see a new icon on the Home screen.
To place it on a different canvas, touch and
hold it to drag it to the desired location and
release your finger from the screen.
%
TIP
To add a preloaded application or an application
you have downloaded from Play Store to the
Home screen, simply touch and hold the icon
you want in the Apps screen and drag it to the
desired Home screen canvas.
: Change the Home screen
Apps or Widgets
.
%
NOTE
If there is no available space on a particular
Home screen panel, you must delete or remove
an item before you can add another item. In
this case, you have the option of switching to
another Home screen panel.
To delete an application icon from the Home
screen, touch and hold the shortcut icon
or widget you want to delete and drag to
Remove
at the top of the screen.
changes to , lift your finger.
You cannot delete the preloaded applications.
(Only their icons can be deleted from the screen).
When
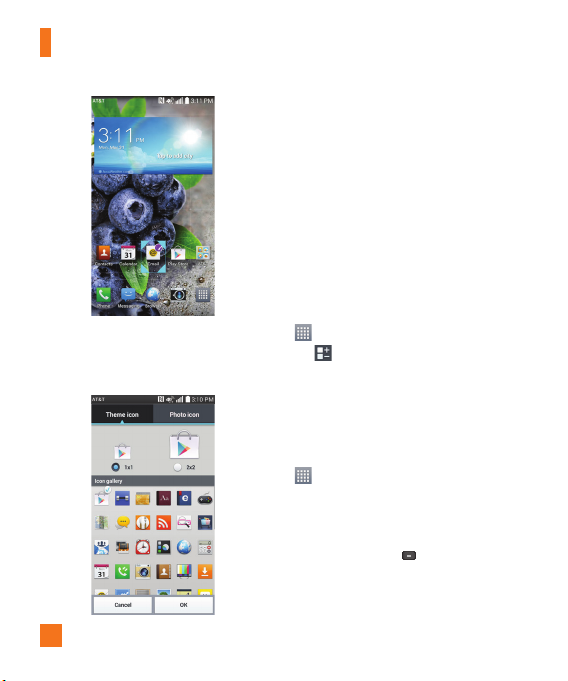
Customizing apps icons on the Home screen
You can customize each application icon with
images from your Gallery.
1 Touch and hold an application icon until it’s
unlocked from its current position. Then
drop it on the screen. The editing icon
will appear in the upper right corner of the
application.
23
Page 24
Your Home screen
2 Tap the application icon again and select the
desired icon design. Or tap Theme icon or
Photo icon to take a new picture or select a
picture from the Gallery.
24
Creating Application Folders on the Home screen
You can create application folders to hold
similar applications if you wish.
On the Home screen
1 Touch and hold an icon to unlock it from its
positions. Then drag it over another icon and
release it.
2 A folder will be created.
On the Apps screen
1 From the Home screen, tap the Apps Key
to open the Apps screen.
, then touch and hold the desired
2 Tap
icon to release it from its position.
3 Drag the icon over another icon and release
it to create a folder
.
Customizing the Apps screen
1 From the Home screen, tap the Apps Key
.
2 Tap the Apps tab at the top of the screen
to go to the Apps screen, if it is not already
selected.
3 Touch the Menu Key
Apps screen using View apps by, Show
large icons, App menu wallpaper, Hide/
Show apps.
to customize the
Page 25
Home screen clean view
You can see the wallpaper without items on
the Home screen by pinching out. Pinch in or
tap the Back Key
widgets again.
to see applications and
Your Home screen
%
NOTE
The available options may vary depending on
the region or service provider.
Notification icons System icons
Notifications
Notifications alert you to the arrival of new
messages, calendar events, and alarms, as
well as to ongoing events, such as video
downloads. From the Notifications panel,
you can view your phone’s current status and
pending notifications.
When a notification arrives, its icon appears
at the top of the screen. Icons for pending
notifications appear on the left, and system
icons showing things like Wi-Fi or battery
strength on the right.
Accessing notifications
Swipe the Status Bar down to open the
Notifications panel to access notifications. To
close the Notifications panel, swipe the bar at
the bottom of the screen upwards.
Quick Settings
Use the Quick Settings to easily toggle function
settings like Wi-Fi, manage display brightness
and more. To access the Quick Settings, swipe
the Status Bar down to open the Notifications
panel and select any of the available Quick
Setting apps at the top of the screen.
25
Page 26
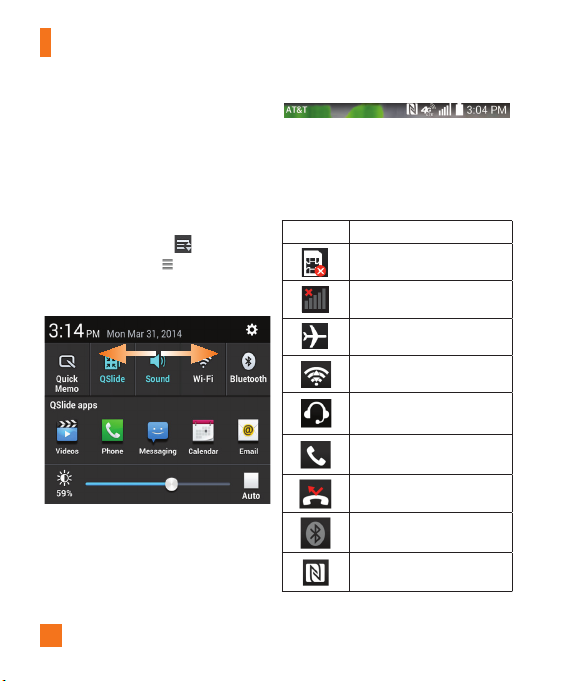
Your Home screen
%
NOTE
Touch and hold an icon on the Quick Settings
menu to go directly to that setting's menu
screen.
To rearrange Quick Setting items on the
Notification panel
Open the Notifications panel, swipe the Quick
Settings to the left, and tap .
To rearrange items, drag to the desired
location. To add more icons, tap the checkmark
boxes next to the feature you want to add.
Indicator icons on the Status Bar
Indicator icons appear on the Status Bar at
the top of the screen to report missed calls,
new messages, calendar events, device status
and more.
The icons displayed at the top of the screen
provide information about the status of the
device. The icons listed in the table below are
some of the most common ones.
Icon Description
No SIM card inserted
No network signal available
Airplane mode is on
Connected to a Wi-Fi network
Wired headset (with mic)
connected
Call in progress
Missed call
Bluetooth is on
NFC is on
26
Page 27

Your Home screen
Icon Description
System warning
An alarm is set
New voicemail available
Ringer is silenced
Vibrate mode is on
Battery fully charged
Battery is charging
Phone is connected to PC via
USB cable
Downloading data
Uploading data
GPS is on
Data is synchronizing
Icon Description
New Gmail message available
New Hangouts message
available
New text or multimedia
message
A song is currently playing
Mobile Hotspot
Choose input method
SmartShare music playing
27
Page 28
Your Home screen
Entering text
You can enter text using the on-screen
keyboard. The on-screen keyboard displays
automatically on the screen when you need to
enter text. To manually display the keyboard,
simply tap a text field where you want to
enter text.
There are two types of keyboards that you can
use:
Android keyboard (AOSP) and LG
keyboard.
To select the keyboard:
1 From the Home screen, tap the Menu
Key > All settings > General tab
> Language & input > Default (Under
KEYBOARD & INPUT METHODS).
2 Select the default keyboard between
Android keyboard (AOSP), LG
Keyboard and Google voice typing.
OR
1 While entering text, drag the Status Bar
down and tap Choose input method.
%
NOTE
Multiple text entry methods must be enabled
for this option to be available.
2 Select the desired input method from
Android keyboard (AOSP), LG
Keyboard (default) or Google voice
typing.
28
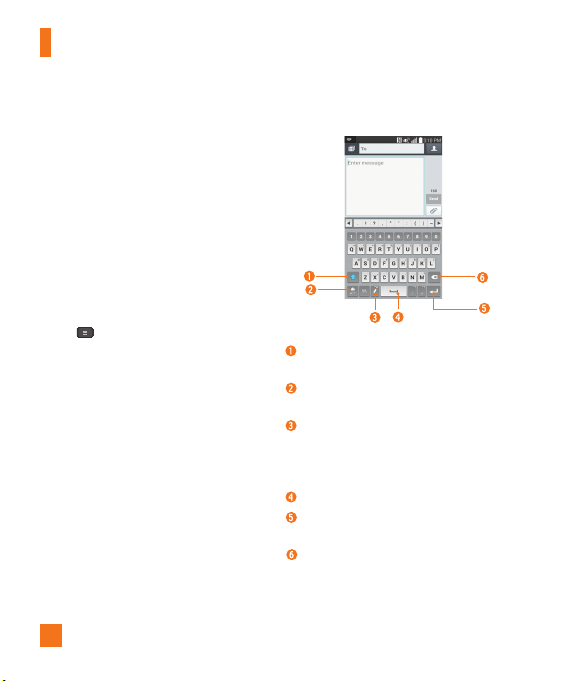
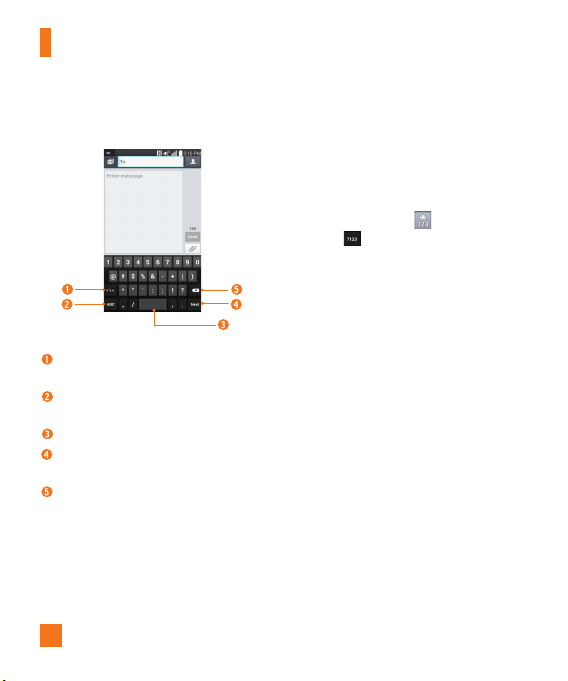
LG keyboard - Letters Entry
Shift Key - Tap once to capitalize the next
letter you type. Double-tap for all caps.
Number and Symbols - Tap to change
input to number and symbol entry.
Handwriting/Voice to Text/Settings Key
Tap to enter text by voice. Touch and hold
to enter text by handwriting or access the
keyboard settings.
Space Key - Tap to enter a space.
Enter Key - Tap to move the cursor to the
next line.
Delete Key - Tap to delete characters to
the left of the cursor.
-
Page 29
Your Home screen
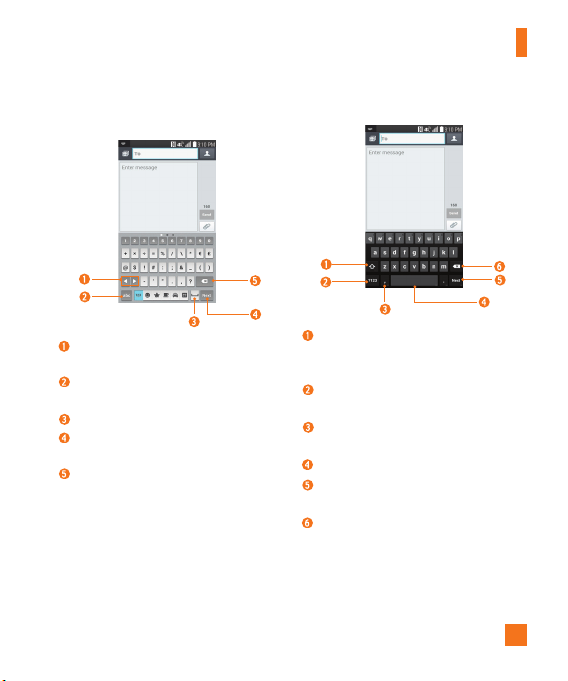
LG keyboard - Numbers and Symbols
Arrow Keys - Tap to display additional
symbols.
Letters Key - Tap to change input to
letters entry.
Space Key - Tap to enter a space.
Enter Key - Tap to move the cursor to
the next line.
Delete Key - Tap to delete characters to
the left of the cursor.
Entry
Android keyboard (AOSP) - Letters Entry
Shift Key - Tap once to capitalize the
next letter you type. Double-tap for all
caps.
Number and Symbols Key - Ta p to
change input to number and symbol entry.
Settings Key - Touch and hold to set
various keyboard settings.
Space Key - Tap to enter a space.
Enter Key - Tap to move the cursor to
the next line.
Delete Key - Tap to delete characters to the
left of the cursor.
29
Page 30
Your Home screen
Android keyboard (AOSP) -
Numbers and Symbols Entry
Alt Key - Tap to enter additional
symbols.
Letters Key - Tap to change input to
letters entry.
Space Key - Tap to enter a space.
Enter Key - Tap to move the cursor to
the next line.
Delete Key - Tap to delete characters to
the left of the cursor.
30
123 Mode
This mode allows you to enter numbers in a
text message (a telephone number, for
example) more quickly. Tap the keys
corresponding to the required digits before
manually switching back to the appropriate
text entry mode by tapping
Keyboard or
on the Android keyboard.
on the LG
Entering Special Characters
The on-screen keyboard allows you to enter
special characters (e.g., “á”).
To enter a special character, press and hold the
desired key (press the “a” key for example).
After the special character appears, slide your
finger over it and lift it off it to enter it.
%
NOTE
A character at the top right or bottom right
corner of a key indicates that additional
characters are available by touching and
holding the key.
Page 31

Google Account Setup
The first time you open a Google application on
your phone, you will be required to sign in with
your existing Google account. If you do not
have a Google account, you will be prompted
to create one.
Creating your Google account
1 From the Home screen, tap the Apps Key .
2 Tap Settings > General tab >
Accounts & sync > Add account >
Google > New.
3 Tap a text field to open the keyboard and
enter your name. Then tap
4 Enter your username and tap
phone will communicate with Google servers
and check for username availability.
5 Enter and re-enter your password. Then
follow the instructions and enter the
required and optional information about
the account. Wait while the server creates
your account.
.
. Your
Signing into your Google
account
1 From the Home screen, tap the
.
2 Tap Settings
Accounts & sync > Add account >
Google > Existing.
3 Enter your email and password and tap
4 Read the disclaimer about signing in and
checkmark if you want to keep updated with
news and offers from Google Play. Then
tap OK.
5 After signing in, you can use Gmail and take
advantage of Google services on your phone.
6 Once you have set up your Google
account, your phone will be automatically
synchronized with your Google account on
the web. (Depending on your synchronization
settings.)
After signing in, your phone will sync with
your Google services, such as Gmail, Contacts,
Google Calendar, and Picasa photo albums.
You can also use Maps, download applications
from Play Store, back up your settings to
Google servers, and take advantage of other
Google services on your phone.
> General tab >
Apps Key
31
.
Page 32

Google Account Setup
IMPORTANT
• Some applications, such as Calendar,
work only with the first Google Account
you add. If you plan to use more than one
Google Account with your phone, be sure
to sign into the one you want to use with
such applications first. When you sign in,
your contacts, Gmail messages, Calendar
events, and other information from these
applications and services on the web are
synchronized with your phone. If you don’t
sign into a Google Account during setup,
you will be prompted to sign in or to create
a Google Account the first time you start an
application that requires one, such as Gmail
or Play Store.
• If you have an enterprise account through
your company or other organization, your IT
department may have special instructions on
how to sign into that account.
32
Page 33

Calls
Making a call
1 From the Home screen, tap the Phone Key
to open the keypad.
2 Enter the number on the keypad. To delete a
digit, tap the
3 Tap the
4 To end a call, tap the
%
TIP
To enter “+” to make international calls,
touch and hold .
Clear
Key .
Call
Key to make a call.
End
Key .
Calling your contacts
1 From the Home screen, tap Contacts to
open your contacts.
2 Scroll through the contact list or tap the
Search
contacts field and enter the first
letter(s) of the contact you want to call. You
can also tap the letters at the right side of
the screen.
3 In the list that is displayed, tap the contact
you want to call.
4 In the Contact Info screen, tap the phone
number you wish to call.
Answering and rejecting a
call
When the screen is locked
When your phone rings, swipe the
icon
in any direction to answer the
incoming call.
Decline
Swipe the
to reject an incoming call.
icon in any direction
Answer
When the screen is unlocked
When your phone rings, tap the
Key . Tap
incoming call.
%
Tap or swipe the Decline with message
Key if you want to send a message to the
caller. If the caller is unknown, the Decline
with message Key is not available.
Decline
NOTE
Answer
Key to reject an
Adjusting the in-call volume
To adjust the in-call volume during a call, use
the Volume Keys on the left side of the phone.
33
Page 34

Calls
Making a second call
1 During your initial call, tap the Menu Key
and select Add call.
2 Dial the number or search your contacts.
Call
Key
3 Tap the
4 Both calls will be displayed on the call
screen. Y
5 Tap the Call entry on the screen to toggle
between active calls or tap Merge calls
to merge the calls.
6 To end active calls, tap
If there is no active call, it will end the call
on hold.
%
NOTE
You will be charged for each call you make.
to connect the call.
our initial call will be put on hold.
the End Key .
Viewing your call logs
From the Home screen, tap the Phone Key
and the Call logs tab.
You can view a complete list of all dialed,
received, and missed voice calls.
%
TIP
Tap any single call log entry to view the
date, time, and duration of the call.
%
TIP
Tap the Menu Key , then tap Delete
all to delete all the recorded items or
Delete to delete individual or groups of
entries.
Call settings
You can configure phone call settings, such
as call forwarding, and other special features
offered by your carrier.
1 From the Home screen, tap the
and tap
All settings
2 Tap the Networks tab (if necessary) >
Set any of the available options.
3
Menu Key
.
Call
.
34
Page 35

Contacts
You can add contacts on your phone and
synchronize them with the contacts in your
Google Account or other accounts that
support syncing contacts.
Searching for a contact
1 From the Home screen, tap the Apps Key
and tap Contacts
contacts.
OR
From the Home screen, tap the Phone
Key > Contacts tab.
2 Tap the Search contacts field and enter
the contact name using the keypad. You
can also tap the letters at the right side
of the screen.
to open your
Adding a new contact
1 From the Home screen, tap the Phone
Key and enter the new contact’s
number. Tap the Menu Key >
Add to Contacts > New contact or
Update contact.
2 Tap
and select the account where you
want to add the new contact. Locations
depend on the type of accounts you have
added to your device.
%
NOTE
The entry fields varies depending on the
account.
3 If you want to add a picture to the new
contact, tap
or Select from Gallery. Then browse for
an image and select it.
4 Tap
information.
5 Enter the details about your contact.
6 Tap Save to save the contact entry
Favorite Contacts
You can classify frequently called contacts
as favorites.
To add a contact to your favorites
1 From the Home screen,
contacts.
2 Tap a contact to view its details.
3 Tap the star to the right of the contact’s
name. The star turns gold and the contact
is added to your favorites.
. Choose from Take photo
to enter more specific name
tap the Apps Key
and then Contacts
.
to open your
35
Page 36

Contacts
To remove a contact from your favorites
list
1 From the Home screen,
and then Contacts
2 Tap the Favorites tab.
3 Tap a contact to view its details.
4 Tap the gold star to the right of the
s name. The star turns grey
contact’
and the contact is removed from your
favorites.
tap the Apps Key
.
AT&T Address Book (AAB)
AT&T Address Book (AAB) is an application
that automatically syncs your contacts to an
online address book for safekeeping! When
you first turn on the phone or change your SIM
card and tap Contacts, the AAB application is
displayed.
After signing up for this service, your
information is synced on a regular basis.
You can find more information on this service
and access your online address book at
www.att.com/addressbook. You can find
the synchronization menu for the service by
tapping the Menu Key
> General tab > Accounts & sync > AT&T
Address Book.
36
> All settings
Page 37

Messaging/Email
Messaging
Your phone combines text and multimedia
messaging into one intuitive, easy-to-use
menu.
Conversation view
Messages exchanged with another party are
displayed in chronological order so that you
can conveniently see an overview of your
conversation.
Sending a message
1 Tap Messaging on the Home screen,
then tap
to create a new message.
2 Enter a contact name or phone number
To
field. As you enter the contact
in the
name, matching contacts appear. You can
tap a suggested recipient. You can also add
multiple contacts.
%
NOTE
You will be charged for a text message for
every person you send the message to.
3 Tap the text field and start entering your
message.
Menu Key
4 Tap the
options menu. Choose from
available options.
to open the
any of the
5 Tap
Send
to send your message.
%
Warning
The 160-character limit may vary from
country to country depending on how the
text message is coded and the language
used in the message.
%
Warning
If an image, video, or audio file is added
to a text message, it will be automatically
converted into a multimedia message and
you will be charged accordingly.
%
NOTE
When you get a text message during a call,
there will be an audible notification.
Using smilies
Liven up your messages using smilies.
When writing a new message, tap the
Key > Insert smiley. You can also tap
and select an emoji category to enter
emojis.
Menu
Changing your message settings
Your phone's message settings are predefined,
so you can send messages immediately.
You can change the settings based on your
37
Page 38

Messaging/Email
preferences.
From the Home screen, tap Messaging
> Menu Key > Settings.
You can use the
email from providers other than Gmail. The
Email application supports the following
account types: POP3, IMAP and Microsoft
Exchange (for Enterprise users).
To open the Email application
From the Home screen, tap the Apps Key
The first time you open the
a setup wizard opens to help you add an email
account.
Microsoft Exchange Email Account
Email address – Enter the account email
address.
Password – Enter the account password.
Server address – Enter the server address.
Domain – Enter the account domain (optional).
Username – Enter the account username.
Use secure connection (SSL) – Choose
whether or not to use SSL for Microsoft
Exchange.
Client certificate – If you check mark this,
38
> Email .
Email
application to read
Email
application,
you accept all SSL certificates regardless
public or private.
Other (POP3 & IMAP) Email
Account
Email address – Enter the account email
address.
Password – Enter the account password.
Incoming server settings
POP/IMAP server – Select protocol type,
either POP3 or IMAP.
Security type – Choose from Off, SSL, or TLS.
Port number – Normally each account’s
default number will be displayed.
Outgoing server settings
SMTP server – Enter the outgoing email
server address.
Security type – Choose from Off, SSL, or TLS.
Port number – Normally each account’s
default number will be displayed.
To open your Combined inbox
If you have configured email to send and
receive email from more than one account, you
can view all messages sent to all accounts in
your Combined inbox.
Open the Email application and touch
. Then touch Combined
Page 39

Messaging/Email
inbox.
Messages in the Combined inbox are color
coded on the left, by account.
When a new email arrives in the Inbox, there
will be sound and/or vibration notification
(depending on your current sound and vibrate
settings).
Composing and Sending Email
1 In the Email application, tap Compose .
2 Enter an address for the message’s intended
recipient. As you enter text, matching
addresses will be offered from your
contacts. Separate multiple addresses with
commas.
3 Tap Cc/Bcc to copy or blind copy to other
contacts/email addresses.
4 Tap the text field and enter your message.
5 Tap Attach to attach the file you want to
send with your message.
6 Tap Send to send the message.
If you are not ready to send the message,
tap Save to save it in a Drafts folder. Touch
a message in the Drafts folder to resume
working on it. Your message will also be saved
as a draft if you touch the Back Key
before sending it.
Tap Cancel to abandon and delete a message,
including any saved drafts. If you are not
connected to a network, for example if you’re
working in airplane mode, the messages you
send are stored in your Outbox folder until
you’re connected to a network. If it contains
any pending messages, the Outbox will be
displayed on the Accounts screen.
%
NOTE
The messages sent using an Exchange account
will not be stored on the phone; they will be
stored on the Exchange server itself. If you
want to see your sent messages in the Sent
folder, you may need to open the Sent folder
and select Refresh from the options menu.
Working with Account Folders
Each account has Inbox, Outbox, Sent,
Drafts, Trash and Junk folders. Depending on
the features your account service provider
supports, you may have additional folders.
39
Page 40

Messaging/Email
Adding and Editing Email Accounts
To add an email account
1 From the Home screen, tap the Apps Key
> Email .
2 Select the desired email provider.
If an email account is already set up, the
wizard is not activated automatically.
In this case, tap the Menu Key
Settings >
Add account.
>
To change account settings
1 Open the Email application.
2 Tap the Menu Key
3 Tap General settings to adjust the settings
that affect all accounts. Or tap an individual
account to adjust settings only for that
account.
> Settings.
To delete an email account
1 Open the Email application.
2 Tap the Menu Key
Menu Key > Remove account.
Select the account(s) you want to delete
3
and tap Remove.
4 Tap Ye s to confirm.
> Settings >
40
Page 41

Social Networking
With your phone, you can enjoy social
networking and manage your micro-blog in
on-line communities. You can update your
current status, upload photos, and view your
friends’ status updates in real-time.
You can add your Facebook, Google+, and
Twitter accounts to your phone. If you don’t
have an account, you can visit their sites to
set one up.
%
NOTE
Additional costs may be incurred when
connecting and using online services.
Check your data charges with your network
provider.
Adding an account to your
phone
1 From the Home screen, tap the Menu Key
> All settings > General tab >
Accounts & sync.
2 Tap Add account.
3 Tap any social networking service you want
to use.
4 Enter your email address and password
that you set up for your social networking
account, then tap
Log in
.
Adding a social networking
widget on the Home screen
If you add a social networking widget on
your Home screen, the widget will show
your status when your phone receives
updates from the network.
You can also access the social community
directly by tapping the widget.
1 Touch and hold an empty spot on the Home
screen.
%
NOTE
If there is no available space on a particular
Home screen panel, you won't be able to
add any widget; you must delete or remove
an item before you can add another item. In
this case, you have the option of switching
to another Home screen panel.
2 Tap the Widgets tab and scroll to the right
or left until you see the social network you
want.
3 Tap the desired widget to add it to the Home
screen panel.
41
Page 42

Social Networking
Viewing and updating your status
1 Go to the Home screen panel where the
social networking widget is located. You can
see the current status of social applications
you set.
2 Tap the Status update icon or field to
update your status with comments or
upload pictures.
3 After entering comments and attachment
(if any), tap the Post icon.
%
TIP
You can use information about friends only
in your social network(s) or sync all data
to Contacts.
Syncing accounts on your phone
You can sync information from your social
networking accounts with your Contacts and
other functions on your phone, if applicable.
1 From the Home screen, tap the
> All settings
Accounts & sync
2 Checkmark Auto-sync data to activate
automatic synchronization.
42
Menu Key
> General tab >
.
3 Tap the account you want to sync.
4 Check the desired options, such as
Contacts.
A checkmark indicates that synchronization
has been enabled.
Removing accounts on your phone
1 From the Home screen, tap the
> All settings
Accounts & sync
2 Tap the account(s) you want to delete, then
Menu Key
> OK.
>
Menu Key
> General tab >
.
Remove account
Page 43

Camera
Getting to know the viewfinder
To open the Camera application, tap Camera on the Home screen.
Swap camera
Flash – Tap to turn the flash On, Off or set it to Auto.
Settings
–
Allows you to swap between the rear camera lens and the front
camera lens.
Mode Switch
Capture
Gallery
– Tap to open the settings menu. See
– Touch and slide to switch
between Camera mode and
Video mode.
– Allows you to take a photo.
– This enables you to access your
saved photos and videos within the
camera mode. Simply tap and your
Gallery will appear on the screen.
Using the advanced settings
page 44.
Mode
– Allows you select the shot mode from Normal, Dynamic tone(HDR),
Panorama, VR panorama, Burst shot, Beauty shot, Dual camera, Time
catch shot, Intelligent auto, Sports and Night.
on
43
Page 44

Camera
Taking a photo
1 From the Home screen, tap Camera .
2 Holding the phone horizontally, point the
lens towards the subject you want to
photograph.
%
NOTE
To zoom in, press the Volume Keys or use
the pinch-to-zoom method.
3 A focus box will appear in the center
of the viewfinder screen. You can also
tap anywhere on the screen to focus on
that spot.
4 When the focus box turns green, the
camera has focused on your subject.
5 Tap Capture to take a picture.
Once you’ve taken the photo
Your captured photo will appear on the
screen if Auto review is set to On (refer to
Using the advanced settings). Otherwise,
tap the image preview at the bottom right
corner of the screen to view the picture.
Using the advanced settings
In the viewfinder, tap to open the
advanced options.
You can change the camera settings by
scrolling the list. After selecting the option,
tap the Back Key
44
.
Cheese shutter - Allows you to take a
picture by voice.
Brightness - Defines and controls of the
amount of sunlight entering the lens. Slide
the brightness indicator along the bar
towards “-” for a lower brightness video or
towards “+” for a higher brightness video.
Focus - Tap to select the focus mode.
Auto: Allows the camera to focus
automatically. (The camera continuously
focuses on the objects in the photo).
Manual: Allows you to set the focus
mode manually before taking a photo.
Face tracking: The camera detects and
focuses on human faces automatically.
Image size - Tap to set the size (in pixels)
of the picture you take. Select a pixel
value from the following options: 13M
(4160x3120), W10M (4160x2340), 8M
(3264x2448), 1M (1280x960).
ISO - Control the camera's sensitivity to
light. Choose from Auto, 800, 400, 200,
and 100.
White balance - The white balance
ensures any the white areas in your picture
are realistic. To enable your camera to
adjust the white balance correctly, you may
need to determine the light conditions.
Choose from Auto, Incandescent, Sunny,
Fluorescent, and Cloudy.
Page 45

Camera
Color effect - Allows you to set a color
effect for the photo. Choose from None,
Mono, Sepia, and Negative.
Timer - The self-timer allows you to set a
delay after the shutter is pressed. Select
Off, 3 sec, 5 sec, or 10 sec. This is ideal if
you want to be included in a photo.
Auto review - If you set Auto review on,
it will automatically display the picture that
was just taken.
Geotagging - Activate to use your phone’s
location-based services. Take pictures
wherever you are and tag them with the
location. If you upload tagged pictures to a
blog that supports geotagging, you can see
the pictures displayed on a map.
%
NOTE
This function uses wireless networks.
Y
ou need to activate Google’s location
From the Home screen, tap the
service.
Menu Key
tab > Location.
Shutter sound - adjust the sound the
shutter makes when taking a picture.
Volume key - Set how to use the volume
key. Choose from Capture or Zoom.
Storage - Allows you to choose where to
save your pictures. Choose from SD card
and Internal storage.
Help - Touch this whenever you want to
know how a function works. This icon will
> All settings > General
provide you with a quick guide.
Reset - Restore all camera default
settings.
%
NOTE
When you exit the camera, some settings
•
will return to their defaults. Check the
camera settings before you take your
next photo.
• The settings menu is superimposed over
the viewfinder
elements of the image color or quality,
you will see a preview of the image
change behind the settings menu.
, so when you change
Viewing your saved photos
You can access your saved photos from
within the camera mode. Just tap the
image preview at the bottom of the camera
screen.
%
TIP
Flick left or right to view other photos or
videos.
Tap the screen to display other options
menus.
– Tap to share the photo using
SmartShare (turn on Wi-Fi if it’s not
already on).
– Tap to edit the photo.
– Tap to take a new photo.
– Tap to share the photo.
45
Page 46

Camera
– Tap to delete the photo.
Menu Key
as, Move, Copy, Copy to Clip Tray,
Rename, Rotate left, Rotate right, Crop,
Slideshow, Add location and Details.
%
TIP
If you have a social networking account
and set it up on your phone, you can share
your photo with your social networking
community.
%
NOTE
Additional charges may apply when
multimedia messages are downloaded
while roaming.
- Tap to access Set image
Setting a photo as the wallpaper
1 Tap the photo you want to set as
wallpaper to open it.
2 Tap the Menu Key > Set image as
> Home screen wallpaper.
3 Crop the image as desired and tap OK.
46
Page 47

Video Camera
Getting to know the viewfinder
To open the Video Camera application, tap Camera on the Home screen and slide down.
Swap camera
– Allows you to swap between the rear camera lens and the
front camera lens.
Flash – Tap to turn the flash On, Off or set it to Auto.
Mode Switch
– Touch and slide to switch
between Camera mode and
Video mode.
Record
– Allows you to start recording.
Gallery
– This enables you to access your
saved photos and videos from
within the video camera mode.
Simply tap and your Gallery will
appear on the screen.
Settings
– Tap to open the settings menu. See
Using the advanced settings
page 48.
Recording mode
- Allows you to change the recording mode to Normal, WDR
recording, Live effect, or Dual recording.
%
TIP
When recording a video, place two fingers on the screen and pinch to use
the Zoom function.
on
47
Page 48

Video Camera
Recording a video
1 From the Home screen, tap
and slide the
down to change to Video mode. The Capture
icon will change to .
2 The video camera’s viewfinder will appear
on the screen.
3 Holding the phone horizontally, point the
lens towards the subject of the video.
4 Tap Record
5 A timer showing the length of the video
is displayed at the top left corner of the
screen.
6 Tap Stop to stop recording.
%
NOTE
Tap on the screen to take a picture
while you're recording. Tap to pause
the recording.
Mode Switch
once to start recording.
Camera
button
Using the advanced settings
Using the viewfinder, tap to open the
advanced options.
Adjust the video camera settings by scrolling
the list. After selecting the option, tap the
Back Key
Audio zoom – Increases sound sensitivity
48
.
in zooming area and decreases noise when
recording.
Video size – Allows you to change the
video resolution to Full HD (1920x1080), HD
(1280x720), QVGA 320x240, QCIF 176x144
(MMS).
Brightness
– Defines and controls of
the amount of sunlight entering the lens.
Slide the brightness indicator along the bar
towards “-” for a lower brightness video or
towards “+” for a higher brightness video.
Anti-shaking - Allows you to reduces image
blur due to the movement of the subject of the
video or hand movement.
White balance
any the white areas in your video are realistic.
To enable your camera to adjust the white
balance correctly, you may need to determine
the light conditions. Choose from
Incandescent, Sunny, Fluorescent
Cloudy
Color effect - Allows you to set a color
effect for the photo. Choose from None,
Mono, Sepia, and Negative.
Auto review
it will automatically play the video you just
recorded.
– The white balance ensures
.
– If you turn Auto review on,
Auto
,
, and
Page 49

Video Camera
Geotagging
location-based services. Take videos wherever
you are and tag them with the location. If you
upload tagged videos to a blog that supports
geotagging, you can see the videos displayed
on a map.
Volume key - Set how to use the volume
key. Choose from Record or Zoom.
Storage – Allows you to choose where to
save your pictures. Choose from SD card and
Internal storage.
Help - Touch this if you want to know how
this function works. This icon will provide
you with a quick guide.
Reset - Restore all video camera default
settings.
– Activate to use your phone’s
After recording a video
Touch the image preview at the bottom of the
screen to view the last video you recorded.
– Tap
to share your video using the
SmartShare function.
– Tap
to record another video
immediately.
– Tap to share the video.
– Tap
to delete the video.
Menu Key - Tap to access
Copy, Trim, Rename
, and
Details
Move
.
,
%
NOTE
Additional charges may apply when multimedia
messages are downloaded while roaming.
Watching your saved videos
1 In the viewfinder, tap the image preview at
the bottom of the camera screen.
2 Your Gallery will appear on the screen.
3 Tap a video to play it automatically.
Adjusting the volume when viewing a video
To adjust the volume of a video while it is
playing, use the Volume Keys on the left side
of the phone.
49
Page 50

Video Camera
Dual recording
The Dual recording feature allows you to
record videos with the front and rear cameras
at the same time.
1 Open the Camera application.
2 Change to video mode and tap
recording.
3 Touch to start dual recording.
> Dual
%
NOTE
Drag the small screen to move it to your
desired location.
Touch and hold the small screen to
resize it.
Tap on the small screen to switch screens.
Tap to change small window's
frame.
Tap to pause while you're recording.
4 Ta p
to stop recording.
50
Page 51

Video Camera
Audio zoom
Increase sound sensitivity in zooming area and
decrease noise when recording.
1 Open the Camera application.
>
2 Change to video mode, tap
zoom
> On.
3 Tap Record
4 Zoom in a certain area to increase sound
sensitivity and decrease noise.
%
Available only in landscape view.
5 Tap
to start recording.
NOTE
Do not cover the side microphones while
using this feature.
to stop recording.
Audio
Tracking focus
1 Open the Camera application.
2 Change to video mode and tap
recording.
3 Tap on the subject in the preview screen
to track it.
to refine the focus.
4 Tap
to start
51
Page 52

Video Camera
Live Zooming
Live Zooming allows you to zoom in or zoom
out on a portion of a video that is being played
to make the desired section appear larger or
smaller.
When viewing a video, use your index finger
and thumb in a pinching or spreading motion to
zoom in or out.
%
NOTE
While a video is playing, slide the left side
of the screen up or down to adjust the
screen brightness.
While a video is playing, slide right side
of the screen up or down to adjust the
screen volume.
While playing a video, slide the screen left
or right to rewind or fast-forward.
Do not press too hard; the touch screen
is sensitive enough to pick up a light, but
firm touch.
52
Page 53

Multimedia
You can store multimedia files to a microSD
card or internal memory to have easy
access to all your image and video files.
Gallery
From the Home screen, tap the Apps Key
> Gallery .
Video Wiz
You can make your own movie using your
images, video, and music.
1 From the Home Screen, tap the Apps
Key > Video Wiz .
2 Read the brief introduction and tap OK.
3 Tap to add images and/or video to
your movie.
4 Tap the Image tab to add pictures and
the Video tab to add videos. Then
tap .
•
To remove images or videos, tap
and tap . When you are done,
tap .
•
To rearrange them, touch and hold an
image or video, then drag and drop it
to the desired position.
5 Tap Select style to select the desired
movie style.
•
Scroll through and select the style
you want. As you tap the desired
style, preview is displayed.
•
Tap OK.
6 Tap Select music to set the
background music.
•
Select Default for this style to use
the default music.
•
Tap Music track to use a song you
have saved on your device.
to play your movie.
7 Tap
to edit the video clip using
8 Tap
Text, Sticker or Magic spot.
•
After editing the video, tap .
9 Tap
to save the video.
53
Page 54

Multimedia
%
NOTE
Tap to clear all edits.
Tap if you want to see help
information about the Video Wiz
application.
Music
Your phone has a music player that lets
you play all your favorite tracks. To access
the music player from the Home screen,
tap the Apps Key and tap Music .
How to save music/video files to the phone
Connect your phone to the PC using
the USB cable.
You'll receive a notification that the USB
is connected and the USB connection type
prompt is displayed. Tap Media sync
(MTP) or Send images (PTP) and open
the folder you wish to view from your
computer.
Save music or video files from the
PC to the phone.
- You may copy or move files from the PC
to the phone's removable storage using
a card reader.
54
- If there is a video file with a subtitle file
(.smi file with the same name as the
video file), place them in the same folder
to display the subtitle automatically
when playing the video file.
- When downloading music or video files,
copyright must be secured. Please note
that a corrupted file or file with a wrong
extension may cause damage to the
phone.
How to play music/video files on the phone
Playing music/video files
Locate the file you want in the Gallery or
Music applications and tap it to play it.
Playing a song
1 From the Home screen, tap the Apps
Key and tap Music .
2 Tap the Songs tab.
3 Tap the song you want to play.
to pause the song.
4 Tap
to skip to the next song.
5 Tap
to go back to the beginning of
6 Tap
the song. Tap twice to go back to
the previous song.
Page 55

Multimedia
To change the volume while listening to
music, press the Volume Keys on the left
side of the phone.
Touch and hold a song to access the
following options: Play, Add to playlist,
Share, Set as ringtone, Delete,
Details, and Search.
Working with Playlists
You can create playlists to organize your
music files into sets of songs, which
you can play in the order you set or in a
shuffle.
To create a playlist
1 When viewing the library tap the
Playlists tab.
2 Tap the Menu Key
playlist.
3 Enter a name for the playlist, then tap
OK.
4 Select the songs you want to add to the
playlist and tap Add. The new playlist is
added to the Playlists library.
> New
To add a song to a playlist
Touch and hold a song and tap Add to
playlist. Then choose the name of the
playlist. You can also add the song that is
playing in the Playback screen by pressing
the Menu Key
playlist and selecting the desired playlist.
then tapping Add to
To remove a song from a playlist
1 Open a playlist.
2 Touch and hold the song you want
to remove, then tap Remove from
playlist.
To rename a playlist
1 Open the Playlists library.
2 Touch and hold the playlist to display
the options menu, then tap Rename.
3 Enter the desired name and tap OK.
To delete a playlist
1 Open the Playlists library.
2 Touch and hold the playlist to display
the options menu, then tap Delete.
s to confirm.
3 Tap Ye
55
Page 56

Multimedia
%
NOTE
Music file copyrights may be protected
by international treaties and national
copyright laws. Therefore, it may be
necessary to obtain permission or a
licence to reproduce or copy music. In
some countries, national laws prohibit
private copying of copyrighted material.
Before downloading or copying the file,
please check the national laws of the
relevant country concerning the use of
such material.
Using SmartShare
The SmartShare application uses
DLNA (Digital Living Network Alliance)
technology to share digital content
through a wireless network. Both Phones
must be DLNA certified to support this
feature.
Enjoy Content Via a Variety of Devices
You can share your phone's contents with
a variety of devices. Tap
contents using various apps, such as Gallery
and Music.
Playing / Sending
•
Play: You can play the contents via a TV, a
56
to share the
Bluetooth speaker, etc.
•
Beam: You can send the contents to
Bluetooth- and SmartShare Beam-enabled
devices.
•
SmartShare Beam: Allows for a fast
transfer of contents via Wi-Fi Direct.
%
NOTICE
Some DLNA enabled devices do not
support the DMS upload functionality
and will not upload files. A few types of
contents are not supported.
Page 57

Google Applications
About Google applications
Google applications, including mobile
versions of Gmail, Hangouts, Google
Calendar, and Google Maps, are loaded
on your phone.
1 To set up a Google account, tap any
Google application, enter your user
name and password and sign in.
2 After signing in, your contacts, email,
and calendar in your Google account
will automatically synchronize with
your phone.
Maps
To open Google Maps and view
your location
1 From the Home screen, tap the Apps
Key and tap Maps .
2 Tap the My Location icon
screen.
The map centers on a blue arrow that
indicates your location. A blue circle
around the arrow indicates that your
actual location is within the circle.
on the
%
Tip
While viewing a map, tap the Menu Key
for the following options: Traffic,
Public transit, Bicycling, Satellite,
Google Earth, Settings, Help, Send
feedback, Tips and tricks.
To get an address and additional
information for a location
1 Touch and hold a location on the map.
A bar with the address and a thumbnail
from Street View (if available) appears
at the bottom of the page.
2 Tap the info bar to access additional
options.
Searching For Locations and
Places
You can search for a location and view it
on a map. You can also search for places
on the map that you're viewing.
To search for a location
1 While viewing a map, tap at the
bottom of the screen.
2 In the search box, enter the place
you're looking for
address, a city, or a type of business or
. You can enter an
57
Page 58

Google Applications
establishment. For example, “theater in
New York”.
3 Tap the Search icon
keyboard.
Markers with letter labels indicate
search matches on the map.
%
NOTE
Location information might be inaccurate if
GPS and Wi-Fi are turned off. Please make
sure that GPS and Wi-Fi are turned on.
on the
Getting Directions
To get directions
1 While viewing a map, tap .
2 Enter a starting point in the top text
box and your destination in the bottom
text box.
Play Store
Play Store lets you browse through and
download thousands of fun and useful
applications and games. You can check
other users' comment regarding an
application or you can post your own
comments. If you install applications and
games from Play Store, they appear in
the phone's menu below the preloaded
58
applications, and you can find them by
scrolling down with your finger. You can
open downloaded applications from the
Play Store by swiping the left edge of the
screen towards to right, then selecting
My apps.
%
NOTE
To purchase a paid app, you’ll need to
set up a payment method with Google
Checkout™. You have the option to use a
credit card or charge to your carrier bill.
%
NOTE
When you want to exit a game or
application, use the Home Key or
Back Key , which will return you to
the Home screen. Or select Menu (or
Options) within the game or application
and select Exit. (Exit option may vary by
game/application). Ending applications
that continue to run in the background
(after going back to the Home screen)
will help conserve battery life and reduce
unwanted data usage.
Gmail
Gmail can be configured when you first
set up your phone. Depending on your
Page 59

Google Applications
synchronization settings, Gmail on your
phone is automatically synchronized with
your Gmail account on the web.The inbox
conversations list is your default view.
to send or receive new email
Tap
and to synchronize your email with
your Gmail™ account on the web. Tap
the Menu Key for the following
additional options: Refresh, Label
settings, Settings, Send feedback,
and Help.
Compose
new message.
Search
account.
Labels
account's labels.
Refresh
account to view new activity.
- Allows you to compose a
- Allows you to search your
- Allows you to view the
- Allows you to refresh the
Hangouts
The Hangouts application lets you have
real-time text conversations with your
friends.
To open the Hangouts application
From the Home screen, tap the
> Hangouts .
Apps Key
To sign out of Hangouts
From the Home screen, tap the Menu
Key > Settings > tap the desired
account > Sign out.
Chatting with Friends
1 From the Home screen, tap the
Key
> Hangouts .
to view your contacts list. It
2 Tap
includes all of the Google Accounts
you've added.
•
Tap the name of the person in your
contacts list. If your friend is not yet on
Hangouts, you can invite your friend via
SMS.
OR
•
Tap the text field to enter a name, email,
or number.
3 Tap Message and then enter your
message.
4 Tap the Send
.
Apps
Hangouts chatting list
Touch and hold the friend in the chat
screen. You can set below options.
Tap to turn the notifications off.
59
Page 60

Google Applications
Tap to archive the conversation.
Tap to delete the conversation.
Blocking your Friends
•
To block a friend from exchanging messages
with you, tap the friend in the chatting
list. Tap the
Menu Key > People &
options. Then tap the block option.
•
To remove a friend from the blocked list,
from the chatting list, tap the
> Settings > tap the desired account >
Menu Key
Blocked people. Then tap Unblock next to
the person’s name.
Hangouts Settings
•
From the chatting list, tap the
Menu
Key to choose from Set mood,
Invites, Snooze notifications, Archived
Hangouts, Settings, Send feedback,
and Help.
•
While chatting, tap the
Menu Key
to choose from People & options, New
group Hangout, Turn history off, Archive,
Delete, Send feedback, and Help.
60
Page 61

Utilities
QSlide
The QSlide function enables an overlay on your
phone's display for easy multitasking.
1 While using an app that supports QSlide, tap
to access QSlide.
OR
Open the Notifications Panel and touch an
app from the QSlide apps section.
2 Use the slider
transparency of the overlay.
3 You can make a call, browse the web, or
choose other phone options.
to exit the QSlide function.
4 Tap
%
NOTE
The QSlide function can support up to two
windows at the same time.
to adjust the
QuickMemo
The QuickMemo feature allows you to create
memos and capture screen shots.
You can use QuickMemo to easily and
efficiently create memos during a call, with a
saved picture or on the current phone screen.
1 While viewing the screen you want to
capture and create a memo on, press the
QuickButton to access the QuickMemo
feature.
OR
Touch and drag the Status Bar down and
tap .
2 Create a memo using the following options:
- Tap to keep the memo on top and
continue using the phone. Tap to
exit the overlay mode.
- Tap to select the type of background
61
Page 62

Utilities
image you want to use.
- Tap to undo the most recent action.
- Tap to redo the most recently deleted
action.
- Tap to select the pen type and color.
You can also select the cropping tool to
crop the image.
- Tap to use the eraser to erase the
memo that you created.
- Tap to share the memo with others via
any of the available applications.
- Tap to save the memo you’ve created.
- Tap to hide or display the
toolbar.
%
NOTE
Please use a fingertip while using the
QuickMemo feature. Do not use your
fingernail.
3 Tap to show the Edit menu and
tap to save the current memo to the
Notebook or Gallery.
62
Discard QuickMemos:
Tap the Back Key
.
View the Saved Memo
From the Home screen tap the Apps Key
> Gallery
the QuickMemo album.
or Notebook and select
QuickRemote
QuickRemote turns your phone into a Universal
Remote for your home TV, cable box, audio
system, DVD/Blu-ray players, air conditioner
and projector.
1 From the Home screen, tap the Apps Key
> QuickRemote > .
OR
Touch and slide the Status Bar downwards and
touch
> ADD REMOTE.
Page 63

Utilities
2 Select the type and brand of device,
then follow the on-screen instructions to
configure the device(s).
%
TIP
To quickly use the QuickRemote feature, touch
and slide the Status Bar downward and tap
on the Quick Settings bar to activate it.
Touch the
Menu Key
Remote setting, Move remote, Delete
device, Edit room, Settings, and Help.
%
NOTE
QuickRemote features an ordinary remote
control and infrared (IR) signals to operate
the same way. Therefore, be careful not to
cover the QuickRemote features when you
use an infrared sensor. This function may not
be supported depending on the model, the
manufacturer or service company.
to select Magic
Setting the alarm
1 From the Home screen, tap the
and tap
Clock .
2 To add a new alarm, tap the Alarms tab
tab (if necessary).
3 Tap
and set the alarm time.
4 Set
any desired options and tap
%
NOTE
When viewing the alarms screen, tap the
Menu Key
to delete all alarms or
adjust the alarm settings.
Apps Key
Save.
Using the calculator
1 From the Home screen, tap the
and tap
Calculator
Apps Key
.
63
Page 64

Utilities
2 Tap the number keys to enter numbers.
3 For simple calculations, tap the function you
want
, followed by .
Adding an event to your calendar
%
NOTE
1 From the Home screen, tap the
and tap
Calendar
2 To view an event, tap the date. The events
occurring on that date are displayed below
the Calendar in Month view. Tap the event
to view its details. If you want to add an
event, tap
Calendar.
3 Tap the
event name. Check the date and enter the
start and end time you want your event to
begin and finish.
4 Tap the
5 To add a note to your event, tap the
Description
6 To repeat the event, set
REMINDERS
7 Tap
A colored square in the calendar will mark
all days that have saved events. An alarm
will sound at the event start time if you
at the top right corner of the
Event name
Location
field to enter the location.
field and enter the details.
, if necessary.
Save
to save the event in the calendar.
64
Apps Key
.
field and enter the
REPEAT
and
set it.
Changing your calendar view
1 From the Home screen, tap the
and tap
Calendar
2 At the top of the Calendar, tap
choose from Day, Week, Month
or Agenda
.
.
Task Manager
You can manage your applications using Task
Manager. You can easily check the number of
applications that are currently running and shut
down certain applications.
Tasks
This task can be synchronized with MS
Exchange account. You can create task, revise
it and delete it in MS Outlook or MS Office
Outlook Web Access.
To Synchronize MS Exchange
1 From the Home screen, tap the
> Settings
> General tab
2 Tap Accounts & sync > Add account.
3 Tap Microsoft Exchange to add your MS
Exchange account.
4 Make sure if you checkmark Sync T
Apps Key
Apps Key
and
, Year
.
asks.
Page 65

Utilities
Polaris Office 4
With Polaris Office 4, you can view, create and
edit document files on your device. The loaded
files can be from microSD cards of your device,
or from downloaded email attachments.
The Polaris Office 4 application supports the
following file formats: txt, doc, docx, xls, xlsx,
ppt, pptx, pdf.
Create a New Document
1 From the Home screen, tap the
>
Polaris Office 4
2 Register your name and email address
on the Registration page if you would
like to do so.
3 Tap List view, Grid view, or Favorites
to search for saved documents.
to start a new document.
4 Tap
5 Tap a document type.
6 Enter contents in the document using the
tools at the top of the screen and the
on-screen keyboard.
7 When you're done working on the
document, tap
enter a new document name) to save.
8 Enter the document name and tap Save.
9 Tap the Back Key
Apps Key
.
> Save (or Save as to
to exit.
View and edit a document on your
device
1 From the Home screen, tap the Apps Key
> Polaris Office 4 .
2 Tap List view, Grid view, or Favorites to
search for saved documents.
3 Tap the document that you want to view
or edit.
%
NOTE
You can also open an attachment in an email
by tapping the attachment in the message.
4 The document opens for you to view. If
you want to edit it, tap anywhere on the
document.
To move between pages or pan through
the document, scroll in the corresponding
direction.
To change the zoom level, simply pinch-to
zoom to achieve the zoom level you want.
Use the toolbar at the top of the screen
to edit the document (Word, Excel, or
PowerPoint file).
Ta p
for the following additional menu
options :
Save, Save as, PDF Export,
Find & Replace, Page layout, Full
width view, Reflow text, Text-tospeech and Share.
65
Page 66

Utilities
5
When you're finished editing, tap >
Save
. Then tap the
Back Key
to exit.
Polaris Office 4 toolbar
The Polaris Office 4 application has a toolbar
that appears automatically when you create
a document.
1 To display the toolbar in an existing
document, tap
2 Tap the Font, Paragraph, or Style tab
and choose the desired options.
3 To hide the tool options pop-up balloon,
tap
.
.
Voice Command
You can search for and dial a contact by
speaking, rather than by manually dialing a
contact or open installed applications.
To place a call by speaking
1 From the Home screen, tap the
> Voice Command
2 Say one of the following commands:
Call [Name or Phone Number]
Send Text [Name or Phone Number]
Redial
Open [App Name]
Play Music
Apps Key
.
Check [Item]
3 If Voice Command finds a match, it performs
the requested action, otherwise, it will
display options.
LG Tag+
LG Tag+ lets you customize NFC tags with
the settings you prefer.
1 From the Home screen, tap Apps Key >
LG Tag+ .
2 Tap .
3 Enter a name for the tag and tap OK.
4 Tap an action to add it to the tag and
configure the setting.
5 Then tap
6 When you’re finished, tap Write on
NFC tag.
7 Hold your phone to a blank tag and the
tag will be written.
to add more actions.
66
Page 67

The Web
Browser
The Browser gives you a fast, full-color world
of games, music, news, sports, entertainment,
and much more, right on your mobile phone.
%
NOTE
Additional charges apply when connecting
to these services and downloading content.
Check data charges with your network
provider.
Browser Toolbar
The Browser Toolbar at the bottom of the
screen enhances your mobile browsing
experience with contextual recommendations,
social applications and browser utilities.
We've included some buttons to get you
started and have made it easy to add more
buttons, move or remove them.
To display the Browser Toolbar, touch and
drag up
at the bottom of the screen.
Using options
Tap the Menu Key to view the following
options:
New tab - Opens a new tab.
Bookmarks - Allows you to view, add, edit,
and delete your bookmarks.
Add to bookmarks - Allows you to bookmark
the current web page.
Homepage - Allows you to open the home
page.
Set as homepage - Allows you to set the
current web page as your home page.
History - Allows you to view the web pages
you've visited.
Share page - Allows you send the web
address (URL) of the web page to others.
Find on page - Allows you to search for text
on the web page.
Desktop view - Allows you to change the
current mobile page to a desktop page.
Save for offline reading - Allows you to save
the current page for offline reading.
Capture plus - Allows you to capture the
current web page from top to bottom without
cutting.
Settings - Opens the Browser settings.
Exit - Allows you to exit the browser.
%
TIP
To return to the previous web page, tap the
Back Key .
67
Page 68

The web
Adding bookmarks
1 When viewing the page you want to
save, tap the Menu Key > Add to
bookmarks.
2 Enter the desired information for Label,
Address, and Add to (location to save
bookmark) and tap OK.
Changing the Browser settings
1 Open the Browser and tap the Menu Key
> Settings.
2 Set any of the available options.
68
Page 69

Settings
The Settings application contains most of the
tools for customizing and configuring your
phone. All of the settings in the Settings
application are described in this section.
To open the Settings application
- From the Home screen, tap the Apps
Key > Settings .
- From the Home screen, tap the Menu
> All settings.
Key
Networks tab
Airplane mode
Airplane mode allows you to quickly turn
off all wireless connections.
1 From the Home screen, tap the Menu
Key > All settings.
2 Select the Networks tab.
3 Tap the Airplane mode switch
to turn it on.
4 Tap the switch again to turn it off.
OR
1 Press and hold the Power/Lock Key
and tap Turn on Airplane mode.
2 Press and hold the Power/Lock Key
and tap Turn off Airplane mode to
turn it off.
Wi-Fi
To use Wi-Fi on your phone, you need
access to a wireless access point, or
"hotspot." Some access points are open
and you can simply connect to them.
Others are hidden or implement other
security features, so you must configure
your phone in order to connect to them.
Turn on Wi-Fi
From the Home Screen , open the
Notifications panel and tap to turn
Wi-Fi on. A blue colored icon indicates
that Wi-Fi is on.
OR
From the Home screen, tap the Menu
Key
and tap All settings >
Networks tab. Then tap the Wi-Fi
switch
To connect to a Wi-Fi Network
Turn off Wi-Fi when you're not using it to
extend the life of your battery.
1 From the Home screen, tap the Menu
2 Tap the Wi-Fi switch
to turn it on.
Key and tap All settings >
Networks tab > Wi-Fi.
to turn it on
and begin scanning for available Wi-Fi
networks.
69
Page 70

Settings
- A list of available Wi-Fi networks will
be displayed. Secured networks are
indicated by a lock icon .
3 Tap a network to connect to it.
If the network is open, you are prompted
-
to confirm that you want to connect to
that network by tapping Connect.
- If the network is secured, you are
prompted to enter a password or
other credentials. (Ask your network
administrator for details).
- Tap the Menu Key
additional options.
4 The Status Bar at the top of your screen
will display an icon that indicates your
Wi-Fi status.
%
TIP
If you are not in range of a Wi-Fi network
and use a network connection. Additional
data charges may apply.
%
NOTE
Access to the Internet and a wireless
router required. As an added convenience,
AT&T has shipped certain smartphones
with Wi-Fi enabled as a default setting.
Leaving Wi-Fi enabled when not
to access
70
connected to a Wi-Fi network may affect
battery charge. Qualifying data plan
required.
%
NOTE
This device supports WEP, WPA/WPA2PSK and 802.1x EAP. (Some EAP methods
are not supported.) If your Wi-Fi service
provider or network administrator sets
encryption for network security
key in the pop-up window. If encryption
is not set, this pop-up window will not
be shown. You can obtain the key from
your Wi-Fi service provider or network
administrator.
Bluetooth
Using Bluetooth
1 From the Home screen, tap the Menu
Key > All settings > Bluetooth,
then tap the Bluetooth switch to
turn on the Bluetooth functionality.
2 Tap Search for devices at the bottom
of the screen.
3 Tap the name of the device you wish
to pair with, and then tap Pair to pair
and connect.
%
TIP
Please consult documentation included
, enter the
Page 71

Settings
with Bluetooth device for information on
pairing mode and passcode (typically 0 0 0
0 – four zeroes).
How to send data from your phone
via Bluetooth
You can send data via Bluetooth by
running a corresponding application, not
from Bluetooth menu.
* Sending pictures: Open the Gallery
application and tap a picture. Then tap
> Bluetooth. Check if Bluetooth is
turned on and tap Search for devices.
Then tap the device you want to send
data to from the list.
* Sending contacts: Open the Contacts
application. Tap the contact you want
to share, then tap the Menu Key
Share > Bluetooth. Check if Bluetooth
is turned on and tap Search for
devices.Then tap the device you want
to send data to from the list.
* Sending multiple contacts: Open the
Contacts application. To select more
than one contact, tap the Menu Key
> Share. Tap the contacts you want
to send or tap Select all at the top
left corner of the screen. Tap Attach >
>
Bluetooth. Check if Bluetooth is turned
on and tap Search for devices. Then
tap the device you want to send data to
from the list.
* Connecting to FTP (Only the FTP
server is supported on this handset):
From the Home screen, tap the Menu
> All settings > Networks
Key
tab > Bluetooth. Make sure Bluetooth
is turned on. Tap the checkbox next to
your phone’s name to make the device
visible to other Bluetooth devices.
Then search for other devices. Find the
service you want and connect to the
FTP server.
%
TIP
The supported Bluetooth version is
Bluetooth 4.0 and certified by Bluetooth
SIG. It is compatible with other Bluetooth
SIG certified devices.
- If you want to search for this phone from
other devices,from the Home screen, tap
the Menu Key
Networks tab > Bluetooth. Make sure
Bluetooth is turned on. Tap the checkbox
next to your phone’s name to make the
device visible to other Bluetooth devices.
> All settings >
71
Page 72

Settings
Being visible for 2 minutes is set by
default.
- To change the visibility time length,
tap the Menu Key
timeout. Choose from 2 minutes, 5
minutes, 1 hour, or Never time out.
- Supported profiles are HFP/HSP, A2DP,
AVRCP, OPP, FTP(Server) ,HID, PAN, MAP
and PBAP.
> Visibility
Data Manager
You can select whether to enable or
disable mobile data. You can check the
current data usage, set to enable/disable
mobile data, or set the mobile data limit.
Mobile data - Tap the switch
enable mobile data.
Limit mobile data usage - Checkmark to
set the mobile data usage limit.
Data usage cycle - Allows you to
change the data usage cycle to display in
the graph.
to
Call
Configure phone call settings such as call
forwarding and other special features
offered by your carrier.
72
Voicemail – Allows you to select your
carrier’s voicemail service.
Fixed dialing numbers – Turn on
and compile a list of numbers that can
be called from your phone. You’ll need
your PIN2, which is available from your
operator. Only numbers within the fixed
dial list can be called from your phone.
Caller ID - Allows you to choose how to
display your number in outgoing calls.
Incoming voice call pop-up – Displays
an incoming call popup when an app is
in use.
Call reject – Allows you to set call
rejection and manage the reject list.
Decline with message – When you
want to reject a call, you can send a quick
message instead. This is useful if you
need to reject a call during a meeting.
This menu allows you to manage the
messages you can send.
Privacy keeper – Hides the caller name
and number for an incoming call.
Auto answer – Sets the time before a
connected hands-free device automatically
answers an incoming call. Choose from
Disable, 1 second, 3 seconds, and 5
Page 73

Settings
seconds.
Connection vibration – Vibrates your
phone when the other party answers
the call.
TTY mode - Allows you to activate TTY
mode.
Hearing aids - Allows you to turn on
hearing aid compatibility.
Noise suppression - Allows you to
suppress background noise during a call.
Power button ends call – Allows you
to end the call by pressing the Power/
Lock Key.
Call duration – View the duration of
calls including Last call, All calls, Dialled
calls and Received calls.
Sound settings - From this menu you can
control the sounds on the phone.
Additional settings – Allows you to
change the following settings:
Call forwarding: Allows you to set
the call forwarding options.
Call waiting: If call waiting is
activated, the handset will notify you
of an incoming call while you are on
a call (depending on your network
provider).
Share & connect
Allows you to transfer data and media
with other devices.
NFC
NFC (Near Field Communication) is a
wireless technology that enables data
transmission between two objects when
they are brought within a few inches of
each others. When you enable NFC on
your phone, your phone can exchange
data with other NFC-enabled devices
or read information from smart tags
embedded in posters, stickers, and other
products.
To turn on NFC:
1 From the Home screen, tap the Menu
Key > All settings.
2 Tap Share & connect and tap the NFC
switch
.
Android Beam
When this feature is turned on, you can
beam app content to another NFC-capable
device by holding the devices close
together. For example, you can beam
Browser pages, YouTube videos, contacts,
Polaris Office 4 files, and more. Just bring
73
Page 74

Settings
the devices together (typically back to
back) and then touch your screen. The app
determines what gets beamed.
To activate Android Beam:
From the Home screen, tap the Menu
Key
> All settings > Share &
Connect > Android Beam .
%
NOTE
You must enable NFC to activate Android
Beam.
SmartShare Beam
Enable to receive files from LG phones.
When this feature is turned on, you can
receive files from LG phones.
To activate SmartShare Beam:
From the Home screen, tap the Menu
> All settings > Share &
Key
connect > SmartShare Beam. Then tap
the switch to activate SmartShare
Beam and set the desired options.
%
NOTE
You must enable Wi-Fi to activate
SmartShare Beam.
74
Media Server
Share media content with nearby devices
via DLNA.
1 From the Home screen, tap the Menu
Key > All settings > Networks
tab > Share & connect.
2 Tap Media sever and checkmark the
Content sharing checkbox to allow
nearby devices to access your content.
Miracast
You can mirror phone screen and sound
onto LG Miracast dongle or TV wirelessly.
1 From the Home screen, tap the Menu
Key > All settings.
2 Tap the Networks tab.
3 Tap Share & connect > Miracast.
4 Tap the switch
feature.
5 Turn on the Miracast feature on your TV
or connect to the LG Miracast dongle.
%
TIP
To start the Miracast feature quickly,
tap the Miracast icon in the Notification
Panel. While mirroring, Mobile Hotspot
cannot be used simultaneously.
to turn on the
Page 75

Settings
Wireless storage
To manage files on your phone in the
computer or copy files to the phone from
the computer without a USB connection.
1 Make sure that the phone and computer
are connected to the same Wi-Fi
network.
2 From the Home screen, tap the Menu
Key > All settings > Networks
tab > Share & connect > Wireless
storage > tap to activate the
feature.
3 Enter the URL shown on your phone in
the address bar of the browser on your
computer.
Tethering & networks
Allows you to configure mobile networks,
tethering, and VPNs.
Mobile Hotspot
You can also use your smartphone to
provide a mobile broadband connection
for up to 8 other devices. Create a hotspot
and share your connection. To create a
portable hotspot, from the Home screen,
tap the Menu Key > All settings >
Networks tab > Tethering & networks
> Mobile Hotspot. Then tap the Mobile
Hotspot switch
feature. Tap Set up Mobile Hotspot to
change the SSID, password, security type,
and other hotspot options.
%
NOTE
Mobile Hotspots requires an appropriate
DataPro data plan. Devices connected to
your Mobile Hotspot use data from your
DataPro plan. Plans are not unlimited and
significant charges may be incurred if
the included data allowance is exceeded.
Performance may vary depending on the
number of devices connected and other
factors. If you do not use a password,
others will be able to use your Mobile
Hotspot connection.
to activate the
Bluetooth tethering
Bluetooth tethering allows you to use
your smart phone to provide a mobile
broadband connection.
To share your connection via Bluetooth
tethering:
From the Home screen, tap the Menu
> All settings > Networks tab
Key
75
Page 76

Settings
> Tethering & networks. Then tap the
Bluetooth tethering switch to turn
the function on.
%
NOTE
Bluetooth tethering can be activated only
when your smartphone is connected to
AT&T network.
Help
Tap to view help information on the
Mobile Hotspot and Bluetooth tethering
functions.
Mobile networks
You can set whether to enable or disable
data access on your phone.
Data enabled
Select whether to enable or disable data
access.
International data roaming
Select whether to enable or disable data
access while international roaming.
Access point names
You can select the access point name, add
a new APN, or reset to default.
76
Network operators
Allows you to select a network operator
(if necessary).
Default SMS app
This menu allows you to set your default
messaging app.
VPN
From your phone, you can add, set up, and
manage virtual private networks (VPNs)
that allow you to connect and access
resources inside a secured local network,
such as your corporate network.
Prepare Your Device for VPN
Connection
Depending on the type of VPN you are
using at work, you may be required to
enter your login credentials or install
security certificates before you can
connect to your company's local network.
You can get this information from your
network administrator. Before you can
initiate a VPN connection, you must set
the screen lock option (Pattern, PIN, or
Password only).
Page 77

Settings
Add a VPN Connection
1 From the Home screen, tap the Menu
Key > All settings.
2 Select the Networks tab.
ethering & Networks > VPN >
3 Tap T
Basic VPN or LG VPN.
%
NOTE
You must change your screen lock before
you use credential storage. You can set a
pattern, PIN, or password.
4 Enter the VPN network according to the
security details you have obtained from
your network administrator.
5 When finished, tap Save.
Sound tab
Sound profile
Allows you to set the sound profile to
Sound, Vibrate only, or Silent.
Volumes
Adjust the phone's volume settings to suit
your needs and your environment.
Vibrate strength
Allows you to set the vibrate strength for
calls, notifications, and touch feedback.
Quiet time
Tap the Quiet time switch to
activate the feature and set times to turn
off all sounds except alarm and media.
Phone ringtone
Select the ringtone for incoming calls.
Smart ringtone
Select to automatically increase the
volume of the ringtone when outside
noise is loud.
Ringtone with vibration
Checkmark for vibration feedback for calls
and notifications.
Incoming call vibration
Allows you to choose the type of vibration
for incoming calls.
Gentle vibration
Gradually increases vibration up to the
current strength set.
77
Page 78

Settings
Default notification sound
Select the ringtone for notifications such
as new messages receipt or calendar
events.
Touch feedback & system
Allows you to set dial pad touch tones,
touch sounds, screen lock sound, and
vibrate on touch.
Dial pad touch tones
Allows you to play tones when using
dial pad.
Touch sounds
Allows you to play sound when making
sceen selection.
Screen lock sound
Allows you to play sound when locking
and unlocking the screen
Vibrate on touch
Allows you to vibrate when pressing front
key and on certain UI interactions.
Display tab
Home screen
Wallpaper - Allows you to set the
wallpaper.
78
Screen swipe effect - Allows you to
select the type of effect to display when
you swipe from one Home screen canvas
to the next.
Allow Home screen looping - Allows
you to select the type of effect to display
when you swipe from one Home screen
canvas to the next.
Portrait view only - Select to display the
Home screen always in portrait view.
Home backup & restore - Select
to backup and restore app/widget
configurations and the theme.
Help - Touch to get information on using
the Home screen of your device.
Lock screen
Select screen lock - Select the desired
option to secure your phone from the
below.
None - No lock screen.
Swipe - Swipe any part of the screen
to unlock screen.
Face Unlock - Unlocks the screen
through facial recognition. Follow the
prompts. You are asked to select Pattern
and/or PIN as a backup.
Page 79

Settings
Pattern - Allows you to set a pattern as
your screen lock. It's recommended that
you enter a backup PIN as well in case
you forget the pattern.
PIN - Enter a numeric PIN to unlock
the screen.
Password - Enter a password to unlock
the screen.
Screen swipe effect - Select the screen
effect you want to use when unlocking
the screen.
Wallpaper - Select the wallpaper to
display for your lock screen.
Shortcuts - Customize shortcuts on the
lock screen.
1 From the Home screen, tap the Menu
Key > All settings > Display tab,
then tap the Lock screen > Shortcuts.
2 Tap the icon you want to replace and
select the app you want to replace it
with.
Owner info - Display the owner info on
the lock screen.
Lock timer - Allows you to set the
amount of time before the screen
automatically locks after the screen has
timed-out.
Power button instantly locks Checkmark to instantly lock the screen
when the Power/Lock Key
Brightness
Adjust the screen brightness by using the
slider. Tap Auto to set the brightness to
automatically change.
Screen timeout
Set the time delay before the screen
automatically turns off.
Auto-rotate screen
Set to switch orientation automatically
when you rotate the phone.
Daydream
Select the screensaver to display when
the phone is sleeping while docked and/
or charging.
Font type
Select the desired font type.
Font size
Select the desired font size.
is pressed.
79
Page 80

Settings
Smart screen
Checkmark this to keep screen on when
the phone detects your face looking at
the screen.
Smart video
Checkmark this to pause videos while
playing automatically when the phone
detects you are not looking at the screen.
Front touch key light
Tap to set the Front key light options.
Turn on front touch key light –
Checkmark this to set the the front keys
(Menu Key, Home Key, Back Key) are
turned on, when you use the device.
Front touch key light duration –
Select how long the front keys remain
backlit while the screen is turned on.
Home button LED
A multi-pattern color LED light appears
around the Home button depending on
item(s) you select. Select the item you
wish to apply LED lighting. You can
immediately note what kind of event has
occurred using the various LED colors such
as Battery charging, Incoming call, Alarm,
80
and Missed event.
Quick Cover
Allows you to activate the Quick Cover
feature, which turns the screen on or off.
This setting is for the Quick Cover (CCF210 model only). Other phone cases
are not supported. To lock your phone
automatically, activate the Quick Cover
feature and close the cover. To unlock the
phone, open the Quick Cover.
%
NOTE
This auto-function is available only when
your phone is set to unlock or swipe
mode.
General tab
Gestures
Silence incoming calls - Flip the device
to silence incoming calls.
Page 81

Settings
Snooze or stop alarm - Flip the device
to snooze or stop the alarm.
Pause video - Flip the device to pause
the video.
Help - Touch to get information on using
the Gesture function of your device.
Motion sensor calibration - Improve
the accuracy of the tilt and speed of the
sensor.
One-handed operation
Allows you to adjust the position of the
dial keypad, LG keyboard, Message or lock
screen left or right side of the screen to
easily use it with one hand.
Dial keypad
Checkmark to adjust the position of the
dial keypad left or right.
LG keyboard
Checkmark to adjust the position of the LG
keyboard left or right.
Lock screen
Checkmark to adjust the position of the
the PIN entry left or right.
Help
Displays help information for each
available option.
Storage
INTERNAL STORAGE
You can monitor the used and available
internal memory in the device.
SD CARD
You can monitor the used and available
space in your microSD card.
Total space - Lists the total amount of
space on any microSD card installed in
your phone. It is divided by the type of
files stored.
Available - Displays the amount of
available space in your microSD card.
Mount/Unmount SD card - Tap to
mount/unmount the microSD card to/
from your phone so that you can view
and tranfer files, format the card or safely
remove it.
Erase SD card - Permanently erases
everything on the microSD card and
prepares it for use with your phone. You
must unmount the microSD card before
you can format it.
Battery
BATTERY INFORMATION
See how much battery power is used for
81
Page 82

Settings
device activities. The battery level displays in
a percentage. The remaining time of use is
also displayed.
Battery percentage on status bar: Displays
the battery percentage on the Status Bar.
BATTERY SAVER
Battery saver
Tap the switch to turn this feature
on. Tap the switch again to turn it off. Tap
Battery saver for the following options.
Turn Battery saver on - Select the level
you want to turn on the Power saver.
BATTERY SAVING ITEMS
Checkmark each feature to turn off or
adjust when battery is low.
Auto-sync: Turns off Auto-sync.
Wi-Fi: Turns off Wi-Fi if data is not
in use.
Bluetooth: Turns off Bluetooth if not
connected.
Vibrate on touch: Turns off touch
feedback.
Brightness: Adjust the brightness.
Screen timeout: Adjust the screen
timeout.
82
Front touch key light: Adjust the front
key light timeout.
Home button LED: Turns off Home
button LED if not connected.
Help - Tap to access information about
the items that can be enabled/disabled
with the Battery saver feature.
Apps
You use the Applications settings menu
to view details about the applications
installed on your phone, manage their
data, force them to stop, and to set
whether you want to permit installation of
applications that you obtain from websites
and email. Tap the DOWNLOADED,
RUNNING or ALL tabs to view
information about your installed apps.
Tap & pay
When NFC is turned on, you can use the
Tap & pay feature to pay for items just
by touching your phone to a reader at a
register.
Accounts & sync
Use the Accounts & sync settings menu to
add, remove, and manage your GoogleTM
Page 83

Settings
and other supported accounts. You also
use these settings to control how and
whether all applications send, receive,
and sync data on their own schedules and
whether all applications can synchronize
user data automatically. Gmail
Calendar, and other applications may also
have their own settings to control how
they synchronize data; see the sections on
those applications for details. Touch Add
account to add new account.
TM
,
Location
Use the Location access menu to set your
preferences for using and sharing your
location when you search for information
and use location-based applications, such
as Maps. Tap the Location switch
to enable the location sources.
Security
Use the Security menu to configure how
to help secure your phone and its data.
ENCRYPTION
Encrypt phone - Allows to you encrypts
data on the phone for security. You will
be required to enter a PIN or password to
decrypt your phone each time you power
it on.
Encrypt SD card storage - Allows you
to encrypt SD card storage and keep data
unavailable for other devices.
SIM CARD LOCK
Set up SIM card lock - Allows you to
set if you want to require a PIN to use or,
if set, allows you to change the PIN.
PASSWORDS
Password typing visible - Checkmark to
briefly show each character of passwords
as you enter them so that you can see
what you enter.
PHONE ADMINISTRATION
Phone administrators - Add or remove
phone administrators.
Unknown sources - Allow installation of
non-Play Store applications.
Verify apps - Disallow or warn before
installation of apps that may cause harm.
CREDENTIAL STORAGE
Storage type - Allows you to see the
storage type for credential storage.
Trusted credentials - Checkmark to
allow applications to access your phone’s
encrypted store of secure certificates and
83
Page 84

Settings
related passwords and other credentials.
You use credential storage to establish
some kinds of VPN and Wi-Fi connections.
If you have not set a password for the
secure credential storage, this setting is
dimmed.
Install from storage - Touch to install a
secure certificate from a microSD card.
Clear credentials - Deletes all secure
certificates and related credentials
and erases the secure storage's own
password, after prompting you to confirm
that you want to do this.
Language & input
Select the language for the text on your
phone and for configuring the on-screen
keyboard, including words that you’ve
added to its dictionary.
Language - Choose a language to use on
your phone.
Spelling correction - Allows spelling
correction when using the on-screen
keyboard.
Personal dictionary - Allows you to
view, edit, and add words to your personal
dictionary.
84
KEYBOARD & INPUT METHODS
Default - Allows you to select the default
keyboard type.
Checkmark the keyboard you want to
use from Android Keyboard (AOSP),
Google voice typing, and LG Keyboard.
to configure each keyboard’s
Tap
settings.
SPEECH
Voice Search - Touch to configure the
Voice Search settings.
Text-to-speech output - Touch to set the
preferred engine or general settings for
text-to-speech output.
MOUSE/TRACKPAD
Pointer speed - Adjust the pointer
speed.
Backup & reset
BACKUP & RESTORE
Back up my data - Back up app data,
Wi-Fi passwords, and other settings to
Google servers.
Backup account - Displays the accounts
that are currently being backed up.
Automatic restore - When reinstalling
Page 85

Settings
an app, restore backed up settings and
data.
PERSONAL DATA
Factory data reset - Erases all data on
the phone, except as follows. In the event
of device failure or error, your device
may record in an error log information
about the device’s status at the time of
the error event. The information recorded
in the error log may include data about
application names and usage, cell phone
location and number, GPS status, memory
usage and other non-personal device
status information. This information is
stored on your phone, and can only be
accessed by LG if the phone is physically
returned to LG for repair and service The
error log information is used by LG only
to diagnose, repair, and improve LG’s
products and services.
Browser Bar
The Browser Bar at the bottom of the Browser
enhances your mobile browsing experience
with contextual recommendations, social
networking applications and browser utilities.
We've included some buttons to get you
started and have made it easy to add more
buttons, move or remove them. To display
the Browser Bar, touch and drag the
upwards.
%
TIP
You must enable the Toolbar and Active
Browsers options to activate the Browser
Bar.
tab
QuickButton
Select apps you wish to get quick access
to using QuickButton.
Date & time
Set your preferences for how the date and
time is displayed.
Accessibility
Use the Accessibility settings to configure
any accessibility plug-ins you have
installed on your phone.
%
NOTE
Requires additional plug-ins to become
selectable.
VISION
TalkBack - Allows you to set up the
TalkBack function which assists people
with impaired vision by providing verbal
85
Page 86

Settings
feedback. Tap the switch the top
right corner of the screen to turn it on. Tap
Settings at the bottom of the screen to
adjust the TalkBack settings.
Large text - Checkmark to increase the
size of the text.
Invert colors - Increases the color
contrast for people with difficulty
perceiving color.
Color adjustment - Allows you to view
the screen with greater color contrast. Tap
the switch
of the screen to turn it on. Then tap the
screen and drag across the screen in any
direction until you see the color contrast
you want to use.
Touch zoom - When this feature is
turned on, you can zoom in and out by
triple-tapping the screen.
Screen shades - Dims the screen's
backlight.
Text-to-speech output - Text-to-speech
output provides audible readout of
text, for example, the contents of text
messages, and the Caller ID for incoming
calls.
at the top right corner
86
HEARING
Audio type - Choose from Mono and
Stereo.
Sound balance - To manually set the
audio route, move the slider on the mono
audio slide bar.
Captions - Allows customized caption
settings for those with hearing
impairments.
PHYSICAL AND MOTOR
Touch feedback time - Sets the touch
and hold delay (short, medium, or long).
Universal touch - Switch to toggle
between on and off. Universal touch can
replace all hardware buttons.
SYSTEM
Auto-rotate screen - Checkmark to
allow the device to rotate the screen
depnding on the device orientation
(portrait or landscape).
Read passwords - Checkmark so that
the device reads out passwords as you
enter them.
Power key ends call - Checkmark so
that you can end voice calls by pressing
Page 87

Settings
the Power/Lock Key . When this option
is enabled, pressing the Power/Lock Key
during a call does not lock the screen.
Accessibility settings shortcut Turning this feature on allows you to
activate an accessibility feature by
pressing the Home Key
times. Select an accessibility option to
use with this feature from Show all,
TalkBack, Invert color, Universal
touch, and Accessibility settings.
SERVICES
On-Screen Phone - Turns the On-Screen
Phone function on so that you can receive
Wi-Fi connection requests. Refer to page
89 for LG On-Screen Phone.
three (3)
PC connection
Select USB connection method -
Opens a dialog box to choose the default
connection mode when connecting your
phone to a PC via USB. Choose from
Charge phone, Media sync (MTP),
Tethering, PC software, or Send
images (PTP).
Tethering
You can use your phone to provide
a data connection to a computer
by activating data tethering and
connecting them with a USB cable.
To tether your phone with your
computer using the USB
1 Connect your phone to your computer
with a USB cable.
2 The USB connection type prompt is
displayed. T
%
Data Tethering requires an appropriate
DataPro data plan. Devices connected
by tethering use data from your DataPro
plan. Plans are not unlimited and
significant charges may be incurred
if the included data allowance is
exceeded. Performance may vary
depending on the number of devices
connected and other factors.
Ask upon connecting - Checkmark to
have the phone ask you to choose which
USB connection mode it should connect
with to a PC.
Help - Touch to get information on the
different types of USB connections.
ap Tethering to confirm.
NOTE
87
Page 88

Settings
LG SOFTWARE
On-Screen Phone - Turns the On-Screen
Phone function on so that you can receive
Wi-Fi connection requests. Refer to page
89 for LG On-Screen Phone.
Help - Displays help information for the
On-Screen Phone function.
About phone
View legal information, check phone
status and software versions, and perform
a software update.
88
Page 89

LG On-Screen Phone
LG SOFTWARE
On-Screen Phone allows you to view
your mobile phone screen from a PC via a
USB and Wi-Fi. You can also control your
mobile phone from your PC, using the
mouse or keyboard.
On-Screen Phone icons
Changes the On-Screen Phone
preferences.
Connects your mobile phone to your
PC, or disconnects it.
Minimizes the On-Screen Phone
window.
Maximizes the On-Screen Phone
window.
Exits the On-Screen Phone program.
On-Screen Phone features
- Real-time transfer and control:
Displays and controls your mobile phone
screen when connected to your PC.
- Mouse control: Allows you to control
your mobile phone by using the mouse to
click and drag on your PC screen.
- Text input with keyboard: Allows you
to compose a text message or note using
your computer keyboard.
- File transfer (mobile phone to PC):
Sends a file from your mobile phone (e.g.
Gallery, Video Player, Music and Polaris
Office) to your PC. Simply right-click on
the file and drag it to send it to your PC.
- File transfer (PC to mobile phone):
Sends files from your PC to your mobile
phone. Just select the files you wish to
transfer and drag and drop them into the
On-Screen Phone window. The sent files
are stored in the OSP folder.
%
NOTE
Please make sure that LG Home is the
default launcher.
- Real-time event notifications:
Prompts a pop-up to inform you of any
incoming calls or text messages, as well
as alarm and event notifications.
How to install On-Screen Phone
on your PC
Visit LG.com (http://www.lg.com/us).
Locate the search box in the upper right
corner and enter the model number. From
89
Page 90

LG On-Screen Phone
the SUPPORT list, select your model.
Scroll down and select the OSP tab and
click on DOWNLOAD. When prompted,
select Run to install On-Screen Phone
on your PC.
How to connect your mobile phone
to your PC
On-Screen Phone provides, USB, and
Wi-Fi connection. Please follow the
instructions on the Connection Wizard of
the On-Screen Phone program.
%
NOTE
To use On-Screen Phone using Wi-Fi
connection, from the Home screen tap
the Menu Key > All settings
> General tab > PC connection >
On-Screen Phone checkbox is selected.
Please make sure that the battery may
run out more quickly due to the current
consumption if On-Screen Phone is
connected via Wi-Fi.
When you connect your mobile phone to
your PC via Mobile Hotspot and access
to the Internet on the PC, additional data
charges may be incurred depending on
your DataPro data plan.
90
Access to the Internet using Wi-Fi
networks may not work well depending on
the network's traffic. When you enlarge
the On-Screen Phone window, the display
on the screen might become slow.
To check the phone-to-PC
connection
Once the devices have been connected,
drag the Status Bar down to check the
On-Screen Phone connection status.
To disconnect your phone from
your PC
Click in the top left of the On-Screen
Phone window. Alternatively, drag the
Status Bar down and select On-Screen
Phone connected > OK.
Page 91

Software Update
Phone Software Update
This feature allows you to update the
firmware of your phone to the latest
version conveniently from the internet
without the need to visit a service center.
For more information on how to use this
function, please visit:
http://update.lgmobile.com or
http://www.lg.com/common/ index.jsp.
As the mobile phone firmware update
requires the user’s full attention for the
duration of the update process, please
make sure to check all instructions and
notes that appear at each step before
proceeding. Please note that removing the
USB cable or battery during the upgrade
may seriously damage your mobile phone.
LG Mobile Phone Software
update via Over-the-Air (OTA)
This feature allows you to update the
firmware of your phone to the newer
version conveniently via OTA without
connecting the USB data cable. This
feature is only available if and when LG
makes the newer version of the firmware
available for your device.
First, you can check the software version
on your mobile phone:
From the Home screen, tap the Menu
> All settings > General tab >
Key
About phone > Software information.
To perform the phone software update,
from the Home screen, tap the Menu
> All settings > General tab
Key
> About phone > Software Update >
Update now.
%
NOTE
Your personal data—including information
about your Google account and any other
accounts, your system/application data
and settings, any downloaded applications
and your DRM licence —might be lost
in the process of updating your phone's
software. Therefore, LG recommends that
you back up your personal data before
updating your phone's software. LG does
not take responsibility for any loss of
personal data.
91
Page 92

Trademarks
Trademarks
• Copyright 2014 LG Electronics, Inc. All
rights reserved. LG and the LG logo are
registered trademarks of LG Group and
its related entities.
®
• Bluetooth
the Bluetooth SIG, Inc. worldwide.
• Wi-Fi
and the Wi-Fi logo are registered
is a registered trademark of
®
, the Wi-Fi CERTIFIED logo,
trademarks of the Wi-Fi Alliance.
• All other trademarks and copyrights are
the property of their respective owners.
DivX Mobile
ABOUT DIVX VIDEO: DivX® is a digital
video format created by DivX, LLC, a
subsidiary of Rovi Corporation. This is an
official DivX Certified
passed rigorous testing to verity that it
plays DivX video. Visit www.divx.com for
more information and software tools to
convert your files into DivX videos.
ABOUT DIVX VIDEO-ON-DEMAND:
This DivX Certified
registered in order to play purchased DivX
Video-on-Demand (VOD) movies. To obtain
your registration code, locate the DivX
VOD section in your device setup menu.
Go to vod.divx.com for more information
on how to complete your registration.
DivX Certified
92
®
device that has
®
device must be
®
to play DivX® video
up to HD 720p, including premium
content.
®
, DivX Certified® and associated
DivX
logos are trademarks of Rovi
Corporation or its subsidiaries and
are used under license.
%
NOTICE
Open Source Software
To obtain the corresponding source code
under GPL, LGPL, MPL and other open
source licences, please visit http://
opensource.lge.com. All referred licence
terms, disclaimers and notices are
available for download with the source
code.
®
and Wi-Fi Protected Access®are
• Wi-Fi
registered trademarks of the Wi-Fi
Alliance.
Dolby Digital Plus
Manufactured under license from Dolby
Laboratories. Dolby and the double-D
symbol are trademarks of Dolby
Laboratories.
Page 93

Q&A
Please check to see if any problems you have encountered with the phone are described in this
section before taking the phone in for a service or calling the Customer Service Center.
Q
How do I view the list of outgoing calls,
incoming calls and missed calls?
A
Tap the Phone Key and tap the
logs
tab.
Q
Why is the connection inconsistent or not
audible in certain areas?
A
When the frequency environment is
unstable in a certain area, connection may
be inconsistent and inaudible. Relocate to
another area and try again.
Q
Why is the connection inconsistent or abruptly
disconnects even when established?
A
When frequency is unstable or weak, or if
there are too many users, a connection may
be cut off even after it was established.
Please try again later or attempt again after
relocating to other areas.
Call
Q
Why does the phone heat up?
A
The phone may get hot when there is a very
long call duration, when games are played
or even when surfing the Internet for a long
time. This has no effect upon the life of the
product or performance.
Q
Why does the battery run out so quickly
during normal use?
A
This may be due to the user environment, a
large number of calls or a weak signal.
Q
Why is no number dialed when an Address
Book entry is recalled?
A
Check that the number has been stored
correctly by using the Address book Search
feature. Re-store them, if necessary.
The screen got frozen. How can I solve this
Q
problem?
A
Press and hold the Power/Lock Key
for 10 seconds to turn it off. Then press and
hold the Power/Lock Key again for 3
seconds to reboot the phone.
93
Page 94

Accessories
There are a variety of accessories available
for your mobile phone, some of which may be
sold separately. You can select these options
according to your personal communication
requirements. Visit your local AT&T store or
www.att.com/wirelessaccessories for specific
offerings.
%
NOTE
• Always use genuine LG accessories. Failure to
do this may invalidate your warranty.
• Accessories may be different in different
regions; please check with our regional service
company or agent for further enquiries.
94
Page 95

For Your Safety
Important Information
This user guide contains important
information on the use and operation
of this phone. Please read all the
information carefully for optimal
performance and to prevent any damage
to or misuse of the phone. Any changes
or modifications not expressly approved in
this user guide could void your warranty
for this equipment. Any changes or
modifications not expressly approved by
the manufacturer could void the user’s
authority to operate the equipment.
Before You Start
WARNING! This product contains
chemicals known to the State of
California to cause cancer and birth
defects or reproductive harm.
hands after handling.
Safety Instructions
WARNING! To reduce the possibility
of electric shock, do not expose your
phone to high humidity areas, such as the
bathroom, swimming pool, etc.
Always store your phone away from
heat. Never store your phone in settings
Wash
that may expose it to temperatures less
than 32°F or greater than 104°F, such
as outside during extreme weather
conditions or in your car on a hot day.
Exposure to excessive cold or heat will
result in malfunction, damage and/or
catastrophic failure.
Be careful when using your phone
near other electronic devices. RF
emissions from your mobile phone may
affect nearby in adequately shielded
electronic equipment. You should consult
with manufacturers of any personal
medical devices such as pacemakers
and hearing aides to determine if they
are susceptible to interference from your
mobile phone. Turn off your phone in a
medical facility or at a gas station. Never
place your phone in a microwave oven as
this will cause the battery to explode.
IMPORTANT! Please read the TIA
SAFETY INFORMATION before using your
phone.
Safety Information
Read these simple guidelines. Breaking
the rules may be dangerous or illegal.
Further detailed information is given in
95
Page 96

For Your Safety
this user guide.
Do not disassemble this unit. Take it
to a qualified service technician when
repair work is required.
Keep away from electrical appliances
such as TVs, radios, and personal
computers.
The unit should be kept away from
heat sources such as radiators or
cookers.
Do not drop.
Do not subject this unit to mechanical
vibration or shock.
The coating of the phone may be
damaged if covered with wrap or vinyl
wrapper.
Use dry cloth to clean the exterior of
the unit. (Do not use solvent such as
benzene, thinner or alcohol.)
Do not subject this unit to excessive
smoke or dust.
Do not keep the phone next to credit
cards or transport tickets; it can affect
the information on the magnetic
strips.
Do not tap the screen with a sharp
object; otherwise, it may damage the
96
phone.
Do not expose the phone to liquid or
moisture.
Use the accessories like an earphone
cautiously. Do not tap the antenna
unnecessarily.
microSD card information and
care
The microSD card cannot be used for
recording copyright- protected data.
Keep the microSD card out of the
small children's reach.
Do not leave the microSD card in
extremely hot location.
Do not disassemble or modify the
microSD card.
FCC RF Exposure Information
WARNING! Read this information before
operating the phone.
In August 1996, the Federal
Communications Commission (FCC)
of the United States, with its action
in Report and Order FCC 96-326,
adopted an updated safety standard
for human exposure to radio frequency
Page 97

For Your Safety
(RF) electromagnetic energy emitted
by FCC regulated transmitters. Those
guidelines are consistent with the safety
standard previously set by both U.S. and
international standards bodies.
The design of this phone complies with
the FCC guidelines and these international
standards.
CAUTION
Use only the supplied antenna. Use of
unauthorized antennas or modifications
could impair call quality, damage the
phone, void your warranty and/or result
in violation of FCC regulations. Do not
use the phone with a damaged antenna.
A damaged antenna could cause a minor
skin burn. Contact your local dealer for a
replacement antenna.
Body-worn Operation
This device was tested for typical bodyworn operations with the back of the
phone kept 0.39 inches (1cm) between
the user’s body and the back of the
phone. To comply with FCC RF exposure
requirements, a minimum separation
distance of 0.39 inches (1cm) must be
maintained between the user’s body and
the back of the phone. Third-party beltclips, holsters, and similar accessories
containing metallic components may not
be used. Bodyworn accessories that cannot maintain
0.39 inches (1cm) separation distance
between the user's body and the back
of the phone, and have not been tested
for typical body-worn operations may not
comply with FCC RF exposure limits and
should be avoided.
Part 15.19 statement
This device complies with part15 of FCC
rules.Operation is subject to the following
two conditions:
(1) This device may not cause harmful
interference.
(2) This device must accept any
interference received, including
interference that may cause undesired
operation.
Part 15.105 statement
This equipment has been tested and
found to comply with the limits for a class
B digital device, pursuant to Part 15 of
the FCC Rules. These limits are designed
97
Page 98

For Your Safety
to provide reasonable protection against
harmful interference in a residential
installation. This equipment generates
uses and can radiate radio frequency
energy and, if not installed and used
in accordance with the instructions,
may cause harmful interference to
radio communications. However, there
is no guarantee that interference will
not occur in a particular installation.
If you experience interference with
reception (e.g.,television), determine if
this equipment is causing the harmful
interference by turning the equipment
off and then back on to see if the
interference is affected. If necessary, try
correcting the interference by one or more
of the following measures:
Reorient or relocate the receiving
antenna.
Increase the separation between the
equipment and receiver.
Connect the equipment into an outlet
on a circuit different from that to which
the receiver is connected.
Consult the dealer or an experienced
radio/TV technician for help.
98
Cautions for Battery
Do not disassemble or open crush, bend
or deform, puncture or shred.
Do not modify or remanufacture,
attempt to insert foreign objects into
the battery, immerse or expose to
water or other liquids, expose to fire,
explosion or other hazard.
Only use the battery for the system for
which it is specified.
Only use the battery with a charging
system that has been qualified with
the system per this standard. Use
of an unqualified battery or charger
may present a risk of fire, explosion,
leakage, or other hazard.
Battery usage by children should be
supervised.
Avoid dropping the phone. If the
phone is dropped, especially on a
hard surface, and the user suspects
damage, take it to a service center for
inspection.
Improper battery use may result in a
fire, explosion or other hazard.
For those host devices that utilize
a USB port as a charging source,
Page 99

For Your Safety
the host device’s user manual shall
include a statement that the phone
shall only be connected to products
that bear the USB-IF logo or have
completed the USB-IF compliance
program.
Adapter (Charger) Cautions
Using the wrong battery charger could
damage your phone and void your
warranty.
The adapter or battery charger is
intended for indoor use only.
Do not expose the adapter or battery
charger to direct sunlight or use it in
places with high humidity, such as the
bathroom.
Avoid damage to your hearing
Damage to your hearing can occur
if you are exposed to loud sound for
long periods of time. We therefore
recommend that you do not turn on or
off the handset close to your ear. We
also recommend that music and call
volumes are set to a reasonable level.
If you are listening to music while
out and about, please ensure that the
volume is at a reasonable level so that
you are aware of your surroundings.
This is particularly imperative when
attempting to cross the street.
Wi-Fi Caution
This device is capable of operating in
802.11a/n mode. For 802.11a/n devices
operating in the frequency range of
5.15 – 5.25 GHz, they are restricted for
indoor operations to reduce any potential
harmful interference for Mobile Satellite
Services (MSS) in the US. WIFI Access
Points that are capable of allowing your
device to operate in 802.11a/n mode(5.15
– 5.25 GHz band) are optimized for indoor
use only.
If your WIFI network is capable of
operating in this mode, please restrict
your WIFI use indoors to not violate
federal regulations to protect Mobile
Satellite Services.
99
Page 100

Safety Guidelines
TIA Safety Information
Provided herein is the complete TIA
Safety Information for Wireless Handheld
phones. Inclusion of the text covering
Pacemakers, Hearing Aids, and Other
Medical Devices is required in the
owner’s manual for CTIA Certification.
Use of the remaining TIA language is
encouraged when appropriate.
Exposure to Radio Frequency
Signal
Your wireless handheld portable
telephone is a lowpower radio transmitter
and receiver. When it is ON, it receives
and also sends out radio frequency (RF)
signals.
In August, 1996, the Federal
Communications Commissions (FCC)
adopted RF exposure guidelines with
safety levels for handheld wireless
phones. Those guidelines are consistent
with the safety standards previously set
by both U.S. and international standards
bodies:
ANSI C95.1 (1992) *
NCRP Report 86 (1986)
100
ICNIRP (1996)
Those standards were based on
comprehensive and periodic evaluations
of the relevant scientific literature. For
example, over 120 scientists, engineers,
and physicians from universities,
government health agencies, and industry
reviewed the available body of research
to develop the ANSI Standard (C95.1).
* American National Standards Institute;
National Council on Radiation Protection
and Measurements; International
Commission on Non-Ionizing Radiation
Protection
The design of your phone complies with
the FCC guidelines (and those standards).
Antenna Care
Use only the supplied or an approved
replacement antenna. Unauthorized
antennas, modifications, or attachments
could damage the phone and may violate
FCC regulations.
Tips on Efficient Operation
For your phone to operate most efficiently:
Don’t touch the antenna unnecessarily
when the phone is in use. Contact with
 Loading...