

Page 1
LG-E400
LG-E400J
LG-E400 User Guide
This guide helps you get started using your phone.
If you need more information, please visit www.lg.com.
Some of the contents of this manual may not apply to your phone. This
•
depends on your phone’s software and your service provider.
This handset is not recommended for the visually impaired because of its
•
touch screen keyboard.
Copyright ©2011 LG Electronics, Inc. All rights reserved. LG and the LG
•
logo are registered trademarks of LG Group and its related entities. All other
trademarks are the property of their respective owners.
Google™, Google Maps™, Gmail™, Google Talk™ and Android Market™
•
are trademarks of Google, Inc.
English
(%%2CTV%NCUU$%QORNKCPEG
7KLVGHYLFHDQGLWVDFFHVVRULHVFRPSO\ZLWKSDUWRI)&&
UXOHVDQG,&(6&ODVV%GLJLWDODSSDUDWXVUHTXLUHPHQWV
IRU,QGXVWU\&DQDGD2SHUDWLRQLVVXEMHFWWRWKHIROORZLQJ
WZRFRQGLWLRQV7KLVGHYLFHDQGLWVDFFHVVRULHVPD\QRW
FDXVHKDUPIXOLQWHUIHUHQFHDQGWKLVGHYLFHDQGLWV
DFFHVVRULHVPXVWDFFHSWDQ\LQWHUIHUHQFHUHFHLYHGLQFOXGLQJ
LQWHUIHUHQFHWKDWPD\FDXVHXQGHVLUHGRSHUDWLRQ
$QF[YQTP1RGTCVKQP
7KLVGHYLFHKDV EHHQWHVWHGIRUERG\ZRUQRSHUDWLRQVZLWK
WKHGLVWDQFHRIFPLQFKHVEHWZHHQWKHXVHUĜV
ERG\DQGWKHSKRQH7RFRPSO\ZLWK)&&5)H[SRVXUH
UHTXLUHPHQWVDPLQLPXPVHSDUDWLRQGLVWDQFHRIFP
LQFKHVPXVWEHPDLQWDLQHGIURPWKHXVHUVERG\
7KLUGSDUW\EHOWFOLSVKROVWHUVDQGVLPLODUDFFHVVRULHV
FRQWDLQLQJPHWDOOLFFRPSRQHQWVmayQRWEHXVHG%RG\
ZRUQDFFHVVRULHVWKDWFDQQRWPDLQWDLQFPLQFKHV
VHS
DUDWLRQGLVWDQFHEHWZHHQWKHXVHUVERG\DQGWKH
SKRQHDQGKDYHQRWEHHQWHVWHGIRUW\SLFDOERG\ZRUQ
RSHUDWLRQVPD\QRWFRPSO\ZLWK)&&5)H[SRVXUHOLPLWV
DQGVKRXOGEHDYRLGHG
Getting to know your phone
To turn on your phone, press and hold the Power key for 3 seconds.
To turn off the phone, press and hold the Power key for 3 seconds, then touch Power off and OK.
Speaker/Receiver
Power/Lock key
Switch your phone on/off by pressing and holding this key.
Turn off and lock the screen.
Proximity sensor
Menu key
Check what options are available.
Home key
Return to home from any screen.
Back key
Return to the previous screen.
Stereo earphone connector
Power/Lock key
33
Page 2

Getting to know your phone
Volume keys
On the home screen: control ringer
volume.
• During a call: control your In-Call
volume.
• When playing a track: control
volume continuously.
34
Camera
lens
SIM card slot
microSD memory
card slot
Back cover
Battery
Charger, micro USB
cable connector
NOTE: Proximity sensor
When receiving and making calls, the
proximity sensor automatically turns
the backlight off and locks the touch
keypad by sensing when the phone is
near your ear. This extends battery life
and prevents the touch keypad from
activating unintentionally during calls.
WARNING
Placing a heavy object on the phone
or sitting on it can damage its LCD
and touch screen functions. Do
not cover the protective fi lm on the
LCD’s proximity sensor. This may
cause the sensor to malfunction.
35
Getting to know your phone
Installing the SIM card and
battery
To remove the back cover, hold the phone
1
in your hand firmly. With the other hand,
firmly press your thumb on the back
cover. Now lift off the battery cover.
36
Slide the SIM card into the SIM card slot.
2
Make sure the gold contact area on the
card is facing downwards.
Insert the battery by aligning the gold
3
contacts on the phone and the battery.
4
Replace the back cover of the phone.
Charging your phone
Insert the charger, then plug it into an
electrical outlet. Your LG-E400 must be
charged before you see
LG-E400H
.
NOTE: The
battery must be
fully charged
initially to
improve battery
lifetime.
37
Page 3

Getting to know your phone
Formatting the memory card
Your memory card may already be
formatted. If it isn’t, you must format it
before you can use it.
NOTE: All fi les on the card are deleted when
you format the card.
In the Home screen, touch the
1
Applications tab to open the applications
menu.
2
Scroll to and touch Settings > SD card
& Phone storage > Mass storage only.
40
Touch Unmount SD card and touch OK
3
to confirm.
4
Touch Erase SD card, then confirm your
choice.
5
If you have set a pattern lock, input
the pattern lock then select Erase
Everything. The card is then formatted
and ready to use.
NOTE: If there is content on your memory
card, the folder structure may be different
after formatting since all the fi les will have
been deleted.
Your Home screen
Touch screen tips
Here are some tips on how to navigate
around your phone.
Touch – To choose a menu/option or open
an application, touch it.
Touch and hold – To open an options menu
or grab an object you want to move, touch
and hold it.
Drag – To scroll through a list or move
slowly, drag across the touch screen.
Flick – To scroll through a list or move
quickly, flick across the touch screen (drag
quickly and release).
NOTE:
To select an item, touch the centre of the
•
icon.
•
Do not press too hard; the touch screen
is sensitive enough to pick up a light, firm
touch.
•
Use the tip of your finger to touch the
option you want. Be careful not to touch
any other keys.
41
Your Home screen
Lock your phone
When you are not using the LG-E400, press
the power key to lock your phone. This helps
prevent accidental presses and saves battery
power.
Also, if you do not use the phone for a while,
the Home screen or another screen you are
viewing is replaced with the lock screen to
conserve battery power.
If there are any programs running when you
set the pattern, they may be still running
in Lock mode. It is recommended that
you exit all programs before entering the
42
LG-E400H
Lock mode to avoid unnecessary charges
(e.g. phone calls, Web access and data
communications).
Setting an unlock pattern: you can draw
your own unlock pattern by connecting the
dots.
If you set a pattern, the phone screen locks.
To unlock the phone, draw the pattern that
you set on the screen.
Caution: When you set an unlock pattern,
you need to create your Gmail account fi rst.
Caution: If there are more than 5 pattern
drawing errors in a row, you cannot unlock
the phone. In this case, Refer Point-4 under
Important Notice.
Unlock screen
Whenever your LG-E400 is not in use, it
returns to the lock screen. Drag your finger
from bottom to top to unlock the screen.
LG-E400H
Silent mode
In the notification drawer touch , to
change to
mode.
Home
Simply swipe your finger to the left or right
to view the panels.
You can customise each panel with widgets,
shortcuts (to your favourite applications),
folders and wallpaper.
NOTE: Some screen images may be
different depending on your phone provider.
43
Page 4

Your Home screen
In your Home screen, you can view quick
keys at the bottom of the screen. Quick
keys provide easy, one-touch access to the
functions you use the most.
Touch the Phone icon to bring up the
touch screen dialpad to make a call.
Touch the Contacts icon to open your
contacts.
Touch the Message icon to access the
messaging menu. This is where you can
create a new message.
Touch the Applications tab at the
bottom of the screen. You can then view all
44
your installed applications.
To open the desired application, simply touch
the icon in the applications list.
NOTE: Preloaded applications may differ
according to your phone’s software or your
service provider.
Adding widgets to your Home
screen
You can customise your Home screen by
adding shortcuts, widgets or folders to it. For
more convenience using your phone, add
your favourite widgets to the Home screen.
In the Home screen, press the Menu key
1
and select Add. Or touch and hold the
empty part of the home screen.
2
In the Edit Mode menu, touch the type of
item you want to add.
3
For example, select Folders from the list
and tap it.
4
You then see a new folder icon on the
Home screen. Drag it to the desired
location on the desired panel, then take
your finger off the screen.
TIP! To add an application icon to the
Home screen from the Applications
menu, touch and hold the application
you want to add.
TIP! To remove an application icon from
the Home screen, touch and hold the
icon you want to remove, then drag it
to
.
NOTE: You cannot delete preloaded
applications. (Only their icons can be
deleted from the screen)
45
Your Home screen
Returning to recently-used
applications
Touch and hold the Home key. The
1
screen displays a pop-up with icons of
applications you used recently.
2
Touch an icon to open the application.
Or touch the Back key to return to the
current application.
Notification drawer
The notification drawer runs across the top
of your screen.
46
Ring
Wi-Fi
Touch and slide the notification drawer down
with your finger.
Below is a table explaining the meaning of
icons you’re likely to see in the status bar.
Or, in the Home screen, press the Menu
key and select Notifications. Here you can
check and manage sound, Wi-Fi, Bluetooth
[Status bar]
and GPS as well as other notifications.
Viewing the status bar
The status bar uses different icons to display
GPSBluetooth
Data
enabled
phone information such as signal strength,
new messages, battery life and active
Bluetooth and data connections.
47
Page 5
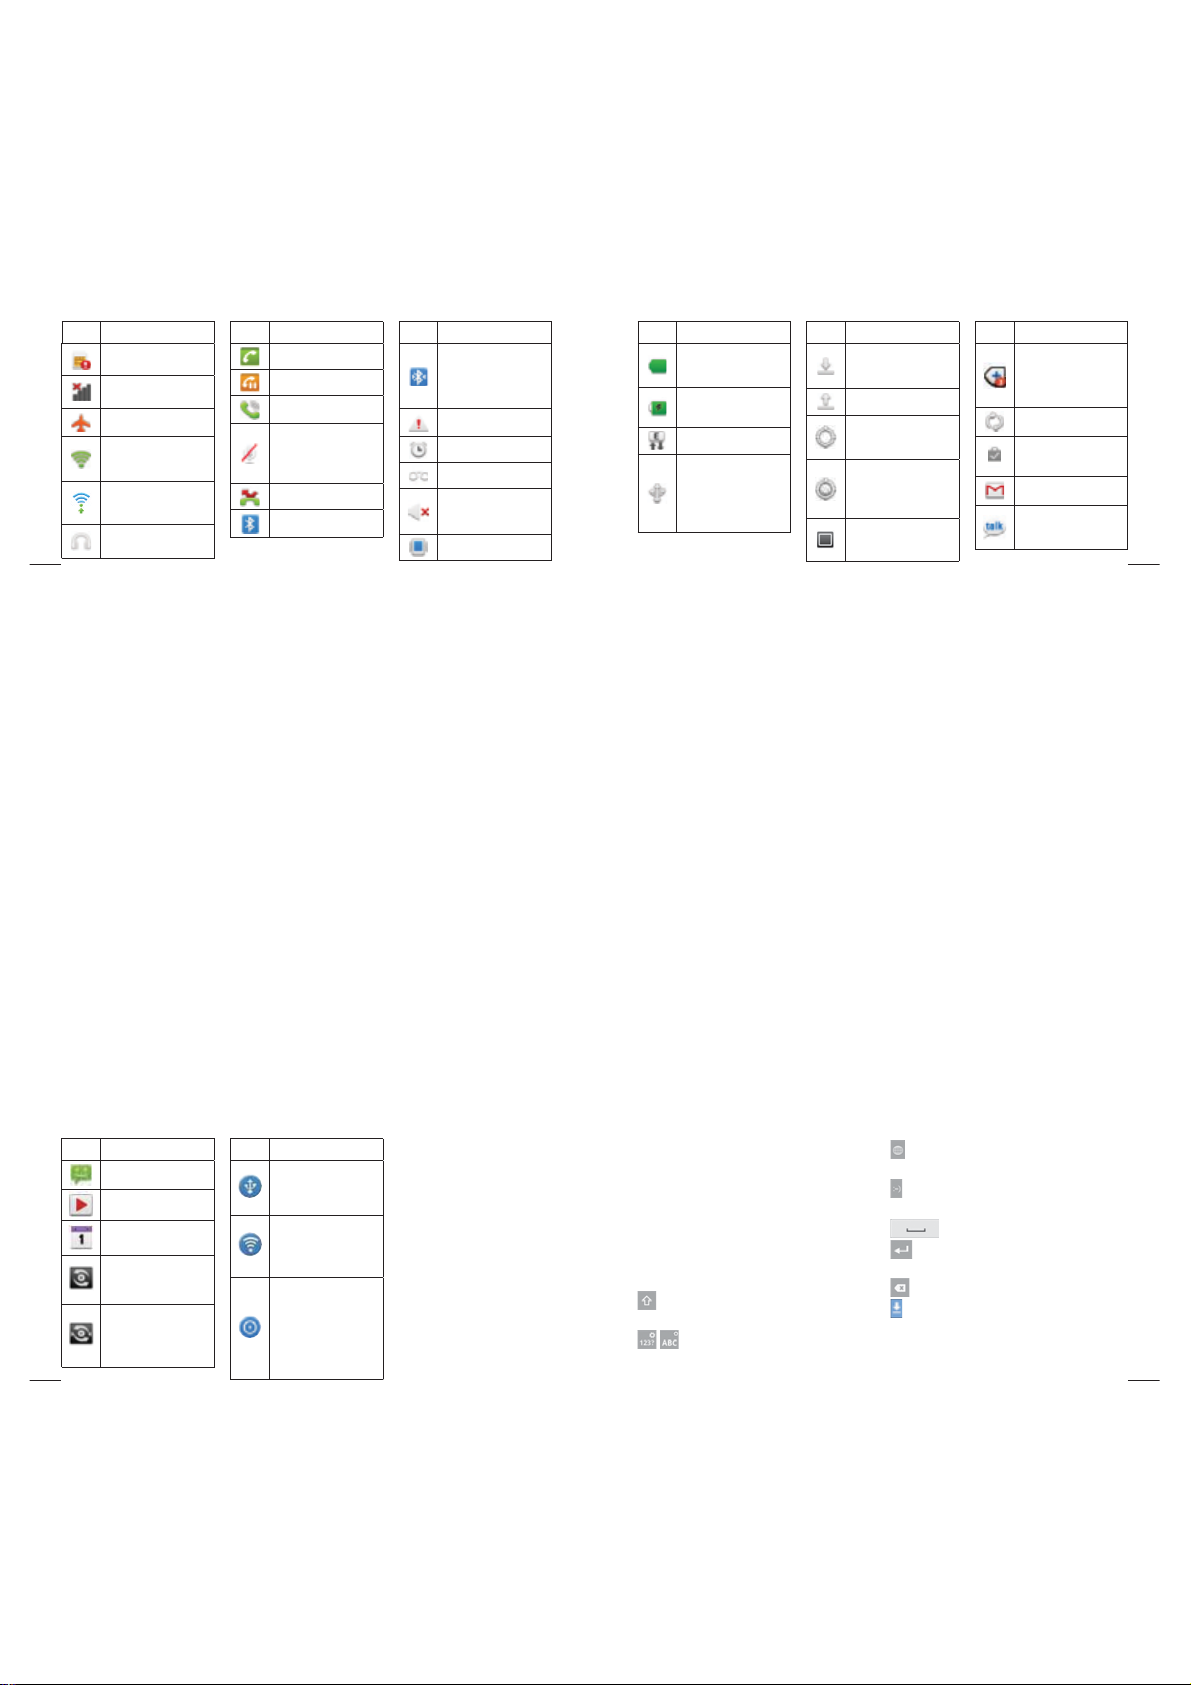
Your Home screen
Icon
Description
No SIM card
No signal
Airplane mode
Connected to a WiFi network
Wi-Fi Direct is on.
Wired headset
48
Icon
Description
Call in progress
Call hold
Speakerphone
Phone microphone
is muted
Missed call
Bluetooth is on
Icon
Description
Connected to a
Bluetooth device
System warning
Alarm is set
New voicemail
Ringer is silenced
Vibrate mode
Icon
Description
Battery fully
charged
Battery is charging
Data in and out
Phone is connected
to PC via USB cable
Icon
Description
Downloading data
Uploading data
GPS is acquiring
Receiving location
data from GPS
On-Screen Phone
connected
Icon
Description
3 more notifications
not displayed
Data is syncing
Download finished
New Gmail
New Google Talk
message
49
Your Home screen
Icon
Description
New message
Song is playing
Upcoming event
SmartShare On
SmartShare
sharing request
50
Icon
Description
USB tethering is
active
Portable Wi-Fi
hotspot is active
Both USB
tethering and
portable hotspot
are active
Onscreen keyboard
You can enter text using the onscreen
keyboard. The onscreen keyboard appears
automatically on the screen when you
need to enter text. To manually display the
keyboard, simply touch a text field where
you want to enter text.
Using the keypad & entering text
Tap once to capitalise the next letter you
type. Double tap for all caps.
Tap to switch to the numeric and
symbol keyboard. You can also touch and
hold this tab to view the Settings menu.
Tap to view or press and hold to change
the writing language.
Tap to insert an emoticon when writing a
message.
Tap to enter a space.
Tap to create a new line in the message
field.
Tap to delete the previous character.
Tap to hide the onscreen keyboard.
51
Page 6

Your Home screen
Entering accented letters
When you select French or Spanish as the
text entry language, you can enter special
French or Spanish characters (e.g. “á”).
For example, to input "á", touch and hold
the "a" key until the zoom-in key grows
bigger and displays characters from different
languages.
Then select the special character you want.
Google account setup
When you first turn on your phone, you have
the opportunity to activate the network, to
sign into your Google Account and how you
want to use some Google services.
To set up your Google account :
* Sign into a Google Account from the
prompted set up screen.
OR
* Applications > select a Google application,
such as Gmail > select Next >select Create
to create a new accout.
If you have a Google account, enter your
e-mail address and password, then touch
Sign in.
Once you have set up your Google account
on your phone, your phone automatically
synchronises with your Google account on
the Web.
Your contacts, Gmail messages, Calendar
events and other information from these
applications and services on the Web are
synchronised with your phone. (This depends
on your synchronisation settings) .
52
Google account setup
After signing in, you can use Gmail™ and
take advantage of Google services on your
phone.
54
Wi-Fi
With Wi-Fi, you can use high-speed Internet
access within the coverage of the wireless
access point (AP).
Enjoy wireless Internet using Wi-Fi, without
extra charges.
Turning on Wi-Fi
From the Home screen, open the notification
drawer and touch
Or touch Application > Settings >
Wireless & networks, then > Wi-Fi
.
.
Connecting to Wi-Fi
Choose the Wi-Fi network you want to
connect to. If you see
you need to enter a password to connect.
NOTE:
If you are outside the Wi-Fi coverage area
•
and choose 3G connection, additional
charges may apply.
•
If your phone goes into sleep mode when
connected to Wi-Fi, the Wi-Fi connection is
automatically disabled.
•
In this case, if your phone has access to
3G data, it may connect to the 3G network
,
53
55
Page 7
Wi-Fi
automatically and additional charges may
apply.
•
The LG-E400 supports WEP, WPA/WPA2-
PSK and 802.1x EAP security. If your Wi-Fi
service provider or network administrator
sets encryption for network security,
enter the key into the pop-up window.
If encryption is not set, this pop-up
window is not shown. Obtain the key from
your Wi-Fi service provider or network
administrator.
56
Sharing your phone’s data
connection
You can share your phone’s mobile data
connection with a single computer via a USB
cable (USB tethering). You can also share
your phone’s data connection with up to five
devices at a time by turning your phone into
a portable Wi-Fi hotspot.
When your phone is sharing its data
connection, an icon appears in the status
bar and as an ongoing notification in the
notifications drawer.
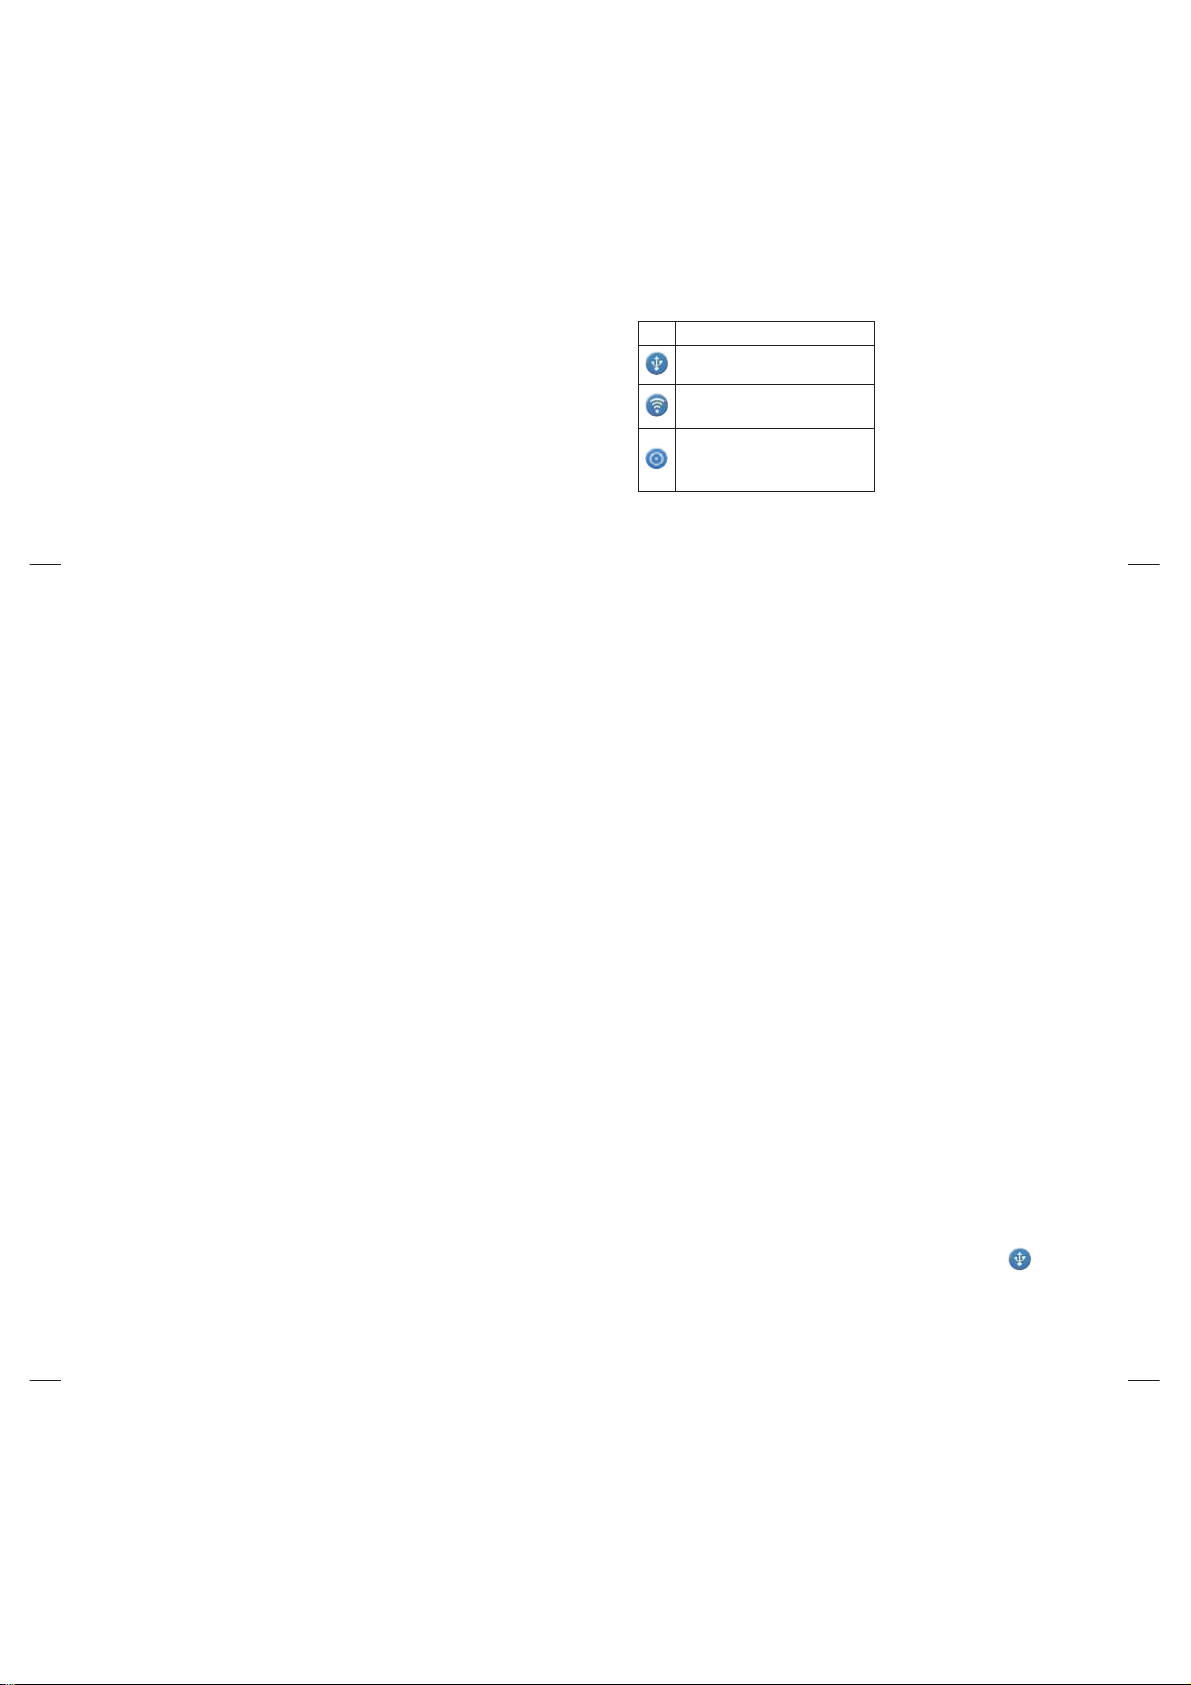
Icon Description
USB tethering is active
Portable Wi-Fi hotspot is active
Both USB tethering and portable
hotspot are active
For the latest information about tethering
and portable hotspots, including supported
operating systems and other details, visit
http://www.android.com/tether.
NOTE: Additional costs may be incurred
when connecting and using online services.
Check data charges with your network
provider.
USB tethering & portable Wi-Fi
hotspot settings
In the Home screen, touch the
1
Applications tab and select Settings.
2
Touch Wireless & networks and select
Tethering & portable hotspot.
3
Choose options that you want to adjust.
57
Wi-Fi
USB tethering – Tick to share your phone’s
mobile network data connection with your
computer via a USB connection.
Portable Wi-Fi hotspot – Tick to
share your phone’s mobile network data
connection as Wi-Fi sharing.
Help – Opens a dialog with information
about USB tethering and portable Wi-Fi
hotspots as well as information on where to
learn more.
58
To share your phone’s data
connection via USB
If your computer is running Windows 7 or a
recent distribution of some flavours of Linux
(such as Ubuntu), you don’t usually need to
prepare your computer for tethering. But if
you’re running an earlier version of Windows
or another operating system, you may need
to prepare your computer to establish a
network connection via USB. For the most
current information about which operating
systems support USB tethering and how to
configure them, visit http://www.android.
com/tether.
USB tethering and data sharing
You can’t share your phone’s data
connection and microSD card via USB
at the same time. If you are using your
USB connection to make your microSD
card available to your computer, you must
disconnect it first.
1
Use the USB cable that came with your
phone to connect your phone to your
computer.
2
In the Home screen, touch the
Applications tab and select Settings.
Touch Wireless & networks and select
3
Tethering & portable hotspot.
4
Tick USB tethering.
•
The phone starts sharing its mobile
network data connection with your
computer via the USB connection. An
ongoing notification
status bar and notifications drawer.
5
Untick USB tethering to stop sharing
your data connection. Or just disconnect
the USB cable.
is added to the
59
Page 8

Wi-Fi
To share your phone’s data
connection as a portable Wi-Fi
hotspot
In the Home screen, touch the
1
Applications tab and select Settings.
2
Touch Wireless & networks and select
Tethering & portable hotspot.
3
Tick Portable Wi-Fi hotspot.
•
After a moment, the phone starts
broadcasting its Wi-Fi network name
(SSID) so you can connect to it with up
to eight computers or other devices. An
ongoing notification
60
is added to the
status bar and notifications drawer.
•
When Portable Wi-Fi hotspot is ticked,
you can change its network name or
secure it.
4
Untick Portable Wi-Fi hotspot to stop
sharing your data connection via Wi-Fi.
To rename or secure your
portable hotspot
You can change the name of your phone’s
Wi-Fi network name (SSID) and secure its
Wi-Fi network.
1
In the Home screen, touch the
Applications tab and select Settings.
Touch Wireless & networks and select
2
Tethering & portable hotspot.
3
Ensure Portable Wi-Fi hotspot is ticked.
4
Touch Portable Wi-Fi hotspot settings.
5
Touch Configure Wi-Fi hotspot.
•
The Configure Wi-Fi hotspot dialog
opens.
•
You can change the network SSID (name)
that other computers see when scanning
for Wi-Fi networks.
•
You can also touch the Security menu to
configure the network with Wi-Fi Protected
Access 2 (WPA2) security, with a preshared key (PSK).
•
If you touch the WPA2 PSK security
option, a password field is added to the
Configure Wi-Fi hotspot dialog. If you
enter a password, you will need to enter
that password when you connect to the
phone’s hotspot with a computer or other
device. Or touch Open in the Security
menu to remove security from your Wi-Fi
network.
61
Wi-Fi
ATTENTION!
If you set the security option as Open,
you cannot pr
of online services by other people and
additional charges can be incurred.
To avoid unauthorised usage, you are
advised to keep the security option
active.
Touch Save.
6
62
event unauthorised usage
Enabling Wi-Fi Direct to share
through SmartShare
Wi-Fi Direct cannot be enabled while using
other Wi-Fi functions.
Wi-Fi Direct automatically scans nearby WiFi Direct devices and the searched devices
will be listed up in the order of arrival and
you can select a specific device to share
multimedia data through SmartShare.
1
On the home screen, touch the
Application tab and select Settings.
2
Touch Wireless & networks and select
Wi-Fi Direct Settings.
Ensure Wi-Fi Direct is selected.
3
Select a device to connect in the scanned
4
device list.
Forced Group owner mode – Touch to
activate group owner mode that enables the
legacy Wi-Fi devices to connect by scanning
your phone.
In this case you must enter the password
that is set in the Menu > Advanced >
Password.
NOTE: When your phone becomes group
owner, it will consume more battery power
than being a client. Wi-Fi Direct connection
does not provide Internet service. Additional
cost may be incurred when connecting and
using online services. Check data charges
with your network provider.
Using the Wi-Fi Cast
You can share your music, picture and video
contents between users who use Android
Phone connected via same Wi-Fi & Wi-Fi
Directed network.
Check your Wi-Fi & Wi-Fi Directed network
in advance and make sure same network is
connected between the users.
63
Page 9

Wi-Fi
On the home screen, touch the
1
Application tab and select Settings.
2
Touch Wireless & networks and select
Wi-Fi Direct Settings.
3
Ensure Wi-Fi Direct is selected and
select a device to connect in the scanned
device list.
4
Touch Connect.
NOTE:
Wi-Fi cast is activated between the users.
Make sure to connect to same Wi-Fi
Network between the users.
64
On-Screen Phone
How to use On-Screen Phone
On-Screen Phone allows you to view your
mobile phone screen from a PC via a USB or
Bluetooth connection.
You can also control your mobile phone from
your PC using the mouse or keyboard.
On-Screen Phone icons
Connects your mobile phone to your PC,
or disconnects it.
Rotates the On-Screen Phone window
(only available at applications that
support rotation).
Changes the On-Screen Phone
preferences.
Exits the On-Screen Phone program.
Minimises the On-Screen Phone
window.
On-Screen Phone features
Real-time transfer and control: displays
•
and controls your mobile phone screen
when connected to your PC.
•
Mouse control: allows you to control your
mobile phone by using the mouse to click
and drag on your PC screen.
65
On-Screen Phone
Text input with keyboard: allows you to
•
compose a text message or note using
your computer keyboard.
•
File transfer (mobile phone to PC): sends
a file from your mobile phone (e.g. photos,
videos, music and Polaris viewer files) to
your PC. Simply right-click and drag to
send a file to your PC.
•
File transfer (PC to mobile phone): sends
files from your PC to your mobile phone.
Simply select the files you wish to transfer
and drag and drop into the On-Screen
Phone window. The files you send are
66
stored on a micro SD card.
•
Real-time event notifications: prompts
a pop-up to inform you of any incoming
calls or text, as well as alarm and event
notifications.
How to install On-Screen Phone
on your PC
If you install LG PC Suite IV, the On-Screen
Phone program will also be downloaded on
your PC. Then you can install the On-Screen
Phone on your PC.
How to connect your mobile
phone to your PC
USB connection:
1
Open Connection Wizard, select "USB
Cable connection" and click "Next".
2
Connect your mobile phone to the PC
using a USB cable and click "Next".
3
Enter the On-Screen Phone password
and click "Next". The default password is
"0000". You can change the password in
Settings > Wireless & networks > OnScreen Phone Settings.
Click "OK" to exit the window.
4
NOTE: Go to Settings > SD card & phone
storage and make sure that the “Mass
storage only” checkbox is deselected.
Wireless connection with Bluetooth:
1
On your mobile phone, go to Settings
> Wireless & networks > Bluetooth
settings. Select Turn on Bluetooth and
select Discoverable.
2
If you have previously connected using a
cable, run the New Connection Wizard to
create a new connection.
67
Page 10

On-Screen Phone
Run the Connection Wizard on the
3
computer, select "Bluetooth connection",
then "Next".
4
The wizard starts searching for Bluetoothenabled mobile phones. When the
mobile phone that you wish to connect to
appears, click "Stop" to stop searching.
5
6
68
LG-E400H
Select "LG-E400" from the device list and
click "Next". You can rename the device
if you wish.
Enter the PIN code (e.g. "0000") and
click "Next".
On your mobile phone, accept the request
7
and check the same PIN code, then touch
"OK".
8
Enter the On-Screen Phone password
and click "Next" (the default password is
"0000").
9
Touch "OK" to exit.
To check the phone to PC
connection
Once the devices have been connected, drag
down the notification bar at the top of the
home screen to check the On-Screen Phone
connection status.
To disconnect your phone from
your PC
Click in the top left of the On- Screen
Phone window. Or drag down the notification
bar at the top of the home screen and select
"On-Screen Phone". Touch "Yes" in the
Disconnect window.
NOTE: You must restart your phone after
shutting down the On-Screen Phone
service.
69
Calls
Making a call
Touch to open the keypad.
1
Enter the number using the keypad. To
2
delete a digit, touch the Clear icon
3
Touch the Call icon
a call.
4
To end a call, touch the End icon
TIP! To enter “+” to make international
calls, touch and hold
70
.
to make
Calling your contacts
Touch to open your contacts.
1
Scroll through the contact list or enter the
2
.
first letter(s) of the contact you want to
call by touching Search.
3
In the list, touch the contact which you
want to call and tap on the number or call
.
icon to make call.
Answering and rejecting a call
When the Screen is locked and your phone
rings, drag the Answer icon
Drag the Decline icon
to the left to
to the right.
reject an incoming call. Drag the Excuse
msg bar from the bottom if you want to
send one.
TIP! Excuse messages
When you reject a call, you can send
a message quickly by touching Send
SMS. This is useful if you need to reply
the message during a meeting.
Adjusting call volume
To adjust the in-call volume during a call,
use the Volume Up and Down key on the left
side of the phone.
Making a second call
During your initial call, tap on the Menu
1
and select
2
Dial the number, or search your contacts.
3
Touch the Call icon
the call.
4
Both calls are displayed on the call
screen. Your initial call is locked and put
on hold.
5
Touch the displayed number to toggle
between calls. Or touch
to make a conference call.
6
To end active calls, touch End.
.
to connect
Merge calls
71
Page 11

Calls
NOTE: You are charged for each call you
make.
Viewing your call logs
In the Home screen, touch and choose
the Call log tab.
View a complete list of all dialled, received
and missed voice calls.
TIP! Touch any call log entry
to view the date, time and duration of
the call.
72
TIP! Press the Menu key,
then touch Delete all to delete all the
recorded items.
Call settings
You can configure phone call settings such
as call forwarding and other special features
offered by your carrier.
1
In the Home screen, touch the
Applications tab to open the applications
menu.
2
Scroll and touch Settings.
3
Tap Call settings and choose the options
that you want to adjust.
Contacts
Add contacts to your phone and synchronise
them with the contacts in your Google
account or other accounts that support
contact syncing.
Searching for a contact
In the Home screen
1
2
to open your contacts.
Touch
Touch Search and enter the contact
name using the keyboard.
Adding a new contact
Touch , enter the new contact’s
1
number, then press the Menu key. Touch
Add to contacts and then Create new
contact.
2
If you want to add a picture to the new
contact, touch
Choose from Capture picture or Pick
from Gallery.
3
Select the contact type by touching
Touch a category of contact information
4
and enter the details about your contact.
5
Touch Save.
.
.
73
Contacts
Favorite contacts
You can classify frequently called contacts
as favorites.
Adding a contact to your favorites
1
2
3
74
to open your contacts.
Touch
Touch a contact to view its details.
Touch the star to the right of the contact’s
name. The star turns gold.
Removing a contact from your favorites
list
1
2
3
to open your contacts.
Touch
Touch the Groups tab, select Favorites at
the top of the list and choose a contact to
view its details.
Touch the Gold star to the right of the
contact’s name. The star turns grey
and the contact is removed from your
favourites.
Moving contacts from your old
phone to your new phone
Export your contacts as a CSV file from
your old phone to your PC using a PC
sync program.
1
Download PC Suite IV from www.lg.com
and install it on the PC. Run the program
and connect your Android mobile phone
to the PC using the USB cable.
2
Select the Contacts icon. Go to Menu
> File > Import and select the CSV file
saved on your PC.
If the fields in the imported CSV file are
3
different from those in PC Suite IV, you
need to map the fields. After mapping
the fields, click OK. The contacts are then
added to PC Suite IV.
4
If PC Suite IV detects the connection
LG-E400H
of your LG-E400 phone (using the USB
cable), click Sync or Sync contacts to
synchronise the contacts saved on your
PC with your phone.
75
Page 12

Messaging/email
Messaging
LG-E400H
Your LG-E400 combines SMS and MMS into
one intuitive, easy-to-use menu.
Sending a message
Touch icon on the home screen, and
1
touch New message to open a blank
message.
2
Enter a contact name or contact number
in the To field. As you enter the contact
name, matching contacts appear. You can
touch a suggested recipient. You can add
multiple contacts.
76
NOTE: You will be charged for a text
message for every person you send the
message to.
Touch Enter message field and start to
3
compose your message.
4
Press the Menu key to open the options
menu. Choose from Call, Add Subject,
Discard, Reply By, Attach and more.
5
Touch Send to send your message.
6
The message screen opens, with your
message after Recipient Name/Number.
Responses appear on the screen. As you
view and send additional messages, a
message thread is created.
WARNING: The 160-character
limit may vary from country to country
depending on how the SMS is coded
and in what language.
WARNING: If an image, video or
audio fi le is added to an SMS, it will be
automatically converted into an MMS ,
and you will be charged accordingly.
NOTE: When you get an SMS message
during a call, there will be a ring notifi cation.
Threaded box
Messages (SMS, MMS) exchanged
with another party can be displayed
in chronological order so that you can
conveniently see an overview of your
conversation.
Using Smilies
Liven up your messages using Smilies.
When writing a new message, press the
Menu key, then choose Insert smiley.
77
Messaging/email
Changing your message settings
Your LG-E400 message settings are
LG-E400H
predefined, so you can send messages
immediately. You can change the settings
based on your preferences.
WARNING: In this mode, the MMS
Client device guides the user in creating
and sending messages with content
belonging to the Core MM Content
Domain. This guidance is provided
through warning dialogs.
78
Opening Email and the Accounts
Screen
You can use the Email application to read
email from services other than Google Mail.
The Email application supports the following
account types: POP3, IMAP and Exchange.
To open the Email application
From the Home screen, touch Application->
Email Select Email Service Provider.
A setup wizard opens to help you add an
email account. After the initial setup, Email
displays the contents of your Inbox (if you
have only one account) or the Accounts
screen (if you have multiple accounts).
The Accounts screen
The Accounts screen lists your Combined
Inbox and each of your email accounts.
1
Open the Email application. If you’re not
on the Account screen, press the Menu
Key and touch Accounts.
2
Select the Email service provider.
- Touch to open your Combined Inbox,
with messages Recieved to all of your
accounts.
- Touch to open a list of just your
starred messages.
- Touch the folder icon to open the
account’s folders.
You can touch an account to view its Inbox.
The account from which you send email by
default is indicated with a tick.
To open your Combined Inbox
If you have configured Email to send and
receive email from more than one account,
you can view all messages sent to all
accounts in your Combined Inbox.
79
Page 13

Messaging/email
Touch Email.
1
Touch Combined Inbox (in the Accounts
2
screen). Messages in the Combined Inbox
are colour coded along their left sides, by
account, using the same colours that are
used for your accounts in the Accounts
screen.
Only your account’s most recent emails are
downloaded to your phone. To download
more (earlier) email messages, touch Load
more messages at the bottom of the
emails list.
80
Composing and Sending Email
To compose and send a message
While in the Email application, press the
1
Menu Key and touch Compose.
2
Enter an address for the message’s
intended recipient. As you enter text,
matching addresses are offered from your
Contacts. Separate multiple addresses
with commas.
3
Touch the Menu key and then touch Add
Cc/Bcc to send copy or blind copy of the
mail to other contacts/email addresses.
4
Enter the text of the message.
Press the Menu Key and touch Add
5
Attachment to send a file with the
message.
6
Touch the Send button.
If you’re not ready to send the message,
touch the Save as draft button to save it
in a Drafts folder. Touch a draft message
in a Drafts folder to resume working on
it. Your message will also be saved as
a draft if you touch the Back Key
before sending it. Touch the Discard
button to abandon and delete a message,
including any saved drafts. If you aren’t
connected to a network, for example,
if you’re working in airplane mode, the
messages that you send are stored in
your Outbox folder until you’re connected
to a network again. If it contains any
pending messages, the Outbox is
displayed on the Accounts screen.
Please note that messages sent using an
Exchange account will not be located on the
phone; they will, however, be located on the
Exchange server itself.
If you want to see your sent messages in the
Sent folder ,then touch Menu key and touch
81
Messaging/email
on Folders then touch on Sent folder and
select Refresh from the options Menu.
TIP! When a new email arrives in the
inbox, you will receive a notifi cation by
sound or vibration.
Working with Account Folders
Each account has Inbox, Outbox, Sent, and
Drafts folders. Depending on the features
supported by your account’s service provider,
you may have additional folders.
82
Adding and Editing email
Accounts
To add an email account Touch the
1
Applications tab and select Email.
2
Select MS Exchange or Others, and enter
account settings.
3
If an email account is already set up, you
need to touch the Menu key then tap Add
account from Accounts Screen.
4
Enter a name for the account, confirm
how you want your name to appear
in outgoing mail, then touch the Done
button.
To change an account’s settings
1
Open the Accounts screen.
2
Touch and hold the account whose
settings you want to change. In the menu
that opens, touch Account settings.
To delete an email account
1
Open the Accounts screen.
2
Touch and hold the account you want to
delete.
3
Touch Remove account in the menu
that opens.
4
Touch the OK button in the dialog box
to confirm that you want to delete the
account.
83
Page 14

Social Networking
Social Networking
With your phone, you can take advantage of
Social Networking and manage your microblog in on-line communities. You can update
your current status, upload photos, and view
your friend's status updates in real-time.
You can add your Facebook, Twitter and
Myspace accounts to your phone. If you
don’t have an account, you can visit their
sites to set it up.
NOTE: Additional costs may be incurred
when connecting and using online services.
Check your data charges with your network
provider.
84
Adding your account to your
phone
Touch and hold the home screen. When
1
various Widgets appear, choose Social+
and tap the Setting button. You
can also access in a different way, on
the home screen, choose Applications >
Settings > Accounts & sync > Social+
settings.
2
Choose the Social Networking client
application you want to use from
Facebook for LG, Twitter for LG and
MySpace for LG.
Enter your community email address and
3
password, then tap Log in.
4
Wait while your details are confirmed with
your community.
5
If you tap your community, you can see
its current status.
TIP! If you add a Social Networking
widget on your home screen, the widget
will show your status when your phone
updates from the network.
You can also access the social
community directly by touching the
widget.
Viewing and updating your
status
You can view and update social
1
community content using the Social+
widget at any time.
2
On the Social+ widget, choose the Social
Networking service which you want to
log in. You will then see your status and
contents.
3
When you touch the input box, the screen
will switch to update your current status
with comments or upload photos.
85
Social Networking
TIP! You can update your status
and upload photos simultaneously to
Facebook for LG,Twitter for LG and
MySpace for LG by selecting the checkbox.
NOTE: This depends on network services.
TIP! You can synchronise your
friend contact to your contact list.
86
Removing accounts from your
phone
Choose Settings > Accounts & sync >
Choose an account you want to delete >
Touch Remove account.
Camera
Getting to know the
viewfinder
TIP! You can close all the shortcut options to
give a clearer viewfi nder screen by touching
the centre of the viewfi nder once. To display
the options, touch the screen again.
Zoom - Zoom in or zoom out. Alternatively you can use the side
volume keys.
Brightness - This defines and controls the amount of sunlight
entering the image. Slide the brightness indicator along the bar
towards “-” to lower the brightness of the image or towards “+” to
increase it.
Scene mode - Choose from Auto, Portrait, Landscape, Sports,
Night and Sunset.
Image size - Touch to set the size (in pixels) of the picture you take.
Settings - Touch this icon to open the advanced settings menu.
Video mode - Slide this icon down to switch to video mode.
Taking a photo
Gallery - Touch to view the last photo you captured. This enables you
to access your gallery and view saved photos from within camera
mode.
87
Page 15

Camera
Taking a quick photo
Open the Camera application.
1
Hold the phone horizontally and point
2
the lens towards the subject you want to
photograph.
3
In the centre of the viewfinder screen, a
focus box starts blinking as it tries to get
the subject in focus.
4
The focus box turns green when the
subject is in focus.
5
Press the capture
press the capture button whether the
focus box is green or not.
88
button. You can
Once you’ve taken the photo
Your captured photo appears on the screen.
Share
Touch to share your photo using
SmartShare, Bluetooth, E-mail,
Gmail, Messaging, Picasa,
or
Social+
NOTE: additional charges may apply when
MMS messages are downloaded while
roaming.
Wi-Fi Cast.
TIP! If you have an SNS account
and set it up on your phone, you
can share your photo with the SNS
community.
Set as
Touch to use the image as a
Contact icon or wallpaper.
Rename
Touch to edit the name of the
picture just taken.
Touch to delete the image.
Touch to take another photo
immediately. Your current photo is
saved.
Touch to view the last photo you
captured as well as the gallery
Using the advanced settings
In the viewfinder, touch to open all
advanced options.
Change camera settings by scrolling through
the list. After selecting the option, touch the
Back key.
ISO – The ISO rating determines the
sensitivity of the camera’s light sensor.
The higher the ISO, the more sensitive the
89
Camera
camera is. This is useful in darker conditions
when you cannot use the flash. Select from
ISO values of Auto, 400, 200 and 100.
White balance – Choose from Auto,
Incandescent, Sunny, Fluorescent and
Cloudy.
Color effect – Choose a colour tone for your
new photo.
Timer – The self-timer allows you to set a
delay after the capture button is pressed.
Select Off, 3 secs., 5 secs. or 10 secs. This
is ideal if you want to be in the photo.
90
Image quality – Choose from Super fine,
Fine and Normal. The finer the quality, the
sharper the photo. However, the file size
increases as a result, which means you can
store fewer photos in the memory.
Auto review – If you turn Auto review on,
it automatically shows you the picture you
just took.
Shutter sound – Select one of four shutter
sounds.
Tag location – Activate to use your phone’s
location-based services. Take pictures
wherever you are and tag them with the
location. If you upload tagged pictures to a
blog that supports geotagging, you can see
the pictures displayed on a map.
NOTE: This function is only available when
GPS is active.
– Restore all camera default settings.
– Touch whenever you want to know
how this function operates. This provides you
with a quick guide.
TIP! When you exit the camera, some
settings return to their defaults, such as
white balance, color effect and timer .
Check these before you take your next
photo.
TIP! The Settings menu is superimposed
over the viewfi nder, so when you change
elements of the image colour or quality,
you see a preview of the image change
behind the Settings menu.
91
Page 16

Viewing your saved photos
Access your saved photos while in Camera
mode. Just touch
You then see Slideshow and Menu.
TIP! Flick left or right to view
other photos or videos.
- Touch to see a slideshow.
- Touch to share the contents or delete a
photo. Touch More for more options.
Details – Check information on the
content.
and touch the screen.
Set as – Set as a contact icon or
wallpaper.
Crop – Crop your photo. Move your
finger across the screen to select the
area.
Rotate – Rotate left or right.
Video camera
Getting to know the
viewfinder
Zoom - Zoom in or zoom out. Alternatively you can use the side
volume keys.
Brightness - This defines and controls the amount of sunlight entering
the video. Slide the brightness indicator along the bar towards “-” to
lower the brightness of the video or towards “+” to increase it.
Video size - Touch to set the size (in pixels) of the video you record.
Duration - Set a duration limit for your video. Choose between Normal
and MMS to limit the maximum size to send as an MMS message.
Settings - Touch this icon to open the advanced settings menu.
Camera mode - Slide this icon up to switch to camera mode.
Start recording
Gallery - Touch to view the last video you recorded. This enables
you to access your gallery and view your saved videos from within
video mode.
92
Video camera
Shooting a quick video
Slide the Camera mode button down and
1
the icon changes to
2
The video camera viewfinder appears on
the screen.
3
Holding the phone horizontally, point the
lens towards the subject you want to
capture in your video.
4
Press the Record
recording.
5
REC appears at the bottom of the
viewfinder with a timer showing the
length of the video.
94
.
button once to start
Touch on the screen to stop
6
recording.
After shooting a video
A still image representing your video will
appear on the screen.
Play
Touch to play the video.
Share
Touch to share your video using
SmartShare, Bluetooth, E-mail,
Gmail, Messaging, Wi-Fi Cast.
NOTE: Additional charges may apply when
MMS messages are downloaded while
roaming.
Rename
Touch to edit the name of the
selected video.
Touch to shoot another video right away.
Your current video is saved.
Touch to delete the video you just made.
Confirm by touching OK. The viewfinder
reappears.
Touch to view the last recorded video as
well as the gallery.
93
Using the advanced settings
Using the viewfinder, touch to open all
the advanced options.
Adjust the video camera setting by scrolling
through the list. After selecting the option,
touch the Back key.
White balance – White balance ensures
that the white areas in your video are
realistic. To enable your camera to adjust
the white balance correctly, you may need to
determine the light conditions. Choose from
Auto, Incandescent, Sunny, Fluorescent
and Cloudy.
95
Page 17

Video camera
Color effect – Choose a colour tone to use
for your new view.
Video quality – Choose from Super fine,
Fine and Normal.
Audio recording – Choose Mute to record
a video without sound.
Auto review – Auto review automatically
shows you the video you just recorded.
– Restore all video camera default
settings.
– Touch if you want to know how this
function operates. This provides you with a
quick guide.
96
Watching your saved videos
In the viewfinder, touch .
1
Your gallery appears on the screen.
2
Touch a video once to bring it to the
3
front of the gallery. It starts playing
automatically.
Adjusting the volume when
viewing a video
To adjust the volume of a video while it is
playing, use the volume keys on the lefthand side of the phone.
Multimedia
You can store multimedia files on a memory
card to have easy access to all your image
and video files.
Touch the Applications tab, then select
Gallery. Open a list of catalogue bars that
store all your multimedia files.
NOTE: Make sure you install
a memory card in the phone to save
photos and videos. Without a memory
card, the phone does not display photos
or videos except Picasa images, which
are in your Picasa web album.
View mode
Touch Gallery. Folder view is displayed.
Touch any folder and it turns to grid view
mode. If you tap a photo, it changes into full
view mode.
Timeline view
LG-E400H
LG-E400 Gallery provides a timeline view of
your photos and videos. In grid view mode,
drag
took your photos is displayed, starting with
the most recent. If you select a specific
date, all the photos you took on that day are
grouped.
to the right and the date you
97
Multimedia
Using SmartShare
SmartShare provides you with a better way
to enjoy multimedia contents with other
DLNA (Digital Living Network Alliance)
enabled devices.
* Share your media contents with other
DLNA devices (DMS)
1
In the Home screen, touch the
Applications tab and select
SmartShare.
2
Press the Menu key and select Settings.
3
You can change your device name, icon
and select the sharing content types
98
Touch the Discoverable tickbox to turn on.
4
* Let your renderer device (e.g. TV)
play multimedia contents from remote
content library (e.g. PC)
1
Touch the top right button to select the
device from a list of renderers.
2
Touch the top left button and select a
remote content library.
3
You can browse the remote content
library.
4
Touch a content thumbnail or press the
Menu key and select the Play button.
Notice: Check that your device is
connected to your home network using
a Wi-Fi connection in order to use this
application.
Notice: Some DLNA-enabled devices (e.g.
TV) support only DMP features of DLNA and
will not appear in the renderer device lists.
Music
LG-E400H
Your LG-E400 has a built-in music player
that lets you play all your favourite tracks. To
access the music player, touch Music.
Playing a song
In the Home screen, touch the
1
Applications tab and select Music.
2
Touch Songs.
3
Select the song you want to play.
4
5
6
to pause the song.
Touch
to skip to the next song.
Touch
to go back to the beginning
Touch
of the song. Touch
the previous song.
twice to return to
99
Page 18

Multimedia
To change the volume while listening to
music, press the up and down volume keys
on the left-hand side of the phone.
Touch and hold any song in the list. It
displays Play, Add to playlist, Use as
phone ringtone, Delete, Details, Share and
Search as options.
100
NOTE: Music fi le copyrights may be
protected by international treaties and
national copyright laws.
Therefore, it may be necessary to obtain
permission or a licence to reproduce or
copy music.
In some countries, national laws prohibit
private copying of copyrighted material.
Before downloading or copying the fi le,
check the national laws of the relevant
country concerning the use of such
material.
Transferring files using USB
mass storage devices
To transfer files using USB devices
1
Connect the LG-E400 to a PC using a
USB cable.
2
If you haven't installed LG Android
Platform Driver on your PC, you need to
change the settings manually. Choose
Settings > SD card & phone storage,
then select Mass storage only.
3
Touch Turn on USB storage.
4
You can view the mass storage contents
on your PC and transfer the files.
LG-E400H
NOTE: You need to install an SD card fi rst.
Without an SD card, you cannot use USB
mass storage.
NOTE:
If you installed LG Android Platform
Driver, you will immediately see a pop-up
saying Turn on USB storage.
How to Transfer music/video
files to your phone
Connect your phone to the PC using the
1
USB cable. In the Home screen, touch
and drag down the notification drawer.
Select USB connected > Turn on USB
storage > Select Open folder to view
101
Multimedia
files from Removable Disk pop up which
appears in PC .
If you didn't install LG Android Platform
Driver on your PC, you must set it up
manually.
For more information, refer to
'Transferring files using USB mass
storage devices'.
2
Transfer music or video files from the PC
to the phone's removable storage.
•
You can copy or move files from your
PC to your phone's removable storage
using a card reader.
102
If there is a video file with a subtitle file
•
(*.srt file with the same name as the
video file), place it in the same folder
to display subtitles automatically when
playing the video file.
•
When downloading music or video files,
copyrights must be secured. Note that
corrupted files or files with incorrect
extensions may damage your phone.
Sending data from your phone
using Bluetooth
Sending data using Bluetooth You can
use Bluetooth to send data by running a
corresponding application, not from the
Bluetooth menu as on most other mobile
phones.
* Sending pictures: Run the Gallery
application, then select Picture > Menu.
Click Share, then select Bluetooth. Check
whether Bluetooth is turned on, then select
Scan for devices. Choose the device you
want to send data to from the list.
* Exporting contacts: Run the Contacts
application. Touch the address you want
to export to. Press the Menu key and
select Share > Bluetooth. Check whether
Bluetooth is turned on, then select Scan
for devices. Choose the device you want
to send data to from the list.
* Sending multi-selected contacts: Run
the Contacts application. To select more
than one contact touch the Menu key and
touch Share. Select the contacts you want
to send or touch Select all option from
top > Select Share > Bluetooth > Enable
Bluetooth and select Scan for devices
>Choose the device you want to send data
from the list.
103
Page 19

Multimedia
* Connecting to FTP (only FTP server
is supported on this handset): select
Settings > Wireless & networks
> Bluetooth Settings. Select the
Discoverable box so you can search for
your phone on other devices. Find the FTP
service and connect to the FTP server.
•
If you want to search for this phone from
other devices, go to Settings > Wireless
& networks > Bluetooth Settings. Select
the Discoverable box. The box is cleared
after 120 seconds.
104
Utilities
Setting your alarm
In the Home screen, touch the
1
Applications tab and select Clock.
2
If you want to add a new alarm, touch
and select Add alarm.
3
Set the time to turn on the alarm. After
you set the time, the LG-E400 lets you
know how much time is left before the
alarm will sound.
4
Set Repeat, Ringtone or Vibrate, then
add a label to name the alarm. Touch
Done.
LG-E400H
NOTE: to change alarm settings on alarm
list screen, press the Menu key and
select Settings. You can adjust the below
options: Alarm in silent mode, Alarm
volume, Snooze duration and Side button
behaviour.
Using your calculator
In the Home screen, touch the
1
Applications tab and select Calculator.
2
Touch the number keys to enter numbers.
3
For simple calculations, touch the
function you want (+, –, x or ÷) followed
by =.
105
Utilities
For more complex calculations, press the
4
Menu key, touch the Advanced panel,
then choose sin, cos, tan, log and so on.
Adding an event to your
calendar
In the Home screen, touch the
1
Applications tab and select Calendar.
2
To check the event, touch the date. Touch
and hold if you want to add a new event.
Touch New event.
3
Touch What then enter the event name.
Check the date and enter the time you
106
want your event to start and finish.
4
Also, touch Where then enter the
location.
5
If you want to add a note to your event,
touch Description and enter the details.
6
If you want to repeat the alarm, set
Repetition, and set Reminders, if
necessary.
7
Touch Done to save the event in the
calendar. A coloured square in the
calendar marks all days that have saved
events. An alarm sounds at the event
start time to help you stay organised.
Changing your calendar view
In the Home screen, touch the
1
Applications tab and select Calendar.
Press the Menu key.
2
Select the calendar view for a particular
day, week or month.
Polaris Viewer
Polaris Viewer is a professional mobile office
solution that lets users conveniently view
various types of office documents, including
Word, Excel and PowerPoint files, anywhere,
anytime, using their mobile devices.
Managing files
Polaris Viewer provides mobile users with
convenient file management features,including
copying, moving, renaming and deleting files
and folders right on the device and sending
files from the device.
Viewing files
Mobile users can now easily view a wide
variety of file types, including Microsoft
Office documents and Adobe PDF, right
on their mobile devices. When viewing
documents using Polaris Viewer, the objects
and layout remain the same as in their
original documents.
107
Page 20

Utilities
Voice recorder
Use the voice recorder to record voice
memos or other audio files.
Recording a sound or voice
In the Home screen, touch the
1
Applications tab and select Voice
Recorder.
2
Touch
3
Touch
4
Touch
NOTE: touch to access your album.
You can listen to the saved recording.
108
to begin recording.
to end the recording.
to listen to the recording.
Notice: the available recording time may
differ from the real time.
Sending the voice recording
Once you have finished recording, you
1
can send the audio clip by touching
Share.
2
Choose from Bluetooth, Email, Gmail
Messaging and Wi-Fi Cast. When you
select E-mail, Gmail and Messaging,
the voice recording is added to the
message, then you write and send the
message normally.
The Web
Browser
Browser gives you a fast, full-colour world
of games, music, news, sport, entertainment
and much more, right on your mobile phone.
Wherever you are and whatever you enjoy.
NOTE: additional charges apply when
connecting to these services and
downloading content. Check data charges
with your network provider.
Using the web toolbar
Touch to go backwards one page.
Touch to go forwards one page to the
one you connected to after the current
page. This is the opposite of what
happens when you press the Back key,
which goes to the previous page.
Touch to show all your open windows.
Touch to add a new window
Touch to change web browser settings.
Add/show bookmark and show Most
visited, Read it later and History.
109
The Web
Using options
Press the Menu key to view options.
Read it later – Add the current web
page as a bookmark.
Add RSS Feed – Add the current web
page to the RSS feed.
Share page – Allows you to share the
web page with others.
Find on page – Allows you to find
letters or words on the current web
page.
110
Select text – allows you to copy any
text from the web page.
More
•
Home page: Go to the Home page.
•
Set Home page: Set the current web
page as your Home page.
•
Add shortcut to Home: Add the shortcut
of the current web page to the Home
screen.
•
Page info: Displays the web page
information.
Downloads: Displays your download
•
history.
TIP To return to the previous web
page, press the Back key.
111
Page 21

Settings
In the Home screen, touch the Applications
tab then scroll to and touch Settings.
Wireless & networks
Here, you can manage Wi-Fi and Bluetooth.
You can also set up mobile networks and
switch to airplane mode.
Airplane mode – After switching to airplane
mode, all wireless connections are disabled.
Wi-Fi – Touch to select: This turns on Wi-Fi
to connect to available Wi-Fi networks.
Wi-Fi settings – Allows you to set up and
manage wireless access points. Set network
112
notification, or add a Wi-Fi network. The
advanced Wi-Fi settings screen is accessed
from the Wi-Fi settings screen. Press the
Menu key and touch Advanced.
Wi-Fi Direct Settings – Set Wi-Fi Direct
device name and scan for other devices.
Or be a Group owner to allow legacy Wi-Fi
devices to connect.
TIP! How to obtain the MAC
address
To set up a connection in some wireless
networks with MAC fi lters, you may
need to enter the MAC address of your
LG-E400H
LG-E400 into the router.
You can fi nd the MAC address in
the following user interface: Touch
Application > Settings > Wireless &
networks > Wi-Fi settings, and press
the Menu key. Then select Advanced >
MAC Address.
Bluetooth – Touch to select: This turns on
Bluetooth to connect to Bluetooth devices.
Bluetooth settings – Set device name &
discoverable mode, scan for other devices.
Or, check a list of Bluetooth devices that
you’ve previously configured and those
detected when the phone last scanned for
Bluetooth devices.
Tethering & portable hotspot – You can
configure the USB tethering and portable WiFi hotspot settings.
VPN settings – Displays the list of Virtual
Private Networks (VPNs) that you’ve
113
Settings
previously configured. Allows you to add
different types of VPN.
Mobile networks – Set options for data
roaming, network mode & operators, access
point names (APNs) and so on.
On-Screen Phone settings – Allows you
to change the On-Screen Phone password
(the default password is "0000"). On-Screen
Phone allows you to view your mobile phone
screen from a PC via a USB or Bluetooth
connection. You can also control your mobile
phone from your PC using the mouse or
keyboard.
114
Call settings
< Fixed Dialing Numbers >
Select Fixed Dialing Numbers to turn on
and compile a list of numbers that can be
called from your phone. You’ll need your
PIN2, which is available from your operator.
Only numbers within the fixed dial list can be
called from your phone.
< Voicemail >
Voicemail service – Allows you to select
your carrier’s voicemail service.
Voicemail settings – If you are using your
carrier’s voicemail service, this option allows
you to enter the phone number to use for
listening to and managing your voicemail.
< Other call settings >
Excuse messages – When you want to
reject a call, you can send a quick message
using this function. This is useful if you need
to reject a call during a meeting.
Call forwarding – Choose whether to divert
all calls, when the line is busy, when there is
no answer or when you have no signal.
Call barring – Select when you would like
calls to be barred. Enter the call barring
password. Please check with your network
operator about this service.
Call reject – Allows you to set the call reject
function. Choose from Off, Reject on list or
Reject all calls.
Call costs – View the charges applied
to your calls. (This service is network
dependent; some operators do not support
this function)
Call duration – View the duration of calls
including last call, all calls, dialled calls and
received calls.
Additional settings – This lets you change
the following settings:
115
Page 22

Settings
Caller ID: Choose whether to display your
number on an outgoing call.
Call waiting: If call waiting is activated, the
handset will notify you of an incoming call
while you are on another call (depending on
your network provider).
Sound
< General >
Silent mode – Allows you to mute all
sounds (including call and notification
ringtones) except the audio from music and
videos and any alarms you have set. You
116
must mute media and alarm sounds in their
own applications.
Vibrate – Allows you to set your phone to
vibrate when you receive an incoming call.
Volume – Allows you to set the volume for
ringtones, media and alarms. If you deselect
the option to use the incoming call volume
for notifications, you can set the volume for
incoming calls and notifications separately.
< Incoming calls >
Phone ringtone – Allows you to set your
default incoming call ringtone.
< Notifications >
Notification ringtone – Allows you to set
your default notification ringtone.
< Feedback >
Audible touch tones – Allows you to set the
phone to play tones when using the dialpad
to dial numbers.
Audible selection – Allows you to set your
phone to play a sound when you touch
buttons, icons and other onscreen items that
react to your touch.
Screen lock sounds – Allows you to set
your phone to play a sound when locking
and unlocking the screen.
Haptic feedback – Allows your phone to
vibrate when pressing soft keys and on
certain UI interactions.
Display
Brightness – Adjust the screen brightness.
Auto-rotate screen – Set to switch
orientation automatically when you rotate
the phone.
Animation – Set to display an animation.
117
Settings
Screen timeout – Set the time for screen
timeout.
Location & security
Use wireless networks – If you select Use
wireless networks, your phone determines
your approximate location using Wi-Fi and
mobile networks. When you select this
option, you’re asked whether you consent to
allowing Google to use your location when
providing these services.
Use GPS satellites – If you select Use
GPS satellites, your phone determines your
118
location to street level accuracy.
Set up screen lock – Set an unlock
pattern to secure your phone. Opens a set
of screens that guide you through drawing
a screen unlock pattern. You can set a PIN
or password instead of a pattern or leave
it as None.
When you turn on your phone or wake up
the screen, you're asked to draw your unlock
pattern to unlock the screen.
Set up SIM/RUIM card lock – Set up SIM/
RUIM card lock or change the SIM/RUIM PIN.
Visible passwords – Select to show
passwords as you type them or deselect to
hide passwords as you type them.
Select device administrators – Add one or
more administrators.
Use secure credentials – Allows you to
access secure certificates.
Install from SD card – Choose to install
encrypted certificates from your SD card.
Set password – Set or change the
credential storage password.
Clear storage – Clear credentials for all
content and reset password.
Applications
You can manage applications and set up
quick launch shortcuts.
Unknown sources – Default setting to
install non-Market applications.
Manage applications – Manage and
remove installed applications.
Running services – Check services that are
currently running.
Storage use – View storage used by
applications.
119
Page 23

Settings
Battery usage – See what has been using
the battery.
Development – Set options for application
development.
Accounts & sync
< General sync settings >
Background data – Permits applications to
synchronise data in the background, whether
or not you are actively working in them.
Deselecting this setting can save battery
power and lowers (but does not eliminate)
data usage.
120
Auto-sync – Permits applications to
synchronise, send and receive data to their
own schedule.
< Manage accounts >
List of all Google accounts and other
accounts you’ve added to your phone.
If you touch an account in this screen, its
account screen opens.
Privacy
If you select Factory data reset, it will erase
all of your personal data from the internal
phone storage, including information about
your Google account, any other accounts,
your system/application data and settings
as well as any downloaded applications and
DRM licence.
Resetting the phone does not erase
any system software updates you have
downloaded or any files on your microSD
card, such as music or photos. If you reset
the phone in this way, you are prompted to
re-enter the same information that you did
when you first started Android.
SD card & phone storage
< USB connection mode >
Mass storage only – Your phone can be
used as a mass storage device if you have
a memory card inserted. You can set Mass
storage only as a default setting of the USB
connection mode.
< SD card >
Check total available SD card space. Touch
Unmount SD Card for safe removal. Erase
SD Card if you want to delete all data from
the SD card.
121
Settings
< Internal storage >
Checks the available space.
Language & keyboard
Set local language and region as well as
keyboard settings.
Voice input & output
< Voice input >
Voice recogniser settings – Use the
Voice recogniser settings to configure the
Android voice input feature.
122
Language: Opens a screen where you
•
can set the language you use for speech
to enter text.
•
SafeSearch: Opens a dialog where you
can set whether you want the Google
SafeSearch filter to block some results.
•
Block offensive words: When deselected,
Google voice recognition will recognise
and transcribe words many people
consider offensive, when you use speech
to enter text. When selected, Google
voice recognition replaces those words
in transcriptions with a placeholder
comprised of hash symbols ( # ).
< Voice output >
Text-to-speech settings – Use the Text-
to-speech settings to configure the Android
text-to-speech synthesiser for applications
that can use this feature.
NOTE: if you don’t have speech synthesiser
data installed, only the Install voice data
setting is available.
Listen to an example: Plays a brief
•
sample of the speech synthesiser, using
your current settings.
Always use my settings: Tick to use the
•
settings on this screen in place of speech
synthesiser settings available in other
applications.
•
Default Engine: Opens a dialog where
you can set the text-to-speech application
you want to use, if you have more than
one installed.
•
Install voice data: If your phone does
not have speech synthesiser data
installed, this connects to Android Market
and guides you through the process
of downloading and installing the data.
123
Page 24

Settings
This setting is not available if the data is
already installed.
•
Speech rate: Opens a dialog where
you can select how quickly you want the
synthesiser to speak.
•
Language: Opens a dialog where you can
select the language of the text you want
the synthesiser to read. This is particularly
useful in combination with Always use
my settings to ensure that text is spoken
correctly in a variety of applications.
•
Pico TTS: Configure the Pico TTS
settings.
124
Accessibility
Use the Accessibility settings to configure
accessibility plug-ins you have installed on
your phone.
NOTE: requires additional plug-ins.
Date & time
Use Date & time settings to set your
preference for how dates are displayed. You
can also use these settings to set your own
time and time zone rather than obtaining the
current time from the mobile network.
About Phone
View legal information and check phone
status and software version.
125
Software update
Phone software update
LG Mobile phone software update from
the Internet
For more information about using this
function, please visit the http://update.
lgmobile.com or http://www.lg.com/
common/ index.jsp J select country and
language.
This feature allows you to update the
firmware on your phone to a newer version
conveniently from the Internet without
needing to visit a service centre. This feature
is only available if and when LG makes the
126
newer version of the firmware available for
your device.
As the mobile phone firmware update
requires the user’s full attention for the
duration of the update process, please make
sure you check all instructions and notes
that appear at each step before proceeding.
Please note that removing the USB data
cable or battery during the upgrade may
seriously damage your mobile phone.
NOTE: LG reserves the right to make
fi rmware updates available only for selected
models at its own discretion and does
not guarantee the availability of the newer
version of the fi rmware for all handset
models.
LG Mobile Phone software update via
Over-the-Air (OTA)
This feature allows you to update the
firmware of your phone to the newer version
conveniently via OTA without connecting the
USB data cable. This feature is only available
if and when LG makes the newer version of
the firmware available for your device.
First, you can check the software version
on your mobile phone: Settings > About
phone > Software update > Check now
for update.
You can also delay the update by 1 hour, 4
hours, 8 hours or 24 hours. In this case, the
application will notify you to update when the
time is up. You can also rearrange an update
manually.
NOTE: This feature is dependent on
the network service provider, region or
countries.
127
 Loading...