

LG DV288K-NS Owner's Manual

DVD PLAYER
OWNER’S MANUAL
MODEL : DV288K
Before connecting, operating or adjusting this product,
please read this instruction booklet carefully and completely.
DV288K-NS.HA1PLLB_ENG
2
This lightning flash with arrowhead symbol within
an equilateral triangle is intended to alert the user
to the presence of uninsulated dangerous voltage
within the product’s enclosure that may be of
sufficient magnitude to constitute a risk of electric
shock to persons.
The exclamation point within an equilateral
triangle is intended to alert the user to the
presence of important operating and maintenance
(servicing) instructions in the literature
accompanying the product.
WARNING : Do not install this equrpment in a confined
space such a bookcase or similar unit.
CAUTION:
Do not block any ventilation openings. Install in accordance
with the manufacturer's instructions.
Slots and openings in the cabinet are provided for ventilation
and to ensure reliable operation of the product and to protect
it from overheating.
The openings should be never be blocked by placing the
product on a bed, sofa, rug or other similar surface.This
product should not be placed in a built-in installation such as
a bookcase or rack unless proper ventilation is provided or
the manufacturer's instruction have been adhered to.
CAUTION:
This product employs a Laser System.
To ensure proper use of this product, please read this
owner’s manual carefully and retain it for future reference.
Should the unit require maintenance, contact an authorized
service center.
Performing controls, adjustments, or carrying out procedures
other than those specified herein may result in hazardous
radiation exposure.
To prevent direct exposure to laser beam, do not try to open
the enclosure. Visible laser radiation when open. DO NOT
STARE INTO BEAM.
CAUTION: The apparatus should not be exposed to water
(dripping or splashing) and no objects filled with liquids, such
as vases, should be placed on the apparatus.
CAUTION concerning the Power Cord
Most appliances recommend they be placed upon a
dedicated circuit;
That is, a single outlet circuit which powers only that
appliance and has no additional outlets or branch circuits.
Check the specification page of this owner's manual to be
certain.
Do not overload wall outlets. Overloaded wall outlets, loose
or damaged wall outlets, extension cords, frayed power
cords, or damaged or cracked wire insulation are dangerous.
Any of these conditions could result in electric shock or fire.
Periodically examine the cord of your appliance, and if its
appearance indicates damage or deterioration, unplug it,
discontinue use of the appliance, and have the cord replaced
with an exact replacement part by an authorized servicer.
Protect the power cord from physical or mechanical abuse,
such as being twisted, kinked, pinched, closed in a door, or
walked upon. Pay particular attention to plugs, wall outlets,
and the point where the cord exits the appliance.
To disconnect power from the mains, pull out the mains cord
plug. When installing the product, ensure that the plug is
easily accessible.
CAUTION
RISK OF ELECTRIC SHOCK
DO NOT OPEN
WARNING: TO PREVENT FIRE OR ELECTRIC SHOCK
HAZARD, DO NOT EXPOSE THIS PRODUCT TO RAIN
OR MOISTURE.
CAUTION: TO REDUCE THE RISK
OF ELECTRIC SHOCK
DO NOT REMOVE COVER (OR BACK)
NO USER-SERVICEABLE PARTS INSIDE
REFER SERVICING TO QUALIFIED SERVICE
PERSONNEL
.

3
1. Read these instructions. - All these safety and operating
instructions should be read before the product is operated.
2. Keep these instructions. - The safety, operating and use
instructions should be retained for future reference.
3. Heed all warnings. - All warnings on the product and in
the operating instructions should be adhered to.
4. Follow all instructions. - All operating and use
instructions should be followed.
5. Do not use this apparatus near water. – For example:
near a bath tub, wash bowl, kitchen sink, laundry tub, in a
wet basement; or near a swimming pool; and other areas
located near water.
6. Clean only with dry cloth. – Unplug this product from the
wall outlet before cleaning. Do not use liquid cleaners.
7.
Do not block any ventilation openings. Install in
accordance with the manufacturer’s instructions. -
Slots
and openings in the cabinet are provided for ventilation
and to ensure reliable operation of the product and to
protect it from over- heating. The openings should never
be blocked by placing the product on a bed, sofa, rug or
other similar surface. This product should not be placed in
a built-in installation such as a bookcase or rack unless
proper ventilation is provided or the manufacturer’s
instructions have been adhered to.
8. Do not install near any heat sources such as
radiators, heat registers, stoves, or other apparatus
(including amplifiers) that produce heat.
9. D
o not defeat the safety purpose of the polarized or
grounding-type plug. A polarized plug has two
blades
with one wider than the other. A grounding
type plug
has two blades and a third grounding prong. The wide
blade or the third prong are provided for your safety. If
the provided plug does not fit into your outlet, consult
an electrician for replacement of the obsolete outlet.
10. Protect the power cord from being walked on or
pinched particularly at plugs, convenience
receptacles, and the point where they exit from the
apparatus.
11. Only use attachments/accessories specified by the
manufacturer.
12. Use only with the cart, stand, tripod, bracket, or table
specified by the manufacturer, or sold with
apparatus. When a cart is used, use caution when
moving the cart/product combination to avoid injury
from tip-over.
13. Unplug this apparatus during lightning storms or
when unused for long periods of time.
14.
Refer all servicing to qualified service personnel.
Servicing is required when the product has been
damaged in any way, such as power-supply cord or
plug is damaged, liquid has been spilled or objects
have fallen into the apparatus, the product has been
exposed to rain or moisture, does not operate
normally, or has been dropped.
IMPORTANT SAFETY INSTRUCTIONS
CAUTION:
PLEASE READ AND OBSERVE ALL WARNINGS AND INSTRUCTIONS IN THIS OWNER’S MANUAL. AND
THOSE MARKED ON THE PRODUCT. RETAIN THIS BOOKLET FOR FUTURE REFERENCE.
This product has been designed and manufactured to assure personal safety. Improper use can result in electric shock or
fire hazard. The safeguards incorporated in this product will protect you if you observe the following procedures for
installation, use, and servicing.
This product does not contain any parts that can be repaired by the user.
DO NOT REMOVE THE CABINET COVER, OR YOU MAY BE EXPOSED TO DANGEROUS VOLTAGE. REFER
SERVICING TO QUALIFIED SERVICE PERSONNEL ONLY.

4
Introduction . . . . . . . . . . . . . . . . . .5-8
About the Symbol Display . . . . . . . . . . . .5
Symbol used in this Manual . . . . . . . . . . . . . .5
Notes on Discs . . . . . . . . . . . . . . . . . . . . . . . .5
Handling Discs . . . . . . . . . . . . . . . . . . . . . .5
Storing Discs . . . . . . . . . . . . . . . . . . . . . . . .5
Cleaning Discs . . . . . . . . . . . . . . . . . . . . . .5
Types of Playable Discs . . . . . . . . . . . . . . . . .6
Regional Code . . . . . . . . . . . . . . . . . . . . . . . .6
Front Panel . . . . . . . . . . . . . . . . . . . . . . . . . . .7
Remote Control . . . . . . . . . . . . . . . . . . . . . . . .8
Remote Control Operation . . . . . . . . . . . . . .8
Remote Control Battery Installation . . . . . . .8
Installation and Setup . . . . . . . . .9-14
Setting up the Player . . . . . . . . . . . . . . . . . . .9
DVD Player Connections . . . . . . . . . . . . . . . .9
Video and Audio Connections to Your TV . . .9
Audio Connection to Optional Equipment . .10
Displaying Disc Information on-screen . . . .11
Initial Settings . . . . . . . . . . . . . . . . . . . . . . . .11
General Operation . . . . . . . . . . . . . . . . . . .11
LANGUAGE . . . . . . . . . . . . . . . . . . . . . . .12
• Menu Language . . . . . . . . . . . . . . . . . . .12
• Disc Audio / Subtitle / Menu . . . . . . . . .12
DISPLAY . . . . . . . . . . . . . . . . . . . . . . . . . .12
• TV Aspect . . . . . . . . . . . . . . . . . . . . . . .12
• Display Mode . . . . . . . . . . . . . . . . . . . . .12
• Progressive Scan . . . . . . . . . . . . . . . . . .12
AUDIO . . . . . . . . . . . . . . . . . . . . . . . . . . .13
• Dolby Digital / DTS / MPEG . . . . . . . . . .13
• Sample Freq. (Frequency) . . . . . . . . . . . .13
• Dynamic Range Control (DRC) . . . . . . .13
LOCK (Parental Control) . . . . . . . . . . . . . .13
• Rating . . . . . . . . . . . . . . . . . . . . . . . . . .13
• Password . . . . . . . . . . . . . . . . . . . . . . . .13
• Area Code . . . . . . . . . . . . . . . . . . . . . . .14
OTHERS . . . . . . . . . . . . . . . . . . . . . . . . . .14
• PBC . . . . . . . . . . . . . . . . . . . . . . . . . . . .14
• B.L.E. (Black Level Expansion) . . . . . . .14
• DivX(R) VOD . . . . . . . . . . . . . . . . . . . . .14
• Score . . . . . . . . . . . . . . . . . . . . . . . . . . .14
Operations . . . . . . . . . . . . . . . . .15-21
General Features . . . . . . . . . . . . . . . . . . . . .15
Additional Features . . . . . . . . . . . . . . . . . . .16
Playing an Audio CD or MP3/WMA file . . . . .17
Programmed Playback . . . . . . . . . . . . . . . .17
Repeat Programmed Tracks . . . . . . . . . . .17
Erasing a Track from Program List . . . . . .17
Erasing the Complete Program List . . . . . .17
Viewing a JPEG file . . . . . . . . . . . . . . . . . . .18
Slide Show . . . . . . . . . . . . . . . . . . . . . . . .18
Still Picture . . . . . . . . . . . . . . . . . . . . . . . . .18
Moving to another File . . . . . . . . . . . . . . . .18
Zoom . . . . . . . . . . . . . . . . . . . . . . . . . . . . .18
Rotating the picture . . . . . . . . . . . . . . . . . .18
To listen to MP3/WMA music while
watching picture . . . . . . . . . . . . . . . . . . . .18
Playing a DivX Movie file . . . . . . . . . . . . . . .19
Playing a DVD VR format Disc . . . . . . . . . . .20
Playing an USB . . . . . . . . . . . . . . . . . . . . . . .20
Using the Karaoke Function . . . . . . . . . . . . .21
Reference . . . . . . . . . . . . . . . . . .22-24
Controlling other TVs with the remote control
. . . .
22
Maintenance and Service . . . . . . . . . . . . . . . .22
Language Codes . . . . . . . . . . . . . . . . . . . . . . .23
Area Codes . . . . . . . . . . . . . . . . . . . . . . . . . . .23
Troubleshooting . . . . . . . . . . . . . . . . . . . . . . .24
Specifications . . . . . . . . . . . . . . . . . . . . . . . . .24
Contents

Operation Reference
Installation and Setup
Introduction
5
To ensure proper use of this product, please read this
owner’s manual carefully and retain it for future
reference.
This manual provides information on the operation
and maintenance of your DVD player. Should the unit
require service, contact an authorized service location.
About the Symbol Display
“ ” may appear on your TV display during
operation and indicates that the function explained in
this owner’s manual is not available on that specific
DVD video disc.
Symbol Used in this Manual
Note:
Indicates special notes and operating features.
Tip:
Indicates tips and hints for making the task easier.
A section whose title has one of the following symbols
is applicable only to the disc represented by the
symbol.
All discs listed below
DVD and finalized DVD±R/RW
Video CDs
Audio CDs
MP3 files
WMA files
DivX files
CD-G Discs
Notes on Discs
Handling Discs
Do not touch the playback side of the disc. Hold the
disc by the edges so that fingerprints do not get on
the surface. Never stick paper or tape on the disc.
Storing Discs
After playing, store the disc in its case. Do not expose
the disc to direct sunlight or sources of heat and never
leave it in a parked car exposed to direct sunlight.
Cleaning Discs
Fingerprints and dust on the disc can cause poor
picture quality and sound distortion. Before playing,
clean the disc with a clean cloth. Wipe the disc from
the center out.
Do not use strong solvents such as alcohol, benzine,
thinner, commercially available cleaners, or anti-static
spray intended for older vinyl records.
CD-G
DivX
WMA
MP3
ACD
VCD
DVD
ALL
Introduction
6
Types of Playable Discs
DVD
(8 cm / 12 cm disc)
Video CD (VCD/SVCD)
(8 cm / 12 cm disc)
Audio CD
(8 cm / 12 cm disc)
In addition, this unit plays DVD±R/RW and CD-R/RW,
Dual disc that contains audio titles, DivX, MP3, WMA,
CD-G, and/or JPEG files.
This indicates a product feature that is
capable of playing DVD-RW discs
recorded with Video Recording format.
Notes:
• Depending on the conditions of the recording
equipment or the CD-R/RW (or DVD±R/RW) disc
itself, some CD-R/RW (or DVD±R/RW) discs may
not be played on the unit.
• Do not use irregularly shaped CDs (e.g., heartshaped or octagonal) since they may result in
malfunctions.
• This unit requires discs and recordings to meet
certain technical standards in order to achieve
optimal playback quality. Pre-recorded DVDs are
automatically set to these standards. There are
many different types of recordable disc formats
(including CD-R containing MP3 or WMA files) and
these require certain pre-existing conditions (see
above) to ensure compatible playback.
Customers should note that permission is
required in order to download MP3 / WMA files
and music from the Internet. Our company has
no right to grant such permission. Permission
should always be sought from the copyright
owner.
Regional Code
This unit has a regional code printed on the rear of the
unit. This unit can play only DVD discs labelled as the
same as the rear of the unit or “ALL”.
Notes on Regional Codes
• Most DVD discs have a globe with one or more
numbers in it clearly visible on the cover. This
number must match your DVD player’s regional
code or the disc cannot play.
• If you try to play a DVD with a different regional
code from your player, the message “Check
Regional Code” appears on the TV screen.
Notes on Copyrights:
It is forbidden by law to copy, broadcast, show,
broadcast via cable, play in public, or rent copyrighted
material without permission. This product features the
copy protection function developed by Macrovision.
Copy protection signals are recorded on some discs.
When recording and playing the pictures of these
discs picture noise will appear. This product
incorporates copyright protection technology that is
protected by method claims of certain U.S. patents
and other intellectual property rights owned by
Macrovision Corporation and other rights owners. The
use of this copyright protection technology must be
authorized by Macrovision Corporation, and is
intended for home and other limited viewing uses only
unless otherwise authorized by Macrovision
Corporation. Reverse engineering or disassembly is
prohibited.
CONSUMERS SHOULD NOTE THAT NOT ALL HIGH
DEFINITION TELEVISION SETS ARE FULLY
COMPATIBLE WITH THIS PRODUCT AND MAY
CAUSE ARTIFACTS TO BE DISPLAYED IN THE
PICTURE. IN CASE OF 525 PROGRESSIVE SCAN
PICTURE PROBLEMS, IT IS RECOMMENDED THAT
THE USER SWITCH THE CONNECTION TO THE
‘STANDARD DEFINITION’ OUTPUT. IF THERE ARE
QUESTIONS REGARDING OUR TV SET
COMPATIBILITY WITH THIS MODEL 525p DVD
PLAYER, PLEASE CONTACT OUR CUSTOMER
SERVICE CENTER.
7
Introduction
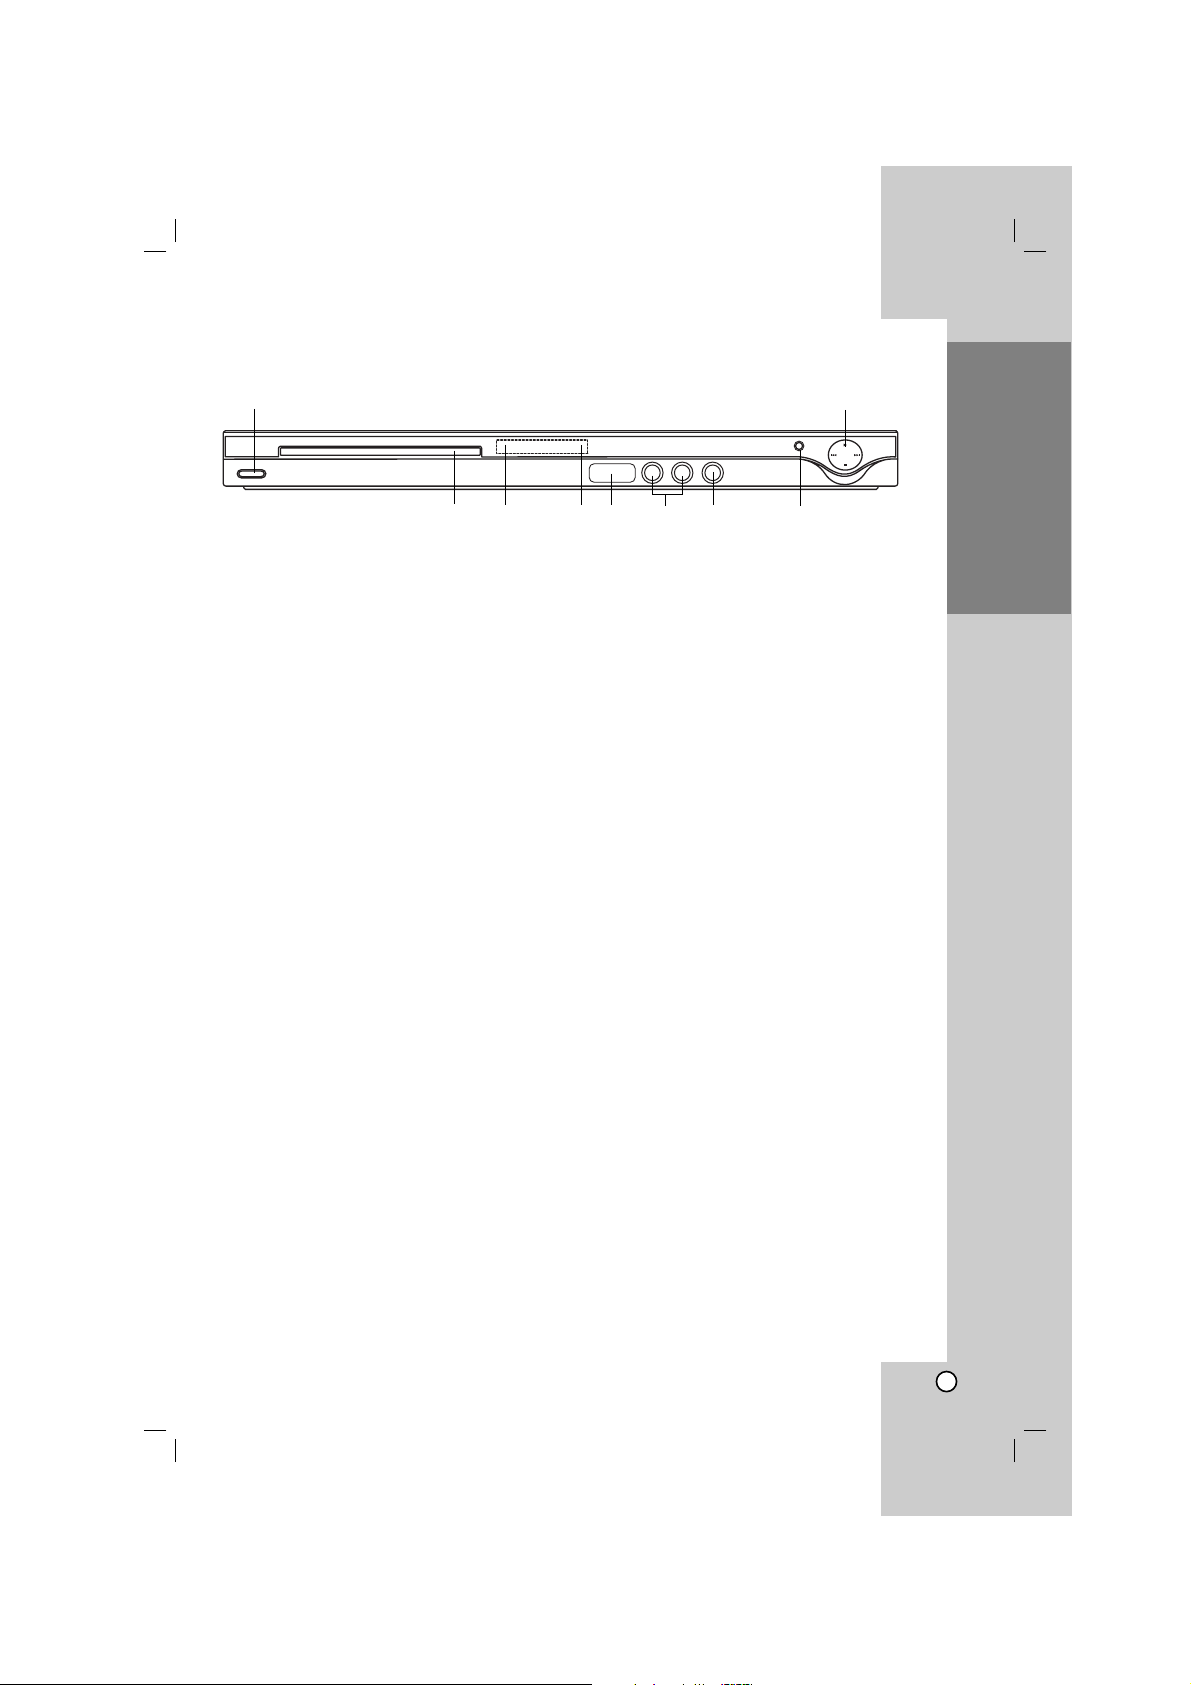
Front Panel
a b
cd ef gh i
a POWER
Switches the unit ON or OFF.
b • N (PLAY)
Starts playback.
• x (STOP)
Stops playback.
• . (SKIP)
Returns to the beginning of current chapter or
track or go to the previous chapter or track.
• > (SKIP)
Go to the next chapter or track.
c Disc Tray
Insert a disc here.
d Remote Sensor
Point the remote control here.
e Display window
Shows the current status of the unit.
f USB
Insert a USB.
g Microphone jack(s)
Connect a microphone(s) to the MIC socket(s).
h Microphone volume control
Adjusts microphone volume.
i Z (OPEN / CLOSE)
Opens or closes the disc tray.
8
Remote Control
Remote Control Operation
Point the remote control at the remote sensor and
press the buttons.
Caution:
Do not mix old and new batteries and never mix
different types of batteries such as standard, alkaline,
etc.
Remote Control Battery installation
Detach the battery cover on the rear of the
remote control, and insert two batteries
(size AAA) with 3 and # aligned correctly.
POWER
Switches DVD Player ON or OFF
OPEN/CLOSE (Z)
Opens and closes the disc tray.
0-9 numerical buttons
Selects numbered options in a
menu.
CLEAR
Removes a track number on the
Program List or a mark on the
Marker Search menu.
TV Control Buttons
POWER: Turns the TV on or off.
AV: Selects the TV’s source.
PR/CH +/–: Selects TV’s channel.
VOL +/–: Adjusts TV’s volume.
AUDIO
Selects an audio language or an
audio channel.
SUBTITLE
Selects a subtitle language.
ANGLE
Selects a DVD camera angle, if
available.
SETUP
Accesses or removes the Setup
menu.MARKER
Marks any point during playback.
SEARCH
Displays MARKER SEARCH menu.
PROGRAM
Enter the program edit mode.
ZOOM
Enlarges video image.
REPEAT
Repeat chapter, track, title, all.
A-B
Repeat sequence from point A to
point B.
RANDOM
Plays tracks in random order.
KARAOKE (ECHO)
Accesses or removes KARAOKE menu.
SCAN (m / M)
Search backward or forward.
SKIP (. / >)
Go to the next chapter or track.
Returns to the beginning of current
chapter or track or go to the
previous chapter or track.
PAUSE / STEP ( X )
Pauses playback temporarily/ press
repeatedly for frame-by-frame
playback.
PLAY (N)
Starts playback.
STOP (x)
Stops playback.
DVD MENU
Accesses menu on a DVD disc.
TITLE
Displays Title menu, if available.
b / B / v / V (left/right/up/down)
Selects an option in the menu.
ENTER
Confirms menu selection.
DISPLAY
Accesses On-Screen Display.
RETURN (O)
Removes the menu.
Displays the menu of a video CD
with PBC.
Change to USB mode.
9
Introduction
Setting up the Player
The picture and sound of a nearby TV, VCR, or radio
may be distorted during playback. If this occurs,
position the player away from the TV, VCR, or radio,
or turn off the unit after removing the disc.
DVD Player Connections
Depending on your TV and other equipment there are
various ways you can connect the player. Please refer
to the manuals of your TV, stereo system or other
devices as necessary for additional connection
information.
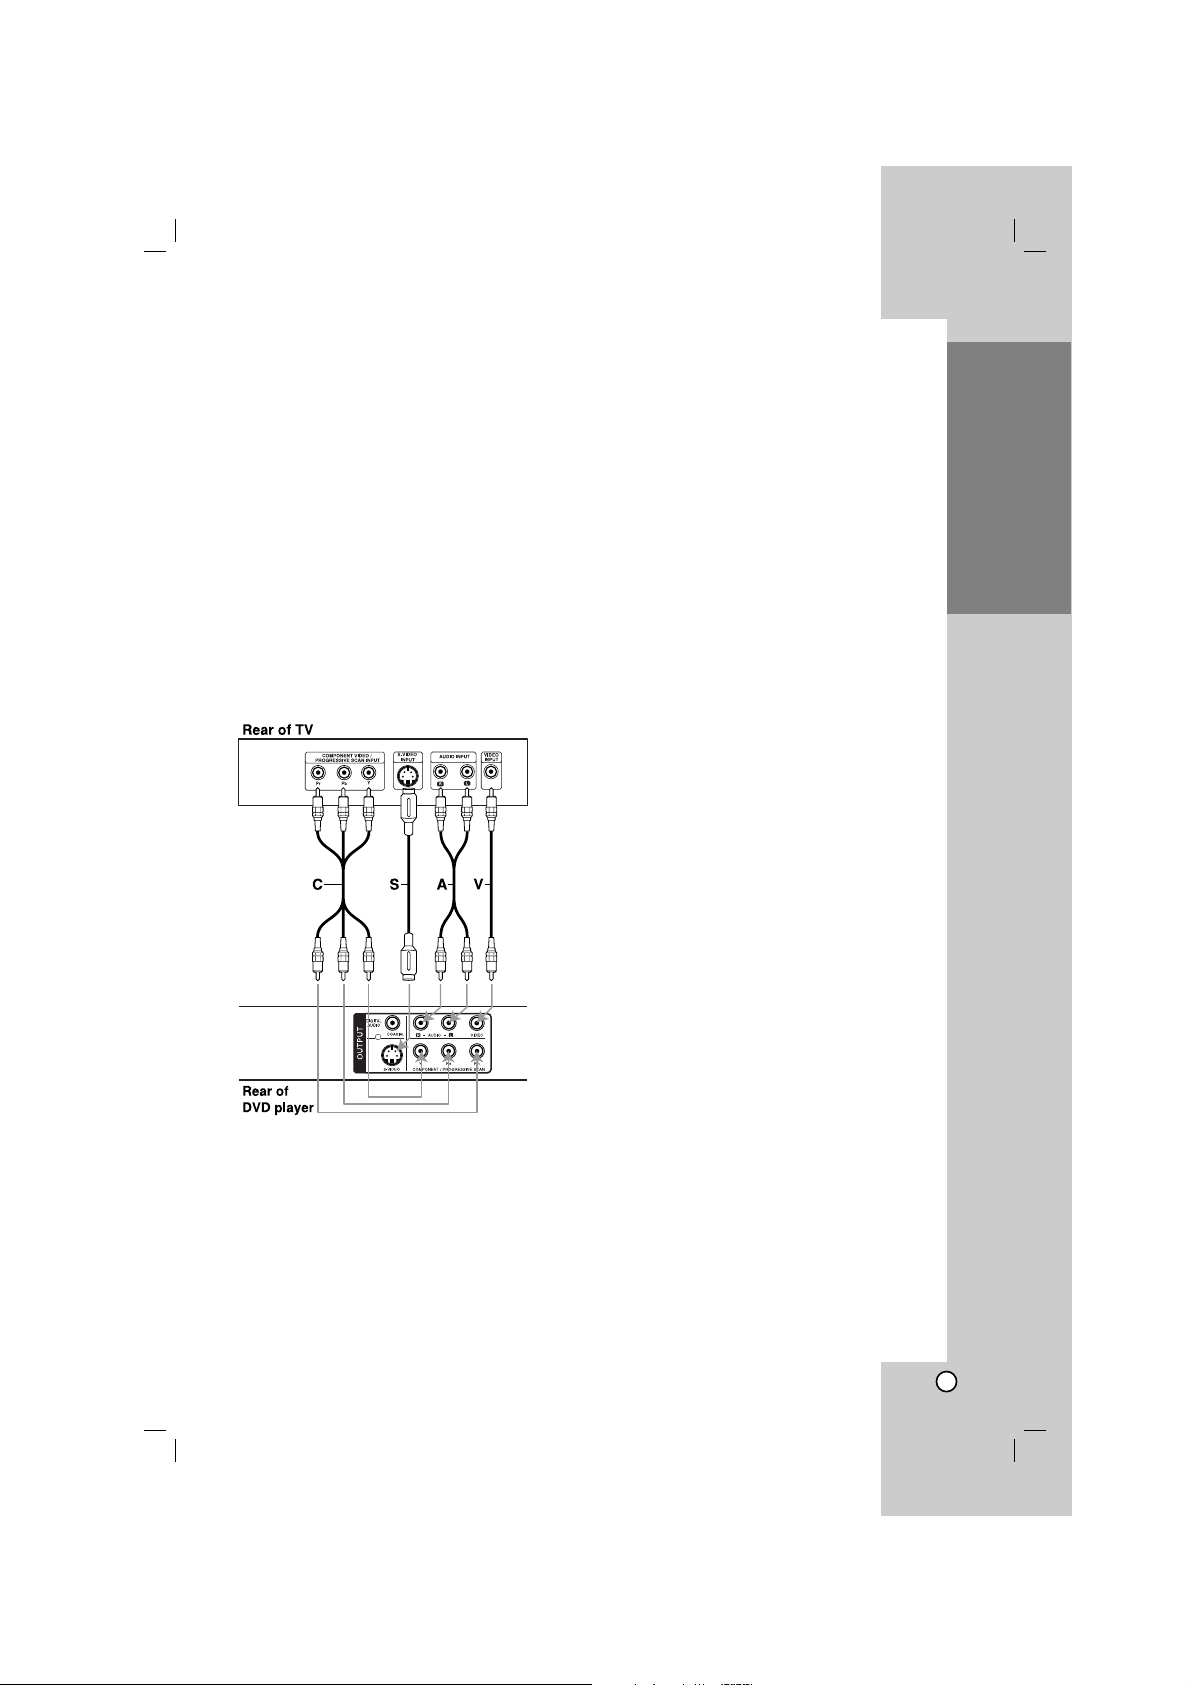
Video and Audio Connections
to Your TV
Make sure the unit is connected directly to the TV and
not to a VCR, otherwise the DVD image could be
distorted by the copy protection system.
Video – Connect the VIDEO OUT jack on the unit
to the video in jack on the TV using the video
cable (V).
S-Video: Connect the S-VIDEO OUT jack on the
DVD Player to the S-Video in jack on the TV using
the S-Video cable (S).
Audio – Connect the left and right AUDIO OUT
jacks of the unit to the audio left and right IN jacks
on the TV using the audio cables (A).
Do not connect the unit’s AUDIO OUT jack to the
phone in jack (record deck) of your audio system.
Component Video – Connect the COMPONENT
/PROGRESSIVE SCAN jacks on the unit to the
corresponding jacks on the TV using an Y P
B PR
cable (C).
Progressive Scan
• If your television is a high-definition or “digital
ready” television, you may take advantage of
the DVD player’s progressive scan output for
the highest possible video resolution.
• Set the Progressive Scan to “On” on the setup
menu for progressive scan signal.
(Refer to page 12)
• Progressive scan does not work with the
analog video connections (yellow VIDEO OUT
jack).
Installation and Setup
10
Audio Connection to Optional
Equipment
Connect the DVD player to your optional equipment
for audio output.
Amplifier equipped with 2-channel analog stereo
or Dolby Pro Logic ll / Pro Logic: Connect the left
and right AUDIO OUT jacks on the DVD player to the
audio left and right IN jacks on your amplifier,
receiver, or stereo system, using the audio cables (A).
Amplifier equipped with 2-channel digital stereo
(PCM) or audio / video receiver equipped with a
multi-channel decoder (Dolby Digital™, MPEG 2,
or DTS): Connect one of the DVD Player’s DIGITAL
AUDIO OUT jacks ( COAXIAL X) to the corresponding
jack on your amplifier. Use an optional digital
(COAXIAL X) audio cable.
Digital Multi-channel sound
A digital multi-channel connection provides the best
sound quality. For this you need a multi-channel audio
/ video receiver that supports one or more of the
audio formats supported by your DVD player such as
MPEG 2, Dolby Digital and DTS. Check the receiver
manual and the logos on the front of the receiver.
Notes:
• If the audio format of the digital output does not match
the capabilities of your receiver, the receiver produces
a strong, distorted sound or no sound at all.
• Six Channel Digital Surround Sound via a digital
connection can only be obtained if your receiver is
equipped with a Digital Multi-channel decoder.
Manufactured under license from Dolby
Laboratories. “Dolby”, “Pro Logic”, and
the double-D symbol are trademarks of
Dolby Laboratories.
DTS and DTS Digital Out are trademarks
of Digital Theater Systems, Inc.
R
L
AUDIO INPUTDIGITAL INPUT
COAXIAL
Amplifier (Receiver)
Rear of DVD player
AX
11
Installation and Setup
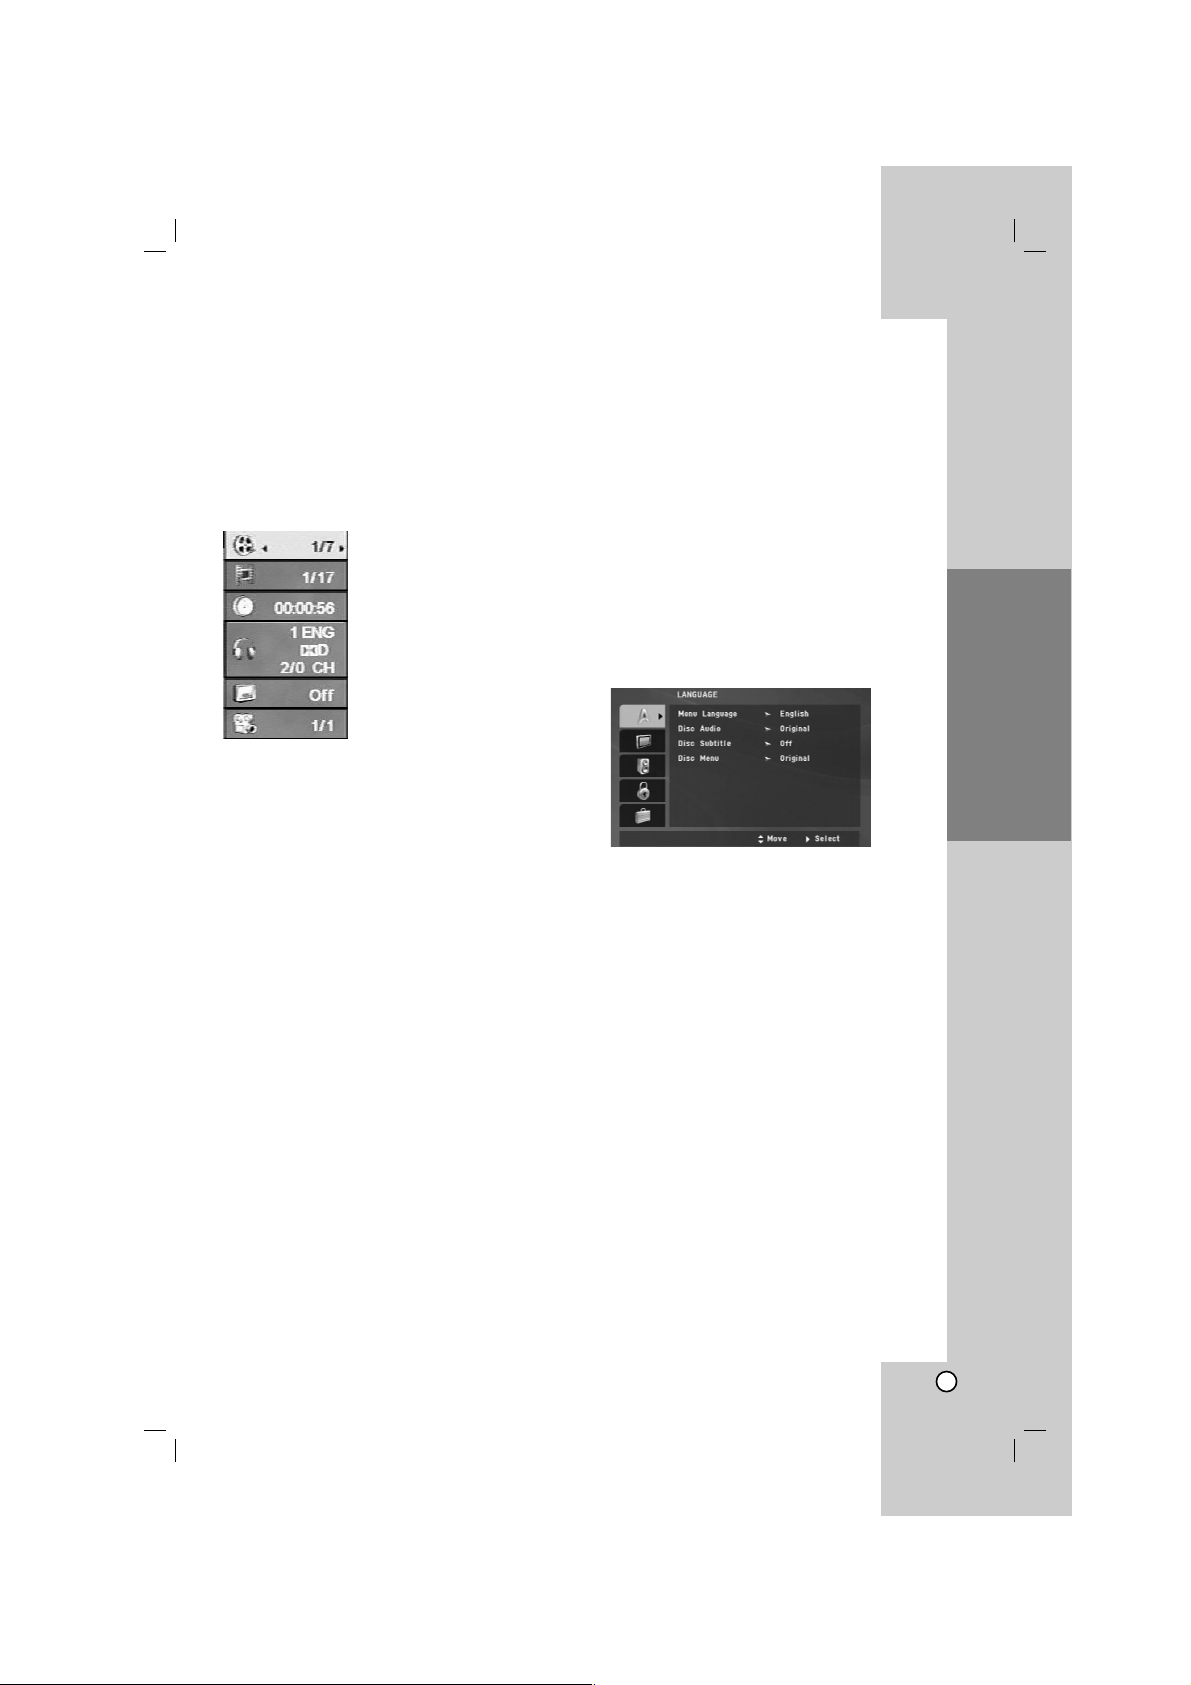
Displaying Disc Information
on-screen
You can display various information about the disc
loaded on-screen.
1. Press DISPLAY to show various playback
information.
The displayed items differ depending on the disc
type or playing status.
2. You can select an item by pressing v / V and
change or select the setting by pressing b / B.
Title (Track) – Current title (or track)
number/total number of titles (or tracks)
Chapter – Current chapter number/total number
of chapters
Time – Elapsed playing time
Audio – Selected audio language or channel
Subtitle – Selected subtitle
Angle – Selected angle/total number of angles
Notes:
• If any button is not pressed for a few seconds, the
on-screen display disappears.
• If a CD-G disc is inserted, SETUP operation is
available only when the CD-G menu on the TV
screen.
Initial Settings
By using the Setup menu, you can make various
adjustments to items such as picture and sound. You
can also set a language for the subtitles and the
Setup menu, among other things. For details on each
Setup menu item, see the pages 12 to 14.
To display and exit the Menu :
Press SETUP to display the menu. A second press of
SETUP will take you back to initial screen.
To go to the next level :
Press B on the remote control.
To go back to the previous level :
Press b on the remote control.
General Operation
1. Press SETUP. The Setup menu appears.
2. Use v / V to select the desired option then press
B to move to the second level. The screen shows
the current setting for the selected item, as well as
alternate setting(s).
3. Use v / V to select the second desired option and
then press B to move to the third level.
4. Use v / V to select the desired setting then press
ENTER to confirm your selection. Some items
require additional steps.
5. Press SETUP or PLAY to exit the Setup menu.
12
LANGUAGE
Menu Language
Select a language for the Setup menu and then onscreen display.
Disc Audio / Subtitle / Menu
Select the language you prefer for the audio track
(disc audio), subtitles, and the disc menu.
Original – Refers to the original language in which
the disc was recorded.
Other – To select another language, press
numeric buttons and then ENTER to enter the
corresponding 4-digit number according to the
language code list on the page 23. If you enter the
wrong language code, press CLEAR.
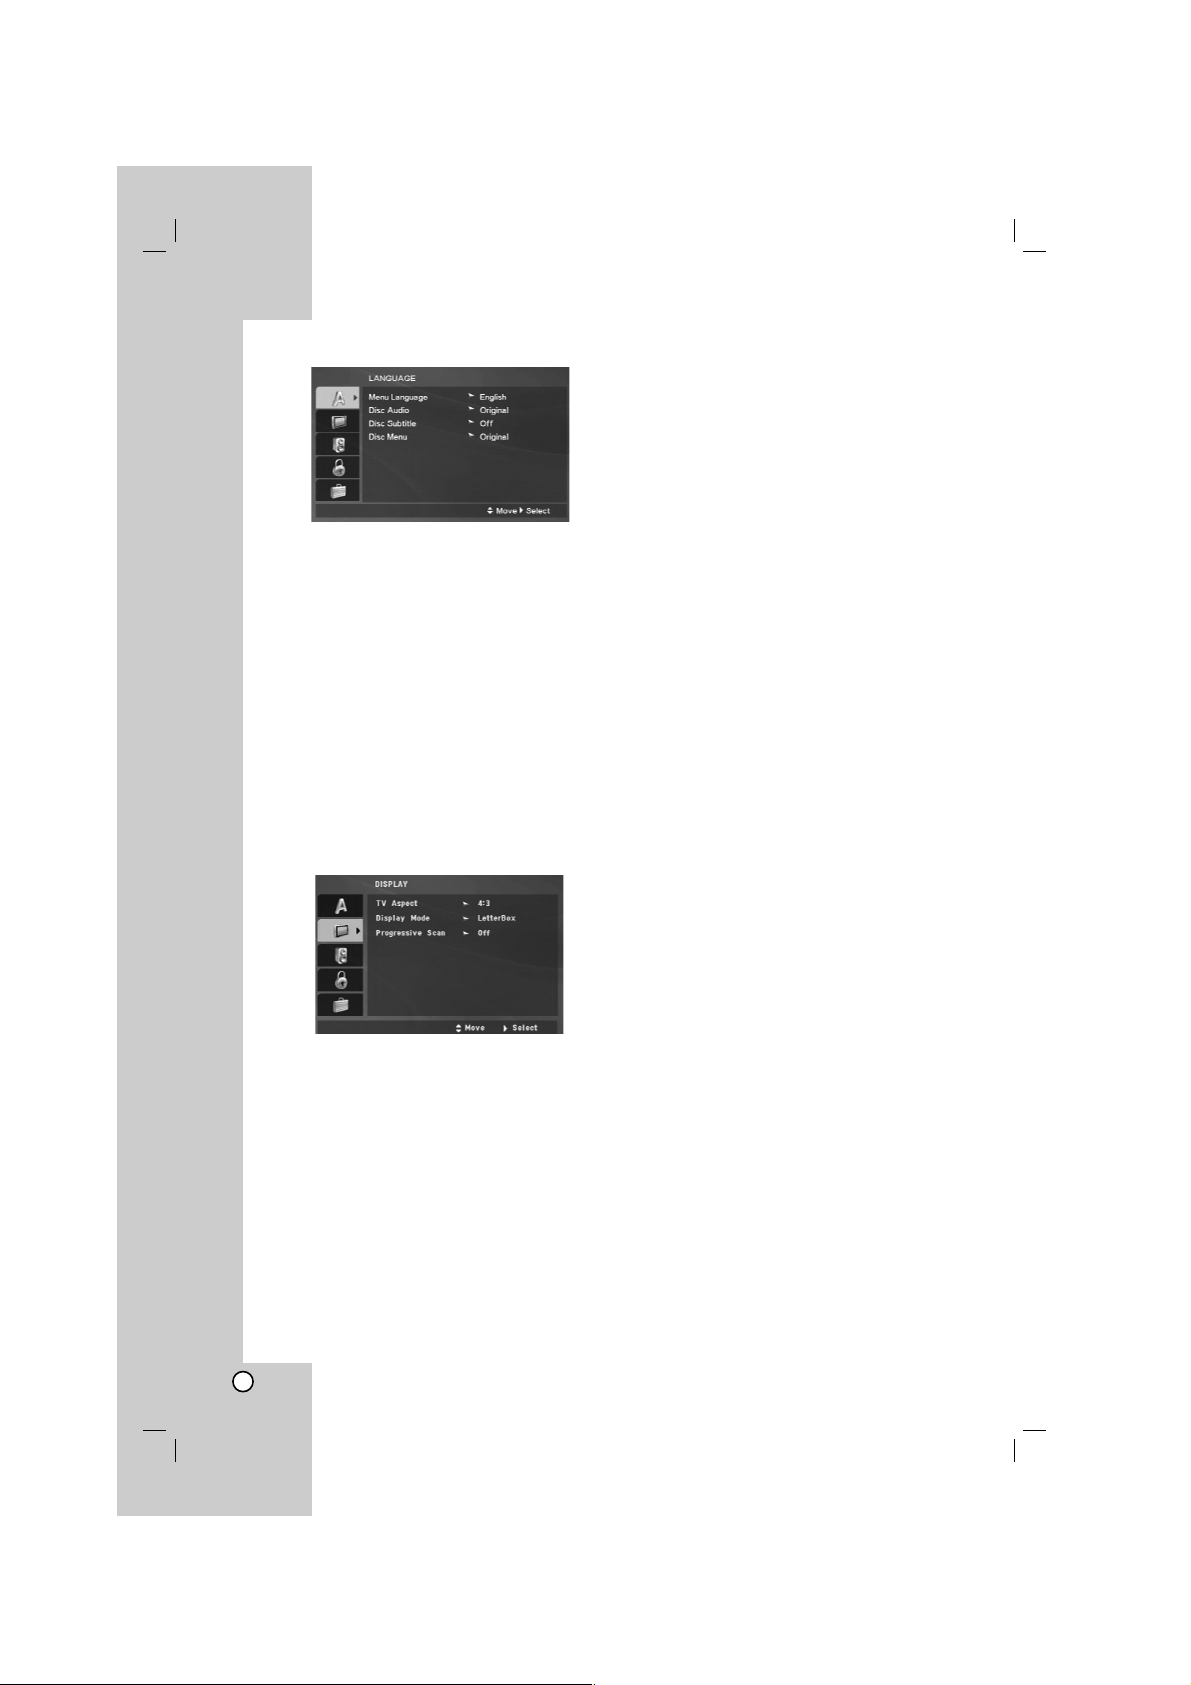
DISPLAY
TV Aspect
4:3 – Select when a standard 4:3 TV is connected.
16:9 – Select when a 16:9 wide TV is connected.
Display Mode
The Display Mode setting works only when the TV
Aspect mode is set to “4:3”.
Letterbox – Displays a wide picture with bands on
the upper and lower portions of the screen.
Panscan – Automatically displays the wide picture
on the entire screen and cuts off the portions that
do not fit.
Progressive Scan
Progressive Scan Video provides the highest quality
pictures with less flickering.
If you are using the Component Video jacks for
connection to a TV or a monitor that is compatible
with a progressive scan signal, set Progressive Scan
to On.
To Turn ON progressive scan:
Connect component video out of this unit to the input
of your TV or monitor, set your TV or monitor to
Component Input.
1. Select “Progressive Scan” on the DISPLAY menu
then press B.
2. Select “On” using the v / V buttons.
3. Press ENTER to confirm your selection.
The confirm menu will appear.
4. When the confirm menu appears on your screen
Cancel is highlighted as default. Use the b / B
buttons to highlight Enter.
5. Pressing ENTER will set the player to Progressive
scan mode.
Caution:
Once the setting for progressive scan output is
entered, an image will only be visible on a progressive
scan compatible TV or monitor. If you set Progressive
Scan to On in error, you must reset the unit.
First, remove the disc in the DVD Player.
Next, press STOP ( x ) and hold it for five seconds
before releasing it. The video output will be restored
to the standard setting, and a picture will once again
be visible on a conventional analog TV or monitor.
13
Installation and Setup
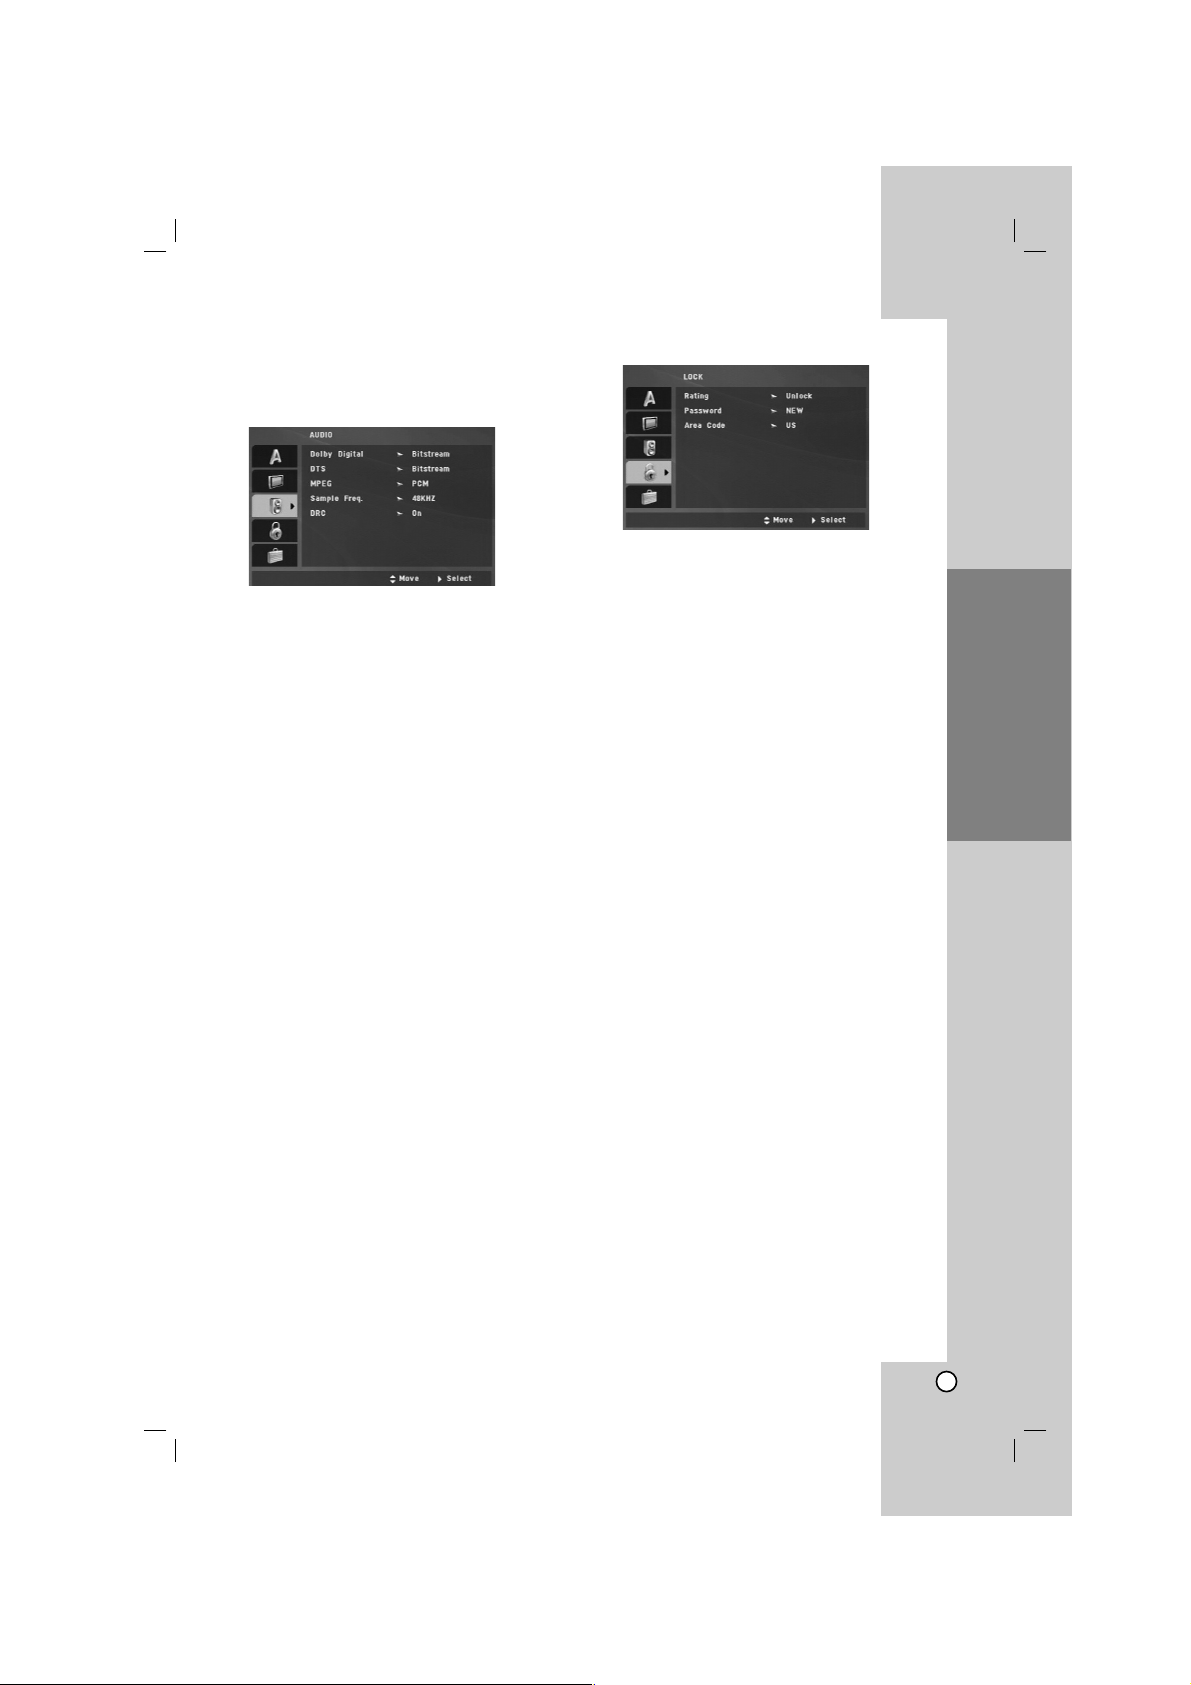
AUDIO
Each DVD disc has a variety of audio output options.
Set the player’s AUDIO options according to the type
of audio system you use.
Dolby Digital / DTS / MPEG
Bitstream – Select “Bitstream” if you connect this
DVD player’s DIGITAL OUT jack to an amplifier or
other equipment with a Dolby Digital, DTS or
MPEG decoder.
PCM (for Dolby Digital / MPEG) – Select when
connected to a two-channel digital stereo amplifier.
DVDs encoded in Dolby Digital or MPEG will be
automatically downmixed to two-channel PCM
audio.
Off (for DTS): If you select “Off”, the DTS signal is
not output through the DIGITAL OUT jack.
Sample Freq. (Frequency)
If your receiver or amplifier is NOT capable of
handling 96 kHz signals, select 48 kHz. When this
choice is made, this unit automatically converts any
96 kHz signals to 48 kHz so your system can decode
them.
If your receiver or amplifier is capable of handling 96
kHz signals, select 96 kHz.
Check the documentation for your amplifier to verify
its capabilities.
Dynamic Range Control (DRC)
With the DVD format, you can hear a program’s
soundtrack in the most accurate and realistic
presentation. However, you may wish to compress the
dynamic range of the audio output (the difference
between the loudest sounds and the quietest ones).
This allows you to listen to a movie at a lower volume
without losing clarity of sound. Set DRC to On for this
effect.
LOCK (Parental Control)
Rating
Blocks playback of rated DVDs based on their
contents. Not all discs are rated.
1. Select “Rating” on the LOCK menu then
press B.
2. To access the LOCK options, you must input the
password you have created. If you have not yet
entered password, you are prompted to do so.
Input a password and press ENTER. Enter it again
and press ENTER to verify. If you make a mistake
before pressing ENTER, press CLEAR.
3. Select a rating from 1 to 8 using the v / V buttons.
Rating 1-8: Rating one (1) has the most
restrictions and rating eight (8) is the least
restrictive.
Unlock
If you select unlock, parental control is not active
and the disc plays in full.
4. Press ENTER to confirm your rating selection, then
press SETUP to exit the menu.
Password
You can enter or change password.
1. Select Password on the LOCK menu and then
press B.
2. To make a new password:
Press ENTER when the “New” option is
highlighted. Enter a new password using the
numerical buttons then press ENTER. Enter the
password again to verify.
To change the password:
Press ENTER when the “Change” option is
highlighted. Enter a current password using the
numbered buttons then press ENTER. Enter a new
password using the numbered buttons then press
ENTER. Enter the password again to verify.
3. Press SETUP to exit the menu.
14
If you forget your password
If you forget your password, you can clear it using the
following steps:
1. Press SETUP to display the Setup menu.
2. Input the 6-digit number “210499” and the security
code is cleared.
Area Code
Enter the code of the area whose standards were
used to rate the DVD video disc, based on the list on
page 23.
1. Select “Area Code” on the LOCK menu then
press B.
2. Follow the step 2 as shown previous page
(Rating).
3. Select the first character using v / V buttons.
4. Press ENTER and select the second character
using v / V buttons.
5. Press ENTER to confirm your Area code selection.
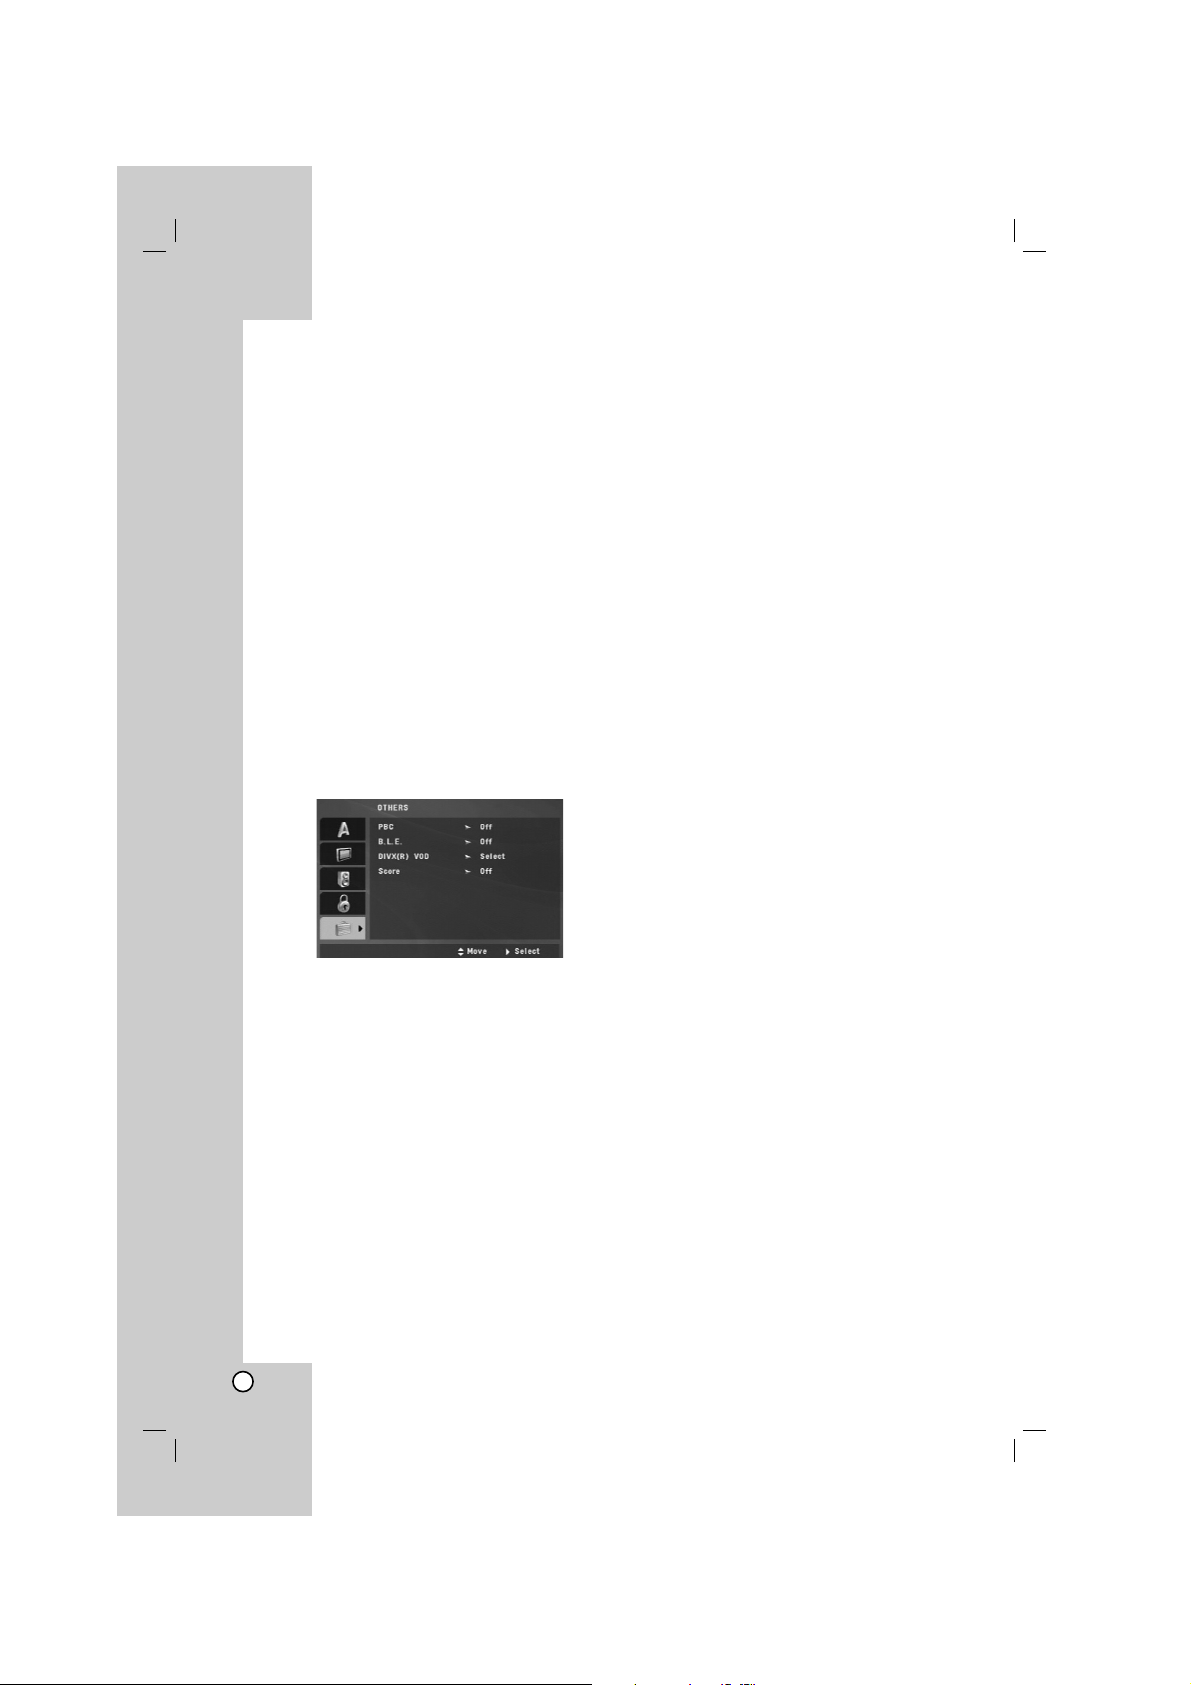
OTHERS
PBC
Set Playback Control (PBC) to On or Off.
On: Video CDs with PBC are played according to
the PBC.
Off: Video CDs with PBC are played in the same
way as Audio CDs.
B.L.E. (Black Level Expansion)
To select the black level of playback pictures. Set your
preference and monitor’s ability.
On: Expanded grey scale. (0 IRE cut off)
Off: Standard grey scale. (7.5 IRE cut off)
DivX(R) VOD
We provide you the DivX
®
VOD (Video On Demand)
registration code that allows you to rent and purchase
videos based on the DivX
®
VOD service. For more
information, visit www.divx.com/vod.
1. Select “DivX(R) VOD” option and then press B.
2. Press ENTER while “Select” is selected and the
registration code will appear.
Use the registration code to purchase or rent the
videos from DivX
®
VOD service at
www.divx.com/vod. Follow the instructions and
download the video onto a disc for playback on
this unit.
3. Press ENTER to exit.
Note:
All the downloaded videos from DivX
®
VOD can only
be played back on this unit.
Score
When a chapter/title/track is fully finished, the score
will appear in the screen with a fanfare sound.
On: Turn the “Score” function on.
Off: Turn the “Score” function off.
Available discs for the score function:
• DVD discs
• DVD Karaoke Discs
• VCD discs with more than 2 tracks
• CD-G discs
Note:
• The score function is available only when a
microphone is connected.
• If the score is below 80, the fanfare sound will not
come out. The fanfare sounds differ according to
the score.
• If the score function is set to “On” and the
microphone is connected while playing a normal
disc, the score may appear on the screen in the
middle of playback.
To prevent this problem, set the score function to
“Off” or disconnect the microphone.
15
Installation and Setup
Operations
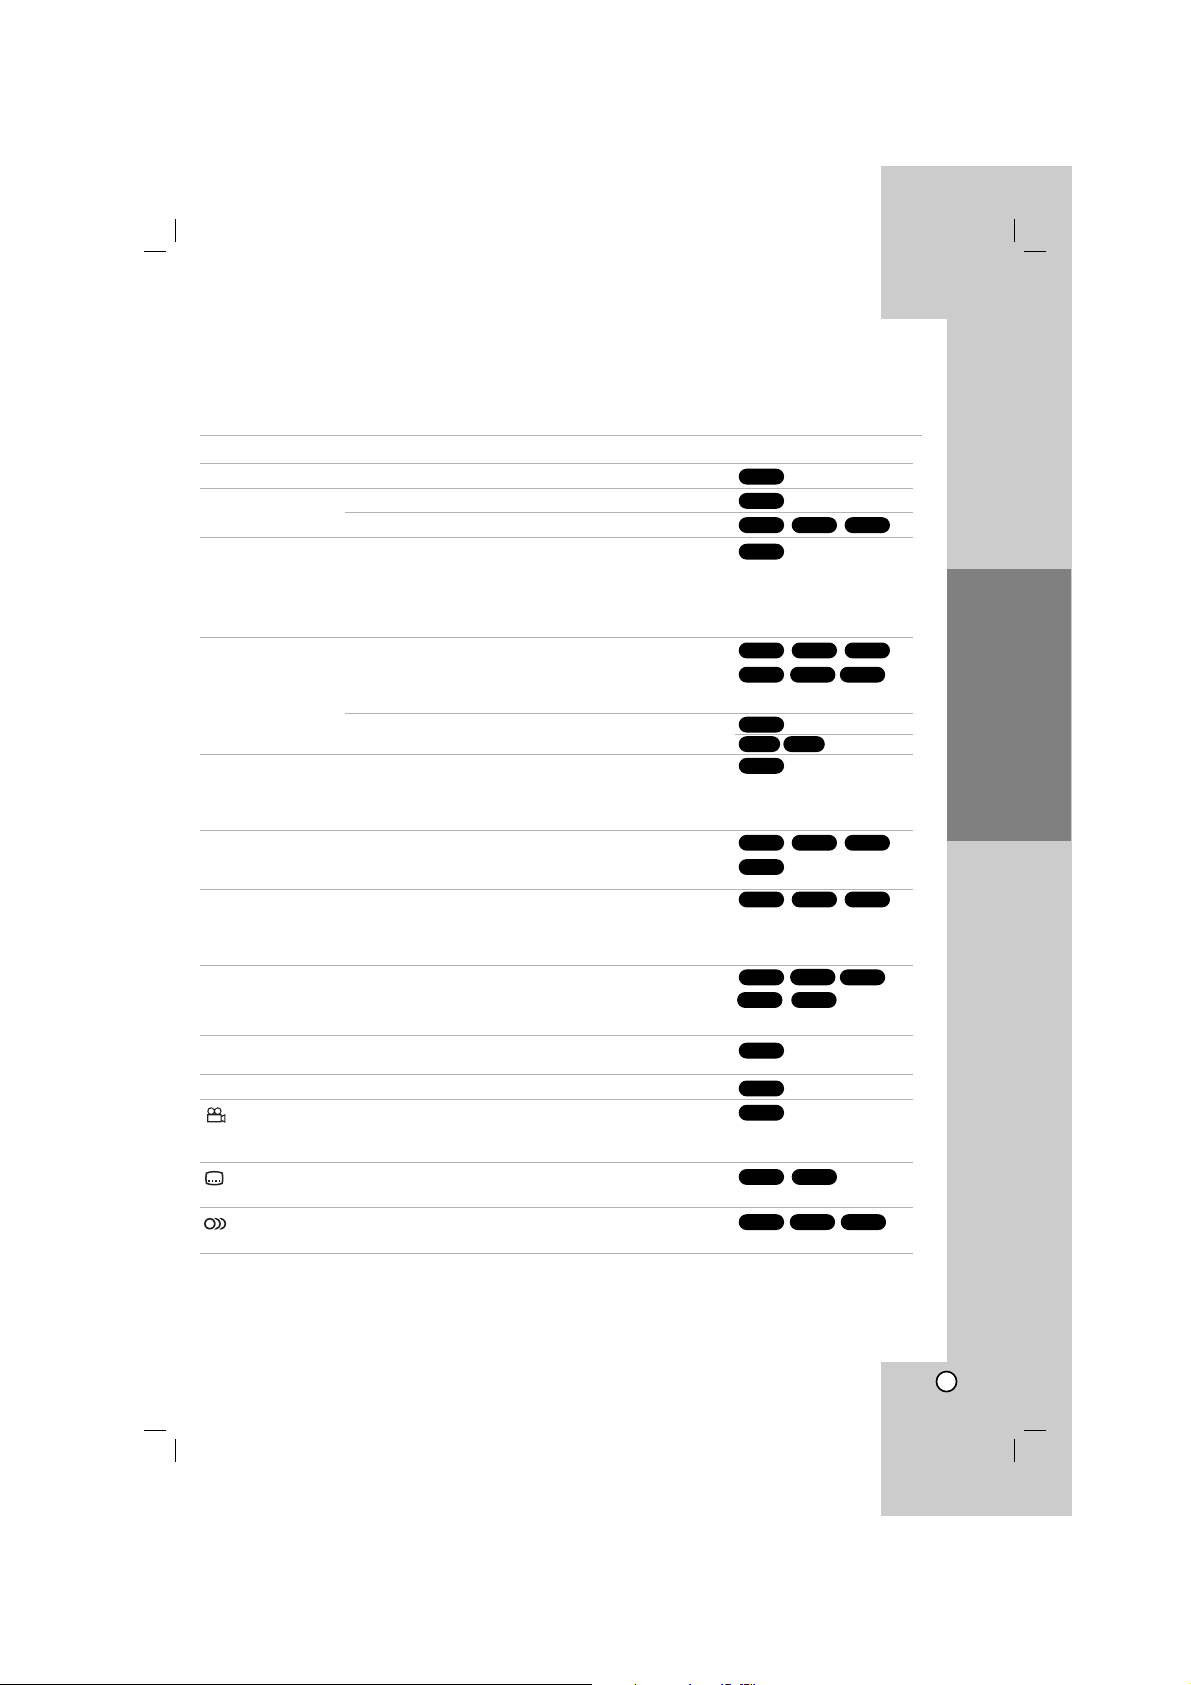
General features
Buttons Operations
OPEN / CLOSE (Z) Opens or closes the disc tray.
PAUSE/STEP (X) During playback, press X to pause playback.
Press X repeatedly to play Frame-by-Frame.
SKIP (. / >) During playback, press SKIP (. or >) to go to the next
chapter/track or to return to the beginning of the current
chapter/track.
Press SKIP . twice briefly to step back to the previous
chapter/track.
SCAN (m / M) During playback, press SCAN (m or M) repeatedly to
select the required scan speed.
DVD, DivX disc: 4 steps
Video CD, MP3, WMA, Audio CD: 3 steps
While the playback is paused, press SCAN (m or M)
repeatedly to play in slow motion (4 steps).
REPEAT During playback, press REPEAT repeatedly to select a
desired repeat mode.
DVD Video discs: Chapter/Title/Off
Video CD, Audio CD, DivX/MP3/WMA discs: Track/All/Off
A-B Press the A-B button one at a time to select a point A and
point B and repeats a sequence from point A (Starting point)
to point B (End point).
ZOOM During playback or pause mode, press ZOOM to enlarge
the video image.( 3 steps)
You can move through the zoomed picture using bBvV
buttons. Press CLEAR to exit.
RANDOM During playback or in stop mode, press RANDOM for
random playback.
TITLE If the current DVD title has a menu, the title menu appears
on the screen. Otherwise, the disc menu may appears.
DVD MENU The disc menu appears on the screen.
(ANGLE) During playback of DVD disc that contains scenes recorded
at different camera angles, press ANGLE repeatedly to
select a desired angle.
(SUBTITLE) During playback, press SUBTITLE repeatedly to select a
desired subtitle language.
(AUDIO) During playback, press AUDIO repeatedly to hear a different
audio language or audio track.
Discs
(forward only)
VCDDivXDVD
DivXDVD
DVD
DVD
DVD
CD-G
WMA
MP3
ACD
VCD
DivXVCDDVD
ACD
DivXVCDDVD
ALL
DivX
VCD
DVD
WMA
MP3ACD
DivXVCDDVD
ALL
DivXVCDDVD
ALL
ALL
 Loading...