

Page 1

Copyright
This publication, including all photographs, illustrations and software, is protected under international copyright laws, with all rights reserved. Neither this manual, nor any of the material contained herein, may be
reproduced without written consent of the author.
© Copyright September, 2007
Disclaimer
The information in this document is subject to change without notice. The manufacturer makes no representations or warranties with respect to the contents hereof and specifically disclaims any implied
warranties of merchantability or fitness for any particular purpose. The manufacturer reserves the right to
revise this publication and to make changes from time to time in the content hereof without obligation of
the manufacturer to notify any person of such revision or changes.
Trademark Recognition
Kensington is a U.S. registered trademark of ACCO Brand Corporation with issued registrations and pending applications in other countries throughout the world.
All other product names used in this manual are the properties of their respective owners and are acknowledged.
— i —
Page 2

D
L
P
P
r
o
j
e
c
t
o
r
—
U
s
e
r
’
s
M
a
n
u
a
l
D
D
L
P
P
r
o
j
e
c
t
o
r
—
U
s
e
r
’
s
L
P
P
r
o
j
e
c
t
o
r
—
U
M
s
e
r
’
s
M
a
n
u
a
l
a
n
u
a
l
Important Safety Information
Important:
It is strongly recommended that you read this section carefully before using the projector. These
safety and usage instructions will ensure that you enjoy many years of safe use of the projector.
Keep this manual for future reference.
Symbols Used
Warning symbols are used on the unit and in this manual to alert you of hazardous situations.
The following styles are used in this manual to alert you to important information.
Note:
Provides additional information on the topic at hand.
Important:
Provides additional information that should not be overlooked.
Caution:
Alerts you to situations that may damage the unit.
Warning:
Alerts you to situations that may damage the unit, create a hazardous environment, or cause personal injury.
Throughout this manual, component parts and items in the OSD menus are denoted in bold font as in this
example:
“Push the Menu button on the remote control to open the Main menu.”
General Safety Information
¾ Do not open the unit case. Aside from the projection lamp, there are no user-serviceable parts in
the unit. For servicing, contact qualified service personnel.
¾ Follow all warnings and cautions in this manual and on the unit case.
¾ The projection lamp is extremely bright by design. To avoid damage to eyes, do not look into the
lens when the lamp is on.
¾ Do not place the unit on an unstable surface, cart, or stand.
¾ Avoid using the system near water, in direct sunlight, or near a heating device.
¾ Do not place heavy objects such as books or bags on the unit.
— ii —
Page 3

Power Safety
¾ Only use the supplied power cord.
¾ Do not place anything on the power cord. Place the power cord where it will not be in the way of
foot traffic.
¾ Remove the batteries from the remote control when storing or not in use for a prolonged period.
Replacing the Lamp
Replacing the lamp can be hazardous if done incorrectly. See Replacing the Projection Lamp on page 31
for clear and safe instructions for this procedure. Before replacing the lamp:
¾ Unplug the power cord.
¾ Allow the lamp to cool for about one hour.
Cleaning the Projector
¾ Unplug the power cord before cleaning. See Cleaning the Projector on page 34.
¾ Allow the lamp to cool for about one hour.
Regulatory Warnings
P
r
P
r
P
e
f
a
c
e
e
f
a
c
e
r
e
f
a
c
e
Before installing and using the projector, read the regulatory notices in the Regulatory Compliance section
on page
44.
– iii –
Page 4

D
L
P
P
r
o
j
e
c
t
o
r
—
U
s
e
r
’
s
M
a
n
u
a
l
D
D
L
P
P
r
o
j
e
c
t
o
r
—
U
s
e
r
’
s
L
P
P
r
o
j
e
c
t
o
r
—
U
M
s
e
r
’
s
M
a
n
u
a
l
a
n
u
a
l
Main Features
• Lightweight unit, easy to pack away and transport.
• Compatible with all major video standards including NTSC, PAL, and SECAM.
• A high brightness rating allows for presentations in daylight or in lit rooms.
• Supports resolutions up to SXGA at 16.7 million colors to deliver crisp, clear images.
• Flexible setup allows for front, rear projections.
• Line-of-vision projections remain square, with advanced keystone correction for angled
projections.
• Input source automatically detected.
About this manual
This manual is intended for end users and describes how to install and operate the DLP projector. Wherever possible, relevant information—such as an illustration and its description—has been kept on one
page. This printer-friendly format is both for your convenience and to help save paper, thereby protecting
the environment. It is suggested that you only print sections that are relevant to your needs.
— iv —
Page 5

P
r
e
f
a
c
P
P
e
r
e
f
a
c
r
e
f
a
c
Table of Contents
GETTING STARTED.......................................................................................................................................................... 1
PACKING CHECKLIST ........................................................................................................................................................... 1
VIEWS OF PROJECTOR PARTS............................................................................................................................................... 2
Front-right View ............................................................................................................................................................. 2
Top view—On-screen Display (OSD) buttons and LEDs ............................................................................................... 3
Rear view ........................................................................................................................................................................ 4
Bottom view..................................................................................................................................................................... 5
REMOTE CONTROL PARTS ................................................................................................................................................... 6
REMOTE CONTROL OPERATING RANGE ............................................................................................................................... 8
PROJECTOR AND REMOTE CONTROL BUTTONS.................................................................................................................... 8
Remote Control ............................................................................................................................................................... 8
SETUP AND OPERATION................................................................................................................................................. 9
INSERTING THE REMOTE CONTROL BATTERIES ................................................................................................................... 9
CONNECTING INPUT DEVICES ............................................................................................................................................ 10
STARTING AND SHUTTING DOWN THE PROJECTOR............................................................................................................. 11
SETTING AN ACCESS PASSWORD (SECURITY LOCK) .......................................................................................................... 13
ADJUSTING THE PROJECTOR LEVEL ................................................................................................................................... 15
ADJUSTING THE ZOOM, FOCUS AND KEYSTONE ................................................................................................................ 16
ADJUSTING THE VOLUME .................................................................................................................................................. 17
e
e
ON-SCREEN DISPLAY (OSD) MENU SETTINGS....................................................................................................... 18
OSD MENU CONTROLS ..................................................................................................................................................... 18
Navigating the OSD ...................................................................................................................................................... 18
SETTING THE OSD LANGUAGE .......................................................................................................................................... 19
OSD MENU OVERVIEW ..................................................................................................................................................... 20
OSD SUB-MENU OVERVIEW ............................................................................................................................................. 21
IMAGE MENU..................................................................................................................................................................... 22
Color Manager.............................................................................................................................................................. 23
COMPUTER MENU.............................................................................................................................................................. 24
VIDEO/AUDIO MENU ......................................................................................................................................................... 25
INSTALLATION I MENU ...................................................................................................................................................... 26
INSTALLATION II MENU..................................................................................................................................................... 27
OSD Menu Setting......................................................................................................................................................... 28
Peripheral Test.............................................................................................................................................................. 29
Lamp Hour Reset .......................................................................................................................................................... 29
Factory Reset ................................................................................................................................................................ 30
Status............................................................................................................................................................................. 30
MAINTENANCE AND SECURITY................................................................................................................................. 31
REPLACING THE PROJECTION LAMP................................................................................................................................... 31
Resetting the Lamp........................................................................................................................................................ 33
CLEANING THE PROJECTOR................................................................................................................................................ 34
Cleaning the Lens ......................................................................................................................................................... 34
Cleaning the Case......................................................................................................................................................... 34
USING THE KENSINGTON
®
LOCK ....................................................................................................................................... 35
TROUBLESHOOTING ..................................................................................................................................................... 36
COMMON PROBLEMS AND SOLUTIONS ............................................................................................................................... 36
TIPS FOR TROUBLESHOOTING ............................................................................................................................................ 36
LED ERROR MESSAGES..................................................................................................................................................... 37
IMAGE PROBLEMS.............................................................................................................................................................. 37
LAMP PROBLEMS ............................................................................................................................................................... 38
REMOTE CONTROL PROBLEMS .......................................................................................................................................... 38
AUDIO PROBLEMS ............................................................................................................................................................. 38
HAVING THE PROJECTOR SERVICED .................................................................................................................................. 38
SPECIFICATIONS............................................................................................................................................................. 39
– v –
Page 6

D
L
P
P
r
o
j
e
c
t
o
r
—
U
s
e
r
’
s
M
a
n
u
a
l
D
L
P
P
r
o
j
e
c
t
o
r
—
U
s
e
r
’
s
D
L
P
P
r
o
j
e
c
t
o
r
—
U
SPECIFICATIONS................................................................................................................................................................. 39
Input/output connectors ................................................................................................................................................ 39
PROJECTION DISTANCE V.S. PROJECTION SIZE.................................................................................................................. 40
TIMING MODE TABLE ........................................................................................................................................................ 41
PROJECTOR DIMENSIONS ................................................................................................................................................... 43
REGULATORY COMPLIANCE ..................................................................................................................................... 44
FCC WARNING .................................................................................................................................................................. 44
CANADA ............................................................................................................................................................................ 44
SAFETY CERTIFICATIONS ................................................................................................................................................... 44
EN 55022 WARNING ......................................................................................................................................................... 44
M
s
e
r
’
s
M
a
n
u
a
l
a
n
u
a
l
— vi —
Page 7

D
L
D
L
D
G
Packing Checklist
Carefully unpack the projector and check that the following items are included:
P
P
r
o
j
e
c
t
o
r
–
U
s
e
r
’
s
P
P
r
o
j
e
c
t
o
r
–
L
P
P
r
o
j
e
c
U
t
o
r
–
U
M
s
e
r
’
s
M
s
e
r
’
s
M
ETTING STARTED
a
n
u
a
l
a
n
u
a
l
a
n
u
a
l
DLP
PROJECTOR REMOTE CONTROL
WITH ONE 3V CR2025 BATTERY)
CABLE POWER CORD AUDIO CABLE
RGB
OPTIONAL)
(
(
COMPONENT CABLE
OPTIONAL)
(
IDEO CABLE
V
OPTIONAL)
(
Contact your dealer immediately if any items are missing, appear damaged, or if the unit does not work. It
is recommend that you keep the original packing material should you ever need to return the equipment
for warranty service.
Caution:
Avoid using the projector in dusty environments.
S-V
OPTIONAL)
(
IDEO CABLE
RGB
TO COMPONENT
ADAPTER
– 1 –
C
ARRYING CASE CD-ROM (THIS
(OPTIONAL)
USER’S MANUAL)
Page 8
D
L
P
P
r
o
j
e
c
t
o
r
—
U
s
e
r
’
s
M
a
D
D
L
P
P
r
o
j
e
c
t
o
r
—
U
s
e
L
P
P
r
o
j
e
c
t
o
r
—
U
r
s
e
r
n
’
s
M
a
n
’
s
M
a
n
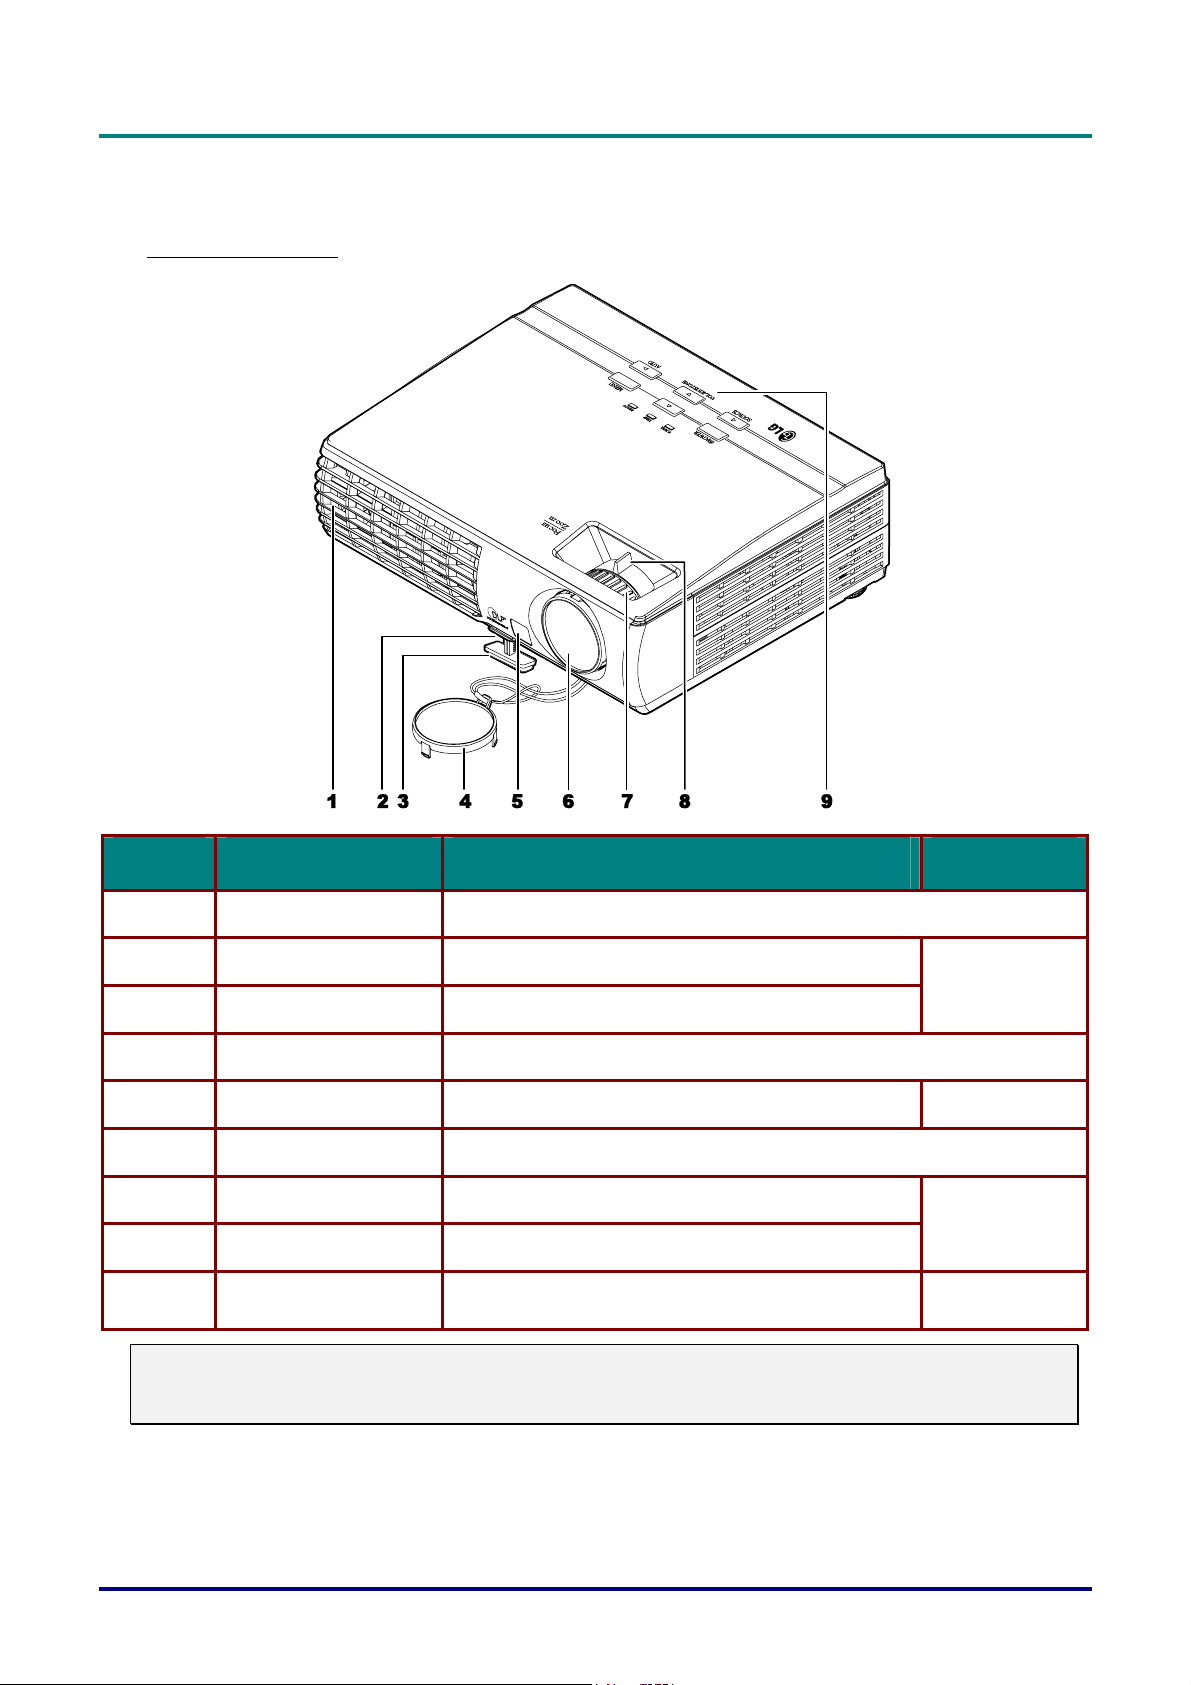
Views of Projector Parts
Front-right View
u
a
l
u
a
l
u
a
l
ITEM LABEL DESCRIPTION SEE PAGE:
1.
2.
Ventilation opening
Height-adjuster button Push to release height adjuster
To keep the projector lamp cool
15
3.
4.
5.
6.
7.
Height adjuster Adjusts level of projector
Lens cap
IR receiver Receiver for IR signal from remote control
Lens Remove lens cap before use
Focus ring Focuses the projected image
Covers lens to protect when not in use
6
16
8.
9.
Important:
Ventilation openings on the projector allow for good air circulation, which keeps the projector lamp
cool. Do not obstruct any of the ventilation openings.
Zoom ring Enlarges the projected image
See
Function keys
Top view—On-screen Display (OSD) buttons and
.
LEDs
3
– 2 –
Page 9

D
D
D
Top view—On-screen Display (OSD) buttons and LEDs
L
P
P
r
o
j
e
c
t
o
r
–
U
s
e
r
’
s
M
a
n
u
a
l
L
P
P
r
o
j
e
c
t
o
r
–
U
s
e
r
’
s
L
P
P
r
o
j
e
c
t
o
r
–
U
M
s
e
r
’
s
M
a
n
u
a
l
a
n
u
a
l
ITEM LABEL DESCRIPTION
1.
2.
4.
5.
6.
(POWER)
▲ (Up cursor) Navigates and changes settings in the OSD
POWER LED
TEMP LED
READY LED
MENU Open and exits the OSD buttons
◄ (Left cursor) /
SOURCE/
Turns the projector On or Off
Green Power On
Off Power Off (AC Off) 3.
Flashing Error code
On System over temperature
Off Normal State
Orange Lamp is ready to be powered-on.
Flashing
Detects the input device
Navigates and changes settings in the OSD
Lamp not ready (Warm-up/shutting down/cooling)
LED Error Messages on page 37)
(see
SEE
PAGE:
18
187.
▼ (Down cursor) /
VOL./KEYSTONE
► (Right cursor) /
AUTO/
Quick Menu – For Keystone, Audio Volume
Navigates and changes settings in the OSD
Optimizes image size, position, and resolution
Navigates and changes settings in the OSD
– 3 –
178.
7, 189.
Page 10

D
L
P
P
r
o
j
e
c
t
o
r
—
U
s
e
r
’
s
M
a
n
u
a
l
D
D
L
P
P
r
o
j
e
c
t
o
r
—
U
s
e
r
’
s
L
P
P
r
o
j
e
c
t
o
r
—
U
M
s
e
r
’
s
M
a
n
u
a
l
a
n
u
a
l
Rear view
ITEM LABEL DESCRIPTION SEE PAGE:
1.
2.
3.
4.
5.
6.
7.
8.
Note:
If your video equipment has both S-VIDEO and RCA jacks (composite video) connect to the
S-VIDEO connector. S-VIDEO provides a better quality signal.
AC IN Connect the POWER CABLE
Rear IR receiver
(Optional)
USB (Service Only)
AUDIO Connect the AUDIO CABLE from the input device
S-VIDEO Connect the S-VIDEO CABLE from a video device
VIDEO Connect the VIDEO CABLE from a video device
RGB
(Security Lock)
Receiver for IR signal from remote control
Connect the USB CABLE from a computer (service
only)
Connect the RGB CABLE from a computer and components
Secure to permanent object with a Kensington® Lock
system
11
10
35
– 4 –
Page 11

Bottom view
D
D
D
L
P
P
r
o
j
e
c
t
o
r
–
U
s
e
r
’
s
M
a
n
u
a
l
L
P
P
r
o
j
e
c
t
o
r
–
U
s
e
r
’
s
L
P
P
r
o
j
e
c
t
o
r
–
U
M
s
e
r
’
s
M
a
n
u
a
l
a
n
u
a
l
ITEM LABEL DESCRIPTION SEE PAGE:
Lamp cover Remove when changing the lamp.
2.
3.
4.
5.
Lens cap hook To fasten the lens cap cover.
Tilt adjustor Rotate adjuster lever to adjust angle position.
Height adjustor button Push to release adjustor.
Height adjustor Adjuster drops down when adjuster button is pushed.
311.
15
– 5 –
Page 12

D
L
P
P
r
o
j
e
c
t
o
r
—
U
s
e
r
’
s
D
D
L
P
P
r
o
j
e
c
t
o
r
—
L
P
P
r
o
j
e
c
U
t
o
r
—
U
M
s
e
r
’
s
M
s
e
r
’
s
M
Remote Control Parts
a
n
u
a
l
a
n
u
a
l
a
n
u
a
l
Important:
1. Avoid using the projector with bright fluorescent lighting turned on. Certain high-frequency fluo-
rescent lights can disrupt remote control operation.
2. Be sure nothing obstructs the path between the remote control and the projector. If the path between the remote control and the projector is obstructed, you can bounce the signal off certain
reflective surfaces such as projector screens.
3. The buttons and keys on the projector have the same functions as the corresponding buttons on
the remote control. This user’s manual describes the functions based on the remote control.
– 6 –
Page 13

D
L
P
P
r
o
j
e
c
t
o
r
–
U
s
e
r
’
s
M
a
n
D
L
P
P
r
o
j
e
c
t
o
r
–
U
s
e
r
’
D
L
P
P
r
o
j
e
c
t
o
r
–
U
s
s
e
r
’
u
M
a
n
s
u
M
a
n
ITEM LABEL DESCRIPTION SEE PAGE:
a
l
a
l
u
a
l
1.
2.
3.
4.
5.
6.
7.
8.
9.
10.
11.
12.
Up cursor Navigates and changes settings in the OSD
Enter Changes settings in the OSD
Power Turns the projector On or Off
Right cursor Navigates and changes settings in the OSD
Volume + Increase volume
Volume - Decrease volume
Mute Mutes the built-in speaker
Freeze Freeze/unfreezes the on-screen picture
Source Detects the input device
Auto Auto adjustment for frequency, tracking, size, position (RGB only)
Keystone top Corrects image-trapezoid (wider top) effect
Keystone bottom Corrects image trapezoid (wider bottom) effect
18
11
18
17
16
13.
14.
15.
Down cursor Navigates and changes settings in the OSD
Left cursor Navigates and changes settings in the OSD
Menu Opens the OSD
18
– 7 –
Page 14

D
L
P
P
r
o
j
e
c
t
o
r
—
U
s
e
r
’
s
M
a
n
u
a
l
D
D
L
P
P
r
o
j
e
c
t
o
r
—
U
s
e
r
’
s
L
P
P
r
o
j
e
c
t
o
r
—
U
M
s
e
r
’
s
M
a
n
u
a
l
a
n
u
a
l
Remote Control Operating Range
The remote control uses infrared transmission to control the projector. It is not necessary to point the
remote directly at the projector. Provided you are not holding the remote perpendicular to the sides or
the rear of the projector, the remote will function well within a radius of about 7 meters (23 feet) and
15 degrees above or below the projector level. If the projector does not respond to the remote control,
move a little closer.
Projector and Remote Control Buttons
The projector can be operated using the remote control or the buttons on the top of the projector. All
operations can be carried out with the remote control; however, the buttons on the projector are limited in use. The following illustration shows the corresponding buttons on the remote control and on
the projector.
Remote Control
Some buttons on the projector have multiple functions. For example, item 3/6/7 on the projector functions as the keystone button, volume adjuster, and as the down cursor key.
– 8 –
Page 15

Inserting the Remote Control Batteries
Remove the battery compartment cover
1.
by sliding the cover in the direction of
the arrow. (A) Pull out the cover. (B)
Insert the battery with the positive side
2.
facing up.
S
ETUP AND OPERATION
Replace the cover.
3.
Caution:
1. Only use a 3V lithium battery (CR2025).
2. Dispose of used batteries according to local ordinance regulations.
3. Remove the battery when not using the projector for prolonged periods.
– 9 –
Page 16

D
L
P
P
r
o
j
e
c
t
o
r
—
U
s
e
r
’
s
M
a
n
u
a
l
D
D
L
P
P
r
o
j
e
c
t
o
r
—
U
s
e
r
’
s
L
P
P
r
o
j
e
c
t
o
r
—
U
M
s
e
r
’
s
M
a
n
u
a
l
a
n
u
a
l
Connecting Input Devices
A PC or notebook computer and video devices can be connected to the projector at the same time. Video
devices include DVD, VCD, and VHS players, as well as movie camcorders and digital still cameras.
Check the user manual of the connecting device to confirm it has the appropriate output connector.
ITEM LABEL DESCRIPTION
A
B
C
D
E
Warning:
As a safety precaution, disconnect all power to the projector and connecting devices before making
connections.
USB (Service Only) Connect the USB CABLE from a computer (service only).
AUDIO
S-VIDEO Connect the S-VIDEO CABLE from a video device.
VIDEO Connect the VIDEO CABLE from a video device.
RGB
Connect the AUDIO CABLE from the computer’s audio-out connector.
Connect the AUDIO CABLE (mini jack-to-RCA x 2) from a video device.
Connect the RGB CABLE from a computer.
Connect DVD input YCbCr / YPbPr, through optional RGB to
COMPONENT ADAPTOR.
– 10 –
Page 17

Starting and Shutting down the Projector
D
D
D
L
P
P
r
o
j
e
c
t
o
r
–
U
s
e
r
’
s
M
a
n
u
a
l
L
P
P
r
o
j
e
c
t
o
r
–
U
s
e
r
’
s
L
P
P
r
o
j
e
c
t
o
r
–
U
M
s
e
r
’
s
M
a
n
u
a
l
a
n
u
a
l
Connect the power cord to the projector.
1.
Connect the other end to a wall outlet.
The
on the projector light.
Turn on the connected devices.
2.
Ensure the READY LED displays a
3.
solid orange and not a flashing orange.
Then press the
turn on the projector.
The projector splash screen displays and
connected devices are detected.
See
(Security Lock)
lock is enabled.
POWER and READY LEDs
POWER button to
Setting an Access Password
on page 13 if security
If more than one input device is con-
4.
nected, press the SOURCE button and
use ▲▼ to scroll among devices.
(Component is supported through the
RGB to COMPONENT ADAPTER.)
• RGB: Analog RGB
Component: DVD input YCbCr / YPbPr, or
HDTV input YPbPr via HD15 connector
• Composite Video: Traditional composite video
• S-Video: Super video (Y/C separated)
– 11 –
Page 18

D
L
P
P
r
o
j
e
c
t
o
r
—
U
s
e
r
’
s
M
a
n
u
a
l
D
L
P
P
r
o
j
e
c
t
o
r
—
U
s
e
r
’
s
D
L
P
P
r
o
j
e
c
t
o
r
—
U
When the “Power Off? /Press Power
5.
again” message appears, press the
POWER button. The projector turns
off.
Caution:
1. Be sure to remove the lens cap before starting projector.
2. Do not unplug the power cord until the READY LED stops flashing–indicating the projector has
cooled down.
M
s
e
r
’
s
M
a
n
u
a
l
a
n
u
a
l
– 12 –
Page 19

D
L
P
P
r
o
j
e
c
t
o
r
–
U
s
e
r
’
D
D
L
P
P
r
o
j
e
c
t
o
r
–
L
P
P
r
o
j
e
c
t
o
r
–
U
U
s
s
e
r
’
s
s
e
r
’
s
Setting an Access Password (Security Lock)
You can use the four (arrow) buttons to set a password and prevent unauthorized use of the projector.
When enabled, the password must be entered after you power on the projector. (See
on page 18 and Setting the OSD Language on page 19 for help on using OSD menus.)
OSD
Important:
Keep the password in a safe place. Without the password, you will not be able to use the projector.
If you lose the password, contact your reseller for information on clearing the password.
Press the MENU button to open the OSD
1.
menu.
Press the cursor ◄► button to move to
2.
the Installation I menu.
Navigating the
M
a
n
u
a
l
M
M
a
n
u
a
l
a
n
u
a
l
Press the cursor ▲▼ button to select
3.
Security Lock.
Press the cursor ◄► button to enable or
4.
disable security lock function.
A password dialog box automatically
appears.
– 13 –
Page 20

D
D
D
L
L
L
P
P
r
o
j
e
c
t
o
r
—
U
s
e
r
’
s
M
a
n
u
a
l
P
P
r
o
j
e
c
t
o
r
—
U
s
e
r
’
s
P
P
r
o
j
e
c
t
o
r
—
U
You can use the cursor buttons ▲▼◄►
5.
either on keypad or IR remote control for
password entry. You can use any
combination including the same arrow five
times, but not less than five.
Press the cursor buttons in any order to set
the password. Push the MENU button to
exit the dialog box.
The password confirm menu appears when
6.
user presses the power-on key in case the
Security Lock is enabled.
Enter the password in the order you set it
at step 5. In case you forget the password,
please contact the service center.
Service center will validate the owner and
help reset the password.
M
s
e
r
’
s
M
a
n
u
a
l
a
n
u
a
l
– 14 –
Page 21

Adjusting the Projector Level
Take note of the following when setting up the projector:
• The projector table or stand should be level and sturdy.
• Position the projector so that it is perpendicular to the screen.
• Ensure the cables are in a safe location. You could trip over them.
D
L
P
P
r
o
j
e
c
t
o
r
–
U
s
e
r
’
s
M
a
n
u
a
l
D
L
P
P
r
o
j
e
c
t
o
r
–
U
s
e
r
’
s
D
L
P
P
r
o
j
e
c
t
o
r
–
U
M
s
e
r
’
s
M
a
n
u
a
l
a
n
u
a
l
1.
2.
3.
To raise the level of the projector, lift the projector [A] and press the height-adjuster
button [B].
The height adjuster drops down [C].
To lower the level of the projector, press the height-adjuster button and push down
on the top of the projector.
To adjust the angle of the picture, turn the tilt-adjuster [D] right or left until the
desired angle has been achieved.
– 15 –
Page 22

D
L
P
P
r
o
j
e
c
t
o
r
—
U
s
e
r
’
s
M
a
n
u
a
l
D
D
L
P
P
r
o
j
e
c
t
o
r
—
U
s
e
r
’
s
L
P
P
r
o
j
e
c
t
o
r
—
U
M
s
e
r
’
s
M
a
n
u
a
l
a
n
u
a
l
Adjusting the Zoom, Focus and Keystone
Use the Image-zoom
1.
control (on the projector
only) to resize the projected image and screen
B
size
Use the Image-focus
2.
control (on the projector
only) to sharpen the pro-
jected image
Use the KEYSTONE
3.
buttons (on the projector
or the remote control) to
correct image-trapezoid
(wider top or bottom)
effect.
.
A
.
The keystone control
4.
appears on the display.
Remote control and OSD panel
– 16 –
Page 23

Adjusting the Volume
Press the Volume +/-
1.
buttons on the remote
control.
The volume control
appears on the display.
Press the Down Cursor
2.
button on the keypad to
adjust Volume +/-.
D
D
D
L
P
P
r
o
j
e
c
t
o
r
–
U
s
e
r
’
s
M
a
n
u
a
l
L
P
P
r
o
j
e
c
t
o
r
–
U
s
e
r
’
s
L
P
P
r
o
j
e
c
t
o
r
–
U
M
s
e
r
’
s
M
a
n
u
a
l
a
n
u
a
l
Press the MUTE button to
3.
turn off the volume (This
feature is available only
on the remote).
– 17 –
Page 24

ON-S
CREEN DISPLAY
(OSD) M
ENU SETTINGS
OSD Menu Controls
The projector has an OSD that lets you make image adjustments and change various settings.
Navigating the OSD
You can use the remote control cursor buttons or the buttons on the top of the projector to navigate
and make changes to the OSD. The following illustration shows the corresponding buttons on the remote control and on the projector.
1. To enter the OSD, press the MENU button.
2. There are five menus. Press the cursor ◄►
button to move through the menus.
3. Press the cursor ▲▼ button to move up
and down in a menu.
4. Press ◄► to change values for settings.
5. Press MENU to close the OSD or leave a
submenu.
Note:
Depending on the video source, not all items in the OSD are available. For example, the Horizontal/Vertical Position items in the Computer menu can only be modified when connected to a PC.
Items that are not available cannot be accessed and are grayed out.
– 18 –
Page 25

Setting the OSD Language
Set the OSD language to your preference before continuing.
1. Press the MENU button. Press the cursor ◄► button to navigate to Installation I.
D
D
D
L
P
P
r
o
j
e
c
t
o
r
–
U
s
e
r
’
s
M
a
n
u
a
l
L
P
P
r
o
j
e
c
t
o
r
–
U
s
e
r
’
s
L
P
P
r
o
j
e
c
t
o
r
–
U
M
s
e
r
’
s
M
a
n
u
a
l
a
n
u
a
l
2. Press the cursor ▲▼ button until Language is highlighted.
3. Press the cursor ◄► button until the language you want is highlighted.
4. Press the MENU button twice to close the OSD.
– 19 –
Page 26

D
L
P
P
r
o
j
e
c
t
o
r
—
U
s
e
r
’
s
M
a
n
u
a
l
D
D
L
P
P
r
o
j
e
c
t
o
r
—
U
s
e
r
’
s
L
P
P
r
o
j
e
c
t
o
r
—
U
M
s
e
r
’
s
M
a
n
u
a
l
a
n
u
a
l
OSD Menu Overview
Use the following illustration to quickly find a setting or determine the range for a setting.
Image
Display Mode
Brilliant Color
0 ~ 2
Brightness
0 ~ 100
Contrast
0 ~ 100
Sharpness
0 ~ 31
Gamma
Color Space
Color Temperature
Color Manager
Reset
Presentation
Bright
Game
Movie
TV
sRGB
User
PC
MAC
Video
Chart
B&W
Auto
RGB
YCbCr
YPbPr
6500 °K
9300 °K
10500 °K
Computer
Horizontal Position
Vertical Position
Frequency
Tracking
-5 ~ 5
Auto Image
Installation
II
Video / Audio
Video AGC
On - Off
Video Saturation
0 ~ 100
Video Tint
0 ~ 100
Film Mode
Video Overscan
On - Off
Vo l u m e
0 ~ 8
Mute
On - Off
Reset
Auto
Off
Installation
I
Language
Auto Source
On - Off
Blank Screen
Projection
Security Lock
On - Off
Aspect Ratio
Keystone
-30 ~ 30
Digital Zoom
Black
Red
Green
Blue
White
Front
Rear
Fill
4:3
16:9
LetterBox
English,
Deutsch,
Français,
Italiano,
Español,
Português,
Polski,
Svenska,
Suomi,
Ελληνικά,
繁體中文,
简体中文,
한국어,
Английский,
Magyar,
Čeština
Auto Power off (min.)
Auto Power On
On - Off
Fan Speed
Lamp Mode
OSD Menu Setting
Peripheral Test
Lamp Hour Reset
Factory Reset
Status
Off
5/10/15 ~ 180
Normal
High
Eco
Normal
– 20 –
Page 27

OSD Sub-Menu Overview
Color
Manager
Hue -99 ~ 99
Red
Green
Blue
Cyan
Magenta
Yellow
Saturation 0 ~ 199
Gain 0 ~ 199
Hue -99 ~ 99
Saturation 0 ~ 199
Gain 0 ~ 199
Hue -99 ~ 99
Saturation 0 ~ 199
Gain 0 ~ 199
Hue -99 ~ 99
Saturation 0 ~ 199
Gain 0 ~ 199
Hue -99 ~ 99
Saturation 0 ~ 199
Gain 0 ~ 199
Hue -99 ~ 99
Saturation 0 ~ 199
Gain 0 ~ 199
Peripheral Test
Remote Control Test
Button Test
Color Test
Sound Test
Status
Active Source
Video information
Lamp Hours
D
D
D
L
P
L
P
L
P
OSD Menu
P
r
P
r
P
r
Setting
o
j
e
o
j
o
j
c
t
o
r
–
U
e
c
t
o
e
c
t
o
Menu Position
Translucent Menu
Menu Display
10 ~ 20
s
r
–
U
s
r
–
U
e
r
’
s
M
a
n
u
a
l
e
r
’
s
M
s
e
r
’
s
M
a
n
u
a
l
a
n
u
a
l
Center
Down
Up
Left
Right
0%
25%
50%
75%
100%
Red 0 ~ 199
White
Green 0 ~ 199
Blue 0 ~ 199
– 21 –
Page 28

D
L
P
P
r
o
j
e
c
t
o
r
—
U
s
e
r
’
s
M
a
n
u
a
l
D
D
L
P
P
r
o
j
e
c
t
o
r
—
U
s
e
r
’
s
L
P
P
r
o
j
e
c
t
o
r
—
U
M
s
e
r
’
s
M
a
n
u
a
l
a
n
u
a
l
Image Menu
Press the MENU button to open the OSD menu. Press the cursor ◄► button to move to the Image
Menu. Press the cursor ▲▼ button to move up and down in the Image menu. Press ◄► to change
values for settings.
ITEM DESCRIPTION
Display Mode Press the cursor ◄► button to set the display mode.
Brilliant Color Press the cursor ◄► button to adjust the Brilliant Color value.
Brightness Press the cursor ◄► button to adjust the display brightness.
Contrast Press the cursor ◄► button to adjust the display contrast.
Sharpness Press the cursor ◄► button to adjust the display sharpness level.
Gamma Press the cursor ◄► button to adjust the gamma correction of the display.
Color Space Press the cursor ◄► button to adjust the color space.
Color Temperature Press the cursor ◄► button to select different color temperature.
Color Manager
Reset Press Enter / ► to reset all settings to default values.
Press Enter / ► to enter the color manager menu.
Color Manager on page 23 for more information.
See
– 22 –
Page 29

Color Manager
D
D
D
L
P
P
r
o
j
e
c
t
o
r
–
U
s
e
r
’
s
M
a
n
u
a
l
L
P
P
r
o
j
e
c
t
o
r
–
U
s
e
r
’
s
L
P
P
r
o
j
e
c
t
o
r
–
U
M
s
e
r
’
s
M
a
n
u
a
l
a
n
u
a
l
Press (Enter) / ►
to enter the color manger sub menu.
ITEM DESCRIPTION
Red
Green
Select to enter the Red Color Manager.
Press the ◄► buttons to adjust the Hue, Saturation, and Gain.
Select to enter the Green Color Manager.
Press the ◄► buttons to adjust the Hue, Saturation, and Gain.
Blue
Cyan
Magenta
Yellow
White
Select to enter the Blue Color Manager.
Press the ◄► buttons to adjust the Hue, Saturation, and Gain.
Select to enter the Cyan Color Manager.
Press the ◄► buttons to adjust the Hue, Saturation, and Gain.
Select to enter the Magenta Color Manager.
Press the ◄► buttons to adjust the Hue, Saturation, and Gain.
Select to enter the Yellow Color Manager.
Press the◄► buttons to adjust the Hue, Saturation, and Gain.
Select to enter the White Color Manager.
Press the ◄► buttons to adjust the Hue, Saturation, and Gain.
– 23 –
Page 30

D
L
P
P
r
o
j
e
c
t
o
r
—
U
s
e
r
’
s
M
a
n
u
a
l
D
D
L
P
P
r
o
j
e
c
t
o
r
—
U
s
e
r
’
s
L
P
P
r
o
j
e
c
t
o
r
—
U
M
s
e
r
’
s
M
a
n
u
a
l
a
n
u
a
l
Computer Menu
Press the MENU button to open the OSD menu. Press the cursor ◄► button to move to the Computer menu. Press the cursor ▲▼ button to move up and down in the computer menu. Press ◄► to
change values for settings.
ITEM DESCRIPTION
Horizontal Position Press the cursor ◄► button to adjust the display position to left or right.
Vertical Position Press the cursor ◄► button to adjust the display position to up or down.
Frequency Press the cursor ◄► button to adjust the A/D sampling clock.
Tracking Press the cursor ◄► button to adjust the A/D sampling dot.
Auto Image Press (Enter) / ► to automatically adjustment for phase, tracking, size and position.
– 24 –
Page 31

D
L
P
P
r
o
j
e
c
t
o
r
–
U
s
D
D
L
P
P
r
o
j
e
c
t
o
L
P
P
r
o
r
j
e
c
t
o
e
–
U
s
r
e
–
U
s
Video/Audio Menu
Press the MENU button to open the OSD menu. Press the cursor ◄► button to move to the
Video/Audio menu. Press the cursor ▲▼ button to move up and down in the Video/Audio menu.
Press ◄► to change values for settings.
r
’
s
M
a
n
u
a
l
r
’
s
M
e
r
’
s
M
a
n
u
a
l
a
n
u
a
l
ITEM DESCRIPTION
Video AGC Press the ◄► buttons to enable or disable the Automatic Gain Control for video source.
Video Saturation Press the ◄► buttons to adjust the video saturation.
Video Tint Press the ◄► buttons to adjust the video tint/hue.
Film Mode Press the ◄► buttons to select a different film mode.
Video Overscan Press the ◄► buttons to enable or disable video over scan.
Volume Press the ◄► buttons to adjust the audio volume level.
Mute Press the ◄► buttons to turn On or Off the speaker.
Reset Press Enter / ► to reset all settings to default values.
Note:
Video jagging may occur when playing interlace video. To overcome this issue, open the
Video / Audio menu and adjust the Film Mode feature.
– 25 –
Page 32

D
L
P
P
r
o
j
e
c
t
o
r
—
U
s
e
r
’
s
M
a
n
u
a
l
D
D
L
P
P
r
o
j
e
c
t
o
r
—
U
s
e
r
’
s
L
P
P
r
o
j
e
c
t
o
r
—
U
M
s
e
r
’
s
M
a
n
u
a
l
a
n
u
a
l
Installation I Menu
Press the MENU button to open the OSD menu. Press the cursor ◄► button to move to the Installation I menu. Press the cursor ▲▼ button to move up and down in the Installation I menu. Press
◄► to change values for settings.
ITEM DESCRIPTION
Language Press the cursor ◄► button to select a different localization Menu.
Auto Source
Blank Screen Press the cursor ◄► button to select different color to blank the screen.
Projection Press the cursor ◄► button to choose from two projection methods:
Security Lock Press the cursor ◄► button to enable or disable security lock function.
Aspect Ratio
Keystone Press the cursor ◄► button to adjust the display keystone.
Digital Zoom
Press the cursor ◄► button to enable or disable the automatically searching of all input port
to find out the valid source.
Press the cursor ◄► button to adjust the video aspect ratio.
Note: The Aspect Ratio function is only accessible when the Digital Zoom is not active.
Press Enter / ► to enter the Digital Zoom menu. Press ▲ to zoom in; press ▼ to zoom out.
Use the
Note: You must zoom in before the Pan menu is accessible.
Note: Digital zoom is disabled in SXGA/SXGA+/UXGA resolutions.
buttons to employ the Pan function.
– 26 –
Page 33

D
L
P
P
r
o
j
e
c
t
o
r
–
U
s
e
D
D
L
P
P
r
o
j
e
c
t
o
r
L
P
P
r
o
j
e
c
t
o
r
r
–
U
s
e
r
–
U
s
e
r
Installation II Menu
Press the MENU button to open the OSD menu. Press the cursor ◄► button to move to the Installation II menu. Press the cursor ▲▼ button to move up and down in the Installation II menu.
’
s
M
a
n
u
a
l
’
s
M
’
s
M
a
n
u
a
l
a
n
u
a
l
ITEM DESCRIPTION
Auto Power Off
(min.)
Auto Power On Press the cursor ◄► button to enable or disable automatic power On when AC power is supplied.
Fan Speed
Lamp Mode
OSD Menu Setting
Peripheral Test
Lamp Hour Reset
Factory Reset
Status Press (Enter) / ► to enter the Status menu. See page 30 for more information on Status.
Press the cursor ◄► button to enable or disable automatic shutdown of lamp when no signal.
Press the cursor ◄► button to toggle between Normal and High fan speeds.
Note: We recommend selecting high speed in high temperatures, high humidity, or high
altitude areas.
Press the cursor ◄► button to select the lamp mode for higher brightness or lower brightness
to save lamp life.
Press
OSD setting menu.
Press
Peripheral Test.
Press
information on Lamp Hour Reset.
Press
on Factory Reset.
(Enter) / ► to enter the OSD setting menu. See page 18
(Enter) / ► to enter the Peripheral Test menu. See page 29 for more information on
(Enter) / ► to confirm lamp hour reset. Press Menu to cancel. See page
(Enter) / ► to reset the entire item to default value. See page 30 for more information
for more information on
29 for more
– 27 –
Page 34

D
L
P
P
r
o
j
e
c
t
o
r
D
D
L
P
P
r
L
o
P
P
r
o
—
j
e
c
t
o
r
—
j
e
c
t
o
r
—
OSD Menu Setting
ITEM DESCRIPTION
U
U
U
s
e
r
’
s
M
a
n
u
a
l
s
e
r
’
s
M
s
e
r
’
s
M
a
n
u
a
l
a
n
u
a
l
Menu Position Press ◄► button to select different OSD location.
Translucent Menu Press ◄► button to select OSD background translucent level.
Menu Display Press ◄► button to select OSD timeout delay.
– 28 –
Page 35

Peripheral Test
ITEM DESCRIPTION
D
D
D
L
P
P
r
o
j
e
c
t
o
r
–
U
s
e
r
’
s
M
a
n
u
a
l
L
P
P
r
o
j
e
c
t
o
r
–
U
s
e
r
’
s
L
P
P
r
o
j
e
c
t
o
r
–
U
M
s
e
r
’
s
M
a
n
u
a
l
a
n
u
a
l
Remote Control Test
Button Test
Color Test
Sound Test Press (Enter) / ► to test the sound function of the internal speaker.
Press (Enter) / ►
Press
Press (Enter) / ►
(Enter) / ►
to test the IR remote controller for diagnostic.
to test the button on keypad.
to select different colors on screen.
Lamp Hour Reset
Please refer to
Resetting the Lamp on page 33 to reset the lamp hour counter.
– 29 –
Page 36

D
L
P
P
r
o
j
e
c
t
o
r
—
U
s
e
r
’
s
M
a
n
u
a
l
D
D
L
P
P
r
o
j
e
c
t
o
r
—
U
s
e
r
’
s
L
P
P
r
o
j
e
c
t
o
r
—
U
M
s
e
r
’
s
M
a
n
u
a
l
a
n
u
a
l
Factory Reset
Press the cursor ▲▼ button to move up and down in the Installation II menu. Select the Factory
Reset sub menu and press
(Enter) / ► to reset all the menu items to the factory default values.
Status
Press the cursor ▲▼ button to move up and down in the Installation II menu. Select the
Installation II sub menu and press
ITEM DESCRIPTION
(Enter) / ► to enter the Status sub menu.
Active Source Display the activated source.
Video Information Displays resolution/video information for RGB source and color standard for Video source.
Lamp Hours Lamp hour used information is displayed. ECO and Normal counter are separated.
– 30 –
Page 37

D
L
P
P
r
o
j
e
c
t
o
r
–
U
s
e
D
L
P
P
r
o
j
e
c
t
o
r
D
L
P
P
r
o
M
AINTENANCE AND SECURITY
j
e
c
t
o
r
r
–
U
s
e
r
–
U
s
e
r
Replacing the Projection Lamp
The projection lamp should be replaced when it burns out. It should only be replaced with a certified
replacement part, which you can order from your local dealer.
Important:
a. The fluorescent lamp used in this product contains a small amount of mercury
b. Do not dispose this product with general household waste.
c. Disposal of this product must be carried out in accordance with the regulations of your local
authority.
Warning:
Be sure to turn off and unplug the projector at least 30 minutes before replacing the lamp. Failure to
do so could result in a severe burn.
’
s
M
a
n
u
a
l
’
s
M
’
s
M
a
n
u
a
l
a
n
u
a
l
Loosen the two captive
1.
screws on the lamp
compartment cover (A).
Remove the lamp com-
2.
partment cover (B).
– 31 –
Page 38

D
D
D
L
L
L
P
P
r
o
j
e
c
t
o
r
—
U
s
e
r
’
P
P
r
o
j
e
c
t
o
r
P
P
r
o
Remove the two screws from
3.
the lamp module (A).
Lift the module handle up (B).
4.
—
j
e
c
t
o
r
—
U
U
s
s
e
r
’
s
s
e
r
’
s
M
a
n
u
a
l
M
M
a
n
u
a
l
a
n
u
a
l
Pull firmly on the module han-
5.
dle to remove the lamp
module.
– 32 –
Page 39

Reverse steps 1 to 5 to install
6.
the new lamp module.
While installing, align the
lamp module with the connector and ensure it is level to
avoid damage.
Note: The lamp module must
sit securely in place and the
lamp connector must be connected properly before
tightening the screws.
D
D
D
L
P
P
r
o
j
e
c
t
o
r
–
U
s
e
r
’
s
M
a
n
u
a
l
L
P
P
r
o
j
e
c
t
o
r
–
U
s
e
r
’
s
L
P
P
r
o
j
e
c
t
o
r
–
U
M
s
e
r
’
s
M
a
n
u
a
l
a
n
u
a
l
Resetting the Lamp
After replacing the lamp, you should reset the lamp hour counter to zero. Refer to the following:
Press the MENU button to open the
1.
OSD menu.
Press the cursor ◄► button to move
2.
to the Installation II menu.
Press the cursor ▲▼ button to move
3.
down to Lamp Hour Reset.
Press the cursor ► or button.
4.
A message screen appears.
Press ▼ ▲ ◄ ► buttons to reset the
5.
lamp hour.
Press the MENU button to get back
6.
to Installation II.
– 33 –
Page 40

D
L
P
P
r
o
j
e
c
t
o
r
—
U
s
e
r
’
s
M
a
n
u
a
l
D
D
L
P
P
r
o
j
e
c
t
o
r
—
U
s
e
r
’
s
L
P
P
r
o
j
e
c
t
o
r
—
U
M
s
e
r
’
s
M
a
n
u
a
l
a
n
u
a
l
Cleaning the Projector
Cleaning the projector to remove dust and grime will help ensure trouble-free operation.
Warning:
1. Be sure to turn off and unplug the projector at least 30 minutes before cleaning. Failure to do so
could result in a severe burn.
2. Use only a dampened cloth when cleaning. Do not allow water to enter the ventilation openings
on the projector.
3. If a little water gets into the projector interior while cleaning, leave unplugged in a well-ventilated
room for several hours before using.
4. If a lot of water gets into the projector interior when cleaning, have the projector serviced.
Cleaning the Lens
You can purchase optic lens cleaner from most camera stores. Refer to the following to clean the projector lens.
1. Apply a little optic lens cleaner to a clean soft cloth. (Do not apply the cleaner directly to the lens.)
2. Lightly wipe the lens in a circular motion.
Caution:
1. Do not use abrasive cleaners or solvents.
2. To prevent discoloration or fading, avoid getting cleaner on the projector case.
Cleaning the Case
Refer to the following to clean the projector case.
1. Wipe off dust with a clean dampened cloth.
2. Moisten the cloth with warm water and mild detergent (such as used to wash dishes), and then wipe
the case.
3. Rinse all detergent from the cloth and wipe the projector again.
Caution:
To prevent discoloration or fading of the case, do not use abrasive alcohol-based cleaners.
– 34 –
Page 41

D
L
P
P
r
o
j
e
c
t
o
r
–
U
s
D
D
L
P
P
r
o
j
e
c
t
o
L
P
P
r
o
r
j
e
c
t
o
e
–
U
s
r
e
–
U
s
e
Using the Kensington® Lock
If you are concerned about security, attach the projector to a permanent object with the Kensington
slot and a security cable.
Note:
Contact your vendor for details on purchasing a suitable Kensington security cable.
The security lock corresponds to Kensington’s MicroSaver Security System. If you have any comment, contact: Kensington, 2853 Campus Drive, San Mateo, CA 94403, U.S.A. Tel: 800-535-4242,
http://www.Kensington.com.
r
’
s
M
a
n
u
a
l
r
’
s
M
r
’
s
M
a
n
u
a
l
a
n
u
a
l
– 35 –
Page 42

T
ROUBLESHOOTING
Common problems and solutions
These guidelines provide tips to deal with problems you may encounter while using the projector. If
the problem remains unsolved, contact your dealer for assistance.
Often after time spent troubleshooting, the problem is traced to something as simple as a loose connection. Check the following before proceeding to the problem-specific solutions.
• Use some other electrical device to confirm that the electrical outlet is working.
• Ensure the projector is turned on.
• Ensure all connections are securely attached.
• Ensure the attached device is turned on.
• Ensure a connected PC is not in suspending mode.
• Ensure a connected notebook computer is configured for an external display. (This is usu-
ally done by pressing an Fn-key combination on the notebook.)
Tips for Troubleshooting
In each problem-specific section, try the steps in the order suggested. This may help you to solve the
problem more quickly.
Try to pin point the problem and thus avoid replacing non-defective parts.
For example, if you replace batteries and the problem remains, put the original batteries back and go
to the next step.
Keep a record of the steps you take when troubleshooting: The information may be useful when calling for technical support or for passing on to service personnel.
– 36 –
Page 43

LED Error Messages
D
D
D
L
P
P
r
o
j
e
c
t
o
r
–
U
s
e
r
’
s
M
a
n
u
a
l
L
P
P
r
o
j
e
c
t
o
r
–
U
s
e
r
’
s
L
P
P
r
o
j
e
c
t
o
r
–
U
M
s
e
r
’
s
M
a
n
u
a
l
a
n
u
a
l
ERROR CODE MESSAGES
Over temperature 0 ON 0
Thermal break status error 4 0 0
Lamp error 5 0 0
Fan1 error 6 0 1
Fan2 error 6 0 2
Fan3 error 6 0 3
Lamp door open 7 0 0
DMD error 8 0 0
Color wheel error 9 0 0
In the event of an error, please disconnect the AC power cord and wait for one (1) minute before restarting the projector. If the Power or Ready LEDs are still blinking or the Over Temp LED is lit,
contact your service center.
POWER LED
BLINK
OVER TEMP LED
READY LED
BLINK
Image Problems
Problem: No image appears on the screen
1. Verify the settings on your notebook or desktop PC.
2. Turn off all equipment and power up again in the correct order.
Problem: The image is blurred
1. Adjust the Focus on the projector.
2. Press the Auto button on the remote control or projector.
3. Ensure the projector-to-screen distance is within the 10-meter (33-feet) specified range.
4. Check that the projector lens is clean.
Problem: The image is wider at the top or bottom (trapezoid effect)
1. Position the projector so it is as perpendicular to the screen as possible.
2. Use the Keystone button on the remote control or projector to correct the problem.
Problem: The image is reversed
Check the Projection setting on the Installation I menu of the OSD.
Problem: The image is streaked
1. Set the Frequency and Tracking settings on the Computer menu of the OSD to the de-
fault settings.
2. To ensure the problem is not caused by a connected PC’s video card, connect to another
computer.
Problem: The image is flat with no contrast
Adjust the Contrast setting on the Image menu of the OSD.
Problem: The color of the projected image does not match the source image.
Adjust the Color Temperature and Gamma settings on the Image menu of the OSD.
– 37 –
Page 44

D
L
P
P
r
o
j
e
c
t
o
r
—
U
s
e
r
’
s
M
a
n
D
D
L
P
P
r
o
j
e
c
t
o
r
—
U
s
e
r
’
L
P
P
r
o
j
e
c
t
o
r
—
U
s
s
e
r
’
s
u
M
a
n
u
M
a
n
u
Lamp Problems
Problem: There is no light from the projector
1. Check that the power cable is securely connected.
2. Ensure the power source is good by testing with another electrical device.
3. Restart the projector in the correct order and check that the Power LED is green.
4. If you have replaced the lamp recently, try resetting the lamp connections.
5. Replace the lamp module.
6. Put the old lamp back in the projector and have the projector serviced.
Problem: The lamp goes off
1. Power surges can cause the lamp to turn off. Re-plug power cord. When the Ready LED
is on, press the power button.
2. Replace the lamp module.
3. Put the old lamp back in the projector and have the projector serviced.
Remote Control Problems
Problem: The projector does not respond to the remote control
a
l
a
l
a
l
1. Direct the remote control towards remote sensor on the projector.
2. Ensure the path between remote and sensor is not obstructed.
3. Turn off any fluorescent lights in the room.
4. Check the battery polarity.
5. Replace the batteries.
6. Turn off other Infrared-enabled devices in the vicinity.
7. Have the remote control serviced.
Audio Problems
Problem: There is no sound
1. Adjust the volume on the remote control.
2. Adjust the volume of the audio source.
3. Check the audio cable connection.
4. Test the source audio output with other speakers.
5. Have the projector serviced.
Problem: The sound is distorted
1. Check the audio cable connection.
2. Test the source audio output with other speakers.
3. Have the projector serviced.
Having the Projector Serviced
If you are unable to solve the problem, you should have the projector serviced. Pack the projector in
the original carton. Include a description of the problem and a checklist of the steps you took when
trying to fix the problem: The information may be useful to service personnel. For servicing, return the
projector to the place you purchased it.
– 38 –
Page 45

Specifications
S
PECIFICATIONS
Model
Display type
Resolution
Projection distance
Projection screen size
Projection lens
Zoom ratio
Vertical keystone
correction
Projection methods
Data compatibility
SDTV/EDTV/ HDTV
Video compatibility
H-Sync
V-Sync
Safety certification
Operation temperature
DS325-JD DX325-JD
TI DMD Type X, 0.55 inches, SVGA TI DMD Type X, 0.55 inches, XGA
SVGA 800x600 Native XGA 1024x768 Native
1.5 meters ~ 10 meters
0.86 to 6.6 meters (34 to 260 inches)
Manual focus / Manual zoom
1.15:1
+/- 30 degrees
Desktop front/rear
IBM PC or compatibles (VGA, SVGA, XGA, SXGA, UXGA), Mac
480i, 576i, 480p, 576p, 720p, 1080i
NTSC/NTSC 4.43, PAL (B/G/H/I/M/N 60), SECAM
15, 31 - 70 KHz 15, 31 - 90 KHz
50 - 85 Hz
FCC-B, UL, cUL, TUV, CB, CE, GOST SABS, IRAM, MIC, C-TICK, CCC, EK
5° ~ 35°C
Dimensions
AC Input
Power consumption
Stand By
Lamp
Audio speaker
PC
Video
Audio
Security
AC Universal 100 ~ 240, Typical @ 110 VAC (100~240)/±10%
Typical 260W (standard mode); Typical 210W (ECO mode)
220 mm (W) x 71 mm (H) x 178 mm (D)
< 5 watts
Normal Mode: 200W; Eco Mode: 160W
1W / 4 ohm mono speaker
RGB
Composite video (RCA X 1)
S-Video (Mini-DIN)
Mini-jack
Kensington lock
Input connectors
PC
Video
Audio Mini-jack
Security Kensington slot
VGA
USB (Service only)
Composite video (RCAx1)
S-Video (Mini-DIN)
– 39 –
Page 46

D
L
P
P
r
o
j
e
c
t
o
r
—
U
s
e
r
’
s
M
a
n
u
a
l
D
D
L
P
P
r
o
j
e
c
t
o
r
—
U
s
e
r
’
s
L
P
P
r
o
j
e
c
t
o
r
—
U
M
s
e
r
’
s
M
a
n
u
a
l
a
n
u
a
l
Projection Distance V.S. Projection Size
Tele Wide
Distance (m) 1.34 3.58 4.47 8.94 1.54 3.09 3.86 11.58
Diagonal Size (inches) 30 80 100 200 40 80 100 300
Keystone Correction Angle
(degree)
Image Height (mm) 457 1219 1524 1864 610 1219 1524 4572
Image Width (mm) 610 1626 2032 3762 813 1626 2032 6096
A (mm) (64) (171) (213) (427) (85) (171) (213) (640)
12.3 12.3 12.3 12.3 14.2 14.2 14.2 14.2
– 40 –
Page 47

D
L
P
P
r
o
j
e
c
t
o
r
–
U
s
e
r
D
D
L
P
P
r
o
j
e
c
t
o
r
L
P
P
r
o
j
–
e
c
t
o
r
–
’
U
s
e
r
U
s
e
r
Timing Mode Table
The projector can display several resolutions. The following table outlines the resolutions that can be
displayed by the projector.
s
M
a
n
u
a
l
’
s
M
’
s
M
a
n
u
a
l
a
n
u
a
l
Signal Resolution
NTSC
PAL/SECAM
VESA
-
-
640 x 350* 31.5 70.0
640 x 350* 37.9 85.0
640 x 400* 37.9 85.0
640 x 480 31.5 60.0
640 x 480 37.9 72.0
640 x 480 37.5 75.0
640 x 480 43.3 85.0
800 x 600 35.2 56.0
800 x 600 37.9 60.0
800 x 600 48.1 72.0
800 x 600 46.9 75.0
800 x 600 53.7 85.0
H-Sync
(KHz)
15.734 60.0
15.625 50.0
V-Sync
(Hz)
Composite /
S-Video
○ - -
○ - -
- - ○
- - ○
- - ○
- - ○
- - ○
- - ○
- - ○
- - ○
- - ○
- - ○
- - ○
- - ○
Component RGB
Apple Macintosh
1024 x 768 48.4 60.0
1024 x 768 56.5 70.0
1024 x 768 60.0 75.0
1024 x 768 68.7 85.0
1440 x 900 55.6 60.0
1280 x 1024 63.98 60.0
1280 x 1024 79.98 75.0
1400 x 1050 65.3 60.0
1400 x 1050 64.7 60.0
1600 x 1200* 75.0 60.0
640 x 480 34.98 66.66
640 x 480 35.0 66.68
832 x 624 49.725 74.55
1024 x 768 60.24 75.0
1152 x 870 68.68 75.06
- - ○
- - ○
- - ○
- - ○
- - ○
- - ○
- - ○
- - ○
- - ○
- - ○
- - ○
- - ○
- - ○
- - ○
- - ○
– 41 –
Page 48

D
D
D
L
P
P
r
o
j
e
c
t
o
r
—
U
s
e
r
’
s
M
a
n
u
a
l
L
P
P
r
o
j
e
c
t
o
r
—
U
s
e
r
’
s
L
P
P
r
o
j
e
c
t
o
r
—
U
M
s
e
r
’
s
M
a
n
u
a
l
a
n
u
a
l
Signal Resolution
480i 15.734 60
SDTV
576i 15.625 50
480p 31.469 60
EDTV
576p 31.25 50
720p 37.5 50
720p 45.0 60
HDTV
1080i 33.8 60
1080i 28.1 50
○: Frequency supported
-: Frequency not supported
* : Displayable level
• The resolution of the panel for the DS325 is 800 x 600 and 1024 x 768 for the DX325. Resolution
other than native resolution may display with uneven size of text or lines.
H-Sync
(KHz)
V-Sync
(Hz)
Composite /
S-Video
- ○ -
- ○ -
- ○ -
- ○ -
- ○ -
- ○ -
- ○ -
- ○ -
Component RGB
• HDTV timing: DVD player (main source), VG828 (secondary source).
– 42 –
Page 49

Projector Dimensions
220 mm (8.6 inches)
D
D
D
L
P
P
r
o
j
e
c
t
o
r
–
U
s
e
r
’
s
M
a
n
u
a
l
L
P
P
r
o
j
e
c
t
o
r
–
U
s
e
r
’
s
L
P
P
r
o
j
e
c
t
o
r
–
U
178 mm (7 inches)
M
s
e
r
’
s
M
a
n
u
a
l
a
n
u
a
l
(2.7 inches)
71 mm
– 43 –
Page 50

R
EGULATORY COMPLIANCE
FCC Warning
This equipment has been tested and found to comply with the limits for a Class B digital device pursuant to Part 15 of the FCC Rules. These limits are designed to provide reasonable protection
against harmful interference when the equipment is operated in a commercial environment.
This equipment generates, uses, and can radiate radio frequency energy and, if not installed and
used in accordance with the instruction manual, may cause harmful interference to radio communications. Operation of this equipment in a residential area is likely to cause harmful interference in which
case the user will be required to correct the interference at his/her own expense.
Changes or modifications not expressly approved by the parties responsible for compliance could
void the user’s authority to operate the equipment.
Canada
This class B digital apparatus complies with Canadian ICES-003.
Safety Certifications
FCC-B, UL, cUL, TUV, CB, CE, GOST SABS, IRAM, MIC, C-TICK, CCC, and EK
EN 55022 Warning
This is a Class B product. In a domestic environment, it may cause radio interference, in which case
the user may be required to take adequate measures. The typical use is in a conference room, meeting room, or auditorium.
– 44 –
Page 51

English
Disposal of your old appliance
1. When this crossed-out wheeled bin symbol is attached to a product it means the product is covered by the European Directive
2002/96/EC.
2. All electrical and electronic products should be disposed of separately from the municipal waste stream via designated collection facilities appointed by the government or the local authorities.
3. The correct disposal of your old appliance will help prevent potential negative consequences for the environment and human health.
4. For more detailed information about disposal of your old appliance, please contact your city office, waste disposal service or the
shop where you purchased the product.
French
Italian
Swedish
Dutch
Élimination de votre ancien appareil
1. Ce symbole, représentant une poubelle sur roulettes barrée d'une croix, signifie que le produit est couvert par la directive
européenne 2002/96/EC.
2. Les éléments électriques et électroniques doivent être jetés séparément, dans les vide-ordures prévus à cet effet par votre
municipalité.
3. Une élimination conforme aux instructions aidera à réduire les conséquences négatives et risques éventuels pour l'environnement et la santé humaine.
4. Pour plus d'information concernant l'élimination de votre ancien appareil, veuillez contacter votre mairie, le service des ordures
ménagères ou encore la magasin où vous avez acheté ce produit.
Smaltimento delle apparecchiature obsolete
1. Quando su un prodotto è riportato il simbolo di un bidone della spazzatura barrato da una croce significa che il prodotto è coperto dalla direttiva europea 2002/96/EC.
2. Tutti i prodotti elettrici ed elettronici dovrebbero essere smaltiti separatamente rispetto alla raccolta differenziata municipale,
mediante impianti di raccolta specifici designati dal governo o dalle autorità locali.
3. Il corretto smaltimento delle apparecchiature obsolete contribuisce a prevenire possibili conseguenze negative sulla salute
umana e sull'ambiente.
4. Per informazioni più dettagliate sullo smaltimento delle apparecchiature obsolete, contattare il comune, il servizio di smaltimento
rifiuti o il negozio in cui è stato acquistato il prodotto.
Kassering av din gamla apparat
1. När den här symbolen med en överkryssad soptunna på hjul sitter på en produkt innebär det att den regleras av European
Directive 2002/96/EC.
2. Alla elektriska och elektroniska produkter bör kasseras via andra vägar än de som finns för hushållsavfall, helst via för
ändamålet avsedda uppsamlingsanläggningar som myndigheterna utser.
3. Om du kasserar din gamla apparat på rätt sätt så bidrar du till att förhindra negativa konsekvenser för miljön och människors hälsa.
4. Mer detaljerad information om kassering av din gamla apparat kan får av kommunen, renhållningsverket eller den butik där du
köpte produkten.
Uw oude toestel wegdoen
1. Als het symbool met de doorgekruiste verrijdbare afvalbak op een product staat, betekent dit dat het product valt onder de
Europese Richtlijn 2002/96/EC.
2. Elektrische en elektronische producten mogen niet worden meegegeven met het huishoudelijk afval, maar moeten worden
ingeleverd bij speciale inzamelingspunten die door de lokale of landelijke overheid zijn aangewezen.
3. De correcte verwijdering van uw oude toestel helpt negatieve gevolgen voor het milieu en de menselijke gezondheid
voorkomen.
4. Wilt u meer informatie over de verwijdering van uw oude toestel? Neem dan contact op met uw gemeente, de afvalophaaldienst
of de winkel waar u het product hebt gekocht.
Finnish
German
Danish
Vanhojen laitteiden hävittäminen
1. Tämä merkki tuotteessa tarkoittaa, että tuote kuuluu sähkö- ja elektroniikkalaiteromusta annetun EU-direktiivin 2002/96/EY
soveltamisalaan.
2. Kaikki elektroniset laitteet ovat ongelmajätettä, joten ne on toimitettava paikalliseen keräyspisteeseen.
3. Vanhan laitteen asianmukainen hävittäminen ehkäisee mahdollisia ympäristöön ja terveyteen kohdistuvia haittavaikutuksia.
4. Lisätietoa vanhan laitteen hävittämisestä saat ottamalla yhteyden paikallisiin viranomaisiin, kierrätyskeskukseen tai myymälään,
josta ostit laitteen.
Entsorgung von Altgeräten
1. Wenn dieses Symbol eines durchgestrichenen Abfalleimers auf einem Produkt angebracht ist, unterliegt dieses Produkt der
europäischen Richtlinie 2002/96/EC.
2. Alle Elektro- und Elektronik-Altgeräte müssen getrennt vom Hausmüll über dafür staatlich vorgesehenen Stellen entsorgt werden.
3. Mit der ordnungsgemäßen Entsorgung des alten Geräts vermeiden Sie Umweltschäden und eine Gefährdung der persönlichen
Gesundheit.
4. Weitere Informationen zur Entsorgung des alten Geräts erhalten Sie bei der Stadtverwaltung, beim Entsorgungsamt oder in
dem Geschäft, wo Sie das Produkt erworben haben.
Sådan smider du dit gamle apparat ud
1. Når der er et tegn med et kryds over en skraldespand, betyder det, at produktet er omfattet af EU-direktiv 2002/96/EC.
2. Alle elektriske og elektroniske produkter skal smides ud et andet sted end gennem den kommunale affaldsordning ved hjælp
af specielle indsamlingsfaciliteter, der er organiseret af staten eller de lokale myndigheder.
3. Korrekt bortskaffelse af dit gamle apparat er med til at forhindre mulige skadevirkninger på miljøet og menneskelig sundhed.
4. Mere detaljerede oplysninger om bortskaffelse af dit gamle apparat kan fås ved at kontakte dit lokale kommunekontor, renovationsselskab eller den butik, hvor du købte produktet.
Page 52

Greek
Spanish
∞fiÚÚÈ„Ë Ù˘ ·ÏÈ¿˜ Û·˜ Û˘Û΢‹˜
1. ŸЩ·У ¤У· ЪФ˚fiУ ‰И·ı¤ЩВИ ЩФ ‰‡М‚ФПФ ВУfi˜ ‰И·БЪ·ММ¤УФ˘ О¿П·ıФ˘ ·ФЪЪИММ¿ЩˆУ, ЩfiЩВ ЩФ ЪФ˚fiУ О·П‡ЩВЩ·И ·fi ЩЛУ E˘Ъˆ·˚О‹
O‰ЛБ›· 2002/96/EOK.
2. H ·fiÚÚÈ
3. H ÛˆÛÙ‹ ·fiÚÚÈ
4. °И· ИФ ПВЩФМВЪВ›˜ ПЛЪФКФЪ›В˜ Ы¯ВЩИО¿ МВ ЩЛУ ·fiЪЪИ
Cómo deshacerse de aparatos eléctricos y electrónicos viejos
1. Si en un producto aparece el símbolo de un contenedor de basura tachado, significa que éste se acoge a la Directiva
2002/96/CE.
2. Todos los aparatos eléctricos o electrónicos se deben desechar de forma distinta del servicio municipal de recogida de basura,
a través de puntos de recogida designados por el gobierno o las autoridades locales.
3. La correcta recogida y tratamiento de los dispositivos inservibles contribuye a evitar riesgos potenciales para el medio ambiente y la salud pública.
4. Para obtener más información sobre cómo deshacerse de sus aparatos eléctricos y electrónicos viejos, póngase en contacto
con su ayuntamiento, el servicio de recogida de basuras o el establecimiento donde adquirió el producto.
„
М¤Ыˆ О·ıФЪИЫМ¤УˆУ ВБО·Щ·ЫЩ¿ЫВˆУ Ы˘ППФБ‹˜ ·ФЪЪИММ¿ЩˆУ, ФИ ФФ›В˜ ¤¯Ф˘У ‰ЛМИФ˘ЪБЛıВ› В›ЩВ ·fi ЩЛУ О˘‚¤ЪУЛЫЛ ‹ ·fi ЩИ˜
ЩФИО¤˜ ·Ъ¯¤˜.
Î·È ÙËÓ ˘Á›· ÙÔ˘ ·ÓıÚÒÔ˘.
БЪ·КВ›Ф, ˘ЛЪВЫ›· ‰И¿ıВЫЛ˜ ФИОИ·ОТУ ·ФЪЪИММ¿ЩˆУ ‹ ЩФ М·Б·Н› ·fi ЩФ ФФ›Ф ·БФЪ¿Ы·ЩВ ЩФ ЪФ˚fiУ.
Л fiПˆУ ЩˆУ ЛПВОЩЪИОТУ О·И ЛПВОЩЪФУИОТУ ЪФ˚fiУЩˆУ Ъ¤ВИ У· Б›УВЩ·И ¯ˆЪИЫЩ¿ ·fi Щ· БВУИО¿ ФИОИ·О¿ ·ФЪЪ›ММ·Щ·
„
Л ЩЛ˜ ·ПИ¿˜ Ы·˜ Ы˘ЫОВ˘‹˜ ı· ‚ФЛı‹ЫВИ ЫЩЛУ ·ФЩЪФ‹ Иı·УТУ ·ЪУЛЩИОТУ Ы˘УВИТУ ˆ˜ ЪФ˜ ЩФ ВЪИ‚¿ППФÓ
„
Л ЩЛ˜ ·ПИ¿˜ Ы·˜ Ы˘ЫОВ˘‹˜, ВИОФИУˆУ‹ЫЩВ МВ ЩФ ·ЪМfi‰›Ф ЩФИОfi
Portuguese
Slovak
Czech
Croatian
Eliminação do seu antigo aparelho
1. Quando este símbolo de latão cruzado estiver afixado a um produto, significa que o produto é abrangido pela Directiva
Europeia 2002/96/EC.
2. Todos os produtos eléctricos e electrónicos devem ser eliminados separadamente do lixo doméstico através de pontos de
recolha designados, facilitados pelo governo ou autoridades locais.
3. A eliminação correcta do seu aparelho antigo ajuda a evitar potenciais consequências negativas para o ambiente e para a
saúde humana.
4. Para obter informaçõs mais detalhadas acerca da eliminação do seu aparelho antigo, contacte as autoridades locais, um
serviço de eliminação de resíduos ou a loja onde comprou o produto.
Likvidácia vበho starého prístroja
1. Keì sa na produkte nachádza tento symbol preãiarknutej smetnej nádoby s kolieskami, znamená to, Ïe dan˘ produkt
vyhovuje európskej Smernici ã. 2002/96/EC.
2. V‰etky elektrické a elektronické produkty by mali byÈ zlikvidované oddelene od komunálneho odpadu prostredníctvom na
to urãen˘ch zbern˘ch zariadení, ktoré boli ustanovené vládou alebo orgánmi miestnej správy.
3. Správnou likvidáciou star˘ch zariadení pomôÏete predchádzaÈ potenciálnym negatívnym následkom pre prostredie a
ºudské zdravie.
4. Podrobnej‰ie informácie o likvidácii star˘ch zariadení nájdete na miestnom úrade, v sluÏbe na likvidáciu odpadu alebo u
predajcu, kde ste tento produkt zakúpili.
Likvidace star˘ch spotfiebiãÛ
1. Pokud je u v˘robku uveden symbol pojízdného kontejneru v pfie‰krtnutém poli, znamená to, Ïe na v˘robek se vztahuje
smûrnice Evropské unie ãíslo 2002/96/EC.
2. V‰chny elektrické a elektronické v˘robky by mûly b˘t likvidovány oddûlenû od bûÏného komunálního odpadu
prostfiednictvím sbûrn˘ch zafiízení zfiízen˘ch za tímto úãelem vládou nebo místní samosprávou.
3. Správn˘ zpÛsob likvidace starého elektrického spotfiebiãe pomáhá zamezit moÏn˘m negativním dopadÛm na Ïivotní
prostfiedí a zdraví.
4. Bliωí informace o likvidaci starého spotfiebiãe získáte u místní samosprávy, ve sbûrném zafiízení nebo v obchodû, ve
kterém jste v˘robek zakoupili.
Uklanjanje starog aparata
1. Ako se na proizvodu nalazi simbol prekriÏene kante za smeçe, to znaãi da je proizvod pokriven europskom direktivom
2002/96/EC.
2. Elektriãni i elektronski proizvodi ne smiju se odlagati zajedno s komunalnim otpadom, veç u posebna odlagali‰ta koja je
odredila vlada ili lokalne vlasti.
3. Pravilno odlaganje starog proizvoda spreãit ãe potencijalne negativne posljedice po okoli‰ i zdravlje ljudi.
4. Podrobnije informacije o odlaganju starog proizvoda potraÏite u gradskom uredu, sluÏbi za odlaganje otpada ili u trgovini
u kojoj ste kupili proizvod.
Hungarian
Polish
Régi eszközök ártalmatlanítása
1. A termékhez csatolt áthúzott, kerekes szeméttároló jel jelöli, hogy a termék a 2002/96/EC EU-direktíva hatálya alá esik.
2. Minden elektromos és elektronikai terméket a lakossági hulladéktól elkülönítve kell begyüjteni, a kormány vagy az önkormányzatok által
kijelölt begyüjtö eszközök használatával.
3. Régi eszközeinek megfelelö ártalmatlanítása segíthet megelözni az esetleges egészségre vagy környezetre ártalmas hatásokat.
4. Ha több információra van szüksége régi eszközeinek ártalmatlanításával kapcsolatban, tanulmányozza a vonatkozó környezetvédelmi szabályokat, vagy lépjen kapcsolatba az üzlettel, ahol a terméket vásárolta.
Utylizacja starych urzàdzeƒ
1. Kiedy do produktu do∏àczony jest niniejszy przekreÊlony symbol ko∏owego pojemnika na Êmieci, oznacza to, ˝e produkt
jest obj´ty dyrektywà 2002/96/EC.
2. Wszystkie elektryczne i elektroniczne produkty powinny byç utylizowane niezale˝nie od odpadów miejskich, z wykorzystaniem przeznaczonych do tego miejsc sk∏adowania wskazanych przez rzàd lub miejscowe w∏adze.
3. W∏aÊciwy sposób utylizacji starego urzàdzenia pomo˝e zapobiec potencjalnie negatywnemu wp∏ywowi na zdrowie i
Êrodowisko.
4. Aby uzyskaç wi´cej informacji o sposobach utylizacji starych urzàdzeƒ, nale˝y skontaktowaç si´ z w∏adzami lokalnymi,
przedsi´biorstwem zajmujàcym si´ utylizacjà odpadów lub sklepem, w którym produkt zosta∏ kupiony.
 Loading...