

LG DLE0332W, DLG5932W, DLG5932S, DLG2532W, DLG2511W Owner’s Manual
...
DLE5911W
DLE2511W
andGasD
DLG5911W
DLG2511W
Thank you for buying an LG dryer.
Please read your owner's manual carefully, as it provides
instructions on safe installation, use, and maintenance.
Retain it for fialure reference and record the model and serial
Jm_rs of your dryer.
L
_mpletamente AuIomAti_ _.
cuidado_mente, ya que
bre la _ura instalaci6n, manejo
futuras refe4_encias,archive
secadora.
SAFETY INSTRUCTIONS .............................................................................................................................................. 2-5
BEFORE USING YOUR NEW DRYER .........................................................................................................................................................2
IMPORTANT SAFETY iNSTRUCTiONS ...................................................................................................................... 3
LG DRYER WARRANTY _.....................................................................................................................................................................................5
INSTALLATION INSTRUCTIONS ................................................................................................................................ 6-21
iNSTALLiNG THE DRYER ..................................................................................................................................................................................7
DOOR REVERSAL PROCEDURE ............................................................................................................................ 10
MANUFACTURED (MOBILE) HOME iNSTALLATiON ...................................................................................................................11
ELECTRICAL REQUIREMENTS - ELECTRICAL DRYER ........................................................................................ 12
ELECTRICAL REQUIREMENTS - GAS DRYER ....................................................................................................................................16
GAS REQUIREMENT .......................................................................................................................................... 18
EXHAUST REQUIREMENTS ............................................................................................................................................................................19
OPERATION INSTRUCTIONS ................................................................................................................................... 22-28
USER • MAiN • TENANCE .................................................................................................................................................................................22
FEATURES AND BENEFITS ...................................................................................................................................... 23
TROUBLESHOOTING TIPS ...................................................................................................................................... _-_
BEFORE YOU CALL FOR SERVICE ......................................................................................................................... 28
CUSTOMER SERVICE ............................................................................................................................................... _-31
SERVICE TELEPHONE NUMBER ............................................................................................................................. 30
LG DRYER LiMiTED WARRANTY. ........................................................................................... 31
Please read this manual Itwi]] help you install and operate
your new LG dryer in the safest and most economical way.
if you need more information about the care and operation of
LG appliances, call your nearest LG store. You will need
the complete model and serial numbers when requesting
information.
Your dryer's model and serial numbers are located on the
Mode] and Seria] Number Plate.
LG SERVICE Call : 1-877-714-7486
Use the space below to record the model number
and seria] number of your new LG dryer.
Model No.
Serial No.
Date of Purchase
2
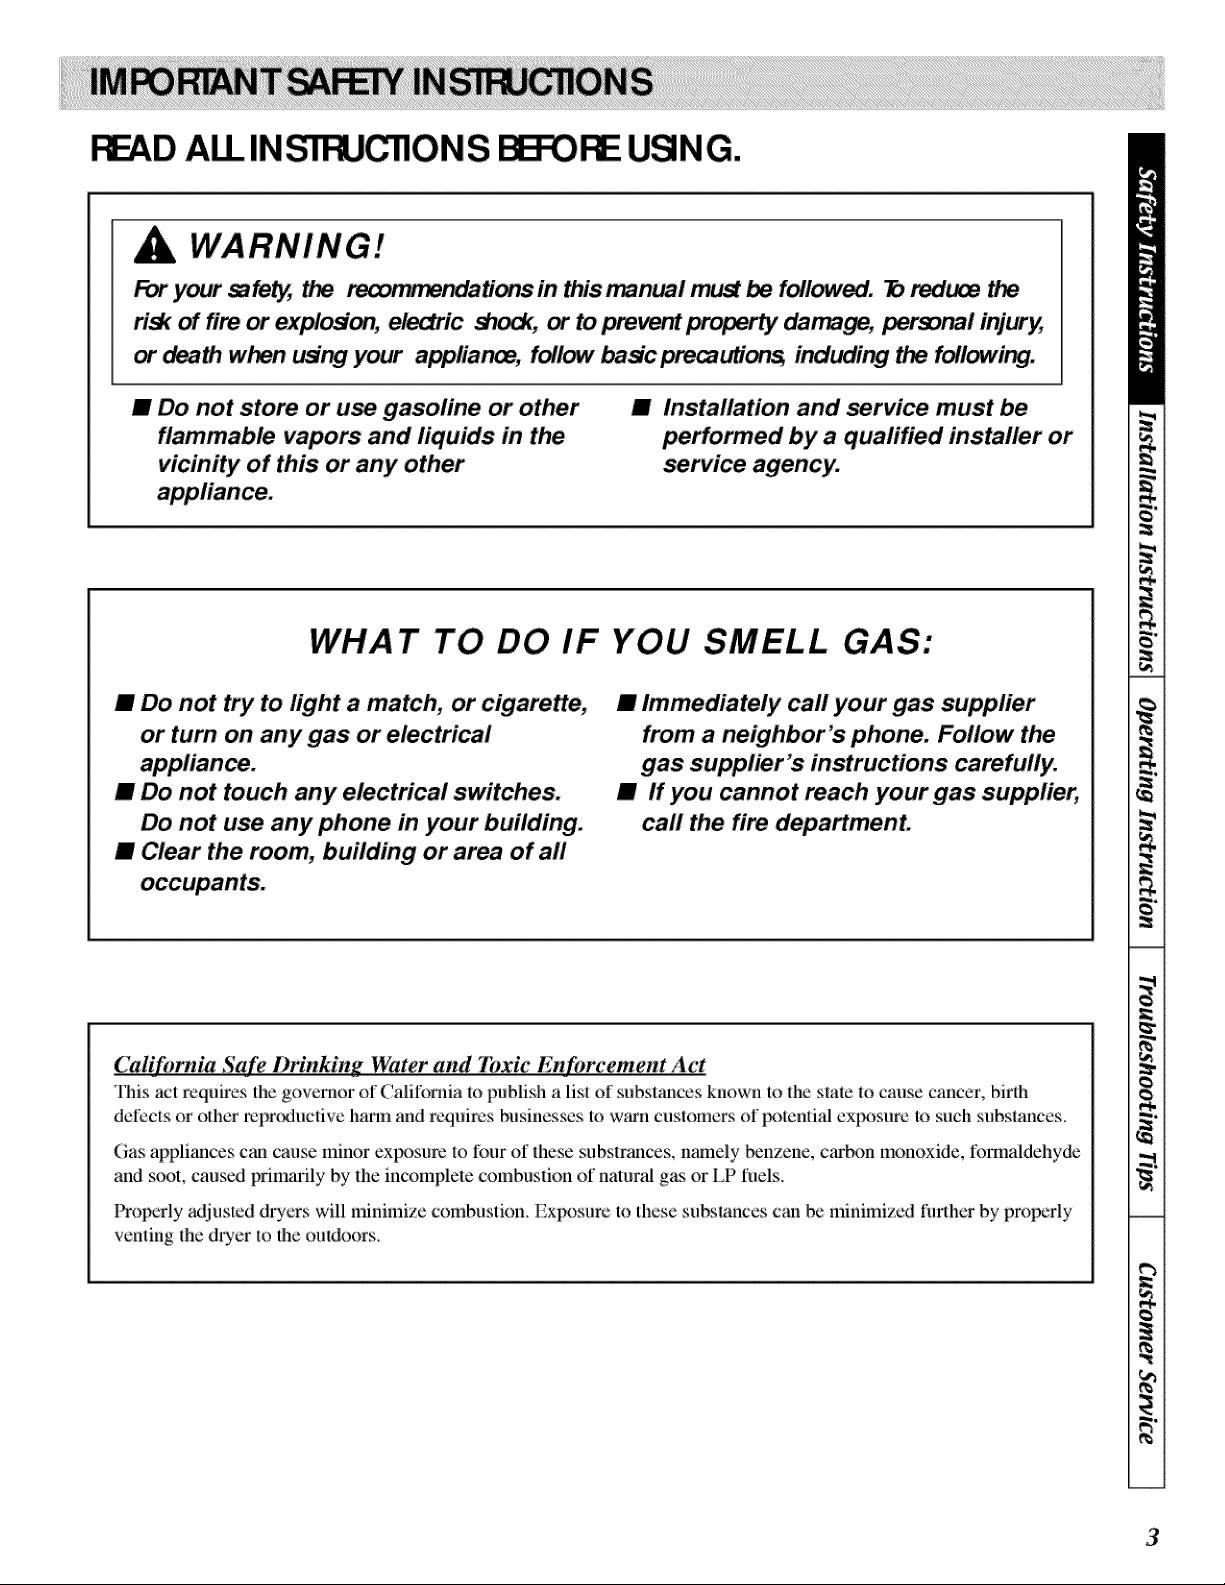
ALLINSTFIJ ONS I:E UgNG.
WARNING!
your mfety, tl_ tions in this n_n_l m'_st _ followed. Toreduoe the
risk of fire _ sh_, _ to _vent datrmge, persop._l injury,
or _th when using you,, applianoa, follow basic precaution_ including the following.
JI Do not store or u_ gasoline or other
flammable vapors and liquids in the
vicinity of this or any other
WHAT TO DO IF YOU SMELL GAS:
m Do not try to light a match, or cigarette,
or turn on any gas or electrical
JI Do not touch any electrical switches.
Do not use any phone in your building.
JI Clear the room, building or area of all
JI Installation and _rvice must be
performed by a qualified installer or
service agency.
il Immediately call your gas supplier
from a neighbor _ phone. _llow the
gas supplier's instructions carefully.
JI If you cannot reach your gas supplier,
call the fire departmenL
rnia Safe Drinking _lter and Ibxic ement Act
This act rcquircs the governor of California u) publish a list of substanccs known to thc s|ate u) cause canccr, birlh
defects or other mpr_xluctive harm and requires busines_s to warn customers of potcnfial ext×)sure to such substances.
(;as appliances ca'l cause minor exit)sure m four of thcse subs|rances, namely benzene, carbon monoxide, fonnaldehyde
and _)ol, cau_:d primarily by the incomplete combuslion of natural gas or LP fuels.
ProF_rly adjustcd drycrs will minimize combustion. ExF_)surc m these snNlances can be minimized further by Ox)perly
venting _le dqer to the outdoors.
3

IMPORTANT SAFETY INSTRUCTIONS
WARNING - "I_,)reduce the risk of fire, electric Sh(_zk, or
i_my' to t_rsons when using your _)pliance, follow basic
precautions, includirig the lbllowirig:
I) Re;gJ all instructions beli)re using the appliance.
2)
Do not dry a_:icles that have come into contact with
gasoline, dry=clcarfing _)lvents, or other flammable or
explosivc substances, as they give off w_po-_ Gmt could
ignite or expk_de.
3)
Do not allow chil&'en to play on or in the appliance. Close
supervision of children is necessary when using the
appliance.
4) Beti}re the appliance is removed ti'om service or
di_arded, remove the d(×)r to the drying compartment.
5) Do not rcach into _ae appliance if the drum is moving.
6) Do not install or store lhis appli_mce where it will be
exposed to the weather.
7) Do nol: tamt_r with controls.
SAVE THESE INSTRUCTIONS
For a grounded, cord-connected appliance:
GROUNDING INSTRUCTIONS
This appliance must _ grom'lded. In the event of
maltunction o:r breakdown, grounding will reduce the risk of
electric shock by t)roviding a path of least :msist_mce for
electric curJ'ent. This appliance is equipped with a cord
having _mequipment-grounding couductor _md a gronnding
plug. The plug must _ plumed iuto an appropria|e ou|let
that is prot_rly installed ;rod grounded in accordalme with all
local c{_des and ordinances.
WARNING - ImprotK:r conneclion of the equipment-
gr(mnding condncmr can result in a risk of electric shock.
Check with a qualified electrician or service Fmrsxm if you
are in doubt as to whether the appliance is properly
grounded.
8) Do not rcpair or replace any part of the appliance or
attempt any servicing unless st'_cifically recommend_ in
the user-maintenance instructions.
9) Do not use heat to dry articles containing tkmm mbl_r or
similarly textured rnb_cr-like mate:rials.
10) Clean lint s_:reen _l_orc or alter each load.
11)
Keep a_2a around the exhaust opening and adjacent
snrroundi_vg areas five from ihe accmnnlation of lint,
dust, and di_l.
12)
The interior of the _pliance and exhaust duct should be
cleaned periodically by qu;dified service personnel.
13)
J-N)not place items cxt×)sed m cooking oils in your dryer.
Items contaminat_ with cooking oils may contribute to
a chemical _actiou that could cau_a_ a load to catch tim.
14) Do not use fabric sofiners or products to eliminate static
unless recommended by the mmmtimmrer of file ti_bric
soflner or product.
Do not modify" the plug provided with the appliance: if it will
not fit the ontleL have a proper outlet installed by, a qualified
electrician.
For a permanently connected appliance:
GROI1NIIING INSTRUCTIONS
This appliance must Nz connected to a grounded metal
_rmanent wMng system. Alternatively, an equipment-
gr(mnding conductor must _ run with the circuit conductors
and connected to the equipment-grounding terminal or lead
on the appli_mce.
4
_1 One Year Warra_ on M_ni_l a_ Be_r_l
use, all warranty coverage is effective for only 90
days.
For one year from the date of purchase, if this dryer is
installed and operated according to the instructions in
this manual LG will repair or replace any of its
mechanical or electrical parts if they are defective in
material or workmanship.
NO_: Exhausting your dryer with a plastic vent may
void this warranty. Refer to section on Dryer Exhaust
Warranty _i_n
Ifthe dryer is subjected to other than private family
Warranty service is available by contacting your
nearest LG Service Center in the United States.
www.LGESERVICE.COM
This waranty applies only while this dryer is in use in
the United States.
This warranty gives you specific legal rights, and you
may also have other rights which vary from state to
state.
& You,A vioe
S_aple sales dip _ canceled _ here.
Proof of the original tmrchase date is uceded to oblaiu service under the wammty.
_R YOUR _O_S
Write _ _ ap.d serial numbers here:
#
#
_D THIS MANb¼L
Inside you will find many helpful hints on how to use and maintain ),'ourdryer properly. Just a little
t)reven|ive care on your part can save you a great deal of time _mdmoney over the life of your dryer.
IF YOU N_
You'll find many answers to comm(m problems in the Troublesh(×_fing Tit)s section. It"you review our
chaal of Troublesh(×)ting Tips first, you may no! need to call lk)r servicc.
If you do need _rvice, yon can relax knowing hel t) is only a phone call away. A list of toll-fi'ee customer
service nmnbers is includcd in the back section. In the IJ.S., you can always call the I11; Answer Center.
(SERVICE Call No. 1-877-714-7486)
5
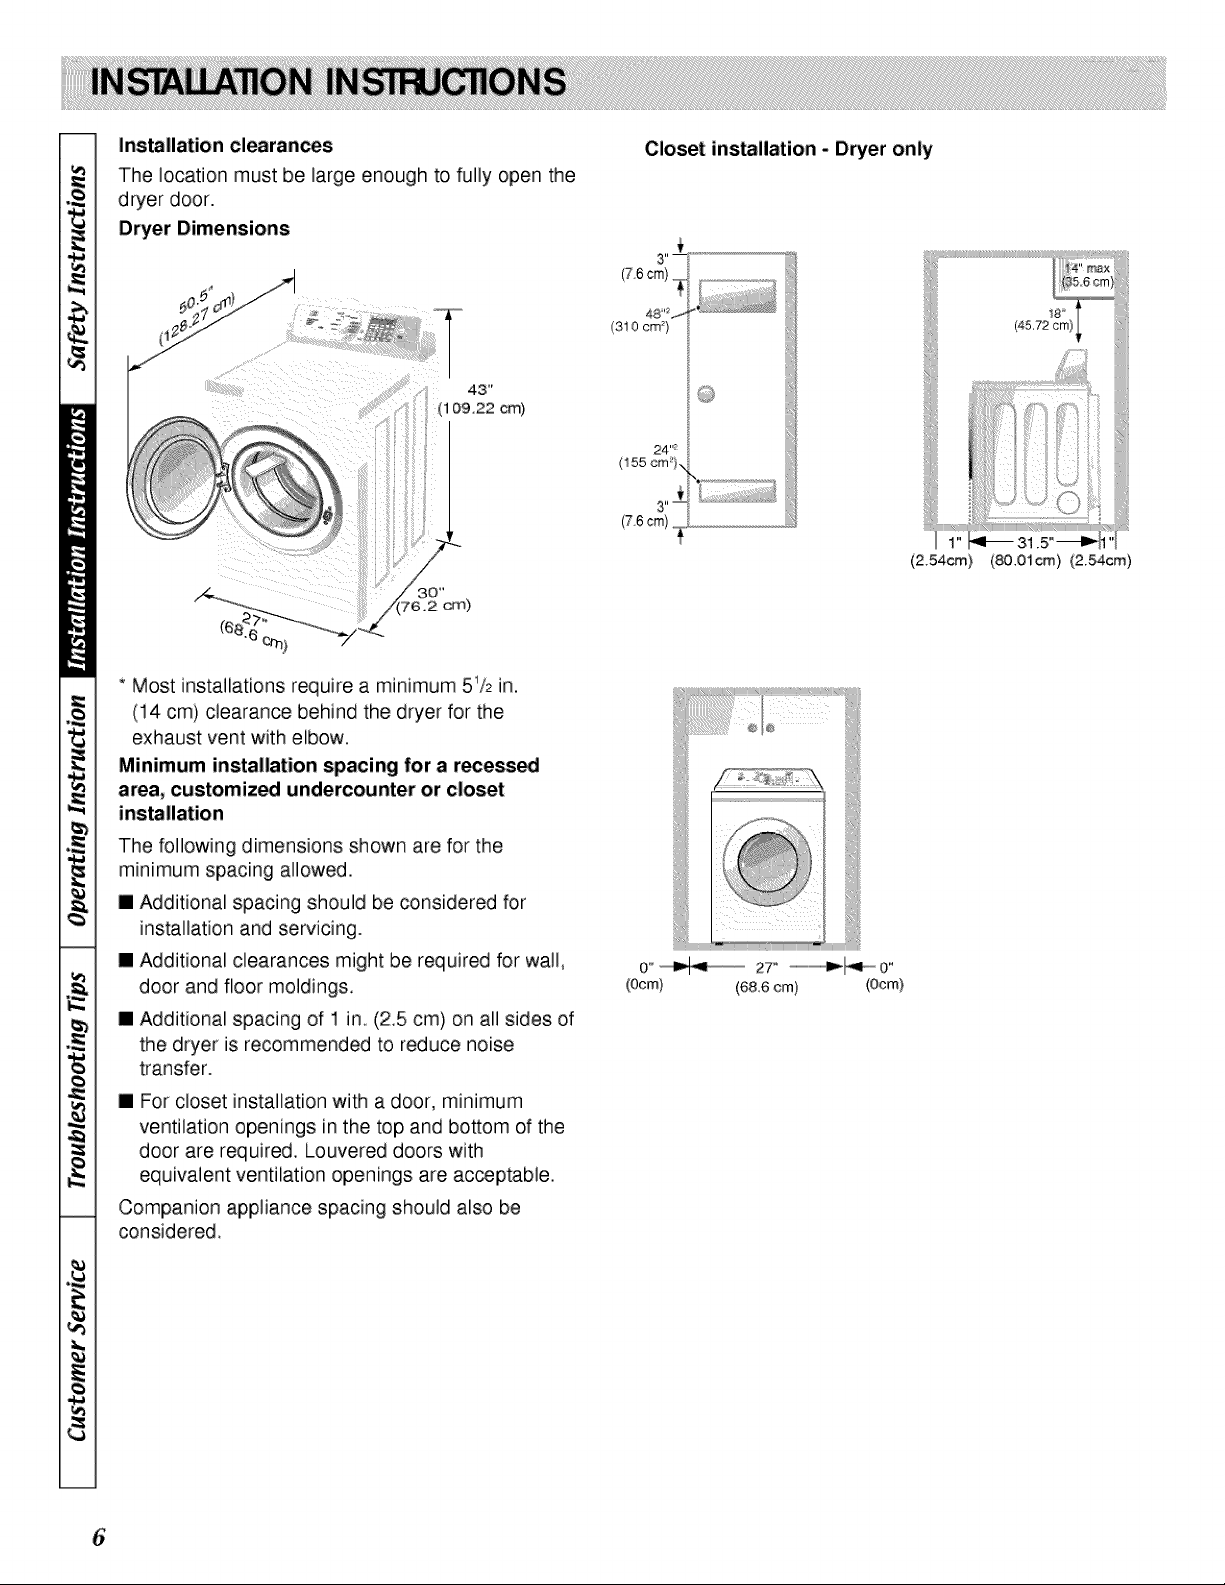
Installation clearances
The location must be large enough to fully open the
dryer door.
Dryer Dimensions
(1 09.22 cm)
t_
i
* Most installations require a minimum 5_/=in.
(14 cm) clearance behind the dryer for the
exhaust vent with elbow.
Minimum installation spacing for a r_ess_
area, customized undercounter or closet
installation
Closet installation - Dryer only
(310 era}
43 _
(76cm}....
(2,54cm) (80,01cm} (2,54cm)
The following dimensions shown are for the
minimum spacing allowed.
[] Additional spacing should be considered for
installation and servicing.
[] Additional clearances might be required for wall,
door and floor moldings,
[] Additional spacing of 1 in, (2,5 cm) on all sides of
the dryer is recommended to reduce noise
transfer.
[] For closet installation with a door, minimum
ventilation openings in the top and bottom of the
door are required, Louvered doors with
equivalent ventilation openings are acceptable.
Companion appliance spacing should also be
considered.
o"_ 27......................................._ o"
(Ocm) (68.6 cm) (Ocm)
6

Step I : Position and Level the Dryer
l:or fu_her assistance refer to section on Location
Requirements.
Place the dryer in lx)sition, and adjust the legs until the
dryer is level :fron_side:to side and fi_mt to back,
[vvel :fl_×_r: Maximum slope under emire dwcr should
not be more tlmn 2.5cm (1 inch), If slope is greater than
2.5 cm (I inch), clothes may not tumNe proFvfly and
_mtomatic sensor cycles may not ot_mte correctly if
dryer is not level,
Step 2 : Conn_t Dryer Exhaust System
For t!urther assistance refer to _ctions {m Ix)cation
Requirements and Dryer Exhaust Requirements.
A clothes dryer produces combustible lint.
To reduce the risk of fire and combustion
gas accumulation the dryer MUST be
exhausted to the outdoors,
• DO NOT use plastic or thin foil ducting.
• Locate dryer so exhaust duct is as short as
possible.
• Be certain old ducts are cleaned before installing
your new dryer.
• Use 4" (10.2 cm) diameter rigid or flexible metal
duct.
• The male end of each section of duct must point
away from the dryer.
• Use as few elbows as possible.
• Use duct tape on all duct joints.
• Ductwork that runs through unheated areas must
be insulated to help reduce condensation and
lint build-up on pipe walls.
• Failure to exhaust dryer properly will void
NOTE : Venting materials are not supplit_l with the
dryer (obtain locally).
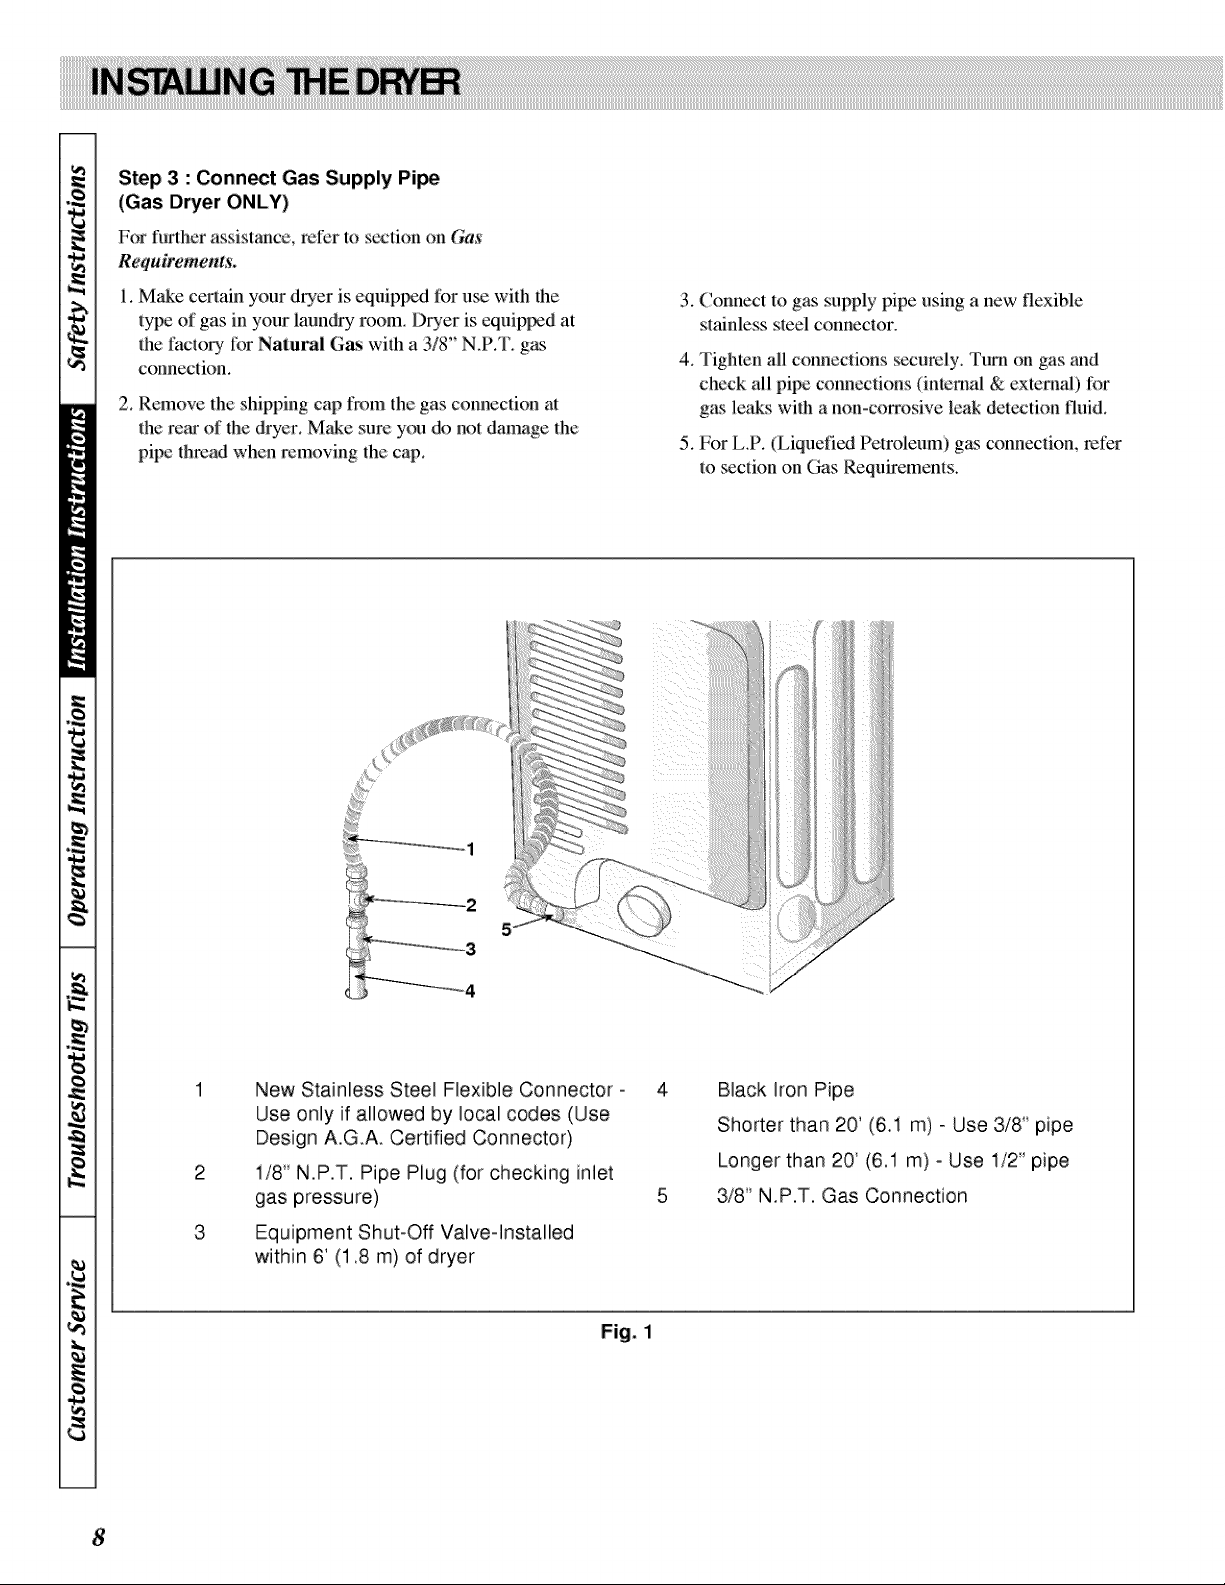
Step 3 : Conn_t Gas Supply Pi_
(Gas Dryer ONLY)
For l!u_lherassistance, relL_rto _ction on Gas
Requirements.
I. Make ceri:ain your dryer is equippvd fi_ruse with lhe
l:ypeof gas in your laundry room_ Dryer is equiplyad at
the tTml:OD,:liarNaiural Gas with a 3/8" N.P.T. g_s
connection.
2. Remove the shipping cap fix)m ihe gas connection at
ihe rear of the dryer. Make sure you do not damage the
pipe i:h:madwhen removing the cap.
i
I
3. (onnect to gas supply pipe using a new flexible
stainless sled connector.
4. Tighten all conneclious _:curely. 'l'um on gas and
check all pipe couneclions (internal & external) for
g_s leaks wilh a non-corrosive leak deiectkm fluid.
5. For L.P. (Liquefied Pe:troleum) gas conneciion, refer
l:osection on Gas Requiremems.
New Stainless Steel Flexible Connector -
Use only if allowed by local codes (Use
Design A.G.A. Certified Connector)
2
i/8" N.P.T. Pipe Plug (for checking inlet
gas pressure)
3
_a
Equipment Shut-Off Valve-Installed
within 6' (1.8 m) of dryer
Fig. 1
Black Iron Pipe
Shorter than 20' (6A m) - Use 318" pipe
Longer than 20' (6.1 m) - Use 1/2" pipe
3/8" N.P.T. Gas Connection
8
Step 4: (Electric Dryer Only) Connect
Electrical Plug
For furlher assistance refer to section on Electrical
Requirements.
IMPORTANT : U_ only a new U.L. li_t,d No. 10
(copper wire only) three conductor _)wer supply
cord kit rat,._'l 240 Volts (minimum)30 Amper¢_
and labeled a:ssuitable for use in a clothes dryer.
NOTE : For more de_iled information on
conn_ction three=wire or four-wire plugs, refer to
s_etion on Fdectric Dryer Fdectrical Requirements.
NOTE : Four-wire cord is required for nmbile
homes or where c_'les do not __it grounding
Step 5: Wipe Out Inside of Dryer
Belbre using dryer for the fi_t timc, use an all-purpo_
clcancr, or a detc_Nent and water _lufion, and a damp
cloth to remove shipping dust from inside the drycr
drt|lll.
Heat Source Check
El_tric Dryers
Close the loading door and start the dryer in a heat
setting (ml_r to the ()perating Inslructions suppli_ with
the dryer). After the d_'cr has operated l;:_rfllree minutes,
the exhaust air or exhaust pipe should bc warm.
Gas Dryers
Close the loading door, start the dryer in a heat _tting
(rct;cr to the Operating Instructions supplied with the
dryer); the dryer will start, the igniter will glow red and
the main burner will ignite.
IMPORTANT : If all air is not purged out of the gas
line, the ga_sigmiter may go off before gas it is ignited.
If this happens, aher approximately two minutes the
igniter will ag_n attempt ga_ ignition.
Step 6: Plug In the Dryer
Refer to section on Electrical Requirements, ;rod
COlmectthe dryer to an electrical l_)wer sxmrce.
Step 7: Check Installation
9

The door on this dryer is completely reve_ible.
To reverse d(×>rpr(meed as IMlows:
_ _ii__i_i_!i _iili_i
t_
I
1. Remove screw & exhaust duct.
. Detach and remove the bottom, left or right
side knockout as desired.
PORTION"A_ i
@
®
O. Reconnect the new duct[11 in(28cm)] to
the blower housing, and Fixing the duct to
the base.
4, Pro-assemble 4" elbow with 4" duct.
Wrap duct tape around joint.
DUCT
TAPE
_a
5. Insert duct assembly, elbow first, through the
side opening and connect the elbow to the
dryer internal duct.
DUCT
TAPE
...........i
1 0
 Loading...