

LG DH18NS50 User Manual [en, de, fr]
DH18NS50
To enjoy fully all the features and functions of your product, please read this owner’s manual
carefully and completely.
www.lg.com
2
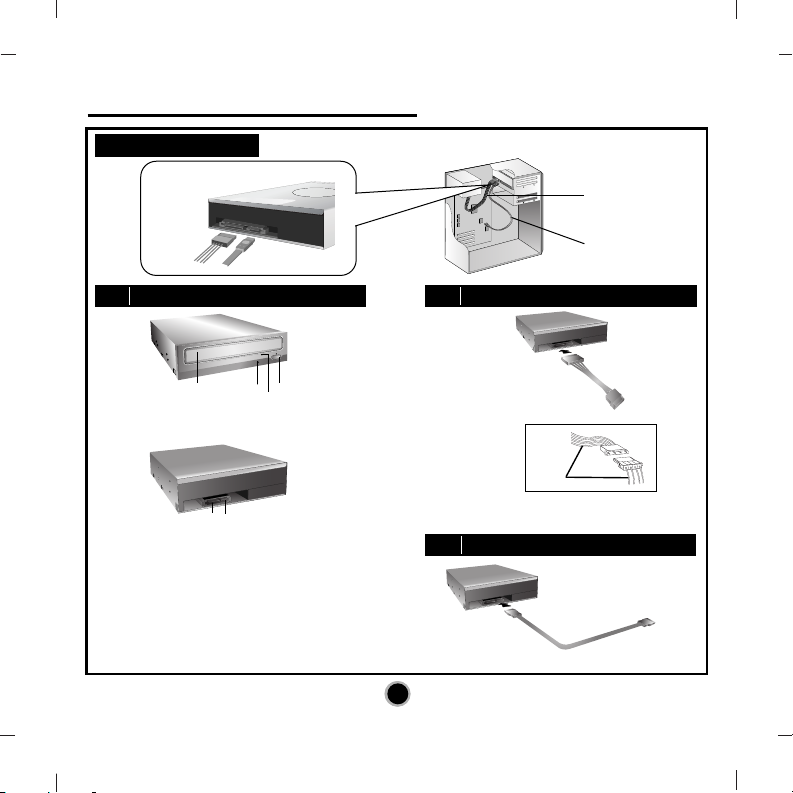
Internal Serial ATA Drive
2
❶
❷
❸
❶ ❷
❹
Red
• Connect to the SATA connector on the PC's Motherboard.
PC Connection
A
Location and Function of Controls
C
Connecting the SATA Data Cable
B
Connecting the SATA Power Cable
Data cable
Power cable
Data cable
Power
cable
• Connect to the power connector of the PC.

English
Features
• Serial ATA interface
• Data transfer rate (DVD-ROM max-18X-speed,
CD-ROM max-48X-speed)
• Motorized tray loading system
• Designed for internal mounting
• Emergency eject support
• Read compatible for DVD-R, DVD+R, DVD+R DL,
DVD-R DL, DVD-RW, DVD+RW & DVD-RAM discs
• Supports Region playback control Phase II
System Requirements*
• Pentium IV 2.4 GHz or higher
• Motherboard that supports Serial ATA
interface.
• A minimum of 256 MB memory
(higher recommended).
• A suitable free standard 13.34 cm (5
1
/4”) internal
drive bay.
• OS: Windows XP, Vista, Windows 7, Windows 8.
* Please note: Certain software (i.e. particularly
those including Video playback) may require a
considerably increased specification PC to give
acceptable results. While this DVD-ROM drive can
read DVD-video discs, decoding them to display on
your pc’s monitor requires separate MPEG decoding
that is done by separate hardware (either an MPEG
decoder card or MPEG decoding done by your video
card), or separate software that you install to do
MPEG decoding. These items are separate and are
not included with this DVD-ROM drive.
Location and Function of Controls
Front Panel
1. Disc Tray
2. Drive activity indicator
3. Emergency Eject Hole
4. Stop/Eject Button
Rear Panel
1. SATA Power connector (15pin).
2. SATA Data connector (7pin).
A
3
4
Installing the Drive
Before installing the drive, turn off the system power.
Follow the steps below to install the DVD-ROM drive:
1. Remove the cover from your computer system.
Refer to manual for the computer for details about
removing the cover.
2. Mounting the Drive
• Remove the a 51/4″ drive bay panel from the
computer. Refer to the manual for the computer
for details.
• Insert the drive unit into the bay. Do not apply
excessive pressure to the cables inside the
computer.
• Secure the drive with the screws. If there is not
much space behind the drive,
connect the SATA and other cables before
securing the drive.
3. PC Connection
The DVD-ROM drive connects to the motherboard
of the host computer using a SATA interface
cable.
• Connecting the SATA Power Cable
Connect the power cable so the projection of the
cable connector side to come to the left side.
Be careful not to connect upside down.
• Connecting the SATA Data Cable
Connect the data cable. Be careful not to connect
upside down.
4. When the installation of the drive unit is complete,
replace the computer cover.
5. Reconnect the computer power cord and turn on the
computer.
Device Drivers
When using Windows XP, Vista, Windows 7 or
Windows 8 the installation of any software driver or
special device is not required.
For Windows XP Users
[ In order to ensure normal drive operation, please
check the following:
• The drive is displayed in
Windows XP : [Control Panel]-[System][Hardware]-[Device Manager][DVD/CD-ROM-Drive]
• 32-bit is displayed in
[control panel]-[system]-[performance]
[ If the drive is not recognized by your computer,
please check the following items.
• If an indicator is displayed on the IDE
controller in [control panel]-[system]-[device
manager]-[harddisk controller], you will need to
contact your PC’s manufacturer or the motherboard’s manufacturer and get the appropriate IDE
controller driver.
[ Run ADD NEW HARDWARE in Control Panel to let
the PC search again for the new device.
CB
English
455
How to Use the Discs
When using CD-ROM discs, DVD-ROM discs, CD-R
discs or CD-RW discs, don’t attach any stickers or
labels to the discs. Using discs with them attached not
only causes read and write errors, but data on the disc
may be lost due to damage to the disc itself.
The Discs in this unit operate at a very high speed!
DO NOT use damaged, cracked or warped discs.
The drive’s optical unit may be damaged if they break.
DO NOT use non-standard discs.
NON-standard discs may not play or store data properly.
Non-standard discs are any discs that are not the
standard 12 cm CD type discs.
This includes Sony
Walkman™ discs, non-circular discs including promotional,
business card discs, and other unusual discs.
Notes on CD-RW/DVD-RW discs
This product can read CD-RW/DVD-RW disc data.
Note the following:
- A little longer time is needed to sense a
CD-RW/ DVD-RW disc when the operation starts,
compared with standard CD-ROM/ DVD-ROM discs.
- Since playback signal level of CD-RW/
DVD-RW is lower than the replicated CD/DVD discs,
reading speed of those discs is lower than that of the
replicated discs to ensure data reading.
- Blank discs, discs that you failed to write data, or
discs that session close processing has not been
made, cannot be used.
- Operation may not start, or the data may not be read
under the following conditions:
The quality of the recorded signal has deteriorated
due to the dirt or scratches on the disc, or frequently
rewritten discs. If the drive fails to read the disc, open
the disc drawer, check the data side of the disc (side
opposite the label side) for dust or scratches, and
reinsert the disc and close the drawer to try to read
the disc again
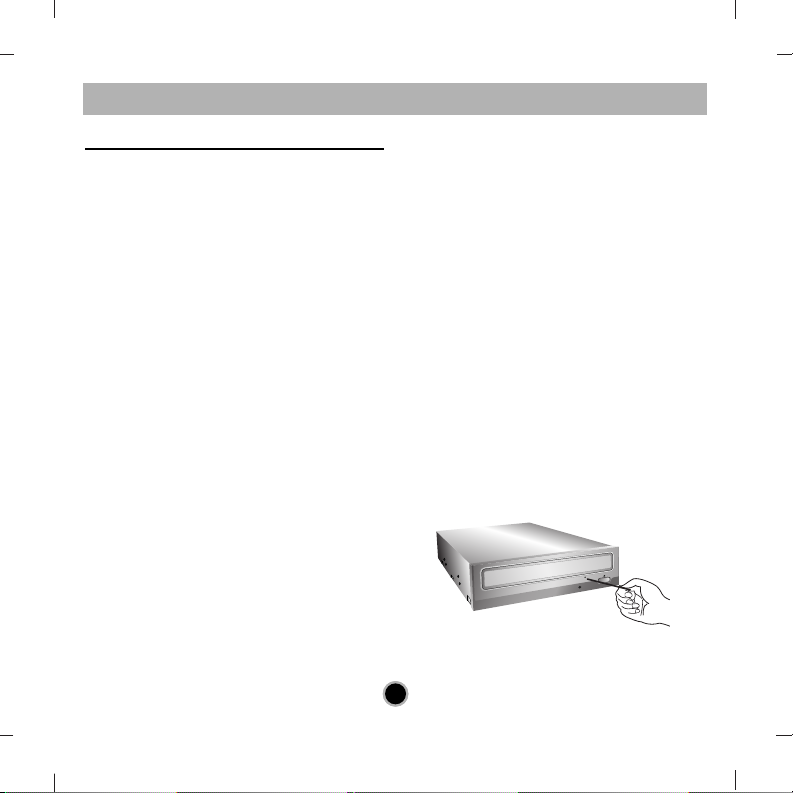
Emergency Eject
This drive has a feature that allows the CD to be
ejected manually if necessary in an emergency, such
as failure of the drive or a power outage.
NOTE: Don’t use this feature except in an emergency.
1) Turn the power to OFF.
2) Poke a fine-tipped object (such as a straightened
heavy duty paper clip) into the small hole above the
eject button.
The front door will pop open and the disk tray will
come partway out.
3) Pull the front door to open it all the way, then grip the
disc tray between thumb and forefinger and gently
pull it straight out.
NOTE: This feature is a last measure to be used
only in an emergency. Using it excessively will cause
malfunction. If you cannot get a good grip on the disc
tray with your fingers, use a steel binder clip or spring
clamp to pull it out.
English
 Loading...