

Page 1
A
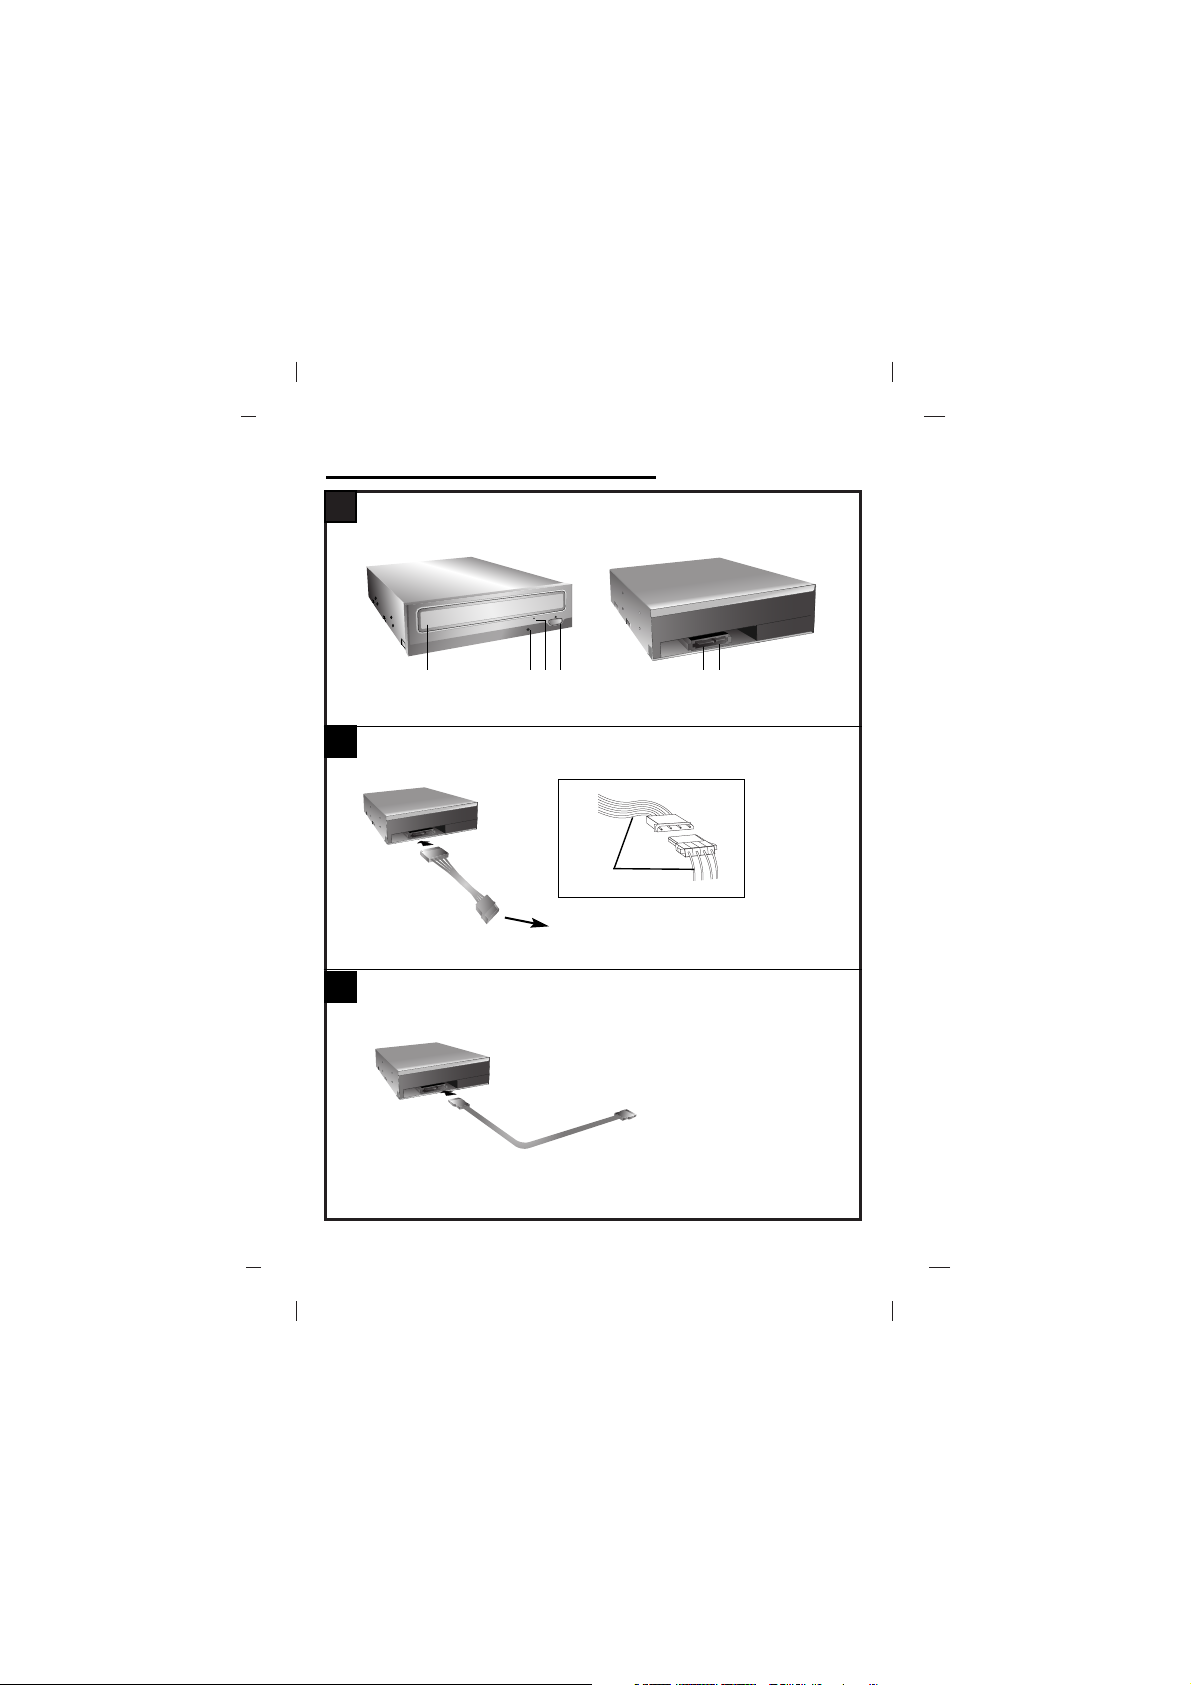
Internal Serial ATA Drive
❶
B
C
❷ ❸
❶ ❷
❹
• Connect to the power connector of the PC.
Red
Connecting the SATA Power Cable
Connecting the SATA Data Cable
• Connect to the SATA connector on
the PC's Motherboard.
Location and Function of Controls
Page 2

English
Features
• Serial ATA interface
• Data transfer rate (DVD-ROM max-16Xspeed: 22,100KB/sec, CD-ROM max-52Xspeed : 7,800KB/sec)
• Motorized tray loading system
• Designed for internal mounting
• Emergency eject support
• Read compatible for DVD-R, DVD+R,
DVD+R DL, DVD-R DL, DVD-RW,
DVD+RW & DVD-RAM discs
• Supports Region playback control Phase II
System Requirements*
• IBM PC AT or compatible, Pentium-266MHz
processor or higher (higher recommended).
• Motherboard that supports Serial ATA
interface.
•Aminimum of 64MB memory
(higher recommended).
•Asuitable free standard 5
1/
4”
internal drive
bay.
• OS: Windows 2000, XP, Vista.
* Please note: Certain software (i.e. particularly
those including Video playback) may require a
considerably increased specification PC to
give acceptable results. While this DVD-ROM
drive can read DVD-video discs, decoding
them to display on your pc’s monitor requires
separate MPEG decoding that is done by
separate hardware (either an MPEG decoder
card or MPEG decoding done by your video
card), or separate software that you install to
do MPEG decoding. These items are separate and are not included with this DVD-ROM
drive.
Location and Function of
Controls
Front Panel
1. Disc Tray
2. Drive activity indicator
3. Emergency Eject Hole
4. Stop/Eject Button
Rear Panel
1. SATA Power connector (15pin).
2. SATA Data connector (7pin).
A
Page 3

Installing the Drive
Before installing the drive, turn off the system
power. Follow the steps below to install the
DVD-ROM drive:
1. Remove the cover from your computer
system. Refer to manual for the computer
for details about removing the cover.
2. Mounting the Drive
• Remove the a 51/4″ drive bay panel from
the computer. Refer to the manual for the
computer for details.
• Insert the drive unit into the bay. Do not
apply excessive pressure to the cables
inside the computer.
• Secure the drive with the screws. If there is
not much space behind the drive,
connect the SATA and other cables before
securing the drive.
3. PC Connection
The DVD-ROM drive connects to the
motherboard of the host computer using a
SATA interface cable.
• Connecting the SATA Power Cable
Connect the power cable so the projection
of the cable connector side to come to the
left side. Be careful not to connect upside
down.
• Connecting the SATA Data Cable
Connect the data cable. Be careful not to
connect upside down.
4. When the installation of the drive unit is
complete, replace the computer cover.
5. Reconnect the computer power cord and
turn on the computer.
Device Drivers
When using Windows 2000 Pro, XP or Vista,
the installation of any software driver or
special device is not required.
The DOS and Windows 3.1 users can
download the DOS Device drivers anytime
via internet.
For your information, please consult the
following internet sites:
http//www. lgsevice.com
For Windows 2000 Pro/XP Users
[ In order to ensure normal drive operation,
please check the following:
• The drive is displayed in
Windows 2000 Pro/XP : [Control Panel][System]-[Hardware]-[Device Manager][DVD/CD-ROM-Drive]
• 32-bit is displayed in
[control panel]-[system]-[performance]
[ If the drive is not recognized by your com-
puter, please check the following items.
• If an indicator is displayed on the IDE
controller in [control panel]-[system]-[device
manager]-[harddisk controller], you will
need to contact your PC’s manufacturer or
the motherboard’s manufacturer and get
the appropriate IDE controller driver.
[ Run ADD NEW HARDWARE in Control
Panel to let the PC search again for the new
device.
CB
English
Page 4
How to Use the Discs
When using CD-ROM discs, DVD-ROM discs,
CD-R discs or CD-RW discs, don’t attach any
stickers or labels to the discs. Using discs with
them attached not only causes read and write
errors, but data on the disc may be lost due to
damage to the disc itself.
The Discs in this unit operate at a very high
speed! DO NOT use damaged, cracked or
warped discs.
The drive’s optical unit may be damaged if they
break. DO NOT use non-standard discs.
NON-standard discs may not play or store data
properly. Non-standard discs are any discs that
are not the standard 12 cm CD type discs. This
includes Sony Walkman™ discs, non-circular
discs including promotional, business card
discs, and other unusual discs.
Notes on CD-RW/DVD-RW discs
This product can read CD-RW/DVD-RW disc
data. Note the following:
- A little longer time is needed to sense a
CD-RW/ DVD-RW disc when the operation
starts, compared with standard CD-ROM/
DVD-ROM discs.
- Since playback signal level of CD-RW/
DVD-RW is lower than the replicated CD/DVD
discs, reading speed of those discs is lower
than that of the replicated discs to ensure
data reading.
- Blank discs, discs that you failed to write data,
or discs that session close processing has not
been made, cannot be used.
- Operation may not start, or the data may not
be read under the following conditions:
The quality of the recorded signal has deteriorated due to the dirt or scratches on the disc,
or frequently rewritten discs. If the drive fails
to read the disc, open the disc drawer, check
the data side of the disc (side opposite the
label side) for dust or scratches, and reinsert
the disc and close the drawer to try to read
the disc again
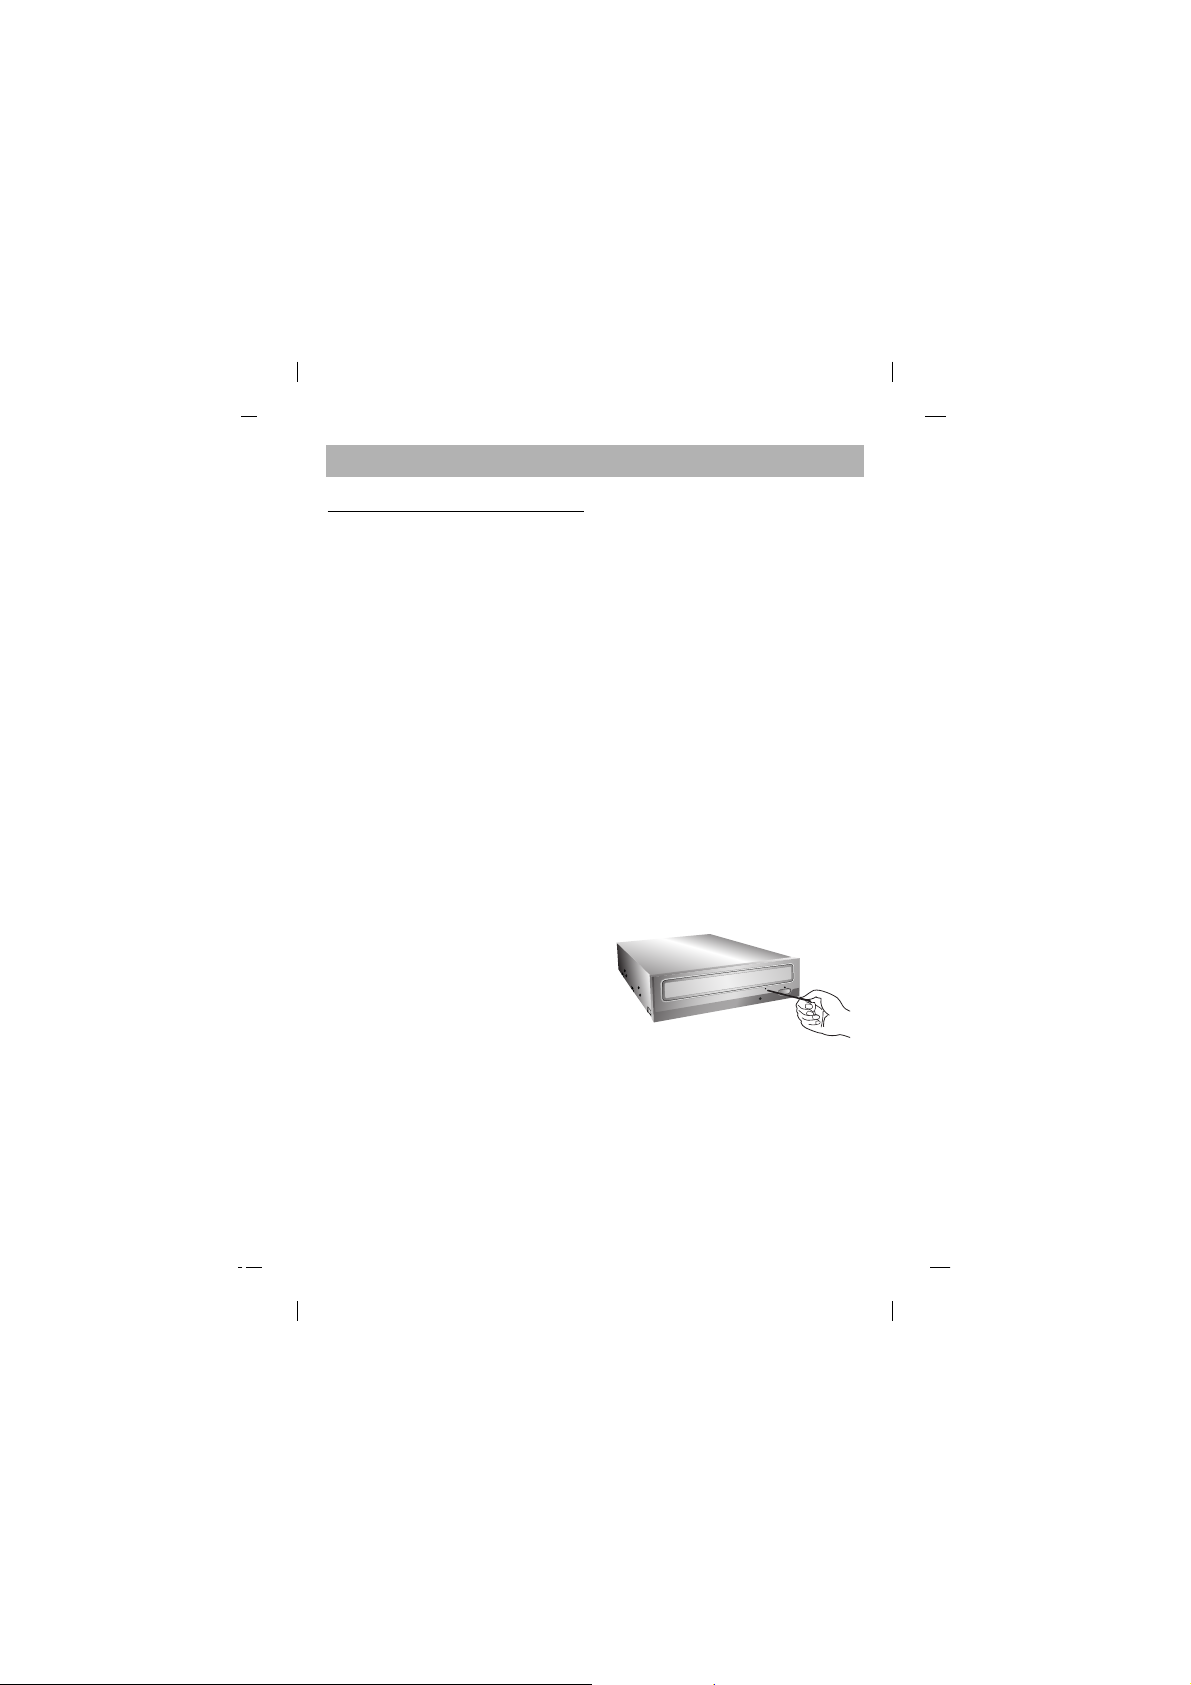
Emergency Eject
This drive has a feature that allows the CD
to be ejected manually if necessary in an
emergency, such as failure of the drive or a
power outage.
NOTE: Don’t use this feature except in an
emergency.
1) Turn the power to OFF.
2) Poke a fine-tipped object (such as a
straightened heavy duty paper clip) into the
small hole above the eject button.
The front door will pop open and the disk
tray will come partway out.
3) Pull the front door to open it all the way, then
grip the disc tray between thumb and
forefinger and gently pull it straight out.
NOTE: This feature is a last measure to be
used
only in an emergency. Using it excessively will
cause malfunction. If you cannot get a good
grip on the disc tray with your fingers, use a
steel binder clip or spring clamp to pull it out.
English
Page 5

Troubleshooting
Before Requesting Service
Before calling for service, check this list.
• The drive doesn’t have power.
• Is the power supply cable from the host
computer plugged in?
• Is the Power Connector to the drive
securely attached?
•
The system doesn’t start.
• Are the power and SATA cables to the
PC correctly connected?
• Is the total length of the SATA cable 20
inches or less?
• Is each connector completely attached?
Other connections may have been
knocked lose while installing the drive.
• Cannot Read discs.
• Does the CD or DVD disc have dirt or
scratches?
• Is the disc loaded in the drive with the
read/write surface facing the right
direction? (label up)
• Is the drive installed in the correct
orientation?
•Was the drive or disc moved from a low
temperature environment to a high
temperature environment? (There is a
possibility of condensation on the lens in
the drive or on the surface of the disc.)
When you call for service, be prepared to give
as much information as possible of your
system, environment, and the specific problem.
(What happened? When? How long? What was
going on? Were there any error messages
displayed? etc.)
Please Note: Since this product supports
Region Playback Control Phase II, a certain
MPEG decoder card or Software without
regional code setting may cause this drive not
to read DVD-ROM discs.
This DVD-ROM Drive enables you to change
the regional code up to 5 times.
Important Precautions
Follow these precautions when handling the
drive or discs.
Precautions
• Please take notice that the manufacturer of
this equipment does not offer any warranty
against data loss due to inappropriate
installation or handling or direct or indirect
damages.
• Please take notice that the manufacturer will
bear no responsibility for direct or indirect
damages caused by the use of this product
or its malfunction.
• Please take notice that the manufacturer will
bear no responsibility for damage to data
caused by this product.
Installation
•Avoid placing the drive in a location subject to:
- high humidity
- high temperature
- excessive dust
- mechanical vibration
- direct sunlight
We recommend using the drive in a horizontal
or vertical position. Do not install the drive at an
angle.
Operation
• Don’t move the drive suddenly from a cold
place to a warm one or raise the room
temperature suddenly. Condensation may
occur, causing abnormal operation.
• Make sure to remove the disc before moving
the drive. The disc may be damaged,
causing data loss.
• Be careful to prevent foreign objects, such as
liquids or metal, from entering the drive. In
case a foreign object enters the drive, please
consult the dealer where the drive was
purchased.
• Don’t interrupt the electric power while the
drive is operating.
English
Page 6

English
Specifications
Items CD-ROM DVD-ROM
General
Data Capacity
(User Data/Block)
Rotational Speed
Disc Diameter
Supported Disc
Performance Access Time
(Random Access)
Transfer Rate
* Sustained
* Burst (ATAPI)
Interface
MTBF
Buffer size
Environment Temperature
Humidity
Electrical Power
NOTE : Specifications are subject to change without notice for improvement.
Yellow Book: Book A,B:
2048 bytes/block 2048 bytes/block
(Mode1 & Mode2 Form1)
2340, 2336 bytes/block (Mode2)
2332 bytes/block (Mode2 Form2)
2352 bytes/block (CD-DA)
22X~52X (CAV) 6.7X~16X (CAV) Approx.
Approx. 10,540 rpm 9,420 rpm (single layer)
5X~12X (CAV) Approx.
7,780 rpm (dual layer)
12cm/8cm
(8cm disc can be used only with drive placed horizontally.)
DVD-ROM, DVD-R, DVD+R, DVD+R DL, DVD-RW, DVD+RW,
DVD-RAM, CD-Digital Audio & CD Extra, CD-ROM,
CD-ROM
XA-Ready, CD -I FMV, CD-R, CD-RW, CD-DA, Photo-CD
(Single &
Multi-Session), Video CD, CD-Text
90ms Typical 95ms Typical
Outer side:Approx 7,800 Kbytes/s Outer side:Approx 22,100 Kbytes/s
1.5 Gbits/s (10b side)
1.2 Gbits/s (8b side)
Serial ATA
125,000 Power On Hours (Duty Cycle 20%)
256 Kbytes
0° ~ 50 °C (operating)
10% to 90% (operating)
+12/+5V DC
Page 7

Deutsch
Merkmale
• Serial ATA Schnittstelle
• Datenübertragungsrate: DVD-ROM max.
16x : 22.100 KB/s, CD-ROM max. 52x:
7.800 KB/S
• Motorbetriebene Schublade
• Einbauart: intern
• Notauswurf
• DVD-R, DVD+R, DVD+R DL, DVD-R DL,
DVD-RW, DVD+RW und DVD-RAM lesen
• Unterstützt Region Playback Control Phase II.
Systemanforderungen*
• IBM PC AT oder kompatibel, Pentium
266MHz Prozessor oder höher
• Motherboard, das SATA unterstützt
• Mind. 64 MB RAM oder mehr
• Freier 5 1/4” Einschub
• OS: Windows 2000, XP, Vista.
* Bitte beachten Sie: Bestimmte Software
(besonders solche mit Video Abspiel-Funktion)
kann bedeutend höhere Systemanforderungen
benötigen, um akzeptable Ergebnisse zu
erzielen. Obwohl dieses DVD-ROM Laufwerk
Video-DVDs lesen kann, müssen diese, um
auf Ihrem Monitor gezeigt werden zu können,
MPEG decodiert werden. Das geschieht
entweder durch separate Hardware (entweder
eine MPEG Decoder-Karte oder ein in Ihre
Video-Karte integrierter MPEG-Decoder), oder
durch separat installierte MPEG-DecoderSoftware.
Diese Soft- bzw. Hardware ist im
Lieferumfang dieses DVD-Laufwerks nicht
enthalten.
Lage und Funktion der
Bedienelemente
Vorderseite
1. CD-Schublade
2. Betriebsanzeigen
3. Notauswurföffnung
4. Stop-/Auswurftaste
Rückseite
1. SATA Power-Konnektor (15 Pin)
2. SATA Daten-Konnektor (7 Pin)
A
Page 8

Installation des Laufwerks
Bevor Sie mit der Installation beginnen,
müssen Sie das System ausschalten. Anhand
folgender Schritte installieren Sie das DVDROM-Laufwerk:
1. Nehmen Sie die Systemabdeckung ab.
Beziehen Sie sich dabei auf das Handbuch
lhres Systems.
2. Einbau des Laufwerks
• Entfernen Sie die Abdeckung des 51/4″
Einbauschachts vom Rechner. Detaillierte
Anweisungen hierzu enthält das zu Ihrem
Rechner gehörige Handbuch.
•
Schieben Sie das Laufwerk in den
Einbauschacht. Gehen Sie dabei vorsichtig
vor, um die Kabel im Rechner nicht zu
beschädigen.
• Befestigen Sie das Laufwerk mit den
beigepackten Schrauben. Ist hinter dem
Laufwerk nicht ausreichend Platz,
schließen Sie das SATA-und andere Kabel
an, bevor Sie das Laufwerk im
Einbauschacht befestigen.
3. PC-Verbindung
Der DVD-ROM Laufwerk wird über die
SATA-Schnittstelle mit dem Motherboard
verbunden.
• Das SATA-Powerkabel verbinden
Verbinden Sie das Datenkabel so, dass die
Nase des Datenkabels nach links zeigt.
Bitte achten Sie darauf, das Kabel nicht
verkehrt herum anzuschließen.
• Verbinden des SATA-Datenkabels
Schließen Sie das Datenkabel an. Achten
Sie bitte darauf, das Kabel nicht verkehrt
herum anzuschließen.
4. Nach der vollständigen lnstallation des
DVD-ROM-Laufwerks können Sie das
Rechnergehäuse wieder aufsetzen.
5. Schließen Sie die Stromversorgung wieder
an.
Gerätetreiber
Bei Einsatz von Windows 2000 Pro, XP,
Vista braucht kein spezieller Treiber
installiert zu werden.
Das DOS und die Windows 3.1 Benutzer
können den DOS-Gerätetreiber über Internet zu
jeder Zeit downloaden.
Für Ihr Informationen, beraten bitte folgende
Internet-Sites:
http//www. lgsevice.com
Für Benutzer von Windows 2000
Pro/XP
[ Um sicherzustellen, dass das Laufwerk
ordnungsgemäß läuft, sollten Sie folgendes
überprüfen:
• Das Laufwerk erscheint in
Windows 2000 Pro/XP :
[Systemsteuerung]-[System]-[Hardware][Geräte-Manager]-[DVD/CD-ROM]
• "32-Bit" erscheint in
[Systemsteuerung]-[System][Leistungsmerkmale]
[ Wenn lhr Rechner das Laufwerk nicht
erkennt, müssen Sie folgendes überprüfen:
• Erscheint auf dem IDE-Controller in
[Systemsteuerung]-[System]-[GeräteManager]-[Festplattenlaufwerk-Controller]
das Symbol , müssen Sie den korrekten
IDE-Controller-Treiber beim Hersteller Ihres
PCs oder der Systemplatine beschaffen.
[ Rufen Sie in der Systemsteuerung die
Option "Hardware" auf, und lassen Sie
Windows erneut nach einem neuen Gerät
suchen.
CB
Deutsch
Page 9

Umgang mit den CDs
Kleben Sie keinesfalls Etiketten oder Aufkleber
auf Ihre CD-ROMs, DVD-ROMs, CD-Rs oder
CD-RWs.
Beim Einsatz von beklebten CDs können nicht
nur Lese- und Schreibfehler auftreten, sondern
die auf der CD gespeicherten Daten aufgrund
der Beschädigung der CD verloren gehen.
Die Drehgeschwindigkeit der CDs in diesem
Laufwerk ist sehr hoch! KEINE beschädigten,
gebrochenen oder verbogenen CDs benutzen.
Die optische Einheit des Laufwerks könnte bei
einem Bruch der CDs beschädigt werden.
KEINE anderen CDs als die Standard-CDs
benutzen.
Nicht standardisierte CDs könnten nicht richtig
abgespielt werden oder Daten unvollständig
speichern.
Hinweise zu CD-RWs / DVD-RWs
Dieses Laufwerk kann CD-RWs / DVD-RWs
lesen. Bitte beachten Sie folgendes:
- Das Laufwerk benötigt nach dem Einlegen
von CD-RWs / DVD-RWs etwas mehr Zeit
zum Einlesen als für Standard CD-ROMs /
DVD-ROMs.
- Die Lesegeschwindigkeit von CD-RWs /
DVD-RWs ist niedriger als die von CDs /
DVDs
- Leere CDs, CDs mit fehlgeschlagenen
Schreibversuchen und CDs mit offenen
Sessions können nicht gelesen werden.
- Wenn von der CD nicht gelesen werden kann,
kann das folgende Gründe haben: Die
Qualität des aufgenommenen Signals hat sich
aufgrund von Schmutz, Kratzern oder häufig
wiederbeschriebenen CDs verschlechtert. In
dem Fall nehmen Sie die CD heraus und
überprüfen die Datenseite der CD (die Seite
ohne Beschriftung oder Etikett) nach Staub
oder Kratzern. Legen Sie die CD wieder ins
Laufwerk, schließen Sie die Schublade und
versuchen Sie erneut, ob das Laufwerk die
CD jetzt lesen kann.
Notauswurf
Dieses DVD-ROM-Laufwerk verfügt über eine
spezielle Funktion, über welche die CD im Notfall
manuell ausgeworfen werden kann. Gehen Sie in
einer derartigen Situation - beispielsweise, wenn
das Laufwerk nicht funktioniert oder der Strom
ausgefallen ist - vor wie nachfolgend
beschrieben.
HINWEIS: Diese Funktion ist nur im Notfall
anzuwenden.
1) Schalten Sie den Rechner AUS.
2) Stecken Sie einen spitzen Gegenstand
(beispielsweise eine aufgebogene
Büroklammer) in die kleine Öffnung, die sich
oberhalb der Auswurftaste befindet. Daraufhin
öffnet sich die vordere Abdeckung, und die
CD-Schublade fährt teilweise heraus.
3) Öffnen Sie die vordere Abdeckung vollständig.
Fassen Sie die CD-Schublade zwischen
Daumen und Zeigefinger, und ziehen Sie sie
vollständig heraus.
HINWEIS: Benutzen Sie diese Funktion nur als
letztes Mittel in einem Notfall. Wird sie übermäßig
oft angewendet, können Fehlfunktionen
auftreten. Wenn Sie die CD-Schublade mit den
Fingern nicht fassen können, benutzen Sie eine
Stahlklemme oder einen Klemmhaken, um die
Schublade herauszuziehen.
Deutsch
Page 10

Fehlerbeseitigung
Vor der Inanspruchnahme des
Kundendienstes
Gehen Sie die nachstehende Checkliste durch,
bevor Sie sich an den Kundendienst
wenden.
• Das Laufwerk wird nicht mit Spannung versorgt.
• Ist das Netzkabel des Host-Rechners
ordnungsgemäß eingesteckt?
• Ist das Spannungsversorgungskabel an
der Rückseite des Laufwerks korrekt
befestigt?
• Das System startet nicht.
• Sind Powerkabel und SATA-Kabel
korrekt mit Ihrem PC verbunden?
• Beträgt die Gesamtlänge das SATAKabels 50cm oder weniger?
• Sind alle Anschlüsse ordnungsgemäß
befestigt?
Wenn der PC bewegt wird, können sich
Anschlüsse lösen.
• CDs können nicht gelesen.
• Ist die CD oder DVD verschmutzt oder
verkratzt?
• Ist die CD korrekt eingelegt
(Lesen/Schreibseite nach unten,
bedruckte Seite nach oben)?
• Ist das Laufwerk in der korrekten
Orientierung installiert?
•Wurde das Laufwerk oder die CD aus
einer kalten in eine warme Umgebung
gebracht? (In diesem Fall besteht die
Möglichkeit der Kondensierung auf der
Linse im Laufwerk oder auf der
Oberfläche der CD.)
Wenn Sie den Kundendienst anrufen, halten Sie
so viele Informationen wie möglich zu Ihrem
System, Ihrer Umgebung und dem jeweiligen
Problem bereit. (Was ist passiert? Wann? Wie
lange? Welche Vorgänge liefen zu dem
Zeitpunkt? Wurden Fehlermeldungen
angezeigt?)
Bitte beachten : Solange dieses Produkt mit
"Region Playback Control Phase II" verwendet
wird, besteht die Möglichkeit, dass andere MPEG
Decoderkarten oder MPEG Software ohne
Ländercodes, das Laufwerk dazu veranlassen,
DVDs nicht zulesen.
Dieses DVD-ROM Laufwerk erlaubt es Ihnen,
den Ländercode bis zu 5 mal zu ändern.
Wichtige Sicherheitshinweise
Beachten Sie beim Einsatz des DVD-ROMLaufwerks oder beim Umgang mit CDs folgende
Hinweise.
Sicherheitshinweise
• Der Hersteller ist weder für Datenverluste, die
durch fehlerhafte Installation oder
unsachgemäßen Umgang mit dem Laufwerk
verursacht wurden, noch für direkte oder
indirekte Schäden haftbar oder verantwortlich.
• Der Hersteller übernimmt keine
Verantwortung für direkte oder indirekte
Schäden, die durch den Einsatz dieses
Produktes oder Funktionsstörungen
verursacht wurden.
• Der Hersteller ist nicht haftbar oder
verantwortlich für von diesem Produkt
verursachte Datenbeschädigungen.
Installation
•Vermeiden Sie Standorte, an denen das
Gerät folgenden Umgebungsbedingungen
ausgesetzt ist:
- Übermäßige Luftfeuchtigkeit
- Hohe Temperatur
- Übermäßige Staubentwicklung
- Mechanische Vibration
- Direkte Sonneneinstrahlung
Wir empfehlen, das Laufwerk in einer
horizontalen Position zu installieren.
Einsatz
• Bringen Sie das Laufwerk nicht plötzlich von
einem kalten an einen warmen Ort, und
erhöhen Sie nicht kurzfristig die
Raumtemperatur.
Die dadurch entstehende Kondensierung
kann zu Betriebsstörungen führen.
• Nehmen Sie vor einem Transport des
Laufwerks die eingelegte CD heraus, damit
sie nicht beschädigt wird. Andernfalls
könnten Datenverluste auftreten.
• Achten Sie darauf, dass keine Fremdkörperbeispielsweise Flüssigkeiten oder
Metallgegenstände - in das Laufwerkinnere
gelangen. Sollte dennoch ein
Fremdkörper in
das Innere des Laufwerks gelangen,
wenden
Sie sich an den Händler, bei dem Sie das
Laufwerk erworben haben.
• Unterbrechen Sie keinesfalls die
Stromversorgung, während das Laufwerk
läuft.
Deutsch
Page 11

Français
Caractéristiques
• Interface Serial ATA
•Vitesse de transfert : 22100 KB/Sec
(DVD-ROM), 7800 KB/Sec (CD-ROM)
• Introduction : Tiroir motorisé
• Montage : Montage interne
• Contrôle frontal : Touche d’éjection
d’urgence
• Lisez compatible pour DVD-R, DVD+R,
DVD+R DL, DVD-R DL, DVD-RW,
DVD+RW & DVD-RAM disques
•
Supports Région playback contrôle Phase II
Configuration du système*
• Un ordinateur de bureau avec processeur
Intel Pentium 266 MHz ou supérieur
• Carte mère compatible SATA
• 64 Mo RAM minimum ou plus
• Baie de 5,25 pouces.
• OS: Windows 2000, XP, Vista.
* Remarque: Certains logiciels, (en particuliers
ceux comprenant la fonction vidéo playback),
exigent un PC vraiment performant en vue
d’atteinre de bons résultats.
Afin que ce lecteur DVD ROM lise les disques
DVD vidéo, en les retranscrivant sur votre
moniteur, grâce à une carte MPEG séparée,
vous avez besoin soit d’un disque séparé
(ou une carte MPEG ou MPEG, décodage
réalisé par votre carte vidéo), soit d’un logiciel
séparé que vous installerez.
Ces produits sont non compris avec le lecteur
DVD ROM.
Emplacement et Fonction des
Commandes
Façade
1. Plateau de chargement
2. Témoins d’activité
3. Trou d’ejection d’urgence
4. Touche d’arrêt/éjection
Panneau arrière
1. Câble d’alimentation SATA (15 broches)
2. Nappe SATA (7 broches)
A
Page 12

Installation du lecteur de
DVD-ROM
Avant l’installation de lecteur de DVD-ROM,
mettre l’unité centrale hors tension.
1. Retirez le capot de votre unité centrale en
vous reportant au manuel d’utilisation.
2. Montage du lecteur de DVD-ROM
• Déposer le panneau de la baie de 5,25
pouces de l’unité centrale en procédant
selon les indications du manuel fourni
avec l’ordinateur.
• Introduire le lecteur de DVD-ROM dans la
baie. Ne pas comprimer excessivement
les câbles internes de l’unité centrale.
• Immobiliser le lecteur de DVD-ROM à
l’aide des vis fournies. Si le volume
derrière le lecteur de DVD-ROM est
insuffisant, connecter le câble SATA ainsi
que les autres câbles avant de fixer le
périphérique.
3. Connection PC
Le lecteur de DVD-ROM se connecte à
la carte mère de l’ordinateur principal en
utilisant un câble d’interface SATA.
• Connection du câble d’alimentation
SATA
Relier le câble d’alimentation de façon à
ce que la projection du connecteur du
câble soit à gauche. Faite attention ne
pas connecter à l’envers
• Connection de la nappe SATA
Connecter la nappe. Faite attention de ne
pas connecter à l’envers.
4. Remettre le capot de l’unité de centrale en
place à l’issue de l’installation du lecteur.
5. Rebranchez l’alimentation électrique.
Périphériques
Aucune procédure spécifique d’installation
de périphérique n’est nécessaire sous 2000
Pro, XP ou Vista.
Pour DOS et Windows 3.1, les utilisateurs
peuvent télécharger le gestionnaire sur
Internet.
Pour plus d’informations ou pour télécharger
les drives, merci de consulter les sites suivants:
http//www. lgsevice.com
Pour Windows 2000 Pro/XP
[ Contrôler les points suivants, dont le
fonctionnement normal du périphérique
dépend:
• Le périphérique doit apparaître sous
Windows 2000 Pro/XP : [panneau de
configuration]-[système]-[matériel][gestionnaire de périphériques][DVD/CD-ROM]
• La mention 32 bits doit être affichée
sous [panneau de configuration/
système/performances]
[ Contrôler les éléments suivants si
l’ordinateur ne reconnaît pas le
périphérique:
• Si l’indicateur apparaît en regard du
contrôleur IDE sous [panneau de
configuration/système /gestionnaire de
périphériques/contrôleurs de disque dur],
contacter le fabricant du PC ou celui la
carte mère afin d’obtenir le pilote de
contrôleur IDE approprié.
[ Depuis le panneau de configuration,
exécuter [Ajout de périphérique] afin de
laisser Windows effectuer une tentative
de recherche du nouveau périphérique.
CB
Français
Page 13

Utilisation des disques
Ne coller aucune étiquette sur les CD-ROM,
DVD-ROM, CD-R et CD-RW.
De telles étiquettes risquent en effet non
seulement de provoquer des erreurs de lecture
et écriture, mais également d’endommager le
disque dur et de causer une perte de données.
Sur cette unité, les disques tournent à très
haute vitesse! N’UTILISEZ PAS de disques
endommagés, brisés ou voilés.
Les composants optiques de l’unité pourraient
être endommagés si le disque se brise.
N’UTILISEZ PAS de disques hors normes.
Ceux-ci pourraient ne pas fonctionner ou ne
pas enregistrer convenablement les données.
Remarque sur les CD-RW/DVD-RW
Ce produit est capable de lire les CD et DVD
gravés.
- Il faut un peu plus de temps pour lancer un
CD ou un DVD gravé au début de l’opération,
comparé à un CD ou DVD standard.
- Lorque le niveau du signal playback des
graveurs CD et DVD est plus bas que les CD
et DVD copiés, la lecture de ces disque est
moins rapide que celle des disques reproduits
afin d’assurer la lecture des informations.
- Les disques vierges, les disques non gravés
ou interrompus en cours de gravure, ne
doivent pas être utilisés.
- Les opérations ne doivent pas débuter ou la
lecture des données ne doit pas avoir lieu
dans certaines conditions: La qualité du signal
d’enregistrement est déteriorée s’il y a des
poussières ou des rayures sur le disque ou
s’il s’agit de CD très souvent regravés. En cas
d’échec de la lecture, il faut ouvrir le tiroir du
lecteur et vérifier sur l’état de la face des
informations du disques, celle opposé à la
marque, puis réinsérer le disque dans le
lecteur pour essayer de lire à nouveau.
Ejection manuelle
Ce lecteur est doté d’une fonction permettant
l’éjection manuelle du CD, par exemple en cas
de défaillance ou de coupure de l’alimentation.
La procédure d’éjection manuelle est la
suivante.
Remarque: Cette fonction ne doit être utilisée
qu’en cas de besoin absolu.
1) Couper l’alimentation électrique.
2) Enfoncer une tige fine (grand trombone
redressé, par exemple) dans le petit orifice
situé au-dessus de la touche d’arrêt/éjection.
La trappe s’ouvre et le plateau sort
partiellement.
3) Tirer sur la trappe afin de la sortir
complètement puis saisir le plateau
entre le pouce et l’index et tirer
délicatement.
Remarque: Cette fonction de secours ne doit
être utilisée qu’en cas de besoin absolu.
Un recours trop fréquent à l’éjection manuelle
provoquerait une défaillance.
S’il est impossible de bien tenir le plateau à la
main, tirer à l’aide d’une pince métallique à
documents.
Français
Page 14

Dépannage
Avant de contacter le S.A.V.
Vérifier les éléments de la liste ci-dessous
avant de contacter le S.A.V.
•
Lecteur non alimenté.
•L’alimentation interne de l’unité centrale
est-elle connectée?
• Le connecteur d’alimentation du lecteur
est-il bien fixé?
• Démarrage du système impossible.
• Les câbles SATA sont-ils bien
connectés?
• La longueur totale du câble SATA est de
50cm ou moins?
•Tous les connecteurs sont-ils bien fixés ?
Tout ballottement d’éléments internes
risque de relâcher les connexions.
• Lecture impossible.
• Le CD ou DVD est-il poussiéreux ou
rayé?
• La face active du CD est-elle bien
orientée dans le plateau (étiquette
vers le haut)?
• Le périphérique ou le CD a-t-il été
déplacé d’un endroit froid à un
emplacement où la température est
élevée?
(Il est possible que la condensation se
soit accumulée dans le périphérique ou à
la surface du disque.)
Préparez le contact avec le S.A.V., qui est
susceptible de poser de nombreuses questions
relatives au système, à son environnement et à
la nature du problème (Que s’est-il passé?
Quand? Pendant combien de temps? Quels
ont-été les événements? Des messages
d’erreur ont-ils été affichés? etc.)
Remarque:
Depuis que ce produit est compatible avec
Region Playback Control Phase 2, une certaine
carte décodeur MPEG ou un logiciel sans code
régional peuvent entraîner la non lecture des
disques DVD-ROM.
Ce lecteur DVD vous permet de changer le
code regional 5 fois seulement.
Avertissement
Les instructions ci-dessous doivent être
observées lors de toute manipulation du
lecteur comme des disques.
Précautions
• Le fabricant du présent équipement décline
toute responsabilité en cas de perte de
données ou de dommages directs ou
indirects imputables à une installation
ou à une manipulation non appropriée.
• Le fabricant décline toute responsabilité en
cas de dommages directs ou indirects dus à
l’utilisation ou à un mauvais fonctionnement
du présent produit.
• Etablissez une copie de sauvegarde de
toutes les données importantes afin de ne
risquer aucune perte.
Installation
• Eviter les emplacements soumis aux
contraintes suivantes :
- forte humidité
- température élevé
- excès de poussière
- vibrations mécaniques
- rayonnement solaire direct
Il est préférable d’utiliser ce lecteur en position
horizontale.
Fonctionnement
• Ne pas déplacer brusquement le lecteur
d’un endroit froid à un endroit chaud ni
augmenter brutalement la température
de la pièce : la condensation ainsi générée
risque de provoquer une anomalie de
fonctionnement.
• Ne pas omettre de retirer le disque avant
tout déplacement du lecteur :
le disque pourrait subir des dommages,
entraînant ainsi une perte de données.
•Veiller à prévenir toute pénétration d’objets
ou de liquides dans le lecteur.
Si un corps étranger a pénétré, s’adresser
au distributeur ayant vendu le périphérique.
• Ne pas couper l’alimentation électrique
pendant le fonctionnement du lecteur.
Français
Page 15

DVD-ROM DRIVE
DH16NS10
English
Deutsch
Français
Italiano
Español
Português
To enjoy fully all the features and functions of your product, please
read this owner’s manual carefully and completely.
Um den Leistungs-und Funktionsumfang lhres Produkts in vollem
Umfang nutzen zu können, sollten Sie dieses Handbuch vollständig
und gewissenhaft drucharbeiten.
Veuillez lire avec attention la totalité de ce guide afin de pouvoir maîtriser
toutes les possibilités de ce produit.
Nel ringraziarvi per avere acquistato questo prodotto, vi raccomandiamo
di leggere attentamente le seguenti istruzioni e di conservare questo
manuale per eventuali consultazioni future.
Rogramos lea detenidamente todo este manual para aprovechar al
máximo todas las características y funciones del producto.
Para usufruir todas as características e funções do seu produto leia
atentamente todas as instruções deste Manual do Usuário.
Page 16

P/NO: 3828HM1063X (No.2-1) Ver. A
Caution!
The disc rotates at high speed in the drive unit.
Use of worn, damaged, or non-standard CDROM discs can only adversely affect the drive
and cause the disc to shatter or crush while in
use. Disc crush can only occur when you use a
damaged CD-ROM disc in the drive. It is an
extremely rare occurrence, but there are steps
which can be taken to prevent it.
Always check your discs before inserting
them into the drive.
1. Take care not to use worn, cracked, damaged, warped or poor quality CD-ROMs, as
this may cause damage to your drive.
2. Check the clear plastic on the center of
the disc, cracks here are the main cause
of disc crush.
3. Do not play CD-ROMs which are a non-standard (I.e. non-circular)shape, such as heart
shaped discs, or discs in the shape of a
business card.
How can you keep your discs from becoming
damaged?
1. When not in use, remove discs from the
drive.
2. Keep discs in the packaging supplied with
them and out of direct sunlight and away
from heat sources.
Excessive vibration or a sudden jolt to the drive
during operation may cause a malfunction.
Avoid exposing the drive to sudden changes in
temperature as it may cause condensation to
collect inside the drive.
Copyright ©2008
LG Electronics U.S.A. Inc.
1000 Sylvan Ave.
Englewood Cliffs NJ 07632
U. S. A.
or http://www.lgusa.com
LG Electronics Canada Inc.
550 MATHESON Blvd. East Mississauga.
Ontario L4Z4G3 Canada
LG Electronics Deutschland GMBH
Jakob-Kaiser-Straße 12,
D-47877 Willich, Germany
LG Electronics U. K. Ltd.
LG House, 250 Bath Road,
Slough Berkshire SL1 4DX
United Kingdom
Goldstar France E.U.R.L
Paris Nord II 22, Avenue des
Nations-B.P.50372 VILLEPINTE
95945 ROISSY CDG CEDEX France
LG Electronics Italia S.P.A.
Centro Direzione “IL Quadrate” Via
Modigliani, 20090 Segrate (MI) Italy
LG Electronics España
Complejo Europa Empressaries (Edif.Bruselas)
Ctra. N-VI 28230 Las Rozas Madrid Spain
LG Electronics Australia Pty Ltd.
2 Wonderland drive, Eastern creek, NSW
2766
or http://www.lge.com.au
LG Electronics Portugal S.A.
Quinta da Fonte – Edifício D. Amélia
Rua Vítor Câmara, nº2, Piso 2
2700-229 Paço d´ Arcos, Portugal
ou www.lge.pt
©
2008 Made by
Please visit www.lgservice.com and install the automatic firmware
download program, “LG ODD Online F/W update.” This program
will automatically check for new firmware releases and download
them.
 Loading...