


OWNER’S MANUAL
LCOS PROJECTOR
Please read this manual carefully before operating
your set and retain it for future reference.
CF181D
www.lg.com
LCOS PROJECTOR
LCOS PROJECTOR
Warning
This is a class B product. In a domestic environment this product may cause radio interference, in which
case the user may be required to take adequate measures.

Contents
Contents
Safety Instructions .......................................................4
Names of parts
Main Body ..........................................................................................7
Connecting Part .............................................................................. 8
Control Panel .................................................................................... 9
Remote Control .............................................................................10
Installing Batteries ..........................................................................10
Projector Status Indicators ...........................................................11
Accessories ......................................................................................12
Optional Extras ................................................................................12
Installing and Composition
Installation Precautions .................................................................13
Positioning the Projector ..............................................................14
Kensington Security System .......................................................15
Turning on the Projector ..............................................................16
Turning off the Projector ..............................................................16
Focus and Position of the Screen Image ................................17
Selecting source mode ................................................................17
Connection
Connecting to a Desktop PC ......................................................18
Connecting to a Video Source ...................................................18
Connecting to a DVD Player .......................................................19
Connecting to a D-TV Set-Top Box ..........................................19
Function
PICTURE Menu Options
Picture mode ..................................................................................20
Adjusting Video .............................................................................20
OPTION Menu Options
Using the Still Function ...............................................................27
Selecting Language .....................................................................27
Using Blank Function ................................................................... 27
Selecting Blank image color ......................................................28
Sleep time Function .....................................................................28
Auto sleep Function .....................................................................29
Option Reset Function ................................................................. 29
INFORMATION Menu Options
To See The Projector Information .............................................29
Information
Supported Monitor Display .........................................................30
Maintenance ....................................................................................31
Replacing the Lamp .....................................................................32
Specifications ................................................................................. 35
ADV. PICTURE Menu Options
Auto Iris Function ...........................................................................21
TruMotion Demo Function ........................................................... 21
Advanced Control Function ........................................................22
Advanced Picture Reset Function ............................................23
SCREEN Menu Options
To Change PJT Mode ..................................................................24
Using Aspect Ratio Function ..................................................... 24
Using Keystone Function ............................................................25
Test Pattern Function ...................................................................25
Auto Configure Function .............................................................25
RGB Config. Function .................................................................. 26
Screen Reset Function .................................................................26
Disposal of your old appliance
1. When this crossed-out wheeled bin symbol is attached to a product it means the product is covered by the
European Directive 2002/96/EC.
2. All electrical and electronic products should be disposed of separately from the municipal waste stream via
designated collection facilities appointed by your government or your local authorities.
3. The correct disposal of your old appliance will help prevent potential negative consequences for the environ-
ment and human health.
4. For more detailed information about disposal of your old appliance, please contact your city office, waste dis-
posal service or the shop where you purchased the product.
3
Safety Instructions
Safety Instructions
Please take note of the safety instructions to prevent any potential accident or misuse of the projector.
ꔈ Safety Instructions are given in two forms as detailed below.
WARNING : The violation of this instruction may cause serious injuries and even death.
NOTES : The violation of this instruction may cause injuries or damage to the projector.
After reading this manual, keep it in the place that you can access easily.
ꔈ
Indoor Installation WARNING
Do not place the Projector in direct
sunlight or near heat sources such
as radiators, fires, stove etc.
This may cause a fire hazard!
Do not block the vents of the projector or restrict air-flow in any way.
This would cause the internal temperature to increase and could cause a fire
hazard or damage to the unit!
Do not use the projector in a
damp place such as a bathroom
where it is likely to get wet.
This may cause a fire or an electric
shock hazard!
Do not place flammable materials in, on or near the projector.
This may cause a fire hazard!
Do not place the projector close
to sources of steam or oil such
as a humidifier.
This may create a fire hazard or an
electric shock hazard!
Do not place the projector directly on a carpet, rug or place where
ventilation is restricted.
This would cause its internal temperature to increase and might create a
fire hazard or damage the unit.
Indoor Installation NOTES
When installing the projector on
a table, be careful not to place it
near the edge.
The projector could fall causing injur y
and damage to the projector.
Only use a suitable stand.
Disconnect from the power supply and remove all connections
before moving, or cleaning.
Do not hang on the installed
projector.
It may cause the projector to fall,
causing injury or death.
Do not place the projector where
it might be exposed to dust.
This may cause a fire hazard or
damage to the unit!
Ensure good ventilation around the
projector. The distance between
the projector and the wall should
be more than 30 cm.
An excessive increase in its internal
temperature may cause a fire hazard or
damage to the unit!
Only use the projector on a level
and stable surface.
It may fall and cause injury and/or
damage to the unit.
Power WARNING
Earth wire should be connected.
Ensure that you connect the earth ground
wire to prevent possible electric shock (That
is a Projector with a three-prong grounded
AC plug must be connected to a threeprong grounded AC outlet).
If grounding methods are not possible, have
a qualified electrician install a separate circuit
breaker.
Do not try to ground the unit by connecting
it to telephone wires, lightening rods, or gas
pipes.
4
The power cord should be inserted
fully into the power outlet to avoid
a fire hazard!
This may cause a fire hazard or damage
the unit.
Do not place heavy objects on
the power cord.
This may cause a fire or an electric
shock hazard!
Power WARNING
Safety Instructions
Never touch the power plug with
a wet hand.
This may cause an electric shock
hazard!
Power NOTES
Hold the plug firmly when
unplugging. If you pull the cord,
it may be damaged.
This may cause a fire hazard!
Place the projector where people
will not trip or tread on the power
cord.
This may cause a fire or an electric
shock hazard or damage to the unit!
Using WARNING
Do not place anything containing
liquid on top of the projector
such as flowerpot, cup, cosmetics or candle.
This may cause a fire hazard or
damage to the unit!
Do not plug-in too many items
into one power outlet.
It may result in overheating of the outlet and create a fire hazard!
Do not use if the power cord or
the plug is damaged or any part
of the power outlet is loose.
This may cause a fire or an electric
shock hazard or damage to the unit!
Prevent dust from collecting on
the power plug pins or outlet.
This may cause a fire hazard!
Ensure the power cord does not
come into contact with sharp or
hot objects.
This may cause a fire or an electric
shock hazard or damage to the unit!
Do not turn the projector On/Off by plugging-in or unplugging the
power plug to the wall outlet.
(Allow the unit to cool before removing power.)
It may cause mechanical failure or could cause an electric shock.
In case of impact shock or damage
to the projector switch it off and
unplug it from the power outlet and
contact an authorized service center.
This may cause a fire or an electric shock
hazard or damage to the unit!
Do not allow any objects to fall
into the projector.
This may cause an electric shock hazard or damage to the unit!
If water is spilt into the projector unplug it from the power supply
immediately and consult your Service Agent.
This may cause an electric shock hazard or damage to the unit!
Do not remove any covers. High
risk of Electric Shock!
Don’t look directly into the lens
when the projector is in use. Eye
damage may occur!
Dispose of used batteries
carefully and safely.
In the case of a battery being
swallowed by a child please consult
a doctor immediately.
Do not touch metal parts during
or soon after operation since the
vents will remain very hot!
CAUTION concerning the Power Cord
Do not overload wall outlets or circuit breakers. Overloaded wall outlets, loose or damaged wall outlets,
extension cords, frayed power cords, or damaged or cracked wire insulation are dangerous.Any of these
conditions could result in electric shock or fire. Periodically examine the cord of your appliance, and if its
appearance indicates damage or deterioration, unplug it, discontinue use of the appliance, and have the
cord replaced with an exact replacement part by authorized service personnel.
Protect the power cord from physical or mechanical abuse, such as being twisted, kinked, pinched,
closed in a door, or walked upon. Pay particular attention to plugs, wall outlets, and the point where the
cord exits the appliance.
5
Safety Instructions
Using WARNING
If the projector is in a room that experiences a gas leak, do not touch
the projector.
It can cause a fire or a burn by a spark.
Using NOTES
Do not place heavy objects on
top of projector.
This may cause mechanical failure or
personal injury!
Do not use any sharp tools on
the projector as this will damage
the casing.
Take care not to impact the lens
particularly when moving the
projector.
In the event that an image does
not appear on the screen please
switch it off and unplug it from the
power outlet and contact your
Service Agent.
This may cause a fire or an electric
shock hazard or damage to the unit!
Cleaning WARNING
Do not use water while cleaning
the projector.
This may cause damage to the projector or an electric shock hazard.
In the unlikely event of smoke or
a strange smell from the projector, switch it off, unplug it from
the wall outlet and contact your
dealer or service center.
This may cause a fire or an electric
shock hazard or damage to the unit!
Always open the lens door or
remove the lens cap when the
projector lamp is on.
Do not touch the lens of the projector. It is delicate and easily
damaged.
Do not drop the projector or
allow impact shock.
This may cause mechanical failure or
personal injury!
Use an air spray or soft cloth that
is moist with a neutral detergent
and water for removing dust or
stains on the projection lens.
Cleaning NOTES
Contact the Service
Center once a year to
clean the internal
parts of the projector.
Accumulated dust can
cause mechanical failure.
When cleaning the plastic parts such as projector case, unplug the power and
wipe it with a soft cloth. Do not use cleanser, spray water or wipe with a wet
cloth. Especially, never use cleanser (glass cleaner), automobile or industrial
shiner, abrasive or wax, benzene, alcohol etc., which can damage the product.
Use an air spray or soft cloth that is moist with a neutral detergent and water
for removing dust or stains on the projection lens.
It can cause fire, electric shock or product damage (deformation, corrosion and damage).
Others WARNING
Do not attempt to service the projector yourself. Contact your dealer or service center.
This may cause damage to the projector and could give an electric Shock as well as invalidating the warranty!
Others NOTES
Do not mix new batteries with old
batteries.
This may cause the batteries to overheat and leak.
Be sure to unplug if the projector is
not to be used for a long period.
Accumulated dust may cause a fire hazard or damage to the unit!
Refer lamp servicing to qualified service personnel.
6
Only use the specified type
of battery.
This could cause damage to the
remote control.
Names of parts
Names of parts
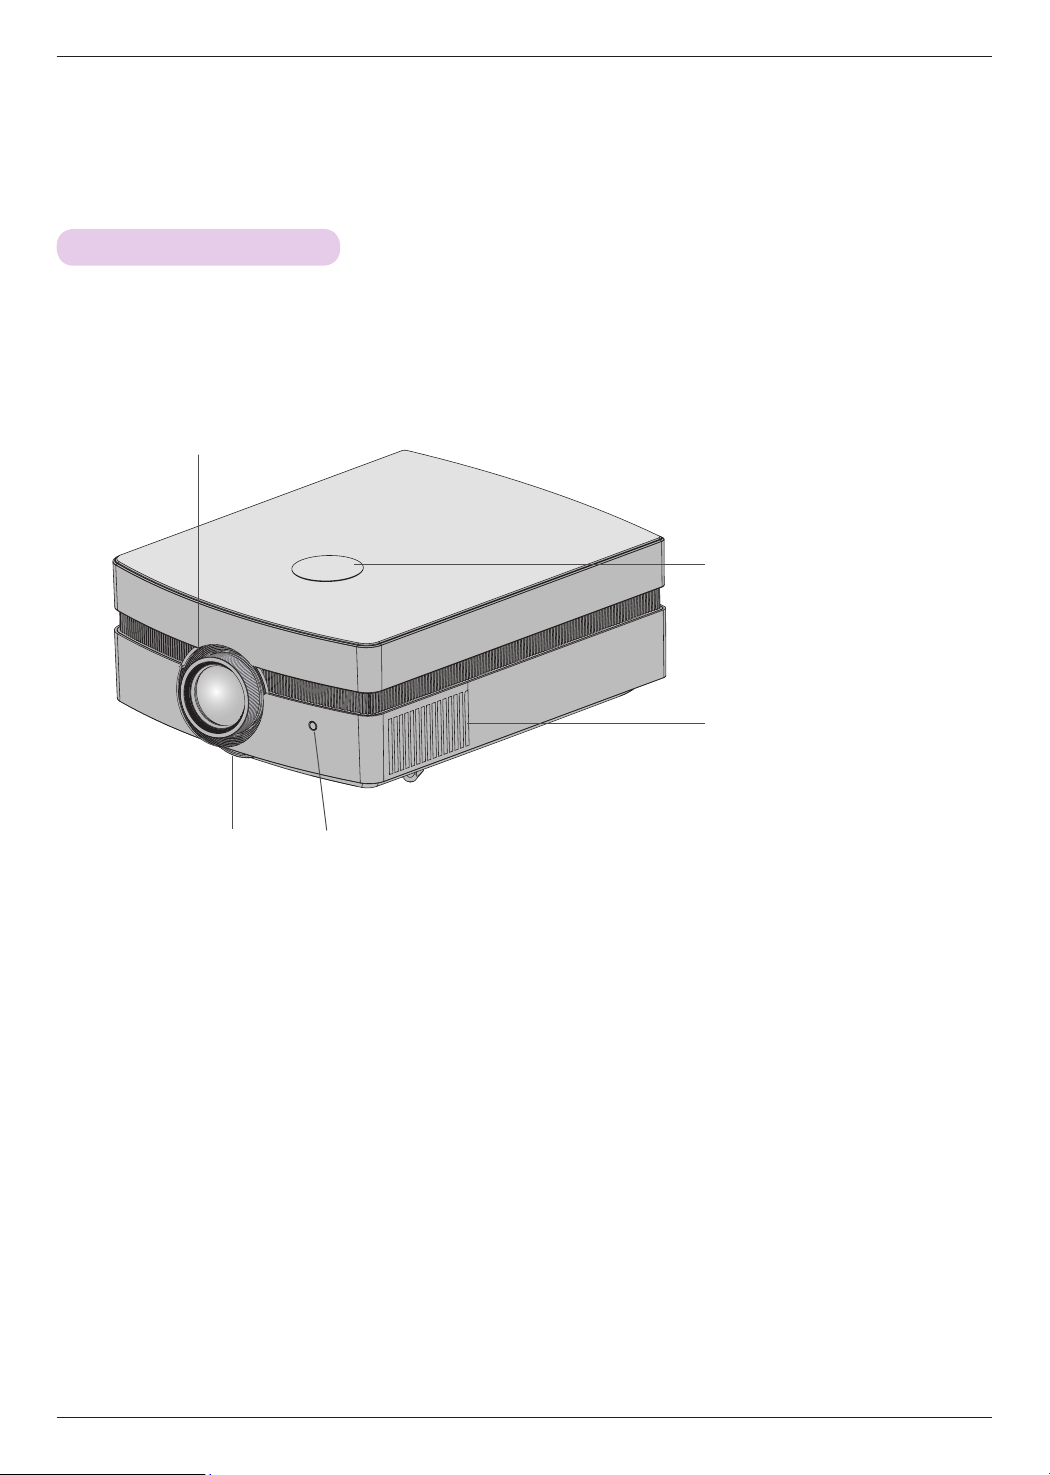
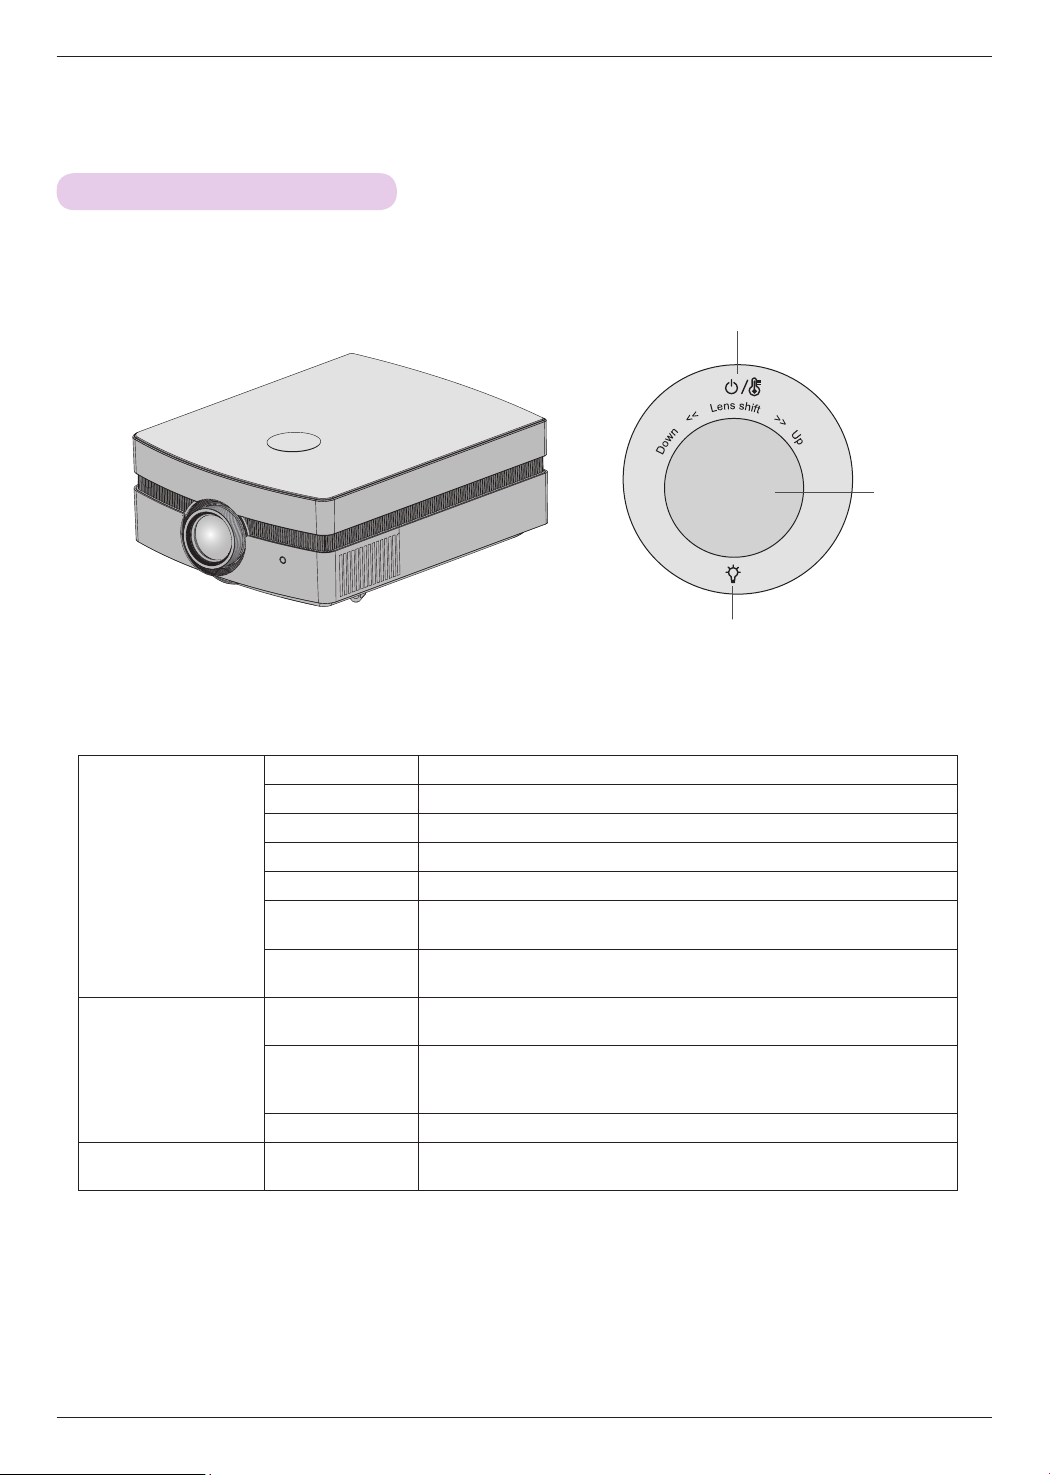
Main Body
* The projector is manufactured using high-precision technology. You may, however, see on the Projector screen tiny black points and/or bright
points (red, blue, or green). This can be a normal result of the manufacturing process and does not always indicate a malfunction.
Focus ring
Lens Shift Dial
Zoom ring
Ventilation Holes
Front remote control sensor
7
Names of parts
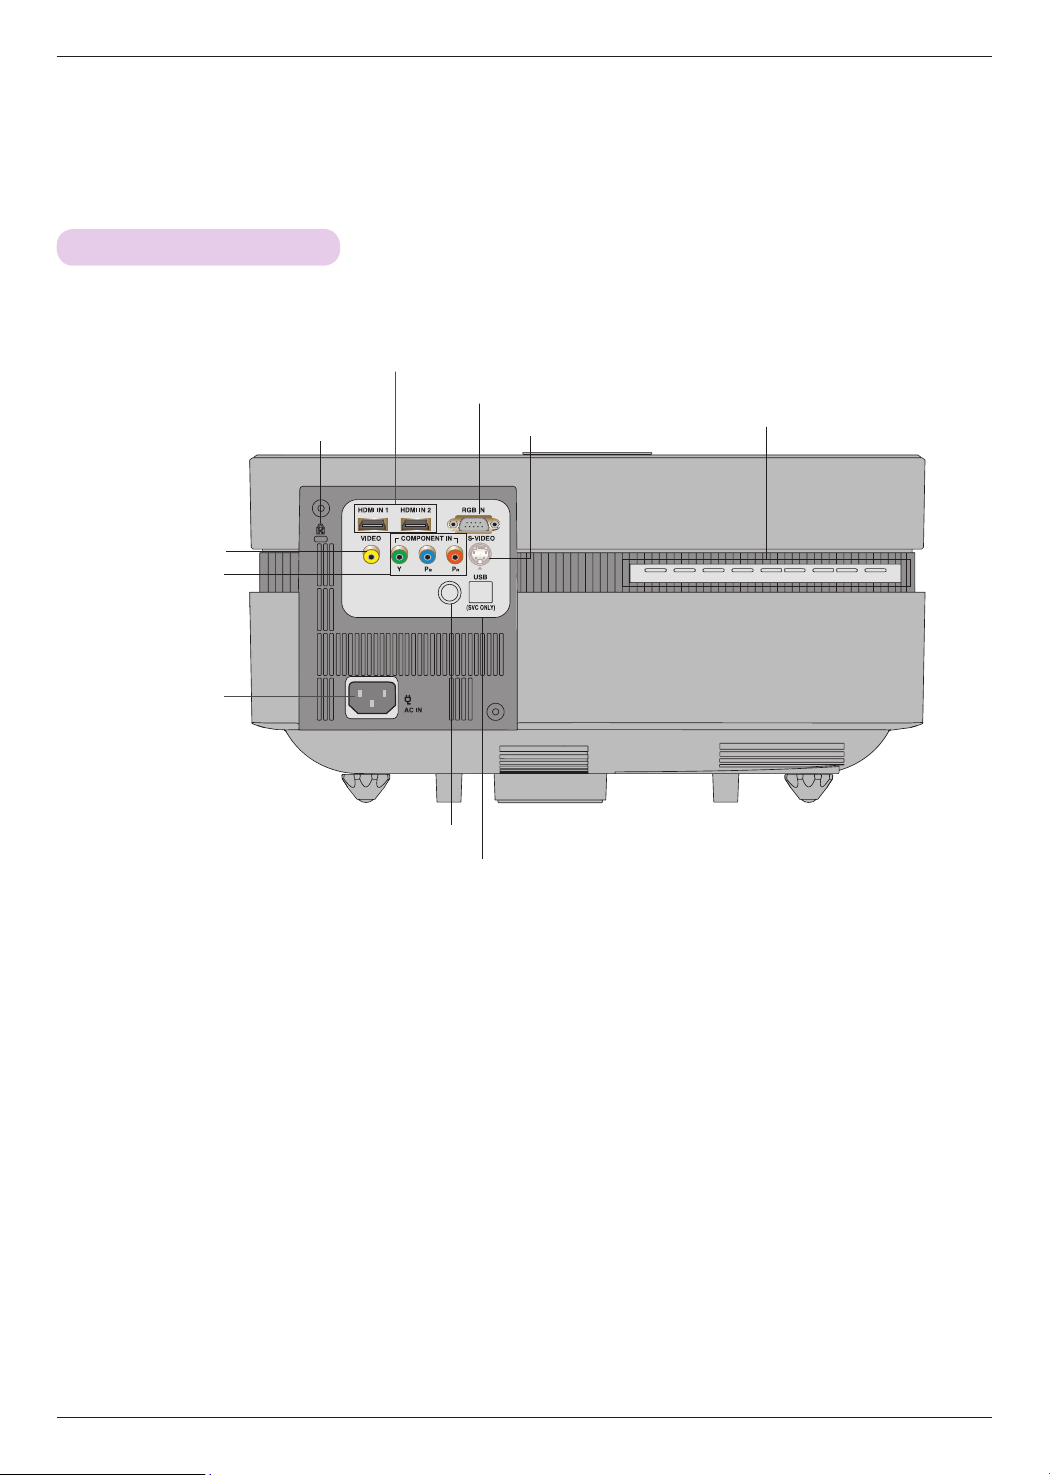
Connecting Part
COMPONENT IN
Kensington Security
System Connector
(Refer to page 15)
Video
HDMI IN 1/2
RGB IN
S-VIDEO
Control Panel
AC IN
Rear remote control
sensor
USB(SVC Only)
8
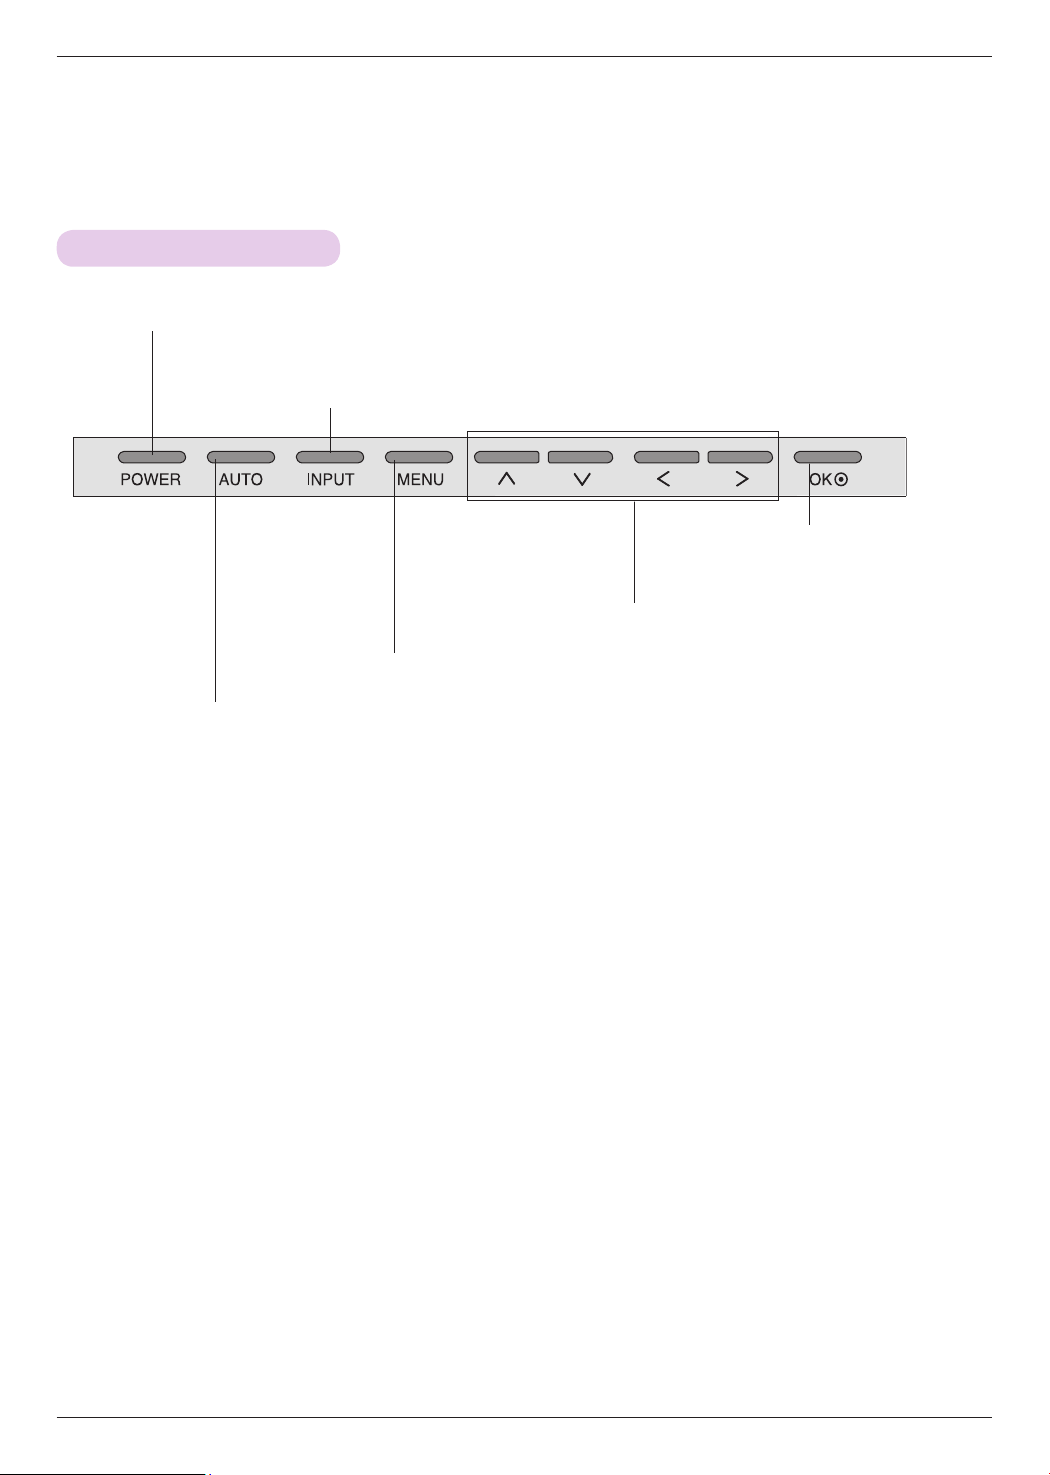
Control Panel
POWER Button
Turn On/Off the projector.
Names of parts
INPUT Button
Switches to RGB, HDMI, Video, S-Video or
Component mode.
ꔉOK Button
Checks present mode and
saves the function changes.
∧/∨/</> Button
MENU Button
Selects or closes menus.
AUTO Button
It automatically corrects the position and
shaking of the image in RGB mode.
Adjusts functions of menus
9
Names of parts
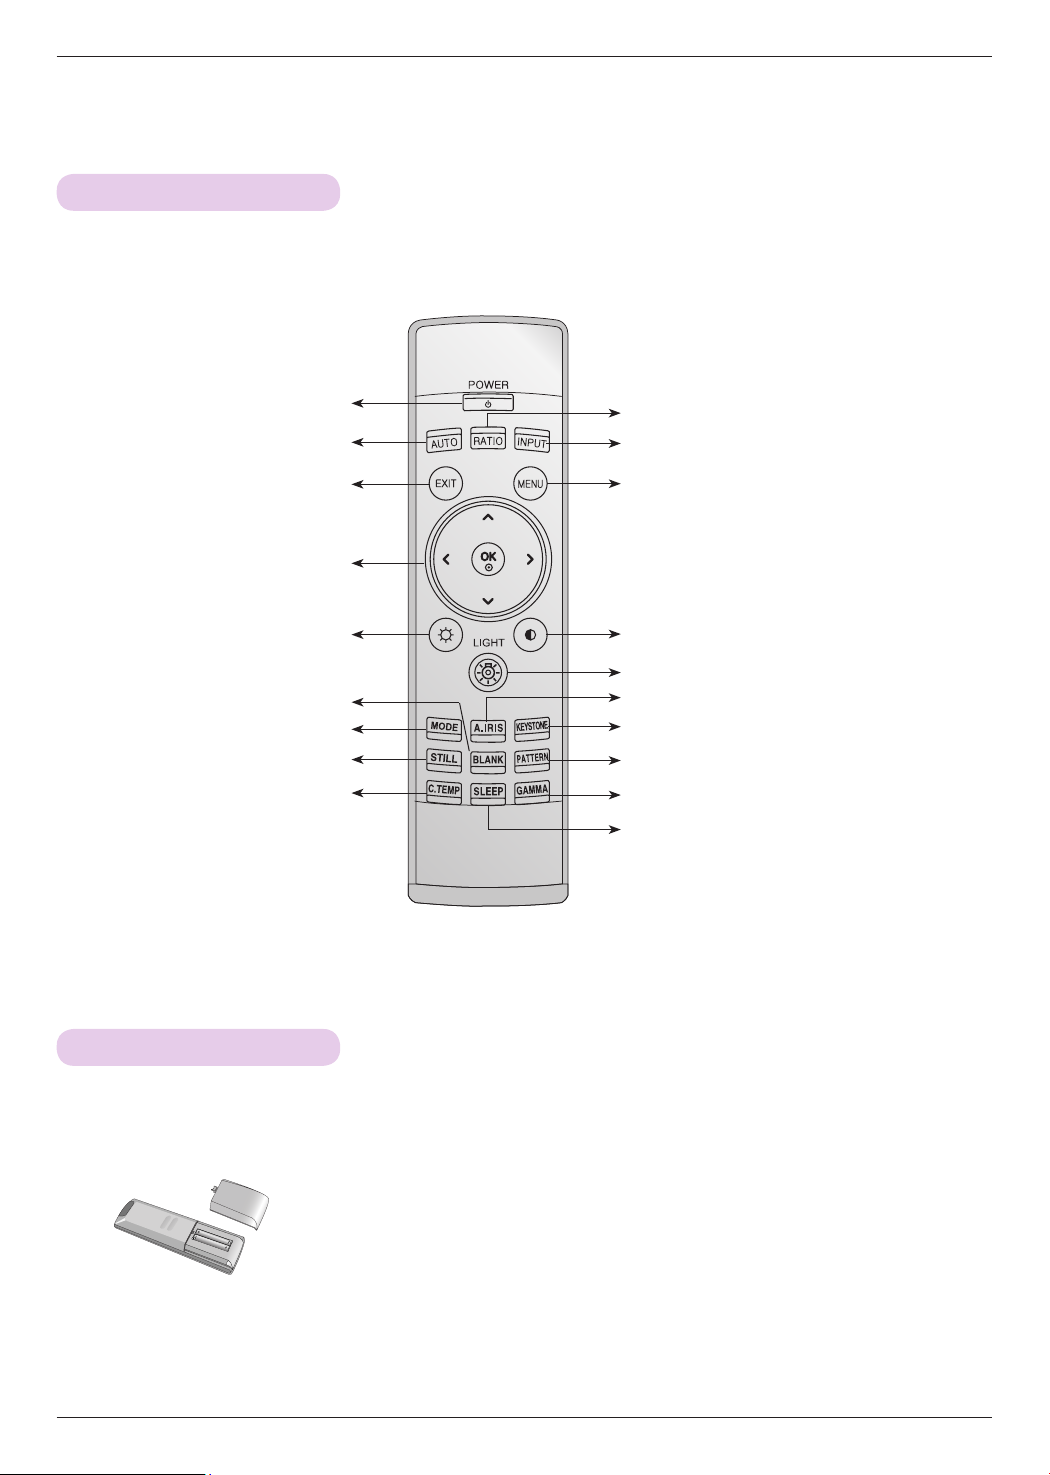
Remote Control
POWER Button
AUTO Button
EXIT Button
ꔉOK, ∧/∨/</> Button
Brightness Button
BLANK Button
MODE Button
STILL Button
C.TEMP Button
RATIO Button
INPUT Button
MENU Button
Contrast Button
LIGHT Button
A.IRIS Button
KEYSTONE Button
PATTERN Button
GAMMA Button
SLEEP Button
Installing Batteries
CAUTION
RISK OF EXPLOSION IF BATTERY IS REPLACED WITH AN INCORRECT TYPE.
DISPOSE OF USED BATTERIES ACCORDING TO THE INSTRUCTIONS.
• Open the battery compartment cover on the back of the remote control.
• Insert the specified type of batteries with correct polarity, match “+” with “+”, and
match “-” with “-”.
• Install two 1.5V AAA batteries. Don’t mix used batteries with new batteries.
10
Names of parts
Projector Status Indicators
* Lamp indicator, operation indicator and temperature indicator at the top of the projector show the user the operating status of the projector.
Operation Indicator
Temperature Indicator
Deco LED
(Lens Shift Dial)
Operation Indicator
/ Temperature Indicator
Lamp Indicator
Deco LED
(Lens Shift Dial)
Lamp Indicator
Red Standby.
Green Unit is in operation (Lamp is turned on)
Orange (flashing) The lamp is cooling (60 seconds).
Green (flashing) The projector has been turned off due to excessive heat (60 seconds).
Off Power off.
Orange
Red (flashing)
Red
This is the warning message of excessive heat when the projector is on.
Turn the projector off and check the ventilator.
Power has turned off due to problem with the internal cooling fan.
Contact your service center.
Projector lamp is reaching the end of its life and needs
to be replaced with a new lamp.
An error has occurred in the projector lamp. Turn the projector on again
Red (flashing)
after sufficient amount of time. If this indicator flashes red again, contact
your local service center.
Green (flashing) The lamp cover and filter cover is opened.
Blue (flashing) Lamp is starting up.
11
Names of parts
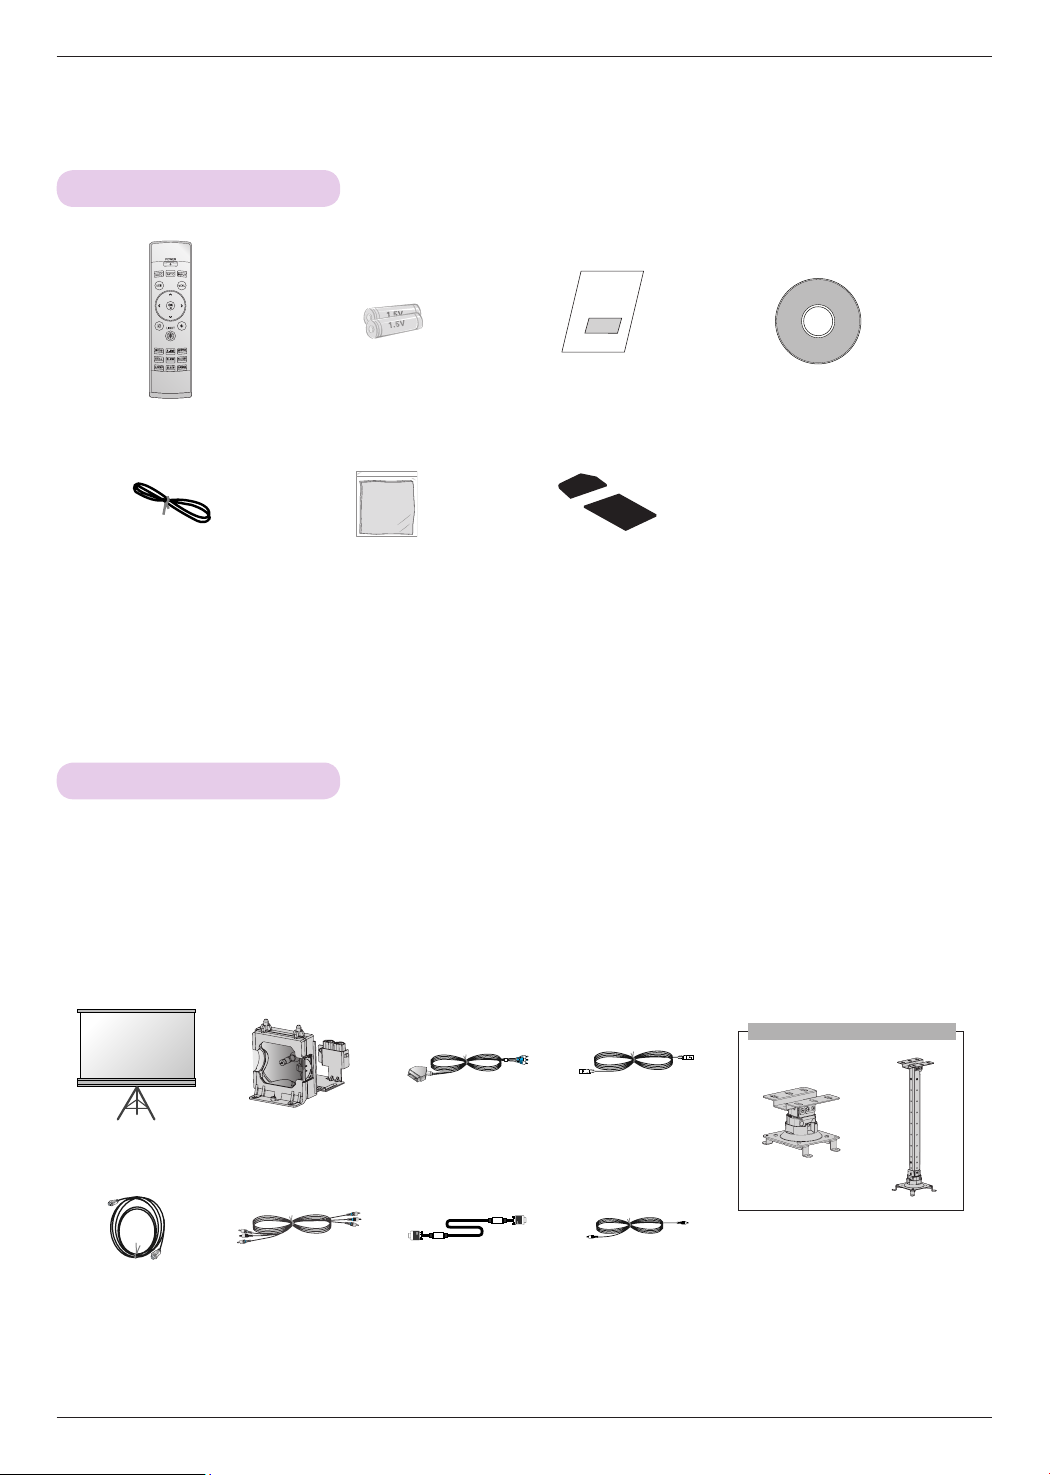
Accessories
Remote Control AAA Battery Owner’s manual CD Owner’s manual
Power Cord Polishing Cloth Filter
Optional Extras
* Contact your dealer to purchase these items.
* The lamp is consumable and needs to be replaced with a new one when it is burned out. Contact your dealer or service center for a replacement
lamp.
* Optional parts can be changed without notice to improve the quality of the product, and new optional parts can be added.
Ceiling mount for projector
Projection Screen Lamp SCART to RCA jack S-Video Cable
HDMI Cable Component Cable Computer Cable Video Cable
12
Installing and Composition
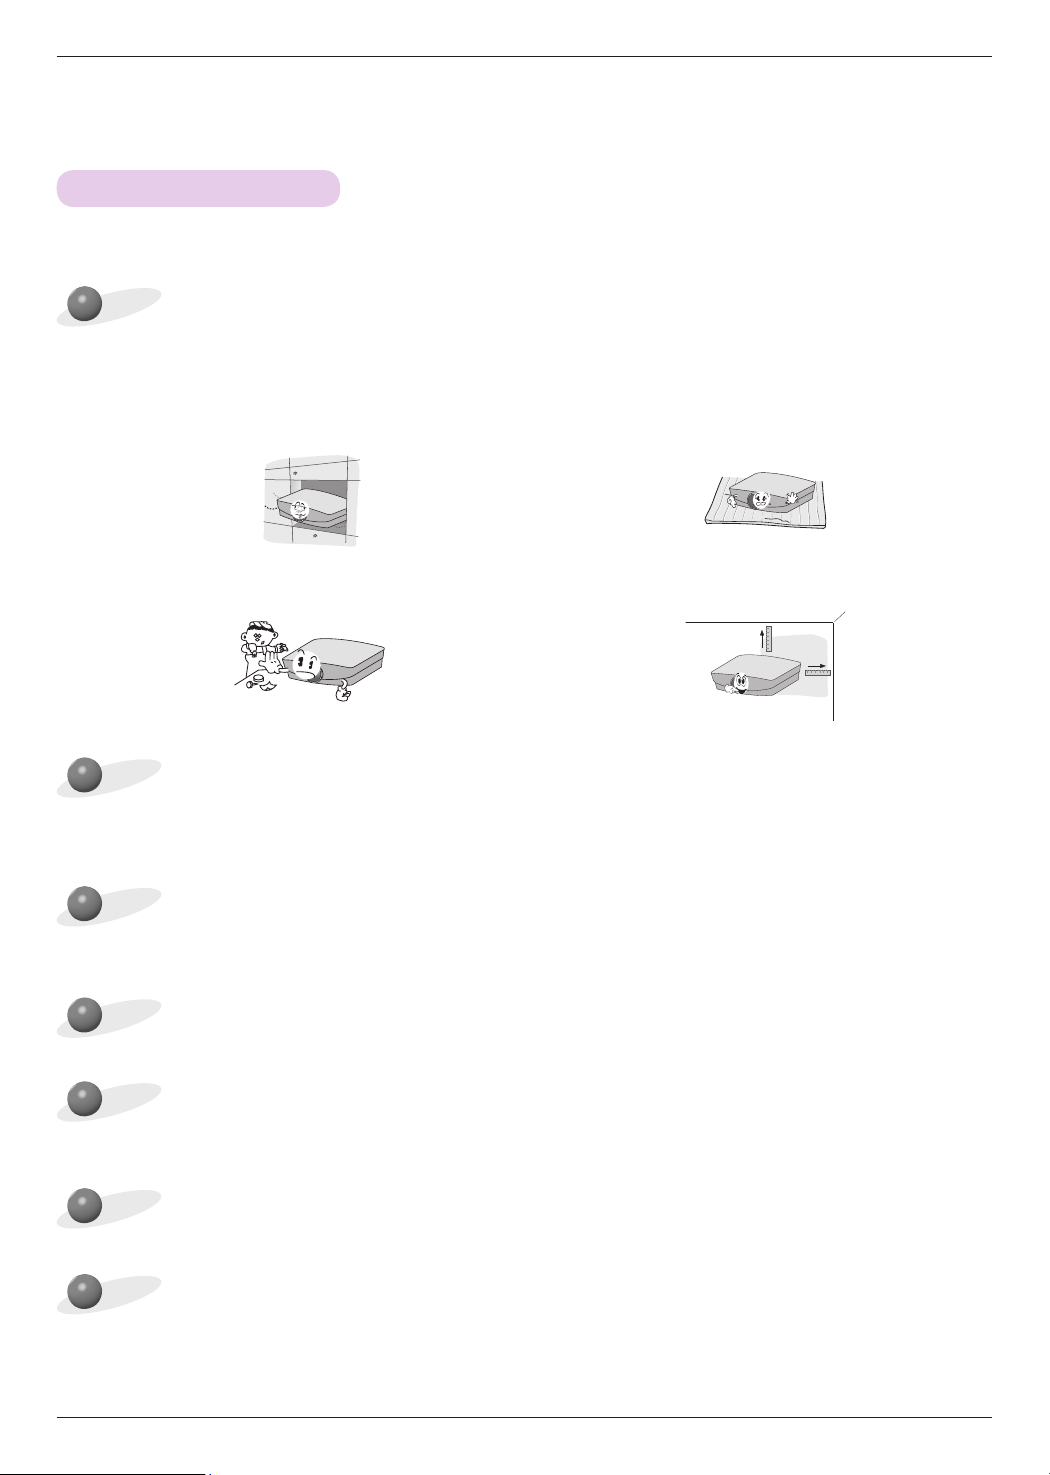
Installation Precautions
Provide proper ventilation for this projector.
Installing and Composition
• The projector is equipped with ventilation holes(intake) on
the bottom and ventilation holes(exhaust) on the front. Do
not block or place anything near these holes. Internal heat
build-up may occur, causing picture degradation or damage to the projector.
• Never push projector or spill any kind of liquid into the
projector.
Place this projector in adequate temperature and humidity conditions.
• Install this projector only in a location where adequate temperature and humidity is available. (Refer to page 35)
Don’t place the projector where it can be covered with dust.
• Do not place the projector on a carpet, rug or other similar
surface. It may prevent a adequate ventilation of the projector bottom. This product should be mounted to a wall
or ceiling only.
• Leave an adequate distance (30 cm or more) around the
projector.
• This may cause overheating of the projector.
Do not obstruct the slots and openings of the projector. This may cause overheating and create a fire hazard.
This projector is manufactured using high-precision technology. You may, however, see tiny black points and/or bright
points (red, blue or green) that continuously appear on the projector Screen. This is a normal result of the manufacturing
process and does not indicate a malfunction.
To display DTV programs, it is necessary to purchase a DTV receiver (Set-top Box) and connect it to the projector.
The remote control may not work when a lamp equipped with electronic ballast or a three-wavelength lamp is installed.
Replace those lamps with international standard products to use the remote control normally.
13

Installing and Composition
30 762 664 374 877 1605
40 1016 886 498 1181 2152
50 1270 1107 623 1484 2699
60 1524 1328 747 1788 3246
70 1778 1550 872 2092 3794
80 2032 1771 996 2395 4341
90 2286 1992 1121 2699 4888
100 2540 2214 1245 3003 5435
120 3048 2657 1494 3610 6530
140 3556 3099 1743 4218 7624
160 4064 3542 1992 4825 8719
180 4572 3985 2241 5433 9813
200 5080 4428 2491 6040 10907
220 5588 4870 2740 6648 12002
240 6096 5313 2989 7255 13096
260 6604 5756 3238 7863 14191
280 7112 6199 3487 8470 15285
300 7620 6641 3736 9078 16380
Positioning the Projector
1. Place the projector on a sturdy and horizontal surface.
2. Place the projector the desired distance from the screen. The distance between the projector and the screen
determines the actual size of the image.
3. Position the projector so that the lens is set at a right angle to the screen. If the projector is not set at a right
angle, the screen image will be crooked. Although, slight angles can be counteracted using the Keystone adjustement. (Refer to page 25.).
4. Connect the power cable to the projector and the wall outlet after placing the projector in its desired location.
projection distance based on the picture format
Lens shift : Max
X/2
X/2
Screen
Projection distance (D)
Lens shift : 0
Projection off-set ratio:120%
(Lens shift : Max)
Screen height (X)
Y/2
Screen Width (Y)
Diagonal Size
(inch)
14
Diagonal Size
(mm)
Screen
Y/2
Projection distance (D)
16 : 9 Scale
Screen Projection Distance
Horizontal Size
(mm)
Vertical Size
(mm)
Shortest
Distance (mm)
Longest
Distance (mm)
* The projector distancd can be
adjusted using the Zoom
function.
* You can move an image up to
70% of the screen size from
the lens center.

Installing and Composition
Kensington Security System
• This projector has a Kensington Security System Connector on the side panel. Connect the Kensington Security
System cable as below.
• For the detailed installation and use of the Kensington Security System, refer to the user’s guide included
with the Kensington Security System set.
• And for further information, contact http://www.kensington.com, the internet homepage of the Kensington
company that deals with expensive electronic equipment such as notebook PCs or projectors.
• The Kensington Security System is an optional item.
15

Installing and Composition
Turning on the Projector
1. Make sure the power cord is connected correctly.
2. Remove the lens cap. If it is left on, it could become deformed due to the heat produced by the projection
lamp.
3. Press the POWER button on the remote control or back cover.
• An image will appear after the operation deco LED turns (Blue (flashing))(Refer to page 11).
• Press the INPUT button on the remote control or the INPUT button on the control panel to select the input signal
you want.
* Do not disconnect the power cord while the fan is in operation. It may shorten the life of the fan. It will also take longer to
activate the lamp when turning the power back on.
Turning off the Projector
1. Press the POWER button on the back cover or remote control.
2. Press the POWER button on the back cover or remote control again to turn off the power.
3. If the operation indicator is flashing orange, in other words the fan is working (60 seconds), do not disconnect the projector. When the indicator turns red, you may remove the power cord (Refer to page 11).
• If the operation indicator LED is orange and flashing, the power button on the back cover or on the remote control will
not operate.
Power off?
Please press Power key again.
16

Focus and Position of the Screen Image
When an image appears on the screen, check if it is in focus and fits the screen properly.
Focus ring
Zoom ring
• To adjust the focus of the image, rotate the focus ring which is the outer ring on the lens.
• To adjust the size of the image, rotate the zoom ring which is the under ring on the lens.
When you need to move the screen image up or down, use the Lens shift dial on the projector
to adjust the height as shown below.
Lens shift Dial
Installing and Composition
• Turn the Lens shift dial left or right to adjust the projector image up or down.
Turning the Lens shift dial with excessive power may cause damage to the projector.
Selecting source mode
1. Press the INPUT button.
Input List
RGB HDMI1 HDMI2 Video S-Video Component
2. Selecting an input signal with the INPUT button will only change the projector only to connected
inputs. You can change it to any inputs with the <, > button.
17

Connection
Connection
Connecting to a Desktop PC
* You can connect the projector to a computer with VGA, SVGA, XGA, SXGA and 1080p/60Hz output.
* Refer to page 30 for resolutions the projector supports.
< How to connect >
Connect the RGB IN of the projector and the computer
output port with a computer cable.
* You may have to change the resolution that your PC exports
to one supported by the projector. Refer to page 30. This
projector may not support output from laptops when the laptop screen is on.
Connecting to a Video Source
* You can connect a VCR, a camcorder or any other compatible video image source to the projector.
< How to connect 1 >
a. Connect the Video input jacks of the projector to the out-
put jacks of the A/V source with a video cable.
< How to connect 2 >
b. Connect the S-Video input jack of the projector to the
S-Video output jack of an A/V source with an S-Video
cable.
* S-Video supports better video quality than a regular A/V
connection.
<VCR>
18

Connection
Connecting to a DVD Player
* Depending on the equipment, the component output jacks (Y, PB, PR) of the DVD Player may be labeled as Y, Pb, Pr/Y, B-Y, R-Y/
Y, Cb, Cr.
< How to connect >
a. Connect the DVD Player component cable to the Y, PB
and PR of the COMPONENT IN of the projector.
* When connecting the component cable, match the jack
colors with the component cable.(Y=green, PB=blue,
PR=red)
b. You may use HDMI instead of component if available on
the DVD player. HDMI supports better quality than component.
Component cable
<DVD Player>
Signal
480i
480p
720p
1080i
1080p
576i
576p
Component
O
O
O
O
O
O
O
HDMI
X
O
O
O
O
X
O
Connecting to a D-TV Set-Top Box
* To receive Digital TV (D-TV) programs, it is necessary to purchase a D-TV receiver (Set-Top Box) and connect it to the projector.
* Please refer to the owner's manual of the D-TV Set-Top Box for the connection between projector and D-TV Set-Top Box.
< How to connect a HDMI source >
a. Connect the HDMI IN of the projector and the HDMI
output port of the DTV set-top box with an HDMI
cable.
b. Set the DTV receiver's resolution to one of the follow-
ing: 480p(576p)/720p/1080i/1080p mode.
HDMI Cable
<D-TV Set-Top Box>
< How to connect a Component source >
a. Connect the component cable connected to the DTV set-top
box to the
* When connecting the component cable, match the jack colors.
Y, PB and PR
(Y=green, PB=blue, PR=red)
of the COMPONENT IN of the projector.
<D-TV Set-Top Box>
Component cable
19

Function
Function
* The On-Screen Display (OSD) in this manual may be slightly different from your projector.
* This operating guide explains operation of RGB(PC) mode mainly.
PICTURE Menu Options
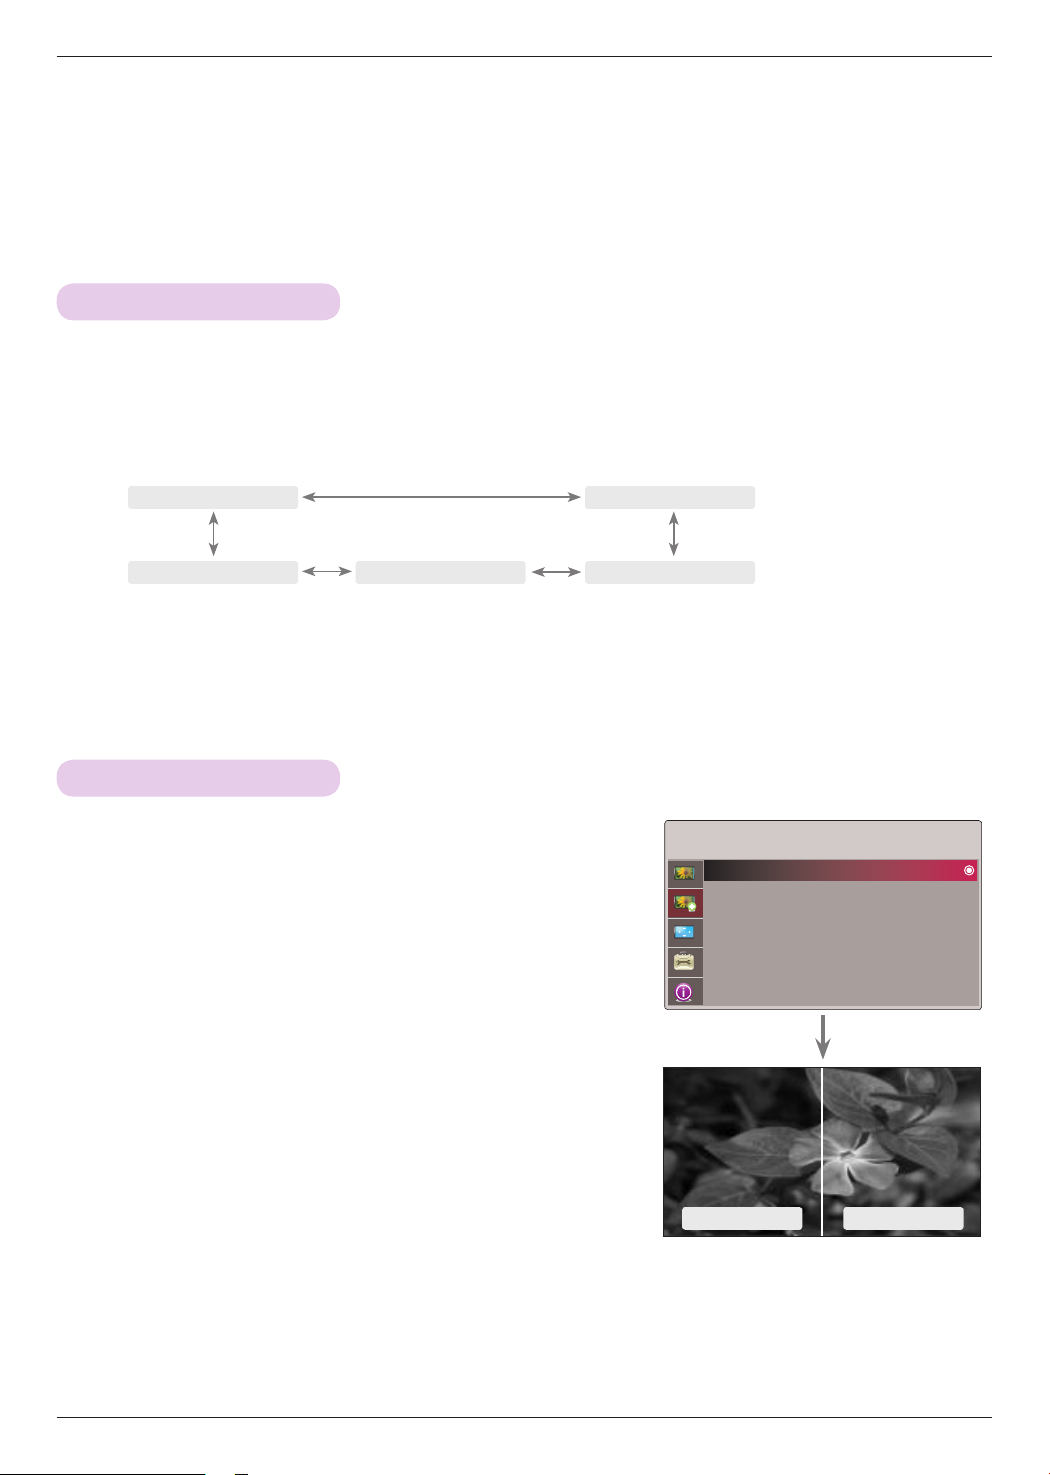
Picture mode
* Use the Picture mode function to set the projector for the best picture appearance.
1. Press the MODE button on the remote control.
2. Press the <, > button to toggle through the preset picture settings.
• Each press of the <, > button changes the screen as shown below.
ꔗ
Vivid
ꔃ ꔗ
Standard
ꔃ ꔗ
Cinema
ꔃ ꔗ
Sport
ꔃ
ꔗ
Expert2
• You can use this function through the MENU button.
• To exit the menu display, press the EXIT button.
ꔃ ꔗ
Expert1
ꔃ ꔗ
Adjusting Video
1. Press the MENU button. Then, move to PICTURE with the ∧, ∨, <, >
buttons and press the ꔉOK button.
2. Move to a sub-item with the > button. Then, use the ∧, ∨ buttons to
move to a desired function and press the ꔉOK button.
3. Use the <, > buttons to make a desired adjustment and then press the
ꔉOK button.
• You can set image values differently for each input and Picture Mode.
• Saving after making adjustments will display (User) in adjusted Picture
Mode. (except Expert 1/2)
• Execute Picture Reset for Picture Mode to restore back to default factory settings.
• You can adjust contrast by pressing the button on the remote control.
• You can adjust brightness by pressing the button on the remote control.
• Press the MENU or EXIT button to exit the menu screen.
Game
PICTURE
Picture Mode : Standard
• Contrast 50
• Brightness 50
• Sharpness 5
• Color 70
• Tint 0
• Picture Reset
ꔃ
ꔂMove ꔉOK
R G
20
ADV. PICTURE Menu Options
Auto Iris Function
* This function adjusts the brightness of the entire image depending on inputted image to provide optimum image quality.
1. Press the A.IRIS button on the remote control.
2. Press the <, > button to adjust the screen condition as you want.
• Each press of the <, > button changes the screen as shown below.
ꔗ
Manual
ꔃ
ꔗ
Auto Iris1
ꔃ
Function
ꔗ
Off
• Manual : You can adjust from 0 to 32 on Advanced Control of ADV. PICTURE.
• You can use this function through the MENU button.
• To exit the menu display, press the EXIT button.
ꔃ ꔗ
ꔗ
Auto Iris3
ꔃ
Auto Iris2
TruMotion Demo Function
1. Press the MENU button. Then, move to ADV. PICTURE with the
∧, ∨, <, > buttons and press the ꔉOK button.
2. Move to a sub-item with the > button. Then, use the ∧, ∨ buttons
to move to TruMotion Demo and press the ꔉOK button.
• Press the MENU or EXIT button to exit the menu screen.
ꔃ
ADV. PICTURE
TruMotion Demo
Advanced Control
Adv. Picture Reset
ꔂMove ꔉOK
TruMotion on TruMotion off
21

Function
Advanced Control Function
1. Press the MENU button. Then, move to ADV. PICTURE with the
∧, ∨, <, > buttons and press the ꔉOK button.
2. Move to a sub-item with the > button. Then, use the ∧, ∨ but-
tons to move to Advanced Control and press the ꔉOK button.
3. Move to a desired item with the ∧, ∨ buttons and then press the
ꔉOK button.
< When Picture Mode is Vivid/Standard/Sport/Game >
ADV. PICTURE
TruMotion Demo
Advanced Control
Adv. Picture Reset
Auto Iris
• Manual
• TruMotion
• Color Temp.
• Noise Reduction
• Gamma
• Real Cinema
• Black Level
4. Use the <, > buttons to make a desired adjustment and then
press the ꔉOK button.
• You can set image values differently for each input and Picture
Mode.
• Press the MENU or EXIT button to exit the menu screen.
► TruMotion : Makes the moving image smoother through compensation.
ꔃ
• TruMotion
ꔗ
High
ꔗ
• This function cannot be set when PC signal is input.
• If you adjust Keystone set TruMotion to Off. Execute Reset for Keystone to be able to adjust TruMotion
► Color Temp : Selects the mood of screen colors.
ꔃ
• Color Temp.
ꔗ
Medium
ꔗ
ꔉ OK
ꔉ OK
ꔃ ꔗ
ꔃ ꔗ
Off
Cool
ꔃ
ꔃ
ꔗ
ꔗ
< When Picture Mode is Cinema/Expert 1/2 >
ADV. PICTURE
TruMotion Demo
Expert Control
Adv. Picture Reset
Low
Natural
Auto Iris
• Manual
• TruMotion
• Noise Reduction
• Real Cinema
• Black Level
• Lamp Mode
• Overscan
ꔃ
ꔃ ꔗ
Warm
ꔍ
ꔍ
ꔗ
Off
0
Off
Natural
Off
Low
Off
Auto
ꔗ
Off
0
High
Off
Off
High
Low
100
ꔃ
ꔃ
ꔃ
• You can also use the C.TEMP button on the remote control.
► Noise Reduction : Removes noise from image without damaging it.
ꔃ
• Noise Reduction
ꔗ
On
ꔗ
ꔉ OK
ꔃ ꔗ
O ff
ꔃ
• You can use it only in Video, S-Video, Component(480i, 480p, 576i, 576p) and HDMI(480p, 576p) modes.
► Gamma : Sets the intensity of the picture.
ꔃ
• Gamma
ꔗ
Low
ꔗ
ꔉ OK
ꔃ ꔗ
Medium
ꔃ
ꔗ
High
ꔃ
• You can also use the GAMMA button on the remote control.
► Real Cinema : Set up the picture for the best picture appearance for viewing movies.
ꔃ
• Real Cinema
ꔗ
O ff
ꔗ
ꔉ OK
ꔃ ꔗ
On
ꔃ
• You can use it only in Video, S-Video, Component(480i/576i/1080i 50/60Hz, 1080p 24Hz) and
HDMI(1080i 50/60Hz, 1080p 24Hz) modes.
• You can select this function only when TruMotion is Off.
► Black Level : Adjusting the contrast and the brightness of the screen using the black level of the screen.
ꔃ
• Black Level
ꔗ
Low
ꔗ
ꔉ OK
ꔃ ꔗ
High
ꔃ
• You cannot set this function in SECAM, PAL 60 and PAL BGDK signals of Video, S-Video and RGB modes.
22

Function
► Lamp Mode : Adjusts the lamp brightness.
ꔃ
• Lamp Mode
ꔗ
High
ꔗ
ꔉ OK
ꔃ ꔗ
Low
ꔃ
► Overscan : You can adjust from 90, 92, 94...100.
ꔃ
• Overscan
ꔗ
90
ꔗ
ꔉ OK
ꔃ
~
ꔗ
100
ꔃ
• This function cannot be set when the signal is 1080i and 1080p or Aspect Ratio is set as Justscan.
• Noise can occur at the edges of the screen at the signal of 1080i/1080p because of the malfunctioning of an image input
device. In this case, change the signal into the one that can be set with Overscan and set Overscan.
► Gamma Mode : You can select this mode only when Picture Mode is Cinema/Expert 1/2.
ꔃ
•Gamma Mode
ꔗ
Preset
ꔗ
ꔉ OK
ꔃ ꔗ
User
ꔃ
• Adjustment : You can select Low, Medium or High.
• Level : You can adjust from 0 to 8.
• IRE : Automatically set from 0 to 100 according to Level change.
• When you select User -> Red/Green/Blue : You can adjust from -127 to 127.
► White Balance : Adjusts the overall feeling of the screen to your choice. You can select this function only when Picture Mode is
Cinema/Expert 1/2.
ꔃ
•White Balance
•Red Contrast
ꔗ
Medium
ꔗ
ꔃ
ꔗ
-30
ꔗ
ꔉ OK
ꔉ OK
ꔃ ꔗ
ꔃ ꔗ
~
Cool
0
ꔃ
ꔃ
~
ꔗ
Natural
ꔗ
30
ꔃ ꔗ
ꔃ
Warm
• Red/Green/Blue Contrast : You can adjust from -30 to 30.
• Red/Green/Blue Brightness : You can adjust from -30 to 30.
Advanced Picture Reset Function
* Settings of the selected ADV PICTURE function for each input and Picture Mode return to the default factory settings.
1. Press the MENU button. Then, move to ADV. PICTURE with
the ∧, ∨, <, > buttons and press the ꔉOK button.
2. Move to a sub-item with the > button. Then, use the ∧, ∨
buttons to move to Adv. Picture Reset and press the ꔉOK
button.
ADV. PICTURE
TruMotion Demo
Advanced Control
Adv. Picture Reset
ꔂMove ꔉOK
ꔃ
3. Move to Yes with the <, > buttons and then press the ꔉOK
button.
• Press the MENU or EXIT button to exit the menu screen.
23

Function
SCREEN Menu Options
To Change PJT Mode
* This function turns the projected image upside down or flips horizontal.
1. Press the MENU button. Then, move to SCREEN with the ∧, ∨, <,
> buttons and press the ꔉOK button.
2. Move to a sub-item with the > button. Then, use the ∧, ∨ buttons to
move to PJT Mode and press the ꔉOK button.
3. Move to a desired item with the ∧, ∨ buttons and then press the ꔉOK
button.
• Select Rear when projecting from the back of the transparent screen purchased separately.
• Select Ceiling when installing the product on the ceiling.
• Press the MENU or EXIT button to exit the menu screen.
SCREEN
PJT Mode : Front
Aspect Ratio : 16 : 9
Keystone
Test Pattern
RGB Config.
Screen Reset
ꔂMove ꔉOK
Using Aspect Ratio Function
1. Press the RATIO button on the remote control.
2. Use the <, > buttons to select a desired screen size.
ꔗ
Auto
ꔗ
Just Scan
• Some options may not be available depending on input signals.
• You can use this function through the MENU button.
• To exit the menu display, press the EXIT button.
ꔃ ꔗ
ꔃ ꔗ
4 : 3
16 : 9
ꔃ
ꔃ
24

Using Keystone Function
* Use this function when the screen is not at a right angle to the projector and the image is a trapezoid shape.
* Only use the Keystone function when you can’t get the best angle of projection.
1. Press the KEYSTONE button of remote control.
Keystone
2. Move to a desired item with the ∧, ∨ buttons and then press the > but-
ton.
3. Press the ∧, ∨, <, > button to adjust the screen condition as you want
and then press the ꔉOK button.
• Keystone can be adjusted from -100 to 100.
• Execute Reset to restore back to default factory settings.
• You can use this function through the MENU button.
• To exit the menu display, press the EXIT button.
Top Left ꔃ
Top Right
Bottom Left
Bottom Right
Reset
H : 0
V : 0
Test Pattern Function
* Execute this function when installing the projector to adjust the screen size and focus.
Function
ꔂMove ꘀ OK
Press the PATTERN button of remote control.
• You can use this function through the MENU button.
• To exit the menu display, press the EXIT button.
Auto Configure Function
* This function assures you of getting the best video quality by automatically adjusting the horizontal size and synchronization
of the image.
* Auto Tracking function works in RGB PC input only.
1. Press the AUTO button of the remote control.
• Image positioning and synchronization are automatically adjusted.
2. After automatic adjustments, if further manual adjustments are
needed depending on RGB Config. on the SCREEN menu. In certain
circumstances, you can’t get the best picture quality by only using
auto-correction.
Auto RGB Config.
Auto configuration is on the process.
Please wait a moment.
You can also use this function by using the MENU button. (Only in RGB mode)
For best results, perform this function while displaying a still image.
25

Function
RGB Config. Function
1. Press the MENU button. Then, move to SCREEN with the ∧, ∨, <,
> buttons and press the ꔉOK button.
2. Move to a sub-item with the > button. Then, use the ∧, ∨ buttons to
move to RGB Config. and press the ꔉOK button.
3. Move to a desired item with the ∧, ∨ buttons and then press the >
RGB Config.
Auto Configure ꔃ
Phase
Clock
Position
button.
4. Press the ∧, ∨, <, > button to adjust the screen condition as you want and then press the ꔉOK button.
• The Auto Configure function operates only for RGB input. If you execute screen adjustment for a video from PC
graphic signal, optimal state may not be found. Execute the Auto Configure function for a still image.
• The variable range can be different depends on input resolutions.
• To exit the menu display, press the EXIT button.
Screen Reset Function
* Settings of the selected SCREEN modes return to the default factory settings.
1. Press the MENU button. Then, move to SCREEN with the ∧, ∨, <,
> buttons and press the ꔉOK button.
2. Move to a sub-item with the > button. Then, use the ∧, ∨ buttons to
move to Screen Reset and press the ꔉOK button.
3. Move to Yes with the <, > buttons and then press theꔉOK button.
• Keystone function is not reset.
• Press the MENU or EXIT button to exit the menu screen.
SCREEN
PJT Mode : Front
Aspect Ratio : 16 : 9
Keystone
Test Pattern
RGB Config.
Screen Reset
ꔂMove ꔉOK
Auto Configure?
Yes No
ꔂMove ꔉOK
26
OPTION Menu Options
Using the Still Function
1. Press the STILL button on the remote control.
* You can freeze the moving image.
Function
<Moving Image>
<Still Image>
2. To exit STILL, press any button.
* The STILL function will release automatically after approximately 10 minutes.
Selecting Language
1. Press the MENU button. Then, move to OPTION with the ∧, ∨, <,
> buttons and press the ꔉOK button.
2. Move to a sub-item with the > button. Then, use the ∧, ∨ buttons to
move to Language and press the ꔉOK button.
3. Move to a desired item with the ∧, ∨ buttons and then press the ꔉOK
OPTION
Language : English
Blank Image : Blue
Sleep Time : Off
Auto Sleep : Off
Option Reset
ꔂMove ꔉOK
button.
• On-Screen-Display (OSD) is displayed in the selected language.
• Press the MENU or EXIT button to exit the menu screen.
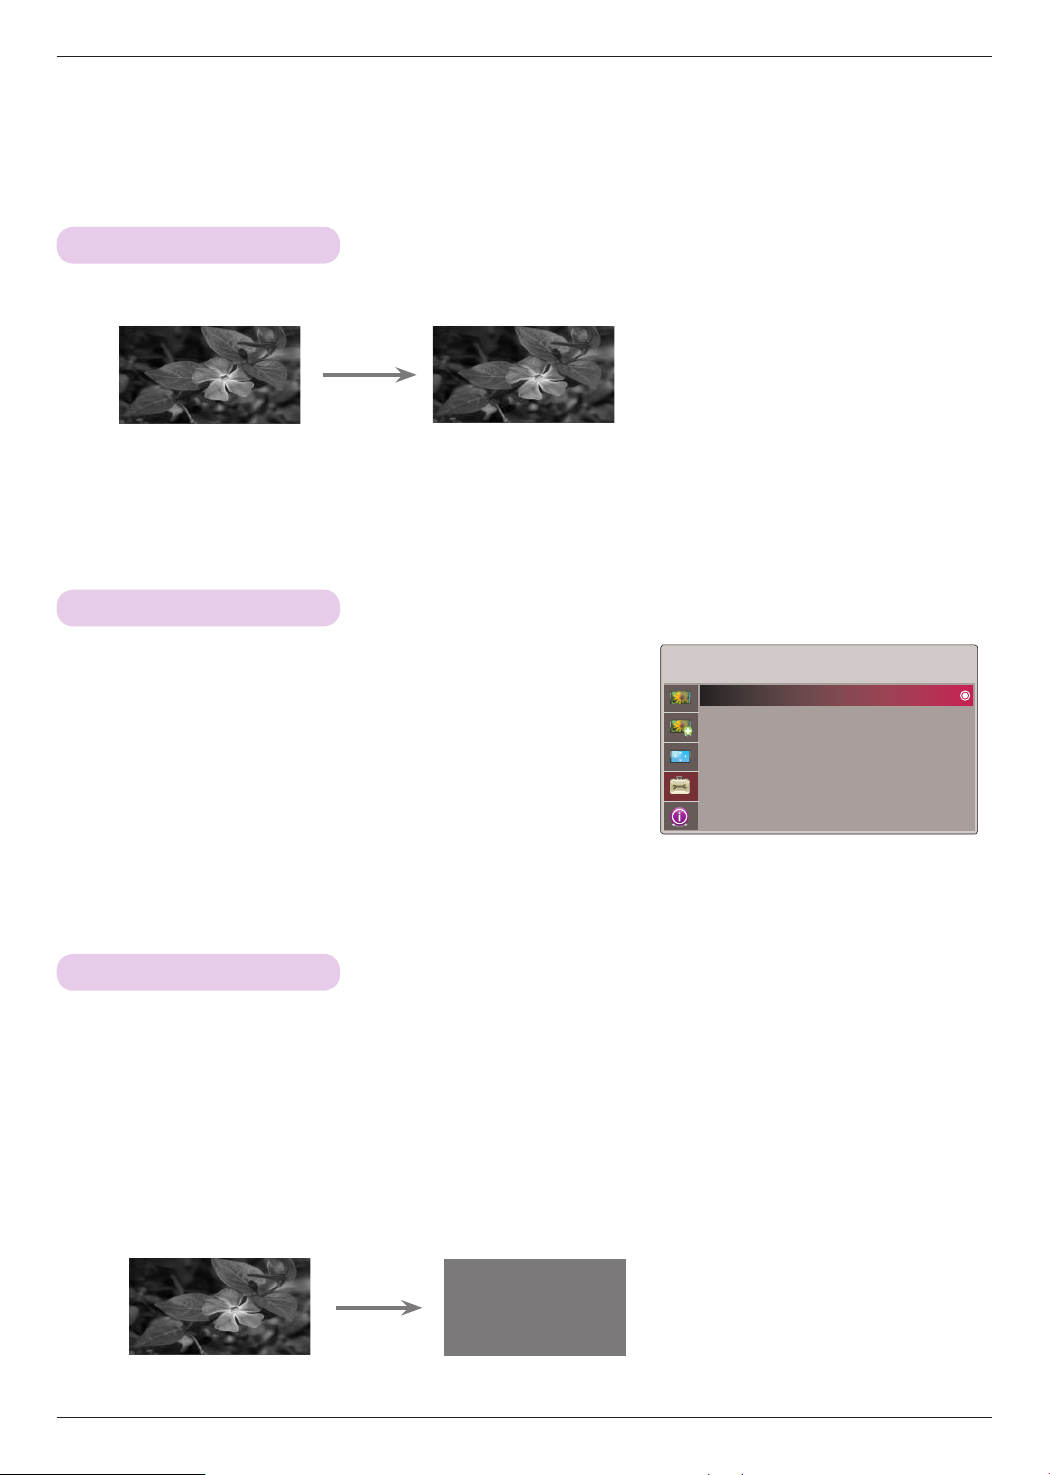
Using Blank Function
* This function may be effective if you need to get the attention of the audience during presentations, meetings or briefings.
1. Press the BLANK button on the remote control.
• The screen turns off to a background color.
• You can choose the background color. (Refer to ‘Selecting Blank image color’)
2. Press any button to cancel the blank function.
• To temporarily turn off the lamp, press BLANK on the remote control. Do not block the projection lens with any objects
when the projector is under operation as this could cause the objects to become heated and deformed or even cause
a fire.
27

Function
Selecting Blank image color
1. Press the MENU button. Then, move to OPTION with the ∧, ∨, <,
> buttons and press the ꔉOK button.
2. Move to a sub-item with the > button. Then, use the ∧, ∨ buttons to
move to Blank Image and press the ꔉOK button.
3. Move to a desired item with the ∧, ∨ buttons and then press the ꔉOK
button.
• Background color will be altered to the selected Blank function color.
• Press the MENU or EXIT button to exit the menu screen.
Sleep time Function
* The sleep timer turns the projector off at the preset time.
1. Press the SLEEP button of remote control.
2. Press the <, > button to select the desired preset time.
• Each press of the <, > button changes the screen as shown below.
OPTION
Language : English
Blank Image : Blue
Sleep Time : Off
Auto Sleep : Off
Option Reset
ꔂMove ꔉOK
ꔗ
ꔗ
Off
240 Min
ꔃ ꔗ
ꔃ ꔗ
10 Min
180 Min
• You can use this function through the MENU button.
• To exit the menu display, press the EXIT button.
ꔃ ꔗ
ꔃ ꔗ
20 Min
120 Min
ꔃ ꔗ
ꔗ
ꔃ ꔗ
30 Min
60 Min
90 Min
ꔃ
ꔃ
ꔃ
28

Auto sleep Function
* This function turns the projector off automatically after 10 minutes is passed when there is no signal.
Function
1. Press the MENU button. Then, move to OPTION with the ∧, ∨, <, >
buttons and press the ꔉOK button.
2. Move to a sub-item with the > button. Then, use the ∧, ∨ buttons to
move to Auto Sleep and press the ꔉOK button.
3. Move to On with the <, > buttons and then press the ꔉOK button.
• Press the MENU or EXIT button to exit the menu screen.
Option Reset Function
* Settings of the selected OPTION modes return to the default factory settings.
1. Press the MENU button. Then, move to OPTION with the ∧, ∨, <,
> buttons and press the ꔉOK button.
2. Move to a sub-item with the > button. Then, use the ∧, ∨ buttons to
move to Option Reset and press the ꔉOK button.
3. Move to Yes with the <, > buttons and then press the ꔉOK button.
• Language function is not reset.
• Press the MENU or EXIT button to exit the menu screen.
OPTION
Language : English
Blank Image : Blue
Sleep Time : Off
Auto Sleep : Off
Option Reset
OPTION
Language : English
Blank Image : Blue
Sleep Time : Off
Auto Sleep : Off
Option Reset
ꔂMove ꔉOK
ꔂMove ꔉOK
INFORMATION Menu Options
To See The Projector Information
1. Press the MENU button. Then, move to INFORMATION with the
∧, ∨, <, > buttons and press the ꔉOK button.
2. You can see the current information of the projector.
• Press the MENU or EXIT button to exit the menu screen.
INFORMATION
Serial No. : CF181D-JS
Lamp Time : 9 Hr
Input : Video
Resolution : NTSC M
Fh/Fv : 15.7KHz/60.0Hz
ꔂMove
29

Information
Information
Supported Monitor Display
* The following table lists the display formats supported by the projector.
Format Vertical Freq.(Hz) Horizontal Freq.(kHz)
* If the projector does not support the input signal, “Out of Range” message appears on the screen.
* The projector supports DDC1/2B type as Plug & Play function. (Auto recognition of PC monitor)
* The Synchronization input form for horizontal and vertical frequencies are Separate.
< DVD/DTV Input >
Signal Component-*1 HDMI (DTV) -*2
60 Hz
50 Hz
24/25/30Hz 1080p
480i O X
480p O O
720p O O
1080i O O
1080p O O
576i O X
576p O O
720p O O
1080i O O
1080p O O
O O
* Cable type
1- Component Cable
2- HDMI Cable
30

Information
Maintenance
* The projector needs little maintenance. You should keep the lens clean because any dirt or stains may appear on the screen. If
any parts need to be replaced, contact your dealer. When cleaning any part of the projector, always turn the power off and
unplug the projector first.
Cleaning the lens
If there is any dust or stain on the surface of the lens, you must always clean the lens. Use an air spray or cleaning cloth for product exterior, provided with the product, to lightly clean the product. Please use a recommended air spray or lens cleaning product.
To clean the lens, spray a small amount of cleaning agent on a swab or a soft cloth and the clean the lens. Please be aware that
liquid may flow pass into the lens if the product is sprayed on lens directly.
Cleaning the Projector Case
To clean the projector case, first unplug the power cable. To remove dirt or dust, wipe the casing the provided polishing cloth. Do
not use alcohol, benzene, thinners or other chemical detergents as these can cause the casing to be warped or discolored.
Cleaning the Filter
When prompted to clean the filter while using the projector, take the following steps to clean it.
Turn off the projector and unplug the power
cable. Turn it upside down and place it on a
1
table or flat surface.
Press as indicated by arrows with both hands
2
and remove the filter cover.
Filter cover
Turn the filter cover upside down, take the filter
3
out and remove dust from it.
(When the filter is damaged, use additionally-provided new filer.)
Insert the filter into the cover. Fit the cover
onto the projector and press it until a click
4
sound is heard.
Filter
31

Information
Replacing the Lamp
Lamp Replacement
The change interval of the lamp depends on the use environment of Projector.
You can see the used lamp time in the CHECKING LAMP TIME section of the
Menu (page.29). You must replace the lamp when:
• The projected image gets darker or starts to deteriorate.
• The lamp indicator is red.
• The message “Replace the lamp” appears on the screen when turning
the projector on.
Lamp indicators
<Top panel of the Projector>
Be careful when replacing lamp
▪ Press the POWER button on the control panel or remote control to turn off power.
▪ If the operation indicator LED is orange and blinking, do not disconnect the main supply until the operation indicator
LED is lit up constantly (red).
▪ Allow the lamp to cool for 1 hour before replacing it.
▪ Replace only with the same type lamp from an LG Electronics Service Center. Using another manufacturers lamp may
cause damage to the Projector and lamp.
▪ Pull out the lamp only when replacing the lamp.
▪ Keep the lamp unit out of reach of children. Keep the Lamp away from heat sources such as radiators, stoves etc.
▪ To reduce the risk of fire do not expose the lamp to liquids or foreign materials.
▪ Do not place the lamp near any heat source.
▪ Make sure the new lamp is securely tightened with screws. If not, the image may be dark or there could be an
increased risk of fire.
▪ Never touch the glass on the lamp. Image quality may be compromised or lamp life may be reduced.
To obtain a replacement Lamp unit
Lamp model number is on page 35. Check the lamp model and then purchase it from an LG Electronics Service Center.
Using another manufacturers lamp may cause damage to the projector.
Lamp unit disposal
Dispose of the used lamp by returning it to the LG Electronics Service Center.
32

Replacing the Lamp
Information
Turn off the projector and unplug the power
1
cable. Carefully place on a cushioned surface.
(Allow the lamp to cool for 1 hour before removing
the used lamp from the projector.)
After lifting the lamp cover off, remove the two
retaining screws on the lamp case with a
3
screwdriver.
Unscrew the screw from the lamp cover using
2
a screwdriver.
Lamp cover screw
Lift the lamp up from the projector.
4
Screws
Pull out the handle slowly and remove the
lamp case.
5
Tighten the screws you removed in step 3.
7
(Make sure they are fixed firmly.)
• Using another manufacturers lamp may cause damage to the projector or lamp.
• Make sure the lamp cover is securely fastened. If the lamp cover is not installed correctly the unit will not power on.
• If this fault persists contact an LG Authorized Service Center.
bottom
Knob
Insert the new lamp gently into the correct
position. Push the lamp bottom to check if it
is correctly installed.
6
Close the lamp cover and install the screws
from step 2 to install the cover.
8
(If the lamp cover is not installed correctly the unit
will not power on.)
33

Information
Regarding the projector lamp control
WARNING
• Don’t turn off the projector at least 5 minutes after activating it.
- The frequent On/Off changes may cause the lamp to deteriorate.
• Don’t pull out the power cord while operating the projector or the cooling fan.
- It will shorten the life of the lamp or damage it.
• The life-span of the projector depends on the user's environment and treatment conditions.
• The projector uses a high pressure mercury lamp. Use caution when handling. The lamp can shatter and cause harm.
• If you continue to use the projector after the lamp timer has recommended replacing the lamp, the lamp could shatter and
be difficult and dangerous to remove.
• Do the following if the lamp shatters
- Unplug the projector immediately.
- Let some fresh air in immediately (Ventilation).
- Have service center check the projector for damage and replace the lamp.
- Don’t try to disassemble the projector.
34

Specifications
Information
MODEL
CF181D (CF181D-JS)
Resolution 1920 (Horizontal) x 1080 (Vertical) pixel
Horizontal / Vertical Ratio 16:9 (horizontal:vertical)
LCOS panel size (mm) 15.4
Screen size
(Projection distance)
Wide: 0.9 m ~ 9.1 m (76.2 cm ~ 762.0 cm)
Tele: 1.6 m ~ 16.4 m (76.2 cm ~ 762.0 cm)
Projection Offset 120 %
Remote control distance 12 m
Zoom ratio 1:1.8
Video compatibility NTSC/PAL/SECAM/NTSC4.43/PAL-M/PAL-N/PAL-60
Power AC 110 V - 240 V~ 50/60 Hz, 3.0 A-1.2 A
Height (mm) 173.0
Width (mm) 366.0
Length (mm) 447.5
Weight (kg) 9.8
Operating Condition Projector Lamp
Temperature Lamp model
In operation : 0°C ~ 40°C
In storage and transit : -20°C ~ 60°C
AJ-LAF1
Humidity Lamp power consumption
In operation : 0 % ~ 75% relative humidity
Not in operation : 0 % ~ 85% relative humidity
220 W
35

The model and serial number of the projector is
located on the back or one side of the projector.
Record it below should you ever need service.
MODEL
SERIAL
 Loading...