

Page 1
OWNER’S MANUAL
AIR CONDITIONER
Please read this manual carefully before operating
your set and retain it for future reference.
P/NO : MFL67605116
TYPE : WALL MOUNTED
www.lg.com
ČEŠTINA
LIMBA ROMÂNĂ
БЪЛГАРСKN
SRPSKI
HRVATSKI
SVENDKA
NORSK SUOMI
DANSK
ENGLISH
ITALIANO ESPAÑOL FRANÇAIS
DEUTSCH
ΕΛΛΗΝΙΚΆ
PORTUGUESE
NEDERLANDS
POLSKI
MAGYAR
Page 2
2 Air Conditioner
Air Conditioner Ownerʼs Manual
TABLE OF CONTENTS
FOR YOUR RECORDS
Write the model and serial numbers here:
Model #
Serial #
You can find them on a label on the side of each unit.
Dealer's Name
Date Purchased
n Staple your receipt to this page in the event you need
it to prove date of purchase or for warranty issues.
READ THIS MANUAL
Inside you will find many helpful hints on how to use
and maintain your air conditioner properly. Just a little
preventive care on your part can save you a great deal
of time and money over the life of your air conditioner.
You'll find many answers to common problems in the
chart of troubleshooting tips. If you review our chart of
Troubleshooting Tips first, you may not need to call
for service at all.
PRECAUTION
• Contact the authorized service technician for repair or maintenance of this unit.
• Contact the installer for installation of this unit.
• The air conditioner is not intended for use by
young children or invalids without supervision.
• Young children should be supervised to ensure
that they do not play with the air conditioner.
• When the power cord is to be replaced, replacement work shall be performed by authorized personnel only using only genuine replacement
parts.
A. Safety Precautions ..............................3
B. Electrical Safety...................................6
Temporary Use of an Adapter................6
Temporary Use of an Extension Cord ...6
Symbols used in this Manual.................6
C. Product Introduction...........................7
D. Operating Instructions........................8
How to insert the Batteries ....................8
Wireless Remote Controller
Maintenance..........................................8
Operating Method..................................8
Wireless Remote Controller ..................9
Operation Mode ...................................11
Auto Changeover Operation (Single Air Con-
ditioner) ...................................................
12
Auto Operation(Multi Air Conditioner)..12
Healthy Dehumidification Operation....12
Air Circulation Operation .....................13
Auto Clean Operation..........................13
NEO PLASMA Purification Operation(Op-
tional)...................................................13
Energy-Saving Cooling Mode (Optional) ....
14
Display Luminosity(Optional)...............14
Setting the Current Time .....................14
Timer Setting .......................................15
To cancel the timer setting...................15
Sleep Mode .........................................15
Horizontal Vane Control.......................16
Vertical Louver Control (Optional) .......16
Jet Cool Operation ..............................16
Forced operation .................................17
Auto Restart Function..........................17
E. Maintenance and Service..................18
Indoor Unit...........................................18
Outdoor Unit ........................................19
Operation Tips!....................................19
Self-Diagnosis Function ......................19
Troubleshooting Tips! Save time
and money!..........................................20
Call the service immediately in the follow-
ing situations........................................20
Page 3
Owner's Manual 3
Safety Precautions
Safety Precautions
To prevent injury to the user or other people and property damage, the following instructions must be followed.
n Incorrect operation due to ignoring instruction will cause harm or damage. The seriousness is classified by
the following indications.
n Meanings of symbols used in this manual are as shown below.
This symbol indicates the possibility of death or serious injury.
This symbol indicates the possibility of injury or damage.
Be sure not to do.
Be sure to follow the instruction.
Always use a power plug and socket with
a ground terminal.
• There is a risk of electric shock.
Do not use a defective or underrated circuit breaker. Use the correctly rated
breaker and fuse.
• There is risk of fire or electric shock .
Do not use a multi consent. Always use
this appliance on a dedicated circuit
breaker.
• Otherwise it can cause electric shock or fire.
For electrical work, contact the dealer, seller,
a qualified electrician, or an Authorized Service Center. Do not disassemble or repair the
product by yourself.
• There is risk of fire or electric shock.
Always ground the product as per the
wiring diagram. Do not connect the
ground wire to gas or water pipes lightening rod or telephone ground wire.
• There is risk of fire or electric shock.
Install the panel and the cover of control
box securely.
• There is risk of fire or electric shock due to
dust , water etc.
Use the correctly rated breaker or fuse.
• There is risk of fire or electric shock.
Do not modify or extend the power cable.
If the power cable or cord has scrathes or
skin peeled off or deteriorated then it
must be replaced.
• There is risk of fire or electric shock.
For installation, removal or reinstall , always contact the dealer or an Authorized
Service Center.
• There is risk of fire, electric shock, explosion,
or injury.
Do not install the product on a defective installation stand. Be sure that the installation
area does not deteriorate with age.
• It may cause product to fall.
Never install the outdoor unit on a moving base or a place from where it can
fall down.
• The falling outdoor unit can cause damage or
injury or even death of a person.
When the product is soaked (flooded or
submerged) in water , contact an Authorized Service Center for repair before
using it again.
• There is risk of fire or eletric shock.
In outdoor unit the step-up capacitor supplies high voltage electricity to the electrical components. Be sure to discharge
the capacitor completely before conducting the repair work.
• An charged capacitor can cause electrical
shock.
When installing the unit, use the installation kit provided with the product.
• Otherwise the unit may fall and cause severe
injury.
Be sure to use only those parts which
are listed in the svc parts list. Never attempt to modify the equipment.
• The use of inappropriate parts can cause an
electrical shock, excessive heat generation or
fire.
ENGLISH
Page 4
4 Air Conditioner
Safety Precautions
Indoor/outdoor wiring connections must
be secured tightly and the cable should
be routed properly so that there is no
force pulling the cable from the connection terminals.
• Improper or loose connections can cause
heat generation or fire.
Safely dispose off the packing materials.
Like screws, nails, batteries, broken
things etc after installation or svc and
then tear away and throw away the plastic packaging bags.
• Children may play with them and cause injury.
Make sure to check that the power cable
plug is not dirty, loose or broken and
then only insert the plug completely.
• Dirty, loose or broken power plug can
cause electric shock or fire.
Be sure to check the refrigerant to be
used. Please read the label on the product.
• Incorrect refrigerant used can prevent the
normal operation of the unit.
Don't use a power cord, a plug or a loose
socket which is damaged.
• Otherwise it may cause a fire or electrical
shock.
Do not touch , operate, or repair the
product with wet hands. Hold the plug by
hand when taking out
• There is risk of electric shock or fire.
Do not place a heater or other heating appliances near the power cable.
• There is risk of fire and electric shock.
Do not allow water to run into electric
parts. Install the unit away from water
sources.
• There is risk of fire, failure of the product, or
electric shock.
Do not store or use or even allow flammable gas or combustibles near the product.
• There is risk of fire.
Do not use the product in a tightly closed
space for a long time. Perform ventilation
regularly.
• Oxygen deficiency could occur and hence
harm your health.
Do not open the front grille of the product
during operation. (Do not touch the electrostatic filter, if the unit is so equipped.)
• There is risk of physical injury, electric shock,
or product failure.
If strange sound, smell or smoke comes
from product.Immediately turn the breaker
off or disconnect the power supply cable.
• There is risk of electric shock or fire.
Ventilate the product room from time to
time when operating it together with a
stove, or heating element etc.
• Oxygen deficiency can occur and hence harm
your health.
Turn the main power off and unplug the
unit when cleaning or repairing the product.
• There is risk of electric shock.
When the product is not to be used for a
long time, disconnect the power supply
plug or turn off the breaker.
• There is risk of product damage or failure, or
unintended operation.
Take care to ensure that nobody especially kids could step on or fall onto the
outdoor unit.
• This could result in personal injury and product damage.
Take care to ensure that power cable
could not be pulled out or damaged during operation.
• There is risk of fire or electric shock.
Do not place ANYTHING on the power
cable.
• There is risk of fire or electric shock.
Do not plug or unplug the power supply plug to turn the unit
ON/OFF .
• There is risk of fire or electric shock.
When flammable gas leaks, turn off the gas and open a window
for ventilation befor turning on the product.
• Do not use the telephone or turn switches on or off. There is risk of explosion or fire.
Two or more people must lift and transport the product.
• Avoid personal injury.
Do not install the product where it will be
exposed to sea wind (salt spray) directly.
• It may cause corrosion on the product.
Install the drain hose to ensure that the
condensed water is drained away properly.
• A bad connection may cause water leakage.
Keep level even when installing the product.
• To avoid vibration or noise.
Do not install the product where the noise
or hot air from the outdoor unit could damage or disturb the neighborhoods.
• It may cause a problem for your neighbors
and hence dispute.
Always check for gas (refrigerant) leakage after installation or repair of product.
• Low refrigerant levels may cause failure of
product.
Page 5
Owner's Manual 5
Safety Precautions
Do not use the product for special purposes,
such as preserving foods, works of art, etc. It
is a consumer air conditioner, not a precision
refrigeration system.
• There is risk of damage or loss of property.
Do not block the inlet or outlet of air flow.
• It may cause product failure.
Use a soft cloth to clean. Do not use
harsh detergents, solvents or splashing
water etc .
• There is risk of fire, electric shock, or damage
to the plastic parts of the product.
Do not touch the metal parts of the product when removing the air filter.
• There is risk of personal injury.
Do not step on or put anyting on the
product. (outdoor units)
• There is risk of personal injury and failure of
product.
Always insert the filter securely after
cleaning. Clean the filter every two weeks
or more often if necessary.
• A dirty filter reduces the efficiency.
Do not insert hands or other objects
through the air inlet or outlet while the
product is operating.
• There are sharp and moving parts that could
cause personal injury.
Be cautious when unpacking and installing the product.
• Sharp edges could cause injury.
If the refrigerant gas leaks during the repair, do not touch the leakaing refrigerant
gas.
• The refrigernat gas can cause frostbite (cold
burn)
Do not tilt the unit when removing or
uninstalling it.
• The condensed water inside can spill .
Do not mix air or gas other than the specified refrigerant used in the system .
• If air enters the refrigerant system, an excessively high pressure results, causing equipment damage or injury.
If the refrigerant gas leaks during the installation, ventilate the area immediately.
• Otherwise it can be harmfull for your health.
Dismantling the unit, treatment of the refrigerant oil and eventual parts should be
done in accordance with local and national standards.
Replace the all batteries in the remote
control with new ones of the same type.
Do not mix old and new batteries or different types of batteries.
• There is risk of fire or product failure.
Do not recharge or disassemble the batteries. Do not dispose off batteries in a
fire.
• They may burn or explode.
If the liquid from the batteries gets onto
your skin or clothes, wash it well with
clean water. Do not use the remote if the
batteries have leaked.
• The chemicals in batteries could cause burns
or other health hazards.
If you eat the liquid from the batteries,
brush your teeth and see doctor. Do not
use the remote if the batteries have
leaked.
• The chemicals in batteries could cause
burns or other health hazards.
Do not let the air conditioner run for a
long time when the humidity is very high
and a door or a window is left open.
• Moisture may condense and wet or damage
furniture.
Do not expose your skin or kids or
plants to the cool or hot air draft.
• This could harm to your health.
Do not drink the water drained from the
product.
• It is not sanitary and could cause serious
health issues.
Use a firm stool or ladder when cleaning, maintaining or repairing the product at an height.
• Be careful and avoid personal injury.
ENGLISH
Page 6
6 Air Conditioner
Electrical Safety
Electrical Safety
• This appliance must be properly grounded.
To minimize the risk of electric shock, you must always plug into a grounded oulet.
• Do not cut or remove the grounding prong from the power plug.
• Attaching the adapter ground terminal to the wall receptacle cover screw does not ground the appliance
unless the cover screw is metal and not insulated, and the wall receptacle is grounded through the
house wiring.
• If you have any doubt whether the air conditioner is properly grounded, have the wall receptacle and circuit checked by a qualified electrician.
We strongly discourage the use of an adapter due to potential safety hazards. For temporary connections,
use only a genuine adapter, available from most local hardware stores. Ensure that the large slot in the
adapter is aligned with the large slot in the receptacle for a proper polarity connection.
To disconnect the power cord from the adapter, use one hand on each to avoid damaging the ground terminal. Avoid frequently unplugging the power cord as this can lead to eventual ground terminal damage.
• Never use the appliance with a broken adapter.
We strongly discourage the use of an extension cord due to potential safety hazards.
Temporary Use of an Adapter
Temporary Use of an Extension Cord
This symbol alerts you to the risk of electric shock.
This symbol alerts you to hazards that may cause harm to the
air conditioner.
This symbol indicates special notes.
NOTE
Symbols used in this Manual
This appliance should be installed in accordance with national wiring regulations. This manual acts as a
guide to explaining product features.
Page 7
Owner's Manual 7
Product Introduction
Product Introduction
ENGLISH
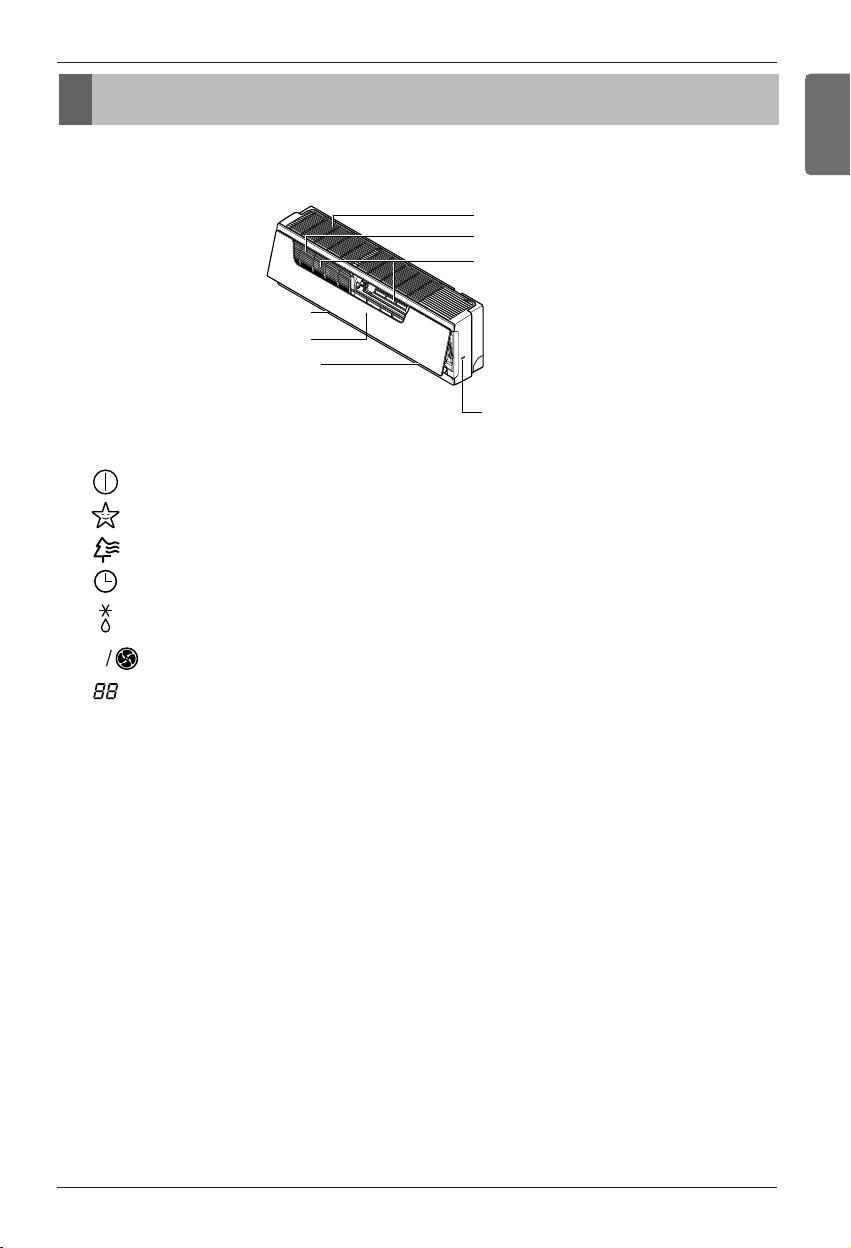
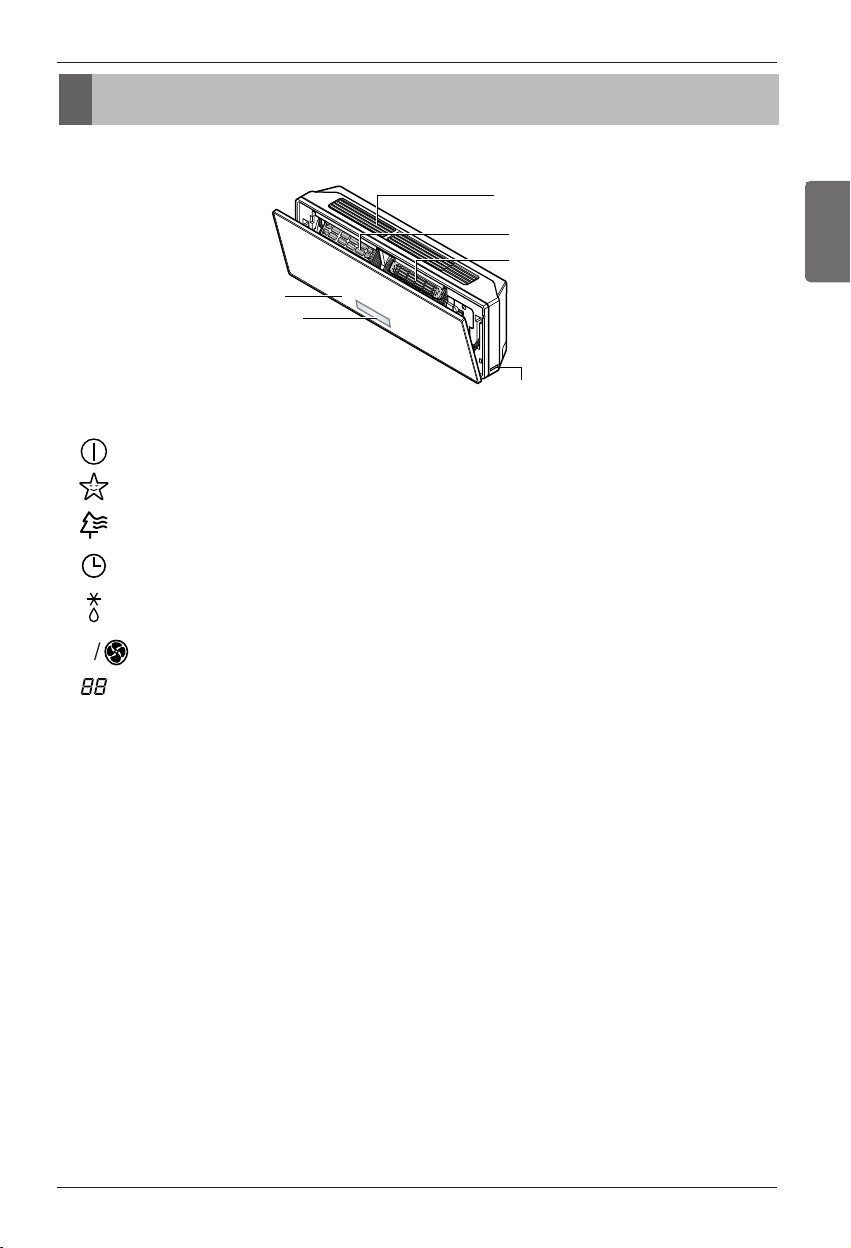
Artcool Mirror Type
Display panel LCD indicators
Air discharge
Front panel
Signal receiver
Air inlet
Air filter
Plasma filter
ON/OFF button
OUT
DOOR
On/Off
Sleep mode : Lights up during sleep mode auto operation.
Plasma : The function illustrates its dynamic mode by using a multiple lighting system.
Timer
Defrost mode
Outdoor unit
operation
Power Display : Indicates the setting temperature, auto operation (auto changeover operation),
auto clean operation, test operation and error code.
: Lights up during the system operation, and auto restart setting.
: Lights up during timer operation.
: Lights up during defrost mode or *hot start operation (Heat pump model only)
: Lights up during outdoor unit operation. (Cooling model only)
Page 8
8 Air Conditioner
Operating Instructions
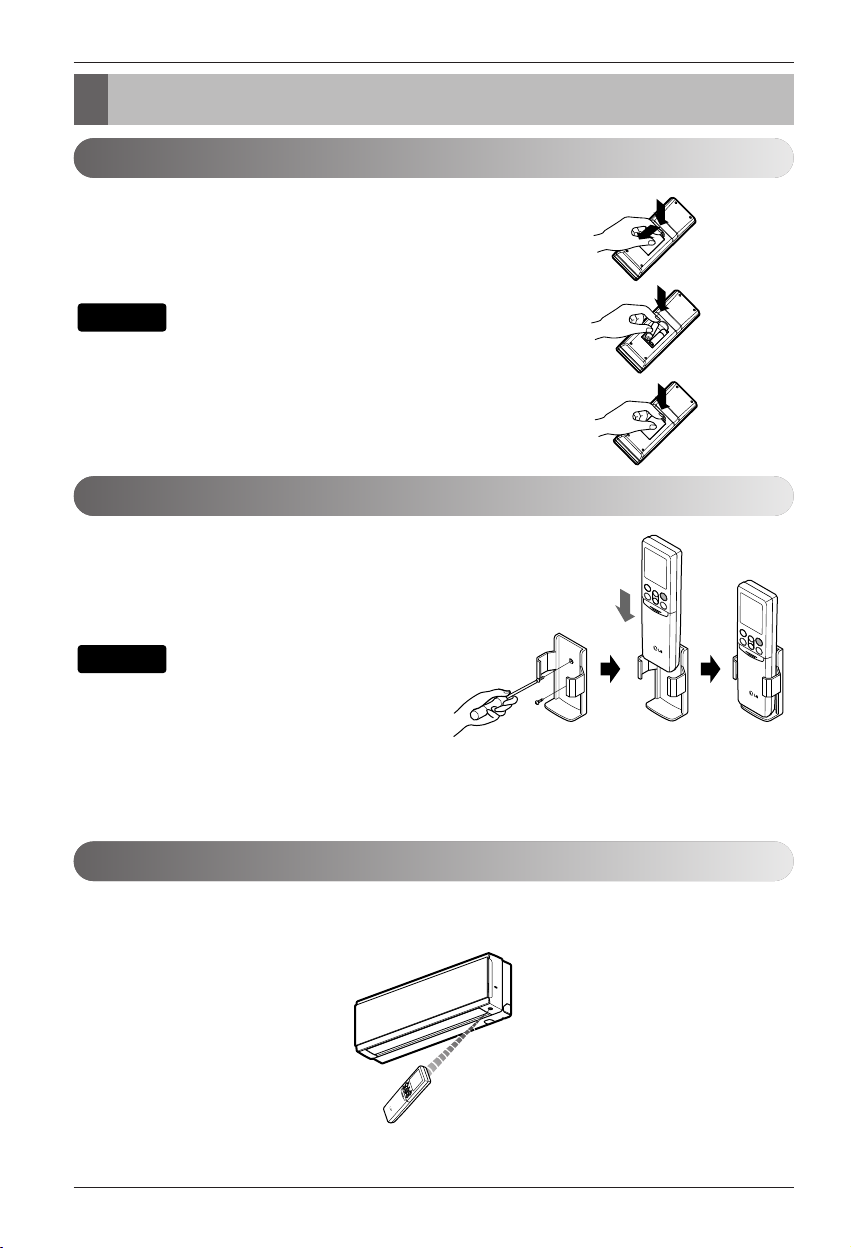
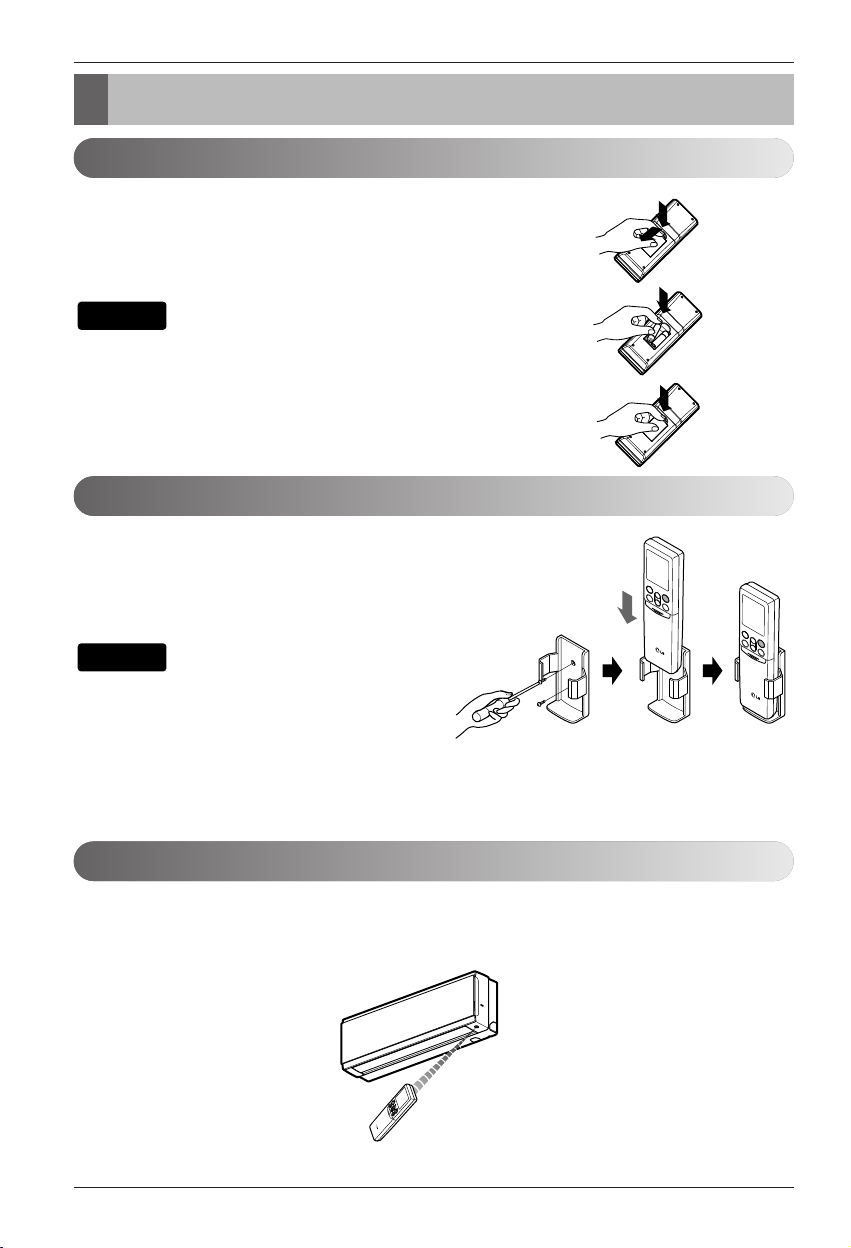
1.
Choose a suitable place where its safe & easy to reach.
2. Fix the holder to wall etc with the supplied
screws firmly.
3. Slide the remote controller inside the holder.
1. Remote controller should never be exposed to
direct sunlight.
2. Signal transmitter & receiver should always be
clean for proper communication. Use a soft
cloth to clean them.
NOTE
Operating Instructions
How to insert the Batteries
Wireless Remote Controller Maintenance
1. Remove the battery cover by pulling it according to the arrow direction.
2. Insert new batteries making sure that the (+) and (-) of battery are installed correctly.
3. Reattach the cover by sliding it back into position.
1. Always use/replace both batteries of same type.
2. If the system is not to be used for a long time, remove the batteries to
save their working life.
3. If the display screen of remote controller starts, fading replace both of
the batteries.
4. Use 2 AAA(1.5 volt) batteries.
NOTE
3. In case some other appliances also get operated with remote control, change their position or consult
your serviceman.
1. The signal receiver is inside the unit.
2.
Aim the remote controller towards the unit to operate it. There should not be any blockage in between.
Operating Method
Page 9
Owner's Manual 9
Operating Instructions
Wireless Remote Controller
ENGLISH
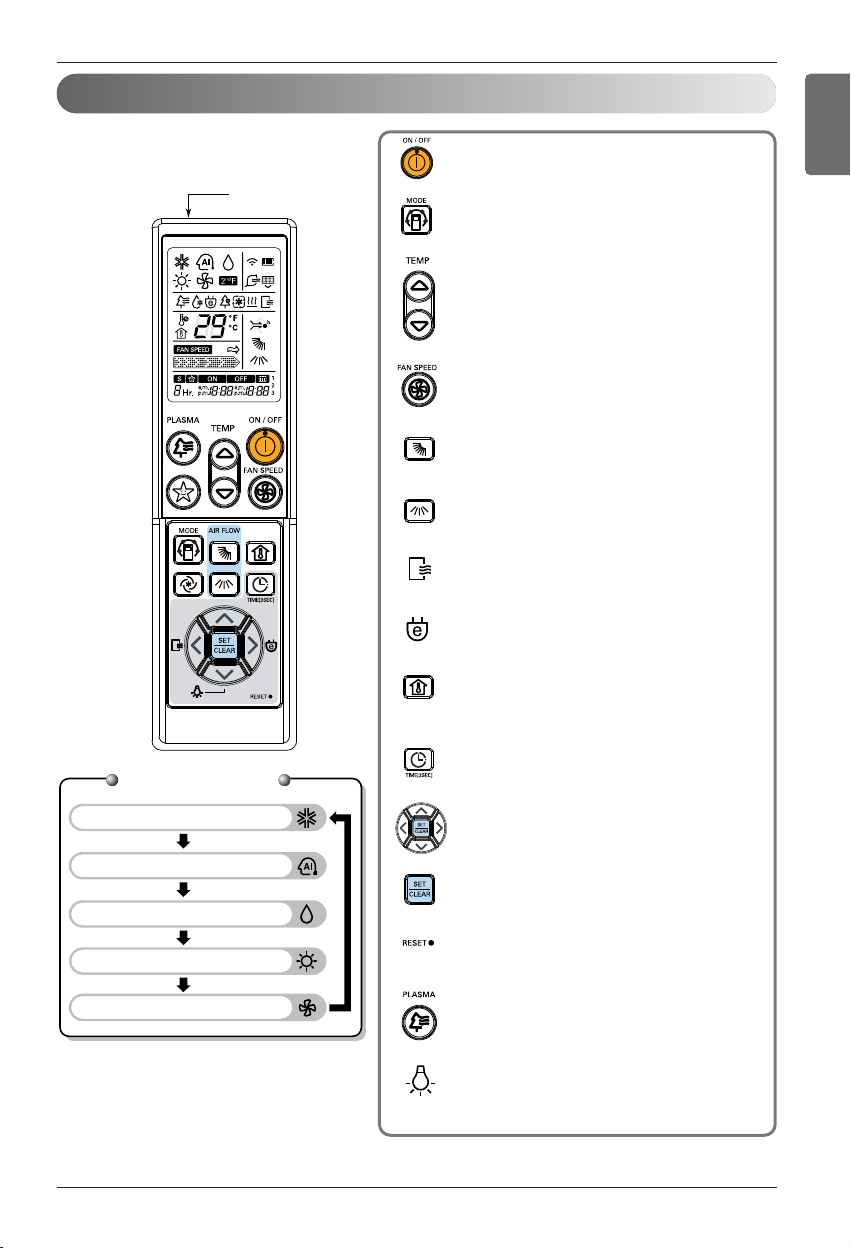
The controls will look like the following.
Signal transmitter
SLEEP
ON/OFF BUTTON
Used to turn off/on the unit.
OPERATION MODE SELECTION BUTTON
Used to select the operation mode.
ROOM TEMPERATURE SETTING BUTTONS
Used to select the room temperature.
INDOOR FAN SPEED SELECTION BUTTON
Used to select fan speed in six steps low, medium-low,
medium, medium-high, high and natural wind.
HORIZONTAL VANE CONTROL BUTTON
Used to set the desired vertical airflow direction.
VERTICAL LOUVER CONTROL BUTTON
Used to set the desired horizontal airflow direction.
AUTO CLEAN BUTTON
Used to set auto clean.
ENERGY SAVING COOLING BUTTON
Used to save Energy.
ROOM TEMPERATURE CHECKING BUTTON
Used to check the room temperature.
Operation Mode
Cooling Operation
Auto Operation or Auto Changeover
Healthy Dehumidification Operation
Heating Operation (Only heat pump)
Air Circulation
TIMER BUTTON(before adjusting)
Used to set the current time and the time of starting / stopping.
TIME ADJUSTING BUTTONS
Used to adjust the time.
TIMER SET/CLEAR BUTTON(after adjusting)
Used to set and to cancel the timer operation.
RESET BUTTON
Used prior to resetting time.
PLASMA BUTTON
Used to start or stop the plasma-purification.
LED LUMINOSITY BUTTON
Used to adjust LED luminosity.
Page 10

10 Air Conditioner
Operating Instructions
The controls will look like the following.
SLEEP
Signal transmitter
SLEEP MODE AUTO BUTTON
Used to set sleep mode auto operation.
JET COOL/JET HEAT BUTTON
Used to start or stop the speed cooling
and heating.
The Jet Cool/Jet Heat operates fan in super
high speed.
Operation Mode
Cooling Operation
Auto Operation or Auto Changeover
Healthy Dehumidification Operation
Heating Operation (Only heat pump)
Air Circulation
Page 11
Owner's Manual 11
Cooling
Auto
Changeover
Healthy
Dehumidification
Heating
(Heat pump model only)
Air Circulation
Natural Wind
Step2(Medium)Step1(Low) Step3(High)
Auto Operation (Multi Air conditioner)
Auto Changeover (Single Air conditioner)
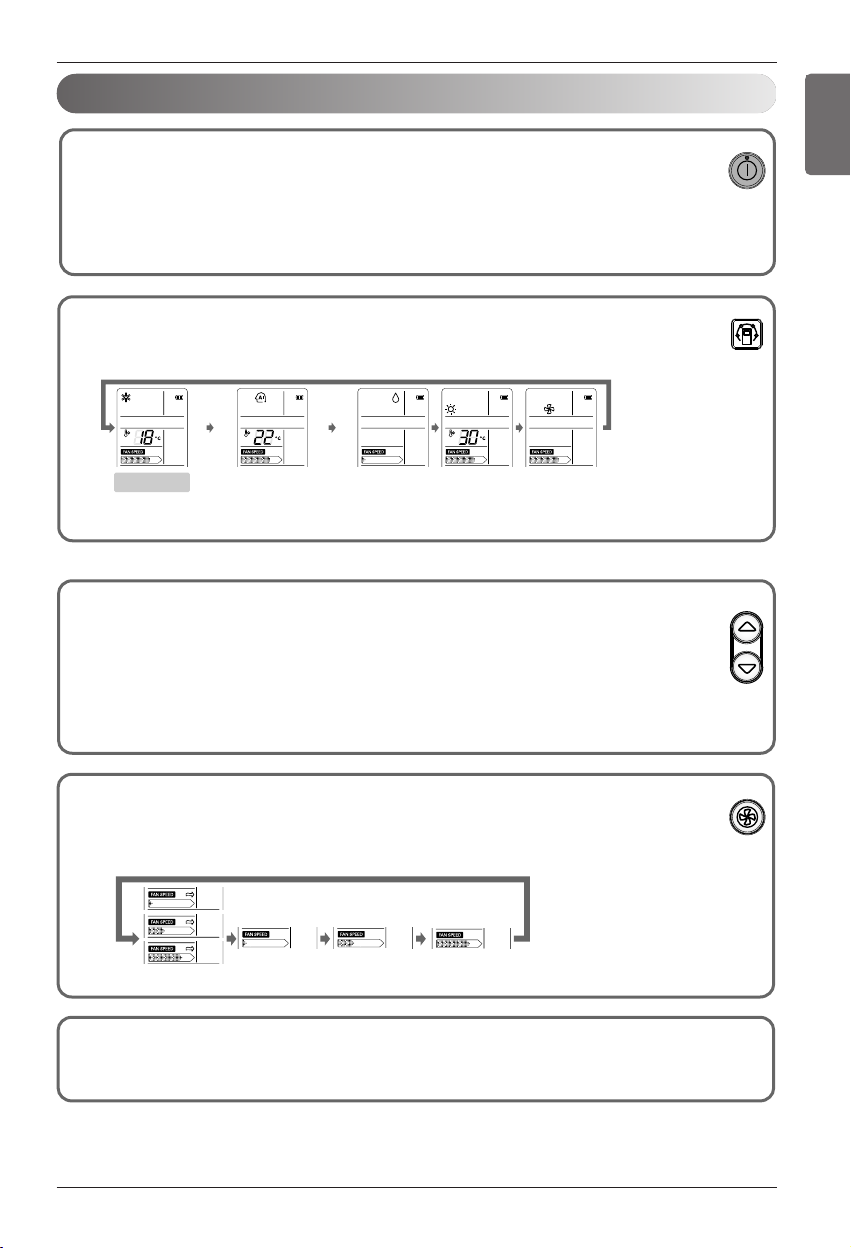
ON/OFF
MODE
TEMP
FAN SPEED
Operating Instructions
Press the ON/OFF BUTTON to turn the unit on.
The unit will respond with a beep.
Open the cover of the remote controller and press the operation mode button. Each time
the button is pressed, the operation mode is shifted in the direction of the arrow.
For cooling or heating operation set the desired indoor temperature by pressing the ROOM TEMPERATURE SETTING
BUTTONS.
For cooling the temperature can be set within 18°C~30°C and
for heating the temperature range is 16°C~30°C.
Set the fan speed with the remote controller. You can select the fan speed in four Steps : low,
medium, high and natural wind by pressing the INDOOR FAN SPEED SELECTION BUTTON.
Each time the button is pressed, the fan speed mode is shifted in the direction of the arrow.
1
2
3
4
Natural wind
o
For fresher feeling, press the INDOOR FAN SPEED SELECTION BUTTON and set to Natural wind mode.
In this mode, the wind blows like a natural breeze by automatically changing fan speed.
Operation Mode
ENGLISH
Page 12
12 Air Conditioner
During Healthy Dehumidification Operation
o If you select the dehumidification mode on the OPERATION MODE
SELECTION BUTTON, the product starts to run the dehumidification function.
It automatically sets the room temperature and airflow volume to the best con-
dition for dehumidification, based on the sensed current room temperature.
In this case, however, the setting temperature is not displayed on the remote
controller and you are not able to control the room temperature either.
o During the healthy dehumidification function, the fan speed is automatically set
according to the optimization algorithm responding to the current room temper-
ature status, so that the room condition is kept healthy and comfortable even in
the very humid season.
Operating Instructions
Auto Operation(Multi Air Conditioner)
Healthy Dehumidification Operation
MODE
MODE
This operation is basically heating or cooling function of the air
conditioner. But during this operation the controller changes the
operation mode automatically to keep the temperature within
±2°C with respect to the setting temperature.
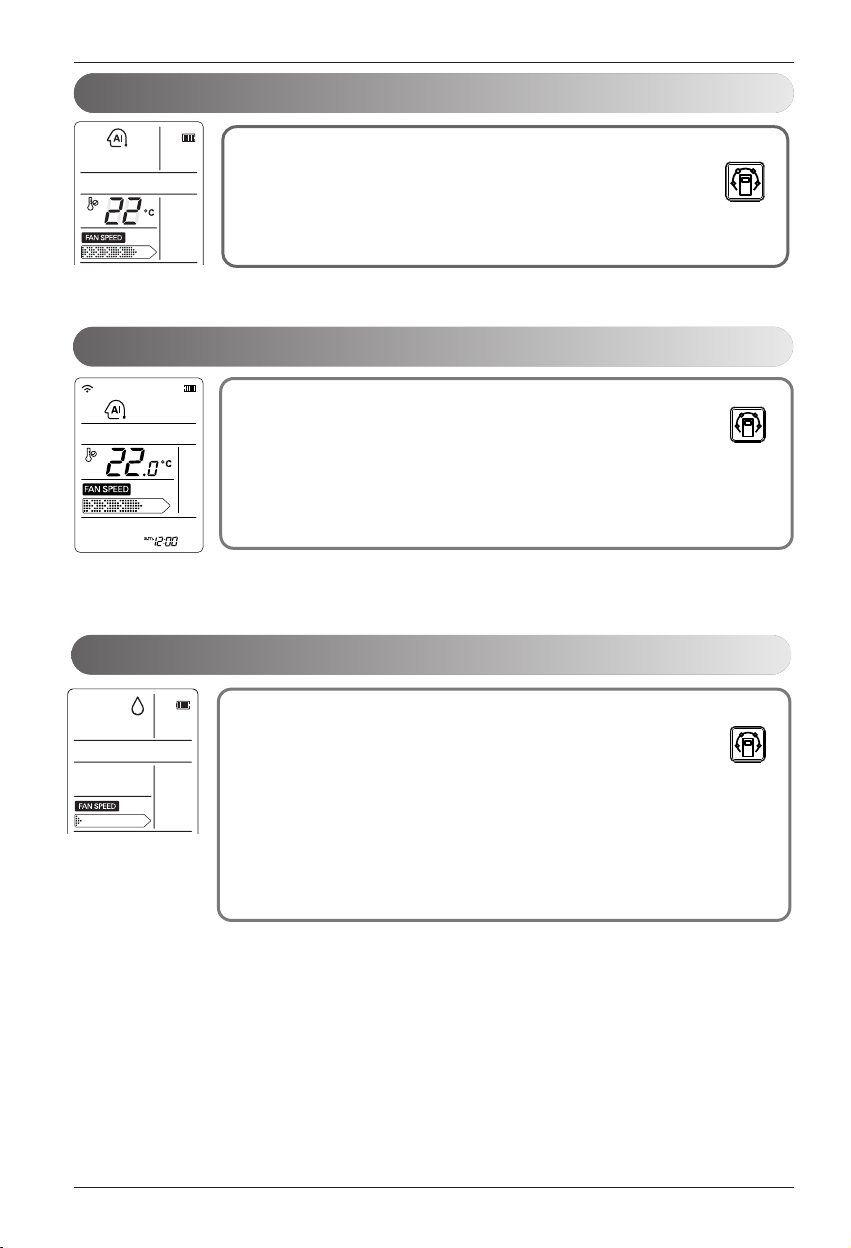
Auto Changeover Operation (Single Air Conditioner)
MODE
In this operation, mode is automatically set by the logic based on the current temperature and connected indoor unit. You can set desired temperature and indoor fan speed.
Setting Temp. Range : 18~30°C
Page 13
Owner's Manual 13
o During Auto Clean Operation, moistures left in indoor units after cooling operation or healthy dehumidifica-
tion operation can be removed.
Select Auto Clean Operation by the function setting button( ) .
Now whenever the unit is turned off, the indoor fan is still running
for about 30 minutes internally without cooling or dehumidification
operation. This function dries up any remains of moisture & cleans
the unit internally. If you push the Auto Clean button again, this
function is cancelled.
o During Auto Clean fuction, only ON/OFF button, Plasma button, Auto Clean but-
ton is used. During this operation, 'Co' lamp lights up.
NOTE
Auto Clean Operation
Operating Instructions
PLASMA Purification Operation
Plasma filter is a technology developed by LG to get rid of microscopic contaminants in the intake air by generating a plasma of high charge electrons. This
plasma kills and destroys the contaminants completely to provide clean and hygienic air.
Plasma purification operation can be started by pressing the PLASMA BUTTON on the
remote controller.
Repressing it will deactivate the operation.
• This features can be used in any operation mode and fan speed by pressing the plasma button.
• Separate plasma purification operation is possible in stop condition. It is cancelled by pressing plasma
button or on/off button.
NOTE
PLASMA
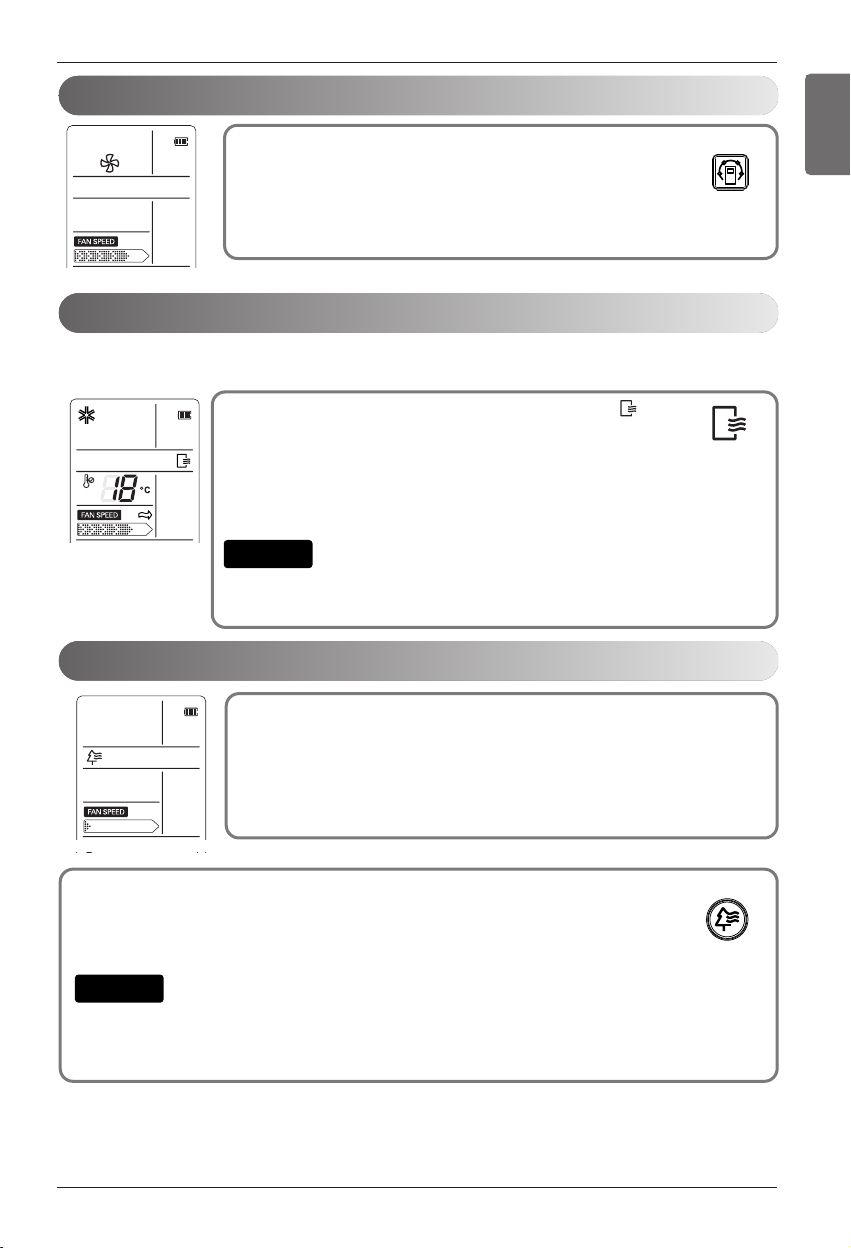
This operation circulates the air without cooling or heating. It can be
activated by pressing the OPERATION MODE SELECTION BUTTON. Once the air circulation is activated you can select the fan
speed by pressing the INDOOR FAN SPEED SELECTION BUTTON.
MODE
Air Circulation Operation
ENGLISH
Page 14
14 Air Conditioner
Operating Instructions
Energy-Saving Cooling Mode
Energy-saving cooling mode can save energy in cooling operation, because it can operate efficiently by setting body-adaptation time according to the change of time and temperature and adjusting desired temperature automatically.
1. Press the ON/OFF BUTTON to start the unit.
2. Open the cover of the remote controller.
Select cooling operation.
3. Press the ENERGY-SAVING COOLING MODE BUTTON.
4. To cancel the energy-saving cooling mode, press the ENERGY-SAVING COOLING MODE BUTTON again and unit will operate in previous mode(Cooling
mode).
Display Luminosity
The unit display Luminosity can be adjusted by using the remote controller.
Open the cover of the remote controller and press the LED LUMINOSITY button.
Display LED will be dark. Press the button again to set bright display.
(The order of 50%
fi
0% LUMINOSITY is repeated whenever you press the button.)
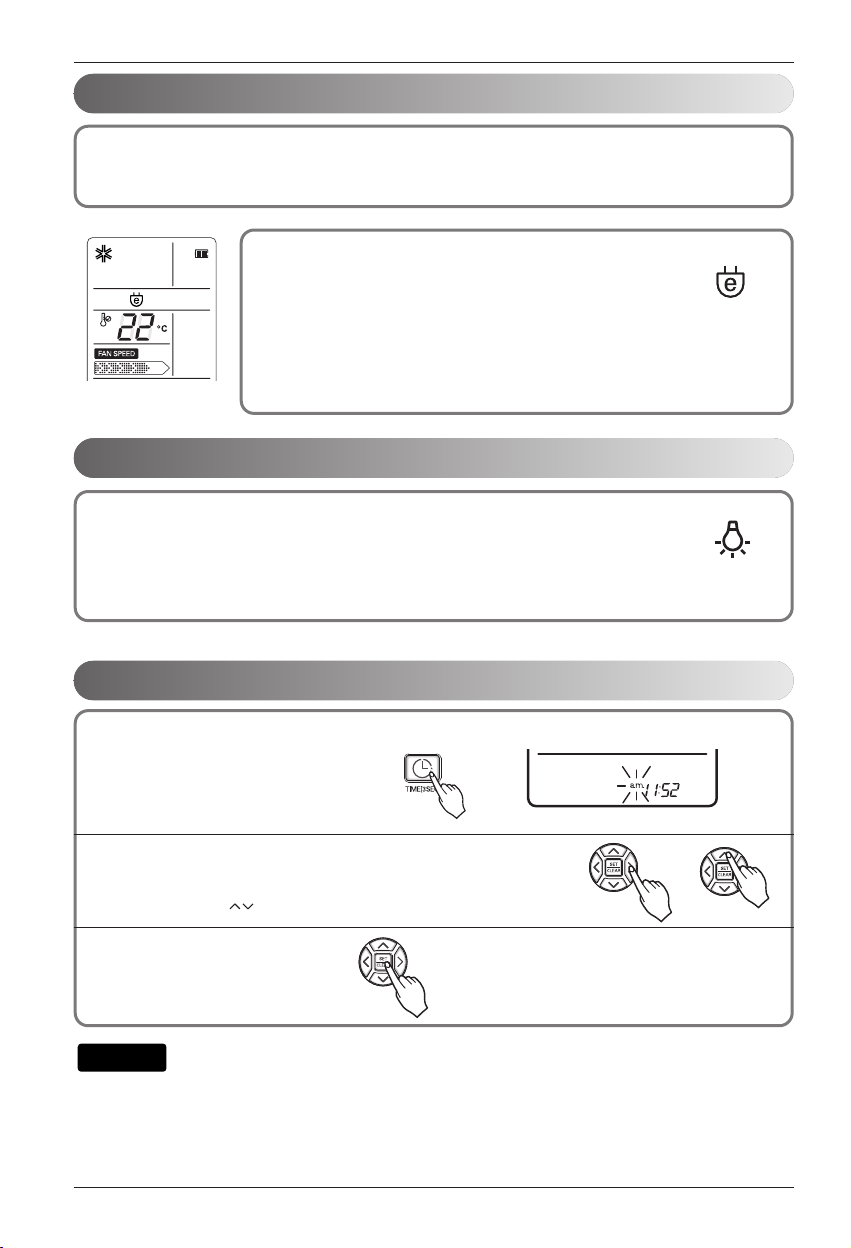
Press the TIMER BUTTON For 3 seconds.
Press the TIMER SETTING BUTTONS until the desired time is set.
- The order of a.m. and p.m. -> hour ->minute is repeated whenever you press
the < > button.
- By pressing the button, you can set the current time.
Check the indicator for a.m. and p.m.
NOTE
Setting the Current Time
2
Press the SET/CLEAR button.
3
1
Page 15
Owner's Manual 15
Operating Instructions
To cancel the timer setting
Timer Setting
Press the SLEEP MODE AUTO BUTTON to set the time when you want the unit to stop
automatically. The timer is programmed in one-hour increments by pressing the
SLEEP MODE AUTO BUTTON 1 to 7 times. The sleep mode is available for 1 to 7 hours.
• The sleep mode will operate indoor fan at super low speed in cooling mode and at low speed in heating
mode for pleasant sleep.
In cooling mode or healthy dehumidification mode:
The setting temperature will rise automatically two times by 1°C over next consecutive 30 minutes (Maximum 2°C) for a comfortable sleep. This will be the final setting temperature as long as sleep mode is functioning.
In heating mode (Single Air conditioner):
The setting temperature will descend automatically two times by 1°C over next consecutive 60 minutes
(Maximum 2 °C) for a comfortable sleep. This will be final Setting temperature as long as sleep mode is
functioning.
NOTE
Sleep Mode Operation
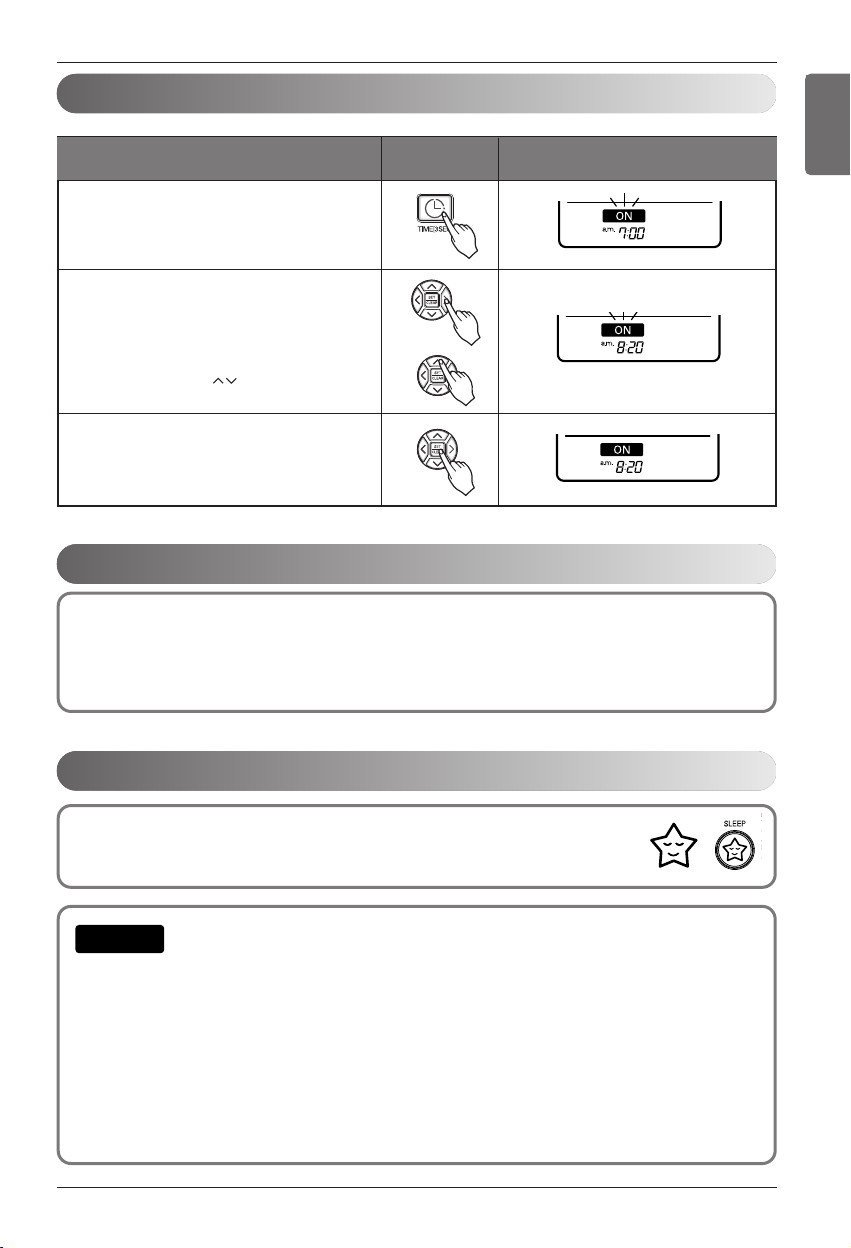
Press the Timer button once to set on the
Reserved 'On'
(Press the Timer button twice to set the Reserved 'Off')
1
Press the Time Setting buttons until the desired time is set.
- The order of a.m. and p.m. -> hour
->minute is repeated whenever you press
the < > button.
- By pressing the button, you can set
the desired time.
2
Press the SET/CLEAR BUTTON
(Press the SET/CLEAR BUTTON once more
to cancel)
3
Description
Button on the
Indication on the LCD Display
Remote Controller
• If you wish to cancel all timer setting, press the SET/CLEAR button.
• In order to cancel the timer settings individually, press the Timer button to select Reserved 'On' or Reserved 'Off'. And then press the Set/Clear button aiming the remote controller at the signal receiver. (the
timer lamp on the display will go off)
ENGLISH
Page 16

16 Air Conditioner
Operating Instructions
The Horizontal Vane can be adjusted by using the remote controller.
1. Press the ON/OFF BUTTON to start the unit.
2. Press the vertical airflow direction button.
The horizontal vane will swing up & down automatically.
To Stop the vane at a desired angle, press the vertical airflow direction button again.
The Vertical Louvers can be adjusted by using the remote controller.
1. Press the ON/OFF BUTTON to start the unit.
2. Press the horizontal airflow direction button.
The vertical vane will swing left & right automatically.
To Stop the vane at a desired angle, press the horizontal airflow direction button again.
Horizontal Vane Control
Vertical Louver Control
•
Manually moving the Horizontal Vane or Vertical Louvers by hand could damage the mechanism.When the
unit is shut off, the the Horizontal Vane and Vertical Louvers will close the air outlet vent of the product.
NOTE
Jet Cool/Heat Operation
Jet cool function can be used to cool the room quickly in hot summer. When this
function is turned on, the air conditioner runs in cooling operation mode with super
high fan speed and 18°C setting temperature for 30 minutes for fast and effective
cooling.
Similarly, jet heat function (available only in some models) warms up the room quickly
by operating at super high fan speed and 30°C setting temperature for 30 minutes.
You can activate this operation by pressing the JET COOL BUTTON.
To change from jet cool mode to high fan speed cooling mode, press the JET COOL BUTTON or
INIDOOR FAN SPEED SELECTOR BUTTON or the ROOM TERPERATURE SETTING BUTTON again.
• Jet Cool/Heat operation cannot be activated during Air Circulation operation, Auto operation and Auto
changeover operation.
• If wired remote controller is connected, Jet Heat Operation can not be used.
NOTE
Page 17
Owner's Manual 17
Operating Instructions
Forced operation
Forced operation is used when the remote controller can't be used. The operation will be started if the ON/OFF
button is pressed. If you want to stop the operation, re-press the button.
Heat pump Model
Cooling Model
Room Temp. ≥ 24°C 21°C ≤ Room Temp. < 24°C Room Temp. < 21°C
Operating mode Cooling Cooling Healthy Dehumidification Heating
Indoor FAN Speed
High High High High
Setting Temperature
22°C 22°C 23°C 24°C
Test operation
During the TEST OPERATION, the unit operates in cooling mode at high speed fan, regardless of room temperature
and resets in 18 minutes.
During test operation, if remote controller signal is received, the unit operates as remote controller
sets.
If you want to use this operation, Press and hold the ON/OFF button for 3~5 seconds, then the buzzer sound 1
'beep'. If you want to stop the operation, re-press the button.
This feature is enabled by factory default setting, but you can disable it by pressing the ON/OFF button for 6
seconds. The LCD indicator will blink 3 times at once.
To enable it, press the button again for 6 seconds. The LCD indicator will blink 3 times at twice.
NOTE
This function is useful in the situation of power failure.
When power regains after a failure this feature restore the previous operating condition
and the air conditioner will run in the same settings.
Auto Restart Function
Power
button
Power
button
ENGLISH
Power
Power
button
button
Power
Power
button
button
Page 18
18 Air Conditioner
Maintenance and Service
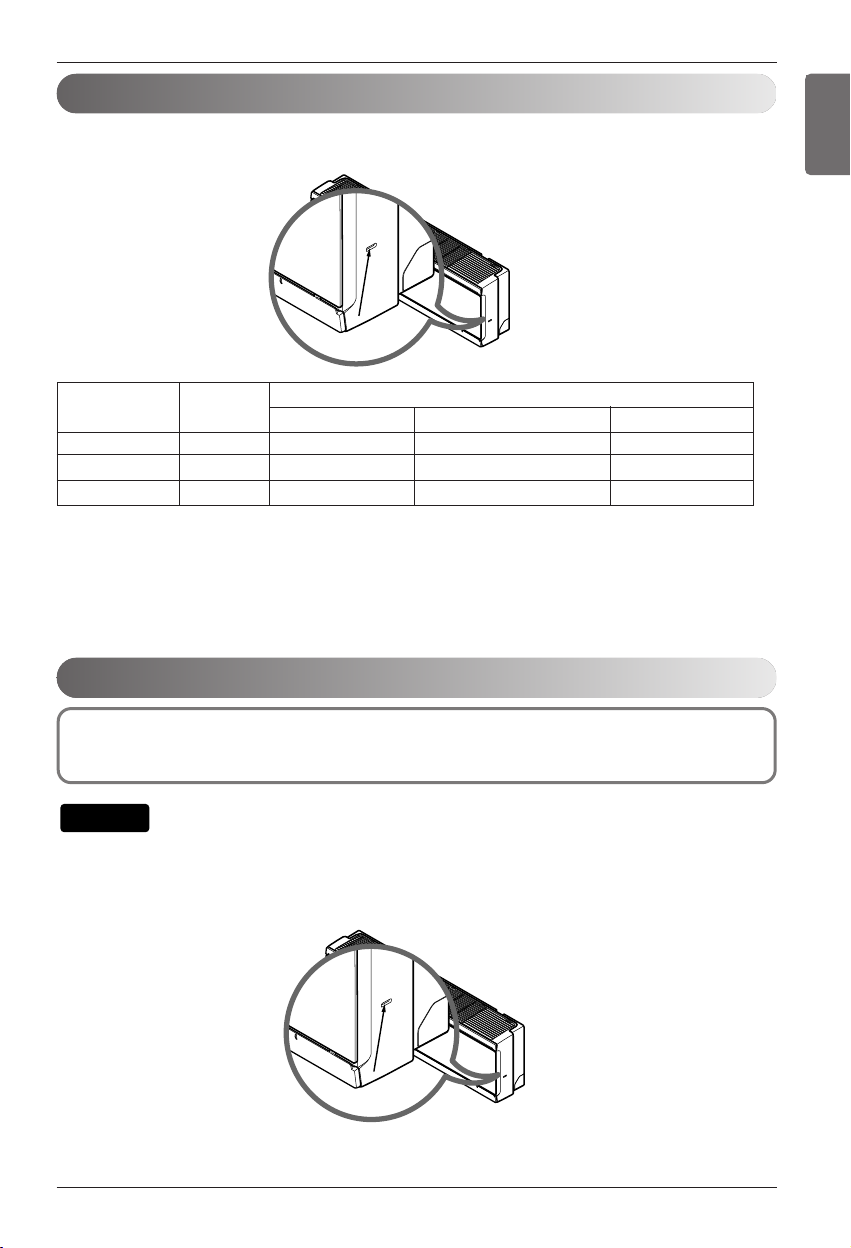
Removal of Filters
Open the front panel as shown.
Then pull the filter tab slightly forward to remove the air filter.
After removing the air filter remove the plasma and Allergy Free Filter by slightly pulling downwards.
Plasma filter
Front panel
Don't touch this plasma filter within 10 seconds after opening the inlet grille, it may cause an electric shock.
Clean the unit with a soft dry cloth. Do not use bleach or abrasives.
Never use any of these
• Water hotter than 40°C. It may cause deformation and discoloration.
• Volatile substances. They may damage the surface of the air conditioner.
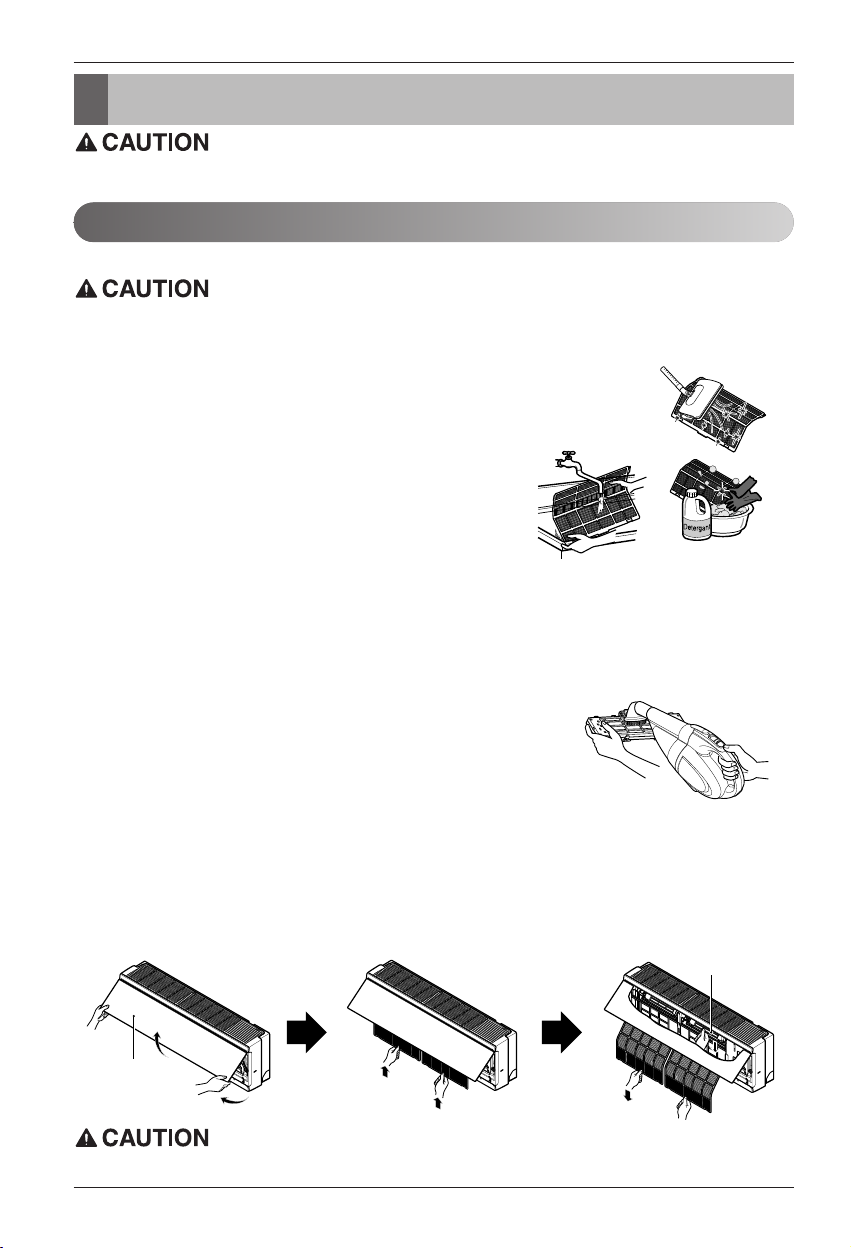
Air Filters
The air filters behind the front panel / grill should be checked and cleaned once in every
2 weeks or more often if necessary. To remove the filters see the self explanatory diagrams for each model type. Clean the filters with a vacuum cleaner or
warm soapy water. If dirt is not easily removed, wash with a solution of
detergent in luke warm water. Dry well in shade after washing and
reinstall the filters back in place.
Plasma Filter
The plasma filters behind the air filter should be checked and cleaned once in every 3 months or more
often if necessary. To remove the filters see the self explanatory diagrams for each model type. Clean the
filters with a vacuum cleaner. If it is dirty wash it with water and dry well in shade an install back in place.
Allergy Free Filter + Triple Filter
Remove the Allergy Free Filter + Triple Filter behind the air filter and expose
them in direct sunlight for 2 hours.
And then insert these filters into original position.
Maintenance and Service
Indoor Unit
Before performing any maintenance, turn off the main power to the system, disconnect the circuit breaker and
unplug the power cord.
Page 19
Owner's Manual 19
Maintenance and Service
Outdoor Unit
The heat exchanger coils and panel vents of the outdoor unit should be checked regularly.
If clogged with dirt or soot, the heat exchanger
and panel vents may be professionally steam cleaned.
Dirty or clogged coils will reduce the operating efficiency of the system and cause higher operating costs.
NOTE
Operation Tips!
Self-Diagnosis Function
Error Display LED
(once)
2 sec 2 sec 2 sec
This unit has an inbuilt error diagnosis capability. Unit LED will blink in case if thermistor fails.
Please contact your serviceman/dealer in such a situation
Do not overcool the room.
This is not good for the health and
wastes electricity.
Keep blinds or curtains
closed.
Do not let direct sunshine enter
the room when the air conditioner
is in operation.
Keep the room temperature
uniform.
Adjust the vertical and horizontal
airflow direction to ensure a uniform temperature in the room.
Make sure that the
doors and windows
are shut thight.
Avoid opening doors and
windows as much as possible to keep the cool air
in the room.
Clean the air filter
regularly.
Blockages in the air filter
reduce the airflow and
lower cooling and dehumidifying effects. Clean at
least once every two
weeks.
Ventilate the room occasionally.
Since windows are kept
closed, it is a good idea
to open them and ventilate the room now and
ten.
Use high fan speed
for effective and fast
cooling.
The unit gives its rated
cooling capacity when the
fan speed is high.
ENGLISH
Page 20
20 Air Conditioner
Maintenance and Service
Troubleshooting Tips! Save time and money!
The air conditioner may be operating abnormally when:
Problem
n The air conditioner is un-
plugged.
n The fuse is blown/circuit
breaker is tripped.
n Power failure.
n High voltage.
n Airflow is restricted.
n The air filter is dirty.
n
The room may have been hot.
n Cold air is escaping.
n
Check the temperature settings.
n There might be any heating
source in the room.
Air conditioner does
not start
Air conditioner does
not cool as it
should
• Make sure the air conditioner plug is
pushed completely into the outlet.
• Check the house fuse/circuit breaker box
and replace the fuse or reset the breaker.
• If power failure occurs, turn the mode control to OFF.
When power is restored, wait 3 minutes to
restart the air conditioner to prevent tripping of the compressor overload.
• If the voltage is unusually very high or low
the circuit Breaker will trip.
• Make sure there are no curtains, blinds, or
furniture blocking the front of the air conditioner.
• Clean the filter at least every 2 weeks.
See the Maintenance and Service section.
• When the air conditioner is first turned on,
you need to allow time for the room to cool
down.
• Check for open furnace floor registers and
cold air returns.
• Make sure they are correct.
• Check and remove such source or turn it
off while using the air conditioner.
What To DoPossible Causes
1. Anything abnormal such as burning smell, loud noise etc. happen. Stop the unit and
turn the breaker off. Never try to repair by yourself or restart the system in such cases.
2. Main power cord is too hot or damaged.
3. Error code is generated by self diagnosis.
4. Water leaks from indoor unit even if the humidity is low.
5. Any switch, breaker (safety, earth) or fuse fails to work properly
User must carry routine checkup & cleaning to avoid unitʼs poor performance.
In case of special situation, the job must be carried out by service person only.
Call the service immediately in the following situations
Page 21

MANUALE DEL’UTENTE
CLIMATIZZATORE
Leggere con attenzione questo manuale prima di usare
l’unità e conservare per uso futuro.
TIPO: UNITÀ INTERNA PARETE STANDARD
www.lg.com
ITALIANO
Page 22

2 Condizionatore d'aria
Manuale dellʼutente del condizionatore d'aria
SOMMARIO
DATI DA RICORDARE
Annotare qui il numero di serie e il modello:
N°. modello
N°. di serie
I numeri sono riportati sull'etichetta a lato di ogni unità.
Nome del rivenditore
Data di acquisto
n
Spillare la ricevuta su questa pagina qualora fosse
necessaria per provare la data di acquisto o per motivi
di garanzia.
LEGGERE IL MANUALE
Allʼinterno troverà molti suggerimenti utili sullʼuso e la
manutenzione del condizionatore. Un minimo di
attenzione può far risparmiare molto tempo e denaro
nel corso della vita del condizionatore. Nella tabella di
riferimento per la risoluzione dei problemi troverà molte
risposte ai problemi più comuni. Consultando la tabella
Risoluzione dei problemi potrebbe non essere
necessario contattare il servizio di assistenza.
AVVERTENZE
• Contattare un tecnico dell'assistenza autorizzato
per la riparazione o la manutenzione dellʼunità.
• Contattare lʼinstallatore per eseguire
lʼinstallazione dellʼunità.
•
Il condizionatore non è stato progettato per essere
utilizzato da bambini o invalidi senza supervisione.
• È consigliabile vigilare sui bambini affinché essi
non giochino con il condizionatore.
• Se il cavo di alimentazione deve essere sostituito,
il servizio di sostituzione deve essere eseguito
solo da personale autorizzato utilizzando parti di
ricambio originali.
A. Misure di sicurezza ............................3
B. Sicurezza elettrica ...............................6
Uso temporaneo di un adattatore .........6
Uso temporaneo di una prolunga .........6
Simboli utilizzati nel manuale ................6
C. Introduzione al prodotto .....................7
D. Istruzioni per il funzionamento ..........8
Inserimento delle batterie .....................8
Telecomando senza fili Manutenzione
....8
Metodo di funzionamento ......................8
Telecomando senza fili..........................9
Modalità di funzionamento ..................11
Funzionamento autochangeover
(Condizionatore aria singolo) .................
12
Funzionamento automatico
(Condizionatore aria multiplo)
.................12
Funzionamento in modalità
deumidificazione..................................12
Funzionamento in modalità ventilazione
..13
Pulizia automatica ...............................13
Operazione di depurazione
NEO PLASMA (opzionale) ..................13
Modalità di raffreddamento a risparmio
energetico (opzionale) ...............................
14
Luminosità display (Opzionale) ...........14
Impostazione dellʼora corrente ...........14
Impostazione del timer .......................15
Annullamento dellʼimpostazione del timer
...15
Modalità Sleep ....................................15
Comando aletta orizzontale ................16
Controllo aletta verticale (opzionale) ..16
Funzionamento in modalità Jetcool
...........16
Funzionamento forzato .......................17
Funzione di Riavvio automatico ..........17
E. Manutenzione e assistenza ..............18
Unità interna ........................................18
Unità Esterna ......................................19
Suggerimenti per il funzionamento......19
Funzione autodiagnosi .......................19
Risoluzione dei problemi per
risparmiare tempo e denaro. ..............20
Contattare immediatamente
l'assistenza nei casi seguenti .............20
Page 23
Manuale dell'utente 3
Misure di sicurezza
ITALIANO
Misure di sicurezza
È necessario seguire le seguenti istruzioni per prevenire lesioni alle persone o danni alla proprietà..
n Lʼuso errato causato dalla mancata osservanza delle istruzioni può causare danni o lesioni.
La gravità viene classificata sulla base delle indicazioni seguenti.
n Il significato dei simboli utilizzati in questo manuale è spiegato di seguito.
AVVERTENZA
ATTENZIONE
Questo simbolo indica la possibilità di lesioni gravi o decesso.
Questo simbolo indica il rischio di lesioni alla persona o di danni alla proprietà.
Non fare assolutamente.
Seguire attentamente le istruzioni.
AVVERTENZA
Utilizzare sempre la spina e la presa con
un terminale di massa.
• Vi è il rischio di scosse elettriche.
Non utilizzare interruttori automatici difettosi
o di potenza inferiore. Utilizzare fusibili e
interruttori automatici di capacità adeguata.
• C'è il rischio di scossa elettrica o incendio.
Non utilizzare prese multiple. Utilizzare
sempre questa apparecchiatura su un
circuito e interruttore dedicato.
•
In caso contrario, si potrebbero verificare
incendi o scosse elettriche.
Per i collegamenti elettrici, rivolgersi al
rivenditore, a un elettricista qualificato o a un
centro di assistenza autorizzato. Non smontare
o tentare di riparare il prodotto da soli.
• Vi è il rischio di incendio o di scosse
elettriche.
Prevedere sempre la messa a terra per il prodotto secondo
quanto indicato nello schema elettrico. Non collegare il filo
della messa a terra a tubi di gas o dellʼacqua, al parafulmine,
o ai fili della messa a terra del telefono.
• C'è il rischio di scossa elettrica o incendio.
Installare il pannello e il coperchio della
scatola di controllo in modo sicuro.
• Vi è il rischio di scosse elettriche o incendio
dovuti a polvere, acqua, e così via.
Utilizzare sempre fusibilied interruttori
automatici di capacità adeguata
• C'è il rischio di scossa elettrica o incendio.
Non modificare o prolungare il cavo di
alimentazione. Se la spina o il cavo di alimentazione
presentano graffi o sono danneggiati, provvedere
immediatamente alla sostituzione.
• C'è il rischio di scossa elettrica o incendio.
Per l'installazione, la rimozione o la
reinstallazione, rivolgersi sempre al
rivenditore o a un centro di assistenza
autorizzato.
• C'è il rischio di scossa elettrica o incendio,
esplosione o lesioni.
Non montare il prodotto su un supporto
difettoso. Accertarsi che lʼarea di installazione
non sia soggetta a deterioramento nel tempo.
• In caso contrario, il prodotto potrebbe cadere.
Non installare lʼunità esterna su una base
rimovibile o in posizioni in cui possa
cadere.
•
La caduta dell'unità esterna può causare danni
o infortuni, e in alcuni casi anche la morte.
In caso di allagamento del prodotto con
acqua, rivolgersi a un centro di
assistenza autorizzato per la riparazione
prima di utilizzare ancora il prodotto.
• C'è il rischio di scossa elettrica o incendio.
Nell'unità esterna, il condensatore
moltiplicatore fornisce elettricità ad alta
tensione ai componenti elettrici. Prima di
procedere con la riparazione, assicurarsi che
il condensatore sia completamente scarico.
• Un condensatore carico può causare scosse
elettriche.
Quando si installa l'unità, utilizzare il kit
di installazione fornito con il prodotto.
• In caso contrario, l'unità potrebbe cadere e
causare infortuni seri.
Utilizzare unicamente le parti elencate
nella lista delle parti di assistenza.
Non provare a modificare l'apparecchio.
• L'uso di parti non appropriate può causare
scosse elettriche, un'eccessiva generazione
di calore e anche un incendio.
Page 24
4 Condizionatore d'aria
Misure di sicurezza
I collegamenti delle unità interna ed esterna
devono essere saldamente fissati e il cavo deve
essere passato in modo corretto, in modo che
non si verifichino pressioni o torsioni del cavo
dai terminali di collegamento.
•
Collegamenti non corretti o lenti possono
causare la generazione di calore e un incendio.
Smaltire in modo sicuro i materiali
dʼimballaggio, quali viti, chiodi, batterie,
parti rotte e così via, dopo l'installazione
o l'assistenza, quindi strappare e gettare i
sacchi di plastica dell'imballaggio.
• I bambini potrebbero giocarci e incorrere in
lesioni.
Verificare che la spina del cavo di
alimentazione non sia sporca, lenta o
danneggiata e quindi inserirla per intero.
• Una spina sporca, lenta o danneggiata può
causare incendi o scosse elettriche.
Controllare il refrigerante utilizzato.
Leggere attentamente l'etichetta del
prodotto.
• L'uso di un refrigerante non corretto può
impedire il normale funzionamento dell'unità.
Non utilizzare cavi di alimentazione,
spine o prese danneggiate.
• In caso contrario, si potrebbero verificare
incendi o scosse elettriche.
Non toccare, utilizzare o riparare il prodotto con
le mani bagnate. Estrarre il cavo di
alimentazione tenendolo per la testa della spina.
• Vi è il rischio di scosse elettriche o incendio.
Non posizionare stufe o altre
apparecchiature di riscaldamento vicino
al cavo di alimentazione.
• Vi è il rischio di scosse elettriche e incendio.
Evitare lʼingresso di acqua nelle parti
elettriche. Installare il prodotto lontano
da sorgenti d'acqua.
• Vi è il rischio di scosse elettriche, incendio o
guasti al prodotto.
Non conservare, utilizzare o avvicinare
gas infiammabili o combustibili in
prossimità del prodotto.
• Vi è il rischio di un incendio.
Non utilizzare il prodotto in luoghi chiusi
per periodi prolungati. Ventilare
regolarmente l'area.
• Può verificarsi una deficienza di ossigeno e
quindi un pericolo per la salute.
Non aprire la griglia anteriore del prodotto
durante il funzionamento (non toccare il filtro
elettrostatico, se presente).
• C'è il rischio di lesioni fisiche, scossa elettrica
o guasto del prodotto.
In caso di rumori, odori o fumo anomali provenienti
dal prodotto. Spegnere immediatamente lʼinterruttore
automatico e scollegare il cavo di alimentazione.
• Vi è il rischio di scosse elettriche o incendio.
Di tanto in tanto, aerare la stanza del
prodotto quando utilizzato insieme a
fornelli, stufe, elementi riscaldanti, ecc.
• Può verificarsi una deficienza di ossigeno e
quindi un pericolo per la salute.
Spegnere lʼalimentazione e scollegare
l'unità prima di pulire o riparare il
prodotto.
• Vi è il rischio di scosse elettriche.
In caso di inutilizzo del prodotto per lunghi periodi,
scollegare il cavo di alimentazione e spegnere
lʼinterruttore automatico.
• Vi è il rischio di guasti al prodotto o
attivazione accidentale.
Assicurarsi che nessuno possa
inciampare o cadere sull'unità esterna.
• Questo potrebbe avere come risultato lesioni
personali o danni al prodotto.
Avere cura di non tirare o danneggiare il
cavo di alimentazione durante il
funzionamento.
• C'è il rischio di scossa elettrica o incendio.
Non appoggiare NULLA sul cavo di
alimentazione.
• C'è il rischio di scossa elettrica o incendio.
Non collegare/scollegare il cavo di alimentazione per
accendere/spegnere l'unità.
• C'è il rischio di scossa elettrica o incendio.
In caso di perdite di gas infiammabile, aprire la finestra per
ventilare il locale prima di azionare l'unità.
• Non utilizzare il telefono o accendere o spegnere interruttori.
Vi è il rischio di esplosioni o incendi.
ATTENZIONE
Il prodotto va sollevato e trasportato
almeno in due persone.
• Evitare lesioni personali.
Non installare il prodotto in luoghi esposti
direttamente al vento di mare (spruzzi di sale).
• Può provocare corrosione del prodotto.
Installare il tubo flessibile di scarico in modo da
garantire uno scarico corretto e sicuro della condensa.
• Un collegamento malfatto potrebbe provocare
perdite d'acqua.
Mantenere il prodotto in piano durante
l'installazione.
• Per evitare vibrazioni o rumore.
Non installare il prodotto in modo che il rumore
o lʼaria calda provenienti dallʼunità esterna
possano causare danni o disturbare i vicini.
• Ciò potrebbe causare problemi o liti con i
vicini.
Controllare sempre che non vi siano perdite
del gas (refrigerante) successivamente
all'installazione o riparazione del prodotto.
• Livelli di refrigerante insufficienti possono
provocare guasti al prodotto.
Page 25
Manuale dell'utente 5
Misure di sicurezza
ITALIANO
Non utilizzare lʼapparecchio per scopi specifici
come conservare alimenti, opere dʼarte ecc.
Lʼunità è un condizionatore dʼaria, non un
sistema di refrigerazione di precisione.
• C'è il rischio di danni o perdita di proprietà.
Non bloccare lʼingresso o lʼuscita del
flusso dʼaria.
• In caso contrario, si potrebbero verificare
guasti al prodotto.
Utilizzare un panno soffice per la pulizia.
Non utilizzare detergenti potenti, solventi
o spruzzi d'acqua e così via.
• Vi è il rischio di scosse elettriche, incendio o
danni alle parti in plastica del prodotto.
Non toccare le parti metalliche del
prodotto durante la rimozione del filtro
dell'aria.
• Vi è il rischio di lesioni personali.
Non calpestare o mettere oggetti sul
prodotto (unità esterne)
• Vi è il rischio di infortuni alle persone e guasti
al prodotto.
Inserire sempre il filtro in modo stabile
dopo la pulizia. Pulire il filtro ogni 2
settimane o più spesso, se necessario.
• Un filtro sporco riduce l'efficienza.
Non introdurre le mani o altri oggetti nella
bocca di ingresso o uscita dellʼaria
mentre l'unità è in funzione.
• Ci sono componenti taglienti o in movimento
che possono provocare lesioni personali.
Disimballare e installare il prodotto con
attenzione.
• I bordi taglienti possono causare infortuni.
In caso di perdite di gas refrigerante
durante la riparazione, non toccare il gas
refrigerante fuoriuscito.
• Il gas refrigerante può provocare ustioni
(bruciatura da freddo).
Non inclinare l'unità quando la si rimuove
o la si disinstalla.
• L'acqua condensata al suo interno potrebbe
fuoriuscire.
Non mischiare aria o gas diversi dal
refrigerante specificato e utilizzato nel sistema.
•
Se nel sistema del refrigerante entra dell'aria,
può verificarsi una pressione eccessiva,
causando danni all'apparecchiatura o infortuni.
In caso di perdite di gas refrigerante durante
lʼinstallazione, aerare immediatamente l'area.
• In caso contrario, si potrebbero verificare
danni alla salute.
Lo smontaggio dell'unità e il trattamento
dell'olio refrigerante e di eventuali parti sono
operazioni da eseguirsi in conformità con le
normative standard locali e nazionali.
Sostituire tutte le batterie del
telecomando sempre con altre dello
stesso tipo. Non mischiare batterie nuove
e vecchie o batterie di tipo diverso.
• Vi è il rischio di incendio o guasti al prodotto.
Non ricaricare o smontare le batterie.
Non gettare le batterie nel fuoco.
• Potrebbero bruciare o esplodere.
In caso di caduta del liquido delle batterie sulla
pelle o sugli indumenti, lavare accuratamente con
acqua pulita. Non utilizzare il telecomando se le
batterie presentano delle perdite.
• Le sostanze chimiche delle batterie
potrebbero causare scottature o altri pericoli.
Se si ingerisce il liquido delle batterie,
lavarsi i denti e rivolgersi a un dottore.
Non utilizzare il telecomando se le
batterie presentano delle perdite.
•
Le sostanze chimiche delle batterie
potrebbero causare scottature o altri pericoli.
Non utilizzare il prodotto troppo a lungo
in ambienti molto umidi e con una
finestra o una porta aperta.
• Lʼumidità potrebbe condensarsi e bagnare o
danneggiare i mobili.
Non esporre direttamente la pelle, i bambini
o piante al flusso di aria fredda o calda.
• Ciò potrebbe causare danni alla salute.
Non bere acqua fuoriuscita dal prodotto.
• Ciò può causare gravi danni alla salute.
Utilizzare una scala salda per pulire, riparare o
eseguire operazioni di manutenzione al prodotto
quando questo è in alto.
• Fare attenzione a non procurarsi lesioni
personali.
Page 26

6 Condizionatore d'aria
Sicurezza elettrica
Sicurezza elettrica
• l'apparecchio deve essere dotato di corretta messa a terra.
Per ridurre al minimo i rischi di scosse elettriche, è sempre necessario utilizzare una presa elettrica
dotata di messa a terra.
• non tagliare o rimuovere i componenti della messa a terra dalla spina di alimentazione.
• il collegamento del terminale di messa a terra dell'adattatore alla vite del coperchio della presa a muro
non consente di dotare l'apparecchio di adeguata messa a terra, a meno che le vite del coperchio non
sia di metallo e non isolata, e che la presa a muro non sia dotata di messa a terra mediante il cablaggio
della casa.
• se si hanno dubbi sul fatto che il condizionatore sia fornito di corretta messa a terra, rivolgersi a un
professionista qualificato per controllare la presa a muro e l'impianto elettrico.
Si scoraggia vivamente l'uso di un adattatore a causa di potenziali pericoli per la sicurezza.
Per collegamenti temporanei, utilizzare solo adattatori originali, disponibili nella maggior parte dei negozi di componenti
elettrici. Accertarsi che lo slot grande dell'adattatore sia allineato con lo slot grande della presa per un corretto collegamento
delle polarità. Per scollegare il cavo di alimentazione dall'adattatore, tenerli entrambi con le due mani separate in modo da
evitare danni al terminale della messa a terra.
Evitare di scollegare frequentemente il cavo di alimentazione, dato che ciò può causare danni al terminale di messa a terra.
• Non utilizzare l'apparecchio con un adattatore difettoso.
Si scoraggia vivamente l'uso di una prolunga a causa di potenziali pericoli per la sicurezza.
AVVERTENZA
AVVERTENZA
Uso temporaneo di un adattatore
Uso temporaneo di una prolunga
Questo simbolo indica il pericolo di scosse elettriche.
Questo simbolo indica pericoli che potrebbero danneggiare il
condizionatore.
Questo simbolo indica avvisi particolari.
NOTA
Simboli utilizzati nel manuale
l'apparecchio deve essere installato secondo le normative nazionali in tema di cablaggio.
La presente guida costituisce una guida per aiutare l'utente nella comprensione delle caratteristiche del
prodotto.
AVVERTENZA
Page 27
Manuale dell'utente 7
Introduzione al prodotto
Introduzione al prodotto
ITALIANO
Unità interne Art Cool Mirror
Indicatori LCD del pannello display
Pannello frontale
Ricevitore del segnale
Ingresso dell'aria
Filtro dell’aria
Filtro Plasma
Tasto ON/OFF
OUT
DOOR
On/Off : Accesa quando il sistema è in funzione, lampeggia invece per indicare un
Sleep mode :
Plasma : Questo indicatore si illumina dimanicamente all' attivazione del filtro
Timer : Si accende nel funzionamento in modalità di spegnimento automatico o con timer.
Defrost mode : Si illumina durante l'esecuzione dello sbrinamento* e durante il pre-riscaldamento*
Outdoor unit
operation
Power display : Indica temperatura desiderata,Ooperazione automatica (operazione di cambio
automatico), operazione pulizia automatica, operazione di test e codice errore.
e durante l'impostazione del riavvio automatico.
Accesa durante il funzionamento nella modalità automatica Sleep.
purificatore d'aria
(modelli pompa di calore)
: Si accende durante il funzionamento dell’unità esterna
(modelli solo raffreddamento)
Page 28
8 Condizionatore d'aria
Istruzioni per il funzionamento
1.
Scegliere un posto adatto per sicurezza e facilità di intervento.
2. Fissare saldamente il sostegno al muro con le
viti fornite.
3. Far scorrere il telecomando nel supporto.
1. Il telecomando non deve essere esposto alla
luce diretta del sole.
2.
La traiettoria tra telecomando e ricevitore deve essere
libera per garantire una corretta comunicazione. Utilizzare
un panno soffice per la pulizia di entrambi.
NOTA
Istruzioni per il funzionamento
Inserimento delle batterie
Manutenzione del telecomando senza fili
1.
Rimuovere il coperchio delle batterie estraendolo nella direzione della freccia.
2. Inserire batterie nuove facendo attenzione alla corretta installazione dei
poli (+) e (-).
3. Reinserire il coperchio facendolo scorrere in posizione.
1. Utilizzare/sostituire entrambe le batterie con batterie dello stesso tipo.
2. Se il sistema non deve essere utilizzato per un periodo di tempo
prolungato, rimuovere le batterie per aumentarne la durata.
3. Se il display del telecomando inizia ad affievolirsi, sostituire entrambe le
batterie.
4. Utilizzare 2 batterie 2 AAA (1,5 V).
NOTA
3. In caso di altre apparecchiature comandate con telecomando, cambiarne la posizione o consultare un
tecnico dell'assistenza.
1. Il ricevitore del segnale si trova dentro l'unità.
2.
Puntare il telecomando verso l'unità da comandare. Non devono esservi ostacoli tra di essi.
Metodo di funzionamento
Page 29

Manuale dell'utente 9
ITALIANO
Istruzioni per il funzionamento
Telecomando senza fili
La figura seguente illustra i controlli del
telecomando.
Trasmettitore di segnale
Tasto ON/OFF (ACCESO / SPENTO)
Accende/spegne l'unità.
TASTO DI SELEZIONE DELLA MODALITÀ DI FUNZIONAMENTO
Utilizzato per selezionare la modalità di funzionamento
TASTI DI IMPOSTAZIONE DELLA TEMPERATURA DELL’AMBIENTE.
Utilizzato per impostare la temperatura dell’ambiente.
TASTO SELETTORE VELOCITÀ VENTILATORE INTERNO
Utilizzato per selezionare una delle sei velocità del ventilatore,
bassa, medio-bassa, media, medio-alta, alta o Chaos wind.
TASTO DI CONTROLLO ALETTA
ORIZZONTALE
Utilizzato per impostare la direzione desiderata del flusso d'aria verticale.
TASTO DI CONTROLLO ALETTA VERTICALE
Utilizzato per impostare la direzione desiderata
del flusso d'aria orizzontale.
TASTO PULIZIA AUTOMATICA
Utilizzato per impostare la pulizia automatica.
TASTO DI RAFFREDDAMENTO IN RISPARMIO ENERGETICO
Per risparmiare energia.
TASTO DI CONTROLLO DELLA TEMPERATURA DELL’AMBIENTE
Utilizzato per controllare la temperatura dell’ambiente.
TASTO TIMER (prima della regolazione)
Modalità di funzionamento
Raffreddamento
Funzionamento automatico o autochangheover
Funzionamento per deumidificazione
Funzionamento in riscaldamento (solo modelli a pompa di calore)
Ventilazione
Utilizzato per impostare l’ora corrente e l’ora di accensione/
spegnimento.
TASTI DI REGOLAZIONE DELL’ORA
Utilizzati per la regolazione dell’orario.
TASTO SET / TASTO ANNULLA (dopo la regolazione)
Utilizzato per impostare e annullare il funzionamento con timer.
TASTO RESET
Utilizzato per la reimpostazione dell’orario.
TASTO PLASMA
Utilizzato per avviare o fermare la funzione di
depurazione al plasma.
TASTO LUMINOSITÀ DISPLAY
Utilizzato per regolare la luminosità del display.
Page 30

10 Condizionatore d'aria
Istruzioni per il funzionamento
La figura seguente illustra i controlli del
telecomando.
Trasmettitore di segnale
TASTO MODALITÀ SLEEP AUTOMATICA
Utilizzato per impostare il modalità Sleep in
automatico.
Pulsante JET COOL/JET HEAT
Serve per avviare o arrestare il raffreddamento e
riscaldamento rapido.
La funzione Jet Cool/Jet Heat aziona il
ventilatore ad altissima velocità.
Modalità di funzionamento
Raffreddamento
Funzionamento automatico o autochangheover
Funzionamento per deumidificazione
Funzionamento in riscaldamento (solo modelli a pompa di calore)
Ventilazione
Page 31

Manuale dell'utente 11
Raffreddamento
Auto
Changeover
Deumidificazione
Riscaldamento
(solo modelli a
pompa di calore)
Ventilazione
Livello 2 (media)
Livello 1 (bassa)
Livello 3 (alta)
Funzionamento automatico (Condizionatore aria multiplo)
Autochangeover (Condizionatore aria singolo)
ON/OFF
MODE
TEMP
FAN SPEED
Vento naturale
Istruzioni per il funzionamento
Premere il TASTO ON/OFF per avviare lʼunità.
Lʼunità emette un segnale acustico.
Aprire il coperchio del telecomando e premere il pulsante di selezione della modalità di
funzionamento. Ogniqualvolta si preme il tasto, la modalità di funzionamento cambia
sulla base del ciclo indicato dalla direzione della freccia.
Per il funzionamento in raffreddamento o riscaldamento, impostare la
temperatura desiderata premendo i TASTI DI IMPOSTAZIONE DELLA
TEMPERATURA DELLA STANZA.
Per il raffreddamento, è possibile impostare la temperatura in un intervallo da
18°C a 30°C, mentre per il riscaldamento l'intervallo di temperatura è da
16°C a 30°C.
Impostare la velocità del ventilatore con il telecomando.
La velocità del ventilatore può essere impostata in quattro stadi, bassa, media, alta e ventilazione
naturale premendo il SELETTORE PER L'IMPOSTAZIONE DELLA VELOCITÀ DEL
VENTILATORE INTERNO.
Ogni qualvolta si preme il tasto, la modalità di velocità della ventola cambia sulla base del ciclo
indicato dalla direzione della freccia.
1
2
3
4
Chaos Wind
o
Per un maggior comfort, premere il TASTO SELETTORE DI VELOCITÀ DEL VENTILATORE e impostarlo alla modalità Chaos Wind.
In questa modalità, il ventilatore genera una brezza naturale cambiando automaticamente la velocità del ventilatore.
Modalità di funzionamento
ITALIANO
Page 32

12 Condizionatore d'aria
Durante il funzionamento in modal deumidificazione
o
Se si seleziona la modalità di deumidificazione con il PULSANTE DI SELEZIONE DELLA
MODALITAʼ DI FUNZIONAMENTO, il prodotto si avvia in funzione deumidificazione.
Imposta automaticamente la temperatura ambiente e il volume del flusso dellʼaria alla
migliore condizione di deumidificazione sulla base della temperatura corrente rilevata.
In questo caso, tuttavia, la temperatura di impostazione non viene visualizzata sul
telecomando e non è quindi possibile controllare la temperatura dellʼambiente.
o Durante la funzione di deumidificazione, la velocità della ventola viene
impostata automaticamente sulla base di un algoritmo di ottimizzazione che
risponde alla temperatura ambiente attuale e mantiene lʼambiente salutare e
piacevole anche in caso di elevata umidità.
Istruzioni per il funzionamento
Funzionamento automatico (Condizionatore aria multiplo)
Funzionamento in modalità deumidificazione
MODE
MODE
Questo funzionamento rappresenta fondamentalmente la funzione di
riscaldamento o raffreddamento del condizionatore d'aria.
Durante questo funzionamento, il sistema cambia automaticamente la
modalità di funzionamento per mantenere la
temperatura entro ±2°C rispetto alla temperatura di impostazione.
Funzionamento in Modalità autochangeover (Condizionatore aria singolo)
MODE
Con questa operazione la modalità viene impostata automaticamente dalla
logica in base alla temperatura corrente e unità interna connessa.
Potete impostare la temperatura desiderata e la velocità del ventilatore.
Page 33

Manuale dell'utente 13
ITALIANO
o Durante la funzione di pulizia automatica è possibile rimuovere le tracce di umidità che restano nelle unità
interne dopo il funzionamento come raffreddamento o deumidificazione.
Selezionare la pulizia automatica mediante il pulsante di impostazione delle funzioni ( ).
A questo punto, ogni volta che si spegne l'unità, la ventola interna resta ancora in funzione
internamente per circa 30 minuti senza raffreddamento o deumidificazione.
In questo modo, qualsiasi residuo di umidità viene asciugata e l'unità viene pulita internamente. Se si preme
nuovamente il TASTO DI PULIZIA AUTOMATICA durante il funzionamento, questa funzione viene annullata.
o Durante la funzione di pulizia automatica, sono disponibili solo i tasti di ON/OFF,
Plasma e pulizia automatica. In questa modalità, la spia ʻCoʼ si illumina.
NOTA
Pulizia automatica
Istruzioni per il funzionamento
Operazione di depurazione PLASMA
Il filtro al Plasma è una tecnologia sviluppata da LG per eliminare i microscopici
contaminanti presenti nell'aria in ingresso generando un plasma di elettroni
altamente carichi.
Questo plasma uccide e distrugge completamente i contaminanti e fornisce
un'aria pulita e igienica.
La purificazione al Plasma può essere avviata premendo il TASTO PLASMA sul
telecomando.
Una nuova pressione disattiva la funzione.
• Questa funzione può essere utilizzata in qualsiasi modalità di funzionamento e velocità di ventilatore
premendo il tasto plasma.
• Un funzionamento separato di purificazione al plasma è possibile in condizione di arresto. Si annulla
premendo il pulsante plasma o on/off.
NOTA
Questo funzionamento fa circolare lʼaria nellʼambiente senza raffreddamento
o riscaldamento. Può essere attivata premendo il TASTO DI SELEZIONE
MODALITAʼ DI FUNZIONAMENTO. Una volta attivata la circolazione
dell'aria, è possibile selezionare la velocità della ventola premendo il TASTO
DI SELEZIONE DELLA VELOCITÀ INTERNA.
MODE
Funzionamento in Modalità ventilazione
PLASMA
Page 34

14 Condizionatore d'aria
Istruzioni per il funzionamento
Modalità di raffreddamento a risparmio energetico
La modalità a risparmio energetico può essere utilizzata nel funzionamento a raffreddamento, dato che può
operare efficientemente impostando il tempo di adattamento del corpo a seconda del cambiamento di tempo
e temperatura e regolando automaticamente la temperatura desiderata.
1. Premere il TASTO ON/OFF per avviare lʼunità.
2. Aprire il coperchio del telecomando.
Selezionare il Funzionamento in raffreddamento.
3. Premere il TASTO DELLA MODALITÀ DI RAFFREDDAMENTO A
RISPARMIO ENERGETICO.
4.
Per annullare la modalità di raffreddamento a risparmio energetico, premere
nuovamente il TASTO DELLA MODALITÀ DI RAFFREDDAMENTO A RISPARMIO
ENERGETICO e l'unità funzionerà nella modalità precedente (raffreddamento).
Luminosità display
Con il telecomando è possibile regolare la luminosità del display.
Aprire il coperchio del telecomando e premere il pulsante di selezione della luminosità del
display.
Il display si oscurerà. Premere nuovamente il tasto per impostare la luminosità.
(Lʼordine di 50%
fi
0% LUMINOSITAʼ si ripete a ogni pressione del tasto.)
Premere il pulsante TIMER per 3 secondi.
Premere i TASTI DI IMPOSTAZIONE DEL TIMER per impostare lʼorario desiderato.
-
Lʼordine di a.m. and p.m. -> ora -> minuto si ripete a ogni pressione del tasto (
< >
).
- Premere il pulsante ( ) per impostare lʼora corrente.
Verificare lʼindicatore per la rappresentazione dellʼorario in AM e PM.
NOTA
Impostazione dellʼora corrente
2
Premere il tasto SET/CLEAR.
3
1
Page 35

Manuale dell'utente 15
ITALIANO
Istruzioni per il funzionamento
Annullamento dellʼimpostazione del timer
Impostazione del timer
Premere il TASTO DI MODALITÀ SLEEP AUTOMATICA per impostare lʼora in cui si desidera che lʼunità si
arresti automaticamente. Il timer è programmabile in incrementi di unʼora mediante la pressione del TASTO DI
MODALITÀ SLEEP AUTOMATICA da uno a sette orari. La modalità Sleep è disponibile da 1 a 7 ore.
• La modalità Sleep azionerà la ventola interna a velocità super bassa in modalità raffreddamento e a
velocità bassa in modalità riscaldamento, per una piacevole dormita.
In modalità di raffreddamento o di deumidificazione:
La temperatura di impostazione sale automaticamente due volte di 1 °C nei successivi 30 minuti (2°C
massimo) per consentire un sonno piacevole. A questo punto questa sarà la temperatura di impostazione
finale finché sarà attiva la funzione Sleep.
Nella modalità riscaldamento (condizionatore aria singolo):
La temperatura impostata scende automaticamente due volte di 1°C nei successivi 60 minuti (massimo
2°C) per garantire un riposo confortevole. Questa rimane come temperatura finale impostata fino alla
disattivazione della modalità sleep.
NOTA
Modalità Sleep
Premere una volta il tasto Timer per
impostare Timer ON.
(Premere due volte il tasto Timer per
impostare Timer OFF.)
1
Premere i tasti di impostazione dellʼora per
impostare lʼorario desiderato.
- Lʼordine di a.m. and p.m. -> ora -> minuto si
ripete a ogni pressione del tasto (< >).
- Premere il pulsante ( ) per impostare
lʼora desiderata.
2
Premere il tasto SET/CLEAR
(Premere nuovamente il tasto SET/CLEAR
per annullare)
3
Descrizione
Tasto sul
Indicazione sul display LCD
telecomando
• Per annullare lʼimpostazione del timer, premere il tasto SET/CLEAR.
• Per annullare singolarmente le impostazioni del timer, premere il tasto Timer per selezionare timer 'On' o
timer 'Off'. Quindi, premere il tasto Set/Clear con il telecomando puntato verso il ricevitore di segnale (la
spia luminosa del timer sul display si spegnerà).
Page 36

16 Condizionatore d'aria
Istruzioni per il funzionamento
Con il telecomando è possibile regolare l'aletta verticale.
1. Premere il TASTO ON/OFF per avviare lʼunità.
2. Premere il pulsante di direzione flusso aria verticale.
Le alette orizzontali iniziano a oscillare verso l'alto e il basso automaticamente.
Per bloccare le alette sull'angolo desiderato, premere nuovamente il pulsante di flusso aria verticale.
Con il telecomando è possibile regolare le alette orizzontali.
1. Premere il TASTO ON/OFF per avviare lʼunità.
2. Premere il pulsante direzione flusso aria orizzontale.
Le alette iniziano a oscillare verso destra e sinistra automaticamente. Per bloccare le alette sull'angolo
desiderato, premere nuovamente il pulsante di flusso aria orizzontale.
Comando aletta verticale
Controllo alette orizzontali
• Lo spostamento manuale della pala orizzontale o delle alette verticali del flusso può danneggiare il
meccanismo. Allo spegnimento dellʼunità, la pala orizzontale e le alette verticali chiudono lʼuscita dʼaria
del sistema.
NOTA
Funzione Jet Cool/ Jet Heat
La funzione Jet Cool può essere utilizzata per raffreddare rapidamente la stanza in
Estate. Quando si attiva questa funzione, il condizionatore d'aria funziona in modalità
raffreddamento con velocità di ventilatore massima e temperatura di impostazione di
18°C per 30 minuti per un rapido ed efficace raffreddamento.
In modo simile, la funzione di riscaldamento rapido Jet Heat (disponibile solo in alcuni
modelli) riscalda rapidamente la stanza funzionando con velocità di ventilatore
massima e temperatura di impostazione pari a 30°C per 30 minuti.
Questa funzione può essere attivata premendo il TASTO JET COOL. Per passare dalla modalità di
raffreddamento rapido Jet Cool alla modalità di raffreddamento con ventola ad alta velocità, premere il
TASTO JET COOL, il TASTO DI SELEZIONE DELLA VELOCITÀ DELLA VENTOLA INTERNA o
nuovamente il TASTO DI IMPOSTAZIONE DELLA TEMPERATURA DELLA STANZA.
• Non è possibile attivare il funzionamento Riscaldamento/raffreddamento Jet durante il funzionamento
in modalità ventilazione o Autochangeover.
• Se il telecomando è connesso, l'operazione Jet Heat non può essere utilizzata.
NOTA
Page 37

Manuale dell'utente 17
ITALIANO
Istruzioni per il funzionamento
Funzionamento forzato
Il funzionamento forzato è usato quando non è possibile utilizzare il telecomando. Premere il tasto ON/OFF per
avviare lʼunità. Per arrestare il funzionamento, premere nuovamente il tasto.
Modello
Modello a pompa di calore
araffreddamento
Temp. ambiente ≥24°C 21°C ≤ Temp. ambiente < 24°C Temp. ambiente < 21°C
Modalità di funzionamento
Raffreddamento
Raffreddamento Deumidificazione Riscaldamento
Velocità ventilatore interno
Alta Alta Alta Alta
Temperatura di impostazione
22°C 22°C 23°C 24°C
Funzionamento test
Durante il funzionamento TEST, lʼunità funziona in modalità di raffreddamento con ventilatore ad alta velocità, a prescindere dalla
temperatura ambiente, e si reimposta dopo 18 minuti. Durante questo tipo di funzionamento, se lʼunità riceve segnali del
telecomando opera sulla base delle impostazioni inviate dal telecomando. Per utilizzare questa modalità, tenere premuto il tasto
ON/OFF per 3-5 secondi, si udirà il cicalino emettere un bip. Per arrestare il funzionamento, premere nuovamente il tasto.
Questa funzione è attivata per impostazione predefinita di fabbrica, ma può essere disattivata premendo il tasto
ON/OFF per 6 secondi. L'indicatore LCD lampeggia 3 volte una volta.
Per attivarla, premere nuovamente il tasto per 6 secondi. L'indicatore LCD lampeggia 3 volte due volta.
NOTA
Questa funzione è utile quando manca la corrente.
Al ritorno della corrente, questa funzione ripristina la condizione di funzionamento precedente e il
condizionatore si avvia con le stesse impostazioni.
Funzione di Riavvio automatico
PowerPower
buttonbutton
Power
button
PowerPower
buttonbutton
Power
button
Page 38

18 Condizionatore d'aria
Manutenzione e assistenza
Rimozione dei filtri
Aprire il pannello anteriore come illustrato.
Tirare delicatamente la linguetta del filtro per rimuoverlo.
Dopo aver rimosso il filtro dellʼaria, rimuovere il filtro anallergico tirandolo verso il basso delicatamente.
Filtro Plasma
Pannello
frontale
Non toccare il filtro al plasma per almeno 10 secondi dopo aver aperto la griglia di immissione in quanto ciò
potrebbe causare scosse elettriche.
Manutenzione e assistenza
Prima di effettuare interventi di manutenzione, spegnere lʼalimentazione del sistema, escludere il circuito
mediante l'interruttore e scollegare il cavo di alimentazione.
Pulire utilizzando un panno morbido e asciutto. Non utilizzare candeggine o abrasivi.
Non utilizzare mai:
• Acqua a una temperatura superiore ai 40°C. Ciò potrebbe causare deformazione e scolorimento.
• Sostanze volatili. Potrebbero danneggiare le superfici del condizionatore dʼaria.
Filtri dellʼaria
Il filtro dellʼaria dietro la griglia/il pannello anteriore deve essere controllato e pulito ogni
2 settimane o più spesso, se necessario.
Per la rimozione dei filtri, vedere gli schemi autoesplicativi per ciascun
modello. Pulire i filtri con un aspirapolvere o con acqua tiepida e
sapone. Se la sporcizia non viene via facilmente, lavare con una
soluzione di detergente in acqua tiepida.
Dopo il lavaggio con acqua, far asciugare allʼombra e reinstallare i
filtri al loro posto.
Filtro al Plasma
I filtri al Plasma dietro al filtro dellʼaria deve essere controllato e pulito ogni 3
mesi o più spesso, se necessario. Per la rimozione dei filtri, vedere gli schemi autoesplicativi per ciascun
modello. Pulire i filtri utilizzando un aspirapolvere.
Se è sporco, lavarlo con acqua e lasciarlo asciugare all'ombra, quindi reinstallarlo al suo posto.
Filtro antiallergie + Filtro triplo
Rimuovere il filtro antiallergie + filtro triplo dietro il filtro dell'aria ed
esporlo alla luce del sole per 2 ore.
Inserire quindi i filtri al loro posto.
Unità interna
Page 39

Manuale dell'utente 19
Manutenzione e assistenza
Unità Esterna
Le serpentine scambiatrici di calore e gli scarichi del pannello dell'unità esterna devono essere controllati
periodicamente. Se ostruite di sporcizia o polvere, lo scambiatore di calore e gli scarichi del pannello
possono essere puliti con vapore.
Serpentine sporche o ostruite riducono l'efficienza operativa del sistema e provocano costi di
funzionamento maggiori.
NOTA
Suggerimenti per il funzionamento
Funzione autodiagnosi
LED di visualizzazione errori
(una volta)
2 sec 2 sec 2 sec
Questa unità ha una funzione interna di diagnostica degli errori. Il LED dell'unità lampeggia se il termistore
è guasto. In questo caso, rivolgersi al tecnico dell'assistenza o al rivenditore.
Non raffreddare
eccessivamente lʼambiente.
Ciò può causare danni alla salute
e sprechi di energia.
Tenere tende e persiane
chiuse.
Durante il funzionamento del
condizionatore evitare lʼingresso
diretto della luce solare nellʼambiente.
Mantenere la temperatura
dellʼambiente uniforme.
Regolare la direzione del flusso dellʼaria
verticale e orizzontale per garantire che la
temperatura nellʼambiente sia uniforme.
Accertarsi che porte e
finestre siano ben
chiuse.
Evitare per quanto
possibile di aprire porte e
finestre per non far uscire
lʼaria fresca dagli ambienti.
Pulire regolarmente il
filtro dellʼaria.
Lʼostruzione del filtro
riduce il flusso dʼaria e gli
effetti di raffreddamento e
deumidificazione.
Pulirlo almeno ogni due
settimane.
Di tanto in tanto
ventilare lʼambiente.
Poiché le finestre vanno
tenute chiuse, di tanto in
tanto è consigliabile
aprirle per ventilare la
stanza.
Utilizzare un'elevata velocità della
ventola per una raffreddamento
rapido ed efficace.
L'unità fornisce i valori di
raffreddamento nominali a
velocità di ventola elevate.
ITALIANO
Page 40

20 Condizionatore d'aria
Manutenzione e assistenza
Risoluzione dei problemi per risparmiare tempo e denaro.
È possibile che il condizionatore d'aria stia funzionando in maniera anomala quando:
Problema
n Il condizionatore è
scollegato.
n
Il fusibile si è fuso/l'interruttore
del circuito è scattato.
n Manca la corrente.
n Tensione elevata.
n Il flusso d'aria è ostruito.
n Il filtro dell'aria è sporco.
n La stanza potrebbe essere
troppo calda.
n C'è una fuga di aria fredda.
n
Controllare le impostazioni della temperatura.
n
Potrebbe esserci un'altra
sorgente di calore nella stanza.
Il
condizionator
e non si avvia
Il
condizionator
e non
raffredda
come
dovrebbe
•
Accertarsi che la spina del condizionatore
d'aria sia inserita completamente nella presa.
•
Controllare il fusibile di casa/la cassetta dell'interruttore del
circuito, quindi sostituire il fusibile o ripristinare l'interruttore.
• Se manca la corrente, passare in modalità
spento (OFF).
Al ripristino della corrente,
attendere 3 minuti per riavviare il condizionatore
per evitare che scatti l'interruttore del circuito a
causa del sovraccarico del compressore.
• Verificare che la tensione non sia
insolitamente alta o bassa.
• Accertarsi che non vi siano persiane,
tende o mobili che ostruiscono la parte
anteriore del condizionatore d'aria.
•
Pulire il filtro almeno ogni 2 settimane. Vedere la
sezione relativa alla manutenzione e all'assitenza.
• Quando il condizionatore è attivato per la
prima volta, occorre un po' di tempo per
raffreddare la stanza.
• Verificare la presenza di forni aperti, fughe
d'aria, o altri elementi di perdita.
•
Verificare che siano nelle condizioni raccomandate.
•
Controllare ed eliminare qualsiasi sorgente o
disattivarla quando si utilizza il condizionatore.
Cosa farePossibili cause
1. Si verifica qualcosa di anomalo, come odore di bruciato, forte rumore, e così via.
Spegnere l'unità ed escludere l'interruttore.
In questi casi, non tentare di riparare da soli o riavviare il sistema.
2. Il cavo di alimentazione è troppo caldo o danneggiato.
3. La diagnostica automatica genera un codice di errore.
4. Esce dell'acqua dall'unità interna anche quando l'umidità è ridotta.
5. Selettore, interruttore (di sicurezza o di massa) o fusibile non funziona più.
L'utente deve eseguire controlli periodici e pulizia per evitare che le prestazioni si
riducano.
In queste situazioni particolari, il lavoro deve essere eseguito solo da personale
qualificato.
Contattare immediatamente l'assistenza nei casi seguenti
Page 41

MANUAL DEL PROPIETARIO
AIRE ACONDICIONADO
Por favor lea este manual detenidamente antes de
utilizar su equipo y guárdelo para consultas futuras.
TIPO: MONTADO EN LA PARED
www.lg.com
ESPAÑOL
Page 42

2 Aire acondicionado
Manual de propietario del aire acondicionado
ÍNDICE
PARA SU REGISTRO
Escriba el número de serie y de modelo aquí:
Nº de modelo
Nº de serie
Puede encontrarlos en la etiqueta situada en el lateral de
cada unidad.
Nombre del distribuidor
Fecha de compra
n Grape el recibo a esta página por si tiene necesidad de
probar la fecha de compra por problemas con la garantía.
LEA ESTE MANUAL
En el interior encontrará muchos útiles consejos acerca de
cómo usar y mantener el aire acondicionado correctamente.
Un poco de cuidado preventivo de su parte puede ahorrarle
una gran cantidad de dinero en toda la vida útil del aire
acondicionado.
Encontrará muchas respuestas a problemas comunes en el
diagrama de sugerencias de solución de problemas.
Si consulta nuestro gráfico de Sugerencias de solución de
problemas primero, puede que no necesite llamar al servicio
técnico.
PRECAUCIÓN
• Póngase en contacto con el servicio técnico autorizado
para reparar o mantener esta unidad.
• Póngase en contacto con el instalador para instalar la
unidad.
• El aire acondicionado no está destinado para ser usado
con niños pequeños o inválidos sin supervisión.
• Los niños pequeños deben supervisarse para
asegurarse de que no juegan con el aire acondicionado.
• Si es necesario sustituir el cable de alimentación, el
trabajo deberá ser realizado por personal autorizado
usando solamente recambios originales.
A. Precauciones de seguridad.....................3
B. Seguridad eléctrica ..................................6
Uso temporal de un adaptador ..................6
Uso temporal de un alargador....................6
Símbolos usados en este manual..............6
C. Introducción al producto.........................7
D. Instrucciones de funcionamiento...........8
Instalación de las baterías .........................8
Control remoto inalámbrico
Mantenimiento............................................8
Método de operación .................................8
Control remoto inalámbrico........................9
Modo de operación ..................................11
Operación de cambio automático
(Aire acondicionado individual) ...............12
Operación automática
(Aire acondicionado múltiple) ..................12
Operación Deshumidificación
saludable..................................................12
Operación Circulación de aire .................13
Operación Autolimpieza...........................13
Operación Purificación NEO PLASMA
(Opcional).................................................13
Modo de refrigeración con ahorro de energía
(Opcional) ................................................14
Luminosidad de pantalla (Opcional).........14
Configuración de la hora actual ..............14
Configuración del temporizador ..............15
Para cancelar la configuración del
temporizador ...........................................15
Modo Sueño ............................................15
Control de rejilla horizontal ......................16
Control de rejilla vertical (Opcional) .........16
Operación Jet Cool .................................16
Operación forzada....................................17
Función de reinicio automático ................17
E. Mantenimiento y reparación..................18
Unidad interior..........................................18
Unidad exterior.........................................19
Sugerencias de operación ......................19
Función de autodiagnóstico ....................19
Consejos de resolución de problemas
Ahorre tiempo y dinero ............................20
Llame al servicio técnico inmediatamente
en las siguientes situaciones ..................20
Page 43

Manual de propietario 3
Precauciones de seguridad
ESPAÑOL
Precauciones de seguridad
Para evitar daños en el usuario u otras personas y daños materiales, deben seguirse las siguientes instrucciones.
n Un funcionamiento incorrecto causado por ignorar las instrucciones causará daños personales o materiales.
La seriedad se clasifica según las siguientes indicaciones.
n
El significado de los símbolos de este manual se muestra a continuación.
Este símbolo indica la posibilidad de muerte o heridas serias.
Este símbolo indica la posibilidad de heridas o daños materiales.
Asegúrese de no hacer.
Asegúrese de seguir las instrucciones.
Para los trabajos eléctricos, póngase en
contacto con el distribuidor, el vendedor, un
electricista cualificado o un Servicio técnico
autorizado. No desmonte ni repare el
producto.
• Existe el riesgo de fuego o descargas eléctricas.
Conecte una toma de tierra al producto
como muestra el diagrama de cableado. No
conecte la toma de tierra a tuberías de gas o
agua, un tubo de pararrayos o un cable de
toma de tierra de teléfono.
• Existe el riesgo de fuego o descargas eléctricas.
Instale el panel y la cubierta de la caja de
control con seguridad.
• Existe riesgo de fuego o descargas eléctricas
debido al polvo, agua, etc…
Utilice un cortacircuitos o fusible con la
clasificación adecuada.
• Existe el riesgo de fuego o descargas eléctricas.
No modifique ni alargue el cable de
alimentación. Si el cable de alimentación
tiene arañazos o se ha dañado el aislante o
está deteriorado, deberá sustituirlo.
• Existe el riesgo de fuego o descargas eléctricas.
Para la instalación, retirada o reinstalación,
póngase en contacto con el distribuidor o
un centro de servicio técnico autorizado.
• Existe el riesgo de fuego, descargas eléctricas,
explosion o heridas.
No instale el producto en una base de
instalación defectuosa. Asegúrese de que el
área de instalación no se deteriora con el
tiempo.
• Podría hacer que el producto se caiga.
Nunca instale la unidad exterior en una base
móvil o en un lugar desde donde pueda
caerse.
• La caída de la unidad exterior puede causar
daños materiales o personales, incluso la muerte
de una persona.
Cuando el producto se moje (se inunda o se
sumerja) en agua, póngase en contacto con
un centro de servicio técnico para repararlo
antes de usarlo de nuevo.
• Existe riesgo de fuego o descargas eléctricas.
En la unidad exterior, el condensador de
aumento proporciona electricidad de alto voltaje
a los componentes eléctricos. Asegúrese de
descargar el condensador completamente antes
de realizar algún trabajo de reparación.
• Un condensador cargado puede causar
descargas eléctricas.
Al instalar la unidad, use el kit de
instalación proporcionado con el producto.
• En caso contrario la unidad podría caerse y
causar heridas serias.
Asegúrese de usar solamente los
componentes de la lista de componentes
svc. No intente nunca modificar el equipo.
•
Usar componentes inadecuados puede causar
descargas eléctricas, generar un calor excesivo o fuego.
Utilice siempre un enchufe de alimentación
y toma de corriente con toma de tierra.
• Existe el riesgo de descarga eléctrica.
No utilice un cortacircuitos defectuoso o
con una capacidad nominal inferior a la
necesaria. Utilice un cortacircuitos y un
fusible con una capacidad nominal correcta.
• Existe el riesgo de fuego o descargas eléctricas.
No utilice un multi consent. Utilice este
dispositivo con un cortacircuitos dedicado.
• De no hacerlo podría causarse descargas
eléctricas o fuego.
Page 44

4 Aire acondicionado
Precauciones de seguridad
Las conexiones de cableado de
interior/exterior deben fijarse fuertemente y
el cable debe disponerse correctamente
para que no haya fuerzas que tiren del cable
en los terminales de conexión.
• Una conexiones inadecuadas o flojas pueden
generar calor o fuego.
Deshágase de forma segura de los materiales de
embalaje. Como los tornillos, clavos, baterías,
elementos rotos, etc… tras la instalación o
reparación y, a continuación, rompa y deshágase
de las bolsas de plástico del embalaje.
• Los niños podrían jugar con ellos y herirse.
Asegúrese de comprobar que el enchufe de
alimentación no está sucio, flojo o roto y, a
continuación, insértelo completamente.
• Un enchufe sucio, flojo o roto puede causar
descargas eléctricas o fuego.
Asegúrese de comprobar el refrigerante
usado. Lea la etiqueta del producto.
• Usar un refrigerante incorrecto puede impedir el
funcionamiento normal de la unidad.
No use un cable de alimentación, enchufe o
toma de corriente floja dañada.
• De hacerlo, podría causar descargas eléctricas
o fuego.
No toque, opera ni repare el producto con
las manos mojadas. Al desenchufar el
equipo sujete el enchufe y no el cable
• Existe riesgo de descargas eléctricas o fuego.
No coloque un calefactor u otros
dispositivos de calor cerca del cable de
alimentación.
• Existe riesgo de fuego o descargas eléctricas.
Evite que entre agua en las partes
eléctricas. Instale la unidad alejada de las
fuentes de agua.
• Existe riesgo de fuego, averías en el producto o
descargas eléctricas.
No guarde ni use, ni siquiera permita gas
inflammable o combustibles cerca del
producto.
• Existe riesgo de fuego.
No utilice el producto en un lugar muy
cerrado durante un largo periodo de tiempo.
Ventile regularmente.
• Podría aparecer deficiencia de oxígeno y por lo
tanto dañar su salud.
No abra la rejilla frontal del producto
mientras esté en funcionamiento. (No toque
el filtro electrostático en caso de que la
unidad disponga de uno.)
• Existe riesgo de heridas, descargas eléctricas o
averías en el producto.
Si el producto emite ruidos, olores o humo
extraños. Interrumpa la corriente con el
cortacorrientes inmediatamente o
desenchufe el cable de alimentación.
• Existe riesgo de descargas eléctricas o fuego.
Ventile la sala del producto de vez en
cuando mientras lo utilice con una estufa,
dispositivos de calor, etc...
• Podría aparecer deficiencia de oxígeno y por lo
tanto dañar su salud.
Apague el suministro de corriente y
desenchufe la unidad cuando vaya a
limpiarla o reparar el producto.
• Existe riesgo de descarga eléctrica.
Cuando no se vaya a usar el producto durante
un largo periodo de tiempo, desenchufe el
cable de alimentación o interrumpa la
alimentación con el cortacircuitos.
• Existe riesgo de daños o averías en el producto
o de un funcionamiento no deseado.
Tenga cuidado de asegurar que nadie, en
especial los niños, podría pisar o caerse
sobre la unidad exterior.
• Podría causar heridas o daños en el producto.
Tenga cuidado para asegurarse de que el
cable no pueda desenchufarse de un tirón ni
resultar dañado durante el funcionamiento.
• Existe el riesgo de fuego o descargas eléctricas.
No coloque NADA sobre el cable de
alimentación.
• Existe el riesgo de fuego o descargas eléctricas.
No enchufe ni desenchufe el cable de alimentación para encender o
apagar la unidad.
• Existe el riesgo de fuego o descargas eléctricas.
Cuando haya fugas de gas inflamable, corte el circuito de gas y abra
una ventana para ventilar la sala antes de encender el producto.
• No utilice el teléfono ni encienda o apague interruptores. Existe riesgo de
explosión o fuego.
Para mover y transportar el producto son
necesarias dos personas.
• Evitará daños personales.
No instale el producto en un lugar donde
pueda estar expuesto al viento marino
(viento salado) directamente.
• Podría causar corrosión en el producto.
Instale la manguera de drenaje para
asegurarse de que el agua condensada se
drena adecuadamente.
• Una mala conexión podría causar fugas de
agua.
Mantenga el equipo nivelado mientras lo
instala.
• Para evitar vibraciones o ruidos.
No instale el producto donde el ruido o el aire
caliente de la unidad exterior podría dañar o
molestar a los vecinos.
• Podría causar un problema para sus vecinos y,
por lo tanto, tensiones.
Compruebe siempre que no hay fugas de
gas (refrigerante) tras instalar o reparar el
producto.
• Unos niveles bajos de refrigerante podrían
causar averías en el producto.
Page 45

Manual de propietario 5
Precauciones de seguridad
ESPAÑOL
No utilice el producto para fines especiales,
como conservar comida, obras de arte, etc…
Es un aire acondicionado doméstico, no un
sistema de refrigeración de precisión.
• Existe riesgo de daños o pérdidas de propiedad.
No bloquee la entrada o la salida del caudal
de aire.
• Podría causar averías en el producto.
Utilice un paño suave para limpiarlo. No use
detergentes agresivos, disolventes ni lo
salpique de agua.
• Existe riesgo de fuego, descargas eléctricas o
daños en las partes de plástico del producto.
Nunca toque las partes metálicas del
producto al retirar el filtro de aire.
• Existe riesgo de daños personales.
No pise ni coloque nada sobre el producto.
(unidades de exterior)
• Existe riesgo de daños personales y de avería
del producto.
Inserte siempre el filtro con seguridad una
vez limpio. Limpie el filtro cada dos
semanas o con mayor frecuencia si es
necesario.
• Un filtro sucio reduce la eficacia.
No inserte las manos ni ningún otro objeto
por la entrada o la salida de aire mientras el
producto esté funcionando.
• Existen partes afiladas y móviles que podrían
causar heridas.
Tenga cuidado al desembalar e instalar el
producto.
• Los bordes afilados podrían causar heridas.
Si el gas refrigerante se escapa durante una
reparación no toque el gas refrigerante de la
fuga.
• El gas refrigerante podría causar quemaduras
por frío.
No incline la unidad al retirarla o
desinstalarla.
• El agua condensada del interior podría
derramarse.
No mezcle aire o gas distintos al
refrigerante específico usado en el sistema.
• Si el aire entra en el sistema de refrigerante hará
que la presión suba excesivamente, causando
daños en el quipo o daños personales.
Si el gas refrigerante se escapa durante la
instalación, ventile el área inmediatamente.
• De no hacerlo podría ser peligroso para su
salud.
El desmontaje de la unidad, el tratamiento
del aceite refrigerante y componentes debe
realizarse según los estándares locales y
nacionales.
Cambie las baterías del control remoto por
unas nuevas del mismo tipo. No mezcle
baterías nuevas y viejas ni de tipos
diferentes.
• Existe riesgo de fuego o averías en el producto.
No recargue ni desmonte las baterías. No se
arroje las baterías al fuego.
• Podrían arder o explotar.
Si el líquido de las baterías entra en
contacto con la piel o la ropa, lave la zona
con abundante agua. No utilice el control
remoto si las baterías tienen fugas.
• Los productos químicos de las baterías podrían
causar quemaduras u otros riesgos para su
salud.
Si ingiere el líquido de las baterías, lávese
los dientes y consulte a un médico. No
utilice el control remoto si las baterías
tienen fugas.
• Los productos químicos de las baterías podrían
causar quemaduras u otros riesgos para su
salud.
Evite que el aire acondicionado funcione
durante un largo periodo de tiempo cuando
la humedad sea alta y se haya dejado
abierta una ventana o puerta.
• La humedad puede condensarse y mojar o
dañar los muebles.
No exponga la piel o los niños o plantas a la
corriente de aire frío o caliente.
• Podría dañar su salud.
No beba el agua de drenaje del producto.
• No es potable y podría causar problemas de
salud serios.
Utilice una banqueta estable o una escalera
para la limpieza, el mantenimiento o
reparación de un producto que se encuentre
en alto.
• Tenga cuidado para evitar daños personales.
Page 46

6 Aire acondicionado
Seguridad eléctrica
Seguridad eléctrica
• Este dispositivo debe incluir toma de tierra adecuada. Para minimizar el riesgo de descargas eléctricas debe
conectar el equipo en un enchufe con toma de tierra.
• No corte ni retire el polo de toma de tierra del enchufe.
• Conectar el terminal de toma de tierra del adaptador al tornillo de la cubierta de la caja de pared no proveerá
una toma de tierra adecuada a menos que el tornillo de la cubierta sea de metal no aislado y la caja de la
pared disponga de toma de tierra por el cableado.
• Si tiene alguna duda de si el aire acondicionado tiene una toma de tierra adecuada, haga que un electricista
cualificado revise la caja de pared y el circuito.
No recomendamos utilizar un adaptador debido a los potenciales riesgos para la seguridad. Para conexiones
temporales, use un adaptador original, disponible en la mayoría de las tiendas de herramientas. Asegúrese de
que la ranura grande del adaptador está alineada con la ranura grande del receptáculo para que la polaridad
sea la correcta.
Para desconectar el cable de alimentación del adaptador, use una mano en cada uno para evitar dañar el
terminal de toma de tierra. Evite desenchufar el cable de alimentación con demasiada frecuencia ya que podría
acabar dañando el terminal.
• Nunca utilice el dispositivo con un adaptador roto.
No recomendamos utilizar un alargador debido a los potenciales riesgos para la seguridad.
Uso temporal de un adaptador
Uso temporal de un alargador
Este símbolo le alerta del riesgo de descargas eléctricas.
Este símbolo le alerta de peligros que podrían causar daños en el aire
acondicionado.
Este símbolo indica que existen comentarios especiales.
NOTA
Símbolos usados en este manual
Este dispositivo debe instalarse según las regulaciones de cableado nacionales. Este manual sirve de
guía para explicar las características del producto.
Page 47

Manual de propietario 7
Introducción al producto
Introducción al producto
ESPAÑOL
Art Cool Delux (Tipo 2)
Indicadores LCD en el panel de visualización
Entrada de aire
Filtro de aire
Filtro de plasma
OUT
DOOR
Encendido/
apagado
Salida de aire
Panel frontal
Receptor de señal
Botón ON/OFF
(encendido/apagado)
: Se encenderá durante el funcionamiento del sistema, en caso de
y ajuste de reinicio automático.
Modo reposo : Se enciende durante el funcionamiento del modo reposo.
Plasma : La función ilustra su modo dinámico utilizando un sistema de iluminación múltiple.
Temporizador : Se ilumina durante el funcionamiento del temporizador.
Modo
descongelación
Funcionamiento
de unidad exterior
: Se enciende durante el modo descongelación o el *Arranque en caliente
(Sólo modelo bomba de calor).
: Se enciende durante el funcionamiento al aire libre de la unidad.
(Sólo modelo de enfriamiento).
Pantalla digital : Indica temperatura deseada,Funcionamiento automático (funcionamiento de
cambio automático), funcionamiento de limpieza automática, funcionamiento
de prueba y código de error.
Page 48

8 Aire acondicionado
Instrucciones de funcionamiento
1. Elija un lugar adecuado donde esté seguro y sea fácil de
alcanzar.
2. Fije el soporte a la pared con los tornillos incluidos.
3. Deslice el control remoto dentro del soporte.
1. El control remoto no debe estar nunca expuesto a la luz
solar directa.
2. El transmisor y receptor de señal debe mantenerse
limpio para que se comuniquen correctamente. Utilice
un paño suave para limpiarlos.
NOTA
Instrucciones de funcionamiento
Instalación de las baterías
Mantenimiento del control remoto inalámbrico
1. Retire la cubierta de la batería tirando en la dirección de las flechas.
2. Inserte las pilas nuevas asegurándose de que los polos (+) y (-) se colocan en la
posición correcta.
3. Vuelva a colocar la cubierta deslizándola de nuevo en su posición.
1. Utilice siempre baterías del mismo tipo.
2. Si el sistema no va a usarse durante un largo periodo de tiempo, retire las pilas para
alargar su vida útil.
3. Si la pantalla del control remoto comienza a perder intensidad, cambie ambas
baterías.
4. Utilice 2 baterías AAA (1.5 v.).
NOTA
3. En caso de que algún otro aparato se ponga en funcionamiento con el control remoto, cambie su posición o consulte a su
personal de reparaciones.
1. El receptor de señal se encuentra en el interior de la unidad.
2. Para utilizarlo, apunte el control remoto hacia la unidad. No debe haber ningún obstáculo entre ellos.
Método de operación
Page 49

Manual de propietario 9
ESPAÑOL
Instrucciones de funcionamiento
Control remoto inalámbrico
Los controles son como los siguientes.
Transmisor de señal
BOTÓN ON/OFF (ENCENDIDO/APAGADO)
Se utiliza para encender y apagar la unidad.
BOTÓN DE SELECCIÓN DE MODO DE OPERACIÓN
Se utiliza para seleccionar el modo de operación.
BOTONES DE CONFIGURACIÓN DE TEMPERATURA AMBIENTE
Se utiliza para seleccionar la temperatura ambiente.
BOTÓN DE SELECCIÓN DE VELOCIDAD DE VENTILADOR INTERIOR
Se utiliza para seleccionar la velocidad del ventilador en seis
pasos: baja, media baja, media, media alta, alta y brisa natural.
BOTÓN DE CONTROL DE REJILLA HORIZONTAL
Se utiliza para seleccionar la dirección vertical del
caudal de aire que desee.
BOTÓN DE CONTROL DE REJILLA VERTICAL
Se utiliza para seleccionar la dirección horizontal
del caudal de aire que desee.
BOTÓN DE AUTOLIMPIEZA
Se utiliza para seleccionar la autolimpieza.
BOTÓN DE REFRIGERACIÓN CON AHORRO DE ENERGÍA
Se utiliza para ahorrar energía.
BOTÓN DE COMPROBACIÓN DE TEMPERATURA AMBIENTE
Se utiliza para comprobar la temperatura ambiente.
BOTÓN TIMER (TEMPORIZADOR) (Antes de ajustar)
Modo de operación
Operación de refrigeración
Funcionamiento automático o Cambio automático
Operación Healthy Dehumidification (Deshumidificación saludable)
Operación de calefacción (solo para bomba de calor)
Circulación de aire
Se utiliza para configurar la hora actual y la hora de inicio/fin.
BOTONES DE AJUSTE DE HORA
Se utilizan para ajustar la hora.
BOTÓN TIMER SET/CLEAR (CONFIG./BORRADO
DE TEMPORIZADOR) (tras el ajuste)
Se utiliza para configurar y cancelar la operación de temporizador.
BOTÓN RESET (REINICIO)
Se utiliza para reiniciar la hora.
BOTÓN PLASMA
Se utiliza para iniciar o detener la purificación por plasma.
BOTÓN DE LUMINOSIDAD DE LED
Se utiliza para ajustar la luminosidad de los LED.
Page 50

10 Aire acondicionado
Instrucciones de funcionamiento
Los controles son como los siguientes.
Transmisor de señal
BOTÓN DE MODO SUEÑO AUTOMÁTICO
Se utiliza para activar el modo automático.
BOTÓN DE ENFRIAMIENTO/CALEFACCIÓN
POR CHORRO DE AIRE
Utilizado para iniciar o parar la velocidad de
enfriamiento o calefacción.
En enfriamiento/calefacción por chorro de aire
activa el ventilador a una velocidad muy elevada.
Modo de operación
Operación de refrigeración
Funcionamiento automático o Cambio automático
Operación Healthy Dehumidification (Deshumidificación saludable)
Operación de calefacción (solo para bomba de calor)
Circulación de aire
Page 51

Manual de propietario 11
Cooling (Refrigeración)
Auto Changeover
(Cambio automático)
Healthy Dehumidification
(Deshumidificación saludable)
Paso 2 (Media) Paso 1 (Baja) Paso 3 (Alta)
Auto Operation (Operación automática) (Aire acondicionado múltiple)
Auto Changeover (Cambio automático) (Aire acondicionado individual)
ON/OFF
MODE
TEMP
FAN SPEED
Heating (Calefacción)
(sólo para modelos con
bomba de calor)
Air Circulation
(Circulación de aire)
Brisa natural
Instrucciones de funcionamiento
Pulse el BOTÓN ON/OFF (ENCENDIDO/APAGADO) para
encender la unidad.
La unidad responderá con un pitido.
Abra la cubierta del control remoto y pulse el botón de modo de operación.
Cada vez que pulse el botón, el modo de operación cambiará en la dirección de la
flecha.
Para el funcionamiento de refrigeración o calefacción
seleccione la temperatura de interior pulsando los BOTONES
DE CONFIGURACIÓN DE TEMPERATURA AMBIENTE.
Para refrigeración, la temperatura puede configurarse entre
18°C~30°C y para calefacción, el rango es de 16°C~30°C.
Configure la velocidad del ventilador utilizando el mando a distancia.
Puede seleccionar la velocidad del ventilador en cuatro pasos: bajo, medio, alto y natural con sólo pulsar
el BOTÓN DE SELECCIÓN DE VELOCIDAD DEL VENTILADOR INTERIOR.
Cada vez que pulse el botón,
el modo de velocidad de ventilador cambiará en la dirección de la flecha.
1
2
3
4
Brisa natural
o
Para una sensación más fresca, pulse el BOTÓN DE SELECCIÓN DE VELOCIDAD DE VENTILADOR INTERIOR y seleccione el
modo Brisa natural. En este modo, el aire parece una brisa natural cambiando de velocidad automáticamente.
Modo de operación
ESPAÑOL
Page 52

12 Aire acondicionado
Durante la operación Healthy Dehumidification (Deshumidificación saludable)
o
Si selecciona el modo de deshumidificación con el BOTÓN DE SELECCIÓN DE MODO DE
OPERACIÓN, el producto comenzará a ejecutar la función de deshumidificación. Configura
automáticamente la temperatura de la sala y el caudal de aire a las mejores condiciones
para deshumidicación, basándose en la detección de la temperatura actual de la sala.
En este caso, sin embargo, la tempertura seleccionada no se mostrará en el control remoto y
no podrá controlar tampoco la temperatura de la sala.
o Durante la función de deshumidificación saludable, la velocidad del ventilador
se seleccionará según el algoritmo de optimización que responda al estado
actual de la temperatura de la sala, de forma que las condiciones de la sala se
mantengan saludables y cómodas incluso en la estación húmeda.
Instrucciones de funcionamiento
Operación automática (Aire acondicionado múltiple)
Operación Healthy Dehumidification (Deshumidificación saludable)
MODE
Esta operación es basicamente la función de calefacción o
refrigeración del aire acondicionado. Pero duranta esta operación el
controlador cambia el modo de operación automáticamente para
mantener la temperatura a ±2°C respecto a la temperatura
seleccionada.
Operación de cambio automático (Aire acondicionado individual)
MODE
MODE
En esta operación, el modo se configura automáticamente conforme a la
lógica basada en la temperatura actual y la unidad interior conectada.
Puede establecer la temperatura deseada y la velocidad del ventilador
interior.
Page 53

Manual de propietario 13
ESPAÑOL
o Durante la operación Autolimpieza, se puede eliminar la humedad atrapada en las unidades de interior tras
la operación de refrigeración o de deshumidificación saludable.
Seleccione la operación Autolimpieza con el botón de selección de función
( ). Cada vez que la unidad se apague, el ventilador de interior seguirá
funcionando durante unos 30 minutos de forma interna sin la operación de
refrigeración o deshumidificación.
Esta función seca los restos de humedad y limpia internamente la unidad.
Si pulsa de nuevo el botón Autolimpieza, esta función se cancelará.
o
Durante la función Autolimpieza, sólo se utilizarán los botones ON/OFF (ENCENDIDO/APAGADO),
Plasma y Autolimpieza. Durante esta operación, se iluminará el indicador “Co” (Refrigeración).
NOTA
Operación Autolimpieza
Instrucciones de funcionamiento
Operación PLASMA Purification (Purificación por plasma)
El filtro de plasma es una tecnología desarrollada por LG para deshacerse de
contaminantes microscópicos del aire de entrada generando un plasma de
electrones de alta carga.
Este plasma mata y destruye completamente los contaminantes para
proporcionar un aire limpio e higiénico.
La operación de purificación por plasma puede iniciarse pulsando el BOTÓN PLASMA
del control remoto.
Al volver a pulsarlo se desactivará la operación.
•
Estas funciones pueden usarse en cualquier modo de operación y velocidad de ventilador pulsando el botón de plasma.
• Es posible usar la operación de purificación de plasma de forma independiente con el equipo
detenido. La operación se cancela pulsando el botón de plasma o el botón de encendido/apagado.
NOTA
Esta operación hacer circular el aire sin enfriar ni calentar. Puede
activarse pulsando el BOTÓN DE SELECCIÓN DE MODO DE
OPERACIÓN. Una vez activada la circulación de aire, puede seleccionar
la velocidad del ventilador pulsando el BOTÓN DE SELECCIÓN DE
VELOCIDAD DE VENTILADOR DE INTERIOR.
MODE
Operación Air Circulation (Circulación de aire)
PLASMA
Page 54

14 Aire acondicionado
Instrucciones de funcionamiento
Modo de refrigeración con ahorro de energía
El modo de refrigeración con ahorro de energía podemos ahorrar energía en la operación de refrigeración,
ya que puede funcionar de forma eficiente configurando el tiempo de adaptación del cuerpo al cambio de
tiempo y temperatura y ajustando automáticamente la temperatura que desee.
1.
Pulse el BOTÓN ON/OFF (ENCENDIDO/APAGADO) para encender la unidad.
2. Abra la cubierta del control remoto.
Seleccione la operación de refrigeración.
3.
Pulse el BOTÓN MODO DE REFRIGERACIÓN CON AHORROR DE ENERGÍA.
4.
Para cancelar el modo de refrigeración con ahorro de energía, pulse el BOTÓN
MODO DE REFRIGERACIÓN CON AHORRO DE ENERGÍA de nuevo y la unidad
funcionará en el modo anterior (Modo Refrigeración).
Luminosidad de pantalla
La luminosidad de la pantalla de la unidad puede ajustarse usando el control remoto.
Abra la cubierta del control remoto y pulse el botón LED LUMINOSITY (LUMINOSIDAD DE LED).
La pantalla estará oscura. Pulse el botón de nuevo para configurar el brillo de la pantalla.
(El orden de LUMINOSIDAD 50%
fi
0% se repite siempre que pulse el botón.)
Pulse el BOTÓN TEMPORIZADOR durante 3 segundos.
Pulse el BOTÓN DE CONFIGURACIÓN DE TEMPORIZADOR hasta configurar el tiempo que desee.
-
El orden de a.m. y p.m. -> hora -> minuto se repetirá siempre que pulse el botón (< >).
- Pulsando el botón ( ), puede configurar la hora actual.
Compruebe el indicador para a.m. y p.m.
NOTA
Configuración de la hora actual
2
Pulse el botón SET/CLEAR (CONFIGURAR/BORRAR).
3
1
Page 55

Manual de propietario 15
ESPAÑOL
Instrucciones de funcionamiento
Para cancelar la configuración del temporizador
Configuración del temporizador
Pulse el BOTÓN MODO SUEÑO AUTOMÁTICO para configurar la hora a la que desea que la unidad se
detenga automaticamente. El temporizador se programa en incrementos de una hora pulsando el BOTÓN
DE MODO SUEÑO AUTOMÁTICO de 1 a 7 veces. El modo sueño está disponible entre 1 a 7 horas.
• El modo sueño operará el ventilador de interior a una velocidad mínima en modo refrigeración y una
velocidad baja en el modo calefacción para permitirle tener un sueño apacible.
En los modos refrigeración o deshumidificación saludable:
La temperatura seleccionada aumentará automáticamente dos veces 1ºC durante los siguientes 30
minutos consecutivos (máximo 2°C) para permitirle un sueño apacible. Esta será la temperatura final
mientras funcione el modo sueño.
En modo calefacción (Aire acondicionado individual)
La temperatura configurada descenderá automáticamente dos veces en intervalos de 1°C durante los 60
minutos siguientes (2°C como máximo) para permitirle un sueño confortable.
Ésta será la temperatura configurada final durante el funcionamiento del modo inactivo.
NOTA
Operación Modo Sueño
Pulse el botón Timer (Temporizador) una vez
para activar la opción Reserved (Reservado)
(Pulse el botón Timer (Temporizador) dos veces
para desactivar la opción Reserved (Reservado)
1
Pulse los botones de configuración de hora
hasta que seleccione la hora que desee.
-
El orden de a.m. y p.m. -> hora -> minuto se
repetirá siempre que pulse el botón (< >).
- Pulsando el botón ( ), puede
configurar la hora que desee.
2
Pulse el BOTÓN SET/CLEAR (CONFIGURAR/BORRAR).
(Pulse el BOTÓN CONFIGURAR/BORRAR
una vez más para cancelar la operación)
3
Descripción
Botón del
Indicadores de la pantalla LCD
control remoto
•
Si desea cancelar la configuración del temporizador, pulse el botón SET/CLEAR (CONFIGURAR/BORRAR).
• Para cancelar las opciones del temporizador individualmente, pulse el botón Timer (Temporizador) para
activar o desactivar la opción Reserved (Reservado).
Y a continuación, pulse el botón Set/Clear (Configurar/borrar) apuntando el control remoto al receptor de
señal. (El indicador luminoso del temporizador de la pantalla se apagará)
Page 56

16 Aire acondicionado
Instrucciones de funcionamiento
La rejilla horizontal puede ajustarse usando el control remoto.
1. Pulse el BOTÓN ON/OFF (ENCENDIDO/APAGADO) para encender la unidad.
2. Presione de nuevo el botón de dirección del flujo de aire.
La rejilla horizontal se moverá automáticamente hacia arriba y hacia abajo.
Para detener la rejilla en el ángulo deseado, pulse de nuevo el botón de dirección del flujo de aire
vertical.
La rejilla vertical puede ajustarse usando el control remoto.
1. Pulse el BOTÓN ON/OFF (ENCENDIDO/APAGADO) para encender la unidad.
2.
Presione el botón de dirección del flujo de aire horizontal.
La rejilla vertical se moverá automáticamente hacia la izquierda y derecha.
Para detener la rejilla en el ángulo deseado, pulse de nuevo el botón de dirección del flujo de aire
horizontal.
Control de rejilla horizontal
Control de rejilla vertical
•
Mover manualmente la rejilla horizontal o vertical podría dañar el mecanismo. Cuando se apague la unidad,
las rejillas vertical y horizontal cerrarán la salida de aire del producto.
NOTA
Operación del enfriamiento por chorro de aire frío/caliente
La función de chorro de aire frío puede ser empleada para enfriar rápidamente un cuarto en un día
caluroso. Cuando esta función esté activa, el aire acondicionado funcionará en modo operación de
enfriamiento, con una velocidad ultrarrápida del ventilador y una temperatura de 18 °C durante 30
minutos a fin de lograr un enfriamiento rápido y eficaz. De forma similar, la función de chorro de aire
caliente (disponible únicamente en algunos modelos) calienta rápidamente el cuarto mediante la
operación del ventilador a una velocidad ultrarrápida y a una temperatura de 30 °C durante 30 minutos.
Podrá activar este funcionamiento presionando el BOTÓN JET COOL (enfriamiento por chorro de aire). Para cambiar del modo
enfriamiento por chorro de aire al modo enfriamiento por velocidad alta del ventilador, presione de nuevo el BOTÓN JET COOL o
BOTÓN SELECTOR DE VELOCIDAD DEL VENTILADOR INTERIOR o el BOTÓN DE AJUSTE DE TEMPERATURA AMBIENTE.
• La función de calefacción o Jet Cool no puede activarse durante la operación de circulación de aire y la operación de
cambio automático.
• Si está conectado el mando a distancia por cable, no se podrá utilizar el calefacción por chorro de aire.
NOTA
Page 57

Manual de propietario 17
ESPAÑOL
Instrucciones de funcionamiento
Operación forzada
La operación forzada se usa cuando no puede usarse el control remoto. La operación comenzará cuando se
pulse el botón ON/OFF (ENCENDIDO/APAGADO). Si desea detener la operación, vuelva a pulsar el botón.
Modelo de
Modelo con bomba de calor
refrigeración
Temp. de sala ≥24°C 21°C ≤_Temp. de sala < 24°C Temp. de sala < 21°C
Modo de funcionamiento
Refrigeración Refrigeración
Healthy Dehumidification (Deshumidificación saludable)
Calefacción
Velocidad de ventilador de interior
Alto Alto Alto Alto
Selección de temperatura
22°C 22°C 23°C 24°C
Funcionamiento de prueba
Durante el FUNCIONAMIENTO DE PRUEBA, la unidad funcionará en modo refrigeración con una velocidad de ventilador alta,
independientemente de la temperatura de la sala y se reiniciará a los 18 minutos. Durante el funcionamiento de prueba, si se recibe señal del
control remoto, la unidad funcionará con las órdenes del control remoto. Si desea usar esta operación, mantenga pulsado el botón ON/OFF
(ENCENDIDO/APAGADO) durante 3~5 segundos y podrá oír un pitido. Si desea detener la operación, vuelva a pulsar el botón.
Esta función está habilitada de forma predeterminada de fábrica pero puede deshabilitarla pulsando el botón ON/OFF
(ENCENDIDO/APAGADO) durante 6 segundos. El indicador LCD parpadeará 3 veces a la vez.
Para habilitarlo, pulse el botón de nuevo durante 6 segundos. El indicador LCD parpadeará 3 veces, por duplicado
NOTA
Esta función es útil en caso de un fallo eléctrico.
Cuando se recupere la alimentación, esta función recupera la situación de funcionamiento anterior y el aire
acondicionado funcionará con la misma configuración.
Función de reinicio automático
PowerPower
buttonbutton
Power
button
PowerPower
buttonbutton
Power
button
Page 58

18 Aire acondicionado
Mantenimiento y reparación
Retirada de los filtros
Abra el panel frontal como se muestra.
A continuación tire ligeramente de la pestaña del filtro para retirarlo.
Tras retirar el filtro, retire el filtro de plasma y el filtro antialergénico tirando ligeramente hacia abajo.
Filtro de plasma
Panel frontal
No toque este filtro de plasma antes de transcurridos 10 segundos desde que se abra la rejilla de entrada,
podría causar descargas eléctricas.
Limpie la unidad con un paño suave. No utilice lejía ni limpiadores abrasivos.
Nunca use ninguno de estos
• Agua más caliente de 40°C. Podría causar deformación y descoloración.
• Substáncias volátiles. Podrían dañar la superficie del aire acondicionado.
Filtros de aire
Los filtros de aire detrás del panel frontal / rejilla deben revisarse y limpiarse
cada 2 semanas o con mayor frecuencia si fuera necesario. Para retirar los
filtros, consulte los diagramas autoexplicativos de cada tipo de modelo.
Limpie los filtros con una aspiradora o con agua jabonosa caliente. Si la
suciedad no se elimina fácilmente, lave los filtros con una solución de
detergente en agua templada. Séquelos bien a la sombre tras lavarlos y
vuelva a colocarlos en su sitio.
Filtro de plasma
Los filtros de plasma detrás del filtro de aire deben revisarse y limpiarse una
vez cada tres meses o con mayor frecuencia si es necesario.
Para retirar los filtros, consulte los diagramas autoexplicativos de cada
tipo de modelo. Limpie los filtros con un aspirador.
Si está sucio, lávelo con agua, séquelo bien a la sombra y vuelva a colocarlo en su sitio.
Filtro antialergénico + filtro triple
Retire el filtro antialergénico + filtro triple de detrás del filtro de aire y
expóngalo a la luz solar directa durante 2 horas.
Y a continuación, inserte estos filtros en su lugar original.
Mantenimiento y reparación
Unidad interior
Antes de realizar ninguna labor de mantenimiento, desconecte la alimentación principal del sistema,
desconecte el cortacircuitos y desenchufe el cable de alimentación.
Page 59

Manual de propietario 19
Mantenimiento y reparación
Unidad exterior
Debe revisar regularmente las bobinas del intercambiador de calor y las aberturas del panel de la unidad
exterior. Si está atascado con suciedad, deberá limpiar el intercambiador de calor y las aberturas del
panel con un equipo profesional de limpieza por vapor.
Las bobinas sucias o atascadas pueden reducir la eficacia de funcionamiento del sistema y causar unos
costes de funcionamiento más altos.
NOTA
Sugerencias de operación
Función de autodiagnóstico
Indicador LED de error
(una vez)
2 seg 2 seg 2 seg
Esta unidad incluye capacidad de diagnóstico de errror. El LED de la unidad parpadeará si falla un condensador.
Si ocurre esto, póngase en contacto con su técnico de mantenimiento/distribuidor
No sobreenfríe la sala.
Esto no es bueno para la salud y
se malgasta electricidad.
Mantenga las cortinas y
persianas cerradas.
Impida que la luz solar directa entre en
la sala cuando el aire acondicionado se
encuentre en funcionamiento.
Mantenga la temperatura de
la sala uniforme.
Ajuste la dirección del caudal de aire
vertical y horizontal para asegurar que
la temperatura de la sala es uniforme.
Asegúrese de que las
puertas y las ventanas
están cerradas.
Evite abrir las puertas y
las ventanas todo lo
posible para mantener el
aire frío en la sala.
Limpie el filtro de aire
con regularidad.
Los bloqueos en el filtro de
aire, reducen el caudal de aire
y los efectos de refrigeración y
deshumidificación.
Límpielo al menos cada dos
semanas.
Ventile la sala
ocasionalmente.
Ya que las ventanas
deben mantenerse
cerradas, es una buena
idea abrirlas y ventilar la
sala de vez en cuando.
Utilice una mayor velocidad del
ventilador para una refrigeración
más rápida y efectiva.
La unidad aporta su
capacidad de refrigeración
nominal cuando la
velocidad del ventilador es
alta.
ESPAÑOL
Page 60

20 Aire acondicionado
Mantenimiento y reparación
Consejos de resolución de problemas Ahorre tiempo y dinero
El aire acondicionado podría funcionar de forma anormal cuando:
Problema
n El aire acondicionado está
desenchufado.
n El fusible se ha fundido / se
ha activado el cortacircuitos.
n Fallo eléctrico.
n Alto voltaje.
n El caudal de aire está
bloqueado.
n El filtro de aire está sucio.
n
La sala puede estar
demasiado caliente.
n
El aire frío se está escapando.
n
Compruebe la configuración de temperatura.
n Puede haber alguna fuente
de calor en la sala.
El aire
acondicionad
o no se
enciende
El aire
acondicionad
o no enfría
como debería
•
Asegúrese de que el enchufe del aire acondicionado
está completamente introducido en la toma.
•
Compruebe la caja de fusibles / cortacircuitos de la
casa y cambia el fusible o reinicie el cortacircuitos.
•
Si hay un corte eléctrico, seleccione el control de
modo como OFF (APAGADO). Cuando se reanude
la alimentación, espere 3 minutos antes de reinciiar
el aire acondicionado para evitar que se active la
protección de sobrecarga del compresor.
• Si la tensión es inusalmente alta o baja, el
cortacircuitos se activará.
• Asegúrese de que no hay cortinas,
persianas o muebles bloqueando la parte
frontal del aire acondicionado.
•
Limpie el filtro, al menos, cada 2 semanas.
Consulte la sección de Mantenimiento y reparación.
• Al encender el aire acondicionado por
primera vez, debe dejar algo de tiempo
para que la sala se enfríe.
• Compruebe los registros de calefacción
abiertos y el retorno de aire frío.
• Asegúrese de que están bien.
•
Compruebe y elimine esta fuente o apáguela
mientras usa el aire acondicionado.
Qué hacerCausas posibles
1. Cualquier situación anormal, como olor a quemado, un ruido algo, etc.
Detenga la unidad y active el cortacircuitos. Nunca intente reparar el equip ousted
mismo o reiniciar el equipo en estos casos.
2. El cable de alimentación está demasiado caliente o dañado.
3. El autodiagnóstico genera un código de error.
4. Hay fugas de agua desde la unidad interior incluso cuando la humedad sea baja.
5. Cualquier interruptor, cortacircuitos (de seguridad, de tierra) o fusible falla no funciona
correctamente
El usuario debe llevar a cabo una comprobación y limpieza de rutina para evitar un
mal rendimiento de la unidad.
En caso de que aparezca una situación especial, el trabajo debe ser llevado a cabo
solamente por personal de mantenimiento.
Llame al servicio técnico inmediatamente en las siguientes situaciones
Page 61

MANUEL D’UTILISATION
CLIMATISEUR
Veuillez lire attentivement ce manuel avant d’utiliser
votre appareil, et le conserver pour toute consultation ultérieure.
www.lg.com
TYPE : MURAL
FRANÇAIS
Page 62

2 Climatiseur
Manuel d'utilisation du climatiseur
TABLE DES MATIÈRES
INFORMATIONS À CONSERVER
Spécifiez le numéro de modèle et de série :
Modèle
N° de série
Ils sont mentionnés sur lʼétiquette apposée sur la face latérale de lʼunité.
Nom du revendeur
Date dʼachat
n
Agrafez votre facture à cette page afin de la retrouver
facilement si vous devez, le cas échéant, prouver la
date dʼachat ou vous prévaloir de la garantie.
LISEZ CE MODE DʼEMPLOI
Il contient de nombreuses astuces utiles sur la manière
dʼutiliser et dʼassurer lʼentretien de votre climatiseur.
Un minimum de mesures de précaution de votre part peut
vous éviter de perdre beaucoup de temps et dʼargent
pendant la durée de vie de votre appareil. Vous trouverez
de nombreuses réponses aux problèmes fréquents dans
le tableau de résolution des problèmes. La consultation du
Tableau de résolution des problèmes peut vous éviter
de faire appel à nos services.
PRÉCAUTIONS DʼUSAGE
• Pour toute réparation ou maintenance de cette
unité, contactez le service technique agréé.
• Pour toute installation de cette unité, contactez
lʼinstallateur agréé.
•
Ce climatiseur ne doit pas être mis en marche par des
enfants ou des personnes infirmes, sans surveillance.
• Les enfants ne doivent en aucun cas jouer avec
lʼappareil.
• Si le câble dʼalimentation doit être remplacé, il
convient de confier cette tâche à un technicien
agréé qui utilisera uniquement des pièces de
rechange dʼorigine.
A. Consignes de sécurité .......................3
B. Sécurité électrique ..............................6
Utilisation provisoire dʼun adaptateur ...6
Utilisation provisoire dʼun câble de rallonge
....6
Symboles utilisés dans le manuel .........6
C. Présentation de lʼappareil...................7
D. Instructions dʼutilisation.....................8
Mise en place des piles ........................8
Télécommande sans fil Maintenance....8
Méthode dʼutilisation..............................8
Télécommande sans fil .........................9
Mode de fonctionnement.....................11
Mode de basculement automatique
(Climatiseur simple)
....................................
12
Fonctionnement automatique
(Climatiseur multiple)
............................12
Mode Déshumidification saine ............12
Mode Circulation de lʼair .....................13
Mode Nettoyage automatique .............13
Mode Purification dʼair néo-plasma
(Option)................................................13
Mode Froid à économie dʼénergie (Option)
....
14
Luminosité affichage (Option) .............14
Réglage de lʼheure actuelle ................14
Réglage du Timer ...............................15
Pour annuler le réglage du timer ........15
Mode Nuit ...........................................15
Contrôle des volets horizontaux .........16
Contrôle du volet vertical (Option) ......16
Mode Jet Cool ....................................16
Fonctionnement forcé .........................17
Fonction Redémarrage automatique...17
E. Maintenance et entretien ..................18
Unité intérieure ....................................18
Unité extérieure ..................................19
Conseils dʼutilisation ! .........................19
Auto-diagnostic ...................................19
Conseils de dépannage ! Pour gagner
du temps et de lʼargent !
............................20
Contactez le service technique
immédiatement dans les cas suivants :
........20
Page 63

Manuel dʼutilisation 3
Consignes de sécurité
FRANÇAIS
Consignes de sécurité
Pour éviter tout risque de blessure pour l'utilisateur ou des tiers, ainsi que tout dégât matériel, respectez les consignes ci-dessous.
n Toute mauvaise utilisation découlant d'un non-respect des instructions comporte des risques corporels ou
matériels. Leur niveau de gravité est indiqué par les libellés ci-dessous.
n Les symboles ci-dessous utilisés dans ce manuel ont la signification suivante :
AVERTISSEMENT
ATTENTION
Ce signe indique un danger de mort ou de blessure grave.
Ce signe indique un risque de blessure corporelle ou de dégât matériel.
À ne pas faire
Instructions à respecter
AVERTISSEMENT
Utilisez toujours un connecteur
dʼalimentation avec une prise de terre.
•
Il existe un risque dʼincendie ou dʼélectrocution.
Évitez d'utiliser un disjoncteur défectueux ou
de capacité insuffisante. Utilisez un disjoncteur
ou un fusible de puissance adéquate.
•
Il existe un risque dʼincendie ou dʼélectrocution.
Nʼutilisez pas un dispositif de déclenchement
groupé. Utilisez toujours cet appareil sur un
circuit avec disjoncteur dédié.
•
Sinon, vous risquez de provoquer un choc électrique ou un incendie.
Pour toute réparation, contactez le concessionnaire,
le revendeur, un électricien qualifié ou un centre de
réparation agréé. Ne tentez pas de démonter ou de
réparer vous-même l'appareil.
• Il existe un risque dʼincendie ou
dʼélectrocution.
Procédez dans tous les cas à une mise à la terre de
lʼappareil conformément au schéma de câblage. Ne reliez
pas le fil de terre à une canalisation de gaz, une conduite
dʼeau, à un paratonnerre ou à un fil de terre téléphonique.
• Il existe un risque dʼincendie ou
dʼélectrocution.
Installez le boîtier de commande et fixez
soigneusement le capot.
•
Sinon, vous risquez de provoquer un incendie ou un choc
électrique en raison de la présence de poussières, dʼhumidité, etc.
Utilisez un disjoncteur ou un fusible de
puissance adéquate.
• Il existe un risque dʼincendie ou
dʼélectrocution.
Ne changez pas le câble d'alimentation et
n'utilisez pas de rallonge. Si le câble
dʼalimentation est abîmé, dénudé par endroit
ou défectueux, remplacez-le immédiatement.
• Il existe un risque d'incendie ou
d'électrocution.
Pour tout démontage, installation ou
réinstallation, contactez votre revendeur
ou un centre après-vente agréé.
• Il existe un risque dʼincendie, d'électrocution,
dʼexplosion ou de blessure.
N'installez pas lʼappareil sur un support
défectueux. Assurez-vous que lʼemplacement
choisi pour lʼinstallation ne sʼest pas altéré au
fil du temps.
•
Autrement, le produit risque de tomber par terre.
Nʼinstallez jamais lʼunité extérieure sur
une surface instable, ni dans un endroit
où elle risque de tomber.
•
La chute de lʼunité extérieure peut provoquer des
dommages, des blessures voire entraîner la mort.
Si de lʼeau pénètre dans lʼappareil,
contactez un service après-vente agréé
pour le faire réparer avant de le réutiliser.
• Il existe un risque dʼincendie ou
dʼélectrocution.
Le transformateur élévateur de lʼunité
extérieure fournit un courant haute tension aux
composants électriques. Assurez-vous de
décharger complètement le condensateur avant
de procéder à une quelconque réparation.
• Un condensateur chargé peut être à lʼorigine
dʼun choc électrique.
Lors de lʼinstallation, utilisez le kit fourni
à cet effet avec lʼappareil.
• Autrement, lʼunité risque de tomber et de
provoquer de graves blessures.
Utilisez uniquement des composants
figurant dans la liste des pièces de
rechange. Nʼessayez en aucun cas de
modifier lʼéquipement.
• Toute utilisation de pièces inadéquates peut
causer un choc électrique, une surchauffe ou
un incendie.
Page 64

4 Climatiseur
Consignes de sécurité
Les connexions électriques entre lʼunité intérieure
et lʼunité extérieure doivent supporter les
contraintes mécaniques et le câble dʼalimentation
doit être placé de façon à n'exercer aucune traction
sur les bornes de connexion.
• Toute connexion inadéquate présente un
risque de surchauffe ou d'incendie.
Procédez à une mise au rebut réglementaire
des matériaux dʼemballage, tels que les vis,
les clous, les piles, les éléments cassés, etc.,
après lʼinstallation ou lʼentretien de lʼappareil.
Veillez ensuite à jeter tout sac en plastique.
• Les enfants pourraient jouer avec ces
éléments et se blesser.
Assurez-vous que le connecteur du câble
dʼalimentation n'est pas encrassé,
desserré ou cassé, puis insérez-le à fond
dans la prise.
•
Un connecteur de câble sale, desserré ou cassé
présente un risque dʼélectrocution ou d'incendie.
Vérifiez bien le fluide frigorigène à utiliser
(consultez lʼétiquette apposée sur
lʼappareil).
•
Lʼutilisation dʼun fluide frigorigène inadapté risque
de nuire au fonctionnement normal de lʼunité.
Nʼutilisez pas un câble dʼalimentation ni une
fiche ou une prise desserrée qui soient
endommagés.
• Sinon, vous risquez de provoquer un incendie
ou un choc électrique.
Si vos mains sont mouillées, ne touchez pas
lʼappareil et ne lʼactionnez pas. Lorsque vous
débranchez le cordon, tenez-le par le connecteur.
• Il existe un risque d'incendie ou
d'électrocution.
Ne placez pas un radiateur ou dʼautres
appareils de chauffage à proximité du
câble dʼalimentation.
• Il existe un risque dʼincendie ou
dʼélectrocution.
Assurez-vous que les pièces électriques ne
soient pas au contact de lʼeau. Veillez notamment
à installer lʼunité loin de toute source dʼeau.
•
Il existe un risque dʼincendie, de dysfonctionnement
de l'appareil ou d'électrocution.
Ne stockez pas et nʼutilisez pas de
combustible ou de gaz inflammable à
proximité de l'appareil.
• Sinon, vous risquez de provoquer un
incendie.
Nʼutilisez pas lʼappareil dans un espace
hermétiquement clos pendant une longue
période. Aérez la pièce régulièrement.
• Sinon, un manque dʼoxygène pourrait être
observé, ce qui nuirait à votre santé.
Nʼouvrez pas la grille frontale de lʼappareil
pendant son fonctionnement (Ne touchez pas le
filtre électrostatique, si lʼunité en est équipée).
•
Il existe un risque dʼincendie, de dysfonctionnement
de l'appareil ou d'électrocution.
En cas de bruit anormal, d'odeur ou de
fumée, coupez immédiatement le disjoncteur
ou débranchez le câble dʼalimentation.
• Il existe un risque dʼincendie ou
dʼélectrocution.
Aérez régulièrement la pièce où se trouve
lʼappareil lorsque celui-ci est utilisé
simultanément avec un appareil de chauffage, etc.
• Sinon, un manque dʼoxygène pourrait être
observé, ce qui nuirait à votre santé.
Coupez lʼalimentation et débranchez
lʼunité lorsque vous nettoyez ou réparez
lʼappareil.
• Il existe un risque d'électrocution.
Si lʼappareil reste inutilisé pendant un
long moment, coupez lʼalimentation ou
arrêtez le disjoncteur.
• Il existe un risque de dommage ou de panne
ou un fonctionnement inattendu.
Veillez à ce que personne ne puisse
trébucher ou tomber sur lʼunité
extérieure, en particulier les enfants.
• Cela pourrait provoquer des blessures
corporelles ou endommager lʼappareil.
Veillez à ce quʼil soit impossible de tirer sur
le câble dʼalimentation ou de lʼendommager
pendant le fonctionnement de lʼappareil.
• Il existe un risque d'incendie ou
d'électrocution.
Ne placez AUCUN objet sur le câble
dʼalimentation.
• Il existe un risque dʼincendie ou
dʼélectrocution.
Ne branchez pas ou ne débranchez pas lʼalimentation électrique
pour allumer ou arrêter lʼappareil.
• Il existe un risque dʼincendie ou dʼélectrocution.
En cas de fuite dʼun gaz inflammable, fermez lʼarrivée de gaz et ouvrez
une fenêtre afin dʼaérer la pièce avant de mettre en marche lʼappareil.
• Nʼutilisez pas de téléphone et nʼallumez ni nʼéteignez les interrupteurs,
au risque de provoquer une explosion ou un incendie.
ATTENTION
Faites appel à deux ou plusieurs personnes
pour soulever et transporter l'appareil.
• Attention à ne pas vous blesser.
Nʼexposez pas lʼappareil directement à
l'action du vent marin (vent salé)
• Vous éviterez tout risque de corrosion.
Installez le flexible dʼévacuation de façon à assurer
une évacuation convenable des eaux de condensats.
•
Un mauvais raccordement peut provoquer une fuite d'eau.
L'appareil doit être installé de niveau.
• Vous éviterez ainsi toute vibration ou
nuisance sonore.
N'installez pas l'appareil dans un endroit où le bruit
ou l'air chaud émanant de lʼunité extérieure risque
de constituer une nuisance pour le voisinage.
•
Dans le cas contraire, votre installation pourrait gêner vos
voisins et être à lʼorigine dʼun conflit avec ces derniers.
Vérifiez systématiquement la présence éventuelle
d'une fuite de fluide frigorigène après l'installation
ou après une réparation de l'appareil.
•
Si le niveau de fluide frigorigène est insuffisant,
l'appareil risque de tomber en panne.
Page 65

Manuel dʼutilisation 5
Consignes de sécurité
FRANÇAIS
Nʼutilisez pas lʼappareil à des fins particulières
comme la conservation dʼaliments, dʼœuvres
dʼart, etc. C'est un climatiseur grand public, pas
un système frigorifique de précision.
• Sinon, vous risquez dʼendommager ou
dʼaltérer les propriétés de votre appareil.
Nʼobstruez pas l'entrée et la sortie du flux
dʼair.
• au risque dʼendommager lʼappareil.
Utilisez un chiffon doux pour le
nettoyage. Nʼutilisez pas de détergents
agressifs ni de solvants ou autres
produits de ce type.
•
Sinon, vous risquez de provoquer un incendie ou un choc
électrique ou dʼendommager les composants en plastique.
Ne touchez pas les parties métalliques de
lʼappareil lorsque vous enlevez le filtre à
air.
• Il existe un risque de blessure.
Ne montez pas sur lʼappareil et ne posez
rien dessus. (unités extérieures)
• Vous risqueriez de provoquer un incendie ou
dʼaltérer le fonctionnement de lʼappareil.
Remettez le filtre correctement en place après
le nettoyage. Nettoyez le filtre toutes les
quinze jours ou plus souvent si nécessaire.
• Un filtre sale entraîne une réduction des
performances.
Ne placez pas les mains ou un objet au
niveau de lʼentrée ou de la sortie dʼair
lorsque lʼappareil fonctionne.
• Certaines pièces qui sont acérées et
amovibles peuvent provoquer des blessures.
Déballez et installez le produit avec
prudence.
• Il comporte des arêtes vives présentant un
risque de coupure.
Si une fuite de fluide frigorigène se
produit lors de la réparation, ne le
touchez pas.
• Ce fluide peut provoquer des gelures
(brûlures froides).
Nʼinclinez pas lʼunité lorsque vous la
déplacez ou que vous la démontez.
• Lʼeau condensée quʼelle contient pourrait
sʼécouler.
Nʼutilisez pas de mélange dʼair ou de gaz autre
que le fluide frigorigène spécifique du système.
•
La présence dʼair dans le système frigorifique provoquerait
une augmentation excessive de la pression, susceptible
dʼendommager lʼappareil ou de provoquer des blessures.
Si une fuite de fluide frigorigène se produit lors de
lʼinstallation, aérez la pièce immédiatement.
• Sinon, vous mettez en danger votre santé.
Les procédures de démontage de lʼunité et de
remplacement de lʼhuile frigorigène ou de
composants du système doivent être exécutées
conformément aux normes locales et nationales.
Remplacez les piles des télécommandes
par des piles de même modèle.
Ne mélangez pas des piles usées et
neuves ou de types différents.
•
Il existe un risque dʼincendie ou de dysfonctionnement de lʼappareil.
Ne rechargez pas et ne démontez pas les
piles. Ne jetez pas les piles dans le feu.
• Elles risquent de brûler ou dʼexploser.
En cas de projection de lʼélectrolyte pour
batterie sur la peau ou les vêtements, rincez
soigneusement à lʼeau claire. N'utilisez pas
la télécommande en cas de fuite des piles.
•
Les produits chimiques contenus dans les piles et les batteries
peuvent provoquer des brûlures ou des blessures autres.
En cas dʼingestion du liquide des piles,
brossez-vous les dents et consultez un
médecin. N'utilisez pas la télécommande
en cas de fuite des piles.
•
Les produits chimiques contenus dans les piles et les batteries
peuvent provoquer des brûlures ou des blessures autres.
Ne laissez pas le climatiseur en marche
pendant une période trop longue lorsque
le taux d'humidité est très élevé et qu'une
porte ou une fenêtre est restée ouverte.
• L'humidité risque alors de se condenser et de
mouiller ou d'endommager le mobilier.
Nʼexposez pas votre peau, ni les enfants ou
les plantes aux courants dʼair chaud ou froid.
• Sinon, vous mettez en danger votre santé.
Ne buvez pas lʼeau évacuée de lʼappareil.
• Cette eau nʼest pas potable et peut provoquer
des problèmes de santé graves.
Utilisez un escabeau ou une échelle stable pour
nettoyer ou réparer lʼappareil en hauteur.
• Faites attention à ne pas vous blesser.
Page 66

6 Climatiseur
Sécurité électrique
Sécurité électrique
• Cet appareil doit être correctement mis à la terre.
Pour limiter le risque d'électrocution, vous devez toujours relier la fiche à une prise de terre.
• Ne retirez pas la broche de terre du connecteur dʼalimentation.
• Le fait de relier le fil de terre de lʼadaptateur à la vis du boîtier de la prise murale ne suffit pas à mettre
lʼappareil à la terre, sauf si la vis est métallique et non isolée et si la prise murale est reliée à la terre par
le câblage général.
• En cas de doute sur la mise à la terre du climatiseur, faites vérifier lʼinstallation par un électricien.
Nous vous déconseillons dʼutiliser un adaptateur en raison des risques de sécurité.
Pour des connexions temporaires, utilisez un adaptateur agréé, disponible dans la plupart des magasins
spécialisés. Vérifiez que la grande encoche de lʼadaptateur est alignée sur celle du réceptacle afin de
garantir une connexion correcte des polarités.Pour débrancher le câble dʼalimentation de lʼadaptateur,
tenez-le dʼune main pour éviter dʼendommager la borne de terre. Évitez de débrancher trop souvent le
câble afin de ne pas endommager la borne de terre.
• Nʼutilisez jamais lʼappareil avec un adaptateur endommagé.
Nous vous déconseillons dʼutiliser un câble de rallonge en raison des risques de sécurité.
AVERTISSEMENT
AVERTISSEMENT
Utilisation provisoire dʼun adaptateur
Utilisation provisoire dʼun câble de rallonge
Ce symbole signale un risque dʼélectrocution.
Ce symbole signale les risques de détérioration du climatiseur.
Ce symbole attire votre attention sur des remarques particulières.
REMARQUE
Symboles utilisés dans le manuel
Cet appareil doit être installé conformément aux réglementations électriques nationales en vigueur.
Le présent manuel présente les caractéristiques électriques du produit.
AVERTISSEMENT
Page 67

Manuel dʼutilisation 7
Présentation de lʼappareil
Présentation de lʼappareil
FRANÇAIS
Art Cool Mirror
Voyants DCL du panneau d’affichage
Sortie d’air
Panneau avant
Récepteur de signal
Entrée d’air
Filtre à air
Filtre plasma
OUT
DOOR
Touche MARCHE/ARRÊT
(ON/OFF)
Marche/Arrêt : S’allume pendant le fonctionnement du système, pour indiquer un
Mode sommeil
Plasma : Cette fonction illustre son mode dynamique en utilisant un système de
Minuterie : S’allume pendant le fonctionnement de la minuterie.
Mode dégivrage
Affichage pendant
fonctionnement
et lors du réglage du redémarrage automatique.
: S’allume pendant le fonctionnement automatique en mode sommeil.
d'éclairage multiple.
: S’allume pendant le fonctionnement en mode dégivrage ou lors du
démarrage à chaud* (modèle pompe à chaleur uniquement).
: Fonctionnement de l’unité extérieure: S’allume lorsque l’unité extérieure est en
marche (modèle refroidissement uniquement).
:
Indique la température, Mode automatique (basculement automatique),
nettoyage automatique, test et code d’erreur.
Page 68

8 Climatiseur
Instructions dʼutilisation
1. Choisissez un emplacement facile dʼaccès.
2. Fixez le support mural à lʼaide des vis.
3. Insérez la télécommande dans son support en
la faisant glisser.
1. La télécommande ne doit jamais être exposée
à la lumière directe du soleil.
2.
Lʼémetteur et le récepteur de signaux doivent toujours
être propres pour garantir une bonne communication.
Utilisez un chiffon doux pour le nettoyage.
REMARQUE
Instructions dʼutilisation
Mise en place des piles
Maintenance de la télécommande sans fil
1. Retirez le cache des piles en suivant le sens de la flèche.
2. Insérez les nouvelles piles en veillant à respecter les polarités( + ) et( - ).
3. Remettez le cache en place.
1. Utilisez toujours des piles de même type.
2. Si le système doit rester inactif pendant longtemps, retirez les piles afin
de préserver leur durée de vie.
3. Si les informations sur lʼafficheur de la télécommande commencent à
sʼestomper, remplacez les piles.
4. Utilisez deux piles de type AAA (1,5 volt).
REMARQUE
3. Si dʼautres appareils sont contrôlés par télécommande, modifiez leur position ou consultez votre
technicien.
1. Le récepteur de signaux se trouve dans lʼunité.
2.
Pointez la télécommande vers lʼunité pour quʼelle fonctionne. Aucun obstacle ne doit se trouver entre la télécommande et l'appareil.
Méthode dʼutilisation
Page 69

Manuel dʼutilisation 9
FRANÇAIS
Instructions dʼutilisation
Télécommande sans fil
Les télécommandes ressemblent au
modèle suivant.
Émetteur de signaux
BOUTON ON/OFF
Permet d’allumer/éteindre l’unité.
BOUTON DE SÉLECTION DU MODE DE FONCTIONNEMENT
Permet de sélectionner le mode de fonctionnement.
BOUTONS DE RÉGLAGE DE LA TEMPÉRATURE DE LA PIÈCE
Permet de sélectionner la température de la pièce.
BOUTON DE SÉLECTION DE LA VITESSE DU VENTILATEUR INTÉRIEUR
Permet de sélectionner la vitesse du ventilateur : basse,
moyenne-basse, moyenne, moyenne-haute, haute et naturelle.
BOUTON DE COMMANDE DU VOLET HORIZONTAL
Permet de régler la direction de l'air soufflé verticalement.
BOUTON DE COMMANDE DU VOLET VERTICAL
Permet de régler la direction de l'air soufflé horizontalement.
BOUTON NETTOYAGE AUTOMATIQUE
Permet de définir le mode Nettoyage automatique.
BOUTON FROID ÉCONOMIE D’ÉNERGIE
Permet d’économiser de l’énergie.
BOUTON VÉRIFICATION DE LA TEMPÉRATURE DE LA PIÈCE
Permet de vérifier la température de la pièce.
Mode de fonctionnement
Mode Froid
Mode automatique ou Basculement automatique
Mode Déshumidification saine
Mode Chaud (modèle réversible uniquement)
Circulation d'air
BOUTON TIMER (avant réglage)
Permet de régler l'heure et de définir l’heure de marche/arret.
BOUTONS RÉGLAGE DE L’HEURE
Permet de régler l'heure.
BOUTON RÉGLAGE/ANNULATION DU TIMER (après réglage)
Permet de définir et d’annuler le fonctionnement du Timer.
BOUTON RÉINITIALISER
Permet de réinitialiser l’heure.
BOUTON ECO EYE
Permet de définir et d’annuler le fonctionnement du Timer.
BOUTON LUMINOSITÉ LED
Permet de régler la luminosité des voyants (LED).
Page 70

10 Climatiseur
Instructions dʼutilisation
Les télécommandes ressemblent au
modèle suivant.
Émetteur de signaux
BOUTON MODE NUIT AUTOMATIQUE
Permet d'activer le mode Nuit automatique.
BOUTON JETCOOL/JET HEAT
Permet de démarrer ou d'arrêter le mode
chaud/froid accéléré
Le ventilateur chaud/froid est ultrarapide.
Mode de fonctionnement
Mode Froid
Mode automatique ou Basculement automatique
Mode Déshumidification saine
Mode Chaud (modèle réversible uniquement)
Circulation d'air
Page 71

Manuel dʼutilisation 11
Froid
Basculement
automatique
Déshumidification
saine
Chaud (Modèle
réversible
uniquement)
Circulation d'air
Étape 2 (Moyenne)
Étape 1 (basse)
Étape 3 (Haute)
Fonctionnement automatique (Climatiseur multiple)
Basculement automatique (Climatiseur simple)
ON/OFF
MODE
TEMP
FAN SPEED
Ventilation naturelle
Instructions dʼutilisation
Appuyez sur le bouton ON/OFF pour allumer lʼunité.
Lʼunité émet un signal sonore en réponse.
Ouvrez le cache de la télécommande et appuyez sur le bouton du mode de
fonctionnement. Chaque fois que vous appuyez sur ce bouton, le mode de
fonctionnement bascule dans le sens indiqué par la flèche.
Pour le mode Chaud ou Froid, définissez la température
souhaitée en appuyant sur les boutons RÉGLAGE DE LA
TEMPÉRATURE DE LA PIÈCE.
Pour le mode Froid, vous pouvez choisir une température
entre 18°C et 30°C et, en mode chaud, entre 16°C et 30°C.
Réglez la vitesse du ventilateur à lʼaide de la télécommande.
Vous pouvez choisir parmi quatre vitesses : basse, moyenne, haute et naturelle. Pour cela,
appuyez sur le BOUTON DE SÉLECTION DE LA VITESSE DU VENTILATEUR DE LʼUNITÉ I
NTÉRIEURE.
Chaque fois que vous appuyez sur ce bouton, le mode de ventilation bascule dans le sens indiqué par la flèche.
1
2
3
4
Ventilation naturelle
o
Pour une sensation de fraîcheur, appuyez sur le BOUTON DE SÉLECTION DE LA VITESSE DU VENTILATEUR INTÉRIEUR et
choisissez le mode Ventilation naturelle. Dans ce mode, le ventilateur produit un courant dʼair frais et naturel.
Mode de fonctionnement
FRANÇAIS
Page 72

12 Climatiseur
En mode Déshumidification saine
o
Si vous sélectionnez le mode de déshumidification avec le BOUTON DE SÉLECTION DU
MODE DE FONCTIONNEMENT, l'appareil met en route la fonction de déshumidification.
Automatiquement, il règle la température de la pièce et le débit d'air pour assurer une
déshumidification optimale, en fonction de la température détectée dans la pièce.
Dans ce cas, toutefois, la température réglée ne sʼaffiche pas sur la télécommande et vous ne
pouvez pas non plus contrôler la température de la pièce.
o En mode Déshumidification saine, la vitesse du ventilateur est
automatiquement réglée de manière optimale en fonction de la température de
la pièce, de sorte que l'atmosphère reste saine et confortable même en saison
très humide.
Instructions dʼutilisation
Fonctionnement automatique (Climatiseur multiple)
Mode Déshumidification saine
MODE
Ce mode de fonctionnement correspond à la fonction Chaud ou Froid du
climatiseur.
Toutefois, dans ce mode, le contrôleur change de mode automatiquement
pour maintenir la température réglée, dans une tolérance de ±2°C.
Mode de basculement automatique (Climatiseur simple)
MODE
MODE
Dans ce cas, le mode est déterminé automatiquement selon la
température ambiante et lʼunité intérieure branchée.
Vous pouvez choisir la température et la vitesse du ventilateur.
Page 73

Manuel dʼutilisation 13
FRANÇAIS
o En mode Nettoyage automatique, il est possible dʼéliminer lʼhumidité accumulée dans les unités intérieures
après un fonctionnement en mode Froid ou Déshumidification saine.
Sélectionnez le mode Nettoyage automatique à lʼaide du bouton de réglage ( ).
Ainsi, chaque fois que lʼunité est éteinte, le ventilateur continue de tourner en interne
pendant environ 30 minutes, sans effet de froid ou de déshumidification dans la pièce.
Cette fonction permet de sécher lʼintérieur de lʼunité et dʼen supprimer lʼhumidité résiduelle.
Si vous appuyez à nouveau sur le bouton Nettoyage automatique, vous annulez la fonction.
o
Durant la fonction de Nettoyage automatique, seuls les boutons ON/OFF, Plasma et
Nettoyage automatique sont utilisés. Dans ce mode, le voyant Froid sʼallume.
REMARQUE
Mode Nettoyage automatique
Instructions dʼutilisation
Mode Purification dʼair PLASMA
Le filtre Plasma est une technologie mise au point par LG pour éliminer les
contaminants microscopiques présents dans lʼair ambiant, en générant un un
flux électromagnétique puissant.
La filtration "Plasma" détruit les contaminants et garantit un air propre et sain.
Vous pouvez déclencher le mode Purification Plasma en appuyant sur le
BOUTON PLASMA de la télécommande.
Pour désactiver la fonction, appuyez une deuxième fois sur ce bouton.
• Vous pouvez utiliser ces fonctionnalités dans tous les modes et toutes les vitesses de ventilation en
appuyant sur le bouton Plasma.
• Un mode Purification Plasma séparé est possible en condition dʼarrêt. Pour lʼannuler, il suffit
dʼappuyer sur le bouton Plasma ou ON/OFF.
REMARQUE
Lʼair circule sans effet de chauffage ni de refroidissement. Pour activer ce
mode, appuyez sur le BOUTON DE SÉLECTION DU MODE DE
FONCTIONNEMENT. Une fois que la circulation dʼair est activée, vous
pouvez sélectionner la vitesse du ventilateur en appuyant sur le BOUTON DE
SÉLECTION DE LA VITESSE DU VENTILATEUR INTÉRIEUR.
MODE
Mode Circulation de lʼair
PLASMA
Page 74

14 Climatiseur
Instructions dʼutilisation
Mode Froid à économie dʼénergie
Le mode Froid à économie dʼénergie sʼappuie sur le temps dʼadaptation du corps en fonction des
changements dʼheure et de température de façon à régler automatiquement la température souhaitée.
1. Appuyez sur le BOUTON ON/OFF pour allumer lʼunité.
2. Ouvrez le cache de la télécommande.
Sélectionnez le mode de fonctionnement Froid.
3.
Appuyez sur le BOUTON DE MODE FROID À ÉCONOMIE DʼÉNERGIE.
4. Pour annuler ce mode, appuyez à nouveau sur le bouton ; l'unité repasse dans
le mode précédent (Froid).
Luminosité dʼaffichage et des voyants
Vous pouvez régler la luminosité de lʼaffichage à lʼaide de la télécommande.
Ouvrez le cache de la télécommande et appuyez sur le bouton LUMINOSITÉ LED.
L'intensité lumineuse de la led d'affichage diminue.
Appuyez à nouveau sur le bouton pour obtenir un affichage plus lumineux.
(La luminosité varie de 50 à 0 % chaque fois que vous appuyez sur le bouton.)
Appuyez sur le BOUTON TIMER pendant 3 secondes.
Appuyez sur les BOUTONS REGLAGE DE LʼHEURE jusquʼà ce lʼheure souhaitée sʼaffiche.
- Pour passer de lʼafffichage a.m et p.m aux heures et aux minutes, appuyez sur
le bouton (< >).
- En appuyant sur le bouton ( ), vous pouvez régler lʼheure actuelle.
Vérifiez lʼindicateur a.m. et p.m.
REMARQUE
Réglage de lʼheure actuelle
2
Appuyez sur le bouton SET/CLEAR (définir/effacer).
3
1
Page 75

Manuel dʼutilisation 15
FRANÇAIS
Instructions dʼutilisation
Pour annuler le réglage du timer
Réglage du Timer
Appuyez sur le BOUTON MODE NUIT AUTOMATIQUE pour fixer l'heure à laquelle l'unité doit s'arrêter
automatiquement. Le timer est programmé par incréments dʼune heure ; vous pouvez appuyer sur le BOUTON
MODE NUIT AUTOMATIQUE entre 1 et 7 fois. Le mode nuit est réglable pour une durée de 1 à 7 heures.
• Lorsque le mode Nuit est activé, le ventilateur de l'unité intérieure fonctionne à très basse vitesse en
mode Froid et à basse vitesse en mode Chaud pour des raisons de confort.
En mode Froid ou Déshumidification saine :
La température réglée augmente automatiquement deux fois de 1°C au cours des 30 minutes qui suivent
(sans dépasser 2°C) pour un confort nocturne optimal.
Ce réglage est le dernier effectué aussi longtemps que le mode Nuit est opérationnel.
En mode chaud (climatiseur simple) :
La température diminue automatiquement deux fois de 1 °C au cours des 60 minutes qui suivent (sans
dépasser 2 °C) pour un confort nocturne optimal.
Ce réglage est le dernier effectué tant que le mode nuit est opérationnel.
REMARQUE
Mode Nuit
Appuyez sur le bouton Timer une fois pour
activer le mode Programmation.
(Appuyez sur le bouton Timer deux fois pour
désactiver le mode Programmation).
1
Appuyez sur les boutons de réglage de lʼheure
jusquʼà ce que l'heure souhaitée sʼaffiche.
- Pour passer de lʼafffichage a.m et p.m aux
heures et aux minutes, appuyez sur le bouton
(< >).
- En appuyant sur le bouton ( ), vous
réglez lʼheure.
2
Appuyez sur le bouton SET/CLEAR (définir/effacer).
(Appuyez une nouvelle fois sur le bouton
SET/CLEAR pour annuler.)
3
Description
Bouton de la
Indication sur lʼafficheur
télécommande
• Si vous voulez annuler tous les réglages du timer, appuyez sur le bouton SET/CLEAR.
• Pour annuler individuellement les réglages du timer, appuyez sur le bouton Timer pour activer ou
désactiver le mode Programmation. Appuyez ensuite sur le bouton Set/Clear en pointant la
télécommande vers le récepteur de signaux. (Le voyant du timer sur lʼafficheur sʼéteint)
Page 76

16 Climatiseur
Instructions dʼutilisation
Vous pouvez régler le volet horizontal à lʼaide de la télécommande.
1. Appuyez sur le BOUTON ON/OFF pour démarrer lʼunité.
2. Appuyez sur le bouton de direction du flux vertical.
Le volet horizontal oscille automatiquement de haut en bas.
Pour arrêter le volet à lʼangle souhaité, appuyez une nouvelle fois sur le bouton de
direction du flux dʼair vertical.
Vous pouvez régler les volets verticaux à lʼaide de la télécommande.
1. Appuyez sur le BOUTON ON/OFF pour allumer lʼunité.
2. Appuyez sur le bouton de direction du flux horizontal.
Le volet horizontal oscille automatiquement de droite à gauche.
Pour arrêter le volet à lʼangle souhaité, appuyez une nouvelle fois sur le bouton de direction du flux
dʼair horizontal.
Contrôle du volet horizontal
Contrôle des volets verticaux
•
Le fait dʼactionner manuellement le volet horizontal et les volets verticaux peut endommager le mécanisme.
Lorsque lʼunité est arrêtée, le volet horizontal et les volets verticaux bloquent la sortie d'air de l'appareil.
REMARQUE
Mode refroidissement/chauffage rapide
La fonction de refroidissement rapide peut être utilisée pour refroidir la pièce rapidement durant
les étés très chauds. Lorsque cette fonction est activée en mode refroidissement, le ventilateur
commence à marcher à une vitesse extrêmement rapide pendant 30 minutes, réglant ainsi la
température ambiante sur 18°C et en atteignant un refroidissement rapide et efficace.
De même, la fonction de réchauffement rapide (disponible seulement sur certains modèles)
réchauffe la pièce rapidement grâce au fonctionnement du ventilateur à une vitesse
extrêmement rapide, réglant la température ambiante sur 30°C pendant 30 minutes.
Pour activer cette fonction, appuyez sur la TOUCHE JET COOL (REFROIDISSEMENT RAPIDE).
Pour passer du mode refroidissement rapide au mode de refroidissement par fonctionnement du ventilateur à une vitesse
élevée, appuyez sur la TOUCHE REFROIDISSEMENT RAPIDE ou sur le BOUTON SÉLECTEUR DE VITESSE DU
VENTILATEUR INTÉRIEUR ou de nouveau sur la TOUCHE DE RÉGLAGE DE LA TEMPÉRATURE AMBIANTE.
•
Le mode Jet Cool/Chaud ne peut pas être activité lorsque les modes de circulation dʼair et de basculement automatique.
• Si la télécommande filaire est branchée, le mode froid accéléré est indisponible.
REMARQUE
Page 77

Manuel dʼutilisation 17
FRANÇAIS
Instructions dʼutilisation
Fonctionnement forcé
Le fonctionnement forcé est employé lorsquʼil est impossible dʼutiliser la télécommande. Ce mode démarre
lorsque vous appuyez sur le bouton ON/OFF. Pour lʼarrêter, appuyez à nouveau sur le bouton.
Modèle réversible
Modèle Froid
Température de la pièce ≥24°C
21°C ≤_Température de la pièce < 24°C
Température de la pièce < 21°C
Mode de fonctionnement
Froid Froid Déshumidification saine Chaud
Vitesse du ventilateur intérieur
Haut Haut Haut Haut
Température réglée
22°C 22°C 23°C 24°C
Test de fonctionnement
Durant le TEST DE FONCTIONNEMENT, lʼunité est en mode Froid avec une vitesse du ventilateur élevée, quelle que soit la température de
la pièce, et elle se réinitialise au bout de 18 minutes. Durant le test de fonctionnement, si lʼunité reçoit un signal de la télécommande, elle
fonctionne conformément aux instructions de la télécommande. Pour utiliser le mode Test, appuyez sur le bouton ON/OFF et maintenez-le
enfoncé pendant 3 à 5 secondes ; un signal sonore retentit. Pour lʼarrêter, appuyez à nouveau sur le bouton.
Cette fonction est réglée en usine, mais vous pouvez la désactiver en appuyant sur le bouton ON/OFF pendant 6 secondes.
Lʼindicateur LCD clignote 3 fois.
Pour activer la fonction, appuyez à nouveau sur le bouton pendant six secondes. Lʼindicateur LCD clignote deux fois 3 fois.
REMARQUE
Cette fonction est utile en cas de panne de courant.
Lorsque le courant revient après une coupure, cette fonction permet de restaurer les conditions de
fonctionnement précédentes et le climatiseur récupère ses paramètres.
Fonction Redémarrage automatique
PowerPower
buttonbutton
Power
button
PowerPower
buttonbutton
Power
button
Page 78

18 Climatiseur
Maintenance and Service
Retrait des filtres
Ouvrez le capot avant comme indiqué dans la figure.
Tirez la languette du filtre légèrement vers lʼavant afin d'extraire le filtre de son logement.
Une fois le filtre à air enlevé, retirez le filtre à plasma et le filtre anti-allergie en tirant doucement vers le bas.
Filtre Plasma
Panneau
avant
Ne touchez pas le filtre à plasma dans les 10 secondes qui suivent lʼouverture de la grille dʼentrée, au risque
de subir un choc électrique.
ATTENTION
Utilisez un chiffon doux et sec pour nettoyer lʼunité. Nʼutilisez pas de détergents ou de produits abrasifs.
Nʼutilisez jamais les substances suivantes :
• Eau à plus de 40°C. Cela risque de provoquer une déformation ou une décoloration de lʼappareil.
• Des substances volatiles. Elles pourraient endommager la surface de lʼappareil.
Filtres à air
Vous devez contrôler et nettoyer les filtres à air derrière le capot avant et la grille tous les
15 jours ou plus souvent si nécessaire.
Pour retirer les filtres, reportez-vous aux schémas dʼexplication
spécifiques à chaque modèle. Nettoyez les filtres avec un aspirateur
ou de lʼeau chaude savonneuse. Si la saleté ne s'enlève pas
facilement, utilisez une solution à base détergent dilué dans de l'eau
tiède. Faites sécher les filtres à lʼombre puis remettez-les en place.
Filtre Plasma
Vous devez contrôler et nettoyer les filtres plasma situés derrière le filtre à air
tous les trois mois ou plus souvent si nécessaire. Pour retirer les filtres, reportez-vous aux schémas
dʼexplication spécifiques à chaque modèle.
Nettoyez les filtres à lʼaide dʼun aspirateur. Si la saleté persiste, lavez le filtre à lʼeau et séchez le bien à
lʼombre, puis remettez-le en place.
Filtre antiallergique + filtre triple
Retirez le filtre antiallergique et le filtre triple, situés derrière le filtre à
air, et exposez-les à la lumière directe du soleil pendant 2 heures.
Remettez ensuite les filtres en place.
ATTENTION
Maintenance et entretien
Unité intérieure
Avant de procéder à une opération de maintenance, désactivez lʼalimentation principale
du système, déconnectez le disjoncteur et débranchez le câble dʼalimentation.
ATTENTION
Page 79

Manuel dʼutilisation 19
Maintenance et entretien
Unité extérieure
L'échangeur et les évents du panneau de lʼunité extérieure doivent faire lʼobjet de contrôles réguliers. En
cas dʼaccumulation de saleté ou de suie, vous devez demander à un professionnel dʼeffectuer un
nettoyage de lʼéchangeur et des évents.
Lʼencrassement de l'échangeur entraîne une diminution des performances et, éventuellement, une
augmentation des coûts de fonctionnement.
REMARQUE
Conseils dʼutilisation !
Auto-diagnostic
LED d’affichage d’erreur
(une fois)
2 sec 2 sec 2 sec
Cette unité comporte une fonction intégrée de diagnostic des erreurs. La LED de lʼunité clignote en cas de
panne de la thermistance. Dans ce cas, contactez votre distributeur ou votre technicien.
Ne refroidissez pas trop la
pièce.
Cela peut avoir des effets
nuisibles pour la santé et
entraîner un gaspillage dʼénergie.
Laissez les rideaux et les
volets fermés.
Ne laissez pas la lumière directe
entrer dans la pièce lorsque le
climatiseur est en service.
Maintenez une température
uniforme dans la pièce.
Réglez la direction de l'air dans le sens
vertical et horizontal de façon à
maintenir une température homogène.
Vérifiez que les
portes et les fenêtres
sont bien étanches.
Evitez dʼouvrir les portes
et les fenêtres afin de
maintenir lʼair frais dans la
pièce.
Nettoyez
régulièrement le filtre
à air.
Lʼencrassement du filtre à
air a pour effet de réduire
le refroidissement et la
déshumidification.
Nettoyez le filtre au moins
toutes les deux semaines.
Aérez la pièce à
intervalles réguliers.
Du fait que les fenêtres
sont fermées, il est bon
dʼaérer la pièce de temps
à autre.
Utilisez la vitesse de
ventilation haute pour
accélérer le refroidissement.
Lʼunité fournit sa capacité
nominale de froid lorsque
la vitesse du ventilateur
est à son maximum.
FRANÇAIS
Page 80

20 Climatiseur
Maintenance et entretien
Conseils de dépannage ! Pour gagner du temps et de lʼargent !
Le climatiseur peut présenter les dysfonctionnements suivants :
Problème
n Le climatiseur est
débranché.
n Le fusible/le disjoncteur a
sauté.
n Panne de courant.
n Tension élevée.
n Le débit dʼair est restreint.
n Le filtre à air est sale.
n
La pièce a été chauffée.
n Lʼair froid sʼest échappé.
n
Vérifiez les réglages de température.
n La pièce comporte peut-être
une source de chauffage.
Le
climatiseur
ne démarre
pas.
Le
climatiseur
ne refroidit
pas comme il
le devrait.
• Vérifiez que la fiche du climatiseur est
correctement branchée.
• Vérifiez le fusible/le disjoncteur et
remplacez-les si nécessaire.
•
En cas de coupure de courant, désactivez la
commande de sélection de mode.
Lorsque le courant est rétabli, attendez trois
minutes avant de redémarrer le climatiseur
pour éviter une surcharge du compresseur.
• Si la tension est anormalement élevée ou
faible, le disjoncteur saute.
• Vérifiez quʼaucun rideau, volet ou meuble
ne fait obstruction au climatiseur.
•
Nettoyez le filtre au moins tous les quinze jours.
Reportez-vous à la section Maintenance et service.
•
Lorsque le climatiseur est allumé pour la
première fois, vous devez prévoir un temps
nécessaire pour le refroidissement de la pièce.
•
Vérifier l'absence d'ouverture ne permettant pas
de faire chuter la température.
•
Assurez-vous que les réglages sont corrects.
•
Supprimez ces sources ou désactivez-les si
nécessaire pendant le fonctionnement du climatiseur.
SolutionCauses possibles
1. Survenance dʼun phénomène anormal (odeur de brûlé, bruit intense, etc.).
Arrêtez lʼunité et coupez le disjoncteur. N'essayez en aucun cas de réparer l'appareil
vous-même ou de le redémarrer en pareille situation.
2. Le câble de lʼalimentation principale est extrêmement chaud ou est endommagé.
3. Un code erreur est généré grâce à l'autodiagnostic.
4.
Lʼunité intérieure présente toujours des fuites dʼeau même si le niveau dʼhumidité est bas.
5. L'interrupteur, le disjoncteur (de sécurité, différentiel) ou un fusible ne fonctionne pas
correctement.
Lʼutilisateur doit vérifier et nettoyer régulièrement lʼunité afin dʼéviter toute
altération de ses performances.
Dans certains cas, cette tâche ne doit être réalisée que par un technicien qualifié.
Contactez le service technique immédiatement dans les cas suivants :
Page 81

KLIMAANLAGE
AIR CONDITIONER
Bitte lesen Sie diese Bedienungsanleitung vor dem
Betrieb des Gerätes aufmerksam durch und bewahren
Sie es zum späteren Nachschlagen auf.
TYP: WANDMONTAGE
www.lg.com
DEUTSCH
Page 82

2 Klimagerät
Klimagerät - Benutzerhandbuch
INHALTSVERZEICHNIS
FÜR IHRE UNTERLAGEN
Notieren Sie hier die Modell- und Seriennummer des Gerätes:
Modellnr.:
Seriennr.:
Diese Nummern finden Sie auf einem Etikett auf der
Seite jedes Gerätes.
Händler
Kaufdatum
n
Heften Sie Ihren Beleg als Nachweis über das Kaufdatum
bzw. zur Vorlage im Garantiefall an diese Seite.
LESEN SIE DIESES HANDBUCH
Hier finden Sie eine Reihe nützlicher Hinweise zur
richtigen Bedienung und zur Wartung des Klimagerätes.
Ein sorgsamer Umgang mit dem Gerät kann Ihnen
während der Betriebsdauer des Klimagerätes viel Zeit
und Geld ersparen. Suchen Sie bei einer Störung
zunächst in den Tipps zur Störungsbehebung nach einer
Lösung. Die Tipps zur Störungsbehebung ersparen
Ihnen u. U. einen Anruf beim Kundendienst.
VORSICHTSHINWEISE
• Reparaturen und Wartungsarbeiten sollten nur
von einem ausgebildeten Service-Techniker
ausgeführt werden.
•
Lassen Sie das Gerät von einem Monteur anbringen.
•
Das Klimagerät sollte ohne Aufsicht nicht von Kindern
oder gebrechlichen Personen bedient werden.
•
Kinder sollten stets beaufsichtigt werden, damit
das Klimagerät nicht als Spielzeug gebraucht wird.
• Das Netzkabel sollte, falls nötig, nur von
Fachpersonal und ausschließlich durch OriginalErsatzteile ausgetauscht werden.
A. Sicherheitshinweise ...........................3
B. Sicherheit bei der Elektrik ..................6
Vorübergehender Einsatz eines Adapters
...6
Vorübergehender Einsatz eines
Verlängerungskabels ............................6
In diesem Handbuch verwendete Symbole
...6
C. Einführung ...........................................7
D. Bedienungsanleitung..........................8
Einlegen der Batterien ..........................8
Kabellose Fernbedienung Wartung.......8
Bedienung .............................................8
Kabellose Fernbedienung .....................9
Betriebsmodus ....................................11
Automatischer Wechselbetrieb
(Einzel-Klimagerät)
...................................
12
Automatikbetrieb
(Kombinations-Klimagerät) .................12
Gesunder Entfeuchtungsbetrieb..........12
Luftzirkulationsbetrieb ........................13
Automatischer Reinigungsbetrieb .......13
NEO PLASMA-Luftreinigungsbetrieb
(Optional).............................................13
Energiesparender Kühlungsmodus (Optional)
...
14
Helligkeit der Anzeige (Optional).........14
Einstellung der Uhrzeit .......................14
Timer-Einstellung ................................15
Timer-Einstellung löschen ..................15
Ruhemodus ........................................15
Horizontale Flügelsteuerung ..............16
Vertikale Luftklappensteuerung (Optional)
...16
Schnellkühlungsbetrieb ......................16
Erzwungener Betrieb ..........................17
Automatische Neustartfunktion ...........17
E. Wartung und Service.........................18
Innengerät ...........................................18
Außengerät .........................................19
Hinweise zum Betrieb! ........................19
Selbstdiagnosefunktion ......................19
Tipps zur Störungsbehebung!
Sparen Sie Zeit und Geld! ..................20
Verständigen Sie in folgenden Fällen
unverzüglich den Kundendienst .........20
Page 83

Benutzerhandbuch 3
Sicherheitshinweise
DEUTSCH
Sicherheitshinweise
Um Verletzungen des Benutzers oder anderer Personen sowie Sachschäden zu vermeiden, müssen die folgenden Anleitungen befolgt werden.
n Ein unsachgemäßer Betrieb unter Missachtung der Anleitungen kann zu Verletzungen oder
Beschädigungen führen. Die Schweregrade werden durch folgende Symbole gekennzeichnet.
n Die Bedeutung von Symbolen in diesem Handbuch lauten wie folgt.
ACHTUNG
VORSICHT
Dieses Symbol bedeutet Lebensgefahr oder Gefahr schwerer Verletzungen.
Dieses Symbol bedeutet Verletzungsgefahr oder Gefahr von Sachschäden.
Darf nicht ausgeführt werden.
Die Anleitung sollte befolgt werden.
ACHTUNG
Der Netzstecker und die Steckdose
müssen immer ordnungsgemäß geerdet
sein.
• Es besteht die Gefahr von Stromschlägen.
Verwenden Sie niemals einen defekten Überlastungsschalter oder
einen mit zu geringer Nennleistung. Nur Überlastungsschalter und
Sicherungen mit geeigneter Nennleistung verwenden.
• Es besteht Brand- oder Stromschlaggefahr.
Das Klimagerät nicht zusammen mit anderen Geräten
verwenden. Das Gerät sollte immer an einen separaten
Stromkreis mit Überlastungsschalter angeschlossen werden.
•
Ansonsten besteht Brand- oder Stromschlaggefahr.
Elektrische Anschlüsse sollten nur vom Händler,
Verkäufer, einem qualifizierten Elektriker oder
zugelassenen Servicebetrieb vorgenommen werden. Das
Gerät nicht selbst auseinandernehmen oder reparieren.
• Es besteht Brand- oder Stromschlaggefahr.
Das Gerät muss immer laut Schaltplan geerdet
werden. Die Erdungsleitung niemals an eine Gasoder Wasserleitung, einen Blitzableiter oder eine
Telefon-Erdungsleitung anschließen.
• Es besteht Brand- oder Stromschlaggefahr.
Die Frontblende sowie die Abdeckung
der Reglerkastens müssen gut befestigt
werden.
• Es besteht Brand- oder Stromschlaggefahr
auf Grund von Staub, Wasser usw.
Nur Überlastungsschalter und
Sicherungen mit geeigneter Nennleistung
verwenden.
• Es besteht Brand- oder Stromschlaggefahr.
Das Netzkabel niemals verändern oder
verlängern. Bei Beschädigungen des
Netzkabels oder der Isolierung muss das
Kabel ausgetauscht werden.
• Es besteht Brand- oder Stromschlaggefahr.
Die Montage, Demontage oder
Neumontage sollte nur vom Händler oder
einem zugelassenen Servicebetrieb
vorgenommen werden.
• Ansonsten besteht Brand-, Stromschlag-,
Explosions- oder Verletzungsgefahr.
Das Gerät nicht auf einem defekten
Montagestandfuß anbringen. Der Montageort
darf im Laufe der Zeit nicht an Stabilität
verlieren.
• Ansonsten könnte das Gerät herunterfallen.
Das Außengerät nicht auf einem
beweglichen oder instabilen Untergrund
aufstellen.
•
Das Außengerät könnte herunterfallen und Sachschäden
oder u. U. tödliche Verletzungen verursachen.
Falls das Gerät nass wurde (überflutet oder in
Flüssigkeit getaucht), verständigen Sie vor
dem erneuten Betrieb des Gerätes einen
qualifizierten Fachbetrieb zwecks Reparatur.
• Es besteht Brand- oder Stromschlaggefahr.
Die elektrischen Bauteile im Außengerät
werden über einen Kondensator mit
Hochspannung versorgt. Der Kondensator
muss daher vor Reparaturarbeiten immer
vollständig entladen werden.
• Bei einem geladenen Kondensator besteht
die Gefahr von Stromschlägen.
Zur Montage des Gerätes sollte immer
der mitgelieferte Montagebausatz
eingesetzt werden.
• Ansonsten könnte das Gerät herunterfalle
und schwere Verletzungen verursachen.
Es dürfen nur in der Ersatzteilliste
aufgeführte Bauteile verwendet werden.
Das Gerät niemals selbst verändern.
•
Bei Verwendung von ungeeigneten Ersatzteilen
besteht die Gefahr von Stromschlägen,
Überhitzungen oder Bränden.
Page 84

4 Klimagerät
Sicherheitshinweise
Die Kabelanschlüsse innen und außen
müssen gut befestigt werden und die
Kabel sollten so verlegt werden, dass
keine Zugkräfte auf die Kabel und deren
Anschlüsse wirken.
•
Unsachgemäße oder lockere Anschlüsse können
zu Hitzeentwicklung und Bränden führen.
Verpackungsmaterialien müssen ordnungsgemäß
entsorgt werden. Schrauben, Nägel, Batterien oder
defekte Teile müssen nach der Montage oder
Wartung entsorgt werden. Zerschneiden Sie
sämtliche Plastikverpackungen.
• Kinder könnten damit spielen und sich
dabei gefährden oder verletzen.
Der Stecker des Netzkabels darf nicht
verschmutzt, locker oder beschädigt
sein. Nur dann darf der Stecker
angeschlossen werden.
•
Bei einem verschmutzten, lockeren oder beschädigten
Netzstecker besteht Stromschlag- oder Brandgefahr.
Überprüfen Sie das verwendete
Kältemittel. Bitte lesen Sie die Hinweise
auf dem Produktetikett.
•
Bei ungeeignetem Kältemittel kann der
Normalbetrieb des Gerätes beeinträchtigt werden.
Keine beschädigten oder defekten
Netzkabel, Netzstecker oder lockere
Steckdosen verwenden.
• Ansonsten besteht Brand- oder
Stromschlaggefahr.
Das Gerät niemals mit nassen Händen berühren,
bedienen oder reparieren. Der Netzstecker muss beim
Abziehen immer am Stecker selbst festgehalten werden.
• Es besteht Brand- oder Stromschlaggefahr.
Das Netzkabel nicht in der Nähe von
Heizgeräten oder sonstigen
Wärmequellen verlegen.
• Es besteht Brand- und Stromschlaggefahr.
Es darf kein Wasser in die elektrischen
Bauteile eindringen. Das Gerät nicht in
der Nähe von Wasserquellen montieren.
• Es besteht die Gefahr von Bränden,
Geräteausfällen oder Stromschlägen.
Keine brennbaren Gase oder
Flüssigkeiten in Gerätenähe lagern oder
verwenden.
• Es besteht Brandgefahr.
Das Gerät nicht über einen längeren
Zeitraum in einem geschlossenen Raum
betreiben. Lüften Sie regelmäßig.
•
Ansonsten könnte ein gesundheitsschädlicher
Sauerstoffmangel eintreten.
Das Vordergitter des Gerätes während des
Betriebs niemals öffnen. (Einen evtl. vorhandenen
elektrostatischen Filter nicht berühren.)
• Es besteht die Gefahr von Verletzungen,
Stromschlägen oder Geräteausfällen.
Bei ungewöhnlichen Geräuschen oder bei austretendem
Rauch sofort den Überlastungsschalter ausschalten und
das Netzkabel trennen. Schalten Sie den
Überlastungsschalter aus und ziehen Sie den Netzstecker.
• Es besteht Brand- oder Stromschlaggefahr.
Bei gleichzeitigem Betrieb zusammen mit
einem Ofen oder einer Heizung sollte der
Raum regelmäßig gelüftet werden.
•
Ansonsten könnte ein gesundheitsschädlicher
Sauerstoffmangel eintreten.
Vor der Reinigung oder Reparatur des
Gerätes immer die Hauptstromversorgung
trennen und den Netzstecker ziehen.
• Es besteht die Gefahr von Stromschlägen.
Falls das Gerät über einen längeren Zeitraum
nicht betrieben wird, den Netzstecker ziehen
oder den Überlastungsschalter ausschalten.
•
Es besteht die Gefahr von Beschädigungen, Ausfällen
oder unbeabsichtigtem Einschalten des Gerätes.
Es muss gewährleistet werden, dass niemand,
auf das Außengerät tritt oder darauf fällt. Dies
gilt insbesondere für Kinder.
• Ansonsten besteht die Gefahr von
Verletzungen und Schäden am Gerät.
Es muss gewährleistet werden, dass das
Netzkabel während des Betriebs nicht
abgezogen oder beschädigt werden kann.
• Es besteht Brand- oder Stromschlaggefahr.
Stellen Sie NIEMALS Gegenstände auf
das Netzkabel.
• Es besteht Brand- oder Stromschlaggefahr.
Das Gerät niemals durch Einstecken oder Ziehen des
Netzsteckers ein- bzw. ausschalten.
• Es besteht Brand- oder Stromschlaggefahr.
Bei austretendem brennbaren Gas sofort die Gaszufuhr trennen
und vor dem Einschalten zum Lüften die Fenster öffnen.
• Benutzen Sie nicht das Telefon und schalten Sie keine Geräte ein oder
aus. Es besteht Explosions- oder Brandgefahr.
VORSICHT
Das Gerät sollte von mindestens zwei
Personen angehoben oder getragen werden.
• Ansonsten besteht Verletzungsgefahr.
Das Gerät nicht an einem Ort mit direktem
Seewind montieren (salzhaltige Luft).
• Es besteht Korrosionsgefahr.
Montieren Sie zur Abfuhr von
Kondenswasser einen Ablassschlauch.
•
Ein unsachgemäßer Anschluss kann zu Wasserlecks führen.
Das Gerät muss immer waagerecht
montiert werden.
• Ansonsten können Vibrationen oder
Geräusche auftreten.
Das Gerät so montieren, dass umliegende
Nachbarn nicht durch warme Abluft oder
Lärm belästigt werden.
• So vermeiden Sie Streitfälle mit den
Nachbarn.
Überprüfen Sie das Gerät nach der
Montage oder nach Reparaturarbeiten
immer auf Gaslecks (Kältemittel).
• Eine zu geringe Kältemittelmenge kann zu
Geräteausfällen führen.
Page 85

Benutzerhandbuch 5
Sicherheitshinweise
DEUTSCH
Das Gerät nicht für besondere Zwecke verwenden, z. B. zur
Kühlung von Lebensmitteln oder Kunstgegenständen. Bei
diesem Gerät handelt es sich um ein Haushalts-Klimagerät
und nicht um ein Präzisions-Kühlsystem.
• Es besteht die Gefahr von Sachschäden oder
-verlusten.
Lufteinlass und -auslass dürfen nicht
verdeckt werden.
• Ansonsten besteht die Gefahr von
Fehlfunktionen.
Verwenden Sie zur Reinigung nur ein
weiches Tuch. Keine starken Reiniger,
Lösemittel oder Wasser verwenden.
•
Es besteht die Gefahr von Bränden, Stromschlägen
oder Schäden an den Kunststoffteilen des Gerätes.
Beim Herausnehmen des Luftfilters keine
Metallteile am Gerät berühren.
• Es besteht die Verletzungsgefahr.
Nicht auf das Gerät treten oder
Gegenstände daraufstellen.
(Außengeräte)
• Es besteht Verletzungsgefahr sowie die
Gefahr von Fehlfunktionen.
Den Filter nach der Reinigung immer fest
einsetzen. Er sollte bei Bedarf alle zwei
Wochen oder häufiger gereinigt werden.
• Bei einem verschmutzten Filter verringert sich
die Kühlungsleistung.
Bei angeschlossenem Klimagerät niemals
die Hand oder andere Gegenstände in den
Lufteinlass oder -auslass einführen.
•
Scharfe Kanten und sich bewegende Teile im
Innern des Gerätes bergen Verletzungsgefahren.
Gehen Sie beim Auspacken und bei der
Montage sorgsam vor.
• Scharfe Kanten bergen Verletzungsgefahren.
Falls während der Reparatur Kältemittel
austritt, vermeiden Sie den Kontakt mit
dem Kältemittel.
• Es besteht die Gefahr von Erfrierungen
(Kälteverbrennungen).
Das Gerät beim Demontieren oder
während des Transports nicht kippen.
• Kondenswasser im Gerät könnte verschüttet
werden.
Niemals andere Gas-Luft-Gemische erzeugen,
als für das Kältemittel des Systems angegeben.
•
Luft im Kältemittelkreislauf könnte zu einem übermäßig
hohen Druck im Kreislauf führen. Dadurch besteht die
Gefahr von Schäden am Gerät oder Verletzungen.
Falls während der Montage Kältemittel austritt,
muss der Raum sofort gelüftet werden.
•
Es besteht die Gefahr von Gesundheitsschäden.
Die Zerlegung des Gerätes sowie die
Entsorgung von Kälteöl und Bauteilen
sollte nach den örtlichen und
gesetzlichen Bestimmungen erfolgen.
Tauschen Sie alle Batterien der Fernbedienung
durch neue desselben Typs aus. Keine
verschiedenen Batterietypen verwenden (alte und
neue Batterien zusammen).
•
Es besteht die Gefahr von Bränden oder Geräteausfällen.
Batterien nicht wieder aufladen oder
auseinandernehmen. Verbrauchte
Batterien niemals ins Feuer werfen.
• Sie könnten brennen oder explodieren.
Auf die Haut oder Kleidung gelangte
Batterieflüssigkeit gründlich mit Wasser
abspülen. Die Fernbedienung niemals mit
ausgelaufenen Batterien verwenden.
•
Die Chemikalien in den Batterien könnten zu
Verbrennungen oder Gesundheitsschäden führen.
Falls Batterieflüssigkeit in die Mundöffnung
gelangt, putzen Sie die Zähne und suchen Sie
einen Arzt auf. Die Fernbedienung niemals mit
ausgelaufenen Batterien verwenden.
•
Die Chemikalien in den Batterien könnten zu
Verbrennungen oder Gesundheitsschäden führen.
Das Klimagerät bei sehr hoher
Luftfeuchtigkeit oder bei geöffneten
Türen und Fenstern nicht über einen
längeren Zeitraum betreiben.
• Die Feuchtigkeit kann kondensieren und die
Einrichtung beschädigen.
Erwachsene und Kinder sollten sich nicht
direkt im Kalt- oder Warmluftstrom aufhalten.
• Es besteht die Gefahr von
Gesundheitsschäden.
Das Abwasser des Gerätes niemals
trinken.
• Das Wasser ist verunreinigt und
gesundheitsschädlich.
Benutzen Sie zur Reinigung, Wartung oder Reparatur
des Klimagerätes ggf. einen Tritt oder eine Leiter.
•
Achten Sie auf mögliche Verletzungsgefahren.
Page 86

6 Klimagerät
Sicherheit bei der Elektrik
Sicherheit bei der Elektrik
• Dieses Gerät muss ordnungsgemäß geerdet werden.
Um die Gefahr von Stromschlägen zu vermeiden, sollte stets eine geerdete Steckdose verwendet werden.
• Den Erdungskontakt des Netzsteckers nicht entfernen.
• Die Verbindung des Erdungsanschlusses des Adapters mit einer Schraube an der Steckdose ist für
eine Erdung des Gerätes nicht ausreichend -- es sei denn, die Schraube ist aus Metall und nicht isoliert
und die Steckdose wird über das Hausnetz geerdet.
• Falls Sie nicht sicher sind, ob das Klimagerät ordnungsgemäß geerdet ist, lassen Sie die Steckdose
sowie den Schaltkreis von einem ausgebildeten Elektriker überprüfen.
Der Einsatz eines Adapters wird aus Sicherheitsgründen nicht empfohlen.
Für einen vorübergehenden Anschluss sollte nur ein Original-Adapter verwendet werden, der bei den meisten
Elektrohändlern erhältlich ist. Für eine richtige Polung muss große Anschlussstift des Adapters in den großen Steckplatz
der Steckdose angeschlossen werden. Um die Erdungsanschlüsse nicht zu beschädigen, halten Sie das Netzkabel sowie
den Adapter beim Trennen mit beiden Händen fest. Vermeiden Sie ein häufiges Trennen des Netzkabels.
• Das Gerät niemals mit einem defekten Adapter anschließen.
Der Einsatz eines Verlängerungskabels wird aus Sicherheitsgründen nicht empfohlen.
ACHTUNG
ACHTUNG
Vorübergehender Einsatz eines Adapters
Vorübergehender Einsatz eines Verlängerungskabels
Dieses Symbol weist auf die mögliche Gefahr von Stromschlägen hin.
Dieses Symbol weist auf die mögliche Gefahr von Beschädigungen
des Klimagerätes hin.
Dieses Symbol verweist auf besondere Hinweise.
HINWEIS
In diesem Handbuch verwendete Symbole
Der Anschluss des Gerätes muss gemäß den gesetzlichen Vorschriften erfolgen.
Diese Bedienungsanleitung dient als hinweisende Beschreibung der Produktfunktionen.
ACHTUNG
Page 87

Benutzerhandbuch 7
Einführung
Einführung
DEUTSCH
Art Cool Mirror
LCD-Anzeigen des Anzeigefeldes
Luftauslass
Frontblende
Signalempfänger
Lufteinlass
Luftfilter
Plasmafilter
Ein/Aus-Taste
OUT
DOOR
Ein/Aus
Ruhemodus : Leuchtet während des automatischen Betriebs im Ruhemodus (Abschalt Timer).
Plasma : Dynamische Anzeige der Plasmafilter-Betriebsart.
Timer : Leuchtet während des Timer-Betriebs oder während des automatischen
Abtaumodus
Betrieb
Außengerät
Netzanzeige : Weist Temperatur instellung ,Automatikbetrieb (Automatischer Wechselbetrieb),
: Leuchtet während des Betriebs, bei Störungen sowie beim automatischen Neustart.
Betriebs im Ruhemodus.
: Leuchtet im Abtaumodus oder beim *Vorheiz-Betrieb (Nur Geräte mit Wärmepumpe)
: Leuchtet während des Außengerätebetriebs. (Nur Kühlgeräte)
Automatischer Reinigungsbetrieb, Testbetrieb und Fehlercode.
Page 88

8 Klimagerät
Bedienungsanleitung
1.
Bewahren Sie die Fernbedienung an einem leicht erreichbaren Ort auf.
2. Befestigen Sie die Halterung mit den
beiliegenden Schrauben z. B. an der Wand.
3.
Legen Sie die Fernbedienung in der Halterung ab.
1. Die Fernbedienung sollte keiner direkten
Sonneneinstrahlung ausgesetzt werden.
2.
Zur störungsfreien Übertragung sollten Signalsenderund -empfänger stets sauber gehalten werden.
Reinigen Sie beide ggf. mit einem weichen Tuch.
HINWEIS
Bedienungsanleitung
Einlegen der Batterien
Pflege der kabellosen Fernbedienung
1. Schieben Sie die Batterieklappe zum Öffnen in Pfeilrichtung.
2.
Legen Sie die Batterien ein. Achten Sie dabei auf die richtige Polung (+) und (-) der Batterien.
3. Setzen Sie die Batterieklappe wieder auf die Fernbedienung.
1. Verwenden Sie keine Batterien unterschiedlichen Typs.
2. Falls das Gerät über einen längeren Zeitraum nicht genutzt wird,
nehmen Sie die Batterien heraus.
3. Falls die Anzeige der Fernbedienung schwächer wird, tauschen Sie
beide Batterien gegen neue aus.
4. Legen Sie zwei Batterien Größe AAA (1,5 Volt) ein.
HINWEIS
3.
Mehrere fernbedienbare Geräte im Raum sollten entfernt voneinander aufgestellt werden. Bitten Sie ggf. einen Techniker um Hilfe.
1. Der Signalempfänger befindet sich im Gerät.
2.
Richten Sie die Fernbedienung auf das Gerät. Achten Sie darauf, dass sich keine Hindernisse zwischen Fernbedienung und Gerät befinden.
Bedienung
Page 89

Benutzerhandbuch 9
DEUTSCH
Bedienungsanleitung
Kabellose Fernbedienung
Die Fernbedienung besitzt folgende
Bedienelemente.
Signalsender
NETZSCHALTER
Ein- und Ausschalten des Gerätes.
BETRIEBSWAHLTASTE
Auswahl des Betriebsmodus.
TASTEN FÜR RAUMTEMPERATUR
Einstellung der Raumtemperatur.
WAHLTASTE LÜFTERGESCHWINDIGKEIT INNENGERÄT
Dient zur Auswahl der Lüftergeschwindigkeit in sechs Stufen niedrig,
mittel-niedrig, mittel, mittel-hoch, hoch und natürlicher Luftzug.
TASTE ZUR HORIZONTALEN FLÜGELSTEUERUNG
Dient zur Einstellung der gewünschten vertikalen
Luftstromrichtung.
TASTE ZUR VERTIKALEN LUFTKLAPPENSTEUERUNG
Einstellung der gewünschten horizontalen Luftstromrichtung.
TASTE AUTO CLEAN
Beginnen der automatischen Reinigung.
TASTE FÜR ENERGIESPARENDEN KÜHLUNGSBETRIEB
Dient zum Einsparen von Energie.
TASTE ZUR ÜBERPRÜFUNG DER RAUMTEMPERATUR
Anzeige der aktuellen Raumtemperatur.
Betriebsmodus
Kühlungsbetrieb
Automatikbetrieb bzw. automatischer Wechselbetrieb
Gesunder Entfeuchtungsbetrieb
Heizbetrieb (Nur mit Wärmepumpe)
Luftzirkulation
TASTE TIMER (vor der Einstellung)
Dient zur Einstellung der aktuellen Uhrzeit sowie der
Uhrzeit für das Starten/Anhalten des Gerätes.
TASTEN ZUR UHRZEITEINSTELLUNG
Einstellung der Uhrzeit.
TASTE TIMER SET/CLEAR (nach der Einstellung)
Einstellen und Abbrechen des Timer-Betriebs.
RESET-TASTE
Muss vor den Einstellen der Uhrzeit gedrückt werden.
PLASMA-TASTE
Dient zum Ein- und Ausschalten der Plasma-Luftreinigung.
TASTE FÜR LED-HELLIGKEIT
Einstellen der Helligkeit der LED-Anzeige.
Page 90

10 Klimagerät
Bedienungsanleitung
Die Fernbedienung besitzt folgende
Bedienelemente.
Signalsender
TASTE FÜR AUTOMATISCHEN RUHEMODUS
Einstellung des automatischen Betriebs im Ruhemodus.
TASTE FÜR SCHNELLKÜHL-/
SCHNELLHEIZBETRIEB
Ein- und Ausschalten der Schnellkühlung und heizung.
Im Schnellkühl-/Schnellheizbetrieb wird der Lüfter
mit sehr hoher Geschwindigkeit betrieben.
Betriebsmodus
Kühlungsbetrieb
Automatikbetrieb bzw. automatischer Wechselbetrieb
Gesunder Entfeuchtungsbetrieb
Heizbetrieb (Nur mit Wärmepumpe)
Luftzirkulation
Page 91

Benutzerhandbuch 11
Kühlung
Automatischer
Wechselbetrieb
Gesunder
Entfeuchtungsbetrieb
Heizung
(Nur Geräte mit Wärmepumpe)
Luftzirkulation
Stufe 2 (Mittel) Stufe 1 (Niedrig) Stufe 3 (Hoch)
Automatischer Wechselbetrieb (Kombinations-Klimagerät)
Automatischer Wechselbetrieb (Einzel-Klimagerät)
ON/OFF
MODE
TEMP
FAN SPEED
Natürlicher Luftzug
Bedienungsanleitung
Drücken Sie den Netzschalter, um das Gerät einzuschalten.
Das Gerät gibt daraufhin einen Signalton aus.
Öffnen Sie die Klappe der Fernbedienung und drücken Sie die Betriebsmodus-Taste.
Bei jedem Drücken dieser Taste wird die Betriebsart in Pfeilrichtung weitergeschaltet.
Stellen Sie die gewünschte Raumtemperatur im Kühl- bzw.
Heizbetrieb über die TASTEN ZUR EINSTELLUNG DER
RAUMTEMPERATUR ein.
Die Temperatur kann zwischen 18°C und 30°C im Kühlungsund zwischen 16°C und 30°C im Heizbetrieb eingestellt
werden.
Lüftergeschwindigkeit über die Fernbedienung einstellen.
Die Lüftergeschwindigkeit kann in vier Stufen eingestellt werden: Niedrig, Mittel, Hoch und
Natürlicher Luftzug über die AUSWAHLTASTE FÜR DIE LÜFTERGESCHWINDIGKEIT DES
INNENGERÄTES.
Bei jedem Drücken dieser Taste wird die Lüftergeschwindigkeit in Pfeilrichtung weitergeschaltet.
1
2
3
4
Natürlicher Luftzug
o
Wählen Sie für ein erfrischenderes Gefühl als bei einer festen Lüftergeschwindigkeit die Betriebsart Natürlicher Luftzug.
Drücken Sie dazu den WAHLSCHALTER FÜR DIE LÜFTERGESCHWINDIGKEIT DES INNENGERÄTES. In diesem
Modus wird ein Luftzug erzeugt, der einer natürlichen Briese ähnlich ist, indem die Lüftergeschwindigkeit automatisch
verändert wird.
Betriebsmodus
DEUTSCH
Page 92

12 Klimagerät
Während des gesunden Entfeuchtungsbetriebs
o Nach Wahl des Entfeuchtungsbetrieb über die BETRIEBSWAHLTASTE wird
der Entfeuchtungsbetrieb gestartet. Je nach herrschender Raumtemperatur
werden die Temperatur und die Luftstrommenge zur Trocknung automatisch
optimal eingestellt.
In diesem Fall wird die aktuelle Temperatur weder auf der Fernbedienung
angezeigt, noch kann die Temperatur verändert werden.
o Je nach herrschender Raumtemperatur wird die Lüftergeschwindigkeit im
Entfeuchtungsbetrieb nach einem Optimierungsalgorithmus automatisch
angepasst, so dass ein gesundes und angenehmes Raumklima geschaffen
wird, selbst in der feuchten Jahreszeit.
Bedienungsanleitung
Automatikbetrieb (Kombinations-Klimagerät)
Gesunder Entfeuchtungsbetrieb
MODE
MODE
In dieser Betriebsart werden grundsätzlich nur der Heiz- und der
Kühlungsbetrieb des Klimagerätes gesteuert. Im Automatikbetrieb werden
grundsätzlich nur der Heiz- und der Kühlungsbetrieb des Klimagerätes
gesteuert. In dieser Betriebsart wird der Betriebsmodus automatisch so
gewählt, dass die Temperatur innerhalb von ±2°C der eingestellten
Temperatur gehalten wird.
Automatischer Wechselbetrieb (Einzel-Klimagerät)
MODE
Die Betriebsart wird je nach der aktuellen Temperatur und dem
angeschlossenen Innengerät automatisch eingestellt.
Sie können die gewünschte Temperatur sowie die Lüftergeschwindigkeit
des Innengerätes einstellen.
Page 93

Benutzerhandbuch 13
DEUTSCH
o Während der automatischen Reinigung kann Feuchtigkeit in den Innengeräten nach dem Kühlungsbetrieb
oder dem gesunden Entfeuchtungsbetrieb beseitigt werden.
Wählen Sie über die Funktionswahltaste ( ) die automatische Reinigung. Daraufhin
dreht sich der Lüfter der Innenanlage bei jedem Ausschalten des Gerätes ohne Kühlung
oder Entfeuchtung der Raumluft ca. 30 Minuten lang weiter.
Hierbei wird überschüssige Feuchtigkeit beseitigt und das Gerät wird gereinigt. Durch
erneutes Drücken der Taste zur automatischen Reinigung wird diese Funktion
abgebrochen.
o
Während der automatische Reinigung können nur die Tasten EIN/AUS, Plasma und Auto
Clean verwendet werden. In dieser Betriebsart leuchtet die Anzeige ʻCoʼ (Kühlung).
HINWEIS
Automatischer Reinigungsbetrieb
Bedienungsanleitung
Plasma-Luftreinigungsbetrieb
Die Plasmafilter-Technologie wurde von LG entwickelt, um die einströmende
Luft durch Erzeugung eines Plasmas aus Elektronen mit hoher Ladung von
mikroskopisch kleinen Verunreinigungen zu befreien.
Das Plasma beseitigt die Verunreinigungen vollständig und sorgt so für eine
saubere und hygienische Raumluft.
Die Plasma-Luftreinigung wird über die PLASMA-TASTE auf der Fernbedienung gestartet
und durch erneutes Drücken dieser Taste wieder angehalten.
• Diese Funktion kann in jeder Betriebsart und beim Drücken der Plasma-Taste genutzt werden.
• Bei angehaltenem Gerät ist der separate Plasma-Luftreinigungsbetrieb möglich.
Die Funktion wird beim Drücken der Plasma-Taste oder der Ein-/Aus-Taste beendet.
HINWEIS
PLASMA
In diesem Betriebsmodus wird die Luft ohne Kühlung oder Erwärmung
umgewälzt.
Diese Betriebsart wird durch Drücken der BETRIEBSWAHLTASTE aktiviert.
Die Luft wird daraufhin umgewälzt, wobei Sie die Strömungsgeschwindigkeit
der Luft über die WAHLTASTE FÜR DIE LÜFTERGESCHWINDIGKEIT DES
INNENGERÄTES anpassen können.
MODE
Luftzirkulationsbetrieb
Page 94

14 Klimagerät
Bedienungsanleitung
Energiesparender Kühlungsmodus
Diese Betriebsart dient zum energiesparenden Kühlungsbetrieb. Hierbei wird der Betrieb durch Einstellung
der Anpassungsdauer des Körpers, je nach der Uhrzeit und Temperatur, sowie durch die automatische
Einstellung der gewünschten Temperatur optimiert.
1. Drücken Sie den NETZSCHALTER, um das Gerät einzuschalten.
2. Öffnen Sie die Klappe der Fernbedienung.
Wählen Sie den Kühlungsbetrieb.
3. Drücken Sie die TASTE FÜR DEN ENERGIESPARENDEN
KÜHLUNGSMODUS.
4. Drücken Sie zum Abbrechen des Energiesparmodus nochmals die TASTE FÜR
DEN ENERGIESPARENDEN KÜHLUNGSMODUS. Das Gerät wechselt wieder
in die ursprüngliche Betriebsart (Kühlungsbetrieb).
Helligkeit der Anzeige
Die Helligkeit der Anzeige kann über die Fernbedienung eingestellt werden.
Öffnen Sie die Klappe der Fernbedienung und drücken Sie die Taste LED LUMINOSITY.
Die Anzeige-LED wird daraufhin abgeschaltet.
Drücken Sie diese Taste nochmals, um die Anzeige wieder zu erhellen.
(Bei jedem Drücken dieser Taste wechselt die HELLIGKEIT zwischen 50%
fi
0%.)
Halten Sie die TIMER-TASTE drei Sekunden lang gedrückt.
Stellen Sie die gewünschte Zeit über die TASTEN ZUR UHRZEITEINSTELLUNG ein.
- Bei jedem Drücken der Taste (
< >
) wechselt die Anzeige in der Reihenfolge a. m.
und p. m. ->Stunde ->Minute.
- Stellen Sie mit den Tasten ( ) die aktuelle Uhrzeit ein.
Prüfen Sie auch die Einstellung a. m. (vormittags) oder p. m. (nachmittags).
HINWEIS
Einstellung der Uhrzeit
2
Drücken Sie die Taste SET/CLEAR.
3
1
Page 95

Benutzerhandbuch 15
DEUTSCH
Bedienungsanleitung
Timer-Einstellung löschen
Timer-Einstellung
Drücken Sie die TASTE FÜR DEN AUTOMATISCHEN RUHEMODUS, um die automatische Ausschaltzeit für das Gerät einzustellen.
Der Timer kann in Schritten zu einer Stunde eingestellt werden. Drücken Sie dazu ein bis sieben Mal die TASTE FÜR DEN
AUTOMATISCHEN RUHEMODUS. Die Aktivierung des Ruhemodus erfolgt nach einer bis sieben Stunden.
•
Im Ruhemodus dreht sich der Lüfter der Innenanlage im Kühlungsmodus mit sehr geringer und im
Heizmodus mit geringer Geschwindigkeit. Auf diese Weise wird eine störungsfreie Nachtruhe gewährleistet.
Im Kühlungs- oder im gesunden Entfeuchtungsbetrieb:
Die Temperatureinstellung wird für einen geruhsamen Schlaf zweimal innerhalb der folgenden 30 Minuten
automatisch um jeweils 1°C erhöht (maximal um 2°C pro Stunde). Diese Temperatur wird während des
gesamten Ruhemodus gehalten.
Im Heizmodus (Einzel-Klimagerät):
Die Temperature instellung wird für einen geruhsamen Schlaf zweimal innerhalb der folgenden 60 Minuten
automatisch um jeweils 1°C verringert (maximal um 2°C pro Stunde).
Diese Temperatur wird während des gesamten Ruhemodus gehalten.
HINWEIS
Betrieb im Ruhemodus
Drücken Sie einmal die Uhrzeit-Taste, um die
Option Programmierung auf 'Ein' einzustellen
(Drücken Sie zweimal die Uhrzeit-Taste, um die
Option Programmierung auf 'Aus' einzustellen)
1
Stellen Sie die gewünschte Zeit über die
Tasten zur Uhrzeiteinstellung ein.
- Bei jedem Drücken der Taste (< >)
wechselt die Anzeige in der Reihenfolge a.
m. und p. m. -> Stunde -> Minute.
- Stellen Sie mit den Tasten ( ) die
gewünschte Uhrzeit ein.
2
Drücken Sie die Taste SET/CLEAR.
(Drücken Sie zum Abbrechen einmal die
Taste SET/CLEAR)
3
Beschreibung
Taste auf der
Anzeige in der LCD-Anzeige
Fernbedienung
• Um sämtliche Timer-Einstellungen zu löschen, drücken Sie die Taste SET/CLEAR.
• Um eine einzelne Timer-Einstellung zu löschen, drücken Sie die Taste Timer und wählen Sie die
Einstellung Programmierung ʻEinʼ oder Programmierung ʻAusʼ. Richten Sie nun die Fernbedienung auf
den Signalempfänger und drücken Sie die Taste Set/Clear. (die Timer-Anzeige wird ausgeblendet.)
Page 96

16 Klimagerät
Bedienungsanleitung
Die horizontale Flügelstellung Helligkeit der Anzeige kann über die Fernbedienung eingestellt werden.
1. Drücken Sie den NETZSCHALTER, um das Gerät einzuschalten.
2. Press the vertical airflow direction button.
The horizontal vane will swing up & down automatically.
To Stop the vane at a desired angle, press the vertical airflow direction button again.
Die vertikalen Luftklappen Helligkeit der Anzeige kann über die Fernbedienung eingestellt werden.
1. Drücken Sie den NETZSCHALTER, um das Gerät einzuschalten.
2. Press the horizontal airflow direction button.
The vertical vane will swing left & right automatically.
To Stop the vane at a desired angle, press the horizontal airflow direction button again.
Horizontale Flügelsteuerung
Vertical Louver Control
•
Durch das Verschieben der horizontalen Luftklappen mit der Hand könnte den Mechanismus beschädigt
werden. Beim Ausschalten des Gerätes werden horizontalen und vertikalen Luftklappen zum Verdecken der
Luftstromöffnungen geschlossen.
HINWEIS
Schnellkühl-/Schnellheizbetrieb
Die Schnellkühlfunktion dient zum schnellen Abkühlen der Raumtemperatur im Sommer. In dieser
Betriebsart wird das Klimagerät 30 Minuten lang im Kühlungsbetrieb mit sehr hoher
Lüftergeschwindigkeit und einer Temperatureinstellung von 18°C betrieben, um den Raum schnell
abzukühlen. In gleicher Weise arbeitet die Schnellheizfunktion (nur bei bestimmten Modellen).
Dabei wird die Raumtemperatur schnell erhöht, indem das Klimagerät 30 Minuten lang mit sehr
hoher Lüftergeschwindigkeit bei einer Temperatureinstellung von 30°C betrieben wird.
Drücken Sie zum Starten dieses Betriebsmodus die SCHNELLKÜHL-TASTE. Um vom Schnellkühl-Modus in den Kühlungsmodus
mit hoher Lüftergeschwindigkeit zu wechseln, drücken Sie erneut die SCHNELLKÜHL-TASTE, die WAHLTASTE FÜR DIE
LÜFTERGESCHWINDIGKEIT DES INNENGERÄTES oder die TASTE ZUR EINSTELLUNG DER RAUMTEMPERATUR.
• Der Schnellkühl-/Schnellheizbetrieb kann nicht während des Luftzirkulationsbetriebs und des
automatischen Wechselbetriebs.
• Bei angeschlossener Kabel-Fernbedienung ist der Schnellheizbetrieb nicht möglich.
HINWEIS
Page 97

Benutzerhandbuch 17
DEUTSCH
Bedienungsanleitung
Erzwungener Betrieb
Der erzwungene Betrieb wird bei defekter Fernbedienung genutzt. Der Betrieb wird bei Drücken des
Netzschalters aufgenommen. Um den Testbetrieb anzuhalten, drücken Sie den Schalter erneut.
Geräte mit Wärmepumpe
Kühlgeräte
Raumtemperatur ≥ 24°C
21°C ≤ Raumtemperatur < 24°C
Raumtemperatur < 21°C
Betriebsmodus Kühlung Kühlung
Gesunder Entfeuchtungsbetrieb
Heizung
Lüftergeschw. Innengerät
Hoch Hoch Hoch Hoch
Temperatureinstellung
22°C 22°C 23°C 24°C
Testbetrieb
Während des TESTBETRIEBS wird die Anlage unabhängig von der Raumtemperatur mit hoher Lüftergeschwindigkeit im
Kühlungsmodus betrieben und wird nach 18 Minuten zurückgesetzt. Falls ein Signal von der Fernbedienung empfangen wird, wird die
Anlage während des Testbetriebs über die Fernbedienung gesteuert. Um den Testbetrieb zu starten, halten Sie den Netzschalter 3-5
Sekunden lang gedrückt und es wird ein Signalton ausgegeben. Um den Testbetrieb anzuhalten, drücken Sie den Schalter erneut.
Diese Funktion ist werkseitig aktiviert, sie kann jedoch auch ausgeschaltet werden. Halten Sie dazu den Netzschalter sechs Sekunden
lang gedrückt. Die LCD-Anzeige gibt einmal drei Lichtsignale aus.
Um diese Funktion zu aktivieren, halten Sie diese Taste erneut sechs Sekunden lang gedrückt. Die LCD-Anzeige gibt zweimal drei
Lichtsignale aus.
HINWEIS
Diese Funktion wird nach einem Stromausfall genutzt.
Nach einem Stromausfall können die vorherige Betriebsart des Klimagerätes zusammen mit allen
Einstellungen wiederhergestellt werden.
Automatische Neustartfunktion
PowerPower
buttonbutton
Power
button
PowerPower
buttonbutton
Power
button
Page 98

18 Klimagerät
Wartung und Pflege
Herausnehmen der Filter
Öffnen Sie die Frontblende, wie in der Abbildung gezeigt.
Ziehen Sie die Filterhalterung zum Herausnehmen des Luftfilters leicht nach vorne.
Nehmen Sie den Luftfilter heraus und ziehen Sie den Anti-Allergen-Filter etwas nach vorn heraus.
Plasmafilter
Frontblende
Den Plasmafilter während der ersten 10 Sekunden nach dem Öffnen des Innengitters nicht berühren. Es
besteht Stromschlaggefahr.
VORSICHT
Reinigen Sie das Gerät mit einem weichen, trockenen Tuch. Verwenden Sie keine Bleich- oder Scheuermittel.
Folgende Mittel dürfen nicht verwendet werden:
• Wasser wärmer als 40°C. Es besteht die Gefahr von Verformungen und Verfärbungen.
• Flüchtige Substanzen. Können die Oberflächen des Klimagerätes beschädigen.
Luftfilter
Die Luftfilter hinter der vorderen Abdeckung/dem Vordergitter sollten mindestens alle zwei Wochen
überprüft und bei Bedarf gereinigt werden. Hinweise zum Herausnehmen der Filter können Sie den
Abbildungen für jedes Modell entnehmen. Reinigen Sie die Filter mit einem Staubsauger oder warmer
Seifenlauge. Starke Verschmutzungen können mit einer lauwarmen Reinigungslösung
gereinigt werden. Lassen Sie die Filter nach dem Abspülen an der
Luft trocknen und setzen Sie sie wieder ein.
Plasmafilter
Die Plasmafilter befinden sich hinter dem Luftfilter und sollten alle drei Monate überprüft und je nach
Bedarf gereinigt werden. Hinweise zum Herausnehmen
der Filter können Sie den Abbildungen für jedes Modell entnehmen. Reinigen Sie die Filter mit einem
Staubsauger. Entfernen Sie hartnäckige Verschmutzungen mit Wasser, lassen Sie die Filter
trocknen und setzen Sie sie wieder ein.
Anti-Allergen-Filter + Dreifach-Filter
Nehmen Sie den Anti-Allergen-Filter und den Dreifach-Filter hinter dem Luftfilter heraus und lassen Sie die
Filter zwei Stunden an der Luft trocknen.
und setzen Sie sie danach wieder in das Gerät ein.
VORSICHT
Wartung und Pflege
Innengerät
Vor Wartungsarbeiten muss die Hauptstromversorgung des Systems sowie der Überlastungsschalter getrennt
und der Netzstecker muss gezogen werden.
VORSICHT
Page 99

Benutzerhandbuch 19
Wartung und Pflege
Außengerät
Die Windungen des Wärmetauschers sowie die Belüftungsschlitze des Außengerätes sollten regelmäßig
überprüft werden. Bei Verstopfungen und Verschmutzungen müssen der Wärmetauscher und die
Belüftungsschlitze u. U. mit einem Dampfstrahler fachgerecht gereinigt werden.
Verschmutzte oder verstopfte Windungen verringern die Leistung des Gerätes und führen zu höheren Betriebskosten.
HINWEIS
Hinweise zum Betrieb!
Selbstdiagnosefunktion
Fehleranzeige-LED
(einmal)
2 sek 2 sek 2 sek
Dieses Gerät besitzt eine integrierte Funktion zur Fehlerdiagnose. Bei einem Thermistorfehler blinkt die
LED des Gerätes. Verständigen Sie in diesem Falle den Kundendienst bzw. den Händler
Der Raum darf nicht
unterkühlt werden.
Eine zu kalte Raumluft ist
gesundheitsschädlich und
verursacht hohe Stromkosten.
Rollos und Vorhänge sollten
geschlossen sein.
Während des Betriebs des Klimagerätes
sollte eine direkte Sonneneinstrahlung
vermieden werden.
Die Raumtemperatur sollte
gleichbleibend gehalten werden.
Stellen Sie die vertikale und horizontale
Luftstromrichtung so ein, dass eine
gleichbleibende Raumtemperatur erreicht wird.
Fenster und Türen
sollten stets fest
verschlossen sein.
Türen und Fenster sollten
nach Möglichkeit nicht
geöffnet werden, damit
keine Kaltluft entweicht.
Der Luftfilter sollte
regelmäßig gereinigt
werden.
Hindernisse im Luftfilter hindern
den Luftstrom und
verschlechtern die Leistung bei
der Kühlung und Entfeuchtung.
Der Filter sollte mindestens alle
zwei Wochen gereinigt werden.
Der Raum sollte
gelegentlich gelüftet
werden.
Da die Fenster möglichst
geschlossen sein sollten
ist es ratsam, die Fenster
zum Lüften gelegentlich
zu öffnen.
Zur effektiven und schnellen Kühlung
sollte eine hohe Lüftergeschwindigkeit
gewählt werden.
Bei hohen
Lüftergeschwindigkeiten
erreicht das Gerät die
maximale Kühlungsleistung.
DEUTSCH
Page 100

20 Klimagerät
Wartung und Pflege
Tipps zur Störungsbehebung! Sparen Sie Zeit und Geld!
In folgenden Fällen liegt eine Störung des Klimagerätes vor:
Störung
n Das Klimagerät ist nicht
angeschlossen.
n
Die Sicherung ist durchgebrannt/der
Überlastungsschalter wurde ausgelöst.
n Stromausfall.
n Überspannung.
n Luftstrom wird gehindert.
n Verschmutzter Luftfilter.
n
Der Raum war zuvor sehr
warm.
n Kaltluft entweicht.
n
Einstellung der Raumtemperatur überprüfen
n Im Raum befindet sich u. U.
eine Wärmequelle.
Klimagerät
kann nicht
eingeschaltet
werden
Das
Klimagerät
kühlt nicht
wie erwartet
•
Stellen Sie sicher, dass der Netzstecker des Klimagerätes
vollständig an der Steckdose angeschlossen ist.
•
Überprüfen Sie die Sicherungen/Überlastungsschalter des Hauses und ersetzen
Sie die defekte Sicherung oder setzen Sie den Überlastungsschalter zurück.
•
Schalten Sie das Gerät bei einem Stromausfall
auf AUS. Warten Sie nach dem Stromausfall drei
Minuten, bevor Sie das Klimagerät wieder
einschalten, um eine Überlastung des
Kompressors zu vermeiden.
•
Bei ungewöhnlich hoher bzw. niedriger Spannung
wird der Überlastungsschalter ausgelöst.
• Stellen Sie sicher, dass die Vorderseite
des Klimagerätes nicht durch Gardinen,
Jalousien oder Möbel verdeckt wird.
•
Reinigen Sie den Filter mindestens alle zwei
Wochen. Siehe Kapitel Wartung und Pflege.
• Warten Sie nach dem ersten Einschalten
des Klimagerätes, bis sich die
Raumtemperatur abgekühlt hat.
• Schließen Sie offene Heizklappen und
verhindern Sie Kaltluftrückströme.
• Stellen Sie die Temperatur richtig ein.
•
Schalten Sie sämtliche Wärmequellen
während des Betriebs des Klimagerätes ab.
LösungMögliche Ursachen
1. Bei ungewöhnlichen Brandgerüchen, lauten Geräuschen usw. Schalten Sie das Gerät
und den Überlastungsschalter aus. Das Gerät darf in solchen Fällen niemals selbst
repariert oder wieder eingeschaltet werden.
2. Das Hauptnetzkabel ist heiß oder beschädigt.
3. Bei der Selbstdiagnose wurde ein Fehler ermittelt.
4. Aus dem Innengerät tropft Wasser, selbst bei geringer Luftfeuchtigkeit.
5. Ein Schalter, Überlastungsschalter (Sicherheit, Erdung) oder eine Sicherung ist defekt
Für eine gleichbleibende Leistung sollte das Gerät regelmäßig geprüft und
gereinigt werden.
Störungen sollten ausschließlich vom Kundendienst behoben werden.
In folgenden Fällen sollte unverzüglich der Kundendienst verständigt werden:
 Loading...