

LG BD690 User Manual

OWNER’S MANUAL
Network 3D Blu-ray Disc™
Player
Please read this manual carefully before operating
your set and retain it for future reference.
BD690
P/NO : SAC35095316
www.lg.com

Safety Information
Getting Started 3
CAUTION
RISK OF ELECTRIC SHOCK
DO NOT OPEN
CAUTION: TO REDUCE THE RISK OF ELECTRIC
SHOCK DO NOT REMOVE COVER (OR BACK) NO
USER-SERVICEABLE PARTS INSIDE REFER SERVICING
TO QUALIFIED SERVICE PERSONNEL.
This lightning ash with arrowhead
symbol within an equilateral triangle
is intended to alert the user to the
presence of uninsulated dangerous
enclosure that may be of sucient magnitude to
constitute a risk of electric shock to persons.
instructions in the literature accompanying the
product.
WARNING: TO PREVENT FIRE OR ELECTRIC SHOCK
HAZARD, DO NOT EXPOSE THIS PRODUCT TO RAIN
OR MOISTURE.
WARNING: Do not install this equipment in a
conned space such as a book case or similar unit.
CAUTION: Do not block any ventilation openings.
Install in accordance with the manufacturer’s
instructions.
Slots and openings in the cabinet are provided for
ventilation and to ensure reliable operation of the
product and to protect it from over heating. The
openings shall be never be blocked by placing
the product on a bed, sofa, rug or other similar
surface. This product shall not be placed in a builtin installation such as a bookcase or rack unless
proper ventilation is provided or the manufacturer’s
instruction has been adhered to.
voltage within the product’s
The exclamation point within an
equilateral triangle is intended
to alert the user to the presence
of important operating and
maintenance (servicing)
CAUTION: This product employs a Laser System.
To ensure proper use of this product, please read
this owner’s manual carefully and retain it for future
reference. Shall the unit require maintenance,
contact an authorized service center.
Use of controls, adjustments or the performance of
procedures other than those specied herein may
result in hazardous radiation exposure.
To prevent direct exposure to laser beam, do not try
to open the enclosure. Visible laser radiation when
open. DO NOT STARE INTO BEAM.
CAUTION concerning the Power Cord
Most appliances recommend they be placed upon
a dedicated circuit;
That is, a single outlet circuit which powers only
that appliance and has no additional outlets or
branch circuits. Check the specication page of this
owner’s manual to be certain. Do not overload wall
outlets. Overloaded wall outlets, loose or damaged
wall outlets, extension cords, frayed power cords, or
damaged or cracked wire insulation are dangerous.
Any of these conditions could result in electric
shock or re. Periodically examine the cord of your
appliance, and if its appearance indicates damage
or deterioration, unplug it, discontinue use of the
appliance, and have the cord replaced with an
exact replacement part by an authorized service
center. Protect the power cord from physical or
mechanical abuse, such as being twisted, kinked,
pinched, closed in a door, or walked upon. Pay
particular attention to plugs, wall outlets, and
the point where the cord exits the appliance. To
disconnect power from the mains, pull out the
mains cord plug. When installing the product,
ensure that the plug is easily accessible.
1
Getting Started

Getting Started4
This device is equipped with a portable battery or
accumulator.
Safety way to remove the battery or the
battery from the equipment: Remove the
1
old battery or battery pack, follow the steps
Getting Started
in reverse order than the assembly. To prevent
contamination of the environment and bring on
possible threat to human and animal health, the
old battery or the battery put it in the appropriate
container at designated collection points. Do
not dispose of batteries or battery together with
other waste. It is recommended that you use
local, free reimbursement systems batteries and
accumulators. The battery shall not be exposed to
excessive heat such as sunshine, re or the like.
CAUTION: The apparatus shall not be exposed to
water (dripping or splashing) and no objects lled
with liquids, such as vases, shall be placed on the
apparatus.
FCC Compliance Statement
This device complies with part 15 of the FCC
rules. Operation is subject to the following two
conditions:
(1) This device may not cause harmful interference,
and
(2) This device must accept any interference
received, including interference that may cause
undesired operation.
NOTE: This equipment has been tested and found
to comply with the limits for a Class B digital device,
pursuant to Part 15 of the FCC Rules. These limits are
designed to provide reasonable protection against
harmful interference in a residential installation. This
equipment generates, uses, and can radiate radio
frequency energy and, if not installed and used
in accordance with the instructions, may cause
harmful interference to radio communications.
However, there is no guarantee that interference
will not occur in a particular installation.
If this equipment does cause harmful interference
to radio or television reception, which can be
determined by turning the equipment o and
on, the user is encouraged to try to correct the
interference by one or more of the following
measures:
yReorient or relocate the receiving antenna.
yIncrease the separation between the equipment
and receiver.
yConnect the equipment into an outlet on a
circuit dierent from that to which the receiver is
connected.
yConsult the dealer or an experienced radio/TV
technician for help.
CAUTION: Any changes or modications not
expressly approved by the party responsible for
compliance could void the user’s authority to
operate this equipment.
FCC RF Radiation Exposure Statement : This
equipment complies with FCC radiation exposure
limits set forth for an uncontrolled environment.
This equipment should be installed and operated
with minimum distance 20 cm between the
radiator and your body. End users must follow the
specic operating instructions for satisfying RF
exposure compliance. This transmitter must not be
co-located or operating in conjunction with any
other antenna or transmitter.
FCC Radio Frequency Interference
Requirements : This device is restricted to indoor
use due to its operation in the 5.15 to 5.25 GHz
frequency range. FCC requires this product to
be used indoors for the frequency range 5.15
to 5.25 GHz to reduce the potential for harmful
interference to co-channel Mobile Satellite systems.
CAUTION: Regulations of the FCC and FAA prohibit
airborne operation of radio-frequency wireless
devices because their signals could interfere with
critical aircraft instruments.
Responsible Party :
LG Electronics USA, Inc.1000 Sylvan Avenue
Englewood Clis, NJ 07632
TEL. : +1-800-243-0000

Getting Started 5
Notes on Copyrights
yBecause AACS (Advanced Access Content
System) is approved as content protection
system for Blu-ray Disc format, similar to use of
CSS (Content Scramble System) for DVD format,
certain restrictions are imposed on playback,
analog signal output, etc., of AACS protected
contents. The operation of this product and
restrictions on this product may vary depending
on your time of purchase as those restrictions
may be adopted and/or changed by AACS after
the production of this product.
yFurthermore, BD-ROM Mark and BD+ are
additionally used as content protection systems
for Blu-ray Disc format, which imposes certain
restrictions including playback restrictions for
BD-ROM Mark and/or BD+ protected contents.
To obtain additional information on AACS, BDROM Mark, BD+, or this product, please contact
an authorized Customer Service Center.
yMany BD-ROM/DVD discs are encoded with
copy protection. Because of this, you should only
connect your player directly to your TV, not to a
VCR. Connecting to a VCR results in a distorted
picture from copy-protected discs.
yThis product incorporates copyright protection
technology that is protected by U.S. patents
and other intellectual property rights. Use of
this copyright protection technology must be
authorized by Rovi, and is intended for home and
other limited viewing uses only unless otherwise
authorized by Rovi. Reverse engineering or
disassembly is prohibited.
yUnder the U.S. Copyright laws and Copyright
laws of other countries, unauthorized recording,
use, display, distribution, or revision of television
programs, videotapes, BD-ROM discs, DVDs, CDs
and other materials may subject you to civil and/
or criminal liability.
IMPORTANT SAFETY
INSTRUCTIONS
1. Read these instructions.
2. Keep these instructions.
3. Heed all warnings.
4. Follow all instructions.
5. Do not use this apparatus near water.
6. Clean only with dry cloth.
7. Do not block any ventilation openings.
Install in accordance with the manufacturer’s
instructions.
8. Do not install near any heat sources such
as radiators, heat registers, stoves, or other
apparatus (including ampliers) that produce
heat.
9. Do not defeat the safety purpose of the
polarized or grounding-type plug. A polarized
plug has two blades with one wider than the
other. A grounding type plug has two blades
and a third grounding prong. The wide blade or
the third prong are provided for your safety. If
the provided plug does not t into your outlet,
consult an electrician for replacement of the
obsolete outlet.
10. Protect the power cord from being walked on
or pinched particularly at plugs, convenience
receptacles, and the point where they exit from
the apparatus.
11. Only use attachments/accessories specied by
the manufacturer.
12. Use only with the cart, stand,
tripod, bracket, or table
specied by the manufacturer,
or sold with the apparatus.
When a cart is used, use
caution when moving the cart/
apparatus combination to avoid injury from tipover.
13. Unplug this apparatus during lightning storms
or when unused for long periods of time.
14. Refer all servicing to qualied service personnel.
Servicing is required when the apparatus has
been damaged in any way, such as powersupply cord or plug is damaged, liquid has been
spilled or objects have fallen into the apparatus,
the apparatus has been exposed to rain or
moisture, does not operate normally, or has
been dropped.
1
Getting Started

Table of Contents6
Table of Contents
1 Getting Started
3 Safety Information
8 Introduction
8 – Playable Discs and symbols used in
this manual
9 – About the “7” Symbol Display
10 – File requirement
11 – AVCHD (Advanced Video Codec High
Definition)
11 – About DLNA
12 – Certain System Requirements
12 – LG Remote
12 – WOL (Wake On LAN)
12 – Regional Code
12 – Compatibility Notes
13 Remote control
14 Front panel
14 Rear panel
2 Connecting
15 Connecting to Your TV
15 – HDMI Connection
16 – What is SIMPLINK?
16 – Component Video Connection
17 – Video/Audio (Left/Right) Connection
17 – Resolution Setting
18 Connecting to an Amplifier
18 – Connecting to an Amplifier via HDMI
Output
19 – Connecting to an Amplifier via Digital
Audio Output
19 – Connecting to an Amplifier via 2
Channel Audio Output
20 Connecting to your Home Network
20 – Wired network connection
21 – Wired Network Setup
22 – Wireless Network Connection
22 – Wireless Network Setup
25 USB device connection
25 – Playback content in the USB device
3 System Setting
26 Settings
26 – Adjust the Setup Settings
26 – [DISPLAY] Menu
28 – [LANGUAGE] Menu
28 – [AUDIO] Menu
30 – [LOCK] Menu
31 – [NETWORK] Menu
32 – [OTHERS] Menu
4 Operating
34 General Playback
34 – Using [HOME] menu
34 – Playing a Disc
34 – Playing a file on the hard disk drive/
disc/USB device
35 – Playing Blu-ray 3D disc
35 – Enjoying BD-Live™
36 – Playing a file on a network server
37 – Wi-Fi Direct™ Connection
39 – Basic operations for video and audio
content
39 – Basic operations for photo content
39 – Using the disc menu
40 – Searching content in the hard disk
drive by entering file name
40 – Resume playback
41 Advanced Playback
41 – Repeat Playback
41 – Repeating a specific portion
41 – Enlarge the playback image
42 – Marker Search
42 – Using the search menu
43 – Changing content list view
43 – Viewing content information
43 – Selecting a subtitle file
44 – Last Scene Memory
44 – Applying your photo to the Wallpaper
44 – Options while viewing a photo
45 – Listening to music while slide show
45 – Using the Music Library
47 – Using the Photo Library
47 On-Screen display
47 – Displaying content information on-
screen

Table of Contents 7
48 – Playing from selected time
48 – Hearing a different audio
49 – Selecting a subtitle language
49 – Watching from a different angle
49 – Changing the TV Aspect Ratio
49 – Changing the Picture Mode
50 – Changing subtitle code page
50 Copying
50 – Copying file(s)/folder(s) to the internal
hard disk drive
51 – Copying file(s)/folder(s) from the
internal hard disk drive to a USB
storage device
52 – Deleting file(s)/folder(s)
53 – Moving file/folder
53 – Naming a file/folder
54 – Audio CD Archiving
56 Viewing information from Gracenote
Media Database
57 Using the Premium
57 Using the LG Apps
58 – Signing in
58 – Managing my Apps
5 Troubleshooting
59 Troubleshooting
59 – General
60 – Network
61 – Picture
61 – Customer Support
61 – Open source software notice
6 Appendix
62 Controlling a TV with the Supplied
Remote Control
62 – Setting up the remote to control your
TV
63 Network Software Update
63 – Network update notification
63 – Software Update
64 About Nero MediaHome 4 Essentials
64 – Installing Nero MediaHome 4
Essentials
65 – Sharing files and folders
66 Area Code List
67 Language code List
68 Trademarks and Licenses
70 Audio Output Specifications
72 Video Output Resolution
73 Specifications
74 Maintenance
74 – Handling the Unit
74 – Notes on Discs
75 – About the internal hard disk drive
75 Important Information Relating to
Network Services
1
2
3
4
5
6
Getting Started8
Introduction
1
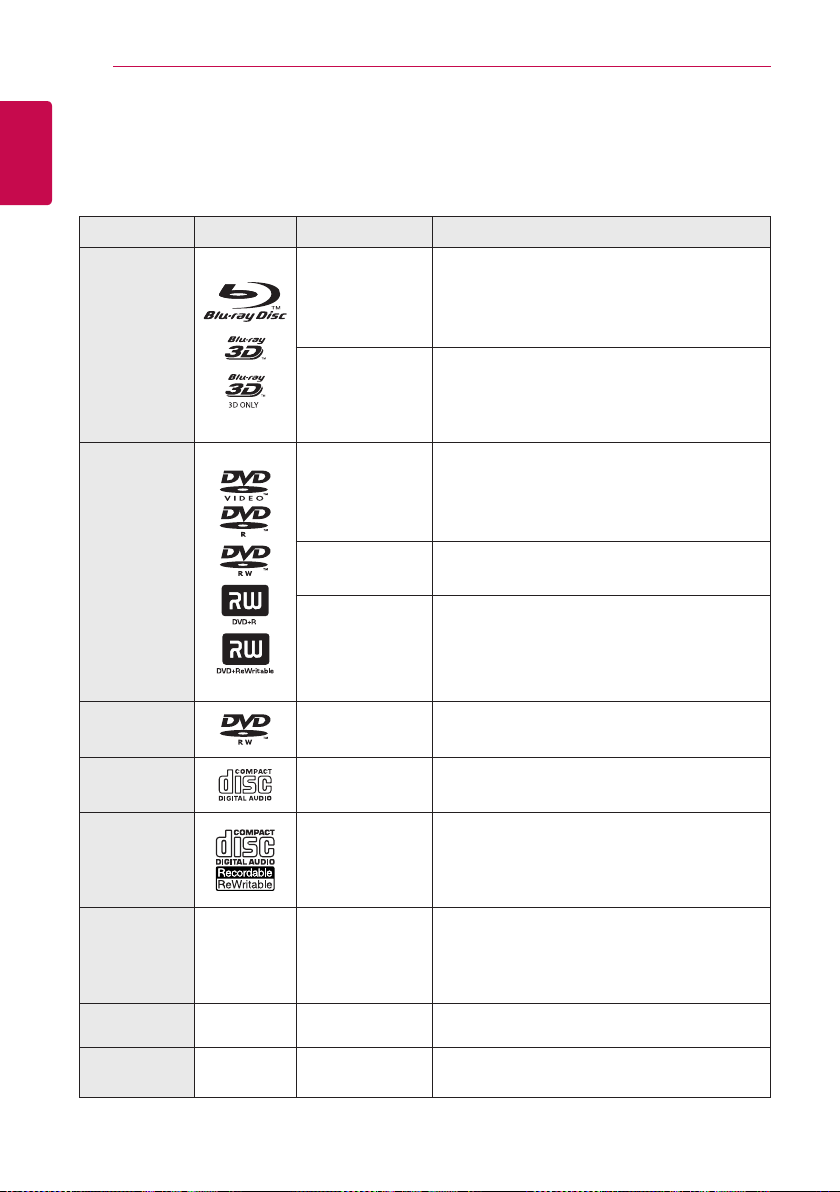
Playable Discs and symbols used in this manual
Getting Started
Media/Term Logo Symbol Description
yDiscs such as movies that can be purchased or
rented.
y“Blu-ray 3D” discs and “Blu-ray 3D ONLY” discs.
yBD-R/RE discs that are recorded in BDAV format.
yBD-R/RE discs that contain Video, Audio or
Photo les.
yISO 9660+JOLIET, UDF and UDF Bridge format
yDiscs such as movies that can be purchased or
rented.
yVideo mode and nalized only
ySupports the dual layer disc also
Finalized AVCHD format
yDVD±R/RW discs that contain Video, Audio or
Photo les.
yISO 9660+JOLIET, UDF and UDF Bridge format
Blu-ray
DVD-ROM
DVD-R
DVD-RW
DVD+R
DVD+RW
(8 cm, 12 cm)
e
y
u
i
r
o
y
u
i
DVD-RW (VR)
(8 cm, 12 cm)
Audio CD
(8 cm, 12 cm)
CD-R/RW
(8 cm, 12 cm)
HDD
Note –
Caution –
r
t
y
u
VR mode and nalized only
Audio CD
yCD-R/RW discs that contain Video, Audio or
Photo les.
yISO 9660+JOLIET, UDF and UDF Bridge format
i
y
–
u
Video, Audio or Photo les that contained in the
internal hard disk drive.
i
,
>
Indicates special notes and operating features.
Indicates cautions for preventing possible
damages from abuse.

Note
,
yDepending on the conditions of the
recording equipment or the CD-R/RW (or
DVD±R/RW) disc itself, some CD-R/RW (or
DVD±R/RW) discs cannot be played on the
unit.
yDepending on the recording software & the
nalization, some recorded discs (CD-R/RW,
DVD±R/RW, BD-R/RE) may not be playable.
yBD-R/RE, DVD±R/RW and CD-R/RW discs
recorded using a personal computer or a
DVD or CD Recorder may not play if the
disc is damaged or dirty, or if there is dirt or
condensation on the player’s lens.
yIf you record a disc using a personal
computer, even if it is recorded in a
compatible format, there are cases in which
it may not play because of the settings of
the application software used to create the
disc. (Check with the software publisher for
more detailed information.)
yThis player requires discs and recordings to
meet certain technical standards in order to
achieve optimal playback quality.
yPre-recorded DVDs are automatically set to
these standards. There are many dierent
types of recordable disc formats (including
CD-R containing MP3 or WMA les) and
these require certain pre-existing conditions
to ensure compatible playback.
yCustomers should note that permission
is required in order to download MP3 /
WMA les and music from the Internet.
Our company has no right to grant such
permission. Permission should always be
sought from the copyright owner.
yYou have to set the disc format option
to [Mastered] in order to make the discs
compatible with the LG players when
formatting rewritable discs. When setting
the option to Live System, you cannot use
it on LG player. (Mastered/Live File System :
Disc format system for windows Vista)
Getting Started 9
About the “7” Symbol Display
“7” may appear on your TV display during
operation and indicates that the function explained
in this owner’s manual is not available on that
specic media.
1
Getting Started
Getting Started10
File requirement
Video files
1
Getting Started
File
Location
Disc,
USB,
HDD
DLNA, PC
Audio files
File
Extension
“.avi”, “.divx”,
“.mpg”, “.mpeg”,
“.mkv”, “.mp4”,
“.asf”, “.wmv”,
“.m4v” (DRM
free)
“.avi”, “.divx”,
“.mpg”, “.mpeg”,
“.mkv”, “.mp4”,
“.asf”, “.wmv”,
Codec Format Audio Format Subtitle
DIVX3.xx, DIVX4.xx,
DIVX5.xx, DIVX6.xx
(standard playback
only), XVID, MPEG1 SS,
H.264/MPEG-4 AVC,
MPEG2 PS, MPEG2 TS,
VC-1 SM (WMV3)
DIVX3.xx, DIVX4.xx,
DIVX5.xx, DIVX6.xx
(standard playback
only), XVID, MPEG1 SS,
H.264/MPEG-4 AVC,
MPEG2 PS, MPEG2 TS,
VC-1 SM (WMV3)
Dolby Digital,
DTS, MP3,
WMA, AAC,
AC3
Dolby Digital,
DTS, MP3,
WMA, AAC,
AC3
SubRip (.srt / .txt), SAMI (.smi),
SubStation Alpha (.ssa/.txt),
MicroDVD (.sub/.txt), VobSub
(.sub), SubViewer 1.0 (.sub),
SubViewer 2.0 (.sub/.txt), TMPlayer
(.txt), DVD Subtitle System (.txt)
SubRip (.srt / .txt), SAMI (.smi),
SubStation Alpha (.ssa/.txt),
MicroDVD (.sub/.txt), SubViewer
1.0 (.sub), SubViewer 2.0 (.sub/.
txt), TMPlayer (.txt), DVD Subtitle
System (.txt)
File
Location
Disc,
USB,
HDD,
DLNA, PC
Photo files
File
Location
Disc,
USB,
HDD,
DLNA, PC
File
Extension
“mp3”, “.wma”,
“.wav”, “.m4a”
(DRM free)
File
Extension
“.jpg”, “.jpeg”,
“.png”,
Sampling Frequency Bitrate Note
within 32 - 48 kHz
(WMA), within 16 - 48
kHz (MP3)
Recommended
Size
Less than 4,000 x 3,000 x 24 bit/pixel
Less than 3,000 x 3,000 x 32 bit/pixel
within 20 - 320 kbps
(WMA), within 32 - 320
kbps (MP3)
Progressive and lossless
compression photo image les
are not supported.
Some wav les are
not supported on
this player.
Note

Note
,
yThe le name is limited to 180 characters.
yMaximum les/Folder: Less than 2000 (total
number of les and folders)
yDepending on the size and number of the
les, it may take several minutes to read the
contents on the media.
yFile compatibility may dier depending on
the server.
yBecause the compatibility on DLNA server
are tested on the bundle DLNA server (Nero
MediaHome 4 Essentials) environment, le
requirements and playback functions may
dier depending on media servers.
yThe le requirements on page 10 are not
always compatible. There may have some
restrictions by le features and media
server’s ability.
yPlaying a movie subtitle les are only
available on share folder of a PC or DLNA
media server created by supplied Nero
MediaHome 4 Essentials software on this
player package.
yThe les from removable media such as USB
drive, DVD-drive etc. on your media server
may not be shared properly.
yThis unit cannot support the ID3 Tag
embedded MP3 le.
yThe total playback time of audio le
indicated on the screen may not correct for
VBR les.
yHD video les contained on the CD or USB
1.0/1.1 may not played properly.
Blu-ray Disc, DVD or USB 2.0 are
recommended to play back HD video les.
yThis player supports H.264/MPEG-4 AVC
prole Main, High at Level 4.1. For a le
with higher level, the warning message will
appear on the screen.
yThis player does not support les that are
recorded with GMC
*1 GMC – Global Motion Compensation
*2 Qpel – Quarter pixel
1
or Qpel
*
2
.
*
Getting Started 11
AVCHD (Advanced Video
Codec High Definition)
yThis player can playback AVCHD format discs.
These discs are normally recorded and used in
camcorders.
yThe AVCHD format is a high denition digital
video camera format.
yThe MPEG-4 AVC/H.264 format is capable of
compressing images at higher eciency than
that of the conventional image compressing
format.
yThis player can playback AVCHD discs using
“x.v.Color” format.
ySome AVCHD format discs may not play
depending on the recording condition.
yAVCHD format discs need to be nalized.
y“x.v.Color” oers a wider color range than normal
DVD camcorder discs.
About DLNA
This Player is a DLNA Certied digital media player
that can display and play movie, photo and music
content from your DLNA-compatible digital media
server (PC and Consumer Electronics).
The Digital Living Network Alliance (DLNA) is a
cross-industry organization of consumer electronics,
computing industry and mobile device companies.
Digital Living provides consumers with easy sharing
of digital media through your home network.
The DLNA certication logo makes it easy
to nd products that comply with the DLNA
Interoperability Guidelines. This unit complies with
DLNA Interoperability Guidelines v1.5.
When a PC running DLNA server software or
other DLNA compatible device is connected to
this player, some setting changes of software or
other devices may be required. Please refer to the
operating instructions for the software or device for
more information.
1
Getting Started

Getting Started12
Certain System Requirements
For high denition video playback:
yHigh denition display that has COMPONENT or
1
Getting Started
HDMI input jacks.
yBD-ROM disc with high denition content.
yHDMI or HDCP capable DVI input on your display
device is required for some content (as specied
by disc authors).
For Dolby® Digital Plus, Dolby TrueHD and DTS-HD
multi-channel audio playback:
yAn amplier/receiver with a built-in (Dolby
Digital, Dolby Digital Plus, Dolby TrueHD, DTS or
DTS-HD) decoder.
yMain, center, surround speakers and subwoofer
as necessary for chosen format.
For playing les on your PC’s share folder via your
home network, the PC requires below.
yWindows® XP (Service Pack 2 or higher),
Windows Vista® (no Service Pack required)
Windows 7® (no Service Pack required)
y1.2 GHz Intel® Pentium® III or AMD
Sempron™ 2200+ processors
yNetwork environment: 100 Mb Ethernet, WLAN
yMore than 1 folder on your PC has to be shared.
Visit suppot link of your operating system for
more information on le share settings.
LG Remote
You can control this player with your iPhone
or Android phone via your home network. This
player and your phone must be connected to your
wireless network device such as access point.
Visit “Apple iTunes” or “Google Apps Marketplace” for
detailed information of “LG Remote”.
Regional Code
This unit has a regional code printed on the rear of
the unit. This unit can play only BD-ROM or DVD
discs labeled same as the rear of the unit or “ALL”.
Compatibility Notes
yBecause BD-ROM is a new format, certain disc,
digital connection and other compatibility issues
are possible. If you experience compatibility
problems, please contact an authorized
Customer Service Center.
yThis unit allows you to enjoy functions such
as picture-in-picture, secondary audio and
Virtual packages, etc., with BD-ROM supporting
BONUSVIEW (BD-ROM version 2 Prole 1 version
1.1/ Final Standard Prole). Secondary video and
audio can be played from a disc compatible with
the picture-in-picture function. For the playback
method, refer to the instructions in the disc.
yViewing high-denition content and up-
converting standard DVD content may require a
HDMI-capable input or HDCP-capable DVI input
on your display device.
ySome BD-ROM and DVD discs may restrict the
use of some operation commands or features.
yDolby TrueHD, Dolby Digital Plus and DTS-HD are
supported with maximum 7.1 channels if you
use HDMI connection for the audio output of the
unit.
yYou can use the internal hard disk drive or a USB
device to store some disc related information,
including downloaded on-line content. The
disc you are using will control how long this
information is retained.
WOL (Wake On LAN)
Users can turn on this player using WOL embeded
utility on your personal computer or smartphone
via your home network. To use this feature, this
player must be connected to the WOL available
access point or router. Refer to the relevant manual
of the utility or network devices for more detailed
information.

Remote control
Getting Started 13
Battery Installation
Remove the battery cover on the
rear of the Remote Control, and
insert two R03 (size AAA) batteries
with 4 and 5 matched correctly.
• • • • • • a • • • • • •
(POWER): Switches the player
1
ON or OFF.
(OPEN/CLOSE): Opens and
B
closes the disc tray.
0-9 numerical buttons: Selects
numbered options in a menu or
inputs letters in the keypad menu.
CLEAR: Removes a mark on the
search menu or a number when
setting the password.
REPEAT (h): Repeats a desired
section or sequence.
• • • • • • b • • • • •
c/v
backward or forward.
C/V
next or previous chapter / track /
le.
Z
z
M
• • • • • • c • • • • •
HOME (n): Displays or exits the
[Home Menu].
MUSIC ID: When connected
to the network, can provide
information about the current
song while movie playback.
INFO/DISPLAY (m): Displays or
exits On-Screen Display.
Direction buttons: Selects an
option in the menu.
ENTER (b): Acknowledges menu
selection.
BACK (x): Exits the menu or
resumes playback. The resume
play function may not work
depending on the BD-ROM disc.
(SCAN): Searches
(SKIP): Goes to the
(STOP): Stops playback.
(PLAY): Starts playback.
(PAUSE): Pauses playback.
TITLE/POP-UP: Displays the DVD
title menu or BD-ROM’s pop-up
menu, if available.
DISC MENU: Accesses menu on a
disc.
• • • • • • d • • • • •
Colored (R, G, Y, B) buttons:
Use to navigate BD-ROM menus.
They are also used for [MOVIE],
[PHOTO], [MUSIC], [Premium] and
[LG Apps] menu.
MARKER: Marks any point during
playback.
SEARCH: Displays or exits the
search menu.
ZOOM: Displays or exits the
[Zoom] menu.
TV Control Buttons: See page 62.
1
Getting Started
Getting Started14
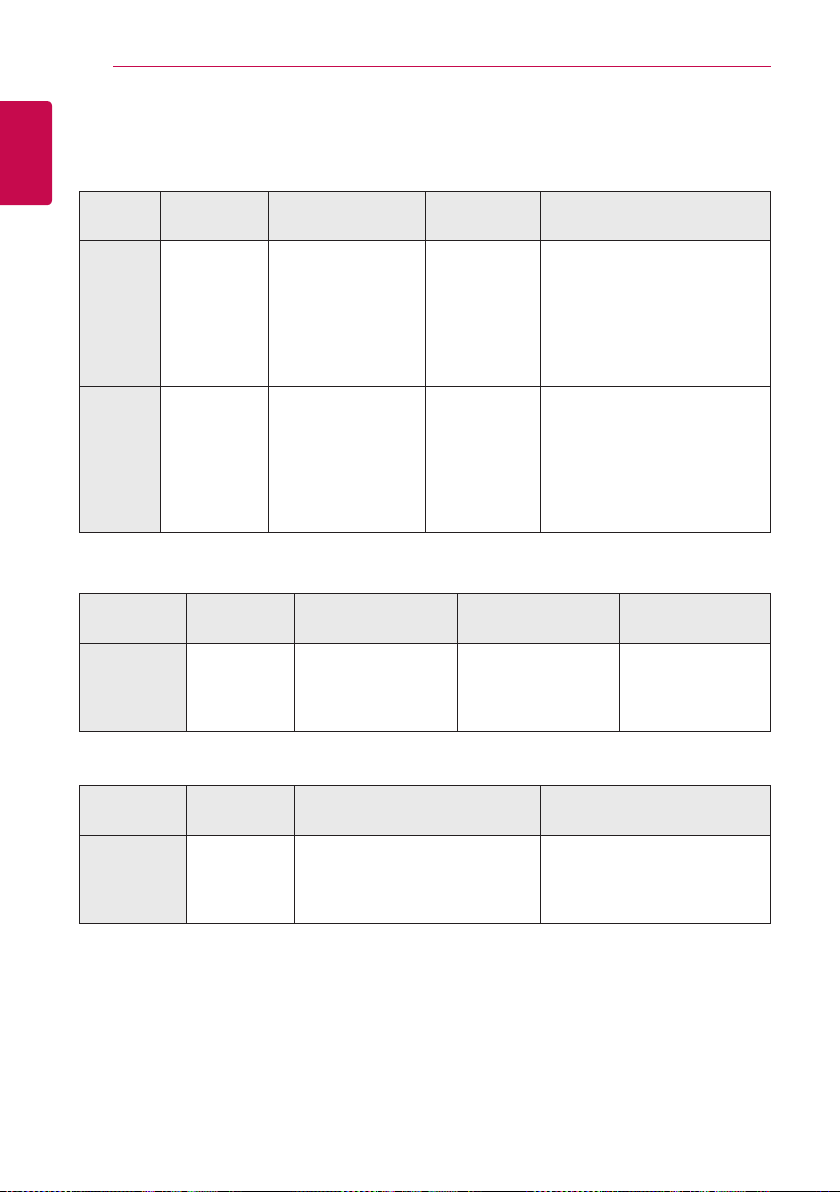
Front panel
1
Getting Started
a 1
Disc Tray
b
Display Window
c
d T
e I
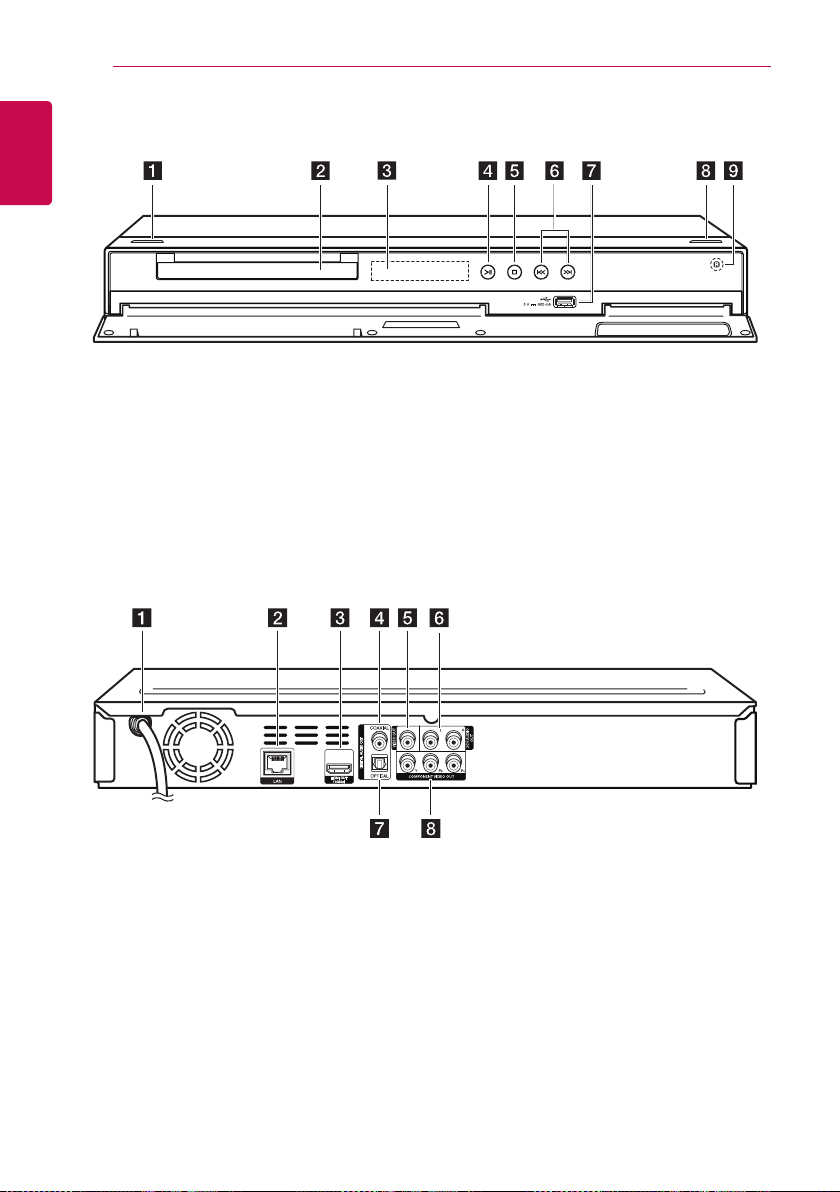
Rear panel
(POWER) Button
(PLAY / PAUSE)
(STOP)
f Y/U
USB Port
g
(OPEN/CLOSE)
h R
Remote Sensor
i
(SKIP)
AC power cord
a
LAN port
b
HDMI OUT
c
DIGITAL AUDIO OUT (COAXIAL)
d
VIDEO OUT
e
2CH AUDIO OUT (Left/Right)
f
DIGITAL AUDIO OUT (OPTICAL)
g
COMPONENT VIDEO OUT (Y PB PR)
h
Connecting 15
Connecting to Your TV
Make one of the following connections, depending
on the capabilities of your existing equipment.
yHDMI connection (page 15)
yComponent Video connection (page 16)
yVideo connection (page 17)
Note
,
yDepending on your TV and other
equipment you wish to connect, there are
various ways you could connect the player.
Use only one of the connections described
in this manual.
yPlease refer to the manuals of your TV,
Stereo System or other devices as necessary
to make the best connections.
yDo not connect the player’s AUDIO OUT
jack to the phono in jack (record player) of
your audio system.
yDo not connect your player via your VCR.
The image could be distorted by the copy
protection system.
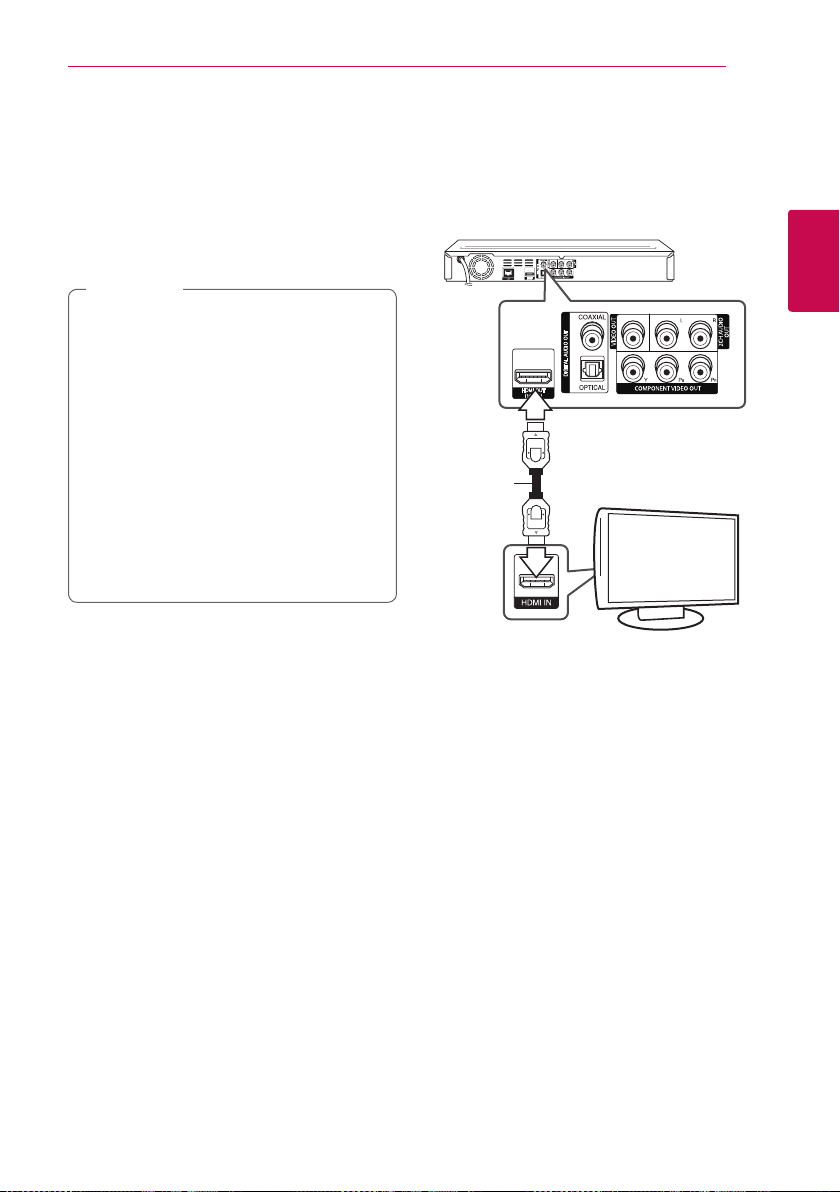
HDMI Connection
If you have a HDMI TV or monitor, you can connect
it to this player using a HDMI cable (Type A, High
Speed HDMI™ Cable). Connect the HDMI jack on
the player to the HDMI jack on a HDMI compatible
TV or monitor.
Rear of the unit
HDMI
cable
Set the TV’s source to HDMI (refer to TV’s Owner’s
manual).
TV
2
Connecting
Additional Information for HDMI
yWhen you connect a HDMI or DVI compatible
device make sure of the following:
-Try switching o the HDMI/DVI device and
this player. Next, switch on the HDMI/DVI
device and leave it for around 30 seconds,
then switch on this player.
-The connected device’s video input is set
correctly for this unit.
-The connected device is compatible with
720x480p, 1280x720p, 1920x1080i or
1920x1080p video input.
yNot all HDCP-compatible HDMI or DVI devices
will work with this player.
-The picture will not be displayed properly
with non-HDCP device.
16
Connecting
Note
,
yIf a connected HDMI device does not accept
the audio output of the player, the HDMI
device’s audio sound may be distorted or
may not output.
yWhen you use HDMI connection, you can
change the resolution for the HDMI output.
(Refer to “Resolution Setting” on page 17)
ySelect the type of video output from the
2
Connecting
HDMI OUT jack using [HDMI Color Setting]
option on the [Setup] menu (see page 27).
yChanging the resolution when the
connection has already been established
may result in malfunctions. To solve the
problem, turn o the player and then turn it
on again.
yWhen the HDMI connection with HDCP
is not veried, TV screen is changed to
black screen. In this case, check the HDMI
connection, or disconnect the HDMI cable.
yIf there are noises or lines on the screen,
please check the HDMI cable (length is
generally limited to 4.5 m(15 ft.)).
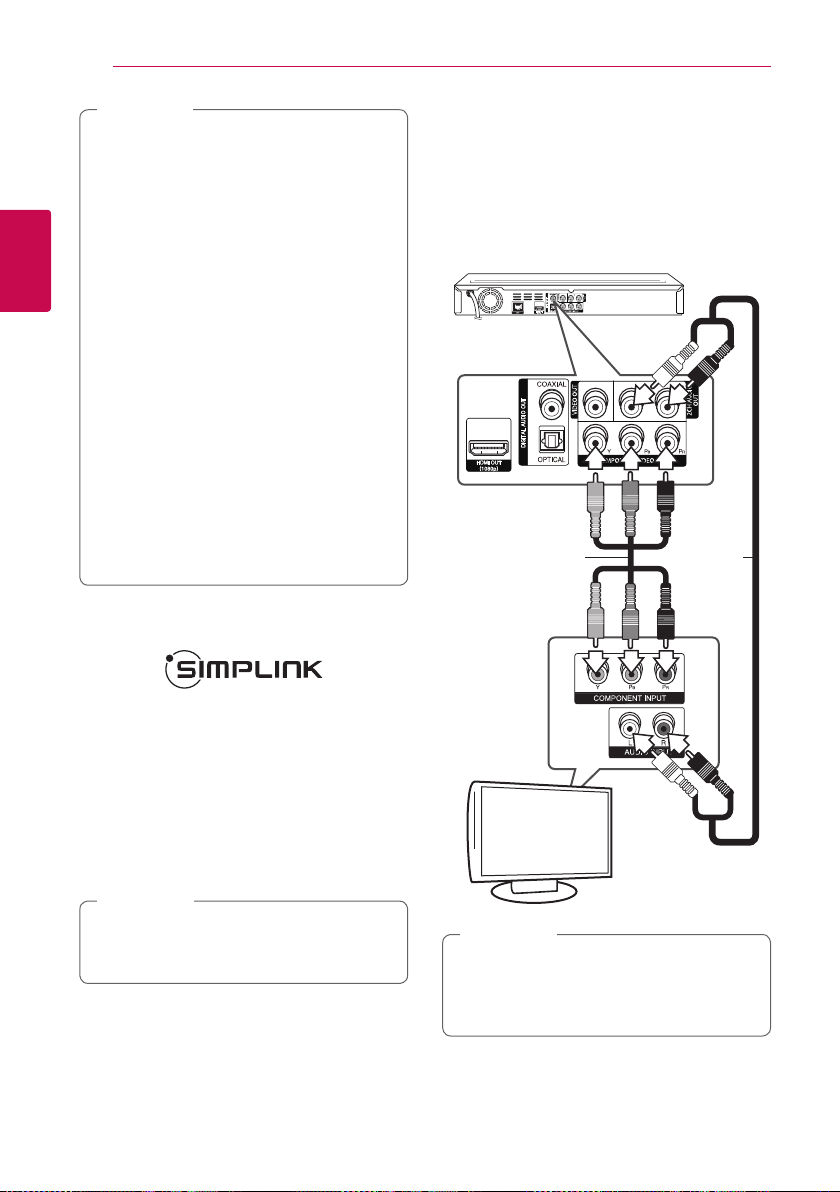
What is SIMPLINK?
Component Video Connection
Connect the COMPONENT VIDEO OUT jacks on the
player to the corresponding input jacks on the TV
using component video cable. Connect the left and
right AUDIO OUT jacks of the player to the audio
left and right IN jacks on the TV using the audio
cables.
Rear of the unit
Component
video cable
Audio
cable
Some functions of this unit are controlled by the
TV’s remote control when this unit and LG TV’s with
SIMPLINK are connected through HDMI connection.
Controllable functions by LG TV’s remote control;
Play, Pause, Scan, Skip, Stop, Power O, etc.
Refer to the TV owner’s manual for the details of
SIMPLINK function.
LG TV’s with SIMPLINK function has the logo as
shown above.
Note
,
Depending on the disc type or playing status,
some SIMPLINK operation may dier from your
purpose or not work.
TV
Note
,
When you use COMPONENT VIDEO OUT
connection, you can change the resolution for
the output. (Refer to “Resolution setting” on
page 17)
Connecting 17
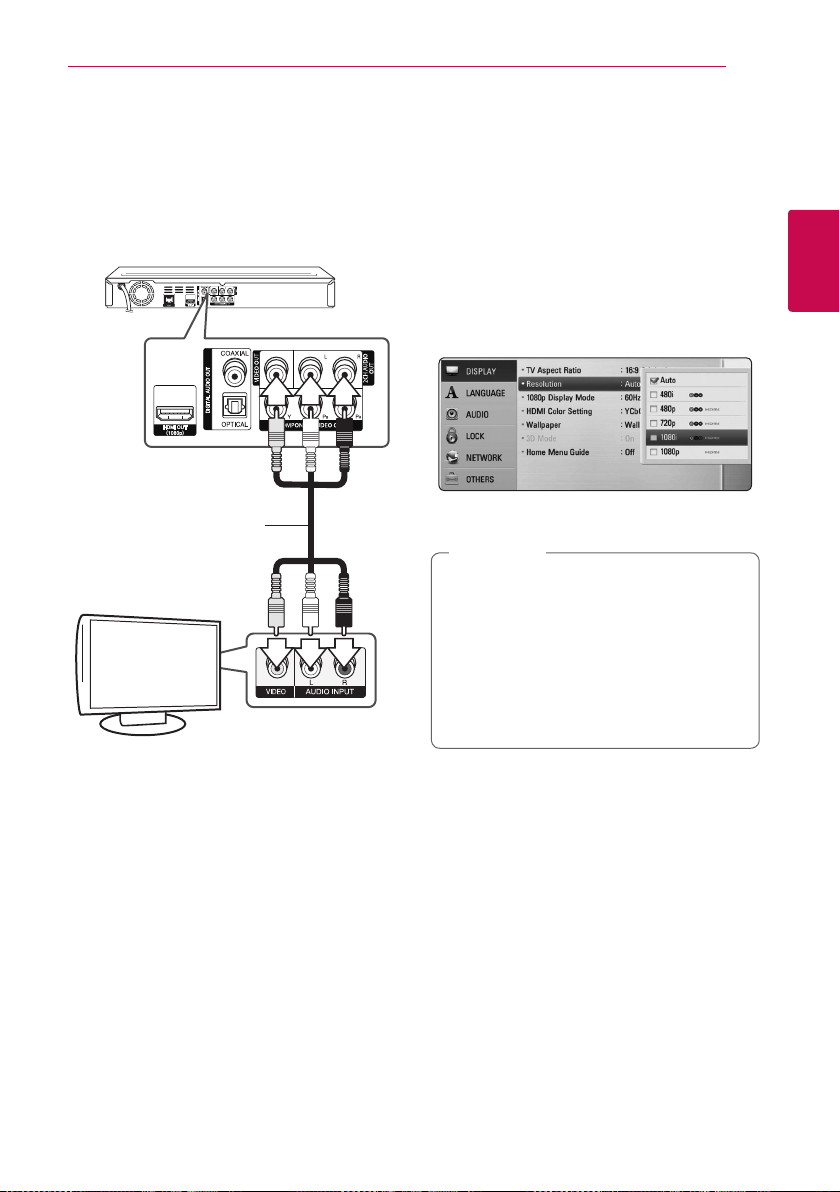
Video/Audio (Left/Right) Connection
Connect the VIDEO OUT jack on the player to the
video in jack on the TV using a video cable. Connect
the left and right AUDIO OUT jacks of the player to
the audio left and right IN jacks on the TV using the
audio cables.
Rear of the unit
Video/Audio cable
TV
Resolution Setting
The player provides several output resolutions for
HDMI OUT and COMPONENT VIDEO OUT jacks. You
can change the resolution using [Setup] menu.
1. Press HOME (n).
2. Use
ENTER (b). The [Setup] menu appears.
3. Use
press D to move to the second level.
4. Use
then press ENTER (b) to move to the third level.
5. Use
press ENTER (b) to conrm your selection.
yIf your TV does not accept the resolution
ySince several factors aect the resolution of
to select the [Setup] and press
A/D
to select [DISPLAY] option then
W/S
to select the [Resolution] option
W/S
to select the desired resolution then
W/S
Note
,
you have set on the player, you can set
resolution to 480p as follows:
1. Press B to open the disc tray.
2 Press Z (STOP) for more than 5 seconds.
video output, see “Video Output Resolution”
on page 72.
2
Connecting
Connecting18
Connecting to an
Amplifier
Make one of the following connections, depending
on the capabilities of your existing equipment.
yHDMI Audio connection (page 18)
yDigital Audio connection (page 19)
2
y2CH Analog Audio connection (page 19)
Connecting
Since many factors aect the type of audio output,
see “Audio Output Specications” for details (page
70).
About Digital Multi-channel sound
A digital multi-channel connection provides the
best sound quality. For this, you need a multichannel Audio/Video Receiver that supports one
or more of the audio formats supported by your
player. Check the logos on the front of the Audio/
Video receiver and the manual. (PCM Stereo, PCM
Multi-Ch, Dolby Digital, Dolby Digital Plus, Dolby
TrueHD, DTS and/or DTS-HD)
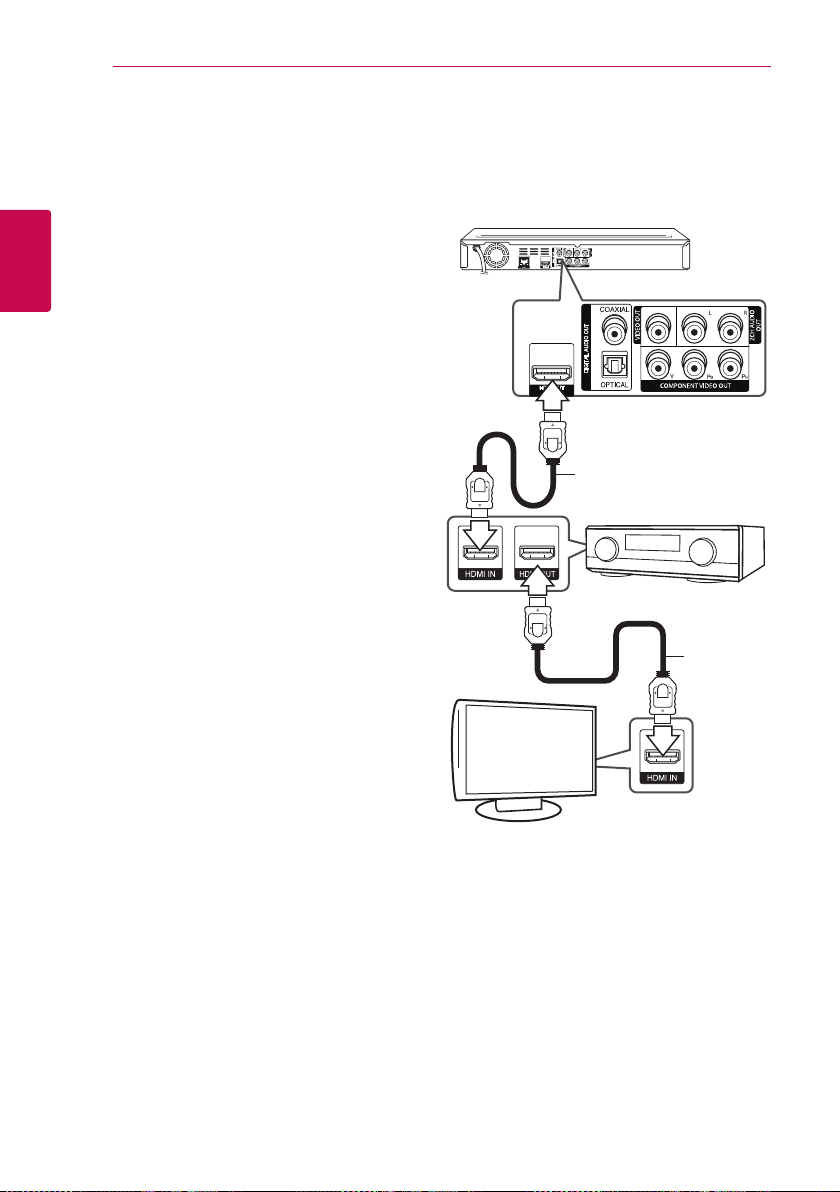
Connecting to an Amplifier via
HDMI Output
Connect the player’s HDMI OUT jack to the
corresponding in jack on your amplier using a
HDMI cable.
Rear of the unit
HDMI cable
Receiver/Amplier
HDMI cable
TV
Connect the amplier’s HDMI output jack to HDMI
input jack on your TV using a HDMI cable if your
amplier has HDMI output jack.
You will need to activate the player’s digital output.
(See “[AUDIO] Menu” on page 28)
Connecting 19
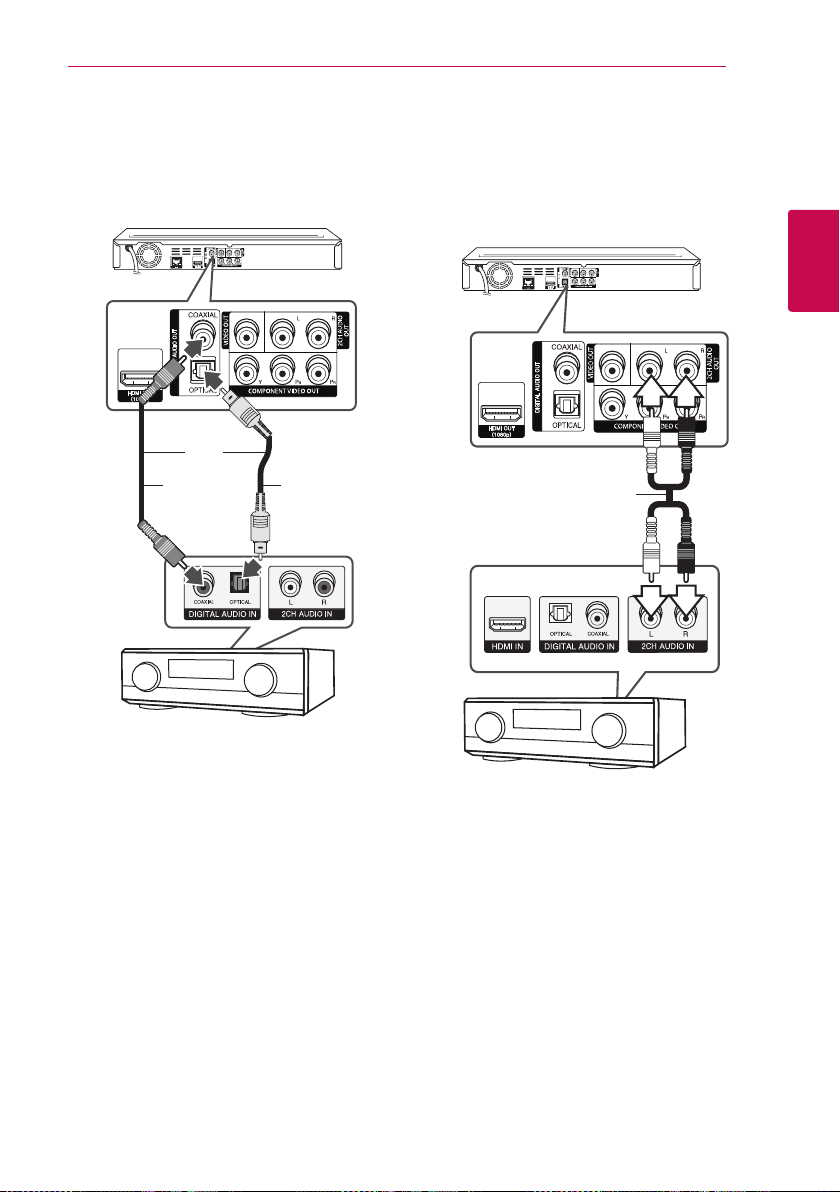
Connecting to an Amplifier via
Digital Audio Output
Connect the player’s DIGITAL AUDIO OUT jack to
the corresponding in jack (OPTICAL or COAXIAL) on
your amplier using an optional digital audio cable.
Rear of the unit
OR
Coaxial
cable
Optical
cable
Connecting to an Amplifier via
2 Channel Audio Output
Connect the Left and Right 2CH AUDIO OUT jacks
on the player to the audio left and right in jacks
on your amplier, receiver, or stereo system using
audio cables.
Rear of the unit
Audio cable
2
Connecting
Receiver/Amplier
You will need to activate the player’s digital output.
(See “[AUDIO] Menu” on page 28)
Receiver/Amplier
Connecting20
Connecting to your Home Network
This player can be connected to a local area
network (LAN) via the LAN port on the rear panel or
the internal wireless module.
By connecting the unit to a broadband home
network, you have access to services such as
2
software updates, BD-Live interactivity and on-line
Connecting
content services.
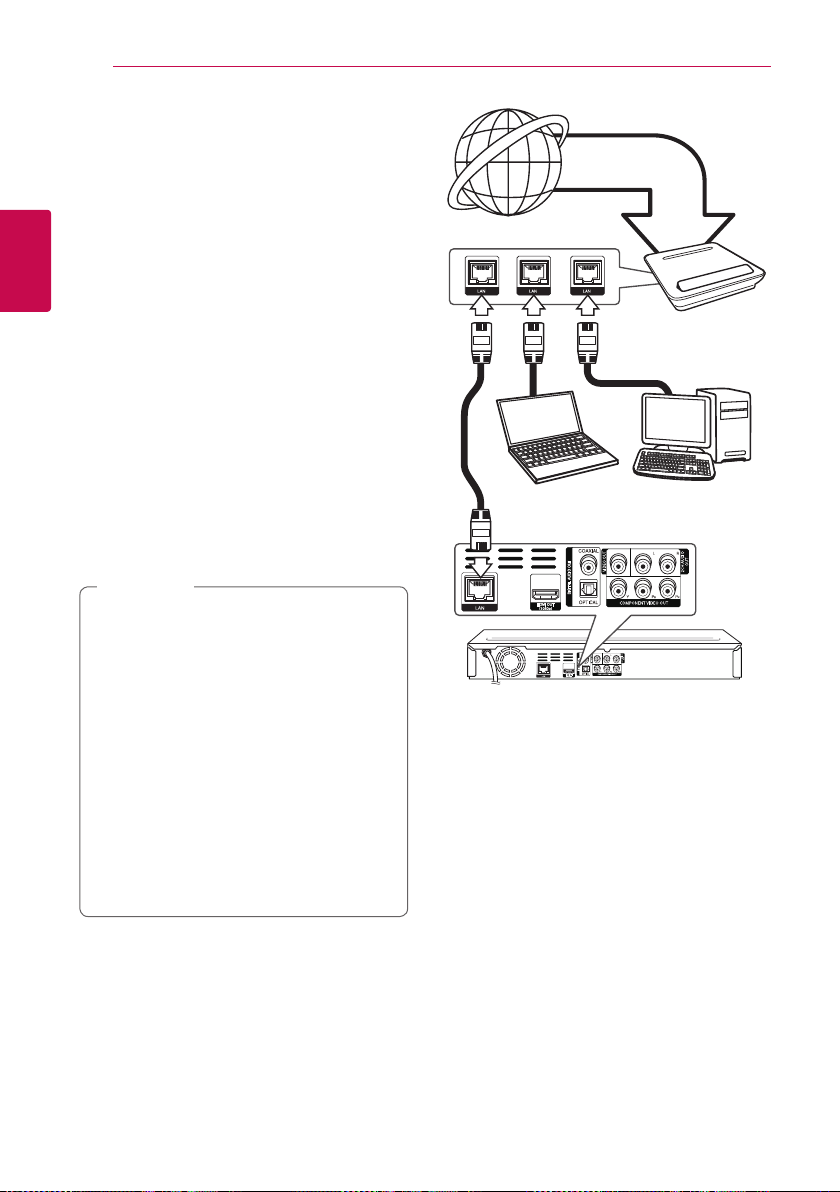
Wired network connection
Using a wired network provides the best
performance, because the attached devices
connect directly to the network and are not subject
to radio frequency interference.
Please refer to the documentation for your network
device for further instructions.
Connect the player’s LAN port to the corresponding
port on your Modem or Router using a
commercially available LAN or Ethernet cable.
Note
,
yWhen plugging or unplugging the LAN
cable, hold the plug portion of the cable.
When unplugging, do not pull on the LAN
cable but unplug while pressing down on
the lock.
yDo not connect a modular phone cable to
the LAN port.
ySince there are various connection
congurations, please follow the
specications of your telecommunication
carrier or internet service provider.
yIf you want to access content from PCs
or DLNA servers, this player must be
connected to the same local area network
with them via a router.
Broadband
service
Router
PC and/or DLNA certied server
Rear of the unit
Wired Network Setup
If there is a DHCP server on the local area network
(LAN) via wired connection, this player will
automatically be allocated an IP address. After
making the physical connection, a small number of
home networks may require the player’s network
setting to be adjusted. Adjust the [NETWORK]
setting as follow.
Preparation
Before setting the wired network, you need to
connect the broadband internet to your home
network.
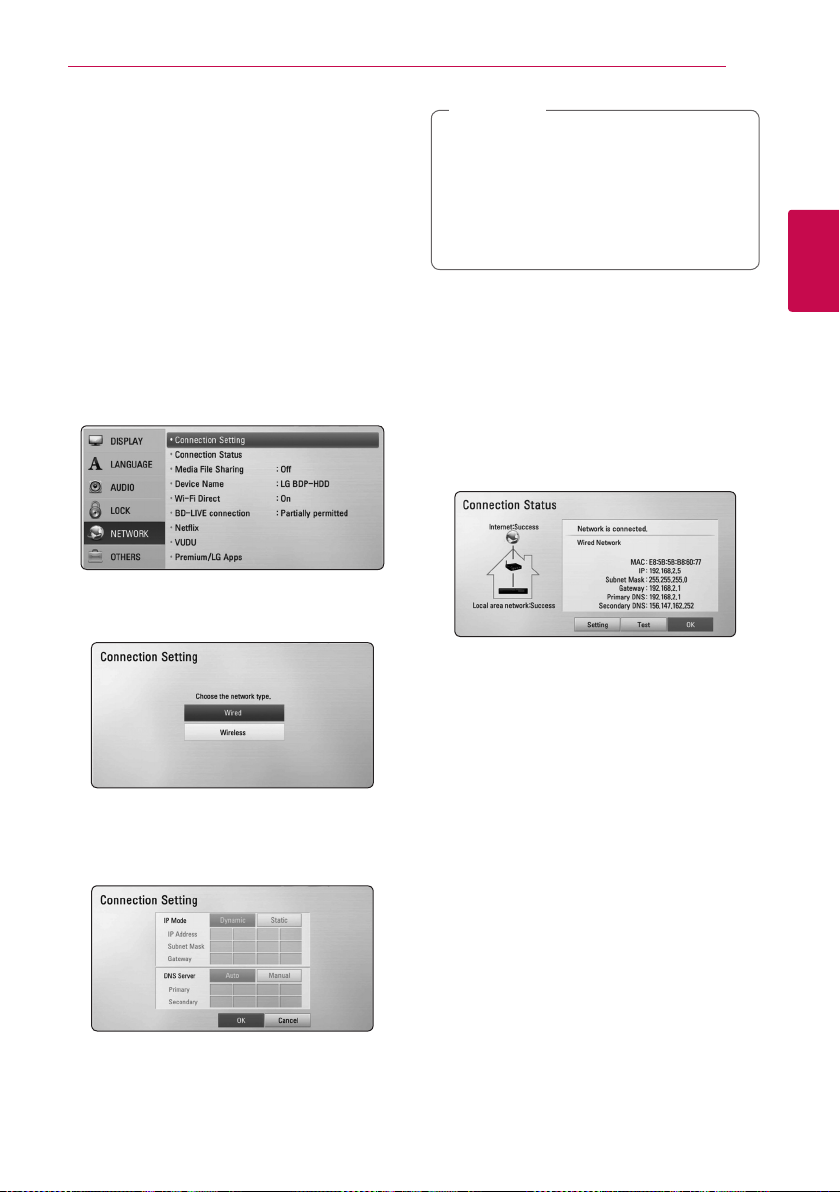
1. Select [Connection Setting] option in the
[Setup] menu then press ENTER (b).
2. The [Connection Setting] menu appear on the
screen. Use
press ENTER (b).
to select the [Wired] and
W/S
Connecting 21
Note
,
If there is no DHCP server on the network and
you want to set the IP address manually, select
[Static] then set [IP Address], [Subnet Mask],
[Gateway] and [DNS Server] using
and numerical buttons. If you make a
A/D
mistake while entering a number, press CLEAR
to clear the highlighted part.
4. Select [OK] and press ENTER (b) to apply
network settings.
5. The player will ask you to test the network
connection. Select [OK] and press ENTER (b) to
complete the network connection.
6. If you select [Test] and press ENTER (b) at
step 5 above, the network connection status is
displayed on the screen.
You can also test it on the [Connection Status]
in the [Setup] menu.
W/S/
2
Connecting
3. Use
W/S/A/D
between [Dynamic] and [Static].
Normally, select [Dynamic] to allocate an IP
address automatically.
to select the IP mode
Connecting22
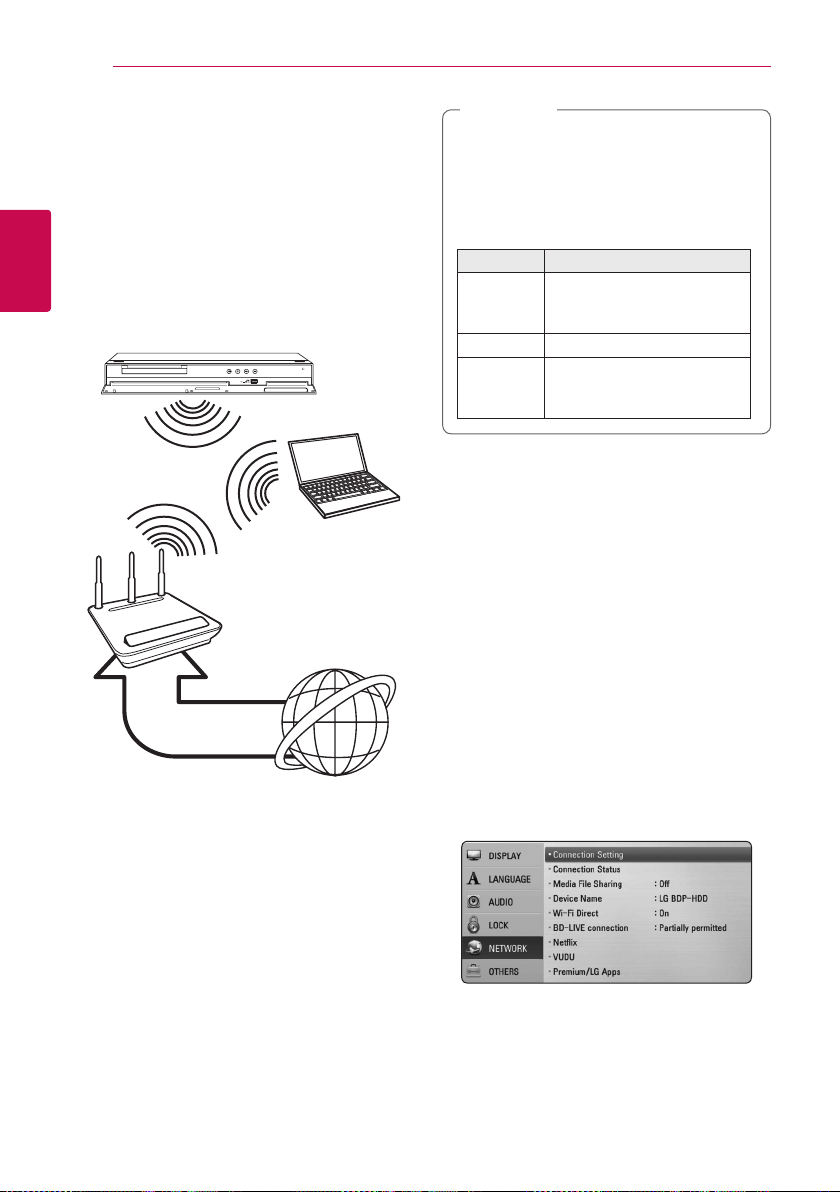
Wireless Network Connection
Another connection option is to use an Access Point
or a wireless router. The network conguration and
connection method may vary depending on the
equipment in use and the network environment.
This player is equipped with an IEEE 802.11n (Dualband 5 GHz and 2.4 GHz band) wireless module,
which also supports the 802.11a/b/g standards.
For the best wireless performance, we recommend
2
using a IEEE 802.11n certied Wi-Fi network (access
Connecting
point or wireless router).
Note
,
Available frequency range and channels for
5 GHz band are listed as below. But, there
may have the dierences and restrictions
depending on the country. Try setting your
access point with other channel if you have
diculties in wireless network connection.
Area Frequency Range
North
America
Europe 5.15-5.25 GHz (ch. 36-48)
Others 5.15-5.25 GHz (ch. 36-48),
5.15-5.25 GHz (ch. 36-48),
5.725-5.825 GHz (ch. 149-161),
5.825-5.850 GHz (ch.165)
5.725-5.825 GHz (ch. 149-161),
5.825- 5.850 GHz (ch.165)
Wireless
Communication
PC and/or
DLNA certied server
Access Point or
Wireless Router
Broadband
service
Refer to the setup instructions supplied with
your access point or wireless router for detailed
connection steps and network settings.
For best performance, a direct wired connection
from this player to your home network’s router or
cable/DSL modem is always the best option.
If you do chose to use the wireless option, note that
performance can sometimes be aected by other
electronic devices in the home.
Wireless Network Setup
For the wireless network connection, the player
needs to be set up for network communication.
This adjustment can be done from the [Setup]
menu. Adjust the [NETWORK] setting as follow.
Setting up the access point or the wireless router
is required before connecting the player to the
network.
Preparation
Before setting the wireless network, you need to:
-connect the broadband internet to the wireless
home network.
-set the access point or wireless router.
-note the SSID and security code of the network.
1. Select [Connection Setting] option in the
[Setup] menu then press ENTER (b).
Connecting 23
2. The [Connection Setting] menu appear on the
screen. Use
ENTER (b).
3. Select [Yes] and press ENTER (b) to continue.
The new connection settings reset the current
network settings.
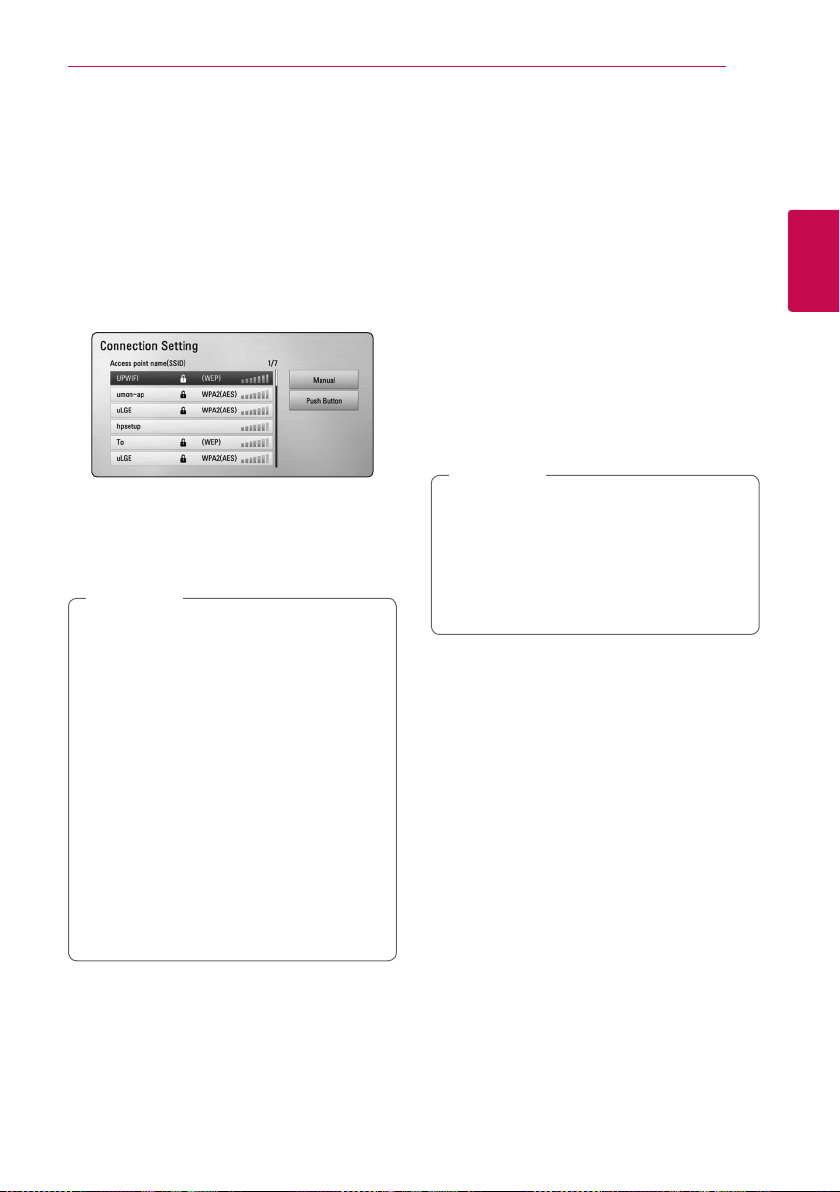
4. The player scans the all available access points
or wireless routers within range and display
them as a list. Use
point or wireless router on the list, and then
press ENTER (b).
If you have security on your access point or
wireless router, verify that the WEP or WPA key
that was entered into the player matches the
router’s information exactly. You need to input
the security code as necessary.
Note
,
yWEP security mode generally have 4 keys
available on an access point or wireless
router’s setting. If your access point or
wireless router use WEP security, enter the
security code of the key “No.1” to connect
on your home network.
yAn Access Point is a device that allows you
to connect to your home network wirelessly.
yIf your access point or wireless router
supports the PIN Code conguration
method based on WPS(Wi-Fi Protected
Setup), press yellow (Y) colored button and
note the code number on the screen. And
then, enter the PIN number on a setting
menu of your access point or wireless router
to connect. Refer to the documentation for
your network device.
to select [Wireless] and press
W/S
to select an access
W/S
[Manual] – Your access point may not be
broadcasting its access point name (SSID).
Check your router settings through your
computer and either set your router to
broadcast SSID, or manually enter the access
point name (SSID) in [Manual].
[Push Button] – If your access point or
wireless router that supports the Push Button
Conguration method, select this option and
press the Push Button on your access point or
wireless router within 120 counts. You do not
need to know the access point name (SSID) and
security code of your access point or wireless
router.
5. Use
W/S/A/D
between [Dynamic] and [Static].
Normally, select [Dynamic] to allocate an IP
address automatically.
Note
,
If there is no DHCP server on the network and
you want to set the IP address manually, select
[Static] then set [IP Address], [Subnet Mask],
[Gateway] and [DNS Server] using
and numerical buttons. If you make a
A/D
mistake while entering a number, press CLEAR
to clear the highlighted part.
6. Select [OK] and press ENTER (b) to apply
network settings.
7. The player will ask you to test the network
connection. Select [OK] and press ENTER (b) to
complete the network connection.
8. If you select [Test] and press ENTER (b) at
step 7 above, the network connection status is
displayed on the screen. You can also test it on
the [Connection Status] in the [Setup] menu.
to select the IP mode
W/S/
2
Connecting
 Loading...