


OWNER’S MANUAL
AIR
CONDITIONER
www.lg.com
Please read this manual carefully before operating your set and retain it for future
reference.
CEILING CONCEALED DUCT
Original instruction
Copyright © 2018 LG Electronics Inc. All Rights Reserved.
ENGLISH
Tiếng Việt
BAHASA INDONESIA
ABNQ09GL1A2 / ABNQ12GL2A2
ABNQ18GL2A2 / ABNQ24GL3A2
I.15.LEI8.04287.1018
*MFL67798206*
Rev. : 00(11T18)
2
TIPS FOR SAVING ENERGY
ENGLISH
Here are some tips that will help you minimize the power consumption when you use the air conditioner. You can use your air conditioner more efficiently by referring to the instructions below:
• Do not cool excessively indoors. This may be harmful for your health and may consume more electricity.
• Block sunlight with blinds or curtains while you are operating the air conditioner.
• Keep doors or windows closed tightly while you are operating the air conditioner.
• Adjust the direction of the air flow vertically or horizontally to circulate indoor air.
• Speed up the fan to cool or warm indoor air quickly, in a short period of time.
• Open windows regularly for ventilation as the indoor air quality may deteriorate if the air conditioner is used for many hours.
• Clean the air filter once every 2 weeks. Dust and impurities collected in the air filter may block the
air flow or weaken the cooling / dehumidifying functions.
For your records
Staple your receipt to this page in case you need it to prove the date of purchase or for warranty
purposes. Write the model number and the serial number here:
Model number :
Serial number :
You can find them on a label on the side of each unit.
Dealer’s name :
Date of purchase :
TIPS FOR SAVING ENERGY

IMPORTANT SAFETY INSTRUCTIONS
3
ENGLISH
IMPORTANT SAFETY INSTRUCTIONS
READ ALL INSTRUCTIONS BEFORE USING THE APPLIANCE.
Always comply with the following precautions to avoid dangerous situations and ensure peak performance of your product
WARNING
It can result in serious injury or death when the directions are ignored
CAUTION
It can result in minor injury or product damage when the directions are ignored
This appliance is intended to be used by expert or trained users in shops, in light industry and on
farms, or for commercial use by lay persons.
WARNING
• Always ground the product. There is a risk of electric shock.
• Do not use a defective or underrated circuit breaker. Use the correctly rated breaker and fuse.
There is risk of fire or electric shock .
• Do not use a multi consent. Always use this appliance on a dedicated cicuit and breaker.
Otherwise it can cause electric shock or fire.
• For electrical work, contact the dealer, seller, a qualified electrician, or an Authorized Service Center. Do not disassemble or repair the product by yourself. There is risk of fire or electric shock.
• Always ground the product as per the wiring diagram. Do not connect the ground wire to gas or
water pipes lightening rod or telephone ground wire. There is risk of fire or electric shock.
• Install the panel and the cover of control box securely. There is risk of fire or electric shock due to
dust , water etc.
• Use the correctly rated breaker or fuse. There is risk of fire or electric shock.
• Do not modify or extend the power cable. If the power cable or cord has scrathes or skin peeled
off or deteriorated then it must be replaced. There is risk of fire or electric shock.
• For installation, removal or reinstall , always contact the dealer or an Authorized Service Center.
There is risk of fire, electric shock, explosion, or injury.
• Do not install the product on a defective installation stand. Be sure that the installation area does
not deteriorate with age. It may cause product to fall.
• Never install the outdoor unit on a moving base or a place from where it can fall down.
The falling outdoor unit can cause damage or injury or even death of a person.
• When the product is soaked (flooded or submerged) in water , contact an Authorized Service Center for repair before using it again. There is risk of fire or eletric shock.
• Be sure to check the refrigerant to the used. Please read the label on the product. Incorrect refrigerant used can prevent the normal operation of the unit.
• Don't use a power cord, a plug or a loose socket which is damaged. Otherwise it may cause a fire
or electrical shock.
• Do not touch , operate, or repair the product with wet hands. Hold the plug by hand when taking
out. There is risk of electric shock or fire.
• Do not place a heater or other heating appliances near the power cable. There is risk of fire and
electric shock.
• Do not allow water to run into electric parts. Install the unit away from water sources. There is risk
of fire, failure of the product, or electric shock.
• Do not store or use or even allow flammable gas or combustibles near the product.
There is risk of fire.
!
!
!

4
IMPORTANT SAFETY INSTRUCTIONS
ENGLISH
• Indoor/outdoor wiring connections must be secured tightly and the cable should be routed properly so that there is no force pulling the cable from the connection terminals. Improper or loose
connections can cause heat generation or fire.
• Safely dispose off the packing materials. Like screws, nails, batteries, broken things etc after installation or svc and then tear away and thraw away the plastic packaging bags. Children may play
with them and cause injury.
• Make sure to check that the power cable plug is not dirty, loose or broken and then only insert
the plug completely. Dirty, loose or broken power plug can cause electric shock or fire.
• In outdoor unit the step-up capacitor supplies high voltage electricity to the electrical components.
Be sure to discharge the capacitor completely before conducting the repair work.
An charged capacitor can cause electrical shock.
• When installing the unit, use the installation kit provided with the product. Otherwise the unit may
fall and cause severe injury.
• Be sure to use only those parts which are listed in the svc parts list. Never attempt to modify the
equipment. The use of inappropriate parts can cause an electrical shock, excessive heat generation
or fire.
• Do not use the product in a tightly closed space for a long time. Perform ventilation regularly. Oxygen deficiency could occur and hence harm your health.
• Do not open the front grille of the product during operation. (Do not touch the electrostatic filter, if
the unit is so equipped.) There is risk of physical injury, electric shock, or product failure.
• If strange sounds, smell or smoke comes from product.Immediately turn the breaker off or disconnect the power supply cable. There is risk of electric shock or fire.
• Ventilate the product room from time to time when operating it together with a stove, or heating
element etc. Oxygen deficiency can occur and hence harm your health.
• Turn the main power off and unplug the unit when cleaning or repairing the product. There is risk
of electric shock.
• When the product is not to be used for a long time, disconnect the power supply plug or turn off
the breaker. There is risk of product damage or failure, or unintended operation.
• Take care to ensure that nobody especially kids could step on or fall onto the outdoor unit. This
could result in personal injury and product damage.
• Take care to ensure that power cable could not be pulled out or damaged during operation. There
is risk of fire or electric shock.
• Do not place ANYTHING on the power cable. There is risk of fire or electric shock.
• Do not plug or unplug the power supply plug to turn the unit ON/OFF. There is risk of fire or electric shock.
• When flammable gas leaks, turn off the gas and open a window for ventilation before turn the
product on. Do not use the telephone or turn switches on or off. There is risk of explosion or fire.
• Do not turn on the breaker or power under condition that front panel, cabinet, top cover, control
box cover are removed or opened. Otherwise, it may cause fire, electric shock, explosion or death.
• Use a vacuum pump or Inert (nitrogen) gas when doing leakage test or air purge. Do not compress
air or Oxygen and Do not use Flammable gases. Otherwise, it may cause fire or explosion. There is
the risk of death, injury, fire or explosion.
CAUTION
• Two or more people must lift and transport the product. Avoid personal injury.
• Do not install the product where it will be exposed to sea wind (salt spray) directly. It may cause
corrosion on the product.
• Install the drain hose to ensure that the condensed water is drained away properly. A bad connection may cause water leakage.
• Keep level even when installing the product. To avoid vibration or noise.
• Do not install the product where the noise or hot air from the outdoor unit could damage or disturb
!

IMPORTANT SAFETY INSTRUCTIONS
the neighborhoods. It may cause a problem for your neighbors and hence dispute.
• Always check for gas (refrigerant) leakage after installation or repair of product. Low refrigerant levels may cause failure of product.
• Do not use the product for special purposes, such as preserving foods, works of art, etc. It is a
consumer air conditioner, not a precision refrigeration system. There is risk of damage or loss of
property.
• Do not block the inlet or outlet of air flow. It may cause product failure.
• Use a soft cloth to clean. Do not use harsh detergents, solvents or splashing water etc. There is
risk of fire, electric shock, or damage to the plastic parts of the product.
• Do not touch the metal parts of the product when removing the air filter. There is risk of personal
injury.
• Do not step on or put anyting on the product. (outdoor units) There is risk of personal injury and
failure of product.
• Always insert the filter securely after cleaning. Clean the filter every two weeks or more often if
necessary. A dirty filter reduces the efficiency.
• Do not insert hands or other objects through the air inlet or outlet while the product is operating.
There are sharp and moving parts that could cause personal injury.
• Be cautious when unpacking and installing the product. Sharp edges could cause injury.
• If the refrigerant gas leaks during the repair, do not touch the leakaing refrigerant gas. The refrigernat gas can cause frostbite (cold burn)
• Do not tilt the unit when removing or uninstalling it. The condensed water inside can spill.
• Do not mix air or gas other than the specified refrigerant used in the system. If air enters the refrigerant system, an excessively high pressure results, causing equipment damage or injury.
• If the refrigerant gas leaks during the installation, ventilate the area immediately. Otherwise it can
be harmfull for your health.
• Dismantling the unit, treatment of the refrigerant oil and eventual parts should be done in accordance with local and national standards.
• Replace the all batteries in the remote control with new ones of the same type. Do not mix old and
new batteries or different types of batteries. There is risk of fire or product failure.
• Do not recharge or disassemble the batteries. Do not dispose off batteries in a fire. They may burn
or explode.
• If the liquid from the batteries gets onto your skin or clothes, wash it well with clean water. Do not
use the remote if the batteries have leaked. The chemicals in batteries could cause burns or other
health hazards.
• If you eat the liquid from the batteries, brush your teeth and see doctor.
Do not use the remote if the batteries have leaked. The chemicals in batteries could cause burns
or other health hazard.
• Do not let the air conditioner run for a long time when the humidity is very high and a door or a
window is left open. Moisture may condense and wet or damage furniture.
• Do not expose your skin or kids or plants to the cool or hot air draft. This could harm to your
health.
• Do not drink the water drained from the product. It is not sanitary and could cause serious health
issues.
• Use a firm stool or ladder when cleaning, maintaining or repairing the product at an height. Be
careful and avoid personal injury.
• The air conditioner is not intended for use by young children or invalids without supervision.
• Young children should be supervised to ensure that they do not play with the air conditioner.
5
ENGLISH
6
TABLE OF CONTENTS
ENGLISH
TABLE OF CONTENTS
2 TIPS FOR SAVING ENERGY
3 IMPORTANT SAFETY INSTRUCTIONS
7 BEFORE USE
7
Preparing for operation
7
Usage
7
Cleaning and maintenance
7
Service
8 PRODUCT INTRODUCTION
8
Name and function of parts (CEILING CONCEALED DUCT)
9
What to do before operation
10
Wired Remote Controller
11 OPERATING INSTRUCTIONS
11
Standard Operation - Standard Cooling
12
Standard Operation - Power Cooling
12
Standard Operation - Heating Mode
13
Standard Operation - Dehumidification Mode
13
Auto Changeover Mode
14
Standard Operation - Fan Mode
15
Standard Operation - Auto Operation Mode
16
Standard Operation - Airflow Setting
17
Standard Operation - Temperature Setting/Room Temperature Check
18
Function Setting - Child Lock
19
Function Setting - Change Temp
20
Function Setting - Filter Sign Clear
21
Function Setting - Vane Angle Control
22
Function Setting - Changing Current Time
24
Programming - Simple Reservation
25
Programming : Weekly Reservation
27
Programming - Sleep Reservation
28
Programming - ON Reservation
30
Programming - OFF Reservation
32
Programming : Holiday Reservation
33 MAINTENANCE AND SERVICE
33
Indoor Unit
34
Operation Tips!
34
When the air conditioner is not going....
35
Troubleshooting Tips! Save time and money!
35
Call the service immediately in the following situations

BEFORE USE
7
ENGLISH
Preparing for operation
• Contact an installation specialist for installation.
• Use a dedicated circuit.
Usage
• Being exposed to direct airflow for an extended period of time could be hazardous to your health. Do
not expose occupants, pets, or plants to direct airflow for extended periods of time.
• Due to the possibility of oxygen deficiency, ventilate the room when used together with stoves or
other heating devices.
• Do not use this air conditioner for non-specified special purposes (e.g. preserving precision devices,
food, pets, plants, and art objects). Such usage could damage the items.
Cleaning and maintenance
• Do not touch the metal parts of the unit when removing the filter. Injuries can occur when handling
sharp metal edges.
• Do not use water to clean inside the air conditioner. Exposure to water can destroy the insulation,
leading to possible electric shock.
• When cleaning the unit, first make sure that the power and breaker are turned off. The fan rotates at
a very high speed during operation. There is a possibility of injury if the unit’s power is accidentally
triggered on while cleaning inner parts of the unit.
Service
For repair and maintenance, contact your authorized service dealer.
BEFORE USE
8
PRODUCT INTRODUCTION
ENGLISH
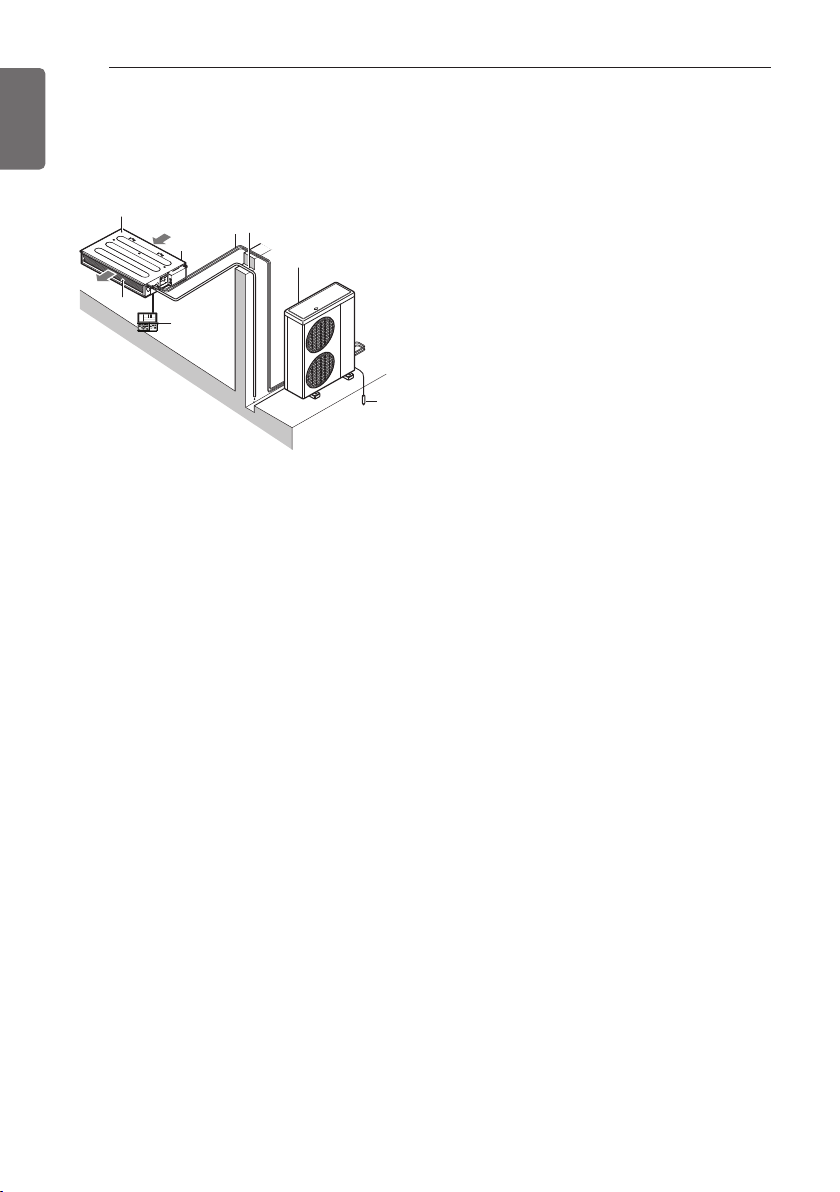
Name and function of parts (CELING CONCEALED DUCT)
1: Indoor unit
2: Outdoor unit
3: Remote controller
4: Inlet air
5: Discharge air
6: Refrigerant piping, connection electric wire
7: Drain pipe
8: Ground wire
wire to ground outdoor unit to prevent electrical
shocks.
PRODUCT INTRODUCTION
Air intake
vents
4
5
1
Air outlet
vents
2
8
6
7
Remote
Controller
3
PRODUCT INTRODUCTION
9
ENGLISH
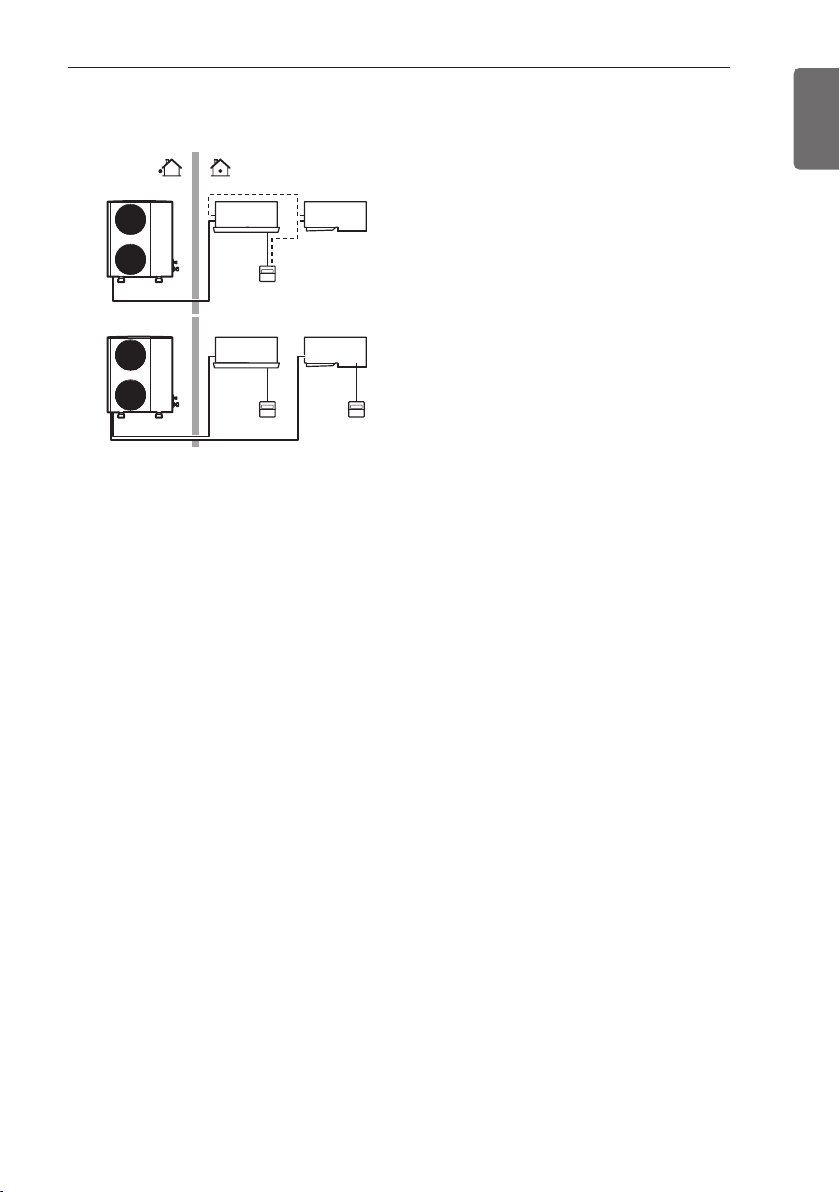
What to do before operation
A
B
1 1
1 2
If your installation has a customized control
system, ask your LG dealer for
the operation that corresponds to your system.
1: Unit with remote controller
2: Unit without remote controller (when used as
simultaneous operation)
10
PRODUCT INTRODUCTION
ENGLISH
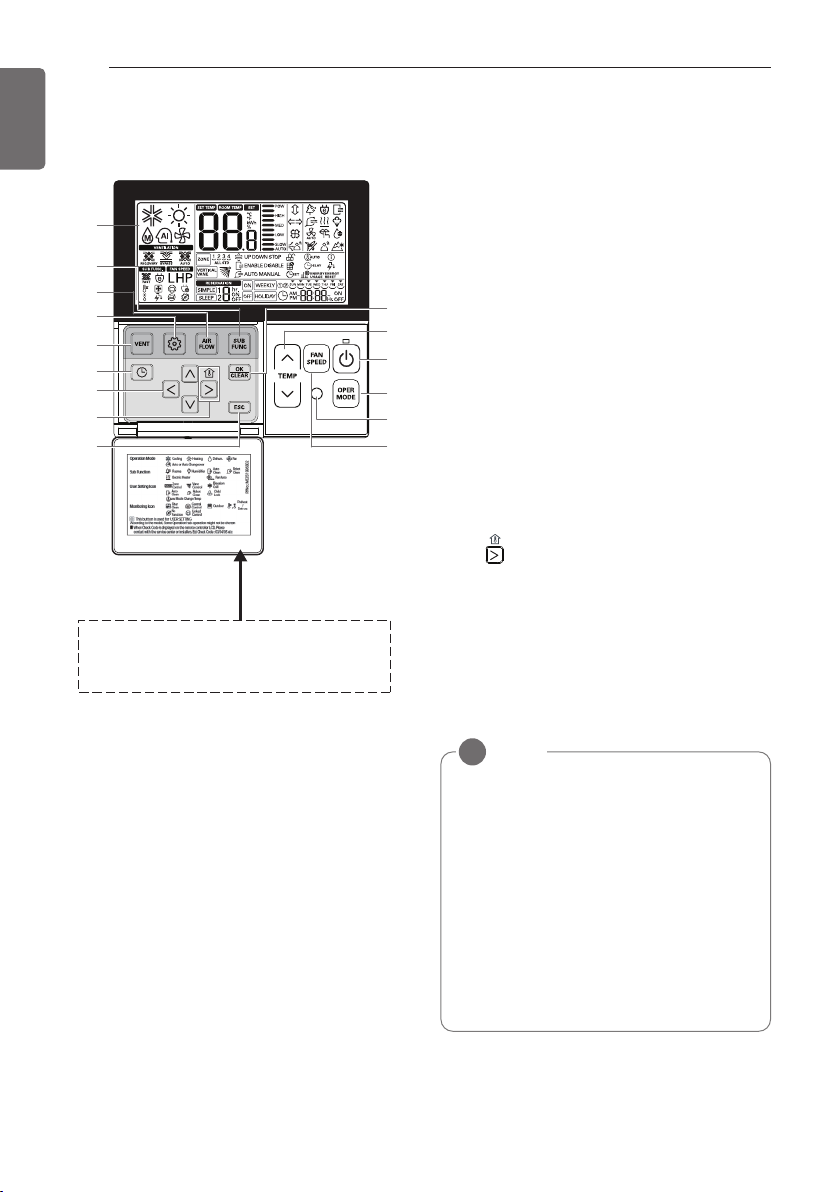
1 OPERATION INDICATION SCREEN
2 SET TEMPERATURE Button
3 FAN SPEED Button
4 ON/OFF Button
5 OPRATION MODE SELECTION Button
6 WIRELESS REMOTE CONTROLLER RE-
CEIVER
• Some products don't receive the wireless
signals.
7 AIR FLOW Button
8 SUBFUNCTION Button
9 FUNCTION SETTING Button
10 VENTILATION Button
11 RESERVATION
12 UP,DOWN,LEFT,RIGHT Button
• To check the indoor temperature, press
button.
13 ROOM TEMPERATURE Button
14 SETTING/CANCEL Button
15 EXIT Button
* Some functions may not be operated and dis-
played depending on the product type.
NOTE
!
• Display temperature can be different from
actual room temperature if the remote
controller is installed at the place where
sun-rays are falling directly or the place
nearby heat source.
• The actual product can be different from
above contents depending upon model
type.
• When using simultaneous operation system, whenever press remote controller
button, system will approximately operate
after 1~2 minutes.
Wired Remote Controller
1
8
7
9
10
11
12
13
15
Please attach the inform label inside of the door.
Please choose proper language depend on your
country.
14
2
4
5
6
3

OPERATING INSTRUCTIONS
Standard Operation - Standard Cooling
It cools the room by comfortable and clean wind.
Press button to turn on the
1
indoor.
Press button to select
2
Cooling operation mode.
Adjust the desired temperature
3
by pressing buttons.
Press button to check the
Room temperature.
When setting the desired
temperature higher than room
temperature, only ventilation
wind is blow out instead of
cooling wind.
OPERATING INSTRUCTIONS
11
ENGLISH
OPERATING INSTRUCTIONS
12
ENGLISH
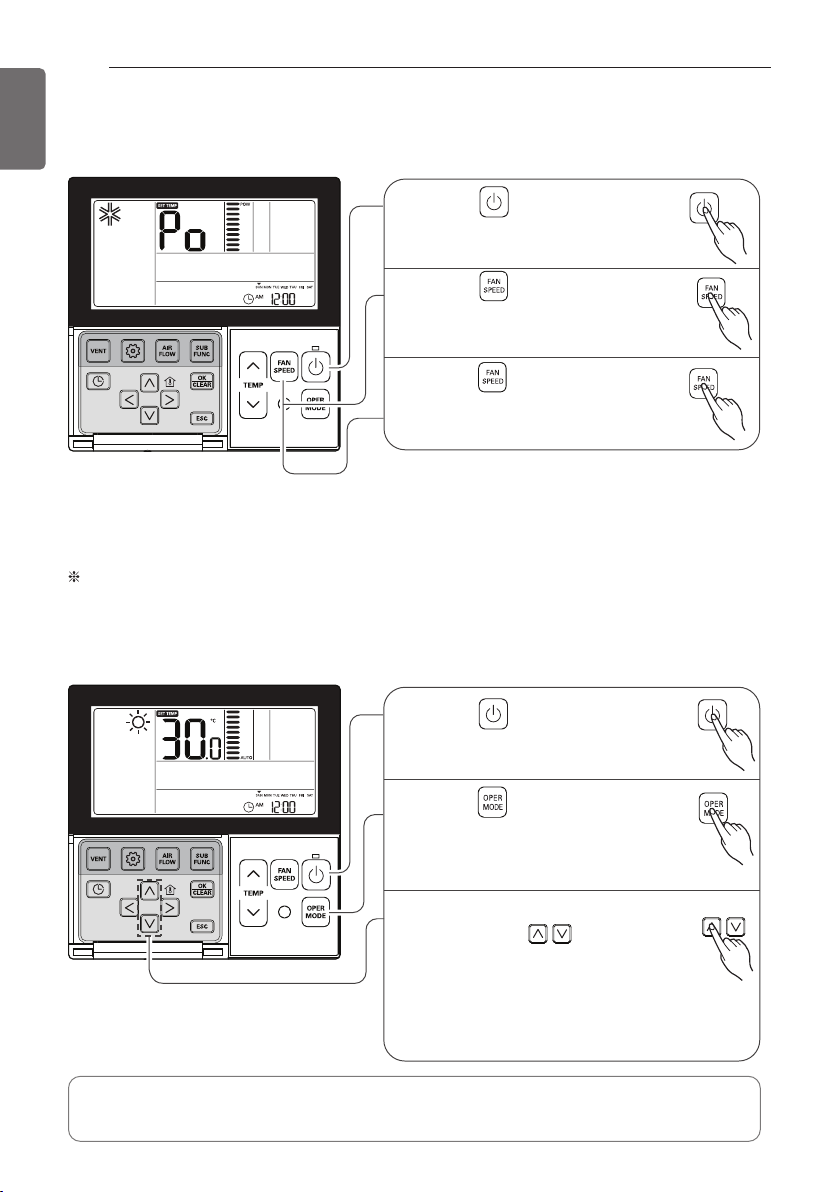
Standard Operation - Power Cooling
It makes the room cool using pleasant and fresh air quickly.
What is Power Cooling?
• Desired temperature: Po (actually 18 °C)
• Wind flow: power wind
• Wind direction: fix to air-cooling position
Partial product has no power air-cooling function.
It make room temperature
}
drop fast by running
Standard Operation - Heating Mode
It supplies warm wind to the indoor.
Press button to trun on the
1
indoor.
Press button to select
2
cooling operation mode.
Press button continuously
3
until 'Po' displayed.
Press button to turn on the
1
indoor.
Press button to select
2
Heating mode.
(To check the indoor temperature,
press the room temperature button.)
Adjust the desired temperature
3
by pressing buttons.
When setting the desired
temperature lower than room
temperature, there is only
ventilation wind.
• Heating drive only operates at the cooling and heating model.
• Heating doesn't operate at cooling exclusive model.
OPERATING INSTRUCTIONS
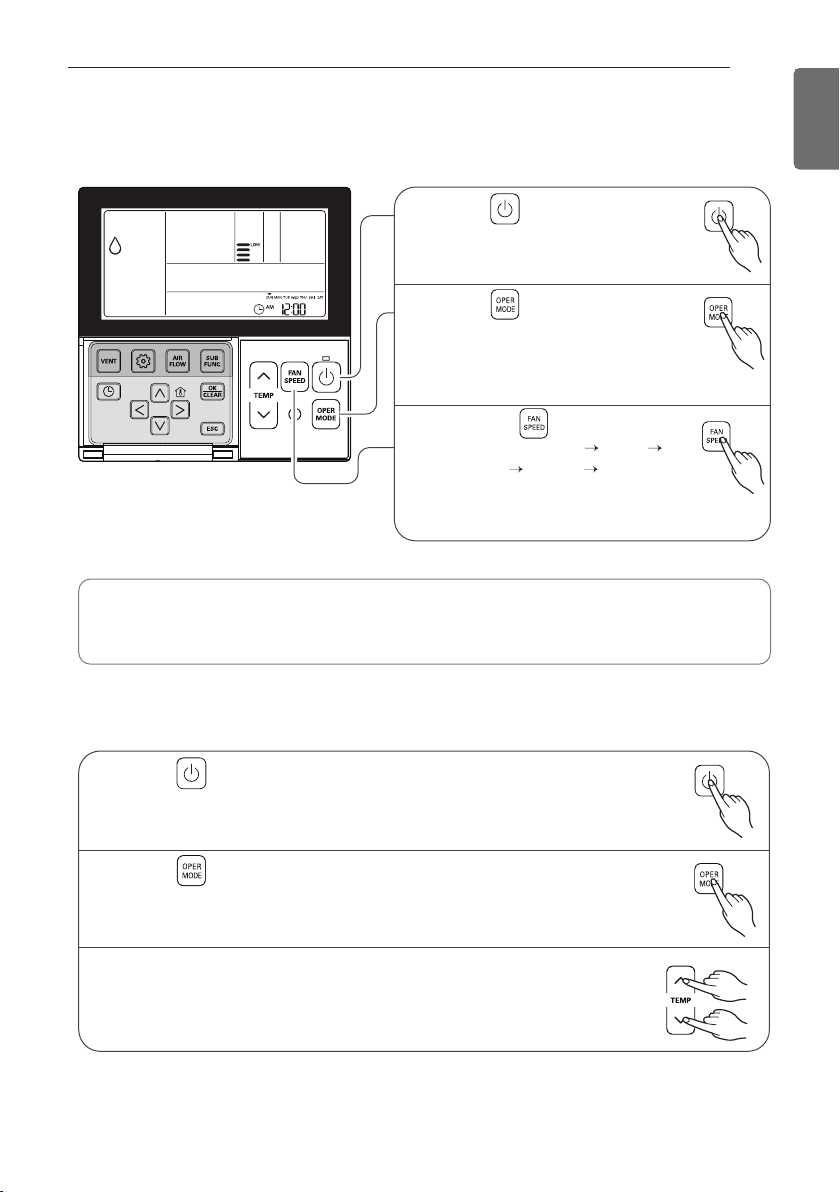
Standard Operation - Dehumidification Mode
It removes humidity while air-cooling weakly.
Press button to turn on the
1
indoor.
Press button to select
2
Dehumidification mode.
The temperature setting can not be
adjusted during operation this mode.
Press the button to select
3
airflow rate feeble
medium
(The initial wind powerfulness of
humidity removal drive is 'weak'.)
• In rainy season or high humidity climate, it is possible to operate simultaneously dehumidifier
and cooling mode to remove humidity effectively.
• The menu item of wind powerfulness might not be partially selected according to the product.
strong automatic.
weak
13
ENGLISH
Auto Changeover Mode
Press button to turn on the indoor.
1
Press button to select Auto Changeover Mode.
2
The setting temperature as the right side picture can be set in
3
both cooling/ heating model.
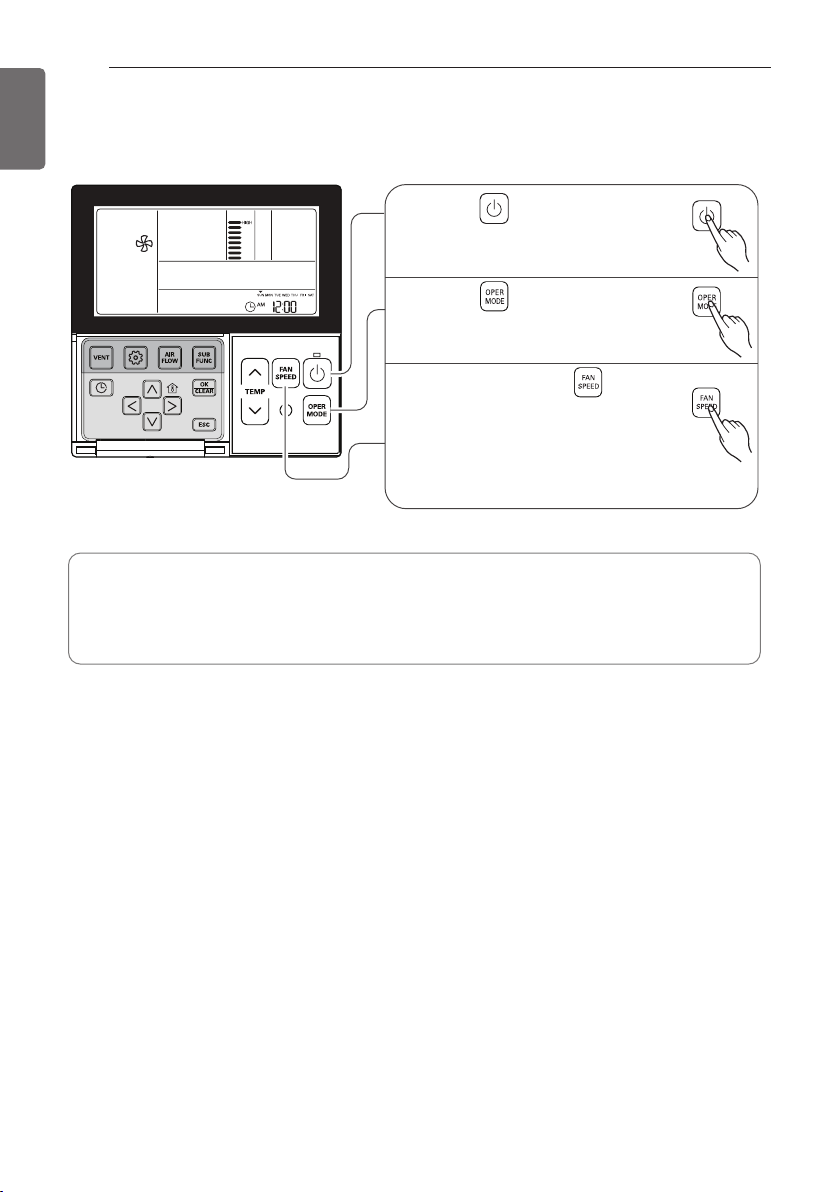
Press button to turn on the
indoor.
1
Press button to select Fan
Mode.
2
Every time pressing button, you
can select wind flow in order of
feeble → weak → medium → strong
→ automatic.
When running ventilation,
compressor of AHU doesn't work.
3
OPERATING INSTRUCTIONS
14
ENGLISH
Standard Operation - Fan Mode
It blows the air as it is in the indoor, not the cold wind.
• Ventilation drive does not release cool wind but general fan
• Because it releases the wind that has no temperature difference from the room, it functions to
circulate the inside air.
• The menu item of wind powerfulness might not be partially selected according to the product.
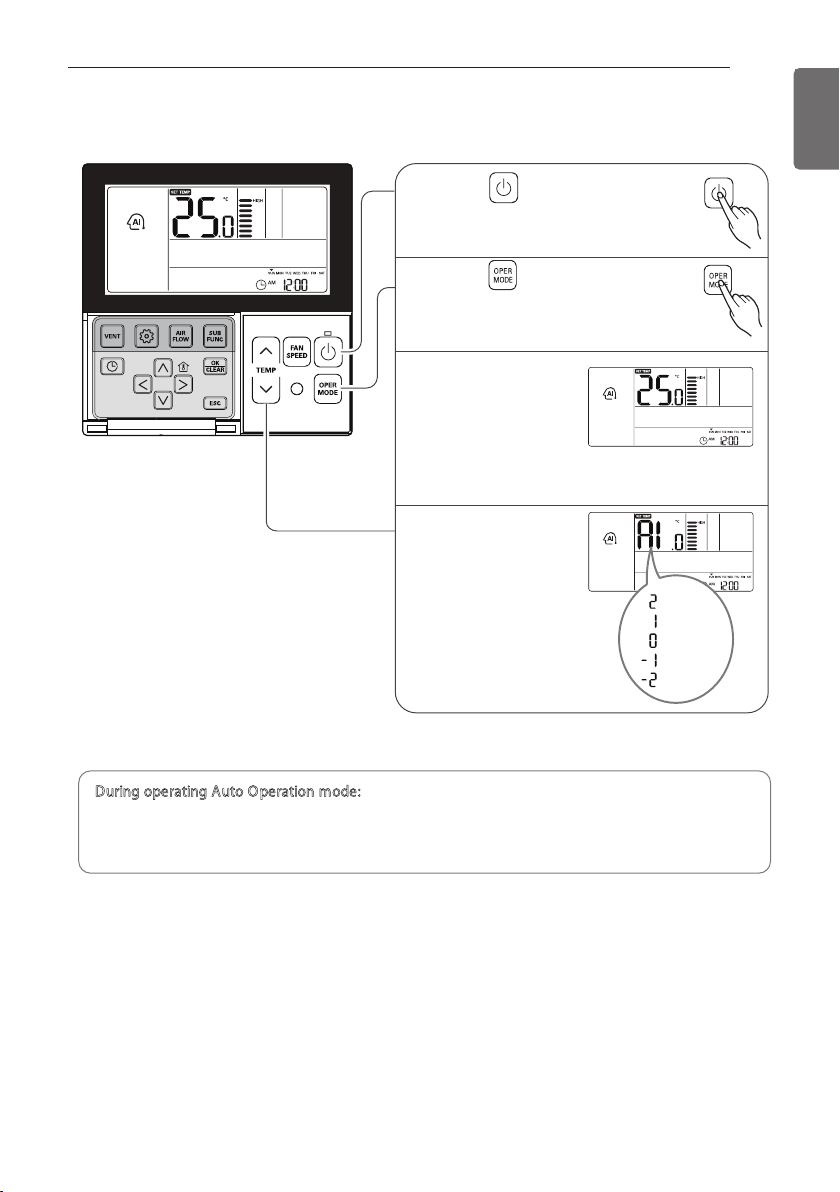
Press button to turn on the
indoor.
1
Press button to select
Artificial intelligence Mode.
2
You can adjust
the temperature
as the picture on
the right for
cooling and
heating model.
3
For the case of
cooling exclusive,
as the picture on
the right, you can
adjust the
temperature from
hot to cold, from
"-2" to "2" based
on "00".
4
When cold
When cool
When appropriate
When warm
When hot
OPERATING INSTRUCTIONS
Standard Operation - Auto Operation Mode
15
ENGLISH
During operating Auto Operation mode:
• We can use the FAN SPEED button
• We can change manually to other operation mode.
OPERATING INSTRUCTIONS
16
ENGLISH
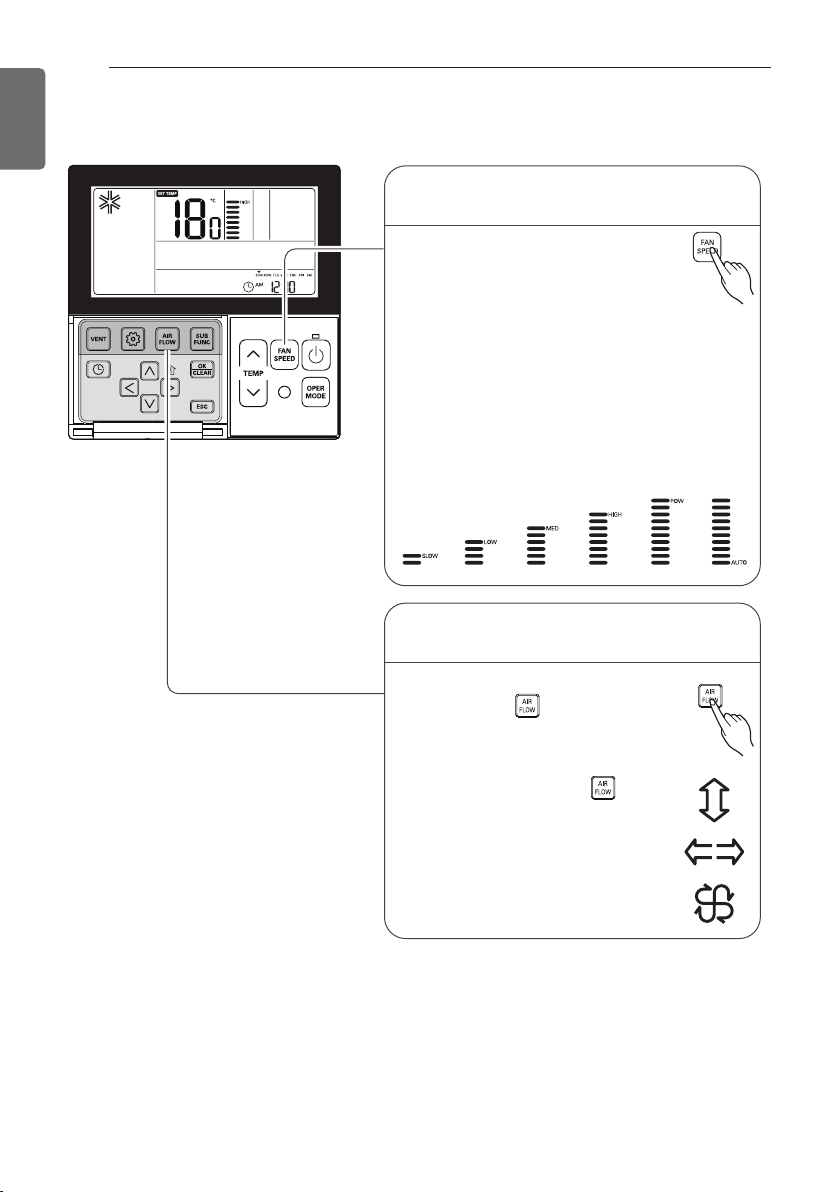
Standard Operation - Airflow Setting
Wind powerfulness : You can simply adjust desired
wind powerfulness.
Please setup desired wind
1
powerfulness by wind powerfulness
button.
• Every time you press wind
powerfulness, you can select the wind flow in
order of ‘feeble → weak → weak medium →
medium → medium strong → strong →
power → automatic’.
• The menu item might not be partially
selected according to product function.
Wind direction : You can simply adjust desired
wind direction.
Please set desired wind direction
1
by pressing button.
You can select wind direction of
(comfortable wind → Up/Down
and Right/Left → Right/Left →
Up/Down) by pressing
button.
Partial item of wind directions
might not be selected according
to product function.
* Some functions may not be operated and displayed
depending on the product type.
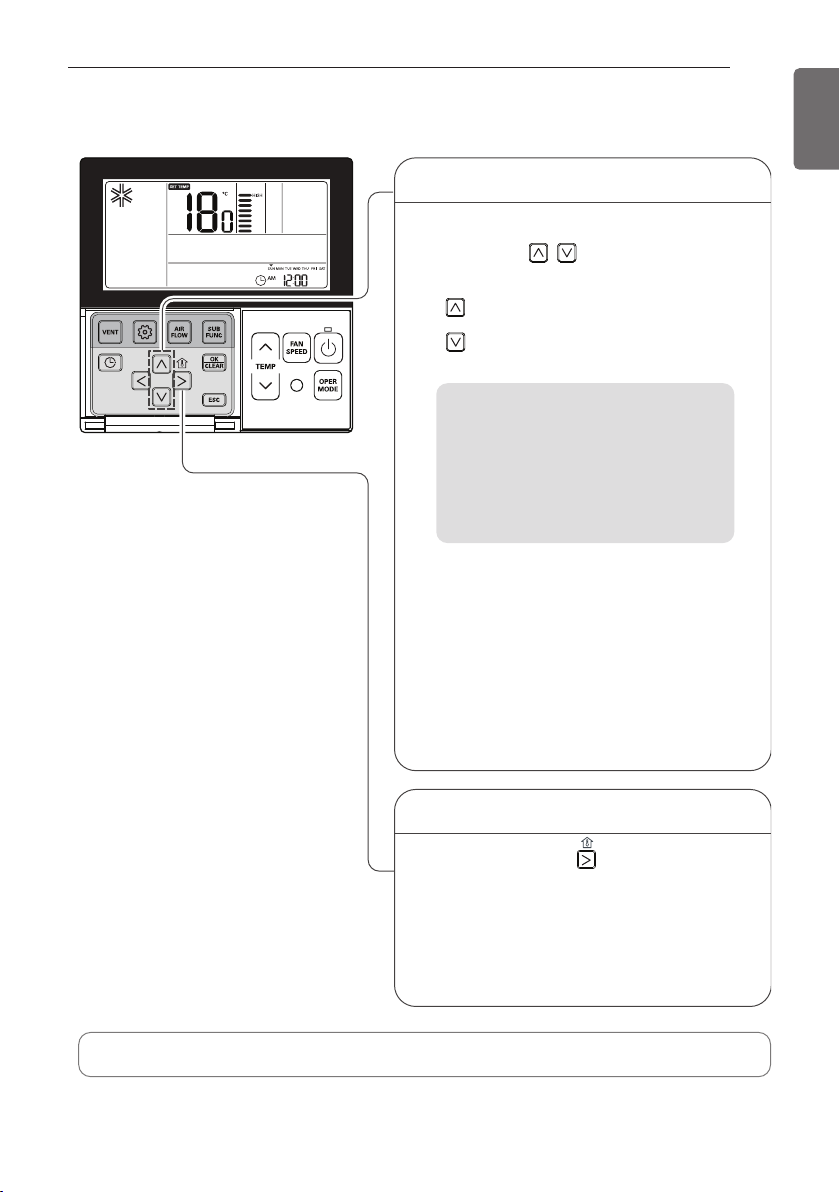
We can simply adjust the desired
temperature.
• Press the buttons to adjust the
desired temperature.
: Increase 1 ˚C or 2 ˚F per one time
pressing
: Decrease 1 ˚C or 2 ˚F per one time
pressing
Cooling operation:
- The cooling mode doesn't work if
desired temperature is higher than room
temperature Please lower the desired
temperature.
Heating operation:
- The heating mode doesn't work if desired
tempera ture is lower than room
temperature Please increase the desired
temperature.
1
Whenever press button, the room
temperature will be displayed within 5
seconds.
After 5 seconds, it turns to display the
desired temperature.
Because of location of remote controller,
the real room temperature and the this
displayed value can be different.
1
Temperature Setting
Room Temperature Check
OPERATING INSTRUCTIONS
Standard Operation - Temperature Setting/Room Temperature Check
17
ENGLISH
• Room temp: Indicate the current
room temperature.
• Set temp: Indicate the temperature
that user want to set.
* Depend on what kind of controller,
the desired temperature can be
adjusted at 0.5 ˚C or 1 ˚F.
• 5 °C is proper for the difference between room and outside temperature.
OPERATING INSTRUCTIONS
18
ENGLISH
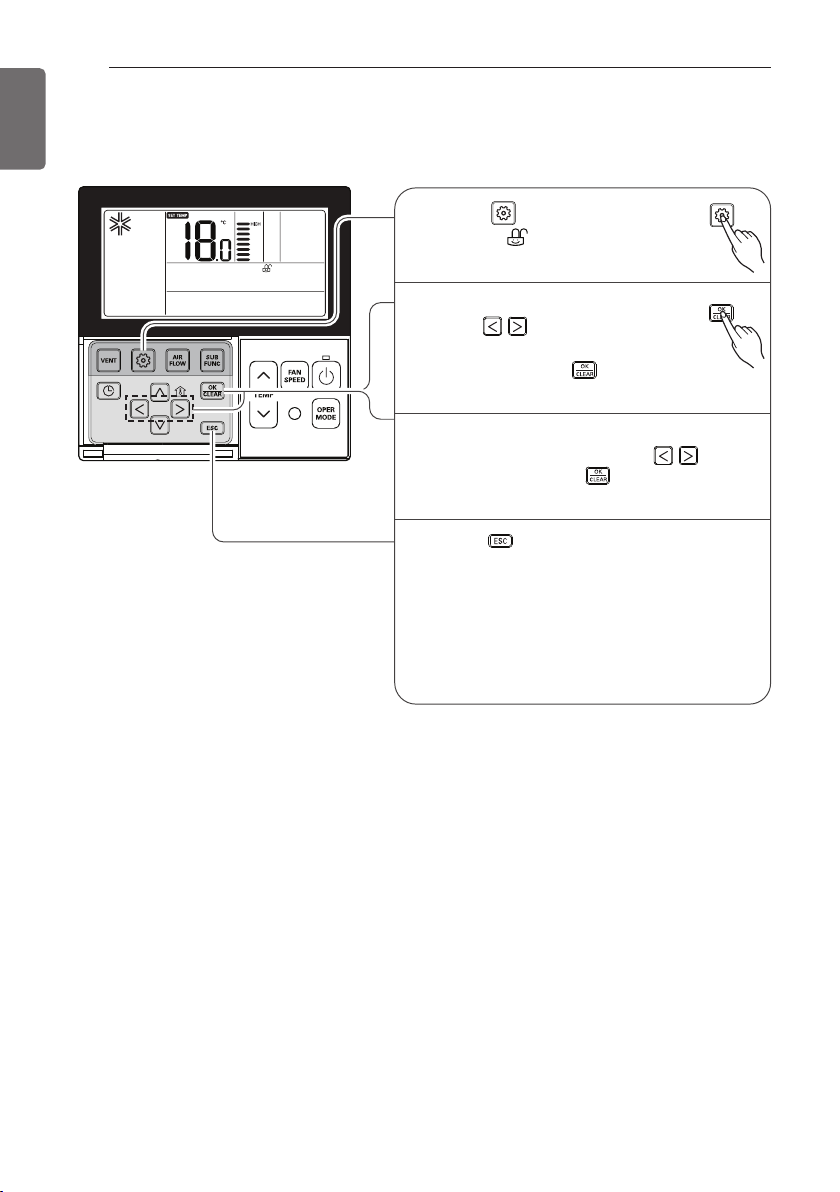
Function Setting - Child Lock
It is the function to use preventing children or others from careless using.
Press button repeatedly
1
until the is flashing.
If moving to 'setup' icon area by
2
using button, 'setup' icon
blinks, and child lock function is
setup if pressing button at
that time.
When cancelling lock function, if moving
3
to 'cancel' icon by pressing button
and then, pressing button, child lock
function is cancelled.
Press button to exit.
4
❈ After setup, it automatically gets out of
setup mode if there is no button input
for 25 seconds.
❈ When exiting without pressing set
button, the manipulated value is not
reflected.
OPERATING INSTRUCTIONS
19
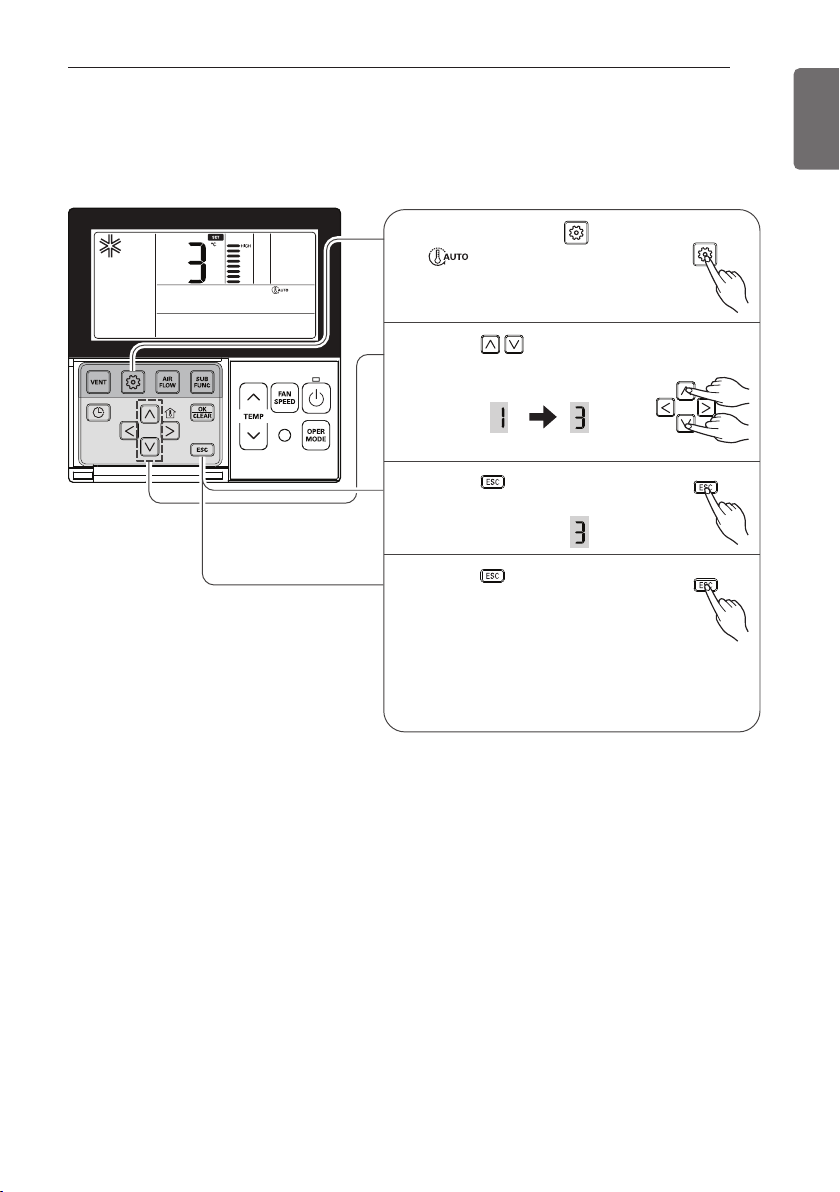
Function Setting - Change Temp
Change temperature is the function to setup air-cooling and heating drive automatically changeable
according to the temperature at artificial intelligence drive mode.
Repeat pressing button until
1
icon flash.
Press button to change.
2
❈ Converting temp value : 1~7
Press button to complete
3
and active the setting process.
Press button to exit or
4
system will automatically release
without any input after 25
seconds.
❈ When exiting without pressing
set button, the manipulated
value is not reflected.
ENGLISH

OPERATING INSTRUCTIONS
20
ENGLISH
Function Setting - Filter Sign Clear
This function is to clear the indicator of indoor filter cleaning.
Press button repeatedly
1
until the is flashing.
When the is flashing, press
2
the to clear this display
• When filter is covered by dust, it will reduce cooling/heating efficiency and accumulate more
electric power. Therefore. do clean the filter whenever cleaning time is expired.
* Filter cleaning indication is automatically cancelled without the separate cancellation after certain
pe
riod of time.
OPERATING INSTRUCTIONS
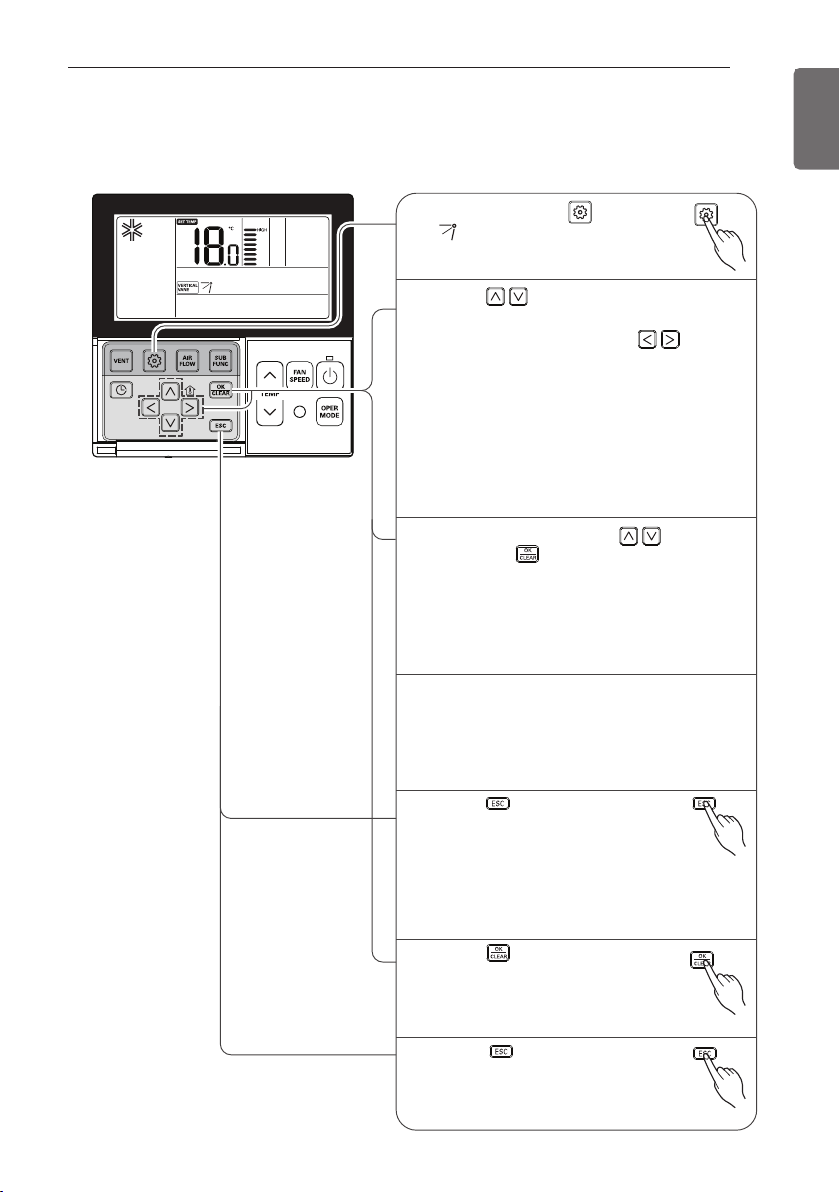
Function Setting - Vane Angle Control
This function is to adjust angle at which airflow is blow out.
* Some functions may not be operated and displayed depending on the product type.
Repeat pressing button until
1
icon flash.
Press button to select active vane :
2
1 / 2 / 3 / 4 / All / Standard
Select Vane number using buttons.
❈ Vane number : No. 1, 2, 3, 4, all, or
standard
- Selected vane is in operation.
- Please verify the operating vane.
- To set the angle of all the vanes,
select 'all'.
- To set as the factory default settings,
select 'standard'.
Select wind angle using button,
3
and press button.
- The boundary of wind angle settings
can be changed to 5 levels or 6 levels
according to the product.
- When selecting 'standard' for Vane
number, the wind angle does not move.
21
ENGLISH
Set the wind angles for the remaining
4
vanes as the same as above.
❈ There are products with vanes with
no. 1 and no. 2 only according to the
product types.
Press button to exit.
❈
After setup, it automatically
5
gets out of setup mode if there
is no button input for 60 seconds.
❈
When exiting without pressing set
button, the manipulated value is not
reflected.
Press button to complete and
6
active the setting process.
(Airflow direction function will be
released whenever setting vane angle)
Press button to exit or
7
system will automatically release
without any input after 25
seconds.
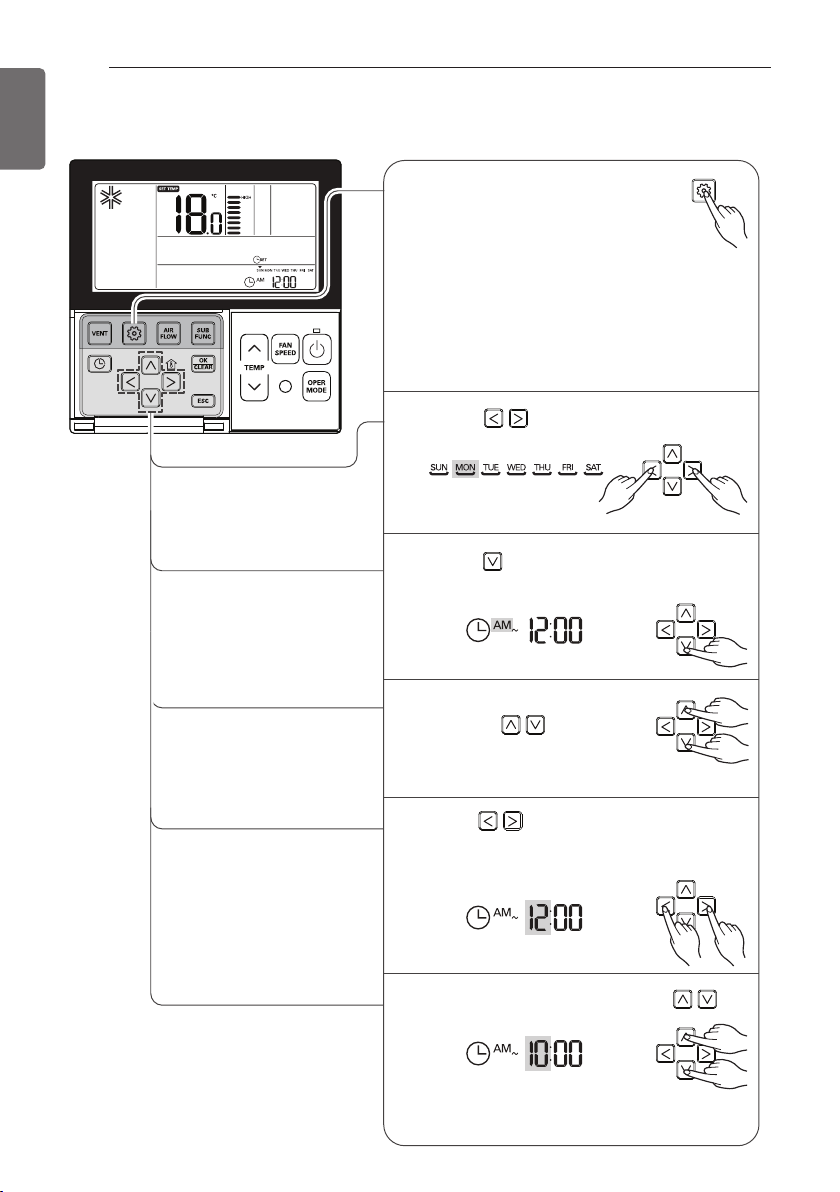
Please press function setup
button. If pressing function
setup button repeatedly, it
moves to time setup menu.
‘Time setup’ icon is indicated at that time
and date blinks at current time indication
area.
Ex) Changing Current Time as
'Monday / AM 10:20'.
1
Press key to adjust the current
day.
2
Press key to move to AM/ PM
setting mode (the 'AM/ PM segment will
flash).
3
Setting AM/ PM value by
pressing button.
4
Press button to move to 'Hour'
setting mode. (the 'Hour' segment will
flash)
5
Setting Hour value by pressing
button.
6
OPERATING INSTRUCTIONS
22
ENGLISH
Function Setting - Changing Current Time
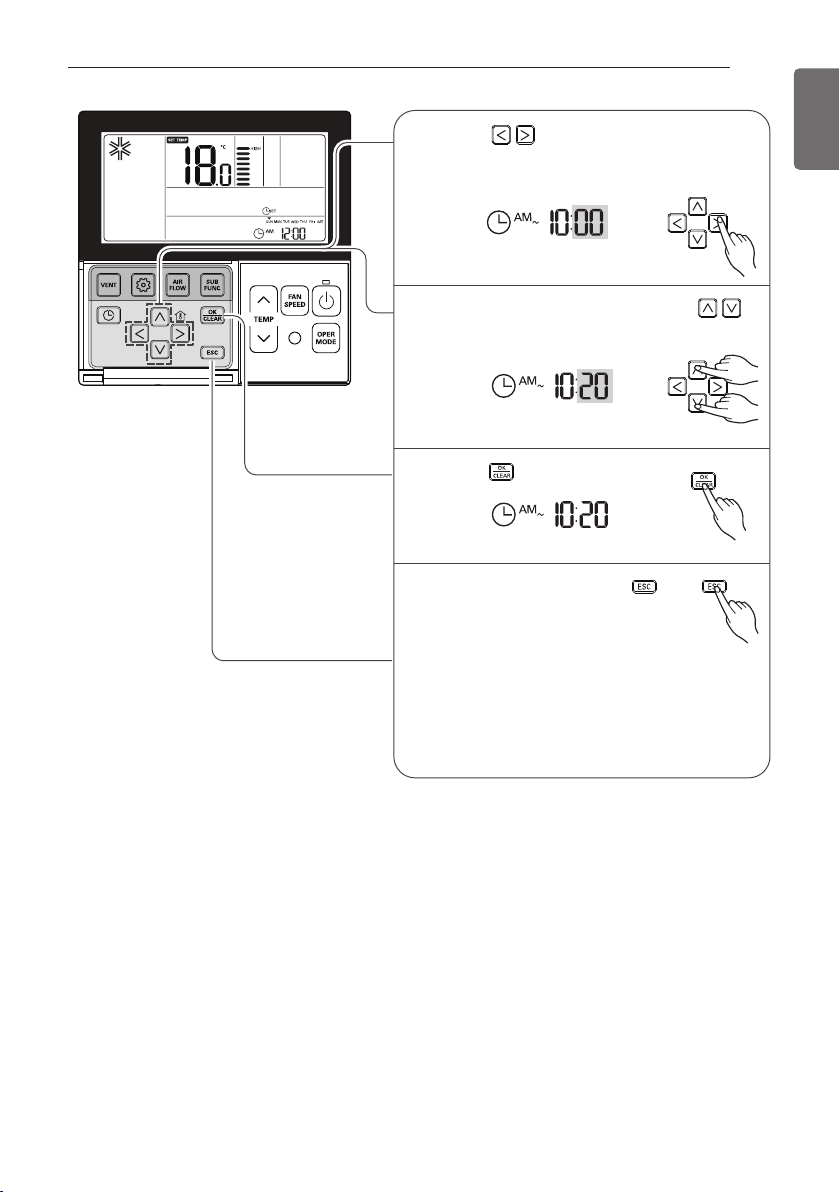
Press button to move to 'Minute'
setting mode. (the 'Minute' segment will
flash)
7
Setting Minute value by pressing
button.
8
Press button to finish.
9
In the process, press
button to release and exit
from setting mode.
(In case of exit with
incomplete information, it will
return to the previous setting)
❈ When exiting without pressing set
button, the manipulated value is
not reflected.
10
OPERATING INSTRUCTIONS
23
ENGLISH
OPERATING INSTRUCTIONS
24
ENGLISH
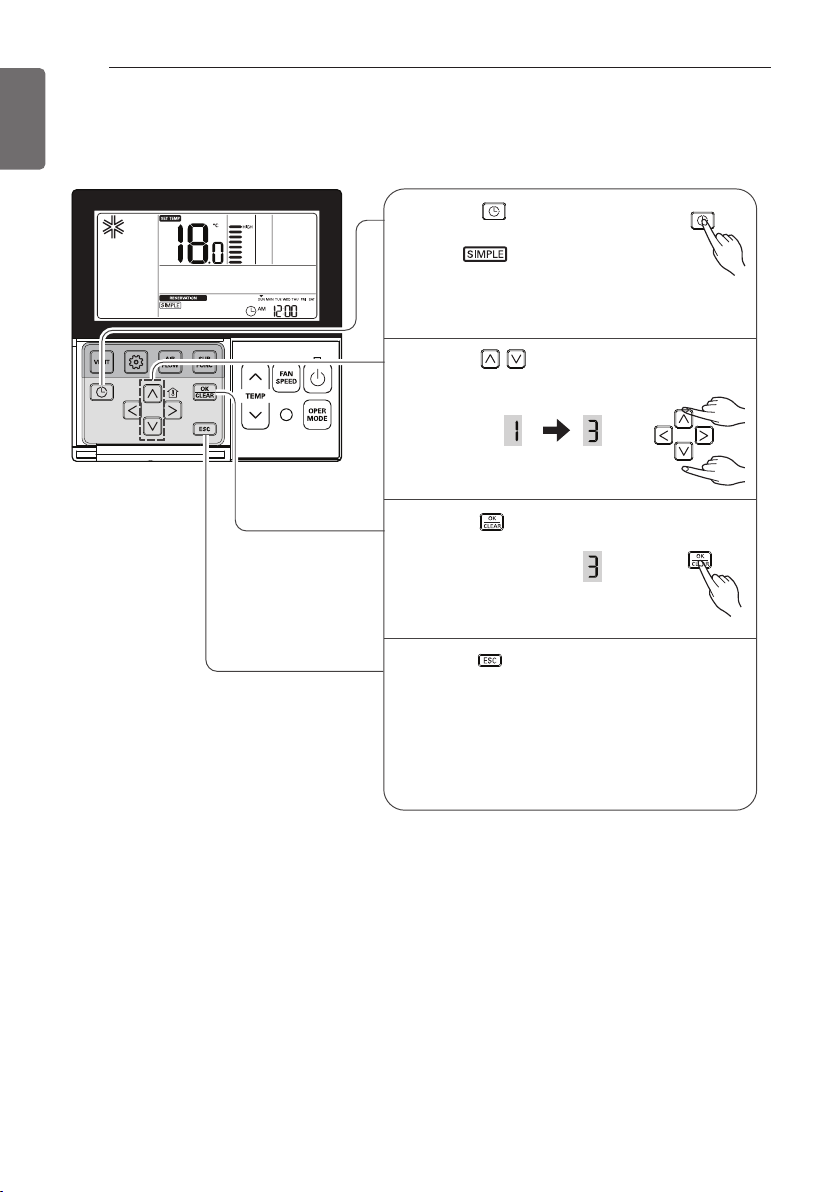
Programming - Simple Reservation
You can set the reservation conveniently in the units of 1 hour from 1 hour to 7 hours.
Press button to enter the
1
Programming mode.
(the segment flashing)
Ex) Setting Simple Reservation
time as '3'.
Press button to adjust reservation
2
time.
Press button to finish setting.
3
Press button to exit.
4
❈ After setup, it automatically gets out
of setup mode if there is no button
input for 25 seconds.
❈ When exiting without pressing set
button, the manipulated value is not
reflected.
* When simple reservation setup, product automatically runs or stops after the time that is set.
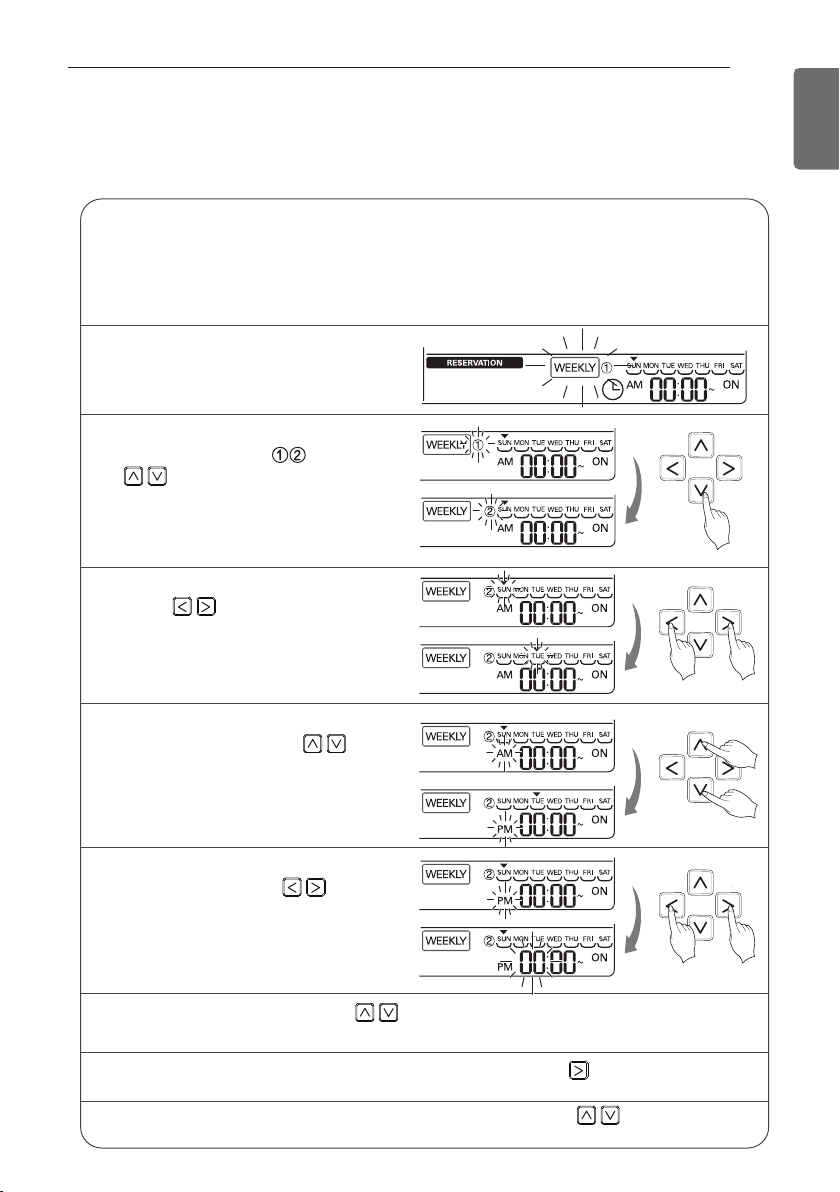
Please move to 'weekly' by
repeatedly pressing reservation
button. 'Weekly' blinks at this time.
Please move to reservation setup mode by pressing reservation button.
❈ You can setup two weekly reservations for one day, and up to fourteen
reservations for a week.
For example, to setup (Tuesday morning 11:30 turned on ~ afternoon 12:30
turned off), you setup in order below.
2
1
Please select weekly reservation or
weekly reservation
by using
button.
❈ You can setup two reservations,
weekly reservation 1 and weekly
reservation 2, for a day.
3
Please move to 'date' setup part by
using button. If 'date'
indication blinks, please setup date.
You can setup date from Monday to
Sunday.
4
Please move to 'AM/PM' setup part
of turning on by using button.
5
Please move to 'hour' setup part of
turning on by using button.
- It is the part to setup the time at
which air-conditioner is turned on.
6
Please move to 'minute' setup part of turning on by using button.
8
Please change time by using button.
- You can setup hour 0~12.
7
If 'minute' indication blinks, please setup 'minute' by using button
9
OPERATING INSTRUCTIONS
Programming : Weekly Reservation
You can set the daily reservation in weekly unit.
Weekly reservation keeps operating until before you cancel it once you setup.
25
ENGLISH
26
ENGLISH
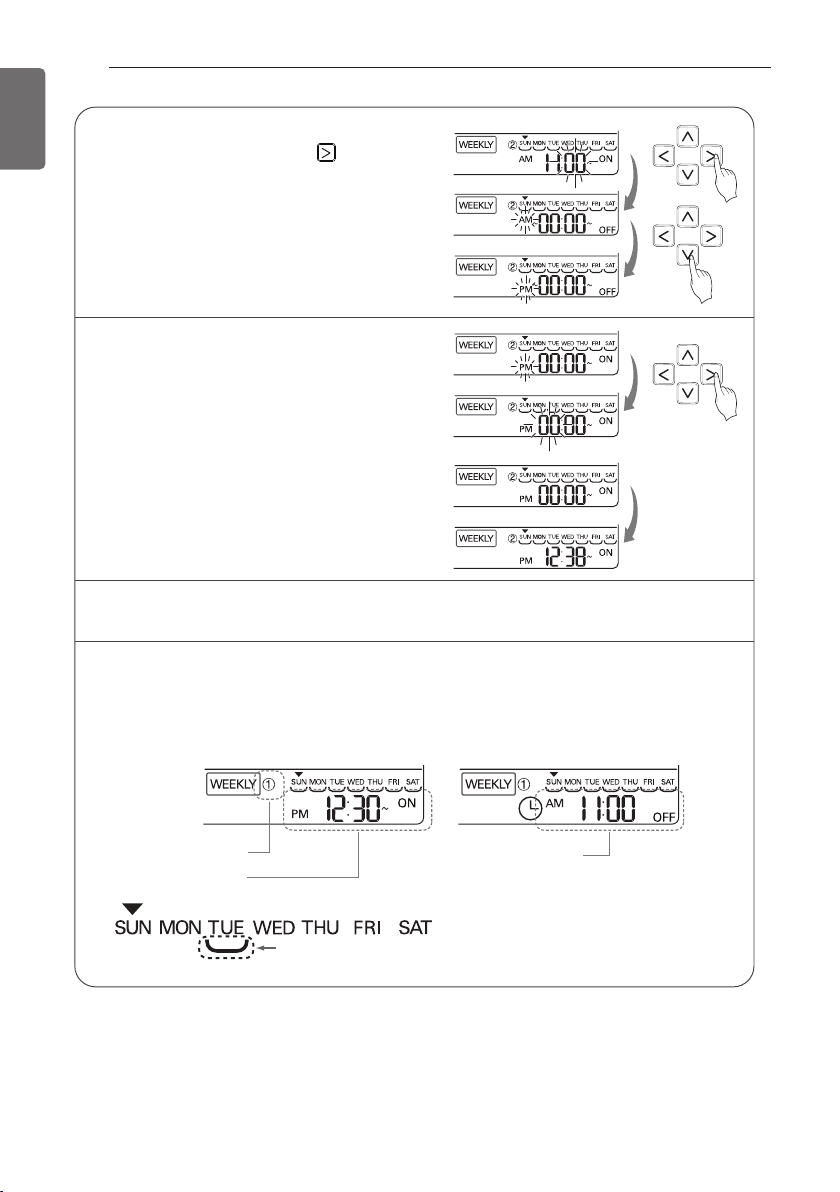
10
11
12
OPERATING INSTRUCTIONS
Please move to 'AM/PM' setup part
of turning off by using button.
- AM/PM setup is identical with
turning on time setup.
Please move to 'hour' setup part
of turning off by using Right
button.
- It is the part to reserve the
time at which air-conditioner is
turned off.
- If 'hour' indication blinks,
please setup 'hour'.
h
Please setup 'hour' and 'minute'
identically with the method to
setup turning on time.
If finishing weekly reservation setup, please press setup/cancellation button.
Weekly reservation setup for the day that you set is finished.
If you setup with the method identical with above by selecting the day that
13
you'd like to setup, it operates weekly reservation.
If you setup both turning on reservation time and turning off reservation time
identically, it doesn't operate reservation drive.
Weekly reservation explanation
Reservation number
Turning on time
Under bar: the indication that there is weekly reservation for
corresponding day
* Indoor unit is turned on to desired temperature if it is configured using up/down button during preset
of weekly operation time.
- When desired temperature is not set, it is turned on automatically with desired temperature
of previous operation.
Turning off time
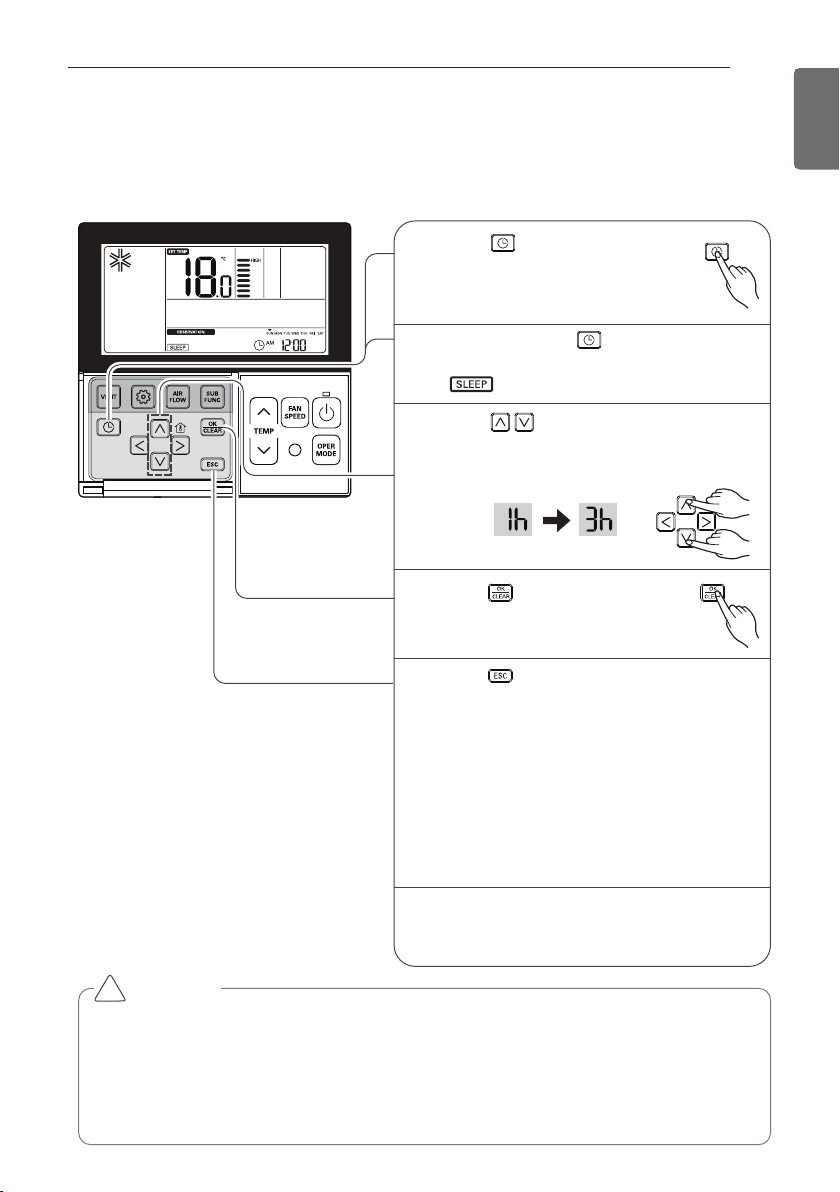
Press button to enter the
Programming mode.
Ex) Setting Sleep Reservation
time as '3'.
1
Repeat pressing button to enter
the SLEEP reservation setting mode.
( segment flashing)
2
Press button to adjust reservation
time.
The SLEEP reservation time is from 1 to
7 hours.
3
Press button to finish setting.
Whenever reservation is done.
4
Press button to exit.
❈ After setup, it automatically gets out
of setup mode if there is no button
input for 60 seconds.
❈ When exiting without pressing set
button, the manipulated value is not
reflected.
- If reservation is setup, 'sleep'
indication shows up at the lower part
of LCD screen.
5
If finishing sleep reservation setup,
air-conditioner product operates sleep
drive and stops after the time that is set.
6
OPERATING INSTRUCTIONS
Programming - Sleep Reservation
Sleep reservation is the function of air-conditioner to run and stop after certain period of time at sleep
mode before sleep. When connected to a ventilation product and set the sleep reservation, when it
goes to the sleep mode, after the set time has elapsed.
27
ENGLISH
CAUTION
!
Please reserve proper time at sleeping. (Too much air-cooling is not good for your health.)
• Because it automatically adjusts desired temperature for comfortable air-cooling at sleep drive,
there could be difference between remote controller's desired temperature and air-conditioner
body's desired temperature.
• Sleep reservation operates as off reservation for the product whose temperature adjustment
isn't controlled by unit of 0.5 °C.
OPERATING INSTRUCTIONS
28
ENGLISH
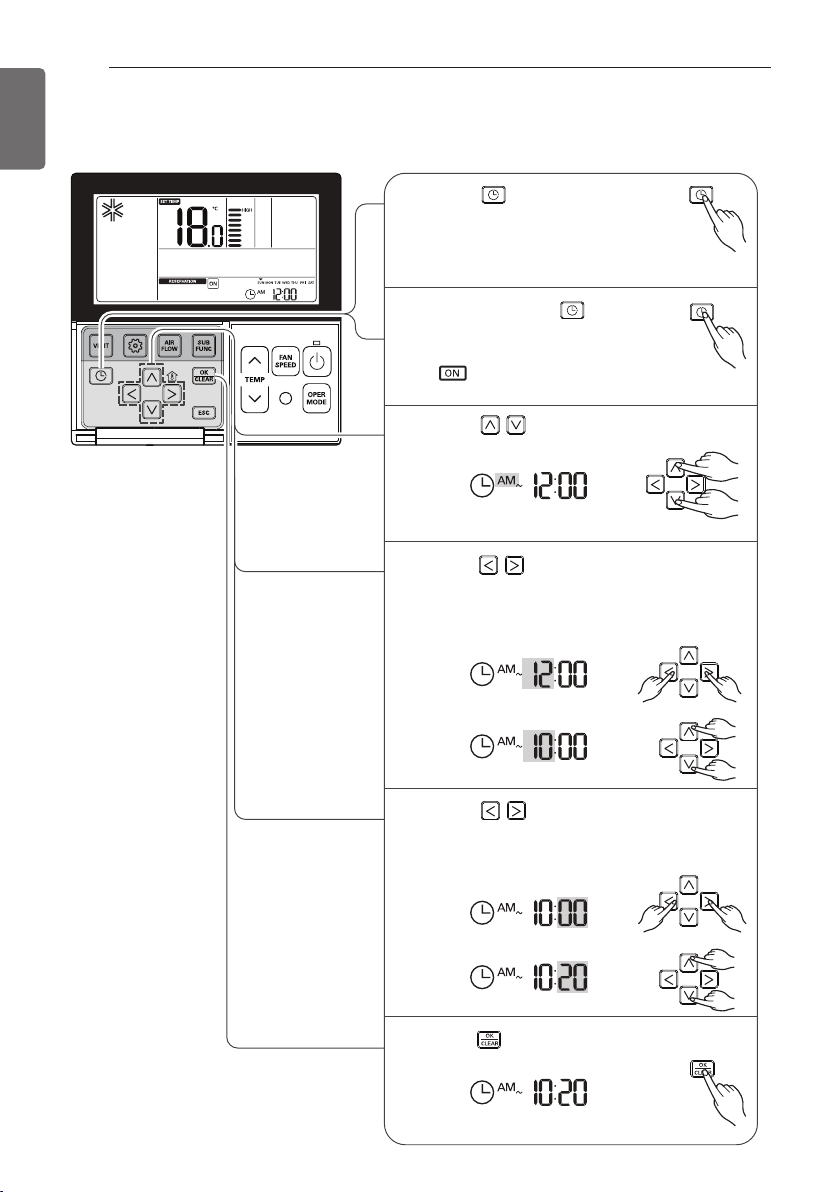
Programming - ON Reservation
Automatically turned On at reserved time that you set.
Press button.
1
Ex) Setting ON Reservation
Time as 'AM 10:20'.
Repeat pressing button to
2
enter the ON reservation
setting mode.
( segment flashing)
Press button to adjust AM/ PM
3
setting.
Press button to Hour setting
4
mode. When the Hour icon flash, please
setting time.
The setting range is within 1~12.
Press button to shift to Minute
5
setting mode. When the Minute icon
flash, please setting minute the setting
range is within 00~59.
Press button to finish setting.
6
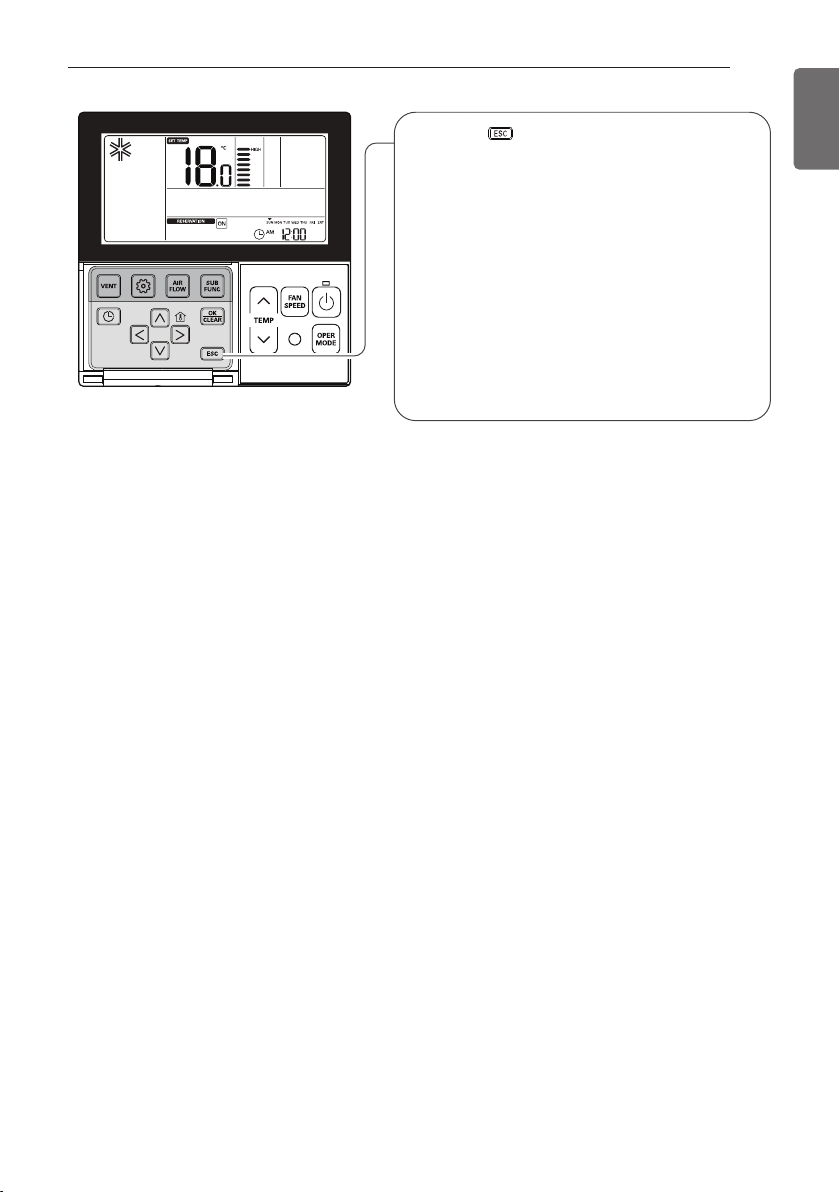
OPERATING INSTRUCTIONS
Press button to exit.
7
❈ After setup, it automatically gets out
of setup mode if there is no button
input for 25 seconds.
❈ When exiting without pressing set
button, the manipulated value is not
reflected.
- If reservation is set, 'turned on'
indication shows up at the lower part
of LCD screen, and air-conditioner
product runs at the time that is set.
- If reservation is cancelled, 'turned
on' indication disappears.
29
ENGLISH
OPERATING INSTRUCTIONS
30
ENGLISH
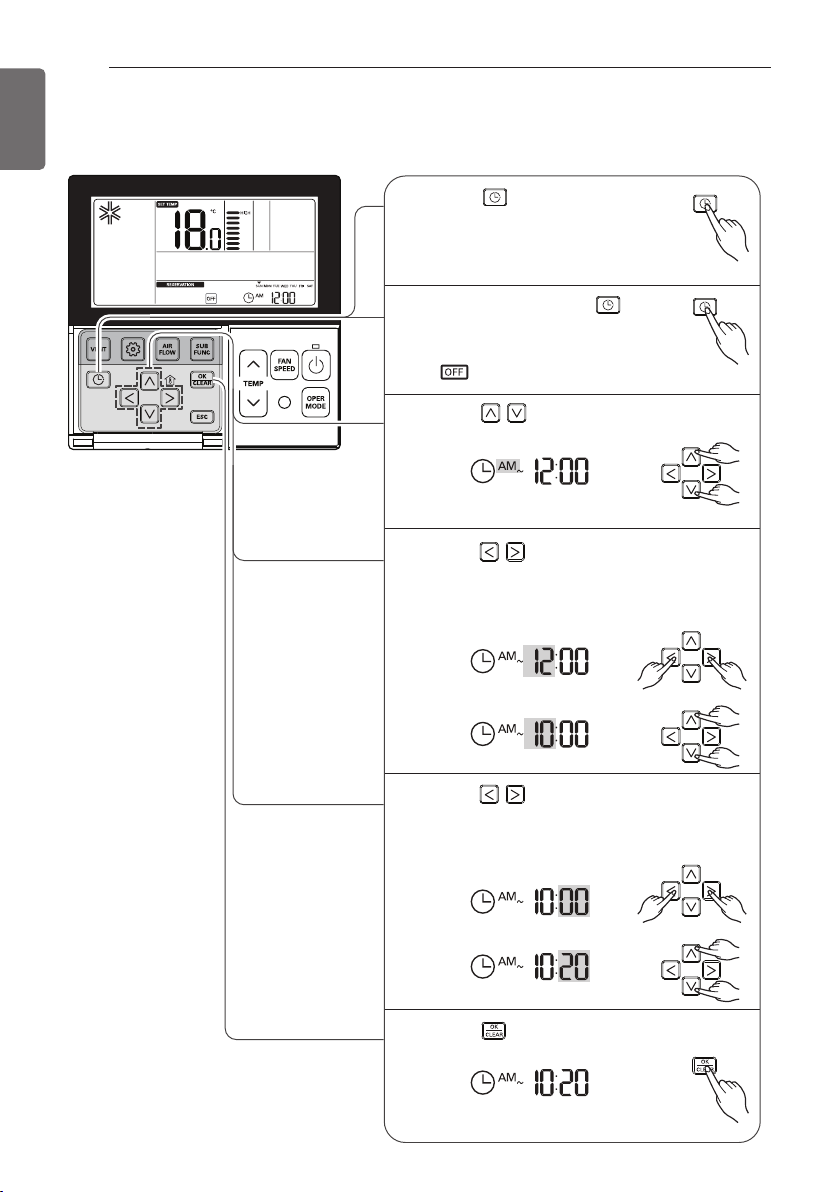
Programming - OFF Reservation
Automatically turned Off at reserved time that you set.
Press button.
1
Ex) Setting OFF Reservation
Time as 'AM 10:20'.
Repeatedly pressing button
2
to enter the OFF reservation
setting mode.
( segment flashing)
Press button to adjust AM/ PM
3
setting.
Press button to shift to Hour
4
setting mode. When the Hour icon flash,
please setting time.
The setting range is within 1~12.
Press button to shift to Minute
5
setting mode. When the Minute icon
flash, please setting minute the setting
range is within 00~59.
Press button to finish setting.
6

OPERATING INSTRUCTIONS
Press button to exit.
7
❈ After setup, it automatically gets out
of setup mode if there is no button
input for 25 seconds.
❈ When exiting without pressing set
button, the manipulated value is not
reflected.
- If reservation is set, 'turned off'
indication shows up at the lower part
of LCD screen, and air-conditioner
product runs at the time that is set.
- If reservation is cancelled, 'turned
off' indication disappears.
31
ENGLISH

OPERATING INSTRUCTIONS
32
ENGLISH
Programming : Holiday Reservation
It automatically stops at reserved day that you set.
Please press button.
1
It enters into reservation
setup mode.
Please move to 'holiday' by repeatedly
2
pressing button.
Please move to 'date' that
3
you want to setup holiday
by using button.
Please appoint or cancel holiday by using
4
or button.
For example, when you setup
Monday/Friday to holiday
- 'Monday', 'Friday' letter disappears.
Please press button if finishing
5
holiday setup.
❈ If it comes to appointed holiday,
air-conditioner automatically stops.
Once you setup holiday appointment,
until before you cancel holiday setup,
air-conditioner automatically stops
within one hour even though you run
air-conditioner.

B
e
n
z
e
n
e
S
C
O
U
R
I
N
G
C
L
B
A
R
G
E
R
G
S
I
N
N
E
R
MAINTENANCE AND SERVICE
MAINTENANCE AND SERVICE
33
ENGLISH
CAUTION
!
Before performing any maintenance, turn
off the main power to the system.
Indoor Unit
Grille, Case and Remote Control
- Turn the system off before cleanining, To
clean, wipe with a soft, dry cloth. Do not use
bleach or abrasives.
NOTE
!
Supply power must be disconnected before
cleaning the indoor unit.
Air Filters
The air filters behind the front grille should be
checked and cleaned once every 2 weeks or
more often if neccessary.
Air outlet vent
- Never use any of the followings:
Water hotter than 40 °C.
Could cause deformation and/or discoloration.
Volatile substances.
Could damage the surfaces of the air
conditioner.
1
Remove the Air filters.
- Take hold of the tab and pull slightly
forward to remove the filter.
CAUTION
!
When the air filter is to be removed, do not
touch the metal parts of the indoor unit.
It may cause an injury.
2
Clean dirt from the air filter using a vacuum
cleaner or washing with water.
- If dirt is conspicuous, wash with a neutral
detergent in lukewarm water.
- If hot water (50 °C or more) is used, it may
be deformed.
3
After washing with water, dry well in the
shade.
- Do not expose the air filter to direct
sunlight or heat from a fire when drying it.
4
Install the air filter.

34
ENGLISH
Do not overc ool the room.
This is not good for the health
and wastes electricity.
Ke ep blinds or c urtains clos ed.
Do not let direct sunshine enter
the room when the air
conditioner is in operation.
Ke ep the room temperature
uniform.
Adjust the vertical and
horizontal airflow direction
to ensure a uniform
temperature in the room.
M ake sure that the doors
and w indows are s hut tight.
Avoid opening doors and
windows as much as possible
to keep the cool air in the room.
Clean the air filter regularly.
Blockages in the air filter reduce
the airflow and lower cooling
and dehumidifying effects.
Clean at least once every two
weeks.
Ventilate the room occas ionally.
Since windows are kept closed,
it is a good idea to open them
and ventilate the room now and
then.
When the air conditioner is not
going....
When air conditioner is not going to
be used for a long time.
1
Operate the air conditioner at the following
settings for 2 to 3 hours.
- Type of operation: Fan operation mode.
- This will dry out the internal mechanisms.
2
Turn off the breaker.
3
Remove the batteries from the Remote
Controller.
Helpful information
The air filters and your electiric bill.
If the air filters become clogged with dust, the
cooling capacity will drop, and 6 % of the
electricity used to operate the air conditioner
will be wasted.
When the air conditioner is to be
used again.
1 Clean the air filter and install it in the indoor
unit.
2 Check that the air inlet and outlet of the
indoor/outdoor unit are not blocked.
3 Check that the ground wire is connected
correctly. It may be connect to the indoor
unit side.
CAUTION
Turn off the breaker when the air
conditioner is not going to be used for
a long time.
Dirt may collect and may cause a fire.
!
Operation Tips!
MAINTENANCE AND SERVICE

35
ENGLISH
MAINTENANCE AND SERVICE
Call the service immediately in the following situations
- Anything abnormal such as burning smell, loud noise etc. happen. Stop the unit and turn the breaker
off. Never try to repair by yourself or restart the system in such cases.
- Main power cord is too hot or damaged.
- Error code is generated by self diagnosis.
- Water leaks from indoor unit even if the humidity is low.
- Any switch, breaker (safety, earth) or fuse fails to work properly
User must carry routine checkup & cleaning to avoid unit’s poor performance.
In case of special situation, the job must be carried out by service person only.
Case E xplanation
The air conditioner does
not operate.
• Have you made a mistake in timer operation?
• Has the fuse blown or has the circuit breaker been tripped?
The room has a peculiar
odor.
• Check that this is not a damp smell exuded by the walls, carpet, furniture
or cloth items in the room.
It seems that condensation
is leaking from the air
conditioner.
• Condensation occurs when the airflow from the air conditioner cools the
warm room air.
Air conditioner does not
operate for about 3 minutes
when restart.
• This is the protector of the mechanism.
• Wait about three minutes and operation will begin.
Does not cool or heat
effectively.
• Is the air filter dirty? See air filter cleaning instructions.
• The room may have been very hot when the room air conditioner was first
turned on. Allow time for it to cool down.
• Has the setting temperature been set incorrectly?
• Are the indoor unit's air inlet or outlet vents obstructed?
The air conditioner
operation is noisy.
• For a noise that sounds like water flowing.
-This is the sound of freon flowing inside the air conditioner unit.
• For a noise that sounds like the compressed air releasing into atmosphere.
-This is the sound of the dehumidifying water being processed inside the
air conditioning unit.
Crack sound is heard.
• This sound is generated by the expansion/contraction of the inlet grille,
etc. due to changes of temperature.
Filter sign lamp (LED) is
ON.
• Cleaning the filter, press the Timer button and
◀
button of wired remote
controller at the same time for 3 seconds.
Remote control display is
faint, or no display at all.
• Has the circuit breaker been tripped?
• Are the batteries inserted in the opposite (+) and (-) directions?
The error code is occurred
after lightning struck
• This product has been applied to the over current protection circuit.
Error can occur, but it is normal behavior.
After few minutes, It will operate normally.
Troubleshooting Tips! Save time and money!
Check the following points before requesting repairs or service.... If the malfunction persist, please
contact your dealer.

36
ENGLISH

HƯỚNG DẪN SỬ DỤNG
ĐIỀU HÒA
KHÔNG KHÍ
www.lg.com
Vui lòng đọc kỹ hướng dẫn này trước khi vận hành thiết bị của bạn và giữ
lại để tham khảo về sau.
DÀN LẠNH ÂM TRẦN NỐI ỐNG GIÓ
Hướng dẫn cơ bản
Copyright © 2018 LG Electronics Inc. All Rights Reserved.
Tiếng Việt

2
HƯỚNG DẪN TIẾT KIỆM ĐIỆN
Tiếng Việt
Dưới đây là một số hướng dẫn giúp bạn giảm thiểu mức tiêu thụ điện khi bạn sử dụng điều hòa không
khí. Bạn có thể sử dụng điều hòa không khí hiệu quả hơn bằng cách tham khảo các hướng dẫn dưới
đây:
• Không được làm mát quá mức trong nhà. Điều này có thể ảnh hưởng đến sức khỏe của bạn và có
thể tiêu hao nhiều điện hơn.
• Ngăn chặn ánh nắng mặt trời bằng mành hoặc rèm trong khi bạn đang sử dụng điều hòa không
khí.
• Luôn đóng chặt các cửa ra vào và cửa sổ trong khi bạn đang sử dụng điều hòa không khí.
• Điều chỉnh hướng luồng không khí theo hướng dọc hoặc ngang để lưu thông không khí trong nhà.
• Tăng tốc độ quạt để làm mát hoặc làm ấm không khí trong nhà nhanh chóng, trong thời gian ngắn.
• Mở các cửa sổ thường xuyên để thông gió vì chất lượng không khí trong nhà có thể giảm xuống
nếu sử dụng máy điều hòa trong nhiều giờ.
• Vệ sinh bộ lọc không khí 2 tuần một lần. Bụi bẩn và tạp chất tích tụ bên trong bộ lọc không khí có
thể làm tắc luồng khí hoặc làm giảm chức năng làm mát / khử ẩm.
Các chứng từ mua hàng của bạn
Đính phiếu thu của bạn vào trang này trong trường hợp bạn cần nó để chứng minh ngày mua hoặc phục
vụ bảo hành. Ghi số dòng máy và số sêri tại đây:
Số dòng máy :
Số sêri :
Bạn có thể tìm thấy chúng trên nhãn ở mặt bên cạnh của mỗi thiết bị.
Tên đại lý bán hàng :
Ngày mua hàng :
HƯỚNG DẪN TIẾT KIỆM ĐIỆN

CÁC HƯỚNG DẪN AN TOÀN QUAN TRỌNG
3
Tiếng Việt
CÁC HƯỚNG DẪN AN TOÀN QUAN TRỌNG
ĐỌC KỸ TẤT CẢ HƯỚNG DẪN TRƯỚC KHI SỬ DỤNG THIẾT BỊ NÀY.
Luôn tuân thủ các lưu ý sau đây để tránh các trường hợp nguy hiểm và đảm bảo hiệu quả hoạt động
cao nhất của sản phẩm
CẢNH BÁO
Nó có thể dẫn đến tổn thương nghiêm trọng hoặc tử vong khi bỏ qua các chỉ dẫn
THẬN TRỌNG
Nó có thể dẫn đến tổn thương nhẹ hoặc hư hỏng sản phẩm khi bỏ qua các chỉ dẫn
Thiết bị này phải do các chuyên gia hoặc người dùng có trình độ sử dụng trong các cửa hàng, trong
ngành công nghiệp nhẹ và trên các nông trại, hoặc cho mục đích sử dụng thương mại của người lắp
đặt.
CẢNH BÁO
• Luôn tiếp đất sản phẩm. Có nguy cơ bị điện giật.
• Không được sử dụng một cầu dao ngắt mạch bị lỗi hoặc được đánh giá thấp. Sử dụng bộ ngắt mạch
và cầu chì được đánh giá chính xác. Có nguy cơ cháy và bị điện giật.
• Không sử dụng multi consent. Luôn sử dụng thiết bị này trên một mạch và bộ ngắt mạch chuyên dụng.
Nếu không nó có thể gây điện giật hoặc cháy nổ.
• Đối với thao tác điện, hãy liên hệ với đại lý, người bán, một thợ điện có trình độ, hoặc một Trung tâm
Dịch vụ được Ủy quyền. Không tự mình tháo rời hoặc sửa chữa sản phẩm. Có nguy cơ cháy nổ hoặc
bị điện giật.
• Luôn nối đất sản phẩm theo sơ đồ đi dây. Không kết nối dây nối đất với các đường ống khí hoặc nước,
cột thu lôi hoặc đường dây nối đất điện thoại. Có nguy cơ cháy nổ hoặc bị điện giật.
• Lắp đặt bảng điều khiển và vỏ hộp điều khiển một cách an toàn. Có nguy cơ cháy nổ hoặc điện giật do
bụi, nước, v.v.
• Sử dụng bộ ngắt mạch hoặc cầu chì được đánh giá chính xác. Có nguy cơ cháy nổ hoặc bị điện giật.
• Không sửa hoặc kéo dài dây cáp điện. Nếu cáp hoặc dây điện bị trầy xước hoặc bong vỏ hoặc bị hư
hỏng, thì phải thay thế ngay. Có nguy cơ cháy nổ hoặc bị điện giật.
• Để lắp đặt, luôn liên hệ với đại lý bán hàng hoặc Trung tâm Dịch vụ Được ủy quyền. Có nguy cơ cháy
nổ, điên giật hoặc tổn thương.
• Không được lắp đặt sản phẩm trên bệ lắp đặt hư hỏng. Cần đảm bảo rằng khu vực lắp đặt không gây
ra lão hóa. Nó có thể làm sản phẩm rơi xuống.
• Tuyệt đối không lắp đặt dàn nóng trên đế di chuyển hoặc nơi có thể làm nó rơi xuống.
Dàn nóng bị rơi có thể gây ra thiệt hại hoặc thương tổn hoặc thậm chí là gây tử vong cho con người.
• Khi sản phẩm bị ngâm (lụt hoặc bị ngập) trong nước, hãy liên hệ với Trung tâm Dịch vụ được Ủy
quyền để sửa chữa trước khi sử dụng lại. Có nguy cơ cháy nổ hoặc bị điện giật.
• Đảm bảo kiểm tra môi chất lạnh dành cho dòng máy được sử dụng. Hãy đọc nhãn trên sản phẩm. Sử
dụng không đúng môi chất lạnh có thể làm thiết bị vận hành không như bình thường.
• Không được sử dụng dây điện, phích cắm hoặc ổ cắm lỏng đã bị hư hỏng. Nếu không, nó có thể gây
ra cháy hoặc điện giật.
• Không được chạm vào, vận hành, hoặc sửa chữa thiết bị bằng tay ướt. Dùng tay giữ phích cắm khi rút
ra. Có nguy cơ xảy ra điên giật hoặc cháy.
• Không được để bộ tản nhiệt hoặc các thiết bị tản nhiệt khác gần dây cáp điện. Có nguy cơ cháy nổ và
bị điện giật.
• Không được để nước chảy vào các bộ phận điện. Lắp đặt thiết bị tránh xa các nguồn nước. Có nguy
cơ xảy ra cháy, hư hỏng sản phẩm hoặc bị điện giật.
!
!
!

4
CÁC HƯỚNG DẪN AN TOÀN QUAN TRỌNG
Tiếng Việt
• Không được bảo quản hoặc sử dụng hoặc thậm chí để khí dễ cháy hoặc vật liệu dễ cháy gần sản
phẩm. Có nguy cơ xảy ra cháy nổ.
• Các điểm nối dây điện của dàn nóng / dàn lạnh phải được bảo vệ chắc chắn và phải đi cáp phù hợp
sao cho không tạo ra lực kéo cáp từ các điểm kết nối. Các điểm nối lỏng hoặc không đúng có thể sinh
ra nhiệt hoặc cháy nổ.
• Tiêu hủy một cách an toàn các vật liệu đóng gói. Như ốc vít, đinh, pin, những thứ bị hỏng, vv., sau khi
lắp đặt hoặc svc và sau đó xé đi và vứt bỏ các túi bao bì nhựa. Trẻ em có thể chơi với chúng và gây ra
thương tích.
• Đảm bảo kiểm tra phích cắm cáp điện không bị bẩn, lỏng hoặc vỡ và sau đó cắm hết phích cắm. Phích
điện bị bẩn, lỏng hoặc vỡ có thể gây ra bị điện giật hoặc cháy nổ.
• Trong dàn nóng, tụ điện nâng cao cung cáp nguồn điện có điện áp cao cho các bộ phận điện. Đảm
bảo xả hết tụ điện trước khi tiến hành công tác sửa chữa.
Một tụ điện có điện có thể gây ra điện giật.
• Khi lắp đặt thiết bị, hãy sử dụng bộ dụng cụ lắp đặt đi kèm với sản phẩm. Nếu không, thiết bị có thể rơi
xuống và gây ra thương tích nghiêm trọng.
• Đảm bảo chỉ sử dụng các bộ phận được liệt kê trong danh mục các bộ phận svc. Tuyệt đối không cố
sửa đổi thiết bị. Sử dụng các bộ phận không phù hợp có thể gây ra điện giật, quá nhiệt hoặc cháy nổ.
• Không được sử dụng sản phẩm ở nơi kín đáo trong thời gian dài. Thực hiện thông gió thường xuyên.
Có thể xảy ra hiện tượng thiếu oxy và do đó gây tổn hại sức khỏe của bạn.
• Không được mở lưới dẫn khí trước của sản phẩm trong khi vận hành. (Không được sờ vào bộ lọc tĩnh
điện, nếu thiết bị được trang bị bộ lọc đó.) Có nguy cơ xảy ra tổn thương cơ thể, điên giật hoặc hư
hỏng sản phẩm.
• Nếu có âm thanh, mùi hoặc khói lạ thoát ra từ sản phẩm. Hãy tắt bộ ngắt mạch ngay hoặc rút cáp
nguồn điện ngay. Có nguy cơ xảy ra điên giật hoặc cháy.
• Thông gió phòng chứa thiết bị thường xuyên khi vận hành nó cùng với một bếp lò, hoặc bộ phận tản
nhiệt, v.v., Có thể xảy ra hiện tượng thiếu oxy và làm tổn hại sức khoẻ của bạn.
• Tắt nguồn điện chính và rút phích điện thiết bị khi vệ sinh hoặc sửa chữa sản phẩm. Có nguy cơ bị
điện giật.
• Khi không sử dụng sản phẩm trong thời gian dài, hãy rút phích cắm nguồn điện hoặc tắt cầu giao. Có
nguy cơ hư hỏng hoặc lỗi sản phẩm hoặc vận hành không mong muốn.
• Cần cẩn thận để đảm bảo không ai, đặc biệt là trẻ nhỏ, có thể giẫm lên hoặc ngã vào thiết bị ngoài
trời. Việc này có thể gây tổn thương ở người và làm hư hỏng sản phẩm.
• Cần cẩn thận để đảm bảo cáp điện không bị kéo ra ngoài hoặc bị hư hỏng trong khi vận hành. Có
nguy cơ cháy nổ hoặc bị điện giật.
• Không được đè BẤT KỲ VẬT GÌ lên dây cáp điện. Có nguy cơ cháy nổ hoặc bị điện giật.
• Không cắp hoặc rút phích điện để BẬT / TẮT thiết bị. Có nguy cơ cháy nổ hoặc bị điện giật.
• Khi khí dễ cháy rò rỉ, hãy tắt nguồn khí và mở cửa sổ để thông gió trước khi bật nguồn sản phẩm.
Không được sử dụng điện thoại để bật hoặc tắt các công tắc. Có nguy cơ xảy ra cháy nổ.
• Không được bật cầu giao hoặc nguồn điện trong trường hợp bảng điều khiển phía trước, vỏ máy, nắp
trên, nắp hộp điều khiển đã bị tháo ra hoặc đang mở. Nếu không, nó có thể gây ra cháy, điện giật, nổ
hoặc tử vong.
• Sử dụng bơm chân không hoặc Khí trơ (khí nitơ) khi thực hiện thử rò hoặc xả khí. Không được nén
không khí hoặc Ôxi và Không được sử dụng các Khí dễ cháy. Nếu không, nó có thể gây ra cháy hoặc
nổ. Có nguy cơ gây tử vong, tổn thương, cháy hoặc nổ.
THẬN TRỌNG
• Cần có hai hoặc nhiều người để nâng và vận chuyển sản phẩm. Tránh tổn thương ở người.
• Không được lắp đặt sản phẩm tại nơi có thể chịu gió biển (bụi nước muối) trực tiếp. Nó có thể gây ra
sự ăn mòn trên sản phẩm.
• Lắp đặt ống thoát nước để đảm bảo nước ngưng tụ được thoát ra đúng cách. Kết nối kém có thể gây
ra rò rỉ nước.
• Giữ thăng bằng ngay cả khi đang lắp đặt sản phẩm. Để tránh rung hoặc tiếng ồn.
!

CÁC HƯỚNG DẪN AN TOÀN QUAN TRỌNG
• Không được lắp đặt sản phẩm tại nơi mà tiếng ồn hoặc không khí nóng sinh ra từ sản phẩm có thể làm
bị thương hoặc gây phiền toái cho hàng xóm. Nó có thể gây khó khăn cho hàng xóm của bạn và nảy
sinh xung đột.
• Luôn kiểm tra sự rò rỉ khí (môi chất lạnh) su khi lắp đặt hoặc sửa chữa sản phẩm. Mức môi chất lạnh
thấp có thể làm hư hỏng sản phẩm.
• Không sử dụng sản phẩm cho các mục đích đặc biệt, chẳng hạn như bảo quản các loại thực phẩm,
tác phẩm nghệ thuật... Đây chỉ là một máy điều hòa không khí tiêu dùng, không phải là một hệ thống
làm lạnh chính xác. Có nguy cơ hư hỏng hoặc thiệt hại tài sản.
• Không được làm tắc đầu vào hoặc đầu ra của luồng không khí. Nó có thể làm hư hỏng sản phẩm.
• Sử dụng dẻ lau mềm để vệ sinh. Không sử dụng các chất tẩy rửa mạnh, dung môi hoặc làm nước bắn
tung tóe, vv. Có nguy cơ xảy ra cháy nổ, điện giật, hoặc làm hỏng các bộ phận nhựa của sản phẩm.
• Không chạm vào phần kim loại của cụm điều hòa khi tháo bộ lọc không khí. Có nguy cơ bị tổn thương
ở người.
• Không giẫm lên hoặc đặt bất cứ thứ gì trên sản phẩm. (các thiết bị ngoài trời) Có nguy cơ xảy ra tổn
thương ở người và hư hỏng sản phẩm.
• Luôn lắp bộ lọc chắc chắn sau khi vệ sinh. Vệ sinh bộ lọc 2 tuần một lần hoặc thường xuyên hơn nếu
cần. Bộ lọc bị bẩn sẽ làm giảm hiệu quả.
• Không được thò tay hoặc các vật khác vào đường khí vào hoặc ra trong khi sản phẩm đang hoạt động.
Có các bộ phận sắc cạnh và chuyển động có thể gây ra tổn thương ở người.
• Cần cẩn trọng khi mở kiện và lắp đặt sản phẩm. Các cạnh sắc có thể gây ra tổn thương.
• Nếu khí làm lạnh bị rò rỉ trong quá trình sửa chữa, không được tiếp xúc với khí làm lạnh rò rỉ đó. Khí
làm lạnh có thể gây tê cóng (bỏng lạnh)
• Không được nghiêng thiết bị khi gỡ hoặc tháo thiết bị. Các nước ngưng tụ bên trong có thể tràn ra.
• Không trộn lẫn không khí hay chất khí ngoài môi chất lạnh theo quy định được sử dụng trong hệ thống.
Nếu không khí lọt vào hệ thống môi chất lạnh, dẫn đến áp suất quá cao, gây ra hỏng hóc thiết bị hoặc
thương tích.
• Nếu rò rỉ khí làm lạnh trong quá trình lắp đặt, hãy thông gió khu vực đó ngay. Nếu không, nó có thể có
hại cho sức khoẻ của bạn.
• Tháo dỡ đơn vị, xử lý dầu môi chất lạnh và các bộ phận cuối cùng nên được thực hiện theo tiêu chuẩn
địa phương và quốc gia.
• Thay thế tất cả pin trong bộ điều khiển từ xa bằng các pin mới cùng loại. Không được sử dụng lẫn lộn
pin cũ và pin mới hoặc pin khác loại. Có nguy cơ cháy nổ và bị điện giật hoặc làm hư hỏng sản phẩm.
• Không được sạc lại hoặc tháo các pin ra. Không được vứt pin vào đống lửa. Chúng có thể cháy bùng
hoặc nổ.
• Nếu chất lỏng trong pin dính vào da hoặc quần áo, hãy rửa kỹ bằng nước sạch. Không được sử dụng
điều khiển nếu pin bị rỉ nước. Hóa chất trong pin có thể gây bỏng da hoặc các rủi ro sức khỏe khác.
• Nếu bạn uống phải chất lỏng của pin, hãy đánh răng và thăm khám bác sỹ ngay.
Không được sử dụng điều khiển nếu pin bị rỉ nước. Hóa chất trong pin có thể gây bỏng da hoặc rủi ro
sức khỏe khác.
• Không được để máy điều hòa chạy trong một thời gian dài khi độ ẩm quá cao và cửa ra vào hay cửa
sổ đang mở. Hơi ẩm có thể ngưng tụ và làm ẩm ướt hoặc hư hỏng đồ nội thất.
• Không để da hoặc trẻ em hoặc các loại cây tiếp xúc với luồng gió nóng hoặc lạnh. Điều này có thể ảnh
hưởng đến sức khỏe của bạn.
• Không uống nước được xả từ sản phẩm. Nước không vệ sinh và có thể gây ra các vấn đề sức khỏe
nghiêm trọng.
• Sử dụng ghế chắc chắn hoặc thang khi vệ sinh, bảo trì hay sửa chữa sản phẩm trên cao. Hãy cẩn
thận và tránh gây thương tích cá nhân.
• Điều hòa không khí này không được thiết kế cho trẻ nhỏ hoặc người khuyết tật sử dụng mà không
được giám sát.
• Trẻ nhỏ cần được giám sát để đảm bảo rằng chúng không chơi đùa với điều hòa không khí.
5
Tiếng Việt

6
MỤC LỤC
Tiếng Việt
MỤC LỤC
2 HƯỚNG DẪN TIẾT KIỆM ĐIỆN
3 CÁC HƯỚNG DẪN AN TOÀN QUAN TRỌNG
7 TRƯỚC KHI SỬ DỤNG
7
Chuẩn bị vận hành
7
Cách sử dụng
7
Vệ sinh và bảo trì
7
Bảo dưỡng
8 GIỚI THIỆU VỀ SẢN PHẨM
8
Tên và chức năng của các bộ phận (ĐƯỜNG ỐNG ÂM TRẦN)
9
Cần làm gì trước khi vận hành
10
Bộ Điều Khiển Từ Xa Có Dây
11 HƯỚNG DẪN VẬN HÀNH
11
Vận hành Tiêu chuẩn - Chế độ Làm mát
12
Vận hành Tiêu chuẩn - Làm mát nhanh
12
Vận hành Tiêu chuẩn - Chế độ Sưởi ấm
13
Vận hành Tiêu chuẩn - Chế độ Khử ẩm
13
Chế độ Chuyển đổi Tự động
14
Vận hành Tiêu chuẩn - Chế độ Quạt
15
Vận hành Tiêu chuẩn - Chế độ Vận hành Tự động
16
Vận hành Tiêu chuẩn - Thiết lập Luồng không khí
17
Vận hành Tiêu chuẩn - Thiết lập Nhiệt độ / Kiểm tra Nhiệt độ Phòng
18
Cài đặt chức năng - Khóa Trẻ em
19
Cài đặt chức năng - Thay đổi Nhiệt độ
20
Cài đặt chức năng - Xoá Tín hiệu Bộ lọc
21
Cài đặt chức năng - Kiểm soát Góc Cánh quạt
22
Cài đặt chức năng - Thay đổi Thời gian Hiện tại
24
Lập trình - Bảo quản Đơn giản
25
Lập trình : Bảo quản Hàng tuần
27
Lập trình - Bảo quản Khi ngủ
28
Lập trình - Bảo quản BẬT
30
Lập trình - Bảo quản TẮT
32
Lập trình : Bảo quản Ngày nghỉ
33 BẢO TRÌ VÀ BẢO DƯỠNG
33
Thiết bị Trong nhà
34
Các Hướng dẫn Vận hành!
34
Khi máy điều hòa không khí không hoạt động....
35
Hướng dẫn Xử lý sự cố! Tiết kiệm thời gian và tiền bạc!
35
Hãy gọi điện ngay cho trung tâm dịch vụ trong các trường hợp sau

TRƯỚC KHI SỬ DỤNG
7
Tiếng Việt
Chuẩn bị vận hành
• Liên hệ với kỹ thuật viên lắp đặt để lắp đặt sản phẩm.
• Sử dụng mạch được chỉ định.
Cách sử dụng
• Việc tiếp xúc với luồng không khí trực tiếp trong một khoảng thời gian dài có thể gây nguy hại cho
sức khỏe của bạn. Không để người sử dụng, vật nuôi hay cây cối tiếp xúc trực tiếp với luồng không
khí trong thời gian dài.
• Do có khả năng xảy ra thiếu ôxi, hãy thông gió căn phòng khi sử dụng máy điều hòa cùng với bếp lò
hoặc các thiết bị nhiệt khác.
• Không được sử dụng máy điều hòa không khí này cho các mục đích đặc biệt không được chỉ định
(như bảo quản thiết bị chính xác, thực phẩm, vật nuôi, cây trồng và đồ nghệ thuật). Việc sử dụng
như vậy có thể làm hư hỏng các đồ vật.
Vệ sinh và bảo trì
• Không chạm vào phần kim loại của thiết bị khi tháo bộ lọc không khí. Có thể gây ra các tổn thương
khi cầm nắm các cạnh kim loại sắc.
• Không được dùng nước để vệ sinh bên trong máy điều hòa. Việc nhiễm nước có thể làm hư hỏng
lớp cách điện, và có thể bị điện giật.
• Khi vệ sinh thiết bị, trước hết cần đảm bảo bạn đã tắt nguồn điện và cầu giao. Quạt quay ở tốc độ rất
cao trong khi hoạt động. Có thể gây ra tổn thương nếu nguồn điện của thiết bị được bật bất ngờ
trong khi đang vệ sinh các bộ phận bên trong của thiết bị.
Bảo dưỡng
Để sửa chữa và bảo trì, hãy liên hệ với đại lý dịch vụ được ủy quyền của bạn.
TRƯỚC KHI SỬ DỤNG

8
GIỚI THIỆU VỀ SẢN PHẨM
Tiếng Việt
Tên và chức năng của các bộ phận (ĐƯỜNG ỐNG ÂM
TRẦN)
1: Thiết bị trong nhà
2: Thiết bị ngoài trời
3: Bộ điều khiển từ xa
4: Không khí vào
5: Không khí thoát
6: Ống dẫn môi chất lạnh, dây điện kết nối
7: Ống thoát nước
8: Dây nối đất
nối đất với thiết bị ngoài trời để phòng ngừa điện
giật.
GIỚI THIỆU VỀ SẢN PHẨM
Air intake
vents
4
5
1
Air outlet
vents
2
8
6
7
Remote
Controller
3

GIỚI THIỆU VỀ SẢN PHẨM
9
Tiếng Việt
Cần làm gì trước khi vận hành
A
B
1 1
1 2
Nếu công tác lắp đặt của bạn có một hệ thống kiểm
soát tuỳ chỉnh, hãy hỏi đại lý LG của bạn để biết
cách vận hành tương ứng với hệ thống của bạn.
1: Thiết bị có điều khiển từ xa.
2: Thiết bị không có điều khiển từ xa (khi được sử
dụng như hoạt động đồng thời)

10
GIỚI THIỆU VỀ SẢN PHẨM
Tiếng Việt
1 Màn hình biểu thị vận hành
2 Nút cài đặt nhiệt độ
3 Nút tốc độ quạt
4 Nút BẬT / TẮT
5 Nút CHỌN CHẾ ĐỘ VẬN HÀNH
6 Bộ thu tín hiệu bộ điều khiển từ xa không dây
• Một số sản phẩm không nhận được các tín
hiệu không dây.
7 Nút luồng không khí
8 Nút chức năng phụ
9 Nút CÀI ĐẶT CHỨC NĂNG
10 Nút thông gió
11 Bảo quản
12 UP,DOWN,LEFT,RIGHT ButtonNút LÊN,
XUỐNG, TRÁI, PHẢI
• Để kiểm tra nhiệt độ trong phòng, nhấn nút
.
13 Nút nhiệt độ trong phòng
14 Nút Cài đặt/Hủy bỏ
15 Nút Thoát
* Một số chức năng có thể không hoạt động và
không được hiển thị tùy thuộc từng loại sản
phẩm.
CHÚ Ý
!
• Nhiệt độ hiển thị có thể khác nhiệt độ thực
trong phòng nếu bộ điều khiển từ xa được
cài đặt tại nơi tia mặt trời chiếu trực tiếp
hoặc gần nguồn nhiệt.
• Sản phẩm thực tế có thể khác với nội
dung nêu trên phụ thuộc vào mẫu sản
phẩm.
• Khi sử dụng hệ thống vận hành đồng thời,
bất cứ khi nào bấm nút điều khiển từ xa,
hệ thống sẽ hoạt động sau khoảng 1 ~ 2
phút.
Bộ Điều Khiển Từ Xa Có Dây
1
8
7
9
10
11
12
13
15
Vui lòng dán nhãn thông tin bên trong cửa.
Vui lòng chọn ngôn ngữ phù hợp tùy thuộc
ngôn ngữ của bạn.
14
2
4
5
6
3

HƯỚNG DẪN VẬN HÀNH
HƯỚNG DẪN VẬN HÀNH
11
Vận hành Tiêu chuẩn - Chế độ Làm mát
Nó làm mát căn phòng bằng gió sạch và dễ chịu.
Nhấn để bật thiết bị trong
1
nhà.
Nhấn nút để chọn Chế độ
2
vận hành làm mát.
Điều chỉnh nhiệt độ mong muốn
3
bằng cách nhấn các nút .
Nhấn nút để kiểm tra Nhiệt
độ phòng.
Khi thiết lập nhiệt độ mong
muốn cao hơn nhiệt độ phòng,
chỉ gió thông gió được thổi ra
thay vì gió mát.
Tiếng Việt

HƯỚNG DẪN VẬN HÀNH
12
Vận hành Tiêu chuẩn - Làm mát nhanh
Nó làm mát căn phòng bằng cách sử dụng không khí trong lành và dịu mát nhanh chóng.
Tiếng Việt
Nhấn để bật thiết bị trong
1
nhà.
Nhấn nút để chọn Chế độ
2
vận hành làm mát.
Nhấn nút liên tục cho đến
3
khi 'Po' được hiển thị.
Công suất Làm mát là gì?
• Nhiệt độ mong muốn : Po (thực tế là 18 °C)
• Lưu lượng : công suất gió
• Hướng gió: liên quan đến vị trí gió làm mát
Từng phần sản phẩm không có chức năng công suất khí làm mát.
Nó làm nhiệt độ phòng giảm xuống
nhanh chóng bằng cách vận hành
}
Vận hành Tiêu chuẩn - Chế độ Sưởi ấm
Nó cấp gió ấm cho trong nhà
Nhấn để bật thiết bị trong
1
nhà.
Nhấn nút để chọn Chế độ
2
Sưởi ấm.
(Để kiểm tra nhiệt độ trong
phòng, nhấn nút nhiệt độ phòng.)
Điều chỉnh nhiệt độ mong muốn
3
bằng cách nhấn các nút .
Khi thiết lập nhiệt độ mong
muốn thấp hơn nhiệt độ phòng,
chỉ có gió thông gió.
• Thiết bị sưởi ấm chỉ vận hành ở các dòng làm ấm và làm mát.
• Chế độ sưởi ấm không vận hành ở dòng chỉ làm mát.

HƯỚNG DẪN VẬN HÀNH
Vận hành Tiêu chuẩn - Chế độ Khử ẩm
Nó loại bỏ độ ẩm trong khi làm mát không khí yếu.
Nhấn để bật thiết bị trong
1
nhà.
Nhấn nút để chọn Chế độ
2
khử ẩm
Không thể điều chỉnh được cài đặt
nhiệt độ trong khi đang vận hành chế
độ này.
Nhất nút để chọn tốc độ
3
lưu lượng gió nhẹ → yếu →
trung bình → mạnh → tự động.
(Cường độ gió ban đầu của điều khiển
khử độ ẩm là ‘yếu’.)
• Trong mùa mưa hoặc khí hậu có độ ẩm cao, có thể vận hành đồng thời chế độ khử ẩm và làm
mát để khử độ ẩm một cách hiệu quả.
• Mục trình đơn của cường độ gió có thể không chọn riêng được tùy theo từng sản phẩm.
13
Tiếng Việt
Chế độ Chuyển đổi Tự động
Nhấn để bật thiết bị trong nhà.
1
Nhấn nút để chọn Chế độ Vận hành Tự động.
2
Thiết lập nhiệt độ như hình ảnh bên phải có thể được thiết lập trong
3
cả hai dòng máy làm mát / làm ấm.

Nhấn để bật thiết bị trong
nhà.
1
Nhấn nút để chọn Chế độ
Quạt.
2
Mỗi lần nhấn nút , bạn có thể
chọn lưu lượng gió theo thứ tự nhẹ
→ yếu → trung bình → mạnh → tự
động.
Khi chạy thông gió, máy nén khí
AHU sẽ không hoạt động.
3
HƯỚNG DẪN VẬN HÀNH
14
Vận hành Tiêu chuẩn - Chế độ Quạt
Nó thổi không khí khi ở trong nhà, chứ không phải gió lạnh.
Tiếng Việt
• Điều khiển không khí không thoát ra gió lạnh mà là quạt thông thường.
• Bởi vì nó thoát ra luồng gió không chênh lệch nhiệt độ so với nhiệt độ trong phòng, nó hoạt
động để lưu thông không khí trong phòng.
• Mục trình đơn của cường độ gió có thể không chọn riêng được tùy theo từng sản phẩm.
Tiếng Việt

Nhấn để bật thiết bị trong
nhà.
1
Nhấn nút để chọn Chế độ
Trí tuệ Nhân tạo.
2
Bạn có thể điều
chỉnh nhiệt độ
như hình ảnh bên
phải cho dòng
máy làm mát và
làm ấm.
3
Trong trường hợp
chỉ làm mát, như
hình bên phải,
bạn có thể điều
chỉnh nhiệt độ từ
ấm về mát, từ
"-2" về "2" dựa
trên "00".
4
Khi trời lạnh
Khi trời mát mẻ
Khi trời dễ chịu
Khi trời ấm áp
Khi trời nóng
HƯỚNG DẪN VẬN HÀNH
Vận hành Tiêu chuẩn - Chế độ Vận hành Tự động
15
Tiếng Việt
Trong quá trình vận hành chế độ Vận hành Tự động:
• Chúng ta có thể sử dụng nút TỐC ĐỘ QUẠT
• Chúng ta có thể thay đổi bằng tay sang chế độ vận hành khác.

HƯỚNG DẪN VẬN HÀNH
16
Vận hành Tiêu chuẩn - Thiết lập Luồng không khí
Tiếng Việt
Công suất gió : Bạn có thể điều chỉnh đơn giản
công suất gió mong muốn.
Hãy thiết lập công suất gió mong
1
muốn bằng nút công suất gió.
• Mỗi lần bạn nhấn nút công suất gió,
bạn có thể chọn lưu lượng gió theo
thứ tự ‘nhẹ → yếu → trung bình yếu → trung
bình → mạnh trung bình → mạnh → rất mạnh
→ tự động’.
• Mục menu không chọn riêng được tùy theo
chức năng của sản phẩm.
Hướng gió : Bạn có thể điều chỉnh đơn giản
hướng gió mong muốn.
Hãy thiết lập hướng gió mong
1
muốn bằng cách nhấn nút .
Bạn có thể chọn hướng gió (gió
thoải mái → Lên / Xuống và Phải
/ Trái → Phải / Trái → Lên /
Xuống) bằng các nhấn nút .
Mục từng phần hướng gió có thể
không chọn được tùy theo chức
năng của sản phẩm.
* Một số chức năng có thể không hoạt động và không
được hiển thị tùy thuộc từng loại sản phẩm.

Chúng ta có thể điều chỉnh nhiệt độ
mong muốn một cách đơn giản.
• Nhấn nút để điều chỉnh nhiệt độ
mong muốn.
: Tăng 1 °C hoặc 2 °F mỗi lần nhấn
: Giảm 1 °C hoặc 2 °F mỗi lần nhấn
Vận hành làm mát :
- Chế độ làm mát không hoạt động nếu nhiệt
độ mong muốn cao hơn nhiệt độ phòng,
hãy hạ thấp nhiệt độ mong muốn.
Vận hành Sưởi ấm :
- Chế độ làm ấm không hoạt động nếu nhiệt
độ mong muốn thấp hơn nhiệt độ phòng,
hãy tăng nhiệt độ mong muốn.
1
Mỗi lần nhấn nút , nhiệt độ phòng sẽ
được hiển thị trong vòng 5 giây.
Sau 5 giây, nó chuyển sang hiển thị
nhiệt độ mong muốn.
Vì vị trí của điều khiển từ xa, nhiệt độ
phòng thực tế và giá trị được hiển thị
này có thể khác nhau.
1
Thiết lập Nhiệt độ
Kiểm tra Nhiệt độ Phòng
HƯỚNG DẪN VẬN HÀNH
17
Vận hành Tiêu chuẩn - Thiết lập Nhiệt độ/Kiểm tra Nhiệt độ Phòng
• Nhiệt độ Phòng : Cho biết nhiệt độ
phòng hiện tại.
• Thiết lập nhiệt độ : Cho biết nhiệt độ
người dùng muốn thiết lập.
* Tùy thuộc vào kiểu bộ điều khiển,
nhiệt độ mong muốn có thể được
điều chỉnh ở 0,5 °C hoặc 1 °F.
Tiếng Việt
• 5 °C là phù hợp với sự chênh lệch nhiệt độ trong phòng và ngoài trời.

HƯỚNG DẪN VẬN HÀNH
18
Cài đặt chức năng - Khóa Trẻ em
Sử dụng chức năng này để phòng ngừa trẻ em hoặc người khác do sử dụng bất cẩn.
Tiếng Việt
Nhấn nút liên tục cho đến khi
1
nhấp nháy.
Nếu chuyển đến vùng biểu tượng
2
'setup' bằng cách sử dụng nút
, biểu tượng 'setup' nhấp nháy,
và chức năng khoá trẻ em được thiết
lập nếu nhấn nút lúc đó.
Khi huỷ bỏ chức năng hoá, nếu chuyển
3
đến biểu tượng 'cancel' bằng cách nhấn
nút và sau đó nhấn nút , chức
năng khoá trẻ em sẽ bị huỷ bỏ.
Nhấn nút để thoát.
4
❈ Sau khi thiết lập, nó tự động thoát khỏi
chế độ thiết lập nếu không nhấn nút
nào trong 25 giây.
❈ Khi thoát mà không nhấn nút thiết lập,
giá trị được thao tác không được phản
ánh.

HƯỚNG DẪN VẬN HÀNH
Cài đặt Chức năng - Thay đổi Nhiệt độ
Thay đổi nhiệt độ là chức năng để thiết lập điều khiển làm mát và làm ấm không khí có thể thay đổi tự
động theo nhiệt độ ở chế độ điều khiển trí tuệ nhân tạo.
Nhấn liên tục nút cho đến khi
1
biểu tượng nhấp nháy.
Nhấn nút để thay đổi.
2
❈ Chuyển đổi giá trị nhiệt độ : 1~7
Nhấn nút để hoàn thành và
3
kích hoạt quy trình thiết lập.
Nhấn nút để thoát hoặc hệ
4
thống sẽ tự động thoát khỏi nếu
không nhấn nút nào trong 25
giây.
❈ Khi thoát mà không nhấn nút
thiết lập, giá trị được thao tác
không được phản ánh.
19
Tiếng Việt

HƯỚNG DẪN VẬN HÀNH
20
Cài đặt chức năng - Xoá Tín hiệu Bộ lọc
Chức năng này là để làm sạch đèn chỉ báo của chức năng vệ sinh bộ lọc của dàn lạnh.
Tiếng Việt
Nhấn nút liên tục cho đến
1
khi nhấp nháy.
Khi nhấp nháy, nhấn để
2
xoá bỏ hiển thị này
• Khi bộ lọc bị phủ bụi, nó sẽ làm giảm hiệu quả làm mát / làm ấm và tiêu thụ nhiều điện năng
hơn. Do đó, vệ sinh bộ lọc khi hết hạn thời gian vệ sinh.
* Chỉ báo vệ sinh bộ lọc được huỷ bỏ tự động mà không có sự huỷ bỏ riêng sau khoảng thời gian nhất
định.

Nhấn liên tục nút cho đến khi
biểu tượng nhấp nháy.
1
Nhấn nút để chọn cánh quạt kích hoạt
: 1 / 2 / 3 / 4 / Tất cả / Tiêu chuẩn
Chọn số cánh quạt bằng cách sử dụng nút
.
❈ Số cánh quạt : Số 1, 2, 3, 4, tất cả, hoặc
tiêu chuẩn
- Số cánh quạt được chọn đang vận hành.
- Hãy xác minh cánh quạt đang vận hành.
- Để thiết lập góc của tất cả các cánh
quạt, hãy chọn 'all'.
- Để thiết lập cài đặt mặc định của hãng,
hãy chọn 'standard'.
2
Chọn góc gió sử dụng nút , và
nhấn nút .
- Ranh giới của các thiết lập góc gió có
thể được thay đổi đến 5 cấp hoặc 6 cấp
theo sản phẩm.
- Khi chọn 'standard' cho số cánh quạt,
góc gió không di chuyển.
3
Thiết lập góc gió cho các cánh quạt còn
lại tương tự như trên.
❈
Có các sản phẩm chỉ có các cánh
quạt số 1 và số 2 theo loại sản phẩm.
4
Nhấn nút để thoát.
❈ Sau khi thiết lập, nó tự động
thoát khỏi chế độ thiết lập nếu
không nhấn nút nào trong 60 giây.
❈ Khi thoát mà không nhấn nút thiết lập,
giá trị được thao tác không được phản
ánh.
5
Nhấn nút để hoàn thành và kích
hoạt quy trình thiết lập.
(Chức năng hướng lưu lượng không khí
sẽ được thả ra khi thiết lập góc cánh quạt)
6
Nhấn nút để thoát hoặc hệ
thống sẽ tự động thoát khỏi nếu
không nhấn nút nào trong 25
giây.
7
HƯỚNG DẪN VẬN HÀNH
Cài đặt chức năng - Kiểm soát Góc Cánh quạt
Chức năng này là để điều chỉnh góc lưu lượng khí được thổi ra.
* Một số chức năng có thể không hoạt động và không được hiển thị tùy thuộc từng loại sản phẩm.
21
Tiếng Việt

Hãy nhấn nút thiết lập chức
năng. Nếu nhấn nút thiết lập
chức năng liên tục, nó chuyển
đến menu thiết lập thời gian.
Biểu tượng ‘Time setup’ được chỉ báo ở
ngày và giờ đó nhấp nháy ở khu vực chỉ
báo thời gian hiện tại.
Ví dụ) Thay đổi thời gian hiện tại thành
'Thứ hai / AM 10:20'.
1
Nhấn phím để điều chỉnh ngày
hiện tại.
2
Nhấn phím để chuyển sang chế độ
thiết lập AM / PM (đoạn 'AM / PM sẽ
nhấp nháy).
3
Thiết lập giá trị AM / PM
bằng cách nhấn nút
.
4
Nhấn nút để chuyển sang chế độ
Thiết lập 'Giờ'. (đoạn 'Giờ' sẽ nhấp nháy)
5
Thiết lập giá trị Giờ bằng cách nhấn nút
.
6
HƯỚNG DẪN VẬN HÀNH
22
Cài đặt chức năng - Thay đổi Thời gian Hiện tại
Tiếng Việt

Nhấn nút để chuyển đến chế độ
thiết lập 'Phút'. (đoạn 'Phút' sẽ nhấp
nháy)
7
Thiết lập giá trị Phút bằng cách nhấn nút
.
8
Nhấn để kết thúc.
9
Trong quy trình, nhấn nút
để giải phóng và thoát khỏi
chế độ cài đặt.
(Trong trường hợp thoát với
thông tin không đầy đủ, nó sẽ
quay trở về thiết lập trước)
❈ Khi thoát mà không nhấn nút thiết
lập, giá trị được thao tác không
được phản ánh.
10
HƯỚNG DẪN VẬN HÀNH
23
Tiếng Việt

HƯỚNG DẪN VẬN HÀNH
24
Lập trình - Bảo quản Đơn giản
Bạn có thể thiết lập hẹn giờ một cách thuận tiện trong các thiết bị 1 giờ từ 1 giờ đến 7 giờ.
Tiếng Việt
Nhấn nút để nhập chế độ
1
Lập trình.
(đoạn nhấp nháy)
Ví dụ : Thiết lập thời gian Hẹn giờ Đơn
giản là '3'.
Nhấn nút để điều chỉnh thời gian
2
hẹn giờ.
Nhấn nút để điều chỉnh hoàn tất
3
thiết lập.
Nhấn nút để thoát.
4
❈ Sau khi thiết lập, nó tự động thoát khỏi
chế độ thiết lập nếu không nhấn nút
nào trong 25 giây.
❈ Khi thoát mà không nhấn nút thiết lập,
giá trị được thao tác không được phản
ánh.
* Khi thời gian hẹn giờ đơn giản được thiết lập, sản phẩm sẽ tự động vận hành và dừng lại sau thời
gian được thiết lập.

Vui lòng chuyển đến 'hàng tuần'
bằng cách nhấn lặp đi lặp lại nút hẹn
giờ. 'Hàng tuần' nhấp nháy lúc này.
Vui lòng chuyển đến chế độ thiết lập hẹn giờ bằng cách nhấn nút hẹn giờ.
❈ Bạn có thể thiết lập hai thời gian hẹn giờ hàng tuần cho một ngày, và tới
mười bốn thời gian hẹn giờ cho một tuần.
Ví dụ, để thiết lập (11:30 sáng thứ ba được bật ~ 12:30 chiều được tắt), bạn
thiết lập theo trình tự dưới đây.
2
1
Vui lòng chọn hẹn giờ hàng tuần
hoặc hẹn giờ hàng tuần
bằng
cách sử dụng nút .
❈ Bạn có thể thiết lập hai thời gian
hẹn giờ, hẹn giờ hàng tuần 1 và
hẹn giờ hàng tuần 2, cho một ngày.
3
Vui lòng chuyển đến phần thiết lập
'ngày' bằng cách sử dụng nút .
Nếu chỉ thị 'ngày' nhấp nháy, vui lòng
thiết lập ngày.
Bạn có thể thiết lập ngày từ thứ hai
đến chủ nhật.
4
Vui lòng chuyển đến phần thiết lập
'AM/PM' khi bật bằng cách sử dụng
nút .
5
Hãy chuyển đến phần thiết lập 'hour'
bật bằng cách sử dụng nút .
- Đó là phần để thiết lập thời gian
bật điều hoà không khí.
6
Hãy chuyển đến phần thiết lập 'minute' bật bằng cách sử dụng nút .
8
Hãy thay đổi thời gian bằng cách sử dụng nút .
- Bạn có thể thiết lập từ 0~12 giờ.
7
Nếu chỉ báo 'minute' nhấp nháy, hãy thiết lập 'minute' bằng cách sử dụng nút
9
HƯỚNG DẪN VẬN HÀNH
Lập trình : Bảo quản Hàng tuần
Bạn có thể thiết lập hẹn giờ hàng ngày ở thiết bị hàng tuần.
Hẹn giờ hàng tuần duy trì vận hành cho đến trước khi bạn hủy nó ngay sau khi bạn thiết lập.
25
Tiếng Việt

Tiếng Việt
HƯỚNG DẪN VẬN HÀNH
26
Vui lòng chuyển đến phần thiết lập
10
'AM/PM' khi tắt bằng cách sử dụng
nút .
- Thiết lập AM/PM giống với thiết lập
thời gian bật.
Vui lòng chuyển đến phần thiết
11
lập 'giờ' khi tắt bằng cách sử
dụng nút Phải.
- Đó là phần để hẹn giờ thời gian
mà điều hòa không khí được
tắt.
- Nếu chỉ thị 'giờ' nhấp nháy, vui
lòng thiết lập 'giờ'.
Vui lòng thiết lập 'giờ' và 'phút'
❈
giống với phương pháp thiết lập
thời gian bật.
Nếu kết thúc thiết lập hẹn giờ hàng tuần, vui lòng nhấn nút hủy / thiết lập.
12
Hẹn giờ hàng tuần thiết lập cho ngày mà bạn đặt sẽ được hoàn thành.
Nếu bạn thiết lập bằng phương pháp giống như trên bằng cách chọn ngày
13
mà bạn muốn thiết lập, hẹn giờ hàng tuần sẽ hoạt động.
Nếu bạn thiết lập thời gian hẹn giờ bật và thời gian hẹn giờ tắt giống nhau,
chế độ điều khiển hẹn giờ sẽ không hoạt động.
Giải thích hẹn giờ hàng tuần
Số hẹn giờ
Thời gian bật
Dưới thanh: chỉ báo có hẹn giờ theo tuần cho ngày tương ứng
* Thiết bị trong nhà được bật đến nhiệt độ mong muốn nếu nó được cấu hình bằng cách sử dụng nút
lên / xuống trong khi thiết lập lại thời gian vận hành hàng tuần.
- Khi nhiệt độ mong muốn được thiết lập, nó được bật tự động với nhiệt độ mong muốn của vận
hành trước đó.
Thời gian tắt

HƯỚNG DẪN VẬN HÀNH
Lập trình - Bảo quản Khi ngủ
Hẹn giờ ngủ là chức năng của điều hòa không khí để vận hành và dừng sau một khoảng thời gian
nhất định ở chế độ ngủ trước khi ngủ. Khi được kết nối với một sản phẩm thông khí và thiết lập hẹn
giờ ngủ, khi nó vào chế độ ngủ, sau khi thời gian thiết lập kết thúc.
Nhấn nút để vào chế độ Lập
1
trình.
Ví dụ) Thiết lập thời gian Hẹn giờ
Ngủ là '3'.
Nhấn lặp lại nút để vào chế độ thiết
2
lập hẹn giờ NGỦ.
(đoạn nhấp nháy)
Nhấn nút để điều chỉnh thời gian
3
hẹn giờ.
Thời gian hẹn giờ NGỦ là từ 1 đến 7
giờ.
Nhấn nút để điều chỉnh
4
hoàn tất thiết lập.
Bất cứ khi nào hẹn giờ hoàn tất.
27
Tiếng Việt
Nhấn nút để thoát.
5
❈ Sau khi thiết lập, nó tự động thoát khỏi
chế độ thiết lập nếu không nhấn nút
nào trong 60 giây.
❈ Khi thoát mà không nhấn nút thiết lập,
giá trị được thao tác không được phản
ánh.
- Nếu hẹn giờ được thiết lập, chỉ thị
'ngủ' sẽ hiển thị ở phần dưới của
màn hình LCD.
Nếu hoàn thành thiết lập hẹn giờ khi ngủ, sản
6
phẩm điều hoà không khí vận hành điều khiển ngủ
và dừng lại sau khoảng thời gian được thiết lập.
THẬN TRỌNG
!
Hãy duy trì thời gian phù hợp khi ngủ. (Quá nhiều không khí mát không tốt cho sức khoẻ của bạn.)
• Bởi vì nó điều chỉnh tự động nhiệt độ mong muốn để làm mát dễ chịu ở chế độ ngủ, nên sẽ có
sự khác biệt giữa nhiệt độ mong muốn của bộ điều khiển từ xa và nhiệt độ mong muốn của thân
điều hòa không khí.
• Hẹn giờ ngủ sẽ vận hành dưới dạng hẹn giờ tắt cho sản phẩm mà nhiệt độ điều chỉnh của nó
không được điều khiển bởi thiết bị có nhiệt độ 0.5 °C.

HƯỚNG DẪN VẬN HÀNH
28
Lập trình - Bảo quản BẬT
Tự động được Bật ở thời gian đã hẹn giờ mà bạn thiết lập.
Tiếng Việt
Nhấn nút .
1
Ví dụ) Thiết lập Thời gian Hẹn giờ
BẬT là '10:20 AM'.
Nhấn lặp lại nút để vào
2
chế độ thiết lập hẹn giờ BẬT.
(đoạn nhấp nháy)
Nhấn nút để điều chỉnh thiết lập
3
AM/ PM.
Nhấn nút để điều chỉnh Chế độ
4
Thiết lập Giờ. Khi biểu tượng Giờ nhấp
nháy, vui lòng thiết lập giờ.
Khoảng thiết lập là 1~12.
Nhấn nút để điều chỉnh Chế độ
5
Thiết lập Phút. Khi biểu tượng Phút nhấp
nháy, vui lòng thiết lập phút Khoảng thiết
lập là 00~59.
Nhấn nút để điều chỉnh hoàn tất
6
thiết lập.

HƯỚNG DẪN VẬN HÀNH
Nhấn nút để thoát.
7
❈ Sau khi thiết lập, nó tự động thoát khỏi
chế độ thiết lập nếu không nhấn nút
nào trong 25 giây.
❈ Khi thoát mà không nhấn nút thiết lập,
giá trị được thao tác không được phản
ánh.
- Nếu hẹn giờ được thiết lập, chỉ thị
'được bật' sẽ hiển thị ở phần dưới
của màn hình LCD, và điều hòa nhiệt
độ vận hành ở thời gian được thiết
lập.
- Nếu hẹn giờ bị hủy, chỉ thị 'được bật'
sẽ biến mất.
29
Tiếng Việt

HƯỚNG DẪN VẬN HÀNH
30
Lập trình - Bảo quản TẮT
Tự động được Tắt ở thời gian đã hẹn giờ mà bạn thiết lập.
Tiếng Việt
Nhấn nút .
1
Ví dụ) Thiết lập Thời gian Hẹn giờ
TẮT là '10:20 AM'.
Nhấn lặp lại nút để vào chế
2
độ thiết lập hẹn giờ TẮT.
(đoạn nhấp nháy)
Nhấn nút để điều chỉnh thiết lập
3
AM/ PM.
Nhấn nút để điều chỉnh Chế độ
4
Thiết lập Giờ. Khi biểu tượng Giờ nhấp
nháy, vui lòng thiết lập giờ.
Khoảng thiết lập là 1~12.
Nhấn nút để điều chỉnh Chế độ
5
Thiết lập Phút. Khi biểu tượng Phút nhấp
nháy, vui lòng thiết lập phút Khoảng thiết
lập là 00~59.
Nhấn nút để điều chỉnh hoàn tất
6
thiết lập.

HƯỚNG DẪN VẬN HÀNH
Nhấn nút để thoát.
7
❈ Sau khi thiết lập, nó tự động thoát khỏi
chế độ thiết lập nếu không nhấn nút
nào trong 25 giây.
❈ Khi thoát mà không nhấn nút thiết lập,
giá trị được thao tác không được phản
ánh.
- Nếu hẹn giờ được thiết lập, chỉ thị
'được tắt' sẽ hiển thị ở phần dưới
của màn hình LCD, và điều hòa nhiệt
độ vận hành ở thời gian được thiết
lập.
- Nếu hẹn giờ bị hủy, chỉ thị 'được tắt'
sẽ biến mất.
31
Tiếng Việt

BẢO TRÌ VÀ BẢO DƯỠNG
32
Lập trình : Bảo quản Ngày nghỉ
Nó sẽ tự động dừng lại ở ngày đã hẹn giờ mà bạn thiết lập.
Tiếng Việt
Vui lòng nhấn nút .
1
Nó sẽ vào chế độ thiết lập hẹn
giờ.
Vui lòng chuyển đến 'ngày nghỉ' bằng
2
cách nhấn lặp đi lặp lại nút .
Vui lòng chuyển đến 'ngày' mà
3
bạn muốn thiết lập ngày nghỉ
bằng cách sử dụng nút .
Vui lòng chỉ định hoặc hủy ngày nghỉ bằng
4
cách sử dụng nút hoặc .
Ví dụ: khi bạn thiết lập Thứ hai / Thứ sáu
thành ngày nghỉ
- Các từ 'Monday', 'Friday' biến mất.
Hãy nhấn nút nếu hoàn thành thiết lập
5
ngày nghỉ.
Nếu nó đến ngày nghỉ đã được thiết lập,
điều hoà không khí sẽ dừng vận hành.
Sau khi bạn thiết lập lịch nghỉ, cho đến
trước khi bạn huỷ thiết lập ngày nghỉ,
điều hoà không khí dừng tự động trong
vòng một giờ mặc dù bạn đang vận
hành điều hoà không khí.

B
e
n
z
e
n
e
S
C
O
U
R
I
N
G
C
L
B
A
R
G
E
R
G
S
I
N
N
E
R
BẢO TRÌ VÀ BẢO DƯỠNG
BẢO TRÌ VÀ BẢO DƯỠNG
33
THẬN TRỌNG
!
Trước khi thực hiện bảo trì, hãy tắt nguồn
điện chính vào hệ thống.
Thiết bị Trong nhà
Lưới, Vỏ và Điều khiển Từ xa
- Tắt hệ thống trước khi vệ sinh, lau bằng vài
mềm, khô. Không được dùng chất tẩy trắng
hoặc giấy ráp.
CHÚ Ý
!
Phải ngắt nguồn điện trước khi vệ sinh thiết
bị trong nhà.
Bộ lọc Không khí
Cần phải kiểm tra và vệ sinh các bộ lọc không
khí ở sau lưới phía trước 2 tuần một lần hoặc
thường xuyên hơn nếu cần.
Air outlet vent
- Tuyệt đối không sử dụng :
Nước nóng trên 40 °C.
Có thể làm biến dạng và / hoặc bạc màu.
Các chất dễ bay hơi.
Có thể làm hư các bề mặt của máy điều hòa.
1 Tháo các Bộ lọc không khí ra.
- Giữ vấu hãm và kéo nhẹ về phía trước để
tháo bộ lọc ra.
THẬN TRỌNG
!
Khi bộ lọc không khí đã được tháo ra, không
được sờ vào các bộ phận kim loại của thiết
bị trong nhà.
Nó có thể gây ra tổn thương.
2 Vệ sinh bụi bẩn trong bộ lọc không khí bằng
cách sử dụng máy hút bụi hoặc rửa sạch
bằng nước.
- Nếu là bụi bẩn nhìn thấy được, hãy rửa bộ
lọc bằng chất tẩy rửa trung tính ngâm với
nước ấm.
- Nếu dùng nước nóng (50 °C trở lên), bộ lọc
có thể bị biến dạng.
3 Sau khi rửa bằng nước, hãy sấy khô màn
chắn bộ lọc.
- Không được phơi bộ lọc không khí dưới
ánh nắng mặt trời trực tiếp hoặc hơ lửa để
sấy khô bộ lọc.
4 Lắp đặt bộ lọc không khí.
Tiếng Việt

34
Tiếng Việt
Không được bật quá lạnh
trong phòng.
Điều này không tốt cho sức
khỏe và làm lãng phí điện.
Luôn đóng mành che hoặc
rèm cửa.
Không được để ánh nắng trực
tiếp vào phòng khi điều hòa
không khí đang hoạt động.
Luôn giữ nhiệt độ trong
phòng tỏa đều.
Điều chỉnh luồng không khí
hướng dọc và ngang để đảm
bảo nhiệt độ tỏa đều trong
phòng.
Cần đảm bảo đóng chặt các
cửa ra vào và cửa sổ.
Cần tránh mở các cửa ra vào
và cửa sổ nếu có thể để giữ
không khí lạnh trong phòng.
Vệ sinh bộ lọc không khí
thường xuyên.
Việc tắc trong bộ lọc không khí
sẽ làm giảm dòng không khí và
làm giảm tác dụng làm mát và
khử ẩm. Vệ sinh tối thiểu hai
tuần một lần.
Để cho phòng thông khí
thường xuyên.
Do các cửa sổ được đóng kín,
tốt nhất thi thoảng nên mở các
cửa sổ và để cho phòng thông
khí.
Khi máy điều hòa không khí
không hoạt động....
Khi không định sử dụng điều hòa
không khí trong một thời gian dài.
1 Chạy điều hòa không khí ở các cài đặt sau
trong vòng từ 2 đến 3 tiếng.
- Kiểu vận hành : Chế độ vận hành quạt.
- Chế độ này sẽ sấy khô các bộ phận bên
trong.
2 Ngắt cầu dao.
3 Tháo pin ra khỏi bộ điều khiển từ xa.
Thông tin hữu ích
Bộ lọc không khí và hóa đơn tiền điện của bạn.
Nếu các bộ lọc không khi bị tắc do bụi bẩn, công
suất làm mát sẽ giảm, và sẽ gây lãng phí 6 %
lượng điện tiêu hao để vận hành điều hòa không
khí.
Khi dự định sử dụng lại điều hòa
không khí.
1 Hãy vệ sinh bộ lọc không khí và lắp nó ở
trong bộ phận bên trong.
2 Đảm bảo rằng các cửa nạp và cửa thông khí
của các bộ phận bên trong / bên ngoài không
bị tắc.
3 Đảm bảo kết nối đúng cách dây dẫn nối đất.
Có thể kết nối dây dẫn nối đất với phía bộ
phận bên trong.
THẬN TRỌNG
Ngắt cầu dao khi không định sử dụng máy
điều hòa trong một thời gian dài.
Bụi bẩn có thể tích tụ và có thể gây ra cháy.
!
Các Hướng dẫn Vận hành!
BẢO TRÌ VÀ BẢO DƯỠNG

35
Tiếng Việt
BẢO TRÌ VÀ BẢO DƯỠNG
Hãy gọi điện ngay cho trung tâm dịch vụ trong các trường hợp sau
- Bất kỳ bất thường nào như mùi cháy khét, tiếng ồn lớn, v.v. xảy ra. Tắt thiết bị và ngắt cầu dao. Tuyệt
đối không tự ý sửa chữa hay khởi động lại hệ thống trong trường hợp đó.
- Dây nguồn chính quá nóng hoặc bị hư hỏng.
- Phát ra mã lỗi bằng chức năng tự chẩn đoán.
- Nước rò rỉ từ thiết bị trong nhà ngay cả khi độ ẩm thấp.
- Bất kỳ công tắc, cầu dao (an toàn, nối đất) hay cầu chì nào không hoạt động bình thường
Người dùng phải thực hiện kiểm tra & vệ sinh định kỳ để tránh sự hoạt động kém của thiết bị.
Trong trường hợp đặc biệt, chỉ nhân viên sửa chữa mới được thực hiện công việc.
Vỏ Giải thích
Điều hòa không khí không
hoạt động.
• Bạn có cài đặt sai chế độ hẹn giờ không?
• Cầu chì có bị hở hoặc cầu dao có bị ngắt điện không?
Phòng có mùi khác
thường.
• Cần đảm bảo không có mùi khó chịu bốc ra từ tường, thảm, đồ nội thất
hoặc đồ vải trong phòng.
Có vẻ như có nước ngưng
rò ra từ điều hòa không khí.
• Nước ngưng xảy ra khi luồng không khí từ máy điều hòa làm mát không
khí ấm trong phòng.
Máy điều hòa không hoạt
động trong khoảng 3 phút
khi khởi động lại.
• Đây là cơ chế bảo vệ của máy.
• Hãy chờ khoảng 3 phút và máy sẽ hoạt động.
Không có tác dụng làm mát
hoặc làm ấm.
• Bộ lọc không khí có bị bẩn không? Xem mục hướng dẫn vệ sinh bộ lọc
không khí.
• Phòng có thể quá nóng khi máy điều hòa không khí được bật lần đầu tiên.
Chờ một thời gian để máy làm mát.
• Đã cài đặt sai nhiệt độ mong muốn?
• Các cửa nạp khí và thông khí của thiết bị trong nhà có bị tắc không?
Hoạt động của máy có
tiếng ồn.
• Đối với tiếng ồn giống như tiếng nước chảy.
- Đây là tiếng của freon đi vào bên trong bộ phận của máy điều hòa.
• Đối với tiếng ồn giống như khí nén xả ra không khí.
- Đây là tiếng của nước khử ẩm được xử lý bên trong bộ phận của máy
điều hòa.
Nghe thấy tiếng ồn lớn.
• Âm thanh này do sự giãn nở / co lại của bảng điều khiển phía trước, v.v.
sinh ra do sự thay đổi nhiệt độ.
Đèn tín hiệu của bộ lọc
(LED) đang BẬT.
• Vệ sinh bộ lọc, nhấn đồng thời nút Hẹn giờ và nút ◀ của bộ điều khiển từ
xa cài sẵn trong vòng 3 giây.
Màn hiển thị của điều khiển
từ xa mờ hoặc không hiển
thị.
• Bộ ngắt mạch đã được nhả ra chưa?
• Đã lắp các pin theo các chiều ngược nhau (+) và (-) chưa?
Mã lỗi sẽ xảy ra sau khi bị
sét đánh
• Sản phẩm này được trang bị mạch bảo vệ quá dòng.
Lỗi có thể xảy ra, nhưng điều này là bình thường.
Sau một vài phút, Thiết bị sẽ hoạt động bình thường.
Hướng dẫn Xử lý sự cố! Tiết kiệm thời gian và tiền bạc!
Hãy kiểm tra các mục sau trước khi yêu cầu sửa chữa hay bảo dưỡng.... Nếu chưa khắc phục được
trục trặc, hãy liên hệ với đại lý bán hàng của bạn.

36
ENGLISH

BUKU PANDUAN PEMILIK
PENDINGIN
RUANGAN
Silakan baca buku panduan ini dengan cermat sebelum mengoperasikan alat Anda
dan simpan buku ini untuk referensi di masa mendatang.
BAHASA INDONESIA
CEILING CONCEALED DUCT
Petunjuk asli
www.lg.com
Hak cipta © 2018 LG Electronics. Semua hak cipta di lindungi.

2
KIAT UNTUK MENGHEMAT ENERGI
BAHASA INDONESIA
Berikut ini beberapa kiat yang akan membantu Anda meminimalkan konsumsi daya saat Anda
menggunakan pendingin ruangan. Anda dapat menggunakan pendingin ruangan secara lebih efisien
dengan mengikuti petunjuk di bawah ini:
• Jangan mendinginkan ruangan secara berlebihan. Hal ini dapat berbahaya bagi kesehatan Anda
dan dapat mengonsumsi lebih banyak listrik.
• Halangi sinar matahari dengan tirai atau gorden saat
Anda mengoperasikan pendingin ruangan.
• Pastikan pintu dan jendela tertutup rapat saat
Anda mengoperasikan pendingin ruangan.
• Sesuaikan arah aliran udara secara vertikal atau horizontal untuk mengalirkan udara di dalam
ruangan.
•
Tambah kecepatan kipas untuk mendinginkan atau menghangatkan udara dalam ruangan dengan
cepat, dalam waktu yang singkat.
• Buka jendela secara rutin untuk ventilasi karena kualitas udara di dalam ruangan dapat memburuk
jika pendingin ruangan digunakan selama berjam-jam.
• Bersihkan filter udara setiap 2 minggu sekali. Debu dan kotoran yang terkumpul di filter udara
dapat menghambat aliran udara atau melemahkan fungsi pendinginan / pengurang kelembapan.
Untuk catatan Anda
Rekatkan tanda terima Anda dengan halaman ini apabila Anda membutuhkannya untuk membuktikan
tanggal pembelian atau untuk garansi. Tuliskan nomor model dan nomor seri di sini:
Nomor model :
Nomor seri :
Anda dapat menemukannya pada label di bagian samping setiap unit.
Nama dealer :
Tanggal pembelian :
KIAT UNTUK MENGHEMAT ENERGI

PETUNJUK KESELAMATAN PENTING
3
BAHASA INDONESIA
PETUNJUK KESELAMATAN PENTING
BACA SEMUA PETUNJUK SEBELUM MENGGUNAKAN ALAT.
Selalu patuhi tindakan pencegahan berikut untuk menghindari situasi yang berbahaya dan
memastikan kinerja terbaik produk Anda
PERINGATAN
Saat petunjuk diabaikan, itu dapat menyebabkan cedera serius atau kematian.
PERHATIAN
Saat petunjuk diabaikan, itu dapat menyebabkan cedera ringan atau kerusakan produk.
Alat ini dimaksudkan untuk digunakan oleh ahli atau pengguna terlatih di toko, di industri ringan dan di
pertanian, atau untuk penggunaan komersial oleh orang awam.
PERINGATAN
• Selalu bumikan produk. Ada risiko sengatan listrik.
• Jangan menggunakan pemutus arus listrik yang cacat atau di bawah spesifikasi yang diperlukan.
Gunakan pemutus arus listrik dan sekring dengan kapasitas yang benar. Ada risiko kebakaran atau
sengatan listrik.
• Jangan menggunakan stopkontak ganda. Selalu gunakan alat ini pada rangkaian dan pemutus arus
listrik terpisah. Jika tidak itu dapat menyebabkan sengatan listrik atau kebakaran.
• Untuk pekerjaan listrik, hubungi dealer, penjual, teknisi listrik yang memenuhi syarat, atau Pusat
Layanan Resmi. Jangan membongkar atau memasang produk sendiri. Ada risiko kebakaran atau
sengatan listrik.
• Selalu bumikan produk sesuai diagram kabel. Jangan menyambungkan kabel tanah ke pipa gas
atau air, penangkal petir atau kabel tanah telepon. Ada risiko kebakaran atau sengatan listrik.
• Pasang panel dan tutup kotak kontrol dengan erat. Ada risiko kebakaran atau sengatan listrik
karena debu, air, dsb.
• Gunakan pemutus arus listrik atau sekring dengan kapasitas yang benar. Ada risiko kebakaran atau
sengatan listrik.
• Jangan mengubah atau memperpanjang kabel daya. Jika kabel daya tergores atau kulitnya
mengelupas atau memburuk maka kabel harus diganti. Ada risiko kebakaran atau sengatan listrik.
• Untuk pemasangan, pelepasan atau pemasangan ulang, selalu hubungi dealer atau Pusat Layanan
Resmi. Ada risiko kebakaran, sengatan listrik, ledakan, atau cedera.
• Jangan memasang produk pada tempat pemasangan yang cacat. Pastikan area pemasangan tidak
menjadi lapuk seiring berjalannya waktu. Hal itu dapat menyebabkan produk jatuh.
• Jangan pernah memasang unit luar ruangan di dasar yang bergerak atau tempat di mana unit
dapat jatuh. Unit luar ruangan yang jatuh dapat menyebabkan kerusakan atau cedera atau bahkan
kematian seseorang.
• Saat produk basah (terkena banjir atau terendam), hubungi Pusat Layanan Resmi untuk perbaikan
sebelum menggunakannya lagi. Ada risiko kebakaran atau sengatan listrik.
• Pastikan untuk mengecek zat pendingin yang akan digunakan. Silakan baca label pada produk.
Menggunakan zat pendingin yang salah dapat mencegah pengoperasian normal unit.
• Jangan menggunakan kabel daya, steker atau soket longgar yang rusak. Jika tidak itu dapat
menyebabkan kebakaran atau sengatan listrik.
• Jangan menyentuh, mengoperasikan, atau memperbaiki produk dengan tangan basah. Pegang
steker dengan tangan saat mencabutnya. Ada risiko sengatan listrik atau kebakaran.
• Jangan meletakkan pemanas atau alat pemanas lainnya di dekat kabel daya. Ada risiko kebakaran
dan sengatan listrik.
• Jangan biarkan air mengalir ke komponen listrik. Pasang unit jauh dari sumber air. Ada risiko
kebakaran, kerusakan produk, atau sengatan listrik.
• Jangan menyimpan atau menggunakan atau bahkan membiarkan gas yang mudah menyala atau
terbakar di dekat produk. Ada risiko kebakaran.
• Sambungan kabel dalam ruangan/luar ruangan harus tersambung dengan erat dan kabel harus
diarahkan dengan benar agar tidak ada gaya yang menarik kabel dari terminal sambungan.
Sambungan yang tidak benar atau longgar dapat menyebabkan panas atau kebakaran.
!
!
!

4
PETUNJUK KESELAMATAN PENTING
BAHASA INDONESIA
• Buang bahan kemasan dengan aman. Seperti sekrup, paku, baterai, barang yang rusak, dsb
setelah pemasangan atau servis dan kemudian robek dan buang tas kemasan plastik. Anak-anak
dapat bermain dengannya dan menyebabkan cedera.
• Pastikan untuk mengecek steker tidak kotor
, longgar atau rusak dan kemudian hanya masukkan
steker sepenuhnya. Steker yang kotor, longgar atau rusak dapat menyebabkan sengatan listrik atau
kebakaran.
• Pada unit luar ruangan kapasitor penaik tegangan memasok listrik bertegangan tinggi ke komponen
listrik. Pastikan untuk mengosongkan kapasitor sepenuhnya sebelum melakukan pekerjaan
perbaikan. Kapasitor yang bermuatan dapat menyebabkan sengatan listrik.
• Saat memasang unit, gunakan kit pemasangan yang disediakan bersama produk. Jika tidak unit
dapat jatuh dan menyebabkan cedera serius.
• Pastikan untuk hanya menggunakan komponen yang tercantum di daftar komponen servis. Jangan
pernah mencoba untuk memodifikasi peralatan. Penggunaan komponen yang tidak tepat dapat
menyebabkan sengatan listrik, panas berlebih atau kebakaran.
• Jangan menggunakan produk di ruangan yang tertutup rapat untuk waktu yang lama. Lakukan
ventilasi secara teratur. Kekurangan oksigen dapat terjadi dan membahayakan kesehatan Anda.
• Jangan membuka kisi-kisi depan produk selama pengoperasian. (Jangan menyentuh filter
elektrostatik, jika unit dilengkapi dengan filter tersebut.)
Ada risiko cedera fisik, sengatan listrik, atau
kerusakan produk.
• Jika ada bunyi yang aneh, bau atau asap keluar dari produk, segera matikan pemutus arus listrik
atau cabut kabel sumber daya.
Ada risiko sengatan listrik atau kebakaran.
• Alirkan udara ke ruangan produk dari waktu ke waktu saat alat dioperasikan bersamaan dengan
kompor, atau elemen pemanas, dsb. Kekurangan oksigen dapat terjadi dan membahayakan
kesehatan Anda.
• Matikan daya utama dan cabut unit saat membersihkan atau memperbaiki produk.
Ada risiko
sengatan listrik.
• Saat produk tidak digunakan untuk waktu yang lama, cabut steker atau matikan pemutus arus
listrik. Ada risiko kerusakan atau kegagalan produk, atau pengoperasian yang tidak diinginkan.
• Berhati-hatilah untuk memastikan tidak ada orang terutama anak-anak yang dapat menginjak atau
jatuh ke unit luar ruangan. Hal ini dapat menyebabkan cedera pribadi dan kerusakan produk.
• Berhati-hatilah untuk memastikan kabel daya tidak dapat ditarik atau rusak selama pengoperasian.
Ada risiko kebakaran atau sengatan listrik.
• Jangan meletakkan
APA PUN di atas kabel daya. Ada risiko kebakaran atau sengatan listrik.
• Jangan mencolokkan atau mencabut steker untuk MENY
ALAKAN/MEMATIKAN unit. Ada risiko
kebakaran atau sengatan listrik.
• Saat terjadi kebocoran gas yang mudah terbakar, matikan gas dan buka jendela untuk ventilasi
sebelum menyalakan produk. Jangan menggunakan telepon atau menyalakan atau mematikan
sakelar. Ada risiko ledakan atau kebakaran.
• Jangan menyalakan pemutus arus listrik atau daya dengan kondisi panel depan, kabinet, penutup
atas, penutup kotak kontrol dalam keadaan dilepas atau terbuka. Jika tidak, itu dapat menyebabkan
kebakaran, sengatan listrik, ledakan atau kematian.
• Gunakan pompa vakum atau Gas inert (nitrogen) saat melakukan uji kebocoran atau pembersihan
udara. Jangan memampatkan udara atau Oksigen dan jangan menggunakan Gas yang mudah
terbakar
. Jika tidak, itu dapat menyebabkan kebakaran atau ledakan. Ada risiko kematian, cedera,
kebakaran atau ledakan.
PERHATIAN
• Dua orang atau lebih harus mengangkat dan mengangkut produk. Hindari cedera pribadi.
• Jangan memasang produk di mana produk akan terkena angin laut (semprotan garam) secara
langsung. Hal itu dapat menyebabkan korosi pada produk.
• Pasang selang pembuangan untuk memastikan air kondensasi dibuang dengan baik. Sambungan
yang buruk dapat menyebabkan kebocoran air
.
• Pastikan produk rata saat memasang produk. Untuk menghindari getaran atau kebisingan.
• Jangan memasang produk di mana kebisingan atau udara panas dari unit luar ruangan dapat
merusak atau mengganggu lingkungan sekitar
. Hal itu dapat menyebabkan masalah bagi tetangga
Anda dan perselisihan.
• Selalu cek apakah terjadi kebocoran gas (zat pendingin) setelah pemasangan atau perbaikan
produk. Tingkat zat pendingin yang rendah dapat menyebabkan kerusakan produk.
!

PETUNJUK KESELAMATAN PENTING
• Jangan menggunakan produk untuk tujuan khusus, seperti mengawetkan makanan, karya seni,
dsb. Ini adalah pendingin ruangan untuk konsumen, bukan sistem pendinginan yang presisi. Ada
risiko kerusakan atau hilangnya properti.
• Jangan menghalangi aliran udara masuk atau keluar. Hal itu dapat menyebabkan kerusakan
produk.
• Gunakan kain lembut untuk membersihkan. Jangan menggunakan detergen yang keras, pelarut
atau percikan air dsb. Ada risiko kebakaran, sengatan listrik, atau kerusakan pada bagian plastik
produk.
• Jangan menyentuh bagian logam produk saat melepas filter udara. Ada risiko cedera pribadi.
• Jangan menginjak atau menaruh apa pun di atas produk. (unit luar ruangan) Ada risiko cedera
pribadi dan kerusakan produk.
• Selalu masukkan filter dengan erat setelah membersihkan. Bersihkan filter setiap dua minggu sekali
atau lebih sering jika perlu. Filter yang kotor mengurangi efisiensi.
• Jangan memasukkan tangan atau benda lain melalui saluran masuk atau keluar udara saat produk
dioperasikan. Ada bagian yang tajam dan bergerak yang dapat menyebabkan cedera pribadi.
• Berhati-hatilah saat mengeluarkan dan memasang produk. Tepi yang tajam dapat menyebabkan
cedera.
• Jika gas zat pendingin bocor selama perbaikan, jangan menyentuh gas zat pendingin yang bocor.
Gas zat pendingin dapat menyebabkan radang dingin.
• Jangan memiringkan unit saat melepas atau mencopotnya. Air kondensasi di dalamnya dapat
tumpah.
• Jangan mencampur udara atau gas selain zat pendingin yang ditentukan untuk digunakan di dalam
sistem. Jika air masuk ke dalam sistem zat pendingin, tekanan yang sangat tinggi akan terjadi,
menyebabkan kerusakan peralatan atau cedera.
• Jika gas zat pendingin bocor selama pemasangan, segera alirkan udara ke ruangan. Jika tidak itu
dapat berbahaya bagi kesehatan Anda.
• Membongkar unit, perawatan zat pendingin, minyak dan bagian akhirnya harus dilakukan sesuai
dengan standar lokal dan nasional.
• Ganti semua baterai dalam pengendali jarak jauh dengan baterai baru dengan jenis yang sama.
jangan mencampur baterai lama dan baru atau baterai dengan jenis yang berbeda. Ada risiko
kebakaran atau kerusakan produk.
• Jangan mengisi ulang atau membongkar baterai. Jangan membuang baterai ke dalam api. Baterai
dapat terbakar atau meledak.
• Jika cairan dari baterai mengenai kulit atau pakaian Anda, cuci dengan air bersih. Jangan
menggunakan pengendali jarak jauh jika baterainya bocor. Bahan kimia di dalam baterai dapat
menyebabkan luka bakar atau bahaya kesehatan lainnya.
• Jika Anda memakan cairan dari baterai, sikat gigi Anda dan pergilah ke dokter. Jangan
menggunakan pengendali jarak jauh jika baterainya bocor. Bahan kimia di dalam baterai dapat
menyebabkan luka bakar atau bahaya kesehatan lainnya.
• Jangan biarkan pendingin ruangan menyala untuk waktu yang lama saat kelembapannya sangat
tinggi dan pintu atau jendela dibiarkan terbuka. Udara yang lembap dapat mengembun dan
membasahi atau merusak perabotan.
• Jangan biarkan kulit Anda atau anak-anak atau tanaman terkena aliran udara dingin atau panas.
Hal ini dapat membahayakan kesehatan Anda.
• Jangan meminum air yang dibuang dari produk. Air tersebut tidak bersih dan dapat menyebabkan
masalah kesehatan serius.
• Gunakan bangku atau tangga yang kokoh saat membersihkan, melakukan pemeliharaan atau
memperbaiki produk di tempat yang tinggi. Berhati-hatilah dan hindari cedera pribadi.
• Pendingin ruangan tidak dimaksudkan untuk digunakan oleh anak kecil atau penyandang disabilitas
tanpa pengawasan.
• Anak kecil harus diawasi untuk memastikan mereka tidak bermain dengan pendingin ruangan.
5
BAHASA INDONESIA

6
DAFTAR ISI
BAHASA INDONESIA
DAFTAR ISI
2 KIAT UNTUK MENGHEMAT ENERGI
3 PETUNJUK KESELAMATAN PENTING
7 SEBELUM MENGGUNAKAN
7
Mempersiapkan untuk pengoperasian
7
Penggunaan
7
Pembersihan dan pemeliharaan
7
Layanan
8 PENGENALAN PRODUK
8
9
10
11 PETUNJUK PENGOPERASIAN
11
Operasi Standar - Pendinginan Standar
12
Operasi Standar - Pendinginan Kuat
12
Operasi Standar - Mode Pemanasan
13
Operasi Standar - Mode Dehumidifikasi
13
Mode Pergantian Otomatis
14
Operasi Standar - Mode Kipas
15
Operasi Standar - Mode Operasi Otomatis
16
Operasi Standar - Pengaturan Aliran Udara
17
Operasi Standar - Pengaturan Suhu/Pengecekan Suhu Ruangan
18
Pengaturan Fungsi - Kunci Pengaman Anak
19
Pengaturan Fungsi - Mengubah Suhu
20
Pengaturan Fungsi - Menghapus Tanda Filter
21
Pengaturan Fungsi - Kontrol Sudut baling-baling
22
Pengaturan Fungsi - Mengubah Waktu Saat Ini
24
Pemrograman - Reservasi Sederhana
25
Pemrograman : Reservasi Mingguan
27
Pemrograman - Reservasi Tidur
28
Pemrograman - Reservasi NYALA
30
Pemrograman - Reservasi MATI
32
Pemrograman - Reservasi Liburan
33 PEMELIHARAAN DAN LAYANAN
33
Unit Dalam Ruangan
34
Kiat Pengoperasian!
34
Saat pendingin ruangan tidak akan....
35
Kiat Pemecahan Masalah! Menghemat waktu dan uang!
35
Segera hubungi layanan servis dalam situasi berikut
Nama dan fungsi bagian(CEILING CONCEALED DUCT)
Apa yang harus dilakukan sebelum pengoperasian
Pengendali Jarak Jauh Berkabel

SEBELUM MENGGUNAKAN
7
BAHASA INDONESIA
Mempersiapkan untuk pengoperasian
• Hubungi spesialis pemasangan untuk melakukan pemasangan.
• Gunakan rangkaian khusus tersendiri.
Penggunaan
• Terpapar aliran udara langsung untuk waktu yang lama dapat berbahaya bagi kesehatan Anda.
Jangan biarkan penghuni, hewan piaraan, atau tanaman terpapar aliran udara langsung untuk waktu
yang lama.
• Karena kemungkinan terjadinya kekurangan oksigen, alirkan udara ke dalam ruangan saat
digunakan bersamaan dengan kompor atau perangkat pemanas lainnya.
• Jangan menggunakan pendingin ruangan ini untuk tujuan khusus yang tidak ditentukan (misalnya
mengawetkan perangkat yang presisi, makanan, hewan piaraan, tanaman dan benda seni).
Penggunaan semacam itu dapat merusak benda-benda tersebut.
Pembersihan dan pemeliharaan
• Jangan menyentuh bagian logam unit saat melepas filter. Cedera dapat terjadi saat memegang tepi
logam yang tajam.
• Jangan menggunakan air untuk membersihkan bagian dalam pendingin ruangan. Jika terkena air, itu
dapat merusak penyekatan, sehingga menyebabkan kemungkinan sengatan listrik.
• Saat membersihkan unit, pertama-tama pastikan daya dan pemutus arus listrik dimatikan. Kipas
berputar dengan kecepatan yang sangat tinggi selama pengoperasian. Ada kemungkinan cedera jika
daya unit secara tidak sengaja dinyalakan saat membersihkan bagian dalam unit.
Layanan
Untuk perbaikan dan pemeliharaan, hubungi dealer layanan resmi Anda.
SEBELUM MENGGUNAKAN

8
PENGENALAN PRODUK
BAHASA INDONESIA
Nama dan fungsi bagian
PENGENALAN PRODUK
Saluran
udara
4
5
1
2
8
6
7
Pengendali
jarak jauh
3
Lubang
keluar udara
Lubang
keluar udara
1: Unit dalam ruangan
2: Unit luar ruangan
3: Pengendali jarak jauh
4: Udara masuk
5: Udara buangan
6: Pipa zat pendingin, sambungan kabel listrik
7: Pipa pembuangan
8: Kabel tanah
kabel ke tanah unit luar ruangan untuk
mencegah sengatan listrik.
(CEILING CONCEALED DUCT)

PENGENALAN PRODUK
9
BAHASA INDONESIA
Apa yang harus dilakukan sebelum pengoperasian
Lubang
keluar udara
A
B
1 1
12
Jika pemasangan Anda memiliki sistem kontrol
yang disesuaikan, tanyakan kepada dealer LG
Anda untuk operasi yang sesuai dengan sistem
Anda.
1: Unit dengan pengendali jarak jauh
2: Unit tanpa pengendali jarak jauh
(saat digunakan sebagai operasi simultan)

10
PENGENALAN PRODUK
BAHASA INDONESIA
1 LAYAR INDIKATOR OPERASI
2 Tombol SETEL SUHU
3 Tombol KECEPATAN KIPAS
4 Tombol NYALA/MATI
5 Tombol PEMILIHAN MODE OPERASI
6 PENERIMA PENGENDALI JARAK JAUH
NIRKABEL
• Beberapa produk tidak menerima sinyal
nirkabel.
7 Tombol ALIRAN UDARA
8 Tombol SUBFUNGSI
9 Tombol PENGATURAN FUNGSI
10 Tombol VENTILASI
11 RESERVASI
12 Tombol ATAS, BAWAH, KIRI, KANAN
• Untuk mengecek suhu dalam ruangan,
tekan tombol .
13 Tombol SUHU RUANGAN
14 Tombol PENGATURAN/BATAL
15 Tombol KELUAR
* Beberapa fungsi mungkin tidak beroperasi dan
ditampilkan tergantung pada tipe produk.
CATATAN
!
• Suhu tampilan dapat berbeda dari suhu
ruangan yang sebenarnya jika pengendali
jarak jauh dipasang di tempat yang
terkena sinar matahari langsung atau
tempat yang dekat dengan sumber panas.
• Produk yang sebenarnya dapat berbeda
dari isi di atas tergantung pada tipe model.
• Saat menggunakan sistem operasi
simultan, kapan pun tombol pengendali
jarak jauh ditekan, sistem akan beroperasi
setelah sekitar 1~2 menit.
Pengendali Jarak Jauh Berkabel
1
8
7
9
10
11
12
13
15
Silakan tempelkan label informasi di bagian
dalam pintu. Silakan pilih bahasa yang sesuai
tergantung negara Anda.
14
2
4
5
6
3

PETUNJUK PENGOPERASIAN
11
BAHASA INDONESIA
Operasi Standar - Pendinginan Standar
Ini akan mendinginkan ruangan dengan angin yang nyaman dan bersih.
PETUNJUK PENGOPERASIAN
Tekan tombol untuk
1
menyalakan Unit dalam
ruangan.
Tekan tombol untuk
2
memilih mode operasi
Pendinginan.
Sesuaikan suhu yang diinginkan
3
dengan menekan tombol .
Tekan tombol untuk
mengecek suhu Ruangan.
Saat mengatur suhu yang
diinginkan lebih tinggi dari suhu
ruangan, hanya angin ventilasi
yang dialirkan dan bukan angin
dingin.

Apa itu Pendinginan Kuat?
• Suhu yang diinginkan: Po (sebenarnya 18 °C)
• Aliran angin: angin kuat
• Arah angin: tetap ke posisi pendinginan udara
h Produk parsial tidak memiliki fungsi pendinginan udara kuat.
12
PETUNJUK PENGOPERASIAN
BAHASA INDONESIA
Fungsi ini membuat suhu
ruangan turun dengan cepat
}
Operasi Standar - Mode Pemanasan
Operasi ini mengalirkan angin hangat ke dalam ruangan.
• Drive pemanas hanya beroperasi pada model pemanas dan pendingin.
• Pemanas tidak beroperasi pada model eksklusif pendingin.
Operasi Standar - Pendinginan Kuat
Ini membuat ruangan dingin menggunakan udara yang nyaman dan segar dengan cepat.
Tekan tombol untuk
1
menyalakan Unit dalam ruangan.
Tekan tombol untuk memiliki
2
mode operasi pendinginan.
Tekan tombol berulang kali
3
sampai 'Po' ditampilkan.
Tekan tombol untuk
1
menyalakan Unit dalam ruangan.
Tekan tombol untuk memilih
2
mode Pemanasan.
(Untuk mengecek suhu dalam
ruangan, tekan tombol suhu ruangan.)
Sesuaikan suhu yang diinginkan
3
dengan menekan tombol .
Saat menyetel suhu yang
diinginkan lebih rendah dari
suhu ruangan, hanya akan ada
angin ventilasi.

PETUNJUK PENGOPERASIAN
13
BAHASA INDONESIA
• Pada musim hujan atau di iklim berkelembapan tinggi, dimungkinkan untuk mengoperasikan
mode dehumidifier dan pendinginan secara simultan untuk menghilangkan kelembapan secara
efektif.
• Menu kekuatan angin ini mungkin tidak dapat dipilih sebagian sesuai dengan produk.
Mode Pergantian Otomatis
Operasi Standar - Mode Dehumidifikasi
Operasi ini menghilangkan kelembapan sambil mendinginkan udara dengan lemah.
Tekan tombol untuk
1
menyalakan Unit dalam ruangan.
Tekan tombol untuk memilih
2
mode Dehumidifikasi.
Penyetelan suhu tidak dapat
disesuaikan selama pengoperasian
mode ini.
Tekan tombol untuk memilih
3
laju aliran udara sangat lemah →
lemah → sedang → kuat → otomatis.
(Kekuatan angin awal pada drive
penghilang kelembapan adalah 'lemah'.)
Tekan tombol
untuk menyalakan Unit dalam ruangan.
1
Tekan tombol untuk memilih Mode Pergantian Otomatis.
2
Suhu yang disetel seperti gambar sebelah kanan dapat disetel
3
pada model pendingin / pemanas.

14
PETUNJUK PENGOPERASIAN
BAHASA INDONESIA
1
Tekan tombol untuk memilih
Mode Kipas.
2
Setiap kali menekan tombol ,
Anda dapat memilih aliran angin
dengan urutan sangat lemah →
lemah → sedang → kuat → otomatis.
Saat menjalankan ventilasi,
kompresor AHU tidak bekerja.
3
• Drive ventilasi tidak melepaskan udara dingin tetapi kipas biasa.
• Karena ia melepaskan angin yang dengan suhu yang tidak berbeda dari ruangan, fungsinya
adalah untuk sirkulasi udara di dalam.
• Menu kekuatan angin ini mungkin tidak dapat dipilih sebagian sesuai dengan produk.
Operasi Standar - Mode Kipas
Operasi ini mengembuskan udara seperti di dalam ruangan, bukan angin dingin.
Tekan tombol untuk
menyalakan Unit dalam ruangan.

PETUNJUK PENGOPERASIAN
15
BAHASA INDONESIA
1
Tekan tombol untuk memilih
Mode Kecerdasan buatan.
2
Anda dapat
menyesuaikan
suhu seperti
gambar di sebelah
kanan untuk
model pendingin
dan pemanas.
3
Untuk kasus
eksklusif
pendingin, seperti
gambar di sebelah
kanan, Anda dapat
menyesuaikan
suhu dari panas
ke dingin, dari "-2"
ke "2"
berdasarkan "00".
4
Saat dingin
Saat sejuk
Saat sesuai
Saat hangat
Saat panas
Selama mengoperasikan mode Operasi Otomatis:
• Kita dapat menggunakan tombol KECEPATAN KIPAS.
• Kita dapat mengubah secara manual ke mode operasi lainnya.
Operasi Standar - Mode Operasi Otomatis
Tekan tombol untuk
menyalakan Unit dalam ruangan.

16
PETUNJUK PENGOPERASIAN
BAHASA INDONESIA
Operasi Standar - Pengaturan Aliran Udara
* Beberapa fungsi mungkin tidak beroperasi dan
ditampilkan tergantung pada tipe produk.
Kekuatan angin: Anda dapat menyesuaikan
kekuatan angin yang diinginkan.
Silakan atur kekuatan angin yang
1
diinginkan dengan tombol kekuatan
angin.
• Setiap kali Anda menekan
• Menu ini mungkin tidak dipilih sebagian
Arah angin: Anda dapat menyesuaikan arah
angin yang diinginkan.
kekuatan angin, Anda dapat memilih aliran
angin dengan urutan ‘sangat lemah → lemah
→ lemah sedang → sedang → sedang kuat
→ kuat → sangat kuat → otomatis’.
sesuai dengan fungsi produk.
Silakan menyetel arah angin
1
yang diinginkan dengan menekan
tombol .
Anda dapat memilih arah angin
(angin nyaman → Atas/Bawah
dan Kanan/Kiri → Kanan/Kiri →
Atas/Bawah) dengan menekan
tombol .
Sebagian arah angin mungkin
tidak dapat dipilih sesuai dengan
fungsi produk.

PETUNJUK PENGOPERASIAN
17
BAHASA INDONESIA
Kita dapat menyesuaikan suhu yang
diinginkan.
• Tekan tombol-tombol untuk
memilih suhu yang diinginkan.
: Menaikkan 1 °C atau 2 °F per satu
kali tekan
: Menurunkan 1 °C atau 2 °F per
satu kali tekan
Operasi pendinginan:
- Mode pendinginan tidak bekerja jika suhu
yang diinginkan lebih tinggi dari suhu
ruangan. Silakan turunkan suhu yang
diinginkan.
Operasi pemanasan:
- Mode pemanasan tidak bekerja jika suhu
yang diinginkan lebih rendah dari suhu
ruangan. Silakan naikkan suhu yang
diinginkan.
1
Setiap kali menekan tombol , suhu
ruangan akan ditampilkan dalam 5 detik.
Setelah 5 detik, pengendali akan
berubah menampilkan suhu yang
diinginkan.
Karena lokasi pengendali jarak jauh,
suhu ruangan yang sebenarnya dan nilai
yang ditampilkan dapat berbeda.
1
Pengaturan Suhu
Pengecekan Suhu Ruangan
• 5 °C adalah selisih yang wajar antara suhu ruangan dan luar.
• Suhu ruangan: Menunjukkan suhu
ruangan saat ini.
• Suhu setelan: Menunjukkan suhu
yang ingin disetel pengguna.
Operasi Standar - Pengaturan Suhu/Pengecekan Suhu Ruangan
h
Tergantung jenis pengendali, suhu yang
diinginkan dapat disesuaikan per 0,5 °C atau
1 °F.

18
PETUNJUK PENGOPERASIAN
BAHASA INDONESIA
Pengaturan Fungsi - Kunci Pengaman Anak
Ini adalah fungsi yang digunakan untuk mencegah anak-anak atau orang lain menggunakan alat
dengan sembrono.
Tekan tombol berulang kali
1
sampai berkedip.
Jika pergi ke area ikon
2
‘pengaturan’ dengan
menggunakan tombol , ikon
‘pengaturan’ berkedip, dan fungsi
kunci pengaman anak disetel jika
menekan tombol pada saat itu.
Saat membatalkan fungsi kunci, jika pergi
3
ke ikon ‘batal’ dengan menekan tombol
dan kemudian, menekan tombol
, fungsi kunci pengaman anak
dibatalkan.
Tekan tombol untuk keluar.
4
❈ Setelah pengaturan, alat akan otomatis
keluar dari mode pengaturan jika tidak
ada masukan tombol selama 25 detik.
❈ Saat keluar tanpa menekan tombol set,
nilai yang diubah tidak akan tercermin.

PETUNJUK PENGOPERASIAN
19
BAHASA INDONESIA
Pengaturan Fungsi - Mengubah Suhu
Mengubah suhu adalah fungsi untuk mengatur drive pendinginan udara dan pemanasan dapat
berubah-ubah secara otomatis sesuai suhu pada mode drive kecerdasan buatan.
Ulangi menekan tombol
1
sampai ikon berkedip.
Tekan tombol untuk mengubah.
2
❈ Konversi nilai suhu : 1~7
Tekan tombol untuk
3
menyelesaikan dan mengaktifkan
proses pengaturan.
Tekan tombol untuk keluar
4
atau sistem akan melepaskan
secara otomatis jika tidak ada
masukan setelah 25 detik.
❈ Saat keluar tanpa menekan
tombol set, nilai yang diubah
tidak akan tercermin.

20
PETUNJUK PENGOPERASIAN
BAHASA INDONESIA
Tekan tombol berulang kali
sampai berkedip.
1
Saat berkedip, tekan
untuk menghilangkan tampilan
ini.
2
• Saat filter tertutup debu, itu akan mengurangi efisiensi pendinginan/pemanasan dan
mengumpulkan lebih banyak daya listrik. Karenanya, bersihkan filter setiap kali waktu
membersihkan berakhir.
* Indikator pembersihan filter dibatalkan secara otomatis tanpa pembatalan terpisah setelah jangka
waktu tertentu.
Pengaturan Fungsi - Menghapus Tanda Filter
Fungsi ini adalah untuk menghilangkan indikator pembersihan filter dalam ruangan.

PETUNJUK PENGOPERASIAN
21
BAHASA INDONESIA
Pengaturan Fungsi - Kontrol Sudut baling-baling
Fungsi ini adalah untuk menyesuaikan sudut aliran udara yang keluar.
* Beberapa fungsi mungkin tidak beroperasi dan ditampilkan tergantung pada tipe produk.
Ulangi menekan tombol
1
sampai ikon berkedip.
Tekan tombol untuk memilih
2
baling-baling yang aktif: 1 / 2 / 3 / 4 / Semua /
Standar. Pilih nomor Baling-Baling
menggunakan tombol .
❈ Nomor baling-baling: No. 1, 2, 3, 4, semua,
atau standar
- Baling-baling yang dipilih yang beroperasi
- Silakan verifikasi baling-baling yang
beroperasi.
- Untuk menyetel sudut semua
baling-baling, pilih 'semua'.
- Untuk menyetel pengaturan default pabrik,
pilih 'standar'.
Pilih sudut angin menggunakan dan
3
tekan tombol .
- Batas pengaturan sudut angin dapat diubah
menjadi 5 tingkat atau 6 tingkat sesuai
produk.
- Saat memilih 'standar' untuk nomor
Baling-Baling, sudut angin tidak bergerak.
Setel sudut angin untuk baling-baling lainnya
4
sama seperti di atas.
❈ Ada produk dengan baling-baling dengan
no. 1 dan no. 2 saja sesuai tipe produk.
Tekan tombol untuk keluar.
❈ Setelah pengaturan, alat akan
5
otomatis keluar dari mode
pengaturan jika tidak ada masukan tombol
selama 60 detik.
❈ Saat keluar tanpa menekan tombol set, nilai
yang diubah tidak akan tercermin.
Tekan tombol untuk
6
menyelesaikan dan mengaktifkan
proses pengaturan. (Fungsi arah
aliran udara akan dilepaskan setiap
kali mengatur sudut baling-baling)
Tekan tombol untuk keluar atau
7
sistem akan melepaskan secara
otomatis jika tidak ada masukan
setelah 25 detik.

22
PETUNJUK PENGOPERASIAN
BAHASA INDONESIA
Pengaturan Fungsi - Mengubah Waktu Saat Ini
Silakan tekan tombol pengaturan
1
fungsi. Jika tombol pengaturan
fungsi ditekan berulang kali, itu
akan pergi ke menu pengaturan
waktu. Ikon ‘Pengaturan waktu’ ditunjukkan
pada saat itu dan tanggal berkedip pada area
indikator waktu saat ini.
Mis) Mengubah Waktu Saat Ini ke
'Senin / AM 10:20'.
Tekan tombol untuk
2
menyesuaikan hari ini.
Tekan tombol untuk pergi ke mode
3
pengaturan AM/PM (bagian 'AM/ PM
akan berkedip).
Atur waktu AM PM dengan
4
menekan tombol .
Tekan tombol untuk pergi ke mode
5
pengaturan 'Jam'. (Bagian 'Jam' akan
berkedip)
Atur waktu Jam dengan menekan tombol
6
.

PETUNJUK PENGOPERASIAN
23
BAHASA INDONESIA
Tekan tombol untuk pergi ke mode
7
pengaturan 'Menit'. (Bagian 'Menit' akan
berkedip)
Atur waktu Menit dengan menekan tombol
8
.
Tekan tombol untuk selesai.
9
Dalam proses, tekan tombol
10
untuk melepaskan dan
(Jika keluar dengan informasi
yang tidak lengkap, itu akan
kembali ke pengaturan
sebelumnya)
❈ Saat keluar tanpa menekan tombol
set, nilai yang diubah tidak akan
tercermin.

24
PETUNJUK PENGOPERASIAN
BAHASA INDONESIA
* Saat mengatur reservasi sederhana, produk akan berjalan atau berhenti secara otomatis setelah
waktu yang disetel.
Pemrograman - Reservasi Sederhana
Anda dapat menyetel reservasi dengan mudah dalam satuan 1 jam mulai dari 1 jam sampai 7 jam.
Tekan tombol untuk masuk
1
ke mode Pemrograman.
(bagian berkedip)
Mis) Mengatur waktu Reservasi
Sederhana ke '3'.
Tekan tombol untuk menyesuaikan
2
waktu reservasi.
Tekan tombol untuk menyelesaikan
3
pengaturan.
Tekan tombol untuk keluar.
4
❈ Setelah pengaturan, alat akan
otomatis keluar dari mode pengaturan
jika tidak ada masukan tombol selama
25 detik.
❈ Saat keluar tanpa menekan tombol
set, nilai yang diubah tidak akan
tercermin.

PETUNJUK PENGOPERASIAN
25
BAHASA INDONESIA
Pemrograman : Reservasi Mingguan
Anda dapat menyetel reservasi harian dalam satuan mingguan.
Reservasi mingguan terus beroperasi sampai sebelum Anda membatalkannya setelah Anda
melakukan pengaturan.
Silakan akses ke mode pengaturan reservasi dengan menekan tombol reservasi.
1
❈ Anda dapat mengatur dua reservas i mingguan untuk satu hari, dan hingga empat
belas reservasi untuk satu minggu.
Misalnya, untuk mengatur (Selasa pagi 11:30 nyala ~ sore 12:30 mati), Anda
mengaturnya dengan urutan di bawah ini.
Silakan akses ke 'mingguan' dengan
2
menekan tombol reservasi berulang
kali. 'Mingguan' berkedip pada saat ini.
Silahkan memilih reservasi mingguan
3
atau reservasi mingguan ڸڹ degan
menggunakan tombol .
❈ Anda dapat mengatur dua reservasi,
reservasi mingguan 1 dan reservasi
mingguan 2, untuk satu hari.
Silakan akses ke bagian pengaturan
4
'tanggal' dengan menggunakan
tombol . Jika indikator
'tanggal' berkedip, silakan atur
tanggal. Anda dapat mengatur
tanggal dari Senin sampai Minggu.
Silakan akses ke bagian pengaturan
5
'AM/PM' waktu nyala dengan
menggunakan tombol .
Silakan akses ke bagian pengaturan
6
'jam' waktu nyala dengan
menggunakan tombol .
- Ini adalah bagian untuk mengatur
waktu kapan pendingin ruangan
menyala.
Silakan mengubah waktu dengan menggunakan tombol .
7
- Anda dapat mengatur jam 0~12.
Silahkan pindah ke 'menit' set pemutar on dengan menggunakan tombol .
8
Jika indikator 'menit' berkedip, silakan atur 'menit' dengan menggunakan tombol
9
.

26
PETUNJUK PENGOPERASIAN
BAHASA INDONESIA
* Unit dalam ruangan dinyalakan dengan suhu yang diinginkan jika unit dikonfigurasi menggunakan
tombol atas/bawah selama preset waktu operasi mingguan.
- Saat suhu yang diinginkan tidak disetel, alat akan menyala otomatis dengan suhu yang diinginkan
pada operasi sebelumnya.
Silakan akses ke bagian pengaturan
10
'AM/PM' waktu mati dengan
menggunakan tombol .
- Pengaturan AM/PM sama persis
dengan pengaturan waktu nyala.
Silakan akses ke bagian pengaturan
11
'jam' waktu mati dengan
menggunakan tombol Kanan.
- Ini adalah bagian untuk mengatur
waktu kapan pendingin ruangan
mati.
- Jika indikator 'jam' berkedip, silakan
atur 'jam'.
Silakan atur 'jam' dan 'menit'
❈
sama persis dengan metode
untuk mengatur waktu nyala.
Jika selesai mengatur reservasi mingguan, silakan tekan tombol pengaturan /
12
pembatalan. Pengaturan reservasi mingguan untuk hari yang Anda setel selesai.
Jika Anda mengatur menggunakan metode yang sama persis dengan di atas
13
dengan memilih hari yang ingin Anda atur, itu akan mengoperasikan reservasi
mingguan. Jika Anda mengatur waktu reservasi nyala dan waktu reservasi
mati yang sama persis, itu tidak akan mengoperasikan drive reservasi.
Penjelasan reservasi mingguan
Nomor reservasi
Waktu nyala
Garis bawah: indikator bahwa ada reservasi mingguan untuk hari
yang bersangkutan
Waktu mati

PETUNJUK PENGOPERASIAN
27
BAHASA INDONESIA
PERHATIAN
Silakan reservasi waktu yang sesuai saat tidur. (Terlalu banyak pendinginan udara tidak baik bagi
kesehatan Anda.)
• Karena alat menyesuaikan suhu yang diinginkan secara otomatis untuk pendinginan udara yang
nyaman pada drive tidur
, akan ada perbedaan antara suhu yang diinginkan pada pengendali
jarak jauh dan suhu yang diinginkan pada badan pendingin ruangan.
• Reservasi tidur beroperasi sebagai reservasi mati untuk produk yang penyesuaian suhunya
tidak dikontrol dengan satuan 0,5 °C.
!
Pemrograman - Reservasi Tidur
Reservasi tidur adalah fungsi pendingin ruangan untuk beroperasi dan berhenti setelah jangka waktu
tertentu pada mode tidur sebelum tidur. Saat disambungkan ke produk ventilasi dan reservasi tidur
disetel, alat akan masuk ke mode tidur, setelah waktu yang disetel berlalu.
Tekan tombol untuk masuk
1
ke mode Pemrograman.
Mis) Mengatur waktu Reservasi
Tidur ke '3'.
Tekan tombol berulang kali untuk
2
masuk ke mode pengaturan reservasi
TIDUR. (bagian berkedip)
Tekan tombol untuk menyesuaikan
3
waktu reservasi.
Waktu reservasi TIDUR adalah dari 1
sampai 7 jam.
Tekan tombol untuk
4
menyelesaikan pengaturan.
Setiap kali reservasi selesai
dilakukan.
Tekan tombol untuk keluar.
5
❈ Setelah pengaturan, alat akan otomatis
keluar dari mode pengaturan jika tidak
ada masukan tombol selama 60 detik.
❈ Saat keluar tanpa menekan tombol set,
nilai yang diubah tidak akan tercermin.
- Jika reservasi sudah disetel, indikator
'tidur' akan muncul pada bagian
bawah layar LCD.
Setelah selesai mengatur reservasi tidur,
6
produk pendingin ruangan akan
mengoperasikan drive tidur dan berhenti
setelah waktu yang disetel.

28
PETUNJUK PENGOPERASIAN
BAHASA INDONESIA
Pemrograman - Reservasi NYALA
Otomatis menyala pada waktu reservasi yang Anda setel.
Tekan tombol .
1
Mis) Mengatur waktu Reservasi
NYALA ke 'AM 10:20'.
Tekan tombol berulang kali
2
untuk masuk ke mode
pengaturan reservasi NYALA.
(bagian berkedip)
Tekan tombol untuk menyesuaikan
3
pengaturan AM/ PM.
Tekan tombol untuk akses ke
4
mode pengaturan Jam. Saat ikon Jam
berkedip, silakan atur waktu.
Rentang pengaturan adalah antara 1~12.
Tekan tombol untuk akses ke
5
mode pengaturan Menit. Saat ikon Menit
berkedip, silakan atur menit dengan
rentang pengaturan antara 00~59.
Tekan tombol untuk menyelesaikan
6
pengaturan.
 Loading...