

LG 828A20468Q Owner's Manual
OWNER’S MANUAL
AIR CONDITIONER
Please read this manual carefully before operating
your set and retain it for future reference.
P/NO : 3828A20468Q
TYPE : VENTILATOR
http://www.lghvac.com
www.lg.com
ENGLISH
FRANÇAIS
ESPAÑOL

2
TIPS FOR SAVING ENERGY
ENGLISH
Here are some tips that will help you minimize the power consumption when you use the air
conditioner. You can use your air conditioner more efficiently by referring to the instructions
below:
• Do not cool excessively indoors. This may be harmful for your health and may consume more
electricity.
• Block sunlight with blinds or curtains while you are operating the air conditioner.
• Keep doors or windows closed tightly while you are operating the air conditioner.
• Adjust the direction of the air flow vertically or horizontally to circulate indoor air.
• Speed up the fan to cool or warm indoor air quickly, in a short period of time.
• Open windows regularly for ventilation as the indoor air quality may deteriorate if the air conditioner is used for many hours.
• Clean the air filter once every 2 weeks. Dust and impurities collected in the air filter may block
the air flow or weaken the cooling / dehumidifying functions.
For your records
Staple your receipt to this page in case you need it to prove the date of purchase or for warranty
purposes. Write the model number and the serial number here:
Model number :
Serial number :
You can find them on a label on the side of each unit.
Dealer’s name :
Date of purchase :
TIPS FOR SAVING ENERGY

IMPORTANT SAFETY INSTRUCTIONS
3
ENGLISH
IMPORTANT SAFETY INSTRUCTIONS
READ ALL INSTRUCTIONS BEFORE USING THE APPLIANCE.
Always comply with the following precautions to avoid dangerous situations and ensure peak
performance of your product
WARNING
It can result in serious injury or death when the directions are ignored
CAUTION
It can result in minor injury or product damage when the directions are ignored
WARNING
• Installation or repairs made by unqualified persons can result in hazards to you and others.
• The product shall be installed according to the Wiring regulations of the corresponding country.
• The information contained in the manual is intended for use by a qualified service technician
familiar with safety procedures and equipped with the proper tools and test instruments.
• Failure to carefully read and follow all instructions in this manual can result in equipment malfunction, property damage, personal injury and/or death.
Installation
• Do not use a defective or underrated circuit breaker. Use this appliance on a dedicated circuit.
There is risk of fire or electric shock.
• For electrical work, contact the dealer, seller, a qualified electrician, or an Authorized Service
Center. Do not disassemble or repair the product. There is risk of fire or electric shock.
• Always ground the product. There is risk of fire or electric shock.
• Install the panel and the cover of control box securely. There is risk of fire or electric shock.
• Always install a dedicated circuit and breaker. Improper wiring or installation may cause fire or
electric shock.
• Use the correctly rated breaker or fuse. There is risk of fire or electric shock.
• Do not modify or extend the power cable. There is risk of fire or electric shock.
• Do not install, remove, or re-install the unit by yourself (customer).
There is risk of fire, electric shock, explosion, or injury.
• Be cautious when unpacking and installing the product. Sharp edges could cause injury.
Be especially careful of the case edges and the fins on the condenser and evaporator.
• For installation, always contact the dealer or an Authorized Service Center.
There is risk of fire, electric shock, explosion, or injury.
• Do not install the product on a defective installation stand.
It may cause injury, accident, or damage to the product.
• Do not let the ventilator run for a long time when the humidity is very high and a door or a
window is left open. Moisture may condense and wet or damage furniture.
• For re-installation of the installed product, always contact the dealer or an Authorized Service
Center. There is risk of fire, electric shock, explosion or injury.
!
!
!

4
IMPORTANT SAFETY INSTRUCTIONS
ENGLISH
• Do not open the maintenance cover of the main body during operation.
Otherwise, it may cause electrical shock.
• Use the outdoor air suction hole with the net installed to ensure that birds could not come in.
Remove estrange things like the bird’s nest. Otherwise, it may cause scarcity of indoor oxygen.
• Install the air intake where polluted air can not be directly sucked in. It may cause various
accidents, including suffocation, due to the suction of harmful gasses(CO, etc.)
• Install the product a place that can support its weight.
Otherwise, it may cause accident due to falling of the product.
Operation
• Take care to ensure that power cable could not be pulled out or damaged during operation.
There is risk of fire or electric shock.
• Do not place anything on the power cable. There is risk of fire or electric shock.
• Do not plug or unplug the power supply plug during operation.
There is risk of fire or electric shock.
• Do not touch(operate) the product with wet hands. There is risk of fire or electrical shock.
• Do not place a heater or other appliances near the power cable.
There is risk of fire and electric shock.
• Do not allow water to run into electric parts.
It may cause There is risk of fire, failure of the product, or electric shock.
• Do not store or use flammable gas or combustibles near the product.
There is risk of fire or failure of product.
• When flammable gas leaks, turn off the gas and open a window for ventilation before turn the
product on. Do not use the telephone or turn switches on or off. There is risk of explosion or
fire
• If strange sounds, or small or smoke comes from product. Turn the breaker off.
There is risk of electric shock or fire.
• Stop operation and close the window in storm or hurricane. If possible, remove the product
from the window before the hurricane arrives. There is risk of property damage, failure of
product, or electric shock.
• When the product is soaked (flooded or submerged), contact an Authorized Service Center.
There is risk of fire or electric shock.
• Be cautious that water could not enter the product.
There is risk of fire, electric shock, or product damage.
• Turn the breaker off when cleaning or maintaining the product.
There is risk of electric shock.
• When the product is not be used for a long time, disconnect the power supply plug or turn off
the breaker. There is risk of product damage or failure, or unintended operation.
• Avoid fire equipment. There is risk of fire.
• Don’t touch a dedicated circuit or breaker with wet hands. There is risk of electric shock.
• Use a firm stool or ladder when cleaning or maintaining the roduct.
Be careful and avoid personal injury.

IMPORTANT SAFETY INSTRUCTIONS
CAUTION
Installation
• Use two or more people to lift and transport the product. Avoid personal injury.
• Do not install the product where it will be exposed to sea wind (salt spray) directly.
It may cause corrosion on the product. Corrosion, particularly on the condenser and evaporator fins, could cause product malfunction or inefficient operation.
Operation
• Do not expose the skin directly to cool air for long periods of time. (Don't sit in the draft.)
This could harm to your health.
• Do not use the product for special purposes, such as preserving foods, works of art, etc. It is
a consumer ventilator, not a precision refrigeration system. There is risk of damage or loss of
property.
• Use a soft cloth to clean. Do not use harsh detergents, solvents, etc.
There is risk of fire, electric shock, or damage to the plastic parts of the product.
• Do not step on or put anyting on the product. (outdoor units)
There is risk of personal injury and failure of product.
• Use a firm stool or ladder when cleaning or maintaining the product.
Be careful and avoid personal injury.
!
5
ENGLISH
6
TABLE OF CONTENTS
ENGLISH
TABLE OF CONTENTS
2 TIPS FOR SAVING
ENERGY
3 IMPORTANT SAFETY
INSTRUCTIONS
7 PRIOR TO OPERATION
7 Preparing for operation
7 Usage
7 Cleaning and maintenance
7 Service
8 INTRODUCTION
8 Símbolos utilizados en este manual
8 Features
10 OPERATING INSTRUC-
TIONS (ACCESSORY)
10 LCD Remote Controller
11 ELECTRICAL SAFETY
12 CHARACTERISTICS
12 Ventilation via Total Heat Exchanger
12 Ventilation via Total Heat Exchanger
13 Normal Ventilation
14 MAINTENANCE AND
SERVICE
14 Handling and Cleaning
16 Method to Clean and Replace Each
Part
17 Assembly and Check after Mainte-
nance
18 CHECK ITEM PRIOR TO
NOTIFY A FAILURE

PRIOR TO OPERATION
7
ENGLISH
Preparing for operation
• Contact an installation specialist for installation.
• Plug in the power plug properly.
• Use a dedicated circuit.
• Do not use an extension cord.
• Do not start/stop operation by plugging/unplugging the power cord.
• If the cord/plug is damaged, replace it with only an authorized replacement part.
Usage
• Being exposed to direct airflow for an extended period of time could be hazardous to your
health. Do not expose occupants, pets, or plants to direct airflow for extended periods of time.
• Due to the possibility of oxygen deficiency, ventilate the room when used together with stoves
or other heating devices.
• Do not use this ventilator for non-specified special purposes (e.g. preserving precision devices,
food, pets, plants, and art objects). Such usage could damage the items.
• While using the remote control, refer the user manual.
Cleaning and maintenance
• Do not touch the metal parts of the unit when removing the filter. Injuries can occur when handling sharp metal edges.
• Do not use water to clean inside the ventilator. Exposure to water can destroy the insulation,
leading to possible electric shock.
• When cleaning the unit, first make sure that the power and breaker are turned off. The fan rotates at a very high speed during operation. There is a possibility of injury if the unit’s power is
accidentally triggered on while cleaning inner parts of the unit.
Service
• For repair and maintenance, contact your authorized service dealer.
PRIOR TO OPERATION
8
INTRODUCTION
ENGLISH
Símbolos utilizados en este manual
This symbol alerts you to the risk of electric shock.
This symbol alerts you to hazards that could cause harm to the ventilator.
This symbol indicates special notes.
Features
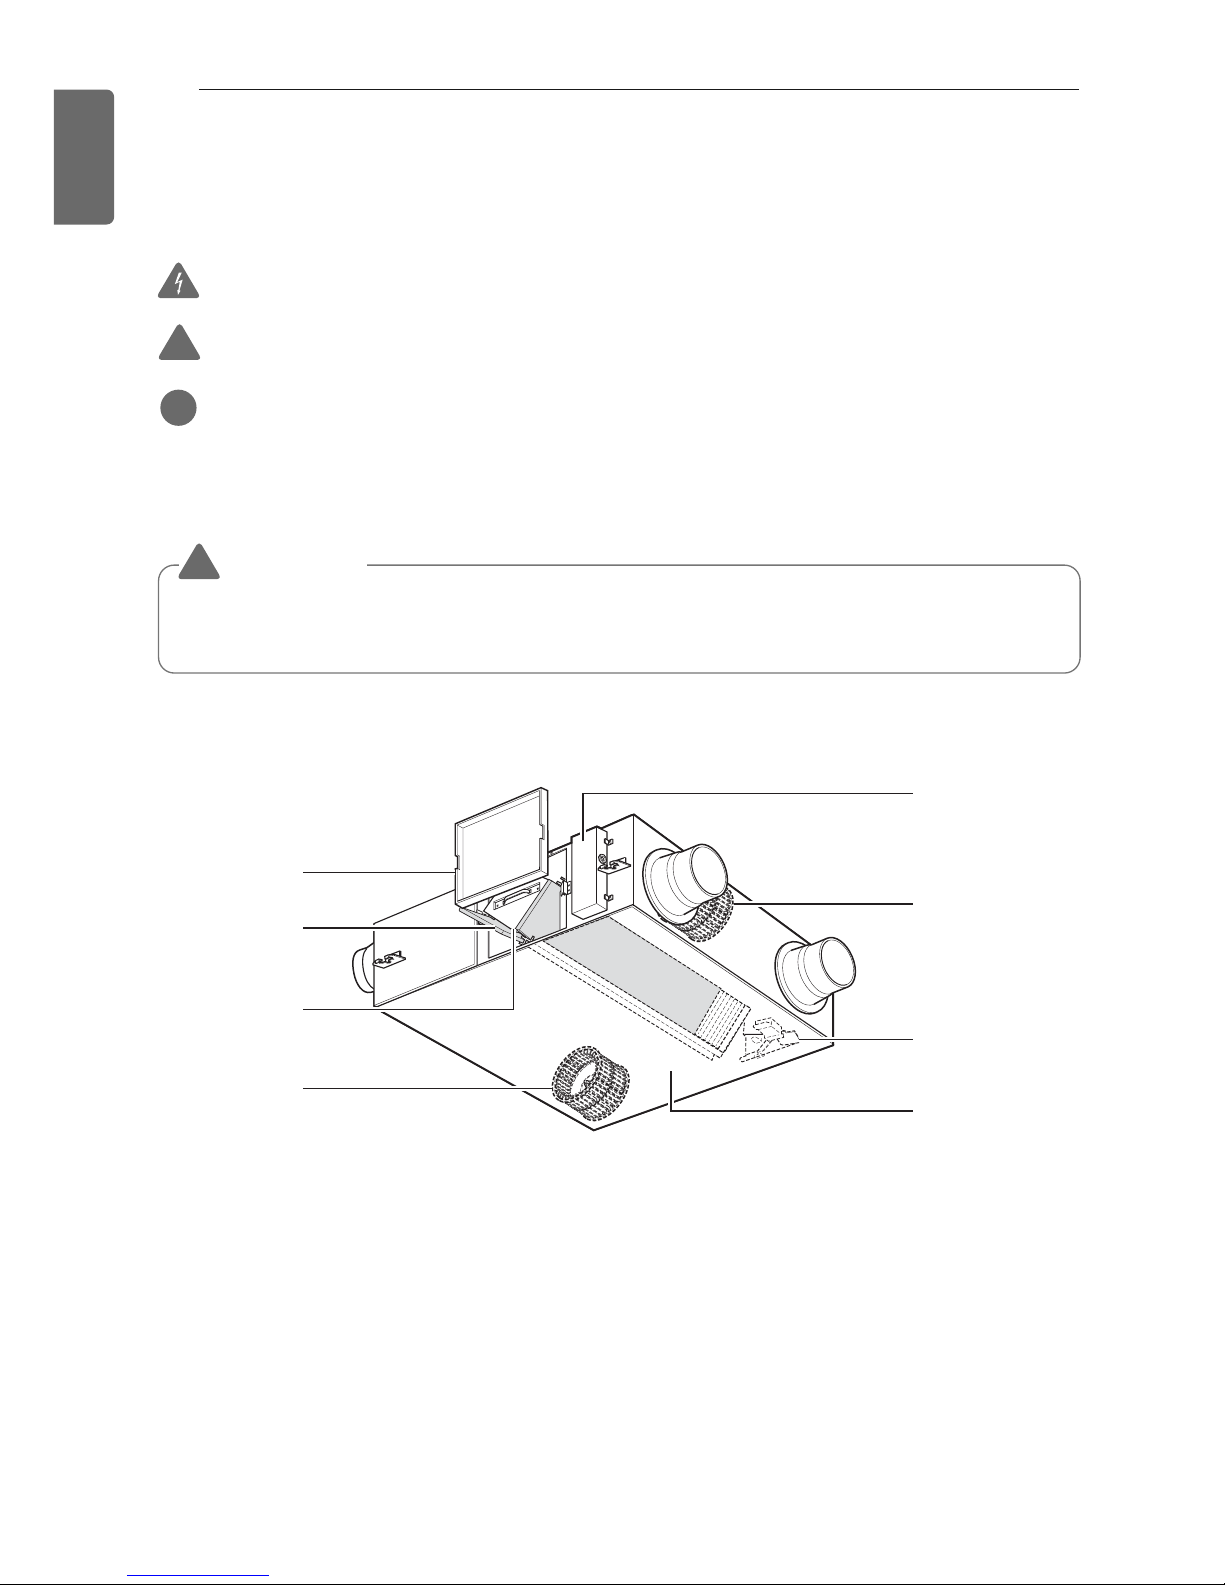
Models : LZ-H080GBA2 [ARVU053ZEA2] / LZ-H100GBA2 [ARVU063ZEA2]
INTRODUCTION
!
!
1
5
6
7
8
2
3
4
1 Maintenance Cover
2 Air Filter
- It prevents dust from clogging in Total
Heat Exchanger.
3 Total Heat Exchanger
- It changes temperature and humidity
between Supplying Air and exhausted air.
4 Blower for Exhaust Air
- It is a fan for discharging the contaminated air to outdoor.
5 Control box
6 Blower for Supply Air
- It is a fan for inhaling exterior air into an
indoor space.
7 Damper plate(board)
- It converts exchanging mode between total
heat ventilation and general ventilation.
8 Total Heat Exchanger holder
- It is used in guiding for the installation of
Total Heat Exchanger.
❈ The form of Total Heat Exchanger varies according to models.
WARNING
!
This appliance should be installed in accordance with national wiring regulations.
This guide acts as a guide to help to explain product features.

INTRODUCTION
9
ENGLISH
Models : LZ-H150GBA2 [ARVU093ZFA2]/ LZ-H200GBA2 [ARVU123ZFA2]
1 Maintenance Cover
2 Air Filter
It prevents dust from clogging in Total
Heat Exchanger.
3 Total Heat Exchanger
It changes temperature and humidity
between Supplying Air and exhausted air.
4 Blower for Exhaust Air
It is a fan for discharging the contaminated
air to outdoor.
5 Control box
6 Blower for Supply Air
It is a fan for inhaling exterior air into an
indoor space.
7 Damper plate(board)
It converts exchanging mode between total
heat ventilation and general ventilation.
8 Total Heat Exchanger holder
It is used in guiding for the installation of
Total Heat Exchanger.
❈ The form of Total Heat Exchanger varies according to models.
1
2
3
4
5
6
7
8
10
OPERATING INSTRUCTIONS (ACCESSORY)
ENGLISH
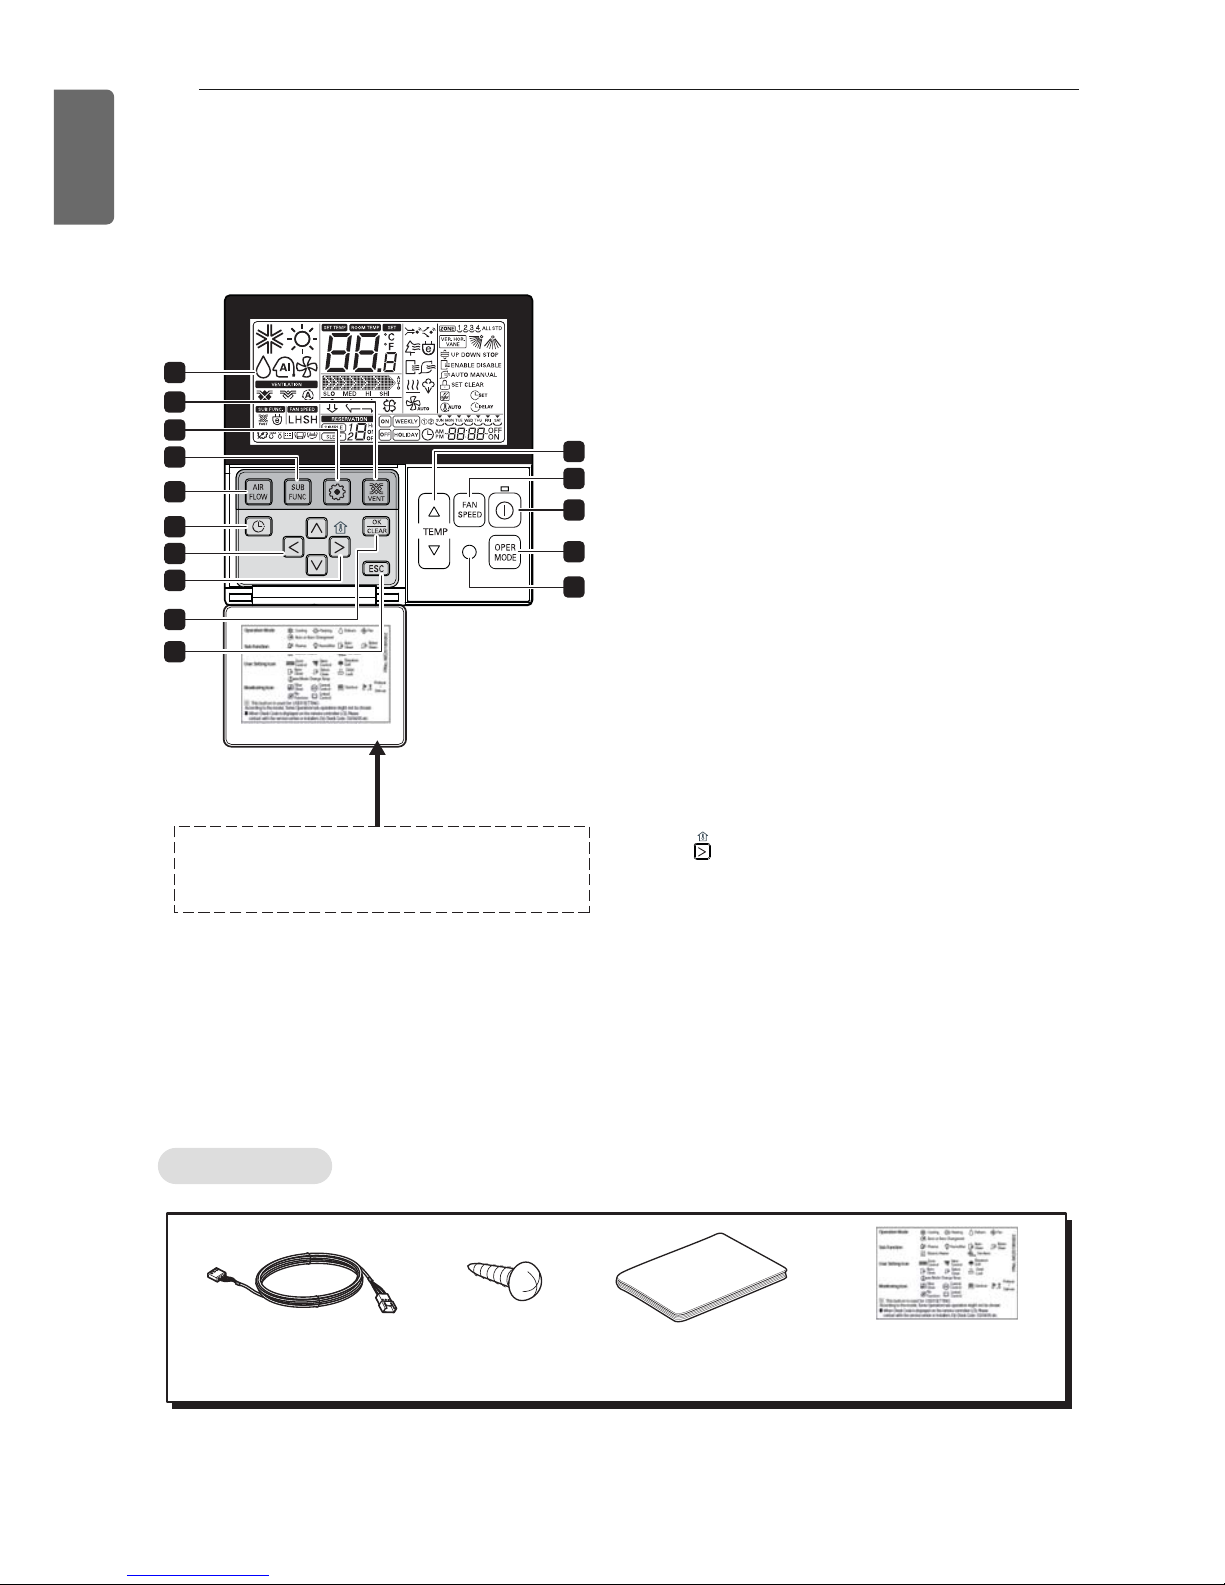
1 OPERATION INDICATION SCREEN
2 SET TEMPERATURE BUTTON
3 FAN SPEED BUTTON
4 ON/OFF BUTTON
5 OPRATION MODE SELECTION BUTTON
6 WIRELESS REMOTE CONTROLLER RE-
CEIVER
• Some products don't receive the wire-
less signals.
7 AIR FLOW BUTTON
8 SUBFUNCTION BUTTON
9 FUNCTION SETTING BUTTON
10 VENTILATION BUTTON
11 RESERVATION
12 UP,DOWN,LEFT,RIGHT BUTTON
• To check the indoor temperature, press
button.
13 ROOM TEMPERATURE BUTTON
14 SETTING/CANCEL BUTTON
15 EXIT BUTTON
1
4
5
7
11
10
9
8
2
3
6
13
12
Please attach the inform label inside of the door.
Please choose proper language depend on your
country.
14
15
h Some functions may not be operated and displayed depending on the product type.
h For more information of wired remote controller, refer to attached remote controller manual
Accessory
Connection Cable
(1EA, 10m)
Screw
(4 EA)
Owner’s & Installation
Manual
Inform label
(8EA-8Languages)
OPERATING INSTRUCTIONS (ACCESSORY)
LCD Remote Controller
Model :
PQRCVSL0
PQRCVSL0QW
ELECTRICAL SAFETY
11
ENGLISH
To minimize the risk of electric shock, you must alway plug into a grounded outlet.
WARNING
!
This appliance must be properly grounded.
WARNING
!
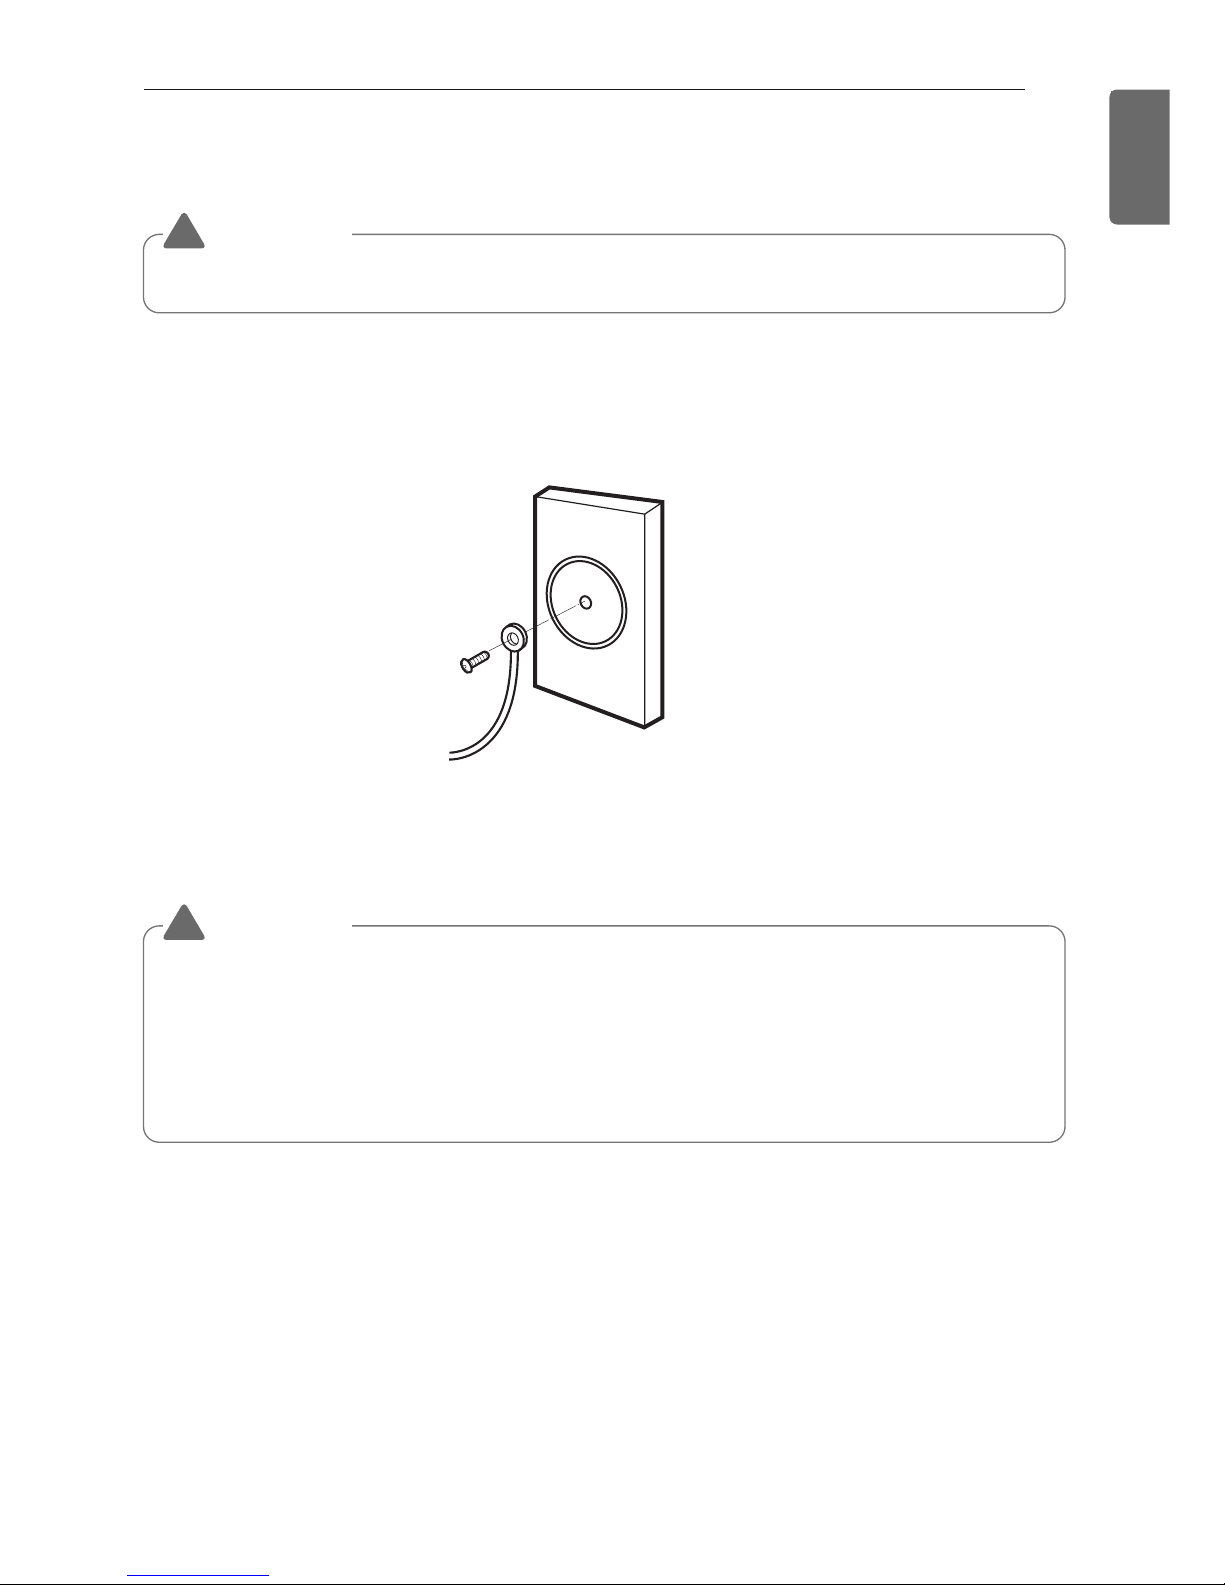
• Do not cut or remove the grounding prong from the power wire.
• Attaching the adapter ground terminal to the wall receptacle cover screw does not ground
the appliance unless the cover screw is metal and not insulated, and the wall receptacle is
grounded through the house wiring.
• If you have any doubt whether the ventilator is properly grounded, have the wall receptacle and circuit checked by a qualified electrician.
Preferred method
Ensure proper ground
exists before use
ELECTRICAL SAFETY
12
CHARACTERISTICS
ENGLISH
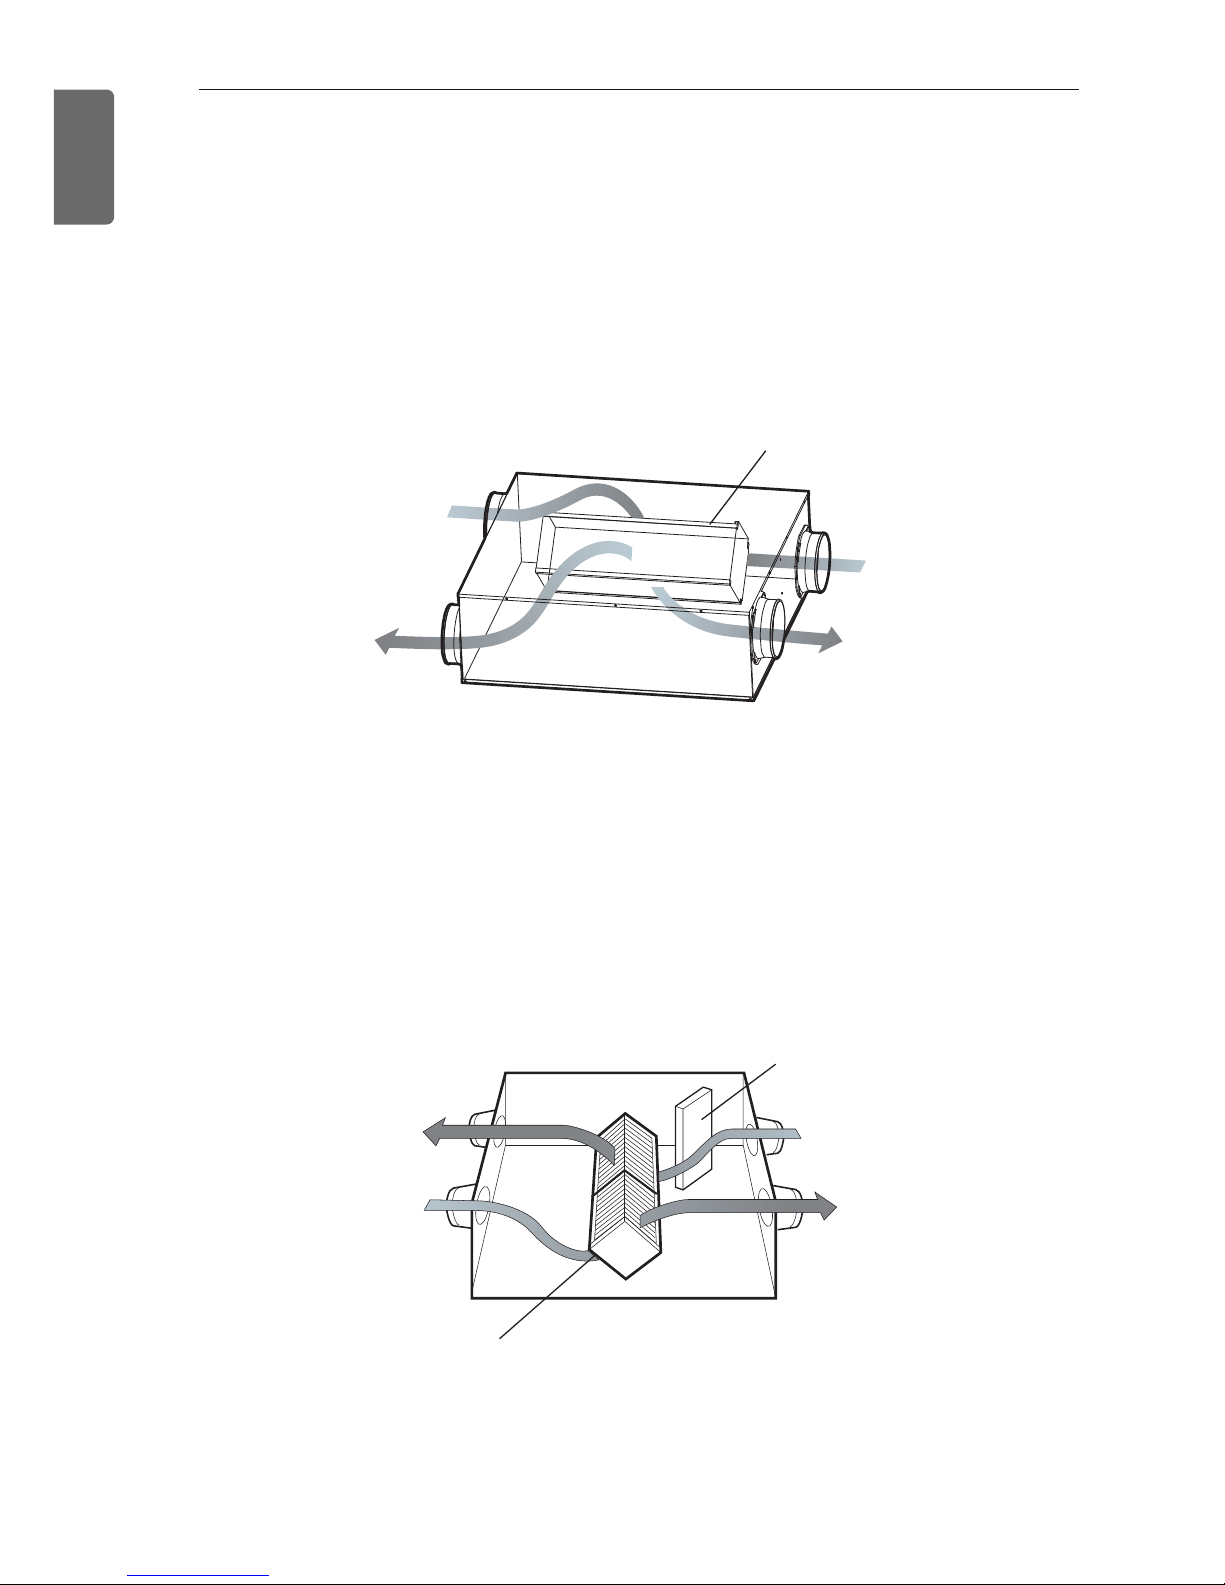
Exhaust air
Outdoor air
Total Heat Exchanger
Return Air
Supply Air
Exhaust air
Outdoor air
Total Heat Exchanger
Damper
Return Air
Supply Air
Ventilation via Total Heat Exchanger
Exhausts indoor air via the Total Heat Exchanger outdoor.
- The outdoor air heat exchanged is supplied to indoor. Operate the ventilator in the Ventilation
via Total heat exchanger in summer/winter when cool/heat operation is done.
Ventilation via Total Heat Exchanger
Exhausts indoor air via the Total Heat Exchanger outdoor.
- The outdoor air heat exchanged is supplied to indoor. Operate the ventilator in the Ventilation
via Total heat exchanger in summer/winter when cool/heat operation is done.
CHARACTERISTICS
CHARACTERISTICS
13
ENGLISH
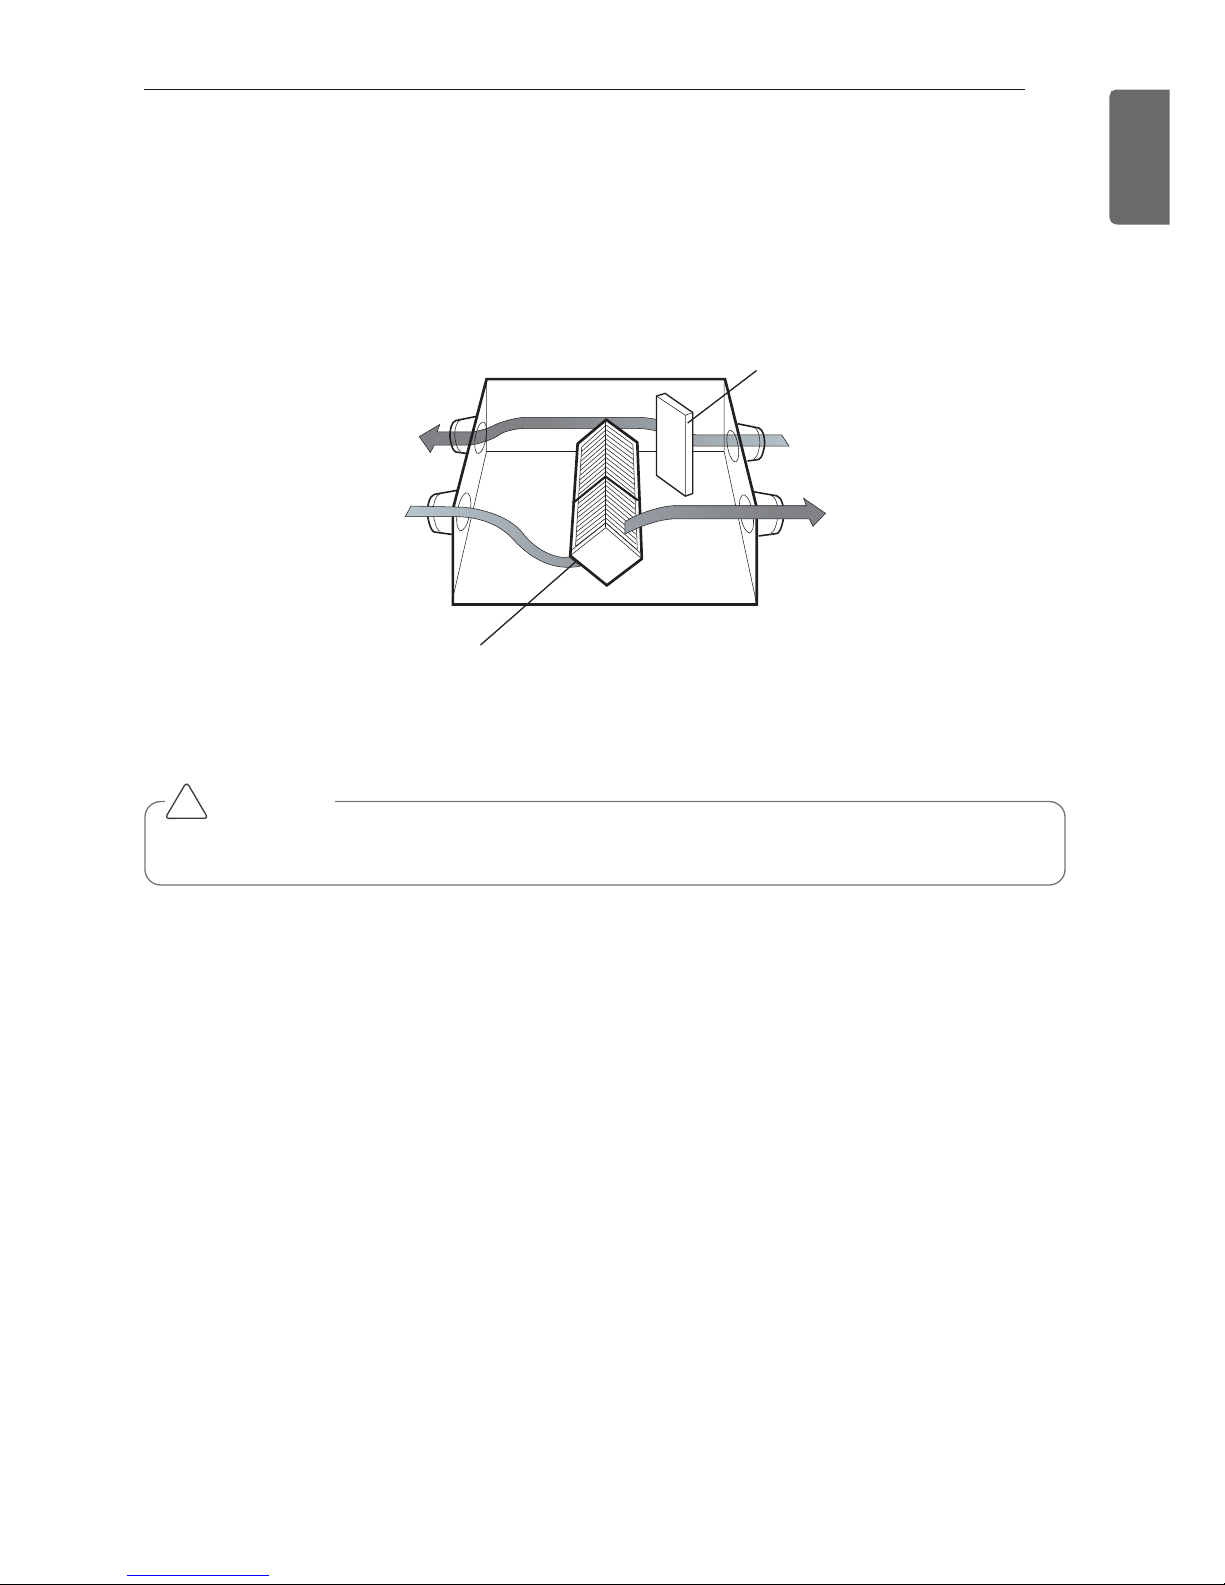
Normal Ventilation
Exhausts the polluted indoor-air directly without via the Total Heat Exchanger.
- Operate the ventilator in the Normal Ventilation in spring/autumn when the Total heat exchanger
is not required.
Exhaust air
Outdoor air
Total Heat Exchanger
Damper
Return Air
Supply Air
CAUTION
In case of high outdoor pollution degree like yellow sand please pause the ventilator.
!
14
MAINTENANCE AND SERVICE
ENGLISH
Main Body
Air Filter
Main Body
Handle
CAUTION
Take care to ensure that you could not
damage when taking the air filter out
since there is a sharp part on it.
!
CAUTION
Gloves should be worn when doing the
maintenance work.
!
WARNING
!
Turn the breaker off when cleaning the
product.
Handling and Cleaning
To prevent function of the ventilator deteriorating, clean dust adhered to the air filter and
total heat exchanger regularly.
Cleaning Cycle
- Air filter: More than once every 6 months.
- Total heat exchanger: More than once every
2 years (Cleaning cycle may increase according to pollution degree.)
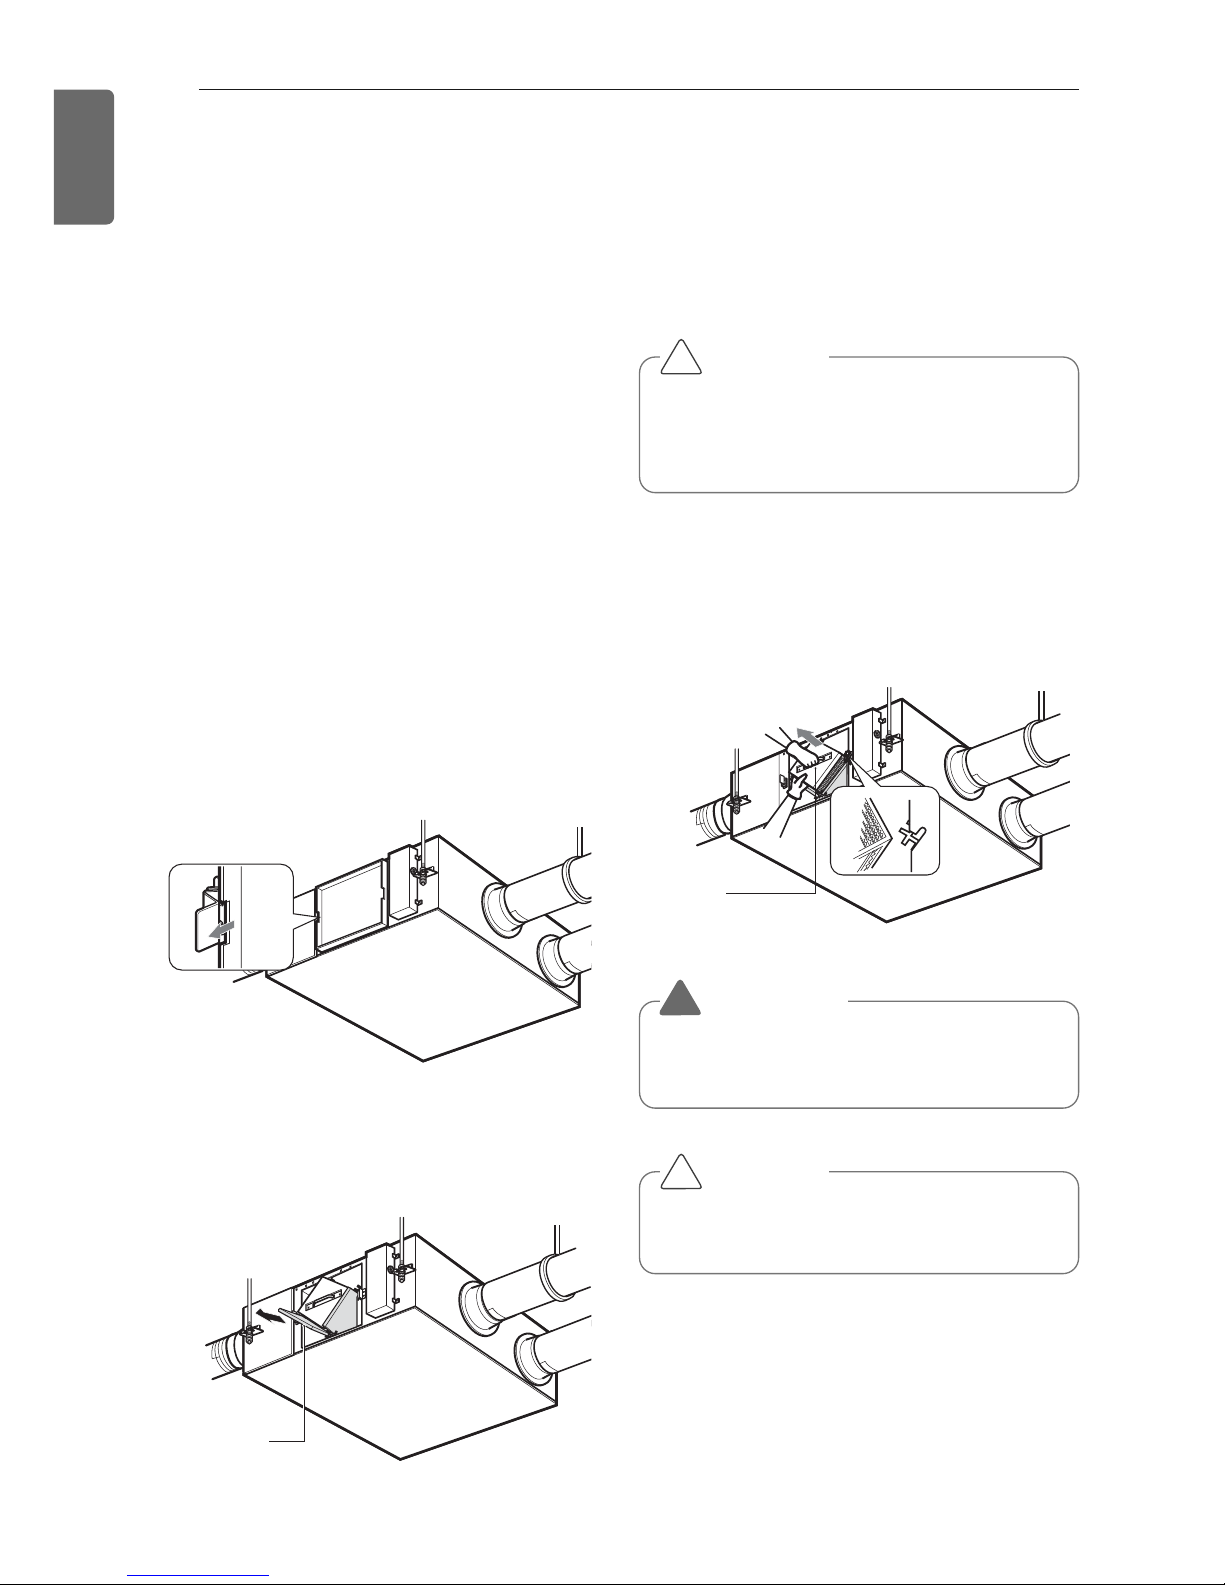
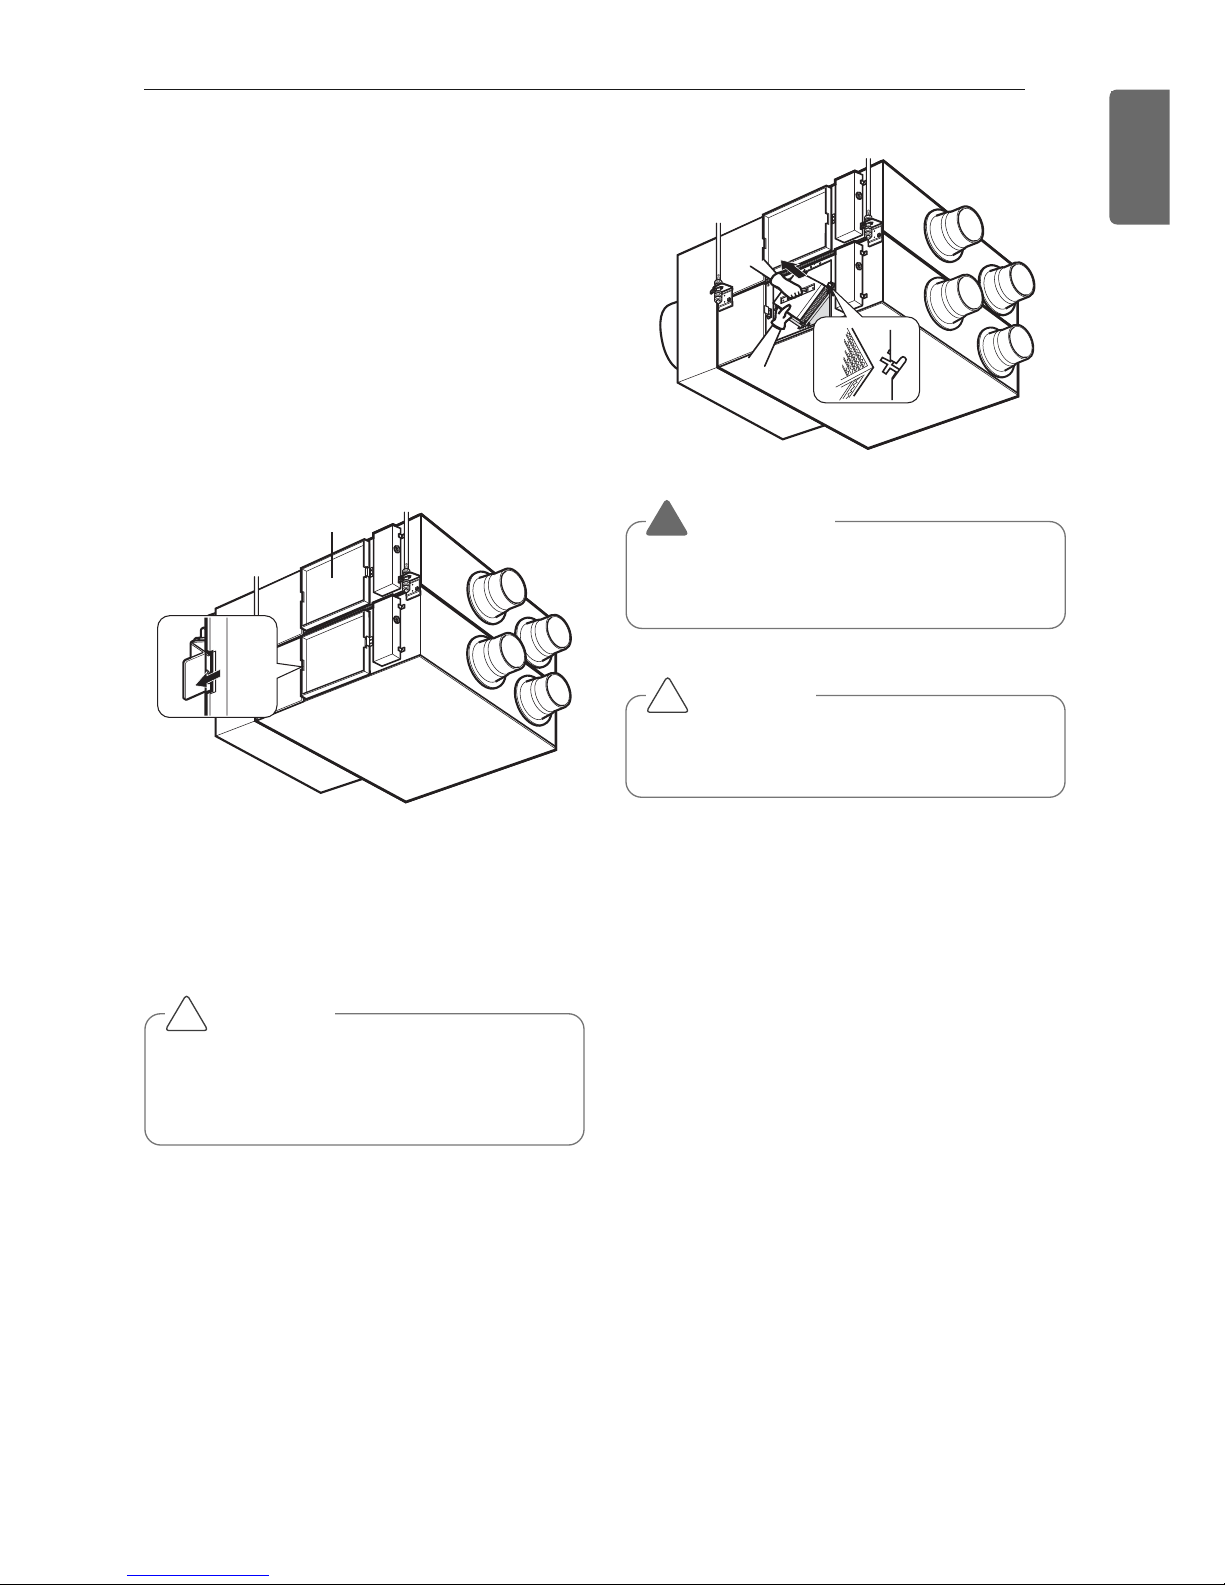
Method to take each part out
Model : LZ-H080GBA2 [ARVU053ZEA2]/
LZ-H100GBA2 [ARVU063ZEA2]
1 Remove the maintenance cover.
Put the hands inside of the ceiling from the
maintenance cover, and pull the maintenance cover up. (Looser the hinge and detach the maintenance cover.)
2 Take the air filter out.
Take the air filter with each contained to
the left/right downside of the Total heat
exchanger.
❈ If it adheres to the ceiling in reverse, it is
equal to the left/right topside of the Total
heat exchanger.
3 Take the Total heat exchanger out.
Catch the handle and then take the Total
heat exchanger out from the main body.
(2 units)
MAINTENANCE AND SERVICE
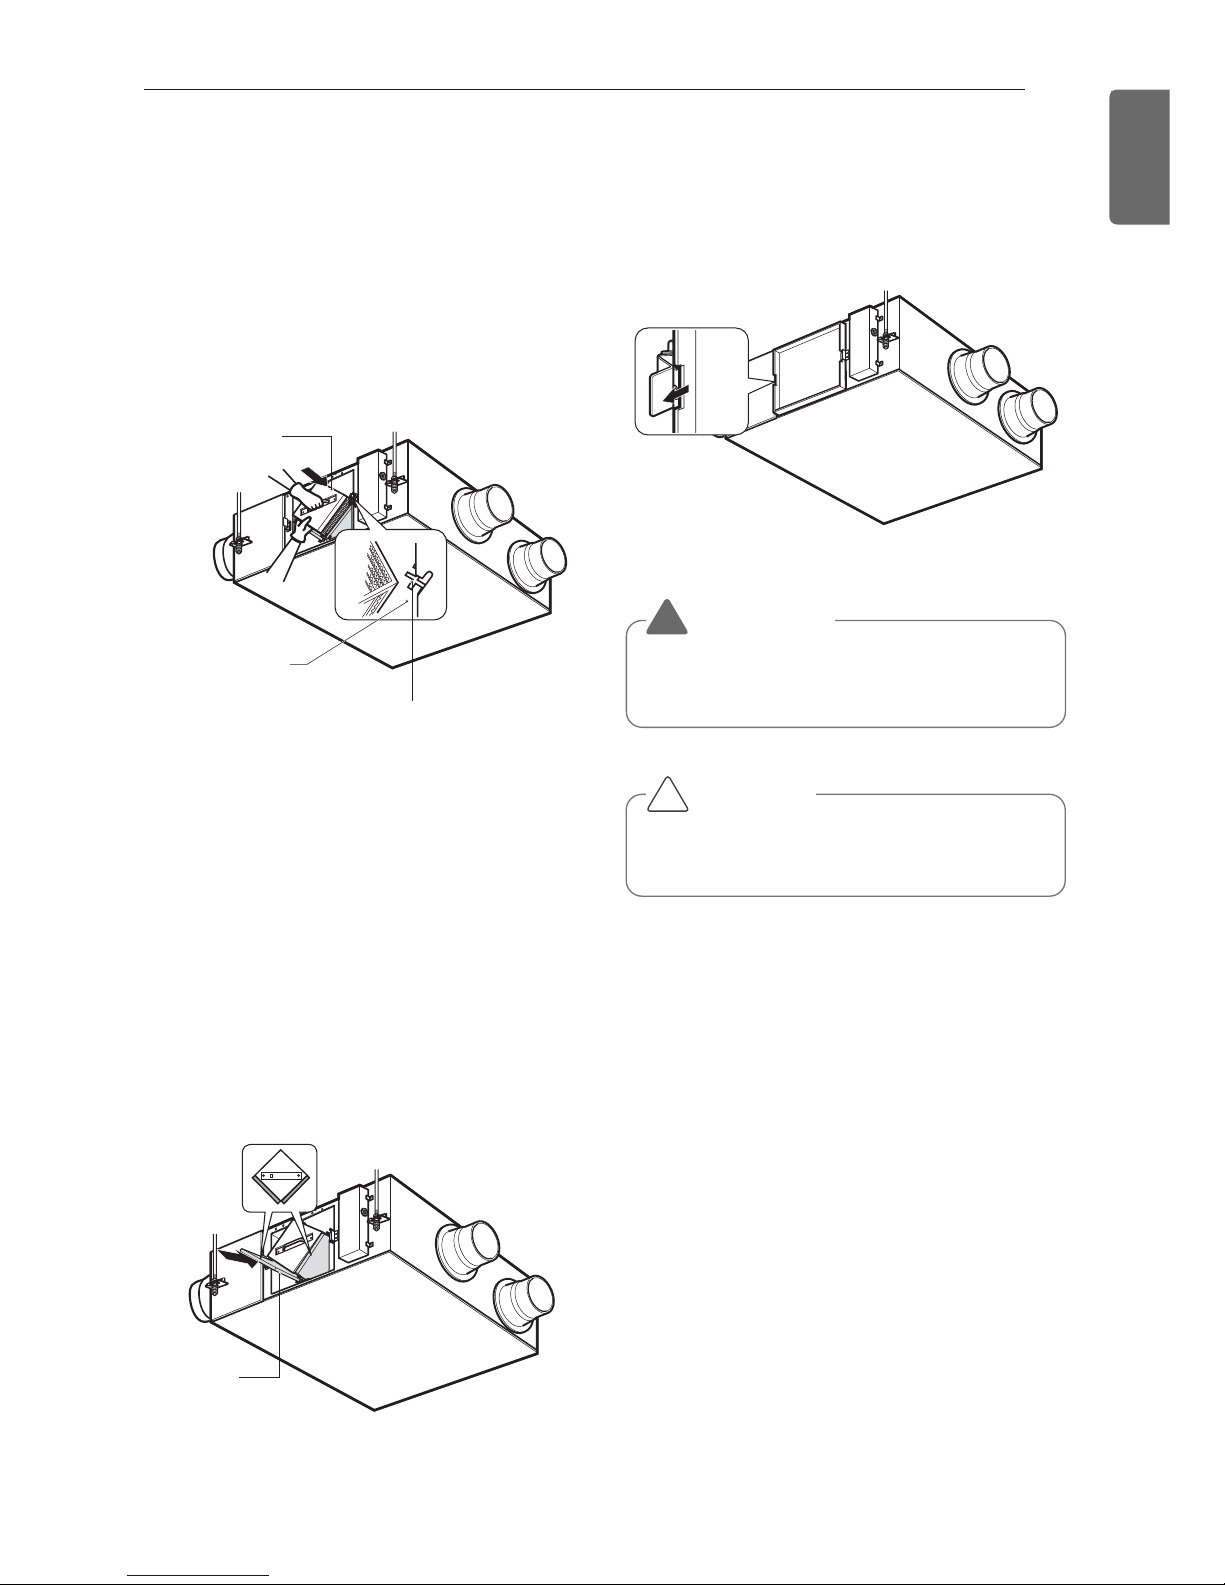
Main Body
Model : LZ-H150GBA2 [ARVU093ZFA2]/
LZ-H200GBA2 [ARVU123ZFA2]
1 Remove the maintenance cover.
Put the hands inside of the ceiling from the
maintenance cover, and pull the maintenance cover up. (Looser the hinge and detach the maintenance cover.)
2 Take the air filter out.
Take the air filter with each contained to
the left/right downside of the Total heat
exchanger.
❈ If it adheres to the ceiling in reverse, it is
equal to the left/right topside of the Total
heat exchanger.
3 Take the Total heat exchanger out.
Catch the handle and then take the Total
heat exchanger out from the main body.
(2 units)
MAINTENANCE AND SERVICE
15
ENGLISH
CAUTION
Gloves should be worn when doing the
maintenance work.
!
CAUTION
Take care to ensure that you could not
damage when taking the air filter out
since there is a sharp part on it.
!
Maintenance Cover
Main body
WARNING
!
Turn the breaker off when cleaning the
product.
Main body
16
MAINTENANCE AND SERVICE
ENGLISH
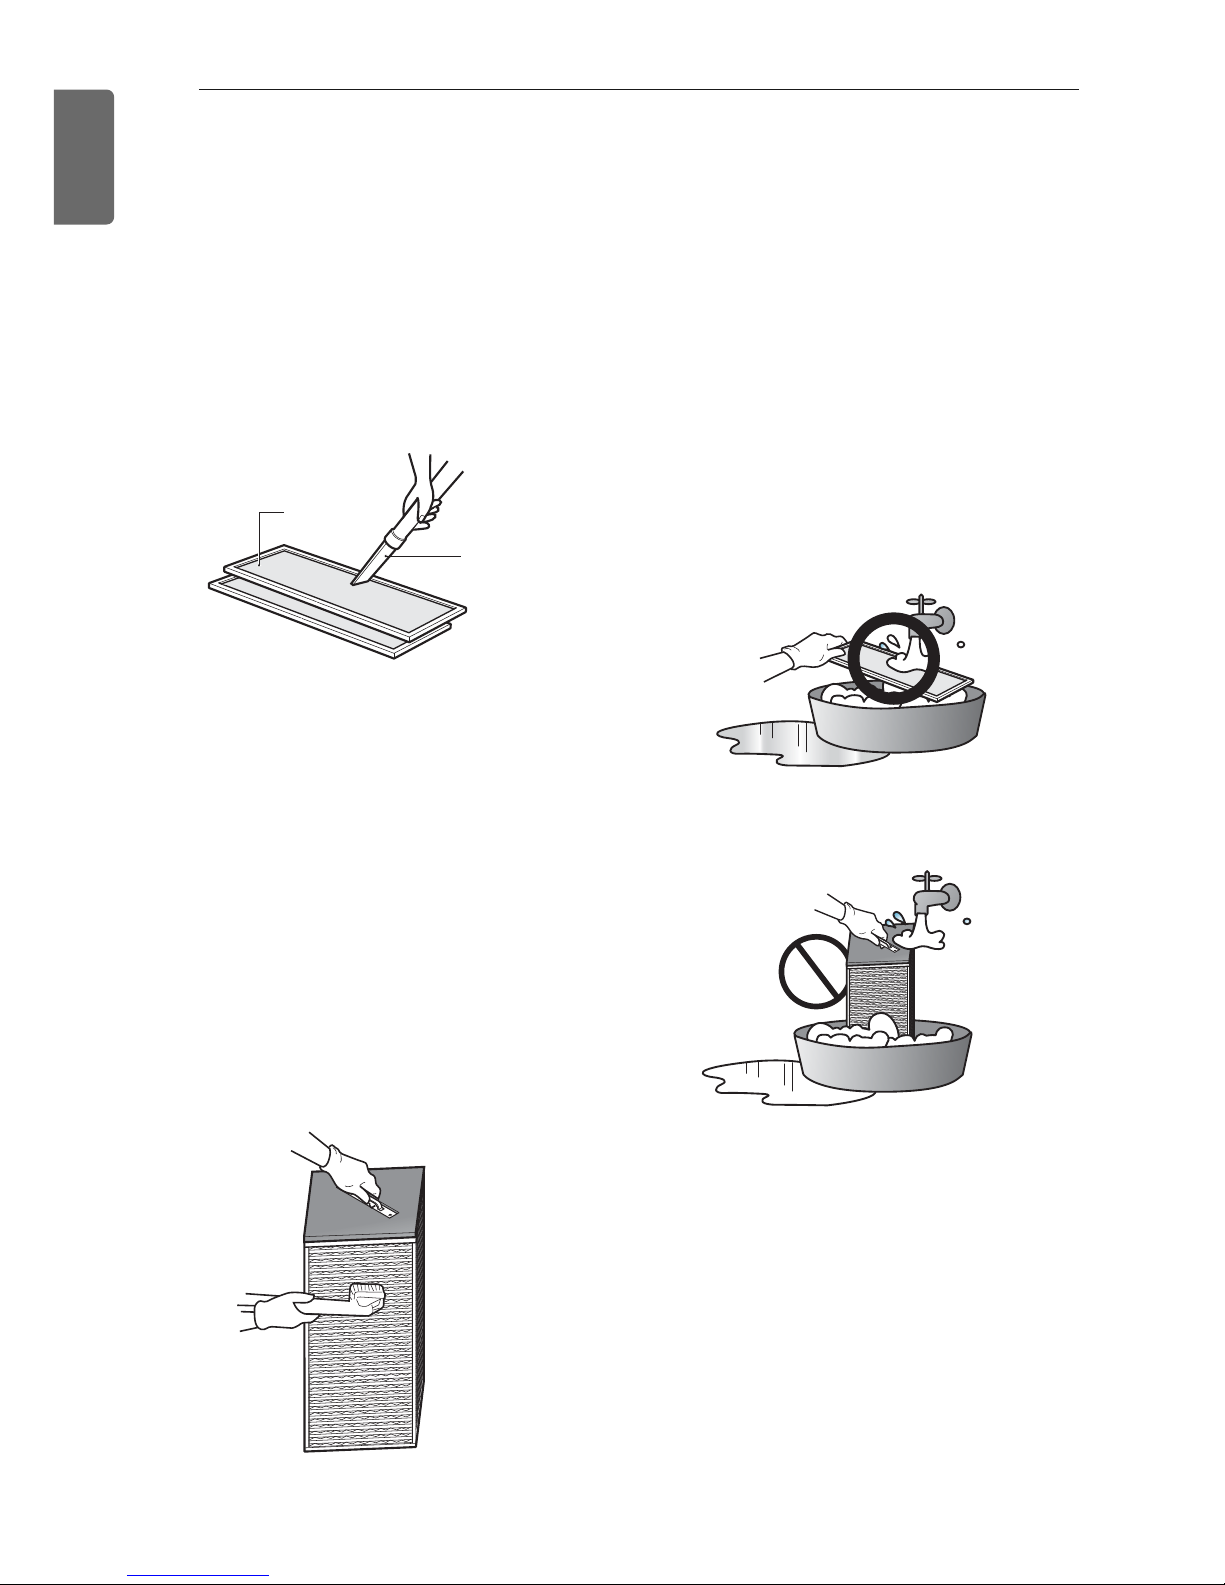
Method to Clean and Replace
Each Part
1 Cleaning of Air Filter
Clean once every 6 months.
- Clean dirt from the air filter using a vacuum cleaner or washing with water.
(if dirt is conspicuous, wash with a neutral
detergent in lukewarm water)
- After washing with water, dry well in the
shade.
(Do not expose the air filter to direct sunlight or heat from a fire when drying it)
- If the air filter is damaged, purchase it
from the service center or professional
agent.
2 Cleaning of Total Heat Exchanger.
Suck dusts adhered to the surface of the
Total heat exchanger with a cleaner.
- Use the cleaner that attached to brush at
its nozzle, and use a soft brush.
- Do not use a hard nozzle on the cleaner.
(Otherwise, surface of the Total heat exchanger may be damaged.)
- Never wash the Total heat exchanger
with water.
- Replacement expenses are for a consideration after 2 years from the purchasing
date.
- Expenses are for a consideration when
you will contact the service center even
within 2 years from the purchasing date.
- For service, always contact the dealer or
an Authorized Service Center.
Cleaner
Air Filter
Air Filter
Total Heat Exchnger
MAINTENANCE AND SERVICE
17
ENGLISH
Assembly and Check after
Maintenance
1 Assembly of Total heat exchanger
Securely put the corner parts (4 or 6 parts)
of the Total heat exchanger into the holder
for assembly and slide them into the inside
of the main body.
2 Assembly of air filter
Assemble the air filter into the holder
structure of the Total heat exchanger.
- Take care to ensure that surface of the
Total heat exchanger could not be damaged.
- Dusts adhered to the Total heat
exchanger may cause deterioration of Air
volume.
3 Assembly of maintenance cover
Fix the cover to the right hinge and fix it to
the left side. (A nameplate is adhered toward the reading direction).
Main Body
Assemble the
air filter into the
holder structure.
Holder for
Total Heat Exchanger
Total Heat
Exchanger
Hinge
Main Body
Main Body
Air Filter
CAUTION
Gloves should be worn when doing the
maintenance work.
!
WARNING
!
Turn the breaker off when cleaning the
product.
 Loading...