

Checked
Suin.Kim
Jun/26/2013
Printing specification
Signature
MMM/DD/YYYY
Drawn Approved
Danbi.Park Jongok.kim
Jun/26/2013 Jun/26/2013
1. Model Description
:Model name
EA98 LG MBM63877304
:2nd, 3rd Suffix
EU/BG/PI EA9800-ZA (1306-REV00)
:Brand name
:Product name
(Revision number)
2. Printing Specification
:1. Trim size (Format)
160 mm x 85 mm
2. Printing colors
: • Cover
4 Color (Cyan, Magenta, Yellow, Black)
4 Color (Cyan, Magenta, Yellow, Black)
: • Inside
3. Stock (Paper)
: • Cover
Coated, Snow white paper 150 g/㎡, Laminating coated - Matt
Uncoated, wood-free paper 60 g/㎡
: • Inside
:4. Bindery
Perfect binding
:5. Language
ENG/GER/FRE/ITA/SPA/RUS (6)
:6. Number of pages
120
“This part contains Eco-hazardous substances (Pb, Cd, Hg, Cr6+, PBB, PBDE, etc.) within LG standard level,
N
Details should be followed Eco-SCM management standard[LG(56)-A-2524].
O
Especially, Part should be followed and controlled the following specification.
T
(1) Eco-hazardous substances test report should be submitted when Part certification test and First Mass Production.
E
(2) Especially, Don’t use or contain lead(Pb) and cadmium(Cd) in ink.
:Part number
3. Origin Notification
Printed in Kazakhstan
:LGEAK :LGEKR :LGERS
Printed in Brazil
:LGEAZ :LGEMA :LGESY
:LGEEG :LGEMX :LGETH
Printed in India
:LGEIL :LGEND :LGEVN
Printed in Indonesia
:LGEIN :LGERA :LGEWR
4. Changes
10
9
8
7
6
5
4
3
Printed in Korea
Printed in Poland
Printed in MexicoPrinted in Egypt
Printed in China
Printed in Mexico
Printed in China
Printed in Thailand
Printed in Vietnam
Printed in PolandPrinted in Russia
2
1
Rev. Number MMM/DD/YYYY
Signature Change ContentsECO Number
Pagination sheet
Front Back
(Eng) (Eng)
Blank 3 … … 18 Blank
Front Back
(Ger) (Ger)
Blank 3 … … 18 Blank
Front Back
(Fre) (Fre)
Blank 3 … … 18 Blank
Front Back
(Ita) (Ita)
Blank 3 … … 18 Blank
MBM63877304
:Part number
:Total pages 120 pages
Front Back
(Spa) (Spa)
Blank 3 … … 18 Blank
Front Back
(Rus) (Rus)
Blank 3 … … 18 Blank (P/No.)

User Quick Guide

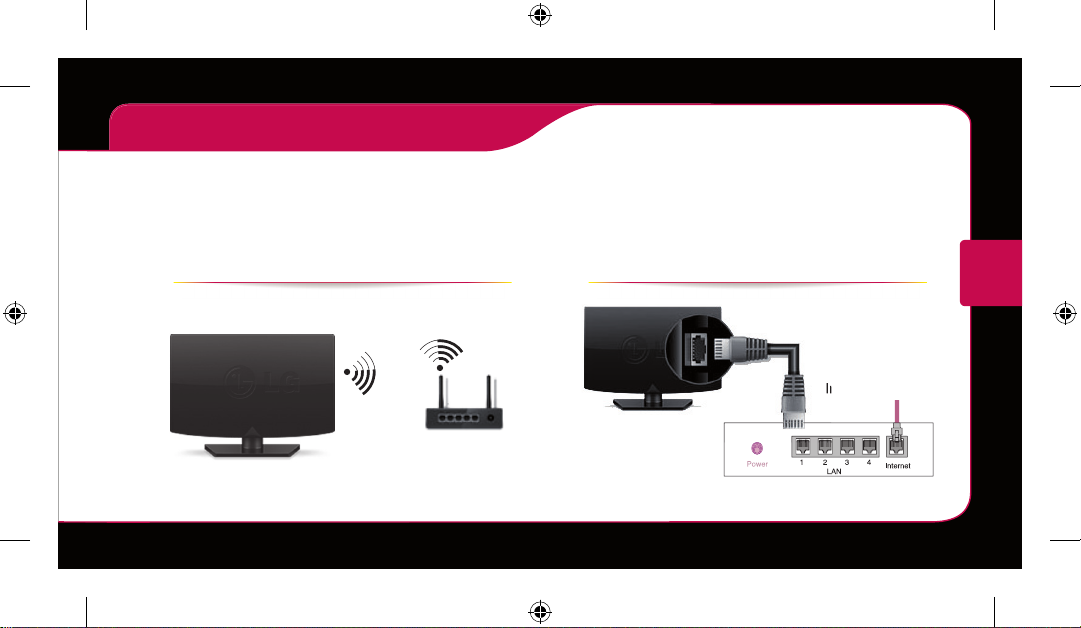
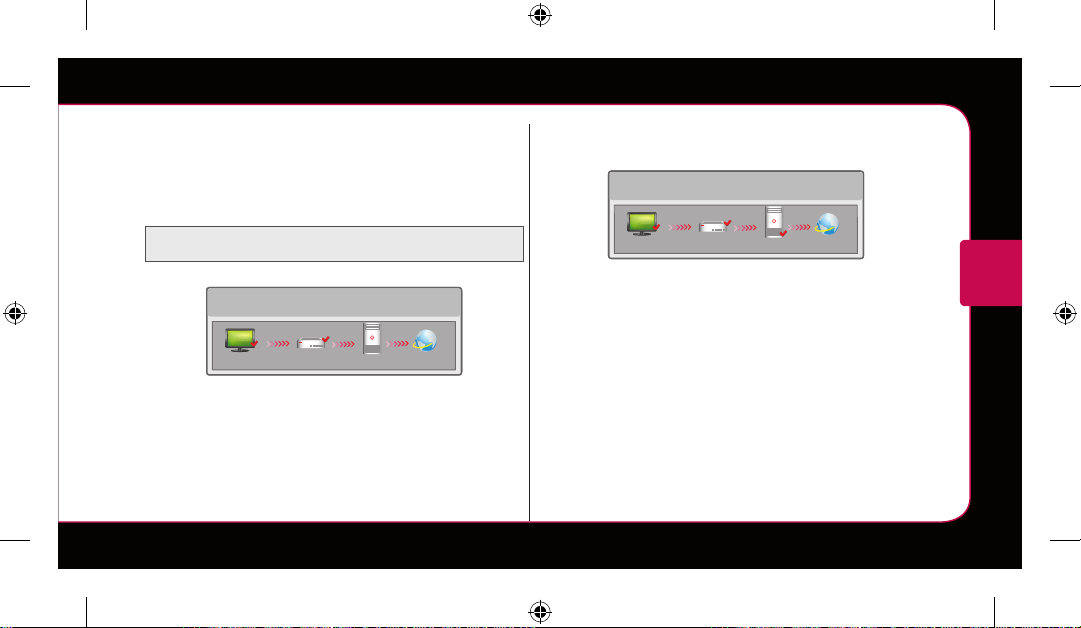
Network Connection
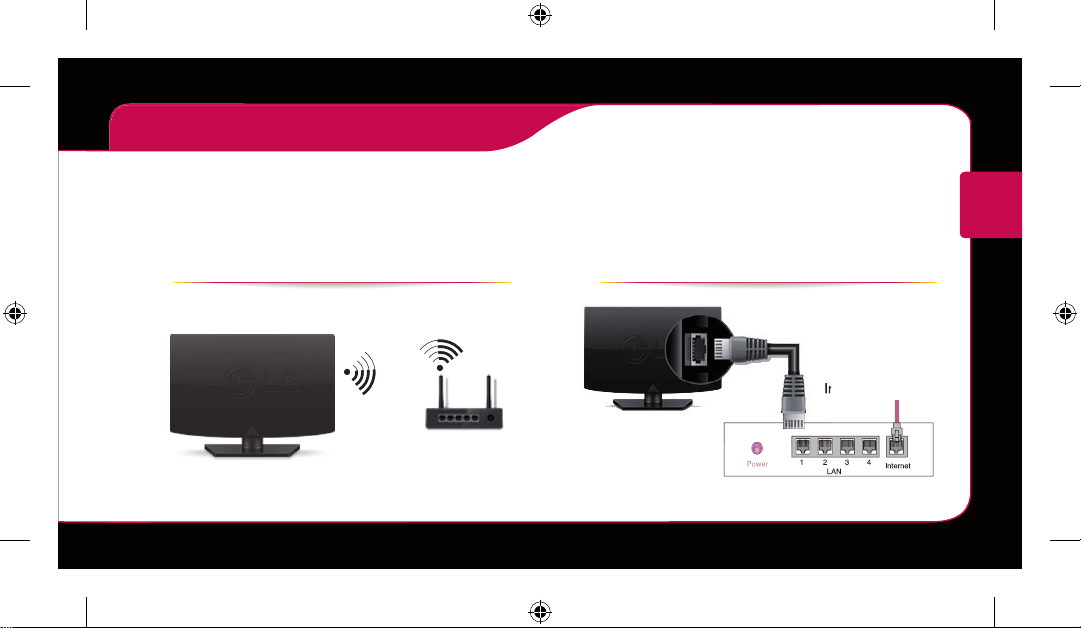
Internet connection
SMART TV Quick Setup Guide
* Image shown may differ from your TV.
* Image shown on a PC or mobile phone may vary depending on the OS(Operating System).
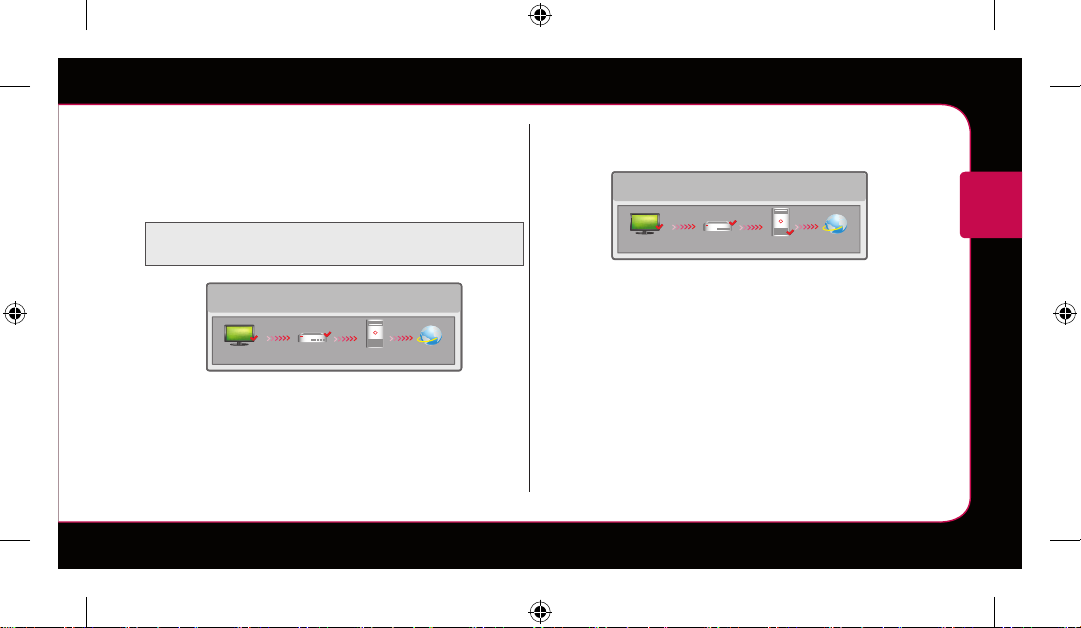
Wireless Network Connection Wired Network Connection
wireless router
Wired router
ENGLISH
Internet connection
Network Setting
ENGLISH
* Premium Apps are pre-installed on the TV. These may vary by country.
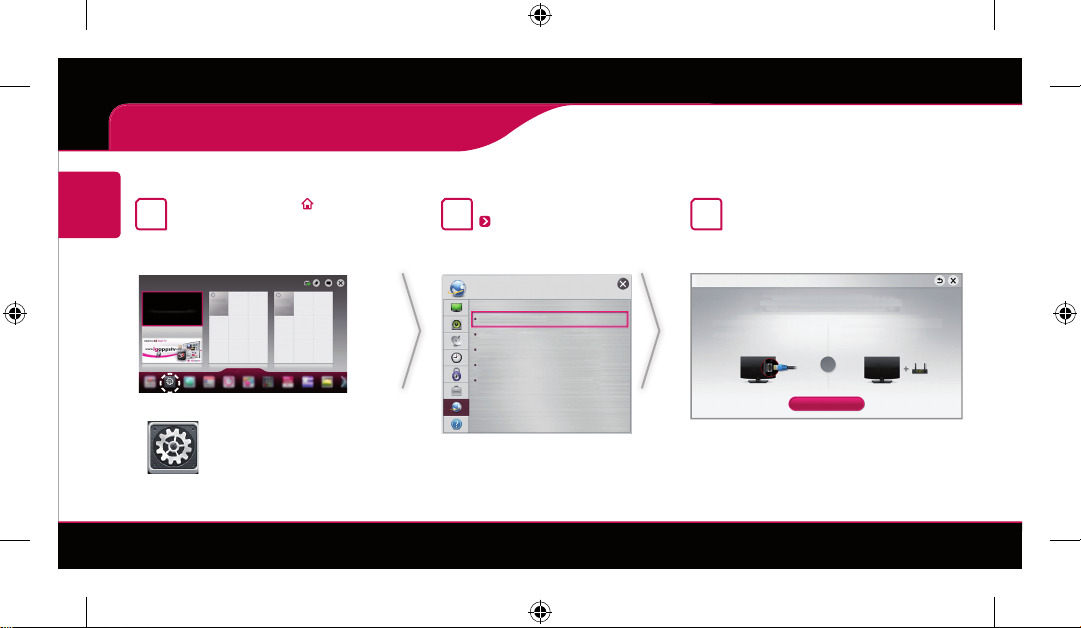
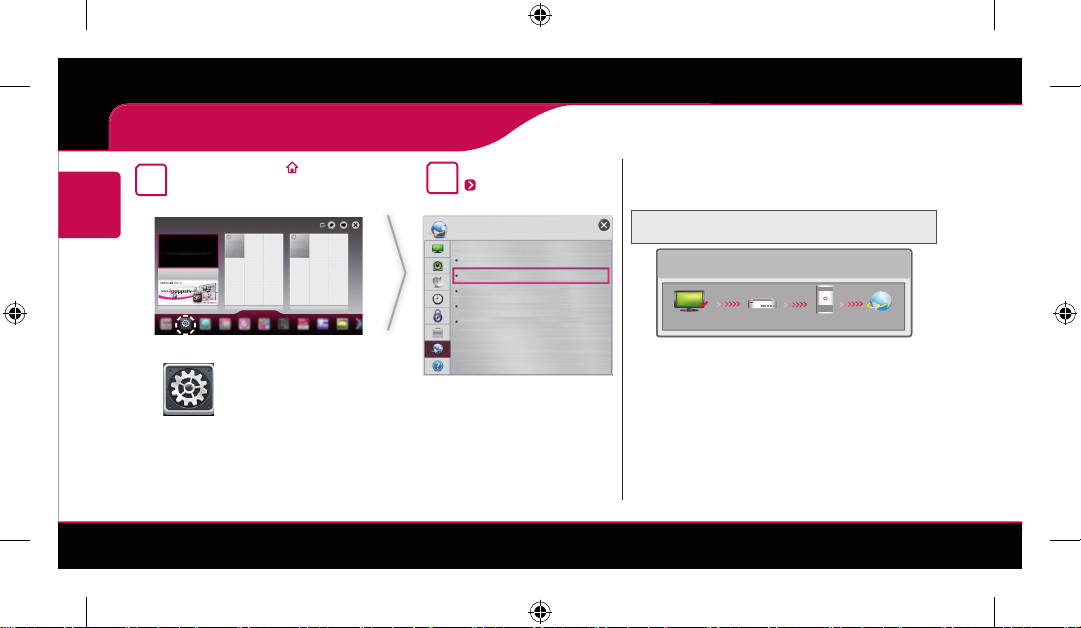
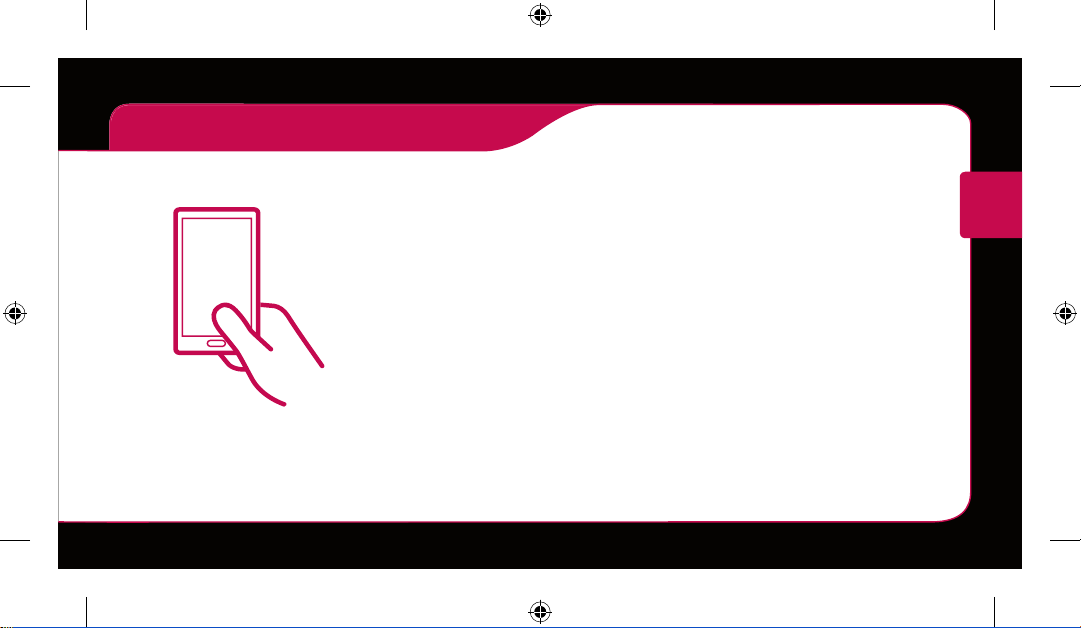
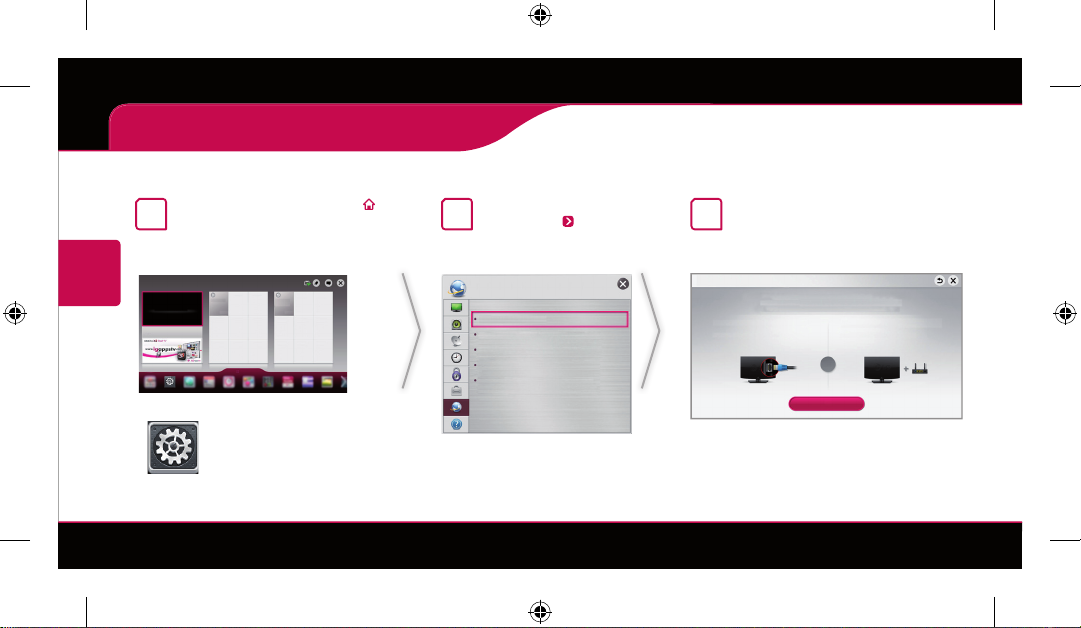
Press the SMART button to
1
access the Smart Home menu.
Select Settings and press
Wheel(OK).
More
Settings
More
Settings
Select the NETWORK
2
Network Connection
menu.
NETWORK
Network Connection
Network Status
Wi-Fi Direct
Miracast
My TV Name : 55EA9800-ZA
TM
/Intel's WiDi
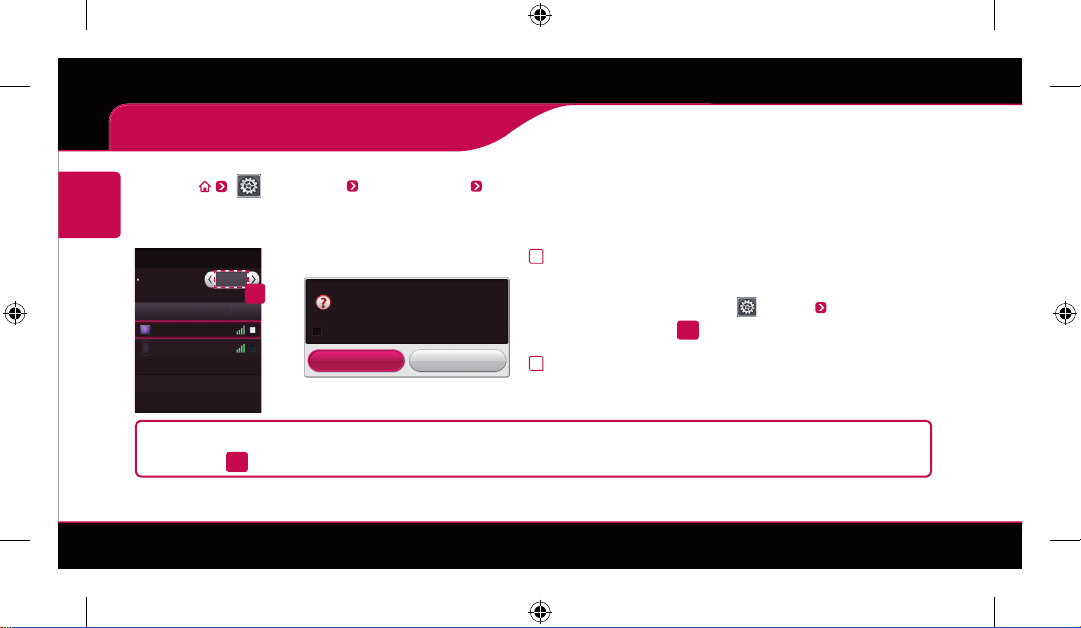
Select the Start Connection.
3
Network Connection
Connect to your wired or wireless network.
Enjoy various Smart TV features through network.
To connect to a wired network:
Connect a LAN cable to the back of TV.
or
Start Connection
To connect to a wireless network:
Requires a wireless router or access point.
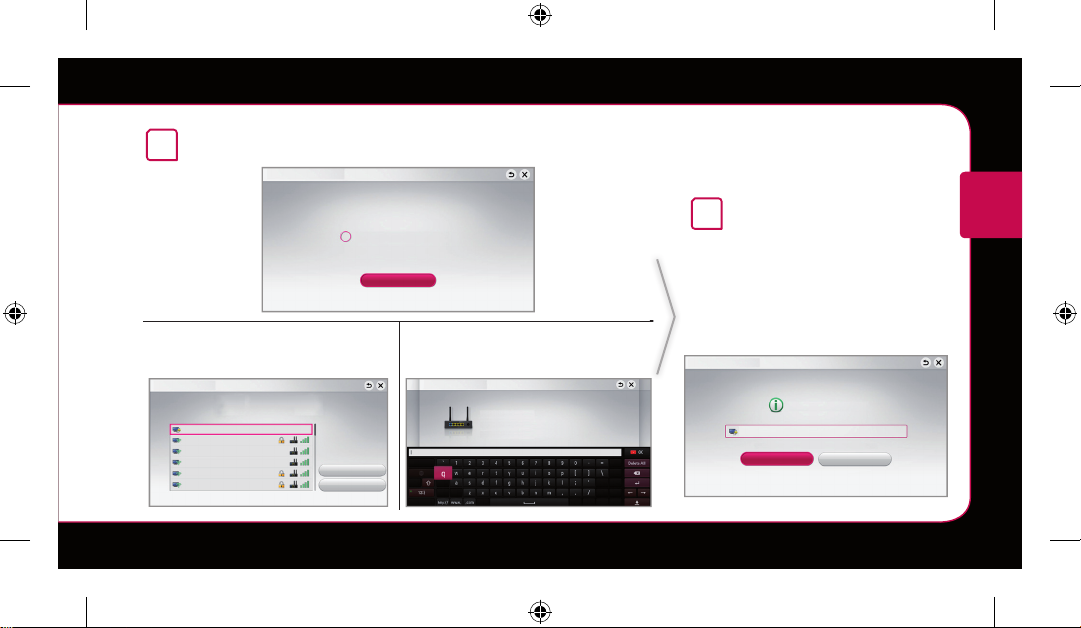
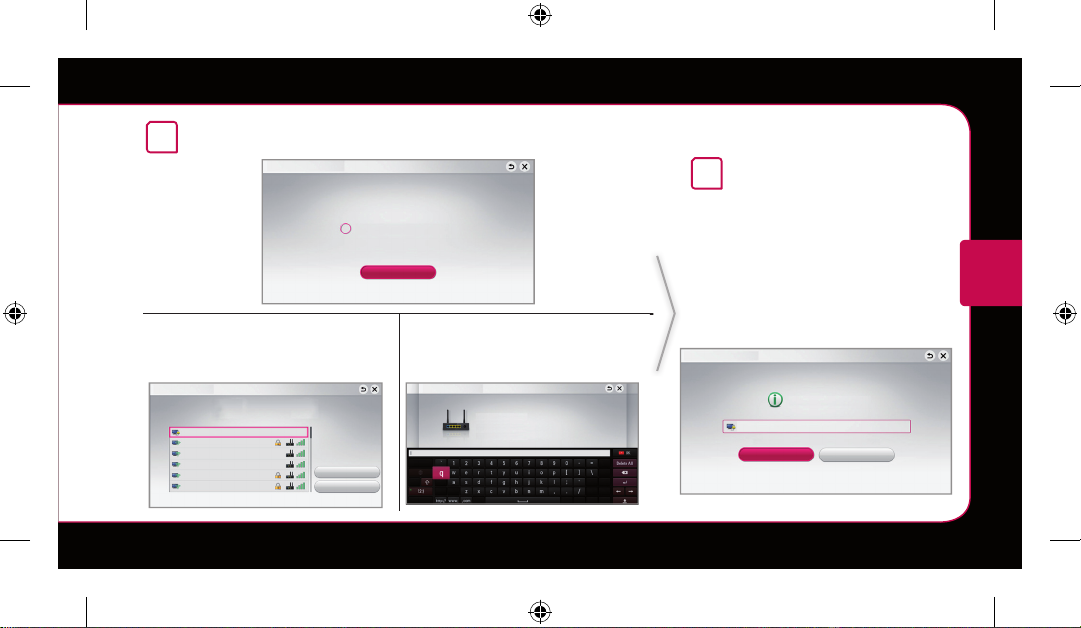
The device automatically tries to connect to the network available(wired
4
network first).
Network Connection
Connecting to the network.
Cancel
If you select Cancel or it fails to connect
to the network, the network list available is
displayed. Choose the network you want.
Network Connection
Choose the network you want.
Wired Network
Wireless : AAA
Wireless : BBB
Wireless : CCC
Wireless : 11111
Wireless : 22222
Manual Setup
Refresh List
If you want to connect your TV to a
wireless router, select the network you
want and enter the password.
Network Connection
Wireless : AAA
Enter security key of network.
Forgot your password? Contact your AP manufacturer.
SMART TV Quick Setup Guide
The connected network is
5
displayed.
Select Complete to confirm the
network connection.
If you select the Other Network
List, the network list available is
displayed.
Network Connection
Network is connected.
Wireless:AAA
Select [Other Network List] to connect to another network.
Complete
Other Network List
ENGLISH
Troubleshooting Network Problems
ENGLISH
1
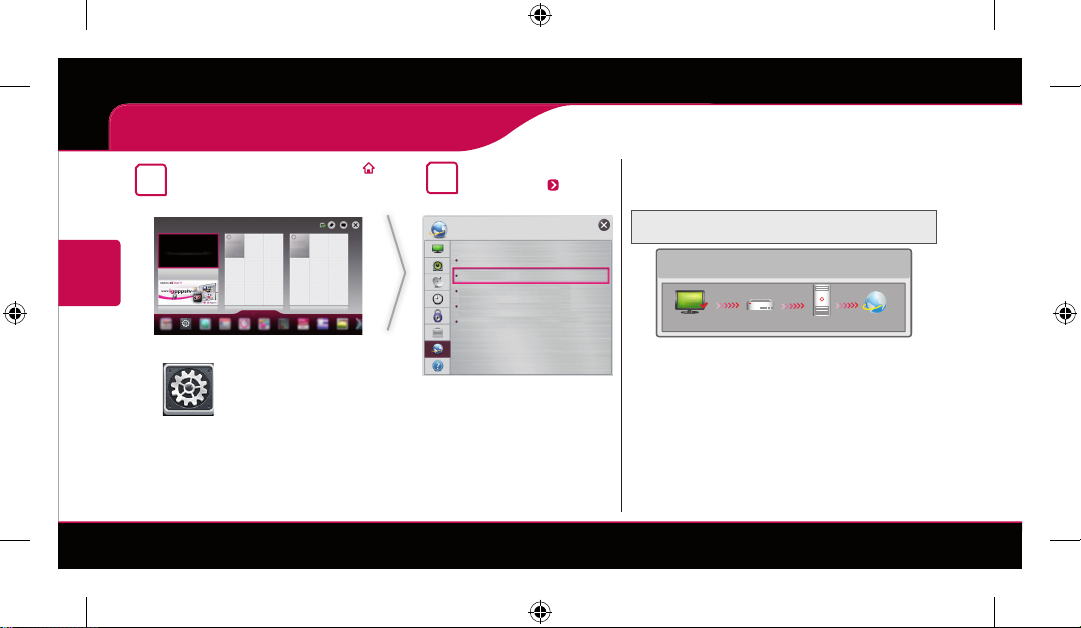
Press the SMART button to
access the HOME munu.
More
Settings
More
Settings
Select the NETWORK
2
Network Status
menu.
NETWORK
Network Connection
Network Status
Wi-Fi Direct
TM
/Intel's WiDi
Miracast
My TV Name : 55EA9800-ZA
Follow the instructions below that correlate to
your network status.
Check the TV or the router.
Network Status
TV Gateway DNS Internet
When an ✔ appears TV.
Check the connection status of TV, AP and
1
cable modem.
Power off and power on TV, AP and cable
2
modem.
If you are using a static IP, enter IP directly.
3
Contact internet companies or AP
4
companies.
< Additional points to check when using a wireless connection>
Check the password for the wireless connection in the
1
router settings window.
Change the router SSID (network name) or the wireless
2
channel.
SMART TV Quick Setup Guide
ENGLISH
Network Status
consult your Internet service provider.
Check the router or
Network Status
TV Gateway DNS Internet
When an ✔ appears TV and Gateway.
Unplug the power cord of the AP, cable modem and try to
1
connect after 5 seconds.
Initialize(Reset) the AP or cable modem.
2
Contact internet companies or AP companies.
3
TV Gateway DNS Internet
When an ✔ appears TV, Gateway and DNS.
Unplug the power cord of the AP, cable modem and try to con-
1
nect after 5 seconds.
Initialize(Reset) the AP or cable modem.
2
Check that the MAC address of the TV/router is registered
3
with your Internet service provider. (The MAC address displayed on the right pane of the network status window should
be registered with your Internet service provider.)
Check the router manufacturer’s website to make sure your
4
router has the latest firmware version installed.
SmartShare PC SW Installing & Setting
ENGLISH
Install the programme on your PC.
1
Go to . Then, select your region.
2
Select SUPPORT. Then, Search for your model.
3
Select Drivers & Software or SOFTWARE UPDATE. Then, select .
4
You can run the programme when installation is complete.
!
SMART TV Quick Setup Guide
NOTE
DLNA service is only available if TV and other devices are connected via a single router.
DLNA Connection to Smartphone
SMART TV Quick Setup Guide
1
Check that Wi-Fi is enabled on your smartphone.
2
Install/run the app for sharing content on your smartphone (It's called SmartShare on LG phones).
3
Enable your smartphone to share content files with other devices.
4
Select the file type you want to play (movie, audio or photo).
5
Select a movie, music or photo file to play on the TV.
6
Add the selected file to the playlist.
7
Select a TV model name on which to play the files. (The TV model name is labelled on the rear side of the panel.)
8
Play the media file to view and enjoy it on your TV.
ENGLISH
Updating the TV Firmware
ENGLISH
SMART
Use Software Update to check and obtain the latest version. If not updated, certain functions may not work properly. It is also
possible to check manually for available updates.
Software Update
Automatic update mode If an update is available, the update automatically starts without prompting.
Check Update Version
!
NOTE
Settings SUPPORT Software Update
Set it to On.
If an update is available, a prompt will appear to perform the update.
Checks the latest update version installed. When a new update is available, the
download process can be performed manually.
When the update starts, the update progress window appears for a short time and disappears.
The latest version can be obtained via the digital broadcast signal or an internet connection.
Changing the programme while downloading the software via a digital broadcast signal interrupts the
download process. Returning to the initial programme allows downloading to resume.
If software is not updated, certain functions may not work properly.
[For Finland/Sweden/Denmark/Norway models.]
If the software update is performed via the broadcasting signal, you will be prompted to continue the update
regardless of whether the Automatic update mode is enabled or not.
Please call LG Customer Service if you experience any problems.
SMART TV Quick Setup Guide
Tag On
Tag On
SMART TV Quick Setup Guide
ENGLISH
(This item is not included for all models.)
*This function is supported only on a smartphone with Android 4.0 (ICS) or later.
Tag On is a data transmission technology that can be used on smartphones with NFC (Near Field
Communication).
Simply by tapping your smartphone to a Tag On sticker, you can share content between your
smartphone and TV.
To connect your smartphone to the TV using Tag On, they must be connected on the same Wi-Fi
network or Miracast™/Intel’s WiDi of the smart TV is set to On.
WiFi Direct Setting
ENGLISH
SMART
The Wi-Fi Direct function supports wireless connection technology. With
connected to Wi-Fi Direct.
Wi-Fi Direct
Wi-Fi Direct
Device Name
TAAAA
BBBB
*If you are not using Wi-Fi Direct to minimize the interference between Wi-Fi devices, it is recommended to set
Wi-Fi Direct(
Settings NETWORK Wi-Fi Direct
If Wi-Fi Direct is set to On, a list of available devices appears.
1
On
Connection
Connection
a
[TAAAA]
Do you want to request a connection?
Automatically connect without asking
Yes No
»
When you are prompted to request connection, select
2
Wi-Fi Direct
a
) to Off. You can only use devices that support Wi-Fi Direct.
SmartShareTM, you can share files or screens of devices
To use
set
Wi-Fi Direct
Wi-Fi Direct
, go to Settings NETWORK and
(a) to On.
is now connected to your TV.
SMART TV Quick Setup Guide
Yes.
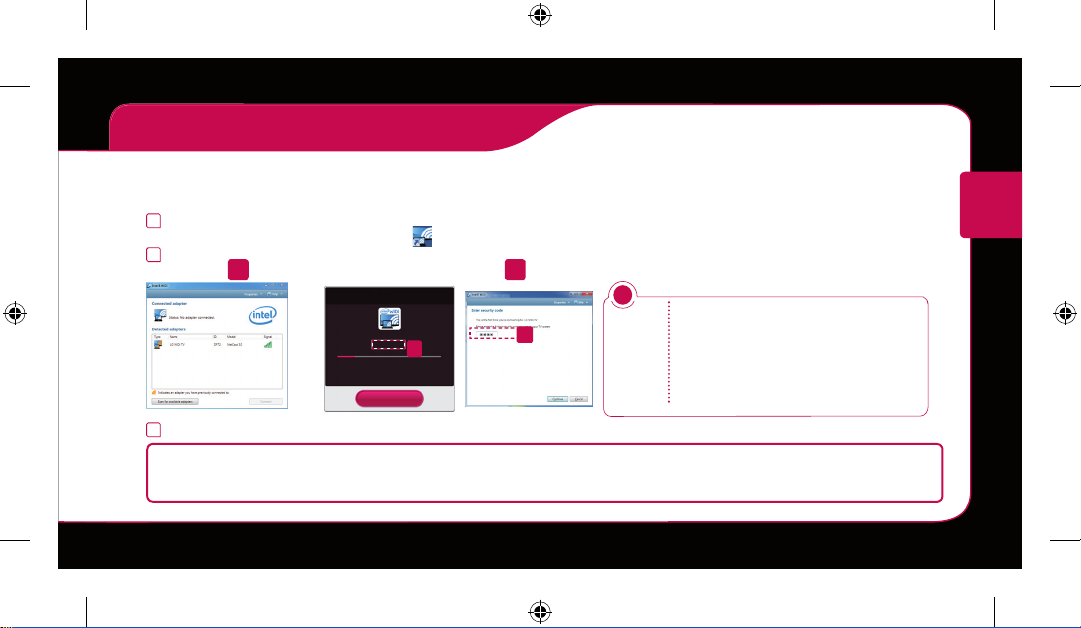
WiDi (Wireless Display) Setting
SMART TV Quick Setup Guide
WiDi represents Wireless Display. Intel’s WiDi (Wireless Display) technology enables easy and fast connection without wires or
internet network for mirrored and dual monitor display on your TV. You can sit back and experience your favorite movies, videos,
photos, online shows and more in full HD on your TV with great image clarity and sound.
Intel’s WiDi
1
to AP.) Your laptap runs the Intel WiDi(
It detects LG Smart TVs available, which supports WiDi. In the list, select the TV you want and click Connect. Enter the PIN
2
number(
3
The wireless environment may affect the screen display. If the connection is poor, the Intel WiDi connection may be lost.
is set to On. Connect your laptop to AP. (Without AP, it is possible to this function; it is recommended to connect
) programme.
a
) shown on the screen into the input field(b) on your laptop and then click Continue.
[Intel's WiDi] Request connection
Enter the following Security keys.
MY PIN : ****
Remain: 92 second(s)
* When WiDi is connected, devices
connected
with Wi-Fi Direct are disconnected.
Cancel
a
b
!
NOTE
When you connect the TV and
laptop, you should set up TV
mode for “Live TV” and “external
input”. If not, your computer
cannot detect LG Smart TV.
* LG TV is not need to register.
* For more information on Intel WiDi, visit http://intel.com/go/widi
* A list of Intel’s WiDi devices does not appear on the TV screen. Please check the list on your laptop.
ENGLISH
Time Machine II
P
A
G
E
TV/
RAD
RATIO INPUT
FAV
MUTE
OK
1
.,;@
2
abc
3
def
4
ghi
5
jkl
6
mno
7
pqrs
8
tuv
0
9
wxyz
LIST
Q.VIEW
Time Machine II
Ready
ENGLISH
Take Control of Time with Time Machine II
Ready
With your removable USB storage devices, Timeshift allows you to stop and rewind live TV, and record or set the timer for your
favourite TV programmes.
* Time Machine II
Ready
can record any programme in analogue and digital format, and can also record AV input.
* You can still use other services while recording a TV programme.
* Requires external data storage device (not included).
*
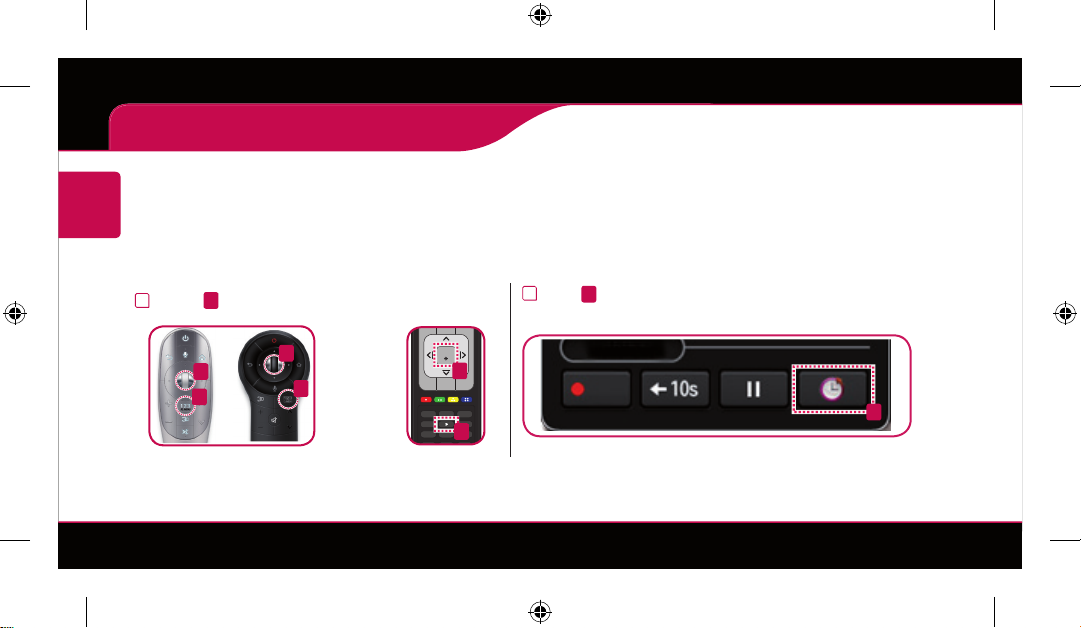
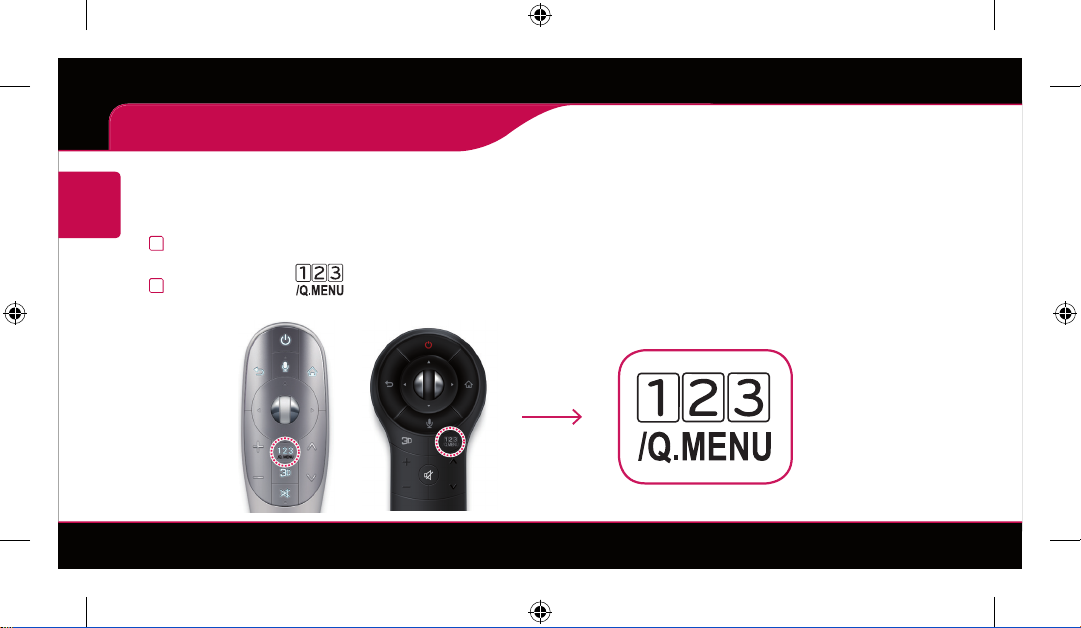
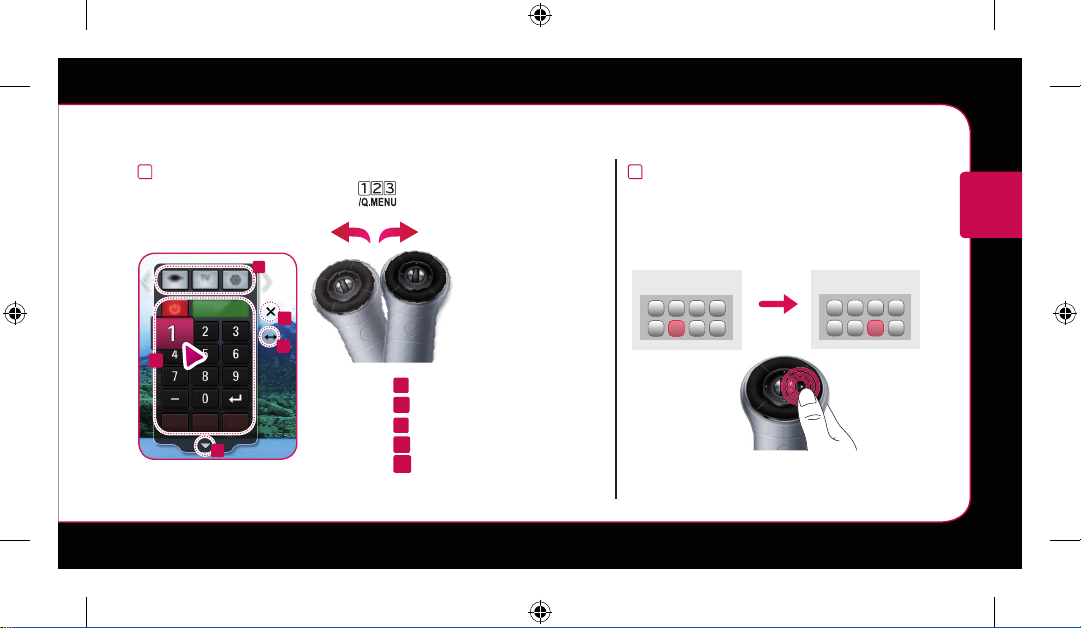
If you are watching an HbbTV broadcast, use the 123 button to use the (Smart Remote) Time Machine II
2
1
Press a on the Remote Control while watching TV.
Press b. The progress bar appears and you can use Time
Machine’s various functions.
Ready
function.
a
a
a
a
or
a
a
b
SMART TV Quick Setup Guide
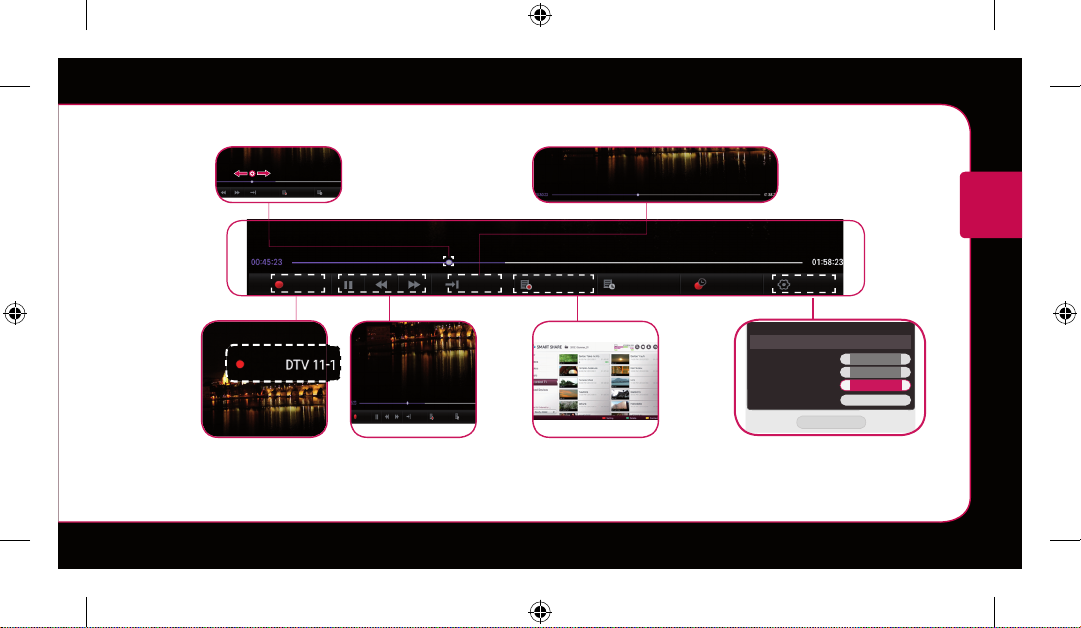
Live
Recorded TV
REC
REC
The REC icon appears
at the top right of the
screen when recording
starts.
You can select the point you
want to play.
Schedule
Recorded TV
REC Live
Schedule List
You can use these buttons to go to the time/
location position you want
to playback.
You can return to a live TV
programme when using
ENGLISH
the Timeshift function.
Live
Recorded TV
You can view a list of recorded TV programmes.
Schedule List
Schedule
Option
Option
* You may obtain space by deleting old videos for more space.
Recording Quality
Timeshift
Auto deleting
USB device initialization
Close
You can change the Time
Machine settings.
<
<
<
High Quality
On
On
Initialize
>
>
>
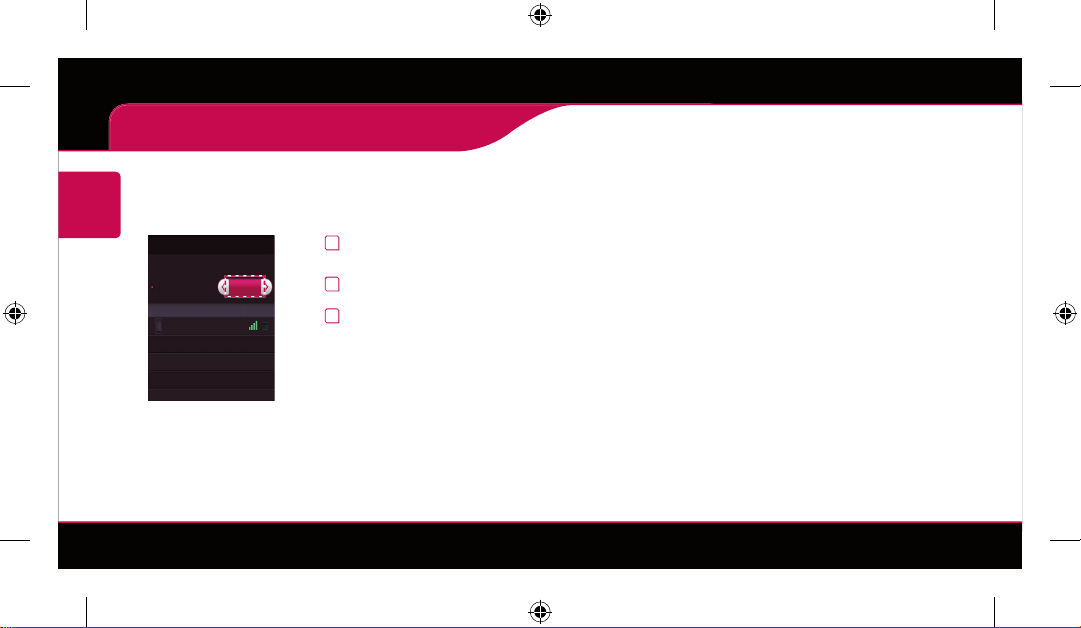
Universal Control
To use the Universal Control function (for Magic Remote Control only)
ENGLISH
(This feature is not available in all countries.)
With the Magic Remote Control, you can easily control your set-top box, Blu-ray player, home theater system, and Sound Bar.
1
Check if the device is connected to the TV.
2
After pressing the ‘
tab. The Screen Remote that can control the device appears.
’ button on the Magic Remote Control, select the device you want to control in the Change Device
SMART TV Quick Setup Guide
Time Machine II
You can control external devices using the Screen Remote on the screen.
3
(This may not work with the ‘
a
d
b
c
e
’ button for some models.)
a
: Change Device tab
»
b
: Device control buttons
»
c
: Expand the ScreenRemote
»
d
»
: Exits the Screen Remote
e
: Moves the position of the
»
ScreenRemote to left or right
Control external devices using the navigation
4
keys, wheel (OK), or BACK button on the
Magic Remote Control.
External Device Menu
External Device Menu
ENGLISH
MiracastTM Setting
ENGLISH
MiracastTM allows a portable device to securely send video and sound to TV wirelessly.
TM
Miracast
/ Intel's WiDi
The device which is applied Miracast
technology can be shown on the TV.
MiracastTM / Intel's WiDi
Device Name
TAAAA
TM
and intel's WiDi
On
Connection
Connection
MiracastTM is set to On on your TV and portable device.
1
Go to the Network settings to set the Miracast
When your portable device is detected, select the device.
2
For more information about how to connect the portable device, refer to the portable
3
device manual.
SMART TV Quick Setup Guide
TM
.

Kurzanleitung zur Einrichtung

Netzwerkverbindung
Internetverbindung
* Ihr TV-Gerät kann von der Abbildung möglicherweise leicht abweichen.
* Auf PC oder Mobiltelefon angezeigte Bilder können möglicherweise je nach Betriebssystem leicht abweichen.
SMART TV Kurzanleitung zur Einrichtung
Kabellose Netzwerkverbindung Kabelgebundene Netzwerkverbindung
Internetverbindung
W-LAN-Router
Kabelgebundener
Router
DEUTSCH
Netzwerkeinrichtung
* Premium Apps sind auf dem Fernsehgerät vorinstalliert. Sie können je nach Land variieren.
1
DEUTSCH
Einstellungen
Drücken Sie die Taste SMART ,
um auf das Smart-Startmenü zuzugreifen. Wählen Sie Einstellungen
und drücken Sie das Rad (OK).
Einstellungen
Wählen Sie das Menü
2
NETZWERK Netzwerkverbindung.
NETZWERK
Netzwerkverbindung
Netzwerkstatus
Wi-Fi Direct
Miracast™ / Intel's WiDi
Mein TV-Name : 55EA9800-ZA
Drücken Sie auf Verbindung
3
herstellen.
Netzwerkverbindung
Stellen Sie eine Verbindung mit Ihrem Kabelnetzwerk oder Ihrem drahtlosen Netzwerk her.
Genießen Sie zahlreiche Smart TV-Funktionen über ein Netzwerk.
Für kabelgebundene Netzwerkverbindungen:
Schließen Sie an der Rückseite des Fernsehgeräts ein LAN-Kabel an.
Für kabellose Netzwerkverbindungen:
Es ist ein WLAN-Router oder ein Zugriffspunkt
oder
Verbindung herstellen
Das Gerät versucht automatisch, eine Verbindung zu dem verfügbaren
4
Netzwerk herzustellen (zuerst kabelgebundenes Netzwerk).
Netzwerkverbindung
Netzwerkverbindung wird hergestellt.
Abbrechen
Wenn Sie „Abbrechen“ wählen oder keine Verbindung zu dem Netzwerk hergestellt werden kann,
wird die Liste verfügbarer Netzwerke angezeigt.
Wählen Sie das gewünschte Netzwerk aus.
Netzwerkverbindung
Wählen Sie das gewünschte Netzwerk aus.
Kabelgebundenes Netzwerk
Kabellos : AAA
Kabellos : BBB
Kabellos : CCC
Kabellos : 11111
Kabellos : 22222
Manuelle Einrichtung
Aktualisieren
Wenn Sie Ihr TV-Gerät an einen kabellosen
Router anschließen möchten, wählen Sie
das von Ihnen gewünschte Netzwerk aus,
und geben Sie das Kennwort ein.
Netzwerkverbindung
Kabellos : AAA
Geben Sie den Sicherheitsschlüssel des Netzwerks ein.
Haben Sie Ihr Passwort vergessen? Wenden Sie sich an Ihren
Router-Hersteller
SMART TV Kurzanleitung zur Einrichtung
Da
s verbundene Netzwerk wird
5
angezeigt.
Klicken Sie auf „Fertig“, um die
Netzwerkverbindung zu bestätigen.
Wenn Sie Liste verfügbarer
Netzwerke wählen, wird die Liste
verfügbarer Netzwerke angezeigt.
Netzwerkverbindung
Netzwerk ist verbunden.
Kabellos: AAA
"Wählen Sie [Liste verfügbarer Netzwerke] aus, um eine Verbindung zu einem anderen Netzwerk herzustellen."
Fertig
Liste verfügbarer Netzwerke
DEUTSCH
Behebung von Netzwerkproblemen
1
DEUTSCH
Drücken Sie die Taste SMART
, um auf das Smart-Startmenü
zuzugreifen.
Einstellungen
Einstellungen
Wählen Sie das Menü
2
NETZWERK Netzwerkverbindung.
NETZWERK
Netzwerkverbindung
Netzwerkstatus
Wi-Fi Direct
Miracast™ / Intel's WiDi
Mein TV-Name : 55EA9800-ZA
Befolgen Sie je nach Netzwerkstatus die nachfolgenden Anweisungen.
Prüfen Sie das Fernsehgerät oder den Router.
Netzwerkstatus
Fernsehgerät Gateway DNS Internet
Wenn bei Fernsehgerät ein ✔ erscheint.
Überprüfen Sie den Verbindungsstatus von
1
TV, Router und/oder Kabelmodem.
Ein- und Ausschalten bei Fernsehgerät,
2
Router und/oder Kabelmodem.
Wenn Sie eine feste IP verwenden, geben
3
Sie die IP direkt ein.
Kontakt zu Internetanbieter oder Router-
4
Hersteller.
<Zusätzlich zu prüfende Punkte bei Verwendung einer kabellosen Verbindung>
Prüfen Sie in dem Fenster mit den Routereinstellungen
1
das Passwort für die kabellose Verbindung.
Ändern Sie die SSID des Routers (Netzwerkname) oder
2
den kabellosen Kanal.
Prüfen Sie den Router, oder wenden Sie sich an Ihren
Internetdienstanbieter.
SMART TV Kurzanleitung zur Einrichtung
Netzwerkstatus
Fernsehgerät Gateway DNS Internet
DEUTSCH
Netzwerkstatus
Fernsehgerät Gateway DNS Internet
Zwischen Fernsehgerät und Gateway erscheint ein ✔.
1
Trennen Sie das Stromkabel des Router oder Kabelmodems und versuchen Sie nach 5 Sekunden erneut, eine Verbindung herzustellen.
Router oder Kabelmodem initialisieren (Grundeinstellung).
2
Kontakt zu Internetanbieter oder Router-Hersteller.
3
Zwischen Fernsehgerät, Gateway und DNS erscheint ein ✔.
Trennen Sie das Stromkabel des Router oder Kabelmo-
1
dems und versuchen Sie nach 5 Sekunden erneut, eine
Verbindung herzustellen.
Router oder Kabelmodem initialisieren (Grundeinstellung).
2
Prüfen Sie, ob die MAC-Adresse des Fernsehgerätes/Rou-
3
ters bei Ihrem Internetdienstanbieter registriert ist. (Die MACAdresse, die im rechten Bereich des Netzwerkstatusfensters
angezeigt wird, muss bei Ihrem Internetdienstanbieter registriert
sein.)
Prüfen Sie auf der Website des Routerherstellers, ob die
4
neueste Firmwareversion auf Ihrem Router installiert ist.

Installation und Einrichtung von SmartShare PC SW
Installieren Sie das -Programm auf Ihrem PC.
Gehen Sie auf . Wählen Sie dann Ihre Region aus.
1
2
DEUTSCH
Wählen Sie SUPPORT. Suchen Sie dann nach Ihrem Modell.
3
Wählen Treiber & Software oder SW UPDATE. Wählen Sie dann .
4
Wenn die Installation abgeschlossen ist, können Sie das Programm ausführen.
SMART TV Kurzanleitung zur Einrichtung
!
HINWEIS
Der DLNA-Dienst ist nur verfügbar, wenn Fernseher und andere Geräte über einen einzelnen Router
verbunden sind.

DLNA-Verbindung zum Smartphone
Prüfen Sie, ob auf Ihrem Smartphone Wi-Fi aktiviert ist.
1
Installieren Sie die App zur Freigabe von Inhalt auf Ihrem Smartphone bzw. führen Sie diese App aus (auf LG-Telefo-
2
nen hat diese die Bezeichnung SmartShare).
Aktivieren Sie die Freigabe von Inhaltsdateien für andere Geräte auf Ihrem Smartphone.
3
Wählen Sie den Dateityp, den Sie abspielen möchten (Film, Audio oder Foto).
4
Wählen Sie eine Film-, Musik- oder Fotodatei aus, die Sie auf dem Fernsehgerät abspielen möchten.
5
Fügen Sie die gewählte Datei der Playlist hinzu.
6
Wählen Sie den Modellnamen des Fernsehgeräts, auf dem Sie die Dateien abspielen möchten. (Der Modellname des
7
Fernsehgerätes befindet sich auf einem Etikett auf der Rückseite des Bildschirms.)
Starten Sie die Mediendatei, um diese über Ihr Fernsehgerät abzuspielen.
8
SMART TV Kurzanleitung zur Einrichtung
DEUTSCH

Aktualisieren der TV-Firmware
SMART TV Kurzanleitung zur Einrichtung
SMART Einstellungen SUPPORT Software-Aktualisierung
Mit der Funktion Software-Aktualisierung wird die Software überprüft und gegebenenfalls auf die neueste Version aktualisiert. Wenn keine Aktualisierung vorgenommen wird, können bestimmte Funktionen u.U. nicht genutzt werden. Es kann auch manuell nach verfügbaren Aktualisierungen gesucht werden.
Software-Aktualisierung
DEUTSCH
Modus für automatische Aktualisierung
Versionsaktualisierung prüfen
!
HINWEIS
Beim Start der Aktualisierung öffnet sich für kurze Zeit ein Fenster zum Aktualisierungsfortschritt. Nach einer bestimmten Zeit schließt sich
das Fenster wieder.
Die neueste Version kann über das digitale Rundfunksignal oder über eine Internetverbindung heruntergeladen werden.
Ein Programmwechsel während des Software-Downloads über ein digitales Rundfunksignal stört den Downloadvorgang. Durch das
Zurückkehren zum vorherigen Programm kann der Download fortgesetzt werden.
Wenn keine Softwareaktualisierung vorgenommen wird, können bestimmte Funktionen u.U. nicht genutzt werden.
[Folgendes gilt für Modelle aus Finnland, Schweden, Dänemark und Norwegen.]
Wenn die Software-Aktualisierung über ein Übertragungssignal läuft, werden Sie aufgefordert, mit der Aktualisierung fortzufahren, egal ob der
Modus für automatische Aktualisierung aktiviert ist oder nicht.
Auf Ein schalten.
Wenn eine Aktualisierung verfügbar ist, werden Sie zum Ausführen der Aktualisierung aufgefordert.
Wenn eine Aktualisierung verfügbar ist, startet diese automatisch ohne Aufforderung.
Es wird die letzte Versionsaktualisierung geprüft. Wenn eine Aktualisierung verfügbar ist, kann
der Downloadvorgang manuell durchgeführt werden.
Rufen Sie den LG Kundendienst an, wenn Sie Probleme haben.

Tag On
Tag On
SMART TV Kurzanleitung zur Einrichtung
(Dieses Teil ist bei keinem der Modelle im Lieferumfang enthalten.)
*Diese Funktion wird nur auf Smartphones mit Android 4.0 (ICS) oder höher unterstützt.
„Tag On“ ist eine Technologie zur Datenübertragung, die von NFC (Near Field Communication)fähigen Smartphones verwendet werden kann. Halten Sie Ihr Smartphone einfach an einen Tag
On-Sticker, und Sie können das Teilen von Inhalten zwischen Ihrem Smartphone und Ihrem TVGerät aktivieren.
Um Ihr Smartphone mittels „Tag On“ mit einem TV-Gerät verbinden zu können, müssen sich beide
Geräte im selben WLAN-Netzwerk befinden, oder das Miracast™/Intel WiDi des Smart TV-Geräts
muss auf Ein gestellt sein.
DEUTSCH

Wi-Fi Direct-Einstellungen
SMART TV Kurzanleitung zur Einrichtung
SMART Einstellungen NETZWERK Wi-Fi Direct
Die Funktion Wi-Fi Direct unterstützt drahtlose Verbindungstechnologien. Mit SmartShareTM können Sie Dateien oder Bildschirme von Geräten freigeben, die mit Wi-Fi Direct verbunden sind.
DEUTSCH
Wi-Fi Direct
Wi-Fi Direct
TAAAA
BBBB
*
Wenn Sie Wi-Fi Direct nicht verwenden, empfehlen wir, Wi-Fi Direct (a) auf Aus zu stellen, um die Interferenzen zwischen
den Wi-Fi-Geräten zu minimieren.
Ein
Gerätename Verbindung
Connection
a
[TAAAA]
Möchten Sie eine Verbindung anfordern?
Ohne Nachfrage automatisch verbinden
Ja Nein
Sie können nur Geräte verwenden, die Wi-Fi Direct unterstützen.
Wenn Wi-Fi Direct auf Ein gestellt ist, wird eine Liste mit
1
verfügbaren Geräten angezeigt.
»
Um Wi-Fi Direct zu nutzen, wechseln Sie zu
Einstellungen NETZWERK, und stellen Sie Wi-Fi
a
Direct (
Wenn Sie aufgefordert werden, eine Verbindung anzufordern,
2
) auf Ein.
wählen Sie Ja.Wi-Fi Direct ist jetzt mit Ihrem Fernseher
verbunden.

WiDi (Wireless Display)-Einstellung
SMART TV Kurzanleitung zur Einrichtung
WiDi steht für Wireless Display. Die Intel WiDi (Wireless Display)-Technologie ermöglicht eine einfache und schnelle kabellose Verbindung oder
Internetverbindung für gespiegelte und duale Bildschirme auf Ihrem Fernsehgerät. Sie können Ihre Lieblingsfilme, -videos, -fotos, -onlinesendungen
und vieles mehr in Full HD mit hervorragender Bildqualität und großartigem Ton entspannt auf Ihrem Fernsehgerät genießen.
Intel’s WiDi ist auf Ein gestellt. Verbinden Sie Ihren Laptop mit dem Router. (Diese Funktion kann auch ohne Router verwendet werden; die Verwen-
1
dung des Router wird jedoch empfohlen.) Ihr Laptop ist mit dem Programm Intel WiDi( ) ausgestattet.
Es erkennt die verfügbaren LG Smart TVs, die WiDi unterstützen. Wählen Sie in der Liste den gewünschten Fernseher aus und klicken Sie auf Klicken Sie auf „Connect (Verbin-
2
dung)“. Geben Sie die PIN-Nummer (
3
Die kabellose Umgebung kann sich auf die Bildschirmanzeige auswirken. Bei einer schlechten Verbindung kann die Intel WiDi-Verbindung verloren gehen.
), die auf dem Bildschirm angezeigt wird, in das Eingabefeld (b) auf Ihrem Laptop ein, und klicken Sie dann auf „Weiter“.
a
[Intel's WiDi] Verbindung anfordern
Geben Sie die folgenden Sicherheitsschlüssel ein.
Meine PIN : ****
a
* Wenn WiDi verbunden ist, werden Geräte, die mit
92 Sekunden verbleiben
Wi-Fi Direct verbunden sind, getrennt.
Abbrechen
b
!
HINWEIS
Richten Sie bei der Verbindung
von Fernsehgerät und Laptop
den TV-Modus auf „Live-TV“ und
„externer Eingang“ ein.
* LG TV muss nicht registriert werden.
* Weitere Informationen zu Intel WiDi erhalten Sie unter http://intel.com/go/widi
* Die Liste mit Intel›s WiDi-Geräten erscheint nicht auf dem TV-Bildschirm. Prüfen Sie die Liste auf Ihrem Laptop.
DEUTSCH

Time Machine II
P
A
G
E
TV/
RAD
RATIO INPUT
FAV
MUTE
OK
1
.,;@
2
abc
3
def
4
ghi
5
jkl
6
mno
7
pqrs
8
tuv
0
9
wxyz
LIST
Q.VIEW
Time Machine II
Ready
Steuern Sie die Zeit mit Time Machine II
Ready
Mit Ihren transportablen USB-Speichergeräten können Sie per Timeshift das Fernsehprogramm anhalten und zurückspulen, das Live-TV-Programm aufnehmen
oder den Timer für Ihre Lieblingsfernsehsendungen einstellen.
* Time Machine II
* Sie können immer noch andere Geräte verwenden, während Sie eine TV-Sendung aufnehmen.
DEUTSCH
* Externes Datenspeichergerät wird benötigt (nicht enthalten)
* Wenn Sie eine HbbTV-Übertragung ansehen, verwenden Sie den “123”-Knopf, um die Funktion Time Machine II
1
Drücken Sie a auf der Fernbedienung, während Sie
fernsehen.
Ready
kann jedes Programm in analogem oder digitalem Format sowie per AV-Input aufnehmen.
2
Drücken Sie b.
Der Fortschrittsbalken erscheint, und Sie können die
Ready
der Smart-Bedienungsanleitung zu benutzen.
verschiedenen Funktionen von Time Machine nutzen.
a
a
a
a
oder
a
b
a

SMART TV Kurzanleitung zur Einrichtung
Sie können den Zeitpunkt
Live
AUFNAHMELISTE
wählen, den Sie abspielen
Aufnahmeliste
möchten.
Mithilfe der TimeshiftFunktion können Sie
zum Live-TV-Programm
zurückkehren.
DEUTSCH
REC
REC
Das REC-Symbol erscheint
rechts oben am Bildschirm,
wenn die Aufnahme beginnt.
Live
AUFNAH-
REC Live
MELISTE
Aufnahmeliste
Sie können diese Tasten
verwenden, um die
Abspielzeit einzustellen.
AUFNAHMELISTE
Aufnahmeliste
Sie können eine Liste
mit aufgezeichneten TVSendungen durchsuchen.
Zeitplan
Option
Option
* Zusätzlichen Speicherplatz durch Löschen alter Videos
verfügbar machen.
Aufnahmequalität
Timeshift
Autom. Löschen
Initialisierung des USB-Geräts
Schließen
Hohe Qualität
<
<
<
Sie können die Time MachineEinstellungen ändern.
Ein
Ein
Initialisieren
>
>
>

Universalsteuerung
So verwenden Sie die Universalsteuerungsfunktion (nur für Magic-Fernbedienung)
(Diese Funktion der Kippsicherung steht nicht bei allen Modellen zur Verfügung.)
Mit der Magic-Fernbedienung können Sie ganz einfach Set-Top-Box, Blu-ray-Player, Heimkinoanlage und die Sound Bar steuern.
1
DEUTSCH
Überprüfen Sie, ob das Gerät mit dem TV-Gerät verbunden ist.
2
Drücken Sie auf der Magic-Fernbedienung die Taste ‘
das Gerät aus, das Sie bedienen möchten. Der Remote-Bildschirm, mit dem das Gerät bedient werden kann, wird angezeigt.
’ , und wählen Sie anschließend auf der Registerkarte „Gerät ändern“

SMART TV Kurzanleitung zur Einrichtung
Time Machine II
Externe Geräte können Sie über den Remote-Bildschirm auf dem
3
Bildschirm steuern.
(Bei einigen Modellen kann diese Funktion möglicherweise nicht mit
der Taste ‘
b
c
’ ausgeführt werden.)
a
d
e
a
»
: Registerkarte „Gerät ändern“
»
: Gerätesteuerungstasten
b
c
»
: Remote-Bildschirm erweitern
»
: Der Remote-Bildschirm wird
d
verlassen
e
»
: Die Position des Remote-Bildschirms
wird nach rechts oder links
verschoben.
Steuern Sie externe Geräte über die
4
Navigationstasten oder die Tasten Rad (OK)
oder BACK auf der Magic-Fernbedienung.
Menü für externe Geräte
Menü für externe Geräte
DEUTSCH

MiracastTM-Einstellung
SMART TV Kurzanleitung zur Einrichtung
Mit MiracastTM können Videos und Audiodateien sicher von einem tragbaren Gerät kabellos an ein TV-Gerät gesendet werden.
DEUTSCH
Miracast™ / Intel's WiDi
Geräte mit MiracastTM- und Intel's WIDI-Technologie können auf
dem TV angezeigt werden.
MiracastTM / Intel's WiDi
TAAAA
Ein
Gerätename Verbindung
Connection
MiracastTM ist auf Ihrem Fernseher und einem tragbaren Gerät auf Ein gestellt. Wechseln
1
Sie zu den Netzwerkeinstellungen, um MiracastTM einzustellen.
Wenn Ihr tragbares Gerät erkannt wurde, wählen Sie das Gerät aus.
2
Weitere Informationen darüber, wie Sie das tragbare Gerät verbinden können, finden Sie
3
in der Bedienungsanleitung des tragbaren Geräts.


Guide de confi guration rapide


Connexion à un réseau
Connexion Internet
* L’image affichée peut être différente de celle de votre téléviseur.
* L’image affichée sur un ordinateur ou un téléphone portable peut être différente selon le système d’exploitation.
SMART TV Guide de confi guration rapide
Connexion à un réseau sans fi l Connexion à un réseau fi laire
FRANÇAIS
Connexion Internet
routeur sans fi l
Routeur câblé

Paramètre Réseau
* Des applications Premium sont préinstallées sur votre TV. Elles peuvent varier selon le pays.
1
FRANÇAIS
Paramètres
Appuyez sur le bouton SMART
pour accéder au menu
correspondant. Sélectionnez
Paramètres et appuyez sur Molette
(OK).
Paramètres
Sélectionnez RÉSEAU
2
menu Connexion
réseau.
RÉSEAU
Connexion réseau
État du réseau
Wi-Fi Direct
Miracast™ / Intel's WiDi
Nom de mon téléviseur : 55EA9800-ZA
Appuyez sur Démarrer la
3
connexion.
Connexion réseau
Connectez-vous à votre réseau câblé ou sans fi l.
Bénéfi ciez de plusieurs fonctions Smart TV via le réseau.
Pour vous connecter à un réseau câblé, procédez comme suit :
Branchez un câble LAN à l'arrière de votre téléviseur.
Pour vous connecter à un réseau sans fi l, procédez comme suit
Un routeur sans fi l ou un point d'accès est requis.
ou
Démarrer la connexion

Le périphérique tente automatiquement de se connecter au réseau
4
disponible (prioritairement au réseau câblé).
Connexion réseau
Connexion au réseau.
Annuler
Si vous sélectionnez Annuler ou si la connexion au réseau
échoue, la liste des réseaux disponibles s’affiche.
Choisissez le réseau auquel vous souhaitez vous connecter.
Connexion réseau
Sélectionnez le réseau de votre choix.
Réseau fi laire
Sans fi l : AAA
Sans fi l : BBB
Sans fi l : CCC
Sans fi l : 11111
Sans fi l : 22222
Configuration manuelle
Actualiser
Si vous souhaitez connecter votre téléviseur à un
routeur sans fil, sélectionnez le réseau auquel vous
voulez vous connecter, puis saisissez le mot de passe.
Connexion réseau
Sans fi l : AAA
Saisissez la clé de sécurité du réseau.
Mot de passe oublié ? Contactez le constructeur de votre point d'accès.
SMART TV Guide de confi guration rapide
L
e réseau auquel vous êtes
5
connecté s’affiche.
Cliquez sur Terminé pour
confirmer la connexion au
réseau.
Si vous sélectionnez Liste des
autres réseaux, la liste des
réseaux disponibles s’affiche.
Connexion réseau
Le réseau est connecté.
Sans fi l : AAA
Pour vous connecter à un autre réseau, [Liste des autres réseaux].
Terminé Liste des autres réseaux
FRANÇAIS

Dépannage des problèmes de réseau
1
FRANÇAIS
Appuyez sur le bouton SMART
pour accéder au menu
correspondant.
Paramètres
Paramètres
Sélectionnez RÉSEAU
2
menu État du
réseau.
RÉSEAU
Connexion réseau
État du réseau
Wi-Fi Direct
TM
/Intel's WiDi
Miracast
Nom de mon téléviseur : 55EA9800-ZA
Suivez les instructions ci-dessous en fonction
de l’état de votre réseau.
Vérifiez l’état de la TV ou du routeur.
État du réseau
TV Passerelle DNS Internet
Lorsque ✔ apparaît sur la TV.
Vérifiez l’état de la connexion de la TV, du
1
point d’accès et du modem câble.
Éteignez et allumez la TV, le point d’accès
2
et le modem câble.
Si vous utilisez une adresse IP statique,
3
saisissez-la directement.
Contactez votre fournisseur d’accès Internet
4
ou votre fournisseur de point d’accès.

<Autres points à vérifier pour la connexion sans fil>
Vérifiez le mot de passe de la connexion sans fil dans
1
les paramètres du routeur.
Modifiez le SSID (nom du réseau) du routeur ou le
2
canal du réseau sans fil.
Vérifiez l’état du routeur ou contactez votre fournisseur
de services Internet.
État du réseau
TV Passerelle DNS Internet
Lorsque le symbole ✔ apparaît sur votre TV et sur la passerelle.
Débranchez le cordon d'alimentation du point d'accès et le
1
modem câble, patientez 5 secondes, puis rebranchez-le.
Initialisez (Réglages usine) le point d'accès ou le modem
2
câble.
Contactez votre fournisseur d'accès Internet ou votre fournisseur de
3
point d'accès.
SMART TV Guide de confi guration rapide
État du réseau
TV Passerelle DNS Internet
Lorsque le symbole ✔ apparaît sur la TV, la passerelle et le
DNS.
Débranchez le cordon d’alimentation du point d’accès et le
1
modem câble, patientez 5 secondes, puis rebranchez-le.
Initialisez (Réglages usine) le point d’accès ou le modem câble.
2
Vérifiez que l’adresse MAC de votre TV/du routeur a bien été
3
enregistrée auprès de votre fournisseur de services Internet.
(L’adresse MAC est inscrite sur le panneau de droite de
la fenêtre de l’état du réseau et doit avoir été enregistrée
auprès de votre fournisseur de services Internet.)
Consultez le site Web du fabricant de votre routeur pour
4
savoir si votre routeur bénéficie de la dernière version du
micrologiciel.
FRANÇAIS

Installation et réglage du logiciel SmartShare PC
Installez sur votre ordinateur.
Accédez à . Puis, sélectionnez votre région.
1
2
Sélectionnez ASSISTANCE. Puis, recherchez votre modèle.
3
Sélectionnez Pilotes & Logiciels ou MISE À JOUR DU LOGICIEL. Puis, sélectionnez .
4
FRANÇAIS
Procédez à l’installation pour exécuter le programme.
SMART TV Guide de confi guration rapide
!
REMARQUE
Le service DLNA est uniquement disponible si le téléviseur et d’autres périphériques sont connectés via un
seul routeur.

Connexion DLNA pour smartphone
Vérifiez que la fonction Wi-Fi est activée sur votre smartphone.
1
Installez/exécutez l'application de partage de contenus sur votre smartphone (fonction SmartShare sur les téléphones
2
LG).
Autorisez le partage de fichiers avec d'autres périphériques sur votre smartphone.
3
Sélectionnez le type de fichier que vous souhaitez lire (films, fichiers audio ou photos).
4
Sélectionnez un film, une musique ou une photo pour diffuser le fichier sur votre téléviseur.
5
Ajoutez le fichier sélectionné à la liste de lecture.
6
Sélectionnez le nom du modèle de la TV sur laquelle lire les fichiers. (Le nom du modèle du téléviseur est inscrit à
7
l'arrière de l'écran.)
Lancez la lecture du fichier multimédia sur votre TV.
8
SMART TV Guide de confi guration rapide
FRANÇAIS

Updating the TV Firmware
SMART TV Guide de confi guration rapide
SMART Paramètres ASSISTANCE Mise à jour auto.
Permet d’utiliser la fonction Mise à jour auto. pour vérifier et obtenir la version la plus récente. Sans les mises à jour, certaines fonctions
risquent de ne pas fonctionner correctement. Vous pouvez également vérifier manuellement la présence de mises à jour disponibles.
Mise à jour auto.
Mode de mise à jour automatique
FRANÇAIS
Vérifiez version mise à jour
Définissez la fonction sur Activée.
Si une mise à jour est disponible, un message vous demandera si vous souhaitez exécuter cette mise à jour.
Si une mise à jour est disponible, la mise à jour démarre automatiquement, sans invite.
Permet de vérifier la dernière version des mises à jour installée. Lorsqu’une nouvelle mise à
jour est disponible, le téléchargement peut s’effectuer manuellement.
!
REMARQUE
Au démarrage de la mise à jour, la fenêtre de progression de la mise à jour apparaît un court instant, puis disparaît.
La version la plus récente peut être obtenue via le signal de diffusion numérique ou une connexion Internet.
Si vous changez de chaîne pendant que vous téléchargez le logiciel via un signal de diffusion numérique, le téléchargement
s’interrompt. Lorsque vous revenez à la chaîne initiale, il reprend.
Si le logiciel n’est pas mis à jour, certaines fonctions risquent de ne pas fonctionner correctement.
[L’information suivante est valable pour les modèles en Finlande/Suède/Danemark/Norvège.]
Si la mise à jour du logiciel se fait via le signal de diffusion, il vous sera demandé de continuer la mise à jour, que le Mode de mise
à jour automatique soit activé ou non.
Veuillez appeler le service clientèle de LG en cas de problème.

Tag On
Tag On
SMART TV Guide de confi guration rapide
(Cet élément n’est pas intégré à tous les modèles.)
*Cette fonction est prise en charge uniquement sur les smartphones avec Android version 4.0 (ICS)
ou ultérieure.
Tag On (Balise active) est une technologie de transmission de données qui peut être utilisée
avec les smartphones compatibles NFC (Near Field Communication, communication en champ
proche). Il suffit d’approcher votre smartphone d’une étiquette Tag On pour partager du contenu
entre votre smartphone et votre téléviseur.
Pour connecter votre smartphone à votre téléviseur grâce à la fonction Tag On, vous devez les
configurer de façon à ce qu’ils utilisent tous les deux le même réseau Wi-Fi ou activer la fonction
Miracast™/Intel WiDi de votre Smart TV.
FRANÇAIS

Paramètres Wi-Fi Direct
SMART TV Guide de confi guration rapide
SMART Paramètres RÉSEAU
Wi-Fi Direct
La fonction Wi-Fi Direct prend en charge les technologies de connexion sans fil. Avec Smart ShareTM, vous pouvez partager des
fichiers ou des écrans de périphériques connectés à Wi-Fi Direct.
Si Wi-Fi Direct est Activé, la liste des périphériques
Wi-Fi Direct
Wi-Fi Direct
FRANÇAIS
TAAAA
BBBB
Activé
Nom du périphérique Connexion
Connection
a
[TAAAA]
Voulez-vous demander une connexion ?
Connecter automatiquement sans invite
Oui
Non
1
disponibles s’affiche.
»
Pour utiliser Wi-Fi Direct, accédez à
RÉSEAU et réglez Wi-Fi Direct(
Lorsqu’il vous est demandé d’établir une connexion,
2
sélectionnez
Oui. Wi-Fi Direct
a
) sur Activé.
est désormais connecté à
votre TV.
Paramètres
*Si vous n’utilisez pas Wi-Fi Direct afin de minimiser les interférences entre les périphériques Wi-Fi, il vous est recommandé
de régler Wi-Fi Direct(a) sur Désactivé.Utilisez uniquement des périphériques qui prennent en charge Wi-Fi Direct.

Réglage WiDi (Wireless Display, Affi chage sans fi l)
SMART TV Guide de confi guration rapide
WiDi signifie Wireless Display (Affichage sans fil). La technologie d’affichage sans fil WiDi (Wireless Display) d’Intel offre une connexion rapide et sans câbles
ni réseau Internet pour les affichages à double écran et en miroir sur votre téléviseur. Installez-vous confortablement et profitez de vos films, vidéos, photos,
programmes en ligne préférés et bien plus encore en Full HD sur votre téléviseur avec une qualité d’image et de son exceptionnelle.
Intel’s WiDi est réglé sur Activé. Connectez votre ordinateur portable au point d’accès. (Vous pouvez utiliser cette fonction sans point d’accès, mais il
1
est recommandé de se connecter à un point d’accès.) Votre ordinateur portable prend en charge le programme Intel Widi ( ).
Cette fonction détecte les Smart TV LG disponibles et prenant en charge le WiDi. Dans la liste, sélectionnez votre TV et cliquez sur Connecter. Entrez le
2
code PIN (a) indiqué à l’écran dans le champ prévu à cet effet (b) sur votre ordinateur portable, puis cliquez sur Continuer.
[Intel's WiDi] Demande de connexion
Entrez les clés de sécurité suivantes.
Mon code PIN : ****
Annuler
a
Reste : 92 seconde(s)
* Lorsque le WiDi est connecté, les périphériques
connectés avec Wi-Fi Direct sont déconnectés.
3
L’environnement sans fil peut affecter l’affichage de l’écran. Si la connexion est mauvaise, vous pouvez perdre la connexion Intel WiDi.
b
!
REMARQUE
Lorsque vous connectez le
téléviseur et l’ordinateur, vous
devez régler le mode TV sur
« Live TV » (Programme en
direct) et « Entrée externe ».
* Il n’est pas nécessaire d’enregistrer votre TV LG.
* Plus d’informations sur Intel WiDi sur http://intel.com/go/widi
* L’écran du téléviseur n’affiche pas la liste des périphériques Intel’s WiDi. Veuillez consulter la liste sur votre ordinateur portable.
FRANÇAIS

Time Machine II
P
A
G
E
TV/
RAD
RATIO INPUT
FAV
MUTE
OK
1
.,;@
2
abc
3
def
4
ghi
5
jkl
6
mno
7
pqrs
8
tuv
0
9
wxyz
LIST
Q.VIEW
Time Machine II
Ready
Profitez du contrôle du direct avec Time Machine II
Ready
Timeshift vous permet d’utiliser vos périphériques de stockage USB amovibles pour mettre vos programmes en direct en pause
ou effectuer un retour en arrière et enregistrer avec ou sans minuterie vos programmes préférés.
* Time Machine II
Ready
peut enregistrer n’importe quel programme au format analogique ou numérique ainsi que les contenus de
l’entrée AV.
* Vous pouvez continuer à utiliser les autres services pendant l’enregistrement d’un programme TV.
* Un périphérique de stockage externe est requis (non inclus).
FRANÇAIS
* Si vous regardez une émission HbbTV, utilisez le bouton « 123 » pour utiliser la fonction (Smart Remote) Time Machine II
2
Appuyez sur le bouton a de la télécommande
1
pendant que vous regardez la télévision.
Appuyez sur b.
Vous verrez alors la barre de progression s’afficher afin de vous
permettre d’utiliser les diverses fonctions de Time Machine.
a
a
a
a
ou
a
a
Ready
.
b

SMART TV Guide de confi guration rapide
Sélectionnez l’endroit où
vous voulez débuter la
Liste de
Enregistrements
Direct
planifi cation
lecture.
Vous pouvez retourner sur
un programme TV en direct
lorsque vous utilisez la fonction
Timeshift.
REC
REC
L’icône REC apparaît en
haut à droite de l’écran
lors du démarrage de
l’enregistrement.
Direct
Recorded TV
REC Live
Schedule List
Servez-vous de ces
boutons pour vous rendre
au moment où vous
voulez débuter la lecture.
Enregistrements
Liste de planifi cation
Vous pouvez afficher la liste
des programmes enregistrés.
Programmer
Option
Option
* Libérez davantage d'espace en supprimant d'anciennes vidéos.
Fermer
<
<
<
Qualité d'enregistrement
Décalage
Suppression automatique
Initialization d'appareil de
sauvegarde USB
Vous pouvez modifier les
paramètres de Time Machine.
Haute qualité
Activé
Activé
Initialiser
>
>
>
FRANÇAIS

Commande universelle
Pour utiliser la fonction Universal Control (pour télécommande Magic uniquement)
(Cette option n’est pas disponible sur tous les modèles.)
À l’aide de la télécommande Magic, vous pouvez facilement contrôler votre décodeur, votre lecteur Blu-ray, votre système
Home Cinema et la Sound Bar.
1
Vérifiez si l’appareil est connecté à votre téléviseur.
2
FRANÇAIS
Appuyez sur le bouton ‘
l’onglet Change Device (Changer l’appareil). La télécommande d’écran pouvant contrôler l’appareil est affichée.
’ sur la télécommande Magic, puis sélectionnez l’appareil que vous souhaitez contrôler dans

Vous pouvez contrôler des périphériques externes grâce à la télécommande d’écran sur le
Time Machine II
3
4
moniteur.
(Cette procédure peut ne pas fonctionner avec le bouton ‘
’ de certains modèles.)
SMART TV Guide de confi guration rapide
Contrôlez vos périphériques externes grâce aux touches
de navigation, à la Molette (OK) ou BACK (RETOUR) sur la
télécommande Magic.
a
d
b
c
e
»a :
Onglet Changer l’appareil
b
:
»
Boutons de contrôle de
périphériques
c
:
»
Étendre les fonctionnalités de
la télécommande d’écran
d
:
»
Quitte la télécommande d’écran
e
:
»
Décale la position de la
télécommande d’écran vers la
Menu Périphérique externe
Menu Périphérique externe
FRANÇAIS
gauche ou la droite

Réglage Miracast
TM
SMART TV Guide de confi guration rapide
MiracastTM permet à un périphérique vidéo d’envoyer sans fil en toute sécurité des contenus vidéo ou audio à une TV.
TM
Miracast
Vous pouvez afficher les périphériques dotés de la technologie
MiracastTM et Intel's WIDI sur le téléviseur.
MiracastTM / Intel's WiDi
FRANÇAIS
TAAAA
/ Intel's WiDi
Nom du périphérique
Activé
Connection
Connexion
MiracastTM est réglé sur Activé sur votre TV et périphérique portable.
1
Accédez au Paramètres réseau pour régler MiracastTM.
Lorsque votre périphérique portable est détecté, sélectionnez le périphérique.
2
Pour en savoir plus sur la façon de connecter un périphérique portable, consultez le
3
guide d’utilisation du périphérique.


Guida alla confi gurazione rapida


Connessione di rete
* L’immagine mostrata può risultare differente rispetto alla TV in uso.
* L’immagine mostrata su un PC o su un cellulare può variare a seconda del sistema operativo.
SMART TV Guida alla confi gurazione rapida
Connessione di rete wireless Connessione di rete cablata
router wireless
Router cablato
Connessione
a Internet
ITALIANO

Impostazione Rete
* Le applicazioni Premium sono preinstallate sulla TV. Tuttavia, possono variare a seconda del Paese.
1
ITALIANO
Impostazioni
Premere il pulsante SMART per
accedere alla schermata principale
Smart. Selezionare Impostazioni e
premere la rotella (OK).
Impostazioni
Selezionare il menu
2
RETE Connessione
di rete.
RETE
Connessione di rete
Stato rete
Wi-Fi Direct
TM
/Intel's WiDi
Miracast
Nome TV : 55EA9800-ZA
Premere Avvia connessione.
3
Connessione di rete
Connettersi alla rete cablata o wireless.
Utilizzare le diverse funzionalità della Smart TV tramite rete.
Per connettersi a una rete cablata:
Collegare un cavo LAN al retro della TV.
o
Avvia connessione
Per connettersi a una rete wireless:
Router o access point wireless necessario.

Il dispositivo prova a connettersi automaticamente alla rete disponibile
4
(rete cablata per prima).
Connessione di rete
Connessione alla rete in corso.
Annulla
SMART TV Guida alla confi gurazione rapida
Vi
ene visualizzata la rete a cui si
5
è connessi.
Fare clic su Completato per
confermare la connessione di
rete.
Se si seleziona Altro elenco reti,
viene visualizzato l’elenco delle
reti disponibili.
Se si seleziona Annulla o se la
connessione alla rete non riesce, viene
visualizzato l’elenco delle reti disponibili.
Scegliere la rete desiderata.
Connessione di rete
Scegliere la rete desiderata.
Rete cablata
Wireless : AAA
Wireless : BBB
Wireless : CCC
Wireless : 11111
Wireless : 22222
Impostazione manuale
Aggiorna
Per collegare il TV a un router wireless,
selezionare la rete desiderata e
immettere la password.
Connessione di rete
Wireless : AAA
Inserire la chiave di sicurezza della rete.
Password dimenticata? Contattare il produttore dell'access point.
Connessione di rete
Wireless: AAA
Selezionare [Altro elenco rete] per connettersi a un'altra rete.
Completato
Rete connessa.
ITALIANO
Altro elenco reti

Risoluzione dei problemi relativi alla rete
1
ITALIANO
Premere il pulsante SMART
per accedere alla schermata
principale Smart.
Impostazioni
Impostazioni
Selezionare il menu
2
RETE Stato rete.
RETE
Connessione di rete
Stato rete
Wi-Fi Direct
TM
/Intel's WiDi
Miracast
Nome TV : 55EA9800-ZA
Attenersi alle istruzioni riportate di seguito
relative allo stato della rete.
Controllare la TV o il router.
Stato rete
TV Gateway DNS Internet
Quando viene visualizzato il simbolo ✔ sulla TV.
Verificare lo stato della connessione della
1
TV, dell’access point e del modem via cavo.
Spegnere e accendere la TV, l’access point
2
e il modem via cavo.
Se si utilizza un IP statico, immetterlo
3
direttamente.
Contattare il provider Internet o dell’access
4
point.

<Ulteriori punti da verificare quando si utilizza una connessione wireless>
Controllare la password della connessione wireless
1
nella finestra delle impostazioni del router.
Modificare l’SSID del router (nome della rete) o il canale
2
wireless.
Controllare il router oppure consultare il proprio
provider di servizi Internet.
SMART TV Guida alla confi gurazione rapida
Stato rete
TV Gateway DNS Internet
Stato rete
TV Gateway DNS Internet
Quando viene visualizzato il simbolo ✔ sulla TV e sul
Gateway.
Scollegare il cavo di alimentazione dell'access point
1
o del modem via cavo e provare a connettersi dopo
cinque secondi.
Inizializzare (ripristinare) l'access point o il modem via cavo.
2
Contattare le il provider Internet o dell'access point.
3
Quando viene visualizzato il simbolo ✔ sulla TV, sul Gateway
e sul DNS.
Scollegare il cavo di alimentazione dell’access point o
1
del modem via cavo e provare a connettersi dopo cinque
secondi.
Inizializzare (ripristinare) l’access point o il modem via cavo.
2
Verificare che l’indirizzo MAC della TV o del router sia registrato
3
presso il proprio provider di servizi Internet (l’indirizzo MAC
visualizzato nel riquadro di destra della finestra dello stato della rete
deve essere registrato presso il proprio provider di servizi Internet).
Controllare il sito Web del produttore per assicurarsi che sul
4
router sia installata la versione più recente del firmware.
ITALIANO

Installazione e impostazione del software per PC SmartShare
Installare il programma sul PC.
Andare a . Quindi, selezionare la propria area geografica.
1
2
Selezionare SUPPORTO. Quindi, cercare il modello in uso.
3
Selezionare Drivers & Software o Aggiornamenti Software. Quindi, selezionare .
4
Una volta completata l'installazione, è possibile eseguire il programma.
ITALIANO
!
SMART TV Guida alla confi gurazione rapida
NOTA
Il servizio DLNA è disponibile solo se il TV e gli altri dispositivi sono connessi tramite un singolo router.

Connessione DLNA allo smartphone
Verificare che sullo smartphone sia attivata la funzione Wi-Fi.
1
Sullo smartphone, installare/eseguire l'applicazione per la condivisione dei contenuti (sui telefoni LG tale applicazione
2
si chiama SmartShare).
Attivare sullo smartphone la condivisione di file di contenuto con altri dispositivi.
3
Selezionare il tipo di file che si desidera riprodurre (filmato, audio o foto).
4
Selezionare un filmato, una brano o una foto da riprodurre sulla TV.
5
Aggiungere il file selezionato alla playlist.
6
Selezionare il nome di un modello di TV sul quale riprodurre i file (il nome del modello di TV è riportato su un'etichetta
7
sul lato posteriore del pannello).
Riprodurre il file multimediale e visualizzarlo sulla TV.
8
SMART TV Guida alla confi gurazione rapida
ITALIANO

Aggiornamento firmware TV
SMART TV Guida alla confi gurazione rapida
SMART Impostazioni SUPPORTO Aggiorn. software
Utilizza Aggiorn. software per controllare e ottenere la versione più recente. Se non vengono aggiornate, determinate funzioni
potrebbero non funzionare correttamente. È anche possibile cercare manualmente gli aggiornamenti disponibili.
Aggiorn. software
Modalità Aggiornamento automatico
Verifica versione aggiornata
!
ITALIANO
NOTA
All’avvio dell’aggiornamento, verrà visualizzata per breve tempo una finestra che mostra l’avanzamento dell’aggiornamento.
La versione più recente può essere ottenuta tramite il segnale di trasmissione digitale o tramite una connessione a Internet.
La modifica del programma durante il download del software tramite un segnale di trasmissione digitale interrompe il processo di
download. Tornando al programma iniziale, è possibile riprendere il download.
Se il software non viene aggiornato, determinate funzioni potrebbero non funzionare correttamente.
[Quanto segue è applicabile ai modelli di Finlandia/Svezia/Danimarca/Norvegia.]
Se l’aggiornamento software viene effettuato tramite il segnale di trasmissione, verrà richiesto di proseguire con l’aggiornamento
indipendentemente dal fatto che sia stata attivata o meno la Modalità Aggiornamento automatico.
Impostare su Acceso.
Se è disponibile un aggiornamento, verrà visualizzata una richiesta di conferma di esecuzione.
Se è disponibile un aggiornamento, l’aggiornamento verrà avviato automaticamente senza una richiesta di
conferma.
Consente di controllare l’ultima versione aggiornata installata. Quando è disponibile un nuovo
aggiornamento, è possibile eseguire manualmente il processo di download.
Chiamare il servizio clienti LG se si verificano problemi.

Tag On
Tag On
SMART TV Guida alla confi gurazione rapida
(Articolo non incluso in tutti i modelli.)
*Questa funzione è supportata solo in uno smartphone con Android 4.0 (ICS) o versioni
successive.
Tag On (Metti in contatto) è una tecnologia di trasmissione dati che può essere utilizzata sugli
smartphone con NFC (Near Field Communication). Semplicemente mettendo in contatto lo
smartphone con uno sticker Tag On (Metti in contatto), è possibile condividere contenuti tra lo
smartphone e il TV.
Per connettere lo smartphone al TV tramite Tag On (Metti in contatto), è necessario che entrambi i
dispositivi siamo collegati alla stessa rete Wi-Fi oppure che l’opzione Miracast™/Intel’s WiDi dello
smart TV sia impostata su Acceso.
ITALIANO

Impostazione Wi-Fi Direct
SMART TV Guida alla confi gurazione rapida
SMART Impostazioni RETE Wi-Fi Direct
La funzione Wi-Fi Direct supporta la tecnologia di connessione wireless. Con Smart ShareTM, è possibile condividere i file o le
schermate dei dispositivi collegati a Wi-Fi Direct.
Wi-Fi Direct
Wi-Fi Direct
TAAAA
BBBB
ITALIANO
*Se non si sta utilizzando Wi-Fi Direct per ridurre al minimo l’interferenza tra i dispositivi Wi-Fi, si consiglia di impostare Wi-Fi Direct(a)
su Spento. È possibile utilizzare soltanto i dispositivi che supportano Wi-Fi Direct.
Acceso
Nome dispositivo Connessione
Connection
a
[TAAAA]
Richiedere una connessione?
Connetti automaticamente senza chiedere
Sì No
Se la funzione Wi-Fi Direct è impostata su Acceso, viene
1
visualizzato un elenco dei dispositivi disponibili.
»
Per utilizzare Wi-Fi Direct, accedere a
RETE, quindi impostare Wi-Fi Direct(a) su Acceso.
Quando viene richiesto di stabilire la connessione,
2
selezionare Sì. Wi-Fi Direct è connesso al TV.
Impostazioni

Impostazione WiDi (Wireless Display)
SMART TV Guida alla confi gurazione rapida
WiDi sta per Wireless Display. La tecnologia WiDi (Wireless Display) di Intel consente una connessione semplice e veloce
senza l’uso di cavi o reti Internet per la visualizzazione di monitor mirror e dual sul TV. Puoi sederti e goderti i tuoi film preferiti,
video, foto, programmi online e molto altro in full HD sul TV, con qualità audio e video incredibili.
Intel’s WiDi è impostato su Acceso. Collegare il laptop all’access point (questa funzione può essere utilizzata anche senza collegamento con l’access
1
point, tuttavia è consigliabile eseguire il collegamento). Il laptop esegue il programma Intel WiDi ( ).
Vengono rilevate le LG Smart TV disponibili che supportano WiDi. Nell’elenco, selezionare la TV desiderata e fare clic su Connetti. Immettere il codice
2
PIN (a) visualizzato sullo schermo nel campo di immissione (b) del laptop e fare clic su Continua.
[Intel's WiDi] Connessione richiesta
Immettere le seguenti chiavi di sicurezza.
PIN personale : ****
Annulla
a
Rimanente: 92 secondi
* Quando WiDi è connesso, i dispositivi connessi
con Wi-Fi Direct sono disconnessi.
3
L’ambiente wireless può influire sulla visualizzazione dello schermo. In caso di scarsa connettività, la connessione Intel WiDi potrebbe essere persa.
b
!
NOTA
Quando vengono collegati TV e
laptop, è necessario impostare
la modalità TV per “Live TV” e
“ingresso esterno”.
* Non è necessario registrare la TV LG.
* Per ulteriori informazioni su Intel WiDi, visitare il sito Web http://intel.com/go/widi
* L’elenco dei dispositivi Intel’s WiDi non viene visualizzato sullo schermo del TV. Controllare l’elenco sul computer laptop.
ITALIANO

Time Machine II
P
A
G
E
TV/
RAD
RATIO INPUT
FAV
MUTE
OK
1
.,;@
2
abc
3
def
4
ghi
5
jkl
6
mno
7
pqrs
8
tuv
0
9
wxyz
LIST
Q.VIEW
Time Machine II
Ready
Controlla il tempo con Time Machine II
Ready
Con i dispositivi di archiviazione USB rimovibili, Timeshift consente di interrompere e tornare indietro durante un programma TV in
tempo reale e di registrare o impostare il timer per i propri programmi TV preferiti.
* Time Machine II
Ready
consente di registrare qualsiasi programma in formato sia analogico che digitale e di registrare l’ingresso AV.
* Durante la registrazione di un programma TV, è comunque possibile utilizzare altri servizi.
* Richiede un dispositivo di memorizzazione dati esterno (non incluso).
* Se si sta guardando una trasmissione HbbTV, servirsi del tasto “123” per utilizzare la funzione Time Machine II
Ready
(Telecomando
Smart).
2
1
Premere a sul telecomando mentre si guarda il TV.
Premere b.
Viene visualizzata la barra di avanzamento ed è possibile
utilizzare le varie funzioni di Time Machine.
ITALIANO
a
a
a
a
a
o
a
b

SMART TV Guida alla confi gurazione rapida
È possibile selezionare
la parte che si desidera
Registrazioni TV
Elenco
programmaz.
riprodurre.
Dal vivo
Durante l’utilizzo della funzione
Timeshit, è possibile tornare a
visualizzare un programma TV
in tempo reale.
REC
REC
Nella parte in alto a
destra della schermata,
viene visualizzata l’icona
REC quando viene
avviata la registrazione.
Dal vivo
Elenco
REC Dal vivo
È possibile utilizzare
questi pulsanti per
spostarsi verso la parte
che si desidera riprodurre.
Registrazioni TV
programmaz.
Registrazioni TV
È possibile visualizzare un
elenco dei programmi TV
registrati.
Elenco programmaz.
Programmazione
Opzione
Opzione
* Libera ulteriore spazio eliminando video precedenti.
Qualità di registrazione
Timeshift
Eliminazione automatica
USB storage device initialization
È possibile modificare le
impostazioni di Time Machine.
Chiudi
<
<
<
Qualità alta
Inizializza
Acceso
Acceso
>
>
>
ITALIANO

Telecomando universale
Per utilizzare la funzione Telecomando universale (solo per telecomando magico)
(Funzione non disponibile su tutti i modelli.)
Con il telecomando Magic Remote, è possibile controllare il decoder, il lettore Blu-ray, il sistema Home Theater e Soundbar.
1
Verificare che il dispositivo sia connesso alla TV.
2
ITALIANO
Dopo aver premuto ‘
scheda Cambia dispositivo. Verrà visualizzato il telecomando a schermo che consente di controllare il dispositivo.
’ sul telecomando Magic Remote, selezionare il dispositivo che si desidera controllare nella

È possibile controllare dispositivi esterni utilizzando il Telecomando sullo schermo.
Time Machine II
3
(Questa operazione potrebbe non funzionare con il pulsante ‘
modelli.)
’ in alcuni
SMART TV Guida alla confi gurazione rapida
Controllare i dispositivi esterni utilizzando i tasti di
4
navigazione, la rotella (OK), oppure il tasto BACK sul
telecomando Magic Remote.
a
d
b
c
e
»a :
Scheda Cambia dispositivo
b
»
:
Pulsanti di controllo del
dispositivo
c
»
:
Espande il Telecomando
schermo
d
:
»
Consente di chiudere il
Telecomando schermo
e
:
»
Consente di spostare la
posizione del Telecomando
schermo a sinistra o a destra
Menu dispositivo esterno
Menu dispositivo esterno
ITALIANO

Impostazione Miracast
TM
SMART TV Guida alla confi gurazione rapida
MiracastTM consente a un dispositivo portatile di inviare video e audio al TV in modalità wireless, in totale sicurezza.
TM
Miracast
/ Intel's WiDi
Dispositivi con tecnologia MiracastTM e Intel's WIDI possono
essere visualizzati sulla TV.
MiracastTM / Intel's WiDi
TAAAA
Acceso
Nome dispositivo Connessione
Connection
MiracastTM è impostato su Acceso sul TV e sul dispositivo portatile.
1
Per impostare MiracastTM, accedere a Impostazioni rete.
Una volta rilevato il dispositivo portatile, selezionare il dispositivo.
2
Per ulteriori informazioni su come collegare il dispositivo portatile, consultare il manuale
3
del dispositivo portatile.
ITALIANO


Guía de instalación rápida


Conexión de red
* La imagen mostrada puede ser diferente a la que aparece en la TV.
* La imagen mostrada en un PC o teléfono móvil puede variar en función del SO (sistema operativo).
TV INTELIGENTE Guía de instalación rápida
Conexión de red inalámbrica Conexión de red cableada
Conexión a Internet
router inalámbrico
ESPAÑOL
Enrutador cableado

CONFIGURACIÓN DE RED
* Las aplicaciones premium se preinstalan en la TV. Pueden diferir en función del país.
ESPAÑOL
Pulse el botón SMART para
1
acceder al menú de inicio de
Smart. Seleccione Config. y pulse
Rueda(OK).
Config.
Config.
Seleccione el menú RED
2
Conexión de red.
RED
Conexión de red
Estado de red
Wi-Fi Direct
TM
/Intel's WiDi
Miracast
Nombre de Mi TV : 55EA9800-ZA
Pulse Iniciar conexión.
3
Conexión de red
Conéctese a su red cableada o inalámbrica.
Disfrute de diferentes características de Smart TV mediante la red.
Para conectarse a una red cableada:
Conecte el cable LAN a la parte posterior de la TV.
Para conectarse a una red inalámbrica:
Se requiere un enrutador inalámbrico o un punto de acceso.
o
Iniciar conexión

El dispositivo intenta conectarse automáticamente a la red disponible
4
(red cableada en primer lugar).
Conexión de red
Conectando la red.
Cancelar
TV INTELIGENTE Guía de instalación rápida
Se
muestra la red conectada.
5
Haga clic en Terminado para
confirmar la conexión de red.
Si selecciona Otra Lista de
Red, se muestra la lista de redes
disponibles.
Si selecciona Cancelar o si falla la
conexión a la red, se muestra la lista de
redes disponibles. Seleccione la red que
desee.
Conexión de red
Elija la red que desee.
Red cableada
Inalámbrica: AAA
Inalámbrica: BBB
Inalámbrica: CCC
Inalámbrica: 11111
Inalámbrica: 22222
Confi guración Manual
Actualizar
Si desea conectar su TV a un router inalámbrico, seleccione la red que prefiera
e introduzca la contraseña.
Conexión de red
Inalámbrica: AAA
Inserte la clave de seguridad de la red.
¿Ha olvidado su contraseña? Póngase en contacto con su fabricante
del router inalámbrico.
Conexión de red
La red está conectada.
Inalámbrica: AAA
Seleccione [Otra Lista de Red] para conectarse a otra red.
Terminado
Otra Lista de Red
ESPAÑOL

Solución de problemas de red
ESPAÑOL
Pulse el botón SMART para
1
acceder al menú de inicio de
Smart.
Config.
Config.
Seleccione el menú
2
RED Estado de red.
RED
Conexión de red
Estado de red
Wi-Fi Direct
TM
/Intel's WiDi
Miracast
Nombre de Mi TV : 55EA9800-ZA
Siga las instrucciones indicadas a continuación
que establecen el estado de la red.
Compruebe la TV o el router.
Estado de red
TV Gateway DNS Internet
Cuando aparece un ✔ en TV.
Compruebe el estado de la TV, AP y módem
1
por cable.
Apague y encienda la TV, AP y módem por
2
cable.
Si utiliza una IP estática, introdúzcala.
3
Póngase en contacto con las empresas de
4
Internet o con las empresas del AP.

< Puntos adicionales que comprobar al usar una conexión inalámbrica>
Compruebe la contraseña de la conexión inalámbrica
1
en la ventana de ajustes del router.
Cambie el valor de SSID del router (nombre de red) o el
2
canal inalámbrico.
Compruebe el router o consulte con su proveedor de
servicios de Internet.
Estado de red
TV Gateway DNS Internet
Cuando aparece un ✔ en TV y Gateway.
Desenchufe el cable de alimentación del AP o
1
módem por cable e intente conectar de nuevo cuando
transcurran 5 segundos.
Inicialice (Reajuste) el AP o módem por cable.
2
Póngase en contacto con las empresas de Internet o
3
con las empresas del AP.
TV INTELIGENTE Guía de instalación rápida
Estado de red
TV Gateway DNS Internet
Cuando aparece un ✔ en TV, Gateway y DNS.
Desenchufe el cable de alimentación del AP o módem por
1
cable e intente conectar de nuevo cuando transcurran 5
segundos.
Inicialice (Reajuste) el AP o módem por cable.
2
Compruebe que la dirección MAC de la TV/router está
3
registrada con su proveedor de servicios de Internet. (La
dirección MAC mostrada en el panel derecho de la ventana
de estado de red se debe registrar con su proveedor de
servicios de Internet.)
Compruebe el sitio web del fabricante del router para
4
asegurarse de que su router tiene la versión más reciente de
firmware instalada.
ESPAÑOL

Instalación y ajuste del SW SmartShare PC
Instale el programa en su PC.
Vaya a . A continuación, seleccione su región.
1
2
Seleccione SOPORTE. A continuación, busque su modelo.
3
Seleccione Drivers & Software o Actualización de software. A continuación, seleccione .
4
Puede ejecutar el programa cuando la instalación finalice.
TV INTELIGENTE Guía de instalación rápida
!
ESPAÑOL
NOTA
El servicio DLNA solo está disponible si la TV y otros dispositivos están conectados a través de un router
individual.

Conexión DLNA a smartphone
Compruebe que la red Wi-Fi está habilitada en su smartphone.
1
Instale/ejecute la aplicación de contenido compartido en su smartphone (denominada SmartShare en los teléfonos
2
LG).
Habilite su smartphone para compartir archivos de contenido con otros dispositivos.
3
Seleccione el tipo de archivo que desea reproducir (película, audio o foto).
4
Seleccione un archivo de película, música o foto para reproducirlo en la TV.
5
Agregue el archivo seleccionado a la lista de reproducción.
6
Seleccione un nombre del modelo de TV en el que reproducir los archivos. (El nombre del modelo de TV se encuentra
7
en la parte posterior del panel.)
Reproduzca el archivo multimedia para verlo y disfrutarlo en la TV.
8
TV INTELIGENTE Guía de instalación rápida
ESPAÑOL

Actualización del firmware de la TV
TV INTELIGENTE Guía de instalación rápida
SMART Config. SOPORTE Act. Software
Utiliza Act. Software para comprobar y obtener la última versión. Si no se actualiza, es posible que determinadas funciones no
funcionen correctamente. También es posible comprobar manualmente las actualizaciones disponibles.
Act. Software
Modo de actualización automática
Revisar Versión de Actualización
Ajústelo en Conex.
Si hay alguna actualización disponible, se preguntará al usuario si desea realizarla.
Si hay alguna actualización disponible, esta se iniciará automáticamente sin preguntar al usuario.
Comprueba la última versión instalada. Cuando hay disponible una nueva actualización, el
proceso de descarga puede realizarse manualmente.
ESPAÑOL
!
NOTA
Cuando comienza la actualización, la ventana de progreso de la actualización aparece durante unos segundos y después desaparece.
Se puede obtener la versión más reciente a través de la señal de emisión digital o de una conexión a Internet.
Si cambia el programa mientras se está descargando el software a través de una señal de emisión digital, se interrumpe el proceso de
descarga. Volver al programa inicial permite que se reanude la descarga.
Si no se actualiza el software, es posible que determinadas funciones no funcionen correctamente.
[La siguiente información se aplica a los modelos de Finlandia/Suecia/Dinamarca/Noruega.]
Si la actualización de software se realiza a través de una señal de difusión, se le pedirá que continúe con la actualización,
independientemente de que el Modo de actualización automática esté activo o no.
Llame al centro de atención al cliente de LG si experimenta algún problema.

Tag On
Tag On
TV INTELIGENTE Guía de instalación rápida
(Este elemento no se incluye en todos los modelos.)
*Esta función solo es compatible con teléfonos inteligentes con Android 4.0 (ICS) o posterior.
Tag On es una tecnología de transmisión de datos que se puede utilizar en smartphones con
NFC (del inglés Near Field Communication, comunicación de campo cercano). Con solo poner en
contacto el smartphone con la pegatina Tag On, podrá compartir contenido entre su smartphone y
la TV.
Para conectar su smartphone a la TV mediante Tag On, deberá conectarlos a la misma red
inalámbrica Wi-Fi o bien el Miracast™/Intel’s WiDi de la Smart TV tendrá que estar establecido en
Conex.
ESPAÑOL

Ajuste Wi-Fi Direct
TV INTELIGENTE Guía de instalación rápida
SMART Config. RED Wi-Fi Direct
La función Wi-Fi Direct es compatible con la tecnología de conexión inalámbrica. Smart ShareTM le permite compartir archivos o
pantallas de dispositivos conectados a Wi-Fi Direct.
Wi-Fi Direct
Wi-Fi Direct
Nombre del dispositivo Conexión
TAAAA
BBBB
* Si no está utilizando Wi-Fi Direct para minimizar las interferencias entre los dispositivos Wi-Fi, recomendamos que
ESPAÑOL
establezca Wi-Fi Direct (
Conex
Connection
a
[TAAAA]
¿Desea solicita r una co nexión?
Conectar automáticamente sin preguntar
Sí No
a
) en Descon. Solo puede utilizar dispositivos compatibles con Wi-Fi Direct.
Si Wi-Fi Direct está conectado (Conex), aparecerá una lista
1
de dispositivos disponibles.
Para utilizar Wi-Fi Direct, vaya a
»
establezca Wi-Fi Direct (
Cuando se le pida que solicite conexión, seleccione Sí. Wi-Fi
2
a
) en Conex.
Config. RED y
Direct está ya conectado a su TV.

Ajuste WiDi (pantalla inalámbrica)
TV INTELIGENTE Guía de instalación rápida
WiDi quiere decir Wireless Display (pantalla inalámbrica). La tecnología Intel’s WiDi (WiDi de Intel) (pantalla inalámbrica) permite realizar
una conexión sencilla y rápida sin cables ni red de Internet para la visualización de monitores reflejados y duales en su TV. Puede sentarse y
disfrutar de sus películas, vídeos, fotos y programas en línea favoritos en Full HD en su TV con una magnífica claridad de imagen y sonido.
Intel’s WiDi (WiDi de Intel) está establecido en Conex. Conecte su portátil al AP. (Esta función se puede utilizar sin AP;
1
se recomienda conectar al AP para un mejor rendimiento.) Su portátil ejecuta el programa Intel WiDi( ).
Detecta las TV inteligentes de LG disponibles, que son compatibles con WiDi. En la lista, seleccione la TV que desee y haga clic en Conectar.
2
Introduzca el número de PIN (a) que se muestra en la pantalla en el campo de entrada (b) en su portátil y, a continuación, haga clic en Continuar.
[Intel's WiDi] Solicitar conexión
Inserte las siguientes claves de seguridad.
Mi PIN : ****
Cancelar
a
92 segundos restantes
* Cuando se conecta WiDi, los dispositivos
conectados con Wi-Fi Direct se desconectan.
3
El entorno inalámbrico puede afectar a la visualización de la pantalla. Si la conexión es deficiente, puede perderse la conexión Intel WiDi.
b
!
NOTA
Al conectar la TV y el portátil,
debe establecer el modo de TV
para “TV en vivo” y “entrada
externa”.
* No es necesario registrar la TV LG.
* Para obtener más información sobre Intel WiDi, visite http://intel.com/go/widi
* No aparece una lista de dispositivos Intel’s WiDi en la pantalla de la TV. Compruebe la lista en su portátil.
ESPAÑOL

Time Machine II
P
A
G
E
TV/
RAD
RATIO INPUT
FAV
MUTE
OK
1
.,;@
2
abc
3
def
4
ghi
5
jkl
6
mno
7
pqrs
8
tuv
0
9
wxyz
LIST
Q.VIEW
Time Machine II
Ready
Controle el tiempo con Time Machine II
Ready
Con sus dispositivos de almacenamiento USB extraíbles, Timeshift le permite detener y rebobinar TV en vivo y grabar o
establecer el temporizador para sus programas de TV favoritos.
T
ime Machine II
*
* Puedes continuar utilizando otros servicios mientras graba un programa de TV.
* Requiere un dispositivo de almacenamiento de datos externo (no incluido)
* Si está viendo una emisión HbbTV, utilice el botón “123” para utilizar la función Time Machine II
1
Pulse a en el mando a distancia mientras ve la TV.
Ready
puede grabar cualquier programa en formato digital y analógico, así como grabar la entrada AV.
Ready
(Smart Remote).
2
Pulse b.
La barra de progreso aparecerá y podrá utilizar las distintas
funciones de Time Machine.
a
a
a
ESPAÑOL
a
o
a
a
b

TV INTELIGENTE Guía de instalación rápida
Puede seleccionar el
momento que desea
TV grabada
Lista de
programación
reproducir.
En Vivo
Puede volver a un
programa de TV en vivo
utilizando la función
Timeshift.
GRABAR
GRABAR
El icono de grabación
aparece en la parte
superior derecha de
la pantalla cuando la
grabación se inicia.
En Vivo
Lista de
TV grabada
En Vivo
GRABAR
Puede utilizar estos
botones para ir al
momento exacto que
desea reproducir.
programación
TV grabada
Puede ver una lista de
programas de TV grabados.
Lista de programación
Programación
Opción
Opción
* Para disponer de espacio adicional, elimine vídeos antiguos.
Calidad de Grabación
Pausa en vivo
Eliminación automática
Iniciar USB
Puede cambiar la configuración
de Time Machine.
Cerrar
<
<
<
Alta calidad
Conex
Conex
Iniciar
>
>
>
ESPAÑOL

Universal Control
Para usar la función Mando a distancia universal (solo para Mando a distancia Mágico)
(Esta función no está disponible en todos los modelos.)
Con el mando a distancia Mágico, puede controlar fácilmente la caja receptora, el reproductor de Blu-ray, el sistema Home
Cinema y la barra de sonido.
1
Compruebe si el dispositivo se encuentra conectado a la TV.
2
ESPAÑOL
Después de pulsar el botón ‘
ficha Cambiar dispositivo. Se mostrará el Mando de pantalla que permite controlar el dispositivo.
’ en el Mando a distancia Mágico, seleccione el dispositivo que desee controlar en la

TV INTELIGENTE Guía de instalación rápida
Time Machine II
Puede controlar dispositivos externos con el Mando de pantalla en la pantalla.
3
(Puede que en algunos modelos esto no funcione con el botón ‘
a
d
b
c
e
»a :
Ficha Cambiar dispositivo
b
:
»
Botones de control de
dispositivos
c
:
»
Amplíe el Mando de pantalla
d
:
»
Permite salir del Mando de
pantalla
e
:
»
Desplaza el Mando de
pantalla a la izquierda o la
’.)
derecha
Controle los dispositivos externos con las
4
teclas de navegación, el botón rueda (OK) o
BACK del mando a distancia Mágico.
Menú de dispositivo externo
Menú de dispositivo externo
ESPAÑOL

Ajuste Miracast
TM
TV INTELIGENTE Guía de instalación rápida
MiracastTM permite a un dispositivo portátil enviar vídeo y sonido a la TV de forma inalámbrica y segura.
TM
Miracast
/ Intel's WiDi
En la TV se pueden mostrar los dispositivos con tecnología
MiracastTM e Intel's WIDI.
MiracastTM / Intel's WiDi
Nombre del dispositivo Conexión
TAAAA
Conex
Connection
MiracastTM está establecido en Conex en la TV o dispositivo portátil.
1
Vaya a la configuración de red para establecer Miracast
2
Cuando se detecte el dispositivo portátil, seleccione el dispositivo.
3
Para obtener más información sobre cómo conectar el dispositivo portátil, consulte el
manual del dispositivo.
ESPAÑOL
TM
.
 Loading...