

Page 1
Creator Adviser Approver
User’s Guide Specication
In charger
DD/MM/YY
SI Kim
17/01/12
HJ Shin
17/01/12
JO Kim
17/01/12
1. Model Description
Model 42PA4500-ZF/50PA6500-ZA Brand LG Part number
Sufx RU_DR Product name 42PA4500
50PA6500
MFL67099987
(1204-REV02)
2. Printing Specication
1. Trim Size (Format) : 182 mm x 257 mm
2. Printing Colors
Cover : 1 COLOR (BLACK)
Inside : 1 COLOR (BLACK)
3. Stock (Paper)
yy Cover : Uncoated paper ,
yy Inside : Uncoated paper ,
백상지
백상지
60 g/m
60 g/m
4. Printing Method : Off-set
5. Bindery : Saddle Stitch
6. Language : English/Russian/Kazakh/Ukrainian (4)
7. Number of pages : 88
“This part contain Eco-hazardous substances (Pb, Cd, Hg, Cr6+, PBB, PBDE, etc.) within LG standard level,
N
Details should be followed Eco-SCM management standard[LG(56)-A-2524].
O
Especially, Part should be followed and controlled the following specication.
T
(1)Eco-hazardous substances test report should be submitted
E
when Part certication test and First Mass Production.
S
(2) Especially, Don’t use or contain lead(Pb) and cadmium(Cd) in ink.
2
2
3. Special Instructions
(1) Origin Notication
* LGEIN : Printed in Indonesia * LGEWA : Printed in U.K.
* LGESP : Printed in Brazil * LGEMX : Printed in Mexico
* LGEND : Printed in China * LGEIL : Printed in India
* LGEMA : Printed in Poland
4. Changes
14
13
12
11
10
9
8
7
6
5
4
3
02/04/12 Kim SI EKPC300231 Manual Revision For Added Models.
2
19/01/12 Kim SI EKPC100274 Manual Revision for quality improvement
1
Rev.
DD/MM/YY Creator ECO Number Change description
No.
Page 2
Pagination sheet
Front
Cover
(EN)
Total pages : 88 pages
P/No.
Front
Cover
(RU)
Front
Cover
(KA)
Front
Cover
(UK)
2 ... ... .... .... 21
2 ... ... .... .... 21
2 ... ... .... .... 21
2 ... ... ... ... 21
Blank
Blank
Blank
Back
Cover
(EN)
Page 3

OWNER’S MANUAL
PLASMA TV
Please read this manual carefully before operating your
set and retain it for future reference.
PA45**
PA49**
PA55**
PA65**
P/NO : MFL67099987 (1204-REV02)
Printed in Korea
www.lg.com
Page 4
2
ENGLISH
SAFETY INSTRUCTIONS
Please read these safety precautions carefully before using the product.
In this manual, the illustration may be somewhat different from your product because
it is just example to help the instruction.
WARNING
If you ignore the warning message, you may be seriously injured or there is a
possibility of accident or death.
CAUTION
If you ignore the caution message, you may be slightly injured or the product may be damaged.
PRECAUTION IN INSTALLING THE
PRODUCT
WARNING
Keep away from heat sources like electrical
heaters.
- Electrical shock, fire, malfunction or
deformation may occur.
Do not use the product in damp place such
as a bathroom or any place where it is likely
to get wet.
- This may cause a fire or could give an
electric shock.
If you can smell smoke or other odours or hear
a strange sound unplug the power cord and
contact the service center.
- If you continue to use without taking proper
measures, electrical shock or fire can occur.
CAUTION
Install the product on a flat and stable place
that has no risk of dropping the product.
- If the product is dropped, you may be injured
or the product may be broken.
Keep the product away from direct sunlight.
- The product can be damaged.
Do not place the product in a built-in
installation such as bookcase or rack.
- Ventilation required.
As long as this unit is connected to the AC wall outlet, it is
not disconnected from the AC power source even if you
turn off this unit by SWITCH.
PRECAUTIONS WHEN MOVING THE
PRODUCT
WARNING
Make sure to turn off the product.
Make sure to remove all cables before
moving the product.
- You may be electrocuted or the product
can be damaged.
CAUTION
Do not impact the product when moving it.
- You may be electrocuted or the product
can be damaged.
Make the panel face forward and hold it
with both hands to move.
- If you drop the product, the damaged
product can cause electric shock or fire.
Contact your nearest service center for
repair.
PRECAUTIONS WHEN USING THE
PRODUCT
WARNING
Do not disassemble, repair or modify the
product at your own discretion.
- Fire or electric shock accident can occur.
- Contact the service center for check,
calibration or repair.
ELECTRICAL POWER RELATED
PRECAUTIONS
WARNING
Make sure to connect the power cable to a
properly earthed outlet.
- You may be electrocuted or injured.
Do not touch the power plug with wet hands.
Additionally, it the cord pin is wet or covered with dust,
dry the power plug completely or wipe dust off.
- You may be electrocuted due to excess moisture.
Never touch this product or antenna during a
thunder or lighting storm.
- You may be electrocuted.
Do not insert a conductor (like a metal chopstick)
into one end of the power cable while the other
end is connected to the input terminal on the wall.
Additionally, do not touch the power cable right after
plugging into the wall input terminal.
You may be electrocuted.
CAUTION
Protect the power cord from physical or
mechanical abuse, such as being twisted,
kinked, pinched, closed in a door, or walked
upon. Pay particular attention to plugs, wall
outlets, and the point where the cord exits
the appliance.
To reduce the risk of fire or electric shock,
do not expose this apparatus to rain or
moisture.
Apparatus shall not be exposed to
dripping or splashing and no objects
filled with liquids, such as vases, shall be
placed on the apparatus.
Refer all servicing to qualified service
personnel. Servicing is required when
the apparatus has been damaged in any
way, such as power supply cord or plug
is damaged, liquid has been spilled or
objects have fallen into the apparatus, the
apparatus has been exposed to rain or
moisture, does not operate normally, or
has been dropped.
IMPORTANT INFORMATION TO PREVENT “IMAGE BURN /
BURN-IN” ON YOUR TELEVISION SCREEN
-
When a fixed image (e.g. logos, screen menus, video game,
computer display or teletext pages) is displayed on the
television for an extended period it can become permanently
imprinted on the screen. This phenomenon is known as “image
burn” or “burn-in”. Image burn is not covered under the
manufacturer’s warranty.
-
In order to prevent image burn, avoid displaying a fixed
image on your television’s screen for a prolonged period (2 or
more hours for LCD, 1 or more hours for Plasma).
-
Image burn can also occur on the letterboxed areas of
your television if you use the 4:3 aspect ratio setting for an
extended period.
Page 5

TABLE OF CONTENTS
3 TABLE OF CONTENTS
4 INSTALLATION PROCEDURE
4 ASSEMBLING AND PREPARING
4 Unpacking
8 Separate purchase
8 Parts and buttons
11 Lifting and moving the TV
12 Setting up the TV
12 - Attaching the stand
14 - Tidying cables
15 - Mounting on a table
16 - Mounting on a wall
16 ADDITIONAL INFORMATION
TABLE OF CONTENTS
3
ENGLISH
17 REMOTE CONTROL
18 WATCHING TV
18 Connecting an antenna
18 Turning the TV on for the first time
19 MAKING CONNECTIONS
19 Connecting your Unit
19 OPEN SOURCE SOFTWARE NOTICE
20 WEIGHT
20 TROUBLESHOOTING
Page 6

4
ENGLISH
INSTALLATION PROCEDURE
1
2
3
ASSEMBLING AND PREPARING
Unpacking
Check your product box for the following items. If there are any missing accessories, contact the local dealer
where you purchased your product. The illustrations in this manual may differ from the actual product and item.
Only 42/50PA45**, 50/60PA55**, 50/60PA65**
INSTALLATION PROCEDURE / ASSEMBLING AND PREPARING
Open the package and make sure all the accessories are included.
Attach the stand to the TV set.
Connect an external device to the TV set.
Remote control,
Batteries (AAA)
x 3 x 4
M5 x 16 M4 x 30
Screw for assembly
Protection Cover Ferrite core
Owner’s manual,
CD manual
Power Cord Holder Power Cord
(Depending on model)
Cable Holder
Polishing cloth
(Depending on model)
Gently wipe the spots on the
cabinet with the polishing cloth.
Stand Body Stand Base Isolator
(Depending on model)
1
Page 7
Only 42/50PA49**
ASSEMBLING AND PREPARING
5
ENGLISH
Remote control,
Batteries (AAA)
Owner’s manual,
CD manual
Pentouch Caution Guidelines
x 3 x 4
M5 x 16 M4 x 30
Power Cord Holder D-sub 15 pin signal cable
Screw for assembly
Protection Cover Ferrite core
Power Cord
(Depending on model)
x 2
Cable Holder Eye-bolt , Wall bracket Polishing cloth
(Depending on model)
Gently wipe the spots on the
cabinet with the polishing cloth.
Charging Cable Tip
The number of tip may differ
depending on the model.
Touch Pen Dongle
Cradle Stand Base
(AN-TD200)
Stand Body Isolator
(Depending on model)
Touch Pen (AN-TP300)
The number of touch pen may
differ depending on the model.
1
Page 8
ASSEMBLING AND PREPARING
ANTENNA/
CABLE IN
6
ENGLISH
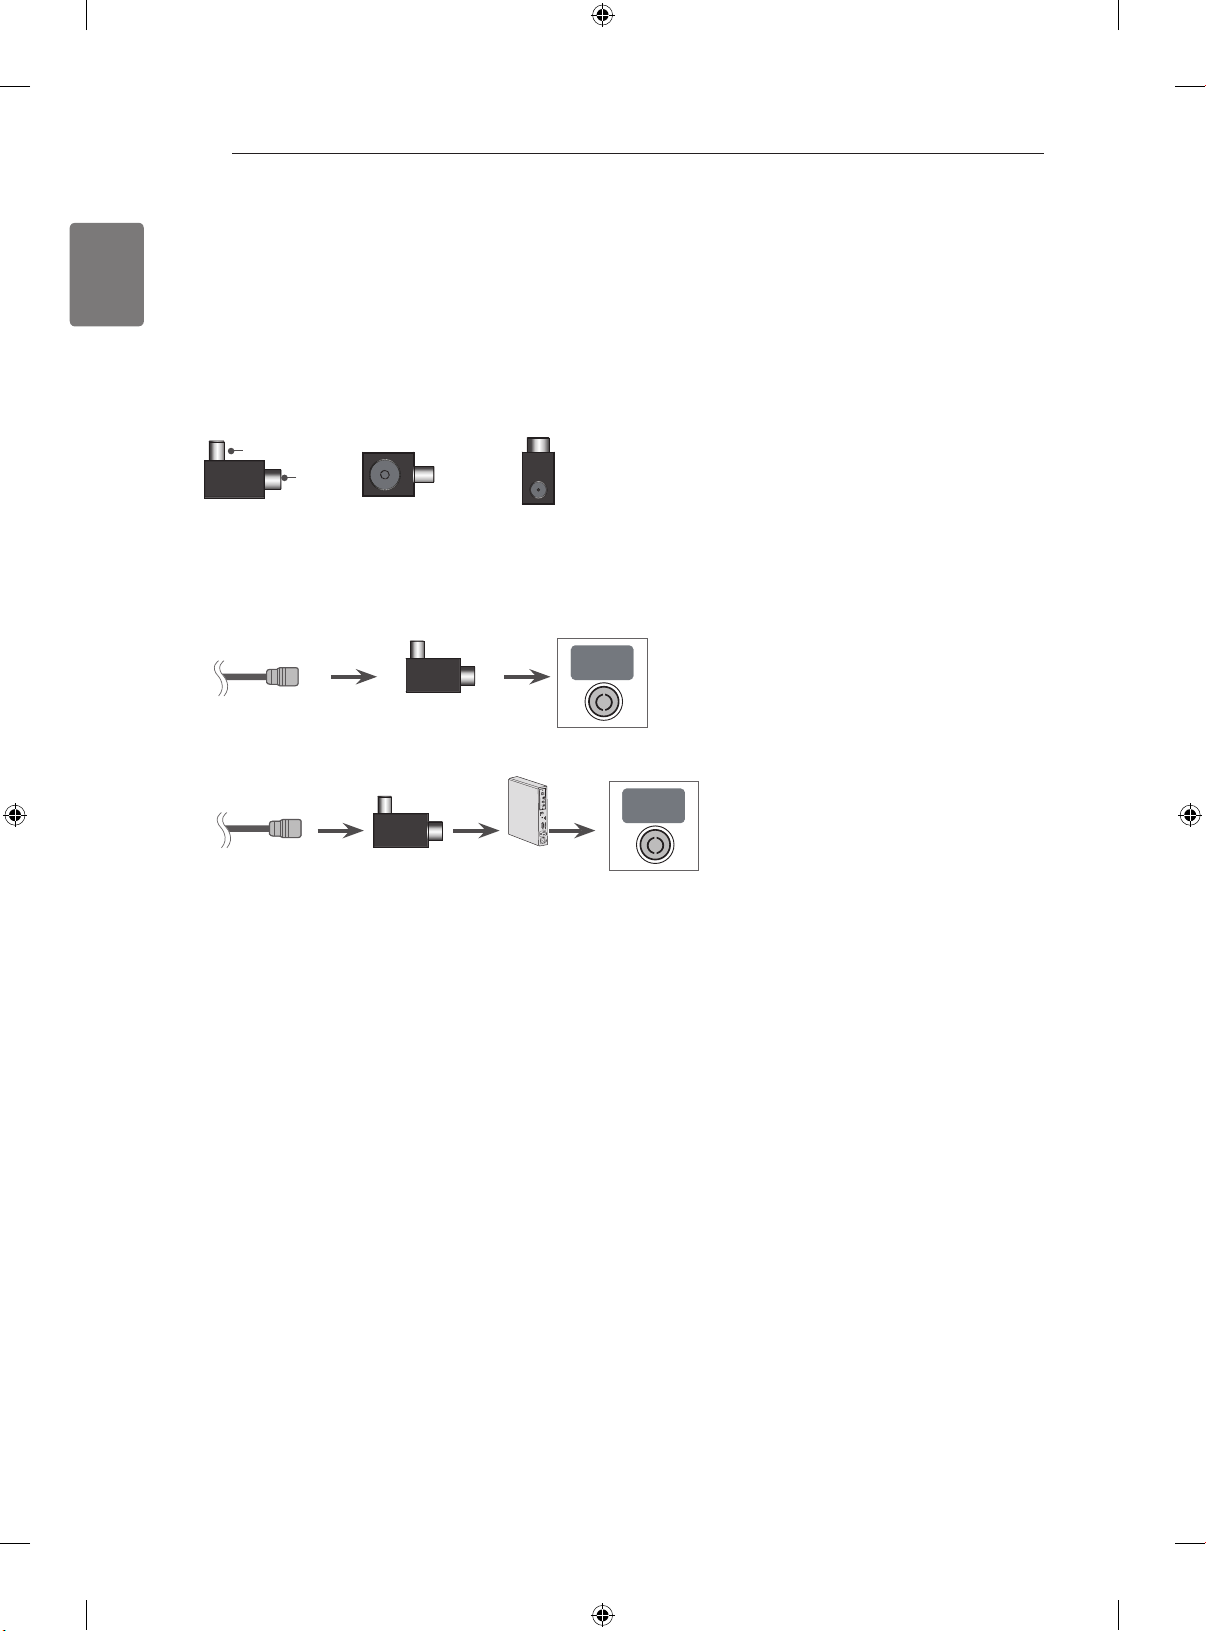
1 Antenna Isolator Installation Guide
Use this to install TV in a place where there is a voltage difference between GND of power and GND of
antenna signal.
- If there is a voltage difference between GND of power and GND of antenna signal, the antenna contact
might be heated and excessive heat might cause an accident.
You can improve the safety when watching TV by efficiently removing power voltage from TV antenna.
Avoid disconnecting the antenna Isolator after installation.
Exterior of antenna isolator:
Plug 2
Plug 1
Isolator
Connection method :
Plug 1 Plug 2
- Connect Plug 1 with a signal cable.
- Connect Plug 2 with ANT input end on the back of TV.
ANTENNA/
CABLE IN
RF-Coaxial Wire Isolator
ANTENNA/
CABLE IN
RF-Coaxial Wire Isolator
STB
“Equipment connected to the protective earthing of the building installation through the mains connection or
through other equipment with a connection to protective earthing - and to a cable distribution system using
coaxial cable, may in some circumstances create a fire hazard.
Connection to a cable distribution system has therefore to be provided through a device providing electrical
isolation below a certain frequency range (galvanic isolator, see EN 60728-11)”
When applying the RF Isolator, a slight loss of signal sensitivity can occur.
Page 9

ASSEMBLING AND PREPARING
NOTE
The items supplied with your product may vary depending on the model.
Product specifications or contents of this manual may be changed without prior notice due to
upgrade of product functions.
How to use the ferrite core
1 Use the ferrite core to reduce the electromagnetic interference in the PC audio cable.
Wind the PC audio cable on the ferrite core thrice. Place the ferrite core close to the TV.
7
ENGLISH
[to an External device]
[Figure 1]
10 mm(+ / - 5 mm)
[to the TV]
(Gray)
[Cross Section of
Ferrite Core]
2 Use the ferrite core to reduce the electromagnetic interference in the power cable.
Wind the power cable on the ferrite core once. Place the ferrite core close to the TV and a wall plug.
[to a wall plug]
[Figure 2]
[to the TV]
(Black)
[Cross Section of
Ferrite Core]
3 Use the ferrite core to reduce the electromagnetic interference in the component Y, Pb, Pr, L,
R cable.
Place the ferrite core close to the TV.
[to an External device]
Wind the
component Y, Pb, Pr, L, R cable
[Figure 3]
on the ferrite core once.
[to the TV]
10 mm(+ / - 5 mm)
(Black)
[Cross Section of
Ferrite Core]
4 Use the ferrite core to reduce the electromagnetic interference in the LAN cable. Wind the
LAN cable thrice on the ferrite core. Place the ferrite core close to the TV and an External device.
A (Gray) B (Gray)
[to the TV]
B A A
[Figure 4]
[to an External
device]
[Cross Section of
Ferrite Core]
- If there is one ferrite core, follow as shown in Figure 1.
- If there are three ferrite cores, follow as shown in Figures 1 and 2.
- If there are four ferrite cores, follow as shown in Figures 1, 2 and 3.
- If there is LAN port, additionally follow as shown in Figure 4.
For an optimal connection, HDMI cables and USB de-
vices should have bezels less than 10 mm thick and
18 mm width. Use an extension cable that supports
USB 2.0 if the USB cable or USB memory stick does
not fit into your TV’s USB port.
*A 10 mm
*B 18 mm
Page 10
ASSEMBLING AND PREPARING
Only
42/50PA49**,
50/60PA65**
8
ENGLISH
Separate purchase
Separate purchase items can be changed or modified for quality improvement without any notification.
Contact your dealer for buying these items.
This device only works with compatible LG Plasma TV.
CAUTION
Do not use any pirated items to ensure the safety and product life span.
Any damages or injuries by using pirated items are not covered by the warranty.
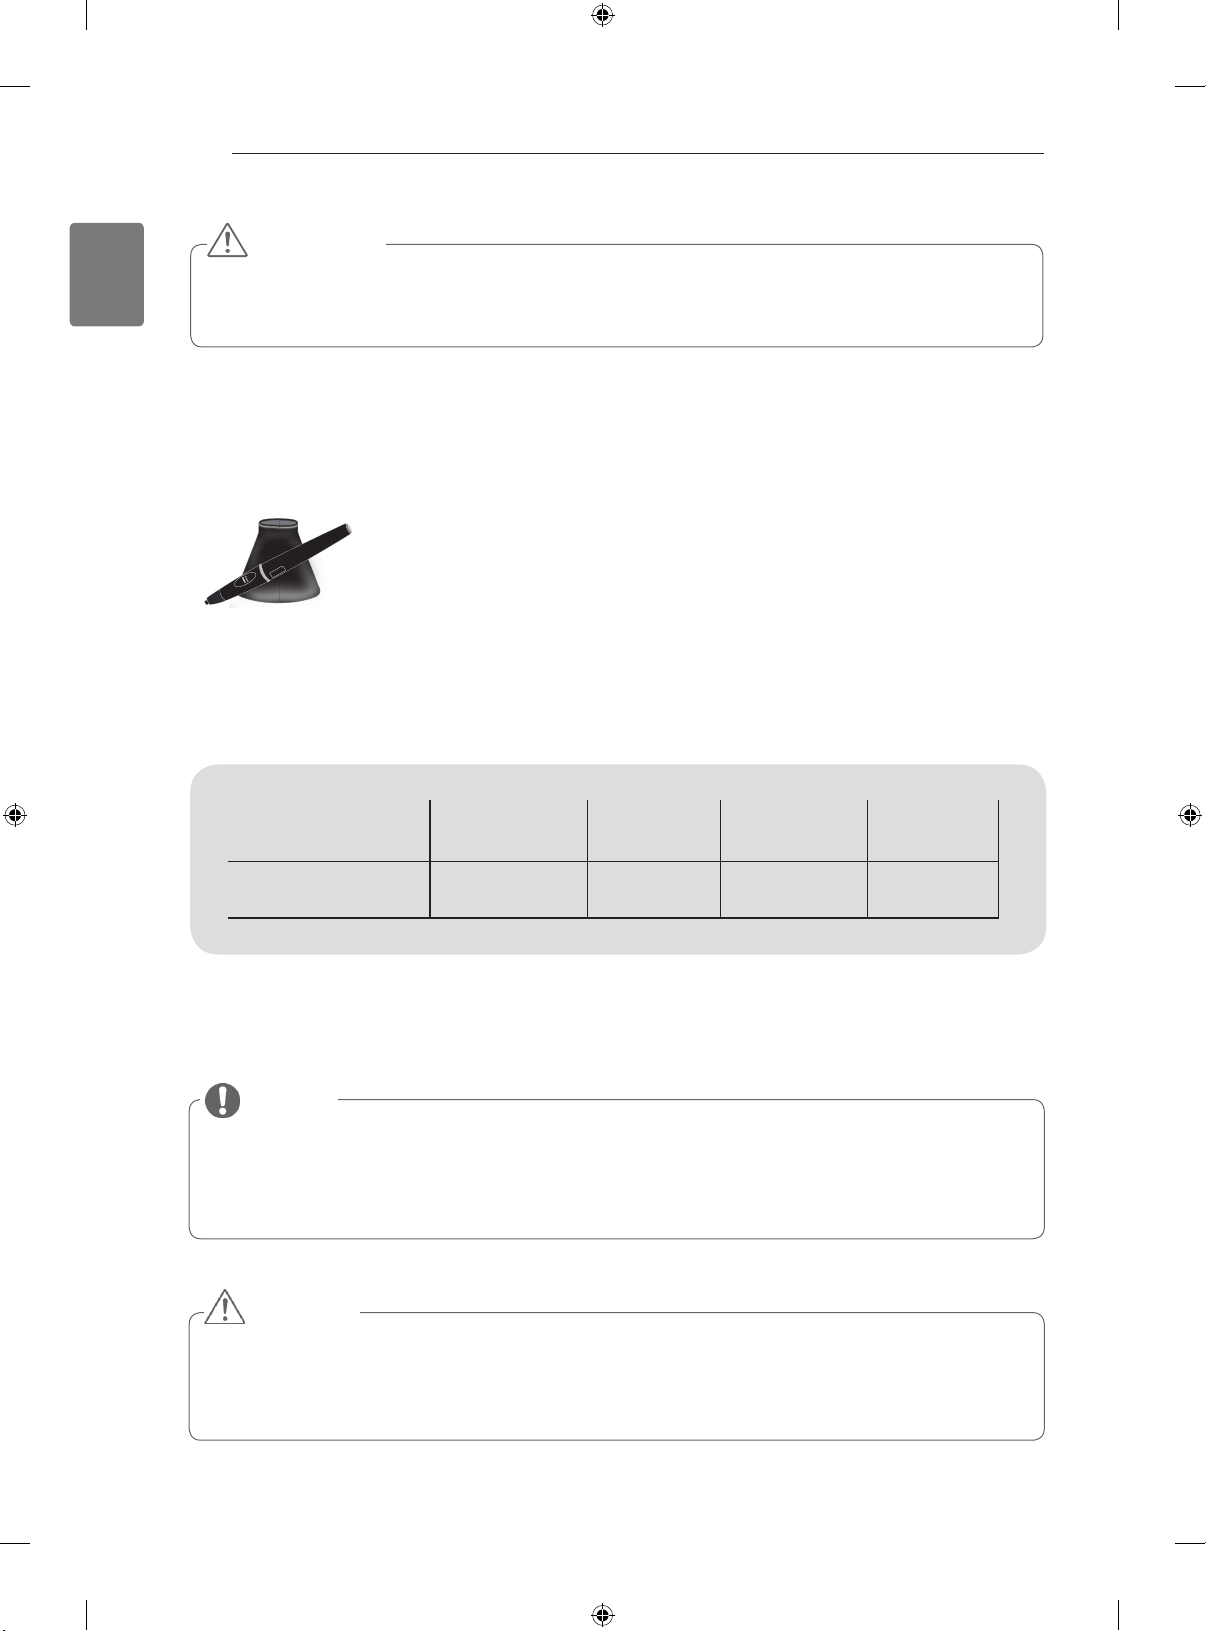
AN-TP300
Touch Pen, Cradle
The number of touch pen and
cradle may differ depending on
the model.
Compatibility
AN-TP300
Touch Pen, Cradle
42/50PA45** 50/60PA55** 50/60PA65** 42/50PA49**
Parts and buttons
NOTE
TV can be placed in standby mode in order to reduce the power consumption. And TV should be
turned off if it will not be watched for some time, as this will reduce energy consumption.
The energy consumed during use can be significantly reduced if the level of brightness of the
picture is reduced, and this will reduce the overall running cost.
CAUTION
Do not step on the glass stand or subject it to any impact. It may break, causing possible injury
from fragments of glass, or the TV may fall.
Do not drag the TV. The floor or the product may be damaged.
Some models have a thin film attached on to the screen and this must not be removed.
•
Page 11
ASSEMBLING AND PREPARING
9
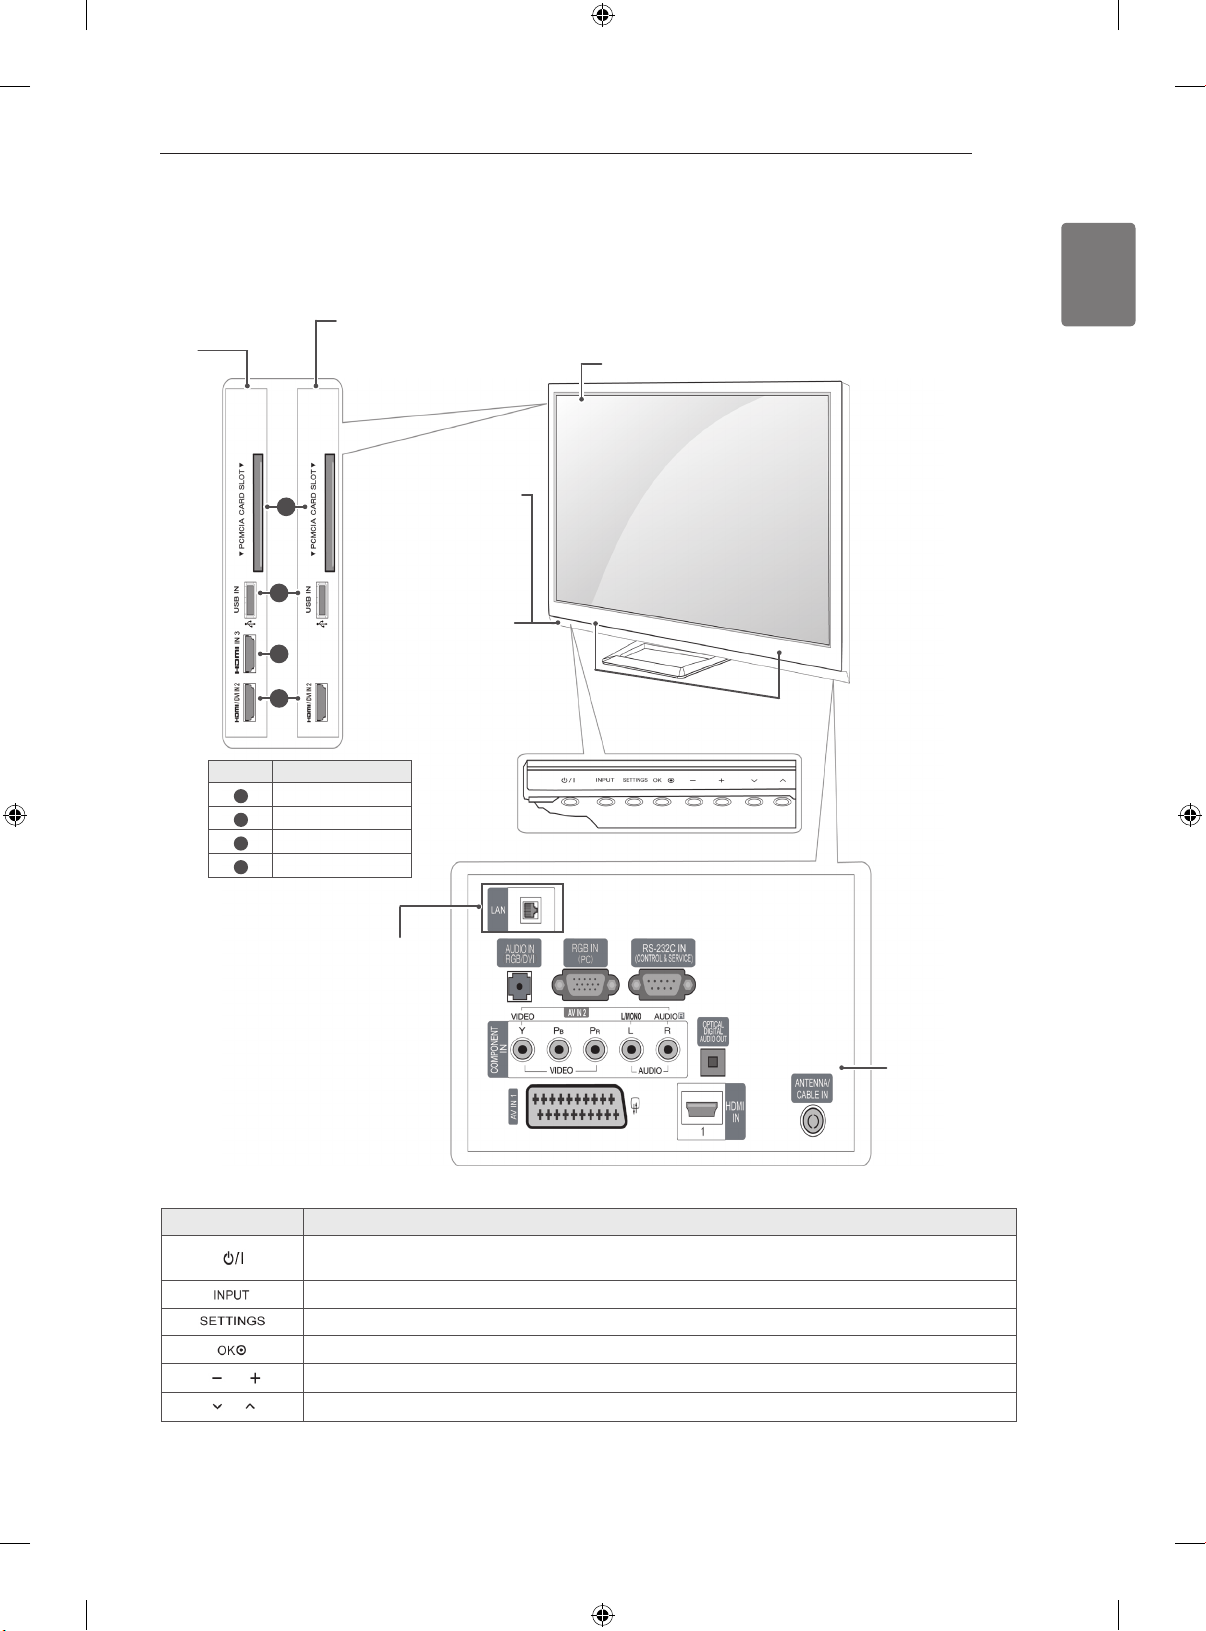
Only 42/50PA45**-ZA~F, 42/50PA49**-ZA~F, 50/60PA55**-ZA~F, 50/60PA65**-ZA~F
Image shown may differ from your TV.
Only
42/50PA45**,
1
50/60PA55**
Remote control and
intelligent1 sensors
Power Indicator
Red – In Standby
mode
Off – TV turns on
Screen
Speakers
42/50PA49**,
Only
50/60PA65**
2
3
4
Menu Description
PCMCIA Card Slot
1
USB input
2
HDMI IN 3
3
HDMI / DVI IN 2
4
ENGLISH
(Only LAN PORT
model)
Connection panel
Button Description
Turns the power on or off
Changes the input source
Accesses the main menus, or saves your input and exits the menus
Selects the highlighted menu option or confirms an input
Adjusts the volume level
Scrolls through the saved programmes
1 Intelligent sensor - Adjusts the image quality corresponding to the surrounding environment.
Page 12
ASSEMBLING AND PREPARING
10
ENGLISH
42/50PA49**,
50/60PA65**
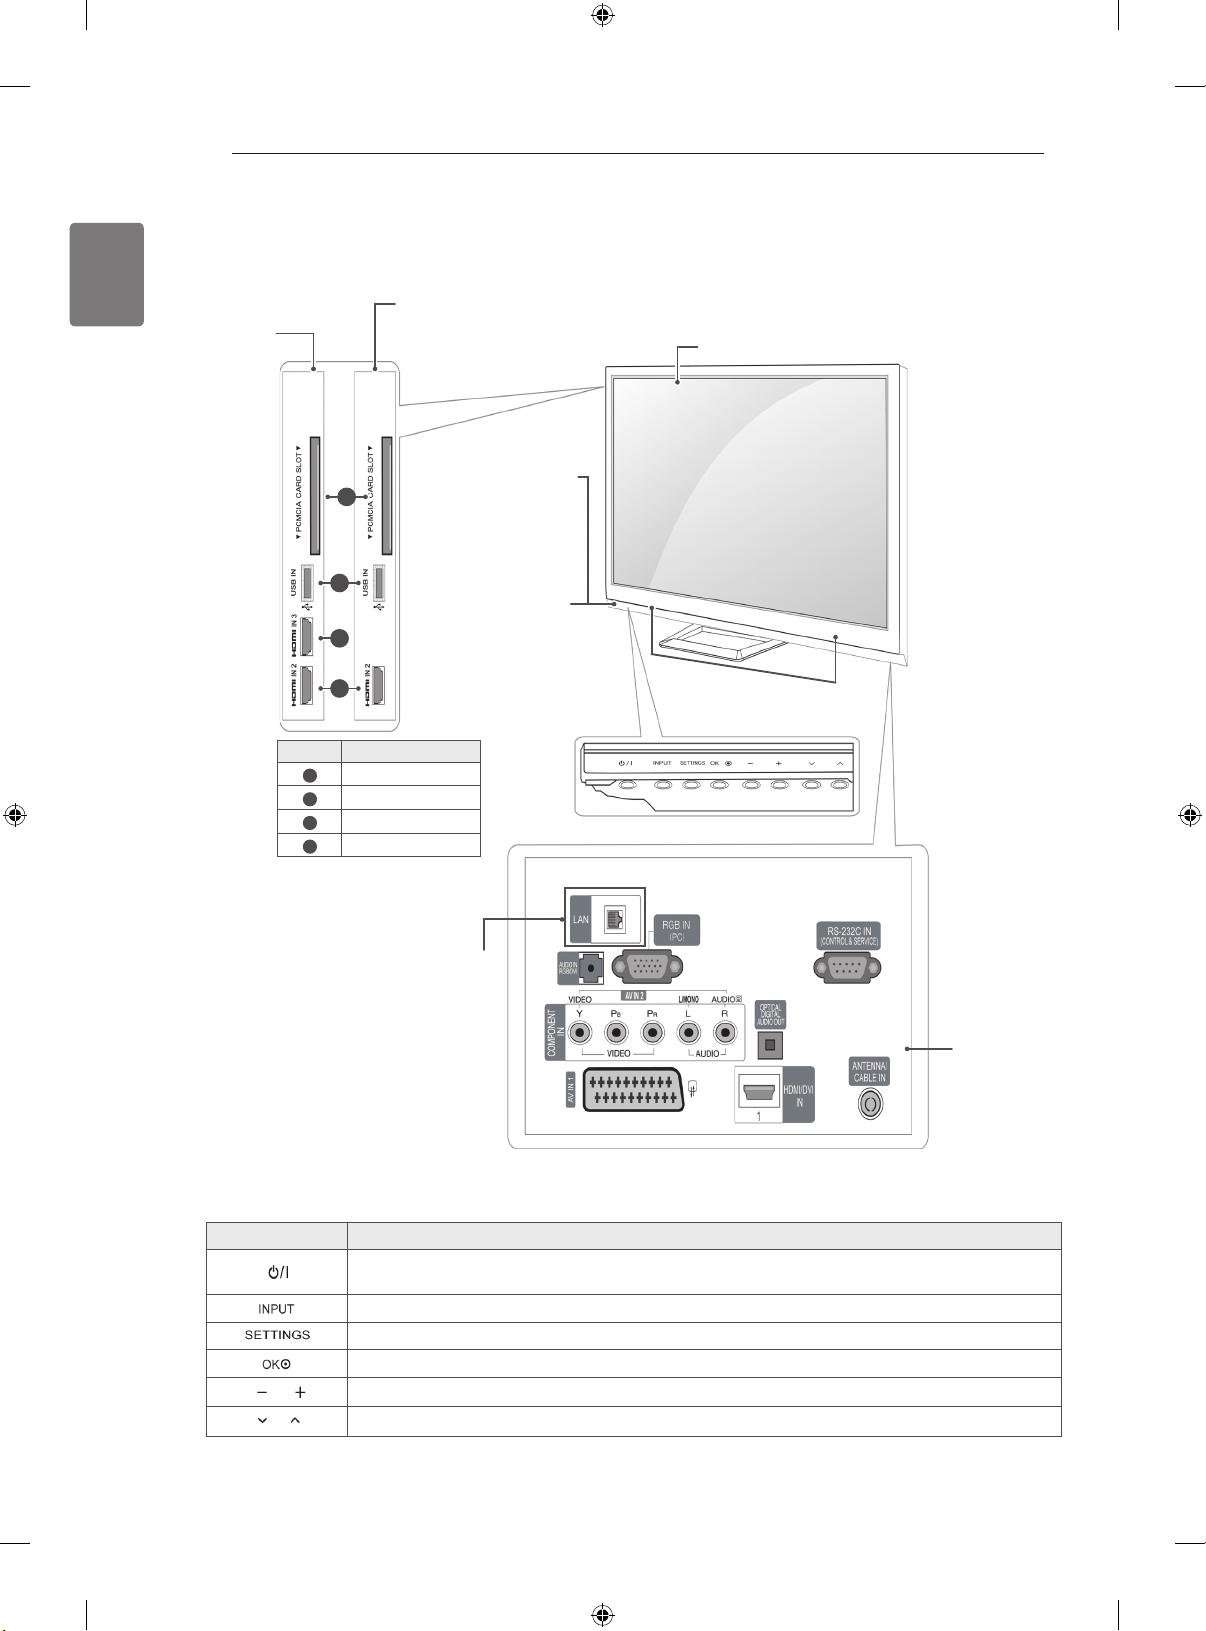
Only 42/50PA45**-ZG~M, 42/50PA49**-ZG~M, 50/60PA55**-ZG~M, 50/60PA65**-ZG~M
Image shown may differ from your TV.
Only
42/50PA45**,
Only
2
3
4
Menu Description
1
2
3
4
50/60PA55**
Remote control and
1
intelligent1 sensors
Power Indicator
Red – In Standby
mode
Off – TV turns on
PCMCIA Card Slot
USB input
HDMI IN 3
HDMI IN 2
Screen
Speakers
(Only LAN PORT
model)
Button Description
Turns the power on or off
Changes the input source
Accesses the main menus, or saves your input and exits the menus
Selects the highlighted menu option or confirms an input
Adjusts the volume level
Scrolls through the saved programmes
1 Intelligent sensor - Adjusts the image quality corresponding to the surrounding environment.
Connection panel
Page 13
ASSEMBLING AND PREPARING
11
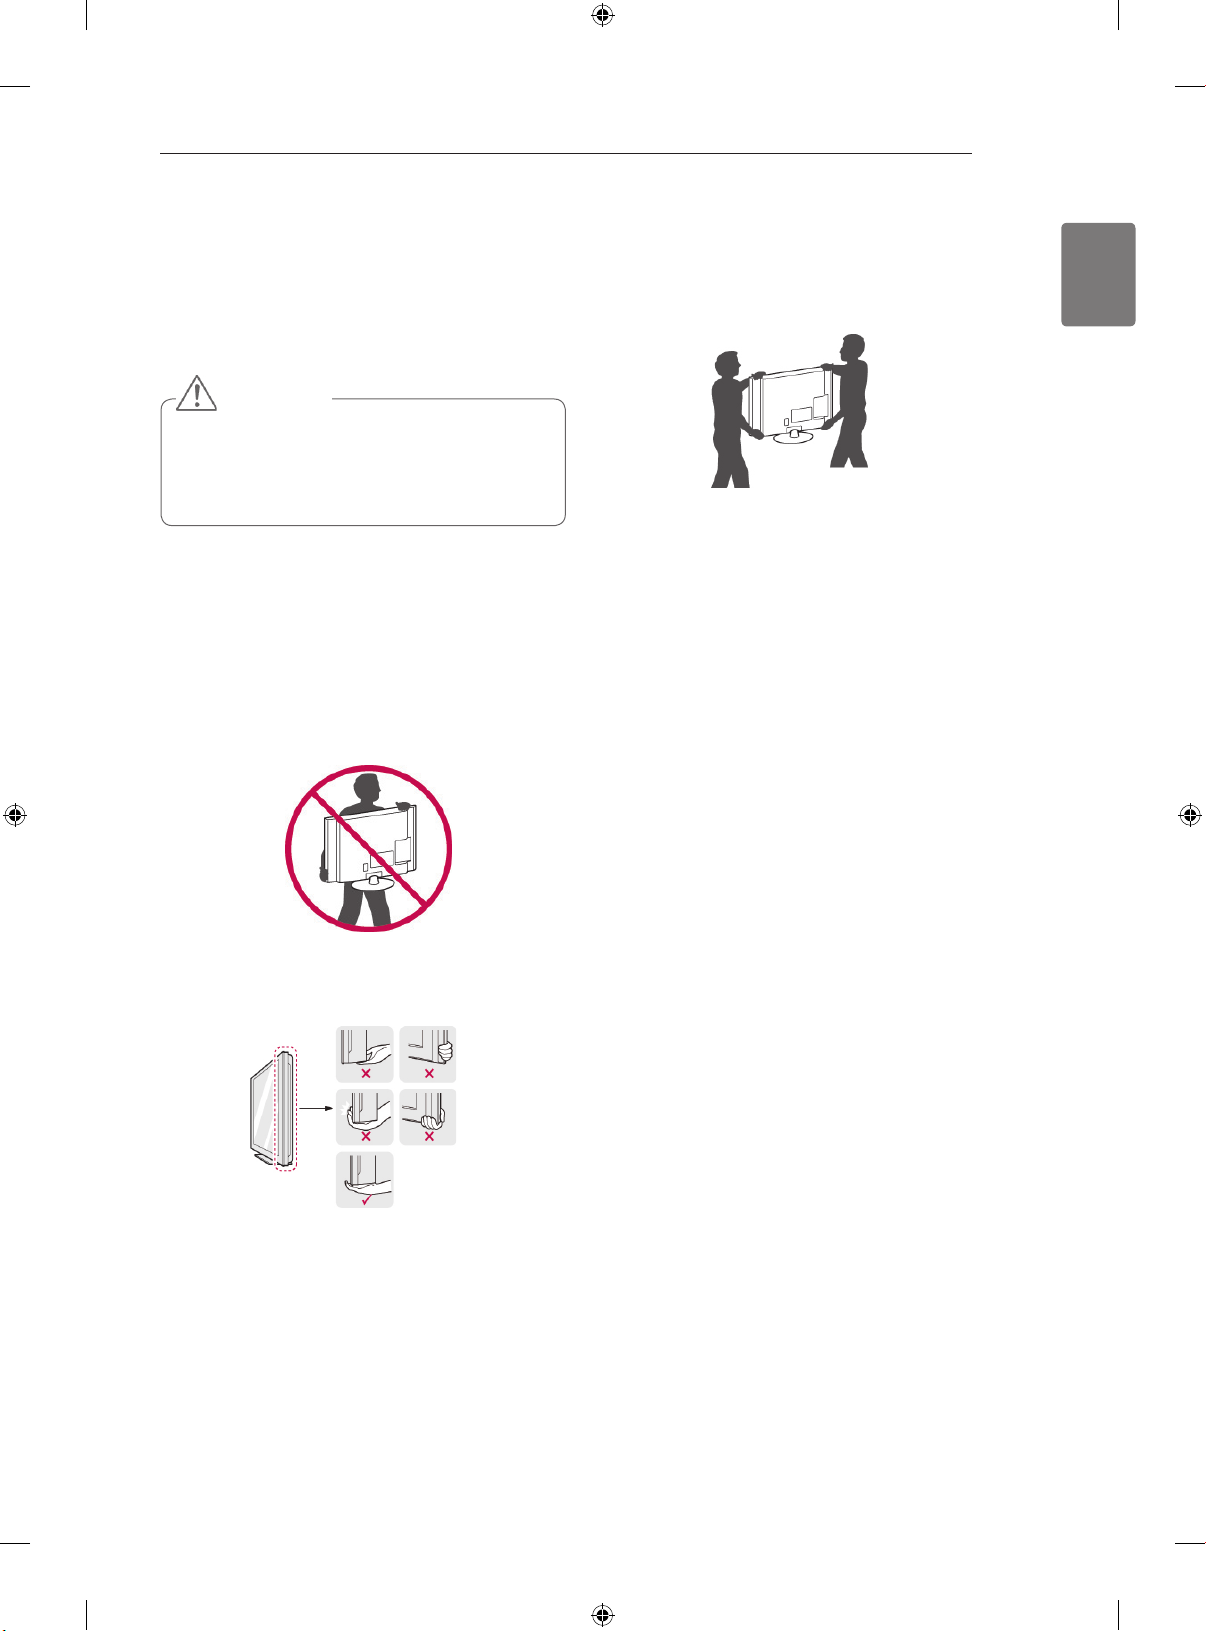
Lifting and moving the TV
When moving or lifting the TV, read the following to
prevent the TV from being scratched or damaged
and for safe transportation regardless of its type
and size.
CAUTION
Avoid touching the screen at all times, as
this may result in damage on the screen
or some of the pixels used to create
images.
It is recommended to move the TV in the box
or packing material that the TV originally came
in.
Before moving or lifting the TV, disconnect the
power cord and all cables.
When holding the TV, the screen should face
away from you to prevent the screen from
scratches.
When transporting a large TV, there should be
at least 2 people.
When transporting the TV by hand, hold the
TV as shown in the following illustration.
When transporting the TV, do not expose the
TV to jolts or excessive vibration.
When transporting the TV, keep the TV
upright, never turn the TV on its side or tilt
towards the left or right.
ENGLISH
Hold the top and bottom of the TV frame firmly.
Make sure not to hold the transparent part,
speaker, or speaker grill area.
Page 14
ASSEMBLING AND PREPARING
12
ENGLISH
Setting up the TV
Put your TV on a pedestal stand and mount the TV on a table or wall.
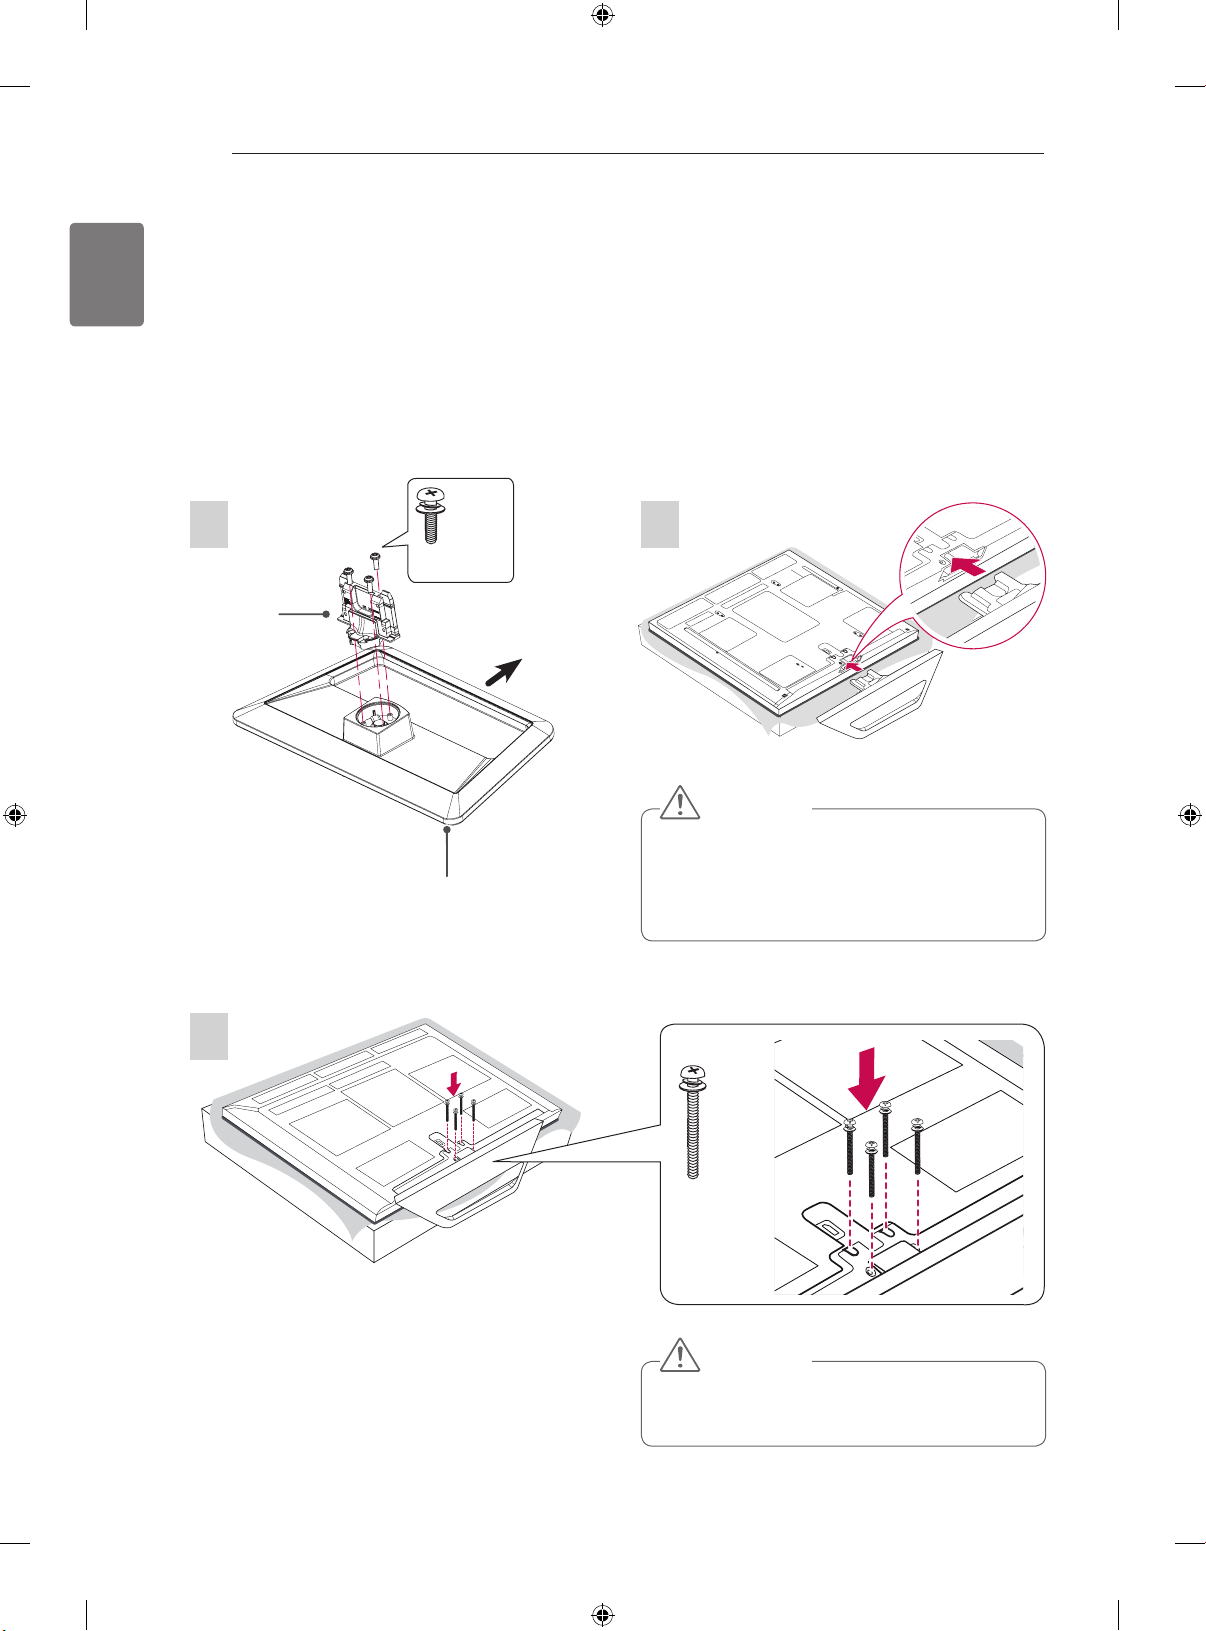
Attaching the stand
If you are not mounting the TV to a wall, use the following instructions to attach the stand.
Only 42/50PA45**, 42/50PA49**, 50/60PA55**, 50/60PA65**
Stand Body
Image shown may differ from your TV.
1 2
3 EA
M5 x 16
Front
CAUTION
When attaching the stand to the TV
set, place the screen facing down on a
Stand Base
cushioned table or flat surface to protect
the screen from scratches.
3
4 EA
M4 x 30
CAUTION
Tighten the screws firmly to prevent the TV
from tilting forward. Do not over tighten.
Page 15
ASSEMBLING AND PREPARING
13
To detach the stand,
1
2
4 EA
M4 x 30
CAUTION
When attaching the stand to the TV
set, place the screen facing down on a
cushioned table or flat surface to protect
the screen from scratches.
ENGLISH
NOTE
This will protect the opening from accu-
mulating dust and dirt.
When installing the wall mounting brack-
Protection Cover
et, use the Protection cover.
3
2 EA
M4 x 30
CAUTION
Tighten the screws firmly to prevent the TV
from tilting forward. Do not over tighten.
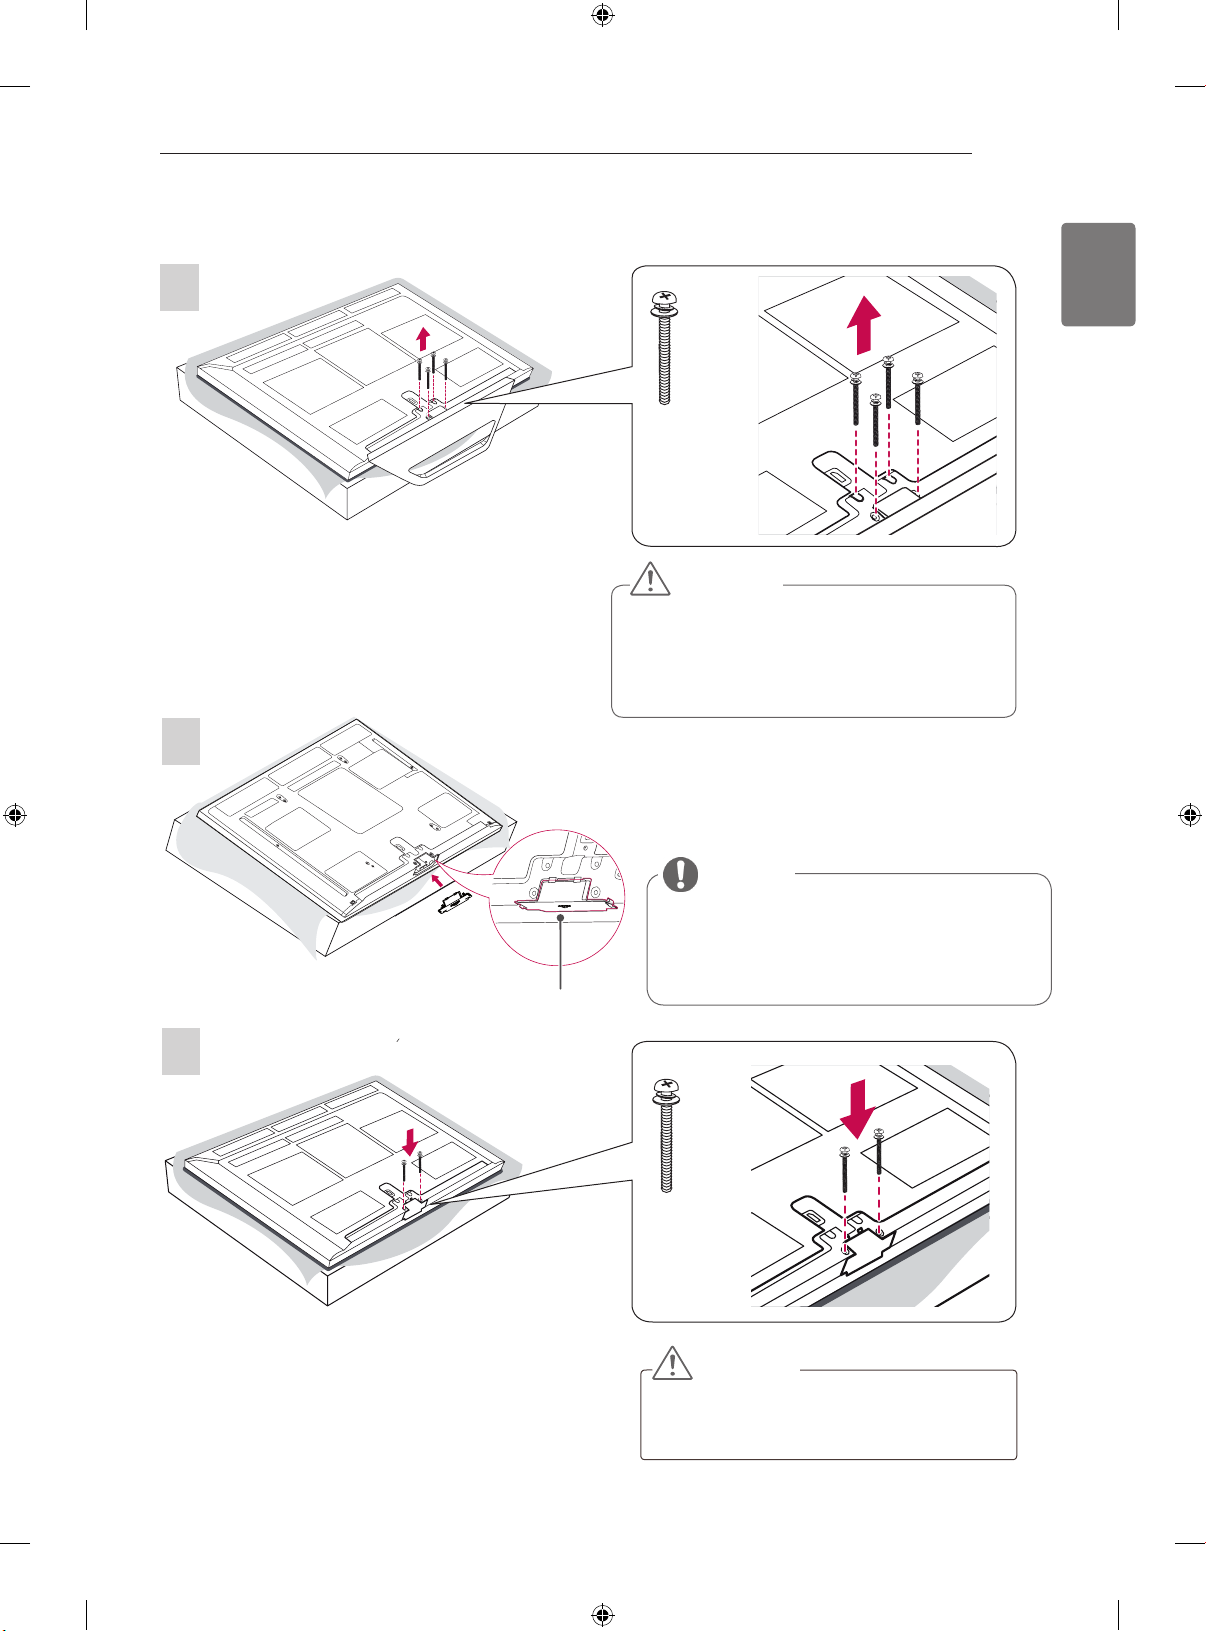
Page 16
ASSEMBLING AND PREPARING
14
ENGLISH
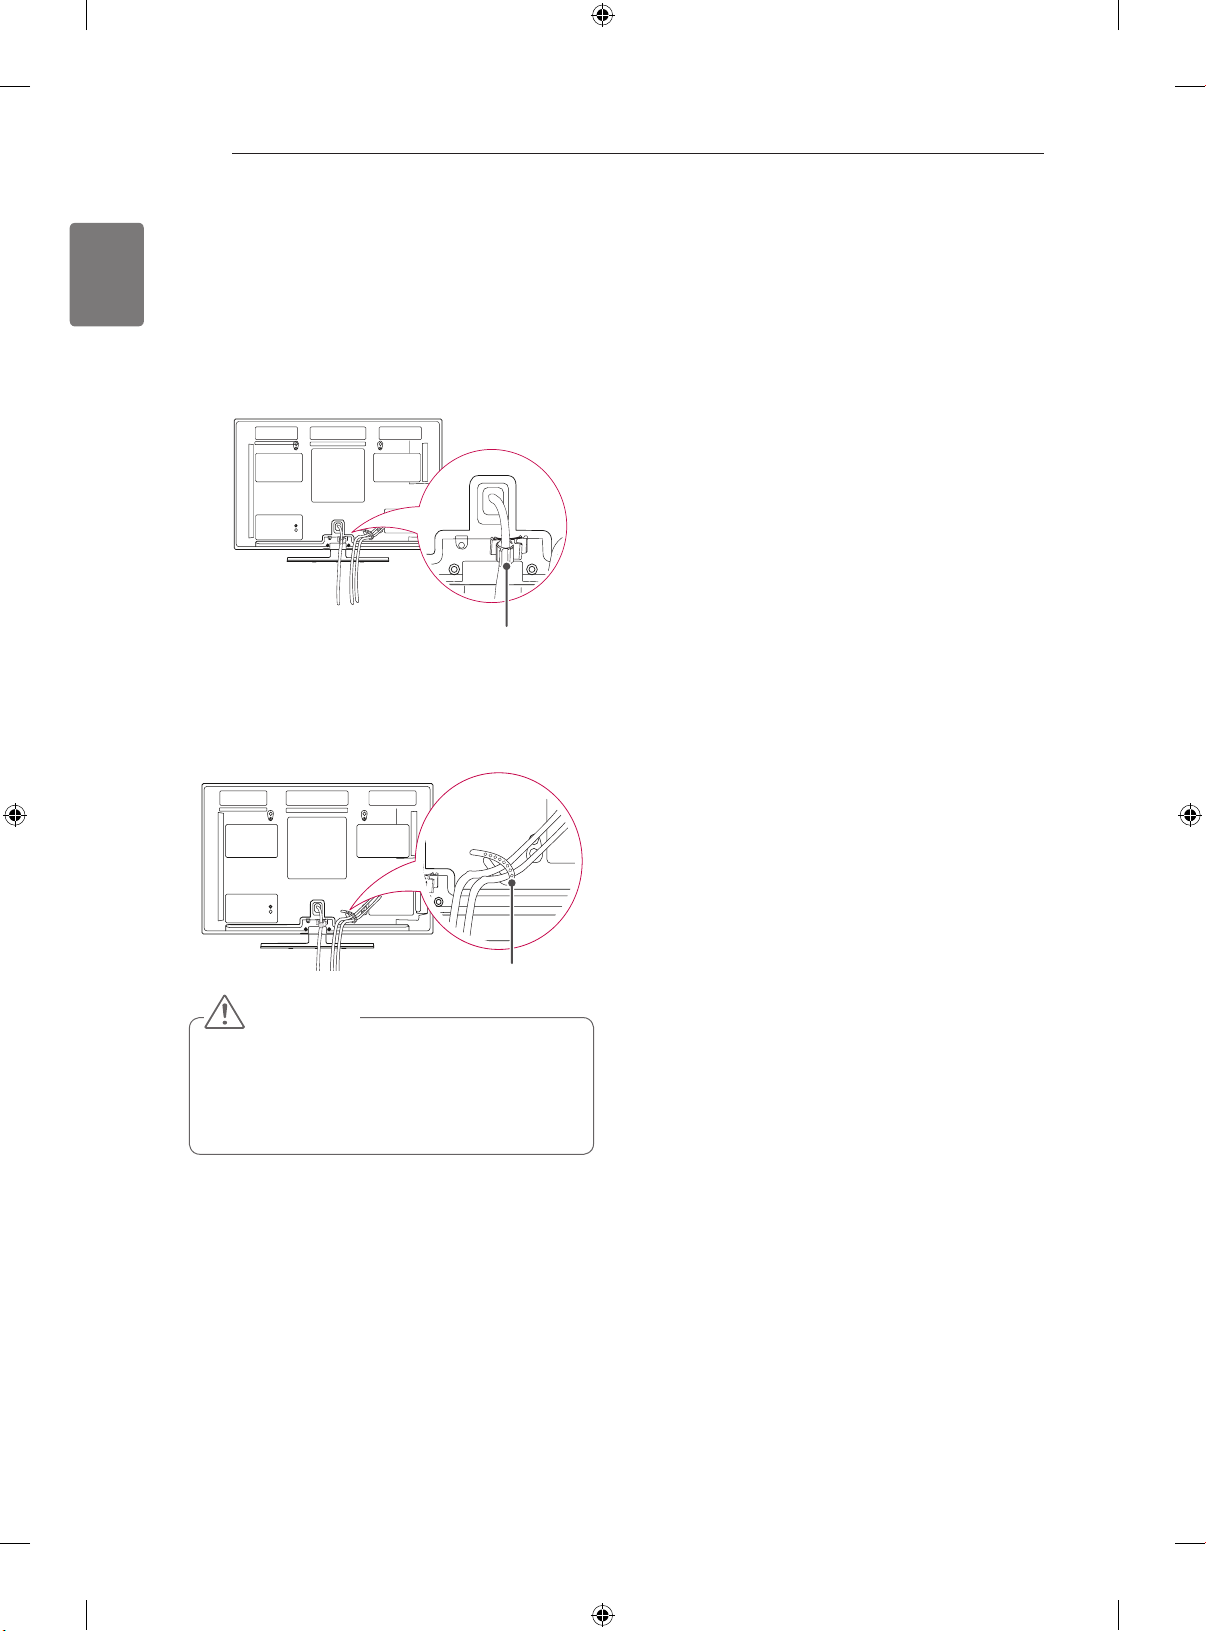
Tidying cables
1 Install the Power Cord Holder and Power
2 Gather and bind the cables with the Cable
Image shown may differ from your TV.
Cord. It will help prevent the power cable from
being removed by accident.
Power Cord Holder
Holder.
Cable Holder
CAUTION
Do not move the TV by holding the Cable
Holder & Power Cord Holder, as the
Cable Holders may break, and injuries
and damage to the TV may occur.
Page 17
ASSEMBLING AND PREPARING
15
Mounting on a table
Image shown may differ from your TV.
Lift and tilt the TV into its upright position on a table.
1
- Leave a 10 cm (minimum) space from the wall for
proper ventilation.
10 cm
10 cm
Connect the power cord to a wall outlet.
2
CAUTION
Do not place the TV near or on sources
of heat, as this may result in fire or other
damage.
10 cm
10 cm
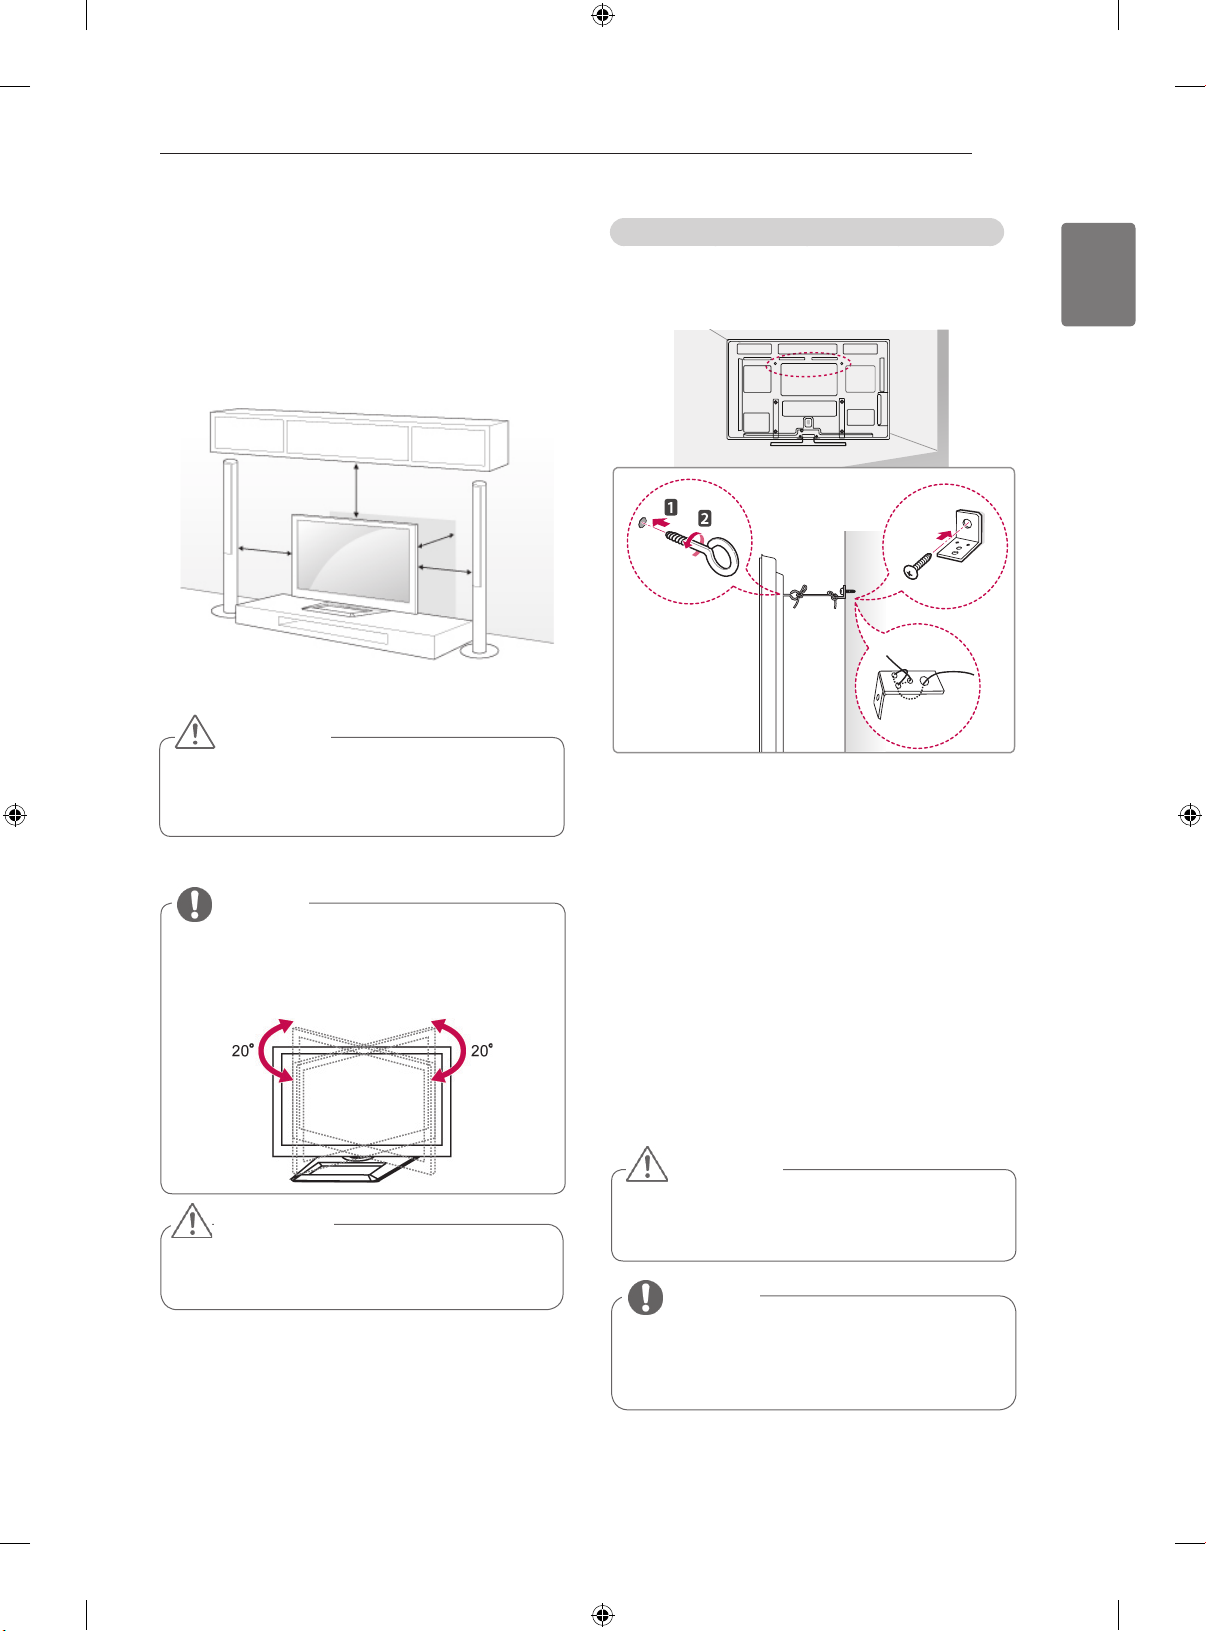
Securing the TV to a wall (Depending on model)
Image shown may differ from your TV.
Insert and tighten the eye-bolts, or TV brackets
1
and bolts on the back of the TV.
- If there are bolts inserted at the eye-bolts
position, remove the bolts first.
ENGLISH
NOTE
Swivel 20 degrees to the left or right and
adjust the angle of the TV to suit your
view.
CAUTION
When adjusting the angle of the product,
watch out for your fingers.
Mount the wall brackets with the bolts to the
2
wall.
Match the location of the wall bracket and the
eye-bolts on the rear of the TV.
Connect the eye-bolts and wall brackets tightly
3
with a sturdy rope.
Make sure to keep the rope horizontal with the
flat surface.
CAUTION
Make sure that children do not climb on
or hang on the TV.
NOTE
Use a platform or cabinet that is strong
and large enough to support the TV
securely.
Page 18
ASSEMBLING AND PREPARING / ADDITIONAL INFORMATION
A
B
16
ENGLISH
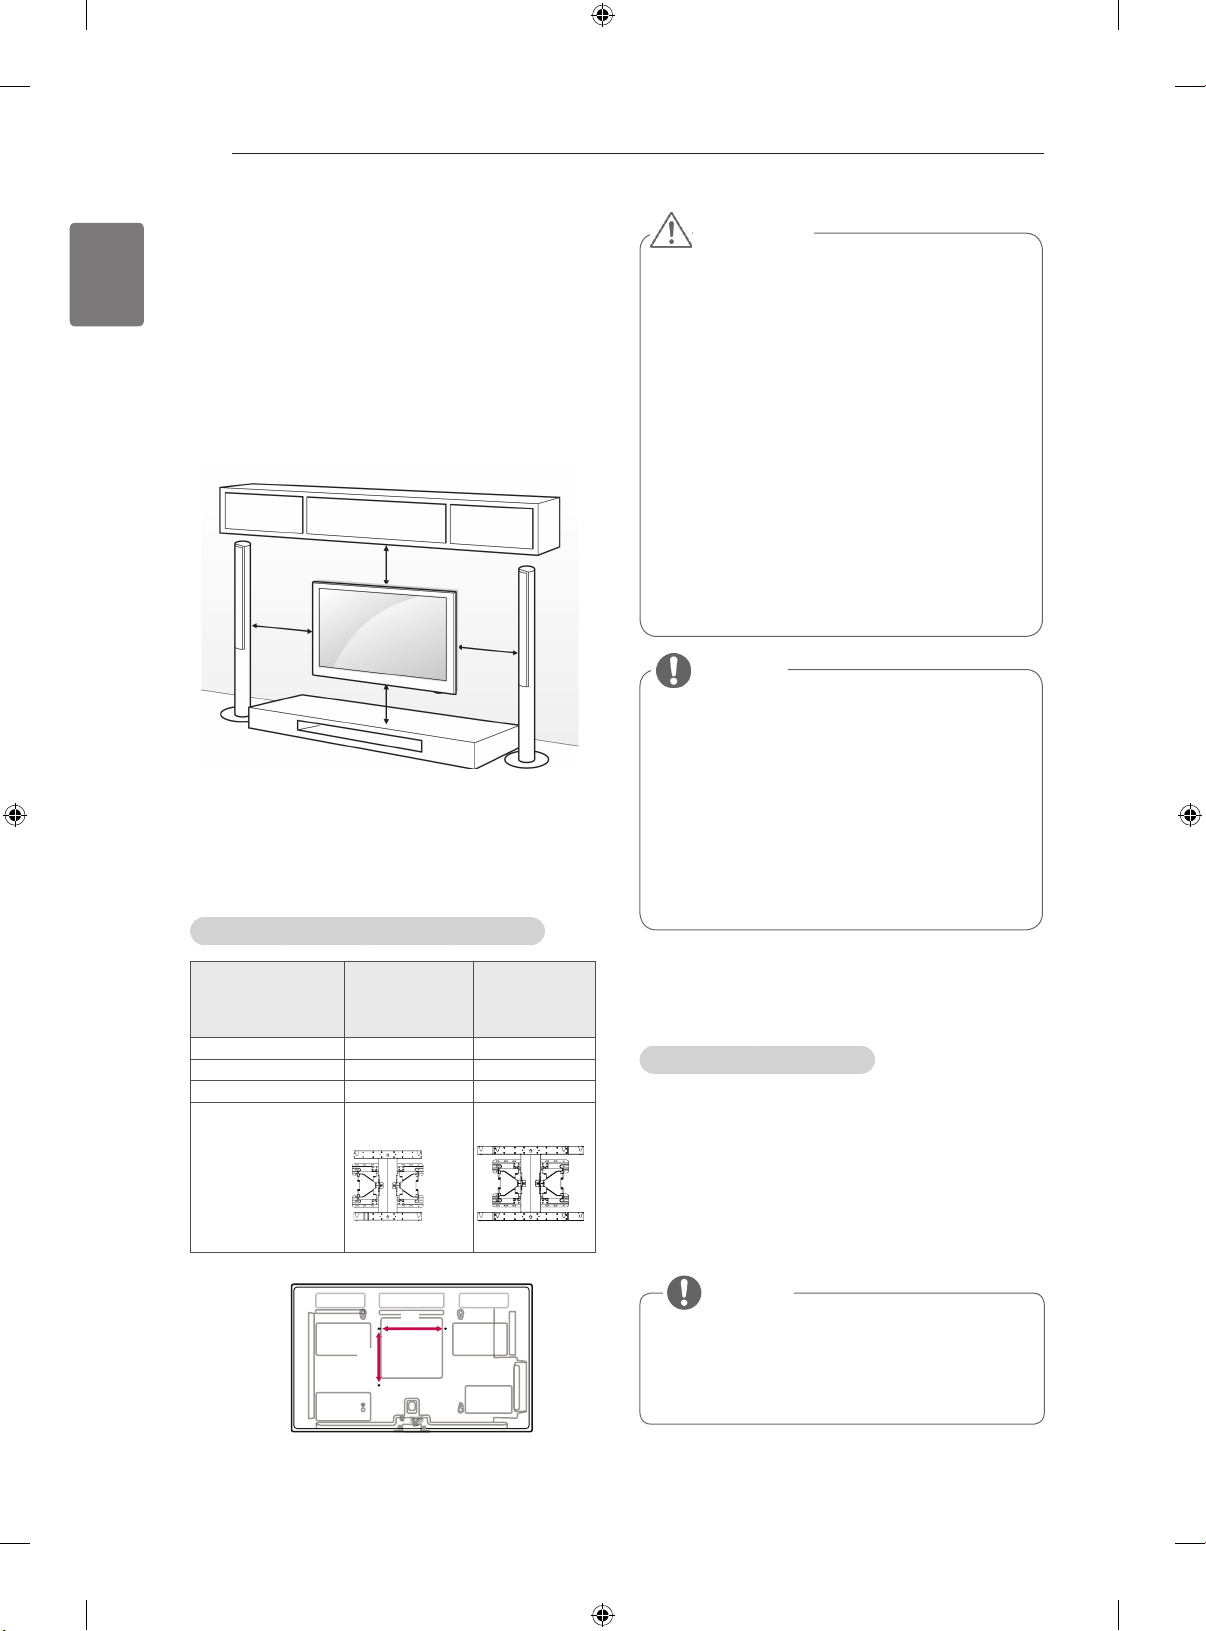
Mounting on a wall
Attach a wall mount bracket at the rear of the TV
carefully and install the wall mount bracket on a
solid wall perpendicular to the floor. When you
attach the TV to other building materials, please
contact qualified personnel.
LG recommends that wall mounting be performed
by a qualified professional installer.
Make sure to use screws and wall mount
bracket that meet the VESA standard. Standard
dimensions for the wall mount kits are described in
the following table.
10 cm
10 cm
10 cm
10 cm
Separate purchase(Wall Mounting Bracket)
CAUTION
Disconnect the power first, and then move
or install the TV. Otherwise electric shock
may occur.
If you install the TV on a ceiling or slanted
wall, it may fall and result in injury. Use
an authorized LG wall mount bracket
and contact the local dealer or qualified
personnel.
Do not over tighten the screws as this may
cause damage to the TV and void your
warranty.
Use the screws and wall mount bracket that
meet the VESA standard. Any damages
or injuries by misuse or using an improper
accessory are not covered by the warranty.
NOTE
Use the screws that are listed on the
VESA standard screw specifications.
The wall mount kit includes an installation
manual and necessary parts.
The length of screws may differ
depending on the wall mount. Make sure
to use the proper length.
For more information, refer to the manual
supplied with the wall mount bracket.
Model 42/50PA45**
42/50PA49**
50PA55**
50PA65**
VESA (A x B) 400 x 400 600 x 400
Standard screw M6 M8
Number of screws 4 4
Wall mount bracket PSW400B,
PSW400BG
60PA55**
60PA65**
PSW600B,
PSW600BG
ADDITIONAL
INFORMATION
Viewing the owner’s manual
The owner’s manual in PDF file format is supplied
on the enclosed CD. Install the Adobe Acrobat
Reader to view the owner’s manual on your PC.
Insert the supplied CD. The web page appears
1
automatically.
Click Owner’s Manual on the web page.
2
View the owner’s manual.
3
NOTE
If the web page does not appear
automatically, access My computer and then
click LG and index.htm to view the owner’s
manual.
Page 19
REMOTE CONTROL
The descriptions in this manual are based on the buttons on the remote control.
Please read this manual carefully and use the TV correctly.
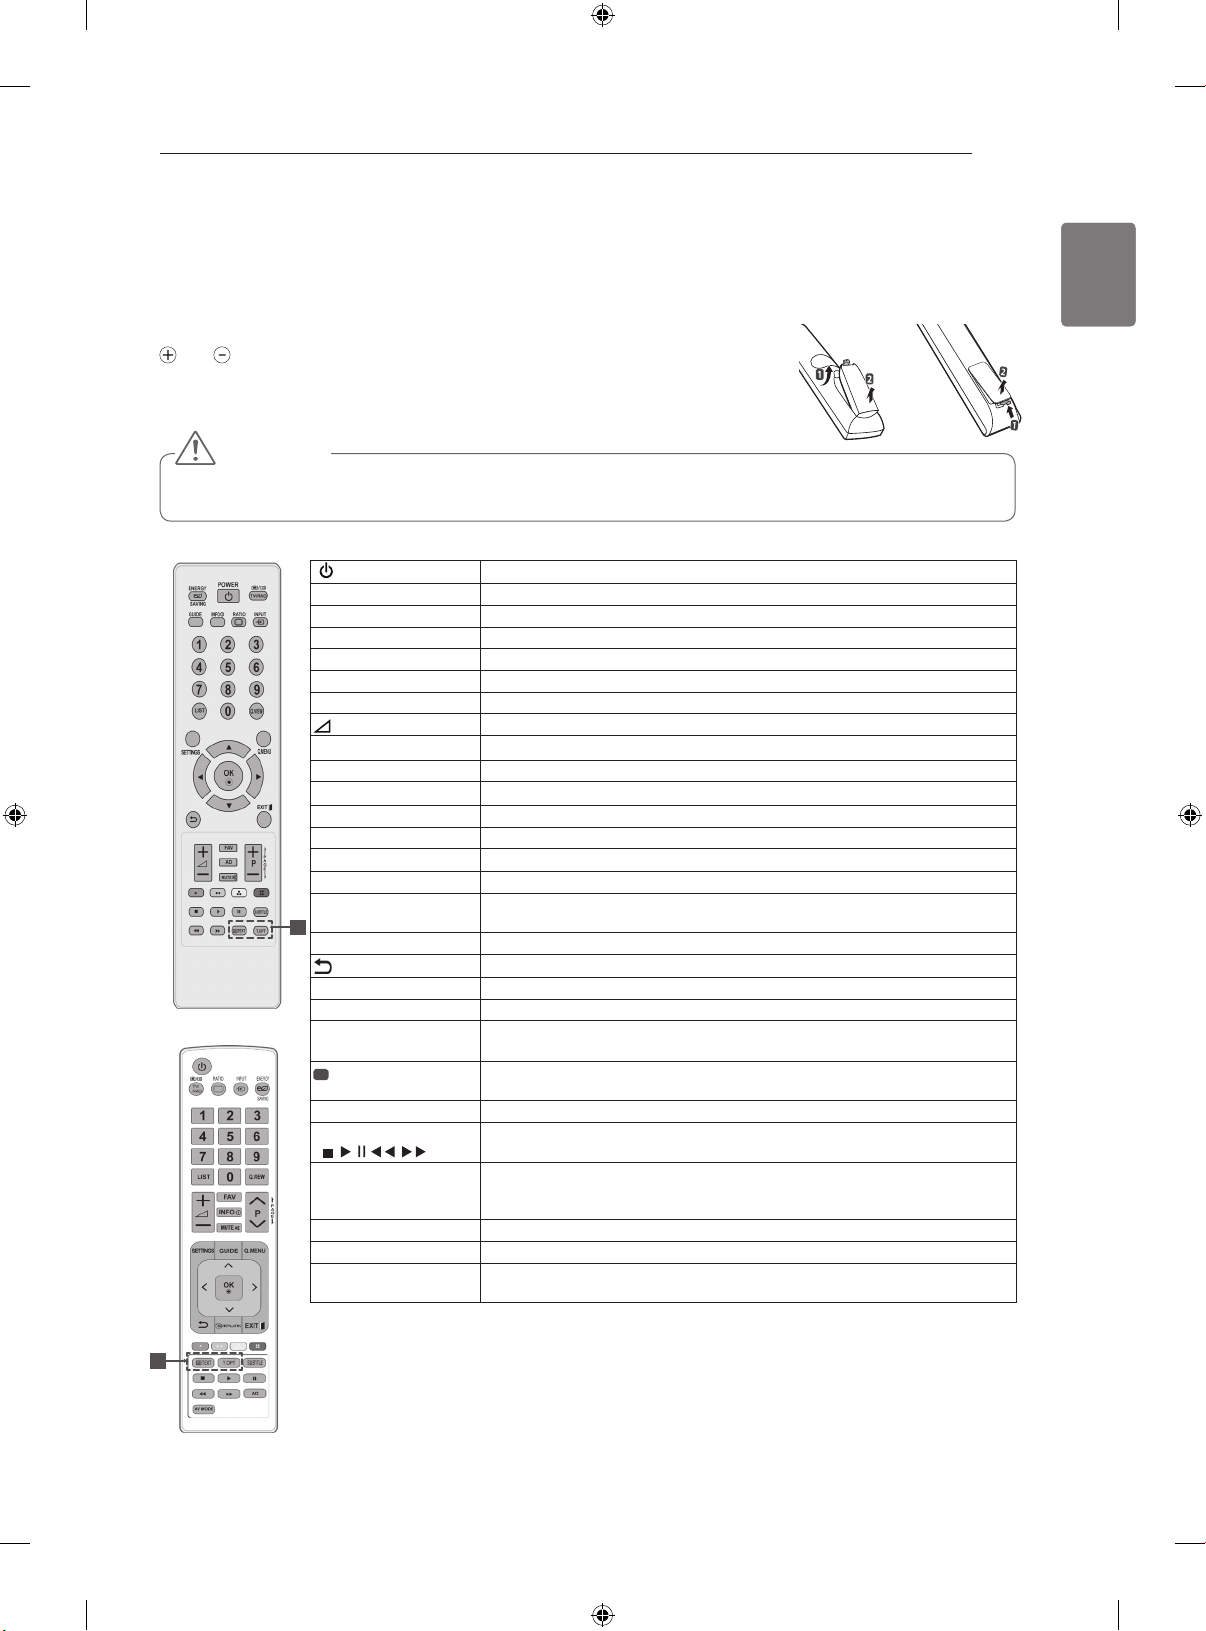
To replace batteries, open the battery cover, replace batteries (1.5 V AAA) matching
and ends to the label inside the compartment, and close the battery cover. Be
sure to point the remote control to the remote control sensor on the TV.
To remove the batteries, perform the installation actions in reverse.
CAUTION
Do not mix old and new batteries, as this may damage the remote control.
Image shown may differ from your TV.
Turns the TV on or off.
Scrolls through the saved programmes.
Scrolls through menus or options.
Returns to the previous level.
Programme edit.
These buttons are used for teletext.
For further details, see the ‘Teletext’ section.
Controls the MY MEDIA menus, or the SIMPLINK compatible devices
(USB,SIMPLINK).
Accesses the AV devices connected with the HDMI cable through HDMICEC.
Opens the SIMPLINK menu.
Selects an AV mode
or
(POWER)
ENERGY SAVING Adjusts the brightness of the screen to reduce energy consumption .
INPUT Changes the input source; Turns the TV on .
TV/RAD Selects Radio, TV and DTV programme.
Number buttons Enters numbers.
LIST Accesses the saved programme list.
Q.VIEW Returns to the previously viewed programme.
+ - Adjusts the volume level.
FAV Accesses your favourite programme list.
MUTE Mutes all sounds.
∧∨ (P + -)
P
PAGE Moves to the previous or next screen.
GUIDE Shows programme guide.
SETTINGS Accesses the main menus, or saves your input and exit the menus.
Q. MENU Accesses the quick menus.
Navigation buttons
(up/down/left/right)
1
OK Selects menus or options and confirms your input.
INFO Views the information of the current programme and screen.
EXIT Clears all on-screen displays and return to TV viewing.
Coloured buttons These buttons are used for teletext (on TELETEXT models only),
1
TELETEXT
BUTTONS
SUBTITLE Recalls your preferred subtitle in digital mode.
Control buttons
(
, , , , )
SIMPLINK
(Depending on model)
AD Switches the Audio Description On or Off.
RATIO Resizes an image.
AV MODE
(Depending on model)
REMOTE CONTROL
or
17
ENGLISH
ENGLISH
1
Page 20
WATCHING TV
18
ENGLISH
WATCHING TV
Connecting an antenna
Connect an antenna to watch TV while referring to
the following.
To prevent damage do not connect to the mains
outlet until all connections are made between the
devices.
Connect the TV to a wall antenna socket with an
RF cable (75 Ω).
Turning the TV on for the first
time
When you turn the TV on for the first time, the
Initial setting screen appears. Select a language
and customize the basic settings.
NOTE
For optimum picture quality, adjust
antenna direction.
In poor signal areas, to achieve better
picture quality it may be necessary to
install a signal amplifier to the antenna.
If the image quality is poor with an
antenna connected, aim the antenna to
the correct direction.
An antenna cable and converter are not
supplied.
Follow the on-screen instructions to customize
3
your TV settings according to your preferences.
Language
Mode Setting
Selects a language to display.
Selects Home Use for the
home environment.
Country
Selects a country to display.
(Depending on model)
Set Password
Time Zone
Network Setting
Set the password.
(When France or Italy is
selected for Country)
Selects the time zone and
daylight saving.
(When Russia is selected for
Country)
(If there is LAN port) selects
Network Setting to display.
Auto Tuning
NOTE
For those countries without confirmed DTV
broadcasting standards, some DTV features
might not work, depending on the DTV
broadcasting environment.
When France is selected for Country,
password is not ‘0’, ‘0’, ‘0’, ‘0’ but ‘1’, ‘2’, ‘3’,
‘4’.
To display images in the best quality for your
home environment, select Home Use.
Store Demo is suitable for the retail
environment.
If you select Store Demo, any customized
settings will switch back to the default
settings of Store Demo in 5 minutes.
Scans and saves
available programmes
automatically.
Connect the power cord to a power outlet.
1
In Standby mode, press (POWER) to turn the TV
2
on.
The Initial setting screen appears if you turn
the TV on for the first time.
NOTE
You can also access Factory Reset by
accessing OPTION in the main menus.
When the basic settings are complete,
4
press OK.
NOTE
If you do not complete the Initial setting, it
will appear whenever the TV turns on.
Disconnect the power cord from the
power outlet when you do not use the TV
for a long period of time.
To turn the TV off, press
5
(POWER)
.
Page 21
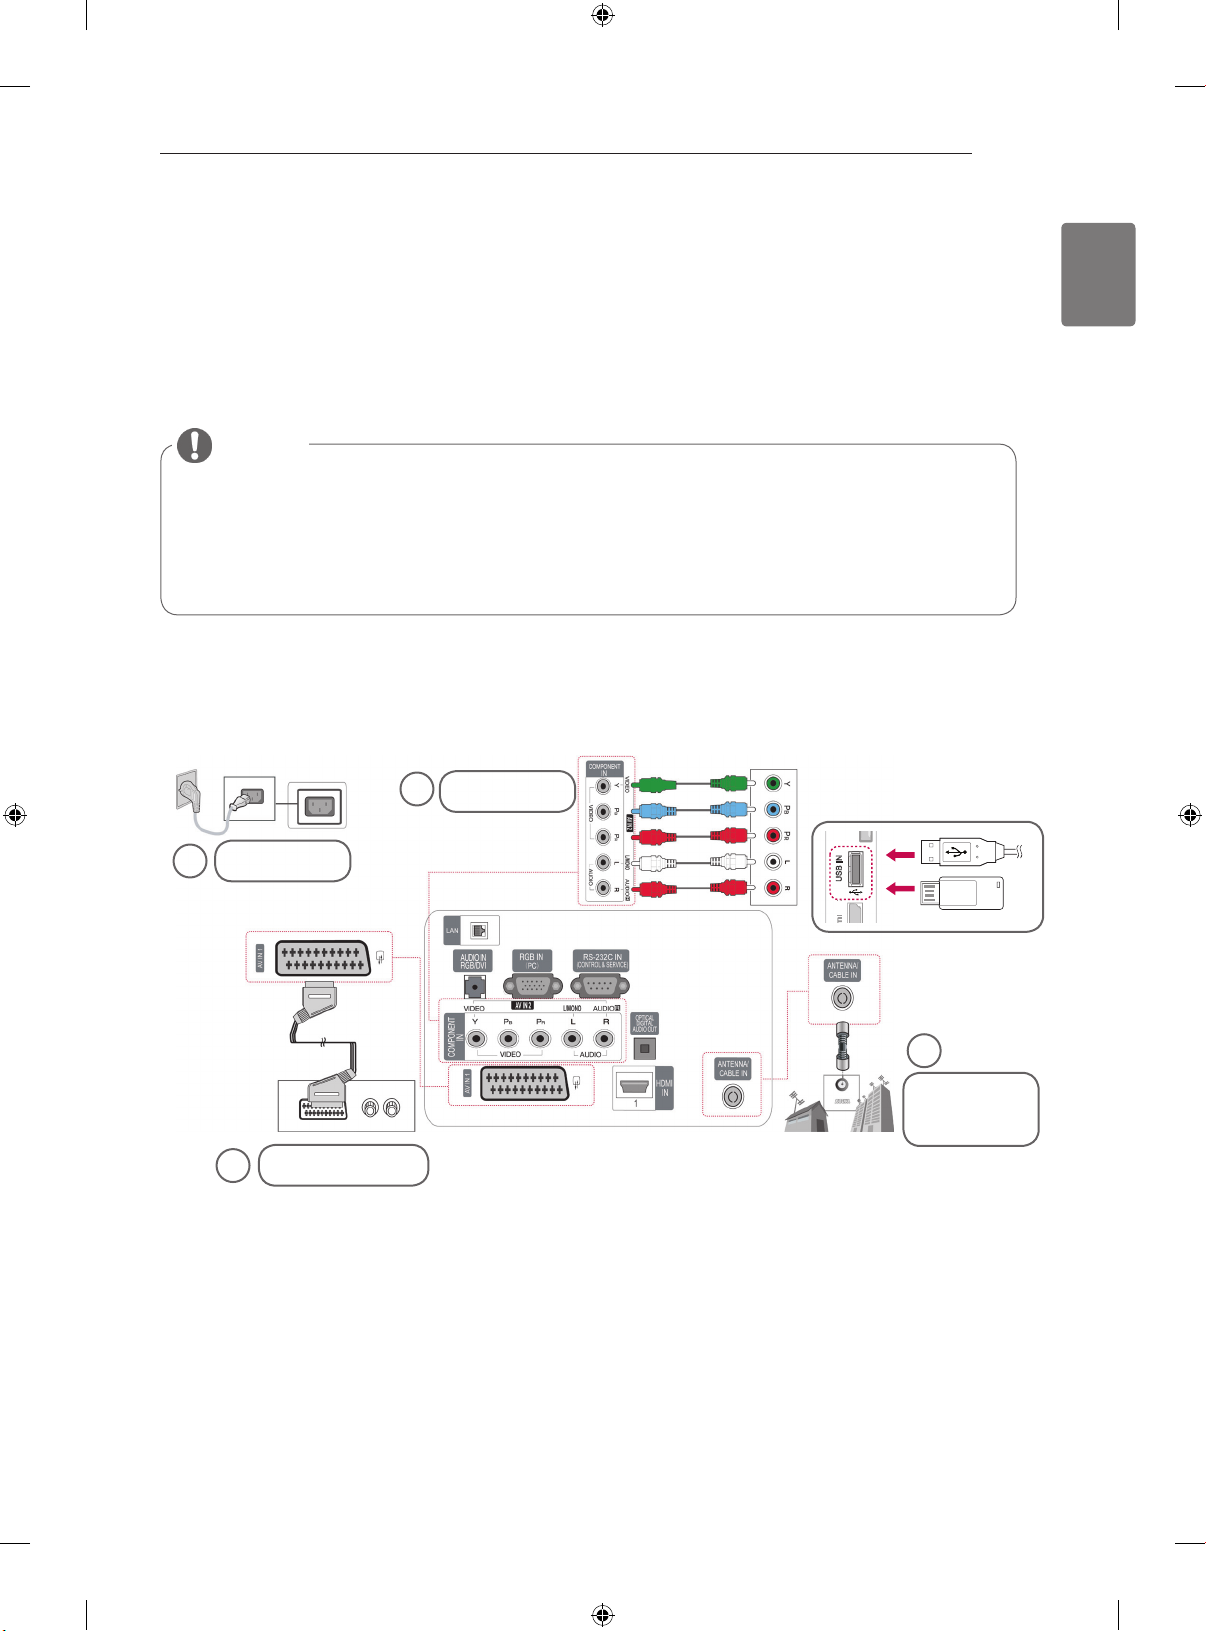
MAKING CONNECTIONS / OPEN SOURCE LICENSE
MAKING CONNECTIONS
Connect various external devices to the TV and switch input modes to select an external device. For more
information of external device’s connection, refer to the manual provided with each device.
Available external devices are: HD receivers, DVD players, VCRs, audio systems, USB storage devices,
PC, gaming devices, and other external devices.
NOTE
If you record a TV programme on a DVD recorder or VCR, make sure to connect the TV
signal input cable to the TV through a DVD recorder or VCR. For more information on
recording, refer to the manual provided with the connected device.
The external device connection may differ from the model.
Connect external devices to the TV regardless of the order of the TV port.
Connecting your Unit
Image shown may differ from your TV
To connect additional equipment, see the External equipment Setup section in CD Manual.
19
ENGLISH
DVD/STB back
2
DVD/STB
Power Cord
3
VCR Connection
2
USB IN
1
Antenna
Connection
OPEN SOURCE SOFTWARE NOTICE
To obtain the source code under GPL, LGPL, MPL and other open source licenses, that is contained in this
product, please visit http://opensource.lge.com .
In addition to the source code, all referred license terms, warranty disclaimers and copyright notices are
available for download.
LG Electronics will also provide open source code to you on CD-ROM for a charge covering the cost of
performing such distribution (such as the cost of media, shipping and handling) upon email request to
opensource@lge.com. This offer is valid for three (3) years from the date on which you purchased the
product.
or
Page 22
20
ENGLISH
WEIGHT
WEIGHT / TROUBLESHOOTING
42PA45** 42PA49**
42PA4500-ZF / 42PA450T-ZF
MODELS
42PA4500-ZM / 42PA450T-ZM
42PA4510-ZA / 42PA451T-ZA
42PA4510-ZG / 42PA451T-ZG
42PA4900-ZE / 42PA490T-ZE
42PA4900-ZL / 42PA490T-ZL
42PA4520-ZC / 42PA452T-ZC
42PA4520-ZJ / 42PA452T-ZJ
Weight With stand 20.6 kg 20.6 kg
Without stand 19.0 kg 19.0 kg
50PA45** 50PA49**
50PA4500-ZF / 50PA450T-ZF
MODELS
50PA4500-ZM / 50PA450T-ZM
50PA4510-ZA / 50PA451T-ZA
50PA4510-ZG / 50PA451T-ZG
50PA4520-ZC / 50PA452T-ZC
50PA4900-ZE / 50PA490T-ZE
50PA4900-ZG / 50PA490T-ZG
50PA4900-ZL / 50PA490T-ZL
50PA4520-ZJ / 50PA452T-ZJ
Weight With stand 28.2 kg 28.2 kg
Without stand 25.8 kg 25.8 kg
50PA55** 50PA65**
MODELS
50PA5500-ZB / 50PA550T-ZB
50PA5500-ZH / 50PA550T-ZH
50PA6500-ZA / 50PA650T-ZA
50PA6500-ZG / 50PA650T-ZG
50PA6520-ZF / 50PA652T-ZF
50PA6520-ZM / 50PA652T-ZM
Weight With stand 28.8 kg 28.8 kg
Without stand 26.4 kg 26.4 kg
60PA55** 60PA65**
MODELS
60PA5500-ZB / 60PA550T-ZB
60PA5500-ZH / 60PA550T-ZH
60PA6500-ZA / 60PA650T-ZA
60PA6500-ZG / 60PA650T-ZG
Weight With stand 40.6 kg 40.6 kg
Without stand 36.4 kg 36.4 kg
Product specifications shown above may be changed without prior notice due to upgrade of product functions.
TROUBLESHOOTING
General
Problem Solution
Cannot control the TV with the
remote control.
No image display and no sound is
produced.
Image appears slowly when the TV
turns on.
Cannot connect external devices.
The TV turns off suddenly.
Check the remote control sensor on the product and try again.
Check if there is any obstacle between the product and the remote control.
Check if the batteries are still working and properly installed ( to , to ).
Check if the product is turned on.
Check if the power cord is connected to a wall outlet.
Check if there is a problem in the wall outlet by connecting other products.
The image is muted during the product startup process. This is normal. If the
image does not appear in a few minutes, unplug the TV for 30 seconds and try
again. If the image still does not appear, contact the authorized service center
in your local area.
Refer to the “Connection overview” and connect an external device.
Check the power control settings. The power supply may be interrupted.
Check if the Auto sleep feature is activated in the Time settings.
Refer to the “Sleep Timer”.
If there is no signal while the TV is on, the TV will turn off automatically after 15
minutes of inactivity.
Page 23
TROUBLESHOOTING
21
Audio
Problem Solution
No sound is produced while images
are displaying.
One of the speakers produce noises
or does not produce sound.
Press + or - button.
Check if the sound is muted by pressing MUTE.
Scroll to other channels. There may a problem with the broadcast.
Check if the audio cables are connected properly.
A change in ambient humidity or temperature may result in an unusual noise
when the product turns on or off.
There is no problem with your product.
Video
Problem Solution
An image displays in black and
white or the colour quality is poor.
Horizontal or vertical bars appears
or images blur
Lines or streaks appear on imagesCheck the antenna or aim the antenna to the proper direction.
Afterimages (ghosts) appear when
the product turns off
The power is on but the screen
appears extremely dark.
“No Signal” appears on the screen.Check if the signal cable is connected between the TV and products properly.
The display offset is wrong.
Thin lines appear in the background
of the screen.
Horizontal noises appear or
characters blur.
The reception on some channels is
poor
Adjust the colour setting in the PICTURE menu.
Keep a sufficient distance between this product and other electronic products.
Scroll to other channels. There may a problem with the broadcast.
Check if there are local interferences such as an electrical appliance or power tool.
Pixels may have been damaged from a fixed image displayed for a long time
(image burn). Use a screen saver to prevent the pixel damage on the screen.
Adjust the brightness and contrast in the PICTURE menu.
Check the selected input source by pressing INPUT.
Adjust the position setting in the PICTURE menu.
Check if the video card solution and frequency are supported by the product.
If the frequency is out of range, set to the recommended solution using the
display settings on the external device.
Check the video cable connections.
Adjust the Phase setting in the PICTURE menu. Refer to the “SCREEN”.
Scroll to other channels. There may a problem with the broadcast.
The station signal may be weak. Aim the antenna to the proper direction.
Check if there is local interference such as an electrical appliance or power tool.
ENGLISH
Pentouch
Problem Solution
The touch pen does not work.
The TV screen doesn’t look normal
when using Pentouch.
The touch pen is touched on wrong
positions.
The touch pen movement is not
smooth.
Check that you used the remote control to enter Pentouch mode.
Check that the Pentouch dongle is connected to the computer and the red LED is on.
Press the on the touch pen to check that it is powered on.
Check that the touch pen is paired for use. (The touch pen is correctly paired if the red
LED is on once when you press the Touch Home button on the touch pen.)
Set the computer screen to display only on the TV.
A Check that the computer is correctly connected to the TV.
A Check that you are using the optimal solution.
Set the aspect ratio on the TV to Just Scan.
Set the computer screen to display only on the TV.
If the point you touch on the TV screen using the touch pen and the point
indicated as touched on the computer screen do not match when the computer
and the TV are connected by a PC signal (RGB) cable, use the TV remote
control to select [Home] → [PICTURE] → [SCREEN] (RGB) , then select [Auto
Configure] to adjust the screen.
Check whether the computer and the TV are too far from each other. Check
whether there are too many obstructions between the computer and the TV.
A Check whether many other applications are running on the computer. (Please
avoid running other applications while using the Pentouch program.)
Page 24

Page 25

РУКОВОДСТВО ПОЛЬЗОВАТЕЛЯ
PDP телевизор
Внимательно прочтите это руководство перед тем,
как начать использовать устройство, и сохраните
его на будущее.
PA45**
PA49**
PA55**
PA65**
BZ03
www.lg.com
Page 26
ИНСТРУКЦИИ ПО ТЕХНИКЕ БЕЗОПАСНОСТИ
2
• Прежде чем пользоваться устройством, внимательно прочитайте эти инструкции по
технике безопасности.
• Иллюстрации в этом руководстве могут немного отличаться от вашего устройства и
приведены здесь только для примера.
Проигнорировав такое предупреждение, можно получить серьезную травму.
ОПАСНО
ВНИМАНИЕ
Возможен несчастный случай или смертельный исход.
Проигнорировав такое сообщение, можно получить легкую травму или повредить
устройство.
Русский
ENG
МЕРЫ ПРЕДОСТОРОЖНОСТИ ПРИ УСТАНОВКЕ
УСТРОЙСТВА
ОПАСНО
Держите устройство вдали от источников тепла,
например электронагревателей.
- Несоблюдение этого правила может привести к
поражению электрическим током, пожару, неправильной
работе или деформации устройства.
Не используйте устройство в местах повышенной
влажности, например в ванной комнате, или там,
где оно может намокнуть.
- Иначе возможен пожар или поражение
электрическим током.
При появлении запаха дыма, других запахов
или необычных звуков выньте кабель питания
из розетки и обратитесь в сервисный центр.
- Использование неисправного устройства
может привести к поражению электрическим
током или пожару.
ВНИМАНИЕ
Устройство должно стоять на плоской и
устойчивой поверхности, откуда оно не может
упасть.
- Если устройство упадет, оно может быть
повреждено, а вы можете получить травму.
Защищайте устройство от прямого
солнечного света.
- Иначе возможно повреждение устройства.
Не ставьте устройство в отсеки стенок и
книжных шкафов.
-Вентиляция обязательна.
МЕРЫ ЗАЩИТЫ ОТ ПОРАЖЕНИЯ
ЭЛЕКТРИЧЕСКИМ ТОКОМ
ОПАСНО
Убедитесь в том, что розетка, в которую
вставлен кабель питания, заземлена.
- Иначе возможно поражение электрическим
током или травма.
Не прикасайтесь к вилке мокрыми руками. Если
контакты мокрые или пыльные, насухо вытрите
вилку или сотрите с нее пыль.
- Избыточная влага может привести к поражению
электрическим током.
Во время грозы отсоединяйте кабель питания и
сигнальный кабель.
- Иначе возможно поражение электрическим током или
пожар.
Когда кабель питания вставлен в розетку, не
вставляйте проводник (например, металлическую
спицу) в другой конец кабеля.Кроме того, не
прикасайтесь к другому концу кабеля питания,
когда кабель вставлен в розетку.Возможно
поражение электрическим током.
ВНИМАНИЕ
Защищайте кабель питания от физического или
механического повреждения. Нельзя
перекручивать, сгибать, пережимать кабель,
наступать на него и зажимать дверью.
Обращайте особое внимание на разъемы,
стенные розетки и место, где кабель выходит из
устройства.
Если устройство подключено к розетке переменного
тока, оно не отключается от источника питания
переменного тока даже при выключении с помощью
переключателя питания.
МЕРЫ БЕЗОПАСНОСТИ ПРИ ПЕРЕМЕЩЕНИИ УСТРОЙСТВА
ОПАСНО
Убедитесь в том, что устройство выключено.
Прежде чем перемещать устройство,
отсоедините от него все кабели.
- Иначе возможно повреждение устройства
или поражение электрическим током.
ВНИМАНИЕ
Во время перемещения не подвергайте
устройство тряске и ударам.
- Иначе возможно повреждение монитора или
поражение электрическим током.
При переноске держите устройство двумя руками
экраном вперед.
- Если вы уроните устройство, то поврежденное
устройство может стать причиной поражения
электрическим током или пожара. Обратитесь в
сервисный центр для ремонта.
МЕРЫ БЕЗОПАСНОСТИ ПРИ ЭКСПЛУАТАЦИИ
УСТРОЙСТВА
ОПАСНО
Не следует самостоятельно разбирать,
ремонтировать и модифицировать устройство.
- Возможно поражение электрическим током
или пожар.
- Для проверки, калибровки или ремонта
устройства обращайтесь в сервисный центр.
Чтобы уменьшить риск пожара или
поражения электрическим током, защищайте
устройство от дождя и влаги. На устройство
не должны попадать капли жидкости или
брызги. Нельзя также ставить на него
предметы, наполненные жидкостью
(например, вазы).
Устройства должно обслуживаться только
специалистами. Обслуживание требуется,
когда устройство было повреждено какимлибо образом (поврежден кабель питания
или разъем, пролита жидкость, внутрь попал
посторонний предмет, устройство пострадало
от дождя или влаги, устройство не работает
должным образом, или его уронили).
ВАЖНАЯ ИНФОРМАЦИЯ ПО ПРЕДОТВРАЩЕНИЮ
«ВЫГОРАНИЯ» ЭKРАНА ТЕЛЕВИЗОРА В РЕЗУЛЬТАТЕ
ОТОБРАЖЕНИЯ ИЗОБРАЖЕНИЙ
- Если в течение продолжительного периода времени на
экране отображается статическое изображение (логотипы,
экранные меню, видеоигры, экраны компьютера и страницы
телетекста), на экране может остаться его «отпечаток». Это
явление называется «выгоранием» экрана. Гарантия
производителя не распространяется на экраны с
признаками «выгорания».
- Чтобы предотвратить «выгорание» экрана, не допускайте
длительного отображения статического изображения на
экране телевизора (2 или более часов для ЖK-экранов, 1
или более часов для плазменных экранов).
- «Выгорание» экрана может также происходить в боковых
областях экрана телевизора, если формат 4:3 используется
в течение продолжительного периода времени.
Page 27

СОДЕРЖАНИЕ
3 СОДЕРЖАНИЕ
4 ПРОЦЕДУРА УСТАНОВКИ
4 СБОРКА И ПОДГОТОВКА
4 Распаковка
8 Принадлежности, приобретаемые
отдельно
8 Составляющие и кнопки
11 Поднятие и перемещение телевизора
12 Настройка телевизора
12 - Подсоединение подставки
14 - Закрепление кабелей
15 - Установка на столе
16 - Крепление на стене
СОДЕРЖАНИЕ
3
ENGРусский
16 ДОПОЛНИТЕЛЬНАЯ ИНФОРМАЦИЯ
В РУКОВОДСТВЕ
17 ПУЛЬТ ДИСТАНЦИОННОГО
УПРАВЛЕНИЯ
18 ПРОСМОТР ПРОГРАММЫ
18 Подсоединение антенны
18 Включение телевизора в первый раз
19 УСТАНОВЛЕНИЕ СОЕДИНЕНИЙ
19 ПОДKЛЮЧЕНИЕ УСТРОЙСТВА
19 УВЕДОМЛЕНИЕ О ПРОГРАММНОМ
ОБЕСПЕЧЕНИИ С ОТКРЫТЫМ
ИСХОДНЫМ КОДОМ
20 ВЕС
20 УСТРАНЕНИЕ НЕИСПРАВНОСТЕЙ
Page 28

ПРОЦЕДУРА УСТАНОВКИ / СБОРКА И ПОДГОТОВКА
4
ПРОЦЕДУРА УСТАНОВКИ
1 Откройте упаковку и убедитесь в наличии полного комплекта аксессуаров.
2 Подсоедините подставку к телевизору.
Русский
ENG
3 Подключите внешнее устройство к телевизору.
СБОРКА И ПОДГОТОВКА
Распаковка
Комплект должен включать следующие элементы. В случае отсутствия аксессуаров обратитесь
в магазин по месту приобретения изделия. Рисунки в инструкции могут отличаться от данного
устройства и элементов.
Только 42/50PA45**, 50/60PA55**, 50/60PA65**
Пульт ДУ,
Батареи (AAA)
x 3 x 4
Руководство пользователя,
Руководство пользователя
на компакт-диске
Держатель для кабеля
M5 x 16 M4 x 30
Винты для сборки
Защитная крышка Ферритовый сердечник
Ножка подставки Основание подставки Изолятор
Фиксатор кабеля питания Кабель питания
(в зависимости от модели)
Салфетка для протирки
(в зависимости от модели)
Аккуратно протрите корпус
телевизора салфеткой.
(в зависимости от модели)
1
Page 29

Только 42/50PA49**
СБОРКА И ПОДГОТОВКА
5
Пульт ДУ,
Батареи (AAA)
x 3 x 4
M5 x 16 M4 x 30
Винты для сборки
Защитная крышка Ферритовый сердечник
Держатель для кабеля Винт с ушком, настенный
Руководство пользователя,
Руководство пользователя
на компакт-диске
Фиксатор кабеля питания 15-контактный кабель D-sub
(в зависимости от модели)
кронштейн
x 2
Инструкции по
безопасности Pentouch
Кабель питания
Салфетка для протирки
(в зависимости от модели)
Аккуратно протрите корпус
телевизора салфеткой.
ENGРусский
Кабель зарядки Наконечник
Аппаратный ключ пера
Touch pen (AN-TD200)
Ножка подставки Изолятор
Количество наконечников
может отличаться в
зависимости от модели.
Подставка Основание подставки
1
(в зависимости от модели)
Перо (AN-TP300)
Количество перьев может
отличаться в зависимости
от модели.
Page 30

Русский
ANTENNA/
CABLE IN
ENG
СБОРКА И ПОДГОТОВКА
6
1
Руководство по установке антенного изолятора
Используется для установки телевизора в месте, где между GND питания и GND антенного сигнала
есть разница напряжения.
- Если между GND питания и GND антенного сигнала существует разница напряжения, антенный
контакт может нагреваться, что может привести к аварии.
Безопасность эксплуатации телевизора можно повысить, сняв напряжение с телевизионной
антенны. Не отсоединяйте антенный изолятор после его установки.
Внешний вид антенного изолятора:
Разъем 2
Разъем 1
Изолятор
Способ подключения :
Разъем 1 Разъем 2
- Подключите к разъему 1 сигнальный кабель.
- Соедините разъем 2 с входом ANT на задней панели
телевизора.
ANTENNA/
CABLE IN
РС-коаксиальный
кабель
РС-коаксиальный
кабель
Изолятор
Изолятор
STB
ANTENNA/
CABLE IN
“Оборудование, подключенное к защитному заземлению здания через электропроводку или другое
оборудование, соединенное с защитным заземлением - и к системе кабельного телевидения с
помощью коаксиального кабеля, при определенных обстоятельствах может создать опасность
пожара.
Подключение к системе кабельного телевидения, таким образом, должно осуществляться через устройство
с гальванической развязкой ниже определенной полосы частот (гальванический разъединитель, см. EN
60728-11)”
При применении РЧ-изолятора может происходить небольшое снижение мощности сигнала.
Page 31

СБОРКА И ПОДГОТОВКА
ПРИМЕЧАНИЕ
Комплектация вашего продукта может отличаться в зависимости от модели.
Спецификации продуктов или содержание данного руководства может изменяться без
предварительного уведомления ввиду модернизации функций продукта.
Использование ферритового кольца
1 Ферритовый сердечник используется для снижения электромагнитных помех в аудиокабеле ПО.
Три раза намотайте аудиокабель ПК на ферритовый сердечник. Поместите ферритовый
сердечник рядом с телевизором.
[внешним устройством]
[Рис. 1]
2 Ферритовый сердечник используется для снижения электромагнитных помех в кабеле питания.
Один раз намотайте кабель питания на ферритовый сердечник. Поместите ферритовый
сердечник рядом с телевизором и штепсельной вилкой.
10 мм (+ / - 5 мм)
[с телевизором]
(серый)
[Вид ферритового
сердечника в разрезе]
7
ENGРусский
[со штепсельной вилкой]
[Рис. 2]
[с телевизором]
[Вид ферритового
(Черный)
сердечника в разрезе]
3 Ферритовый сердечник используется для снижения электромагнитных помех в
компонентном Y, Pb, Pr, L, R кабеле. Один раз намотайте компонентный кабель Y, Pb, Pr, L,
R на ферритовый сердечник. Поместите ферритовый сердечник рядом с телевизором.
[внешним устройством]
[с телевизором]
(Черный)
10 мм (+ / - 5 мм)
[Рис. 3]
[Вид ферритового
сердечника в разрезе]
4 Используйте ферритовый сердечник для снижения электромагнитных помех в кабеле ЛВС.
Обмотайте кабель ЛВС три раза вокруг ферритового сердечника. Разместите ферритовый
сердечник вблизи телевизора и внешнего устройства.
[с телевизором]
[внешним
A
(Серый)B (Серый)
устройством]
B A A
[Рис. 4]
[Вид ферритового
сердечника в разрезе]
- При наличии одного ферритового сердечника выполните действия, как показано на рис. 1.
- При наличии трех ферритовых сердечников выполните действия, как показано на рис. 1 и рис. 2.
- При наличии четырех ферритовых сердечников выполните действия, как показано на рис. 1, 2 и 3.
- При наличии порта ЛВС см. изображение 4.
Для оптимального соединения кабели HDMI и
USB-устройства должны иметь кайму толщиной
не более 10 мм и шириной не более 18 мм.
Используйте удлинитель с поддержкой USB 2.0,
если кабель USB или флэш-накопитель USB не
входит в порт USB на вашем телевизоре.
*A 10 мм
*B 18 мм
Page 32

СБОРКА И ПОДГОТОВКА
Только
42/50PA49**
50/60PA65**
8
ПРЕДОСТЕРЕЖЕНИЕ
Для обеспечения безопасности и продолжительного срока службы устройства не
используйте детали, выполненные с нарушением авторского права.
В противном случае гарантия на данное устройство не распространяется на ущерб, в том
числе ущерб здоровью, возникший вследствие их использования.
Русский
ENG
Принадлежности, приобретаемые отдельно
Отдельные элементы каталога могут быть изменены или модифицированы без уведомления.
Обратитесь к своему дилеру для покупки таких изделий.
Данное устройство работает только с совместимыми телевизорами компании LG: плазменными
телевизорами.
AN-TP300
Перо, Подставка
Количество перьев и
подставок может отличаться
в зависимости от модели.
Совместимость
AN-TP300
Перо,Наконечникe
42/50PA45** 50/60PA55** 50/60PA65** 42/50PA49**
•
Составляющие и кнопки
ПРИМЕЧАНИЕ
Для снижения энергопотребления переключайте телевизор в режим ожидания. Если какое-
то время телевизор не смотрят, следует выключить его, чтобы снизить потребление энергии.
Энергопотребление во время использования может быть значительно снижено путем
уменьшения яркости изображения. При этом будут снижены и эксплуатационные расходы.
ПРЕДОСТЕРЕЖЕНИЕ
Не наступайте на стеклянную подставку и не подвергайте ее воздействию излишнего
давления. Она может разбиться, что может привести к травме или падению телевизора.
Не двигайте телевизор. Это может повредить пол или изделие.
На экране некоторых моделей может быть тонкая пленка; не снимайте ее.
Page 33

Только 42/50PA45**-ZA~F, 42/50PA49**-ZA~F, 50/60PA55**-ZA~F, 50/60PA65**-ZA~F
Рисунок может отличаться для разных моделей.
Только
42/50PA45**,
Только
42/50PA49**
50/60PA65**
50/60PA55**
Экран
СБОРКА И ПОДГОТОВКА
9
ENGРусский
1
2
3
4
Меню Описание
Разъем для карты
1
памяти PCMCIA
Вход USB
2
HDMI IN 3
3
HDMI / DVI IN 2
4
Пульт дистанционного
управления и
интеллектуальные1
сенсоры
Индикатор питания
(Только для
модели порта
Красный – в режиме
ожидания
Выкл. – телевизор
включен
LAN)
Динамики
Панель подключения
Кнопка Описание
Включает или выключает устройство
Меняет источник ввода
Открывает главное меню или сохраняет вход и выходит из меню
Выбор подсвеченного пункта меню или подтверждение ввода
Настройка громкости
Прокрутка сохраненных программ
1 Интеллектуальный сенсор настраивает изображение в зависимости от условий освещения.
Page 34

Русский
ENG
СБОРКА И ПОДГОТОВКА
10
Только 42/50PA45**-ZG~M, 42/50PA49**-ZG~M, 50/60PA55**-ZG~M, 50/60PA65**-ZG~M
Рисунок может отличаться для разных моделей.
Только
42/50PA45**,
Только
42/50PA49**,
50/60PA65**
50/60PA55**
Экран
1
2
3
4
Меню Описание
Разъем для карты
1
памяти PCMCIA
Вход USB
2
HDMI IN 3
3
HDMI IN 2
4
Пульт дистанционного
управления и
интеллектуальные1
сенсоры
Индикатор питания
(Только для
модели порта
Красный – в режиме
ожидания
Выкл. – телевизор
включен
LAN)
Динамики
Панель подключения
Кнопка Описание
Включает или выключает устройство
Меняет источник ввода
Открывает главное меню или сохраняет вход и выходит из меню
Выбор подсвеченного пункта меню или подтверждение ввода
Настройка громкости
Прокрутка сохраненных программ
1 Интеллектуальный сенсор настраивает изображение в зависимости от условий освещения.
Page 35

Поднятие и перемещение
телевизора
Перед перемещением или поднятием
телевизора ознакомьтесь со следующими
инструкциями во избежание повреждения и
для обеспечения безопасной транспортировки
независимо от типа и размера телевизора.
ПРЕДОСТЕРЕЖЕНИЕ
Всегда избегайте касания экрана, так
как это может привести к повреждению
всего экрана или отдельных пикселов.
Телевизор предпочтительно перемещать
в оригинальной коробке или упаковочном
материале.
Перед перемещением или подъемом
телевизора отключите шнур электропитания
и все кабели.
При удерживании телевизора экран должен
смотреть в другую сторону от вас, чтобы
избежать образования царапин.
СБОРКА И ПОДГОТОВКА
Большой телевизор должны переносить не
менее 2-х человек.
При транспортировке телевизора в
руках удерживайте его, как показано на
следующем рисунке.
При транспортировке не подвергайте
телевизор тряске или избыточной вибрации.
При транспортировке держите телевизор
вертикально, никогда не ставьте на бок и не
наклоняйте влево или вправо.
11
ENGРусский
Крепко удерживайте верхнюю и нижнюю
части рамки телевизора. Не дотрагивайтесь
до прозрачной части, динамика или области
решетки динамика.
Page 36

Русский
ENG
СБОРКА И ПОДГОТОВКА
12
Настройка телевизора
Рисунок может отличаться для разных моделей.
Поставьте телевизор на подставку и установите телевизор на стол или смонтируйте на стену.
Подсоединение подставки
Если не будет производиться монтаж телевизора на стену, подсоедините подставку, следуя
следующим инструкциям.
Только 42/50PA45**, 42/50PA49**, 50/60PA55**, 50/60PA65**
1 2
Ножка подставки
3
3 EA
M5 x 16
Основание подставки
Вид спереди
ПРЕДОСТЕРЕЖЕНИЕ
При подсоединении подставки к
телевизору положите его на стол с
подложенной мягкой тканью или плоскую
поверхность экраном вниз, чтобы
предотвратить появление царапин.
4 EA
M4 x 30
ПРЕДОСТЕРЕЖЕНИЕ
Заверните винты, чтобы предотвратить
наклон телевизора. Не заворачивайте
винты с чрезмерной силой.
Page 37

Для отсоединения подставки
1
4 EA
СБОРКА И ПОДГОТОВКА
13
M4 x 30
ENGРусский
ПРЕДОСТЕРЕЖЕНИЕ
При подсоединении подставки к
телевизору положите его на стол с
подложенной мягкой тканью или плоскую
поверхность экраном вниз, чтобы
предотвратить появление царапин.
2
ПРИМЕЧАНИЕ
Крышка защищает от попадания пыли.
При установке устройства для
настенного монтажа используйте
Защитная крышка
защитную крышку.
3
2 EA
M4 x 30
ПРЕДОСТЕРЕЖЕНИЕ
Заверните винты, чтобы предотвратить
наклон телевизора. Не заворачивайте
винты с чрезмерной силой.
Page 38

Русский
ENG
СБОРКА И ПОДГОТОВКА
14
Закрепление кабелей
Рисунок может отличаться для разных
моделей.
1 Установите фиксатор кабеля питания
и кабель питания. Это поможет
предотвратить случайное отсоединение
кабеля питания.
Фиксатор кабеля питания
2 Соберите и свяжите кабели фиксатором
кабеля.
фиксатором кабеля
ПРЕДОСТЕРЕЖЕНИЕ
Не перемещайте телевизор за
фиксатор кабеля & фиксатор кабеля
питания, т.к. они могут разрушиться и
повредить телевизор.
Page 39

СБОРКА И ПОДГОТОВКА
15
Установка на столе
Рисунок может отличаться для разных
моделей.
Поднимите и прямо установите телевизор
1
на столе.
- Оставьте 10 см. (минимум) зазор от стены
для достаточной вентиляции.
10 см
10 см
Подключитешнурпитаниякрозетке.
2
ПРЕДОСТЕРЕЖЕНИЕ
Не размещайте телевизор вблизи источников
тепла, так как это может привести к пожару
или другим повреждениям.
ПРИМЕЧАНИЕ
Поверните телевизор на 20 градусов
влево или вправо, чтобы улучшить
видимость с места просмотра.
10 см
10 см
Закрепление телевизора на стене (в зависимости от модели)
Рисунок может отличаться для разных
моделей.
Вставьте и затяните винты с ушком или
1
винты для кронштейнов ТВ на задней
панели телевизора.
- Если в местах для винтов с ушком уже
установлены другие винты, то сначала
вывинтите их.
Закрепите кронштейны на стене с помощью
2
винтов.
Согласуйте расположение кронштейна
и болтов с ушком на задней панели
телевизора.
Крепким шнуром надежно привяжите винты
3
с ушком к кронштейнам.
Убедитесь, что веревка располагается
горизонтально.
ENGРусский
ПРЕДОСТЕРЕЖЕНИЕ
При регулировке угла обзора устройства
будьте осторожны, чтобы не прищемить
пальцы.
ПРЕДОСТЕРЕЖЕНИЕ
Следите, чтобы дети не забирались и
не висели на телевизоре.
ПРИМЕЧАНИЕ
Используйте держатель или шкаф
достаточно большой и прочный, чтобы
выдержать вес устройства.
Page 40

СБОРКА И ПОДГОТОВКА / ДОПОЛНИТЕЛЬНАЯ ИНФОРМАЦИЯ В РУКОВОДСТВЕ
A
B
16
Русский
ENG
Крепление на стене
Осторожно прикрепите настенный кронштейн
к задней части телевизора и прикрепите его
к сплошной стене перпендикулярно полу.
Для монтажа телевизора на стены из других
строительных материалов, обращайтесь к
квалифицированным специалистам.
Компания LG рекомендует вызывать
квалифицированного мастера для крепления
телевизора к стене.
10 см
10 см
10 см
10 см
Убедитесь, что винты и настенный кронштейн
отвечают стандартам VESA. В следующей
таблице приведены стандартные габариты для
комплектов настенного крепления.
Принадлежности, приобретаемые отдельно
(Кронштейн для настенного крепления)
Модель 42/50PA45**
VESA (A x B) 400 x 400 600 x 400
Стандартный винт M6 M8
Количество
винтов
Кронштейн для
настенного
крепления
42/50PA49**
50PA55**
50PA65**
4 4
PSW400B,
PSW400BG,
60PA55**
60PA65**
PSW600B,
PSW600BG
ПРЕДОСТЕРЕЖЕНИЕ
Перед перемещением и установкой
телевизора отключите шнур электропитания.
Несоблюдение этого правила может
привести к поражению электрическим током.
Установка телевизора на потолок или
наклонную стену может привести к его
падению и получению травмы. Используйте
разрешенный кронштейн LG для настенного
крепления и обратитесь к местному
поставщику или квалифицированному
специалисту.
Не заворачивайте винты с избыточной
силой, т.к. это может привести к
повреждению телевизора и потере гарантии.
Используйте винты и настенные
кронштейны, отвечающие стандарту VESA.
Гарантия не распространяется на любые
повреждения или травмы в результате
неправильного использования или
использования неправильных аксессуаров.
ПРИМЕЧАНИЕ
Следует использовать винты, указанные в
спецификации для винтов стандарта VESA.
Комплект кронштейна для настенного
крепления снабжается инструкцией
по монтажу и необходимыми
комплектующими.
Длина винтов может зависеть от кронштейна
для стенного крепления. Убедитесь, что
винты правильной длины.
Дополнительная информация приведена в
руководстве к кронштейну для настенного
крепления.
ДОПОЛНИТЕЛЬНАЯ
ИНФОРМАЦИЯ В
РУКОВОДСТВЕ
Просмотр руководства пользователя
Руководство пользователя поставляется в
формате PDF на CD-диске. Установите программу
Adobe Acrobat Reader, чтобы просматривать
руководство пользователя на ПК.
Вставьте прилагаемый CD-диск.
1
На экране автоматически появится вебстраница.
Щелкните Owner’s Manual (Руководство
2
пользователя) на веб-странице.
Ознакомьтесь с руководством пользователя.
3
ПРИМЕЧАНИЕ
Если веб-страница не появляется
автоматически, откройте окно Мой
компьютер и затем щелкните LG и index.
htm, чтобы просмотреть руководство
пользователя.
Page 41

ПУЛЬТ ДИСТАНЦИОННОГО УПРАВЛЕНИЯ
ПУЛЬТ ДИСТАНЦИОННОГО УПРАВЛЕНИЯ
Описания в данном руководстве относятся к кнопкам на пульте дистанционного
управления.
Внимательно прочтите настоящее руководство и правильно используйте
телевизор.
Для замены батарей, откройте крышку батарейного отсека, замените батареи
(1,5 V AAA) соблюдая
Направляйте пульт дистанционного управления на телевизор.
Чтобы снять аккумуляторы, выполните указания по установке аккумуляторов в
обратном порядке.
ПРЕДУПРЕЖДЕНИЕ
Не используйте старые и новые батареи вместе, это может вызвать повреждение пульта ДУ.
Приведенное изображение может отличаться от вашего телевизора.
1
или
и на наклейке в отсеке, и закройте крышку.
или
(ПИТАНИЕ ) Включение и выключение телевизора.
ЭКОНОМИЯ ЭНЕРГИИ
РЕЖИМ ВХОДА Изменение источника входа; включение телевизора.
TV/RAD Выбор радио-, телевизионного канала или канала DTV.
Цифровые кнопки Ввод чисел.
СПИСОК Доступ к списку сохраненных программ.
Q.VIEW Возврат к ранее просматриваемой программе.
+ - Регулировка уровня громкости.
РЕЖИМ FAV Доступ к списку избранных программ.
MUTE Выключение звука.
(P + -)
∧∨
P
PAGE Переход к предыдущему или следующему экрану.
GUIDE
(РУКОВОДСТВО)
SETTINGS Открывает главное меню.
В. МЕНЮ Открывает быстрое меню.
Кнопки навигации
(вверх/вниз/ влево/
вправо)
OK Выбор меню или параметров и подтверждение ввода.
INFO Отображение информации от текущей программе и экране.
EXIT Закрытие всех окон просмотра на экране и возврат к просмотру ТВ.
Цветные кнопки Эти кнопки используются для работы с телетекстом (только для
1
КНОПКИ
ТЕЛЕТЕКСТА
СУБТИТРЫ Повторно вызывает наиболее часто используемые в цифровом
Кнопки управления
(
, , , , )
SIMPLINK
(в
зависимости от модели)
AD Включение или выключение описания аудио.
RATIO Изменяет размеры изображения.
AV MODE
(в
Регулировка яркости экрана для снижения энергопотребления.
Перемещение по списку сохраненных программ.
Показ программы передач.
Прокрутка меню или параметров.
Возврат на предыдущий уровень.
моделей телевизоров, поддерживающих ТЕЛЕТЕКСТ) или для
редактирования программ.
ти кнопки используются для работы с телетекстом.
Дополнительные сведения см. в разделе «Телетекст».
режиме субтитры.
Управление в меню «МОИ МУЛЬТИМЕДИА» или меню SIMPLINK-
совместимых устройств (USB, SIMPLINK).
Доступ к видеоустройствам, подключенным с помощью кабеля HDMI,
через функцию HDMI-CEC.
Открывает меню «SIMPLINK».
Выбор режима AV.
зависимости от модели)
17
ENGРусский
1
Page 42

Русский
ENG
ПРОСМОТР ПРОГРАММЫ
18
ПРОСМОТР ПРОГРАММЫ
Подсоединение антенны
Далее приведена инструкция по подсоединению
антенны для просмотра телеканалов.
Ни в коем случае не подключайте телевизор к
сети, если не закончили подсоединять к нему
оборудование. Это может привести к поломке
телевизора.
Подключите ВЧ-кабель, подсоединенный к
телевизору, к настенной антенной розетке (75
Ω).
ПРИМЕЧАНИЕ
Выберите оптимальное направление
антенны. Это повысит качество
картинки.
Для получения лучшего качества
изображения в зонах с низким уровнем
сигнала, может понадобиться антенна
или усилитель сигнала.
Если после подключения антенны
качество изображение плохое,
направьте антенну в правильном
направлении.
Антенный кабель и преобразователь в
комплект поставки не входят.
Включение телевизора в
первый раз
При первом включении телевизора появляется
экран Заводских настроек. Выберите язык и
произведите основные настройки.
Подключите шнур питания к розетке.
1
Следуя указаниям на экране произведите
3
настройки телевизора согласно своим
предпочтениям.
Язык
Выбор языка отображения.
Настройка режима
Страна
Выбор параметра Домашний
просмотр для просмотра в
домашних условиях.
Выбор страны.
(в зависимости от модели)
Устан. пароль
Часовой пояс
Настройка сети
Автопоиск
ПРИМЕЧАНИЕ
Для стран с неподтвержденными
стандартами цифрового телевещания
некоторые функции цифрового
телевидения, в зависимости от среды
вещания, могут быть недоступны.
Если в качестве страны выбрана Франция,
то пароль меняется с 0, 0, 0, 0 на 1, 2, 3, 4.
Для просмотра изображений в самом
лучшем качестве в домашних условиях
выберите режим Домашний просмотр.
Режим Магазин демо подходит для
использования в торговых помещениях.
После выбора режима Магазин демо
все используемые по умолчанию
настройки режима Магазин демо будут
восстановлены в течение 5 минут.
Установите пароль.
(При выборе "Франция" или
"Италия" в пункте "Страна")
Выбор часового пояса и функции
перехода на летнее время.
(при выборе в списке стран
России)
(При наличии порта ЛВС) для
отображения выбирается сетевая
настройка.
Автоматическое
сканирование и сохранение
доступных программ.
Если телевизор находится в режиме ожидания,
2
нажмите кнопку (ПИТАНИЕ) , чтобы включить
его.
Экран заводских настроек отображается при
первом включении телевизора.
ПРИМЕЧАНИЕ
Доступ к заводским настройкам
можно получить с помощью ОПЦИИ в
главном меню.
4 После завершения основных настроек
нажмите OK.
ПРИМЕЧАНИЕ
Если начальная настройка не завершена,
соответствующее уведомление будет
отображаться при каждом включении
телевизора.
Если не планируется использовать
телевизор в течение длительного периода
времени, отсоедините шнур питания от
розетки электросети.
5 Чтобы выключить телевизор, нажмите
(ПИТАНИЕ)
.
Page 43

УСТАНОВЛЕНИЕ СОЕДИНЕНИЙ / УВЕДОМЛЕНИЕ О ПРОГРАММНОМ ОБЕСПЕЧЕНИИ С ОТКРЫТЫМ ИСХОДНЫМ КОДОМ
3
19
УСТАНОВЛЕНИЕ СОЕДИНЕНИЙ
Подключите к телевизору различные внешние устройства и переключайте режимы источников для
выбора внешнего устройства. Для получения дополнительной информации о подключении внешнего
устройства см. руководства пользователя каждого устройства.
Доступно подключение следующих внешних устройств: ресиверов HD, DVD-проигрывателей,
видеомагнитофонов, аудиосистем, устройств хранения данных USB, ПК, игровых приставок и т. д.
ПРИМЕЧАНИЕ
При записи программы с помощью устройства записи DVD или видеомагнитофона
проверьте подключение к телевизору устройства записи DVD или видеомагнитофона
с помощью кабеля входного сигнала телевизора. Для получения дополнительной
информации о записи см. руководство пользователя подключенного устройства.
Процесс подключения внешнего устройства отличается в зависимости от модели.
Подключите внешние устройства независимо от порядка расположения разъемов
телевизора.
ПОДKЛЮЧЕНИЕ УСТРОЙСТВА
Приведенное изображение может отличаться от изображения на вашем телевизоре.
Инструкции по подключению дополнительного оборудования см. в разделе «Настройка внешнего оборудования»
в руководстве на компакт-диске.
ENGРусский
Зa
дняя cтopoнa DVD/STB
DVD/STB
2
Kабель
3
питания
2
Подключение видеомагнитофона
USB IN
IN
1
Подключение
антенны
или
УВЕДОМЛЕНИЕ О ПРОГРАММНОМ ОБЕСПЕЧЕНИИ
С ОТКРЫТЫМ ИСХОДНЫМ КОДОМ
Для получения исходного кода по условиям лицензий GPL, LGPL, MPL и других лицензий с открытым
исходным кодом, который содержится в данном продукте, посетите веб-сайт: http://opensource.lge.
com.Кроме исходного кода, для загрузки доступны все соответствующие условия лицензии, отказ от
гарантий и уведомления об авторских правах.
LG Electronics также предоставляет исходный код на компакт-диске за плату, которая покрывает
стоимость выполнения этой рассылки (в частности, стоимость медианосителя, пересылки и
обработки) посредством запросов в LG Electronics по адресу: opensource@lge.com.
Page 44

Русский
ENG
ВЕС / УСТРАНЕНИЕ НЕИСПРАВНОСТЕЙ
20
ВЕС
42PA45** 42PA49**
42PA4500-ZF / 42PA450T-ZF
МОДЕЛИ
Вес С подставкой 20,6 kg 20,6 kg
Без подставки 19,0 kg 19,0 kg
МОДЕЛИ
Вес С подставкой 28,2 kg 28,2 kg
Без подставки 25,8 kg 25,8 kg
МОДЕЛИ
Вес С подставкой 28,8 kg 28,8 kg
Без подставки 26,4 kg 26,4 kg
МОДЕЛИ
Вес С подставкой 40,6 kg 40,6 kg
Без подставки 36,4 kg 36,4 kg
42PA4500-ZM / 42PA450T-ZM
42PA4510-ZA / 42PA451T-ZA
42PA4510-ZG / 42PA451T-ZG
42PA4520-ZC / 42PA452T-ZC
42PA4520-ZJ / 42PA452T-ZJ
50PA45** 50PA49**
50PA4500-ZF / 50PA450T-ZF
50PA4500-ZM / 50PA450T-ZM
50PA4510-ZA / 50PA451T-ZA
50PA4510-ZG / 50PA451T-ZG
50PA4520-ZC / 50PA452T-ZC
50PA4520-ZJ / 50PA452T-ZJ
50PA55** 50PA65**
50PA5500-ZB / 50PA550T-ZB
50PA5500-ZH / 50PA550T-ZH
60PA55** 60PA65**
60PA5500-ZB / 60PA550T-ZB
60PA5500-ZH / 60PA550T-ZH
42PA4900-ZE / 42PA490T-ZE
42PA4900-ZL / 42PA490T-ZL
50PA4900-ZE / 50PA490T-ZE
50PA4900-ZG / 50PA490T-ZG
50PA4900-ZL / 50PA490T-ZL
50PA6500-ZA / 50PA650T-ZA
50PA6500-ZG / 50PA650T-ZG
50PA6520-ZF / 50PA652T-ZF
50PA6520-ZM / 50PA652T-ZM
60PA6500-ZA / 60PA650T-ZA
60PA6500-ZG / 60PA650T-ZG
Указанные выше характеристики продуктов могут быть изменены без предварительного
уведомления в связи с модернизацией функций устройства.
УСТРАНЕНИЕ НЕИСПРАВНОСТЕЙ
Общая аудитория
Проблема Решение
Невозможно управлять
телевизором с помощью пульта
дистанционного управления.
Отсутствуют изображение и звук.Убедитесь, что устройство включено.
Изображение появляется не сразу
после включения телевизора.
Не удалось подключить внешнее
устройство.
Телевизор неожиданно
выключается.
Проверьте датчик дистанционного управления на продукте и повторите попытку.
Убедитесь в отсутствии препятствий между продуктом и пультом дистанционного
управления.
Убедитесь, что батареи находятся в рабочем состоянии и правильно установлены
( к , к ).
Убедитесь, что шнур питания подключен к розетке.
Убедитесь, что розетка работает, подключив к ней другие продукты.
При включении телевизора изображение появляется не сразу. Это
нормальное явление. Если изображение не появится через несколько
минут, отключите телевизор от розетки на 30 секунд и повторите
попытку. Если изображение так и не появилось, обратитесь в местный
авторизованный сервисный центр.
Обратитесь к разделу Обзор подключений и подключите внешнее
устройство.
Проверьте параметры управления энергопотреблением. Возможно,
произошел сбой в сети электропитания.
Убедитесь, что в меню «Время» включена функция Auto sleep. Обратитесь
к разделу Таймер сна .
Если при включении телевизора отсутствует сигнал, телевизор
выключится автоматически через 15 минут бездействия.
Page 45

Аудио
Проблема Решение
Во время показа изображения
отсутствует звук.
Из одного из динамиков исходит
шум или динамик не работает.
Видео
Проблема Решение
Отображается черно-белое
изображение или низкое качество
цветопередачи.
На экране появляются горизонтальные
или вертикальные полосы, или
изображение размыто
Линии или штрихи на изображении
После выключения устройства
на экране остается остаточное
изображение (призрачное).
Питание включено, но отображается
очень темное изображение.
На экране отображается надпись
«Нет сигнала».
На экране отобразятся черные
точки.
Нарушено смещение экрана.
На фоне отображаются тонкие линии.
Видны горизонтальные искажения
или символы размыты.
Низкое качество изображения
некоторых каналов.
Pentouch
Проблема Решение
Перо не работает.
УСТРАНЕНИЕ НЕИСПРАВНОСТЕЙ
Нажмите кнопку + или - .
Убедитесь, что не включен режим БЕЗ ЗВУКА.
Переключите канал. Возможно, проблема связана с каналом.
Убедитесь, что аудиокабели правильно подключены.
Изменение влажности или температуры окружающей среды может привести к
появлению необычного шума при включении или выключении устройства.
Продукт работает исправно.
Настройте параметры в меню КАРТИНКА .
Обеспечьте достаточное расстояние между устройством и другими
электронными устройствами.
Переключите канал. Возможно, проблема связана с каналом.
Убедитесь в отсутствии источников помех, например других электрических
устройств или электроинструментов.
Убедитесь, что антенна направлена в необходимом направлении, или
направьте антенну.
Возможно, что пикселы были повреждены в результате длительного
отображения неподвижного изображения («прогорание» изображения). Чтобы
избежать повреждения пикселов, используйте экранную заставку.
Отрегулируйте яркость и контрастность в меню КАРТИНКА .
Убедитесь, что другие устройства надежно подключены к телевизору с
помощью сигнального кабеля.
Проверьте источник входного сигнала, нажав кнопку ВХОД.
Несколько пикселов отображаются красным, зеленым, белым или черным, что
может являться характеристикой ЖК-дисплея.
Это нормальное явление.
Настройте параметры позиции в меню КАРТИНКА .
Убедитесь, что продукт поддерживает разрешение и частоту кадров
видеоплаты. Если установлена неподдерживаемая частота, в настройках
отображения внешнего устройства выберите рекомендуемое разрешение.
Убедитесь, что видеокабели подключены.
Настройте параметры фазы в меню КАРТИНКА. Обратитесь к разделу ЭКРАН.
Переключите канал. Возможно, проблема связана с каналом.
Сигнал станции слишком слабый. Направьте антенну в правильном направлении.
Убедитесь в отсутствии источников помех, например других электрических
устройств или электроинструментов.
Убедитесь, что вы включили режим Pentouch с помощью пульта ДУ.
Убедитесь, что к компьютеру подключен аппаратный ключ Pentouch, и горит
красный светодиодный индикатор.
Нажмите на пере кнопку /Home (Питание/Главное) меню, чтобы убедиться, что
перо включено.
Убедитесь, что подключение пера к устройству настроено. (Подключение
настроено верно, если при нажатии на пере кнопки /Home (Питание/Главное)
меню загорается красный светодиодный индикатор.)
Включите режим просмотра экрана компьютера только на ТВ.
21
ENGРусский
При использовании Pentouch экран
ТВ выглядит не так как обычно.
Касание пером происходит в
неверных местах.
Движение пера недостаточно
плавное.
Убедитесь, что компьютер правильно подсоединен к ТВ.
Убедитесь, что вы используете оптимальное разрешение.
Установка формата изображения телевизора на Just Scan (Исходный).
Включите режим просмотра экрана компьютера только на ТВ.
При подключении с помощью кабеля RGB PC если точка, которой вы касаетесь
пером на экране ТВ, не совпадает с точкой, отображаемой в качестве
выбранной на экране компьютера, для настройки экрана с помощью пульта
ДУ выберите [Home/Главное меню] → [КАРТИНКА] → [ЭКРАН] (RGB), затем
[Автонастройка].
Проверьте, не находятся ли компьютер и ТВ слишком далеко друг от друга.
Проверьте, не находится ли между компьютером и ТВ слишком много
препятствий.
Убедитесь, что на компьютере не работает слишком много других приложений.
(Не запускайте другие приложения во время использования функции Pentouch .)
Page 46

Page 47

ПАЙДАЛАНУШЫ НҰСҚАУЛЫҒЫ
плазмалық теледидар
Құрылғыны қолданар алдында нұсқаулықты мұқият
оқып, анықтамалық құрал ретінде қолдану үшін
сақтап қойыңыз.
PA45**
PA49**
PA55**
PA65**
www.lg.com
Page 48

Қауiпсiздiк техникасы ережелерi
2
• Құрылғыны пайдаланар алдында осы қауiпсiздiк ережелерiн зер салып оқып шығуыңызды өтiнемiз.
• Бұл нұсқаулықтағы суреттер сiз сатып алған құрылғыдан сәл басқаша болуы мүмкiн, себебi, олар тек
нұсқаулар түсiнiктi болу үшiн көмек ретiнде берiлген.
Қазақша
ЕСКЕPT
AБAЙ БОЛЫҢЫЗ
У
Егер сiз ескерту хабарын назарға алмасаңыз, қатты жарақат алуыңыз мүмкiн
немесе тiптi жазатайым оқиға немесе өлiмге соқтыру қаупi бар.
Егер сiз ескерту хабарын назарға алмасаңыз, сiз жеңiл жарақат алуыңыз мүмкiн
немесе құрылғыға зақым келуi мүмкiн.
ҚҰРЫЛҒЫНЫ ОРНАТУ КЕЗIНДЕГI САҚТЫҚ
ШАРАЛАРЫ
ЕСКЕPT
A
БAЙ БОЛЫҢЫ
У
Электр жылытқыштары сияқты жылу
көздерiнен алыс ұстаңыз.
- Әйтпесе электр тогы соғуы, өрт шығуы, құрылғы
дұрыс жұмыс iстемеуi немесе пiшiнi бүлiнуi мүмкiн.
Құрылғы дымқыл тартуы мүмкiн ванна
бөлмесi сияқты қандай да бiр ылғалды жерде
оны пайдаланбаңыз.
- Әйтпесе бұл өрт шығуына немесе электр
тогы соғуына себеп болуы мүмкiн.
Егер сiз монитордан түтiн иiсiн немесе басқа иiс сезсеңiз
немесе бөтен дыбыс естiсеңiз, қуат көзiне қосу сымын
ажыратыңыз да, қызмет көрсету орталығына хабарласыңыз.
- Егер сiз тиiстi сақтық шараларын қабылдамастан пайдалана
берсеңiз, электр тогы соғуы немесе өрт шығуы мүмкiн.
З
Егер сiз құрылғыны жерге құлатып алсаңыз немесе оның
қорабы сынса, оны өшiрiп, қуат көзiне қосу сымын ажыратыңыз.
- Егер сiз тиiстi сақтық шараларын қабылдамастан
пайдалана берсеңiз, электр тогы соғуы немесе өрт шығуы
мүмкiн. қызмет көрсету орталығына хабарласыңыз.
Құрылғыны тура түскен күн сәулесiнен
аулақ ұстаңыз.
- Құрылғыға зақым келуi мүмкiн.
Осы құрылғыны кiтап шкафы немесе сөре
сияқты құрастырмалы қондырғының iшiне
қоймаңыз.
- Желдетiлу талап етiледi.
ЭЛЕКТР ҚУАТЫНА ҚАТЫСТЫ САҚТЫҚ
ШАРАЛАРЫ
ЕСКЕPT
A
БAЙ БОЛЫҢЫ
Қуат көзiне қосу сымын оратылып, бұратылып,
қысылып, есiкке қыстырылып немесе үстiнен
басылып қалу сияқты физикалық немесе
механикалық зақымнан сақтаңыз. Әсiресе
ашаларға. қабырғалық розеткаларға және сым
электр аспабынан шығатын жер ерекше назар
аударыңыз.
У
Қуат көзi кабелiн жерге қосылған ток
көзiне жалғауды ұмытпаңыз.
- Олай болмаса сiздi электр соғуы немесе
жарақат алуыңыз мүмкiн.
Қуат көзi ашасын дымқыл қолмен ұстамаңыз. Сонымен
бiрге, егер аша iстiкшесi дымқыл немесе шаң басқан
болса, қуат көзi ашасын Әбден құрғатыңыз немесе
шаңын сүртiңiз.
- Олай етпесеңiз, артық ылғалдың салдарынан сiздi
электр тогы соғуы мүмкiн.
Дауыл соққан немесе найзағай жарқыраған кезде қуат
көзi сымын немесе сигнал кабелiн ажыратып қойыңыз.
- Олай болмаса сiздi электр соғуы немесе өрт шығуы
мүмкiн.
Қуат кабелінің бір ұшы қабырға розеткасына
сұғылып тұрғанда, екінші ұшына өткізгіш (металл
таяқша сияқты) енгізбеңіз. Оған қоса, қуат
кабелін қабырға розеткасына жалғай салысымен
ұстамаңыз. Сізді электр тогы соғуы мүмкін.
З
Бұл құрылғы айнымалы ток қабыға шығысына қосулы
кезде құрылғыны ҚОСУ арқылы өшiретiн болсаңыз да,
ол айнымалы ток қорегiнен ажыратылмайды.
ҚҰРЫЛҒЫНЫ ЖЫЛЖЫТҚАН КЕЗДЕГI САҚТЫҚ
ШАРАЛАРЫ
ЕСКЕPT
Құрылғыны токтан ажырат уды
ұмытпаңыз. Құрылғыны жылжытпас
бұрын барлық сымдарды шешiп
тастауды ұмытпаңыз.
- Әйтпесе сiздi электр тогы соғуы немесе
өнiмге зақым келуi мүмкiн.
A
БAЙ БОЛЫҢЫ
Құрылғыны жылжытқан кезде оны соғып
алмаңыз.
- Әйтпесе сiздi электр тогы соғуы немесе өнiмге
зақым келуi мүмкiн.
Панелiн алдыңғы жаққа қаратуды ұмытпаңыз және
оны жылжытқанда екi қолмен ұстаңыз.
- Егер сiз құрылғыны құлатып алсаңыз, зақымданған
құрылғы электр тогы соғуына немесе өрт
шығуына себеп болуы мүмкiн. Жөндеу үшiн
қызмет көрсету орталығына хабарласыңыз.
У
З
ҚҰРЫЛҒЫНЫ ПАЙДАЛАНУ КЕЗIНДЕГI САҚТЫҚ
ШАРАЛАРЫ
ЕСКЕPT
Құрылғыны өз бетiңiзше бөлшектемеңiз,
жөндемеңiз және өзгертпеңiз.
- Өйткенi өрт шығуы немесе электр тогы
соғуы мүмкiн.
- Тексеру, дәлдеу немесе жөндеу үшiн қызмет
көрсету орталығына хабарласыңыз.
Өрт шығу не электр тогы соғу қатерiн
азайту үшiн осы құрылғыға жаңбыр не
ылғал тигiзбеңiз.
Бұл аппаратқа ештеңенiң тамшылауына
не шашырауына жол бермеу керек және
аппараттың үстiне ваза сияқты iшiнде
сұйықтық бар заттар қоюға болмайды.
Кез келген ағымдық жөндеуге байланысты
бiлiктi қызмет көрсетушi мамандарға жүгiнiңiз.
Ағымдық жөндеу құрылғыға кез келген түрде
зақым келген жағдайда, мысалы, қуат көзiне
қосу сымы немесе ашасы зақымданғанда,
құрылғының iшiне сұйық зат ағып кетсе немесе
қатты заттар түсiп кеткенде, құрылғыға жаңбыр
немесе ылғал тисе, ол дұрыс жұмыс iстемесе
немесе құлап кеткен жағдайда қажет болады.
ТЕЛЕДИДAР БЕЙНЕБЕТіНДЕГі “БЕЙНЕНіҢ КҮЙіП КЕТУі/КҮЙіП
КЕТУДіҢ” AЛДЫН AЛУ ҮШіН МAҢЫЗДЫ АПAРAТ
- Егер орнатылған бейне (мысалы, логотип, бейнебет мәзiрлерi,
бейне ойын, компьютер дисплейi және телемәтiн беттерi)
теледидарда ұзақ уақыт бойы көрсетiлсе, оның iзi бейнебетте
уақытша қалып қоюы мүмкiн. Бұл құбылыс “бейненiң күйiп кетуi”
немесе “күйiп кету” деген атаумен белгiлi. Бейненiң күйiп кетуiне
дайындаушы кепiлдiгi берiлмейдi.
- Бейненiң күйiп кетуiн алдын алу үшiн орнатылған бейненiң
теледидар бейнебетiне шамадан тыс уақыт көрсетiлiп тұруына
жол бермеңiз (СКД үшiн 2 немесе одан көп сағат, плазмалық
теледидар үшiн 1 немесе одан да көп сағат).
- Егер 4:3 бейне пiшiмi теңшелiмiн ұзақ уақыт бойы қолданатын
болсаңыз, бейненiң күюi теледидардың кең бейнебеттiк пiшiм
аумағында да пайда болуы мүмкiн.
У
Page 49

МАЗМҰНЫ
3 МАЗМҰНЫ
4 ОРНАТУ ІС РӘСІМІ
4 ҚҰРАСТЫРУ ЖӘНЕ ДАЙЫНДАУ
4 Орамасынан шығару
8 Бөлек сатылады
8 Бөлшектер мен түймелер
11 Теледидарды көтеру және жылжыту
12 Теледидардың параметрлерін орнату
12 - Тіректі тағу
14 - Кабельдерді жинау
15 - Үстелге орнату
16 - Қабырғаға орнату
16 ПАЙДАЛАНУШЫ НҰСҚАУЛЫҒЫНА
ҚОСЫМША АҚПАРАТ
МАЗМҰНЫ
3
Қазақша
17 ҚАШЫҚТАН БАСҚАРУ ҚҰРАЛЫ
18 ТЕЛЕДИДАР ҚАРАУ
18 Антеннаны жалғау
18 Теледидарды бірінші рет қосу
19 БАЙЛАНЫС ОРНАТУ
19 ҚұPылғыңызды ҚOCу
19 БАСТАПҚЫ КОДЫ АШЫҚ
БАҒДАРЛАМАЛЫҚ ҚҰРАЛ
ЕСКЕРТУІ
20 САЛМАҒЫ
20 АҚАУЛЫҚТАРДЫ ЖОЮ
Page 50

ОРНАТУ ІС РӘСІМІ / ҚҰРАСТЫРУ ЖӘНЕ ДАЙЫНДАУ
4
ОРНАТУ ІС РӘСІМІ
1 Буманы ашып, барлық жабдықтардың бар екендігін тексеріңіз.
2 Тіректі теледидарға тіркеңіз.
3 Сыртқы құрылғыны теледидарға қосыңыз.
ҚазақшаҚазақша
ҚҰРАСТЫРУ ЖӘНЕ ДАЙЫНДАУ
Орамасынан шығару
Өнімнің қорабында төмендегі заттардың бар екенін тексеріңіз. Кейбір қосалқы құралдары жетіспесе,
өнімді сатып алған жергілікті дилерге хабарласыңыз. Осы нұсқаулықтағы суреттер өнімнің және бірге
берілген заттардың нақты түрінен өзгеше болуы мүмкін.
Тек 42/50PA45**, 50/60PA55**, 50/60PA65**
Қашықтан басқару құралы,
Батареялар (AAA)
x 3 x 4
M5 x 16 M4 x 30
Құрастыру бұрандасы
Пайдаланушы нұсқаулығы,
Ықшам дискідегі нұсқаулық
Қуат сымының Ұстағышы Қуат сымы
Кабель Ұстағышы
Қорғау Қақпағы Феррит өзегі
(үлгіге байланысты)
Тірек корпусы Тірек негізі Оқшаулағыш
Сүртетін шүберек
(үлгіге байланысты)
Теледидардың сыртындағы дақтарды
шүберекпен ақырын сүртіп алыңыз.
(в зависимости от модели)
1
Page 51

Тек 42/50PA49**
ҚҰРАСТЫРУ ЖӘНЕ ДАЙЫНДАУ
5
Қашықтан басқару құралы,
Батареялар (AAA)
Пайдаланушы нұсқаулығы,
Ықшам дискідегі нұсқаулық
x 3 x 4
M5 x 16 M4 x 30
Қуат сымының Ұстағышы 15 істікшелі D-sub сигнал кабелі
Құрастыру бұрандасы
Қорғау Қақпағы Феррит өзегі
(үлгіге байланысты)
x 2
Кабель ұстағышы Сақиналы болт, қабырға
қапсырмасы
Pentouch сақтық
нұсқаулары
ҚазақшаҚазақша
Қуат сымы
Сүртетін шүберек
(үлгіге байланысты)
Теледидардың сыртындағы
дақтарды шүберекпен
ақырын сүртіп алыңыз.
Зарядтау кабелінің ұшы Ұш
Ұш саны үлгіге қарай әр
түрлі болуы мүмкін.
Сенсорлық қалам кілті
Қондырғы(43-бетті қараңыз) Тірек негізі
(AN-TD200)
Тірек корпусы Оқшаулағыш
(в зависимости от модели)
Сенсорлы қалам (AN-TP300)
Сенсорлық қалам саны үлгіге
қарай әр түрлі болуы мүмкін.
1
Page 52

ҚҰРАСТЫРУ ЖӘНЕ ДАЙЫНДАУ
ANTENNA
IN
6
1 Антеннаның оқшаулағышын орнату нұсқаулығы
Бұл нұсқаулықты қуаттың жерге қосылуы мен антенна сигналының жерге қосылуы арасындағы кернеу
айырмашылығы болғанда теледидарды орнату үшін пайдаланыңыз.
-Егер қуаттың жерге қосылуы мен антенна сигналының жерге қосылуы арасындағы кернеу
айырмашылығы болса, антенна түйіспесі қызып кетіп, нәтижесінде келеңсіз оқиға орын алуы мүмкін.
ТД қарап отырғанда қауіпсіздікті арттыру үшін, ТД антеннасынан қуат кернеуін тиімді түрде
шығаруға болады. Орнатқаннан кейін антенна оқшаулағышын ажыратпаңыз.
Антенна оқшаулағыштың сырты:
2-штепсель
1-штепсель
Қазақша
Оқшаулағыш
Байланыс әдісі:
1-штепсель 2-штепсель
- 1-штепсельді сигнал кабеліне жалғаңыз.
- 2-штепсельді ТД артындағы ANT кіріс ұясына жалғаңыз.
ANTENNA/
CABLE IN
РЖ-коаксиалды сым Оқшаулағыш
ANTENNA/
CABLE IN
РЖ-коаксиалды сым Оқшаулағыш
Теледидар
қондырғысы
«Ғимарат құрылысындағы қорғау жер қосылысына розетка арқылы немесе қорғау жер қосылысына
жалғанатын басқа жабдық арқылы жалғанған, сондай-ақ, коаксиалды кабельді қолданатын кабельді
тарату жүйесіне жалғанған жабдық кейбір жағдайларда өрт шығаруы мүмкін.
Кабельді тарату жүйесімен орнатылған байланыс белгілі бір жиілік диапазонынан (гальваникалық
оқшаулағыш, EN 60728-11 стандартын қараңыз) төмен электр оқшаулауын қамтамасыз ететін құрылғы
арқылы болуы керек»
РЖ оқшаулағышын қолданғанда, сәл сигнал сезімталдығының жоғалуы орын алуы мүмкін.
Page 53

ҚҰРАСТЫРУ ЖӘНЕ ДАЙЫНДАУ
ЕСКЕРТПЕ
Өніммен бірге берілген заттар оның үлгісіне қарай әртүрлі болуы мүмкін.
Өнім сипаттамалары немесе осы нұсқаулықтың мазмұны өнім функцияларының
жетілдірілуіне байланысты алдын ала ескертусіз өзгертілуі мүмкін.
Феррит өзегін пайдалану әдісі
1 Компьютердің дыбыс кабеліндегі электрмагниттік кедергілерді азайту үшін феррит өзегін
пайдаланыңыз.
Компьютердің дыбыс кабелін феррит өзегіне үш рет ораңыз. Феррит өзегін теледидарға
жақын қойыңыз.
[Сыртқы құрылғыға]
[1-сурет]
2 Қуат кабеліндегі электрмагниттік кедергілерді азайту үшін феррит өзегін пайдаланыңыз.
Қуат кабелін феррит өзегіне бір рет ораңыз. Феррит өзегін теледидарға және қабырға
розеткасына жақын қойыңыз.
10 мм (+ / - 5 мм)
[теледидарға]
(Сұр)
[Феррит өзегінің көлденең
кесілгендегі көрінісі]
7
Қазақша
[қабырға розеткасына]
[2-сурет]
[теледидарға]
[Феррит өзегінің
түйісетін жері]
(Қара)
3 Феррит өзегін құрамдас Y, Pb, Pr, L, R кабелінде электрмагниттік кедергіні азайту үшін
пайдаланыңыз. Құрамдас Y, Pb, Pr, L, R кабелін феррит өзегіне бір рет ораңыз.
[Сыртқы құрылғыға]
10 мм (+ / - 5 мм)
[3-сурет]
[теледидарға]
(Қара)
[Феррит өзегінің
түйісетін жері]
4 Феррит өзегін LAN кабеліндегі электрмагниттік кедергіні азайту үшін пайдаланыңыз. LAN
кабелін феррит өзегіне үш рет ораңыз. Феррит өзегін теледидар мен сыртқы құрылғыға
жақын қойыңыз.
A (Сұр) B (Сұр)
[теледидарға]
B A A
[4-сурет]
[Сыртқы
құрылғыға]
[Феррит өзегінің
түйісетін жері]
- Феррит өзегі біреу болса, 1-суретте көрсетілген нұсқауларды орындаңыз.
- Үш феррит өзегі болса, 1 және 2-суреттерде көрсетілген нұсқауларды орындаңыз.
- Төрт феррит өзегі болса, 1, 2 және 3-суреттерде көрсетілген нұсқауларды орындаңыз.
- LAN порты болса, 4-суретте көрсетілген нұсқауларды қосымша орындаңыз.
Оңтайлы байланыс болу үшін, HDMI кабельдері
және USB құрылғылары ұштарының қалыңдығы
10 мм-ден және ені 18 мм-ден аспауы керек. USB
кабелі немесе USB жад істікшесі теледидардың
USB ұясына сыймаса, USB 2,0 қолдайтын ұзарту
кабелін пайдаланыңыз.
*A 10 мм
*B 18 мм
Page 54

ҚҰРАСТЫРУ ЖӘНЕ ДАЙЫНДАУ
Тек
42/50PA49**
50/60PA65**
8
ЕСКЕРТУ
Қауіпсіздік мақсатында және өнімнің жарамдылық мерзімін ұзарту үшін, қолдан жасалған
өнімдерді пайдаланбаңыз.
Қолдан жасалған өнімдерді пайдаланудан туындаған зақымдар немесе жарақаттар
кепілдікке кірмейді.
Қазақша
Бөлек сатылады
Сапаны арттыру мақсатында, бөлек сатылатын бөлшектерді ешбір ескертусіз ауыстыруға немесе
өзгертуге болады. Осы заттарды сатып алу үшін, дилеріңізге хабарласыңыз. Бұл құрылғы тек
үйлесімді LG плазмалық теледидарларымен жұмыс істейді.
AN-TP300
Сенсорлық қалам, қондырғы
Сенсорлық қалам,Ұш саны
үлгіге қарай әр түрлі болуы
мүмкін.
Үйлесімділік
AN-TP300
Сенсорлық қалам, қондырғы
42/50PA45** 50/60PA55** 50/60PA65** 42/50PA49**
•
Бөлшектер мен түймелер
ЕСКЕРТПЕ
Тұтынылатын қуат мөлшерін азайту үшін теледидарды күту режиміне қоюға болады. Егер
біраз уақыт көрілмейтін болса, теледидарды өшіріп қою қажет. Бұл тұтынылатын қуат
мөлшерін азайтады.
Сурет жарықтығының деңгейі төмендетілсе, қолданыс үстінде тұтынылатын қуат мөлшері
айтарлықтай азайып, бұл өз ретінде жалпы қуат ақысын азайтады.
ЕСКЕРТУ
Әйнек тіректің үстіне баспаңыз немесе оның соққы алуына жол бермеңіз. Ол сынып, шыны
бөлшектері жарақат туғызуы немесе теледидар құлауы мүмкін.
Теледидарды сүйремеңіз. Еден немесе өнім зақымдалуы мүмкін.
Кейбір үлгілердің экранына жұқа үлдір жабыстырылған, оны алуға болмайды.
Page 55

ҚҰРАСТЫРУ ЖӘНЕ ДАЙЫНДАУ
Тек 42/50PA45**-ZA~F, 42/50PA49**-ZA~F, 50/60PA55**-ZA~F, 50/60PA65**-ZA~F
Көрсетілген сурет теледидарыңыздан өзгеше болуы мүмкін.
Тек
42/50PA45**,
42/50PA49**
Тек
50/60PA65**
50/60PA55**
Screen («Экран»)
9
1
Қашықтан басқару
құралы және зерделі1
сенсорлар
2
Қуат көрсеткіші
3
4
Мәзір Сипаттама
PCMCIA
1
картасының ұясы
USB кірісі
2
HDMI IN 3
3
HDMI / DVI IN 2
4
(Тек LAN ПОРТЫ
Қызыл: күту
режимінде
Өшірулі:
теледидар
қосылады
үлгісінде)
Қазақша
Динамиктер
Қосылым панелі
Түйме Сипаттама
Қуатты қосады немесе өшіреді
Кіріс көзін өзгертеді
Негізгі мәзірлерге кіреді немесе енгізілген ақпаратты сақтап, мәзірлерден шығады
Белгіленген мәзір опциясын таңдайды немесе енгізілген ақпаратты растайды
Дыбыс деңгейін реттейді
Сақталған бағдарламалар ішінде жылжиды
1 Зерделі сенсор: қоршаған ортаға сәйкес бейне сапасын реттейді.
Page 56

ҚҰРАСТЫРУ ЖӘНЕ ДАЙЫНДАУ
10
Тек 42/50PA45**-ZG~M, 42/50PA49**-ZG~M, 50/60PA55**-ZG~M, 50/60PA65**-ZG~M
Көрсетілген сурет теледидарыңыздан өзгеше болуы мүмкін.
Тек
42/50PA45**,
42/50PA49**,
Тек
50/60PA65**
50/60PA55**
Screen («Экран»)
Қазақша
1
Қашықтан басқару
құралы және зерделі1
сенсорлар
2
3
Қуат көрсеткіші
4
Мәзір Сипаттама
PCMCIA
1
картасының ұясы
USB кірісі
2
HDMI IN 3
3
HDMI IN 2
4
(Тек LAN ПОРТЫ
Қызыл: күту
режимінде
Өшірулі:
теледидар
қосылады
үлгісінде)
Динамиктер
Қосылым панелі
Түйме Сипаттама
Қуатты қосады немесе өшіреді
Кіріс көзін өзгертеді
Негізгі мәзірлерге кіреді немесе енгізілген ақпаратты сақтап, мәзірлерден шығады
Белгіленген мәзір опциясын таңдайды немесе енгізілген ақпаратты растайды
Дыбыс деңгейін реттейді
Сақталған бағдарламалар ішінде жылжиды
1 Зерделі сенсор: қоршаған ортаға сәйкес бейне сапасын реттейді.
Page 57

Теледидарды көтеру және
жылжыту
Теледидарды жылжытқанда немесе көтергенде,
сырып немесе зақымдап алмай, түріне және
көлеміне қарамастан қауіпсіз түрде тасымалдау
үшін, төмендегі ақпаратты оқыңыз.
ЕСКЕРТУ
Экранды қолмен ұстамаңыз, экранға
немесе бейнені құрайтын кейбір
пиксельдерге зақым келуі мүмкін.
Теледидарды зауытта салынған қорабында
немесе орамасында тасымалдаған жөн.
Теледидарды жылжыту немесе көтеру
үшін, алдымен қуат сымын және барлық
кабельдерді ажырату керек.
Теледидарды ұстағанда, сырылып қалмауы
үшін, экран сыртқа қарап тұру керек.
ҚҰРАСТЫРУ ЖӘНЕ ДАЙЫНДАУ
Үлкен теледидарды кемінде 2 адам
тасымалдауы керек.
Теледидарды қолмен тасымалдағанда,
төмендегі суретте көрсетілгендей ұстау
керек.
Тасымалдағанда, теледидарды қатты
шайқамаңыз.
Тасымалдағанда, теледидарды тігінен
ұстаңыз. Жанына жатқызбаңыз және сол
немесе оң жағына қарай еңкейтпеңіз.
11
Қазақша
Теледидар жақтауының жоғарғы жағы мен
түбін жақсылап ұстаңыз. Мөлдір бөлікті,
динамикті немесе динамик торының
аймағын ұстамаңыз.
Page 58

ҚҰРАСТЫРУ ЖӘНЕ ДАЙЫНДАУ
12
Теледидардың параметрлерін орнату
Көрсетілген сурет теледидарыңыздан өзгеше болуы мүмкін.
Теледидарды тірегіне қойып, үстелге немесе қабырғаға орнатыңыз.
Тіректі тағу
Егер теледидарды қабырғаға бекітпесеңіз, тіректі тағу үшін келесі нұсқауларды орындаңыз.
Тек 42/50PA45**, 42/50PA49**, 50/60PA55**, 50/60PA65**
Қазақша
1
Тірек корпусы
3
M5 x 16
Тірек негізі
3 EA
Алдыңғы жағы
2
ЕСКЕРТУ
Тіректі теледидарға бекіткен кезде,
экранға сызық дақтардан қорғау үшін,
экранның бетін төмен қаратып, жұмсақ
үстелге немесе тегіс бетті жерге
қойыңыз.
4 EA
M4 x 30
ЕСКЕРТУ
Теледидар алдыға қарай еңкейіп кетпеу
үшін, бұрандаларды мықтап бұраңыз.
Тым қатты бұрап жібермеңіз.
Page 59

Тіректі шешу
1
4 EA
M4 x 30
ҚҰРАСТЫРУ ЖӘНЕ ДАЙЫНДАУ
13
ЕСКЕРТУ
Тіректі теледидарға бекіткен кезде,
экранға сызық дақтардан қорғау үшін,
экранның бетін төмен қаратып, жұмсақ
үстелге немесе тегіс бетті жерге
қойыңыз.
Қазақша
2
ЕСКЕРТПЕ
Сонда саңылауға шаң мен кір
жиналмайды.
Қабырғаға бекіту қапсырмасын
Қорғау қақпағы
орнатқанда, қорғағыш қақпақты
пайдаланыңыз.
3
2 EA
M4 x 30
ЕСКЕРТУ
Теледидар алдыға қарай еңкейіп кетпеу
үшін, бұрандаларды мықтап бұраңыз.
Тым қатты бұрап жібермеңіз.
Page 60

Қазақша
ҚҰРАСТЫРУ ЖӘНЕ ДАЙЫНДАУ
14
Кабельдерді жинау
Көрсетілген сурет теледидарыңыздан
өзгеше болуы мүмкін.
1 Қуат сымының ұстағышын орнатып,
қуат сымын жалғаңыз. Ол қуат кабелінің
байқаусызда ажыратылуынан сақтайды.
Қуат сымының ұстағышы
2 Кабельдерді жинап, кабель ұстағышымен
қыстырып қойыңыз.
Кабель ұстағышы
ЕСКЕРТУ
Теледидарды кабель ұстағышынан
және қуат сымының ұстағышынан
ұстап жылжытпаңыз. Кабель
ұстағыштары сынып, жарақат алынуы
немесе теледидар зақымдануы мүмкін.
Page 61

ҚҰРАСТЫРУ ЖӘНЕ ДАЙЫНДАУ
15
Үстелге орнату
Көрсетілген сурет теледидарыңыздан
өзгеше болуы мүмкін.
Теледидарды көтеріп, үстелге тігінен
1
қойыңыз.
- Желдетуге арнап, қабырға мен
теледидардың арасында 10 см (ең кемінде)
бос орын қалдырыңыз.
10 см
10 см
Қуат сымын қабырғадағы розеткаға қосыңыз.
2
ЕСКЕРТУ
Теледидарды жылу көзінің жанына немесе
үстіне қоймаңыз, бұл өртке әкеп соғуы
немесе басқа зақым келтіруі мүмкін.
ЕСКЕРТПЕ
20 градус солға немесе оңға бұрып,
теледидар бұрышын көруіңізге
ыңғайлы етіп, орналастырыңыз.
10 см
10 см
Теледидарды қабырғаға бекіту (үлгіге байланысты)
Көрсетілген сурет теледидарыңыздан өзгеше
болуы мүмкін.
Сақиналы болттарды немесе теледидардың
1
артқы жағындағы қапсырмалар мен
болттарды кіргізіп, бекітіңіз.
- Сақиналы болттардың орнында басқа
болттар болса, алдымен соларды шығарып
алыңыз.
Қабырға қапсырмаларын болттардың
2
көмегімен қабырғаға орнатыңыз.
Қабырға қапсырмасы мен теледидардың
артындағы сақиналы болттарды бір-біріне
келтіріңіз.
Сақиналы болттарды және қабырға
3
қапсырмаларын мықты баумен тартып
байлап қойыңыз.
Бау тегіс бетке көлденең тартылып тұру
керек.
Қазақша
ЕСКЕРТУ
Өнімнің бұрышын реттегенде,
саусақтарыңызды қысып алмаңыз.
ЕСКЕРТУ
Балалардың теледидарға шықпауын
және асылып тұрмауын қадағалаңыз.
ЕСКЕРТПЕ
Теледидар теңселмей тұратын мықты
және үлкен үстел немесе түпқойманы
пайдаланыңыз.
Page 62

ҚҰРАСТЫРУ ЖӘНЕ ДАЙЫНДАУ / ПАЙДАЛАНУШЫ НҰСҚАУЛЫҒЫНА ҚОСЫМША АҚПАРАТ
A
B
16
Қазақша
Қабырғаға орнату
Теледидардың артындағы қабырғаға бекіту
қапсырмасын орнатып, қапсырманы қатты,
еденге перпендикуляр түрде орнатыңыз.
Теледидарды басқа құрылыс бөліктеріне орнату
үшін, білікті мамандарға хабарласыңыз.
LG компаниясы қабырғаға бекітуді білікті кәсіби
орнатушы орындауын ұсынады.
10 см
10 см
10 см
10 см
Міндетті түрде VESA стандартына сәйкес
келетін бұрандаларды және қабырғаға бекіту
қапсырмасын қолданыңыз. Қабырғаға бекіту
жинақтарының стандартты өлшемдері төмендегі
кестеде берілген.
Бөлек сатылатындар (қабырғаға бекіту қапсырмасы)
ЕСКЕРТУ
Алдымен қуатты ажыратыңыз, содан кейін
барып теледидарды жылжытыңыз немесе
орнатыңыз. Әйтпесе, ток соғуы мүмкін.
Төбеге немесе қисық қабырғаға орнатылса,
теледидар құлап, ауыр жарақат тудыруы мүмкін.
Рұқсат етілген LG қабырғаға бекіту қапсырмасын
қолданыңыз және жергілікті дилерге немесе
білікті мамандарға хабарласыңыз.
Бұрандаларды тым қатты бұрамаңыз:
теледидар зақымданып, кепілдік күшін жоюы
мүмкін.
VESA стандартына сәйкес келетін
бұрандаларды және қабырғаға бекіту
қапсырмасын қолданыңыз. Дұрыс қолданбау
немесе сәйкес келмейтін қосалқы құралды
пайдалану нәтижесінде болған зақымдар мен
жарақаттар кепілдікке кірмейді.
ЕСКЕРТПЕ
VESA стандартты бұранда
сипаттамаларында берілген бұрандаларды
ғана пайдаланыңыз.
Қабырғаға бекіту жинағына орнату
нұсқаулығы мен қажетті бөлшектер кіреді.
Бұрандалардың ұзындығы қабырға
бекітпесіне байланысты әртүрлі болуы
мүмкін. Міндетті түрде қажетті ұзындықты
таңдаңыз.
Қосымша ақпаратты қабырғаға бекіту
қапсырмасымен берілген нұсқаулықтан
қараңыз.
ПАЙДАЛАНУШЫ
НҰСҚАУЛЫҒЫНА ҚОСЫМША
АҚПАРАТ
Үлгі 42/50PA45**
VESA (A x B) 400 x 400 600 x 400
Стандартты
бұранда
Бұрандалар саны 4 4
Қабырғаға бекіту
қапсырмасы
42/50PA49**
50PA55**
50PA65**
M6 M8
PSW400B,
PSW400BG,
60PA55**
60PA65**
PSW600B,
PSW600BG
Пайдаланушы нұсқаулығын қарау
PDF файл пішіміндегі пайдаланушы нұсқаулығы
ықшам дискіде берілген. Пайдаланушы
нұсқаулығын компьютерде қарау үшін, Adobe
Acrobat Reader бағдарламасын орнатыңыз.
Берілген ықшам дискіні енгізіңіз.
1
Веб-бет автоматты түрде ашылады.
Веб-беттегі пайдаланушы нұсқаулығын
2
басыңыз.
Пайдаланушы нұсқаулығын қараңыз.
3
ЕСКЕРТПЕ
Веб-бет автоматты түрде ашылмаса,
пайдаланушы нұсқаулығын қарау үшін,
Менің компьютеріме кіріп, LG белгішесін,
одан кейін index.htm белгішесін басыңыз.
Page 63

ҚАШЫҚТАН БАСҚАРУ ҚҰРАЛЫ
ҚАШЫҚТАН БАСҚАРУ ҚҰРАЛЫ
Бұл нұсқаулықтағы сипаттамалар қашықтан басқару құралындағы түймелерге
арналған.
Нұсқаулықты мұқият оқып, теледидарды дұрыс пайдаланыңыз.
Батареяларды ауыстыру үшін, батарея қақпағын ашып, батареяларды (1,5 В
AAA) және жақтарын ішіндегі белгілерге келтіріп салыңыз да, қақпақты
жабыңыз. Қашықтан басқару құралын теледидардағы сенсорына бағыттау
керек.
Батареяларды шығару үшін, орнатқандағы әрекеттерді керісінше орындаңыз.
ЕСКЕРТУ
Ескі және жаңа батареяларды бірге салмаңыз: қашықтан басқару құралы зақымдануы мүмкін.
Көрсетілген бейне теледидарда көрсетілгеннен өзгеше болуы мүмкін.
Теледидарды қосады немесе өшіреді.
Радио, теледидар және DTV бағдарламаларын таңдайды.
Сақталған бағдарламаларда жылжиды.
Жылдам мәзірлерді көрсетеді.
Мәзірлер мен опциялар бойынша жылжиды.
Алдыңғы деңгейге қайтады.
қайтарады.
өңдеу үшін қолданылады.
Бұл түймелер телемәтінге арналған.
Қосымша ақпаратты «Телемәтін» бөлімінен қараңыз.
МЕНІҢ МУЛЬТИМЕДИАМ мәзірлерін немесе SIMPLINK үйлесімді
құрылғыларын (USB,SIMPLINK) басқарады.
HDMI-CEC арқылы HDMI кабелімен жалғанған AV құрылғыларына
қосылады.
SIMPLINK мәзірін ашады.
AV режимін таңдайды.
немесе
(ҚУАТ)
ENERGY SAVING Тұтынылатын энергияны азайту үшін экранның жарықтығын реттейді.
КІРІС Кіріс көзін өзгертеді және теледидарды қосады.
TV/RAD (Теледидар/радио)
Сан түймелері Сандарды енгізеді.
ТІЗІМ Сақталған бағдарламалар тізімін көрсетеді.
ЖЫЛДАМ К Бұрын қаралған бағдарламаларға әкеледі.
+ - Дыбыс деңгейін реттейді.
FAV(ТАҢДАУЛЫ) Таңдаулы бағдарламалар тізімін көрсетеді.
ПІШІМ Бейненің өлшемін өзгертеді.
(P + -)
∧∨
P
БЕТ Алдыңғы немесе келесі экранға өтеді.
GUIDE(Нұсқаулық) Бағдарлама нұсқаулығын көрсетеді.
SETTINGS Негізгі мәзірлерді көрсетеді.
Оң жағын/сол жағын
1
таңдау
Жылжу түймелері
(жоғары/төмен/солға/
оңға
OK Мәзірлер мен опцияларды таңдап, енгізуді растайды.
АҚПАРАТ Ағымдағы бағдарламаның және экранның ақпаратын көрсетеді.
ШЫҒУ Экрандағы дисплейлерді кетіріп, теледидарды көру режиміне
Түсті түймелер Бұл түймелер телемәтін (тек ТЕЛЕМӘТІН үлгілерінде), бағдарламаны
1
ТЕЛЕМӘТІН
түймелері
Субтитр Сандық режимде қалаулы субтитрді қайта шығарады.
Басқару түймелері
(
, , , , )
SIMPLINK
(үлгіге байланысты)
AD Дыбысты сипаттау функциясын қосады немесе өшіреді.
ПІШІМ Бейненің өлшемін өзгертеді.
AV MODE
(үлгіге байланысты)
17
немесе
Қазақша
1
Page 64

Қазақша
ТЕЛЕДИДАР ҚАРАУ
18
ТЕЛЕДИДАР ҚАРАУ
Антеннаны жалғау
Теледидар қарау үшін, төмендегі нұсқаулар
бойынша антеннаны жалғаңыз.
Зақым келмеу үшін, құрылғылар толық
байланысып болғанша, қуат сымдарын
розеткаға қоспаңыз.
RF кабелі (75 Ω) арқылы теледидарды
қабырғадағы антенна ұясына жалғаңыз.
ЕСКЕРТПЕ
Сурет сапасы мейлінше оңтайлы болу
үшін антеннаның бағытын лайықтаңыз.
Сигнал әлсіз болған аймақтарда
сурет сапасын мейлінше жақсарту
үшін, сигнал күшейткішін суретте
көрсетілгендей етіп антеннаға орнату
керек болуы мүмкін.
Егер антенна қосылған күйде бейне
сапасы нашар болса, антеннаның
бағытын түзетіңіз.
Антенна кабелі мен конвертер жинаққа
кірмейді.
Теледидарды бірінші рет
қосу
Теледидарды бірінші рет қосқанда, Алғашқы
орнату экраны пайда болады. Тілді таңдап,
негізгі параметрлерді реттеңіз.
Қуат сымын розеткаға қосыңыз.
1
Күту режимінде теледидарды қосу үшін, (ҚУАТ)
2
түймесін басыңыз.
Теледидарды бірінші рет қосқанда, Алғашқы
орнату экраны пайда болады.
ЕСКЕРТПЕ
Басты мәзірде ПАРАМЕТР тармағына
өтіп, Зауыттық параметрлерді
қалпына келтіру мүмкіндігін
пайдалануға болады.
Теледидардың параметрлерін
3
қалауларыңызға сәйкес реттеу үшін,
экрандағы нұсқауларды орындаңыз.
Тіл
Режимді орнату
Ел
Көрсетілетін тілді
таңдайды.
Үй ортасы үшін Үйде
қолдану функциясын
таңдайды.
Көрсетілетін елді таңдайды.
(үлгіге байланысты)
Кілтсөз орнату
Уақыт белдеуі
Желі параметрі
Кілтсөзді орнатады.
(Ел ретінде Франция
немесе Италия
таңдалғанда)
Уақыт белдеуі мен жаз
уақытын таңдайды.
(Ел ретінде Ресей
таңдалғанда)
(LAN порты болса) көрсету
үшін желі параметрін
таңдайды.
Автоматты түрде
реттеу
ЕСКЕРТПЕ
DTV трансляция стандарттары
расталмаған елдерде, DTV трансляция
ортасына байланысты, кейбір DTV
мүмкіндіктері жұмыс icтемеуі мүмкін.
Ел ретінде Франция таңдалғанда,
кілтсөз «0», «0», «0», «0» емес, «1»,
«2», «3», «4» болады.
Суреттерді үйдегі орта үшін ең жақсы
сапада көрсету үшін Үйде қолдану
параметрін таңдаңыз.
Сақтау көрмесі сату ортасына қолайлы.
Сақтау көрмесі параметрі таңдалғанда,
кез келген реттелген параметрлер 5
минут ішінде Сақтау көрмесінің әдепкі
параметрлеріне ауысады.
Бар бағдарламаларды
автоматты түрде іздеп,
сақтайды.
4 Негізгі параметрлер орнатылғанда OK
түймесін басыңыз.
ЕСКЕРТПЕ
Бастапқы параметрлердің орнатылуы
аяқталмаса, олар теледидар қосылған
сайын көрсетіледі.
Теледидар ұзақ уақыт
пайдаланбағанда, қуат сымын
розеткадан ажыратыңыз.
5 Теледидарды өшіру үшін,
басыңыз.
(ҚУАТ)
түймесін
Page 65

БАЙЛАНЫС ОРНАТУ / БАСТАПҚЫ КОДЫ АШЫҚ БАҒДАРЛАМАЛЫҚ ҚҰРАЛ ЕСКЕРТУІ
3
БАСТАПҚЫ КОДЫ АШЫҚ БАҒДАРЛАМАЛЫҚ ҚҰРАЛ ЕСКЕРТУІ
19
БАЙЛАНЫС ОРНАТУ
Теледидарға әртүрлі сыртқы құрылғыларды жалғап, сыртқы құрылғыны таңдау үшін, кіріс сигналы
режимдерін ауыстырып қосыңыз. Сыртқы құрылғының қосылымы туралы қосымша ақпаратты әрбір
құрылғымен берілетін нұсқаулықтан қараңыз.
Қолдануға болатын сыртқы құрылғылар: HD ресиверлері, DVD ойнатқыштары, бейнемагнитофондар,
дыбыстық жүйелер, USB жад құрылғылары, компьютерлер, ойын құрылғылары және басқа да сыртқы
құрылғылар.
ЕСКЕРТПЕ
Егер теледидар бағдарламасын DVD рекордеріне немесе бейнемагнитофонға жазсаңыз,
теледидардың сигнал кіріс кабелін теледидарға міндетті түрде DVD рекордері немесе
бейнемагнитофон арқылы жалғаңыз. Жазу туралы қосымша ақпаратты жалғанған
құрылғының нұсқаулығынан қараңыз.
Сыртқы құрылғыны жалғау түрі үлгіге қарай әртүрлі болуы мүмкін.
Теледидарға сыртқы құрылғыларды теледидар портының ретіне қарамастан жалғаңыз.
ҚұPылғыңызды ҚOCу
Көрсетілген бейне ТД көрсетілгеннен өзгешеленуі мүмкін.
Қосымша жабдықты қосу үшiн CD H
ұсқаудағ
ы Cыртқы жабдықты Oрнату бөлiмiне қараңыз.
Қазақша
DVD/STB ap
DVD/STB
2
Корек сымы
3
Бейнемагнитофонды
2
қосуa
Осы өнімдегі GPL, LGPL, MPL және басқа да бастапқы коды ашық лицензиялардағы бастапқы кодты
алу үшін, http://opensource.lge.com веб-торабына өтіңіз.
ты
USB IN
IN
1
Антеннаы
қосу
немесе
Бастапқы мәтінмен бірге, барлық тиісті лицензия шарттарын, кепілдік бойынша жауапкершіліктен бас
тарту мәлімдемелерін және авторлық құқық ескертулерін жүктеп алуға болады.
Сондай-ақ, LG Electronics компаниясы тарату шығындары (мысалы, тасушы, тасымал және орындау
ақылары) өтелген жағдайда бастапқы кодты «opensource@lge.com» мекенжайына сұрау жасалғанда
CD-ROM дискімен жібере алады. Бұл ұсыныс өнімді сатып алған күннен бастап үш (3) жылдың ішінде
жарамды болады.
Page 66

Қазақша
САЛМАҒЫ / АҚАУЛЫҚТАРДЫ ЖОЮ
20
САЛМАҒЫ
42PA45** 42PA49**
42PA4500-ZF / 42PA450T-ZF
ҮЛГІЛЕР
Салмағы Тірекпен 20,6 кг 20,6 кг
Тірексіз 19,0 кг 19,0 кг
ҮЛГІЛЕР
Салмағы Тірекпен 28,2 кг 28,2 кг
Тірексіз 25,8 кг 25,8 кг
ҮЛГІЛЕР
Салмағы Тірекпен 28,8 кг 28,8 кг
Тірексіз 26,4 кг 26,4 кг
ҮЛГІЛЕР
Салмағы Тірекпен 40,6 кг 40,6 кг
Тірексіз 36,4 кг 36,4 кг
Жоғарыда көрсетілген өнім сипаттамалары өнім функцияларының жетілдірілуіне байланысты алдын
ала ескертусіз өзгертілуі мүмкін.
42PA4500-ZM / 42PA450T-ZM
42PA4510-ZA / 42PA451T-ZA
42PA4510-ZG / 42PA451T-ZG
42PA4520-ZC / 42PA452T-ZC
42PA4520-ZJ / 42PA452T-ZJ
50PA45** 50PA49**
50PA4500-ZF / 50PA450T-ZF
50PA4500-ZM / 50PA450T-ZM
50PA4510-ZA / 50PA451T-ZA
50PA4510-ZG / 50PA451T-ZG
50PA4520-ZC / 50PA452T-ZC
50PA4520-ZJ / 50PA452T-ZJ
50PA55** 50PA65**
50PA5500-ZB / 50PA550T-ZB
50PA5500-ZH / 50PA550T-ZH
60PA55** 60PA65**
60PA5500-ZB / 60PA550T-ZB
60PA5500-ZH / 60PA550T-ZH
42PA4900-ZE / 42PA490T-ZE
42PA4900-ZL / 42PA490T-ZL
50PA4900-ZE / 50PA490T-ZE
50PA4900-ZG / 50PA490T-ZG
50PA4900-ZL / 50PA490T-ZL
50PA6500-ZA / 50PA650T-ZA
50PA6500-ZG / 50PA650T-ZG
50PA6520-ZF / 50PA652T-ZF
50PA6520-ZM / 50PA652T-ZM
60PA6500-ZA / 60PA650T-ZA
60PA6500-ZG / 60PA650T-ZG
АҚАУЛЫҚТАРДЫ ЖОЮ
Жалпы
Проблема Шешімі
Теледидарды қашықтан басқару
құралымен басқару мүмкін емес.
Бейне көрсетілмейді және дыбыс
шықпайды.
Теледидарды қосқан кезде, бейне
жайлап пайда болады.
Сыртқы құрылғыларды жалғау
мүмкін емес.
Теледидар кенет өшіп қалады.
Өнімдегі қашықтан басқару құралының сенсорын тексеріп, әрекетті қайталаңыз.
Өнім мен қашықтан басқару құралының арасында кедергінің жоқ екенін тексеріңіз.
Батареялардың жұмыс істеп тұрғанын және дұрыс орнатылғанын тексеріңіз (
жағын жағына, жағын жағына).
Өнімнің қосылып тұрғанын тексеріңіз.
Қуат сымының розеткаға қосылғанын тексеріңіз.
Басқа өнімдерді жалғап, розеткада проблеманың бар-жоқтығын тексеріңіз.
Өнім іске қосылған кезде, бейненің дыбысы өшірулі болады. Бұл қалыпты жағдай.
Егер бейне бірнеше минут ішінде пайда болмаса, теледидарды 30 секундқа
розеткадан ажыратып, әрекетті қайталаңыз. Бейне сонда да көрсетілмесе,
жергілікті өкілетті қызмет көрсету орталығына хабарласыңыз.
«Байланыстарға шолу» бөлімін оқып, сыртқы құрылғыны жалғаңыз.
Қуатты басқару параметрлерін тексеріңіз. Қуат көзі үзілген болуы мүмкін.
Уақыт параметрлерінде Автоматты ұйықтау мүмкіндігінің қосылып тұрғанын
тексеріңіз.
«Автосөндіру таймері» бөлімін қараңыз.
Теледидар қосылып тұрғанда, сигнал болмаса, онда 15 минут
әрекетсіздіктен кейін, теледидар автоматты түрде өшеді.
Page 67

Дыбыс
Проблема Шешімі
Бейнелер көрсетілгенімен, дыбыс
шықпайды.
Динамиктердің біреуінен
шу шығады немесе дыбыс
шықпайды.
Бейне
Проблема Шешімі
Бейне қара және ақ түсте
көрсетіледі немесе түс сапасы
нашар.
Көлденең немесе тік сызықтар
пайда болады немесе бейнелер
анық көрсетілмейді.
Бейнелерде сызықтар немесе
жолақтар пайда болады
Өнім өшірілгенде, қалдық
бейнелер (іздер) пайда болады.
Қуат қосылып тұрса да, экран қапқара болып көрінеді.
Экранда «Сигнал жоқ» хабары
пайда болады.
Дисплей контрасты дұрыс емес.
Экран фонында жіңішке сызықтар
пайда болады.
Көлденең сызықтар пайда болады
немесе таңбалар бұлдырлайды.
Кейбір арналарда сигнал нашар
қабылданады.
АҚАУЛЫҚТАРДЫ ЖОЮ
+ немесе - түймесін басыңыз.
MUTE (Дыбысты өшіру) түймесі басылғанда дыбыстың өшірілетін-
өшірілмейтіндігін тексеріңіз.
Басқа арналарға өтіңіз. Таратуда проблема болуы мүмкін.
Дыбыстық кабельдердің дұрыс жалғанғанын тексеріңіз.
Қоршаған орта ылғалдылығының немесе температураның өзгеруі өнімнің қосылуы
немесе өшірілуі кезінде әдеттен тыс шудың пайда болуына апаруы мүмкін.
Өніміңізде проблема жоқ.
Түс параметрін СУРЕТ мәзірінде реттеңіз.
Осы өнім мен басқа электрондық өнімдердің арасында жеткілікті қашықтықты сақтаңыз.
Басқа арналарға өтіңіз. Таратуда проблема болуы мүмкін.
Электр жабдығы немесе механикалық құрал секілді жергілікті
кедергілердің бар-жоғын тексеріңіз.
Антеннаны тексеріңіз немесе антеннаны дұрыс бағытқа бұрыңыз.
Ұзақ уақыт бойы экранда қозғалыссыз тұрған бейненің әсерінен
пиксельдер зақымданған болуы мүмкін (бейненің ізі). Экрандағы пиксель
зақымдануына жол бермеу үшін, экран сақтағышын пайдаланыңыз.
Түс ашықтығы мен контрастын СУРЕТ мәзірінде реттеңіз.
Теледидар мен өнімдердің арасында сигнал кабелінің дұрыс жалғанғанын тексеріңіз.
INPUT (Кіріс) түймесін басып, таңдалған кіріс көзін тексеріңіз.
Орналасу параметрін СУРЕТ мәзірінде реттеңіз.
Өнімнің бейне карта ажыратымдылығы мен жиілігін қолдайтынын тексеріңіз. Егер
жиілік мөлшерден тыс болса, сыртқы құрылғыдағы дисплей параметрлерін қолданып,
ұсынылатын ажыратымдылықты орнатыңыз.
Бейне кабель қосылымдарын тексеріңіз.
Фаза параметрін СУРЕТ мәзірінде реттеңіз. «ЭКРАН» бөлімін қараңыз.
Басқа арналарға өтіңіз. Таратуда проблема болуы мүмкін.
Станция сигналы әлсіз болуы мүмкін. Антеннаны дұрыс бағытта бұрыңыз.
Электр жабдығы немесе механикалық құрал секілді жергілікті
кедергілердің бар-жоғын тексеріңіз.
21
Қазақша
Pentouch қаламсабы
Проблема Шешімі
Сенсорлық қалам істемейді.
Теледидар экраны Pentouch
қолданылғанда қалыпты түрде
көрсетпейді.
Сенсорлық қалам қате жерлерінен
түртілуде.
Сенсорлық қалам тегіс
қозғалмайды.
Pentouch режиміне кіру үшін қашықтан басқару құралы қолданылғанын тексеріңіз
Pentouch кілті компьютерге жалғанғанын және LED шамы жанып тұрғанын
тексеріңіз.
Сенсорлы қаламдағы экран түймесін басып оның қосылып тұрғанын тексеріңіз.
Сенсорлық қаламның пайдалану үшін жұптасқанын тексеріңіз. (Сенсорлық қалам
оның үстіндегі Touch Home экран түймесі басылғанда LED шамы жанса дұрыс
жұпталған болып есептеледі.)
Компьютер экранын тек теледидарда көрсетілетін етіп реттеңіз.
Компьютердің теледидарға дұрыс қосылғанын тексеріңіз.
Оңтайлы ажыратымдылық қолданылуда екенін тексеріңіз.
Теледидардағы кадр пішімін Just Scan (Тек қарап шығу) етіп орнатыңыз.
Компьютер экранын тек теледидарда көрсетілетін етіп реттеңіз.
Компьютер мен теледидар компьютердің сигналдық (RGB) кабелімен
жалғанғанда, сенсорлық қаламмен теледидар экранында түртілген
жер және компьютер экранында түртілген деп белгіленген нүкте сәйкес
келмесе, теледидардың қашықтан басқару құралымен [Home] → [PICTURE]
→ [SCREEN] (RGB) тармағын, сосын [Auto Configure] пәрменін таңдап
экранды реттеңіз.
Компьютер мен теледидардың арасы алыстап кетпегенін тексеріңіз.
Компьютер мен теледидар арасында кедергілер көп емес екенін тексеріңіз.
Компьютерде басқа көп қолданба қосылмағанын тексеріңіз. (Pentouch
бағдарламасы қосулы болғанда, басқа қолданбаларды пайдаланбаңыз.)
Page 68

Page 69

ПОСІБНИК КОРИСТУВАЧА
Плазмовий телевізор
Уважно ознайомтеся з цим посібником, перш ніж почнете користуватися пристроєм, та збережіть його
для довідки в майбутньому.
PA45**
PA49**
PA55**
PA65**
www.lg.com
Page 70

ІНСТРУKЦІЇ З ТЕХНІKИ БЕЗПЕKИ
2
Будь ласка, уважно прочитайте ці застереження з безпеки, перш ніж розпочинати
експлуатацію виробу.
Ілюстрації, наведені в цьому керівництві, можуть дещо відрізнятися від вашого
приладу, оскільки вони є лише прикладами для сприяння поясненню.
Нехтування попереджувальними повідомленнями може призвести до серйозної
ПОПЕРЕДЖЕННЯ
травми, нещасного випадку або летальних наслідків.
Нехтуючи застережливими повідомленнями, ви ризикуєте зазнати легких травм або
УВАГА
пошкодити цей виріб.
Застереження стосовно встановлення виробу
ПОПЕРЕДЖЕННЯ
Встановлюйте виріб подалі від джерел
тепла, таких як електричні нагрівальні
пристрої.
- Це може призвести до ураження
електричним струмом, виникнення пожежі,
несправної роботи або деформації виробу.
Не використовуйте виріб у приміщенні з підвищеною
вологістю, наприклад у ванній кімнаті, або в іншому місці
де на нього може потрапити вода.
- Це може спричинити пожежу або ураження електричним
струмом!
Якщо відчувається запах диму або інші
незвичні запахи, або чути сторонні шуми,
висуньте шнур живлення з настінної розетки
та зверніться до сервісного центру.
- Якщо продовжити працювати, не вживши
відповідних заходів, це може призвести
до ураження електричним струмом або
виникнення пожежі.
УКРАЇНСЬКА
УВАГА
Встановлюйте виріб на плоскій та стійкій
поверхні, з якої він не зможе впасти.
- Якщо виріб впаде, він може завдати вам
травми або пошкодитись.
Не залишайте виріб під прямим сонячним
промінням.
- Це може призвести до пошкодження
виробу.
Не розташовуйте продукт у вбудованих
конструкціях, наприклад полицях або
книжкових шафах. - Потрібна вентиляція.
Зауваження стосовно електричного живлення
ПОПЕРЕДЖЕННЯ
Переконайтесь, що шнур живлення підключено
до заземленого джерела живлення.
- У протилежному випадку ви можете отримати
смертельне ураження електричним струмом або
серйозну травму.
Не доторкайтесь до кабелю живлення
вологими руками. Kрім того, якщо штепсельна
розетка волога або вкрита пилом, повністю
висушіть її або очистіть від пилу.
- Вас може бути уражено електричним
струмом через надмірну вологість.
Під час грози відключіть шнур живлення або
сигнальний кабель.
- Існує небезпека ураження електричним
струмом або виникнення пожежі.
Не вставляйте пристроїв, що є провідниками
(наприклад, шпицю) в один кінець кабелю, тоді
як інший під’єднано до електророзетки.Крім
того, не торкайтеся кабелю живлення одразу
після під’єднання до електророзетки.Це може
призвести до ураження електричним струмом.
УВАГА
Уникайте фізичного або механічного
ураження кабелю живлення, наприклад,
перекручування, стиснення, затискання
в дверях або ходіння по ньому. Під
час користування, будьте особливо
уважними до розеток, вилок и точки, де
кабель виходить з пристрою.
Доки пристрій підключено до настінної розетки змінного струму,
він залишається підключеним до джерела живлення незалежно
від того, чи вимкнули ви пристрій за допомогою кнопки SWITCH
(Увімкнення).
Застереження стосовно переміщення виробу
ПОПЕРЕДЖЕННЯ
Обов’язково вимикайте виріб. Перш ніж
переносити виріб, від’єднуйте від нього всі
кабелі.
- У протилежному випадку ви можете
зазнати смертельного ураження електричним
струмом; або виріб може бути пошкоджено.
УВАГА
Не трусіть виріб, переносячи його.
- У протилежному випадку ви можете зазнати
смертельного ураження електричним
струмом; або виріб може бути пошкоджено.
Переносьте монітор, тримаючи його двома
руками екраном уперед.
- Якщо виріб впаде, то, пошкодившись, він
може спричинити ураження електричним
струмом або пожежу. Зверніться до
сервісного центру, щоб виконати ремонт.
Застереження стосовно експлуатації виробу
ПОПЕРЕДЖЕННЯ
Не розбирайте виріб, не ремонтуйте його та не
змінюйте його самостійно.
- Може статися пожежа або ураження
електричним струмом.
- Зверніться до сервісного центру для
перевірки або ремонту виробу.
Для зменшення ризику виникнення пожежі або
ураження електричним струмом, бережіть виріб
від дощу та вологи. На прилад в жодному разі
не повинна капати або розливатись рідина, на
нього не можна ставити предмети, заповнені
рідиною, наприклад, вази.
Обслуговування повинно виконуватись
виключно кваліфікованим персоналом.
Необхідність у технічному обслуговуванні
виникає у випадку пошкодження виробу, або
його частини, наприклад, кабелю живлення або
вилки, розлиття рідини або падіння предметів
у виріб, дії дощу або підвищеної вологи,
порушення нормальної роботи або падіння.
ВАЖЛИВА ІНФОРМАЦІЯ ЩОДО ПОПЕРЕДЖЕННЯ “IMAGE
BURN /BURN-IN” (ЕФЕKТУ ПРОГОРАННЯ АБО ЗАЛИШKОВОГО
ЗОБРАЖЕННЯ) НА ЕKРАНІ ТЕЛЕВІЗОРА
- Kоли зображення (логотипів, меню екрана, відеогри, дисплея
комп’ютера або сторінок телетексту) відображається на екрані
телевізора протягом тривалого часу, воно може залишитися на
поверхні екрана при зміні каналу. Цей феномен називається “image
burn” (ефект прогорання) або “burn-in” (залишкове зображення).
Відповідно до гарантії, наданої виробником, ефект залишкового
зображення не підлягає відшкодування.
- Щоб попередити виникнення залишкового зображення, уникайте
тривалого відображення зображення на екрані телевізора (від 2
годин для рідкокристалічних екранів або від 1 години для плазмових
телевізорів).
- Ефект залишкового зображення також може виникнути під час
розміщення кадру у форматі 16:9 у кадрі з форматом 4:3, якщо
налаштування цього формату (4:3) використовуються тривалий час.
Page 71

ЗМІСТ
3 ЗМІСТ
4 ПРОЦЕДУРА ВСТАНОВЛЕННЯ
4 ВСТАНОВЛЕННЯ ТА ПІДГОТОВКА
4 Розпакування
8 Приладдя, яке не входить у комплект
8 Частини та кнопки
11 Піднімання та перенесення телевізора
12 Встановлення телевізора
12 - Приєднання підставки
14 - Організація кабелів
15 - Встановлення на столі
16 - Встановлення на стіні
16 ДОДАТКОВІ ВІДОМОСТІ ЩОДО
ПОСІБНИКА
ЗМІСТ
3
УКРАЇНСЬКА
17 ПУЛЬТ ДИСТАНЦІЙНОГО
КЕРУВАННЯ
18 ПЕРЕГЛЯД ТЕЛЕПРОГРАМ
18 Під’єднання антени
18 Перше -ввімкнення телевізора
19 ПІДКЛЮЧЕННЯ
19 ПРИЄДНАННЯ ПРИСТРОЮ
19 ІНФОРМАЦІЯ ПРО ПРОГРАМНЕ
ЗАБЕЗПЕЧЕННЯ З ВІДКРИТИМ
КОДОМ
20 ВАГА
20 УСУНЕННЯ НЕПОЛАДОК
Page 72

ПРОЦЕДУРА ВСТАНОВЛЕННЯ / ВСТАНОВЛЕННЯ ТА ПІДГОТОВКА
4
ПРОЦЕДУРА ВСТАНОВЛЕННЯ
1 Відкрийте упаковку та перевірте, чи всі приладдя в комплекті.
2 Під’єднайте підставку до телевізора.
3 Під’єднайте зовнішній пристрій до телевізора.
ВСТАНОВЛЕННЯ ТА ПІДГОТОВКА
Розпакування
Перевірте наявність перелічених елементів в упаковці. Якщо якогось компонента бракує, зверніться
до місцевого постачальника, у якого ви придбали виріб. Зображення в цьому посібнику можуть відрізнятись від дійсного вигляду виробу чи певного елемента.
Лише для моделей 42/50PA45**, 50/60PA55**, 50/60PA65**
УКРАЇНСЬКА
Пульт дистанційного керування, батарейки (AAA)
x 3 x 4
M5 x 16 M4 x 30
Гвинти для монтажу
Захисна кришка Феритове осердя Тканина для чищення
Посібник користувача,
компакт-диск з інструкцією
Тримач для кабелю живлення Кабель живлення
Фіксатор для кабелів
(залежно від моделі)
Використовуючи тканину для
чищення, обережно витріть
плями на корпусі.
Тірек корпусы Тірек негізі Ізолятор
(в зависимости от модели)
1
Page 73

Лише для моделей 42/50PA49**
ВСТАНОВЛЕННЯ ТА ПІДГОТОВКА
5
Пульт дистанційного керування, батарейки (AAA)
Посібник користувача,
компакт-диск з інструкцією
x 3 x 4
M5 x 16 M4 x 30
Тримач для кабелю живлення 15-контактний кабель пе-
Гвинти для монтажу
Захисна кришка Феритове осердя
(залежно від моделі)
x 2
Фіксатор для кабелів Гвинт із кільцем і скоба
для кріплення до стіни
Інструкції із застереженнями
щодо використання Pentouch
редачі сигналу D-sub
Кабель живлення
Тканина для чищення
(залежно від моделі)
Використовуючи тканину для
чищення, обережно витріть плями
на корпусі.
УКРАЇНСЬКА
Зарядний кабель із наконечником
Наконечник
Кількість наконечників може
бути різною залежно від моделі.
Блок бездротового зв’язку
Підставка Тірек негізі
сенсорного пера (AN-TD200)
Тірек корпусы Ізолятор
(в зависимости от модели)
Сенсорне перо (AN-TP300)
Кількість сенсорних пер може бути
різною залежно від моделі.
1
Page 74

ВСТАНОВЛЕННЯ ТА ПІДГОТОВКА
ANTENNA
IN
6
1 Довідник зі встановлення ізолятора для антени
Використовуйте цей пристрій для встановлення телевізора в місцях, де існує різниця напруг між
заземленням джерела живлення і заземленням антени.
- Якщо існує різниця напруг між заземленням джерела живлення і заземленням антени, контакт
антени може сильно нагріватись, що в свою чергу може призвести до нещасного випадку.
Підвищити безпеку під час перегляду телевізійних програм можна шляхом ефективного
усунення напругу з антени телевізора. Не від’єднуйте ізолятор після його встановлення.
Зовнішній вигляд ізолятора для антени:
Роз’єм 2
Роз’єм 1
Ізолятор
Спосіб під’єднання:
Роз’єм 1 Роз’єм 2
- З’єднайте роз’єм 1 із кабелем передачі сигналу.
- З’єднайте роз’єм 2 із входом для антени на задній панелі
телевізора.
ANTENNA/
CABLE IN
Радіочастотний коаксіал
кабелькоаксіальний кабель
Ізолятор
УКРАЇНСЬКА
ANTENNA/
CABLE IN
Радіочастотний коакс
кабелькоаксіальний кабель
“Обладнання, підключене до захисного заземлення будівлі через мережу або через інше обладнання,
що під’єднане до захисного заземлення, – і до системи кабельного мовлення за допомогою
коаксіального кабелю, в деяких випадках може бути пожежонебезпечним.
Тому підключення до системи кабельного мовлення слід виконувати через пристрій, обладнаний
електричною ізоляцією, нижчою певного діапазону частот (гальванічний ізолятор, дивіться правила EN
60728-11)”.
У разі використання радіочастотного ізолятора може мати місце незначна втрата чутливості сигналу.
Ізолятор
Декодер
Page 75

ВСТАНОВЛЕННЯ ТА ПІДГОТОВКА
ПРИМІТКА
Комплектація виробу може дещо відрізнятися залежно від моделі.
Характеристики виробу або зміст цього посібника можуть бути змінені без попередження у
зв'язку із вдосконаленням функціональності виробу.
Використання феритового осердя
1 Феритове осердя можна використовувати для зменшення інтерференції електромагнітних
хвиль в аудіокабелі комп'ютера. Тричі намотайте аудіокабель комп'ютера на феритове
осердя. Розташуйте феритове осердя поблизу телевізора.
[до зовнішнього пристрою]
[Малюнок 1]
2 Феритове осердя можна використовувати для зменшення інтерференції електромагнітних
хвиль у кабелі живлення.
Один раз намотайте кабель живлення на феритове осердя. Розташуй-
те феритові осердя поблизу телевізора і розетки.
10 мм (+ / - 5 мм)
[до телеві-
зора]
[Поперечний переріз
(Сіре)
феритового осердя]
7
[до настінної розетки]
[Малюнок 2]
[до телеві-
зора]
(чорне)
[Поперечний переріз
феритового осердя]
3
Феритове осердя можна використовувати для зменшення інтерференції електромагнітних
хвиль у кабелі компонентного сигналу (Y, Pb, Pr, L, R). Один раз обмотайте компонентний кабель
Y, Pb, Pr, L, R навколо феритового осердя. Розташуйте феритове осердя поблизу телевізора.
[до зовнішнього при-
строю]
10 мм (+ / - 5 мм)
[Малюнок 3]
4
Феритове осердя можна використовувати для зменшення інтерференції електромагнітних
[до телеві-
зора]
(чорне)
[Поперечний переріз
феритового осердя]
хвиль у мережевому кабелі. Тричі обмотайте мережевий кабель довкола феритового осердя.
Розташуйте феритові осердя якомога ближче до телевізора та зовнішнього пристрою.
A (сіре) B (сіре)
[до телеві-
зора]
B A A
[Малюнок 4]
[до зовнішнього
пристрою]
[Поперечний переріз
феритового осердя]
- Якщо в комплекті є одне феритове осердя, дотримуйтеся вказівок на малюнку 1.
- Якщо в комплекті три феритові осердя, дотримуйтеся вказівок на малюнках 1 і 2.
- Якщо в комплекті чотири феритові осердя, дотримуйтеся вказівок на малюнках 1, 2 та 3.
- Якщо виріб має мережевий порт, виконайте також вказівки на малюнку 4.
Для оптимального з'єднання кабелі HDMI і при-
строї USB повинні мати роз'єми зовнішньою товщиною 10 мм і шириною 18 мм. Використовуйте
кабель-подовжувач, що підтримує USB 2.0, якщо
USB-кабель або USB-накопичувач не підходять
для USB-порту телевізора.
*A 10 мм
*B 18 мм
УКРАЇНСЬКА
Page 76

ВСТАНОВЛЕННЯ ТА ПІДГОТОВКА
Лише для
моделей
42/50PA49**
50/60PA65**
8
УВАГА
Заради власної безпеки та продовження терміну експлуатації виробу не використовуйте не-
ліцензійні елементи.
Гарантія не поширюється на будь-які пошкодження або травми, які виникли внаслідок ви-
користання неліцензійних елементів.
Приладдя, яке не входить у комплект
Окремі придбані вироби може бути без попередження змінено або модифіковано з метою покращення якості. Цей пристрій працює лише зі сумісними плазмовими LG.
AN-TP300
Сенсорне перо, підставка
УКРАЇНСЬКА
Кількість сенсорних
пер,наконечників може бути
різною залежно від моделі.
Сумісність
AN-TP300
Сенсорне перо, підставка
42/50PA45** 50/60PA55** 50/60PA65** 42/50PA49**
•
Частини та кнопки
ПРИМІТКА
З метою зменшення споживання живлення телевізор можна перевести в режим очікування.
Також для економії електроенергії телевізор слід вимикати, коли протягом певного часу його
ніхто не дивитиметься.
За рахунок зниження рівня яскравості зображення під час перегляду телепрограм можна зна-
чно зменшити споживання електроенергії та експлуатаційні витрати.
УВАГА
Не ставайте на скляну підставку та оберігайте її від ударів. Вона може розбитись, в результа-
ті чого ви можете порізатися склом, або телевізор може впасти.
Не тягніть телевізор по підлозі. Можна пошкодити підлогу або виріб.
На деяких моделях до екрана прикріплено тонку плівку, яку не можна знімати.
Page 77

ВСТАНОВЛЕННЯ ТА ПІДГОТОВКА
Лише для моделей 42/50PA45**-ZA~F, 42/50PA49**-ZA~F, 50/60PA55**-ZA~F, 50/60PA65**-ZA~F
Зображення може дещо відрізнятися від реального вигляду вашого телевізора.
Лише для моделей
42/50PA45**,
Лише для
моделей
42/50PA49**
50/60PA65**
50/60PA55**
Екран
9
1
2
3
4
Меню Опис
Гніздо для карти
1
PCMCIA
Вхід USB
2
Роз'єм HDMI IN 3
3
Роз’єм HDMI / DVI
4
IN 2
(Лише для моделей із
Сенсор дистанційного
керування та цифровий1 сенсор
Індикатор живлення
Червоний –
урежимі очікування
Вимкнений – теле-
візор увімкнено
портом LAN)
Гучномовці
УКРАЇНСЬКА
Панель з’єднань
Кнопка Опис
Для ввімкнення та вимкнення живлення
Для зміни джерела вхідного сигналу
Для доступу до головних меню, збереження введених даних та виходу з меню
Для вибору виділеного параметру меню або підтвердження введених даних
Для регулювання рівня гучності
Для перемикання між збереженими програмами
1 Цифровий сенсор – використовується для регулювання якості зображення відповідно до умов
оточення.
Page 78

ВСТАНОВЛЕННЯ ТА ПІДГОТОВКА
10
Лише для моделей 42/50PA45**-ZG~M, 42/50PA49**-ZG~M, 50/60PA55**-ZG~M, 50/60PA65**-ZG~M
Зображення може дещо відрізнятися від реального вигляду вашого телевізора.
Лише для моделей
42/50PA45**,
Лише для
моделей
42/50PA49**,
50/60PA65**
50/60PA55**
Екран
1
Сенсор дистанційного
керування та цифровий1 сенсор
2
Індикатор живлення
Червоний –
3
4
жимі очікування
Вимкнений – теле-
візор увімкнено
уре-
Гучномовці
УКРАЇНСЬКА
Меню Опис
Гніздо для карти
1
PCMCIA
Вхід USB
2
Роз'єм HDMI IN 3
3
Роз’єм HDMI IN 2
4
(Лише для моделей із
портом LAN)
Панель з’єднань
Кнопка Опис
Для ввімкнення та вимкнення живлення
Для зміни джерела вхідного сигналу
Для доступу до головних меню, збереження введених даних та виходу з меню
Для вибору виділеного параметру меню або підтвердження введених даних
Для регулювання рівня гучності
Для перемикання між збереженими програмами
1 Цифровий сенсор – використовується для регулювання якості зображення відповідно до умов
оточення.
Page 79

Піднімання та перенесення
телевізора
Перш ніж піднімати чи переносити телевізор,
незалежно від його типу чи розміру, прочитайте
подані нижче вказівки; викладена далі інформація дозволить попередити пошкодження телевізора чи появу подряпин, а також дасть змогу
безпечно транспортувати пристрій.
УВАГА
Не торкайтеся екрана, адже це може
пошкодити його або окремі піксели, що
використовуються для створення зображення.
Транспортувати телевізор найкраще в
коробці або пакувальних матеріалах, у яких
телевізор доставлено.
Перш ніж переносити чи піднімати телеві-
зор, від'єднайте кабель живлення та всі інші
кабелі.
Тримайте телевізор екраном від себе, щоб
не подряпати екран.
ВСТАНОВЛЕННЯ ТА ПІДГОТОВКА
Щоб перенести великий телевізор, потрібно
щонайменше 2 людини.
Переносячи телевізор у руках, тримайте
його так, як показано на малюнку нижче.
Переносьте телевізор обережно, без різких
струсів і сильних вібрацій.
Коли переносите телевізор, тримайте його
вертикально, ніколи не перевертайте на бік
і не нахиляйте праворуч чи ліворуч.
11
УКРАЇНСЬКА
Міцно тримайте телевізор за корпус вгорі та
знизу. У жодному разі не тримайте пристрій
за прозору частину, динамік чи сітку динаміка.
Page 80

ВСТАНОВЛЕННЯ ТА ПІДГОТОВКА
12
Встановлення телевізора
Зображення може дещо відрізнятися від реального вигляду вашого телевізора.
Телевізор можна встановити на підставці, на столі або на стіні.
Приєднання підставки
Якщо телевізор встановлюється не на стіну, прикріпіть підставку, дотримуючись вказівок далі.
Лише для моделей 42/50PA45**, 42/50PA49**,50/60PA55**, 50/60PA65**
УКРАЇНСЬКА
1
Тірек корпусы
3
M5 x 16
Тірек негізі
3 шт.
Лицева
сторона
2
УВАГА
Встановлюючи підставку на телевізор,
його слід покласти екраном на покритий тканиною стіл або рівну поверхню,
щоб уникнути подряпин на екрані.
4 шт.
M4 x 30
УВАГА
Надійно закрутіть гвинти, щоб телевізор
не нахилявся вперед. Але не затягуйте
гвинти надто сильно.
Page 81

Від’єднання підставки,
1
ВСТАНОВЛЕННЯ ТА ПІДГОТОВКА
4 шт.
M4 x 30
УВАГА
Встановлюючи підставку на телевізор,
його слід покласти екраном на покритий тканиною стіл або рівну поверхню,
щоб уникнути подряпин на екрані.
13
2
УКРАЇНСЬКА
ПРИМІТКА
Кришка запобігатиме нагромадженню
пилу та бруду в отворі.
Встановлюючи виріб на настінному
кронштейні, використовуйте захисну
Захисна кришка
кришку.
3
2 шт.
M4 x 30
УВАГА
Надійно закрутіть гвинти, щоб телевізор
не нахилявся вперед. Але не затягуйте
гвинти надто сильно.
Page 82

ВСТАНОВЛЕННЯ ТА ПІДГОТОВКА
14
Організація кабелів
Зображення може дещо відрізнятися від
реального вигляду вашого телевізора.
1 Встановіть тримач кабелю живлення і
вставте кабель живлення. Це допоможе
запобігти випадковому від'єднанню кабелю.
Тримач кабелю живлення
2 Зберіть і закріпіть кабелі разом за допомо-
УКРАЇНСЬКА
гою фіксатора для кабелів.
Фіксатор для кабелів
УВАГА
Не пересувайте телевізор, тримаючи
його за фіксатор для кабелів чи тримач кабелю живлення, оскільки вони
можуть зламатися, що в свою чергу
може призвести до травмування користувача чи пошкодження телевізора.
Page 83

ВСТАНОВЛЕННЯ ТА ПІДГОТОВКА
15
Встановлення на столі
Зображення може дещо відрізнятися від
реального вигляду вашого телевізора.
Підніміть телевізор і поставте його верти-
1
кально на столі.
- Для належної вентиляції залишіть відстань
до стіни не менше 10 см.
10 см
10 см
Під'єднайтекабельживленнядорозетки.
2
УВАГА
Не ставте телевізор поблизу джерел
тепла, оскільки це може призвести до
пожежі або інших пошкоджень.
10 см
10 см
Кріплення телевізора до стіни (залежно від моделі)
Зображення може дещо відрізнятися від
реального вигляду вашого телевізора.
Надійно вкрутіть гвинти з кільцями або зви-
1
чайні гвинти із кутовими скобами в отвори
на задній панелі телевізора.
- Якщо в цих отворах закручені інші гвинти,
викрутіть їх.
УКРАЇНСЬКА
ПРИМІТКА
Щоб вибрати оптимальне положення
екрана для перегляду, можна повернути телевізор у межах 20 градусів
праворуч або ліворуч.
УВАГА
Регулюючи кут, будьте обережні, щоб не
поранити пальці.
Зафіксуйте скоби на стіні за допомогою шу-
2
рупів або анкерних гвинтів.
Скоби повинні бути розташовані на стіні
приблизно навпроти гвинтів із кільцями на
задній панелі телевізора.
За допомогою міцного шнура прив'яжіть
3
гвинти з кільцями до скоб на стіні.
Шнур має натягуватися горизонтально, пер-
пендикулярно до стіни.
УВАГА
Слідкуйте, щоб діти не намагалися
вилізти на телевізор чи повиснути на
ньому.
ПРИМІТКА
Ставте телевізор тільки на стійку та
міцну підставку або шафку, яка витримає вагу телевізора.
Page 84

ВСТАНОВЛЕННЯ ТА ПІДГОТОВКА / ДОДАТКОВІ ВІДОМОСТІ ЩОДО ПОСІБНИКА
A
B
16
Встановлення на стіні
Обережно прикріпіть настінний кронштейн до
задньої панелі телевізора, після чого надійно
закріпіть настінний кронштейн на міцній стіні,
перпендикулярно до підлоги. Для кріплення
телевізора до інших будівельних матеріалів
зверніться до кваліфікованого майстра.
Компанія LG радить залучати до встановлення
телевізора на стіні кваліфікованого спеціаліста.
10 см
10 см
10 см
УКРАЇНСЬКА
Використовуйте тільки гвинти та настінні кронштейни стандарту VESA. Стандартні розміри
наборів для настінного кріплення описано в
таблиці нижче.
10 см
ДОДАТКОВІ ВІДОМОС-
УВАГА
Перед встановленням або перенесенням
телевізора обов'язково від'єднайте кабель
живлення. Нехтування цією пересторогою
може призвести до ураження електричним
струмом.
Якщо встановити телевізор на стелі або похи-
лій стіні, він може впасти та спричинити травми. Для кріплення використовуйте кронштейн
настінного кріплення, рекомендований LG, та
зверніться по допомогу до місцевого дилера
або до кваліфікованого майстра.
Не затягуйте гвинти надто сильно, це може
пошкодити телевізор та спричинити втрату
гарантії.
Використовуйте гвинти та кронштейни на-
стінного кріплення, які відповідають стандарту
VESA. Гарантія на цей виріб не поширюється на будь-які пошкодження чи травми, що
виникли через неналежне використання або
використання невідповідних аксесуарів.
ПРИМІТКА
Використовуйте гвинти, вказані у списку
характеристик стандартних гвинтів VESA.
Набір для настінного кріплення містить
посібник зі встановлення та всі необхідні
частини.
Залежно від настінного кріплення довжи-
на гвинтів може відрізнятися. Виберіть
гвинти потрібної довжини.
Детальніше читайте в посібнику до
кронштейна настінного кріплення.
Продається окремо (кронштейн настінного кріплення)
Модель 42/50PA45**
VESA (A x B) 400 x 400 600 x 400
Стандартний
гвинт
Кількість гвинтів 4 4
Кронштейн настін-
ного кріплення
42/50PA49**
50PA55**
50PA65**
M6 M8
PSW400B,
PSW400BG,
60PA55**
60PA65**
PSW600B,
PSW600BG
ТІ ЩОДО ПОСІБНИКА
Перегляд посібника користувача
Посібник користувача надається у вигляді
файлу PDF на компакт-диску. Для перегляду
посібника користувача потрібно встановити на
комп’ютері програму Adobe Acrobat Reader.
Вставте компакт-диск, що постачається
1
разом із виробом.
Автоматично відкриється сторінка у веб-
браузері.
Клацніть на посилання “Посібник
2
користувача” на цій сторінці.
Відкриється посібник користувача.
3
ПРИМІТКА
Якщо вікно веб-браузера не відкривається
автоматично, відкрийте у провіднику
розташування “Мій комп’ютер”, перейдіть
на диск LG, відкрийте файл index.htm і
відкрийте посібник користувача.
Page 85

ПУЛЬТ ДИСТАНЦІЙНОГО КЕРУВАННЯ
ПУЛЬТ ДИСТАНЦІЙНОГО КЕРУВАННЯ
У цьому посібнику описано кнопки пульта дистанційного керування.
Уважно прочитайте цей посібник та використовуйте телевізор належним чином.
Для заміни батарей відкрийте кришку батарей, замініть батареї (1,5 В, AAA),
вставляючи їх відповідним боком до відповідної позначки та всередині
відсіку. Закрийте кришку батарей. Натичкаючи кнопки, спрямовуйте пульт дистанційного керування на сенсор дистанційного керування на телевізорі.
Щоб вийняти батареї, виконайте ті самі дії у зворотному порядку.
УВАГА
Не використовуйте одночасно старі та нові батареї, це може пошкодити пульт дистанційного керування.
Подані в цьому документі зображення можуть дещо відрізнятися від вигляду вашого телевізора.
або
17
або
(Живлення)
ENERGY SAVING Для регулювання яскравості екрана для зменшення споживання елек-
INPUT Використовується для зміни джерела вхідного сигналу; використову-
TV/RAD Вибір каналу радіо, ТБ або цифрового ТБ.
Цифрові клавіші Введіть числа.
LIST Для доступу до списку збережених програм.
Q.VIEW Повернення до попередньої програми.
+ - Для регулювання рівня гучності.
FAV Для доступу до списку улюблених програм.
MUTE Повне вимкнення звуку.
(P + -)
∧∨
P
PAGE Для перегляду збережених програм
GUIDE Викликає довідник програм.
1
SETTINGS Використовується для доступу до головних меню.
Q. MENU Для доступу до швидких меню.
Навігаційні кнопки
(догори/донизу/ліворуч/праворуч)
OK Для вибору пункту чи параметру в меню та підтвердження вибору.
INFO Для перегляду інформації поточної програми або екрана.
EXIT
Кольорові кнопки Ці кнопки використовуються для операцій із телетекстом (тільки моде-
1
КНОПКИ ТЕЛЕ�КНОПКИ ТЕЛЕ�
ТЕКСТУ
SUBTITLE Викликає обрані вами субтитри в цифровому режимі.
Кнопки керування
(
, , , , )
SIMPLINK
(Залежно від моделі)
AD Вмикання і вимикання функції звукового опису.
RATIO Для зміни формату зображення на екрані.
AV MODE
(Залежно від моделі)
Для увімкнення та вимкнення живлення телевізора.
троенергії.
ється для вмикання телевізора.
Почергове перемикання збережених каналів.
Для переміщення між пунктами меню та параметрами.
Для повернення до попереднього рівня.
Для виходу з екранного меню та повернення до перегляду телепередач.
лі з підтримкою телетексту) та редагування програм.
Ці кнопки використовуються для управління телетекстом.
Детальніше про це читайте в розділі “Телетекст”.
Для керування меню МОЇ МУЛЬТИМЕДІЙНІ ДАНІ або сумісними пристроями SIMPLINK (USB, SIMPLINK).
Доступ до аудіовідеопристроїв, підключених за допомогою кабелю
HDMI через HDMI-CEC.
Підключених до телевізора; відкриває меню SIMPLINK.
Дозволяє вибрати режим аудіо-відео сигналу.
УКРАЇНСЬКА
1
Page 86

ПЕРЕГЛЯД ТЕЛЕПРОГРАМ
18
Виконуйте вказівки, що з'являтимуться на
ПЕРЕГЛЯД ТЕЛЕПРОГРАМ
Під’єднання антени
Для перегляду телепередач під’єднайте антену
згідно з вказівками, поданими нижче.
Для запобігання пошкодженню обладнання ніколи не підключайте кабелі живлення до завершення підключення всього обладнання.
За допомогою кабелю для передачі радіочастотного сигналу під’єднайте телевізор до настінного гнізда антени (75 Ω).
ПРИМІТКА
Для оптимальної якості зображення,
налаштуйте напрямок антени.
Для отримання кращої якості
зображення у зонах слабкого сигналу,
УКРАЇНСЬКА
можливо, потрібно буде встановити на
антені підсилювач сигналу.
Якщо зображення неналежної якості і
при цьому під’єднано антену, скеруйте
антену в правильному напрямку.
Кабель та конвертер антени не входять
в комплект.
Перше -ввімкнення телевізора
Коли ви вперше вмикаєте телевізор, з'являється
екран початкового налаштування. На цьому
етапі можна вибрати мову та встановити деякі
основні налаштування.
Під'єднайте кабель живлення до розетки.
1
У режимі очікування натисніть кнопку (жив-
2
лення), щоб увімкнути телевізор.
Якщо телевізор вмикається вперше,
з'явиться екран початкового налаштування.
ПРИМІТКА
Ви також можете відкрити пункт За-
водські налаштування, увійшовши до
пункту ПАРАМЕТРИ в головних меню.
3
екрані, щоб налаштувати телевізор відповідно до своїх уподобань.
Мова
Режим налаштування
Країна
Вибір мови відображення.
Вибір пункту Режим для
дому для перегляду телепрограм удома.
Вибір країни використання.
(залежно від моделі)
Введіть пароль
Часовий пояс
Налаштування мережі
Встановіть пароль.
(якщо в пункті "Країна" ви-
брано Францію або Італію)
Вибір часового поясу та
налаштування переходу на
літній час.
(Якщо в пункті "Країна" вибрано Росію)
(Якщо виріб має мережевий порт) – виклик екрана
мережевих налаштувань.
Автопошук
ПРИМІТКА
У країнах, де відсутні єдині стандарти циф-
рового телебачення, деякі функції цифрового телебачення можуть бути недоступні,
в залежності від характеристик цифрового
телемовлення.
Якщо в меню вибору країни вибрано Фран-
цію, буде встановлено пароль не "0", "0", "0",
"0", а "1", "2", "3", "4".
Щоб отримати оптимальне зображення в
домашніх умовах, рекомендовано використовувати налаштування Режим для дому.
Режим Магазин демо краще підходить для
магазинів.
Якщо вибрати режим Магазин демо, усі змі-
нені налаштування будуть повертатися до
стандартних налаштувань режиму Магазин
демо за 5 хвилин.
Автоматичний пошук і
збереження каналів.
4 Після завершення налаштування основних
параметрів натисніть OK.
ПРИМІТКА
Якщо ви не завершили початкове налаштуван-
ня, вікно налаштувань з'явиться після наступного увімкнення телевізора.
Від'єднуйте кабель живлення від розетки, якщо
не використовуєте телевізор тривалий час.
5 Щоб вимкнути телевізор, натисніть кнопку
(ЖИВЛЕННЯ).
Page 87

ПІДКЛЮЧЕННЯ / ІНФОРМАЦІЯ ПРО ПРОГРАМНЕ ЗАБЕЗПЕЧЕННЯ З ВІДКРИТИМ КОДОМ
3
ПІДКЛЮЧЕННЯ
Під’єднайте до телевізора різні зовнішні пристрої та змініть режим вхідного сигналу, щоб вибрати зовнішній пристрій. Детальніше про під’єднання зовнішнього пристрою читайте в інструкції з використання кожного пристрою.
Доступні зовнішні пристрої: HD приймачі, DVD програвачі, відеомагнітофони, аудіосистеми, USBнакопичувачі, ПК, ігрові пристрої та інші зовнішні пристрої.
ПРИМІТКА
Якщо ви хочете записувати телевізійні програми на DVD-програвач або на відеомагнітофон,
під'єднайте кабель вхідного сигналу до записувального пристрою, а пристрій – до телевізора.
Детальніше про запис читайте в посібнику користувача під'єднаного пристрою.
Під'єднання зовнішнього пристрою може відрізнятись, залежно від моделі.
Під'єднувати зовнішні пристрої до телевізора можна, не зважаючи на порядок роз'ємів теле-
візора.
ПРИЄДНАННЯ ПРИСТРОЮ
Надане зображення може відрізнятися від вашого телевізора.
Щоб приєднати додаткове обладнання, див. розділ про встановлення додаткового обладнання на
компакт-диску з посібником.
19
Приставка DVD/STB
DVD/STB
2
Kабель
3
живлення
Підключення
2
відеомагнітофону
USB IN
IN
1
Підключення
антени
ІНФОРМАЦІЯ ПРО ПРОГРАМНЕ ЗАБЕЗПЕЧЕННЯ З
ВІДКРИТИМ КОДОМ
Щоб отримати вихідний код за ліцензією GPL, LGPL, MPL чи іншими відповідними ліцензіями, який
міститься у цьому виробі, відвідайте сторінку http://opensource.lge.com.
УКРАЇНСЬКА
або
На додаток до вихідного коду можна завантажити усі умови відповідних ліцензій, відмови від
відповідальності і повідомлення про авторські права.
Компанія LG Electronics надає також відкритий вихідний код на компакт-диску із оплатою вартості
виконання такого розповсюдження (наприклад, вартості носія, пересилання і транспортування) після
надсилання відповідного запиту на електронну адресу opensource. Ця пропозиція дійсна протягом
трьох (3) років із дати придбання виробу.
Page 88

ВАГА / УСУНЕННЯ НЕПОЛАДОК
20
ВАГА
42PA45** 42PA49**
42PA4500-ZF / 42PA450T-ZF
МОДЕЛІ
Вага Разом із підставкою 20,6 кг 20,6 кг
Без підставки 19,0 кг 19,0 кг
МОДЕЛІ
Вага Разом із підставкою 28,2 кг 28,2 кг
Без підставки 25,8 кг 25,8 кг
МОДЕЛІ
УКРАЇНСЬКА
Вага Разом із підставкою 28,8 кг 28,8 кг
Без підставки 26,4 кг 26,4 кг
МОДЕЛІ
Вага Разом із підставкою 40,6 кг 40,6 кг
Без підставки 36,4 кг 36,4 кг
Технічні характеристики виробу, подані вище, можуть бути змінені без попереднього повідомлення у
зв’язку із вдосконаленням функціональності виробу.
42PA4500-ZM / 42PA450T-ZM
42PA4510-ZA / 42PA451T-ZA
42PA4510-ZG / 42PA451T-ZG
42PA4520-ZC / 42PA452T-ZC
42PA4520-ZJ / 42PA452T-ZJ
50PA45** 50PA49**
50PA4500-ZF / 50PA450T-ZF
50PA4500-ZM / 50PA450T-ZM
50PA4510-ZA / 50PA451T-ZA
50PA4510-ZG / 50PA451T-ZG
50PA4520-ZC / 50PA452T-ZC
50PA4520-ZJ / 50PA452T-ZJ
50PA55** 50PA65**
50PA5500-ZB / 50PA550T-ZB
50PA5500-ZH / 50PA550T-ZH
60PA55** 60PA65**
60PA5500-ZB / 60PA550T-ZB
60PA5500-ZH / 60PA550T-ZH
42PA4900-ZE / 42PA490T-ZE
42PA4900-ZL / 42PA490T-ZL
50PA4900-ZE / 50PA490T-ZE
50PA4900-ZG / 50PA490T-ZG
50PA4900-ZL / 50PA490T-ZL
50PA6500-ZA / 50PA650T-ZA
50PA6500-ZG / 50PA650T-ZG
50PA6520-ZF / 50PA652T-ZF
50PA6520-ZM / 50PA652T-ZM
60PA6500-ZA / 60PA650T-ZA
60PA6500-ZG / 60PA650T-ZG
УСУНЕННЯ НЕПОЛАДОК
Загальні
Проблема Вирішення
За допомогою пульта дистанційного керування не відбувається
керування телевізором.
Не з'являється зображення та немає звуку.
Після увімкнення телевізора зображення з'являється повільно.
Неможливо під'єднати зовнішні
пристрої.
Раптове вимкнення телевізора.
Перевірте сенсор пульта дистанційного керування на виробі та спробуйте ще раз.
Усуньте будь-які перешкоди між пультом дистанційного керування та телевізором.
Перевірте ресурс батарей та їх належне розташування (
Перевірте, чи пристрій увімкнено.
Перевірте під'єднання кабелю живлення до розетки на стіні.
Перевірте наявність несправностей розетки, під'єднуючи інші пристрої.
Зображення відтворюється без звуку короткий час після ввімкнення ви-
робу. Це нормальне явище. Якщо зображення не з'являється протягом
декількох хвилин, від'єднайте телевізор від електромережі на 30 секунд та
спробуйте ще раз. Якщо все-таки зображення не з'являється, зверніться
до місцевого авторизованого сервісного центру.
Перегляньте розділ "Огляд варіантів під'єднання" і під'єднайте зовніш-
ній пристрій.
Перевірте настройки управління живленням. Може відбуватись збій подачі
живлення.
Перевірте увімкнення функції автоматичного вимкнення в меню часу.
Дивіться розділ "Таймер сну".
Якщо увімкнений телевізор не отримує сигналу, він автоматично вимкнеть-
ся через 15 хвилин бездіяльності.
до , до ).
Page 89

Звук
Проблема Вирішення
Відтворення зображення відбувається без звуку.
Один з динаміків шумить або не
подає звуку.
Натисніть кнопку + або - .
Перевірте, чи не натиснуто кнопку MUTE.
Перемкніть на інший канал. Проблема може бути у якості трансляції.
Перевірте належне під'єднання аудіокабелю.
Зміни вологості приміщення або температури можуть спричинити незвич-
ний шум під час вимкнення або увімкнення телевізора.
Виріб справний.
Відео
Проблема Вирішення
Зображення чорно-біле або низька якість кольору.
На екрані з'являються горизонтальні або вертикальні смуги або
зображення розмите.
Лінії або інші спотворення зображення
Після вимкнення телевізора
з'являється залишкове зображення.
Живлення увімкнено, але екран
дуже темний.
На екрані з'явилось повідомлення
“Немає сигналу”.
Зображення зсунуте.
На фоні екрана з'являються тонкі лінії.Перевірте під'єднання відеокабелю.
З'являється горизонтальний шум
або символи розмиті.
Поганий прийом сигналу певних
каналів.
Налаштуйте колір у меню ЗОБРАЖЕННЯ.
Дотримуйтеся достатньої відстані між виробом та іншими електронними пристроями.
Перемкніть на інший канал. Проблема може бути у якості трансляції.
Перевірте наявність перешкод поблизу, як-от увімкнених електричних при-
строїв чи механічних інструментів.
Перевірте під'єднання антени або спрямуйте антену в потрібний напрямок.
Піксели могли бути пошкоджені після відображення нерухомого зображен-
ня впродовж тривалого часу ("вигоряння" зображення). Для запобігання
пошкодження пікселів на екрані використовуйте заставку.
Налаштуйте яскравість і контрастність у меню ЗОБРАЖЕННЯ.
Перевірте, чи кабель передачі сигналу від іншого пристрою під'єднано до
телевізора належним чином.
Перевірте вибране джерело вхідного сигналу, натиснувши кнопку INPUT.
Налаштуйте положення в меню ЗОБРАЖЕННЯ.
Перевірте, чи роздільна здатність і частота відеокарти підтримуються телевізором.
Якщо значення частоти виходить за межі, встановіть рекомендовану роздільну
здатність, використовуючи налаштування відображення зовнішнього пристрою.
Налаштуйте фазу в меню ЗОБРАЖЕННЯ. Читайте розділ "ЕКРАН".
Перемкніть на інший канал. Проблема може бути у якості трансляції.
Сигнал станції передавання може бути слабким. Спрямуйте антену в потрібний напрямок.
Перевірте наявність перешкод поблизу, як-от увімкнених електричних пристроїв чи механіч-
них інструментів.
Pentouch
Проблема Вирішення
Стилус не працює.
Під час використання програми
Pentouch телеекран виглядає не
так, як зазвичай.
За допомогою стилуса вибрано
неправильну точку.
Рух стилуса переривчастий.
Упевніться, що для переходу в режим Pentouch використовується пульт
дистанційного керування.
Перевірте, чи адаптер Pentouch під’єднано до комп’ютера, та чи світиться
червоний індикатор.
Натисніть на стилусі , щоб перевірити, чи його увімкнено.
Перевірте, чи стилус об’єднано в пару для використання. (Якщо в разі натиснення
Touch Home (переходу до головного екрана) на стилусі червоний індикатор
засвічується один раз, стилус об’єднано в пару належним чином).
Налаштуйте екран комп’ютера для відображення лише на телевізорі.
Перевірте, чи комп’ютер під’єднано до телевізора належним чином.
Перевірте, чи вибрано оптимальну роздільну здатність.
Встановлення формату точного відображення Just Scan для екрана телевізора.
Налаштуйте екран комп’ютера для відображення лише на телевізорі.
Якщо комп’ютер і телевізор з’єднано за допомогою кабелю передачі
сигналу для комп’ютера (RGB) і точка, якої ви торкаєтесь на телевізорі
стилусом, не збігається із точкою, яка на комп’ютері відображається як
вибрана, скористайтесь пультом дистанційного керування телевізора, щоб
вибрати пункт [Home] → [PICTURE] → [SCREEN] (RGB-PC), після чого
виберіть пункт [Auto Configure], щоб налаштувати екран.
Перевірте, чи комп’ютер і телевізор не знаходяться надто далеко один
від одного. Перевірте, чи між комп’ютером і телевізором не надто багато
перешкод.
Перевірте, чи на комп’ютері не запущено інших програм. (Не запускайте
інших програм під час використання програми Pentouch).
УСУНЕННЯ НЕПОЛАДОК
21
УКРАЇНСЬКА
Page 90

An extended Owner ’s Ma nual that con tains
information on the advanced features of these
LG TV sets is located on the CD- ROM provided
in an electronic version.
To read thes e files, you will need to use a
Personal Computer (PC) equipped with a CDROM drive.
Rec o rd th e mo de l n u m be r a nd ser i a l
number of the TV.
Refer to the label on the back cover and
quote this information to your dealer when
requiring any service.
Model :
Serial No. :
Please contact LG First.
If you have any inquiries or comments,
please contact LG customer information centre.
Customer Information Centre
Country Service Country Service
0 810 144 131 0900 543 5454
32 15 200255
07001 5454 808 78 54 54
810 555 810 031 228 3542
8088 5758 0850 111 154
0800 0 54 54 902 500 234
3220 54
01803 11 54 11 0848 543 543
801 11 200 900 0844 847 5454
06 40 54 54 54 8 800 200 7676
0818 27 6955 800 9990
199600099 0 800 303 000
8 820 0071 1111 2255
8 0003 271
8 800 30 800
800 187 40
801 54 54 54
0770 54 54 54
800 0071 0005
 Loading...