

LG 49VL5B-B Quick Guide

USER GUIDE
LG Digital
Signage
(MONITOR SIGNAGE)
Please read this manual carefully before operating your set and retain it
for future reference.
L15
www.lg.com

2
ENGLISH
TABLE OF CONTENTS
USING THE MONITOR ............. 3
- Using the Input List .................................. 3
- Adjusting Aspect Ratio ............................. 3
ENTERTAINMENT .................... 5
- Using the Network .................................... 5
Connecting to a Network
Network Status
- Using the My Media ................................. 7
Connecting USB storage devices
Browsing Files
Viewing Movies
Viewing Photos
Listening to Music
Viewing the Contents List
CUSTOMIZING SETTINGS .... 20
- Accessing Main Menus .......................... 20
PICTURE Settings
AUDIO Settings
TIME Settings
OPTION Settings
NETWORK Settings
- PICTURE ID Settings ............................. 30
IR CODES ............................... 31
TO CONTROL MULTIPLE
PRODUCTS ............................ 33
- Connecting the Cable ............................ 33
- RS-232C Configurations ........................ 34
4P Cable
RS-232C Cable
- Communication Parameter .................... 34
- Command Reference List ...................... 35
- Transmission / Receiving Protocol ......... 37
To obtain the source code under GPL, LGPL,
MPL, and other open source licenses, that is
contained in this product, please visit
http://opensource.lge.com.
In addition to the source code, all referred
license terms, warranty disclaimers and
copyright notices are available for download.
LG Electronics will also provide open source
code to you on CD-ROM for a charge covering
the cost of performing such distribution (such
as the cost of media, shipping, and handling)
upon email request to
This offer is valid for three (3) years from the
date on which you purchased the product.
opensource@lge.com.
3
USING THE MONITOR
Using the Input List
Press INPUT to access the Input List.
1
Press the navigation buttons to scroll to one of the input mode and press OK.
2
yRGB-PC
yHDMI
yDVI-D
yUSB
yDisplay Port
yOPS
NOTE
• Some input signals may not be supported depending on the model.
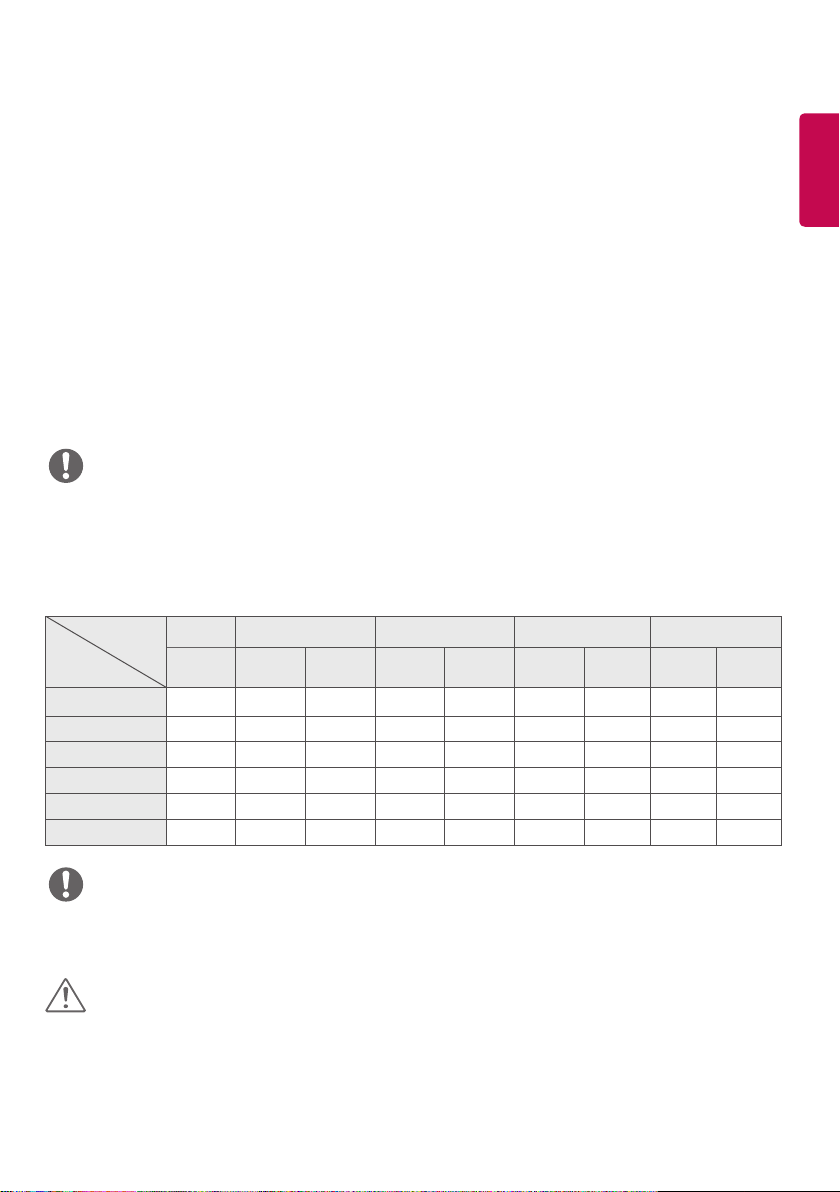
Adjusting Aspect Ratio
Resize the image to view the image at its optimal size by pressing ARC while you are watching monitor set.
Aspect Ratio
16:9
Just Scan x o x o x o x o x
Set By Program x o x o x o x o x
4:3 o o o o o o o o o
Zoom x o x o x o x o x
Cinema Zoom1 x o x o x o x o x
NOTE
• You can also change the image size by accessing the main menus.
• The Just Scan mode operates when a video signal has resolution of 720p or higher.
MODE
RGB HDMI DVI-D Display Port OPS
PC DTV PC DTV PC DTV PC DTV PC
o o o o o o o o o
ENGLISH
CAUTION
• If a fixed image displays on the screen for a long period of time, it will be imprinted and become a
permanent disfigurement on the screen. This is image burn or burn-in and not covered by the warranty.
• If you don't use your monitor, turn the power off or set a screen saver program from the PC or the system to
prevent image retention.
• If the aspect ratio is set to 4:3 for a long period of time, image burn may occur on the letterboxed area of the
screen.

4
y16:9 : This selection will allow you to adjust the picture horizontally, in linear proportion, to fill the entire
ENGLISH
screen (useful for viewing 4:3 formatted DVDs).
yJust Scan : This Selection will allow you view the picture of best quality without loss of original picture
in high resolution image. Note: If there is noise in original Picture, You can see the noise at the
edge.
ySet By Program : Depending on the input signal, screen aspect ratio changes to 4:3 or 16:9.
y4:3 : This selection will allow you to view a picture with an original 4:3 aspect ratio, black bars will appear
on both the left and right of the screen.
yZoom : This selection will allow you to view the picture without any alteration, while filling the entire
screen. However, the top and bottom of the picture will be cropped.
yCinema Zoom1 : Choose Cinema Zoom when you want to enlarge the picture in correct proportion.
Note: When enlarging or reducing the picture, the image may become distorted.
5
NW
@
ENTERTAINMENT
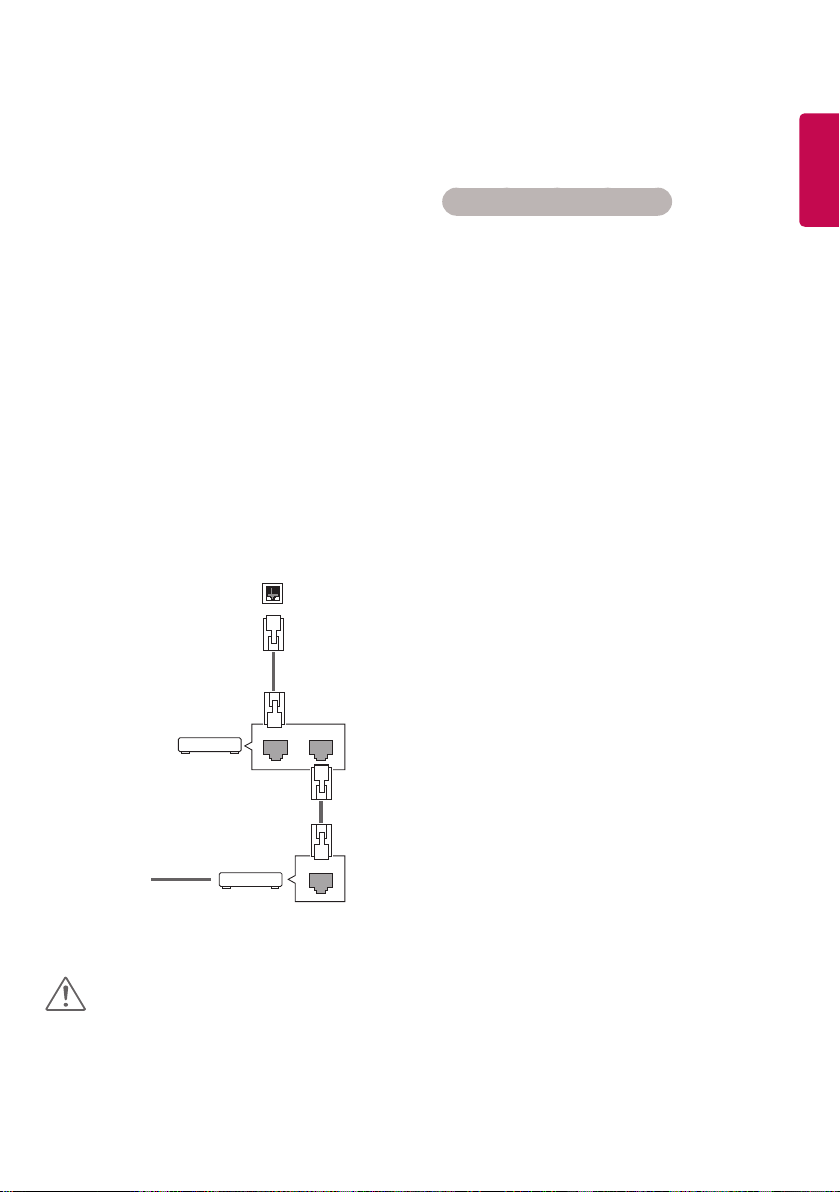
Using the Network
Connecting to a Network
For wired network connections, connect the
display to a local area network (LAN) via the LAN
port as shown on the following diagram. Then, set
up the network settings. For wireless network connections, connect the Wi-Fi USB module to the USB
port. Then, set up the network settings.
After making a physical connection, a small
number of home networks may require the display
network settings to be adjusted. For most home
networks, the display will connect to automatically
without any adjustments.
For detail information, contact your internet pro-
vider or router manual.
LAN
LA
Router
AN
To set up the network settings: (Even if your display
has already connected automatically, running
setup again will not harm anything),
Connecting to a wired network
1 Press SETTINGS to access the main menus.
2 Press the navigation buttons to scroll to NET-
WORK and press OK.
3 Press the navigation buttons to select Net-
work Setting and press OK.
4 If you already set network setting, select
Resetting. The new connection settings resets
the current network settings.
5 Select IP Auto Setting or IP Manual Setting.
- IP Manual Setting
press the navigation and number buttons. IP
addresses will need to be input manually.
- IP Auto Setting
Select this if there is a DHCP server (Router)
on the local area network (LAN) via wired
connection, the display will automatically
be allocated an IP address. If you’re using a
broadband router or broadband modem that
has a DHCP (Dynamic Host Configuration
Protocol) server function. The IP address will
automatically be determined.
ENGLISH
Internet
Internet
CAUTION
• Do not connect a modular phone cable to the
LAN port.
• Since there are various connection methods,
please follow the specifications of your
telecommunication carrier or internet service
provider.
Cable modem
6 When you are finished, press EXIT.
ETHERNET

6
Connecting to a wireless network
ENGLISH
1 Press SETTINGS to access the main menus.
2 Press the navigation buttons to scroll to NET-
WORK and press OK.
3 Press the navigation buttons to select Net-
work Setting and press OK.
4 Select Setting from the AP list or Simple
setting (WPS-button mode).
-Setting from the AP list
Select an AP to connect to a wireless network.
- Simple setting (WPS-button mode)
Press the button on the wireless router that
supports PBC to easily connect to the router.
5 When you are finished, press EXIT.
CAUTION
• Network setting menu will not be available until
the display connected to physical network.
• Since there are various connection methods,
please follow the specifications of your
telecommunication carrier or internet service
provider.
• When a Wi-Fi dongle is used with a model that
has only one USB input port, the distribution or
content schedule via the SuperSign software is
not available.
NOTE
• If you want to access the Internet directly on
your display, the Internet connection should
always be on.
• If you cannot access the Internet, check the
network conditions from a PC on your network.
• When you use Network Setting, check the LAN
cable or check if DHCP in the router is turned on.
• If you do not complete the network settings, the
network may not work properly.
Tips for Network setting
y Use a standard LAN cable with this display. Cat5 or
better with a RJ45 connector.
y Many network connection problems during set
up can often be fixed by re-setting the router or
modem. After connecting the display to the home
network, quickly power off and/or disconnect the
power cable of the home network router or cable
modem. Then power on and/or connect the power
cable again.
y Depending on the internet service provider (ISP),
the number of devices that can receive internet
service may be limited by the applicable terms of
service. For details, contact your ISP.
y LG is not responsible for any malfunction of the
display and/or the internet connection feature due
to communication errors/malfunctions associated
with your internet connection, or other connected
equipment.
y LG is not responsible for problems within your
internet connection.
y You may experience undesired results if the net-
work connection speed does not meet the requirements of the content being accessed.
y Some internet connection operations may not be
possible due to certain restrictions set by the Internet service provider (ISP) supplying your Internet
connection.
y Any fees charged by an ISP including, without limi-
tation, connection charges are your respon- sibility.
y A 10 Base-T or 100 Base-TX LAN port is required
when using a wired connection to this display. If
your internet service does not allow for such a connection, you will not be able to connect the display.
y A DSL modem is required to use DSL service and
a cable modem is required to use cable modem
service. Depending on the access method of and
subscriber agreement with your ISP, you may not
be able to use the Internet connection feature contained in this display or you may be limited to the
number of devices you can connect at the same
time. (If your ISP limits subscription to one device,
this display may not be allowed to connect when a
PC is already connected.)
y The use of a router may not be allowed or its usage
may be limited depending on the policies and
restrictions of your ISP. For details, contact your ISP
directly.
7
Tips for Wireless Network Setting
y Wireless networks can be subject to interfer-
ence from other devices operating at a frequency of 2.4 GHz (wireless phones, Bluetooth
devices, or microwave ovens). There may also
be interference from devices with a frequency
of 5 GHz, same as other Wi-Fi devices.
y The surrounding wireless environment can
cause the wireless network service to run
slowly.
y For an AP connection, an access point device
that supports wireless connection is required
and the wireless connection feature must be
enabled on the device. Contact your service
provider regarding availability of wireless connection on your access point.
y Check the SSID and security settings of the AP
for AP connection. Refer to the appropriate
documentation for SSID and security settings
of the AP.
y Invalid settings on network devices (wired/
wireless line sharer, hub) can cause the
monitor to run slowly or not operate properly.
Install the devices correctly according to the
appropriate manual and set the network.
y Connection method may differ according to
the AP manufacturer.
Network Status
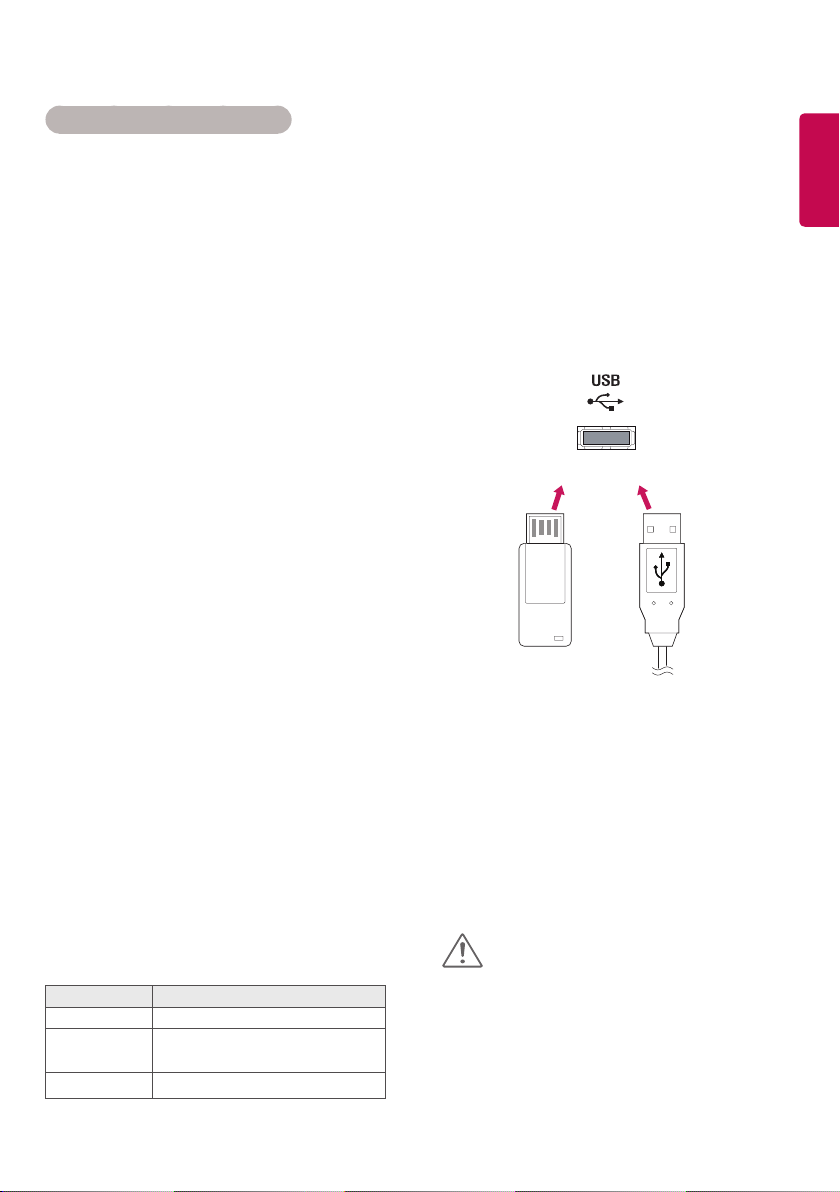
Using the My Media
Connecting USB storage devices
Connect USB storage devices such as a USB flash
memory, external hard drive to the display and use
multimedia features.
Connect a USB flash memory or USB memory card
reader to the Display as shown on the following
illustration. The My Media screen appears.
or
ENGLISH
1 Press SETTINGS to access the main menus.
2 Press the navigation buttons to scroll to
NETWORK and press OK.
3 Press the navigation buttons to select
Network Status.
4 Press OK to check the network status.
5 When you are finished, press EXIT.
Option Description
Setting Return to the network setting menu.
Test
Close Return to the previous menu.
Test the current network status after
setting the network.
CAUTION
• Do not turn the display off or remove a USB
storage device while MY MEDIA menu is
activated, as this could result in loss of files or
damage to the USB storage device.
• Back up your files saved on a USB storage device
frequently, as you may lose or damage the files
and this may be not covered by the warranty.

8
Tips for using USB storage devices
ENGLISH
y Only a USB storage device is recognizable.
y If the USB storage device is connected through
a USB hub, the device is not recognizable.
y A USB storage device using an automatic rec-
ognition program may not be recognized.
y A USB storage device which uses its own driver
will not be recognized.
y The recognition speed of a USB storage device
may depend on each device.
y Please do not turn off the display or unplug
the USB device when the connected USB storage device is working. When such a device is
suddenly separated or unplugged, the stored
files or the USB storage device may be damaged.
y Please do not connect the USB storage device
which was artificially maneuvered on the PC.
The device may cause the product to malfunction. Only use a USB storage device which has
normal music files, image files
or movie files.
y Please only use USB storage devices formatted
using the FAT32 file system. Storage devices
formatted with utility programs that are not
supported by Windows may not be recognized.
y Please connect power to a USB storage device
(over 0.5 A) which requires an external power
supply. If not, the device may not be recognized.
y Please connect a USB storage device with the
cable included by the device maker.
y Some USB storage devices may not be sup-
ported or operate smoothly.
y File alignment method of USB storage devices
is similar to Window XP and the monitor can
recognize up to 100 English characters.
y Be sure to back up important files since data
stored on a USB memory device may be damaged. We will not be responsible for any data
loss.
y If the USB HDD does not have an external
power source, the USB device may not be
detected. So be sure to connect the external
power source.
- Please use a power adaptor for an external
power source.
y If your USB memory device has multiple parti-
tions, or if you use a USB multi-card reader,
you can use up to 4 partitions or USB memory
devices.
y If a USB memory device is connected to a USB
multi-card reader, its volume data may not be
detected.
y If the USB memory device does not work prop-
erly, disconnect and reconnect it.
y How fast a USB memory device is detected
differs from device to device.
y If the USB is connected in Standby Mode, that
drive will automatically be loaded when the
display is turned on.
y The recommended capacity is 1 TB or less for
a USB external hard disk and 32 GB or less for
USB memory.
y Any device with more than the recommended
capacity may not work properly.
y If a USB external hard disk with a Energy Sav-
ing function does not work, turn the hard disk
off and on again to make it work properly.
y USB storage devices below USB 2.0 are sup-
ported as well. But they may not work properly
with videos.
y A maximum of 999 folders or files can be
recognized under one folder.
y It is recommended you use a certified USB
storage device and cable. Otherwise, a USB
storage device may not be detected or a playback error may occur.
y Only a USB memory device can be used to play
back the files distributed and stored by SuperSign Manager. A USB hard disk or multi-card
reader will not work.
y Only an FAT 32 file formatted storage device
can play back the files distributed and stored
by SuperSign manager.
y A USB 3.0 storage device may not work.
y Data on some USB storage devices may be
damaged in a high temperature environment.
y It is recommended that you avoid playing
contents using more than two USB ports
simultaneously.
9
Browsing Files
Browse files saved in a USB storage device.
Press SETTINGS to access the main menu.
1
Press the search button to scroll to MY MEDIA and press OK.
2
Press the Search button to go to the Movie List, Photo List, Music List, or Content List that you want, and
3
press OK.
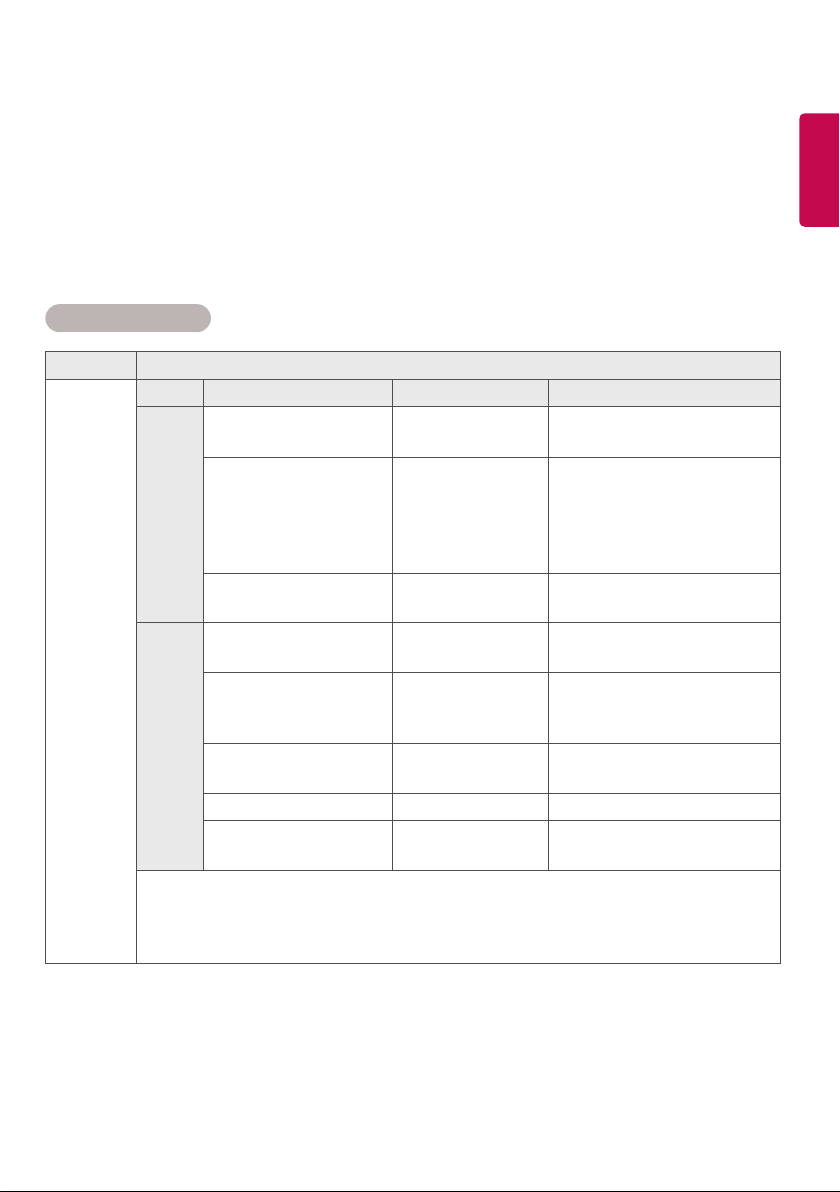
Supported file format
Typ e Supported file format
Movie Codec Media Container Profile
Video MPEG1 / MPEG2 DAT, MPG, MPEG, TS, TP 1080P @ 30 fps
MPEG4
(DivX 3.11, DivX 4,
DivX 5, DivX 6,
Xvid 1.01, Xvid 1.02, Xvid
1.03, Xvid 1.10-beta1/2)
H.264 AVI, MP4, MKV, TS, TRP, TP1080P @ 60 fps
Audio MP3 MP3 8 kbps to 320 kbps (Bit rate)
AC3 AC3 32 kbps to 640 kbps (Bit rate)
MPEG MP3 32 kbps to 448 kbps (Bit rate)
AAC, HEAAC MP4 8 kHz to 48 kHz (Sample rate)
LPCM AVI, WAV 64 kbps to 1.5 Mbps (Bit rate)
Bit rate : within 8 kbps to 320 kbps(MP3)
External Subtitle format : *.smi/*.srt/*.sub(MicroDVD, Subviewer1.0/2.0)/*.ass/*.ssa/*.txt(TMPlayer)/
*.psb(PowerDivX)
Internal Subtitle format : only, XSUB (It is the subtitle format used in DivX6 files)
AVI, DIVX, MP4, MKV, TS,
TRP
1080P @ 30 fps
16 kHz to 48 kHz (Sample rate)
32 kHz, 44.1 kHz, 48 kHz
(Sample rate)
16 kHz to 48 kHz (Sample rate)
8 kHz to 48 kHz (Sample rate)
ENGLISH

10
ENGLISH
Photo
Music
Content
(when using
SuperSign
Manager)
Typ e Supported file format
JPEG
Min : 64 x 64
Max : Normal Type: 15360 (W) x 8640 (H)
Progressive Type: 1920 (W) x 1440 (H)
BMP
Min : 64 x 64
Max : 9600 x 6400
PNG
Min : 64 x 64
Max : Interlace: 1200 x 800
Non-Interlace: 9600 x 6400
y Non-supported files are displayed in the form of predefined icon.
mp3
[Bit rate] 32 kbps ~ 320 kbps
[Sample freq] 16 kHz ~ 48 kHz
[Support] MPEG1, MPEG2, Layer2, Layer3
AAC
[Bit rate] Free Format
[Sample freq.] 8 kHz ~ 48 kHz
[Support] ADIF, ADTS
M4A
[Bit rate] Free Format
[Sample freq.] 8 kHz ~ 48 kHz
[Support] MPEG-4
OGG
[Bit rate] Free Format
[Sample freq.] ~ 48 kHz
[Support] Vorbis
WMA
[Bit rate] 128 kbps ~ 320 kbps
[Sample freq.] 8 kHz ~ 48 kHz
[Support] WMA7, 8, 9 Standard
WMA 10 Pro
[Bit rate] ~768 kbps
[Channel / Sample freq.]
M0 : Up to 2 / 48 kHz
M1 : Up to 5.1 / 48 kHz
M2 : Up to 5.1 / 96 kHz
[Support] WMA 10 Pro
File Extensions : *.cts/ *.sce
Movie
File Extensions: *.mpg/*.mpeg/*.dat/*.ts/*.trp/*.tp/*.mp4/*.mkv/*.avi/*. avi(motion JPEG)/*.mp4(motion
JPEG)/*.mkv(motion JPEG)
Video format: MPEG1, MPEG2, MPEG4,H.264, DivX 3.11, DivX 4, DivX 5, DivX 6,
Xvid 1.00,Xvid 1.01, Xvid 1.02, Xvid 1.03,Xvid 1.10-beta1/2, JPEG
Audio format: MP3, Dolby Digital, LPCM, AAC, HE-AAC
11
Viewing Movies
Plays movie files saved in the USB storage device.
Press SETTINGS to access the main menu.
1
Press the navigation button to scroll to MY MEDIA and press OK.
2
Press the navigation button to scroll to Movie List and press OK.
3
Press the navigation buttons to scroll to a folder you want and press OK.
4
Press the navigation buttons to scroll to a file you want and press OK.
5
y Change Device : Selects the USB storage device. (Depending on model)
y Go to root folder : Returns to the home screen of My Media.
y Go to upper folder : Returns to the previous screen.
y Exit : Exits My Media.
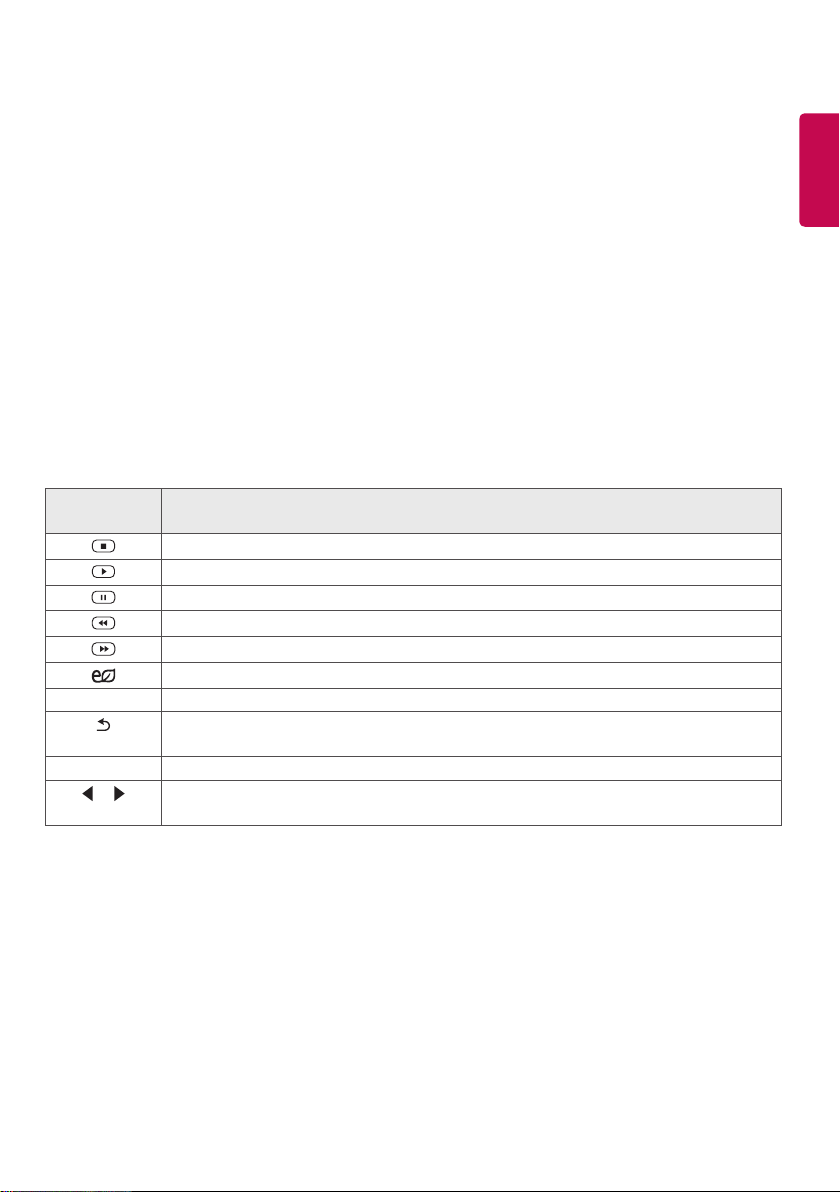
6 During movie playback, press OK to access the following settings.
Remote
button
Stops the playback.
Plays a video.
Pauses or resumes the playback.
Scans backward in a file.
Scans forward in a file.
Adjusts the screen brightness to save energy.
SETTINGS Show the Option menu.
Hide the menu on the full-sized screen.
BACK
EXIT Returns to Movie List.
or
Skips to specific points in a file during playback. The time of a specific point will appear on
the status bar. In some files, this function may not work properly.
Description
ENGLISH

12
Tips for using playing video files
ENGLISH
y Some user-created subtitles may not work properly.
y Some special characters are not supported in subtitles.
y HTML tags are not supported in subtitles.
y Subtitles in languages other than the supported languages are not available.
y The screen may suffer temporary interruptions (image stoppage, faster playback, etc.) when the audio
language is changed.
y A damaged movie file may not be played correctly, or some player functions may not be usable.
y Movie files produced with some encoders may not be played correctly.
y If the video and audio structure of recorded file is not interleaved, either video or audio is outputted.
y HD videos with a maximum of 1920 x 1080 @ 25/30p or 1280 x 720 @ 50/60p are supported, depending
on the frame.
y Videos with resolutions higher than 1920 x 1080 @ 25/30p or 1280 x 720 @ 50/60p may not work prop-
erly depending on the frame.
y Movie files other than the specified types and formats may not work properly.
y Max bitrate of playable movie file is 20 Mbps. (only, Motion JPEG : 10 Mbps)
y We do not guarantee smooth playback of profiles encoded level 4.1 or higher in H.264/AVC.
y DTS Audio codec is not supported.
y A movie file more than 30 GB in file size is not supported for playback.
y A DivX movie file and its subtitle file must be located in the same folder.
y A video file name and its subtitle file name must be identical for it to be displayed.
y Playing a video via a USB connection that doesn’t support high speed may not work properly.
y Files encoded with GMC(Global Motion Compensation) may not be played.
Video options
1 Press SETTINGS to access the Pop-Up menus.
2 Press the navigation buttons to scroll to Set Video Play, Set Video, or Set Audio, and press OK.
NOTE
y The option values changed in Movie List do not affect Photo List or Music List. Therefore, they are not
affected by option values changed in Photo List or Music List.
y The option values changed in Photo List and Music List do affect each other.
y When replaying the video file after stopping, you can play from where it stopped previously.
13
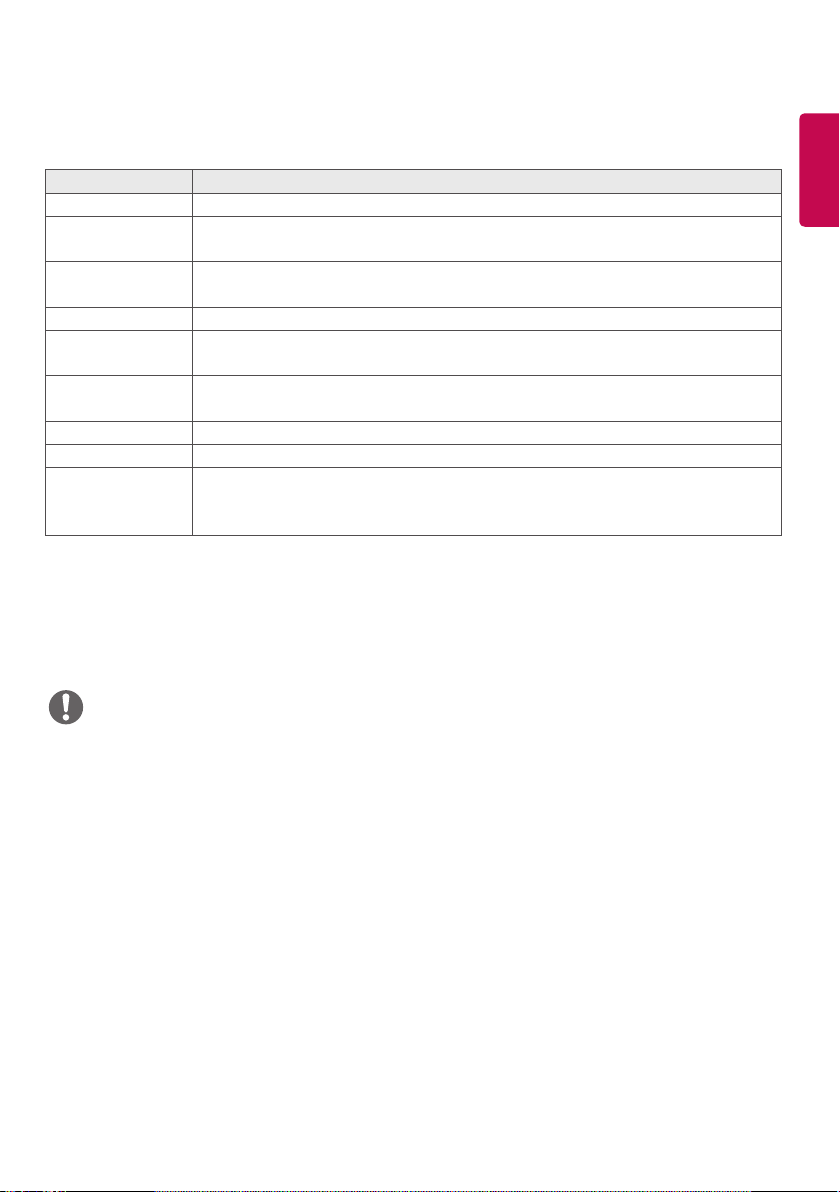
Select Set Video Play to access the following menus:
Menu Description
Picture Size Selects your desired picture format during movie play.
Audio
Language
Subtitle
Language
Language Activated for SMI subtitle and can select the language within the subtitle.
Code Page Can select the font for subtitle.
Sync Adjusts the time synchronisation of the subtitle from -10 secs to +10 secs by steps of
Position Changes the position of the subtitle either up or down during movie play.
Size Selects your desired Subtitle size during movie play.
Repeat Turn on/off repeat function of movie playback. When turned on, the file within the
Changes the Language Group of the audio during movie play. Files with a single audio
track cannot be selected.
Turn on/off the subtitle.
When set to default, same font as general menu will be used.
0.5 secs during movie play.
folder will be played back repeatedly. Even when the repeated playback is turned off, it
can run the playback if the file name is similar to the previous file.
ENGLISH
NOTE
y Only 10,000 of sync blocks can be supported within the subtitle file.
y When playing a video, you can adjust the picture size by pressing the ARC button.
y Subtitles in your language are only supported when the OSD menu is also in this language.
y The code page options may be disabled depending on the language of the subtitle files.
y Select the appropriate code page for the subtitle files.

14
ENGLISH
Viewing Photos
View image files saved in the USB storage device.
Press SETTINGS to access the main menu.
1
Press the navigation button to scroll to MY MEDIA and press OK.
2
Press the navigation button to scroll to Photo List and press OK.
3
Press the navigation buttons to scroll to a folder you want and press OK.
4
Press the navigation buttons to scroll to a file you want and press OK.
5
y Change Device : Selects the USB storage device. (Depending on model)
y Go to root folder : Returns to the home screen of My Media.
y Go to upper folder : Returns to the previous screen.
y Exit : Exits My Media.
While viewing photos, you can access the following settings.
6
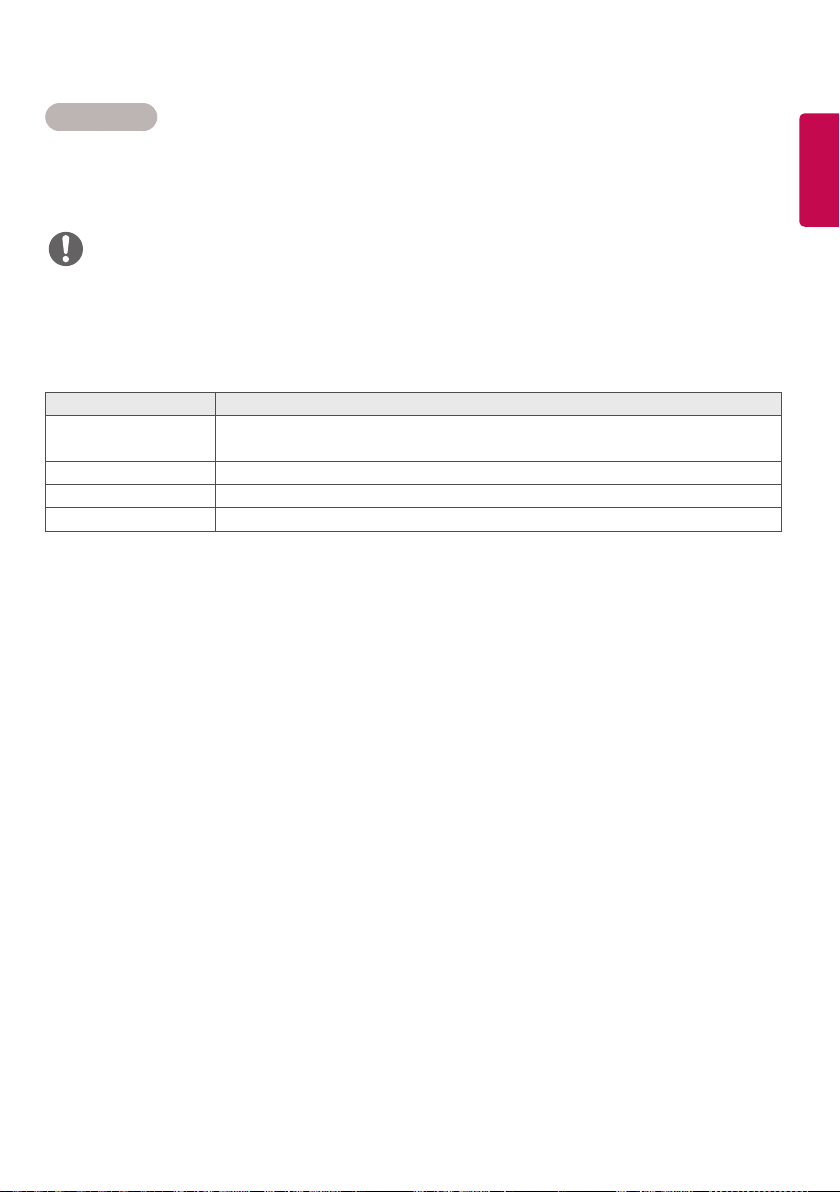
Menu Description
Slideshow Starts or stops a slideshow with selected photos. If there are no selected photos, all photos
saved in the current folder display during a slideshow. To set a slideshow speed, select Option.
BGM Turns the background music on or off. To set the background music folder, select Option.
You can adjust option by SETTINGS button on the remote control.
Rotates photos clockwise (90 °, 180 °, 270 °, 360 °).
NOTE
y The supported photo size is limited. You cannot rotate a photo if the resolution of the rotated
width is larger than the supported resolution size.
Enlarges the photo by 100 %, 200 % or 400 %.
Adjusts the brightness of the screen for energy saving.
Option To display the OPTIONs.
Hide Hides the option window.
Exit Return to Photo List.
15
Photo options
1 Press SETTINGS to show the Option menus.
2 Press the navigation buttons to scroll to Set Photo View, Set Video, or Set Audio, and press OK.
NOTE
y The option values changed in Movie List do not affect Photo List or Music List. Therefore, they are not
affected by option values changed in Photo List or Music List.
y The option values changed in Photo List and Music List do affect each other.
Select Setting Photo View to access the following menus:
Menu Description
Slide Speed Select a slideshow speed.
(Options: Fast, Medium, or Slow.)
BGM Selects a music folder for the background music.
Repeat Plays background music on repeat.
Random Plays background music in random order.
ENGLISH
 Loading...